

Page 1

Nortel LinkPlexer
Installation and Configuration Guide
Product release 6.0 Standard 3.02 October 2007
297-2183-964
Page 2

Page 3

Nortel LinkPlexer
Installation and Configuration Guide
Publication number: 297-2183-964
Product release: 6.0
Document release: Standard 3.02
Date: October 2007
Copyright © 2007 Nortel Networks. All Rights Reserved.
Information is subject to change without notice. Nortel Networks reserves the right to make changes
in design or components as progress in engineering and manufacturing may warrant.
The process of transmitting data and call messaging between the Meridian 1 and LinkPlexer is
proprietary to Nortel Networks. Any other use of the data and the transmission process is a violation
of the user license unless specifically authorized in writing by Nortel Networks prior to such use.
Violations of the license by alternative usage of any portion of this process or the related hardware
constitutes grounds for an immediate termination of the license and Nortel Networks reserves the
right to seek all allowable remedies for such breach.
This page and the following page are considered the title page, and contain Nortel Networks and
third-party trademarks.
*Nortel Networks, the Nortel Networks logo, the Globemark, CallPilot, Contivity, DMS, DMS-10,
DMS-100, DMS-200, DMS-250, DMS-300, DMS-500, DMS-MTX, DMS-STP, DPN, DPX, Dualmode,
Helmsman, ICN, IVR, MAP, Meridian, Meridian 1, Meridian Mail, Meridian SL, Norstar, Optera,
Optivity, Passport, Periphonics, SL, SL-1, Succession, Supernode, and Symposium are trademarks
of Nortel Networks.
ADOBE, ACROBAT, ADOBE ACROBAT, ACROBAT READER, FRAME, FRAMEMAKER, and
POSTSCRIPT are trademarks of Adobe Systems Incorporated.
CELERON, ITANIUM, INTEL XEON, INTEL INSIDE XEON, PENTIUM, PENTIUM II XEON, and
XEON are trademarks of Intel Corporation.
ACTIVE DIRECTORY, INTERNET EXPLORER, MICROSOFT, MICROSOFT ACCESS, MS-DOS,
POWERPOINT, WINDOWS, WINDOWS NT, and WINDOWS XP are trademarks of Microsoft
Corporation.
MCAFEE and NETSHIELD are trademarks of Networks Associates Technology, Inc.
Page 4

PCANYWHERE is a trademark of Symantec Corporation.
Page 5

Installation and Configuration Guide v
Contents
1 Getting started 9
New in this release . . . . . . . . . . . . . . . . . . . . . . . . . . . . . . . . . . . . . . . . . . . . . 10
Overview. . . . . . . . . . . . . . . . . . . . . . . . . . . . . . . . . . . . . . . . . . . . . . . . . . . . . 12
About LinkPlexer 6.0 . . . . . . . . . . . . . . . . . . . . . . . . . . . . . . . . . . . . . . . . . . . 13
How to use this guide . . . . . . . . . . . . . . . . . . . . . . . . . . . . . . . . . . . . . . . . . . . 23
Skills you need . . . . . . . . . . . . . . . . . . . . . . . . . . . . . . . . . . . . . . . . . . . . . . . . 24
Related documents . . . . . . . . . . . . . . . . . . . . . . . . . . . . . . . . . . . . . . . . . . . . . 25
How to get help. . . . . . . . . . . . . . . . . . . . . . . . . . . . . . . . . . . . . . . . . . . . . . . . 27
2 Installation overview 29
System requirements. . . . . . . . . . . . . . . . . . . . . . . . . . . . . . . . . . . . . . . . . . . . 30
Preinstallation procedures. . . . . . . . . . . . . . . . . . . . . . . . . . . . . . . . . . . . . . . . 33
3 Installing and configuring pcAnywhere 35
Overview. . . . . . . . . . . . . . . . . . . . . . . . . . . . . . . . . . . . . . . . . . . . . . . . . . . . . 36
Installing pcAnywhere version 11.5. . . . . . . . . . . . . . . . . . . . . . . . . . . . . . . . 37
Configuring pcAnywhere 11.5 or later. . . . . . . . . . . . . . . . . . . . . . . . . . . . . . 40
Uninstalling pcAnywhere 11.5. . . . . . . . . . . . . . . . . . . . . . . . . . . . . . . . . . . . 49
4 Installing and configuring the Eicon X.25 card 51
Supported configurations for X.25 . . . . . . . . . . . . . . . . . . . . . . . . . . . . . . . . . 52
Installing the Eicon X.25 card . . . . . . . . . . . . . . . . . . . . . . . . . . . . . . . . . . . . 53
5 Installing LinkPlexer 6.0 55
LinkPlexer 6.0 checklist . . . . . . . . . . . . . . . . . . . . . . . . . . . . . . . . . . . . . . . . . 56
Installing the iButton software and hardware. . . . . . . . . . . . . . . . . . . . . . . . . 57
Installing LinkPlexer 6.0. . . . . . . . . . . . . . . . . . . . . . . . . . . . . . . . . . . . . . . . . 68
Using Nortel License Manager. . . . . . . . . . . . . . . . . . . . . . . . . . . . . . . . . . . . 73
Using Tracker . . . . . . . . . . . . . . . . . . . . . . . . . . . . . . . . . . . . . . . . . . . . . . . . . 75
6 LinkPlexer 6.0 procedures 77
Upgrading from LinkPlexer 1.1 to 6.0 . . . . . . . . . . . . . . . . . . . . . . . . . . . . . . 78
Page 6

vi LinkPlexer
Contents Standard 3.02
Upgrading from LinkPlexer 1.2 to 6.0 . . . . . . . . . . . . . . . . . . . . . . . . . . . . . . 79
Backing up LinkPlexer and restoring to a new server . . . . . . . . . . . . . . . . . . 80
Backing up LinkPlexer to enable restoration in the event of a faulty PEP or
Service Update . . . . . . . . . . . . . . . . . . . . . . . . . . . . . . . . . . . . . . . . . . . . . . . . 81
Installing an SU for LinkPlexer 6.0 . . . . . . . . . . . . . . . . . . . . . . . . . . . . . . . . 82
7 Configuring and maintaining LinkPlexer 6.0 87
LinkPlexer 6.0 configuration . . . . . . . . . . . . . . . . . . . . . . . . . . . . . . . . . . . . . 88
Starting the LinkPlexer 6.0 service. . . . . . . . . . . . . . . . . . . . . . . . . . . . . . . . 102
Uninstalling LinkPlexer 6.0 . . . . . . . . . . . . . . . . . . . . . . . . . . . . . . . . . . . . . 103
Configuring LinkPlexer to use an X.25 connection . . . . . . . . . . . . . . . . . . . 106
Configuring LinkPlexer to use a TCP/IP connection . . . . . . . . . . . . . . . . . . 107
Configuring the CS 2x00/DMS switch. . . . . . . . . . . . . . . . . . . . . . . . . . . . . 108
Configuring Contact Center Manager Server to use LinkPlexer 6.0 . . . . . . 109
Configuring the ICM TAPI driver to use LinkPlexer 6.0. . . . . . . . . . . . . . . 112
Configuring Periphonics VPS/is (Peri-ICM) to use LinkPlexer. . . . . . . . . . 117
A Troubleshooting 119
Common problems . . . . . . . . . . . . . . . . . . . . . . . . . . . . . . . . . . . . . . . . . . . . 120
Frequently asked questions. . . . . . . . . . . . . . . . . . . . . . . . . . . . . . . . . . . . . . 123
Log files . . . . . . . . . . . . . . . . . . . . . . . . . . . . . . . . . . . . . . . . . . . . . . . . . . . . 126
Startup procedures for a Nortel Contact Center solution . . . . . . . . . . . . . . . 129
B Configuring LinkPlexer for X.25/CompuCALL 133
Overview. . . . . . . . . . . . . . . . . . . . . . . . . . . . . . . . . . . . . . . . . . . . . . . . . . . . 134
Configuring the Eicon X.25 card . . . . . . . . . . . . . . . . . . . . . . . . . . . . . . . . . 135
Configuring the X.25 modems . . . . . . . . . . . . . . . . . . . . . . . . . . . . . . . . . . . 144
CS 2x00 table definitions for configuring X.25/CompuCALL . . . . . . . . . . 151
C CS 2x00/DMS table definitions and examples 159
Overview. . . . . . . . . . . . . . . . . . . . . . . . . . . . . . . . . . . . . . . . . . . . . . . . . . . . 160
Table definitions. . . . . . . . . . . . . . . . . . . . . . . . . . . . . . . . . . . . . . . . . . . . . . 161
D DN association management 165
DN association management examples . . . . . . . . . . . . . . . . . . . . . . . . . . . . 166
Page 7

October 2007 Contents
Installation and Configuration Guide vii
E LinkPlexer configuration changes 169
Overview. . . . . . . . . . . . . . . . . . . . . . . . . . . . . . . . . . . . . . . . . . . . . . . . . . . . 170
Configuration file changes . . . . . . . . . . . . . . . . . . . . . . . . . . . . . . . . . . . . . . 171
F Comparison of LinkPlexer across releases 173
Comparison matrix . . . . . . . . . . . . . . . . . . . . . . . . . . . . . . . . . . . . . . . . . . . . 174
G Softphone message sequence chart 177
Overview. . . . . . . . . . . . . . . . . . . . . . . . . . . . . . . . . . . . . . . . . . . . . . . . . . . . 178
Generation of dv-Set-Offhook-U message sequence . . . . . . . . . . . . . . . . . . 179
Glossary 181
Index 189
Page 8

viii LinkPlexer
Contents Standard 3.02
Page 9

Installation and Configuration Guide 9
Chapter 1
Getting started
In this chapter
New in this release 10
Overview 12
About LinkPlexer 6.0 13
How to use this guide 23
Skills you need 24
Related documents 25
How to get help 27
Page 10

10 LinkPlexer
Getting started Standard 3.02
New in this release
The following sections detail what is new in the Nortel LinkPlexer Installation
and Configuration Guide (297-2183-964) for release 3.02.
“Features” on page 10
“Other changes” on page 11
Features
See the following sections for information about feature changes:
“Installation updates” on page 10
“License Manager support” on page 10
“Continuity test” on page 11
Installation updates
LinkPlexer 6.0 supports Windows Server 2003. The operating system platform
changes affect the following sections:
“Minimum server requirements” on page 30
“Preinstallation procedures” on page 33
License Manager support
LinkPlexer supports Nortel License Manager with the addition of Service
Update 01. License Manager support affects the following sections:
“Support for Nortel License Manager” on page 18
“LinkPlexer 6.0 checklist” on page 56
“Installing the iButton software and hardware” on page 57
“Using Nortel License Manager” on page 73
“Installing an SU for LinkPlexer 6.0” on page 82
“LPConfig.ini section and parameter descriptions” on page 90
Page 11

Installation and Configuration Guide 11
October 2007 Getting started
Continuity test
Continuity test updates affect the following sections:
“Application continuity test” on page 17
“SCAICOMS table” on page 155
“SCAICOMS” on page 161
Other changes
See the following sections for information about changes that are not featurerelated:
“Co-residency” on page 11
“Eicon configuration updates” on page 11
“Modem information updated” on page 11
“X.25 requirements” on page 11
Co-residency
LinkPlexer can be installed on its own server or co-resident with ot her Contact
Center applications. For more information, see “Co-residency” on page 19
Eicon configuration updates
Updated information for configuring the Eicon card was added. Eic on
configuration updates affect the following section:
“Configuring the Eicon X.25 card” on page 135
Modem information updated
Updated information about modem requirements and configuration for X.25 was
added. Updates about the X.25 modems affect the following sections:
“X.25 modem support” on page 31
“Configuring the X.25 modems” on page 144
X.25 requirements
If LinkPlexer uses X.25 to connect to the CS 2x00/DMS, LinkPlexer must be
installed on its own server. For more information, see “X.25 requirements” on
page 31.
Page 12

12 LinkPlexer
Getting started Standard 3.02
Overview
Introduction
This document describes how to install and configure the Nortel LinkPlexer 6.0
application.
Throughout this guide, the term CS 2x00/DMS switch applies to the following
switch types:
Digital Multiplex Switch (DMS)
Communication Server 2000
Communication Server 2100
Meridian SL-100
Who should read this guide
This guide is designed for:
Nortel customers
Nortel personnel
Nortel distributors
Page 13

Installation and Configuration Guide 13
October 2007 Getting started
About LinkPlexer 6.0
Introduction
LinkPlexer 6.0 is a Windows-based Contact Center application that enables
multiple applications to share the same communications session and CS 2x00/
DMS resources. Each application operates as if it were directly connected to the
CS 2x00/DMS. LinkPlexer 6.0 can connect to the CS 2x00/DMS using the ICM
protocol (IP) or CompuCALL (X.25); however, applications connect to
LinkPlexer 6.0 using Intelligent Call Management (ICM). With LinkPlexer 6.0,
an application that does not support CompuCALL can communicate on the
CompuCALL/X.25 interface of CS 2x00/DMS. If only one application is
connected to the CS 2x00/DMS, LinkPlexer is not required.
With LinkPlexer 6.0, a pplications can share Directory Number (DN) association
between different applications.
For example:
An Interactive Voice Response (IVR) application and Contact Center
Manager Server can share IVR voice ports. The IVR application controls
the ports while Contact Center Manager Server monitors and reports on
activity at the ports.
A softphone application, built using Communication Control Toolkit
(CCT), and Contact Center Manager Server can share agent positions. The
Contact Center Manager Server routes calls to and reports activity at the
agent positions while the softphone implements the agent capability.
A voice recorder and Contact Center Manager Server can share an agent
position. The Contact Center Manager Server monitors agent activity and
call routing at the position while the voice recorder uses the activity to
trigger recording.
Page 14
14 LinkPlexer
Getting started Standard 3.02
Network architecture
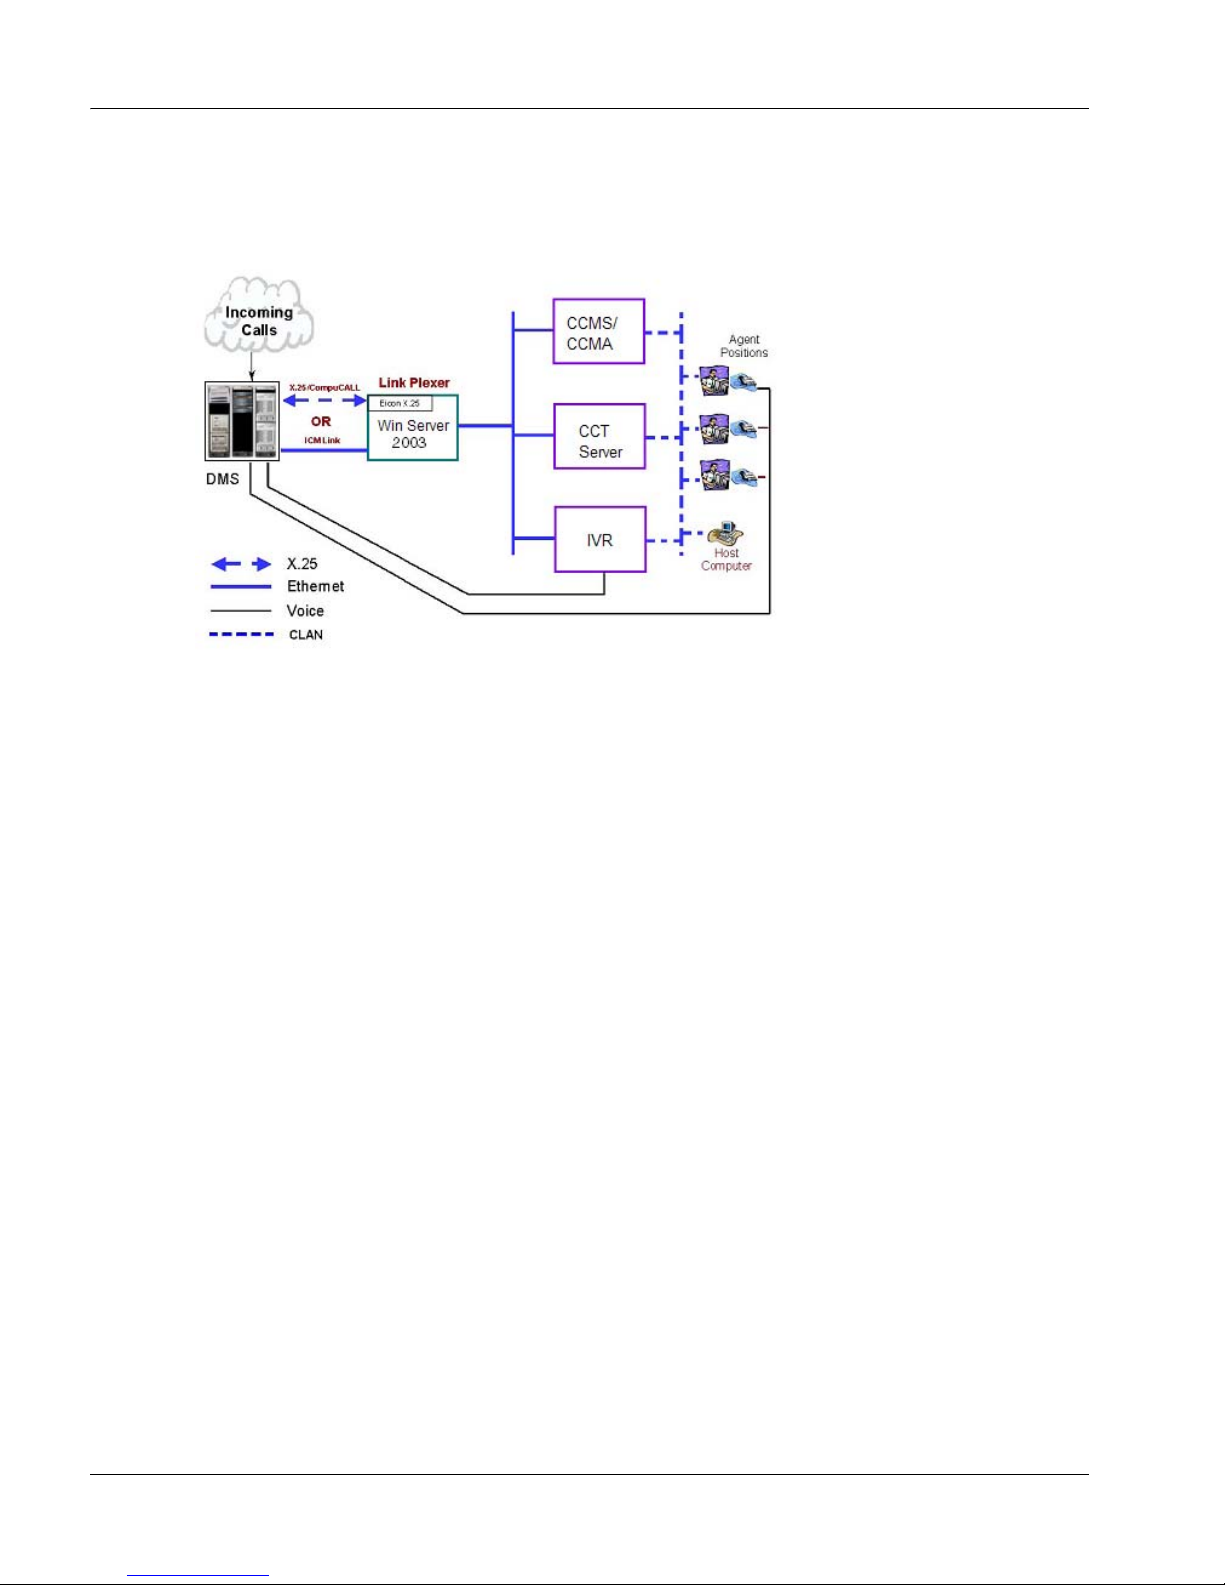
The following diagram shows the general architecture of LinkPlexer 6.0.
Page 15
Installation and Configuration Guide 15
October 2007 Getting started
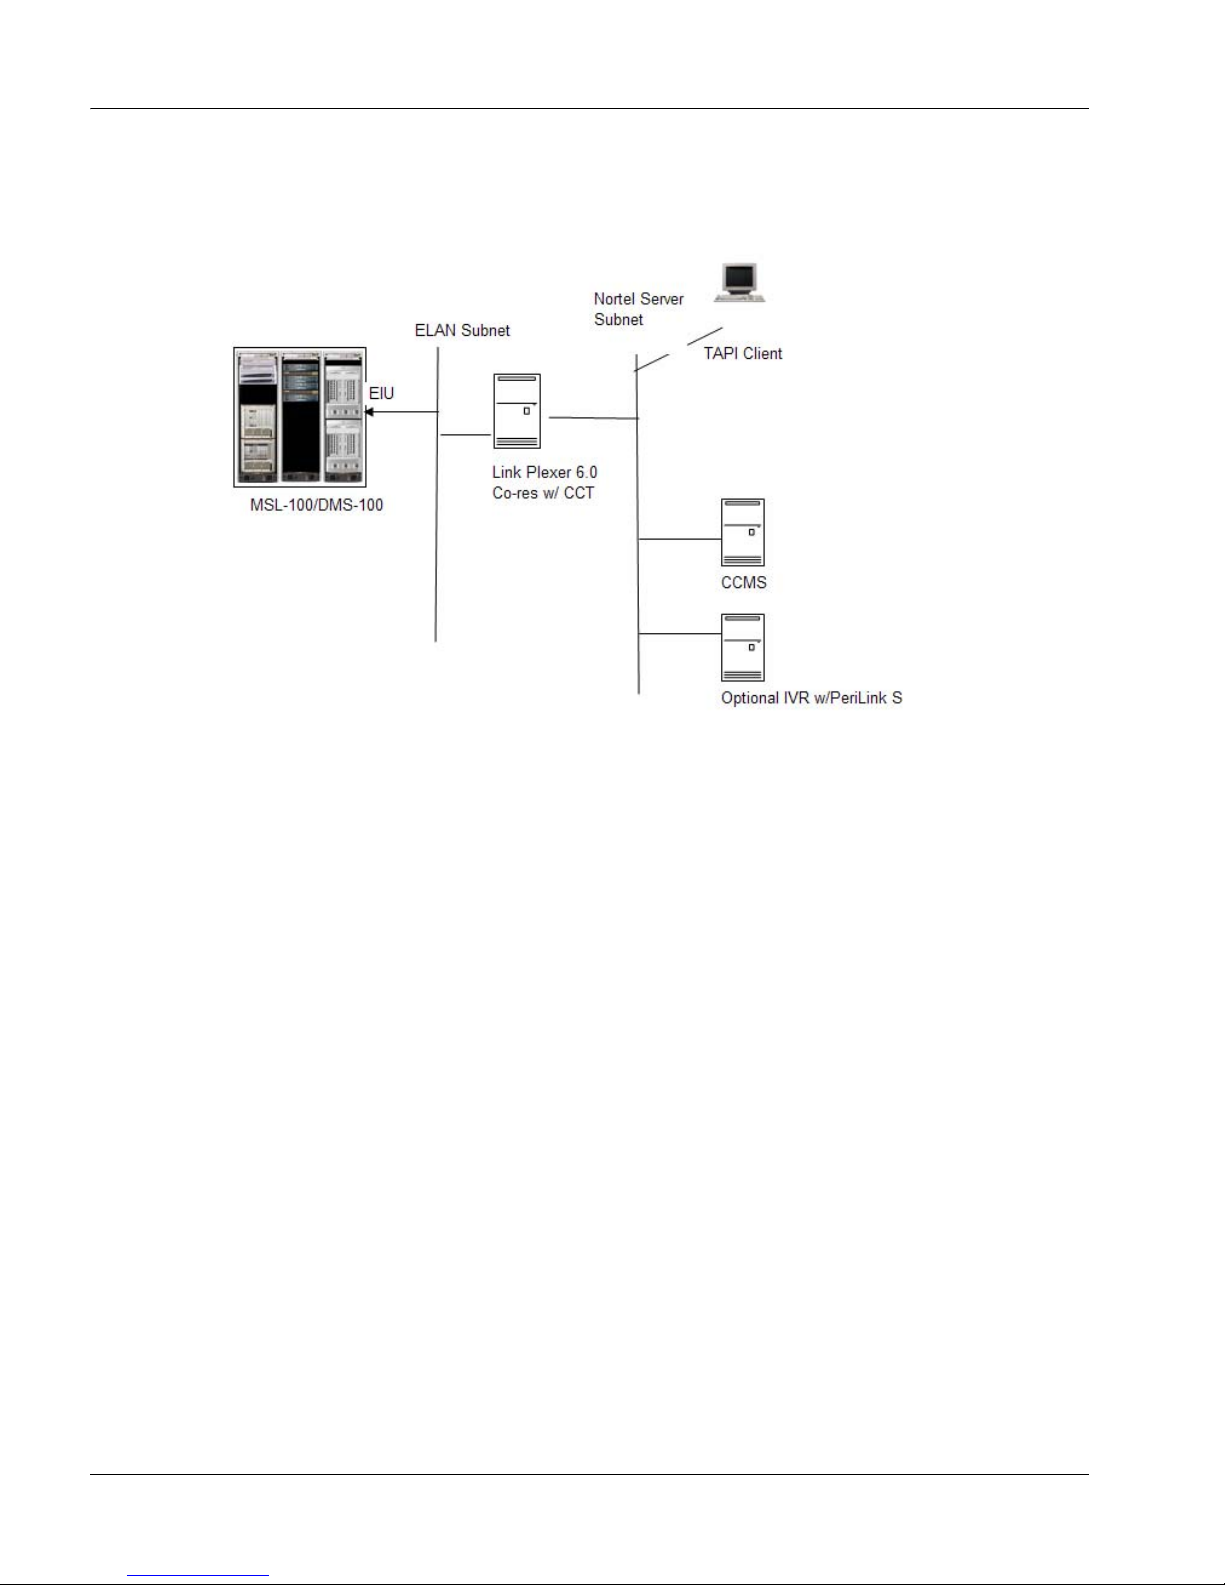
The following diagram shows LinkPlexer 6.0, co-resident with Communication
Control Toolkit.
Features
This section describes the main features of LinkPlexer 6.0.
DN association sharing
Both CompuCALL and Intelligent Call Management (ICM) limit the association
of resources to a single session. Two host applications with simultaneous
CompuCALL/ICM application sessions established with a given switch cannot
have the same resource associated with the two sessions at the same time.
LinkPlexer 6.0 overcomes this limitation by propagating all resource messages
from the CS 2x00/DMS to all clients.
For example, a dv-call-offered message from the CS 2x00/DMS is propagated to
all applications and not just the client that originally issued the dv-dnassociation request.
Page 16

16 LinkPlexer
Getting started Standard 3.02
ICM application multiplexing
The CS 2x00/DMS lets a resource be associated with only one link session with
the switch. LinkPlexer 6.0 enables ICM applications to share, through TCP/IP,
the same session and CS 2x00/DMS resources, and manages messages to and
from the switch.
Connectivity of ICM client to CompuCALL
LinkPlexer 6.0 supports a single connection to the CS 2x00/DMS switch, either
Ethernet TCP/IP or X.25. ICM-only applications can access CompuCALLequipped systems through this connection. LinkPlexer relays messages to the
X.25/ICM link on the switch.
Messaging
LinkPlexer 6.0 tracks each message from an application to the CS 2x00/DMS.
The initial response message is sent only to the sending application. Event or
unconfirmed type messages are broadcast to all connected applications.
An application communicating with LinkPlexer 6.0 operates exactly as if it were
connected directly to the CS 2x00/DMS.
DN association management
LinkPlexer 6.0 keeps track of which DNs and agent position IDs are associated
with each application (such as Contact Center Manager Server or
Communication Control Toolkit). This ensures that DNs and agent position IDs
associated with a particular agent/client connection are not disassociated by a
dv-Dn-Associate (delete) message being received from another application. For
more detailed information, see Appendix D, “DN association management.”
Session management
Session management is carried out by LinkPlexer 6.0 and operates as follows:
On service startup, LinkPlexer establishes a connection with the switch and
starts a logon session by sending a dv-Appl-Logon message.
When the last application disconnects from LinkPlexer 6.0, the link
between LinkPlexer 6.0 and the CS 2x00 /DMS is also disconnected. After a
short period (less than 10 seconds), LinkPlexer 6.0 reestablishes the
connection to the switch and restarts the logon session by sending a dvAppl-Logon message.
Page 17

Installation and Configuration Guide 17
October 2007 Getting started
Client connection management
LinkPlexer 6.0 manages all application connections. An application connection
is any successful socket connection to LinkPlexer 6.0. Each connection uses o ne
LinkPlexer 6.0 license. The number of application connections is limited, by the
keycode, to 150.
LinkPlexer 6.0 maintains the integrity of the connection between the LinkPlexer
6.0 server and each connected application. This lets LinkPlexer 6.0 free the
license when an application disconnects.
Generation of dv-Set-Offhook-U on behalf of a softphone
When a physical phoneset is used to make an outbound call, the CS 2x00/DMS
sends a dv-Set-Offhook-U message at the time the phoneset goes offhook. When
a Communication Control Toolkit-enabled softphone is used to make an
outbound call, the CS 2x00 does not sent a dv-Set-Offhook-U message.
However, LinkPlexer 6.0 generates the dv-Set-Offhook-U message and sends it
to all connected applications. For more detailed information, see Appendix G,
“Softphone message sequence chart.”
Application continuity test
Contact Center Manager Server and LinkPlexer applications both support an
application-invoked continuity test. This test is sent by Contact Center Manager
Server or LinkPlexer applications to the switch and the switch responds. This
continuity test is initiated from the opposite direction from that of a switchinvoked continuity test but performs the same function from the perspective of
the application. In the case of Contact Center Manager Server to the CS 2x00/
DMS, the continuity test interval is 60 seconds. In the case of LinkPlexer to the
switch, you can configure the interval (default is 600 seconds). It is not
mandatory to have both a switch continuity test and an application continuity
test running.
For information about configuring a switch continuity test with X.25, see
“SCAICOMS table” on page 155. For information about configuring a switch
continuity test with TCP/IP, see “SCAICOMS” on page 161.
Page 18

18 LinkPlexer
Getting started Standard 3.02
Support for Nortel License Manager
Service Update (SU) 01 for LinkPlexer 6.0 introduces support for the License
Manager technology in Contact Center Manager. With SU01, LinkPlexer
expects to obtains licenses from Nortel License Manager for applications to
connect to LinkPlexer. The License Manager can be local to or remote from the
LinkPlexer server. LinkPlexer supports both Nodal and Corporate licensing.
SU01 is backwardly compatible with the legacy iButton hardware and software.
LinkPlexer can be configured to use the lega cy technology.
Benefits
The main benefits of LinkPlexer 6.0 are:
Migration—LinkPlexer 6.0 facilitates the introduction of Nortel
applications (such as Contact Center Manager Server) into existing
customer CompuCALL or ICM-based networks without the need to
displace the existing applications.
Connectivity—LinkPlexer 6.0 provides conversion of ICM to X.25 and
vice versa, allowing ICM-only applications to be used with existing
CompuCALL links.
Compatibility—LinkPlexer performs no protocol conversion.
Applications conforming to the NIS Q218 CompuCALL/Meridian SCAI
Interface Specification can work in a LinkPlexer integrated environment.
Considerations and limitations
Operating system
The following table illustrates the operating system support of LinkPlexer 6.0
and Contact Center Manager Server.
Windows NT Windows 2000 Windows 2003
SCCS 5.0NoNoYes
LinkPlexer 1.2 Yes Yes No
CCMS 6.0NoNoYes
LinkPlexer 6.0 No Yes Yes
Page 19

Installation and Configuration Guide 19
October 2007 Getting started
LinkPlexer 6.0 does not require a Windows 2003 service pack. However , Nortel
recommends that you install Service Pack 1 and all hot fixes to ensure full
security of the server.
Compatibility
The following table shows compatibility for LinkPlexer 6.0 and other Nortel
applications.
Co-residency
LinkPlexer can co-reside with other Nortel applications only if LinkPlexer
connects to the CS 2x00/DMS through ICM. Co-residency is not supported if
LinkPlexer uses X.25 to connect to the switch.
The following table shows co-residency support for LinkPlexer 6.0 and other
Nortel applications.
Application Compatibility with LinkPlexer 6.0
SCCS 5.0 Yes
CCMS 6.0 Yes
ICM TAPI Driver 1.1 Yes
CCT 6.0 Yes
PERI ICM 2.1 Yes
Symposium Agent 2.3 No
ATTENTION
When LinkPlexer co-resides with another application, that
application uses the IP addre ss of its own server rather than the
IP address of the switch.
LinkPlexer 1.2 LinkPlexer 6.0
SCCS 5.0 Yes Yes
CCMS No Yes
Page 20

20 LinkPlexer
Getting started Standard 3.02
There are no special requirements or dependencies for LinkPlexer 6.0 when it is
installed co-resident with another application. However, limitations associated
with all applications must be respected.
For a co-resident system, Nortel recommends installing the most complex
system first. For example, when installing LinkPlexer co-resident with Contact
Center Manager Server, install Contact Center Manager Server first, and then
install LinkPlexer. During Contact Center Manager server configuration, enter
the IP address of the Contact Center Manager Server as the target switch
address. You can then install and configure LinkPlexer prior to server restart.
For pertinent startup information, see “Startup procedures for a Nortel Contact
Center solution,” on page 129.
Procedures in this guide apply to both stand-alone and co-resident installations
of LinkPlexer, except where it is stated otherwise.
Nortel recommends that you install LinkPlexer 6.0 on a separate server for the
following reasons:
ICM TAPI Driver 1.0 Yes Yes
CCT 6.0 No Yes (TCP/IP only)
Co-residency with CCT
is not supported if
LinkPlexer connects to
the switch through X.25.
PERI ICM 2.04 No No
Symposium Agent 2.3 No No
ATTENTION
LinkPlexer 6.0 and LinkPlexer 1.2 can co-reside; however,
there is no advantage to such a configuration. Nortel
recommends that you install LinkPlexer 6.0 only and
uninstall any previous versions.
LinkPlexer 1.2 LinkPlexer 6.0
Page 21

Installation and Configuration Guide 21
October 2007 Getting started
Reliability—You can make changes to co-resident applications without
affecting the status of their link to the switch. This lets contact center
activity continue for other applications in the solution.
Troubleshooting—Diagnosis of issues is limited to LinkPlexer. Other
applications conflicting with the operation of LinkPlexer do not need to be
eliminated.
Application considerations
Applications connected to LinkPlexer 6.0 must cooperate in controlling
common resources:
A race condition can result if two applications attempt to change the state of
the same device at the same time.
One application should control the device, others should only monitor
events at the device. This is particularly applicable to controlling CDNs.
Only one application should attempt to control an individual CDN.
The applications must also be tolerant of receiving events related to resources
with which the application is not previously associated for the following
reasons:
Applications can still get events on devices they have disassociated.
Applications receive messages about resources that other applications are
monitoring.
The impact of receiving these unexpected events can only be determined
through testing the application in a LinkPlexer 6.0 environment.
Limitations
LinkPlexer 6.0 has the following known limitations:
X.25 bandwidth Enhanced Multi-Protocol Controller (EMPC) interface
limited to 19,200 bps. This is actually a CS 2x00/DMS limitation, rather
than a LinkPlexer limitation.
512 invoke IDs
invoke IDs are shared between applications
LinkPlexer supports a maximum of 512 invoke IDs in either direction
LinkPlexer can run out of invoke IDs if switch latency is long
Page 22

22 LinkPlexer
Getting started Standard 3.02
Note: This is actually a CS 2x00/DMS limitation, rather that a LinkPlexer
limitation. This switch limitation is removed in SE/SN09 and is made available
in SCAI 19.
Remote Alarm Monitoring is not supported
Engineering guidelines
Nortel does not recommend connecting more than 10 applications to LinkPlexer
6.0.
Page 23

Installation and Configuration Guide 23
October 2007 Getting started
How to use this guide
This guide provides information about installing and configuring LinkPlexer 6.0
for the Contact Center suite.
The guide includes details about:
installing LinkPlexer 6.0
configuring LinkPlexer 6.0
configuring Contact Center Manager Server to use LinkPlexer 6.0
LinkPlexer 6.0 procedures
Page 24

24 LinkPlexer
Getting started Standard 3.02
Skills you need
This guide assumes familiarity with the following:
Microsoft Windows 2003
TCP/IP networking concepts such as IP address, subnet mask, and port
CompuCALL or ICM on CS 2x00/DMS switches
Contact Center 6.0 suite
Page 25

Installation and Configuration Guide 25
October 2007 Getting started
Related documents
The following guides are available on the Contact Center portfolio DVD or on
the Nortel Web site (www.nortel.com).
For information about Refer to NTP number
Planning and
engineering guidelines,
and server requirements
Contact Center Planning and
Engineering Guide
297-2183-934
Server requirements Nortel Contact Center Server and
Operating System Requirements
Guide
297-2183-263
The Contact Center
portfolio
Contact Center What’s New in
Release 6.0
297-2183-903
Required installation
and server data
Contact Center Installer’s Roadmap
(see www.nortel.com/pic)
297-2183-226
Switch configuration Contact Center – Manager Switch
Guide for Communication Server
2X00/DMS
297-2183-937
Server operating system
configuration and
requirements
Contact Center Manager Server
Technical Requirements and
Operating System Configuration
Guide
297-2183-212
Contact Center Manager Server
Technical Requirements and
Operating System Configuration
Guide for the coresident server
297-2183-944
Contact Center Manager
Administration Technical
Requirements and Operating System
Configuration Guide
297-2183-213
Page 26

26 LinkPlexer
Getting started Standard 3.02
Communication Control Toolkit
Server Technical Requirements and
Operating System Configuration
Guide
297-2183-215
Contact Center 6.0 Security Guide
Contact Center Portfolio Service
Packs Compatibility and Security
Hotfixes Applicability List
Installation, upgrades,
migration, and
maintenance
Contact Center Manager Server
Installation and Maintenance Guide
297-2183-925
Contact Center Manager Server
Installation and Maintenance Guide
for the Co-resident Server
297-2183-218
Contact Center Manager Server
Installation and Maintenance Guide
for the Standby Server
297-2183-919
Contact Center Manager
Administration Installation and
Maintenance Guide
297-2183-926
Communication Control Toolkit
Installation and Maintenance Guide
297-2183-946
MPS and VPS/is interface to M1/
DMS100 (Peri-IPML v2.0, Peri-ICM
v2.0)
PO988599
ICM TAPI Network Manager’s Guide PO881940
For information about Refer to NTP number
Page 27

Installation and Configuration Guide 27
October 2007 Getting started
How to get help
This section explains how to get help for Nortel products and services. However ,
before contacting Nortel for support, cons ult the Troubleshooting section of this
guide.
Finding the latest updates on the Nortel Web site
The content of this documentation was current at the time the product was
released. To check for updates to the latest documentation and software for
Contact Center 6.0, click one of the following links:
Getting help from the Nortel Web site
The best way to get technical support for Nortel products is the Nortel Technical
Support Web site:
w
ww.nortel.com/support
This site provides quick access to software, documentation, bulletins, and tools
to address issues with Nortel products. From this site, you can:
download software and related tools
download technical documents, release notes, and product bulletins
sign up for automatic notification of new software and documentation
search the Technical Support Web site and Nortel Knowledge Base for
answers to technical issues
open and manage technical support cases
Link to Takes you directly to
Latest software The Nortel page for Contact Center located at
www.nortel.com/espl.
Latest documentation The Nortel page for Contact Center documentation
located at www.nortel.com/helmsman.
Page 28

28 LinkPlexer
Getting started Standard 3.02
Getting help over the phone from a Nortel Solutions Center
If you do not find the information you require on the Nortel Technical Support
Web site, and you have a No rtel sup port co ntract, y ou can also get h elp ov er the
phone from a Nortel Solutions Center.
In North America, call 1-800-4NORTEL (1-800-466-7835).
Outside North America, go to the following Web site to obtain the phone
number for your region:
w
ww.nortel.com/callus
Getting help from a specialist by using an Express Routing Code
You can use an Express Routing Code (ERC) to more quickly route your call to
the appropriate support specialist. T o locate the ERC for your product or service,
go to:
w
ww.nortel.com/erc
Getting help through a Nortel distributor or reseller
If you purchased a service contract for your Nortel product from a distributor or
authorized reseller, you can contact the technical support staff for that distributor
or reseller.
Page 29

Installation and Configuration Guide 29
Chapter 2
Installation overview
In this chapter
System requirements 30
Preinstallation procedures 33
Page 30

30 LinkPlexer
Installation overview Standard 3.02
System requirements
Introduction
A LinkPlexer 6.0 system consists of a PC running the Microsoft Windows
Server 2003 operating system. The system is connected to a CS 2x00/DMS
switch.
See the Microsoft Windows Server Catalog (www.microsoft.com) for the latest
hardware and software designed especially for the Windows Server 2003 family.
See the hardware manufacturer’s Web site to ensure that the operating system is
supported.
Minimum server requirements
The minimum server requirements are as follows:
Intel Xeon 3GHz
Microsoft Windows 2003
512 MB RAM
18 GB storage
one network interface card (NIC). If LinkPlexer is co-resident with
Communication Control Toolkit, two NICs are required.
If you are using the Dallas Semiconductor iButton for software control and
licensing, the following requirements are necessary:
security iButton (dongle) and keycode
port (USB, parallel, or serial) for iButton adapter
If you are using X.25 (CompuCALL), the following requirements are necessary:
two communication ports (only one is required for ICM)
Eicon card
a pair of stand-alone modems
Page 31

Installation and Configuration Guide 31
October 2007 Installation overview
Notes:
LinkPlexer 6.0 is supported on Windows Server 2003 operating system
with the service pack number indicated in the readme file.
LinkPlexer 6.0 is a software-only product. Nortel is not responsible for
replacing hardware components.
TCP/IP requirements
To connect to CS 2x00/DMS through TCP/IP, the minimum requirements are:
an Ethernet Interface Unit (EIU) on the DMS switch or a 3PC on the
CS 2x00 switch
a 10 Mb or 10/100 Mb Ethernet card on the LinkPlexer 6.0 server
X.25 requirements
To connect to CS 2x00/DMS through X.25, the minimum requirements are:
an EMPC/MOC or IOM card on the CS 2x00/DMS switch
an Eicon C91 V2 (or compatible) card on the LinkPlexer 6.0 server
a pair of stand-alone modems (see “X.25 modem support” on page 31)
If you use X.25 to connect to the CS 2x00/DMS, you must install LinkPlexer on
its own server.
X.25 modem support
Nortel recommends that you use specific X.25 modems as part of a Contact
Center 6.0 CS 2x00/DMS solution.
The minimum requirements for the X.25 modem are:
Synchronous data support
Compliance with the connectivity requirements of the CS 2x00/DMS
switch
Minimum data rate of 19 200 baud is recommended
Data rates of 9600, 19 200, and 48 000 baud are supported
Page 32

32 LinkPlexer
Installation overview Standard 3.02
Data rates of 14 400 and 36 000 baud are not supported
Nortel recommends the following modems for typical X.25-based application
environments:
Motorola V.3600
GDC VF28.8
For specific configuration parameters for the recommended modems, see
“Configuring the X.25 modems” on page 144.
You can use an alternative modem if it meets the minimum requirements. If you
cannot achieve satisfactory performance with an alternative modem, Nortel can
advise you on reverting to one of the recommended modems.
Other considerations
To install LinkPlexer 6.0, you must have administrator rights on the local server.
The minimum switch requirements are:
MSL-100: MSL-09 or later
DMS-100: CCM10 (MMP10) or later
Nortel recommends the following:
pcAnywhere V11.5 on systems that require remote administration
uninteruptible power supply (UPS) backup power supply
Page 33

Installation and Configuration Guide 33
October 2007 Installation overview
Preinstallation procedures
LinkPlexer 6.0 requires the following preinstallation procedures:
TCP/IP must be configured and working prior to beginning the LinkPlexer
installation. For information, see the system administrator's manual for
Microsoft Windows 2003.
Microsoft Windows Server 2003 must be installed on the PC.
Nortel recommends that pcAnywhere 11.5 is installed on the PC prior to
installing LinkPlexer 6.0.
An ICM or CompuCALL line to the switch must be in place. For more
information, see the ICM TAPI Network Manager’s Guide.
If using the X.25 network protocol to communicate with the CS 2x00/DMS
switch, you must complete the hardware and network configuration prior to
installing LinkPlexer 6.0. For more information, see Chapter 4, “Installing
and configuring the Eicon X.25 card” and Chapter 7, “Configuring and
maintaining LinkPlexer 6.0.”
Page 34

34 LinkPlexer
Installation overview Standard 3.02
Page 35

Installation and Configuration Guide 35
Chapter 3
Installing and configuring
pcAnywhere
In this chapter
Overview 36
Installing pcAnywhere version 11.5 37
Configuring pcAnywhere 11.5 or later 40
Uninstalling pcAnywhere 11.5 49
Page 36

36 LinkPlexer
Installing and configuring pcAnywhere Standard 3.02
Overview
One copy of pcAnywhere 11.5 is included on the Nortel Contact Center 6.0
DVD.
If your server is a stand-alone server, with only LinkPlexer 6.0 installed, follow
the procedures in this section to install and configure pcAnywhere. However, if
you are installing LinkPlexer 6.0 on a co-resident server with Contact Center
Manager Server, you do not have to install pcAnywhere, as you can use the
installation that was already performed with the co-resident Contact Center
Manager Server.
In the case of co-residency with Communication Control Toolkit, a modem is
not supported. You must follow the guidelines found in the Communication
Control Toolkit Installation and Maintenance Guide. Install pcAnywhere on the
co-resident Communication Control Toolkit only and LinkPlexer can use the
same installation.
Page 37

Installation and Configuration Guide 37
October 2007 Installing and configuring pcAnywhere
Installing pcAnywhere version 11.5
The following steps are general guidelines only. For complete information, see
the documentation included with the pcAnywhere software.
To install pcAnywhere
1 Log on to the LinkPlexer server as the administrator.
2 Insert the Nortel Contact Center DVD into the server.
3 Open the pcAnywhere folder.
.
CAUTION
Risk of system failure
Before you install pcAnywhere version 11.5, ensure that the video
drivers on the LinkPlexer server are current by consulting the
driver manufacturers’ Web sites for available updates. Failure to
check the video drivers can result in a blue screen after you install
pcAnywhere or after you perform an operation such as a file
transfer. For more information, refer to the pcAnywhere Web site
at www.symantec.com/pcanywhere.
Page 38

38 LinkPlexer
Installing and configuring pcAnywhere Standard 3.02
4 Double-click the NTJK08BA-02 - Host Only.exe file.
Result: The Symantec pcAnywhere installation program starts.
5 Click Next.
Result: The License Agreement window appears.
6 Accept the terms of the license agreement, and then click Next.
Result: The Customer Information window appears.
7 Enter your user name and company details, and then click Next.
Result: The Destination Folder window appears.
8 Accept the default location for installing the software, or click Change to
choose a custom location.
9 Click Next.
Result: The Ready to Install the Program window appears.
10 Click Install.
Result: The installation program installs the software. When the installation
is complete, the LiveUpdate window appears.
11 Click Next.
Result: The installation program installs any updates.
12 When the updates are installed, click Finish.
Page 39

Installation and Configuration Guide 39
October 2007 Installing and configuring pcAnywhere
13 When the installation is complete, click Finish.
Starting pcAnywhere 11.5 or later for the first time
1 Log on to Windows as the local administrator.
2 Click Start > All Programs > Symantec pcAnywhere.
Note: If the system asks you to register pcAnywhere, select Skip, and click
Yes to confirm.
Result: The Symantec pcAnywhere window appears.
3 Continue with the following procedure to configure pcAnywhere 11.5.
ATTENTION
If the following message appears, it indicates that your video
driver is incompatible with pcAnywhere: pcAnywhere
detected and fixed a display driver problem.
Please restart your computer to allow the
change to take effect. You must uninstall pcAnywhere,
update your video driver, and reinstall pcAnywhere.
Page 40

40 LinkPlexer
Installing and configuring pcAnywhere Standard 3.02
Configuring pcAnywhere 11.5 or later
Configuration of pcAnywhere sets up a secure caller account to access the
server. You can add a caller account for each remote server. Caller accounts
restrict the use of pcAnywhere to appropriate users (for example, Nortel support
personnel and distributors).
If, during the pcAnywhere configuration, a message indicates that you do not
have the rights to modify a setting or create a new caller, use the following
procedure to change the Windows user access rights for pcAnywhere files.
To change the Windows access rights for pcAnywhere files
1 Ensure pcAnywhere is closed.
2 In Windows Explorer, navigate to the folder where pcAnywhere is installed.
3 Right-click the pcAnywhere folder icon, and then click Properties.
Result: The pcAnywhere Properties window appears.
4 Click the Security tab.
5 In the Name box, select Administrators.
Page 41

Installation and Configuration Guide 41
October 2007 Installing and configuring pcAnywhere
6 To grant administrators full access to the pcAnywhere folder, in the
Permissions box, ensure the Allow check box is selected beside Full
Control.
7 Click OK to save your changes and close the Properties window.
Configuring an account in pcAnywhere 11.5 or later
Note: If you are using a modem connection with pcAnywhere, yo u must
configure your modem before you perform this procedure.
1 If it is not already started, start pcAnywhere 11.5 by logging on to the server
as the local administrator and clicking Start > All Programs > Symantec
pcAnywhere.
Note: If the system asks you to register pcAnywhere, click Skip, and click
Yes to confirm.
2 On the pcAnywhere manager (left side), select the Hosts option.
3 On the File menu, choose New Item > Connection Wizard.
Result: The Connection Wizard - Connection Method window appears.
4 Select I want to use cable modem/DSL/LAN/dial-up Internet ISP.
Page 42

42 LinkPlexer
Installing and configuring pcAnywhere Standard 3.02
5 Click Next.
Result: The Connection Wizard - Authentication Type window appears.
6 Select I want to set up a user name and password to create a new type
of authentication.
7 Click Next.
Result: The Connection Wizard - Name and Password window appears.
Page 43

Installation and Configuration Guide 43
October 2007 Installing and configuring pcAnywhere
8 In the User name box, type a name for the caller account. You can choose
any name, or you can use a name familiar to you, such as NGenDist.
9 In the Password box, type the password for the caller account.
10 In the Enter the password again box, type the same password again.
11 Click Next.
Result: The Connection Wizard - Summary window appears.
12 Review the summary.
13 Click Finish.
Result: The Hosts window reappears with the new account selected.
14 Type a custom name for this account to identify it in the list of caller
accounts.
Page 44

44 LinkPlexer
Installing and configuring pcAnywhere Standard 3.02
15 Right-click the account name, and click Properties.
Result: The Host Properties: <account name> window appears.
Page 45

Installation and Configuration Guide 45
October 2007 Installing and configuring pcAnywhere
16 Click the Settings tab.
17 Select Launch with Windows and Run minimized.
18 Click the Callers tab.
Page 46

46 LinkPlexer
Installing and configuring pcAnywhere Standard 3.02
19 In the Caller list box, right-click the caller account you just created, and then
click Properties.
Result: The Caller Properties window appears.
20 Click the Privileges tab.
21 Click Superuser.
22 Click OK to save your changes and close the Caller Properties window.
Result: The Host Properties window reappears with the account now listed
according to its Login ID.
Page 47

Installation and Configuration Guide 47
October 2007 Installing and configuring pcAnywhere
23 Click the Security Options tab.
24 Under Session options, ensure the session options are set to Host and
Remote.
25 Under Login options, ensure Limit login attempts per call and Limit
Time to complete login are selected and set to 3.
Page 48

48 LinkPlexer
Installing and configuring pcAnywhere Standard 3.02
26 Click the Conference tab.
27 Ensure that Enable conferencing and Obtain IP address automatically
are selected.
28 Click Apply to save your settings.
29 If you want to assign a password to control who can modify the network
icon settings, click the Protect Item tab and type the password; otherwise,
skip to the next step.
30 Click OK to save all pcAnywhere host settings.
31 Optionally, repeat steps 2 to 30 to create another caller account of your
choice.
32 Close the Symantec pcAnywhere window.
ATTENTION
If you select the Required to modify properties option on the
Protect Item tab, you must enter the password each time a
setting is changed. Record the password and keep it in a safe
place. If you forget the password, you cannot change any
settings.
Page 49

Installation and Configuration Guide 49
October 2007 Installing and configuring pcAnywhere
Uninstalling pcAnywhere 11.5
Before you uninstall pcAnywhere, ensure no pcAnywhere icon is in the taskbar
on your desktop. If the icon is in the taskbar, right-click it and select Cancel
Host.
To uninstall pcAnywhere
1 From the Windows Start menu, choose Settings > Control Panel.
2 Double-click Add/Remove Programs.
3 Select Symantec pcAnywhere, and then click Remove.
4 When you are prompted to confirm, click Yes.
Result: The Symantec pcAnywhere dialog box appears. PcAnywhere is
uninstalled.
5 The system prompts you to restart the server PC.
6 Click Yes.
7 If the server stops functioning, restart it manually.
Page 50

50 LinkPlexer
Installing and configuring pcAnywhere Standard 3.02
Page 51

Installation and Configuration Guide 51
Chapter 4
Installing and configuring the Eicon
X.25 card
In this chapter
Supported configurations for X.25 52
Installing the Eicon X.25 card 53
Page 52

52 LinkPlexer
Installing and configuring the Eicon X.25 card Standard 3.02
Supported configurations for X.25
X.25 supports two configurations:
A direct connection using a modem eliminator (or null modem) for
distances of 50 feet or less.
A normal modem connection for distances greater than 50 feet. The
following figure shows the X.25 connection configuration to Link Plexer
6.0.
Note: The supported modem is the Motorola V.3600 modem. For further
information about specifications and configuration, see the V.3600 modem user
guide, located at http:// www.arcelect.com (you can also use http://
www.motorola.com for reference).
Page 53

Installation and Configuration Guide 53
October 2007 Installing and configuring the Eicon X.25 card
Installing the Eicon X.25 card
If you are using an X.25 connection, you must install the Eicon X.25 card prior
to installing LinkPlexer. For detailed installation instructions, see the following
Web site:
http://www.eicon.com
To install the Eicon X.25 card
1 Insert the Eicon C91 V2 (or compatible) Card into the slot in the computer.
You do not need to change any settings on the card.
2 Connect the Eicon card and the modem using the V24 cable (db25 to
db25).
3 Install the driver:
a. The driver for Windows 2003 is available from the following Web site:
http://www.eicon.com/support
b. Choose Add in the Network Adapter.
c. Choose Eicon Wan Adapters and select the location for the
downloaded executable.
4 Configure the Eicon card as shown in “Configuring the Eicon X.25 card,” on
page 135
5 Click Yes to install OEM Option.
6 Add the Eicon Performance Counter.
7 Restart the computer.
For information about testing and troubleshooting the X.25 connection, see the
Eicon Web site:
http://www.eicon.com/support/
Page 54

54 LinkPlexer
Installing and configuring the Eicon X.25 card Standard 3.02
Page 55

Installation and Configuration Guide 55
Chapter 5
Installing LinkPlexer 6.0
In this chapter
LinkPlexer 6.0 checklist 56
Installing the iButton software and hardware 57
Installing LinkPlexer 6.0 68
Using Nortel License Manager 73
Using Tracker 75
Page 56

56 LinkPlexer
Installing LinkPlexer 6.0 Standard 3.02
LinkPlexer 6.0 checklist
The following items are supplied with LinkPlexer 6.0:
Contact Center 6.0 DVD containing:
LinkPlexer 6.0 installation software consisting of a setup.exe file and a
ReadMeFile.txt file
Dallas Semiconductor 1-Wire Driver V4.00
pcAnywhere 11.5
iTMEX RTE iButton (with USB port adapter) and associated keycode
Note: If using Nortel License Manager for licensing, the 1-Wire drivers and
TMEX RTE software are not required.
To enable support for Nortel License Manager, Lin kPlexer S ervice Upd ate (SU)
01 must be downloaded and installed after installing LinkPlexer 6.0.
Page 57

Installation and Configuration Guide 57
October 2007 Installing LinkPlexer 6.0
Installing the iButton software and hardware
Introduction
In addition to the LinkPlexer 6.0 software, Nortel provides an iButton and a
USB adapter for mounting the iButton on the server, a keycode specific to the
iButton, and Dallas Semiconductor 1-Wire drivers.
To install the 1-Wire iButton drivers
1 Remove any 1-Wire USB devices that are plugged in an available USB port
of the LinkPlexer 6.0 server. Leave any non-USB devices plugged in.
2 Insert the DVD containing LinkPlexer 6.0 into the DVD drive and using
Windows Explorer, launch the installation package <DVD
DRIVE>:\LinkPlexer\ThirdParty\install_1_wire_drivers_v400.msi. You
can also obtain the 1-Wire drivers from the following Web site:
ATTENTION
The iButton hardware and software installation is only
necessary if you are using the iButton for software control and
licensing. If you are using Nortel License Manager, you can
omit this procedure. However, you must install LinkPlexer
SU01 to take advantage of the License Manager technology.
Page 58

58 LinkPlexer
Installing LinkPlexer 6.0 Standard 3.02
http://www.maxim-ic.com
Result: The1-Wire-Drivers Welcome window appears.
3 Click Next.
Result: The License Agreement window appears.
Page 59

Installation and Configuration Guide 59
October 2007 Installing LinkPlexer 6.0
4 Read the License Agreement, select I Agree, and then click Next.
Result: The Custom Installation Choices window appears.
5 Ensure that all check boxes are cleared, and then click Next.
Result: The 1-Wire Drivers USB Warning window appears.
6 If a 1-Wire USB device is attached to the LinkPlexer 6.0 server, unplug it.
Page 60

60 LinkPlexer
Installing LinkPlexer 6.0 Standard 3.02
7 Click Next.
Result: The Select Installation Folder window appears.
Note: The default folder for installation appears. If you want to select an
alternative location, click Browse or type the path in the Folder box.
8 Click Disk Cost to ensure that there is sufficient free space on the selected
disk for the installation.
9 Under Install 1-Wire Drivers for yourself, or for anyone who uses this
computer, select Everyone.
Page 61

Installation and Configuration Guide 61
October 2007 Installing LinkPlexer 6.0
10 Click Next.
Result: The Confirm Installation window appears.
11 Click Next to begin the installation.
Result: The Installing 1-Wire Drivers window appears. The installation
proceeds. The Back and Next buttons are unavailable during the
installation.
Page 62

62 LinkPlexer
Installing LinkPlexer 6.0 Standard 3.02
When the installation is complete, the USB Instructions dialog box appears.
12 Insert the USB adapter and click OK. Wait for Windows to detect the new
hardware. If Windows cannot detect the driver, select it manually by
browsing to the location where the 1-Wire software is installed.
Result: The Welcome to the Found New Hardware Wizard window
appears.
Page 63

Installation and Configuration Guide 63
October 2007 Installing LinkPlexer 6.0
13 Under Can Windows connect to Windows Update to search for new
software?, select No, not this time, and then click Next.
Result: The Found New Hardware - This Wizard helps you install software
for USB Host Adapter for 1-Wire Network window appears.
14 Select Install from a list or specific location (Advanced), and then click
Next.
Result: The Found New Hardware - Please choose your search and
installation options appears.
Page 64

64 LinkPlexer
Installing LinkPlexer 6.0 Standard 3.02
15 Select Search for the best driver in these locations.
16 Clear the check box for Search removable media (floppy, CD ROM).
17 Select Include this location in the search.
18 Click Browse and navigate to the location where you installed the driver in
Step 8 (by default, C:\Program Files\Dallas Semiconductor\1-Wire Drivers
Version 4.00)
Result: The Security Alert - Driver Installation window appears.
Page 65

Installation and Configuration Guide 65
October 2007 Installing LinkPlexer 6.0
19 Click Yes.
Result: The application installs the USB Host Adapter for 1-Wire Network.
The 1-Wire Net Port Selection window appears.
The application detects the iButton adapter that is installed and sets up the
1-Wire driver to access this device.
20 Click Next.
Result: The 1-Wire Net Port Selection window appears.
Page 66

66 LinkPlexer
Installing LinkPlexer 6.0 Standard 3.02
21 Click Auto-Detect. The application searches all ports for the connected
device.
Result: A Warning dialog box appears, indicating that the application
communicates with all available ports until it finds an iButton device.
22 Click OK.
Result: The Auto-Detect In Progress dialog box appears.
When Auto-Detect locates a device, the following window appears.
Page 67

Installation and Configuration Guide 67
October 2007 Installing LinkPlexer 6.0
23 Click Yes to select the detected port as your 1-Wire Net Port.
Result: The auto-detect process is complete. The Installation Complete
window appears.
Tip: If the Auto-Detect process fails to locate a device, refer to the
Troubleshooting section.
24 Click Close.
25 Restart the LinkPlexer 6.0 server.
Tip: The 1-Wire installation process creates a Start menu folder called 1-
Wire Driver. This folder contains the default 1-Wire Net application for
detecting and setting the port and device, and a Java-based
OneWireViewer for viewing the attached device.
Page 68

68 LinkPlexer
Installing LinkPlexer 6.0 Standard 3.02
Installing LinkPlexer 6.0
This section describes how to install the LinkPlexer 6.0 application from the
DVD. You need the supplied keycode to complete the installation.
To install LinkPlexer 6.0
1 Insert the DVD containing LinkPlexer 6.0 into the DVD drive. In Windows
Explorer, browse to <DVD DRIVE>:\LinkPlexer\Setup.exe.
Result: The Welcome window appears.
Page 69

Installation and Configuration Guide 69
October 2007 Installing LinkPlexer 6.0
2 Click Next.
Result: The Destination Folder window appears.
Tip: The default folder for installation appears. Nortel recommends that you
use the default location.You can change the folder for installation by clicking
the Change button.
3 Click Next.
Result: The Ready to Install window appears.
Page 70

70 LinkPlexer
Installing LinkPlexer 6.0 Standard 3.02
4 Click Next.
Result: The Installing Nortel LinkPlexer 6 window appears.
When the installation is complete, the InstallShield Wizard Completed
window appears.
5 Click Finish. The LinkPlexer 6.0 installation is now complete.
Page 71

Installation and Configuration Guide 71
October 2007 Installing LinkPlexer 6.0
LinkPlexer Keycode Tracker
Use the LinkPlexer Keycode Tracker to enter the dongle keycodes. The
Keycode Tracker displays the number of applications that can connect to the
LinkPlexer 6.0 server.
You can also use the Keycode tracker to confirm dongle detection. Click the
Check Dongle button and wait approximately 10 seconds. If a dongle is
detected, the Check Dongle box on the Keycode Tracker window displays
Connected. If the dongle is not detected, the Check Dongle box displays Not
Connected. If this occurs, see Appendix A, “Troubleshooting.”
Alternatively, the dongle can be also be detected using iButton applications as
referred to at http://www.ibutton.com/software.
ATTENTION
This section is applicable only if you are using the iButton for
software control and licensing.
Page 72

72 LinkPlexer
Installing LinkPlexer 6.0 Standard 3.02
To enter the keycode
1 Click Start > Programs > Nortel Contact Center > LinkPlexer >
KeycodeTracker.
Result: The LinkPlexer KeycodeTracker window appears.
2 In the Keycode box, type the supplied keycode.
3 Click Apply.
Result: The LinkPlexer 6.0 KeycodeTracker window closes. The
KeycodeTracker application closes.
ATTENTION
Perform this procedure only if you are using the iButton for
software control and licensing. If you are using Nortel License
Manager, omit this pr ocedure and p roceed wit h “Using Nortel
License Manager” on page 73.
Page 73

Installation and Configuration Guide 73
October 2007 Installing LinkPlexer 6.0
Using Nortel License Manager
Introduction
Service Update (SU) 01 for LinkPlexer 6.0 introduces support for Nortel
License Manager. To take advantage of this feature, the License Manager
identified to distribute licenses to LinkPlexer must support the new license
features introduced to support LinkPlexer. The LinkPlexer configuration file
must be modified to configure LinkPlexer to connect to the License Manager.
Deployment Procedure
1 Update the license file on the target License Manager to support the new
LinkPlexer license features.
Note: The target License Manager can be NODAL or CORPORATE and
can be co-resident with or remote from LinkPlexer.
2 Restart the License Manager service.
3 Upgrade the existing LinkPlexer to LinkPlexer 6.0 and LP_6.0_SU_01. For
more information, see “Installing an SU for LinkPlexer 6.0” on page 82.
4 Configure LinkPlexer 6.0 to connect to the target License Manager. Add the
following to the LPConfig.ini file (values shown are samples only)
[LicenseManager]
UseLicenseManager=ON
MaxConnectedApplications=10
Address=192.192.192.192
Por t=3998
LicenseType=NODAL
RetryIntervalSecs=30
MaxRetries=10
5 Start the LinkPlexer service.
Page 74

74 LinkPlexer
Installing LinkPlexer 6.0 Standard 3.02
Useful hints for deployment
To revert back to iButton/Keycode set UseLicenseManager=OFF and
restart the LinkPlexer service.
If LinkPlexer fails to start, use the License Manager tool LMConfig.exe at
the target License Manager to view the licenses available from the License
Manager. There must be LM_LP and LM_LP_CNTN features and licenses
available.
Page 75

Installation and Configuration Guide 75
October 2007 Installing LinkPlexer 6.0
Using Tracker
LinkPlexer Tracker
The LinkPlexer Tracker application provides information about the LinkPlexer
6.0 build version and the operating system. It detects and displays information
about the Microsoft Windows operating version, the build number and date of
the installation, and the version number and date of any PEP installation.
To launch the Tracker application
Click Start > Programs > Nortel Contact Center > LinkPlexer > Tracker.
Result: The Tracker window appears.
Page 76

76 LinkPlexer
Installing LinkPlexer 6.0 Standard 3.02
The LinkPlexer Tracker application window displays the follo wing co mpon ents
and information:
Windows—refers to the operating syst em and service pack versions
Tracker—indicates the current version of the LinkPlexer Tracker
application
DMS Server File Stamp—refers to the version of the file stamp
Build Info—indicates the LinkPlexer 6.0 build.
The date for the Tracker, DMS Server File Stamp, and Build Info components
refer to the date LinkPlexer 6.0 was installed.
Page 77

Installation and Configuration Guide 77
Chapter 6
LinkPlexer 6.0 procedures
In this chapter
Upgrading from LinkPlexer 1.1 to 6.0 78
Upgrading from LinkPlexer 1.2 to 6.0 79
Backing up LinkPlexer and restoring to a new server 80
Backing up LinkPlexer to enable restoration in the event of a faulty PEP or
Service Update 81
Installing an SU for LinkPlexer 6.0 82
Page 78

78 LinkPlexer
LinkPlexer 6.0 procedures Standard 3.02
Upgrading from LinkPlexer 1.1 to 6.0
Introduction
There is no advantage in leaving LinkPlexer 1.1 installed with LinkPlexer 6.0.
The following procedure removes LinkPlexer 1.1 but ensures that the
configuration files associated with LinkPlexer 1.1 are backed up and available
for reference during the configuration of LinkPlexer 6.0. In case of absolute
failure of LinkPlexer 6.0, these files can be used if you reinstall LinkPlexer 1.1.
To upgrade from LinkPlexer 1.1 to 6.0
1 Locate the LinkPlexer 1.1 folder. By default, the location of the folder is
C:\Program Files\Nortel\LinkPlexer 1.1.
2 Copy this folder (and consequently all the files) to another location. This
step ensures that there are backup copies of all the LinkPlexer 1.1 files, in
case of a fault during LinkPlexer 6.0 installation and configuration.
3 Make a separate copy of the DMSGlobal.ini and DMSLocal.ini configuration
files, which have been adapted locally for LinkPlexer 1.1 configuration.
Store a copy of these files externally (that is, on a separate machine) for
reference when completing the configuration for LinkPlexer 6.0.
Note: Although the format of the LinkPlexer 1.1 files is different from the
format of the LinkPlexer 6.0 configuration file, there is common information.
For further details, see Appendix E, “LinkPlexer configuration changes.”
4 Uninstall LinkPlexer 1.1 by clicking Start > Settings > Control Panel >
Add/Remove Programs and selecting Nortel LinkPlexer 1.1.
5 Install and configure LinkPlexer 6.0 as directed in Chapter 5, “Installing
LinkPlexer 6.0” and Chapter 7, “Configuring and maintaining LinkPlexer
6.0.”
Page 79

Installation and Configuration Guide 79
October 2007 LinkPlexer 6.0 procedures
Upgrading from LinkPlexer 1.2 to 6.0
Introduction
The following procedure removes LinkPlexer 1.2 but ensures that the
configuration file associated with LinkPlexer 1.2 is backed up and available for
reference during the configuration of LinkPlexer 6.0. In case of absolute failure
of LinkPlexer 6.0, this file can be used if you reinstall LinkPlexer 1.2.
To upgrade from LinkPlexer 1.2 to 6.0
1 Locate the LinkPlexer 1.2 folder. By default, the location of the folder is
C:\Program Files\Nortel\LinkPlexer 1.2.
2 Copy this folder (and consequently, all the files) to another location. This
step ensures that there are backup copies of all the LinkPlexer 1.2 files, in
case of a fault during LinkPlexer 6.0 installation and configuration.
3 Make a separate copy of the LPConfig.ini configuration file, which has been
adapted locally for LinkPlexer 1.2 configuration. Store a copy of this file
externally (on another machine) for reference when completing the
configuration for LinkPlexer 6.0.
4 Uninstall LinkPlexer 1.2 by clicking Start > Settings > Control Panel >
Add/Remove Programs and selecting Nortel LinkPlexer 1.2.
5 Install and configure LinkPlexer 6.0 as directed in Chapter 5, “Installing
LinkPlexer 6.0” and Chapter 7, “Configuring and maintaining LinkPlexer
6.0.”
Page 80

80 LinkPlexer
LinkPlexer 6.0 procedures Standard 3.02
Backing up LinkPlexer and restoring to a new
server
Introduction
This section documents the steps to ensure the current configuration of
LinkPlexer 6.0 (and the LinkPlexer files) is backed up. It also outlines the steps
to restore LinkPlexer to a new server in the case of a fault or damage to the
original server.
To back up LinkPlexer and restore to a new server
1 Locate the LinkPlexer 6.0 folder. By default, this folder is located in
C:\Program Files\Nortel\LinkPlexer.
2 Copy this folder (and consequently all the files) to another location. This
step ensures that there are backup copies of all the installed files.
3 Make a separate copy of the LPConfig.ini configuration file, which has been
adapted locally for LinkPlexer 6.0 configuration. Store a copy of this file
externally (that is, on a separate machine).
4 Install LinkPlexer 6.0 on the new server. See Chapter 5, “Installing
LinkPlexer 6.0.”
5 Locate the LinkPlexer 6.0 folder. By default, this folder is located in
C:\Program Files\Nortel\LinkPlexer.
6 Retrieve the copied LPConfig.ini. Copy the file into the LinkPlexer 6.0 folder
over the default LPConfig.ini file.
7 Reconfigure the TCP/IP or X.25 connections. See Chapter 7, “Configuring
and maintaining LinkPlexer 6.0.”
Page 81

Installation and Configuration Guide 81
October 2007 LinkPlexer 6.0 procedures
Backing up LinkPlexer to enable restoration in
the event of a faulty PEP or Service Update
Introduction
The LinkPlexer 6.0 Program Enhancement Package (PEP) or Service Update
(SU) installers can be used to update the LinkPlexer 6.0 file content. The PEP/
SU installer reads the LinkPlexer 6.0 path from the registry keys and installs the
modifications in the Nortel LinkPlexer 6.0 folder.
After you install the PEP/SU, you cannot uninstall it. The uninstall process
removes the complete application. In case a fault occurs in the PEP/SU
installation, it is advisable to have a backup copy of the original LinkPlexer 6.0
files.
To back up LinkPlexer 6.0
1 Locate the LinkPlexer 6.0 folder. By default, the folder is located at
C:\Program Files\Nortel\LinkPlexer.
2 Copy this folder (and consequently all the files) to another location.
3 Close all applications that are currently running.
4 Proceed with the PEP/SU installation (see “Installing an SU for LinkPlexer
6.0,” on page 82).
5 If a problem with the PEP/SU installation occurs, delete the LinkPlexer 6.0
folder located, by default, at C:\Program Files\Nortel\LinkPlexer.
6 Restore the LinkPlexer 6.0 folder to C:\Program Files\Nortel\LinkPlexer.
You can now run LinkPlexer 6.0 and its associated applications as usual.
Page 82

82 LinkPlexer
LinkPlexer 6.0 procedures Standard 3.02
Installing an SU for LinkPlexer 6.0
Introduction
LP_6.0_SU_01 for LinkPlexer 6.0 is available from the Meridian PEP Library
(http://qtcfs0n6.ca.nortel.com/mpl/)
. The SU contains the most up-to-date files
for LinkPlexer 6.0.
LP_6.0_SU_01 introduces support for Nortel License Manager in LinkPlexer
6.0. The integration with License Manager deprecates the current iButton
technology. However, you can continue to use the iButton technology. The
default operation is assumed to be using License Manager rather than iButton
technology. A number of new configuration items are introduced that enable
configuration related to the License Manager.
Nortel recommends that you follow the procedure “Backing up LinkPlexer to
enable restoration in the event of a faulty PEP or Service Update” on page 81
prior to beginning this procedure.
Note: LinkPlexer 6.0 must be installed and all unassociated applications must be
closed.
To install LP_6.0_SU01
1 Locate and download LP_6.0_SU_01 from the Nortel Meridian PEP Library
(http://qtcfs0n6.ca.nortel.com/mpl/).
2 Unzip the file and double-click the setup icon (setup.exe).
Result: The following dialog box appears.
Page 83

Installation and Configuration Guide 83
October 2007 LinkPlexer 6.0 procedures
3 Click Yes.
Result: The Setup Initialization window appears.
When the initialization is complete, a Readme file for SU01 appears.
4 Read and close the Readme file.
Result: The SU01 Welcome window appears.
Page 84

84 LinkPlexer
LinkPlexer 6.0 procedures Standard 3.02
5 Click Next.
Result: The Resume Installation window appears.
6 Click Next to proceed with the installation.
Result: The Installation Progress window appears.
Page 85

Installation and Configuration Guide 85
October 2007 LinkPlexer 6.0 procedures
When the installation is complete, the following window appears.
7 Click Finish.
8 Click Start > All Programs > Nortel Contact Center > LinkPlexer >
Tracker.
Result: The Tracker application launches. The PEP level now indicates that
LP_6.0_SU_01 is installed.
Page 86

86 LinkPlexer
LinkPlexer 6.0 procedures Standard 3.02
Page 87

Installation and Configuration Guide 87
Chapter 7
Configuring and maintaining
LinkPlexer 6.0
In this chapter
LinkPlexer 6.0 configuration 88
Starting the LinkPlexer 6.0 service 102
Uninstalling LinkPlexer 6.0 103
Configuring LinkPlexer to use an X.25 connection 106
Configuring LinkPlexer to use a TCP/IP connection 107
Configuring the CS 2x00/DMS switch 108
Configuring Contact Center Manager Server to use LinkPlexer 6.0 109
Configuring the ICM TAPI driver to use LinkPlexer 6.0 112
Configuring Periphonics VPS/is (Peri-ICM) to use LinkPlexer 117
Page 88

88 LinkPlexer
Configuring and maintaining LinkPlexer 6.0 Standard 3.02
LinkPlexer 6.0 configuration
Configure LinkPlexer 6.0 using a single configuration file, called LPConfig.ini,
which is in the LinkPlexer 6.0 install directory (by default C:\Program
Files\Nortel\LinkPlexer).
Note: LinkPlexer 1.1 was configured using two configuration files:
DMSGlobal.ini and DMSLocal.ini. LinkPlexer 1.2 and LinkPlexer 6.0 are
configured using the single configuration file LPConfig.ini.
The configuration file is read when LinkPlexer 6.0 is started. All entries are read
at startup; however, LinkPlexer 6.0 checks for updates to certain fields in the
configuration file every 10 seconds. Configuration items are grouped by
function dynamic or static and mandatory or optional.
Dynamic configuration items
Dynamic configuration items are read less than 10 seconds after the
configuration file is modified. You can change dynamic configuration items
without stopping the LinkPlexer 6.0 service.
Static configuration items
Static configuration items are only read at LinkPlexer service startup. To change
one of these items, you must stop the LinkPlexer service and then restart the
service after modifying the configuration file.
Mandatory configuration items
Mandatory configuration items must be present in the configuration file and
must be valid (within specified ranges). If they are not present or are set
incorrectly, the LinkPlexer service cannot start. A fatal error indicating the
reason is logged.
Optional configuration items
Optional configuration items are not mandatory. If they are not present in the
configuration file or their settings are not within the specified ranges, the
specified default settings are used.
Page 89

Installation and Configuration Guide 89
October 2007 Configuring and maintaining LinkPlexer 6.0
To manage logging, new configurat ion items ap pear un der the section [ Logging Dynamic] (see “Log files,” on page 126). The section [Agent] contains
information about the agent and the section [Agent-Dynamic] contains the
dynamic entries pertaining to client connection management. LinkPlexer 6.0
sends the dv-Appl-Logon message to the switch on service startup. The dv-Appl
Logon message includes the parameters in the section [Switch-Logon] th at must
be configured on LinkPlexer 6.0.
ATTENTION
The names of the configuration items are case-sensitive.
Page 90

90 LinkPlexer
Configuring and maintaining LinkPlexer 6.0 Standard 3.02
LPConfig.ini section and parameter descriptions
Configuration
Item Description
Rate/
Settings Default Mandatory Type
[LoggingDynamic]
MaxLogFileSizeMegs
Specifies the
maximum size in
megabytes that the
current log file
LP_Curr.log reaches
before it is moved to
LP_Prev.log. After it
is moved, an empty
LP_Curr.log file is
recreated and logging
to this file continues.
1–50 1 No Dynamic
IcmMessageLogg
ing
Determines whether
hex dumps of the ICM
messages to and
from the switch are
logged to the file
LP_SndRcvCurr.log.
ON or OFF OFF No Dynamic
IcmMessageMax
Log-FileSizeMegs
Specifies the
maximum size in
megabytes that the
current LinkPlexer
ICM message log file
LP_SndRcvCurr.log
reaches before it is
moved to
LP_SndRcvPrev.log.
After it is moved, an
empty
LP_SndRcvCurr.log
file is recreated and
logging to this file
continues.
1–50 1 No Dynamic
Page 91

Installation and Configuration Guide 91
October 2007 Configuring and maintaining LinkPlexer 6.0
[Agent]
AgentListenerPort Specifies the IP port
that LinkPlexer 6.0
listens on for
connections from
LinkPlexer 6.0 clients
(such as Contact
Center Manager
Server or TAPI)
1–65535 Yes Static
[Agent-Dynamic]
AgentContinuityT
est
On receipt of a
continuity message
from the switch, this
configuration item is
read and the
appropriate action is
taken depending on
whether it is set or
not (see “Client
connection
management,” on
page 17 for more
information)
ON or OFF ON No Dynamic
Configuration
Item Description
Rate/
Settings Default Mandatory Type
Page 92

92 LinkPlexer
Configuring and maintaining LinkPlexer 6.0 Standard 3.02
AgentPingTest If agent pinging is
enabled, all servers/
PCs on which active
LinkPlexer 6.0 clients
(Contact Center
Manager Server,
TAPI) reside are
pinged at the
configured time
interval. Any agent
PCs that do not
respond to the ping in
a timely fashion are
disconnected from
LinkPlexer and the
agent license
becomes available.
See “Client
connection
management,” on
page 17 for more
details.
ON or OFF OFF No Dynamic
AgentPingInterval
-
Secs
This configuration
item is only read if
AgentPingTest is
enabled (ON). It
specifies the interval
in seconds at which
ping requests are
sent to servers/ PCs
on which active
LinkPlexer clients
reside.
10–86400
(10 sec to 1
day)
60 No Dynamic
Configuration
Item Description
Rate/
Settings Default Mandatory Type
Page 93

Installation and Configuration Guide 93
October 2007 Configuring and maintaining LinkPlexer 6.0
[LicenseManager]
UseLicenseMana
ger
When set to ON,
LinkPlexer assumes
Nortel License
Manager is being
used. When set to
OFF, LinkPlexer
assumes that iButton/
keycode is being
used.
OFF or ON ON No Static
MaxConnectedAp
plications
The maximum
number of application
that can connect to
LinkPlexer.
1-50 10 No Static
LicenseType The type of License
Manager that
LinkPlexer connects
to.
NODAL or
COPORATE
NODAL No Static
MaxRetries The maximum
number of attempts to
establish a
connection to the
License Manager
5-50 10 No Static
RetryIntervalSecs The number of
seconds between
attempts to establish
a connection to the
License Manager.
5-300 30 No Static
Address The address of the
License Manager.
IP Address /
Host name
Yes Static
Configuration
Item Description
Rate/
Settings Default Mandatory Type
Page 94

94 LinkPlexer
Configuring and maintaining LinkPlexer 6.0 Standard 3.02
Port The port that the
License Manager
expects applications
to connect at to
request licenses.
1-65535 3998 No Statics
[Switch]
SwitchLinkType Specifies the type of
link that LinkPlexer
uses when
communicating with
the switch.
IP or
X25
IP No Static
SwitchAddress Specifies the address
(IP or X25) of the
switch that LinkPlexer
communicates with.
Valid IP
or X25
address
Yes Static
SwitchPort Specifies the port (IP
or X25) on the switch
that LinkPlexer
connects to.
1–65535 Yes Static
SwitchReplyTime
out-MilliSecs
Specifies the time in
milli-seconds that
LinkPlexer waits for a
response to a request
sent to the switch.
Responses received
from the switch after
this timeout period
are discarded.
250–300000
(250 ms
to 5 min)
10000
(10 sec)
No Static
Configuration
Item Description
Rate/
Settings Default Mandatory Type
Page 95

Installation and Configuration Guide 95
October 2007 Configuring and maintaining LinkPlexer 6.0
SwitchContinuityT
est
If switch continuity
testing is enabled
(ON), LinkPlexer
sends a dv-ApplContinuity-Test to the
switch at the
configured time
interval
(SwitchContinuityInte
rvalSecs). If the
switch does not reply
to the message within
SwitchReplyTimeout
MilliSecs, the link to
the switch is dropped.
ON or OFF ON No Static
SwitchContinuityI
ntervalSecs
This configuration
item is only valid/read
if SwitchContinuity
Test is enabled (ON).
It specifies the
interval in seconds at
which dv-ApplContinuity-Test
messages are sent to
the switch.
60–86400 (1
min to 1
day)
600 (10
min)
No Static
Configuration
Item Description
Rate/
Settings Default Mandatory Type
Page 96

96 LinkPlexer
Configuring and maintaining LinkPlexer 6.0 Standard 3.02
[Switch-Login]
NetworkNodeID Specifies the switch
with which LinkPlexer
communicates. This
is the switch that
LinkPlexer connects
to through the ICM/
CompuCALL link and
is defined by the
operating company.
(Switch: Defined in
NETNODEID of the
table SCAIGRP)
0–32767 Yes Static
ServiceID Identifies a service
profile for a session.
An operating
company can define
functions and
parameters in service
profiles on the switch.
Also, an operating
company can assign
a customer up to
eight service IDs.
(Switch: Defined in
PROFKEY.LINKSET.
SRVCID of table
SCAIPROF)
0–255 Yes Static
ServiceVersion Specifies the
application level
signaling version
used by LinkPlexer.
0–65535 Yes Static
Configuration
Item Description
Rate/
Settings Default Mandatory Type
Page 97

Installation and Configuration Guide 97
October 2007 Configuring and maintaining LinkPlexer 6.0
BusinessGroupID Identifies the
customer to whom
the LinkPlexer
application belongs.
This is defined by the
operating company.
(Switch: Defined in
BGID in table
BGDATA and ECM
option in table
CUSTNTWK)
1–4194304 Yes Static
ApplicationID Identifies the specific
LinkPlexer application
initiating the logon
request.
1–32767 Yes Static
Password This is used for
security purposes
and corresponds to a
specific
BusinessGroupID.
One password
datafilled for the
customer is
applicable to all eight
service IDs. (Switch:
Defined in
PASSWORD in table
SCAIGRP)
variable
length IA5string (1 to 8
characters)
Yes Static
Configuration
Item Description
Rate/
Settings Default Mandatory Type
Page 98

98 LinkPlexer
Configuring and maintaining LinkPlexer 6.0 Standard 3.02
TcpLinkSetName TCP connections
between LinkPlexer
and the switch use
TcpLinksetName to
identify which linkset
is sent to dv-ApplLogon. For X.25
connections,
TcpLinkSetName is
not applicable and is
not checked by the
switch. If
TcpLinkSetName is
sent for X.25
connections, the
parameter is ignored
by the switch.
(Switch: Defined in
LINKSET in table
SCAICOMS)
variable
length IA5string (1 to
16
characters)
No Static
Configuration
Item Description
Rate/
Settings Default Mandatory Type
Page 99

Installation and Configuration Guide 99
October 2007 Configuring and maintaining LinkPlexer 6.0
HardReset If HardReset is set to
ON then LinkPlexer
uses the algorithm
described here to log
on to the CS 2x00/
DMS. On startup,
LinkPlexer sends a
dv-Appl-Logon
message to the
switch. If the
response to this
message is
RETURN-ERROR
with the error LinkAlready-In-Use,
LinkPlexer sends a
second dv-ApplLogon message with
the dv-Appl-Logon
optional parameter,
HardReset set to
TRUE. With the
HardReset parameter
populated in the dvAppl-Logon
message, the switch
removes all data
associated with the
existing session and
forces a new session
to be formed. The
switch sends a
RETURN-RESULT in
response to the
second dv-ApplLogon message.
ON or OFF
Note: The
HardReset
parameter is
only
supported
on the CS
2x00/DMS
from SCAI
16 onwards.
Do not use
HardReset
unless the
Service
Version is
16 or later.
OFF No Static
Configuration
Item Description
Rate/
Settings Default Mandatory Type
Page 100

100 LinkPlexer
Configuring and maintaining LinkPlexer 6.0 Standard 3.02
Default content of LPConfig.ini
The default content of the LPConfig.ini file is as follows:
[Logging-Dynamic]
MaxLogFileSizeMegs=1
IcmMessageLogging=OFF
IcmMessageMaxLogFileSizeMegs=1
[Agent]
AgentListenerPort=2500
[Agent-Dynamic]
AgentContinuityTest=ON
AgentPingTest=OFF
AgentPingIntervalSecs=60
[Feature]
DVSetOffHookGe
nerate
If DVSetOffHookGen
erate is enabled
(ON), LinkPlexer
generates a dv-SetOffHook message
(unsolicited event)
and sends it to all
connected agents/
clients on receipt of a
dv-Make-Call
RETURN-RESULT
message from the
switch.
ON or OFF OFF No Static
Configuration
Item Description
Rate/
Settings Default Mandatory Type
 Loading...