

Page 1

CallPilot.
TM
Release 2.0
Voice Mail User Guide
Page 2

Contents
Welcome to CallPilot . . . . . . . . . . . . . . . . . . . . . . . . . . . . . . . . . . . . . . . .3
Working with CallPilot . . . . . . . . . . . . . . . . . . . . . . . . . . . . . . . . . . . . . . .4
CallPilot keypad commands . . . . . . . . . . . . . . . . . . . . . . . . . . . . . . . . . . .5
Using standard commands . . . . . . . . . . . . . . . . . . . . . . . . . . . . . . . . . . .6
Logging in to your mailbox . . . . . . . . . . . . . . . . . . . . . . . . . . . . . . . . . . . .7
Changing your password . . . . . . . . . . . . . . . . . . . . . . . . . . . . . . . . . . . . .8
Recording your name . . . . . . . . . . . . . . . . . . . . . . . . . . . . . . . . . . . . . . . .8
Recording greetings . . . . . . . . . . . . . . . . . . . . . . . . . . . . . . . . . . . . . . . . .9
Assigning a custom operator . . . . . . . . . . . . . . . . . . . . . . . . . . . . . . . . .10
Blocking messages . . . . . . . . . . . . . . . . . . . . . . . . . . . . . . . . . . . . . . . .10
Turning Autologin on or off . . . . . . . . . . . . . . . . . . . . . . . . . . . . . . . . . . .10
Returning to speech commands . . . . . . . . . . . . . . . . . . . . . . . . . . . . . .10
Playing your messages . . . . . . . . . . . . . . . . . . . . . . . . . . . . . . . . . . . . .11
Changing message speed . . . . . . . . . . . . . . . . . . . . . . . . . . . . . . . . . . .12
Changing message volume . . . . . . . . . . . . . . . . . . . . . . . . . . . . . . . . . .12
Deleting and restoring messages . . . . . . . . . . . . . . . . . . . . . . . . . . . . . .12
Calling the sender . . . . . . . . . . . . . . . . . . . . . . . . . . . . . . . . . . . . . . . . 13
Replying to the sender . . . . . . . . . . . . . . . . . . . . . . . . . . . . . . . . . . . . .13
Replying to the sender and all recipients . . . . . . . . . . . . . . . . . . . . . . . . 13
Forwarding a message . . . . . . . . . . . . . . . . . . . . . . . . . . . . . . . . . . . . . . 14
Composing a message . . . . . . . . . . . . . . . . . . . . . . . . . . . . . . . . . . . . . 15
Addressing a message . . . . . . . . . . . . . . . . . . . . . . . . . . . . . . . . . . . . . . 16
Addressing by name . . . . . . . . . . . . . . . . . . . . . . . . . . . . . . . . . . . . . . . 17
Checking and editing your message . . . . . . . . . . . . . . . . . . . . . . . . . . 17
Adding message options . . . . . . . . . . . . . . . . . . . . . . . . . . . . . . . . . . .18
Adding message attachments . . . . . . . . . . . . . . . . . . . . . . . . . . . . . . . . 19
Express messaging . . . . . . . . . . . . . . . . . . . . . . . . . . . . . . . . . . . . . . 20
Thru-dialing . . . . . . . . . . . . . . . . . . . . . . . . . . . . . . . . . . . . . . . . . . . . 20
Distribution lists . . . . . . . . . . . . . . . . . . . . . . . . . . . . . . . . . . . . . . . . . 21
Remote Notification . . . . . . . . . . . . . . . . . . . . . . . . . . . . . . . . . . . . . . . . 22
When you are the caller . . . . . . . . . . . . . . . . . . . . . . . . . . . . . . . . . . . . . 26
Your CallPilot numbers . . . . . . . . . . . . . . . . . . . . . . . . . . . . . . . . . . . . . 27
Document information . . . . . . . . . . . . . . . . . . . . . . . . . . . . . . . . . . . . . . 28
2
Page 3

Welcome to CallPilot
CallPilot fr om Nortel Networks is an advanced business
communications system that offers exceptional flexibility for
managing your messaging needs.
You can work with CallPilot from your telephone or your computer.
Here are some of the many CallPilot features you can use by
entering commands on the keypad of your touchtone telephone:
Play your messages.
Forw ard and reply to messages.
Compose, edit, and send messages.
Dial and address by name or b y number.
Add message options such as urgent, private, and timed delivery.
Create personalized distribution lists for sending messages.
Receive remote noti fication of incoming messages.
3
Page 4

Working with CallPilot
How to use this guide
This guide explains in detail how to work with CallPilot from the keypad of your
touchtone t el ep hone. If you w an t t o u s e a feature or service d es cribe d in this guide
but you cannot access i t , c he ck with your ad m in is t r a tor.
CallPilot terms
Access numbers
Your administrat or gi ves you the acc ess n um b ers you need for C all Pi lo t. Keep a handy
record of these numbers in Your CallPilot numbers.
Mailbox
Your CallPilot ma il box stores your m es sa ge s, recorded greetin gs, distribution lists, and
other person al s ettings. You can log in to your mailbox at any time to play your
messages and use all of the available CallPilot features and services. Your
administrator will assign you a mailbox number, which is usually your extension number.
Password
Your personal pas sword provides s ec urity for your mail box and its conte nt s . Al l o f your
interactio n w it h C a ll Pi lo t i s co nfidential; no one el s e can access your m ai lb ox.
Help sources
Voice prompts
On your telephone, CallPilot guides you with voice prompts at each step. The prompts
tell you what to do next, or what options are available, so you don’t have to remember
ev e ry step. You can interrupt a pr om pt by pressing the key for the next step.
Context-sensitive help
On you r te le ph on e, you can press * for Help at any time while y ou are logged into your
mailbo x . You will h ea r th e op tions that are av a il able for yo ur next step.
My CallPilot
On your com pute r, web-based My CallPi lot pro v ides a Usef ul Information page specific
to the mailbox options, features, and services that are available to you.
Printed help
In addition to this user guide, a printed Quick Reference Card and a printed Wallet Card
are av aila b le . Keep them near your teleph one or take them with you when y ou tra vel.
4
Page 5
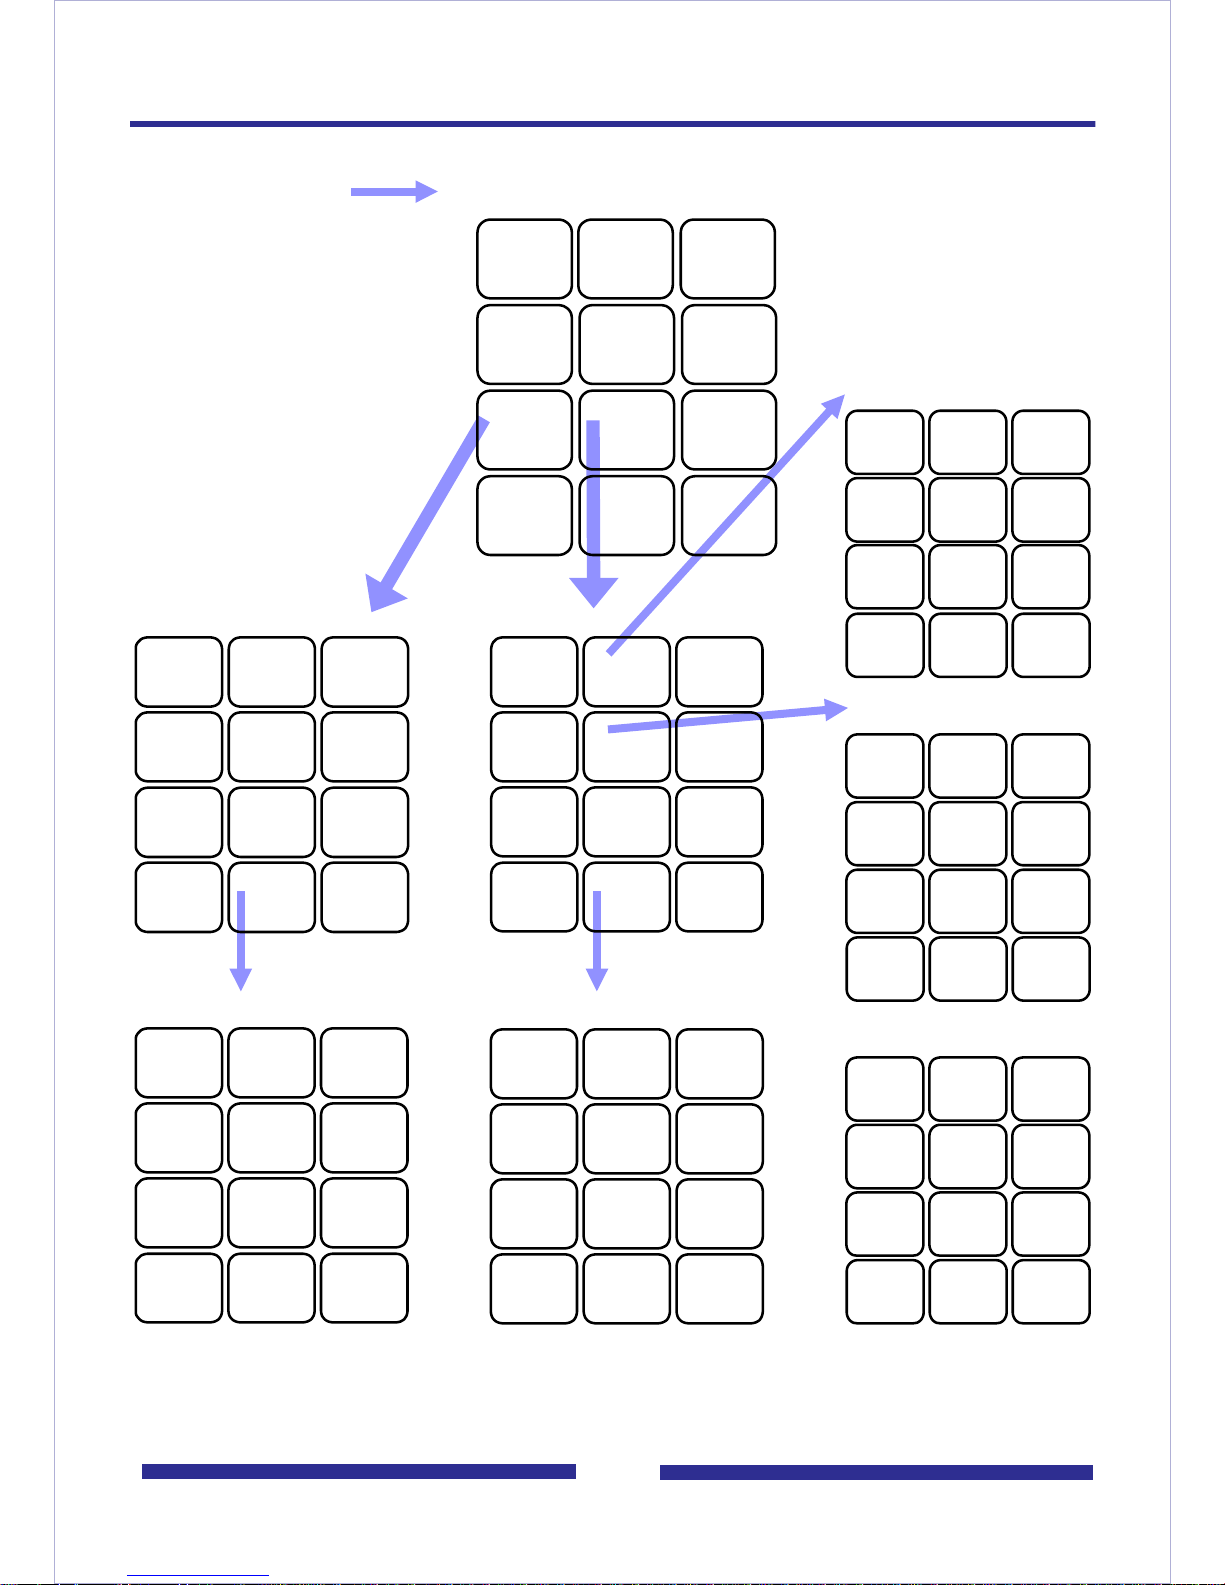
CallPilot keypad commands
Login
Message List Commands
1
Skip
Back
4
Previous
Message
7
Message
Commands
*
Help
2
Play
5
Record
8
Mailbox
Commands
0
Attendant/
Thru-Dial
3
Skip
Forward
6
Next
Message
9
Call
Sender
#
Stop
Message Commands Mailbox Commands
1
Reply
4
Reply
All
7
*
Message
Help
2
Play
Envelope
5
Compose
8
0
Message
Options
3
Forward
6
Delete/
Restore
9
Send
#
Cancel/
Exit
1
Login
4
Password
Change
7
*
Mailbox
Help
2
Greetings
5
CallPilot
Tools
8
0
Mailbox
Options
3
Disconnect
6
Go to a
Message
9
#
Cancel/
Exit
Greetings
1
External
Greeting
4
7
*
Greeting
Help
2
Internal
Greeting
5
8
0
CallPilot Tools
1
4
7
2
5
Distribution
Lists
8
3
Temporary
Greeting
6
9
Record
Name
#
Cancel/
Exit
3
6
9
Message Options
1
Urgent
On/Off
4
Private
On/Off
7
Add
Attachment
*
Options
Help
2
5
Acknowledge On/Off
8
0
3
Economy
On/Off
6
Timed
Delivery
9
#
Cancel/
Exit
Mailbox Options
1
Custom
Operator
4
7
Block
Messages
*
Options
Help
2
5
8
0
3
6
9
#
Cancel/
Exit
5
*
Tools
Help
0
Fax Options
#
Page 6
Using standard commands
CallPilot has many standard commands that are common to all features, so you don’t
need a main menu. For example, Play is always 2, Record is always 5, and Help is
always *. If you learn these standard commands, you can use all CallPilot features
without mem orizi ng e v e ry step .
Playing and recording
To play you r m es s ag es, record messages , and record greeti ng s , us e th es e standard
commands as needed:
1
Skip
Back
4
Previous
Message
2
Play
5
Record
3
Skip
Forward
6
Next
Message
Message commands and mailbox commands
To access more features from your message list, use these two families of commands.
Commands that you use on the current message begin with 7. Commands that you use
to manage your mailbox begin with 8.
7
Message
Commands
8
Mailbox
Commands
Always available
Press * for context sensitive Help prompts at any time. Press # to stop playbac k or
recording, to cancel a menu selection, to end data entry, or to end addressing.
*
Help
#
Stop
6
Page 7

Logging in to your mailbox
To log in to your CallPilot mailbox, you need the CallPilot multimedia messaging access
number, and you r own mailbox number and password.
Your administrator gives you these numbers and any other numbers you need for
CallPilot features and services. Keep a handy record of these numbers in Your CallPilot
numbers, page 31.
To log in for the first time
Your administrato r will giv e you a tempora ry passwo rd that y ou change th e first time y ou
log in.
1 Decide on a new password. See Changing your password, page 8.
2 Follow the login steps below, using your temporary password.
3 When you are a sk ed to enter a ne w pas s w ord, follow the prompts . See Changing
your password, page 8.
To log in
You can log in to your mailbox from any touchtone telephone. When logging in from your
own tel eph one, you may be able to p res s a message key i ns tead of dialing the a cc e ss
number.
1 Dial the CallPilot multimedia messaging access number, or press the message
key on your telephone.
2 Enter your mailbox number, then press #. Or, at your o wn telephon e, jus t press #.
3 Enter your password, then press #.
You are now in your mailbox and can use all the message list commands.
To log in using Autologin
Autol og in i s an op ti on th at makes login eas i er be ca us e you don’t have to enter your
mailbox and password. Your administrator can allow secure numbers such as your
office or home telephone fo r Autologin. See Turning Autologin on or off, page 10.
To access your mailbox when Autologin is turned on, dial the CallPilot access number or
press the message key at one of your specified Autologin numbers.
To disconnect
When you have finished your CallPilot session, press 8 3 to disconnect, or ha ng up .
7
Page 8
Changing your password
When yo u l og i n for the first time, you must cha ng e your password from the one you
were first assi gned. After that, yo u can change yo ur passwo rd as often as required. Your
administr ator sets the minimu m le ng th for a passw ord .
To change your password
1 While logged in to your mailb ox, press 8 4.
2 Enter your current password, then press #.
3 You may see dashes instead of numbers if you have a display phone.
4 Enter your new passwo rd, then press #.
5 Enter your new password again, then press #.
If your p as sword expi res, follow the s te ps for changing a pa ssword.
If you forget your password, your administrator can assign you a temporary password.
Log in wit h t he te m po r a ry password, then cha nge it immediately.
Choosing a secure password
CallPilot prevents you from using some passwords if they are too short or too simple, or
if you h ave used the sam e on e recently. Also, C al lP il ot req ui res that you change your
password on a regular sch edule set by yo ur ad mi nistrator.
8
4
Kee p your mailbox se c ure by choosing passwords that are n ot easily discovered.
Decide on a system for choosing passwords that is easy for you to remember but hard
for anyone else to guess. For example, you can create a unique and easy-to-remember
passw o rd b y comb inin g lette rs and n umb ers on y ou r teleph one k e yp ad.
Recording your name
Your personal verification is used in your greetings and addressed messages, and in
express messaging, name dialing, and remote notification announcements.
To record a personal verification
1 While logge d in t o yo ur mail bo x, p ress 8 2 for Greetings, then 9 to record yo ur name .
You hear your current recorded name, if there is one.
2 Press 5 to record. Wait for the tone, then record your name.
3 Press # to end the recording.
To play, delete, or re-record your personal verification
You can play, delete, or re-record yo ur pers onal ve rificat ion the sam e way as your
greetings. See Recording greeting s , page 9. If you delete your personal verification,
your callers hear just your mailbox number or your name spelled one letter at a time.
8
2
9
To return to your messages
When you have finished recording your personal verification, press 4.
8
Page 9

Recording greetings
You can record external, internal, and temporary greetings. Callers from outside your
organization hear your external greeting, callers within your organization hear your
internal greeting. If you don’t record an internal greeting, all callers hear your external
greeting.
You can record a temporary greeting to tell your callers that you are away from the
office. All callers hear your temporary greeting if you record one. T ell your callers the
times or dates of your absence, and when you will retrieve your messages. You can set
up your ma il box to refuse mess ag es while you are away. See Blocking messages,
page 10.
Keep your greetings brief and informative, and speak clearly. Check your greetings by
calling your number fro m external and internal te le ph on es.
To record your greeting
1 While logged in to your mailb ox, press 8 2.
2 Press 1 for external greeting, 2 for internal greeting, or 3 for temporary greeting.
3 Press 5 to record. Wait for the tone, then record your greeting.
4 Press # to end the recording.
8
2
To play, delete, or re-record your greeting
While at your greeting, you can play, delete, or re-record it.
To play your greeting, press 2.
To delete your greeting, press 7 6.
To re-record your greeting or add to it, press 5 at the point in the greeti ng where
you want to start. Record the new greeting, then press #.
To set the expiry date for your temporary greeting
You can set an expiry month, day, and time for your temporary greeting. When the
temporary greeting expires, your callers will hear your external or internal greeting.
1 While at your temporary greeting, press 9 to set the expiry date.
2 Enter the mont h, day, and time, pressing # after each entry.
For the current month or day, press # only.
For a time setting of 9:00, press 9 0 0 #. For a.m., press 1; for p.m., press 2.
Expiry time will be 9:00 in the time zone at your mailbox location.
For the standard expiry time of one minute after midnight on the date you
specified, press # for time.
For no expir y, press ###.
If you do not set an expiry date, or if you press # for month, day, and time, your
temporary greeting will remain in effect unti l yo u delete it.
To return to your messages
When yo u h ave finished r ecord ing your greetings, press 4.
9
Page 10

Assigning a custom operator
You can off er your callers the op ti on of leaving a mess ag e or sp eaking to one of your
assistants or c olle ague s . In y our g reeti ng, tel l cal lers to pres s z ero if the y wish to spea k
to this person in your absence. The custom operator number is the number your callers
reach when they press zero. Ask your ad mi ni s trator if this feature is avail able to you.
To review and assign your custom operator number
1 While logged in to your mailb ox, press 8 0 for mailbox options, then 1 to revie w
the custom operator number.
A prompt tells you the current custom opera tor number.
2 Enter the new custom operator number.
8
0 1
Blocking messages
You can temporarily prevent your ca ller s f rom lea v ing me ssa ge s in yo ur ma ilbox. You
can choose to transfer callers to an operator, or disconnect them. As a courtesy to your
callers while message blocking is turned on, you should record a temporary greeting
that provid es details of your abse nce and tells callers wha t to do . Ask you r administr ator
if message blocking is a vailable to you.
To block your messages and set options
1 Press 8 0 for mailbox options, then 7 for message blocking.
2 Turn message blocking on or off:
To turn message blocking on at all times, press 1.
To turn message blocking off, press 2.
To block your messages only when a temporary greeting is in effect, press 3.
3 To allow callers to speak to the custom operator you assigned, press 1.
Or, to have callers disconnected after your greeting, press 2.
Turning Autologin on or off
8
8
0
0 4
7
Ask you r a dm in istrator if Autologin is availa ble to you. See To log in using Autologin,
page 7.
1 While logged in to your mailb ox, press 8 0 for mailbox options, then 4 for
Autologin.
2 Press 1 to turn Autologin on, or press 2 to turn it off.
10
Page 11

Playing your messages
CallPilot le ts you know when y o u have new m ess ag es. Your telepho ne m ay have a
message w a iting light, or yo u may hear a speci al dial tone when yo u p ick up the
handset.
Your mailbox summary tells you the number of new voice and fax messages in your
message list and if any of them are urgent. The summary also tells you if any recorded
messages are unsent.
Each message header tells you the sender’s name, and the date and time that the
message was received at your mailbox.
To play your messages
When yo u l og i n t o Cal lPi lo t, you hear the mailbox summary, then the header for your
first new message. (If Autoplay is enabled, your messages play automatically .)
1 While you are in your message list, you can go to any message and play it.
To play the current message, press 2.
To go to the next message, press 6; to go to the previous message, press 4.
To go to a specific message, pres s 8 6, enter the message number, then press #.
To start over at the first message from the end of your message list, press 6.
2
2 When you have playe d your messages, press 8 3 to di sc on nec t from CallPilot, or
hang up. Or, you can remain logged in to use other messaging features.
To review and respond to your messages
While y ou are playing a m e ss ag e , you can use t he se m es s ag e c o mm ands:
To skip back five second s in the message, press 1; to skip f orw ard fiv e se conds i n
the mes s age, press 3.
To pause, press #; to continue, press 2.
To slow down a message, press 2 1; to speed it up, press 2 3. You can increase
the speed three times above normal, and decrease it two times below normal.
To play your messag es softer , press 2 4; to play your me ssages louder, press 2 6.
You can increase the volume three times above normal, and decrease it two
times below normal. The next time you log in, message volume will be normal.
Before, during, or after playing a message, you can use these message commands:
To play the message envelope, press 7 2.
To delete the message and move to the next message, press 7 6. To re store the
deleted message (before disconnecting), retur n to the message and press 7 6.
To respond to the message, see Calling the sender, page 15, Replying to the
sender, page 15, Replying to the sender and all recipients, page 15, and
Forw ardi ng a messa ge , page 16.
Press 7 * for Help on message commands.
11
Page 12

Changing message speed
You can change the speed of a me ssag e whi le playing it. For e xam ple , if y our ca ller
spoke very fast, yo u c a n s l o w d own the message.
To play a message slower or faster
While yo u are pla y ing a mes sag e, pres s 2 1 to slow it down, or press 2 3 to speed it u p.
You can increase th e speed three ti mes ab ov e normal, and decr ease it two tim es bel ow
normal.
2
1
2
3
Changing message volume
You can change the vo lume of a mess age wh ile pl a yi ng it. F or e x amp le , if y ou ar e
playi ng y our me ssa ges in a noisy en v iro nment , y ou ca n incre ase th e v olum e to hear
better . Whi le yo u are logge d in to Cal lPilot, al l you r message s pla y at the volu me you set
unless you change the sett ing. The next ti me you log in, message volume will be
normal.
To play a message softer or louder
While yo u are pla ying a messag e, press 2 4 to play it softer, or press 2 6 to play it louder .
You can increase the volume three times above normal, and decrease it two times
below normal.
Deleting and restoring messages
You can delete and restore (undelete) messages before, during, or after playing the
message. Deleted messages are removed from your mailbox at the end of your
CallPilot session. You cannot restore a message after you disconnect.
To delete a message
2
4
2
6
7
6
While at a message, press 7 6 to delete it and m ove to the next message.
To restore a message
Befor e d isc on ne ct in g, return to the deleted mess a ge and press 7 6 to restore it.
Message storage
Your played messages are automatically deleted on a schedule set by your
administr ator. You can re v i ew auto-deleted mess ages and restore them. To restore an
auto-deleted message when prompted, press 7 6. Ask your admi nis tr ator if this fe at ure
is available to you.
12
Page 13

Calling the sender
You can place a c a ll to the sender of a mess ag e, if CallPilot can ad dress the sender.
To call the sender
1 After listening to a message or while it is playing, press 9 to call the sender.
2 Speak to the sender or leave a message.
3 When you have finished your call, hang up.
You may be able to return to your messages without hanging up and logging in
again.
Replying to the sender
You can record a re pl y to the sender of a mess a ge, if CallPilot can a ddr es s th e s e nder.
To record a reply to the sender
1 After listening to a me ss age or w hi le it is pl aying, press 7 1 to reply to t he s en der.
Your reply is addressed automatically. You do not have to enter a name or number.
2 Press 5 to record your reply. Wait for the tone, then begin recording.
9
7
1
3 Press # to end recording your reply.
To review your messa ge, see Checking and editing your message, page 19.
To add options, see Adding message options, page 20.
To add attachments, see Addi ng me ss age at tachm ents, page 21.
4 Press 7 9 to send the message.
Replying to the sender and all recipients
You can record a reply to t he sender an d all the re cipien ts of a mes sage , if CallPi lot can
address the numbers.
To record a reply to the sender and all recipients of a message
1 After listening to a mes sa ge or whi le it i s p laying, press 7 4 to reply t o the sender
and all recipients of the message.
Your reply is addressed automatically . You do not have to enter names or num bers.
To play the list of recipients to whom your reply will be sent, press 7 2.
2 Press 5 to record your reply. Wait for the tone, then begin recording.
3 Press # to end recording your reply.
7
4
To review your messa ge, see Checking and editing your message, page 19.
To add options, see Adding message options, page 20.
4 Press 7 9 to send the message.
13
Page 14

Forwarding a message
You can forward a message to another mailbox, to a distribution list, or to a telephone
number. You can also record an introduction to the original message. You cann ot
forw ar d a messag e ma rke d Priv at e.
To forward a message
1 After listening to a message or while it is playing, press 7 3 to forward the
message.
2 Enter the number to which you want to forward the message, then press #.
Repeat this step for each additional number to which you want to forward the
message.
For details on addressing your message, see Addressing a message, page 18,
and Addressing by name, page 19.
If you need to cancel an address, see To cancel an address entry, page 17.
3 When you have finished entering addresses, press # again to end the list.
4 Press 5 if you want to record an introduction. Wait for the tone, then begin
recording.
5 Press # to end recording your introduction.
7
3
To review your message, see Checking and editing your message, page 19.
To add options, see Adding message options, page 20.
6 Press 7 9 to send the message.
14
Page 15

Composing a message
To compose a message, you address it first, then record your message and send it. You
can addres s a m es s ag e to on e or more people or distribution li sts. Before y ou send a
message, you can edit it and add message options. You can also attach other
messages , i nc lu di ng faxes, to your new messa ge an d send them together.
To address, record, and send a message
You address a mess ag e to on e o r m o re rec ip ie nt s be fore you start recording. An
address is typically a mailbox number or a distribution list number. You may also be able
to address messages to other numbers. You can also address a message by spelling a
person’s n am e .
1 While logged in to your mailb ox, press 7 5.
2 Enter the first address, then press #.
3 Continue to enter addresses followed by #.
See Addres sing a message, page 18, and Addressing by name, page 19.
If you need to cancel an address, see To cancel an address entry below.
4 When you have finished entering addresses, press # again to end the list.
5 Press 5 to record your message. Wait for the tone, then start recording.
7
5
6 Press # to end the recording.
To review your messa ge, see Checking and editing your message, page 19.
To add options, see Adding message options, page 20.
7 Press 7 9 to send the message.
To cancel an address entry
You can cancel a n add re ss you entered while you are at step 2 a bove. After y o u have
pressed the fi na l # at the end of the li st , you cannot cance l a n y e ntries. If you cancel a
distribution list number, the entire dist ribution list is delete d from your addr es s li st .
1 Press 0 # to cancel the last address you entered in the list.
2 Repeat this step for each address you want to cancel, erasing entries one at a
time from the end of the list.
3 Return to step 3 above.
15
Page 16

Addressing a message
You can address your messages to local mailboxes and distribution lists. For the
required prefixes, press * for Help when addressing, or ask your administrator. Keep a
record of these prefixes in Your CallPilot numbers, page 31.
When CallPilot prompts you for a mailbox number, enter the appropriate prefix if
required, then the number. When you have entered all the required addresses, return to
step 3 in To address, record, and send a message, page 17.
To address a message to a local mailbox
Enter the mailbox number, then press #.
To address a message to a distribution list
Enter the distribution list number, then press #.
To address a message to a telephone
You can address and send a recorded message to a telephone.
Enter the prefix if required, followed by the recipient’s telephone, then press #.
When you send a message to a person at a telephone number, CallPilot calls the
person’s telephone and states that there is a message from you. The system tells the
recipient which key to press to hear the message, or the message plays
automatically. The recipient can respond by recording a reply.
16
Page 17

Addressing by name
You can enter an address by spelling a person’s name on your telephone keypad
instead of entering a number. You can use name addressing for addressing a message,
creating a d is tribution list, express messaging, an d thru-dialing.
When you have entered all the required addresses, return to step 3 in To address,
record, and send a message, page 17.
To address by name
1 When CallPilot prompts you for a mailbox number, enter the name addressing
prefix.
If you don’t know the prefix, press *.
2 Spell the last name, then the first name.
For Q, p ress 7; for Z, press 9. For example, to reach Quinn, Bob, dial 78466262.
If you don’t know the complete name, enter the first few letters, then press #.
Select from the list of possible matches for the name.
3 You can stop spelling the name as soon as the system announces a match. You
do not hav e to press #. The mes sage is automatical ly addres sed wi th the ma ilbo x
number for this name.
4 If the name is part of a list of addresses, continue to enter addresses. When you
are finished, press # to end the list.
Checking and editing your message
After you have recorded your message, you can review it before sending it. T o pla y or
change the message, use any of these standard commands:
To play the message, press 2.
To skip back five second s in the message, press 1; to skip f orw ard fiv e se conds i n
the mes s age, press 3.
To pause, press #; to continue, press 2.
To play the message envelope, including the list of recipients, press 7 2.
To slow down a message, press 2 1; to speed it up, press 2 3. You can increase
the speed three times above normal, and decrease it two times below normal.
To play the message softe r, press 2 4; to pla y t he me ssage loud er, press 2 6. You
can increase the volume three times above normal, and decrease it two times
below normal. The next time you log in, the message volume will be normal.
To delete the message and move to the next message, press 7 6. To re store the
deleted message (before disconnecting), return to the message and press 7 6.
To re-record the message or add to it, pre ss 5 at th e poi nt i n the mes s age where
you want to start. Record the new message, and end by pressing #.
The new recording erases the old one from the point w here y ou start to re-record.
17
Page 18

Adding message options
When you create a message, you can indicate that you want it handled in a special way.
The message options are Urgent, Economy, Private, Acknowledgment, and Timed
Delivery. A message cannot be tagged both Urgent and Economy. Before sending the
message, you can check the options by pressing 7 2 to play the m es s ag e e nvelope.
To add an Urgent option
When yo u s e nd a message marked U rge nt , the recipient is notif ie d in the mailbox
summary and in th e m e ss ag e he ad er that the message is ur gen t.
Before or after recording a message, press 7 0, then 1 to add the Urgent option.
To cancel an Urgent option for a message, press 7 0, then 1 again.
To add a Private option
7
0
When you send a message marked Private, recipients in your organization cannot
forward it or attach it to another message.
Before or after recording a message, press 7 0, then 4 to add the Private option.
To cancel a Private option for a message, press 7 0, then 4 again.
To request an acknowledgment to your message
When you send a message marked Acknowledgment, CallPilot automatically deposits
a separate acknowledgment message in your mailbox after each recipient has read
your message.
Before or after recording a message, press 7 0, then 5 for Acknowledgment.
To cancel an Acknowledgment request for a message, press 7 0, then 5 again.
To set a specific time for delivering a message
You can compose a messa ge to be de liv e red to the recip ients at a futur e da te and ti me .
1 Before or after recording a message, press 7 0, then 6 for Tim ed D elivery.
2 Enter the month, day, and time, pressing # after each entry.
For a time setting of 9:00, press 900#. For a.m., press 1; for p.m., press 2.
Delivery will be 9:00 in each recipient’s time zone.
For the current month or day, press # only.
For deliv ery one minute afte r midnight on the date you sp ecified, pre ss # for time .
To cancel Timed Delivery for a message, press # for month, day, and time.
18
Page 19

Adding message attachments
To add an attachment to a message
You can attach one or more voice messages currently in your mailbox to your message
before sending it. You cannot attach a message marked Private.
1 Before or after recording a message, press 7 0 for Message Options, then 7 for
Add Attachment.
2 Enter the message number of the message that you want to attach to your
unsent message, then press #.
7
0
7
19
Page 20

Express messaging
Express messaging is a fast way to send a message to another mailbox without logging
in to yo ur o w n m ai lb ox to compose a nd se nd the message. You ma y al s o b e able to
send a f ax b y e xpress f ax mes saging. Ask yo ur admini strator f or the e xpress m essaging
number and if express fax messaging is available.
To send a message without logging in
1 Dial the CallPilot express messaging number.
2 Enter the mailbox number of the person for whom you are leaving the message,
then press #.
To address your message by name, see Addressing by name, page 19.
3 Wait for the tone, then record your message.
To review your messa ge, see Checking and editing your message, page 19.
To add options, see Adding message options, page 20.
To add attachments, see Addi ng me ss age at tachm ents, page 21.
4 Hang up.
Thru-dialing
While you are using CallPilot, you can make a call without hanging up. Ask your
administr ator if th ru-dial is available to you .
To place a call while logged in
While logge d in to y our ma ilbo x, pres s 0, followed immediately by the telephone number
you w a nt to c al l, th en press #. Do not pause for more than two seconds while you are
entering the number.
To place a call while logged in using name dialing
When yo u e nt er a name instead of a number with thru-dial, C a ll Pil ot pl ac es t he c al l a s
soon as it fi nd s a m a tc h for the name .
1 While logged in to your mailb ox, press 0, then enter the name dialing prefix.
If you don’t know the number, press *.
2 Enter the last name, then the first, until your call is placed.
For instructions on entering the name, see Addressing by name, page 19.
To reach your custom operator number while logged in
Your custom oper at or n um b er is th e n um b er your callers reach whe n they press zero.
While logged in to your mailbox, press 0, then wa it for the call to be an swered.
20
Page 21

Distribution lists
A distribution list saves you time when you send messages to the same group of
addresses. You can create up to 99 personal di st rib u tion lists, and reco rd a name to
identify each list. Each personal distribution list can contain up to 200 entries. You can
also use shared distribution lists supplied by your administrator.
To create a personal distribution list
A personal distribution list can contain all of the same types of addresses to which you
can send a composed message, except other personal distribution lists. An entry can
be a mailbox number, shared distribution list number, network mailbox, open network
mailbo x, Internet us er , or te lephone n umber . Se e Addressing a message, page 18. You
can also ad d a n ent ry by s pell ing a pe rson ’s na me . See Addres si ng by name, page 19.
1 While logged in to your mailb ox, press 8 5 for CallPilot Tools, then 5 to create
distribution lists.
To play a summary of a ll your lists, press *.
2 Enter a number from 1 to 99, then press #.
3 Press 9 if you want to record a name to help you identify this list in the future.
At the prompt, press 5, record the list name, then press #.
8
5 5
4 Press 5 to start entering addresses into the list.
5 Enter the first address, then press # in the same way you address a message.
6 Continue to enter addresses, pressing # after each one.
To cancel the last number you entered in the list, press 0 #.
7 When the list is complete, press #.
8 When you are finished, pres s 4 to return to your messages.
To play, edit, or delete a personal distribution list
After you c reate a pers onal distrib ution l ist, you c an pla y it to hea r all the add resses, ad d
to it, delete it, and search for addresses in the list.
1 While logged in to your mailb ox, press 8 5, then 5.
2 Enter the distribution list number, then press #. If you don’t remember the
number, press * to hear a summary of your personal distribution lists.
To play the contents of the list, press 2.
To add addresses to the list, press 5. Enter each address, then press #. When
the list is comple te, press #.
To delete the entire list, press 7 6. You can restore the list by pressing 7 6
immediately after del eti ng it.
To search for an address in the list so you can add it or delete it, press 6. Enter
the address, then press #. Call Pilot tells you if the address is in the list. If the
address is not in th e li st, you can add it by pressi ng 5. If the addr ess is in th e li st,
you can delete it by pressing 7 6.
3 When you are finished, pres s 4 to return to your messages.
21
Page 22

Remote Notification
CallPilot can notify you of new messages at a remote telephone or pager. Instead of
calling in to your mailbox to retrieve your messages, you can specify a number, day, and
time f or Rem ot e Notification. You can change t he se s et tin gs e as il y, and turn Remote
Notification on or off as needed. Messages can be voice, fax, or mixed voice and fax.
Ask your administrator if this option is available to you.
CallPilot can also notify you of new messages at a wireless e-mail device using Remote
Text Notification. This feature can only be set up from My CallPilot, not from your
telephone . See the My CallPilot User Guide .
You can hav e the tw o types of notificat ion turned On s imultane ously. For both type s, y ou
can set up two time periods for notification, and te ll Cal lP il ot whe ther you want to be
notified of all messages or urgent messages only
To set up Remote Notification the first time
All you ne ed to do t he fi rs t ti m e you set up Remote Not ific ati on i s en ter your remote
number an d s e le ct telephone or pager. You can change the message type, no tification
days , a nd no tification times no w, or use th e s ta nd ard s et tin gs.
1 While logged in to your mailb ox, press 8 5 for CallPilot Tools, then 2 for Remote
Notification.
8
5 2
2 Press 5 to set up Remote Notification.
3 At the prompt, enter the number of the telephone or pager at which you want to
receive notification, then press #.
If you enter the wrong number, press #, then press 5 and re-enter the number.
4 Press 1 if the remote number is a telephone; press 2 if the number is a pager.
To change your Remo te Notification settings, see the fol lowing pages.
To turn Remote Notification on and off
After you ha v e se t up Remote Noti fica tion f or the firs t time , y ou ca n turn it on or off as
needed, and c ha nge the setup at any ti me.
1 While logged in to your mailb ox, press 8 5 for CallPilot Tools, then 2 for Remote
Notification.
2 If Remote Notification is off, press 1 to turn it on.
or
If Remote Notification is on, press 2 to turn it off.
To return to your messages
When yo u h ave finished wo rking i n Remote Notification, pr es s 4.
22
Page 23

Remote Notification (continued)
Working in Remote Notification setup
There are four main settings in Remote Notification: telephone or pager number,
message noti fi cation type, notific at io n d ays, and notifi c ati on ti m es. At each setting,
CallPilot tell s y ou the cu rrent set ting and allo ws yo u to k eep the setting or chang e it. F or
detailed explanations of e ac h s etting, see the f ol lowing pages.
This is how to go from one setting to the next:
1 While logged in to your mailb ox, press 8 5 for CallPilot Tools, then 2 for Remote
Notification.
2 Press 5 to review your current settings.
3 Press 5 again to change the first setting.
4 At each setting, chan ge it if required, or press # to leave a setting without
changing it. Press 3 to go to the next setting, or press 1 to go to the previous
setting.
5 Press 6 to exit Remote Notif ica tion setup change .
Use the Rem o te Notification Planner bel o w to decide how you w a nt to set up your
notificatio n da y an d time periods .
8
5 2
Remote Notification Planner
Remote phone /pager number Notif ica tion type: Any ❑ Urgent ❑
Monday T uesday Wednesday Thursday Friday Saturday Sunday
23
Page 24

Remote Notification (continued)
You can set one number at which you will be notified of new messages on all the days
and times you specify. The remote number you specify must be a number allowed by
CallPilot. Ask y our ad minist r ator i f y ou c an u se th is n umber for remote notif icat ion. Your
administr ator m ay ha ve to co nfigure yo ur mai lbo x f or th e page r or pa ger service you are
using.
1 In Remote Notification setup change, press 5 when prompted for telephone or
pager number change. You can press # to leave this setting without changing it,
or continue.
2 At the prompt, enter the number of the telephone or pager at which you want to
receive notification, then press #.
If you enter the wrong number, press #, then press 5 and re-enter the number.
3 Press 1 if the remote number is a telephone, or press 2 if the number is a pager.
4 If you selected pager, specify the pager type:
To select tone only pager, press 1.
To select tone and voice pager, press 2.
To select digital or numeric pager, press 3. You can then enter a callbac k n umber
followed by #, or just press # to use your organiz ati on ’s sta ndard callback
number.
8
5 2
To select a paging service, press 4. At the prompt, enter y o ur P a ger Iden tif icatio n
Number (PIN), then press #.
To select an alphanumeric pager, press 5. At the prompt, enter your Pager
Identification Number (PIN), then press #.
5 Press 3 to go to the next setting.
To change your notification message type
You can select one of two notification message types. This message type applies to all
days an d t im es you specify. If you s el ec t A n y, the standa rd s e tti ng , you receive
notification of all new messages. If you select Urgent, you receive notification only about
messages that were marked urgent by the sender. Notification is for voice and fax
messages.
1 In Remote Notification setup change, press 5 when prompted for message type.
You can press # to leave this setting without changing it, or continue.
2 At the prompt, press 1 for Any, or press 2 for Urgent.
3 Press 3 to go to the next setting, or press 1 to go to the previous setting.
To change your notification days
You can set the days of the week on which you want to receive message notification
remotely. The standard set up is M o nday to F riday. You select e ac h o f the s even da ys
individual ly, and yo u c an o mi t so me days. For example, you can select Mo nd ay,
Wednes d ay, and Friday for remote no ti fic at io n. You can listen to a s um ma ry of your
current selections by pressing * for Help.
24
Page 25

Remote Notification (continued)
To change your notification days (continued)
1 In Remote Notification setup change, press 5 when prompted for no tification
days. You can press # to leave this setting without changing it, or continue.
2 Select each notifica tio n day by pressing the n u mbe r co rres pon di ng to that day of
the week. For example, to select Monday, press 1, to select Sunday, press 7.
Each day is assumed to be off until you select it, regardless of any previous
settings.
To deselect a day, press its number again.
3 When you have finished selecting days, press #.
To change your selections, press 5.
4 Press 3 to go to the next setting, or press 1 to go to the previous setting.
To change your notification times
You can set the ti m es of th e day at which you want to receive remote notific ati on o f
messages. The standard time is all day. You can set two non-overlapping time periods
within a 24-hour day; both periods apply to the one sequence of notification days that
you selected above. Here are some tips for setting times:
8
5 2
Time settings include minutes, and each setting must end with #.
For a time setting of 9:00, press 9 0 0 #. For a.m., press 1; for p.m., press 2.
Time setting is for the time zone at your mailbox location.
Ask your administrator if your mailbox can be set up so that you receive
notification when new messages are waiting at the start of your notification time
period.
You can enter times that span midnight by entering an end time that is earlier
than the start time; the end time is assumed to be on the next day. Select only the
first day as a notification day.
For example, if you select Monday as your only notification day, and you set up
the time period for 11 p.m. to 7 a.m., you will receive notification from 11 p.m.
Monday to 7 a.m. Tuesday.
1 In Remote Notification setup change, press 5 when prompted for no tification
times.
2 At the prompt for start time, enter a new time, or press # to keep the cu rren t tim e .
3 At the prompt fo r end time, enter a new time, or press # to keep the current time.
If a second tim e p eriod already exists, y ou hear the times currently se t. To delete
the sec ond time period, press 7 6. To change the times, press 5.
If a second time period does not exist and you want to add one, press 5.
4 At the prompt for start time, enter a new time, or press # to keep the cu rren t tim e .
5 At the prompt fo r end time, enter a new time, or press # to keep the current time.
6 Press 6 to exit Remote Notif ica tion setup change .
25
Page 26

When you are the caller
When yo u a re calling another pers on ’s C a ll Pil ot m ai lb ox, you can use m any of the
messaging commands described in this guide. You can also tell callers from outside
your organization how to use these commands. Here are some convenient and timesaving ti ps.
Interrupting greetings
While y ou are listening to a pers on ’s g reeting, you can s top the greeting at any time by
pressing # and then recording your message. This saves time when you call the same
person frequently and don’t ne ed to he ar the greeting.
If you call a person who has recorded a temporary absence greeting, you hear a
warning when you try to stop the g ree ti ng . Th is a ll ows you to conti nue listening if y ou
want to, or to start recording.
Connecting to the custom operator
While you are listening to a person’s greeting, you can press 0 to transf er to th e custom
operator number assigned for that mailbox.
Thru-Dialing to another number
You may be able to transfer to another person in the same organization by pressing 0,
followed immediately by the person’s extension number. See Thru-dialing, page 22.
You may be able to use name dialing if you don’t know the extension number. Ask your
administr ator if these options a r e available t o you.
Editing your recorded messages
When yo u r ec ord a m es s ag e t o l eave in anothe r person’s mailbo x, you can play i t,
delete it, or rerecord it just a s you do when yo u c o mp os e a message in CallPilot . U s e
the comman ds d es c ribed i n Checking and editing your message, page 19.
Adding options to your recorded messages
When you record a message to leave in another person’s mailbox, you can add options
such as Urgent and Private just as you do when you compose a message in CallPilot.
Use the c omma nd s described in Adding message options, page 20.
To log in after leaving a message
After you have left a me ss ag e in a nother person’s mailbox, you may be able to l og in
again to your CallPilot mailbox without hanging up. This is useful if you are using a pay
phone or a credit card. Ask your administrator if this option is available.
To log in after lea v in g a m es s ag e in another person’s mailb ox, press # then 8 1 , and
follo w th e u s ual s teps for logging i n.
26
Page 27

Your CallPilot numbers
Voice Mail access number: 434-984-7099 or X-7099
Express Messaging number: X-6000
Name Dialing/Name Addressing prefix: 11
27
Page 28

Document information
CallPilot Multimedia Messaging
User Guide
Copyright © 2002 Nortel Networks, All Rights Reserved
Information is subject to change without notice. Nortel Networks
reserves the right to make changes in design or components as
progress in engineering and manufacturing may warrant.
For soft copy release only
Product release: 2.0
Document issue: Standard 1.0
Date: September 2002
28
 Loading...