

Page 1

C40 12 Ha ndse t Stan dard 2.00
Table of contents
Important safety information. . . . . . . . . . . . . . . . . . . . . . . 5
Handset information . . . . . . . . . . . . . . . . . . . . . . . . . . . . . . . . . . . . . . . . . . . . . . . 5
Battery information . . . . . . . . . . . . . . . . . . . . . . . . . . . . . . . . . . . . . . . . . . . . . . . . 6
Initial Setup. . . . . . . . . . . . . . . . . . . . . . . . . . . . . . . . . . . . . . . . . . . . . . . . . . . . . . 8
Cleaning the C4012 handset. . . . . . . . . . . . . . . . . . . . . . . . . . . . . . . . . . . . . . . . . 8
Registering the C4012 handset. . . . . . . . . . . . . . . . . . . . . 8
C4012 handset features. . . . . . . . . . . . . . . . . . . . . . . . . . . 9
Handset display screen. . . . . . . . . . . . . . . . . . . . . . . . . . . . . . . . . . . . . . . . . . . . . 9
Handset icons. . . . . . . . . . . . . . . . . . . . . . . . . . . . . . . . . . . . . . . . . . . . . . . . . . . . 10
Handset keys . . . . . . . . . . . . . . . . . . . . . . . . . . . . . . . . . . . . . . . . . . . . . . . . . . . . 10
Handset audio signals. . . . . . . . . . . . . . . . . . . . . . . . . . . . . . . . . . . . . . . . . . . . . . 10
Using the C4012 handset. . . . . . . . . . . . . . . . . . . . . . . . . . 11
Switching the handset on/off. . . . . . . . . . . . . . . . . . . . . . . . . . . . . . . . . . . . . . . . . 11
Locking/unlocking the keypad. . . . . . . . . . . . . . . . . . . . . . . . . . . . . . . . . . . . . . . . 11
Switching speech monitoring on/off . . . . . . . . . . . . . . . . . . . . . . . . . . . . . . . . . . . 11
Changing the speaker and loudspeaker volume. . . . . . . . . . . . . . . . . . . . . . . . . . 11
Muting the microphone and ringer . . . . . . . . . . . . . . . . . . . . . . . . . . . . . . . . . . . . 11
Making a call. . . . . . . . . . . . . . . . . . . . . . . . . . . . . . . . . . . . . . . . . . . . . . . . . . . . . 12
Making a call from the last number redial list/caller list. . . . . . . . . . . . . . . . . . . . . 12
Making a call from the shortcut list . . . . . . . . . . . . . . . . . . . . . . . . . . . . . . . . . . . . 13
Answering a call . . . . . . . . . . . . . . . . . . . . . . . . . . . . . . . . . . . . . . . . . . . . . . . . . . 13
Transferring a call . . . . . . . . . . . . . . . . . . . . . . . . . . . . . . . . . . . . . . . . . . . . . . . . . 14
Conferencing. . . . . . . . . . . . . . . . . . . . . . . . . . . . . . . . . . . . . . . . . . . . . . . . . . . . . 14
Terminating a call . . . . . . . . . . . . . . . . . . . . . . . . . . . . . . . . . . . . . . . . . . . . . . . . . 14
Programming the C4012 handset . . . . . . . . . . . . . . . . . . . 15
Shortcut list. . . . . . . . . . . . . . . . . . . . . . . . . . . . . . . . . . . . . . . . . . . . . . . . . . . . . . 15
Ringer settings . . . . . . . . . . . . . . . . . . . . . . . . . . . . . . . . . . . . . . . . . . . . . . . . . . . 16
Key click . . . . . . . . . . . . . . . . . . . . . . . . . . . . . . . . . . . . . . . . . . . . . . . . . . . . . . . . 16
Accessing the Meridian PBX features. . . . . . . . . . . . . . . . . . . . . . . . . . . . . . . . . . 16
Subscribing the C4012 handset . . . . . . . . . . . . . . . . . . . . 18
Subscribing. . . . . . . . . . . . . . . . . . . . . . . . . . . . . . . . . . . . . . . . . . . . . . . . . . . . . . 1 8
Selecting/changing the handset ID. . . . . . . . . . . . . . . . . . . . . . . . . . . . . . . . . . . . 18
Selecting a DECT system. . . . . . . . . . . . . . . . . . . . . . . . . . . . . . . . . . . . . . . . . . . 19
3
Page 2

C40 12 Ha ndse t Stan dard 2.00
De-subscribing. . . . . . . . . . . . . . . . . . . . . . . . . . . . . . . . . . . . . . . . . . . . . . . . . . . 19
Deleting a DECT system . . . . . . . . . . . . . . . . . . . . . . . . . . . . . . . . . . . . . . . . . . . 19
Quick reference . . . . . . . . . . . . . . . . . . . . . . . . . . . . . . . . . 20
4
Page 3

C40 12 Ha ndse t Stan dard 2.00
Important safety information
Handset information
Read the following information before you use the handset.
Make sure the adapter voltage is the same as the electrical outlet voltage.
The C4012 handset uses radio signals and does not guarantee a connection
in all circumstances. Do not rely on a cordless telephone to make emergency
calls.
Never use your handset:
• in the vicinity of electrical detonators
• in shielded rooms
• in areas where radio transmission is forb idden
•in aircraft
Do not place a handset near:
• water, moisture, or damp areas
• heat sources, direct sunlight, or unventilated areas
• devices that generate strong magnetic fields such as electrical
appliances, fluorescent lamps, computers, radios, televisions or fax
machines
• areas where the handset can be underventilated or exposed to liquid, or
exposed to the insertion of foreign objects
• areas with excessive dust, vibration, shock, or temperature
Do not cover the handset. Do not insert foreign objects in the handset.
Check for small metal objects in the C4012
handset earpiece and mouthpiece before
using the handset.
N441
Do not locate flammable liquids, gases, or
explosive materials in the same compartment
or vicinity as the cordless handset, its parts,
or its accessories.
5
Page 4
C40 12 Ha ndse t Stan dard 2.00
Battery information
Read the following information before you handle the batteries:
• Do not replace the batteries in potentially explosive environments, such
as rooms containing flammable liquids or gases.
• Do not charge the batteries unless you use the supplied charger and the
proper batteries.
• Do not let the battery or the charger come into contact with conductive
metal objects.
• Do not dispose of the batteries in a fire.
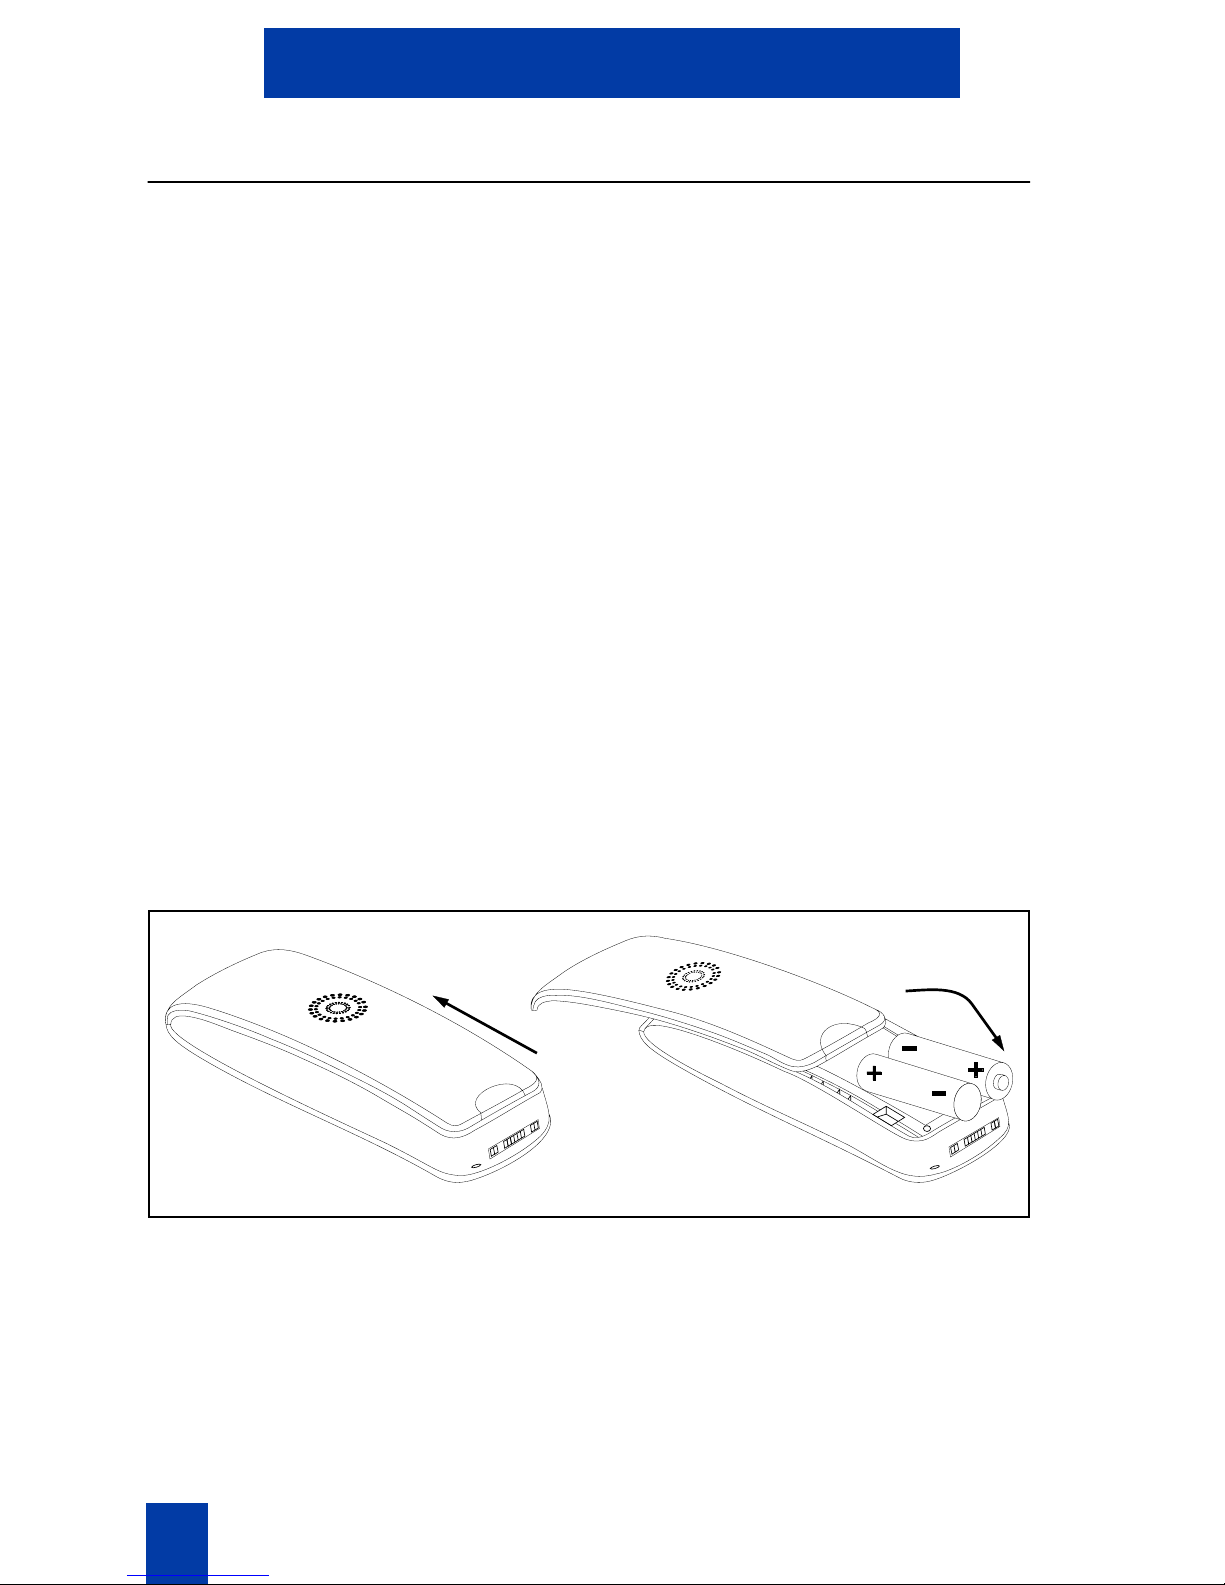
Battery installation
The C4012 handset uses two NiMH (Nickel-Metal Hydride) rechargeable AA
700 mAh batteries.
Do not use disposable AA batteries.
Battery replacement
To insert and remove the batteries:
1. Push the rear side of the handset upward.
2. Insert or remove the batteries.
Battery charging
553-A0080
Comply with the following:
• Charge the batteries f or at least 14 hours before using the handset for the
first time.
6
Page 5

C40 12 Ha ndse t Stan dard 2.00
• Charge the handset on a regular basis.
• Do not connect an unused handset to the charger for more than one
month.
Charging and operating times
Charging time to full capacity:
• Empty batteries: approximately 12 hours
• Unknown status: approximately 14 hours
Talk time: up to 10 hours (with fully charged batteries).
Standby time: up to 100 hours (with fully charged batteries).
A fully charged handset, when switched off, discharges in approx imately one
week.
The handset display screen shows batte ry charge status.
Battery charge status
The following symbols indicate battery charge status when the handset is not
in the charger:
z
x
w
y
v
u
fully charged (75 - 100%)
50 - 75%
25 - 50%
0 - 25%
(frame flashes) empty: alert tone has been given.
(blocks and frame flashes): status unknown.
When the batteries are replaced, the status does not appear on the display
screen until the replaced batteries are charged.
When ten minutes of battery standby time remains, the handset emits three
short beeps. If you are in the middle of a call, you can talk up to three minutes
before the handset switches off.
7
Page 6
C40 12 Ha ndse t Stan dard 2.00
Initial Setup
Plug the charger into the electrical outlet.
Place the handset in the charger. Charging appears on the handset display.
Cleaning the C4012 handset
When cleaning the handset and charger, disconnect the charger from the
electrical outlet.
Wipe the handset and charger using an anti-static cloth, or a slightly
moistened soft chamois leather. Dry with a soft cloth.
Clean the charging contacts on the handset and charger with a lint-free cloth.
Caution
Never use cleaning agents or solvents on
the handset or charger.
Registering the C4012 hand set
Register the handset on the DECT system as described in “Subscribing the
C4012 handset” on page 18.
The handset can operate on up to five different DECT systems, if registered
on each system.
8
Page 7

C40 12 Ha ndse t Stan dard 2.00
C4012 handset features
Earpiece
Display
Loudspeaker
(on rear)
PM
Function keys
OK
Dialling keypad
C
1
4
7
GHI
PQRS
2
ABC
5
JKL
8
TUV
0
R
DEF
3
6
MNO
9
WXYZ
#
Microphone
Handset display screen
The display uses icons, numbers, and letters to show the current connection
status or the respective programming status:
th E p A z
D
9
Page 8

C40 12 Ha ndse t Stan dard 2.00
Handset icons
The handset icons have the following meanings:
t
h
E
D
p
A
z
Signal strength displa ys in increments of 0, 25, 50, 75, and 100%.
Connection status, incoming call (flashes).
Call in absence (appears in Caller List).
Message waiting.
Programming mode and speed-dial.
Microphone off (m ute).
Battery charging stat us (see “Battery charge status” on page 7).
Handset keys
The handset keys have the following functions:
Star ts programmi ng.
P
Acts as scroll key within redial list, caller list, and
shortcut list.
M
C
R
o
H
1...0, a, n
Activates and deactivates speech monito r ing .
Removes digits from right to left (backspace).
Recalls key for PABX facilities.
Confirms entries and actions.
Calls and accepts call (corresponds to the function
ePickup/Put-down receiver).
Enters numbers and characters.
Handset audio signals
Acknowledgement signal (programming successful):
Warning signal (entry error)/Leaving radio range:
10
Page 9

C40 12 Ha ndse t Stan dard 2.00
Using the C4012 handset
Switching the handset on/off
To switch the handset on, press o for more than 2 seconds or place the
handset in the charger.
To switch the handset off, press
handset is in an idle state.
o for more than 2 seconds when the
Locking/unloc ki ng the keypad
To prevent accidental operation, press Pa to lock the keypad. The
display shows --------. To unlock the keypad, repeat the above procedure or
place the handset in the charger.
When the key lock is active, calls can be answered normally. To use other
handset keys during a call, unlock the handset as described above.
Switching speech monitoring on/off
During a conversation, speech monitoring activates the loudspeaker , enabling
you to hear the other party without placing the handset to your ear.
To toggle speech monitoring on or off, press
M.
Changing the speaker and loudspeaker volume
During a call and in idle state, the speaker and loudspeaker volume can be
changed (low/high—effective for speaker and loudspeaker).
To toggl e the speaker and loudspeaker volume, press
selection is remembered and valid.
Muting the microphone and ringer
To mute the microphone, press C.
To mute the ringer during alerting, press
Pn. The last
C.
11
Page 10

C40 12 Ha ndse t Stan dard 2.00
Making a call
There are two ways to make a call:
1. Dialing: Press
2. Pre-dial: Enter the phone number and press
To correct an entry during pre-dial, press
Press
C for a longer period to delete the whole phone number.
H and enter the phone number.
H.
C to delete individual digits.
Making a call from the last number redial list/caller list
Your handset contains a list (redial list) of 10 memory slots that stores the
most recently dialled numbers and the most recent incoming calls, depending
on call number transmission from the Meridian PBX.
The first displayed number is either the number dialled most recently or the
number of the last missed call.
If 10 call numbers are already stored and a new number is added to the list,
the oldest number is automatically removed from the list.
Selecting a number from the list:
1. Press P with the handset in an idle state.
The
p icon flashes and the list displays.
2. Press
To distinguish between dialled numbers and missed call numbers, missed
call numbers are preceded by a C.
After you dial a missed call number, that number goes to the top of the list,
and the C is removed.
P repeatedly to page through the list of numbers.
Dialling the selected number:
3. (Optional) To use pre-dial, press H for a longer period.
The selected phone number is entered in pre-dial. Add digits to the
beginning of the displayed phone number, as required. To terminate
pre dial, press
C for a longer period.
4. Press
12
H to dial the number.
Page 11

C40 12 Ha ndse t Stan dard 2.00
Leaving the list:
To leave the list before placing a call, press o.
Making a call from the shortcut list
You can store up to 10 frequently called numbers in the speed-dialling
memory. These numbers occupy memory slots 0…9.
To make a call from the shortcut list:
1. While the handset is in idle state, press
ber under which the call number is stored.
2. (Optional) To use pre-dial, press
The selected phone number is entered in pre-dial. Add digits to the
beginning of the displayed phone number, as required. To terminate
pre dial, press
3. Press
H to dial the number.
C for a longer period.
H for a longer period.
P and the corresponding num-
Answering a call
The ringer and the flashing h on the display indicate an incoming call. If
CLID is available, the calling number displays. Without CLID, the display
shows c.
To answer the call, press
H or lift the handset from the charger.
To mute the ringer for this call only, press
display and the caller continues to hear the ringing tone. To accept the call,
press
Note: Answered call s are not stored in th e caller list.
The
stops the call. The number is stored in the caller list.
Activate the list to delete the
H, if the caller is still connected.
E icon appears when the incoming call is not answ ered and the initiator
C. The A icon appears on the
E icon from the display.
13
Page 12

C40 12 Ha ndse t Stan dard 2.00
Transferring a call
To transfer a call to another party:
1. Press
2. Dial the transfer number.
3. Press
R to hold the first call.
H to transfer the call.
Conferencing
To use conferencing:
1. Press
2. Dial the conference number.
3. When the conference party answers , press
conference.
R to hold the first call.
R to join the on hold call to the
Terminating a call
To terminate a call, press H or place the handset on the charger.
14
Page 13

C40 12 Ha ndse t Stan dard 2.00
Programming the C4012 handset
Shortcut list
You can store up to 10 frequently called numbers in speed-dialling memory.
These numbers occupy memory slots 0...9.
Adding a number:
1. Press PRP.
2. Press
number directly (where
3. Press
4. Press
5. Press
Editing a number:
1. Press PRP.
2. Press
number directly (where
3. Press
4. Press
P until the desired location displays (01...10) or select the location
o to add the number.
C to remove incorrect entries.
o to save the number and return to idle state.
P until the desired location displays (01...10) or select the location
o to edit the number.
C to remove incorrect entries (backspace).
0 = location 10).
0 = location 10).
5. Press
Removing a number:
1. Press PRP.
2. Press
number directly (where
3. Press
4. Press
o to save the number and return to idle state.
P until the desired location displays (01...10) or select the location
o and C until the display is empty.
o to save the number and return to idle state.
0 = location 10).
15
Page 14

C40 12 Ha ndse t Stan dard 2.00
Ringer settings
You can program different ringer melodies and volumes.
Six ringer tones and five volume levels are available.
Setting the melody and volume:
1. Press PR7.
2. Press
3. Press
quiet.
1...6 to select a melody.
0,7...9, a, or n to set the ringer volume, where 0 =
Switching the ringer on/off:
Press PR8 to toggle the ringer on and off. The deactivated ringer is
indicated by the
A icon.
Key click
Press PR9 to enable or disable key click.
Accessing the Meridian PBX features
Enter the FFC and press H to access the Meridian PBX features while the
handset is idle.
Press
Flexible Feature Codes (FFC) — Dial an FFC code to access the handset
features.
Special Prefix Codes (SPRE) — Dial a SPRE code plus a one or two digit
number to access the handset features. The SPRE codes are unique to your
system; however, the digits following the SPRE are fixed. For example, dial
SPRE + 74 to call forward all calls to another number.
Ask your System Administrator for the FFC or SPRE codes.
R to access the Meridian PBX features during a call.
16
Page 15

C40 12 Ha ndse t Stan dard 2.00
Use the following table to enter your FFC or SPRE codes for each feature.
Feature FFC or SPRE +
Call forward - to activate
Call forward - to cancel
Call park - to park a call
Call park - to retrieve a call
17
Page 16

C40 12 Ha ndse t Stan dard 2.00
Subscribing the C4012 handset
The handset can be subscribed to a maximum of five DECT systems. If the
handset is not subs cribed or out-of-reach for a DECT system, no Base
appears on the display.
Subscribing
With the handset in subscription mode, perform the following steps:
1. Press
PR2.
d appears on the display.
2. Enter the PIN code.
Obtain PIN code from the DECT management system.
3. Press
The handset is subscribed.
o.
Selecting/changing the handset ID
With the handset in subscription mode, perform the following steps:
1. Press
Edit appears on the display.
2. Enter the number of the DECT system to name or edit.
Name of system appears on the display. On the first use, C4012 is the
default handset ID.
PR3.
3. Enter the new handset ID using the ke ypad. This will overwrite the existing
digits.
You can edit digits by pressing
4. Press
The handset ID contains a maximum of six digits.
18
o.
C.
Page 17

C40 12 Ha ndse t Stan dard 2.00
Selecting a DECT system
There are two ways to select a DECT system:
1. Automatically: Press
2. Manually: Press
1...5).
(
PR4 and 0.
PR4 and choose the DECT system number
De-subscribing
De-subscription is only possible for non-active subscriptions. The last
subscription can be removed when out-of-coverage or by the DECT
management system.
Deleting a DECT system
Press PR5 and select the DECT system number (1...5).
Only non-active subscriptions can be deleted. The last subscription can be
removed when out-of-coverage or by the DECT management system.
19
Page 18

C40 12 Ha ndse t Stan dard 2.00
Quick reference
Handset on/off o for longer than 2 seconds (toggle)
Keylock on/off
Monitoring on/off
Volume Speaker/
loudspeaker
Ringer settings
Melody 1...6
Volume 0,7...9, a, n,
Subscription
Handset ID PR3
Auto select PR40
Pa (toggle)
M (toggle)
Pn (toggle)
PR7
(
0 = very quiet)
PR2 PIN code o
DECT system (
1...5)
o New ID
Key click on/off
Manual
select
PR4
DECT system (
PR9
1...5)
20
 Loading...