


Initial Setup Guide
BSGX4e
Business Gateway
NN47928-311
Software Release 2.1.1
NN47928-311

BSGX4e 1.2
Business Services Gateway
Document Status: Standard
Document Version: 01.01
Document Number: NN47928-311
Date: July 2008
Copyright © 2008 Nortel Networks, All Rights Reserved
The information in this document is subject to change without notice. The statements, configurations, technical data,
and recommendations in this document are believed to be accurate and reliable, but are presented without express or
implied warranty. Users must take full responsibility for their applications of any products specified in this document. The
information in this document is proprietary to Nortel Networks.
Trademarks
Nortel, the Nortel logo, and the Globemark are trademarks of Nortel Networks.
Microsoft, MS, MS-DOS, Windows, and Windows NT are trademarks of Microsoft Corporation.
All other trademarks and registered trademarks are the property of their respective owners.
NN47928-311

CONTENTS
List of figures 5
List of tables 6
1 Introduction and preparation 7
Hardware notice. . . . . . . . . . . . . . . . . . . . . . . . . . . . . . . . . . . . . . . . . . . . . . . 7
Introduction. . . . . . . . . . . . . . . . . . . . . . . . . . . . . . . . . . . . . . . . . . . . . . . . . . 7
Getting started. . . . . . . . . . . . . . . . . . . . . . . . . . . . . . . . . . . . . . . . . . . . . . . . 9
Cables . . . . . . . . . . . . . . . . . . . . . . . . . . . . . . . . . . . . . . . . . . . . . . . . . . . . 9
Preliminary Information. . . . . . . . . . . . . . . . . . . . . . . . . . . . . . . . . . . . . . 11
Terminology . . . . . . . . . . . . . . . . . . . . . . . . . . . . . . . . . . . . . . . . . . . . . . . . . 12
Standard Internet Connection Parameters . . . . . . . . . . . . . . . . . . . . . . . . 12
Acronyms and Abbreviations . . . . . . . . . . . . . . . . . . . . . . . . . . . . . . . . . . 13
How to get help . . . . . . . . . . . . . . . . . . . . . . . . . . . . . . . . . . . . . . . . . . . . . . 14
Getting help from the Nortel Web site . . . . . . . . . . . . . . . . . . . . . . . . . . . 14
Getting help over the phone from a Nortel Solutions Center . . . . . . . . . . . 14
Getting help from a specialist by using an Express Routing Code. . . . . . . 15
Getting help through a Nortel distributor or reseller. . . . . . . . . . . . . . . . . 15
2 Connecting to BSGX4e 16
Browser requirements . . . . . . . . . . . . . . . . . . . . . . . . . . . . . . . . . . . . . . . . . 16
Initial connections . . . . . . . . . . . . . . . . . . . . . . . . . . . . . . . . . . . . . . . . . . . . 16
Wizard navigation and features . . . . . . . . . . . . . . . . . . . . . . . . . . . . . . . . . . 18
Configuration overview. . . . . . . . . . . . . . . . . . . . . . . . . . . . . . . . . . . . . . . . . 19
3 Wizard pages 21
Configuration process . . . . . . . . . . . . . . . . . . . . . . . . . . . . . . . . . . . . . . . . . 21
Configuration is complete . . . . . . . . . . . . . . . . . . . . . . . . . . . . . . . . . . . . 29
Backup configuration file . . . . . . . . . . . . . . . . . . . . . . . . . . . . . . . . . . . . . . . 29
Index 31
NN47928-311 3

List of figures
Figure 1 BSGX4e internet-side connection diagram . . . . . . . . . . . . . . . . . . . 10
Figure 2 BSGX4e Local Network Connection Diagram . . . . . . . . . . . . . . . . . 11
Figure 3 Configuration Page Features . . . . . . . . . . . . . . . . . . . . . . . . . . . . . . 19
LIST OF FIGURES
5 NN47928-311

LIST OF TABLES
Table 1 BSGX4e Cables . . . . . . . . . . . . . . . . . . . . . . . . . . . . . . . . . . . . . . . . . 9
Table 2 Preliminary Configuration Data . . . . . . . . . . . . . . . . . . . . . . . . . . . . 12
Table 3 Default Values . . . . . . . . . . . . . . . . . . . . . . . . . . . . . . . . . . . . . . . . . 25
NN47928-311 6

Hardware notice 1 Introduction and preparation
1 INTRODUCTION AND PREPARATION
Hardware notice
WARNING: Before working on this equipment, be aware of good safety practices
and the hazards involved with electrical circuits.
WARNING: To reduce risk of injury, fire hazard, and electric shock, do not install
the unit near a damp location.
CAUTION: Do not connect the PHONE port to the central office line.
CAUTION: To reduce the risk of fire, use only number 26 AWG or larger UL Listed
or CSA Certified telecommunication line cord for all network and
telecommunication connections.
Introduction
This Initial Setup Guide provides explanations and instruction details for using the
Initial Setup Wizard in the BSGX4e. The Initial Setup Wizard guides you through a series
of steps that configure the basic functions of the BSGX4e so that it is ready for
operation.
The comprehensive configuration tool for the BSGX4e is the Web User Interface (Web
UI). To access the Initial Setup Wizard you logon to the Web UI. The Web UI is highly
detailed and is designed for technicians and engineers. The Initial Setup Wizard
performs a simplified configuration process using the most common configuration
parameters.
This document applies to the BSGX4e model in a home or small office environment and
assumes you are connecting primarily SIP phones (for VoIP service) and PCs to your
BSGX4e.
The BSGX4e has an Ethernet interface for connecting to the Internet. This interface is
suitable for connecting to Digital Subscriber Line (DSL) and Cable modems.
The BSGX4e is a stand-alone box designed to sit on a desktop.
The following BSGX4e models are also available.
7 NN47928-311

1 Introduction and preparation Introduction
The 210 model has an Asymmetric Digital Subscriber Line (ADSL) interface for
connecting to the Digital Subscriber Line Access Multiplexer (DSLAM) of a service
provider, which is a central office switch for DSL service. This model has a DSL
modem built in to the WAN connector.
The BSGX4e has a T1/E1 interface for connecting to a T1/E1 link of a service
provider.
Who should use the Initial Setup
Wizard?
The BSGX4e is typically installed by
professional technicians in a
corporate setting using the Web UI or
the command line utility. However,
the Initial Setup Wizard is designed to
allow a less-technical user to perform
a self-installation in a small office or
home setting.
You are expected to have computer
experience such as installing
programs and connecting hardware
devices.
Technicians: If you use this wizard,
be aware that it sets many parameter
defaults in the background. You must
use the Web UI to change their values
as needed.
What is the BSGX4e?
BSGX4e is a powerful device that delivers
Unified Communications to your office.
z What is a gateway device?
In general, a gateway is an Internet
device that connects one network to
another. In this case, it is connecting
your office to the Internet, or perhaps to
another office.
Connecting two networks involves
several different functions. BSGX4e
handles them all in one device rather
than having several different boxes with
each handling one function.
z What is unified communications?
Unified communications is a popular
term to describe the convergence of
various communications technologies in
one device. As applied to BSGX4e, this
refers to voice, video, and data
communications.
What does the Initial Setup Wizard do?
You can use the Initial Setup Wizard to:
z Change the administrator password from the factory default password.
z Assign a name to the unit and select the country of operation.
z Set the date and time for the system clock.
z Configure the Internet interface in accordance with the specifications of your service
provider’s network.
z Configure the local network interface. The phones, computers, and fax machines that
you connect to the BSGX4e constitute your local network.
z Configure the Quality of Service (QoS) feature. QoS guarantees bandwidth for critical
functions when your Internet connection is at full capacity. With QoS you can use
Voice over Internet Protocol ( VOIP) telephones without the call being disrupted.
z Configure the VoIP feature in accordance with the specifications of your VoIP service
provider.
NN47928-311 8

Getting started 1 Introduction and preparation
Getting started
At this point, you are ready to make the initial cabling connections and then begin the
configuration process. The Quick Start Guide and the Installation Guide contain a lot of
technical information, but they are intended primarily for technicians.
This document provides summarized installation information specifically for a home or
small office, self-install user. Use the Quick Start Guide and Installation Guide as
references while reading this document.
Cables
You must supply the network cables needed for the BSGX4e installation. The BSGX4e
uses commonly available cables that you can find at most consumer electronic stores.
Look at the connection diagrams in Figure 1
BSGX4e. Decide on where to place the BSGX4e box and determine the length of cables
needed to your Internet connection, and to any devices that you connect to the BSGX4e.
After determining these lengths, you must acquire the cables listed in the following table.
Tabl e 1
BSGX4e
connector
WAN Ethernet /
1 2 3 4 Ethernet /
LINE Telephone /
Nortel recommends that you connect the cable from the LINE port to the phone wall
jack, although this is optional. You connect the cable from the LINE port to the phone
wall jack to provide backup phone service through the traditional telephone line
when your Internet connections goes down, or when the VoIP servers are not
available. The LINE port is also used for all 911 calls.
BSGX4e Cables
Cable Type/
connector Type Notes
RJ-45 plug
Both ends
RJ-45 plug
Both ends
RJ-11 plug
Both ends
Use CAT-5E or better cables.
The cables can be straight-thru or
cross-over.
Use CAT-5E or better cables.
The cables can be straight-thru or
cross-over.
Standard 2-wire telephone cable.
and Figure 2 that apply to your model of the
9 NN47928-311
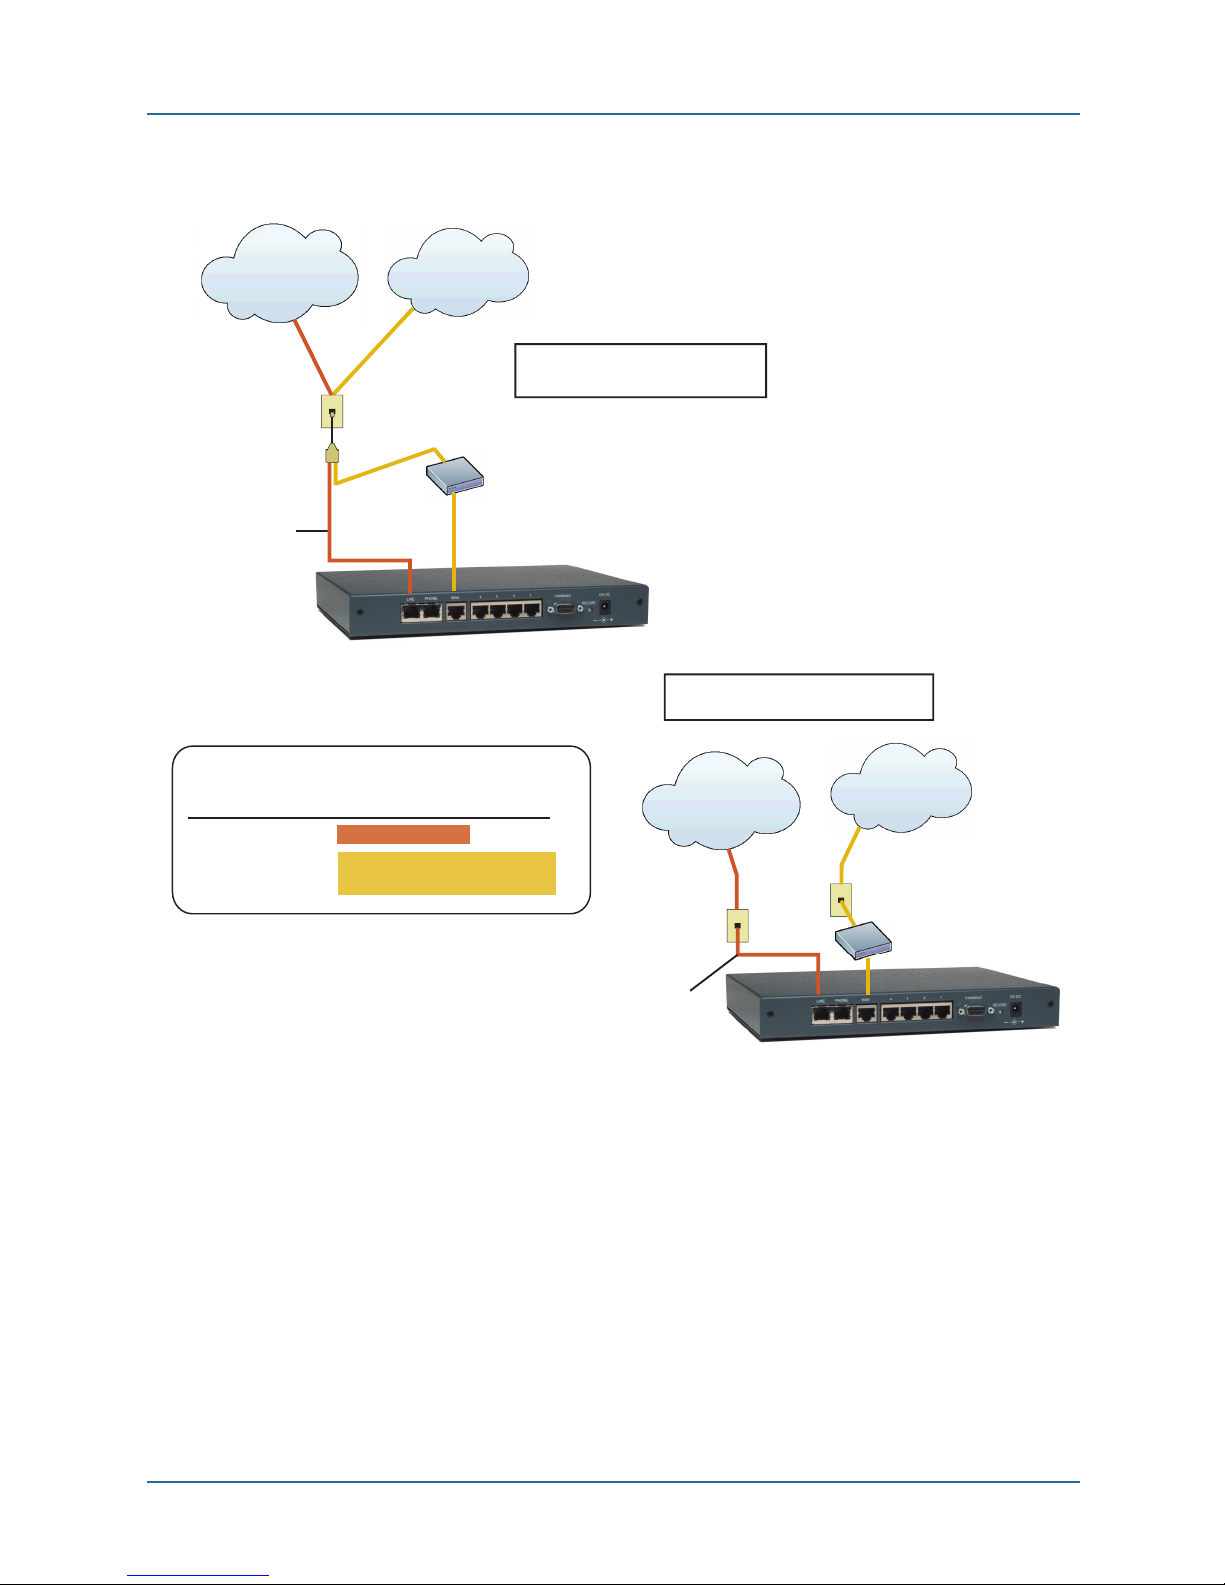
1 Introduction and preparation Getting started
Figure 1 BSGX4e internet-side connection diagram
Public Telephone
Network
DSL
Filter
Phone
Wall Jack
Internet
Service Provider
Emergency
Public Network
Connection
Internet-Side Cables and Wiring
BSGX4e Port Connection
LINE Phone Wall Jack
WAN DSL/Cable Modem
(or other Internet Connection)
DSL Modem Connections
DSL
Modem
Public Telephone
Phone
Wall Jack
Cable Modem Connections
Internet
Service Provider
Network
Cable
Wall Jack
Cable
Modem
NN47928-311 10
Emergency
Public Network
Connection
Getting started 1 Introduction and preparation
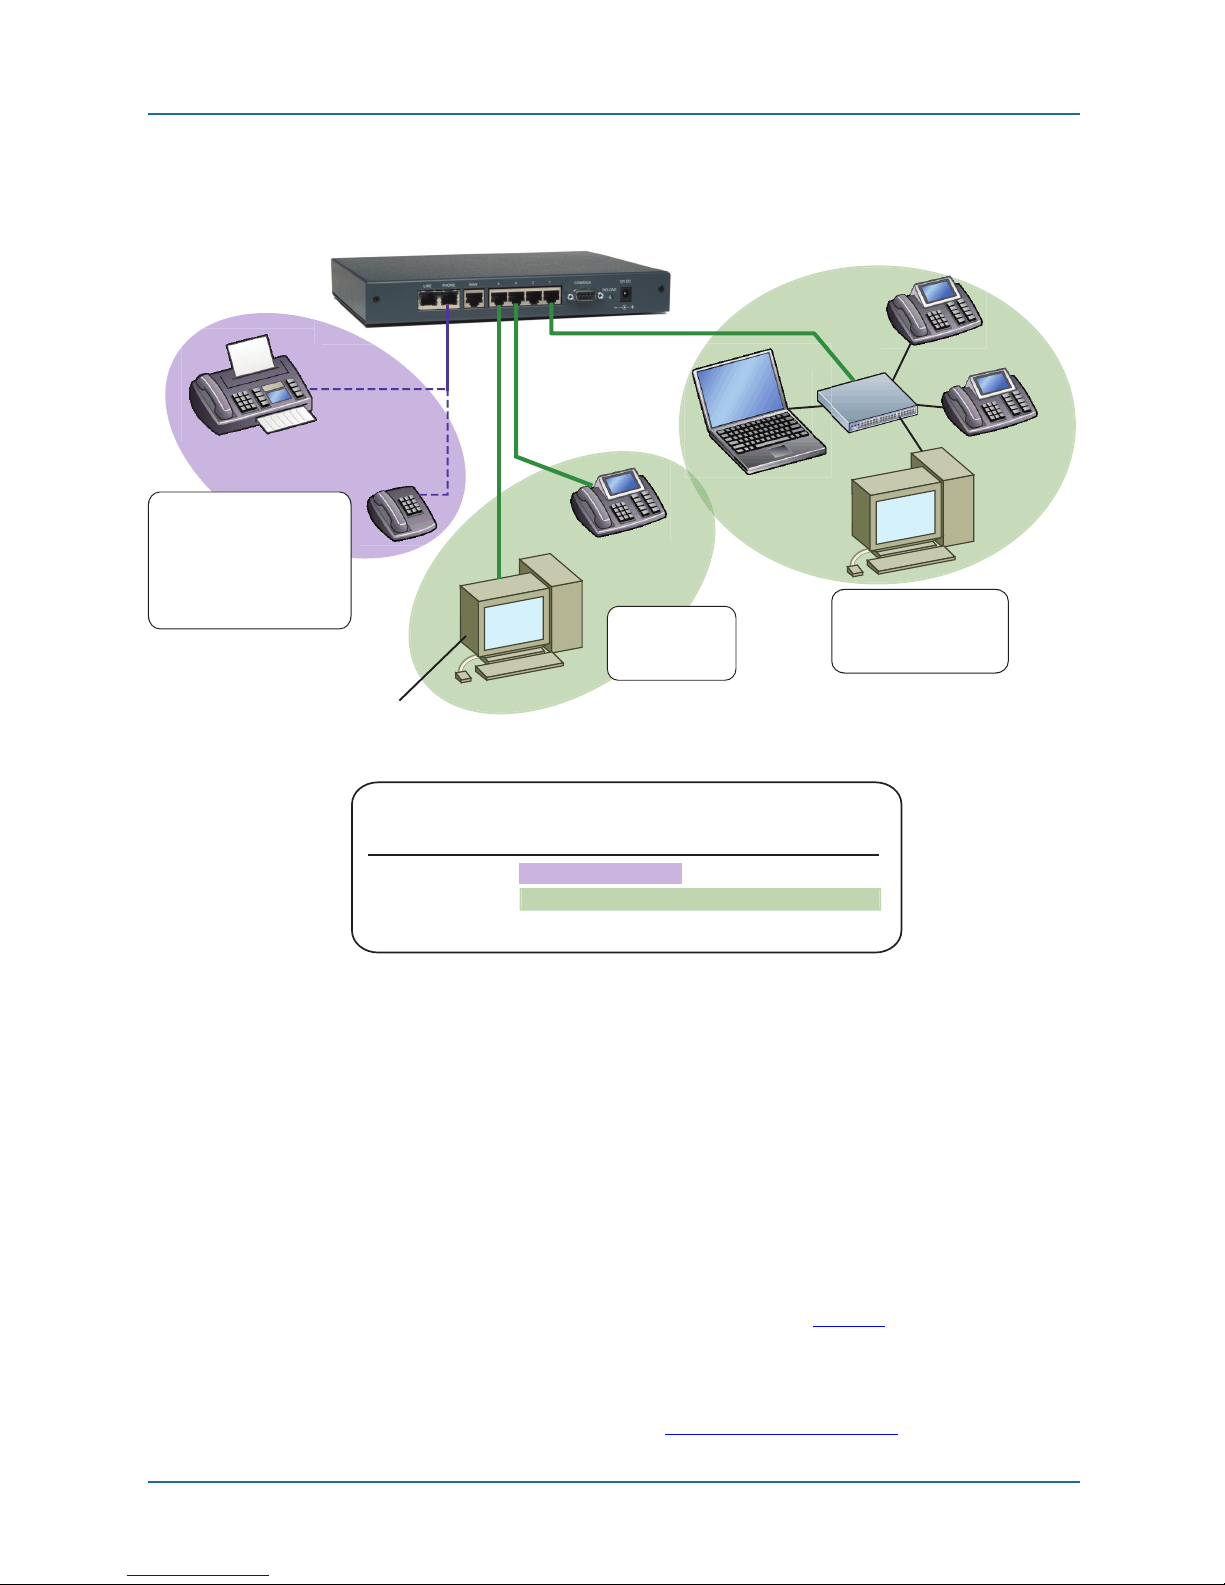
Figure 2 BSGX4e Local Network Connection Diagram
IP Phones, Computers, and Switch
Switch
Analog Fax or Phone
The Phone port
accommodates one
phone number, which is
intended for a fax
machine or a public
network (non-IP) phone.
Connect a
single device to
any port 1 – 4.
AND / OR
Connect multiple
devices to a switch,
then connect the
switch to a port 1 - 4.
Use this connection for the
Initial Setup Wizard.
Local Network Cables and Wiring
BSGX4e Port Connection
PHONE Analog Fax or Phone
1 – 4 IP Phones, Computers and other Intenet Devices
CONSOLE Command Line Terminal (used by technicians)
Preliminary Information
When you enter data into the Initial Setup Wizard, you are asked for various Internet
addresses and other technical data for your service account. Table 2
information you need. Gather this information before proceeding with the configuration
process. Most of this information is available from your service provider and probably
was received with your account information.
For frequently used acronyms and terms, see Terminology on page 12
11 NN47928-311
shows the
.

1 Introduction and preparation Terminology
Table 2
Wizard Page Page Field Description
Time and Date SNTP IP/FQDN Simple Network Time Protocol is a server on the Internet
Time and Date GMT Offset If you use an SNTP server, you must tell it how many hours
WAN Interface
Setup
LAN Interface
Setup
Preliminary Configuration Data
that provides a time signal to your BSGX4e.
Does your service provider offer an SNTP service? If not,
you can set the time manually.
you are away from Greenwich Mean Time.
In the U.S., the East Coast is –5 (minus 5) hours from GMT
and the West Coast is –8 hours.
PPP
Variation include:
• PPPoE
• PPPoHDLC
• PPPoATM
IP Address
Subnet Mask
PPP is one type of protocol used for transporting data
packets over the Internet. Most DSL connections use PPP,
and it is also common with a T1 interface.
If your account uses PPP, your service provider will supply
a user name and password.
A PPP account may also require a Self IP address, which is
like the static IP address described in the following row.
By default, the BSGX4e automatically supplies this address
and mask. This works for most situations so no further
information is needed.
If you are connecting a device to the BSGX4e that requires
this address or mask be changed, seek professional
advice. See more discussion on the LAN Interface Setup
Page on page 24
.
Quality of
Service Setup
Voice over IP
Setup
Terminology
This section provides definitions for technical terms used in this guide.
Standard Internet Connection Parameters
When configuring the BSGX4e to connect to the Internet, or to connect to any devices
you connect to ports 1–4, you are asked for the following common network parameters.
Since these terms appear frequently in the Initial Setup Wizard, they are defined here for
your information.
Upstream QoS
Max Bandwidth
Downstream QoS
Line Rate
SIP Session
Controller
SIP Server
Your service provider states the bandwidth rate for the
service account you have purchased.
Ideally, they state an upstream and downstream rate
separately. Having both of these rates helps QoS work
more efficiently.
Your VoIP service provider will supply the needed
addresses and logon information with your account.
NN47928-311 12

Terminology 1 Introduction and preparation
IP Address
(self IP)
Subnet Mask
(mask or
netmask)
Gateway A device that connects one network to another. This typically involves
DNS Server A system for converting domain names into IP addresses. For example,
The network (IP) address of any device connected to a local network or the
Internet. The format is 148.174.89.25. Each of the four numbers in the
address has a range of 0-255.
See the IP listing in Acronyms and Abbreviations
This mask helps Internet traffic route through networks and subnetworks, and
defines the range of addresses that can be used when creating a subnetwork.
The format is the same as an IP address, but typically ends with 0:
148.174.0.0.
converting raw data into an IP protocol, or converting one protocol to another
protocol.
www.webpage.com is translated to 142.178.15.12.
.
Acronyms and Abbreviations
ADSL – Asymmetric Digital Subscriber Line is an Internet technology that uses the
telephone line to transmit Internet data at broadband speeds. “Asymmetric” means
the download speed is faster than the upload speed.
DHCP – Dynamic Host Configuration Protocol is a service that automatically assigns
temporary IP addresses to network equipment.
DNS – Domain Name System is a service that converts host names and domain
names into IP addresses. For example, a Web URL of www.someplace.com is
translated to an IP address such as 140.178.12.56 on the Internet.
FQDN – A Fully Qualified Domain Name is similar to the common Web URL we all use
for surfing the Web. Its format typically looks like some.domain.com or just
domain.com.
IP (address) – I
address on the Internet. It consists of four numbers separated by periods. For
example, 140.178.12.56. Each of these four number must be 0 through 255. Every
device on the Internet (including the BSGX4e, computers, and IP phones) has an IP
address.
A dynamic address is temporary and is assigned by a DHCP server.
A static address is permanent and is manually set in the device.
LAN – A Local Area Network is a technical term for a collection of PCs, IP phones, and
other devices that you connect to BSGX4e’s 1–4 ports.
PPP – Point-to-Point Protocol is a popular network protocol for establishing a direct
connection between your computer and your service provider. If PPP includes
encapsulation schemes, the designation is, for example PPPoE or PPPoHDLC.
PVC – A Permanent Virtual Circuit establishes a permanent, long-term connection
directly between your BSGX4e and another network device, such as a switch or
server. A PVC has to be ordered from your service provider.
nternet Protocol is commonly used in this document to indicate an
13 NN47928-311

1 Introduction and preparation How to get help
SIP – Session Initiation Protocol is the most popular protocol used with VoIP. The
phones you use with the BSGX4e are likely marked as “SIP phones.”
VoIP – Voice over Internet Protocol is a digital telephone service that uses the public
Internet instead of the traditional analog telephone network.
WAN – A Wide Area Network is a technical term for the network of servers and other
devices on the Internet with which you will connect.
How to get help
This section explains how to get help for Nortel products and services.
Getting help from the Nortel Web site
The best way to get technical support for Nortel products is from the Nortel
Technical Support Web site:
www.nortel.com/support
This site provides quick access to software, documentation, bulletins, and tools
to address issues with Nortel products. More specifically, the site enables you to:
• download software, documentation, and product bulletins
• search the Technical Support Web site and the Nortel Knowledge Base for answers to
technical issues
• sign up for automatic notification of new software and documentation for Nortel
equipment
• open and manage technical support cases
Getting help over the phone from a Nortel Solutions Center
If you do not find the information you require on the Nortel Technical Support
Web site, and have a Nortel support contract, you also get help over the phone
from a Nortel Solutions Center.
In North America, call 1-800-4NORTEL (1-800-466-7835).
Outside North America, go to the following web site to obtain the phone number
for your region:
www.nortel.com/callus
NN47928-311 14

How to get help 1 Introduction and preparation
Getting help from a specialist by using an Express Routing
Code
To access some Nortel Technical Solutions Centers, you can use an Express
Routing Code (ERC) to quickly route your call to a specialist in your Nortel
product or service. To locate the ERC for your product or service, go to:
www.nortel.com/erc
Getting help through a Nortel distributor or reseller
If you purchased a service contract for your Nortel product from a distributor or
authorized reseller, contact the technical support staff for that distributor or reseller.
15 NN47928-311

Browser requirements 2 Connecting to BSGX4e
2 CONNECTING TO BSGX4E
This section explains how to connect your PC to the BSGX4e, log in, and start the Initial
Setup Wizard. This section also describes the navigation features of the wizard and an
overview of the configuration process.
At this point you have:
acquired all the cables you need, as shown in Table 1 on page 9
gathered the configuration data cited in Table 2 on page 12.
Note: The next procedure includes connecting your PC to the BSGX4e. Your PC must be
equipped with a Network Interface Card (NIC), which provides the RJ-45 connector needed
for this connection. A NIC is built in to virtually all laptop PCs, and is standard equipment on
most desktop PCs. Look for an RJ-45 connector on the back panel of your PC. The RJ-45 has
eight connector pins in it.
RJ-45
Browser requirements
The BSGX4e has been tested with Microsoft® Internet Explorer® and Mozilla® FireFox®
browsers.
Internet Explorer must have the Adobe
have the Adobe Flash Player plug-in. Use the Manage Add-ons (Explorer) or the Add-ons
(Firefox) command in your browser to obtain the plug-in.
Initial connections
Perform the following steps to connect the BSGX4e to the Internet, connect your PC to
the BSGX4e, and open the Initial Setup Wizard. Network cables are described in Table 1
on page 9
For connection diagrams, see Figure 1
CAUTION: Your PC must be configured to accept addresses from DHCP rather
than having a static address, otherwise Step 3 fails. DHCP is the default in PCs
But if your PC has been previously configured for a particular network (for
example, a home network), it may have a static address. Consult the user guide
of your PC, or professional assistance, to change the address configuration.
.
® Shockwave® Flash Object add-on. Firefox must
and Figure 2 beginning on page 10.
.
Step 1 Connect the power source.
Connect the power supply to
NN47928-311 16
12V DC connector on the back panel of the BSGX4e.

2 Connecting to BSGX4e Initial connections
The STATUS LED on the front panel is off and then red during the start-up process. When
the LED is steady green, the unit is ready for operation.
Step 2 Connect the Internet cable.
The Internet cable for the BSGX4e is an Ethernet cable from your DSL or cable modem.
Connection to other Internet outlets is possible, but these modems are the most common
source.
Connect the Ethernet cable to the BSGX4e
connection diagram in Figure 1
on page 10 for reference.
WAN port on the back panel. See the
After connecting the cable, the
WAN LED on the front panel is steady green indicating the
link is active. The LED flickers when data is being passed. The LED blinks slow when no
signal is detected.
Step 3 Connect your PC to the BSGX4e.
Connect an Ethernet cable from your PC to any of the LAN ports labeled
panel. See the connection diagram in Figure 2
The front panel contains green LEDs labeled
on page 11 for reference.
Ethernet 10/100 and 1–4 that correspond to
the back panel ports.
The LED corresponding to the port where you connected the PC cable is steady green
when the link is active. The LED flickers when data is being passed.
These lighting patterns apply to all equipment that you connect to the LAN ports. You
are instructed to connect your equipment to the LAN ports after the configuration
process.
Step 4 Open a Web browser (Internet Explorer or Firefox) on your computer.
In the address bar of your browser, enter:
192.168.1.1
o
1–4 on the back
The login page opens.
Step 5 On the login page:
17 NN47928-311

Wizard navigation and features 2 Connecting to BSGX4e
a. Enter the default login names:
User name: admin
Password: PlsChgMe!
b. Select the
Setup Wizard check box.
c. Click
Login.
The Welcome page of the wizard appears.
After reading the Welcome page, click
Next to begin
the configuration process.
Wizard navigation and features
The various configuration pages of the wizard contain the following features to help you
fill in the data fields on each page. See Figure 3
z Navigation
All configuration pages in the wizard are listed in the left panel of each page. The current
page is highlighted. Completed pages are bold. Remaining pages are dim.
Each page has
Next accepts your data entries and moves to the next page.
Skip moves you to the next page without having entered any data.
Previous moves you backward through the pages. This does not undo any configuration
Previous, Skip, and Next buttons.
entries that you have already made.
z Help
.
Most fields on each page have “mouse-over” help. Hover the mouse pointer over the field
label and a pop-up help window opens with a brief description of the item.
z Default values
A few of the pages contain a
Set Default button. Also, notice that on these pages some of the
field labels are yellow. When you click the default button, the fields with the yellow labels are
populated with default values that are calculated from other data on the page, or are
common defaults that work in most situations.
z Error protection
The logic built into the wizard pages displays an error message if you leave blank a field that
is required, or if you have entered data outside the allowable limits.
NN47928-311 18

2 Connecting to BSGX4e Configuration overview
Figure 3 Configuration Page Features
Default Button
Fields with
Default Values
Navigation
Mouse-Over Help
Navigation
Configuration overview
Before you begin the actual configuration of the BSGX4e, you may find an overview of
the process beneficial.
After the Welcome page, the Initial Setup Wizard consists of the following pages:
1. Administrator Password page (page 21
Change main password used to log on to the Web User Interface and the Initial Setup
Wizard.
2. System Information Setup page (page 22
Create a display name for your system and select the country of operation.
3. Date and Time Setup page (page 22
Set the date and time for the system clock.
4. WAN Interface Setup page (page 23
Configure the Internet interface in accordance with the technical requirements of the
network of your service provider.
5. LAN Interface Setup page (page 24
)
)
)
)
)
Configure the local network. The telephones, computers, and fax machines you connect to
the BSGX4e constitute your local network.
6. Quality of Service Setup page (page 25
Configure the Quality of Service (QoS) feature. QoS guarantees bandwidth for critical
functions during times when your Internet connection is at full capacity. This allows you to
use VoIP (voice over internet protocol) telephones without the call being disrupted.
19 NN47928-311
)

Configuration overview 2 Connecting to BSGX4e
7. Voice over IP Setup page (page 28)
Configure the VoIP feature in accordance with the technical requirements of your VoIP
service provider.
8. Finishing up page (page 28
)
Completion message and reminder to save the configuration created by the wizard.
NN47928-311 20

Configuration process 3 Wizard pages
3 WIZARD PAGES
This section provides an overview of the configuration process, then walks you through the
process of filling in the fields on each page of the wizard. We conclude with a short process on
how to save a configuration file.
The wizard pages contain fields into which you enter data. But, much of that data is technical in
nature and the purpose of this section is to explain those technical details.
Configuration process
Perform the following steps to configure the BSGX4e.
Note:
page. Use the
Step 1 Administrator Password page
Remember: Use the Skip button to move to the next page without changing any data on the current
Next button to save data changes on the current page and move to the next page.
For security reasons, create a new password.
After doing so, your login user name is still
admin, but the password is what you have set
here.
CAUTION: Be sure to record your new password and store it in a secure location.
21 NN47928-311

3 Wizard pages Configuration process
Step 2 System Information Setup page
z The Unit Name appears on the button bar of
the Web UI, near the corporate logo on the
top-left.
Change the default name as desired.
z United States (US) and Canada (CA) are the
two choices for the
Country field in the current
models.
The country selection defines some of the
telephone standards that the BSGX4e uses.
Step 3 Date and Time Setup page
Most network equipment use a date and time
signal in their internal processing, logging, and
messaging functions. Your choices are:
z SNTP Enable
Simple Network Time Protocol refers to a
network server that sends a date and time
signal to the BSGX4e.
Choose
yes if your service provider offers an
SNTP server.
Choose
z SNTP IP/FQDN
no to set date and time manually.
If using an SNTP server, enter the IP address
(ex. 123.156.7.89) or the FQDN (ex.
some.domain.com).
z GMT Offset
If using an SNTP server, enter the difference (offset) in hours from your location to Greenwich
ean Time (SNTP servers use GMT). For example, the East Coast of the U.S. is –5 (minus)
M
hours and the West Coast is –8 hours.
z Date and Time
If using manual settings, enter the current date and time here. All fields are numeric. The
Hour field accepts 1–24.
NN47928-311 22

Configuration process 3 Wizard pages
Step 4 WAN Interface Setup page
WAN (Wide Area Network) is your Internet
connection. Your choices to define this
connection are:
DHCP Client – Your service provider assigns a
dynamic (temporary) IP address. This is the
most common interface type.
Static IP – You have purchased a static
(permanent) IP address.
PPPoE – This is a protocol that establishes a
direct connection to your service provider
(rather than routing an IP address). This is
common with DSL.
Note: Make note of the connection type you select
here because you use it again in Step 6
.
Click the radio button that corresponds to your service account’s interface type:
z DHCP Client
No configuration is required.
z Static IP
If you purchased a static IP address, you received from your service provider the standard
Internet connection data (see page 12
z PPPoE
) for the fields under this heading.
If your service provider uses PPPoE, you received from your service provider your account
login information, which you enter here.
If the PPP account includes a static IP address, enter it into the
subnet mask into the
Mask field.
Self IP field, and enter the
23 NN47928-311

3 Wizard pages Configuration process
Step 5 LAN Interface Setup page
LAN (Local Area Network) is the collection
of phones, PCs, and other equipment that you
connect to the BSGX4e ports 1–4. These are
referred to as “LAN devices.”
z LAN Interface
This is the address of the switch that drives
ports 1–4. When a LAN device sends data to
the BSGX4e, it is sending to this address.
The default IP address and mask are
automatically filled in. Unless you have
professional advice to the contrary, use the
default settings.
CAUTION: If you change the IP address, the connection with your PC ceases.
You must repeat Step 4 on page 17
and enter the new address into the browser,
and you may need to re-configure the DHCP server and change the address in
your PC. Seek professional advice for this procedure.
z DHCP Server for LAN devices
The BSGX4e has a DHCP server that provides IP addresses to the LAN devices. Each device
receives a unique address. When the BSGX4e sends data to a LAN device, it is sending to
this address.
The DHCP server is enabled and configured by default.
Unless you have professional advice to the contrary, use the default settings.
NN47928-311 24

Configuration process 3 Wizard pages
Step 6 Quality of Service Setup page
Background
QoS is a system that reserves some amount of
bandwidth for critical functions at times when
your Internet connection is at maximum
capacity.
Placing a function under QoS management
means it has protected and uninterrupted
service. Functions not under QoS
management may experience delays and
interruptions during times of data traffic
congestion.
Critical functions are assigned to “QoS
Groups,” which then get priority over
unprotected traffic that the BSGX4e is
transmitting out its WAN port.
The upstream bandwidth reserved for the QoS groups is relative to the total amount of bandwidth
available on your upstream Internet connection (
allocated to all groups combined cannot be more than 90 percent of
Max Bandwidth field). The total bandwidth
Max Bandwidth.
The wizard configures the two most critical QoS groups for you:
The Voice group is for VoIP phone functions.
The Control group is for network functions that are critical to the BSGX4e’s operation.
PPP and ARP are two such functions that get placed into this group.
QoS can protect traffic in both the upstream and downstream directions. Downstream QoS works
differently from the upstream. When downsteam QoS is enabled in one or more QoS groups, the
BSGX4e limits incoming traffic that is not destined for a function protected by one of those QoS
groups. This creates sufficient incoming bandwidth for the protected traffic.
Configuration
Click the Set Default button to get started. This loads the following values into the page.
Table 3 Default Values
Variable Value
Upstream QoS 800000
Downstream QoS 1500000
Voice Group 500000
Control Group 64000
25 NN47928-311

3 Wizard pages Configuration process
NOTE: The numbers in the previous table are bps (bits per second). You may have seen
large numbers abbreviated as Kbps (1,000 bps) or Mbps (1,000,000 bps).
The BSGX4e likely requires a change of values, given that this model is commonly used with DSL
and cable modems. Bandwidth for DSL and cable can vary widely with various location and
network factors. And, service providers may offer different bandwidth rates for different prices.
Compare the upstream and downstream default rates on this page to the bandwidth rates your
service provider quoted to you. If there are significant differences, use the quoted rates. If you use
the quoted rates, you may want to calculate a new value in the QoS Groups section, as explained
below.
Fill in the page fields as follows.
z Upstream QoS
Compare the Upstream QoS default value on the page to the upstream rate your service
provider quoted to you. If there is a significant differences, enter the quoted rate in the
Bandwidth
field.
QoS performs best with the most accurate upstream link rate value, so you may want to run
bandwidth speed tests to determine your actual rate. For the best results, perform the test
several times over different days and average the results. You can use the following popular
test sites.
•
• www.speedtest.net
Max
•
•
• myspeed.visualware.com
• www.dslreports.com/speedtest
• www.pcpitstop.com/internet/bw.asp
z Downstream QoS
Link Rate – As with the upstream rate, compare the default value on the page to the
downstream rate quoted by your service provider. If there are significant differences, use the
quoted rates. The accuracy of the downstream link rate is not as critical as for the upstream
rate.
Encapsulation – Encapsulation is the network process of adding header information to data
packets for transporting and routing across the Internet. Encapsulation makes the packets
larger thereby consuming more bandwidth. The BSGX4e needs to know the encapsulation
type for its internal calculations involving bandwidth.
The encapsulation field does not have a default value. You must select the value that
matches the WAN selection from Step 4
1. If you chose
2. If you chose
PPPoE in Step 4, select PPPoE from the drop-down list here.
DHCP Client or Static IP in Step 4, select ethernet here.
:
NN47928-311 26

Configuration process 3 Wizard pages
z QoS Groups
The Voice QoS group protects the data packets traveling to and from your VoIP phones. The
Control QoS group protects PPP and ARP signals that are needed to maintain an Internet
connection.
The default value for the Control group is 64,000 bps. Do not change this value.
The default value for the Voice group is 500 000 bps, which protects between
(approximately) 4 and 13 simultaneous calls, based on each VoIP call requiring between
approximately 39 000 bps to 133 000 bps of bandwidth.
The variation in the size of calls is due to different encapsulation types, and because VoIP
phones negotiate which codec to use. A codec is a program that determines the level of
compression of the VoIP traffic stream. VoIP phones decide which codec to use with each
call, and different codecs have different compression rates.
You may want to recalculate the Voice group if your quoted or actual upstream bandwidth is
much different than the default 800,000 bps.
If the upstream rate is actually lower than the default value, you probably do not have to
change the Voice group bandwidth. Its 500,000 value works unless your upstream actual
rate drops below 626,000. It is not common to have your bandwidth drop that low.
If the upstream rate is actually higher than the default value and you want to protect
more simultaneous calls, you can perform a simple calculation to determine the
maximum value you can enter into the Voice Bandwidth field:
— Calculate 90 percent of the upstream QoS bandwidth.
— Subtract 64 000 (for the Control group).
The result is the maximum value for the Voice Bandwidth field.
Here is an example calculation:
Your service provider informs you that your upstream rate is
about 1 Mbps (1,000,000 bps).
a. 1,000,000 × 0.9 = 900,000
b. 1,080,000 – 64,000 = 836,000
The maximum value you can enter into the Voice bandwidth field is 836000. At this
bandwidth:
The highest compression codec sustains [836,000
The lowest compression codec sustains [836,000
Typical VoIP traffic is a combination of calls using different compression rates, although the
high-compression codecs are more common. You need to consider the number of
simultaneous calls you want to support compared to your available bandwidth, and enter an
appropriate value up to the maximum that you just calculated.
÷ 39,200] 21 calls.
÷ 132,800] 6 calls.
Entering the maximum value into the
other functions. QoS actually reserves only the bandwidth needed for the current number of
calls and allows the remaining bandwidth to be available for other, non-protected functions
such as email and Web browsing. So you can be generous in reserving bandwidth without
27 NN47928-311
Voice Bandwid th field might not restrict bandwidth for

3 Wizard pages Configuration process
preventing access by non-protected functions. Only when your Internet WAN link is at
maximum capacity, and you have many simultaneous calls in progress are your
non-protected functions interrupted.
The drawback to using the maximum value for
Voice Bandwid th is if you want to add another
QoS group in the future to protect other traffic. You would have to lower the Voice group
bandwidth to accommodate the new group.
Notes on video
The BSGX4e is capable of protecting a video IP stream under QoS. However, due to the unique
technical aspects of IP video, professional assistance would be needed to set this up. The BSGX4e
does process all types of video streams, but configuring the BSGX4e to guarantee uninterrupted
service with QoS is what requires the professional assistance.
Video also requires large amounts of bandwidth. The typical Internet connection in a home or
small office may not have enough bandwidth to ensure uninterrupted video transmission.
Step 7 Voice over IP Setup page
VoIP phones must connect to your VoIP
service provider’s SIP server. The User Agent
can also connect to the server. (The User
Agent allows you to connect a standard,
analog phone to the BSGX4e.)
z SIP Session Controller
Enter the Domain name (some.domain.com) or
network address (123.456.7.89) of the server
of your service provider.
Your service provider may also have a
Proxy
server (which improves the reliability of your
Internet connection). If so, enter its domain
name or network address.
Use the
Port, Heartbeat, and Frequency fields unless
Set Default button to populate the
you have professional advice to use different settings.
Set the
z SIP User Agent
Maxcalls field to what your license agreement states. This is 10 or 30 calls.
If your service provider supports a User Agent (sometimes called a “SIP gateway”), they
supply the account login data needed for these fields.
Step 8 Finishing up page
After completing the last configuration page you are taken to the finishing page where you can go
back through the pages to check any previous settings, or finish by saving the configuration into
the BSGX4e’s memory.
NN47928-311 28

Backup configuration file 3 Wizard pages
Note: You have now completed the configuration process. However, before you disconnect the PC you
used for this task, read Backup configuration file (page 29).
Configuration is complete
Now that you have completed the basic configuration process you can proceed to connecting your
LAN devices to the BSGX4e LAN ports. See Figure 2
reference.
Note: Most network equipment is “plug-n-play” in that they perform a self-configuration when you
connect them to the BSGX4e. However, some devices may require manual configuration. Check the
literature that accompanies the devices.
You are now ready to use your network equipment with the BSGX4e.
Modifying the configuration
If you need to modify a configuration parameter after you have used the Initial Setup Wizard, you
can go back into the wizard and
parameter value, click
Next to implement the change. Then Skip to the last page and Save the
changes.
Skip to the page that contains the parameter. After changing the
(page 11) and Table 1 (page 9) for
z If you have logged out of the Web UI, log back in as described beginning at Step 4 on page 17.
z If you have closed the wizard but are still logged in to the Web UI:
Wizards on the button bar.
Click
Initial Setup on the side menu. The Initial Setup Wizard opens.
Click
Backup configuration file
The configuration process you just completed with the Initial Setup Wizard stores the
configuration parameters in the BSGX4e’s memory. As with any computer device, there is some
possibility of memory corruption. To avoid having to repeat the configuration process if this
occurs, you can export a configuration file to your PC. Then, if the BSGX4e loses its
configuration, you can import the configuration file for complete recovery. Follow the steps below
to perform this task.
Creating a configuration file requires you to go into the Web UI (U
Web page you see behind the Initial Setup Wizard pages.
Saving a backup configuration file
Step 1 Access the Web UI.
ser Interface), which is that
If you closed the Initial Setup Wizard but did not log out of the Web UI, you see the home page.If
you did log out of the Web UI, repeat the login instructions on page 17
29 NN47928-311
.

3 Wizard pages Backup configuration file
Step 2 On the menu in the left pane of the window, click
Configuration. In the display in the right pane, click
Save/Restore tab.
the
Step 3 Under the
Download.
Download configuration heading, click
Click Save in the window that opens. This opens the
standard
Save As dialog box where you choose a storage
location on your PC.
Restoring a backup configuration file
Step 1 Log in to the Web UI and navigate to the System > Configuration page, as described
above for saving the configuration file.
Step 2 Under the
graphic in the preceding section.)
This opens the standard Choose File dialog box where you navigate to the location on your PC
where you stored the configuration file.
Step 3 Select the configuration file and click Open in the dialog box. The path to the file now
shows in the
Step 4 Click
minutes.
Step 5 After uploading the file, you are prompted to click the
left pane of the window.
Select a configuration file to restore heading, click the Browse button. (See the
Load File field of the Web UI.
Restore and the configuration file is read into memory. This process may take a few
Reboot System button in the lower
NN47928-311 30

Index
INDEX
Numerics
911 call 9
A
analog phone 28
B
backup 29
backup phone service 9
browser requirements 16
BSGX4e
cables 9
connecting to 16
initial connections 16
C
cables 9
codec 27
configuration backup 29
configuration data 11
configuration overview 19
configuration, modify 29
navigation 18
initial connections 16
Initial Setup Wizard
defined
opening 16
overview 19
preliminary info 11
Internet connection 12
IP address
defined 13
LAN 24
WAN 23
7
L
LAN
defined
setup 24
LAN devices 24
LED
internet connection
LAN ports 17
power 17
LINE port 9
local network 8
login 17
13
17
D
default button 18
DHCP, defined 13
DNS Server 13
DNS, defined 13
dynamic IP address 23
F
FQDN 13
G
Gateway 13
GMT Offset 12
I
Initial Configuration Wizard
features
31 NN47928-311
18
M
modify configuration 29
N
navigation, wizard pages 18
P
phones
28
analog
SIP 14
PPP 12
PPP, defined 13
PVC, defined 13
Q
QoS see Quality of Service
Quality of Service

Index
bandwidth 25
defined 8
Groups 25
setup 25
R
restore configuration 29
S
SIP
defined
phones 14
server 28
SNTP server 12
standard Internet connection parameters 12
static address, initial connection 16
static IP address 23
Subnet Mask 13
14
T
Terminology 12
U
Unified Communications 8
User Agent 28
V
video 28
VoIP
defined
QoS 8
server 28
14
W
WAN setup 23
WAN, defined 14
Web UI (User Interface) 7, 29
NN47928-311 32
 Loading...