

Nortel BayStack Instant Internet 100-S, BayStack 400, BayStack Instant Internet 400-S, BayStack 100 Using Manual
Page 1

Part No. 300868-G
November 2000
4401 Great America Parkway
Santa Clara, CA 95054
Using the BayStack
Instant Internet
Management Software
Version 7.11
Page 2

Copyright © 2000 Nortel Networks
All rights reserved. November 2000.
The information in this document is subj ect to change witho ut notice. The statemen ts, configurat ions, technica l data, and
recommendations in this document are believed to be accurate and reliable, but are presented without express or implied
warranty. Users must take full responsibility for their applications of any products specified in this document. The
information in this document is proprietar y to Nortel Netwo rks NA Inc.
The software described in this docu ment is furnished under a license agreement and may be used only in ac cordance
with the terms of that license. The software license agreement is included in this document.
Trademarks
NORTEL NETWORKS is a trademark of Nortel Networks.
BayStack, Contivity, Instant Internet, Nortel Networks, and the Nort el Networks logo are trademarks of Nortel
Networks.
Microsoft, Windows, and Windows NT are registered trademarks of Microsoft Corporation.
All other trademarks and registered trademarks are the property of their respect ive owners.
Restricted rights legend
Use, duplication, or disclosu re by the United States Government is subject to restrictions as set forth in subparagraph
(c)(1)(ii) of th e Rights in Technical Data and Computer Software clause at DFARS 252.227-7013.
Notwithstanding any othe r li cen se ag re eme nt that may pertain to, or a cco mpany th e deliv er y o f, th is c o mput er softwa re ,
the rights of the United States Government regarding its use, reproduction, and disclosure are as set forth in the
Commercial Computer Software-Rest r icted Rights clause at FAR 52.227-19.
Statement of conditions
In the interest of improving internal design, operational function, and/or reliability, Nortel Networks NA Inc. reserves
the right to make changes to the products described in this document without notice.
Nortel Networks NA Inc. does not assume any liability that may occur due to the use or application of the product(s) or
circuit layout(s ) described herein .
In addition, the prog ram and information contained herein are l icensed only pursuant to a license agree ment that cont ains
restrictions on use and disclosure (t hat may incorporate by reference certain limitatio ns and notices imposed by third
parties).
2 300868-G
Page 3

Nortel Networks NA Inc. software license agreement
NOTICE: Please carefully read this license agreement before copying or using the accompanying software or installing
the hardware unit with pre-enabled software (each of which is referred to as “Software” in this Agreeme nt) . BY
COPYING OR USING THE SOFTWARE, YOU ACCEPT ALL OF THE TERMS AND CONDITIONS OF THIS
LICENSE AGREEMENT. THE TERMS EXPRESSED IN THIS AGREEMENT ARE THE ONLY TERMS UNDER
WHICH NORTEL NETWORKS WILL PERMIT YOU TO USE THE SOFTWARE. If you do not accept these terms
and conditions, return the product, unused and in the original shipping container, within 30 days of purchase to obtain a
credit for the full purchase price.
1. License grant. Nortel Networks NA Inc. (“Nortel Networks”) grants the end user of the Software (“Licensee”) a
personal, nonexclusive, nontransferable license: a) to use the Software either on a single computer or, if applicable, on a
single authorized device identified by host ID, for which it was originally acquired; b) to copy the Software solely for
backup purposes in support o f authorized use of the Software; and c) t o use and copy the associated user man ual solely
in support of authorized use of the Software by Licensee. This license applies to the Software only and does not extend
to Nortel Networks Agent software or other Nortel Networks software products. Nortel Networks Agent software or
other Nortel Networks software products are licensed for use under the terms of the applicable Nortel Networks NA Inc.
Software License Agreement that accompanies such software and upon payment by the end user of the appl icable
license fees for such software.
2. Restrictions on use; reservation of rights. The S oft ware and user manuals are protected und er copyright laws.
Nortel Networks and/or its licensors retain all title and ownership in both the Software and user manuals, including any
revisions made by Nortel Networks or its li censors. The copyrig ht notice must be repr oduced and included with any
copy of any portion of the Software or user manuals. Licensee may not modify, translate, decompile, disassemble, use
for any competitive analysis, reverse engineer, distribute, or create derivative works from the Software or user manuals
or any copy, in whole or in part. Except as expressly pr ovided in this Agreement, Licensee may not copy or transfe r the
Software or user ma nuals, in whole or in part. The Softw a re and user manuals em body Nortel Networks’ and its
licensors’ confidentia l an d proprietary intellectual p roperty. Licensee shall not sublicense, assign, or otherwise disclose
to any third pa rty the Software, or any information about the operation, des ign, performance, or implementation of the
Software and user manuals that i s confidential to Nortel Networks and its licensors; however, Licensee may grant
permission to its consultants, subcontractors, and agents to use the Software at Licensee’s facility, provided they have
agreed to use the Software only in accordance with the terms of this license.
3. Limited warranty. Nortel Networks warrants each item of Software, as delivered by Nortel Net works and properly
installed and operated on Nortel Networks hardware or other equipment it is originally licensed for, to function
substantially as describ ed in its accompanying user manual during its warranty period, which begins on the date
Software is first shipped to Licensee. If any item of Software fails to so function during its warranty period, as the sole
remedy Nortel Networks will at its discretion provide a suitable fix, patch, or workaround for the problem that may be
included in a future Software release. Nortel Networks further warrants to Licensee that the media on which the
Software is provided will be free from defects in materials and workmanship under normal use for a period of 90 days
from the date Software is first shipped to Licensee. Nortel Networks will replace defective media at no charge if it is
returned to N ortel Netw orks du ring the w arr anty perio d al ong w it h pro of of the da te o f shi pme nt. Th is warr an ty do es no t
apply if the media has been damaged as a result of accident, misuse, or abuse. The Licensee assumes all responsibility
for selection of the Software to achieve Licensee’s intended results and for the installation, use, and results obtained
from the Software. Nortel Networks does not warrant a) that the functions contained in the software will meet the
Licensee’s requirements, b) that the Software will operate in the hardware or software combinations that the Li censee
may select, c) that the operatio n of the Software will be uninterrup ted or e rror free, or d) that all defects in the operation
of the Software will be corrected. Nortel Networks is not obligated to remedy any Software defect that cannot be
reproduced with the latest Software release. T hese warranties do not apply to the Software if it has been (i) altered,
except by Nortel Networks or in accorda nce with its instru ctions; (ii) used in conjun ction with anothe r vendo r’s product,
resulting in the defect; or (iii) damaged by improper environment, abuse, misuse, accident, or negligence. THE
FOREGOING WARRANTIES AND LIMITATIONS ARE EXCLUSIVE REMEDIES AND ARE IN LIEU OF ALL
OTHER WARRANTIES EXPRESS OR IMPLIED, INCLUDING WITHOUT LIMITATION ANY WARRANTY OF
MERCHANTABILITY OR FITNESS FOR A PAR T ICULAR PURPOSE. Licensee is responsible for the security of its
own data and information a nd for mainta ining ad equate pro cedures apart from the Software to rec onstruc t lost or altered
files, data, or programs.
3
Using the BayStack Instant Internet Management Software Version 7.11
Page 4

4
4. Limitation of liability. IN NO EVENT WILL NORTEL NETWORKS OR ITS LICENSORS BE LIABLE FOR
ANY COST OF SUBSTITUTE PROCUREMENT; SPECIAL, INDIRECT, INCIDENTAL, OR CONSEQUENTIAL
DAMAGES; OR ANY DAMAGES RESULTING FROM INACCURATE OR LOST DATA OR LOSS OF USE OR
PROFITS ARISING OUT OF OR IN CONNECTION WITH THE PERFORMANCE OF THE SOFTWARE, EVEN IF
NORTEL NETWORKS HAS BEEN ADVISED OF THE POSSIBILITY OF SUCH DAMAGES. IN NO EVENT
SHALL THE LIABILITY OF NORTEL NETWORKS RELATING TO THE SOFTWARE OR THIS AGREEMENT
EXCEED THE PRICE PAID TO NORTEL NETWORKS FOR THE SOFTWARE LICENSE.
5. Government licensees. This provision applies to a ll Software and do cumentatio n acqu ired directly or indire ctly by o r
on behalf of the United Stat es Government. The Software and documentation are commerci al products, licensed on th e
open market at market prices, and were developed entirely at private expense and without the u s e of any U.S.
Government funds. The license to the U.S. Government is granted only with restricted r ights, and use, dup lication, or
disclosure by the U.S. Government is subject to the restrictions set forth in subparagraph (c)(1) of the Commercial
Computer Software––Restricted Rights clause of FAR 52.227-19 and the limitations set out in this license for civilian
agencies, and subparagraph (c)(1 ) (ii) of the Rights in Technical Data and Computer Software clause of DFARS
252.227-7013, for agencies of the Department of Defense or their successors, whichever is applicab le.
6. Use of Software in the European Community. This provision applies to all Software acquired for use within the
European Community. If Licensee uses the Software within a country in the European Community, the Software
Directive enacted by the Counc il of European Commu nities Directive dated 14 May, 1991, will apply to the examination
of the Software to facilitate interoperability. Licensee agrees to notify Nortel Networks of any such intended
examination of the S of tware and may procure support and assistance f rom Nortel Networks.
7. Term and termination. This license is effective until terminated; however, all of the restrictions with respect to
Nortel Networks’ copyright in the Software and user manuals will cease being effective at the date of expiration of the
Nortel Networks copyright; those restrictions relatin g to use and disclosure o f Nortel Networks’ co nfidential information
shall continue in effect. Licensee may terminate this license at any time. The license will automatically terminate if
Licensee fails to comply with any of the terms and conditions of the license. Upon termination for any reason, Licensee
will immediately destroy or return to Nort el Networks the Software, u ser manuals, and all copies. Nort el Networks is not
liable to Licensee for damages in any form solely by reason of the termination of this license.
8. Export and re-export. Licensee agrees not to exp ort , directly or indirectly, the Software or related technical data or
information without first obtaining any required export licenses or other governmental approvals. Without limiting the
foregoing, Licensee, on beha lf of itself and its subsidiarie s and affili ates, agrees that it will no t, without first obta ining all
export licenses and approvals required by the U.S. Government: (i) export, re-export, transfer, or divert any such
Software or technical data, or any direct product thereof, to any country to which such exports or re-exports are restricted
or embargoed under United States export control laws and regulations, or to any national or resident of such restricted or
embargoed coun trie s; or (ii) pro vid e the So ftware o r relate d tech nica l da ta or in form a tio n to any m ilit ary end user or for
any military end use, including the design, development, or production of any chemical, nuclear, or biological weapons.
9. General. If any provision of this Agreement is held to be invalid or unenforceable by a court of competent
jurisdiction, the remainder of the prov isions of this Agree ment shall remain in full force and effe ct. This Agreeme nt will
be governed by the laws of the state of Cal i fornia.
Should you ha ve any qu estion s conce rning this Agr eement, contac t Norte l Networ ks, 44 01 Great A meric a Parkw ay, P .O.
Box 58185, Santa Clara, California 95054-8185.
LICENSEE ACKNOWLEDGES THAT LICENSEE HAS READ THIS AGREEMENT, UNDERSTANDS IT, AND
AGREES TO BE BOUND BY ITS TERMS AND CONDITIONS. LICENSEE FURTHER AGREES THAT THIS
AGREEMENT IS THE ENTIRE AND EXCLUSIVE AGREEMENT BETWEEN NORTEL NETWORKS AND
LICENSEE, WHICH SUPERSEDES ALL PRIOR ORAL AND WRITTEN AGREEMENTS AND
COMMUNICATIONS BETWEEN THE PARTIES PERTAINING TO THE SUBJECT MATTER OF THIS
AGREEMENT. NO DIFFERENT OR ADDITIONAL TERMS WILL BE ENFORCEABLE AGAINST NORTEL
NETWORKS UNLESS NORTEL NETWORKS GIVES ITS EXPRESS WRITTEN CONSENT, INCLUDING AN
EXPRESS WAIVER OF THE TERMS OF THIS AGREEMENT.
300868-G
Page 5

Contents
Preface . . . . . . . . . . . . . . . . . . . . . . . . . . . . . . . . . . . . . . . . . . . . . . . . . . . . . . 25
Before you begin . . . . . . . . . . . . . . . . . . . . . . . . . . . . . . . . . . . . . . . . . . . . . . . . . . . . . 25
Text conventions . . . . . . . . . . . . . . . . . . . . . . . . . . . . . . . . . . . . . . . . . . . . . . . . . . . . . 26
Related publications . . . . . . . . . . . . . . . . . . . . . . . . . . . . . . . . . . . . . . . . . . . . . . . . . . . 27
Hard-copy technical manuals . . . . . . . . . . . . . . . . . . . . . . . . . . . . . . . . . . . . . . . . . . . . 29
How to get help . . . . . . . . . . . . . . . . . . . . . . . . . . . . . . . . . . . . . . . . . . . . . . . . . . . . . .29
Chapter 1
Introduction . . . . . . . . . . . . . . . . . . . . . . . . . . . . . . . . . . . . . . . . . . . . . . . . . . 31
How Instant Internet can function in your network . . . . . . . . . . . . . . . . . . . . . . . . . . . . 31
IP networks . . . . . . . . . . . . . . . . . . . . . . . . . . . . . . . . . . . . . . . . . . . . . . . . . . . . . .32
IPX networks . . . . . . . . . . . . . . . . . . . . . . . . . . . . . . . . . . . . . . . . . . . . . . . . . . . . .32
Services Instant Internet provides . . . . . . . . . . . . . . . . . . . . . . . . . . . . . . . . . . . . . . . . 33
Deciding what to do next . . . . . . . . . . . . . . . . . . . . . . . . . . . . . . . . . . . . . . . . . . . . . . . 34
5
Chapter 2
User access administration . . . . . . . . . . . . . . . . . . . . . . . . . . . . . . . . . . . . . 35
Administration program overview . . . . . . . . . . . . . . . . . . . . . . . . . . . . . . . . . . . . . . . . . 35
Starting Admin . . . . . . . . . . . . . . . . . . . . . . . . . . . . . . . . . . . . . . . . . . . . . . . . . . . . 36
Administration program icons . . . . . . . . . . . . . . . . . . . . . . . . . . . . . . . . . . . . .36
Default user and everyone group . . . . . . . . . . . . . . . . . . . . . . . . . . . . . . . . . . . . . . . . . 37
Restoring the default user . . . . . . . . . . . . . . . . . . . . . . . . . . . . . . . . . . . . . . . . . . .37
Restoring the everyone group . . . . . . . . . . . . . . . . . . . . . . . . . . . . . . . . . . . . . . . . 38
Managing directory service users and groups . . . . . . . . . . . . . . . . . . . . . . . . . . . . . . .38
Setting the domain . . . . . . . . . . . . . . . . . . . . . . . . . . . . . . . . . . . . . . . . . . . . . . . . .39
Setting user name order . . . . . . . . . . . . . . . . . . . . . . . . . . . . . . . . . . . . . . . . . . . .40
Using the BayStack Instant Internet Management Software Version 7.11
Page 6

6 Contents
Setting up IP users not using iiLogin . . . . . . . . . . . . . . . . . . . . . . . . . . . . . . . . . . . . . .44
Creating and removing users and groups . . . . . . . . . . . . . . . . . . . . . . . . . . . . . . . . . . 45
Managing users and groups . . . . . . . . . . . . . . . . . . . . . . . . . . . . . . . . . . . . . . . . . . . . . 50
Defining user and group access . . . . . . . . . . . . . . . . . . . . . . . . . . . . . . . . . . . . . . . . . . 54
Configuring Internet access . . . . . . . . . . . . . . . . . . . . . . . . . . . . . . . . . . . . . . . . . . . . .58
Managing news group access . . . . . . . . . . . . . . . . . . . . . . . . . . . . . . . . . . . . . . . . . . . 70
Migrating your database to use unique users and groups by server . . . . . . . . . . . 41
Managing Windows 95, Windows 98, Windows NT, and Windows 2000
domain users and groups . . . . . . . . . . . . . . . . . . . . . . . . . . . . . . . . . . . . . . . . . . 41
Viewing Windows 95, Windows 98, Windows NT, or Windows 2000
Users and Groups . . . . . . . . . . . . . . . . . . . . . . . . . . . . . . . . . . . . . . . . . . . .42
Managing NetWare NDS users and groups . . . . . . . . . . . . . . . . . . . . . . . . . . . . . 42
Setting the context for NDS . . . . . . . . . . . . . . . . . . . . . . . . . . . . . . . . . . . . . . . 43
Managing Novell Bindery users and groups . . . . . . . . . . . . . . . . . . . . . . . . . . . . . 43
Setting the NetWare preferred server . . . . . . . . . . . . . . . . . . . . . . . . . . . . . . .44
Creating a new user or group . . . . . . . . . . . . . . . . . . . . . . . . . . . . . . . . . . . . . . . . 45
Creating a user . . . . . . . . . . . . . . . . . . . . . . . . . . . . . . . . . . . . . . . . . . . . . . . . 46
Creating a group . . . . . . . . . . . . . . . . . . . . . . . . . . . . . . . . . . . . . . . . . . . . . . . 47
Adding a user to a group . . . . . . . . . . . . . . . . . . . . . . . . . . . . . . . . . . . . . . . . . . . . 48
Deleting users and groups . . . . . . . . . . . . . . . . . . . . . . . . . . . . . . . . . . . . . . . . . . .49
Deleting a user . . . . . . . . . . . . . . . . . . . . . . . . . . . . . . . . . . . . . . . . . . . . . . . . 49
Deleting a group . . . . . . . . . . . . . . . . . . . . . . . . . . . . . . . . . . . . . . . . . . . . . . . 50
Copying user and group Internet access settings . . . . . . . . . . . . . . . . . . . . . . . . . 51
Viewing effective user access . . . . . . . . . . . . . . . . . . . . . . . . . . . . . . . . . . . . . . . . 53
Disabling user or group access . . . . . . . . . . . . . . . . . . . . . . . . . . . . . . . . . . . . . . . 56
Ignoring group settings option . . . . . . . . . . . . . . . . . . . . . . . . . . . . . . . . . . . . . . . . 57
Enabling logging for a user . . . . . . . . . . . . . . . . . . . . . . . . . . . . . . . . . . . . . . . . . . 57
Defining controlled Internet access . . . . . . . . . . . . . . . . . . . . . . . . . . . . . . . . . . . .59
Three kinds of Internet addressing . . . . . . . . . . . . . . . . . . . . . . . . . . . . . . 60
Overview of configuring Internet access . . . . . . . . . . . . . . . . . . . . . . . . . . . . .61
Adding Internet access . . . . . . . . . . . . . . . . . . . . . . . . . . . . . . . . . . . . . . . . . . . . .63
Removing Internet access . . . . . . . . . . . . . . . . . . . . . . . . . . . . . . . . . . . . . . . . . . .66
Changing Internet access . . . . . . . . . . . . . . . . . . . . . . . . . . . . . . . . . . . . . . . . . . .68
Adding news group access . . . . . . . . . . . . . . . . . . . . . . . . . . . . . . . . . . . . . . . . . .71
Removing news group access . . . . . . . . . . . . . . . . . . . . . . . . . . . . . . . . . . . . . . . .73
Changing news group access . . . . . . . . . . . . . . . . . . . . . . . . . . . . . . . . . . . . . . . .74
300868-G
Page 7

Contents 7
Managing incoming port access . . . . . . . . . . . . . . . . . . . . . . . . . . . . . . . . . . . . . . . . . . 76
Adding incoming port access . . . . . . . . . . . . . . . . . . . . . . . . . . . . . . . . . . . . . . . . .77
Removing incoming port access . . . . . . . . . . . . . . . . . . . . . . . . . . . . . . . . . . . . . .79
Changing incoming port access . . . . . . . . . . . . . . . . . . . . . . . . . . . . . . . . . . . . . .81
Managing RAW sockets . . . . . . . . . . . . . . . . . . . . . . . . . . . . . . . . . . . . . . . . . . . . . . . . 83
Specifying the message a user sees upon an error . . . . . . . . . . . . . . . . . . . . . . . . . . .85
Creating reports . . . . . . . . . . . . . . . . . . . . . . . . . . . . . . . . . . . . . . . . . . . . . . . . . . . . . . 85
Common user and group access examples . . . . . . . . . . . . . . . . . . . . . . . . . . . . . . . . . 86
Allowing unlimited access for everyone . . . . . . . . . . . . . . . . . . . . . . . . . . . . . . . . . 86
Restricting access to a few sites for everyone . . . . . . . . . . . . . . . . . . . . . . . . . . . 88
Allowing access to a few sites . . . . . . . . . . . . . . . . . . . . . . . . . . . . . . . . . . . . . . . .90
Managing a remote Instant Internet unit . . . . . . . . . . . . . . . . . . . . . . . . . . . . . . . . . . . 91
Chapter 3
Internet activity logging . . . . . . . . . . . . . . . . . . . . . . . . . . . . . . . . . . . . . . . . 93
Activity logging overview . . . . . . . . . . . . . . . . . . . . . . . . . . . . . . . . . . . . . . . . . . . . . . . 93
Monitoring an Instant Internet unit . . . . . . . . . . . . . . . . . . . . . . . . . . . . . . . . . . . . . . . . 95
Viewing statistics . . . . . . . . . . . . . . . . . . . . . . . . . . . . . . . . . . . . . . . . . . . . . . . . . . 95
Viewing users . . . . . . . . . . . . . . . . . . . . . . . . . . . . . . . . . . . . . . . . . . . . . . . . . . . . 99
Viewing Web site access . . . . . . . . . . . . . . . . . . . . . . . . . . . . . . . . . . . . . . . . . . .101
Viewing diagnostic information . . . . . . . . . . . . . . . . . . . . . . . . . . . . . . . . . . . . . . 104
Performing a Trace . . . . . . . . . . . . . . . . . . . . . . . . . . . . . . . . . . . . . . . . . . . . . . .106
Monitoring multiple Instant Internet units . . . . . . . . . . . . . . . . . . . . . . . . . . . . . . . . . .107
Activating automatic logging . . . . . . . . . . . . . . . . . . . . . . . . . . . . . . . . . . . . . . . . . . . 109
Enabling Auto Run . . . . . . . . . . . . . . . . . . . . . . . . . . . . . . . . . . . . . . . . . . . . . . . . 110
Configuring automatic logging . . . . . . . . . . . . . . . . . . . . . . . . . . . . . . . . . . . . . . . 110
Editing an automatic logging configuration . . . . . . . . . . . . . . . . . . . . . . . . . . . . . 112
Deleting a log from the automatic logging configuration . . . . . . . . . . . . . . . . . . . 112
Exporting log files . . . . . . . . . . . . . . . . . . . . . . . . . . . . . . . . . . . . . . . . . . . . . . . . . . . . 113
Using the BayStack Instant Internet Management Software Version 7.11
Page 8

8 Contents
Chapter 4
Proxy services . . . . . . . . . . . . . . . . . . . . . . . . . . . . . . . . . . . . . . . . . . . . . . . 115
Understanding proxy servers . . . . . . . . . . . . . . . . . . . . . . . . . . . . . . . . . . . . . . . . . . . 115
Configuring Instant Internet as a Web proxy server . . . . . . . . . . . . . . . . . . . . . . . . . . 116
Using a commercial proxy server . . . . . . . . . . . . . . . . . . . . . . . . . . . . . . . . . . . . . . . . 118
Enabling Web configuration . . . . . . . . . . . . . . . . . . . . . . . . . . . . . . . . . . . . . . . . . . . . 119
Configuring workstations to use the Instant Internet unit as a Web proxy server . . . 119
Configuring Instant Internet as a DNS proxy server . . . . . . . . . . . . . . . . . . . . . . . . . .120
Configuring Instant Internet as a SOCKS proxy server . . . . . . . . . . . . . . . . . . . . . . .121
Using SOCKS workstations with the Administration program . . . . . . . . . . . . . . . . . .122
Configuring socksified applications . . . . . . . . . . . . . . . . . . . . . . . . . . . . . . . . . . . . . . 124
Configuring common SOCKS-enabled software . . . . . . . . . . . . . . . . . . . . . . . . . . . . 125
Using Setup . . . . . . . . . . . . . . . . . . . . . . . . . . . . . . . . . . . . . . . . . . . . . . . . . . . . . 115
Administration options that do not apply to SOCKS workstations . . . . . . . . . . . . 123
Host name access controls and SOCKS . . . . . . . . . . . . . . . . . . . . . . . . . . . . . . .123
Third-party socksifying software . . . . . . . . . . . . . . . . . . . . . . . . . . . . . . . . . . . . .126
Additional information . . . . . . . . . . . . . . . . . . . . . . . . . . . . . . . . . . . . . . . . . . . . .126
Chapter 5
Advanced IP configuration . . . . . . . . . . . . . . . . . . . . . . . . . . . . . . . . . . . . . 127
Using Setup . . . . . . . . . . . . . . . . . . . . . . . . . . . . . . . . . . . . . . . . . . . . . . . . . . . . . . . . 127
Configuring a static route . . . . . . . . . . . . . . . . . . . . . . . . . . . . . . . . . . . . . . . . . . . . . . 128
Configuring IP forwarding . . . . . . . . . . . . . . . . . . . . . . . . . . . . . . . . . . . . . . . . . . . . . .130
Enabling IP forwarding . . . . . . . . . . . . . . . . . . . . . . . . . . . . . . . . . . . . . . . . . . . .130
Enabling IP forwarding for a unit . . . . . . . . . . . . . . . . . . . . . . . . . . . . . . . . . . 131
Enabling IP forwarding for two interfaces . . . . . . . . . . . . . . . . . . . . . . . . . . .132
Enabling IP forwarding for two Ethernet interfaces . . . . . . . . . . . . . . . . . . . . 132
Using network address translation . . . . . . . . . . . . . . . . . . . . . . . . . . . . . . . . . . . . . . . 133
Configuring address translation . . . . . . . . . . . . . . . . . . . . . . . . . . . . . . . . . . . . . .134
Disabling address translation . . . . . . . . . . . . . . . . . . . . . . . . . . . . . . . . . . . . 134
300868-G
Page 9

Contents 9
Publishing a private server . . . . . . . . . . . . . . . . . . . . . . . . . . . . . . . . . . . . . . . . . 135
Using Dynamic DNS . . . . . . . . . . . . . . . . . . . . . . . . . . . . . . . . . . . . . . . . . . . 135
Configuring Instant Internet to publish a private server . . . . . . . . . . . . . . . . .136
Example: Publishing an SMTP server when you have a static
IP address . . . . . . . . . . . . . . . . . . . . . . . . . . . . . . . . . . . . . . . . . . . . . .138
Example: Publishing a Web server when you have a dynamic
IP address . . . . . . . . . . . . . . . . . . . . . . . . . . . . . . . . . . . . . . . . . . . . . .139
Example: Publishing a server for NetMeeting . . . . . . . . . . . . . . . . . . . . . 141
Configuring an IP filter . . . . . . . . . . . . . . . . . . . . . . . . . . . . . . . . . . . . . . . . . . . . . . . .142
Processing a packet through an IP filter . . . . . . . . . . . . . . . . . . . . . . . . . . . . . . .143
Applying a filter to an interface . . . . . . . . . . . . . . . . . . . . . . . . . . . . . . . . . . . . . . 148
Enabling Instant Internet as a DHCP server . . . . . . . . . . . . . . . . . . . . . . . . . . . . . . . 149
Scopes and leases . . . . . . . . . . . . . . . . . . . . . . . . . . . . . . . . . . . . . . . . . . . . . . . 149
Using the DHCP/BootP relay agent feature . . . . . . . . . . . . . . . . . . . . . . . . . . . . 150
Configuring Instant Internet as a DHCP server . . . . . . . . . . . . . . . . . . . . . . . . . . 152
Using Instant Internet as a DHCP workstation . . . . . . . . . . . . . . . . . . . . . . . . . . 157
Configuring the routing information protocol . . . . . . . . . . . . . . . . . . . . . . . . . . . . . . . 157
Configuring an alias for an interface . . . . . . . . . . . . . . . . . . . . . . . . . . . . . . . . . . . . . 159
Example . . . . . . . . . . . . . . . . . . . . . . . . . . . . . . . . . . . . . . . . . . . . . . . . . . . .159
Using a DMZ . . . . . . . . . . . . . . . . . . . . . . . . . . . . . . . . . . . . . . . . . . . . . . . . . . . . . . .160
Configuring Instant Internet to support a DMZ . . . . . . . . . . . . . . . . . . . . . . . . . . 161
Configuring the interface to support the DMZ: . . . . . . . . . . . . . . . . . . . . . . .161
Publishing the server(s) . . . . . . . . . . . . . . . . . . . . . . . . . . . . . . . . . . . . . . . .162
Deciding whether to enable IP forwarding for your DMZ . . . . . . . . . . . . . . . 162
Example: Using a DMZ to publish a Web server . . . . . . . . . . . . . . . . . . . . . . . . .163
Chapter 6
IP security and VPN. . . . . . . . . . . . . . . . . . . . . . . . . . . . . . . . . . . . . . . . . . . 167
Understanding virtual private networking . . . . . . . . . . . . . . . . . . . . . . . . . . . . . . . . . . 167
Understanding modes . . . . . . . . . . . . . . . . . . . . . . . . . . . . . . . . . . . . . . . . . . . . . 168
Using perfect forward secrecy . . . . . . . . . . . . . . . . . . . . . . . . . . . . . . . . . . . . . . .169
Using the default network specification . . . . . . . . . . . . . . . . . . . . . . . . . . . . . . . . 170
Managing local and remote IP addresses . . . . . . . . . . . . . . . . . . . . . . . . . . . . . . 172
Adding a local or remote IP address . . . . . . . . . . . . . . . . . . . . . . . . . . . . . . . 172
Removing a local or remote IP address . . . . . . . . . . . . . . . . . . . . . . . . . . . . 173
Using the BayStack Instant Internet Management Software Version 7.11
Page 10

10 Contents
Using Pings . . . . . . . . . . . . . . . . . . . . . . . . . . . . . . . . . . . . . . . . . . . . . . . . . . . . .173
Understanding how an Instant Internet-to-Instant Internet VPN works . . . . . . . .177
Understanding how an Instant Internet-to-CES VPN works . . . . . . . . . . . . . . . . 183
Troubleshooting a VPN tunnel connection . . . . . . . . . . . . . . . . . . . . . . . . . . . . . . . . . 196
Viewing a unit’s IPsec log . . . . . . . . . . . . . . . . . . . . . . . . . . . . . . . . . . . . . . . . . .197
Allowing only incoming connections . . . . . . . . . . . . . . . . . . . . . . . . . . . . . . .177
Allowing only outgoing connections . . . . . . . . . . . . . . . . . . . . . . . . . . . . . . . 178
Allowing both outgoing and incoming connections . . . . . . . . . . . . . . . . . . . .181
General guidelines . . . . . . . . . . . . . . . . . . . . . . . . . . . . . . . . . . . . . . . . . . . .183
Other issues . . . . . . . . . . . . . . . . . . . . . . . . . . . . . . . . . . . . . . . . . . . . . . . . . 185
How a tunnel is initiated . . . . . . . . . . . . . . . . . . . . . . . . . . . . . . . . . . . . . . . .186
Tunnel validity . . . . . . . . . . . . . . . . . . . . . . . . . . . . . . . . . . . . . . . . . . . . .186
Dial-up environments and tunnel validity . . . . . . . . . . . . . . . . . . . . . . . .186
Tunnel timeouts . . . . . . . . . . . . . . . . . . . . . . . . . . . . . . . . . . . . . . . . . . . . . . . 187
Tunneling to CES when Instant Internet has a static IP address . . . . . . . . . 188
Example for configuring a branch office connection in the CES . . . . . . . 189
Configuring Instant Internet as a main-mode VPN tunnel . . . . . . . . . . . 190
Tunneling to the CES when Instant Internet has a dynamic IP address . . . .192
Example for configuring the non-Contivity client connection
on the CES . . . . . . . . . . . . . . . . . . . . . . . . . . . . . . . . . . . . . . . . . . . . .193
Configuring Instant Internet as an aggressive-mode VPN tunnel . . . . . .194
IPsec connection state information . . . . . . . . . . . . . . . . . . . . . . . . . . . . . . . .197
Chapter 7
Web cache configurat ion . . . . . . . . . . . . . . . . . . . . . . . . . . . . . . . . . . . . . . 201
Introduction to Web caching . . . . . . . . . . . . . . . . . . . . . . . . . . . . . . . . . . . . . . . . . . . .201
Connecting to the Instant Internet unit with a Web browser . . . . . . . . . . . . . . . . . . . . 204
Viewing the Instant Internet unit system status . . . . . . . . . . . . . . . . . . . . . . . . . . . . . 205
300868-G
How the Instant Internet unit functions as a proxy server . . . . . . . . . . . . . . . . . .201
How the Instant Internet unit functions as a caching proxy server . . . . . . . . . . . 202
How Web caching works . . . . . . . . . . . . . . . . . . . . . . . . . . . . . . . . . . . . . . . . . . . 202
How the Instant Internet unit expires entries . . . . . . . . . . . . . . . . . . . . . . . . . 202
How Web caching works with a user’s local cache . . . . . . . . . . . . . . . . . . . . . . . 203
Getting started with the Web cache . . . . . . . . . . . . . . . . . . . . . . . . . . . . . . . . . . .206
Page 11

Contents 11
Increasing efficiency . . . . . . . . . . . . . . . . . . . . . . . . . . . . . . . . . . . . . . . . . . . . . . . . . .207
Fine-tuning cache settings . . . . . . . . . . . . . . . . . . . . . . . . . . . . . . . . . . . . . . . . . .208
Increasing response times . . . . . . . . . . . . . . . . . . . . . . . . . . . . . . . . . . . . . .208
Increasing bandwidth savings . . . . . . . . . . . . . . . . . . . . . . . . . . . . . . . . . . . . 208
Deciding how long to run an experiment . . . . . . . . . . . . . . . . . . . . . . . . . . . . 209
Selecting a cache level . . . . . . . . . . . . . . . . . . . . . . . . . . . . . . . . . . . . . . . . . . . .209
How cache levels are defined . . . . . . . . . . . . . . . . . . . . . . . . . . . . . . . . . . . .210
Expiration percent . . . . . . . . . . . . . . . . . . . . . . . . . . . . . . . . . . . . . . . . . . . . .210
Example one . . . . . . . . . . . . . . . . . . . . . . . . . . . . . . . . . . . . . . . . . . . . . . 211
Example two . . . . . . . . . . . . . . . . . . . . . . . . . . . . . . . . . . . . . . . . . . . . . . 211
Minimum expiration time . . . . . . . . . . . . . . . . . . . . . . . . . . . . . . . . . . . . . . . . 211
Example one . . . . . . . . . . . . . . . . . . . . . . . . . . . . . . . . . . . . . . . . . . . . . .212
Example two . . . . . . . . . . . . . . . . . . . . . . . . . . . . . . . . . . . . . . . . . . . . . . 212
Special Web requests . . . . . . . . . . . . . . . . . . . . . . . . . . . . . . . . . . . . . . . . . .212
Error message . . . . . . . . . . . . . . . . . . . . . . . . . . . . . . . . . . . . . . . . . . . . . . . . 212
Predefined cache levels default values . . . . . . . . . . . . . . . . . . . . . . . . . . . . . . . . 213
Creating a custom cache level . . . . . . . . . . . . . . . . . . . . . . . . . . . . . . . . . . . . . .214
Interpreting statistics . . . . . . . . . . . . . . . . . . . . . . . . . . . . . . . . . . . . . . . . . . . . . . . . . 215
Using statistics to fine-tune cache settings . . . . . . . . . . . . . . . . . . . . . . . . . . . . .215
Viewing why requests are not sent from the cache . . . . . . . . . . . . . . . . . . . . . . . 216
Limiting the size of a cached entry . . . . . . . . . . . . . . . . . . . . . . . . . . . . . . . . . . . 217
Setting options for special Web requests . . . . . . . . . . . . . . . . . . . . . . . . . . . . . . 219
CGI requests . . . . . . . . . . . . . . . . . . . . . . . . . . . . . . . . . . . . . . . . . . . . . . . . . 219
Query requests . . . . . . . . . . . . . . . . . . . . . . . . . . . . . . . . . . . . . . . . . . . . . . . 219
“No-cache” requests . . . . . . . . . . . . . . . . . . . . . . . . . . . . . . . . . . . . . . . . . . . 220
Setting the action the cache performs when a Web server error occurs . . . . . . .222
Resetting cache statistics . . . . . . . . . . . . . . . . . . . . . . . . . . . . . . . . . . . . . . . . . .222
Managing cookies . . . . . . . . . . . . . . . . . . . . . . . . . . . . . . . . . . . . . . . . . . . . . . . . . . .223
Establishing a cookie management policy . . . . . . . . . . . . . . . . . . . . . . . . . . . . . . 224
Managing cookies for all unconfigured Web sites . . . . . . . . . . . . . . . . . . . . . . . . 225
Managing cookies for a particular Web site . . . . . . . . . . . . . . . . . . . . . . . . . . . . . 226
Enabling cookies for a particular Web site . . . . . . . . . . . . . . . . . . . . . . . . . . . . . . 226
Sorting the Web sites list . . . . . . . . . . . . . . . . . . . . . . . . . . . . . . . . . . . . . . . . . . . 227
Using the BayStack Instant Internet Management Software Version 7.11
Page 12

12 Contents
Managing Web site access . . . . . . . . . . . . . . . . . . . . . . . . . . . . . . . . . . . . . . . . . . . .228
Blocking Web site access . . . . . . . . . . . . . . . . . . . . . . . . . . . . . . . . . . . . . . . . . .229
Setting Web site activity display options . . . . . . . . . . . . . . . . . . . . . . . . . . . . . . . 230
Configuring Web site display options . . . . . . . . . . . . . . . . . . . . . . . . . . . . . . . . . . 231
Bypassing the cache for a Web site . . . . . . . . . . . . . . . . . . . . . . . . . . . . . . . . . . 231
Saving and Restoring Web site configuration . . . . . . . . . . . . . . . . . . . . . . . . . . . . . . 233
Refreshing cache entries . . . . . . . . . . . . . . . . . . . . . . . . . . . . . . . . . . . . . . . . . . . . . .234
Setting active refresh options . . . . . . . . . . . . . . . . . . . . . . . . . . . . . . . . . . . . . . . 234
Interpreting active refresh statistics . . . . . . . . . . . . . . . . . . . . . . . . . . . . . . . . . . . 235
Troubleshooting the Web cache . . . . . . . . . . . . . . . . . . . . . . . . . . . . . . . . . . . . . . . . .235
I requested a Web site, but there was no response. . . . . . . . . . . . . . . . . . . . . . . 236
I blocked a site, but it still opens in a user’s Web browser. . . . . . . . . . . . . . . . . .236
I requested a Web page, but the content looks outdated. . . . . . . . . . . . . . . . . . . 236
I requested a Web page and the originating Web server takes a long time
I am not able to configure a personalized Web page. . . . . . . . . . . . . . . . . . . . . . 238
I logged on to a Web site, but I am prompted to log on again. . . . . . . . . . . . . . . 238
I added an item to my online shopping cart, but it’s still empty. . . . . . . . . . . . . . . 238
Blocking access to all unconfigured Web sites . . . . . . . . . . . . . . . . . . . . . . .229
Blocking access to a particular Web site . . . . . . . . . . . . . . . . . . . . . . . . . . . . 230
to respond. . . . . . . . . . . . . . . . . . . . . . . . . . . . . . . . . . . . . . . . . . . . . . . . . . . . . 237
Chapter 8
Advanced c o mmu n ications co n fig u r a tion . . . . . . . . . . . . . . . . . . . . . . . . 2 3 9
Configuring advanced communication settings for an ISDN connection . . . . . . . . . .239
300868-G
Adding a backup phone number . . . . . . . . . . . . . . . . . . . . . . . . . . . . . . . . . . . . .240
Setting the inactivity timeout . . . . . . . . . . . . . . . . . . . . . . . . . . . . . . . . . . . . . . . .241
Configuring advanced ISDN features . . . . . . . . . . . . . . . . . . . . . . . . . . . . . . . . . 241
Enabling bandwidth on demand . . . . . . . . . . . . . . . . . . . . . . . . . . . . . . . . . . 243
Configuring voice call options . . . . . . . . . . . . . . . . . . . . . . . . . . . . . . . . . . . . 244
Configuring incoming data call options . . . . . . . . . . . . . . . . . . . . . . . . . . . . .244
Page 13

Contents 13
Configuring advanced communication settings for a dial-up connection . . . . . . . . . . 245
Adding a backup phone number . . . . . . . . . . . . . . . . . . . . . . . . . . . . . . . . . . . . .246
Setting the inactivity timeout . . . . . . . . . . . . . . . . . . . . . . . . . . . . . . . . . . . . . . . .247
Enabling bandwidth on demand . . . . . . . . . . . . . . . . . . . . . . . . . . . . . . . . . . . . . 247
Configuring the modem speaker . . . . . . . . . . . . . . . . . . . . . . . . . . . . . . . . . . . . .248
Setting the number of lines . . . . . . . . . . . . . . . . . . . . . . . . . . . . . . . . . . . . . . . . .249
Configuring advanced communication settings for a T1 connection . . . . . . . . . . . . . 249
Configuring advanced communication settings for an E1 connection . . . . . . . . . . . .251
Configuring advanced communication settings for a PPPoE connection . . . . . . . . .254
Chapter 9
IPX configuration and support . . . . . . . . . . . . . . . . . . . . . . . . . . . . . . . . . . 257
Using Instant Internet as an IPX-to-IP gateway . . . . . . . . . . . . . . . . . . . . . . . . . . . . . 257
Security considerations . . . . . . . . . . . . . . . . . . . . . . . . . . . . . . . . . . . . . . . . . . . .257
Performance considerations . . . . . . . . . . . . . . . . . . . . . . . . . . . . . . . . . . . . . . . .258
Normal delays . . . . . . . . . . . . . . . . . . . . . . . . . . . . . . . . . . . . . . . . . . . . . . . .258
Number of simultaneous connections . . . . . . . . . . . . . . . . . . . . . . . . . . . . . . 258
When to consider a higher-speed connection . . . . . . . . . . . . . . . . . . . . . . . . 259
Configuring IPX workstations to use a new unit name . . . . . . . . . . . . . . . . . . . . . . . . 259
Configuring IPX frame types . . . . . . . . . . . . . . . . . . . . . . . . . . . . . . . . . . . . . . . . . . . 261
Resolving Winsock conflicts . . . . . . . . . . . . . . . . . . . . . . . . . . . . . . . . . . . . . . . . . . . . 262
16-bit Winsocks . . . . . . . . . . . . . . . . . . . . . . . . . . . . . . . . . . . . . . . . . . . . . . . 262
32-bit Winsocks . . . . . . . . . . . . . . . . . . . . . . . . . . . . . . . . . . . . . . . . . . . . . . . 263
Winsock 1.1 and Winsock 2.0 . . . . . . . . . . . . . . . . . . . . . . . . . . . . . . . . . . . . . . . 263
Using multiple versions of Winsock . . . . . . . . . . . . . . . . . . . . . . . . . . . . . . . . . . .263
Using multiple 16-bit Winsocks . . . . . . . . . . . . . . . . . . . . . . . . . . . . . . . . . . .264
Using multiple 32-bit Winsocks . . . . . . . . . . . . . . . . . . . . . . . . . . . . . . . . . . .264
Winsock files installed . . . . . . . . . . . . . . . . . . . . . . . . . . . . . . . . . . . . . . . . . . . . .265
Windows 3.x . . . . . . . . . . . . . . . . . . . . . . . . . . . . . . . . . . . . . . . . . . . . . . . . . 265
16-bit only . . . . . . . . . . . . . . . . . . . . . . . . . . . . . . . . . . . . . . . . . . . . . . . . 265
Windows 95 and Windows 98 . . . . . . . . . . . . . . . . . . . . . . . . . . . . . . . . . . . . 265
16-bit and 32-bit . . . . . . . . . . . . . . . . . . . . . . . . . . . . . . . . . . . . . . . . . . .265
Windows 95 . . . . . . . . . . . . . . . . . . . . . . . . . . . . . . . . . . . . . . . . . . . . . . . . . . 266
16-bit and 32-bit . . . . . . . . . . . . . . . . . . . . . . . . . . . . . . . . . . . . . . . . . . .266
Using the BayStack Instant Internet Management Software Version 7.11
Page 14

14 Contents
Resolving Winsock conflicts during installation . . . . . . . . . . . . . . . . . . . . . . . . . .266
IP filters and Winsock compatibility . . . . . . . . . . . . . . . . . . . . . . . . . . . . . . . . . . .267
Configuring the Instant Internet unit in a multiple-unit environment . . . . . . . . . . . . . .267
Configuring fault tolerance and automatic user load balancing . . . . . . . . . . . . . . 268
Configuring multiple default sets . . . . . . . . . . . . . . . . . . . . . . . . . . . . . . . . . . . . .269
Installing multiple Instant Internet units . . . . . . . . . . . . . . . . . . . . . . . . . . . . . . . . . . .272
Tips for installing multiple units . . . . . . . . . . . . . . . . . . . . . . . . . . . . . . . . . . . . . . 272
Chapter 10
Instant Internet unit configuration, support, and diagnostics. . . . . . . . . 273
Windows NT 4.0 . . . . . . . . . . . . . . . . . . . . . . . . . . . . . . . . . . . . . . . . . . . . . . 266
16-bit and 32-bit . . . . . . . . . . . . . . . . . . . . . . . . . . . . . . . . . . . . . . . . . . .266
Example: Sales . . . . . . . . . . . . . . . . . . . . . . . . . . . . . . . . . . . . . . . . . . . .270
Example: Accounting . . . . . . . . . . . . . . . . . . . . . . . . . . . . . . . . . . . . . . .270
Example: Marketing . . . . . . . . . . . . . . . . . . . . . . . . . . . . . . . . . . . . . . . .271
Example: IS . . . . . . . . . . . . . . . . . . . . . . . . . . . . . . . . . . . . . . . . . . . . . . 271
Example: normal . . . . . . . . . . . . . . . . . . . . . . . . . . . . . . . . . . . . . . . . . . .272
Restarting the Instant Internet unit . . . . . . . . . . . . . . . . . . . . . . . . . . . . . . . . . . . . . . . 273
Identifying the login workstation . . . . . . . . . . . . . . . . . . . . . . . . . . . . . . . . . . . . . . . . . 274
Adding a unit to the selection list . . . . . . . . . . . . . . . . . . . . . . . . . . . . . . . . . . . . . . . .275
Understanding the name server list order . . . . . . . . . . . . . . . . . . . . . . . . . . . . . . . . . 276
Saving and restoring unit configurations . . . . . . . . . . . . . . . . . . . . . . . . . . . . . . . . . .277
Backing up a unit configuration to disk . . . . . . . . . . . . . . . . . . . . . . . . . . . . . . . .277
Restoring a unit configuration from disk . . . . . . . . . . . . . . . . . . . . . . . . . . . . . . . 278
Changing the unit configuration . . . . . . . . . . . . . . . . . . . . . . . . . . . . . . . . . . . . . . . . .279
Changing your ISP . . . . . . . . . . . . . . . . . . . . . . . . . . . . . . . . . . . . . . . . . . . . . . .280
Changing registration information . . . . . . . . . . . . . . . . . . . . . . . . . . . . . . . . . . . .283
Changing a unit’s configuration password . . . . . . . . . . . . . . . . . . . . . . . . . . . . . .284
Changing a unit’s name . . . . . . . . . . . . . . . . . . . . . . . . . . . . . . . . . . . . . . . . . . . .285
Changing a unit’s time, date, or time zone . . . . . . . . . . . . . . . . . . . . . . . . . . . . . 286
Selecting additional support options . . . . . . . . . . . . . . . . . . . . . . . . . . . . . . . . . . . . .288
Enabling diagnostic IP tools . . . . . . . . . . . . . . . . . . . . . . . . . . . . . . . . . . . . . . . . . . . . 288
300868-G
Page 15

Contents 15
Testing connections . . . . . . . . . . . . . . . . . . . . . . . . . . . . . . . . . . . . . . . . . . . . . . . . . . 289
Testing the connection to the Internet . . . . . . . . . . . . . . . . . . . . . . . . . . . . . . . . . 290
Testing the connection to a host . . . . . . . . . . . . . . . . . . . . . . . . . . . . . . . . . . . . . 290
Testing the response time of a host . . . . . . . . . . . . . . . . . . . . . . . . . . . . . . . 292
Tracing the route to a host . . . . . . . . . . . . . . . . . . . . . . . . . . . . . . . . . . . . . .294
Testing the echo port of a host . . . . . . . . . . . . . . . . . . . . . . . . . . . . . . . . . . .297
Setting host connection test options . . . . . . . . . . . . . . . . . . . . . . . . . . . . . . . 300
Appendix A
T roubleshooting and error messages . . . . . . . . . . . . . . . . . . . . . . . . . . . . 303
Viewing the Instant Internet serial number . . . . . . . . . . . . . . . . . . . . . . . . . . . . . . . . . 303
Viewing system files . . . . . . . . . . . . . . . . . . . . . . . . . . . . . . . . . . . . . . . . . . . . . . . . . . 304
Viewing system files in setup . . . . . . . . . . . . . . . . . . . . . . . . . . . . . . . . . . . . . . . . 304
Viewing unit log information . . . . . . . . . . . . . . . . . . . . . . . . . . . . . . . . . . . . . 304
Viewing a unit’s users . . . . . . . . . . . . . . . . . . . . . . . . . . . . . . . . . . . . . . . . . . 304
Viewing a unit’s update history . . . . . . . . . . . . . . . . . . . . . . . . . . . . . . . . . . .305
Viewing a unit’s advanced TCP/IP settings . . . . . . . . . . . . . . . . . . . . . . . . . .305
Viewing a unit’s port mappings . . . . . . . . . . . . . . . . . . . . . . . . . . . . . . . . . . .305
Viewing a unit’s support hosts . . . . . . . . . . . . . . . . . . . . . . . . . . . . . . . . . . . .306
Viewing system files through a Web browser . . . . . . . . . . . . . . . . . . . . . . . . . . .306
Viewing log files . . . . . . . . . . . . . . . . . . . . . . . . . . . . . . . . . . . . . . . . . . . . . . 307
Viewing the update history . . . . . . . . . . . . . . . . . . . . . . . . . . . . . . . . . . . . . .307
Viewing the system settings file . . . . . . . . . . . . . . . . . . . . . . . . . . . . . . . . . .308
Viewing a unit’s port mappings . . . . . . . . . . . . . . . . . . . . . . . . . . . . . . . . . . .308
Viewing the hosts file . . . . . . . . . . . . . . . . . . . . . . . . . . . . . . . . . . . . . . . . . . 308
IP workstation error messages . . . . . . . . . . . . . . . . . . . . . . . . . . . . . . . . . . . . . . . . . .308
IPX workstation error messages . . . . . . . . . . . . . . . . . . . . . . . . . . . . . . . . . . . . . . . .309
Access errors . . . . . . . . . . . . . . . . . . . . . . . . . . . . . . . . . . . . . . . . . . . . . . . . . . . .309
Server name errors . . . . . . . . . . . . . . . . . . . . . . . . . . . . . . . . . . . . . . . . . . . . . . . 311
Winsock.dll errors . . . . . . . . . . . . . . . . . . . . . . . . . . . . . . . . . . . . . . . . . . . . . . . . 311
Version errors . . . . . . . . . . . . . . . . . . . . . . . . . . . . . . . . . . . . . . . . . . . . . . . . . . . 312
Errors connecting to the network . . . . . . . . . . . . . . . . . . . . . . . . . . . . . . . . . . . . .312
Common questions and answers . . . . . . . . . . . . . . . . . . . . . . . . . . . . . . . . . . . . . . . . 313
Glossary . . . . . . . . . . . . . . . . . . . . . . . . . . . . . . . . . . . . . . . . . . . . . . . . . . . . 315
Index . . . . . . . . . . . . . . . . . . . . . . . . . . . . . . . . . . . . . . . . . . . . . . . . . . . . . . . 331
Using the BayStack Instant Internet Management Software Version 7.11
Page 16

16 Contents
300868-G
Page 17

Figures
Figure 1 Default User icon . . . . . . . . . . . . . . . . . . . . . . . . . . . . . . . . . . . . . . . . . . . 37
Figure 2 Set Domain dialog box . . . . . . . . . . . . . . . . . . . . . . . . . . . . . . . . . . . . . . . 39
Figure 3 Set User Name Order dialog box . . . . . . . . . . . . . . . . . . . . . . . . . . . . . . . 40
Figure 4 Prompt to use selected user as a template . . . . . . . . . . . . . . . . . . . . . . .46
Figure 5 Create a User dialog box . . . . . . . . . . . . . . . . . . . . . . . . . . . . . . . . . . . . . 46
Figure 6 Prompt to use selected group as a template . . . . . . . . . . . . . . . . . . . . . . 47
Figure 7 Create a Group dialog box . . . . . . . . . . . . . . . . . . . . . . . . . . . . . . . . . . . . 47
Figure 8 Delete user confirmation message box . . . . . . . . . . . . . . . . . . . . . . . . . .49
Figure 9 Delete group confirmation message box . . . . . . . . . . . . . . . . . . . . . . . . . 50
Figure 10 Copy user confirmation message box . . . . . . . . . . . . . . . . . . . . . . . . . . . 52
Figure 11 Copy group confirmation message box . . . . . . . . . . . . . . . . . . . . . . . . . . 52
Figure 12 Effective Settings of User dialog box . . . . . . . . . . . . . . . . . . . . . . . . . . . .53
Figure 13 Change Settings of User dialog box . . . . . . . . . . . . . . . . . . . . . . . . . . . . . 56
Figure 14 Change User Access dialog box . . . . . . . . . . . . . . . . . . . . . . . . . . . . . . .58
Figure 15 Change Settings of User dialog box . . . . . . . . . . . . . . . . . . . . . . . . . . . . . 64
Figure 16 Change Internet Access dialog box . . . . . . . . . . . . . . . . . . . . . . . . . . . . .64
Figure 17 Add Internet Access dialog box . . . . . . . . . . . . . . . . . . . . . . . . . . . . . . . . 65
Figure 18 Change Settings of User dialog box . . . . . . . . . . . . . . . . . . . . . . . . . . . . . 67
Figure 19 Change Internet Access dialog box . . . . . . . . . . . . . . . . . . . . . . . . . . . . .67
Figure 20 Delete access confirmation message box . . . . . . . . . . . . . . . . . . . . . . . . 68
Figure 21 Change Settings of User dialog box . . . . . . . . . . . . . . . . . . . . . . . . . . . . . 69
Figure 22 Change Internet Access dialog box . . . . . . . . . . . . . . . . . . . . . . . . . . . . .69
Figure 23 Change Internet Access dialog box . . . . . . . . . . . . . . . . . . . . . . . . . . . . .70
Figure 24 Change Settings of User dialog box . . . . . . . . . . . . . . . . . . . . . . . . . . . . . 71
Figure 25 Change News Groups dialog box . . . . . . . . . . . . . . . . . . . . . . . . . . . . . . . 72
Figure 26 Add News Group dialog box . . . . . . . . . . . . . . . . . . . . . . . . . . . . . . . . . . . 72
Figure 27 Change Settings of User dialog box . . . . . . . . . . . . . . . . . . . . . . . . . . . . . 73
Figure 28 Change News Groups dialog box . . . . . . . . . . . . . . . . . . . . . . . . . . . . . . . 74
Figure 29 Delete news group confirmation message box . . . . . . . . . . . . . . . . . . . . .74
17
Using the BayStack Instant Internet Management Software Version 7.11
Page 18

18 Figures
Figure 30 Change Settings of User dialog box . . . . . . . . . . . . . . . . . . . . . . . . . . . . . 75
Figure 31 Change News Groups dialog box . . . . . . . . . . . . . . . . . . . . . . . . . . . . . . . 75
Figure 32 Change News Group dialog box . . . . . . . . . . . . . . . . . . . . . . . . . . . . . . . .76
Figure 33 Change Settings of User dialog box . . . . . . . . . . . . . . . . . . . . . . . . . . . . . 77
Figure 34 Change Incoming Ports dialog box . . . . . . . . . . . . . . . . . . . . . . . . . . . . . .78
Figure 35 Add Incoming Port dialog box . . . . . . . . . . . . . . . . . . . . . . . . . . . . . . . . . .78
Figure 36 Change Settings of User dialog box . . . . . . . . . . . . . . . . . . . . . . . . . . . . . 80
Figure 37 Change Incoming Ports dialog box . . . . . . . . . . . . . . . . . . . . . . . . . . . . . .80
Figure 38 Delete incoming port confirmation message box . . . . . . . . . . . . . . . . . . .81
Figure 39 Change Settings of User dialog box . . . . . . . . . . . . . . . . . . . . . . . . . . . . . 82
Figure 40 Change Incoming Ports dialog box . . . . . . . . . . . . . . . . . . . . . . . . . . . . . .82
Figure 41 Change Incoming Port dialog box . . . . . . . . . . . . . . . . . . . . . . . . . . . . . .83
Figure 42 Change Settings of User dialog box . . . . . . . . . . . . . . . . . . . . . . . . . . . . . 84
Figure 43 Select Reports dialog box . . . . . . . . . . . . . . . . . . . . . . . . . . . . . . . . . . . . .85
Figure 44 Change User Access dialog box . . . . . . . . . . . . . . . . . . . . . . . . . . . . . . .87
Figure 45 Change Internet access to deny access to a site example . . . . . . . . . . . .88
Figure 46 Restrict Internet access example . . . . . . . . . . . . . . . . . . . . . . . . . . . . . . . 89
Figure 47 Allow Internet access example . . . . . . . . . . . . . . . . . . . . . . . . . . . . . . . . . 90
Figure 48 Monitor main window . . . . . . . . . . . . . . . . . . . . . . . . . . . . . . . . . . . . . . . . 94
Figure 49 Sample Stats window . . . . . . . . . . . . . . . . . . . . . . . . . . . . . . . . . . . . . . . .96
Figure 50 Sample Users window . . . . . . . . . . . . . . . . . . . . . . . . . . . . . . . . . . . . . . . 99
Figure 51 Sample Log window . . . . . . . . . . . . . . . . . . . . . . . . . . . . . . . . . . . . . . . . 102
Figure 52 Sample Diag window . . . . . . . . . . . . . . . . . . . . . . . . . . . . . . . . . . . . . . . 104
Figure 53 Sample Trace results file . . . . . . . . . . . . . . . . . . . . . . . . . . . . . . . . . . . . 107
Figure 54 Multiple Instant Internet units window . . . . . . . . . . . . . . . . . . . . . . . . . . .108
Figure 55 Event Information dialog box . . . . . . . . . . . . . . . . . . . . . . . . . . . . . . . . . 111
Figure 56 Services dialog box, Web Proxy option . . . . . . . . . . . . . . . . . . . . . . . . . 117
Figure 57 WEB Proxy Configuration dialog box . . . . . . . . . . . . . . . . . . . . . . . . . . . 118
Figure 58 WEB Server Configuration dialog box . . . . . . . . . . . . . . . . . . . . . . . . . . 119
Figure 59 Services dialog box, DNS Proxy option . . . . . . . . . . . . . . . . . . . . . . . . . 121
Figure 60 Services dialog box, SOCKS Proxy option . . . . . . . . . . . . . . . . . . . . . . .122
Figure 61 Static Routes dialog box . . . . . . . . . . . . . . . . . . . . . . . . . . . . . . . . . . . . .129
Figure 62 Static Route Configuration dialog box . . . . . . . . . . . . . . . . . . . . . . . . . . 129
Figure 63 Other Settings dialog box . . . . . . . . . . . . . . . . . . . . . . . . . . . . . . . . . . . . 131
Figure 64 Interface Configuration dialog box . . . . . . . . . . . . . . . . . . . . . . . . . . . . .135
300868-G
Page 19

Figures 19
Figure 65 Server Publication dialog box . . . . . . . . . . . . . . . . . . . . . . . . . . . . . . . . . 137
Figure 66 Server Publication Configuration dialog box . . . . . . . . . . . . . . . . . . . . . . 138
Figure 67 Publishing an SMTP server when you have a static IP address . . . . . . 139
Figure 68 Other Settings dialog box . . . . . . . . . . . . . . . . . . . . . . . . . . . . . . . . . . . . 140
Figure 69 Publishing a server for NetMeeting . . . . . . . . . . . . . . . . . . . . . . . . . . . .142
Figure 70 Interface Filter Configuration dialog box . . . . . . . . . . . . . . . . . . . . . . . . . 144
Figure 71 Filter Configuration dialog box . . . . . . . . . . . . . . . . . . . . . . . . . . . . . . . .145
Figure 72 Rule Configuration dialog box . . . . . . . . . . . . . . . . . . . . . . . . . . . . . . . .146
Figure 73 Interface Filter Configuration dialog box . . . . . . . . . . . . . . . . . . . . . . . . . 148
Figure 74 Services dialog box . . . . . . . . . . . . . . . . . . . . . . . . . . . . . . . . . . . . . . . . 151
Figure 75 DHCP Configuration dialog box . . . . . . . . . . . . . . . . . . . . . . . . . . . . . . . 151
Figure 76 Services dialog box . . . . . . . . . . . . . . . . . . . . . . . . . . . . . . . . . . . . . . . . 152
Figure 77 DHCP Configuration dialog box . . . . . . . . . . . . . . . . . . . . . . . . . . . . . . . 153
Figure 78 Scope Configuration dialog box . . . . . . . . . . . . . . . . . . . . . . . . . . . . . . .154
Figure 79 Enter Excluded Addresses dialog box . . . . . . . . . . . . . . . . . . . . . . . . . .155
Figure 80 Enter Server Address dialog box . . . . . . . . . . . . . . . . . . . . . . . . . . . . . . 156
Figure 81 RIP’s dialog box . . . . . . . . . . . . . . . . . . . . . . . . . . . . . . . . . . . . . . . . . . .158
Figure 82 Enter IP Information for Interface dialog box . . . . . . . . . . . . . . . . . . . . . 162
Figure 83 Enter IP Information for Interface dialog box . . . . . . . . . . . . . . . . . . . . . 163
Figure 84 Server Publication dialog box . . . . . . . . . . . . . . . . . . . . . . . . . . . . . . . . . 164
Figure 85 IPsec Configuration dialog box . . . . . . . . . . . . . . . . . . . . . . . . . . . . . . . . 170
Figure 86 IPsec Configuration dialog box . . . . . . . . . . . . . . . . . . . . . . . . . . . . . . . . 171
Figure 87 Enter IP Address dialog box . . . . . . . . . . . . . . . . . . . . . . . . . . . . . . . . . . 172
Figure 88 Pings dialog box . . . . . . . . . . . . . . . . . . . . . . . . . . . . . . . . . . . . . . . . . . . 175
Figure 89 Ping Configuration dialog box . . . . . . . . . . . . . . . . . . . . . . . . . . . . . . . . .176
Figure 90 IPsec Configuration dialog box . . . . . . . . . . . . . . . . . . . . . . . . . . . . . . . . 178
Figure 91 IPsec Configuration dialog box . . . . . . . . . . . . . . . . . . . . . . . . . . . . . . . . 179
Figure 92 Enter Monitor / Control Connection Information dialog box . . . . . . . . . .180
Figure 93 IPsec Configuration dialog box . . . . . . . . . . . . . . . . . . . . . . . . . . . . . . . . 181
Figure 94 Enter Monitor / Control Connection Information dialog box . . . . . . . . . .182
Figure 95 IPsec Configuration dialog box . . . . . . . . . . . . . . . . . . . . . . . . . . . . . . . . 190
Figure 96 Enter Monitor / Control Connection Information dialog box . . . . . . . . . .191
Figure 97 IPsec Configuration dialog box . . . . . . . . . . . . . . . . . . . . . . . . . . . . . . . . 194
Figure 98 Enter Monitor / Control Connection Information dialog box . . . . . . . . . .195
Figure 99 Instant Internet Web home page . . . . . . . . . . . . . . . . . . . . . . . . . . . . . .205
Using the BayStack Instant Internet Management Software Version 7.11
Page 20

20 Figures
Figure 100 Web Cache page . . . . . . . . . . . . . . . . . . . . . . . . . . . . . . . . . . . . . . . . . . 206
Figure 101 ISDN Configuration dialog box . . . . . . . . . . . . . . . . . . . . . . . . . . . . . . . . 240
Figure 102 ISDN Configuration (advanced) dialog box for the 100-S
Figure 103 ISDN Configuration (advanced) dialog box for the 100 and 400 units . . 243
Figure 104 Dialup Configuration dialog box . . . . . . . . . . . . . . . . . . . . . . . . . . . . . . . 246
Figure 105 Dialup Configuration (advanced) dialog box . . . . . . . . . . . . . . . . . . . . . . 247
Figure 106 Dialup Configuration (advanced) dialog box . . . . . . . . . . . . . . . . . . . . . . 248
Figure 107 T1 Configuration dialog box . . . . . . . . . . . . . . . . . . . . . . . . . . . . . . . . . .250
Figure 108 T1 Advanced Configuration dialog box . . . . . . . . . . . . . . . . . . . . . . . . . .250
Figure 109 E1 Configuration dialog box . . . . . . . . . . . . . . . . . . . . . . . . . . . . . . . . . . 252
Figure 110 E1 Advanced Configuration dialog box . . . . . . . . . . . . . . . . . . . . . . . . .252
Figure 111 PPPoE Configuration dialog box . . . . . . . . . . . . . . . . . . . . . . . . . . . . . . 254
Figure 112 PPPoE Configuration (advanced) dialog box . . . . . . . . . . . . . . . . . . . . . 255
Figure 113 Windows 95 Run dialog box . . . . . . . . . . . . . . . . . . . . . . . . . . . . . . . . . . 260
Figure 114 Instant Internet Units dialog box . . . . . . . . . . . . . . . . . . . . . . . . . . . . . . . 260
Figure 115 Select IPX Frame Types dialog box . . . . . . . . . . . . . . . . . . . . . . . . . . . . 261
Figure 116 Restarting Instant Internet dialog box . . . . . . . . . . . . . . . . . . . . . . . . . . . 273
Figure 117 iiLogin icon . . . . . . . . . . . . . . . . . . . . . . . . . . . . . . . . . . . . . . . . . . . . . . .274
Figure 118 iiLogin Connected as username dialog box . . . . . . . . . . . . . . . . . . . . . .274
Figure 119 Instant Internet Units dialog box . . . . . . . . . . . . . . . . . . . . . . . . . . . . . . . 275
Figure 120 Enter Unit’s IP Address dialog box . . . . . . . . . . . . . . . . . . . . . . . . . . . . . 276
Figure 121 Backup Setup Configuration dialog box . . . . . . . . . . . . . . . . . . . . . . . . . 277
Figure 122 Restore Setup Configuration dialog box . . . . . . . . . . . . . . . . . . . . . . . . .278
Figure 123 Prompt to restore users and groups . . . . . . . . . . . . . . . . . . . . . . . . . . . . 279
Figure 124 Dialup Configuration dialog box . . . . . . . . . . . . . . . . . . . . . . . . . . . . . . . 281
Figure 125 ISDN Configuration dialog box . . . . . . . . . . . . . . . . . . . . . . . . . . . . . . . . 282
Figure 126 Registration Information dialog box . . . . . . . . . . . . . . . . . . . . . . . . . . . . 283
Figure 127 Enter Password dialog box . . . . . . . . . . . . . . . . . . . . . . . . . . . . . . . . . . . 284
Figure 128 Re-enter Password dialog box . . . . . . . . . . . . . . . . . . . . . . . . . . . . . . . . 285
Figure 129 Unit Name dialog box . . . . . . . . . . . . . . . . . . . . . . . . . . . . . . . . . . . . . . .285
Figure 130 Unit Time dialog box . . . . . . . . . . . . . . . . . . . . . . . . . . . . . . . . . . . . . . . . 286
and 400-S units . . . . . . . . . . . . . . . . . . . . . . . . . . . . . . . . . . . . . . . . . . . .242
300868-G
Page 21

Figures 21
Figure 131 Time Zone dialog box . . . . . . . . . . . . . . . . . . . . . . . . . . . . . . . . . . . . . . . 287
Figure 132 Services dialog box . . . . . . . . . . . . . . . . . . . . . . . . . . . . . . . . . . . . . . . . 289
Figure 133 Tools main window . . . . . . . . . . . . . . . . . . . . . . . . . . . . . . . . . . . . . . . . .291
Figure 134 Ping test started . . . . . . . . . . . . . . . . . . . . . . . . . . . . . . . . . . . . . . . . . . .293
Figure 135 Ping test finished . . . . . . . . . . . . . . . . . . . . . . . . . . . . . . . . . . . . . . . . . . 294
Figure 136 Trace test started . . . . . . . . . . . . . . . . . . . . . . . . . . . . . . . . . . . . . . . . . .296
Figure 137 Trace test finished . . . . . . . . . . . . . . . . . . . . . . . . . . . . . . . . . . . . . . . . .297
Figure 138 Stress test started . . . . . . . . . . . . . . . . . . . . . . . . . . . . . . . . . . . . . . . . . .298
Figure 139 Stress test finished . . . . . . . . . . . . . . . . . . . . . . . . . . . . . . . . . . . . . . . . .299
Figure 140 Options dialog box in Tools . . . . . . . . . . . . . . . . . . . . . . . . . . . . . . . . . . . 300
Figure 141 About Instant Internet Setup dialog box, Serial Number box . . . . . . . . .303
Figure 142 Instant Internet Web home page . . . . . . . . . . . . . . . . . . . . . . . . . . . . . .307
Using the BayStack Instant Internet Management Software Version 7.11
Page 22

22 Figures
300868-G
Page 23

Tables
Table 1 Services that Instant Internet provides . . . . . . . . . . . . . . . . . . . . . . . . . .33
Table 2 Admin user icons . . . . . . . . . . . . . . . . . . . . . . . . . . . . . . . . . . . . . . . . . . .36
Table 3 Designating Internet access – wildcard symbol . . . . . . . . . . . . . . . . . . . .61
Table 4 Designating Internet access – checkmark . . . . . . . . . . . . . . . . . . . . . . . .62
Table 5 Designating Internet access — X . . . . . . . . . . . . . . . . . . . . . . . . . . . . . . . 62
Table 6 Sample Internet access control list . . . . . . . . . . . . . . . . . . . . . . . . . . . . . .62
Table 7 Add Internet Access dialog box items . . . . . . . . . . . . . . . . . . . . . . . . . . . 65
Table 8 Add Incoming Port dialog box items . . . . . . . . . . . . . . . . . . . . . . . . . . . . . 79
Table 9 Report options . . . . . . . . . . . . . . . . . . . . . . . . . . . . . . . . . . . . . . . . . . . . . 86
Table 10 Monitor main window toolbar buttons . . . . . . . . . . . . . . . . . . . . . . . . . . . 94
Table 11 Stats window statistics . . . . . . . . . . . . . . . . . . . . . . . . . . . . . . . . . . . . . . . 96
Table 12 Stats window statistics for a dial-up or ISDN interface or a VPN
Table 13 Users window statistics . . . . . . . . . . . . . . . . . . . . . . . . . . . . . . . . . . . . .100
Table 14 Monitor main window toolbar buttons . . . . . . . . . . . . . . . . . . . . . . . . . . 100
Table 15 Sort options in the Users window . . . . . . . . . . . . . . . . . . . . . . . . . . . . . .101
Table 16 Log statistics . . . . . . . . . . . . . . . . . . . . . . . . . . . . . . . . . . . . . . . . . . . . . 102
Table 17 Log window toolbar buttons . . . . . . . . . . . . . . . . . . . . . . . . . . . . . . . . . . 103
Table 18 Sort options in the log window . . . . . . . . . . . . . . . . . . . . . . . . . . . . . . . . 103
Table 19 Diag window statistics . . . . . . . . . . . . . . . . . . . . . . . . . . . . . . . . . . . . . . 105
Table 20 AutoLog toolbar buttons . . . . . . . . . . . . . . . . . . . . . . . . . . . . . . . . . . . .109
Table 21 Phase 1 main mode states . . . . . . . . . . . . . . . . . . . . . . . . . . . . . . . . . . . 198
Table 22 Phase 1 aggressive mode states . . . . . . . . . . . . . . . . . . . . . . . . . . . . . . 198
Table 23 Phase 2 main mode states . . . . . . . . . . . . . . . . . . . . . . . . . . . . . . . . . . 199
Table 24 Other state . . . . . . . . . . . . . . . . . . . . . . . . . . . . . . . . . . . . . . . . . . . . . . . 199
Table 25 Cache level default expiration settings for text and non-text entries . . . 213
23
tunnel . . . . . . . . . . . . . . . . . . . . . . . . . . . . . . . . . . . . . . . . . . . . . . . . . . . . 97
Using the BayStack Instant Internet Management Software Version 7.11
Page 24

24 Tables
300868-G
Page 25

Preface
The BayStack™ Instant Internet™ hardware and software solution is a managed
and secure gateway that connects any type of LAN to the Inter net through a s ingle
IP address. It connects directly to a network and lets all LAN users access the
Internet simultaneously. Instant Internet, along with your service provider, can
allow all network users to enjoy the broad information services available on the
Internet automatically! Within minutes, you can browse the World Wide Web,
retrieve f iles, searc h for inform ation, participate in news groups, and send and
receive e-mail.
Before you begin
This manual is intended for network administrators and contains the following
information:
25
• Administ ering the In stant Intern et unit
• Administering user and group Internet access
• Monitoring the Instant Internet unit
• Configuring the Instant Internet unit as a DNS, Web, or SOCKS proxy
• Configuring the IP services that the Instant Internet unit will use
• Configuring IP security (IPsec) for a virtual private network (VPN)
• Using Web cache configuration to administer and configure the Instant
Internet unit’s Web cache settings
• Support and diagnostic functions of the Instant Internet unit
• Using built-in tools to test a connection to the Internet and to a host
• IP and IPX support
Using the BayStack Instant Internet Management Software Version 7.11
Page 26

26 Preface
Before you use this manual, you need to do two things. First, write down the
model number and ser ial number of the I nstant I nternet unit. Thi s informat ion will
be required if you ne ed to call Nort el Networks Technical Support. These number s
are located on the back of the Instant Internet unit. You can also view the serial
number using the Setup utility. For more information, see “Viewing the Instant
Internet seria l nu mber” on page 303.
Model #_____________________________________________
Example: CQ1001104 or CQ2001E80
Serial # _____________________________________________
Example: I0300004F or I4000181CC404F
Second, review the basic installation process in Installing the BayStack Instant
Internet Management Software Version 7.11 and determine how you want Instant
Internet to function in your network.
300868-G
Page 27

Text conventions
This manual uses the following text conventions:
angle brackets (< >) Indicate that you choose the text to enter based on the
Preface 27
description inside the brackets. Do not type the
brackets when entering the command.
Example: If the command syntax is:
ping <ip_address>, you enter:
ping 192.32.10.12
bold courier text
Indicates text that you need to enter and command
names and options.
italic text
Example: Enter
Example: Use the
Indicates file and directory names, new terms, book
ipconfig /release.
winipcfg command.
titles, and variables in command syntax descriptions.
Where a variable is two or more words, the words are
connected by an underscore.
Example: If the command syntax is:
dns <name_server>
<name_server> is one variable and you substitute one
value for it.
screen text
Indicates command syntex and system output, for
example, prompts and system messages.
Example: Waiting for Instant Internet to
restart.
separator ( > ) Shows menu paths.
Example: From the Window Start menu, choose
Settings > Control Panel.
Using the BayStack Instant Internet Management Software Version 7.11
Page 28

28 Preface
Related publications
For more information about using Instant Internet, refer to the following
publications:
For more information about using Instant Internet, refer to the following
publications:
• Important Notice for the BayStack Instant Internet Version 7.11
(Part number 307603-E)
Provides instructions for viewing documentation and installing the Instant
Internet software and third-party applications (Ado be Acrobat R eader,
Netscape Communicator, and AniTa Terminal Emulator).
• Installing the BayStack Instant Internet Management Software Version 7.11
(Part number 209226-B)
Provides instructions for installing the In stant Intern et software.
• Setting Up the BayStack Instant Internet 100 Unit (Part number 300866-G)
Provides instructions on installing and administering the Instant Internet 100
hardware.
• Setting Up the BayStack Instant Internet 100-S Unit (Part number 209374-A)
Provides instructions on installing and administering the Instant Internet
100-S hardware.
• Setting Up the BayStack Instant Internet 400 Unit (Part number 300867-G)
Provides instructions on installing and administering the Instant Internet 400
hardware.
• Setting Up the BayStack Instant Internet 400-S Unit (Part number 209375-A)
Provides instructions on installing and administering the Instant Internet
400-S hardware.
• Using the BayStack Instant Internet Management Software Version 7.11
(Part number 300868-G)
Provides an intr oduction to Instant I nt ernet, instruc ti ons for administering th e
product, and procedures for using Instant Internet features.
300868-G
Page 29

Preface 29
• Reference for the BayStack Instant Internet Remote Access Commands
Version 7.11 (Part number 302005-F)
Provides instructions and commands for remotely accessing Instant Internet.
• BayStack Instant Internet Software and Documentation Version 7.11 CD
(Part number 206664-D)
Provides manuals for using and installing the Instant Internet software and
third-party applications. Th e CD contains the following documents:
— Installing the BayStack Instant Internet Management Software Version
7.11
— Setting Up the BayStack Instant Internet 100 Unit
— Setting Up the BayStack Instant Internet 100-S Unit
— Setting Up the BayStack Instant Internet 400 Unit
— Setting Up the BayStack Instant Internet 400-S Unit
— Using the BayStack Instant Internet Management Software Version 7.11
— Reference for the BayStack Instant Internet Remote Access Commands
Version 7.11
You can print selected technical manuals and release notes free, directly from the
Internet. Go to the www25.nortelnetworks.com/library/tpubs/ URL. Find the
product for which you n eed documentation. Then lo cat e t he specific categor y an d
model or version for your hardware or software product. Use Adobe Acrobat
Reader to open the manuals and release notes, search for the sections you need,
and print them on most standard printers. Go to Adobe Systems at the
www.adobe.com URL to download a free copy of the Adobe Acrobat Reader.
You can purchase selected documentation sets, CDs, and technical publications
through the Internet at the www1.fatbrain.com/documentation/nortel/ URL.
Using the BayStack Instant Internet Management Software Version 7.11
Page 30

30 Preface
How to get help
If you purchased a service contract for your Nortel Networks product from a
distributor or authorized reseller, contact the technical support staff for that
distributor or reseller for assistance.
If you purchased a Nortel Networks service progr am, contact one of the following
Nortel Networks Technical Solutions Centers:
Technical Solutions Center Telephone
EMEA (33) (4) 92-966-968
North America (800) 2LANWAN or (800) 252-6926
Asia Pacific (61) (2) 9927-8800
China (800) 810-5000
An Express Routing Code ( ERC) i s available for many Norte l Ne twor ks p rod uct s
and services. When you use an ERC, your call is routed to a technical support
person who speciali zes in s upporting that prod uct or ser vice. To locate an ERC for
your product or service, go to the www12.nortelnetworks.com/ URL and click
ERC at the bottom of the page.
300868-G
Page 31

Chapter 1
Introduction
The BayStack Instant Internet unit is a network gateway system that enables you
to access the Internet safely and efficiently, providing management tools that
allow you to track and block u ser ac tivi ties. The In stan t Int ernet unit c onnect s any
type of LAN to the Internet using only a single IP address, thereby saving you
time and money.
This chapter provides information about the types of network environments in
which Instant Internet works as well as the services that Instant Internet provides
for your network.
31
How Instant Internet can function in your network
Before you install the Instant Internet unit, you should understand your network
environment and how the unit functions in the network.
Instant Internet can function in your network in three ways. It can:
• Provide security – You can isolate your network from the Internet to help
ensure network security. You do this for three reasons:
— To prevent Internet users from outside your organization from seeing
internal IP addresses.
— To protect your network from being accessed by intruders or hackers.
— To permit remote LANs to communicate with your LAN over a virtual
private network (VPN) using IP security (IPsec).
• Control Internet access – You can restrict your users’ access by date and
time, and you can restrict access to certain sites or news groups.
• Ease adm inistration – Instant Internet allows you to adopt the users and
groups you are already using from your directory services.
Using the BayStack Instant Internet Management Software Version 7.11
Page 32

32 Chapter 1 Introduction
IP networks
For security purposes, on an IP network, you may want to isolate your network
from the Internet. You can isolate your network from the Internet by configuring
the network workstations to go through a router before accessing the Internet.
However, using a router to isolate the LAN can be very time-consuming to set up
and maintain because each LAN user must have a “legal” IP address and be
protected from hackers. Instant Intern et, on the ot her hand, makes it easy to iso late
your IP network from the Internet by using address translation to translate illegal
(reserved private) LAN workstation IP addresses into legal IP addresses.
You can also configure IP security (IPse c) to use a vir tual pr ivate network (VPN) .
A VPN is a special type of connection that permits remote users or LANs to
communicate with another LAN over a public network, such as the Internet.
When you set up a VPN, you are essentially using a public network as your own
private, secure network.
On IP networks with IP workstations, there is no limit to the number of
application sessions (instances) that can access the Instant Internet unit.
IPX networks
An IPX network is automatically secure because there is no IP traffic on the
network. In this type of network, Instant Internet provides quick and easy access
to the Internet. On IPX networ ks with IPX workstations, Ins ta nt In ternet supports
up to 250 application sessions.This means that IPX workstations can access the
Instant Internet unit using up to 250 application instances.
300868-G
Page 33

Chapter 1 Introduction 33
Services Instant Internet provides
Table 1 describes the services that Instant Int ernet provides for IP and IPX
networks.
Table 1 Services that Instant Internet provides
Service Features
Address Transla tion The Address T ran slati on ser vice enable s Ins tant In ternet to act l ike a s tandard router
by routing IP information fro m one locatio n to anothe r. However, this service enab les
Instant Internet to go beyond the simple routing role by translating illegal (reserved
private) LAN workstation IP addresses into legal IP addresses.
Address Translation supports the IPSEC ESP protocol.
Client Login Instant Internet allows you to identify workstations for logging and access control.
DHCP Server Using Instant Internet as a DHCP server allows you to set one option on each
workstation, and then configure Instant Internet once.
When you install Instant Internet, it determines whether or not you are running DHCP
on your network. If not, then Instant Internet configures itself as a DHCP server. If
Instant Internet does not configure itself as a DHCP server and you want to use this
service, you must enable it.
DNS Proxy Server Instant Internet acts as a Domain Name Service (DNS) proxy server by translating
host names into numerical IP addresses.
IP Routing Instant Internet provides access to the Internet through IP routing. It maintains
routing tables that help it determine the destination of data packets. This enables
non-Windows workstations (for example, Macintosh, UNIX, and OS/2) to access the
Internet through Instant Internet as IP workstations.
Remote
Configuration
SOCKS Proxy
Server
VPN Tunnel You can configure IP security (IPsec) to establish a virtual private network (VPN)
You can use a Telnet application or a terminal em ula tio n appl ic ation (Instant Internet
100-S and 400-S units only) and remote access commands to configure the Instant
Internet unit from a remote location. For details, refer toReference for the BayStack
Instant Internet Remote Access Commands Version 7.11.
You can configure the Instant Internet unit as a SOCKS proxy server as a means for
handling FTP requests. If you have IP workstations already configured as SOCKS
workstations, you can use the Instant Internet unit to connect them to the Internet.
tunnel between an Instant Internet unit and a Connectivity Extranet Switch (CES),
between an Instant Internet unit and a BayRS, or between two Inst an t Inter net un its .
For details, refer to Using the BayStack Instant Internet Management Software
Version 7.11.
Using the BayStack Instant Internet Management Software Version 7.11
Page 34

34 Chapter 1 Introduction
Table 1 Services that Instant Internet provides (continued)
Service Features
Web Configuration This feature allows you to access and edit the Instant Internet configuration files
using a Web browser.
Web (HTTP) Proxy
Server
Enabling the Instant Internet as a Web (HTTP) proxy server provides:
• A single point of contact for LAN workstations
• A single point for LAN workstations to obtain access to other proxies
• Web caching to the network in addition to individual workstations (on Instant
Internet 400 units equipped w ith add iti ona l memory and Inst ant Inte rnet 400-S
units)
Deciding what to do next
Instant Internet is a powerful system that enables you to customize settings and
services specifically for your organization. Following are some suggestions for
getting started:
• To estab lish and maint ain contr ol o ver t he Int ernet sit es y our u ser s an d grou ps
of users access, for example, block access to Web sites, newsgroups, and
incoming ports, refer to Chapter 2, “User access administration,” on page 35.
• To log and vi ew the Internet si tes your users are accessing, refer to Chapter 3,
“Internet activity logging,” on page 93.
• To use the Instan t I nternet unit as a Web, DNS, or SOCKS proxy server, refer
to Chapter 4, “Proxy services,” on page 115.
• To adjust the default IP services or configure the IP services on Instant
Internet, refer to Chapter 5, “Advanced IP configuration,” on page 127.
• To use the Instant Internet unit in a virtual private network (VPN), refer to
Chapter 6, “IP security and VPN,” on page 167.
• To speed up the Internet response time even more by caching sites that are
accessed on a regular ba sis, re fer to Chapter 7, “Web cache configuratio n,” on
page 201.
300868-G
Page 35

Chapter 2
User access administration
This chapter introduces Instant Internet’s Administration (Admin) program and
provides instructions on how to use Admin to set Internet access rights for users
and groups.
Administration program overview
Admin is the util ity you u se to es tablish and set I nternet access r ights f or users and
groups within Instant Internet. Access rights control the times and days that users
have access to the Internet and to specific sites, including news groups, incoming
ports, and RAW sockets.
35
When you instal l In st ant I ntern et, all networ k user s ar e aut omatica lly set u p t o use
the default Instant Internet user profile, giving them full Internet access. If this
suits your environment, you do not need to further configure Instant Internet.
However, if you want some users to have restricted access to the Internet, or, if
you want to log the activi ty of a par ti cul ar use r, you can configure group and user
access to In ternet resources.
You can create users in two ways:
• Adopt your users and groups from your network directory services. For
details, re fer to “Managing directory service users and groups” on page 38.
• Create new users and groups for Instant Internet. For details, refer to
“Creating and removing users and groups” on page 45.
Using the BayStack Instant Internet Management Software Version 7.11
Page 36

36 Chapter 2 User access administration
Starting Admin
To start Admin:
From the Instant Internet program group or menu (depending on your
operating system ), select Admin.
If you have an IP network or a network with more than one Instant Internet
unit, the Insta nt Int ernet Unit s dialog box opens. Select the unit y ou want , and
then click OK. If you do not see the Instant Internet unit in the list, refer to
“Adding a unit to the selection list” on page 275.
If you have an IPX network with one In st ant Internet unit, t he Instant Internet
Admin main window opens.
Administration program icons
In Admin, the color of the symbol reflects the user’s type of directory service:
• Light blue identifies an Instant Internet user.
• Gold identifies Instant Internet groups.
• Red identifies Novell Bindery or NetWare NDS users and groups.
• Dark blue identifies NT users and groups.
The actual icon itself denotes the type of access granted to the user. Table 2
describes the user icons in Admin.
Table 2 Admin user icons
Icon Meaning
User has no specific Internet access control, so Instant Internet assigns
default user settings.
User’s Internet access Disable option is activated, and the user has no
access to Internet resources.
User’s Ena ble Loggi ng option is activated.
User has no specific Internet access control, but is inheriting access control
from a group (or groups).
300868-G
Page 37

Chapter 2 User access administration 37
Table 2 Admin user icons (continued)
Icon Meaning
User has specific Internet access.
User’s Internet access Ignore Group Settin gs option is activa ted and the user
has no access to the user’s group settings.
Default user and everyone group
When you install Instant Internet, a Default User and the Everyone group are
automatically set up for you. These provide a baseline for setting up and
establishing your users and groups.
Restoring the default user
When you create a new user, Instant Internet uses the Default User as a template.
The new user has all the settings and attributes of the Default User. You can then
change the settings for the new user to be whatever you would like them to be.
You can also change the settings of the Default User to the settings that you want
all new users to have.
To restore the Default Us er:
1 On the toolbar, click Users.
2 Choose Users > Create the Default User.
A new user icon labeled <default> is added to the List of Users (Figure 1).
Figure 1 Default User icon
Using the BayStack Instant Internet Management Software Version 7.11
Page 38

38 Chapter 2 User access administration
Restoring the everyone group
When you first set up the Instant Internet unit, the Everyone group is
automatically set up for you. All users automatically belong to the Everyone
group. You can then create new groups and move users into those groups so that
you can administer a gr oup of people wi th little ef for t and you can as sign dif fere nt
access rights for different groups. The Everyone group is helpful if you need to
assign the same user access to everyone on your network.
Note: It is possible to dele te the Everyone g roup. However, if you delete
it and choose to restore it, the restored group does not have the same
properties as the original.
To restore the Everyone Group:
1 On the toolbar, click Groups.
2 From the menu bar, choose Groups > Create the Everyone Group.
A new group folder labeled Everyone is added to the List of Groups. All the
users on your network are automatically added to the folder.
3 If you want all your users to be able to use Internet Explorer, set the Internet
Access to allow 127.*.*.*. Refer to “Defining controlled Internet access” on
page 59.
Managing directory service users and groups
Instant Internet allows you to use the user groups that you already have set up in
your network directory services. This eases the administration setup process. The
directory services that Instant Internet adopts automatically are:
• Windows 95, Windows 98, Windows NT, and Windows 2000 domain users
and groups (refer t o “Managing W indows 95, W indows 98, Windows NT, and
Windows 2000 domain users and groups” on page 41).
• NetWare NDS users and groups (refer t o “Managing NetWare NDS users and
groups” on page 42).
• Novell Bindery users and groups (refer to “Managing Novell Bindery users
and groups” on page 43).
300868-G
Page 39
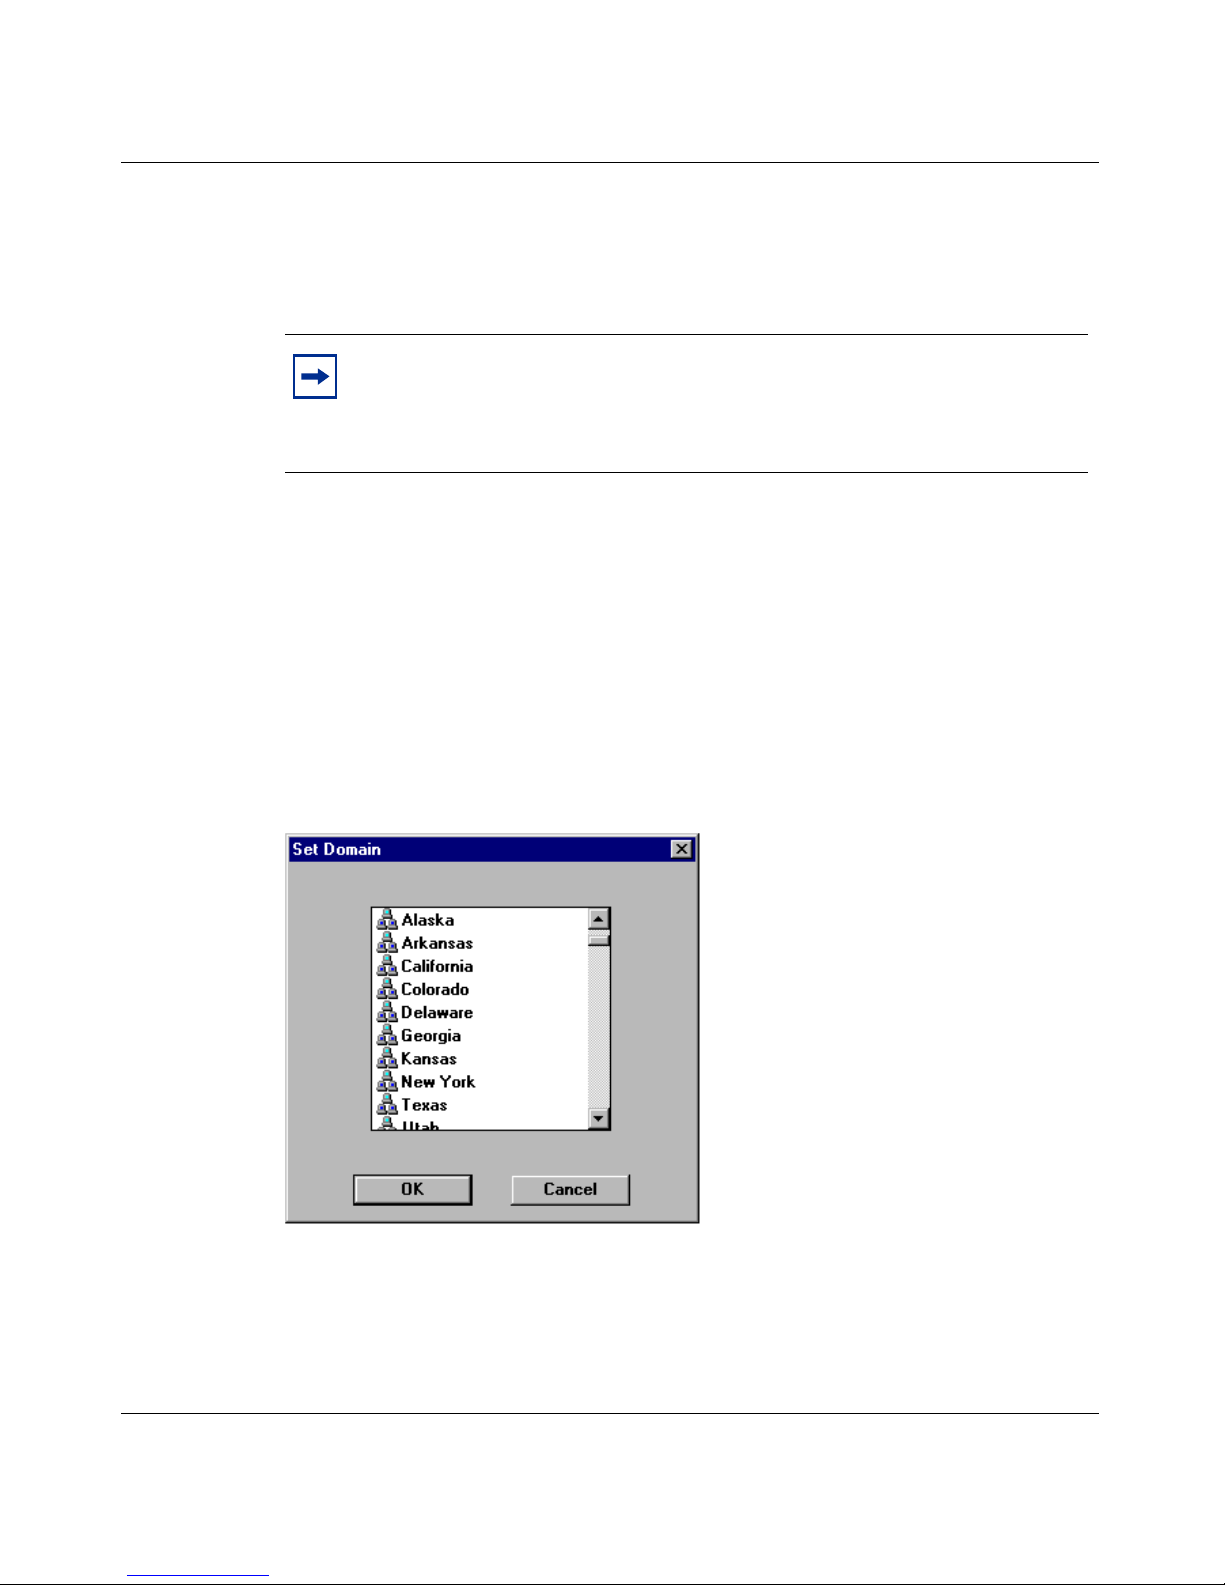
Chapter 2 User access administration 39
Adopting existing users and groups is convenient because you do not have to
create each new user or group or manage a duplicate database. Instead, Instant
Internet finds the users and groups for you and maintains their Internet access
settings.
Note: You cannot administer network directory users from Instant
Internet. If you want to make changes to users or groups and their
members, you must make the changes in the user or group’s specific
network directory service, not in Instant Internet.
Setting the domain
You can choose the domain of the users and groups you want to view.
To set the domain:
1 Choose View > Set Domain.
The Set Domain dialog box opens (Figure 2).
Figure 2 Set Domain dialog box
2 Select the domain you want to view and then click OK.
Using the BayStack Instant Internet Management Software Version 7.11
Page 40
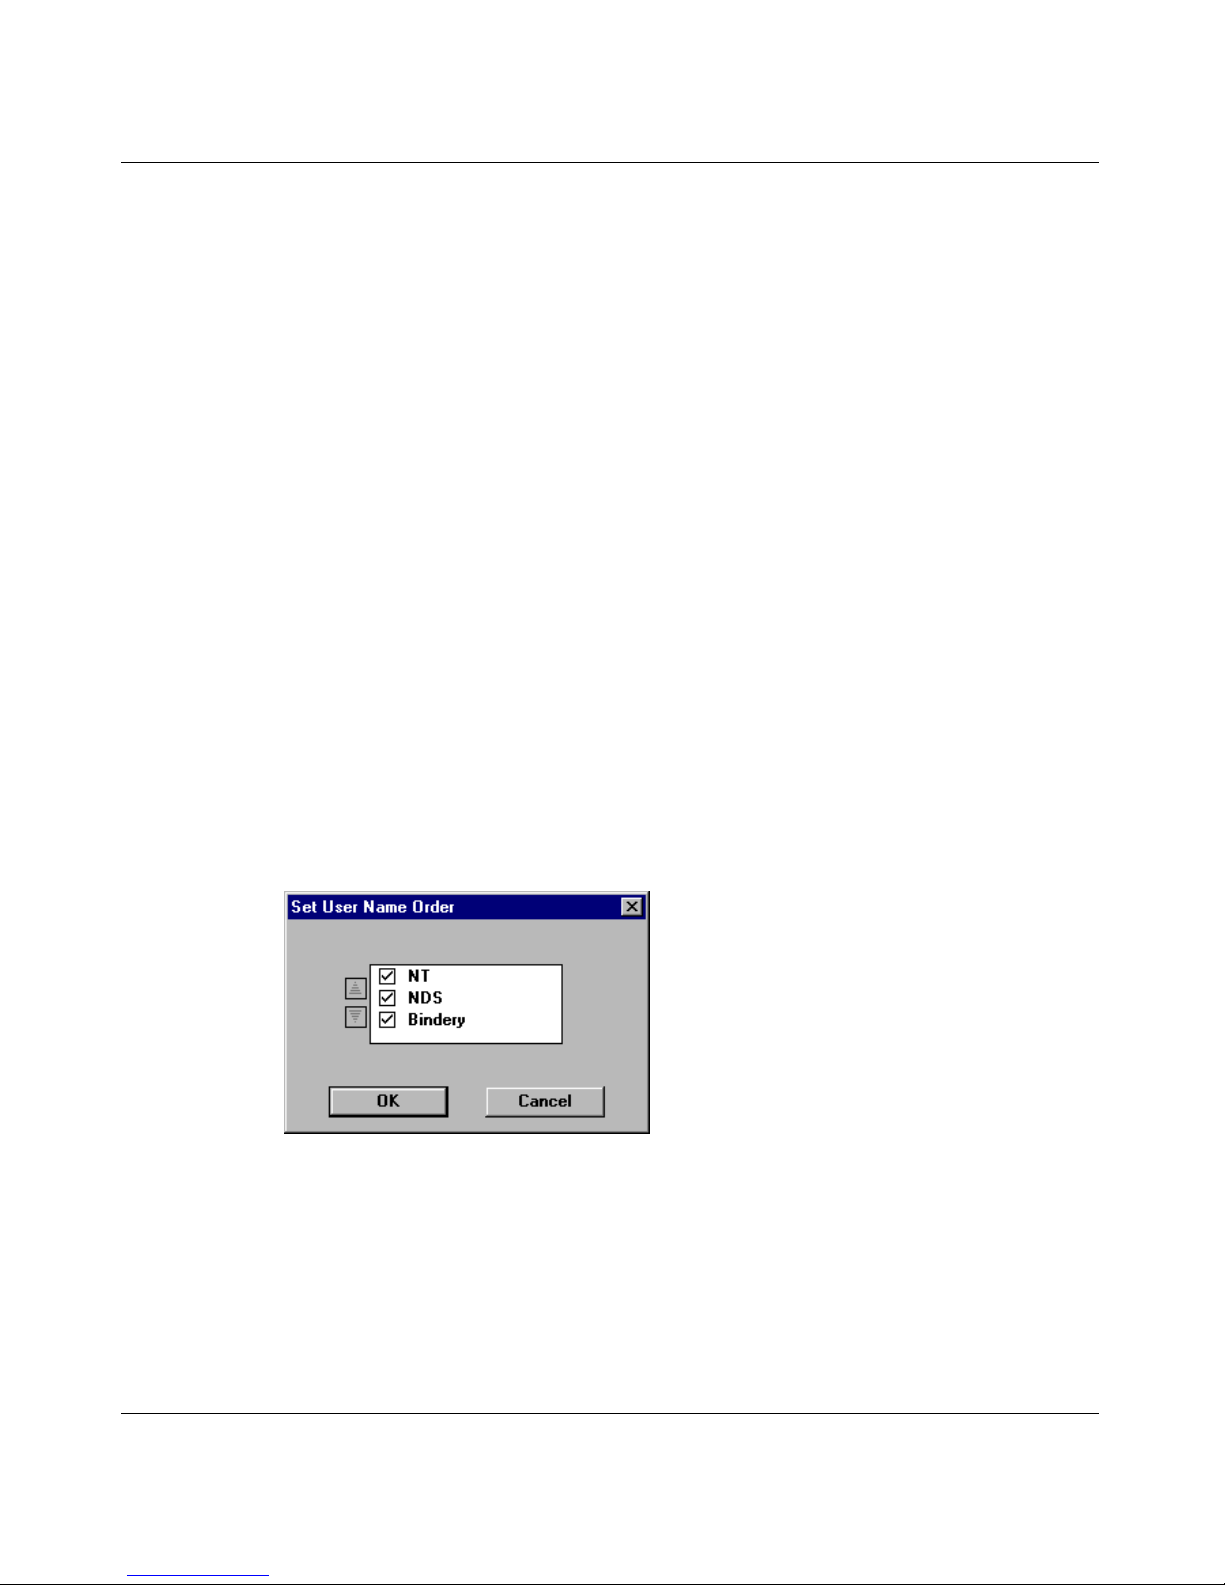
40 Chapter 2 User access administration
Setting user name order
If you are using mul tiple ne tworks in your env ironment, you ca n speci fy th e order
that Instant Internet uses to identify users and groups. The order is determined by
user type (NT, NDS, or Bindery).
For example, if Jane has a log on of JANE under the NT domai n and anothe r logon
for a Novell server with NDS as JDOE, you can use this option to determine
which user identification Instant Internet will use to identify Jane. If Set User
Name Order has NDS first, then Instant Inte rnet identifies Jane as JDOE. This
does not affect how the Novell Server identifies her.
IP workstations on Windows 95, Windows 98, Windows NT, or Windows 2000
can check h ow they are identified from their workstation by clicking the Instant
Internet icon in the status area of the taskbar. Refer to “Identifying the login
workstation” on page 274.
To set user name order:
1 Choose View > Set User Name Order.
The Set User Name Order dialog box opens (Figure 3).
Figure 3 Set User Name Order dialog box
2 Select the option you want to move.
3 Do one of the following:
• Click the Up arrow to move the option to a higher priority. If you choose
the first option, you cannot move it higher.
• Click the Down arrow to move the option to a lower priority. If you
choose the last option, you cannot move it lower.
300868-G
Page 41

Chapter 2 User access administration 41
Migrating your database to use unique users and group s by
server
You can migrate your database to use unique users and groups by server. This
feature is useful if you currently have bindery users and groups configured and
then select t he Uniq ue users and g roups by server chec k box. Select ing t his option
copies the access of a ll the configured users and groups to the match ing user s a nd
groups of the server you are currently viewing. The copied users and groups are
then delete d.
Note: You must be running a NetWare workstation and have the option
Unique users and groups by server selected in order to use this option.
For details, refer to “Setting th e NetWare preferred server” on page 43.
To migrate your database to use unique users and groups by server:
Click View > Move to Server.
A check mark next to the menu item indicates that the option is enabled.
Managing Windows 95, Windows 98, Windows NT, and
Windows 2000 domain users and groups
In the Instant Internet Admin window, Windows 95, Windows 98, Wi ndows NT,
and Windows 2000 domain users are displayed as dark blue figure icons and
groups are displayed as dark blue folders.
In the Windows 95, Windows 98, Windows NT, and Windows 2000 domain
environments, Instant Internet uses the Windows 95, Windows 98, Windows NT,
or Windows 2000 domain user and group names. To change group membership,
modify users, and so forth, the Windows 95, Windows 98, Windows NT, or
Windows 2000 administration utilities must be used.
For more information on managing users and groups, refer to “Managing users
and groups” on page 50.
Using the BayStack Instant Internet Management Software Version 7.11
Page 42

42 Chapter 2 User access administration
Viewing Windows 95, Windows 98, Windows NT, or Windows
2000 Users and Groups
To view or not view NT users and groups:
Choose View > View NT Users and Groups.
Managing NetWare NDS users and groups
Instant Internet displays NDS users as red figure ico ns and groups as red f olders in
the Instant Internet Ad min window.
In the Novell environment, Instant Internet uses the NDS user names and groups.
To change group membership, modify users, and so forth, you must use NDS
administration utilities (refer to the Instant Internet Admin online Help for more
information).
For more information on managing users and groups, refer to “Managing users
and groups” on page 50.
Note: In a Novell environment, if a user is logged in to the NetWare
Directory Services (NDS), by default Instant Internet uses the NDS user
name and groups for access con trol. If you have bot h NDS and Bindery
users on your network, you may want to force the use of the Bindery
user name and groups. Refer to “Setting user name order” on page 40.
To view or not view NDS users and groups:
Choose View > View NDS Users and Groups.
300868-G
Page 43

Chapter 2 User access administration 43
Setting the conte xt for NDS
In NetWare Directory Services (NDS), context refers to the location of an object
in the directory tree. The context is necess ary for NDS to locate specific network
resources.
Note: You must use the Novell NetWare workstation to set co ntext.
To edit the context for the selected user or group:
1 Choose View > Set Context.
2 Edit the context and save the new configuration.
Managing Novell Bindery users and groups
Instant Internet displays Bindery users as red figure icons and groups as red
folders in the Instant Internet Admin window.
For more information on managing users and groups, refer to “Managing users
and groups” on page 50.
To view or not view Bindery users and groups:
Choose View > View Bindery Users and Groups.
Note: In a Novell environment, when a user is logged into the NetWare
Directory Services (NDS), Instant Internet by default uses the NDS user
name and groups for access control. If you have both NDS and Bindery
users on your networ k, y ou may want to force th e us e of t he Bindery user
name and groups. Refer to “Setting user name order” on page 40.
Using the BayStack Instant Internet Management Software Version 7.11
Page 44

44 Chapter 2 User access administration
Setting the NetWare preferred server
Instant Internet provides the ability to se t the NetWare server of the users and
groups you want to v iew. When a preferred server is set i t be comes the one that is
displayed first.
Note: You must be running a NetWare workstation to use this feature.
To set the NetWare preferred server:
1 Choose View > Set Preferred Server.
2 Select the p referred server and then click OK.
To assign different access settings for the same bindery user or group on
different servers, select Unique users and groups by server.
Setting up IP users not using iiLogin
When Instant Internet is installed on an IP workstation running Windows 95,
Windows 98, Windows NT, or Windows 2000, an Instant Internet icon (iiLogin)
appears in the your system tray. You can double-click the icon to find out how
that workstation is logged on. For more information, refer to “Identifying IP
Workstations” in Installing the BayStack Instant Internet Management Software
Version 7.11.
UNIX and Macintosh workstations cannot use the iiLogin workstation
identification. Others, such as guests or temporary employees who use
your network occasionally, also may not have an iiLogin workstation
identification. These types of users are identified in Admin by their IP address.
Users that do not have the iiLogin workstation identification use the Internet
access settings for the Default user. However, if you want to control their access,
then you can create a “wildcard user” with a name that reflects the IP address of
these users. For instructions on how to create a new user, refer to “Creating a new
user or group” on page 45.
300868-G
Page 45

Chapter 2 User access administration 45
For example, you may assign the IP addresses: 192.0.0.130, 192.0.0.131, and
192.0.0.132 to guest workstations. Using the IP address 102.0.0.* (* is the
wildcard character) for your wildcard users will allow you to control these
accesses as a group. O nly users identified in Admin by an IP address that falls in
that range are affected by the access controls you place on this wildcard user. All
other users are af fected by either the Def ault User’s access control s or other acces s
controls you may have set for them, even if their IP address falls in the range of
the wildcard user.
Creating and removing users and groups
Instant Internet provides the ability to create and maintain users and groups within
Instant Internet that are distinct and separate from you r network. This option is
helpful if you want t o add users or remove use rs on the ba sis of Int ernet ac cess but
do not want to make c hang es t o t h e e xi st ing net w ork dir ectory service. When y ou
use Instant Internet to set up and maintain the Internet access settings for these
users, they do not appear in your network directory services.
Creating a new user or group
Instant Internet provides two methods for adding new users and groups:
• Using a template. The new user or group inherits all template attributes. This
feature is useful when you add multiple users or groups that require the same
Internet access .
• Creating each user or gro up individually. You must create and configure each
new user or group individually.
Instant Internet provides a default user facility , specifying attributes that it uses for
individual users. If you add a user and do not set specific Internet access settings,
that user is considered a defaul t u ser.
Using the BayStack Instant Internet Management Software Version 7.11
Page 46
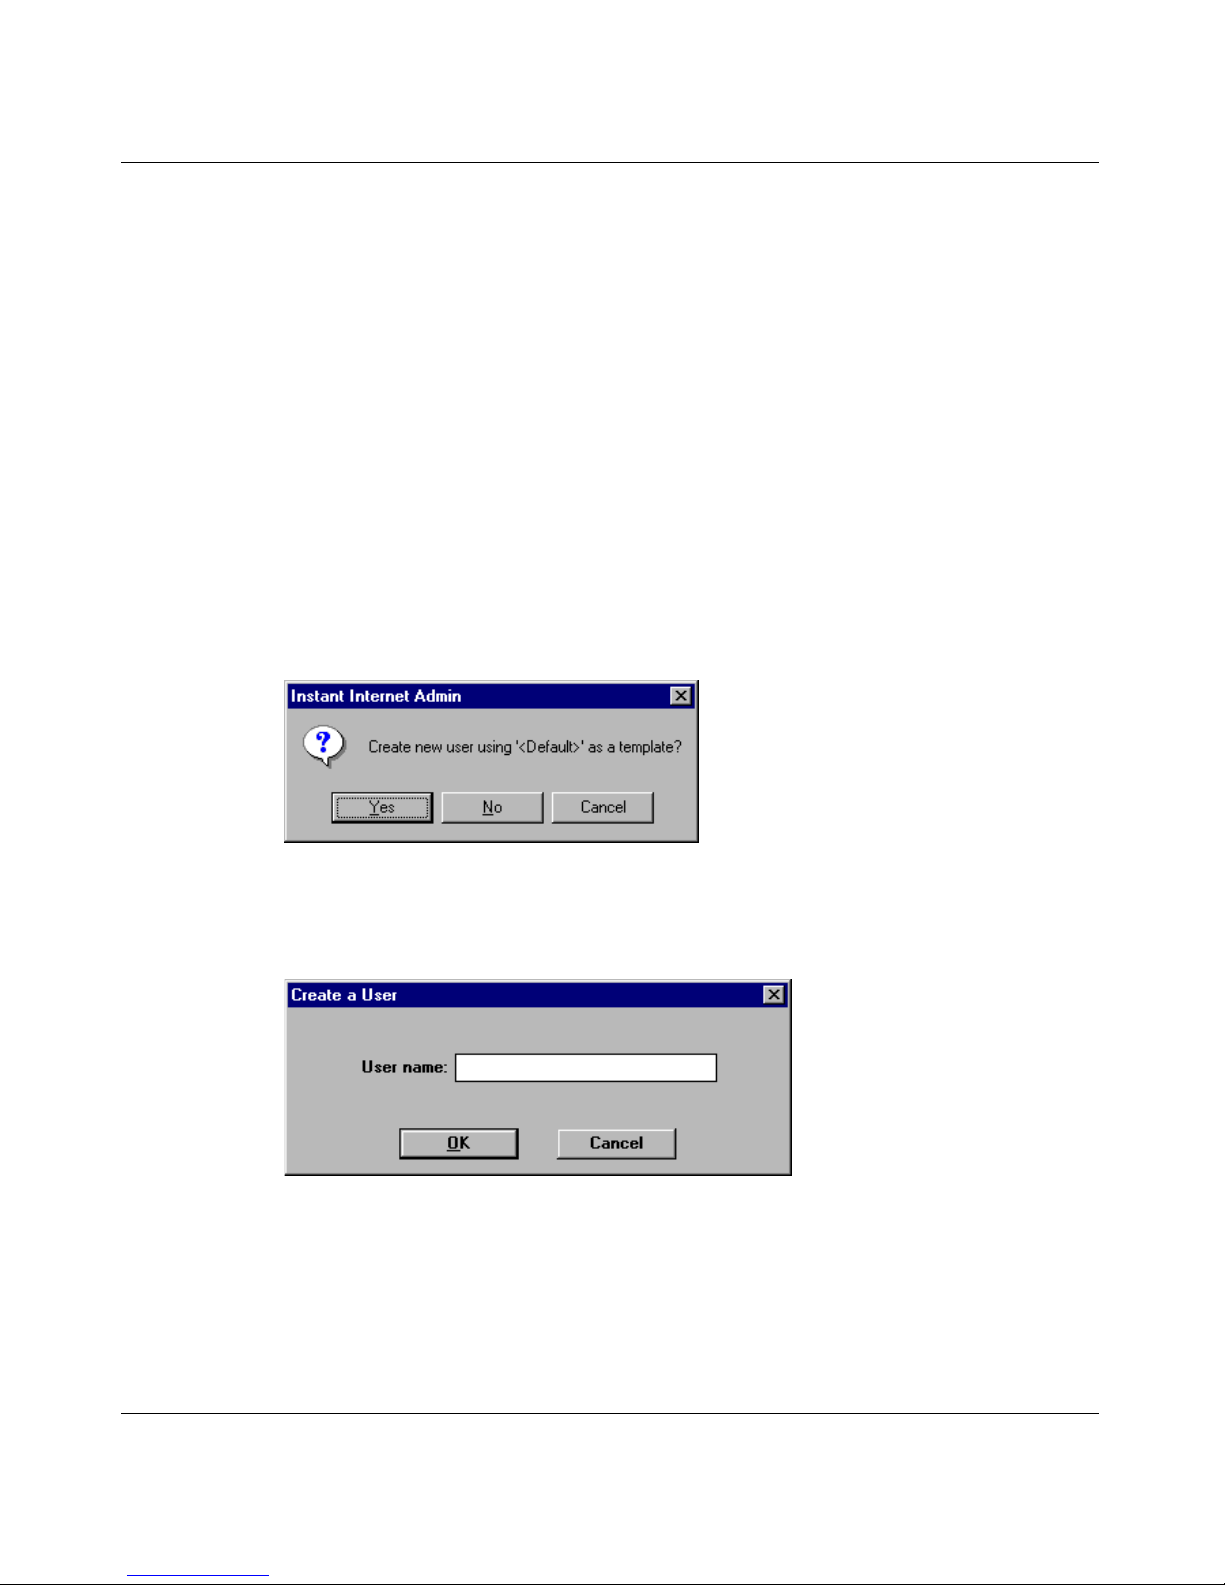
46 Chapter 2 User access administration
Creating a user
To create a new user:
1 Do one of the following:
• On the toolbar, click Users.
• Choose Users > View User List.
2 Select the icon of the user you want to use as a template.
If you do not want to use a template, you do not need to select a user.
3 On the toolbar, click Create.
If you selected a user in step 2, you are prompted to verify that the user’s
profile is to serve as a template (Figure 4).
Figure 4 Prompt to use selected user as a template
300868-G
The Create a User dialog box opens (Figure 5).
Figure 5 Create a User dialog box
4 Enter the new user name.
User names can be up to 255 characters in length and must be unique.
5 Click OK.
Page 47
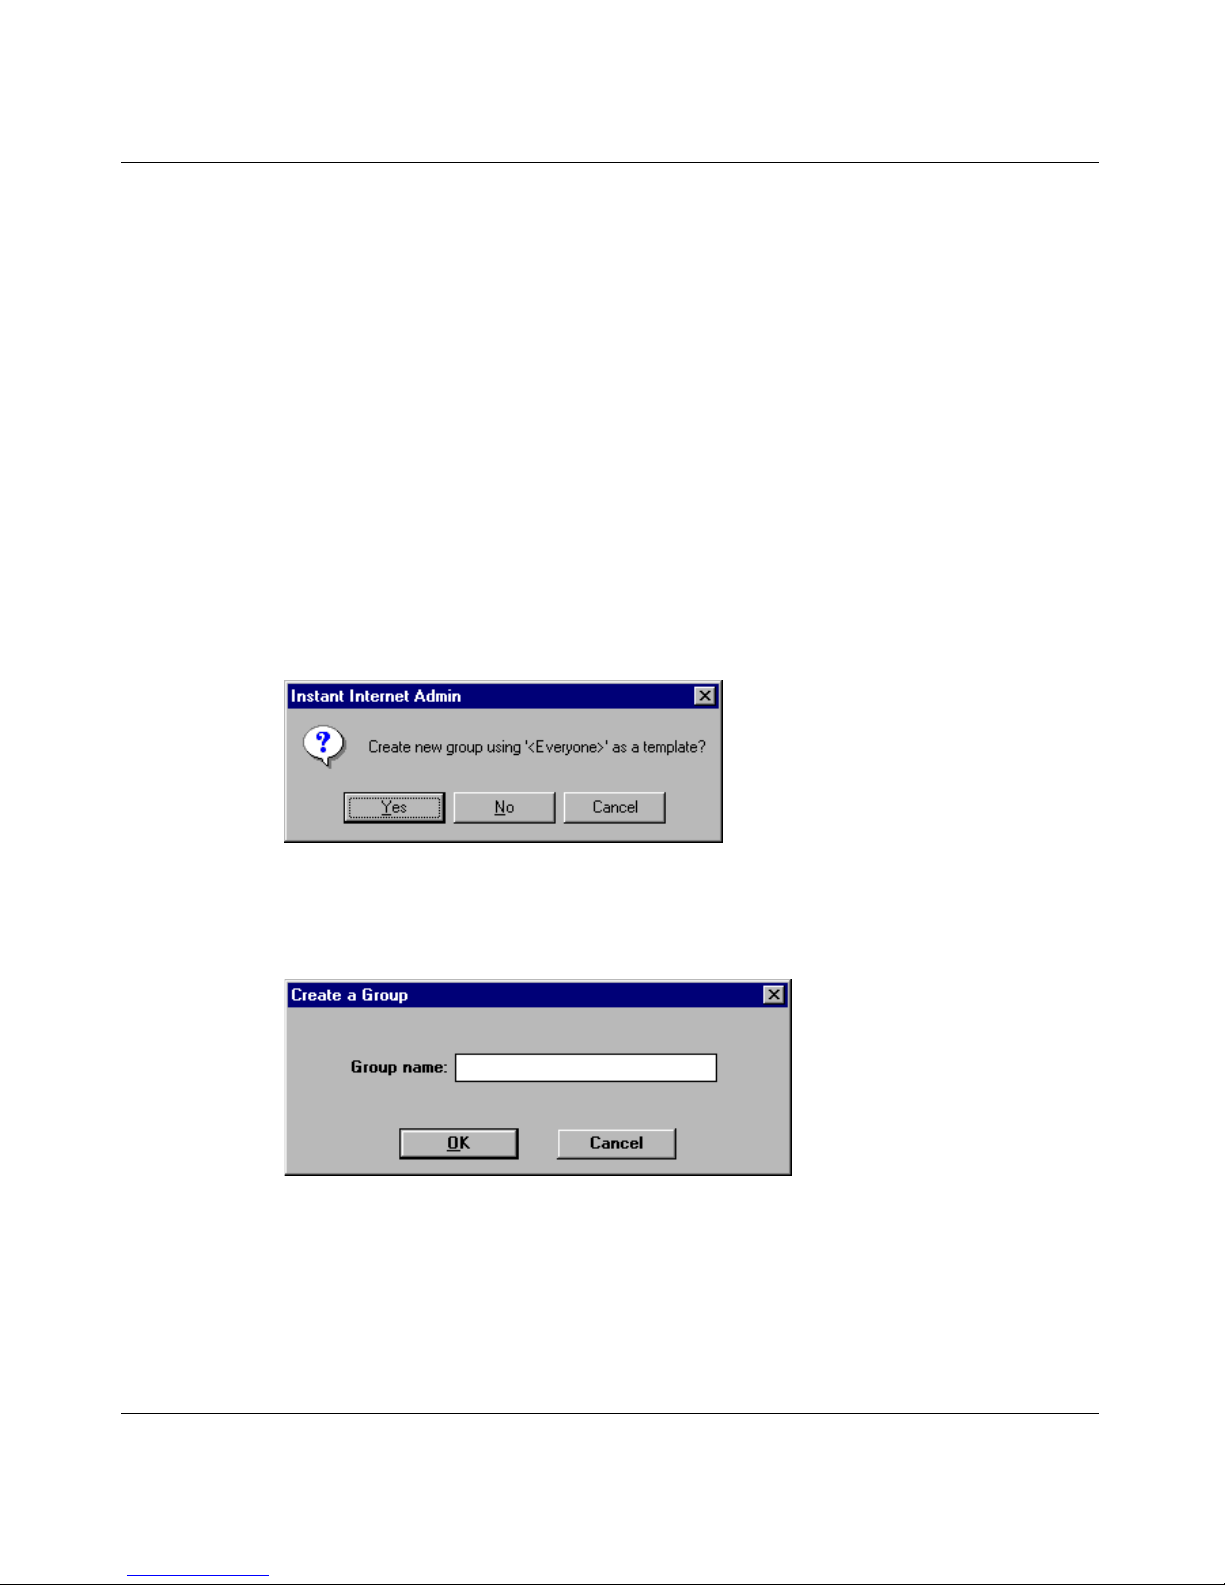
Chapter 2 User access administration 47
Creating a group
To create a new group:
1 Do one of the following:
• On the toolbar, click Groups.
• Choose Groups > View Group List.
2 Select the icon of the group you want to use as a template.
If you do not want to use a template, you do not have to select a group.
3 On the toolbar, click Create.
If you selected a group in step 2, you are prompted to verify that the group’s
profile is to serve as a template (Figure 6).
Figure 6 Prompt to use selected group as a template
The Create a Group dialog box opens (Figure 7).
Figure 7 Create a Group dialog box
4 Enter the new group name.
Group names can be up to 255 characters in length and must be unique.
5 Click OK.
Using the BayStack Instant Internet Management Software Version 7.11
Page 48

48 Chapter 2 User access administration
Adding a user to a group
When you add a user to a group, the user inherits the group’s characteristics. You
can add a user to or remove it from a group.
To add a user to a group by dragging:
1 On the toolbar, click Users.
2 In the List of Users area, select the icon of the user.
3 In the Groups the User Is Not In area, select the group folder to which you
want to add the user.
4 Drag the fold er to Groups the User Is In.
Note: You cannot use dragging to move users who have been adopted
from directory services.
To add a user to a group using the Move toolbar button:
1 On the toolbar, click Users.
2 Select the group folder to which you want to move the user.
3 Select the user you want to move.
4 On the toolbar, click Move.
To remove a user from a group by dragging:
1 On the toolbar, click Users.
2 In the List of Users area, select the icon of the user.
3 In the Groups the User Is In area, sele ct the group folde r from which you wan t
to remove the user.
4 Drag the fold er to Groups the User Is N ot In.
Note: You cannot use dragging functions to move us ers who have be en
adopted from directory services.
300868-G
Page 49
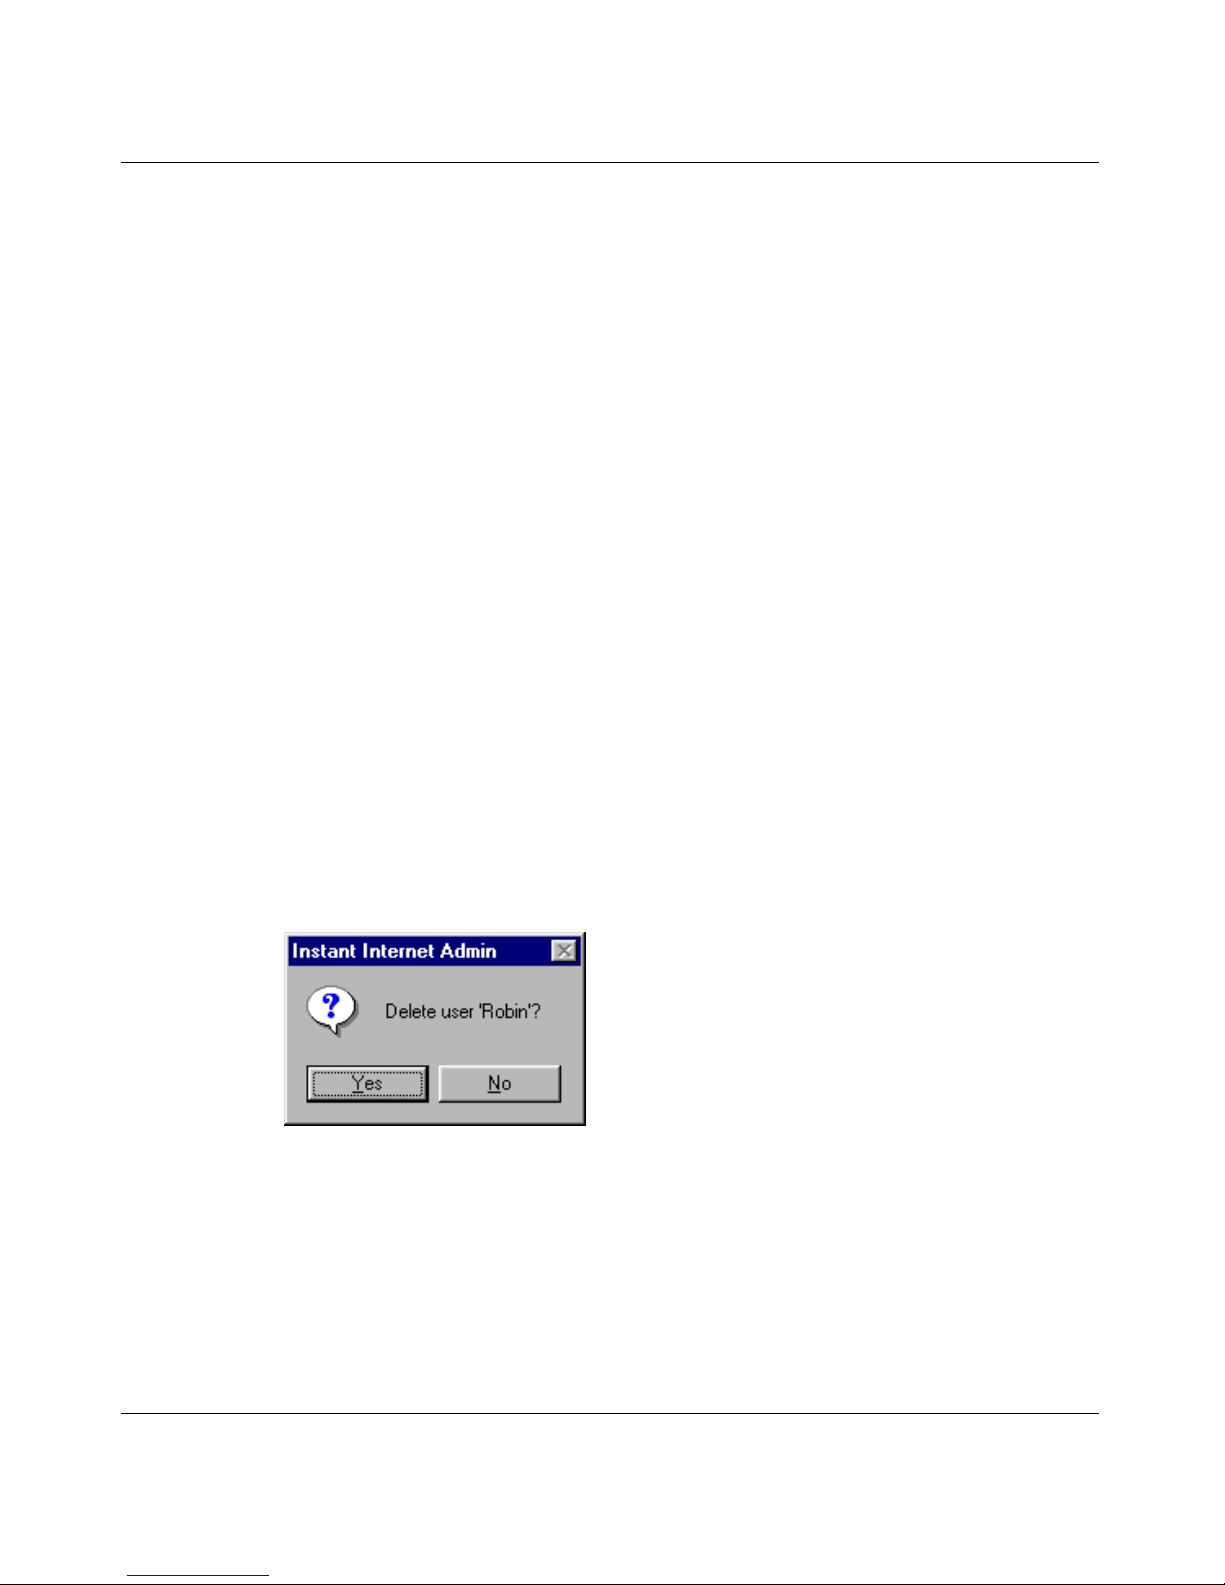
Chapter 2 User access administration 49
To remove a user from a group using the Move toolbar button:
1 On the toolbar, click Users.
2 Select the group folder from which you want to remove the user.
3 Select the user you want to move.
4 On the toolbar, click Move.
Deleting users and groups
Only those users and groups that were created within the Instant Internet utility
may be deleted by the Instant Internet utility. When a user name is deleted, Instant
Internet uses the Default User access setting to cont rol that user’s Internet access.
Deleting a user
To delete a user:
1 From the List of Users, select the user you want to delete.
2 On the toolbar, click Delete.
A confirmation message box opens (Figure 8).
Figure 8 Delete user confirmation message box
3 Click Yes to verify th e deletion .
Using the BayStack Instant Internet Management Software Version 7.11
Page 50
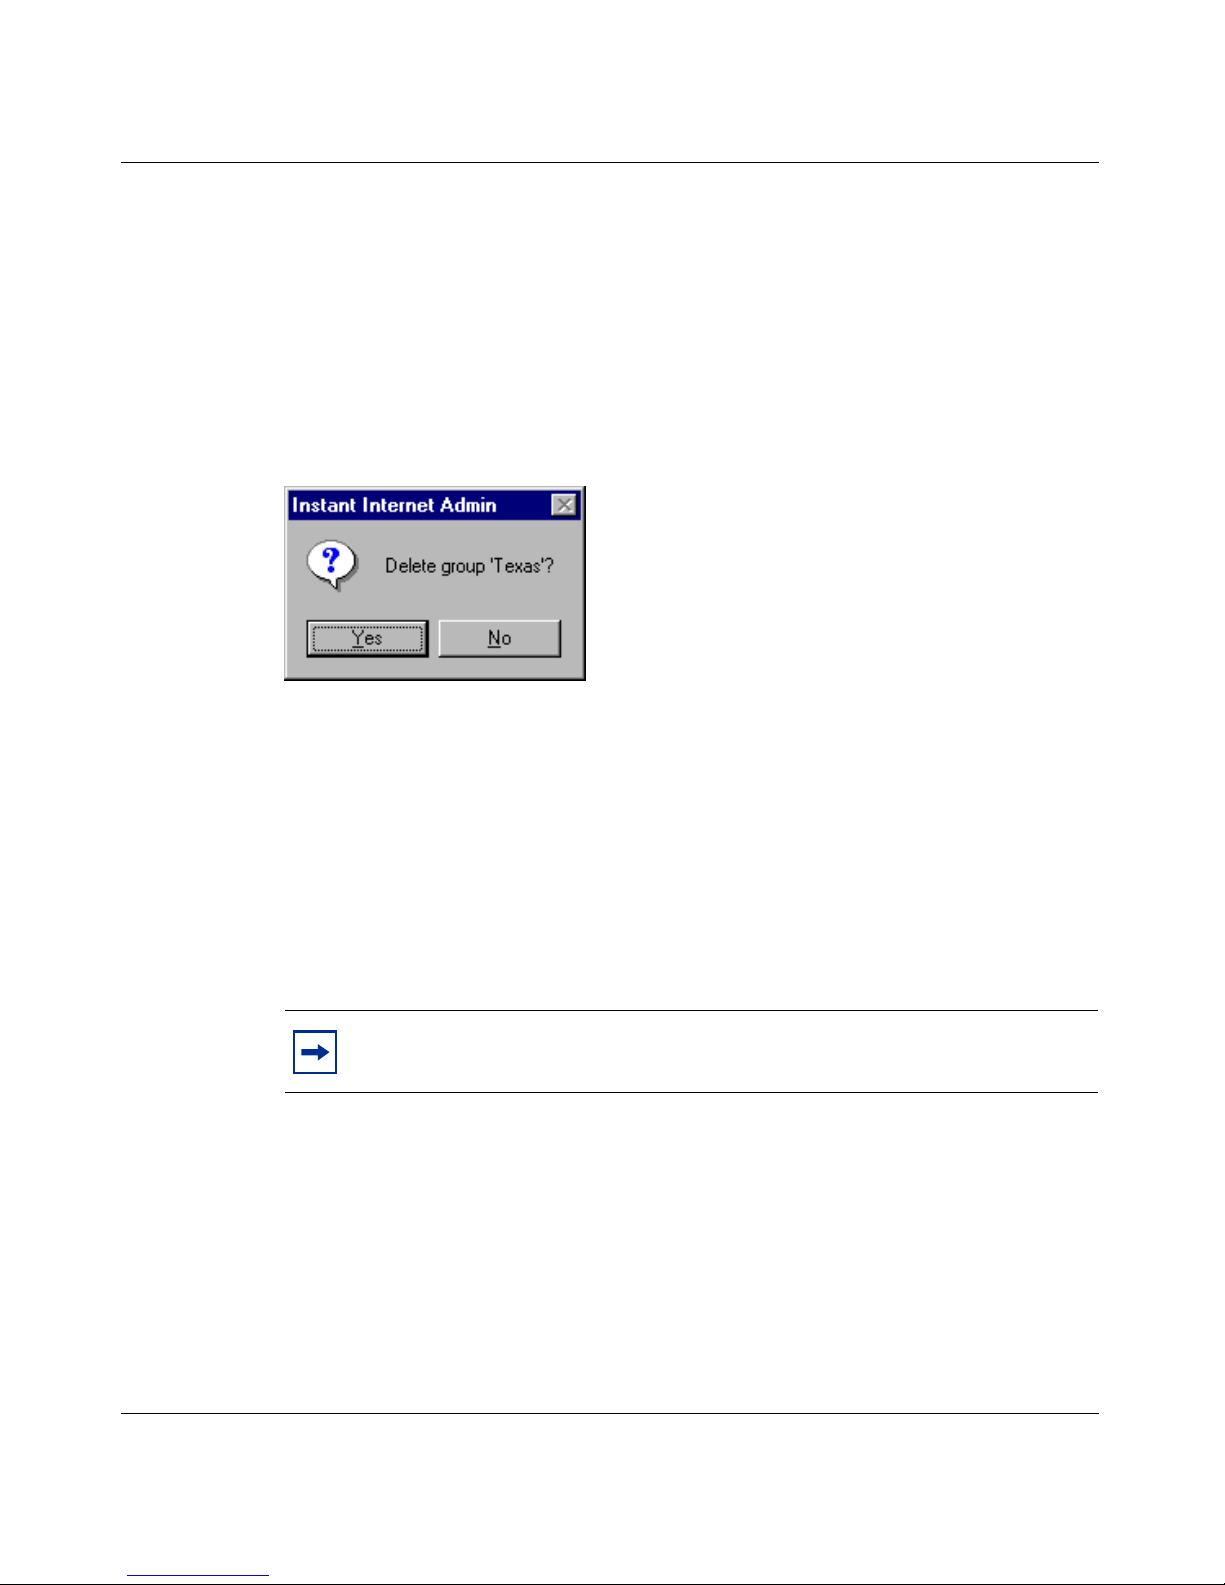
50 Chapter 2 User access administration
Deleting a group
To delete a group:
1 From the List of Groups, select the group folder.
2 On the toolbar, click Delete.
A confirmation message box opens (Figure 9).
Figure 9 Delete group confirmation message box
3 Click Yes to confirm the deletion.
Managing users and groups
You can view a list of all users and groups in the Instant Internet Admin window.
Icons displaying a figure rep res ent a user; those displaying a folder represe nt a
group of users.
Note: The procedures and instructions in this section also apply to the
users and groups adopted from the directory services of your network.
To display all users, either click the Users toolbar button or choose Users > View
User List from the menu bar.
The Instant Internet Admin main window dis plays the fo llowing information:
• List of Users
• Groups the User Is In
• Groups the User Is Not In
300868-G
Page 51

Chapter 2 User access administration 51
When you select a user, all groups to which the user belongs display as folders in
the Groups the User Is In area. All groups to which the user does not belong
display as folders in the Groups the User Is Not In area.
To display all groups, either click the Groups toolbar button or choose
Groups > View Groups List from the menu bar.
The Instant Internet Admin window displays the following inform ation:
• List of Groups
• Users In t he Group
• Users Not In the Group
When you select a group, all users in the group are displayed as figures in the
Users In the Group area. All users who do not belong are displayed as figures in
the Users Not In the Group area
.
Note: If you want be able to view the username rather than the IP
address in all lo gs, either give the d efault us er no acce ss and pu t everyone
else in a group that has the access you want or create a user that matches
your IP address scheme, and make sure that user is assigned no access.
Copying user and group Internet access settings
To simplify th e proce ss of adding use rs o r modifying ex is ting use rs, you can copy
the Internet access settings from one user or group and paste it to another user or
group.
To copy the Internet access settings of one user to another user:
1 On the toolbar, click Users.
2 Select the user with the access settings you want to copy.
3 Do one of the following:
• On the toolbar, click Copy.
• Choose Users > Copy a User.
4 Select the destination user.
Using the BayStack Instant Internet Management Software Version 7.11
Page 52
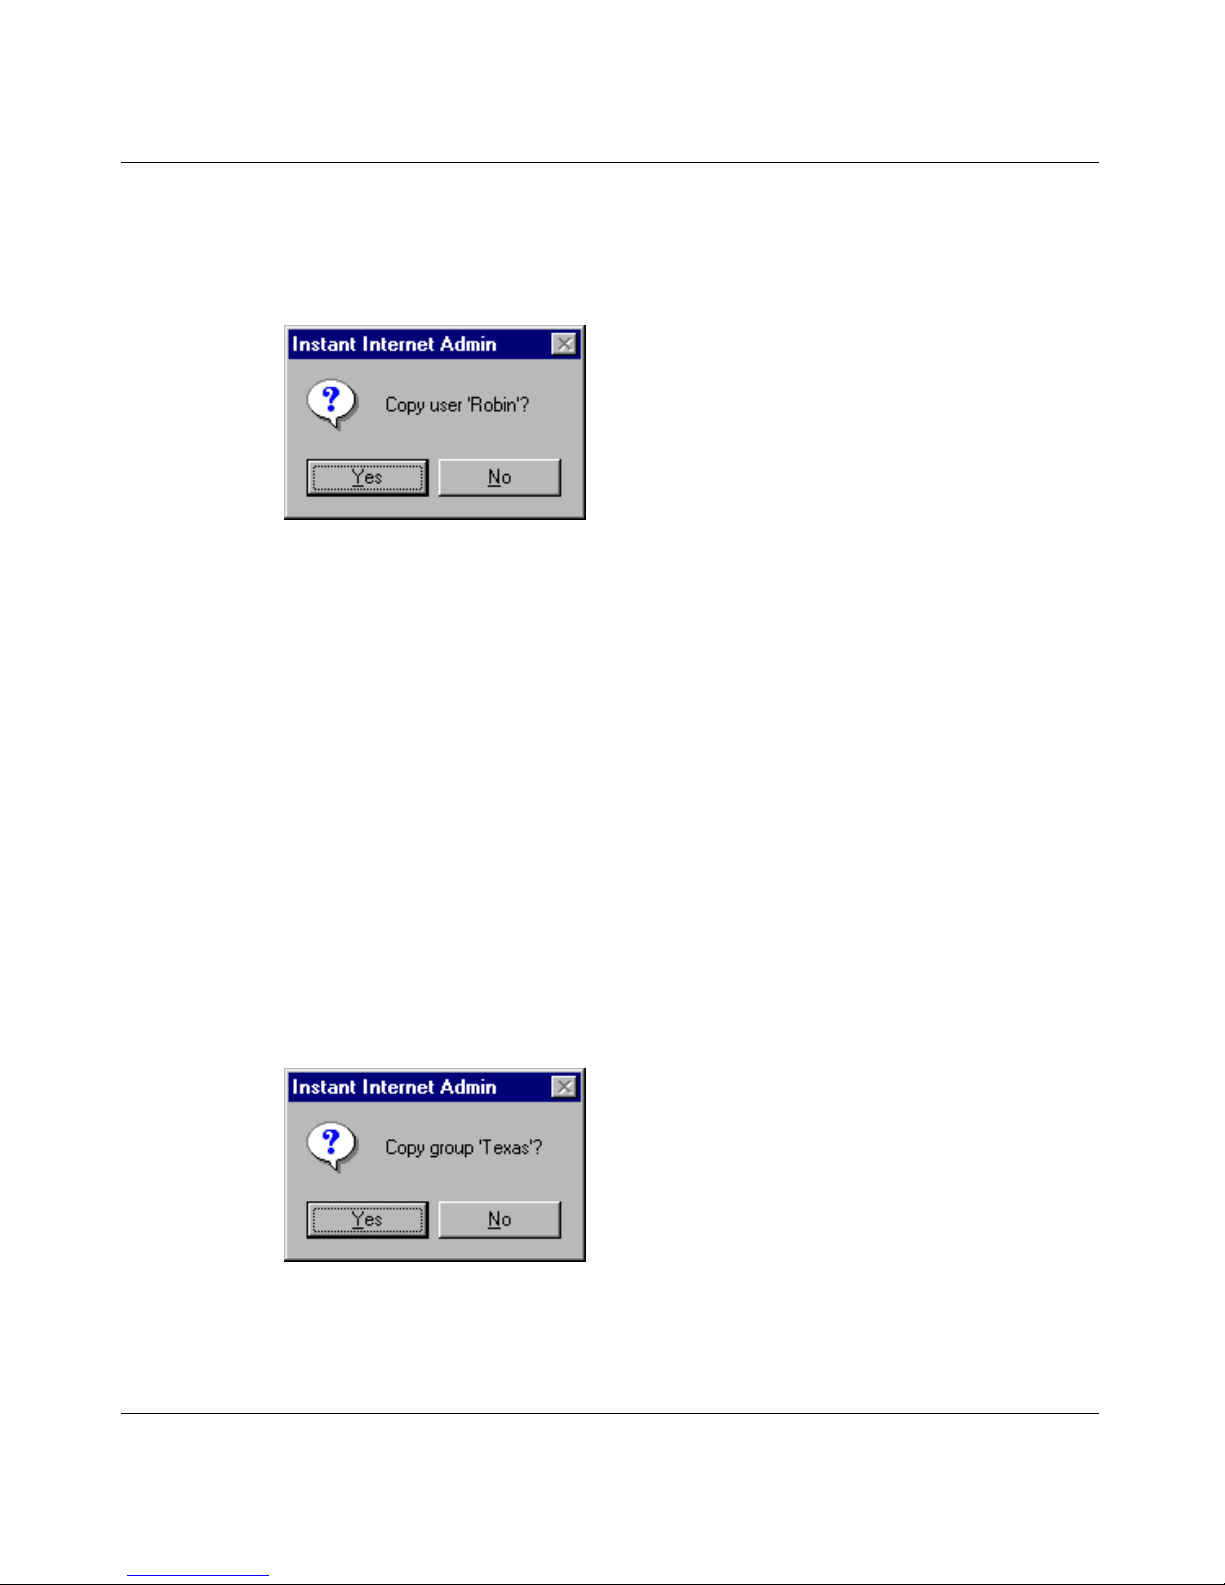
52 Chapter 2 User access administration
5 On the toolbar, click Paste.
A confirmation message box opens (Figure 10).
Figure 10 Copy user confirmation message box
6 Click Yes to copy the user.
To copy the Internet access settings of one group to another group:
1 On the toolbar, click Groups.
2 Select the group that has the access settings you want to copy.
3 Do one of the following:
• On the toolbar, click Copy.
• Choose Groups > Copy a Group.
4 Select the destination group.
5 On the toolbar, click Paste.
A confirmation message box opens (Figure 11).
Figure 1 1 Copy group confirmation message box
6 Click Yes to copy the group.
300868-G
Page 53
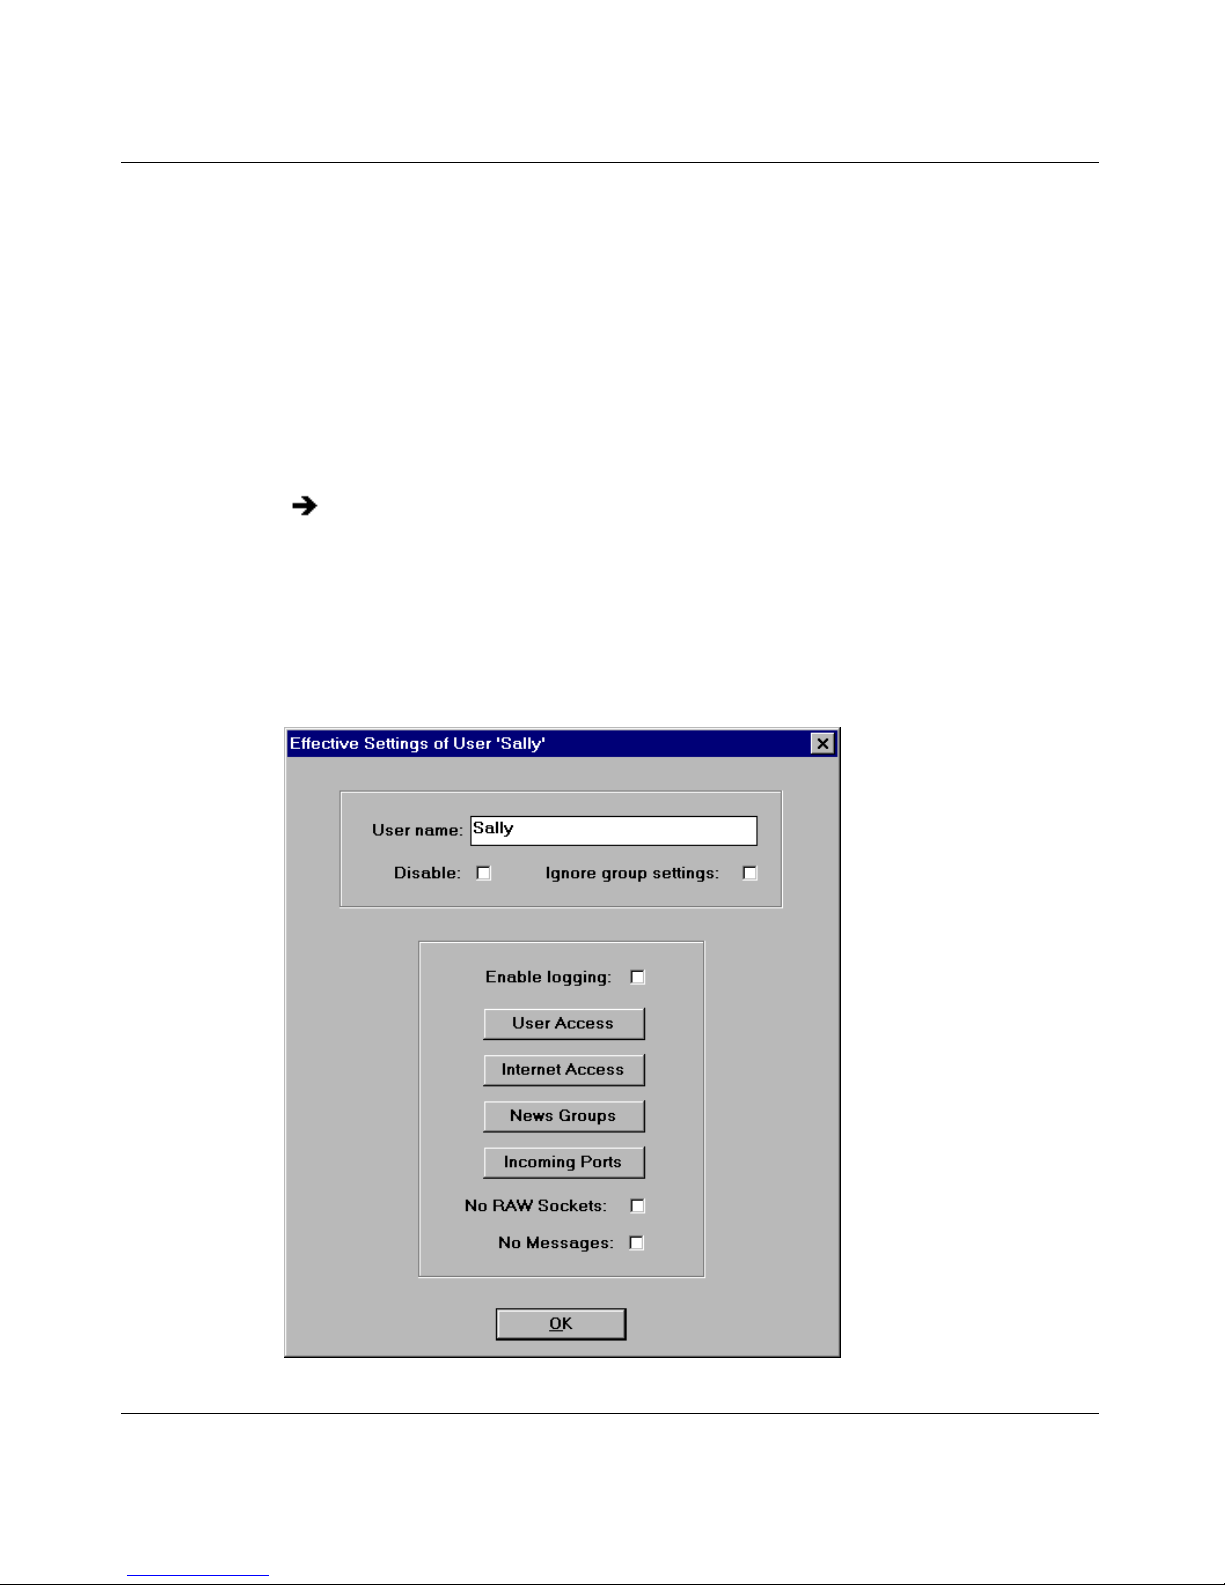
Chapter 2 User access administration 53
Viewing effective user acc ess
Because Instant Internet lets you configure the Internet access of individual users
as well as groups, a particular user may have Internet access designated through
several groups, and access might vary from group to group. Instant Internet
provides the View Effective User Access option so that you can view the user’s
effective (actual) Internet access.
To view a user’s effective user access:
Do one of the following:
• On the toolbar, click Effect.
• Choose Users > View Effective User Access.
The Effective Settings of User dialog box opens (Figure 12).
Figure 12 Effective Settings of User dialog box
Using the BayStack Instant Internet Management Software Version 7.11
Page 54

54 Chapter 2 User access administration
You can view User Access (time and days a user may access the Internet),
Internet Access (IP addresses and ports to which a user has access), News
Groups (news groups to which a user has access), and Incoming Ports (the
incoming ports that users may access). You can view but not edit this
information with this feature. For instructions on editing these configuration
settings, refer to “Configuring Internet access” on page 58, “Defining
controlled Internet access” on page 59, “Managing news group access” on
page 70, and “Managing incoming port access” on page 76.
Defining user and group access
When you assign Internet access to users or groups of users, use these guidelines:
• To simplify a dministration, set the Internet access contr ol for groups, rather
than for individual users, whenever possible.
• After you set group a ccess to a set of Inte rn et resources, acces s fo r every user
in the group changes simultaneo usly when Internet access changes for the
group.
A user can belong to several groups, each with different Internet access settings.
When this happens, In stant Intern et assigns t he user the most restri ctive Intern et
access.
For example, Peter is a member of the group New Hires, which has access to the
Internet on Monday t hrough Friday from 10 a.m. t o 2 p.m. Pet er is al so a member
of the group Development, which has unlimited access to the Internet. With
Admin, Peter has Internet access on Monday through Friday from 10 a.m. to 2
p.m. only, because that is the most restrictive.
You can view the access effectively applied to the user’s access to the Internet.
Refer to “Viewing effective user access” on page 53.
300868-G
Page 55

Chapter 2 User access administration 55
When a user accesses Instant Internet, Instant Internet searches the user database
in this sequence:
1 Instant Internet determines if the user has an Instant Internet user profile.
2 Instant Internet deter mines if the user ’s groups are configured as Instant
Internet groups. If the user has an Instant Internet user profile or is a member
of one or more Instant Internet groups, Instant Internet uses the most
restrictive access attributes.
3 If Instant Int ernet finds no Instan t In terne t group or user pro file for the user, it
designates the default Instant Internet user profile settings as the user’s
Internet access sett ings.
Note: Any users not assigned s peci f ica ll y t o a group or who do not h ave
an Instant Internet user profile automatically assume the default Instant
Internet user profile and are identified by their IP address. Refer to
“Setting up IP users not using iiLogin” on page 44.
Use the Change option t o limit or expand user an d group I nternet access. It is most
common to change Internet access for a group rather than for an individual user,
unless a particular use r has unique Internet access requi rements. Changing access
for a group simultaneously changes the access of each user in the group.
To change user or group access:
1 Select the icon of the user or group you want to change.
2 On the toolbar, click Change.
The Change Settings of User dialog box opens (Figure 13).
Using the BayStack Instant Internet Management Software Version 7.11
Page 56
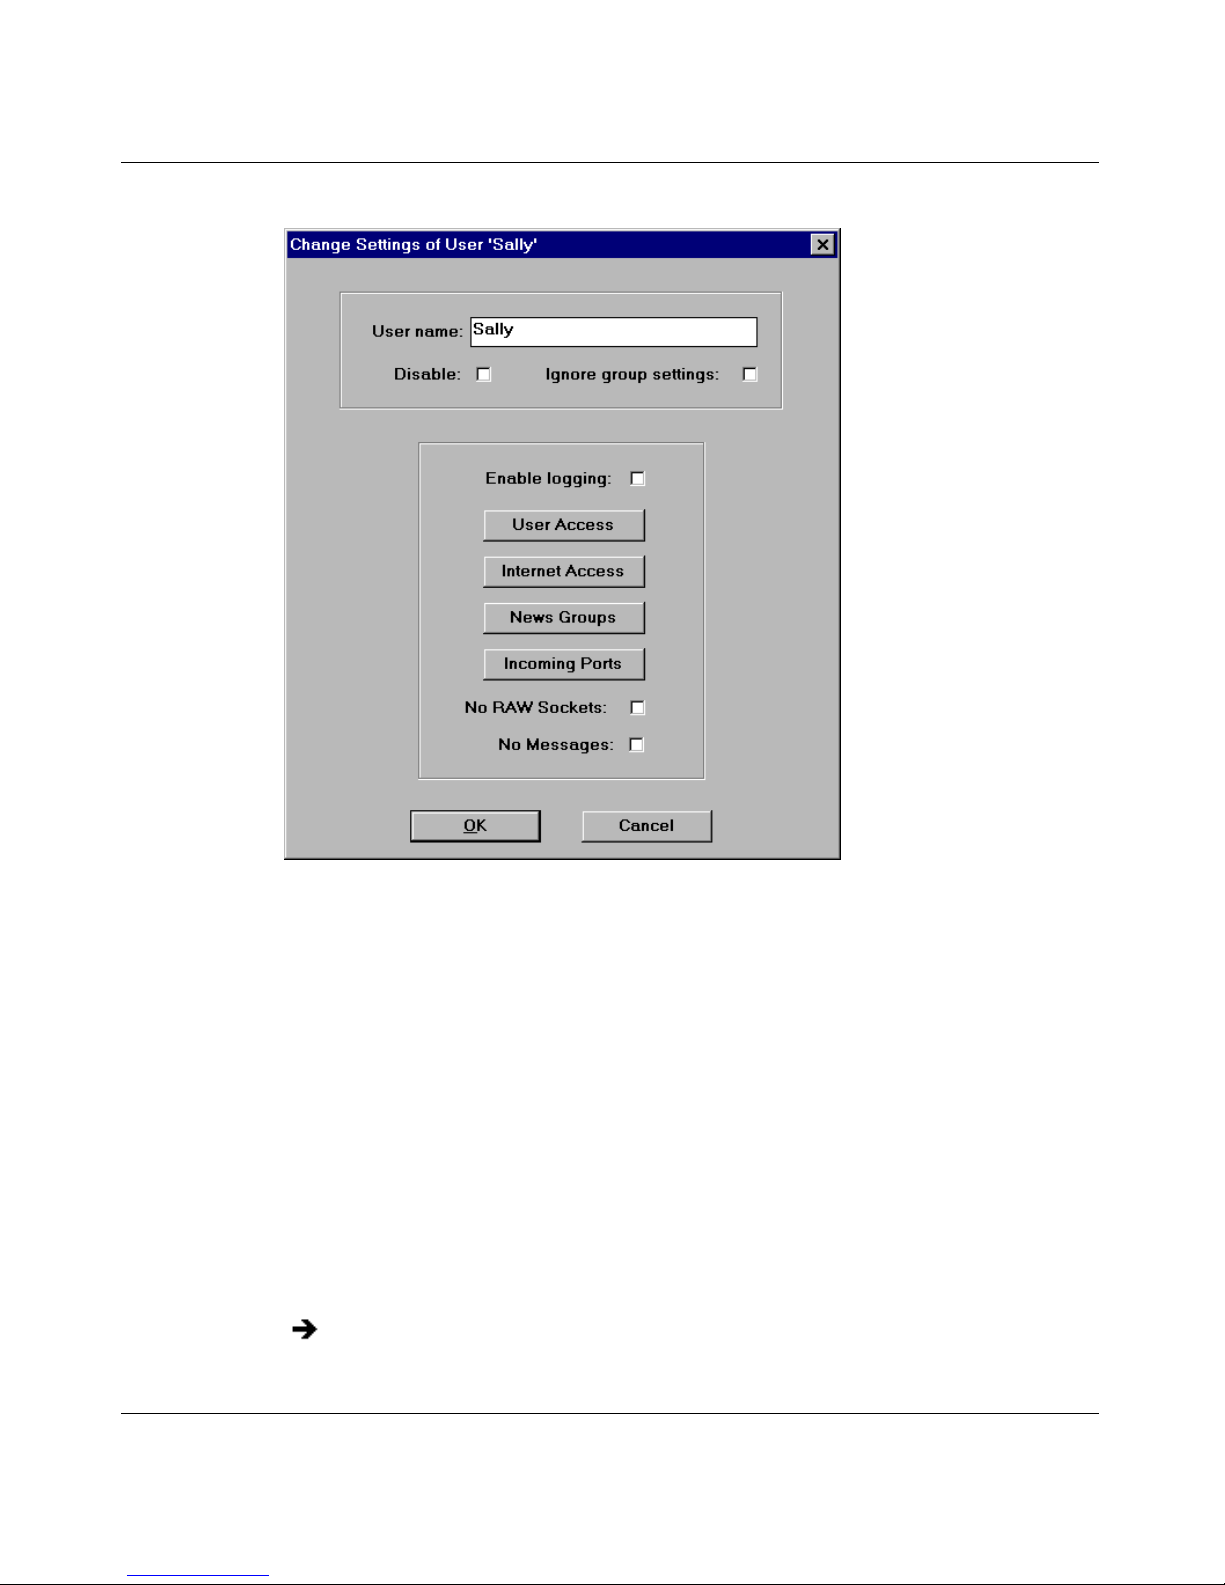
56 Chapter 2 User access administration
Figure 13 Change Settings of User dialog box
Disabling user or group access
300868-G
The options and buttons on this dialog box ar e ex plained in more detail in t he
following sections.
The disable option has a diff erent meani ng for us ers than it does for group s. If you
disable access for a user, that user is denied access to the Internet. If you disable
access for a group, access settings that have been defined for that group are
ignored and individual settings are used to determine access for each member of
the group. Disabling access is most useful when dealing with groups you adopted
from a directory service.
To disable user or group access:
In the Change Settings of User dialog box (Figure 13), select the Disable
check box.
Page 57

Chapter 2 User access administration 57
Ignoring group settings option
The ignore group se ttings opt ion is ava ilable only f or users. When y ou choose this
option, Instant Internet ignores the group Internet access settings of the groups
that this user belongs to. Instead, Instant Internet uses only the user’s specific
Internet access .
For example, if you choose the Ignore group settings for one user in a particular
group, Instant Internet uses the individual user’s Internet access options only and
ignores the settings for that group.
To ignore group settings for a user:
In the Change Settings of User dialog box (Figure 13), select the Ignore
group settings check box.
Enabling logging for a user
The Enable Logging option keeps a record of each Internet site (IP address and
port number) that a user accesses. Refer to “Viewing a unit’s users” on page 304.
This log is separate from the User Log, which is a continuous running total and
summary kept for each user (until the log is cleared). The Automatic Logging
utility (refer to “Activating automatic logging” on page 109) collects this data and
writes it to a file.
The log is maintained, regardless of this setting. The Enable Logging option
controls only the detailed connection log.
Note: The lo g file generat ed by logging ca n grow rapidly, so the amount
of logging information an Instant Internet unit can store depends on the
load.
The Instant Internet Monitoring program can collect the logging data on a
different computer running Wi ndows. You can display or save this data to a
common file format, so that you can mani pul ate the data i nt o t he format you want
with an external progra m, such as Exc el. Refer to “Activity logging overview” on
page 93.
Using the BayStack Instant Internet Management Software Version 7.11
Page 58
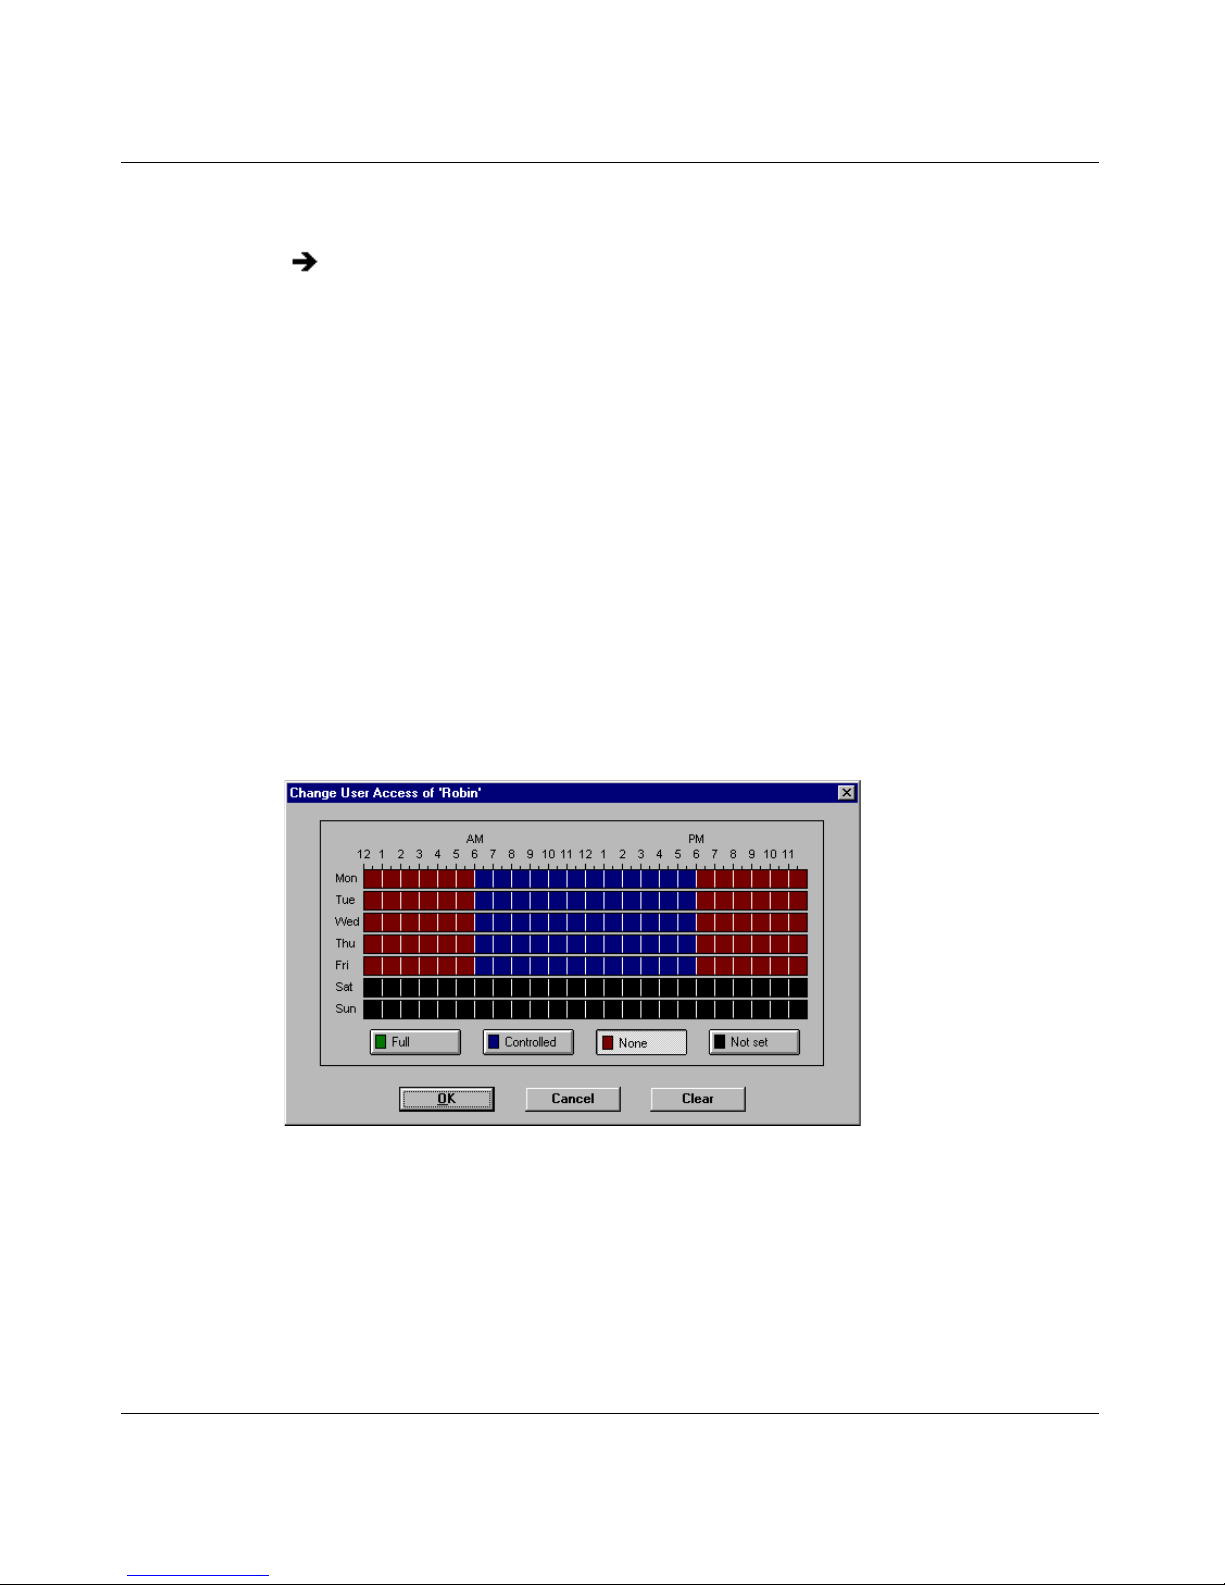
58 Chapter 2 User access administration
To enable logging for a user:
In the Change Settings of User dialog box (Figure 13), select the Enable
logging check box.
Configuring Internet access
The User Access button in t he Change Settings of User dialog box lets you specify
days of the week and times during the day when users may access the Internet.
The User Access option defines the settings for days of week and hours of day.
To configure user access for a specific day of week and time of day:
1 In the Change Settings of User dialog box (Figure 13), click User Access.
The Change User Access dialog box opens (Figure 14), showing the days of
week and hours in a day.
Figure 14 Change User Access dialog box
2 To select user access, click the appropriate button.
• Full – Total uncontrolled Internet access.
• Controlled – Internet access is limited to specified IP addresses and
ports. Refer to “Defining controlled Internet access” on page 59.
• None – Absolutely no Internet access is permitted.
300868-G
Page 59

Chapter 2 User access administration 59
• Not Set – (For advanced administration only.) When a user is a member
of one or more groups, this option allows you to control the access of the
user during specifi ed times and leave the remaini ng time “not set” so that
other group settings will take effect.
3 To set all days and hours for a specific button, double-click one of the access
buttons and then proceed with step 7.
4 Position the mouse pointer over the graph.
5 Drag to select the access hours for each day.
As you drag, the color o f the graph in the are a you are dra gging chang es to the
color designated by the button you selected. Release the mouse button when
you complete your selecti on. You can designate as many areas this way as you
choose. Note that the graph is divided into half-hour increments, and that one
square on the graph c an have tw o colors in it .
6 Select the days of the week and hours of each day for which Inte rnet ac cess is
to be allowed, and then click OK.
Internet access is available for the specified days and times only.
7 Click OK.
After you make changes to User Access, an asterisk (*) appears to the left of the
option, indicating that specific Internet User Access settings have been defined.
For those times that you mark “Controlled,” you can allow or prohibit specific IP
addresses, host names, and port numbers for the group or user. Refer to
“Overview of configuring Internet access” on page 61.
Defining controlled Internet access
The Internet Access button in the Change Settings of User dialog box (Figure 13)
enables you to define the access the user or group has to the Internet for those
times you have defined user access as controlled (blue). You can specify IP
addresses, domain names, and port numbers that give users Internet access, thus
providing total Internet access control.
You can define Internet access only if you have defined the user or group access
to “Controlled.” Refer to “Configuring Internet access” on page 58.
Using the BayStack Instant Internet Management Software Version 7.11
Page 60

60 Chapter 2 User access administration
Before you continue, familiarize yourself with the basic concepts of Internet
addressing protocols.
Three kinds of Internet ad dressing
There are three kinds of Internet addressing:
• IP addresses are direct communications over the Internet to the appropriate
destinations. All connections on the Internet are made using IP addresses.
Each IP address consists of an actual IP address and a port number. The
format is nnn.nnn.nnn.nnn:#. You can use one to three digits between each
decimal point in the address (such as, 206.210.192.99). IP addresses and port
numbers are separated by a colon (:). For example, 198.67.8.99:80.
• Host names are human readable versions of IP addresses, such as
nortelnetworks.com or instant.net. The list of allowed/denied host names
controls only the ability to l ook up the IP addre ss associated wit h a host name.
Note: If you allow access based on host names, you must also allow
access to their associated IP addresses. To allow access to one Web site
and dis-allow access to all others, allow all IP addresses but deny access
based on host name.
For example, if you open a browser and ty pe i n “www.xyz.com”, the browser
first asks the DNS proxy to look up the address of that name. Instant Internet
then checks the access controls having to do with host names and decides
whether or not the site is allowable. The access controls therefore determine
whether or not a name can be resolved into an address.
• Port numbers can be any number from 0 to 65535, where the first 1024 are
well-known port numbers that define specific tasks. For example, Web
browsing occurs on port number 80, file transfer protocol (ftp) uses ports 20
and 21, and simple mail transfer protocol (SMTP) uses port 25.
Note: You can thin k of the I P addr ess ( or do main name ) as the add ress of
an apartment building, with the port number functioning as an apartment
within the building.
Access to ports can be connectionless (UDP) or connection-oriented (TCP).
300868-G
Page 61

Chapter 2 User access administration 61
Overview of configuring Internet access
When a user attempts Internet access, Instant Internet checks the access list for
that user and determines whether or not to permit access to that address. Instant
Internet sorts all access controls by:
• Day of week and time of day
• Fully specified addresses
• Partially specified addresses (using wildcards)
The Internet Access option lets you designate specific IP addresses and port
numbers to which each user or group may gain access.
Note: You must set the Day of Week and the Time of Day access to
controlled (blue) for these entries to be enforced. Refer to “Configuring
Internet access ” on page 58.
You can designate Internet addresses as IP addresses or host names, and you can
select port numbers from the access list provided, or enter them numerically.
Within this option, Internet access is designated as follows:
• An asterisk (*), the wildcard symbol, is all encompassing, whether
designating full access, no access, or specific addresses or ports (Table 3).
Table 3 Designating Internet access – wildcard symbol
Address Type Explanation
√ *:* Allow both TCP & UDP Specifies total Internet access.
√206.210.192.99:* Allow both TCP & UDP Specifies access to all ports at this
specific IP address only.
• A check mark (3) designates user access to the specified address or port
(T able 4).
Using the BayStack Instant Internet Management Software Version 7.11
Page 62

62 Chapter 2 User access administration
Table 4 Designating Internet access – checkmark
Address Type Explanation
√ 198.* Allow both TCP & UDP Specifies access to all ports at all IP
√ *:80 Allow TCP only Specifies IP access only to port 80
• An X designates no access to the specified address or port (Table 5).
Table 5 Designating Internet access — X
Address Type Explanation
X *:21 Disallow TCP Specifies no ftp access from any
addresses beginning with 198.
at all connection-oriented IP
addresses.
address.
When you click Internet Access in the Change Settings of User dialog box, the
Internet Access dialo g box opens with the group’s or user’s current Interne t access
control list in the form at of access symbo l, type, IP address, por t number , and host
name. Internet acces sibility is li sted from the most spec ific to the le ast specific.
Table 6 shows a sample Internet acc ess control list.
Table 6 Samp le Inte rnet acc ess co ntrol list
Address Type Explanation
√ *:* Allow both TCP & UDP User has unlimited Internet access.
X 198.67.8.99:80 Disallow TCP User may not browse this IP
address.
√ 198.67.8.99:* Allow both TCP & UDP IP address has unlimited access.
User can access any port for the
specified IP address.
√ *:80 Allow TCP only User may browse only.
X *:25 Disallow Both TCP &
UDP
X *:* Disallow both TCP &
UDP
User cannot access SMTP.
User has no Internet access.
300868-G
Page 63

Chapter 2 User access administration 63
Yo u can redefine a group’s or user’s access control list from the Internet A ccess
dialog box. You can add, delete, or change IP addresses, host names, and port
numbers to which the specified group or user has access.
If a user or group access is set to “Full” (refer to “Configuring Internet access ” on
page 58), that user has access to everything on the Internet. However, if you add
one restriction to the Internet access list, the user has no Internet access at all.
Therefore, if you want to restrict access to only a few sites, you must first allow
access to everything. You can allow access to all IP addresses, ports, and host
names, and then disallow access one by one, as desired. Or, you can disallow
access to all IP addresses, ports, host names, and then allow access one by one,
as desired.
The reverse is true if you h ave the user or group acc es s set t o “Controlled.” In this
case, the user has no Internet access, and you must specifically allow Internet
access to IP addresses, ports, and host names.
When you make changes to Internet Access, an asterisk (*) appears to the left of
the option, indicating that specific Internet access control settings have been
defined.
Adding Internet access
To add Internet access to a user or group:
1 In the Admin window, select a group folder or user icon.
2 On the toolbar, click Change.
The Change Settings of User dialog box opens (Figure 15).
Using the BayStack Instant Internet Management Software Version 7.11
Page 64
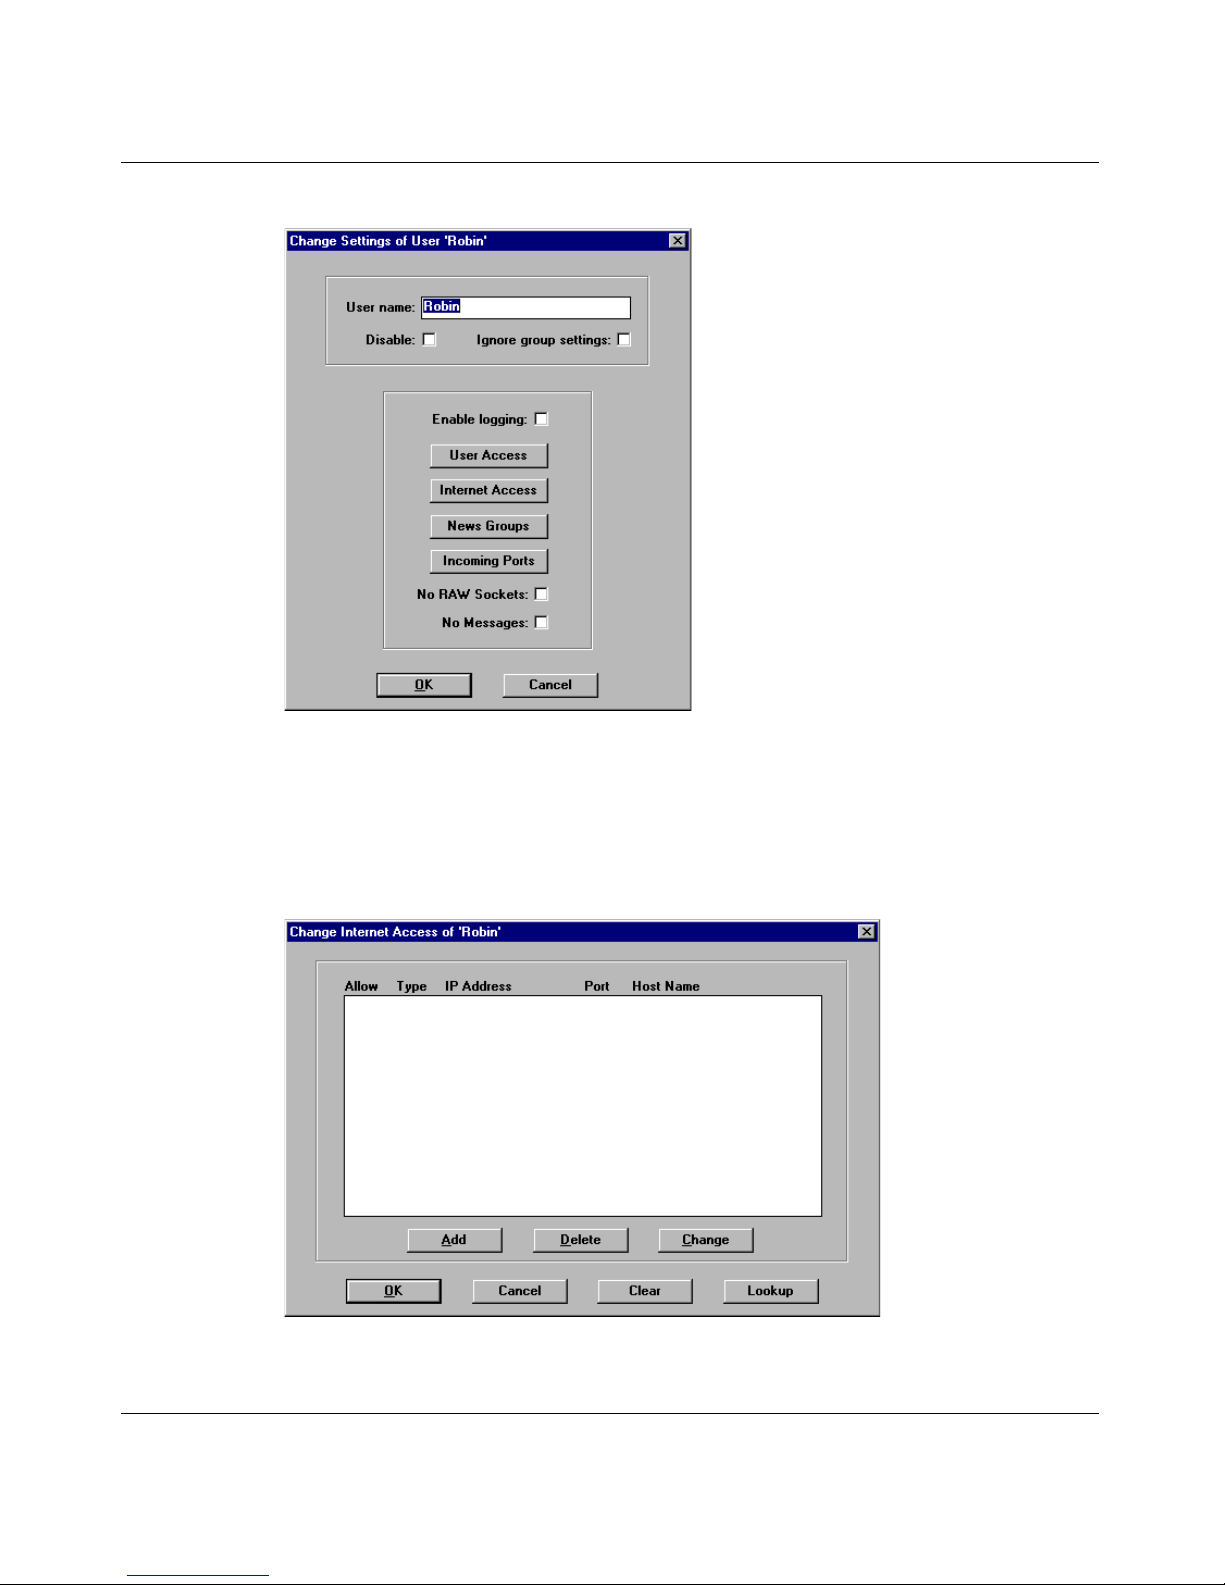
64 Chapter 2 User access administration
Figure 15 Change Settings of User dialog box
3 Click Internet Access.
The Change Internet Access dialog box opens (Figure 16) and displays the
current access control list for the group or user.
Figure 16 Change Internet Access dialog box
300868-G
Page 65
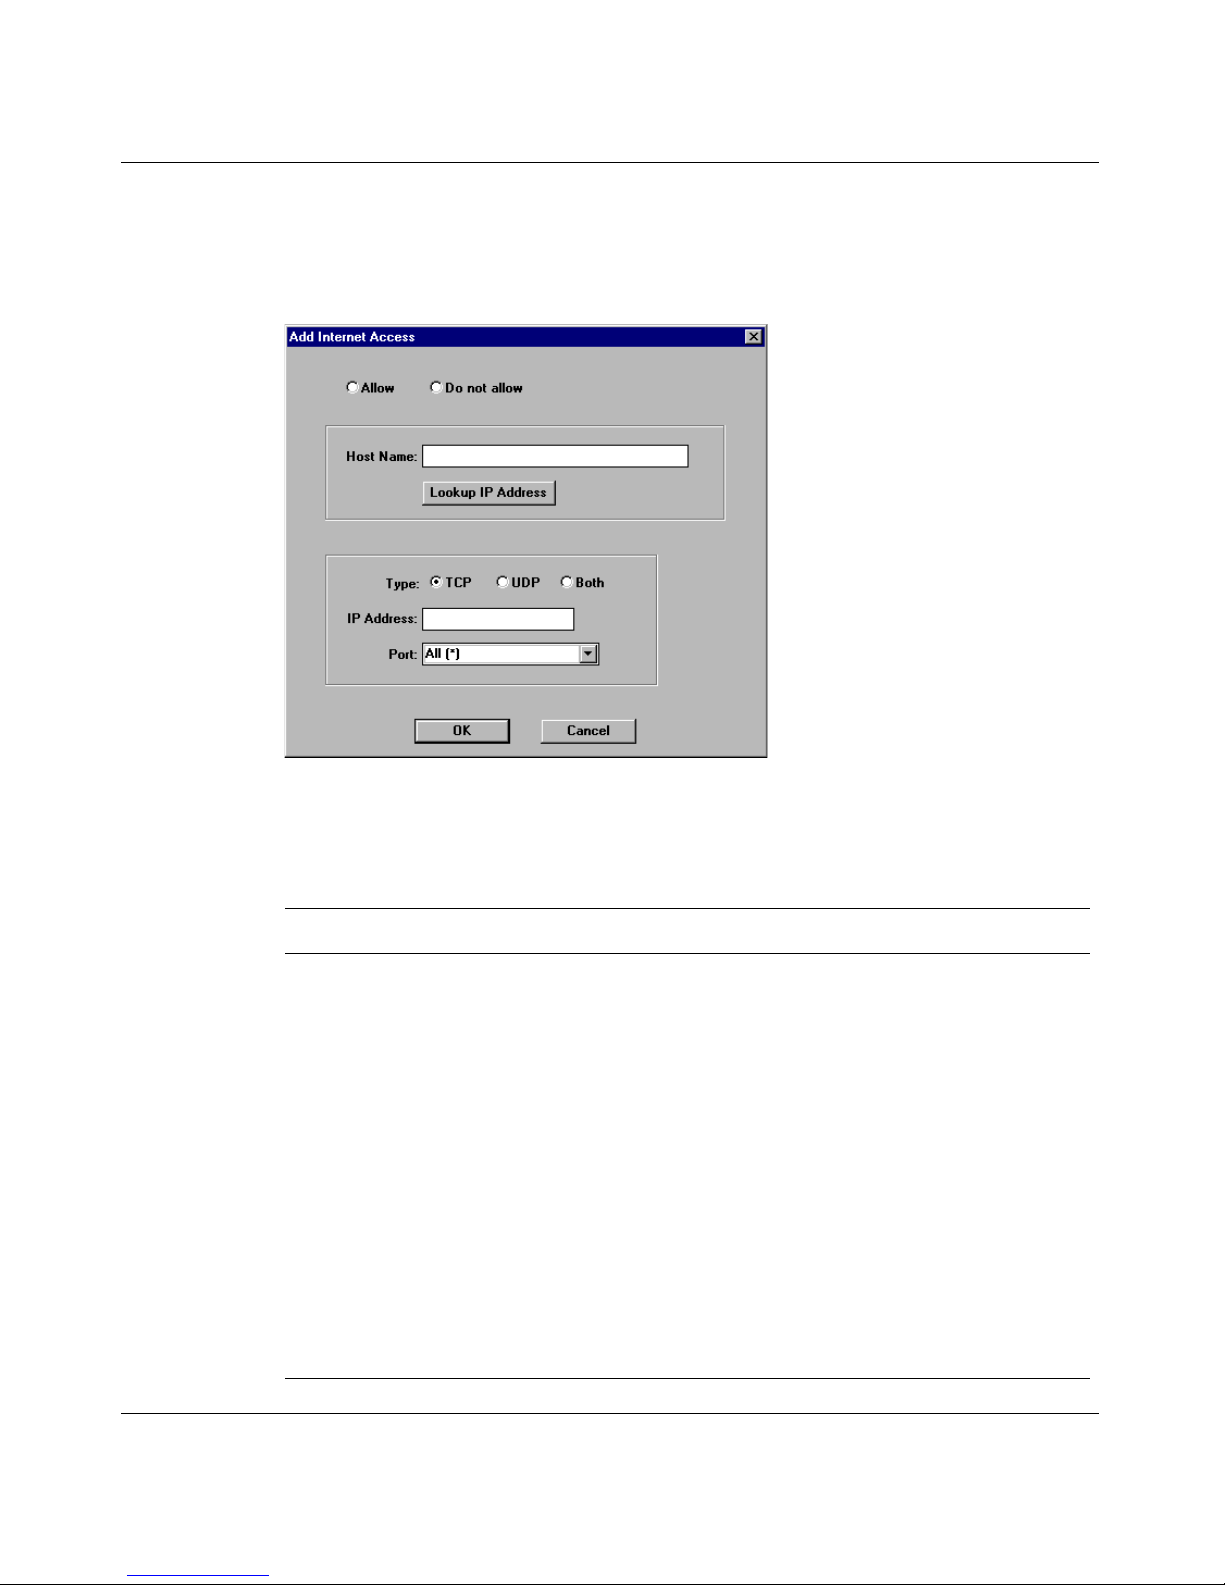
Chapter 2 User access administration 65
4 Click Add.
The Add Internet Access dialog box opens (Figure 17).
Figure 17 Add Internet Access dialog box
Table 7 describes the items in the Add Internet Access dialog box
Table 7 Add Internet Access dialog box items
Item Description
Allow Allows access.
Do not allow Denies access.
Host Name Enter a host name for which you are defining access.
Lookup IP Address If you do not know the IP address of a host name, you can enter
the host name and then click Lo okup IP Addre ss. Inst an t Internet
looks up the IP address of the specified host name.
Type • TCP – connection oriented
• UDP – connectionless
• Both – TCP and UDP
IP Address Enter the IP address of the host name. If you do not know the IP
address, you can enter the host name and select the Lookup IP
Address button. Instant Internet looks up the IP address of the
specified host name.
Port Select a port number.
Using the BayStack Instant Internet Management Software Version 7.11
Page 66

66 Chapter 2 User access administration
Note: You can define access to a host name without specifying its
corresponding IP address (or addresses). Some sites change their IP
addresses regularly, so to avoid editing the access list often, you can
specify the host name without the IP address. Remember, however, that
you must also allow host names for any IP addresses that you allow.
5 Click Allow.
6 Enter the Host Name.
If you want to sp ecify an IP addres s, but do not know what it is, click Lookup
IP Address.
7 Select a Type.
8 Enter the IP Address (optional).
9 Enter the Port number.
10 Click OK.
Removing Internet access
To remove Internet access from a group or user:
1 In the Admin window, select a group folder or user icon.
2 On the toolbar, click Change.
The Change Settings of User dialog box opens (Figure 18).
300868-G
Page 67
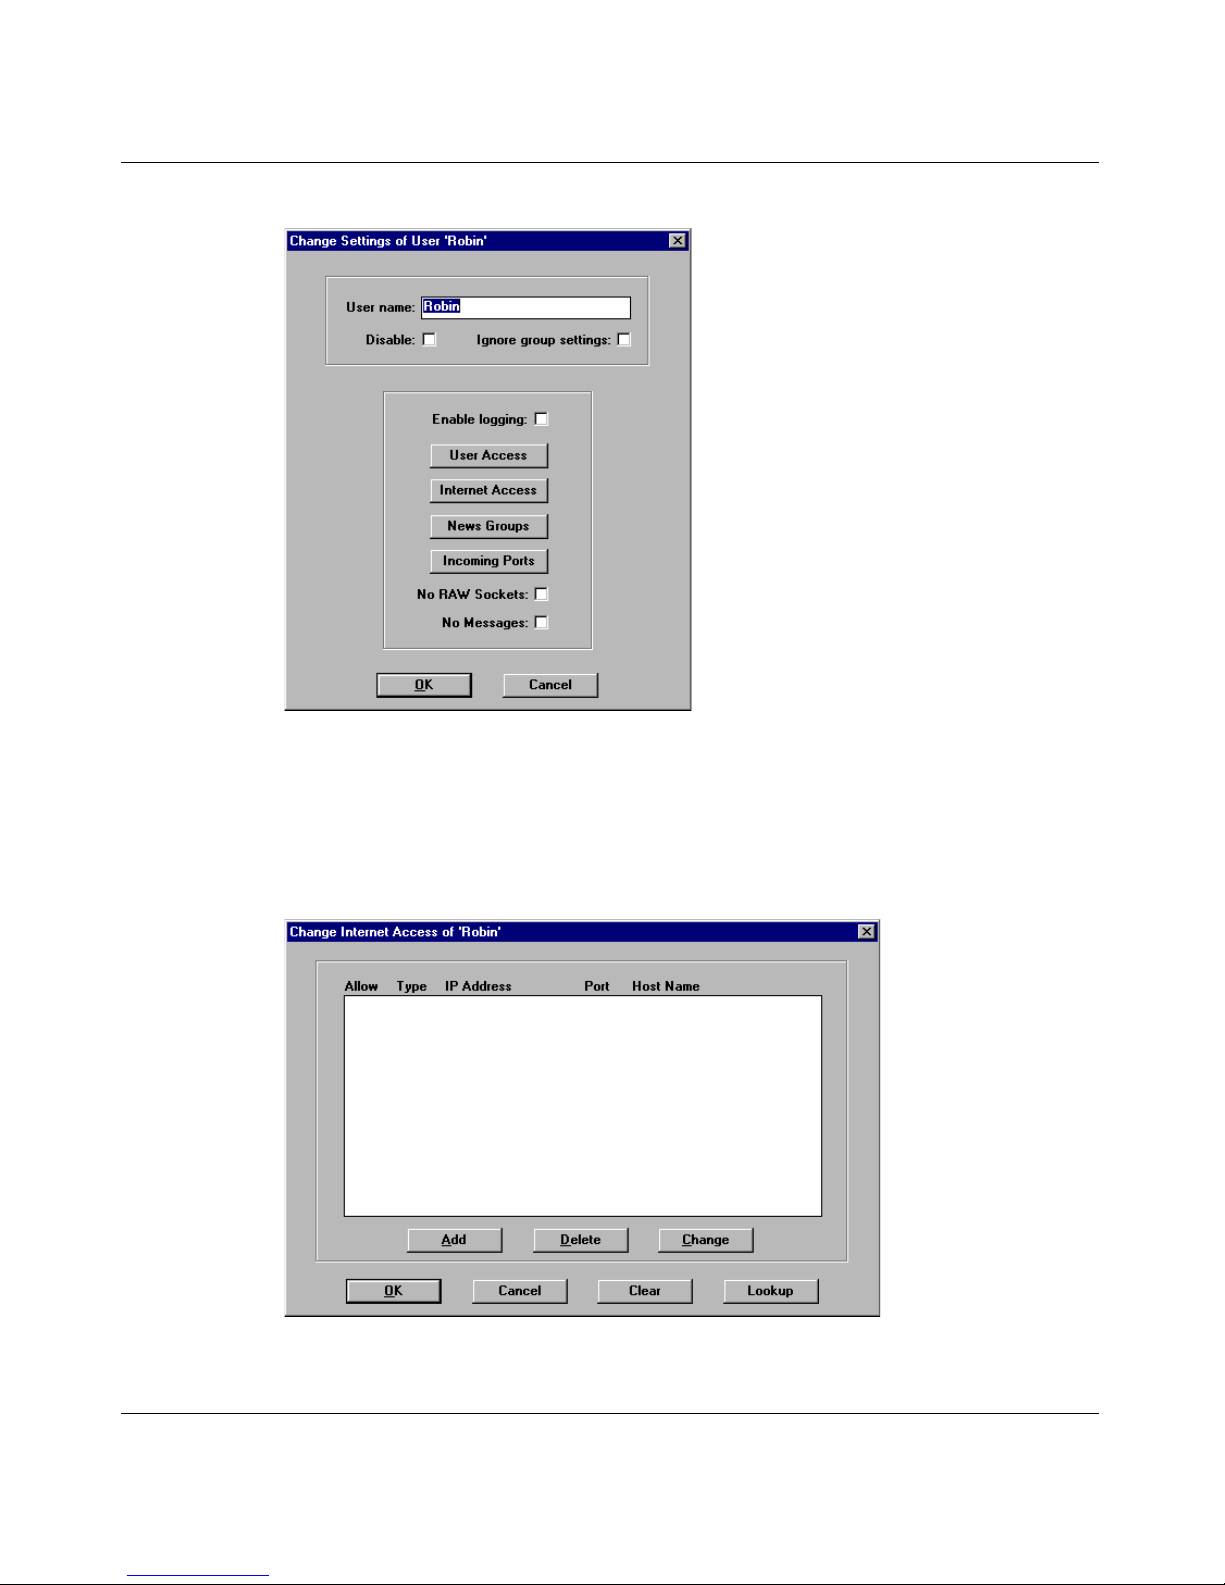
Chapter 2 User access administration 67
Figure 18 Change Settings of User dialog box
3 Click Internet Access.
The Change Internet Access dialog box opens (Figure 19) and displays the
current access control list for the group or user.
Figure 19 Change Internet Access dialog box
4 Select the Intern et addres s for which the group (or user ) is to be denied acces s.
Using the BayStack Instant Internet Management Software Version 7.11
Page 68
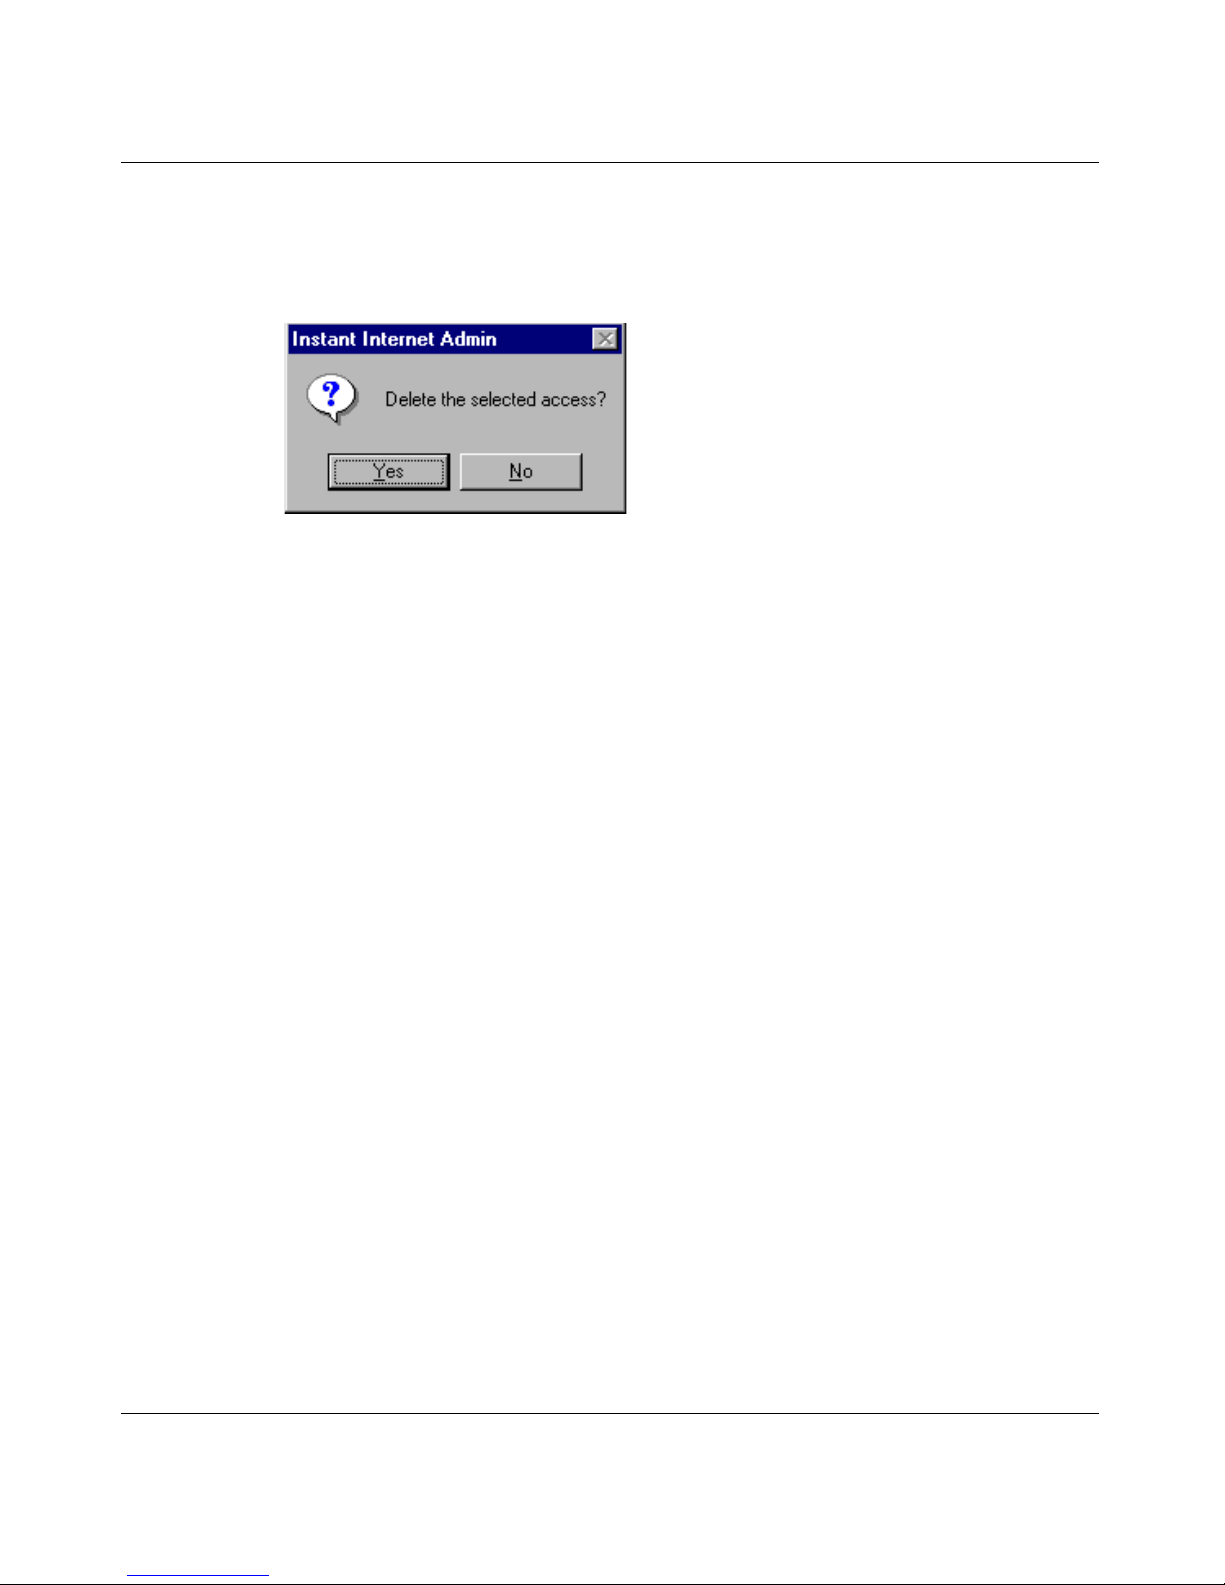
68 Chapter 2 User access administration
5 Click Delete.
A confirmation message box opens (Figure 20).
Figure 20 Delete access confirmation message box
6 Click Yes to confirm the deletion.
The IP address is deleted from the group’s (or user’s) access control list, and
the user no longer has access to that Internet address.
Changing Internet access
To change the Internet access of a user or group:
1 In the Admin window, select a group folder or user icon.
2 On the toolbar, click Change.
The Change Settings of User dialog box opens (Figure 21).
300868-G
Page 69
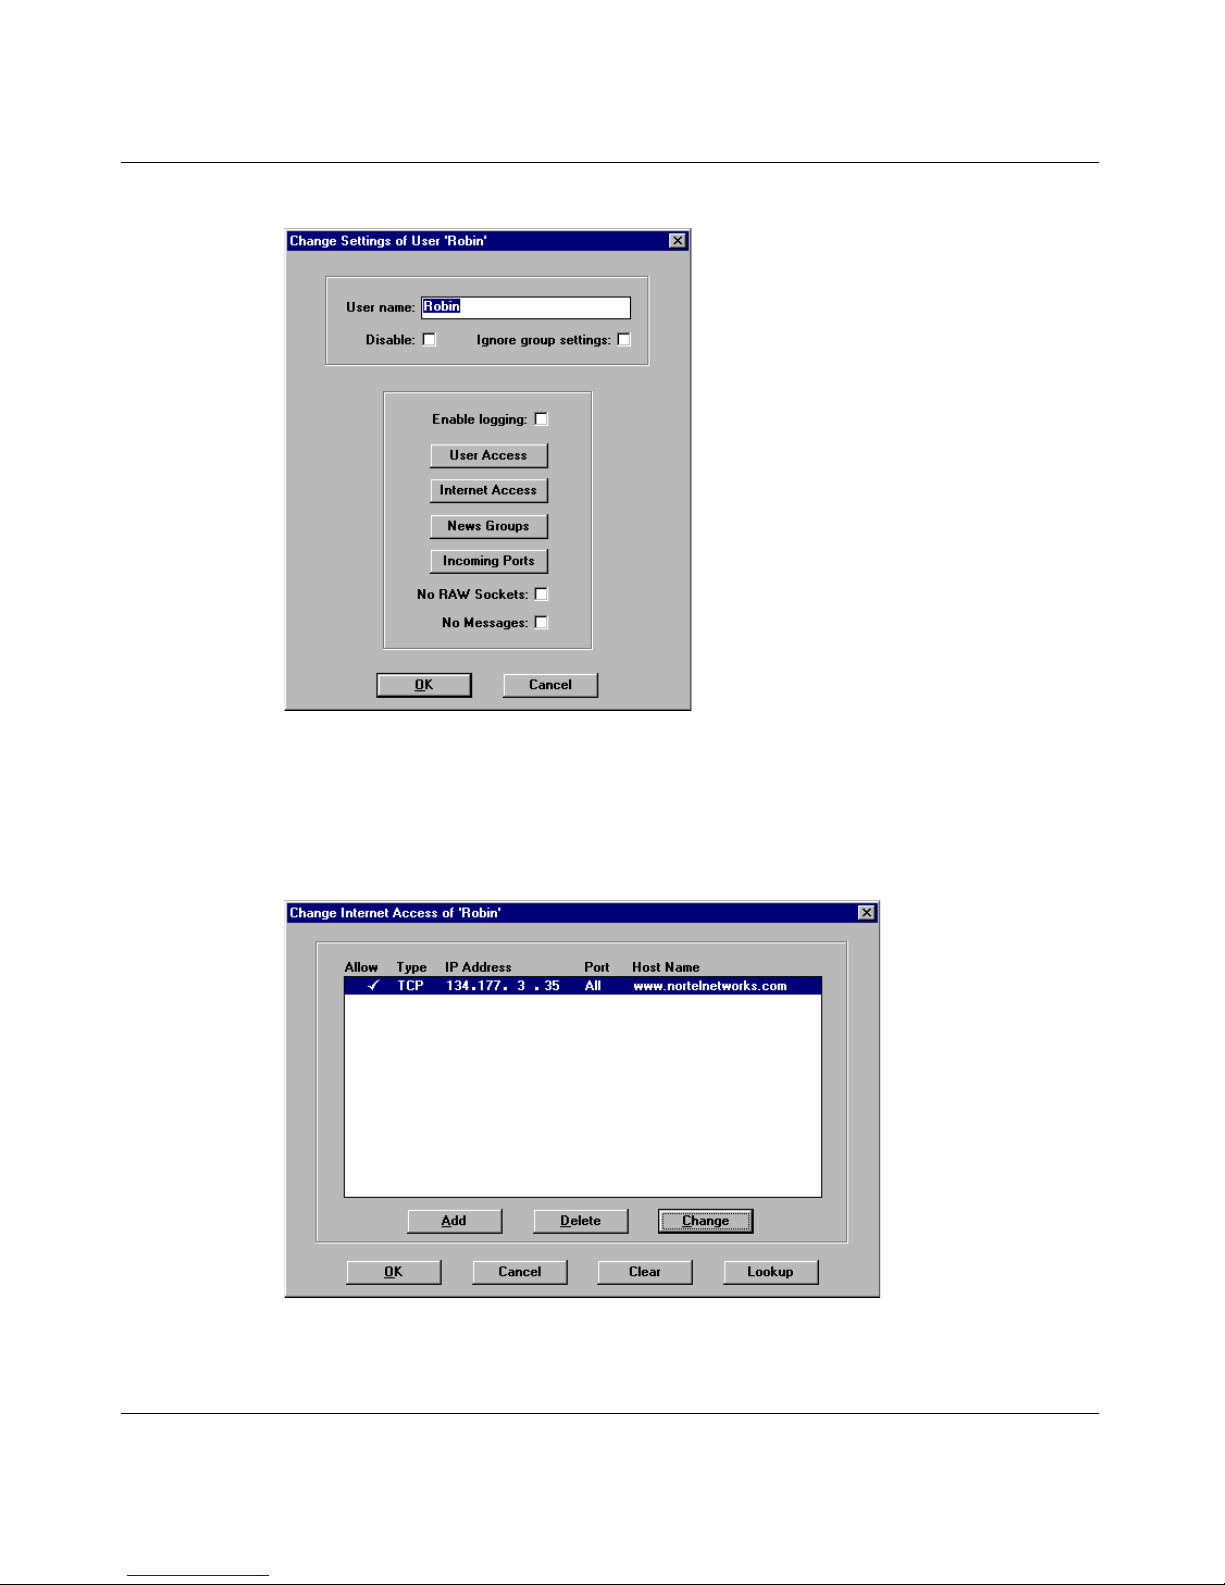
Chapter 2 User access administration 69
Figure 21 Change Settings of User dialog box
3 Click Internet Access.
The Change Internet Access dialog box opens (Figure 22) and displays the
current access control list for the group or user.
Figure 22 Change Internet Access dialog box
4 Select the Internet address for which the group (or user) access is to be
changed.
Using the BayStack Instant Internet Management Software Version 7.11
Page 70
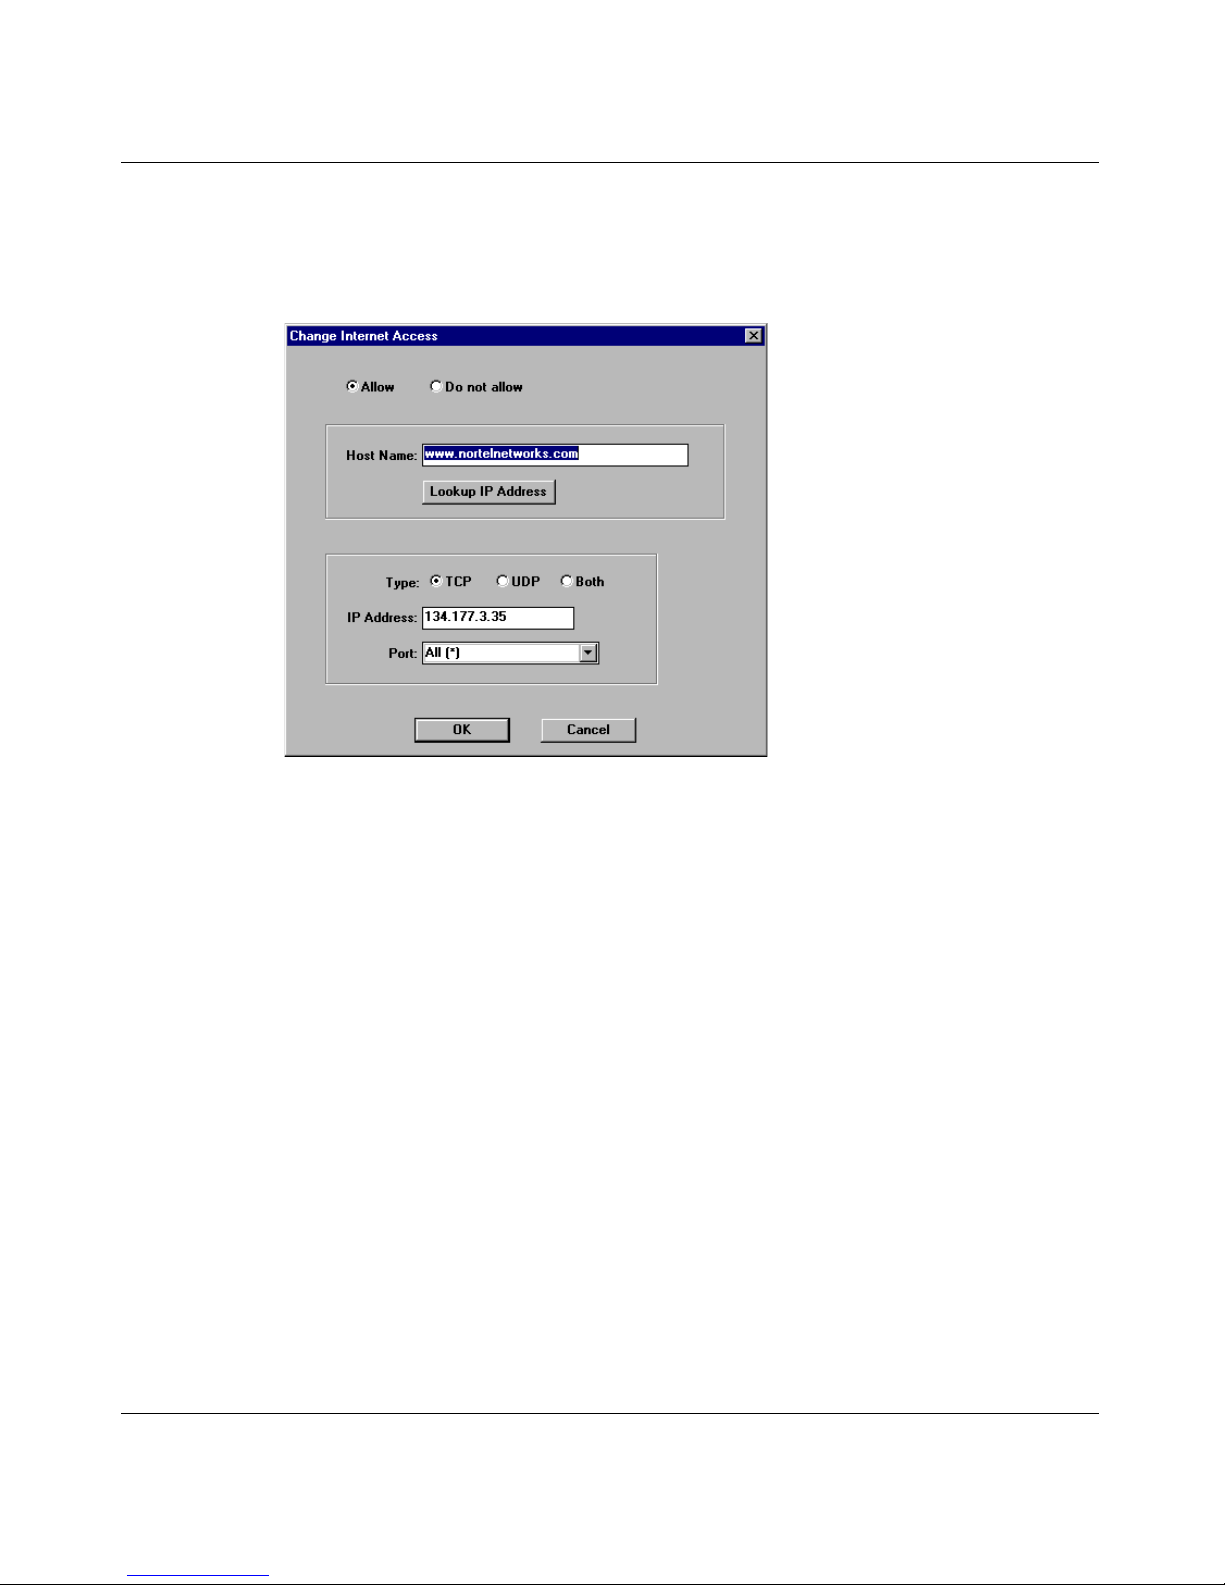
70 Chapter 2 User access administration
5 Click Change.
The Change Internet Access dialog box opens (Figure 23).
Figure 23 Change Internet Access dialog box
6 Change the informat ion .
7 Click OK.
Managing news group access
The News Group button on the Change Settings of User dialog box (Figure 24)
enables you to designate specific news groups to which each user or group may
gain or be denied access.
News group access is de signated when a check mar k is display ed next to t he name
of the news group. If access is denied, an X is displayed.
You can add, delete, or change news groups to which the selected user has access.
300868-G
Page 71
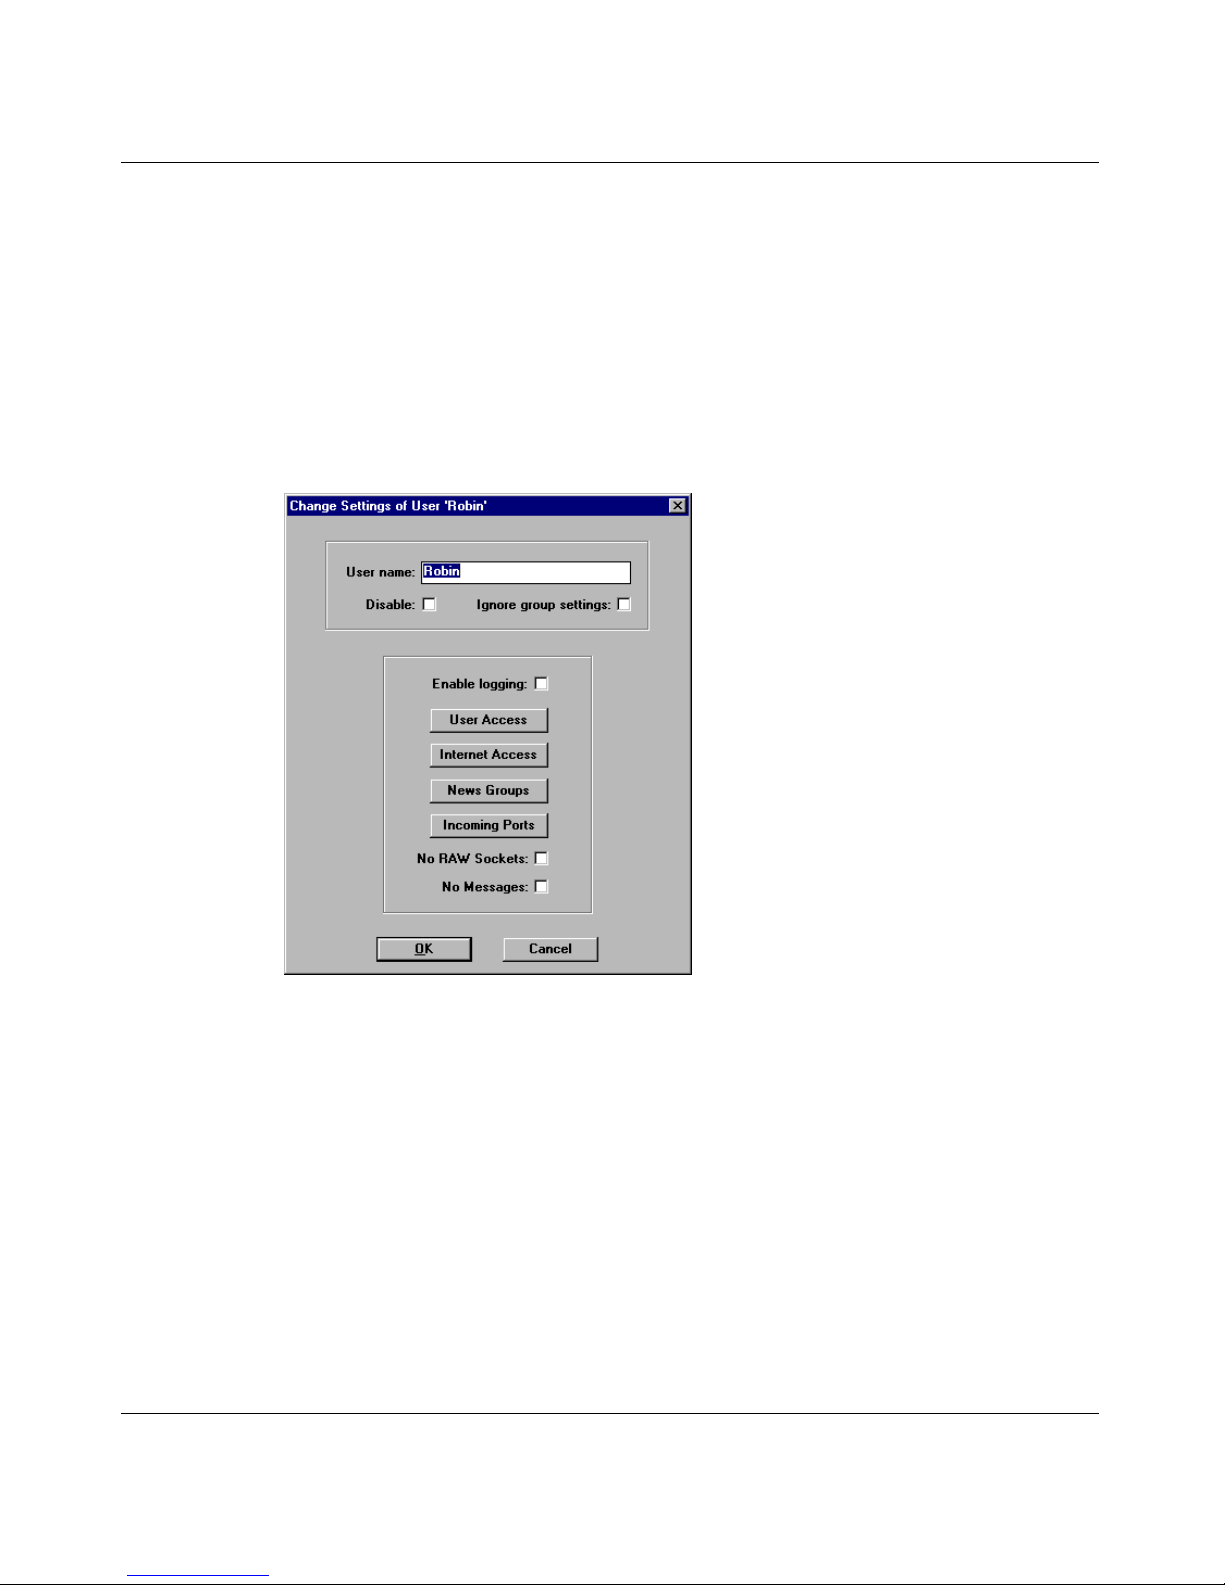
Chapter 2 User access administration 71
Adding news group access
To add a news group to group or user access:
1 In the Admin window, select a group folder or user icon.
2 On the toolbar, click Change.
The Change Settings of User dialog box opens (Figure 24).
Figure 24 Change Settings of User dialog box
3 Click News Groups.
The Change News Groups dialog box opens (Figure 25).
Using the BayStack Instant Internet Management Software Version 7.11
Page 72
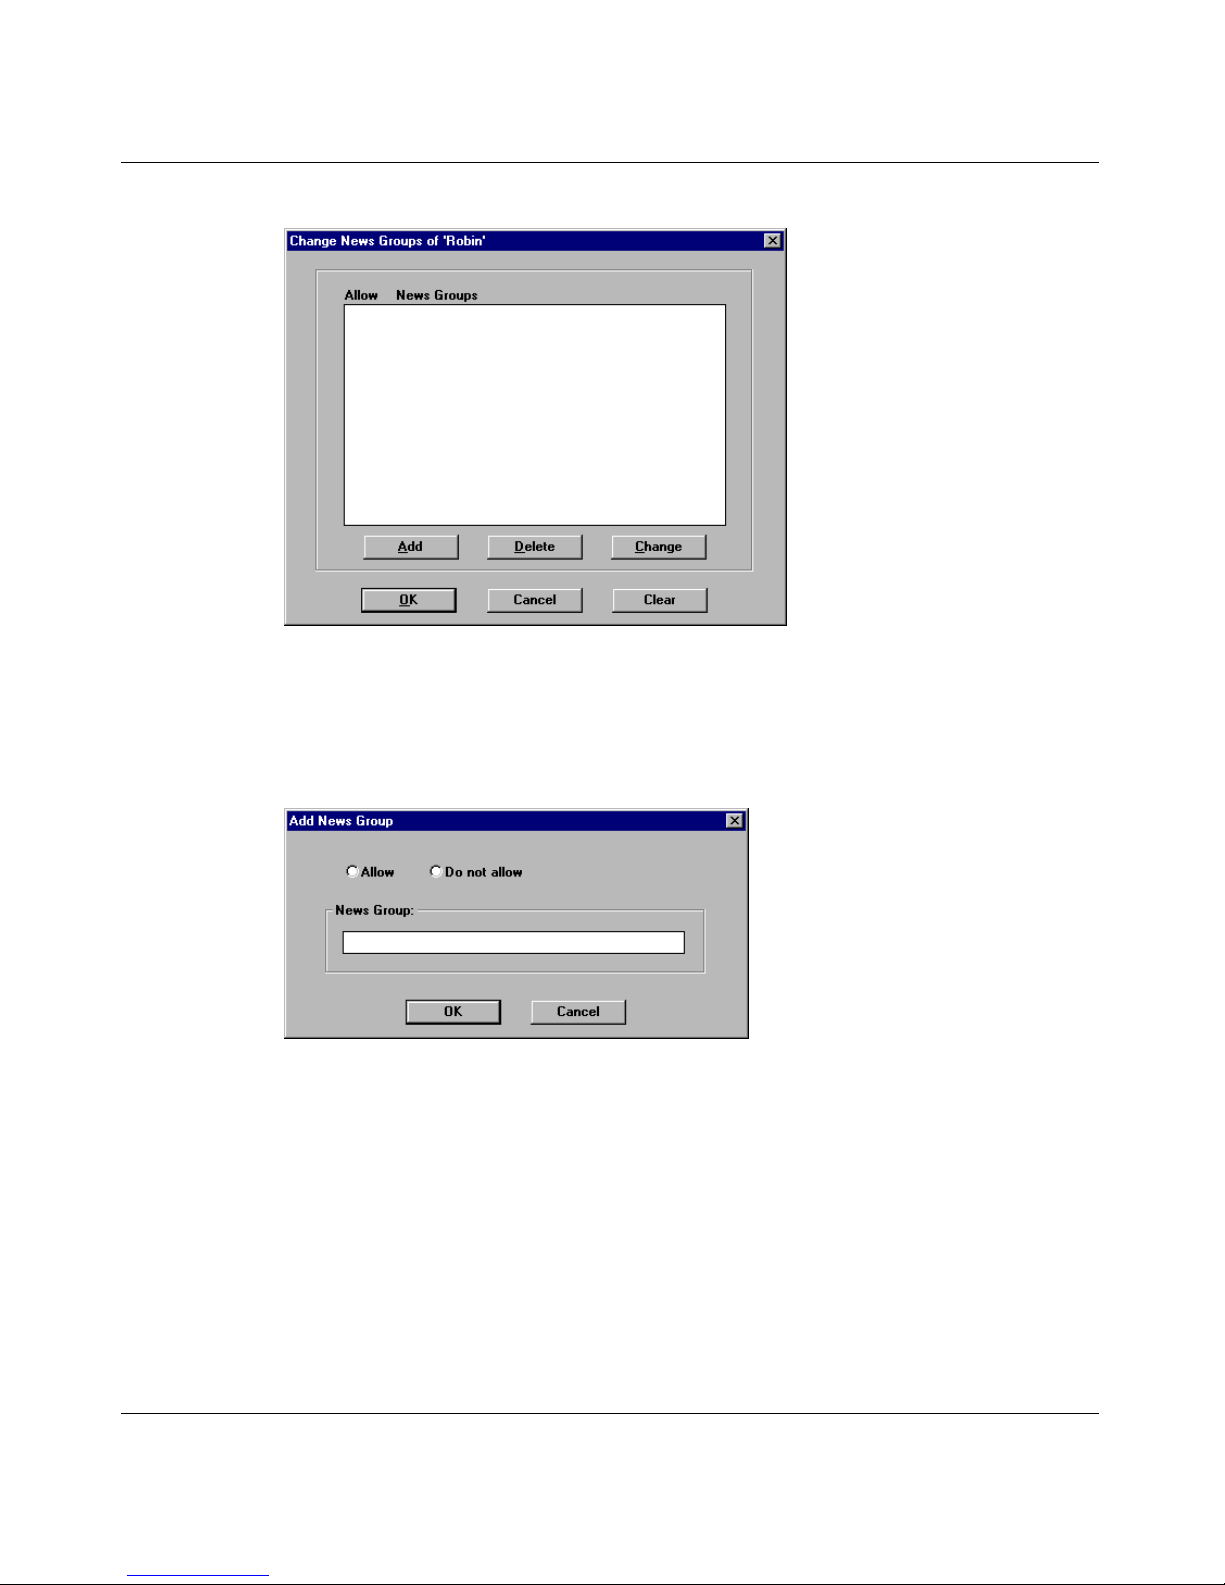
72 Chapter 2 User access administration
Figure 25 Change News Groups dialog box
4 Click Add.
The Add News Group dialog box opens (Figure 26).
Figure 26 Add News Group dialog box
The following information is displayed:
• Allow – Allows access.
• Do not allow – Denies access.
• News Groups – Enter the name of the news group for which you are
defining access.
5 Do one of the following:
• To allow access to the news group, click Allow.
• To deny access to the news group, click Do not allow.
300868-G
Page 73
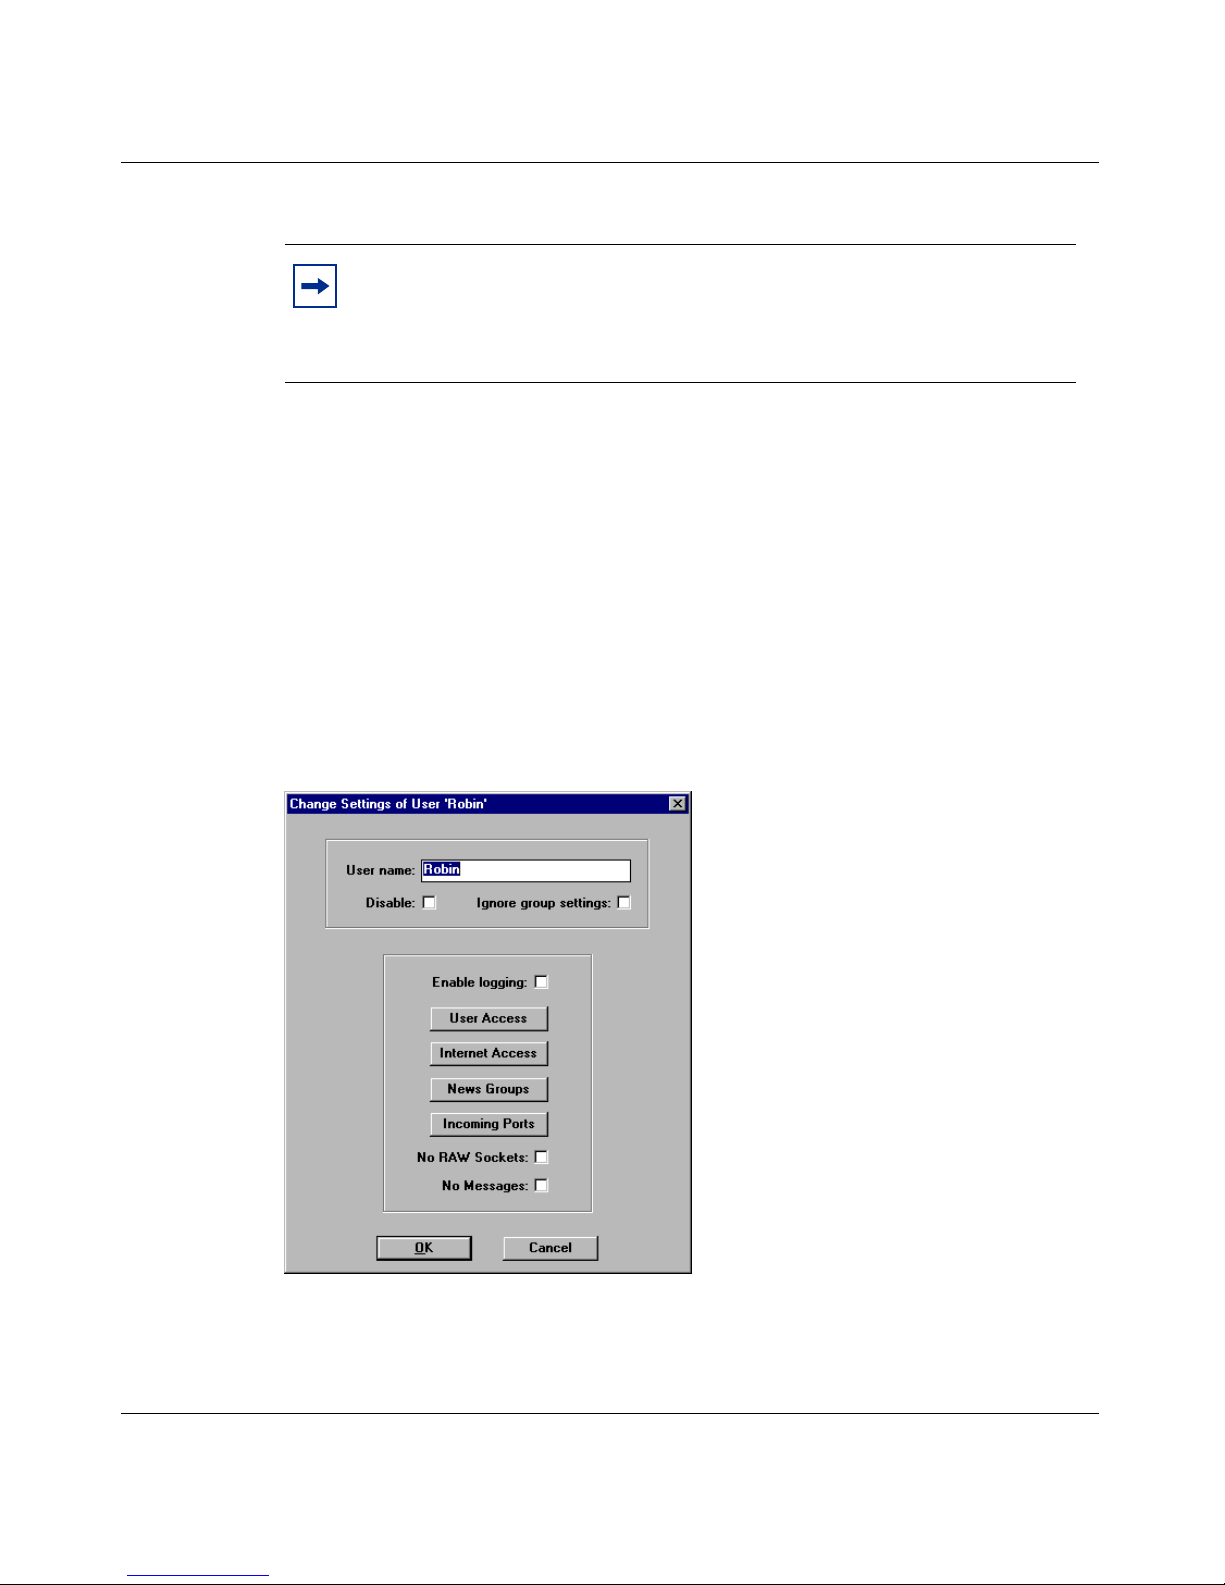
Chapter 2 User access administration 73
6 Enter the name of the news group for which you are defining access.
Note: You can also add or remove an entire section of news groups
by placing an asterisk after the news group address. For example,
alt.binaries.pictures.* selects all the sub-news groups within the
alt.binaries.pictures news group.
7 Click OK.
Removing news group access
To remove a news group from the list:
1 In the Admin window, select a group folder or user icon.
2 On the toolbar, click Change.
The Change Settings of User dialog box opens (Figure 27).
Figure 27 Change Settings of User dialog box
3 Click News Groups.
The Change News Groups dialog box opens (Figure 28).
Using the BayStack Instant Internet Management Software Version 7.11
Page 74
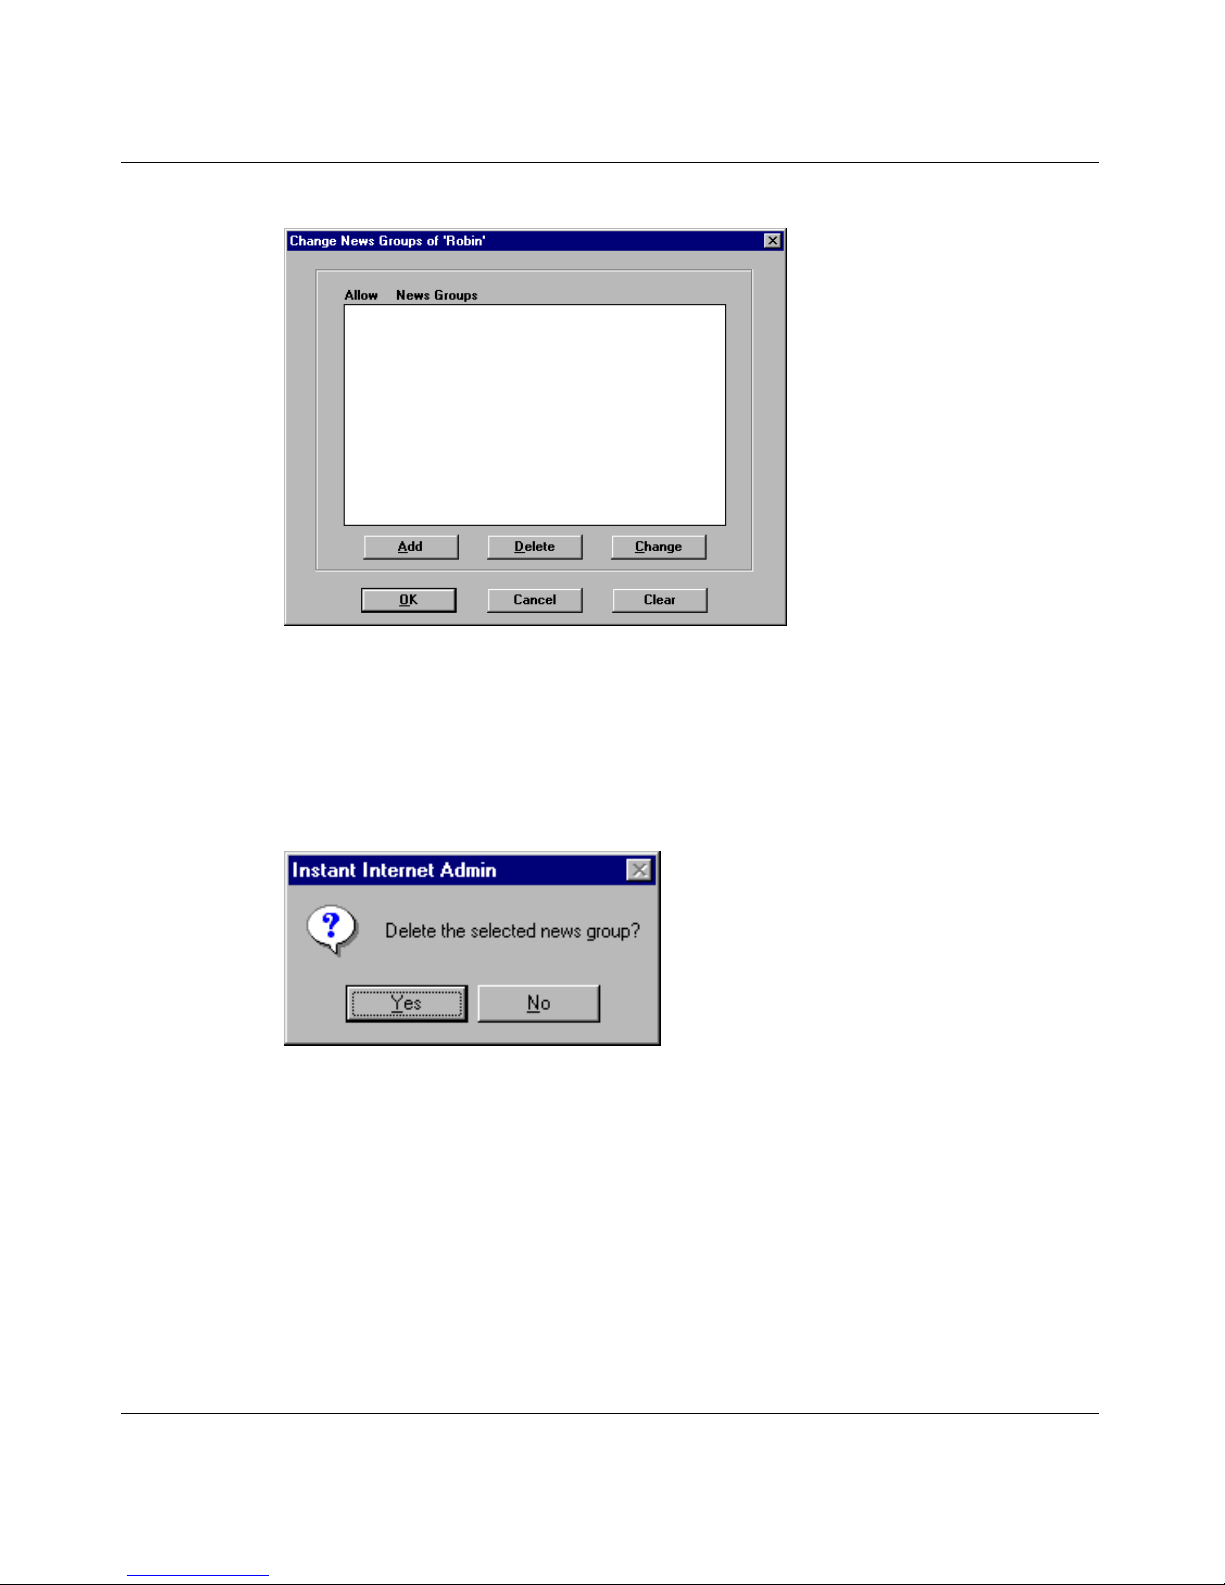
74 Chapter 2 User access administration
Figure 28 Change News Groups dialog box
4 Select the news group to which the group (or user) is to be denied access.
5 Click Delete.
A confirmation message box opens (Figure 29).
Figure 29 Delete news group confirmation message box
6 Click Yes to confirm the deletion.
The news group is de leted fr om the grou p’s (or u ser’s) access list , and the u ser
no longer has access to that news group.
Changing news group access
To change group or user access to current news groups:
1 In the Admin window, select a group folder or user icon.
300868-G
Page 75
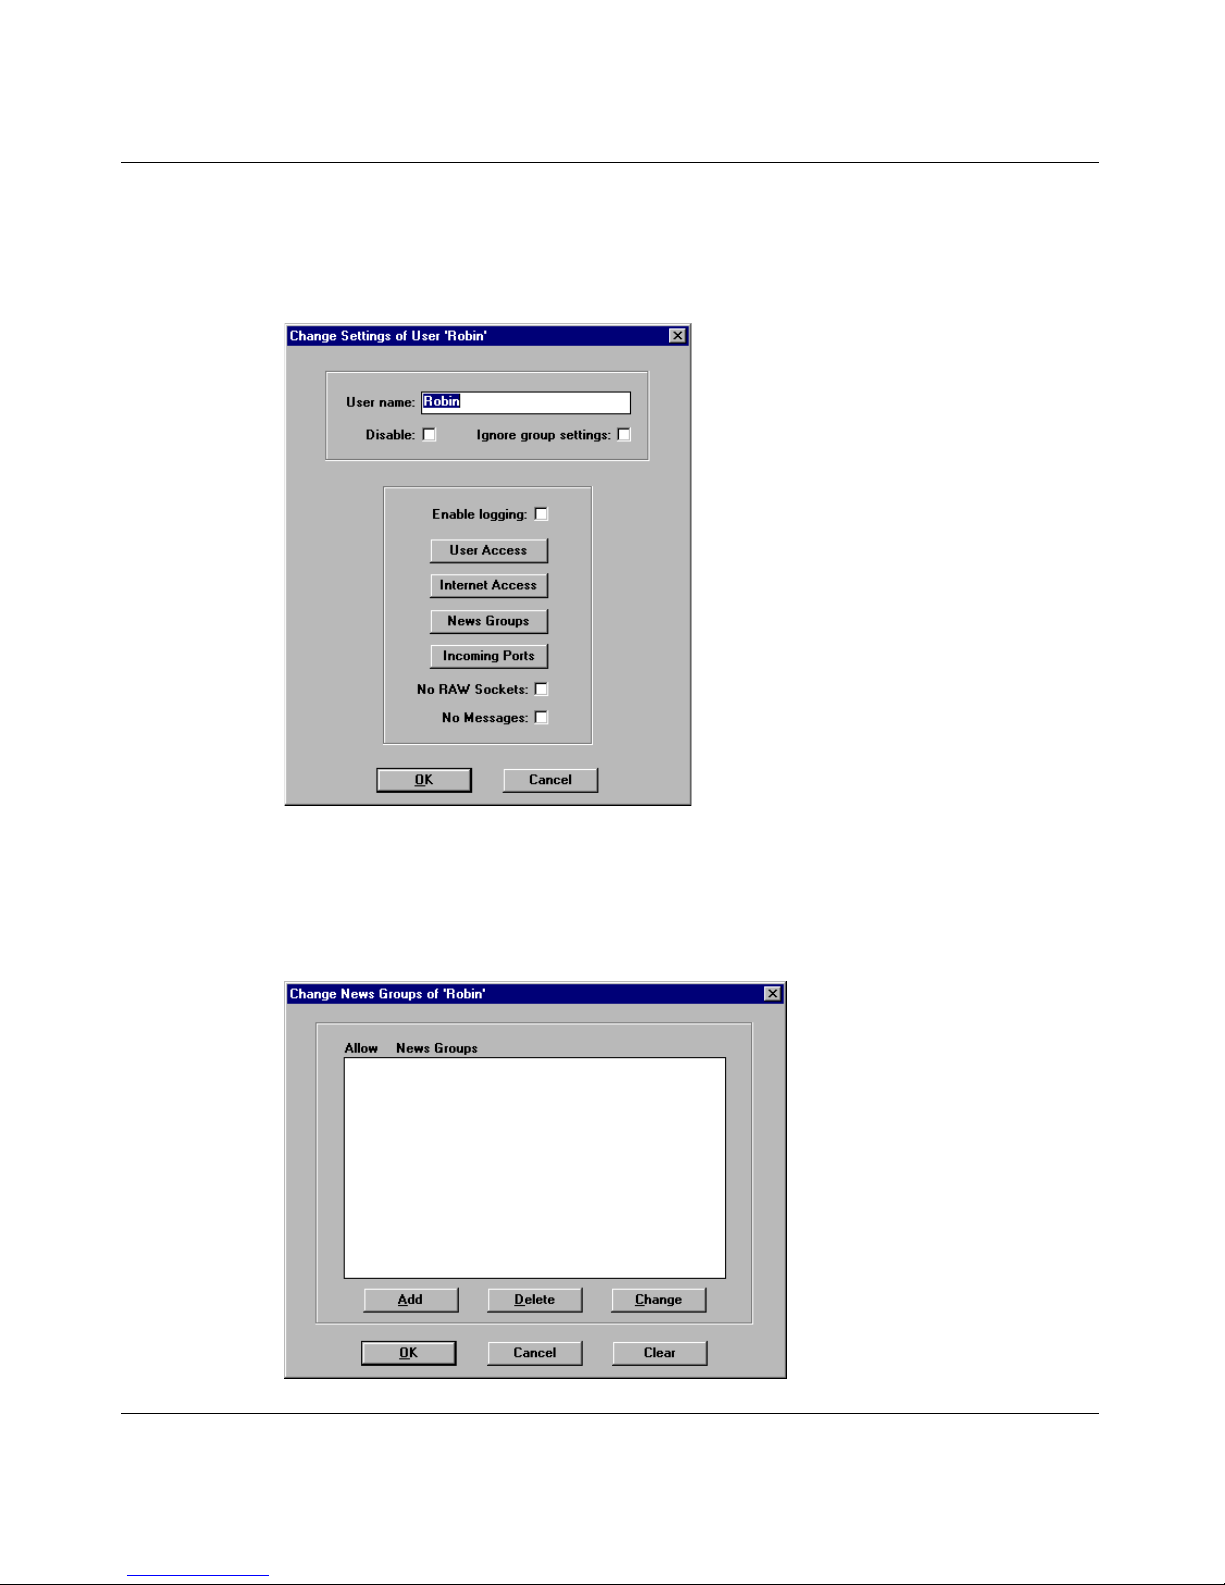
Chapter 2 User access administration 75
2 On the toolbar, click Change.
The Change Settings of User dialog box opens (Figure 30).
Figure 30 Change Settings of User dialog box
3 Click News Groups.
The Change News Groups dialog box opens (Figure 31).
Figure 31 Change News Groups dialog box
Using the BayStack Instant Internet Management Software Version 7.11
Page 76
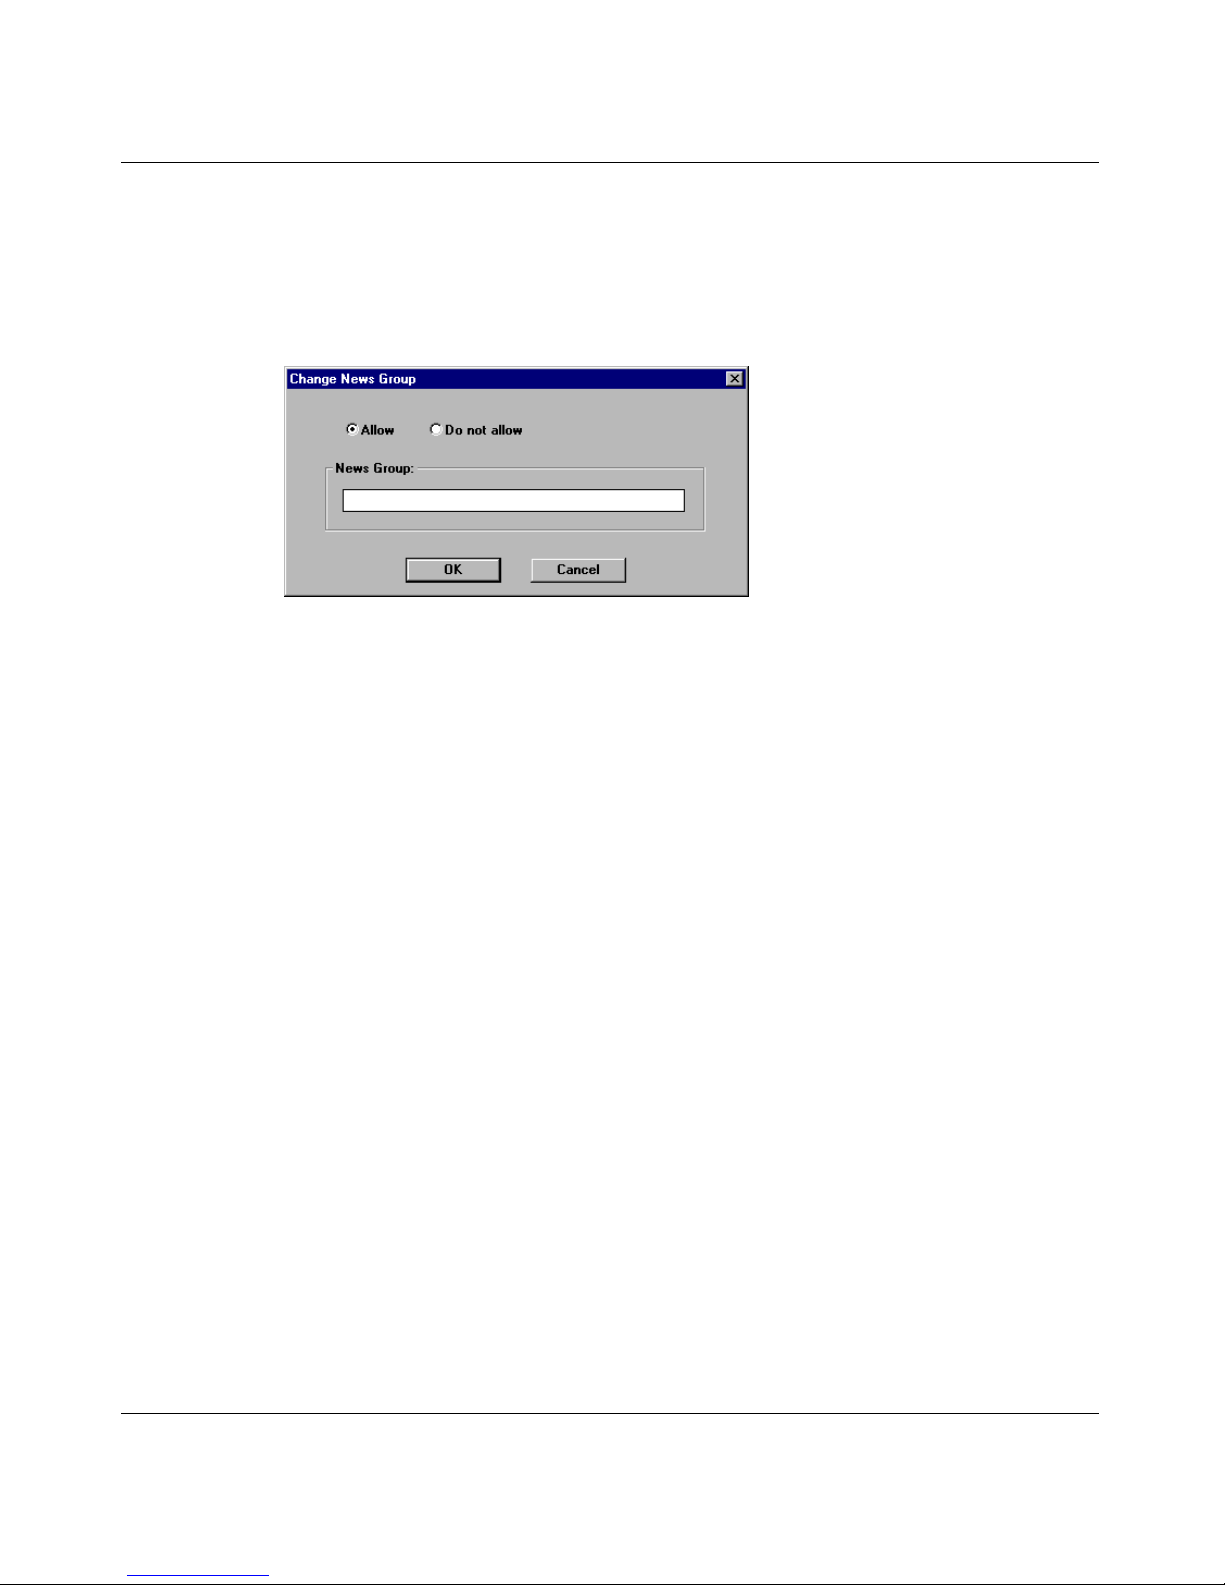
76 Chapter 2 User access administration
4 Select the news group for which the group (or user) access is to be changed.
5 Click Change.
The Change News Group dialog box opens (Figure 32).
Figure 32 Change News Group dialog box
6 Change the informat ion .
7 Click OK.
When you make changes to news group access, an asterisk (*) is displayed to
the left of the option, indicating that specific news group access control
settings have been defined.
Managing incoming port access
The Incoming Ports button on the Change Settings for User dialog box
(Figure 33) enables you to designate incoming ports to which each user or group
is allowed access. An incoming port is the port number that outside workstations
can access. Incoming ports allow a user to run server applications on a local
computer.
For example, if a user has incoming port acc ess to po rt 80, t he use r can star t a Web
server on a local computer. To run the server’s FTP applications on a local
computer, select incoming port 21.
Incoming port access is designated by a check mark next to the name of the port
within the Incoming Ports access option. If access to an incoming port is denied,
an X is displayed next to the name of the port.
300868-G
Page 77
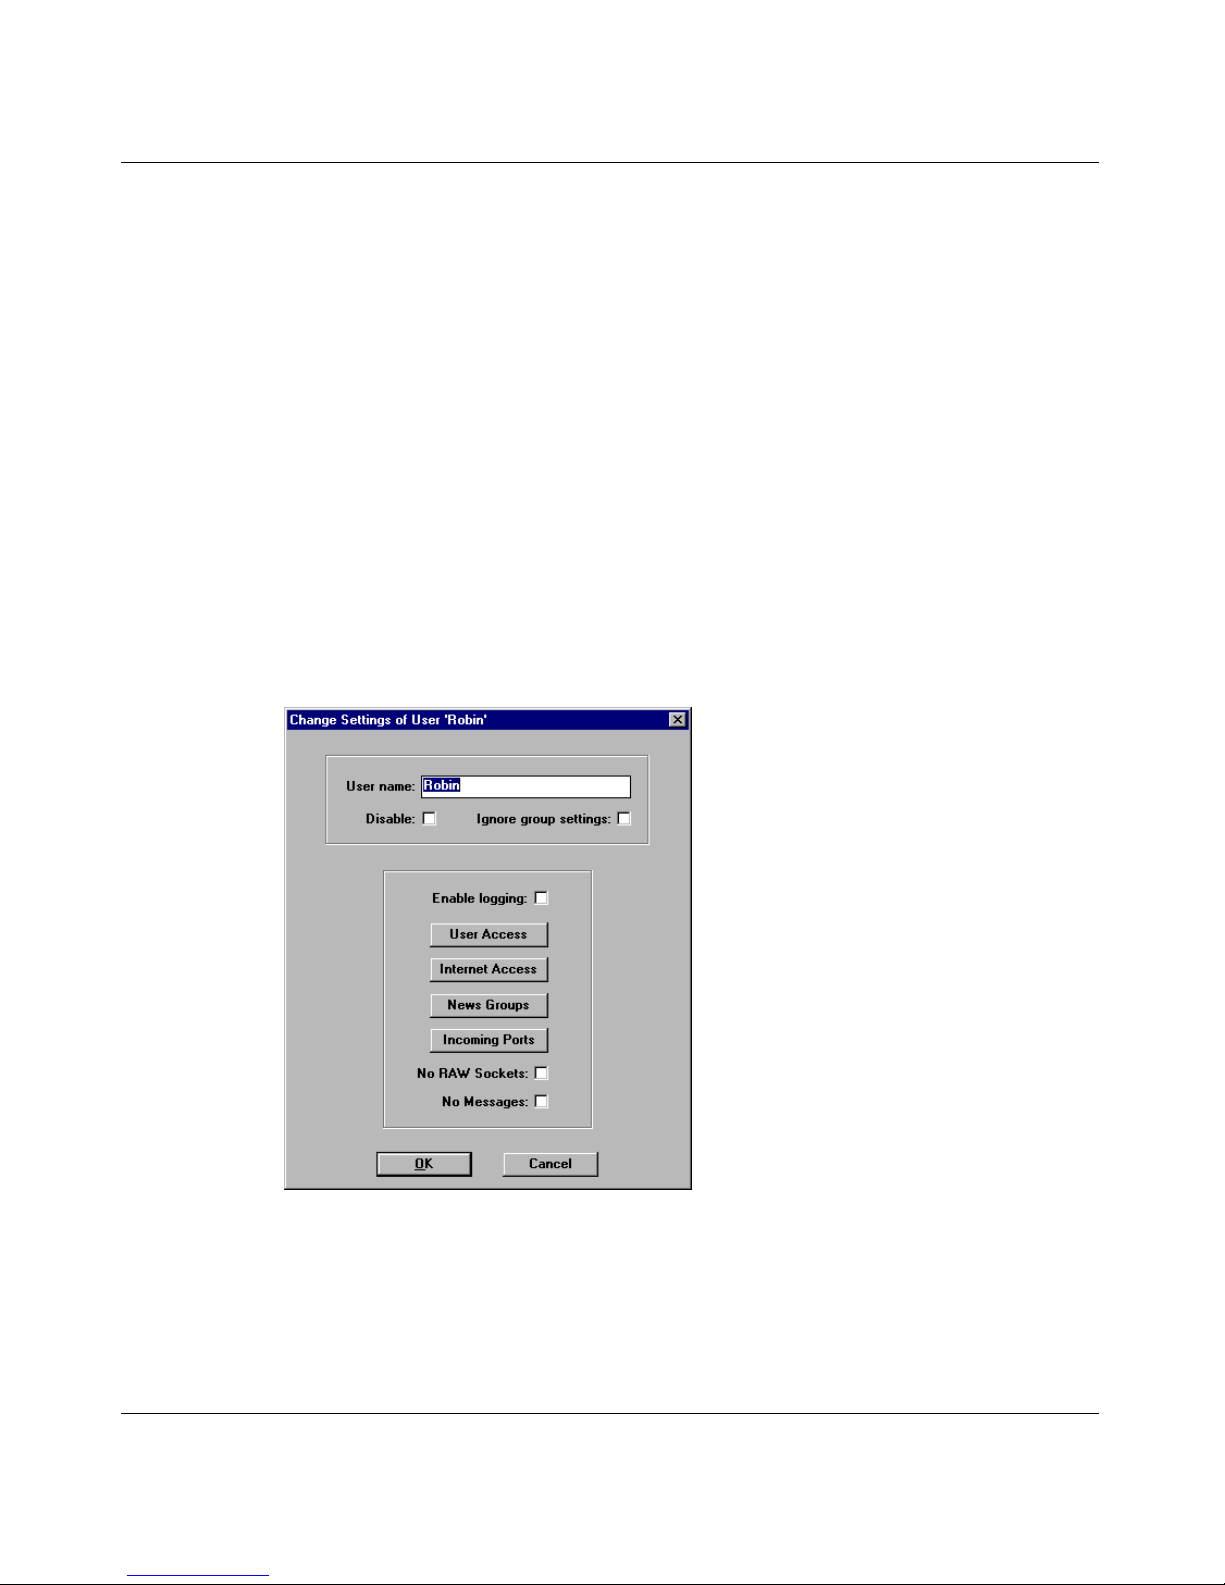
Chapter 2 User access administration 77
You can add, delete, or change incoming ports to which the selected user has
access.
Port numbers 0, 25, 50, 79, 106, 109, 110 and the range 5001-65535 are open by
default. You can have total control of port access by configuring incoming ports
individually for any particular group or user.
Adding incoming port access
To add an incoming port to group or user access:
1 In the Admin window, select a group folder or user icon.
2 On the toolbar, click Change.
The Change Settings of User dialog box opens (Figure 33).
Figure 33 Change Settings of User dialog box
3 Click Incoming Ports.
The Change Incoming Ports dialog box opens (Figure 34).
Using the BayStack Instant Internet Management Software Version 7.11
Page 78
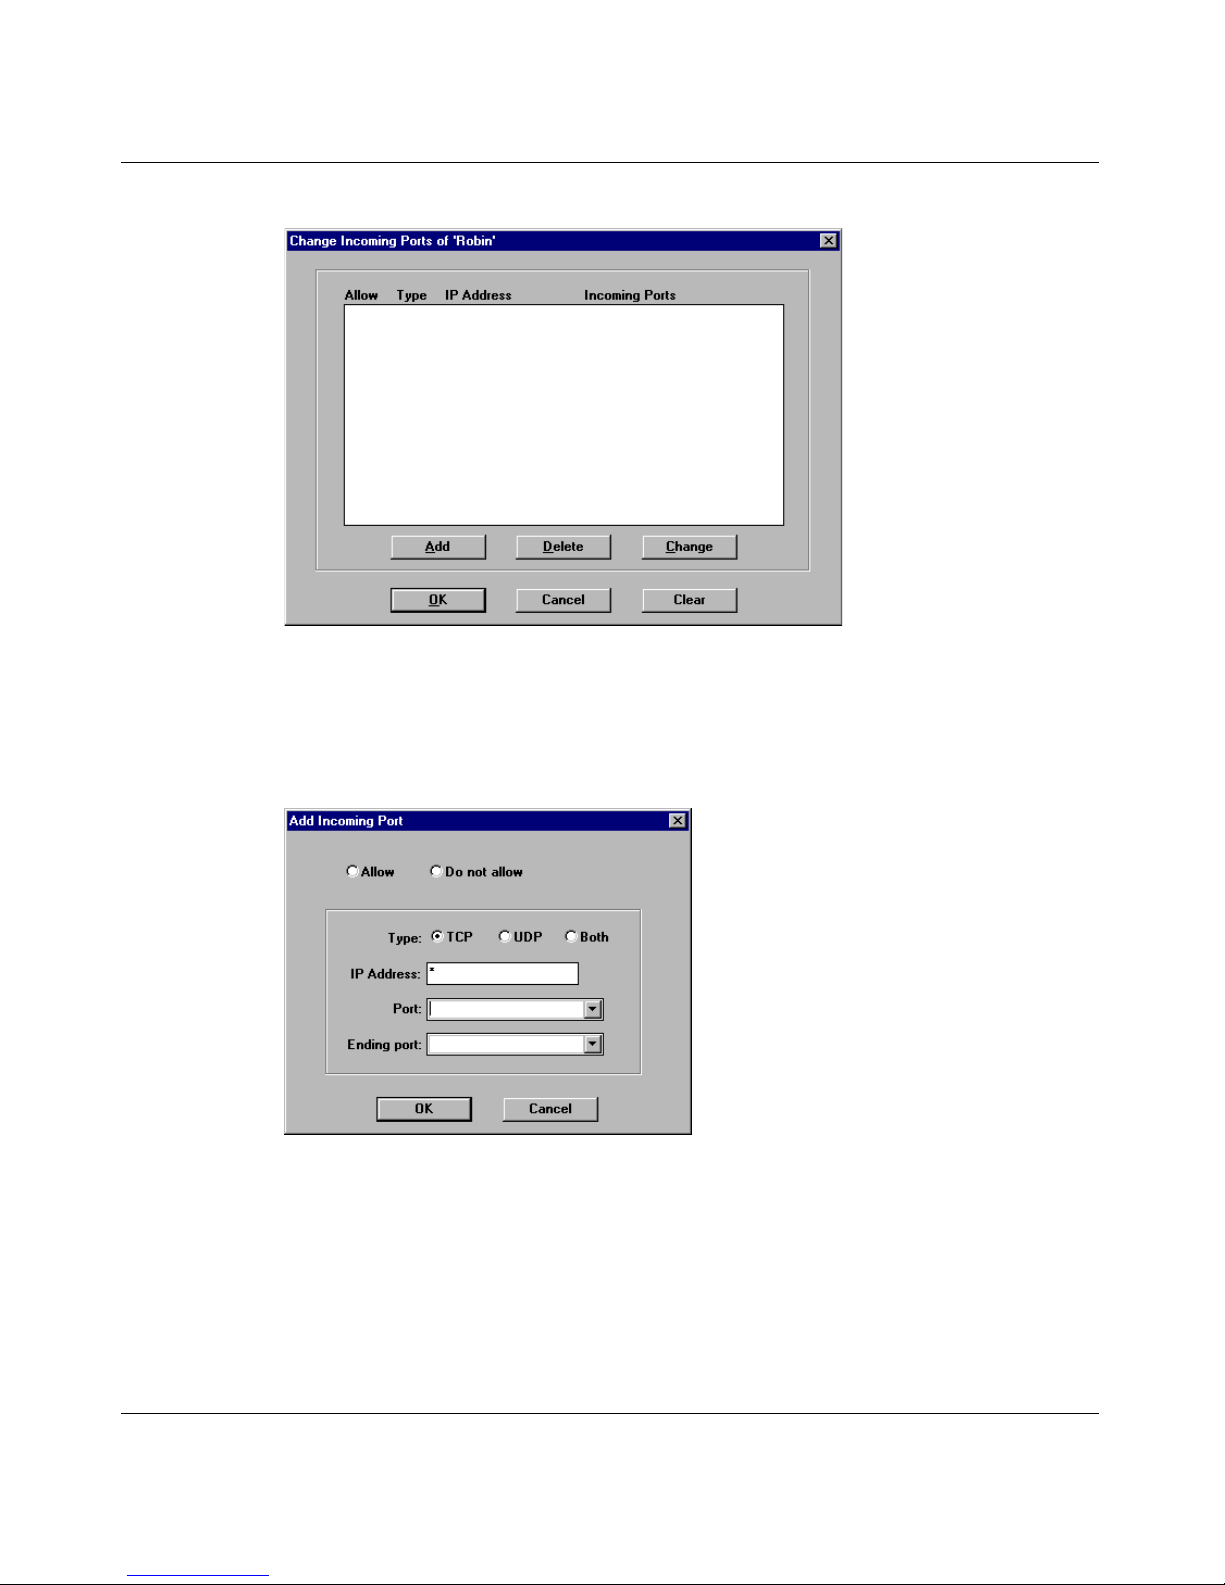
78 Chapter 2 User access administration
Figure 34 Change Incoming Ports dialog box
4 Click Add.
The Add Incoming Port dialog box opens (Figure 35).
Figure 35 Add Incomi ng Port dialog box
Table 8 describes the items in the Add Incoming Port dialog box.
300868-G
Page 79

Chapter 2 User access administration 79
Table 8 Add Incoming Port dialog box items
Item Description
Allow Allows access.
Do not allow Denies access.
Type • TCP – connection oriented
• UDP – connectionless
• Both – TCP and UDP
IP Address Enter the IP address of the host name. If you do not know the IP
address, you can enter the host name and select the Lookup IP
Address button. Instant Internet looks up the IP address of the
specified host name.
Port Sele ct a port number. If you are specifying a rang e of port s, this is
the beginning port number.
Ending Port To enter a range of ports, select an ending port number.
5 Do one of the following:
• To allow access to the incoming port, click Allow.
• To deny access to the incoming port, click Do not allow.
6 Select a Type.
7 Specify an IP Address.
8 Specify an Incoming Port.
9 Specify an Ending port.
10 Click OK.
Removing incoming port access
To remove an incoming port from the list:
1 In the Admin window, select a group folder or user icon.
2 On the toolbar, click Change.
The Change Settings of User dialog box opens (Figure 36).
Using the BayStack Instant Internet Management Software Version 7.11
Page 80
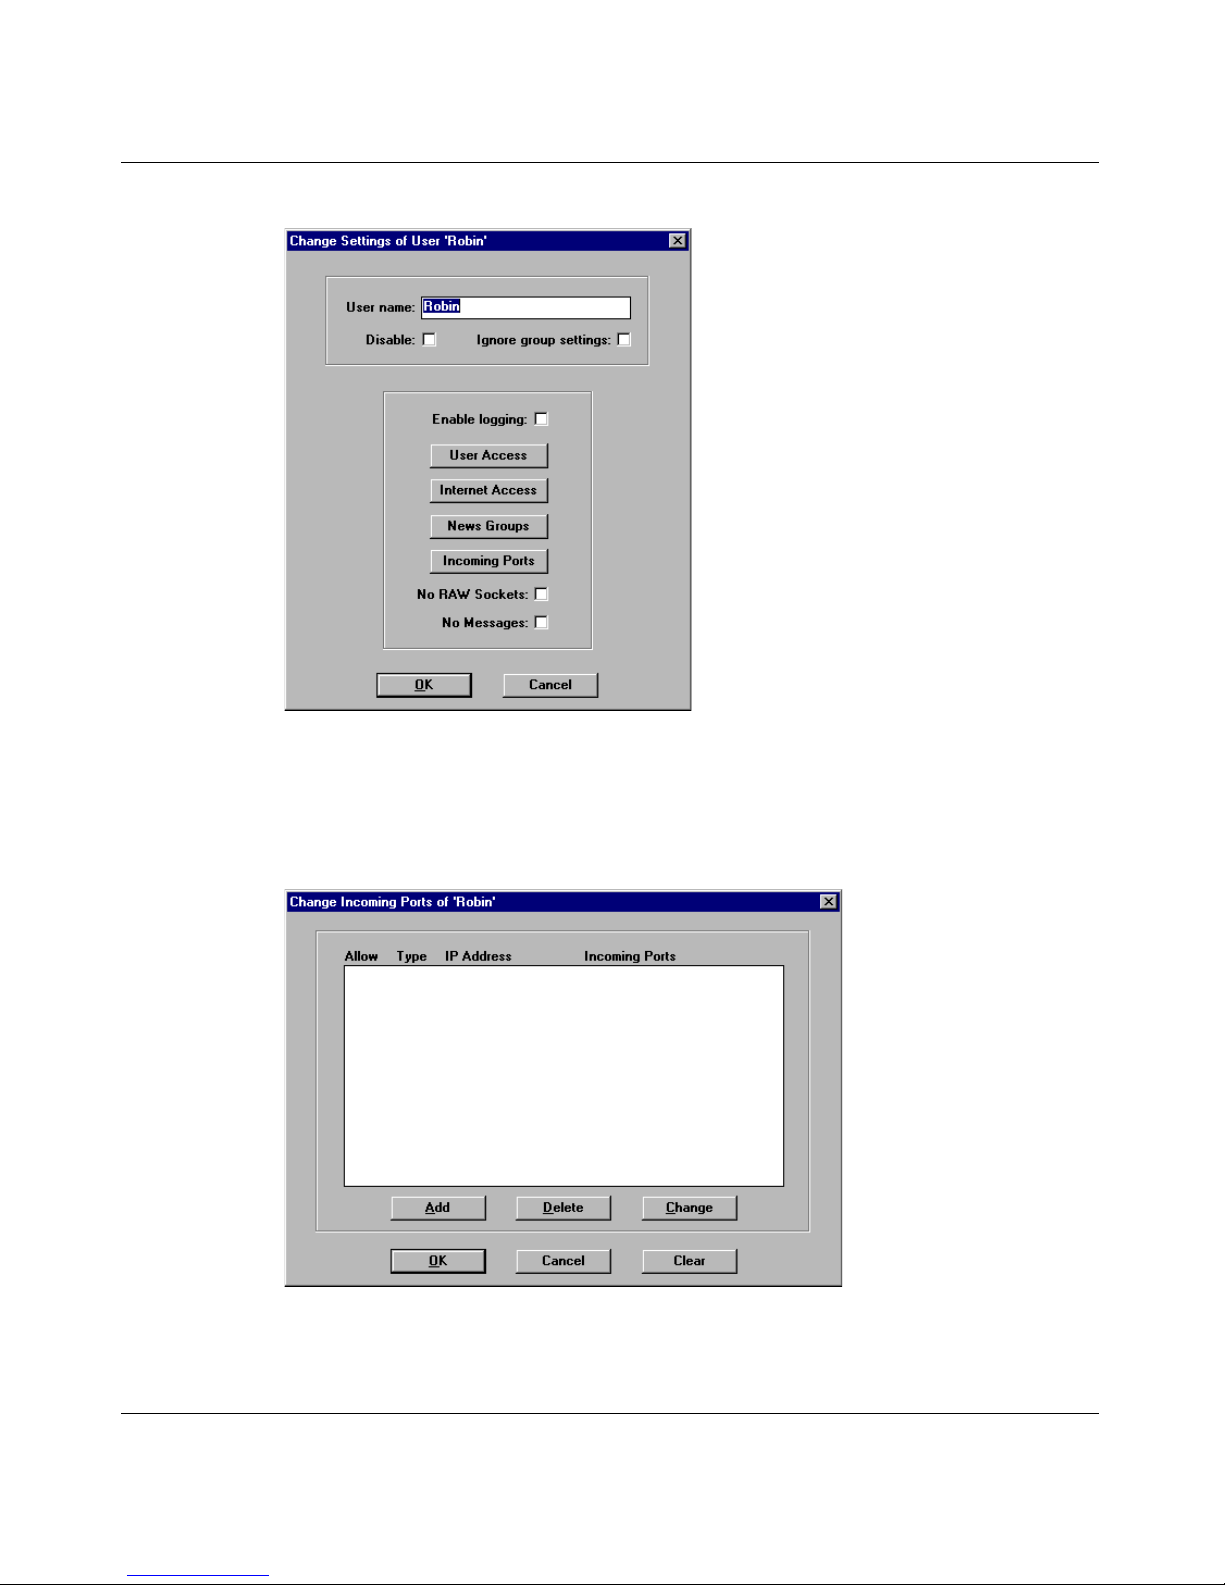
80 Chapter 2 User access administration
Figure 36 Change Settings of User dialog box
3 Click Incoming Ports.
The Change Incoming Ports dialog box opens (Figure 37).
Figure 37 Change Incoming Ports dialog box
4 Select the incoming port to which the group (or user) is to be denied access.
300868-G
Page 81
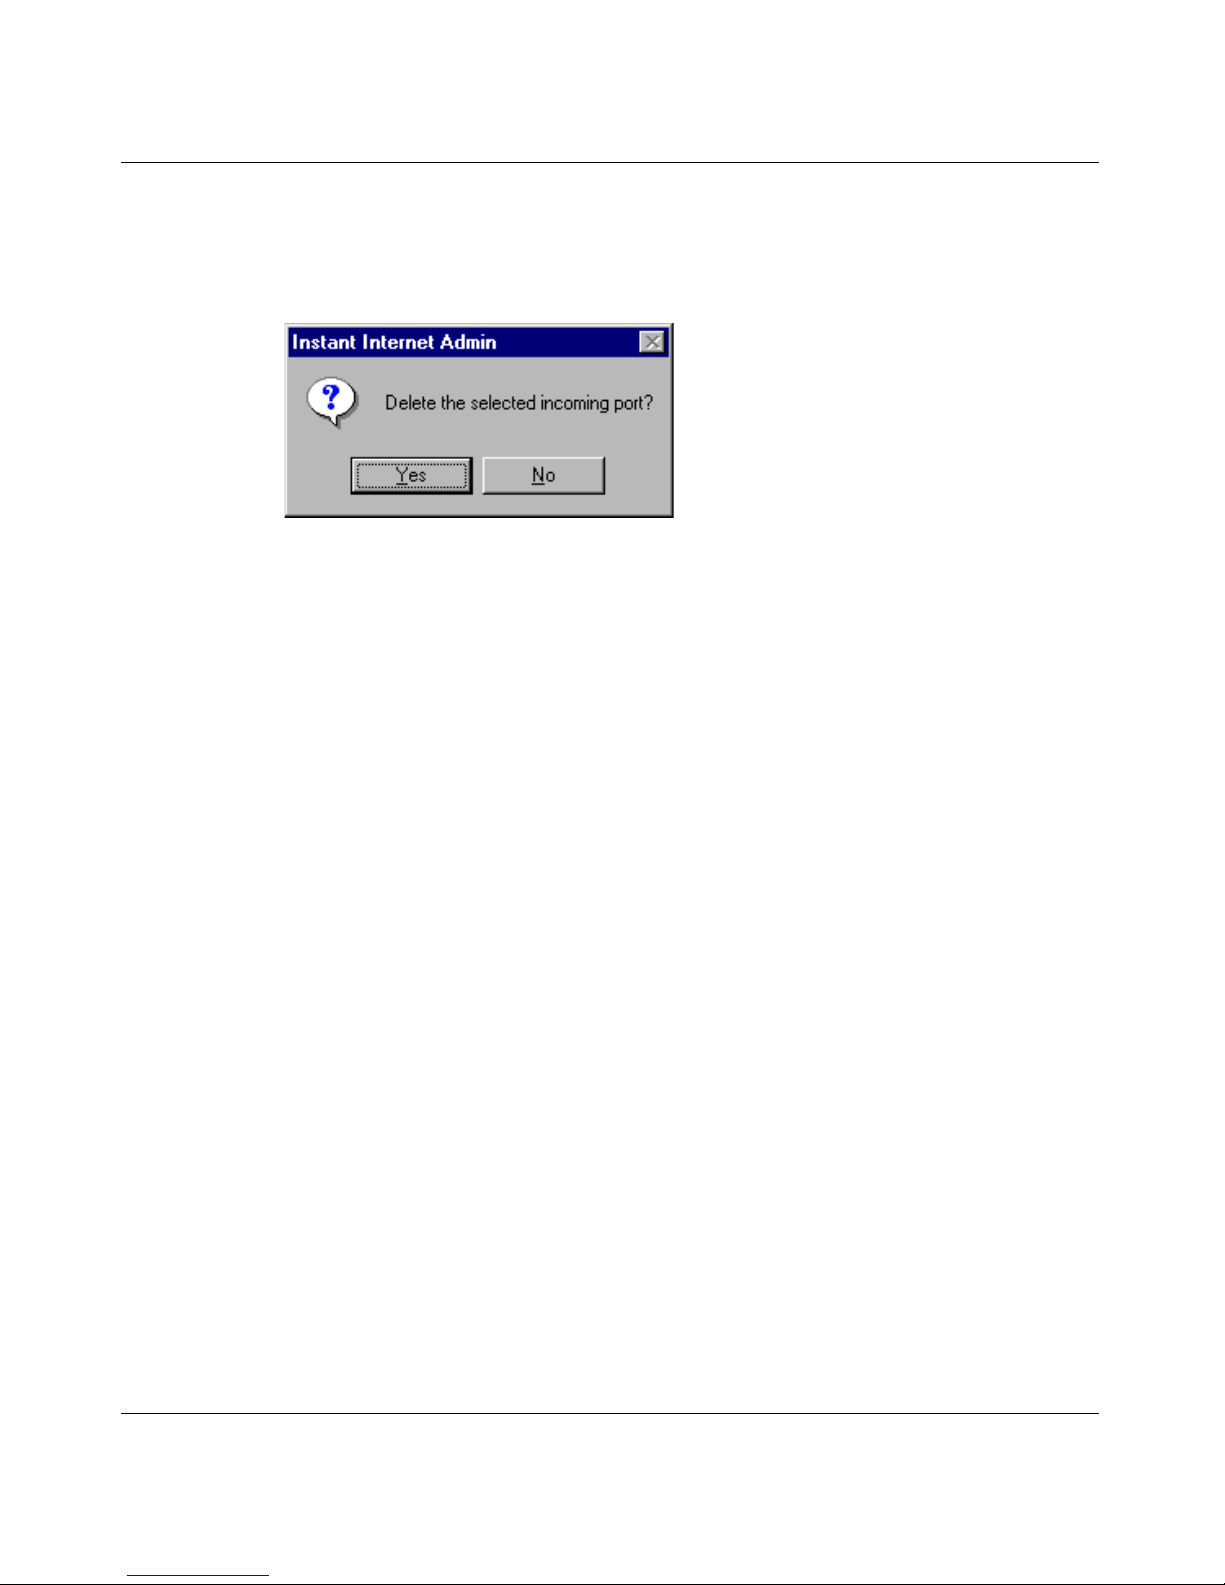
Chapter 2 User access administration 81
5 Click Delete.
A confirmation message box opens (Figure 38).
Figure 38 Delete incoming port confirmation message box
6 Confirm the deletion when prompted.
The incoming port is deleted from the group’s (or user’s) access list, and the
user no longer has access to that incoming port.
Changing incoming port access
To change group or user access of current incoming ports:
1 In the Admin window, select a group folder or user icon.
2 On the toolbar, click Change.
The Change Settings of User dialog box opens (Figure 39).
Using the BayStack Instant Internet Management Software Version 7.11
Page 82
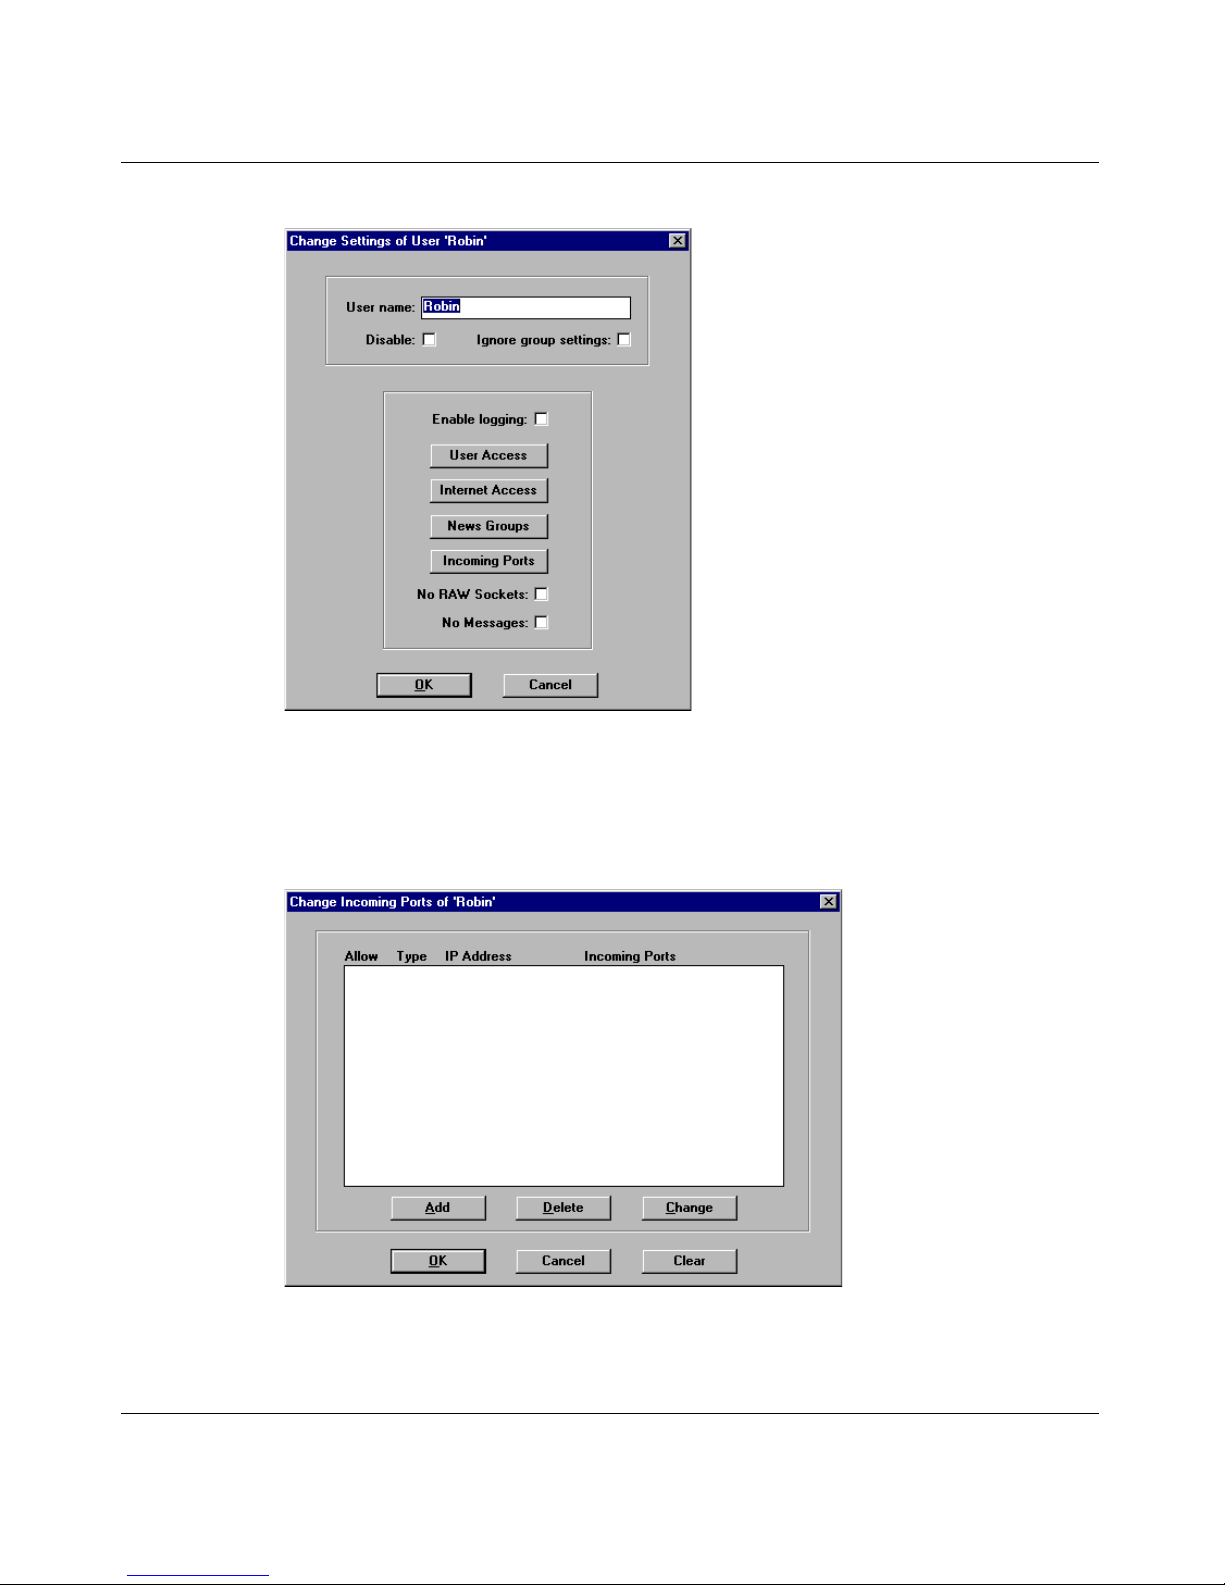
82 Chapter 2 User access administration
Figure 39 Change Settings of User dialog box
3 Click Incoming Ports.
The Change Incoming Ports dialog box opens (Figure 40).
Figure 40 Change Incoming Ports dialog box
4 Select the inc oming port fo r which t he grou p (or us er) acces s is to be change d.
300868-G
Page 83
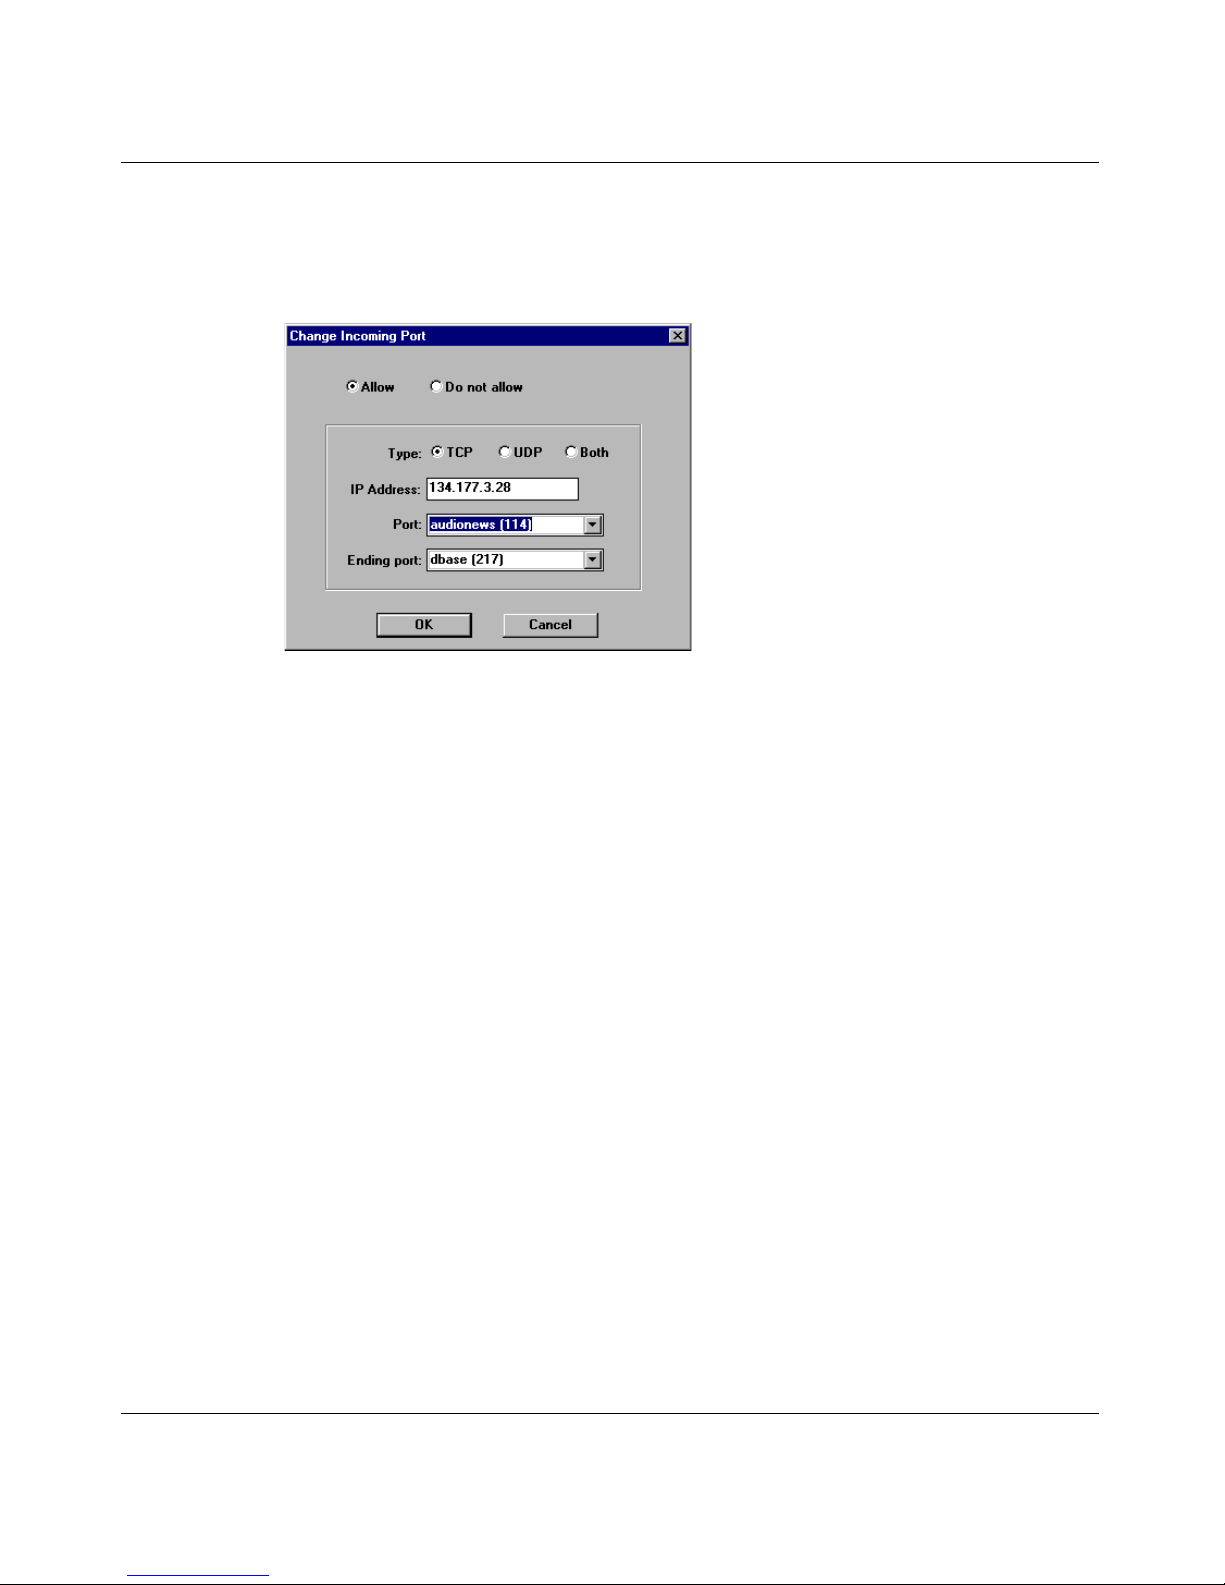
Chapter 2 User access administration 83
5 Click Change.
The Change Incoming Port dialog box opens (Figure 41).
Figure 41 Change Incoming Port dialog box
6 Change the informat ion .
7 Click OK.
When you make changes to an incoming por t’s access, an asterisk (*) appears
to the left of the opt ion, indicating that specific incoming port s access control
settings have been defined.
Managing RAW sockets
The No RAW Sockets option on the Change Settings for User dialog box
(Figure 42) applies to:
• IPX workstations
• IP worksta t ions when Instant Internet address translation is enabled for th e
client-side interface
Some Internet applications (typically diagnostics such as ping) use a protocol of
RA W sockets fo r communicati on. Because the se sockets require spe cial low-leve l
control of the IP packets, some administrators may want to restrict user access to
these diagnostics. This type of connection is not blocked by restricting the IP
address in the Instant Internet access control list.
Using the BayStack Instant Internet Management Software Version 7.11
Page 84
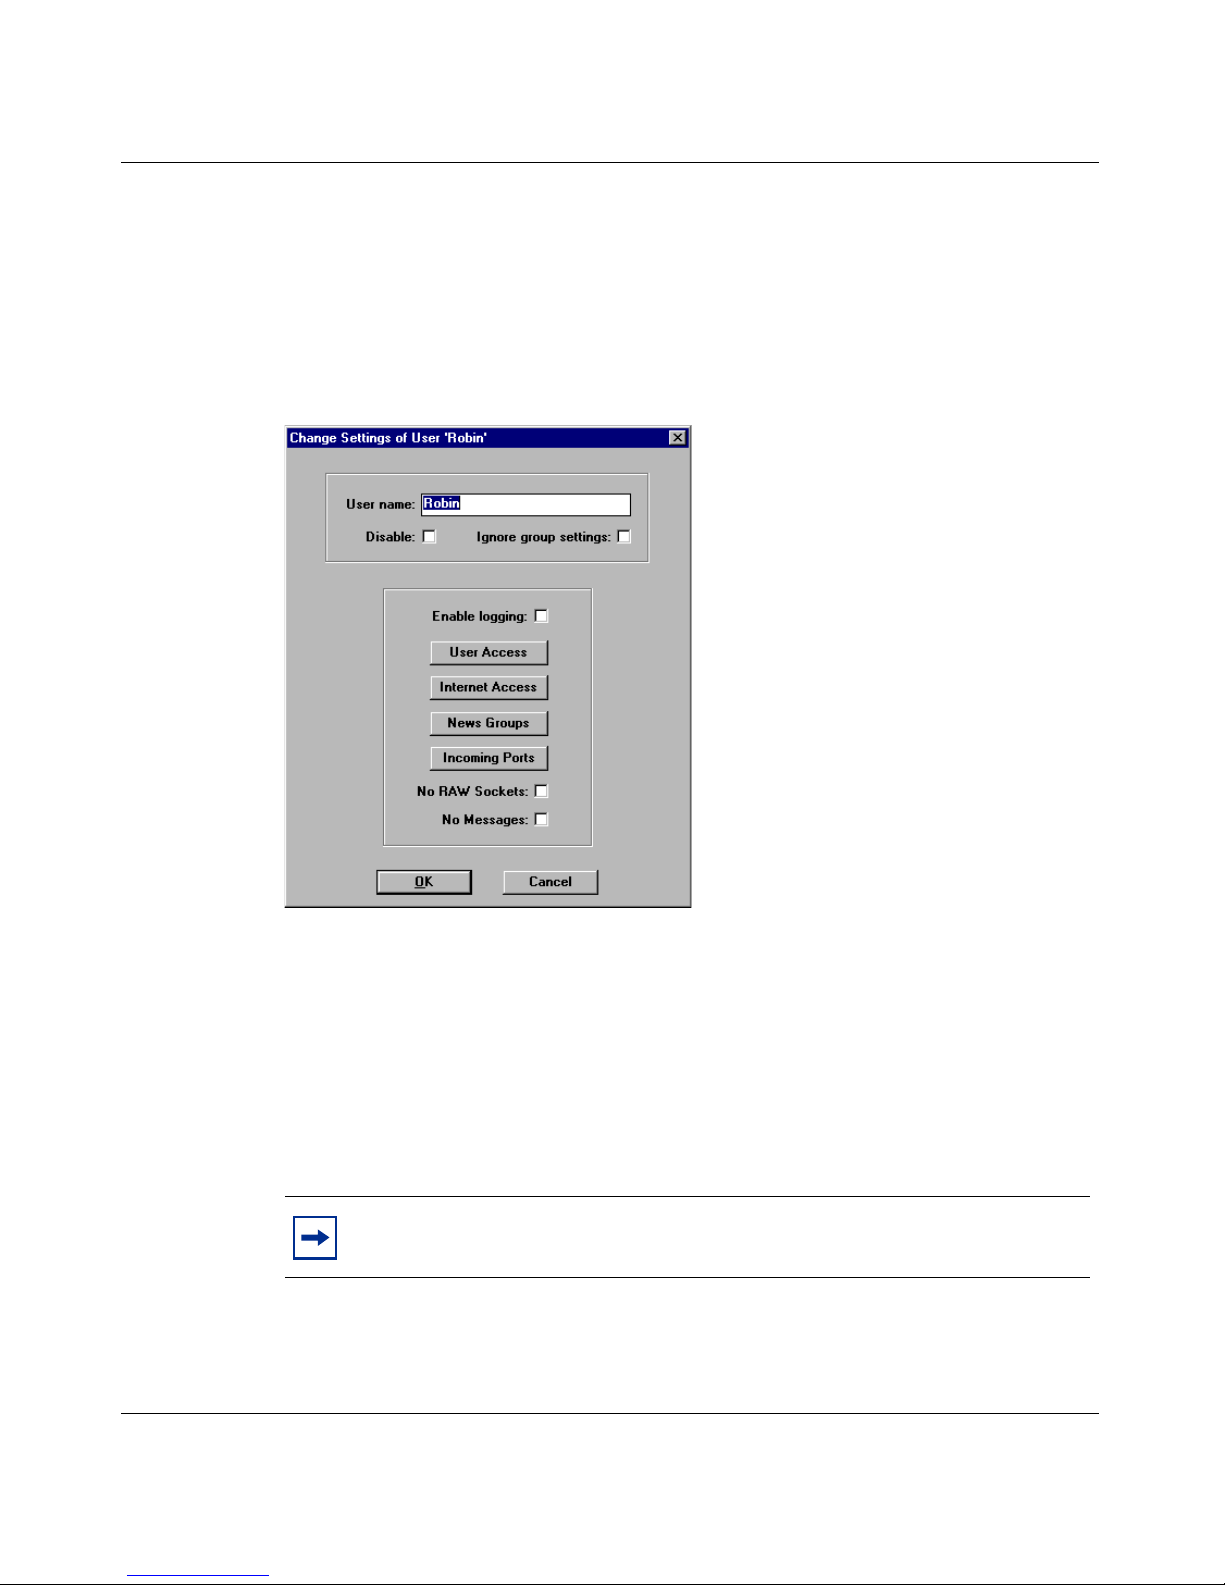
84 Chapter 2 User access administration
To prohibit the use of RAW sockets:
1 In the Admin window, select a group folder or user icon.
2 On the toolbar, click Change.
The Change Settings of User dialog box opens (Figure 42).
Figure 42 Change Settings of User dialog box
300868-G
3 Select the No RAW Sockets check box.
This prohi bits the use of RAW sockets.
An error message that the Int ernet user will see when the No RAW Sockets option
is selected is Erro r 10044, WSAESOCKTNOSUPPORT. If messages ar e allowed,
IPX workstations will receive a RAW sockets restricted message panel, and IP
workstations will receive an ICMP restricted message panel.
Note: In Tools, ping and trace receive errors if No RAW Sockets is
enabled.
Page 85
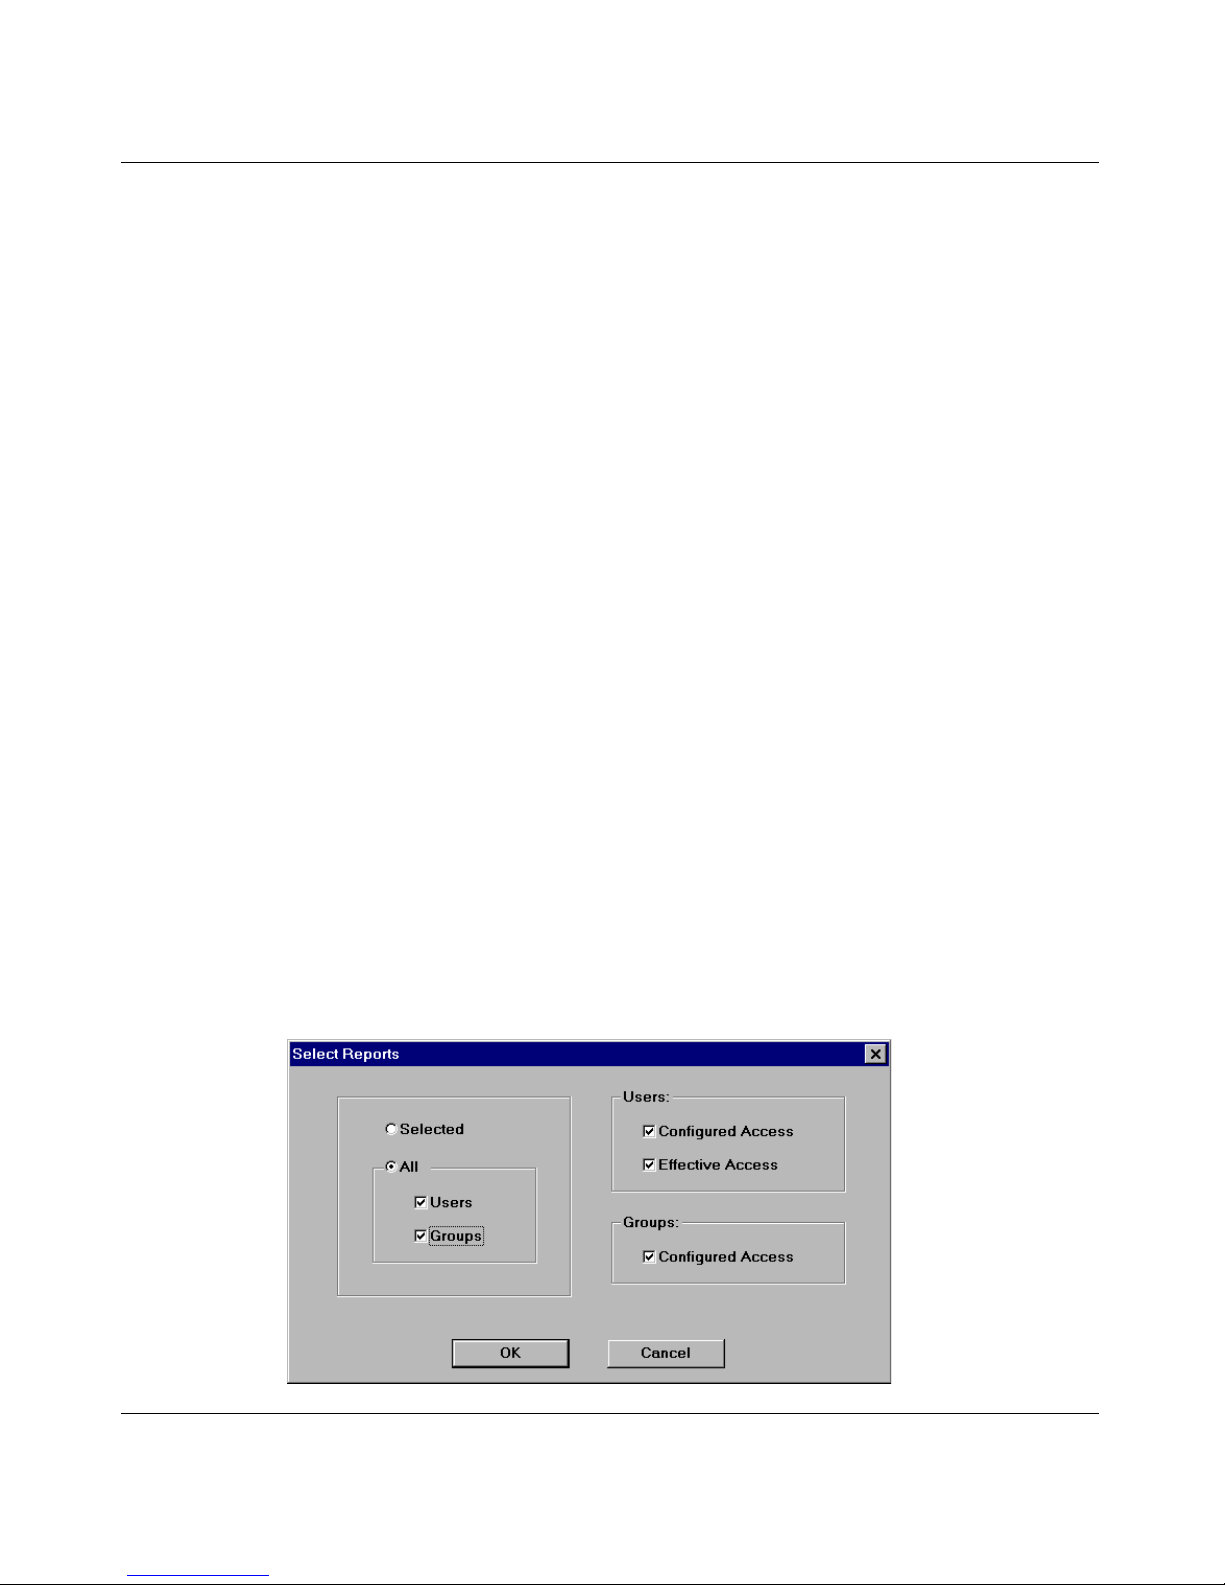
Chapter 2 User access administration 85
Specifying the message a user sees upon an error
The No Messages option in the Change Setting s for User dia log box allows you to
control what users s ee when they at tempt to access re strict ed Instant Internet sites.
When messages are enabled, a message is displayed with an explanation of why
the user’s att empt ed acc ess failed.
For example, if the user tried to access www.xrated.com, which has been
disallowed, the message “Host name restricted” is displayed. However, if you
select No M essages, the user sees only the application’s error message, such as,
“Host name does not a ppe ar in the DNS table,” or a similar messa ge that does not
reveal why the access failed.
Creating reports
The Instant Internet Reports option lets you select user and group Internet access
reports and save them to disk for use with other applications. You can select
specific user and group reports or you can save all reports to the specified drive
and directory.
To create a report:
1 Choose File > Reports.
The Select Reports dialog box opens (Figure 43).
Figure 43 Select Reports dialog box
Using the BayStack Instant Internet Management Software Version 7.11
Page 86

86 Chapter 2 User access administration
2 Use the information in Table 9 to choose the report options you want.
Table 9 Report options
Item Description
Selected If you choose this option, you can choose the reports you want.
All When you choose this option, the Users area becomes active.
Users • Configured Access – Reports on the access define d for each user.
• Effective Access – Reports on the effective access for each user.
Groups Configured Access – Reports on the access def ine d for each group.
3 Click OK.
4 Enter the drive and directory where you want the reports to be saved.
Common user and group access examples
The following examples represent the most common ways of creating users and
groups in Admin. This section gives general instructions on:
• Setting unlimited access (next)
• Restricting access to a few sites (page 88)
• Allowing access to a few sites (page 88)
Allowing unlimited access for everyone
To allow unlimited access for everyone in a group:
1 Set the Everyone Group’s access to Full access.
Refer to “Configuring Internet access” on page 58 for more information. The
Change User Access dialog box opens (Figure 44).
300868-G
Page 87
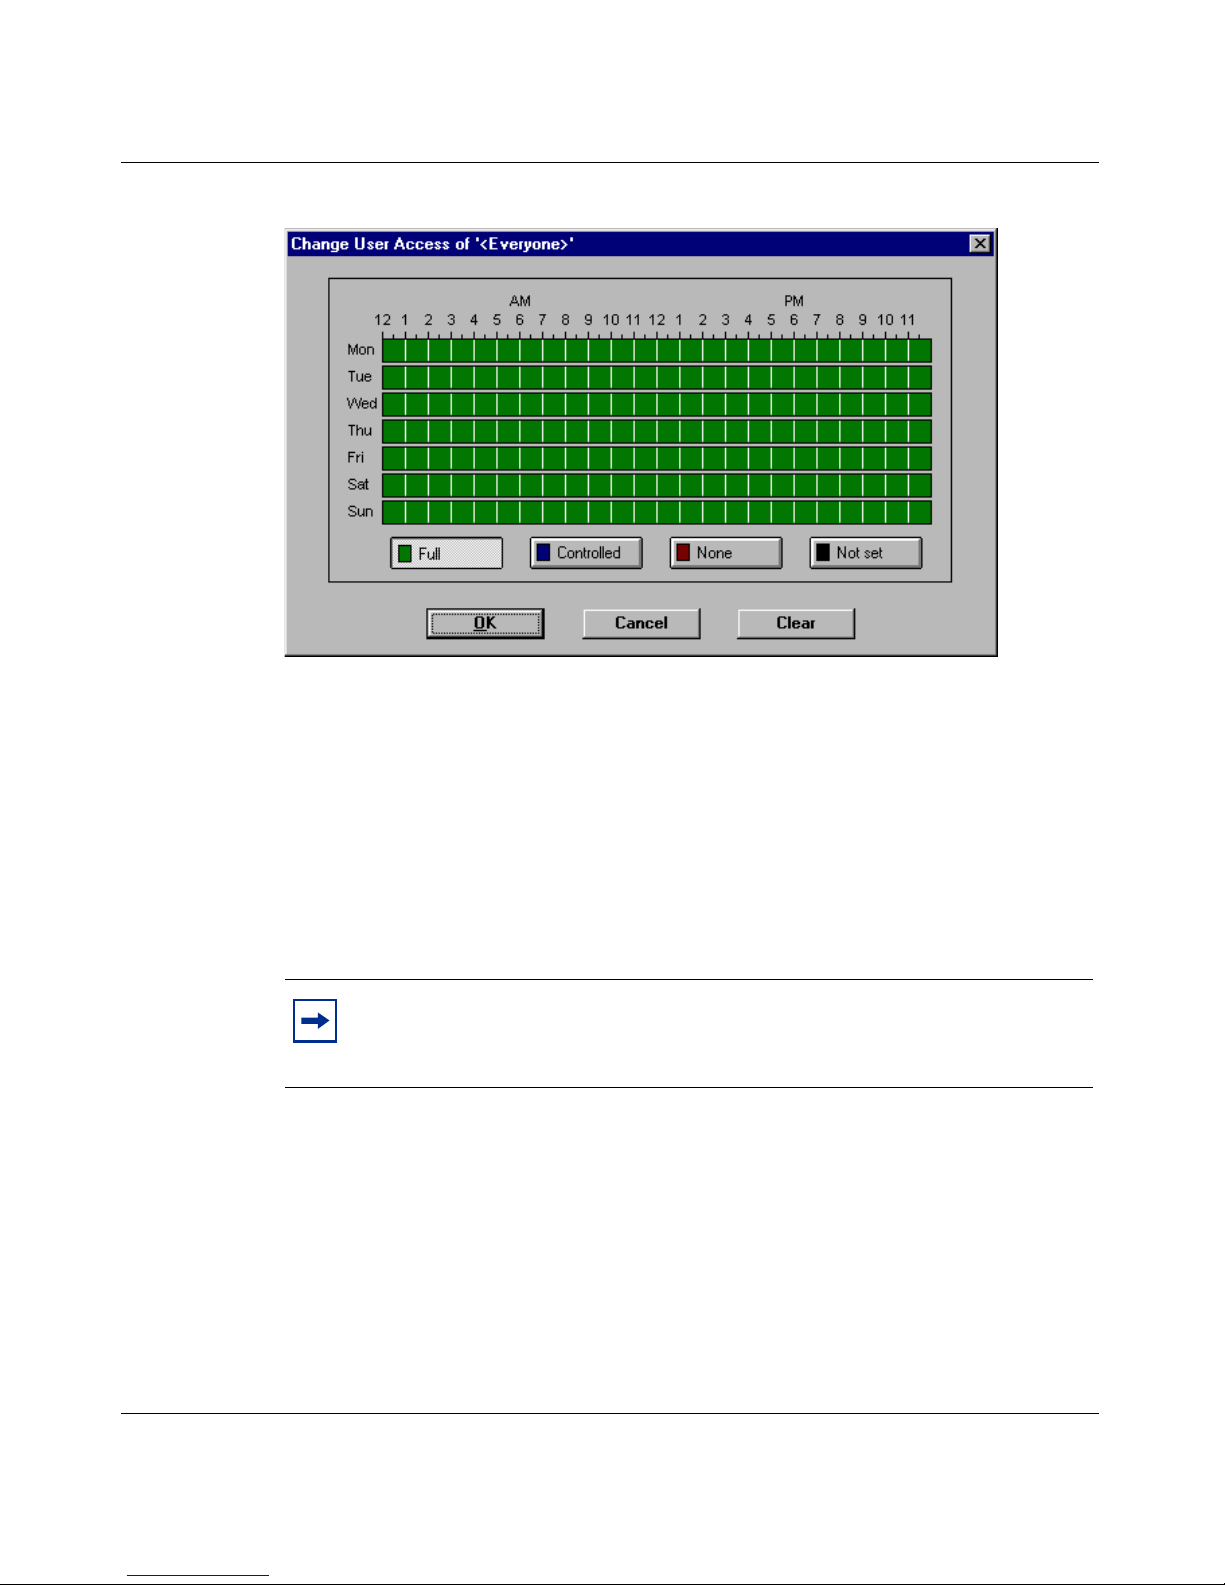
Chapter 2 User access administration 87
Figure 44 Change User Access dialog box
2 Configure News Group access to allow access to all news groups.
Refer to “Managing news group access” on page 70 for more information.
3 Configure Incoming Ports to allow acc ess to all por ts and Both TCP and UDP.
Refer to “Managing incoming port access” on page 76 for more information.
After you complete t he previous steps, al l users follow t he Everyone Group acce ss
settings.
Note: If a user’s individual access settings are more restrictive than the
Everyone Group settin gs, Instant Internet uses the mo re restrict ive acces s
settings.
Using the BayStack Instant Internet Management Software Version 7.11
Page 88
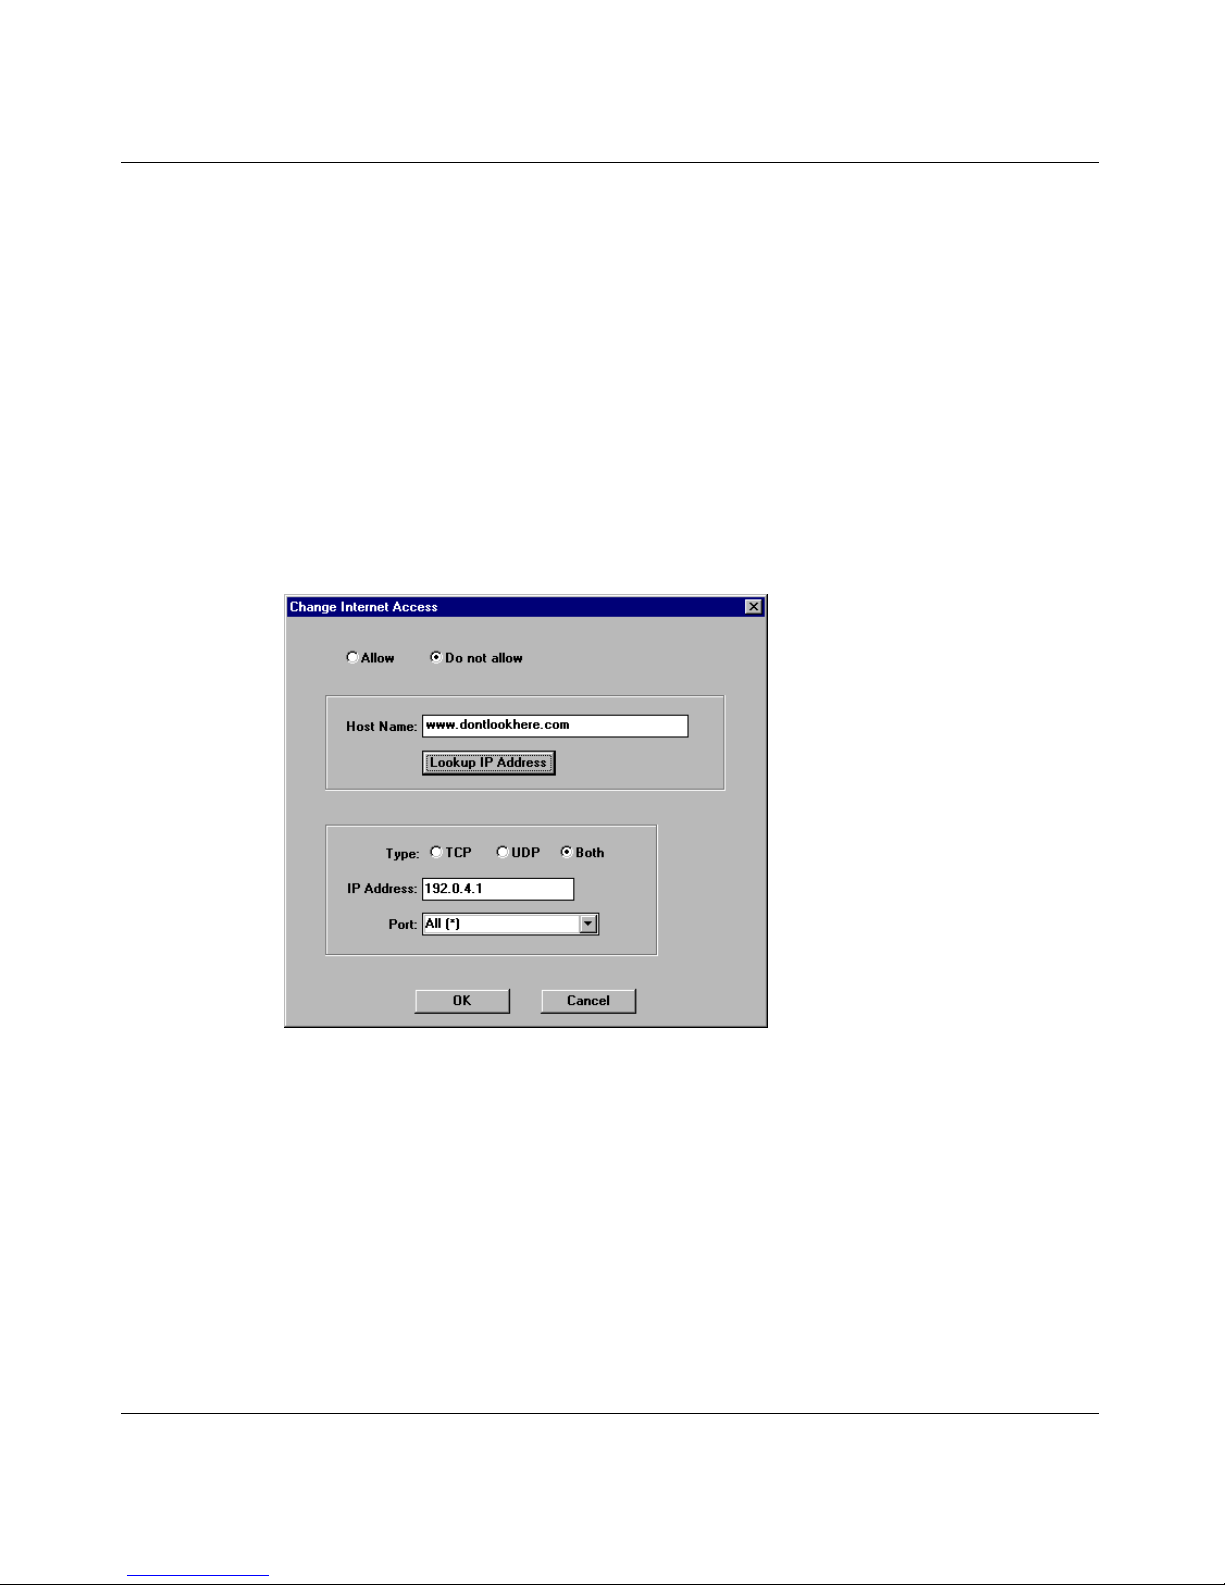
88 Chapter 2 User access administration
Restricting access to a few sites for everyone
To restrict a few sites for everyone :
1 Set the Everyone Group’s access to Controlled access.
Refer to “Configuring Internet access” on page 58 for more information.
2 Configure Internet Access for the Everyone Group by restricting access to a
site. Figure 45 shows an example.
Refer to “Defining controlled Internet access” on page 59 and for more
information.
Figure 45 Change Internet access to deny access to a site example
3 Repeat Step 2 for each site for which you want to restrict access.
You should now see a list of sites restricted to all users within the Everyone
Group, similar to that in Figure 46.
300868-G
Page 89
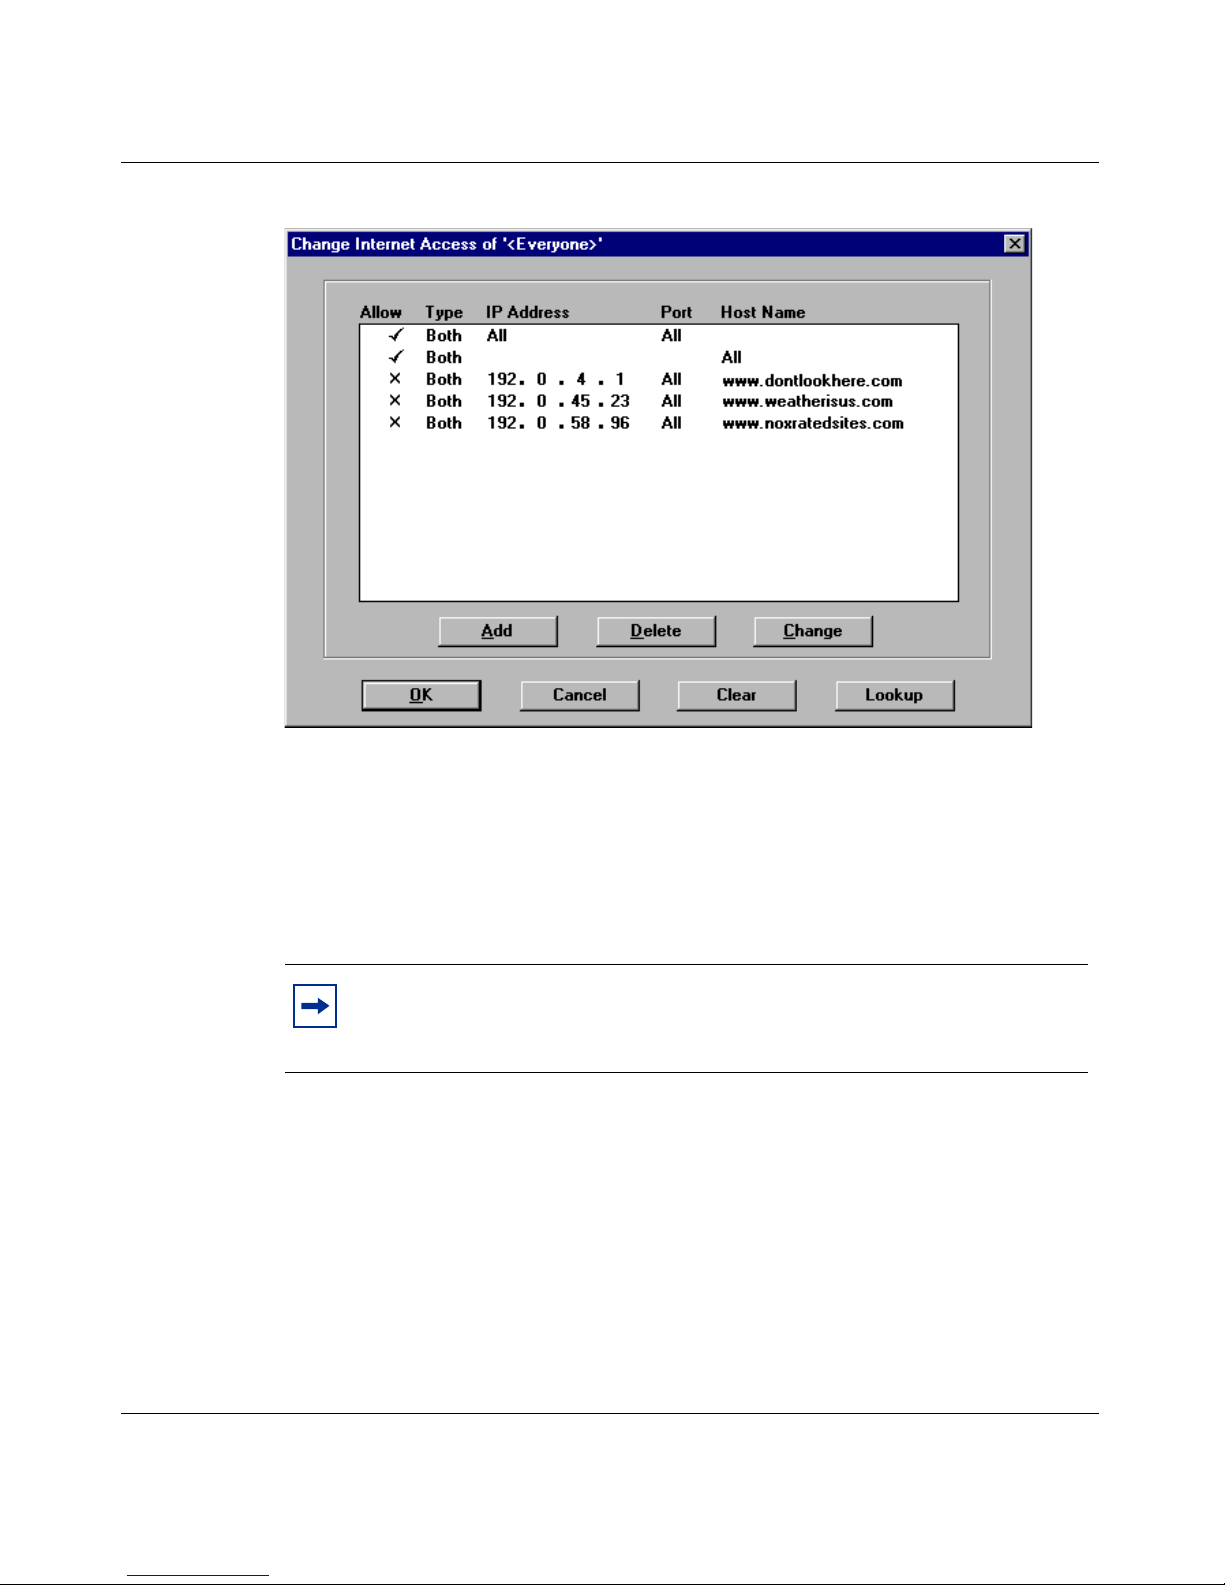
Chapter 2 User access administration 89
Figure 46 Restrict Internet access example
4 Configure Incoming Ports to allow acc ess to all por ts and Both TCP and UDP.
Refer to “Managing incoming port access” on page 76 for more information.
After you have co mpleted th ese st eps, al l u sers f ollow t he Ever yone Grou p ac cess
settings.
Note: If a user’s individual access settings are more restrictive than the
Everyone Group settings, then Instant Internet uses the more restrictive
access settings.
Using the BayStack Instant Internet Management Software Version 7.11
Page 90
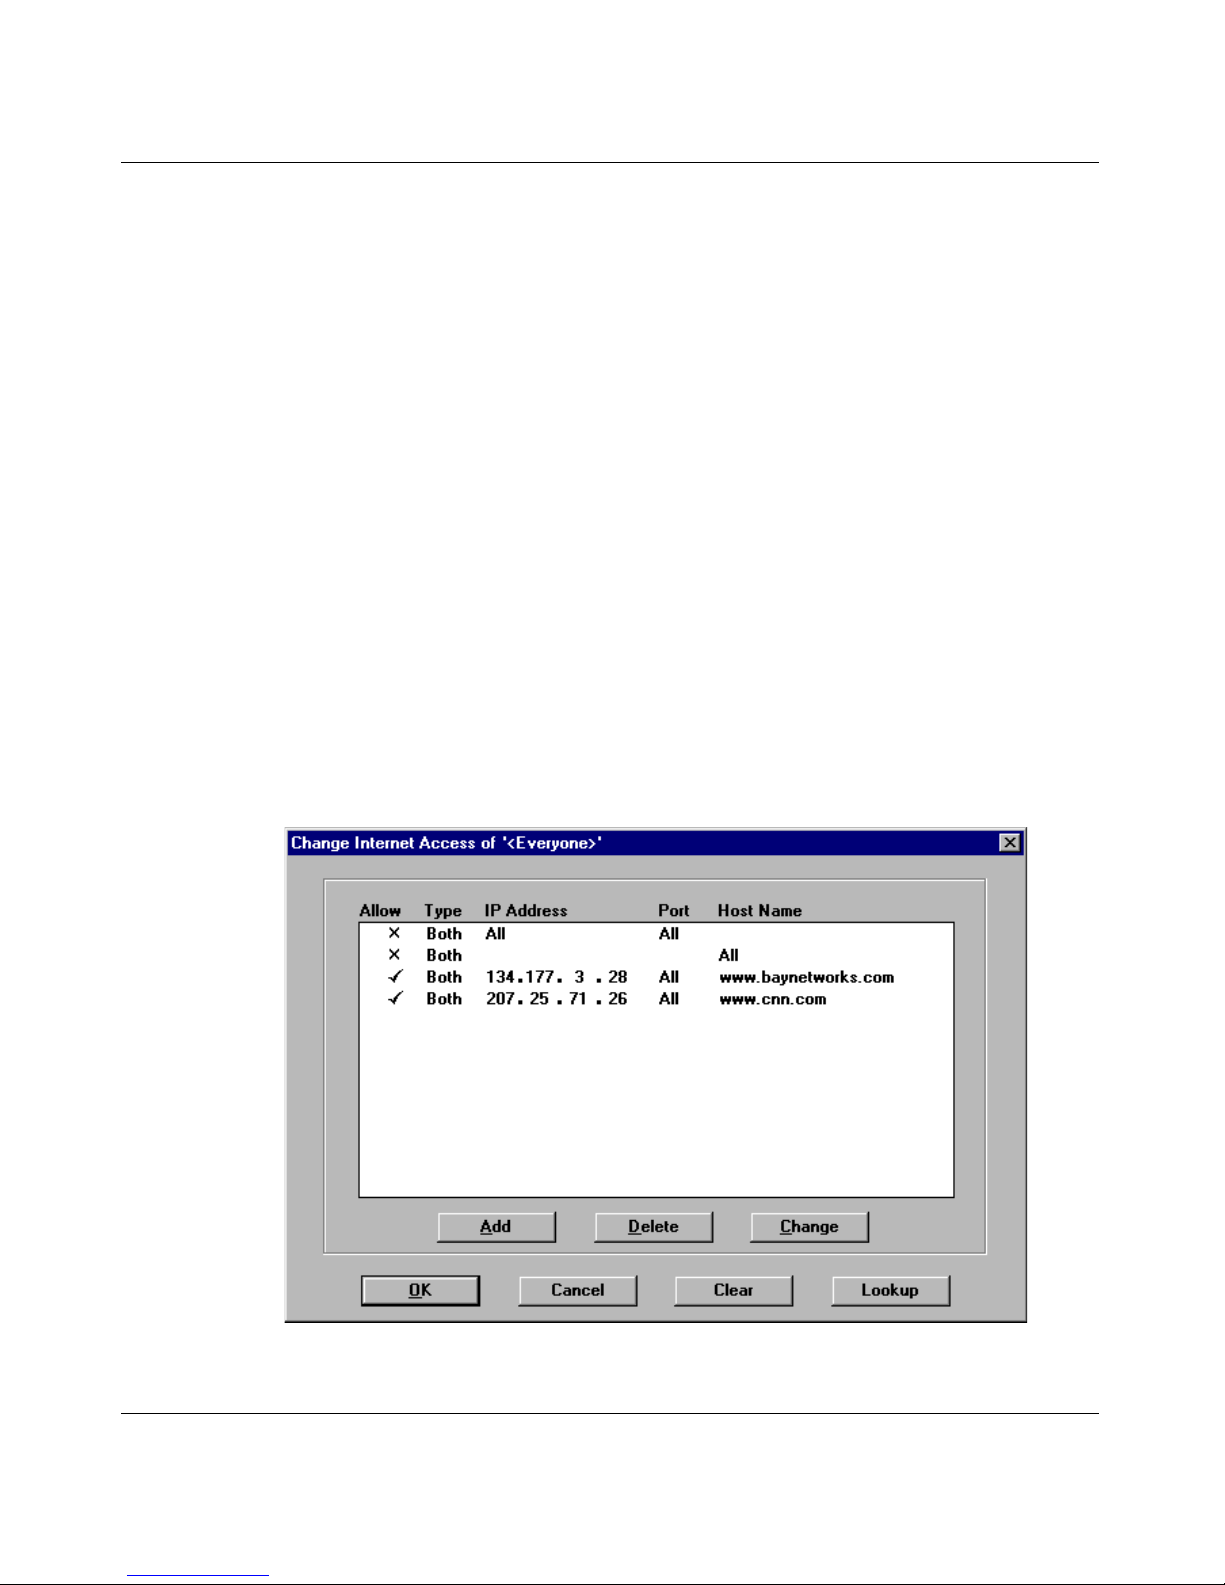
90 Chapter 2 User access administration
Allowing access to a few sites
Some major Web sites such as www.microsoft.com and www.cnn.com have more
than one IP address. For very large sites, you must allow access to all IP addresses
for the site.
To allow a few sites for everyone in a group:
1 Set the Everyone Group’s access to Controlled access.
Refer to “Configuring Internet access” on page 58 for more information.
2 Configure Internet Access for the Everyone Group by allowing access to
www.nortelnetworks.com.
Refer to “Defining controlled Internet access” on page 59 for more
information.
3 Repeat step 2 to allow access to the site www.cnn.com.
You should now see a list of sites allowed to all users within the Everyone
Group, similar to that in Figure 47.
Figure 47 Allow Internet access example
300868-G
Page 91

Chapter 2 User access administration 91
4 Configure Incoming Ports to allow acc ess to all por ts and Both TCP and UDP.
Refer to “Managing incoming port access” on page 76 for more information.
All users now have access to only the sites on the list.
Note: If a user’s individual access settings are more restrictive than the
Everyone Group settings, then Instant Internet uses the more restrictive
access settings.
Managing a remote Instant Internet unit
Admin cannot manage the remote users and groups unless the LANs are linked
together such that the administrator at the main site’s PC has access to the group.
The complete LAN directory is known when the PC client runs Admin. The PC
client, rather t han the Instan t Inte rnet u nit , obtai ns user or group infor mation f rom
the NT domain controller or NetWare server.
To use the remote site’s groups and users rather than the local groups and users,
create an additional icon in the Instant Internet section of the Start menu called
“Admin Remote,” which runs Admin with the /remote command.
Note: You will see only users and groups that have had access controls
defined for that unit. If a group has certain Internet access permissions,
you will see the group in Admin, but you will not necessarily see the
users in that group unless they have some unique privilege defined.
Using the BayStack Instant Internet Management Software Version 7.11
Page 92

92 Chapter 2 User access administration
300868-G
Page 93

Chapter 3
Internet activity logging
This chapter offers information on advanced Instant Internet feat ures that allow
experienced network supervisors to monitor and log Internet activity.
Activity logging overview
Instant Internet’s Monitor program is a utility that monitors individual Instant
Internet units in real time. It provides a dynamic display of the performance and
load of a specific Ins tant Internet unit (or multiple units) on bar graphs and
histograms.
93
With Monitor, you can monitor statistics, logs, and diagnostics of one or more
Instant Internet units. Because it provides multi-document interface (MDI), you
can use Monitor to view an individual Instant Internet unit or several units
simultaneously.
To start the Monitor program:
1 Locate the Instant Internet menu or program group (depending on your
operating system).
2 Select Monitor.
3 If prompted, select an Instant Internet unit to monitor.
If the Instant Internet unit is not in the list of units to choose from, refer to
“Adding a unit to the selection list” on page 275.
The Monitor main window opens (Figure 48).
Using the BayStack Instant Internet Management Software Version 7.11
Page 94
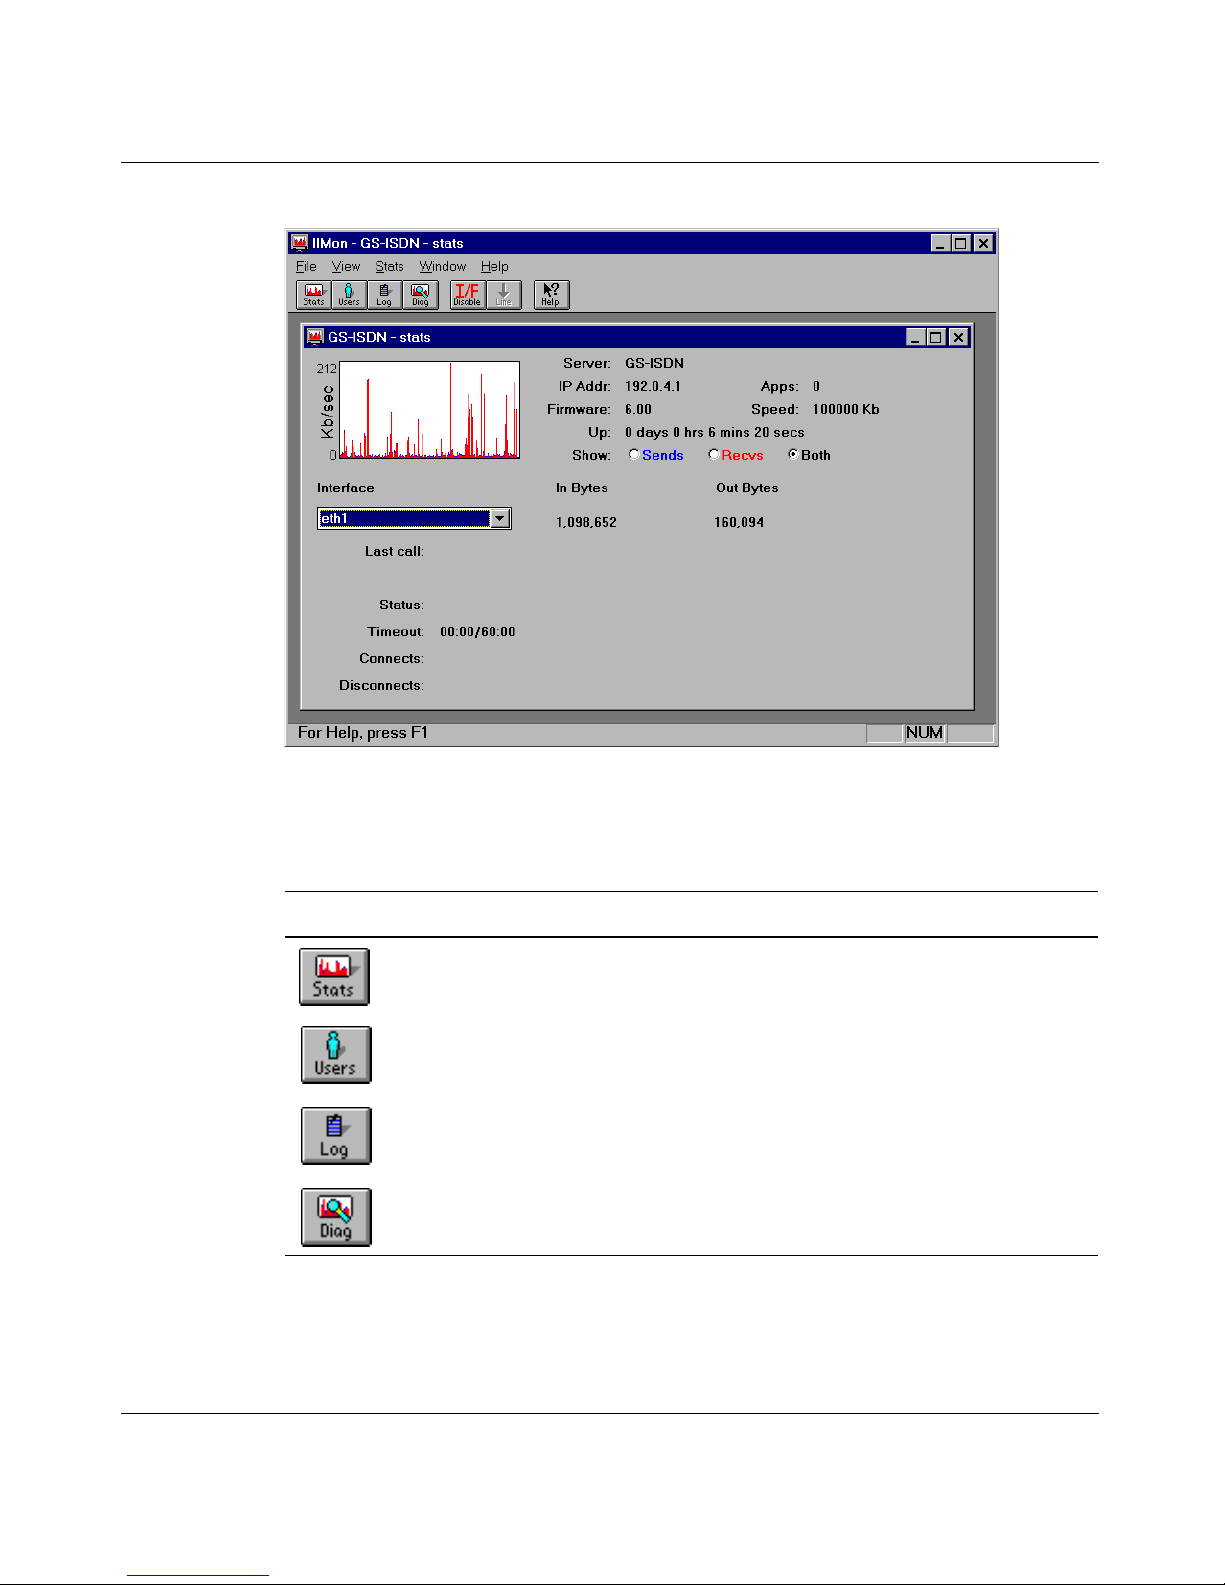
94 Chapter 3 Internet activity loggin g
Figure 48 Monitor main window
Table 10 describes the toolbar buttons in the Monitor main window.
Table 10 Monitor main window toolbar buttons
Button Description
Opens a window that shows you statistics about the Instant Internet
unit.
Opens a window tha t show s whi ch us ers are c urrentl y using t he I nst ant
Internet unit.
Opens a window that shows the logging activity of the Instant Internet
unit.
Opens a window that shows diagnostic information about the
connections to the Instant Internet unit.
300868-G
Page 95

The toolbar on the Monitor main window changes depending on the type of
information you are monitoring. For example, the buttons available for Stats are
different from the buttons available for Users. To see this, practice clicking the
Stats, Users, Log, and Diag buttons to see what happens to the toolbar.
Monitoring an Instant Internet unit
To monitor an Instant Internet unit:
1 In the Monitor main window, click the button for the information you want to
view.
2 When prompted, select the Instant Internet unit you want to monitor.
The information for the selected unit is displayed.
Chapter 3 Internet activity logging 95
If you do not see the Instant Internet unit you want to monitor, refer to
“Adding a unit to the selection list” on page 275.
Viewing statistics
The Stats win dows displays the statistical information available for the sele cted
Instant Internet unit, including a real-time graph that shows the data being either
sent or received in kilobits per second.
To view statistics for a unit:
Click the Stats toolbar button.
The Stats window opens (Figure 49).
Using the BayStack Instant Internet Management Software Version 7.11
Page 96
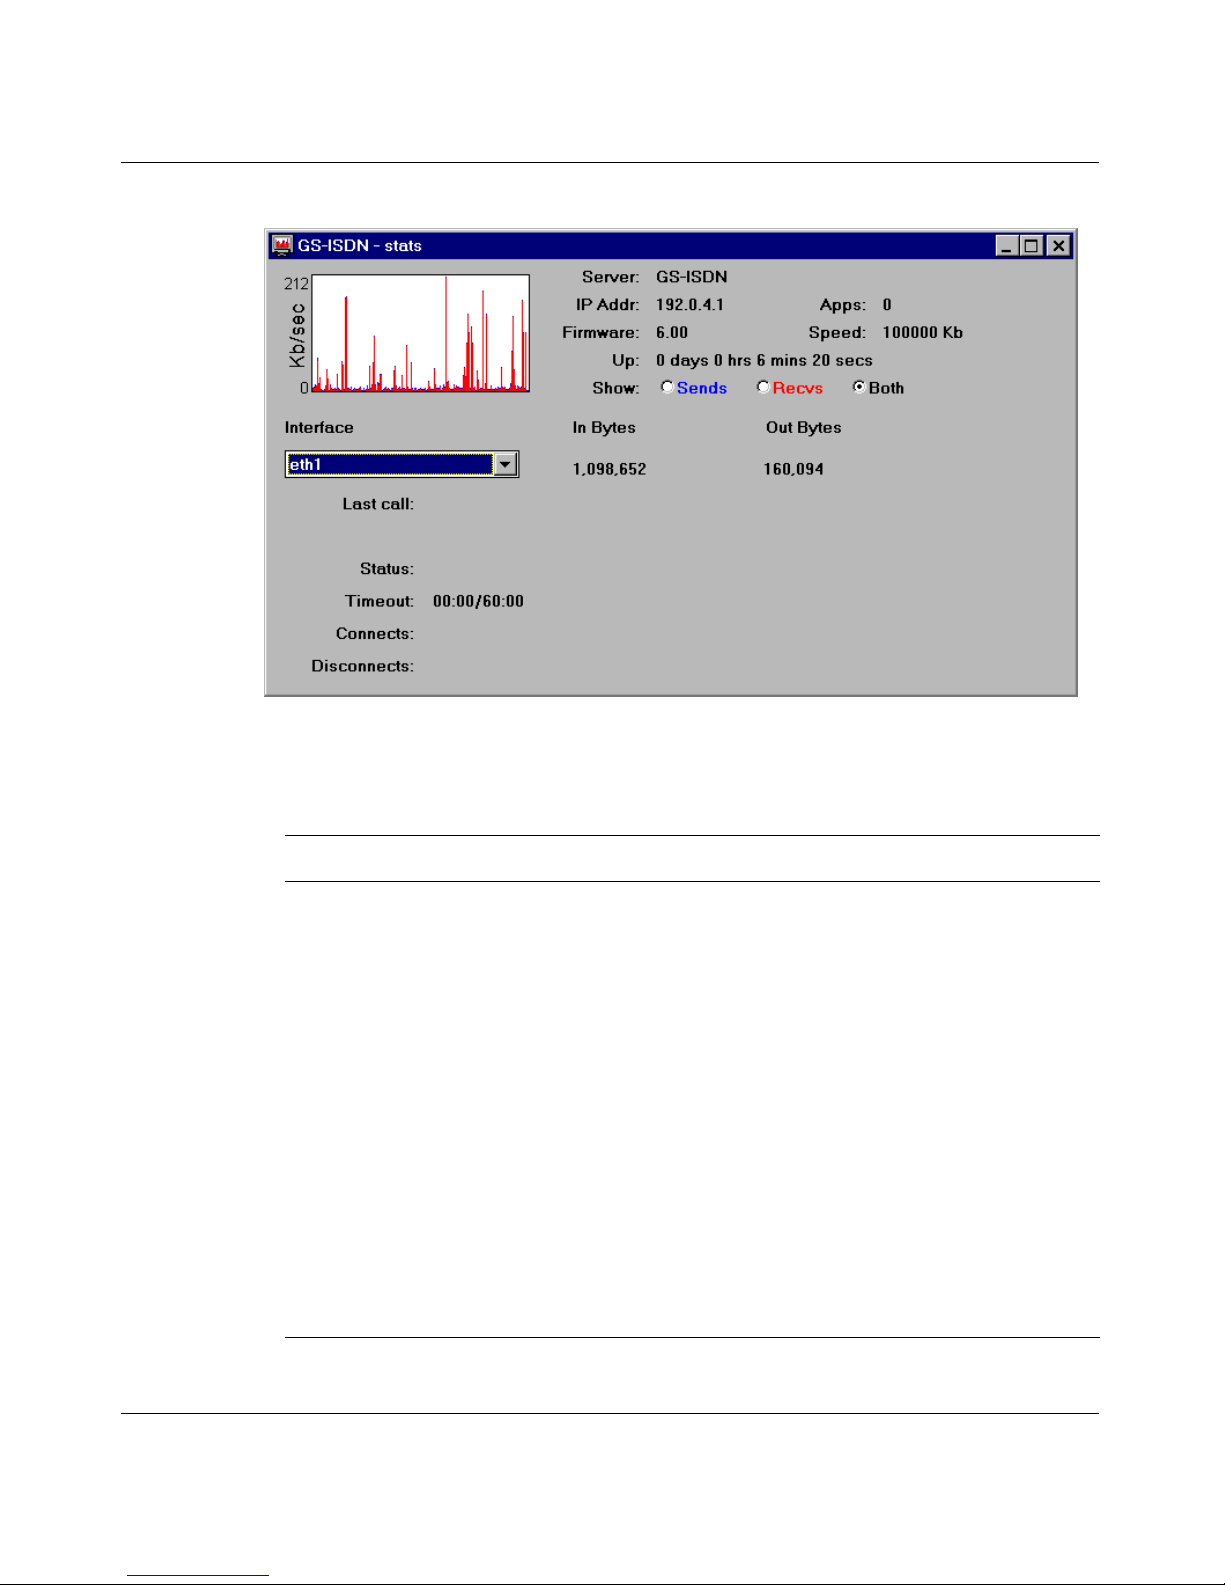
96 Chapter 3 Internet activity loggin g
Figure 49 Sample Stats window
Table 11 lists the statistics displayed in the Stats window.
Table 11 Stats window statistics
Item Description
Server The name of the Instant Internet unit selected for monitoring.
IP Add The IP address of the selected interface or the destination IP
address of the selected VPN tunnel.
Firmware The version of the firmware running on the Instant Internet unit.
Up The number of days, hours, minutes, and seconds the Instant
Internet unit has been up since last reset.
Apps The number of applications currently accessing the unit. Instant
Internet can support an unlimited number of IP workstation
application instances and up to 250 IPX workstation application
instances.
Show • Sends – When you select this option, only the data sent is
displayed.
• Recvs – When you select this option, only the data received is
displayed.
• Both – When you select this option, the data for Sends is
displaye d in blue, and the data for R ecvs is dis played in red.
300868-G
Page 97

Chapter 3 Internet activity logging 97
Table 11 Stats window statistics (continued)
Item Description
Speed The speed (in kilobits) at which data is being sent and received.
To calculate the speed in kilobytes, divide by 8.
Interface If you have more than one interface, you can choose the interface
you want to moni tor . You can also sele ct the VPN tunnel y ou want to
monitor.
In Bytes/Out Bytes The data sent and received since the last reset is displayed (in
kilobytes). To calculate this speed in kilobits, multiply the kilobytes
by 8.
Table 12 lists additional statistics that are displayed for a dial-up or ISDN
interface or a VPN tunnel.
Table 12 Stats window statistics for a dial-up or ISDN interface or a VPN
tunnel
Item Description
Last call Day, date, time, and year of last Internet connection, as well as a
descript ion of the connection.
Status Whether the Instant Internet connection is up or down, and the
number or hours and minutes up or down. For a VPN tunnel, it
shows authentication and encryption types for a connection. For
ISDN, the status field always has the form:
up|down, n/m active (dialing x) (no MP) (y disabled)
• up|down - The status of the interface. This status depends on
whether the interface is fully activated and IPCP negotiation is
complete.
• n/m active - Where “n” is the number of individual B channels
active, and “m” is the number of available B channels in the
bundle (normally 2).
• (dialing x) - Appears only if one or more of the B channels are
attempting to connect. “x” is the number of channels dialing.
• (no MP) - Appears only if a Mul tilink conn ection i s atte mpted but
the ISP does not allow MP or the ISP rejects the MP request.
• (y disabled) - Appears only if one or more individual B channel
interfaces are disabled. “y” indicates the number of disabled
interfaces.
Timeout Current timeout value is displayed in 0:00/0:00 format. The first
value shows how much time has elapsed with no activity. The
second value shows the inactivity timeout value. For a VPN tunnel,
it shows the SA lifetime (timeout).
Using the BayStack Instant Internet Management Software Version 7.11
Page 98
98 Chapter 3 Internet activity loggin g
Table 12 Stats window statistics for a dial-up or ISDN interface or a VPN
tunnel (continued)
Item Description
Connects The number of successful connections, number of connection
attempts, and percentage of successful connections.
Disconnect s The number of lines dro pped from the use r’s end of t he conn ection,
number of total line drops, and percentage of connections dropped
from the user’s end.
When the Stats window is active, you can select any of the following options on
the toolbar:
• I/F Disable – This button disables the Instant Internet interface selected in the
list box below the graph. To re-enable the unit, click the I/F Enable toolbar
button.
Caution: If you are using a dynamic IP address and a different IP
address is accessed when the dial-up connection reestablishes, this may
disconnect users currently on the selected Instant Internet unit.
• Line – This button displ ays t he co nnection status. This butt on is available for
the following connections:
a Between the phone line and the Internet
If the line is active it shows a green arrow pointing up. If the line is
inactive it shows a red arrow pointing down. To activate or deactivate a
line, click the corresponding button.
b Between ends of a VPN tunnel
This button appear s for a VPN tunnel onl y i f you are monitoring an I Pse c
interface. Yo u use it to test situations where you want to force the tunnel
to be inactive. To make a VPN tunnel connection inact ive, cl ick th e down
arrow button.
The Stats menu contains options for the above buttons, and it also contains the
following options:
300868-G
Page 99
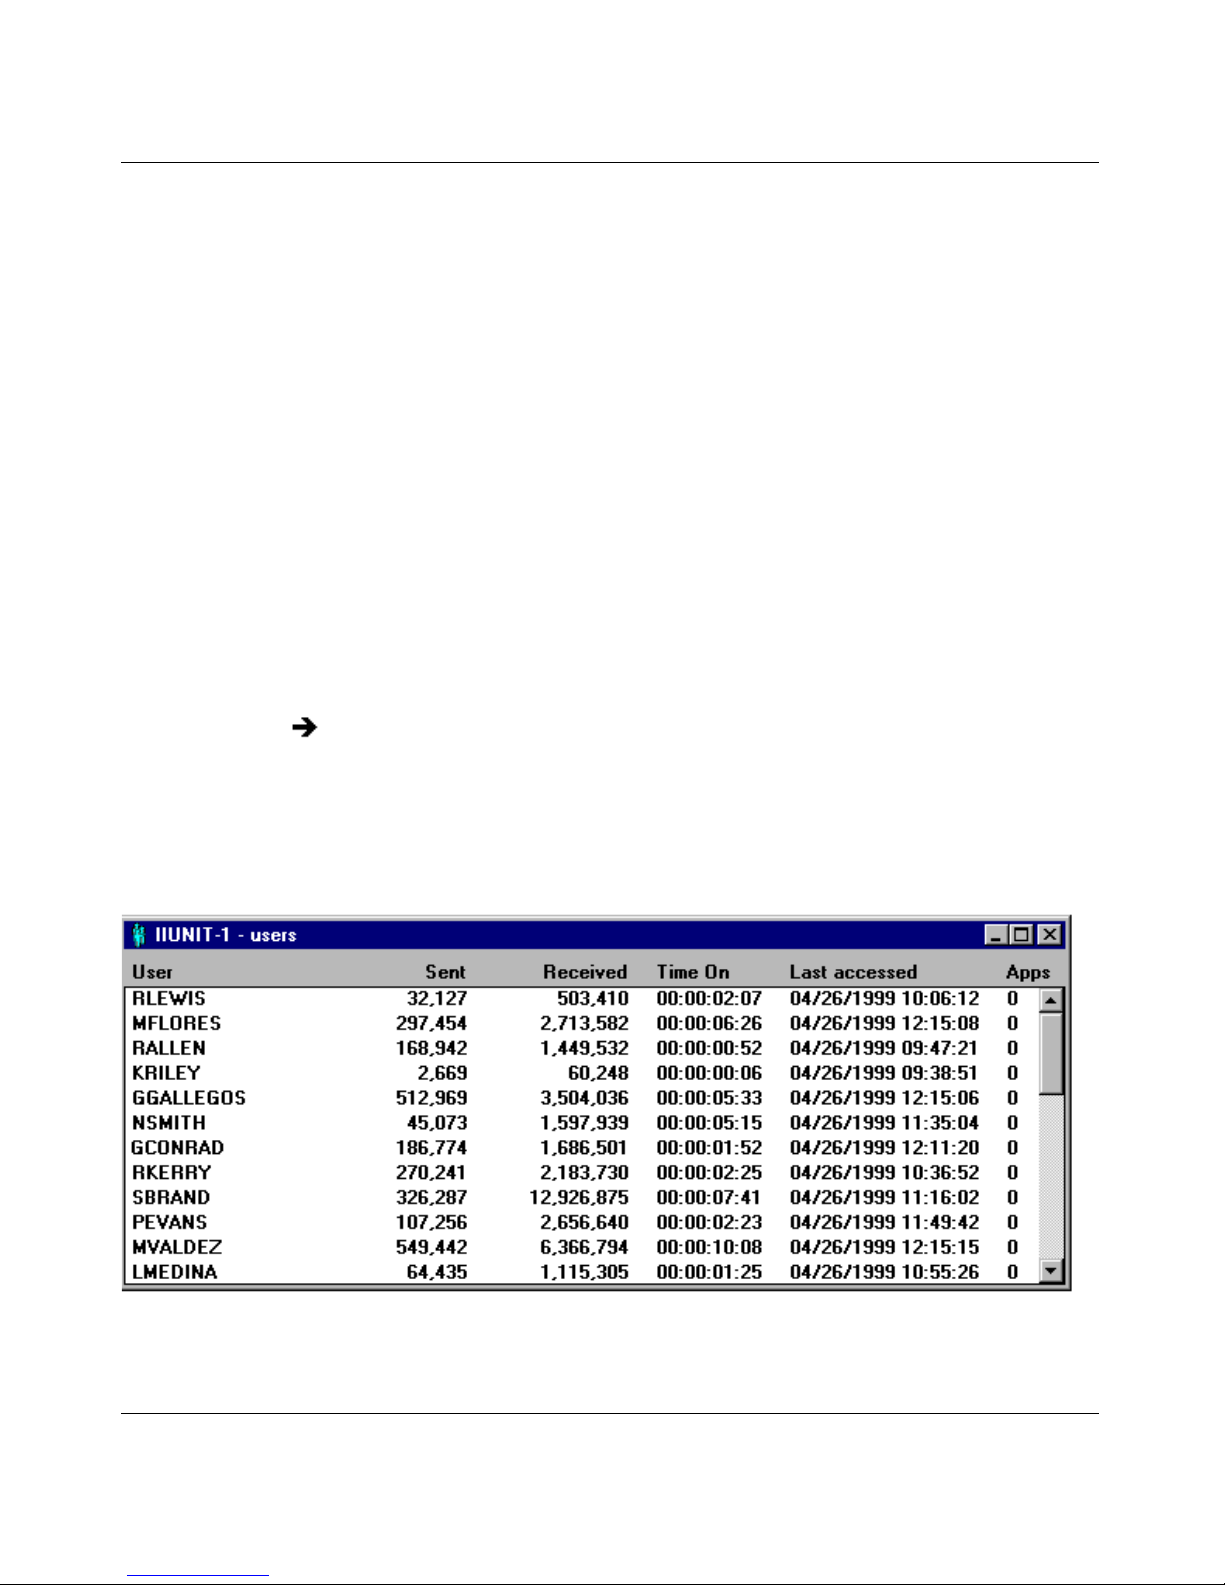
Chapter 3 Internet activity logging 99
• Forget password – If you select the Remember Password option when you
are prompted for a password for a specific Instant Internet unit, this option
cancels t hat selection.
• Forget all passwords – If you select the Remember Password option when
you are prompted for a password for an Instant Internet unit, this option
cancels that selection for all Instant Inter net units.
Viewing users
You can view a list of all users connected to the Instant Internet unit. The user
name that appears in the log is controlled by the Set User Name Order you
configure in Admin. Refer to “Setting user name order” on page 40. IP
workstations not lo gged in with t he Inst ant Int ernet works tation l ogin works tati on
are identified in the log by their IP address.
To view a list of users connected to an Instant Internet unit:
Click the Users toolbar button.
The Users window opens.
Figure 50 shows a sample Users window.
Figure 50 Sample Users window
Using the BayStack Instant Internet Management Software Version 7.11
Page 100

100 Chapter 3 Internet activity logging
Table 13 lists the information shown in the Users window.
Table 13 Users window statistics
Item Description
User The user names.
Sent The amount of data the user sent.
Received The amount of data the user received.
Time on The amount of time the user has been logged onto the Instant
Internet unit.
Last accessed The time the user last accessed the Instant Internet unit.
Apps The number of applications being used to access the Internet.
Instant Internet can support an unlimited number of IP workstation
application instances and up to 250 IPX workstation application
instances.
When the Users window is active, the options in Table 14 are available on the
toolbar.
Table 14 Monitor main window toolbar buttons
Button Description
Refreshes the display to view up-to-the-minute user
information, including users added.
Clears all columns for all users. The displayed information is
cumulative since the log was last reset. When you select Clear,
the user’s Sent, Received, Time, and Last columns are reset to
zero. After you select Clear, users are added to the log as they
access Instant Internet.
Exports user data to a specified file for use at a later date. This
option is useful before clearing the User Log.
You can select a single user and click this button. This logs the
user off temporarily until they access the network again.
You can select this button to log off all use rs. This log s them of f
temporarily until they access the network again.
300868-G
 Loading...