

Page 1
Voice over Internet Protocol (VoIP) voicemail quick reference guide
RMIT University ITS Training 15/02/2012 - www.rmit.edu.au/its/training 1
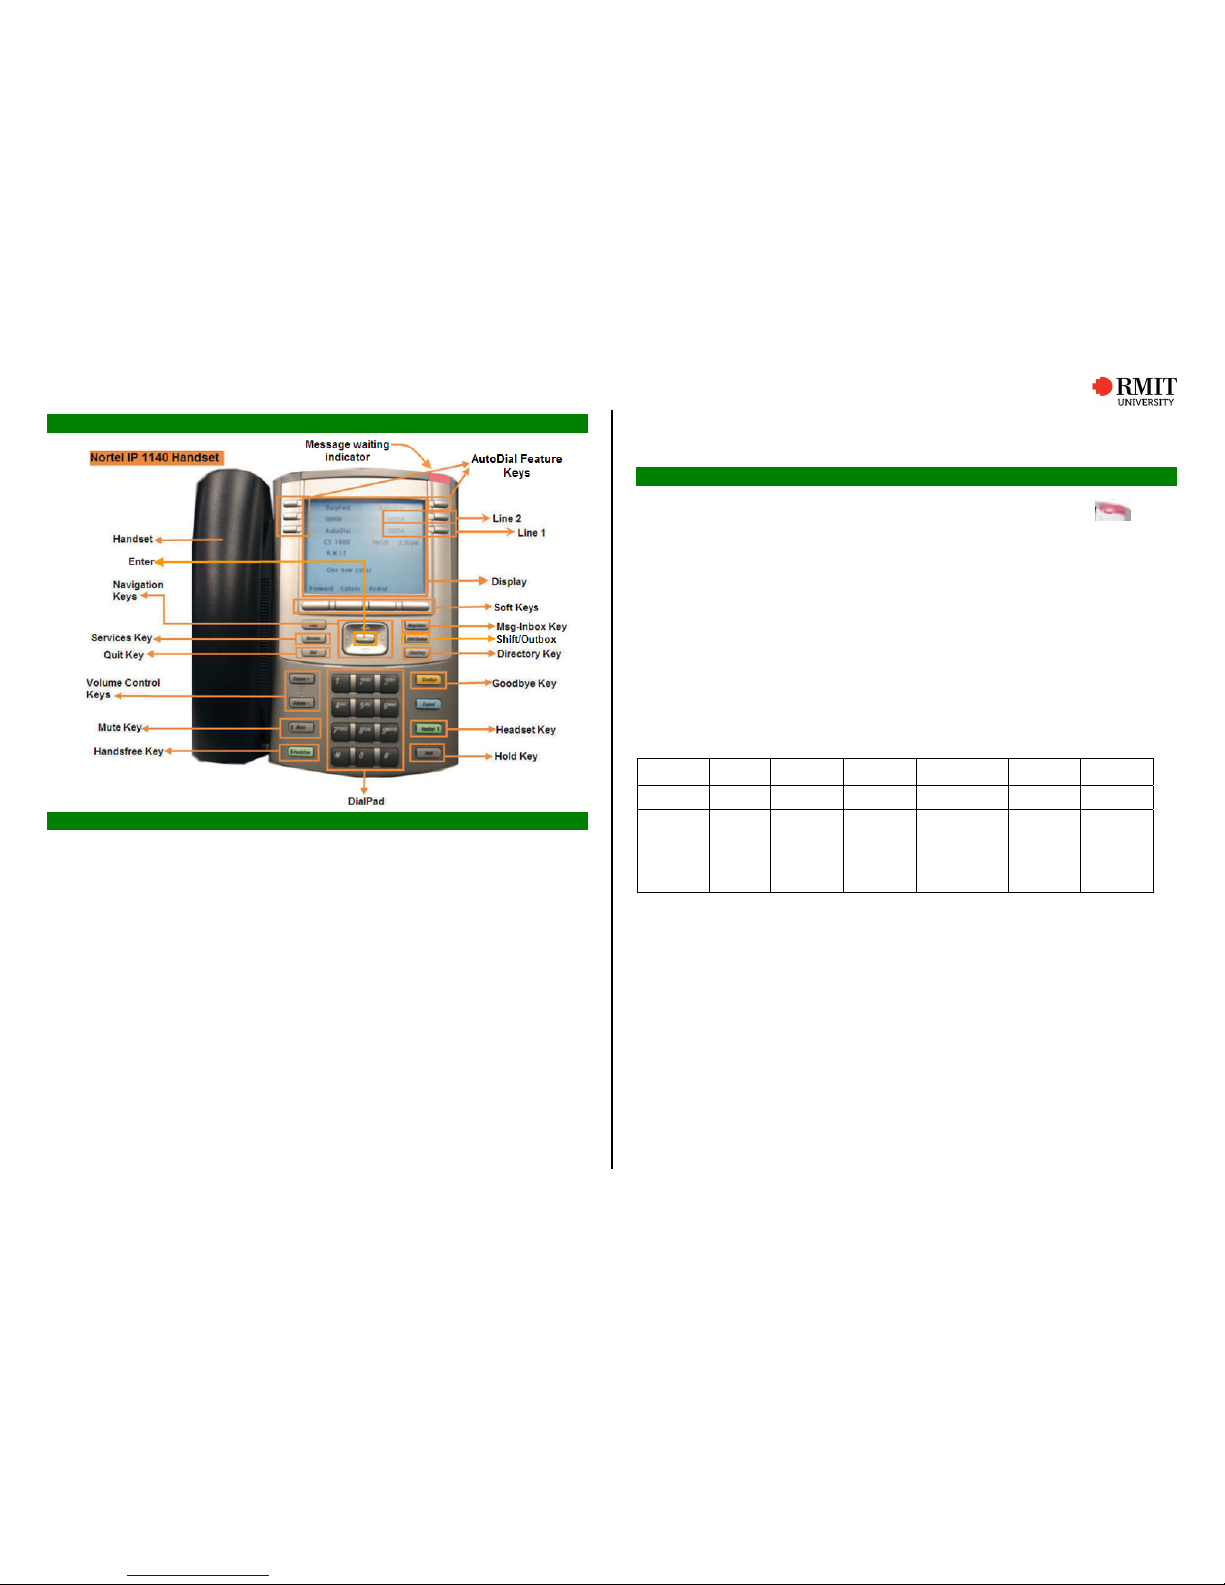
Nortel IP 1140 handset
Access voicemail
The RMIT voicemail number is 50852 (external 992 50852). If you do not have
Voicemail, see reverse on how to request a Voicemail account.
Logging into Voicemail from your extension
1. Lift handset (or press Line key, Handsfree key or Headset key)
2. Press Msg/Inbox key (or dial 50852).
3. Press # key
4. Enter your password (first time you login the default password is 12+extension
number, then you will be prompted to change your password)
5. Press # key.
Logging into voicemail from any extension
1. Lift handset (or press Line key, Handsfree key or Headset key)
2. Press Msg/Inbox key
3. Enter mailbox number (your extension number)
4. Press # key
5. Enter password
6. Press # key
Logging into voicemail from an external telephone
1. Dial the voicemail access number 992 50852
2. Enter your mailbox number (your extension number)
3. Press # key
4. Enter your password
5.
Press # key.
Messages
Playing messages
New messages are indicated by the red lamp on top of the handset.
When you log on to the voicemail
system new messages will play automatically.
The following options are available: You may also use the soft keys functions.
Press 2 to play the current message
Press 6 to go to the next message
Press 4 to go to the previous message
Press 21 to play the message slower
Press 23 to play the message faster
Press 1 to skip back 5 seconds through a message
Press 3 to skip forward 5 seconds through a message
Press # to pause, then Press 2 to continue
Press 76 to delete
Playback controls
The following controls can be used while listening to a message:
# 2 1 3 4 6
76
Pause Play
Back
5 secs
Forw 5
secs
Previous
msg
Next
msg
Delete
msg
Deleting messages
1. Press 76 to d
elete (before, during or after playing a message).
Retrieve a deleted message
1. Press 4 to ret
urn to the message
2. Press 76 to restore the message.
Note:
Deleted messages cannot be retrieved after you logout of voicemail
Messages are automatically saved unless deleted
Saved messages that have been listened to will be automatically deleted after
seven working days
Messages can be a maximum of three minutes long
The mailbox can store 10 minutes worth of messages.
Page 2

VoIP voicemail quick reference guide
2 RMIT University ITS Training 15/02/2012 - www.rmit.edu.au/its/training
Change voicemail password
Note: Password must be between 4 to 16 digits in length.
1. Press 84 while logged in to mailbox
2. Enter password
3. Press # key
4. Enter new password
5. Press # key
6. Enter new password again
7. Press # key.
Create a voicemail greeting
External, Internal, Temporary Greetings and Personal Verification (recording
your name) may be recorded.
Note: If no internal greeting is recorded, external greeting is used. Temporary
greetings replace external and internal greeting until expiry or deleted. Use
temporary greetings when on leave. External and internal greetings will remain
unchanged.
Record your greeting
1. Press 82 while logged in to your mailbox
2. Press:
1 for external
2 for internal
3 for temporary greeting
9 for personal verification (you should record a personal verification)
3. Press 5 to start recording, wait for the tone, and then record greeting
4. Press # key to stop the recording
5. Press 2 to review greeting
Note: If recording is unsuccessful, delete and re-record greeting
6. Press 76 to delete greeting
7. Press 5 to re-record
8. Press # key to stop recording
9. Press 4 to exit Greetings.
Set an expiry date for temporary greeting
After you have recorded your temporary greeting:
1. Press 9 to set expiry date (while at temporary greeting)
2. Enter the month (e.g. 03 for March)
3. Press # key
4. Enter the day (14 for the 14
th
)
5. Press # key
6. Enter the time (Press 900# for a time setting of 9.00am)
7. Press 1 for AM or press 2 for PM.
8. Press # key.
Note: Press # key with no number will enter the current month or day. If no expiry
date is set, the temporary greeting will remain until it is deleted.
Forwarding messages
Messages can be forwarded to other mailboxes or to a distribution list.
Introductions can be recorded onto an original message. Messages marked
Private cannot be forwarded.
Forwarding a message
1. Press 73 to forward the message (while it is playing or after listening to it)
2. Enter the forwarding mailbox number
3. Press # key (repeat this step for each additional forwarding number)
4. Press # key again to end the list
5. Press 5 to record an introduction (wait for the tone before recording)
6. Press # key to stop recording.
Note: The following options are available:
Press 70 then 1 to add the Urgent option
Press 70 then 4 to add the Private option
Press 70 then 5 to receive a ‘Message Read’ receipt
Press 79 to send the message.
Requesting a new voicemail account
1. Go to www.rmit.edu.au/staff/it/forms
2. Scroll down to Telephony and voicemail
3. Download the Voicemail request form (DOC 71 KB)
4.
Complete the form
5. Get your line managers to approve and sign
6. Email or fax it to Service Desk [email protected] Fax 9925 3177.
Once your voic
email account is activated follow procedures from the start of this
document.
Online documentation and troubleshooting
Telephony and voicemail web site: www.rmit.edu.au/staff/it/telephone
ITS Service Desk: www.rmit.edu.au/its/ithelp, email: [email protected]
ITS Service Desk Tel. 9925 8888
ITS training web site: www.rmit.edu.au/its/training
 Loading...