

Page 1
WARNINGSPULSE User Manual
PULSE Pro
User Manual
Page 2

PULSE PRO User Manual
1TABLE OF CONTENTS
Warnings 2
Labels 4
Indications for Use, Risks and Benefits of the NormaTec Recovery System 6
Illustrations 7
Operating Instructions 11
Setup the System
Choose your Attachment
Adjust the Mode
Adjust the Intensity
Adjust the Session Time
Start the Session
What to Expect
Finishing Treatment
To Stop or Pause the Session
To Turn o the Device
How to use Zone Boost
Custom Mode
Options 16
Adjust Rest Time
Changing the Massage Pattern
Adjust the Number of Zones
Utilities 17
Display Brightness
Default Settings
Statistics 18
Pressure and Time
Device Usage
Caring for the System 19
Cleaning the System
Maintaining the System
Storing the System
Replacement Parts
Technical Information 20
Troubleshooting 26
Warranty Information 27
Return Policy 28
PULSE PRO User Manual
Table of Contents
Page 3
2
WARNINGS
Read the entire instruction manual before using the NormaTec PULSE PRO Recovery System.
• Do not attempt to take apart the system. The system has no user-serviceable parts. When service
or repairs are required, please contact customer service at 866.658.5896.
• Only use the power supply and power cord provided with the system. Using a dierent power
supply or cord may cause the system to operate incorrectly.
• To avoid risk of electric shock, do not use the system near water, such as near a bathtub, kitchen
sink, laundry tub, or swimming pool.
• Never spill liquid of any kind on the system to avoid damage and risk of electric shock.
• Do not place the system, cord, or any accessories where they could be damaged, present a fall
hazard, or become an obstruction to others.
• Keep the open ports of the Control Unit, NormaTec Hose interconnect and Power Jack free of debris
• If the power supply or power cord is damaged, the PULSE PRO Control Unit is dropped or
damaged, liquid is spilled on the system, or if the system does not operate normally when the
operating instructions are followed, turn the system o by pushing the PULSE PRO Control Unit’s
Power Button and then unplugging the system from the wall outlet. Contact customer service at
866.658.5896 for assistance.
• Do not puncture or otherwise damage the inflatable attachments (legs, arms, hips, or custom
attachments) since this may cause the system to operate incorrectly.
• Do not walk while wearing the inflatable attachments (to avoid falling).
• The inflatable attachments are designed to be used by only one person.
• Do not use this product if you are experiencing inflammation, an infection, pain of unknown origin,
bleeding (internal or external) at or near the site of application, or if you have a wound at or near
the site of application.
• Do not use this product if you are under the care of a physician or have a contraindication
requiring the use of any medical device.
• Do not use this product on sensitive skin.
• Do not hold the unit by the NormaTec Hose.
• Do not use this product if you have any of the following conditions:
— Acute pulmonary edema
— Acute thrombophlebitis
— Acute congestive cardiac failure
— Acute infections
— Deep Vein Thrombosis (DVT)
— Episodes of pulmonary embolism
— Wounds, lesions, or tumors at or near the site of application
— Where increased venous and lymphatic return is undesirable
— Bone fractures or dislocations at or near the site of application
WARNINGS
Page 4
3
WARNINGSPULSE PRO User Manual
• This product contains a lithium ion battery. Dispose of this product in accordance with local
regulations.
• Do not use the Control Unit air output or NormaTec Hose to direct pressurized air towards your
eyes, nose, mouth, or ears. Doing so may lead to serious injury.
• Use without supervision by children, unconscious persons, or incapacitated persons may be
dangerous.
• Make sure the power input connector on the NormaTec Control Unit is easily accessible at all
times in order to easily disconnect power if required.
WARNING!
No modification of this equipment is allowed.
WARNING!
If you experience severe pain, any unusual symptoms or want to remove pressure in an emergency
during use:
• Stop the device by pressing the Power Button.
• Disconnect the attachment connector of the NormaTec Hose from either the control unit or body
attachment.
• Remove the attachment(s) from your limb(s).
• Promptly consult your licensed healthcare practitioner, as required.
The NormaTec PULSE PRO contains a Li-Ion Battery and, if discarded, needs to be disposed of in
accordance with local regulations
Save this manual for future reference.
Page 5
4 LABELS
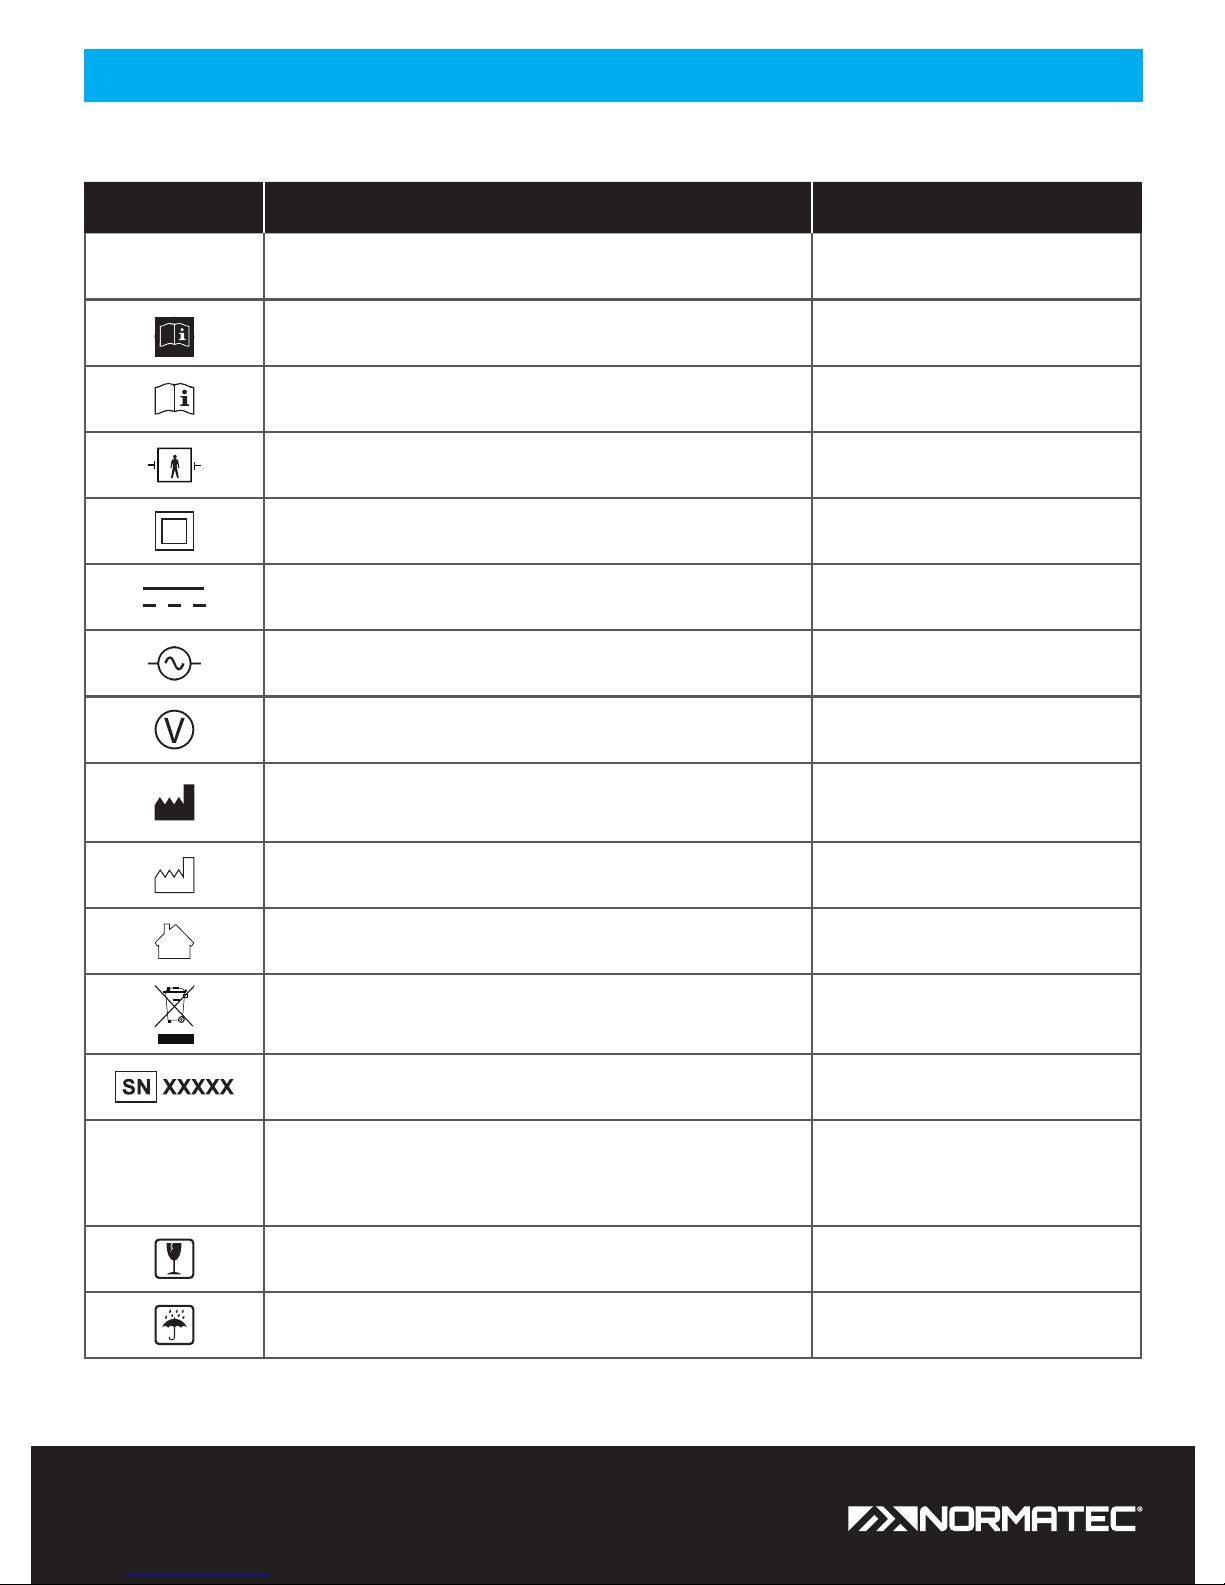
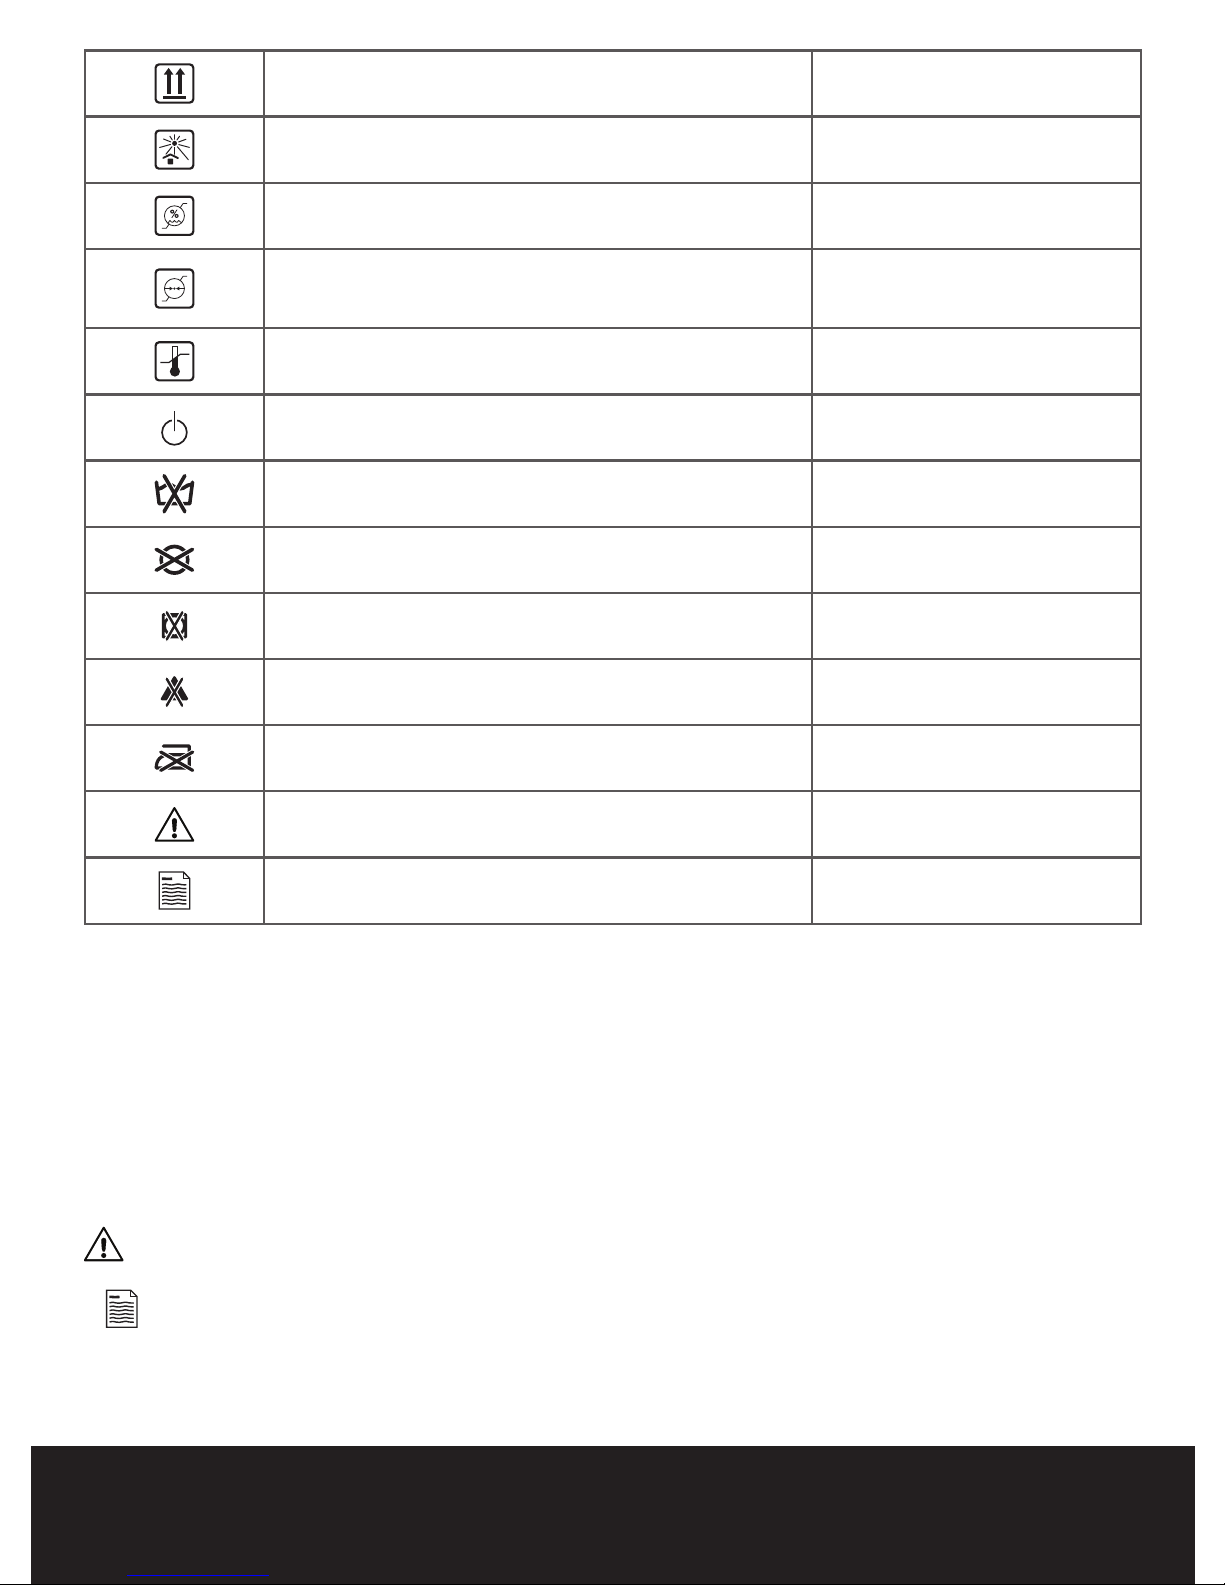
The following labels and symbols appear on the control unit, garments, and/or packaging.
SYMBOL DESCRIPTION LOCATION
IP21
Degree of protection against ingress of water On base of control unit
Read instructions before use On base of control unit
Read instructions before use On attachment tag
Level of protection type BF equipment On base of control unit
Double insulation On power adapter
Direct current On base of control unit
Alternating current In manual
Eciency level In manual
Manufacturer’s name and address
On base of control unit and
attachment tag
Date of manufacture On base of control unit
For indoor use In manual
Separate collection for waste electrical and
electronic equipment
On base of control unit
Serial number of the console On base of control unit
RoHS
Restriction of the Use of Certain Hazardous
Substances in Electrical and Electronic Equipment
compliant
On base of control unit
Fragile, handle with care On package
Keep dry On package
Labels
Page 6
5LABELSPULSE PRO User Manual
This side up On package
Keep away from sunlight On package
93%RH
10%RH
Transportation & storage humidity limitation On package
1060hPa
700hPa
Transportation & storage atmospheric pressure
limitation
On package
-4ºF
-20ºC
70ºC
158ºF
-4ºF
-20ºC
70ºC
158ºF
Transportation & storage temperature limitation On package
Place in and out of Standby Mode. On standby button
Do not wash On attachment tag
Do not dry-clean On attachment tag
Do not tumble dry On attachment tag
Do not bleach On attachment tag
Do not iron On attachment tag
Warning symbol In manual
Note In manual
*
Warning symbol – Used to identify a hazard that may lead to death or serious injury.
***
Note (Precaution) – Used to identify a hazard that may result in minor or moderate injury to the
user or patient, or damage to the equipment or other property.
Page 7

6 ABOUT THE PULSE PRO
The NormaTec PULSE PRO Recovery System is an air pressure massager indicated to temporarily
relieve minor muscle aches and/or pains and to temporarily increase circulation to the treated areas.
The risks and benefits of using the NormaTec PULSE PRO Recovery System are the same as having a
massage. If the massage feels uncomfortable, you can reduce the intensity or stop the session.
Similar to a massage, the benefits can include the temporary relief of minor muscle aches and pains. It
can also temporarily increase circulation in the area being massaged.
Please call customer service at 866.658.5896 if you have any questions.
Indications for use
Risks and Benefits of the Normatec Recovery System
Page 8
7ILLUSTRATIONSPULSE PRO User Manual
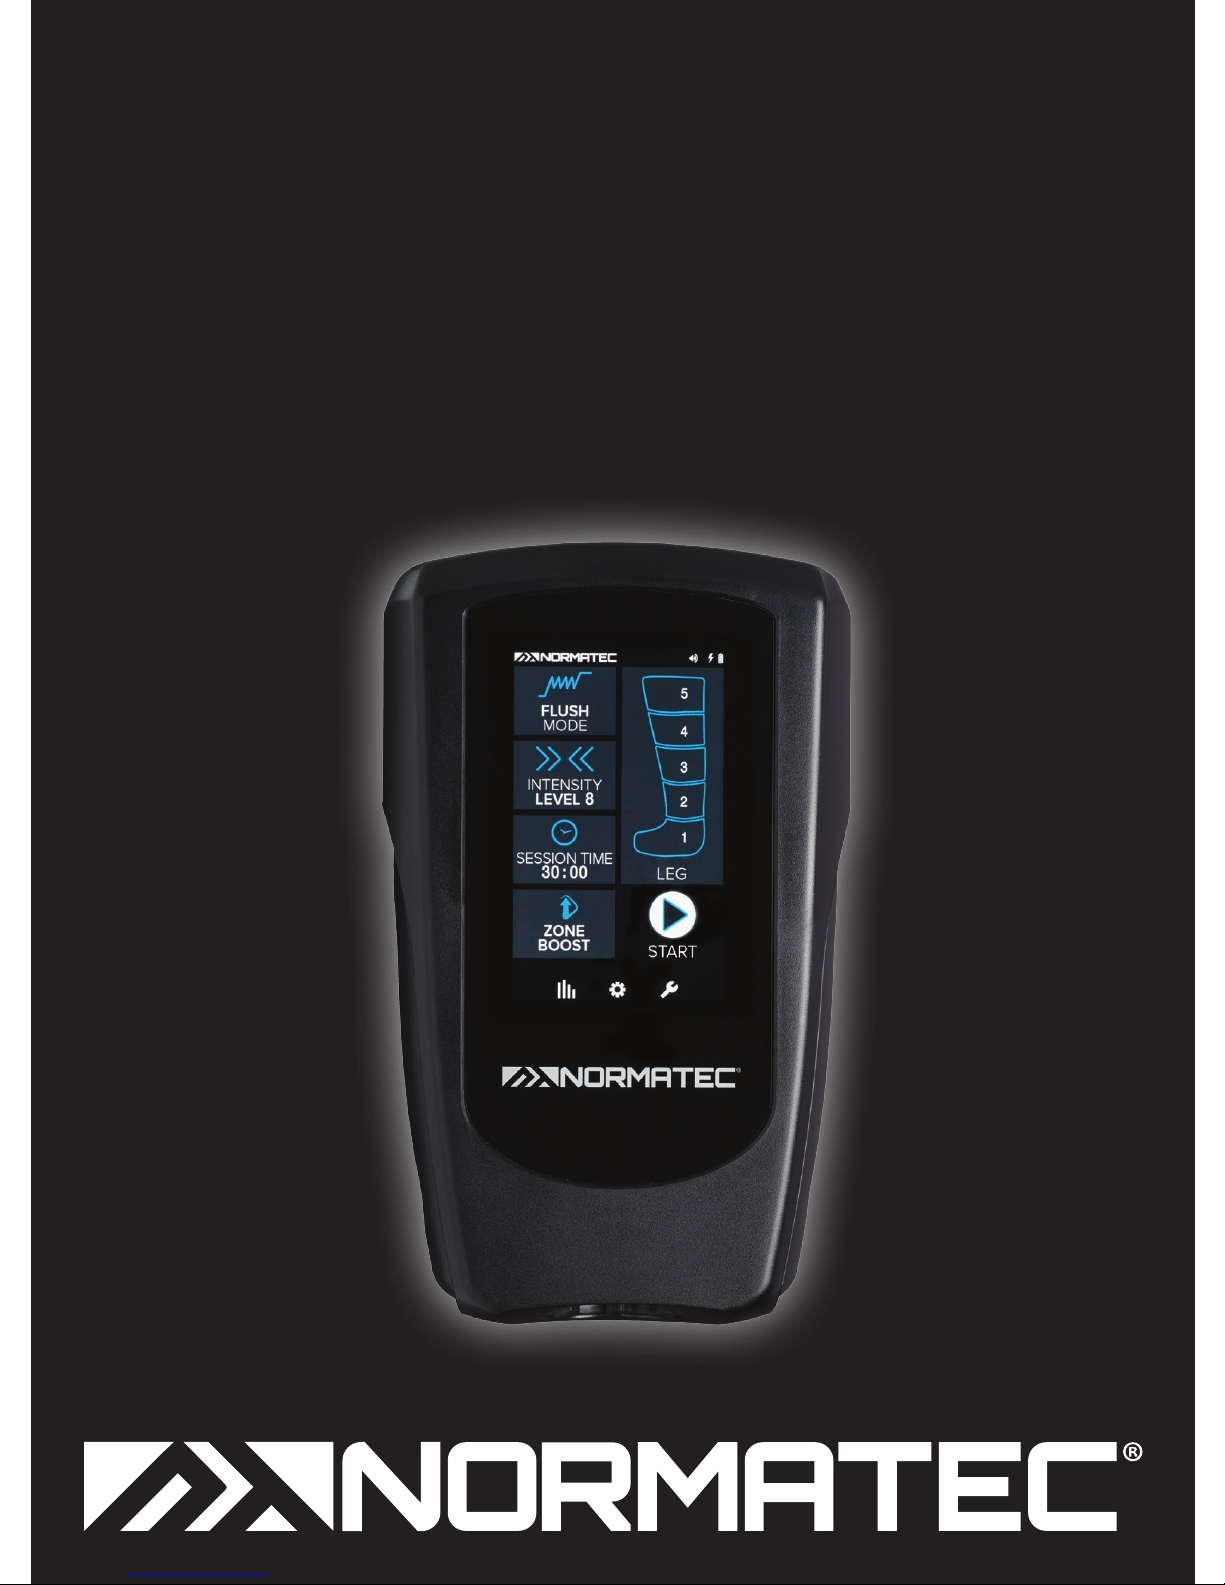
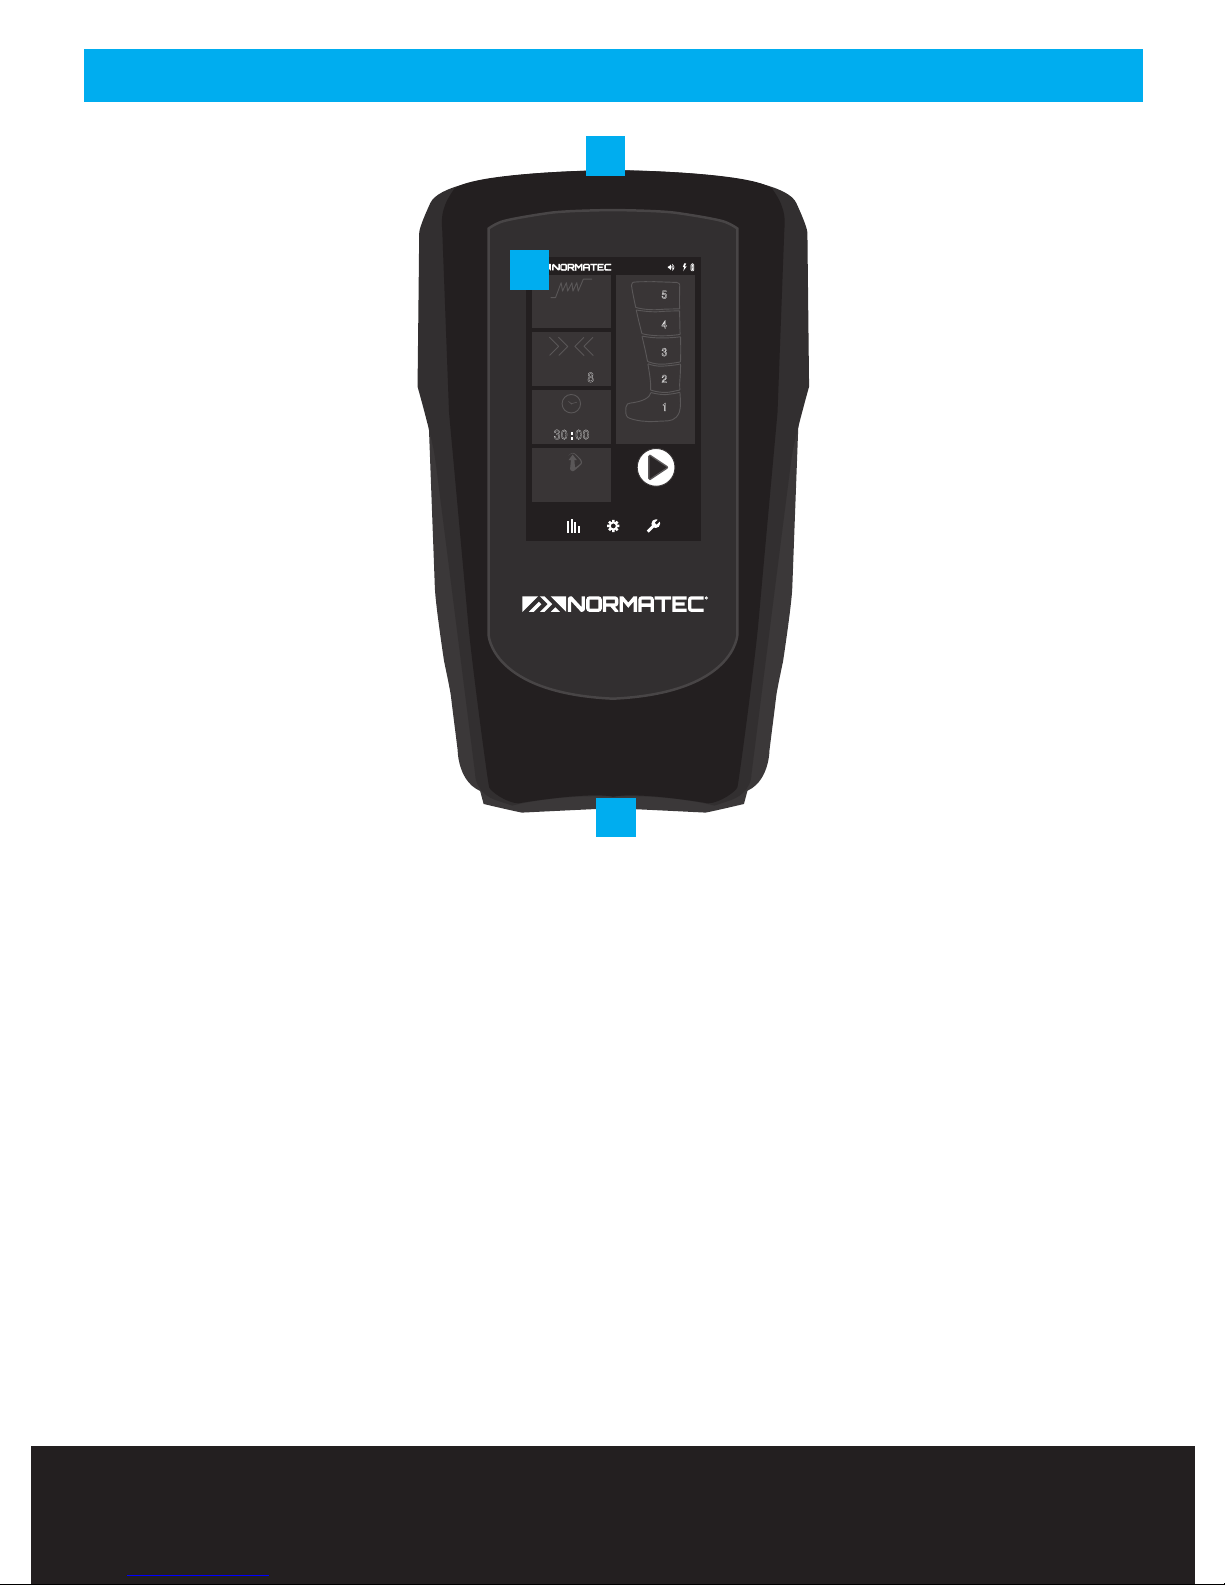
PULSE PRO CONTROL UNIT
STA RT
ZONE
BOOST
SESSION TIME
30:00
INTENSITY
LEVEL
8
FLUSH
MODE
LEG
5
4
3
2
1
1. Power Button
2. Touchscreen
3. Air Outlet and Power Inlet
Illustrations
1
2
3
Page 9
8 ILLUSTRATIONS
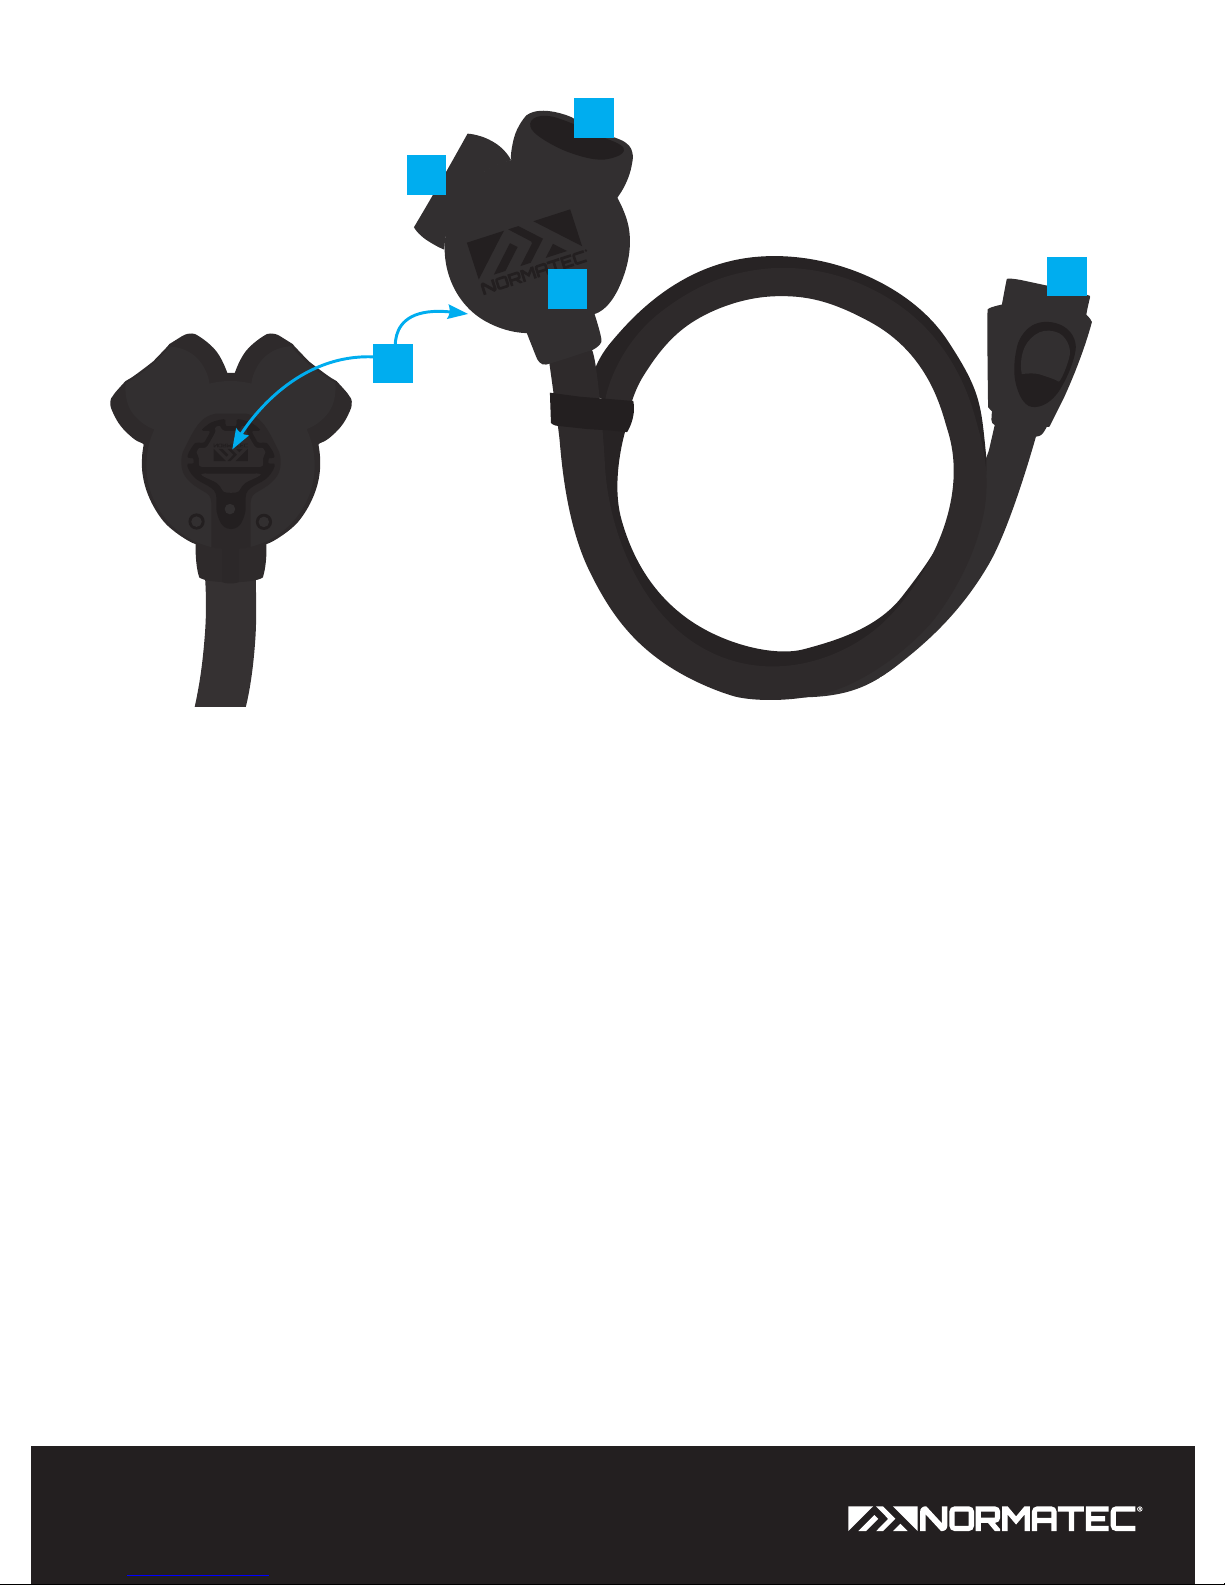
NORMATEC HOSE
1. Junction Box Air Outlet
2. Junction Box Air Outlet
3. Junction Box
4. Blocking Plug (on the underside of the Junction Box)
5. NormaTec Hose Connector (connects to PULSE PRO Control Unit)
1
3
5
2
4
Page 10
9PULSE PRO User Manual ILLUSTRATIONS
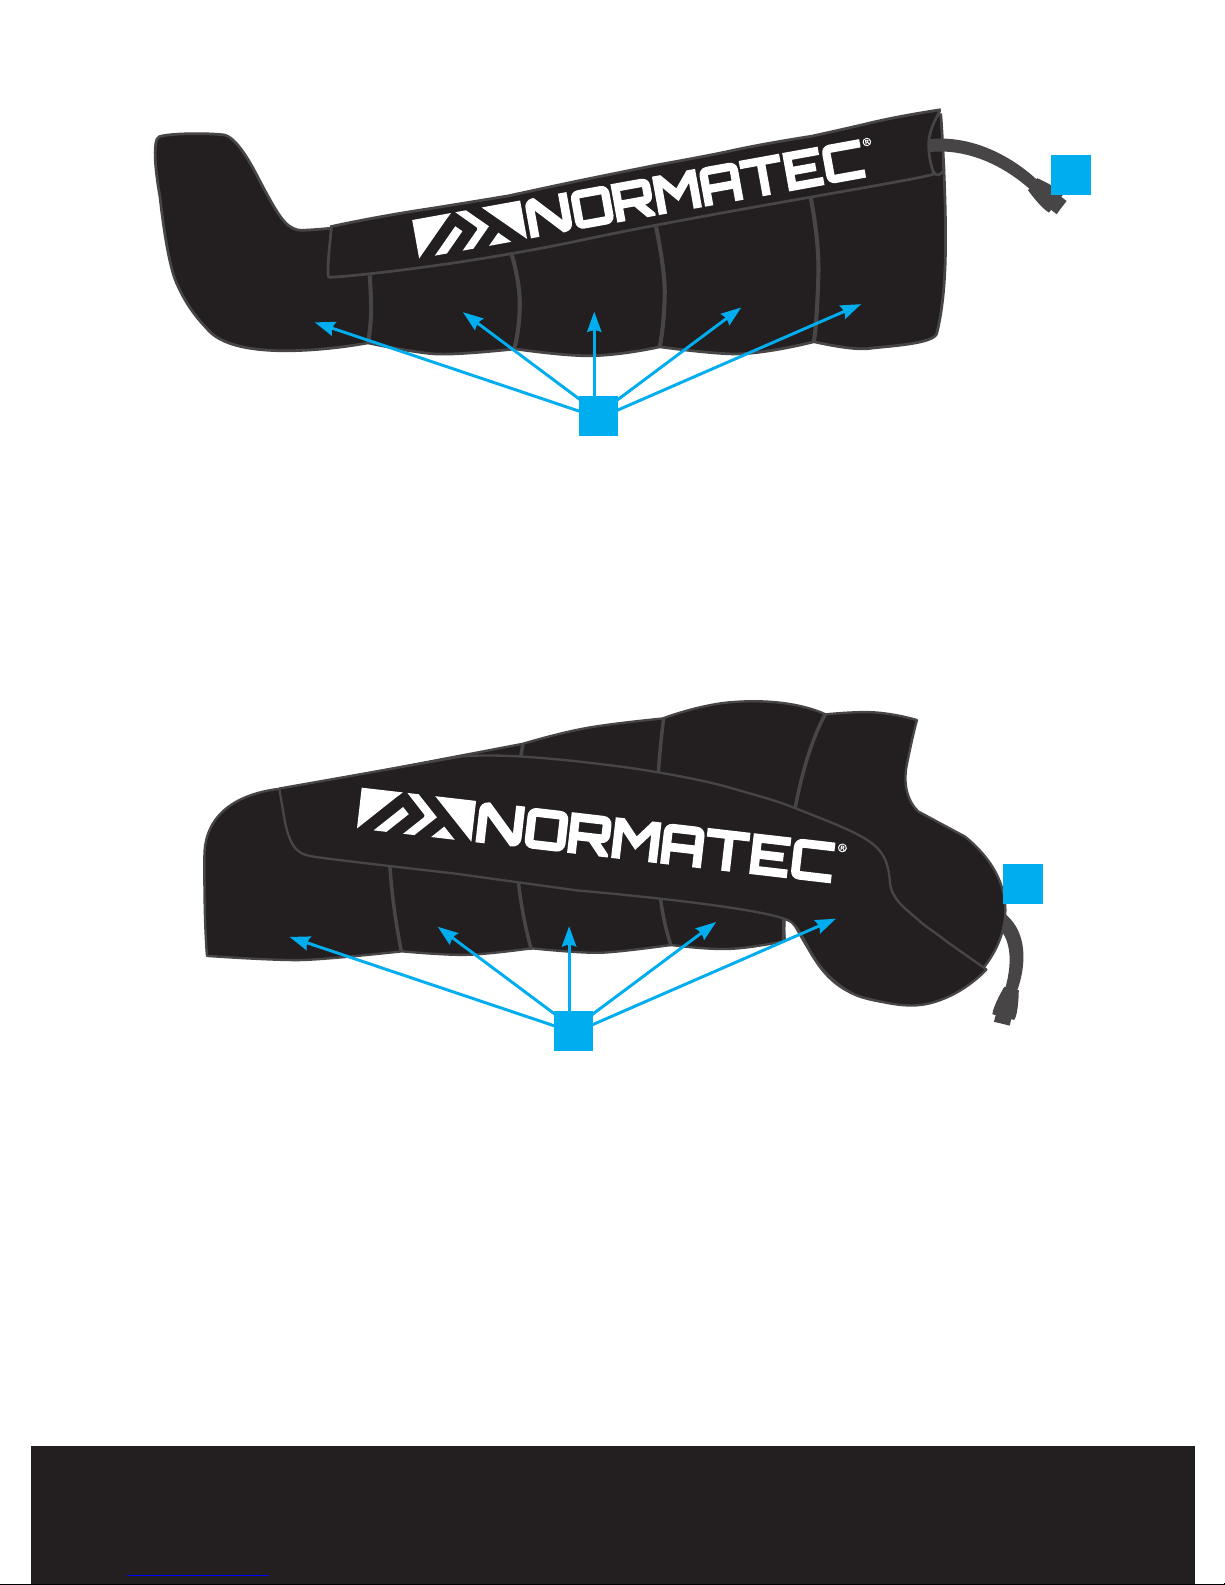
LEG ATTACHMENT
(Single person use only.)
1. Attachment Connector
2. Zones
ARM ATTACHMENT
(Single person use only.)
1. Attachment Connector
2. Zones
1
2
1
2
Page 11
10 ILLUSTRATIONS
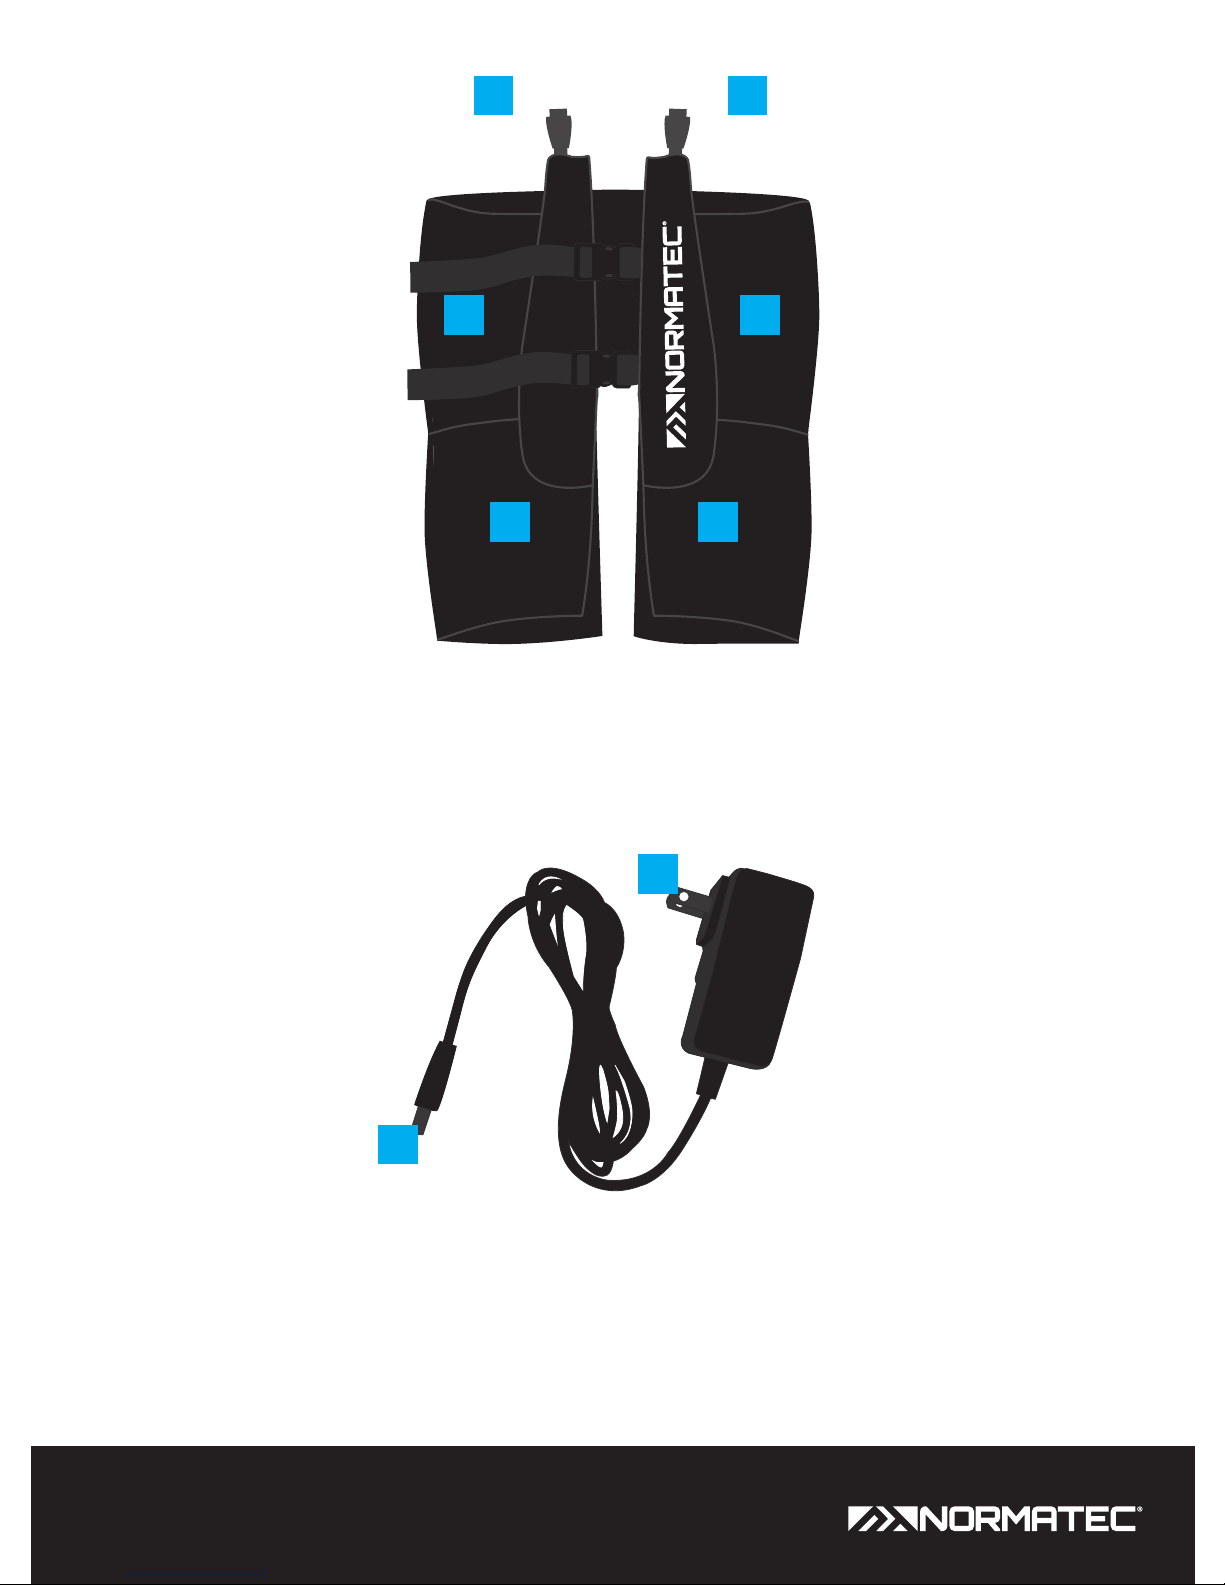
HIP ATTACHMENT
(Single person use only.)
1. Attachment Connector
2. Zones
POWER SUPPLY
1. Barrel Connector
2. Wall outlet plug
11
2
2 2
2
1
2
Page 12
11PULSE PRO User Manual OPERATING INSTRUCTIONS
WARNING!
BEFORE OPERATING THIS DEVICE: Read all warnings at the beginning of this manual.
If you do not understand these Operating Instructions, contact NormaTec at 866.658.5896.
SETUP THE SYSTEM
Step 1: Plug the NormaTec Power Supply into an electrical outlet and then into the PULSE PRO Control Unit.
This device is equipped with a lithium ion battery. The battery automatically charges when the
power supply is connected to the PULSE PRO Control Unit and an electrical outlet.
Step 2: Connect the long end of the NormaTec Hose to the Air Outlet on the front of the PULSE PRO
Control Unit. The connector can only be inserted in the correct orientation. Press the connector firmly
into the PULSE PRO Control Unit until you hear an audible “click.”
Step 3: Put the attachment on (leg, arm, or hip). For a leg, hip, or an arm appliance, sit down, put the
appliance on, and sit in a reclined or supine position. If the attachment has a zipper, be sure to zip-up
the attachment completely. (Never try to use the system with the zipper partially or totally unzipped.
This could void your warranty.)
Step 4: Connect the Attachment Connectors on each attachment to the Junction Box Air Outlets. The
Attachment Connectors can only be connected to the Junction Box in the correct orientation. Press the
Attachment Connectors firmly into the Junction Box Air Outlets until you hear an audible “click.”
If only one attachment will be connected to the Junction Box, use the Blocking Plug located on
the underside of the Junction Box to block o the unused Junction Box Air Outlet. Press firmly to
make sure the blocking plug is fully seated.
Step 5: Press the Power Button on the PULSE PRO Control Unit to turn on the system. The green LED
next to the Power Button and the screen will light up.
Operating Instructions
Page 13
12 OPERATING INSTRUCTIONS
CHOOSE YOUR ATTACHMENT
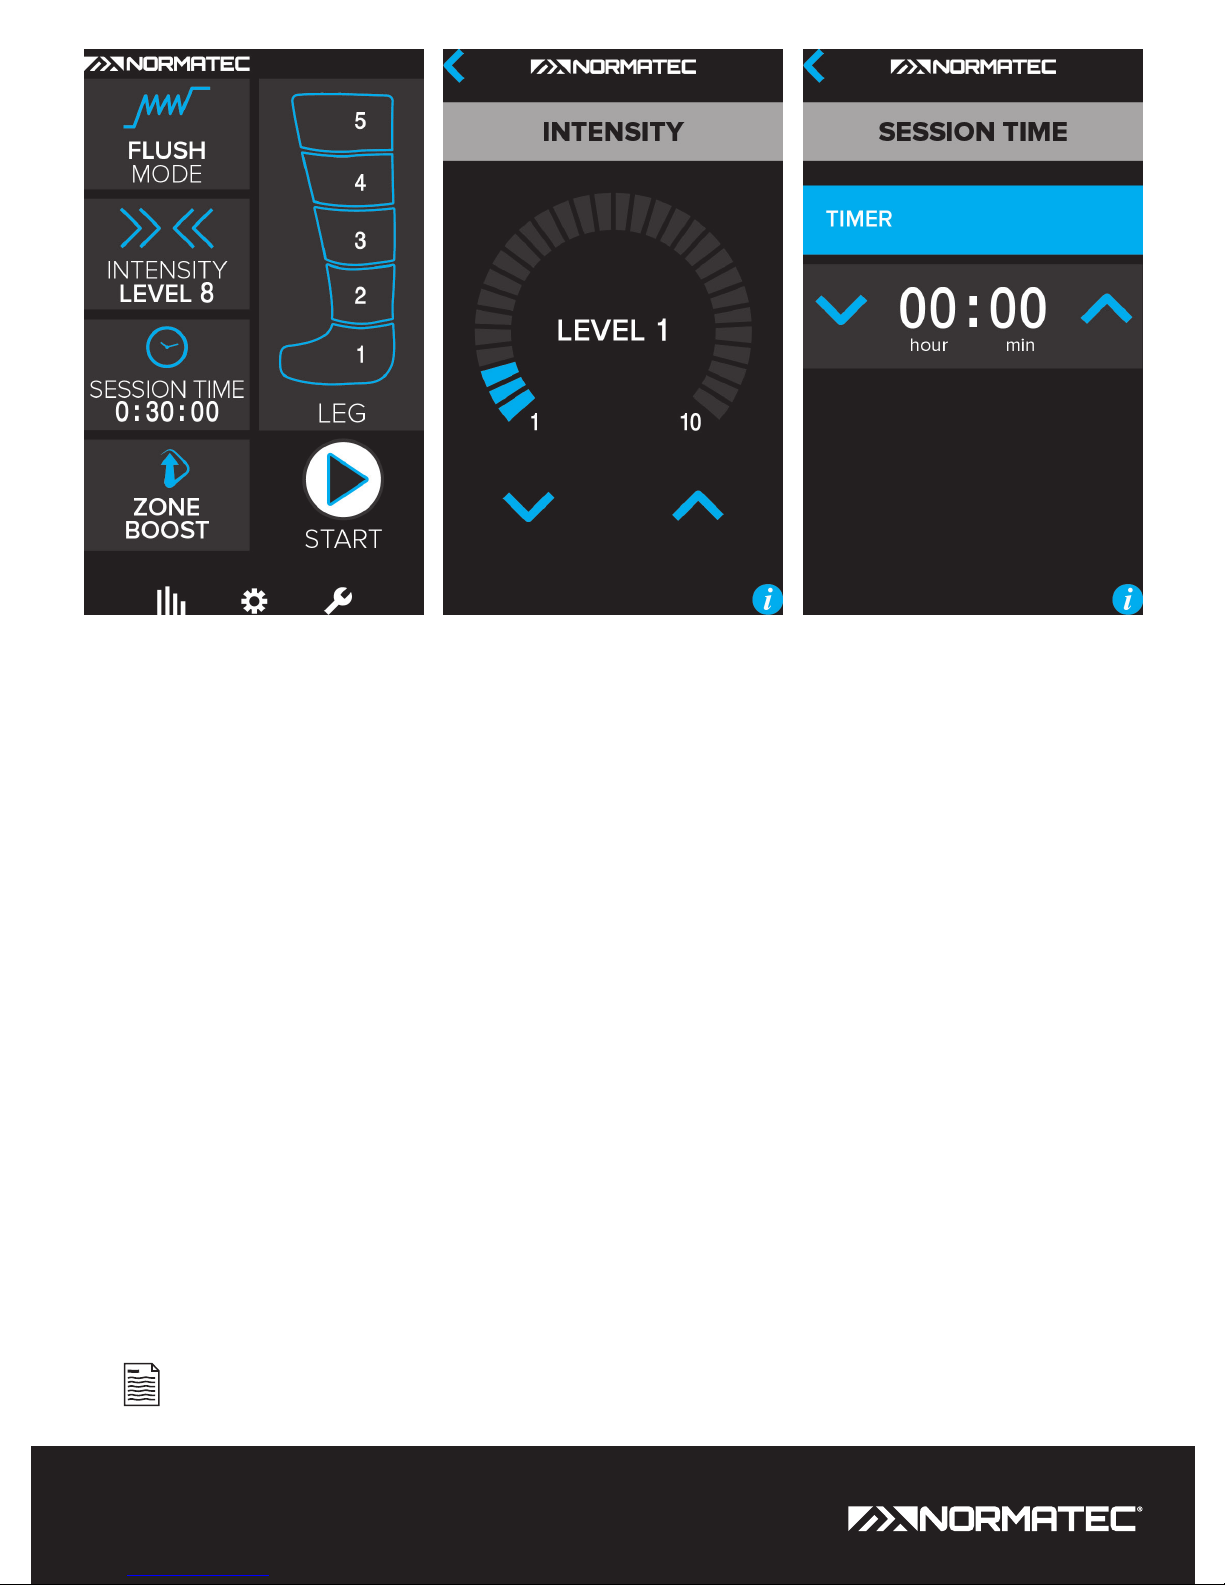
Select the attachment you are using with the system by tapping on the attachment graphic on the
Home Screen. Tap an attachment to select it, and then tap the Back Button to return to the Home
Screen.
You can quickly identify which attachment is selected by looking at the attachment graphic on the
Home Screen.
ADJUST THE MODE
The current mode is displayed in upper left of the Home Screen.
Adjust the mode by tapping the Mode Button on the Home Screen. The Mode Selection Screen will
open. The active mode will be highlighted in blue. To change the mode, tap on the desired mode.
When complete, tap the Back Button to return to the Home Screen.
Recovery Flush: Use Recovery Flush for a quick recovery session.
Rehab: Use Rehab Mode to select pre-programmed sessions designed for specific applications. When
you select Rehab Mode, you will be prompted with additional options depending on which attachment
you have selected.
Custom: Use Custom Mode to program your own settings. See the Custom Mode section (Page 15) for
details on how to use this mode.
This option can only be adjusted before a session starts.
Time Adjustment ScreenLevel Adjustment ScreenHome Screen
Page 14
13OPERATING INSTRUCTIONSPULSE PRO User Manual
ADJUST THE INTENSITY
Adjust the intensity level by tapping the Intensity Button on the Home Screen. The Level Adjustment
Screen will open. Tap on the up and down arrows to adjust the intensity level between level 1 and 10.
When you are done, tap the Back Button in the upper left of the screen to return to the Home Screen.
Intensity level 1 is the gentlest setting. The massage becomes stronger as the intensity level is
increased to a maximum intensity level of 10.
The currently selected intensity level will be displayed on the Intensity Button on the Home Screen.
Intensity can be adjusted while the session is running. Tap the Intensity Button to select the
desired intensity. The system will stop for 10 seconds and the cycle will restart in the foot, hand, or
thigh at the new intensity.
Tap the information icon in the lower right of the screen for helpful tips.
ADJUST THE SESSION TIME
The session time can be adjusted by tapping the Session Time Button on the Home Screen. The Time
Adjustment screen will open. Tap on the up and down arrows to adjust the number of minutes for the
session. When you are done, tap the Back Button in the upper left of the screen to return to the Home
Screen.
The currently selected time will be displayed on the Session Time Button on the Home Screen.
Session Time can be adjusted between 10 minutes and 2 hours 55 minutes.
Tap the information icon in the lower right of the screen for helpful tips.
Continuous Mode can be enabled allowing the system to run until the session is manually
stopped. To enter Continuous Mode, tap the increase time button until the time shows 2 hours 55
minutes and then tap one more time. To exit Continuous Mode, tap the down arrow.
Page 15
14 OPERATING INSTRUCTIONS
START THE SESSION
To start the session, tap the Start Button
.
WHAT TO EXPECT
When using the NormaTec Pulse Massage Pattern, you will first experience a pre-inflate cycle, during
which the connected attachments are molded to your exact body shape. The session will then begin
by compressing your feet, hands, or thigh (depending on which attachment you are using). Similar to
the kneading and stroking done during a massage, each segment of the attachment will first compress
in a pulsing manner and then release. This will repeat for each segment of the attachment as the
compression pattern works its way up your limb.
When the last segment of the attachment completes its massage, there will be a brief rest period and
then the cycle will begin again from the feet, hands, or thigh (depending on which attachment you are
using). A typical session time is 20 to 60 minutes.
If the system is not able to inflate the attachment(s) after three minutes, the system will stop
pumping. See the Troubleshooting section for more information.
FINISHING TREATMENT
The session will continue massaging until the Time Button on the Home Screen reads 00:00:00 and
the current cycle is completed. To stop the cycle tap QUIT or tap ADD TIME to extend the session.
Once the session is complete, the control unit will reset to the original session time.
When the session is completed, if you are done using the system, first remove attachments from
junction box, next, remove the attachment(s) from your limb(s), turn o the device by pressing the
Power Button, and disconnect the hose from PULSE PRO Control Unit.
To disconnect connectors from the Junction Box or the PULSE PRO Control Unit, push on the
button on the top of the NormaTec Hose Connector/Attachment Connectors while pulling away
from the Junction Box/PULSE PRO Control Unit.
TO STOP OR PAUSE THE SESSION
To stop the session at any time, tap the Pause Button on the Home Screen. This will temporarily stop
the session.
To resume a paused session, tap the Resume Session Button.
To end a session, tap the Pause Button and then tap the Quit Session Button. If you are done using the
system, remove the attachment(s) from your limb(s), turn o the device, and disconnect the NormaTec
Hose from PULSE PRO Control Unit and Junction Box.
Page 16

15OPERATING INSTRUCTIONSPULSE PRO User Manual
To disconnect connectors from the Junction Box or the PULSE PRO Control Unit, push the
button on the top of the NormaTec Hose Connector/Attachment Connectors while pulling away
from the Junction Box/PULSE PRO Control Unit.
TO TURN OFF THE DEVICE
To turn o the system, press the Power Button and confirm that the green power LED is shut o.
It is recommended that you leave the Control Unit plugged into the wall to charge.
HOW TO USE ZONE BOOST
During your session, you can increase the intensity of a single zone with the Zone Boost feature. Zone
Boost will add an extra 60 seconds of massage time, as well as 10 mmHg increased pressure, in the
zone that is selected.
To turn Zone Boost on or o, tap the Zone Boost Button on the Home Screen. An image of the
attachment will appear on the screen. To turn Zone Boost on, tap on the zone you wish to select. To
turn Zone Boost o, tap once on the selected zone. When complete, tap on the Back Button to return
to the Home Screen.
To determine which zone is active, refer to attachment graphic on the Home Screen—the
selected zone will flash the Zone Boost Icon.
When you power o the machine, the Zone Boost feature will also be turned o.
CUSTOM MODE
When entering Custom Mode, the pressure is displayed to the left of each zone and the time is
displayed to the right of each zone. Starting with Zone 1, tap on the pressure or time for any zone to
adjust that zone’s settings. Use the up and down arrows to adjust the pressure and time, and tap the
Back Button to return to the Custom Screen.
Starting from the foot, hand, or thigh (depending on the attachment selected), each zone can
not be set more than 10 mmHg higher than the previous zone.
When Custom Mode is enabled both the Mode Button and Intensity Button on the Home
Screen will display custom.
You can change the selected attachment from this screen by tapping once on the Change
Attachment Button at the bottom of the screen.
Page 17
16
ADJUSTING REST TIME
Adjust the Rest Time by tapping on the Gear Icon at the bottom of the Home Screen, in the center.
Tap on the Rest Time Button and then tap on the up and down arrows to adjust the rest time between
15 and 90 seconds. When you are done, tap the Back Button in the upper left of the screen to return to
the Home Screen.
This option can only be adjusted before a session starts.
CHANGING THE MASSAGE PATTERN
Adjust the massage pattern by tapping on the Gear Icon
at the bottom of the Home Screen, in
the center. Tap on the Massage Pattern Button and select the pattern you wish to use. The selected
massage pattern is highlighted in blue. Tap on the Back Button twice to return to the Home Screen.
This option can only be adjusted before a session starts.
ADJUST THE NUMBER OF ZONES
The number of zones that are enabled in the attachment can be changed between one and five
zones. Zones can be disabled from the top to the bottom of the attachment, one zone at a time. Zone
adjustments remain after you turn o the device.
Adjust the number of zones by tapping on the Gear Icon
at the bottom of the Home Screen, in the
center. Tap on the Number of Zones Button and then tap on the up and down buttons to increase or
decrease the number of enabled zones. At least one zone must be enabled. Enabled zones are solid
blue, disabled zones are outlined in gray. Tap on the Back Button twice to return to the Home Screen
when complete.
You can change the selected attachment from this screen by tapping once on the Change
Attachment Button at the bottom of the screen.
This option can only be adjusted before a session starts.
Options
OPTIONS
Page 18
17PULSE PRO User Manual
Utilities
UTILITIES
DISPLAY BRIGHTNESS
Adjust the display brightness by tapping on the Wrench Icon at the bottom of the Home Screen,
on the right. Tap on the Intensity Button and then tap on the up and down arrows to adjust the display
brightness between level 1 and 10.
Brightness level 1 is the darkest and level 10 is the brightest.
DEFAULT SETTINGS
Reset the device to factory settings by tapping on the Wrench Icon
at the bottom of the Home
Screen, on the right. Tap on the Default Settings Button and then tap YES.
This option can only be adjusted before a session starts.
Page 19
18 STATISTICS
Statistics
PRESSURE AND TIME
View the current settings for pressure and time by tapping on the Graph Icon at the bottom of
the Home Screen, on the left, and then tapping on the Zone: Pressure & Time Button. Tap on the Back
Button twice to return to the Home Screen when complete.
DEVICE USAGE
View the device usage by tapping on the Graph Icon
at the bottom of the Home Screen, on the
left, and then tapping on the Device Usage Button. The usage “SINCE LAST CLEAR” setting can be
reset to zero by pressing the Clear Usage Button. The lifetime usage cannot be cleared. Tap on the
Back Button twice to return to the Home Screen when complete.
Page 20

19CARING FOR THE SYSTEMPULSE PRO User Manual
Caring for The System
CLEANING THE SYSTEM
To clean the NormaTec PULSE PRO Control Unit:
• Wipe down the system with a damp, clean cloth.
• Dry thoroughly with a fresh, clean cloth.
Cleaning the single person-use inflatable leg, arm, or hip attachments:
• Wipe down the legs, arms, or hip attachment(s) inside and out with a damp, clean cloth. Dry
thoroughly with a fresh, clean cloth.
• Do not machine wash or dry!
• Do not dry clean!
MAINTAINING THE SYSTEM
The NormaTec PULSE PRO Recovery Control Unit, NormaTec Hose, Power Supply, and Attachments
(legs, arms, or hips) require no routine maintenance or service except for the care in this section.
STORING THE SYSTEM
Store NormaTec PULSE PRO Recovery Control Unit, NormaTec Hose, Power Supply, and Attachments
(legs, arms, or hips) in a clean, dry location.
REPLACEMENT PARTS
Please call Customer Service at 866.658.5896 or visit our website at www.NormaTecRecovery.com for
information regarding the following replacement parts:
• Power Supply
• NormaTec Hose
• Blocking plug
• Attachments (legs, arms, hips)
Page 21
20 TECHNICAL INFORMATION
Do not attempt to take apart the system.
The system has no user-serviceable parts. There are no user-replaceable fuses.
INTERNAL BATTERY INFORMATION
This device contains a rechargeable lithium ion battery. The battery will provide power for up to two
hours of continuous use. The battery charges when the device is connected to the wall and takes
approximately six hours to fully charge.
This product contains a lithium ion battery. The battery is intended to be changed only by service
personnel.
PULSE PRO DIMENSIONS: 4” (width), 5” (depth), 9” (height); [10.2 cm (width), 12.7 cm (depth), 22.9 cm
(height)]
PULSE PRO WEIGHT: 3.6 lbs [1.63 kg]
PULSE PRO ELECTRICAL REQUIREMENT: 12V DC 1.2A
AC-DC ADAPTER
WARNING!
Only use the AC-DC Adapter Model Number 50-00048 provided with the system.
Using a dierent adapter may cause the system to not operate correctly.
INPUT: 100-240V .6-.8 A 50/60 Hz per NormaTec Model # 50-00048
OUTPUT: 12V DC Minimum 15 Watt per NormaTec Model # 50-00048
TEMPERATURE (OPERATING): +41° F to 104° F [+5° C to +40° C]
TEMPERATURE (STORAGE): -13° F to +158° F [-25° C to +70° C]
RELATIVE HUMIDITY (OPERATING): 15% to 93%, non-condensing
RELATIVE HUMIDITY (STORAGE): -25˚C without relative humidity control; +70˚C at relative humidity
up to 93%, non-condensing
ATMOSPHERIC PRESSURE (STORAGE AND TRANSPORTATION): 190hPa to 1060hPa
ATMOSPHERIC PRESSURE (OPERATING): 700hPa to 1060hPa
Technical Information
Page 22
21PULSE PRO User Manual
Electromagnetic Compatibility
The information contained in this section (such as separation distances) is in general specifically written
with regard to the NormaTec PULSE PRO. The numbers provided will not guarantee faultless operation
but should provide reasonable assurance of such. This information may not be applicable to other
medical electrical equipment; older equipment may be particularly susceptible to interference.
GENERAL NOTES
Medical electrical equipment requires special precautions regarding electromagnetic compatibility
(EMC) and needs to be installed and put into service according to the EMC information provided in this
document and the remainder of the instructions for use this device.
Portable and mobile RF communications equipment can aect medical electrical equipment.
Cables and accessories not specified within the instructions for use are not authorized. Using
other cables and/or accessories may adversely impact safety, performance and electromagnetic
compatibility (increased emission and decreased immunity).
Care should be taken if the equipment is used adjacent to or stacked with other equipment; if adjacent
or stacked use is inevitable, the equipment should be observed to verify normal operation in the
configuration in which it will be used.
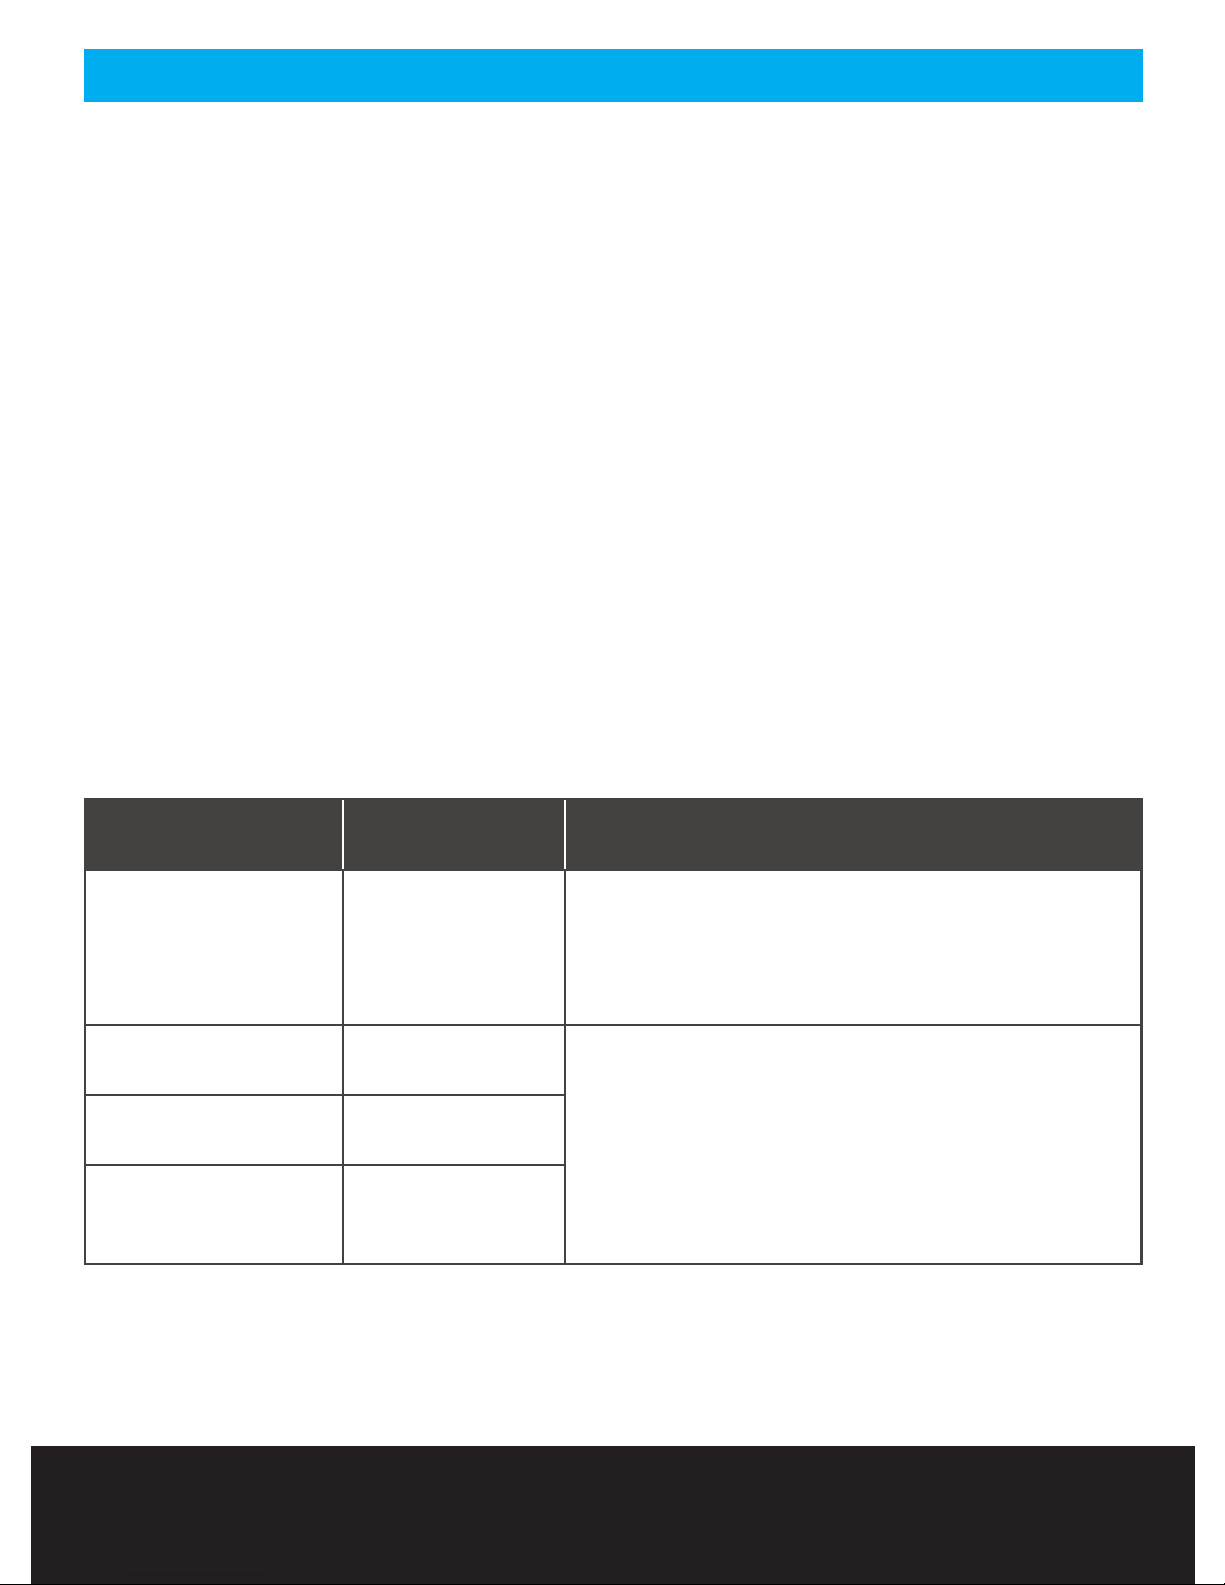
ELECTROMAGNETIC EMISSIONS
This equipment is intended for use in the electromagnetic environment specified below. The user of
this equipment should assure that is used in such an environment.
EMISSIONS
COMPLIANCE
ACCORDING TO
ELECTROMAGNETIC ENVIRONMENT
RF emissions
(CISPR 11)
Group 1 The equipment uses RF energy only for its internal
function. Therefore, its RF emissions are very low
and are not likely to cause any interference in
nearby electronic equipment.
CISPR Emissions
Classification
Class B The equipment is suitable for use in all
establishments including domestic establishments
and those directly connected to the public lowvoltage power supply network that supplies
buildings used for domestic purposes.
Harmonic emissions
(IEC 61000-3-2)
Class A
Voltage fluctuations/
flicker
(IEC 61000-3-3)
Complies
ELECTROMAGNETIC COMPATIBILITY
Page 23
22
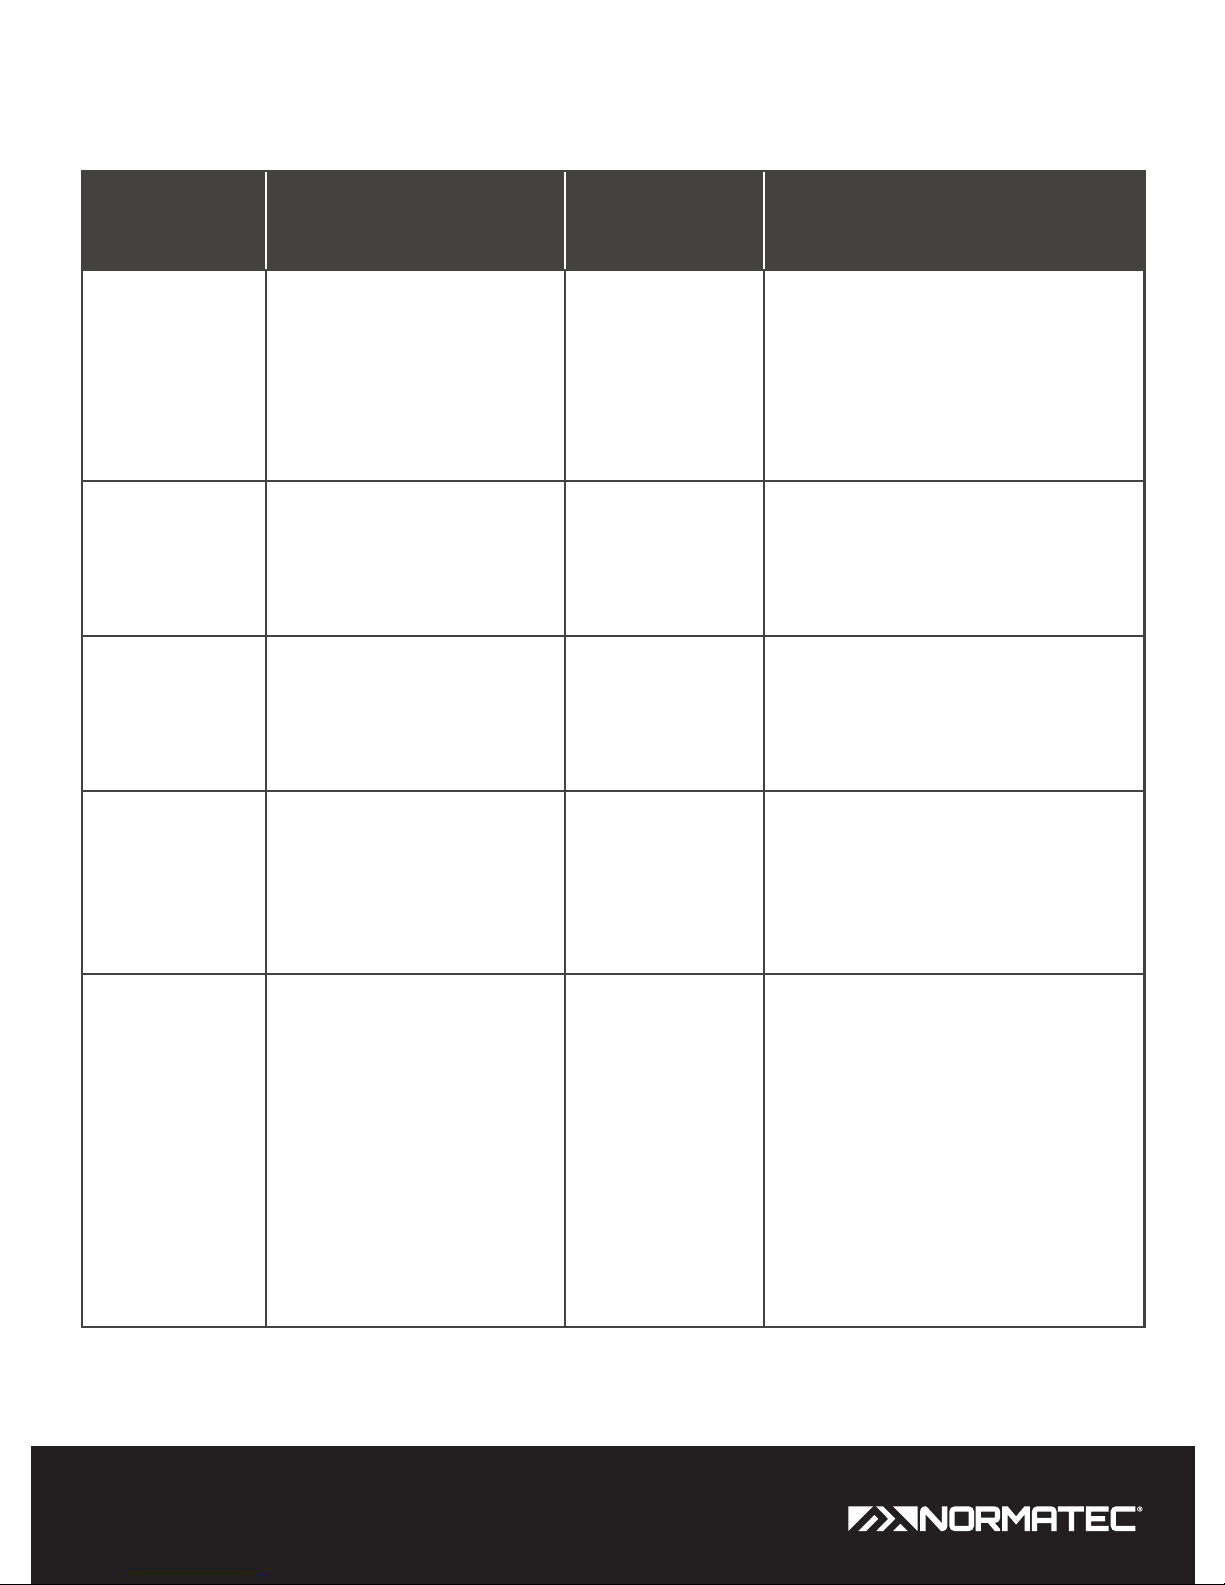
ELECTROMAGNETIC IMMUNITY
This equipment is intended for use in the electromagnetic environment specified below. The user of
this equipment should assure that is used in such an environment.
IMMUNITY
AGAINST
IEC 60601-1-2 TEST
LEVEL
COMPLIANCE
LEVEL (OF
THIS DEVICE)
ELECTROMAGNETIC
ENVIRONMENT
Electrostatic
discharge, ESD
(IEC 61000-4-2)
Contact Discharge:
± 6 kV
Air Discharge:
± 8 kV
± 6 kV
± 8 kV
Floors should be wood, concrete
or ceramic tile. If floors are covered
with synthetic material, the relative
humidity should be kept at levels
to reduce electrostatic charge to
suitable levels.
Electrical fast
transients/
bursts
(IEC 61000-4-4)
Power Supply Lines:
± 2 kV
Longer Input/Output Lines:
± 1 kV
± 2 kV
± 1 kV
Mains power quality should be
that of a typical commercial or
hospital environment.
Surges on AC
mains lines
(IEC 61000-4-5)
Common Mode:
± 2 kV
Dierential Mode:
± 1 kV
± 2 kV
± 1 kV
Mains power quality should be
that of a typical commercial or
hospital environment.
Power
frequency
magnetic field
50/60 Hz
(IEC 61000-4-8)
3 A/m 3 A/m Equipment which emits high
levels of power line magnetic
fields (in excess of 3A/m) should
be kept at a distance to reduce
the likelihood of interference.
Voltage dips
and short
interruptions
on AC mains
input lines
(IEC 61000-4-11)
Dip >95%, 0.5 periods
Dip 60%, 5 periods
Dip 30%, 25 periods
Dip >95%, 5 seconds
>95%, 0.5 per.
60%, 5 per.
30%, 25 per.
>95%, 5 sec.
Mains power should be that of
a typical commercial or hospital
environment. If you require
continued operation during
power mains interruptions insure
that batteries are installed and
charged. Insure that battery life
exceeds longest anticipated
power outages or provide
additional uninterruptible power
source.
ELECTROMAGNETIC COMPATIBILITY
Page 24
23PULSE PRO User Manual
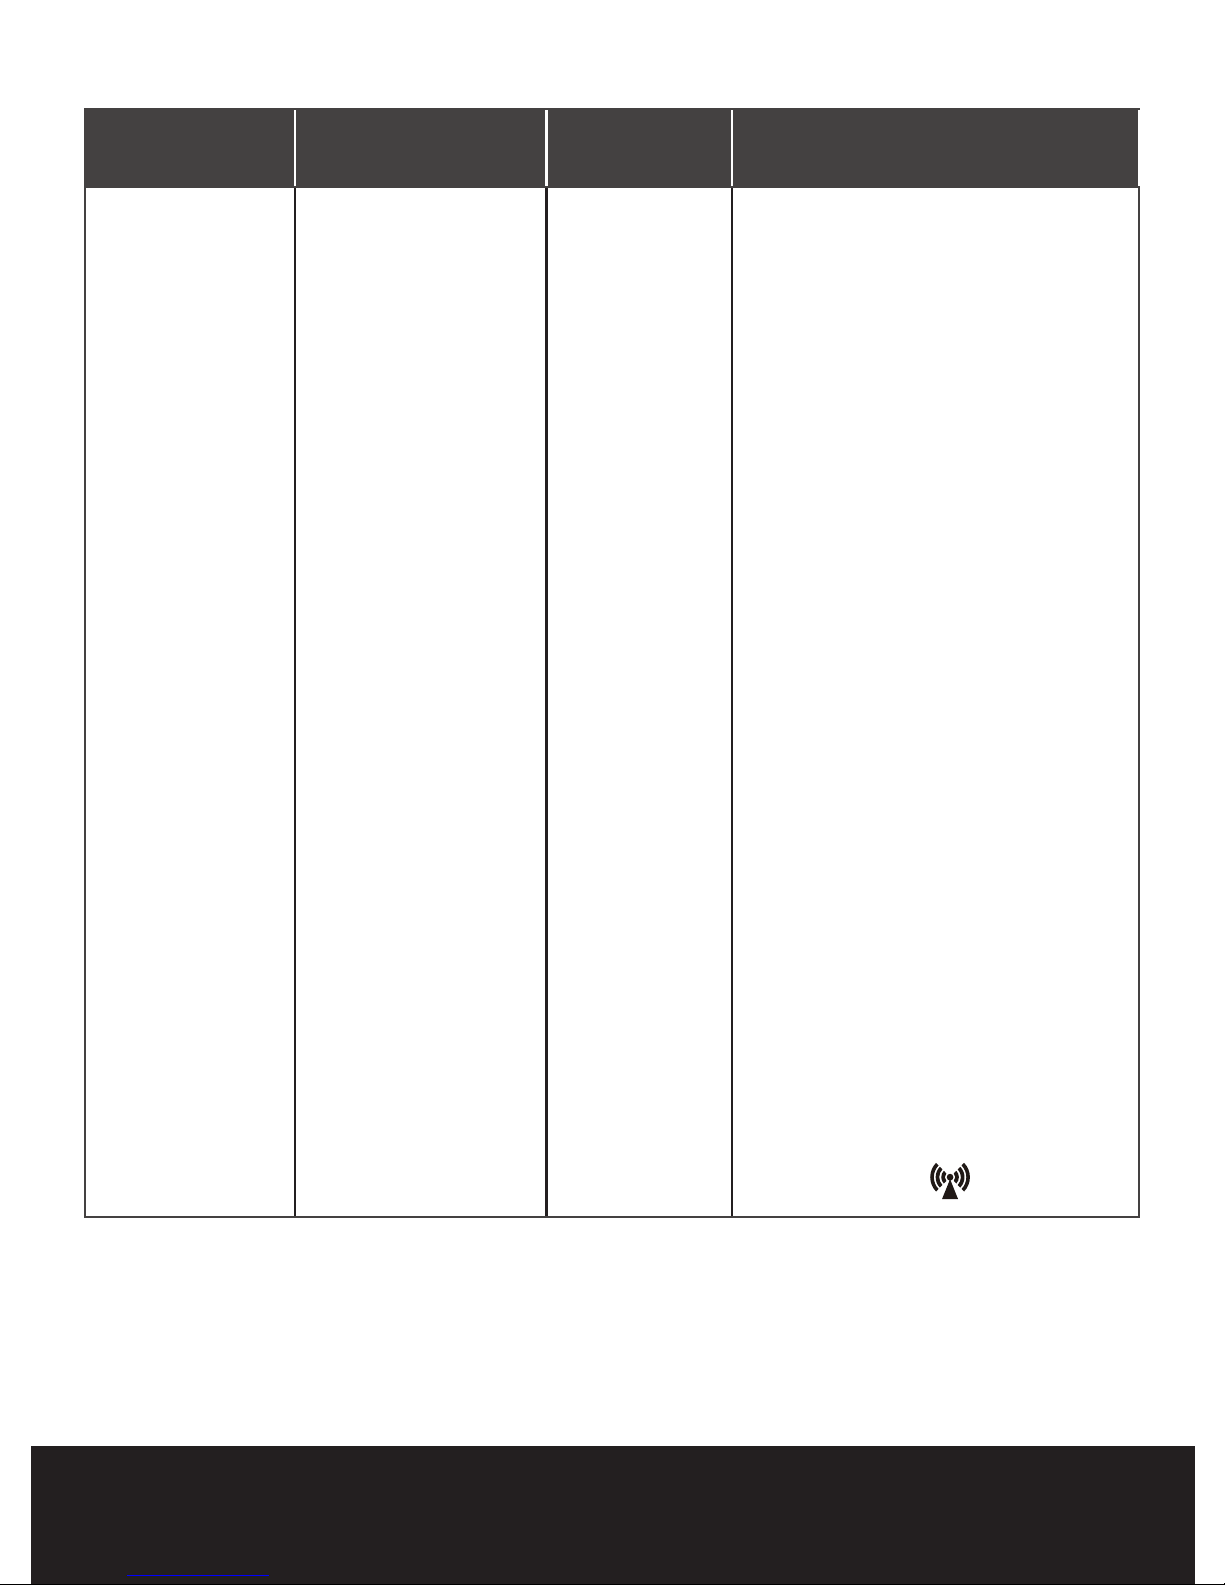
This equipment is intended for use in the electromagnetic environment specified below.
The customer or the user of should assure that it is used in such an environment.
IMMUNITY TEST IEC 60601 TEST
LEVEL
COMPLIANCE
LEVEL
ELECTROMAGNETIC
ENVIRONMENT – GUIDANCE
Conducted RF
rf coupled into
lines
(IEC 61000-4-6)
Radiated rf
(IEC 61000-4-3)
150 kHz to 80 MHz
outside ISM bandsa
150 kHz to 80 MHz
in ISM bandsa
80 MHz – 2.5 GHz
3 Vrms
10 Vrms
10 V/m
Portable and mobile RF
communications equipment should
be used no closer to any part of
the, including cables, than the
recommended separation distance
calculated from the equation
applicable to the frequency of the
transmitter as below.
Recommended separation distance:
d=1.2/V1]√P
d=1.2/√P 80 MHz to 800MHz
d=2.3√P 800 MHz to 2.5 GHz
Where P is the maximum output
power rating of the transmitter
in watts (W) according to the
transmitter manufacturer and d is the
recommended separation distance in
metres (m).
Field strengths from fixed RF
transmitters, as determined by an
electromagnetic site surveya, should
be less than the compliance level in
each frequency rangeb.
Interference may occur in the vicinity
of equipment marked with the
following symbol:
a
The ISM (industrial, scientific and medical) bands between 150 kHz and 80 MHz are 6,765 MHz to 6,795 MHz; 13,553 MHz to 13,567
MHz; 26,957 MHz to 27,283 MHz; and 40,66 MHz to 40,70 MHz.
b
Field strengths from fixed transmitters, such as base stations for radio (cellular/cordless) telephones and land mobile radios, amateur
radio, AM and FM radio broadcast and TV broadcast cannot be predicted theoretically with accuracy. To assess the electromagnetic
environment due to fixed RF transmitters, an electromagnetic site survey should be considered. If the measured field strength in the location
in which the equipment is used exceeds the applicable RF compliance level above, the equipment should be observed to verify normal
operation. If abnormal performance is observed, additional measures may be necessary, such as reorienting or relocating the equipment.
ELECTROMAGNETIC COMPATIBILITY
Page 25
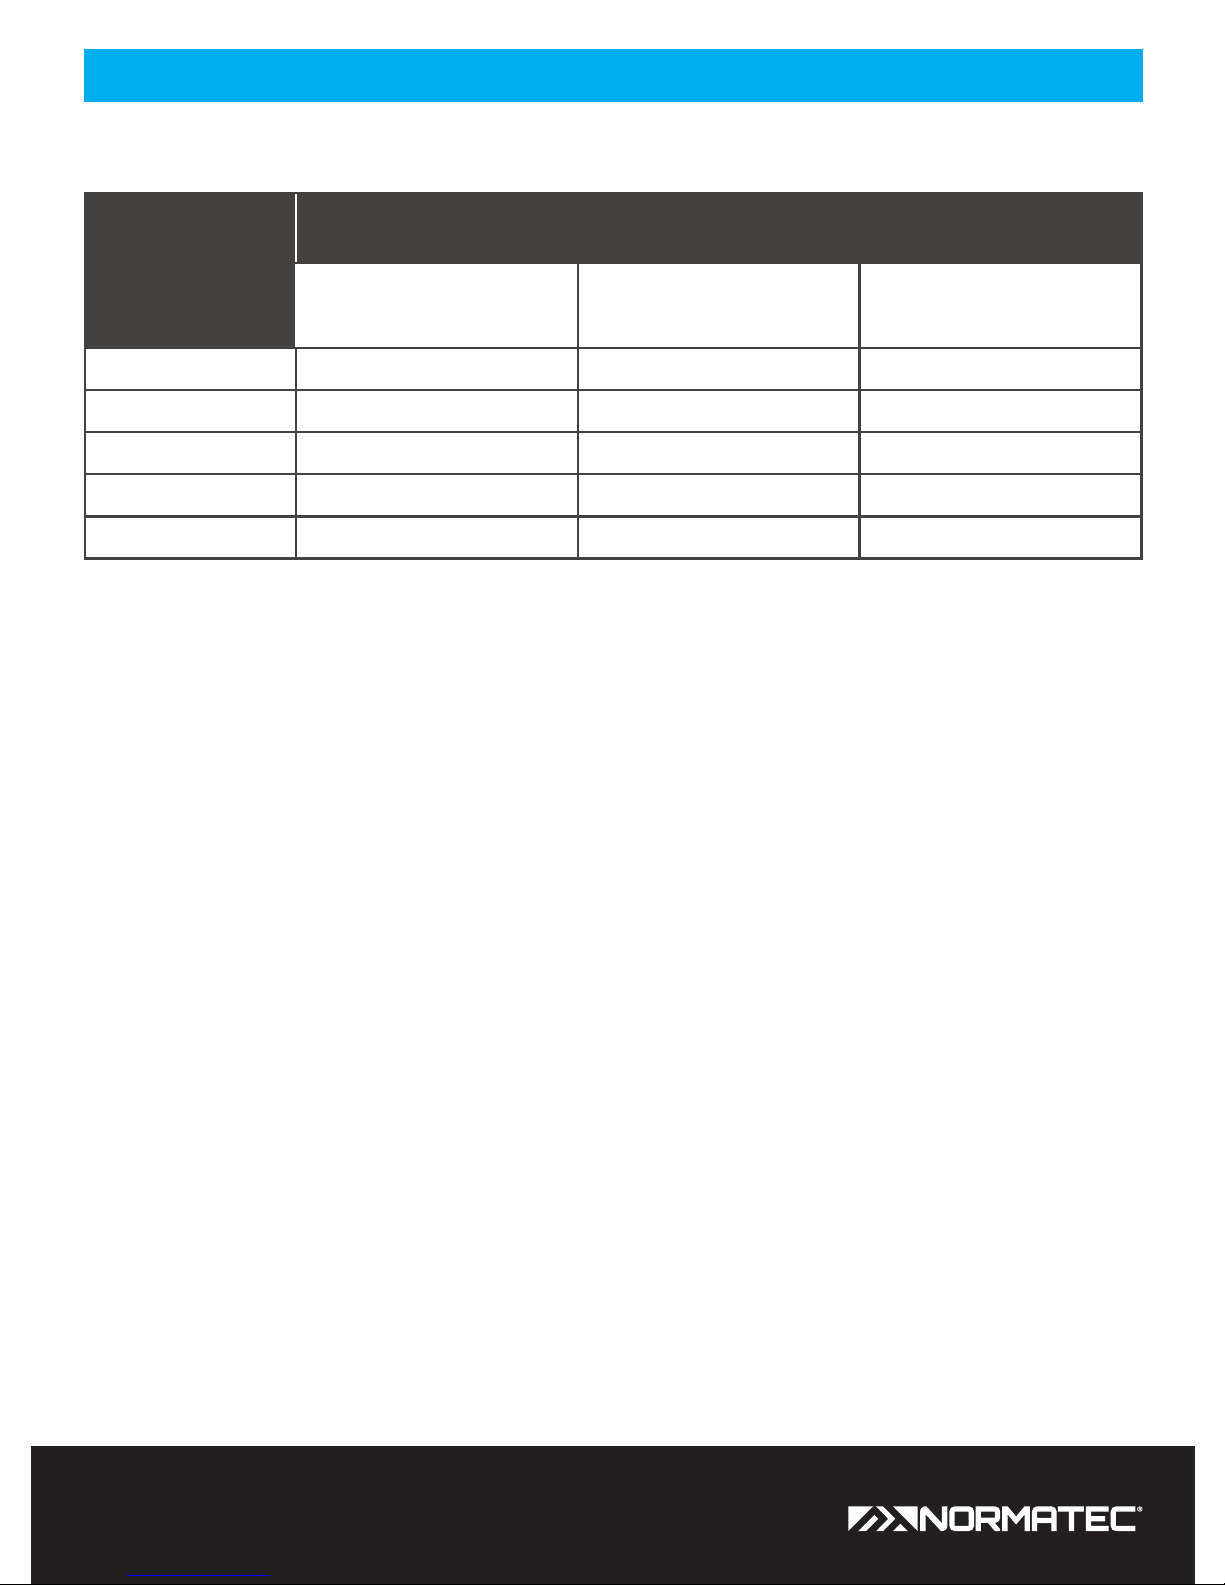
24
BETWEEN PORTABLE AND MOBILE RF COMMUNICATIONS EQUIPMENT AND THE EQUIPMENT
RATED
MAXIMUM
OUTPUT
POWER OF
TRANSMITTER W
SEPARATION DISTANCE ACCORDING TO FREQUENCY OF TRANSMITTERS
IN METERS
150 kHz – 80 MHz
d=1.2/V1]√P
80 MHz to 800MHz
d=1.2/V1]√P
800 MHz to 2.5 GHz
d=2.3√P
0.01 0.1 2 0.1 2 0.23
0.1 0.38 0.38 0.73
1 1.2 1.2 2.3
10 3.8 3.8 7.3
100 12 12 23
For transmitters rated at a maximum output power not listed above, the recommended separation
distance d in meters (m) can be estimated using the equation applicable to the frequency of the
transmitter, where P is the maximum output power rating of the transmitter in watts (W) according to the
transmitter manufacturer.
Note 1: At 80 MHz and 800 MHz, the separation distance for the higher frequency range applies.
Note 2: These guidelines may not apply in all situations. Electromagnetic propagation is aected by
absorption and reflection from structures, objects and people.
Recommended Separation Distances
RECOMMENDED
SEPARATION DISTANCES
Page 26

25PULSE PRO User Manual EQUIPMENT CLASSIFICATION
• Protection against electric shock: Class II / internally powered equipment
• Degree of protection against electric shock: Type BF applied part (Control Unit, Leg, Arm, and Hip
Attachments)
• Ingress protection: IP21
• Equipment not suitable for use in the presence of a flammable anesthetic mixture with air, or with
oxygen, or nitrous oxide
• Equipment not suitable for use with oxygen or oxygen enriched atmospheres
• Continuous operation
Equipment Classification
Page 27
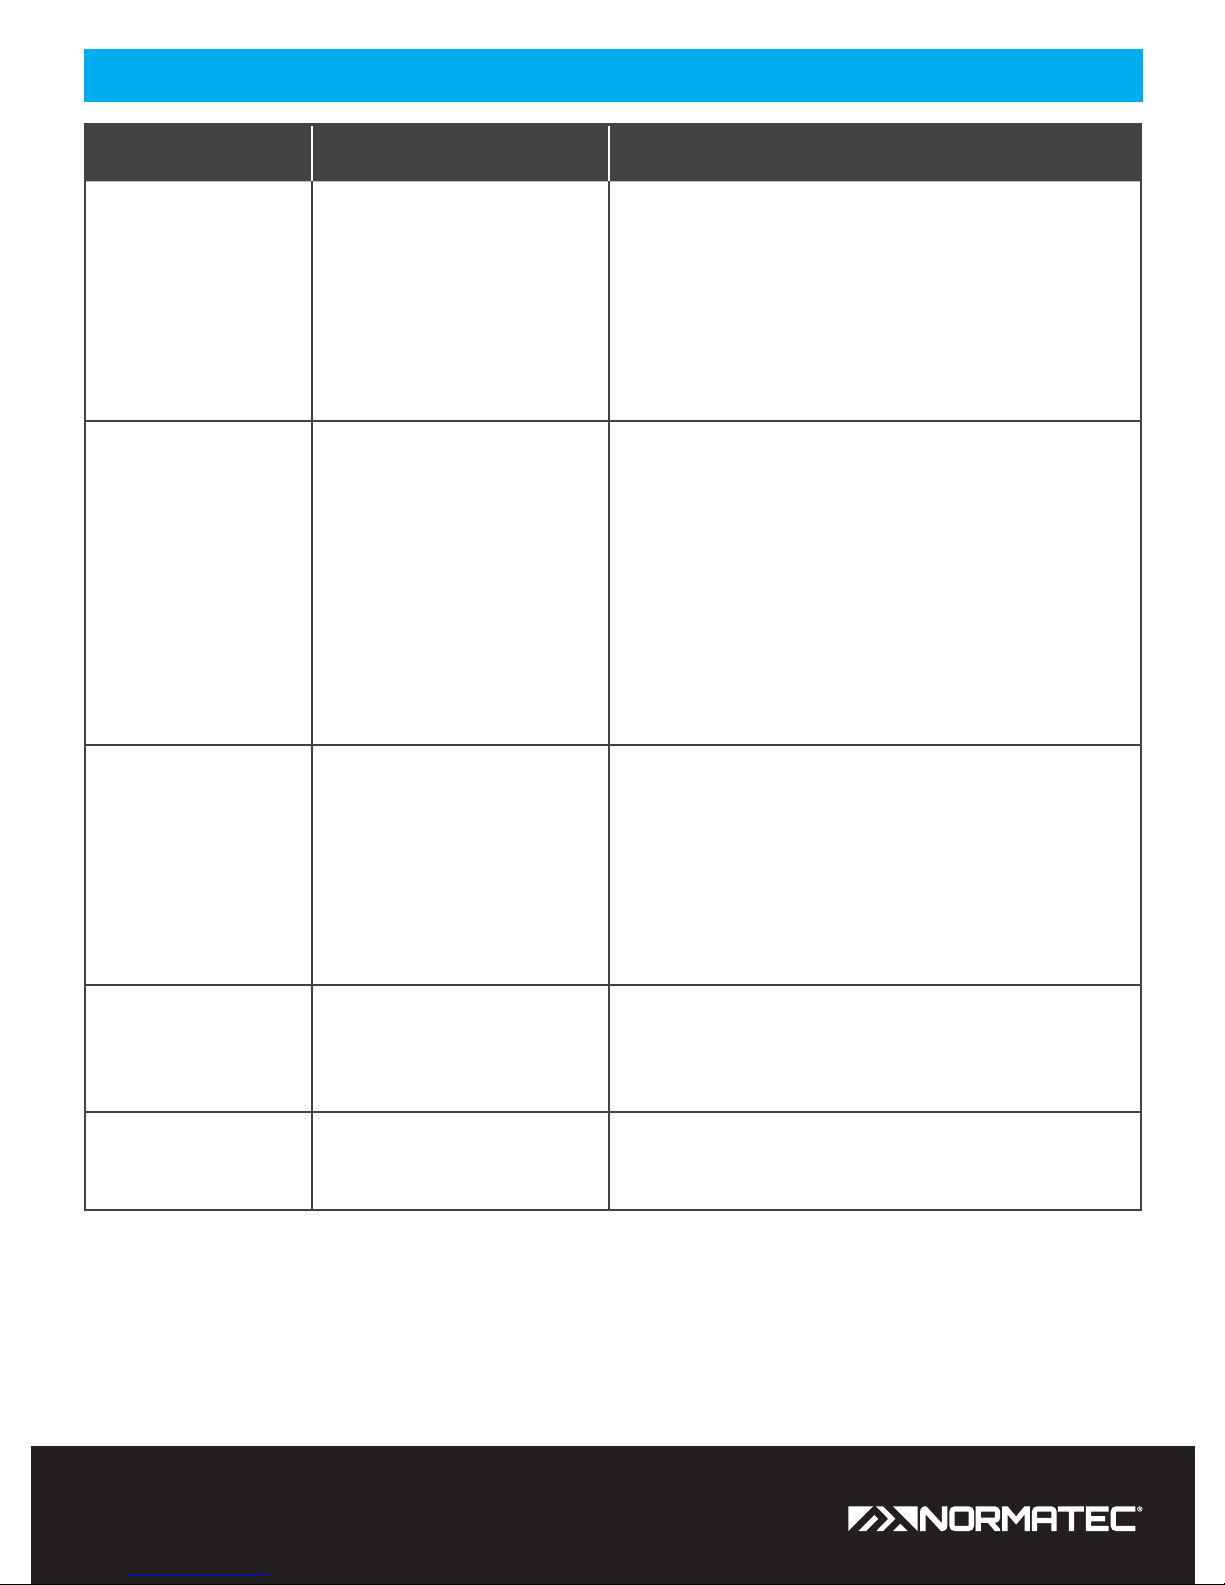
26 TROUBLESHOOTING
PROBLEM POSSIBLE CAUSES SOLUTIONS
The system does
not start
Power is not turned on
Power Supply is not
securely connected
Faulty electrical wall outlet
Press the Power Button to turn the unit on
Check that the Power Supply is securely
connected to the PULSE PRO Control Unit and
the electrical outlet
Check that the wall outlet works
The attachments
(legs, arms, or hips)
do not inflate.
The session has not been
started
The NormaTec Hose is not
securely connected
The attachment(s) have
been damaged
Tap the Start Button to start the session
Check that the NormaTec Hose is securely
connected to the PULSE PRO Control Unit and
that the attachments are securely connected to
the Junction Box
Check that the attachment(s) do not have an air
leak
The system
stopped pumping.
The NormaTec Hose is not
securely connected
The attachment(s) have
been damaged
Check that the NormaTec Hose is securely
connected to the PULSE PRO Control Unit and
that the attachments are securely connected to
the Junction Box
Check that the attachment(s) do not have an air
leak
Error Message Potential air leak Check connections and for leaks in the NormaTec
Hose or attachment. If no leak is found, call
NormaTec.
Low Battery Battery needs to be
charged
Plug in the Control Unit to charge the battery.
Call NormaTec Customer Service at 866.658.5896 if further assistance is needed.
Troubleshooting
Page 28

27PULSE PRO User Manual WARRANTY INFORMATION
Warranty Information
NORMATEC PULSE PRO CONTROL UNIT LIMITED TWO-YEAR WARRANTY
NORMATEC ATTACHMENTS AND OTHER ACCESSORIES LIMITED ONE-YEAR WARRANTY
The NormaTec PULSE PRO Control Unit is warranted by NormaTec, a Massachusetts corporation
(“NormaTec”), against manufacturing defects in material and workmanship for a period of two years
from the date of purchase from NormaTec. In the event of any such defect occurring during the
warranty period, NormaTec will, at its option, (a) correct the defect by repair or by replacement of the
applicable part or component that fails as a result of such defect, without charge for parts and labor; or
(b) replace the device with one of the same or then current design.
The NormaTec Attachments and Other Accessories includes the boot(s), sleeve(s), power cord/supply,
and hosing. NormaTec Attachments and Other Accessories are warranted by NormaTec against
manufacturing defects in material and workmanship for a period of one year from the date of purchase
from NormaTec. In the event of any such defect occurring during the warranty period, NormaTec will, at
its option, (a) correct the defect by repair or by replacement of the applicable part or component that
fails as a result of such defect, without charge for parts and labor; or (b) replace the device with one of
the same or then current design.
The foregoing Warranties do not cover normal wear and tear or cosmetic damage, and are void if the
device and/or the boot(s) or sleeve(s) (collectively, the “product”) are not used in accordance with the
User Manual, are otherwise misused or modified in any way, and/or are repaired or altered by anyone
other than an authorized service representative of NormaTec. These Warranties expressly exclude
transportation, shipping or insurance costs, or defects, damages or failure resulting from misuse,
abuse, improper or abnormal usage, or neglect.
EXCEPT AS PROVIDED ABOVE, NORMATEC MAKES NO EXPRESS WARRANTIES OR ANY IMPLIED
WARRANTIES, INCLUDING THOSE OF MERCHANTABILITY AND FITNESS FOR A PARTICULAR
PURPOSE OR USE, AND ARE LIMITED IN DURATION AS STATED ABOVE. EXCEPT AS EXPRESSLY
STATED ABOVE, NORMATEC SHALL HAVE NO LIABILITY OR RESPONSIBILITY TO ITS CUSTOMER,
OR ANY OTHER PERSON OR ENTITY, WITH RESPECT TO ANY LIABILITY, LOSS OR DAMAGE CAUSED
DIRECTLY OR INDIRECTLY BY USE OR PERFORMANCE OF THE PRODUCT OR ARISING OUT OF THE
USE, INABILITY TO USE OR ANY BREACH OF THESE WARRANTIES, INCLUDING BUT NOT LIMITED
TO ANY DAMAGES RESULTING FROM INCONVENIENCE, LOSS OF TIME, PROPERTY OR INCOME, OR
ANY INDIRECT, SPECIAL, INCIDENTAL OR CONSEQUENTIAL DAMAGES OF ANY KIND.
Some states do not allow the exclusion or limitation of incidental or consequential damages, so the above
limitation or exclusion may not apply to you. These Warranties give you specific legal rights, and you may also
have other rights, which vary from state to state. In the event of a product defect covered by the foregoing
Warranties during the applicable warranty period, send the product to NormaTec at 44 Glen Avenue, Newton
Center, MA 02459, postage prepaid and insured and an indication of the nature of the defect identified.
All replaced parts and products become the property of NormaTec. New or reconditioned parts and
products may be used in the performance of Warranty service. Repaired or replaced parts and products
are warranted for the remainder of the original warranty period only. You will be charged for repair or
replacement of parts and products made after the expiration of the applicable Warranty period.
Page 29

28 RETURN POLICY
This policy is only applicable if you are an end user and you purchased the equipment directly from the
Manufacturer.
In the unlikely event that you are not satisfied with your purchase, you may return it within thirty (30)
days of the purchase date. If you purchase incorrectly sized attachments, they may be exchanged
within fourteen (14) days of the purchase date. All returns and exchanges are subject to the conditions
listed below.
1. Returns and exchanges must have a Return Merchandise Authorization (RMA) number. Obtain an
RMA number by contacting us at 866.658.5896 or [email protected]. Returned
items without an RMA number will not be eligible for a credit to your account.
2. Returns must be shipped within 30 days of the purchase date; exchanges must be shipped within
14 days of the purchase date.
3. Products and packaging must be returned in new and undamaged condition. Any product(s)
showing signs of wear or being soiled in any way will be deemed “unacceptable” and you will be
so notified. Unacceptable returns and/or exchanges may be reshipped to you following payment
of an inspection/shipping fee.
4. Returned items will be subject to a 7.5% restocking fee. A returned item is an item that is being
sent back for a refund.
5. If you refuse delivery of your order for any reason, you will be refunded the cost of your order less
shipping fees.
6. All partial or full refunds will be posted to the credit card used for purchase.
7. NormaTec is not responsible for items lost or damaged during shipping.
RETURN SHIPPING DIRECTIONS
Step 1: Contact us at 866.658.5896 or [email protected] to obtain a Return
Merchandise Authorization (RMA) number.
Step 2: Place item(s) with original packaging and all original shipping documentation inside the
shipping box. Be sure to include your name, contact information, reason for return/exchange, and RMA
number in the shipment so that we can properly process your return/exchange.
Step 3: Ensure your name, address and RMA number are also on the outside of the shipping box, and
ship to NormaTec, 44 Glen Avenue, Newton Center, MA 02459.
Step 4: Ship via FedEx or UPS. Be sure to obtain delivery confirmation and full insurance if necessary.
NormaTec is not responsible for items lost or damaged during shipping.
Return Policy
Page 30
NormaTecRecovery.com | 866.658.5896
NormaTec Recovery
NormaTec Recovery
@NTrecovery
NormaTec Recovery
@NTrecovery
NormaTec Recovery
NormaTec Recovery
03232016 15-045 Rev 3
 Loading...