

Page 1
LABORATORY FREEZER
Installation, Operation and
Maintenance Instructions
INSPECTION
When the equipment is received, all items should be carefully checked against the bill of lading to
insure all crates and cartons have been received. All units should be inspected for concealed
damage by uncrating the units immediately. If any damage is found, it should be reported to the
carrier at once, and a claim should be filed with the carrier. This equipment has been inspected and
tested at the manufacturing facility and has been crated in accordance with transportation rules and
guidelines. Manufacturer is not responsible for freight loss or damage.
Before connecting the freezer to the power supply, let it stand for approximately two hours to
reduce the possibility of malfunctions in the cooling system due to transport handling
INSTALLATION
GENERAL
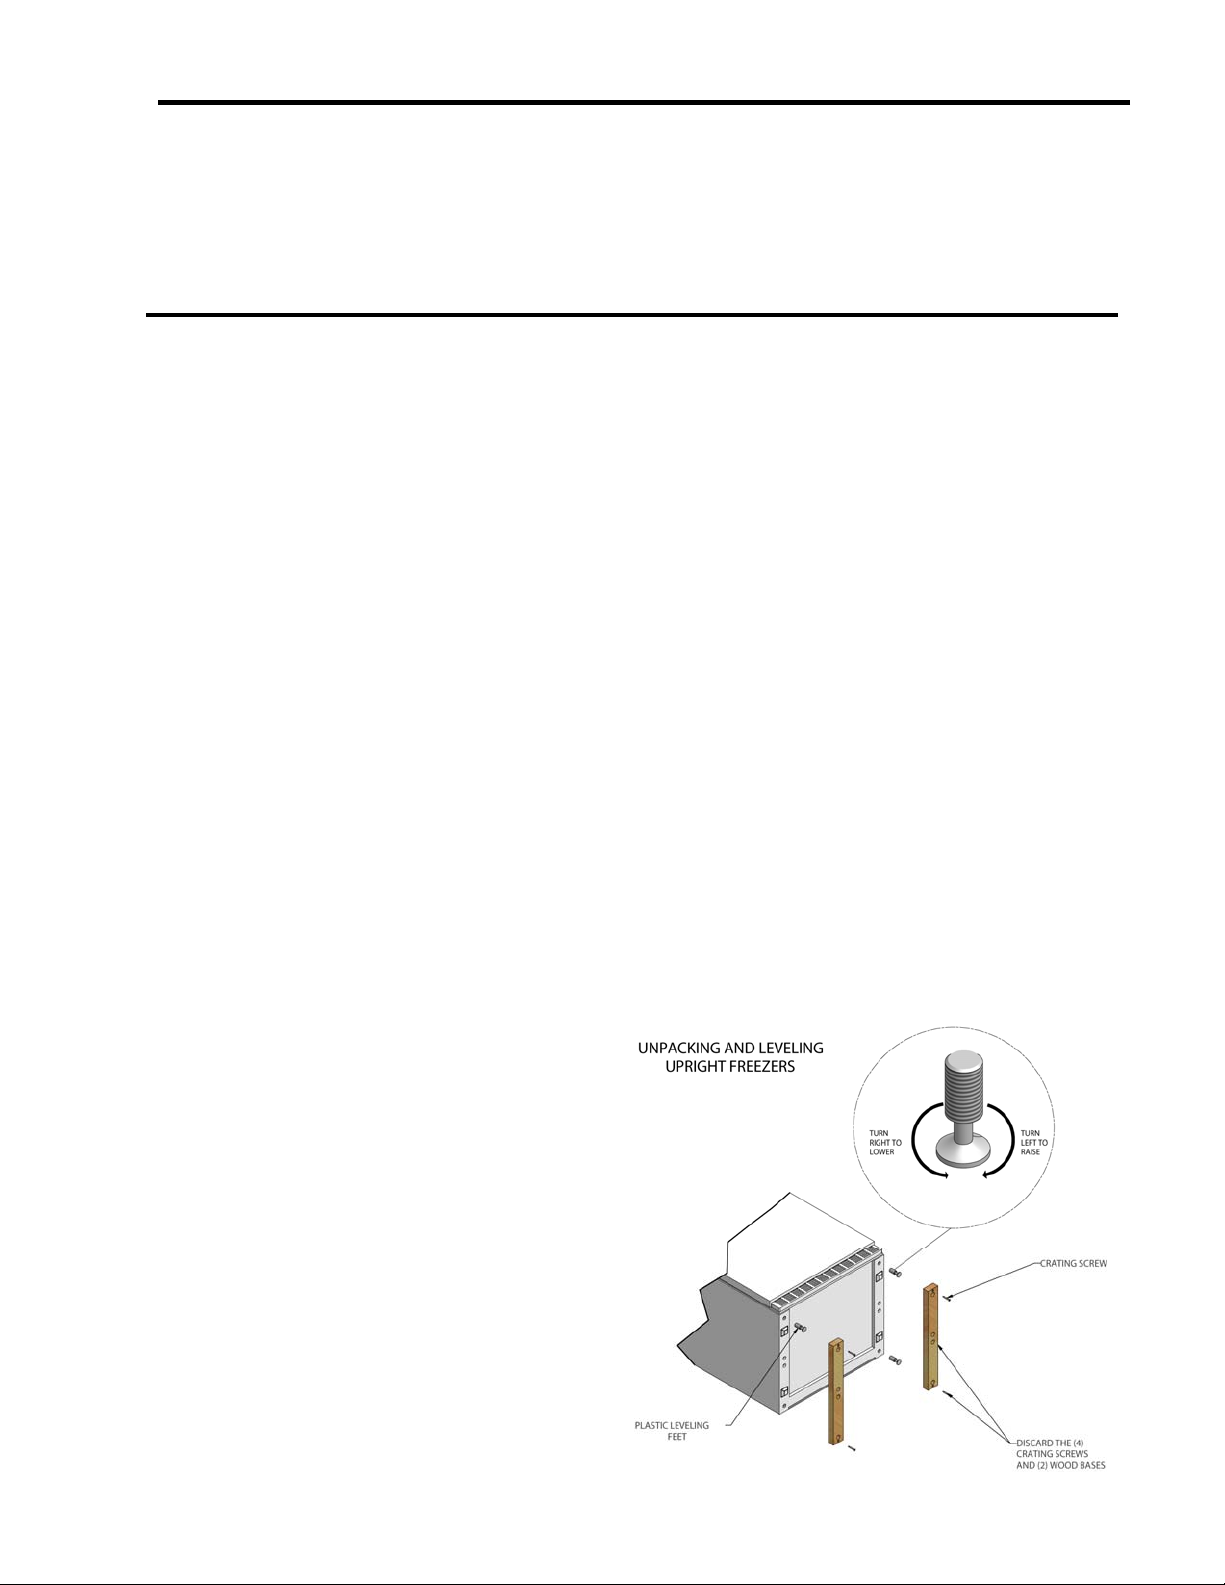
After the unit crate and crate base have been removed, use a carpenter’s level to level the freezer
from front-to-back. Adjust the plastic leveling feet in front ½ bubble higher to ensure that the door
closes easily when left halfway open.
Note: It is extremely important that the freezer be level in order to function properly. If the freezer is
not properly leveled during installation, the door may be misaligned and not close or seal properly
causing cooling, frost or moisture problems. See the illustration below.
Choose a location near a grounded electrical outlet. For the most efficient operation, the freezer
should be located where the temperatures will
not exceed 110°F (43°C). Temperatures of
32°F (0°C) and below will not affect freezer
operation. Additional compressor heaters are
not recommended.
Allow adequate space around the unit for good
air circulation. A minimum of 3 inches (75 mm)
space on all sides of the freezer is required for
adequate air circulation.
Note: The exterior walls of the freezer may
become quite warm as the compressor works
to transfer heat from the interior. Temperatures
as much as 30°F (-1°C) warmer than room
temperature can be expected. It is particularly
important in hotter climates to allow adequate
space for air circulation around the freezer.
1
12/10 Rev. B 138707
Page 2
ELECTRICAL
Check the proposed outlet to be used to insure that the voltage, phase, and current carrying
capacity of the circuit from the electrical panel correspond to the requirements of the cabinet.
NEVER use an extension cord or adapter plug to wire any unit. Refer to the serial tag for all
pertinent electrical information.
The freezer must be plugged into its own 115 volt, 60 Hz, single phase outlet. The power cord of
the freezer is equipped with a three-prong grounding plug for protection against shock hazards. It
must be plugged into a properly grounded three-prong receptacle. The receptacles must be
installed in accordance with local codes and ordinances.
If voltage varies by more than 10%, freezer performance may be affected. Operating the freezer
with insufficient power can damage the compressor.
To prevent the freezer from being accidentally turned off, do not plug the unit into an outlet
controlled by a wall switch or pull cord. Do not pinch, knot or bend the cord in any manner.
Observe all Warning Labels. Disconnect power supply to eliminate injury from electrical
shock or moving parts when servicing equipment.
OPERATION
Cool Down Period
For safe storage of product, allow a minimum of four hours for the freezer to cool down completely.
The freezer will run continuously for the first several hours.
Temperature Control
The temperature control is located inside the freezer. The temperature is factory preset to provide
satisfactory product storage temperatures. The temperature control is adjustable to provide a range
of temperatures for any desired application. If a colder temperature is required, turn the temperature
control knob toward COLDEST and allow several hours for temperatures to stabilize between
adjustments. The Automatic Freeze Control feature will maintain proper interior freezer temperature
even when the ambient exterior temperature drops to 10°F (-12°C).
Power On Light
The Power On light indicates that the freezer is properly connected to electrical power. The light is
energized even when the temperature control is turned to OFF. If the light goes out, refer to the
Maintenance Service and Analysis Guide.
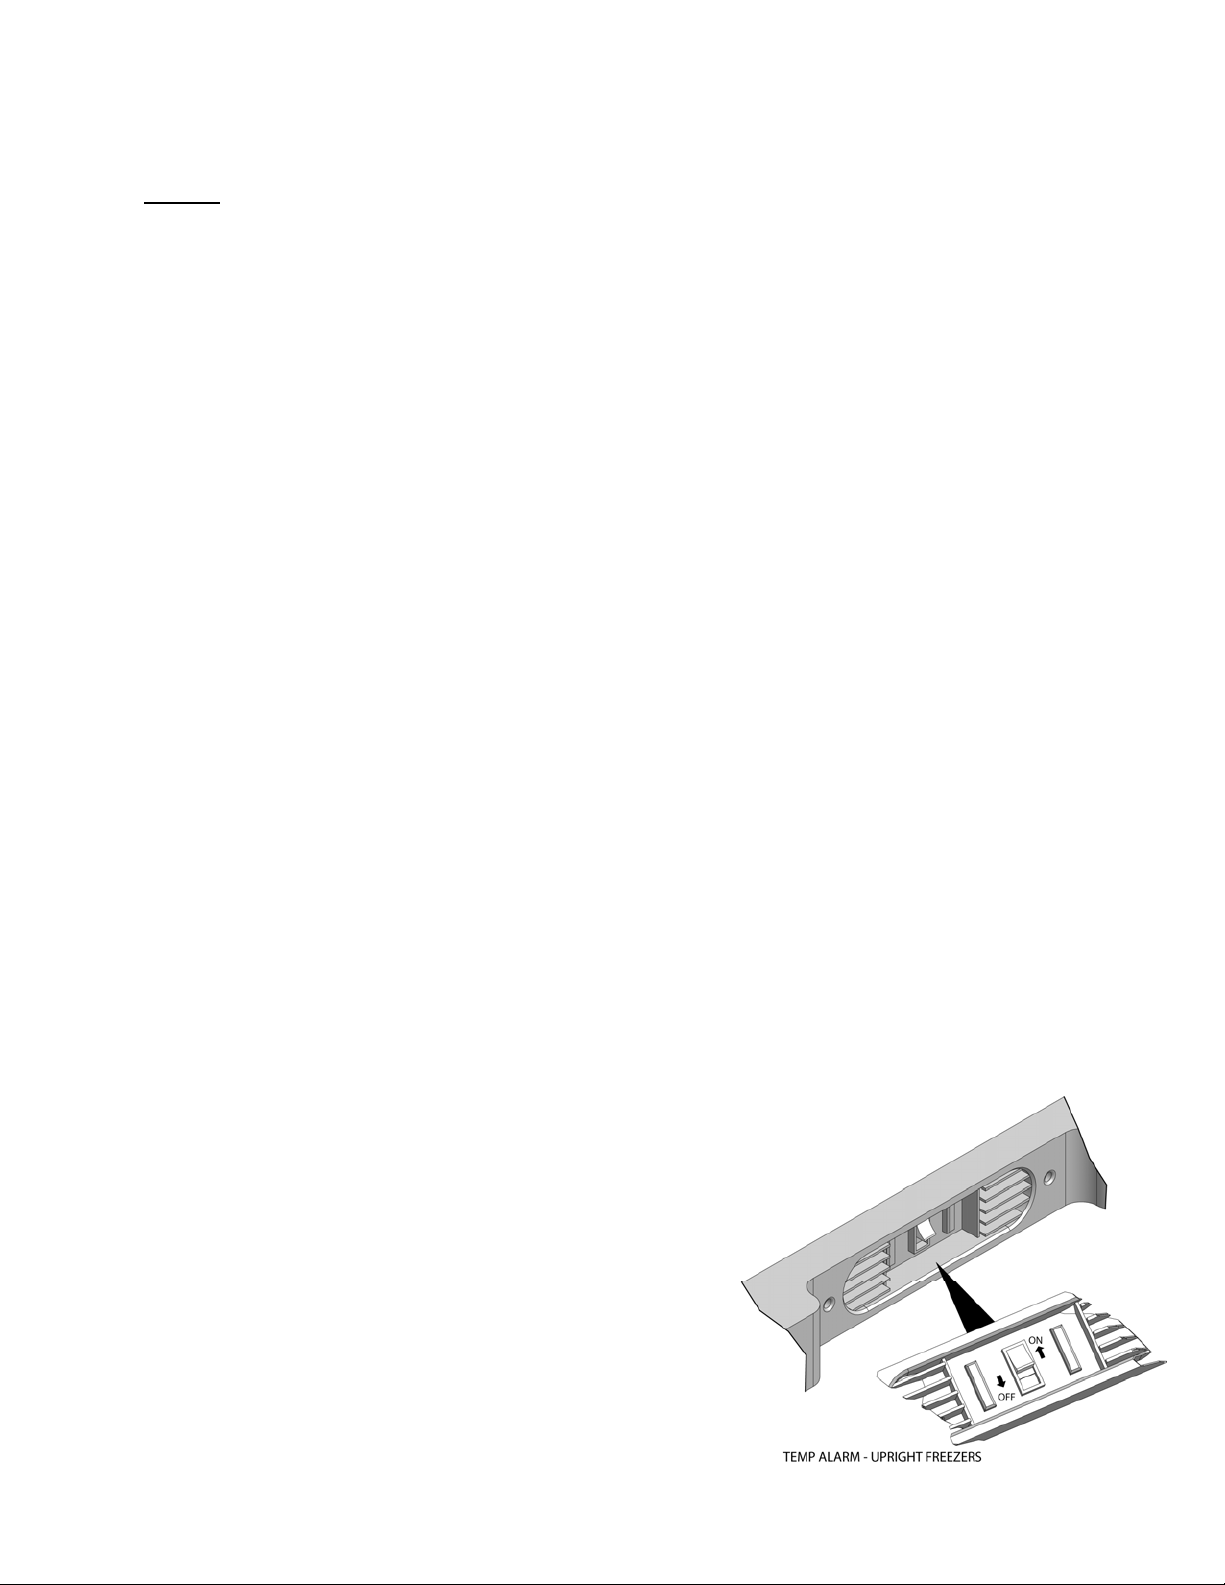
Temp Alarm (Audible or Audible with Warning Light)
This feature is designed to provide a warning of a possible malfunction. If the product temperature
rises to an unsafe level for long-term storage, the buzzer
will sound. The red light, if equipped, will energize. The
Temp Alarm feature operates on laboratory/facility
electricity. If power fails, the alarm will not function. An
On/OFF switch allows the user to deactivate the Temp
Alarm when not required. The freezer is shipped with the
Temp Alarm in the OFF position. After the freezer has run
for at least four hours, the red light, if equipped, will deenergize. The Temp Alarm may then be activated without
the alarm sounding. Press the ON switch to activate the
Temp Alarm. Press OFF to deactivate the Temp Alarm. If
the alarm sounds, ensure that the freezer is properly
leveled and the door closes freely and seals properly. If a
malfunction is suspected, notify an authorized service
technician immediately.
2
12/10 Rev. B 138707
Page 3

Defrost Drain
The defrost drain provides a method of
draining the condensate during the defrost
cycle and scheduled cleaning. See
“Defrosting” in the Periodic Cleaning
section.
Door Removal
If the door must be removed to fit through a
narrow passageway:
1. Lay the freezer on its back on a cover protect its exterior surface.
2. Remove the base panel by unscrewing two screws from the front of the panel.
3. Unplug connector, if required, by holding the
cabinet connector in place and pulling the
door connector out (see illustration).
4. Remove the bottom hinge screws (see
illustration).
5. remove the plastic top hinge cover.
6. Remove screws from the top hinge.
7. Remove the top hinge from the cabinet.
8. Remove the door and bottom hinge from the
cabinet.
9. To replace the door, reverse the above order
and securely tighten all screws to prevent
hinge slippage.
MAINTENANCE
PERIODIC CLEANING
Disconnect the power supply before cleaning the freezer.
Beginning with the initial installation, the interior surfaces of the cabinet should be periodically
wiped down with a solution of warm water and baking soda (two tablespoons in one quart of warm
water). This solution will remove any odors from spillage that has occurred. The exterior of the
cabinet should also be cleaned frequently with warm water and a mild liquid detergent. Caution: Do
not use an abrasive or alkaline solution. Do not wash any removable parts in a dishwasher.
Defrosting
This unit is a manual defrost freezer. During normal operation, it will build up a coating of frost/ice
on the evaporator shelves. When the frost layer gets too thick (1/2 inch) it will affect the
performance of the unit causing the internal temperature to rise. When this happens the unit will
need to be manually defrosted. To manually defrost the unit, remove the product stored in the
cabinet, block open the door and disconnect the unit from power.
3
12/10 Rev. B 138707
Page 4

CAUTION: Freezer must be unplugged to avoid electrical hazard from power source when
defrosting the unit.
On upright models with a defrost drain (Figure 1), remove the drain plug on the interior floor of the
freezer by pulling straight out. To access the external drain tube on models with the base panel,
remove the two screws from the base panel. Locate the drain tube near the left center under the
freezer. Place a shallow pan under the drain tube (pan not supplied). Defrost water will run out.
Check the pan occasionally to ensure that the drain water does not overflow. A ½ inch garden hose
adapter cab be used to drain the freezer directly into a floor drain. If the model used is not equipped
with an adapter, one can be purchased at most hardware stores. Replace the drain plug when
defrosting and cleaning are complete. If the drain is left unplugged, warm air may enter the freezer.
Once all the frost has melted, wipe out the unit with a dry cloth, close the door and reconnect the
unit to power. Allow four hours for the unit to return to proper operating temperature prior to
reloading with product.
MAINTENANCE SERVICE AND ANALYSIS GUIDE
MALFUNCTION POSSIBLE CAUSE SOLUTION
Freezer does not 1. Freezer plugged into a 1. Use another circuit.
run. ground fault interrupt circuit.
2. Temperature control is in the 2. See Temperature Control Section.
OFF position.
3. Fuse blown or tripped circuit 3. Check/replace fuse with a 15A time delay
breaker. fuse. Reset circuit breaker
Freezer runs too much 1. Freezer recently dis- 1. 4 hours required for freezer cool down.
or too long. connected for a lengthy period.
2. Large amount of product 2. Warm product will cause freezer to run
recently stored. more until desired temperature is reached.
3. Doors opened too frequently 3. Open doors less often.
or too long.
4. Freezer door may be 4. Freezer may not be level.
slightly open.
5. Temperature control set too cold. 5. Reset temperature control.
6. Freezer gasket is dirty, worn, 6. Clean or replace gasket.
cracked or poorly fitted.
Vibrating or rattling noise. 1. Freezer not level. 1. Re-level the freezer as specified in the
INSTALLATION section.
2. Freezer is touching the wall. 2. Move the freezer away from the wall.
Moisture forms on freezer 1. Weather is hot and humid. 1. This is normal.
interior. 2. Door not seating properly. 2. Re-level the freezer.
3. Door kept open too long or too 3. Open door less often.
frequently.
Moisture forms on freezer 1. Door may not be sealing 1. Re-level the freezer.
exterior. properly.
Door will not close. 1. Freezer is not level. 1. Re-level the freezer.
Light bulb will not turn on. 1. Light bulb burned out. 1. Replace light bulb with a new bulb of the
Same wattage.
2. No electric current reaching the 2. Ensure freezer is plugged into power
Freezer. receptacle.
3. Defective light bulb holder or 3. Contact a service technician.
Light switch.
4
12/10 Rev. B 138707
 Loading...