


579-1 UMEHARA WAKAYAMA-SHI, JAPAN 640-8550
TELEPHONE : +81(73)454-0345
FACSIMILE : +81(73)454-0301
ᑷ␠ຠߩᣇߩߏ⋧⺣㓚ޔ߅ࠃ߮ޔᛛⴚ⊛ߥ߅วࠊߖߪޔޟࡁ࠷ࠦ࡞ࡦ࠲ޠ߹ߢߏㅪ⛊ߊߛߐޕ
ࡁ࠷ࠦ࡞ࡦ࠲ ࡈࠦ࡞㧦
߅วࠊߖౝኈߩ⏕߅ࠃ߮㔚ᔕኻࠨࡆࠬߩะߩߚޔㅢౝኈࠍ⸥㍳ߐߖߡߚߛߡ߅ࠅ߹ߔޕ
ଔᩰ⚊ᦼߩ߅วࠊߖޔߏᵈᢥߦߟߡߪޔ߅⾈ߍߩ⽼ᄁᐫޔ߽ߒߊߪᦨነࠅߩ༡ᬺᚲߦߏㅪ⛊ߊߛߐޕ
ᧄ␠༡ᬺㇱ ޥ ጊᏒ᪢ේ 6'.
ᧅᏻ༡ᬺᚲ ޥ ᧅᏻᏒᄩධ৻᧦ৼ⋡ 6'.
บ༡ᬺᚲ ޥ บᏒ⧯ᨋৼߩ⋡↸ޓᢪ༑ࡦ࠲ࡆ࡞㓏 6'.
᧲༡ᬺᚲ ޥ ᧲ㇺᶏጯৼ⋡ 6'.
ฬฎደ༡ᬺᚲ ޥ ฬฎደᏒ‐ፉ↸ޓฬ㚞6-ࡆ࡞㓏 6'.
ᄢ㒋༡ᬺᚲ ޥ ᄢ㒋Ꮢᧄ↸ৼ⋡ޓߥߦࠊ╭ᄩࡆ࡞㓏 6'.
ᐢፉ༡ᬺᚲ ޥ ᐢፉᏒᄢᚻ↸ৼ⋡ޓࡌ࡞࠺ᄢᚻ↸㓏 6'.
ጟ༡ᬺᚲ ޥ ጟᏒඳᄙඳᄙ㚞᧲ৼ⋡ޓ㊀ᵮඳᄙࡆ࡞㓏 6'.
2-633-357-06(1)
Digital Photo
Printer
IP-64
ᝢం Page 2
JP
Operating Instructions Page 38
GB
Mode d’emploi Page 70
FR
Bedienungsanleitung Seite 104
DE
Manual de instrucciones página 138
ES
Istruzioni per l’uso pagina 172
IT
ȝ៳ȗ˨ȥȗȲȳȠȕɝȟȻșȧȩȗɑȬǿ
ᛏֿɂާпɁȲɔɁาᬱɥަɜȽȗȻǾ
ཌདɗᡵȾȽɞȦȻȟȕɝɑȬǿ
ȦɁᝢంȾɂǾɥ᩻ȣȲɔɁᛵȽาᬱȻᛏֿɁɝȗȞȲɥᇉȪȹȕɝ
ɑȬǿȦɁᝢంɥɛȢȝᝣɒɁșțǾᛏֿɥާпȾȝΈȗȢȳȨȗǿ
IP-64

安全のために
本機は正しく使用すれば事故が起きないように、安全に
は充分配慮して設計されています。しかし、間違った使
いかたをすると、火災や感電などにより死亡や大けがな
ど人身事故につながることがあり、危険です。
事故を防ぐために次のことを必ずお守りください。
安全のための注意事項を守る
4 ~ 5 ページの注意事項をよくお読みください。製品全
般の安全上の注意事項が記されています。
29 ページの「本機の性能を保持するために」も併せてお
読みください。
故障したら使わない
すぐに、サービスセンターにご連絡ください。
警告表示の意味
取扱説明書および製品では、次のような表示をし
ています。表示の内容をよく理解してから本文を
お読みください。
この表示の注意事項を守らないと、火災・感電な
どにより死亡や大けがなどの人身事故につながる
ことがあります。
万一、異常が起きたら
・ 煙が出たら
・ 異常な音、においがしたら
・ 内部に水、異物が入ったら
・ 製品を落としたり、キャビネットを破損したと
きは
1 電源を切ります。
2 電源コードや接続ケーブルを抜きます。
3 サービスセンターまでご相談ください。
この表示の注意事項を守らないと、感電やその他
の事故によりけがをしたり周辺の物品に損害を与
えたりすることがあります。
注意を促す記号
行為を禁止する記号
行為を指示する記号
2

目次
警告 ................................................................................................ 4
注意 ................................................................................................ 5
はじめに
本機の特長 ................................................................................... 7
主な使用例 ............................................................7
各部の名称と働き ....................................................................... 7
準備
付属品を確認する ....................................................................... 9
コンピューターと接続する ...................................................... 9
パソコンにプリンタードライバーをインストールす
る ..........................................................................9
接続する ................................................................ 9
操作
プリント紙・インクリボンを取り付ける ......................... 11
ペーパーホルダーにプリント紙を取り付ける .... 12
プリント紙・インクリボンを取り付ける ........... 14
ペーパートレイを取り付ける ............................. 18
インクリボンが切れてしまったときは ............... 19
インクリボン・プリント紙を取りはずす ........... 20
コンピューターからプリントする ...................................... 22
メニュー操作を行う ............................................................... 24
メニュー操作を始める前に ................................ 24
グレーバランスを好みの色味に調節する ........... 25
プリントした枚数を表示する ............................. 26
プリンターのバージョンを表示する .................. 27
プリント位置を調整する .................................... 27
その他
本機の性能を保持するために .............................................. 29
使用上のご注意 .................................................. 29
設置するときの注意 ........................................... 29
お手入れ ............................................................. 29
使えるインクリボンとプリント紙について ..................... 33
主な仕様 ..................................................................................... 33
メッセージ一覧 ........................................................................34
故障とお考えになる前に ....................................................... 35
保証書とアフターサービス ...................................................36
索引 ............................................................................................. 37
JP
3

火災 感電
下記の注意を守らないと、
火災や感電により死亡や大けがに
つながることがあります。
電源コードを傷つけない
電源コードを傷つけると、火災や感電の原
因となることがあります。
・ 設置時に、製品と壁やラック、棚などの
間に、はさみ込まない。
・ 電源コードを加工したり、傷つけたりし
ない。
・ 重いものをのせたり、引っ張ったりしな
い。
・ 熱器具に近付けたり、加熱したりしない。
・ 電源コードを抜くときは、必ずプラグを
もって抜く。
万一、電源コードが傷んだら、サービスセ
ンターに交換をご依頼ください。
警告
表示された電源電圧で使用する
製品の表示と異なる電源電圧で使用すると、
火災や感電の原因となります。
内部に水や異物を入れない
水や異物が入ると火災や感電の原因となる
ことがあります。
万一、水や異物が入ったときは、すぐに電
源を切り、電源コードや接続コードを抜い
て、サービスセンターにご相談ください。
分解や改造をしない
分解や改造をすると、火災や感電、けがの
原因となることがあります。
内部の点検や修理は、サービスセンターにご
依頼ください。
油煙、湯気、湿気、ほこりの多い場
所では設置・使用しない
上記のような場所に設置すると火災や感電
の原因となります。
取扱説明書に記されている使用条件以外の
環境での使用は、火災や感電の原因となり
ます。
水にぬれる場所で使用しない
水ぬれすると、漏電による感電発火の原因
となることがあります。
警告
4

注意
下記の注意を守らないと、
けがをしたり周辺の物品に損害を与える
ことがあります
ぬれた手で電源プラグをさわらない
ぬれた手で電源プラグを抜き差しすると、
感電の原因となることがあります。
付属の電源コードを使用する
付属の電源コードを使わないと、火災や感
電の原因となることがあります。
安全アースを接続する
安全アースを接続しないと、感電の原因と
なることがあります。
次の方法でアースを接続してください。
・ 電源コンセントが 3 極の場合
付属の電源コードを使用することで安全
アースが接続されます。
・ 電源コンセントが 2 極の場合
付属の 3 極 t2 極変換プラグを使用し、
変換プラグから出ている緑色のアース線
を建物に備えられているアース端子に接
続してください。
安全アースを取りつけることができない場
合は、サービスセンターにご相談ください。
製品の上に乗らない、重いものを乗
せない
倒れたり、落ちたり、壊れたりして、けが
の原因となることがあります。
プリンタードア開口部の突起に触れ
ない
紙交換時にプリンター開口部の突起に触れ
ると、けがをするおそれがあります。
コード類は正しく配置する
電源コードや接続ケーブルは、足に引っか
けると本機の落下や転倒などによりけがの
原因となることがあります。
充分注意して接続・配置してください。
前扉の開閉の際に手や指をはさまな
い
前扉を開閉するときに手や指をはさみ、け
がの原因となることがあります。また、前
扉を開いたままで使用しないでください。
プリント直後サーマルヘッドに触れ
ない
プリント直後は、サーマルヘッドが熱く
なっている場合があり、触れるとやけどの
原因となることがあります。
電源コードのプラグおよびコネク
ターは突き当たるまで差し込む
真っ直ぐに突き当たるまでさし込まないと、
火災や感電の原因となります。
プリント紙排出口をのぞかない
プリント紙排出口からプリントされたプリ
ント紙が排出されます。のぞきこむと排出
されたプリント紙にあたり失明やけがの原
因となることがあります
プリント紙の排出口はのぞかないでくださ
い。
お手入れの際は、電源を切る
電源を接続したままお手入れをすると、感
電の原因となることがあります。
開梱、運搬時は慎重に
本機は重量があるので、本体を取り出す際
や運搬時に腰を痛めるおそれがあります。
通気孔をふさがない
通気孔をふさぐと内部に熱がこもり、火災
や故障の原因となることがあります。風通
しをよくするために次の項目をお守りくだ
さい。
・ 壁から 10cm 以上離して設置する。
・ 密閉された狭い場所に押し込めない。
・ 毛足の長い敷物(じゅうたんや布団など)
の上に設置しない。
・ 布などで包まない。
・ あお向けや横倒し、逆さまにしない。
注意
5

不安定な場所に設置しない
ぐらついた台の上や傾いたところに設置す
ると、倒れたり落ちたりしてけがの原因と
なることがあります。また、設置・取り付
け場所の強度を充分にお確かめください。
プリント紙は縦置きにする
横に置くと回転して落下し、けがの原因とな
ることがあります。
注意
6

はじめに
各部の名称と働き
本機の特長
本機は、コンピューターから送られてくるデジタルスチ
ルカメラなどの画像データを 4 種類のサイズのプリント
紙に、高速フルカラー(各色 256 階調処理、1670 万
色)でプリントするための、高画質、高解像度
(334dpi)の昇華熱転写型デジタルフォトプリンターで
す。
主な使用例
コンピューターなど
プリントする画像の信号を供
給し、プリンターをコント
ロールします。
フロントパネル
はじめに
本機
裏面パネル
A ALARM ランプ(34)
イニシャライズ時、およびエラーが起きたとき赤色
に点灯します。
B 液晶ディスプレイ(26、34)
プリント回数、またはインクリボンの残量を表示し
ます。エラー発生時は、メッセージを表示します。
本機の特長 / 各部の名称と働き
7

C フロントドア用ロックレバー(12、15)
プリント紙およびインクリボン交換時、クリーニン
グ時、フロントドアを開けるとき使用します。
H フロントパネル
メニュー操作時に使用する操作部が内蔵されていま
す。
はじめに
フロントドアを開けた場合
A ペーパーカートリッジ
プリント紙を入れます。
B リボンベース
インクリボンを入れます。
C リボンベース用ロックレバー
リボンベースを上に上げるときに使用します。
D フィルター
D 通風口
サーマルヘッド冷却ファン用のフィルターが内蔵さ
れています。
メニュー操作部
A EXEC ボタン
グレーバランス調整用パターンをプリントするとき
に使用します。
B MENU ボタン(26)
メニュー操作を行うときに押します。MENU ボタン
を押すと、プリンターはオフライン状態になります。
C カーソル移動ボタン(26)
液晶ディスプレイに表示する項目を選ぶときに使用
します。
D CAL(CALIBRATION)ボタン(25)
グレーバランスを調整するときに使用します。
E PRINT STOP ボタン(23)
プリント中に PRINT STOP ボタンを 1 秒以上押す
と、設定されているプリント枚数はキャンセルされ、
メモリーに記憶された画像は消去されます。現在プ
リント中のものはそのままプリントを続け、プリン
ト画が排出された時点でプリントが終了します。
E 排紙口
プリント画が排出されます。
F ペーパートレイ(18)
排出されたプリント画がたまります。使用する用紙
によって長さを調節します。
プリント画と次のプリント画の間に約 20mm の余白
ができます。この余白が切り取られ、ペーパートレ
イの中に排出されます。
G 排紙サポート
プリントパック 2YNR-R155/R156 を使用する場
合は、引き出して使用します。
各部の名称と働き
8
I - AC IN(電源入力)端子(9)
電源コードを接続します。
J ! POWER スイッチ(22)
本機の電源を ON/OFF(入/切)します。
K USB 端子(9)
USB インターフェース(USB2.0 準拠)をもつパソ
コンと接続して使用することができます。接続には
USB ケーブルをお使いください。

準備
付属品を確認する
付属品を確認してください。
ペーパートレイa)(1)
コンピューターと接続する
USB ケーブルでプリンターとパソコンを接続し、電源
コードも接続します。接続機器の取扱説明書も併せてご
覧ください。
パソコンにプリンタードライバーを
インストールする
パソコンに接続する前に、付属のプリンタードライバー
をインストールします。インストールのしかたについて
は、付属の CD-ROM に格納されているインストールマ
ニュアル、および「ReadMe (Japanese)」をお読みくだ
さい。
準備
ペーパーホルダー
電源コード(1)(別送)
3 極→ 2 極変換プラグ(1)(別送)
USB ケーブル(1)
CD-ROM(取扱説明書、プリンタードライバー、ドライ
バーインストールマニュアル、および ReadMe)(1)
ソフトウェアライセンス契約書(1)
ご使用になる前に(1)
取扱説明書(1)
保証書(1)(別送)
a) 使用前に段ボールの紙をお取りください。
b) プリンター本体の中に入っています。電源を入れる前に
本体から取り出してください。
取り出しかたについては、「ペーパーホルダーにプリン
ト紙を取り付ける」 (12 ページ)の手順 1 をご覧くだ
さい。
b)
(2)
接続する
ご注意
・ パソコンの説明書も併せてご覧ください。
・ ケーブルのコネクターは最後までしっかり差し込んでく
ださい。
・ 付属のプリンタードライバーは、ネットワーク経由での
使用には対応しておりません。
・ ハブを使用した USB 接続をする場合は、動作を保証い
たしません。
本機
-AC IN 端子へ
(USB)端子へ
USB ケーブル
電源コード(付属)
ご注意
・ 梱包材から本体を取り出す際は、腰を痛めないようにご
注意ください。
・ 梱包箱や緩衝材は、プリンターの移動や輸送の際に必要
です。捨てずに保管することをおすすめします。
・ 輸送の際は、プリンターからインクリボンとプリント紙
を取り外してください。
コンピューター
付属品を確認する / コンピューターと接続する
電源コンセントへ
9
準備
電源について
電源コンセントが 2 芯の場合は、付属の 3 極
プラグをご使用ください。
3極 t 2 極変換プラグをご使用になる場合のご注意
アースの接続は、必ず電源プラグをコンセントへ接続する
前に行ってください。アースの接続をはずす場合は、必ず
電源プラグを電源コンセントから抜いてから行ってくだ
さい。
t 2 極変換
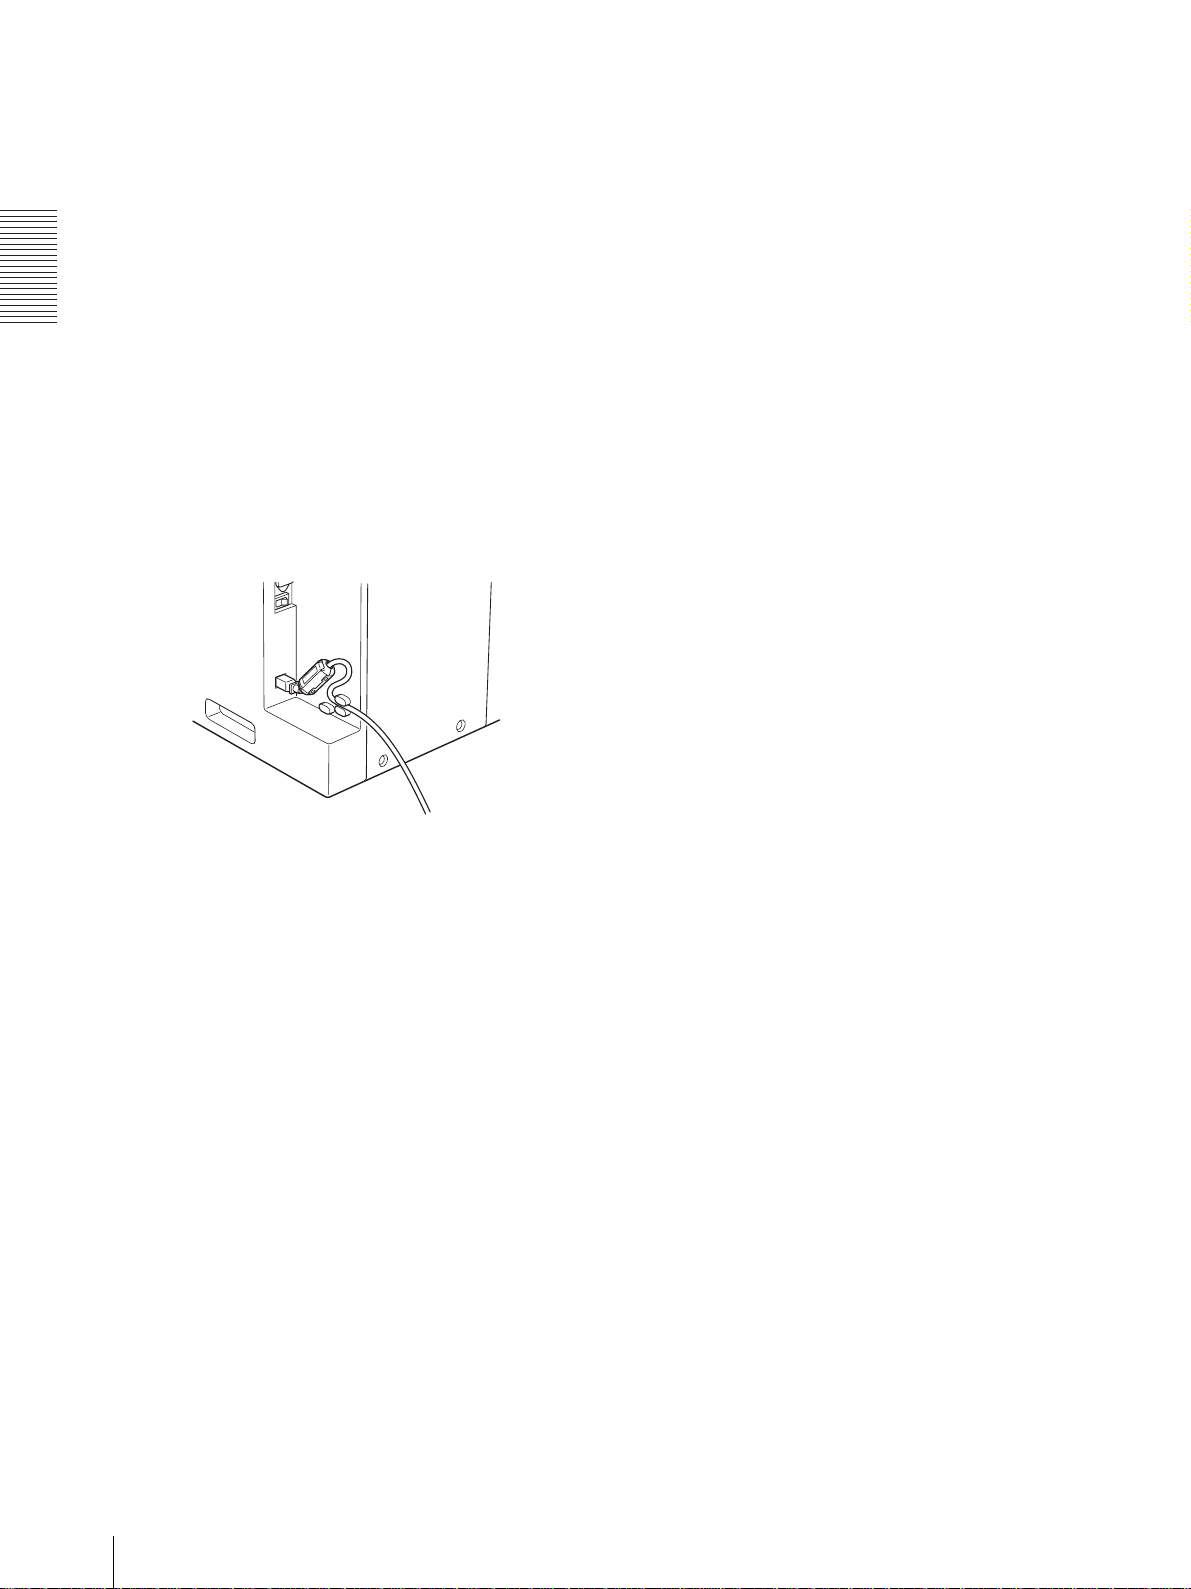
USB ケーブルを固定するには
誤ってケーブルを引っ張っても抜けないように、USB
ケーブル接続後、以下のように固定することをお勧めい
たします。
上のケーブルクランプに通して固定します。
コンピューターと接続する
10

操作
プリント紙・インクリボン
を取り付ける
ここでは、プリンターの接続(9 ページ)が終了し、実際
のプリントを始める前の準備として、プリント紙および
インクリボンの取り付けについて説明します。
を与えないでください。そのインクリボンが使用できな
くなる場合があります。
白のスプール
黒のスプール
プリント紙・インクリボンの取り扱いにつ
いて
ご注意
・ プリントパックにはインクリボンが 2 巻、プリント紙
が 2 巻入っています。インクリボンとプリント紙は同
じ箱に入っているものを必ずセットでお使いください。
(「使えるインクリボンとプリント紙について」 (33
ページ)
・ 印画可能枚数は、プリントパックにより異なります。ま
た、プリントリボン 1 巻とプリント紙 1 巻のセットで
印画可能な枚数は以下のとおりです。
プリント
パック
印画枚数 610 画面 550 画面 335 画面 295 画面
印画サイ
ズ単位:
mm
プリントパックについて詳しくは、「使えるインクリボ
ンとプリント紙について」 (33 ページ)および「仕様」
の「ラミネートカラープリントパック」 (34 ページ)
をご覧ください。
・ インクリボンやプリント紙を使用途中で交換しないでく
ださい。
インクリボンやプリント紙を途中で交換した場合、上記
の可能枚数は、減少します。
・ インクリボンは、プリンター本体に取り付けるまで、白
と黒のスプールのかみ合わせをはずさないでください。
・ 黒のスプールの片側に白い IC シールが貼り付けてあり
ます。このシールをはがしたり、傷つけたり、ショック
2YNRR153
89 × 127 102 × 152 127 × 178 152 × 204
2YNRR154
2YNRR155
2YNRR156
IC シール
・ カッターなどの刃物を使っての開封はおやめください。
プリント紙やインクリボンに傷がつき、プリントできな
くなるときがあります。
インクリボンの色素は他の色素と同様に年月の経過によ
り変化しますが、その点についての補償、代償はご容赦く
ださい。
プリント紙取り扱い上のご注意
・ プリント紙を置くときは、下図のように縱置きにしてく
ださい。横に置くと回転して落下し、けがの原因となる
ことがあります。
・ プリント紙は重いので両手でしっかりお持ちください。
落したりするとけがの原因となることがあります。
操作
両手でしっかり持つ。
プリント紙・インクリボンを取り付ける
11

操作
ペーパーホルダーにプリント紙を取
り付ける
付属のペーパーホルダーにプリント紙を取り付けてから、
プリンター本体に取り付けます。
1
フロントドア用ロックレバーを手前に引いて、フロ
ントドアを開ける。
2
ペーパーカートリッジ前にあるリボンベース用ロッ
クレバーを引いて、リボンベースを上に上げる。
3
ペーパーカートリッジを手前に引き出す。
ペーパーカートリッジからペーパーホルダーが入っ
ている袋を取り出す。
フロントドアを閉めます。
4
ペーパーホルダーの幅を調節する。
プリント紙には、紙幅が 127 mm(5 インチ)のも
のと 152 mm(6 インチ)のものがあります。
工場出荷時は 152 mm(6 インチ)用に調節されて
います。
紙幅 127 mm(5 インチ)のプリントパック
2YNR-R153 および 2YNR-R155 の場合
ブルーのペーパーホルダーの軸を短くします。
プリント紙・インクリボンを取り付ける
12

ブルーのペーパーホルダーの軸の長さを短くするに
は
つめを内側に押す。
紙幅 152 mm(6 インチ)のプリントパック
2YNR-R154 および 2YNR-R156 の場合
ブルーのペーパーホルダーの軸の長さを長くします。
矢印とラベルの
R154/R156 の矢印
とが合っていること。
円盤面を反時計方向に
回しきる。
円盤面を上げる。
v
v
この円盤面を持っ
て下に押し下げる。
短くする場合と逆の手順で、ブルーのペーパーホル
ダーの軸の長さを長くします。
5
ブルーのペーパーホルダーをプリント紙に差し込む。
ブルーのテープが貼ってある
側に差し込む。
すべり止めテープは、ペー
パーホルダーをプリント紙に
取り付けた後、はがして引っ
張って切り込み部から破りと
る。
プリント紙の管の内側には
テープが残ります。
6
逆さにして、ピンクのペーパーホルダーを取り付け
る。
操作
矢印とラベルの
R153/R155 の矢印
とが合っていること。
プリント紙・インクリボンを取り付ける
13

操作
ご注意
プリント紙は重いので、両手でしっかりとお持ちくだ
さい。
ピンクのテープが貼ってある
側に差し込む。
すべり止めテープは、ペー
パーホルダーをプリント紙に
取り付けた後、はがして引っ
張って切り込み部から破りと
る。
プリント紙の管の内側には
テープが残ります。
ピンクのペーパーホルダー
のつまみを押し込み、止ま
るまで、時計方向に回す。
先に取り付けたブルーの
ペーパーホルダーに固定さ
れると、つまみが上下に動
くようになります。
プリント紙・インクリボンを取り付
ける
初めてプリンターをお使いになる場合は、まずプリント
紙およびインクリボンを取り付けてください。
プリント紙を本体に取り付ける前に、プリンターに付属の
ペーパーホルダーを取り付けます。取り付けかたについ
ては、「ペーパーホルダーにプリント紙を取り付ける」
(12 ページ)をご覧ください。
使用済みのプリント紙およびインクリボンの取外しかた
については、20 ページをご覧ください。
プリント紙・インクリボンを取り付ける前に
プリンター本体の電源がはいっているか確認してくださ
い。
入っていない場合は、電源を入れてください。
電源が入っていないと、プリント紙・インクリボンの取
り付けが終了後、自動給紙が正しく行われない場合があり
ます。
プリント紙を 1 ロール使用して新しいプリント紙を取り
付ける場合、取り付ける前にサーマルヘッドなどのクリー
ニングを行ってください。
クリーニングについて詳しくは、「プリント紙を交換する
前に」 (29 ページ)をご覧ください。
次に、本体のペーパーカートリッジに取り付けます。
ペーパーホルダーが確実に取り付けられているか確認す
るには
プリントパック 2YNR-R154 および 2YNR-R156 の場合
ブルーのペーパーホルダーの
円盤外周にある凹部とピンク
のペーパーホルダーの円盤外
周にある凹部が一致すること。
プリントパック 2YNR-R153 および 2YNR-R155 の場合
ブルーのペーパーホルダーの
円盤外周にある凹部とピンク
のペーパーホルダーの円盤外
周にある凹部が一致すること。
ご注意
紙幅 127 mm(5 インチ)のプリントパック 2YNRR153 および 2YNR-R155 をお使いになった後に、紙幅
152 mm(6 インチ)のプリントパック 2YNR-R154 お
よび 2YNR-R156 をお使いにならないでください。著し
く画質が劣る場合があります。
プリント紙・インクリボンを取り付ける
14

取り付けるには
ご注意
・ フロントドアや、フロントドア開口部の突起に手や洋服
がはさまれたり、引っ掛かったりしないようにしてくだ
さい。
・ ペーパートレイに排出されたプリント紙がたまっている
場合は、プリント面に傷や折れ目が付くのを避けるため、
フロントドアを開ける前に取り除いてください。
・ プリント終了直後は、サーマルヘッドが高温になってい
ます。プリント紙およびインクリボンを取り付ける際、
サーマルヘッドに触れるとやけどの原因となることがあ
るのでご注意ください。
2
ペーパーカートリッジ前にあるリボンベース用ロッ
クレバーを引いて、リボンベースを上に上げる。
3
ペーパーカートリッジを手前に引き出す。
操作
サーマルヘッド
1
フロントドア用ロックレバーを手前に引いて、フロ
ントドアを開け、カバーを上に上げる。
ご注意
プリント終了直後は、サーマルヘッドが高温になっ
ています。ペーパーカートリッジを引き出す際、
サーマルヘッドに触れるとやけどの原因となること
があるのでご注意ください。また、サーマルヘッド
を傷つけないようご注意ください。
プリント紙・インクリボンを取り付ける
15

4
プリント紙をペーパーカートリッジに入れる。
6
用紙の端を押さえながら、手前方向に目印の窓が青
に変わるまで回す。
ご注意
プリント紙を回すときは、プリント紙を手で押さえ
てプリント紙がゆるまないよう回してください。
目印の窓
操作
サーマルヘッド
ご注意
・ プリント終了直後は、サーマルヘッドが高温に
なっています。プリント紙をペーパーカートリッ
ジに入れる際、サーマルヘッドに触れるとやけど
の原因となることがあるのでご注意ください。
・ プリンター内のプリント紙装着以外の個所にプリ
ント紙を置かないでください。プリンターが損傷
する恐れがあります。特にサーマルヘッド付近に
は、絶対に置かないでください。
プリント紙を両手で押さえてゆるみが出ないよう
に注意して、目印の窓が青くなるまで回す。
ご注意
・ プリント紙に付いているシールは全てはがしてく
ださい。はがし忘れたシールがプリンターの本体
に残るとトラブルの原因となることがあります。
・ プリント紙をセットした後は、プリント面には触
れないでください。指紋や汗、折り目が付くと、
プリント画に影響が出ることがあります。
7
ペーパーカートリッジを戻す。
5
プリント紙の中央についているシールをはがす。
プリント紙・インクリボンを取り付ける
16

8
左側を
右側を
リボンベースを下げる。
ご注意
白のスプールをはめ込むとき、インクリボンにゆるみ
がないこと、またインクリボンが折れ曲がっていな
いことを確認してください。折れている場合は、広げ
てください。
9
インクリボンの両方のスプールを持って、黒のス
プールを下側の黒のスプール受けにはめ込む。
最初にスプールの
入れてパチッと止まるまではめ込む。
11
フロントドアの中央部を押しながら閉める。
ご注意
・ リボンベースが下がっていることを確認してから
フロントドアを閉めてください。
・ ドアの片側を押して閉めるとドアロックが完全に
できない場合があります。
入れ、次に
操作
最初にスプールの左側を入れ、次に右側を
入れてパチッと止まるまではめ込む。
ご注意
プリント終了直後は、サーマルヘッドが高温になっ
ています。インクリボンを交換する際、サーマル
ヘッドに触れるとやけどの原因となることがあるの
でご注意ください。
10
白のスプールを黒のスプールから引き抜く。リボン
がゆるまないように、白のスプールからリボンを巻き
ほどくようにしながら、上に引き上げて、上側のス
プール受けにはめこむ。
自動的にプリント紙が排出され、プリント可能な状
態になります。
排出されたプリント紙は、廃棄してください。
プリントパック保存上のご注意
・ 次のような場所での保存は避けてください。
プリント紙・インクリボンを取り付ける
17

温度の高いところ
湿度やほこりの多いところ
直射日光の当たるところ
・ 開封後はなるべく早くご使用ください。
・ 輸送時など、使用途中で保存しなければならない場合
は、製品が入っていた袋に入れてください。
ペーパートレイを取り付ける
付属のペーパートレイを取り付けます。
2YNR-R153、2YNR-R154 をご使用の場合
操作
スクラップストッパー
ご注意
プリントすると、プリント画とプリント画の間にできる
余白が切り取られ、ペーパートレイの中に排出されます。
スクラップストッパーは、切り取られた余白が、ペー
パートレイの中にきちんと排出されるように取り付けら
れています。
このスクラップストッパーを折り曲げないようご注意く
ださい。折り曲げると余白がペーパートレイの中にきち
んと排出されず、プリント画と一緒にペーパートレイ上
に排出されプリント画を傷つけてしまう場合があります。
プリント画を約 30 枚ためることができます。しかし、使
用環境やプリント画の画像によっては、ためられる枚数が
大きく異なります。出力されたプリント画は早めに取り
出してください。
ご注意
2YNR-R155、2YNR-R156 の場合、この状態でペーパー
トレイを使用すると、紙づまりを起こします。排紙サポー
トを引き出してください。
詳細については、次の「2YNR-R155 をご使用の場合」、
および「2YNR-R156 をご使用の場合」をご覧ください。
2YNR-R155 をご使用の場合
使用するプリントパックによって、ペーパートレイの長
さを調節します。
プリント紙・インクリボンを取り付ける
18
排紙サポートを引き出し、ストッパーを立て
る。
プリント画を約 20 枚ためることができます。しかし、使
用環境やプリント画の画像によっては、ためられる枚数が
大きく異なります。出力されたプリント画は早めに取り
出してください。

2YNR-R156 をご使用の場合
排紙サポートを引き出し、ストッパーを倒す。
プリント画を約 20 枚ためることができます。しかし、使
用環境やプリント画の画像によっては、ためられる枚数が
大きく異なります。出力されたプリント画は早めに取り
出してください。
ペーパートレイを取り外すには
ペーパートレイの両端を持って下向きに押さえつけなが
ら手前に引き出します。
インクリボンが切れてしまったとき
は
テープなどでつなげば、残りのリボンを使うことができ
ます。
1
上側の白いスプールのリボンを引き出し、リボン先
端の幅一杯にテープを貼り、下側のリボンに貼り付
ける。
上側のリボンの先端に、リボ
リボンを引き出す。
ンの幅一杯にテープを貼り、
下側のリボンに貼りつける。
操作
2
下側のスプールをスプール受けからはずし、ゆるみ
をとってから再度スプールに装着する。
スプール受けからはず
し、ゆるみをとってか
ら再度取り付ける。
3
リボンベースを上に上げ、ペーパーカートリッジを手
前に引き出す。
4
ペーパーホルダーを目印の窓が赤に変わるまで奥の
方に回す。
プリント紙・インクリボンを取り付ける
19

操作
5
用紙の端を押さえながら、手前方向に目印の窓が青に
変わるまで回す。
6
ペーパーカートリッジを元に戻し、リボンベースを下
げ、フロントドアの中央部を押しながら閉める。
自動的にプリント紙が排出されます。
これで印画可能な状態になります。リボンが切れた
場所によっては、プリント画一枚分のリボンが失わ
れる場合があります。
ご注意
プリント紙を回しすぎるとプリント紙が余分に供給
され、紙づまりを起こす可能性があります。目印の窓
が青になったらすぐにプリント紙を回すのをやめて
ください。
3
黒のスプールを左側に押しつけながら、右側を手前
に引いて黒のスプールを取りはずす。
インクリボン・プリント紙を取りは
ずす
「PAPER END」、または「RIBBON END」というメッ
セージが表示された場合は、所定枚数のプリント紙、また
はインクリボンを使いきりました。以下の手順でインク
リボン、プリント紙を取りはずして、新しいインクリボン
とプリント紙を取り付けてください。
1
ペーパートレイに溜まっている紙片を取り除く。
ご注意
ペーパートレイに紙片が溜まっているとフロントド
アが最後まで開ききらない場合があります。プリン
ト紙を交換するたびに捨ててください。
2
フロントドア用ロックレバーを手前に引いて、フロ
ントドアを開け、カバーを上に上げる。
ご注意
プリント終了直後は、サーマルヘッドが高温になっ
ています。プリント紙を取り外す際、サーマルヘッ
ドに触れるとやけどの原因となることがあるのでご
注意ください。
4
白のスプールを左側に押しつけながら、右側を手前
に引いてはずす。
外したインクリボンは白のスプールと黒のスプール
とを合わせます。
取りはずしたインクリボンは再度使用しないでく
ださい。
5
プリント紙を取りはずす。
1 リボンベースを上に上げる。
プリント紙・インクリボンを取り付ける
20
2 ペーパーカートリッジを手前に引き出す。

3 プリント紙の両側を手前から内側に回転させなが
ら、残っている紙を巻き取る。
4 プリント紙を取りはずす。
プリントパックを使用途中で交換するには
インクリボンとプリント紙は、同じ箱に入っているもの
をセットで、使いきってから交換することをお勧めいたし
ます。
どうしても使用途中で交換しなくてはならない場合は、以
下の手順で交換してください。
ご注意
途中で交換した場合、正しいインクリボンの残量が表示さ
れない場合があります。
1
フロントドアを開ける。
2
リボンベースを上に上げる。
3
ペーパーカートリッジを手前に引き出し、プリント紙
を取り出す。
4
プリント紙を巻き取って、ゆるまないようテープで
止める。
5
交換するプリント紙を入れ、ペーパーカートリッジ
を元に戻す。
操作
5 取りはずしたプリント紙からピンクのペーパーホ
ルダーをはずす。
6
リボンベースを下げ、手順 5 で入れたプリント紙と
セットのインクリボンを取り付ける。
7
フロントドアを閉める。
自動的にプリント紙が排出され、プリント可能な状
態になります。
取りはずしたプリント紙とインクリボンはセットで
保管してください。
ご注意
途中でプリントパックの交換をした場合は、何枚か無駄が
発生し、規定量のプリント枚数が得られない場合がありま
す。
プリント枚数については、「印画可能枚数について」 (33
ページ)をご覧ください。
6 ブルーのぺーパーホルダーをはずす。
はずしたブルーとピンクのペーパーホルダーは、
再度使用します。捨てないでください。
プリント紙・インクリボンを取り付ける
21

操作
コンピューターからプリ
ントする
プリントを始める前に
・ プリンターとコンピューターなどと正しく接続されてい
ますか。(9 ページ)
・ インクリボンとプリント紙は正しく取り付けられていま
すか。(11 ページ)
・ ペーパートレイは使用するプリント紙に合わせて調節さ
れていますか?(18 ページ)
・ インクリボンとプリント紙は正しい組み合わせでセット
されていますか。(33 ページ)
数秒後、液晶ディスプレイに次のメッセージが表示
されます。READY 表示が出ている間は、いつでも
プリントできます。
現在使用しているプリントパック
インクリボンの残量が表示される。
液晶ディスプレイ上の表示とプリントパックについ
て
ご注意
プリント中は排紙口をのぞきこまないでください。プリ
ント画の端で目や顔を傷つけ、失明などの危険がありま
す。また、排紙口には異物を挿入しないでください。
カッターが壊れ、破片でけがをする恐れがあります。
プリントするには
液晶ディスプレイ
1
液晶ディスプレイ上の表示 プリントパック
R153 2YNR-R153
R154 2YNR-R154
R155 2YNR-R155
R156 2YNR-R156
ご注意
・ プリンターの電源を切った後再び電源を入れる場
合は、5 秒以上経過してから電源を入れてくださ
い。
・ コンピューターがハードディスクや他のディスク
にアクセスしているときに、プリンターの電源を
入れたり切ったりしないでください。
2
コンピューターからプリンターに画像データを送り、
プリントを開始する。
詳しくは、プリンタードライバーソフトウェアの説
明書をご覧ください。
1 画像データが送れられてくると、次のメッセージ
が表示されます
1
コンピューターとプリンターの電源を入れる。
コンピューターからプリントする
22

2 コンピューターからプリント開始の命令が送ら
れ、プリントが始まり、メッセージが表示されま
す。
メモリーについて
コンピューターから送られる画像データは、プリンター
内のメモリーに記憶されます。プリントしている画像の
他にもう 1 枚の画像データを記憶することができます。
プリントされる枚数
プリント過程により、色表示が変わります。
プリント開始:YELLOW
CYAN
t LAMI t プリント終了
t MAGENTA t
3 プリント終了後、排紙口からプリント画が出てき
ます。プリント時間は、画像サイズ、インクリボ
ン、およびプリント紙により異なります。
プリントが終わると、液晶ディスプレイは
READY 表示に戻ります。
プリントできないとき
エラーメッセージが液晶ディスプレイに表示されている
ときは、操作できません。「メッセージ一覧」 (34 ペー
ジ)をご覧ください。
ご注意
プリント画を保存するときは
・ 直射日光の当たるところや、温度や湿度の高いところに
置かないでください。色が退色する場合があります。
・ プリント画に粘着テープを貼ったり、プリント画を消し
ゴムやデスクマットなどの可塑材を含むものに触れさせ
ないでください。
・ プリント画に無水アルコールなどの揮発性有機溶剤をこ
ぼさないようにしてください。
操作
ご注意
2YNR-R153、2YNR-R154 をお使いの場合は、ペーパー
トレイにプリント紙を 30 枚以上ためないでください。
2YNR-R155、2YNR-R156 をお使いの場合は、ペーパー
トレイにプリント紙を 20 枚以上ためないでください。
しかし、使用環境やプリント画の画像によってはためら
れる枚数が大きく異なります。出力されたプリント画は
早めに取り出してください。
また、使用するプリントパックによっては、ペーパ-ト
レイの長さを調節する必要があります。
詳しくは、「ペーパートレイを取り付ける」 (18 ページ)
をご覧ください。
プリントを途中でやめるには
PRINT STOP ボタンを 1 秒以上押し続けます。現在プリ
ント中の画像は最後までプリントされ、排出されます。
プリント紙が排出されるとプリンターは READY 表示に
戻ります。プリントする画像や枚数を設定していた場合
は、無効となります。
コンピューターからプリントする
23

操作
メニュー操作を行う
メニューを使って以下の調節および確認ができます。
・ グレーバランスを好みの色味に調節する
・ プリントした枚数を表示する
・ プリンターのバージョンを表示する
メニュー操作を始める前に
メニュー操作を行うには、メニューボタンを使用します。
メニューボタンは、フロントパネルの下にあります。メ
ニュー操作を行うときは、このフロントパネルを取りはず
した状態で行います。
1
フロントパネルの下側をはがし、上に持ち上げては
ずす。
フロントパネルを閉じるには
フロントパネルの上側をプリンターの溝にひっかけ、下
側をマグネットで固定します。
ご注意
フロントパネルはきちんと取り付けてください。取り付
けられていないと、プリント画にごみなどがつき、プリ
ント画に影響が出る場合があります。
メニュー操作部が現れます。
2
メニュー操作を行う。
メニュー操作を行う
24

グレーバランスを好みの色味に調節
「
「
「
する
4
プリント A の結果を見ながら、No.0 ~ No.88 のパ
ターン中、グレーバランスが最適と思われるものを
決める。
インクリボンとプリント紙は、ペアごとにおつかいくだ
さい。本機のグレーバランスは無彩色と計測された調整
値 No.0 に設定され、記憶されています。お好みの色味に
調節したい場合は、以下の手順で調節してください。調節
値は電源を切っても保持されます。
インクリボンとプリント紙は、まれに輸送環境などによ
りグレーバランスに多少のばらつきがある場合がありま
す。
ご注意
画像のプリント中は、グレーバランスの調整はできませ
ん。
2,7,8,9,10
3
1,6,11
5
再度、プリント B の結果を見ながら、No.0 ~ No.88
のパターン中、グレーバランスが最適と思われるも
のを決める。
6
CAL ボタンを押す。
プリンターはオフライン状態になります。
7
F、f ボタンを押して「GRAY ADJUST [A]」を選
ぶ。
グレー調整バランスモードに入ります。
GRAY ADJUST」が表示され
るまで
F、 f ボタンを押す。
8
G、g ボタンを押して、手順 4 で選んだパターン番号
を表示させる。
例:手順 4 で No.18 のパターンがグレーバランス
最適と判断した場合
操作
1
CAL ボタンを押す。
プリンターはオフライン状態になります。
2
F、f ボタンを押して「GRAY PATCH PRINT」を
選ぶ。
GRAY PATCH PRINT」が表示さ
れるまで
3
EXEC ボタンを押す。
プリンターはオンライン状態に戻り、プリントが開
始されます。
2YNR-R153、2YNR-R154 の場合は、プリント A
とプリント B の 2 枚に分けてプリントされます。
2YNR-R155、2YNR-R156 の場合は、1 枚にプリ
ントされてでてきます。
F、 f ボタンを押す。
G、 g ボタンを押してグレーバ
ランスの No.18 を表示させる。
9
F、f ボタンを押して「GRAY ADJUST [B]」を選
ぶ。
グレー調整バランスモードに入ります。
GRAY ADJUST」が表示され
るまで
F、 f ボタンを押す。
メニュー操作を行う
25

操作
「
10
G、g ボタンを押して、手順 5 で選んだパターン番号
を表示させる。
例:手順 5 で No.39 のパターンがグレーバランス
最適と判断した場合
G、 g ボタンを押してグレーバ
ランスの No.39 を表示させる。
11
CAL ボタンを押す。
プリンターは、オンライン状態に戻ります。
プリントした枚数を表示する
電源を入れてからプリントした枚数の合計を表示させる
ことができます。電源投入後プリントしていない場合は、
「0」が表示されます。また、プリンターの使用を開始し
てから今までに何枚プリントしたかを表示させることが
できます。
2
1,3
1
MENU ボタンを押す。
プリンターはオフライン状態になります。
2
F、f ボタンを押して表示させたい項目を選ぶ。
電源投入後からのプリント枚数を表示させたい場合
「CURRENT PRINTS」を選びます。
CURRENT PRINTS」が表示される
まで
F、 f ボタンを押す。
プリントした枚数
メニュー操作を行う
26

プリンターを初めて使用してからプリントしたのべ
「
「
「
され
枚数を表示したい場合
「TOTAL PRINTS」を選びます。
TOTAL PRINTS」が表示される
まで
F、 f ボタンを押す。
プリント位置を調整する
2YNR-R153、または 2YNR-R155 をお使いの場合、手
順 3 のイラストのようにプリント位置を微調整すること
ができます。端部に余白が発生したときなど、必要に応
じて調整してください。
プリントした枚数
3
確認後再度 MENU ボタンを押します。
プリンターは、オンライン状態に戻ります。
プリンターのバージョンを表示する
プリンターのファームウェアのバージョンを表示させる
ことができます。
2
1,3
1,4
1
MENU ボタンを押す。
プリンターはオフライン状態になります。
2
F、f ボタンを押して「PRINT OFFSET」を選ぶ。
PRINT OFFSET」が表示
るまで F、 f ボタンを押す。
2
3
操作
現在のオフセット量
3
プリント画を見ながら、G、 g ボタンを押してプリ
ント画の位置を調整する。
1
MENU ボタンを押す。
プリンターはオフライン状態になります。
2
F、f ボタンを押して「VERSION」を選ぶ。
VERSION」が表示されるまで
F、 f ボタンを押す。
プリンターのファームウェアのバージョン
3
確認後再度 MENU ボタンを押す。
プリンターは、オンライン状態に戻ります。
L1:画像は工場出荷時より 0.6 mm 左に移動します。
L2:画像は工場出荷時より 1.2 mm 左に移動します。
R1:画像は工場出荷時より 0.6 mm 右に移動します。
R2:画像は工場出荷時より 1.2 mm 右に移動します。
L2、L1
L2、L1
2YNR-R153 の場合 2YNR-R155 の場合
R1、R2
R1、R2
メニュー操作を行う
27

操作
工場出荷時の位置に戻すには
0 を表示させます。
4
調整後再度 MENU ボタンを押す。
プリンターはオンライン状態に戻ります。
メニュー操作を行う
28

その他
通気孔
本機の性能を保持する
ために
本機の性能を保持するために、「安全のために」 (2 ペー
ジ)、「 」(4 ページ)、「 」(5
ページ)と併せてご覧ください。
使用上のご注意
長い間ご使用にならないときは
・ 本体の電源スイッチを切り、電源コードをコンセントか
ら抜いてください。
・ インクリボンを使用途中で保存する場合は、製品の入っ
ていた袋に戻して密封し、なるべく冷暗所にて保存して
ください。再度使用する場合には、水滴が付かないよう
に、部屋の温度になじませてから開封して、使用してく
ださい。
設置するときの注意
通気孔はふさがないでください。
ご注意
通気孔をふさぐと本機の性能が発揮されない場合があり
ます。
お手入れ
その他
輸送するときは
プリンターを輸送する際は、付属品、およびインクリボ
ンやプリント紙を取りはずしてください。付属品をつけ
たまま持ち運ぶと故障の原因になることがあります。
取りはずしたインクリボンとプリント紙は製品が入って
いた袋に入れて保存してください。
結露について
・ 湿度の低い場所から暖かい場所に移動したり、暖房で湯
気や湿気がたち込めた部屋に置くと、本機の内部に水滴
がつくことがあります。これを結露といいます。この状
態で本機を使用すると、正常に動かないばかりでなく、
故障の原因になります。結露の可能性のあるときは、電
源を切り、しばらくそのまま放置しておいてください。
・ 冬の寒い部屋から急に暖かい部屋にプリントパックを持
ち込むと、インクリボンやプリント紙に水滴がつくこと
があります。そのまま使用すると、プリンターの故障の
原因になる場合があります。また、一度水滴が付いたプ
リントパックを使用すると、プリント画像にシミなどが
現れることがありますので、急激な温度変化は避けてご
使用ください。
ご注意
お手入れの際は、必ず電源を切って電源プラグを抜いて
ください。
キャビネットが汚れたら
キャビネットの汚れがひどいときは、水または水で薄め
た中性洗剤溶液で湿らせた布をかたくしぼってから、汚
れをふきとってください。このあと乾いた布でからぶき
してください。
シンナーやベンジン、無水アルコール、化学ぞうきんな
どは、表面の仕上げをいためることがありますので、使
用しないでください。
プリント紙を交換する前に
プリント紙を 1 ロール使用して、使用済みのプリント紙お
よびインクリボンを取り出し、新しいものを取り付ける前
に、以下のクリーニングを行ってください。
クリーニングには無水アルコールを使用してください。
水または水で薄めた中性洗剤、シンナーやベンジン、化学
ぞうきんなどは使用しないでください。プリントの品質
が劣化する恐れがあります。
ご注意
プリント終了直後は、サーマルヘッドが高温になってい
ます。クリーニングの際、サーマルヘッドに触れるとやけ
どの原因となることがあるのでご注意ください。
本機の性能を保持するために
29

サーマルヘッドクリーニング:
柔らかい布でサーマルヘッドの発熱体とリボンガイド、
リボン用クリーニングローラーを軽く拭きます。
プラテンローラー、ピンチローラー、プリント紙用ゴミ
とりローラーのクリーニング:
ローラーを回しながら、無水アルコールを浸した柔らかい
布で軽く拭いてください。
発熱体
リボン用クリーニングローラー
リボンガイド
その他
無水アルコールを浸した柔らかい布で
サーマルヘッドのまわりを軽く拭く。
ご注意
プラテンローラー
プリント紙用ゴミとりローラー
ピンチローラー
無水アルコールが完全に乾いてからプリンターの動作を
開始してください。無水アルコールが完全に乾いていな
いと、プリント画に影響が出る場合があります。
ローラーを廻しながら無水アルコールを浸し
た柔らかい布で軽く拭く。
紙送りローラーのクリーニング:
紙送りローラーを廻しながら、無水アルコールを浸した
柔らかい布で軽く拭きます。
紙送りローラー
本機の性能を保持するために
30

ご注意
ゴムローラーの表面はやわらかく傷がつきやすいので、
お手入れの際は傷をつけたり、表面を強く押すなどしな
いように注意してください。プリント画の品質が劣化す
る恐れがあります。
こんな症状が出たら
液晶ディスプレイに HEAD IN COOLING というメッ
セージが頻繁に現れるようになったら:
本機の裏面と前面、および上面には通風孔があります。
上面のフィルターを掃除してください。フィルターが汚
れてくると、サーマルヘッドの温度の冷却時間が長くな
り、印画時間が変わってきます。
1
フロントドア用ロックレバーを手前に引いて、フロ
ンとドアを開ける。
4
完全に乾いたらフィルターを元に戻す。
5
フロントドアの中央部を押しながら閉める。
その他
2
フィルターをはずす
3
水洗いしてほこりを取り除く。
ご注意
フィルターの網をブラシなどでこすらないでくださ
い。
ご注意
ドアの片側を押して閉めるとドアロックが完全にできな
い場合があります。
本機の性能を保持するために
31

プリント画にひっかききずなどのプリント不良が生じた
左側
場合:
ラミネートカラープリントパック 2YNR-R153/R155 を
数ロール使用してプリントした後、2YNR-R154/R156
を使用してプリントするとプリント画に白いスジが生じ
たり、ひっかききずなどのプリント不良が起こる場合が
症状 サーマルヘッドの位置
プリント画に皺がよる。 T 側に 1 つ移動させる。
プリント画の濃い部分
が薄い部分へしみのよ
うに流れ出す。
T 側に 1 つ移動させる。
あります。そのような場合は、無水アルコールを浸した
柔らかい布でサーマルヘッドを軽く拭きます。
サーマルヘッドの位置を調整するには
ヘッド位置調整機構は、サーマルヘッドの左右にありま
サーマルヘッドの両端を無水アルコー
ルを浸した柔らかい布で軽く拭く。
す。調整する場合は、左右同じ位置に調整します。
1
マイナスドライバーを調整ねじの溝に入れる。
2
症状に応じて、調整ねじ上の突起を T 側、または S 側に
1 目盛り分カチッとロックするまで回す。
右側
その他
ご注意
プリント終了直後は、サーマルヘッドが高温になってい
ます。クリーニングの際、サーマルヘッドに触れるとやけ
どの原因となることがあるのでご注意ください。
高温または低温環境下でご使用になる場合
寒いところや、暑いところでご使用する際はご注意くだ
さい。本機の性能を保証する温度は 5 ℃~ 35 ℃です。
ご使用の環境下に適合するために、サーマルヘッドの位置
調整が必要になる場合があります。
35 ℃付近の高温の環境下で、非常に濃い画像を大量にプ
リントする場合
下記の症状が出た場合は、サーマルヘッドの位置を調整し
てください。
症状 サーマルヘッドの位置
プリント画に皺がよる。 T 側に 1 つ移動させる。
プリント画の濃い部分
に白っぽいしみが生じ
る。
S 側に 1 つ移動させる。
突起
3
手順 1、2 を繰り返して反対側のヘッド位置調整機構
についても同じ調整を行う。
突起
5 ℃付近の低温の環境下でご使用になる場合
下記の症状が出た場合は、サーマルヘッドの位置を調整し
てください。
本機の性能を保持するために
32

使えるインクリボンと
主な仕様
プリント紙について
インクリボンとプリント紙は、必ず同じ箱に入っている
ものをペアでお使いください。
ラミネートカラープリントパック 2YNR-R153
カラーのインクリボンとプリント紙が入っています。
プリント用インクリボン 2 巻
L サイズ用プリント紙 2 巻
ラミネートカラープリントパック 2YNR-R154
カラーのインクリボンとプリント紙が入っています。
プリント用インクリボン 2 巻
PC サイズ用プリント紙 2 巻
ラミネートカラープリントパック 2YNR-R155
カラーのインクリボンとプリント紙が入っています。
プリント用インクリボン 2 巻
2L サイズ用プリント紙 2 巻
ラミネートカラープリントパック 2YNR-R156
カラーのインクリボンとプリント紙が入っています。
プリント用インクリボン 2 巻
2PC サイズ(6 × 8 インチ)用プリント紙 2 巻
印画可能枚数について
印画可能枚数は、プリントパックにより異なります。ま
た、プリントパックにはインクリボンが 2 巻、プリント
紙が 2 巻入っています。プリントリボン 1 巻とプリント
紙 1 巻のセットで印画可能な枚数は以下のとおりです。
プリント
パック
印画枚数 610 画面 550 画面 335 画面 295 画面
印画サイ
ズ単位:
mm
ご注意
インクリボンやプリント紙を途中で交換した場合、上記
の印画可能枚数は、保証の限りではありません。
2YNRR153
89 × 127 102 × 152 127 × 178 152 × 204
2YNRR154
2YNRR155
2YNRR156
電源 AC 100 V 50/60 Hz
消費電流 最大 5A
動作温度 5 ℃~ 35 ℃
動作湿度 20% ~ 80%
最大外形寸法 約 280 × 356 × 451mm
(最大突起含まず)
約 280 × 356 × 463mm
(最大突起含む)
(幅/高さ/奥行き)
質量 約 20kg(本体のみ)
プリント方式 昇華熱転写型
感熱ヘッド 13.1 ドット /mm、2048 ドット
(334dpi)
プリント階調 8bit 階調処理
(イエロー、マゼンタ、シアン)
最大プリントサイズ
2YNR-R153:89 × 127mm(3.5 ×
5 inches)
2YNR-R154:102 × 152mm
(4 × 6 inches)
2YNR-R155:127 × 178mm
(5 × 7 inches)
2YNR-R156:152 × 204mm
(6 × 8 inches)
プリント画素数 2YNR-R153:1210 × 1728 ドット
2YNR-R154:1382 × 2048 ドット
2YNR-R155:1728 × 2380 ドット
2YNR-R156:2048 × 2724 ドット
(ただし、左右上下各およそ 1.5 mm は
プリントされません)
プリント時間 2YNR-R153:6.6 秒
2YNR-R154:6.6 秒
2YNR-R155:12 秒
2YNR-R156:14 秒
入力端子 AC IN(電源入力用)
インターフェース
Hi-Speed USB(USB2.0 準拠)
付属品 ペーパートレイ(1)
ペーパーホルダー(2)
電源コード(1)(別送)
USB ケーブル(1)
CD-ROM(取扱説明書、プリンタード
ライバー、ドライバーインストール
マニュアル、および ReadMe)(1)
AC プラグ変換アダプター 3 極 t2極変
換プラグ (1)(別送)
ソフトウェアライセンス契約書(1)
ご使用になる前に(1)
その他
使えるインクリボンとプリント紙について / 主な仕様
33

取扱説明書(1)
保証書(1)(別送)
メッセージ一覧
別売り品
使用インクリボン/プリント紙
ラミネートカラープリントパック
部品番号 品名 形式
H146035-00 ラミネートカラープリン
トパック
2YNR-R153
H146036-00 ラミネートカラープリン
トパック
2YNR-R154
H146037-00 ラミネートカラープリン
トパック
2YNR-R155
H146038-00 ラミネートカラープリン
その他
トパック
2YNR-R156
2YNR-R153
(L サイズ、610 枚
×2)
2YNR-R154
(PC サイズ、550
枚× 2)
2YNR-R155
(2L サイズ、335
枚× 2)
2YNR-R156
(2PC サイズ、
295 枚× 2)
本機の仕様および外観は、改良のため予告なく変更する
ことがありますが、ご了承ください。
液晶ディスプレイに表示されるメッセージ、およびエ
ラーメッセージは以下のとおりです。メッセージに従っ
て次に示す処置をしてください。
メッセージおよびエラーメッセージ
異常が起こると、本機前面の ALARM ランプが赤色に点
灯し、液晶ディスプレイにメッセージが表示されます。
メッセージ 意味 / 対処
CHECK PAPER プリント紙を使い切りました。
→使用可能なプリント紙とインクリボン
を取り付けてください。(11 ページ)
CHECK PAPER &
RETRY
CHECK RIBBON ・ インクリボンが切れている可能性があ
DOOR OPEN フロントドアが開いています。
MECHA TROUBLE プリンターの動作に問題が発生しました。
MEDIA MISMATCH プリント紙とインクリボンの組み合わせが
NO PAPER プリント紙がありません。
NO RIBBON インクリボンがありません。
・ プリント紙の給排紙が正しく行えませ
んでした。
→ プリント紙を正しく装着してくださ
い。(14 ページ)
・ プリント紙が折れている可能性があり
ます。
→ 折れていないか確認し、折れている場
合は、折れている部分を切り取ってか
ら装着し直してください。(14 ペー
ジ)
ります。
→ インクリボンを貼りあわせてくださ
い。(19 ページ)
・ インクリボンを使いきりました。
→ 使用可能なプリント紙とインクリボ
ンを取り付けてください。(11 ペー
ジ)
・ インクリボンが正しく装着されていな
い可能性があります。
→ 正しく装着してください。(11 ペー
ジ)
→フロントドアをロックされるまできち
んと閉めてください。(17 ページ)
→サービスセンターまでご相談ください。
正しくありません。
→同じプリントパックに入っていた組み
合わせにしてください。(33 ページ)
→プリント紙を入れてください。
(11 ページ)
→インクリボンを取り付けてください。
(11 ページ)
34
メッセージ一覧

メッセージ 意味 / 対処
PAPER END 所定枚数のプリント紙を使いきりました。
→ 使用可能なプリント紙とインクリボン
を取り付けてください。(11 ページ)
RIBBON END 所定枚数のインクリボンを使いきりまし
た。
→ 使用可能なプリント紙とインクリボン
を取り付けてください。(11 ページ)
RIBBON ERROR インクリボンに付いている IC シールの情
報に異常が発生しました。
→ 新しいインクリボンとプリント紙に交
換してください。(11 ページ)
その他のメッセージ
その他の場合は、メッセージが表示されるだけで、
ALARM ランプは点灯しません。メッセージに従って処
置をしてください。
メッセージ 意味 / 対処
HEAD IN COOLING サーマルヘッドの温度が上昇しました。
→ メッセージが消えるまでお待ちくださ
い。自動的にプリントを再開します。
PLEASE WAIT プリント中止やプリンターが異常終了した
ためにプリント紙を排出しています。
→ メッセージが消えるまでお待ちくださ
い。
故障とお考えになる前に
修理にお出しになる前にもう一度点検してください。そ
れでも正常に動作しないときは、サービスセンターにお
問い合わせください。
症状 原因/処置
プリント紙が装着でき
ない。
プリント紙とインクリ
ボンを取り付け、フロン
トドアを閉めたとき、
自動給紙されない。
インクリボンが装着で
きない。
プリント紙を装着した
のに NO PAPER が表
示される。
リボンを装着したのに
NO RIBBON が表示さ
れる。
PAPER END が表示さ
れているのにプリント
紙が余っている。
RIBBON END が表示
されているのにリボン
が余っている。
HEAD IN COOLING
が頻繁に表示される。
・ ペーパーホルダーの色とプリント紙に
貼ってあるテープの色を間違えて取り
付けていませんか。
→ ペーパーホルダーの色とプリント紙
のテープの色を合わせて取り付けて
ください。(12 ページ)
・ プリント紙を左右逆に入れていません
か。
→ 正しく入れ直してください。(14
ページ)
・ プリンターの電源がオフになっていま
せんか。
→ オンにします。
・ ペーパーホルダーの色とプリント紙に
貼ってあるテープの色を間違えて取り
付け、なおかつそのプリント紙をペー
パーカートリッジに左右逆に入れた。
→ ペーパーホルダーをプリント紙に正
しく取り付け直し、そのプリント紙
をペーパーカートリッジに正しく入
れ直してください。(12 ページ、14
ページ)
インクリボンのスプールを上下間違えて装
着していませんか。
→ インクリボンのスプールとプリンター
本体のスプール受けの色を合わせて正
しく装着してください。(17 ページ)
プリント紙が正しく装着されていますか。
→ 正しく装着してください。(11 ページ)
リボンが正しく装着されていません。
→ 正しく装着してください。(11 ページ)
トラブルではありません。プリント紙は余
分に巻いてあります。
→ 余ったプリント紙は取り出し、新しい
インクリボンとプリント紙を装着して
ください。(11 ページ)
トラブルではありません。インクリボンは
余分に巻いてあります。
余ったインクリボンは取り出し、新しいイ
ンクリボンとプリント紙を装着してくださ
い。(11 ページ)
フィルターにごみがたまっている可能性が
あります。
→ フィルターのクリーニングをしてくだ
さい。(31 ページ)
その他
故障とお考えになる前に
35

症状 原因/処置
プリント面に白ひっか
ききずが入る。
プリント端部に余白が
入る。
サーマルヘッドにゴミが付着している場合
があります。
→ 無水アルコールを浸した柔らかい布で
クリーニングしてください。(32 ペー
ジ)
画像がずれている場合があります。
→ プリント位置を調整してください。(27
ページ)
保証書とアフターサービ
ス
保証書
この製品には保証書が添付されていますので、お買い上
げの際お受け取りください。所定事項の記入および記載
内容をお確かめのうえ、大切に保存してください。
アフターサービス
調子が悪いときはまずチェックを
この説明書をもう一度ご覧になってお調べください。
それでも調子の悪いときはサービスへ
お買い上げ店、またはお近くのサービスセンターにご相
その他
談ください。
保証期間中の修理は
保証書の記載内容に基づいて修理させていただきます。
詳しくは保証書をご覧ください。
サービスセンターにご相談なさるときは、次のことをお
知らせください
・ 型名:IP-64
・ 故障の内容:できるだけ詳しく
購入年月日
保証書とアフターサービス
36

索引
そ
操作 ............................................. 11
あ
アフターサービス......................... 36
安全のために.................................. 2
い
インクリボンとプリント紙........... 33
お
主な使用例 ..................................... 7
か
各部の名称と働き
フロントパネル......................... 7
裏面パネル................................ 7
内部操作パネル......................... 8
く
クリーニング
紙送りローラー....................... 30
キャビネット .......................... 29
サーマルヘッド....................... 30
プラテンローラー、ピンチロー
ラー、プリント紙用ゴミとり
ローラー ............................... 30
グレーバランスを好みの色味に
調節............................................ 25
と
特長 ............................................... 7
ひ
表示
プリンターのバージョン ........ 27
プリントした枚数................... 26
ふ
付属品
確認する................................... 9
プリント紙・インクリボン
切れてしまったときは............ 19
取り付ける ............................. 11
取り外す................................. 20
プリントパック ...................... 33
プリントする ............................... 22
プリントパック
印画可能枚数.......................... 33
2YNR-R153 ......................... 33
2YNR-R154 ......................... 33
2YNR-R155 ......................... 33
2YNR-R156 ......................... 33
ほ
保証書.......................................... 36
索引
こ
故障とお考えになる前に .............. 35
コンピューターと接続.................... 9
し
準備................................................ 9
仕様.............................................. 33
使用上のご注意
警告 .......................................... 4
注意 .......................................... 5
せ
性能の保持
キャビネットが汚れたら......... 29
結露 ........................................ 29
サーマルヘッドの
クリーニング........................ 30
使用上の注意 .......................... 29
設置するときの注意................ 29
プラテンローラーの
クリーニング........................ 30
接続
ご注意....................................... 9
USB ケーブルを固定する ....... 10
USB 端子に接続....................... 9
め
メッセージ一覧............................ 34
索引
37

Owner's Record
The model and serial numbers are located at the rear.
Record these number in the space provided below.
Refer to these numbers whenever you contact your place
of purchase.
Model No. ____________________
Serial No. ____________________
WARNING
To reduce the risk of fire or electric shock, do
not expose this apparatus to rain or moisture.
To avoid electrical shock, do not open the
cabinet. Refer servicing to qualified personnel
only.
THIS APPARATUS MUST BE EARTHED.
To disconnect the main power, unplug the AC
IN connector.
Warning on power connection
Use a proper power cord for your local power supply.
1. Use the approved Power Cord (3-core mains lead) /
Appliance Connector / Plug with earthing-contacts
that conforms to the safety regulations of each
country if applicable.
2. Use the Power Cord (3-core mains lead) / Appliance
Connector /Plug conforming to the proper ratings
(Voltage, Ampere).
If you have questions on the use of the above Power
Cord/Appliance Connector/Plug, please consult a
qualified service personnel.
For the customers in Europe
The manufacturer of this product is Noritsu Koki Co.,
Ltd., 579-1 Umehara Wakayama-shi Wakayama-ken,
Japan.
The Authorized Representative for EMC and product
safety is Noritsu (Deutchland) GmbH, Siemensring 87,
D-47877, Willich, Germany. For any service or
guarantee matters please refer to the addresses given in
separate service or guarantee documents.
For the customers in the U.S.A.
This equipment has been tested and found to comply
with the limits for a Class A digital device, pursuant to
Part 15 of the FCC Rules. These limits are designed to
provide reasonable protection against harmful
interference when the equipment is operated in a
commercial environment. This equipment generates,
uses, and can radiate radio frequency energy and, if not
installed and used in accordance with the instruction
manual, may cause harmful interference to radio
communications. Operation of this equipment in a
residential area is likely to cause harmful interference in
which case the user will be required to correct the
interference at his own expense.
You are cautioned that any changes or modifications not
expressly approved in this manual could void your
authority to operate this equipment.
All interface cables used to connect peripherals must be
shielded in order to comply with the limits for a digital
device pursuant to Subpart B of Part 15 of FCC Rules.
38

Table of Contents
Introduction
Features ................................................................ 40
Basic Application Example .............................. 40
Location and Function of Parts and
Controls ................................................................ 40
Preparation
Supplied Accessories ........................................... 42
Connections .......................................................... 42
Installing the Printer Driver .............................. 42
USB Port Connection .......................................42
Operation
Loading the Paper Roll and Ink Ribbon ........... 44
Attaching the Paper Holders to the Paper
Roll ................................................................. 45
Loading the Paper Roll and Ink Ribbon ........... 47
Attaching the Paper Tray ..................................51
If the Ink Ribbon Breaks during Use ............... 52
Removing the Ink Ribbon and Paper ...............53
Printing from the Computer ............................... 55
Menu Operations .................................................56
Preparation for Menu Operation ...................... 56
Adjusting the Gray Balance .............................57
Displaying the Quantity of Pages Printed ........ 58
Displaying the Firmware Version of the
Printer ............................................................. 59
Adjusting the Position of the Printout Image ... 59
GB
Miscellaneous
Precautions ........................................................... 61
Safety ................................................................ 61
Installation ........................................................ 61
On Transporting the Printer ..............................61
Cleaning ........................................................... 62
Ink Ribbon and Paper .........................................65
Specifications ........................................................ 66
List of Messages ................................................... 67
Troubleshooting ................................................... 68
Index ..................................................................... 69
39

Introduction
Location and Function
of Parts and Controls
Introduction
Features
The IP-64 Digital Photo Printer is a dye sublimation
thermal transfer printer providing high quality, high
resolution (334 dpi), and high speed printing of
computer image data on four sizes of paper in full color
(256 gradations process and 16.7 million colors).
Basic Application Example
Computer: provides
image data for printing
and printer control
signals.
For more details, see the reference pages numbers
enclosed in parentheses.
Front panel
IP-64 Digital Photo Printer
Rear panel
A ALARM indicator (67)
Lights in red when the system is initialized, or when
an error occurs.
40
Features / Location and Function of Parts and Controls

B LCD (liquid crystal display) (55, 58, 67)
Displays the number of pages printed, or the
amount of ink ribbon remaining. Messages are
displayed when an error or warning condition
occurs.
C Lock lever for the front door
Used to open the front door when loading or
replacing the ink ribbon and paper, or cleaning.
When the front door opens
G Support
Pull out the support when using the 2YNR-R155
and 2YNR-R156 Printing Pack.
H Front panel
Buttons to be used for menu operation are located
under this front panel.
Key panel section
A EXEC Button (57)
Press this button to print the gray scale adjustment
pattern.
Introduction
A Paper cartridge
The paper roll is placed here.
B Ribbon base
The ink ribbon is attached here.
C Lock lever for the ribbon base
Pull the lever so that you can pull up the ribbon
base.
D Filter
D Ventilation holes
A filter for the cooling fan to prevent the thermal
head from overheating is located.
E Paper Output Slot
Printed pages are output from the printer here.
F Paper tray (51)
The printouts are ejected onto this tray. Adjust the
length of the paper tray according to the printing
pack to be used.
A margin of about 20mm drops into this tray.
B MENU Button (58)
Press this button to carry out menu operations.
Pressing the MENU button changes the printer to
the off-line mode.
C Cursor Buttons (58)
Press these buttons to select the item to be
displayed on the LCD.
D CAL (calibration) button (57)
Press this button to adjust the gray balance.
E PRINT STOP button (56)
Pressing the PRINT STOP button for more than one
second during printing results in cancelling the
number of printings set and clearing the images
stored in the memory. The printer stops printing
when the page currently printing is completed and
ejected.
I - AC IN (Power Source) Connector (42)
Connect the supplied power cord here.
J !POWER switch (55)
Press this switch to turn the printer on or off.
K USB connector (42)
Connects to a computer equipped with the USB
interface (which conforms to USB 2.0), using a
USB cable.
Location and Function of Parts and Controls
41

Preparation
Preparation
Supplied Accessories
Make certain you have received the following
accessories:
Paper Tray
Paper holders
AC power cord (1) (sent separately)
a)
(1)
b)
(2)
Connections
After connecting a USB connecting cable (supplied) to
the printer and the computer, connect the power cord.
For details about the printer connection, refer to the
manuals for the computer or other peripheral devices.
Installing the Printer Driver
Install the printer driver provided with the printer, before
connecting the printer to the computer. For detailed
instructions on how to install the printer driver, refer to
the Readme.txt file and the install manual contained on
the CD-ROM disc supplied.
USB Port Connection
Notes
• Follow the connection procedures described in the
computer manual.
• Make sure that the interface cable is connected
securely at both ends.
• The printer drive software provided with the printer is
not suitable for using the printer connected to a
network.
• Operation of the printer is not guaranteed for
connection to a USB hub.
USB cable (1)
CD-ROM (Operating Instructions, printer driver,
install manual and the Readme text file) (1)
Operating Instructions (1)
Software License Agreement (1)
Before Using this Printer (1)
a) Before attaching the paper tray, be sure to remove the
corrugated paper from the inside of the paper tray.
b) The paper holders are stored in the printer. Be sure to
remove the two paper holders from the inside of the
printer before turning the power on.
For details on how to remove them, see step 1 of
“Attaching the Paper Holders to the Paper Roll” on
page 45.
Notes
• When taking the printer out of the carton box, be
careful not to hurt your back.
• The packaging materials are needed when
transporting the printer, so we suggest you keep them.
• When transporting the printer, be sure to remove ink
ribbon and paper roll from the printer.
IP-64
to (USB) connector
USB connecting cable
Computer
to - AC IN
connector
AC power
cord
(supplied)
to wall outlet
42
Supplied Accessories / Connections

To secure a USB cable
After you connect a USB cable to the printer, it is
recommended that you secure the USB cable as
illustrated, to prevent it from being accidentally
disonnected.
Pass the USB cable under the upper cable stopper as
illustrated below.
Preparation
Connections
43

Operation
Loading the Paper Roll
and Ink Ribbon
This section describes how to load the paper roll and ink
ribbon in the preparation to start printing, after
connecting the printer as described on page 42.
hurt it, or give it a shock. If you do, you may not be
able to use the ink ribbon any more.
White spool
Black spool
Operation
Notes
• Each printing pack contains two sets of the ink ribbon
and paper roll combination. Use the ink ribbon and the
paper roll in the carton as a set. Do not mix with other
varieties of ribbon or paper roll. (See “Ink Ribbon and
Paper” on page 65.)
• One set of the ink ribbon and paper roll allows you to
print the following number of sheets.
Print
pack
Printing
capacity
Print
size
2YNRR153
610 (sheets) 550 (sheets) 335 (sheets) 295
×127 mm 102×152
89
×5
3.5
inches
2YNRR154
mm
4×6 inches 5×7 inches 6×8
2YNRR155
127×178 mm152×204
2YNRR156
(sheets)
mm
inches
For detailed information on the printing pack, see “Ink
Ribbon and Paper” on page 65 and “Self-Laminating
Color Printing Pack” on page 66 in the
“Specifications.”
• Do not replace the printing pack if it has only been
partially used. The number of printouts that can be
printed may not be guaranteed if you replace the ink
ribbon and paper before they have run out.
• Do not detach the black and white spools of the ink
ribbon until you start loading the ink ribbon.
• A built-in IC chip is located around one side of the
black spool. Be careful not to remove the IC seal,
IC seal into which the IC
chip is built
• Be sure not to open the wrapping with a knife such as
a cutter. This may damage a paper roll and ink ribbon
and you may not be able to use them for printing.
• Since, like other color dyes, the dyes used in this ink
ribbon may discolor over time, the product will neither
be replaced nor be warranted against any color
change.
Cautions on handing the paper roll
• Place the paper roll vertically. If you place the paper
roll horizontally, the paper may roll around and fall.
This may cause an injury.
• Hold the paper roll with both hands so that you do not
drop it, because it is heavy. Dropping may result in an
injury.
44
Loading the Paper Roll and Ink Ribbon
Hold the paper roll with both hands.

Attaching the Paper Holders to the
Paper Roll
A pink paper holder and a blue paper holder are supplied
with the printer. Attach them to the new paper roll, and
then load the paper roll.
When you use the printer for the first time, start the
operation from step 1 to remove paper holders which
were placed in the printer at the factory.
If you have already removed the paper holders, start the
operation from step 4.
1
Pull the lock lever for the front door toward you to
open the front door.
3
Pull the paper cartridge of the printer toward you.
Take out the packages in which the paper holders
are stored inside the printer.
Then, close the front door in the reverse operation.
4
Adjust the length of the blue paper holder.
There are two kinds of paper. One is paper with
127-mm (5-inch) width and the other is paper with
152-mm (6-inch) width.
The blue paper holder has been pre-adjusted for
paper with a 152-mm (6-inch) width.
Operation
2
Pull the lock lever for the ribbon base located on the
front of the ribbon base and pull up the ribbon base.
Paper with 127-mm (5-inch) width: 2YNRR153 and 2YNR-R155 Printing Pack
Shorten the length of the blue paper holder.
Loading the Paper Roll and Ink Ribbon
45

To shorten the length of the blue paper
holder for the left side of the roll
Pinch the two
buttons inward.
Paper with 152-mm (6-inch) width: 2YNRR154 and 2YNR-R156 Printing Pack
Extend the length of the blue paper holder.
Confirm that the arrow
on the shaft of the blue
paper holder is aligned
with the arrow for
R154/R156 on the
label.
Operation
v
Turn this round part fully
counterclockwise.
v
Push this round part
upward.
And then, push
this round part
downward.
Extend the length of the blue paper holder
following the reverse of the operation used for
shortening its length.
5
Insert the blue paper holder inside the paper roll as
illustrated.
Insert this blue paper holder
into the side to which the
blue tape is attached.
To remove the blue tape from
the cut on the tape, tear and
pull the blue tape after
attaching the paper holders.
A part of the tape remains
inside the case of the paper
roll.
6
Place the paper upside down and attach the pink
paper holder as illustrated.
46
Loading the Paper Roll and Ink Ribbon
Confirm that the arrow
on the shaft of the blue
paper holder is aligned
with the arrow for
R153/R155 on the
label.

Note
Hold the paper roll with both hands, because it is
heavy.
Insert this pink paper holder
into the side to which the
pink tape is attached.
To remove the pink tape
from the cut on the tape,
tear and pull the pink tape
after attaching the paper
holders. A part of the tape
remains inside the case of
the paper roll.
Push the knob of the
pink paper holder down
and turn it clockwise
until it stops. After the
pink paper holder is
securely connected to
the blue paper holder
already attached, this
knob will flow up and
down.
Now the paper roll is ready to be loaded into the
paper cartridge of the printer.
To confirm that the blue paper holder and the
pink paper holder are securely attached
Paper with 152-mm (6-inch) width: 2YNR-R154 and
2YNR-R156 Printing Pack
The concave portion on the
circumference of the blue
paper holder should be
aligned with the one on the
pink paper holder.
Paper with 127-mm (5-inch) width: 2YNR-R153 and
2YNR-R155 Printing Pack
The concave portion on the
circumference of the blue
paper holder should be
aligned with the one on the
pink paper holder.
Loading the Paper Roll and Ink
Ribbon
When you use the printer for the first time, load the
paper roll and ink ribbon.
Before loading the paper roll in the printer, be sure to
attach the blue and pink paper holders to the left and
right side of the paper roll.
For detailed information on how to attach the paper
holders, see “Attaching the Paper Holders to the Paper
Roll” on page 45.
For detailed information on how to remove the paper
and ink ribbon, see “Removing the Ink Ribbon and
Paper” on page 53.
Operation
Before loading the paper roll and ink ribbon
Confirm that the printer is powered on. If not, turn the
printer power on.
Otherwise, the automatic paper feeding may not be done
correctly after loading of the paper roll and ink ribbon is
completed.
Also, after you have used up one paper roll, clean the
thermal head and rollers before loading a new paper roll
and ink ribbon.
For detailed information on cleaning, see “Before you
replace a paper roll with a new one” on page 62.
Note
Do not use the 2YNR-R154 or 2YNR-R156 Printing
Pack with the 152-mm (6-inch) paper width after using
the 2YNR-R153 or 2YNR-R155 Printing Pack with the
Loading the Paper Roll and Ink Ribbon
47

127-mm (5-inch) paper width. If you do so, picture
quality may deteriorate markedly.
2
Pull the lock lever for the ribbon base located on the
front of the ribbon base and pull up the ribbon base.
Operation
To load the paper roll and ink ribbon
Cautions
• Be careful that your fingers or clothing are not pinched
or caught by the front door or the protuberance on the
front door.
• When ejected printouts are left on the paper tray,
remove them before opening the front door so that
they are not scratched or folded.
• Since the thermal head is still very hot just after
printing is finished, be careful not to touch the thermal
head when loading the paper and ink ribbon and be
careful not to damage the thermal head.
C
3
Pull the paper cartridge of the printer toward you.
Thermal head
1
Pull the lock lever for the front door toward you to
open the front cover, and then pull the top cover.
Caution
Since the thermal head is still very hot just after
printing is finished, be careful not to touch the
thermal head when pulling the paper cartridge.
Touching the thermal head may burn you. Also, be
careful not to damage the thermal head.
48
Loading the Paper Roll and Ink Ribbon

4
Place the paper roll in the paper cartridge.
6
While holding both ends of the paper roll, insert the
paper roll into the paper cartridge. Feed in the paper
with your hand until the marking hole becomes
blue.
Note
Turn the paper roll while pushing it with both hands
so that the paper roll does not loosen.
Marking hole
Thermal head
Cautions
• Since the thermal head is still very hot just after
printing is finished, be careful not to touch the
thermal head when placing the paper roll in the
paper holder. Touching the thermal head may
burn you.
• Do not place the paper roll on any part of the
printer other than the paper cartridge. Doing so
may damage the printer. Especially do not place
it on the thermal head.
Turn the paper roll until the marking hole
becomes blue, while pushing it with both
hands so that the paper roll does not
loosen.
Notes
• Be sure to remove all of the pieces of tape
attached to the paper roll. A seal remaining inside
the printer may cause problems.
• Do not touch the printing surface of the paper roll
in the paper holder after loading it. Sweat or dirt
from your hands, or folded paper may have an
influence on the quality of the printout.
7
Push the paper cartridge back in as it was.
Operation
5
Remove the tape attached at the center of the paper
roll.
Loading the Paper Roll and Ink Ribbon
49

Operation
8
Pull the ribbon base down.
9
Hold both spools and push the black spool into the
black spool holders.
Note
When attaching the white spool, check that the ink
ribbon does not loosen or is not wrinkled. If the ink
ribbon is wrinkled, smooth it.
Insert the left side of the white spool first,
then the right side and push it until it clicks.
Insert the left side of the black spool first,
then the right side and push it until it clicks.
Caution
Since the thermal head is still very hot just after
printing is finished, be careful not to touch the
thermal head when loading the ink ribbon.
10
Detach the white spool from the black spool. Pull it
upward while winding it off so that the ribbon will
not loosen. And then push it into the white spool
holders.
11
Close the front door by pushing it in the center part
of the front door.
Note
• Close the front door after confirming that the
ribbon base is pulled down.
• If you close the front door by pushing it on one
side, the front door may not be completely
locked.
The printer feeds a certain amount of paper and is
then ready to print.
50
Loading the Paper Roll and Ink Ribbon
Notes on storage
• Avoid placing the printer where it will be subject to:
high temperatures,

high humidity or dust,
direct sunlight.
• After opening the bag, use the ribbon and the paper as
soon as possible.
• When storing after partial use, put the ribbon and the
paper back in their respective bags.
Attaching the Paper Tray
Attach the supplied paper tray as illustrated.
Scrap stoppers
About 30 sheets of printouts can be left on this paper
tray. However, the number of printouts which can be
accumulated on the paper tray changes according to the
environment condition where the printer is used or the
printed image. Remove the printed sheets accumulated
on the paper tray as soon as possible.
Note
When the 2YNR-R155 or 2YNR-R156 printing pack is
used, paper jamming may occur if you use the paper tray
as illustrated above.
For details, see the “When using the 2YNR-R155
Printing Pack” and “When using the 2YNR-R156
Printing Pack” following.
When using the 2YNR-R155 Printing Pack
Operation
Note
When printing, a margin is left between printouts. The
excess portions of margins are cut and dropped into the
scrap receptacle part of the paper tray. Scrap stoppers are
attached to the tray so that these excess margins are
dropped into the proper part of the paper tray. Be careful
not to bend these scrap stoppers. Doing so may result in
the paper scraps missing the receptacle and being
ejected onto the tray together with the printouts. As a
result, the printouts may be damaged.
You have to adjust the length of the paper tray according
to the printing pack to be used.
When using the 2YNR-R153 or 2YNRR154 Printing Pack
Pull the support out, and raise the
stopper.
About 20 sheets of printouts can be left on this paper
tray. However, the number of printouts which can be
accumulated on the paper tray changes according to the
environment condition where the printer is used or the
printed image. Remove the printed sheets accumulated
on the paper tray as soon as possible.
When using the 2YNR-R156 Printing Pack
Pull out the support and lay the
stopper down.
Loading the Paper Roll and Ink Ribbon
51

Operation
About 20 sheets of printouts can be left on this paper
tray. However, the number of printouts which can be
accumulated on the paper tray changes according to the
environment condition where the printer is used or the
printed image. Remove the printed sheets accumulated
on the paper tray as soon as possible.
To remove the paper tray
Hold both sides of the paper tray with both hands, and
remove the paper tray toward you while pushing it
downward.
If the Ink Ribbon Breaks during Use
The remaining ribbon can be used after repairing it with
adhesive tape.
1
Pull out the upper ribbon of the white spool, attach
one edge of a strip of adhesive tape over the entire
end of the ribbon, then attach the other edge of the
adhesive tape on the end of the lower ribbon of the
black spool.
Attach one edge of adhesive
Wind the spool
to feed the
ribbon out.
tape over the entire end of the
ribbon and attach the other
edge of the adhesive tape on
the end of the lower ribbon.
2
Remove the lower black spool and remove any
slack from the ribbon. Then, attach the ink ribbon
again.
Remove the spool
and attach it again
after removing the
slack from the
ribbon.
3
Lift the ribbon base up and pull the paper cartridge
of the printer toward you.
4
Turn the paper holder toward the inside of the
printer until the marking hole turns red.
5
While holding both ends of the paper roll, turn the
paper roll toward you until the marking hole turns
blue.
6
Push the paper cartridge back in as it was, and lower
the ribbon base. Then, close the front door by
pushing it in the center.
The printer feeds a certain amount of paper and is
ready to print.
Depending on the position of the break in the tape,
the ribbon for one sheet of printed paper may be
lost.
Note
If you turn the paper roll too far, too much paper
will be fed. This may cause the paper jamming.
Stop turning the paper roll right after the marking
hole turns blue.
52
Loading the Paper Roll and Ink Ribbon

Removing the Ink Ribbon and
Paper
When the error message “PAPER END” or “RIBBON
END” appears on the LCD, the paper or ink ribbon
corresponding to the designated number of sheets has
been used up.
Proceed as follows to remove the ink ribbon and paper
roll, and then load a new ink ribbon and paper roll.
1
Remove the scraps of paper ejected and
accumulated in the paper tray.
Note
If scraps of paper have accumulated in the paper
tray, the front door may not open completely.
Discard the scraps of paper ejected each time you
replace the ink ribbon and paper roll with new ones.
2
Open the front door.
4
Push the white spool to the left and pull it toward
you to remove the white spool of the ink ribbon.
Engage both white and black spools of the ink
ribbon.
5
Remove the paper.
Operation
Caution
Since the thermal head is still very hot just after
printing is finished, be careful not to touch the
thermal head when removing the ink ribbon and the
paper roll from the paper cartridge.
3
Push the right black spool to the left and pull it
toward you to remove the black spool of the ink
ribbon.
1 Pull the ribbon base up.
2 Pull the paper holder of the printer toward you.
3 Turn both sides of the paper toward the inside
to wind the remaining paper.
Do not re-use the removed ink ribbon.
Loading the Paper Roll and Ink Ribbon
53

Operation
4 Remove the paper roll.
4
Turn both ends of the paper toward the inside to
wind the remaining paper and attach a piece of tape
to prevent the paper from loosening.
5
Load the replacement paper roll.
6
Pull the ribbon base down. Remove the ink ribbon
and attach the ink ribbon that is paired with the
paper roll loaded in step 5.
7
Close the front door.
A certain amount of paper is automatically ejected
so that the paper where sweat or dirt from your
hands may have accumulated will be cut off.
Be sure to retain the removed paper roll and ink
ribbon as a pair.
5 Remove the pink paper holder from the paper.
6 Remove the blue paper holder.
Reuse the paper holders removed. Do not
discard them.
If you have to replace a partially used
printing pack
Do not replace the printing pack if it has only been
partially used. Return the paper roll and ink ribbon set to
their original packaging after they have been fully
consumed.
If you have to replace a partially used ink ribbon and
paper roll, proceed as follows to replace the partially
used ink ribbon and paper with new ones.
Note
If you change ink ribbon and paper roll which have been
partially used, paper equal to several sheets are wasted
and you may not be able to print the number of sheets
specified.
For detailed information on the number of sheets that
can be printed, see “Printing capacity” on page 65.
Note
If you change a partially used ink ribbon and paper, the
remaining amount of ink ribbon displayed may not be
correct.
1
Open the front door.
2
Pull the ribbon base up.
3
Pull the paper cartridge toward you, and remove the
paper.
54
Loading the Paper Roll and Ink Ribbon

Printing from the
Numb
d
Identification of the printing pack currently
being used on the LCD
Computer
Before starting to print
• Confirm that the printer and computer are connected
(page 42).
• Confirm that the paper roll and the ink ribbon are
correctly installed (page 47).
• Confirm that the paper tray is adjusted to suite the
paper to be used (page 46).
• Confirm that compatible ink ribbon and printing paper
are installed (page 65).
Caution
Do not look into the paper output slot during printing.
The sharp edge of the printout may poke your eye or
face. This may cause loss of sight. Also, do not insert a
foreign object in the paper output slot. The cutter may be
damaged or broken and a piece of the cutter can cut you.
Printing
LCD
1
Display on the LCD Printing pack
R153 2YNR-R153
R154 2YNR-R154
R155 2YNR-R155
R156 2YNR-R156
Notes
• Don’t turn the printer on again within 5 seconds
after turning it off.
• Do not turn the computer off and on again while
it is accessing a hard or another disk.
2
Send the image data from the computer to be
printed.
The printer starts printing.
For details, refer to the instructions for the printer
driver included on the CD-ROM disc supplied.
1 While the printer is receiving the image data,
the following message should appear.
Operation
1
Turn on the printer and computer.
After a few seconds, the following message should
appear on the LCD. While READY is being
displayed on the LCD, the printer is ready to print.
Printing pack currently used
Displays the remaining amount of
paper or ink ribbon, whichever is less.
2 The printer starts printing the transferred image
data as soon as the print command is sent from
the computer.
The following message should appear.
er of pages to be printe
The color indication changes as the color printing
procedes:
StarttYELLOWtMAGENTAtCYANtLAMIt
Finish.
3 After printing is finished, the printed paper is
ejected from the output slot.
The printing time depends on the image size,
ink ribbon and the paper.
Printing from the Computer
55

Operation
Once printing has been completed, READY
appears on the LCD again.
Note
Do not leave more than 30 sheets of printouts on the
paper tray when using the 2YNR-R153 or 2YNR-R154
Printing Pack. Do not leave more than 20 sheets of
printouts on the paper tray when using the 2YNR-R155
or 2YNR-R156 Printing Pack. However, the number of
printouts which can be accumulated on the paper tray
changes according to the environment condition where
the printer is used or the printed image. Remove the
printed sheets accumulated on the paper tray as soon as
possible.
Adjust the length of the paper tray according to the
Printing Pack to be used.
For details, see “Attaching the Paper Tray” on page 51.
To stop printing midway
Press and hold the PRINT STOP button for more than
one second. The page currently being printed is
completed and ejected. After the printout is ejected, the
information display returns to READY. The image data
stored in the memory and the number of printings set in
the queue are cancelled.
Menu Operations
You can adjust or confirm the following items using the
menu.
• Adjustment of the gray balance
• Display of the total quantity of pages printed
• Display of the firmware version of the printer
Preparation for Menu Operation
The MENU button allows you to carry out menu
operations. Buttons to be used for menu operation,
including the MENU button, are located under the front
panel. Usually these buttons are hidden under the front
panel. To use them, you have to remove the front panel.
1
Remove the lower part of the front panel and pull it
upward to remove the front panel completely.
Memory capacity
Image data transferred from the computer is stored in the
memory of the printer. Data for one more image can be
stored in addition to that of the one being printed.
If the printer does not print
When an error message is displayed on the LCD, you
cannot operate the printer. Take remedies according to
the advice given in “List of Messages” on page 67.
Notes on storing your printouts
• Avoid exposure to direct sunlight, or conditions of
high temperature and high humidity, which could
cause the colors to fade.
• Avoid applying tape to a printout, and avoid contact
with plastic objects such as erasers and desk mats.
• Do not allow absolute alcohol or other volatile organic
solvents to come into contact with the printouts.
The key panel section appears.
2
Carry out the operation using these buttons
including the MENU button.
56
Menu Operations

To close the front panel
Catch the two protuberance located on the upper part of
the front panel in the groove of the printer and fix the
lower parts of the front panel with the magnets.
Note
The gray balance of images cannot be adjusted during
printing.
2,7,8,9,10
Note
Be sure to attach the front panel correctly. If not, dust
may accumulate on the printout. This may have an
influence on the picture quality of the printouts.
Adjusting the Gray Balance
Use the ink ribbon with the paper that is supplied as a set
in the same package. The gray balance of the printer is
set to No. 0, which is designated as the achromatic color,
as the factory setting. If you want to change the gray
balance, proceed as follows. This setting is retained even
when the printer is turned off.
There may be differences among packages where the ink
ribbon and paper rolls are contained as a set due to
handling during transportation and storage.
3
1
Press the CAL button.
The printer is switched to off-line.
2
Press the F and f buttons to select GRAY PATCH
PRINT.
Press F and f to display GRAY PATCH PRINT.
3
Press the EXEC button.
The printer returns to the on-line mode and starts
printing.
When using the 2YNR-R153 or 2YNR-R154, gray
adjustment patterns Group A and Group B are
printed on two sheets separately.
When using the 2YNR-R155 or 2YNR-R156, gray
patterns Group A and Group B are printed on one
sheet.
1,6,11
Operation
4
Look at the printout of Group A to determine the
best gray balance from this group.
5
Next, look at the printout of Group B to determine
the best gray balance from this group, too.
6
Press the CAL button.
The printer is switched to off-line.
Menu Operations
57

Operation
7
Press the F and f buttons to select GRAY ADJUST
[A].
The printer enters the gray balance adjustment
mode.
Press F and f to display GRAY
ADJUST [A].
8
Press the G and g buttons to display the pattern
number determined in step 4.
For example, select 18 if you determined that
pattern No. 18 in the sample provides the best color
tone of the gray balance.
Press G and g to display 18.
Displaying the Quantity of Pages
Printed
The total number of printings done since turning on the
printer can be displayed. If no printings have been done
since the printer was turned on, “0” is displayed on the
information display. Also, the total number of printings
made so far since you started to use the printer can be
displayed.
2
1,3
9
Press the F and f buttons to select GRAY ADJUST
[B].
The printer enters the adjustment mode of the color
tone of the gray balance.
Press F and f to display GRAY
ADJUST [B].
10
Press the G and g buttons to display the pattern
number determined in step 5.
For example, select 39 if you determined that
pattern No. 39 in the sample provides the best gray
balance.
Press G and g to display 39.
1
Press the MENU button.
The printer is switched to off-line.
2
Press the F and f buttons to select the item you
want to be displayed.
To display the total number of printings
since turning on the printer:
Select “CURRENT PRINTS.”
Press F and f to display CURRENT PRINTS.
Total number of printings since turning on the printer
11
58
Press the CAL button.
The printer returns to the on-line mode.
Menu Operations

To display the total number of printings
made so far since you started to use the
printer:
Select “TOTAL PRINTS.”
Press F and f to display TOTAL PRINTS.
Total number of printings since turning on the printer
3
Press the MENU button after confirming.
The printer returns to the on-line mode.
Adjusting the Position of the
Printout Image
You can adjust the position of the printout image as
shown in the illustration in step 3, below, for the 2YNRR153 and the 2YNR-R155. Adjust the image position,
as required, or when the blank portion appears on the
edge of the printout.
3
Press the MENU button after confirming.
The printer returns to the on-line mode.
Displaying the Firmware Version of
the Printer
The version of the firmware of the printer can be
displayed.
2
1,3
1,423
1
Press the MENU button.
The printer is switched to the off-line mode.
2
Press the F and f buttons to display PRINT
OFFSET.
Press F and f until PRINT OFFSET appears.
Operation
1
Press the MENU button.
The printer is switched to off-line.
2
Press the F and f buttons to display VERSION.
Press F and f to display VERSION.
Version of the firmware of the printer
The offset amount for the current position
3
Press the G and g buttons to shift the printout image
to the desired position, while looking at the
printout.
L1: Moves to the left by 0.6 mm from the default
position.
L2: Moves to the left by 1.2 mm from the default
position.
R1: Moves to the right by 0.6 mm from the default
position.
Menu Operations
59

R2: Moves to the right by 1.2 mm from the default
position.
L2, L1 R1, R2
L2, L1 R1, R2
Operation
For the 2YNR-R153
For the 2YNR-R155
To return to the default position
Display 0.
4
Press the MENU button after completing the
adjustment.
The printer returns to the on-line mode.
60
Menu Operations

Miscellaneous
Precautions
Safety
• Operate the printer using the power source specified in
“Specifications” (page 66).
• Be careful not to damage the power cable by placing
or dropping heavy objects on it; it is dangerous to use
the unit with a damaged power cable.
• If you do not intend to use the unit for a long time,
disconnect the power cable.
• Unplug the power cable by grasping the plug, not the
cable itself.
• Do not disassemble the unit. There is a danger of
electric shock from the internal parts.
• Be careful not to spill water or other liquids on the
unit, or to allow combustible or metallic material to
enter the cabinet. If used with foreign matter in the
cabinet, the unit is liable to fail, or present a risk of fire
or electric shock.
• If the unit malfunctions or if a foreign body falls into
the cabinet, disconnect the power immediately and
contact your place of purchase.
• Do not touch the plug of the AC power cord with wet
hands. If you connect or disconnect the AC power
cord with wet hands, this may cause an electrical
shock.
• Do not stand on the printer. Also, do not put heavy
things on the printer. The printer may topple over, or
you may fall down, causing injury to you, or damage
to the printer.
• Connect the cable correctly. If you trip on the AC
power cord or a connecting cable, the printer may
topple over or fall. This may cause injury. Be careful
to make the proper connections of the cables when you
install the printer.
Installation
• Avoid placing the unit in a location subject to:
– mechanical vibration
– high humidity
– excessive dust
– direct or excessive sunlight
– extremely high or low temperatures
• Ventilation holes are provided to prevent the unit from
overheating. Be careful not to obstruct them with other
objects or by covering the unit with a cloth etc.
Ventilation holes
Note
If you obstruct ventilation holes, the unit may not offer
full performance.
• Connect the cable correctly. If you trip on the AC
power cord or a connecting cable, the printer may
topple over or fall. This may cause injury. Be careful
to make the proper connections of the cables when you
install the printer.
On condensation
• If the printer is subjected to wide and sudden changes
in temperature, such as when it is moved from a cold
room to a warm room or when it is left in a room with
a heater that tends to produce quantities of moisture,
condensation may form inside the printer. In such
cases the printer will probably not work properly, and
may even develop a fault if you persist in using it. If
moisture condensation forms, turn off the power and
leave the printer standing for at least one hour.
• If the printing pack is subjected to wide and sudden
changes in temperature, condensation may form on
the ink ribbon or paper inside. This will cause the
printer to malfunction. Also if the printing pack is
used in this state, spots are likely to appear on the
printout.
• To store a half-used printing pack, replace it in its
original packing and reseal the package. If possible,
keep the sealed printing pack in a cool, dark location.
To subsequently use the printing pack, place it, in its
sealed package, in a warm room for several hours.
Doing so prevents condensation from forming when
the printing pack is removed from its package.
Miscellaneous
On Transporting the Printer
Do not transport the printer with the supplied
accessories, ink ribbon and paper roll attached. Doing so
Precautions
61

may cause a malfunction. It is recommended that you
store the ink ribbon and paper roll in the package they
came in after you remove them.
To clean the thermal head:
Clean the thermal head heating elements, ribbon guide,
and the cleaning roller for the ink ribbon gently with a
soft cloth.
Miscellaneous
Cleaning
Note
Be sure to turn off the power of the printer before
cleaning it.
When the cabinet becomes dirty
Clean the cabinet, panel and controls with a soft dry
cloth, or a soft cloth lightly moistened with a mild
detergent solution.
Do not use any type of solvent, such as thinner, absolute
alcohol or benzine or chemical cloth, which may
damage the finish.
Before you replace a paper roll with a new
one
Before loading a new paper roll after you have used up
one paper roll, perform the following cleaning
operation.
Use absolute alcohol for cleaning. Do not use any type
of solvent, such as thinner, benzine or chemical cloth,
which may deteriorate the quality of printouts.
Caution
Since the thermal head is still very hot just after printing
is finished, be careful not to touch the thermal head
when cleaning. Touching the thermal head may burn
you.
Thermal head heating elements
Cleaning roller for the ink ribbon
Ribbon guide
Clean area around the thermal head gently with a soft
cloth moistened with absolute alcohol.
Note
If you intend to use the printer just after you have
cleaned it, be sure to use it only after it has dried
completely.
62
Precautions

To clean the platen roller, pinch roller, and
cleaning roller used for removing dust
accumulated on the paper:
Clean the rollers gently with a soft cloth moistened with
absolute alcohol.
Platen roller
Cleaning roller to remove
dust accumulated on the
paper
Note
The surface of the rubber roller is soft and easily
scratched. When cleaning it, be careful not to scratch
and not to push on the surface of the rubber roller
strongly. Doing so may cause the picture quality of the
printouts to deteriorate.
When the following symptoms appear
When the message “HEAD IN COOLING”
begins to appear on the information display
frequently:
Ventilation holes are provided on the front and rear of
the printer. Clean the filter on the front panel of the
printer. If the filter is dirty, the time required for cooling
the thermal head is lengthened and this causes the
printing time to become longer.
1
Pull the lock lever for the front door toward you to
open the front cover.
Miscellaneous
Pinch roller
Clean the rollers gently with a soft cloth moistened
with absolute alcohol while turning the roller.
To clean the paper feed roller:
Clean the roller gently with a soft cloth moistened with
absolute alcohol while turning the pinch roller.
Paper feed roller
2
Remove the filter.
3
Wash the filter with water to remove the dust.
Note
Do not rub the netting of the filter roughly.
Precautions
63

Miscellaneous
4
After the filter has been dried completely, reset the
filter on the front panel as it was.
5
Close the front door by pushing it in the center part
of the front door.
If white stripes or scratches appear on the
printout:
When you make printouts using the 2YNR-R153/R155
Printing Pack, after you have used several rolls of the
2YNR-R154/R156 Printing Pack, the printout quality
may deteriorate. For example, white stripes or scratches
may appear on the printout.
In such a case, clean the thermal head gently with a soft
cloth moistened with absolute alcohol.
Clean both ends of the thermal head gently
with a soft cloth moistened with absolute
alcohol.
Note
If you close the front door by pushing it on one side, the
front door may not be completely locked.
Caution
Since the thermal head is still very hot just after printing
is finished, be careful when cleaning it.
If you use the printer in a high or low
temperature
You should be very careful when you use the printer in
cold or hot places.
The operating temperature range at which the
performance of the printer is guaranteed is between 5°C
and 35°C.
You may need to adjust the position of the thermal head
in order to accommodate the printer to the environment
in which you use it.
When you make a lot of printouts of images
containing very dark portions in a high
temperature environment approaching 35°C
Adjust the position of the thermal head if the following
problems occur:
Problem Position of the thermal head
The printout has
shrunk.
Whitish spots occur on
the dark portions of
the printout.
Move the position by one notch toward
the T side.
Move the position by one notch toward
the S side.
64
Precautions

When you use the printer in a low temperature
environment approaching 5°C
Adjust the position of the thermal head if the following
problems occur:
Problem Position of the thermal head
The printout has
shrunk.
Dark portions soak
into the light portions
of the printout.
Move the position by one notch toward
the T side.
Move the position by one notch toward
the T side.
To adjust the position of the thermal head
Thermal head adjustment mechanism plates are
provided at both ends of the thermal head.
When you adjust the position of the thermal head, adjust
both ends to the same position.
1
Insert the head of the screws driver into the groove
on the adjustment screw.
2
Turn the adjustment screw toward the T side or S
side by one notch according to the severity of the
problem until the protuberance locates at the proper
position and you hear a click.
Ink Ribbon and Paper
Each printing pack contains two sets of the ink ribbon
and paper roll combination.
Be sure to use the ink ribbon and the paper roll in the
carton as a set.
2YNR-R153 Self-Laminating Color Printing
Pack
Contains color ink ribbon and paper.
Ink ribbon for printing: 2 rolls
L-size (89 × 127 mm) print paper: 2 rolls
2YNR-R154 Self-Laminating Color Printing
Pack
Contains color ink ribbon and paper.
Ink ribbon for printing: 2 rolls
PC-size (102 × 152 mm) print paper: 2 rolls
2YNR-R155 Self-Laminating Color Printing
Pack
Contains color ink ribbon and paper.
Ink ribbon for printing: 2 rolls
2L-size (127 × 178 mm) paper: 2 rolls
Miscellaneous
Right side
Protuberance
3
Perform the same adjustment for the other side of
the thermal head repeating steps 1 and 2.
Left side
Protuberance
2YNR-R156 Self-Laminating Color Printing
Pack
Contains color ink ribbon and paper.
Ink ribbon for printing: 2 rolls
2PC-size (152 × 204 mm) print paper: 2 rolls
Printing capacity
• Each printing pack contains two sets of the ink ribbon
and paper combination. One set of the ink ribbon and
paper allows you to print the following number of
sheets.
Print
pack
Printing
capacity
Print
size
Note
2YNRR153
610 (sheets) 550 (sheets) 335 (sheets) 295
× 127
89
mm
× 5
3.5
inches
2YNRR154
102 × 152 mm127 × 178 mm152 × 204
4 × 6 inches 5 × 7 inches 6 × 8
2YNRR155
2YNRR156
(sheets)
mm
inches
However the number of sheets that can be printed may
not be guaranteed if you replace the ink ribbon and paper
before the ink ribbon and paper run out.
Ink Ribbon and Paper
65

Specifications
Optional accessories
Self-Laminating Color Printing Pack
Miscellaneous
Power requirements
100 to 240 V AC, 50/60 Hz
Input current 5 to 2.5 A max. (while printing)
Operating temperature range
5 to 35°C
Operating humidity range
20 to 80%
External dimensions
Approx. 280 × 356 × 463 mm (WHD)
1
(11
/8 ×14 1/8 ×18 1/8 inches)
(including the maximum projecting
parts)
Approx. 280 × 356 × 451 mm (WHD)
1
(11
/8 ×14 1/8×17 7/8 inches)
(excluding the maximum projecting
parts)
Mass Approx. 20 kg (44 lb 1 oz) (printer
only)
Printing system Dye sublimation thermal transfer
Thermal head 13.1 dot/mm, 2048 elements (334 dpi)
Gradations 8 bits each for yellow, magenta and
cyan
Picture size 2YNR-R153: 89 × 127 mm (3.5 × 5
inches)
2YNR-R154: 102 × 152 mm (4 × 6
inches)
2YNR-R155: 127 × 178 mm (5 × 7
inches)
2YNR-R156: 152 × 204 mm (6 × 8
inches)
Printable pixels 2YNR-R153: 1210 × 1728 dots
2YNR-R154: 1382 × 2048 dots
2YNR-R155: 1728 × 2380 dots
2YNR-R156: 2048 × 2724 dots
(The top and bottom and right and left
portions will not be printed by about
1.5 mm.)
Printing time 2YNR-R153: 6.6 sec.
2YNR-R154: 6.6 sec.
2YNR-R155: 12 sec.
2YNR-R156: 14 sec.
Input connector AC IN (for power)
Interface Hi-Speed USB (USB2.0)
Accessories supplied
Paper tray (1)
Paper holders (2)
Power Cord (1) (sent separately)
USB cable (1)
CD-ROM (Operating Instructions,
printer driver, install manual and the
Readme text file) (1)
Software License Agreement (1)
Operating Instructions (1)
Before Using this Printer (1)
Part Number Product name Contents
H146035-00 2YNR-R153
Self-Laminating
Color Printing
Pack
H146036-00 2YNR-R154
Self-Laminating
Color Printing
Pack
H146037-00 2YNR-R155
Self-Laminating
Color Printing
Pack
H146038-00 2YNR-R156
Self-Laminating
Color Printing
Pack
2YNR-R153
(L-size, 610 sheets ×
rolls)
2YNR-R154
(PC-size, 550 sheets ×
2 rolls)
2YNR-R155
(2L-size, 335 sheets ×
2 rolls)
2YNR-R156
(2PC-size, 295 sheets ×
2 rolls)
2
Design and specifications are subject to change without
notice.
66
Specifications

List of Messages
Messages appear on the LCD under the following
conditions. Please take the remedial actions shown next
to the message to correct the problem.
Messages and error messages causing
the ALARM indicator to turn on
When the ALARM indicator on the front panel lights in
red, a message or an error message appears on the LCD.
Please take the remedial actions shown next to the
message to correct the problem.
Message Description and Remedy
CHECK PAPER Paper corresponding to the designated
CHECK PAPER &
RETRY
CHECK RIBBON • The ink ribbon may have broken.
DOOR OPEN The front door is open.
MECHA TROUBLE Mechanical trouble has occurred in the
MEDIA MISMATCH An incompatible ink ribbon and paper
NO PAPER There is no paper roll loaded.
NO RIBBON There is no ink ribbon loaded.
PAPER END Paper corresponding to the designated
number of sheets has been used up.
tLoad a new ink ribbon and paper
roll (page 44).
• Paper cannot be fed or ejected
correctly.
tLoad the paper roll correctly
(page 47).
• The end of the paper may be folded
or bent.
tCheck whether or not the paper
is folded or bent. If it is, cut the
folded part of the paper off and
load the paper roll again
(page 47).
tRepair it with adhesive tape
(page 52).
• Ink ribbon corresponding to the
designated number of sheets has
been used up.
tLoad a new ink ribbon and paper
roll (page 44).
• The ink ribbon is not loaded
correctly.
tLoad it correctly (page 44).
tClose the front panel until it is
locked securely (page 50).
printer.
t Contact your place of purchase.
roll are loaded.
tLoad the compatible ink ribbon and
paper roll taken from the same
package (page 65).
tLoad a paper roll (page 44).
tLoad an ink ribbon (page 44).
number of sheets has been used up.
tLoad a new ink ribbon and paper
roll (page 44).
Message Description and Remedy
RIBBON END Ink ribbon corresponding to the
designated number of sheets has been
used up.
tLoad a new ink ribbon and paper
roll (page 44).
RIBBON ERROR Something is wrong with the data on
the IC seal attached to the ink ribbon.
tReplace the ink ribbon and paper
roll with a new ink ribbon and
paper roll (page 44).
Other messages
When the following messages appear even though the
ALARM indicator does not light, take the remedy next
to each message.
Message Description and remedy
HEAD IN COOLING The thermal head is too hot.
tWait for the message to disappear.
Printing will then resume
automatically.
PLEASE WAIT The printer has ejected a printout
because it has received a stop
command or the printer has stopped
printing due to some problem.
tWait for the message to disappear.
Miscellaneous
List of Messages
67

Miscellaneous
Troubleshooting
Before submitting the product for repair, please recheck
the following. If the unit still does not operate properly,
contact your place of purchase.
Problem Cause and Remedy
Cannot load the paper • The paper holders are attached
The printer does not
feed the correct
amount of paper
automatically when
you close the front
door after loading the
paper roll and ink
ribbon.
Cannot load the ink
ribbon
NO PAPER is
displayed even though
a paper roll is loaded.
NO RIBBON is
displayed even though
an ink ribbon is
loaded.
Paper is left even
though PAPER END
is displayed.
Ink ribbon is left even
though RIBBON END
is displayed.
HEAD IN COOLING
is displayed
frequently.
without matching the color of the
paper holders and the tapes attached
on the paper roll correctly.
tAttach the paper holders to the
paper roll correctly (page 45).
• The paper roll is inserted with the
right and left sides reversed.
tInsert the paper roll in the paper
cartridge correctly (page 47).
• The printer is not turned on.
tTurn on the printer on.
• The paper holders are attached to
the paper roll without matching the
color of the paper holders and the
tapes on the paper roll and that
paper roll with the paper holders are
inserted with the right and left sides
reversed.
tAttach the paper holders to the
paper roll correctly, and then
insert this paper roll in the paper
cartridge correctly (pages 45 and
47).
You may be trying to load the spools of
the ink ribbon wrongly.
tLoad the ink ribbon after matching
the colors of the spools of the ink
ribbon and those of the spool
holders of the printer correctly
(page 50).
The paper roll is not loaded correctly.
tLoad the paper roll correctly
(page 44).
The ink ribbon is not loaded correctly.
tLoad the ink ribbon correctly
(page 44).
This is not a malfunction. Extra sheets
of paper are provided with each roll of
paper.
tRemove the current paper roll and
load a new ink ribbon and paper roll
(page 44).
This is not a malfunction. Extra ink
ribbon is provided.
tRemove the current ink ribbon and
load a new ink ribbon and paper roll
(page 44).
The filter may be dirty.
tClean the filter (page 63).
Problem Cause and Remedy
A vertical white stripe
appears on the
printout.
The blank portion
appears on the edge of
the printout.
Dust may have accumulated on the
thermal head.
tClean the thermal head elements
with a soft cloth moistened with
absolute alcohol (page 64).
The image may be shifted.
tShift the printout image to the
desired position (page 59).
68
Troubleshooting

Index
O
Operation 44
A
Accessories supplied
confirmation 42
Adjusting the gray balance 57
B
Basic Application Example 40
C
Cable stopper
securing USB cable 43
Cleaning
before replacing a paper roll with a
new one 62
cabinet 62
paper feed roller 63
platen roller, pinch roller and
cleaning roller 63
thermal head 62
Connections 42
D
Displaying
quantity of printing 58
version of the printer 59
F
Features 40
P
Paper and ink ribbon
loading 47
removing 53
Paper holder
adjusting the length 46
Paper holders
attaching them to the paper roll 45
Paper tray
adjusting the length of the paper
tray 51
attaching 51
removing from the printer 52
Part Names and Functions
front panel 40
operation panel door 41
rear panel 40
Precautions
condensation 61
Installation 61
on transportation 61
Safety 61
Preparation 42
Printer driver installing 42
Printing 55
Printing pack
2YNR-R153 65
2YNR-R154 65
2YNR-R155 65
2YNR-R156 65
printing capacity 65
Index
I
Ink ribbon
if the ribbon breaks 52
Ink ribbon and paper
usable printing pack 65
Introduction 40
M
Menu operations
adjusting the gray balance 57
adjusting the position of the
printout image 59
displaying the firmware version of
the printer 59
displaying the quantity of pages
printed 58
prepration 56
Messages 67
S
Specifications 66
T
Troubleshooting 68
U
USB cable 43
USB port connection 42
69

AVERTISSEMENT
Afin de réduire les risques d’incendie ou
d’électrocution, ne pas exposer cet appareil à la
pluie ou à l’humidité.
Afin d’écarter tout risque d’électrocution,
garder le coffret fermé. Ne confier l’entretien de
l’appareil qu’à un personnel qualifié.
CET APPAREIL DOIT ÉTRE RELIÉ À LA TERRE.
Pour déconnecter l’alimentation principale,
débranchez le connecteur AC IN.
Avertissement sur le connecteur
d’alimentation
Utiliser un cordon d’alimentation approprié à votre
tension d’alimentation secteur locale.
1. Utiliser un cordon d’alimentation approuvé
(conducteur d’alimentation 3 âmes)/connecteur
d’appareil/prise avec contacts de mise à la terre
conforme aux règles de sécurité de chaque pays si
applicable.
2. Utiliser un cordon d’alimentation approuvé
(conducteur d’alimentation 3 âmes)/connecteur
d’appareil/prise conforme aux valeurs nominales
(tension, ampérage) correctes.
Pour toute question concernant l’utilisation du cordon
d’alimentation/connecteur/fiche ci-dessus, veuillez
consulter un personnel de service après-vente qualifié.
Pour les clients en Europe
Le fabricant de ce produit est Noritsu Koki Co., Ltd.,
579-1 Umehara Wakayama-shi Wakayama-ken, Japon.
Le représentant autorisé pour EMC et la sécurité des
produits est Noritsu (Deutschland) GmbH, Siemensring
87, D-47877, Willich, Allemagne. Pour toute question
concernant le service ou la garantie, veuillez consulter
les adresses indiquées dans les documents de service ou
de garantie séparés.
70

Table des matières
Introduction
Caractéristiques ................................................... 72
Exemple d’application de base .........................72
Emplacement et fonction des composants et
commandes ........................................................... 72
Préparation
Accessoires fournis ..............................................75
Raccordements ..................................................... 75
Installation du pilote d’imprimante ..................75
Connexion du port USB ................................... 75
Utilisation
Mise en place du rouleau de papier et du ruban
encreur .................................................................. 77
Mise en place des bacs d’alimentation sur le
rouleau de papier ............................................78
Mise en place du rouleau de papier et du ruban
encreur ............................................................ 80
Mise en place du magasin à papier ...................84
Si le ruban encreur casse en cours
d’utilisation .................................................... 85
Retrait du ruban encreur et du papier ............... 86
Impression depuis l’ordinateur .......................... 88
Fonctions réglables à partir du menu ................ 90
Préparation pour les fonctions réglables à partir
du menu ..........................................................90
Réglage de la balance des gris .......................... 91
Affichage du nombre de pages imprimées ....... 92
Affichage de la version du microprogramme de
l’imprimante ................................................... 93
Réglage de la position de l’image imprimée .... 93
FR
Divers
Précautions ........................................................... 95
Sécurité ............................................................. 95
Installation ........................................................ 95
Transport de l’imprimante ................................ 96
Nettoyage ......................................................... 96
Ruban encreur et papier .....................................99
Spécifications ...................................................... 100
Liste de messages ...............................................101
Dépannage .......................................................... 102
Index ................................................................... 103
71

Introduction
Emplacement et fonction
des composants et
Introduction
Caractéristiques
L’imprimante IP-64 Digital Photo Printer est une
imprimante à transfert thermique par sublimation qui
permet une impression haute qualité, haute résolution
(334 ppp) et haute vitesse des images numériques sur
quatre formats de papier et en couleur (256 gradations et
16,7 millions de couleurs).
Exemple d’application de base
Ordinateur : fournit les
données image à imprimer et
les signaux de commande
d’imprimante
commandes
Pour plus de détails, reportez-vous aux numéros de page
de référence indiqués entre parenthèses.
Panneau avant
IP-64 Digital Photo Printer
Panneau arrière
A Indicateur ALARM (101)
S’allume en rouge lorsque le système est initialisé
ou lorsqu’une erreur se produit.
72
Caractéristiques / Emplacement et fonction des composants et commandes

B LCD (Ecran à cristaux liquides) (88, 92, 101)
Affiche le nombre de pages imprimées ou les
quantités de ruban encreur restantes. Des messages
s’affichent en cas d’erreur ou pour avertir
l’utilisateur.
C Poignée de verrouillage du panneau avant
Utilisée pour ouvrir le panneau avant lors du
chargement ou du remplacement du ruban encreur
et du papier ou lors du nettoyage.
Une marge d’environ 20 mm tombe dans ce
magasin.
G Compatible
Tirez le support lorsque vous utilisez le 2YNRR155 et le 2YNR-R156 Printing Pack.
H Panneau avant
Les touches à utiliser pour les opérations réglables
à partir du menu se trouvent sous ce panneau avant.
Introduction
Lors de l’ouverture du panneau avant
A Cartouche papier
Le rouleau de papier se trouve à cet endroit.
B Base du ruban
Le ruban encreur se trouve à cet endroit.
Section du panneau principal
A Touc he EXE C (91)
Appuyez sur cette touche pour imprimer le modèle
de réglage de l’échelle des gris.
B Touc he MEN U (92)
Appuyez sur cette touche pour effectuer des
opérations réglables à partir du menu. Lorsque vous
appuyez sur la touche MENU, l’imprimante passe
en mode hors ligne.
C Touches de curseur (92)
Appuyez sur ces touches pour sélectionner
l’élément à afficher sur l’écran à cristaux liquides.
C Poignée de verrouillage de la base du ruban
Tirez la poignée de façon à tirer la base du ruban
vers le haut.
D Filtre
D Orifices de ventilation
Un filtre pour le ventilateur servant à empêcher la
surchauffe de la tête d’impression thermique se
trouve ici.
E Fente de sortie du papier
Les pages imprimées sortent par cette fente de
l’imprimante.
F Magasin à papier (84)
Les pages imprimées sont éjectées dans ce
magasin. Réglez la longueur du magasin à papier en
fonction du kit d’impression à utiliser.
D Touche CAL (étalonnage) (91)
Appuyez sur cette touche pour régler la balance des
gris.
E Touche PRINT STOP (89)
Un appui prolongé (pendant plus d’une seconde)
sur la touche PRINT STOP pendant l’impression
permet d’annuler le nombre d’impressions réglé et
d’effacer les images enregistrées dans la mémoire.
L’imprimante s’arrête dès que l’impression de la
page en cours est terminée.
I - Connecteur AC IN (alimentation) (75)
Branchez ici le cordon d’alimentation fourni.
J !Interrupteur POWER (88)
Appuyez sur cet interrupteur pour mettre
l’imprimante sous ou hors tension.
Emplacement et fonction des composants et commandes
73

Introduction
K Connecteur USB (75)
Relie l’imprimante à un ordinateur doté d’une
interface USB (prenant en charge l’USB 2,0) au
moyen d’un câble USB.
74
Emplacement et fonction des composants et commandes

Préparation
Accessoires fournis
Assurez-vous que vous avez reçu les accessoires
suivants :
Magasin à papier a) (1)
Bacs d’alimentation
Cordon d’alimentation secteur (1) (envoyé séparément)
Câble USB (1)
CD-ROM (Mode d’emploi, pilote d’imprimante,
manuel d’installation et le fichier Lisezmoi.txt) (1)
Mode d’emploi (1)
Contrat d’utilisation de logiciel (1)
Avant d’utiliser cette imprimante (1)
b)
(2)
Raccordements
Après avoir raccordé un câble de connexion USB
(fourni) entre l’ordinateur et l’imprimante, branchez le
cordon d’alimentation. Pour plus de détails sur le
raccordement de l’imprimante, reportez-vous aux
manuels qui accompagnent l’ordinateur ou les autres
périphériques.
Préparation
Installation du pilote d’imprimante
Avant de raccorder l’imprimante à l’ordinateur, installez
le pilote d’imprimante fourni avec l’imprimante. Pour
des instructions détaillées sur l’installation du pilote
d’imprimante, reportez-vous au fichier Lisezmoi.txt et
au manuel d’installation se trouvant sur le CD-ROM
fourni.
Connexion du port USB
Remarques
• Suivez les procédures de raccordement indiquées dans
la documentation qui accompagne l’ordinateur.
• Vérifiez que le câble d’interface est correctement
raccordé aux deux extrémités.
• Le logiciel de pilote d’imprimante fourni avec
l’imprimante ne convient pas pour l’utilisation d’une
imprimante connectée sur réseau.
• Le fonctionnement de l’imprimante n’est pas garanti
lorsque celle-ci est connectée à un concentrateur USB.
IP-64
a) Avant de fixer le magasin a papier, assurez-vous de
bien retirer le papier ondulé a l'intérieur de celui-ci.
b) Les bacs d’alimentation sont stockés dans
l’imprimante. Retirez les deux bacs d’alimentation se
trouvant à l’intérieur de l’imprimante avant de la mettre
sous tension.
Pour plus de détails sur la façon de les retirer, reportezvous à l’étape 1 de la section « Mise en place des bacs
d’alimentation sur le rouleau de papier » à la page 78
Remarques
• En sortant l’imprimante de son emballage, veillez à ne
pas vous faire mal au dos.
• Conservez l’emballage pour le cas où l’imprimante
devrait être transportée.
• Lors du transport de l’imprimante, veillez à retirer le
ruban encreur et le rouleau de papier de l’imprimante.
vers le connecteur (USB)
Câble de connexion USB
Ordinateur
Accessoires fournis / Raccordements
au connecteur
- AC IN
Cordon
d’alimentation
secteur
(fourni)
vers la prise
murale
75

Préparation
Pour sécuriser un câble USB
Une fois que vous avez connecté un câble USB à
l’imprimante, nous vous recommandons de le sécuriser
comme illustré afin qu’il ne soit pas déconnecté par
inadvertance.
Faites passer le câble USB sous l’arrêt de câble
supérieur comme illustré ci-dessous.
76
Raccordements

Utilisation
Mise en place du rouleau
de papier et du ruban
encreur
sceau du circuit imprimé. Sinon, le ruban encreur
peut devenir inutilisable.
Bobine blanche
Cette section explique comment mettre en place le
rouleau de papier et le ruban encreur avant de
commencer à imprimer, après avoir connecté
l’imprimante comme décrit à la page 75.
Remarques
• Chaque kit d’impression contient deux cartons
contenant chacun un ruban encreur et un rouleau de
papier. Utilisez toujours le ruban encreur et le rouleau
de papier d’un même carton. Ne les utilisez pas avec
d’autres types de ruban ou de rouleau de papier. (Voir
« Ruban encreur et papier » à la page 99).
• Un carton contenant le ruban encreur et le rouleau de
papier vous permet d’imprimer le nombre de feuilles
suivant.
Kit
d’impression
Capacité
d’impression
Format
d’impression
2YNRR153
610
(feuilles)
×127
89
mm
×5
3,5
pouces
2YNRR154
550
(feuilles)
102×152 mm127×178 mm152×204
4×6
pouces
2YNRR155
335
(feuilles)
5×7
pouces
2YNRR156
295
(feuilles)
mm
6×8
pouces
Bobine noire
Sceau de circuit imprimé
contenant la puce
• Veillez à ne pas ouvrir l’emballage avec un couteau
comme un massicot. Vous risqueriez d’endommager
le rouleau de papier et le ruban encreur, et de ne pas
pouvoir les utiliser pour l’impression.
• Puisque les colorants utilisés dans ce ruban encreur
peuvent, comme d’autres colorants, se décolorer avec
le temps, le produit ne sera ni remplacé ni garanti
contre les modifications de couleur.
Avertissements pour la manipulation du
rouleau de papier
• Placez le rouleau de papier verticalement. Si vous
installez le rouleau de papier à l’horizontale, le papier
peut s’enrouler et tomber. Vous risquez de vous
blesser.
Utilisation
Pour plus de détails sur le kit d’impression, reportezvous à « Ruban encreur et papier » à la page 99 et
« Self-Laminating Color Printing Pack » à la page 100
sous « Spécifications ».
• Ne remplacez pas le kit d’impression si vous l’avez
utilisé en partie uniquement. Le nombre de feuilles
pouvant être imprimées peut ne pas être garanti si vous
remplacez le ruban encreur et le papier avant la fin.
• Ne détachez pas les bobines noir et blanche du ruban
encreur avant d’avoir commencé la mise en place du
ruban.
• Une puce est intégrée sur un côté de la bobine noire.
Veillez à ne pas enlever, endommager ou frapper le
Mise en place du rouleau de papier et du ruban encreur
77

Utilisation
• Tenez le rouleau de papier avec les deux mains afin
qu’il ne tombe pas car il est lourd. Vous risquez de
vous blesser s’il tombe.
Tenez le rouleau de papier avec les deux mains.
Mise en place des bacs
d’alimentation sur le rouleau de
papier
Un bac d’alimentation rose et un bac d’alimentation bleu
sont fournis avec l’imprimante. Mettez-les en place sur
le nouveau rouleau de papier puis chargez ce dernier.
Lorsque vous utilisez l’imprimante pour la première
fois, commencez par l’étape 1 pour retirer les bacs
d’alimentation placés dans l’imprimante en usine.
Si vous les avez déjà retirés, commencez par l’étape 4.
2
Tirez la poignée de verrouillage pour la base du
ruban se trouvant devant la base du ruban et tirez
cette dernière vers le haut.
3
Tirez la cartouche papier de l’imprimante vers
vous.
1
Tirez vers vous la poignée de verrouillage du
panneau avant pour l’ouvrir
Sortez les emballages contenant les bacs
d’alimentation de l’imprimante.
Fermez ensuite le panneau avant dans l’opération
inverse.
4
Réglez la longueur du bac d’alimentation bleu.
Il existe deux types de papier : un dont la largeur est
de 127 mm (5 pouces) et l’autre dont la largeur est
de 152 mm (6 pouces).
Le bac d'alimentation bleu est préréglé pour du
papier de 152 mm (6-pouces) de largeur.
Papier de largeur de 127 mm (5 pouces) :
Kit d’impression 2YNR-R153 et 2YNR-R155
Diminuez la longueur du bac d’alimentation bleu.
78
Mise en place du rouleau de papier et du ruban encreur

Pour diminuer la longueur du bac
d’alimentation bleu pour le côté gauche du
rouleau
Pincez les deux boutons
vers l’intérieur.
Poussez ensuite
cette partie ronde
vers le bas.
v
Tournez cette partie ronde
complètement dans le sens
inverse des aiguilles d’une montre.
Papier de largeur de 152 mm (6-pouces) :
Kits d’impression 2YNR-R154 et 2YNRR156
Augmentez la longueur du bac d’alimentation bleu.
Confirmez que la flèche
située sur l'axe du bac
d'alimentation bleu est
alignée sur la fleche
située sur l'étiquette
du kit d'impression R154/
R156
Allongez la longueur du bac d'alimentation bleu en
suivant l'opération inverse de celle utilisée pour
raccourcir sa longueur.
5
Insérez le bac d’alimentation bleu dans le rouleau
de papier comme illustré.
Utilisation
Poussez cette partie
ronde vers le haut.
v
Confirmez que la flèche
située sur l'axe du bac
d'alimentation bleu est
alignée sur la fleche
située sur l'étiquette
du kit d'impression
R153/R155
Insérez le bac d’alimentation
bleu sur le côté sur lequel la
bande bleue est fixée.
Pour enlever la bande bleue
de l'entaille sur la bande,
détachez-la en la tirant après
avoir mis en place les
supports papier. Une partie de
la bande reste à l'intérieur du
boîtier du rouleau de papier.
6
Placez le papier tête en bas et fixez le bac
d’alimentation rose comme illustré.
Mise en place du rouleau de papier et du ruban encreur
79

Utilisation
Remarque
Tenez le rouleau de papier avec les deux mains car
il est lourd.
Insérez le bac d’alimentation
rose sur le côté sur lequel la
bande rose est fixée.
Pour enlever la bande rose
de l'entaille sur la bande,
détachez-la en la tirant après
avoir mis en place les
supports papier. Une partie
de la bande reste à l'intérieur
du boîtier du rouleau de
papier.
Poussez la molette
située sur le bac
d’alimentation rose vers
le bas et tournez-la dans
le sens horaire jusqu’à
ce qu’elle se bloque.
Une fois que le bac
d’alimentation rose est
bien fixé au bac
d’alimentation bleu déjà
en place, cette molette
se déplace du haut vers
le bas.
Le rouleau de papier est maintenant pret a etre
chargé dans la cartouche papier de l'imprimante.
Pour confirmer que le bac d'alimentation bleu
et le bac d'alimentation rose sont bien fixés
Papier de 152 mm (6-pouces) de largeur : kit
d'impression 2YNR-R154 et 2YNR-R156
La partie bombée sur la
circonférence du bac
d'alimentation bleu doit
etre alignée sur celle du
bac d'alimentation rose.
Papier de 127 mm (5-pouces) de largeur : kit
d'impression 2YNR-R153 et 2YNR-R155
La partie bombée sur le
circonférence du bac
d'alimentation bleu doit
etre alignée sur celle du
bac d'alimentation rose.
Mise en place du rouleau de papier
et du ruban encreur
Si vous utilisez l’imprimante pour la première fois,
mettez en place le rouleau de papier et le ruban encreur.
Avant de charger le rouleau de papier dans l’imprimante,
placez les bacs d’alimentation bleu et rose à gauche et à
droite du rouleau de papier.
Pour des informations plus détaillées sur la façon de
fixer les bacs d’alimentation, reportez-vous à la section
« Mise en place des bacs d’alimentation sur le rouleau
de papier » à la page 78
Pour des informations détaillées sur le retrait du papier
et du ruban encreur, reportez-vous à la section « Retrait
du ruban encreur et du papier » à la page 86.
80
Mise en place du rouleau de papier et du ruban encreur
Avant de charger le rouleau de papier et le
ruban encreur
Vérifiez que l’imprimante est sous tension. Si ce n’est
pas le cas, mettez-la sous tension.
Autrement, l’alimentation automatique du papier risque
de ne pas fonctionner correctement après le chargement
du rouleau de papier et du ruban encreur.
De plus, une fois que vous avez terminé le rouleau de
papier, nettoyez la tête d’impression thermique et les
rouleaux avant de charger un rouleau de papier et un
ruban encreur neufs.
Pour plus d’informations sur le nettoyage, reportez-vous
à « Avant de remplacer un rouleau de papier » à la
page 96.

Remarque
Ne pas utiliser le Printing Pack 2YNR-R154 ou
2YNR-R156 à papier de 152 mm (6 pouces) de large
suite à l’utilisation du Printing Pack 2YNR-R153 ou
2YNR-R155 à papier de 127 mm (5 pouces) de large.
Sinon, la qualité de l’image peut s’en trouver nettement
affectée.
Pour charger le rouleau de papier et le ruban
encreur
Avertissements
• Faites attention de ne pas vous pincer les doigts ni de
• Lorsque les impressions éjectées sont laissées sur le
• Etant donné que la tête d’impression thermique reste
C
coincer vos vêtements dans le panneau avant ou la
saillie de ce dernier.
magasin à papier, retirez-les avant d’ouvrir le panneau
avant de façon à ne pas les déchirer ni les plier.
brûlante juste après une impression, veillez à ne pas
toucher la tête d’impression thermique au moment de
la mise en place du papier et du ruban encreur. Faites
également attention à ne pas endommager la tête
d’impression thermique.
1
Tirez la poignée de verrouillage du panneau avant
vers vous pour ouvrir le couvercle avant et tirez le
couvercle supérieur.
2
Tirez la poignée de verrouillage pour la base du
ruban se trouvant devant la base du ruban et tirez
cette dernière vers le haut.
Utilisation
Tête d’impression thermique
3
Tirez la cartouche papier de l’imprimante vers
vous.
Mise en place du rouleau de papier et du ruban encreur
81

Avertissement
Etant donné que la tête d’impression thermique
reste brûlante juste après une impression, veillez à
ne pas toucher la tête d’impression thermique en
tirant la cartouche papier. Vous risquez de vous
brûler. Veillez également à ne pas endommager la
tête d’impression thermique.
4
Placez le rouleau de papier dans la cartouche
papier.
Utilisation
Tête d’impression thermique
Avertissements
• Etant donné que la tête d’impression thermique
reste brûlante juste après une impression, veillez
à ne pas toucher la tête d’impression thermique
au moment de la pose du rouleau de papier dans
le bac d’alimentation. Vous risquez de vous
brûler.
• Ne placez pas le rouleau de papier à un autre
endroit de l’imprimante que sur la cartouche
d’imprimante. Vous risquez d’endommager
l’imprimante. Ne le posez surtout pas sur la tête
d’impression thermique.
5
Retirez la bande se trouvant au milieu du rouleau de
papier.
6
Tout en tenant les deux extrémités du rouleau de
papier, insérez ce dernier dans la cartouche papier.
Insérez le papier manuellement jusqu’à ce que le
trou de repérage devienne bleu.
Remarque
Tournez le rouleau de papier lorsque vous le
poussez avec les deux mains de façon à ce qu’il soit
bien tendu.
Trou de repérage
Tournez le rouleau de papier jusqu’à ce
que le trou de repérage devienne bleu
tout en le poussant avec les deux mains
de façon à ce qu’il soit bien tendu.
82
Mise en place du rouleau de papier et du ruban encreur

Remarques
• Veillez à enlever tous les morceaux de bande se
trouvant sur le rouleau de papier. Un sceau restant
à l’intérieur de l’imprimante peut entraîner des
problèmes.
• Ne touchez pas la surface d’impression du
rouleau de papier dans le bac d’alimentation
après son chargement. La sueur ou la saleté
présente sur vos mains ou le papier plié peut
affecter la qualité du tirage.
7
Remettez en place la cartouche papier en la
poussant.
9
Tenez les deux bobines et engagez la bobine noire
dans les supports de la bobine noire.
Introduisez le côté gauche de la bobine noire en
premier, puis le côté droit et enfoncez-la jusqu’à
ce qu’elle s’encliquette.
Avertissement
Utilisation
8
Tirez la base du ruban vers le bas.
Etant donné que la tête d’impression thermique
reste brûlante juste après une impression, veillez à
ne pas toucher la tête d’impression thermique au
moment de la mise en place du ruban encreur.
10
Détachez la bobine blanche de la bobine noire.
Tirez-la vers le haut tout en la déroulant de façon à
ce que le ruban soit bien tendu. Poussez-la ensuite
dans les supports de la bobine blanche.
Mise en place du rouleau de papier et du ruban encreur
83

Utilisation
Introdui
ôté
Remarque
Lorsque vous mettez en place la bobine blanche,
vérifiez que le ruban encreur n’est pas détendu ni
froissé. Si c’est le cas, aplatissez-le.
sez le c
premier, puis le côté droit et enfoncez-la jusqu’à ce
qu’elle s’encliquette.
gauche de la bobine blanche en
Remarques sur l’entreposage
• Evitez de placer l’imprimante dans des
environnements soumis aux conditions suivantes :
températures élevées,
forte humidité ou poussière,
lumière directe du soleil.
• Une fois le sachet ouvert, utilisez le ruban et le papier
dès que possible.
• Rangez tout ruban ou papier partiellement utilisé dans
son sachet d’origine.
Mise en place du magasin à papier
Mettez en place le magasin à papier fourni comme
illustré.
Butées
11
Fermez le panneau avant en le poussant dans la
partie centrale du panneau avant.
Remarque
• Fermez le panneau avant après avoir vérifié que la
base du ruban est tirée vers le bas.
• Si vous fermez le panneau avant en poussant un
seul côté, il risque de ne pas se verrouiller
complètement.
Une certaine quantité de papier s’engage dans
l’imprimante puis elle est prête à imprimer.
Remarque
Lors de l'impression, une marge est laissée entre les
tirages. Les portions de marges en excès sont coupées et
tombent dans la partie du magasin à papier prévue à cet
effet. Les butées sont fixées au magasin de façon à ce
que ces marges en excès tombent dans la partie correcte
du magasin à papier. Ne pliez pas ces butées. Si vous le
faites, les morceaux de papier risquent de ne pas tomber
dans la partie du magasin prévue à cet effet et d'être
éjectés dans le magasin avec les impressions. Les tirages
pourraient être abîmés.
Vous devez régler la longueur du magasin à papier en
fonction du kit d’impression à utiliser.
84
Mise en place du rouleau de papier et du ruban encreur
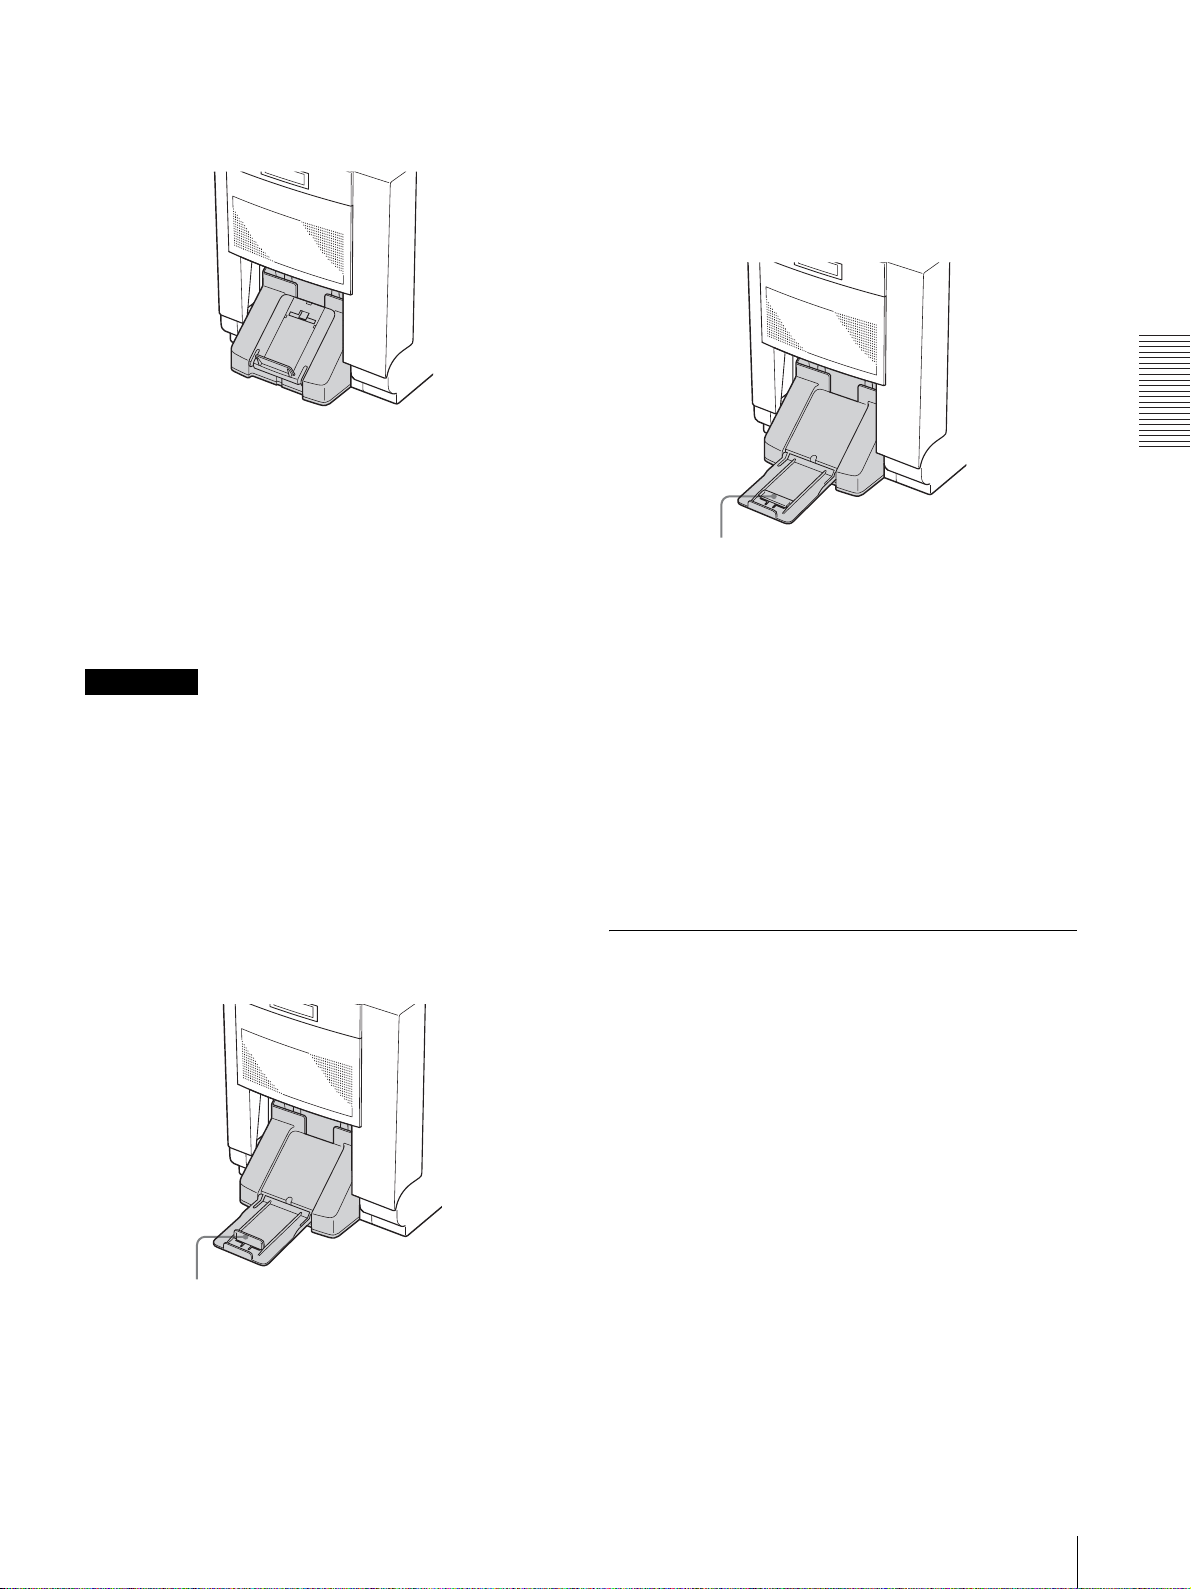
Lors de l’utilisation du kit d’impression
2YNR-R153 ou 2YNR-R154
Ce magasin à papier peut contenir environ 30 feuilles.
Cependant, le nombre d’impressions pouvant être
accumulées dans le magasin à papier change en fonction
des conditions ambiantes dans lesquelles l’imprimante
est utilisée ou de l’image imprimée. Retirez les feuilles
imprimées entassées dans le magasin à papier dès que
possible.
Remarque
Lorsque vous vous servez du kit d’impression 2YNRR155 ou 2YNR-R156, des incidents papier risquent de
se produire si vous utilisez le magasin à papier comme
illustré ci-dessus.
Pour plus de détails, reportez-vous aux sections « Lors
de l’utilisation du kit d’impression 2YNR-R155 » et
« Lors de l’utilisation du kit d’impression 2YNRR156 » suivantes.
est utilisée ou de l’image imprimée. Retirez les feuilles
imprimées entassées dans le magasin à papier dès que
possible.
Lors de l’utilisation du kit d’impression
2YNR-R156
Utilisation
Tirez le support et abaissez la
butée.
Ce magasin à papier peut contenir environ 20 feuilles.
Cependant, le nombre d’impressions pouvant être
accumulées dans le magasin à papier change en fonction
des conditions ambiantes dans lesquelles l’imprimante
est utilisée ou de l’image imprimée. Retirez les feuilles
imprimées entassées dans le magasin à papier dès que
possible.
Pour enlever le magasin à papier
Tenez les deux côtés du magasin à papier et retirez-le en
le tirant vers vous tout en le poussant vers le bas.
Lors de l’utilisation du kit d’impression
2YNR-R155
Tirez le support et soulevez la
butée.
Ce magasin à papier peut contenir environ 20 feuilles.
Cependant, le nombre d’impressions pouvant être
accumulées dans le magasin à papier change en fonction
des conditions ambiantes dans lesquelles l’imprimante
Si le ruban encreur casse en cours
d’utilisation
Il est possible d’en utiliser le reste en le réparant avec du
ruban adhésif.
1
Extrayez le ruban supérieur de la bobine blanche,
posez un bord d’un morceau de ruban adhésif sur
l’extrémité complète du ruban, puis l’autre bord du
ruban adhésif sur l’extrémité du ruban inférieur de
la bobine noire.
Mise en place du rouleau de papier et du ruban encreur
85

Utilisation
P
Reti
osez un bord d’un morceau de
Tournez la
bobine pour
dérouler le
ruban.
2
Retirez la bobine noire inférieure et tendez le ruban.
Ensuite, placez de nouveau le ruban encreur.
ruban adhésif sur l’extrémité
complète du ruban, puis l’autre
bord du ruban adhésif sur
l’extrémité du ruban inférieur.
Selon l’emplacement de la rupture dans la bande, le
ruban pour une feuille de papier imprimé peut être
perdu.
Remarque
Si vous tournez de trop le rouleau de papier, une
quantité de papier trop grande sera alimentée. Des
incidents papier risquent de se produire. Arrêtez de
tourner le rouleau de papier immédiatement après
que le trou de repérage soit devenu bleu.
Retrait du ruban encreur et du
papier
Lorsque le message d’erreur « PAPER END » ou
« RIBBON END » apparaît sur l’écran à cristaux
liquides, le papier ou le ruban encreur correspondant au
nombre de feuilles indiqué est terminé.
Procédez de la façon suivante pour retirer le ruban
encreur et le rouleau de papier. Chargez ensuite un
nouveau ruban encreur et un nouveau rouleau de papier.
rez la bobine et
mettez-la de nouveau
en place après avoir
tendu le ruban.
3
Soulevez la base du ruban et tirez la cartouche
papier de l’imprimante vers vous.
4
Tournez le bac d’alimentation vers l’intérieur de
l’imprimante jusqu’à ce que le trou de repérage
devienne rouge.
5
Tout en tenant les deux extrémités du rouleau de
papier, tournez-le vers vous jusqu’à ce que le trou
de repérage devienne bleu.
1
Retirez les rebuts de papier éjectés et accumulés
dans le magasin à papier.
Remarque
Si des rebuts de papier se sont accumulés dans le
magasin à papier, le panneau avant peut ne pas
s’ouvrir complètement.
Jetez les rebuts de papier éjectés chaque fois que
vous remplacez le ruban d’encre et le rouleau de
papier.
2
Ouvrez le panneau avant.
Avertissement
Etant donné que la tête d’impression thermique
reste brûlante juste après une impression, veillez à
ne pas la toucher au moment de retirer le ruban
encreur et le rouleau de papier de la cartouche
papier.
6
Remettez en place la cartouche papier en la
poussant et abaissez la base du ruban. Ensuite,
fermez le panneau avant en le poussant dans sa
partie centrale.
Une certaine quantité de papier s’engage dans
l’imprimante qui est alors prête à imprimer.
86
Mise en place du rouleau de papier et du ruban encreur

3
Poussez le côté droit de la bobine noire vers la
gauche et tirez-la vers vous pour la retirer.
3 Tournez les deux côtés du papier vers
l’intérieur pour enrouler le reste du papier.
Utilisation
Ne réutilisez pas le ruban encreur que vous avez
retiré.
4
Poussez la bobine blanche vers la gauche et tirez-la
vers vous pour la retirer.
Engagez les bobine blanche et noire du ruban
encreur.
5
Retirez le papier.
4 Retirez le rouleau de papier.
5 Retirez le bac d’alimentation rose du papier.
1 Tirez la base du ruban vers le haut.
2 Tirez le bac d’alimentation de l’imprimante
vers vous.
6 Retirez le bac d’alimentation bleu.
Réutilisez les bacs d’alimentation retirés. Ne
les jetez pas.
Mise en place du rouleau de papier et du ruban encreur
87

Utilisation
Si vous devez remplacer un kit
d’impression partiellement utilisé
Ne remplacez pas le kit d’impression si vous l’avez
utilisé en partie uniquement. Une fois que vous les avez
utilisés entièrement, remettez le rouleau de papier et le
ruban encreur formant un jeu dans l’emballage dans
lequel ils sont fournis.
Si vous devez remplacer un ruban encreur et un rouleau
de papier partiellement utilisés, procédez de la façon
suivante.
Remarque
Si vous changez un ruban encreur et un rouleau de
papier partiellement utilisés, la quantité restante de
ruban encreur affichée risque d'etre incorrecte.
1
Ouvrez le panneau avant.
2
Tirez la base du ruban vers le haut.
3
Tirez la cartouche papier vers vous puis retirez le
papier.
4
Tournez les deux extrémités du papier vers
l’intérieur pour enrouler le reste du papier et mettez
un morceau de ruban adhésif pour éviter que le
papier ne se détende.
5
Chargez le rouleau de papier de remplacement.
Impression depuis
l’ordinateur
Avant de lancer l’impression
• Confirmez que l’imprimante et l’ordinateur sont
branchés (page 75).
• Confirmez que le rouleau de papier et le ruban encreur
sont correctement installés (page 80).
• Confirmez que le magasin à papier est réglé en
fonction du papier à utiliser (page 79).
• Confirmez que le ruban encreur et le papier installés
sont compatibles (page 99).
Avertissement
Ne regardez pas dans la fente de sortie du papier pendant
l’impression. Le bord de l’impression risque de vous
rentrer dans l’oeil ou de vous blesser le visage. Vous
pouvez perdre la vue. De même, n’insérez pas d’objet
étranger dans la fente de sortie du papier. Vous risquez
d’endommager ou de casser le massicot et de vous
couper avec une partie du massicot.
Impression
Ecran LCD
1
6
Tirez la base du ruban vers le bas. Retirez le ruban
encreur et mettez le ruban encreur faisant partie du
meme jeu que le rouleau de papier chargé a l’étape 5.
7
Fermez le panneau avant.
Une certaine quantité de papier est
automatiquement éjectée de façon à ce que le papier
sur lequel de la sueur ou de la saleté de vos mains
aurait pu s’accumuler soit coupé.
Pensez bien à conserver ensemble (sous la forme
d’une paire) le rouleau de papier et le ruban encreur
que vous avez retirés.
Remarque
Si vous changez le ruban encreur et le rouleau de papier
partiellement utilisés, vous gâchez plusieurs feuilles et
risquez de ne pas pouvoir imprimer le nombre de feuilles
spécifié.
Pour des informations sur le nombre de feuilles pouvant
être imprimées, reportez-vous à la section « Capacité
d’impression » à la page 99.
1
Mettez sous tension l’imprimante et l’ordinateur.
Après quelques secondes, le message suivant doit
apparaître sur l’écran LCD. Lorsque READY
s’affiche sur l’écran LCD, l’imprimante est prête à
imprimer.
Kit d’impression en cours
d’utilisation
Affiche la quantité restante de papier
ou de ruban encreur en choisissant
celui des deux qui présente la quantité
la plus faible.
88
Impression depuis l’ordinateur
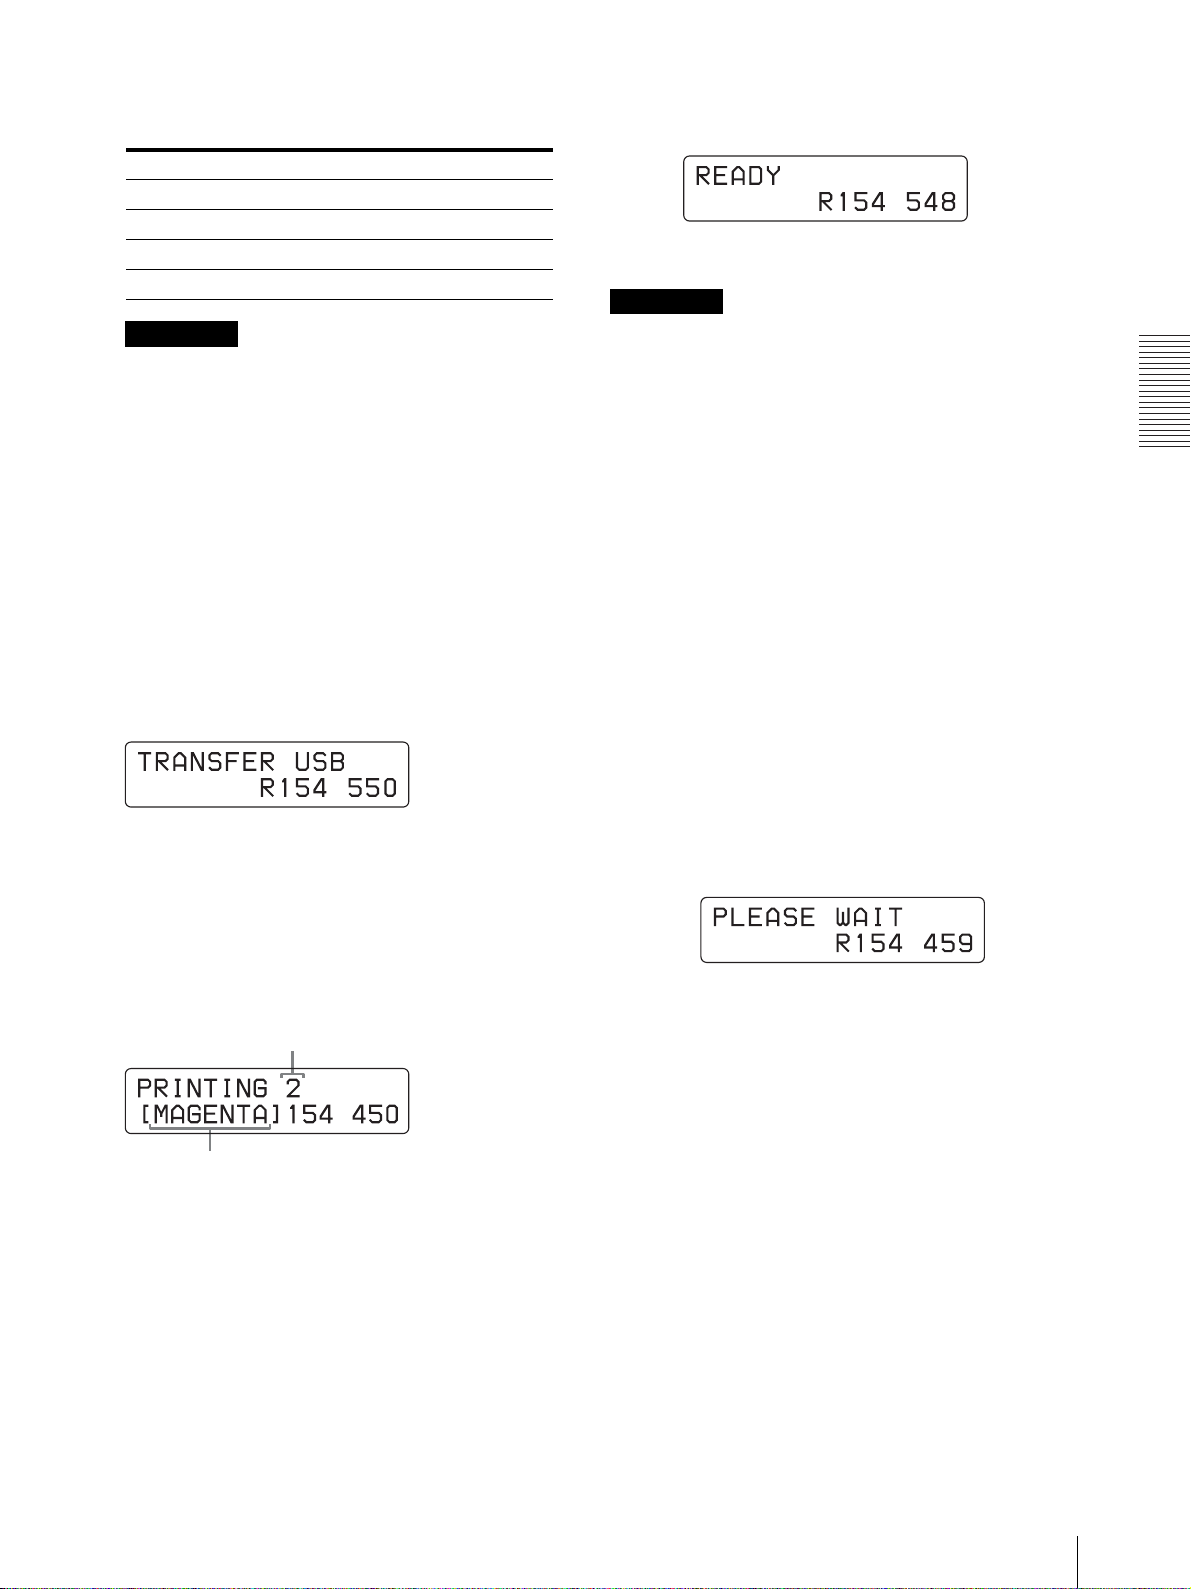
Identification du kit d’impression en cours
Nomb
d’utilisation sur l’écran LCD
Affichage sur l’écran LCD Kit d’impression
R153 2YNR-R153
R154 2YNR-R154
R155 2YNR-R155
R156 2YNR-R156
Remarques
• Ne remettez pas l’imprimante sous tension dans
les 5 secondes qui suivent la mise hors tension.
• Ne tentez pas d’éteindre et de rallumer
l’ordinateur pendant un accès au disque dur ou à
une disquette.
2
Envoyez les données images de l’ordinateur
concerné.
L’imprimante commence à imprimer.
Pour plus d’informations, reportez-vous aux
instructions concernant le pilote d’imprimante sur
le CD-ROM fourni.
1 Pendant que l’imprimante reçoit les données
images, le message suivant doit apparaître.
2 L’imprimante commence à imprimer les
données images transférées dès que la
commande d’impression est envoyée depuis
l’ordinateur.
Le message suivant apparaît.
A la fin de l’impression, READY apparaît de
nouveau sur l’écran LCD.
Remarque
Ne laissez pas plus de 30 feuilles imprimées dans le
magasin à papier lorsque vous utilisez le kit
d’impression 2YNR-R153 ou 2YNR-R154. Ne laissez
pas plus de 20 feuilles imprimées dans le magasin à
papier lorsque vous utilisez le kit d’impression 2YNRR155 ou 2YNR-R156. Cependant, le nombre
d’impressions pouvant être accumulées dans le magasin
à papier change en fonction des conditions ambiantes
dans lesquelles l’imprimante est utilisée ou de l’image
imprimée. Retirez les feuilles imprimées entassées dans
le magasin à papier dès que possible.
Réglez la longueur du magasin à papier en fonction du
kit d’impression à utiliser.
Pour plus de détails, reportez-vous à « Mise en place du
magasin à papier » à la page 84.
Pour arrêter une impression en cours
Appuyez sur la touche PRINT STOP pendant plus d’une
seconde. La page en cours d’impression est terminée et
éjectée. Une fois la page éjectée, la fenêtre d’affichage
retourne à READY. Les données images enregistrées
dans la mémoire et le nombre d’impressions défini dans
la file d’attente sont annulées.
Utilisation
re de pages à imprimer
L’indication de couleur change au fur et à mesure de
l’avancement de l’impression couleur :
DébuttYELLOWtMAGENTAtCYANtLAMI
tFin.
3 Lorsque l’impression est terminée, le papier
imprimé est éjecté de la fente de sortie.
La durée d’impression dépend du format de
l’image, du ruban encreur et du papier.
Capacité mémoire
Les données images envoyées à partir de l’ordinateur
sont enregistrées dans la mémoire de l’imprimante. Les
données d’une image supplémentaire peuvent être
enregistrées en plus de celles de l’image en cours
d’impression.
Si l’imprimante n’imprime pas
Lorsqu’un message d’erreur est affiché sur l’écran LCD,
vous ne pouvez pas utiliser l’imprimante. Procédez
selon les recommandations figurant dans « Liste de
messages » à la page 101.
Remarques sur la conservation de vos
impressions
• Evitez l’exposition au rayonnement direct du soleil ou
les conditions de température et d’humidité élevées
qui peuvent ternir les couleurs.
Impression depuis l’ordinateur
89

• Evitez de coller du ruban adhésif sur l’impression et le
contact avec des objets en plastique comme des
gommes et des sous-mains.
• Veillez à ne pas projeter de l’alcool absolu ou d’autres
solvants organiques volatiles sur les impressions.
Fonctions réglables à
partir du menu
Vous pouvez régler ou confirmer les éléments suivants à
l’aide du menu.
• Réglage de la balance des gris
• Affichage de la quantité totale de pages imprimées
• Affichage de la version du microprogramme de
l’imprimante
Préparation pour les fonctions
Utilisation
réglables à partir du menu
La touche MENU vous permet d’effectuer des fonctions
réglables à partir du menu. Les touches à utiliser pour les
opérations réglables à partir du menu, y compris la
touche MENU, se trouvent sous le panneau avant. Ces
touches sont généralement cachées sous le panneau
avant. Pour les utiliser, vous devez l’enlever.
1
Retirez la partie inférieure du panneau avant et
tirez-la vers le haut pour enlever complètement le
panneau avant.
90
Fonctions réglables à partir du menu
La section du panneau principal apparaît.
2
Effectuez les fonctions à l’aide de ces touches et de
la touche MENU.

Pour fermer le panneau avant
Saisissez les deux parties saillantes se trouvant sur la
partie supérieure du panneau avant, dans la gouttière de
l’imprimante. Fixez les parties inférieures du panneau
avant avec les aimants.
Remarque
La balance des gris des images n’est pas réglable
pendant l’impression.
2,7,8,9,10
Remarque
Assurez-vous de fixer le panneau avant correctement.
S'il n'est pas fixé correctement, de la poussière risque de
s'accumuler sur les impressions et d'affecter leur qualité
d'image.
Réglage de la balance des gris
Utilisez le ruban encreur avec le papier contenu dans le
même carton. La balance des gris de l’imprimante est
réglée sur No. 0, qui correspond à la couleur
achromatique (réglage effectué en usine). Si vous
souhaitez modifier la balance des gris, procédez comme
suit. Ce réglage est maintenu même lorsque
l’imprimante est mise hors tension.
Il peut y avoir des différences dans les emballages
contenant le ruban encreur et les rouleaux de papier en
raison de la manipulation lors du transport et du
stockage.
3
1
Appuyez sur la touche CAL.
L’imprimante passe en mode hors ligne.
2
Appuyez sur F et f pour sélectionner GRAY
PATCH PR IN T.
Appuyez sur F et f pour afficher GRAY PATCH PRINT.
3
Appuyez sur la touche EXEC.
L’imprimante retourne au mode en ligne et
commence l’impression.
En cas d’utilisation du kit 2YNR-R153 ou 2YNRR154, les modèles de réglage des gris Groupe A et
Groupe B sont imprimés sur deux feuilles séparées.
En cas d’utilisation du kit 2YNR-R155 ou 2YNRR156, les modèles de gris Groupe A et Groupe B
sont imprimés sur une feuille.
1,6,11
Utilisation
4
Examinez la copie papier du Groupe A pour
déterminer la meilleure balance des gris dans ce
groupe.
5
Ensuite, examinez la copie papier du Groupe B
pour déterminer la meilleure balance des gris dans
ce groupe.
6
Appuyez sur la touche CAL.
L’imprimante passe en mode hors ligne.
Fonctions réglables à partir du menu
91

Utilisation
A
ffich
7
Appuyez sur les touches F et f pour sélectionner
GRAY ADJUST [A].
L’imprimante entre en mode de réglage de la
balance des gris.
Appuyez sur les touches F et f pour
afficher GRAY ADJUST [A].
8
Appuyez sur les touches G et g pour afficher le
numéro de modèle déterminé à l’étape 4.
Par exemple, sélectionnez 18 si vous jugez que le
modèle No. 18 de l’échantillon offre la meilleure
tonalité chromatique de balance des gris.
Appuyez sur les touches G et g pour
afficher 18.
Affichage du nombre de pages
imprimées
Il est possible d’afficher le nombre total de pages
imprimées depuis la mise sous tension de l’imprimante.
Si aucune impression n’a été effectuée depuis la mise
sous tension de l’imprimante, « 0 » s’affiche dans la
fenêtre d’affichage. Vous pouvez aussi afficher le
nombre total d’impressions effectuées depuis la mise en
service de l’imprimante.
2
1,3
9
Appuyez sur les touches F et f pour sélectionner
GRAY ADJUST [B].
L’imprimante entre en mode de réglage de la
tonalité chromatique de la balance des gris.
ppuyez sur F et f pour a
GRAY ADJUST [B].
10
Appuyez sur les touches G et g pour afficher le
numéro de modèle déterminé à l’étape 5.
Par exemple, sélectionnez 39 si vous jugez que le
modèle No. 39 de l’échantillon offre la meilleure
balance des gris.
Appuyez sur les touches G et g pour
afficher 39.
er
1
Appuyez sur la touche MENU.
L’imprimante passe en mode hors ligne.
2
Appuyez sur les touches F et f pour sélectionner
l’élément à afficher.
Pour afficher le nombre total d’impressions
effectuées depuis la mise sous tension de
l’imprimante :
Sélectionnez « CURRENT PRINTS ».
Appuyez sur F et f pour afficher CURRENT PRINTS.
Nombre total d’impressions effectuées depuis la
mise sous tension de l’imprimante
11
Appuyez sur la touche CAL.
L’imprimante retourne au mode en ligne.
92
Fonctions réglables à partir du menu

Pour afficher le nombre total d’impressions
effectuées depuis la mise en service de
l’imprimante :
Sélectionnez « TOTAL PRINTS. »
Appuyez sur F et f pour afficher TOTAL PRINTS.
Nombre total d’impressions effectuées depuis la
mise sous tension de l’imprimante
3
Appuyez sur la touche MENU après avoir
confirmé.
L’imprimante retourne en mode en ligne.
2
Appuyez sur les touches F et f pour afficher
VERSION.
Appuyez sur les touches F et f pour afficher
VERSION.
Version du microprogramme de l’imprimante
3
Appuyez sur la touche MENU après avoir
confirmé.
L’imprimante retourne en mode en ligne.
Réglage de la position de l’image
Utilisation
Affichage de la version du
microprogramme de l’imprimante
Il est possible d’afficher la version du microprogramme
de l’imprimante.
2
1,3
1
Appuyez sur la touche MENU.
L’imprimante passe en mode hors ligne.
imprimée
Vous pouvez régler la position de l’image imprimée
comme indiqué sur l’illustration de l’étape 3, ci-dessous,
pour le modèle 2YNR-R153 et le modèle 2YNR-R155.
Réglez la position de l’image comme indiqué ou lorsque
la partie blanche apparaît sur le bord de l’impression.
1,4 2 3
1
Appuyez sur la touche MENU.
L’imprimante passe en mode hors ligne.
Fonctions réglables à partir du menu
93

Utilisation
2
Appuyez sur les touches F et f pour afficher
PRINT OFFSET.
Appuyez sur F et f jusqu’à ce que
PRINT OFFSET apparaisse.
La quantité décalée pour la position actuelle
3
Appuyez sur les touches G et g pour décaler
l’image imprimée sur la position souhaitée tout en
observant la copie papier.
L1 : Déplace de 0,6 mm vers la gauche à partir de
la position par défaut.
L2 : Déplace de 1,2 mm vers la gauche à partir de
la position par défaut.
R1 : Déplace de 0,6 mm vers la droite à partir de la
position par défaut.
R2 : Déplace de 1,2 mm vers la droite à partir de la
position par défaut.
L2, L1 R1, R2
L2, L1 R1, R2
Pour le 2YNR-R153
Pour le 2YNR-R155
Pour revenir à la position par défaut
Affichez 0.
4
Appuyez sur la touche MENU une fois le réglage
effectué.
L’imprimante retourne au mode en ligne.
94
Fonctions réglables à partir du menu

Divers
Précautions
Sécurité
• Raccordez l’imprimante à une source d’alimentation
appropriée (reportez-vous à la section
« Spécifications » (page 100)).
• Veillez à ne pas endommager le cordon d’alimentation
en plaçant ou laissant tomber dessus des objets
pesants ; il est dangereux d’utiliser l’imprimante avec
un câble d’alimentation endommagé.
• Si l’imprimante ne doit pas être utilisée pendant une
période prolongée, débranchez le cordon
d’alimentation.
• Débranchez le cordon d’alimentation en tirant sur la
fiche, pas sur le câble.
• Ne démontez pas l’imprimante. Vous risquez de vous
électrocuter à cause des composants internes.
• Veillez à ne pas projeter de l’eau ou d’autres liquides
sur l’imprimante et à ne pas laisser de matériau
combustible ou métallique pénétrer dans le châssis. Si
l’imprimante est utilisée avec des corps étrangers
présents dans le châssis, un risque de défaillance,
d’incendie ou d’électrocution existe.
• Si l’imprimante ne fonctionne pas correctement ou si
un corps étranger pénètre à l’intérieur du boîtier,
débranchez immédiatement le cordon d’alimentation
et consultez votre revendeur.
• Ne touchez pas la fiche du cordon d’alimentation
secteur avec les mains mouillées. Si vous branchez ou
débranchez le cordon d’alimentation secteur avec les
mains mouillées, vous risquez une électrocution.
• Ne vous mettez pas debout sur l’imprimante. Ne posez
pas d’objets pesants sur l’imprimante. L’imprimante
risque de se renverser ou vous risquez de tomber et de
vous blesser ou d’endommager l’imprimante.
• Branchez correctement le câble. Si vous trébuchez sur
le cordon d’alimentation secteur ou sur un câble de
raccordement, l’imprimante peut se renverser ou
tomber. Vous risquez de vous blesser. Veillez à
raccorder correctement les câbles lors de l’installation
de l’imprimante.
Installation
• Evitez de placer l’imprimante dans un endroit exposé
à:
– des vibrations mécaniques
– un niveau élevé d’humidité
– un niveau excessif de poussière
– une exposition directe ou excessive au rayonnement
solaire
– des températures extrêmement hautes ou basses
• Des orifices de ventilation sont ménagés au dos de
l’imprimante pour éviter une surchauffe. Veillez à ne
pas les obstruer avec d’autres objets ou couvrir avec
un chiffon, etc.
Orifices de ventilation
Divers
Remarque
Si vous obstruez les orifices de ventilation, les
performances de l'appareil risquent de ne pas être
optimales.
• Branchez correctement le câble. Si vous trébuchez sur
le cordon d’alimentation secteur ou sur un câble de
raccordement, l’imprimante peut se renverser ou
tomber. Vous risquez de vous blesser. Veillez à
raccorder correctement les câbles lors de l’installation
de l’imprimante.
Condensation
• Si l’imprimante est soumise à des variations brusques
et importantes de température, par exemple lorsqu’elle
est transportée d’un local froid à un local chaud ou
lorsqu’elle reste dans un local avec un chauffage ayant
tendance à produire une certaine quantité d’humidité,
de la condensation risque de se former à l’intérieur de
l’imprimante. En pareil cas, l’imprimante ne
fonctionnera probablement pas correctement et risque
de présenter une défaillance si vous persistez à vouloir
l’utiliser. Si de la condensation se forme, mettez
l’imprimante hors tension et laissez-la reposer
pendant au moins une heure.
• Si le kit d’impression est soumis à des variations
importantes et brusques de la température, de la
condensation peut se former sur le ruban encreur ou le
papier. Ceci empêche l’imprimante de fonctionner
correctement. De plus, si le kit d’impression est utilisé
dans ces conditions, des taches peuvent apparaître sur
les pages imprimées.
• Pour entreposer un kit d’impression à moitié utilisé,
replacez-le dans son emballage d’origine et refermez
Précautions
95

l’emballage. Si possible, conservez le kit d’impression
scellé dans un endroit frais et sombre. Avant de
réutiliser le kit d’impression, placez-le, toujours dans
son emballage scellé, dans un local chauffé pendant
plusieurs heures. Ceci empêche la formation de
condensation au moment où le kit d’impression est
enlevé de son emballage.
Transport de l’imprimante
Ne transportez pas l’imprimante avec les accessoires
fournis, ruban encreur et rouleau de papier mis en place.
Cela risquerait de provoquer un dysfonctionnement.
Nous vous recommandons de stocker le ruban encreur et
le rouleau de papier dans leur emballage d’origine.
Nettoyage
Pour nettoyer la tête d’impression thermique :
Nettoyez les éléments chauffants de la tête d’impression
thermique, le guide de ruban et le rouleau de nettoyage
pour le ruban encreur avec un chiffon doux.
Eléments chauffants de la tête d’impression thermique
Rouleau de nettoyage pour le
ruban encreur
Divers
Remarque
Veillez à mettre l’imprimante hors tension avant de la
nettoyer.
En cas d’encrassement du châssis
Nettoyez le châssis, le panneau et les commandes à
l’aide d’un chiffon doux et sec ou légèrement imbibé
d’une solution détergente non agressive.
N’utilisez pas de solvant, comme le diluant, l’alcool
absolu ou le benzine ou un chiffon chimique, qui
pourrait endommager la finition.
Avant de remplacer un rouleau de papier
Avant de charger un nouveau rouleau de papier une fois
que vous avez utilisé un rouleau de papier entier,
effectuez l’opération de nettoyage suivante.
Utilisez de l’alcool absolu pour le nettoyage. N’utilisez
pas de solvant, comme le diluant, le benzine ou un
chiffon chimique, qui pourrait déteriorer la qualité des
impressions.
Avertissement
Guide de ruban
Nettoyez délicatement autour de la tête d’impression
thermique avec un chiffon doux imbibé d’alcool absolu.
Remarque
Si vous souhaitez utiliser l’imprimante juste après
l’avoir nettoyée, vérifiez qu’elle a bien séché.
Etant donné que la tête d’impression thermique reste
brûlante juste après une impression, veillez à ne pas la
toucher au moment du nettoyage. Vous risquez de vous
brûler.
96
Précautions

Pour nettoyer le rouleau du plateau, le galet
presseur et le rouleau de nettoyage utilisés
pour enlever la poussière accumulée sur le
papier :
Nettoyez délicatement les rouleaux avec un chiffon
doux imbibé d’alcool absolu.
Rouleau de plateau
Rouleau de nettoyage pour
enlever la poussière
accumulée sur le papier
Remarque
La surface du galet en caoutchouc est tendre et se raye
facilement. Lors du nettoyage, veillez à ne pas la rayer
et à ne pas pousser fort sur la surface du galet en
caoutchouc. Vous risquez de détériorer la qualité image
des impressions.
Lorsque les symptômes suivants
apparaissent
Lorsque le message « HEAD IN COOLING »
commence à apparaître fréquemment sur la
fenêtre d’affichage :
Des orifices de ventilation sont prévus à l’avant et à
l’arrière de l’imprimante. Nettoyez le filtre placé sur le
panneau avant de l’imprimante. Si le filtre est colmaté,
le refroidissement de la tête d’impression thermique
prend plus de temps, ce qui allonge aussi la durée
d’impression.
1
Tirez vers vous la poignée de verrouillage du
panneau avant pour ouvrir le capot avant.
Divers
Galet presseur
Nettoyez délicatement les rouleaux avec un chiffon doux
imbibé d’alcool absolu tout en tournant le rouleau.
Pour nettoyer le rouleau d’alimentation papier :
Nettoyez délicatement le rouleau avec un chiffon doux
imbibé d’alcool absolu tout en tournant le galet presseur.
Rouleau d’alimentation papier
2
Retirez le filtre.
3
Lavez le filtre à l’eau pour éliminer les poussières.
Remarque
Ne frottez pas vigoureusement le maillage du filtre.
Précautions
97

4
Une fois que le filtre est bien sec, remettez-le en
place sur le panneau avant.
5
Fermez le panneau avant en poussant sa partie
centrale.
Dans un tel cas, nettoyez délicatement la tête
d’impression thermique avec un chiffon doux imbibé
d’alcool absolu.
Nettoyez délicatement les deux extrémités
de la tête d’impression thermique avec un
chiffon doux imbibé d’alcool absolu.
Divers
Remarque
Si vous fermez le panneau avant en le poussant sur un
côté, il risque de ne pas se verrouiller complètement.
Si des bandes blanches ou des rayures
apparaissent sur les tirages :
Lorsque vous effectuez des tirages à l’aide du kit
d’impression 2YNR-R153/R155, une fois que vous avez
utilisé plusieurs rouleaux du kit d’impression 2YNRR154/R156, la qualité d’impression risque de se
détériorer. Par exemple, des bandes blanches ou des
rayures peuvent apparaître sur les tirages.
Avertissement
Etant donné que la tête d’impression thermique est
encore très chaude juste après la fin d’une impression,
soyez vigilant lorsque vous la nettoyez.
Si vous utilisez l’imprimante à des
températures hautes ou basses
Soyez très prudent lors de l’utilisation de l’imprimante
dans des endroits froids ou chauds.
La plage de température de fonctionnement dans
laquelle les performances de l’imprimante sont
garanties se situe entre 5°C et 35°C.
Vous devrez peut-être ajuster la position de la tête
thermique afin d’adapter l’imprimante à
l’environnement dans lequel vous l’utilisez.
Lorsque vous effectuez de nombreuses
impressions d’images contenant des portions
très foncées dans un environnement avec des
températures élevées proches de 35°C
Ajustez la position de la tête thermique si les problèmes
suivants surviennent :
98
Précautions
Problème Position de la tête thermique
L’impression s’est
rétrécie.
Des taches blanchâtres
apparaissent sur les
portions foncées de
l’impression.
Modifiez la position d’une encoche
vers le côte T.
Modifiez la position d’une encoche
vers le côte S.

Lorsque vous utilisez l’imprimante dans un
environnement avec des températures basses
proches de 5°C
Ajustez la position de la tête thermique si les problèmes
suivants surviennent :
Problème Position de la tête thermique
L’impression s’est
rétrécie.
Des portions de taches
foncées apparaissent
sur les portions claires
de l’impression.
Modifiez la position d’une encoche
vers le côte T.
Modifiez la position d’une encoche
vers le côté T.
Réglage de la position de la tête thermique
Les deux extrémités de la tête thermique comportent des
plaques de mécanisme de réglage de tête thermique.
Lorsque vous ajustez la position de la tête thermique,
réglez les deux extrémités sur la même position.
1
Insérez l’extrémité du tournevis dans la gorge de la
vis de réglage.
2
Tournez la vis de réglage d’une encoche vers le côté
T ou S selon la gravité du problème jusqu’à ce que
la protubérance soit positionnée correctement et
que vous entendiez un clic.
Côté droit
Ruban encreur et papier
Chaque kit d’impression contient deux cartons
contenant chacun un ruban encreur et un rouleau de
papier.
Utilisez toujours le ruban encreur et le rouleau de papier
d’un même carton.
2YNR-R153 Self-Laminating Color Printing Pack
Contient un ruban encreur couleur et du papier.
Ruban encreur pour l’impression : 2 rouleaux
Papier d’impression format L (89 × 127 mm) :
2 rouleaux
2YNR-R154 Self-Laminating Color Printing Pack
Contient un ruban encreur couleur et du papier.
Ruban encreur pour l’impression : 2 rouleaux
Papier d’impression format PC (102 × 152 mm) :
2 rouleaux
2YNR-R155 Self-Laminating Color Printing Pack
Contient un ruban encreur couleur et du papier.
Ruban encreur pour l’impression : 2 rouleaux
Papier format 2L (127 × 178 mm) : 2 rouleaux
2YNR-R156 Self-Laminating Color Printing Pack
Contient un ruban encreur couleur et du papier.
Ruban encreur pour l’impression : 2 rouleaux
Papier d’impression format 2PC (152 × 204 mm) :
2 rouleaux
Divers
Protubérance
3
Effectuez le même réglage de l’autre côté de la tête
thermique en répétant les étapes 1 et 2.
Côté gauche
Protubérance
Capacité d’impression
• Chaque kit d’impression contient deux cartons
contenant chacun un ruban encreur et un rouleau de
papier. Un carton contenant le ruban encreur et le
rouleau de papier vous permet d’imprimer le nombre
de feuilles suivant.
Kit
d’impression
Capacité
d’impression
Format
d’impression
Remarque
2YNRR153
610
(feuilles)
× 127
89
mm
× 5
3,5
pouces
2YNRR154
550
(feuilles)
102 × 152 mm127 × 178 mm152 × 204
4 × 6
pouces
2YNRR155
335
(feuilles)
5 × 7
pouces
2YNRR156
295
(feuilles)
mm
6 × 8
pouces
Toutefois, le nombre de pages pouvant être imprimées
peut ne pas être atteint si vous remplacez le ruban
encreur et le papier avant l’épuisement du ruban encreur
et du papier.
Ruban encreur et papier
99

Divers
Spécifications
Alimentation Secteur de 100 V à 240 V, 50/60 Hz
Courant d’entrée
max. 5 A à 2,5 A (pendant
l’impression)
Plage de température de fonctionnement
5 à 35°C
Plage d’humidité de fonctionnement
20 à 80%
Dimensions extérieures
Environ 280 × 356 × 463 mm (p)
1
(11
/8 ×14 1/8 ×18 1/8 pouces)
(avec parties en saillie)
Environ 280 × 356 × 451 mm (p)
1
(11
/8 ×14 1/8 ×17 7/8 pouces)
(parties en saillie exclues)
Poids 20 kg (44 lb 1 oz) environ (imprimante
uniquement)
Système d’impression
Transfert thermique par sublimation
Tête d’impression thermique
13,1 points/mm, 2048 éléments
(334 ppp)
Gradations 8 bits chaque pour jaune, magenta et
cyan
Taille de l’image
2YNR-R153 : 89 × 127 mm
(3,5 × 5 pouces)
2YNR-R154 : 102 × 152 mm
(4 × 6 pouces)
2YNR-R155 : 127 × 178 mm
(5 × 7 pouces)
2YNR-R156 : 152 × 204 mm
(6 × 8 pouces)
Pixels imprimables
2YNR-R153 : 1210 × 1728 points
2YNR-R154 : 1382 × 2048 points
2YNR-R155 : 1728 × 2380 points
2YNR-R156 : 2048 × 2724 points
(Environ 1,5 mm des portions droite et
gauche en haut et en bas ne sont pas
imprimées.)
Durée d’impression
2YNR-R153 : 6,6 sec.
2YNR-R154 : 6,6 sec.
2YNR-R155 : 12 sec.
2YNR-R156 : 14 sec.
Connecteur d’entrée
AC IN (alimentation)
Interface Hi-Speed USB (USB2,0)
Accessoires fournis
Magasin à papier (1)
Bacs d’alimentation (2)
Cordon d’alimentation secteur (1)
(envoyé séparément)
Câble USB (1)
CD-ROM (Mode d’emploi, pilote
d’imprimante, manuel d’installation
et le fichier Lisezmoi.txt) (1)
Contrat d’utilisation de logiciel (1)
Mode d’emploi (1)
Avant d’utiliser cette imprimante (1)
Accessoires en option
Self-Laminating Color Printing Pack
Numéro de
pièce
H146035-00 2YNR-R153
H146036-00 2YNR-R154
H146037-00 2YNR-R155
H146038-00 2YNR-R156
Type et caractéristiques sont susceptibles d’être
modifiés sans préavis.
Nom du
produit
Self-Laminating
Color Printing
Pack
Self-Laminating
Color Printing
Pack
Self-Laminating
Color Printing
Pack
Self-Laminating
Color Printing
Pack
Contenu
2YNR-R153
Format L, 610
(
feuilles × 2 rouleaux)
2YNR-R154
Format PC, 550
(
feuilles × 2 rouleaux)
2YNR-R155
Format 2L, 335
(
feuilles × 2 rouleaux)
2YNR-R156
Format 2PC, 295
(
feuilles × 2 rouleaux)
100
Spécifications
 Loading...