

Page 1
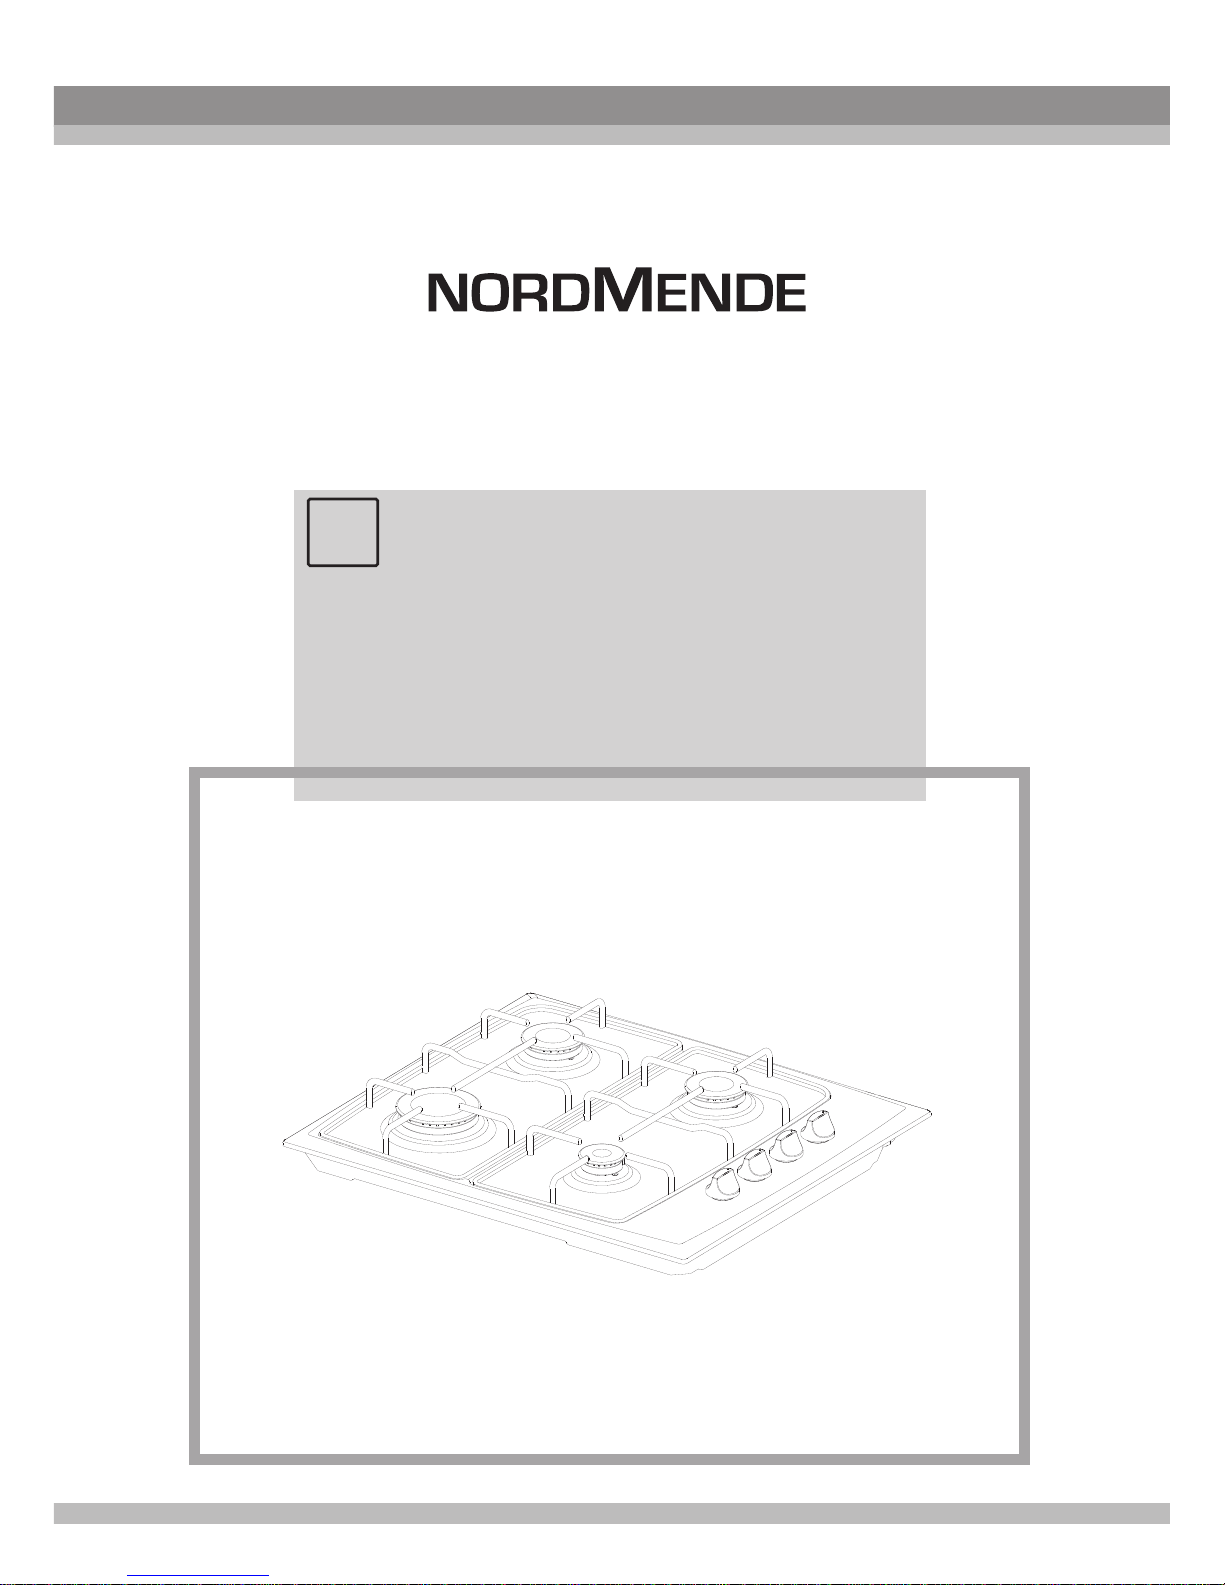
OPERATING AND INSTALLATION
INSTRUCTIONS OF
BUILT-IN GAS HOB
EN
HGE603BL
HGE603IX
Page 2
Dear Customer,
Our goal is to offer you products with high quality that exceed your expectations.
Your appliance is produced in modern facilities carefully and particularly tested for
quality.
This manual is prepared in order to help you use your appliance that is manufactured
by the most recent technology, with confidence and maximum efficiency.
Before using your appliance, carefully read this guide that includes the basic
information for right and safe installation, maintenance and use. Please contact to
the nearest Authorized Service for the installation of your product.
Declaration of conformity
We declare that our products meet the applicable European Directives,
Decisions and Regulations and the requirements listed in the standards
referenced.
Page 3

2
CONTENTS:
1. BRIEF PRESENTATION OF PRODUCT
2. WARNINGS
3. INSTALLATION AND PREPARATIONS FOR USE
3.1
3.2 Gas connection
3.3 Electric connection and safety
3.4 Gas conversion
4. USE OF YOUR PRODUCT
4.1
4.2 Use of hotplate
4.3 Accessories
5. CLEANING AND MAINTENANCE
5.1 Cleaning
5.2 Maintenance
6. SERVICE AND TRANSPORT
6.1
6.2 Information related to the transport
Installation of product
Use of gas burners
Basic troubleshooting before contacting service
Page 4
3
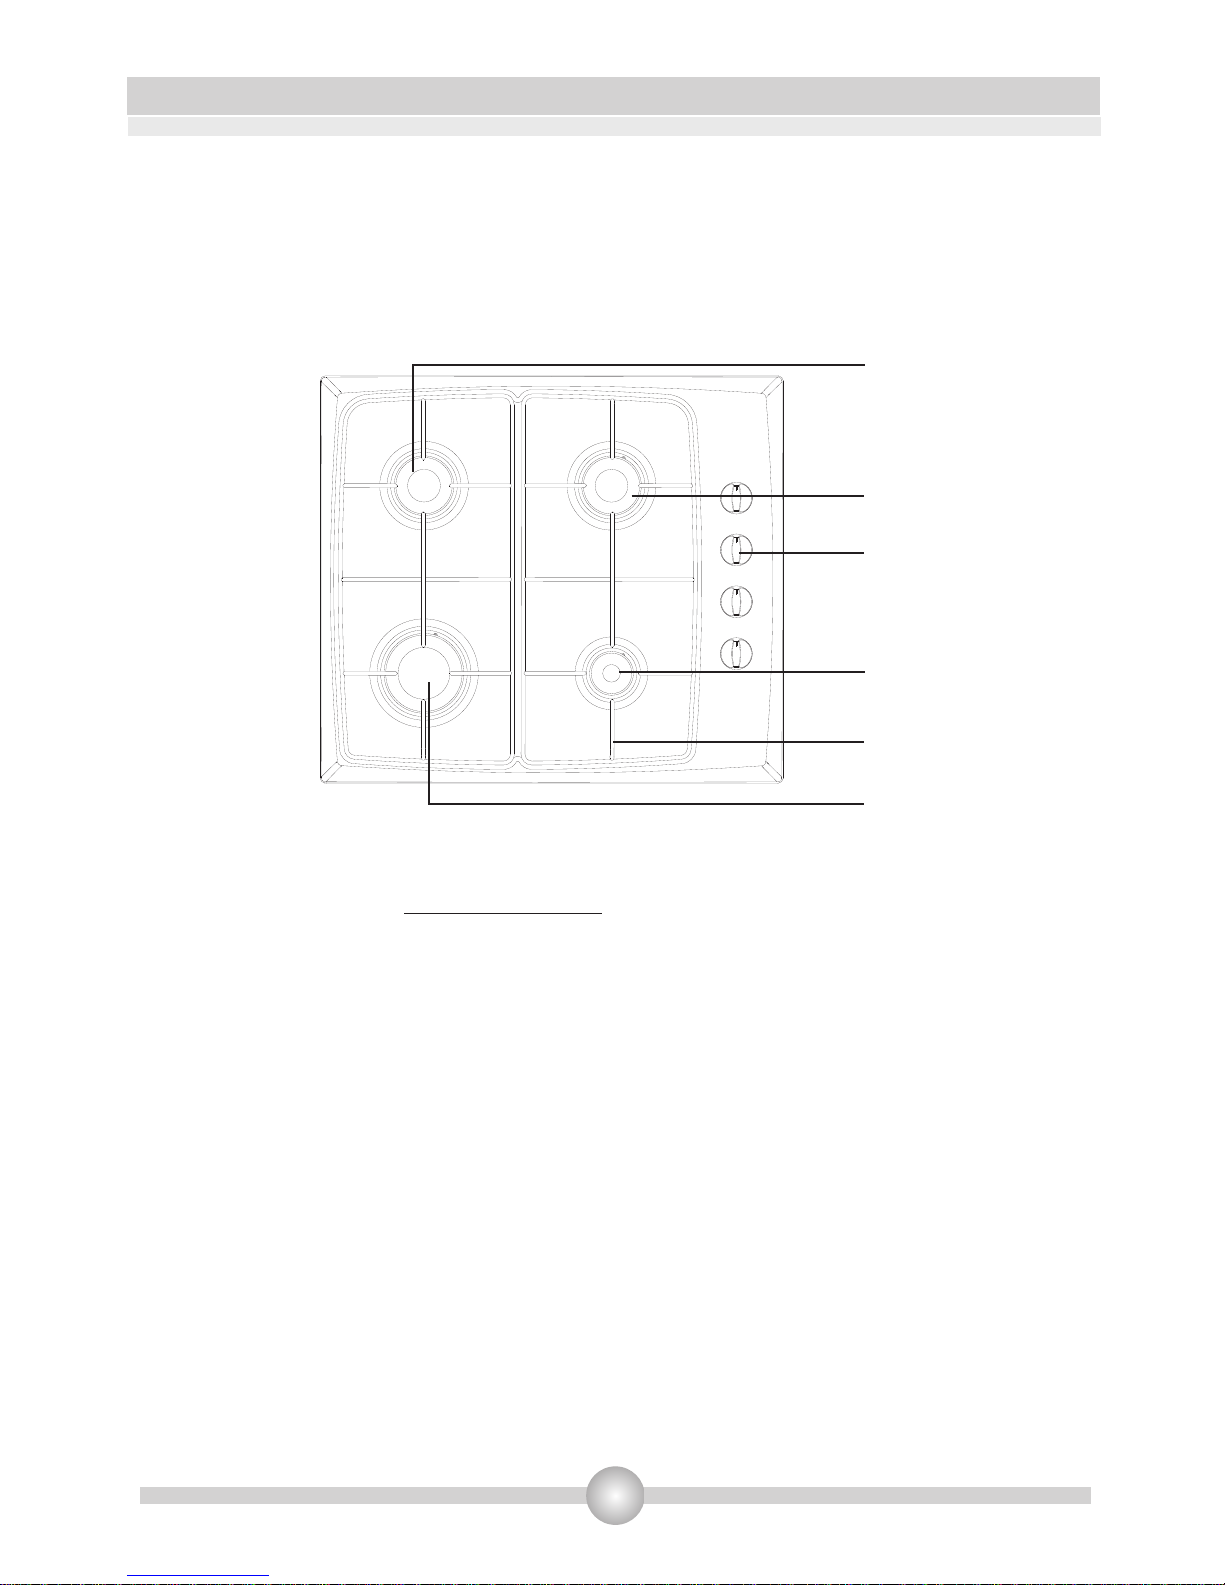
1. BRIEF PRESENTATION OF PRODUCT
Gas Hob:
List of Components:
* The appearance of your hob may be different than the model shown above due to its configuration.
12- Control Knobs
3- Auxiliary Burner
4- Pan Support
5- Rapid Burner
Semi-Rapid Burner
1
1
2
3
4
5
Page 5

4
2. WARNINGS
READ THESE INSTRUCTIONS CAREFULLY AND COMPLETELY BEFORE USING YOUR
APPLIANCE, AND KEEP IT IN A CONVENIENT PLACE FOR REFERENCE WHEN NECESSARY.
THIS MANUAL IS PREPARED FOR MORE THAN ONE MODEL IN COMMON. YOUR APPLIANCE
MAY NOT HAVE SOME OF THE FEATURES THAT ARE EXPLAINED IN THIS MANUAL. PAY
ATTENTION TO THE EXPRESSIONS THAT HAVE FIGURES, WHILE YOU ARE READING THE
OPERATING MANUAL.
General Safety Warnings
- This appliance can be used by children aged
from 8 years and above and persons with
reduced physical, sensory or mental capabilities
or lack of experience and knowledge if they
have been given supervision or instruction
concerning use of the appliance in a safe way
and understand the hazards involved. Children
shall not play with the appliance. Cleaning and
user maintenance shall not be made by children
without supervision.
- WARNING: The appliance and its accessible
parts become hot during use. Care should be
taken to avoid touching heating elements.
Children less than 8 years of age shall be kept
away unless continuously supervised.
- WARNING: Unattended cooking on a hob with
fat or oil can be dangerous and may result in
fire. NEVER try to extinguish a fire with water,
but switch off the appliance and then cover
flame e.g. with a lid or a fire blanket.
- WARNING: Danger of fire: do not store items
on the cooking surfaces.
Page 6

5
2. WARNINGS
-WARNING: If the surface is cracked, switch off
the appliance to avoid the possibility of electric
shock.
-For hobs incorporating a lid, any spillage should
be removed from the lid before opening. And
also the hob surface should be allowed to cool
before closing the lid.
-The appliance is not intended to be operated by
means of an external timer or separate remotecontrol system.
-Do not use harsh abrasive cleaners or sharp
metal scrapers to clean the oven door glass and
other surface since they can scratch the surface,
which may result in shattering of the glass or
damage to the surface.
-Do not use steam cleaners for cleaning the
appliance.
-Your appliance is produced in accordance with all applicable local and international standards and
regulations.
- Maintenance and repair work must be made only by authorized service technicians. Installation and
repair work that is carried out by unauthorized technicians may endanger you. It is dangerous to alter or
modify the specifications of the appliance in any way.
- Prior to installation, ensure that the local distribution conditions (nature of the gas and gas pressure or
electricity voltage and frequency) and the requirements of the appliance are compatible. The
requirements for this appliance are stated on the label.
- CAUTION: This appliance is designed only for cooking food and is intended for indoor domestic
household use only and should not be used for any other purpose or in any other application, such as
for non-domestic use or in a commercial environment or room heating.
- This appliance is not connected to a combustion products evacuation device. It shall be installed and
connected in accordance with current installation regulations. Particular attention shall be given to the
relevant requirements regarding ventilation.
- If after 15 s the burner has not lit, stop operating the device and open the compartment door and/or
wait at least 1 min before attempting a further ignition of the burner.
Page 7

6
2. WARNINGS
- These instructions are only valid if the country symbol appears on the appliance. If the symbol does
not appear on the appliance, it is necessary to refer to the technical instructions which will provide the
necessary instructions concerning modification of the appliance to the conditions of use of the country.
- All possible security measures have been taken to ensure your safety. Since the glass may break,
you should be careful while cleaning to avoid scratching. Avoid hitting or knocking on the glass with
accessories.
- Ensure that the supply cord is not wedged during the installation. If the supply cord is damaged, it
must be replaced by the manufacturer, its service agent or similarly qualified persons in order to
prevent a hazard.
Installation Warnings
- Do not operate the appliance before it is fully installed.
- The appliance must be installed by an authorized technician and put into use. The producer is not
responsible for any damage that might be caused by defective placement and installation by
unauthorized people.
- When you unpack the appliance, make sure that it is not damaged during transportation. In case of
any defect; do not use the appliance and contact a qualified service agent immediately. As the
materials used for packaging (nylon, staplers, styrofoam...etc) may cause harmful effects to children,
they should be collected and removed immediately.
- Protect your appliance against atmospheric effects. Do not expose it to effects such as sun, rain,
snow etc.
- The surrounding materials of the appliance (cabinet) must be able to withstand a temperature of min
100°C.
During usage
- Do not put flammable or combustible materials, in or near the appliance when it is operating.
- Do not leave the cooker while cooking with solid or liquid oils. They may catch fire on condition of
extreme heating. Never pour water on to flames that are caused by oil. Cover the saucepan or frypan
with its cover in order to choke the flame that has occurred in this case and turn the cooker off.
- Always position pans over the centre of the cooking zone, and turn the handles to a safe position so
they cannot be knocked or grabbed.
-If you will not use the appliance for a long time, plug it off. Keep the main control switch off. Also when
you do not use the appliance, keep the gas valve off.
- Make sure the appliance control knobs are always in the "0" (stop) position when it is not used.
- CAUTION: The use of a gas cooking appliance results in the production of heat, moisture and
products of combustion in the room in which it is installed. Ensure that the kitchen is well ventilated
especially when the appliance is in use, keep natural ventilation holes open or install a mechanical
ventilation device (mechanical extractor hood).
- Prolonged intensive use of the appliance may call for additional ventilation, for example opening of a
window, or more effective ventilation, for example increasing the level of mechanical ventilation where
present.
During cleaning and maintenance
- Always turn the appliance off before operations such as cleaning or maintenance. You can do it after
plugging the appliance off or turning the main switches off.
- Do not remove the control knobs to clean the control panel.
TO MAINTAIN THE EFFICIENCY AND SAFETY OF YOUR APPLIANCE, WE RECOMMEND YOU
ALWAYS USE ORIGINAL SPARE PARTS AND TO CALL ONLY OUR AUTHORIZED SERVICE
AGENTS IN CASE OF NEED.
Page 8
7
3. INSTALLATION AND PREPARATIONS FOR USE
Important:
manufacturers installation instructions, local building regulations, gas authority codes and
electrical wiring instructions.
Important
• The appliance should be installed, regulated and adapted to function with other types of gas by
a QUALIFIED INSTALLATION TECHNICIAN. Failure to comply with this condition will render the
guarantee invalid.
• The appliance must be installed in compliance with regulations in force.
• Installation technicians must comply to current laws in force concerning ventilation and the
evacuation of exhaust gases.
• Always disconnect the gas supply from the appliance before carrying out any maintenance
operations or repairs.
• The appliance must be housed in heat-resistant units.
• These tops are designed to be embedded into kitchen fixtures measuring 600 mm in depth.
• The walls of the units must not be higher than work top and must be capable of resisting
temperatures of 60 °C above room temperature.
• Do not install the appliance near inflammable materials (eg. curtains).
Location
• The appliance may be installed in a kitchen, kitchen/diner or a bed sitting room, but not in a
room or space containing a bath or a shower.
3
• The appliance must not be installed in a bed-sitting room of less than 20 m .
• The appliance is designed and approved for domestic use only and should not be installed in a
commercial, semi commercial or communal environment. Your product will not be guaranteed if
installed in any of the above environments and could affect any third party or public liability
insurances you may have.
Ventilation requirements
3 2
• For rooms with a volume of less than 5 m - permanent ventilation of 100 mm free area is
required.
This appliance must be installed by a qualified people according to the
3.1. Installation of your product
Advice for the installer
!
!
Page 9

8
3. INSTALLATION AND PREPARATIONS FOR USE
• For rooms with a volume of between 5 m and 10 m a permanent ventilation of 50 cm free
area will be required unless the room has a door which opens directly the outside air in which
case no permanent ventilation is required.
3
• For rooms with a volume greater than 10 m - no permanent ventilation is required.
Pay attention:
access to the outside air via an openable window or equivalent.
Technical information for the installer
After removing the packaging material from the appliance and its accessories, ensure that the hob is
not damaged. If you suspect any damage do not use the appliance and contact the store where you
purchased this hob.
The appliance is supplied with an installation kit including adhesive sealing material and fixing
brackets&screws are included with the appliance.
• Cut the aperture dimensions as indicated in Figure - 1. Locate the aperture on the worktop such
that after the hob is installed the following requirements are ensured;
• 100mm from edge of cooker to combustible materials
• 700mm underside of overhead cupboards, shelving
• 750mm underside of overhead extractor fans.
3 3 2
Regardless of room size, all rooms containing the appliance must have direct
!
Figure 1
Neighbourhood walls A[mm] B[mm]
Combustible / 50 100
Non-combustible
510 mm
Min.
A
490 mm
Min.
B
Min.
130mm
Min.
25mm
580 mm
560 mm
42 mm
Page 10
•
the outer perimeter edge of the appliance. Ensure that the junctions overlap at the corners and
no gap is left along the sealing material.
•
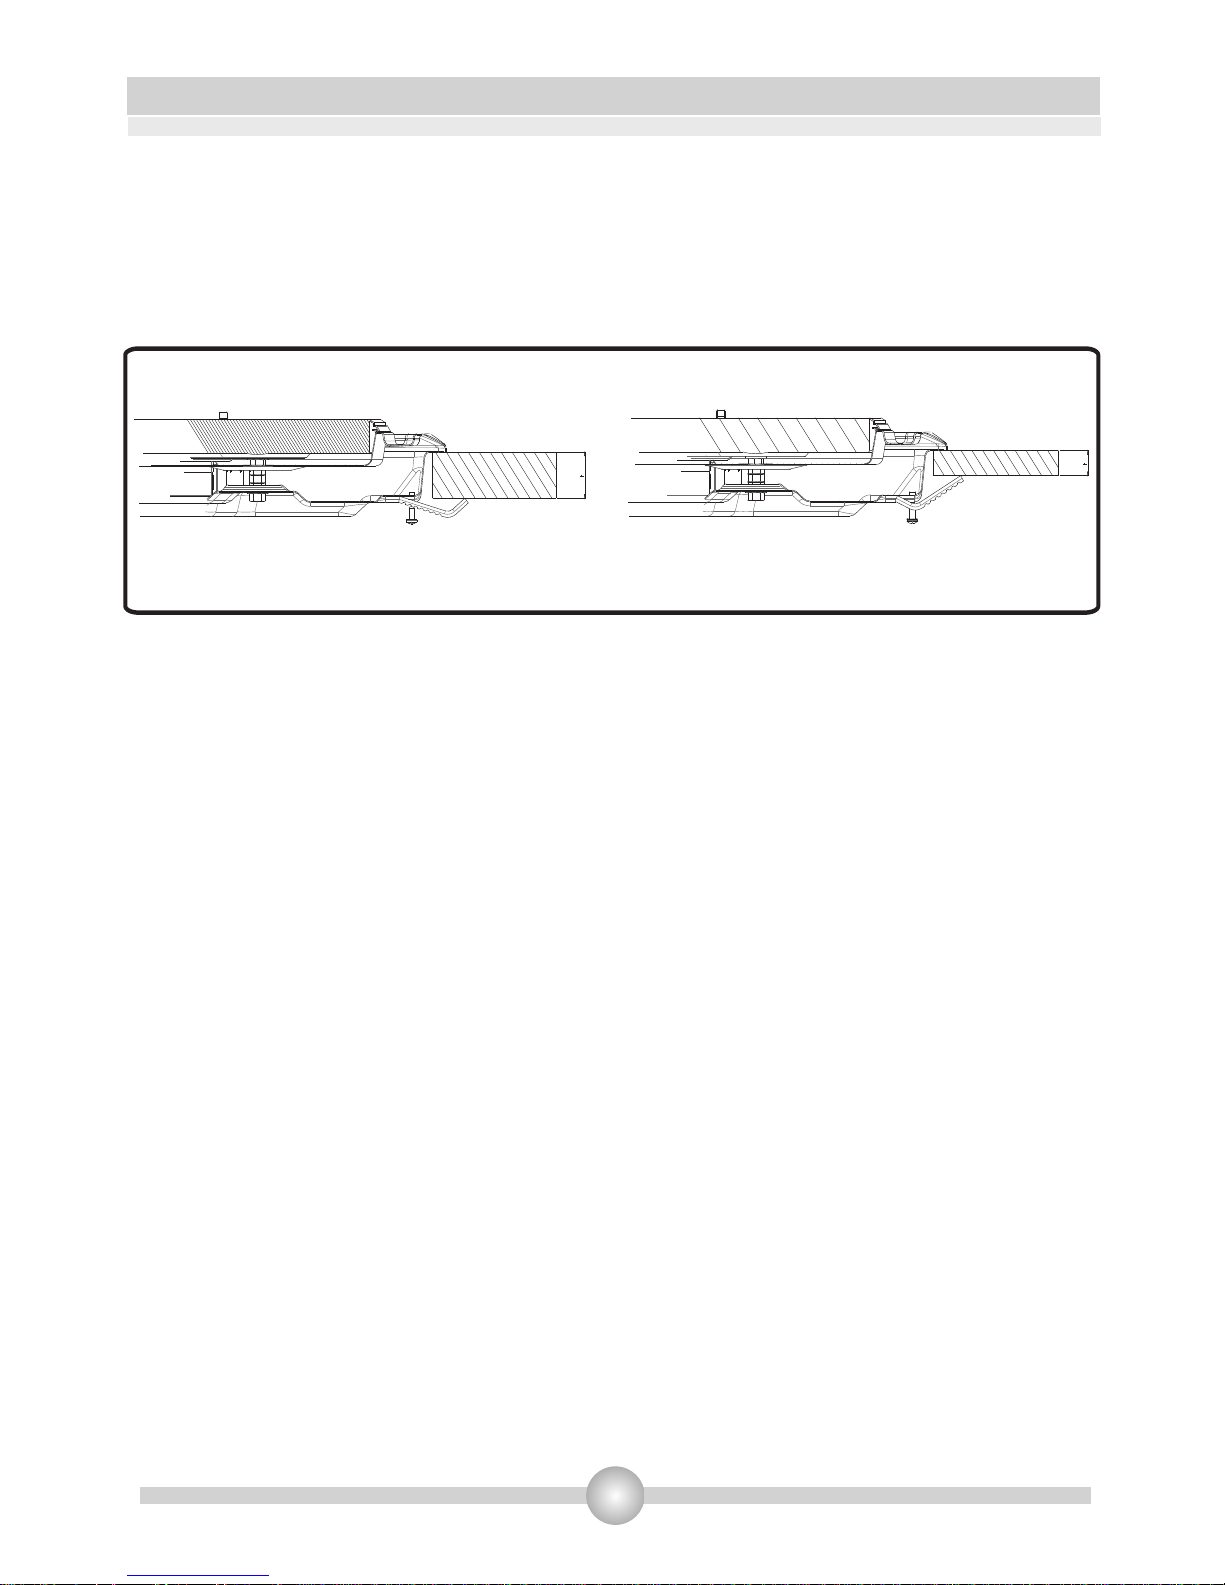
Adjust the position of the brackets depending on the thickness of the worktop as indicated in
Figure-2 and tighten the screws evenly.
Apply the adhesive sealing material “C” all the way round the aperture on the worktop to match
Insert the appliance into the aperture and fix in position via the brackets (A) and screws (B).
9
3. INSTALLATION AND PREPARATIONS FOR USE
Figure 2 - Installation with
Bracket Type 1
t>25mm t>25mm
Page 11

3. INSTALLATION AND PREPARATIONS FOR USE
10
The connection of the appliance should be performed in accordance with local and international
standards and regulations applicable. You can find the information related to appropriate gas types
and appropriate gas injectors on technical data table. If the pressure of used gas is different than
these values stated or not stable in your area, it may be required to assemble an available pressure
regulator on the gas inlet. It is certainly required to contact to the authorized service to make these
adjustments.
The points that must be checked during flexible hose assembly
If the gas connection is made by a flexible hose that is fixed on the gas inlet of appliance, it must be
fixed by a pipe collar as well. Connect your appliance with a short and durable hose that is as close
as possible to the gas source. The hose's permitted maximum length is 1.5m. The hose that brings
gas to the appliance must be changed once a year for your safety.
0
The hose must be kept clear from areas that may heat up to temperatures in excess of 90 C. The
hose must not be ruptured, bent or folded. It must be kept clear of sharp corners, moving things,
and should not be defective. Before assembly, it must be checked whether there is any production
defect.
As gas is turned on, all connection parts and hose must be checked with soapy water or leakage
fluids. Do not use naked flame to check gas leakage. All metal components used during gas
connection must be clear of rust. Also check the expiry dates of components to be used.
The points that must be checked during fixed gas connection assembly
To assemble a fixed gas connection (gas connection made by threads, e.g. a nut), there are different
methods used in different countries. The most common parts are already supplied with your appliance.
Any other part can be supplied as spare part.
3.2. Gas connection
• Carefully trim away the excess sealing material “C” from around the appliance.
Important: If the appliance is to be installed above a cupboard or drawer it is absolutely
essential that you place a separator between the base of the appliance and the drawer unit.
Emptying of the Burned Gases from Environment
The cooking appliances that operate with gas, throw the burned gas wastes out directly to the
outside or through the cooker hoods that are connected to the a chimney that opens directly to the
outside. If it seems that it is not possible to install a cooker hood, it is required to set an electric fan
on the window or wall that has access to fresh air. This electric fan must have the capacity to change
the air of the kitchen environment 4-5 times of its own volume of air per hour.
!
Page 12
3. INSTALLATION AND PREPARATIONS FOR USE
11
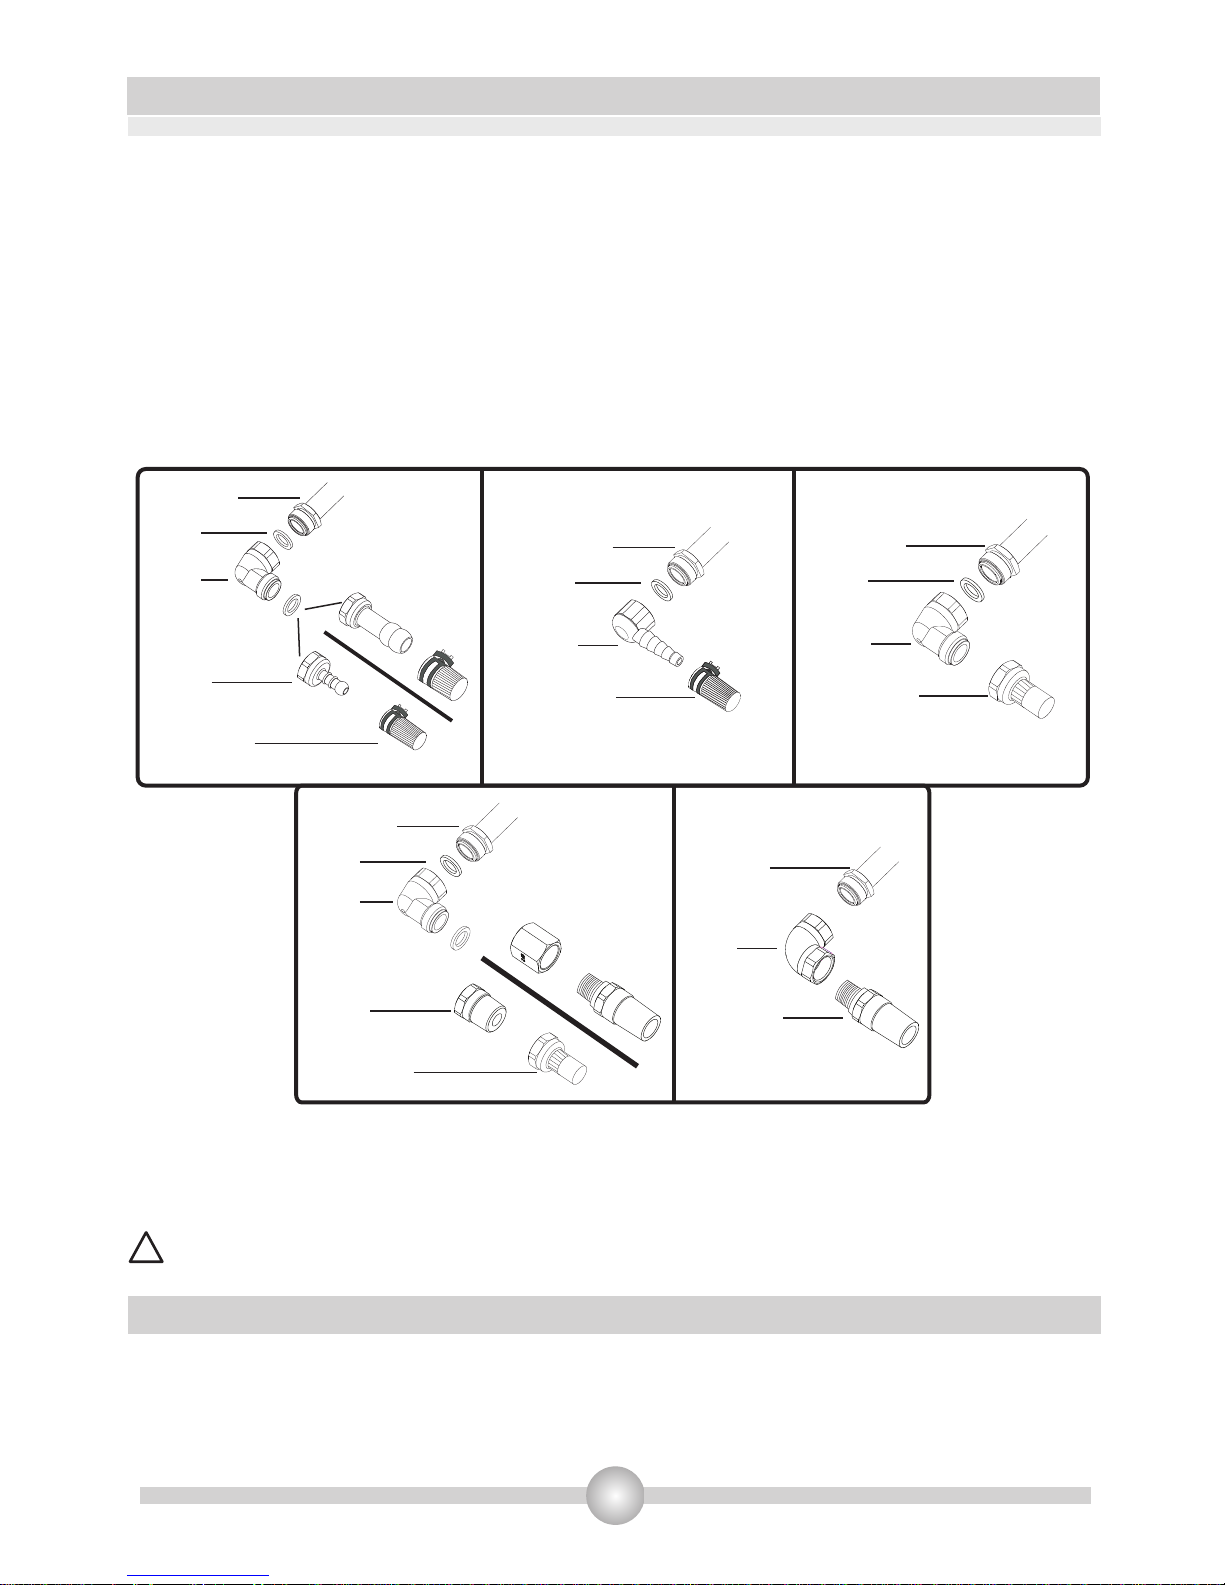
During connections always keep the nut on the gas manifold fixed, while rotating the counter-part.
Use spanners of appropriate size for safe connection. For all surfaces between different
components, always use the seals provided in the gas conversion kit. The seals used during
connection should also be approved to be used in gas connections. Do not use plumbing seals for
gas connections.
Remember that this appliance is ready to be connected to gas supply in the country for which it has
been produced. The main country of destination is marked on the rear cover of the appliance. If you
need to use it in another country, any of the connections in the figure below can be required.
In such a case, contact local authorities to learn the correct gas connection.
It is required to call the authorized service to be able to make the gas connections appropriately
and in compliance with safety standards.
ATTENTION! Surely do not use any match or lighter for control of gas leakage.
!
During the electric connection, follow the instructions stated in the user manual.
• The earthing cable must be connected to the earth terminal
3.3. Electric connection and safety
.
Seal
Hose
Fitting
Hose
Fitting
Gas Hose
with Collar
Gas Pipe
Figure 4
Seal
Hose
Fitting
Gas Hose
with Collar
Gas Pipe
Mechanical
Gas Hose
Seal
Hose
Fitting
Gas Pipe
Seal
Hose
Fitting
Hose
Fitting
Mechanical
Gas Hose
Gas Pipe
Mechanical
Gas Hose
Hose
Fitting
Gas Pipe
Page 13
3. INSTALLATION AND PREPARATIONS FOR USE
12
•
damaged, causing short circuit.
• The manufacturer declares that it has no responsibility against any kind of damages and losses
that are caused by improper connections that are performed by unauthorized people.
Caution: The following procedures must be undertaken by authorized service people.
Your appliance is adjusted to be operated with LPG/NG gas. The gas burners can be adapted to
different types of gas, by replacing the corresponding injectors and adjusting minimum flame length
suitable to the gas in use. For this purpose, following steps should be performed:
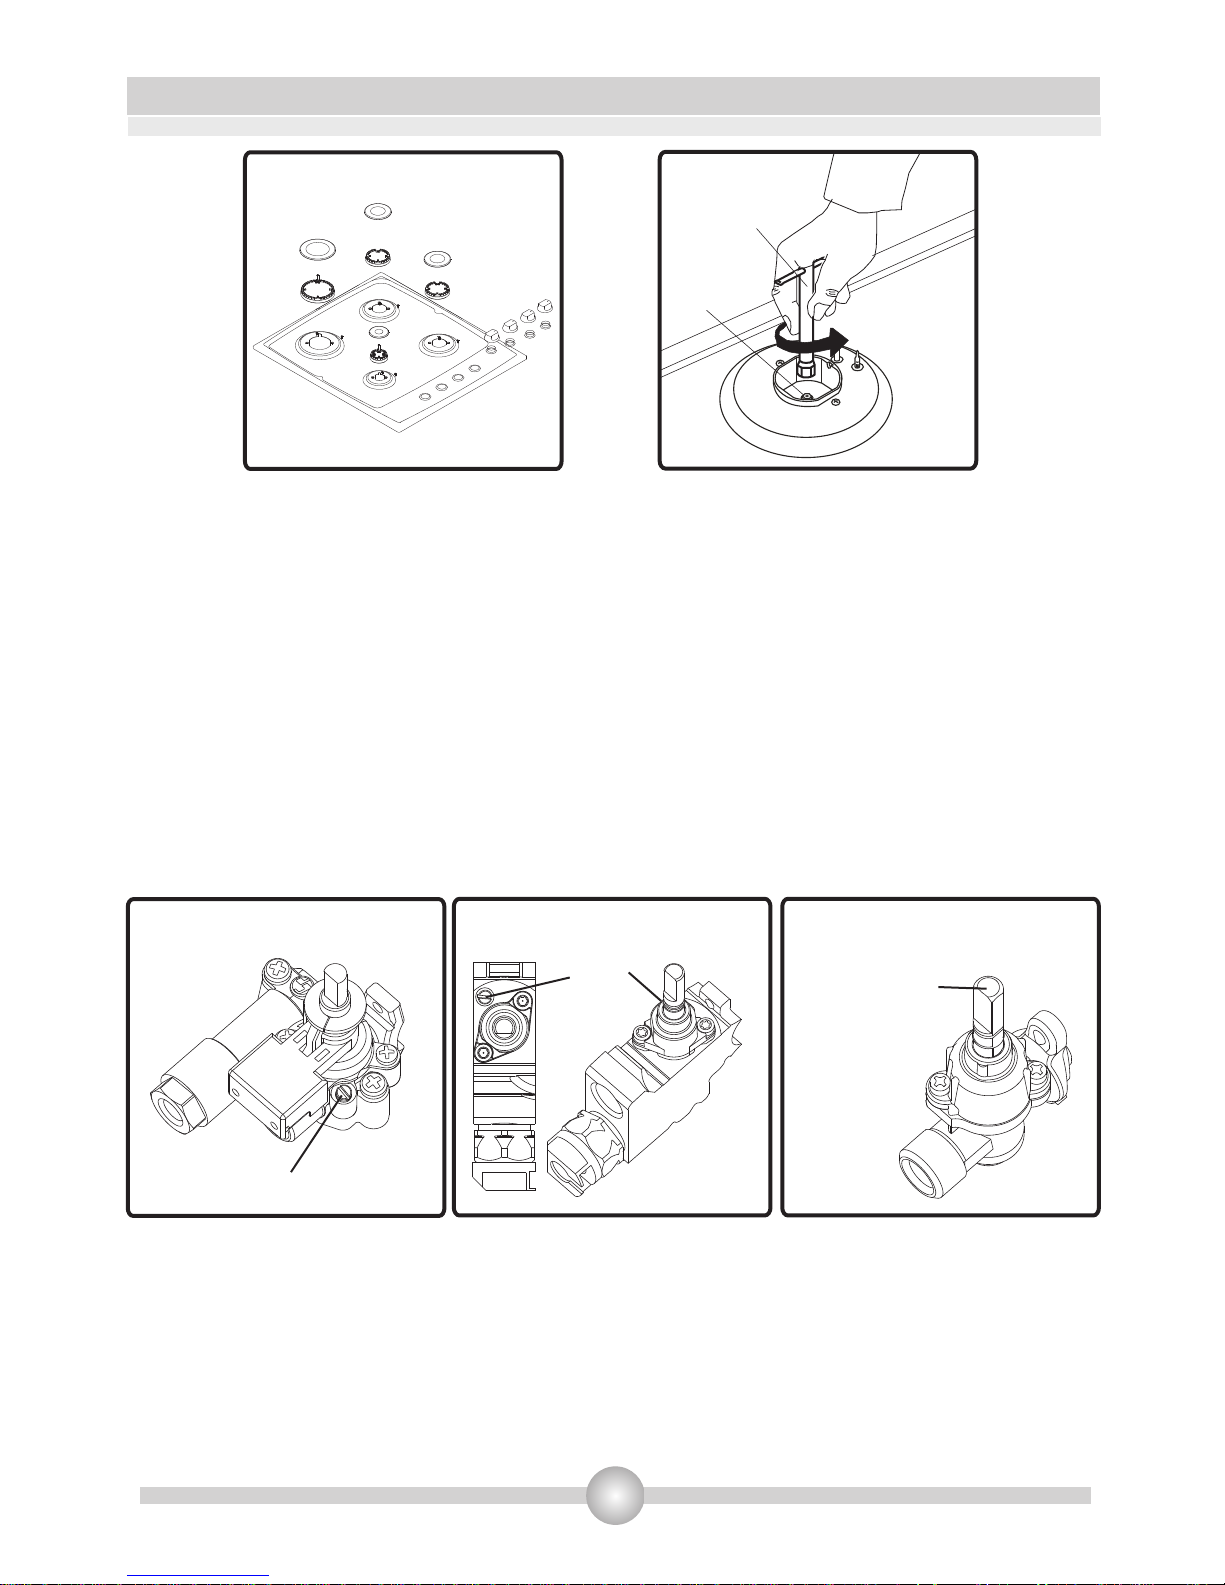
Changing injectors:
• Cut off the main gas supply and unplug from the electric mains.
• Remove the burner cap and the adapter(Figure 6).
• Unscrew the injectors. For this, use a 7mm spanner(Figure 7).
• Replace the injector with the ones from the gas conversion kit, with corresponding diameters
suitable to the type of gas that is going to be used, according to the information chart (which is
also supplied in the gas conversion kit).
The supply cord should be kept away from hot parts of appliance. Otherwise, the cord may be
3.4 Gas conversion
L
N
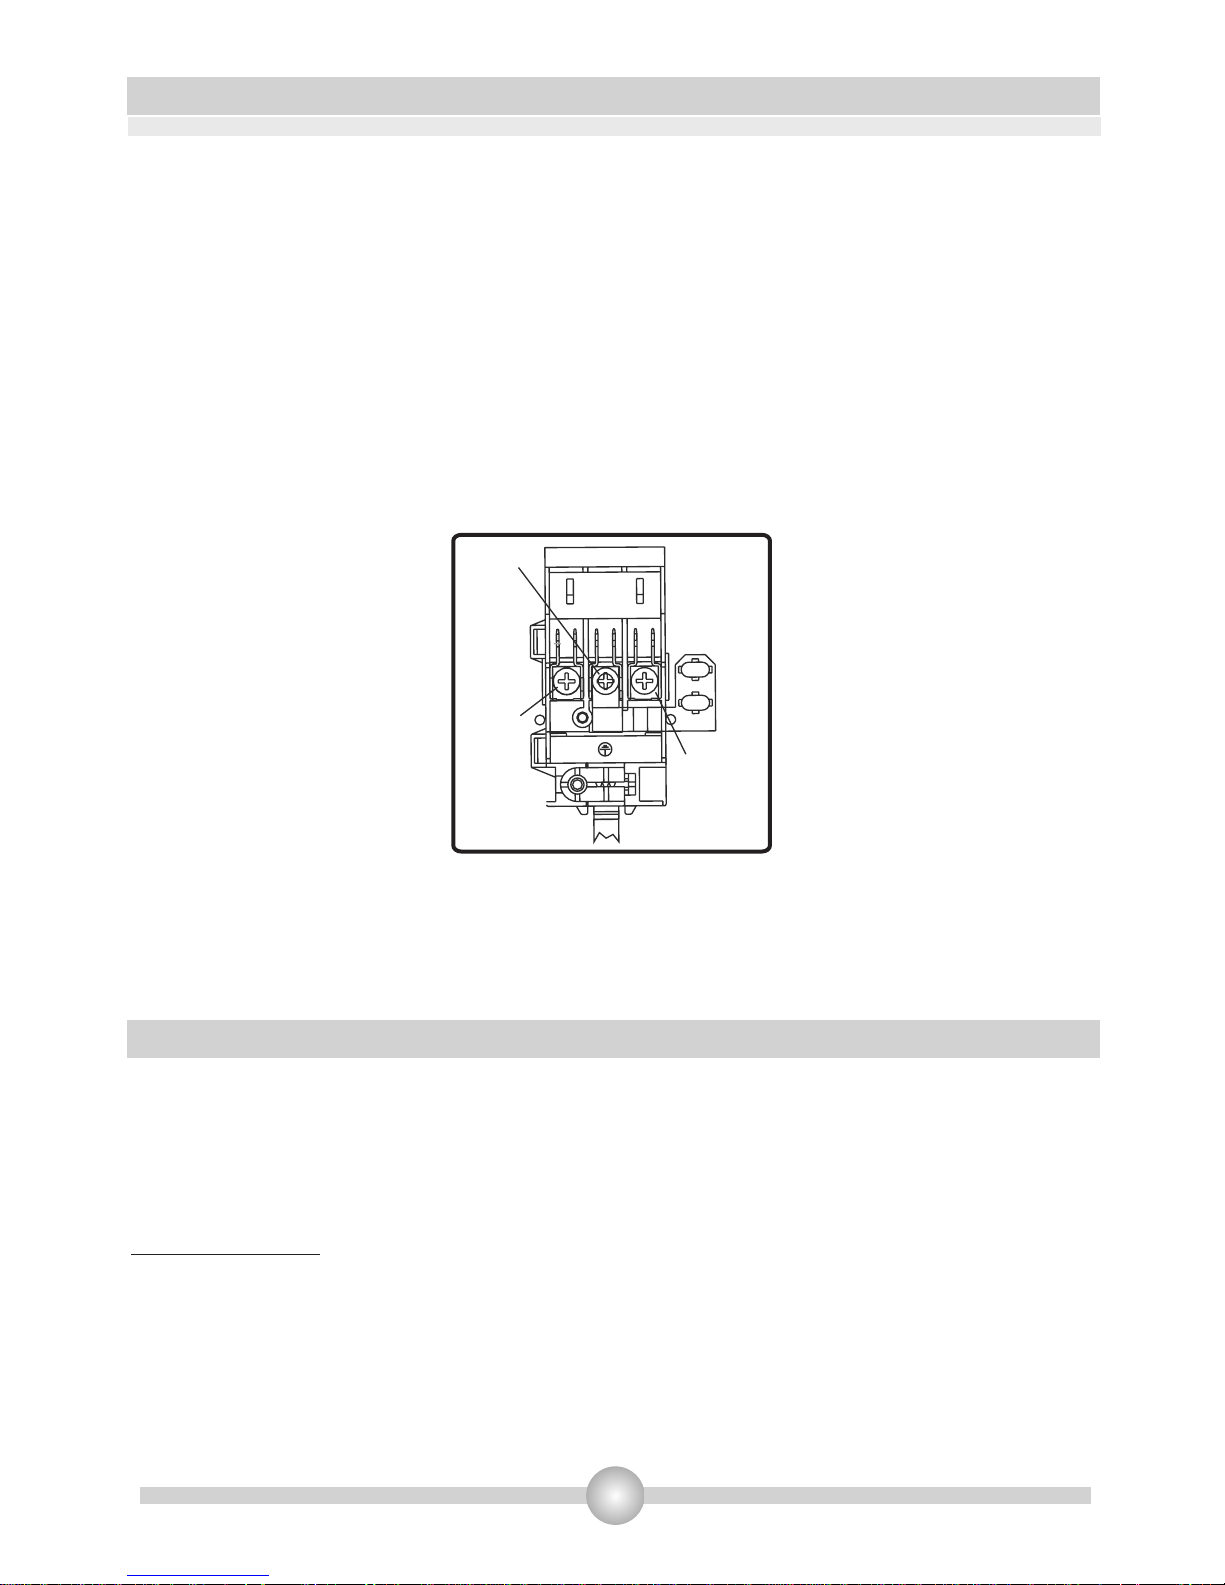
Figure 5
YELLOW+GREEN
BLUE
BROWN
• You have to ensure the power cord with suitable insulation to be connected to the power source
during the connection. If there is no appropriate earthed electric outlet in accordance with
regulations in the place where the appliance to be installed, contact to our authorized service. The
earthed electric outlet must be close to the appliance.
• Do not use an extension cord
• The power cord must not touch to the hot surface of the product.
• In case the cord is damaged, contact Authorized Service to have it changed.
• Any wrong electric connection may damage your appliance, as well as endangering your safety,
rendering your guarantee invalid.
• The appliance is adjusted for 230V 50Hz electricity. If the mains electricity is different contact
your authorized service.
.
Page 14
3. INSTALLATION AND PREPARATIONS FOR USE
13
Adjusting the reduced flame position:
The flame length in the minimum position is adjusted with a flat screw located on the valve. For
valves with flame failure device, the screw is located on the side of the valve spindle(Figure 8-9). For
valves without flame failure device, the screw is located inside the valve spindle(Figure 10). For
easier reduced flame adjustment, it is advised to remove the control panel (and microswitch, if
present) during adjustment.
To determine the minimum position, ignite the burners and leave them on in minimum position.
Remove the with the help of a small screwdriver fasten or loosen the bypass screw around 90
angular degrees. When the flame has a length of at least 4mm, the gas is well distributed. Make
sure that the flame does not die out when passing from the maximum position to the minimum
position. Create an artificial wind with your hand toward the flame to see if the flames are stable.
Figure 7
Injector
Spanner
Figure 9
Figure 10
Figure 6
Figure 8
Valve with flame failure device Valve with flame failure device Valve without flame failure device
Changing the gas inlet:
For some countries, the gas inlet type can be different for NG/LPG gases. In such a case, remove the
current connection components and nuts (if any) and connect the new gas supply accordingly. In all
conditions, all components used in gas connections should be approved by local and/or
international authorities. In all gas connections, refer to the “Assembly of gas supply and leakage
check” clause explained before.
Bypass screw
Bypass screw
Bypass screw
(Inside the hole)
Page 15

4. USE OF YOUR PRODUCT
14
4.1 Use of gas burners
Ignition of the burners
To determine which knob controls which burner, check the position symbol above the knob.
•
If your appliance is not equipped with any ignition aid or in case there is a failure in the electric
network, follow the procedures listed below:
To ignite one of the burners, press and turn its knob counter-clockwise so that the knob is in
maximum position, approach a match, taper or another manual aid to its upper circumference.
Move the ignition source away as soon as you see a stable flame.
Ignition by Hob Control Knob: Press the hob control knob of the burner you want to operate and
turn the hob control knob in the counterclockwise direction so that the knob is in maximum
position while keeping the knob pressed. The spark plugs will generate sparks as long as you keep
the control knob pressed. The micro switch placed under the knob will automatically create sparks
through the spark plug of the burner. Continue pressing the knob until you see a stable flame on
the burner.
Flame safety device:
Hob Burners (If your product is equipped with gas safety device)
Hobs equipped with flame failure device provide security in case of accidentally extinguished flame.
If such a case occurs, the device will block the burners gas lines and will avoid any accumulation of
unburned gas. Wait 90 seconds before re-igniting an extinguished gas burner.
Manual Ignition
Page 16

4. USE OF YOUR PRODUCT
15
Contr l
The knob has 3 positions: Off (0), maximum (big flame symbol) and minimum (small flame symbol).
After you ignite the burner in maximum position; you can adjust the flame length between
maximum and min. positions. Do not operate the burners when the knob position is between
maximum and off positions.
After the ignition, check the flames visually. If you see yellow
tip, lifted or unstable flames; turn the gas flow off, and check
the assembly of burner caps and crowns (Figure 13). Also,
make sure that no liquid has flown into the burner cups. If
the burner flame goes out accidentally, turn the burner off,
ventilate the kitchen with fresh air, and do not attempt reignition for 90 sec.
When turning the hob off, turn the knob in the clockwise
direction so that the knob shows "0" position or the marker
on the knob points upwards.
Your hob has burners of different diameters. The most economic way of using gas is to choose the
correct size gas burners for your cooking pan size and to bring the flame to minimum position once
the boiling point is reached. It is recommended to always cover your cooking pan.
In order to obtain maximum performance from the main burners, use pots with the following flat
bottom diameters. Using smaller pots than the minimum dimensions stated below will cause
energy loss.
Rapid / Wok Burner: 22-26cm
Semi-rapid Burner: 14-22cm
Auxiliary Burner: 12-18cm
o of the hob burners
MAX. position
OFF position
Figure 12
MODULATE
MIN. position
Figure 13
Cap
Crown
Spark
Plug
Burner
Cup
Page 17

4. USE OF YOUR PRODUCT
16
Make sure that the tips of the flames do not spread out of the outer circumference of the pan, as
this may also harm the plastic accessories around the pan (handles etc.).
When the burners are not in use for prolonged periods, always turn the main gas control valve off.
Warning:
• Use only flat pans and with a sufficiently thick base.
• Ensure that the base of the pan is dry before placing it on the burners.
• The temperature of accessible parts may be high when the appliance is operating. So it is
imperative to keep children and animals out of the reach of the burners during and after
cooking.
• After use, the hob remains very hot for a prolonged period of time, do not touch it and do not
place any object on top of the hob.
• Never place knives, forks, spoons and lids on the hob as they will get hot and could cause
serious burns.
!
Figure 14
Page 18

Warning:
When the operating for the first time or whenever the hotplate has not been used for a prolonged
time it is necessary to eliminate any humidity which may have accumulated around the electrical
elements of the plate by operating the hotplate on its lowest setting for about 20 minutes.
• Use only flat pans and with a sufficiently thick base.
• Never use a pan with a smaller diameter than of the hotplate.
• Ensure that the base of the pan is dry before placing it on the hotplate. While the hotplate is in
operation, it is important to ensure that the pan is centred correctly above the hotplate.
17
4. USE OF YOUR PRODUCT
!
CORRECT
INCORRECT
circular saucepan base
INCORRECT
saucepan’s base had not settled
INCORRECT
small saucepan diameter
Figure 16
• Never operate the hob without pans on the hotplate.
• The temperature of accessible parts maybe high when the appliance is operating. So it is
imperative to keep children and animals out of the reach of the hotplate during and after the
operation.
• If you note a crack on the hotplate it must be immediately switched off and replaced.
• To ensure long life, the hotplate must be thoroughly cleaned with appropriate cleaning
products. To avoid rustiness and to keep them new it is recommended to rub the hotplate
lightly with tissue with a small amount of oil. Do not use a steam cleaner.
• After use, the hotplate remain very hot for a prolonged of time, do not touch them and to not
place any object on top of the hotplate.
Page 19

18
5. CLEANING AND MAINTENANCE
5.1 Cleaning
Be sure that all control switches are off and your appliance cooled before cleaning your oven. Plug
off the appliance. Check whether they are appropriate and recommended by the manufacturer
before using the cleaning materials on your oven. As they may damage the surfaces, do not use
caustic creams, abrasive cleaning powders, thick wire wool or hard tools. In case the liquids that
overflow around your oven burn, the enamelled parts may be damaged. Immediately clean the
overflown liquids.
Cleaning of Your Hob
• Lift up the pan supports, caps and crowns of hob burners(Figure 13).
• Wipe and clean the back panel with a soapy cloth.
• Wash the caps and crowns of hob burners and rinse them. Do not leave them wet, immediately
dry them with paper cloth.
• After cleaning, make sure that you re-assemble the parts correctly.
• Do not clean any part of the hob with metal sponge. It causes the surface be scratched.
• The pan support top surfaces may be scratched in time due to usage. These parts will not get
rusted and it is not a production fault.
• During cleaning of the hob plate, make sure that no water flows inside the burner caps, as this
may block the injectors.
Burner Caps:
Periodically, enamelled pan support, enamelled covers, burner heads must be washed with soapy
warm water rinsed and dried. After drying them thoroughly, replace them correctly.
Enamelled Parts:
In order to keep them a new, it is necessary to clean them frequently with mild warm soapy water
and then dry with cloth. Do not wash them while hot and never use abrasive powders or abrasive
cleaning materials. Do not leave vinegar, coffee, milk, salt, water, lemon, or tomato juice to remain
in contact with enamelled parts for long periods of time.
Stainless Steel:
Stainless steel parts must be cleaned frequently with mildly warm soapy water and a soft sponge
and then dry with a soft cloth. Do not use abrasive powders or abrasive cleaning materials. Do not
leave vinegar, coffee, milk, salt, water, lemon or tomato juice to remain in contact with stainless
steel parts long periods of time.
Page 20

Clean the hotplates with a damp sponge and then dry them by turning them on for a few seconds.
To maintain their appearance, apply a small amount of oil on the surface of hotplates.
The hotplate trim rings can be cleaned with products intended for stainless steel. The rings can
become yellowed as a result of heating. This is normal.
If a hotplate is to be out of use for a long time, apply the special grease periodically.
5.2 Maintenance
Periodically check the gas connection pipe. Even if any simple abnormality is felt, inform the
technical service to have it changed. We recommend the gas connection parts to be changed once
a year. If any abnormality is felt while operating the control knobs of cooker, contact to the
authorized service.
Cleaning hotplates:
19
5. CLEANING AND MAINTENANCE
Page 21

If the electrical ignition/hotplate does not operate :
• The hob may be plugged off, there has been a black out.
If the hotplate does not heat :
• The heat may be not adjusted correctly with hob heater control switch.
The hob burners do not operate correctly :
• Check if the burner parts are correctly assembled(especially after cleaning).
• The gas supply pressure may be too low/high. For appliances working with bottled LPG, the
LPG cylinder may be depleted.
Except these, if you still have any problem with your product, please call to the Authorized
Service.
6.2 Information related to transport
If you need any transport; keep the original case of product and carry it with its original case when
needed to be carried. Follow the transport signs on packaging. Tape the hob on upper parts, caps
and crowns and pan supports to the cooking panels.
If you do not have the original packaging; prepare a carriage box so that the appliance, especially
external surfaces (glass and painted surfaces) of oven is protected against external threats.
6.1 Basic troubleshooting before contacting service
20
6. SERVICE AND TRANSPORT
Page 22

21
INJECTOR TABLE
Total Cons umpti on:
G30 28~30 mba r
7,5 Kw 545 g/h
Ga s Category: II2H3+
De sti na tion:IE Cla s s :3
G20 20 mba r
G30/G31
28-30/37 mba r
LARGE BURNER
DI A. of I NJECTOR (1/100mm) 115 85
NOMINAL RATING (KW) 3 3
CONSUMPTION 285,7 l/h 218,1 g/h
MEDIUM BURNER
DI A. of I NJECTOR (1/100mm) 97 65
NOMINAL RATING (KW) 1,75 1,75
CONSUMPTION 166,7 l/h 127,2 g/h
NG LPG
SMALL BURNER
DI A. of I NJECTOR (1/100mm)
72
50
NOMINAL RATING (KW)
1 1
CONSUMPTION
95,2 l/h 72,7 g/h
MEDIUM BURNER
DI A. of I NJECTOR (1/100mm)
97 65
NOMINAL RATING (KW)
1,75 1,75
CONSUMPTION
166,7 l/h 127,2 g/h
Page 23

Brand
Model
Type of Hob Gas
Number of Cooking Zones 4
Heating Technology-1 Gas
Size-1 Auxiliary
Energy Efficiency-1
%
NA
Heating Technology-2 Gas
Size-2 Semi-Rapid
Energy Efficiency-2
%
59,0
Heating Technology-3 Gas
Size-3 Semi-Rapid
Energy Efficiency-3
%
59,0
Heating Technology-4 Gas
Size-4 Rapid
Energy Efficiency-4
%
57,0
Energy Efficiency of Hob
%
58,3
This hob complies with EN 30-2-1
Energy Saving Tips
Hob
- Use cookwares having flat base.
- Use cookwares with proper size .
- Use cookwares with lid.
- Minimize the amount of liquid or fat.
- When liquid starts boiling , reduce the setting.
52156757
HGE603BL - HGE603IX
Page 24

The symbol on the product or on its packaging indicates that this product
may not be treated as household waste. Instead it shall be handed over to
the applicable collection point for the recycling of electrical and electronic
equipment. By ensuring this product is disposed of correctly, you will help
prevent potential negative consequences for the environment and human
health, which could otherwise be caused by inappropriate waste handling of
this product. For more detailed information about recycling of this product,
please contact your local city office, your household waste disposal service or
the shop where you purchased the product.
Page 25

BEDÝENUNG UND INSTALLATÝON
ANLEÝTUNG ZUM
GAS-EÝNBAUKOCHFELD
DE
Page 26

Sehr geehrter Kunde,
Unser Ziel ist es, Ihnen hochqualitative Produkte bieten zu können, die Ihre
Erwartungen übertreffen. Ihr Gerät wird in modernen Fertigungsstätten
produziert und sorgfältig im Hinblick auf seine Qualität getestet.
Diese Anleitung wurde erstellt, um Sie bei der sicheren und effektiven
Bedienung Ihres Gerätes zu unterstützen, das unter Einsatz aktuellster
Technologien für Sie hergestellt wurde.
Bevor Sie Ihr Gerät benutzen, lesen Sie diese Anleitung aufmerksam durch: Sie
enthält grundlegende Informationen zur richtigen und sicheren Installation, zur
Wartung und natürlich auch zum Gebrauch. Zur Installation Ihres Produktes
wenden Sie sich bitte an den autorisierten Kundendienst in Ihrer Nähe.
Konformitätserklärung
Wir erklären, dass unsere Produkte die geltenden europäischen Richtlinien,
Entscheidungen und Regularien sowie die in den referenzierten Standards
gelisteten Anforderungen erfüllen.
Page 27

1
INHALT:
1. KURZE PRODUKTPRÄSENTATION
2. WARNHINWEISE
3. INSTALLATION UND VORBEREITUNGEN VOR DEM GEBRAUCH
3.1 Produktinstallation
3.2 Gasanschluss
3.3 Elektrischer Anschluss und Sicherheit
3.4 Gasumstellung
4. BENUTZUNG IHRES PRODUKTES
4.1 Gasbrenner verwenden
4.2 Kochplatte verwenden
4.3 Zubehör
5. REÝNÝGUNG UND WARTUNG
5.1 Reinigung
5.2 Wartung
6. SERVICE UND TRANSPORT
6.1 Grundlegende Fehlerbehebung vor Kontaktaufnahme mit dem
Kundendienst
6.2 Hinweise zum Transport
Page 28

2
1. KURZE PRODUKTPRÄSENTATION
Gas-Kochfeld:
Komponenten:
* Das Aussehen Ihres Kochfeldes kann je nach Konfiguration etwas von den Abbildungen abweichen.
1- Mittelschneller Brenner
2- Bedienknöpfe
3- Nebenbrenner
4- Kochgeschirrhalter
5- Schnellbrenner
1
1
2
3
4
5
Page 29

2. SICHERHEITSHINWEISE
LESEN SIE DIESE ANLEITUNG VOLLSTÄNDIG UND SORGFÄLTIG DURCH, BEVOR SIE IHR GERÄT
IN BETRIEB NEHMEN, UND HALTEN SIE ES STETS ZUR VERFÜGUNG WENN NÖTIG.
DIESES HANDBUCH WURDE FÜR VERSCHIEDENE MODELLE EINER REIHE VERFASST. ES KANN
SEIN, DASS IHR GERÄT ÜBER EINIGE EIGENSCHAFTEN, DIE IN DIESEM HANDBUCH ERLÄUTERT
WURDEN NICHT VERFÜGT. ACHTEN SIE AUF DIE AUSDRÜCKE, DIE EINE ABBILDUNG HABEN,
WÄHREND SIE DIESE BETRIEBSANLEITUNG LESEN.
Allgemeine Sicherheitshinweise
- Dieses Gerät kann von Kindern ab 8 Jahren und älter
und Personen mit eingeschränkten physischen,
sensorischen oder geistigen Fähigkeiten oder
mangelnder Erfahrung und Wissen verwendet werden,
wenn sie unter Aufsicht sind oder ausführliche Anleitung
zur Benutzung des Gerätes in einer sicheren Weise
erhalten haben und die damit verbundenen Gefahren
verstehen. Kinder dürfen nicht mit dem Gerät spielen.
Reinigung und Wartung darf nicht von Kindern ohne
Aufsicht erfolgen.
- WARNUNG: Das Gerät und die zugänglichen Teile
werden während des Gebrauchs heiß. Achten Sie
darauf, dass Sie nicht die Heizelemente berühren.
Kinder unter 8 Jahren sollten ferngehalten werden, es
sei denn sie werden kontinuierlich überwacht.
- WARNUNG: Brandgefahr: lagern Sie keine
Gegenstände auf den Kochflächen.
- WARNUNG: Wenn die Oberfläche rissig ist, schalten
Sie das Gerät aus, um die Gefahr eines elektrischen
Schlages zu vermeiden.
- Das Gerät ist nicht für die Steuerung durch externe
Zeitgeber oder ein separates Fernbediensystem
ausgelegt.
3
Page 30

- Verwenden Sie keine aggressiven oder scheuernden
Reinigungsmittel oder Metallschaber, um die Scheibe in
der Backraumtür zu reinigen. Diese können die
Oberfläche zerkratzen, was zum Bersten der
Glasscheibe führen kann.
- Verwenden Sie keine Dampfreiniger zur Reinigung des
Gerätes.
- WARNUNG: Stellen Sie sicher, dass das Gerät
ausgeschaltet ist, bevor Sie die Lampe austauschen,
um die Gefahr von elektrischen Schlägen zu vermeiden.
- VORSICHT: Die außen zugänglichen Teile können
sehr heiß werden, wenn das Kochen oder Grillen in
Verwendung ist. Halten Sie kleine Kinder fern von dem
Gerät.
- hr Gerät wurde in Übereinstimmung mit den einschlägigen lokalen und internationalen
Normen und Vorschriften hergestellt.
- Wartungs-und Reparaturarbeiten dürfen nur von autorisierten Service-Technikern
vorgenommen werden. Installations-und Reparaturarbeiten, die durch nicht autorisierte
Techniker durchgeführt wurden, können Sie gefährden. Jegliche Modifikation der technischen
Eigenschaften des Gerätes ist gefährlich und daher verboten.
- Stellen Sie vor der Installation sicher, dass die lokalen Netzbedingungen (Gastyp und
Gasdruck oder Strom-Spannung-und Frequenz) und die Anpassung des Gerätes kompatibel
sind. Die Anpassungsbedingungen dieses Gerätes sind auf dem Typenschild angegeben
- VORSICHT: Dieses Gerät ist nur ist nur zum Kochen von Speisen und für den Gebrauch im
Haushalt bestimmt und sollte nicht für andere Zwecke oder auf einer anderen Anwendung, z.
B. für gewerbliche und industrielle Anwendung oder in einem kommerziellen Umfeld
verwendet werden.
4
Page 31

-Dieses Gerät ist nicht an ein Abzugsgerät für Verbrennungsprodukte angeschlossen. Es
muss in Übereinstimmung mit den aktuell gültigen Installationsrichtlinien eingebaut und
angeschlossen werden. Besonderes Augenmerk ist dabei auf die relevanten Richtlinien
bezüglich der Belüftung zu richten.
Wenn der Brenner nach 15 Sekunden noch immer nicht läuft, stoppen Sie ihn, öffnen Sie
die Backraumtür und/oder warten Sie mindestens 1 Minute, bevor Sie nochmals versuchen,
ihn zu zünden.
- Diese Anleitungen sind nur gültig, wenn das Land-Symbol auf dem Gerät angezeigt wird.
Wenn das Symbol nicht auf dem Gerät angezeigt wird, ist es notwendig, die technischen
Anweisungen, die die erforderlichen Anweisungen zur Änderung des Gerätes an die
Bedingungen der Nutzung des Landes bieten, zu beziehen.
- Es wurden alle erdenklichen Sicherheitsvorkehrungen getroffen, um Ihre Sicherheit zu
garantieren. Da das Glas brechen könnte, sollten Sie bei der Reinigung stets vorsichtig sein,
um Kratzer zu vermeiden. Vermeiden Sie Schläge auf das Glas durch Zubehörgeräte.
- Stellen Sie sicher, dass das Netzkabel während der Installation nicht eingeklemmt ist. Wird
das Netzkabel beschädigt, muss es vom Hersteller, dem Vertrieb oder einer ähnlich
qualifizierten Person ersetzt werden, um eine Gefährdung zu vermeiden.
- Lassen Sie Kinder niemals auf die Backraumtür klettern oder darauf sitzen, wenn diese
offen ist.
Warnhinweise zur Installation
- Nehmen Sie das Gerät nicht in Betrieb, solange es nicht vollständig eingebaut ist.
- Das Gerät muss von einem autorisierten Techniker aufgestellt und in Betrieb genommen
werden. Der Hersteller ist nicht verantwortlich für Schäden, die durch fehlerhafte Aufstellung
und Montage durch nicht autorisierte Personen verursacht werden könnten.
- Wenn Sie das Gerät auspacken, stellen Sie sicher, dass es nicht während des Transports
beschädigt wurde. Wenn Sie irgendwelche Beschädigungen entdecken, nehmen Sie das
Gerät keinesfalls in Betrieb und kontaktieren Sie umgehend den autorisierten
Wartungsdienst. Da die für die Verpackung verwendeten Materialien (Nylon, Heftklammern,
Styropor etc.) für Kinder gefährlich sein können, sollten Sie diese einsammeln und sofort
entsorgen.
- Schützen Sie das Gerät vor Umwelteinflüssen. Setzen Sie es niemals Einflüssen wie
Sonne, Regen, Schnee oder Staub etc. Aus.
- Die umgebenden Materialien des Gerätes (Schaltschrank) müssen einer Temperatur von
mindestens 100 ° C standhalten.
Während der Verwendung
- Während der Verwendung können die äußeren und inneren Oberflächen des Ofens heiß
werden. Wenn Sie die Backraumtür öffnen, treten Sie etwas zurück, um dem aus dem
Backraum entweichenden heißen Dampf auszuweichen. Es kann die Gefahr von
Verbrennungen bestehen.
- Legen Sie keine entzündlichen oder brennbaren Materialien, in das Gerät oder in die Nähe
des Gerätes, wenn es in Betrieb ist.
- Lassen Sie den Herd beim Kochen mit festen oder flüssigen Fetten nicht unbeaufsichtigt.
Diese könnten bei sehr hohen Temperaturen zu brennen beginnen. Gießen Sie niemals
Wasser in brennendes Fett oder Öl. Decken Sie die Kasserolle oder Pfanne mit dem Deckel
zu, um die Flammen zu ersticken und schalten Sie den Herd ab.
- Wenn das Gerät längere Zeit nicht benutzt wird, ziehen Sie den Netzstecker aus der
Steckdose. Halten Sie den Netzhauptschalter ausgeschaltet. Drehen Sie auch den
Gaszufuhrhahn ab, wenn Sie das Gerät nicht verwenden.
5
Page 32

- Achten Sie stets darauf, dass die Regler in der Position "0" (Stop), wenn der Herd nicht in
Betrieb ist.
- VORSICHT: Bei der Verwendung eines Gaskochgeräts kommt es zur Bildung von Hitze,
Feuchtigkeit und Verbrennungsgasen in dem Raum, in dem das Gerät aufgestellt ist. Stellen
Sie sicher, dass die Küche gut gelüftet ist, insbesondere wenn das Gerät verwendet wird.
Halten Sie stets die natürlichen Belüftungsöffnungen offen oder installieren Sie ein
mechanisches Abzugsgerät (Abzugshaube).
- Längere intensive Verwendung des Gerätes kann eine zusätzliche Be-/Entlüftung
erforderlich machen. Zum Beispiel das Öffnen der Fenster für eine effektivere Belüftung
oder das Einschalten einer höheren Stufe, wenn eine mechanische Belüftungseinrichtung
vorhanden ist. (Nur für Gasgeräte)
Reinigung und Wartung
Schalten Sie das Gerät aus, bevor Sie irgendwelche Reinigungs- oder Wartungsarbeiten
durchführen. Das können Sie machen nachdem Sie das Gerät ausstecken oder den
Hauptschalter ausschalten.
- Entfernen Sie die Regler nicht, um das Bedienfeld zu reinigen.
FÜR EINE EINWANDFREIE FUNKTION UND DIE GRÖSSTMÖGLICHE SICHERHEIT
SOLLTEN SIE STETS ORIGINALERSATZTEILE VERWENDEN UND IM BEDARFSFALL
NUR EINEN AUTORISIERTEN WARTUNGSDIENST ANRUFEN.
6
Page 33

7
3. INSTALLATION UND VORBEREITUNGEN VOR DEM GEBRAUCH
Wichtig: Das Gerät muss gemäß den elektrischen Installationsanweisungen des
Herstellers sowie in Übereinstimmung mit lokalen Vorschriften zur Benutzung solcher
Geräte in Gebäuden, Vorschriften des Gasversorgers und Vorschriften zum
elektrischen Anschluss von einer qualifizierten Person installiert werden.
Installation Ihres Produktes
Hinweise für den Installateur
Wichtig
• Das Gerät sollte von einem QUALIFIZIERTEN TECHNIKER installiert, eingestellt und
an unterschiedliche Gasarten angepasst werden. Bei Nichtbeachtung erlischt die
Garantie.
• Das Gerät muss gemäß gültiger Bestimmungen installiert werden.
• Die Installation muss gemäß gültiger Vorschriften zur Belüftung und zur Ableitung von
Abgasen erfolgen.
• Trennen Sie grundsätzlich die Gasversorgung, bevor Sie Wartungsarbeiten oder
Reparaturen ausführen.
• Das Gerät muss in hitzefesten Möbeln eingebaut werden.
• Das Kochfeld ist für den Einbau in Möbel von 600 mm Tiefe vorgesehen.
• Die Seitenwände des Gerätes dürfen nicht über die Arbeitsfläche hinausragen, die
umgebenden Materialien müssen gegen Temperaturen von 60 °C oberhalb der
Raumtemperatur beständig sein.
• Installieren Sie das Gerät nicht in der Nähe von leicht entflammbaren Dingen, z. B.
Vorhängen oder Gardinen.
Der richtige Ort
• Das Gerät kann in Küchen, Wohnküchen oder in möblierten Zimmern installiert
werden, nicht jedoch in Räumen mit Bad- oder Duscheinrichtungen.
3
• Das Gerät darf nicht in möblierten Zimmern mit einer Größe von weniger als 20 m
installiert werden.
• Das Gerät wurde ausschließlich für den Hausgebrauch entwickelt und zugelassen und
darf nicht in gewerblichen, halb-gewerblichen oder kommunalen Einrichtungen
eingesetzt werden. Die Produktgarantie erlischt bei Installation in den oben erwähnten
Umgebungen. Eine solche Installation kann sich auch in negativer Weise auf Ihren
Versicherungsschutz auswirken.
Belüftungsanforderungen
• Bei Räumen mit einem Volumen von weniger als 5 m³ muss eine permanente Belüftung
von 100 mm² freier Fläche gewährleistet sein.
3.1.
!
!
Page 34

8
3. INSTALLATION UND VORBEREITUNGEN VOR DEM GEBRAUCH
•
•
Bei Räumen mit einem Volumen zwischen 5 m³ und 10 m³ muss eine permanente
Belüftung von 50 mm² freier Fläche gewährleistet sein, sofern ein solcher Raum nicht
über eine Tür verfügt, die direkt ins Freie führt. In diesem Fall ist keine permanente
Belüftung erforderlich.
Bei Räumen mit einem Volumen von mehr als 10 m³ ist keine permanente Belüftung
erforderlich.
Achtung: Unabhängig von der Raumgröße muss jeder Raum, in dem das Gerät
genutzt wird, über eine direkte Öffnung ins Freie verfügen; zum Beispiel durch ein
Fenster, das geöffnet werden kann.
Technische Hinweise für den Installateur
Entfernen Sie zunächst sämtliches Verpackungsmaterial vom Gerät und von seinen
Zubehörteilen und überzeugen Sie sich davon, dass das Kochfeld nicht beschädigt ist. Falls
Sie eine Beschädigung vermuten, benutzen Sie das Gerät nicht, sondern setzen sich mit
dem Händler in Verbindung, bei dem Sie das Gerät gekauft haben.
Das Gerät wird mit einem Installationskit geliefert, das haftendes Dichtungsmaterial
und Befestigungshalterungen sowie Schrauben enthält.
• Schneiden Sie eine Öffnung mit den in Abbildung 1 gezeigten Abmessungen aus.
Platzieren Sie die Öffnung so in der Arbeitsfläche, dass nach Installation des Kochfeldes
die nachstehenden Anforderungen erfüllt sind.
• 100 mm Abstand von den Kanten des Herdes zu entflammbaren Materialien.
• 700 mm Abstand zu über dem Herd angebrachten Schränken oder Ablagen.
• 750 mm Abstand zu über dem Herd angebrachten Sauglüftern.
!
Abbildung 1
510 mm
Min.
A
490 mm
Min.
B
Min.
130mm
Min.
25mm
580 mm
560 mm
42 mm
Angrenzende
Wände
A[mm] B[mm]
Brennbare
Materialien /
50
100
Nicht brennbare
Materialien
Page 35

•
•
Tragen Sie das haftende Dichtungsmaterial „C“ entsprechend dem Umkreis des Gerätes rund
um die Öffnung in der Arbeitsfläche auf. Stellen Sie sicher, dass die Verbindungsstellen an
den Ecken überlappen und keine Lücke entlang des Dichtungsmaterials verbleibt.
Setzen Sie das Gerät in die Öffnung ein und fixieren es mittels Halterungen (A) und
Schrauben (B).
Passen Sie die Position der Halterungen je nach Dicke der Arbeitsfläche wie in Abbildung 2
gezeigt an und ziehen die Schrauben gleichmäßig fest.
9
3. INSTALLATION UND VORBEREITUNGEN VOR DEM GEBRAUCH
Abbildung 2 - Installation mit
Halterung Typ 1
t>25mm t>25mm
Page 36

3. INSTALLATION UND VORBEREITUNGEN VOR DEM GEBRAUCH
10
3.2. Gasanschluss
Der Anschluss des Gerätes muss entsprechend lokalen und internationalen Standards und
Richtlinien erfolgen. Sie können Informationen zu geeigneten Gasarten und Gasinjektoren
in der Tabelle mit technischen Daten finden. Falls der Druck des verwendeten Gases von
diesen Werten abweicht oder in Ihrer Region nicht stabil ist, müssen Sie möglicherweise
einen verfügbaren Gasregler an der Gaszufuhr installieren. Zur Durchführung dieser
Einstellungen muss selbstverständlich der autorisierte Kundendienst kontaktiert werden.
Punkte, die während der Montage eines flexiblen Schlauchs geprüft werden müssen
Falls der Gasanschluss über einen flexiblen Schlauch hergestellt wird, der an der
Gaszufuhr des Gerätes befestigt ist, muss er zudem über eine Rohrmanschette fixiert
werden. Verbinden Sie Ihr Gerät mit einem kurzen, robusten Schlauch, der sich so nah wie
möglich an der Gasquelle befindet. Die erlaubte maximale Länge des Schlauchs beträgt
1,5 m. Der Schlauch, der das Gerät mit Gas versorgt, muss aus Sicherheitsgründen einmal
im Jahr ausgetauscht werden.
Halten Sie den Schlauch aus Bereichen fern, die sich auf Temperaturen über 90 °C
erhitzen. Der Schlauch darf nicht gebogen oder geknickt werden. Halten Sie ihn von
scharfen Kanten und beweglichen Gegenständen fern; er darf nicht beschädigt werden. Vor
der Montage muss das Gerät auf jegliche Produktionsfehler geprüft werden.
Während das Gas eingeschaltet ist, müssen sämtliche Anschlussteile und Schläuche mit
Seifenwasser oder Leckflüssigkeiten geprüft werden. Verwenden Sie zur Prüfung von
Gaslecks keine offenen Flammen. Alle während des Gasanschlusses verwendeten
Metallkomponenten müssen rostfrei sein. Prüfen Sie außerdem die Ablaufdaten der
Komponenten, die Sie verwenden möchten.
Punkte, die während der Montage eines festen Gasanschlusses geprüft werden
müssen
Es gibt in unterschiedlichen Ländern verschiedene Methoden zum Montage eines festen
Gasanschlusses (Gasanschluss durch Gewinde, z. B. eine Mutter). Die gängigsten Teile
werden bereits mit Ihrem Gerät geliefert. Jedes andere Teil kann als Ersatzteil geliefert
werden.
• Entfernen Sie überschüssiges Dichtungsmaterial „C“ vorsichtig rund um das Gerät.
Wichtig: Falls das Gerät über eine Schrank oder einer Schublade installiert werden
soll, muss zwischen Gerät und Schubladen unbedingt ein Trennbrett eingesetzt
werden.
Verbrannte Gase aus der Umgebung beseitigen
Kochgeräte, die mit Gas betrieben werden, geben verbranntes Gas direkt nach draußen ab
oder über Abzugshauben, die mit einem ins Freie führenden Kaminschacht verbunden sind,
aus. Falls die Installation einer Abzugshaube nicht machbar erscheint, müssen Sie einen
elektrischen Lüfter an einem Fenster oder einer Wand mit Zugang zu frischer Luft
anbringen. Dieser elektrische Lüfter muss in der Lage sein, die Luft der Küchenumgebung
4- bis 5-mal um ihr eigenes Luftvolumen pro Stunde auszutauschen.
!
Page 37

3. INSTALLATION UND VORBEREITUNGEN VOR DEM GEBRAUCH
11
Fixieren Sie die Mutter am Gassammelrohr immer, während Sie das Gegenstück drehen.
Verwenden Sie zum sicheren Anschließen Schraubenschlüssel von geeigneter Größe.
Verwenden Sie bei allen Oberflächen zwischen verschiedenen Komponenten die im
Gasumstellungsset mitgelieferten Dichtungen. Die während des Anschlusses verwendeten
Dichtungen sollten zudem zur Verwendung in Gasanschlüssen zugelassen sein,
Verwenden Sie keine Sanitärdichtungen für Gasanschlüsse.
Denken Sie daran, dass dieses Gerät für den Anschluss an die Gaszufuhr in dem Land
vorbereitet ist, in dem es produziert wurde. Das Hauptzielland ist an der rückseitigen
Abdeckung des Gerätes angegeben. Falls Sie es in einem anderen Land nutzen müssen,
können beliebige Anschlüsse in der nachstehenden Abbildung benötigt werden. Erkundigen
Sie sich in solch einem Fall bei den örtlichen Behörden nach dem richtigen Gasanschluss.
Sie müssen sich an den autorisierten Kundendienst wenden, damit Sie in der Lage sind,
die Gasanschlüsse ordnungsgemäß und entsprechend den Sicherheitsstandards
durchzuführen.
ACHTUNG! Verwenden Sie auf keinen Fall Streichhölzer oder Feuerzeuge zur
Kontrolle von Gaslecks.
!
•
3.3. Elektrischer Anschluss und Sicherheit
Halten Sie sich bei der elektrischen Installation an die Anweisungen in der Anleitung.
Das Erdungskabel muss mit dem Erdungsanschluss verbunden werden.
Dichtung
Schlauc
hanschl
uss
Schlau
chans
chluss
Gasschlauch
mit
Manschette
Gasrohr
Abbildung 4
Dichtung
Schlauchan
schluss
Gasschlauch
mit
Manschette
Gasrohr
Mechanischer
Gasschlauch
Dichtung
Schlaucha
nschluss
Gasrohr
Dichtung
Schlaucha
nschluss
Schlauc
hanschl
uss
Mechanischer
Gasschlauch
Gasrohr
Mechanischer
Gasschlauch
Schlauchan
schluss
Gasrohr
Page 38

3. INSTALLATION UND VORBEREITUNGEN VOR DEM GEBRAUCH
12
•
•
Changing injectors:
Das Netzkabel muss von den Kochplatten des Gerätes ferngehalten werden. Andernfalls kann das
Kabel beschädigt werden, was einen Kurzschluss verursachen kann.
Der Hersteller erklärt, dass er keine Haftung bei jeglichen Schäden oder Verlusten in Folge
unsachgemäßer Anschlüsse übernimmt, die von nicht autorisierten Personen durchgeführt wurden.
3.4 Gasumstellung
Achtung: Folgende Verfahren müssen von autorisierten Servicekräften durchgeführt werden.
Ihr Gerät darauf eingestellt, mit Propangas/Erdgas betrieben zu werden. Die Gasbrenner können auf
andere Gasarten eingestellt werden; dazu müssen spezielle Injektoren für die jeweilige Gasart
eingebaut und die für die Gasart geeignete minimale Flammenhöhe eingestellt werden. Befolgen Sie
zu diesem Zweck die nachstehenden Schritte:
Injektoren tauschen:
• Unterbrechen Sie die Hauptgaszufuhr und trennen die Stromversorgung.
• Nehmen Sie Brennerkappe und Adapter vom Brenner ab (Abbildung 6).
• Schrauben Sie die Injektoren heraus. Verwenden Sie dazu einen 7-mm-Schraubenschlüssel
(Abbildung 7).
• Tauschen Sie die Injektoren gegen die für die jeweilige Gasart geeigneten Injektoren aus dem
Gasumstellungsset aus; berücksichtigen Sie den Durchmesser. Beachten Sie dabei die
Informationstabelle (diese liegt ebenfalls dem Gasumstellungsset bei).
L
N
Abbildung 5
GELB/GRÜN
BLAU
BRAUN
•
•
•
•
•
•
Sie müssen sicherstellen, dass das Netzkabel mit geeigneter Isolierung während des
Anschlusses mit einer Stromversorgung verbunden wird. Falls keine entsprechend den
Richtlinien angemessen geerdete Steckdose am vorgesehenen Aufstellungsort des
Gerätes installiert ist, wenden Sie sich an unseren autorisierten Kundendienst. Die
geerdete Steckdose muss sich in der Nähe des Gerätes befinden.
Benutzen Sie kein Verlängerungskabel.
Das Netzkabel darf keine heißen Flächen des Produktes berühren.
Falls das Kabel beschädigt ist, wenden Sie sich zur Auswechslung an den autorisierten
Kundendienst.
Ein unsachgemäßer elektrischer Anschluss kann Ihr Gerät beschädigen und
Sicherheitsrisiken bergen; zudem erlischt Ihre Garantie.
Das Gerät ist auf eine Stromversorgung von 230 V/50 Hz eingestellt. Falls die
Netzstromversorgung davon abweicht, wenden Sie sich an Ihren autorisierten
Kundendienst.
Page 39

3. INSTALLATION UND VORBEREITUNGEN VOR DEM GEBRAUCH
13
Minimale Flammenhöhe einstellen:
Die Flammenhöhe in der Minimalposition wird mit einer flachen Schraube am Ventil
eingestellt. Bei Ventilen mit Flammenausfallerkennung befindet sich die Schraube an der
Seite der Ventilspindel (Abbildung 8-9). Bei Ventilen ohne Flammenausfallerkennung
befindet sich die Schraube in der Ventilspindel (Abbildung 10). Zur einfacheren Einstellung
der minimalen Flammenhöhe sollten Sie während der Anpassung das Bedienfeld (sowie
den Mikroschalter, sofern vorhanden) entfernen.
Zünden Sie zur Bestimmung der Minimalposition die Brenner und stellen jeweils die
Minimalposition ein. Drehen Sie die Bypass-Schraube mit einem kleinen Schraubendreher
um etwa 90 °. Bei einer Flammenhöhe von etwa 4 mm ist die minimale Flammenhöhe
richtig eingestellt. Achten Sie darauf, dass die Flamme nicht erlischt, wenn Sie von der
Maximalposition zur Minimalposition umschalten. Erzeugen Sie mit Ihrer Hand künstlichen
Wind gegenüber der Flamme und prüfen, ob die Flammen stabil sind.
Abbildung 7
Injektor
Schrauben
schlüssel
9Abbildung
10Abbildung
Abbildung 6
8Abbildung
Ventil mit
Flammenausfallerkennung
Ventil mit
Flammenausfallerkennung
Ventil ohne
Flammenausfallerkennung
Gasanschluss ändern:
In einigen Ländern kann der Gasanschlusstyp bei Propangas/Erdgas unterschiedlich sein.
Entfernen Sie in solch einem Fall die aktuellen Anschlusskomponenten und Muttern (sofern
vorhanden) und schließen die neue Gasversorgung entsprechend an. Unter allen
Umständen müssen sämtliche im Gasanschluss verwendeten Komponenten von örtlichen
und/oder internationalen Behörden zugelassen sein. Beachten Sie bei sämtlichen
Gasanschlüssen die zuvor erklärte Klausel „Gasversorgung anschließen und auf Lecks
prüfen“.
Bypass-Schraube
Bypass-Schraube
Bypass-Schraube (Im Loch)
Page 40

4. BENUTZUNG IHRES PRODUKTES
14
4.1 Gasbrenner verwenden
Brenner zünden
Welcher Knopf welchen Brenner kontrolliert, erfahren Sie anhand des Positionssymbols
über dem Knopf.
• Manuelle Zündung
Falls Ihr Gerät nicht mit einer Zündhilfe ausgestattet ist oder ein Fehler im Stromnetz
vorliegt, befolgen Sie das nachstehend aufgelistete Verfahren:
Zum Zünden eines Gasbrenners drücken Sie den Knopf und drehen ihn gegen den
Uhrzeigersinn auf die maximale Position und halten ein brennendes Streichholz oder
etwas Ähnliches an den oberen Rand des Brenners. Entfernen Sie die Zündquelle,
sobald Sie eine stabile Flamme sehen.
Zündung per Kochfeldknopf: Drücken Sie den Bedienknopf des gewünschten Brenners
hinein und drehen ihn gegen den Uhrzeigersinn auf die maximale Position, während Sie
den Knopf gedrückt halten. Die Zündkerzen erzeugen Funken, solange Sie den Knopf
gedrückt halten. Im Bedienknopf ist ein Mikroschalter eingebaut, über den der Brenner
automatisch gezündet wird. Halten Sie den Knopf eingedrückt, bis die Flamme des
Brenners stabil brennt.
Flammenausfallerkennung:
Brenner (Wenn Ihr Produkt mit einer Flammenausfallerkennung ausgestattet ist)
Herde mit Flammenausfallerkennung bieten zusätzliche Sicherheit bei versehentlich
ausgelöschten Brennern. Falls dieser Fall eintritt, unterbricht das Gerät die Gaszufuhr zu
den Brennerleitungen und verhindert die Ansammlung unverbrannten Gases. Warten Sie
anderthalb Minuten, bevor Sie einen ausgelöschten Gasbrenner erneut zünden.
Page 41

4. BENUTZUNG IHRES PRODUKTES
15
Brenner steuern
Der Knopf hat 3 Positionen: Aus (0), Maximalwert (großes Flammensymbol) und Minimalwert
(kleines Flammensymbol). Nachdem Sie den Brenner in der maximalen Position gezündet
haben, können Sie die Flammenhöhe zwischen maximaler und minimaler Position anpassen.
Betreiben Sie die Brenner nicht, während sich die Knopfposition zwischen Maximal- und AusPosition befindet.
Prüfen Sie die Flammen nach der Zündung. Falls Sie
eine gelbe Spitze, erhöhte oder instabile Flammen
sehen: Unterbrechen Sie die Gaszufuhr und prüfen die
Montage von Brennerkappen und Köpfen (Abbildung
13). Stellen Sie zudem sicher, dass keine Flüssigkeiten
in die Brennerkappen gelaufen sind. Falls die
Brennerflamme versehentlich ausgeht, schalten Sie den
Brenner aus, lüften die Küche durch und warten bis zur
erneuten Zündung 90 Sekunden.
Ihr Kochfeld verfügt über Brenner mit unterschiedlichen Durchmessern. Um möglichst
ökonomisch mit Ihrem Herd zu arbeiten, sollten Sie grundsätzlich den Brenner wählen, der
zur Größe Ihres Kochgeschirrs passt. Nachdem die gewünschte Temperatur erreicht ist,
drehen Sie die Flamme auf die Minimaleinstellung zurück. Wenn Sie einen Deckel auf die
Töpfe legen, sparen Sie zusätzlich Zeit und Energie.
Damit die Brenner ihre volle Leistung entfalten können, benutzen Sie möglichst
Kochgeschirr mit folgendem Bodendurchmesser: Die Verwendung von Kochgeschirr, das
kleiner als die oben angegebenen Abmessungen ist, führt zu Energieverschwendung.
Schnell- / Wokbrenner: 22 – 26 cm
Mittelschneller Brenner: 14 – 22 cm
Nebenbrenner: 12 – 18 cm
Max. Position
Aus
Abbildung 12
Modulieren
MIN. position
Abbildung 13
Kappe
Kopf
Zünder
Brenner
kappe
Page 42

4. BENUTZUNG IHRES PRODUKTES
16
Stellen Sie sicher, dass die Spitzen der Flammen nicht über den äußeren Rand des Kochgeschirrs
hervorragen, da dies auch Kunststoffzubehör rund um das Kochgeschirr (Griffe etc.) beschädigen
kann.
Schließen Sie grundsätzlich das Hauptgasventil, wenn Sie den Herd längere Zeit nicht benutzen.
Warnung:
• Benutzen Sie ausschließlich flaches Kochgeschirr mit dickem Boden.
• Achten Sie darauf, dass der Boden des Kochgeschirrs trocken ist, bevor Sie es auf das
Kochfeld stellen.
• Im Betrieb können sich die erreichbaren Teile des Gerätes stark erhitzen. Deswegen ist
es ein Muss, Kinder und Tiere beim Kochen und in der Zeit kurz danach vom Kochfeld
fernzuhalten.
• Nach dem Kochen bleibt das Kochfeld noch eine Weile sehr heiß. Nicht berühren, keine
Gegenstände darauf abstellen!
• Legen Sie niemals Messer, Gabeln, Löffel, Deckel oder ähnliche Gegenstände auf dem
Kochfeld ab - solche Dinge erhitzen sich und können schwere Verbrennungen
verursachen.
!
Abbildung 14
Page 43

Warnung:
Wenn Sie das Gerät zum ersten Mal oder nach langer Zeit wieder benutzen, muss zunächst sämtliche
Feuchtigkeit beseitigt werden, die sich zwischenzeitlich eventuell in der Nähe der Heizelemente
angesammelt hat. Dazu lassen Sie die Kochplatte etwa 20 Minuten lang bei niedrigster Stufe arbeiten.
• Benutzen Sie ausschließlich flaches Kochgeschirr mit dickem Boden.
• Benutzen Sie niemals Kochgeschirr, dessen Bodendurchmesser kleiner als der Durchmesser der
Kochplatte ist.
• Achten Sie darauf, dass der Boden des Kochgeschirrs trocken ist, bevor Sie es auf das Kochfeld
stellen. Achten Sie darauf, dass das Kochgeschirr genau in der Mitte der Kochplatte steht und auch
dort bleibt.
17
4. BENUTZUNG IHRES PRODUKTES
RICHTIG
FALSCH
gekrümmter Kochgeschirrboden
FALSCH
Kochgeschirr nicht in der Mitte
FALSCH
Kochgeschirrdurchmesser zu klein
Abbildung 16
• Lassen Sie das Kochfeld niemals ohne Kochgeschirr arbeiten.
• Im Betrieb können sich die erreichbaren Teile des Herdes stark erhitzen. Deswegen ist
es ein Muss, Kinder und Tiere beim Kochen und in der Zeit kurz danach vom Kochfeld
fernzuhalten.
• Falls Sie Sprünge oder Risse in der Kochplatte bemerken sollten, schalten Sie das
Gerät sofort ab und lassen es reparieren.
• Damit Kochplatten möglichst lange halten, müssen sie gründlich mit einem geeigneten
Reinigungsmittel gesäubert werden. Damit nichts zu rosten beginnt und lange Zeit wie
neu aussieht, wischen Sie die Kochplatten leicht mit einem Papiertuch ab, auf das Sie
ein paar Tropfen Speiseöl gegeben haben. Benutzen Sie keine Dampfreiniger.
• Nach dem Kochen bleibt das Kochfeld noch eine Weile sehr heiß. Nicht berühren, keine
Gegenstände darauf abstellen!
Page 44

19
5. REINIGUNG UND WARTUNG
5.1 Reinigung
Bevor Sie Ihren Ofen reinigen, vergewissern Sie sich zunächst, dass sämtliche
Bedienelemente abgeschaltet sind und das Gerät abgekühlt ist. Ziehen Sie den
Netzstecker des Gerätes. Überzeugen Sie sich vor dem Reinigen davon, dass die
Reinigungsmittel geeignet sind und vom Hersteller Ihres Ofens empfohlen werden.
Benutzen Sie keinerlei ätzende Reiniger, Scheuerpulver, Stahlwolle oder harte
Gegenstände, damit die Oberflächen Ihres Gerätes nicht beschädigt werden. Falls
übergekochte Flüssigkeiten rund um Ihren Ofen verbrennen, kann dies die emaillierten
Teile beschädigen. Beseitigen Sie übergekochte Flüssigkeiten sofort.
Kochfeld reinigen
• Heben Sie die Geschirrhalter, Kappen und Köpfe der Brenner an (Abbildung 13).
• Reinigen Sie die Rückblende mit einem mit Wasser und Reinigungsmittel
angefeuchteten Tuch.
• Reinigen Sie Kappen und Köpfe der Brenner und spülen sie ab. Trocknen Sie die Teile
umgehend mit einem Papiertuch ab.
• Achten Sie darauf, die Teile nach der Reinigung wieder richtig anzubringen.
• Reinigen Sie keinen Teil des Kochfeldes mit Stahlwolle. Diese kann die Oberfläche
verkratzen.
• Die Oberflächen der Geschirrhalter können mit der Zeit verkratzen. Diese Teile rosten
nicht, und dies ist kein Produktionsfehler.
• Achten Sie während der Reinigung der Kochplatte darauf, dass kein Wasser in die
Brennerkappen gelangt, da dies die Injektoren blockieren kann.
Brennerkappen:
Reinigen Sie die emaillierten Geschirrhalter, Abdeckungen und Brennerköpfe von Zeit zu
Zeit. Waschen Sie diese Teile mit warmem Seifenwasser, spülen Sie gründlich mit
klarem Wasser nach und lassen Sie die Teile gut trocknen. Nachdem die Teile gründlich
getrocknet sind, setzen Sie sie wieder auf.
Emaillierte Teile:
Damit diese Teile lange Zeit wie neu aussehen, müssen sie regelmäßig mit warmem Wasser
und etwas milder Seife gereinigt werden. Anschließend trocknen Sie die Teile mit einem Tuch.
Reinigen Sie diese Teile nicht, wenn sie noch heiß sind, benutzen Sie keine Scheuerpulver
und keine anderen scheuernden Hilfsmittel. Lassen Sie die emaillierten Teile nicht über
längere Zeit mit Essig, Kaffee, Milch, Salz, Wasser, Zitronensaft oder Tomatensaft in Kontakt
kommen.
Edelstahl:
Edelstahlteile müssen regelmäßig mit warmem, mildem Seifenwasser und einem weichen
Schwamm gereinigt werden. Trocknen Sie diese Teile anschließend mit einem weichen
Tuch gut ab. Benutzen Sie keinerlei Scheuermittel oder andere steuernde Hilfsmittel.
Lassen Sie die Edelstahlteile nicht über längere Zeit mit Essig, Kaffee, Milch, Salz, Wasser,
Zitronensaft oder Tomatensaft in Kontakt kommen.
Page 45

Kochplatten reinigen:
Reinigen Sie die Kochplatten mit einem feuchten Schwamm, schalten Sie sie anschließend zum
Trocknen einige Sekunden ein.
Tragen Sie zur Beibehaltung ihres Aussehens eine geringe Menge Öl auf die Oberfläche der
Kochplatten auf.
Die Kochplatten-Klemmringe können mit Produkten zur Edelstahlreinigung gesäubert werden. Die
Ringe können durch die Hitze mit der Zeit gelb werden. Dies ist normal.
Falls eine Kochplatte lange Zeit nicht genutzt wird, tragen Sie regelmäßig das Spezialfett auf.
5.2 Wartung
Prüfen Sie die Gasleitung regelmäßig. Lassen Sie sie unbedingt bereits bei minimalen Auffälligkeiten
vom technischen Service austauschen. Wir empfehlen, die Gasanschlussteile einmal im Jahr
austauschen zu lassen. Wenden Sie sich bei jeglichen Auffälligkeiten während der Bedienung der
Bedienknöpfe des Kochfeldes an den autorisierten Kundendienst.
20
5. REINIGUNG UND WARTUNG
Page 46

6.1 Grundlegende Fehlerbehebung vor Kontaktaufnahme mit dem Kundendienst
Falls die elektrische Zündung/Kochplatte nicht funktionieren sollte:
• Das Kochfeld ist eventuell von der Stromversorgung getrennt oder ein Stromausfall ist
eingetreten.
Falls sich die Kochplatte nicht aufheizen sollte:
• Möglicherweise haben Sie die Temperatur des Kochfeldes nicht richtig eingestellt.
Die Brenner des Kochfeldes arbeiten nicht richtig:
• Prüfen Sie, ob die Brennerteile richtig montiert sind (insbesondere nach der Reinigung).
• Möglicherweise ist der Druck der Gasversorgung zu gering/hoch. Bei Geräten mit
Propangasflaschen ist möglicherweise der Propangaszylinder leer.
Falls nach wie vor Probleme mit Ihrem Produkt auftreten sollten, wenden Sie sich
bitte an den Kundendienst.
6.2 Hinweise zum Transport
Falls Sie das Gerät transportieren müssen: Zum Transportieren des Gerätes benutzen
Sie am besten das Original-Verpackungsmaterial. Halten Sie sich an die
Transporthinweise auf der Verpackung. Fixieren Sie die oberen Teile des Gerätes,
Kappen, Köpfe und Geschirrhalter mit Klebeband am Kochfeld.
Falls Sie die Originalverpackung nicht mehr haben: Nehmen Sie einen Transportkiste,
damit das Gerät, insbesondere die Oberflächen (Glas- und Lackoberflächen) des Ofens,
vor externen Einflüssen geschützt sind.
21
6. SERVICE UND TRANSPORT
Page 47

22
INJEKTORTABELLE
Ge sa mtverbra uch:
G30 28~30 mba r
7,5 Kw 545 g/h
Ga s Category: II2H3+
Re is ezi el : IE-Kla ss e: 3
G20 20 mba r
G30/G31
28-30/37 mba r
SCHNELLBRENNER
Durchmesser Düse 115 85
Nennleistung 3 3
Verbrauch in 1h
285,7 l/h 218,1 g/h
MITTLERER BRENNER
Durchmesser Düse 97 65
Nennleistung 1,75 1,75
Verbrauch in 1h 166,7 l/h 127,2 g/h
NG LPG
ZUSATZBRENNER
Durchmesser Düse
72
50
Nennleistung
1 1
Verbrauch in 1h
95,2 l/h 72,7 g/h
MITTLERER BRENNER
Durchmesser Düse
97 65
Nennleistung
1,75 1,75
Verbrauch in 1h
166,7 l/h 127,2 g/h
Page 48

Dieses Symbol am Produkt oder auf seiner Verpackung zeigt an, dass
dieses Produkt nicht mit dem regulären Hausmüll entsorgt werden
darf. Stattdessen muss es bei einer geeigneten Sammelstelle zum
Recycling von elektrischen und elektronischen Geräten abgegeben
werden. Durch die ordnungsgemäße Entsorgung dieses Produktes
helfen Sie, potentielle negative Auswirkungen auf Umwelt und
Gesundheit zu vermeiden, die ansonsten durch unsachgemäße
Entsorgung dieses Produktes entstehen können. Detailliertere
Informationen zum Recycling dieses Produktes erhalten Sie von Ihrer
Stadtverwaltung, Ihren lokalen Entsorgungsunternehmen oder im
Geschäft, in dem Sie das Produkt gekauft haben.
52240870
 Loading...