

Page 1
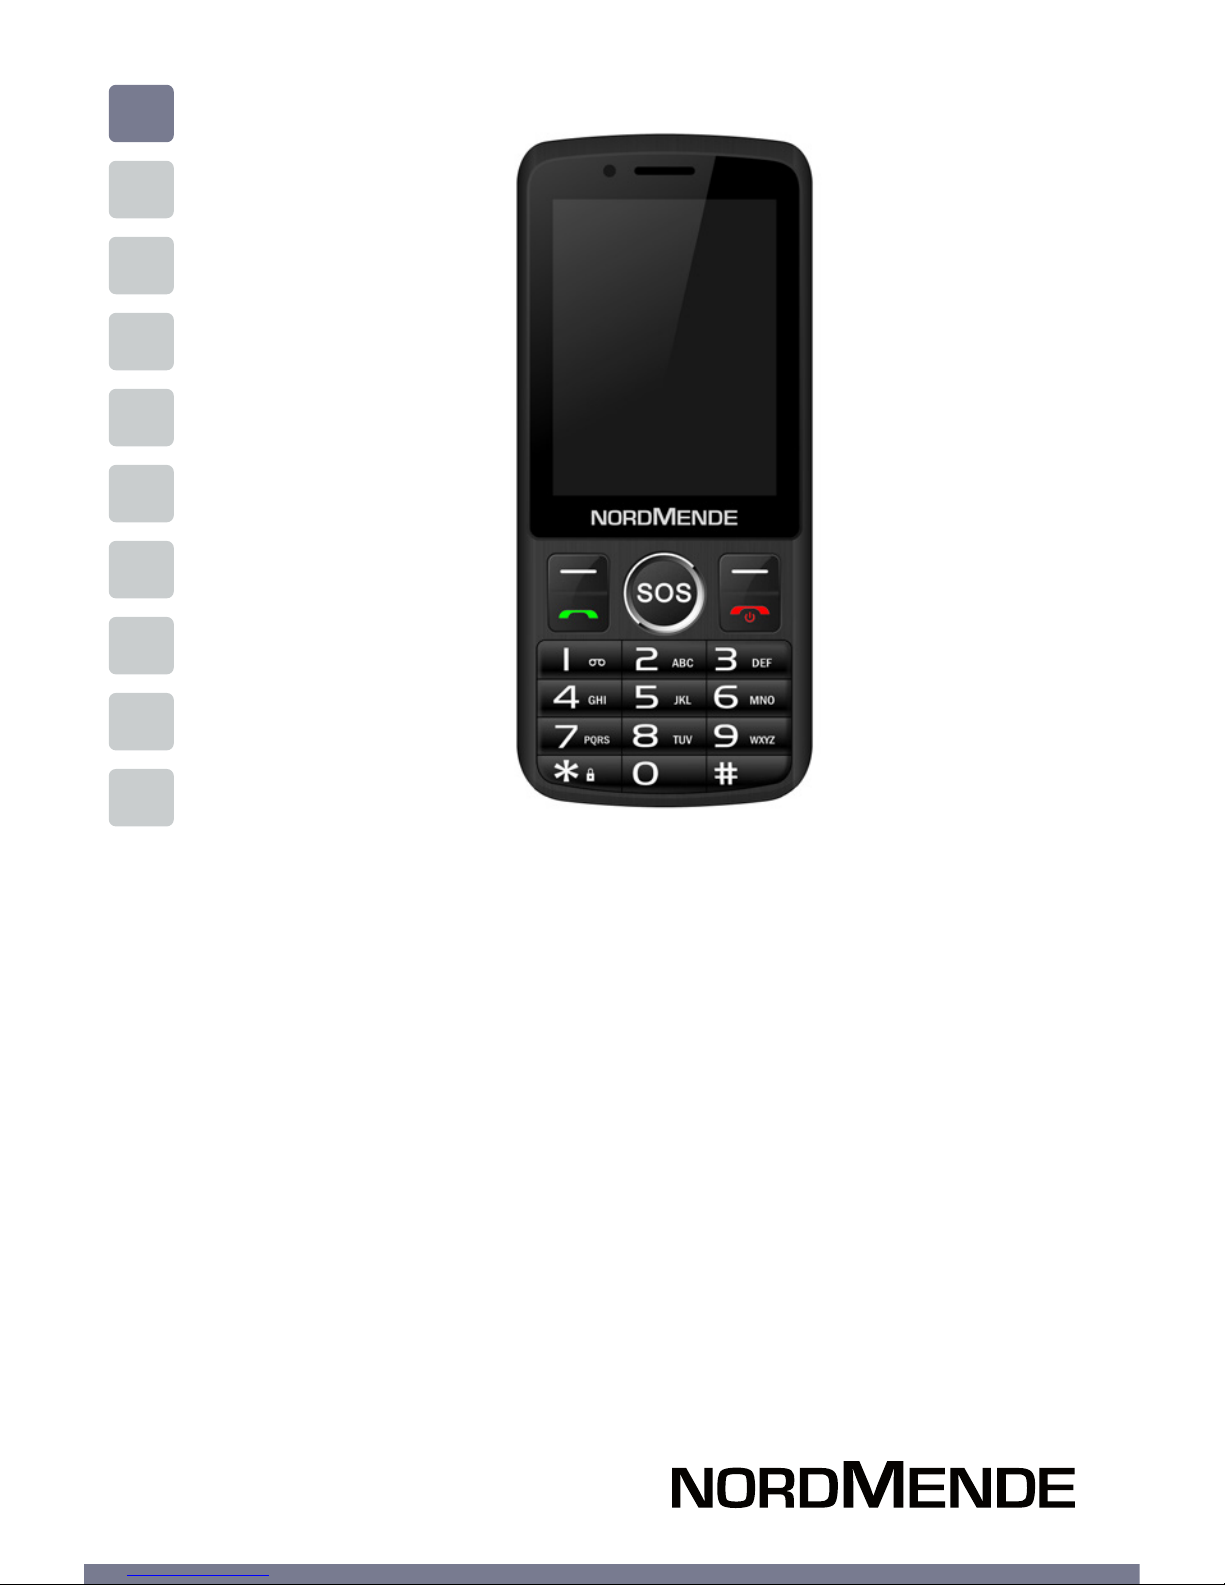
EN
GSM MOBILE PHONE
USER MANUAL
BF500SWA
Page 2

Chapter 1 GENERAL INFORMATION ...................................4
Introduction ...................................................................5
Data and Phone Protection ......................................... 5
Safety Information ........................................................6
Chapter 2 THE PHONE .....................................................................8
Overview .........................................................................9
Button Functions .......................................................... 10
Chapter 3 TO START ......................................................................... 11
general information ..................................................... 12
Use touch display ......................................................... 12
Unlock Display ..............................................................13
Main menu ..................................................................... 13
Using WhatsApp ............................................................14
Installing the SIM card and battery ........................... 16
Install the SD card.......................................................... 17
Charge the battery.........................................................18
Using the Battery .......................................................... 19
Turning the phone on / o .......................................... 21
Main menu images ....................................................... 23
Chapter 4 CONTACTS ....................................................................... 24
Chapter 5 PHONE ..............................................................................28
Contents
USER MANUAL | page 2
Page 3

Chapter 6 Other Functions ................................................ 30
Internet, Facebook, Music ............................................ 31
Camera, instruments ...................................................31
File manager, applications, gallery, SOS .................. 32
Chapter 7 SETTINGS ........................................................................ 33
Internet, Interface Set .................................................. 33
Set (Background, Language, Date and Time) ......... 33
Set ANDROID (SIM Management, Wi-Fi) .................... 33
Airplane mode, tethering / hotspot .......................... 34
Mobile networks, (3G, Data, pref.network, APN) .....34
Audio profile, Display ................................................... 35
Battery, APP, security (SIM and Phone) ....................35
Language and input, restore data ............................. 36
Date and time info ......................................................... 36
Chapter 8 Technical Specifications ............................................. 37
Chapter 9 WARNINGS ...................................................................... 38
Chapter 10 GUARANTEE .................................................................40
USER MANUAL | page 3
Page 4

Chapter 1
General Information
Introduction, phone and data protection,
safety information.
USER MANUAL | page 4
Page 5
USER MANUAL | page 5
1 INTRODUCTION
Thank you for choosing BIG500SWA, the easy phone that with
its simplicity will keep you near to all your contacts.
Please read this manual carefully in order to use your phone as
well as possible, and keep it for future use.
Note: Due to the soware and network systems of dierent
operators, the phone’s menu may be slightly dierent from
those described in this guide.
2 PHONE AND DATA PROTECTION
If your phone has been lost or stolen, notify the telecom
company that the SIM card must be disabled. This can avoid
economic loss caused by unauthorized use.
Please take measures as following to avoid your phone being
unauthorized use:
• Set PIN code of SIM card
• Set phone password
NOTE ON MEMORY CONFIGURATION
The phone internal memory (flash memory) is totally
dedicated to the device management.
For this reason, the free memory must not be used as it
should be kept free for possible soware updates, or the
warranty will be lost.
To store and play multimedia files, it is therefore necessary
to insert a Micro SD card in the device ( Micro SD card not
included).
Page 6

3 SAFETY INFORMATION
To use your phone safely, please read the following
instructions:
1. Pay attention near chemical plants, gas stations and
other potential explosive places. Also in the main
screen, the phone emits radio signals, so you should
turn o the phone.
2. When you are driving, do not use the phone. If you
must use it, please park your car before starting the
conversation.
3. Do not use the phone in the hospital, not to disrupt
the functioning of medical devices such as cardiac
pacemakers, hearing aids, etc. Before turning on the
phone, check the rules for the area in which you want to
use the device.
4. On a plane, turn o your mobile phone before the
plane takes o not to disturb the flight. It is generally
dangerous and illegal to use the phone on board of an
aircra.
5. Place the phone and all accessories in areas not
accessible to children.
6. Accessories and battery: please use the accessories and
battery supplied with the phone, otherwise the phone
may be damaged and cause danger to others. Please
do not shortcut, trim or repair the battery. If the phone
warms up excessively, the battery may swell or leak;
when you experience these unusual phenomena, you
must stop using the phone and immediately change the
battery, not to compromise the device safety.
USER MANUAL | page 6
Chapter 1
GENERAL INFORMATION
Page 7

USER MANUAL | page7
7. WARNING: Lithium battery. Risk of explosion if the
battery is replaced by an incorrect type.
8. Do not recharge the phone without the battery
installed. Before removing the battery, it is advisable to
switch your phone o not to damage the data on your
phone.
9. The phone is not waterproof. Please keep it dry.
10. Avoid using the phone at a too high or too low
temperature.
11. Do not throw, drop or hit the phone, not to cause
damage to the inside or outside of the device.
12. Authorized Service: The phone may only be repaired by
professionals. Therefore, please do not disassemble or
repair the phone by yourself.
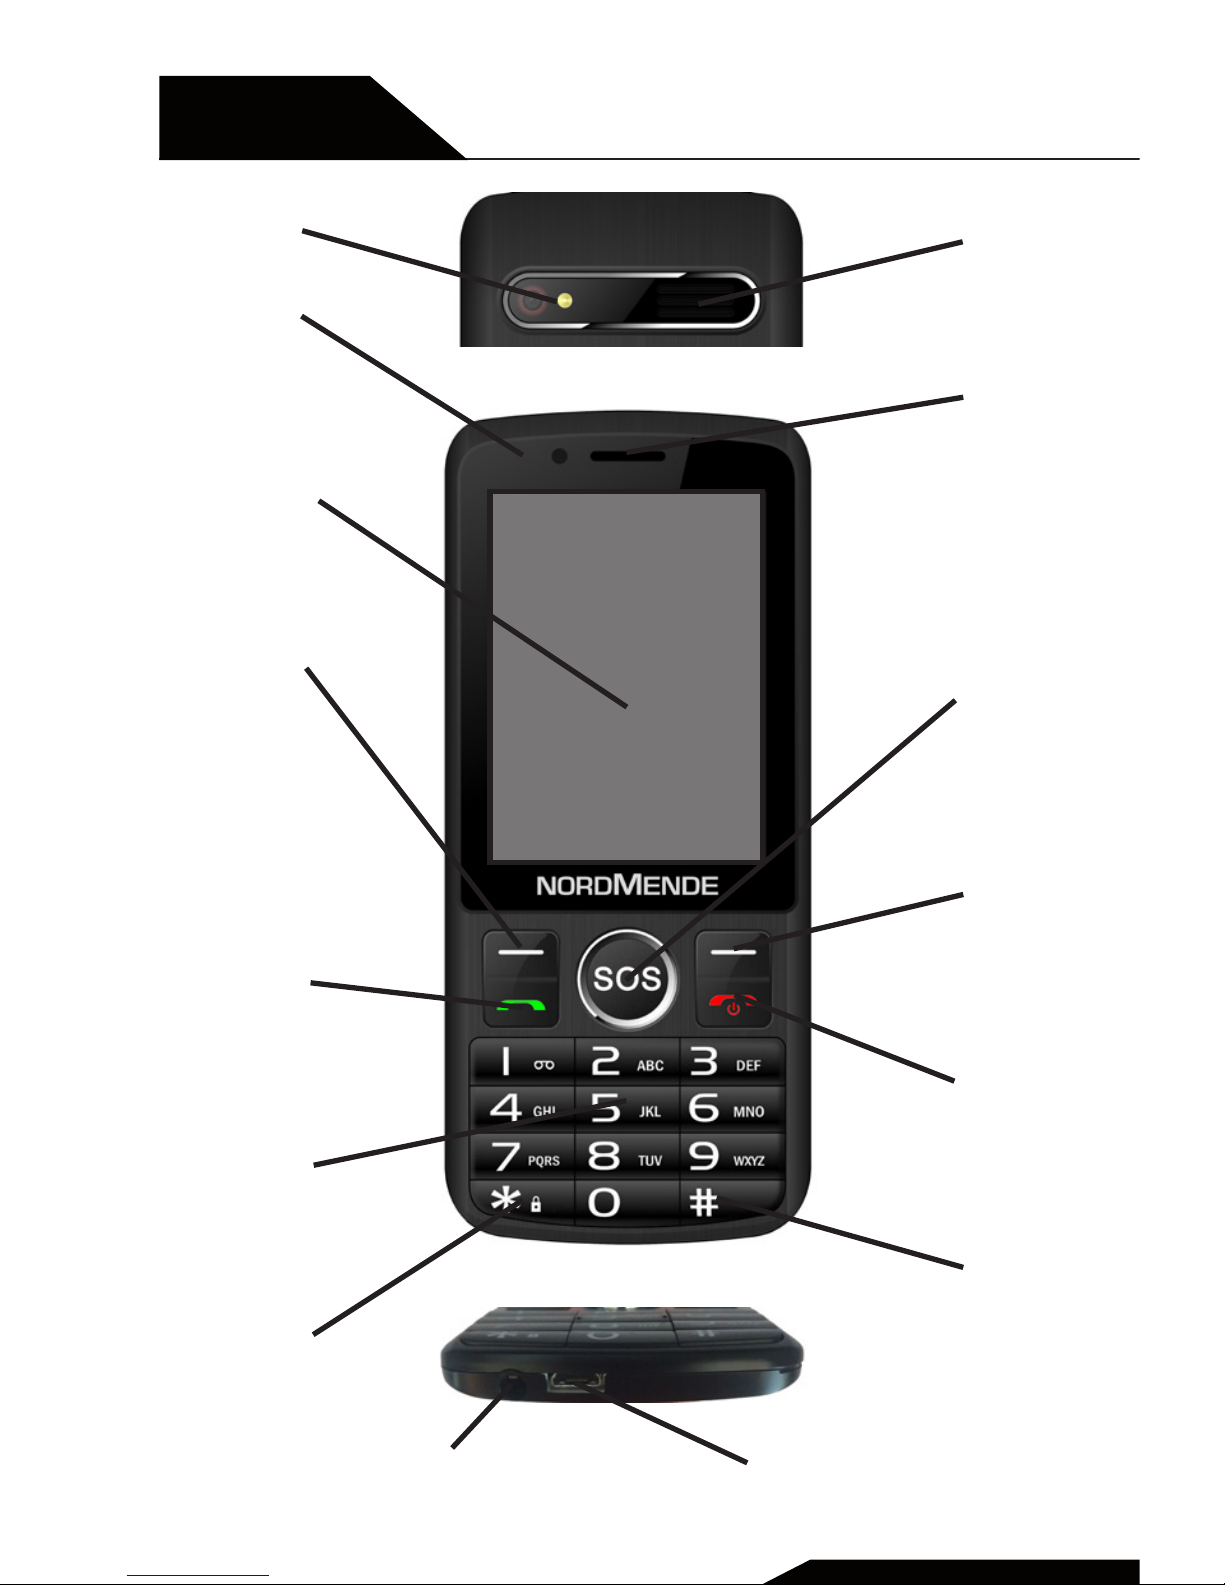
Page 8
Chapter 2
USER MANUAL | page 8
THE PHONE
1
6
2
3
15
14
7
13
5
9
10
8
12
11
4
Fig.1
Page 9

USER MANUAL | page 9
General overview
1. Rear camera
2. Rear handsfree speaker
3. Speaker
4. Front camera
5. Touchscreen
6. Le key (the function is displayed in the bottom le
corner of the display)
7. Call key
8. Numerical keypad
9. * key used to lock the keypad
10. Right key (the function is displayed in the bottom
right corner of the display)
IMPORTANT NOTE: this button always acts as the
“BACK” button in all menus
11. On / O , end call button. In stand-by mode 3 sec. =
On / O
12. # key - if used in the SMS or WhatsApp menu, changes
how the text is entered, for example, abc.
13. Micro USB connector for charging
14. Earphone Jack 3.3mm
15. Browsing button for Up / Down, Le / Right (used to
browse the various menus) and central button
NOTE: If the central key is held down for less than 3
seconds, it provides the “OK / Confirm function”.
If it is held down for at least 3 seconds, it enables
the emergency SOS function (which must be preactivated using the SOS settings menu)
Page 10

2 KEY FUNCTIONS (see Fig. 1 as a reference for the number
indicated below in the respective lines)
Le and right keys (So Key) , key “6” and key ”10”
The first line on the screen describes the functions of the le and
right keys.
Call key, key “7”
Push the key to make a call, aer having keyed in the number or
selected a contact from the contacts. Push the key to answer an
incoming call.
End Call, key “11”
Push to end a call in progress, or to exit any menu and go back to
the main screen.
Directional key, key “15”
Push this key to scroll the options while browsing a list.
OK key, key “15”
Push the central key for less than 3 seconds to confirm a selection (in the centre of the directional keys). This central key,
marked “SOS”, is used to make emergency calls, by holding it
down for more than three seconds (the SOS function must be
activated via the menu).
Numerical keys, * and # , keys ”9” and “11”
Push keys 0 to 9 to enter or change numbers and characters.
USER MANUAL | page 10
Chapter 2
THE PHONE
Page 11

USER MANUAL | page 11
CAPITOLO 5
Chapter 3
Getting started
SIM Card and battery installation, SD Card
installation, charging the battery, battery
usage, powering ON/O the Mobile Phone,
connecting to the network, dialling calls.
Page 12

USER MANUAL | page 12
Chapter 3
GETTING STARTED
The BIG500SWA model is a phone with a normal keypad,
but that has a series of particular features:
• The SW is ANDROID with WhatsApp pre-installed
• The 2,8” display is a touch screen.
• The main menu is made up of a series of panels with
icons that are simple to interpret.
USING THE TOUCHSCREEN
Unlike normal phones, on which the Display is only used
to display what has been selected using the keypad, the
BIG500SWA has a Display that can be said to be a “Touch-
screen”.
What does that mean?
The Touchscreen makes it possible to use the screen itself
as an active area for accessing menus, icons, and various
functions. This means that by simply touching a specific
icon / function with your fingertip, it is activated and you can
access a sub-menu or other specific functions.
You can therefore touch a point, or “swipe” your finger over
the screen to move the page, unlock the screen, or do many
other actions.
Since this phone has both a touchscreen and a normal
numerical keypad, for many of its functions you are free to
choose whether to use the touchscreen or the numerical
keypad, or interact with both (for example, when using
WhatsApp).
NOTE: This choice cannot be made everywhere. Check
what you can and can’t do from time to time, using only
the touchscreen or the keypad. This does not indicate a
defect in the soware.
Page 13

USER MANUAL | page 13
• How to unlock the Display
If the phone is on and no activity takes place for a defined time
(usually 30 seconds), the phone’s screen turns black. This is done
to reduce consumption on the battery.
Therefore its status is: phone on, keypad blocked, and display o.
To unlock the screen and begin using the phone, use one of the
two options indicated below:
1) Push the on/o key (red key) for one second, then swipe the
lock key that is displayed at the bottom of the screen to the right.
2) Alternatively, push the le key immediately followed by the *
(asterisk) key, with the display o.
This brings up large icons on the screen, for the following
functions:
1. “Date and time” - the current date and time are displayed.
2. “Contact” - the contacts saved on the SIM and in the Phone.
3. “WhatsApp“ - the chat application
4. “Phone” - to be able to make a phone call
5. “Message” - to be able to send and read messages
• Swipe to the right (once) to open a screen that
has 6 favourite contacts that are immediately available (part of
the contacts list)
• Swipe to the le (a number of times) to access
other screens that provide access to a series of functions such as,
“Camera”, “Internet“, “File manager”, ”Facebook” (via internet),
”Tools”, etc. (See Fig. 2)
Page 14

USER MANUAL | page 14
Chapter 3
GETTING STARTED
USING WhatsApp (this app must be enabled):
NOTE: To use WhatsApp the phone must be connected to the
data network via the SIM, or to a Wi-Fi connection. In both
cases we recommend checking the costs of these services
with the service providers.
When using WhatsApp for the first time, you need to enable it.
You must therefore link it to your personal number for the SIM in
the phone.
Then refer to the following points:
1. With the SIM inserted and registered on the internet
(the phone operator’s name is shown in the display) touch the
“WhatsApp” icon on the display - see Fig. 2.
2. Follow the instructions in the sequence they
appear on the screen (you will be asked to add your phone
number).
3. You will receive a message with a activation code,
via that same number (therefore on this phone).
4. Enter this code, where indicated.
(next)
Fig.2
Page 15

USER MANUAL | page 15
Once the activation procedure has been completed, to use
WhatsApp normally, follow the instructions below:
1. The main menu includes the “WhatsApp” icon.
2. Touch the icon on the display (touchscreen).
3. An icon circled in green (create new message) will be displayed in the bottom right corner.
4. Open the contacts menu and choose the contact you want
to write to.
5. Now key in the text of the message.
6. To enter the text you must use the phone’s keypad, which
is set as:
• Default setting: “Abc lettering”. Each key pushed
corresponds to a letter (according to the individual keys). For
example, to enter the letter “b”, push key 2 twice in quick succession, and so on.
• Push the # (hash) key to switch to the “intuitive
dictionary” mode, and words will be suggested by the SW.
NOTE: not all commonly used words are recognised, this is not a
SW defect.
• Push the # (hash) key again to switch to entering
“numbers” only (0 ,1, 2, etc.)
• To attach a file (image or any other), touch the
paper clip icon at the bottom right of the screen for the text you
are entering. A list of folders will open, from which the files to be
attached can be taken.
• Once you have completed the message, use the
key with the arrow outlined in green to send the message.
• To read a WhatsApp message that you have received, touch the area of the notification on the screen. You can
reply to the message by repeating points 5 and 6 above, for the
messages to be read.
Page 16

1 SIM CARD AND BATTERY INSTALLATION
A SIM card carries useful information, including your mobile phone
number, PIN (Personal Identification Number), PIN2, PUK (PIN
Unlocking Key), PUK2 (PIN2 Unlocking Key), IMSI (International Mobile
Subscriber Identity), network information, contacts data, and short
messages data.
( See Fig.3 )
Note: Aer powering o your mobile phone, wait for a few
seconds before removing or inserting A SIM card.
Exercise caution when operating A SIM card, as friction or
bending will damage the SIM card.
Properly keep the mobile phone and its fittings such as the
SIM cards beyond children’s reach.
IMPORTANT: Be very careful when inserting the battery, to
prevent copper contacts from bending.
• Hold the End key for a while to power o the mobile
phone
• Push the back cover above the battery and remove it.
• Pull the le battery buckle outward and then li the
battery away.
• Insert the SIM card into the SIM card slot lightly with the
corner cutting of the card aligning to the notch of the
slot and the gold plate of the card facing download, till
the SIM card cannot be further pushed in.
• With the metallic contacts of the battery facing the
metallic contacts in the battery slot, press the battery
down until it locks into place.
USER MANUAL | page 16
Chapter 3
GETTING STARTED
Page 17

USER MANUAL | page 17
2 SD CARD INSTALLATION
The T-Flash card is a pluggable mobile storage card inside the
mobile phone.
To install the T-Flash card, open its latch, place its indented
side downward, insert the card into the card slot, and then
close the latch.
To remove the T-flash card, open its latch and slightly take the
card out. And then close the latch.
Battery
Slot
SIM
Battery contacts
Slot external
memory
micro SD
Fig.3
Page 18

3 CHARGIN THE BATTERY
The lithium battery delivered with the mobile phone can be
put into use immediately aer being unpacked.
Battery level indication:
• Your mobile phone can monitor and display the battery
status.
• Normally the remaining energy of the battery is
indicated by the battery level icon at the upper right
corner of the display screen.
• When the battery energy is insuicient, the mobile
phone prompts “Battery low”. If you have set an alert
tone, an alert tone will be given o when the battery
level is too low.
• A charging animation appears when the battery is being
charged. When the charging is complete, the animation
disappears.
USER MANUAL | page 18
Chapter 3
GETTING STARTED
Note:
Ensure that the plug of the charger and the plug of the USB
cable are inserted in the right direction. Inserting them
in a wrong direction may cause charging failure or other
problems.
Before the charging, ensure that the standard voltage and
frequency of the local main supply match the rated voltage
and power of the travel charger.
Page 19

USER MANUAL | page 19
Insert charging connector here
Plug the charger
plug into an
appropriate
100-240V ~
50-60 Hz power
outlet
Using a travel adapter:
• Install the battery into the mobile phone before charging
the battery.
• Connect the adapter of the travel charger with the
charging slot in the mobile phone. Ensure that the
adapter is fully inserted.
• Insert the plug of the travel charger to an appropriate
power outlet.
• During the charging, the battery level grids in the battery
icon keep flickering till the battery is fully charged.
• It is normal that the battery becomes hot during the
charging period.
• The battery icon does no longer flicker when the charging
process ends.
Page 20

4 BATTERY USAGE
The performance of a battery is subject to multiple factors:
radio network configuration, signal strength, ambient
temperature, chosen functions or settings, phone fittings, and
the voice, data or other application mode you choose to use.
To guarantee the optimal performance of your battery, please
stick to the following rules:
• Use only the battery provided by the vendor. Otherwise,
damages or even injuries could be caused during the
charging.
• Power o the mobile phone before removing the
battery.
• The charging process lasts a longer time for a new
battery or a battery not in use for long. If the battery
voltage is too low to enable the mobile phone to be
powered on, charge the battery for a longer time. In this
case, the battery icon does not flicker until a long time
aer the battery enters the charge status.
• During the charging, ensure the battery is placed in a
room temperature environment or in an environment
close to room temperature.
• Immediately stop using the battery if the battery
produces odor, overheats, cracks, distorts or has other
damage, or if the electrolyte leaks.
• The battery wears out with use. A longer charging time
is required as the battery is put into use for a long time.
If the total conversation duration decreases but the
charging time increases even though the battery is
properly charged, purchase a standard battery from the
OEM or use a battery approved by our company. Using
any poor-quality fittings will cause harm to your mobile
phone or even incur danger!
USER MANUAL | page 20
Chapter 3
GETTING STARTED
Page 21

USER MANUAL | page 21
5 POWERING ON OFF THE MOBILE PHONE
Hold the End key for a while to power on the mobile phone. A
power-on animation appears on the display screen.
Input the phone lock code and press the OK key if the mobile
phone prompts you to input the phone lock code. The original
code is 1234.
Input the PIN and press the OK key if the mobile phone
prompts you to input the PIN. The PIN is provided by the
network operator for new opening SIM card.
Enter the standby interface. To power o the mobile phone,
hold the End key for a while.
6 CONNECTING TO THE NETWORK
Aer the SIM card and the mobile phone are successfully
unlocked, the mobile phone automatically searches for an
available network. Aer finding a network, the mobile phone
enters the standby state. When the mobile phone is registered
in the network, the name of the network operator is displayed
on the screen. Then you can dial or receive a call.
7 DIALING CALLS
In the standby interface, press number keys to input the area
code and the telephone number, and then press the Dial key to
dial a call. To end the call, press the End key.
Dialing an international call
Press the * key twice can input “+”. Then input the country
code, the area code and the telephone number. Finally, press
the Dial key.
Page 22

USER MANUAL | page 22
Chapter 3
GETTING STARTED
Dialing a call to a number in the phonebook
Enter the phonebook and use the up or down direction keys to
find the telephone number you want to call.
Press the Dial key. The mobile phone automatically dials the
chosen telephone number.
Redialing the last number
In the standby interface, press the dial key to show the dialed
calls.
Press the up or down direction keys to select a number you want
to dial and then press the Dial key.
Adapting volume
During a conversation, you can press the Up or Down direction
keys to tune the sound volume.
Answering incoming calls
Press the Dial key or the Le so key to answer an incoming call.
Press the End key to end the current conversation.
To reject an incoming call, press the End key or the Right so key.
Note: If the caller can be identified, the mobile phone will
present the calling number. If the calling number exists in
the phonebook, the mobile phone will present both the
name and the phone number of the caller. If the caller
cannot be identified, the mobile phone will present the
calling number only.
Page 23

USER MANUAL | page 23
Touch here to access Gallery
Touch here to access and enable the
SOS emergency call menu.
Touch here to access File Manager built-in memory and external micro
SD memory (not included in the pack).
Touch here for tools: calculator,
alarm,
Touch here for camera (you must
have an SD storage card, not included
in the pack).
Touch here to listen to music
Touch here for Facebook (via
internet)
Touch here to browse the Internet
Touch here for the messages menu
Touch here to record calls
Touch here for WhatsApp
Touch here for a contact
Touch here for miscellaneous settings
Touch here to access a list of the
applications available.
Page 24

Chapter 4
Contacts
USER MANUAL | page 24
The mobile phone is able to save new numbers by using the free
space available in the built-in memory. This cannot be quantified
beforehand, as it is shared with other functions (e.g. WhatsApp)
and so is not always the same.
The number of phone numbers that can be stored on a SIM
depends on the storage capacity of the SIM itself. The phone
numbers stored in the mobile phone and on the SIM card, for a
single contacts list.
Touch the “Contacts” icon (see Fig. 2) to access your contacts
list.
• How to make a phone call:
1. Touch the contact you want to call (on the touchscreen).
2. Alternatively, use the scroll keys to scroll the list until you find
the contact required.
3. To make a call, simply touch the call key (Key marked with the
number 7).
4. To send an SMS or make a call, you can also touch the contact
listing itself.
5. The menu then provides the option of sending a message or
calling the number.
6. Touch the option displayed that corresponds to your choice.
Page 25

USER MANUAL | page 25
• The search contacts function:
This allows you to view the contacts. You can search for a contact.
Select Contacts, and enter the name or some letters in the name
of the contact you are looking for. A list of all the contacts that relate to the search data is shown. Use the Up and Down scroll keys
to scroll the contacts, and select the contact required. Use the le
or right keys to view the other groups: relatives, friends, and so on.
• Create a new contact:
1. Touch the “Contacts” icon (see Fig. 2)
2. In the bottom right corner the “Create New” icon will appear.
Touch this to open it.
3. Enter the name, phone number, and all other details you wish
to add, using the various fields provided.
4. When you are finished, touch the “Complete” icon.
Page 26

Chapter 5
Message
USER MANUAL | page 26
To access the messages menu:
1. Touch the “Message” icon on the touchscreen.
2. A list of the messages will be displayed.
3. Touch the message you are interested in, to read
its contents.
4. To reply to the message, simply enter the text in
the relevant field on the display.
5. Use the keypad to enter the text.
6. When you are finished, touch the “arrow” icon in
the bottom right corner of the display, to send the message.
Note:
To enter the text you must use the phone’s keypad, which is set
as:
• Default setting: “Abc lettering”. Each key pushed
corresponds to a letter (according to the individual keys). For
example, to enter the letter “b”, push key 2 twice in quick succession, and so on.
• Push the # (hash) key to switch to the “intuitive
dictionary” mode, and words will be suggested by the SW.
NOTE: not all commonly used words are recognised, this is not a
SW defect.
• Push the # (hash) key again to switch to entering
“numbers” only (0 ,1, 2, etc.)
Page 27

USER MANUAL | page 27
To write a new message:
1. In the message menu, touch the envelope icon in the bottom
le corner of the display.
2. The field appears for entering the message. Enter the contact or
the recipient’s phone number.
3. Enter the text.
4. When you are finished, touch the “arrow” icon in the bottom
right corner of the display, to send the message.
Settings menu:
From the message menu, touch the icon in the bottom right corner (marked by 3 dots in a row). This opens the settings menu and
others as well.
Page 28

Chapter 6
Phone
USER MANUAL | page 28
To access the Phone menu:
1. Touch the “Phone” icon on the touchscreen.
2. A list of calls (missed, made, received, and rejected)
will be displayed.
3. Access the list of contacts by touching the “Con-
tacts” icon in the bottom le corner.
4. To access the phone keypad and then key in a
phone number, touch the “keypad” icon in the bottom right
corner.
5. To access the menu, touch the menu icon in the
top right corner (marked by three superimposed lines).
6. Touch the call you require to call back, or to send a
message.
7. To call back, touch the “Call” icon in the bottom
right corner of the display.
(next)
Page 29

USER MANUAL | page 29
8. To reply by sending a message, simply touch the
“send message” icon in the bottom le corner of the display.
9. Use the keypad to enter the text.
10. When you are finished, touch the “arrow” icon in
the bottom right corner of the display, to send the message.
Note:
To enter the text you must use the phone’s keypad, which is set
as:
• Default setting: “Abc lettering”. Each key pushed
corresponds to a letter (according to the individual keys). For
example, to enter the letter “b”, push key 2 twice in quick succession, and so on.
• Push the # (hash) key once to switch to “intuitive
dictionary” mode. The words will be suggested by the SW.
NOTE: Not all words commonly used will be recognised. This
is not a SW defect.
• Push the # (hash) key again to switch to entering
“numbers” only (0 ,1, 2, etc.)
Page 30

OTHER FUNCTIONS
Chapter 6
USER MANUAL | page 30
• Internet:
Touch the “Internet” icon to begin browsing.
The page that opens is Google.it.
To access other websites, touch the top of the display and use
the keypad to key in the website you want to go to.
Suggestion; use a Wi-Fi network, where available, to avoid
consuming large amounts of data traic.
• Facebook :
Touch the “Facebook” icon to access the web version (this is not
a phone application)
You will have to enter your Facebook access details.
• Music:
Touch the “Music” icon to access the music reader, which will
contain your music, ready to listen to.
Select a song by touching the display on the line that corresponds to that song. Use the menu’s arrow keys to move
backwards and forwards in the list.
Suggestion: we recommend adding an external SD storage unit.
(NOT included in the pack).
• Camera:
Click the “Camera” icon to access the menu.
NOTE: An external SD storage unit must be inserted (not included
in the pack), in order to use the camera.
( next)
Page 31

CAPITOLO 5
USER MANUAL | page 31
You can take photos or record videos
The Camera:
• Takes a photo when you touch the (shutter) icon in
the bottom right corner of the display.
• Records a video if you touch the video camera icon
on the display. (Touch the same icon again when you have finished recording to stop the video). To access the various settings,
touch the asterisk icon in the bottom le corner of the display.
NOTE: The photos and videos can be seen in the field at the bottom right, or by accessing them via the “Album” function.
• Tools:
Click the “Tools” icon to access the menu.
1. Calculator:
A simple calculator is available. Use the touchscreen or keypad
to do calculations.
2. Alarm:
You can set various daily, weekly, or personalised alarms.
Touch the alarm clock icon at the top right of the screen to access the alarms menu, which already has a single and a weekly
alarm. Change the time as required, or touch the “+” icon to add
a new alarm.
On the “Alarm” main page, touch the “World Map” icon to set the
time zone.
To access the “Settings” touch the icon in the bottom le corner
with three dots on it.
• Night mode: changes the brightness of the light
• Settings: changes the clock style, alarm snooze
time, volume, and others
Page 32

USER MANUAL | page 32
Chapter 6
• File Manager:
Touch the “File manager“ icon to read the built-in memory and, if
inserted, the external SD memory (not included in the pack).
• Applications:
Touch the “Applications” icon to access the list of applications
available (touch the “+” icon to move the application chosen into
the display).
• Album:
Touch the “Album” icon to access the various photograph, image
and video albums for the camera, WhatsApp, and others.
• SOS:
Touch the SOS icon to enable SOS emergency calls.
1. Select “Open” to activate the function.
2. Edit the text message, by adding your own text.
3. Add the phone numbers of the people to whom
emergency call is to be sent (4 numbers).
When you are finished go back to stand-by mode (phone displays the main menu with date and time, etc.).
To make an emergency call:
1. Hold the key on the keypad marked “SOS” down
for more than 3 (three) seconds. (If held down for less than 3
seconds, the SOS will not be activated).
2. The phone then emits an acoustic alarm and starts
sending the emergency message, as well as making a phone call
to the first number selected.
3. If there is no reply for the call, the second number
is called, and so on.
4. Touch the SOS key again to deactivate the alarm
and calls in progress, if necessary.
Page 33

USER MANUAL | page 33
• Settings:
Touch the “Settings” icon to access the following menus:
• Internet:
Activate / deactivate Wi-Fi and set access to the Wi-Fi selected.
• Set Interface
You can select the 6-icon (default) display for the screen, of bigger icons, with 4 per screen.
Three dierent “Themes” can be chosen, which changes the form
of the icon.
• Set
You can edit:
1. Wallpaper
2. Language
3. Date and time (automatic from the network or
manual)
• Set Android
This opens the menu for the standard ANDROID settings, which
provides access to settings for:
• SIM management
1. Activate / deactivate SIM (two dierent SIMs can be
inserted, and can be enabled or disabled via the menu)
2. Select the default SIM for phone calls, messages,
and data connections.
3. Enable data roaming (this may result in high costs).
• Wi-Fi
1. Activate / deactivate Wi-Fi.
2. Choose the preferred network and connect to it for
better data use (this increases battery consumption).
Chapter7
SETTINGS
Page 34

USER MANUAL | page 34
Chapter 7
SETTINGS
Bluetooth
1. Activate / deactivate Bluetooth
2. Choose the Bluetooth peripherals and connect to
them.
3. These can include earphones, smartwatches,
smartphones, and others.
Data use
1. Enable use of data traic
2. Monitor data consumption for specific applica
tions.
3. Set a usage limit.
Other
1. Aircra mode (activate this function before you
switch of the mobile phone during take-o and
whenever asked to do so).
2. Tethering / portable hotspot
3. VPN
4. Mobile networks
- Data connection
- 3G service
- Favourite networks
- Access point names (APN for data)
- Network operator: for automatic or manual
searches for phone networks available.
NOTE: Even if the networks are listed and visible, this does
not guarantee that you can connect to them. It all depends
on commercial agreements between the various service
providers (Phone companies)
Page 35

USER MANUAL | page 35
Audio profile
Set ring tones for phone calls, messages, and other
purposes: General, silent, vibration, outdoors (high
volume ring and vibration)
Display
Shows notification on the screen when locked.
Battery
Provides a detailed indication of battery status,
consumption due to the screen, the Android SW,
Wi-Fi, Bluetooth, etc.
NOTE: Battery consumption when on stand-by and when
in use can vary greatly, and depends on many factors that
cannot be evaluated beforehand, such as, for example, the
network, use of Wi-Fi, Bluetooth, the time the display stays
on for, and so on.
App:
List of the applications available (note: this phone
does not have Playstore )
Security:
1. Screen lock: none, by swiping, with PIN, with pass
word.
2. Lock SIM: (using the PIN for the SIM, which is indi
cated by the service provider).
3. Other specific security functions for the phone or
parts thereof (not all available).
Page 36

Language and entering
1. Set the reading and writing language for the phone.
2. Use a personal dictionary (this function may not be
operational).
Restore default settings:
is selected, this resets the phone and reinstates the
default settings.
Note: all files not saved on an external storage device (not
included in the pack), may be lost.
Date and time:
Set date and time - select network-based or
manual.
Switch on / switch o programme.
Set an automatic switch on and switch o time.
Phone info - information on:
1. Wireless update availability (only for WhatsApp)
2. Status, phone number, and lots of other network
information, etc.
3. Open source legal information
4. Android SW version, and lots more.
Chapter 7
SETTINGS
USER MANUAL | page 36
Page 37

Chapter 8
Processor MTK6572, dual-core, 1.2GHz
Frequencies GSM900 TX: 880 ÷ 915MHz RX: 925 ÷ 960MHz
GSM1800 TX: 1710 ÷ 1785MHz RX: 1805 ÷1880MHz
WCDMA I TX: 1920 ÷ 1980MHz RX: 2110 ÷2170MHz
WCDMA VIII TX: 880 ÷ 915MHz RX: 925 ÷ 960MHz
WiFi 2412 ÷ 2472MHz
Bluetooth 2402 ÷ 2480 MHz
FM 87.5 ÷ 108 MHz
Colour Black
OS Android 4.4.2
Dimensions 131 * 57 * 11.8mm
SIM SIM Standard or Micro-SIM
Battery 1200mAh Weight 108g (with battery)
Language (ITA, EN, FR, DE, ES ), auto set based on SIM
Display 2.8 inch Resolution 240 * 320 QVGA
Touchscreen Capacitive Touch Screen (G + F)
Camera front 0.3-Mpxl Rear 0.3-Mpxl (by SW 2MP)
Memory RAM 512 MB & ROM4 GB
MicroSD ™ external memory support up to 16GB
(memory not included)
Bluetooth Bluetooth® 2.0 ( 2.4Ghz freq.)
Audio Jack 3.5 mm jack
Wi-Fi Wi-Fi®: IEEE 802.11 b/g/n
Video MP4 player Yes
Recorder Yes
Audio MP3 player Sì
FM Sì
Included Accessories:
Charger Input:
100-240V~ 0,1A 50-60 Hz, Output: 5V 500 mA
Fast guide
Battery
earphone with microphone
SPECS
USER MANUAL | page 37
Page 38

CAPITOLO 5
Chapter 9
USER MANUAL | page 38
SAR Certification information (Specific Absorption Rate)
The device is compliant to European Union (EU) standards that
limit human exposure to radio frequency (RF) energy emitted
by radio and telecommunications equipment. These standards
prohibit the sale of mobile devices that exceed a maximum
exposure level (known as SAR) of 2.0 W/kg.
During testing, the maximum SAR recorded for this model is 0.978
W/kg.
During normal use, the actual SAR level can be much lower, as the
device has been designed to emit only the RF energy necessary
to transmit a signal to the nearest base station. By automatically
emitting lower levels when possible, your device reduces your
overall exposure to RF energy.
To avoid damage to your hearing, please do not
listen at high volume for a long time
Maximum power:
GSM900: 32,92 dBm
GSM1800: 29,65 dBm
WCDMA: 22,65 dBm
WiFi: 9,57 dBm
Bluetooth:4,23 dBm
SPECIFICHE TECNICHE
WARNINGS
Page 39

USER MANUAL | page 39
INFORMATION ON DISPOSAL OF UNITS
This product bears the selective
sorting symbol for waste electrical
and electronic equipment (WEEE).
This means that this product must be handled
to the local collecting points or given back to
retailer when you buy a new product, in a ratio
of one to one (or one to zero if the external
dimension is less than 25 cm) pursuant to
European Directive 2012/19/EC in order to be
recycled or dismantled to minimize its impact on the environment.
For further information, please contact
your local or regional authorities.
Electronic products not included in the selective sorting
process are potentially dangerous for the environment and
human health due to the presence of hazardous substances.
The unlawful disposal of the product carries a
fine according to the legislation currently in force.
This product contains batteries covered by
the European Directive 2013/56/EU, which
must not be put in the household waste.
Please be informed about local regulations regarding the collection of batteries, as their correct disposal helps to prevent negative consequences for the environment and human health.
Page 40

USER MANUAL | page 40
CAPITOLO 5Chapter 10
LIMITED WARRANTY AND CONVENTIONAL WARRANTY IN ADDITIONAL FOR PRODUCTS SOLD BY NORDMENDE IN ITALY
The legal guarantee
The products marketed by Aldinet Spa are covered by free legal
guarantee provided in favor of consumers, ie non-professional
buyers, Articles 128-134 of the Consumer Code (Legislative
Decree 06/09/2005 n. 206).
The statutory warranty has a duration of no. 24 months from the
date of delivery to the consumer as above is understood and is
mentioned by the seller, or by the person who supplied him with
the product, that consumers should seek your own.
By virtue of the legal warranty, the consumer may require the
seller, at its option, (1) to repair the goods or (2) to replace it at no
charge in both cases, unless the remedy requested is impossible
or excessively costly relative to each other, as well as regulated
by Art. 130 paragraph 4.
Alternatively, where one of the following situations, the consumer may, at its option, (3) an appropriate reduction of the price
or (4) have the contract rescinded:
a) repair and replacement are impossible or prohibitively
expensive;
b) the seller has failed to repair or replace the goods within a
reasonable period;
c) the replacement or repair previously carried out has caused
significant inconvenience to the consumer.
In determining the amount of the reduction or the amount to be
repaid is considers the use of the asset.
At the following web address is viewed and downloaded the text
of Articles 128 to 134 of the Consumer Code relating to the legal
warranty described above
www.nordmende-phones.it/
WARRANTY
Page 41

USER MANUAL | page 41
The additional conventional warranty provided in Italy by
ALDINET Spa
In addition to the legal guarantee in the hands of the seller
intended for consumers, or non-professional buyers, Articles
128-134 of the Consumer Code (Legislative Decree 06/09/2005
n. 206), whose recognized rights to consumers remain still firm
and prejudice, Aldinet Spa, located in Viale C. Colombo 8-20090
TREZZANO SUL NAVIGLIO (MI) (d ‘now on Aldinet) provide the
consumer, on the phones it distributes in Italy, Republic of San
Marino and City Vatican, its own standard warranty as defined
below:
Scope and duration of the standard warranty:
The standard warranty covers
“All phone models marketed by Aldinet, including correlative
batteries and accessories”
The standard warranty covers repair and / or replacement free
of charge - a choice of Aldinet - phones and correlative batteries
and accessories sold together with the resulting non-compliant
phones in the manufacturing or material during the following
time periods:
- For a period of twenty four (24) months from the date of purchase (receipt or invoice shall prevail), how to telephones;
- For a period of 6 (six) months from the date of purchase, so
calculated as to batteries and accessories sold with the phone.
Page 42

Exclusion from the standard warranty:
The warranty does NOT cover defects resulting from:
1) Failure to comply with the instructions for proper use of
the device
2) Connection to any equipment not supplied and / or use of
batteries and / or non-original accessories.
3) Modification or repair performed by individuals not authorized by the manufacturer.
4) Modification, adjustment or alteration of soware or
hardware performed by individuals not authorized by the
manufacturer.
5) Damage to the phone caused by bad weather (such as
eg lightning), fire, humidity, infiltration of liquids or foods,
chemical products, download of files, accidental events, high
voltage, corrosion, oxidation.
In addition, as already mentioned, the standard warranty does
not cover the phones and their batteries / accessories that are
not placed in the Italian market, in the Republic of San Marino
and the Vatican City from Aldinet.
Who to contact for the ‘provision of the Conventional
Warranty Service
The consumer will have to apply directly for assistance
commissioned by ALDINETwhose references can be found at
the following address:
http://www.nordmende-phones.it. Alternatively, the
consumer can contact the service via the dealer where you
purchased the phone.
Availability of the present Conventional Warranty conditions
The present conventional warranty conditions are published
on the web site at the following address http://www.nordmende-phones.it/ accessing the ASSISTENZA PRIVATI.
CAPITOLO 5Chapter10
WARRANTY
USER MANUAL | page 42
Page 43

The manufacturer Aldinet S.p.A declares that the type of
radio equipment - mobile phone model BIG500SWA , brand
name NordMende - complies with Directive 2014/53 / EU.
The full text of the EU Compliance Statement is available at
the following Internet address:
www.nordmende-phones.it
MADE IN CHINA BY
Aldinet S.p.A.
Viale Colombo, 8 - 20090 Trezzano S/N (MI) Italy
NORDMENDE è un marchio di Technicolor o dei suoi ailiati,
utilizzato su licenza da Aldinet S.p.A.
TELEFONO GSM
BIG500SWA
 Loading...