


2017-09-22
Nordic ID EXA51 and Nordic ID EXA51e User Guide
Version 1.7
NORDIC ID EXA51
NORDIC ID EXA51e
USER GUIDE

Nordic ID Group | Joensuunkatu 7 | FI-24100 Salo |Finland
Office +358 2 727 7700 | Fax + 358 2 727 7720 | info@nordicid.com 2 / 27
2017-09-22
Nordic ID EXA51 and Nordic ID EXA51e User Guide
Version 1.7
TABLE OF CONTENTS
GETTING STARTED .......................................................................................................................................... 4
1.1. GENERAL ............................................................................................................................................................. 4
1.2. DIFFERENCES BETWEEN NORDIC ID EXA51 AND NORDIC ID EXA51E .......................................... 4
1.3. VARIANTS ........................................................................................................................................................... 4
NORDIC ID EXA51 VARIANTS ........................................................................................................ 4
NORDIC ID EXA51E VARIANTS ..................................................................................................... 5
1.4. AVAILABLE ACCESSORIES ............................................................................................................................. 5
1.5. INBOX CONTENT ............................................................................................................................................. 5
1.6. FEATURES OVERVIEW .................................................................................................................................... 6
1.7. INSTALLING BATTERY ..................................................................................................................................... 8
1.8. CHARGING ......................................................................................................................................................... 9
NORDIC ID EXA51 CHARGING ...................................................................................................... 9
HOST DEVICE CHARGING ............................................................................................................ 10
1.8.2.1. WIRELESS CHARGING ................................................................................................................ 10
1.8.2.2. CHARGING VIA USB ................................................................................................................... 11
BATTERY CHARGING ..................................................................................................................... 13
1.9. FASTENING ..................................................................................................................................................... 14
QUAD LOCK
®
FASTENING ........................................................................................................... 14
MAGNET FASTENING .................................................................................................................... 15
SCREW FASTENING ....................................................................................................................... 16
1.10. CONNECTIONS .......................................................................................................................................... 17
CONNECTING WITH HOST DEVICE VIA HID MODE ......................................................... 17
PAIRING NORDIC ID EXA51 WITH A HOST DEVICE .......................................................... 17
CONFIGURING HID MODE WITH BARCODE ....................................................................... 17
1.10.3.1. CONFIGURING HID MODE VIA APPLICATION ................................................................ 18
1.11. OPERATING WITH HID MODES ............................................................................................................ 18
HID BARCODE ENABLED ........................................................................................................... 18
HID RFID ENABLED ..................................................................................................................... 18
BOTH: HID BARCODE & HID RFID ENABLED. ..................................................................... 18
1.12. USING THE READER.................................................................................................................................. 19
KEYS AND BUTTONS .................................................................................................................. 19
1.12.1.1. TRIGGER BUTTON .................................................................................................................... 19
1.12.1.2. POWER KEY ................................................................................................................................ 19
1.12.1.3. UNPAIR A BLUETOOTH DEVICE KEY .................................................................................. 19
LED INDICATORS ......................................................................................................................... 20
1.12.2.1. READ/HID/CONFIGURABLE LED ......................................................................................... 20
1.12.2.2. BLUETOOTH LED ...................................................................................................................... 20

Nordic ID Group | Joensuunkatu 7 | FI-24100 Salo |Finland
Office +358 2 727 7700 | Fax + 358 2 727 7720 | info@nordicid.com 3 / 27
2017-09-22
Nordic ID EXA51 and Nordic ID EXA51e User Guide
Version 1.7
1.12.2.3. POWER LED ................................................................................................................................ 20
ANTENNAS ..................................................................................................................................... 21
SOFTWARE ...................................................................................................................................................... 23
2.1. NORDIC ID RFID DEMO APPLICATIONS ................................................................................................ 23
NORDIC ID RFID DEMO FOR ANDROID .................................................................................. 23
NORDIC ID RFID DEMO FOR IOS .............................................................................................. 23
2.2. APPLICATION DEVELOPMENT .................................................................................................................. 23
NUR API IN GENERAL .................................................................................................................... 23
APPLICATION DEVELOPMENT ................................................................................................... 24
2.3. FIRMWARE UPDATE ..................................................................................................................................... 25
SERVICE AND SUPPORT .............................................................................................................................. 25
WARRANTY ..................................................................................................................................................... 26
RELATED DOCUMENTS AND CONTENT ................................................................................................ 26
ABOUT NORDIC ID ....................................................................................................................................... 26
VERSION HISTORY ........................................................................................................................................ 27

Nordic ID Group | Joensuunkatu 7 | FI-24100 Salo |Finland
Office +358 2 727 7700 | Fax + 358 2 727 7720 | info@nordicid.com 4 / 27
2017-09-22
Nordic ID EXA51 and Nordic ID EXA51e User Guide
Version 1.7
GETTING STARTED
1.1. GENERAL
Nordic ID EXA51 and Nordic ID EXA51e do provide UHF RFID reader capabilities and optional 1D/2D
barcode scanning functionalities for host devices. The Nordic ID EXA51 and Nordic ID EXA51e are used
with the host devices via Bluetooth® Low Energy wireless technology. Nordic ID EXA51 text is used in
the user guide to cover both products unless otherwise stated.
1.2. DIFFERENCES BETWEEN NORDIC ID EXA51 AND NORDIC ID
EXA51e
Differences between Nordic ID EXA51 and Nordic ID EXA51e have been listed in the following table.
FEATURE
NORDIC ID EXA51
NORDIC ID EXA51e
UHF RFID module
NUR-10W
NUR2-1W
Supported standard
ISO 18000-63 (EPC Class 1
Gen2v2) AES authentication in
accordance with ISO/IEC
29167-10 supported
ISO 18000-63 (EPC Class 1
Gen2v2)
Nominal reading distance
Up to 7m
Up to 10m
Nominal reading speed
200 tags/s
Up to 1000 tags/s
Usage time
Up to 24h
Up to 14h
1.3. VARIANTS
NORDIC ID EXA51 VARIANTS
The Nordic ID EXA51 is available in 8 different variants that are
CODE
FREQUENCY
2D IMAGER
WIRELESS
CHARGING
QUAD LOCK®
IWA00001
868MHz
Yes
No
Yes
IWA00002
915MHz
Yes
No
Yes
IWA00003
868MHz
No
No
Yes
IWA00004
915MHz
No
No
Yes
IWA00005
868MHz
Yes
Yes
No
IWA00006
915MHz
Yes
Yes
No
IWA00007
868MHz
No
Yes
No
IWA00008
915MHz
No
Yes
No

Nordic ID Group | Joensuunkatu 7 | FI-24100 Salo |Finland
Office +358 2 727 7700 | Fax + 358 2 727 7720 | info@nordicid.com 5 / 27
2017-09-22
Nordic ID EXA51 and Nordic ID EXA51e User Guide
Version 1.7
NOTE! Quad Lock® universal adaptor is sold separately
NORDIC ID EXA51e VARIANTS
The Nordic ID EXA51e is available in 8 different variants that are
CODE
FREQUENCY
2D IMAGER
WIRELESS
CHARGING
QUAD LOCK®
IWA00014
868MHz
Yes
No
Yes
IWA00015
915MHz
Yes
No
Yes
IWA00016
868MHz
No
No
Yes
IWA00017
915MHz
No
No
Yes
IWA00021
868MHz
Yes
Yes
No
IWA00018
915MHz
Yes
Yes
No
IWA00019
868MHz
No
Yes
No
IWA00020
915MHz
No
Yes
No
1.4. AVAILABLE ACCESSORIES
CODE
DESCRIPTION
ACN00155
Nordic ID EXA51/Medea Desktop Charger DC USB Out
CWH00036
Nordic ID EXA51/Medea Micro-USB cable for device and desktop charger
(Length 1.8m, type A-Male – type Micro-B-Male –connectors)
ACN00162
Host device installation kit for Nordic ID EXA51. The kit includes counter parts
of magnets (2 pcs) and screws (2pcs) (Minimum order quantity 10 pcs)
ACP00097
Quad Lock Universal Adaptor v1. The Quad Lock Universal Adaptor with 3M™
adhesive is a super thin adaptor that is compatible with all Quad Lock™ mounts.
The Quad Lock Universal Adaptor designed to be used only once, it is not restick-able (link to product page)
1.5. INBOX CONTENT
The Nordic ID EXA51 inbox contains following items
• The Nordic ID EXA51
• Battery (installed)
• Counter parts of magnets for magnet fastening of host device
• Screws for screw fastening
• Safety and regulations guide
• Business card with link to quick guide

Nordic ID Group | Joensuunkatu 7 | FI-24100 Salo |Finland
Office +358 2 727 7700 | Fax + 358 2 727 7720 | info@nordicid.com 6 / 27
2017-09-22
Nordic ID EXA51 and Nordic ID EXA51e User Guide
Version 1.7
1.6. FEATURES OVERVIEW
Picture 1 Key features of wireless charging variant

Nordic ID Group | Joensuunkatu 7 | FI-24100 Salo |Finland
Office +358 2 727 7700 | Fax + 358 2 727 7720 | info@nordicid.com 7 / 27
2017-09-22
Nordic ID EXA51 and Nordic ID EXA51e User Guide
Version 1.7
Picture 2 Key features of Quad Lock variant
Nordic ID Group | Joensuunkatu 7 | FI-24100 Salo |Finland
Office +358 2 727 7700 | Fax + 358 2 727 7720 | info@nordicid.com 8 / 27
2017-09-22
Nordic ID EXA51 and Nordic ID EXA51e User Guide
Version 1.7
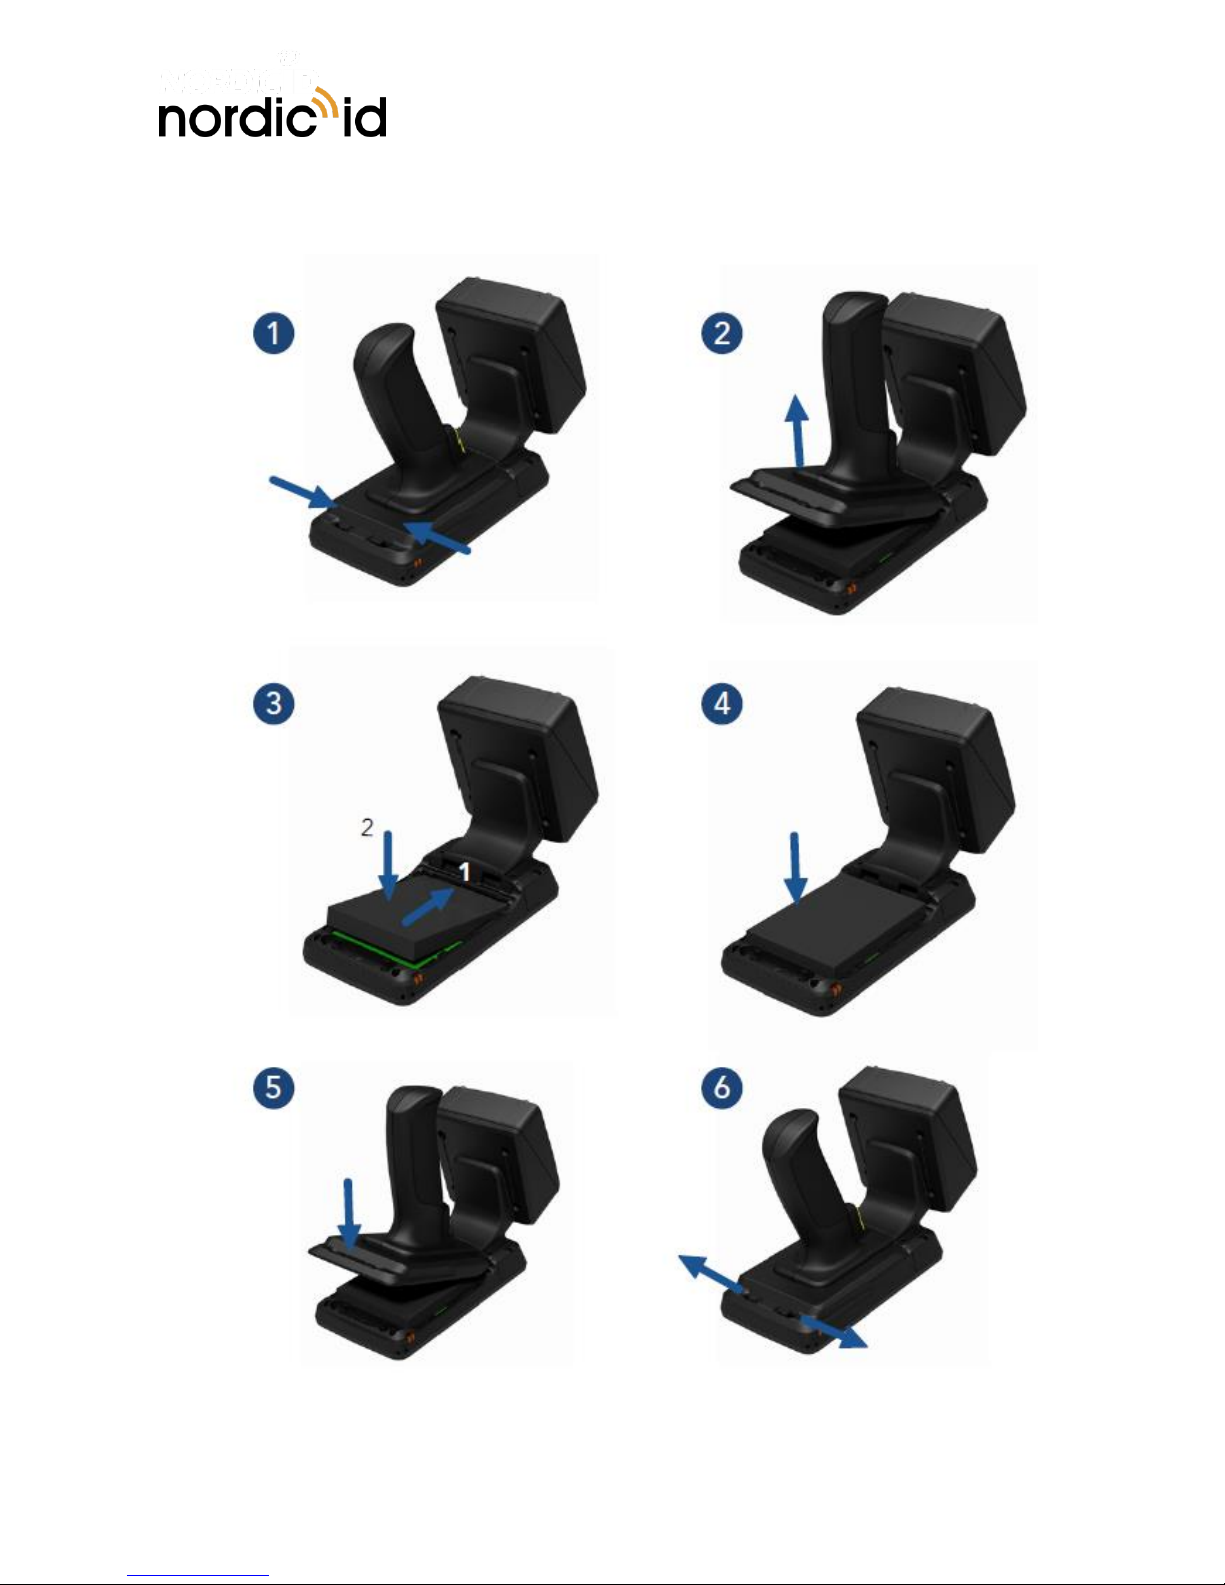
1.7. INSTALLING BATTERY
Picture 3 Installing battery

Nordic ID Group | Joensuunkatu 7 | FI-24100 Salo |Finland
Office +358 2 727 7700 | Fax + 358 2 727 7720 | info@nordicid.com 9 / 27
2017-09-22
Nordic ID EXA51 and Nordic ID EXA51e User Guide
Version 1.7
1.8. CHARGING
NORDIC ID EXA51 CHARGING
The Nordic ID EXA51 can be charged via cradle and USB charger. Maximum charging power via the cradle
is 10W (5V @ 2A). Charging time from 0 – 100% via the cradle is about 5h. The USB charger needs to
have a micro USB connector and recommended charging power is 10W (5V @ 2A).
Charging status is indicated by Power LED. Please see section 1.12.2.3 for information how the Power
LED functions in different situations.
Picture 4 Charging of the Nordic ID EXA51 via cradle

Nordic ID Group | Joensuunkatu 7 | FI-24100 Salo |Finland
Office +358 2 727 7700 | Fax + 358 2 727 7720 | info@nordicid.com 10 / 27
2017-09-22
Nordic ID EXA51 and Nordic ID EXA51e User Guide
Version 1.7
NOTE! The cradle is sold separately by Nordic ID. The USB charger is not
included in the Nordic ID EXA51 inbox and is not sold by Nordic ID.
Picture 5 Charging of the Nordic ID EXA51 via USB charger
HOST DEVICE CHARGING
Host device attached on the Nordic ID EXA51 can be charged via wireless charging or USB from the
cradle.
1.8.2.1. WIRELESS CHARGING
Wireless charging is based on inductive charging technology and is compliant with Qi v1.2 specification.
With the inductive charging technology, the power is transmitted between a transmitter and receiver
coils placed closely together. The Nordic ID EXA51 acts as a transmitter and host device acts as a receiver.
The coils of the transmitter and receiver must be aligned well to make the connection. Charging efficiency
greatly depends on how well the coils are aligned. The wireless charging may not work or may work
unreliably if the coils are misaligned. Please see section 1.6 for information about the coil location of the
Nordic ID EXA51. When wireless charging is powered from the battery of the Nordic ID EXA51 then
wireless charging is disabled in following cases:
• Battery level of the Nordic ID EXA51 is < 10%
• The Nordic ID EXA51 goes to sleep mode
Please note that the Nordic ID EXA51 does not go into sleep mode and will keep wireless charging
enabled when charged via the cradle or USB charger. Maximum charging power via the wireless charging
when the Nordic ID EXA51 is charged is 5W. Maximum charging power via the wireless charging when
the Nordic ID EXA51 is not charged is 2.5W 5W (wireless charging power is delivered from the battery
of the Nordic ID EXA51).

Nordic ID Group | Joensuunkatu 7 | FI-24100 Salo |Finland
Office +358 2 727 7700 | Fax + 358 2 727 7720 | info@nordicid.com 11 / 27
2017-09-22
Nordic ID EXA51 and Nordic ID EXA51e User Guide
Version 1.7
NOTE! Host device needs to support Qi based inductive wireless charging technology in order
to charge from the Nordic ID EXA51. Please contact your device manufacturer in order to
make sure wireless charging is supported.
Picture 6 Wireless charging of host device
1.8.2.2. CHARGING VIA USB
Host device can be charged via the cradle using a proper USB cable (the cradle contains an USB type-A
connector). Maximum charging power via the cradle depends on charge level of the Nordic ID EXA51
battery. Maximum 7W charging power can be achieved when the battery of the Nordic ID EXA51 is
full/almost full. When the Nordic ID EXA51 charges at full power then the maximum charging power of
host device is limited to 4W.

Nordic ID Group | Joensuunkatu 7 | FI-24100 Salo |Finland
Office +358 2 727 7700 | Fax + 358 2 727 7720 | info@nordicid.com 12 / 27
2017-09-22
Nordic ID EXA51 and Nordic ID EXA51e User Guide
Version 1.7
Picture 7 USB charging of host device

Nordic ID Group | Joensuunkatu 7 | FI-24100 Salo |Finland
Office +358 2 727 7700 | Fax + 358 2 727 7720 | info@nordicid.com 13 / 27
2017-09-22
Nordic ID EXA51 and Nordic ID EXA51e User Guide
Version 1.7
BATTERY CHARGING
The battery or spare battery of the Nordic ID EXA51 can be charged in the cradle. Please note that when
USB charging from the cradle is used, spare battery charging of the cradle is disabled. Please find more
information about the how charging from the Picture 8 Battery charging in cradle.
Picture 8 Battery charging in cradle

Nordic ID Group | Joensuunkatu 7 | FI-24100 Salo |Finland
Office +358 2 727 7700 | Fax + 358 2 727 7720 | info@nordicid.com 14 / 27
2017-09-22
Nordic ID EXA51 and Nordic ID EXA51e User Guide
Version 1.7
NOTE! Quad Lock® universal adaptor is sold separately
1.9. FASTENING
The Nordic ID EXA51 provides three different fastening methods for host devices. The fastening methods
are Quad Lock, magnets, and screw fastenings.
QUAD LOCK
®
FASTENING
The Quad Lock fastening uses popular and easy to use Quad Lock fastening system. The Quad Lock
fastening system provides strong and secure fastening and is suitable for different kind of host devices.
Please visit Quad Lock web page for more information about different adapters.
Fastening of the host device on the Nordic ID EXA51 with the Quad Lock fastening system is easy. The
first step is to attach a Quad Lock adapter on the host device. Second step is to fasten the host device on
the Nordic ID EXA51 by attaching and locking the Quad Lock fastening system.
Picture 9 The first installation

Nordic ID Group | Joensuunkatu 7 | FI-24100 Salo |Finland
Office +358 2 727 7700 | Fax + 358 2 727 7720 | info@nordicid.com 15 / 27
2017-09-22
Nordic ID EXA51 and Nordic ID EXA51e User Guide
Version 1.7
MAGNET FASTENING
The magnet fastening is a tight but effortless option to fasten the host device on the Nordic ID EXA51.
Using magnet fastening is easy. The first step is to place the counter parts of magnets to the recesses
located on the top cover of the Nordic ID EXA51 (Note! protective tape should be pointing outwards
from the Nordic ID EXA51). The second step is to remove protective tape from the counter parts of
magnets. The third step is to place the host device on top of the Nordic ID EXA51 and ensure that the
magnet counter parts are securely attached to the host device.
Picture 10 The first installation

Nordic ID Group | Joensuunkatu 7 | FI-24100 Salo |Finland
Office +358 2 727 7700 | Fax + 358 2 727 7720 | info@nordicid.com 16 / 27
2017-09-22
Nordic ID EXA51 and Nordic ID EXA51e User Guide
Version 1.7
SCREW FASTENING
The screw mounting is a robust option to mount a host device on the Nordic ID EXA51. This option
requires a protective case or cover for the host device which is screwed on the Nordic ID EXA51. The
first step is to screw the case/cover to screw holes of the Nordic ID EXA51. The distance between the
screw holes is 68mm and the diameter of each screw is 3.5mm. The second step is to place the host
device into the case/cover.
Picture 11 The first installation

Nordic ID Group | Joensuunkatu 7 | FI-24100 Salo |Finland
Office +358 2 727 7700 | Fax + 358 2 727 7720 | info@nordicid.com 17 / 27
2017-09-22
Nordic ID EXA51 and Nordic ID EXA51e User Guide
Version 1.7
NOTE! Bluetooth Low Energy needs to be supported by host device
NOTE! When the Nordic ID EXA51 is configured for HID mode: remember that you will
need to reconnect the Nordic ID EXA51 after using non-HID applications (such as Nordic
ID RFID Demo). This will enable the HID mode again. The easiest way to do this is turn
off/on Bluetooth of host device.
NOTE! XXXXX is a serial number of the Nordic ID EXA51
1.10. CONNECTIONS
The Nordic ID EXA51 supports only Bluetooth Low Energy Class 2 connection for host devices.
Supported Bluetooth Low Energy versions are 4.0 – 4.2 and supported profiles are GATT and HID.
CONNECTING WITH HOST DEVICE VIA HID MODE
In this mode, the Nordic ID EXA51 functions and communicates in a similar manner as a keyboard.
Therefore, the device will work with any application that supports an active cursor on input fields, for
example web browser applications. When operating in HID mode, the Nordic ID EXA51 needs to be
paired with the host device and configured for the HID mode.
PAIRING NORDIC ID EXA51 WITH A HOST DEVICE
1. Turn Bluetooth of the host device ON.
NOTE: Android 6.0 or newer needs location to be enabled also
2. Power on the Nordic ID EXA51 by pressing the power button for 2...3 seconds
3. Open Bluetooth connection settings of host device and you should see “EXA51 XXXXXX” in the list
4. Select “EXA51 XXXXXX” from the list in order pair your host device with the Nordic ID EXA51
CONFIGURING HID MODE WITH BARCODE
Read barcode below to configure the Nordic ID EXA51 to desired HID mode. Make sure device is not
connected with Bluetooth while configuring with barcodes.
• HIDMODE0 = All HID modes disabled
• HIDMODE1 = HID barcode enabled
• HIDMODE2 = HID RFID enabled

Nordic ID Group | Joensuunkatu 7 | FI-24100 Salo |Finland
Office +358 2 727 7700 | Fax + 358 2 727 7720 | info@nordicid.com 18 / 27
2017-09-22
Nordic ID EXA51 and Nordic ID EXA51e User Guide
Version 1.7
NOTE! XXXXX is a serial number of the Nordic ID EXA51
1.10.3.1. CONFIGURING HID MODE VIA APPLICATION
1. Install Nordic ID RFID Demo application (see section 2.1)
2. Connect your device
3. Turn on HID mode, RFID and/or barcode mode in reader settings
4. Close application and make sure Bluetooth connection is closed
5. Reboot your EXA51 device by pressing the power button for 2...3 seconds.
1.11. OPERATING WITH HID MODES
HID BARCODE ENABLED
Reading Barcode:
• Pressing trigger down barcode aimer starts Releasing trigger scanning start
• When tag found, result is sent to HID immediately
• Pressing trigger down during scan scanning aborted
HID RFID ENABLED
Reading RFID tags:
• Pressing trigger down RFID reading starts
• Reader read tags in memory as long trigger is kept down. Short beep when new tags found
• Releasing trigger Reading stops and tags in memory will be transmitted to HID. Short beep when
single tag sent. If no tags found, double low note beeps.
BOTH: HID BARCODE & HID RFID ENABLED.
Activate Barcode reader:
• Trigger click (short press (<350ms) and released immediately) Barcode scanning start immediately
without aiming.
• Trigger press and keeping down at least 350ms Barcode aimer starts Trigger released
scanning starts.
Activate RFID reader:
• Pressing trigger “double click” and keeping down RFID reading start. Searching tags. Beep when
tags found.
• Releasing trigger Reading stop and tags in memory will be transmitted to HID. Short beep when
single tag sent. If no tags found, double low note beeps.

Nordic ID Group | Joensuunkatu 7 | FI-24100 Salo |Finland
Office +358 2 727 7700 | Fax + 358 2 727 7720 | info@nordicid.com 19 / 27
2017-09-22
Nordic ID EXA51 and Nordic ID EXA51e User Guide
Version 1.7
NOTE! Button usage depends on the application in use.
NOTE! Reader can be powered down even though it has an active Bluetooth connection
by pressing power button down at least 7 seconds
• Pressing trigger during tag sending aborted.
• Pressing trigger during barcode scanning aborted.
1.12. USING THE READER
KEYS AND BUTTONS
The Nordic ID EXA51 includes two capacitive buttons and one physical button for user interactions.
Location of the keys can be seen in the Picture 12.
Picture 12 Location of capacitive keys
1.12.1.1. TRIGGER BUTTON
The trigger button is located on the pistol grip and it can be used to start/stop UHF RFID/barcode
scanning and turn reader on. When turning the reader on the trigger button needs to be pressed 0.5
seconds until blue LED starts blinking before it triggers. This ensures that accidental presses are avoided.
Depending on the application in use, the trigger button starts/stops UHF RFID or barcode reading. By
default, the first press of the button starts the reading and the second press of the button stops it.
1.12.1.2. POWER KEY
Power key turns reader On/Off. The power key needs to be pressed for about 2…3 seconds until red led
turns to green before it triggers, this ensures that accidental presses are avoided. The power key is
disabled when Nordic ID EXA51 has an active Bluetooth connection with host device.
1.12.1.3. UNPAIR A BLUETOOTH DEVICE KEY
If the Nordic ID EXA51 is paired to the host device, it stores information about the paired devices and
tries to connect automatically when turned on. Using the “Unpair a Bluetooth device” key clears paired
device from the Nordic ID EXA51 memory.
Unpairing:

Nordic ID Group | Joensuunkatu 7 | FI-24100 Salo |Finland
Office +358 2 727 7700 | Fax + 358 2 727 7720 | info@nordicid.com 20 / 27
2017-09-22
Nordic ID EXA51 and Nordic ID EXA51e User Guide
Version 1.7
NOTE! The “Unpair a Bluetooth device” key is disabled when Nordic ID EXA51 has an
active Bluetooth connection with host device
• Make sure device is disconnected.
• Press and keep “Unpair” button down at least 3 second.
• When device beeps three times, pairing is cleared. Device may reboot.
LED INDICATORS
The Nordic ID EXA51 includes three LEDs for user indications. Location of the LEDs can be seen from
the Picture 13.
Picture 13 Location of LEDs
1.12.2.1. READ/HID/CONFIGURABLE LED
By default, Read/HID/Configurable LED indicates whether RFID or barcode reading is active. The
Read/HID/Configurable LED can be configured via API if needed.
1.12.2.2. BLUETOOTH LED
The Bluetooth LED indicates whether the Bluetooth connection is On/Off or in search mode.
1.12.2.3. POWER LED
The Power LED indicates whether the reader is On/Off it also indicates the battery level of the reader.
The battery level is indicated by the colour of the Power LED.

Nordic ID Group | Joensuunkatu 7 | FI-24100 Salo |Finland
Office +358 2 727 7700 | Fax + 358 2 727 7720 | info@nordicid.com 21 / 27
2017-09-22
Nordic ID EXA51 and Nordic ID EXA51e User Guide
Version 1.7
NOTE! Wireless charging is disabled when battery level is low (Power LED is red)
NOTE! The reading range depends on used tag and environment
Blinking of the Power LED indicates that the device is charging. The battery level during charging is
indicated by the colour of the blinking Power LED.
ANTENNAS
The Nordic ID EXA51 includes Adaptive Cross Dipole antenna that includes four SW controllable (via
Nordic ID RFID demo application and NUR API) antenna modes that are
• Linear with horizontal and/or vertical polarization mode
o Nordic ID EXA51: Nominal reading distance about 7m/22ft)
o Nordic ID EXA51e: Nominal reading distance about 10m/30ft)
• Circular polarization mode
o Nordic ID EXA51: Nominal reading distance about 4m/22ft)
o Nordic ID EXA51e: Nominal reading distance about 6m/20ft)
• Proximity mode (reading distance down to 1cm/0.4inch)
The linear antenna modes are intended for long range reading when tag density is high and tags are in
horizontal or vertical position (Picture 14). In most cases enabling both linear antenna modes do provide
the best performance. The circular polarization mode is intended for use cases requiring medium range
reading and alignment of tags is random (Picture 15). The circular polarization mode works well if good
performance tags are used and the tags easily readable. The proximity mode is ideal for locate and tag
writing functionalities but shouldn’t be enabled if not needed because it will slow down reading speed.

Nordic ID Group | Joensuunkatu 7 | FI-24100 Salo |Finland
Office +358 2 727 7700 | Fax + 358 2 727 7720 | info@nordicid.com 22 / 27
2017-09-22
Nordic ID EXA51 and Nordic ID EXA51e User Guide
Version 1.7
Picture 15 Tags in random alignment
Picture 14 Tags in horizontal and vertical alignment

Nordic ID Group | Joensuunkatu 7 | FI-24100 Salo |Finland
Office +358 2 727 7700 | Fax + 358 2 727 7720 | info@nordicid.com 23 / 27
2017-09-22
Nordic ID EXA51 and Nordic ID EXA51e User Guide
Version 1.7
SOFTWARE
Nordic ID has taken an open source SW development approach in use with the Nordic ID EXA51. Nordic
ID provides the SDK along with the examples through the GitHub. The Nordic ID EXA51 supports
powerful NUR API so developers can use familiar NUR API for application development.
2.1. NORDIC ID RFID DEMO APPLICATIONS
Nordic ID provides feature rich yet easy-to-use RFID demo applications for iOS and Android platforms.
NORDIC ID RFID DEMO FOR ANDROID
Nordic ID RFID demo application for Android supports Android 5.0 and newer versions. The Nordic ID
RFID demo application is available from the Google Play store.
NORDIC ID RFID DEMO FOR IOS
Nordic ID RFID demo application for iOS supports iOS 9 and newer versions. The Nordic ID RFID demo
application is available from the Apple App store.
2.2. APPLICATION DEVELOPMENT
NUR API IN GENERAL
NUR API is an application programming interface for Nordic ID UHF RFID module. It provides control for
all Nordic ID UHF RFID readers. The NUR API provides compatibility between Nordic ID UHF RFID
reader from RFID functions perspective. The NUR API consists of application, NUR API, transport and
HW layers as depicted in Picture 16.

Nordic ID Group | Joensuunkatu 7 | FI-24100 Salo |Finland
Office +358 2 727 7700 | Fax + 358 2 727 7720 | info@nordicid.com 24 / 27
2017-09-22
Nordic ID EXA51 and Nordic ID EXA51e User Guide
Version 1.7
Picture 16 NUR API architecture
APPLICATION DEVELOPMENT
Nordic ID provides Software Development Kits (SDK) and code samples via GitHub:
https://github.com/NordicID/
The Software Development Kits provide development basics for the Nordic ID EXA51. Samples utilizing
the Android and iOS specific accessory extension used with the Nordic ID EXA51 are available from
GitHub as well (includes e.g. barcode and RFID HID). Samples utilizing NUR API in general are available
for Android, iOS and Windows (includes RFID generic operations such as write, locate etc.).
More information including source code and samples can be found from GitHub via:
https://github.com/NordicID/nur_sample_android

Nordic ID Group | Joensuunkatu 7 | FI-24100 Salo |Finland
Office +358 2 727 7700 | Fax + 358 2 727 7720 | info@nordicid.com 25 / 27
2017-09-22
Nordic ID EXA51 and Nordic ID EXA51e User Guide
Version 1.7
https://github.com/NordicID/nur_sample_ios
2.3. FIRMWARE UPDATE
Firmware of Nordic ID EXA51 is consisted of four different firmwares that are:
• NUR firmware (firmware of the NUR RFID module)
• NUR bootloader (bootloader of the NUR RFID module)
• Device firmware (firmware of the reader)
• Device bootloader (bootloader of the reader)
All the firmwares can be updated using Nordic ID RFID demo applications presented in section 2.1 or
implementing update functionality to 3rd party application using instructions that can be found from
section 2.2.
Please note if firmware version of Nordic ID EXA51 is 2.0.2 or 1.x then it’s not possible to use Nordic ID
RFID demo application to update the firmware. In those cases, please refer to instructions below:
• Firmware version 2.0.2: Please refer to instructions that can be found from GitHub (link)
• Firmware version 1.x: Please contact Nordic ID Support for further instructions (link)
SERVICE AND SUPPORT
For technical enquiries regarding Nordic ID devices or software development, please contact our
Technical Support:
E-mail: support@nordicid.com
Telephone: +358 2 727 7790
As a manufacturer, Nordic ID stands responsible for providing repair services for its devices during and
after the warranty period. Together with partners Nordic ID serves customers globally. When your Nordic
ID device needs repair, always use only our Nordic ID Service or our authorized service partners. We
want to make sure that your Nordic ID product serves you the best possible way, and by using our
preferred service partners the quality of the service is trustworthy and the spare parts are original. This
way the existing product warranty remains, and you receive a 3-month service warranty for the repaired
devices.
Nordic ID works together with full support and primary support partners. Full support partners can handle
both warranty and non-warranty repairs on behalf of Nordic ID in their own regions. In addition, Nordic
ID has a network of smaller repair centres, primary support partners, who offer the first line of support
to their customers locally.
For any enquiries about Nordic ID repair service please contact:
E-mail: service@nordicid.com
Telephone: +358 2 727 7791

Nordic ID Group | Joensuunkatu 7 | FI-24100 Salo |Finland
Office +358 2 727 7700 | Fax + 358 2 727 7720 | info@nordicid.com 26 / 27
2017-09-22
Nordic ID EXA51 and Nordic ID EXA51e User Guide
Version 1.7
WARRANTY
Nordic ID warrants that the Products are at the time of delivery free from defects in materials and
workmanship, provided the Products remain unmodified and are operated under normal and proper
conditions. Warranty period is the longer of twenty-four (24) months from the date of delivery in case
the Customer is end-customer or twenty-seven (27) months from the date of manufacture in case the
Customer is reseller. Spare parts are warranted against defects in workmanship and materials for a period
of ninety (90) days from the date of delivery to Customer.
For more detailed information about the warranty can be found from Nordic ID Sales Terms.
RELATED DOCUMENTS AND CONTENT
• Nordic ID EXA 51 datasheet
• Nordic ID EXA51 Quick Guide (http://www.nordicid.com/exa51qg)
• Nordic ID Safety and Regulations Guide
• Nordic ID GitHub account for developers (https://github.com/NordicID)
ABOUT NORDIC ID
Nordic ID is at the centre of today’s real-time item tracking and reliable RFID technology. We help
organizations fight the damaging effects of item loss, facilitate streamlined business procedures, and stay
ahead of the competition.
We are ready to help you take advantage of our wide range of products and services designed to fit your
needs. Contact us now, and we will help you to tackle your challenges and get your business to the next
level.
Nordic ID Group
Salo IoT-center
Joensuunkatu 7
24100 Salo
FINLAND
tel. +358 2 727 7700
fax +358 2 727 7720
www: www.nordicid.com
E-mail: info@nordicid.com

Nordic ID Group | Joensuunkatu 7 | FI-24100 Salo |Finland
Office +358 2 727 7700 | Fax + 358 2 727 7720 | info@nordicid.com 27 / 27
2017-09-22
Nordic ID EXA51 and Nordic ID EXA51e User Guide
Version 1.7
VERSION HISTORY
Version
Date
Modifications
1.0
10.3.2017
The first version
1.1
15.3.2017
Minor changes
1.2
21.3.2017
Minor changes
1.3
26.4.2017
Antennas section added
1.4
9.6.2017
HID mode operations added
1.5
14.7.2017
Firmware update section added
1.6
23.8.2017
Trigger and power keys functionality
modified. Bluetooth LED section
updated. Nordic ID EXA51e added.
Logo changed.
1.7
22.9.2017
New brand look updated
 Loading...