


Nordic ID Morphic User Manual
Nordic ID International Headquarters
Myllyojankatu 2A
FI-24100 SALO
FINLAND
Phone: +358 2 727 7700
Fax: +358 2 727 7720
Email: support@nordicid.com
www.nordicid.com

Table of Contents
(i) A few words of caution..................................... 4
(ii) Trademarks......................................................... 4
3.3 Stylus and Touch Screen............................ 20
3.3.1 Input Panel: Soft Keyboard ................21
3.4 Rebooting your Nordic ID Morphic ............ 21
3.4.1 Soft-resetting your device................... 21
3.4.2 Hard-resetting your device ................. 22
(iii) Safety precautions .......................................... 5
Laser beam ........................................................... 5
Note of caution about the laser beam in
European languages............................................ 6
Battery.................................................................... 7
Wall charger.......................................................... 8
Medical devices .................................................... 8
(iv) CE Compliance Statement............................. 9
(v) FCC Compliance Statement........................... 9
(vi) FCC Compliance Notice................................. 9
1. Introduction ....................................................... 10
1.1 Nordic ID Morphic........................................ 10
2. Getting Started.................................................. 11
2.1 Wall Charger ................................................ 11
2.2 Installing Battery .......................................... 11
2.3 About the lithium-polymer battery ............. 12
2.4 Charging Battery on Nordic ID Morphic ... 13
2.5 Charging Battery on Docking Cradle........ 13
3. Basics of Nordic ID Morphic.......................... 15
3.1 Desktop Window.......................................... 15
3.1.1 Taskbar ................................................. 15
3.2 Keypad .......................................................... 17
3.2.1 ’Activator’ Key ...................................... 17
3.2.2 ‘Cancel/Esc’ Key.................................. 17
3.2.3 ‘Navigation Ring’.................................. 18
3.2.4 ‘tab/alt’ Key ........................................... 18
3.2.5 ‘F/mode’ - Keypad Function/mode
Selector Key................................................... 18
3.2.6 Alphanumeric Keypad......................... 18
3.2.7 Backspace Key .................................... 19
3.2.8 Function Keys ...................................... 19
3.2.9 Scan Key............................................... 20
3.2.10 Power button...................................... 20
3.5 Registry ......................................................... 22
3.6 Non-volatile Storage.................................... 23
3.7 Control Panel................................................ 23
3.7.1 Accessing Control Panel..................... 24
3.7.2 Opening Applet ....................................24
3.7.3 Closing Applet ...................................... 24
3.7.4 Closing Control Panel .........................24
3.8 Control Panel Applets ................................. 25
3.8.1 Bluetooth Device Properties............... 25
3.8.2 Certificates............................................ 25
3.8.3 Clear Type ............................................ 25
3.8.4 Date/Time
3.8.5 Dialing.................................................... 26
3.8.6 Display................................................... 26
3.8.7 Error Reporting..................................... 26
3.8.8 Input Panel............................................ 26
3.8.9 Internet Options.................................... 26
3.8.10 Keyboard............................................. 26
3.8.11 Network and Dial-up Connections .. 26
3.8.12 NID AutoStart Settings...................... 27
3.8.13 NID Backlight...................................... 27
3.8.14 NID Indicators .................................... 27
3.8.15 NID Keypad ........................................ 27
3.8.16 NID Link Watchdog ...........................28
3.8.17 NID Power Button.............................. 28
3.8.18 NID Scanner....................................... 29
3.8.19 NID SNTP Service............................. 29
3.8.20 NID Touch Screen............................. 30
3.8.21 Owner.................................................. 30
3.8.22 Password ............................................ 30
3.8.23 PC Connection................................... 30
3.8.24 Power .................................................. 31
3.8.25 Regional Settings .............................. 31
3.8.26 Storage Manager............................... 31
3.8.27 Stylus................................................... 31
3.8.28 System ................................................32
3.8.29 USB Profile ......................................... 32
3.8.30 Volume & Sounds.............................. 33
3.9 Power Management .................................... 33
3.9.1 Power States ........................................ 34
3.9.2 Backup battery ..................................... 35
............................................. 25
Nordic ID International Headquarters
Myllyojankatu 2A
FI-24100 SALO
FINLAND
Phone: +358 2 727 7700
Fax: +358 2 727 7720
Email: support@nordicid.com
www.nordicid.com

4. Data Capture...................................................... 37
4.1 Bar Code Reader......................................... 37
4.1.1 Checking on Bar Code Reading........ 37
4.1.2 Enabling / Disabling Bar Code Type.38
4.1.3 Configuring Bar Code Specifics ........ 39
4.1.4 Changing Aim/Triggering of Bar Code
Reading........................................................... 39
4.1.5 Changing Scanning Timeout ............. 39
5. Connectivity....................................................... 40
5.1 Wireless LAN in a nutshell ......................... 40
5.2 Wireless LAN Connectivity......................... 41
5.2.1 Introduction to Configuring Wireless
LAN Interface ................................................. 41
5.2.2 Setting up WLAN Interface – Add New
…...................................................................... 44
5.2.3 Setting up WLAN Interface – SSID
Available ......................................................... 45
5.2.4 Setting up IP-networking .................... 46
6. Configuring and Administering System
Properties ............................................................... 47
6.1 Managing Registry Database .................... 47
6.1.1 Accessing Registry Backup ............... 47
6.1.2 Closing Registry Backup .................... 47
6.1.3 Making Your Configuration Settings
Permanent...................................................... 47
6.1.3 Restoring Your Nordic ID Morphic to
Factory Defaults............................................. 48
6.5 Adjusting Screen Brightness...................... 55
6.6 Setting Timeout for Reduction in Screen
Brightness............................................................ 55
6.7 Setting Timeout for Automatic Screen
Turning-off ........................................................... 56
6.8 Setting Timeout for Automatic Suspension
.............................................................................. 56
6.2 Repartitioning Non-volatile Storage .......... 48
6.3 Configuring Keypad..................................... 49
6.3.1 Adjusting Keys’ Auto-repeat Delay ... 49
6.3.2 Adjusting Keys’ Auto-repeat Rate ..... 50
6.3.3 Enabling/Disabling Keys’ Auto-repeat
Property .......................................................... 50
6.3.4 Mapping Key’s Functionality onto
Another............................................................ 51
6.3.5 Specifying Default Mode of
Alphanumeric Keypad................................... 52
6.3.6 Enabling/Disabling Scan Key............. 52
6.3.7 Adjusting Brightness of Keypad’s
Backlight ......................................................... 52
6.4 Managing Touch Screen ............................ 53
6.4.1 Adjusting Double-tapping Sensitivity of
Touch Screen................................................. 53
6.4.2 Recalibrating Touch screen ............... 53
6.4.3 Disabling/Enabling Touch Screen..... 54
Nordic ID International Headquarters
Myllyojankatu 2A
FI-24100 SALO
FINLAND
Phone: +358 2 727 7700
Fax: +358 2 727 7720
Email: support@nordicid.com
www.nordicid.com

Nordic ID Morphic User Manual
V0.3s draft, December 2008
© Copyright 2008 by Nordic ID Oy. All rights reserved.
(i) A few words of caution
(i) Nordic ID provides this publication “AS IS” without any warranty, either express or implied,
including, but not limited to, the implied warranties of merchantability, fitness for a particular
purpose, and non-infringement. (ii) This publication can include technical inaccuracies or
typographical errors. (iii) The information presented in this publication is subject to change without
notice. (iv) Nordic ID might change the utilities, applets, or programs described in this publication.
You can have the latest version of the manual by visiting Nordic ID’s web pages.
(ii) Trademarks
All designations mentioned in this User Manual that are either trademarks or service marks, are the
property of their respective owners. Where those designations appear in this manual and Nordic ID
was aware of a trademark claim, the designations have been written in initial capital or in capitals.
Microsoft, Windows, Windows Embedded CE, Windows CE, Visual Basic, WordPad, and
ActiveSync are registered trademarks or trademarks of Microsoft Corporation, in the United States,
in other countries, or both.
802.11 and all 802.11-based trademarks and logos are trademarks or registered trademarks of
IEEE Inc., in the United States, in other countries, or both.
Java and all Java-based trademarks and logos are trademarks or registered trademarks of Sun
Microsystems, Inc., in the United States, in other countries, or both.
Bluetooth is a trademark of Bluetooth SIG, in the United States, in other countries, or both. Nordic
ID and the NORDICID -logo are registered trademarks of Nordic ID Oy.
Nordic ID International Headquarters
Myllyojankatu 2A
FI-24100 SALO
FINLAND
Phone: +358 2 727 7700
Fax: +358 2 727 7720
Email: support@nordicid.com
www.nordicid.com

(iii) Safety precautions
Laser beam
The NORDIC ID Morphic is provided with a
laser barcode scanner making the device a
Class 2 Laser product. The laser scanner
uses a low power, visible light diode. As with
any very bright light source, such as the sun,
the user should avoid staring directly into the
light beam. Momentary exposure to a Class
2 laser is not known to be harmful.
The NORDIC ID Morphic fulfils the
regulatory requirements as follows:
Complies with 21CFR1040.10 and
1040.11 except for deviations
pursuant to Laser Notice No. 50,
dated July 26, 2001.
EN60825-1:1994+ A1:2002
+A2:2001
IEC60825-1:1993+A1:1997+A2:2001
Caution: Use of controls, adjustments or performance of procedures other than those specified
herein may result in hazardous laser light exposure.
Although the brief exposure to the visible Class 2 laser beam is not known to be harmful to the eye,
the risk always exists that the light beam causes injury to the eye, when the laser beam is aimed
even indirectly via a reflecting surface (e.g. mirror) at the eyes. So, always take care when you are
reading bar codes or when you troubleshoot bar code scanning problems. Never look in the
direction of the bar code scanner from which the scan engine emits the laser beam when you
activate the scanning process, nor aim the scanner at the human eye or the eye of any animal.
Scan key
Caution: EVERY TIME THE SCAN KEY IS PRESSED THE SCANNER
STARTS EMITTING LASER BEAM. By default the functioning of the scan key
is not conditional on any application being intended to read bar codes and nor
is it conditional on the field or the active area on the display in which barcodes
can be read or is intended to be read.
Caution: Any key on the Nordic ID Morphic’s keypad with the exception of a
power button can control the laser scanner. Besides the scan key or as a
substitute for the scan key the scan functionality can be mapped on any other
key on the keypad.
Nordic ID International Headquarters
Myllyojankatu 2A
FI-24100 SALO
FINLAND
Phone: +358 2 727 7700
Fax: +358 2 727 7720
Email: support@nordicid.com
www.nordicid.com

Note of caution about the laser beam in European languages
DANSK
DEUTSCH
ENGLISH
ESPAÑOL
FRANCAIS
ITALIANO
LASERLYF!
SE IKKE IND I STRÅLEN!
KLASSE 2 LASER!
LASERSTRAHLEN!
NICHT DIRECT IN DEN LASERSTRAHL SCHAUEN!
LASERPRODUKT DER KLASSE 2!
LASER LIGHT!
DO NOT STARE INTO BEAM!
CLASS 2 LASER!
LUZ LASER!
NO MIRE FIJAMENTE EL HAZ!
PRODUCTO LASER DE LA CLASE 2
LUMIERE LASER!
NE PAS REGARDER LE RAYON FIXEMENT!
PRODUIT LASER DE CLASSE 2!
LUCE LASER!
NON FISSARE IL RAGGIO PRODOTTO!
NEDERLANDS
NORSK
PORTUGUÊS
SUOMI
SVENSKA
LASERLICHT!
NIET IN STRAAL STAREN!
KLASSE-2 LASER!
LASERLYS!
IKKE STIRRINN I LYSSTRÅLEN!
LASER, KLASSE 2!
LUZ DE LASER!
NÃO FIXAR O RAIO LUMINOSO!
PRODUTO LASER DA CLASSE 2!
VARO LASERSÄDETTÄ!
ÄLÄ SUUNTAA SÄDETTÄ SILMIIN!
LASER, LUOKKA 2!
VARNING LASERSTÅLNING!
STIRRA EJ IN I STRÅLEN!
KLASS 2 LASER
Nordic ID International Headquarters
Myllyojankatu 2A
FI-24100 SALO
FINLAND
Phone: +358 2 727 7700
Fax: +358 2 727 7720
Email: support@nordicid.com
www.nordicid.com

Battery
Use only original, Nordic ID approved rechargeable batteries being intended for the Nordic ID
Morphic to avoid serious health hazards to you or to your fellow-men, or damage to the
surrounding property and to your device.
Battery
Caution:
Under no circumstances must you disassemble the battery casing or damage it. If the
battery casing is damaged, for example, the joint of the casing is opened when the battery
has fallen onto the floor, dispose of the battery.
If there is any difference from what is usual or expected on the battery such as a change in
normal shape, smell of electrolyte, and an electrolyte leakage, do not use the battery any
longer, and dispose of it.
Do not put the battery into any liquid.
Care shall be taken to handle, or to store the rechargeable battery so that the battery’s
electrical conductors do not short-circuit. The short circuit causes damage to the battery.
Do not expose the rechargeable battery to direct sunlight or to other heat sources. The
battery temperature cannot go up over 60°C (140°F) without possible consequences for the
battery’s useful life. The higher temperature may cause damage to the battery, which
makes the battery unusable. 100°C (212°F) or higher temperature can cause a battery
explosion.
Keep the battery out of the reach of children
Nordic ID International Headquarters
Myllyojankatu 2A
FI-24100 SALO
FINLAND
Phone: +358 2 727 7700
Fax: +358 2 727 7720
Email: support@nordicid.com
www.nordicid.com

Wall charger
Before charging the rechargeable battery, check that the mains voltage into which you are plugging
the wall charger (AC/DC wall adaptor) does not exceed the AC voltage specified on the charger
unit. The input voltage exceeding the specified voltage on the AC wall adaptor may destroy the
wall charger, and the charger electronics on your morphic.
Caution:
Use only the Nordic ID approved wall charger being intended for the Nordic ID Morphic
device
Do not use the wall charger for any other purposes than for charging the rechargeable
batteries on the Nordic ID Morphic or on its docking cradle.
The wall charger and your Nordic ID Morphic are designed to charge the Nordic ID
approved rechargeable batteries INDOORS ONLY at normal room temperature, or at
temperature near that.
Medical devices
Caution: Nordic ID Morphic can interfere with medical devices such as hearing aids or
pacemakers. Keep your Nordic ID Morphic at least 20 cm (8 inches) from a pacemaker; otherwise
it can prevent the pacemaker from working correctly because of radio signals of wireless
communication generated when you use your Morphic.
Nordic ID International Headquarters
Myllyojankatu 2A
FI-24100 SALO
FINLAND
Phone: +358 2 727 7700
Fax: +358 2 727 7720
Email: support@nordicid.com
www.nordicid.com

(iv) CE Compliance Statement
Hereby, Nordic ID Oy, declares that the
NORDIC ID Morphic models are in compliance
with the essential requirements and other
relevant provisions of Directive 1999/5/EC
(v) FCC Compliance Statement
This hand-held device complies with part 15 of the FCC Rules. Operation is subject to the following
two conditions: (1) This device may not cause harmful interference, and (2) this device must accept
any interference received, including interference that may cause undesired operation.
Changes or modifications not expressly approved by the party responsible for compliance could
void the user’s authority to operate the hand-held equipment
The FCC ID information is printed on the back side of your hand-held.
Nordic ID International Headquarters
Myllyojankatu 2A
FI-24100 SALO
FINLAND
Phone: +358 2 727 7700
Fax: +358 2 727 7720
Email: support@nordicid.com
www.nordicid.com

1. Introduction
1.1 Nordic ID Morphic
Nordic ID Morphic is a data collecting platform to develop a lightweight handheld linkage between
information encoded onto bar codes and the business applications running in the edge or data
center systems. For automatic identification needs it provides 1 dimension barcode reader;
802.11b/g wireless communication with strong encryption and authentication; and user interface
with alphanumeric keypad, touch screen, and 2.2”, 320-by-240-pixel resolution backlit color screen.
It supports wide range of technologies to build up client-server applications, and it provides a
device API of its own for different programming technologies like C/C++, JAVA, C#, and Visual
Basic.
Nordic ID International Headquarters
Myllyojankatu 2A
FI-24100 SALO
FINLAND
Phone: +358 2 727 7700
Fax: +358 2 727 7720
Email: support@nordicid.com
www.nordicid.com

2. Getting Started
After opening the box, in addition to Nordic ID Morphic you have the booklet containing information
on how to get started with the handheld. If you have a docking cradle for your Nordic ID Morphic,
the box of the docking cradle also includes the booklet giving you instructions for what you should
do to bring the cradle into service. Use those booklets as a main source of information on getting
started with the handheld unit and its docking cradle. The purpose of this ‘Getting Started’ section
is not to repeat all the details of the booklets but dealing with some topics in general, such as wall
charger, battery, battery installing, and battery charging options.
2.1 Wall Charger
Nordic ID Morphic is provided with a wall charger in its package. The wall charger is made up of a
power switching unit and an exchangeable AC plug part having three different versions included in
the product box for the simple reason that the power supply is targeted at the markets of UK,
continental Europe, and North America. (The Nordic ID Morphic product is targeted at the
European market – both at the Continental and the UK – and at United States market) So before
you can use the wall charger you have to assemble the wall charger by fixing the AC plug part
applying to your location to the power switching unit according to the following picture:
Be aware that you can plug the lead from the power supply into the power socket being either on
the Nordic ID Morphic or on its docking cradle, meaning that you can use the same wall charger
with the handheld unit and with the docking unit.
2.2 Installing Battery
Nordic ID Morphic has two battery options. There is a standard version with an ampere-hour
capacity of 1320mAh. Another battery version is offered as an add-on to the Nordic ID Morphic,
and its ampere-hour capacity is greater than that of the standard version. Due to fact that the
ampere-hour capacity is directly proportional to the weight of the battery, the add-on battery is also
thicker than the standard one and it requires the battery cover of it its own. So be aware that when
you purchase the greater capacity battery you cannot use the standard battery cover with it on the
Nordic ID Morphic.
Nordic ID International Headquarters
Myllyojankatu 2A
FI-24100 SALO
FINLAND
Phone: +358 2 727 7700
Fax: +358 2 727 7720
Email: support@nordicid.com
www.nordicid.com

Whatever the thickness of the battery is, installing the battery remains the same. The following
series of pictures depicts battery installation in its compartment on the device.
STEP 1: Open battery cover STEP 2: Put battery into its
STEP 3: Close battery cover
compartment
2.3 About the lithium-polymer battery
Note that the lithium-polymer rechargeable battery included in the box is not fully charged. Before
first-time use of the device the battery must be fully charged.
Note that it is strongly recommended to charge the lithium-polymer battery indoors at 20°C
temperature, or at temperature near that (r 2°C), because continual charging at high or low
temperature may cause degradation of battery performance even within specified temperature
range, which is 0 to 45 degrees Celsius.
Note that every charge/discharge cycle has an effect on the rechargeable battery’s ampere-hour
capacity, so that the fully charged battery, which is charged many times before, runs down more
rapidly in use than the battery just brought into use. After 500 charge/discharge cycles, if the
battery has been run with care enough, the battery’s ampere-hour capacity is still more than twothirds of its original one. However, the charge/discharge cycle is a conception being not
unambiguous. Accordingly, between short operating periods it is not reasonable to recharge the
battery.
Note that ambient temperature has an effect on how long the fully charged lithium-polymer battery
is able to power your device. A rule of thump is that the colder is using conditions the shorter is
operating time of the device powered by the fully charged battery.
Note that if the battery runs down, do not leave the device with the flat battery or the battery which
has run down lying idle without recharging the battery, because the battery may be overdischarged
due to self discharge. After overdischarging the battery does not preserve its performance
properties. In the worst-case scenario, the battery is damaged and cannot store energy any longer.
Note that if you do not use your Nordic ID Morphic for a long time, remove the battery from its
battery chamber. Never store the battery in the device.
Note that the battery may not be flat nor be fully charged for long-time storage. The ideal charge is
about 60% of the battery’s full capacity.
Nordic ID International Headquarters
Myllyojankatu 2A
FI-24100 SALO
FINLAND
Phone: +358 2 727 7700
Fax: +358 2 727 7720
Email: support@nordicid.com
www.nordicid.com
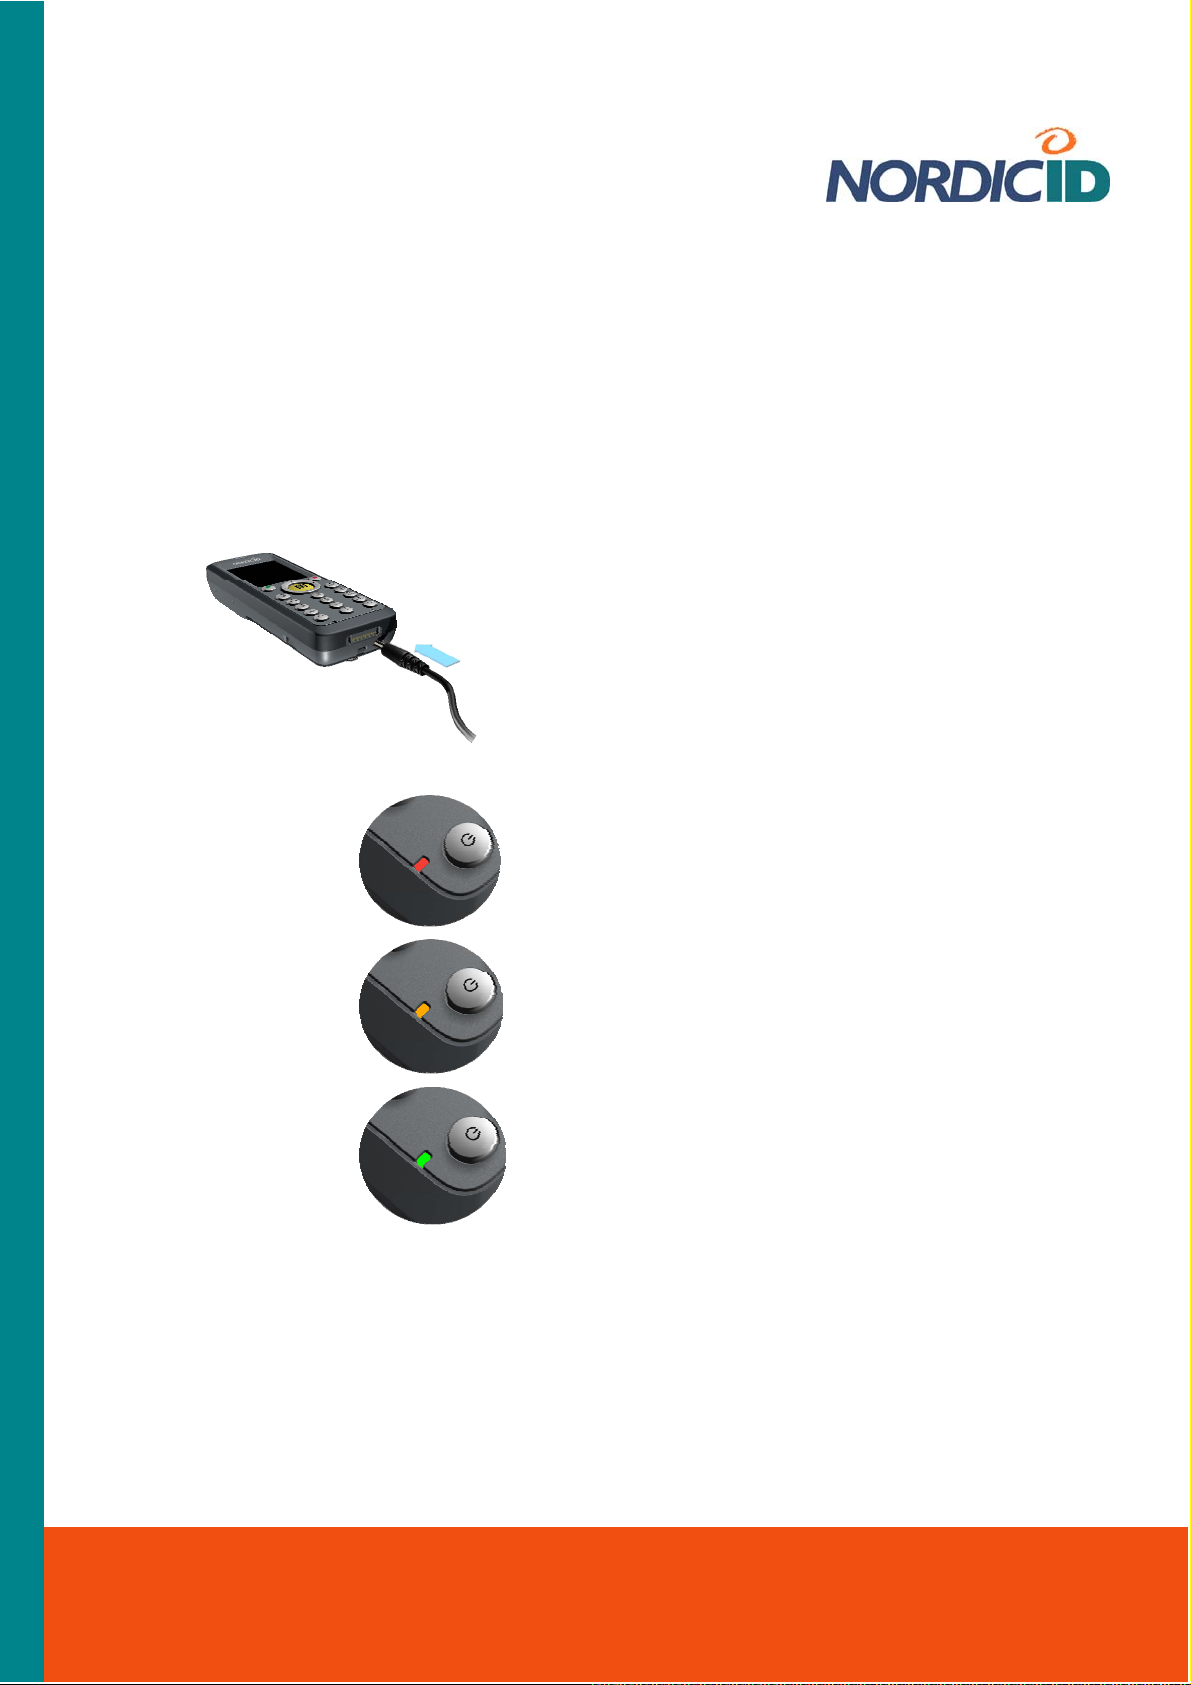
2.4 Charging Battery on Nordic ID Morphic
A standard option to get the rechargeable battery charged is to charge it in the battery chamber of
the device. However, there are two ways how to connect up the Nordic ID morphic to the mains to
get the battery charged in its chamber. When there is no docking cradle available, the lead from
the wall charger is connected to the power socket on the bottom of the Nordic ID Morphic device.
After that the wall charger is plugged into the mains. The other means is to put the Nordic ID
Morphic into its docking cradle, assuming that the docking cradle is plugged into the mains.
RED
Battery is being charged
Once the operating system of the device is up
and running, the LED in the bottom right-hand
corner of the device‘s keypad area indicates
ORANGE
Battery is still being
charged by everlowering current
GREEN
Battery is fully charged
charging status, that is, when the battery is
being charged, and when it is fully charged. Red
light indicates that charging is in progress.
When light changes from red to orange the
battery is charged approximately 80% of its total
capacity. After that, the Nordic ID Morphic
keeps on charging the battery with everlowering current until it has fully charged the
battery. Green light indicates that the battery is
fully charged.
2.5 Charging Battery on Docking Cradle
There are two slots on the docking cradle of Nordic ID Morphic. The one slot is for the device, the
other one is to charge the battery on the docking cradle. This battery charging slot is intended to
charge a so-called spare battery.
Nordic ID International Headquarters
Myllyojankatu 2A
FI-24100 SALO
FINLAND
Phone: +358 2 727 7700
Fax: +358 2 727 7720
Email: support@nordicid.com
www.nordicid.com

If your use of the device is so intensive during the workdays that the battery cannot power the unit
for the whole workday without recharging it, then the spare battery is well worth considering. You
can also see that keeping your Nordic ID Morphic fully operational all the time is essential to get
your job done on time. In that case, your unit should be at full powered and being connected to
back-end system the whole time, which may require replacing the flat battery with the fully charged
one during the workday.
Before you put the battery into its charging slot, connect the docking cradle into the mains (see the
booklet included in the cradle box).
To charge the battery on the docking cradle:
1. Place the contacts end of the battery in
the slot so that there is approximately
3mm space between the battery and slot
contacts
2. Press the battery and slot contacts
against each other by putting the battery
at the back end into its slot
3. Check that the indicator in the front rim
of the device slot displays the red battery
status, meaning that the battery is being
charged
4. The battery is charged when the
charging indicator changes from red to
green
Related information:
Section ‘Power Management’
Nordic ID International Headquarters
Myllyojankatu 2A
FI-24100 SALO
FINLAND
Phone: +358 2 727 7700
Fax: +358 2 727 7720
Email: support@nordicid.com
www.nordicid.com

3. Basics of Nordic ID Morphic
The every day use of Nordic ID Morphic becomes more effortless if you accustom yourself to some
essential features, and to the basic logic embedded in the Nordic ID Morphic. On the other hand,
when Nordic ID Morphic is being integrated with business application, it is good to know of the
different features belonging to Nordic ID Morphic system. The aspects which are dealt with in this
section are the interactions between user and the device, and the basic facilities in the system.
3.1 Desktop Window
A file browser, once opened, it shows
directories off the root of the device file system
A hidden directory to which the shell
moves files and directories when you delete
them
A short cut to Microsoft Web browser
Taskbar
Double-tapping the icon on the desktop you can launch the application or the other facility which
the icon represents.
3.1.1 Taskbar
Start menu icon
The start menu icon is also known as ‘Start‘ button. Tapping on the button with a stylus the
Start Menu opens on the desktop. You can also open the menu by means of a keypad as follows:
1. Set ‘Input focus’ to the Start button with a ‘tab/alt’ key
2. Press an ‘Activator’ key; the Start menu opens
Nordic ID International Headquarters
Myllyojankatu 2A
FI-24100 SALO
FINLAND
Phone: +358 2 727 7700
Fax: +358 2 727 7720
Email: support@nordicid.com
www.nordicid.com

Related information:
Section ‘‘tab/alt’ Key’
Section ‘’Activator’ Key’
Soft keyboard
Tapping on the Soft keyboard icon on the task bar the menu of the soft keyboard opens.
With the menu you can open the soft keyboard on the display as well as close the soft keyboard
window. The soft keyboard is also referred to as ‘Input Panel’ in the Windows CE documentary
material.
Related information:
Section ‘Input Panel: Soft Keyboard’
Desktop
Tapping the Desktop icon and after that selecting ‘Desktop’ menu item you can minimize all
the windows you have open on the screen.
‘Annunciator’ area
In this area on the task bar the various subsystems running behind the scenes notify you
of their status by showing the icon being appropriate at a particular moment. Tapping the
announciator icon you can get further information about the status and even more. However, not all
of the background services provide dialog for user.
Time
On the taskbar there is field showing the time. If you double tab on that field the dialog
window of a Date/Time control panel applet opens.
Related information:
Section ‘Date/Time’ (‘Date/Time’ control panel applet)
Nordic ID International Headquarters
Myllyojankatu 2A
FI-24100 SALO
FINLAND
Phone: +358 2 727 7700
Fax: +358 2 727 7720
Email: support@nordicid.com
www.nordicid.com

3.2 Keypad
1. Activator
2. Navigation ring
3. tab/alt
4. Backspace
1
2
3
5
6
7
5. Cancel/Esc
6. Scan
7. F/mode
8
8. Alphanumeric keypad / Function keys
4
9
9. Power button / Hardware reset, by holding down for 5 sec.
Note! On the keypad all the keys with the exception of the power button are programmable,
including the properties they have. In a sense, the power button is also programmable if you write
your own shutdown utility. The result of a key press depends on the application, so the key can
produce the result differing from its default one explained here. In addition to being programmable,
the keys can be ‘customized’ meaning that a key can be mapped to another one by configuring the
keyboard driver in response to the keystroke of the key to send another key code than the key’s
default one to an application.
Related information:
Section ‘Mapping Key’s Functionality onto Another’
Section ‘Specifying Default Mode of Alphanumeric Keypad’
Section ‘Enabling / Disabling Scan Key’
3.2.1 ’Activator’ Key
With the ‘activator’ key an operation is accepted or activated. In conventional sense it provides the
same functionality as an ‘ENTER’ key. For example, the key advances the cursor to the next line in
writing.
3.2.2 ‘Cancel/Esc’ Key
In general, the ‘Esc/Cancel’ key cancels the selection or the operation being under way just as an
‘Esc’ key on a conventional PC-keyboard.
Nordic ID International Headquarters
Myllyojankatu 2A
FI-24100 SALO
FINLAND
Phone: +358 2 727 7700
Fax: +358 2 727 7720
Email: support@nordicid.com
www.nordicid.com

3.2.3 ‘Navigation Ring’
The ‘navigation ring’ captures control of cursor movements in the editing context, and control of
selection among the items grouped together by window elements such as menus, lists, or the
desktop icons representing applications and utilities. The functionality of the ring is similar to that of
the arrow keys on a PC-keyboard.
3.2.4 ‘tab/alt’ Key
This key is a two-mode in nature; it is both a TAB key and an ALT key. TAB is the key’s default
function. ALT function requires pressing once the ‘F/mode’ key before pressing this key.
Conventionally TAB advances cursor predefined number of spaces or to the next tab stop in the
text editing context. As a TAB the key also gives navigation property by controlling of the input
focus movements among window elements. The input focus means that the window element
having input focus is activated to receive messages from user’s key presses.
As an ALT this key is often pressed together with some other key (ALT + key combination), and
action taken is usually application dependent. The key pressed as a mere ALT accesses various
window menus.
3.2.5 ‘F/mode’ - Keypad Function/mode Selector Key
The key is a multi-mode selector. By means of the ‘F/mode’ key it is possible to change
alphanumeric keys either functioning as numeric or as alphabetic and numeric keys. The key also
switches between lower case and upper case letters. In addition, by this key, the numeric keys
operate as function keys, and ‘tab/alt’ key as an ALT key.
As an ‘F’ the key is pressed once. To get ‘mode’ changed the key needs to be pressed
successively twice. Note that the ‘F’ feature of the key is not coupled with the ‘mode’ feature. To
put it another way, e.g. after one key press the number keys act as function keys no matter in
which mode the alphanumeric keypad is.
The functioning of the key is explained in more detail in the context of the particular key or keys
over which the ‘F/mode’ has control.
3.2.6 Alphanumeric Keypad
Modes of alphanumeric keypad
An alphanumeric keypad can operate in three different modes as follows:
In numeric mode
In lower-case text-writing mode
In upper-case text-writing mode
The mode of the alphanumeric keypad can be changed by two consecutive ‘F/mode’ key presses.
The mode of the alphanumeric keypad changes in the following sequence:
1. From the numeric mode to the lower-case text-writing mode
2. From the lower-case text-writing mode to the upper-case text-writing mode
3. From the upper-case text-writing mode again to the numeric mode
Nordic ID International Headquarters
Myllyojankatu 2A
FI-24100 SALO
FINLAND
Phone: +358 2 727 7700
Fax: +358 2 727 7720
Email: support@nordicid.com
www.nordicid.com
 Loading...