

Page 1
English
OPERATING &
INSTALLATION
INSTRUCTIONS
CAVE 170 DZ | CAVE 180 DZ
Page 2

2
Page 3
3
Please visit www.norcool.no for operating &
installation instructions in other languages.
Page 4

4
Content
1. Safety Instructions & warnings ....................................................................................... 5
2. Components and parts ...................................................................................................... 8
3. Installation .............................................................................................................................. 9
4. Operating your appliance ................................................................................................ 12
5. Care and maintenance ...................................................................................................... 14
6. Troubleshooting guide ...................................................................................................... 15
7. Technical specifications .................................................................................................... 16
8. Disposal of used products ............................................................................................... 16
Page 5
1. Safety instructions and warnings
Please read these instructions fully before installing or operating the product.
THE MANUFACTURER OF THIS APPLIANCE CANNOTBE HELD LIABLE
FOR DAMAGE CAUSED BY NONCOMPLIANCE WITH THESE SAFETY
INSTRUCTIONS AND WARNINGS.
• Secure the accessories during transportation to prevent damage.
• The appliance is designed for use within a certain temperature range
(ambient temperatures), and should not be used outside this range.
The temperature range for your appliance is specified on the data plate inside the
appliance.
5
WARNING:
WARNING:
WARNING:
WARNING:
WARNING:
WARNING:
WARNING:
This appliance contains the coolant lsobutane (R600a), a natural gas which is
environmentally friendly. Although it is flammable, it does not damage the ozone layer
and does not increase the green house eect. The use of this coolant has, however, led
to a slight increase in the noise level of the appliance. In addition to the noise of the
compressor, you might be able to hear the coolant flowing around the system. This is
unavoidable, but does not have any adverse eect on the performance of the appliance.
Care must be taken during the transportation and installation of the appliance that no
parts of the cooling system are damaged. Leaking coolant can damage the eyes.
Keep ventilation openings, in the appliance enclosure or to the inside unit,
clear of obstruction.
Do not use electrical appliances inside the storage compartments of the
appliance unless they are of the type recommended by the manufacturer.
Do not damage the refrigerant circuit.
Due to the instability of the appliance, it must be fixed in accordance with
the instructions to avoid a hazard.
lf the supply cord is damaged, it must be replaced by the manufacturer,
its service agent or similarly qualified persons in order to avoid a hazard.
This appliance is intended to be used in household and domestic
applications only.
This product is not suitable for food storage and must not be used to store
food inside.
In the event of any damage:
• Avoid open flames and anything which creates a spark.
• Disconnect from the mains.
• Air the room in which the appliance is located for at least an hour.
• Contact the manufacturer for further advice.
R600a
Page 6

6
Whilst carrying and positioning the appliance care must be taken not to damage the
cooler gas circuit at the rear of the appliance.
Do not store explosive substances such as aerosol cans with a flammable propellant in
this appliance.
The appliance is designed for indoor use only and must be protected from rain, moisture
and extreme temperature variations.
This appliance is not intended for outdoor use.
lf the socket and refrigerator plug are not compatible please contact after sales service
provider.
This appliance can be used by children aged 8 years and above and people with
reduced physical, sensory or mental capabilities or lack of experience and knowledge
if they have been given supervision or instruction concerning use of the appliance
in a safe way and understand the hazards involved. Children shall not play with the
appliance. Cleaning and user maintenance shall not be made by children without
supervision. Children aged from 3 to 8 years are allowed to load and unload
refrigerating appliances.
Before connecting the appliance, make sure that the connection data on the data
plate (voltage and frequency), matches the mains electricity supply. This data must
correspond in order to avoid the risk of damage to the appliance. Consult a qualified
electrician if in any doubt.
Ensure the accessories are secured during transportation to prevent damage.
Do not splash water on the appliance. It may cause electrical parts to fail and result in
an electric shock.
Do not sit, stand or place any other heavy objects on top of the appliance. This could
result in injury or damage to the appliance.
To prevent possible harm to the environment or human health from uncontrolled waste
disposal, recycle it responsibly to promote the sustainable reuse of material resources
(further detail on page 16 of this instruction manual).
Young children should be supervised to ensure that they do not play with the appliance.
In case there is a flammable gas leak, open the window for air circulation and
disconnect from the mains. Do not turn the temperature knob. Otherwise, sparks may
happen.
Page 7
Before using your appliance
• Before switching on your appliance for the first time, ensure it is positioned in
it’s desired final location and is in it’s upright position for at least 24 hours before
plugging in and switching on the power, otherwise you may damage the compressor.
• You may experience an odour from the appliance when it is operated for the first
time. This is normal and will fade when your appliance starts to cool.
• It is recommended that you remove all the internal and external packaging and clean
the interior of the appliance prior to first use. We recommend you wipe all parts with
warm water, then rise and dry. Place all parts back into the appliance after cleaning.
• Cleaning and user maintenance shall not be made by children without supervision.
7
WARNING:
To avoid the risk of fire, please take the following precautions:
• While positioning the appliance, ensure the supply cord is not trapped or damaged.
• Do not locate multiple portable socket-outlets or portable power supplies at the rear
of the appliance.
To avoid contamination of drinks, pay attention to the following:
• Opening the door for long periods of time can cause a significant
increase in the temperature in the compartments of the appliance.
• Only store wine in sealed containers.
• Do not overload the cabinet.
• Only open the door when necessary.
• This is a self-defrosting appliance. The compressor will not run during
the twenty minutes defrost cycle.
• Do not pull the shelves beyond the anti-stop position when fully loaded.
• This appliance is intended to be used exclusively for the storage of wine.
• In the event of a power failure, leave the door closed as much as possible to maintain
the internal working temperature. If the power failure continue for a prolonged period,
you should take steps to protect the contents of the wine cooler against a rise in
temperature. The wine cooler will remember the selected temperature setting and
revert to these setting once the power is restored.
Risk of fire/flammable materials
Page 8
300.5
Ø76.1
Ø76.1
300.5
Ø76.1
Ø76.1
8
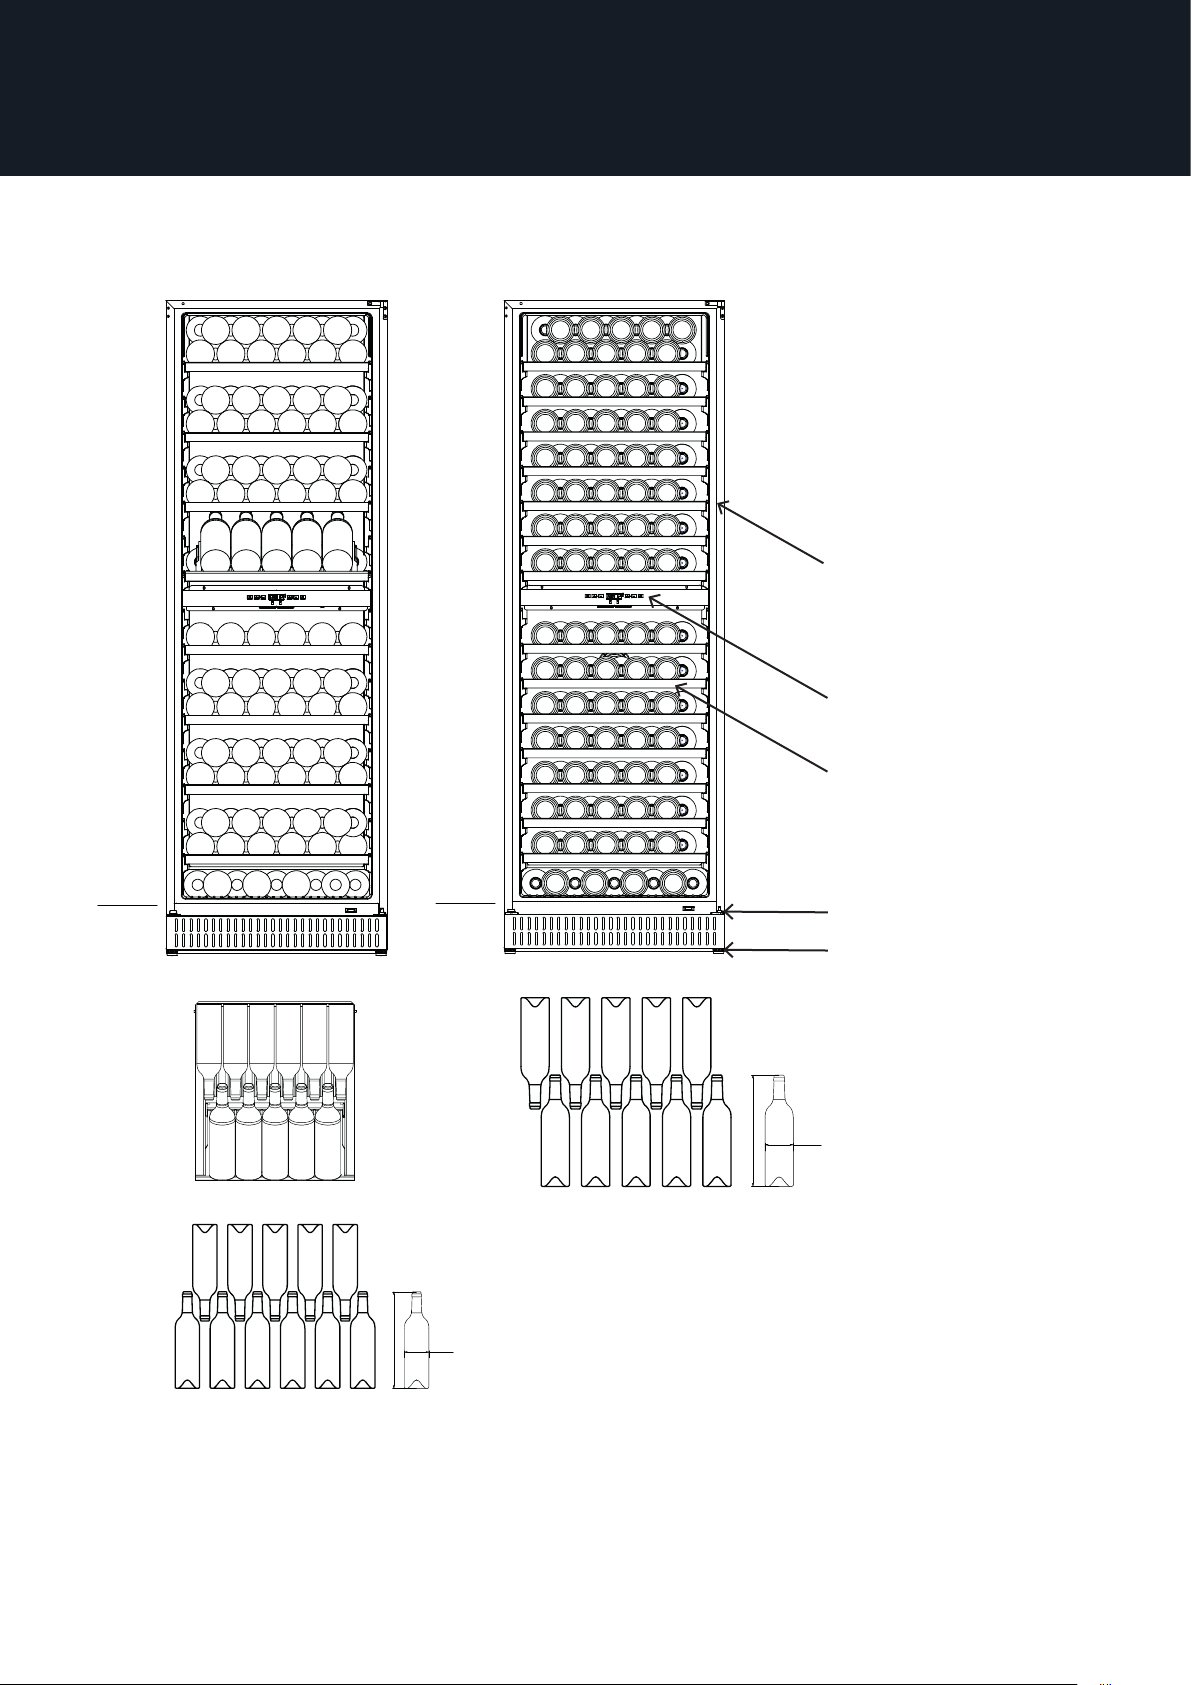
2. Components and parts
PartsCave 170 Cave 180
1 Cabinet
22
22
20
10
10
2 Touch control panel
3 Wine shelves
4 Lower door hinge
5 Levelling feet
10
22
10
10
11
11
22
22
22
9
163
10
10
10
10
10
10
10
10
9
159
1
2
3
4
5
300.5
300.5
Page 9
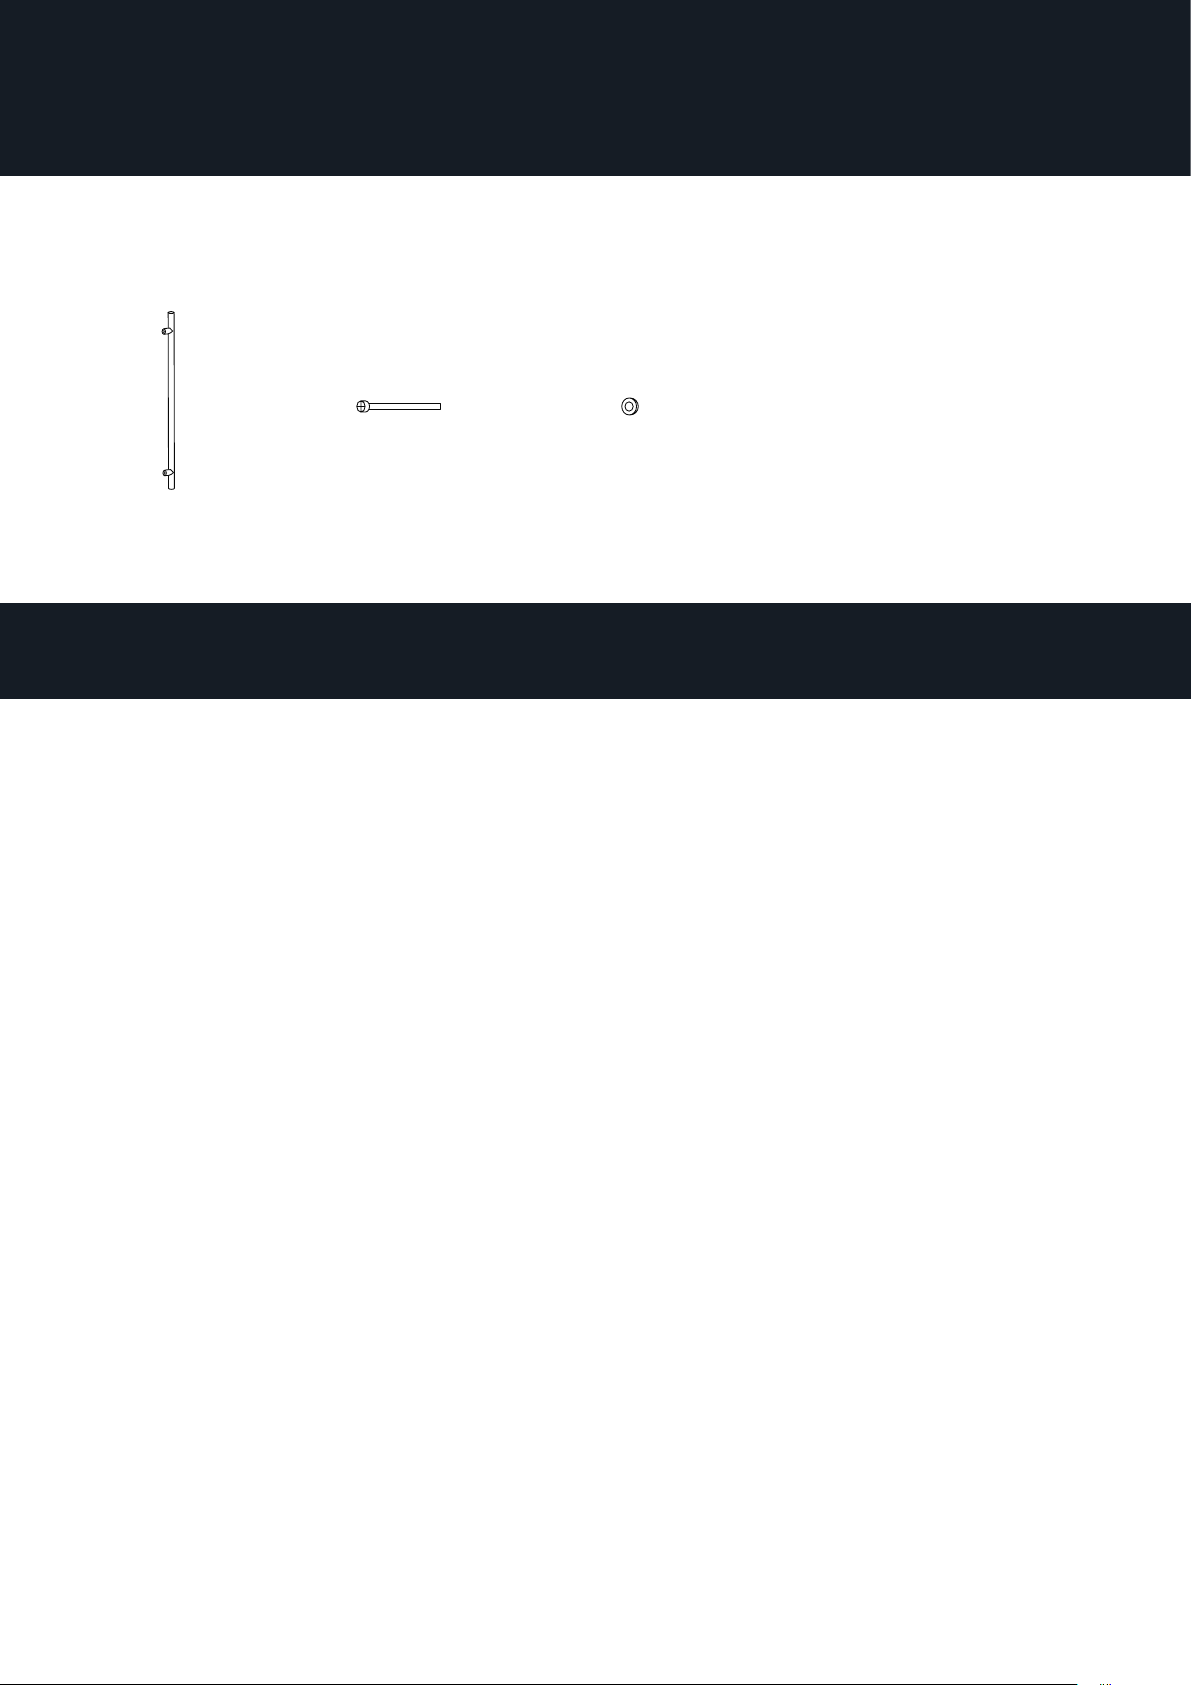
Accessories included
Handle x1 Screws x2 Spacers x2
3. Installation
9
Installation requirements
• Operating voltage for your wine cooler is 220-240V at 50Hz.
• We do not take the responsibility of the damages that occur due to ungrounded
usage.
• Do not place your appliance in direct sunlight. Your appliance should be at least 50
cm away from stoves, gas ovens and heaters, and should be at least 5 cm away from
electrical ovens.
• Your wine cooler should never be used outdoors or left out in the rain.
• When your wine cooler is placed next to a deep freezer, there should be at least 2 cm
gap between them to prevent humidity on the outer surface.
• Before using your wine cooler all parts should be cleaned. See Care and Maintenance
section.
• The installation of this appliance is best carried out by 2 people.
• Dispose of all packaging carefully and responsibly. The appliance is designed for
indoor use only and must be protected from rain, moisture and extreme temperature
variations.
• Cave 180 is designed for households and Cave 170 for commercial use.
• The appliance MUST be positioned on a firm level base.
• Wait for 1 - 1.5 hours after placing the appliance in its final position to allow the
refrigerant to settle before connecting it to the mains power supply.
Unpacking
• Please make sure when unpacking your appliance that it is carried out in a safe
manner. Ensure the packaging is disposed in accordance to local regulation.
• Do not allow children to play with the packaging material, e.g. plastic bags and
wrappings, etc. to avoid danger of suocation.
Page 10
10
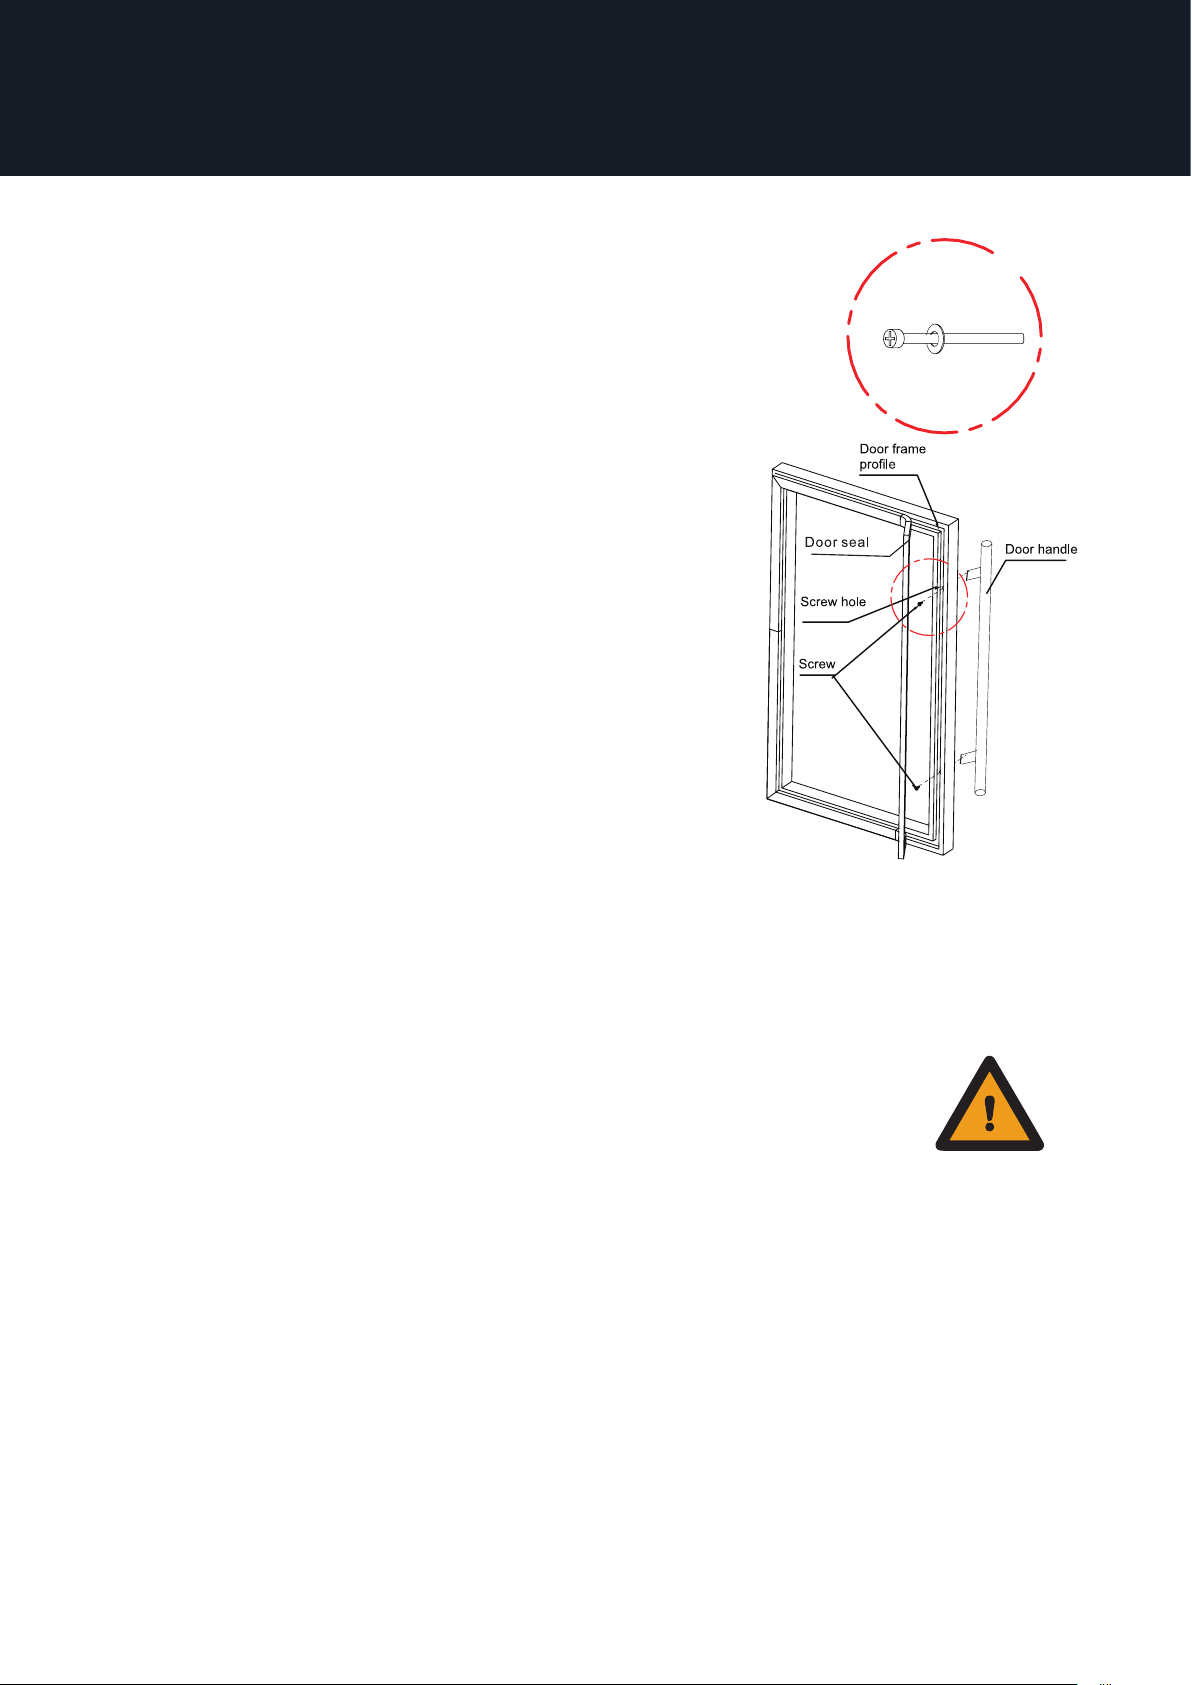
lnstalling the stainless steel handle
1. Peel back the door seal along the right hand side of
the door. You will find a screw hole at the top and
lower part of the door where you have peeled the
seal back. (please refer to the diagram)
2. Take out the screws and spacers from bag at the
back of cabinet. Place the spacers onto the screws
and then put the screws in the hole where the handle
is to be installed. Please make sure the spacer is
correctly in place before you put the screws in the
hole.
3. Align the handle with the screws, tighten the screws
using a screw driver until the handle is both pushed
and secured tightly against the door side. (DO NOT
over-tighten as this may cause damage to the door
surface)
4. After the handle is well attached, put the door seal
back to the door to cover the hole.
lnstalling the appliance
1. Make sure your mains connection is accessible.
2. Align the appliance to the height of the recess by
adjusting the adjustable feet.
3. Connect the power cord.
4. Slide the appliance into the recess. Make sure the power cord does not get wedged.
The appliance should not be in direct contact with the floor when sliding it into place
since this could damage the floor.
WARNING:
WARNING:
Any electrical work that is required to install this appliance
MUST be carried out by a qualified electrician.
THIS APPLIANCE MUST BE EARTHED.
Levelling feet
• The appliance must be installed level in order to work properly. lf the unit is not level,
the doors and magnetic seaI alignments will not be covered properly.
• To level the unit, adjust one or both levelling feet at the base of the unit.
Page 11
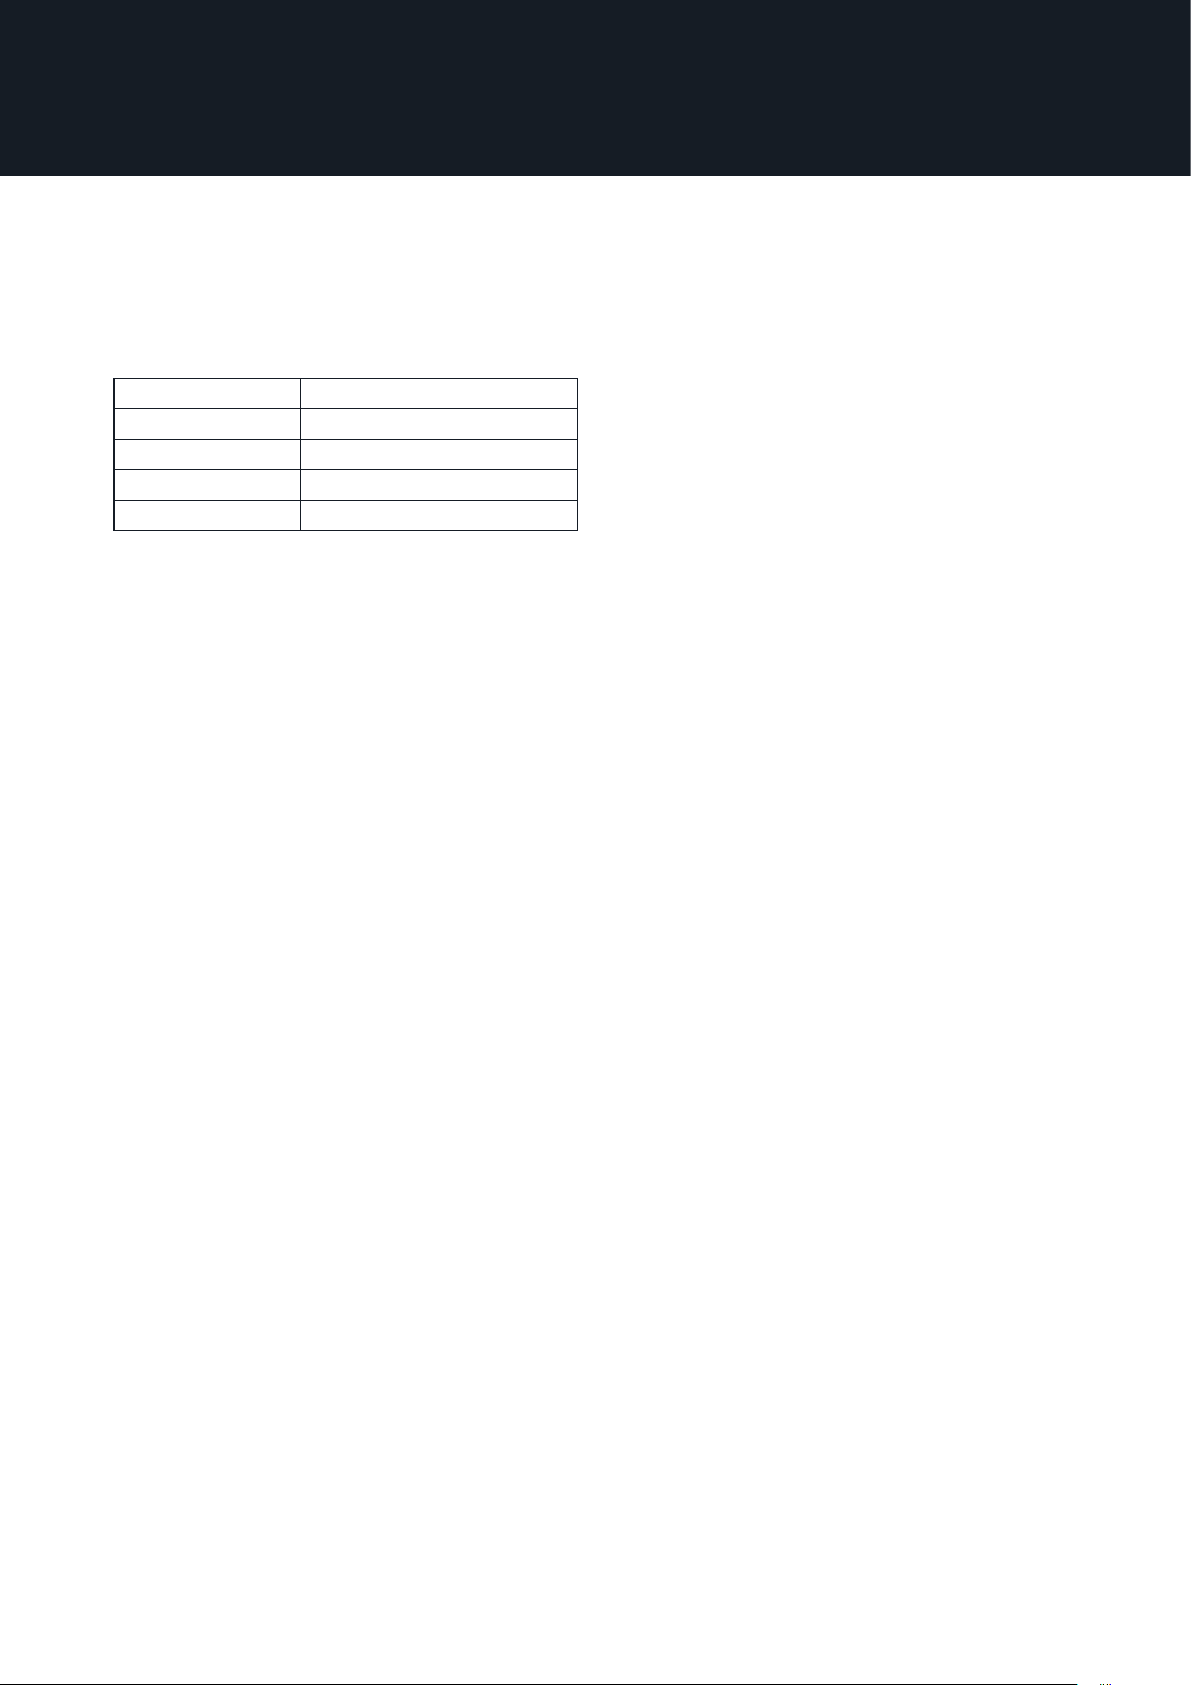
Climate class
Each appliance has a climate class (shown on the rating label) where it indicates the
temperature range of the appliance operation in place. The appliance may not work
properly, if it is left for a long period at a temperature outside the specified range.
Climate class Ambient temperature
SN +10 °C til +32 °C
N +16 °C til +32 °C
ST +16 °C til +38 °C
T +16 °C til +43 °C
Details on how to set temperature can be found on page 13 of this manual.
Before making any electrical connections, ensure that:
• Electrical safety is only guaranteed when the earth system of your house is in
accordance with the related local regulations.
• Do not bend, stretch or pull the supply cable to avoid electric shock.
• Ensure the power socket is suitable for the maximum power of the machine.
• The supply voltage should be the same as what is indicated in the technical
specifications and the appliance rating plate.
• The appliance should be earthed and in compliance with the applicable law.
• When installed, the power socket must be within easy reach.
• lf the socket outlets in your home are not suitable for the plug supplied with this unit,
check with a qualified electrician for replacement.
• To avoid the risk of overloading your plug socket, the use of adapters, multiple
connectors or extension cables are not recommended. The appliance must be
connected to a 220-240 volt 50Hz.
• When positioning the appliance, ensure the supply cord is not trapped or damaged.
• Do not locate multiple portable socket-outlets or portable power supplies at the rear
of the appliance.
11
Page 12

12
4. Operating your appliance
Final checks before operating the appliance
1. Make sure there is sucient space for air circulation around the appliance.
2. The feet have been adjusted for perfect leveling.
3. Clean the compartment as per recommendation in section “Care and Maintenance”.
4. Plug in the appliance and it will start operation to the default temperature setting.
5. The LED display may not show the selected temperature whilst the appliance first
gets to the correct temperature. This is normal, and the display will be corrected
automatically once the appliance has run for a few hours.
6. lf the appliance is switched o, you should allow five minutes before switching it on
again to prevent the risk of unnecessary damage to the compressor.
Please note
The appliance will work continuously until it gets to correct temperature. Continuous
noise from the compressor and refrigeration system is normal, this is not a defect.
Arranging wine in your wine cooler
• Before storing wine in the wine cooler, please ensure the shelves are correctly in
place.
• Adjust the temperature of the wine cooler.
• Allow several hours to let bottles reach the desired temperature.
• Fill the wine cooler with your choice of wine. Lay the wine bottles in a horizontal
position and ensure they sit on the shelf securely (see diagram).
Please be aware that this wine cooler is designed to fit 0.75 litre Bordeaux-style wine
bottles. lf you wish to store other types of bottles, i.e champagne, the maximum
storage capacity will be less than as shown in the diagram. Shelves may also need to be
removed to allow bottles to be stored.
Do not exceed the indicated bottle capacity of the appliance.
Caution
Condensation may be found on the glass door during summer time or humid temperatures.
This is normal. Wipe it with a damp cloth.
Removing the shelves
To remove a shelf from the wine cooler, first remove all bottles from the shelf. Lift up the
inner end of the shelf, then the whole shelf can be pulled out from the cooler.
Defrosting
The wine cooler is designed to defrost automatically every 4 hours. The defrost process
will last for 20 minutes. During defrost, the compressor stops working and fan keeps on
running for 20 minutes.
Dooralarm
The wine cooler is equipped with an alarm that will sound if the door is left open for more
than 60 seconds. Close the door or press any key once to switch o the alarm.
Page 13
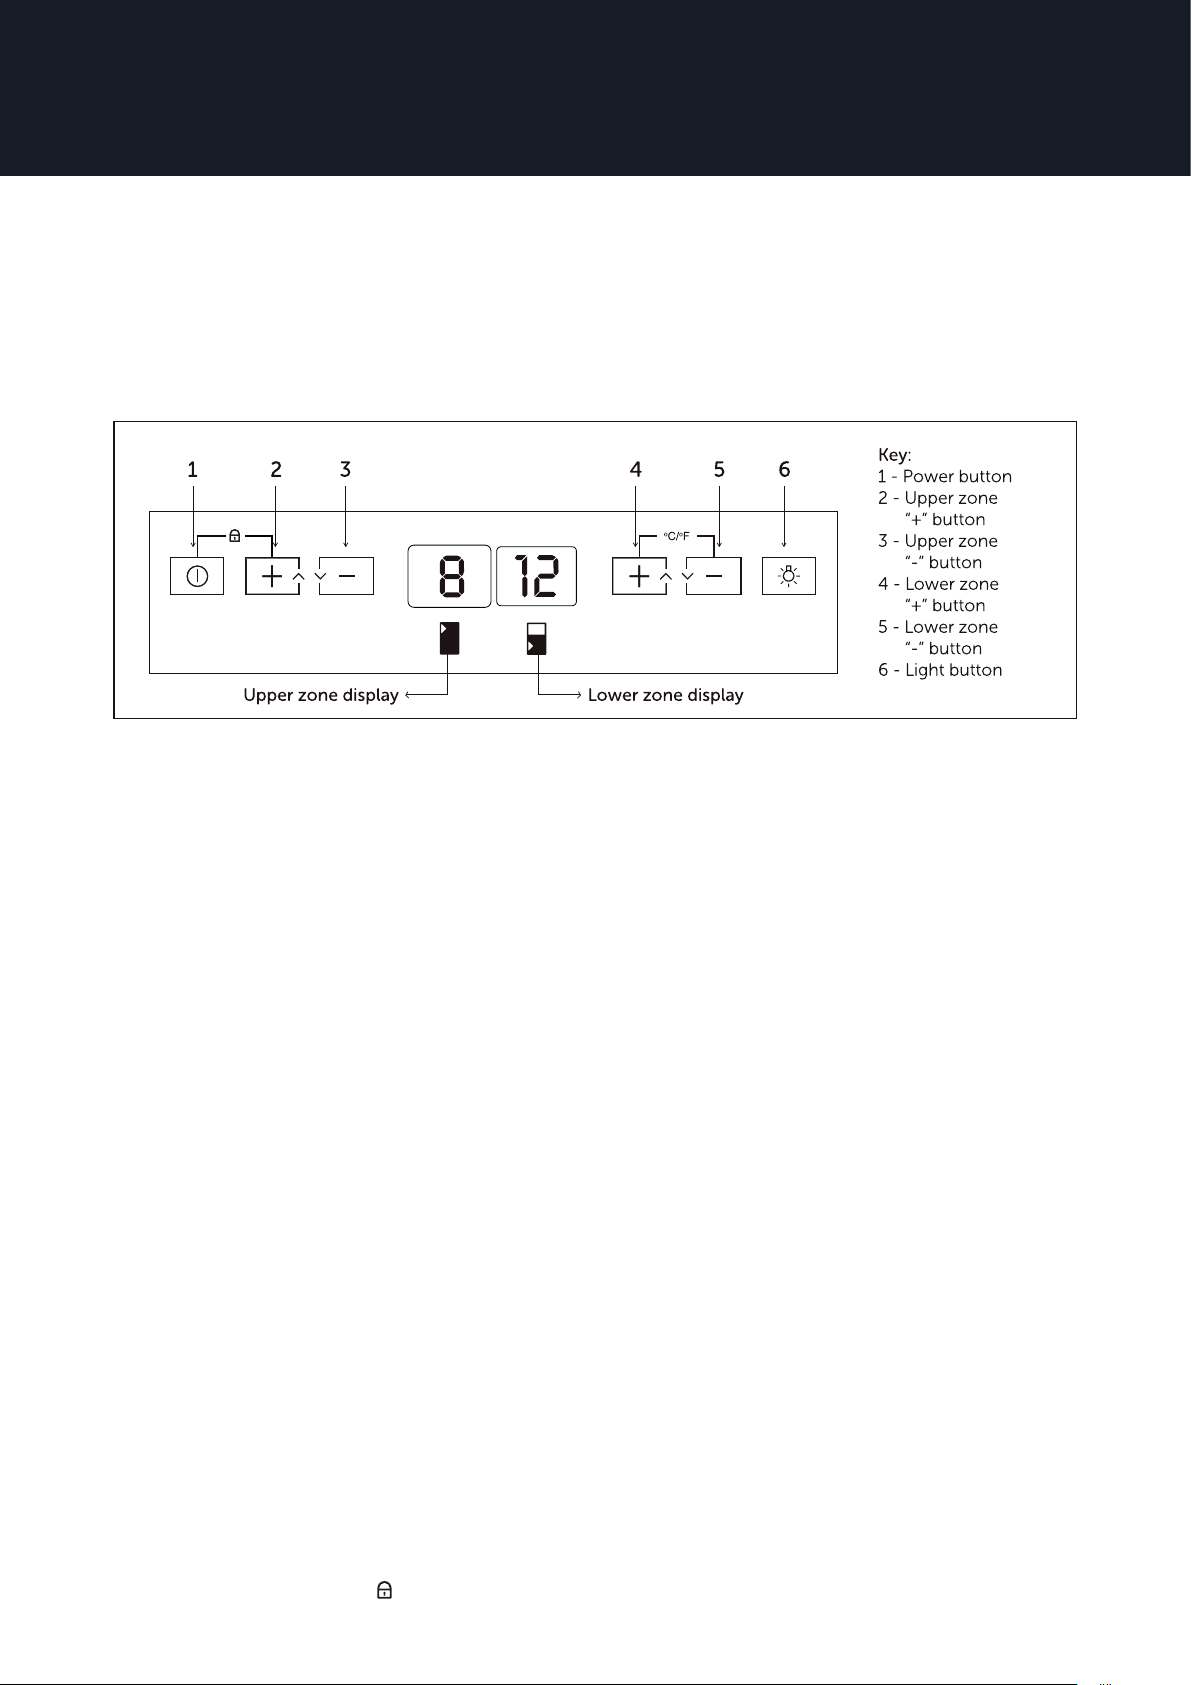
Controls
It is recommended that you install the appliance in a place where the ambient temperature
is between 16˚C - 32˚C lf the ambient temperature is above or below recommended
temperature, the performance of the unit may be aected. For example, placing your unit
in extremely cold or hot conditions may cause interior temperatures to fluctuate, and the
operation temperature range may not be reached.
13
Switching the power on/o
• Press and hold the power button for 6 seconds to switch the wine cooler on.
• Press and hold the power button for 6 seconds again to switch the wine cooler o.
Changing the temperature
• Continue to press the “+” or “-” buttons for the appropriate zone until the required
temperature is shown on the display.
• The preset temperature is 8˚C/46˚F for the upper zone and 12°C/54°F for the lower
zone.
• To change the temperature display from Fahrenheit to Celsius, or Celsius to Fahrenheit,
press lower zone “+” and “-” button at the same time for 2 seconds. Tips:see the
“˚C/˚F” symbol on control panel.
• The display shows the current internal temperature when the wine cooler is on.
Optimal temperature selection
Whilst wine is best stored at temperatures between 13-15°C, your wine can also be stored
at drinking temperature. As a guide for red wine this is between 15-17˚C, and for white
wine between 12-13°C
Internal light
• Press the light button to switch the light on or o.
• To turn the light ON when door opens, press the light button for 6 seconds, the display
with show “OP_” which means the door controls function is ON.
• To turn the light function OFF, press the light button for 6 seconds, the display will
show “CL”, which means the door control function is OFF.
Locking the control panel
• Press the power button and “+” button at the same time for one second, all the buttons
on panel will be locked.
• Press the power button and “+” button once again, all the buttons will be unlocked.
• Tips, please see the “ ” symbol on control panel.
Page 14

14
5. Care and maintenance
Cleaning Your Appliance
Upon installation of your new appliance, cleaning it thoroughly is recommended.
• Make sure you unplug the wine cooler before starting to clean it and remove all
shelves.
• Do not pour water directly over your appliance.
• You can wipe the inner and outer sides with a soft cloth.
• Remove parts individually and clean by hand with soapy water. Do not place them in
the dishwasher.
• Never use flammable, explosive or corrosive material for cleaning your appliance
• Clean dust behind the cooler and on the ground regularly to improve the cooling
eect and energy saving
• The interior of the cooler should be cleaned regularly to avoid odor.
• Check the door gasket regularly to make sure there are no debris.
• Clean the door gasket with mild soap and water.
• Use a soft cloth or sponge to clean the inside of the cooler, with two tablespoons of
baking soda and a quart of warm water. Then rinse with water and wipe clean, and
open the door and let it dry it naturally before the power is turned on.
• Do not use soap, detergent, scrub powder, spray cleaner, etc., as these may cause
odors in the interior of the cooler.
• Clean the bottle frame and shelves with a mild detergent and dry with a soft cloth.
• Wipe the outer surface of the cooler with a soft cloth dampened with soapy water,
detergent, etc., and then wipe dry.
• Do not use hard brushes, steel wool, wire brushes, abrasives, or solvents like, alcohol
or acetone, boiling water, acids or alkaline to clean this appliance, as it may damage
or deform the surface or interior.
• Do not rinse with water so as not to aect the electrical insulation properties.
Light bulb replacement
The internal light is LED type. To replace the lamp, contact an after sales service provider.
Power Failure
lf the power failure lasts for up to 24 hours, keep the door closed. This will allow the
stored bottles to stay cold as long as possible. lf it lasts longer than 24 hours, it is advised
to empty the wine cooler compartment and temporarily store the bottles in a portable
wine cooler.
Short vacation
There is no need to disconnect the appliance from the mains if you will be away for two
to three weeks.
Long vacation
Remove all the wine if you are away for three weeks or more. Unplug the appliance
and leave the doors open to provide air circulation to prevent odour and mould. lf the
refrigerating appliance is left empty for long periods, switch o, defrost, clean, dry, and
leave the door open to prevent mold developing within the appliance.
Page 15
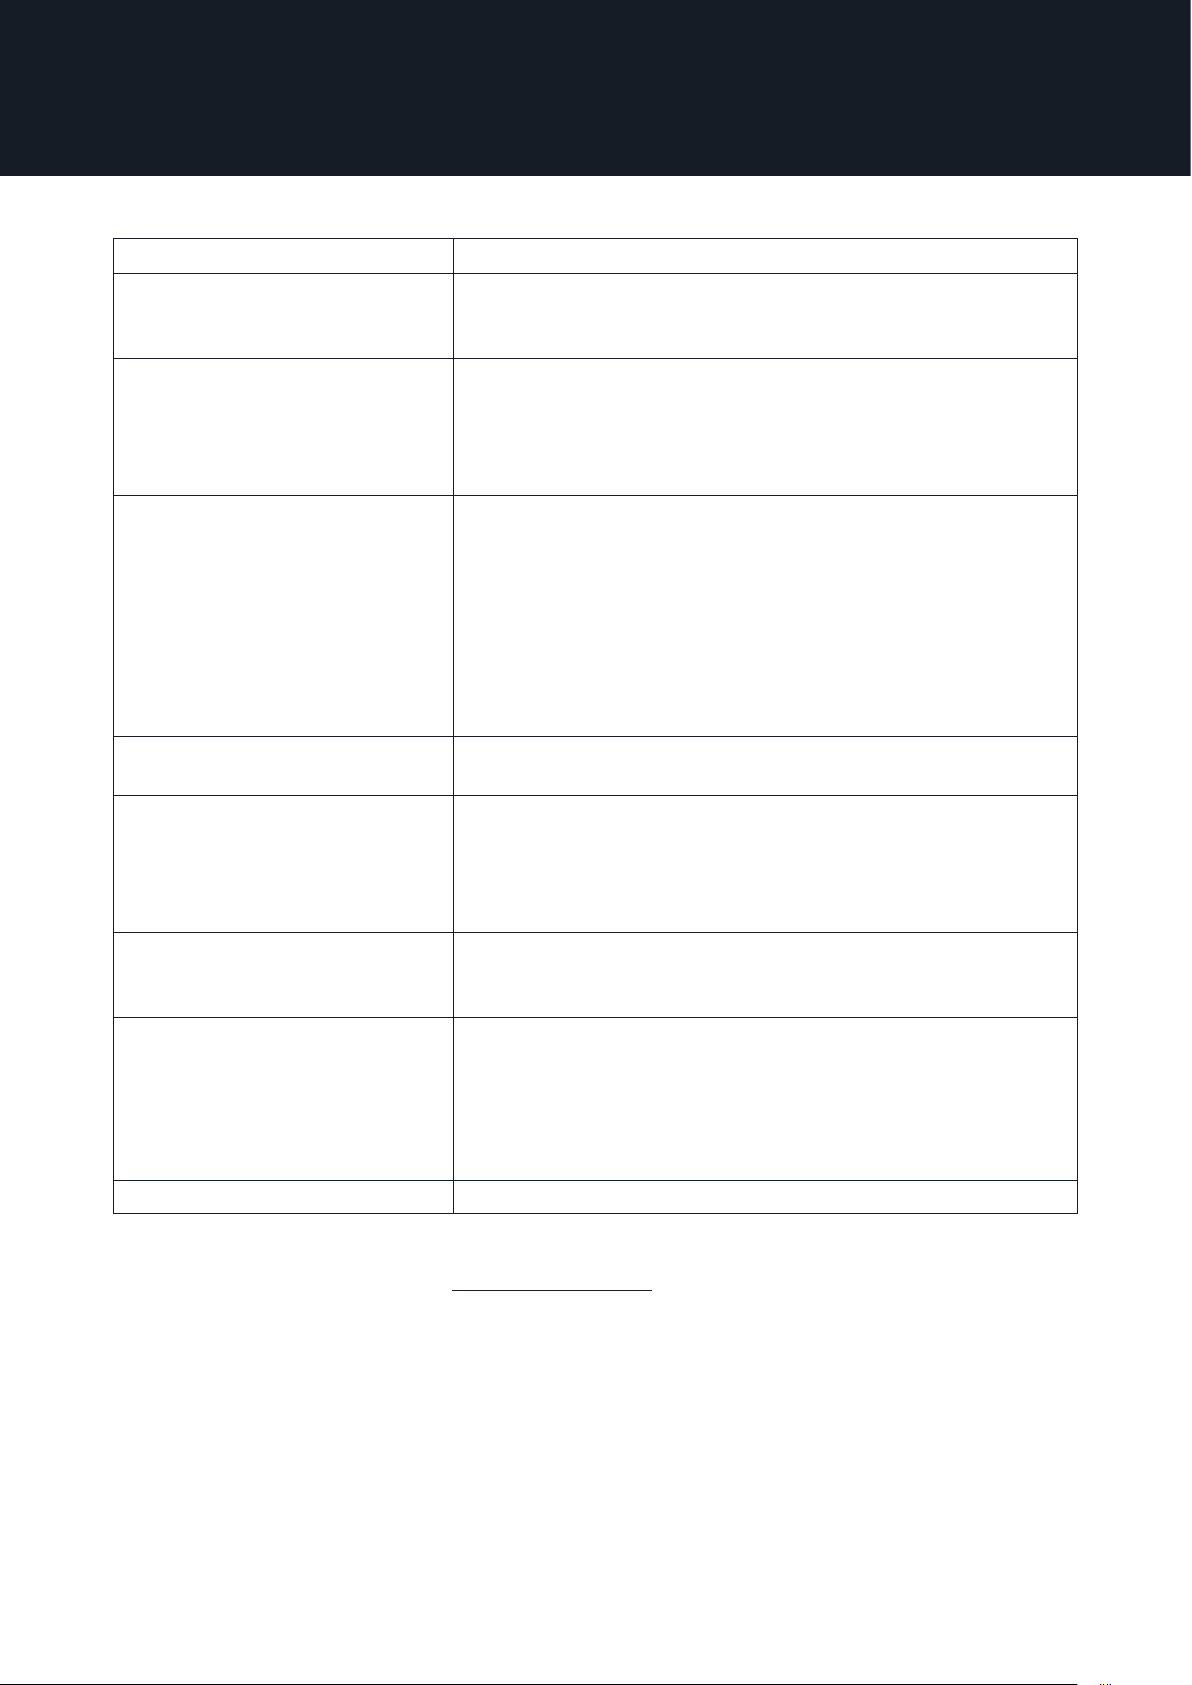
6. Troubleshooting instructions
FAU LT SOLUTION
The appliance is not cooling - Press the ON/OFF button and turn on the appliance.
- Ensure the fuse is switched on.
- Ensure the power cord is correctly inserted.
The door does not close
properly
Unusual noises - Check that the appliance is on a flat, level surface and is
The door will not open - lf the door has just been opened, leave it for a few minutes
The compressor runs
constantly
The external fridge surface is
warm
Smells/odors - Ensure all the drinks that are in the cooler are in date and
The interior light is not working Order service call.
- Ensure there are no obstructions preventing door closure.
- Ensure the door compartments and shelves are correctly in
place.
- Ensure the door seal is not out of position or torn.
- Ensure the appliance is levelled.
stable.
- -Check the spacing around the appliance and ensure it is
not touching other items.
- Bubbling and gurgling sound: This noise is emitted as the
coolant fluid flow through the pipes within the system. This
is normal.
- Contraction and expansion of the inside walls may cause
popping and cracking noises.
to allow the air pressure to equalize before trying again.
- The temperature is set too cold: adjust the temperature to
a warmer setting
- The door is open, or something is obstructing proper door
closure.
- The room temperature is warmer than usual.
The exterior walls can be warmer than room temperature.
This is normal while the compressor works to transfer heat
from inside the cabinet.
correctly packaged. Please remove anything that may be
spoiled and repack if necessary.
- Check for spillages throughout the cooler. Spillages may
cause odours if left unwashed. Clean as advised under the
cleaning and maintenance section.
15
For service, see our website at www.norcool.com
By checking the above before ordering service, you will help the service engineer know
what parts they may need to bring and what measures to take.
Page 16
16
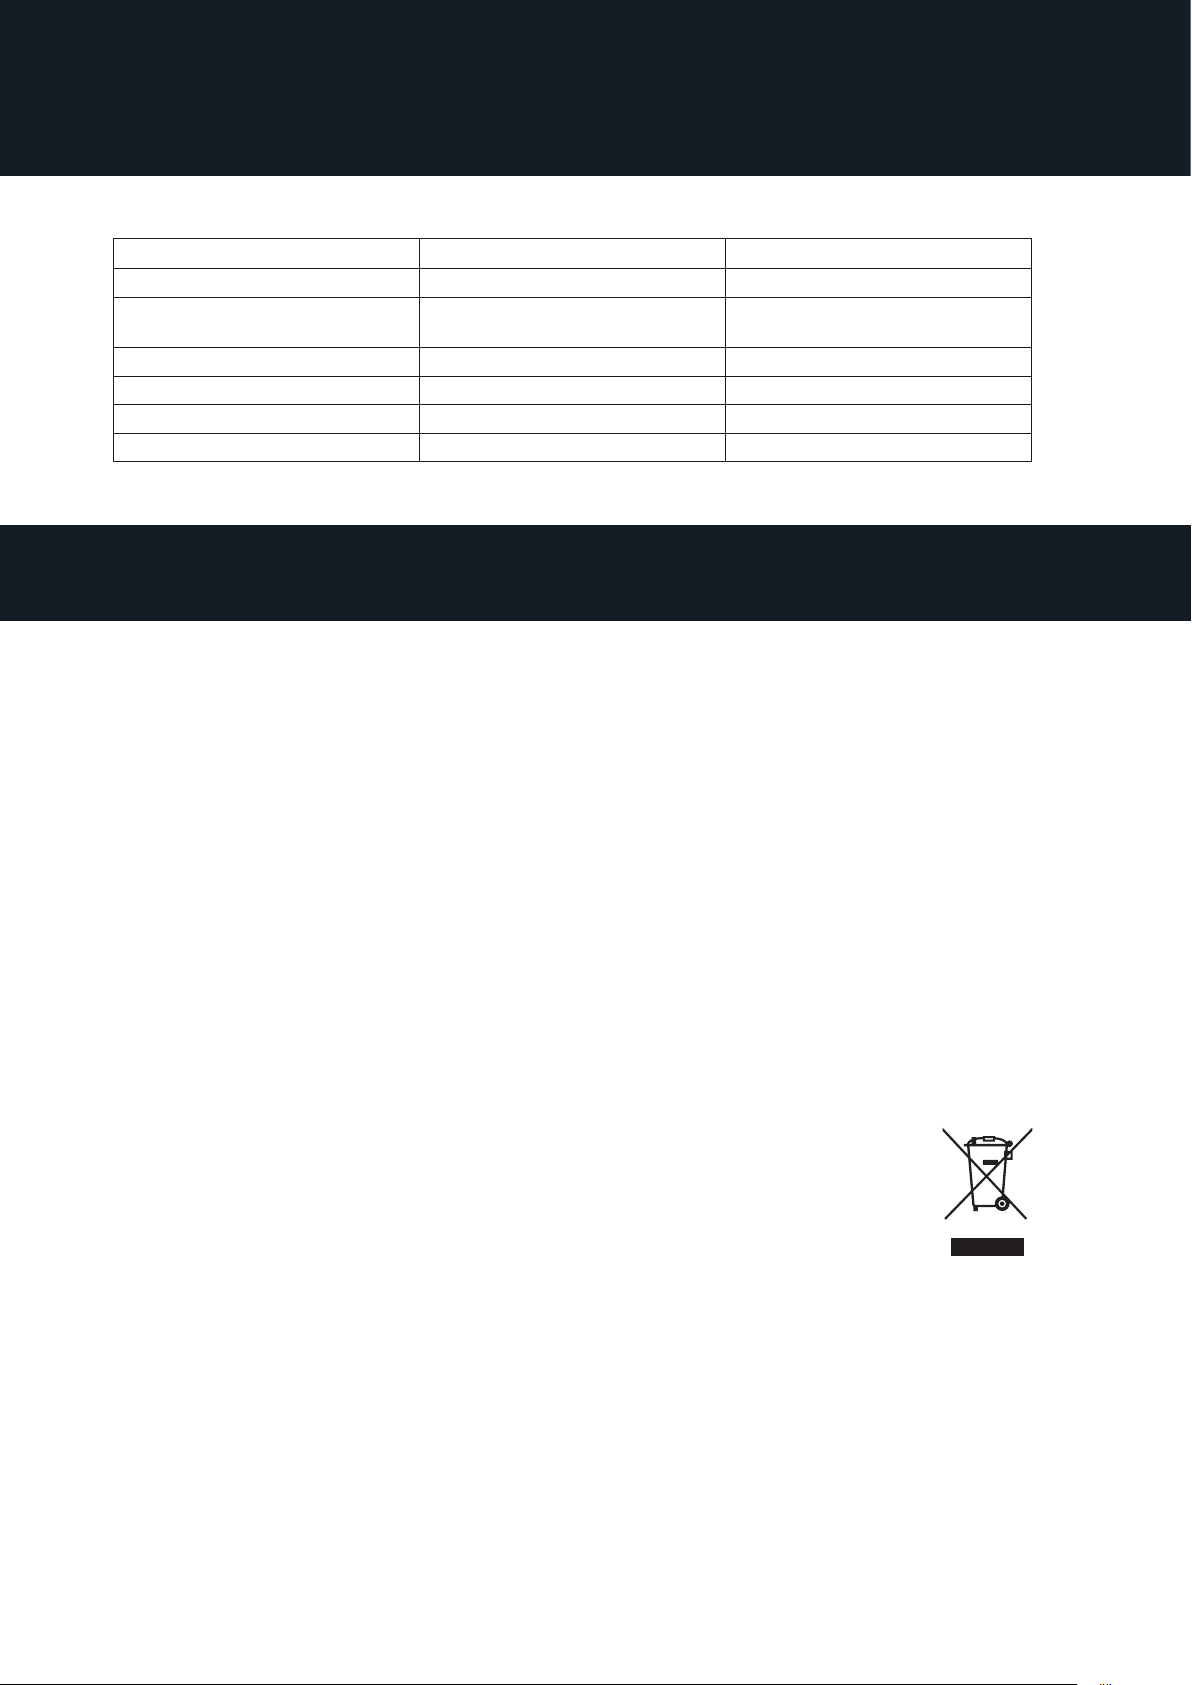
7. Technical specifications
DESCRIPTION
External measurements W595 x H680 x D1762 mm W595 x H680 x D1762 mm
Capacity (standard 75 cl bottles,
76mm Ø x 300,5mm)
Energy consumption 0,55 kWh/24h 0,55 kWh/24h
Energy class G G
Lighting LED 1+1 W LED 1+1 W
Refrigerant R600a R600a
CAVE 170 CAVE 180
163 159
8. Disposal of used products
Disposal of the packaging material:
The packaging protects your appliance from damage during transportation. All packaging
materials are recyclable and display the recycling symbol.
Ensure that any plastic wrappings, bags, etc. are disposed of safely and kept out of the
reach of children, as they are a potential source of danger.
Please ask your dealer or your local authority about relevant means of safe disposal
Disposal of the appliance:
This appliance is subject to European Directive 2002/96/EC on Waste Electrical and
Electronic Equipment (WEEE). This symbol indicates that this appliance must not be
treated as domestic waste. Valuable raw materials can be reclaimed by recycling old
appliances. By disposing of this appliance correctly, you can help prevent potentially
negative consequences for the environment and public health
Scrapping the appliance:
Pull out the mains plug.
• Cut o the power cord.
• Ensure that the refrigerant circuit is not damaged before disposal.
Information about the refrigerant can be found on the data plate.
• Scrapped appliances must be disposed of in a professional and
appropriate way, in accordance with the current local regulations and
legislation.
Page 17
Notes:
17
Page 18
18
Notes:
Page 19
Notes:
19
Page 20
Scandinavian Appliances AS
www.norcool.no
Postboks 61
1740 Borgenhaugen
Norway
T: +47 815 69 117
[email protected]
Please visit out website for operating & installation
instructions in other languages.
Version 1.1 - July 2023
 Loading...