

Norcold DE / EV 0061, DE / EV 0041, DC 0061 Installation Manual
Installation Manual
For models DE / EV 0041 - 3.6 cubic foot, AC / DC electric refrigerators.
For models DE / EV 0061 - 7.0 cubic foot, AC / DC electric refrigerators.
For models DC 0061 - 7.0 cubic foot, DC electric refrigerators.
Special Requirements for Marine Installations:
These refrigerators are internally wired so that the AC and DC circuits are isolated from each other. If the positive
(+12/24 volts) input is grounded (by cuts in the wire insulation, incorrectly insulated components, etc.) a voltage
potential can be caused throughout the boat, which causes corrosion to form on any metal parts that are exposed
to water.
This condition can be avoided by wiring the boat so that the AC and DC grounds are common and so the wiring is
protected per NNMA CERTIFICATION HANDBOOK (1987). Inspect all wiring to make sure that the insulation is
not damaged and use plastic wire clamps.
One reference for more information on corrosion is:
BOAT AND YACHT CORROSION CONTROL
by Yacht Corrosion Consultants, Inc.
2368 Eastman Ave. #6
Ventura, CA 93003
NORCOLD, Inc.
P.O. Box 4248
Sidney, OH 45365-4248
English
Norcold Customer Support Dept.
Telephone: 800-543-1219
Fax: 937-497-3183
Web Site: www.norcold.com
Part No. 635742B (8/1/2017)
Table of Contents
WARNING
WARNING
CAUTION
Safety Awareness .....................................................................................................................................................................................2
Safety Instructions ....................................................................................................................................................................................2
Assemble the Enclosure ..........................................................................................................................................................................3
Ventilation Requirements..........................................................................................................................................................................3
Installation Options ...................................................................................................................................................................................4
Install the decorative door panel(s) ...................................................................................................................................................4
Reverse the door swing (DE / EV0041 models) ................................................................................................................................ 5
Reverse the door swing (DC / DE / EV0061 models)........................................................................................................................8
Connect the Drain Tube..........................................................................................................................................................................11
Install the Refrigerator ............................................................................................................................................................................ 11
Connect the Electrical Components .......................................................................................................................................................12
Electrical current necessary ............................................................................................................................................................12
Connect the 120 / 220 volts AC supply ...........................................................................................................................................12
Connect the 12 / 24 volts DC supply .............................................................................................................................................. 12
Safety Awareness
Read this manual carefully and understand the contents before you install the refrigerator.
Be aware of possible safety hazards when you see the safety alert symbol on the refrigerator and in this manual. A signal word follows
the safety alert symbol and identies the danger of the hazard. Carefully read the descriptions of these signal words to fully know their
meanings. They are for your safety.
!
!
This signal word means a hazard, which if ignored, can cause dangerous personal injury, death, or much
property damage.
This signal word means a hazard, which if ignored, can cause small personal injury or much property
damage.
Safety Instructions
!
- For installations which need an electric outlet that is energized by an external power source, the refrigerator must be
electrically grounded as written in local codes or the National Electrical code, NFPA 70.
- Incorrect installation, adjustment, alteration, or maintenance of this refrigerator can cause personal injury, property
damage, or both.
- Obey the instructions in the “Ventilation Requirements” section of this manual.
- Do not bypass or change the refrigerator’s electrical components or features.
- Protect all wiring from physical damage, vibration, and excessive heat.
- Do not spray liquids near electrical outlets, connections, or the refrigerator components. Many liquids are electrically
conductive and can cause a shock hazard, electrical shorts, and in some cases re.
- This appliance is intended to be used in houshold and similar applications such as recreational vehicles, boats, and
semi trucks.
Installation Manual 2
CAUTION
- To avoid a hazard due to instability of the appliance, it must be xed in accordance with the instructions.
CAUTION
- A means for disconnection from the supply mains must be incorporated in the xed wiring in accordance with the
wiring rules.
- It is necessary to allow disconnection of the appliance from the supply after installation. This disconnection may be
acheived by having the plug accessible or by incorporating a switch in the xed wiring in accordance with the wiring
rules.
!
- The front and rear of the refrigerator have sharp edges and corners. To prevent cuts or abrasions when working on the
refrigerator, use caution and wear cut resistant gloves.
Assemble the Enclosure
Make sure that the enclosure is the correct size:
- For DE / EV 0041 models - 30 7/8 inches high x 23 1/4 inches wide x 23 1/2 inches deep.
- For DC / DE / EV 0061 models - 52 7/8 inches high x 23 1/4 inches wide x 23 3/4 inches deep.
Make sure the oor is solid and level:
- The oor must be metal or a wood panel and extend the full width and depth of the enclosure.
- The oor must be able to support the weight of the refrigerator and its contents.
Make sure there are no adjacent heat sources such as a furnace vent, etc.
Ventilation Requirements
This refrigerator is made for a built-in installation. Correct ventilation is necessary for the correct operation of the refrigerator and to
increase the life of the refrigerator cooling system.
Ventilation allows the natural air ow that is necessary for good refrigeration. Cooler air comes in through a lower intake vent, goes
around the refrigerator coils where it removes the excess heat from the refrigerator components, and goes out through an upper
exhaust vent. If this air ow is blocked or decreased, the refrigerator will not cool correctly. Do not install the vents into completely
enclosed areas such as closets or cabinets.
!
- shortened life of the refrigerator cooling unit.
- poor cooling performance of the refrigerator.
- continuous operation of the refrigerator.
- fast battery discharge.
- void of the refrigerator warranty.
The refrigerator has built in vents at the top and at the bottom. Make sure that the ow of air through these
vents is not blocked in any way. Blockage of air through these vents can cause:
Installation Manual 3
Installation Options
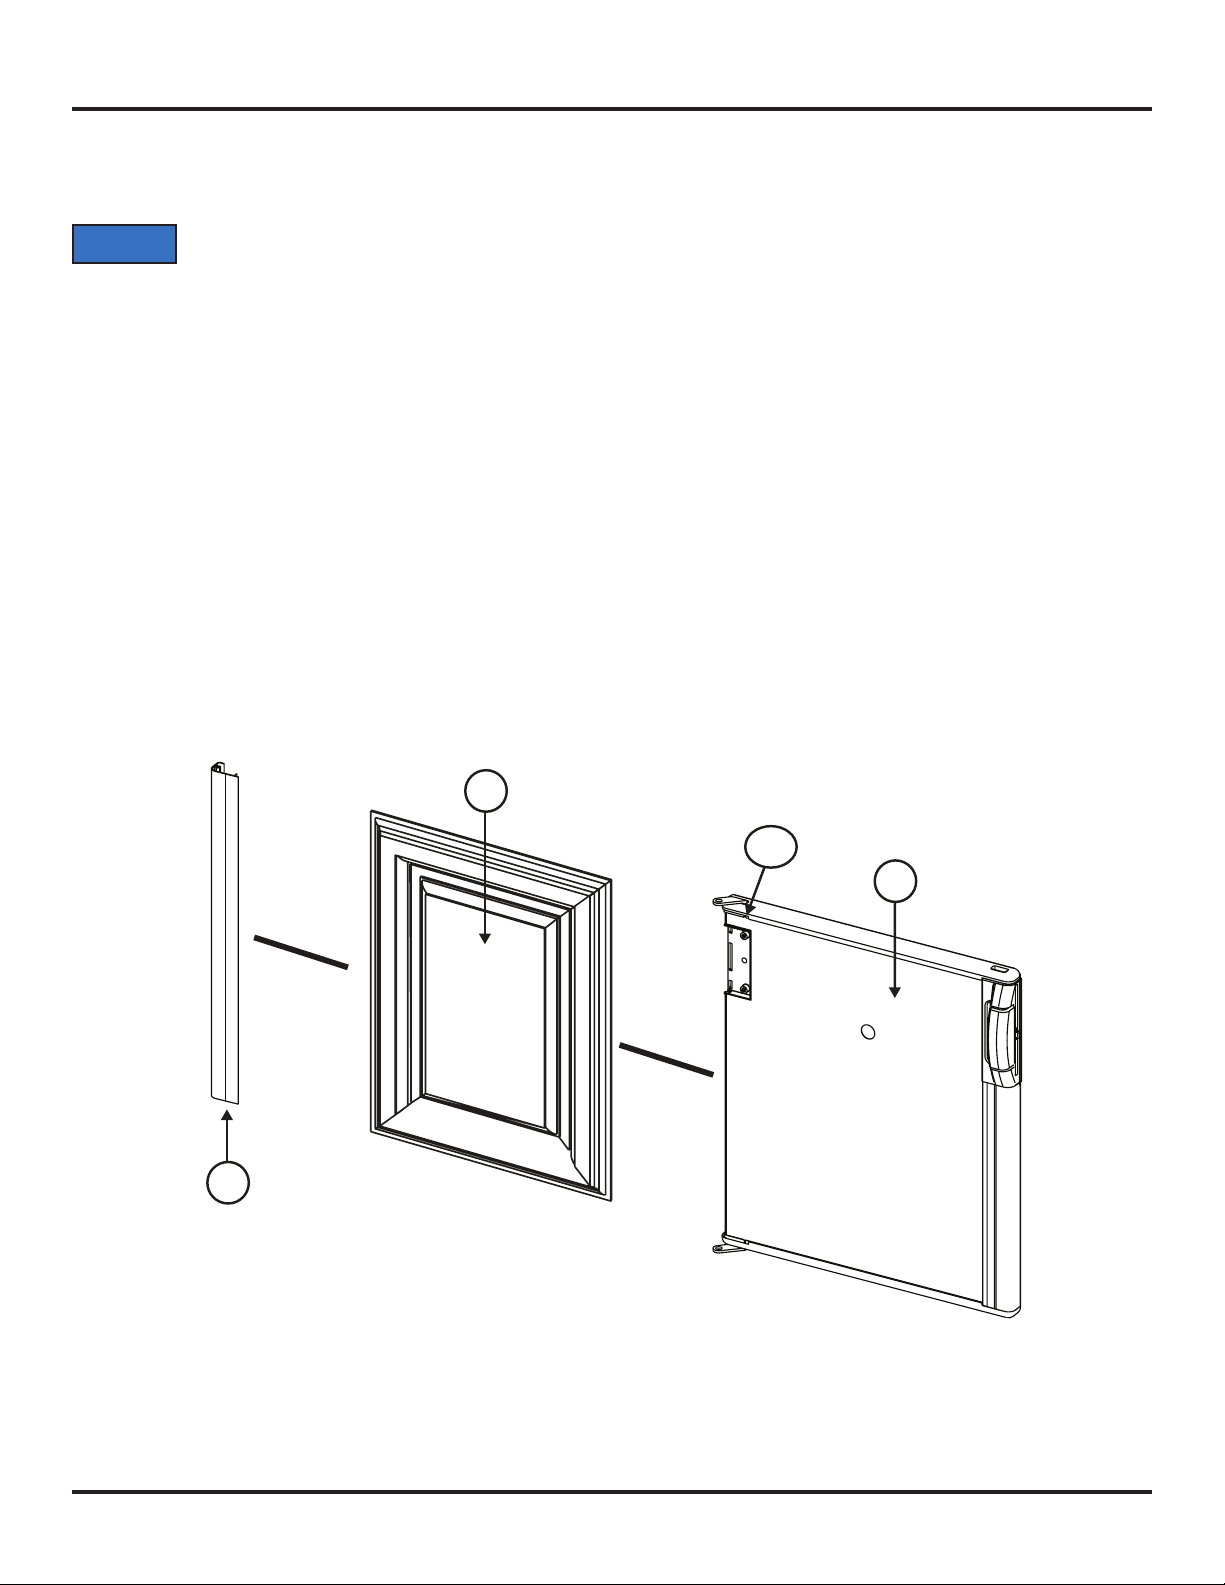
Art02286
37
38
39
157
Install the decorative door panel(s):
1. Make a decorative door panel [38] (See Art02286).
NOTICE
- For DE / EV0041 models, the door panel must be 17 13/16 inches wide x 23 5/8 inches tall.
- If the door panel has a raised panel, the size of the raised part of the panel must be less than 17 7/16 inches wide x 23 5/16
- For DC / DE / EV0061 models, the lower door panel must be 17 13/16 inches wide x 27 1/4 inches tall.
- If the door panel has a raised panel, the size of the raised part of the panel must be less than 17 7/16 inches wide x 26 15/16
- For DC / DE / EV0061 models, the upper door panel must be 17 13/16 inches wide x 16 1/2 inches tall.
- If the door panel has a raised panel, the size of the raised part of the panel must be less than 17 7/16 inches wide 16 3/16
2. Pull the panel retainer [37] off the hinge side of the door [39].
3. Push the decorative door panel into the slots [157] of the door.
4. Push the panel retainer into the original position on the door.
The decorative panels must be 3/16 inch or less in thickness and must be within ± 1/32 inch of the following
dimensions.
inches tall.
inches tall.
inches tall.
Installation Manual 4
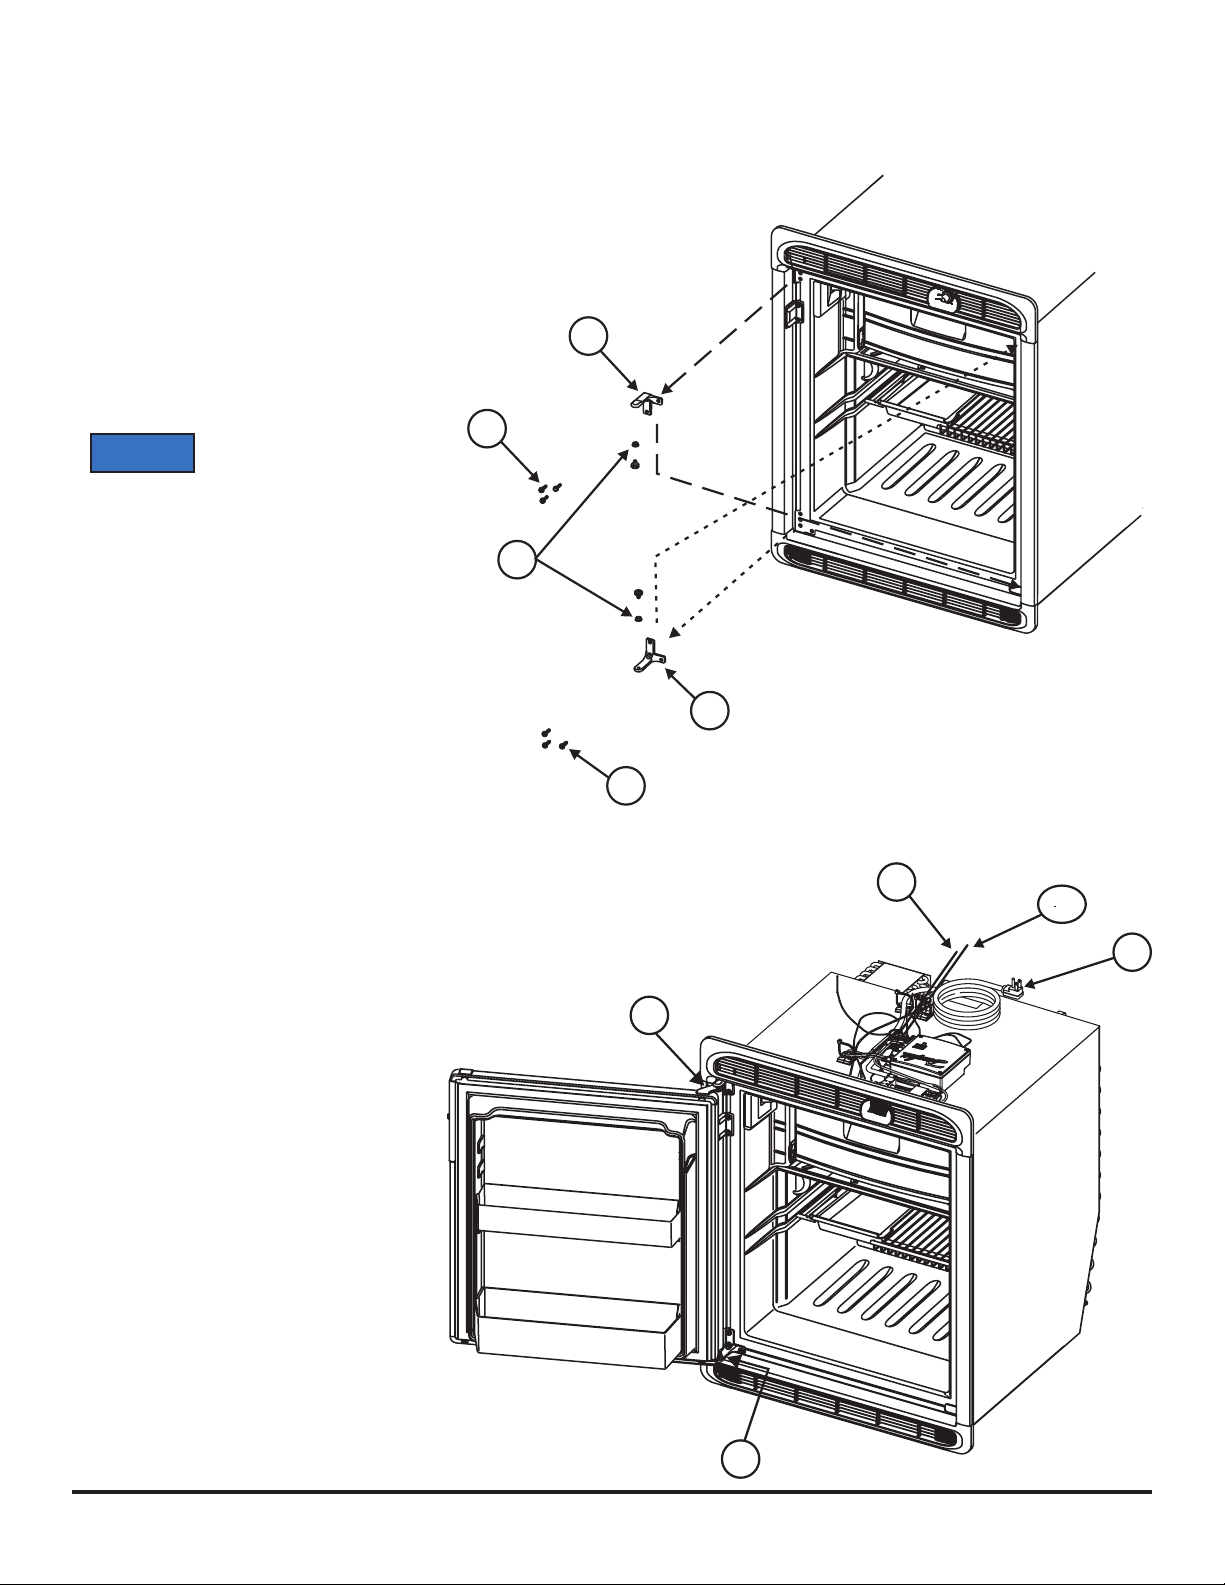
Reverse the door swing (DE / EV0041 models):
Art02282
NOTICE
This refrigerator has door hinges that allow you to change the direction that the door opens by moving the hinges to the opposite corner.
1. Remove the door (See Art02281 and
Art02282):
- Make sure that the door is fully closed.
- Turn out and save the upper hinge pin
[63].
- Turn out and save the lower hinge pin
[64].
- Carefully open the door and pull it away
from the refrigerator.
Make sure that the plastic
bushings [74] remain in the
door hinges.
2. Change the position of the strike plate and
the strike plate cover (See Art02285):
- Remove the screws [41] that attach the
strike plate (with hole) [65] and the strike
plate cover (without hole) [163].
- Reverse the strike plate and the strike
plate cover and put each one on the other
side of the refrigerator cabinet.
- Attach the strike plate and strike plate cover
with the screws.
3. Change the position of the cabinet hinges
(See Art02281 and Art02282):
- Remove the screws [41] from the upper
cabinet hinge [66].
- Reverse this hinge and put on the other
side of the refrigerator as the lower
cabinet hinge.
66
41
74
67
Art02281
41
99
224
87
- Make sure that the center of the
hinge slots are aligned with the
center of the hinge screw holes in
the refrigerator.
- Attach the cabinet hinge with the
screws.
- Remove the screws [41] from the lower
cabinet hinge [67].
63
64
Installation Manual 5

- Put this hinge on the other side of
Art02287
Art00985
NOTICE
the refrigerator as the upper cabinet
hinge.
- Make sure that the center of the
hinge slots are aligned with the
center of the hinge screw holes in
the refrigerator.
- Attach the cabinet hinge with the
screws.
4. Change the position of the door
hinges and handle (See Art00985 and
Art02287):
- Remove and save the screws [41]
that attach the door handle [70] to the
refrigerator door.
- Remove the door handle.
- Pull the panel retainers [37]off the
door.
- Reverse the panel retainers and push
onto opposite side of the door.
Art02285
65
41
163
- Reverse the door handle and put on the other side of
the door.
- Attach the door handle with the screws.
- Remove and save the plastic cap [42] that is opposite
the upper hinge of the door.
- Remove the screw [72] from the door hinges [73].
- Remove the upper door hinge.
- Reverse the hinge and put on the opposite side of the
door as the lower door hinge.
- Remove the lower door hinge.
- Reverse the hinge and put on the opposite side of the
door as the upper door hinge.
- Attach each of these hinges with the screws that were
removed from the other side.
You may need to pierce a hole in the door
gasket to allow the screw to engage the door hinge.
- Put the plastic cap in the hole that is opposite the upper hinge.
73
42
37
70
73
37
41
73
Installation Manual 6
72

5. Install the door:
NOTICE
NOTICE
- Set the lower door hinge onto the lower cabinet hinge and push the door closed until the door latch engages the strike plate.
- Align the holes of the lower door hinge and the lower cabinet hinge.
- Turn the lower hinge pin down through the lower door hinge into the lower cabinet hinge.
- Align the holes of the upper door hinge and the upper cabinet hinge.
- Turn the upper hinge pin up through the upper door hinge into the upper cabinet hinge.
- Make sure that the space between the door and the cabinet is the same all around the door.
- If it is not, loosen the screws that attach the cabinet hinges to the refrigerator and move the cabinet hinges as necessary to
- Tighten the screws that attach the cabinet hinges to the refrigerator.
- Make sure that the door latch goes fully into the strike plate.
- If it is not, loosen the screws that attach the strike plate to the refrigerator and move the strike plate as necessary until the door
- Tighten the screws that attach the strike plate to the refrigerator.
6. Seal all of the screw holes in the door gasket using a 100% silicone multi-purpose sealant that is safe for food contact:
Make sure that the plastic bushings [74] remain in the door hinges.
make the space between the door and the cabinet the same all around the door.
latch goes fully into the strike plate.
Read and follow the instructions on the packaging of the silicone sealant.
- Pull the door gasket away from the door.
- Locate the half-moon shaped openings in the door (See Art00985).
- Apply some of the silicone sealant between the door gasket and the plastic door liner and also ll the screw hole opening.
- Push the door gasket back against the door to allow the gasket to seal against the silicone sealant.
- Smooth the silicone sealant in the screw hole opening so it is even with the door cap.
- Remove any excess silicone sealant from the door cap with a dry paper towel.
- Trim off any excess cured silicone sealant.
Installation Manual 7
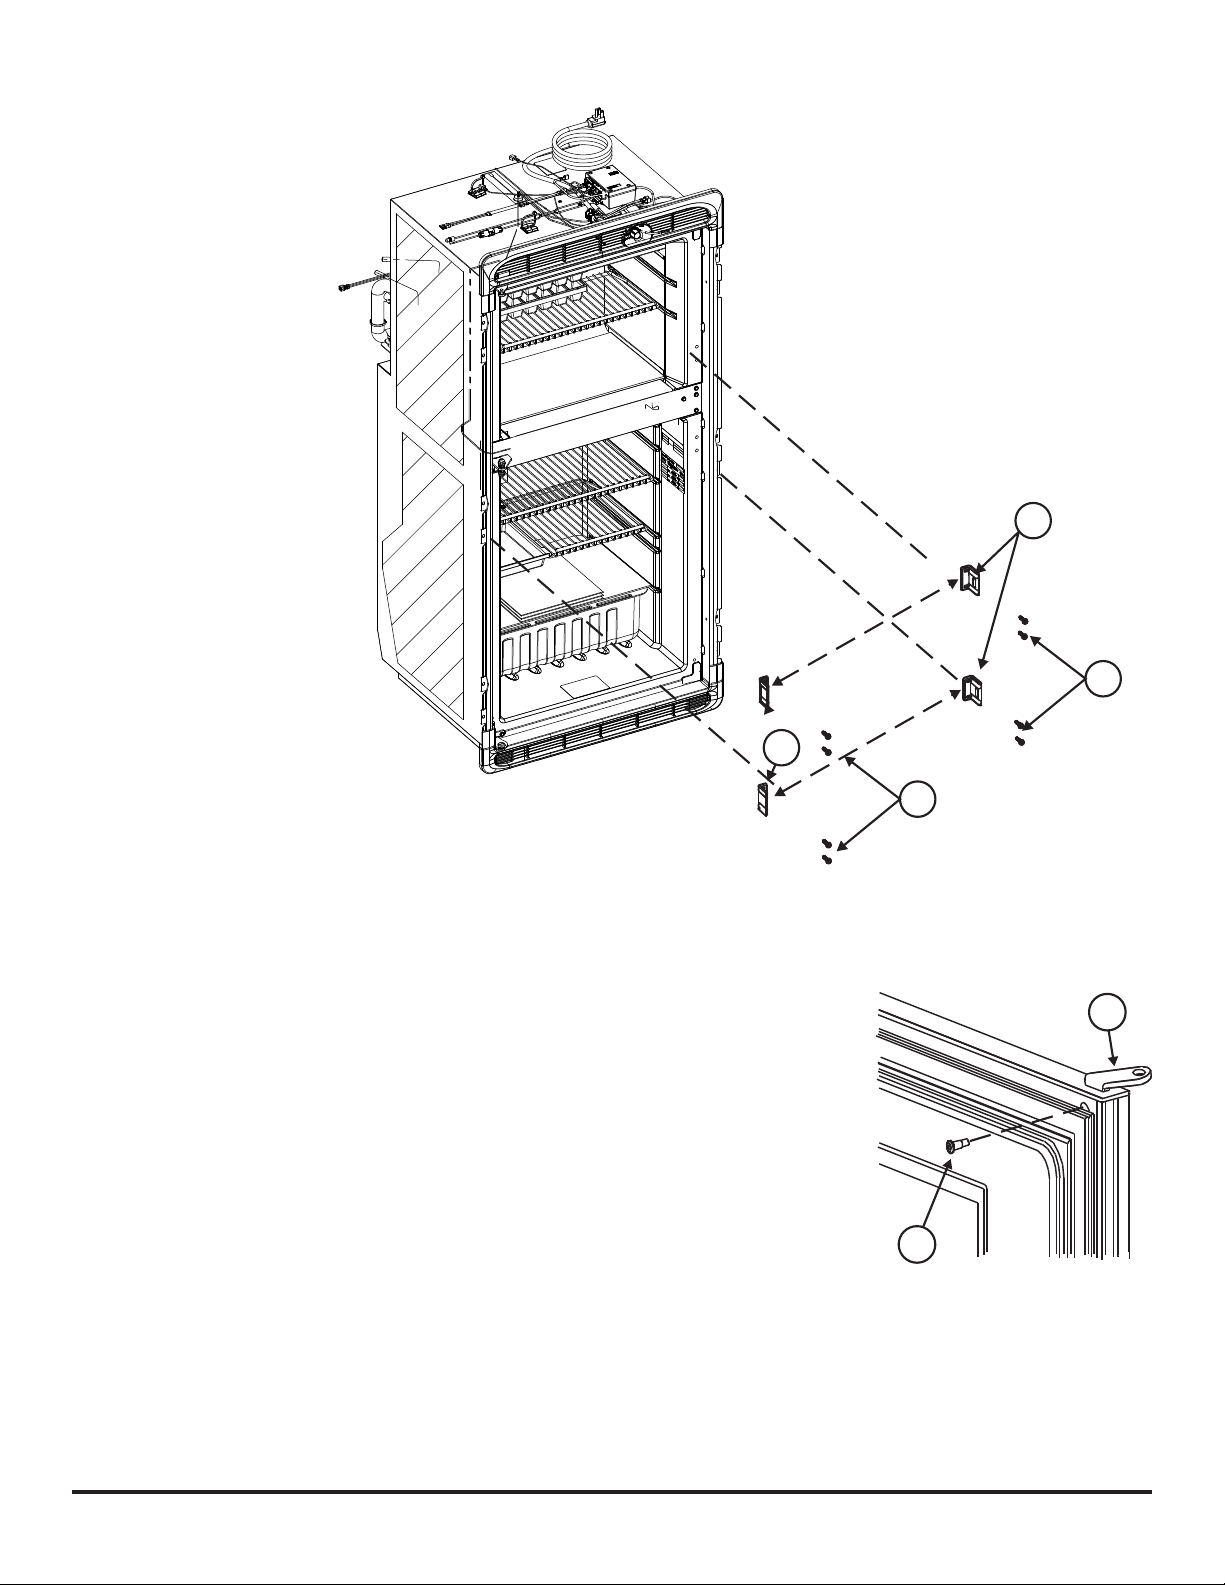
Reverse the door swing (DC / DE / EV0061 models):
The refrigerator has door hinges that allow you to change the direction that the doors
open by moving the hinges to the opposite corner.
1. Remove the doors (See Art02288).
- Make sure that the doors are fully closed.
- Turn out and save the upper hinge pin [63].
66
- Turn out and save the center hinge pin caps [42].
- Open the upper door a small amount and pull the top of the upper door away from
the upper hinge of the refrigerator.
- Lift the upper door off of the center hinge pin [71].
- Turn out and save the lower hinge pin [64].
- Open the lower door a small amount and pull the bottom of the lower door away
from the lower hinge of the refrigerator.
- Pull the lower door down off of the center hinge pin.
NOTICE
2. Change the position of the cabinet hinges:
- Remove the screws [41] from the upper cabinet hinge [66].
- Put this hinge on the other side of the refrigerator cabinet as the lower cabinet
hinge.
- Make sure that the center of the hinge slots are aligned with the center of the
hinge screw holes in the refrigerator.
- Attach the hinge with the screws.
- Remove the screws [41] from the lower cabinet hinge [67].
- Put this hinge on the other side of the refrigerator cabinet as the upper cabinet
hinge.
Make sure that the plastic bushings [74] remain in the door hinges.
41
74
63
42
71
74
235
41
42
64
74
- Make sure that the center of the hinge slots are aligned with the center of the
hinge screw holes in the refrigerator.
- Attach the hinge with the screws.
- Remove the screws [41] from the center cabinet hinge [235].
- Remove the center cabinet hinge.
- Turn the screws back into the original holes and tighten the screws.
- Remove the three screws on the opposite side of the refrigerator cabinet.
- Reverse the center cabinet hinge and put it on the opposite side of the refrigerator cabinet.
- Make sure that the center of the hinge slots are aligned with the center of the hinge screw holes in the refrigerator.
- Attach the hinge with the screws.
- Turn the center hinge pin [71] out of the center cabinet hinge.
- Reverse the center hinge pin and turn it down into the top of the center cabinet hinge.
Installation Manual 8
67
Art02288
3. Change the position of the strike plate and the strike plate cover for both doors (See Art02662):
Art00985
- Remove the screws [41]
that attach the strike plates
(with hole) [65] and the
strike plate covers (without
hole) [63].
- Reverse the strike plates
and the strike plate covers
and put each one on the
other side of the refrigerator
cabinet.
- Attach the strike plates and
strike plate covers with the
screws.
4. Change the position of the
door hinges and handle of
both doors (See Art02287 and
Art00985):
- Remove and save the
screws [41] that attach the
door handle [70] to each
door.
- Remove the door handle
from each door.
- Pull the panel retainers [37]
off each door.
- Reverse the panel retainers
and push onto opposite side
of each door.
63
65
41
41
- Reverse the door handle
and put on the other side of
each door.
Art 02662
- Attach each door handle
with the screws.
- Remove and save the plastic cap [42] that is opposite the upper hinge of each door.
- Remove the screw [72] from each door hinge [73].
- Remove each upper door hinge.
- Reverse the hinge and put on the opposite side of each door as the lower door hinge.
- Remove each lower door hinge.
- Reverse the hinge and put on the opposite side of each door as the upper door hinge.
- Attach the hinges with the screws that were removed from the other side of each door.
73
72
Installation Manual 9
 Loading...