

Page 1
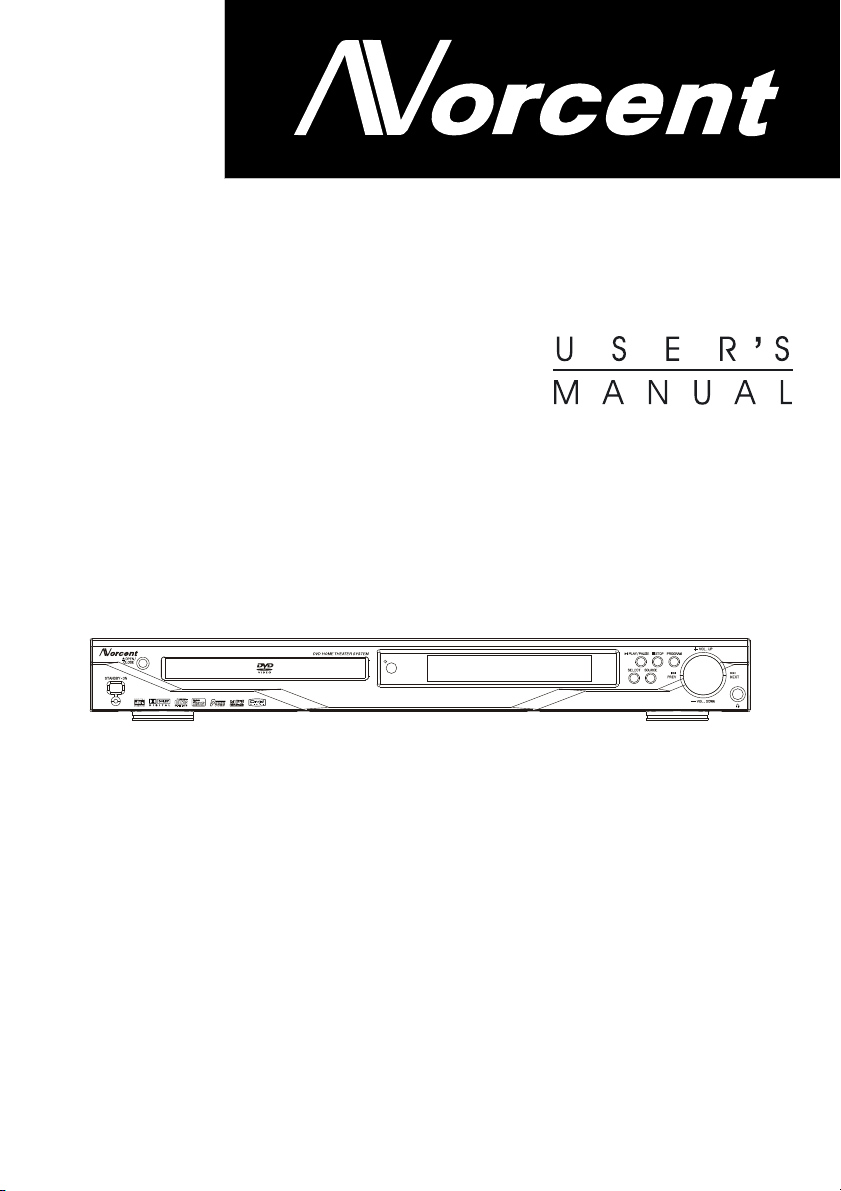
DVD RECEIVER DP5000
Page 2
WARNING
- TO PREVENT FIRE OR SHOCK HAZARD, DO NOT USE THIS PLUG WITH AN EXTENSION
CORD, RECEPTACLE OR OTHER OUTLET UNLESS THE BLADES CAN BE FULLY INSERTED
TO PREVENT BLADE EXPOSURE.
- TO REDUCE THE RISK OF FIRE OR ELECTRIC SHOCK, DO NOT EXPOSE THIS APPARATUS
TO RAIN OR MOISTURE.
2
The lightning flash with arrowhead symbol, within an equilateral triangle, is intended to alert
the user to the presence of
uninsulated “dangerous voltage”
within the product’s enclosure
that may be of sufficient magnitude to constitute a risk of
electric shock to persons.
CAUTION: TO REDUCE THE
RISK OF ELECTRIC SHOCK,
DO NOT REMOVE COVER (OR
BACK). NO USER SERVICEABLE PARTS INSIDE. REFER
SERVICING TO QUALIFIED
SERVICE PERSONNEL.
The exclamation point within an
equilateral triangle is intended
to alert the user to the presence
of important operating and maintenance (servicing) instructions
in the literature accompanying
the appliance.
IMPORTANT SAFETY INSTRUCTIONS
Read these instructions. Keep these instructions. Heed all warnings. Follow all instructions.
Do not use this apparatus near water.
Clean only with soft, dry cloth.
Do not block any ventilation openings. Install in accordance with the manufacturer’s instructions.
Do not install near any heat sources such as radiators, heat registers, stoves, or other apparatus (including amplifiers) that produce heat.
Do not defeat the safety purpose of the polarized or grounding-type plug. A polarized plug has
two blades with one wider than the other. A grounding type plug has two blades and a third
grounding prong. The wide blade or the third prong are provided for your safety. If the provided
plug does not fit into your outlet, consult an electrician for replacement of the obsolete outlet.
Protect the power cord from being walked on or pinched particularly at plugs, convenience
receptacles, and the point where they exit from the apparatus.
Only use attachments/accessories specified by the manufacturer.
Unplug this apparatus during lightning storms or when unused for long periods of time.
Refer all servicing to qualified service personnel. Servicing is required when the apparatus has
been damaged in any way, such as power-supply cord or plug is damaged, has been exposed
to rain or moisture, does not operate normally, or has been dropped.
Apparatus shall not be exposed to dripping or splashing and no objects filled with liquids,
such as vases, shall be placed on the apparatus.
Care and Safety information
Avoid high temperatures, moisture, water and dust. Do not expose the system, batteries or
discs to humidity, rain, sand, or excessive heat (caused by heating equipment or direct
sunlight). Always keep the disc tray closed to avoid dust on the lens.
Page 3
PRECAUTIONS
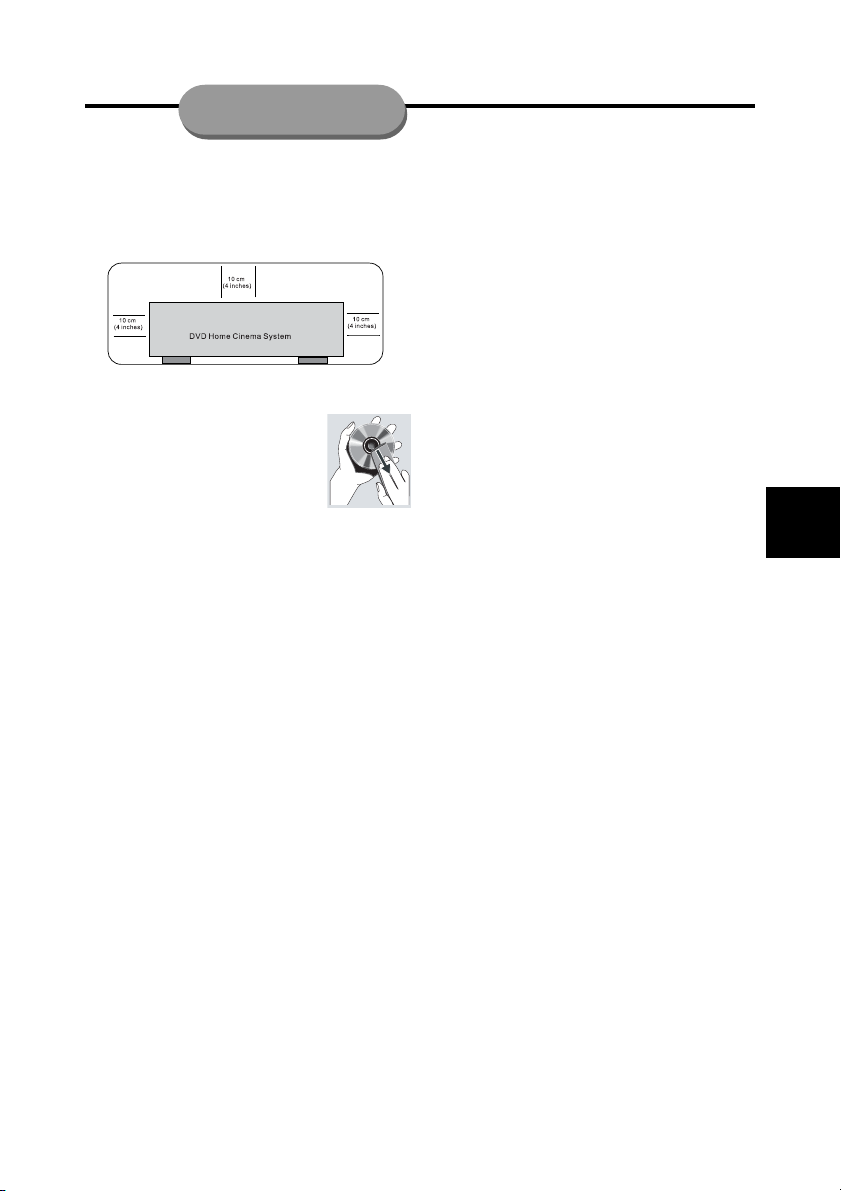
Do not block the vents
Do not operate the DVD system in an enclosed
cabinet, allow about 10cm (4 inches) of free
space all around the player for adequate ventilation.
Care of disc
To clean a CD, wipe it in a
straight line from the center towards the edge using a soft,
lint-free cloth. A cleaning
agent may damage the disc.
Write only on the printed side
of a CDR(W) and only with a soft felt-tipped
pen.
Handle the disc by its edge, do not touch
the surface.
Care of cabinet
Use a soft cloth slightly moistened with a mild
detergent solution. Do not use a solution containing alcohol, spirits, ammonia or abrasives.
Finding a suitable location
Place the player on a flat, hard and stable surface.
Power Cord Protection
To avoid any malfunctions of the unit, and to
protect against electric shock, fire or personal
injury, please observe the following:
When an electric storm is present, unplug
the power cord and disconnect the antenna connections.
Hold the plug firmly when connecting or
disconnecting the AC power cord.
Keep the AC power cord away from the
heating appliances.
Never put any heavy object on the AC
power cord.
Do not attempt to repair or reconstruct the
AC power cord in any way.
To prevent short circuits or damaged wires
in the connection cords, always unplug
the power cord and disconnect the connection cords between all other components when moving the unit.
Nonuse Periods
When the unit is not being used, turn the
unit off.
When left unused for a long period of time,
the unit should be unplugged from the
household AC outlet.
No Fingers or Other Objects Inside
Do not put any foreign object on the disc tray.
Service
Do not attempt to service the unit yourself.
Please refer any service to the nearest
service centre.
On adjusting volume
Do not turn up the volume while listening to a
portion with very low level inputs or no audio
signals. If you do, the speakers may be damaged when a peak level portion is played.
Copyright
Audio-visual material may consist of copyrighted works which must not be recorded
without the authority of the owner of the copyright. Please refer to relevant laws in your country.
3
Page 4
4
PRECAUTIONS
Recommended Measures for Optimum Picture Excellence
This unit is a precision device that is constructed using extremely accurate technology.
Soiling or friction affecting the pickup lens or disc drive can impair the image quality. At the
worst, neither video nor audio will be played back. To obtain optimum picture quality, the player
should be checked (cleaning and replacement of some parts) every 1,000 hours. Note that this
period varies depending on the environment (temperature, humidity, dust, etc..) in which the
player is used.Do not attempt to clean the pickup lens yourself.
This product incorporates copyright protection technology that is protected by method claims
of certain U.S. patents and other intellectual property rights owned by Macrovision Corporation
and other rights owners. Use of this copyright protection technology must be authorized by
Macrovision Corporation, and is intended for home and other limited viewing uses only unless
otherwise authorized by Macrovision Corporation. Reserve engineering or disassembly is
prohibited.
For DVD players with 625p, but not 525p, progressive scan outputs:
‘CONSUMERS SHOULD NOTE THAT NOT ALL HIGH DEFINITION TELEVISION SETS ARE FULLY
COMPATIBLE WITH THIS PRODUCT AND MAY CAUSE ARTIFACTS TO BE DISPLAYED IN THE
PICTURE. IN CASE OF 625 PROGRESSIVE SCAN PICTURE PROBLEMS, IT IS RECOMMENDED
THAT THE USER SWITCH THE CONNECTION TO THE ‘STANDARD DEFINITION’ OUTPUT. IF THERE
ARE QUESTIONS REGARDING OUR TV SET COMPATIBILITY WITH THIS MODEL 625p DVD
PLAYER, PLEASE CONTACT OUR CUSTOMER SERVICE CENTER.’
Manufactured under license from Dolby Laboratories. “Dolby” “Pro Logic” and
the double-D symbol are trademarks of Dolby Laboratories.
Manufactured under license from Digital Theater Systems, Inc. US Pat. No.
5,451,942, 5,956,674, 5,974,380, 5,978,762; 6,226,616; 6,487,535 and other U.S.
and other world-wide patents issued and pending.
round” are registered trademarks of Digital Theater Systems, Inc. Copyright 1996,
2003 Digital Theater Systems. Inc. ALL Rights reserved.
“DTS” and “DTS Digital sur-
Page 5
TABLE OF CONTENTS
Warning ..................................................................................................... 2
Precaution ............................................................................................ 3~4
General Information ................................................................................ 7
Unpacking ............................................................................................................. 7
Disc terminology .................................................................................................. 7
DVD region code .................................................................................................. 7
Disc handling and cleaning .................................................................................. 7
Control and Function .......................................................................... 8~10
Front panel........................................................................................................... 8
Back panel ........................................................................................................... 8
Remote control .............................................................................................. 9~10
Inserting batteries into the remote control ........................................................ 10
Connections ...................................................................................... 11~12
Placing the speakers and subwoofer ............................................................... 11
Connecting FM/AM antennas ............................................................................ 11
Connecting speakers and subwoofer .............................................................. 11
Connecting your unit to the TV ......................................................................... 12
Playback Functions ..........................................................................13~15
Basic playback ................................................................................................... 13
Slow motion play ............................................................................................... 14
Fast search........................................................................................................ 14
Picture zooming ................................................................................................. 14
Repeat play.................................................................................................. 14~15
Repeat A-B ........................................................................................................ 15
Angle selection .................................................................................................. 15
Basic Setup .......................................................................................16~20
General operation .............................................................................................. 16
Setting the general setup ............................................................................ 16~17
Setting the speaker setup ................................................................................. 17
Setting the audio setup................................................................................ 18~19
Setting the preferences setup .......................................................................... 19
Tuner Features........................................................................................ 21
Tuning to radio stations ..................................................................................... 21
Presetting radio stations ................................................................................... 21
Listening to preset radio stations...................................................................... 21
Listening to an external source ........................................................................ 21
5
Page 6
6
TABLE OF CONTENTS
Special Features ............................................................................... 22~26
Play a title ........................................................................................................... 22
Headphones ...................................................................................................... 22
Dimming the VFD ................................................................................................ 22
Move to another chapter/title ............................................................................. 23
Playback from a selected point ......................................................................... 23
Activating P/I mode ............................................................................................ 23
Activating night mode ........................................................................................ 23
Selecting surround mode .................................................................................. 24
Selecting sound effect ...................................................................................... 24
Selecting multiple channel sound ...................................................................... 24
Program play ...................................................................................................... 24
Selecting the subtitle language ......................................................................... 25
Audio language and channel selection ............................................................. 25
Display the status during playback ................................................................... 25
Setting the sleep timer ....................................................................................... 26
Play MP3/ picture CD(JPEG/KODAK) ................................................................ 26
Care and Maintenance ........................................................................... 27
Trouble Shooting..................................................................................... 28
Electrical Specifications ..................................................................29~30
Limited Warranty......................................................................................31
Protect Yourself !
Record the model and serial numbers for this unit while it is easy to see them. These numbers
are located on the back of the unit’s cabinet. Retain this information for future reference.
Model No.: DP5000
Serial No.:
Retain this information for future reference.
Page 7
General Information
Unpacking
Your Norcent DP5000 receiver carton
should contain the following items:
• One DVD receiver.
• Five satellite speakers and a subwoofer.
• Five speaker cables and a subwoofer
cable.
• One RCA cable with red/white/yellow
color-coded connectors.
• One remote control unit.
• Two AAA batteries.
• Operating Instructions/Warranty/QSG.
• AM antenna.
• FM antenna.
Disc terminology
• Title and Chapters (DVD-video discs)
DVDs are divided into several large sections
called Titles and smaller sections called Chapters.
Numbers are allotted to these sections. These
numbers are called title numbers and chapter
numbers.
• Tracks (audio and video CD discs)
Audio and video CD discs are divided into sections called tracks.
Numbers are allotted to these sections. These
numbers are called track numbers.
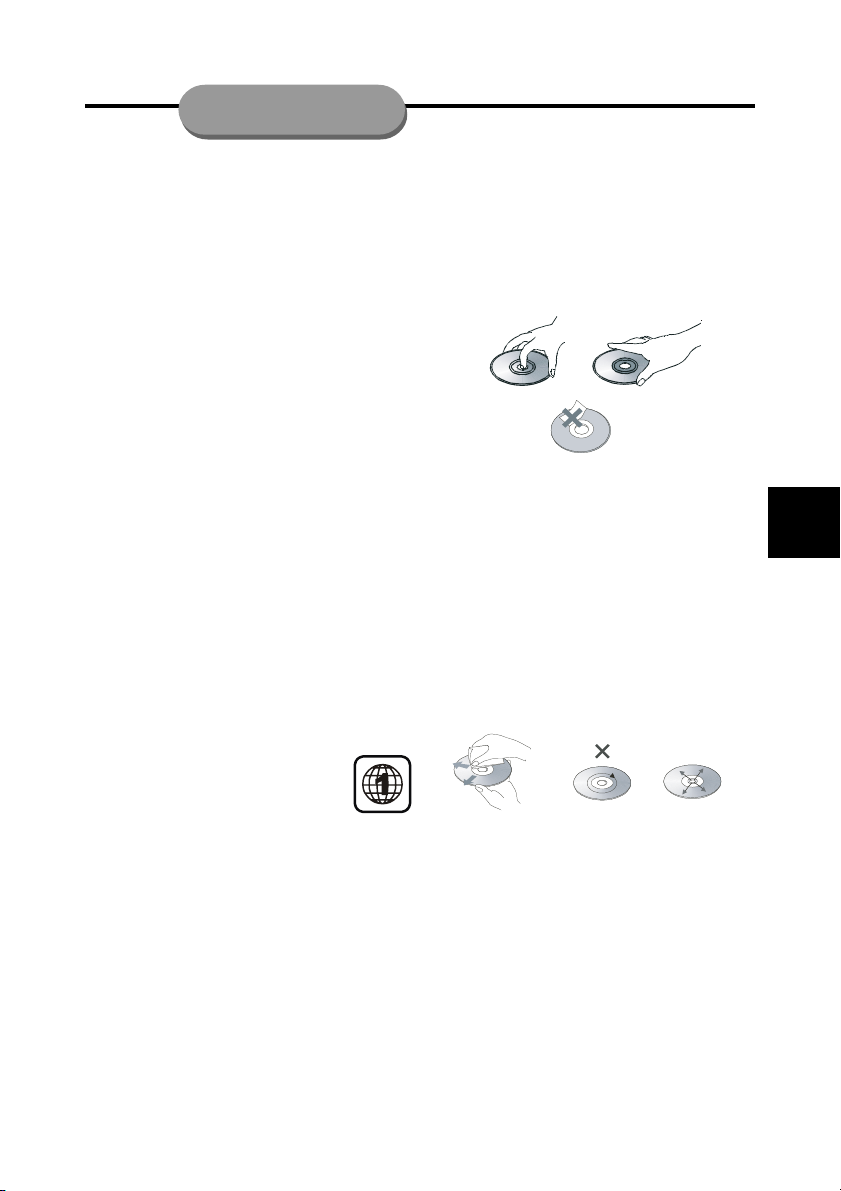
Disc handling precautions
• To keep the disc clean, handle the disc by
its edge.
• Do not stick paper or tape on the disc.
• If there is glue (or a similar substance) on
the disc, remove the glue completely before using the disc.
• Do not expose the disc to direct sunlight or
sources such as hot air ducts, or leave it
in a car parked in direct sunlight, as there
can be a considerable rise in temperature
inside the car.
• After playing, store the disc in its case.
• Do not write on the label side with a ballpoint pen or other writing utensils.
• Be careful not to drop or bend the disc.
Disc cleaning precautions
• Before playing, clean the disc with a cleaning cloth. Wipe the disc from the center
out.
7
DVD region code
This unit is designed and manufactured for compatibility with Region Management Information that is encoded on most DVD
discs. This unit is designed only for playback
of discs with Region Code 1, or for discs that
do not contain Region Code information. If
there is any other Region Code encoded on a
disc, the disc will not play and the message
“WRONG REGION” will appear on the television screen.
Disc installing precautions
• Do not install more than 1 disc on disc tray.
• Do not place the disc on the tray upside
down.
• Do not try to close the disc tray when the
disc is not installed properly.
Page 8
FRONT PANEL
Controls and
Functions
8
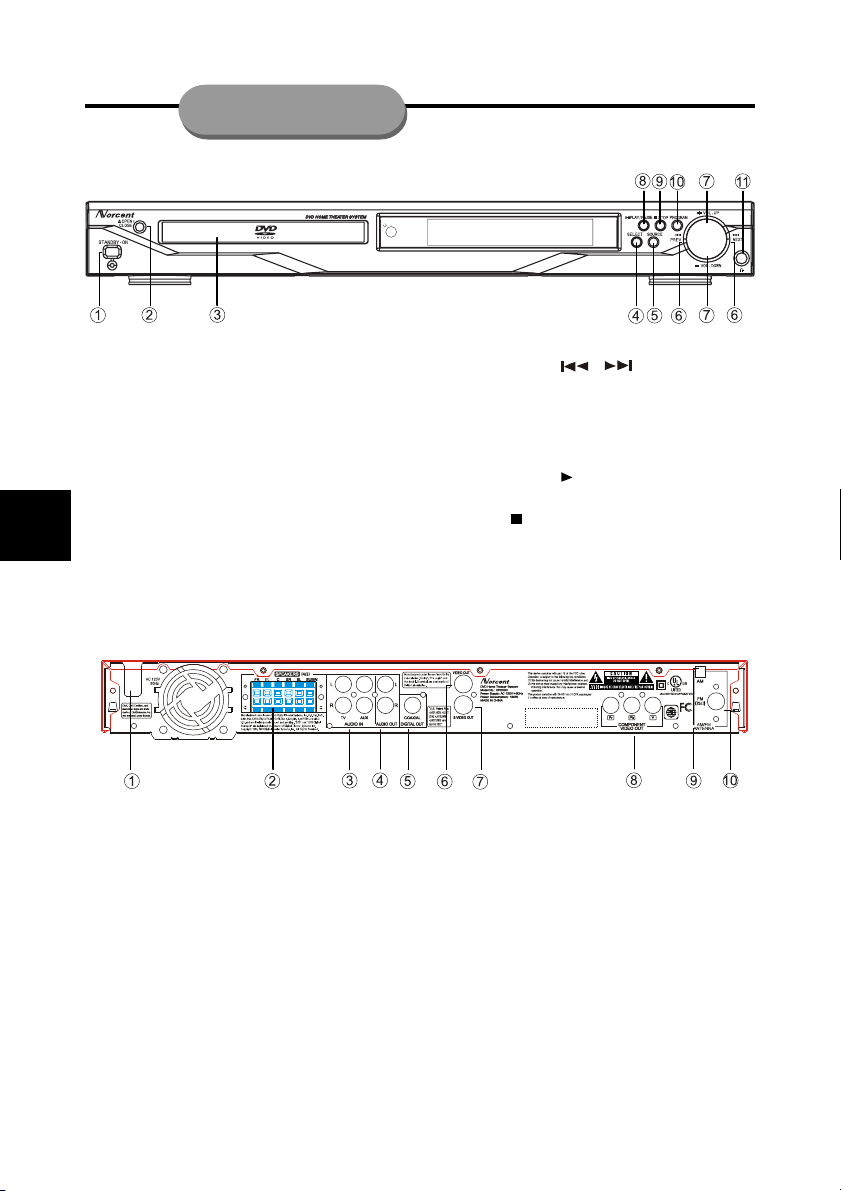
1 STANDBY-ON
Press to power on (LED lights off) or off (LED
lights on).
2 OPEN/CLOSE
Press to open or close the disc tray.
3 DVD DOOR
4 SELECT
Press to select audio channel to view its level.
5 SOURCE
Press to select the relevant active mode: DVD,
FM/AM, TV or AUX.
BACK PANEL
1 AC POWER CORD
Connect to a standard AC outlet.
2 SPEAKERS
Connect to the FR, FL, C, SR, SL and
Subwoofer.
3 AUDIO IN
Connect to the audio outputs of a TV and AUX.
4 AUDIO OUT
Connect to the audio inputs of an external
recording device or amplifier.
5 DIGITAL OUT
Connects to audio equipment with coaxial digital audio input.
6 PREV/NEXT (
/ )
Press to skip to previous/next chapter, title or
track.
7 +/-VOL.UP/DOWN
Press to increase or decrease the volume levels.
8 PLAY/PAUSE (
ll)
Press to play or pause the playing disc.
9 STOP ( )
Press to stop the playing disc.
10 PROGRAM
Press to program a disc track.
11 Headphones
Plug in the headphones jack.
Shanghai Hongsheng Technology
Co., Ltd.
No.618 Shangcheng Rd, Shanghai,
P.R.C.
3SW9 E238193
6 VIDEO OUT
Connect to a TV with video input.
7 S-VIDEO OUT
Connect to a TV with s-video input.
8 COMPONENT VIDEO OUT
Connect to TV with Pr Pb Y inputs.
9AM
Connect to a AM antennas.
10 FM
Connect to a FM antennas.
Page 9
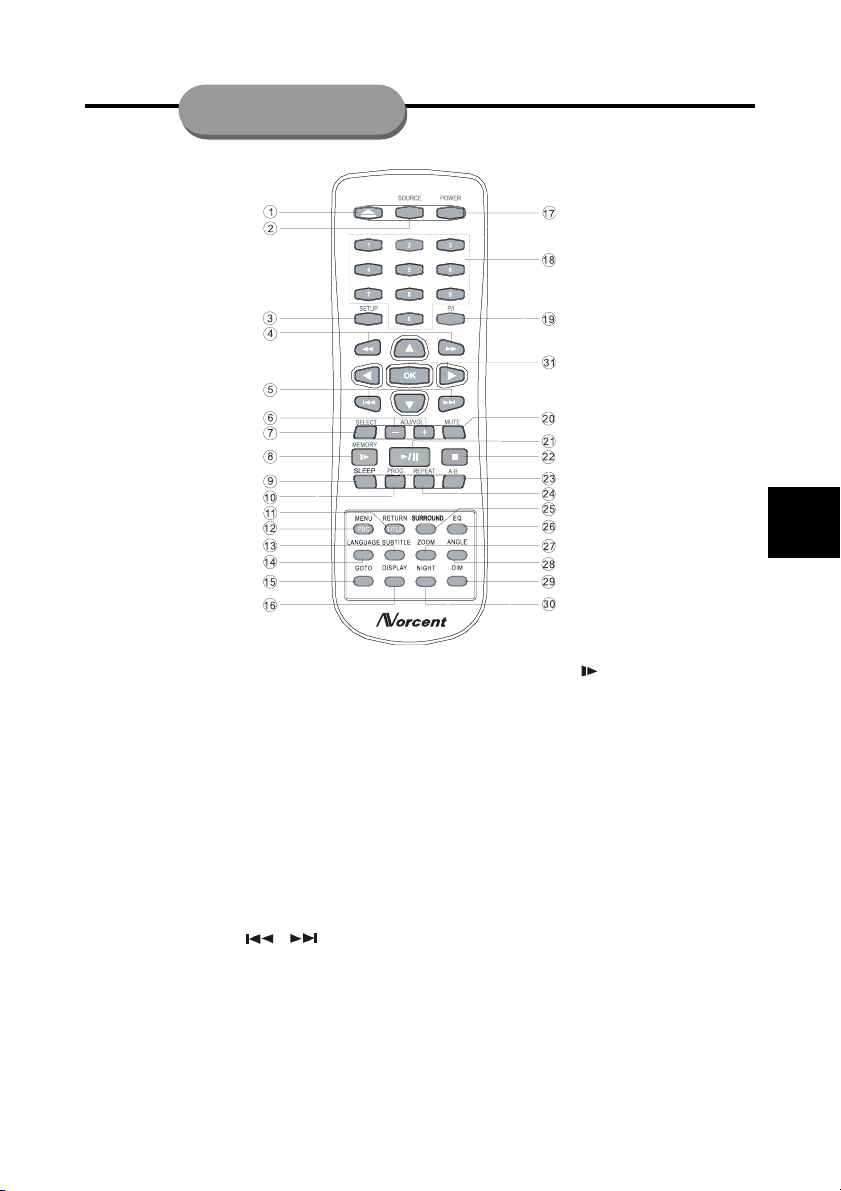
Controls and
REMOTE CONTROL
Functions
9
1 OPEN/CLOSE
Press to open or close the disc tray.
2 SOURCE
Press to select the relevant active mode: DVD,
FM/AM,ATV or AUX.
3 SETUP
Press to enter or exit setup menu.
4 TUNING + / - (
In disc mode, press to play a disc in fast
reverse/forward mode.
In tuner mode, press to tune the lower or higher
frequency.
In tuner mode, press and hold to search the
tuning frequency continuously.
5 PREVIOUS/NEXT (
In disc mode, press to skip to previous or next
chapter, title or track.
6 ADJ/VOL + / -
Press to adjust the volume levels up and down.
7 SELECT
Press to select audio channel to view its level.
/
)
/ )
8 MEMORY/SLOW ( )
In disc mode, press to play a disc in slow-
motion.
In tuner mode, press to store radio station.
9 SLEEP
Press to activate sleep timer.
10 PROG
Press to program a disc tracks.
11 RETURN/TITLE
Press to return to title menu for DVD.
12 MENU/PBC
Press to return to root menu for DVD.
13 SUBTITLE
Press to select a desired subtitle language.
14 LANGUAGE
Press to select a desired audio language and
audio channel.
15 GOTO
Press to select desired title/chapter or time to
start playback.
Page 10
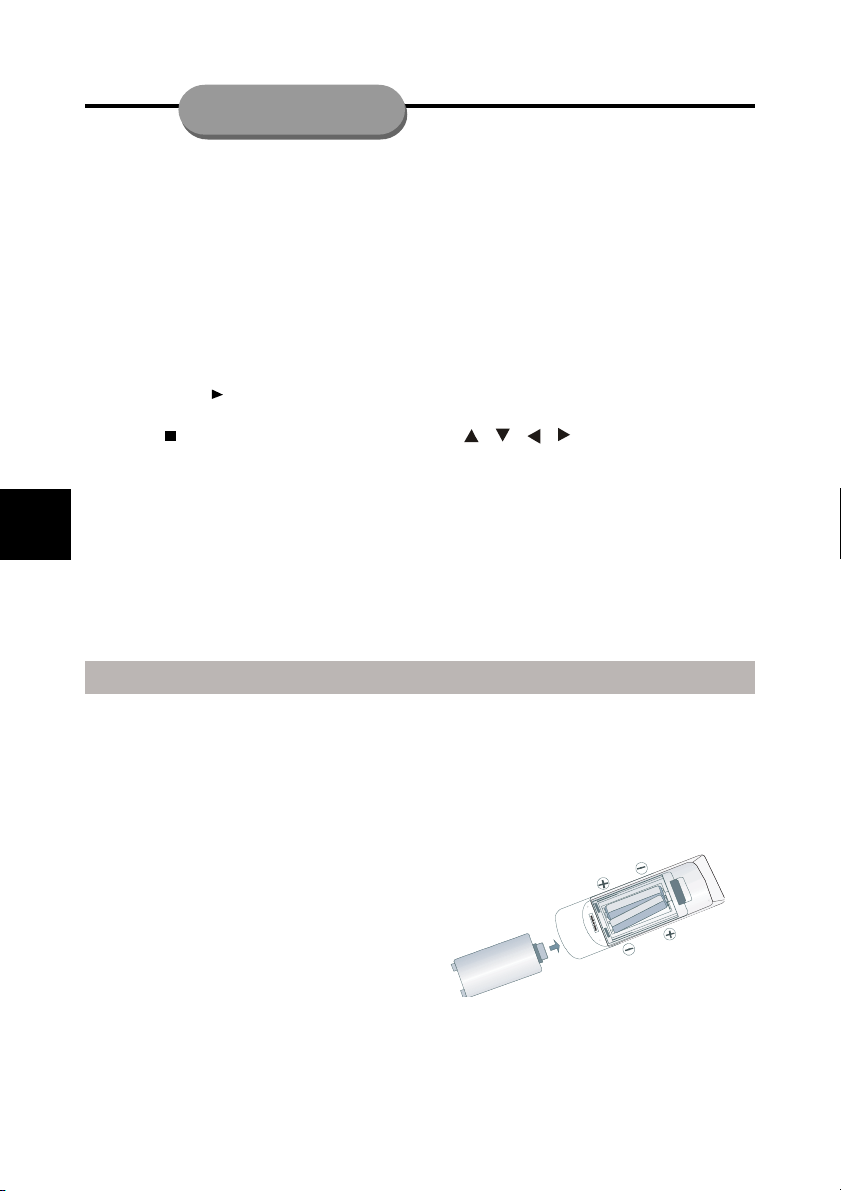
Controls and
Functions
10
16 DISPLAY
Press to display the information about the playing disc.
17 POWER
Press to power on and off.
18 NUMBER (0~9)
Press to select the items or settings directly.
19 P/I
Press to activate or deactivate progressive
function.
20 MUTE
Press to interrupt or resume the audio output.
21 PLAY/PAUSE (
Press to play or pause the playing disc.
22 STOP ( )
Press to stop the playing disc.
23 A-B
Press to repeat a specific section on a disc.
24 REPEAT
Press to select variations of continuous play.
ll)
Inserting batteries into the remote control
You can control the system using the supplied remote control. When using the remote
control, point it at the remote sensor on the
front panel of this system.
Notes
• Do not leave the remote in an extremely
hot or humid place.
• Do not use a new battery with an old one.
• Do not drop any foreign object into the
remote casing, particularly when replacing the batteries.
• Do not expose the remote sensor to direct sunlight or lighting apparatuses. Doing so may cause a malfunction.
25 SURROUND
Press to select a desired surround mode.
26 EQ
Press to select a desired equalizer mode repeatedly (POP, ROCK, JAZZ, CLASSIC).
27 ZOOM
Press to enlarge the playing disc.
28 ANGLE
Press to change the viewing angle.
29 DIM
Press to select difference brightness for VFD.
30 NIGHT
Press to activate or deactivate night function.
/ / /
31
Move to highlight a desired option and press
OK to confirm and execute the highlighted item.
OK
• If you will not use the remote for an ex-
tended period of time, remove the batteries to avoid possible damage from battery
leakage and corrosion. Insert two AAA
batteries (included) by matching the + and
- polarities on the batteries as shown.
Page 11
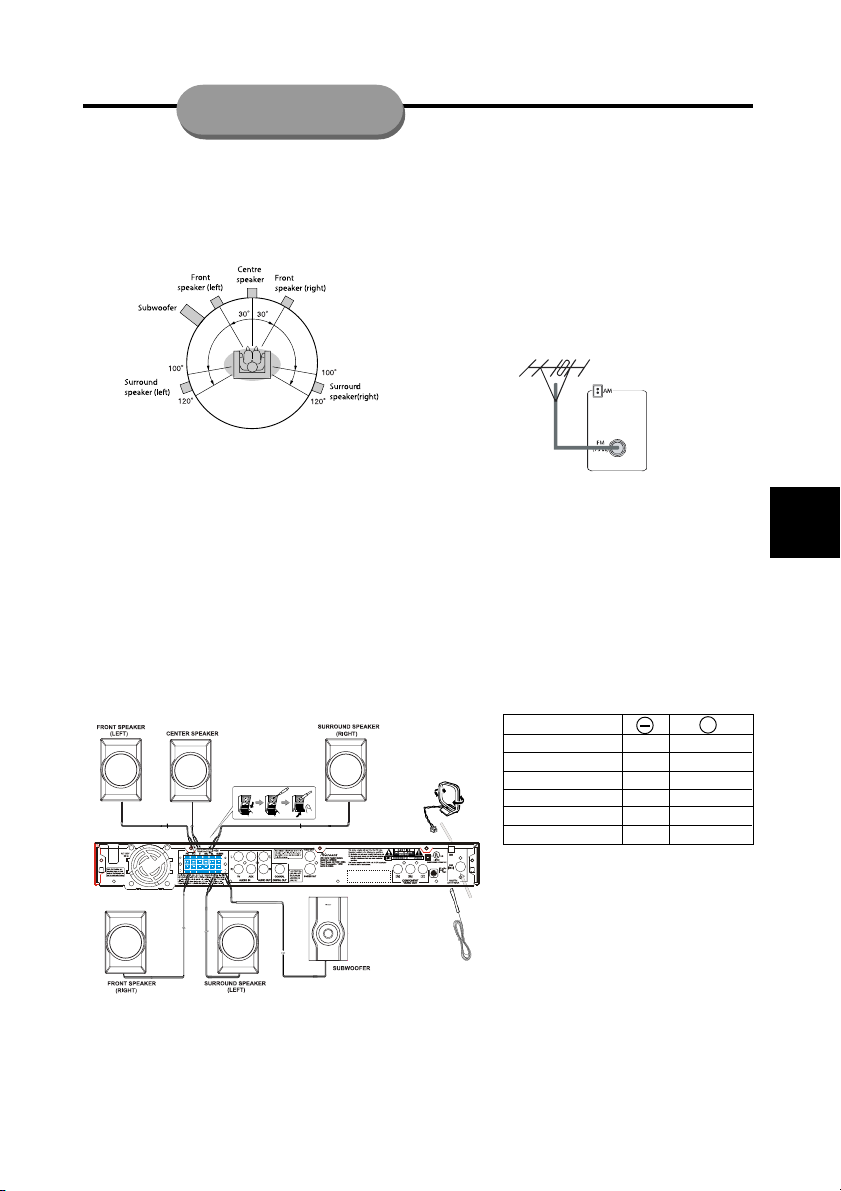
CONNECTIONS
Placing the Speakers and Subwoofer
The best surround effect will be achieved by
placing each speaker at the same distance from
the listening position. It is recommended to arrange the speakers as shown below.
Connecting FM/AM Antennas
1. Connect the supplied AM loop antenna to
the AM jack. Place the AM loop antenna on
a shelf or attach it to a stand or wall.
2. Connect the supplied FM antenna to the
FM jack. Extend the FM antenna and fix its
end to the wall.
For better FM stereo reception, connect
an external FM antenna (not supplied).
Notes:
• If speakers cannot be placed at equal distances, refer to “Setting the Speaker
setup” (see page 17).
• To avoid magnetic interference, do not position the front speakers too close to your
TV.
• Allow adequate ventilation around the DVD
system.
Notes:
• Adjust the position of the antennas for optimal reception.
• Position the antennas as far as possible
from your TV, VCR or other radiation
sources to prevent unwanted interference.
Connecting Speakers and Subwoofer
Connect the supplied speaker system using the supplied speaker cables by matching the
colors of the jacks and speaker plugs. Fully insert the plugs of speaker wire into the jacks on the
DVD system.
Shanghai Hongsheng Technology
Co., Ltd.
No.618 Shangcheng Rd, Shanghai,
P.R.C.
3SW9 E238193
Speakers / Subwoofer
FRONT (L) (white)
CENTER (green)
SURROUND(R)(grey)
SURROUND(L)(blue)
SUBWOOFER (purple)
+
REDFRONT (R) (red)
BLACK
BLACK WHITE
BLACK GREEN
BLACK GREY
BLUE
BLACK
BLACK PURPLE
11
Notes:
• Ensure that the speaker cables are correctly connected. Improper connections may damage the system due to short circuit.
• Do not connect speakers with an impedance lower than the speakers supplied. Please
refer to the ELECTRICAL SPECIFICATIONS section of this manual.
Page 12
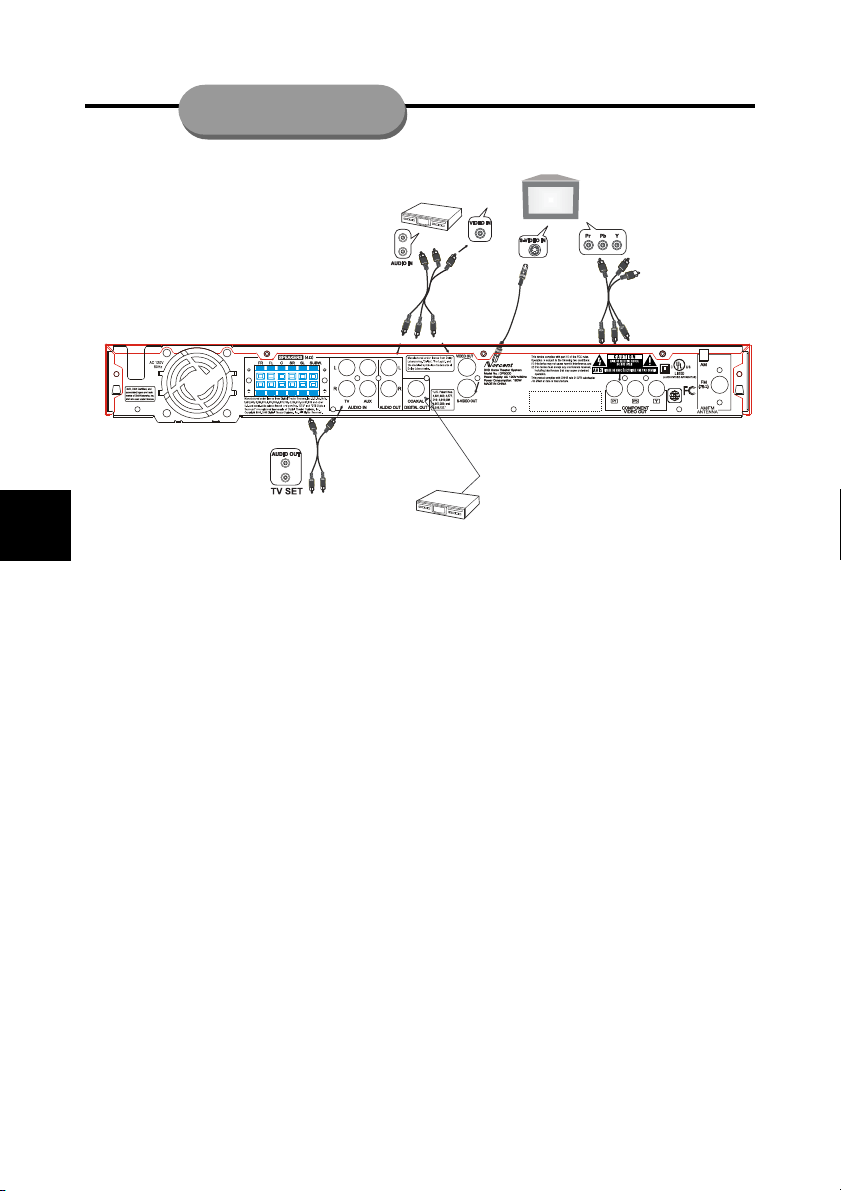
CONNECTIONS
Connecting your player to the TV
12
Shanghai Hongsheng Technology
Co., Ltd.
No.618 Shangcheng Rd, Shanghai,
P.R.C.
3SW9 E238193
You can connect a TV to the DVD system in order to use this DVD system. You can connect other
audio and audio/visual components to the DVD system in order to use the Home Cinema Audio
system’s surround sound capabilities.
Important!
- There are various ways to connect the system to a TV (as shown in the illustration). You
only need to make one of these connections.
- Always refer to the instruction manual of the connected equipment to make an optimal
connection:
1. Use the audio cables to connect LINE OUT jacks to the corresponding AUDIO IN jacks on
the TV or other audio/visual components.
2. Use the Pr Pb Y cables to connect Pr Pb Y jacks to the corresponding video input jacks on
a TV (not supplied).
If your TV is not equipped with Pr Pb Y video input jacks, you can select one of the
following alternative connections:
Option 1
Connect the S-VIDEO OUT jack to the S-Video input jack on the TV using a S-Video cable
(not supplied).
Option 2
Connect the VIDEO OUT jack to the video input jack on the TV using a video cable (supplied).
Use the TV IN and AUX IN jacks
- Connect the DVD system’s TV IN and AUX IN jacks to the AUDIO OUT jacks on the TV, VCR
or other audio/visual components (not supplied).
- Before starting operation, press SOURCE button to switch to AUX or
TV mode in order to
activate the input source.
Use the COAXIAL jack
- Connect the AV receiver’s DIGITAL OUT/COAXIAL jack to the COAXIAL IN jack on a device
equipped with coaxial digital Audio signal processing capability.
Page 13
BASIC PLAYBACK
BASIC PLAYBACK
CAUTION!
• Do not move the unit during playback.
Doing so may damage the DVD system.
• Do not push on the disc tray or put any
objects other than disc on the disc tray.
Doing so may cause the unit to malfunction.
1. After completing audio and video cable
connections, turn your TV set power on
and set the channel to the video input.
2. Plug the AC power cord into an AC wall
outlet and press the POWER button on the
remote control to switch ON the main
power.
3. Press the OPEN/CLOSE button to open the
disc tray. Place a disc on the tray and press
again to close the tray to start to play.
Notes
• Load the disc placing the label side face
up, and use the disc tray as a guide for
proper alignment. When playing a doublesided disc, load it with the desired playing
side face down.
• As the unit begins loading a disc, one of
the following operating messages will be
displayed on the screen: OPEN, CLOSE,
DISC LOADING, PLAY, NO DISC, or BAD
DISC.
4. Press the MUTE button to turn off the
sound, “MUTE ON” will be displayed on the
screen. To restore the volume, press the
MUTE button again, “MUTE OFF” will be
displayed on the screen.
5. To start playback, press the PLAY/PAUSE
ll button.
Note
• Some discs will start playing automatically,
and others will display the menu on the
TV screen. Use the / / / buttons
to select the track, or press the numeric
keypad ( 0 ~ 9 ) to select a desired track/
chapter and then press OK to confirm. If
you want to select a number more than
10, for example: to select 12, press the
numeric key 1 and follow by 2 within 2
seconds and then press OK to confirm.
6. To do resume stop playback in disc playing
mode, press the STOP button one time.
In resume stop playback mode, if the STOP
button is pressed a second time, the disc
will stop completely, resetting play to the
beginning.
7. To resume playback, press ll button.
In resume stop playback mode, press this
button to playback from the last stop point.
8. To skip to another track/chapter, press the
/ buttons repeatedly during play-
back.
Notes
• Your unit will not play discs that have a
region code different from the region code
of your unit.
• If the inhibit icon appears on the screen
when a button is pressed, it means the
function is not available for the disc you
are playing.
13
Page 14
BASIC PLAYBACK
14
Slow motion play
Press the MEMORY/SLOW( ) button to playback in slow motion. SF(slow forward) SR
(slow reverse)
For DVD discs:
Press it repeatedly to select one of the following slow motion speeds: SF x 2 SF x 4
SF x 8 SR x2 SR x 4 SR x 8
PLAY
Note
• The sound will be muted during slow-motion playback.
Fast search
Press for fast reverse and for fast
forward. To change the searching speed
press / repeatedly to select one of the
following options:
For DVD discs:
FF (fast forward): FF x 2 FF x 4 FF x
6 FF x 8 PLAY
FR (fast reverse): FR x 2 FR x 4 FR x
6 FR x 8 PLAY
For MP3 discs:
FF (fast forward): FF x 2 FF x 4 FF x
6 FF x 8 PLAY
FR (fast reverse): FR x 2 FR x 4 FR
x 6 FR x 8 PLAY
For CD discs:
ast forward): FF x 1
FF (f
3 FF x 4 PLAY
ast reverse): FR x 1
FR (f
x 3 FR x 4 PLAY
Notes
• In any FF (fast forward) or FR (fast reverse) mode press the PLAY/PAUSE
button to return immediately to normal play.
• The sound will be muted during fast reverse or fast forward search.
FF x 2 FF x
FR x 2 FR
Picture zooming
This function allows you to enlarge the picture on the TV screen and to pan through the
enlarged image.
1. Press the ZOOM button repeatedly to select a zoom factor as listed below:
ZOOM x 1.5
ZOOM OFF.
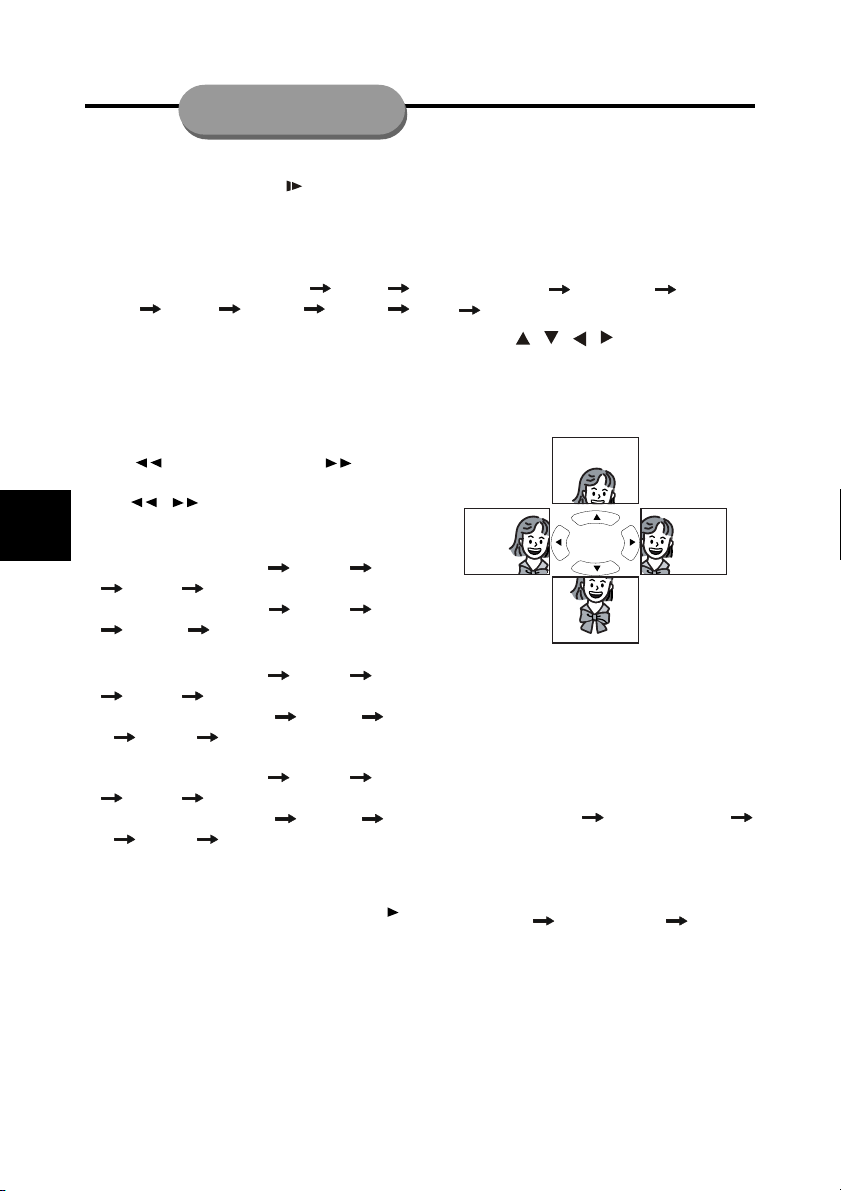
2. Use the / / / buttons to move the
zoomed picture up, down, left or right.
3. Some discs may not respond to the zoom
feature.
ZOOM x 2 ZOOM x 3
Repeat play
You can only select the repeat play mode
during playback.
For DVD repeat chapter/title:
Press the REPEAT button repeatedly to select one of the following repeat modes:
REPEAT CHAPTER REPEAT TITLE
REPEAT OFF
For CD repeat track/disc:
Press the REPEAT button repeatedly to select one of the following repeat modes:
ll
REPEAT ONE REPEAT DISC REPEAT
OFF
Page 15
BASIC PLAYBACK
For MP3 repeat track/album/disc:
Press the REPEAT button repeatedly to select
one of the following repeat modes:
MENU ON:
REPEAT ONE REPEAT ALBUM REPEAT
DISC REPEAT OFF
MENU OFF:
REPEAT ONE REPEAT DISC REPEAT
OFF
Notes
• When operating this function, the OSD will
display the operating information.
• When the disc tray has been opened, the
repeat function will be cancelled.
Repeat A - B
You can play a specific section in a chapter/
track repeatedly, except for MP3 disc.
1. Press the A-B button at your chosen starting point.
“A to B SET A” will be displayed on your
screen.
2. Press the A-B button again at your chosen
end point. “A to B SET B” will be displayed
and the passage will now repeat continuously.
3. To resume normal play, press the A-B button again. “A to B CANCELLED” will be displayed on your screen.
Notes
• The Repeat A-B can be set only within the
same chapter/track.
• The Repeat A-B may not be available on
some disc.
Angle selection
Some DVD discs contain scenes which have
been filmed simultaneously from a number
of different angles. For these discs, the same
scenes can be viewed from each of the different angles. (The recorded angles differ
from disc to disc.)
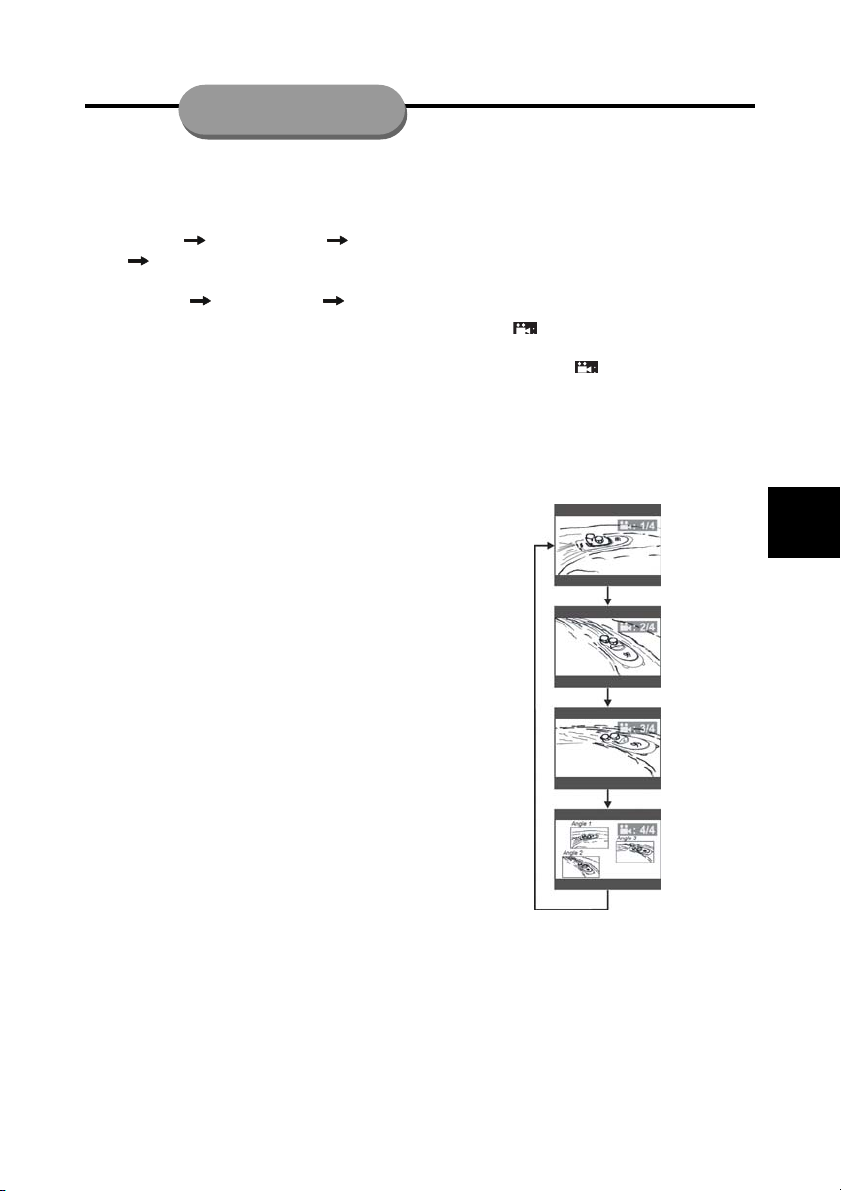
• Set the angle function on by pressing the
ANGLE button at any point during playback.
• The angle icon is displayed on the
screen when a scene shot from various
angles is playing.
• Press the ANGLE button repeatedly to
view the scene from the current angle to
other available angles. For example: 1/4,
2/4, 3/4, 4/4.
15
Notes
• The maximum number of angles stipulated
by the manufacturer is 9.
• Make sure ANGLE function has been set
to ON.
Page 16
BASIC PLAYBACK
16
Setup Menu
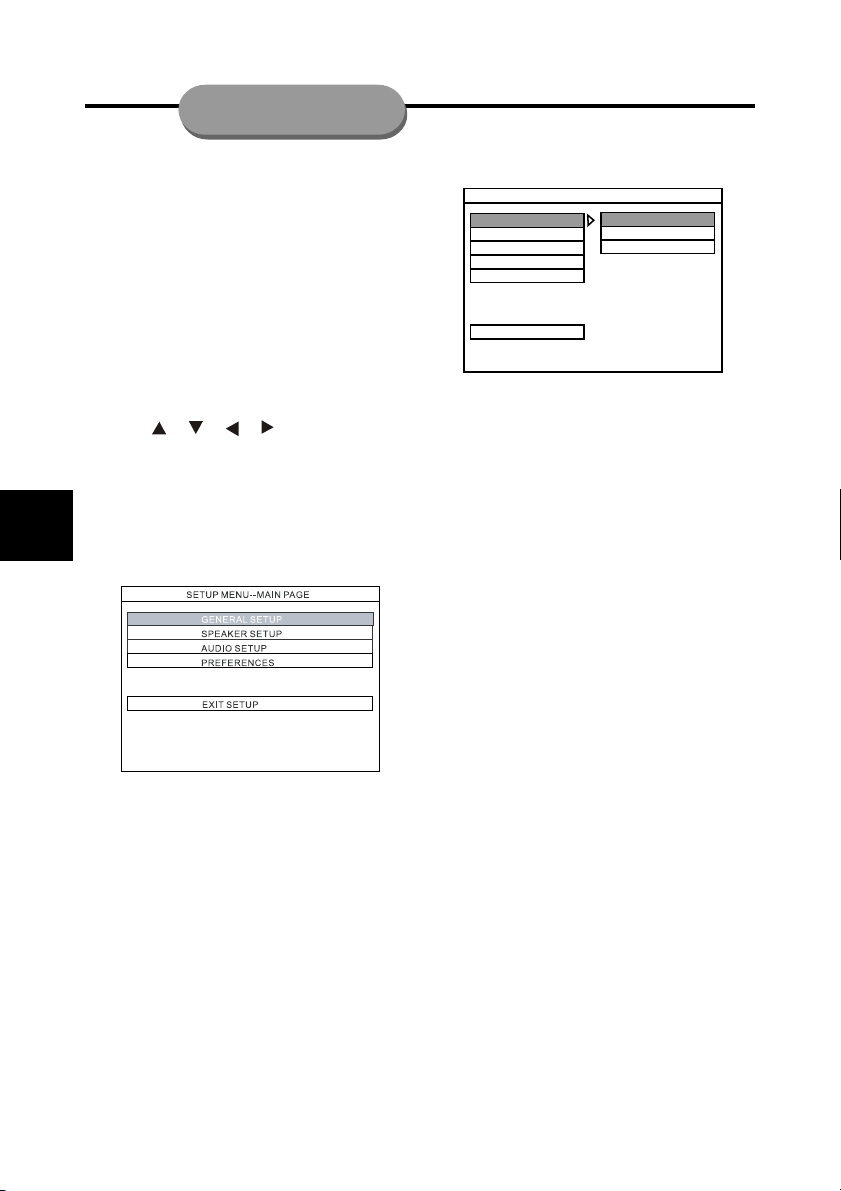
Press SETUP button to display SETUP MENU
on TV screen. it enables you to customize the
DVD system to suit your particular requirement.
If the preferred options selected are not available
on a disc, then the disc’s own preference will be used.
IMPORTANT!
To access the Preferences Setup menu,
playback must be entirely stopped.
General Operation
1. Press SETUP button to enter Setup menu.
2. Use / / / buttons to toggle
through the functions and select your preferred option.
3. Press OK to confirm a highlighted selection.
4. To exit the Setup menu, press SETUP or
select EXIT SETUP menu.
Setting the General Setup
--GENERAL PAGE--
TV DISPLAY
PUT
VIDEO OUT
ANGLE MARK
OSD LANGUAGE
SCREEN SAVER
MAIN PAGE
NORMAL/PS
NORMAL/LB
16:9
TV display setting
Set the aspect ratio of the DVD system according to the TV you have connected. The
format you select must be available on the
disc. If it is not, the setting for TV display will
not affect the picture during playback. The
default setting is NORMAL/LB.
NORMAL/PS: The Pan and Scan presentation crops both sides of the wide screen format to fill a standard 4:3 television screen
NORMAL/LB: The Letter box presentation
places black bars at the top and bottom portions of the screen to provide the full wide
screen format of a movie on a standard 4:3
television screen.
16:9: When connecting to a wide screen 16:9
television, select this option. The unit automatically sets and outputs a recorded signal
in correct aspect ratio. Be sure to set the
screen mode on your wide-screen TV to
“FULL”.
Notes:
• Some DVD discs do not permit Pan and Scan
mode playback and will automatically playback in Letterbox mode.
• If the 16:9 wide screen option is selected
with a standard 4:3 television, the playback picture will appear distorted (objects
will look thin).
Page 17
BASIC PLAYBACK
Video Output Setting
Video output selection enables you to choose
the type of video output suitable for your DVD
system. The default setting is S-VIDEO.
S-VIDEO
Select S-VIDEO if you have connected the SVIDEO output to your TV using S-VIDEO jack.
PR PB Y
Select PR PB Y if you have connected the Pr
Pb Y output to your TV using Pr Pb Y jack.
Angle Mark Setting
If the disc contains sequences recorded from
different camera angles, this allows you to
view the picture from different angles. The
selections of angle are depending on the disc
format. The default setting is ON.
ON: appears on the TV screen when angles
are available on the disc.
OFF: does not appear.
OSD Language Setting
Select the language for on-screen display.
The default setting is ENGLISH.
ENGLISH
Screen Saver Setting
If set to ON, when you leave the system in
stop mode for more than five minutes, the
screen saver will be activated. The default
setting is ON.
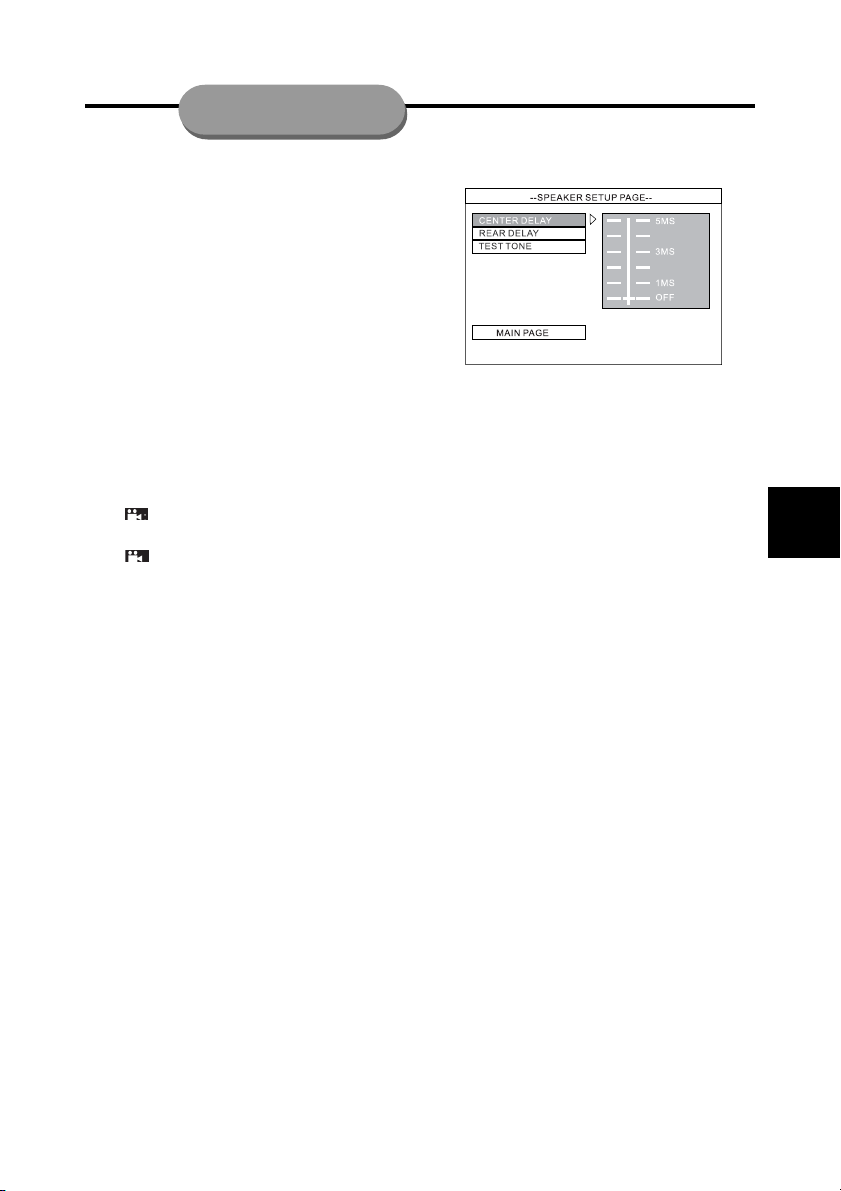
Setting the Speaker Setup
Center Delay Setting
If the listening position is closer to the center
speaker than the front speakers, you can set
the center delay time to improve the surround
sound effect. The default setting is OFF.
Options: 5ms, 4ms, 3ms, 2ms, 1ms, or
OFF.
Rear Delay Setting
If the listening position is closer to the rear
surround speakers than the front speakers,
you can set the rear delay time to improve the
surround sound effect. The default setting is
OFF.
Options: 15ms, 12ms, 9ms, 6ms, 3ms,
or OFF.
Test Tone Setting (disc mode only)
If set to ON, the system will test the speaker
settings. The test signal is generated through
the Left, Center, Right, Right surround, Left
surround and Subwoofer. The default setting
is OFF.
17
Page 18
BASIC PLAYBACK
18
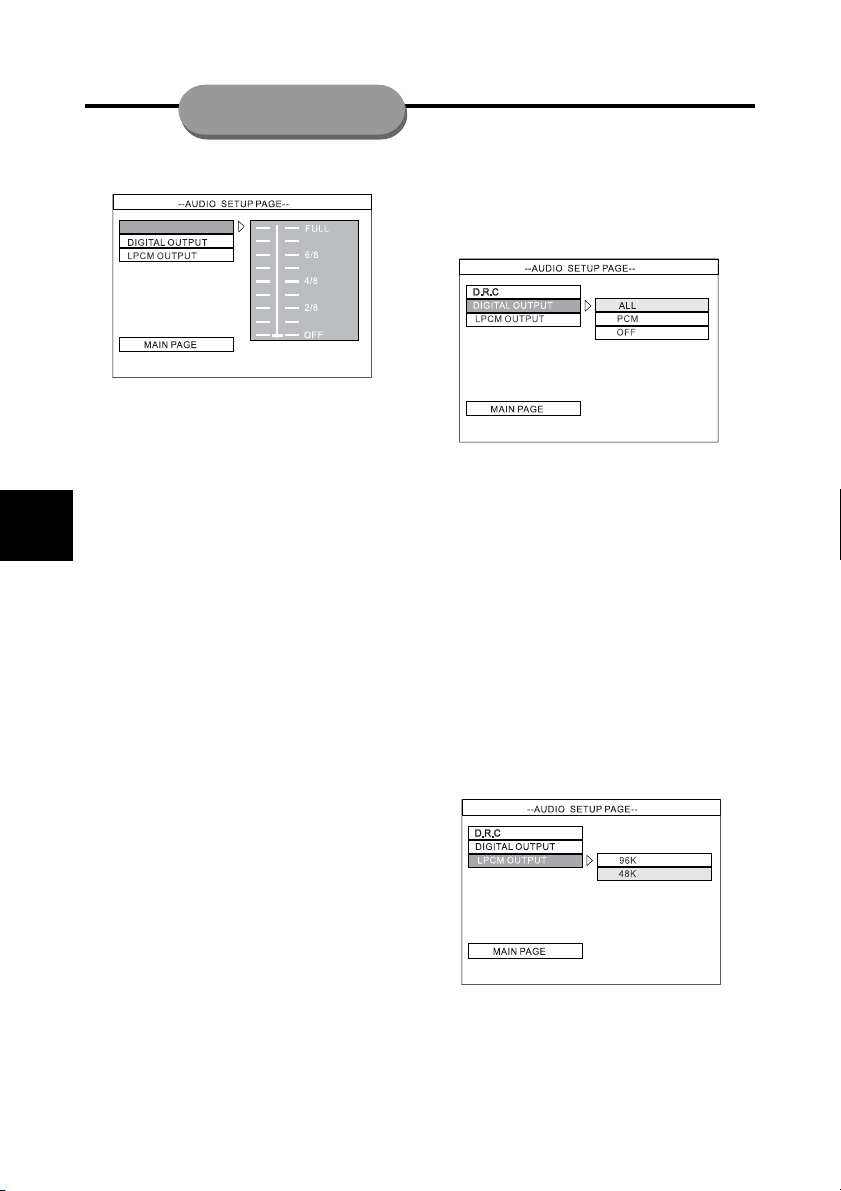
Setting the Audio Setup
D.R.C
D.R.C(Dynamic range control)
Select the dynamic range compression to fit
the individual listening situation of the audience. The default setting is OFF.
The variable range is from FULL, 7/8~1/8
or OFF.
• FULL: Audio with fully compressed dynamic range.
• 7/8~1/8: Audio with partially compressed
dynamic range.
• OFF: Audio with uncompressed dynamic
range.
Note:
• In many listening situations, it is objectionable to allow the sound to become very
loud, and thus the loudest sounds must be
compressed downwards in level. Likewise, the very quiet sounds would be inaudible and must be brought upwards in
level to be heard. Dolby Digital satisfies
these needs with dynamic range compression.
Digital output setting
Set the digital output according to your optional
audio equipment connection. The default setting is ALL.
• ALL: Raw data via DIGITAL OUTPUT.
• PCM: PCM data via DIGITAL OUTPUT.
• OFF: To deactivate the DIGITAL OUTPUT.
Notes:
• It is better to select PCM digital output when
external source cannot decode Dolby
Digital and DTS.
LPCM output setting
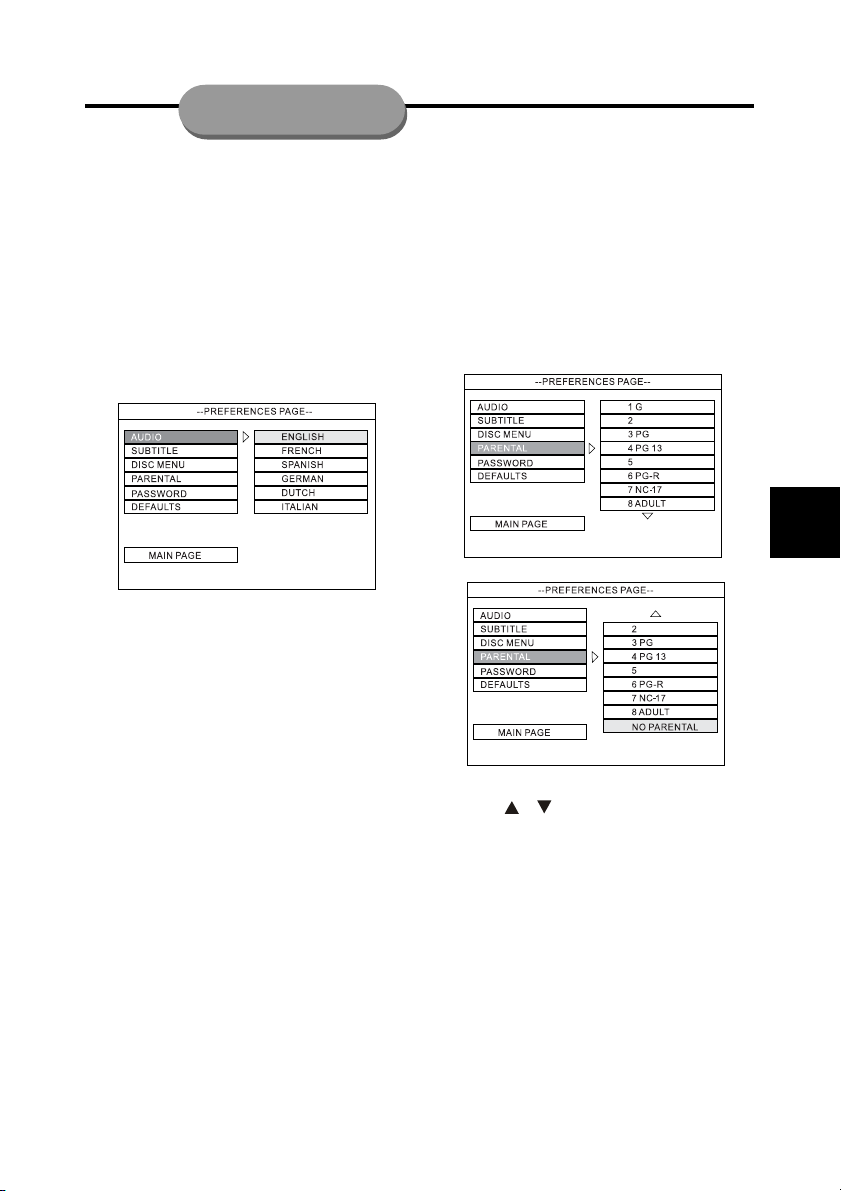
If you connect the DVD receiver to a PCM compatible receiver via the digital terminals, such
as coaxial, you may need to adjust LPCM output. Discs are recorded at a certain sampling
rate. The higher the sampling rate, the better
the sound quality. The default setting is 48K.
Page 19
BASIC PLAYBACK
• 48K: Playback a disc recorded at the sampling rate of 48kHz.
• 96K: Playback a disc recorded at the sampling rate of 96kHz.
Note:
• Most discs are recorded at the sampling
rate of 48kHz.
• If 96K is selected, ensure that receiver or
amplifier supports 96kHz digital signals.
Setting the Preferences Setup
Audio Setting
Subtitle Setting
Disc Menu Setting
• This is to select the audio language, subtitle language and the language used on
TV screen menus or DVD menus that will
always be used for every disc to be played
back. The default setting is ENGLISH.
• If the language selected is not available on
the disc, the original language designated
by each disc will be selected.
Parental Control
Enables setting of playback limitation level.
Some DVDs may have a parental level assigned to the complete disc or to certain
scenes on the disc. The rating levels are from
1 to 8 and are country dependent. You can
prohibit the playing of certain discs that are
not suitable for your children or to have certain discs played with alternative scenes. The
default setting is NO PARENTAL.
19
1. Press / to select the desired
parental level.
2. Press OK to confirm.
3. Enter the 4 - digit code.
Page 20
BASIC PLAYBACK
20
Notes:
• Before changing the parental control level,
you must enter the preset password (4digit code) to unlock this function. If the
entered password is incorrect, you will
not be able to change the level.
• The lower the level is set, the more strict
the limitation.
• If the parental control level of the DVD disc
to be played is higher than the setting level,
“PARENTAL VIOLATION” message will be
shown on the TV screen, and the system
will refuse to play the disc.
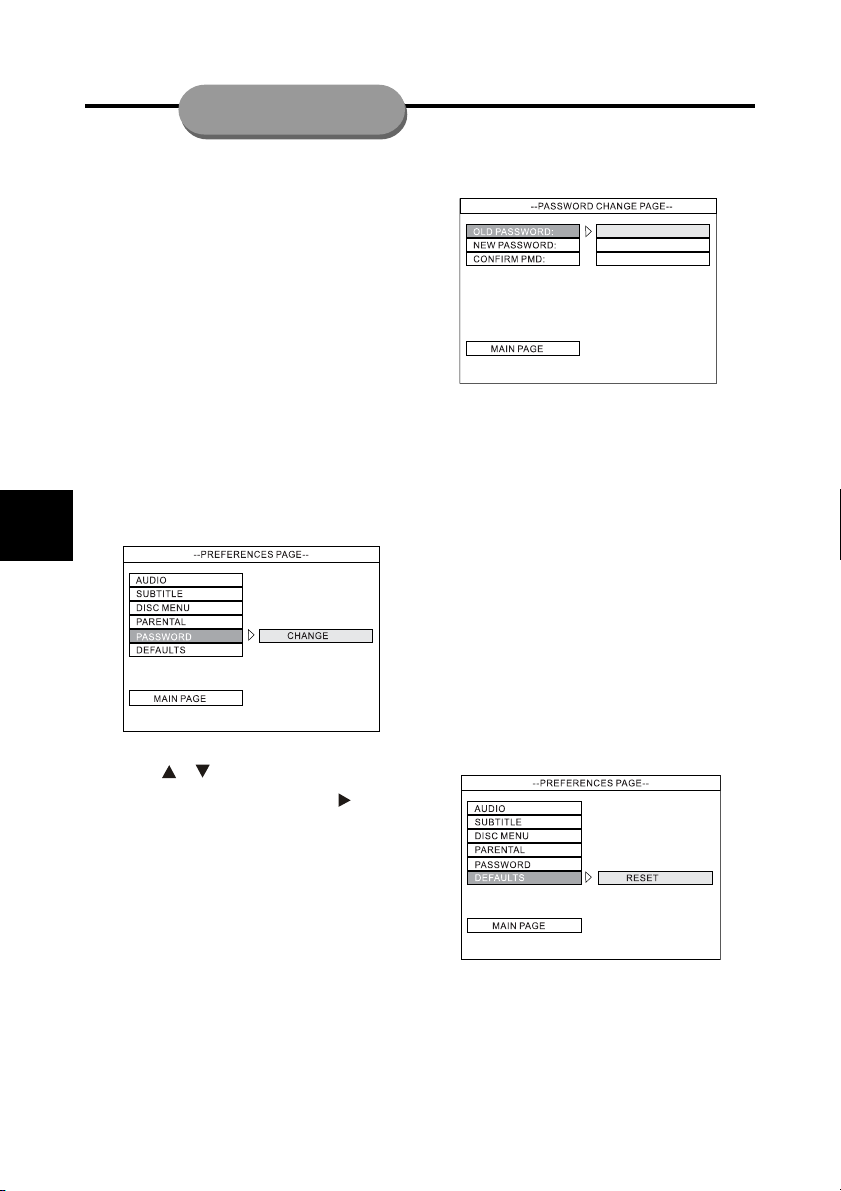
Password changing
This feature is used for Parental Control. Enter
your four digit password when a hint is displayed on the screen. The default password
is “1234”.
1. Press / to highlight “Password”.
2. Enter its submenu by pressing .
3. Press OK to open the password “Change”
page.
Password setting
4. Enter the old password.
5. Enter the new 4-digit code.
6. Enter the new 4-digit code a second time
to confirm.
7. Press OK to return to preferences setup
page.
Notes:
• This password is used to unlock the parental control level reset function. Select a
password you can easily remember.
• To reset the password to the default setting (1234), press STOP button four times.
Defaults Setting
If RESET is selected, all the items in the setup
menu will be reset to default setting.
IMPORTANT:
The parental control level and the password will not be reset.
Page 21
TUNER FEATURES
IMPORTANT!
Make sure FM and AM antennas are
connected.
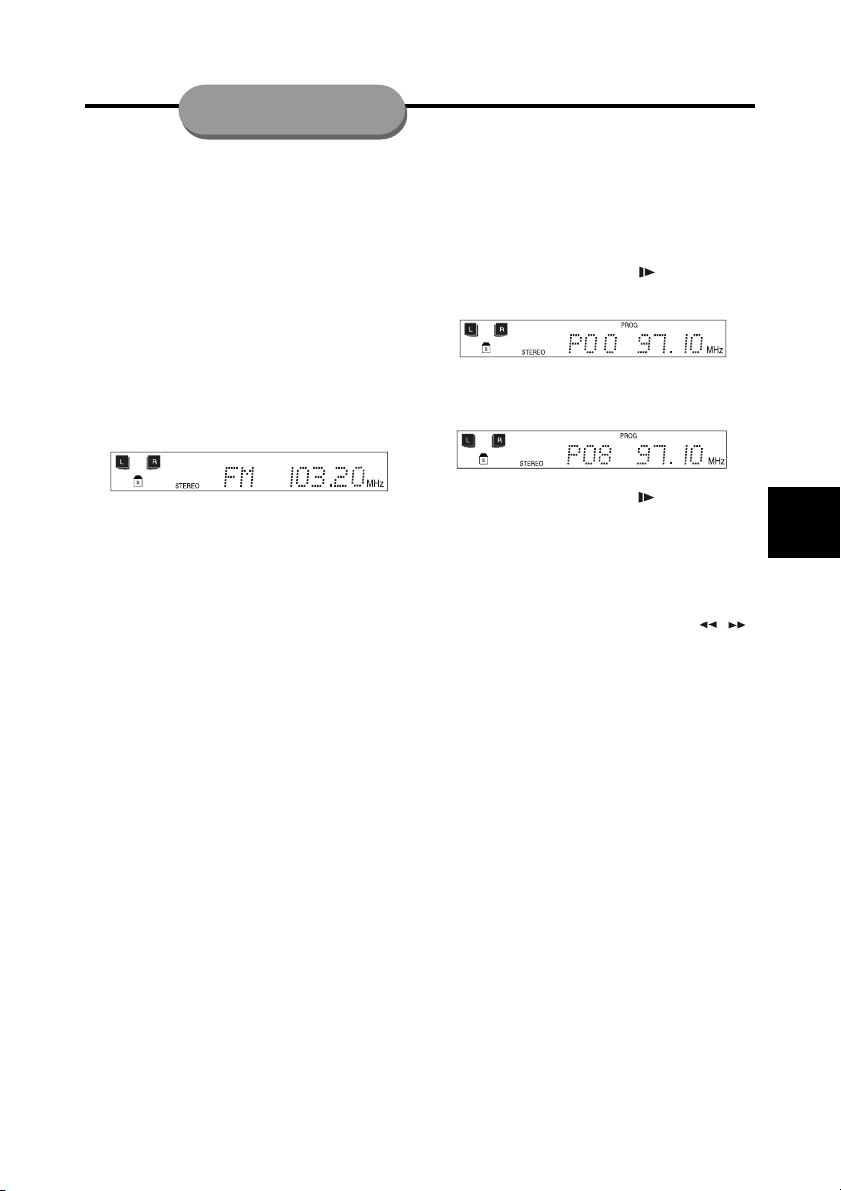
Tuning to Radio Stations
1. Press SOURCE button to switch to tuner
mode: “FM” or “AM”.
2. Press and hold (TUNING -) or (TUN-
ING +) until the frequency indication
starts to change, then release.
– The system automatically tunes to the next
strong radio station.
– When tune to a weak station,
press(TUNING-) or(TUNING+)
briefly and repeatedly until an optimal reception found.
3. Repeat step 2 if necessary until you find
the desired radio station.
Presetting Radio Stations
You can preset up to 40 stations regardless
of the reception.
1. Tune to your desired radio station (refer to
“Tuning to radio stations”).
2. Press MEMORY/SLOW( ), the display
will show as below.
3. Use the numeric keypad (0 ~ 9) to select
the desired radio preset number.
4. Press MEMORY/SLOW( ) to store the
station.
5. To preset another radio stations, repeat
steps 1-4.
Listening to Preset Radio Stations
1. In tuner mode, press PREV/NEXT( / )
or numeric keypad (0 ~ 9) to select the
desired preset stations.
Listening to an External Source
1. Press SOURCE on the front panel repeatedly to select the DVD, FM/AM, AUX or TV
mode.
21
Page 22
SPECIAL FEATURES
22
Playing a Title
1. Press RETURN/TITLE while playing a DVD
disc.
The “TITLE MENU” will be displayed on the
TV screen for a moment, and then the title
menu appears. The contents of the menu
vary from disc to disc.
Use the
2.
keypad (
chapter.
3. Press OK to start playback.
Notes:
• Depending on the DVD discs, when you
press RETURN/TITLE, playback will restart
from the beginning of the disc, go back to
the upper menu, or perform no operation.
• If PBC mode is switched off, press this
button is useless.
/ / / or the numeric
0 ~ 9) to select the desired title or
Using the Root Menus
1. Press MENU/PBC while playing a DVD disc.
The “ROOT MENU” will be displayed on the
television screen for a moment, and then
the root menu appears. The contents of
the menu vary from disc to disc.
Notes:
• Depending on the DVD disc, you may not
be able to select the title or chapter.
• Depending on the DVD disc, a “title menu”
may simply be called a “menu” or “title” in
the instructions supplied with the disc.
• For some DVD discs, when you press
MENU/PBC, playback will restart from the
beginning of the disc.
Headphones
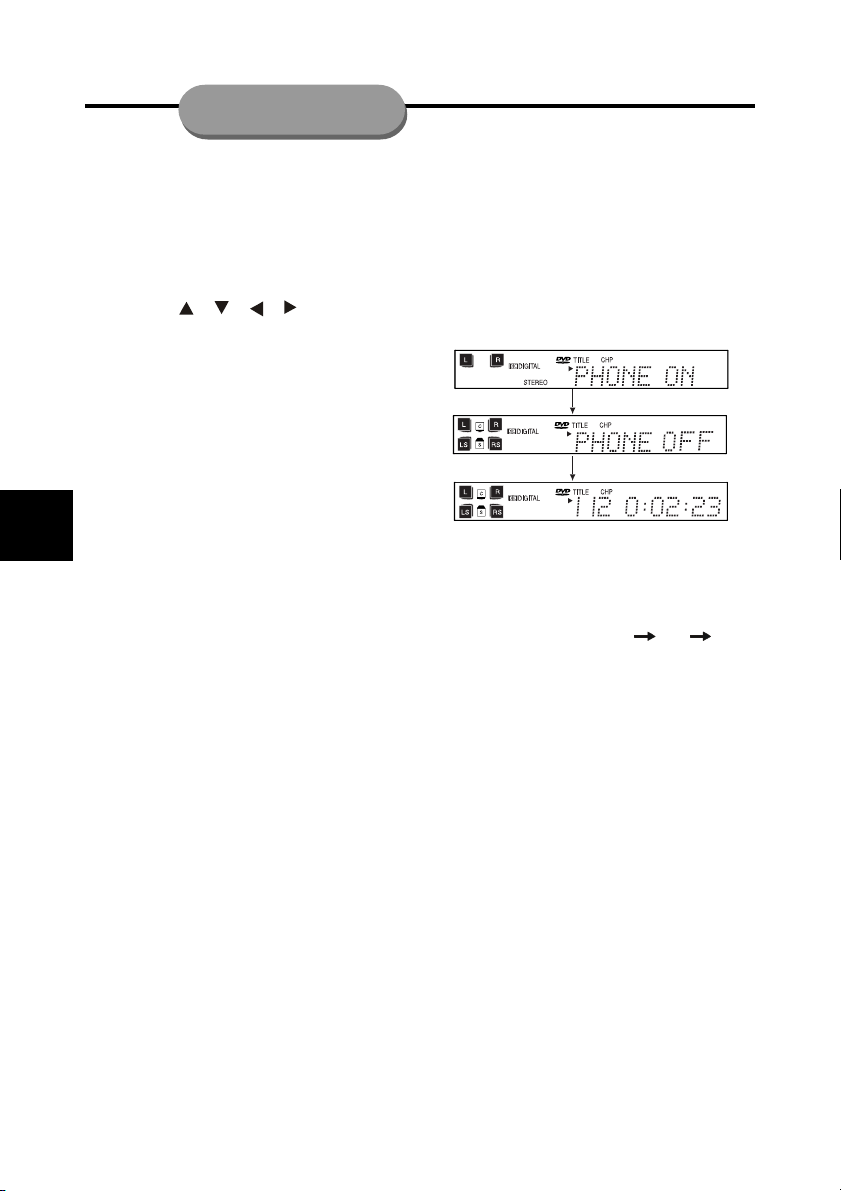
1. When headphones are plugged in, the system will enter the stereo mode automatically and “PHONE ON” will be shown on
VFD for few seconds.
2. When headphones are unplugged and
“PHONE OFF” will be shown on VFD for
few seconds, the system will return to the
previous status.
Dimming the VFD
To adjust the VFD brightness, press DIM on
the remote control repeatedly to select one of
the following settings: HIGH MID LOW.
The default setting is HIGH.
Page 23
SPECIAL FEATURES
Move to another chapter/title
Some disc may contain more than one title or
chapter. If the disc has a title or chapter menu
recorded on it, you can start playback from a
desired point.
When playing DVD discs.
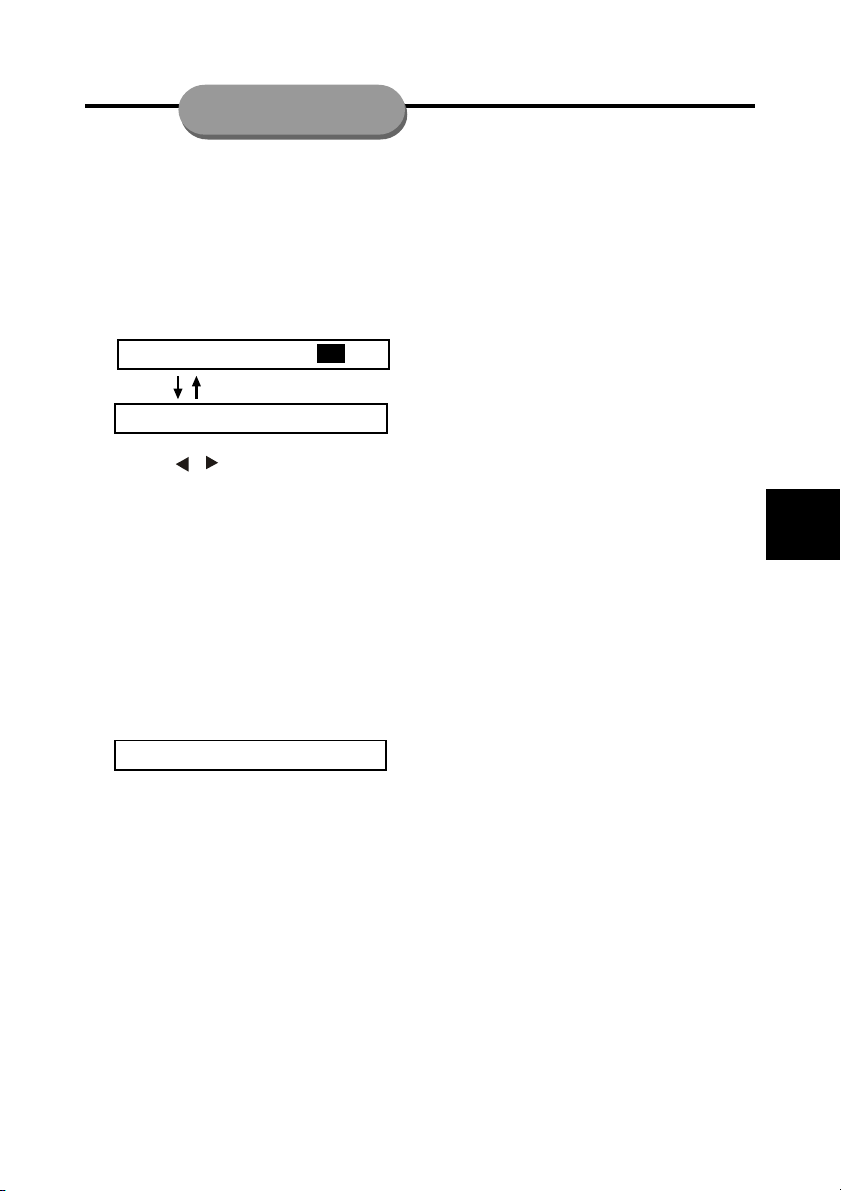
1. Press GOTO repeatedly to display the following menu on the television screen:
TITLE 02 / 05 CHAPTER 001 /006
TITLE 02 / 05 TIME -- : -- : --
– Use the / buttons to go to title or
chapter.
– Use the numeric keypad (0 ~ 9) to input the
desired title, chapter number or time, and
press OK to start playback from that selection.
Playback from a selected point
This function allows you to start playing at
any chosen time on the disc.
When playing CD discs
1. Press GOTO, the following menu appears
on the television screen:
GOTO -- : --
• Use the numeric keypad (0 ~ 9) to input the
desired time and press OK to start playback from that selection.
Notes:
• This function is available for DVD and CD
disc only.
Activating P/I (Progressive/Interlace)
Mode
The Progressive Scan Display presents 60
complete frames per second, rather than 30
frames per seconds of interlaced scanning
(ordinary normal TV system). With nearly
double the number of lines, progressive scan
offers higher picture resolution and eliminates
bothersome motion artifacts like jagged edges
on moving objects. To enjoy the full quality
potential offered by Progressive Scan, a progressive scan TV is required.
1. Press P/I on the remote control and enter
PROGRESSIVE mode.
2. Press P/I again to enter INTERLACE TV
mode.
Note:
• To activate this function, you must set
“Video Output” to PR PB Y and ensure that
your TV has progressive scan.
Activating Night mode
When Night mode is activated, the high volume output will be softened and low volume
outputs will be brought upward to an audible
level. It is useful for watching your favorite
action movie without disturbing others at night.
1. Press NIGHT button on the remote control
to activate night mode and “NIGHT ON” will
be shown on VFD.
2. Press it again to turn off the function and
“NIGHT OFF” will be shown on VFD. The
default setting is OFF.
Note:
• This function is available for DVD disc only.
23
Page 24
SPECIAL FEATURES
24
Selecting Surround Sound
1. Press SURROUND button to select:
Playing a DVD disc
– For a DVD disc with Dolby Digital signal,
you can select: Stereo Dolby Digital
– For a DVD disc with DTS 5.1 signal, you
can select: Stereo DTS.
– For a DVD disc with PCM or Pro Logic sig-
nal, you can select: Pro Logic Stereo.
Playing a CD/MP3 disc or in AUX mode
– You can select: Pro Logic Stereo.
Note:
• The availability of various surround sound
modes depends on the number of speakers connected and the sound mode available for the disc.
Selecting Sound effect
1. Press EQ button repeatedly to select the
preset equalizer mode:
POP ROCK JAZZ CLASSIC.
The display will show on VFD and OSD.
Selecting Multiple channel sound
You can vary the level of each speaker as
follows. At the same time, you can adjust the
treble or bass levels.
1. Press SELECT to select a channel. The
level of the channel will appear on the front
panel display and TV screen.
• TREBLE LEVEL, BASS LEVEL adjustable
range: -10dB to +10dB, 2dB/step.
• Front left, Center, Front right, Rear left, Rear
right and Subwoofer adjustable range: 15dB to +10dB, 1dB/step.
• Master volume adjustable range: 00~39dB/
MAX, 1dB/step.
2. Press VOLUME - and VOLUME + to adjust the selected channel’s level.
3. If you do not press the SELECT or VOL-
UME -/+ buttons for a few seconds, the
display is turned off, and the volume level
is stored in the system.
Note:
• Switch power off, then power on, the
volume level will resume to last setting.
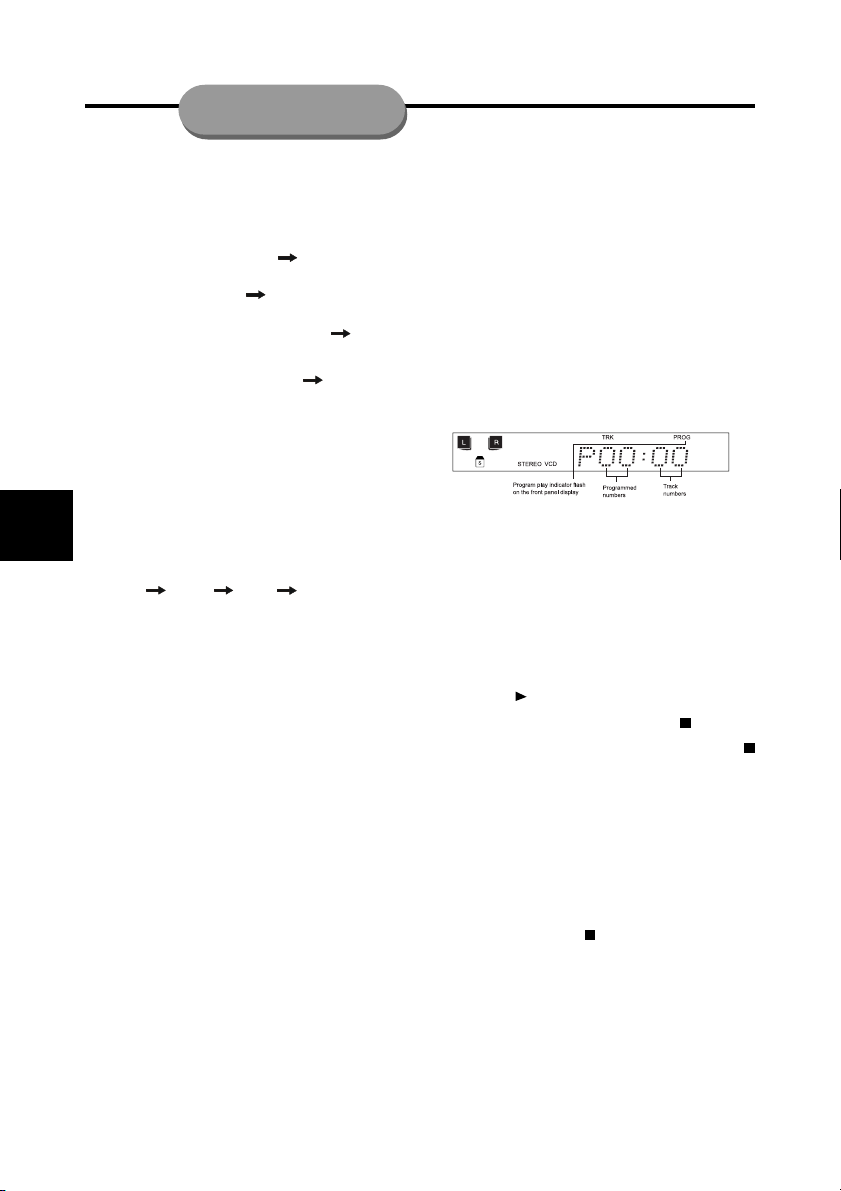
Program play
You can play the contents of the disc in the
order you want by programming the order of
the tracks to be played. Up to 99 tracks can
be stored.
1. In stop mode, press PROG button on the
remote control. The program mode display
appears on the TV screen and the front
panel display.
2. Use the numeric keypad (0 ~ 9) to input the
track numbers in a desired order and then
press OK to confirm.
– If you attempt to program more than 99
tracks, “FULL” will be displayed.
3. Repeat step 2 to add more tracks to the
program list.
4. To begin program playback, press PLAY/
PAUSE ll or OK.
5. To stop playback, press STOP once.
6. To cancel the program, press STOP
twice.
Notes:
• This function is not available when playing
DVD and MP3 discs.
• To repeat playback for the programmed
tracks, press REPEAT while in the pro-
gram playback mode.
• The program sequence is cancelled when
you press STOP twice, open the disc
tray, or turn the power off.
Page 25
SPECIAL FEATURES
Selecting the Subtitle Language
This function can only be used for DVDs recorded with multiple subtitle languages.
– Press SUBTITLE repeatedly to select a
desired subtitle languages.
Notes:
• The maximum number of subtitle languages
stipulated by the manufacturer is 32.
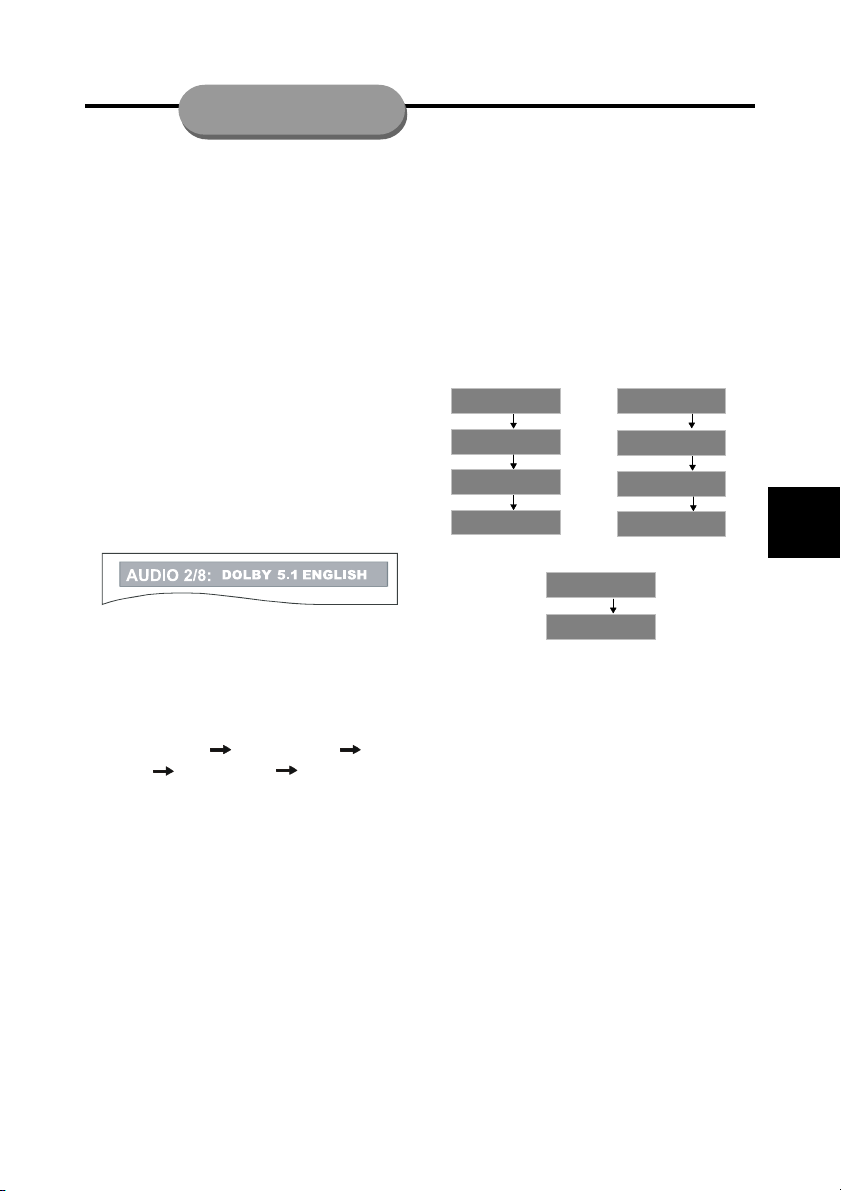
Audio Language and Channel Selection
1. This function of audio language selection
can only be used for DVD discs on which
audio has been recorded in multiple languages.
– While playing a DVD disc, press the LAN-
GUAGE button repeatedly to select a de-
sired language for audio, and playback will
then continue in new language.
2. This function of audio channel selection
can only be used for VCD discs, press the
LANGUAGE button repeatedly on the remote control to select the desired audio
channel as follows:
– LEFT VOCAL RIGHT VOCAL MONO
LEFT MONO RIGHT STEREO
Notes:
• The maximum number of audio languages
stipulated by the manufacturer is 8/8.
• In Tuner and Aux mode, this function is
useless.
Display status during playback
You have the option to view current information, such as titles and chapters on DVD discs
or tracks on CD discs. The information
will be displayed on the television screen and
on the front panel display. The disc will display information similar to the following illustrations:
1. Press DISPLAY repeatedly to display the
following status.
DVD CD
MP3
SINGLE ELAPSED
00:00:52
SINGLE REMAIN
00:03:00
TOTAL ELAPSED
00:01:30
TOTAL REMAIN
00:63:55
T I T L E 01 / 01 CH AP T E R 002/ 025
00:36:15
TITLE REMAIN
00:34:56
CHAPTER ELAPSED
00:01:23
CHAPTER REMAIN
00:03:32
CHAPTER ELAPSED
00:00:30
CHAPTER REMAIN
00:03:50
2. Press DISPLAY again, to turn the display
function off immediately.
Notes:
• Depending on some disc, the title number
or chapter number or time may not appear
or you may not be able to change the display.
25
Page 26
SPECIAL FEATURES
26
Setting the Sleep timer
The sleep timer enables the system to switch
to standby mode automatically at a preset time.
1. Press the SLEEP button on the remote
control repeatedly until it reaches the desired preset turn-off time.
– The selection are as follows (time in min-
utes):
15 minutes 30 minutes 45 minutes 60 minutes
90 minutes 120 minutes OFF
2. Press SLEEP once to show the remaining
time before switching off. If you continue
pressing the SLEEP button, the next sleep
time will appear.
3. To cancel the sleep function, press SLEEP
until it reaches OFF.
Notes:
• If the sleep time has been set, the SLEEP
indicator will illuminate on VFD until sleep
time end.
• If the sleep time is reached, the system will
back to standby mode automatically.
• The sleep time will be cancelled if the
POWER button is pressed, but if you press
the OPEN/CLOSE button, the sleep function is retained.
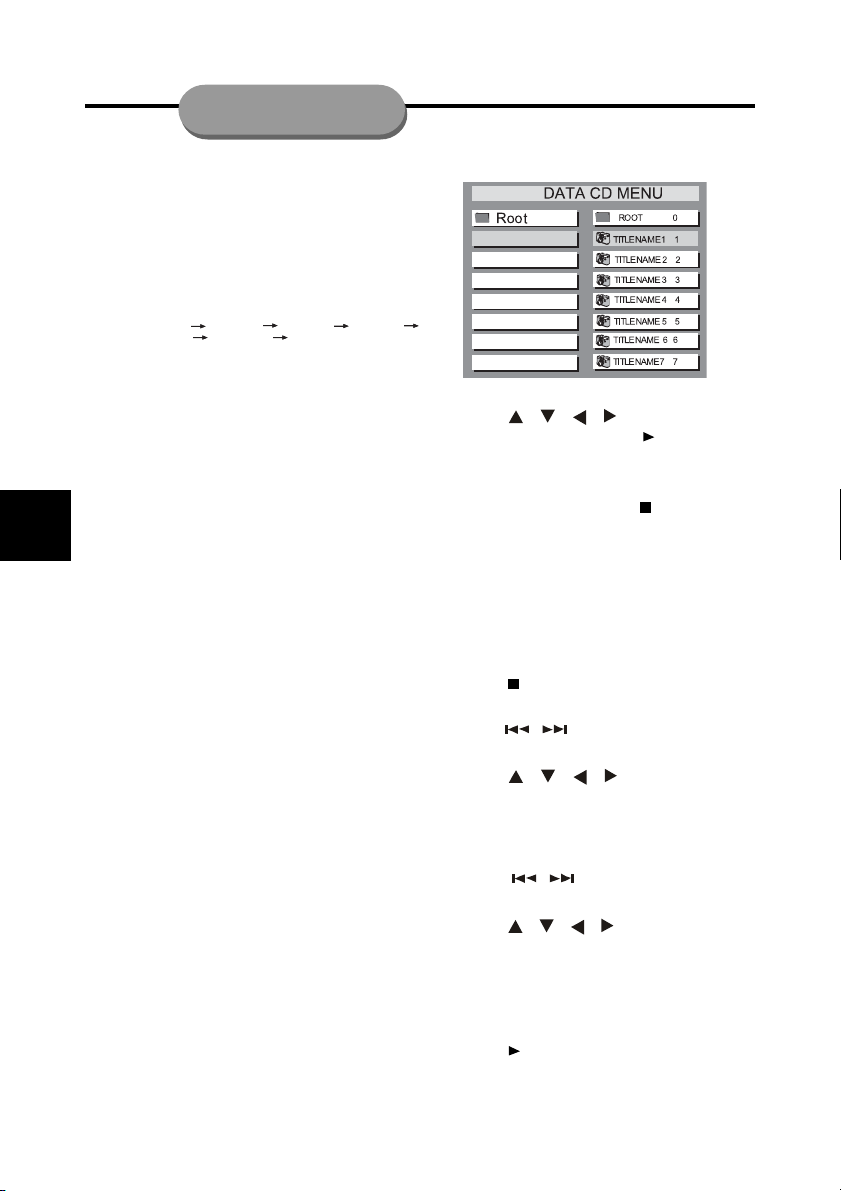
Playing MP3/Picture disc(JPEG/ KODAK)
For MP3/JPEG picture disc
1. Load a MP3/picture (JPEG) disc.
The disc reading time may exceed 30 seconds due to complexity of the directory/
file configuration.
2. Playback will start automatically(only in PBC
OFF status). The album/picture menu will
appear on the TV screen. If not, press
MENU/PBC on the remote control.
(Example for MP3 disc menu)
3. Press / / / to select a desired
album, then press OK or ll to confirm.
– You can also use the numeric keypad (0 ~
9) to enter your choice.
4. To stop playback, press .
For KODAK picture disc
1. Load a Kodak Picture disc.
The disc reading time may exceed 30 seconds due to complexity of the directory/
file configuration.
2. Playback will start automatically.
3. Press 9 thumbnail pictures will appear
on the TV screen.
4. Press / to view the previous / next
page (if available).
5. Press / / / to move within the
menu and press OK to select the desired
picture to play.
During playback, you can:
• Press / to select another title/
picture in the current folder.
• Press / / / on the remote control to rotate or flip the picture files.
• Press ZOOM to select “ZOOM ON” or
“ZOOM OFF”, in “ZOOM ON” mode, press
/ on the remote control to zoom the
picture in or out.
• Press ll to pause/resume playback.
Page 27
Care and Maintenance
Caution !
The device is powered by dangerous voltage. The device must therefore be opened by
authorized specialists only. All maintenance and service work must be carried out by authorized companies only. Unauthorized repair work may endanger the operator’s life.
Any work on the device attempted by unauthorized persons voids the product's warranty.
Cleaning the components
Before cleaning, switch off the DVD receiver.
Clean all components using a wet cloth or a
little synthetic cleaner. Solvents, spirits, detergents, etc., can damage the surface of the
device.
Notes about compact discs
(DVD video CD, audio CD, MP3 CD)
Always keep the disc in its cover and touch
the edges only. The disc's surface must not be
touched and should always be kept clean. Do
not stick paper or adhesive tape onto the labeled side of the disc. Keep the disc away
from direct sunlight and heat sources.
A disc must also never be left in a car parked
in direct sunlight as the temperature inside the
car gets very high. Clean the disc with a cloth
before playing it. Do not use any solvents such
as petrol, dilutions or other detergents.
Notes about the DVD receiver
If the DVD receiver is not being used, the disc
tray should always remain closed to protect
the mechanism against dust. However, it is
still possible that the vents become dirty from
dust or the lens could get covered by a thin,
hardly visible, film.
The DVD receiver system is then no longer
able to scan the inserted disc. In this case
you need to have the lens cleaned by a technician.
Maintenance
Electronic components are subject to a natural aging process. The mechanical parts are
subject to normal wear. Dust particles inside
the device may also cause faults to occur.
For example, problems may occur when the
laser lens get dirty.
• Consult your authorized dealer in the case
of any faults.
• For transporting the set use the original
packaging only.
27
Page 28
TROUBLE SHOOTING
28
If you experience any of the following difficulties while using the system, use this
troubleshooting guide to help you remedy
the problem. Should any problem persist,
consult an authorized service center.
No power
• Check to make sure the power cord is firmly
plugged into the power outlet.
• One of the safety mechanisms may be
operating. In this event, unplug the unit
from the power outlet briefly and then plug
it in again so it will reset itself.
No picture
• Check that the system is connected se-
curely.
• If the video connection cord is damaged,
replace it with a new one.
• Make sure you connect the system to
video input connector on the TV.
• Make sure you turn on the TV.
• Make sure you select the video input chan-
nel on the TV. Refer to your TV manual if
you are not sure.
Picture noise appears
• Take the disc out and clean it.
• If video from this system has to go
through your VCR to get to your TV, the
copy-protection applied to some DVD
programs could affect picture quality. If
you still experience problems after
checking your connections, please try
connecting your DVD system directly to
your - ‘TV’s S-Video input, if your TV is
so equipped.
The aspect ratio of the screen cannot
be changed even though you set “TV
DISPLAY” in the SETUP menu when you
play a wide picture.
• The aspect ratio is fixed on the DVD disc.
• If you connect the system with the S-
Video cable, connect directly to the TV.
Otherwise, you may not change the aspect ratio.
• Depending on the TV, you may not
change the aspect ratio.
Troubleshooting
Severe hum or noise is heard
• Check that the speakers and components
are connected securely.
• Check that the connection cords are away
from a transformer or motor, and at least
3 meters away from a TV set or fluorescent light.
• Move your TV away from the audio components.
• The plugs and jacks are dirty. Wipe them
with a cloth slightly moistened with alcohol.
• Take the disc out and clean it.
The sound loses stereo effect when
you play a CD
• Press LISTENING button switch to stereo
mode.
• Make sure you connect the system appropriately.
The language for the subtitles cannot
be changed when you play a DVD
• Multilingual subtitles are not recorded on
the DVD.
• Changing the language for the subtitles
may be prohibited for the DVD.
The subtitles cannot be turned off
when you play a DVD
• Depending on the DVD, you may not be
able to turn the subtitles off.
The angles cannot be changed when
you play a DVD
• Multi-angles are not recorded on the DVD.
• Change the angles when the angle mark
appears on the TV screen.
• Changing the angles may be prohibited
on the DVD.
• Make sure Angle function has been set to
ON in setup menu.
The system does not operate prop-
erly
• Static electricity, etc., may affect the sys-
tem operation. Press the POWER button
to turn off the system. Then press the
POWER button again to turn the system
back on.
Page 29
Electrical
Specifications
AMPLIFIER SECTION
Output power ............................................................................................................... 600 W Total power
- Front Left ......................................................................................................................................... 80 W
- Front Right ....................................................................................................................................... 80 W
- Center............................................................................................................................................... 80 W
- Rear Left .......................................................................................................................................... 80 W
- Rear Right ........................................................................................................................................ 80 W
- Subwoofer ...................................................................................................................................... 200 W
Frequency Response........................................................................................... 200 Hz - 18 KHz/+ 3 dB
Signal - to - Noise Ratio ................................................................................................................... 55 dB
THD.................................................................................................................................................10%
Input Sensitivity
- AUX In .......................................................................................................................................... 400 mV
- TV In ............................................................................................................................................400 mV
TUNER SECTION
Tuning Range ................................................................................... FM 87.5 - 108 MHz ( 100 kHz steps)
............................................................................................................. AM 530- 1710 kHz (10 kHz steps)
26 dB Quieting Sensitivity ....................................................................................................... FM <32dBf
............................................................................................................................................. AM 5000 uV/m
Image Rejection Ratio ................................................................................................................ FM 20 dB
..................................................................................................................................................... AM 20 dB
IF Rejection Ratio ....................................................................................................................... FM 60 dB
..................................................................................................................................................... AM 24 dB
Signal-to-Noise Ratio .................................................................................................................. FM 50 dB
..................................................................................................................................................... AM 40 dB
AM Suppression Ratio ................................................................................................................. FM 30 dB
Harmonic Distortion .............................................................................................................. FM Mono 3%
............................................................................................................................................. FM Stereo 3%
......................................................................................................................................................... AM 5%
Frequency Response .................................................................................... FM 180 Hz - 10 kHz/ + 6 dB
Stereo Separation ........................................................................................................... FM 26 dB (1 kHz)
29
DISC SECTION
Laser Type .......................................................................................................................... Semiconductor
Disc Diameter ........................................................................................................................ 12 cm / 8 cm
Video DAC ....................................................................................................................................... 10 Bits
Signal System ................................................................................................................................... NTSC
Video Format ................................................................................................................................ 4:3 /16:9
Video S/N ....................................................................................................................... 56 dB (minimum)
Composite Video Output .................................................................................................. 1.0 Vp-p, 75ohm
S - Video Output ........................................................................................................ Y - 1.0 Vp-p, 75ohm
................................................................................................................................ C - 0.286 Vp-p, 75ohm
Audio DAC ........................................................................................................................ 24 Bits / 96 kHz
Frequency Response ......................................................................................... 4 Hz - 20 kHz (44.1 kHz)
............................................................................................................................... 4 Hz - 44 kHz (96 kHz)
Page 30
30
Electrical
Specifications
MAIN UNIT
Power Supply Rating .............................................................................................................. 120V / 60Hz
Power Consumption .......................................................................................................................... 180W
Dimensions (w x d x h) ................................................................................... W430 x D350 x H48 (mm)
Weight ............................................................................................................................................. 5.58 kg
SPEAKERS (front speakers/rear speakers)
Rate impedance ............................................................................................................................... 4 ohm
Speaker drivers ....................................................................................................................................... 3"
Frequency response ........................................................................................................... 150Hz -18KHz
Dimensions (w x d x h) ................................................................................ W92.5 x H140 x D100 (mm)
Weight ............................................................................................................................................. 0.46 kg
SPEAKERS (center speaker)
Rate impedance ............................................................................................................................... 4 ohm
Speaker drivers ....................................................................................................................................... 3"
Frequency response ........................................................................................................... 150Hz -18KHz
Dimensions (w x d x h) ................................................................................ W92.5 x H170 x D100 (mm)
Weight ............................................................................................................................................. 0.56 kg
PASSIVE SUBWOOFER
Rate impedance .............................................................................................................................. 4 ohm
Speaker drivers .................................................................................................................................. 5.25"
Frequency response ........................................................................................................... 50 Hz -150 Hz
Dimensions (w x d x h) ................................................................................. W200 x H330 x D303 (mm)
Weight ............................................................................................................................................. 2.77 kg
Specifications subject to change without prior notice.
Page 31
Warranty obligations of Norcent Technology, Inc. are limited to the terms set forth below:
1. Norcent Technology warrants to the original consumer purchaser that this Norcent Home theater systems
will be free from defects in material and workmanship for the Standard Warranty Period of one year. The
start of the warranty period is the date of purchase, verifiable by a dated sales receipt.
2. The warranty on a replacement player is the remainder of the warranty period on the original player.
3. If the original consumer purchaser discovers a defect, Norcent Technology will, at its option, repair the
Home theater systems at no charge to the consumer, provided it is returned during the warranty period,
with transportation charges prepaid, to Norcent Technology, Inc. The unit must be sent properly packaged
in original Norcent Technology packaging or in Norcent Technology-approved packaging.
4. For warranty service, contact Norcent Technology at +1 909-305-2121(in the U.S.A) to obtain a Return
Material Authorization (RMA) number. A copy of the original dated sales receipt bearing the appropriate
Norcent Technology serial number may be required for warranty service.
The following are not covered under this warranty:
Normal wear and tear
Abuse, unreasonable use, mistreatment, or neglect
Damage caused by the equipment or system with which the disc player is used
Damage caused by modification or repair not made or authorized by Norcent Technology, Inc.
Disc player whose Norcent Technology, Inc. serial number has been removed or defaced
Damage caused by use of non-Norcent Technology, Inc. packaging
Damage caused by improper or improperly used packaging
Players that are determined to be stolen
THIS WARRANTY AND REMEDIES SET FORTH ABOVE ARE EXCLUSIVE AND IN LIEU OF ALL
OTHERS, WHETHER ORAL OR WRITTEN, EXPRESSED OR IMPLIED. NORCENT TECHNOLOGY,
INC.SPECIFICALLY DISCLAIMS ANY AND ALL IMPLIED WARRANTIES, INCLUDING WITHOUT
LIMITAION WARRANTY OF MERCHANT ABILITY AND FITNESS FOR A PARTICULAR PURPOSE AND
AGAINST INFRINGEMENT.
No Norcent Technology, Inc. dealer, agent, distributor, or employee is authorized to make any modification,
extension, or addition to this warranty.
NORCENT TECHNOLOGY, INC. IS NOT RESPONSIBLE FOR SPECIAL, INCIDENTAL, INDIRECT, OR
CONSEQUENTIAL DAMAGES RESULTING FROM ANY BREACH OF WARRANTY OR UNDER ANY
OTHER LEGAL THEORY , INCLUDING, BUT NOT LIMITED TO, LOSS OF DATA, LOSS OF PROPERTY,
AND ANY COSTS OF RECOVERING PROGRAMMING OR REPRODUCING ANY PROGRAM OR DATA
STORED IN OR USED WITH NORCENT TECHNOLOGY, INC. PRODUCTS.
31
Some states do not allow the exclusion of limitation of incidental or consequential damages or exclusion of
implied warranties, so the above limitations or exclusions may not apply to you This warranty gives you
special legal rights; you also have other rights that vary from state to state.
Page 32
 Loading...