

Page 1
DP220
Page 2
WARNING: TO AVOID THE DANGER OF FIRE OR ELECTRIC
SHOCK, DO NOT EXPOSE THIS APPLIANCE TO RAIN OR
MOISTURE. NEVER OPEN THE CABINET, AS DANGEROUS HIGH
VOLTAGES ARE CONTAINED INSIDE. ONLY A QUALIFIED SERVICE
TECHNICIAN SHOULD ATTEMPT OPEN THE CABINET. CAUTION:
TO PREVENT ELECTRIC SHOCK, MATCH WIDE BLADE OF PLUG
TO WIDE SLOT, AND FULLY INSERT INTO ELECTRICAL SOCKET.
CAUTION: This Digital Versatile Disc Player employs a laser system. To prevent direct exposure to the laser
beam, do not open the enclosure. Visible laser radiation is present when enclosure is open. DO NOT STARE
INTO BEAM. Additionally, the use of controls or adjustments or performance of procedures other than those
specified herein may result in hazardous radiation exposure. To ensure proper use of this product, please read
this owner's manual carefully and retain for future reference. Should the unit require maintenance, contact an
authorized service location, or contact Norcent Technology.
This equipment generates, uses and can radiate radio frequency energy and, if not installed and used in
accordance with the instructions, may cause harmful interference to radio communication. However, this is no
guarantee that interference will not occur in a particular installation. If this equipment does cause harmful
interference to radio or television reception,which can be determined by turning the equipment off and on, the
user is encouraged to try to correct the interference by one of the following measures:
Reorient or relocate the receiving antenna
Increase the separation between the equipment and receiver
Connect the equipment into an outlet on a circuit different from that to which the receiver is connected
Consult the dealer or an experienced radio/TV technician for help
FCC Caution: Any changes or modifications not expressly approved by Norcent Technology could void the user's
authority to operate this equipment.
INDUSTRY CANADA REQUIREMENT
This Class B digital apparatus meets all requirements of the Canadian Interference-Causing Equipment
Regulations.
PROTECT YOURSELF!
1
Record the model and serial numbers for this unit while it is easy to see them. These numbers are located on the
back of the unit's cabinet. Retain this information for future reference.
Model No. : DP220
Serial No. :
Retain this information for future reference.
CAUTION
RISK OF ELECTRIC SHOCK DO NOT OPEN
CAUTION: TO REDUCE THE RISK OF ELECTRIC SHOCK, DO NOT REMOVE COVER (OR BACK). THERE IS
NO USER SERVICEABLE PART INSIDE. REFER SERVICING TO QUALIFIED SERVICE PERSONNEL.
Page 3
ant
2
12
6
Page 4
TABLE OF CONTENTS
Page
PRECAUTIONS …………………………………...................................... 1
IMPORTANT SAFETY INFORMATION……………………............................. 2
TABLE OF CONTENTS……………………………………................................ 3
ABOUT YOUR DVD PLAYER……………………………................................. 4
BRIEF INTRODUCTION OF THE FEATURE……………………………......... 5
CONTROL AND FUNCTIONS……………………………………...................... 6
Front panel……………………………............................................. 6
Back panel…………………………..........................................…... 6
REMOTE CONTROL…........……………………......................................…..… 7
CONNECTIONS………………………………......………................................... 8
BATTERY INSTALLATION…………………………….............................…..… 9
Battery installation…………………………..................................... 9
Precautions for battery use……………………............................. 9
BASIC OPERATION………………………………………................................. 10
Basic Playback……………………..........................................….. 10
Start playback ……………………..........................................…… 10
Stop playback……………………..........................................…… 10
Slow motion play……………………..........................................… 10
Fast search…………………….......................................…........… 10
Picture zooming............................................................................ 11
Changing Subtitle Language....................................................... 11
Angle selection............................................................................ 11
Changing Sound Track ................................................................. 11
When playing a DVD...................................................................... 12
When playing a CD........................................................................ 12
When playing a MP3 disc........................................................... 12
BASIC SETUP............................................................................................... 13
General setting............................................................................. 13
Setting the picture…………...................................................…… 13
TV SHAPE……….......................................…………. 13
TV SYSTEM…….........................................………... 13
VIDEO OUT…………....................................………. 13
SCREEN SAVER…………........................................ 13
Digital output……………............................................ 13
Night mode……………..........................................…. 13
Test tone……………............................................…... 14
Setting the language………….............................................….…. 14
Setting the features……………….............................................…. 14
SPECIAL FUNCTIONS…………………………................................…….....…. 15
Special DVD features.........…………........................................... 15
Changing subtitle language…………........................................... 15
Changing sound track language…….......................................… 15
Display status during playback….........................................…… 15
Move to another chapter/title……..........................................…. 15
Playback from a selected point….......................................……. 15
Repeat A B………………………....................................……….... 16
Repeat.......................................................................................... 16
Program play………………………....................................………. 16
Selecting the surround sound mode……................................... 16
Setting the sleep timer……..........................................…………. 16
Activating P/I (Progressive/Interlace) Mode ................…………. 16
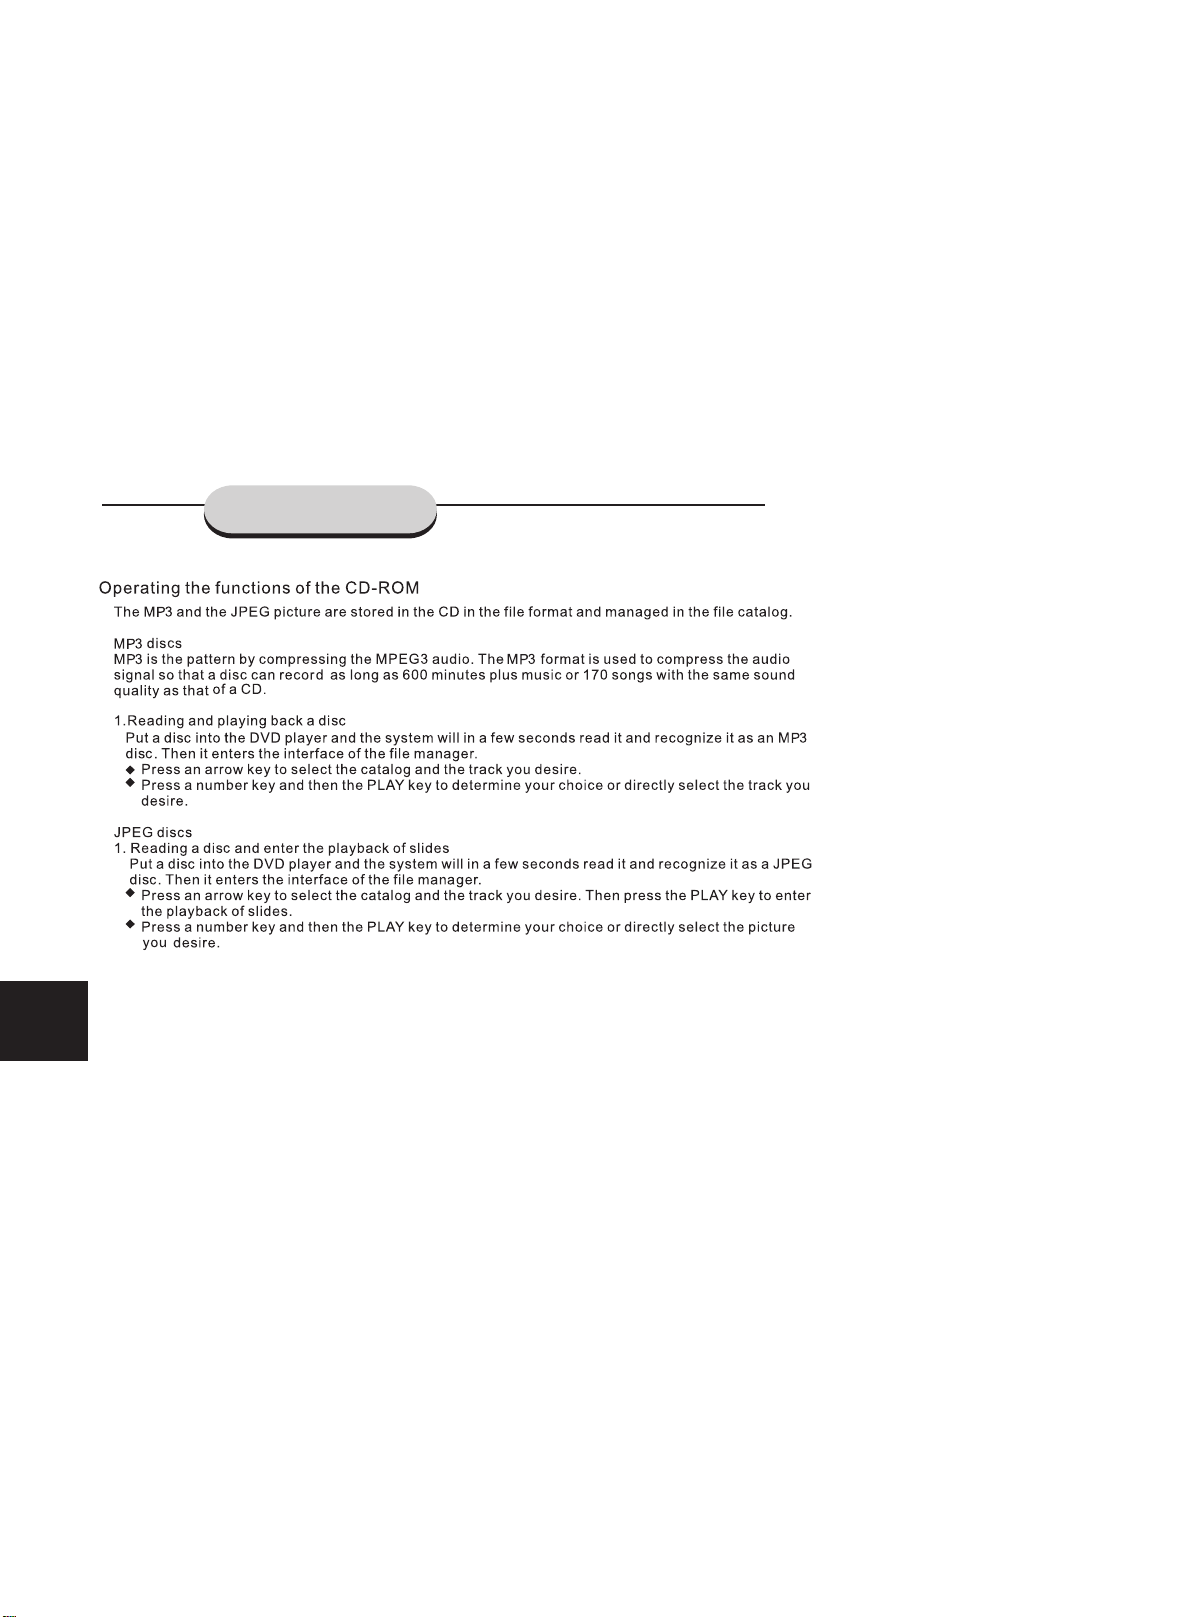
CD_ROM……………………………….......................………………………..... 17
MP3 disks……………………..............................………………… 17
JPEG disks…………………………...............................…………. 17
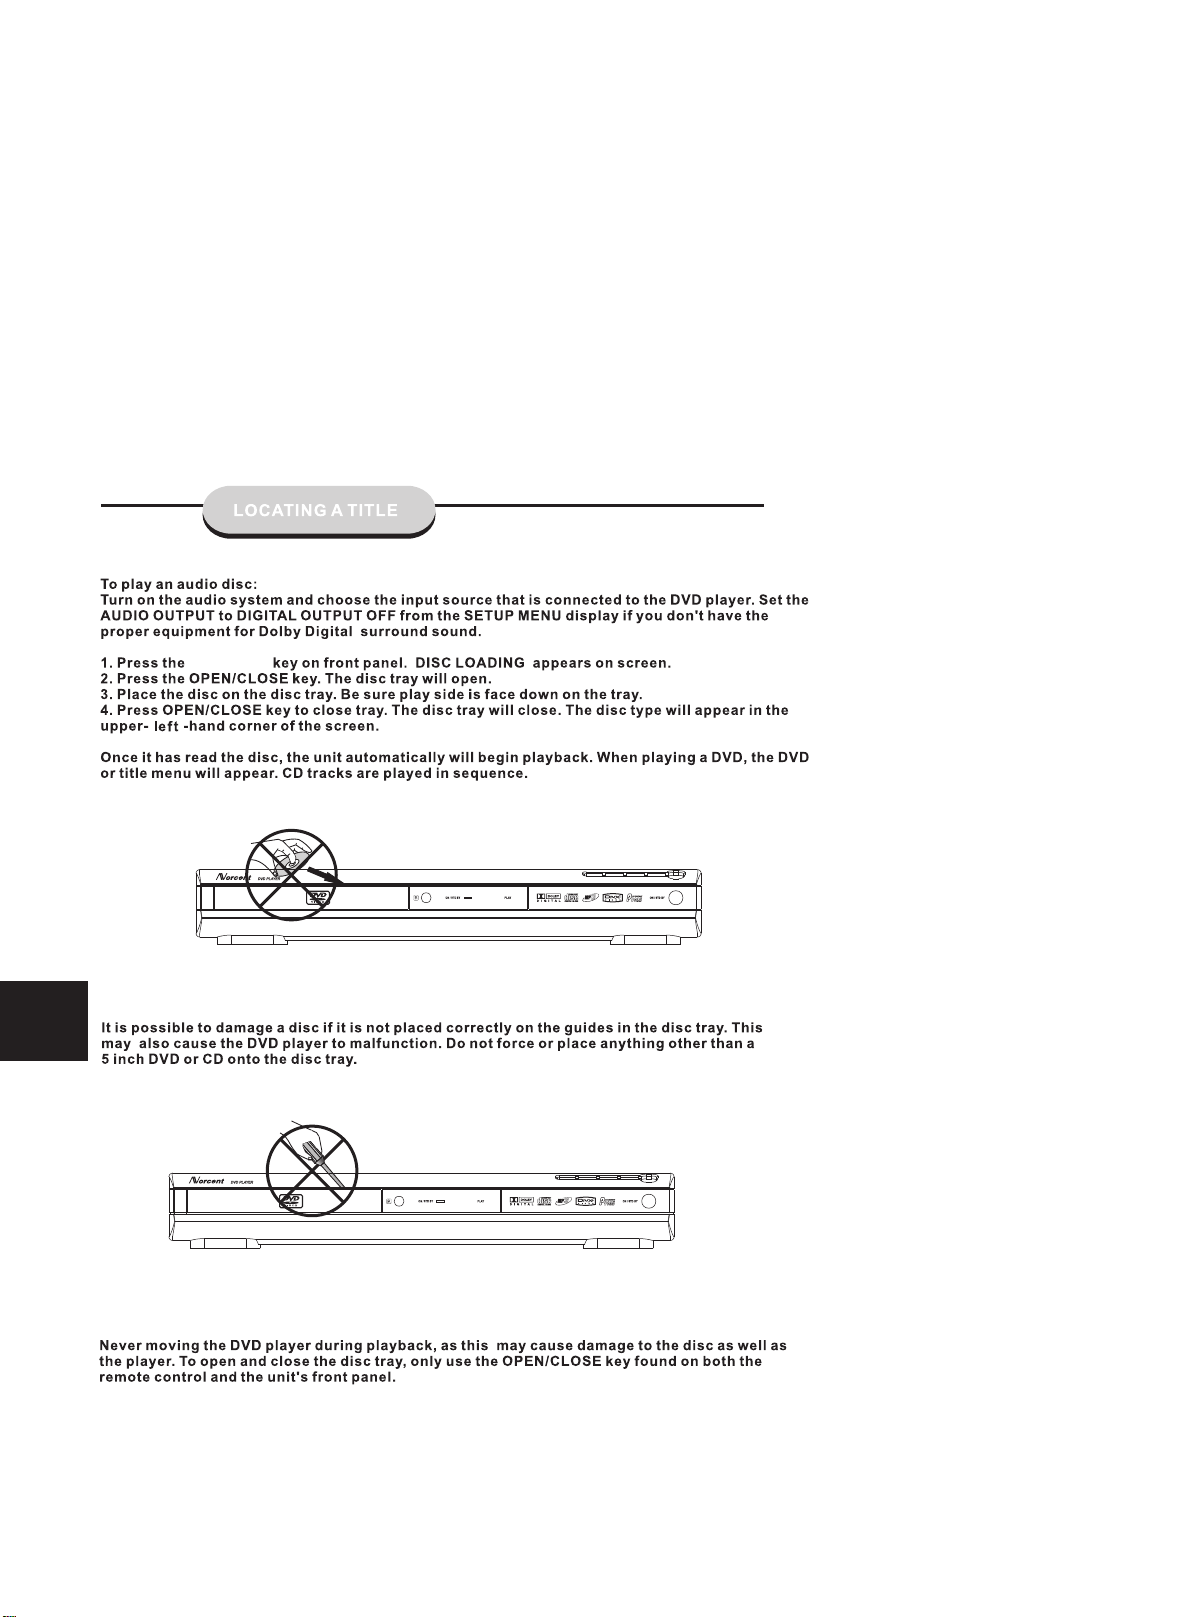
LOCATING A TITLE……………................................………………………… 19
TROUBLE SHOOTING……………..............................………………………. 20
SPECIFICATIONS………....................................…………………………....... 21
LIMITED WARRANTY………….................................………………………… 22
3
Page 5
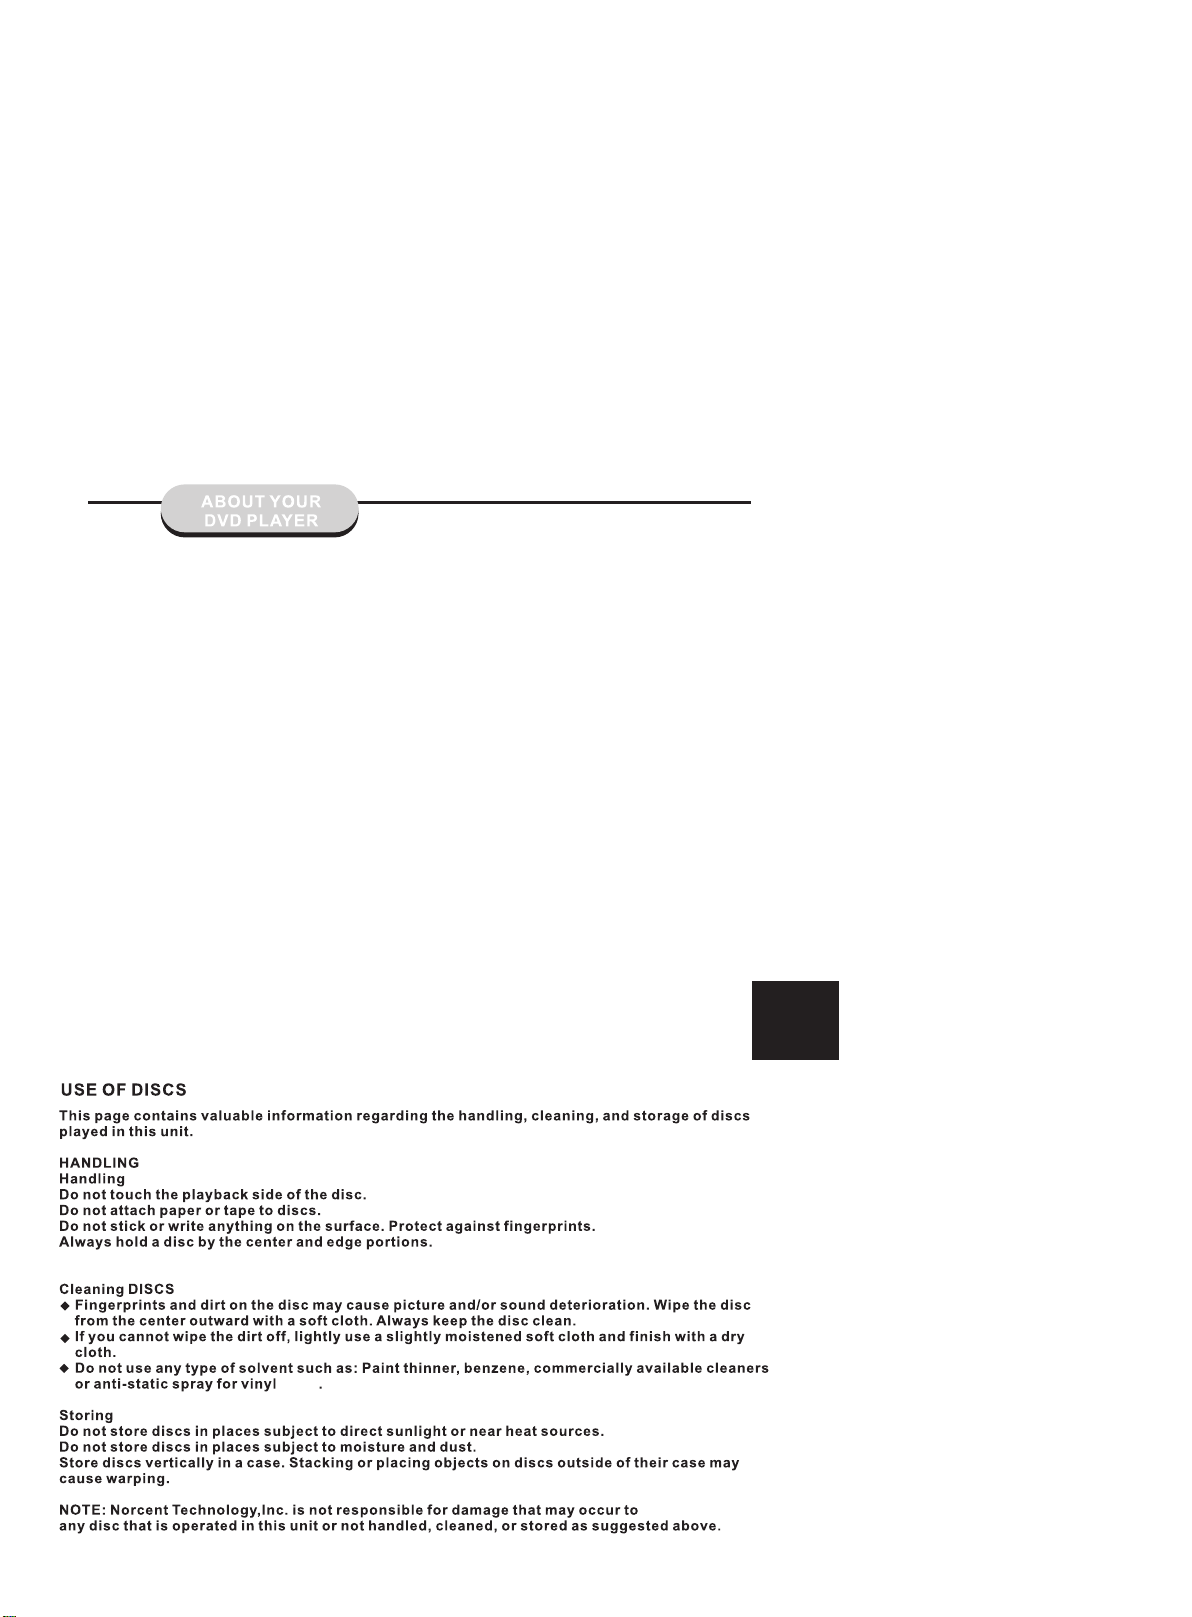
The following will help you get the most enjoyment from your Norcent DVD player.
BEST LOCATION
The unit should be placed on a firm, flat surface, away from VCRs, stereos, radios, or large speakers, as the
magnetic flux from these devices may cause distortion in the sound and a poor picture. If it is placed in a
cabinet, be sure there is at least 1 foot of free space completely around the unit for proper ventilation.
TO OBTAIN A CLEAR PICTURE
A DVD player is a precision device. If the optical pick-up lens and disc drive parts become dirty or worn
down, picture quality will become poor. To obtain a clear picture, regular inspection and maintenance are
recommended every 1,000 hours of use, depending on the operating environment. Contact dealer for details.
PLAYABLE DISCS
This Norcent DVD player will play the following types of discs: DVD, MP3,CD, CD-R, and CD-RW
DVD+R/RW,DVD-R/RW and MPEG4 with super-error correction ability. It is also capable of displaying
picture CDs and digital photo albums. It supports eight languages, up to 32 subtitles, and multi-angle
viewing.
It features easy setup and operation with on-screen menus. It has full function CPU upgradeable capability.
DIGITAL AUDIO OUTPUT
The unit's coaxial output capability enables you to connect an external six-channel AV amplifier and
processor with built-in Dolby Digital codes and MPEG modulating capacity with just one cord. This enables
you to conveniently enjoy different DVD, CD and MP3 discs.
LASER-HEAD OVER-CURRENT PROTECTION SYSTEM
To extend the service life of the laser head, the unit includes a unique laser-head over-current protection
system, ensuring a constant laser current.
4
discs
Page 6
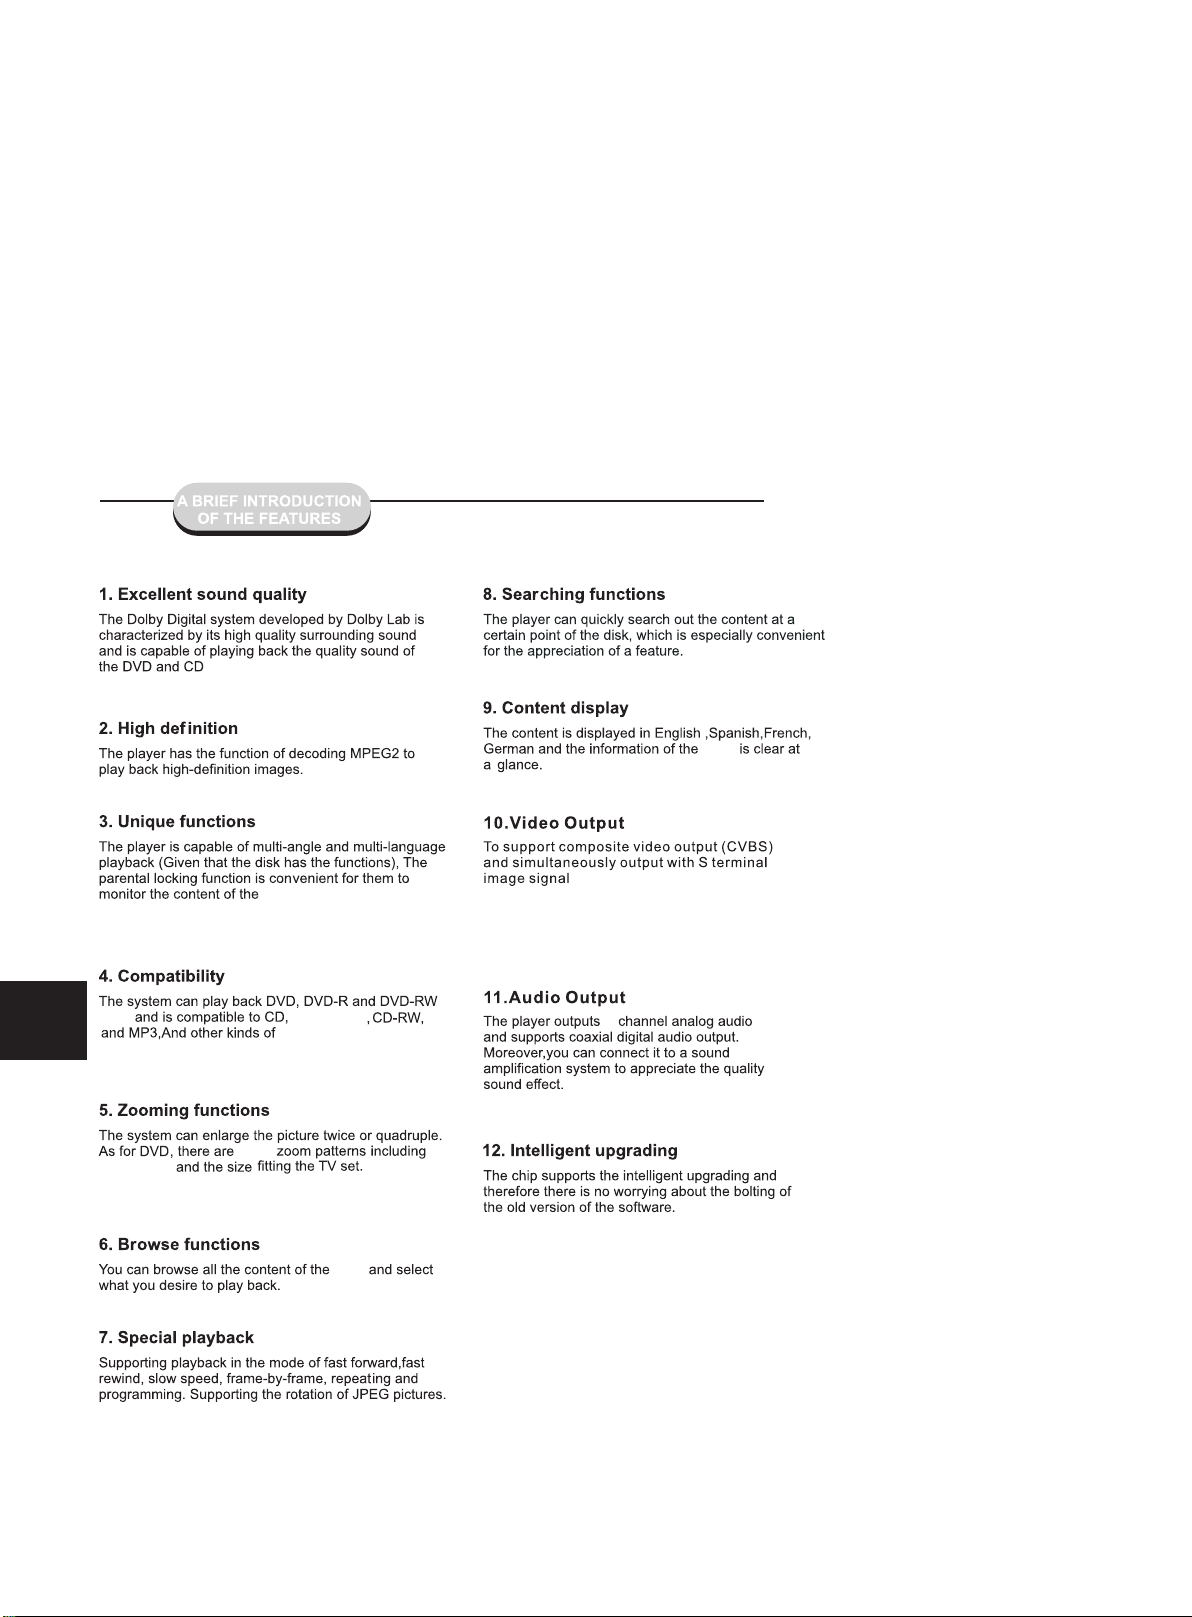
discs.
discs
5
discs
x1.5, x2, x3
three
discs.
DVD+R/RW
discs.
.
2
discs
Page 7
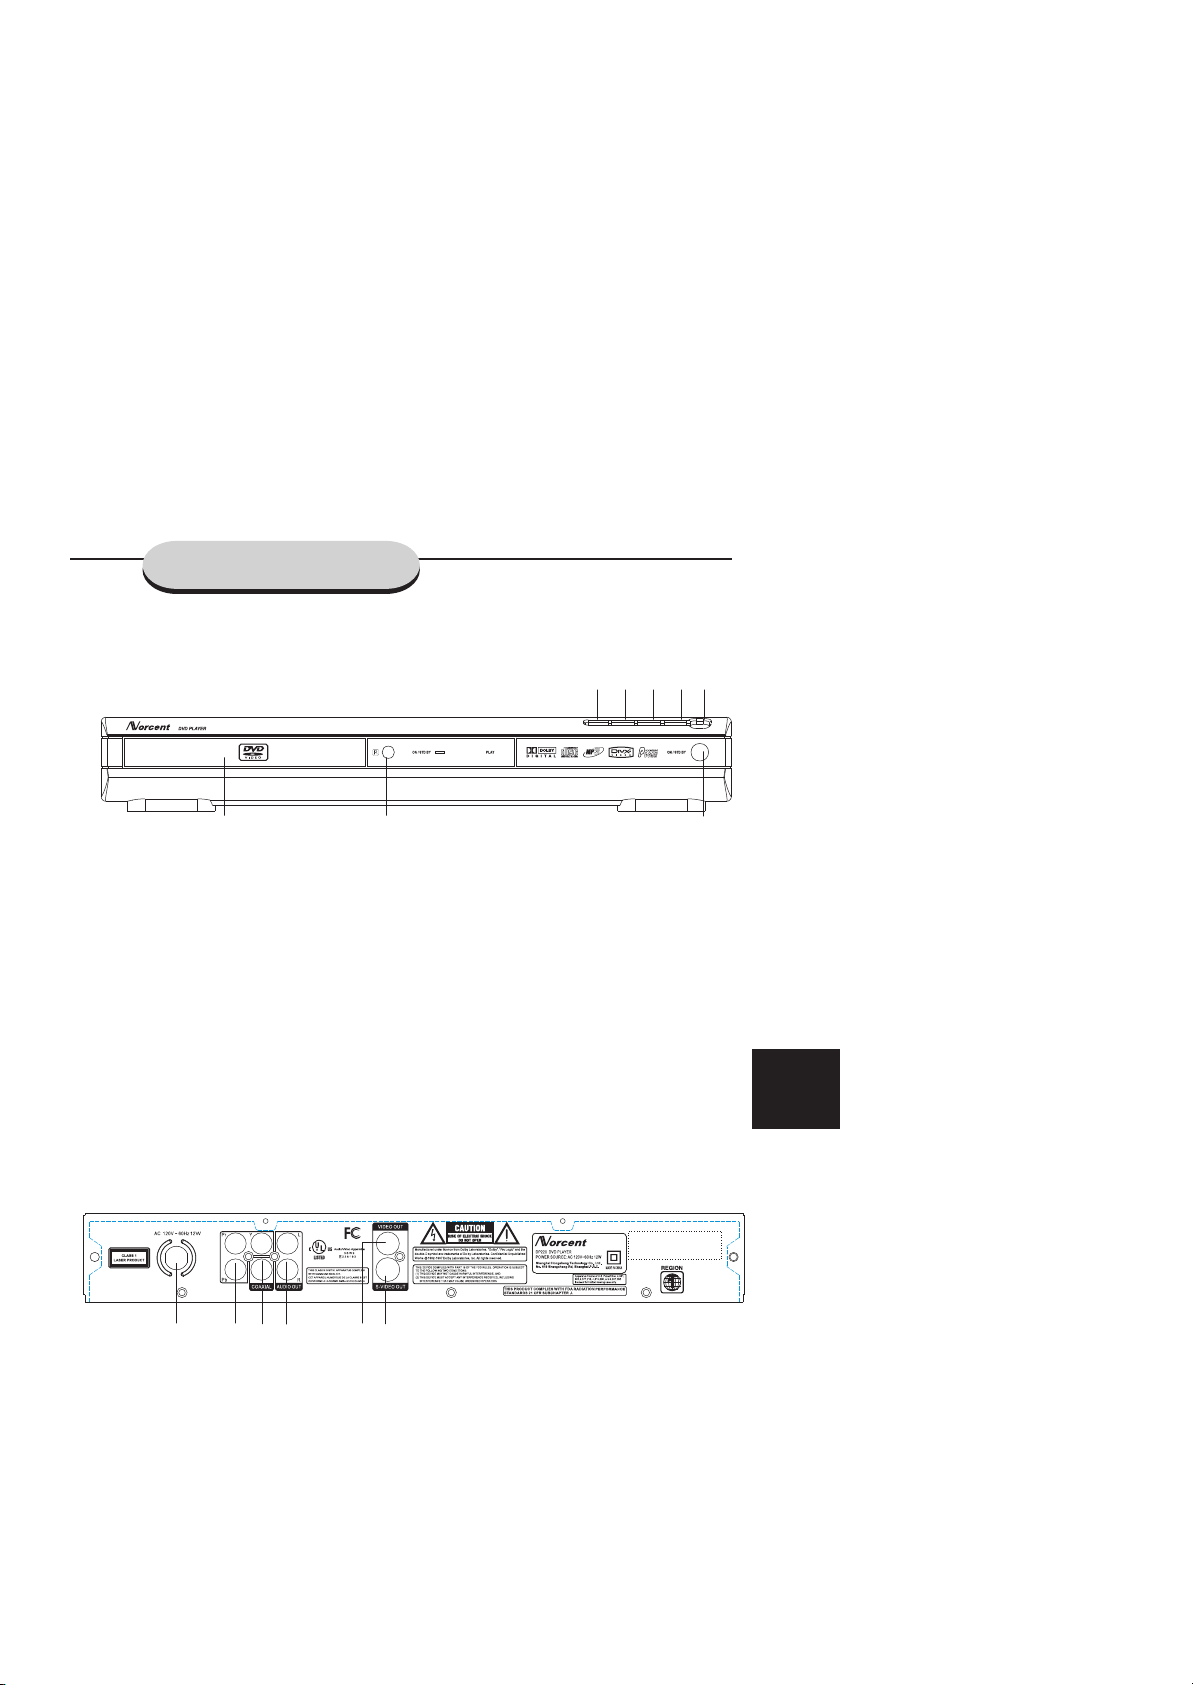
CONTROLS AND FUNCTIONS
Main unit (Front panel)
1 2
1 LOADER TRAY Disc tray
2 IR Point the remote control towards this sensor
3 EJECT Open or close the disc tray
4 I<<SKIP In Disc mode, press to skip to previous track
5 SKIP>>I In Disc mode, press to skip to next track
6 STOP Press to stop the playback
7 PLAY/PAUSE Press to start or stop temporarily playback
8 ON/STD BY Switch the main power on or off.
Main unit (rear panel)
3 4 5
6
7
8
6
2
1
1 AC LINE CORD Connect to AC outlet
2 AUDIO OUT Connect to the AUDIO IN of TV or Amplifier
3 COAXIAL Coaxial digital Audio signal output
4 S-VIDEO OUT Connect to a TV with S-VIDEO input
5 COMPONENT SIGNALS OUTPUT Progressive component signals output
6 COMPOSITE SIGNAL OUTPUT Connect to the Composite signal input of your TV
3
5 6
4
Page 8
CONTROLS AND FUNCTIONS
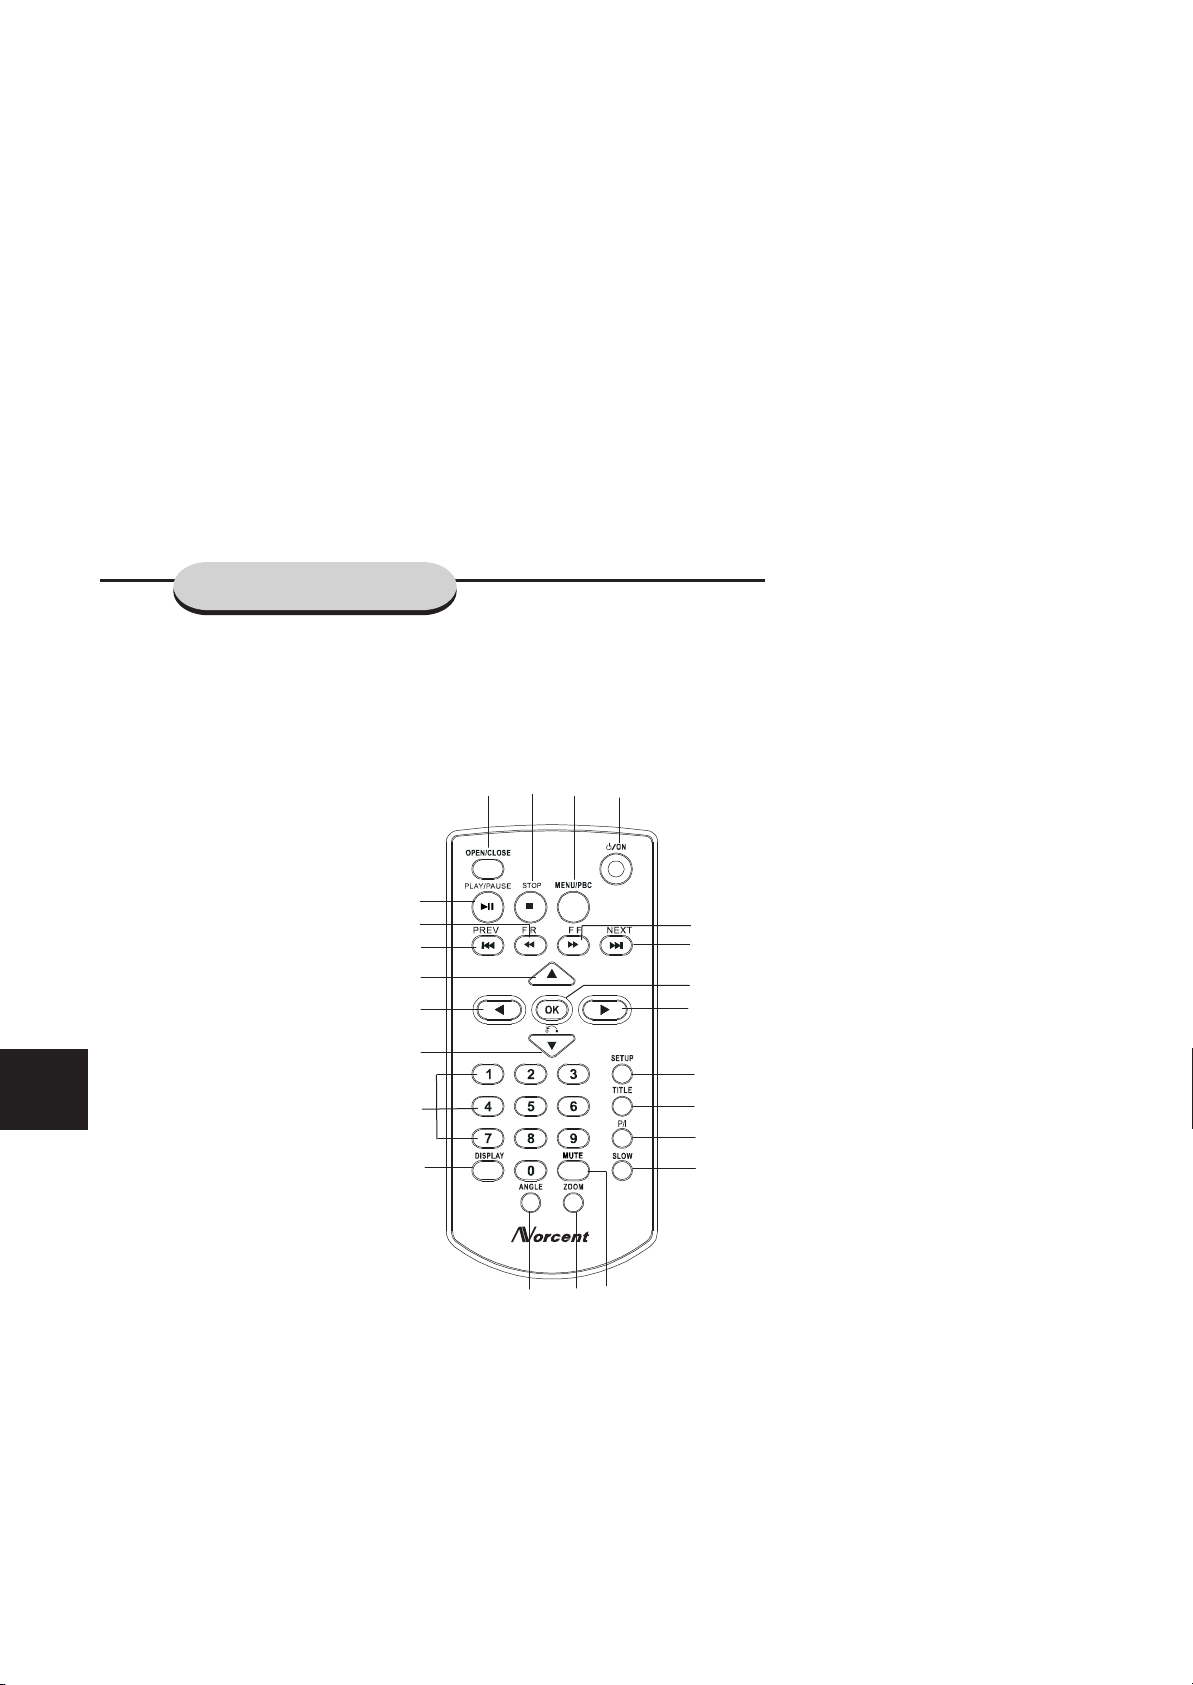
Remote Control
7
1. OPEN/CLOSE button
2. STOp button
3. MENU/PBC button
4. ON/STD BY button
5. PLAY / PAUSE button
6. FR button
7. Prev button
8. FF button
9. Next button
10. OK button
11. Left button
12. Right button
13. Up button
14. Down button
15. SETUP button
16. TITLE button
17. P/I button
18. SLOW button
19. DISPLAY button
20. ANGLE button
21. ZOOM button
22. MUTE button
23. NUMBER buttons
5
6
7
13
11
14
23
19
1 2 3 4
8
9
10
12
15
16
17
18
20 21 22
Page 9
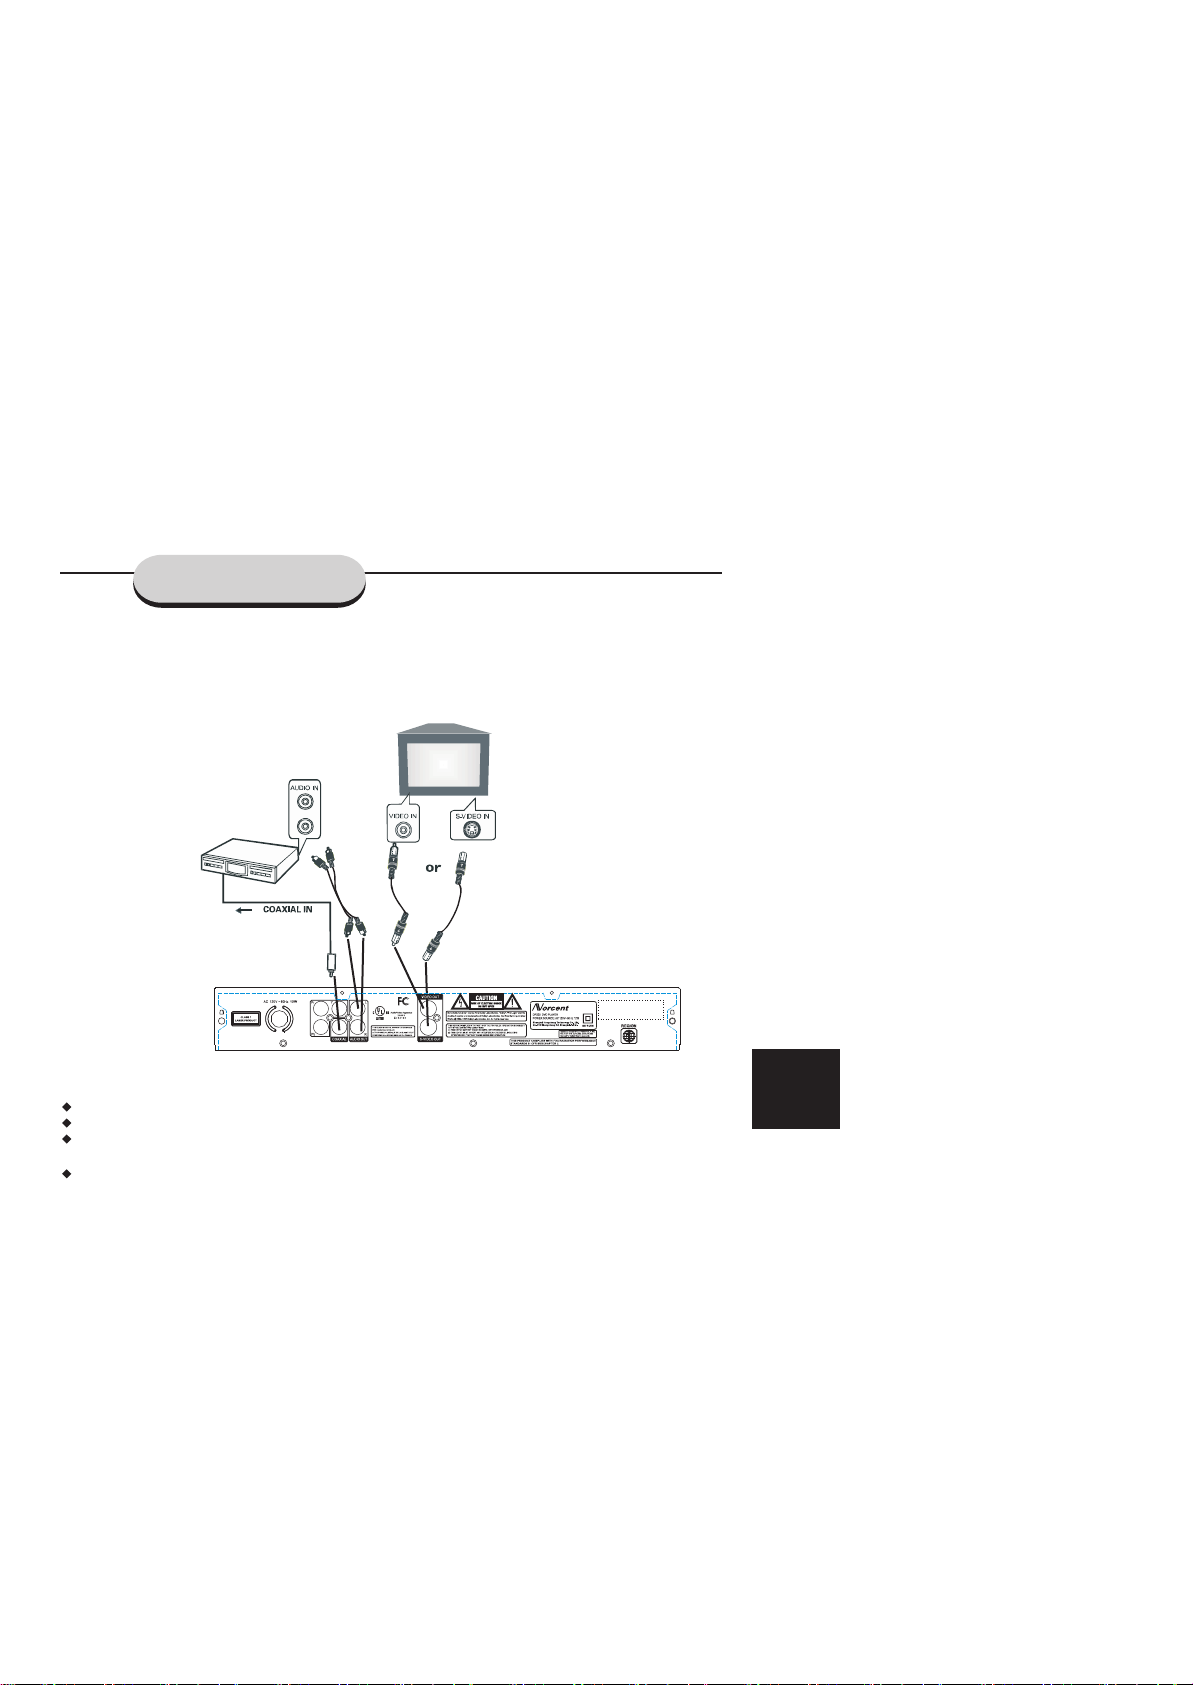
CONNECTIONS
Connecting your player to the TV
Connect the S-VIDEO OUT jack to the S-Video input jack on the TV using a S-Video cable.
Connect the VIDEO OUT jack to the Video input jack on the TV using a video cable.
Use the audio cables to connect AUDIO OUT jacks to the corresponding AUDIO IN jacks on the TV, CD or
TAPE recorder.
Use the Coaxial cables to connect COAXIAL jack to correspond to receive digital Audio signal.
8
Page 10
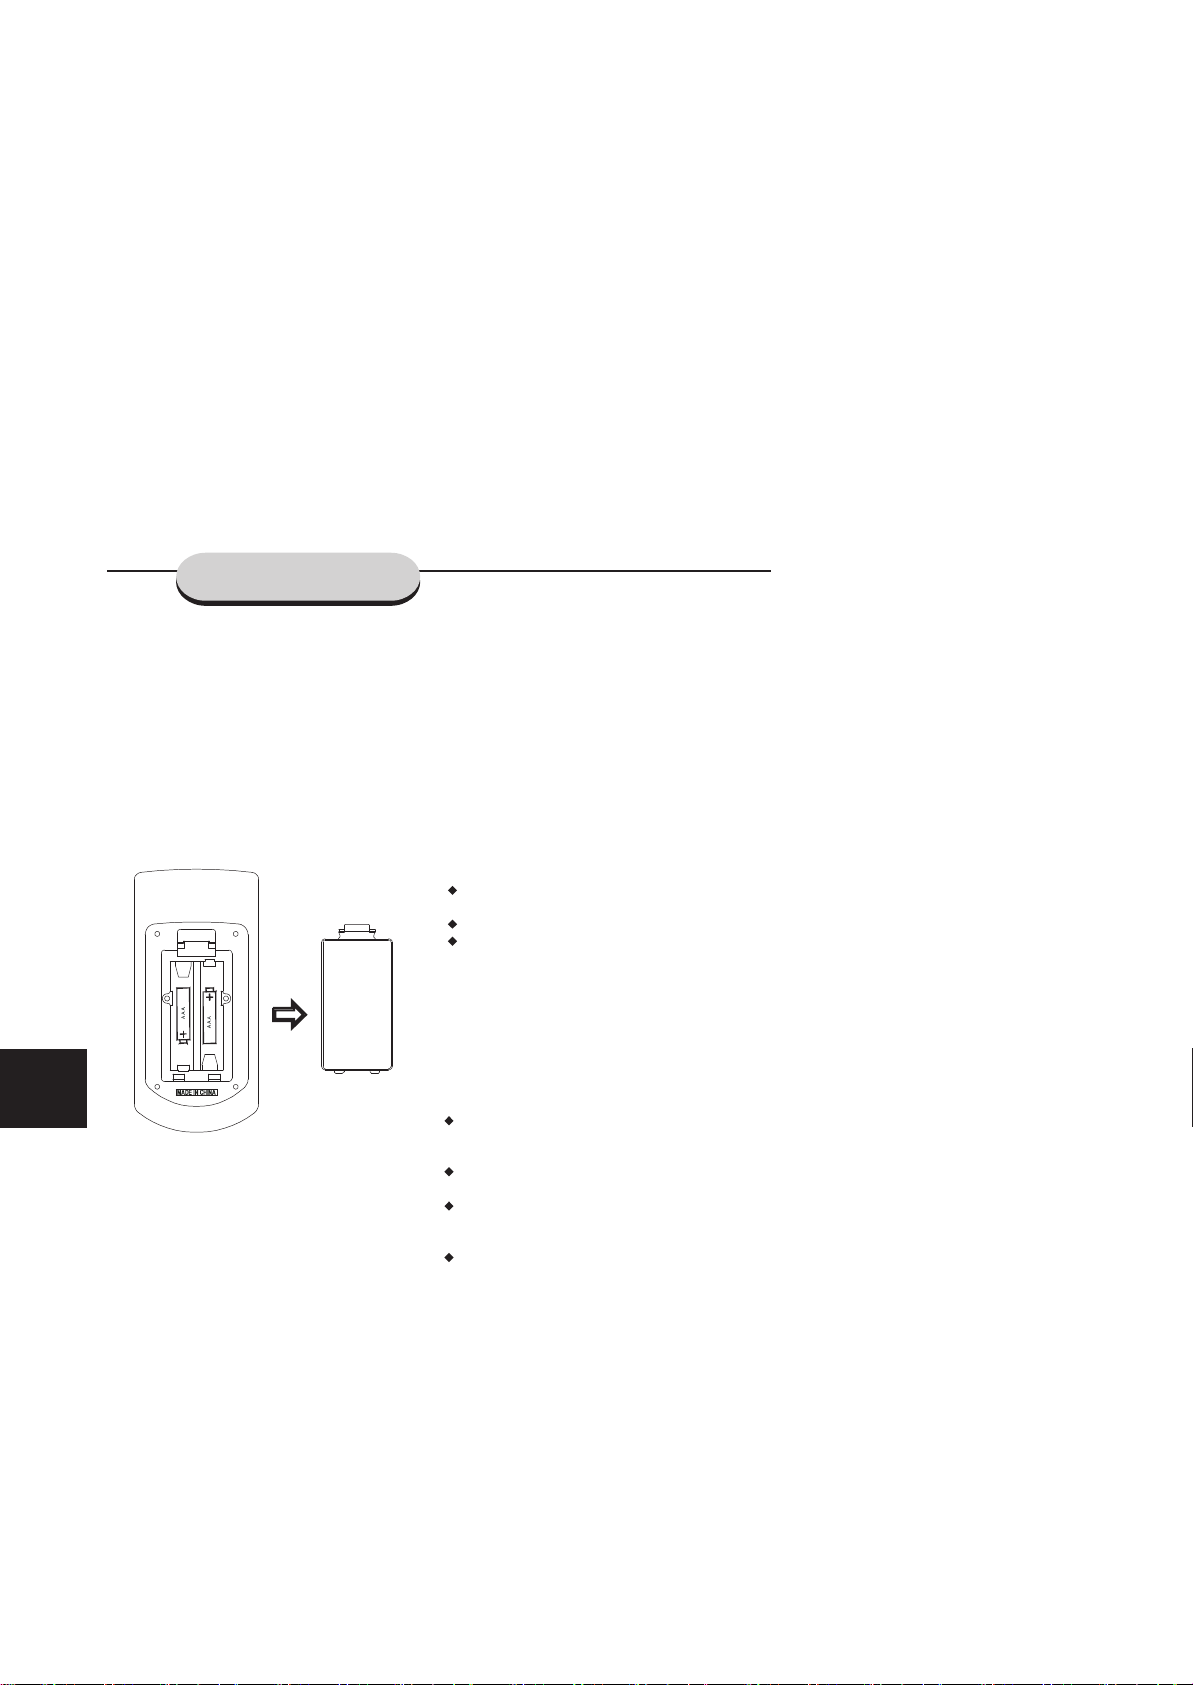
BATTERY INSTALLATION
Battery installation
1. Open the battery cover.
2. Insert the supplied batteries according to the direction
indicated in the battery compartment.
When inserting or removing the batteries, push them
towards the battery terminals.
3. Close the cover.
Precautions for battery use:
Caution:
Do not use rechargeable batteries.
Installing the batteries incorrectly may cause the unit to
malfunction.
Replace all old batteries with new ones at the
same time.
Do not mix old and new batteries.
Remove the batteries if the unit is not to be used
for long periods of time. This will prevent potential
damage due to battery leakage.
9
Notes concerning use:
Replace the batteries if the operating distance is
reduced or if the operation becomes erratic.
Purchase 2 AAA size batteries
Periodically clean the transmitter on the remote
control and the sensor on the unit with a soft cloth.
Exposing the sensor on the unit to strong light may
interfere with operation. Change the lighting or the
direction of the unit.
Keep the remote control away from moisture,
heat, shock, and vibrations.
Page 11
BASIC OPERATIONS
The preferred options will be chosen if they are available on a disc. If the disc loaded does not have the
preferred option then the disc own preference will be used.
Basic Playback
Slow motion play
1 When you complete all the connections, plug the
AC power cord of the player.
2 Press STANDBY-ON to switch ON the main power.
3 Press MUTE to shut off the sound. To restore the
volume, press it again.
4 Skip to another track/chapter
Press remote / repeatedly during playback to
skip to next or previous track / chapter.
5 Press OPEN/CLOSE to open the disc tray, press
again to close the disc tray.
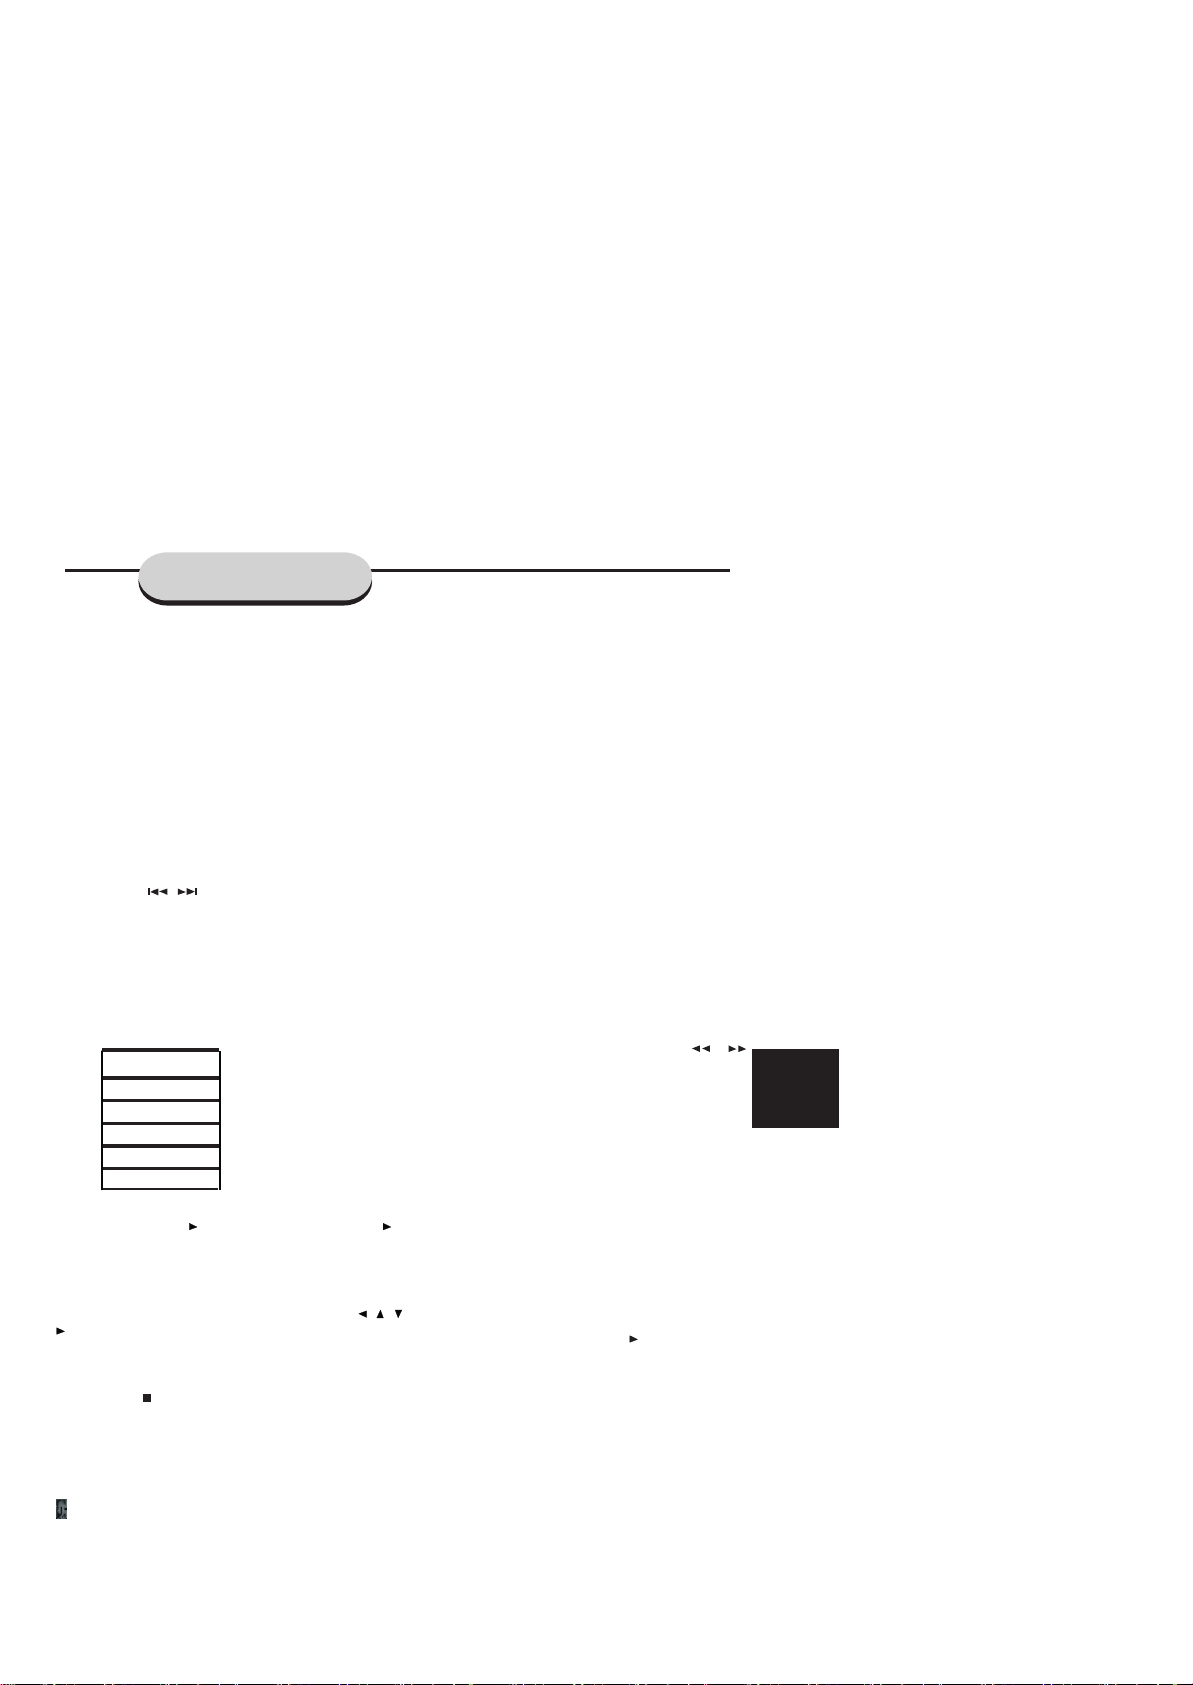
The following mode indicators inform you of the current
drive status (Example only for your reference).
OSD
Open
Close
DISC LOADING
No disc
Bad disc
Start playback
Press PLAY/PAUSE /ll . To pause playback, press /ll
again.
Note:
Some discs will start playing automatically, and others
will display the menu on the TV screen. use the / / /
to select the track, or press the number keys ( 0 ~ 9 )
to go to the desired track/chapter.
Stop playback
Press STOP first time to stop temporarily.
Press this key again to go into full stop status.
Note
Your player will not play discs that have a region code
different from the region code of your player.
Press remote SLOW to play in slow motion.
SF(slow farword)
SR(slow reverse)
For DivX discs
Press it repeatedly to select the slow motion speed:
SFx2-->SFx4-->SFx8--> PLAY
For DVD discs
Press it repeatedly to select the slow motion speed:
SFx2-->SFx4-->SFx8--> SRx2-->SRx4-->SRx8->SLOW OFF
Note:
The sound will be muted during slow motion play.
Fast search
1 Press FR or FF button to fast reverse or
fast forward.
FF(fast forward)
FR(fast reverse)
For DVD discs
FFx2, FFx4, FFx6, FFx8, FF OFF
FRx2,FRx4, FRx6,FRx8, FR OFF
For MP3 discs
FFx2, FFx4, FFx6, FFx8, PLAY
FRx2,FRx4, FRx6,FRx8, PLAY
For DIVX/CD discs
FFx2, FFx4, FFx8, FFx16, PLAY
FRx2,FRx4, FRx8,FRx16,PLAY
2 In any FF or FR status, press /ll to normal play.
Note
The sound will be muted during doing above functions
except the MP3/CD discs.
10
icon:If the inhibit icon appears on the TV screen when
a button is pressed, it means the function is not available
on the disc you are playing.
Page 12
BASIC OPERATIONS
11
Picture zooming
This function allows you to enlarge the picture on
the TV screen
and to pan through the enlarged image.
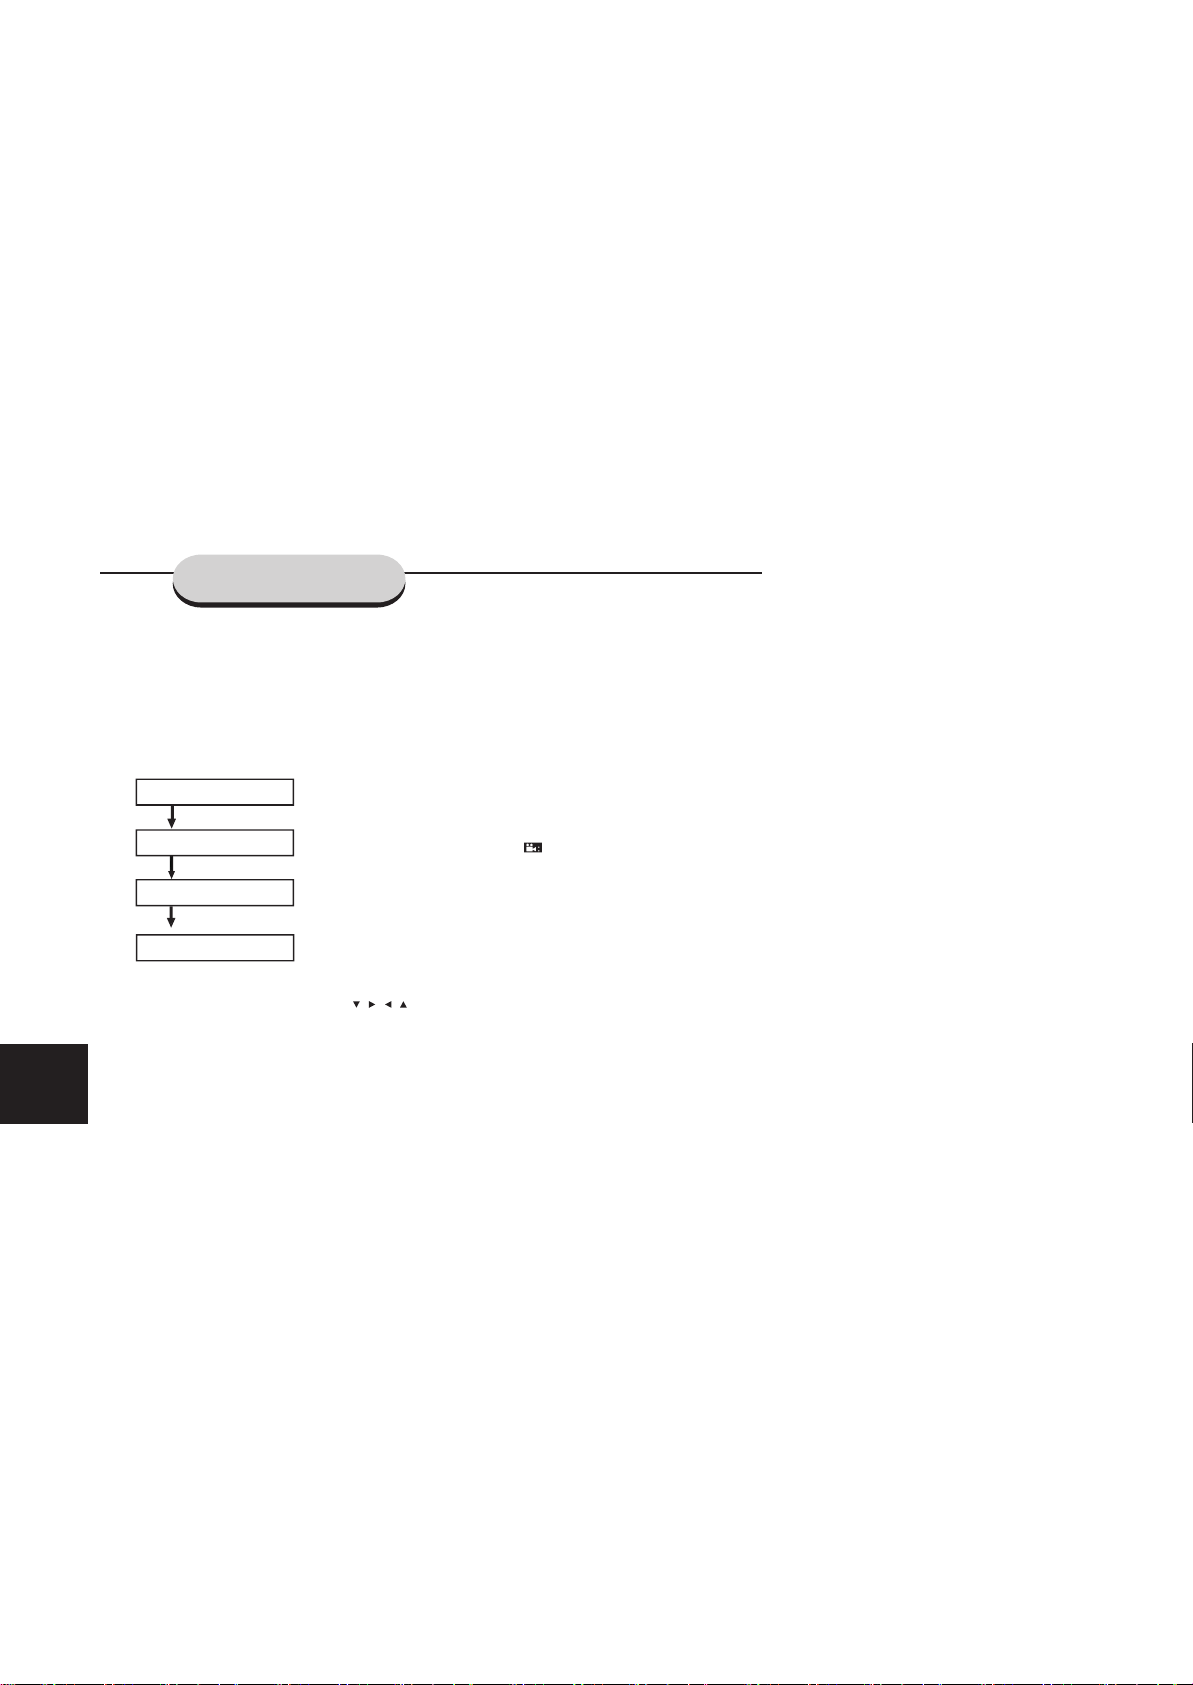
1 Press ZOOM repeatedly to select a zoom factor
as below:
ZOOM x 1.5
ZOOM x 2
ZOOM X 3
ZOOM OFF
2 To pan through the enlarge image, press ok
to confirm the zoom selection and use / / /
keys to move the zoomed picture left, right, up
or down.
3 Some discs may not respond to the zoom
feature.
Changing Subtitle Language
This operation will be used in setup menu, it
works only on DVDs with multiple soundtrack
language.
Angle selection
Some DVD discs contain scenes which have
been taken photos simultaneously from a
number of different angles. For those discs, the
same scenes can be viewed from each of the
different angles. (The recorded angles differ from
disc to disc.) press ANGLE key to set angle
mark.
While playing a title shot from different angles, the
angle mark appears on the TV screen.
Press the remote ANGLE button to change the
scenes from one angle to other angle(s).For
example: 1/3, 2/3, 3/3.
Changing Sound Track Language
This operation will be used in setup menu, it works
only on DVDs with multiple sound track language.
Note
When the desired language is not selected several
times, it means the language is not available on
the disc.
Page 13
BASIC OPERATIONS
Checking the information
You can check information about the disc, such as
the total number of the titles or chapters or tracks
or time, using the Display function. The
information you want appears on the TV screen .
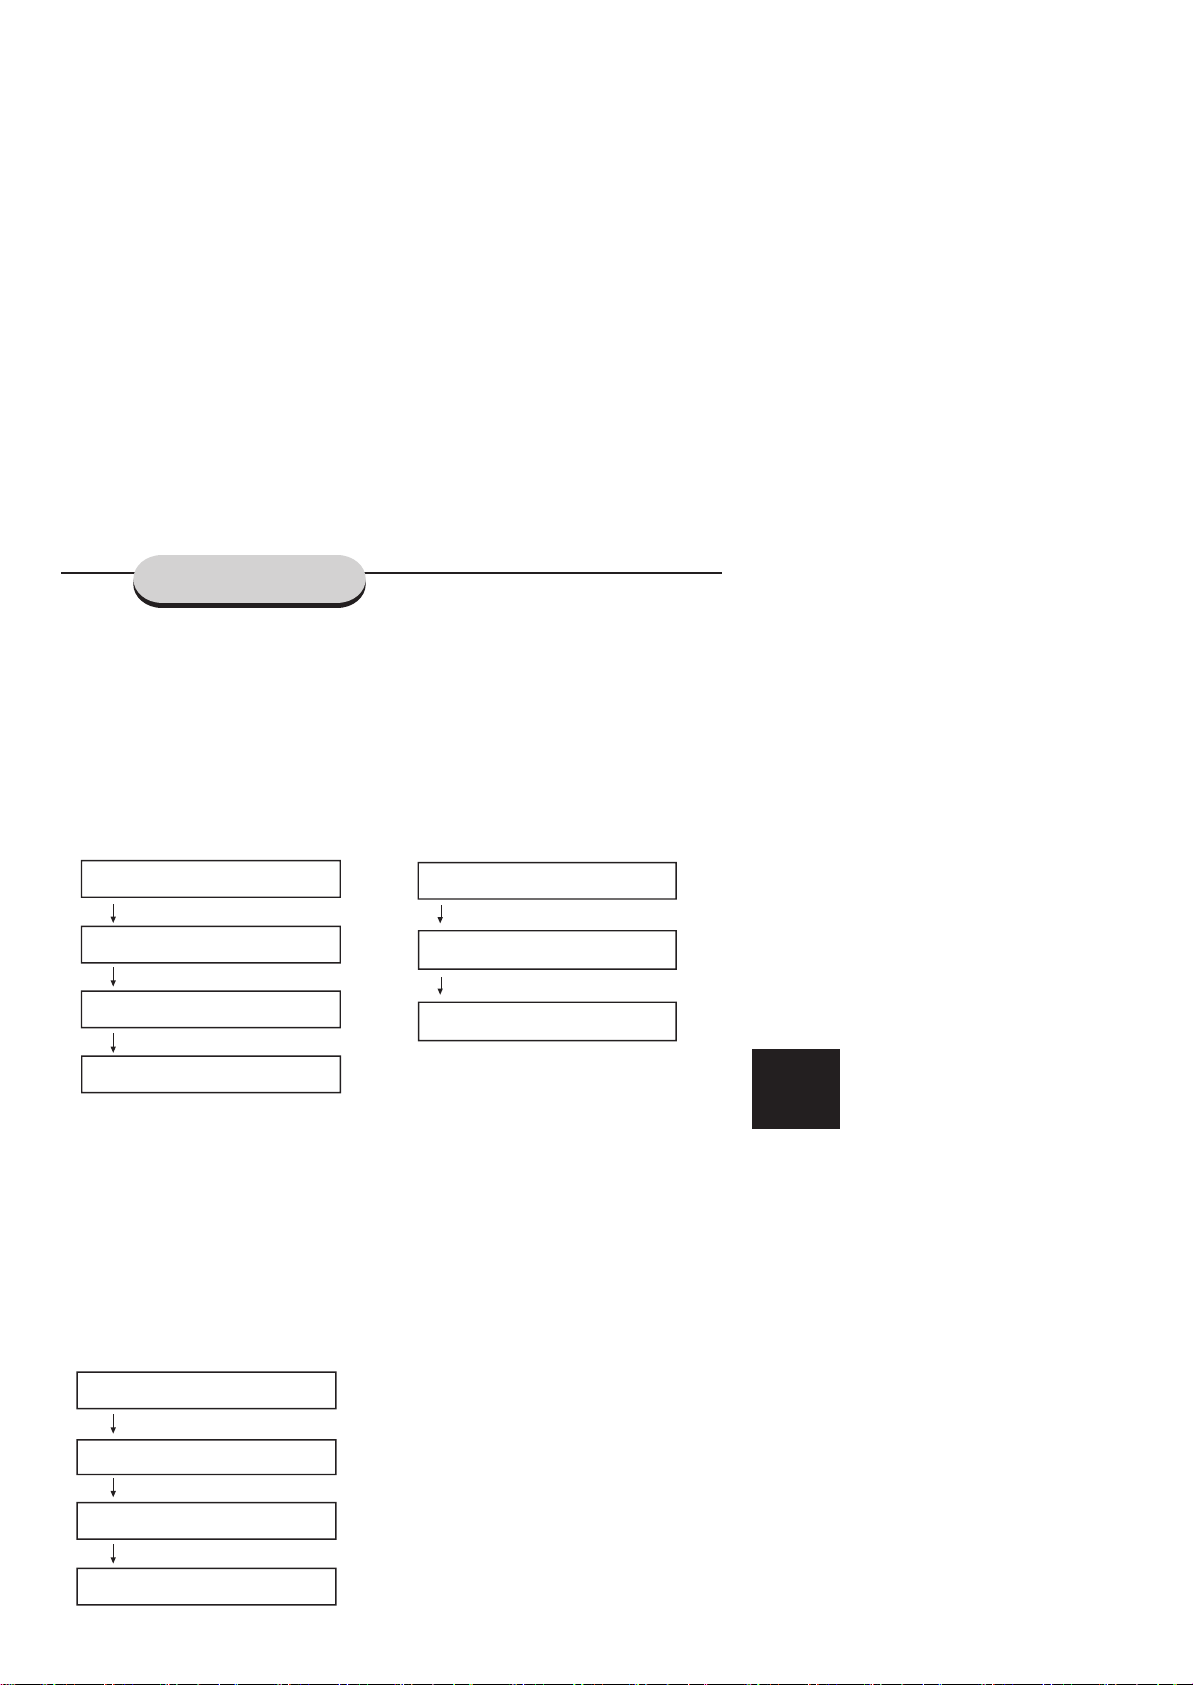
When playing a DVD
1 Press the DISPLAY button repeatedly to show
on TV screen as the following: The display will
disappear after a few seconds.
TITLE 02 / 05 CHAPTER 001 / 006
00 : 34 : 56
TITLE REMAIN
00 : 34 : 56
CHAPTER ELAPSED
00 : 01 : 23
CHAPTER REMAIN
00 : 03 : 21
2 Press the DISPLAY again, the information
display is off.
Note
Depending on the DVD, the title number or chapter
number or time may not appear or you may not
be able to change the display.
2 Press the DISPLAY button again, the infomation
display is off.
When playing a MP3 disc
1 Press the DISPLAY button repeatedly to show
on TV screen as the following:
The display will disappear after a few seconds.
2 Press the DISPLAY button again, the
information display is off.
CHAPTER ELAPSED 00 : 01 : 23
CHAPTER REMAIN 00 : 01 : 23
OFF
12
When playing a CD
1 Press the DISPLAY button repeatedly to show
on TVscreen as the following:
The display will disappear after a few seconds if
you do not press a key in five seconds.
SINGLE ELAPSED
08/15 00 : 59
SINGLE REMAIN
08/15 03 : 21
TOTAL ELAPSED
08/15 12 : 34
TOTAL REMAIN
08/15 54 : 32
Page 14
BASIC SETUP
13
General setup
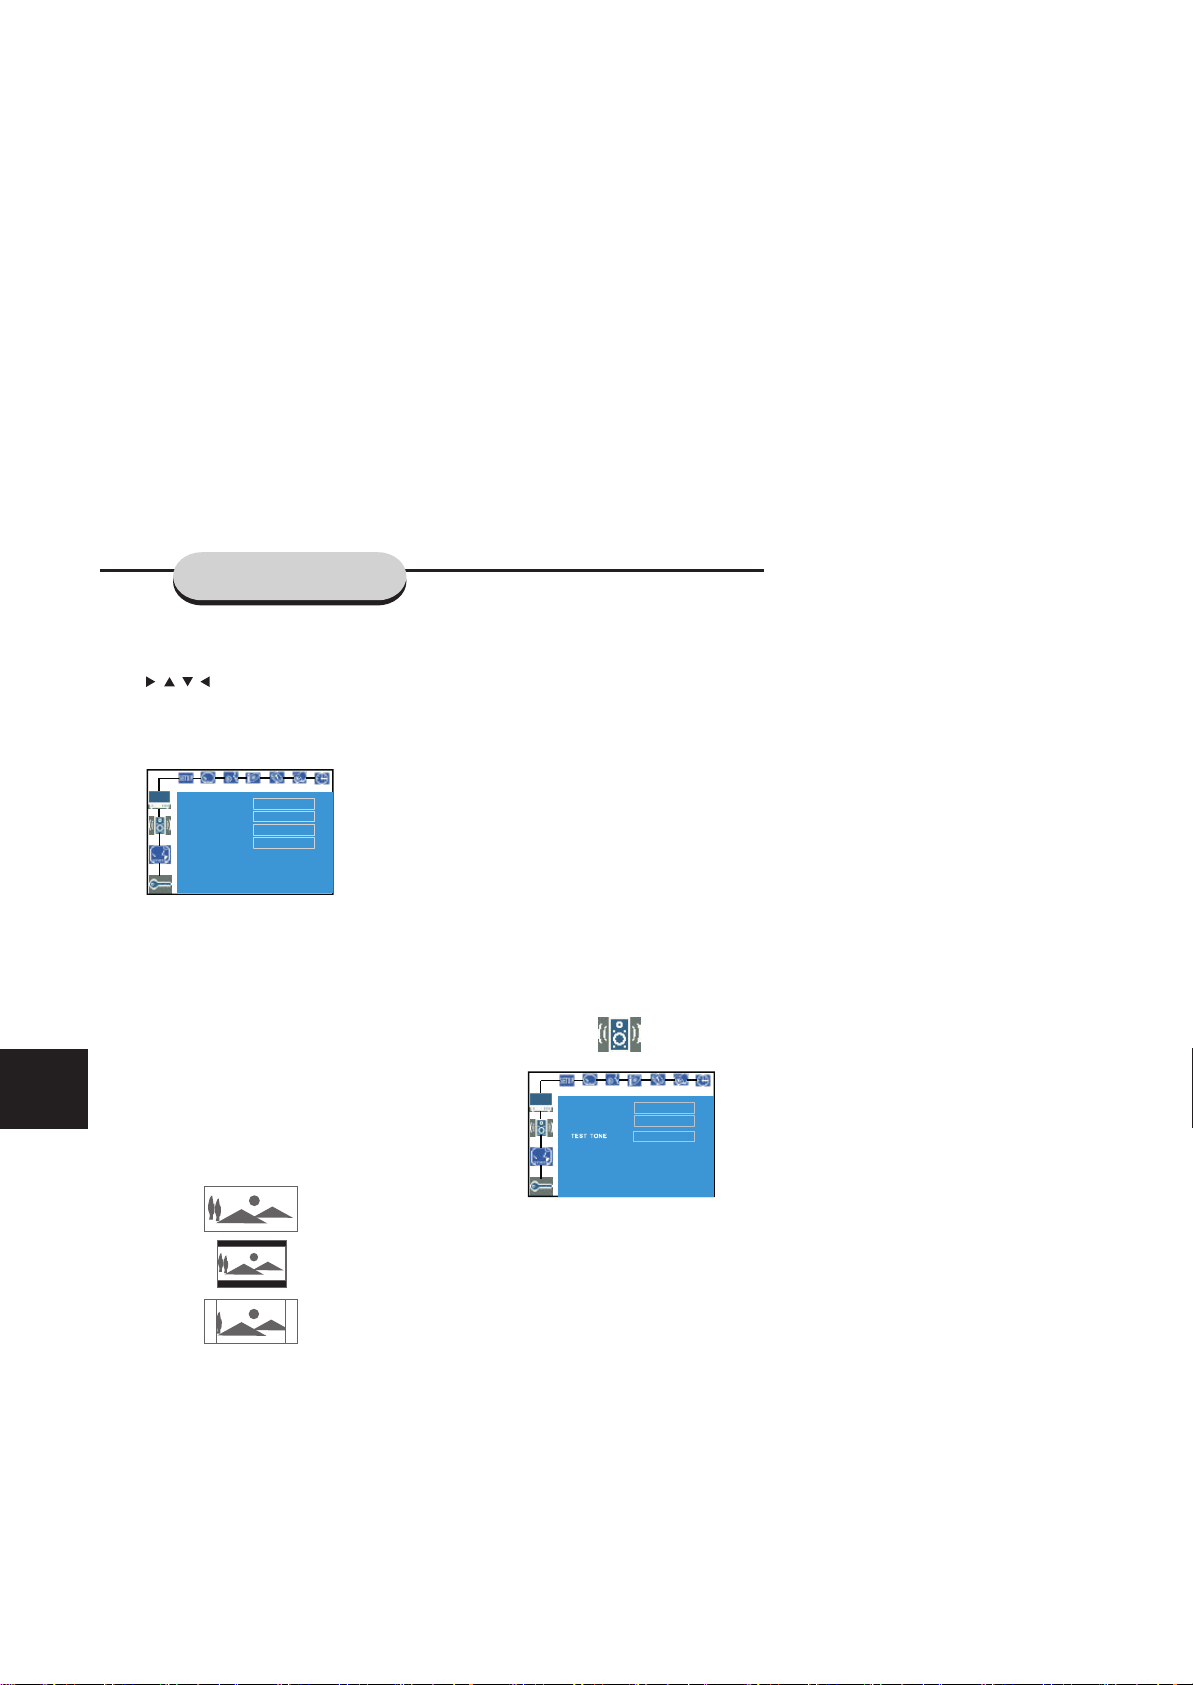
1 Press SETUP to enter SETUP MENU.
2 Use / / / to select your preferred option.
3 Press OK to confirm a highlighted selection.
4 To exit setup menu, press SETUP.
Setting the picture
TV SHAPE
TV TYPE
SCR SAVER
GO TO PICTURE SETUP PAGE
4:3 LB
NTSC
YPRPBVIDEO OUT
OFF
TV Shape
Select the aspect ratio of the TV to be connected.
4:3 PS
If you have a conventional TV set and your DVD
is not formatted for wide screen viewing, use this
setting. A wide picture is displayed on the whole
TV screen with a portion automatically cut off.
4:3 LB (default setting)
If you have a conventional TV set and your DVD
is formatted for wide screen viewing, use this
setting. wide bands will be displayed on the upper
and whole portions of the TV screen.
16:9
If you have a wide screen TV set, use this
setting (you must also set your wide screen TV
to “full size”).
16:9
(Wide screen)
4:3 LB
(Letter Box)
4:3 PS
(Pan Scan)
Note
If your DVD is not encoded to allow you to change
the aspect ratio, TV shape cannot be changed.
TV Type
Allows you to select the colour system matching
the connected TV set.
AUTO
If the connected TV is multi system, select this
mode. The output format will be in accordance
with the video signal of the disc.
NTSC
If the connected TV is NTSC system, select this
mode. It will change the video signal of a PAL
disc and output in NTSC format.
PAL
If the connected TV is PAL system, select this
mode. It will change the video signal of a NTSC
disc and output in PAL format.
Video Out
Video out selection enables you to choose the type
of video output suitable for your receiver.
S-VIDEO
Select S-VIDEO if you have connected the video
output to yourTV using S-VIDEO jack.
YPRPB
Select YPRPB, if you have connected the video
output to your TV using the YPRPB jack.
Screen Saver
If set to ON, when you leave the system in stop or
pause mode for more than three minutes the
screen saver will be activated. The default setting
is OFF.
DIGITAL OUT
NIGHT MODE
GO TO SOUND SETUP PAGE
ALL
OFF
OFF
Digital Out
Digital output selection enables you to specify the
type of digital output suitable for your amplifier or
reciever.
Select ALL (default setting) , if you have
connected the digital output to a multichannel
decoder receiver.
Select PCM 96K if the external component is
capable of processing digital signal input with
sampling rates of 96 kHz.
Select PCM 48K if the external component is
incapable of processing 96kHz digital signal
input, then convert to standard signal with
sampling rates of 48 kHz.
Select OFF to de-activate the coaxial output.
Night Mode
Set night mode to on to level out the volume. For
example, the disc will play at the same sound level
throughout the movie. The default setting is OFF.
Page 15
PREFERENCE SET TO ENGLISH
PREFERENCE SET TO ENGLISH
BASIC SETUP
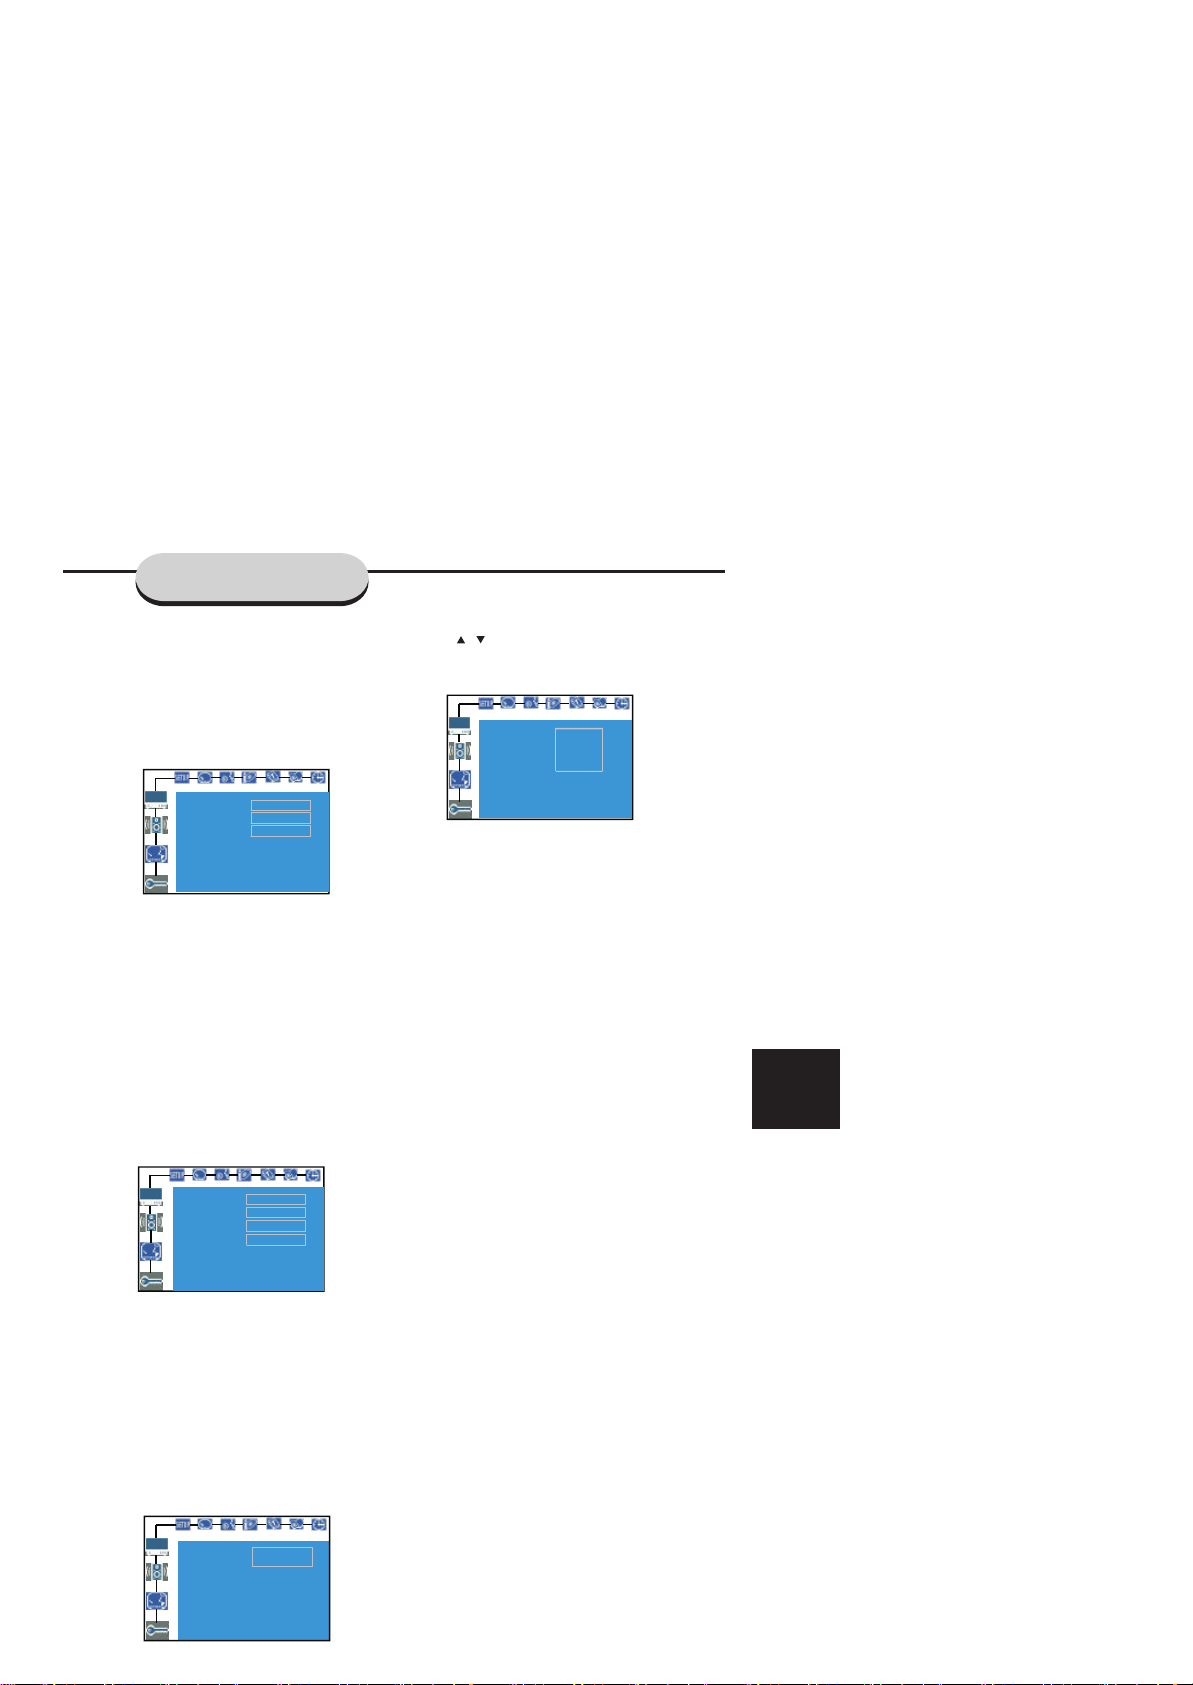
Test Tone (disc mode only)
If set to ON, the system will test the speaker
settings. The test signal is generated through the
left, right speakers. The default setting is OFF.
Setting the Language
AUDIO
SUBTITLE
ENGLISH
ENGLISH
ENGLISHDISC MUNE
-Audio
-Subtitle
-Disc Menu
1.This is to select the audio language, the
language used on TV screen menus or DVD
menus that will always be used for every disc to be
playback. The default setting is English.
2.If the language selected is not available on the
disc, the original language designated by each
disc will be selected.
Setting the Features
PARENTAL
PARENTAL
PASSWORD
SUBTITLE
DISC MUNE
DEFAULTS
1G
CHANGE
ENGLISHOSD LANG
RESET
2. Use / keys to select a rating level .
PARENTAL
PARENTAL
PASSWORD
SUBTITLE
OSD LANG
DISC MUNE
DEFAULTS
PG-R
PREFERENCE SET TO ENGLISH
1G
3PG
4PG13
6PG-R
7NC-17
8AUDLT
NO PARENTAL
3. Press OK to confirm.The default setting is 1G.
Rating 1 to 8
If the player’s parental leven is set below 8, only
discs with a lower or equal level will play. For
example, if the player is set to 5, only discs with
ratings of 5, 4, 3, 2, and 1 will be played. Higher
rated scenes will not be played unless an
alternative that has the same rating or lower is
available on the disc. For example, consider a
disc that general is suitable for most audiences,
and it is rated at level 2 for the most part.
However, in the middle, there are also scenes
rated at 5 (not suitable for children).
Note
some DVDs are not encoded with a rating though
the movie ratingis printed on the disc jacket. The
rating level feature does not work for such discs.
-Password
To set a new password for the parental control
or to change the password. The password
supplied as defualt is 8888.
14
-Parental
Enables setting of playback limitation level. Some
DVDs may have a parental level assigned to the
complete disc or to certain scenes on the disc. The
rating levels are from 1 to 8 and are country
dependent. You can prohibit the playing of certain
discs that are not suitable for your children or
have certain discs played with alternative
scenes.
1.Enter the 4-digit code. If necessary enter the
code a second time.
GO TO FEATURE SETUP PAGE
PREFERENCE SET TO ENGLISH
PARENTAL
PARENTAL
PASSWORD
SUBTITLE
OSD LANG
DISC MUNE
DEFAULTS
SET PARENTAL CONTROL
_ _ _ _
ENTER CODE
-OSD Language
Select the language for on screen display.
-Defaults
If RESET is selected, all the items in the setup menu
will be reset to default setting, except parental and
password setting.
Page 16
SPECIAL FUNCTIONS
15
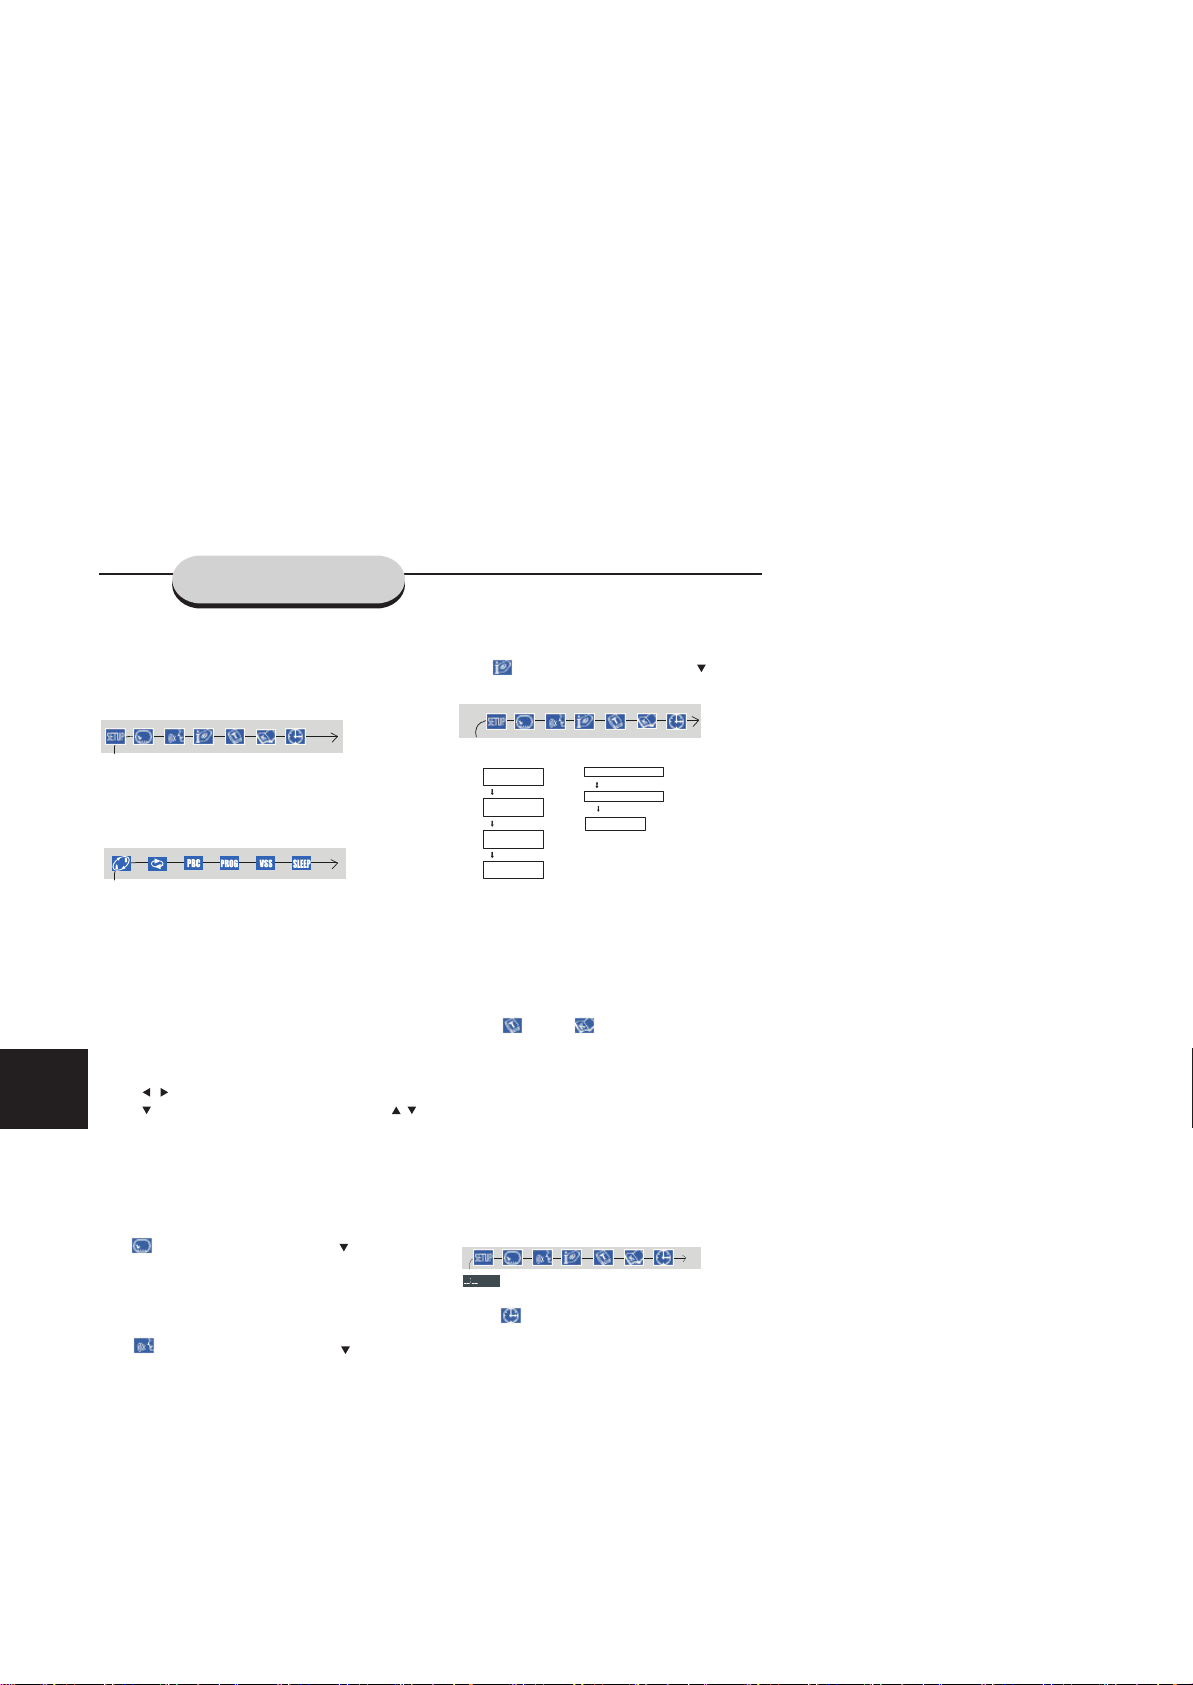
Special DVD features
A number of operations can be carried out directly
via the mutiple menu bars on the TV screen without
interrupting disc playback.
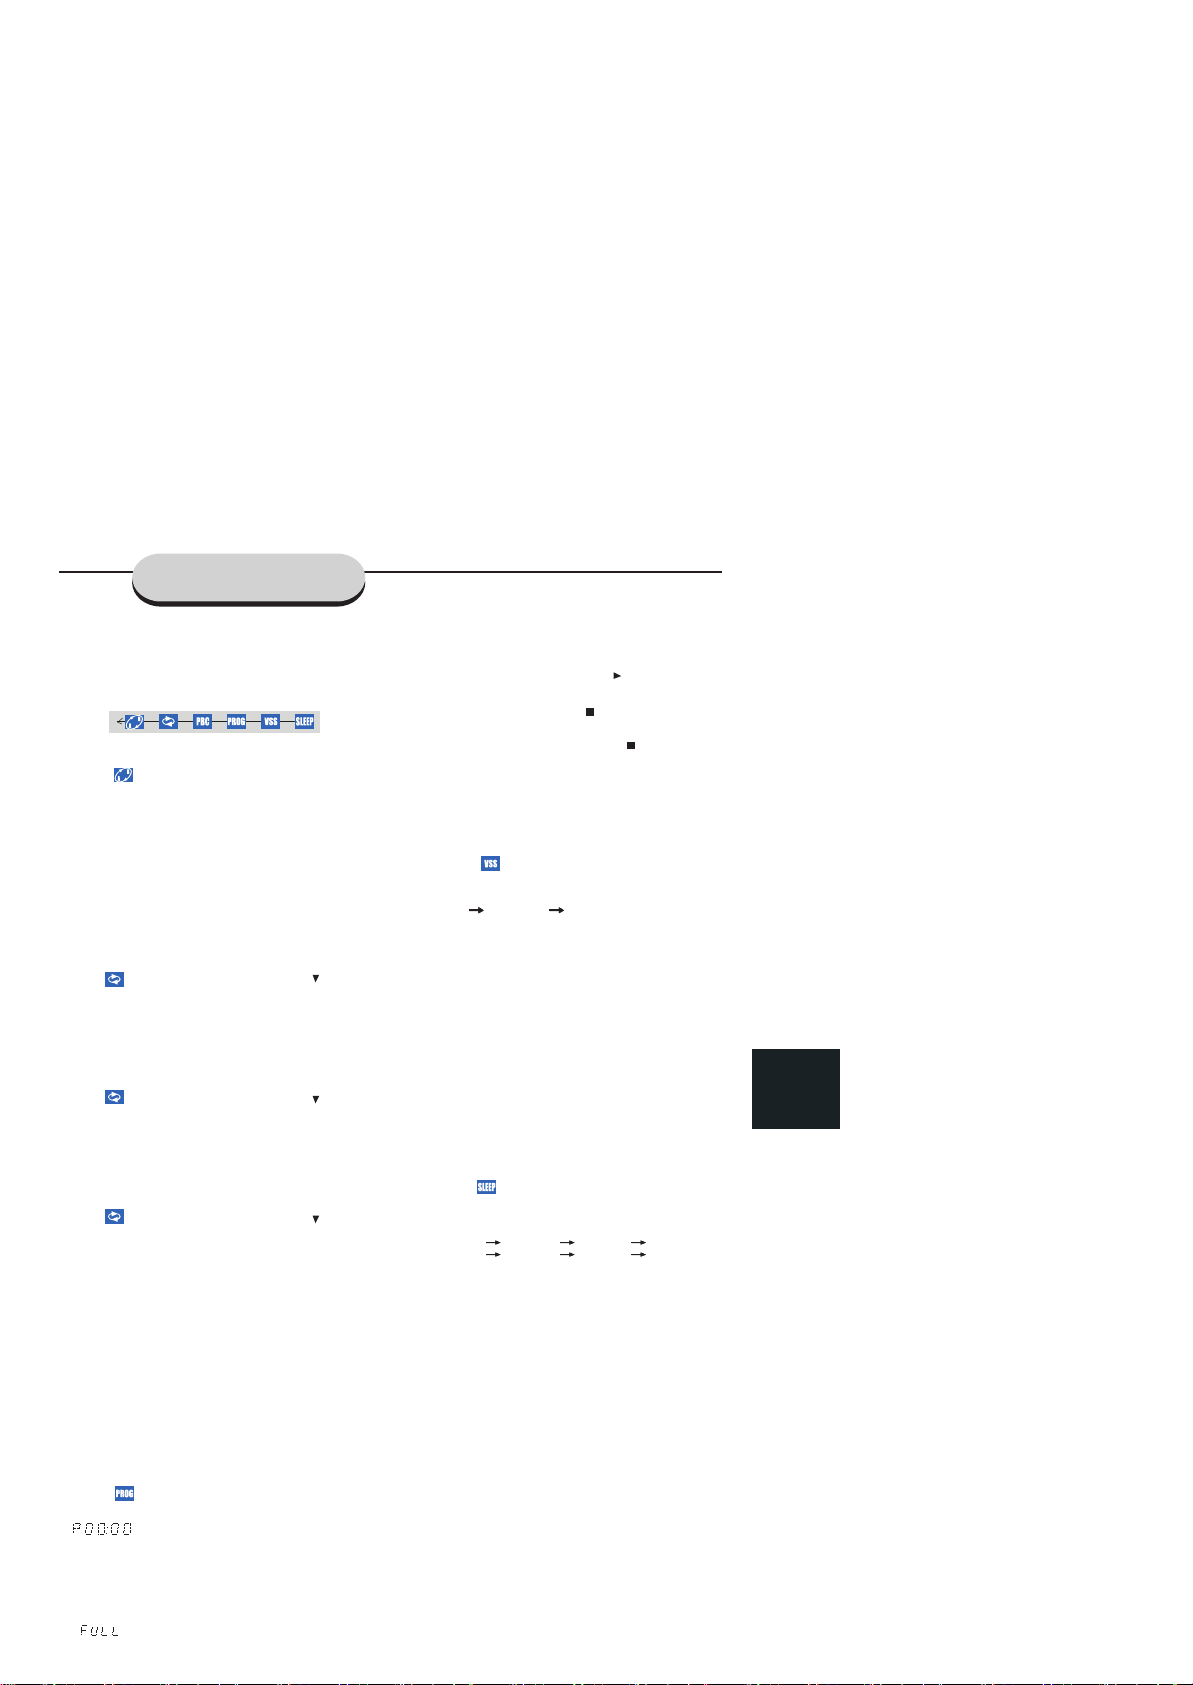
From the left,
SETUP MENU --> SUBTITLE --> LANGUAGE -->
STATUS -->TITLE SEARCH --> CHAPTER
SEARCH --> TIME SEARCH
From the left,
A -B --> REPEAT --> PBC ON / OFF -->
PROGRAM --> VSS --> SLEEP .
IMPORTANT!
Some operations may be different or restricted,
depending on the disc format. Refer to the jacket
or case of the disc you are playing.
1 Press SETUP button the menu bar will be
displayed across the top of the TV screen.
2 Press / to move through the menu bar
3 Press to select the highlighted icon and use /
key to select your preferred option.
4 Press OK to confirm a highlighted selection.
5 To exit, press SETUP or OK.
Changing Subtitle Language
This operation works only on DVDs with multiple
sound track language.
Select from the menu bar and press key to
select the desired language.
Display the disc information during playback
Select from the menu bar and press key to
select the following display informations :
DVD
TITLE 01/06 CHAPTER 05/19
00:36:15
TITLE REMAIN
00:34:56
CHAPTER ELAPSED
00:01:23
CHAPTER REMAIN
00:03:32
Divx/MP3
CHAPTER ELAPSED
00:01:23
CHAPTER REMAIN 00:01:23
OFF
Moving to another Title/Chapter
Some discs may contain more than one title or
chapter. If the disc has a title or chapter menu
recorded on it, you can start playback from the
selected item.
1 Select (title) or (chapter) from the menu
bar..
2 Use number keyed (0~9) to select a desire title /
chapter number and press OK to start playback.
Note
Selecting a title or chapter might not be possible
on certain discs.
Playback from a selected point
This function allows you to start playing at any
chosen time on the disc.
Changing Sound Track Language
This operation works only on DVDs with multiple
sound track language.
Select from the menu bar and press key to
select the desired language.
Note
When the desired language is not selected even
after pressing the button several times, it means
the language is not available on the disc.
1 Select from the menu bar.
2 Enter hours, minutes and seconds from left to
right in the time edit box using the number keys
(0~9).Each time an item has been entered, the
next item will be highlighted.
3 Press OK key to play.
Note
This function is not available for MP3.
Page 17
SPECIAL FUNCTIONS
Repeat A-B
This function can play a specific section in a
chapter / track repeatedly.
1 Select from the menu bar and press 6 key at
the starting you want .
2 Press6 key again at the end portion you want.
The specific section will now repeat continuously.
3 press 6 key the third time to cancel this function.
Note:
The A-B can be set only within the same
chapter/track.
Repeat
For DVD discs
Select from the menu bar and press key
repeatedly to select the following on the display:
[CHAPTER REPEAT ON] : repeat chapter
[TITLE REPEAT ON] : repeat title/disc
[REPEAT OFF] : repeat off
For CD discs
Select from the menu bar and press key
repeatedly to select the following on the display:
[REP-ONE] : repeat the current track
[REP-ALL] : repeat the entire disc
[REPEAT OFF] : repeat off
For Divx / MP3 discs
Select from the menu bar and press key
repeatedly to select the following on the display:
[REP-ONE] : repeat the current track
[FOLDER REPEAT] : repeat the entire disc
[REP-ALL] : repeat the entire disc
[REPEAT OFF] : repeat off
Note
When operating this function, the OSD will
display the operating information.
Program play
At stop mode,you can play the contents of the disc
in the order you want by programming the order of
the tracks to be played. Up to 99 tracks can be
stored.
1 Select in the menu bar and press key 6to
enter program mode.
-“ ” is displayed.
2 Use the number keys (0~9) to input the track
number in the order you want.
-If you attempt to program more than 99 tracks,
“ ” isdisplayed.
3 Press OK to store the track.
4 To start program play, press /ll.
5 To stop playback, press once .
6 To cancel the program , press again.
NOTE:
This function can be suitable to CD only.
Selecting the surround sound mode
1 Select from the menu bar and press 6 key
repeatedly to select desired sound mode:
VSS STEREO ...
-VSS (Virtual Surround Sound)
The prologic MPEG or Dolby Digital surround
channel is processed by a " virtualiser " DSP to add
surround effect from just the two front speakers.
-Stereo
All sound is reproduced and played through the left
and right speakers. This enables standard stereo
reproduction.
Sleep timer setting
The sleep timer enables the system to switch to
stand by mode automatically at a preset time .
1 Select from the menu bar and press 6 key
repeatedly to select a preset time.
- The selections are as follows (time in minutes)
15 minutes 30 minutes 45 minutes 60 minutes
90 minutes 120 minutes OFF 15 minutes...
2 To cancel the sleep timer
- Press 6 key repeatedly until the “OFF ” appears.
Activating P/I (Progressive/Interlace) Mode
If your TV has component input terminals (YPbPr
or YCbCr), you can connect your TV to this DVD
player's component output terminals (YPbPr) using
component signal cables (not provided). Refer to
page 13 to set YPRPB as DVD player's VIDEO
OUT.
Use your TV remote control or control buttons at
the front of your TV to select component input as
your TV's input signal.
Press P/I button on the DVD player's remote
control to switch between progressive and interlace
mode. Older TV system only supports interlace
mode, but newer TV system supports progressive
mode.
16
Page 18
17
CD-ROM
Page 19
7.9
18
Page 20
19
ON/STD BY
Page 21
This handy trouble-shooting guide is provided to save you time in case you experience any
inconvenience with this DVD player.
Problem Possible Solution
No Power
No sound
No picture
Disc does not play
Remote does not work
Divided picture
1. Check to ensure that the power plug is securely plugged.
1. Check the connection between the DVD player and the TV
set, amplifier, or any other unit it is connected to.
2. Check to ensure the TV and amplifier are in the correct mode
(video 1).
1. Check the connection between the DVD player and the TV set
or any other unit it is connected to.
2. Check to make sure TV is turned on.
1. Check to make sure the disc is loaded correctly label side
facing up on disc tray.
2. Check that disc is clean from dirt, dust, finger prints, smudges.
3. Check to ensure disc is within the guides on the tray.
4. Check parental lock function is off.
5. Make sure disc is for use in region 1.
1. Check batteries; possibly replace.
2. Check to ensure there isn't any obstacles between the remote
sensor on the unit's front panel and the remote control.
3. Be sure the remote is aimed at the remote sensor.
1. Check that disc is clean and has no scratches.
2. The unit is controlled by a microcomputer, which may need to
be reset. Turn off the unit's power, wait several seconds, then
turn back on.
20
No color picture
MP3 discs don't play
1. Check to see if the S connector is damaged (bent pin).
1. Use Another Software Edition to Reburn Disc, as the edition
used may not be compatible with the player.
2. Use new editions of software such as Audio station 4, Easy
CD Creator, Toast Titanium, etc.
3. Make sure MP3 file is not encoded with a variable bit rate,
such as provided by Real Networks.
Page 22
21
SPECIFICATION
DVD Player
Pickup............................................................................... Semiconductor laser, Wavelength 650 nm
Signal system.................................................................... PAL / NTSC
Video signal horizontal resolution..................................... 480 lines(DVD)
Video signal-to-noise ratio................................................ 50 dB(DVD)
Audio frequency response(at 2 CH stereo mode).............. DVD(PCM): 20Hz~20kHz(+/-3.0dB)
........................................................................................... CD: 20Hz~20kHz(+/-3.0dB)
Audio signal-to-noise ratio................................................ 60 dB(DVD)
Dynamic range.................................................................. DVD: 80dB; CD: 80dB
Video outputs
Composite Video.............................................................. 2Vp-p 75 ohms
S-video............................................................................ Y: 1Vp-p 75 ohms
..................................................... C: PAL 0.3Vp-p 75 ohms / NTSC 0.286 Vp-p 75 ohms
Audio line outputs
Audio. L/R........................................................................... 2Vrms( 1KHz,0dB)
Coaxial out ......................................................................... 0.7Vp-p 75 ohms
Main unit
Power supply...................................................................... AC120V 60Hz
Power consumption............................................................ 12 W
Dimension........................................................................... W360 x H50 x D228 mm
Weight ................................................................................ 1.8kg
Operation Temperature........................................................... 5°C ~ 35°C
Operation Humidity.................................................................. 15~75%
Design and Specifications are subjected to change without prior notice. Weight and dimensions are
approximate.
Page 23
Warranty obligations of Norcent Technology, Inc. are limited to the terms set forth below:
1. Norcent Technology warrants to the original consumer purchaser that this Norcent DVD player will be free
from defects in material and workmanship for the Standard Warranty Period of one year. The start of the
warranty period is the date of purchase, verifiable by a dated sales receipt.
2. The warranty on a replacement player is the remainder of the warranty period on the original player.
3. If the original consumer purchaser discovers a defect, Norcent Technology will, at its option, repair the
DVD player at no charge to the consumer, provided it is returned during the warranty period, with
transportation charges prepaid, to Norcent Technology, Inc. The unit must be sent properly packaged in
original Norcent Technology packaging or in Norcent Technology-approved packaging.
4. For warranty service, contact Norcent Technology at +1 909-305-2121(in the U.S.A) to obtain a Return
Material Authorization (RMA) number. A copy of the original dated sales receipt bearing the appropriate
Norcent Technology serial number may be required for warranty service.
The following are not covered under this warranty:
Normal wear and tear
Abuse, unreasonable use, mistreatment, or neglect
Damage caused by the equipment or system with which the disc player is used
Damage caused by modification or repair not made or authorized by Norcent Technology, Inc.
Disc player whose Norcent Technology, Inc. serial number has been removed or defaced
Damage caused by use of non-Norcent Technology, Inc. packaging
Damage caused by improper or improperly used packaging
Players that are determined to be stolen
THIS WARRANTY AND REMEDIES SET FORTH ABOVE ARE EXCLUSIVE AND IN LIEU OF ALL
OTHERS, WHETHER ORAL OR WRITTEN, EXPRESSED OR IMPLIED. NORCENT TECHNOLOGY,
INC.SPECIFICALLY DISCLAIMS ANY AND ALL IMPLIED WARRANTIES, INCLUDING WITHOUT
LIMITAION WARRANTY OF MERCHANT ABILITY AND FITNESS FOR A PARTICULAR PURPOSE AND
AGAINST INFRINGEMENT.
No Norcent Technology, Inc. dealer, agent, distributor, or employee is authorized to make any modification,
extension, or addition to this warranty.
NORCENT TECHNOLOGY, INC. IS NOT RESPONSIBLE FOR SPECIAL, INCIDENTAL, INDIRECT, OR
CONSEQUENTIAL DAMAGES RESULTING FROM ANY BREACH OF WARRANTY OR UNDER ANY
OTHER LEGAL THEORY , INCLUDING, BUT NOT LIMITED TO, LOSS OF DATA, LOSS OF PROPERTY,
AND ANY COSTS OF RECOVERING PROGRAMMING OR REPRODUCING ANY PROGRAM OR DATA
STORED IN OR USED WITH NORCENT TECHNOLOGY, INC. PRODUCTS.
22
Some states do not allow the exclusion of limitation of incidental or consequential damages or exclusion of
implied warranties, so the above limitations or exclusions may not apply to you This warranty gives you
special legal rights; you also have other rights that vary from state to state.
Page 24
2004 Norcent Technology, Inc. All rights reserved.
Page 25
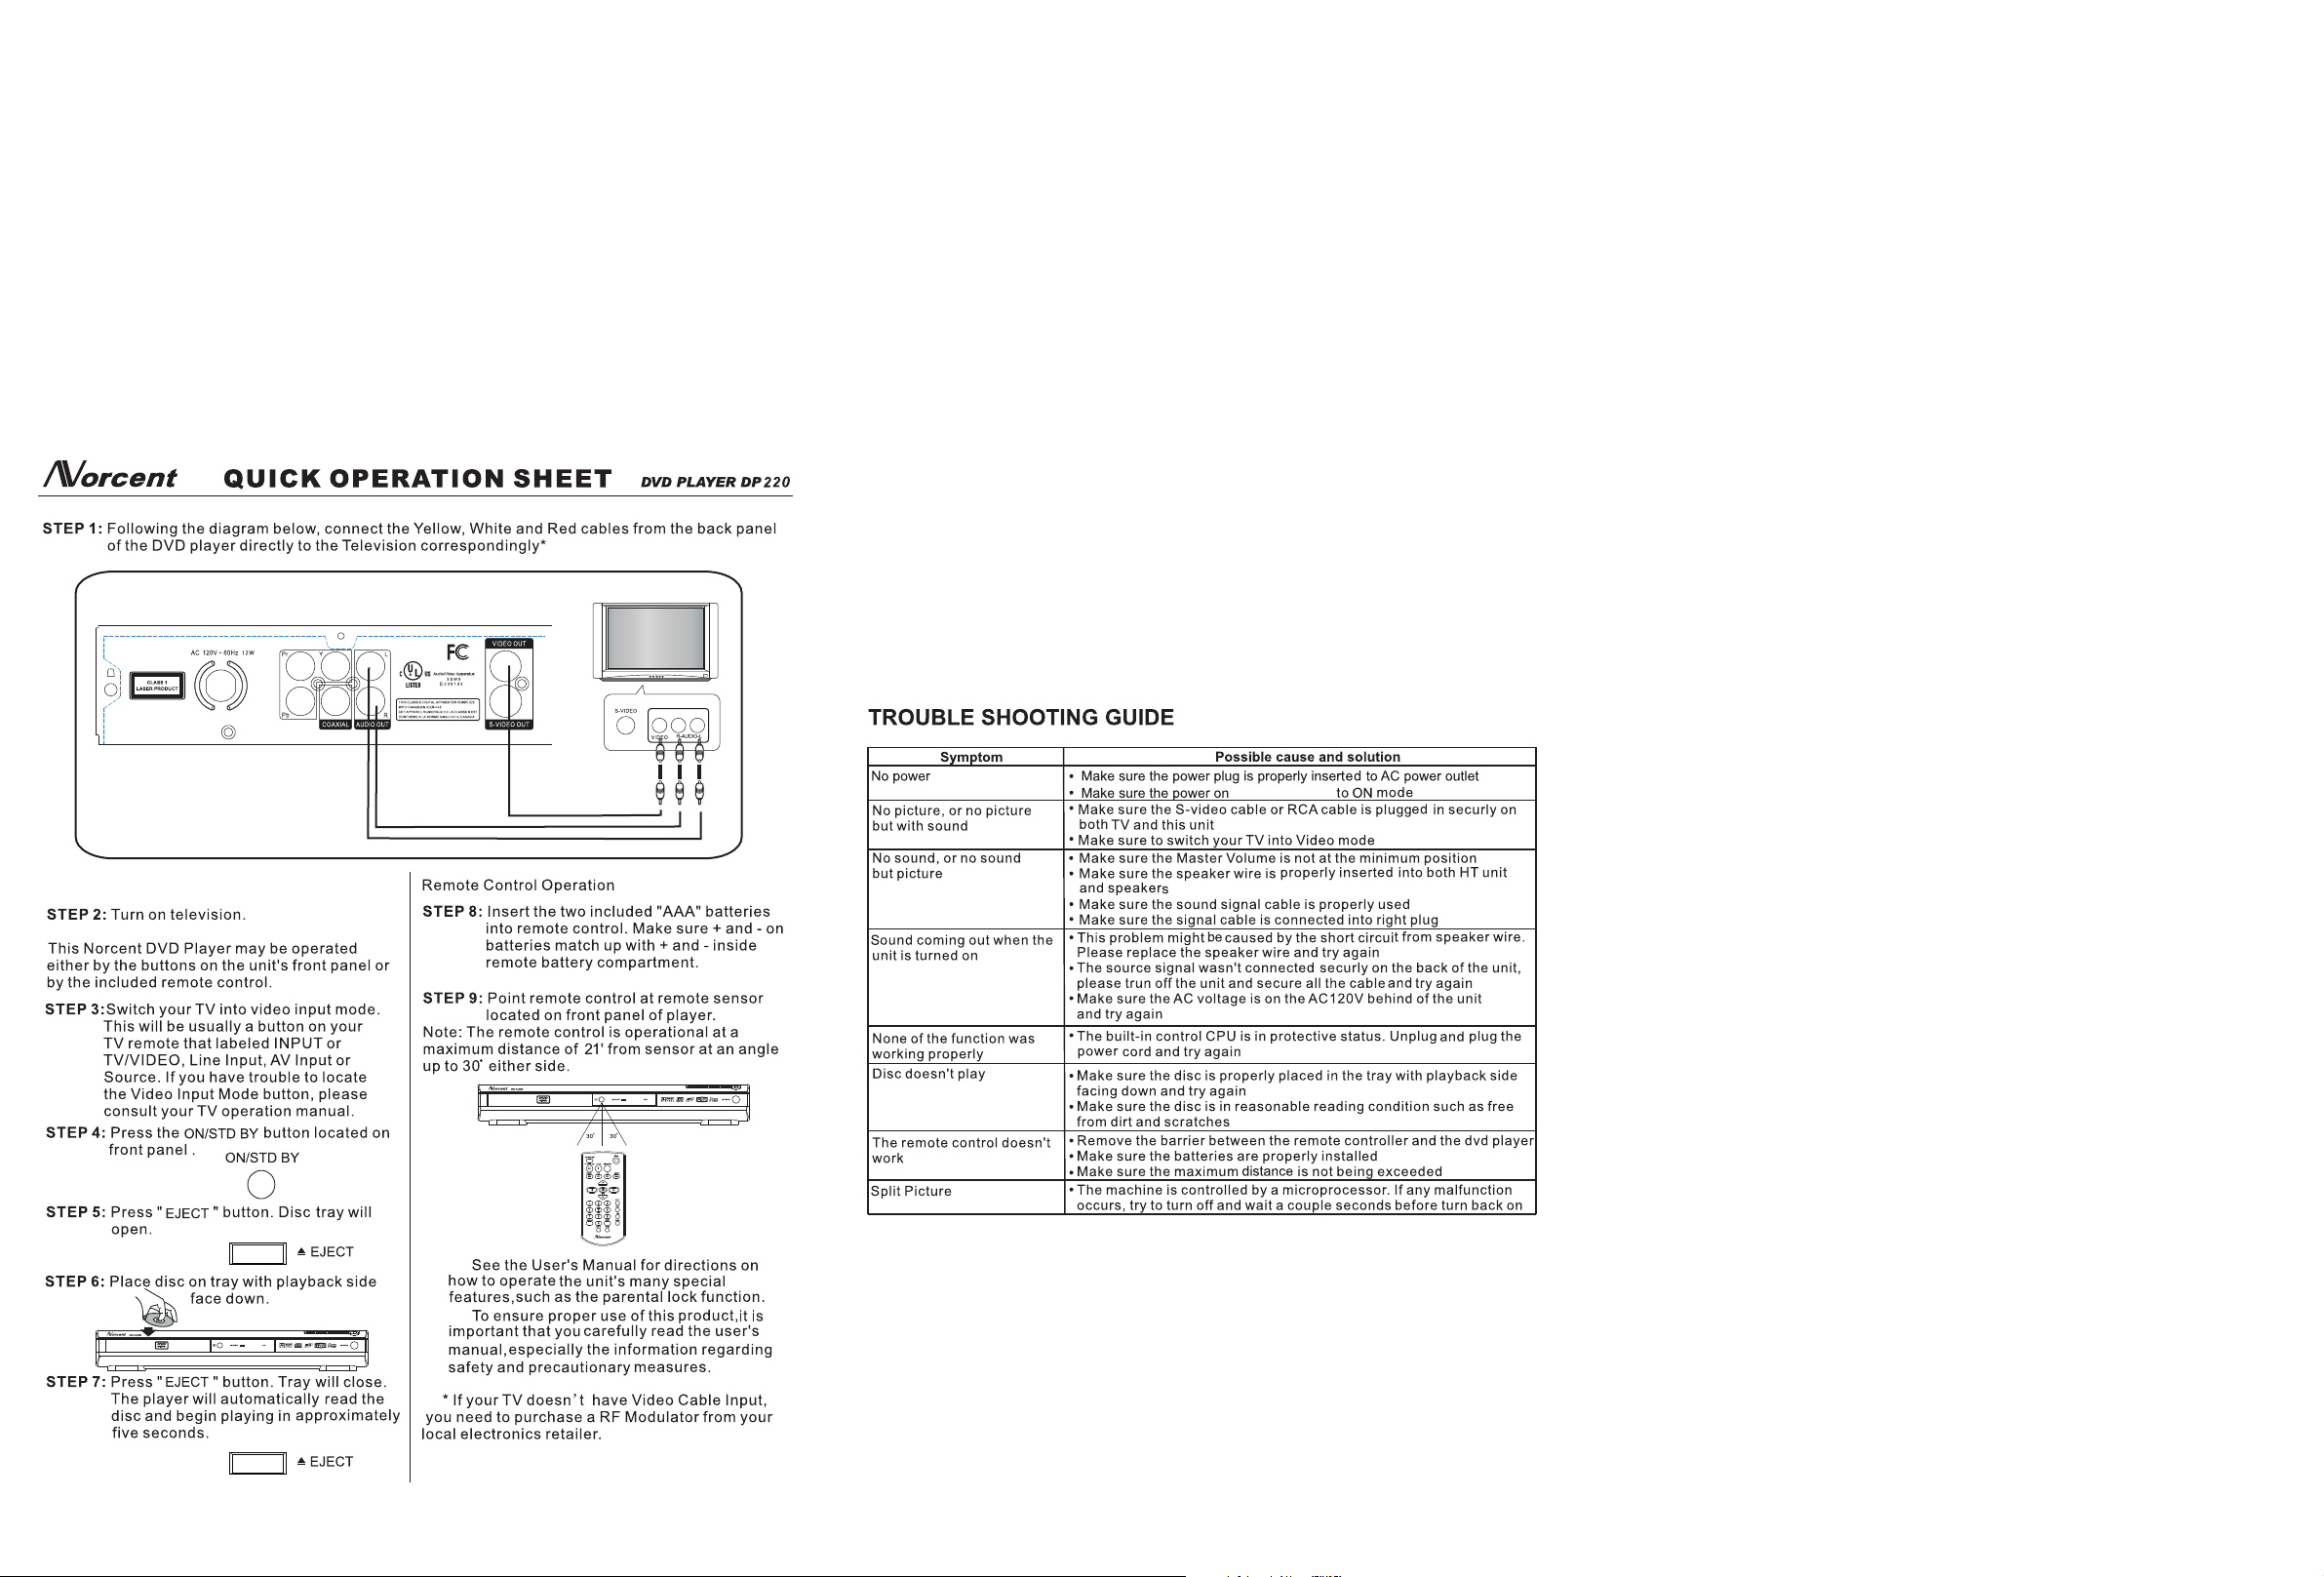
Activating P/I (Progressive/Interlace) Mode
If your TV has component input terminals (YPbPr or YCbCr), you can connect your TV to this DVD player's
component output terminals (YPbPr) using component signal cables (not provided). Please select the YPRPB
in the General setup video out - YPRPB in order to obtain a clear picture.
Use your TV remote control or control buttons at the front of your TV to select component input as your TV's
input signal.
Press P/I button on the DVD player's remote control to switch between progressive and interlace mode. Older
TV system only supports interlace mode, but newer TV system supports progressive mode.
button is pushed
 Loading...