

Page 1
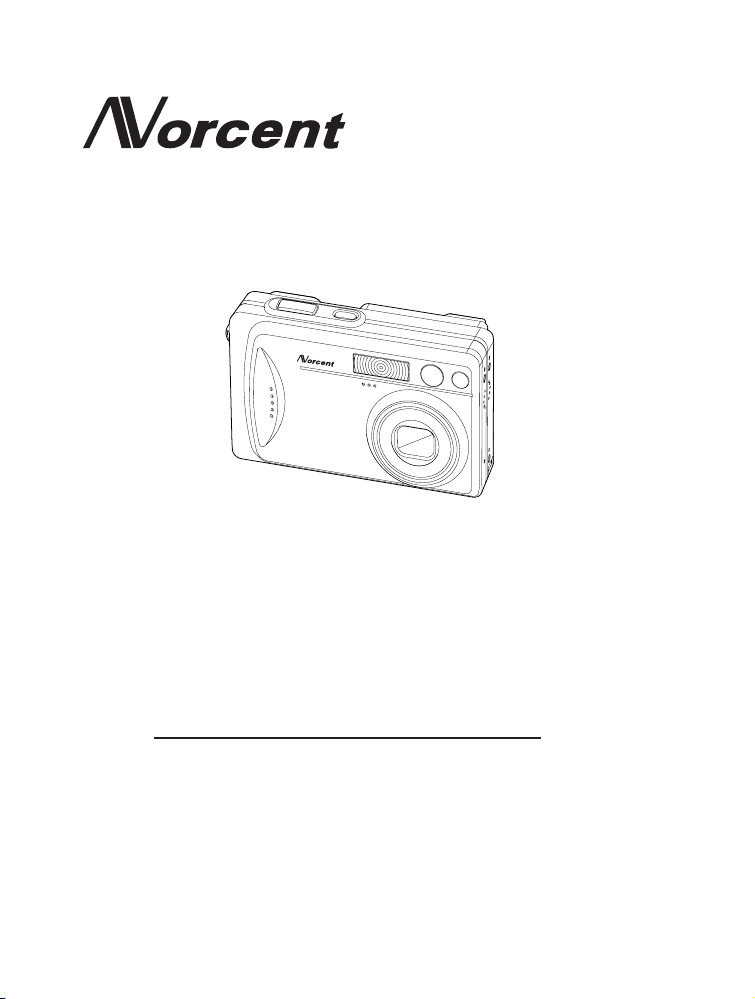
DC420
DIGITAL CAMERA
MANUAL
Thank you very much for choosing the Norcent Product.
We recommend that you take a few minutes to read carefully through this manual
before using. Please keep this manual in a safe place for your future reference.
Page 2

Digital Camera >>
FCC STATEMENT
This device complies with Part 15 of the FCC Rules. Operation is subject to the
following two conditions:
(1) This device may not cause harmful interference, and
(2) This device must accept any interference received, including interference
that may cause undesired operation.
Note:
This equipment has been tested and found to comply with the limits for
Class B digital devices, pursuant to Part 15 of the FCC rules. These limits
are designed to provide reasonable protection against harmful interference
in a residential installation. This equipment generates, uses and can radiate
radio frequency energy and, if not installed and used in accordance with
the instructions, may cause harmful interference to radio communications.
However, there is no guarantee that interference will not occur in a particular
installation. If this equipment does cause harmful interference to radio or
television reception, which can be determined by turning the equipment off
and on, the user is encouraged to try to correct the interference by one or
more of the following measures:
Reorient or relocate the receiving antenna
Increase the separation between the equipment and receiver
Connect the equipment into an outlet on a circuit different from that to which
the receiver is connected
Consult the dealer or an experienced radio/TV technician for help
Use of shielded cable is required to comply with Class B limits in Subpart B of
Part 15 of the FCC rules. Do not make any changes or modifications to the
equipment unless otherwise specified in the manual. If such changes or
modifications should be made, you could be required to stop operation of the
equipment.
2-E
Page 3

TRADEMARK INFORMATION
Microsoft® and Windows® are U.S. registered trademarks of Microsoft
Corporation.
Pentium® is a registered trademark of Intel Corporation.
Macintosh is a trademark of Apple Computer, Inc.
SDTM is a trademark.
Other names and products may be trademarks or registered trademarks of
their respective owners.
READ THIS FIRST
Notice:
1. Product design and specifications are subject to change without notice.
This includes primary product specifications, software, software drivers,
and user’s manual. This User Manual is a general reference guide for the
product.
2. The product and accessories that come with your camera may be different
from those described in this manual. This is due to the fact that different
retailers often specify slightly different product inclusions and accessories
to suit their market requirements, customer demographics, and geographical
preferences. Products very often vary between retailers especially with
accessories such as batteries, chargers, AC adapters, memory cards, cables,
carrying cases/pouches, and language support. Occasionally a retailer will
specify a unique product color, appearance, and internal memory capacity.
Contact your dealer for precise product definition and included accessories.
3. The illustrations in this manual are for the purpose of explanation and may
differ from the actual design of your camera.
4. The manufacturer assumes no liability for any errors or discrepancies in
this user manual.
5. For driver updates, refer to our website.
User’s Manual >>
E-3
Page 4
Digital Camera >>
WARNING
Do not expose the camera to moisture and make sure no water gets into
the camera. Take particular care when using the camera under extreme
weather conditions, such as rain or snow, or when operating the camera at
the beach or near water. Avoid using this camera in places subject to extreme
moisture. Do not use the camera if water has entered the camera. Turn the
camera off and remove the battery. Contact your dealer or authorized service
facility. Do not continue to use the camera as this may cause a fire or an
electrical shock.
Do not use the camera if any foreign objects have entered the camera.
Turn the camera off and remove the battery. Contact your dealer or
authorized service facility. Do not continue to use the camera as this may
cause a fire or an electrical shock.
Do not place the camera in an unstable location such as on a wobbly table
or sloping surface where the camera may fall or tip over and cause injury. If
the camera has been dropped or damaged, turn the camera off and remove
the battery. Contact your dealer or authorized service facility. Do not continue
to use the camera as this may cause a fire or an electrical shock.
Do not insert or drop metallic or other foreign objects into the camera through
access points such as the memory card slot. This may cause a fire or an
electrical shock.
Do not attempt to modify this camera. Do not remove the camera casing.
This may cause a fire or an electrical shock. Internal inspection and repairs
should only be carried out by an authorized service facility.
Never operate this camera in any way while driving a vehicle. This may
cause a traffic accident.
A camera is a precision instruments. Please do not drop it, strike it or use
excessive force when handling the camera.
4-E
Page 5
CAUTION
Do not place this camera in a location affected by oil fumes or steam, such
as near a cooking stove or humidifier. This may cause a fire or an electrical
shock.
Do not leave this camera in a location subject to extremely high temperatures,
such as in a sealed vehicle or in direct sunlight. Exposure to high
temperatures may adversely affect the camera case and internal
components and may cause a fire.
Do not cover or wrap the camera with a cloth or quilt. This may cause heat
to build up and distort the camera case and cause a fire. Always use the
camera and accessories in well-ventilated locations.
Do not use the camera to look directly at the sun. There is a danger of
injury to the eyes.
Do not use battery other than those specified for use with your camera.
Use of unsuitable battery may result in the battery splitting, or leaking and
may cause a fire, injury, or soiling of the battery compartment.
When placing the battery into the camera, check the polarity markings on
the battery ( - and + ) to ensure that the battery is inserted correctly. Incorrect
battery polarity will result in camera inoperability and may result in the battery
splitting or leaking and causing a fire, injury, or soiling of the battery
compartment.
When the camera is left at low or high temperatures do not touch it with
your bare hands. It is possible that you may sustain an injury due to burning.
User’s Manual >>
E-5
Page 6

Digital Camera >>
CONTENTS
8 INTRODUCTION
8 Overview
10 Package Contents
11 GETTING TO KNOW THE CAMERA
11 Front View
12 Rear View
14 Viewfinder LED Indicator
15 LCD Monitor Icons
17 GETTING STARTED
17 Attaching the Camera Strap
18 Inserting and Removing the Battery (Optional Accessory)
19 Charging the Battery
21 Inserting and Removing the SD Card (Optional Accessory)
22 Turning the Power On/Off
23 Setting the Date and Time
24 Choosing the Language
25 Formatting the SD Card
26 Setting Image Resolution and Quality
28 PHOTOGRAPHY MODE
28 [ ] Still Image Mode
30 Recording Voice Memos
31 Using the Optical Zoom
32 Using the Digital Zoom
33 Setting the Flash
35 Setting the Focus
36 Setting the Self-timer
37 Exposure Compensation/Backlight Correction
6-E
Page 7

39 [
] Movie Mode
40 [ ] PLAYBACK MODE
40 Playing Back Still Images
41 Playing Back Video Clips
43 Playing Back Still Images/Video Clips on a TV
44 Attaching Voice Memos
45 Thumbnail Display
46 Zoom Playback
47 Slideshow Display
48 Protecting Images
50 DPOF Settings
52 [ ] Erasing Images
54 MENU OPTIONS
54 Still Image Menu (Picture)
57 Still Image Menu (Function)
60 Movie Menu (Picture)
61 Movie Menu (Function)
62 Playback Menu
63 Setup Menu (In Photography Mode)
65 Setup Menu (In Playback Mode)
67 TRANSFERRING RECORDED IMAGES AND VIDEOS TO YOUR
COMPUTER
68 Step 1: Installing the USB Driver
69 Step 2: Connecting the Camera to Your Computer
70 Step 3: Downloading Images and Video Files
User’s Manual >>
71 INSTALLING PHOTOSUITE
72 INSTALLING PHOTOVISTA
73 CONNECTING THE CAMERA TO OTHER DEVICES
74 CAMERA SPECIFICATIONS
E-7
Page 8

Digital Camera >>
INTRODUCTION
Overview
Congratulations on your purchase of the new digital camera.
Capturing high-quality digital pictures is fast and easy with this state-of-the-art
smart camera. Equipped with a 4.2 Mega pixels CCD, this camera is capable of
capturing pictures with a resolution of up to 2272 x 1704 pixels.
Other cool features provided by the camera include the following:
LCD monitor - 2.0" LTPS TFT color LCD monitor makes it easy
to frame your subject when taking pictures. It also
displays the pictures you have taken.
Recording media - External memory supports SD card.
Optical zoom - 3x optical lens allows you to take telephotoand
wide-angle pictures.
Digital zoom - 3.6x digital zoom and 3x optical zoom permit
zoom photography of up to 10.8 times; 2x and 4x
playback captured images to enlarge a selected
portion of an image.
Flexible flash settings - Change the flash setting according to your
lighting environment and photography mode setting.
Focus mode - Photographs can be taken with the distance to the
subject set by auto focus, macro or infinity.
Self-timer mode - Time selectable between 10 seconds, 2 seconds
and 10+2 seconds.
Capture mode - Take different still images including single, a series
of 3 images with different exposures, and 3 images
continuously.
Movie mode - Record video clips with voice.
8-E
Page 9

Voice memo - A voice memo can be recorded once for 30
seconds at photography mode immediately
following a still image captured or at playback
mode while viewing the picture.
Camera settings - Have more control over picture quality by adjusting
the menu options.
Thumbnail display - Display in sets of nine pictures on the LCD monitor
for easier and quicker selection of pictures.
TV and PC connection - View pictures on a television monitor or computer
while connected to the USB or A/V cable.
DPOF settings - Allow you to embed printing information on your
SD card and to print your images on a DPOF
compatible printer by simply inserting it.
User’s Manual >>
E-9
Page 10

Digital Camera >>
Package Contents
Carefully unpack your camera and ensure that you have the following items.
Common Product Components:
Digital camera
A/V cable
User’s manual
USB cable
Software CD-ROM
Camera strap
Camera pouch
Conversion adapter
AC power adapter
Rechargeable lithium-ion battery
Common (Optional) Accessories:
SD card
Battery charger
10-E
Page 11
GETTING TO KNOW THE CAMERA
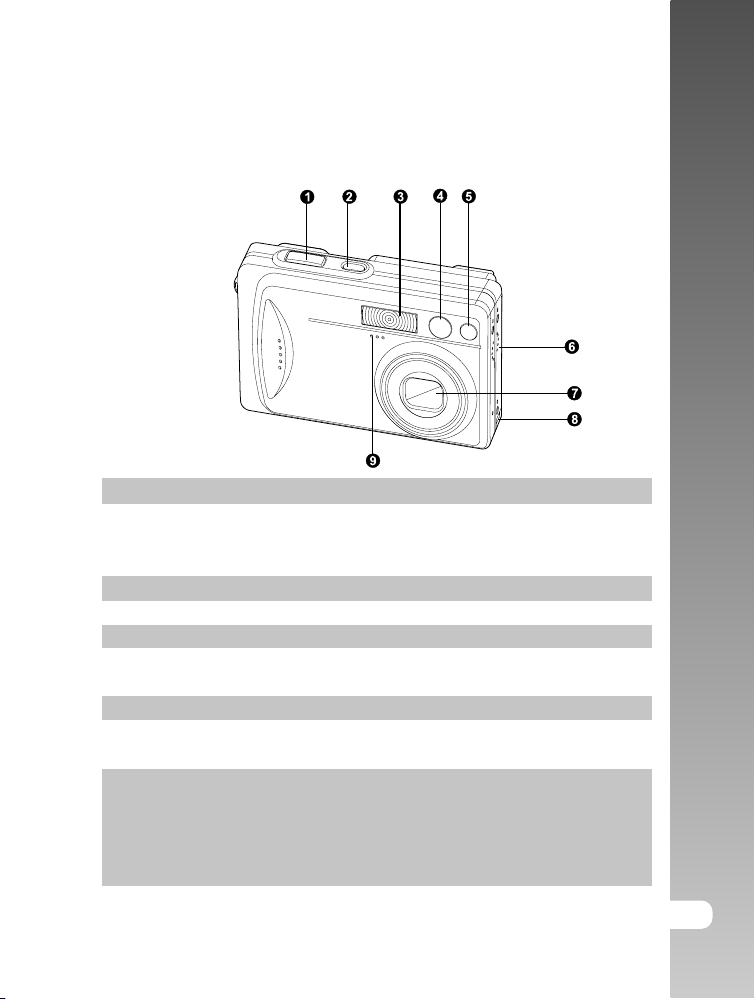
Front View
# Name Description
1. Shutter button Focuses and locks the exposure of the camera when
pressed halfway down, and takes the picture when
pressed all the way down.
2. POWER button Turns the camera power on and off.
3. Flash Provides flash illumination.
4. Viewfinder window Allows you to frame the subject of the picture.
5. Self-timer LED Blinks red during Self-timer mode until picture is
(AF auxiliary light) taken.
6. Speaker Produces camera sounds and plays recorded audio.
7. Lens 3x optical zoom lens allows you to take telephoto and
wide-angle pictures.
8. Conversion adapter Allows you to connect the conversion adapter to an AC
terminal power adapter to the camera to operate the camera
without battery, or to charge rechargeable lithium-ion
battery or to connect a USB cable or an A/V cable to
the camera.
9. Microphone Records audio clips.
User’s Manual >>
E-11
Page 12
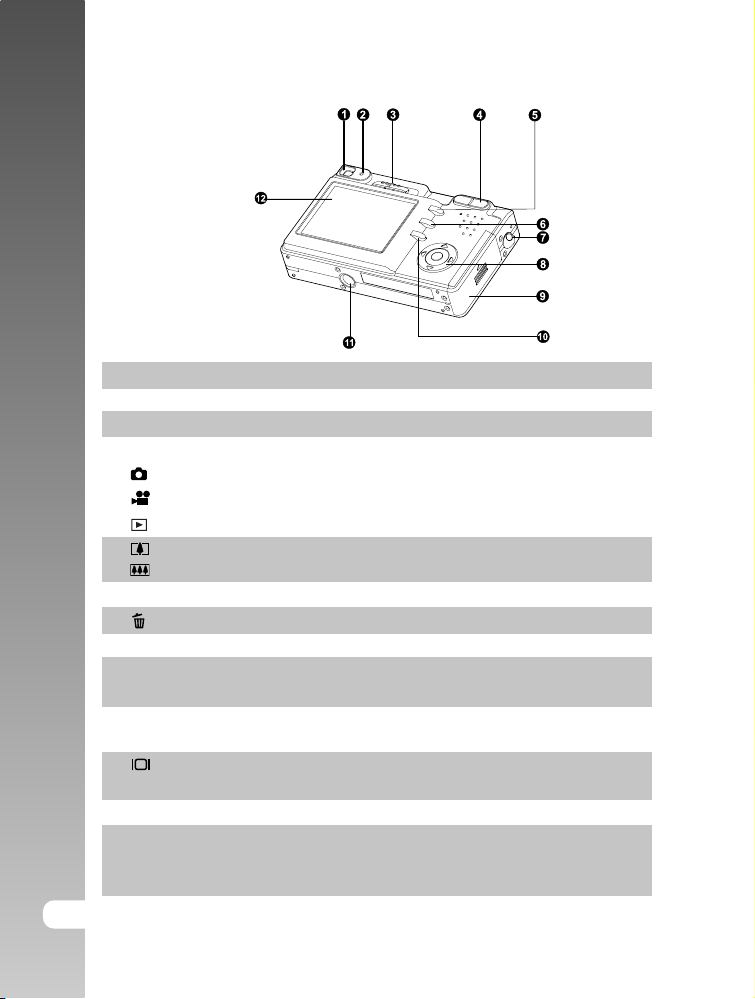
Digital Camera >>
Rear View
# Name Description
1. Viewfinder Allows you to frame the subject of the picture.
2. Viewfinder LED Displays the camera current state.
3. Mode switch Sets the camera mode.
Selects this when taking still images.
Selects this when recording video clips.
Performs image playback and deletion.
4. Zoom in button Zooms the lens to telephoto position.
Zoom out button Zooms the lens to wide-angle position.
5. MENU button Toggles OSD menu on and off.
6. Erase button Allows you to erase the picture.
7. Strap holder Camera strap attachment.
8. SET /Direction button Allows you to scroll through menus and pictures,
and then select choices.
9. Battery/SD card cover Allows access to the battery and insert or remove
the memory card.
10.
11. Tripod socket Allows tripod mounting.
12. LCD monitor Provides menu information to operate the camera,
12-E
Display button Turns the LCD monitor display and live view on
and off.
and previews the picture before taking it and review
it afterwards.
Page 13
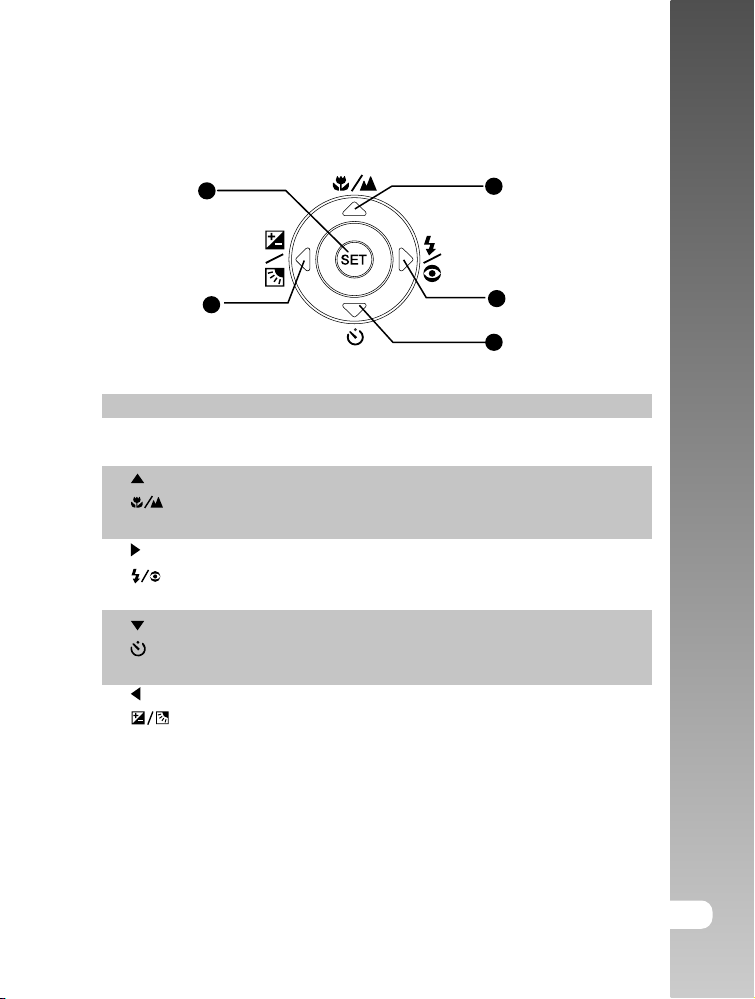
SET /Direction button
User’s Manual >>
1
5
# Name Description
1. SET button Enters the menu page and confirms the
chosen setting.
2. button Scrolls upwards.
Focus button Allows you to choose the appropriate focus
setting.
3.
4. button Scrolls downwards.
5.
button Scrolls right.
Flash button Allows you to choose the appropriate flash
setting.
Self-timer button Allows you to toggle the self-timer on and
off, selects the desired self-timer mode.
button Scrolls left.
Exposure compensation Allows you to toggle the exposure
/ Backlight correction button compensation / backlight correction on and
off.
2
3
4
E-13
Page 14
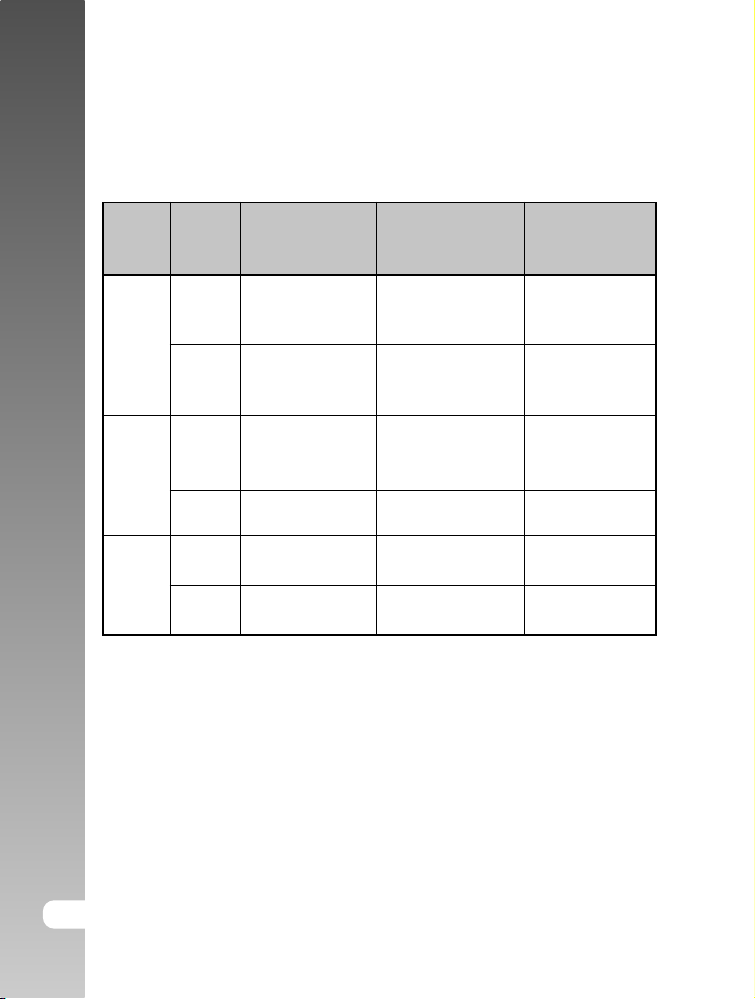
Digital Camera >>
Viewfinder LED Indicator
This describes the color and state of the viewfinder LED.
Color
Green
Red
Orange
State
On
Flashing
On
Flashing
On
Flashing
During power
off
The completion
of battery charge.
Battery charging
in progress.
Battery charging
error.
-
-
-
During
photography
AE or AF is locked
with the shutter
button held halfway.
-
Writing to SD card
in progress.
When the image is
not in focus.
Charging of the
flash in progress.
Hardware
malfunction.
During
connection to a
PC
-
-
In communication
to PC. (SD card
is inserted.)
-
-
SD card is not
inserted.
14-E
Page 15
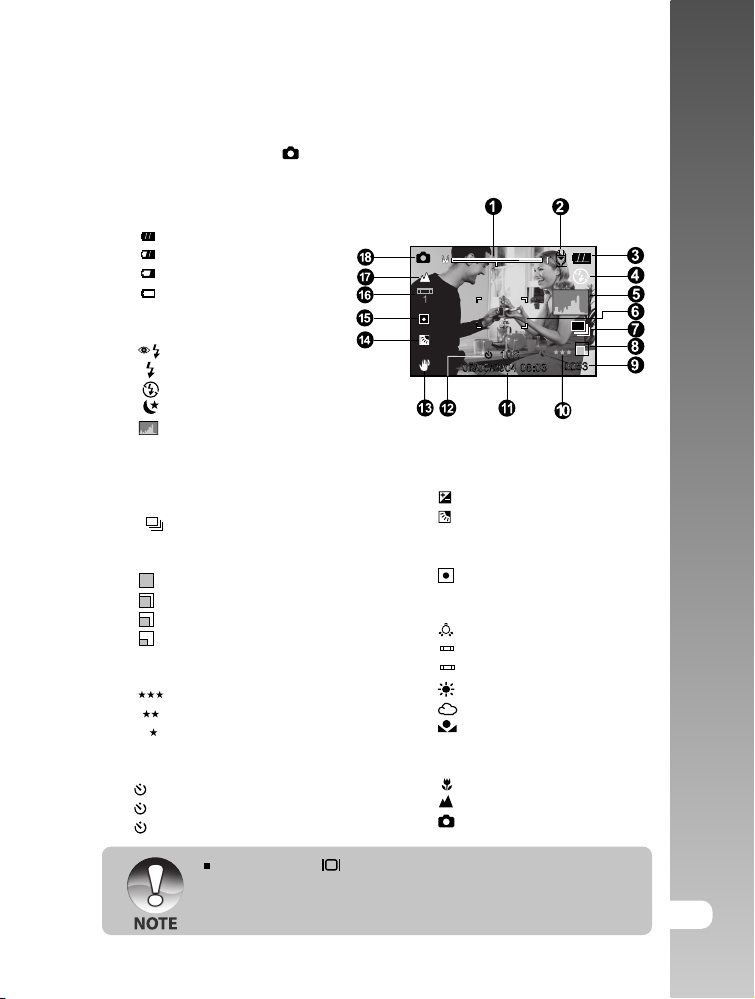
LCD Monitor Icons
Photography mode [ ]
1. Zoom status
2. Voice memo
3. Remaining battery status
] Full battery power
[
] Medium battery power
[
] Low battery power
[
] No battery power
[
4. Flash icon
[Blank] Auto
] Red-eye Reduction
[
] Forced Flash
[
] Suppressed Flash
[
] Night Scene
[
] Histogram
5. [
6. Focus area (When the shutter
button is pressed halfway.)
7. Capture mode icon
[Blank] Single
] Continuous
[
[ AEB ] Auto Exp.
8. Image size
] 2272 x 1704
[
] 1600 x 1200
[
] 1280 x 960
[
] 640 x 480
[
9. Possible number of shots
10. Quality
] Fine
[
] Standard
[
] Economy
[
11. Date and time
12. Self-timer icon
10s] 10 sec.
[
2s ] 2 sec.
[
10+2s ] 10+2 sec.
[
13. Unsteady hold warning icon
] Exposure compensation
14. [
] Backlight correction
[
15. Metering icon
[ Blank ]Multi
] Spot
[
16. White balance icon
[ Blank ]Auto
] Incandescent
[
] Fluorescent 1
[
1
] Fluorescent 2
[
2
] Day Light
[
] Cloudy
[
] Manual
[
17. Focus icon
[Blank] Auto focus
] Macro
[
] Infinity
[
] Still image mode
18. [
User’s Manual >>
Each press of the button switches one step in the sequence of Normal
display (displaying the icons, etc), Normal and Histogram, display OFF,
LCD monitor OFF.
E-15
Page 16
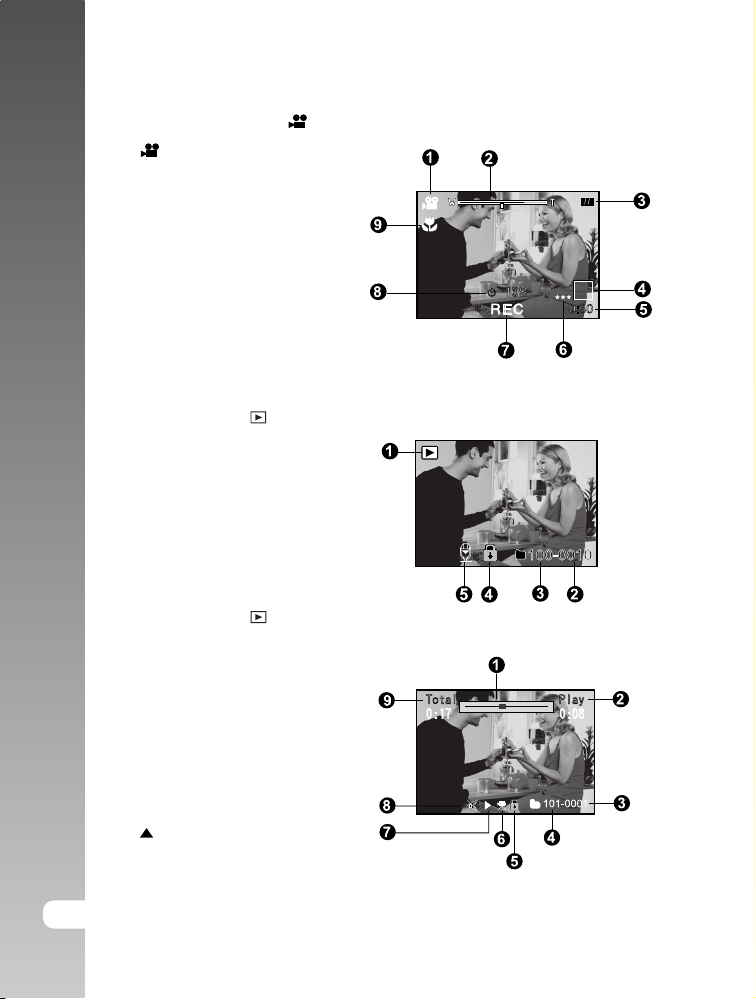
Digital Camera >>
Photography mode [ ]
1. [ ] Movie mode
2. Zoom status
3. Remaining battery status
4. Image size
5. Possible recording time
/ elapsed time
6. Quality
7. Recording indicator
8. Self-timer icon
9. Focus icon
Playback mode [ ] -Still image playback
1. Mode icon
2. File number
3. Folder number
4. Protect icon
5. Voice memo
Playback mode [ ]-Video playback
1. Video status bar
2. Elapsed time
3. File number
4. Folder number
5. Protect icon
6. Mode icon
7. Play mode
8. Sound off icon (When the
[ ] button is pressed
during video playback.)
9. Total time
16-E
Page 17
GETTING STARTED
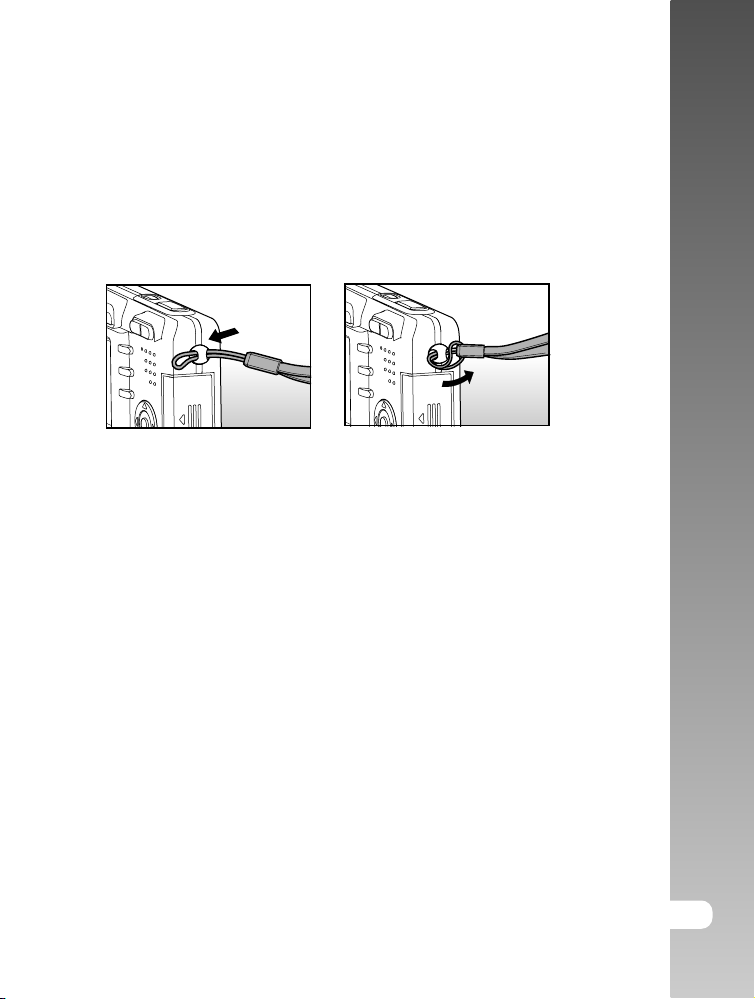
Attaching the Camera Strap
Attach the camera strap as shown in the illustration.
User’s Manual >>
E-17
Page 18
Digital Camera >>
Inserting and Removing the Battery (Optional
Accessory)
We highly recommend using specified rechargeable lithium-ion battery (3.7V)
to fully demonstrate this camera’s function. Charge the battery before using the
camera. Make sure that the power of the camera is off before inserting or
removing the battery.
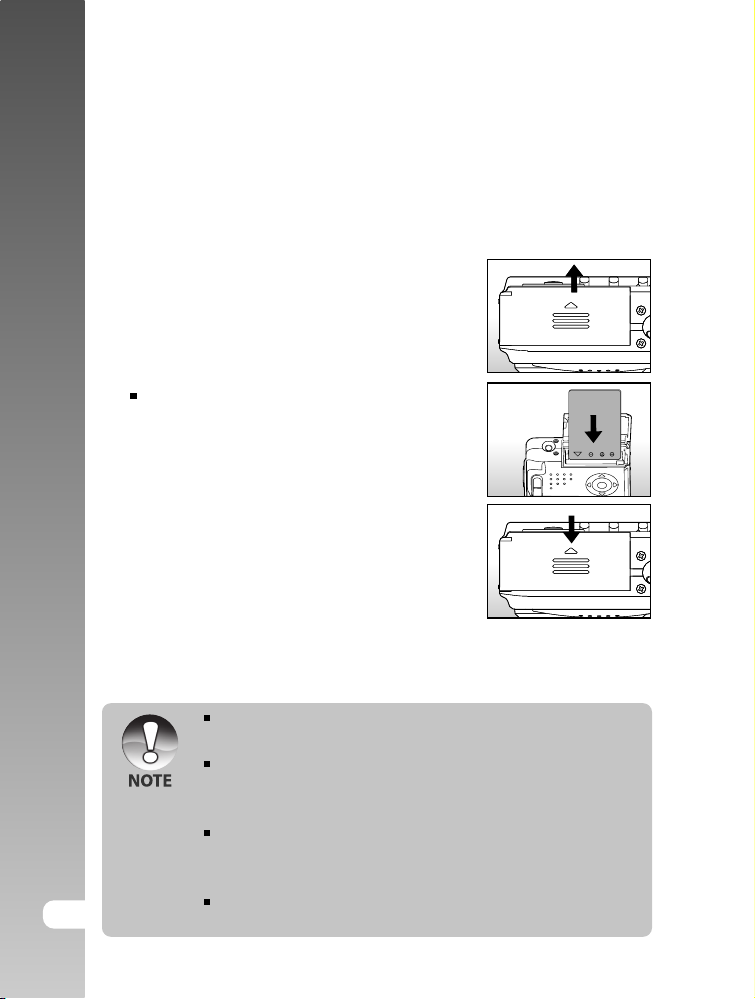
Inserting the Battery
1. Open the battery/SD card cover.
2. Insert the battery in the correct orientation
shown.
Tilt the battery lock lever in the direction
of the arrow and orient the battery so
that its label is facing to the rear side of
the camera, and then insert the battery.
3. Close the battery/SD card cover.
Removing the Battery
Open the battery/SD card cover and then release the battery lock lever. When
the battery has come out a little, slowly pull it out the rest of the way.
18-E
If you are not going to use the battery for an extended period of time,
remove it from the camera to prevent leakage or corrosion.
Avoid using the battery in extremely cold environments as low
temperatures can shorten the battery life and reduce the camera
performance.
The battery may feel warm when using the camera for an extended
period of time or using the flash continuously. This is normal and not a
malfunction.
The camera may feel warm when being used continuously or for an
extended period of time. This is normal and not a malfunction.
Page 19
Charging the Battery
New battery or the battery that has not been used for an extended period of
time (the battery that passed the expiry date is an exception) might affect the
number of pictures that can be taken. Therefore, to maximize its performance
and lifetime, we recommend that you fully charge the battery and discharge it
for at least one complete cycle before use. Using the optional AC power adapter
charges the battery. Make sure that the power of the camera is off and then
insert the battery before starting.
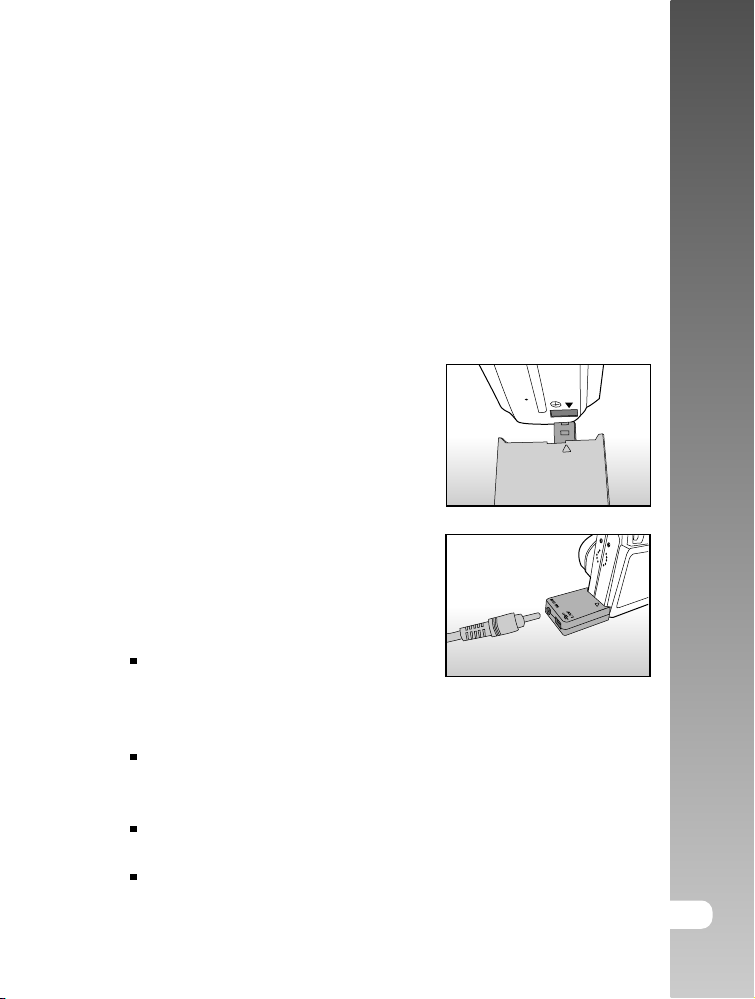
1. Insert the conversion adapter into the
conversion adapter terminal of the camera
as shown in the illustration.
2. Insert one end of the AC power adapter
into the DC IN terminal of the conversion
adapter.
3. Insert the other end of the AC power
adapter into a wall outlet.
The viewfinder LED flashes green when
charging is started and lights green when
charging is completed. It lights red when
a charging error occurs.
It is recommended to fully discharge or
exhaust the battery before being
charged.
Charging time varies according to the ambient temperature and the status
of battery.
If you want to use the camera when the battery charging is in progress,
use the camera with the AC power adapter connected.
User’s Manual >>
E-19
Page 20
Digital Camera >>
This camera must be used with specified AC power adapter. Damage
caused by the use of an incorrect adapter is not covered under the
warranty.
When the charging is not started even if following the above procedure,
turn the power on at any mode after LCD monitor turns on, and then turn
the power off.
The battery may feel warm after it has been charged or immediately
after being used. This is normal and not a malfunction.
When using the camera in cold areas, keep the camera and battery
warm by holding them inside your outer cloth.
If you open the battery cover without removing the battery, the power
will not be terminated. If you remove the battery, you have to insert the
battery again in a period of 2 hours in order to make sure that the date
and time will not be reset.
20-E
Page 21
Inserting and Removing the SD Card (Optional
Accessory)
Images photographed with this camera will be stored on the SD card. Without
inserting the SD card, you cannot take photographs using the camera. Before
inserting or removing the SD card, make sure that the power of the camera is
off.
Inserting the SD card
1. Open the battery/SD card cover.
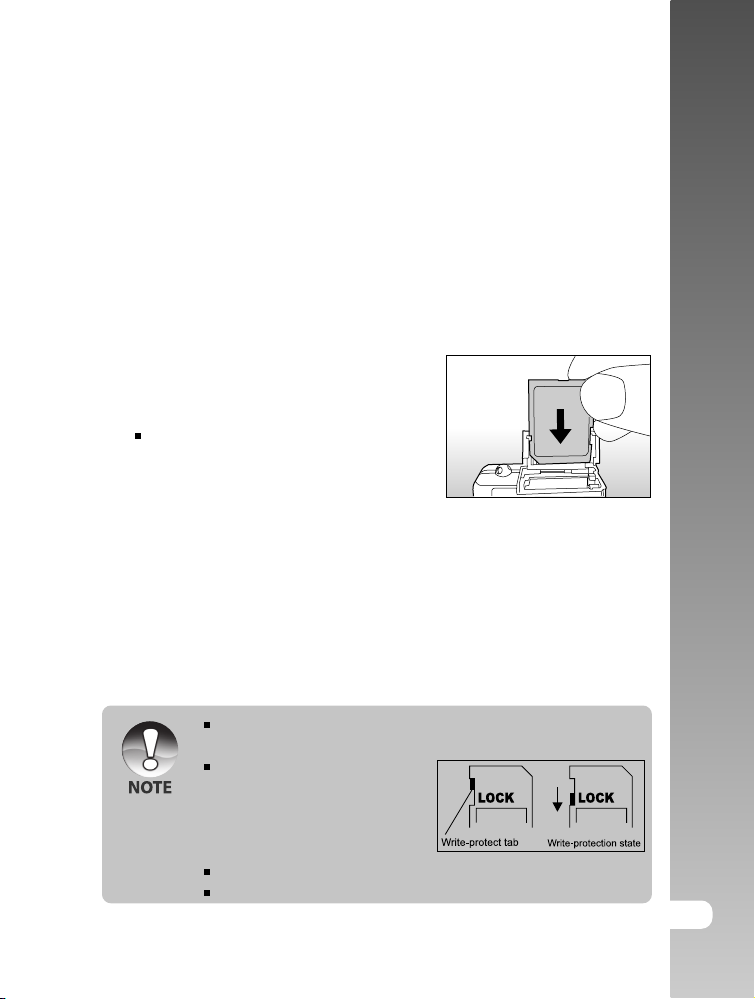
2. Insert the SD card in the correct orientation
shown.
Hold the SD card with its front side of
the SD card (printed arrow) facing the
rear side of the camera, and then insert
the card as far as it can go.
3. Close the battery /SD card cover.
Removing the SD card
Open the battery/SD card cover, press lightly on the edge of the SD card and it
will eject.
User’s Manual >>
If the camera is powered on without an SD card inserted into the camera,
the “NO CARD” message appears on the LCD monitor.
To prevent valuable data from
being accidentally erased from an
SD card you can slide the write-
protected tab (on the side of the SD
card) to “LOCK”.
To save, edit or erase data on an SD card, you must unlock the card.
This camera does not support MultiMediaCardTM.
E-21
Page 22
Digital Camera >>
Turning the Power On/Off
Load the battery and insert an SD card before starting.
Turning the power on
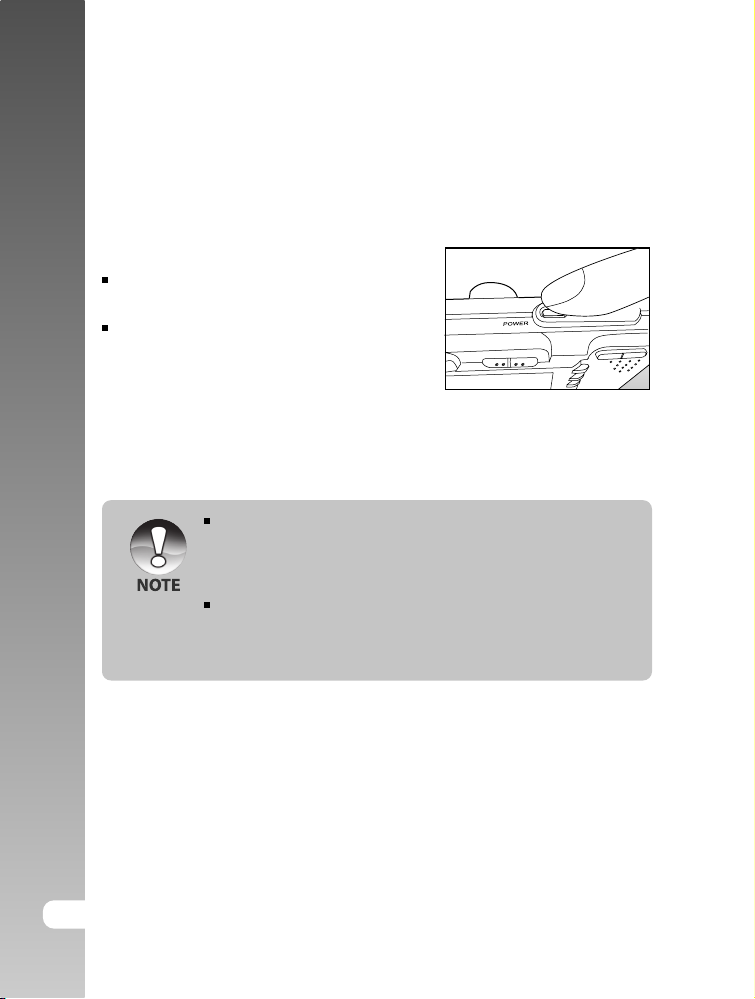
Press the POWER button to turn the power on.
The viewfinder LED lights green and the
camera is initiated.
When the power is turned on, the camera
will start in the mode that was set.
Turning the power off
Press the POWER button to turn the power off.
The power is turned off automatically when the camera has not been
operated for a fixed period time. To resume the operation condition, turn
the power on again. Refer to section in this manual titled “Auto OFF” in
the Setup Menu (In Photography Menu) for further details.
After the power is turned on, it may take several seconds to charge the
flash. While the flash is being charged, the viewfinder LED lights orange,
and then the camera is not yet ready for photography. Start photography
after the viewfinder LED is turned off.
22-E
Page 23
Setting the Date and Time
The date/time needs to be set if/when:
Camera is turned on for the first time.
Camera is turned on after leaving the camera without the battery for an
extended period of time.
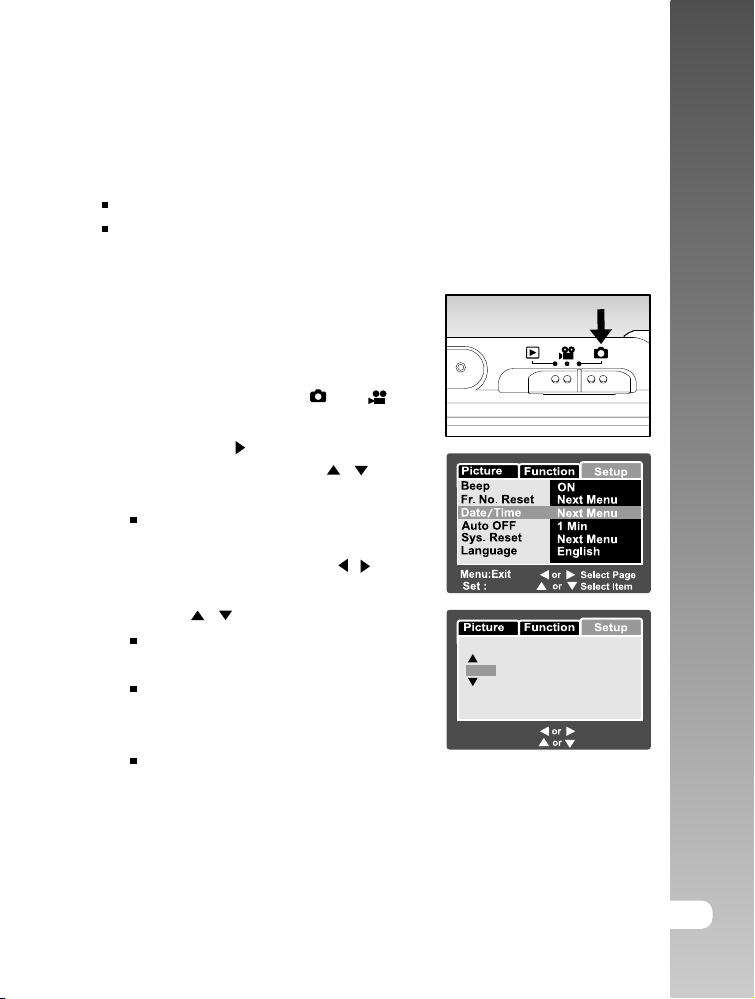
When the date and time information is not
displayed on the LCD monitor, follow these
steps to set the correct date and time.
1. Slide the mode switch to [ ] or [ ].
2. Press the MENU button and select [Setup]
menu with the button
3. Select [Date/Time] with the / buttons
and press the SET button.
The Date/Time setting screen will be
displayed.
4. Select the item’s field with the
and adjust the value for the date and time
with the / buttons.
The date and time is set in the order
year-month-day-hour-minute.
The time is displayed in 24-hours format.
5. After confirming all settings are correct,
press the SET button.
The setting will be stored and the screen
will return to the set-up menu.
/ buttons
Adjust
Date / Time
2004
Menu:Exit
Set : Adjust
01 01
01 01
Select Item
Change Value
User’s Manual >>
E-23
Page 24
Digital Camera >>
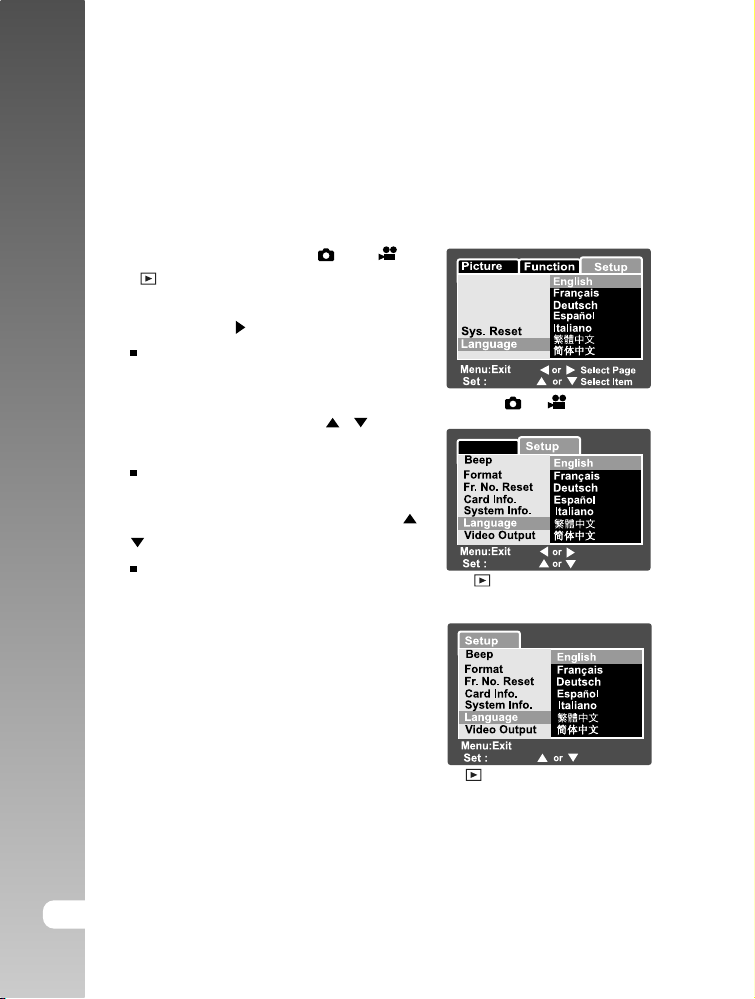
Choosing the Language
Specify in which language menus and messages are to be displayed on the
LCD monitor.
1. Slide the mode switch to [
] or [ ] or
[ ].
2. Press the MENU button and select [Setup]
menu with the button.
If no images/video clips are recorded on
the SD card, press the MENU button and
then [Setup] menu is displayed.
3. Select [Language] with the / buttons
and press the SET button.
The Language setting screen will be
displayed.
4. Select the displayed language with the /
buttons and press the SET button.
The setting will be stored.
Beep
Fr. No. Reset
Date/Time
Auto OFF
Adjust
[ ] / [ ] Mode
Play
Select Page
Adjust
[ ] Mode with Images/Video
Clips on SD card
Adjust
[ ] Mode without Images/Video
Clips on SD card
Select Item
Select Item
24-E
Page 25
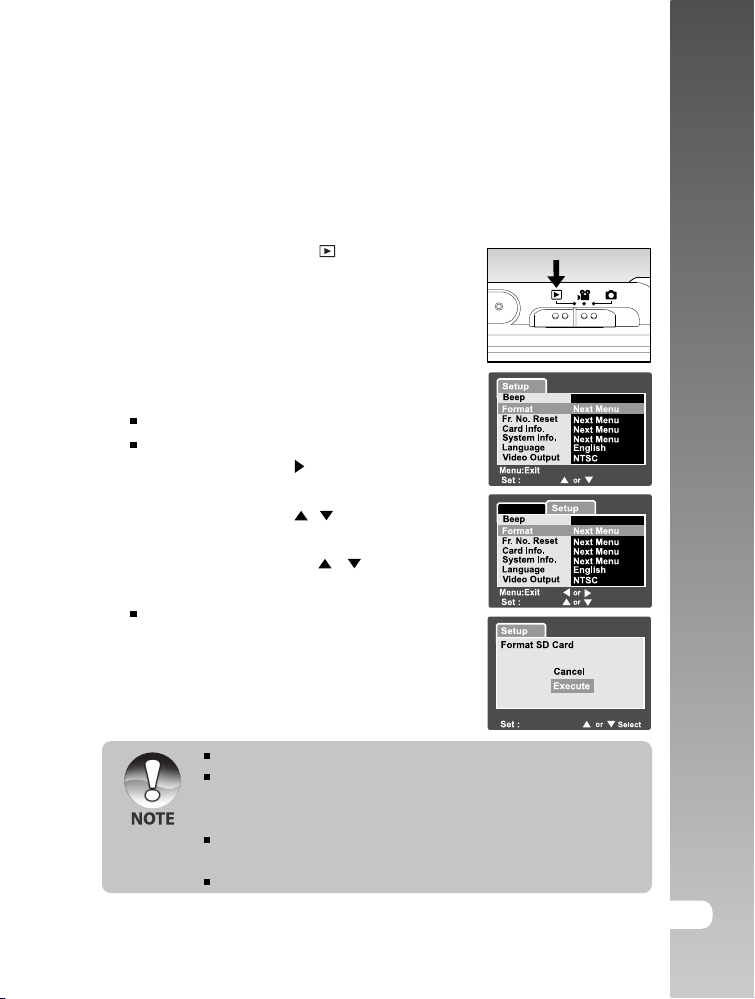
Formatting the SD Card
This erases all of the images and folders that have been recorded on the SD
card. Formatting is not possible when the SD card in the locked condition.
1. Slide the mode switch to [ ] .
User’s Manual >>
2. Press the MENU button.
[Setup] menu is displayed.
If images/video clips are recorded on the
SD card, press the
button after the
MENU button is pressed.
3. Select [Format] with the / buttons, then
press the SET button.
4. Select [Execute] with the / buttons,
and press the SET button.
To cancel formatting, select [Cancel] and
press the SET button.
You need to format an SD card by this camera before using it.
Formatting the SD card also erases the protected images. All data other
than images are also erased. Before formatting the card, make sure
that all the images are unnecessary.
Formatting is an irreversible action and data cannot be recovered at a
later time.
An SD card having any problem cannot be properly formatted.
Play
Adjust
Adjust
Enter
OFF
OFF
Select Item
Select Page
Select Item
E-25
Page 26
Digital Camera >>
Setting Image Resolution and Quality
Resolution and quality settings determine the pixel size (dimension), image file
size, and compression ratio for your images. These settings affect the number
of images that can be stored on a memory card. As you get to know the camera,
it is recommended that you try each quality and resolution setting to get an
appreciation for the effects that these settings will have on your images.
Higher resolution and higher quality images offer the best photographic results
but produce large file sizes. Therefore, few images will take up a lot of memory
space.
High resolution and quality settings are recommended for printed output and
situations requiring the finest detail. Lower resolution/quality images take up
less memory space and may be quite suitable for sharing images via e-mail, in
a report, or on a web page.
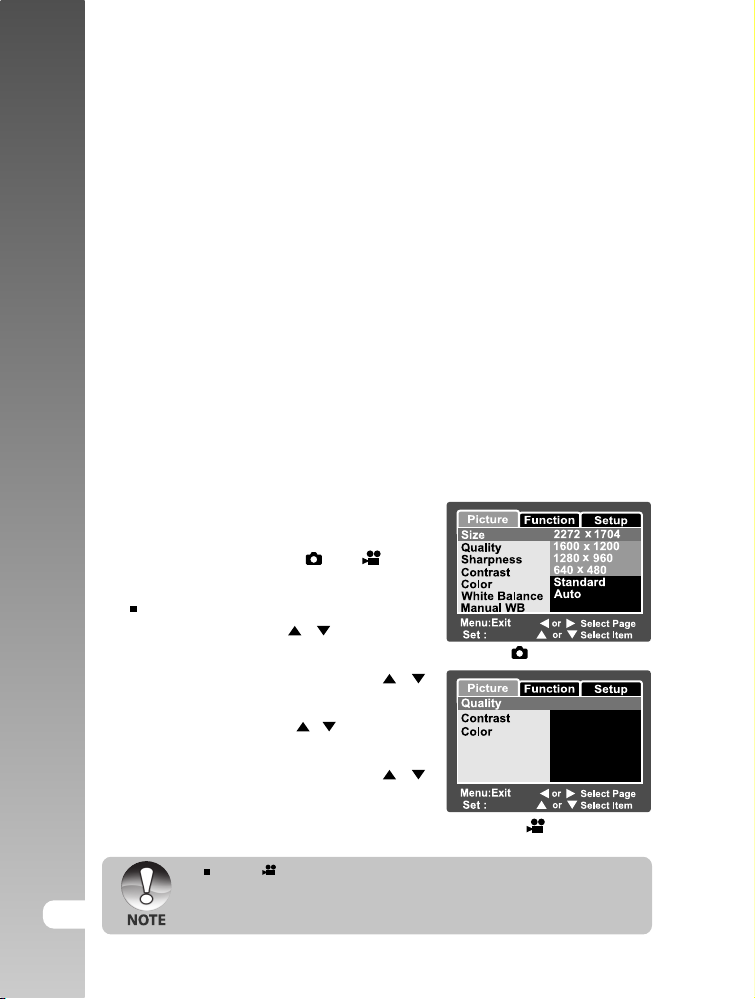
To change image resolution or image quality,
perform these steps below:
1. Slide the mode switch to [ ] or [ ].
2. Press the MENU button.
[Picture] of the photography menu is displayed.
3. Select [Size] with the / buttons, and
press the SET button.
Adjust
[ ] Mode
4. Select the desired setting with the /
buttons, and press the SET button.
5. Select [Quality] with the / buttons, and
press the SET button.
6. Select the desired setting with the /
buttons, and press the SET button.
7. To exit from the photography menu, press
Adjust
[ ] Mode
the MENU button.
In the [ ] mode, size setting is not possible.
Adjust
Fine
Normal
Standard
26-E
Page 27
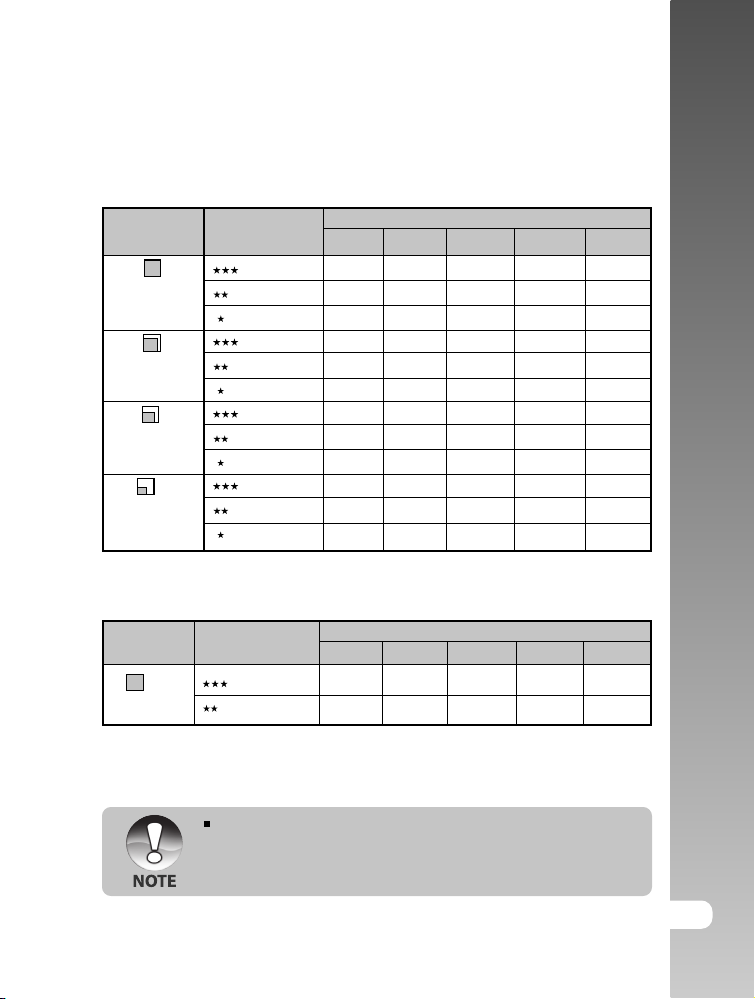
Possible number of shots (still image)
The table shows the approximate shots that you can take at each setting based
on an optional SD card.
Image size Quality
Fine
(4M)
2272 x 1704
(2M)
1600 x 1200
(1M)
1280 x 960
(VGA)
640 x 480
Standard
Economy
Fine
Standard
Economy
Fine
Standard
Economy
Fine
Standard
Economy
32MB 64MB 128MB 256MB 512MB
17
28
52
37
59
118
57
94
189
145
210
379
SD card capacity
34
58
107
76
121
242
117
193
387
298
430
775
70
118
217
153
244
489
237
391
783
602
870
1566
140
236
433
306
487
975
472
780
1560
1200
1734
3121
283
476
872
616
981
1963
952
1571
3142
2417
3491
6284
Possible recording time / sec (video clip)
Image size Quality
Fine
320 x 240
Standard
32MB 64MB 128MB 256MB 512MB
01:45
02:36
SD card capacity
03:34
05:20
07:13
10:46
14:23
21:28
28:59
43:13
User’s Manual >>
* The data shows the standard testing results. The actual capacity varies
according to the shooting conditions and settings.
The memory card testing results are based on Toshiba, Panasonic and
SanDisk SD card.
E-27
Page 28
Digital Camera >>
PHOTOGRAPHY MODE
[ ] Still Image Mode
Auto photography is a typical method of photography. Photographs can be
taken simply because the exposure (the combination of shutter speed and
aperture setting) is controlled automatically to suit the photographic conditions.
You can use both a viewfinder and a 2.0" LCD monitor to compose the images.
Taking photographs using the viewfinder will conserve the battery power. If the
battery power is low, it is recommended that you only compose images using
the viewfinder. Using the LCD monitor, you can compose images more
accurately, but at the cost of the battery consumption.
Using the Viewfinder
Make sure that the battery and SD card are inserted before taking photographs.
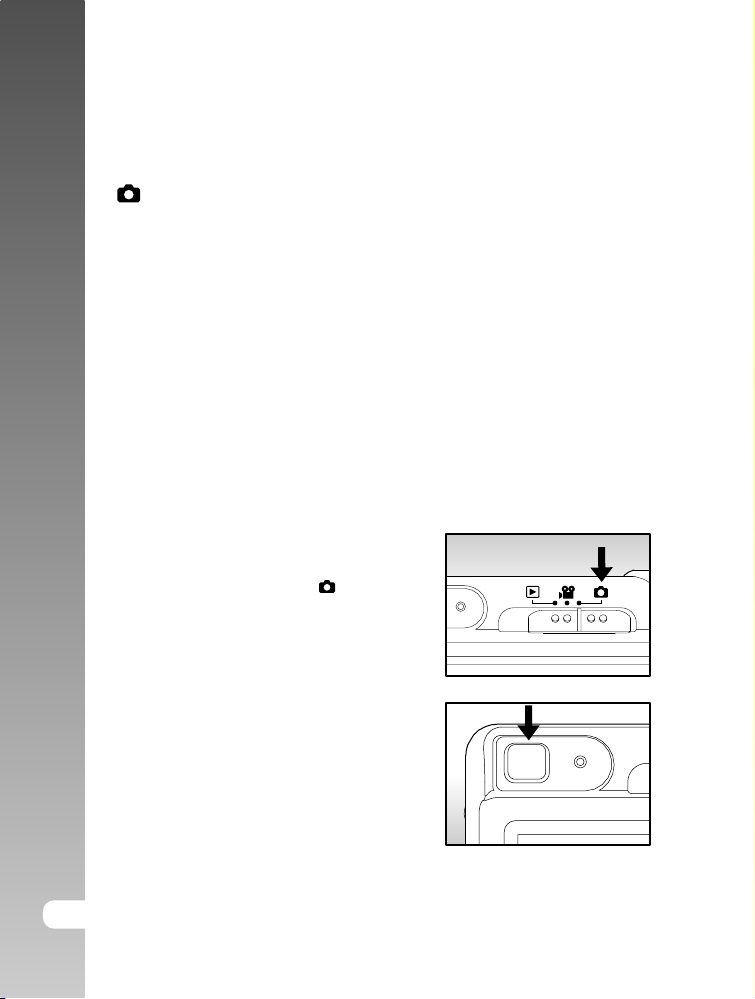
1. Press the POWER button to turn the power
on.
2. Slide the mode switch to [
] .
3. Compose your image in the viewfinder.
28-E
Page 29
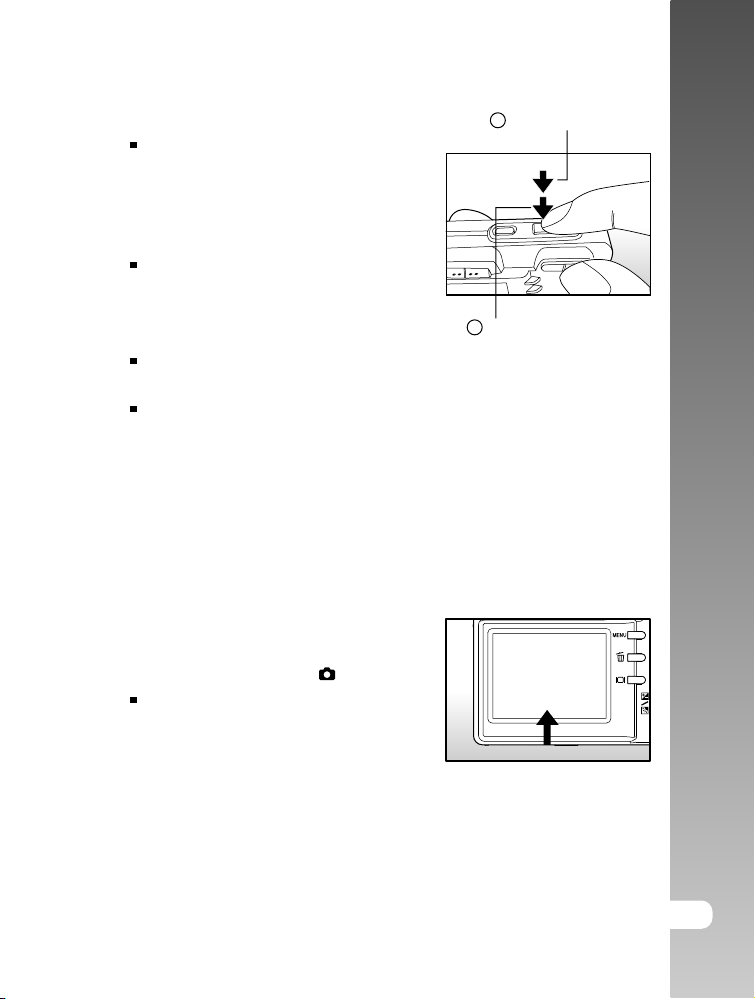
4. Press the shutter button.
Pressing the shutter button down
halfway automatically focuses and
adjusts the exposure, and pressing the
shutter button down fully takes the
photographs.
The focus area frame turns blue and the
viewfinder LED lights green when the
camera is in focus and the exposure is
calculated.
When the focus or exposure is not suitable, the frame of the focus area
turns yellow and the viewfinder LED flashes red.
If the photographic preview is set to “ON”, the preview image (captured
image) will be displayed while the image is being recorded onto the SD
card.
1
Press down halfway
2
Press down fully
Using the LCD Monitor
Make sure that the battery and SD card are inserted before taking photographs.
1. Press the POWER button to turn the power
on.
2. Slide the mode switch to [ ] .
By default, the LCD monitor setting is on.
3. Compose your image in the LCD monitor.
4. Press the shutter button down halfway,
then press it down fully.
User’s Manual >>
E-29
 Loading...