

Page 1

Welcome!
Thank you for buying our Media Player. Please have a read of this
manual to familiarize yourself with it before use.
The Media Player’s design is patented – you should consider the legal
liabilities for infringement of this copyright. The components of the
Media Player have been tested to comply with the relevant safety
standards applicable for low-voltage electronic products.
The unique serial number label on the Media Player and it’s package is
required to obtain warranty service – do not remove or modify these
labels, as an illegible label may prevent us from honoring the product
warranty.
Not all operating conditions apply to the Product. We are only
responsible for quality-related after-sales service according to the
guarantee offered. We are not responsible for any data-loss or
consequential damages arising from a product failure. The Media
Player specification and contents of this manual may be amended from
time to time without prior notification.
Disclaimer
1. Our company shall not bear any responsibility for any loss due to fire,
third-party operation, theft, damage, accidents, or inappropriate uses
(such as using the Media Player for an unintended purpose), which are
not linked to our Company, or due to natural disasters like earthquakes,or storms and
other “acts of god”.
2. This product is not used for commercial purposes. The use of the product will not
be liable for any commercial.
I
Page 2

3. Our company shall not bear any responsibility for any loss due to
any usage outside the guidelines outlined in this Manual.
4. Our company shall not bear any responsibility for any consequential
loss caused by the use of any device or software which is not provided
by our company.
5. Our company shall not bear any legal liability for any consequential
damaged hardware damage or data loss.
6 This product will make the upgrade from time to time, the actual content and
function of the product will be subject to the material object..
7 For the firmware update, there may be some external risks, such as power supply
instability, power outages, file corruption, etc. the company will view the update failure
as man-made damage, not within the scope fo guarantee. If the firmware upgrate is
necessary, please contact the company's authorized distributors to manage it.
Trademark
NOONTEC is an exclusive trademark of our company. All the other
trademarks or product names referred to in this Manual are trademarks
or registered trademarks of our company. Trademarks of other
companies are their own properties.
Safety precautions
The Media Player is designed for trouble-free operation in daily use. To
become familiar with it’s operation, please refer to the safety
precautions, on the product and accessories, and keep this Manual for
future reference.
II
Page 3

1. The components and accessories of the Media Player are tested to
comply with the relevant safety standards for low-voltage electronic
products.
2. The mains-power you provide to the Media Player must comply with
the specification indicated on the power-pack rating plate. If you are
not sure about your local mains-power supply, please contact the
distributor or the power company. For components which use batteries,please refer
to relevant battery specifications to choose the correct battery cells.
3. Please keep the Media Player away from heat sources and humid
environments, and ensure it receives good ventilation, so as to
guarantee reliability and avoid the danger of fire and electric shock.
4. Any strong electromagnetic field may affect reading and writing
capabilities of hard drives – please keep it away from these fields.
5. Locate the Media Player in a stable position, and do not place any
other devices on top of it.
6. Please do not add un-necessary parts to the Media Player, and in
normal usage, do not leave the Media Player dis-assembled.
7. To avoid damage caused by storms or electrical surges, we
recommend you turn-off and unplug the Media Player from the mains
power supply when there is a thunderstorm, or when the power supply
is unstable.
8. In case any foreign object or liquid spills into the Media Player,
immediately turn-off the power and the computer to avoid short circuits.
III
Page 4

9. Please do not physically unplug or disconnect the Media Player
from your computer when it is reading or writing to the drive, otherwise
the physical disk may be damaged and your data may be damaged.
IV
Page 5

Contents
CONTENTS...........................................................................................V
BRIEF INTRODUCTION....................................................................1
FEATURE................................................................................................1
PRODUCT DETAILS............................................................................2
PACKING LIST........................................................................................2
FRONT VIEW..........................................................................................3
BACK VIEW...........................................................................................4
REMOTE CONTROL................................................................................4
BASIC OPERATION.............................................................................7
POWER CONNECTION ............................................................................7
CONNECTION OF TV AUDIO AND VIDEO OUTPUT .................................7
CONNECTION OF RECORDING AND USAGE ...........................................9
CONNECTION AND SETUP OF NETWORK .............................................13
OPERATION OF PRODUCT USAGE.............................................16
BROWSER............................................................................................17
AV IN..................................................................................................23
TIMER..................................................................................................24
INTERNET SERVICES............................................................................25
SETUP MENU.......................................................................................29
NETWORK FUNCTION....................................................................33
WIRED LAN SETUP .............................................................................33
V
Page 6

WIRELESS SETUP ................................................................................34
INSTALL AND USE OF BT/SAMBA...............................................39
THE FIRST INSTALL..............................................................................39
IP ADDRESS SETTING...........................................................................40
NEIGHBOR WEB INTERFACE ...............................................................40
PRODUCT SPECIFICATION...........................................................44
MAINTENANCE NOTICE................................................................45
FAQ.........................................................................................................46
OTHERS................................................................................................51
VI
Page 7

Brief introduction
Feature
The product is a new kind of family high-definition recorder. Via our new products,
you can record favorite program randomly and store it in the device, avoiding the
inconvenience brought by change tape frequently. The product can provide long
recording and good watching. Meanwhile, it can also store and play many kinds of
video files. The product can support UPnP network of multi-media technology,
network access functions particularly. It supports BT/SAMBA and could download
network movies. You can also enjoy the internet service on line by using the product,
such as browsing videos, news and photos. The product, which is facilitated with
many port sand HDMI, can show you pictures and videos with high definition. It is
really your desirable entertainment product.
Basic performance
Recording - support one-key rec, Timer rec and Time shift recording.
Video decoding - MPEG 1/2/4, Divx, Xvid, H.264, VC-1, RM/RMVB
Video format - WMV, MKV, MOV, AVI, MP4, MPG, TS/M2TS/TP/TRP, FLV, ISO, IFO,
VOB, DAT, RM/RMVB
Audio format - MP3, WMA, WAV, AAC, OGG, FLAC, Dolby Digital, DTS Digital
Image - JPG/BMP/PNG/GIF
Card - 3 in 1 card (SD/MMC/MS).
USB HOST - Connection USB mass storage device ( like USB Flash Drive, MP3,
USB HDD etc.)
USB2.0 - high speed USB2.0 port.
HDMI - HDMI high definition port.
External DVD - Support USB external DVD drive to play DVD movies.
1
Page 8
Internet - RJ45 port, 10/100Mbit /s, WLAN ( IEEE 802.11 b/g/n ) ,supporting internet
service.
Product details
Packing list
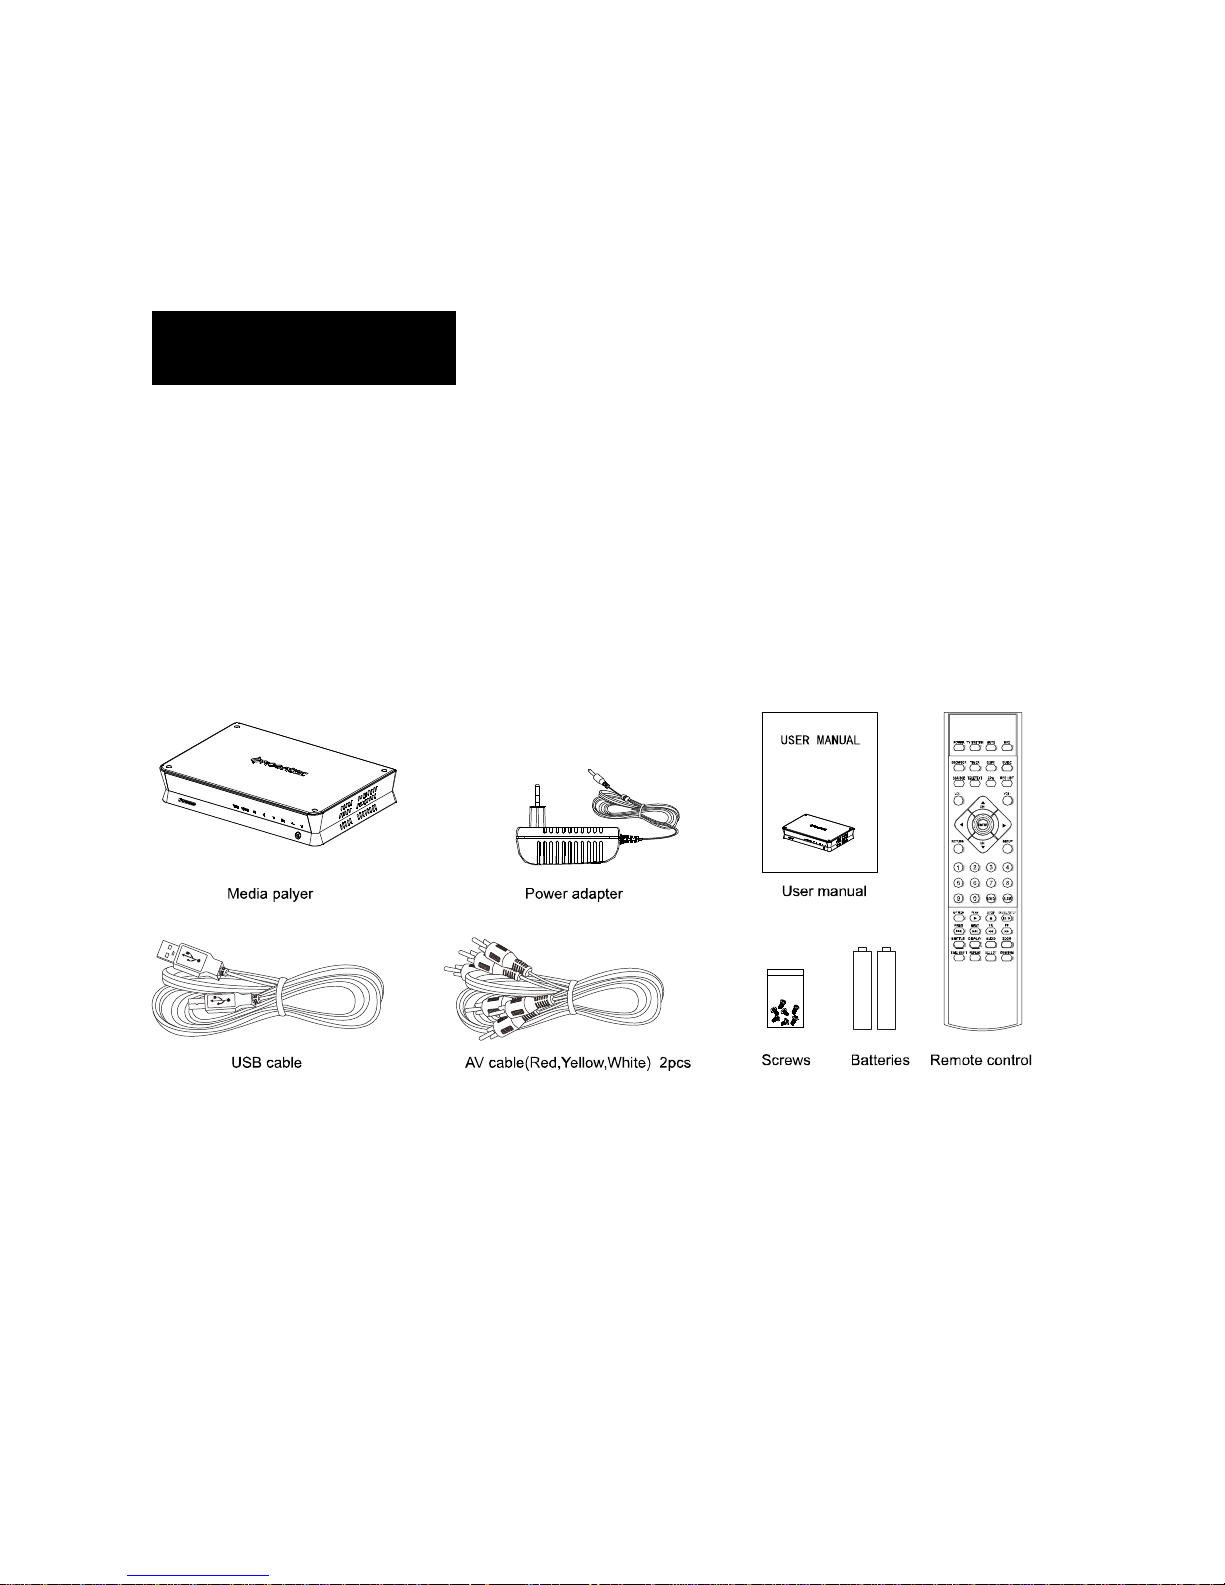
Check the accessories after receiving the product, below accessories should be
included.
2
Page 9

Front view
1) LED definition
LED LED definition
REC Rec LED Turns red while recording
Power Power LED Turns yellow while switched on
Stand-by Stand-by LED Turns red light while stand-by
2) Other definition
IR Remote head Remote control receiver
Card-reader
card-reader
3) Key definition
Key key definition
REC REC key Enter recording mode. choose the Rec time
MENU
Menu key Return to the main menu
Stop key Stop current operation
3 in 1
Instruction
Can read MS / SD / MMC card
instruction
ENTER
Left key Move cursor to left
Right key Move cursor to right
Enter key Confirm the current operation
Up key move cursor up
Down key Move cursor down
Power key Switch on/off the power
3
Page 10
Back View
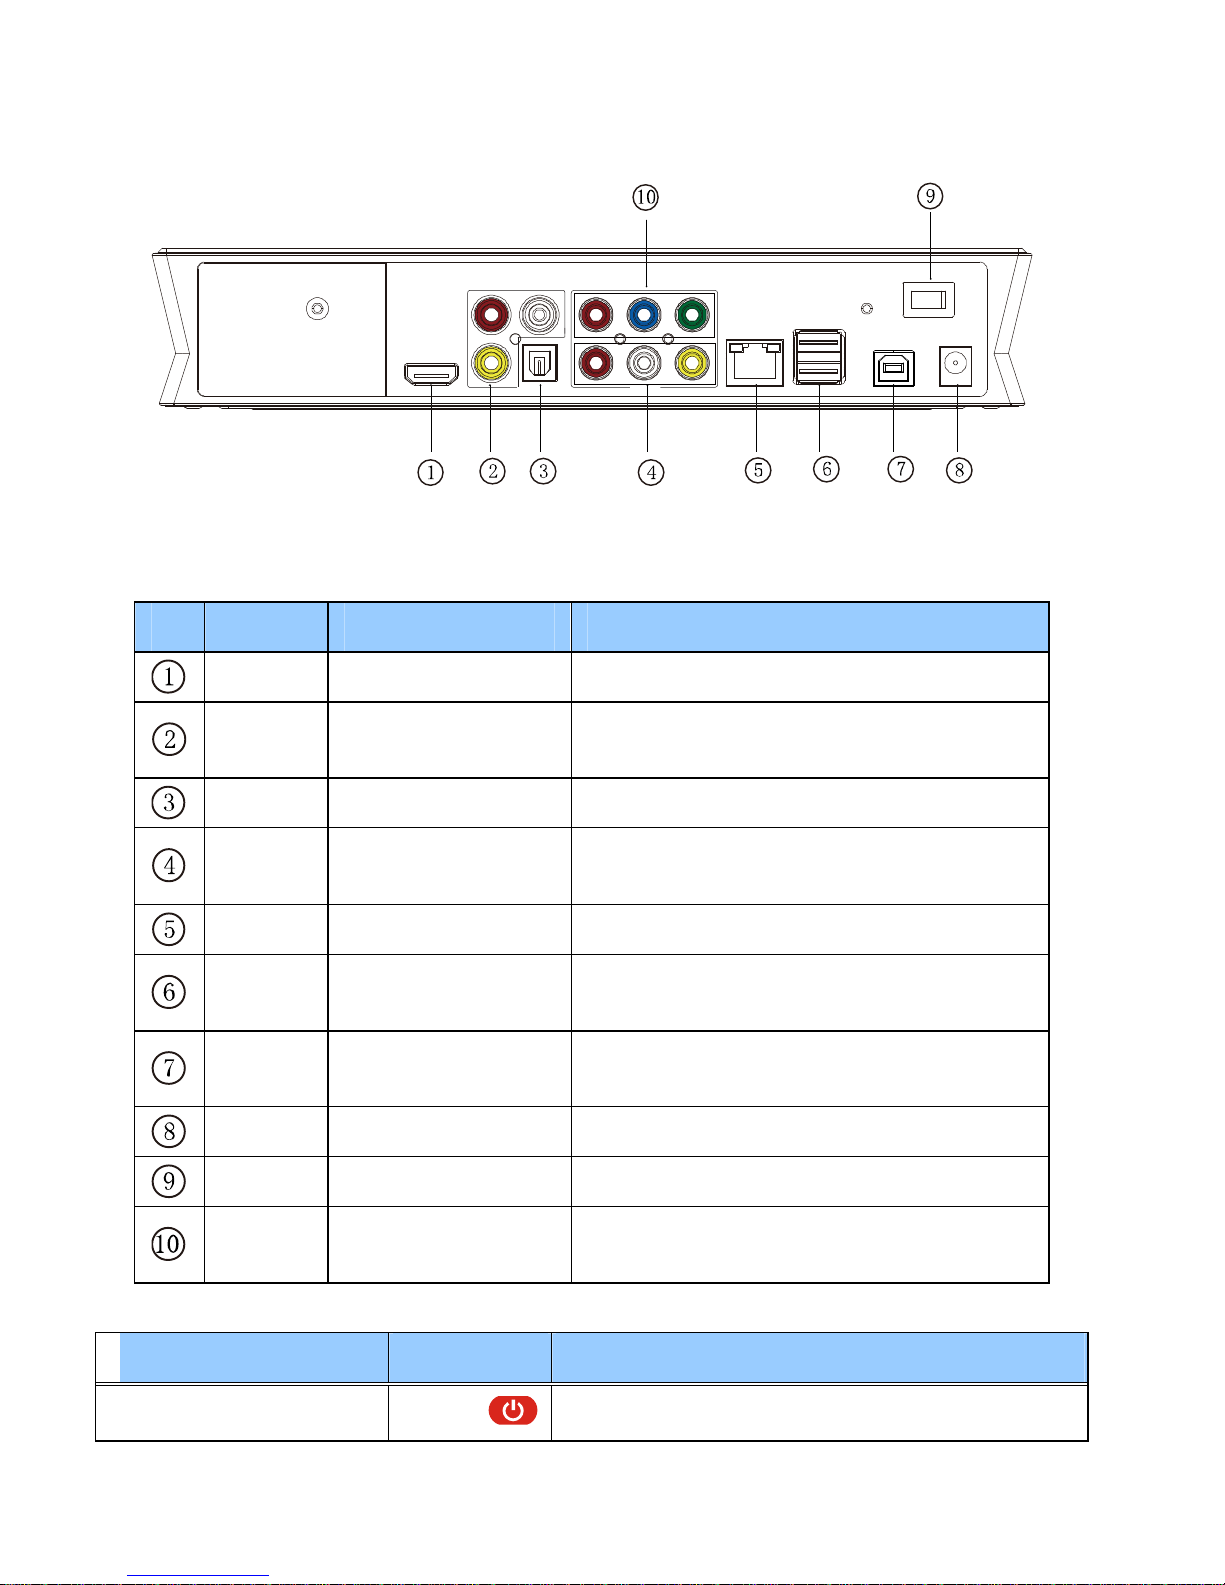
Port definition
Port Port definition Instruction
HDMI High definition port Can output digital signal via HDMI port
AV IN
Composite video
input port
Optical Fine output port Can output 5.1 audio via optical port
Composite video
AV OUT
output port
LAN network port Can connect to network via internet port
USB
Outside USB port
HOST
USB
USB port Via this USB port for PC communication
DEVICE
DC IN Power in port Can input power
ON/OFF Power switch Turn on or off power switch
Component video
YPbPr
output port
Can input video and audio when
connected to video device
Can output composite video and audio
Can read outside USB storage via USB
port
Can output progressive scan component
video
Remote control
BUTTON FUNCTION
POWER
Turn on and off in the stand by mode
4
Page 11
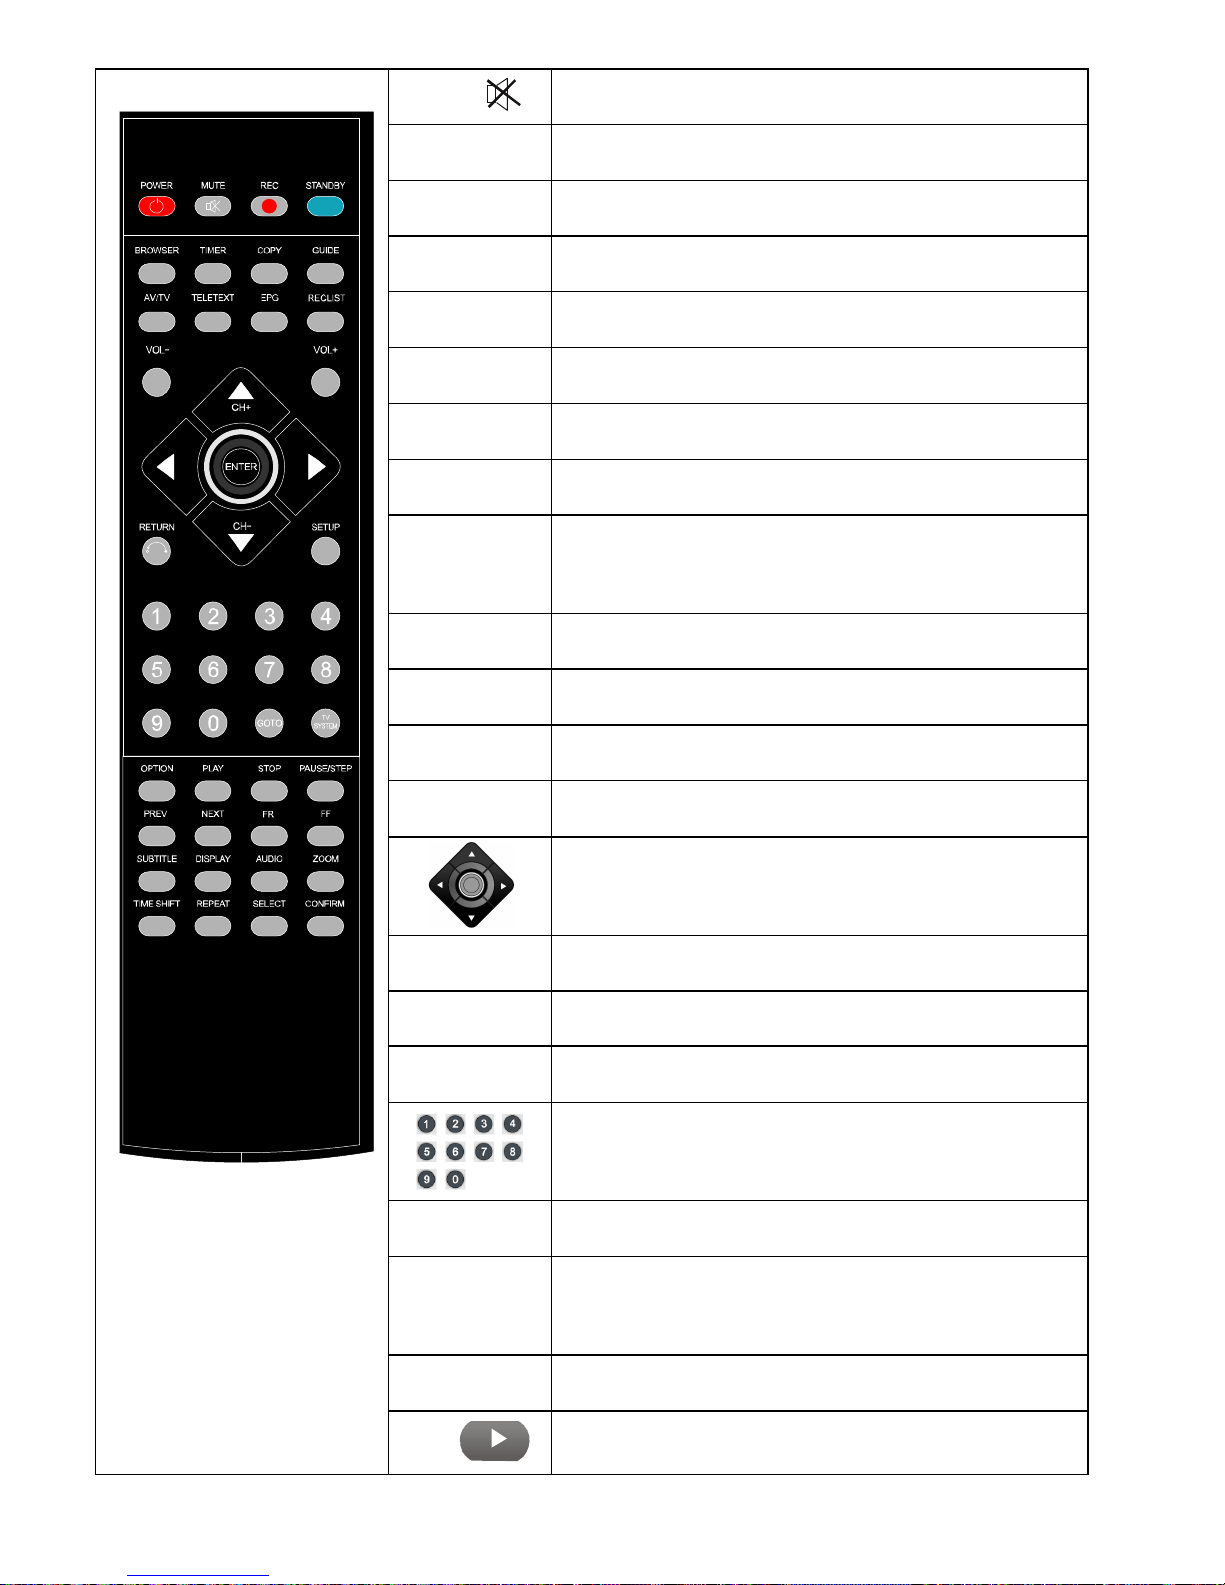
MUTE
if press this key repeat
Press it and enter the STANDBY mode, be used when the
ecording
related advertising that contains
, PAL, 480P, 576P, 720P
Turn on or shut audio output
REC
STANDBY
BROWSER
TIMER
COPY
GUIDE
AV/TV Switch video input source
TELETEXT
EPG On / off television program guide menu
REC LIST A list of the documents listed in record
Start recording in REC mode, and
you can select the recording time
product appoint recording
Enter the browser menu
Enter the Time menu to edit, add, delete r
schedule
Enter the copy mode
Enter the main menu
On / off with DVBinformation such as the menu
VOL-
VOL+
ENTER
RETURN
SETUP
GOTO
TV SYSTEM
Press to decrease the volume
Press to increase the volume
Navigation key for up, down, left and right
Press to confirm
Return to the previous menu
Enter the menu
Press to input digital
Press to play the video at the chapter after setting schedule
Press to switch between NTSC
50HZ, 720P 60HZ, 1080I 50HZ and 1080I 60HZ.
OPTION Press to select option bar. To rename or delete the file.
Press to play file;
PLAY
Or play recording file under time shift mode.
5
Page 12
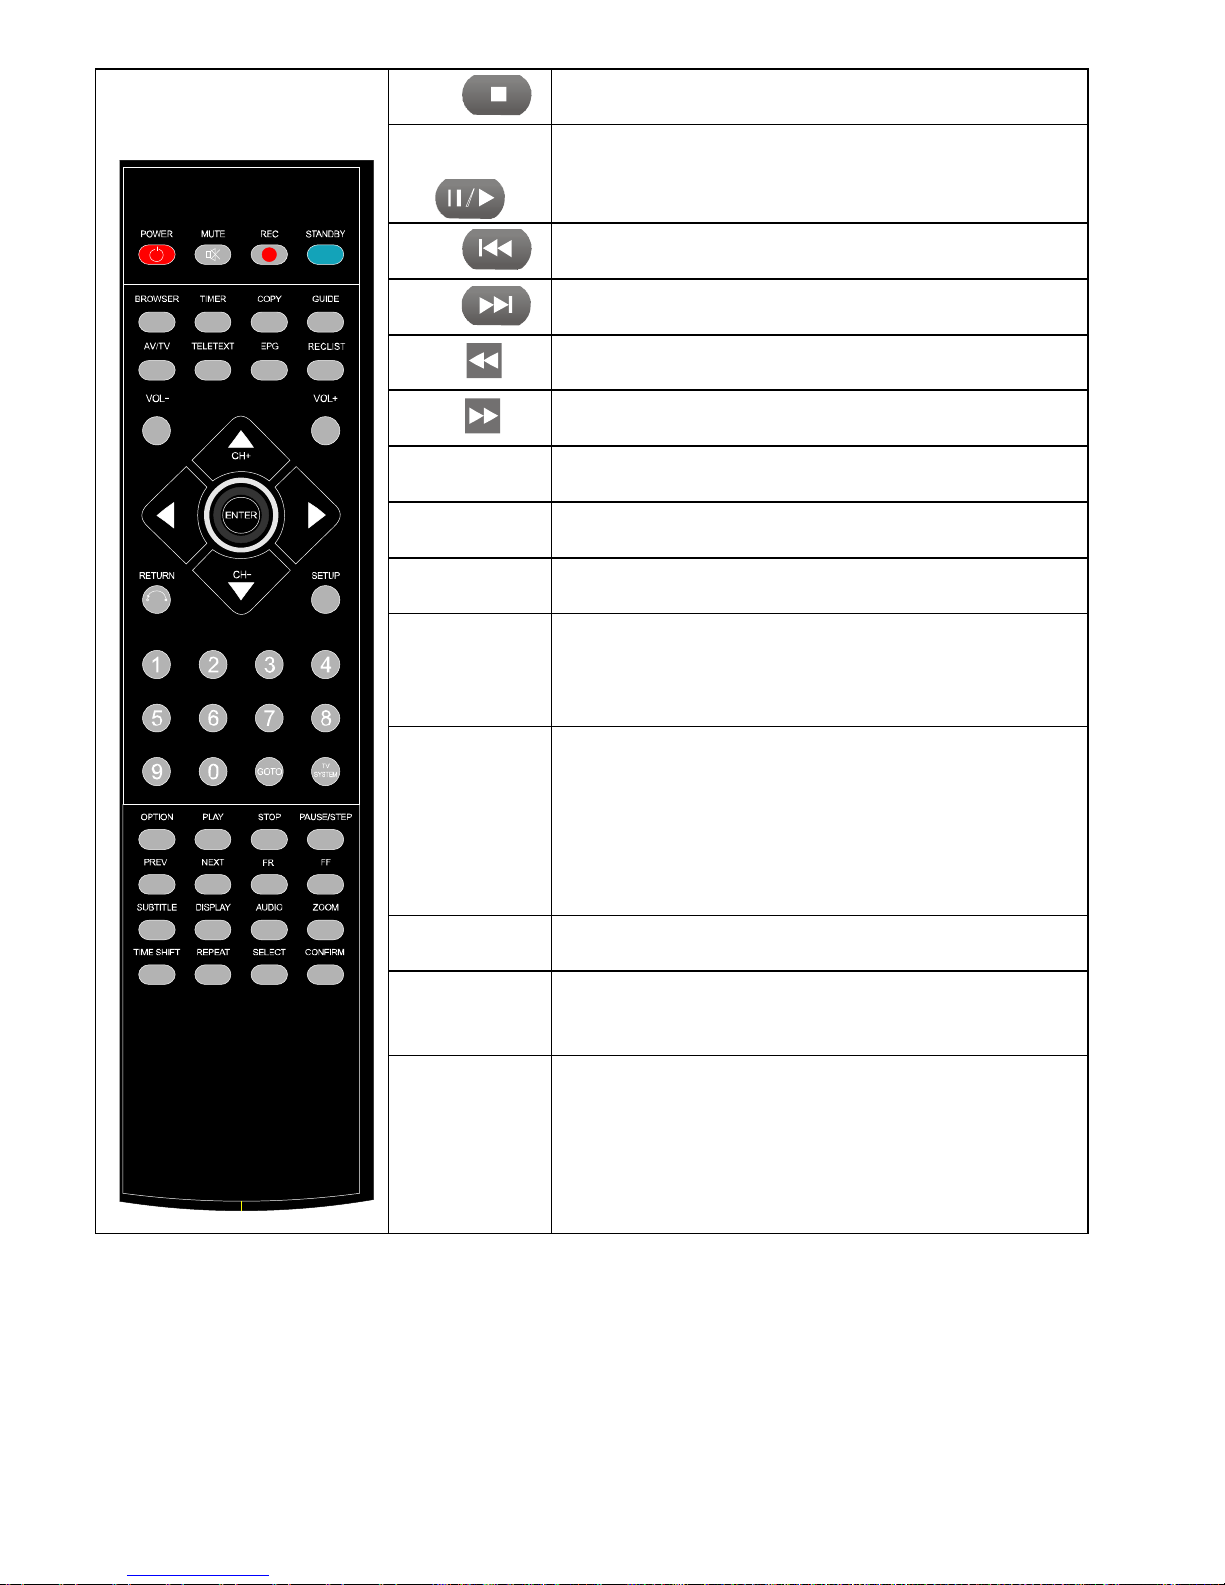
STOP
Press to fast rewind from current play and again to select
Press to fast forward from current play and again to select
le, information of chapter when play
Press to zoom when playing back photos or Video
Press ”Time shift” and wait until the screen display, Press
“pause” to pause program, press “Play” to resume
use the
the
PAUSE/STEP
Press to stop play/recording
Press to pause play/recording, and again for step playing
PREV
NEXT
FR
FF
SUBTITLE
DISPLAY
AUDIO
ZOOM
TIME SHIFT
Press to return to previous file
Press to go to next file
the speed
the speed
Switch the subtitle if the file supported
Press to display time, tit
video and photo.
Switch the audio format output
programs.
Photo zoom levels:2X,4X,8X,16X;
Video zoom levels:2X,3X,4X,8X.
Press to activate time shift in recording mode.
Operation as follow:
playback, and press “Stop” to stop time shift function.
If you need to use the Timeshift function, please
machine to format the hard disk first.
REPEAT
SELECT
CONFIRM
Press to set repeat option: chapter, Title or off
Press to select the file and then press “confirm” to add
or delete file in the playlist;Select copy files or folders in
copy mode
Press to add or delete option in playlist
6
Page 13
Basic operation
Power connection
Take out power adapter from the package and connect it.
Connection of TV audio and video output
The product is designed with multi-output, including composite ( AV ), component
( YPbPr ) and HDMI. You can select different interface according various need. The
product can detect video output automatically, making the operation friendly and
convenient. Please refer to the following instruction for connection to avoid any
problem.
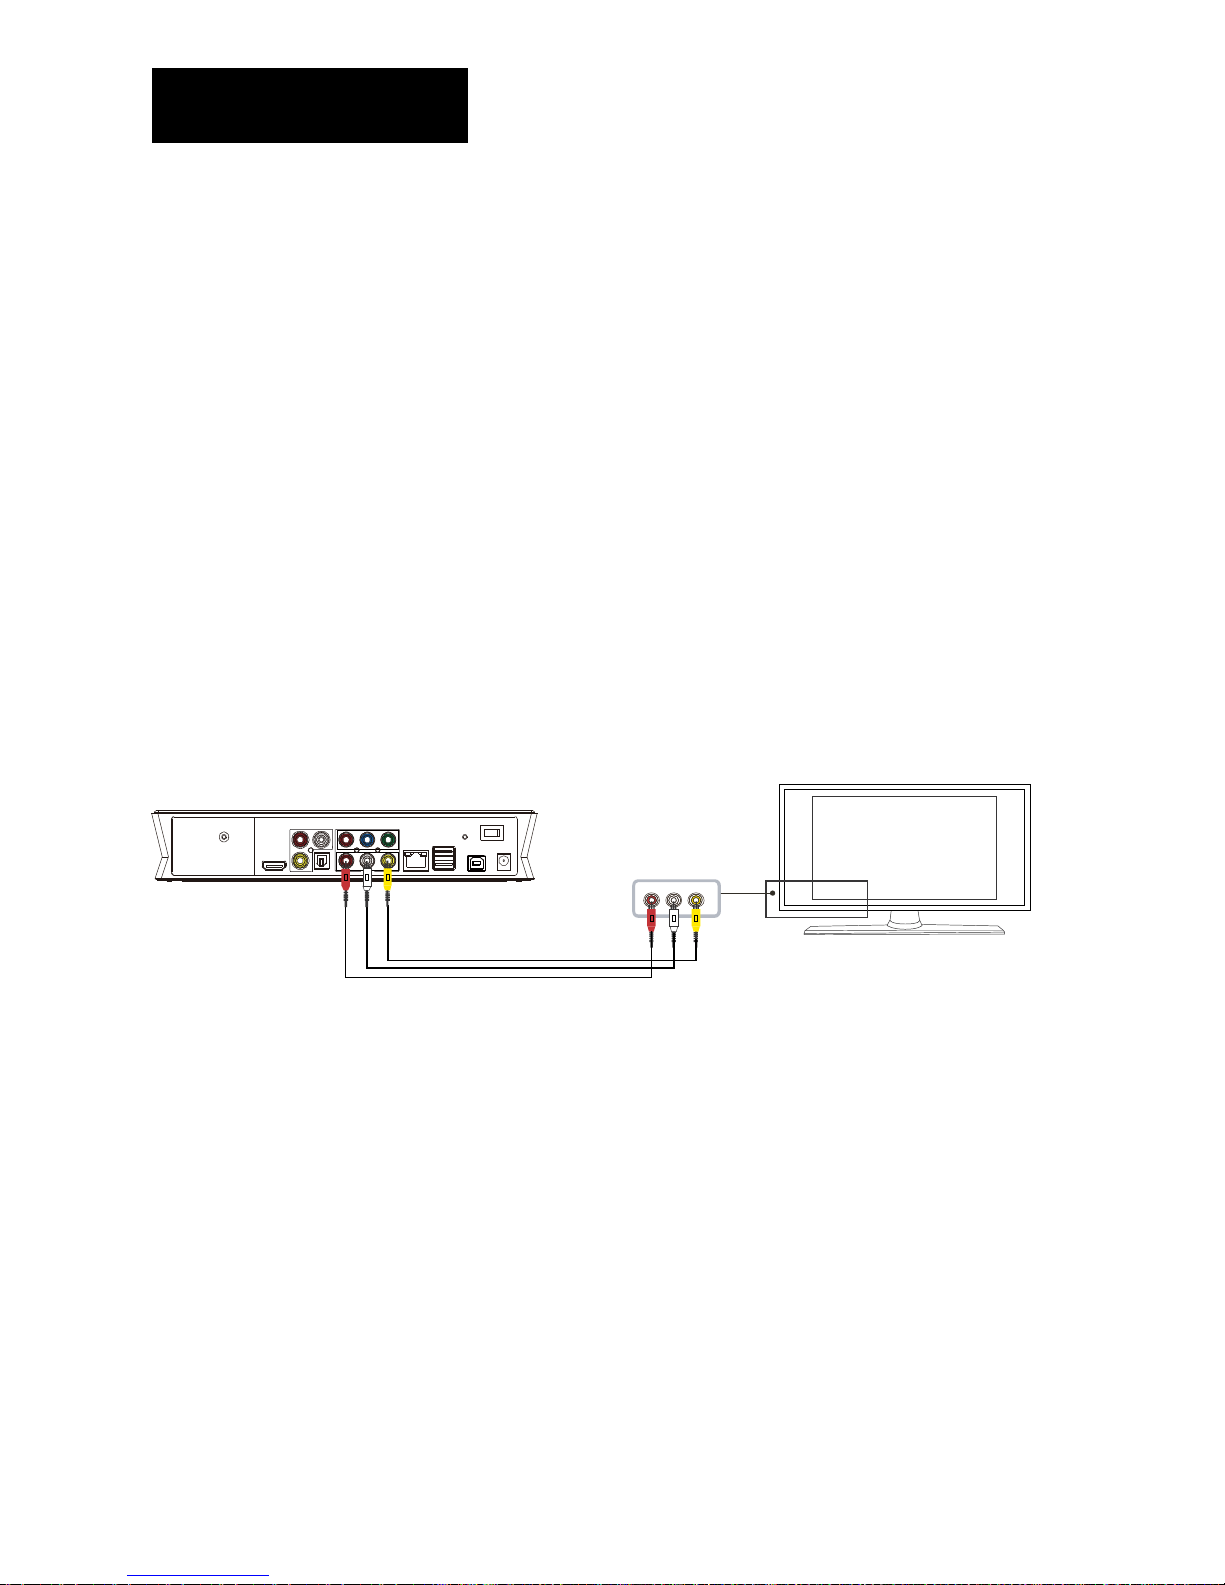
Composite output connection ( AV )
Plug the yellow connector into the AV output of product and AV input of TV, and plug
the red and white connector into the audio input of TV or HIFI. Turn on the TV and
select AV mode. Turn on the product and TV displays the interface of initiation.
Component output connection ( YPbPr )
7
Page 14
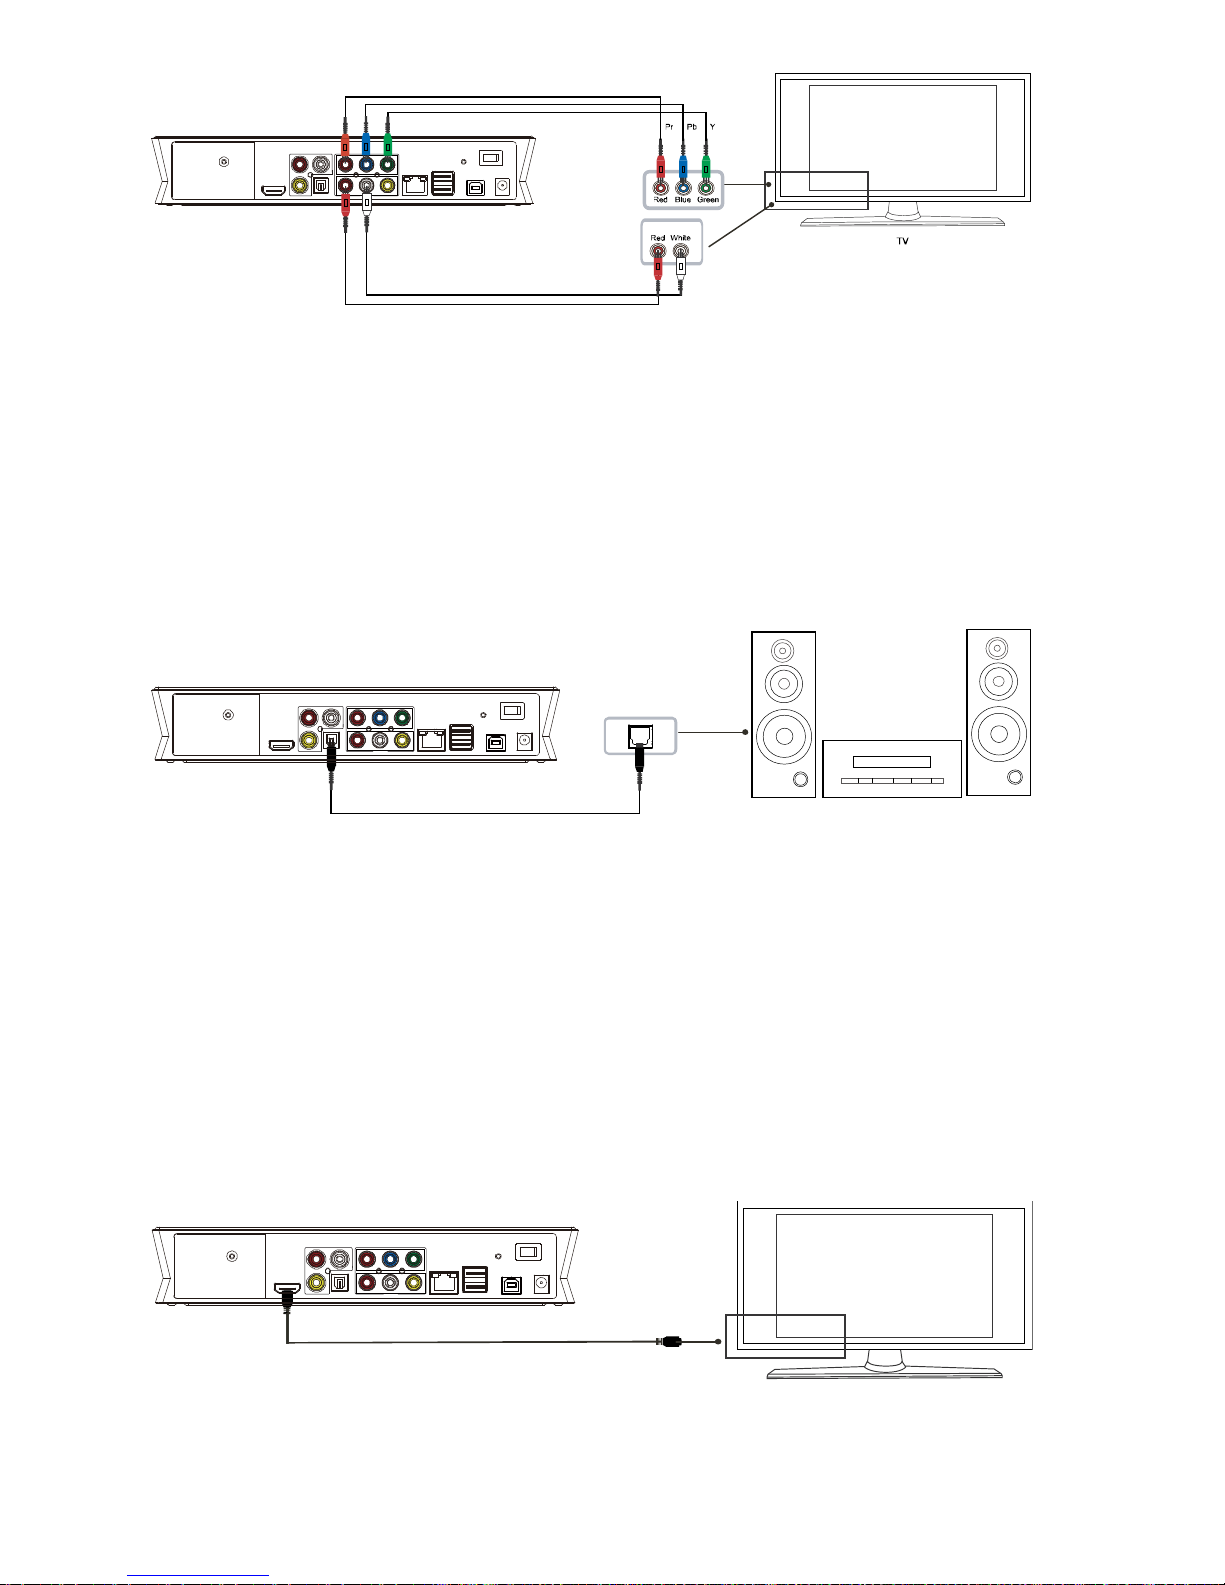
Component output mode: Plug the YPbPr cable into the output of product and input
of TV. Because the cable is only for video signal, another AV cable is necessary. Plug
the red and white connector of AV cable into the audio output of product and audio
input of TV or HIFI. Turn on TV and select YPbPr mode. Turn on the product and TV
displays the interface of initiation.
Optical output connection
Optical output:Connect the Optical connector of the media player with the optical
connector of other video or audio device by Optical cable. Then enter the product's
audio interface, select the Digital Output option "SPDIF LPCM" or "SPDIF RAW". It is
available to enjoy 5.1 high quality sounds through a multi channel decoder/amplifier
with optical input.
HDMI output connection
HDMI is a output with best audio and video effect which outputs digital video and
8
Page 15

audio composited at the same time. Connect HDMI cable to output of product and
display device with HDMI input. Select HDMI mode in TV until it displays the interface
of initiation.
Playback function
With this HDD Recorder & player, individual can browse movie, photo and music files
stored in HDD, USB, card and net work. Please enter “browser” to select the media
and press “ENTER” key to enter.
It is available to preview the selected media and press “ENTER” key to play.
Connection of recording and usage
The product supports to watch television programs while recording television
programs. To watch digital terrestrial television, you can press REC key on the
remote control to start recording.
TV signal can be generated from TV set-top box or satellite receiver, as long as is
equipped with satellite TV set-top box or television receiver, users can achieve the
recording function.
Important notice: The product also supports TV recording from other set-top
box or satellite TV receiver. When the recording of signal other television set-top box
or satellite receiver input, please refer to the following illustration to connect the
product.
A. For set-top box or satellite TV receiver with two signal outputs, please refer
to below connection:
9
Page 16
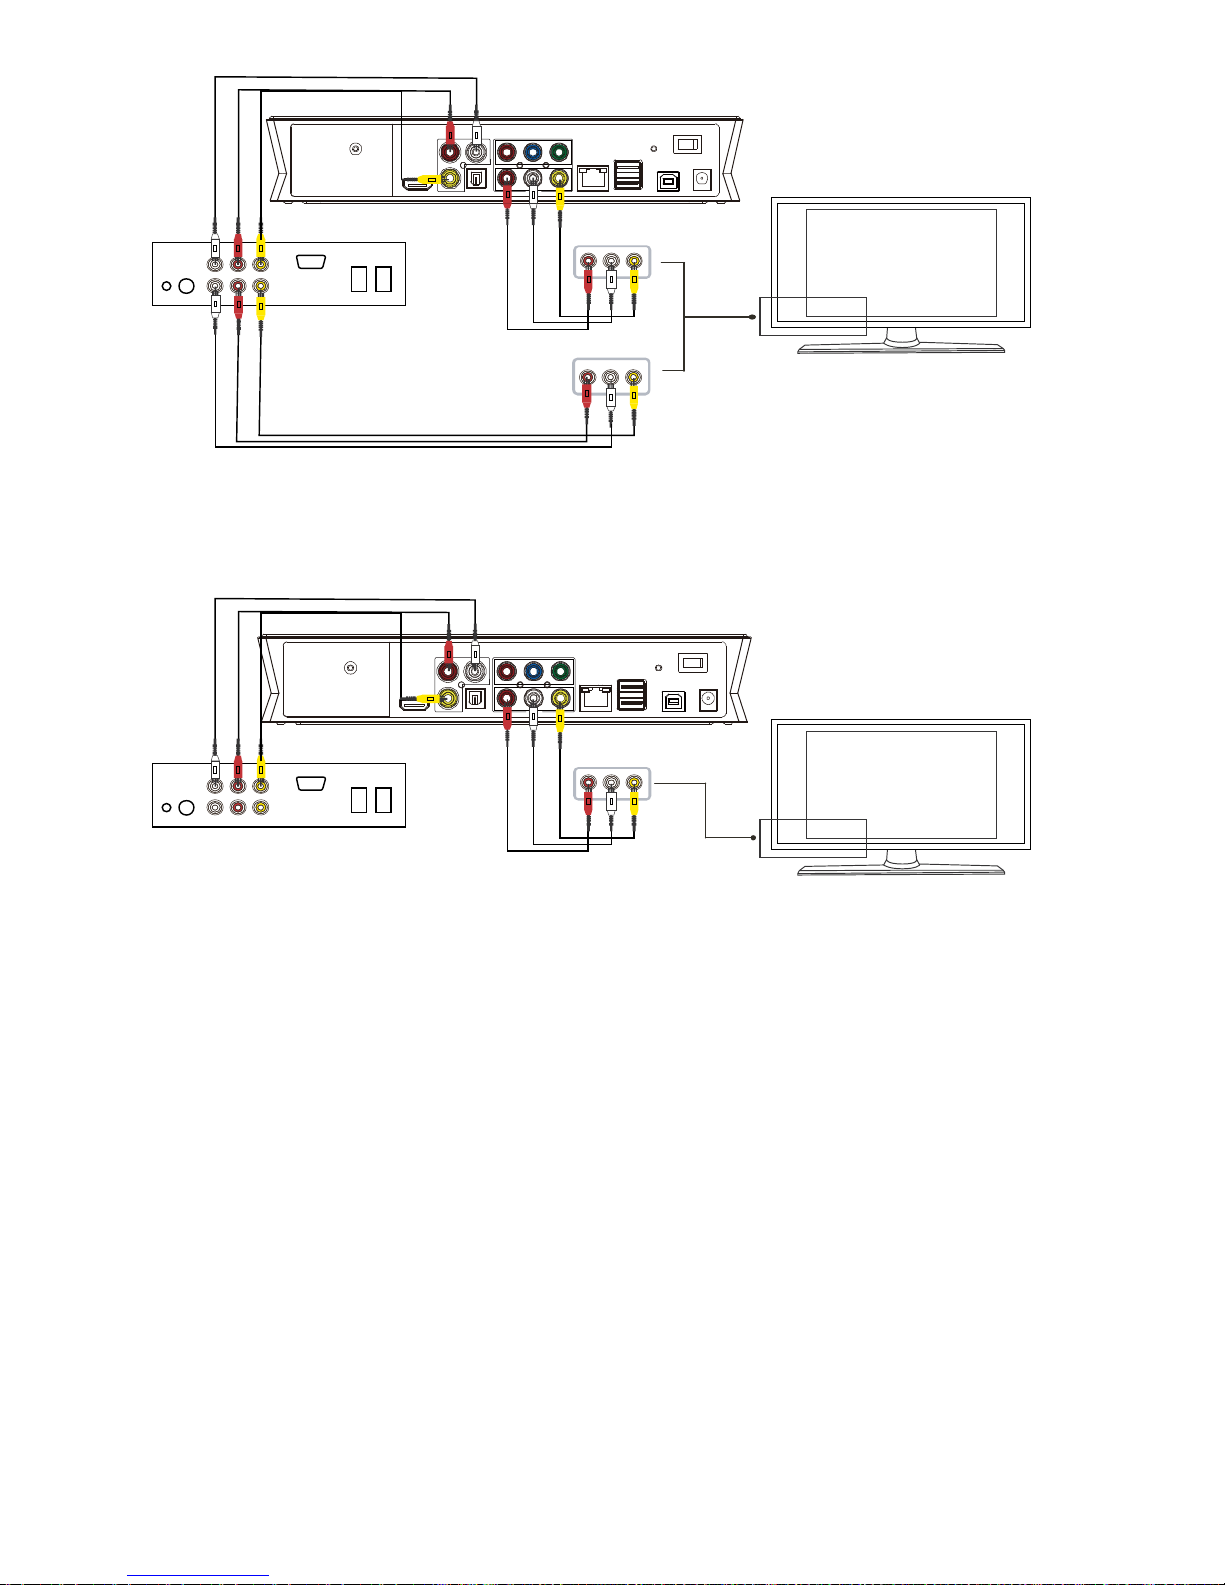
B. For set-top box or satellite with only one signal output, please refer to the
below connection:
There are AV in, AUDIO-R, AUDIO-L and optical output in the back of product.
Connect AV IN and set-top box or satellite TV receiver and make sure the output of
set-top box or satellite TV receiver works well. Turn on TV and select AV mode. Turn
on the product and select AV IN after enter the menu. The TV program displays on
screen and is ready to record.
Usage of starting Record
1. HDD Format
If you choose HDD in REC Device (in Setup menu), it is need to format the hard drive
before recording ,please copy files in HDD firstly in case of losing data. Then choose
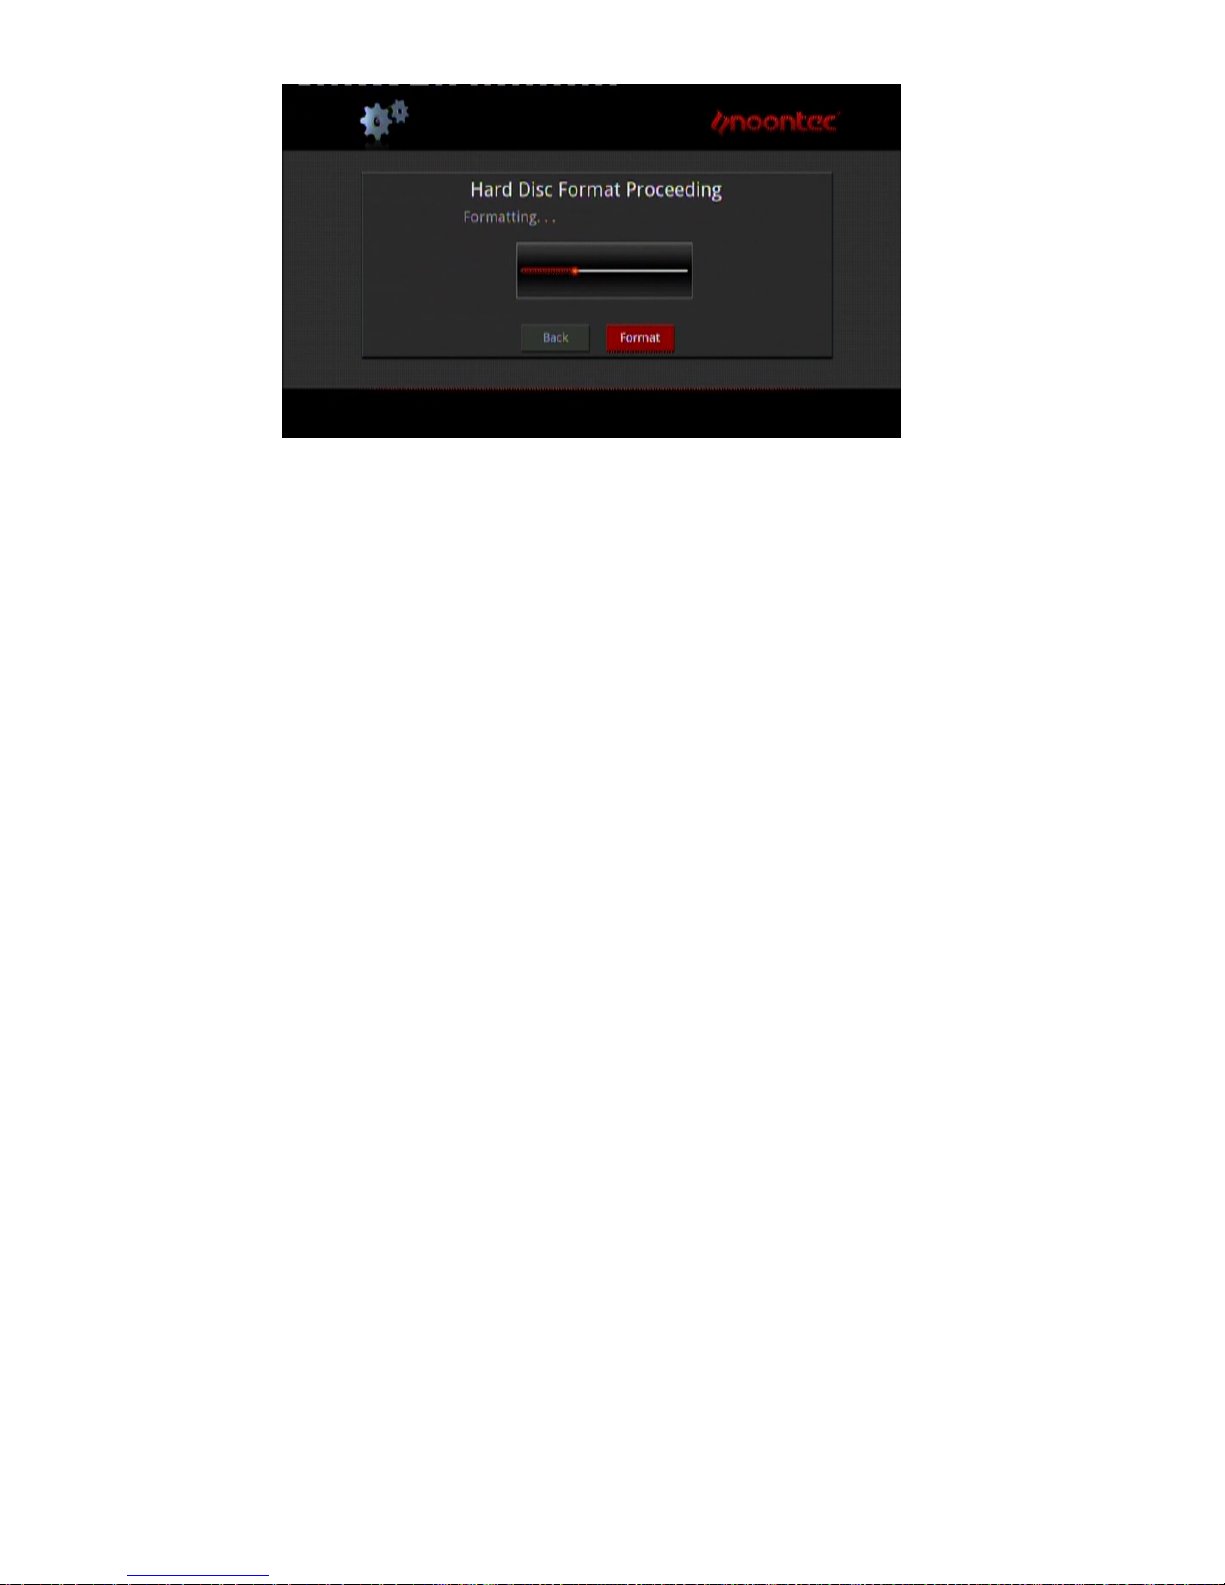
the HDD Format option in System Setup menu. HDD Format Steps:
Step 1: Setting timeshift buffer
The product needs the special space for timeshift to assign the hard drive’s space. At
10
Page 17
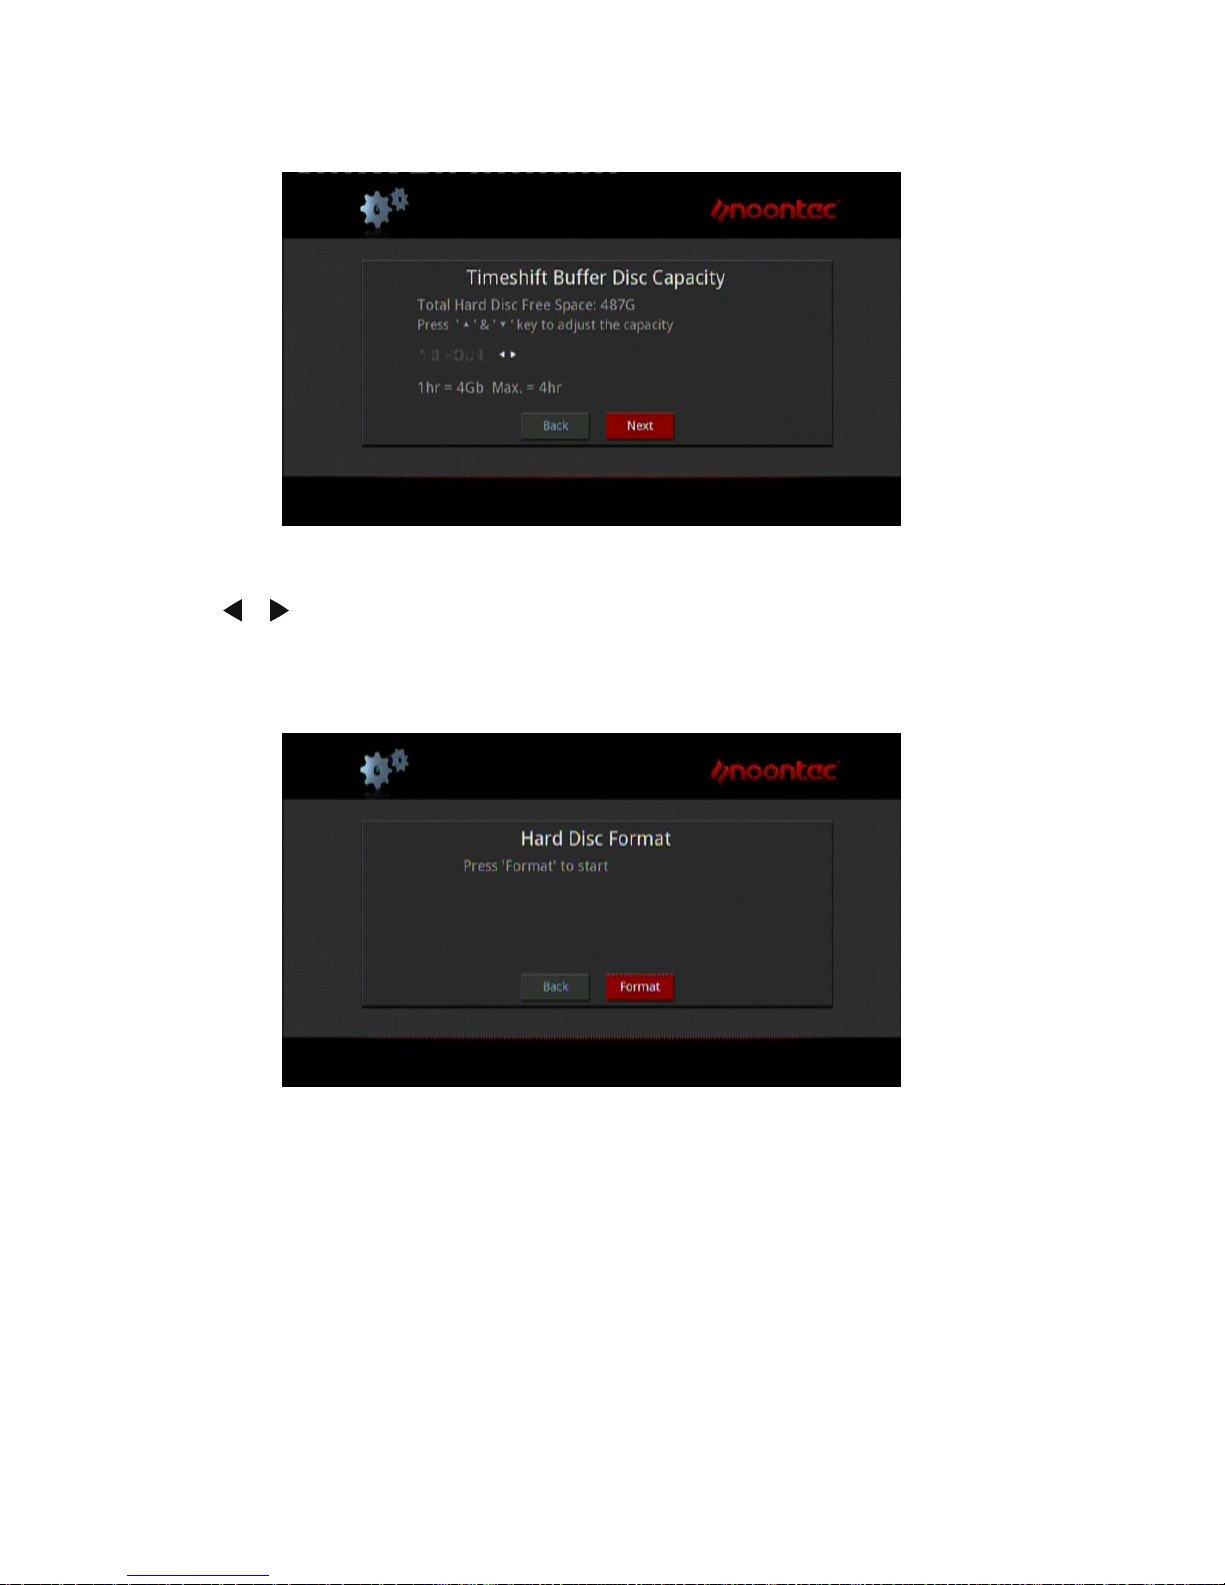
least one hour, maximum 4 hours. One-hour hard disk space occupied by about 4Gb,
so choose up to 4 hours of space occupied by time-lapse of about 16Gb.
Step 2: Hard disk format
Press / on the remote control to select “Back “ or “Format”.
When highlight move the “Format” key, Press “ENTER” to start. Otherwise, select
“Back” key to back..
Step 3: Completing HDD Format.
When HDD format is finished , the system will be restarted to access to the product’s
main interface.
11
Page 18
2. Recording
When using recording function , follow the previous connecting ways and select the
option of AV IN in the guide menu.
AV IN mode
After correct connection of the AV-in signal, power on the set-top box (or satellite TV
receiver), TV and our recorder.
If you only want to watch TV, do not power off the recorder and keep the input
signal of TV with the set-top box signal.
When you want to record the program which you like, please choose “the input video
frequency” the option to enter the television picture ,then choose the television
channel through the set-top box (Or satellite TV receiver).
Select “TV/AV IN” menu to enter the TV screen, you can receive TV programs
through set-top box (or satellite TV receiver) and press REC key to start recording.
Watch the recorded video
All the recorded files are recorded in a file folder named “REC”.
Press “REC LIST” key on remote control or enter the “Browser” in the main menu
and select the “HDD”, you will find this folder and recorded videos were saved in this
folder named by system time. Another way is to select ‘RECLIST’ on the guide
menu to open the recorded video files.
It is available to preview the recorded files and press “ENTER” key to playback.
12
Page 19

Connection and setup of network
The product can play the files stored in the network directly through router or hub.
Please connect the RJ45 cable according to the following illustration. The network
connects well when the LED of network status and W/R blinks.
Connect one end of the RJ45 cable to the product like the PC does and connect the
video output. Press “setup” key or select “setup” menu in the initiation interface.
Select “Network” option in the setup window and press “ENTER” to confirm. It is
available for both automatic and manual IP setup. Press “setup” key again to exist
after setup. Before accessing the PC through network by the product, the media files
must be shared in the network.
How to use USB HOST interface
Player with ability to expand large-capacity. The USB HOST port can read external
mobile hard disk, USB Flash Drive, digital cameras, card readers and other data
storage devices.
Even without the installation of hard drive players, you can connect external storage
devices through the USB HOST interface. To direct play a variety of high-definition
formats high-fidelity audio and video files stored in external storage devices. To watch
HD movies and digital photos are more palatable, at the same time the output digital
audio signals to audio equipment can feel the shock of high-fidelity sound effects.
13
Page 20

How to connect USB interface to PC
This HDD Recorder & Player is also a personal multimedia files storage device and
can be used by connecting to PC via USB interface.
1, Connect to the power supply
While using the HDD recorder & player with PC, power supply is also needed.
2, Connect to PC with USB cable
Connect the HDD Recorder & player to PC with USB cable then you can copy and
transfer data.
Follow the instruction of the above picture and connect the device to PC.
Power on the PC and enter the system. The PC detects the device automatically and
then the device can be used as an external USB storage device.
After data transfer finished, please remove the USB storage device safely (click the
USB device icon to stop the USB device and then pull out the USB cable).
Notes:
1, Please don’t power off when it connect to PC for reading and writing.
2, If there is no USB detected after connected with USB cable, maybe the PC is
operating other program, please pull off the USB cable and wait about 10 seconds
then connect again.
This HDD Recorder & Player is also a personal multimedia files storage device and
can be used by connecting to the PC. You can browse and copy files easily.
14
Page 21

Following is the setup of media file sharing in PC
Operation of file sharing under Windows XP
Two conditions are necessary for a successful play of network connection.
1. Folder sharing and safety setup .
2. Set the same gateway and subnet mark address.
Procedure of file sharing under Windows XP:
1. Select the folder need to be shared, right click mouse and select the option”
Sharing and safety”, lift click the mouse.
2. Select “sharing” in the property option and select “share this folder on the
network” and click “Apply” for confirming to exist.
3. Open “Control panel- Management tool-Computer management-Local users
and groups” and click “Users” option. Right click Guest and select “Properties”.
4. Select 'users can not change your password' and 'password never expires'.
keep the other checkboxes unchecked.
5. Open” Control panel- Network connection”, and select “Local Area connection”
and right click to select “Properties”.
6. In the Pop-up window, select ‘Internet protocol (TCP/IP)’
7. Set up the relevant IP address, subnet mask and gateway, can also choose to
automatically design.
8. Completion of Windows XP network sharing.
9. Finally, please close the Windows Network Connection Firewall
Operation of file sharing under Windows Vista:
1. Please make sure that the Vista operation system is installed as Administrator
supper user.
2. From the desktop select ”start- setup-control panel-select user account”
3. Open User account and select” open a new account” and name it “Guest”
4. Select the folder need to share and right click the mouse, then select the
“sharing” option.
5. Open the shared folder and add guest account to the list
15
Page 22

6. Give the right to all the users after adding the Guest into the list.
7. Select “sharing ”, and then the folder is shared.
8. Finish sharing
9. Operate the device as the same as operate in XP system
Operation of product usage
Power on the Player, the system shows guide menu after a few seconds. There will be
six function options, or you can enter this guide menu by press “Guide” key on the
remote control.
Note: While connect the power supply for the first time, the device will power on
automatically. Please go to the setup menu directly and set up the “Menu Language”,
“TV Region”, “Time setup” and so on when you use it for the first time.
Browser:
Browse and play the media files. With this function, you can browse movie, photo and
music files stored in HDD, card, net work and USB by pressing the “Up” and “Down”
navigation keys to choose the source devices and press “ENTER” key to confirm, also
you can press the “Browser” key on the remote control to enter this function directly.
Rec_List:
Quick automatic search function, can be directly into the player recorded folder and play
recorded files. the time of the recording document to the order in which they are named.
AV in:
Select the input source to be watch and recorded. Connect the device of the recording
resources such as the signal from the set-top box receiver with AV-in output, enter
“TV/AV in ” menu, then you can watch or record the current TV program.
Timer :
Plan recording schedules With this function, you can create, edit or delete the schedule
and view status and history. Please read the following instructions carefully to
16
Page 23

understand the function of each option.
Internet Service:
Enjoying various internet service on TV. With this function, you can access to news,
video , photo, weather ,and download interface on line by watching TV. You can enjoy
many kinds of internet service ,without using your PC to go to the internet.
File copy:
Copy files from one device to another . With this function, individual can copy files from
Hard Disk, NET, USB or Card from a media to another.
Setup:
Enter the setup menu. With this function, you can configure System, movie, music,
photo, network and record settings.
Browser
Select “Browser” in the guide menu or press “Browser” key on the remote control, then
you can browse movie, photo and music files stored in HDD, card, network and USB by
pressing the “Up” and “Down” navigation keys to choose the source devices and press
“ENTER” key to confirm and play the files in the selected device.
Select the file or folder by pressing “Up” and “Down” navigation key and press “ENTER”
key to enter and play the files, press “Return” key you can return to previous list.
File Range function
To make file browsing and playing easier, there is a function to range all files into
different folders named “All”, “Music”, “Photo” and “Movie”, you can switch to any folder
by pressing the “left” and “right” navigation key.
Browsing Music
Use the left and right navigation arrows to select the Music tab.
17
Page 24

Press / to select the folder containing your audio files. A thumbnail strip appears
at the bottom of the screen, along with song information. Press / to select the file
you want to play and press ENTER. This browsing music function supports MP3, WMA,
WAV, AAC, OGG, FLAC, Dolby Digital, DTS Digital… format Playback.
Browsing Photos
Use the left and right navigation arrows to select the Photos tab.
Press “ ” and “ ” to select the folder containing your photo files. Enter the folder
press “ ” and “ ” to select the photo you want to view and press ENTER the photo is
displayed full screen. Depending on the type and size of the picture, you may have to
wait some time before the playback starts.
If the SLIDESHOW is enabled in the Setup (“Photo Setup” menu) ,then press Setup
key to return to the pictures you want to playback, the slideshow will start automatically.
If you want to playback some music during the slideshow, simply make sure that you
copy your music file(s) in the same directory as the pictures. Then choose the “Folder”
or “playlist ” option in Background Music (“Photo Setup ”menu). Press the ENTER key to
playback your slideshow with the music background.
While browsing a photo, you can press / to rotate a photo in any angle. Beside
rotating a photo, you can press ZOOM to zoom in/out that photo, four zoom levels (2X,
4X, 8X, 16X) are available. This browsing photos function supports High Definition
Photo (JPG, BMP, PNG, GIF) Playback.
Note:
a) While listening to audio files, you can browse the photos at the same time.
b) If you press ZOOM during playback slideshow ,the slideshow will automatically
stop.
Browsing Movies
Use the left and right navigation arrows to select the Movies tab.
Press / to select the folder(s) containing your movie files. Enter the folder press
/ to select the movie you want to view and press ENTER. The movie is played
full screen. This browsing movies function supports High Definition Video (720p, 1080i,
1080p) Playback.
18
Page 25

For example: MPEG1 (DAT, MPG)
MPEG2 (VOB, MPG, TS) MPEG4 (AVI, DIVX, XVID)
H.264 (AVI, MKV, MOV) RM / RMVB, FLV, ISO
Note:
When play the HD Video, you can according the movie resolution to adjust HD Video
output. See “Creating TV System of SETUP menu” for more details.
Browsing All
Use the left and right navigation arrows to select the All tab.
Press / to select the folder(s) containing your all files (Besides Music, Photo and
Movie). Enter the folder press / to select the file you want to view and press
ENTER to play.
File Edit menu
Select the file or folder by pressing the navigation keys and display Edit, individual
can rename and delete files, press “ENTER” key to confirm.
Return
Select to return to the main screen.
To rename a file, do as the followings:
1. Press / on the remote control to select the Rename tab from the menu
bar.
2. Press ENTER on the remote control. The name entry screen appears.
3. Use the navigation arrows to select letters and numbers. Select CAPS to
Rename
toggle between uppercase and lowercase letters. Press <- to delete a letter.
Press -> to insert a space. Press ENTER to input each letter or number.
4. Once you have entered the new name, select OK and press ENTER to confirm
all changes.
If you want to cancel the naming during the process, press Return.
To delete a title, do the following:
1. Press / on the remote control to select the Delete tab from the menu bar.
Delete
2. Press ENTER to confirm and delete the file.
3. A confirmation message appears. Press / and select OK.
19
Page 26
4. Press ENTER to delete the selected file. To cancel delete, select Return.
External DVD
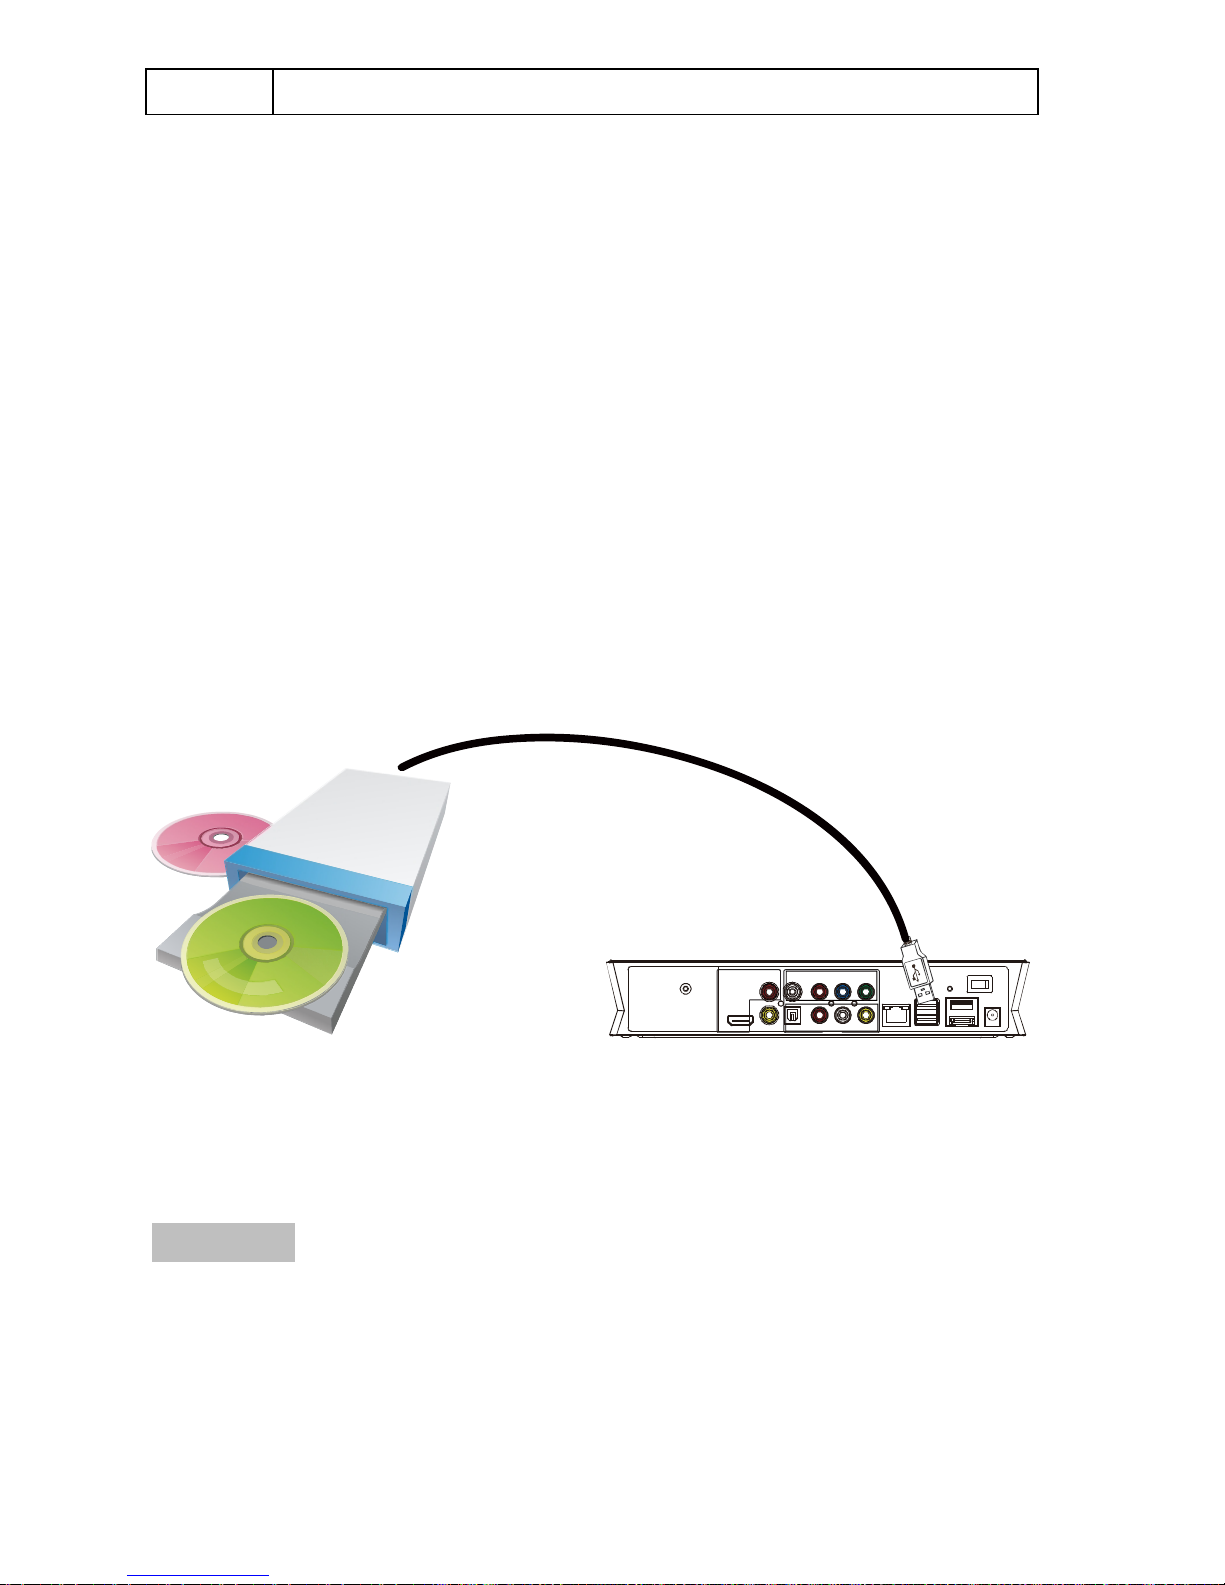
The player supports USB connected external DVD drive. The product can play DVD
through connecting to external drive by USB. Meanwhile, content in DVD can also be
copied to the hard disk, and then operations like backup information and so on can
be done.
Connect the USB CD drive to the peripheral port of the product through USB data
line, then choose External DVD in the homepage of the product and enter. If there is
playable CD in the drive, and the USB DVD PLUG IN tip in the product’s system is on,
the drive will start playing the CD automatically. In the playing process, you can press
“STOP ” in the remote control to stop playing, then press RETURN to return to the
product’s main interface, and then press “STOP” in the main interface to control the
OPEN or CLOSE operations in the drive.
NETWORK
My Shortcut
When you are browsing network, you can choose the computer name from
menu or you can set “Specific File Server IP” and access it from “My Shortcut” in
the menu.
My shortcut is the easiest way to get files from a computer previously configured.
20
Page 27

1) Press [OPTION] into My_Shortcuts interface. Then, choose Add, Modify,
Delete, Return.
2) Input Net User ID, Password, Specific File Server IP address.
3) When you complete settings, you can add a new shortcut.
4) Select it and input the password, you can browse photos, listen to music, and
watch videos through the network account.
Note: When datas are connected on computer with a HDD, USB device or Card
reader Network through the network, you can also browse photos, listen to
music or watch videos from these devices.
UPNP
UPNP means Universal Plug and Play, based on TCP/IP protocol as well as new
internet protocols aim at communication between facilities. All the facilities
connected to the internet can communicate without being interrupted by gateway,
so that communication in the internet can become more fluently, documents
transmission can become more convenient and internet applications which
cannot be used before can be operated. These are all the convenience brought
by UPNP. The Product supports UPNP. Before using UPNP function, please
make sure that connected computer in LAN has software that supports UPNP. If
not, please install a software or shared software that supports UPNP gateway
protocol. For example, connect the player to the family LAN, and then share
multimedia documents in Media Player 11 to access the living room through
UPNP.
Steps to proceed:
1/ Connect the product to the Network. Refer to network connection instructions
to connect the player.
21
Page 28

2/ Install software supporting UPNP gateway protocol. Before using UPNP
function, you need to install software that support UPNP gateway protocol.
3/ Share documents through software settings. Open the software’s interface,
choose “Media Base” in main interface, and then choose “add to the media
base” in the pull-down menu. After adding some documents or folders to the
media base, choose “media share”. You can also set the types and positions for
the shared documents, such as “music, picture or video” and so on.
4/ Use the Product UPNP function. Choose UPNP option in the main interface of
the Product to enter, and then the player can search out computers installed with
UPNP software in LAN. Enter your computer, and you can see multimedia
documents shared through Media Player 11 in your computer. Using UPNP is
more convenient and faster than using the player’s network function. The
product can access to computers without being interrupted by gateway, avoiding
operations like inputting user name, password and so on.
Playlist
The product supports the playlist function, which allows you to add your favorite
content to the playlist. The Playlist allows you to select music files, photos and
videos stored on your HDD. To build your playlist, enter the folder, select the
file and press [SELECT] to add the selected files to the playlist, then press
[CONFIRM].
Use slideshow mode with a playlist:
1 - In the Music menu, select background Slideshow then "Playlist".
2 - Select "Local HDD”, then select audio files.
22
Page 29

3 - When in Music mode, press [select] on remote to add files to playlist, and
then press [Confirm] to save selection.
4 - Go to menu "My Playlist”, then press red button on remote control to select
"All Media".
5 - In "All Media", start slideshow by pressing [Play], and the music starts
automatically.
Use the slideshow mode with the contents of a folder:
1 - In the Setup menu Entertainment, select background Slideshow, then
"Folder".
2 - Copy photos and music you want to play during slideshow in same folder.
3 - Then start the slideshow by pressing [Enter]. The photos and music in the
folder will be read simultaneously.
Notes: Only documents contained in the disk can be added to the playlist. The
primary partition of the hard disk
AV IN
Select AV IN and press ENTER. Then youcan enjoy and record the video which input
from other video in sources. It is important that the hard drive must be formatted
before recording, ,referring to the “HDD Format” in system menu ( “Setup Menu”).
In AV IN, press “REC” on remote controller or panel control to start recording. Press
“Stop” to stop recording.
Time shift
Press “time shift” to active the function, and “play” to continue normal play, “pause” to
hold on, “stop” to cancel the “time shift”
Permanent “time shift”, TV channels will be recorded automatically, user could view
by “skip forward“、‘fast rewind’、‘play’ at any time.
Note: It is need to format the hard drive before using Time shift ,referring to the “HDD
23
Page 30
Format” in system menu ( “Setup Menu”).
, Saturday, Friday, Thursday, Wednesday,
HQ, SLP, EP, LP and SP. Higher quality requires bigger capacity. It is available to
“Local/USB device
Timer
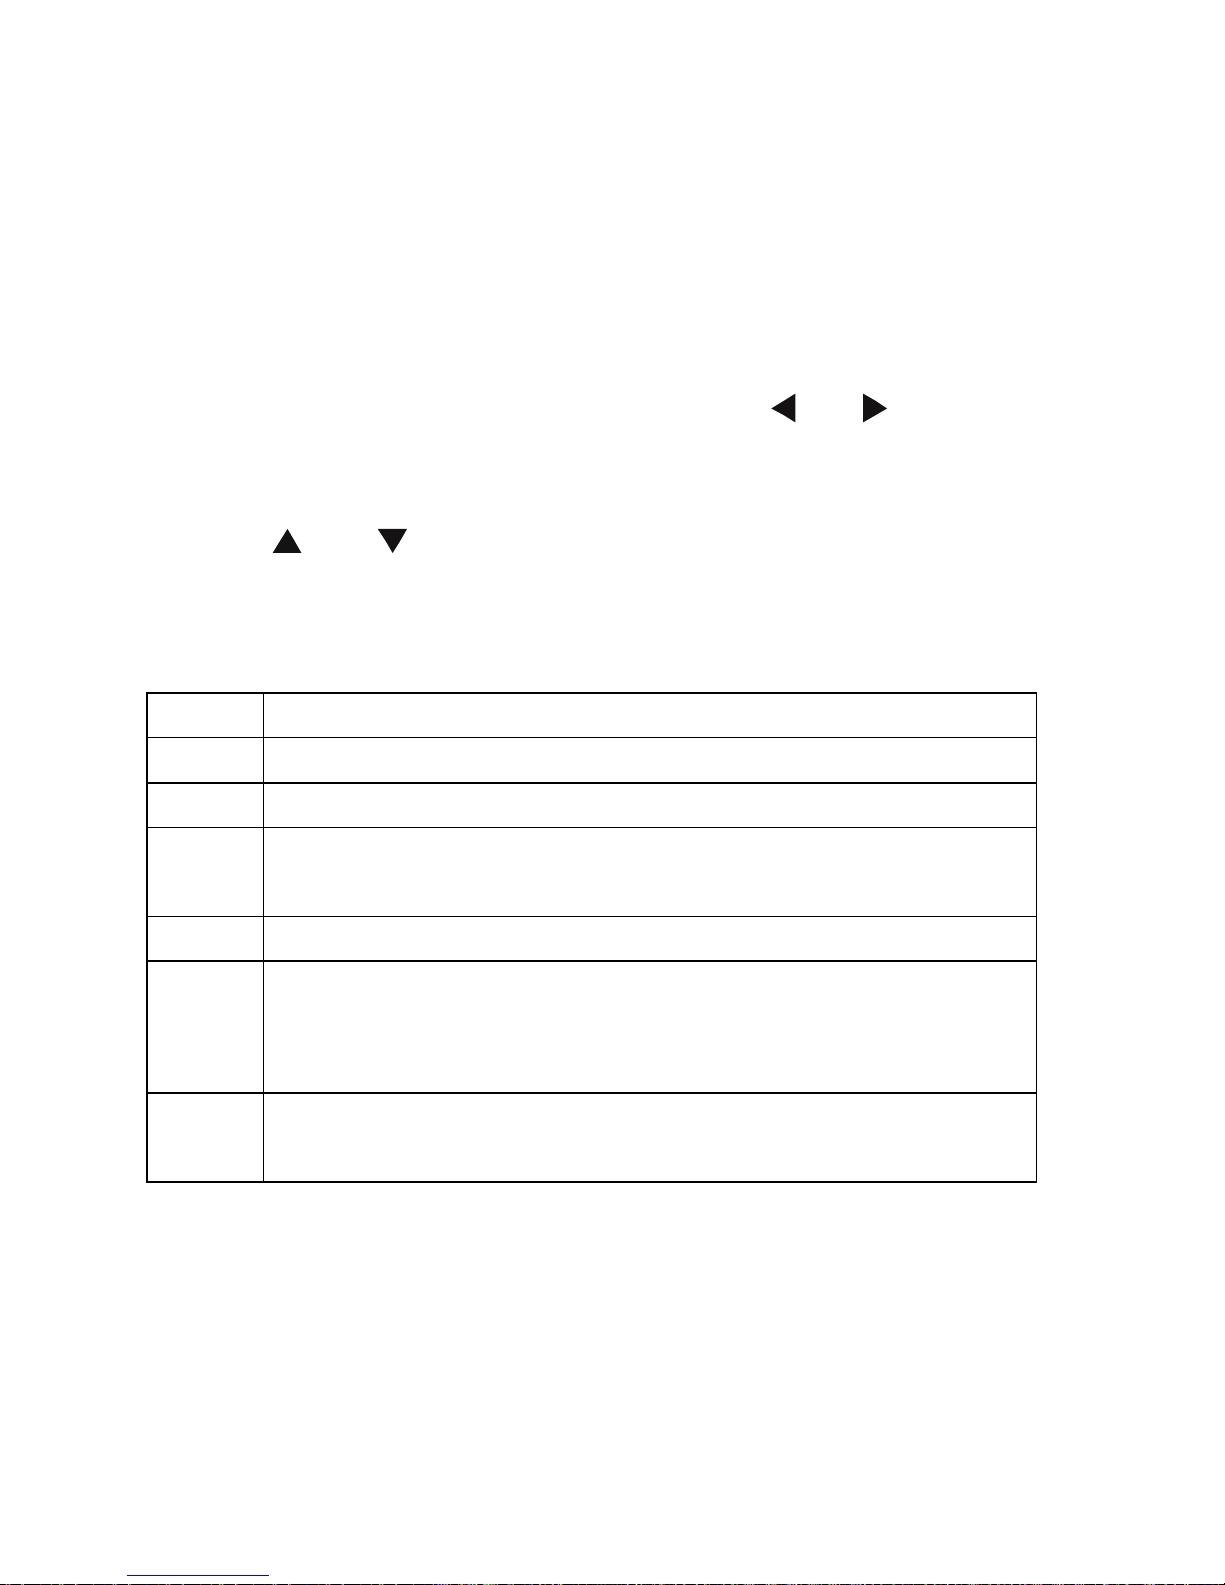
Timer allows you to create, edit and delete recording schedules and view all
schedule status and history. Select Timer Record from the Guide menu, there are
four options: Edit, Delete, Status and History. Please press “ ” and “ ” key select.
Creating a New Schedule
1. Select “Edit”.
2. Press “ ” and “ ” to select “Add a New Schedule” and press “enter”. The
schedule setting screen appears.
3. There are six options on the screen, please do the settings accordingly.
Source Video in
Start time date and time for recording
Length Length for recording
Choose any recording cycle, Once
Repeat
Tuesday, Monday, Sunday, and so on
Device HDD, USB1, USB2
Quality
Nicam
check the spare capacity and time for each recording in
available capacity in the left
On/off, Nicam is shorts for near intantaneous companded audio complex.
If it is selected, the recorded audio has high quality stereo effect when playback.
Usage of Timer
The TV Recorder & Player has the “Timer Recording” function, making you can plan
recording schedules. The device powers on automatically according to the schedule
set and then begin to record and power off after recording finished. It brings you more
convenience.
24
Page 31

Steps of “Timer REC” set up:
1. Enter “Timer ” in the main menu
2. Select “Edit” from menu and select “Add a New Schedule”, then press
“ENTER” key to enter.
3. In “Recording schedule set up” menu, find the rest available recording time
according to different recording quality level. Press the navigation keys to
set up the recording time, length, quality level, place to save the recorded
files and repeat recording time. When you plan to schedule recording time ,
it is advised that 5mins ahead of schedule an appointment. For example,
plan to start recording at 10 :00, and the recording time we set is 9:55.
4. After setting up is finished, press “ENTER” key to confirm, you can select
“confirm” or “cancel” to finish the recording schedule set up.
You can set up one or more recording schedules and edit them.
Stand by
After set up the “Timer REC” schedule,you can press SLOW to make the product
enter standby mode. When it is the time to start recording ,the device powers on
automatically according to the schedule set .
Watch the video recording
All the recorded files are recorded in a file folder named “REC”. Enter the “Browser” in
the main menu and select the “HDD”, you will find this folder and recorded videos were
saved in this folder named according to system time.
It is available to preview the recorded files and press “ENTER” key to play.
Internet Services
If the product is connected well to the Internet (details referring to the wired lan setup
or wireless setup), you can enjoy internet services. Internet Services includes various
kinds of services on line, by which you can browse video, news, photos and
download movies on the internet without using your PC. Select the Internet Services
in the guide menu and press OK key to confirm. As a result, you can access to the
25
Page 32

interface of internet services management, which includes Gougou, BBC, CNN, NPR,
Flickr and Picasa.
Note: the firmware of product may be updated anytime, please refer to the instruction
of actual delivery.
Video
If you want to browse video, you just need to click the video website icon ( Such as
Youku , Gougou ) on the main interface by pressing the navigation key on the remote
control and pressing OK key to confirm. Select any one of the videos that you want to
watch, thus you can watch all kinds of wonderful video files on line. If you want to
browse videos, the system will display a great many varieties of videos, thus you can
choose your favorite video to playback.
For example , after entering the gougou interface, you can use the following functions:
Recnetly Added ,Recently Featured ,Top Favorites and so on. Press the / key to
select your favorite video and press OK key to confirm, Thus you are able to watch your
favorite video to playback.
Note: The content of Internet is provided by internet service providers. The product just
provides the click platform, and can not guarantee whether the service provider could
provide the service of transmitting data continuously.
Download Management
If you want to download films from internet, please enter Gougou video, then press the
navigation button on the remote control to select download management and press
ENTER button to enter. Then the system enters the interface of media library. It is the
management interface of download files, which are sorted in different ways, such as
Show All, Sort by title, Sort by date. Once you have searched out the media source file ,
the screen will display the file’s download information, including the state ,file name, size,
progess and speed. For example, if you have searched out The Founding of a Republic
in Gougou video, the interface will display the file’s download information .
·PUASE : if you want to stop the downloading , firstly please choose the file, press
navigation button to choose Show All and press ENTER button ,then the screen will
pop the menu including three options :Delete, Pause ,Previous. Then you can select
26
Page 33

Pause and the files’ downloading state is changed into be paused .
·RESTART: if you want to restart downloading ,firstly please choose the file, then press
navigation button to choose Show All and press ENTER button, then the screen will
pop the menu including three options : Delete, Restart ,Previous, then you can select
Restart and the files’ downloading state is changed into be restarted.
·FULLSCREEN: if the file’s downloading progress is 100%, it indicates that the file’s
downloading is completed. If you want to playback the film in fullscreen, firstly please
choose the file, then press navigation button to choose Show All and press ENTER
button ,then the screen will pop the menu including three options: FullScreen, Delete,
Previous, then you can select FullScreen and the file can be playbacked in FullScreen.
·Sort by Tiltes: the files are sorted by titles. If you download the movie epsodes, the files
are put in order by titles.
·Sort by Date: the files are sorted by downloading date. They are arranged according to
the download date.
Note:
1. After choosing the file, you can press button on the remote control to enter the
file’s interface in full screen. Then according to the relative prompt to operation.
2. The content of Internet is provided by internet service providers. The product just
provides the click platform, and can not guarantee whether the service provider
could provide the service of transmitting data continuously.
News
If you want to browse news, you just need to click the news website icon ( Such as BBC
News, CNN News, NPR News ) on the main interface by pressing the navigation key
on the remote control and pressing ENTER key to confirm. Then you can enter news
management interface. For example ,if you click the BBC News icon, you will find the
interface which includes News Front Page, Business News , Asia -pacific, etc. Press
the / key to select your favorite news and press ENTER key to confirm, then you
are able to browse various kinds of news , referring to sports, entertainment and so on.
Photos
If you want to browse photos, you just need to click the photos website icon ( Flickr or
27
Page 34

Picasa ) on the main interface by pressing the navigation key on the remote control and
pressing ENTER key to confirm. Then you can enter photos management interface.
For example, select the flickr photos website and press ENTER key to confirm. Then
you can enter photos management interface, where you can find the titles on the upper
left corner : search photos ,previous page, and next page.
If you want to search photos ,just click the title Search Photos, the screen will display a
keyboard interface used to input the content you want to search (such as dog),and
press ENTER key to confirm, so you are able to browse all the photos about dog ,when
you just need press navigation key to select you are interested.
Previous / Next page: the option is used to turn previous or next page.
File Copy
The File Copy allows users to copy files between USB, CARD, HDD, NET. Select
“File Copy” from the Guide menu or select “COPY” on the remote control .It is very
easy to copy files between various devices.
Copying operation
Step 1: Select Source Device
Press / to select the device which need to copy at first after entering the File
copy interface,. Then press to select Destination Device, press to return.
Step 2: Select Destination Device
Press / to select the device of the Destination after go to Destination sector.
Then press to next step, and press to return.
Step 3: Select copy files or folders
At Source sector, press / to select and press “SELECT” to select file or folders
which need to copy. √ .appears at right side of selected file or folder. Then press
to next step, and press to return.
Step 4: Select the folders of Destination
Press / to select a target folder at the destination sector. Then press to next
step, and press to return.
28
Page 35
Step 5: Copy Status
Setting screen display language, Simplified Chinese, English, Traditional
Setting text encoding language, Unicode (UTF8), Simplified Chinese (GBK),
Traditional Chinese (BIG5), Western, Turkish, Central European, Cyrillic, SE
responding text
ed to input the username and
otherwise you can directly login
At top menu, select YES to copy, select No to cancel.
After copy finishing, the system will display “File Copy is completed!”, or will display
“File Copy failed!”
Select “YES” to browse the copied files, or select “No” to return to Video.
Setup Menu
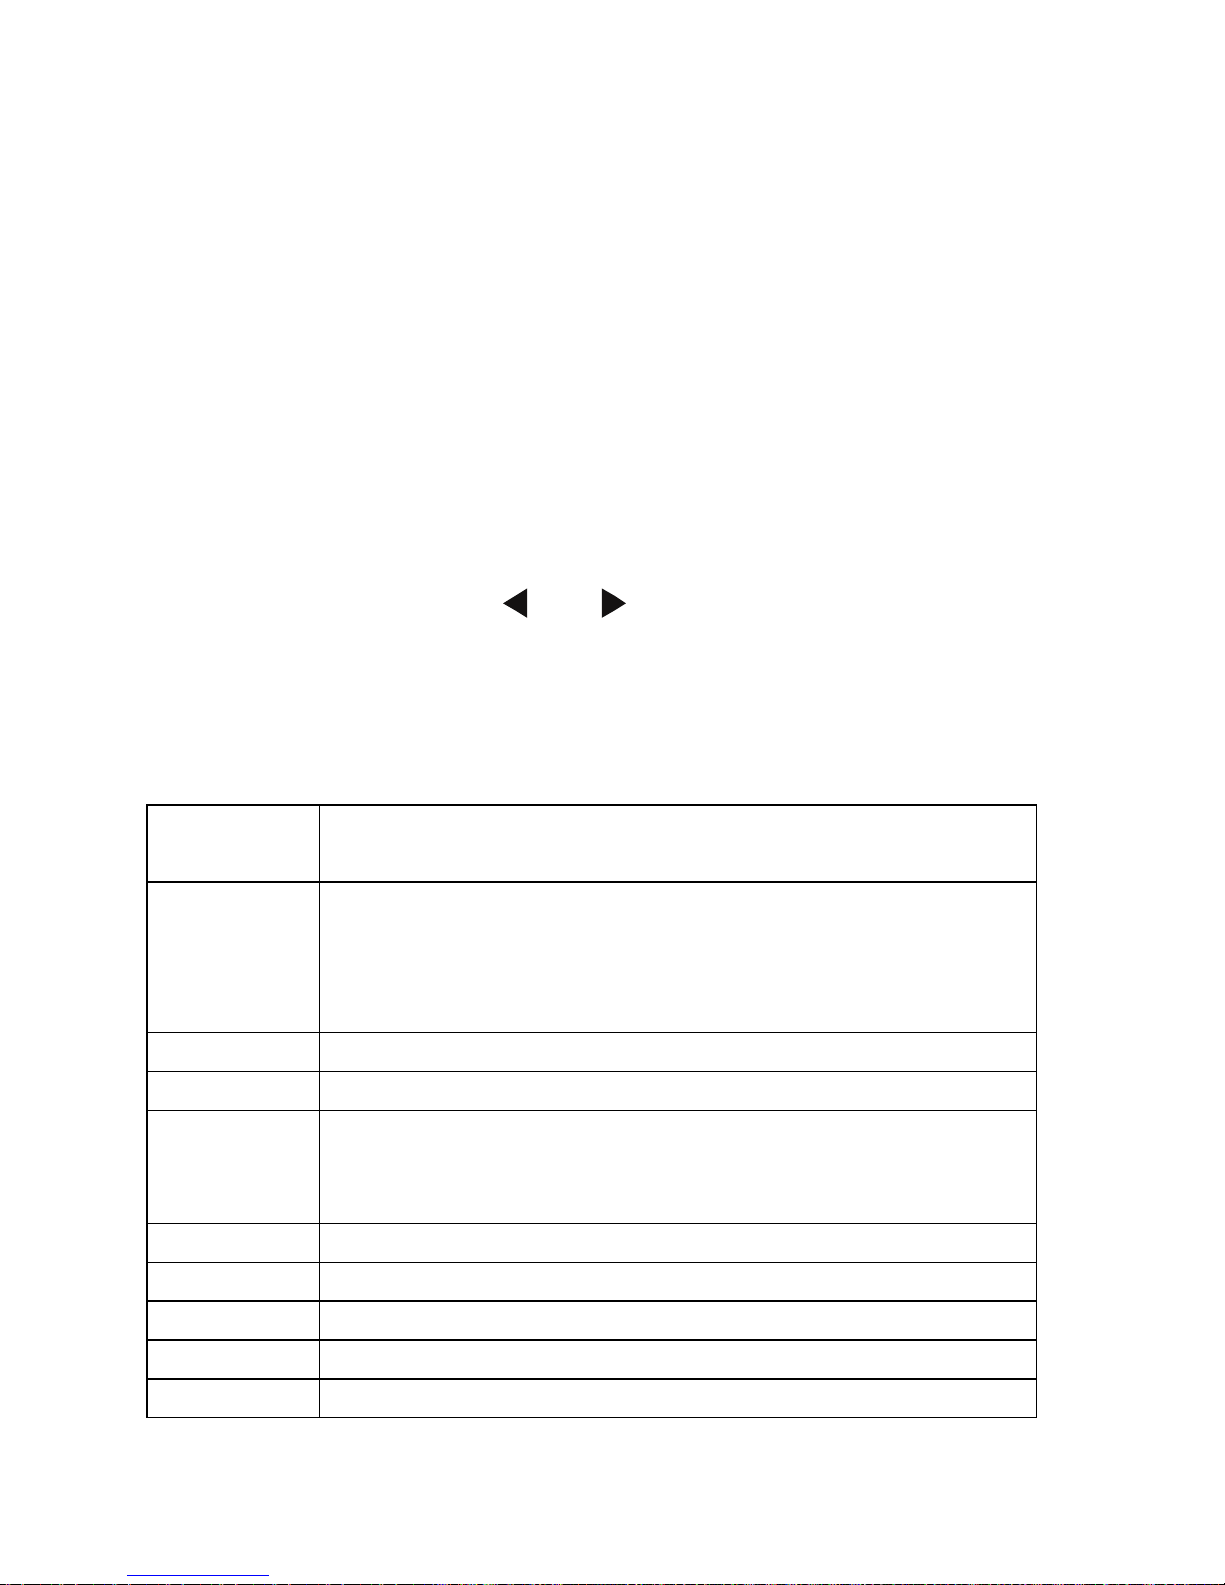
Select” Setup” option or directly press “Setup ” key on the remote controller to enter
the setup menu. It is possible to configure TV, Audio, Video, Rec, Network, System
and MISI.
Select any option by pressing “ ” and “ ” on the remote controller, and press
ENTER to confirm or press “Return” to exit. Press “Setup” key again on remote
control to exit from setup menu.
System Setup
Menu Language
Text Encoding
Screen Saver Off /On., select to turn on or off screen saver.
DVD Auto-Play Set DVD drive to play on or off automatically.
Login Control
BT/Samba Info Showing player BT/Samba installation information.
Chinese, Spanish, French, German, Italian, Dutch, Russian.
European different languages and so on. Please select the cor
encoding, might be garbled characters.
ON/OFF. If Login control is ON, you are requir
password when you login the neighbor web,
without inputting anything.
Time Set the system time Manual, Auto (via TV) or Auto (via DTV).
HDD Format Select to HDD Format.
System Update View the current software version and update the software of the product.
Restore Default To restore the factory’s default settings
29
Page 36

Video Setup
be previewed on the lower right corner of
When the movies did not play at the end of the suspension, the product will
ON/OFF If selecting seamless playback, the movie which has many chapters
e picture on the entire screen and cuts off the
Letter Box 4:3, Display a wide picture with two black borders on top and bottom
age to convert the whole image when a 16:9 TV is
TV is
Movie
preview
Resume Play
Seamless
playback
Aspect Ratio
Off/On, when it is on , the movie can
the screen.
Off/On.
record video of the time suspended, the next player can choose " Resume
Play" can continue from the last interruption point in time to start playing.
of HD movie in the same folder can be playback successively without buffer.
Pan Scan 4:3, Display a wid
redundant portions when a standard 4:3 TV is connected.
of 4:3 screen when a standard 4:3 TV is connected.
16:9: Compress the im
connected.
16:10: Compress the image to convert the whole image when a 16:10
connected.
Brightness Select to set brightness levels.
Contrast Select to set contrast levels.
TV System
1080P 24Hz To achieve better viewing, the film could be playbacked at uniform speed.
Select to adjust TV system.: NTSC, PAL, 480P, 576P, 720P 50HZ, 720P 60HZ,
1080i 50HZ, 1080i 60HZ, 1080P 50HZ, 1080P 60HZ
Audio Setup
Night
Mode
Digital
output
In comfort mode, it restricts the volume automatically so that it would not affect the
peoples’ rest or working.
HDMI LPCM: The digital audio signal which is decoded by the product outputs
through HDMI 2.0 channel
HDMI LPCM MULTI CH: The digital audio signal which is decoded by the product
outputs through HDMI 5.1 channel.
HDMI RAW: The raw digital signal of the multimedia data directly outputs through
HDMI, at this time the remote control has no function of adjusting the volume.
SPIDF LPCM: The digital audio signal which is decoded by the product outputs
through optical .
SPIDIF RAW: The raw digital signal of multimedia data directly outputs through
optical, at this time the remote control has no function of adjusting the volume.
30
Page 37

NOTE: If selecting HDML LPCM/RAW, there is no signal output through optical. If
and you can choose background
he
require less storage space
s, subnet mark address and default gateway. It is
and
the signal coverage of wireless signal sources,
o not need a wireless
source within the region to establish one to one
selecting SPDIF LPCM/ RAW, there is no signal output through HDMI.
Photo Setup
Slide Show
Timing
Transition
Effect
Background
Music
Set time interval of slide show. 2/5/10/30s, 1minutes, 2 minutes
Select a picture transformation effects, there are eight different effects to choose.
the music must be in the same folder or playlist,
music’s position by the navigation
REC Setup
Recording quality setting: HQ, SP, LP, EP, SLP
Quality
Permanent
Timeshift
REC Device HDD, USB
The highest quality is HQ, which requires the most storage capacity . But t
other settings reduce recording quality sequentially
accordingly.
Set the Permanent time shift on or off.
Network Setup
Check the following items before use this function:
Connection between product and network
Network protocol is available
Wired Lan
Setup
Wireless Lan
Setup
PC firewall must be shut down
Files are shared
Auto:Automatically set IP address
Manual: select IP addres
available through navigation and numeric key and press “enter” for confirming
Connecting the configure files: there are 3 modes in all.
Infrastructure(AP): Select the way of point to plane, via a wireless router
wireless card can search out
access to SSID choice for a visit.
Peer to Peer(Ad Hoc): Select the way of point to plane, d
router with a wireless signal
31
Page 38

relationship with each other’s visit.
the
Plug the LAN port using the cable, then input the username and
Pppoe
setup
Password (provided by the ISP) in the box. Then press ENTER key to confirm.
Then select Wired Interface to connect. When the connection is success,
system can get a IP address.
32
Page 39

Network Function
You can streaming playback the multimedia files from network and have file copy
function through network.
Wired Lan Setup
Access the player to LAN, and press “Setting” in the remote control to enter the setting
interface of the player. Select “Network” and enter “Wired Network Setting”. You can
choose automatic or manual mode to do the setting.
DHCP IP (AUTO): To get the IP address of the domain name server automatically.
Select DHIP and then choose “ENTER” according to the operation clues. The player
can search and get IP addresses automatically. If the connection is successful, the
gained IP addresses will be shown on the screen. If no IP address is shown on the
screen, the connection is unsuccessful, thus you need to check the network connected
to see if it has been set according to the requirements. Then try to get IP addresses
again.
FIX IP (MANUAL): To set the fixed IP address, subnet masks and default gateway and
so on manually. Please input information by navigating keys and number keys and
finally press “ENTER” to make confirmation and start testing. Parameters of the
network connection of the product will be shown if the connection is successful.
1. Select “Network” in the home page of the product. If there are open groups in the
sharable wire network, other sharable working group folders, such as
WORKGROUP, will exist besides MY _SHORTCUTS and MY_NEIGHBORS.
Select and enter corresponding folder, then you can play multimedia content
shared in the network of the computer.
2. If there are no other sharable folders, select “MY_SHORTCUTS” and enter.
Press "OPTION" in the remote control, and choose “Add” in the open window to
create a new shortcut for computers that have set network share. Input your user
name, password and IP address of the appointed document server. User name
33
Page 40

is GUEST or EVERYONE and the IP address of the appointed document server
is the IP address of the computer that has set network share. There can be many
sharable computers in the wire network, input the IP address of the computer
you want to access.
3. If the connection is tested to be successful, save the setting. Choose the newly
created shortcut to enter. Input username GUEST or EVERYONE and password,
and then you can access to the appointed IP address and get the shared content
in that computer.
4. The product can play multimedia documents in the shared content. If videos are
played, there will be network connection speed shows on the screen. Higher
speed indicates that the network is more stable and the quality of the video will
be better. The product can also connect TV in the living room with computer in
the study through wire network connection, thus wonderful movies shared in the
computer can be played in the large TV screen, creating a new experience of
home theater.
Wireless Setup
If it is the first time for you to use wireless network function, please do the following
setting:
Access your player to the Local Area Network (LAN), and press “Setting” in the remote
control to enter the player’s setting interface.
1. Select “Network” and enter "Wireless network setting", choose the file name of
the connecting configuration. Then the clue of “Press ‘ENTER’ in the remote
control to connect, and press ‘ENTER’ to test the selected connection ” will show
on the lower part of the screen. Press “ENTER” to connect. There are two
connection modes to choose: "AP" and “Ad Hoc”.
2. If select “AP” mode, the player can detect wireless signal sources within the
searching scope of the configured wireless network card and the interface will
show all the detected wireless SSID.
3. If select “Ad Hoc” mode, the player can access to sharable content in specific
34
Page 41

objects. For example, the product and computers can connect and exchange
data through choosing “Ad Hoc” mode without using wireless Routers.
4. Connect the product’s antenna with a USB wireless network card, put through
the antenna, and then you can set the wireless network according to the
following steps. If no external antenna is configured to the product, a USB
wireless network card that supports 802.11 b/g/n protocol will be needed to insert
into the USB HOST interface of the product. Then “WIFI PLUG IN” will show on
the screen. Thus you can start to set the product’s wireless network. The
following is detailed description for the operations of two wireless network
connection modes:
Infranstructure (AP) setting
1. Select “AP” to get SSID names. You can choose automatic update and the
product will search all the wireless SSID within the searching scope of the
wireless network card automatically.
2. After the searching finished, all the searched SSID will be shown on the screen.
Choose the server’s SSID you want to access, test the connection and save the
setting information. On the bottom right corner, there will be a green symbol
showing the signal strength.
3. Select “Network” in the home page of the product. If there are open groups in the
sharable wireless network, other sharable working group folders, such as
WORKGROUP, will exist besides MY _SHORTCUTS and MY_NEIGHBORS.
Select and enter corresponding folder, then you can play multimedia content
shared in the network of the computer.
4. If there are no other sharable folders, select “MY_SHORTCUTS” and enter.
Press "Edit" in the remote control, and choose “Add” in the open window to
create a new shortcut for computers that have set network share. Input your user
name, password and IP address of the appointed document server. User name
is GUEST or EVERYONE and the IP address of the appointed document server
is the IP address of the computer that has set network share. There can be many
sharable computers in the wireless network, input the IP address of the computer
you want to access.
35
Page 42

5. If the connection is tested to be successful, save the setting. Choose the newly
created shortcut to enter. Input username GUEST or EVERYONE and password,
and then you can access to the appointed IP address and get the shared content
in that computer.
6. The product can play multimedia documents in the shared content. If videos are
played, there will be network connection speed shows on the screen. Higher
speed indicates that the network is more stable and the quality of the video will
be better. The product can also connect TV in the living room with computer in
the study through AP wireless network connection, thus wonderful movies
shared in the computer can be played in the large TV screen, creating a new
experience of home theater.
Peer to Peer (Ad Hoc) setting
Ad Hoc mode can build a peer-to-peer network structure without wireless AP.
Computers configured with wireless network card can connect with each other
wirelessly through this mode. The network building process for Ad Hoc wireless LAN is
very simple as it leaves out wireless AP. But the transmission distance for wireless
network card is generally around 40m in indoor environment, when the distance
exceeds this effective transmission distance, communication cannot be realized. So
this mode is suitable for simple and provisional wireless connection requirements.
The operations introduced below will show you how to connect the product with
computer through Ad Hoc mode.
1. Firstly, set the product’s wireless network, select “Ad Hoc” and enter.
2. Set the product’s wireless SSID name in the wireless network. You can edit the
name whatever you like. Other computers configured with wireless network card
can see the SSID name of your product through searching.
3. Select security modes for your wireless network: open system or WEP (Wireless
Equivalent Privacy). If you choose open system, other computers configured with
wireless network card can connect with your product freely when searching out it.
If you choose WEP, you need to set the shared key (10-25 numbers), and then
other computers can connect with your product after inputting network key.
4. Set the IP address of your host, making sure that the address will not conflict with
36
Page 43

IP addresses of other wireless facilities. When the above three settings are
finished, press “ENTER” to save your setting and start testing. If the connection is
tested to be successful, interface showing network information will be displayed.
Then you can check the set parameters.
5. When the setting of Ad Hoc wireless network for the product is finished, you need
to start the wireless network function of the computers which your product needs
to connect. This description is for operations under WINDOWS XP system, and
operations under other WINDOWS operating systems are similar to this.
6. Select “My Computer” in the desktop, choose “Management” by clicking right key
on the mouse to enter the computer management interface. Double click
“Service and Application” to enter the program. Select “Service” and enter.
7. Double click “Wireless Zero Configuration” in the last third one of the “Service”
options to enter its window of attribute. Then select “Startup” in the routine
options of the window, and click “ENTER”, thus the wireless network function of
the computer is opened.
8. If your computer configures with internal wireless network card (such as most of
notebo ENTER PCs) and has started the wireless network function, it can search
out the product’s SSID and connect with the product. If your computer doesn’t
have internal wireless network card (such as most of desktops), you can insert a
USB wireless network card that supports 802.11 protocol into the computer’s
USB interface and install drive for the network card. You should inactivate wired
network of the computer before configuring the wireless network.
9. Then there will be an icon representing wireless network and showing in the
status bar in the bottom right corner of the computer’s desktop. Click the icon,
and a status window of the wireless network connection will show. Click “Check
the Wireless Network”, then wireless network SSID within the searching scope
will be shown on the interface.
10. Select the product’s SSID and the computer’s Ad Hoc connection icon in the
window of wireless network connection, and click “Connect”. There will be a clue
to indicate that the connection is successful if the wireless network Ad Hoc
connection is done. Then click “Support” in the window of wireless network
connection status to see IP address and so on network information gain from the
37
Page 44

wireless network. Do remember the computer’s wireless IP address because
you need to use it when the player needs to access to the computer.
11. Enter “Network” in the homepage of the product, select “MY_SHORTCUTS”
folder and enter. Press “Edit” in the remote control and choose “Add” to create a
new shortcut for accessing to other computers, and then input user name,
password and IP address of the appointed document server. User name is
GUEST or EVERYONE and the IP address of the appointed document server is
the wireless network IP address of the computer that has built Ad Hoc
connection with the product. There can be many computers building Ad Hoc
connection with the player at the same time, input the IP address of the computer
you want to access.
12. Save the setting and choose the newly created shortcut to enter. Input user
name GUEST or EVERYONE and password, and then you can access to the
appointed IP address and get the shared content in that computer.
13. The product can play multimedia documents in the shared content. If videos are
played, there will be network connection speed shows on the screen. Higher
speed indicates that the network is more stable and the quality of the video will
be better. The product can connect TV in the living room with computer in the
study through Ad Hoc wireless network connection, thus wonderful movies
shared in computer can be played in the large TV screen, creating a new
experience of home theater.
PPPoE Setup
PPPoE (Point-to-Point Protocol over Ethernet) is a protocol used by many ADSL
Internet Service Providers. If your ISP uses PPPoE, but has given you a router, you
may need a PPPoE client on your Linux box. DHCP may work fine. The product ,as a
PPPoE client for Linux and Solaris systems to connect to PPPoE service providers.
The product is ideal for users with a DSL "modem" whose Internet service provider
uses PPPoE. Before you use this function , check whether or not you really need it.
If your product is connected to network via DSL and PPPoE, the DSL service provider
will provide a username and password for you to log in. After passing security
authentication by telecom operators, the user can get the IP address and then the
38
Page 45

product is connected to internet.
The operations for PPPoE setup as following:
Step 1: Firstly use a telephone line to connect to the modem which supports PPPoE ,
then connect the product to the modem via RJ45 port.
Step 2: Select the option “PPPoE setup” in the network setup in SETUP menu. Input
the net user ID and password which are provided by telecom operators .Then press
ENTER button to confirm.
Step 3: For several minutes, the user can get a IP address which is configured by
ethernet .It indicates the net connection is success.
Install and use of BT/SAMBA
Player is a system, which is consist of operating system ( Linux + AP) and application
software (BT/SAMBA).
The first install
When using the function of BT/Samba for the first time ,please enter the item of
System in the menu of Setup to check the BT/Sambar information. If the BT/Samba
is uninstalled yet, please install it firstly. Please copy the four installation files(.ipk) in
the BT/Sambar installation package to the root directory in the U disk, and insert it to
the product’s USB host port. Finally select HDD Format in the System menu under
the Set Up interface.
Step 1: Copy the installation files
Please copy the four installation files(.ipk) in the BT/Sambar installation package to the
root directory in the U disk,and insert it to the product’s USB host
Step 2: Hard disk format
Select the HDD Format in the system settings ( in ‘Setup Menu’ ),then press OK to
confirm. The details please refer to the chapter of “the usage of starting record”.
39
Page 46

Step 3: Install BT/Samba Extension
After format is completed, the system will install BT/Samba automatically.
The system will install automaticly according the following steps.
1) Install BT/Samba Extensio
2) Install Bit-Torrent Support
3) Install Samba Server Support Installing
4) Install Web Support Installing
When the installment is completed, the system will display success at the end of even
steps.
IP address setting
You can obtain a product's IP address to accordance with Wired Lan Setup in front of
introduced.
1. 1). Obtain IP address automatically
The system will obtain the IP address automatically via DHCP protocol if the
local network has DHCP server available.
2). Use static IP address
Acquire a unique IP address, Subnet mask, and Default gateway information
from your network system. Then fill in.
2. 1).Obtain DNS server address automatically The system will get DNS server
addresses from DHCP server if available
2).Use static DNS server addresses Specify DNS server address.
Neighbor Web interface
When you get BT Player’s IP address, launch your web browser ,type the correct IP
address in the browser, you can into Neighbor web interface. The Username is
admin and the initialization password is 123.
40
Page 47
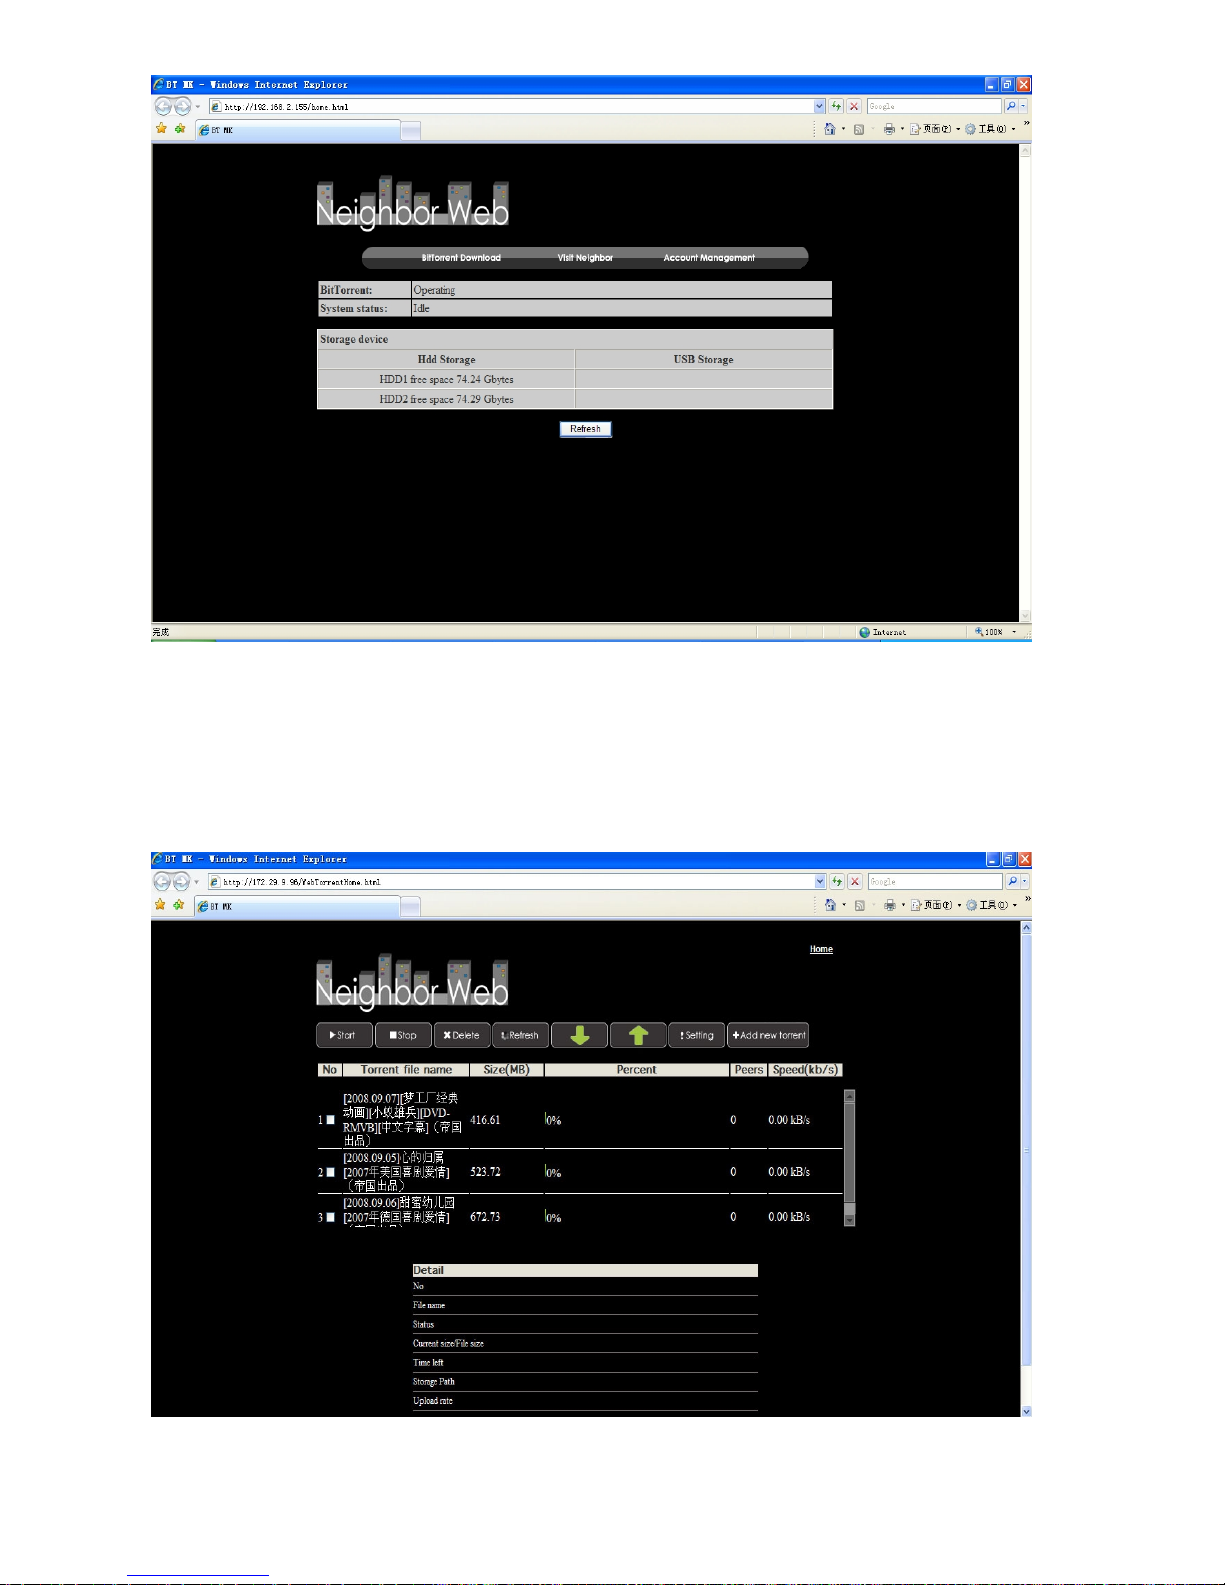
At Home page, the “Neighbor web” will display BT Player’s status and storage device.
BitTorrent Download
At Home page, Select “BitTorrent Download” into download interface.
41
Page 48
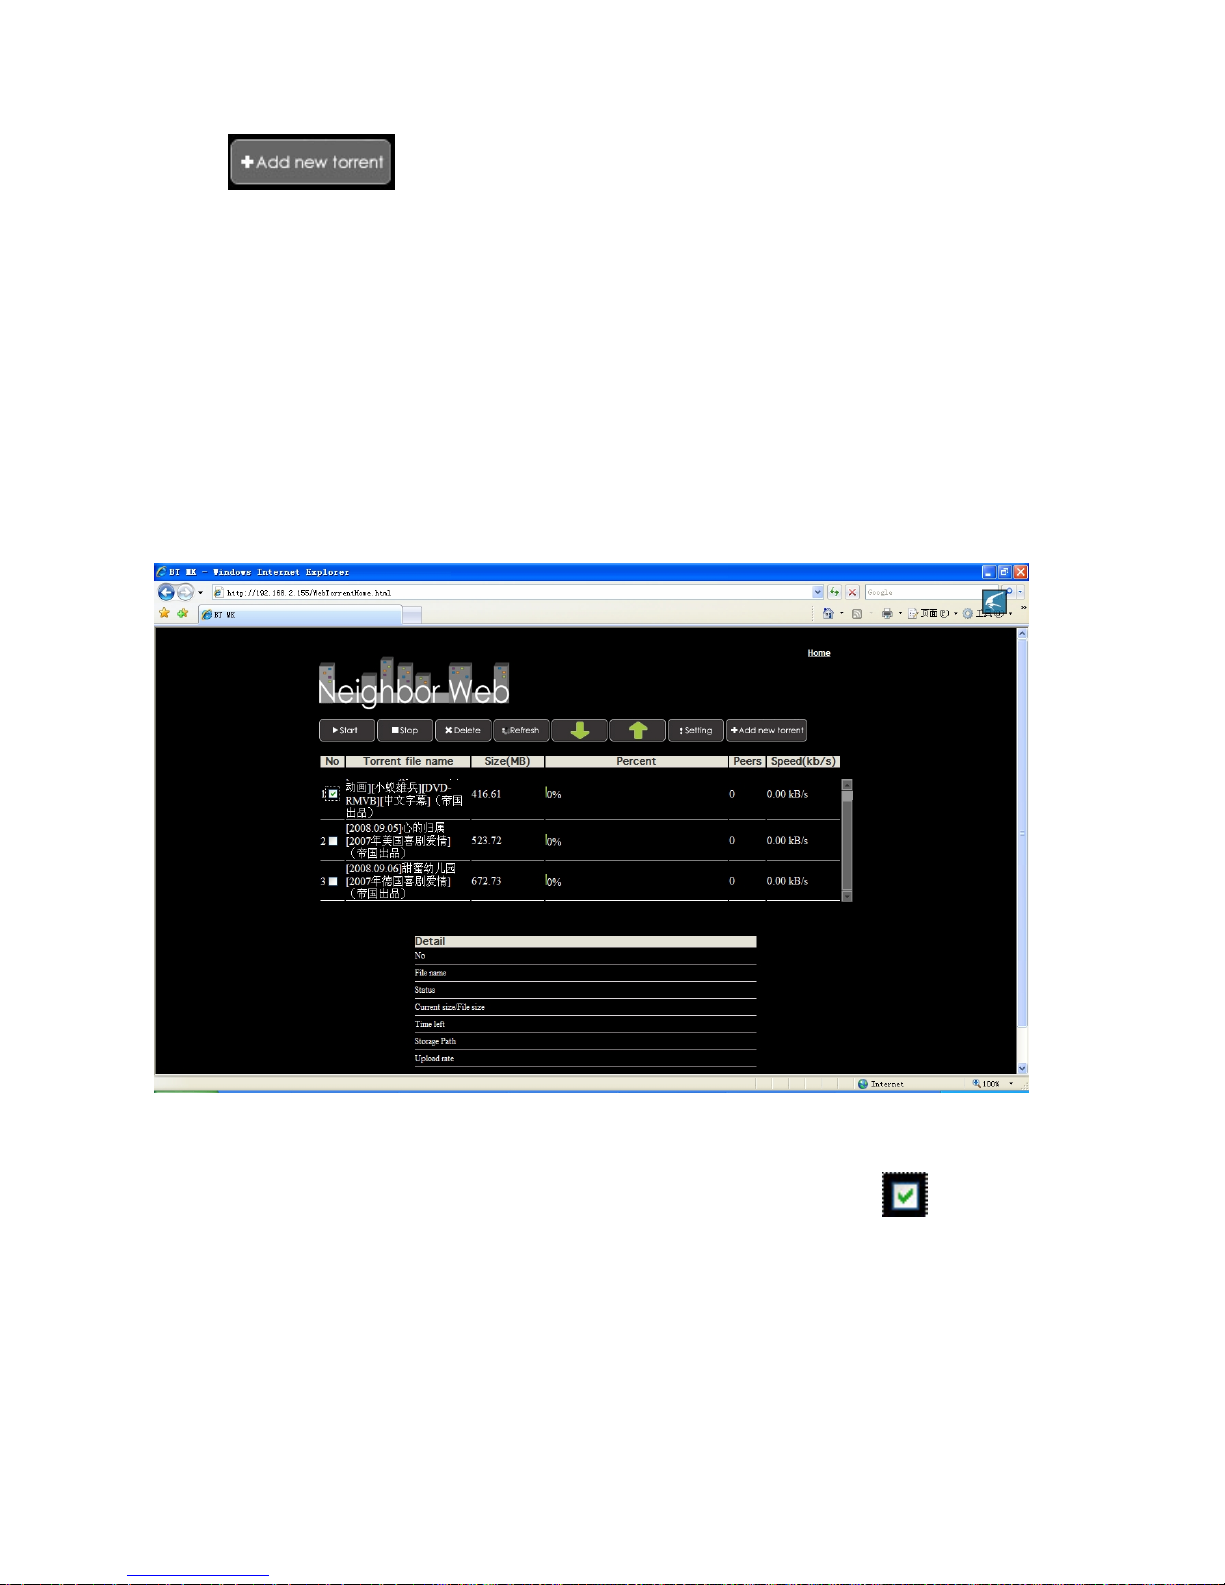
Add new torrent
Select into add new torrent file page.
At “add new torrent” page, click browse key to choose torrent file path from local PC.
When you select a torrent file, press “Open ” key to add.
Next , click “Yes” to confirm your select file and back BitTorrent download page,
otherwise click “No” do nothing and back BitTorrent download page.
When select “Yes”, the page will display “torrent added…You will automatically
redirect to web torrent home page” before back download page.
1) Click “start” to begin download
Click every torrent file name, at the bottom of page will display the torrent file
information.
And you can double click every file, when the left of little frame display ,it means
the files be choose.
Then you can operate to select “start” ,”stop” ,”delete” ,”Refresh” and sort order “up” and
“down ”.
2) BitTorrent Setting
Press “Setting” into BitTorrent setting page.
42
Page 49
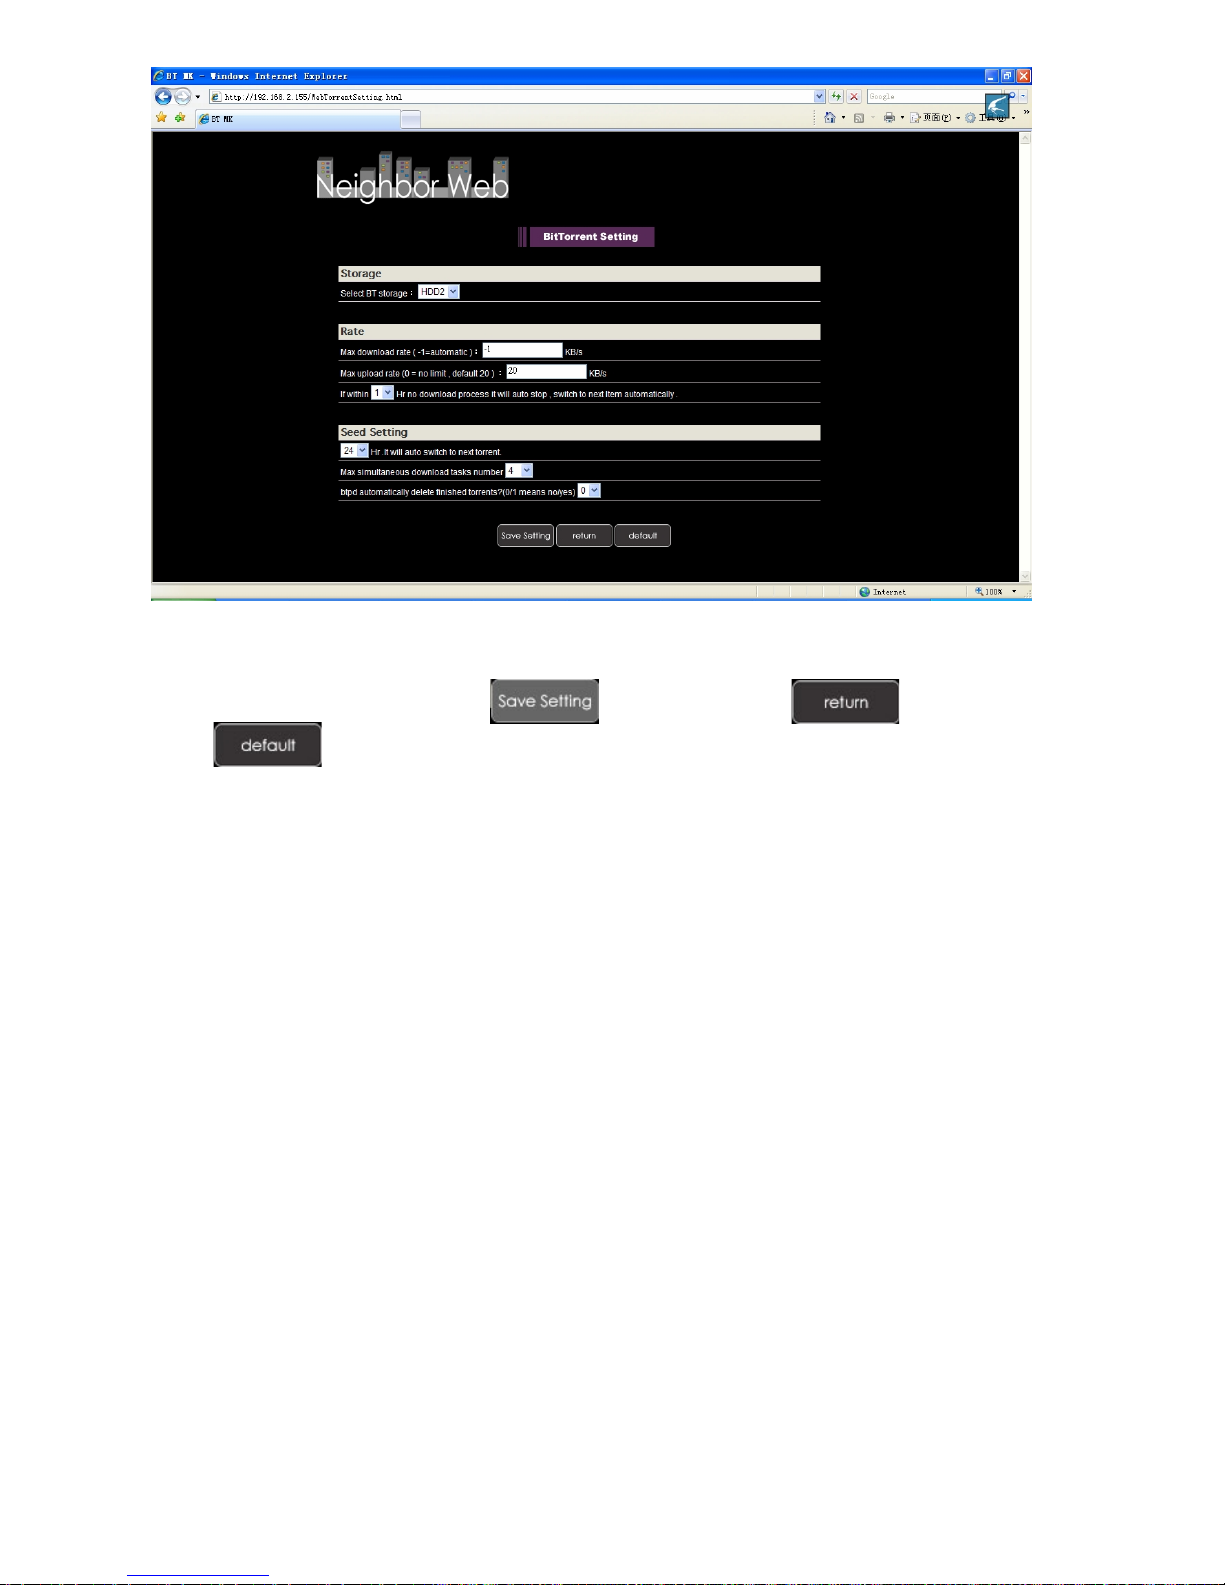
Set BT storage, Max download rate, Max upload rate and seeding setting in this
setting page.
When setting completed, Click to save or Click to return or
Click to come back default setting.
Visit neighbor
At home page, select “Visit negibor” to browser the HDD files. If the player’s Login
Control is on, you need to input the username is admin and the initialization
password is 123.
Account Management
At Home page, Select “Account Management” into Account Management page.
If click “Account Management” is not into this page, please confirm Login control is set
to ON. Please see the “Login control” for more detail.
The Username is Admin and the initialization password is 123. Please setting password
according your favorite .
43
Page 50

login password can be modify at here. Please input password twice and click “Enter”
to confirm. When modify is succeed, press “Confirm” at the pop menu and return.
Please note the User name cannot be change.
Product Specification
Hard disk support Standard SATA 3.5” Hard Drive
HDD partition FAT32 and NTFS partition
USB host Supporting multiple USB storage
USB port USB 2.0 high speed port
Network connection RJ45 10/100Mb connection, WLAN (IEEE 802.11 b/g/n)
Video output Composite video /component video/HDMI
Audio output Stereo/digital HDMI/Optical
Input Audio: stereo(L/R) video: composite(CVBS)
Card SD,MMC, MS
Audio Format: MP3,WMA,WAV,AAC,OGG,FLAC,Dolby Digital, DTS Digital
44
Page 51

Video decode:MPEG 1/2/4, Divx, Xvid, H.264, VC-1, RM/RMVB
Video
Subtitle SSA, SMI, SRT, SUB, SUB+IDX
Picture JPG/BMP/PNG/GIF
Video record mode Surport 5 recording modes :HQ/SP/LP/EP/SLP
Record image NTSC:720 X 480 , PAL: 720 X 576
Power adapter AC input: 100V~240V, 50/60HZ DC output: 12V, 3A
Dimension 256.1×164.5×51.3mm
Weight About 1Kg ( Without hard drive )
Format: WMV, MKV, MOV, AVI, MP4, MPG, TS/M2TS/TP/TRP,
FLV, ISO, IFO, VOB, DAT, RM/RMVB
Note: Up to the improvement, the appearance and specification will be changed
accordingly without notice.
Maintenance notice
To protect the normal use of all accessories, please kindly make sure understand and
pay attention to following points.
♦ Power input AC100~240V,output DC 12V/3A.
♦ Under normal working status, power adapter will keep warming, but body
temperature of 60 degree or under is normal.
♦ Please be sure of aeration under normal working status, do not put the device
in bed, sofa, or similar area where cooling effect is no good.
♦ Please do not tear down personally, but send it back to the pointed service
agent, or there will be danger of electronic shock.
♦ Please pull out the cable and shut the device immediately when cable broken
or liquid in, and send to pointed agent for repair.
♦ We advise to use the product in the environment of room temperature. The
range of environment temperature is 0~40℃.
45
Page 52

FAQ
Q:The green icon appears but no disk symbol when the new product connects to the
system.
A:The new hard disk may not be formatted, please check the chapter of partition and
formatting
Q:The hard disk can not be recognized under Windows 2000 / Windows XP operation
system. Which remind the connected device can not be recognized.
A:It may because the original USB driver get lost. Please reinstall your operation
system, research the driver disk or serve the internet to research USB2.0 driver
procedure.
Q:When I try to disconnect the USB device, I keep on getting The device Generic
volume cannot be stopped right now. Try stopping the device again later message,
what should I do?
A:Close any program that might be accessing data on the player, including Windows®
Explorer. If it does not work, close all programs and wait for another 20 seconds, then
try the green arrow icon again. If it still does not work, you should shut down the player
and disconnect the USB cable.
Q:During power on, why the TV will have a short flash, blue screen or screensaver?
A:This is normal, when the system initialize, it will setup the corresponding parameters
so it can output the correct video signal to the TV, during the initializing time, the TV will
receive incorrect signals or the signals will not be stable and will cause the TV screen to
flash, some TV will treat it as no signal, and will display a blue screen or screensaver.
Q:Why there is no sound in movie, music playback when using YPbPr output?
A:YPbPr output is a video output only, and does not include sound signals, when using
YPbPr output, please plug the AV OUT or the S/PDIF jack to output sounds.
46
Page 53

Q: I have connected the Player to my television. Why is no picture showing on my
television or no sound coming from my television?
A: This problem may have several causes. Please check the following items:
1) Please ensure that you have selected the correct AV source on your television
set.
2) Please check that you have connected the correct cable for the output of the
video and audio signals. Information on the correct connection of the Player to
your home entertainment system can be found in the " Connection of TV audio
and video output " chapter in the basic operation instructions.
3) When the player is connected to HDMI or optical ,please choose the correct
option in Setup menu. You can also refer to Audio Settings in Setup Menu
chapter.
Repeat this procedure until the picture is correctly displayed on your television.
Q: My Player is connected correctly to my television. I can no longer see my media files
in the browser or they are only partially listed in the "Browser".
A: A special media filter is active if you press one of four keys ( as ALL, MUSIC, PHOTO,
MOVIES )on the remote control. Only media files that correspond to the active media
filter are displayed on your television.
If you select e.g. the media filter "Music ", no picture files are shown in the browser. If
you want to see all supported media files, please choose the media filter "All ".
a) Unsupported format.
Your Player supports a great variety of media file formats, a detailed list can be found at
the end of these instructions. If you try to play a file that uses an unsupported file format,
a message will be displayed. If you want to check the utilized audio and video format for
a media file, you can refer to “specification” chapter.
b) The chosen media source is not connected to the PLAYER
If you select a media source that is not currently connected to the Player, such as a
USB stick, this source will be displayed as empty. As soon as a device is connected, the
content appears in the respective path.
If no folders or files are displayed for a resource connected via the network, check the
settings for your network and your network shares. Please check the user name and
47
Page 54

password, if they are required for accessing, and also the firewall settings of your
computers.
Q: I want to copy files onto an external data storage device with my Player, but I always
get an error message.
A: To use the copy function of your Player, the device (or the partition), that you want to
copy the data onto, must be formatted with one of the following file systems: FAT,
FAT32, NTFS, ext3. Please use only targets formatted with FAT, FAT32, NTFS or ext3
for copying onto.
Q: I want to perform a firmware update for my Player but my television goes blank.
A: In some cases, the display via HDMI is not correct during a firmware update.
Please make sure that your Player is also connected to your television via the
composite video connection during the firmware update, not only via HDMI, and select
the composite video input as the active input of your television.
Q: I want to access files with the Player that I have shared in my network. My home
network is working correctly, but the Player does not list the files.
A: If you do not have access to the shared files, please check the following points:
a) Check if the network cable is connected properly at both sides, i.e. to the Player and
to your network.
b) Make sure that the computer that you want to access is running and not in a standby
or idle mode.
c) Check the network and file sharing settings on your computer.
d) Check that you have entered the correct user name and password. Please note that
they are case sensitive.
e) Make sure that your firewall settings permit the Player to access your computer.
f) If you want to access files that are stored on a USB data storage device which is
connected to a router and thus made available as network storage, please note that
you must set up a connection to the drive using "My_ Shortcuts ". To do so, you must
enter the IP address of your router as well as the user name and the password
necessary to access the network storage.
48
Page 55

Q: How is it possible that the playback of a file from a shared folder in the network is
aborted?
A: The energy saving settings of the computer or the NAS interrupt the connection.
If the energy saving settings of your computer or your NAS are active, then they can go
into an idle state or a sleep mode even though they are being accessed via the network.
During a sleep mode no data is transferred via the network. Please adjust the energy
saving settings of the media source so that it does not go into a sleep mode while you
play files via the network.
Q: Why is it possible that there are interruptions when playing movies from my local
network?
A: Sometimes, there are several devices in a network that have to share the maximum
data transfer rate possible via a network connection (shared medium). If there are
several connections active in the network you use the Player in (e.g. to the internet, a
shared printer, etc.), it is possible that this lowers the data transfer rate available for the
streaming of the data to the Player to a level that is insufficient for the playback of e.g. a
DVD file or an HD movie file. Should you experience such problems, please try to
reduce the amount of data transferred by other users of your network.
Q: While using the Player, it no longer responds to my commands.
A: This problem may have several causes. Please check the following items:
a) Please aim the remote control in the direction of the Player so that direct visual
contact between these two devices exists and ensure that the infrared receiver of
the remote control and the Player are not covered.
b) Check the battery in the remote control and, if necessary, replace it with a new
one.
Q: I have connected the Player to my TV via HDMI and I want to change the video
output signal, but the video output resolution I want to use is not available.
A: This problem may have several causes. Please check the following items:
1).Your TV does not support all possible video output resolutions.
Go to the settings menu of your Player and select "HDMI Auto " under the menu item
49
Page 56

"TV system ". Your Player will try to automatically select the best possible video output
resolution for your TV.
2).In some rare cases it is possible that not all options supported by the TV are
selectable. This problem can occur when the TV is switched on from its standby mode,
regardless of the current operating status of the PLAYER
In order to be able to select all video output resolutions supported by your TV,
disconnect your Player from the power supply and reconnect it after a few seconds.
Now all available video output resolutions are shown in the settings menu.
Q: Why can't I hear any sound on my television when I connect it via HDMI?
A: This problem may have several causes. Please check the following items:
An audio output format that is not supported by your television is selected.
The volume is to low / Mute is active.
Please select the correct digital output mode in the Setup Menu. Go to the audio
settings menu and select the menu entry "Digital-Audio -Out " and choose the option
"HDMI LPCM/RAW" if your television set does not support real surround sound. You
can also refer to the Audio Settings.
Q: Why mustn't I disconnect the Player from the mains supply without having switched
it off beforehand?
A: The loading or saving of the current system settings takes approx. 10 seconds when
the Player is turned on or off. If the player is disconnected from the mains supply
without having been switched off beforehand, settings and data may be lost. Please
always switch off the Player by pressing the power key on the device or on the remote
control and wait until the power key on the Player lights up red.
Q: After the player is connected to the Internet ,Why can’t I browse some video or
news ?
A: This problem may have several causes. Please check the following items:
1) Some network function can not be used in the home ( eg, Gougou video, cnn
news , bbc news and so on),the detaills please refer to the local network .
2) Please restart the product it you can not search the wireless IP address.
50
Page 57

Q: Why cann’t I record the TV program when I use the product?
A: This problem may have several causes. Please check the following items:
1) Please make sure that the set-top box or satellite television receiver is power on,
2) Keep the TV with the channel you want to record programs, otherwise, the
recording programs will not be what you want to record.
3) Make sure the connection with the player’s AV in port is correct, and the
connection with TV is also right.
Others
The accessories of products may be different, for this series products are various
according to different series and models.
Please refer to packing list or contact your agent for information.
Pleas understand no advance notice for further product improvement, outlook design
and specification update.
The illustration may be a little different from the real product.
Statement: Manufactured under license from Dolby laboratories “Dolby” and
the double-D symbol are trademarks of Dolby laboratories
51
 Loading...