

Page 1

MS130 USER MANUAL
CONTENTS
BRIEF INTRODUCTION....................................................................................1
FEATURE............................................................................................................1
BASIC PERFORMANCE .........................................................................................1
PRODUCT DETAILS..........................................................................................2
PACKING LIST.....................................................................................................2
FRONT VIEW.......................................................................................................2
SIDE VIEW .........................................................................................................3
BACK VIEW........................................................................................................4
REMOTE CONTROL..............................................................................................5
BASIC OPERATION...........................................................................................6
USAGE PREPARING .............................................................................................6
OPERATION OF FILE SHARING............................................................................11
OPERATION OF PRODUCT USAGE.............................................................12
MAIN MENU.....................................................................................................12
FILE COPY MENU.............................................................................................18
SETUP MENU....................................................................................................20
WIRED LAN SETUP ...........................................................................................24
WIRELESS SETUP..............................................................................................26
SPECIFICATION...............................................................................................35
MAINTENANCE NOTICE................................................................................37
FAQ....................................................................................................................37
OTHERS............................................................................................................43
Page 2

1
Brief introduction
Feature
The product is a new kind of multimedia player product. The product can
provide good watching. Meanwhile, it can also store and play many kinds of
video files. The product, which is facilitated with many ports, can show you
pictures and videos with high definition. It is really your desirable
entertainment product.
Basic performance
Video Decoding-MPEG 1/2/4, Divx,Xvid, H.264,VC-1,RM/RMVB
Video Format-WMV,MKV,MOV,AVI,MPG,MP4,TS/M2TS/TP/TRP,
ISO,IFO,VOB,DAT.RM/RMVB,FLV
Audio- MP3, WMA,WAV,AAC,OGG, Dolby digital ,DTS digital
Image-JPG/BMP/PNG/GIF
USB HOST- Connection USB mass storage device
HDMI- High Definiton Multimedia Interface
1080P output -Full HD 1080P (1920x1080) decoder output
Network - WLAN (IEEE 802.11 b/g/n)(optional),RJ45 port,10/100Mbit/s
External DVD - Support USB external DVD drive to play DVD movies
Page 3
2
Product details
Packing list
Check the accessories after receive the product. If there are some missing,
please contact immediately with your supplier to insure your consumer’s
right.
No. Name Quantity
1 Media player 1 pcs
2 Power Adapter 1 pcs
3 Remote Controller 1 pcs
4 Batteries 2 pcs
5 AV cable 1 pcs
6 User Manual 1 pcs
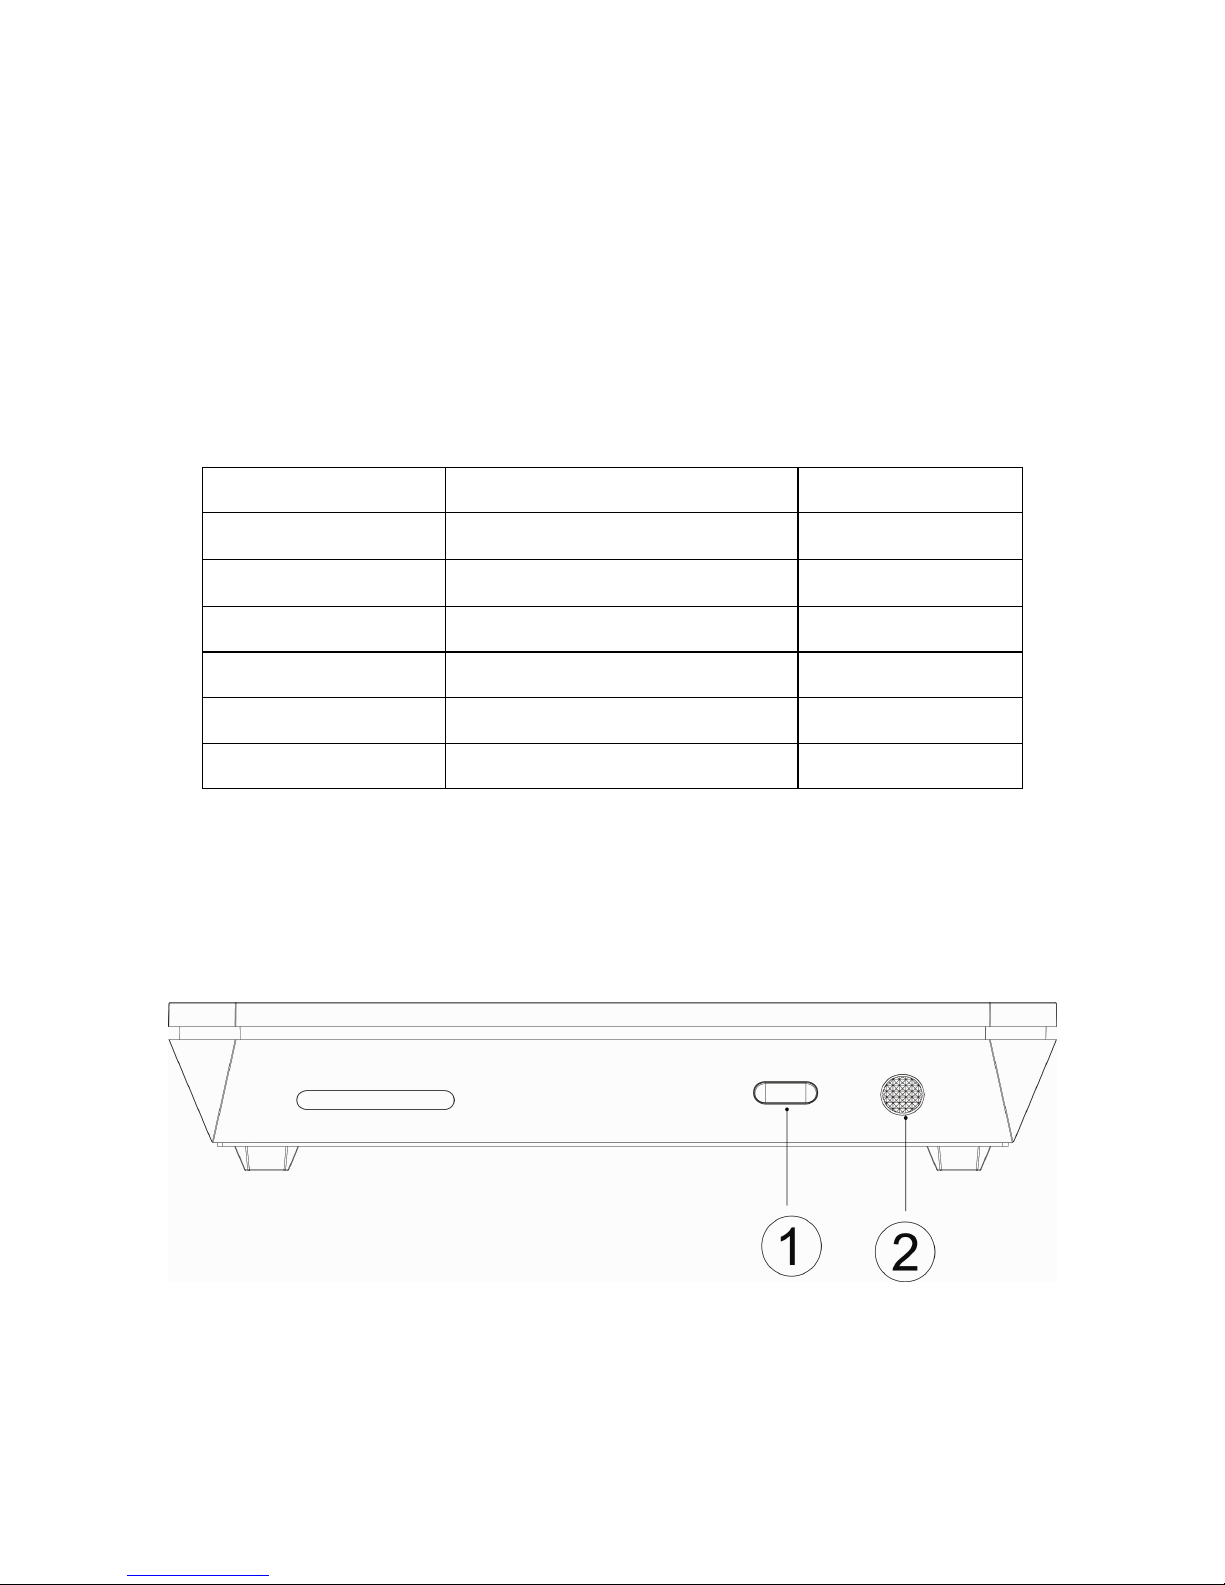
Front view
Page 4
3
Button description
Element Description Remark
①
Power on/off
A short press on the button to
turn on or turn off power
② IR
Infrared receiver
Receives signals from the
remote control. Point the tip
of the remote control to the
infrared receiver and ensure
that the path between the
two is unobstructed.
NOTE: when it is connected to power for the first time, the product is turned
on automatically ,and the LED turns light.
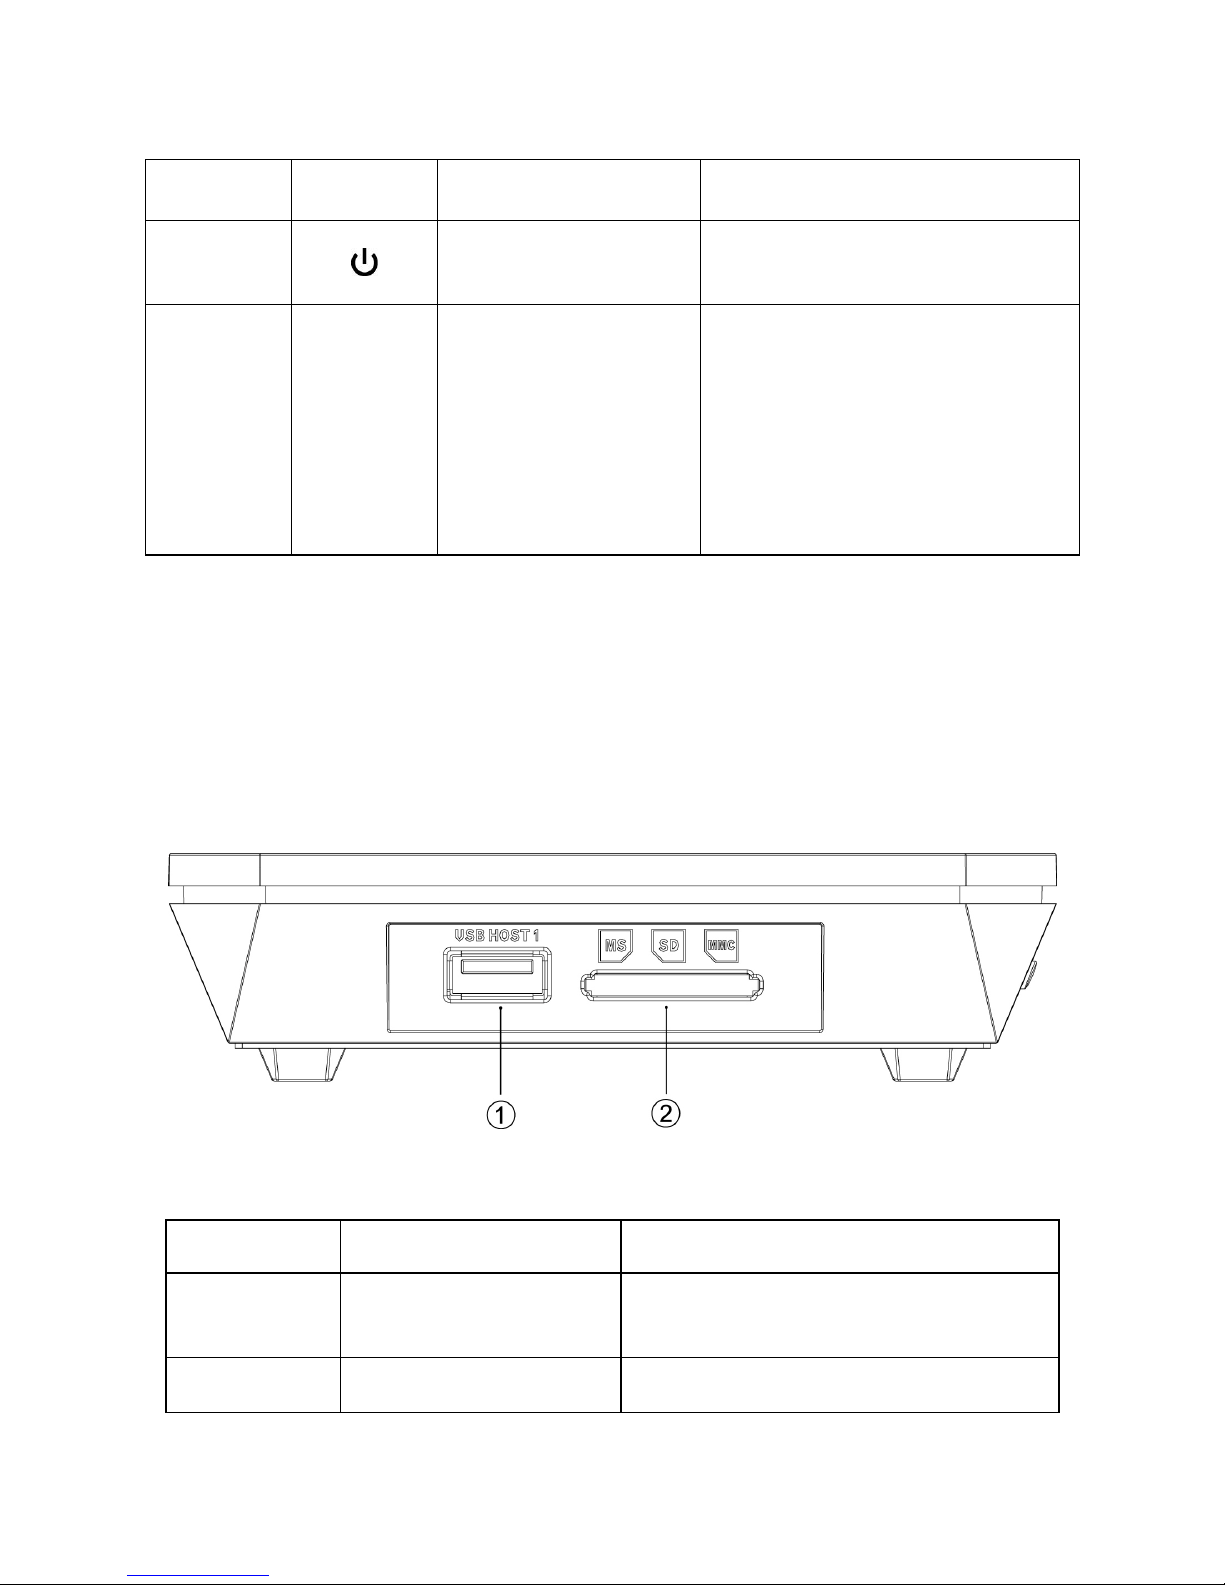
Side View
Interface description
Description Remark
① USB HOST
Support multiple external USB
storage devices
② 3-in-1 card reader
Support MS, SD, MMC
Page 5
4
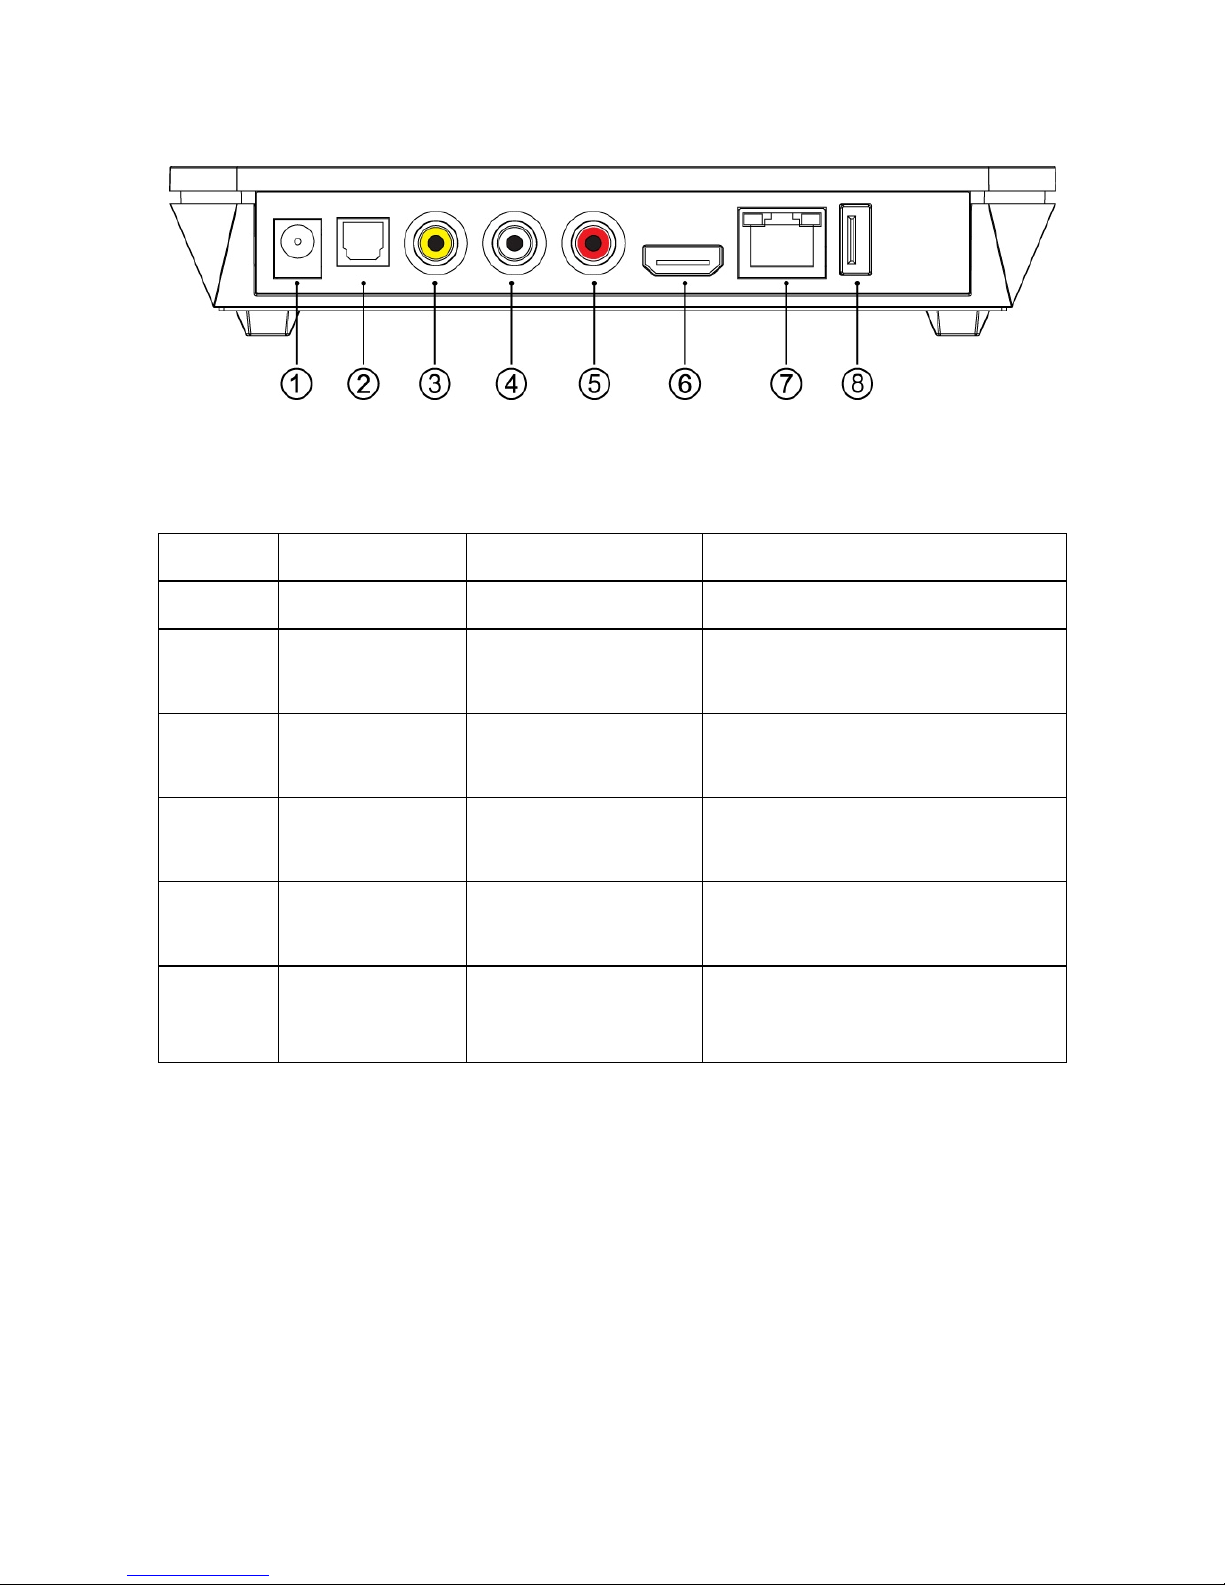
Back View
Port definition
Port Port definition
Instruction
① DC IN Power port Can input power
② Optical
Audio output
port
Can output digital audio
signal
③④
⑤
AV
Composite
video output port
Can output composite video
and audio
⑥ HDMI
High definition
port
Can output digital signal via
HDMI port
⑦ LAN Network port
Can connect to network via
internet port
⑧ USB HOST
Outside USB
port
Can read and write outside
USB storage via USB port
Page 6
5
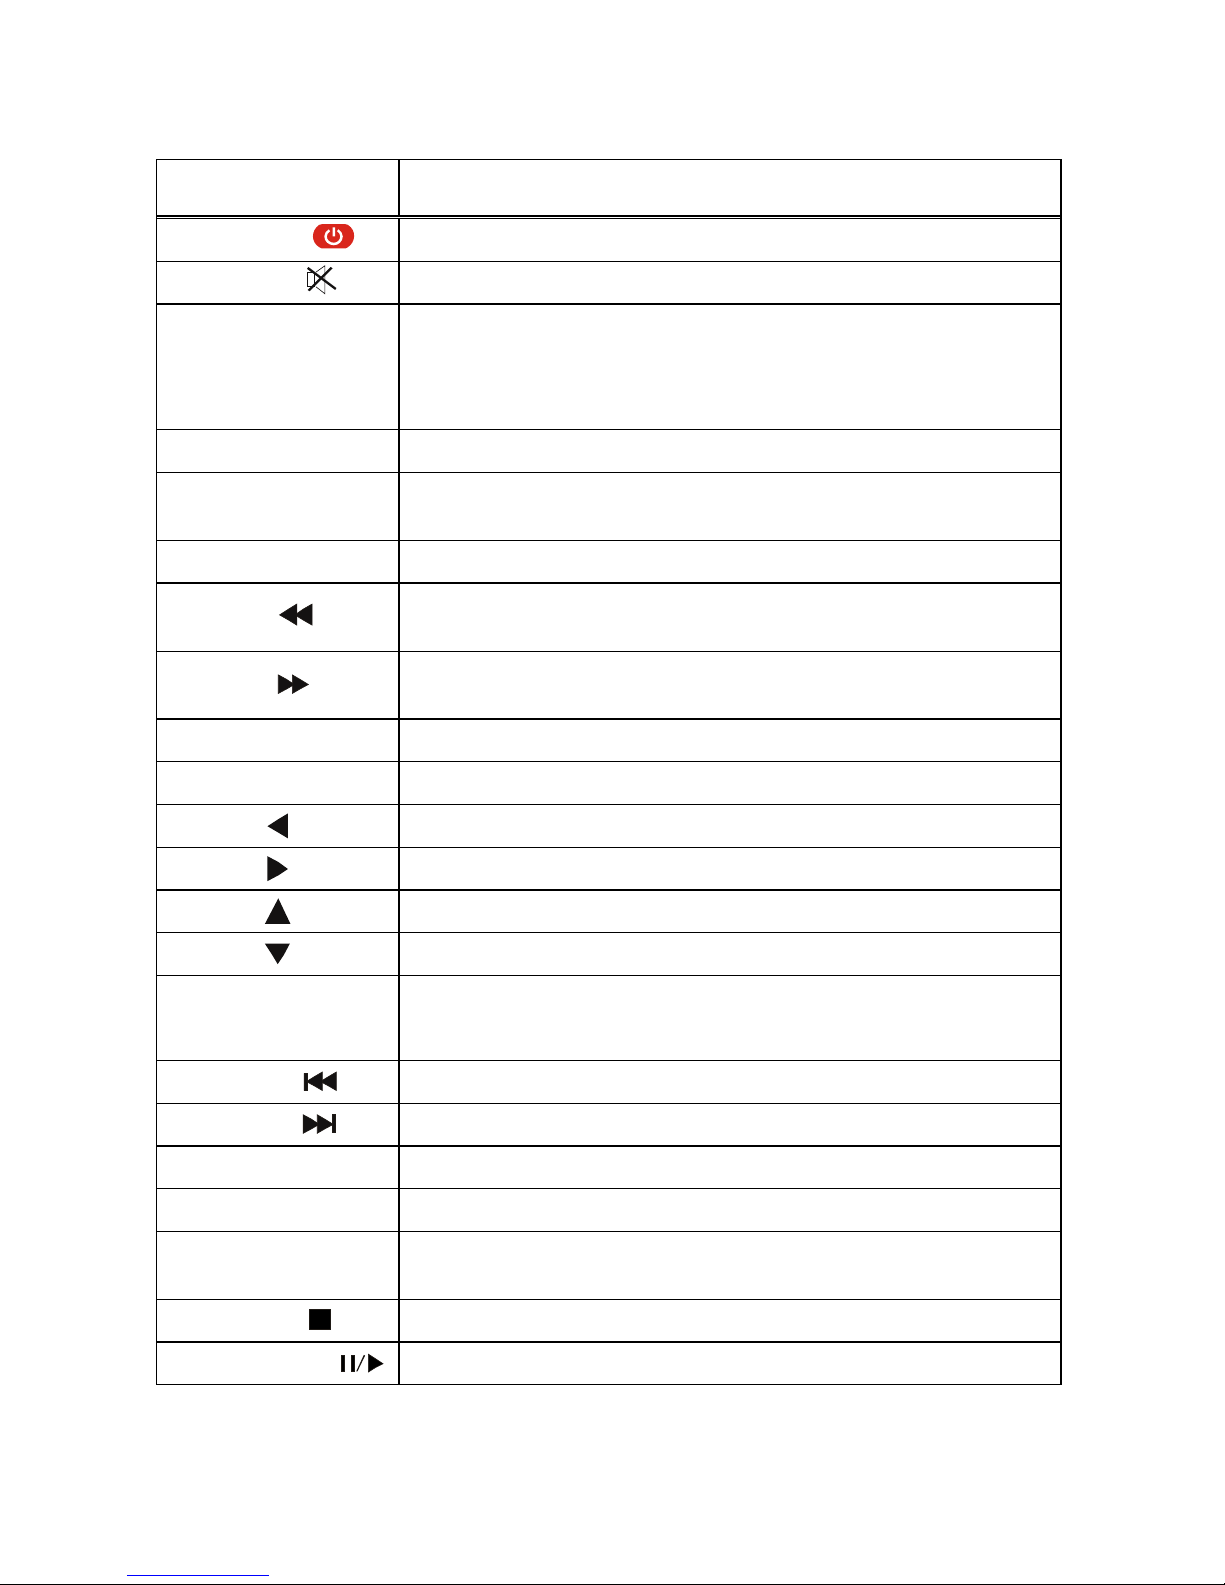
Remote control
BUTTON FUNCTION
POWER
Turn on and off in the stand by mode
MUTE Turn on or shut audio output
TV SYSTEM
Press to switch between NTSC
, PAL, 480P, 576P,
720P 50HZ, 720P 60HZ, 1080I 50HZ and 1080I 60HZ,
1080P 50HZ,1080P 60HZ.
0-9
Press to input digital
GOTO
Press to play the video at the chapter after setting
schedule
GUIDE Switches to the main menu.
FR
Press to fast rewind from current play and again to
select the speed
FF
Press to fast forward from current play and again t
o
select the speed
RETURN
Return to the previous menu
SETUP Opens the settings menu
Press shortly to move cursor left
Press shortly to move cursor right
Press shortly to move cursor up
Press shortly to move cursor down
OK
Press this button confirms a selection and starts the
playback of a media file.
PREV
Press to return to previous file
NEXT
Press to go to next file
VOL-
Press to decrease the volume
VOL+
Press to increase the volume
OPTION
Opens the options menu in the browser t
o rename or
delete the file
STOP Ends the playback of a media file
PAUSE/STEP
Pause / playback by step
Page 7

6
REPEAT
Press to set repeat option: chapter, Title or off
COPY
Enter the copy mode
SELECT
Press to select the file and then press “confirm” to add
or delete file in the playlist;
Select copy files or folders in the copy mode
CONFIRM
Button has no effect
INFO
Press to display time, title, information of chapter when
play video and photo
SUBTITLE
Switch the subtitle if the file supported
SLOW
Press to have slow motion:(1X, 3/4X,1/2X,1/4X ,1/8X,
1/16X.Press PLAY/PAUSE and OK
to resume regular
play mode.
AUDIO
Switch the audio format output
ZOOM
Press to zoom when playing back photos or Video
programs
Photo zoom levels: 2X,4X,8X,16X
Video zoom levels: 1X,2X,3X,4X,8X
ALL
Show all the folders and files of the current directory.
MUSIC
Show the audio files of the current directory.
PHOTO
Show the photos of the current directory.
MOVIES
Show the video files of the current directory.
Basic operation
Usage preparing
1,Power connection
Take out power adapter from the package and connect it.
2,Connection of TV audio and video output
The product is designed with multi-output, including composite( AV) ,
HDMI,and Optical.You can select different interface according various needs.
The product can detect video output automatically, making the operation
Page 8
7
friendly and convenient. Please refer to the following instruction for
connection to avoid any problem.
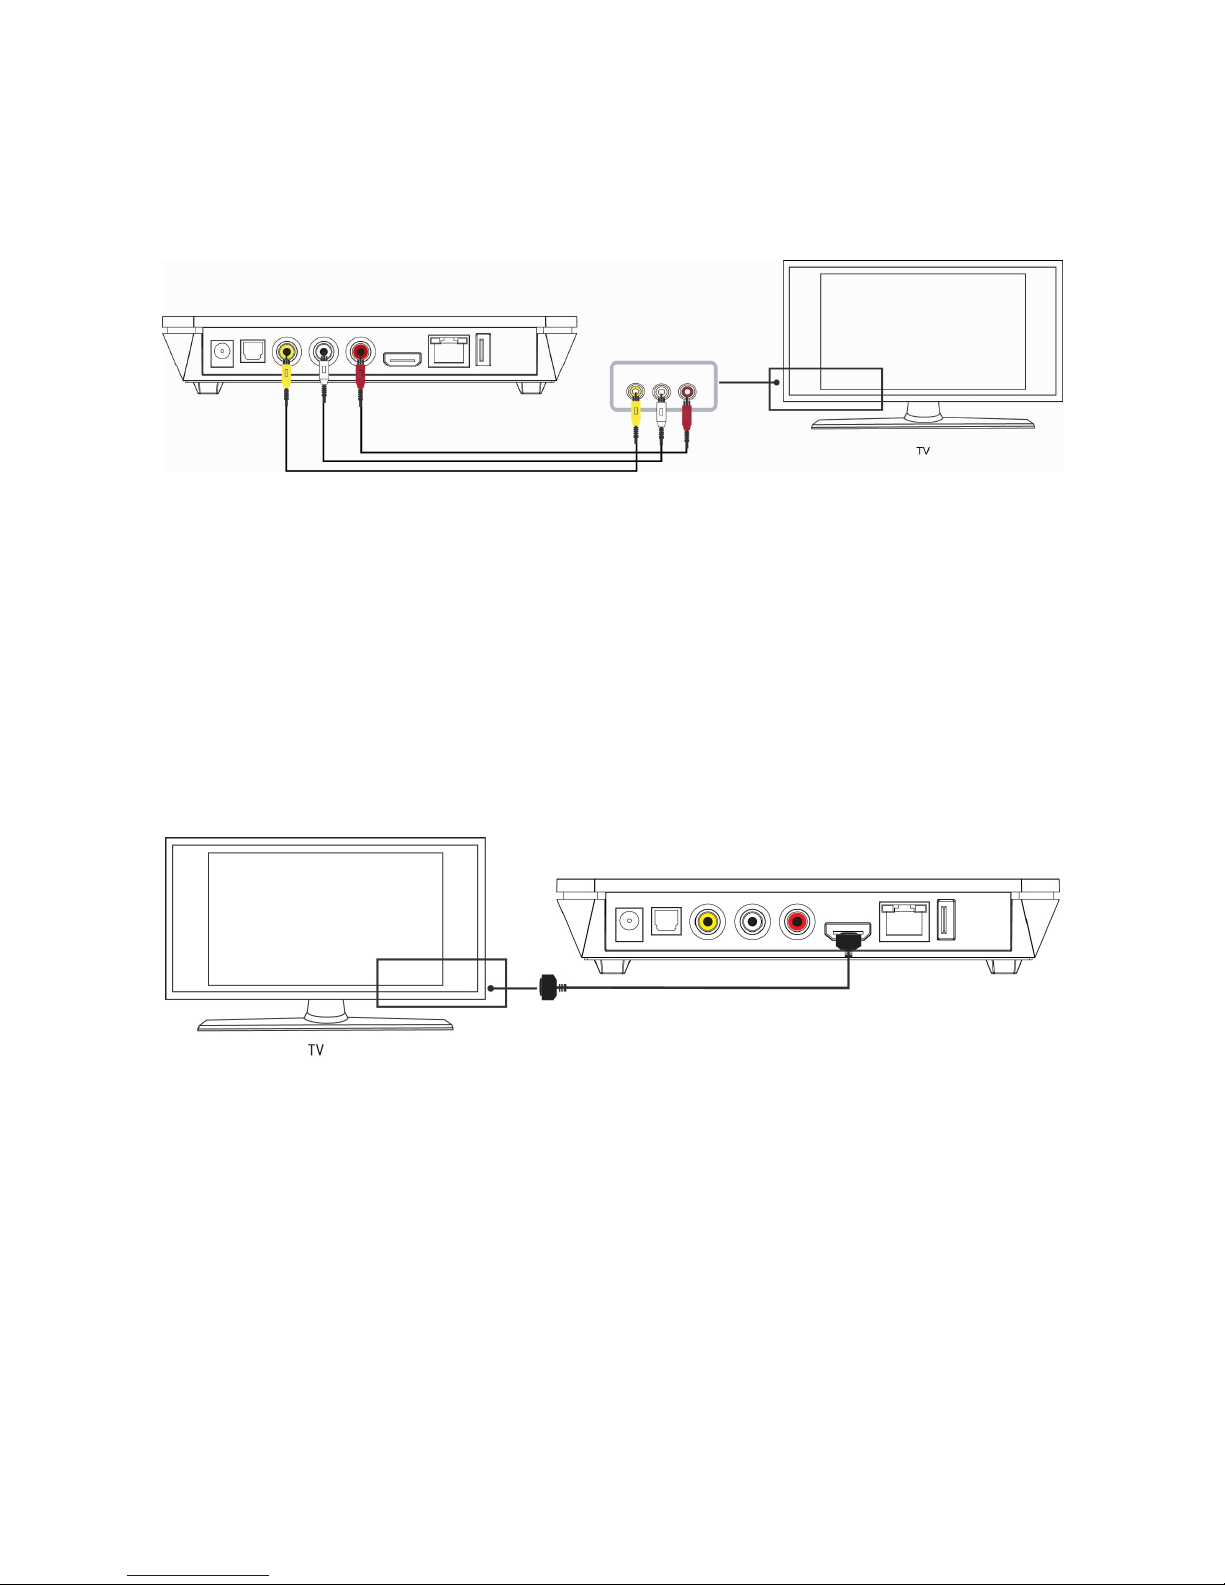
Composite output connection(AV)
Plug the yellow connector into the AV output of product and AV input of TV,
and plug the red and white connector into the audio input of TV or HIFI. Turn
on the TV and select AV mode. Turn on the product and TV displays the
interface of initiation.
HDMI output mode
HDMI is a output with best audio and video effect which outputs digital video
and audio composited at the same time. Connect HDMI cable to output of
product and display device with HDMI input. Select HDMI mode in TV until it
displays the interface of initiation.
Page 9
8
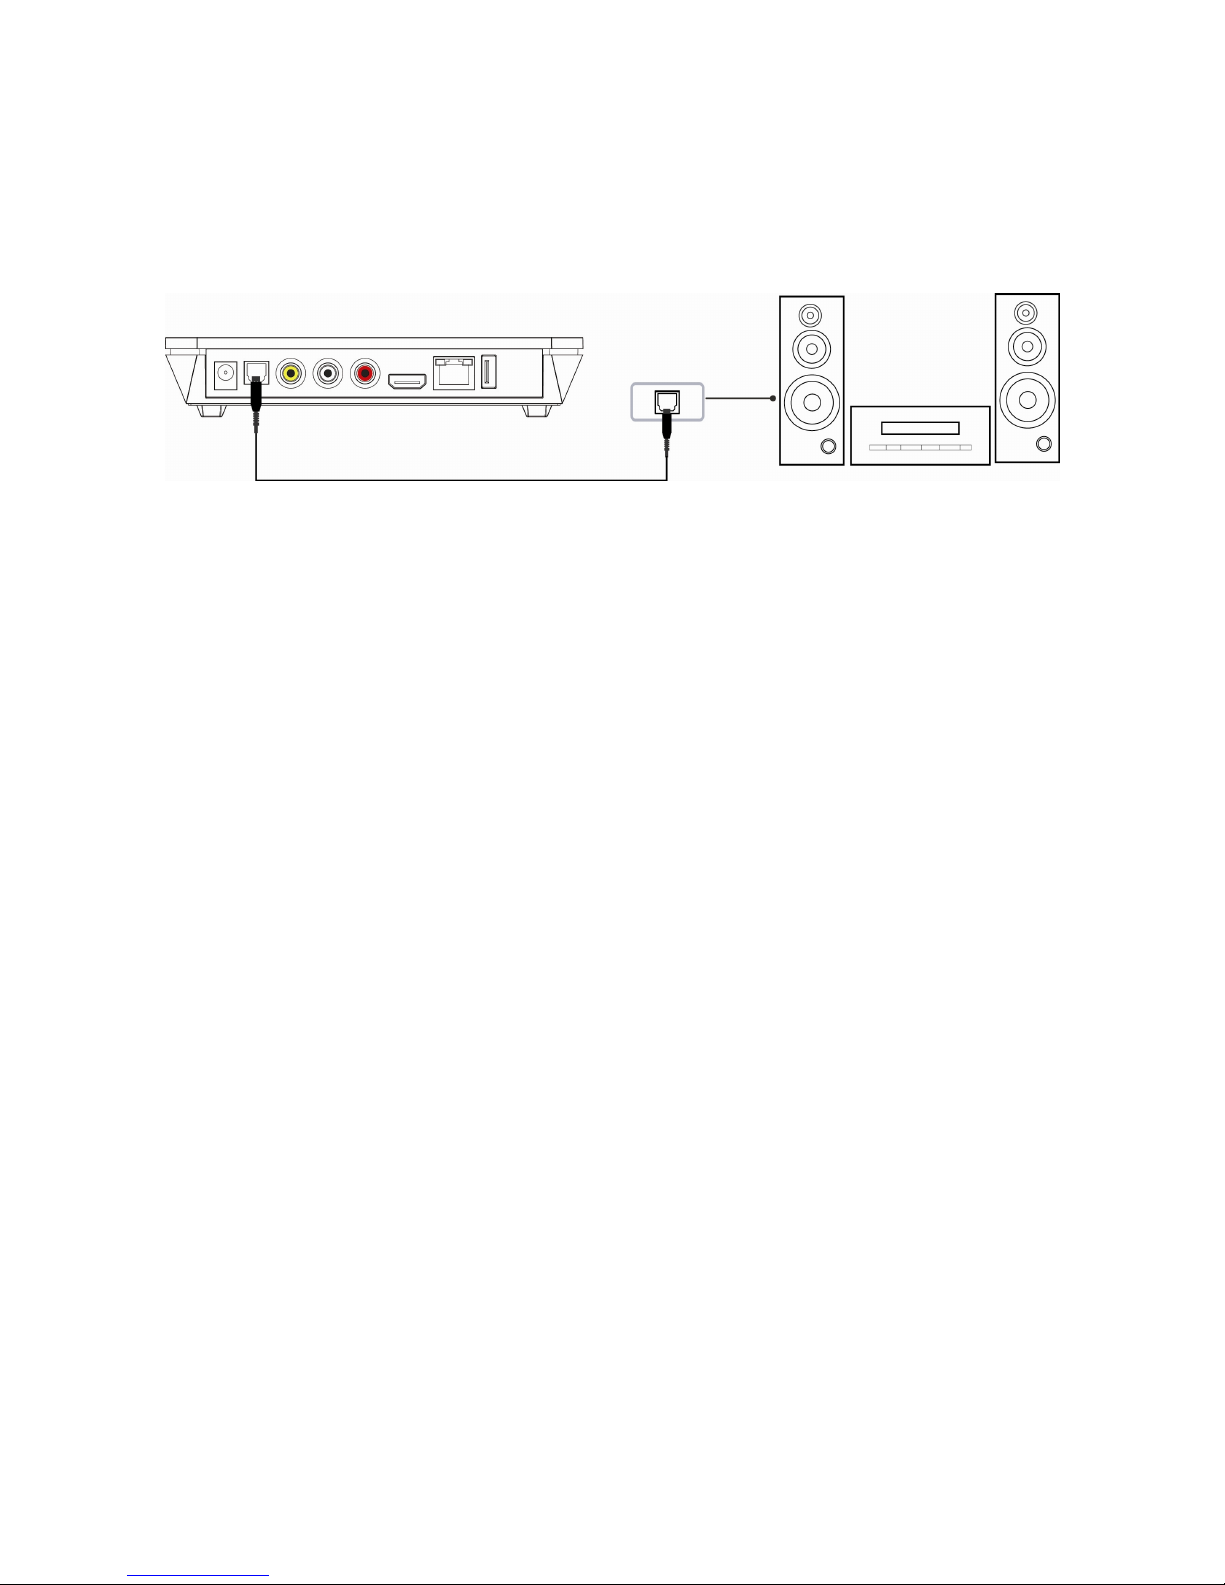
Optical output mode
Optical output:Connect the product optical connector with the other one from
video or audio device by optical cable. Then enter the product's audio
interface, select the Digital Output option "SPDIF LPCM" or "SPDIF RAW".
It is available to enjoy 5.1 high quality sounds through a multi channel
decoder/amplifier with optical input.
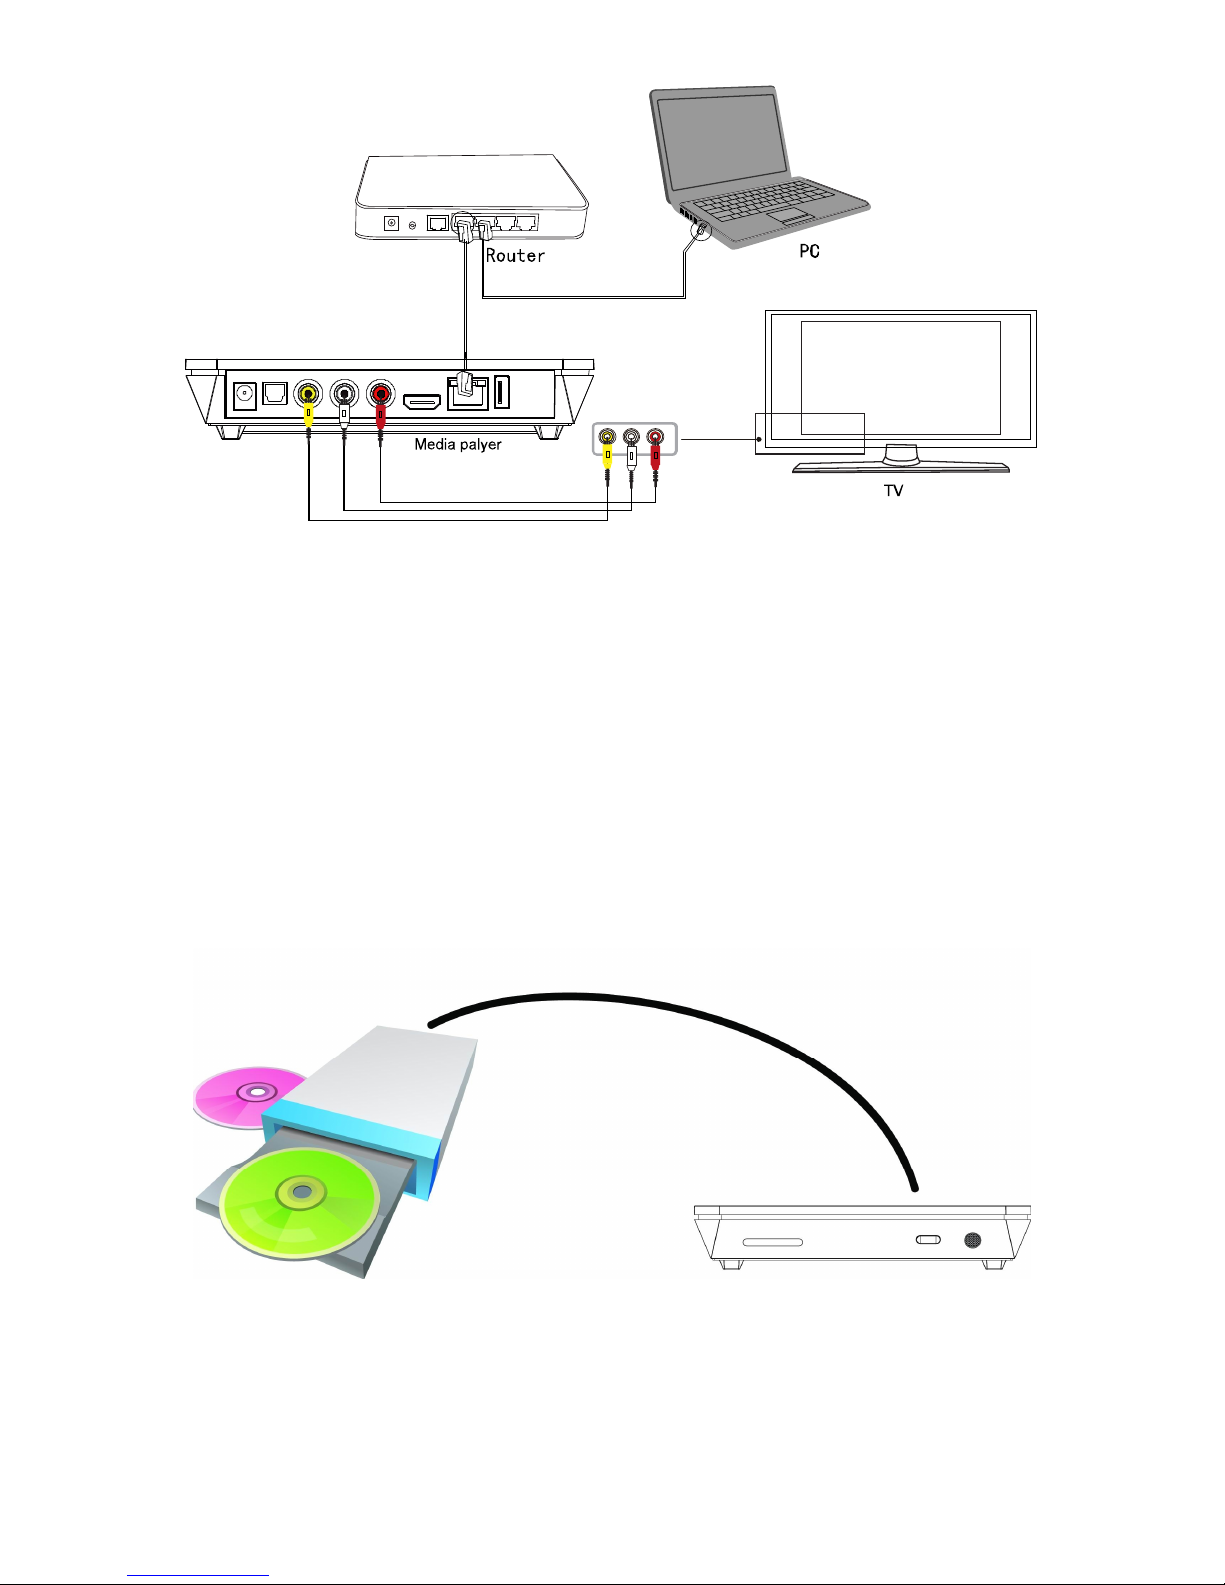
3,Connection and setup of network
The product can play the files stored in the PC directly through network.
Please connect the RJ45 cable according to the following illustration. The
network connects well when the LED of network status blinks.
Page 10
9
Connect the video output. Press “setup” key or select “setup” menu in the
initiation interface. Select “Network” option in the setup window and press
“OK” to confirm. It is available for both automatic and manual IP setup. Press
“setup” key again to exist after setup. Please see " Wired Lan Setup" for
more details.Before accessing to the PC through network by the product, the
media files must be shared in the network.
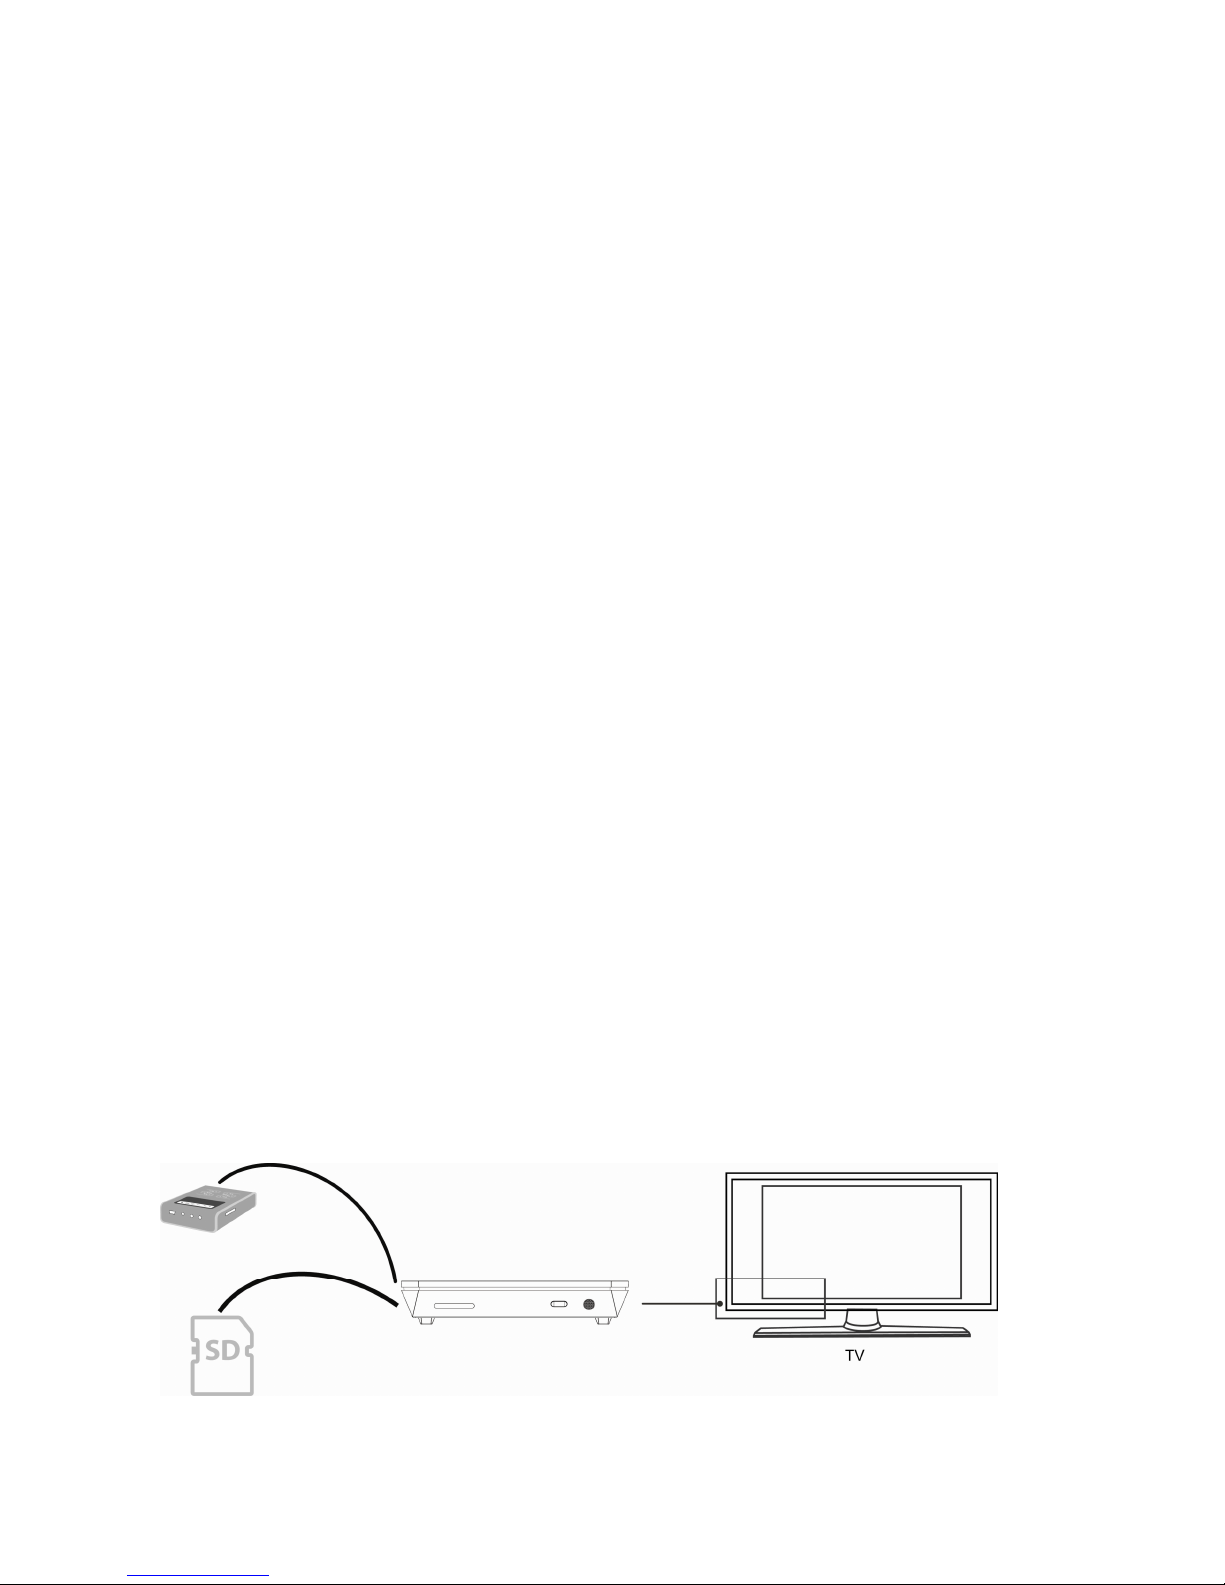
The use and operations of USB CD drive
The player supports USB connected external DVD drive. The product can
play DVD through connecting to external drive by USB. Meanwhile, content in
Page 11
10
DVD can also be copied to the hard disk, and then operations like backup
information and so on can be done.
Connect the USB CD drive to the peripheral port of the product through USB
data line, then choose “External DVD” in the homepage of the product and
enter. If there is playable CD in the drive, and the “DVD automatic play”
option in the product’s system is on, the drive will start playing the CD
automatically. In the playing process, you can press “STOP” in the remote
control to stop playing, then press “GUIDE” to return to the product’s main
interface, and then press “STOP” in the main interface to control the “OPEN”
or “CLOSE” operations in the drive.
How to use USB Host interface
Player with ability to expand large-capacity.The USB HOST port can read
external mobile hard drive, U key, digital cameras, card readers and other
data storage devices. To direct play a variety of high-definition formats
high-fidelity audio and video files stored in external storage devices. To watch
HD movies and digital photos are more palatable, at the same time the output
digital audio signals to audio equipment can feel the shock of high-fidelity
sound effects.
How to use memory cards:
The Product has an integrated multimedia card reader supporting memory
cards including MS, SD, and MMC. Gently insert the memory card into the
reader with the arrow side upward until there goes a “click” sound.
Page 12

11
Operation of file sharing
Operation of file sharing under Windows
Two conditions are necessary for a successful play of network connection.
1. Folder sharing and safety setup
2. Set the same gateway and subnet mark address.
Procedure of file sharing under Windows XP
1. Select the folder need to be shared, right click mouse and select the
option” Sharing and safety”, lift click the mouse.
2. Select “sharing” in the property option and select “share this folder on the
network” and click “Apply” for confirming to exist.
3. Open” Control panel- Management tool-Computer management-Local
users and groups” and click “Users” option. Right click Guest and select
“Properties”.
4. Select 'users can not change your password' and 'password never
expires'. keep the other checkboxes unchecked.
5. Open “ Control panel- Network connection”, and select “Local Area
connection” and right click to select “Properties”.
6. In the Pop-up window, select ‘Internet protocol (TCP/IP)’
7. Set up the relevant IP address, subnet mask and gateway, can also
choose to automatically design.
8. Completion of Windows XP network sharing.
9. Finally, please close the Windows Network Connection Firewall
Operation of file sharing under Windows Vista
Page 13

12
1. Please make sure that the Vista operation system is installed as
Administrator supper user.
2. From the desktop select ”start- setup-control panel-select user account”
3. Open User account and select” open a new account” and name it “Guest”
4. Select the folder need to share and right click the mouse, then select the
“sharing” option.
5. Open the shared folder and add guest account to the list
6. Give the right to all the users after adding the Guest into the list.
7. Select “sharing”, and then the folder is shared.
8. Finish sharing
9. Operate the device as the same as operate in XP system
Operation of product usage
Note: While connect the power supply for the first time, the device will power
on automatically and appear the below menu:
Please read the following instructions carefully to understand the function of
each option.
Main Menu
The main menu allows you browse and play music, photo and movie files
stored on external USB devices, Memory cards,Network.
Press “ ” and “ ” to select the device on which the media is stored.
Choose from USB (for media stored on an external flash disk), Memory cards
and Network or press MOVIES, PHOTO, MUSIC or ALL button on the remote
control to browser movie, photo, music files stored on USB device, Memory
cards and Network .Press OK button to confirm and play the files in the
selected device.
File Range function
Page 14

13
To make file browsing and playing easier, there is a function to range all files
into different folders named “All”, “Music”, “Photo” and “Movie”, you can
switch to any folder by pressing “All”, “Music”, “Photo” and “Movies” four
buttons on the remote control.
Browsing Music
Press the MUSIC button on the remote control to enter the music play mode.
Press “ ” and “ ”to select the folder containing your audio files. A
thumbnail strip appears at the bottom of the screen, along with song
information. Press “ ” and “ ” to select the file you want to play and press
OK. This browsing music function supports MP3,WMA,WAV,AAC,OGG,
Dolby digital ,DTS digital…format Playback.
Browsing Photos
Press the PHOTO button on the remote control to enter the photo play mode.
Press “ ” and “ ” to select the folder containing your photo files. Enter the
folder press “ ” and “ ” to select the photo you want to view and press OK
the photo is displayed full screen.
While browsing a photo, you can press “ ” and “ ” to rotate a photo in any
angle. Beside rotating a photo, you can press ZOOM to zoom in/out that
photo, four zoom levels(2X,4X.8X16X) are available.This browsing photos
function supports High Definition Photo (JPG,BMP,PNG,GIF) Playback.
If the SLIDESHOW is enabled in the Setup (“Photo Setup” menu) ,then
press Setup button to return to the pictures you want to playback, the
slideshow will start automatically.
If you want to playback some music during the slideshow, simply make
Page 15

14
sure that you copy your music file(s) in the same directory as the pictures.
Then choose the “Folder” option in Background Music (“Photo
Setup ”menu). Press the OK button to playback your slideshow with the
music background.
Note:
1. While listening to audio files, you can browse the photos at the same
time.
2. If you press ZOOM during playback slideshow ,the slideshow will
automatically stop.
Browsing Movies
Press the MOVIES button on the remote control to enter the movie play
mode.
Press “ ” and “ ” to select the folder(s) containing your movie files. Enter
the folder press “ ” and “ ” to select the movie you want to view and press
OK. The movie is played full screen.
This browsing movies function supports High Definition Video
(720P,1080i,1080P) Playback.
For example:
1. MPEG1(DAT ,MPG)
2. MPEG2(VOB, MPG, TS)
3. MPEG4(AVI,DIVX,XVID)
4. H.264(AVI,MKV,MOV,MP4)
5. RM/RMVB,ISO,FLV
Note:When play the HD Video, you can according the movie resolution to
adjust HD Video output. See “Creating HD Resolution of SETUP menu” for
more details.
Subtitle
Page 16

15
The product supports subtitle documents in formats of SSA, SMI, SRT, SUB
and so on. When the video being played supports the corresponding subtitle
format, the subtitle can be switched, displayed, or hidden through pressing
the SUBTITLE controlling key. Meanwhile, the size and position of the
subtitle can also be adjusted through direction keys. When the movie is
played with the subtitle showed on the screen, you can press “ ” and “ ” to
change the subtitle’s position in the screen, and press “ ” and “ ” to
change the size of the subtitle, with “ ” to enlarge and “ ” to reduce.
Browsing All
Press ALL button on the remote control to enter browsing all file.
Press “ ” and “ ”to select the folder(s) containing your all files(Beside
Music ,Photo and Movie). Enter the folder press “ ” and “ ”to select the
file you want to view and press OK to play.
NETWORK
When the product is connected to Network(referring to network settings), you
can choose the menu of NETWORK to access the shared files, there is one
options to choose: My Shortcut
My Shortcut
When you are browsing NET, you can choose the PC name from the menu or
you can set “Specific File Server IP” and access it from “My Shortcut” in the
menu. And then you can browse the shared files on the network .
UPNP
The full name of UPNP is Universal Plug and Play.
UPNP criterion is based on TCP/IP protocol as well as new internet protocols
aim at communication between facilities. In fact, UPNP is made in the hope
that all the facilities connected to the internet can communicate without being
Page 17

16
interrupted by gateway in the future, so that our communication in the internet
can become more fluently, documents transmission can become more
convenient by using software that supports UPNP, and internet applications
which cannot be used before can be operated in the future. These are all the
convenience brought by UPNP.
This product is a multimedia player that supports UPNP. Before using UPNP
function, please make sure that computer connected with the product in LAN
has installed software that support UPNP. If not, please install a multimedia
play software or share software that support UPNP gateway protocol, and
then open the UPNP share function in the software, so that the access speed
can be quickened largely.
For example, connect the player to the family LAN, and then multimedia
documents shared in the Media Player 11 software in the computer in study
can be accessed in the living room through UPNP.
Firstly, connect the player to the family LAN. You can refer to network
connection instructions to connect the player.
Secondly, install software that support UPNP gateway protocol.
Before using UPNP function, you need to install software that support UPNP
gateway protocol in your computer and then start the share function. Such as
install a Media Player 11 software that support UPNP function (remark:
former edition of Media Player 11 doesn’t support UPNP function) in your
computer.
Thirdly, share documents through setting the software.
After installing the software, open the software’s interface, choose “Media
Base” in the main interface of the software, and then choose “add to the
media base” in the pull-down menu. After adding some documents or folders
to the media base, choose “media share” in the pull-down menu. You can
also set the types and positions for the shared documents, such as “music,
picture or video” and so on.
Fourthly, use the player’s UPNP function.
When the setting of the shared documents is finished, choose UPNP option
in the main interface of the player to enter, and then the player can search out
Page 18

17
computers installed with UPNP software in LAN. Enter your computer, and
you can see multimedia documents shared through Media Player 11 in your
computer. Using UPNP is more convenient and faster than using the player’s
network function. The player can access to computers without being
interrupted by gateway, avoiding fussy operations like inputting user name,
password and so on. Meanwhile, the function of UPNP is stronger, for
example, through setting the options of Media Player 11, multimedia
documents can be chosen and classified according to different ways, thus the
information can be shown in a more detailed way, helping you to find what
you want among plenty of documents, bringing convenience. All the above
are advantages of UPNP.
File Edit Menu
Press “ ” and “ ”to select the file or folder, press OPTION to display the
Edit tab.
Return Select to return to the main screen.
Rename
To rename a file, do the followings:
1. Press “ ” and “ ” on the remote control to select the
Rename tab from the menu bar.
2. Press OK on the remote control. The name entry screen
appears.
3. Use the navigation arrows to select letters and numbers.
Select CAPS to toggle between uppercase and lowercase
letters. Press <- to delete a letter. Press -> to insert a
space. Press OK to input each letter or number.
4. Once you have entered the new name, select OK and
press OK to confirm all changes.
If you want to cancel the naming during the process, press
Return.
Page 19

18
Delete
To delete a title, do the following:
1. Press “ ” and “ ” on the remote control to select the
Delete tab from the menu bar.
2. Press OK to confirm and delete the file.
3. A confirmation message appears. Press “ ” or“ ”and
select OK.
4. Press OK to delete the selected file. To cancel delete,
select Return.
File Copy Menu
The File Copy allows you to copy files between USB, Memory cards, NET.
Select “COPY” on the remote control .It is very easy to copy files between
various devices.
Copying operation
Step 1: Select Source Device
Press “ ” and “ ”to select the device which need to copy at first after
entering the File copy interface,. Then press “ ”to select Destination Device,
press “ ” to return.
Step 2: Select Destination Device
Press “ ” and “ ” to select the device of the Destination after go to
Destination sector. Then press “ ”o next step, and press “ ” to return.
Step 3: Select copy files or folders
At Source sector, press “ ” and “ ”to select and press “SELECT” to select
file or folders which need to copy. “√”.appears at right side of selected file or
folder.Then press “ ”o next step, and press “ ” to return. Can only choose
a maximum of eight file or folder.
Page 20

19
Step 4: Select the folders of Destination
Press “ ” and “ ” to select a target folder at the destination sector. Then
press “ ”to next step, and press “ ” to return.
Step 5: Copy Status
At top menu, select OK to copy, select No to cancel.
After copy finishing, the system will display “File Copy is completed!”, or will
display “File Copy failed!”
Select “OK” to browse the copied files, or select “No” to return to Video.
Internet Services
If the product is connected well to the Internet (details referring to the wired
lan setup or wireless setup), you can enjoy internet services. Internet
Services includes various kinds of services on line, whch you can browse
media files on the internet without using your PC.Select the Internet Services
in the guide menu and press OK button on the remote control. Then you can
access to the interface of Inernet management, which includes Media
Library,Video, News, Photos and Weather .
Video
Press the navigation button on the remote control to select the video and
press OK button to confirm. Then you can enter video arrangement interface,
where you can find You Tube Video Press the navigation button and select
any one of the videos that you want to watch ,thus you can watch all kinds of
wonderful video files on line. e,g choosing You Tube Video, you can use the
following functions: searching videos ,browsing videos and video sorts. If you
want to browse videos, the system will display all kinds of videos, thus you
can choose your favorite video to playback.
Page 21
20
News
Press the navigation button on the remote control to select the News and
press OK button to confirm. Then you can enter news management
interface,where you can find sina, ifeng,CNN News, NPR News ,BBC News
and Lefigaro. Press the navigation button to select your favorite news web
and press OK button to confirm,then you can browse various kinds of
news ,such as sports,finace,entertainment and so on.
Photos
Press the navigation button on the remote control to select the Photos and
press OK button to confirm. Then you can enter photos management
interface ,where you can find the titles: Picasa ,Flickr and so on.You can
choose your favorite photos and press OK button to enter ,then you will
seach out the photos.
Setup Menu
Select” Setup” option or directly press “Setup” button on the remote controller
to enter the setup menu. It is possible to configure Photo, Audio, Video,
Network and System.
Select any option by pressing “ ” and “ ”on the remote controller, and press
OK to confirm or press “Return” to exit. Press “Setup” button again on remote
control to exit from setup menu.
Changing System Settings
Menu Language
Select
to choose the OSD (On Screen Display)
language. Press and
to select the language.
Press OK to confirm.
Text Encoding
Select to choose the text encoding language.
Press and to select the text
encoding language.
Press OK to confirm.
Page 22
21
Screen Saver
ON/OFF
System Update
View the current software version and update
the
software of the product
DVD Auto-Play
Set DVD drive to play on or off automatically.
Restore Default
To restore the factory’s defulat settings
Changing Video Settings
Movie Preview
Off/On,when it is on ,the movie can be previewed on the
lower right corner of the screen.
Resume Play
When the film stop to
play, the product will record the
location of the suspension, the next pla
yer can resume play
to continue from where it left off the last play.
Seamless
playback
ON/OFF If selecting seamless playback, the movie which
has many chapters of HD movie in the same folder can be
playback successively without buffer.
Aspect Ratio
Select to set aspect ratio.
Press “ ” and “ ” to select from Pan Scan 4:3, Letter Box
4:3, or 16:9. Press OK to confirm.
Pan Scan 4:3, Display a wide picture on the entire screen and
cuts off the redundant portions when a standard 4:3 TV is
connected.
Letter Box 4
:3,
Display a wide picture with two black borders
on top and bottom of 4:3 screen when a standard 4:3 TV is
connected.
16:9: Compress the image to convert the whole image when
a 16:9 TV is connected.
16:10: Compress the image to convert the w
hole image
when a 16:10 TV is connected.
Page 23
22
Brightness
Select to set brightness levels.
Press “ ” and “ ” to adjust brightness. The new setting is
previewed onscreen. Press OK to confirm.
Contrast
Select to set contrast levels.
Press “ ” and “ ” to adjus
t contrast. The new setting is
previewed onscreen. Press OK to confirm.
TV System
Select to adjust TV system. HDMI Auto ,
NTSC ,PAL ,480P ,576P ,720P 50HZ
,720P 60HZ,1080i
50HZ,1080i 60HZ, 1080P 50HZ,1080P 60HZ.
Press “ ” and “ ” to set the TV system, depending on
your
viewing preferences. Press OK to confirm.
Changing Audio Settings
Night Mode
There are “On” “off” and “Comfort modes.
In comfort mode, it restrict the volume automatically so that
it would not affect the peoples’ rest or working.
Digital
output
HDMI LPCM:
The digital audio signal which is decoded by the product
output through HDMI 2.0 channel.
HDMI LPCM MULTI CH
The digital audio signal which is decoded by the product
outputs through HDMI 5.1 channel.
HDMI RAW:
The raw digital signal of the multimedia data directly output
through HDMI,at this time the remote control has no
function of adjusting the volume.
SPIDF LPCM:
The digital audio signal which is decoded by the product
output through optical.
Page 24
23
SPIDIF RAW:
The raw digital signal of multimedia data directly output
through optical,at this time the remote control has no
function of adjusting the volume.
NOTE: If selecting HDML LPCM/RAW, there is no signal output through
optical .If selecting SPDIF LPCM/RAW, there is no signal output through
HDMI.
Changing Photos Settings
Press “ ” and “ ” on the remote control to select the Photos tab from the
menu.
Slide Show
Select to set slide show time.
Press “ ” and “ ” to select the interval you require.
Press OK to confirm.
Transition
Effect
Select to set the transition effect of photos.
Press “ ” and “ ”
to select the transform of photo you
require:
1) Cross Fade – fade in and fade out
2) Left to Right- from left to right
3) Top to Bottom- from top to bottom
4) Waterfal l- like a steep descent of water from a height
5) Snake – like snake motion
6) Dissolve – like water dissolve
7) Strip Left Down – like strip cover fr
om top of left to bottom
of right
8) Shuffle – shuffle in and out
Press OK to confirm.
Page 25

24
Background
Music
Select to play the music file under the same folder.
Press “ ” and “ ”
to select the position of the background
music. Select “off” to close the function.
Press OK to confirm.
Changing Network Settings
Check the following items before use this function:
Connection between product and network
Network protocol is available
PC firewall must be shut down
Files are shared
Auto:Automatically set IP address
Wired Lan Setup
And Wireless Lan
Setup
Manual:select IP address, subnet mark address and
default gateway. It is available through navigation and
numeric key and press “enter” for confirming.
You can streaming playback the multimedia files from network and have file
copy function through network.
Note: For the first use you need to confirm the way in how to get IP manually.
Wired Lan Setup
Access the player to LAN, and press “Setting” in the remote control to enter
the setting interface of the player. Select “Network” and enter “Wired Network
Setting”. You can choose automatic or manual mode to do the setting.
DHCP IP (AUTO): To get the IP address of the domain name server
automatically. Select DHIP and then choose “OK” according to the operation
clues. The player can search and get IP addresses automatically. If the
connection is successful, the gained IP addresses will be shown on the
screen. If no IP address is shown on the screen, the connection is
Page 26

25
unsuccessful, thus you need to check the network connected to see if it has
been set according to the requirements. Then try to get IP addresses again.
FIX IP (MANUAL): To set the fixed IP address, subnet masks and default
gateway and so on manually. Please input information by navigating keys
and number keys and finally press “OK” to make confirmation and start
testing. Parameters of the network connection of the product will be shown if
the connection is successful.
1. Select “Network” in the home page of the product. If there are open
groups in the sharable wire network, other sharable working group
folders, such as WORKGROUP, will exist MY _SHORTCUTS .Select and
enter corresponding folder, then you can play multimedia content shared
in the network of the computer.
2. If there are no other sharable folders, select “MY_SHORTCUTS” and
enter. Press "OPTION" in the remote control, and choose “Add” in the
open window to create a new shortcut for computers that have set
network share. Input your user name, password and IP address of the
appointed document server. User name is GUEST or EVERYONE and
the IP address of the appointed document server is the IP address of the
computer that has set network share. There can be many sharable
computers in the wire network, input the IP address of the computer you
want to access.
3. If the connection is tested to be successful, save the setting. Choose the
newly created shortcut to enter. Input username GUEST or EVERYONE
and password, and then you can access to the appointed IP address and
get the shared content in that computer.
4. The product can play multimedia documents in the shared content. If
videos are played, there will be network connection speed shows on the
screen. Higher speed indicates that the network is more stable and the
quality of the video will be better. The product can also connect TV in the
living room with computer in the study through wire network connection,
Page 27

26
thus wonderful movies shared in the computer can be played in the large
TV screen, creating a new experience of home theater.
Wireless Setup
If it is the first time for you to use wireless network function, please do the
following setting:
Access your player to the Local Area Network (LAN), and press “Setting”
in the remote control to enter the player’s setting interface.
1. Select “Network” and enter "Wireless network setting", choose the file
name of the connecting configuration. Then the clue of “Press ‘OK’ in the
remote control to connect, and press ‘OK’ to test the selected connection”
will show on the lower part of the screen. Press “OK” to connect. There
are two connection modes to choose: "AP" and “Ad Hoc”.
2. If select “AP” mode, the player can detect wireless signal sources within
the searching scope of the configured wireless network card and the
interface will show all the detected wireless SSID.
3. If select “Ad Hoc” mode, the player can access to sharable content in
specific objects. For example, the product and computers can connect
and exchange data through choosing “Ad Hoc” mode without using
wireless Routers.
4. Connect the product’s antenna with a USB wireless network card, put
through the antenna, and then you can set the wireless network
according to the following steps. If no external antenna is configured to
the product, a USB wireless network card that supports 802.11 b/g/n
protocol will be needed to insert into the USB HOST interface of the
product. Then “WIFI PLUG IN” will show on the screen. Thus you can
start to set the product’s wireless network. The following is detailed
description for the operations of two wireless network connection modes:
Infranstructure(AP) setting
Page 28

27
1. Select “AP” to get SSID names. You can choose automatic update and
the product will search all the wireless SSID within the searching scope
of the wireless network card automatically.
2. After the searching finished, all the searched SSID will be shown on the
screen. Choose the server’s SSID you want to access, test the
connection and save the setting information. On the bottom right corner,
there will be a green symbol showing the signal strength.
3. Select “Network” in the home page of the product. If there are open
groups in the sharable wireless network, other sharable working group
folders, such as WORKGROUP, will exist besides MY _SHORTCUTS.
Select and enter corresponding folder, then you can play multimedia
content shared in the network of the computer.
4. If there are no other sharable folders, select “MY_SHORTCUTS” and
enter. Press "Edit" in the remote control, and choose “Add” in the open
window to create a new shortcut for computers that have set network
share. Input your user name, password and IP address of the appointed
document server. User name is GUEST or EVERYONE and the IP
address of the appointed document server is the IP address of the
computer that has set network share. There can be many sharable
computers in the wireless network, input the IP address of the computer
you want to access.
5. If the connection is tested to be successful, save the setting. Choose the
newly created shortcut to enter. Input username GUEST or EVERYONE
and password, and then you can access to the appointed IP address
and get the shared content in that computer.
6. The product can play multimedia documents in the shared content. If
videos are played, there will be network connection speed shows on the
screen. Higher speed indicates that the network is more stable and the
quality of the video will be better. The product can also connect TV in the
living room with computer in the study through AP wireless network
connection, thus wonderful movies shared in the computer can be
Page 29

28
played in the large TV screen, creating a new experience of home
theater.
Peer to Peer (Ad Hoc) setting
Ad Hoc mode can build a peer-to-peer network structure without wireless
AP. Computers configured with wireless network card can connect with
each other wirelessly through this mode. The network building process for
Ad Hoc wireless LAN is very simple as it leaves out wireless AP. But the
transmission distance for wireless network card is generally around 40m
in indoor environment, when the distance exceeds this effective
transmission distance, communication cannot be realized. So this mode is
suitable for simple and provisional wireless connection requirements.
The operations introduced below will show you how to connect the
product with computer through Ad Hoc mode.
1. Firstly, set the product’s wireless network, select “Ad Hoc” and enter.
2. Set the product’s wireless SSID name in the wireless network. You can
edit the name whatever you like. Other computers configured with
wireless network card can see the SSID name of your product through
searching.
3. Select security modes for your wireless network: open system or WEP
(Wireless Equivalent Privacy). If you choose open system, other
computers configured with wireless network card can connect with your
product freely when searching out it. If you choose WEP, you need to set
the shared key (10-25 numbers), and then other computers can connect
with your product after inputting network key.
4. Set the IP address of your host, making sure that the address will not
conflict with IP addresses of other wireless facilities. When the above
three settings are finished, press “OK” to save your setting and start
Page 30

29
testing. If the connection is tested to be successful, interface showing
network information will be displayed. Then you can check the set
parameters.
5. When the setting of Ad Hoc wireless network for the product is finished,
you need to start the wireless network function of the computers which
your product needs to connect. This description is for operations under
WINDOWS XP system, and operations under other WINDOWS
operating systems are similar to this.
6. Select “My Computer” in the desktop, choose “Management” by clicking
right key on the mouse to enter the computer management interface.
Double click “Service and Application” to enter the program. Select
“Service” and enter.
7. Double click “Wireless Zero Configuration” in the last third one of the
“Service” options to enter its window of attribute. Then select “Startup” in
the routine options of the window, and click “OK”, thus the wireless
network function of the computer is opened.
8. If your computer configures with internal wireless network card (such as
most of notebook PCs) and has started the wireless network function, it
can search out the product’s SSID and connect with the product. If your
computer doesn’t have internal wireless network card (such as most of
desktops), you can insert a USB wireless network card that supports
802.11 protocol into the computer’s USB interface and install drive for the
network card. You should inactivate wired network of the computer
before configuring the wireless network.
9. Then there will be an icon representing wireless network and showing in
the status bar in the bottom right corner of the computer’s desktop. Click
the icon, and a status window of the wireless network connection will
show. Click “Check the Wireless Network”, then wireless network SSID
within the searching scope will be shown on the interface.
10. Select the product’s SSID and the computer’s Ad Hoc connection icon in
the window of wireless network connection, and click “Connect”. There
will be a clue to indicate that the connection is successful if the wireless
Page 31

30
network Ad Hoc connection is done. Then click “Support” in the window
of wireless network connection status to see IP address and so on
network information gain from the wireless network. Do remember the
computer’s wireless IP address because you need to use it when the
player needs to access to the computer.
11. Enter “Network” in the homepage of the product, select
“MY_SHORTCUTS” folder and enter. Press “Edit” in the remote control
and choose “Add” to create a new shortcut for accessing to other
computers, and then input user name, password and IP address of the
appointed document server. User name is GUEST or EVERYONE and
the IP address of the appointed document server is the wireless network
IP address of the computer that has built Ad Hoc connection with the
product. There can be many computers building Ad Hoc connection with
the player at the same time, input the IP address of the computer you
want to access.
12. Save the setting and choose the newly created shortcut to enter. Input
user name GUEST or EVERYONE and password, and then you can
access to the appointed IP address and get the shared content in that
computer.
13. The product can play multimedia documents in the shared content. If
videos are played, there will be network connection speed shows on the
screen. Higher speed indicates that the network is more stable and the
quality of the video will be better. The product can also connect TV in the
living room with computer in the study through Ad Hoc wireless network
connection, thus wonderful movies shared in the computer can be played
in the large TV screen, creating a new experience of home theater.
Install and use of BT/SAMBA
Player is a system, which is consist of operating system (Linux+AP) and
Page 32

31
application software (BT/SAMBA).
When using the function of BT/SAMBA,it is essential to make sure your PC
and the product can be connected to the internet. Being sure that the product
can work normally , press the navigation key to enter the Setup menu, and
selcect the wire setup or wireless setup option to search the IP address(for
details referring to the chapter of Wire Setup or Wireless Setup).
IP address setting
You can obtain a product's IP address to accordance with Wired Lan Setup in
front of introduced.
1.1).Obtain IP address automatically
The system will obtain the IP address automatically via DHCP protocol if
the local network has DHCP server available.
2).Use static IP address
Acquire a unique IP address, Subnet mask, and Default gateway
information from your network system. Then fill in.
2. 1).Obtain DNS server address automatically The system will get DNS
server addresses from DHCP server if available
2)Use static DNS server addresses Specify DNS server address.
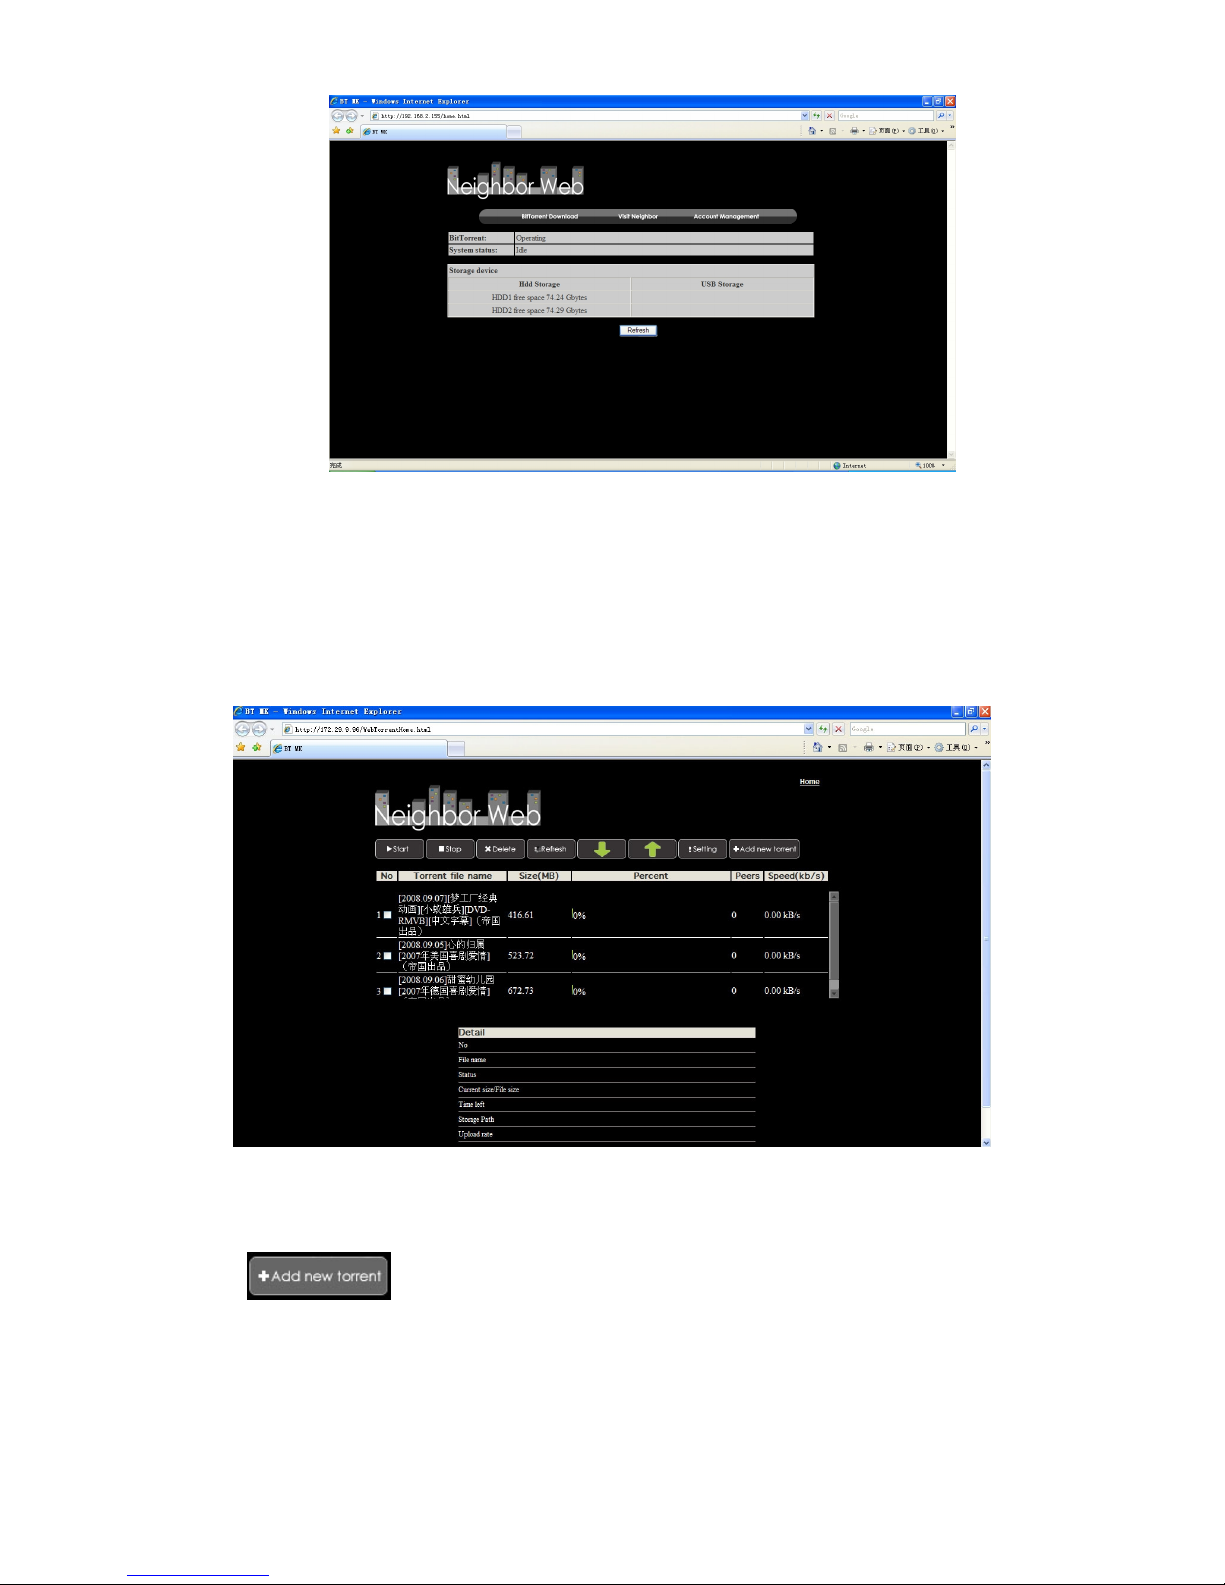
Neighbor Web interface
When you get BT Player’s IP address, launch your web browser ,type the
correct IP address in the browser, you can into Neighbor web interface. The
Username is admin and the initialization password is 123.
Page 33
32
At Home page, the “Neighbor web” will display BT Player’s status and
storage device.
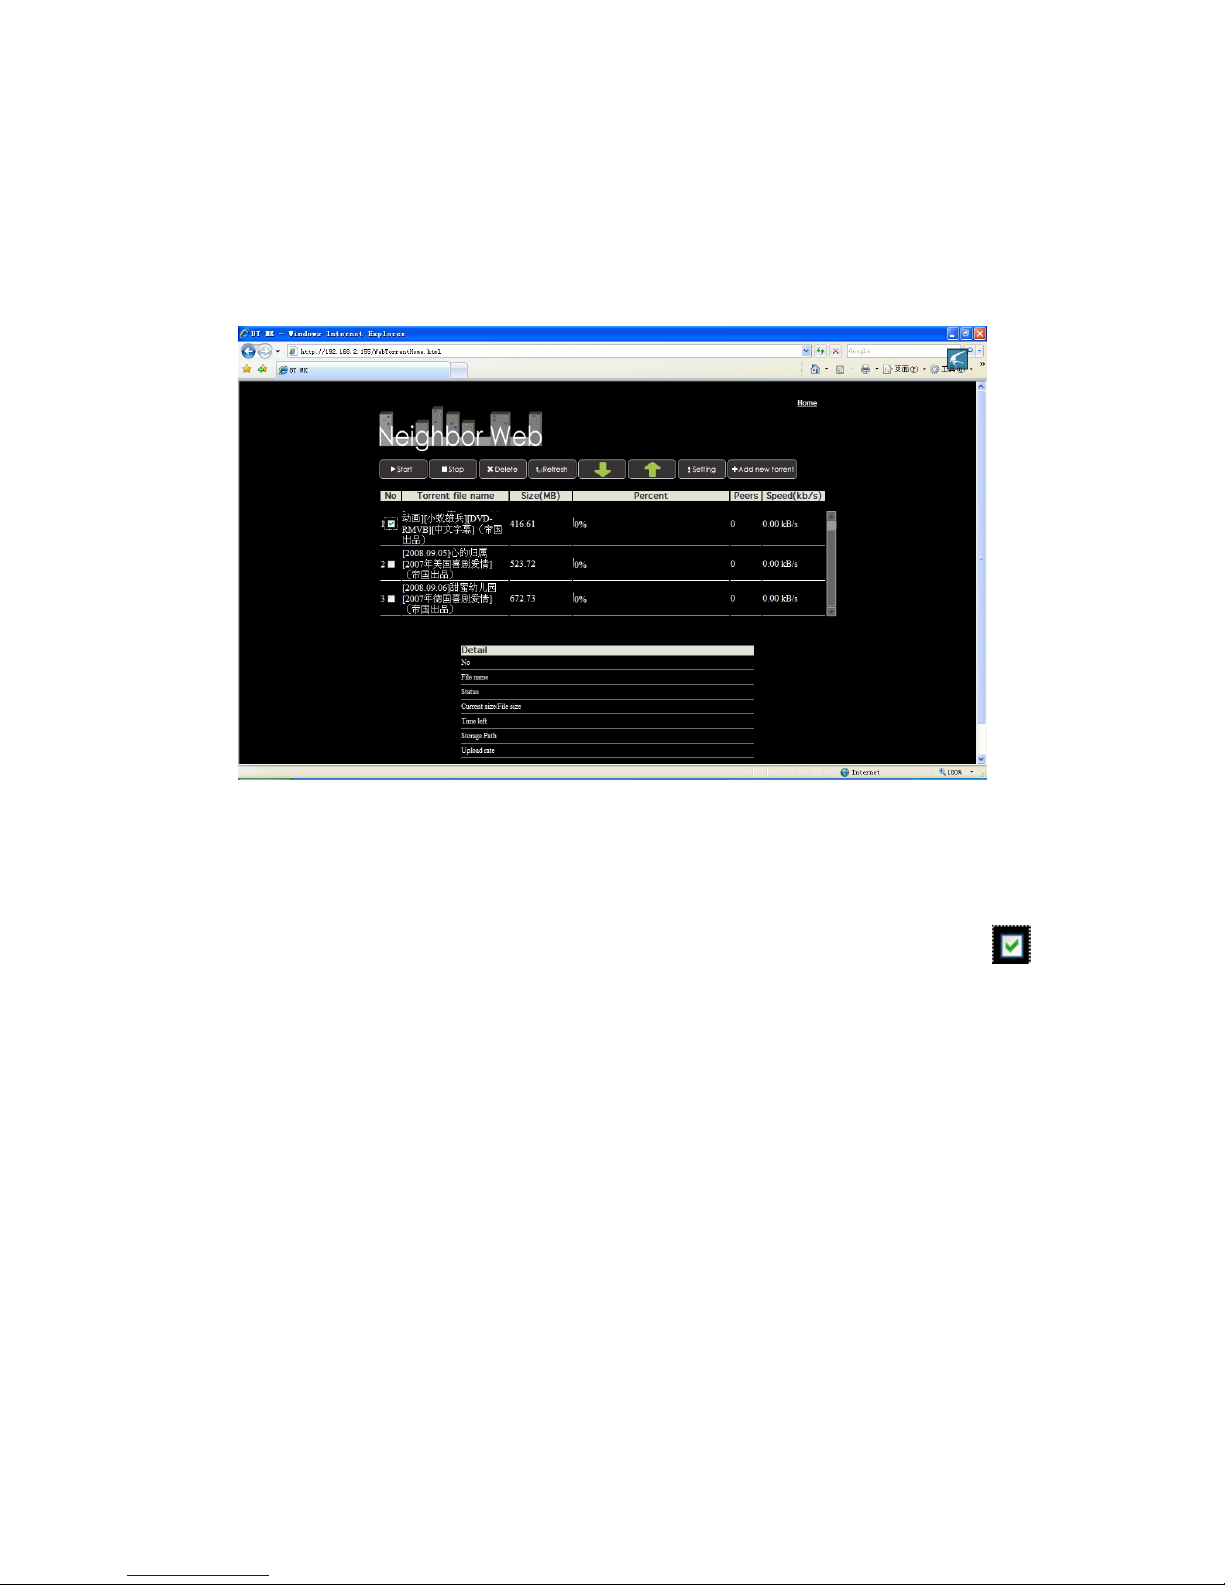
BitTorrent Download
At Home page, Select “BitTorrent Download” into download interface.
Add new torrent
Select into add new torrent file page.
At “add new torrent” page, click browse button to choose torrent file path from
local PC. When you select a torrent file, press “Open” button to add.
Page 34
33
Next , click “Yes” to confirm your select file and back BitTorrent download
page, otherwise click “No” do nothing and back BitTorrent download page.
When select “Yes”, the page will display “torrent added…You will
automatically redirect to webtorrenthome page” before back download page.
1) Click “start” to begin download
Click every torrent file name, at the bottom of page will display the torrent file
information.
And you can double click every file, when the left of little frame display ,it
means the files be choose.
Then you can operate to select “start” ,”stop” ,”delete” ,”Refresh” and sort
order “up” and “down”.
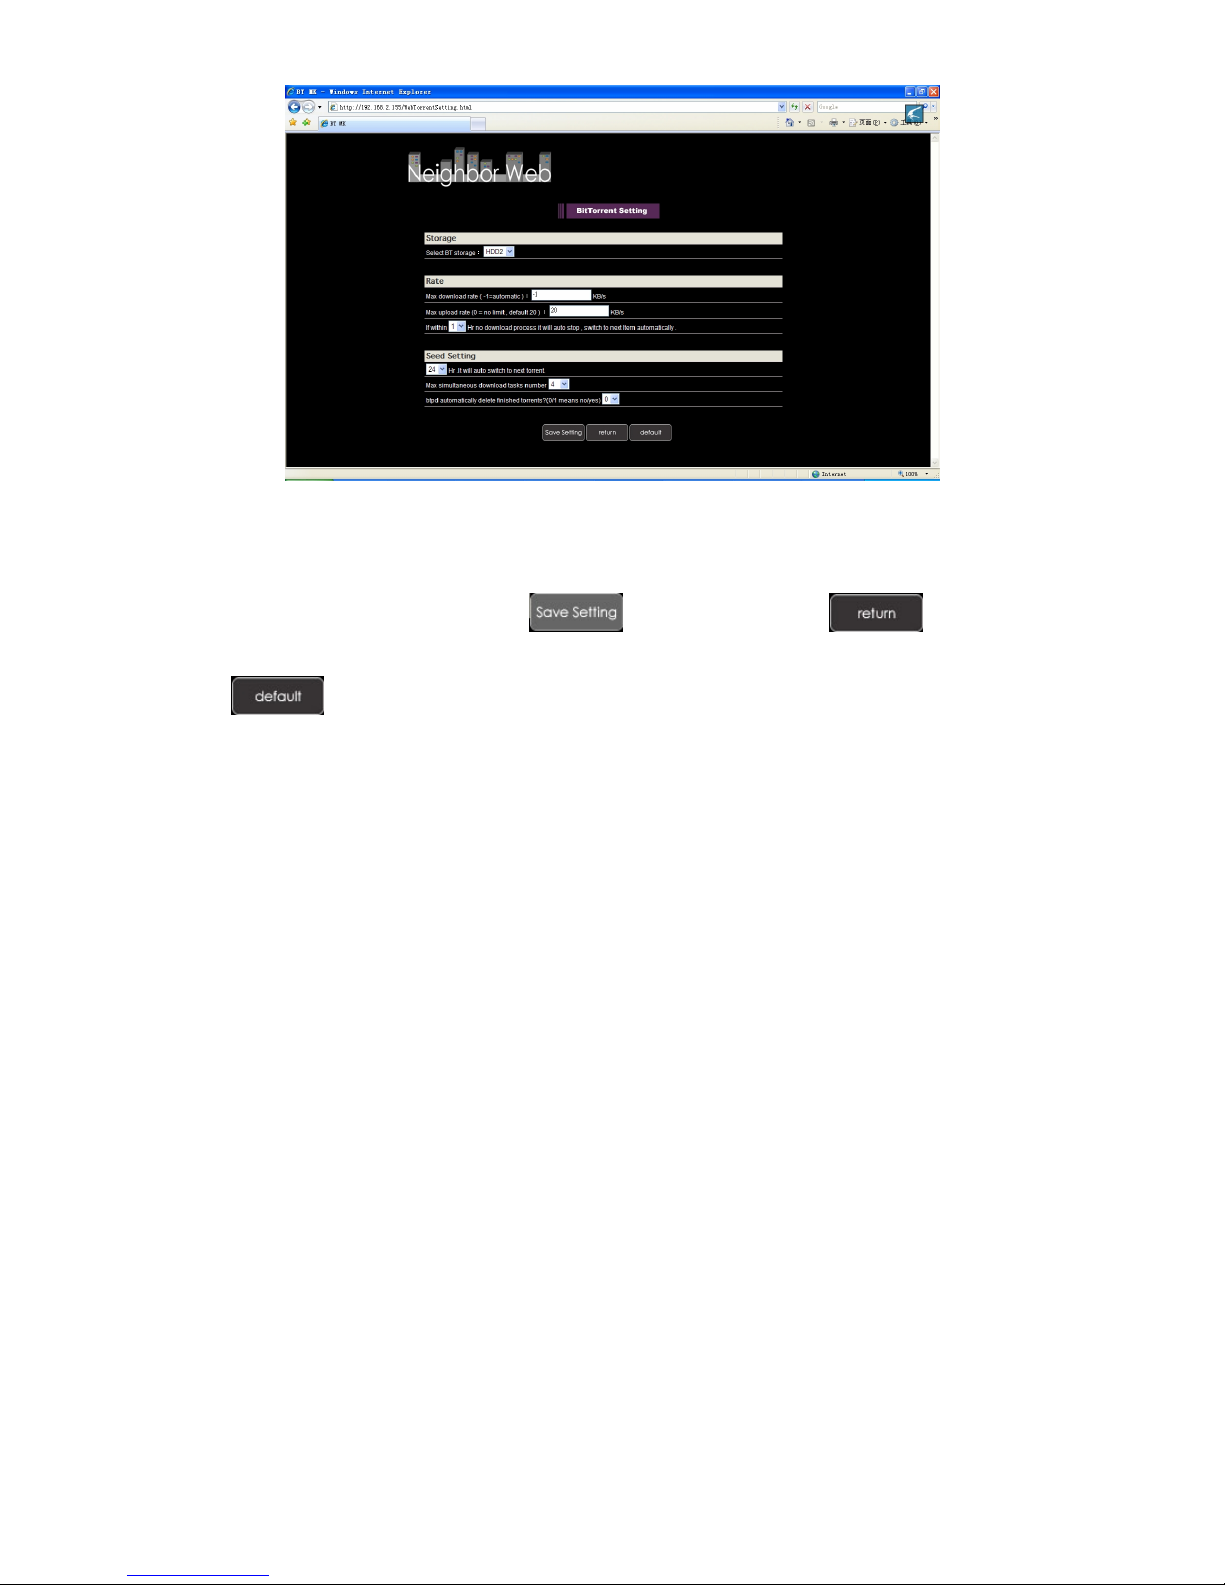
2) BitTorrent Setting
Press “Setting” into BitTorrent setting page.
Page 35
34
Set BT storage, Max download rate, Max upload rate and seeding setting in
this setting page.
When setting completed, Click to save or Click to return or
Click to come back default setting.
Visit neighbor
At home page, select “Visit negibor” to browser the HDD files. If the player’s
Login Control is on, you need to input the username is admin and the
initialization password is 123.
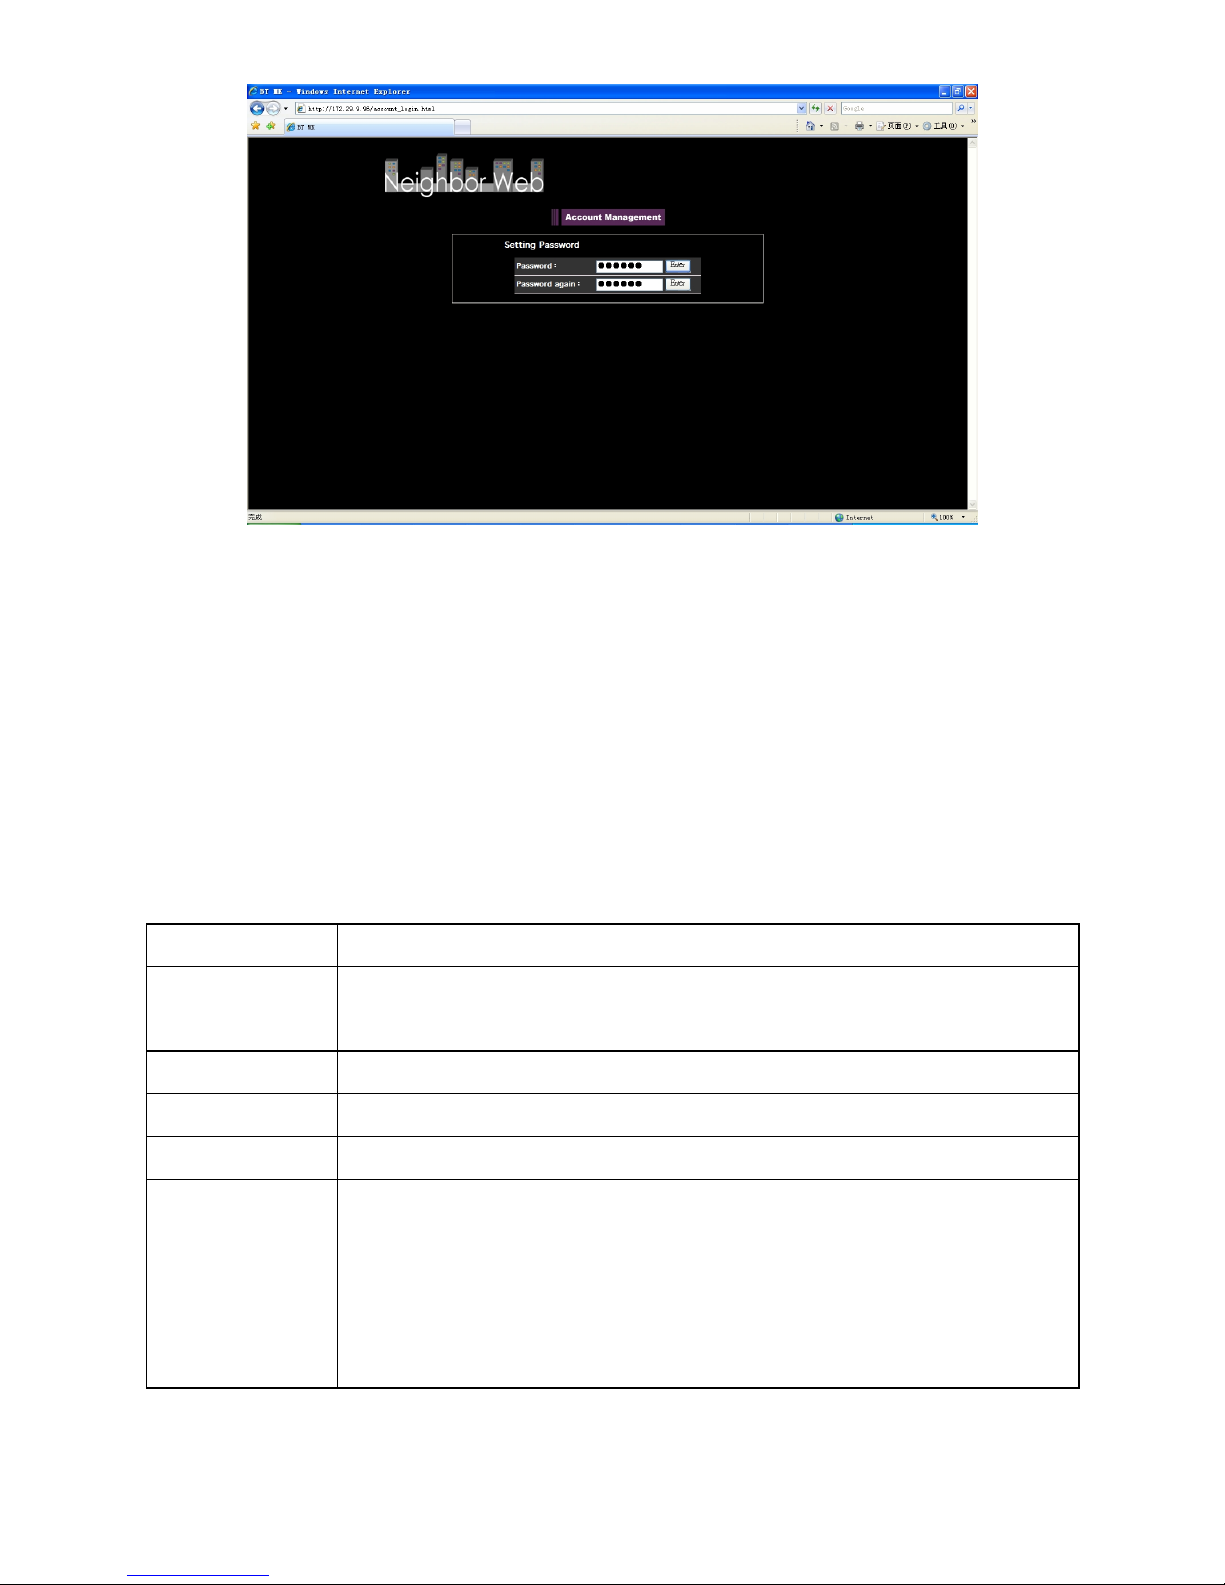
Account Management
At Home page, Select “Account Management” into Account Management
page.
If click “Account Management” is not into this page, please confirm Login
control is set to ON. Please see the “Login control” for more detail.
The Username is Admin and the initialization password is 123. Please setting
password according your favorite .
Page 36
35
login password can be modify at here. Please input password twice and click
“Enter” to confirm. When modify is succeed, press “Confirm” at the pop menu
and return. Please note the User name cannot be change.
Specification
USB host Supporting multiple USB storage
Network
connection
RJ45 10/100M connection; WLAN (IEEE 802.11 b/g/n)
Video output Composite video /HDMI
Audio output Stereo/digital HDMI/Optical
Audio MP3,WMA,WAV,AAC,OGG,Dolby digital,DTS digital
Video
Video decode:
MPEG 1/2/4, Divx,Xvid, H.264,VC-1,RM/RMVB
Format:
WMV,MKV,MOV,AVI,MPG,MP4,TS/M2TS/TP/TRP,ISO,IFO,
VOB,DAT.RM/RMVB,FLV
Page 37

36
Subtitle SSA,SMI,SRT,SUB ,SUB+IDX
Picture JPG/BMP/PNG/GIF
Power
adapter
AC input:100V~240V, 50/60HZ
DC output:12V,2A
Dimension 168.7×124.2×33.0mm
Weight About 340g
Supported video, audio and picture formats as follows
DECODE FORMARTS RESOLUTION
DAT 320×240
MPEG-1
MPG 720×576
VOB 720×576
MPG 1920×1080P
MPEG-2
TS/M2TS/TP/TRP
1920×1080P
AVI 1920×1080P
MP4 1920×1080P
MPEG-4,
DIVX, XVID
MKV 1920×1080P
VC-1 WMV 1920×1080P
AVI 1920×1080P
MP4 1920×1080P
MOV 1920×1080P
H.264
MKV 1920×1080P
VIDEO
RM/RMVB RM/RMVB 1920×1080P
MP3 Support
WMA Support
WAV Support
AAC Support
OGG Support
Dolby digital Support
AUDIO
DTS
digital
Support
Page 38

37
JPG/JPEG Support
BMP Support
PNG Support
PICTURE
GIF Support(support a static display only)
Note: Up to the improvement, the appearance and specification will be
changed accordingly without notice.
Maintenance notice
To protect the normal use of all accessories, please kindly make sure
understand and py attention to following points.
l Power input AC100~240V,output DC 12V/2A
l Under normal working status, power adapter will keep warming, but
body temperature of 60 degree or under is normal.
l Please be sure of aeration under normal working status, do not put the
device in bed, sofa, or similar area where cooling effect is no good.
l Please do not teardown personally, but send it back to the pointed
service agent, or there will be danger of electronic shock.
l Please pull out the cable and shut the device immediately when cable
broken or liquid in, and send to pointed agent for repair.
l We advise to use the product in the environment of room temperature.
The range of environment temperature is 0~40℃.
FAQ
This chapter gives you information on how to solve some problems that may
Page 39

38
occur with your player.
Q: I have connected the Player to my television. Why is no picture
showing on my television or no sound coming from my television?
A: This problem may have several causes. Please check the following items:
1) Please ensure that you have selected the correct AV source on your
television set.
2) Please check that you have connected the correct cable for the output of
the video and audio signals. Information on the correct connection of the
Player to your home entertainment system can be found in the Connection of
TV audio and video output " chapter in the previous Basic Operation guide.
3) Even if you have correctly connected the Player, it is possible that it may
be in the incorrect video output mode. To select a different mode, press the
"TV-OUT" button. Wait a few seconds until the Player and your television
have implemented the change.
Repeat this procedure until the picture is correctly displayed on your
television.
Q: My Player is connected correctly to my television. I can no longer
see my media files in the browser or they are only partially listed in the
"Browser".
A: A special media filter is active. Only media files that correspond to the
active media filter are displayed on your television.
If you select e.g. the media filter "Music ", no picture files are shown in the
browser. Press the
"ALL”,”MUSIC”, “PHOTO”, or “ MOVIES” button on your remote control to
change the media filter. If you want to see all supported media files, please
choose the media filter "All ".
a) Unsupported format.
Your Player supports a great variety of media file formats, a detailed list can
be found at the end of these instructions. If you try to play a file that uses an
unsupported file format,a message will be displayed. If you want to check the
Page 40

39
utilized audio and video format for amedia file, you can refer to
“specification”chapter.
b) The chosen media source is not connected to the PLAYER
If you select a media source that is not currently connected to the Player,
such as a USB stick, this source will be displayed as empty. As soon as a
device is connected, the content appears in the respective path.
If no folders or files are displayed for a resource connected via the network,
check the settings for your network and your network shares. Please check
the user name and password, if they are required for access, and also the
firewall settings of your computers.
Q:I want to copy files onto an external data storage device with my
Player, but I always get an error message.
A:To use the copy function of your Player, the device (or the partition), that
you want to copy the data onto, must be formatted with one of the following
file systems:FAT, FAT32, NTFS, ext3.
Please use only targets formatted with FAT, FAT32, NTFS or ext3 for copying
onto.
Q:I want to perform a firmware update for my Player but my television
goes blank.
A:In some cases, the display via HDMI is not correct during a firmware
update.
Please make sure that your Player is also connected to your television via the
composite video connection during the firmware update, not only via HDMI,
and select the composite video input as the active input of your television
.
Q:I want to access files with the Player that I have shared in my network.
My home network ist working correctly, but the Player does not list the
files.
A: If you do not have access to the shared files, please check the following
points:
Page 41

40
1) Check if the network cable is connected properly at both sides, i.e. to the
Player
and to your network.
2) Make sure that the computer that you want to access is running and not in
a standby or idle mode.
3) Check the network and file sharing settings on your computer.
4) Check that you have entered the correct user name and password. Please
note that they are case sensitive.
5) Make sure that your firewall settings permit the Player to access your
computer.
6) If you want to access files that are stored on a USB data storage device
which is connected to a router and thus made available as network storage,
please note that you must set up a connection to the drive using "My_Sho
rtcuts ". To do so, you must enter the IP address of your router as well as the
user name and the password necessary to access the network storage.
Q:How is it possible that the playback of a file from a shared folder in
the network is aborted?
A: The energy saving settings of the computer or the NAS interrupt the
connection.
If the energy saving settings of your computer or your NAS are active, then
they can go into an idle state or a sleep mode even though they are being
accessed via the network. During a sleep mode no data is transferred via the
network. Please adjust the energy saving settings of the media source so that
it does not go into a sleep mode while you play files via the network.
Q:Why is it possible that there are interruptions when playing movies
from my local network?
A: Sometimes, there are several devices in a network that have to share the
maximum data transfer rate possible via a network connection (shared
medium). If there are several connections active in the network you use the
Player in (e.g. to the internet, a shared printer, etc.), it is possible that this
Page 42

41
lowers the data transfer rate available for the streaming of the data to the
Player to a level that is insufficient for the playback of e.g. a DVD file or
an HD movie file. Should you experience such problems, please try to reduce
the amount of data transferred by other users of your network.
Q: While using the Player, it no longer responds to my commands.
A: This problem may have several causes. Please check the following items:
1) Please aim the remote control in the direction of the Player so that direct
visual contact between these two devices exists and ensure that the infrared
receiver of the remote control and the Player are not covered.
2) Check the battery in the remote control and, if necessary, replace it with a
new one.
Q:I have connected the Player to my TV via HDMI and I want to change
the video output signal, but the video output resolution I want to use is
not available.
A: This problem may have several causes. Please check the following items:
1).Your TV does not support all possible video output resolutions.
Go to the settings menu of your Player and select "Auto " under the menu
item "TV system ". Your Player will try to automatically select the best
possible video output resolution for your TV.
2).In some rare cases it is possible that not all options supported by the TV
are selectable. This problem can occurr when the TV is switchen on from its
standby mode, regardless of the current operating status of the PLAYER
In order to be able to select all video output resolutions supported by your TV,
disconnect your Player from the power supply and reconnect it after a few
seconds. Now all available video output resolutions are shown in the settings
menu.
Q:Why can't I hear any sound on my television when I connect it via
HDMI?
A: An audio output format that is not supported by your television is selected.
Page 43

42
Please go to the audio settings menu and select the menu entry "Digital
-Audio -Out " and choose the option "HDMI LPCM/RAW" if your television set
does not support real surround sound.
Q:My Player does not play any sound.
A: The volume is to low / Mute is active.
Please check if the volume for your Player and your television or your home
entertainment system are set to an adequate volume and that the sound is
not switched off via the "Mute" button.Otherwise, please select the correct
digital output mode in the Setup Menu. You can also refer to the Audio
Settings
Q:Why mustn't I disconnect the Player from the mains supply without
having switched if off beforehand?
A:The loading or saving of the current system settings takes approx. 10
seconds when the Player is turned on or off. If the player is disconnected
from the mains supply without having beem switched off beforehand, settings
and data may be lost. Please always switch off the Player by pressing the
power button on the device or on the remote control and wait until the power
button on the Player lights up red.
Q: Why is the power button still lit in blue even though I have switched
it off?
A: The loading or saving of the current system settings takes approx. 10
seconds. The illumination of the / button changes to red only after all settings
have been saved and the Player has entered the standby mode. If you want
to, you can then disconnect the Player from the mains supply.
Q:The language of the user interface has been changed. How do I
change the language?
A: In order to change the selected language, enter the "Settings " menu by
pressing the "SETUP" button on your remote control. Select the right menu
Page 44

43
("System ") and press the OK button on your remote control. The available
languages are displayed. Please mark the desired language and confirm
your choice by pressing the OK button.
Q:I have adjusted the settings of the Player under "Settings" and would
like to restore the factory defaults.
A:As described in the " Changing System Settings" chapter, execute the
menu item "Restore defaults ". The Player will be reset to the factory defaults.
The saved files are not deleted when you do this.
Others
The accessories of products may be different, for this series products are
various according to different series and models.
Please refer to packing list or contact your agent for information.
Pleas understand no advance notice for further product improvement, outlook
design and specification update.
The illustration may be a little different from the real product.
Statement:
Manufactured under license from Dolby laboratories “Dolby” and the double-D
symbol are trademarks of Dolby laboratories
 Loading...