

Page 1

1
Contents
Safety Instructions . . . . . . . . . . . . . . . . . . . . 2
Meet no!no! . . . . . . . . . . . . . . . . . . . . . . . . 3
Before you no!no! . . . . . . . . . . . . . . . . . . . . 4
Charging no!no! . . . . . . . . . . . . . . . . . . . . . 5
Working with no!no! . . . . . . . . . . . . . . . . . . . 5
Treatment. . . . . . . . . . . . . . . . . . . . . . . . 6-7
Maintenance . . . . . . . . . . . . . . . . . . . . . . . 8
Troubleshooting . . . . . . . . . . . . . . . . . . . . . 9
Technical Information . . . . . . . . . . . . . . . . 9-10
Page 2

2
WARNINGS – To reduce the risk of burns,
fire, electric shock or injury:
Do not use this appliance on sunburned skin, open cuts, •
bruises, blisters, moles or on raised areas such as scars.
If you have any skin condition other than those listed •
above, please consult your physician before using this
device.
Do not use this appliance on the breasts or genitals.•
Before using no!no! make sure your skin surface is •
completely dry.
Keep out of reach of children.•
Do not reach for a device that has fallen into water •
while it is plugged in and charging. Unplug the charger
immediately, before retrieving it from the water.
Do not place or store device near a sink or bathtub.•
Only use this device for its intended purpose as described •
in this manual.
This device should never be left unattended when plugged •
in.
Do not use the Thermicon™ Tip if the wire is bent or •
damaged in any way.
Turn off the device while changing the Thermicon™ Tip.•
Do not use the charger if the cord or plug is damaged in •
any way.
Do not use deodorants, lubricants, liquids, creams, gels, •
water, and etc. before use.
Do not allow the thermodynamic wire to touch your skin.•
CAUTIONS
Do not use this device near or rest it on flammable objects •
such as paper or cloth, etc.
Always unplug the power cord from the electrical outlet •
immediately after charging or use and before cleaning or
maintenance.
Do not allow the thermodynamic wire to touch your skin.•
This device should only be used with the supplied charger.•
Always turn off this device when you have finished •
working with it.
Do not open the outer casing of the unit. This might harm •
the unit and it will void any warranty.
Safety Instructions
READ ALL INSTRUCTIONS BEFORE USING.
ALL WARNINGS AND CAUTIONS SHOULD BE STRICTLY FOLLOWED.
As with any electrical device, certain precautions must be taken in order to ensure your safety.
Page 3
3
Meet no!no!
Congratulations, you are about to enter the world of painless,
professional hair removal. As you do, it’s important to
remember that no!no! is a professional treatment for hair
density reduction. This is science, not magic. Results take time,
patience and a strong commitment to the treatment’s unique
procedures.
Today’s no!no! offers you extra control and flexibility. It
allows you to choose your heat level and keep on top of your
Thermicon™ Tip status.
Experience shows that hair density reduction results may
appear within a 4-6 weeks. Please keep in mind that each
person has their own unique pattern of hair growth and biology
and each will experience results at their own pace.
Do not begin to use no!no! before carefully reading all operating
instructions.
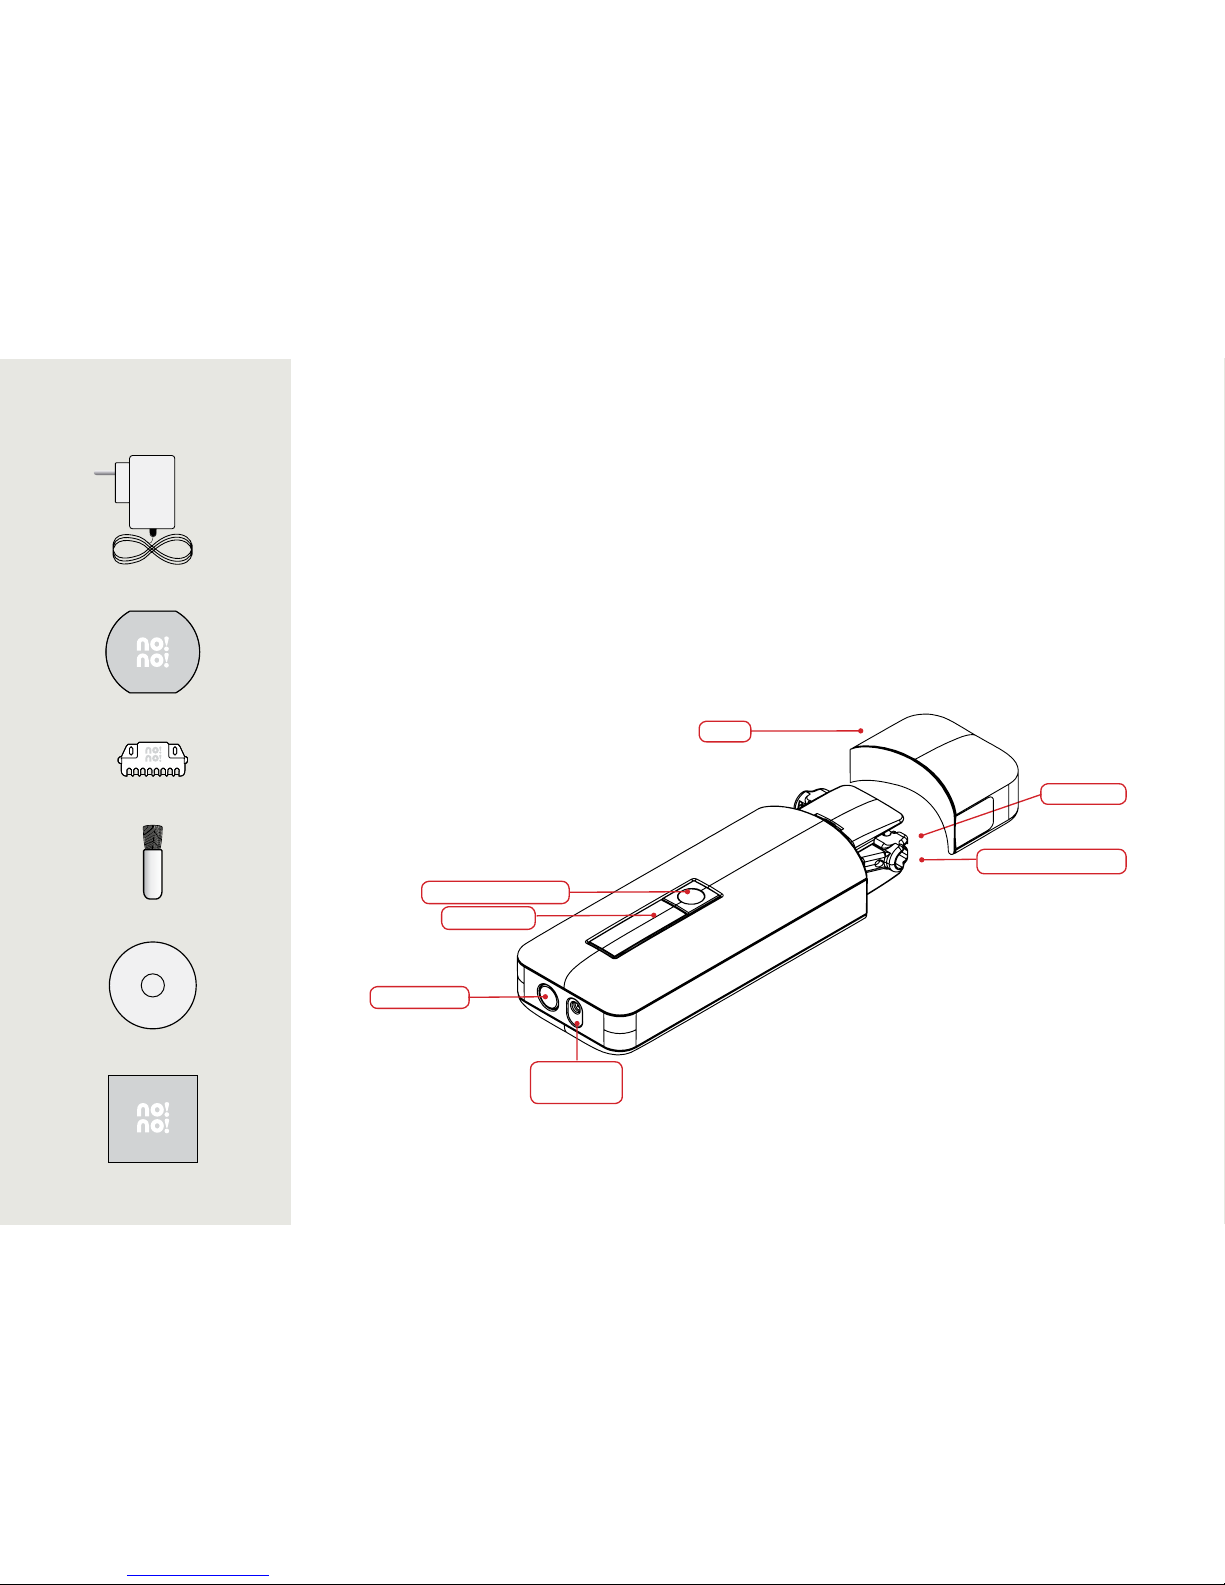
Buffer
no! no! Cleaning brush
Power supply
User Manual on CD
Quick Guide
Thermicon™ Tip
no!no! models 8800 & 8810 are compatible with no!no! Thermicon™ Tips (8820) for treating small, sensitive and curved
areas (available separately).
Treatment Level Button
Status Screen
On/Off Button
Charger
Connection
Thermicon™ Tip socket
Signal light
Cover
Page 4

4
Before you no!no!
Get the best results and performance by learning as much as
you can before you no!no!. Below is a brief description about
what to expect, what to look out for and how each of the parts
work.
Track your progress!• Before you use no!no! the first time,
study the area you want to treat. You might even want to
take pictures or choose a small area and count the hairs.
Then, once every 2 weeks, check your progress. But
remember, it might take 4-6 weeks to see initial results.
Aroma therapy• – no!no! burns hair and burnt hair smells.
But that’s how you know it is working. Try aromatic
candles or other air fresheners. An after treatment cream
or moisturizer like no!no! Smooth will help mask the smell
even further.
Keep in mind, the shorter the hair, the less the smell. You
may notice that as less hair grows back, the smell begins
to lessen.
That feels weird…• Some people experience a mild
tingling sensation when they first use no!no!, especially
around sensitive areas. This should fade then disappear
after the first few treatments.
For the sensitive type –• If your skin feels uncomfortable
during treatment, reduce the treatment level and/or take
short breaks after repeatedly gliding on any one area.
Keep it Smooth –• When you finish your treatment, apply a
non-alcoholic lotion or cream like no!no! Smooth to keep
your skin moisturized.
Patience is a virtue -• Initial results may take 4-6 weeks to
appear.
The first 4-6 weeks - • For best results, use no!no! 2 -3
times a week for the first 4-6 weeks. You don’t have to
wait for a lot of hair to grow back. Just 1mm of stubble is
enough to get the smooth results you are looking for.
After the first 4-6 weeks –• You may have noticed that your
hair isn’t growing in as fast or as thick. You can reduce the
treatments to once or twice a week and as time goes on,
just use no!no! as needed.
Check the Thermicon™ Tips -• Always make sure the
thermodynamic wire is completely intact before use. If it is
bent or torn, replace it before your next treatment.
Clean the Thermicon™ Tips –• Use the cleaning brush
frequently to brush away hair debris, especially when
working on long hair. This will help prolong the life of the
Thermicon™ Tips.
Stay Safe!• Do not use no!no! on sunburned skin, open
cuts, bruises, blisters, large moles or on raised areas
such as scars.
Stay Smart! • Do not use no!no! on the breasts or genitals.
Stay protected!• Your no!no! warranty lasts for one year on
parts and service. Keep your receipt.
Page 5
5
Charging no!no!
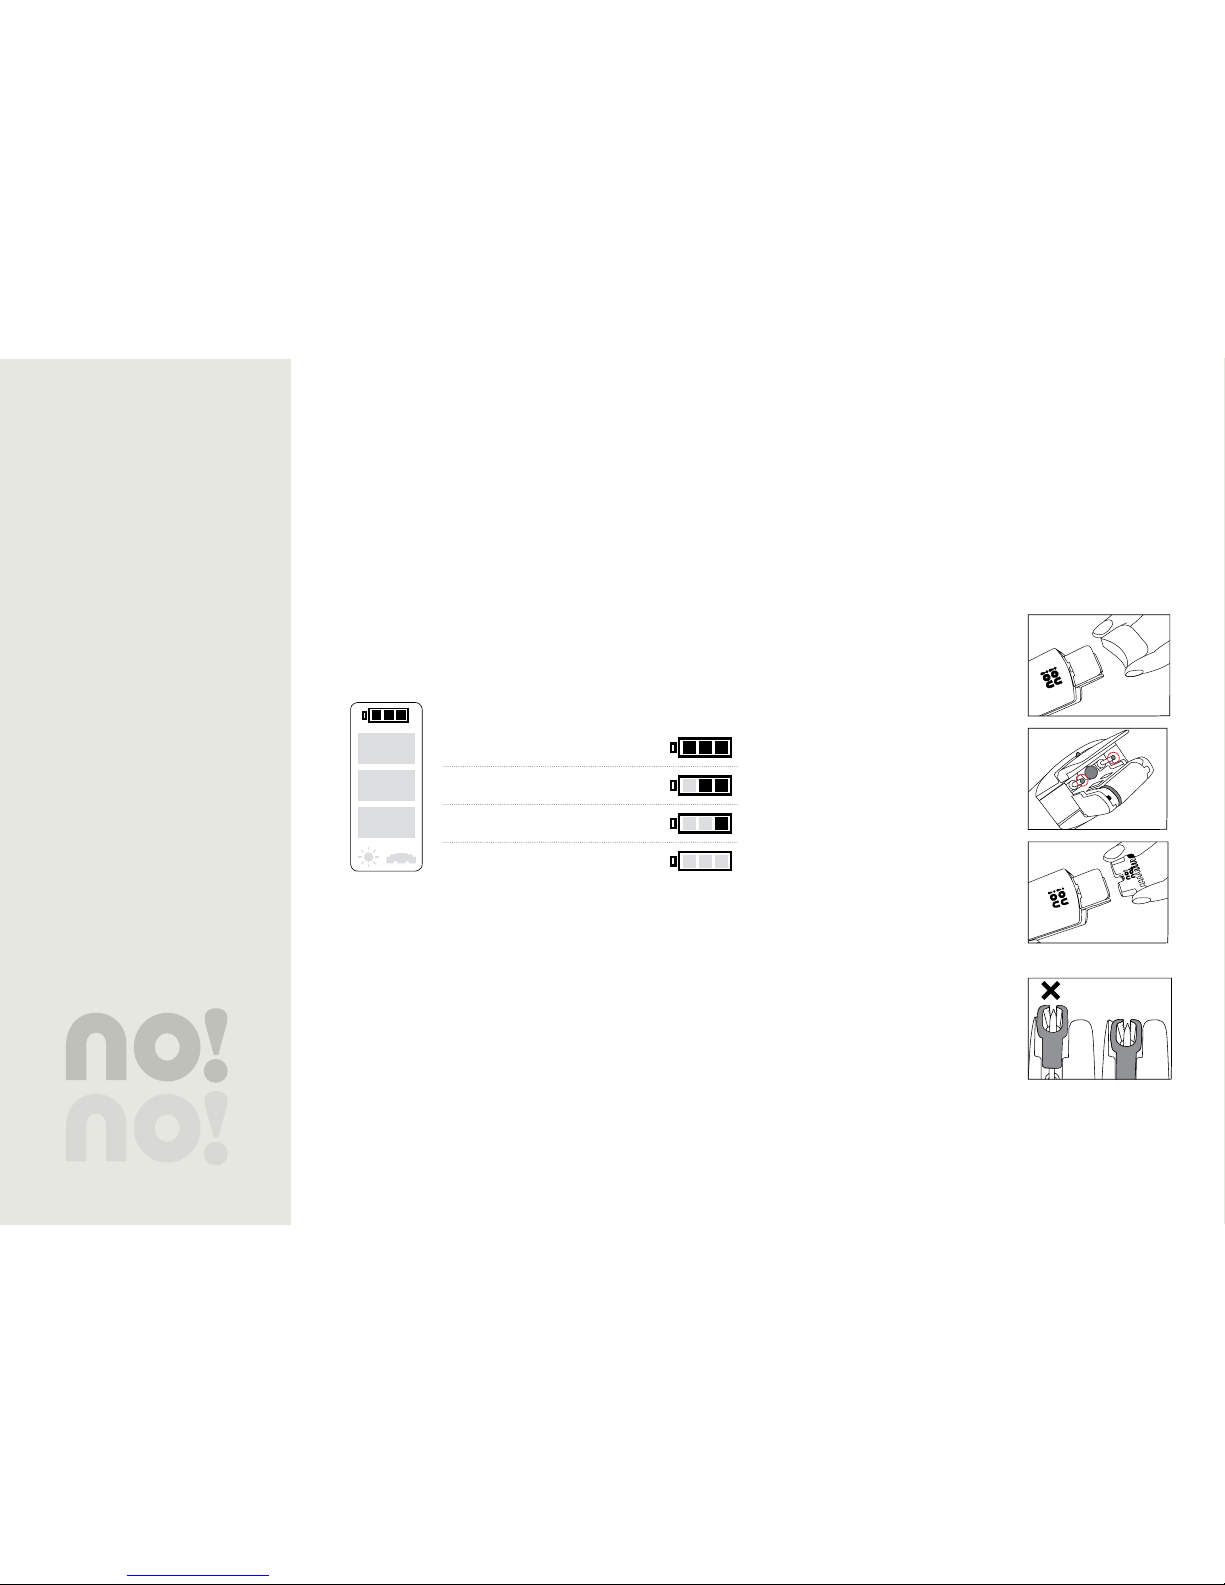
Before you use it the first time, charge no!no! completely.
When recharging is necessary, the empty battery icon and the
red signal light will flicker.
During charging, the bars will alternately light, one after the
other.
When charging is complete, the full battery icon will flicker
until no!no! is removed from the charger.
Battery Status
Full Charge
Partial Charge
Low Charge
Charge Immediately
Table 1: Battery Status
Working with no!no!
Skin preparation
Make sure your skin is clean and dry. Do not use no!no! on
any area where there might be residual gels, oils, lotions,
deodorant, etc.
no!no! Assembly
Remove the cover.1.
Pick up the device with the 2 .
rollers facing you. Inside the
Theramicon™ Tip Socket you will
see 2 posts.
Hold the Thermicon™ Tip by both •
ends.
Line up the two small holes on the •
Thermicon™ Tip with the posts
inside the socket.
Push it gently but firmly into place.•
Do not use force.•
Be sure the Thermicon™ Tip is •
correctly in place.
✔
To remove the Thermicon™ Tip3.
Grasp it by both ends• .
Gently pull.•
Page 6
6
Adjust the Treatment Level
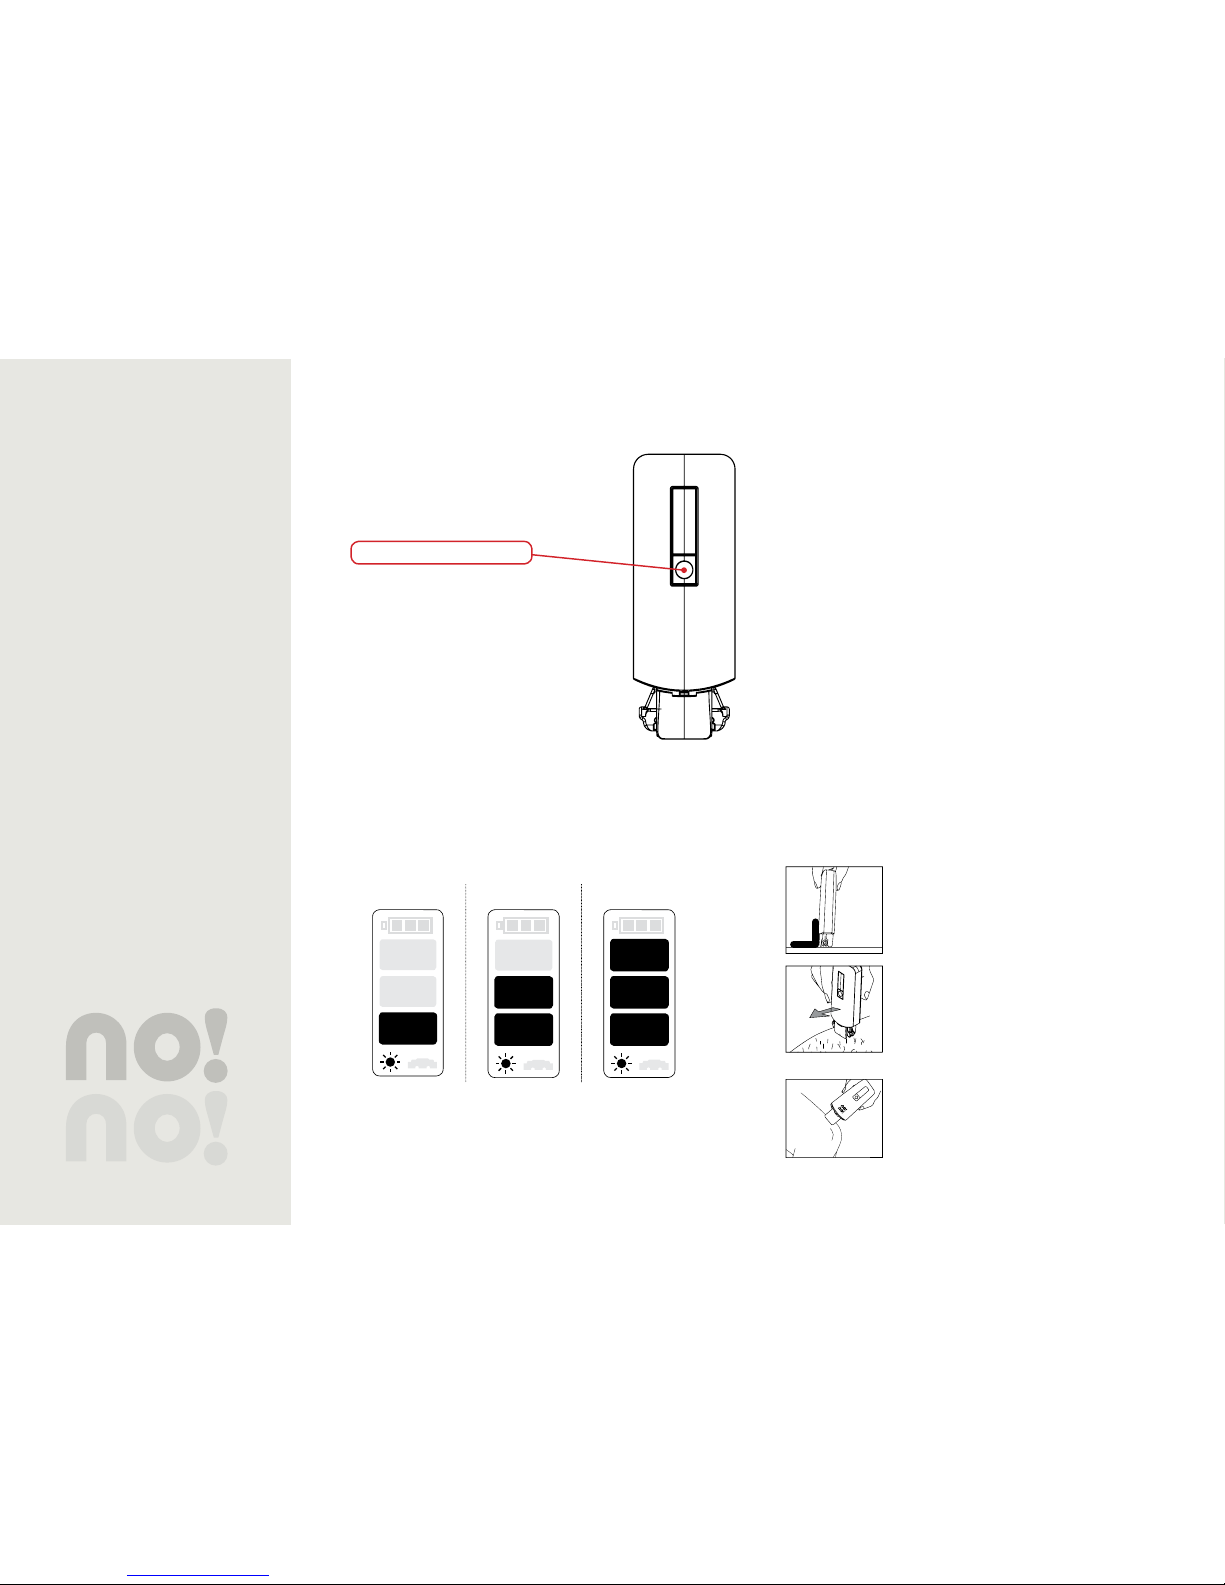
For your comfort, there are 3 different
treatment levels for you to choose from.
Select the level by pressing the button
under the Status Screen until the desired
treatment level appears. Work at the
highest level possible while still maintaining
comfort.
When you turn on again, it will be set to the last used
treatment level.
Low Medium High
Table 2: Current Treatment Level
Treatment
Unplug no!no! from the charger. 1.
If it still needs more time, you may also use it while
plugged in.
Remove the cover.2.
Insert the proper size Thermicon™ Tip for the area you 3.
are treating.
Push the power button on the top of the unit.4.
Set the treatment level.5.
Glide no!no! over your skin at a 90º angle.6.
Buff after completing each section.7.
Apply a moisturizer.8.
Remember to periodically check the Thermicon™ Tip and
clean it whenever necessary.
Do not use no!no! on the breasts or genitals.
Master the Slow Glide
Crucial to the treatment is the Slow Glide. To master this
technique:
Hold no!no! at a 90º angle with the rollers 1.
flat against the skin.
Gently glide no!no! over each section you 2.
want to treat using a slow, smooth, even
motion. Always glide in one direction,
upwards and towards your body at a
gentle, even pace.
Glide over the section you are treating 3.
until you feel it is smooth or nearly
smooth. Don’t over do it.
On rounded areas, follow the natural 4.
curve of the body.
Treatment Level Button
Page 7

7
NOTE: The bikini line may be extra-sensitive to temperature.
If it becomes uncomfortably warm during treatment, lower
the treatment level or work on a different site for a while.
Do not go further than the bikini line.
Watch the Light
The signal light by the Thermicon™ Tip will guide you
throughout your no!no! hair removal experience. It lets you
know when you are working at the right speed and warns you
if the Thermicon™ Tip is torn, damaged or no longer working.
The Signal Light is visible only during the Slow Glide part of
treatment.
While gliding on the skin, the Signal Light should always
be facing you. When working at the right speed, the light
will remain steady. If the light flickers, adjust your speed
accordingly. If it turns red, replace your Thermicon™ Tip.
Meaning Blue Red
Correct gliding speed On and steady Off
No Thermicon™ Tip in
socket Off On
Depleted Thermicon™ Tip Off On
Damaged Thermicon™ Tip Off On
Incorrect gliding speed Flickering Off
No movement Off Off
Charge no!no! Flickering
Table 3: Signal Light
Master the Buffer
You’ve tried everything but your skin still doesn’t feel smooth?
Did you remember to buff? Without buffing, cr ystallized
hair remains in place, giving your skin a prickly feel. These
treated hairs will eventually fall out – but why wait? Buffing
exfoliates your skin, removes crystallized hair and leaves
your skin feeling silky smooth.
To Buff:
Hold the Buffer flaps1.
Firmly rub the buffer in either a 2.
circular or back and forth motion over
the treated area.
Thermicon™ Tips
To avoid possible malfunction or harm, make sure to •
gently push the Thermicon™ Tip all the way into the
socket.
WARNING! Always check the wire in the Thermicon™ Tip •
before. Never use a Thermicon™ Tip if the wire is bent
(Figure 10), torn (Figure 11) or damaged in any way.
Figure 10:
Bent thermodynamic wire
Figure 11:
Torn thermodynamic wire
Page 8
8
Replace the Thermicon™ Tip:
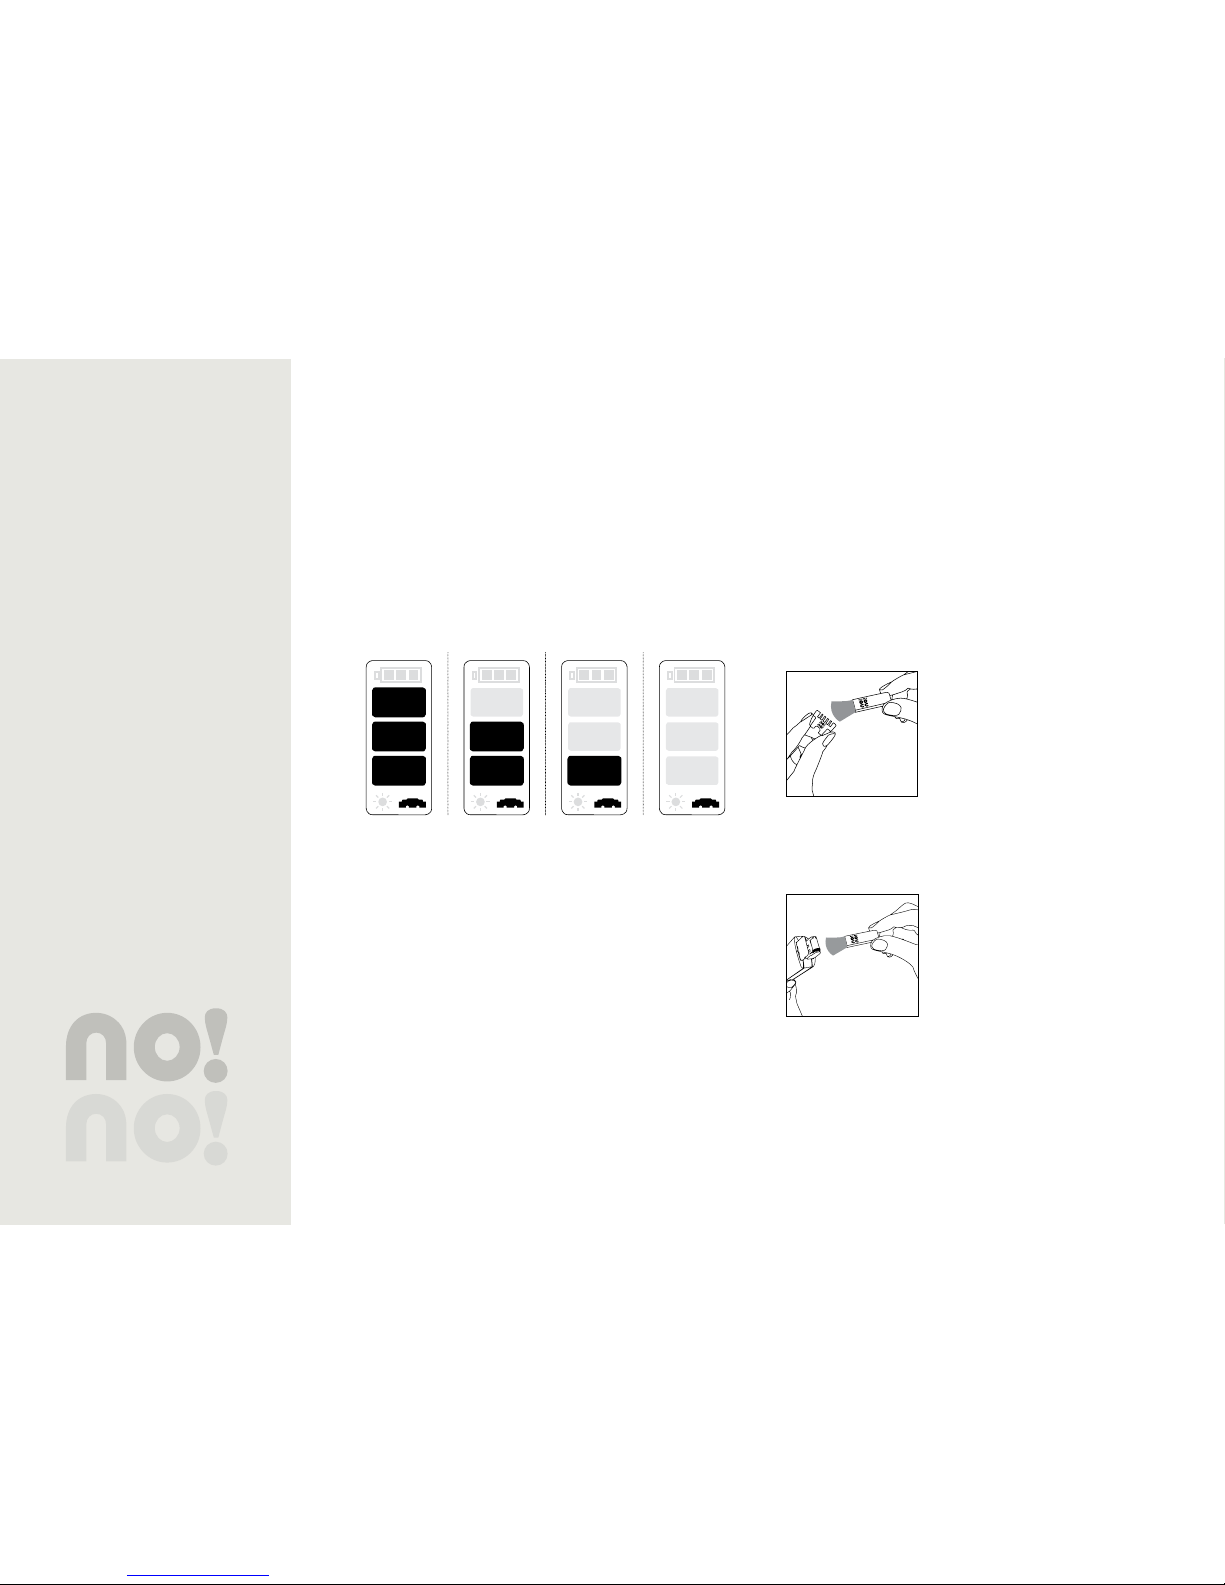
The Thermicon™ Tip indicator appears as you no!no! and lets
you know the present condition of your Thermicon™ Tip.
When the single light turns red•
When the Thermicon™ Tip icon flickers•
If you notice that it is no longer working efficiently•
If the wire is damaged in any way•
New Slightly Used Used Depleted
Table 4: Thermicon™ Tip Status
Maintenance
Do not use any liquids of any kind to clean the Thermicon™
Tip or rollers.
Thermicon™ Tips
It is important to keep the Thermicon™ Tip free of hair
debris. Allowing hair to build up may cause it to burn
out prematurely or malfunction. Check and clean the tip
periodically during each treatment session.
To clean the Thermicon™ Tip:
Turn off your no!no!1.
Remove the Thermicon™ Tip2.
Gently brush clean.3 .
Figure 12
Rollers
Although not necessar y to the
performance of no!no!, keeping the
rollers clean is all part of proper
maintenance. Use the cleaning brush
to remove excess hair and debris from
the rollers.
Brush debris out and away from the
socket in order to prevent any particles from falling into the
socket.
If any hair or debris fall into the socket, this may cause
no!no! to not function properly. Gently blow any particles
out of the socket before beginning the next treatment.
Page 9
9
Troubleshooting
If no!no! does not start when you glide it on the skin:
Press the On/Off button again to make sure it is turned on. •
Make sure the unit is charged. •
Check the LCD screen while gliding. If no blocks appear, •
replace the Thermicon™ Tip.
Make sure the Thermicon™ Tip is not bent or torn. •
Replace it if necessary.
If the signal light turns red while you glide no!no! on your
skin:
Replace the Thermicon™ Tip •
If the device is not working properly, contact your point of
purchase for examination or repair. The no!no! warranty
is only valid if no!no! has been used according to the
instructions in this guide. Retain all receipts and original
packaging.
Technical Information
Technical Specifications:
Weight: 104gr•
Physical Dimensions: 120 X 40 X 25mm (4.7 X 1.6 X 1.0 in)•
Mode of Operation: Continuous•
Operating Conditions:
Temperature: 5° C-30° C•
Humidity: 30%-80% RH•
Power Supply/Battery Charger Rating: •
Input 100-240VAC/50-60Hz. 0.2 AOutput 8.4VDC 0.5A
Transport and Storage
Temperature: -20° C to 80° C•
Humidity: 05-95% RH•
Atmospheric pressure: 0.1-1.5 atm.•
Electrical Safety:
Power Supply: • Class II equipment – double insulation
This appliance is not suitable for use in the presence of •
flammable anesthetic mixture with air or with oxygen or
nitrous oxide.
The Quality Management System of Radiancy Ltd. •
complies with the Quality Management Standard ISO
13485.
no!no! complies with IEC 60335 and with Low Voltage •
Directive (Electric Safety) LVD: 2006/95/EC
Design and technical specifications are subject to change •
without notice.
Page 10

10
Manufacturer:
Radiancy Ltd.
5 Hanagar St., P.O. Box 7329
Hod Hasharon, 45240, Israel
EC Representative:
Obelis S.A Av.de Tervuren 34 Bte. 44
B-1040 Brussels, BELGIUM
Tel: 32 (0) 2 732 59 54
Fax: 32 (0) 2 732 60 03
GSM: 07545 46 60
Email: [email protected]
Page 11

11
 Loading...