

Page 1

Operator’s Manual
0
™
Avant 212
Pulse Oximeter
and NIBP Monitor
0123
English
1
Page 2

CAUTION! Federal law (USA) restricts this device to sale by or
on the order of a physician.
CAUTION! Read this entire manual carefully before using the
Avant 2120 Pulse Oximeter and Noninvasive Blood
Pressure Monitor.
The information in this manual has been checked carefully and is believed to be
accurate. In the interest of continued product development, NONIN reserves the
right to make changes and improvements to this manual and the products it
describes at any time, without notice or obligation.
Nonin Medical, Inc.
2605 Fernbrook Lane North
Plymouth, Minnesota 55447-4755
USA
• (763) 553-9968
• (800) 356-8874 (USA and Canada)
• Fax (763) 553-7807
• mail@nonin.com
• www.nonin.com
References to “NONIN” in this manual shall imply Nonin Medical, Inc.
Nonin is a registered trademark of Nonin Medical, Inc.
© 2003 Nonin Medical, Inc.
Authorized EC Representative:
MPS Medical Product Service GmbH
Borngasse 20
D-35619 Braunfels, Germany
Page 3

Guide to Symbols ........................................................ 1
Precautions for Use ....................................................2
Using the Avant 2120 .................................................. 5
Indications for Use ......................................................... 5
Installing the Batteries .................................................... 6
Verifying Avant 2120 Operation ..................................7
Avant 2120 Alarm Limit Power On Defaults ............7
Displays, Indicators, and Controls ...............................8
Taking %SpO2 Measurements ...................................13
Taking Blood Pressure Measurements ......................13
Automatic and Demand NIBP Measurements ........16
Calibrating Blood Pressure on the Avant 2120 ........ 17
Advanced Features ........................................................18
Printing Quick Reference ............................................20
Care and Maintenance ..................................................21
Alarms and Limits .................................................... 22
Alarms ............................................................................. 22
Alarm Summary ............................................................. 24
Setting and Changing Volume and Alarm Limits ....25
Setting and Changing NIBP Settings .........................26
Communication ........................................................ 27
Memory Features ..........................................................27
Using the Avant 2120 with nVISION™ Software ..28
Real-Time Patient Data Output .................................. 29
Specifications ............................................................ 30
Parts and Accessories ............................................... 32
Service, Support, and Warranty ................................ 34
Troubleshooting ....................................................... 36
Page 4
Guide to Symbols
S
S
Detailed information about functional symbols can be found in this manual’s “Using
the Avant 2120” section.
Symbol Description/Function
Attention: See Instructions for Use or related materials.
!
Type BF Applied Part: Defibrillator Proof (Patient
isolation from electrical shock). Applies to NIBP.
Type BF Applied Part
(Patient isolation from electrical shock). Applies to pulse
oximeter.
I
S
F
I
E
A
D
L
C
U
C
L
UL Mark for Canada and the United States with respect to
electric shock, fire, and mechanical hazards only in accordance
U
with UL 2601-1 and CAN/CSA C22.1 No. 601.1.
0123
SN
CE Marking indicating conformance to EC directive No.
93/42/EEC concerning medical devices.
Serial Number (located under the battery cover).
Signal Output
1
Page 5

Precautions for Use
Precautions for Use
Read and follow all safety instructions in this chapter before using the Avant 2120.
Contraindications
Do not use the Avant 2120 in a magnetic resonance imaging (MRI) environment.
Do not use the blood pressure module of the Avant 2120 on neonatal patients.
Warnings
The Avant 2120 is intended only as an adjunct in patient assessment. It must be used in
conjunction with other methods of assessing clinical signs and symptoms.
This equipment is intended for use in the presence of electrosurgery; however, its general operation might be affected by the use of an electrosurgical unit (ESU).
As with all medical equipment, carefully route patient cables and connections to reduce
the possibility of patient entanglement or strangulation.
Use the Avant 2120 only within the specified temperature ranges: +32°F to +122°F
(0°C to 50°C) for operating, and -22°F to 122°F (-30°C to +50°C) for storage and
transportation.
Do not use a damaged sensor or NIBP cuff under any circumstances.
All parts and accessories connected to the serial port of the Avant 2120 must be certified according to IEC Standard EN 60950 or UL 1950 for data-processing equipment.
Use the Avant 2120 with 300PS-XX, where XX represents the power supply designation.
The Avant 2120 NIBP function has been designed for use on patients with normal sinus
rhythms.
Use only NONIN-manufactured pulse oximeter sensors. These sensors are manufactured to meet the accuracy specifications for NONIN pulse oximeters. Using other
manufacturers’ sensors can result in improper pulse oximeter performance.
Discontinue use of adhesive tape strips if the patient exhibits an allergic reaction to the
adhesive material.
Explosion Hazard: Do not use the Avant 2120 in an explosive atmosphere or in the
presence of flammable anesthetics or gases.
Do not stretch the adhesive tape while applying the pulse oximeter sensor.
Applying the blood pressure cuff to the same arm used for a pulse oximeter might affect
pulse oximeter readings.
Use only NONIN-supplied blood pressure cuffs and hoses. Using other cuffs might
result in inaccurate readings or inability to operate the Avant 2120.
Do not compress or hold the blood pressure cuff or cuff hose while the Avant 2120 is
operating.
Do not apply the blood pressure cuff to an arm being used for intravenous infusion or
to any area with restricted circulation.
Do not use the blood pressure cuff on neonates and patients known to be readily susceptible to bruising.
Ensure that the blood pressure cuff is sized and placed correctly for each patient.
2
Page 6

Ensure that all Avant 2120 users know how to manually remove the blood pressure cuff
in case it fails to deflate.
The safety and effectiveness of the Avant 2120 NIBP function in pregnant women have
not been established.
Do not operate the Avant 2120 blood pressure module unless it has been properly calibrated. Inaccurate blood pressure readings can result if the Avant 2120 has not been
calibrated properly. A calibration check is recommended at least once every year.
Cautions
Before using any sensor or NIBP cuff, carefully read the Directions for Use, which contain specific application times.
Do not, under any circumstances, perform any testing or maintenance on the Avant
2120 while it is being used to monitor a patient.
This equipment complies with International Standard EN 60601-1-2:1993 for electromagnetic compatibility for medical electrical equipment and/or systems. This standard
is designed to provide reasonable protection against harmful interference in a typical
medical installation. However, because of the proliferation of radio-frequency transmitting equipment and other sources of electrical noise in healthcare and other environments (for example, cellular phones, mobile two-way radios, electrical appliances), it is
possible that high levels of such interference due to close proximity or strength of a
source might disrupt the performance of this device.
Verify that all visible indicators light during the start- up (initialization) sequence. If any
indicator does not illuminate (except the AC Power Adapter LED), do not use the
Avant 2120. Contact NONIN Customer Support for assistance.
If the Avant 2120 fails to respond as described, discontinue use until the situation has
been corrected by qualified personnel.
Do not remove any covers other than the battery cover when replacing batteries. There
are no user-serviceable parts inside—other than the replaceable batteries.
Batteries might leak or explode if used or disposed of improperly.
Follow local governing ordinances and recycling instructions regarding disposal or recycling of the device and device components, including batteries.
Do not immerse the Avant 2120 or NONIN sensors in water or any other liquids, and
do not place liquids on top of the Avant 2120.
The Avant 2120 is a precision electronic instrument. It must be repaired by trained
NONIN personnel only.
The Avant 2120 is designed to determine the percentage of arterial oxygen saturation of
functional hemoglobin. Significant levels of dysfunctional hemoglobin, such as methemoglobin, might affect the accuracy of the measurement.
The Avant 2120 might misinterpret motion as good pulse quality (as indicated by a
green pulse quality display). Minimize the patient’s finger motion as much as possible,
or change the type of sensor being used (e.g., ear clip).
3
Page 7

Precautions for Use
Check the pulse oximeter sensor application site frequently to determine the positioning
of the sensor and the circulation and skin sensitivity of the patient. Patient sensitivity to
the Avant 2120 varies depending on medical status or skin condition.
Do not use the 300PS-UNIV battery charger if the integrity of the protective earth conductor of the AC cord or the outlet is in doubt.
Cardiogreen and other intravascular dyes, depending upon their concentrations, might
affect the accuracy of the SpO
Ear Clip and Reflectance sensors are not recommended for pediatric use. The accuracy
of the sensors has not been established for pediatric use.
Some nail polish colors or artificial nails can reduce light transmission and affect SpO2
accuracy.
Check the NIBP cuff application site frequently to ensure that the cuff is not causing
prolonged impairment of the patient’s circulation.
The Avant 2120 might not work on all patients. Check to ensure that the proper cuff
size is used. If you are unable to achieve stable readings, discontinue use.
In certain circumstances, the normal application of a blood pressure cuff might exasperate an underlying medical condition. Be aware of potential circulatory disorders in all
patients using the Avant 2120.
Blood pressure recordings can be affected by the subject’s position, physiological condition, and other factors.
When using the 300PS-UNIV battery charger, ensure that the AC cord is plugged into a
grounded outlet.
measurement.
2
4
Page 8
Using the Avant 2120
This section describes how to use the Avant 2120.
Indications for Use
The NONIN® Avant 2120 Pulse Oximeter and NIBP Monitor is a portable device
indicated for use in measuring and displaying functional oxygen saturation of arterial
hemoglobin (SpO
hospitals, medical facilities, and subacute environments. The Avant 2120 is intended
for spot-checking and/or continuous monitoring of patients. Its functions may be
used separately or simultaneously.
Pulse Oximeter Intended Use
The pulse oximeter is intended for noninvasively monitoring the oxygen saturation
and pulse rate of adult, pediatric, infant, and neonatal patients in hospitals, medical
facilities, and subacute environments. It may be used for spot-checking and/or
continuous monitoring of patients.
Blood Pressure Monitor Intended Use
The blood pressure monitor is intended for noninvasively monitoring the blood
pressure of adult and pediatric patients in hospitals, medical facilities, and subacute
environments. The blood pressure monitor is not intended for use with neonates. It is intended
for attended care and may be used for spot-checking. The Avant 2120 should be
used for patients with arm circumferences of 18-42 cm.
), pulse rate, and blood pressure of adult and pediatric patients in
2
MAP
mmHg
5
Page 9

Using the Avant 2120
Installing the Batteries
2120.003
NOTE: Reposition the back cover carefully, and tighten the screws
firmly—being careful not to over-tighten. Contact NONIN to
purchase or replace battery packs.
NOTE: Removing power from the Avant 2120 erases all previous oximetry
and NIBP data, but it does not erase any user-defined alarm
limits.
6
Page 10

Verifying Avant 2120 Operation
Press the ON/STANDBY button. When the unit is first turned on, the Avant 2120
performs a brief startup (initialization) sequence. Verify that all LEDs illuminate and
the unit beeps three times during the first phase of the startup sequence. If any LED
is not lit (except the AC Power Adapter LED), do not use the Avant 2120. Contact
NONIN Customer Support for assistance.
In order to verify that the Avant 2120 is functioning properly, it is important to
monitor SpO
the pulse oximeter sensor is functioning properly.
1. Ensure that the Avant 2120 is on, with the sensor connected.
2. Apply the pulse oximeter sensor.
3. Verify that a good SpO2 reading is displayed, that a pulse rate value appears,
and that the pulse strength bargraph LED is active.
and pulse rate readings. Use the following procedure to verify that
2
Avant 2120 Alarm Limit Power On Defaults
The Avant 2120 provides the capability to define power on alarm limit defaults that
are different than the factory settings. The two sets of defaults are selected using
DIP switch 8 (DOWN = Factory, UP = User Defined).
During initialization, FAC DFL or USR DFL will appear briefly in the SpO
and Pulse Rate display areas to indicate which set of defaults are in use. After
initialization, any of the alarm limits can be modified.
To program user-defined power on alarm limit defaults, set DIP switch 8 to the UP
position. A value for each limit must be programmed before the unit will continue
to operate.
To return to factory power on defaults, DIP switch 8 must be set in the DOWN
position before entering power on initialization.
NOTE: The unit must be using factory defaults before programming user-
defined power on alarm limit defaults.
2
7
Page 11

Using the Avant 2120
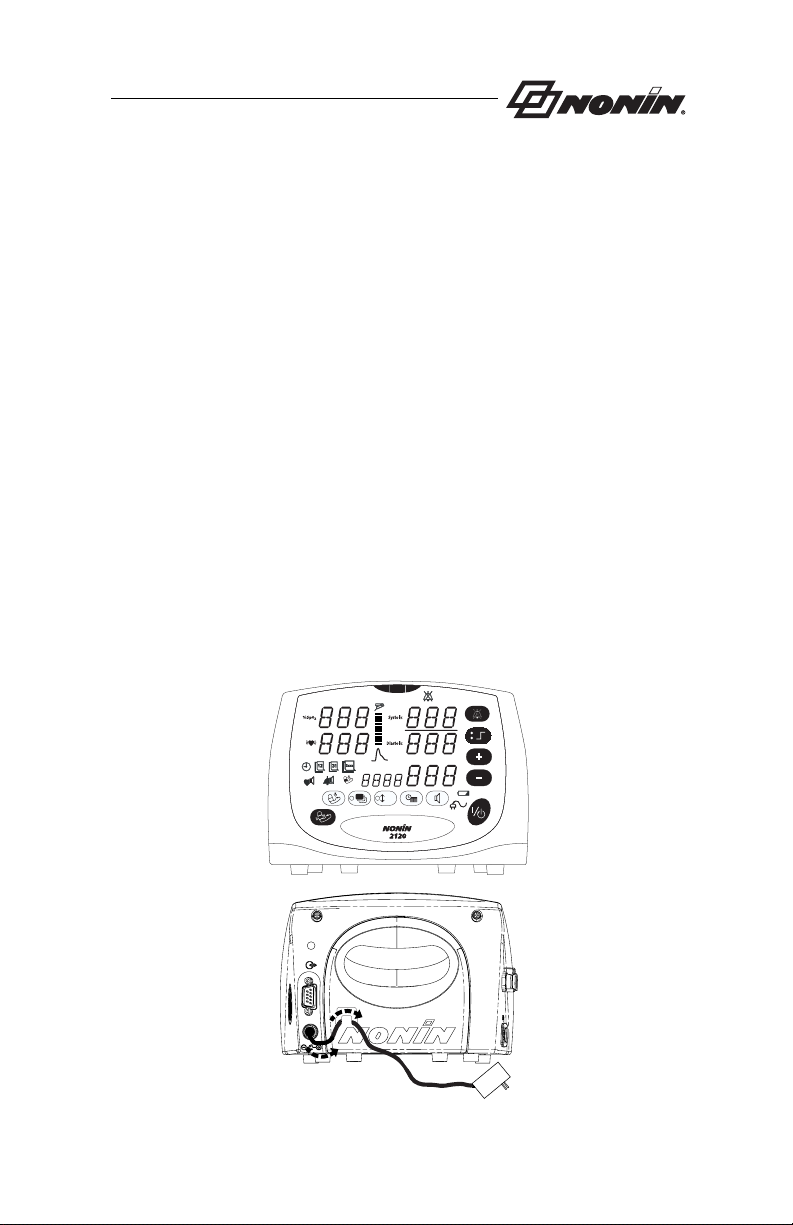
Displays, Indicators, and Controls
This section describes the Avant 2120’s displays, indicators, and controls.
Avant 2120 Parameter Displays
%SpO
Display
2
Numeric light-emitting diodes (LEDs) on the upper left-hand corner of the Avant 2120
display blood oxygen saturation in percent.
Pulse Rate Display
The pulse rate display is the lower numeric display on the upper left-hand corner of the
Avant 2120 (identified by the symbol). This 3-digit LED display shows the pulse
rate in beats per minute.
Systolic Pressure Display
The systolic display is a 3-digit LED display near the upper right-hand corner of the
Avant 2120. The Systolic number displayed represents the blood pressure in mmHg
during contraction of the ventricles.
Diastolic Pressure Display
The diastolic display is a 3-digit LED display in the middle right-hand side of the
Avant 2120. The Diastolic number displayed represents the blood pressure in
mmHg when the ventricles are relaxed.
MAP (Mean Arterial Pressure) Display
The MAP display is a 3-digit LED display near the middle right-hand side of the
Avant 2120. The MAP number displayed is a calculated value in mmHg, based on
measurements of systolic and diastolic pressure:
MAP = 2/3 diastolic + 1/3 systolic
Numeric LEDs
Numeric LEDs appear for SpO2, Pulse Rate, and blood pressure data, and
for time and date displays, cuff pressure, volume, and NIBP history review.
There are five 3-digit multicolor numeric LEDs on the Avant 2120. They
are used for SpO
conditions, these LEDs are displayed in green. For high priority (patient)
alarms, the values are displayed in red, blinking fast. For medium priority
(equipment) alarms, the values are displayed in amber, blinking slowly.
There is a four-digit, green, numeric LED on the Avant 2120 as well. It is
used primarily to display date and time information, adjust volumes, adjust
the auto NIBP cycle time, and set the initial NIBP cuff pressure.
pulse rate, and blood pressure displays. Under normal
2,
8
Page 12

Indicators and Icons
Pulse Oximeter Sensor LED
The Pulse Oximeter Sensor LED indicates when a sensor has become
disconnected, has failed, or has not been applied correctly.
Pulse Strength Bargraph LED
This 10-segment multicolor bargraph indicates pulse strength as
determined by the oximeter. The bargraph changes color based upon
the strength of the pulse. The color and height of the Pulse Strength
Bargraph is proportional to the pulse amplitude. For a low pulse
amplitude, the unit goes into High Priority Alarm mode.
Green = a good pulse strength
Amber = a marginal pulse strength
Red = a low pulse strength, high priority alarm
The Pulse Strength Bargraph LED also indicates the battery charge
percentage in 10% increments in green, displaying the depleted
portion of the bargraph in amber.
Pulse Quality LED
This LED blinks to indicate a poor pulse quality. If there is a sustained
series of poor pulses, the Pulse LED will illuminate solid.
Pulse Volume LED
This amber LED indicates that the unit is in Pulse Volume Program
mode. When this LED is lit, pulse volume can be adjusted using the
Plus (+) and Minus (-) buttons on the front panel. The highest volume
is 15, and the lowest volume is 0. The default volume level is 4. The
Avant 2120 beeps while pulse volume is being changed, showing the
volume progression as it is adjusted.
Auto NIBP Mode LED
This multicolor LED indicates that the unit is in Auto NIBP mode
when it is lit green. When lit amber, this LED indicates that the unit is
in Auto NIBP Cycle Time Program mode. The cycle time can be
adjusted using the Plus (+) and Minus (-) buttons.
Keypad Round LED Indicators
Keypad round LED indicators display whether or not the Avant 2120
is functioning in certain modes (NIBP History Display mode or Initial
mmHg
Cuff Pressure Display/Modify mode).
9
Page 13

Using the Avant 2120
Battery LED
This amber LED indicates a marginal battery capacity by blinking in
sync with the Main Alarm LED indicator. In addition, this LED—
when lit solid—indicates that the battery capacity is being displayed.
This LED does not indicate that the Avant 2120 is running on battery power.
AC Power Adapter LED
This green LED is displayed when an external power supply is
providing power to the Avant 2120.
Alarm Silence LED
This amber LED indicates that the audible alarm is temporarily
silenced when it blinks. When lit solid, the Alarm Silence LED
indicates that the audible alarm volume is set to zero.
Main Alarm LED
The Main Alarm LED indicates visible alarm conditions. It indicates
high priority (via red color blinking fast) or medium priority (via amber
color blinking slowly) alarm conditions.
Alarm Volume LED
This amber LED indicates that the unit is in Alarm Volume Program
mode. When this button is illuminated, the alarm volume can be
adjusted by using the Plus (+) and Minus (-) buttons on the front panel.
The highest volume is 15, and lowest volume is 8. The default volume
level is 8. If DIP switch 2 is moved to the UP position, then the alarm
volume can be adjusted to zero.
10
Time, Month, Day, and Year LEDs
These amber LEDs indicate that the Avant 2120’s Time, Month, Day, or
Ye ar displays can be reviewed or adjusted using the Plus (+) and Minus
(-) buttons.
Page 14

Avant 2120 Keyboard Buttons
NIBP Button
This button is used to begin or cancel a single blood pressure measurement. While the unit is taking a blood pressure reading, pressing any
button on the front panel will cancel the action and deflate the cuff.
Auto NIBP Cycle Time Button
This button is used to display the automatic blood pressure
measurement cycle time. The Plus (+) and Minus (-) buttons are used
to change the cycle time setting. The unit can be set to start a blood
pressure reading every 1, 2, 3, 5, 10, 15, 30, 45, 60, or 90 minutes after
the previous blood pressure reading is complete. The NIBP timer
begins after the previous blood pressure measurement is completed.
NIBP History Review Button
This button displays previously measured blood pressure values. The
Plus (+) and Minus (-) buttons can be used to scroll through and
display stored NIBP readings. All previous blood pressure values—
including those from previous recording sessions—can be reviewed.
Up to 300 readings can be reviewed using the NIBP History Review
button. No readings are lost when the unit is put into Standby mode;
however, only the most recent 300 readings can be retrieved. Readings
from previous sessions are indicated with a blinking time stamp.
Initial Cuff Pressure Button
mmHg
This button displays the initial cuff inflation pressure, i.e., the amount
of pressure to which the cuff initially inflates to begin to obtain a
reading. The inflation pressure will readjust, based on the patient’s
previous blood pressure. The initial cuff pressure can be changed
using the Plus (+) and Minus (-) buttons. Initial cuff pressure can be
set to 120, 140, 160, 180, 200, 220, or 240 mmHg.
ON/STANDBY Button
This button toggles the Avant 2120 between ON and STANDBY
modes. Pressing this button once turns on the Avant 2120. Pressing
and holding this button for at least 1 second turns off the Avant 2120.
Briefly pressing this button while the unit is on displays the battery
capacity percentage, in 10% increments, for four seconds in green. It
displays the remainder of the bargraph in amber. If the ON/
STANDBY button is pressed again, the battery capacity display exits.
Otherwise, the battery capacity display will exit after four seconds.
11
Page 15

Using the Avant 2120
Alarm Silence Button
This button toggles the alarm between silenced and audible. Pressing
the Alarm Silence button silences all alarms for two minutes. In
addition, pressing and holding this button for two seconds clears all
NIBP high and medium priority alarms (including any displayed NIBP
data).
Limits Button
This button displays the upper and lower limits for alarm indications
for SpO2, heart rate, systolic, diastolic, and MAP measurements. These
limits can be adjusted using the Plus (+) and Minus (-) buttons.
The upper LED on the Limits button indicates that the upper alarm
limit is being displayed, and the lower LED indicates that the lower
alarm limit is being displayed.
The limit values are displayed in amber within the appropriate 3-digit
numeric display. (For example, the limits for %SpO2 are displayed
within the %SpO2 numeric display.)
Plus and Minus Buttons
These buttons adjust values for many Avant 2120 functions. The Plus
and Minus buttons are used to adjust timing of automatic blood
pressure readings, initial cuff pressure, time, date, volume, and upper
and lower alarm limits. These buttons are also used to scroll through
the NIBP history.
Pressing this button alone, when the Avant 2120 is not in any program
mode, adjusts the intensity of the LED displays.
12
Time/Date Button
This button displays the time and date. In US mode, pressing the
button toggles the user through the year, month, day, hour, and
minute, which can be set using the Plus (+) and Minus (-) buttons.
Placing DIP switch 3 in the UP position allows users to view and set
the time and date in International mode.
Volume Button
This button displays the pulse volume and alarm volume, depending
upon which corresponding LED is illuminated. The pulse and alarm
volumes can be adjusted using the Plus (+) and Minus (-) buttons.
Page 16

Taking %SpO2 Measurements
The 2120’s NIBP and %SpO2 functions can be used separately or simultaneously.
To take % S p O2 measurements with the 2120, ensure that the unit is on with the
sensor connected. Apply the sensor, following the instructions on the respective
sensor instructional insert. SpO
the %SpO2 and Pulse Rate display areas.
and pulse rate measurements will be displayed in
2
Taking Blood Pressure Measurements
This section describes how to take blood pressure readings with the Avant 2120.
NOTE: If an accurate NIBP reading cannot be achieved, the Avant 2120’s
cuff will begin to reinflate, attempting a second blood pressure
measurement. If the cuff does not automatically reinflate, restart
the blood pressure reading, and/or adjust the cuff position as
necessary. The device will time out two minutes after a reading
cannot be determined.
Inaccurate NIBP measurements can result from many sources, but users can take
precautions to ensure that the Avant 2120 operates efficiently. Blood pressure
readings might be compromised if patient motion is excessive, if an inappropriate
cuff size is being used, if the cuff is positioned improperly, or if the patient has a
restricted blood flow.
If inaccurate blood pressure measurements are suspected, ensure that the arm cuff
is positioned properly and that the Avant 2120 has been properly calibrated.
NIBP Cuff Selection
In order to guarantee accurate readings, the appropriate cuff size must be selected
for each patient.
CAUTION! Use only Nonin-supplied blood pressure cuffs and hoses
with the Avant 2120. Using other cuffs might result in
inaccurate readings or inability to operate the Avant 2120.
Small Adult BP Cuff 18-26 cm arm circumference
Standard Adult BP Cuff 26-35 cm arm circumference
Large Adult BP Cuff 32-42 cm arm circumference
13
Page 17
Using the Avant 2120
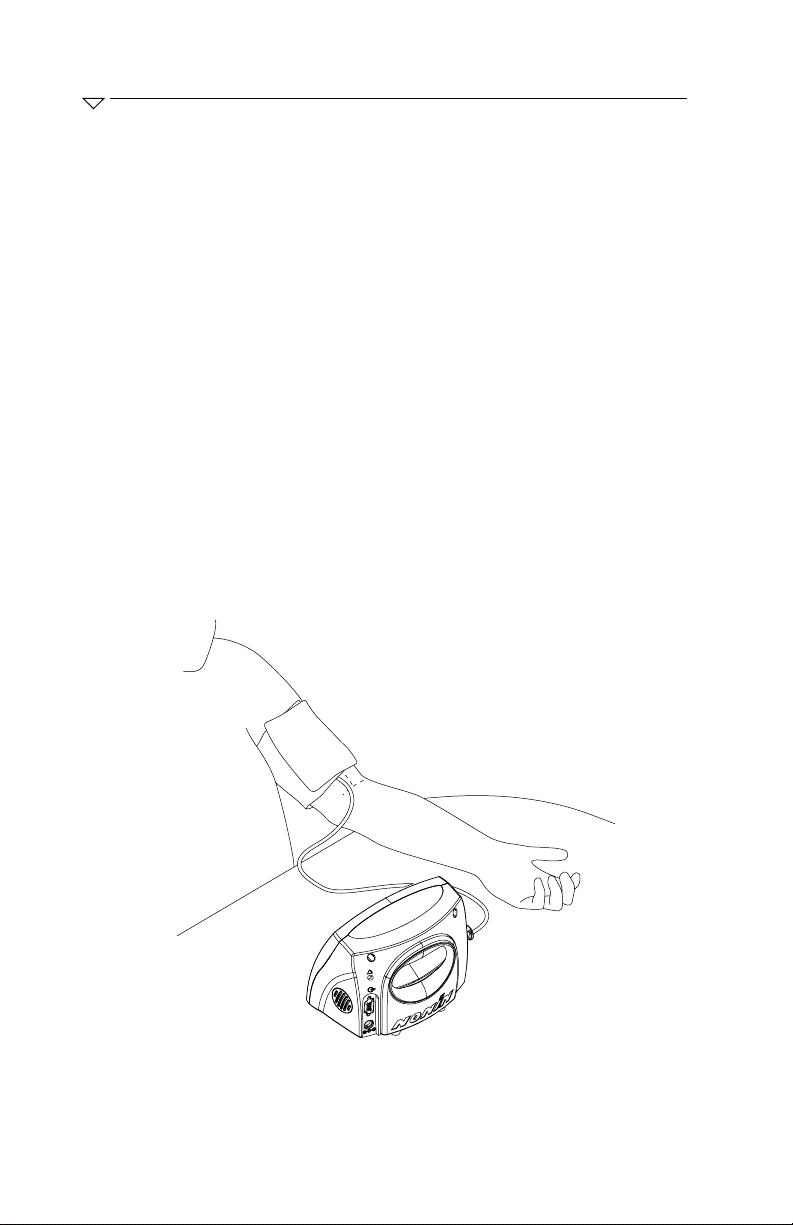
NIBP Cuff Placement
Cuffs can be carefully placed on either the right or left arm. Apply the cuff around
the bicep slightly above the elbow, so that the inflation bladder is centered over the
brachial artery (the inflation bladder is approximately half of the entire length of the
cuff). Do not apply the blood pressure cuff to an arm encumbered with an IV. The
patient’s arm should be resting comfortably, preferably at a level that is parallel to his
or her heart, with the arm adjusted so that the palm is positioned upward.
If a comfortable fit is difficult to achieve, a different cuff size might be required.
Refer to the circumference size in centimeters, which is printed on the cuff label.
Blood pressure arm cuffs should be applied directly to the patient’s skin. Applying cuffs over shirt
sleeves or other materials could affect the accuracy of blood pressure readings.
Patients should maintain a relaxed position with feet flat on the floor (if sitting).
Opposite limbs should be used for the blood pressure arm cuff and the finger clip
sensor.
WARNING! In order to achieve accurate results—and for important
safety reasons—the blood pressure cuff must only be placed
on the patient’s arm.
14
Proper Cuff Placement.
Page 18

Use the following procedure to take blood pressure measurements with the Avant
2120.
NOTE: The NIBP unit can be used without the oximeter. If the unit is
turned on without an oximeter sensor, the oximeter will be
disabled and the SpO
display will remain blank. Plugging in the
2
oximeter sensor at any time will enable the oximeter.
1. Ensure that the Avant 2120 is on and functioning properly.
2. Connect the blood pressure arm cuff and pulse oximeter sensor to the Avant
2120.
• To plug in the blood pressure arm cuff, insert the cuff ’s hose connector
just above the %SpO
connector on the left side of the unit.
2
• To plug in the pulse oximeter sensor, insert the connector in the %SpO
connector on the left side of the unit, with the NONIN logo facing up.
2
%Sp0
2
Connecting the finger clip sensor.
15
Page 19

Using the Avant 2120
3. Carefully place the blood pressure arm cuff around the patient’s bicep.
NOTE: Blood pressure cuffs can be placed on either the right or left
arm, but accurate readings depend upon using opposite limbs
for the finger clip sensor and blood pressure cuff.
4. Place the finger clip sensor on the patient’s finger. While the sensor is in
place, do not press it against any surface and do not squeeze or hold it
together. The correct amount of pressure will automatically be applied.
Additional pressure might cause incorrect readings.
5. When the patient is ready, press the NIBP button to begin a single blood
pressure measurement. The arm cuff will begin inflating, and the cuff
pressure value will appear in the Time LED area on the front panel display.
6. Wait for the reading to be completed. When the reading is complete, the
Systolic, Diastolic, and MAP numeric LEDs will illuminate—providing the
results for blood pressure. If there is no pulse rate value measured from the
oximeter sensor, the pulse rate value from the NIBP will illuminate.
NOTE: If the finger clip sensor is not worn while blood pressure is
measured, the Avant 2120 will display heart rate information
as measured from the blood pressure arm cuff; however, no
data will be displayed. When the finger clip sensor is
%SpO
2
worn, the %SpO2 and heart rate data are displayed based
upon readings only from the finger clip sensor—not the blood
pressure reading.
NOTE: If a blood pressure reading must be cancelled for any reason,
simply press any button on the front panel—except the Alarm
Silence button—to stop the reading and deflate the cuff.
Pressing the Alarm Silence button will not cancel blood
pressure readings.
Automatic and Demand NIBP Measurements
The Auto NIBP Cycle Time button is used to begin or end timed blood pressure
measurements and display the Auto NIBP Cycle time, which can be adjusted using
the Plus (+) and Minus (-) buttons. Blood pressure readings can be started every
1, 2, 3, 5, 10, 15, 30, 45, 60, or 90 minutes after the previous reading. The NIBP timer
begins after the previous blood pressure measurement is completed.
Automatic NIBP measurements are useful in many circumstances. They are
especially appropriate when continuous spot-checking of patients is desired or to
determine fluctuations in blood pressure over periods of time.
Demand NIBP measurements are single-time measurements taken by pressing the
NIBP button on the Avant 2120. They are useful for individual readings and when
long-term spot-checking is unnecessary.
16
Page 20

Calibrating Blood Pressure on the Avant 2120
Use the following procedure to calibrate blood pressure on the Avant 2120.
Calibration should be performed after every 10,000 inflations or once per year.
Calibration should only be performed by qualified personnel.
Suggested Equipment:
•Mercury Manometer
•Pneumatic T-Adapter
•Pressure Bulb
1. With the unit turned off, connect a mercury manometer and pressure bulb to
the Avant 2120 using a T-adapter.
2. Using the tip of a screwdriver or other similar device, place DIP switch 1 in
the UP position.
3. Turn on the Avant 2120. A CAL message is displayed in the Systolic display
window, acknowledging that the Avant 2120 is in Calibration mode.
4. Wait for a green “0” to appear in the Diastolic LED display window.
5. Ensure that the pressure on the manometer is zero. This will ensure that there
is no pressure difference at the pressure transducer and outside the unit.
6. Press the NIBP button. A countdown will begin, followed by “250” in the
Diastolic display. This “250” prompt indicates the pressure required from the
manometer.
7. Using the pressure bulb, apply exactly 250 mmHg to the Avant 2120.
8. Press the NIBP button to calibrate the device at 250 mmHg. The Avant 2120
is now calibrated and will display a cal dne message.
9. Press the ON/STANDBY button to power down the Avant 2120.
10. Return DIP switch 1 to the DOWN position.
NOTE: The pulse oximeter does not require calibration.
17
Page 21
Using the Avant 2120
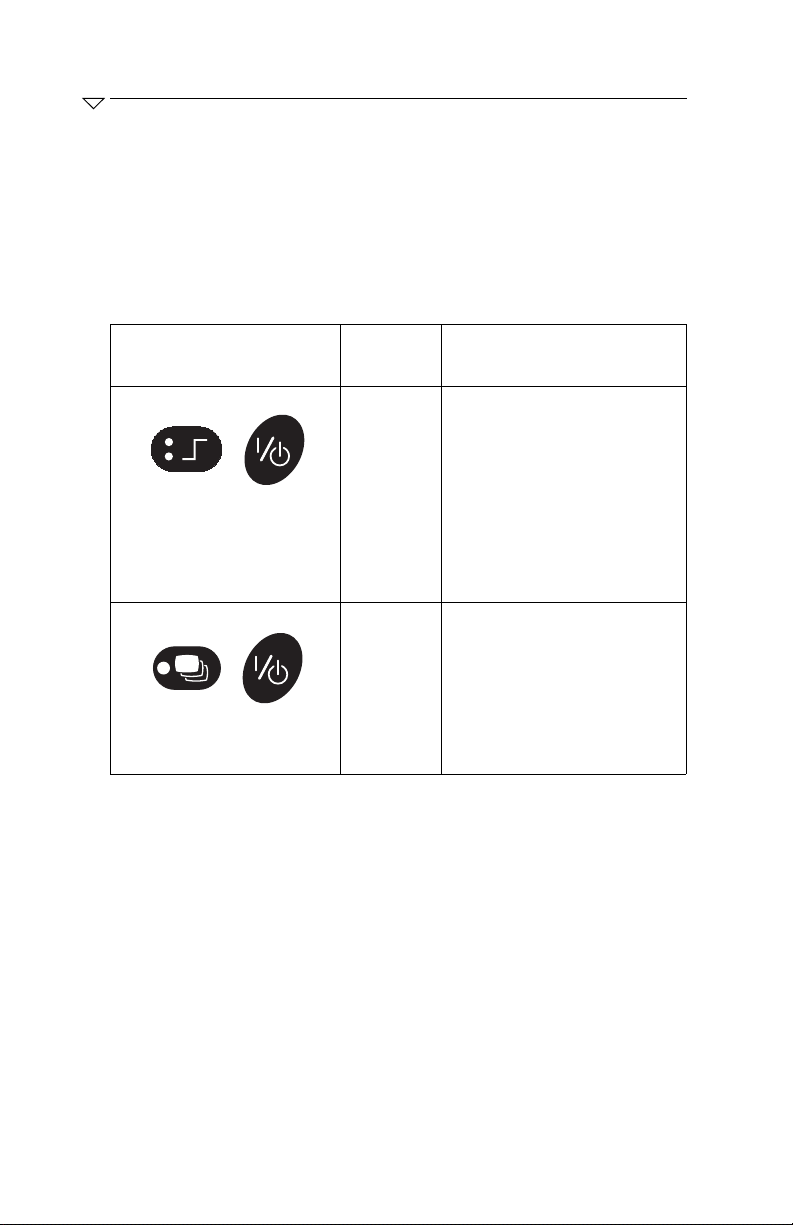
Advanced Features
This section describes the advanced features available on the Avant 2120.
Key Combinations
The Avant 2120 provides two advanced features that are available by using multiple
key combinations. The unit must be in Standby mode before using either of the
advanced features.
Button Combination Feature
Name
Function
Retain
+
+
NOTE: If the Limits button and NIBP History Review button are both held
while pressing the ON/STANDBY button to power the unit, both
of the above advanced features are invoked.
Previous
UserDefined
Alarm
Limits
Clear
Oximeter
Memory
This feature allows users to
retain the previously set userdefined alarm limits—even after
shutting down the Avant 2120.
To use this feature, hold the
Limits button while pressing the
ON/STANDBY button to
power the unit.
This feature allows users to clear
the oximeter memory. To use
this feature, hold the NIBP
History Review button while
pressing the ON/STANDBY
button to power the unit.
18
Page 22

Avant 2120 DIP Switches
The Avant 2120 contains eight DIP switches. The UP position is toward the top of
the unit, and the DOWN position is toward the bottom of the unit. The DIP
switches are located under the green battery cover on the rear of the unit. A small
Phillips screwdriver must be used to remove the battery cover.
The default for all Avant 2120 DIP switches is the DOWN position.
Switch Function
Switch 1 Up—Calibration Mode
Down—Normal Operation (Default)
Switch 2 Alarm Disable/Minimum Alarm Volume Definition:
See “Silencing Alarms” for more information.
Up—0 dB
Down—45 dB (Default)
Switch 3 Up—International Date Format
Down—USA Date Format (Default)
Switch 8 Up—User-Defined Power On Alarm Limit Defaults
Down—Factory Power On Alarm Limit Defaults
(Default)
CAUTION! Do not place DIP switch 1 in the UP position unless unit
calibration is intended.
5
6
78
3
4
12
Avant 2120 DIP Switches.
19
Page 23

Using the Avant 2120
Printing Quick Reference
Your Avant 2120 features new printing capabilities, allowing you to print on
demand or in real-time. These printing capabilities are controlled by DIP switch
4, which is found under the battery cover at the back of the unit.
• When DIP switch 4 is in the UP position, real-time (once per second) data output
is available via the RS232 connector port, using a null modem cable.
• When DIP switch 4 is in the DOWN position (default), the Print-on-Demand
mode is activated, allowing you to print only when desired.
There are three ways to print when the Avant 2120 is in Print-on-Demand mode:
Print-On-Demand Press Printout
Normal Mode
Prints displayed data.
History Mode
Auto NIBP Mode
Prints displayed history data.
Prints displayed data and will automatically print all new displayed data
upon completion of NIBP reading.
Important Notes
• Event markers are not available in Print-On-Demand mode.
• Data must be allowed to finish printing before entering History Review
mode.
• When there is invalid NIBP data, “BP=Error” will print in place of
“SYS=XXX DIA=XXX MAP=XXX” for all Print-On-Demand formats.
• Valid SpO
printer output and on the display—in the event of an NIBP error code.
• Print functions are available only with a 9600 baud serial ASCII printer.
• The Avant 2120 has a Memory Playback feature, allowing stored data to
be
transferred to NONIN’s nVISION® software for analysis. Printing fea-
tures are not available during memory playback.
and heart rate data will continue to be displayed—both on the
2
20
Page 24

Care and Maintenance
The advanced digital circuitry within the pulse oximeter of the Avant 2120 requires
no calibration or periodic maintenance other than battery replacement. The NIBP
module requires calibration after every 10,000 inflations or once each year.
Field repair of the Avant 2120 circuitry is not possible. Do not attempt to open the
Avant 2120 case or repair the electronics. Opening the case will damage the Avant
2120 and void the warranty. If the Avant 2120 is not functioning properly, see
“Troubleshooting.”
Cleaning the Avant 2120
Clean the Avant 2120 separately from its associated sensors. For instructions
regarding cleaning pulse oximeter sensors, refer to the appropriate pulse oximeter
sensor package inserts.
Clean the Avant 2120 with a soft cloth dampened with isopropyl alcohol. Do not
pour or spray any liquids onto the Avant 2120, and do not allow any liquid to enter
any openings in the device. Allow the Avant 2120 to dry thoroughly before reuse.
Cleaning the Blood Pressure Arm Cuff
To clean the blood pressure arm cuff, simply wipe the cuff with a soft cloth
dampened with isopropyl alcohol. Do not pour or spray any liquids onto the arm
cuff, and allow the cuff to dry thoroughly before reusing it.
21
Page 25

Alarms and Limits
Alarms and Limits
This chapter describes the alarms, limits, and error codes for the Avant 2120.
Alarms
The Avant 2120 provides a variety of audible and visual alarms, which are either high
or medium priority. It also provides informational tones.
High Priority Alarms
High priority alarms are those that require immediate attention to the patient. On
the Avant 2120, high priority alarms are indicated with rapidly blinking red LED
displays when alarm limits are met or exceeded. In addition, the pulse strength
bargraph LED may illuminate a red segment to indicate low perfusion.
High priority alarms are sounded as follows: “beep, beep, beep,” (short pause),
“beep, beep” (10-second pause).
Medium Priority Alarms
Medium priority alarms are those that signal potential problems with the equipment
or other non-life-threatening situations. On the Avant 2120, medium priority alarms
are indicated with slowly blinking amber displays.
Medium priority alarms are illuminated amber on the Main Alarm LED and on the
appropriate indicator(s) or numeric displays, sometimes displaying an error code to
help the user identify the source of the error. Use the “Error Codes” table to
identify error codes that might appear on the Avant 2120 front panel. All error codes
are displayed in the MAP display area.
Medium priority alarms are sounded as follows: “beep, beep, beep,” (25-second
pause), “beep, beep, beep.”
Watchdog Alarm
Watchdog alarms are loud, two-tone, steadily beeping signals that indicate a
hardware or software malfunction. When a watchdog alarm is activated, it can be
cleared by shutting down the Avant 2120 (press and hold the ON/STANDBY
button for one second). If the watchdog alarm cannot be cleared, contact NONIN
Customer Support.
Informational Tones
Informational tones communicate important information. They are typically single
“beeps” or a series of three “beeps.” Informational tones include the startup/
initialization tone and the pulse rate tone (which changes in pitch with SpO
values).
2
22
Page 26

Error Codes
The Avant 2120 includes various error codes to indicate potential problems with the
unit. The following table describes the error codes present on the Avant 2120.
Error Codes
CAN NIBP Module, User Cancelled: NIBP module was cancelled from
taking blood pressure reading.
E00 System Error: Retry reading. If reading is not possible, then cycle
power and retry. Calibration may be required. Call NONIN Customer
Support if error persists.
E01 NIBP Module, Bad Signals: NIBP module cannot complete
reading. Failure could be due to patient’s blood pressure falling outside
module’s range. Check patient, air hose connection, and cuff
application.
E02 NIBP Module, Overpressure: Overpressure condition occurred.
E03 NIBP Module, Air Leak: Check hose and cuff for damage or air
leaks.
E04 NIBP Module, Blockage in Line: Check hose for kinks or blockage.
Check NIBP module for any obstructing materials.
E05 NIBP Module, Safety Timer Timeout: Allowed time expired
before reading was complete, or system remained in test mode for
more than three minutes.
E06 NIBP Module, Gross Movement: Check patient, reduce motion.
E07 NIBP Module, Transducer Out of Range: Zero calibration drifted
beyond range of automatic zero circuit. Module pressure transducer
may need recalibration.
E10 NIBP Module, Calibration Data Invalid
E11 NIBP Module, ADC Hardware Failure
E13 NIBP Module, Pressure Calibration Failed: Module unable to
reset pressure calibration data.
E17 Undefined NIBP Error
E19 NIBP Module, No Communication: No data from NIBP module.
E31 Sound Error: Channel 1 Failure
E32 Sound Error: Channel 2 Failure
E33 Sound Error: Both Channels Failure
E34 Sound Error: Amplifier Failure
E35 Sound Error: Channel 1 Failure, Amplifier Failure
E36 Sound Error: Channel 2 Failure, Amplifier Failure
E37 Sound Error: Channel 1 Failure, Channel 2 Failure, Amplifier Failure
23
Page 27

Alarms and Limits
Error Codes
E38 Sound Error: Speaker Failure
E39 Sound Error: Channel 1 Failure, Speaker Failure
E40 Sound Error: Speaker Failure, Channel 2 Failure
E41 Sound Error: Channel 1 Failure, Channel 2 Failure, Speaker Failure
E42 Sound Error: Speaker Failure, Amplifier Failure
E43 Sound Error: Channel 1 Failure, Speaker Failure, Amplifier Failure
E44 Sound Error: Speaker Failure, Channel 2 Failure, Amplifier Failure
E45 Sound Error: Channel 1 Failure, Channel 2 Failure, Speaker Failure,
Amplifier Failure
E51 Sound Module, Communication Failure: No SPI communication
from sound module to display board microcontroller.
E52 SCI Communication Error: SCI communication problem. Too
many overrun, checksum, and/or sync errors.
E53 External Memory Failure: External (patient data) memory failed
test.
Alarm Summary
If patient readings are equal to or above the upper alarm limit, or if they are equal to
or below the lower alarm limit, the Avant 2120 will signal a high priority alarm.
Alarm Description Adjustment Range Default
Upper Alarm Limit Off, 80 to 100 by 1% Off
SpO
2
SpO
Lower Alarm Limit Off, 50 to 95 by 1% 80%
2
Pulse Upper Alarm Limit Off, 75 to 275 by 5 BPM 200 BPM
Pulse Lower Alarm Limit Off, 30 to 110 by 5 BPM 50 BPM
Systolic Upper Alarm Limit Off, 75 to 240 by 5 mmHg 200 mmHg
Systolic Lower Alarm Limit Off, 50 to 150 by 5 mmHg 60 mmHg
Diastolic Upper Alarm Limit Off, 50 to 180 by 5 mmHg 120 mmHg
Diastolic Lower Alarm Limit Off, 25 to 125 by 5 mmHg 30 mmHg
MAP Upper Alarm Limit Off, 70 to 200 by 5 mmHg 150 mmHg
MAP Lower Alarm Limit Off, 25 to 125 by 5 mmHg 50 mmHg
24
Page 28

Setting and Changing Volume and Alarm Limits
IMPORTANT! The Avant 2120 alarm limits automatically reset themselves
to default values each time the unit is powered up. To retain
previously adjusted alarm limits, hold the Limits button
while powering up the Avant 2120.
Setting or Changing SpO2 and or Pulse Alarm Limits
Use the following procedure to set or change the SpO2 or pulse alarm limits.
1. Ensure that the Avant 2120 is on and functioning properly.
2. Press the Limits button. The upper amber LED is illuminated on the Limits
button, and OFF (if the default value) is displayed in the %SpO
3. Use the Plus (+) and Minus (-) buttons to adjust the upper SpO
desired value.
4. When the desired upper alarm limit is displayed, press the Limits button to set the
next alarm limit (SpO
exit the Set/Change Alarm Limits mode. (The Set/Change Alarm Limits mode
exits automatically after ten seconds with no activity.)
Lower Alarm Limit), or press the Limits button 10 times to
2
Setting or Changing Systolic, Diastolic, and MAP Alarm Limits
Use the following procedure to set or change the systolic, diastolic, or MAP alarm limits.
1. Ensure that the Avant 2120 is on and functioning properly.
2. Press the Limits button five times. The upper amber LED is illuminated on the
Limits button, and 200 (if the default value) is displayed in the Systolic display.
3. Use the Plus (+) and Minus (-) buttons to adjust the systolic upper alarm limit to
the desired value.
4. When the desired upper alarm limit is displayed, press the Limits button to set the
next alarm limit (Systolic Lower Alarm Limit), or press the Limits button six times
to exit the Set/Change Alarm Limits mode. (The Set/Change Alarm Limits mode
exits automatically after ten seconds with no activity.)
display.
2
limit to the
2
Setting or Changing Alarm and Pulse Volumes
Use the following procedure to set or change the alarm or pulse volumes.
1. Ensure that the Avant 2120 is on and functioning properly.
2. Press the Volume button. The Alarm Volume LED illuminates and 08 (if the
default value) appears on the display screen.
3. Use the Plus (+) and Minus (-) buttons to adjust the alarm volume to the desired
level. (The Alarm Volume ranges from 08-15.)
4. When the desired alarm volume is displayed, either press the Volume button once
to set the next variable (Pulse Volume), press the Volume button twice to exit Set/
Change Alarm Volume mode, or simply wait 10 seconds to automatically exit Set/
Change Alarm Volume mode.
25
Page 29

Alarms and Limits
Silencing Alarms
To silence alarms for two minutes, press the Alarm Silence button.
In order to permanently silence all alarms, DIP switch 2 must be placed in the UP
position. This allows the Alarm Volume to be set to zero. The Alarm Silence LED will
remain illuminated when the alarm volume is set to zero.
Setting and Changing NIBP Settings
This section describes how to set and change NIBP settings on the Avant 2120.
Setting or Changing Automatic NIBP Cycle Time
Use the following procedure to set or change the automatic NIBP cycle time.
1. Ensure that the Avant 2120 is on and functioning properly.
2. Press the Automatic NIBP Cycle Time button. The Auto NIBP LED
illuminates and OFF (if the default value) appears on the display screen.
3. Use the Plus (+) and Minus (-) buttons to adjust the automatic NIBP cycle
time to the desired interval in minutes.
4. When the desired cycle time is displayed, either press the Automatic NIBP
Cycle Time button once to exit NIBP Cycle Time mode, or simply wait 10
seconds to automatically exit NIBP Cycle Time mode.
Setting or Changing Initial NIBP Cuff Inflation Pressure
Use the following procedure to set or change the initial NIBP cuff inflation pressure.
1. Ensure that the Avant 2120 is on and functioning properly.
2. Press the Initial Cuff Pressure button. The default cuff pressure (typically 160)
appears as an LED display.
3. Press the Plus (+) and Minus (-) buttons to adjust the initial NIBP cuff
inflation pressure to the desired level. Users may select initial pressures of 120,
140, 160, 180, 200, 220, or 240.
4. When the desired inflation pressure is displayed, either press the Initial Cuff
Pressure button once to exit NIBP Cycle Time mode, or simply wait 10
seconds to automatically exit NIBP Cuff Inflation Pressure mode.
26
Page 30

Communication
Memory Features
The Avant 2120 can collect and store up to 33.5 hours of SpO2 and pulse rate
information.
Data may be played back with data retrieval software (NONIN’s nVISION™
software is recommended). If you wish to create your own software, contact
NONIN for the data format.
NOTE: Only SpO
The memory in the Avant 2120 functions much like an “endless loop” tape. When
the memory fills up, the unit begins overwriting the oldest data with the new data.
Each time the Avant 2120 is turned on, the current time/date information (if the
clock is set properly) is stored in memory, starting a new recording session. Only
recording sessions greater than one minute in length are stored in memory.
Patient SpO
extreme value of the 4-second sample period is stored. Oxygen saturation values are
stored in 1% increments in the range of 0 to 100%.
The stored pulse rate ranges from 18 to 300 pulses per minute. The stored values
are in increments of one pulse per minute in the interval from 18 to 200 pulses per
minute, and in increments of 2 pulses per minute in the interval from 201 to 300
pulses per minute.
and pulse rate are sampled every 2 seconds. Every 4 seconds, the
2
and pulse rate data are available for data retrieval.
2
27
Page 31

Communication
Using the Avant 2120 with nVISION™ Software
The Avant 2120 has a Memory Playback feature, allowing stored data to be
transferred to NONIN’s nVISION™ software for analysis. Use the following
procedure to use the Avant 2120 with nVISION™ software.
1. With the unit off, connect the RS-232 connector port of the Avant 2120 to
the back of your computer using a null modem cable.
2. With the Avant 2120 still off, press and hold the NIBP History Review button
while pressing the ON/STANDBY button. All LEDs will illuminate briefly.
“PLy” will appear in the SpO
the Systolic display area. This message signals that the Avant 2120 is now in
Playback mode.
3. The “PLy bAC” message will disappear after a few seconds, signalling that
the memory playback is complete. Larger files might take several minutes
before memory playback is complete. Pressing the ON/STANDBY button
will exit Playback mode.
4. A “CLr no” message will be displayed, and three informational tones will
sound.
• Use the Plus (+) and/or Minus (-) buttons to toggle between
“YES” and “no” on the Systolic display window.
5. Press the ON/STANDBY button when the desired Memory Clear selection
is made.
• If selecting “no,” pressing the ON/STANDBY button exits Play-
back mode, and normal Avant 2120 operation continues.
• If selecting “YES,” pressing the ON/STANDBY button displays
a “dEL” message in the %SpO
sage in the Systolic display window. Use the Plus (+) and/or Minus
(-) buttons to toggle between “YES” and “no” on the Systolic
display window.
CAUTION: Selecting YES from the “dEL” window will
permanently delete the Avant 2120’s memory.
6. If YES is selected, a “dnE CLr” message appears when patient data is
clear. Press the ON/STANDBY button to return to normal operation.
7. Follow the instructions in nVision™ to capture and analyze the data.
LED display area, and “bAC” will appear in
2
display window and a “no” mes-
2
NOTE: Patient oximetry and NIBP data are cleared simultaneously in
Playback mode.
28
Page 32

Real-Time Patient Data Output
The Avant 2120 provides real-time data output capability via the RS232 connector
port. A null modem cable must be connected from the Avant 2120 to the receiving
computer.
RS232
Connector
Port
The information from the Avant 2120 in the real-time mode is sent in an ASCII
serial format at 9600 baud with 9 data bits, 1 start bit, and 1 stop bit. The data are
output at a rate of once per second (on separate lines).
Real-time data may be printed or displayed by devices other than the pulse oximeter.
Upon power up, a header is sent identifying the format and the time and date.
Thereafter, the data are sent once per second by the Avant 2120 in the following
format:
SPO2=XXX HR=YYY
When NIBP data are displayed, the following format will appear:
SPO2=XXX HR=YYY SYS=SSS DIA=DDD MAP=MMM
where XXX is the SpO2 value, YYY is the heart rate value, SSS is the systolic value,
DDD is the diastolic value, and MMM is the MAP value. Essentially, whenever
NIBP data are available from the Avant 2120, that data will be displayed.
If there are no data from the oximeter, the formats will appear as follows:
SPO2=--- HR=--SPO2=--- HR=YYY SYS=SSS DIA=DDD MAP=MMM
The Avant 2120 includes an event marker feature. Events are indicated by a single
“*” whenever ON/STANDBY is pressed to go into Battery Capacity Display
mode. (ON/STANDBY may be pressed again to exit, or Battery Capacity Display
mode will time out after approximately 10 seconds.) This feature can be used to
mark exceeded alarm limits, or in other situations as desired.
SPO2=XXX HR=YYY*
SPO2=XXX HR=YYY SYS=SSS DIA=DDD MAP=MMM*
29
Page 33

Specifications
Specifications
OXIMETER
Oxygen Saturation Range
(%SpO
)
2
Pulse Rate Range
Displays
Numeric Displays
Pulse Indicator
Accuracy
Blood Oxygen Saturation
(%SpO
) (± 1 S.D.)
2
Pulse Rate
Measurement Wavelengths and Output Power
Red
Infrared
Altitude
Operating Altitude
Hyperbaric Pressure
0% to 100%
18 to 300 pulses per minute
3-digit LEDs, Tricolor (red, green, amber)
Amber LED
70% to 100% ± 2 digits
a
± 3%
660 nanometers @ 3 mw nominal
910 nanometers @ 3 mw nominal
Up to 40,000 feet
Up to 4 atmospheres
NIBP
Method of Measurement
Blood Pressure Range
Pressure Transducer Accuracy
Recommended Frequency of
Pressure Transducer
Calibration
Pulse Rate Range (displayed if
there is no value from the
oximeter)
Blood Pressure Altitude
30
Oscillometric
Systolic: 40 mmHg to 260 mmHg
Diastolic: 25 mmHg to 200 mmHg
MAP = 1/3 Systolic + 2/3 Diastolic
±3 mmHg between 0 mmHg and 300 mmHg for
operating conditions between 0°C and 50°C.
(S.D. of 8 mmHg)
The Pressure Transducer calibration should be
verified yearly or every 10,000 readings,
whichever comes first.
to 200 pulses per minute
-170 to 1700 m
Page 34

SYSTEM
Temperature
Operating
Storage/Transportation
Humidity
Operating
Storage/Transportation
Power Requirements
Mains
DC Input
Internal Power
Battery
Operating Life
Storage Life
Recharge Time
Dimensions
Weight
Classifications per IEC 60601- 1 / CSA601.1 / UL2601-1
Type of Protection
+32° to +122°F (+0° to +50°C)
-22° to +122°F (-30° to +50°C)
10% to 90% noncondensing
10% to 95% noncondensing
100-240 VAC 50-60 Hz
12 VDC 1.5A AC adapter
7.2 volt battery pack (6 cells)
minimum 5 hours of continuous operation
18 days
4 hours with unit off
11.4 x 19.0 x 13.8 cm
45.3 oz with batteries
Class I (when on AC power with 300PS-UNIV
battery charger)
Internally powered (on battery power)
Degree of Protection
Type BF-Applied Part (pulse oximeter and
NIBP)
Defibrillator Proof (NIBP only)
Enclosure Degree of
Ingress Protection
Mode of Operation
a. S.D. (Standard Deviation) is a statistical measure; up to 32% of the readings may fall
outside these limits.
IPX0
Continuous
31
Page 35

Parts and Accessories
Parts and Accessories
Model Number Description
AVANTB Battery Pack
2120 Manual Operator’s Manual for the Avant 2120
Simple Cuff—Small Small NIBP Cuff
Simple Cuff—Standard Standard NIBP Cuff
Simple Cuff—Large Large NIBP Cuff
Connect-2 Tubing
UNI-RA-1 40” 90-degree patient cable
UNI-RA-3 120” 90-degree patient cable
UNI-RA-0 7.25” 90-degree patient cable
300PS-UNIV Battery Charger, Universal Desktop With Iec320
Connector
Contact your
distributor or NONIN
for options.
2120 Pole Mount Pole Mount
UNI-RS232 RS-232 Cable
8000AA-1 Adult Articulated Finger Clip Sensor (1 meter)
8000AA-3 Adult Articulated Finger Clip Sensor (3 meters)
8000K2 Adult Finger Clip Sensor
8000AP-1 Pediatric Finger Clip Sensor (1 meter)
8000AP-3 Pediatric Finger Clip Sensor (3 meters)
8000J Adult Flex Sensor
8008J Infant Flex Sensor
8001J Neonatal Flex Sensor
8000Q Ear Clip Sensor
8000R Reflectance Sensor
Cord Set, Charger
.
Pulse Oximeter Reusable Sensors
32
Page 36

Model Number Description
Pulse Oximeter Disposable Sensors
7000A
7000P
7000I
7000N
7000D
Adult Finger Flexi-Form II® Sensor, 10 per box
®
Pediatric Finger Flexi-Form II
Infant Toe Flexi-Form II
Sensor, 10 per box
®
Sensor, 10 per box
Neonatal Foot Flexi-Form II® Sensor, 10 per box
Flexi-Form II® Sensor Assortment Pack, 10 per box
Other Accessories
nVISION nVISION™ software for Microsoft Windows 95/98/
2000/NT 4.0 operating systems
8000JFW Adult FlexiWrap Sensor Wrap
8008JFW Infant FlexiWrap Sensor Wrap
8001JFW Neonatal FlexiWrap Sensor Wrap
8000H Reflectance Sensor Holder System
8000T Sensor Attachment Tape, 100 per box
8500I Patient Extension Cable (1 meter)
8000S Patient Simulator
9440
Finger Phantom
®
Pulse Oximeter Tester
1000MC Memory Cable (for use between the Avant 2120 and a PC
running Microsoft Windows 95/98 operating systems)
1000RTC Real-Time and Memory Cable (for use between the
Avant 2120 and a PC running Microsoft Windows 95/98
operating systems)
For more information about NONIN parts and accessories, contact your
distributor, or contact NONIN at (800) 356-8874 (USA and Canada) or
(763) 553-9968.
33
Page 37

Service, Support, & Warranty
Service, Support, and Warranty
IMPORTANT! The Avant 2120 is a precision electronic instrument and
must be repaired by trained NONIN personnel only.
The Avant 2120 Pulse Oximeter module performs all computations from internal
software stored in microprocessor chips. Thus, there are no critical parts to drift,
and no calibration of the pulse oximeter module is required. The Avant 2120 NIBP
module should be calibrated after every 10,000 checks or once per year, whichever
comes first.
For information about the Avant 2120 and accessories, contact your local sales
representative or distributor. For the sales representative or distributor in your area,
contact NONIN at (800) 356-8874.
A return authorization number is required before returning any product to NONIN.
To obtain this return authorization number, contact NONIN’s Customer Support
Department at:
Nonin Medical, Inc.
2605 Fernbrook Lane North
Plymouth, Minnesota 55447-4755 USA
• (800) 356-8874 (USA and Canada)
• (763) 553-9968 (outside USA and Canada)
• Fax (763) 553-7807
• mail@nonin.com
• www.nonin.com
34
Page 38

Warranty
NONIN MEDICAL, INCORPORATED (NONIN) warrants to the purchaser,
for a period of one year from the date of purchase, each Avant 2120 battery pack,
and for two years from the date of purchase each blood pressure module. NONIN
warrants the pulse oximetry module of the Avant 2120 for a period of three years
from the date of purchase, and the blood pressure cuff for a period of 90 days from
the date of purchase.
NONIN shall repair or replace any Avant 2120 found to be defective in accordance
with this warranty, free of charge, for which NONIN has been notified by the
purchaser by serial number that there is a defect, provided said notification occurs
within the applicable warranty period.
This warranty shall be the sole and exclusive remedy by the purchaser hereunder for
any Avant 2120 delivered to the purchaser that is found to be defective in any
manner, whether such remedies be in contract, tort, or by law.
This war ranty exc lu de s cost of deliv er y t o a nd from NONIN. All repa ired units shall
be received by the purchaser at NONIN's place of business. NONIN reserves the
right to charge a fee for a warranty repair request on any Avant 2120 that is found
to be within specifications.
Avant 2120 is a precision electronic instrument and must be repaired by
knowledgeable and specially trained NONIN personnel only.
Accordingly, any sign or evidence of opening the Avant 2120, field service by
non-NONIN personnel, tampering, or any kind of misuse or abuse of the Avant
2120, shall void the warranty in its entirety. All non-warranty work shall be done
according to NONIN standard rates and charges in effect at the time of delivery to
NONIN.
DISCLAIMER/EXCLUSIVITY OF WARRANTY:
THE EXPRESS WARRANTIES SET FORTH IN THIS MANUAL ARE
EXCLUSIVE, AND NO OTHER WARRANTIES OF ANY KIND, WHETHER
STATUTORY, WRITTEN, ORAL, OR IMPLIED— INCLUDING
WARRANTIES OF FITNESS FOR A PARTICULAR PURPOSE OR
MERCHANTABILITY—SHALL APPLY.
35
Page 39

Troubleshooting
Troubleshooting
Problem Possible Cause Possible Solution
The Model 2120 will
not activate.
The battery pack is
inserted incorrectly.
Check the batteries.
You are unable
to obtain a green
pulse display on the
bargraph.
The batteries are
depleted.
The patient pulse
strength is low.
The pulse oximeter
finger clip sensor is
applied incorrectly.
The finger is perfused
poorly.
The finger is not
positioned correctly.
There is possible
interference from one
of the following
sources:
• arterial catheter
• blood pressure cuff
• electrosurgical
procedure
• infusion line
Plug in the unit to recharge
its batteries, or replace the
batteries and try again.
Reposition the finger or
insert a different finger, and
keep the sensor motionless
for at least 10 seconds.
Apply the sensor correctly.
Reposition the finger, or
insert a different finger and
keep the sensor motionless
for at least 10 seconds.
Warm the application site.
Reposition the finger or
insert a different finger and
keep the sensor motionless
for at least 10 seconds.
Reduce or eliminate any
interference.
36
Page 40

Problem Possible Cause Possible Solution
You are unable
to obtain a green
pulse display on the
bargraph, cont’d.
Circulation is reduced
because of excess
pressure on the sensor
(between the sensor and
a hard surface) after
inserting finger.
Allow the hand to rest
comfortably without
squeezing or pressing the
sensor on a hard surface.
The Pulse Oximeter
Sensor LED
appears.
There is excessive
ambient light.
Avant 2120 is applied to
a polished fingernail or
artificial nail.
The finger is cold. Warm the finger by rubbing
The finger is wet.
The red LED is not
illuminated in the finger
insertion area.
Patient motion is
excessive.
A poor signal from the
finger is being detected.
The finger was removed
from the Avant 2120.
Avant 2120 is not
functioning.
Shield the sensor from the
light source.
Apply the sensor to a finger
without fingernail polish or
an artificial nail.
or covering with a blanket.
Dry the finger and the
sensor’s inner surfaces.
Contact NONIN’s Customer
Support Department.
Reduce patient motion.
Reposition the finger or
insert a different finger and
keep the sensor motionless
for at least 10 seconds.
Warm the application site.
Reinsert the finger and keep
the sensor motionless for at
least 10 seconds.
Contact NONIN’s Customer
Support Department.
An error code
appears in the
display area.
The Avant 2120
encountered an error.
See “Error Codes.”
37
Page 41

Troubleshooting
Problem Possible Cause Possible Solution
The NIBP cuff
overinflates and
becomes
unattached; will not
provide blood
pressure readings.
The Avant 2120 will
not take NIBP
readings.
The unit is in Alarm
mode, but no
audible alarms can
be heard.
The Avant 2120 will
only operate when it
is plugged in.
The cuff is on backward
or is positioned
incorrectly.
The wrong cuff size was
used on the patient.
The blood pressure
connection hose is not
attached.
There is a
communication error.
The 2-minute Alarm
Silence button is
activated.
DIP switch 2 is in the
On (up) position, and
the unit’s volume is set
to zero.
The battery is not
charged or is depleted.
The battery is
inoperable.
Ensure that the cuff is
applied and positioned
correctly. See “NIBP Cuff
Selection” and “NIBP Cuff
Placement” for more
information.
Ensure that the appropriate
cuff size is selected. See
“NIBP Cuff Selection” for
more information.
Attach the blood pressure
connection hose to the Avant
2120.
Return the Avant 2120 to
NONIN Customer Support
for repair or replacement.
Press the Alarm Silence
button to re-engage alarm
volume, or wait for two
minutes—and alarm tones
will automatically re-engage.
Adjust the alarm volume, or
return DIP switch 2 to the
Off (down) position if you
desire audible alarms.
Plug in the Avant 2120
AC Adapter to charge the
battery.
Return the Avant 2120 to
NONIN Customer Support
for repair or replacement.
If these solutions do not correct the problem, please contact NONIN Customer
Support at (800) 356-8874 (USA and Canada) or (763) 553-9968.
38
 Loading...