

Page 1
USER’S MANUAL
Page 2
2
ABOUT THE PRODUCT .................................................................................................................................................................... 4
PACKAGE CONTENT .......................................................................................................................................................................... 5
ASSEMBLY .............................................. ........................ ........................ ........................ ......................... ........................ ........................ . 6
HOW TO US THE TREADMILL ..................................................................................................................................................... 9
HOW TO FOLD AND MOVE THE TREADMILL................................................................................................................ 13
MAINTENANCE AND TROUBLESHOOTING ............................ ........................ ........................ ........................ ................ 13
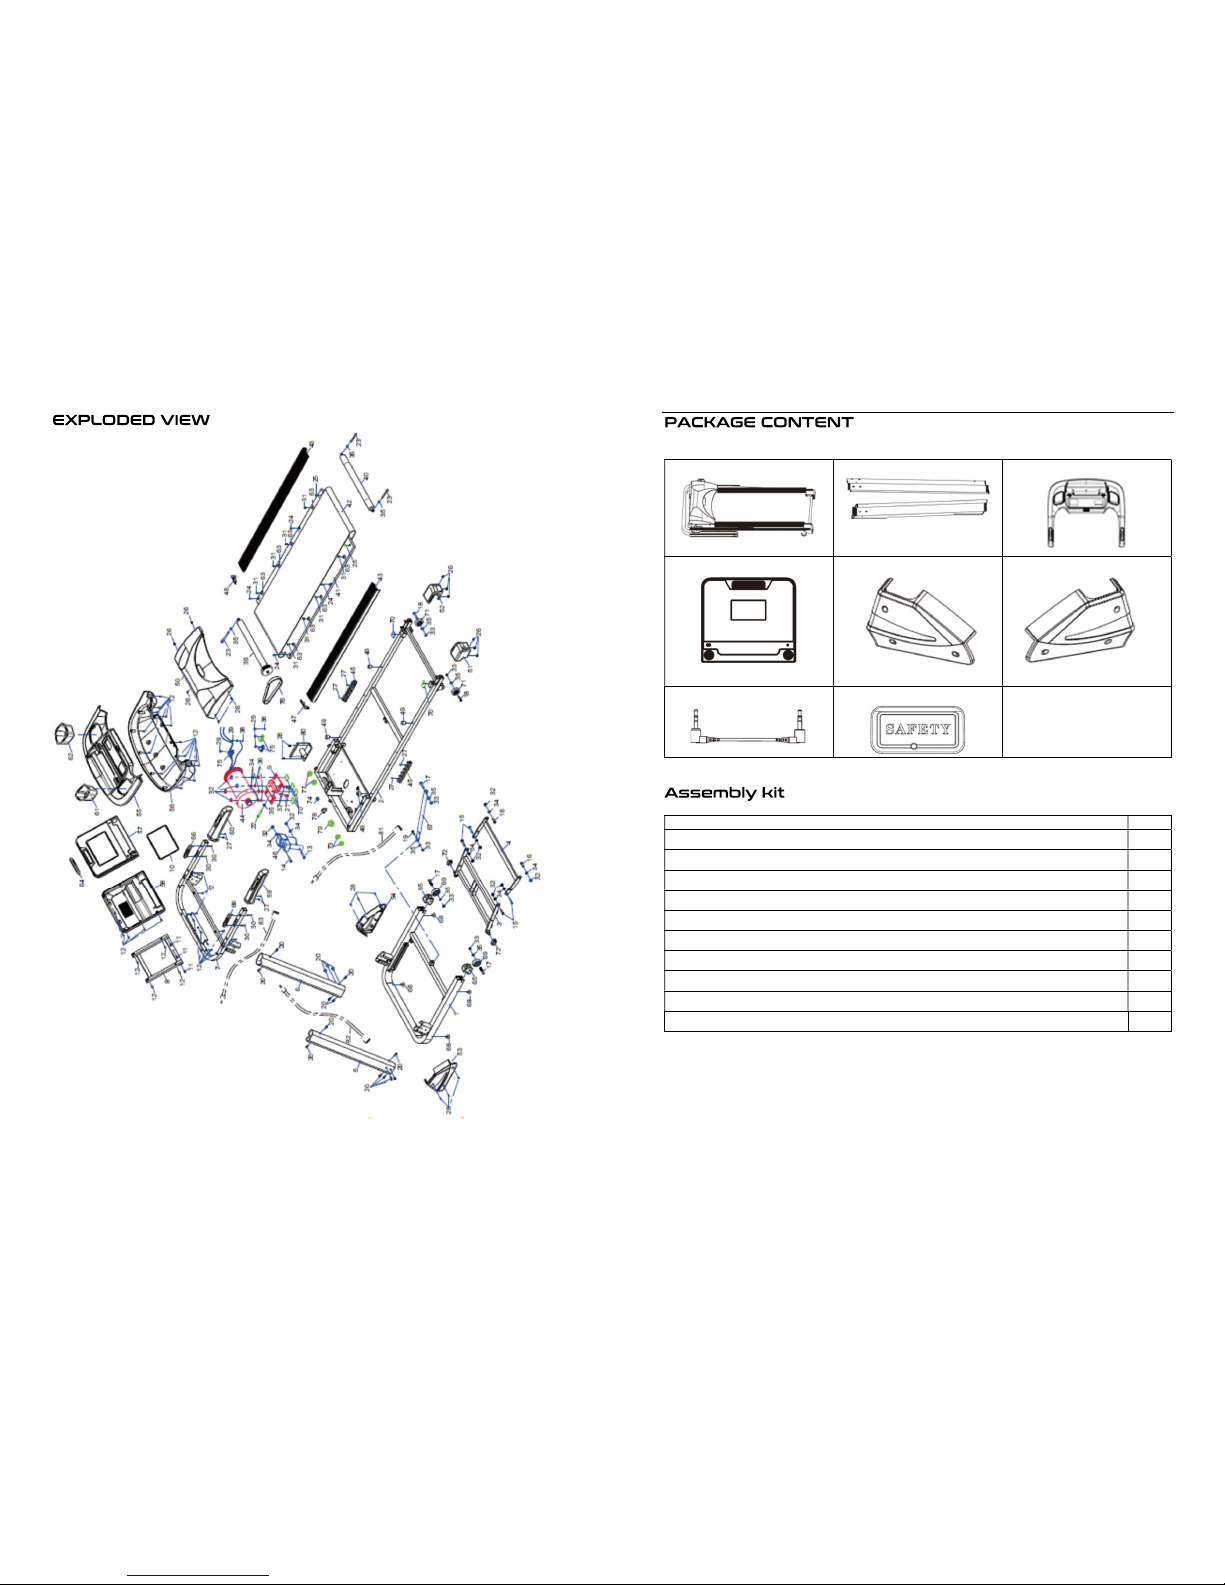
EXPLODED VIEW ................................................................................................................................................................................ 16
PARTS LIST ....................... ........................ ........................ ........................ ........................ ........................ ........................ ...................... 17
ORDERING REPLACEMENT PARTS ....................................................................................................................................... 19
LIMITED WARRANTY ........................ ........................ ........................ ........................ ........................ ........................ ....................... 19
WARNING: To reduce the risk of burns, fire, electric shock, or injury to persons, read all
important precautions and instructions in this manual and all warnings on your treadmill
before using the treadmill. Nomad Fitness Ltd assumes no responsibility for personal injury or
property damage sustained by or through the use of this product.
1. It is the responsibility of the owner to
ensure that all users of this treadmill are
adequately informed of all warnings and
precautions.
2. Before beginning any exercise program,
consult your physician. This is especially
important for persons over age 35 or
persons with pre-existing health problems.
3. Use the treadmill only as described in
this manual.
4. The treadmill is intended for some use
only. Do not use the treadmill in any
commercial or institutional setting.
5. Keep the treadmill indoors, away from
moisture and dust. Do not put the treadmill
in a garage or covered patio, or near water.
6. Place the treadmill on a level surface,
with at least 8 ft. (2.4 m) of clearance behind
it and 2 ft. (0.6 m) on each side. Do not place
the treadmill on any surface that blocks air
openings. To protect the floor or carpet
from damage, place a mat under the
treadmill.
7. Keep children under age 12 and pets
away from the treadmill at all times.
8. The treadmill should be used only by
persons
weighing
287 lbs. (130
kg) or less.
9. Never allow more than one person on
the treadmill at a time.
10. Wear appropriate exercise clothes while
using the treadmill. Do not wear loose
clothes that could become caught in the
treadmill. Athletic support clothes are
recommended for both men and women.
Always wear athletic shoes. Never use the
treadmill with bare feet, wearing only
stockings, or in sandals.
11. Keep fingers, hair, and clothing away
from the moving walking belt.
12. Do not operate the treadmill where
aerosol products are used or where oxygen
is being administered.
13. Plug the power cord into a surge
suppressor (not included), and plug the
surge suppressor into an appropriate outlet.
To avoid overloading the circuit, do not plug
other electrical devices, except for lowpower devices such as cell phone chargers,
into the surge suppressor or into an outlet
on the same circuit.
19
To order replacement parts, please see the front cover of this manual. To help us assist you,
be prepared to provide the following information when contacting us:
• the model number and serial number of the product
• the name of the product (see the front cover of this manual)
• the key number and description of the replacement part(s) (see the PART LIST and the
EXPLODED DRAWING near the end of this manual)
Nomad Fitness Ltd warrants this product to be free from defects in workmanship and material,
under normal use and service conditions. The frame and drive motor are warranted for one (1)
year from the date of purchase. Parts are warranted for one (1) year from the date of purchase.
Labour is warranted for one (1) year from the date of purchase.
This warranty extends only to the original purchaser (customer). Nomad Fitness Ltd obligation
under this warranty is limited to repairing or replacing, at Nomad Fitness Ltd option, the
product through one of its authorized service centres. All repairs for which warranty claims are
made must be preauthorized by Nomad Fitness Ltd. If the product is shipped to a service
centre, freight charges to and from the service centre will be the customer’s responsibility. If
replacement parts are shipped while the product is under warranty, the customer will be
responsible for a minimal handling charge. For in-home service, the customer will be
responsible for a minimal trip charge. This warranty does not extend to freight damage to the
product. This warranty will automatically be voided if the product is used as a store display
model, if the product is purchased or transported outside the UK, if all instructions in this
manual are not followed, if the product is abused or improperly or abnormally used, or if the
product is used for commercial or rental purposes. No other warranty beyond that specifically
set forth above is authorized by Nomad Fitness Ltd.
Nomad Fitness Ltd is not responsible or liable for indirect, special, or consequential damages
arising out of or in connection with the use or performance of the product; damages with
respect to any economic loss, loss of property, loss of revenues or profits, loss of enjoyment
or use, or costs of removal or installation; or other consequential damages of any kind. Some
states do not allow the exclusion or limitation of incidental or consequential damages.
Accordingly, the above limitation may not apply to the customer.
The warranty extended hereunder is in lieu of any and all other warranties, and any implied
warranties of merchantability or fitness for a particular purpose are limited in their scope and
duration to the terms set forth herein. Some states do not allow limitations on how long an
implied warranty lasts. Accordingly, the above limitation may not apply to the customer.
This warranty provides specific legal rights; the customer may have other rights that vary from
state to state.
Page 3
18
No.
Part
Description QTY
No.
Part
Description QTY
29 M4*10 Counter sunk screw 5 71 Wheel 2
30 ST3 .7*40 Counter sunk screw 4 72 Spacer 2
31 ST4 .2*16 Counter sunk screw 8 73 Spacer 2
32 M10 Nut 12 74 Clip 1
33 M8 Nut 6 75 R shape clamp 3
34 F 10 Flat washer 12 76 Belt 1
35 F 8 Flat washer 13 77 f 3 5*f 21*13 Magnetic ring 2
36 F 10 Spring washer 4 78 250V/10A Fuse 1
37 F 8 Spring washer 2 79 15A Switch 1
38 F 5 Lock washer 3 80 Bracket 1
39 Front roller 1 81 800mm Cable 1
40 Rear roller 1 82 1200mm Cable 1
41 Running board 1 83 700mm Cable 1
42 Walking belt 1
3
14. Use only a surge suppressor that meets
all of the specifications in this manual.
Failure to use a properly functioning surge
suppressor could result in damage to the
control system of the treadmill. If the
control system is damaged, the walking
belt may slow, accelerate, or stop
unexpectedly, which may result in a fall and
serious injury.
15. Keep the power cord and the surge
suppressor away from heated surfaces.
16. Never move the walking belt while the
power is turned off. Do not operate the
treadmill if the power cord or plug is
damaged, or if the treadmill is not working
properly. (See MAINTENANCE AND
TROUBLESHOOTING if the treadmill is not
working properly.)
17. Read, understand, and test the
emergency stop procedure before using
the treadmill (see HOW TO TURN ON THE
POWER). Always wear the safety clip while
using the treadmill.
18. Always stand on the foot rails when
starting or stopping the walking belt.
Always hold the handrails while using the
treadmill.
19. Note: When a person is walking on the
treadmill, the noise level of the treadmill
will increase.
20. To avoid static shock wear natural fabric
and if there is build-up of static check that
the plug and electronics are earthed
correctly.
21. The treadmill is capable of high speeds.
Adjust the speed in small increments to
avoid sudden jumps in speed.
22. The heart rate monitor is not a medical
device. Various factors, including the user’s
movement, may affect the accuracy of
heart rate readings. The heart rate monitor
is intended only as an exercise aid in
determining heart rate trends in general.
23. Never leave the treadmill unattended
while it is running. Always remove the key,
press the power switch into the off position,
and unplug the power cord when the
treadmill is not in use.
24. Do not attempt to move the treadmill
until it is fully assembled. (See ASSEMBLY ,
and HOW TO FOLD AND MOVE THE
TREADMILL.) You must be able to safely lift
45 lbs. (20 kg) to raise, lower, or move the
treadmill.
25. When folding or moving the treadmill,
make sure that the storage latch is holding
the frame securely in the storage position
26. Never insert any object into any opening
on the treadmill.
27. Inspect and properly tighten all parts of
the treadmill regularly.
28. DANGER: Always unplug the power cord
immediately after use, before cleaning the
treadmill, and before performing the
maintenance and adjustment procedures
described in this manual. Never remove the
motor hood unless instructed to do so by an
authorized service representative. Servicing
other than the procedures in this manual
should be performed by an authorized
service representative only.
29. Over exercising may result in serious
injury or death. If you feel faint, if you
become short of breath, or if you
experience pain while exercising, stop
immediately and cool down.
Page 4
4
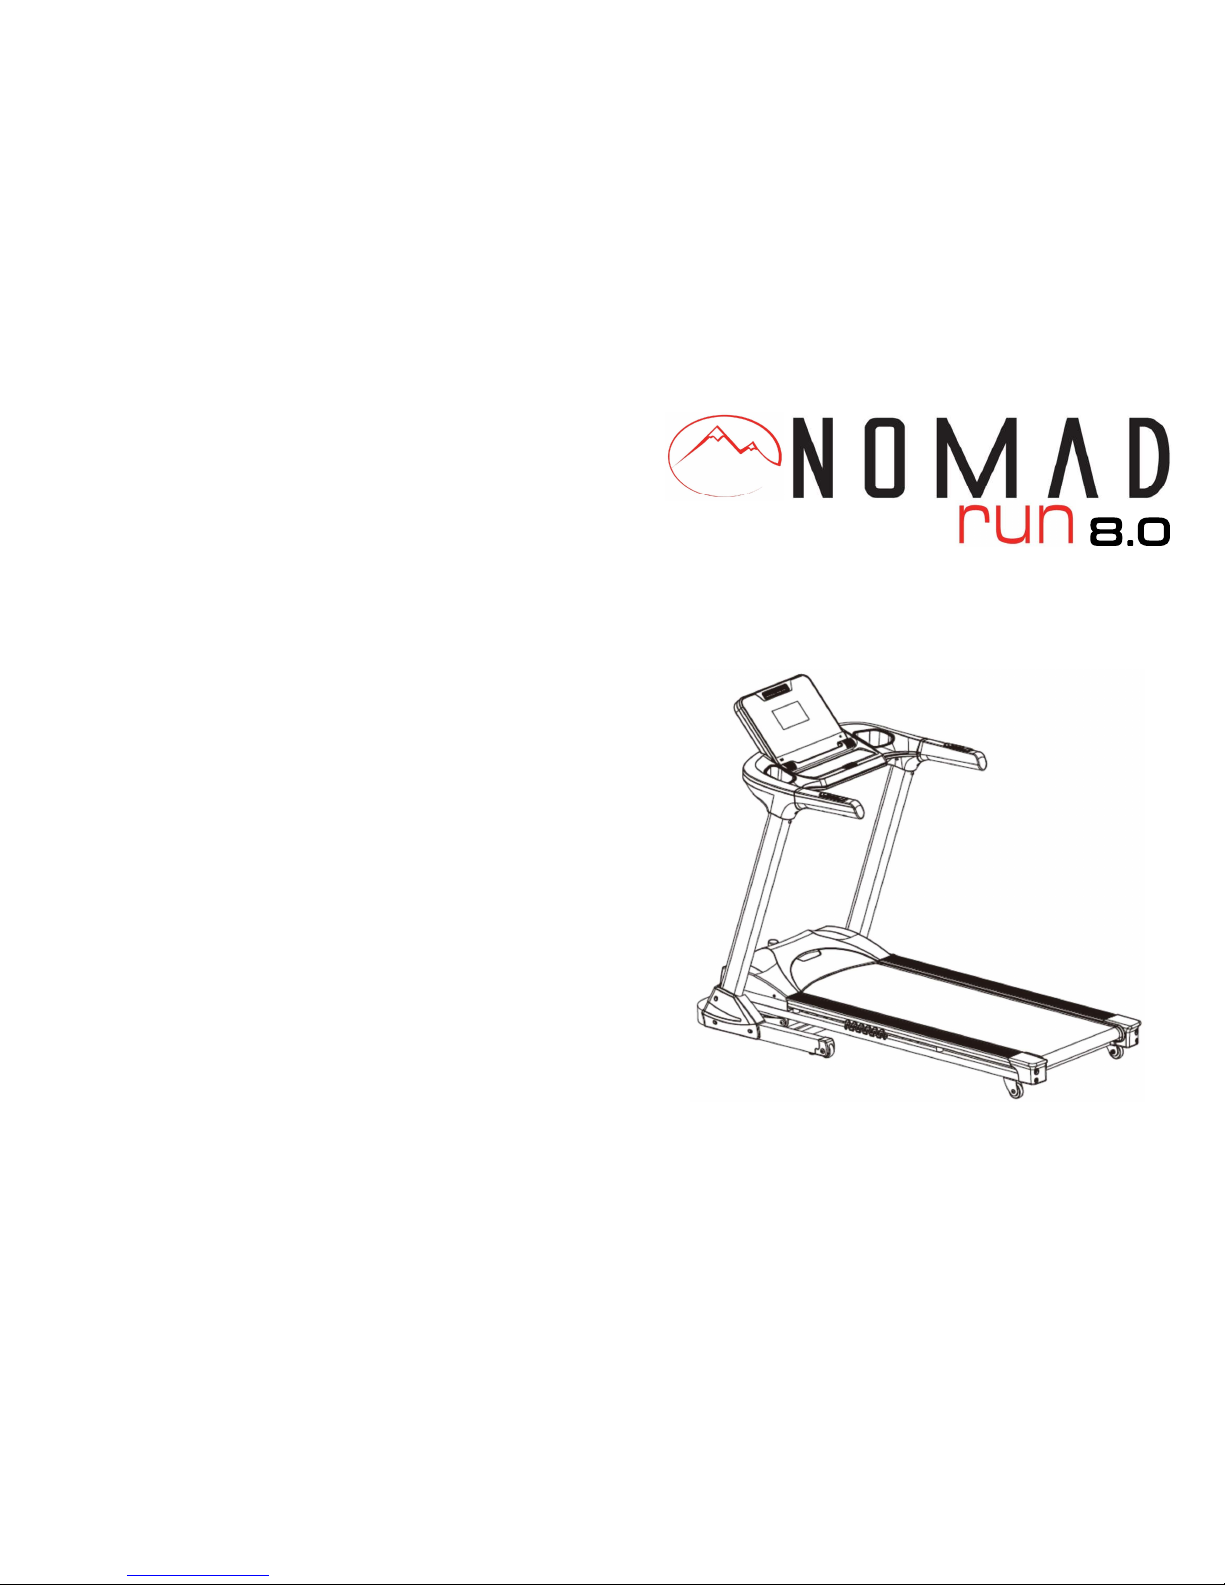
Thank you for selecting the revolutionary Nomad Run 8.0 treadmill. The Nomad Run 8.0
treadmill offers an impressive selection of features designed to make your workouts at home
more effective and enjoyable. And when you’re not exercising, the unique treadmill can be
folded up, requiring less than half the floor space of other treadmills.
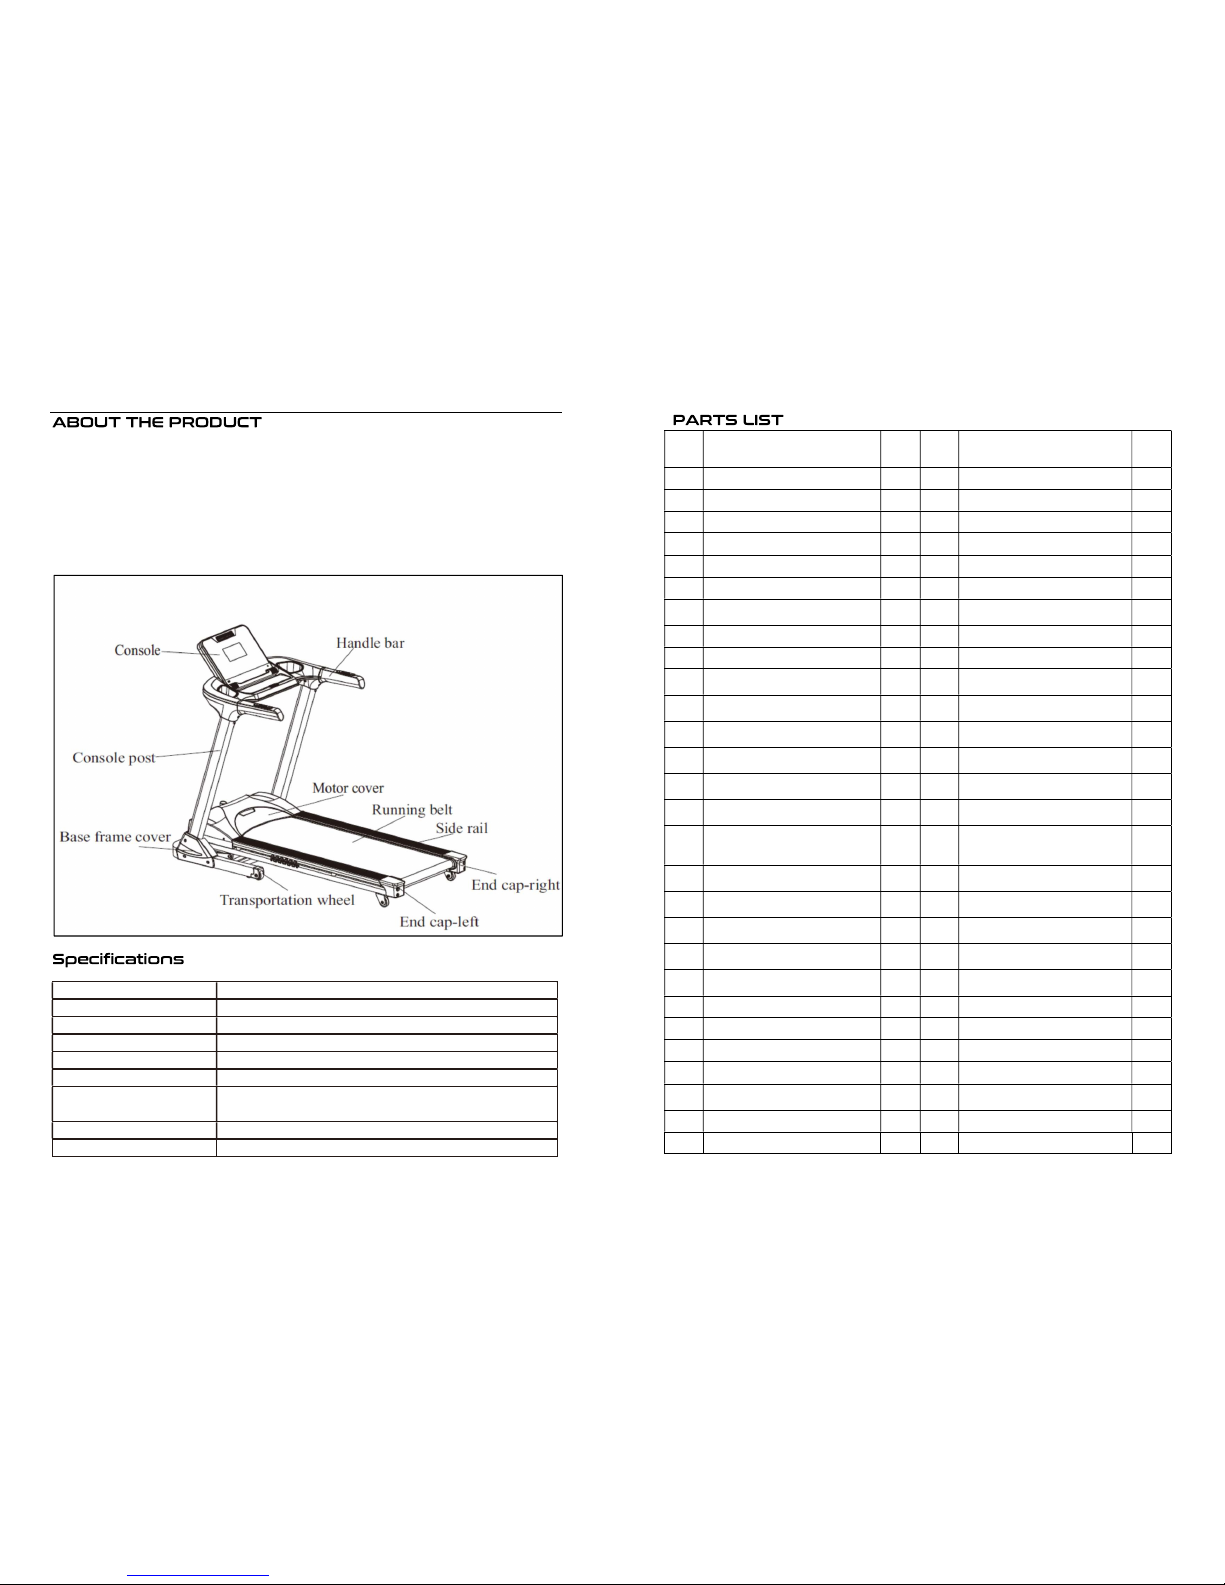
For your benefit, read this manual carefully before using the treadmill. If you have questions
after reading this manual, please see the front cover of this manual. To help us assist you,
please note the product model number before contacting us. Before reading further, please
review the drawing below and familiarize yourself with the labelled parts.
Model NOMAD RUN 8.0
Dimensions 1750*800*1300mm
Operating voltage 220V 50/60 Hz
Max User Weight 130kg
Running Area 1300*480mm
Peak Power 3.0HP
Console
7 inch LCD display, Mp3&USB interface, heart rate testing,
pre-set programs, touch buttons
Speed range 1-18km/h
Incline 1-12%
17
No.
Part
Description QTY
No.
Part
Description QTY
1 Base frame 1 43 Side rail 2
2 Main frame 1 44 Motor 1
3 Incline frame 1 45 Pad 2
4 Connection frame 1 4 6 Incline motor 1
5 Left console post 1 47 Pad left 1
6 Right console post 1 48 Pad right 1
7 Console frame 1 49 Running board pad 4
8 Console small frame 1 50 Motor cover 1
9 Motor base 1 51 End cover left 1
10 Console screen 1 52 End cover right 1
11 M6*15 Hexagon screws 3 53 Frame cover left 1
12
ST4 .2*16 Recessed tapped
screw
35 54 Frame cover right 1
13 M10*60 Hexagon screws 1 55 Console cover top 1
14 M10*45 Hexagon screws 1 56 Console cover bottom 1
15 M10*25 Hexagon screws 4 57 Console screen cover 1
16 M10*30 Hexagon screws 2 58 Console screen cover back 1
17
M8*55* 20 Hexagon half
threaded screws
3 59 Handle left 1
18
M8*40* 20 Hexagon half
threaded screws
2 60 Handle right 1
19
M8*30* 20 Hexagon half
threaded screws
1 61 Bottle holder left 1
20 M8*20 Hexagon screws 14 62 Bottle holder right 1
21
M8*12 Hexagon coarse
threaded screw
2 63 20x12.5x6.5 Washer 8
22 M8*105 Hexagon screws 1 64 Air outlet 1
23 M8*75 Hexagon screws 3 65 Wheel cover 2
24 M6*50 Counter sunk screw 4 66 Pulse sensor 2
25 M6*30 Counter sunk screw 2 67 Gas strut 1
26 M5*10 Counter sunk screw 11 68 Rubber protection 4
27 M5*15 Counter sunk screw 8 69 Wheel 2
28 M4*15 Screw 8 70 Rubber pad 6
Page 5
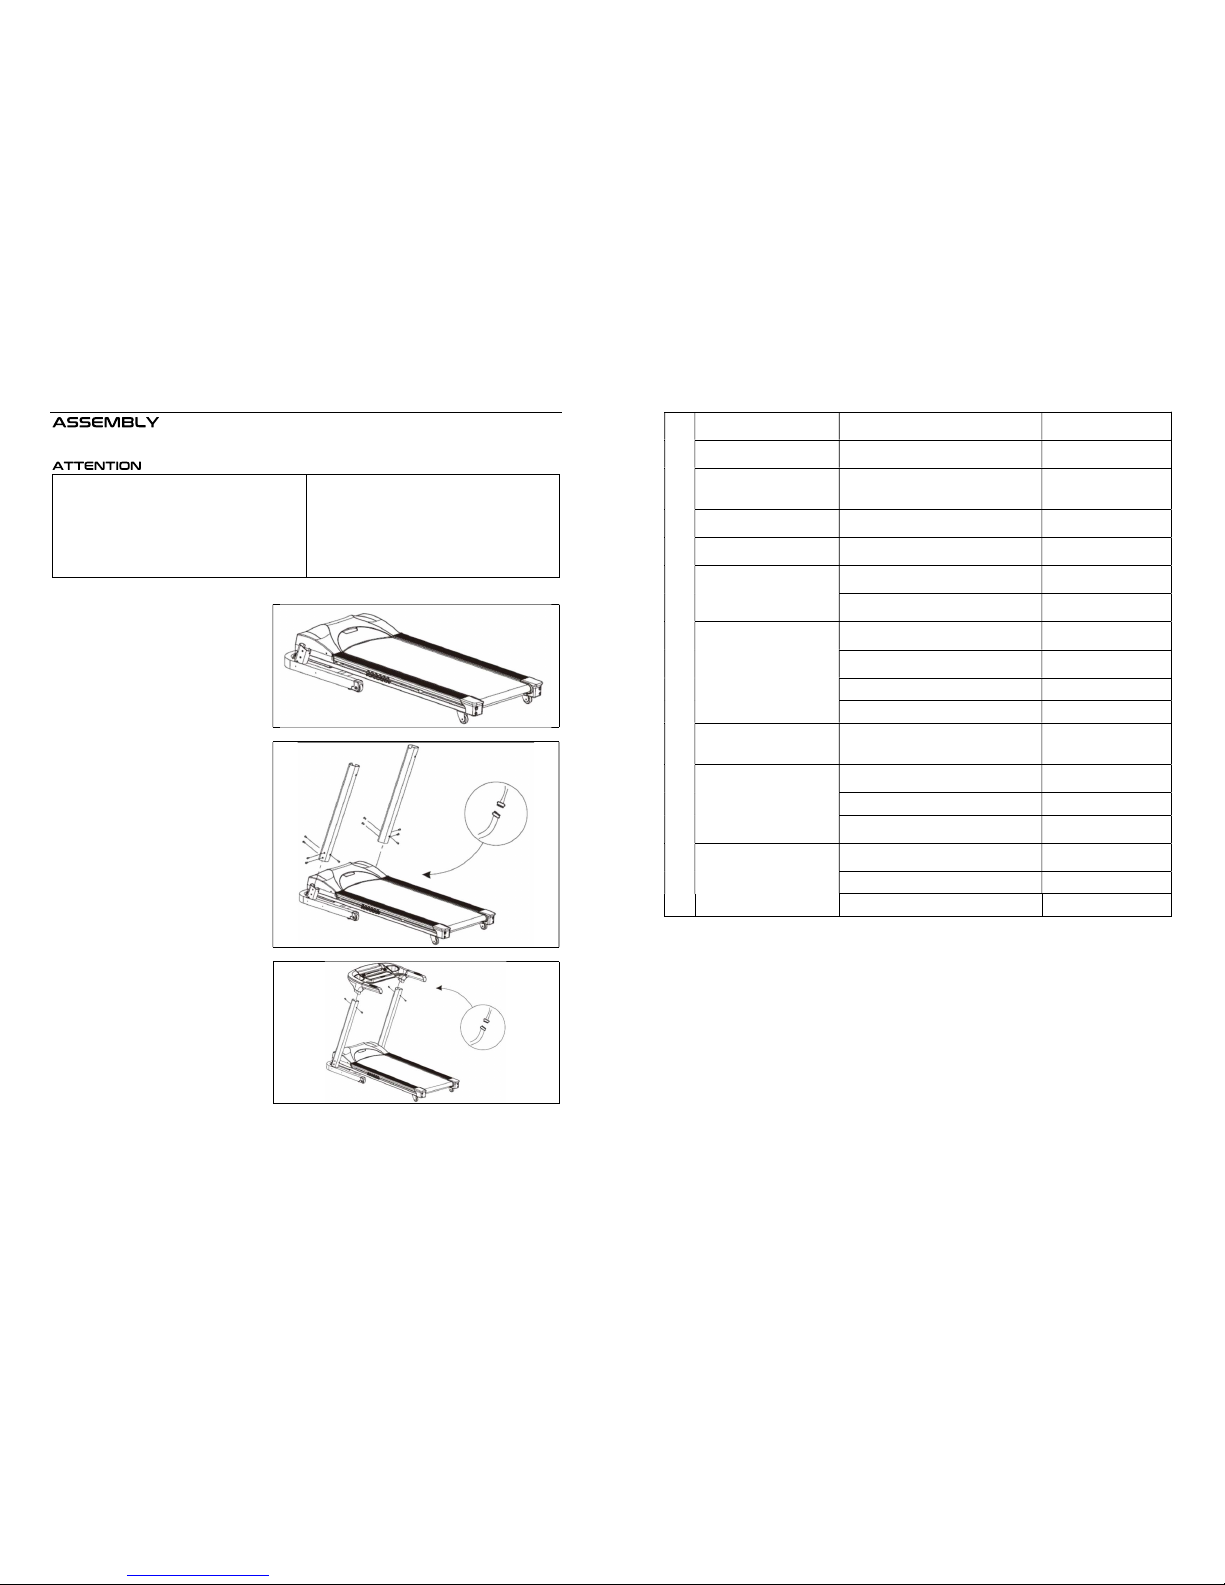
16
5
Base frame
Console post x 2
Console frame
Console
Base cover left
Base cover right
3.5 mm male-male jack
Safety key
Assembly kit
Description
QTY
Hexagon screw M8*20 14
Hexagon screw M6*15 3
Threaded screw M4*15 6
Allen key 4mm 1
Allen key 5mm 1
Allen key 6mm 1
Multi tool 1
Spanner (two sided) 1
Lubrication bottle 1
User’s Manual 1
Page 6
6
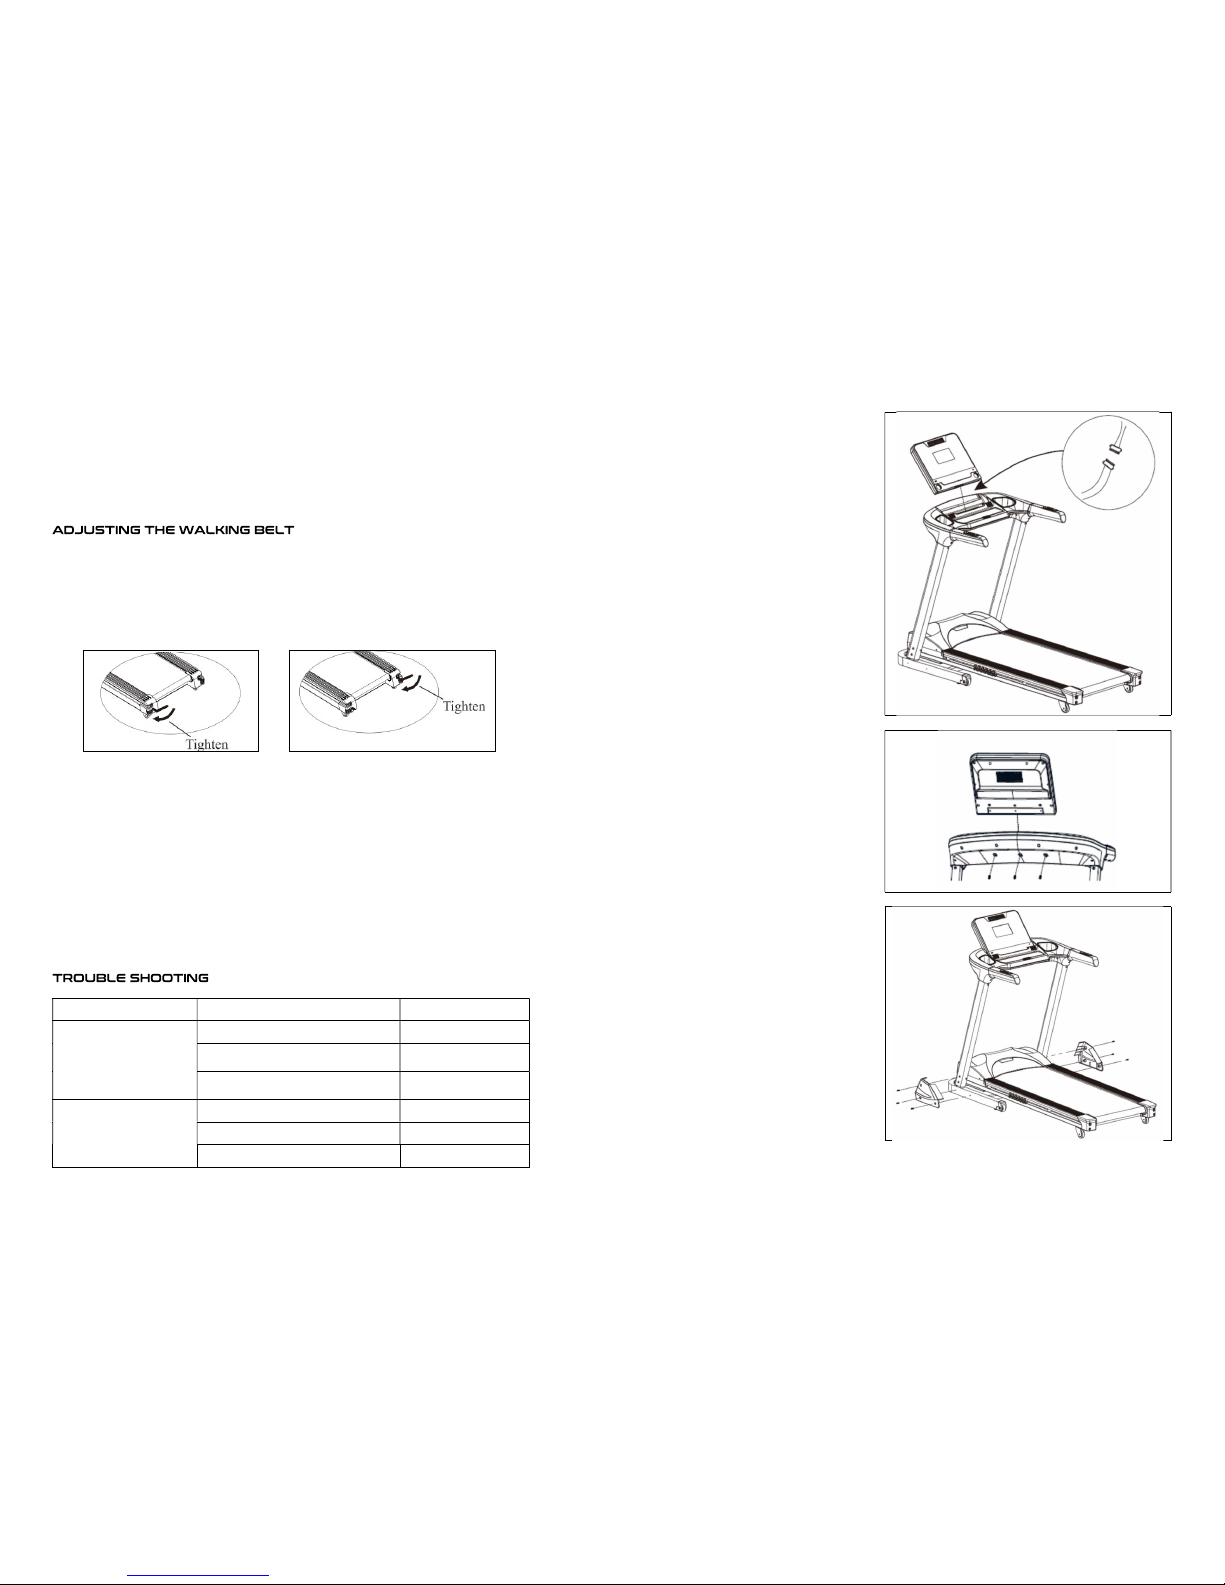
Assembly requires two persons
Assemble in a clean and level area
Before assembly take parts out but do
not dispose of any material until complete
Left parts are marked as “L”. Right parts
are marked as “R”
The treadmill might be covered by light
oil to preserve it from rust
1. Take out the base frame and lay it
out on a clean even floor
2. Connect the signal wire in the right
post. Place the right and left posts in
the base frame.
Use 10 x M8*20 screws to fasten the
posts to the base frame. Fasten
lightly until all screws are aligned
before tightening.
3. Connect the signal wire to the
console on either side of the upright
posts. Fit the console to the posts, be
careful not to crush the wire, it should
be clear of edges.
Use 4 x M8*20 screws to fasten the
posts to the console. Fasten lightly
until all screws are aligned before
tightening.
15
Error Codes
E01 - Communication
failure
Communication wire damaged or
not connected
Replace or connect
communication wire
E13 - Communication
failure
Communication wire damaged or
not connected
Replace or connect
communication wire
E07 - Safety Key Safety key is not in place Place safety key on
allocated console
area
E02 - Stall protection Input voltage is low Check input (plug)
voltage
E03 - No speedo
sensor signal
Speedo sensor wire damaged or
not connected
Replace or connect
sensor wire
E04 - Incline error Incline motor or communication
wire
damaged or not connected
Replace or connect
communication wire
Incline motor is broken Replace the incline
motor
E05 - Over current
protection
Over currents has occur Turn the treadmill
off and on
Walking belt drive blocked or
stuck
Remove blockage or
adjust drive system
Motor is shorting Replace the motor
Motor is not spinning Input current too low
E08 - Memory error
(24C02)
Error with memory IC Check memory IC
(next to the “on”
switch)
E10 - Peak power error Motor belt tension too high Loosen motor
tension belt
Motor error Replace motor
Walking belt drive blocked or
stuck
Remove blockage or
adjust drive system
E06 - Motor error Connections damaged or loose Replace or tighten
connections
Motor is shorting Replace motor
Motor is not spinning Input current too low
Page 7
14
along the underside of the belt. If there is no lubricant residue on your fingers lubrication is
needed.
To add lubrication to the walking belt. Remove the key and UNPLUG THE POWER CORD. Lift
the walking belt in the centre from the running board. Add 10 ml of lubricant to the running
board. Turn the treadmill on using easy mode and let it run for 10 mins at 12 kph. Repeat the
process until there is an even film of lubricant on the walking belt
If the walking belt is off centre, or slowing when walked on or slips, remove the key and
UNPLUG THE POWER CORD. If the walking belt has shifted to the left, use the hex key to turn
the left idler roller screw clockwise ½ of a turn; if the walking belt has shifted to the right, turn
the left idler roller screw counter clockwise 1/2 of a turn. Be careful not to overtighten the
walking belt. Then, plug in the power cord, insert the key, and run the treadmill for a few
minutes. Repeat until the walking belt is centred.
If the walking belt slips when walked on, first remove the key and UNPLUG THE POWER
CORD. Using the hex key, turn both idler roller screws clockwise, 1/4 of a turn. When the
walking belt is correctly tightened, you should be able to lift each edge of the walking belt 2
to 3 inches (5 to 7 cm) off the walking platform. Be careful to keep the walking belt centred.
Then, plug in the power cord, insert the key, and carefully walk on the treadmill for a few
minutes. Repeat until the walking belt is properly tightened.
If the walking belt is overtightened, treadmill performance may decrease and the walking belt
may become damaged. Remove the key and UNPLUG THE POWER CORD. Using the hex key,
turn both idler roller screws counter clockwise, 1/4 of a turn. When the walking belt is
properly tightened, you should be able to lift each edge of the walking belt 2 to 3 inches. (5 to
7 cm) off the walking platform. Be careful to keep the walking belt centred. Then, plug in the
power cord, insert the key, and run the treadmill for a few minutes. Repeat until the walking
belt is properly tightened.
Symptom Possible Causes Solution
Console screen not
displaying anything
The power cord is not connected Connect power cord
The power switch is off Turn on power
switch
A problem with the
communication wire
Connect or replace
communication wire
Treadmill walking belt
not working smoothly
Walking belt is too tight Loosen walking belt
Walking belt is too loose Tighten walking belt
Obstruction Remove obstruction
7
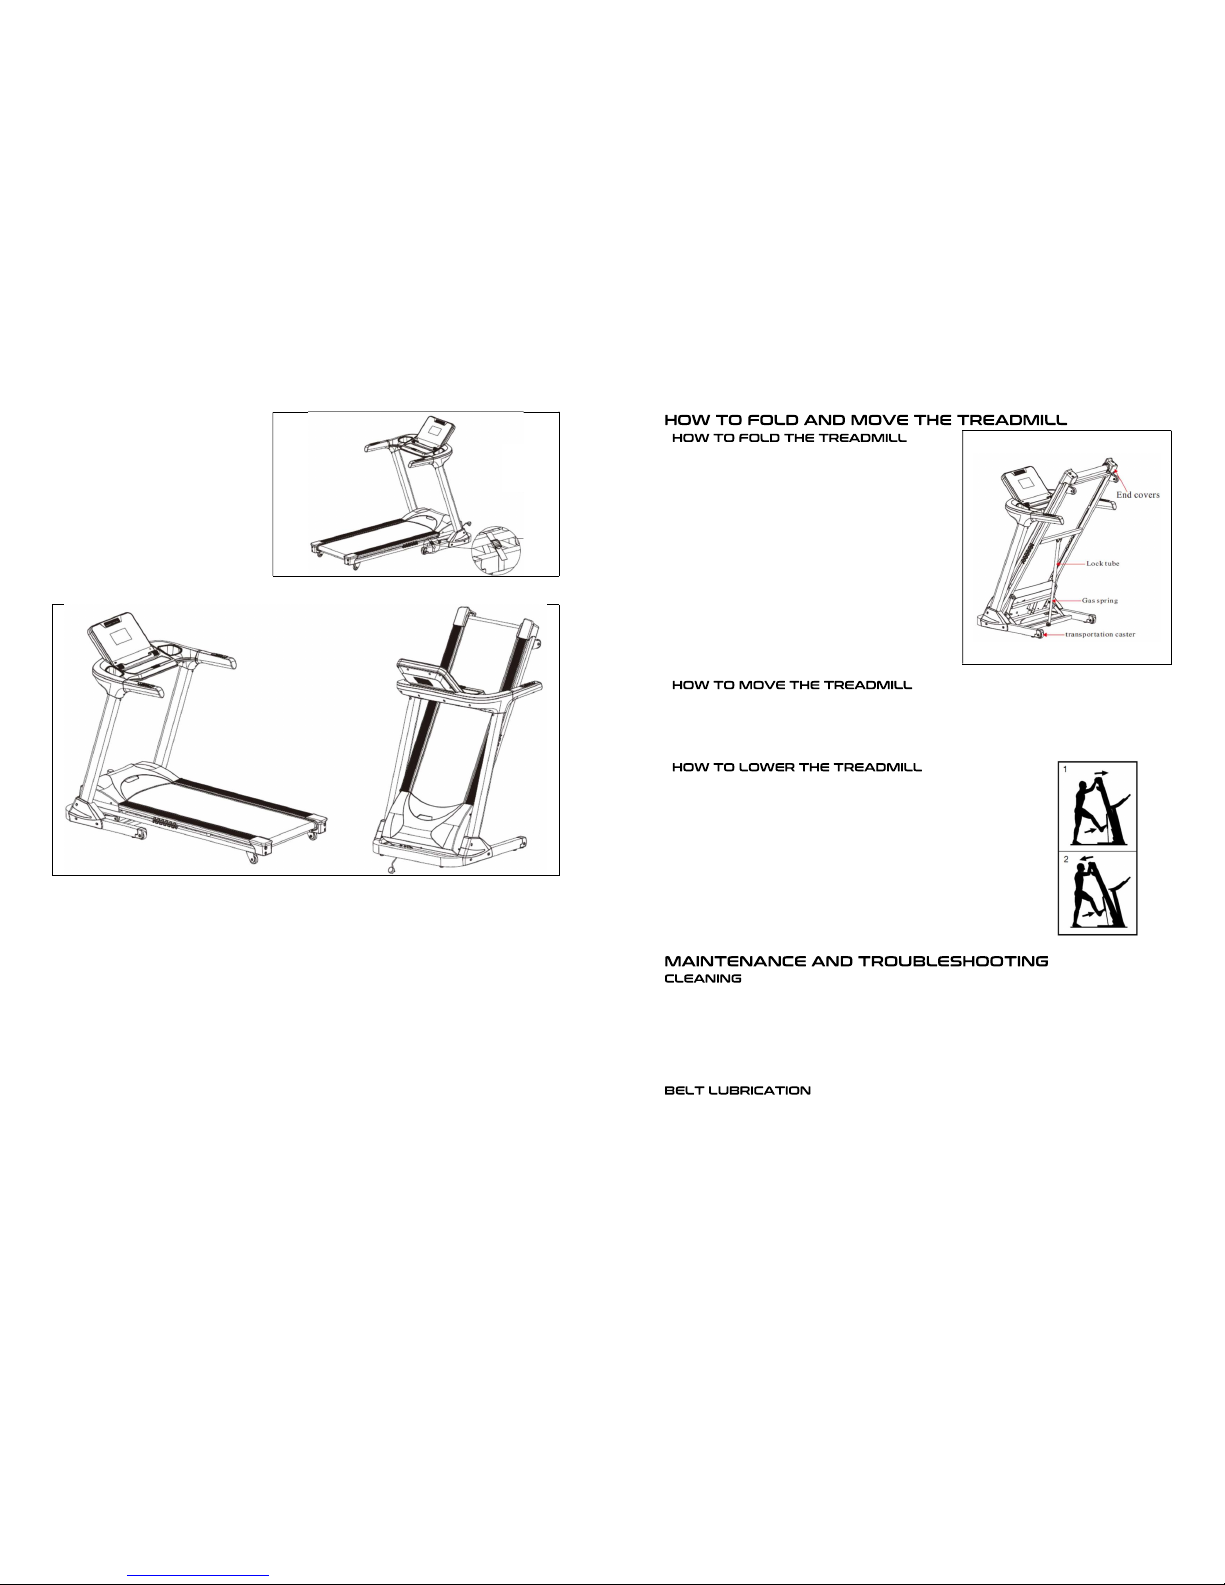
4. Connect the signal wires between
the console base and console. Ensure
all wires are cleared away from the
edges before lowering console onto
base.
5. Remove the 3 x M6*15 screws from
the back of the console. Make sure
not to discard them.
Place the console inside the console
base. Ensure not to pinch or crush the
signal wires.
Use the 3 x M6*15 screws to fasten
the console back onto the console
base.
6. Place the base frame covers in
place.
Use the M4*15 screws to fasten the
covers to the base frame.
Page 8
8
7. Remove the transportation straps
holding the base frame and running
frame.
Complete Assembly
13
To avoid damaging the treadmill, adjust the incline
to zero before you fold the treadmill. Then, remove
the key and unplug the power cord. CAUTION: You
must be able to safely lift 45 lbs. (20 kg) to raise,
lower, or move the treadmill.
1. Hold the end covers firmly in the location shown
by the arrow below. CAUTION: Do not hold the
frame by the plastic foot rails. Bend your legs and
keep your back straight.
2. Raise the frame until the lock tube locks in the
storage position. CAUTION: Make sure that the
locking tube locks. To protect the floor or carpet,
place a mat under the treadmill. Keep the treadmill
out of direct sunlight. Do not leave the treadmill in
the storage position i
n temperatures above
30° C.
Before moving the treadmill, fold it as described at the left. CAUTION: Make sure that the
locking tube is locked in the storage position. Moving the treadmill may require two people.
Hold the handrails with both hands and carefully push the treadmill to the desired location.
CAUTION: Do not pull on the frame, and do not move the treadmill over an uneven surface.
1. Push the upper end of the frame forward, and gently press the
upper part of the storage latch with your foot at the same time.
2. While pressing the storage latch with your foot, pull the
upper end of the frame toward yourself.
3. Step back and let the frame lower to the floor.
Regularly clean the treadmill and keep the walking belt clean and dry. First, press the power
switch into the off position and unplug the power cord. Wipe exterior parts of the treadmill
with a damp cloth and a small amount of mild soap. IMPORTANT: Do not spray liquids directly
onto the treadmill. To avoid damage to the console, keep liquids away from the console. Then,
thoroughly dry the treadmill with a soft towel.
The walking belt is lubricated with a high-performance lubricant to reduce the friction
between the walking belt and the running board. If the lubrication is inadequate the belt will
not operate smoothly. Remove the key and UNPLUG THE POWER CORD. Run your finger
Page 9
12
The mode functionality enables you to set target goals for time, distance and calories which
you want to work towards.
1. Insert the safety key.
See HOW TO TURN ON THE POWER (see page 9)
2. Select MODE
Push the MODE button until the goal type you want set flashes in the console screen.
3. Set the target
The default, min and max values are provided below:
Mode Type
Default Minimum Value
Maximum Value
T
ime 30 mins
5 mins 99 mins
Distance
1 km 0.5 km 99.9 km
Calories 50 kcal 10 kcal 999 kcal
4. Start the walking belt
5. Press the Start button and the belt will start to move. See page 11.
1. Insert the safety key
See HOW TO TURN ON THE POWER (see page 9)
2. Select the pre-set program
Use the SPEED +/- buttons to select one of the 8 pre-set programs and press the Start
button. The programs are graphically illustrated on the console next to the screen. Set the
target time by using the SPEED +/- button.
3. Start the walking belt
Press the Start button to start the workout. A moment after you press the button, the
treadmill will automatically adjust to the first speed and incline settings of the workout.
Hold the handrails and begin walking.
Each workout is divided into segments. One speed setting and one incline setting are
programmed for each segment. Note: The same speed setting and/or incline setting may
be programmed for consecutive segments.
If the speed or incline setting is too high or too low at any time during the workout, you
can manually override the setting by pressing the Speed or Incline buttons; however,
when the next segment of the workout begins, the treadmill will automatically adjust to
the speed and incline settings for the next segment.
4. Measure your heart rate if desired. You can measure your heart rate using the handgrip
heart rate monitor.
5. When you are finished exercising, remove the safety key from the console. See page 11.
9
Use a Surge Suppressor
The treadmill can be damaged by sudden voltage changes in your home’s power. Voltage
surges, spikes, and noise interference can result from weather conditions or from other
appliances being turned on or off. To decrease the risk of damaging the treadmill, always use
a surge suppressor with the treadmill.
Only a surge suppressor that is UL 1449 listed as a transient voltage surge suppressor (TVSS).
The surge suppressor must have a UL suppressed voltage rating of 400 volts or less and a
minimum surge dissipation of 450 joules. The surge suppressor must also be electrically rated
for 240 volts AC and 15 amps. There must be a monitoring light on the surge suppressor to
indicate whether it is functioning properly.
Failure to use a properly functioning surge suppressor could result in damage to the control
system of the treadmill and serious injury to users.
Plug in the power cord
The treadmill must be grounded. If it should malfunction or break down, grounding provides a
path of least resistance for electric current to reduce the risk of electric shock. Plug the power
cord into a surge suppressor, and plug the surge suppressor into an appropriate outlet that is
properly installed and grounded in accordance with all local codes and ordinances.
The outlet must be on a nominal 240-volt circuit capable of carrying 15 or more amps. To
avoid overloading the circuit, do not plug other electrical devices, except for low power
devices such as cell phone chargers, into the surge suppressor or into an outlet on the same
circuit. IMPORTANT: The treadmill may not be compatible with AFCI-equipped outlets.
IMPORTANT: If the treadmill has been exposed to
cold temperatures, allow it to warm to room
temperature before you turn on the power. If you do
not do this, you may damage the console displays or
other electrical components.
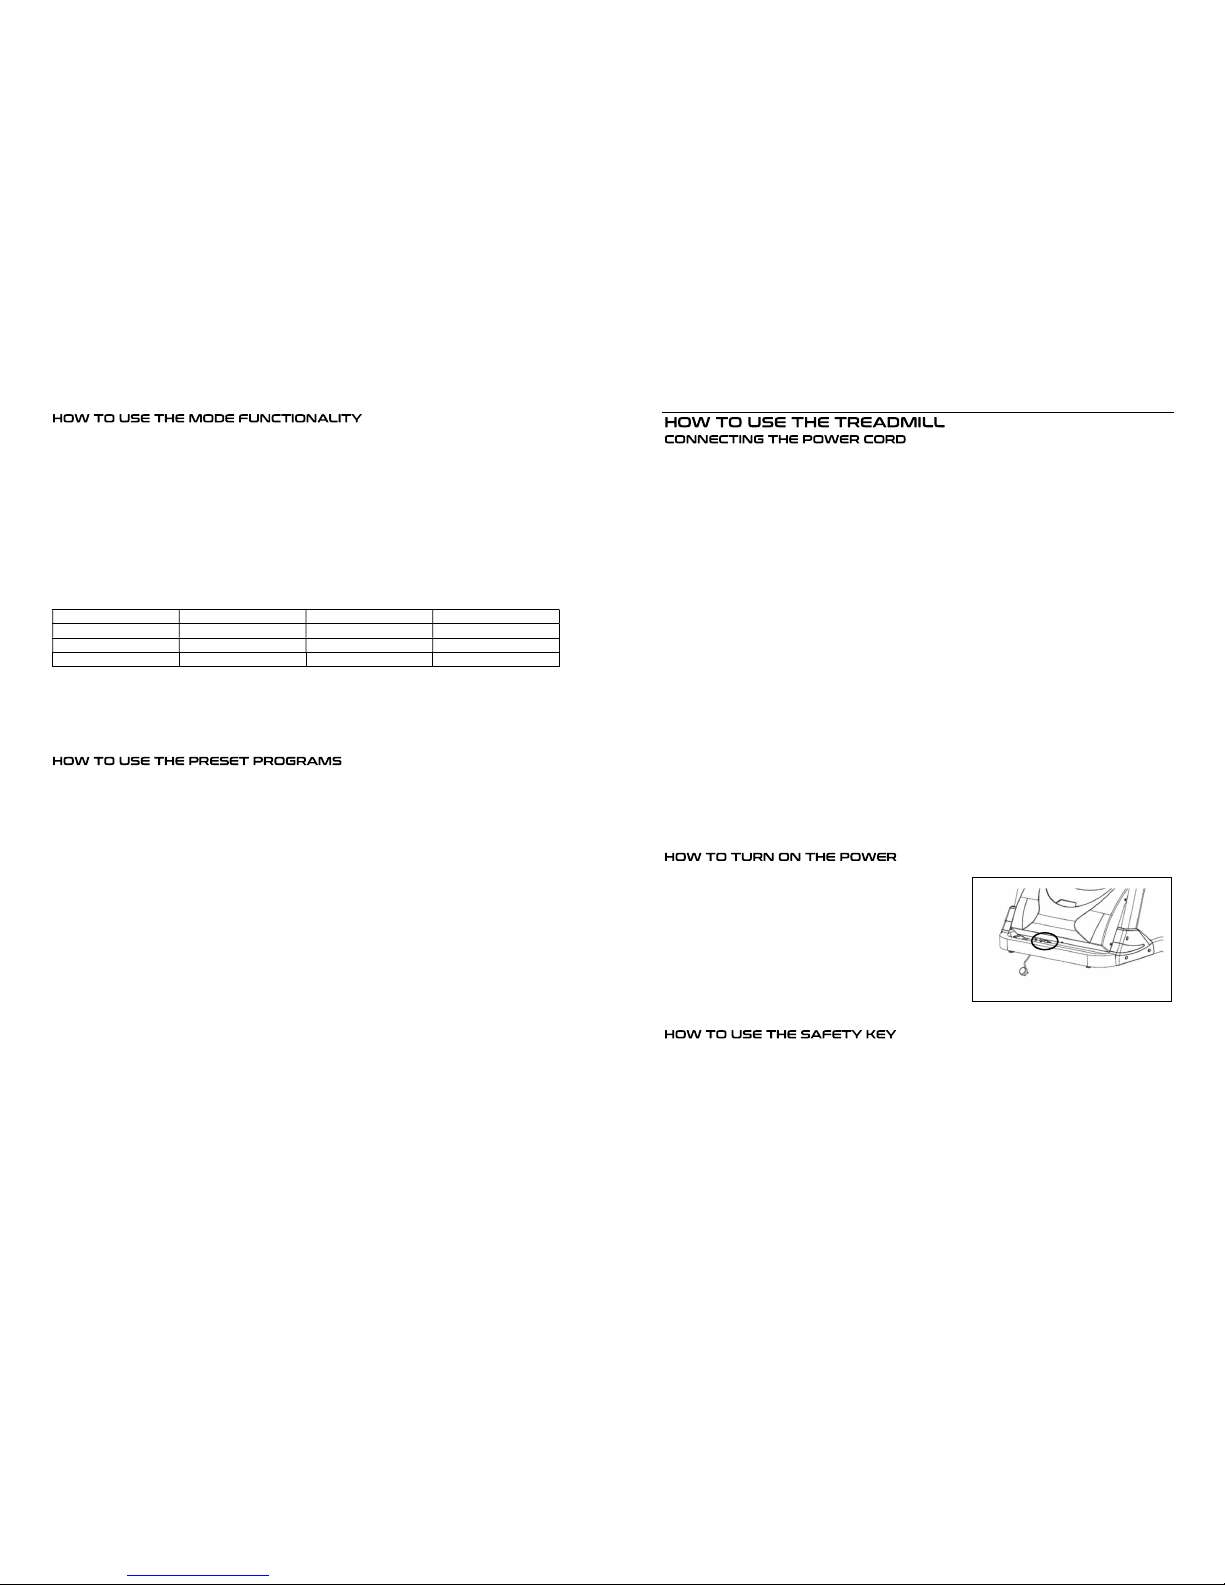
Plug in the power cord. Next, locate the power switch
on the treadmill frame near the power cord. Press the
power switch into the
“on” position.
The treadmill will not function without the safety key being placed on the designated area on
the console. The display will indicate “E-07” if the safety key has not been detected.
IMPORTANT: In an emergency, the key can be pulled from the console, causing the walking
belt to slow to a stop. Test the clip by carefully taking a few steps backward; if the key is not
pulled from the console, adjust the position of the clip.
Page 10
10
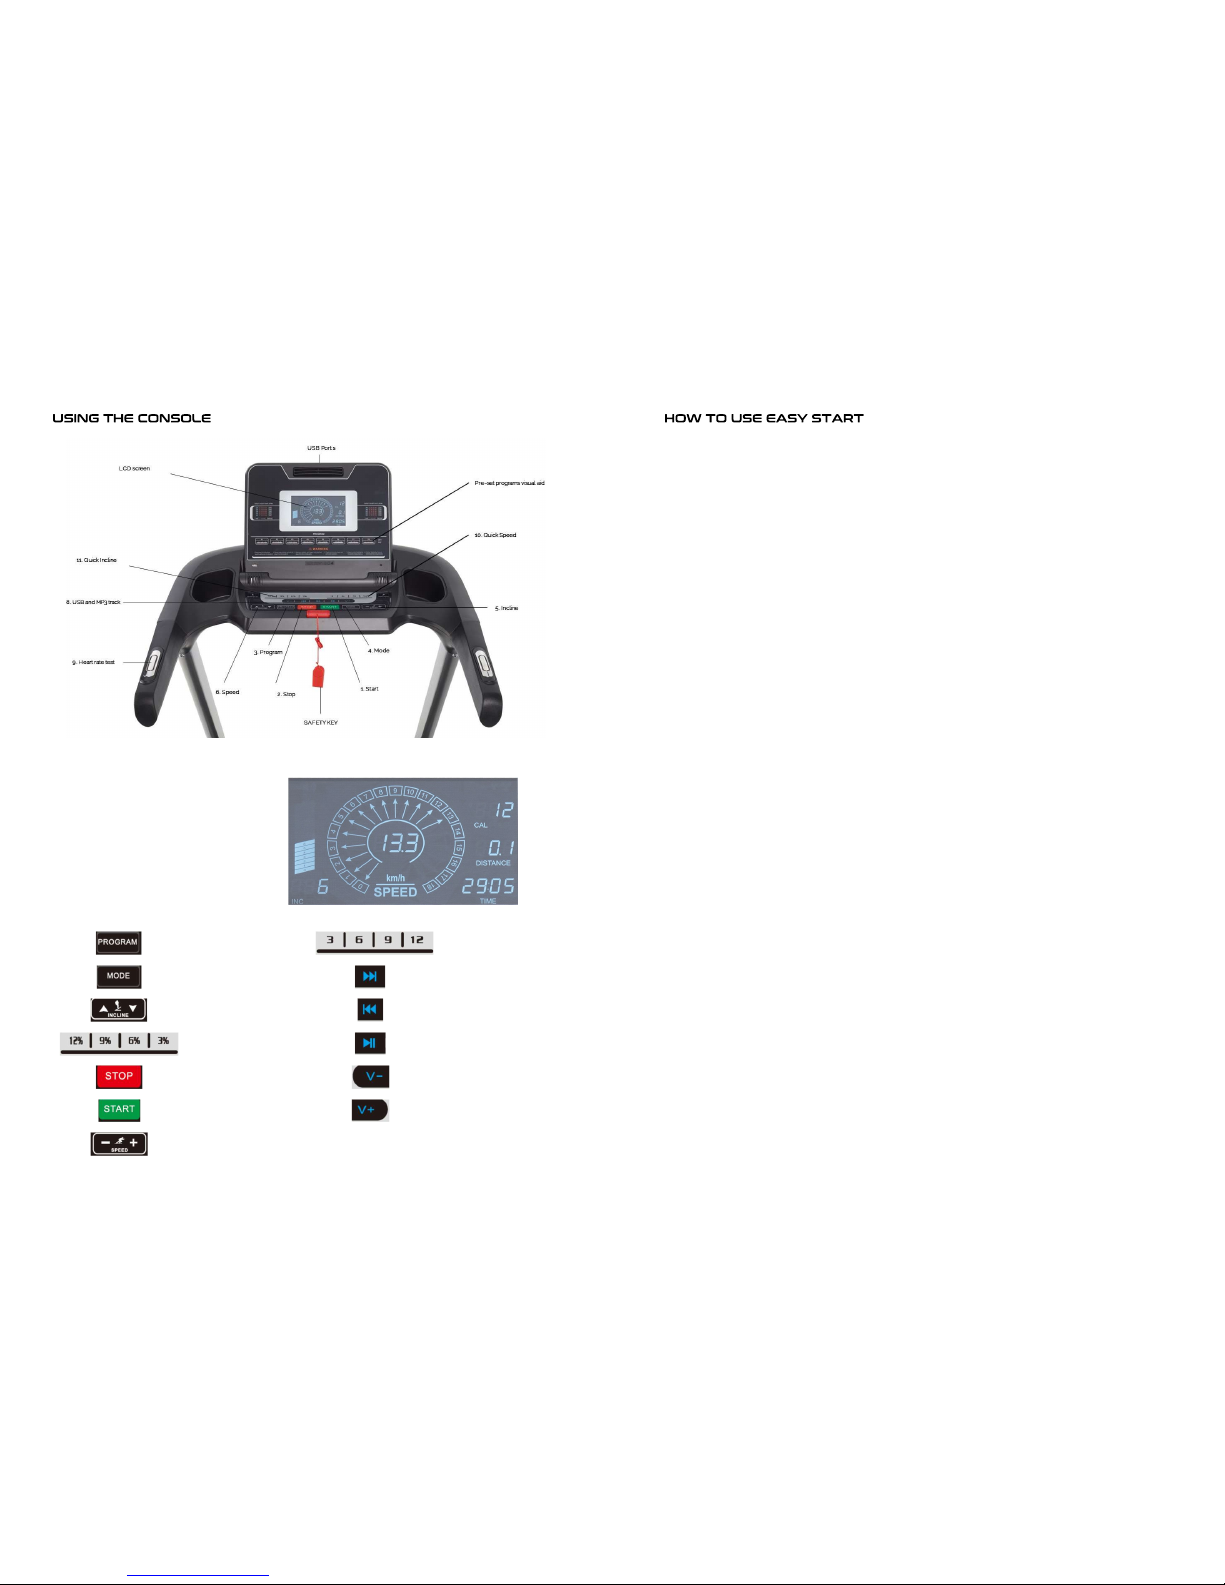
Screen Display:
Speed (km/h)
Incline
Calories / Heart rate
Time
Distance (kilometres)
Bottoms:
Program Quick Speed
Mode
Next song
Incline (+/-)
Previous song
Quick incline
Stop/play music
Stop
Increase volume
Start
Decrease volume
Speed (+/-)
11
1. Insert the safety key.
See the HOW TO TURN ON THE POWER
2. Start the walking belt
Press the Start button and the belt will start to move.
If you press the Start button or the Speed increase button, the walking belt will begin to
move at 1 kph. As you exercise, change the speed of the walking belt as desired by
pressing the Speed increase and decrease buttons. Each time you press one of the
buttons, the speed setting will change by 0.1 kph; if you hold down the button, the speed
setting will change rapidly. Note: After you press the button, it may take a moment for the
walking belt to reach the selected speed setting.
If you press one of the numbered speed buttons, the walking belt will gradually change
speed until it reaches the selected speed setting. To select a speed setting that includes
a decimal—such as 3.1 kph—press two numbered buttons in succession. For example, to
select a speed setting of 3 kph, then immediately press button 5.
To stop the walking belt, press the Stop button. The time will begin to flash in the display.
To restart the walking belt, press the Start button or the Speed increase button.
3. Change the incline of the treadmill as desired. To change the incline of the treadmill,
press the Incline increase and decrease buttons or one of the numbered incline buttons.
Each time you press one of the buttons, the treadmill will gradually adjust to the selected
incline setting.
4. The Calorie tab will show the approximate number of calories you have burned. The
height of each segment represents the number of calories burned during that segment.
When the Calorie tab is selected, the calorie display will show the approximate number of
calories burned per hour.
5. Measure your heart rate if desired. You can measure your heart rate using the handgrip
heart rate monitor.
6. To measure your heart rate, stand on the foot rails and hold the pulse bar with your
palms on the metal contacts; avoid moving your hands. When your pulse is detected, a
heart symbol will appear, and then your heart rate will be shown. For the most accurate
heart rate reading, continue to hold the contacts for about 15 seconds.
7. When you are finished exercising, remove the safety key from the console. Step onto the
foot rails, press the Stop button, and adjust the incline of the treadmill to zero. The incline
must be at zero or you may damage the treadmill. If the machine is turned off and you
can still hear the motor it is the incline coming down, wait for the noise to stop before
switching it off at the wall. It is now ready to be folded away in the storage position. Next,
remove the key from the console and put it in a secure place. When you are finished
using the treadmill, press the power switch into the off position and unplug the power
cord. IMPORTANT: If you do not do this, the treadmill’s electrical components may wear
prematurely.
 Loading...