

NOMA 151-5596-2 Instruction Manual
INSTRUCTION MANUAL
Thank you for purchasing this LED colour-changing tree. This tree is decorated with CSA-certified LED light sets. This
For indoor use only
Retain carton for storage purposes
Instruction Manual
tree has three lighting options: all steady-on white bulbs, all steady-on multi-colour bulbs and continuous colour-changing
• 3 pre-lighted tree sections (A - Top Section, B - Middle Section, C - Bottom Section)
Note: Before you start to assemble your tree, please choose a location near an electrical wall outlet. Place the tree
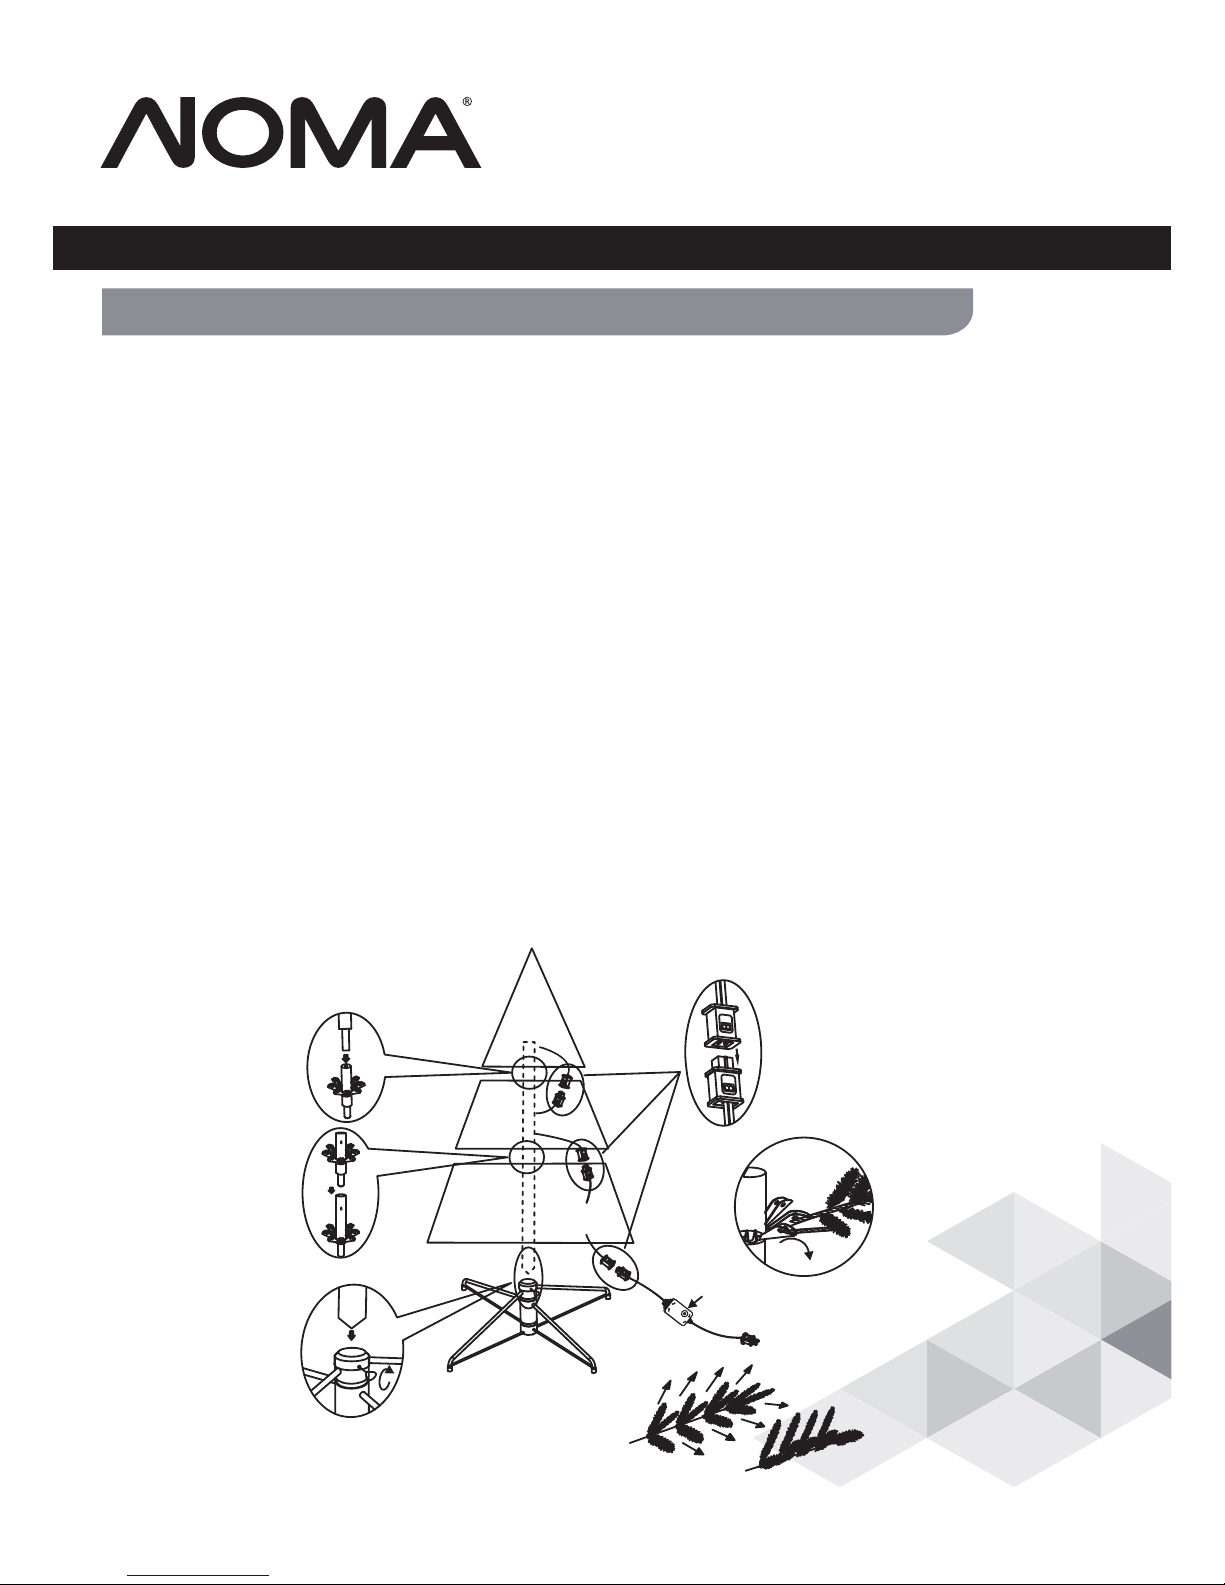
1. Unfold the tree stand and insert the screw into the hole.
This 6 ’ (2 m) tree is pre-strung with 200 lights.½
• 1 sturdy metal tree stand
• 1 spare replacement fuse (3 A) for power cord plug.
FOR INDOOR/SEASONAL USE ONLY
ASSEMBLY:
stand on a level surface.
Please remove protective covers from the base of the pole from each section.
CARTON INCLUDES:
• 1 screw for tree stand
• 6 extra 3 V replacement LED bulbs
2. Carefully insert the bottom section (C) of the tree into the tree stand and tighten the screw (Fig. 1).
model no.|Toll-free number:151 5596 2-- 1-866-827-4985
6 ½' LED Linden Colour-Changing Tree
white to multi-colour. These functions can be changed by pressing the button on the control box.
IMPORTANT:
Please read this manual carefully before assembly and save it for reference.
CAUTION! - ALWAYS UNPLUG YOUR TREE FROM ITS POWER SOURCE
BEFORE ASSEMBLING OR DISASSEMBLING.
Please locate the plug and socket first before assembling each section of the tree.
A
B
C
side
view
side
view
Fig. 4
Fig. 6
Tree stand
Fig. 1
Fig. 2
Fig. 3
Fig.5
D
USE
O
NLYUSE ONLY
125V
F
USE125V FUSE
3AMAX.
TS-M7
WL-C5
WL-C5
WL-C5
WL-C5
WL-C5
WL-C5
1)Warm
w
hite
c
olor steady
o
n1)Warm white color steady on
2)Multicolor steady on2)Multicolor steady on
3)Color changing3)Color changing
4)All off4)All off
control box
WL-C5
WL-C5
• 1 power cord with control box

If any lights do not work on your pre-lighted tree, please check the following:
TROUBLESHOOTING:
1. If entire tree or a section of the tree does not light:
Troubleshooting
a) Make sure the connectors of each section of the tree are well connected.
b) Check that there is power at the electrical outlet.
c) Check fuse in the plug of the power cord and replace if necessary (see Fuse Replacement below).
2. If a strand of lights still does not work:
a) Check that all bulbs are tightly fitted inside the sockets and that no bulbs are broken or missing.
Replace any broken or missing bulbs with replacement bulbs provided (see Bulb Replacement below).
If all bulbs are firmly in the sockets, slightly twist the bulbs from side to side to ensure proper connection.
b) If the lights still do not work, carefully remove each bulb one by one from the problem light string.
Pull the bulb AND plastic base straight out of the socket. Do not twist bulbs while removing from
sockets. Check the two wires at the bottom of the bulb holder. Each wire should be aligned properly
on the bulb holder to ensure a proper connection in the lamp socket. If one wire is missing or too short,
please replace bulb with a replacement bulb (provided).
3. Insert the middle section (B) of the tree into the bottom section (C) (Fig. 2). Insert the top section (A) into middle
4. Insert the connector of the top section (A) into the end connector of the middle section (B), the connector of
5. Allow the branches to fall into place or gently pull branches up and out. When adjusting branches be sure
that all wires are free of branch hinges (Fig. 5).
6. Shape the branches. Starting with tips closest to the pole, shape one tip to the right, one to the left and one
along the centre of the main stem. Repeat pattern for each branch (Fig. 6).
7. Plug the well-connected power supply cord from the bottom section (C) into electrical outlet. This tree is
colour-changing: just press the button on the control box to change functions. The 4 lighting options
available are: all steady on white bulbs, all steady on multi-colour bulbs, continuous colour-changing
section (B) (Fig. 3).
white to multi-colour and off.
Caution
CAUTION! - ALWAYS UNPLUG YOUR TREE FROM ITS POWER
SOURCE BEFORE ATTEMPTING EITHER FUSE OR BULB
IMPORTANT SAFETY INSTRUCTIONS
When using electrical products basic precautions should always be followed including the following:,
a)
READ AND FOLLOW ALL SAFETY INSTRUCTIONS
b) Do not use seasonal products outdoors unless marked suitable for indoor and outdoor use. When
products are used in outdoor applications, connect the product to a Ground Fault Circuit Interrupting
(GFCI) outlet. If one is not provided, contact a qualified electrician for proper installation.
c) This seasonal use product is not intended for permanent installation or use.
d) Do not mount or place near gas or electric heaters, fireplaces, candles or other similar sources of heat.
e) Do not secure the wiring of the product with staples or nails, or place on sharp hooks or nails.
f) Do not let bulbs rest on the supply cord or on any wire.
g) Unplug the product when leaving the house, or when retiring for the night, or if leaving unattended.
h) This is not a toy. For decorative use only! To avoid risk of fire, burns, personal injury and electric shock it
should not be played with or placed where small children can reach it.
i) Do not use this product for other than its intended use.
j) Do not hang ornaments or other objects from cord, wire, or light string.
k) Do not close doors or windows on the product or extension cords as this may damage the wire insulation.
m) This product is equipped with push-in type bulbs. Do not twist bulbs.
n) This product employs overload protection (fuse). A blown fuse indicates an overload or short-circuit
situation. If the fuse blows, unplug the product from the outlet. Also unplug any additional strings or
products that may be attached to the product. Replace the fuse as per the user servicing instructions
(follow product marking for proper fuse rating) and check the product. If the replacement fuse blows,
a short circuit may be present and the product should be discarded.
o) Read and follow all instructions that are on the product or provided with the product.
p)
SAVE THESE INSTRUCTIONS
l) Do not cover the product with cloth, paper, or any material not part of the product when in use.
REPLACEMENT.
the middle section (B) into the end connector of bottom section (C) and the connector of bottom section (C)
into the end connector of power cord in right direction properly and tightly according to the magnified
drawing on Fig. 4.
To Replace a Fuse:
USER SERVICING INSTRUCTIONS
Power cord fuse replacement (1 replaceable 3 A, 125 V fuse is located in the plastic bag):
5. Insert spare replacement fuse. Close fuse cover by sliding fuse access cover
CAUTION:
To reduce risk of fire, replace fuse in power cord with only 3 A, 125 V fuse.
Do not replace attachment plug. Contains a safety device (fuse) that shall not be removed.
Caution
a) Before using or reusing, inspect product carefully. Discard any products that have cut, damaged,
or frayed wire insulation or cords, cracks in the bulb holders or enclosures, loose connections,
b) When storing the product, carefully remove the product from wherever it is placed to avoid any
or exposed copper wire.
Use and care instructions
undue strain or stress on the product conductors, connections, and wires.
Discard product if the attachment plug is damaged.
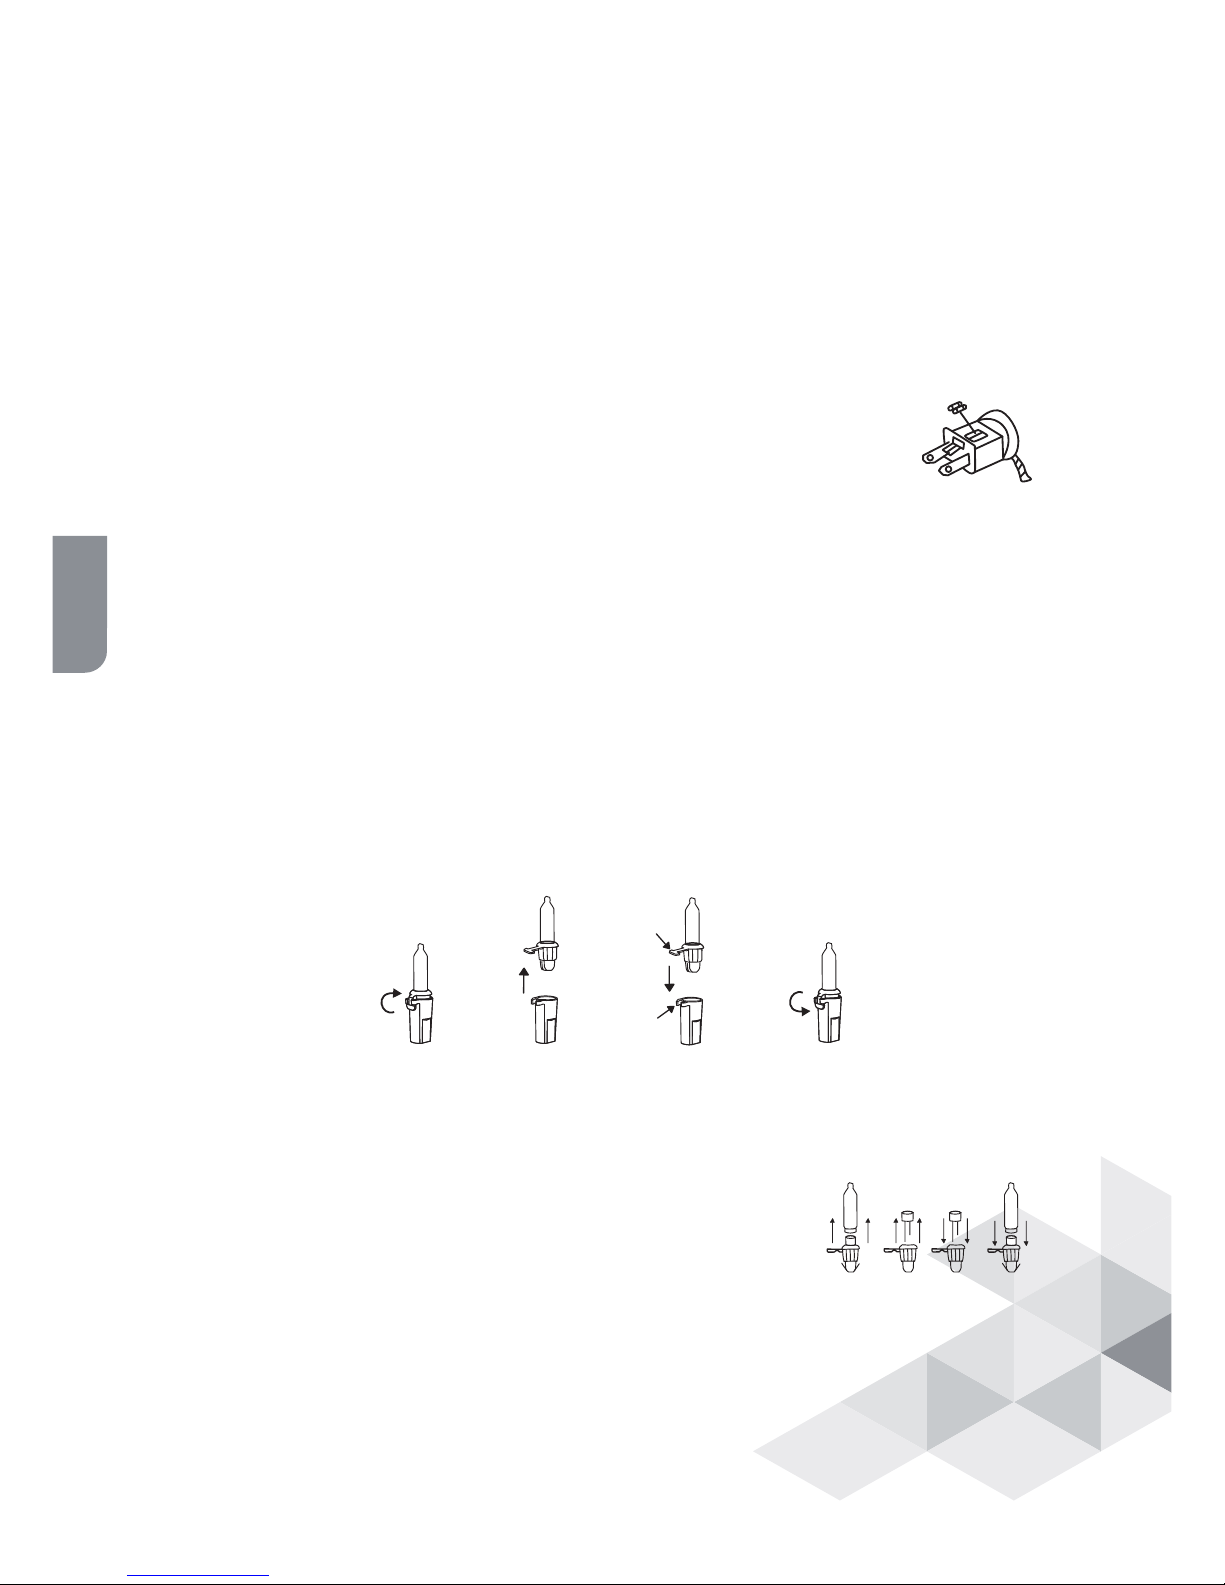
To Replace a Bulb:
If the bulb base of the replacement bulb does not fit in the string: (as shown below by the Figs.)
b) Straighten the two wires on the end of the original burned-out bulb and remove the bulb base.
c) Straighten the wires on the end of the new bulb and remove
a) Pull the reflector out.
the bulb base.
on the cord tag near the connected product’s receptacle.
Connecting Sets End to End (for connect multiple products)
When multiple products are connected together, do not exceed the lowest of the indicated maximum wattage
e) Insert the reflector into the base.
bulb to the hook on bulb base).
bulb base and bend the wires back (always match the long lead of new
d) Guide the two wires of the new bulb into the two holes of the original
1. Grasp plug and remove from the receptacle or other outlet device. Do not unplug by pulling on cord.
2. Open fuse cover by sliding the fuse cover towards the blades of the attachment plug.
3. Turn the fuseholder over or push on the fuse for removal.
4. Risk of fire. Replace fuse only with 3 A, 125 V fuse.
1. Grasp plug and remove from the receptacle or other outlet device. Do not unplug by pulling on cord.
2. Unlock the burned out LED bulb by lifting the hook.
4. Replace bulb with only 3.0 Volt, 20 mA push-in type LED bulb (provided with product). Always
5. Lock the hook of bulb base by pushing lock down into the tab.
3. Pull bulb and plastic base straight out of bulb holder.
match the hook to the tab.
Hook
Tab
Unlock
Lock
towards the cord.
 Loading...