

NOMA 151-0301-4 Instruction Manual

1
Self Shaping
Lighted Whistler Pine Tree
151-0301-4
INSTRUCTION MANUAL
Thank you for purchasing this pre-lighted tree. This tree assembles in minutes and is decorated with CUL-listed
miniature light sets. A permanent contact shunt device is used in each bulb so when a bulb burns out the others
remain lighted. For your convenience, it is equipped with an on/off foot pedal switch for easy illumination.
This 7 1/2' tree is pre-strung with 1300 lights:
CARTON INCLUDES:
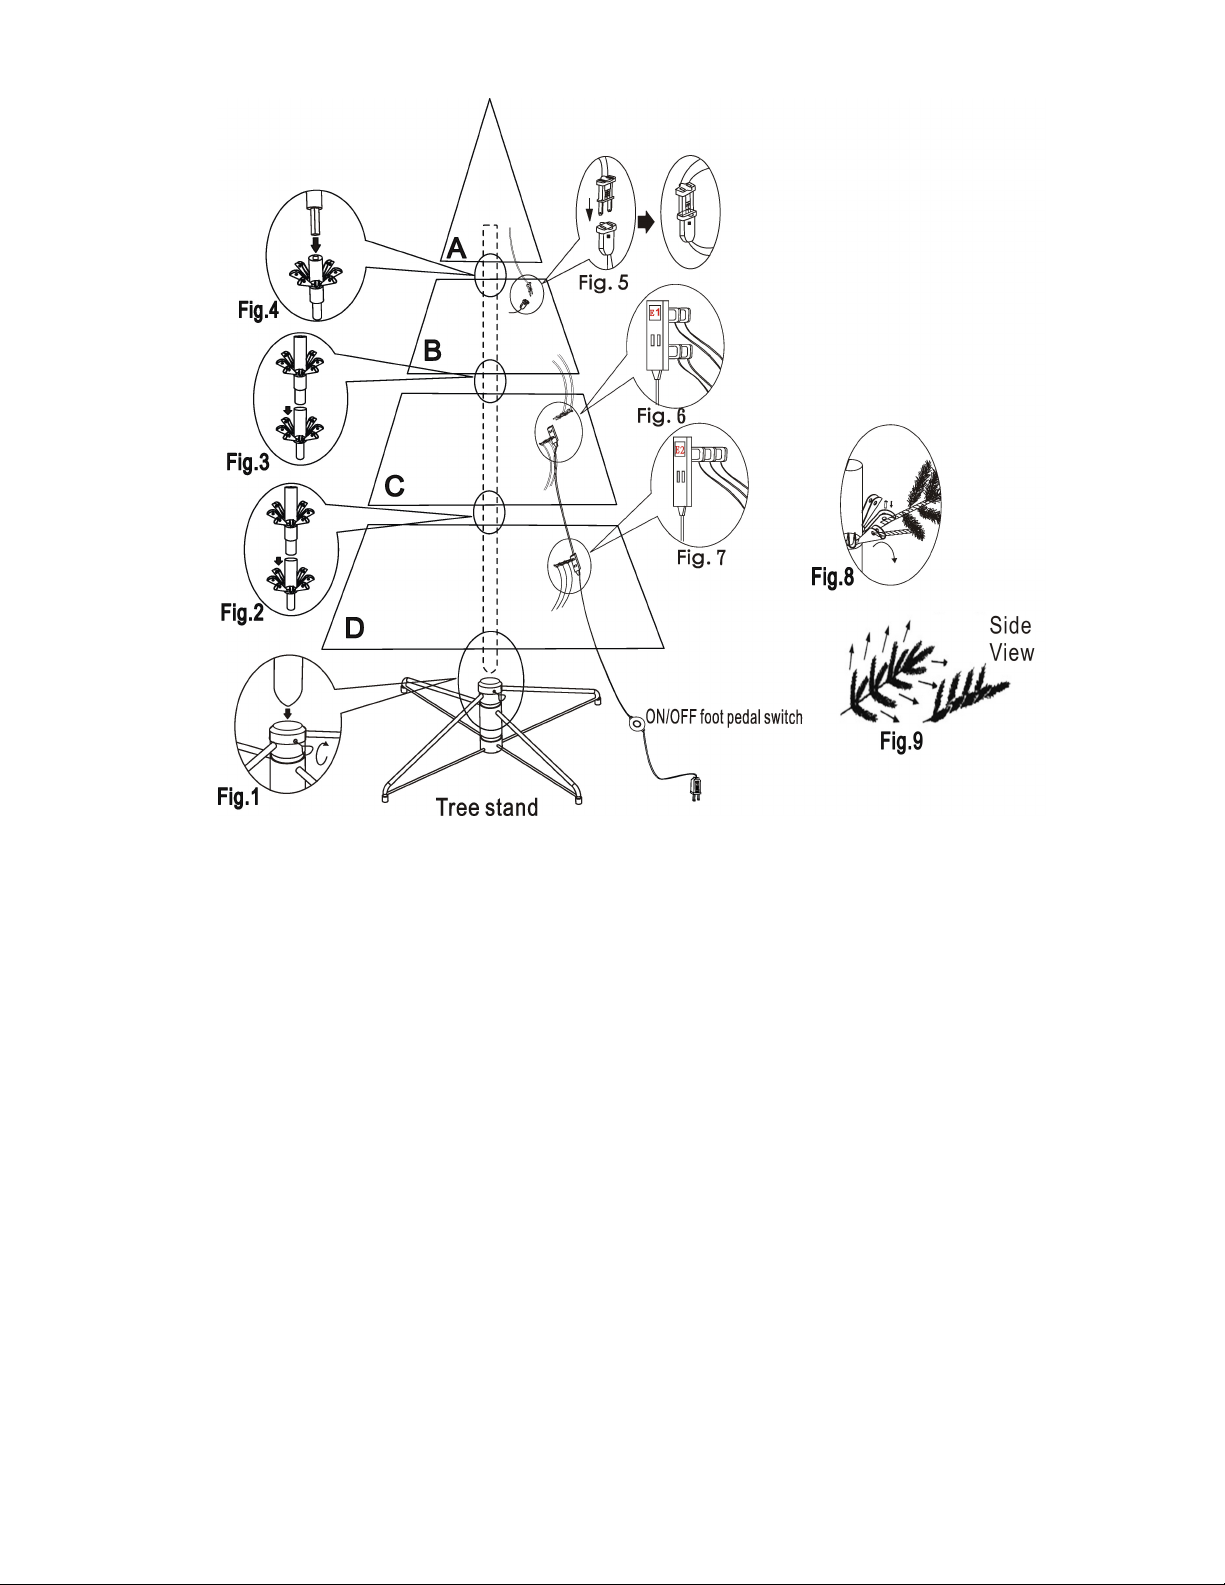
• 4 pre-lighted tree sections (A – Top Section, B – Upper Middle Section, C – Lower Middle Section, D –
Bottom Section)
• 1 sturdy metal tree stand
• 1 screw for tree stand
• 26 extra 2.5 V replacement bulbs
• 1 spare replacement fuse (5 A) for extension cord – note fuse is already in extension cord plug, slide
access panel to open (see Fuse Replacement below)
FOR INDOOR/SEASONAL USE ONLY
ASSEMBLY:
Note: Before you start to assemble your tree please choose a location near an electrical wall outlet. Place the tree
stand on a level surface.
Please remove protective covers from the base of the pole for each tree section before assembling.
1. Carefully insert the bottom section (C) of the tree into the stand. Make sure the pole is firmly inserted into
the stand and screw is tightly. Insert the lower middle section (C) of the tree into the bottom section (D),
insert the upper middle section (B) of the tree into the lower middle section (C), insert the top section (A)
into the upper middle section (B). (Figs. 1, 2, 3, 4)
2. Locate the light set plug from the top section (A) and plug it into the end connector of the upper middle
section (B). (Fig. 5)
3. Locate the light set plug from the upper middle section (B) and plug it into the outlet mounted in the lower
middle section (C). (Fig. 6)
IMPORTANT: Do not remove the tape wrapped around the outlets of the extension cord mounted
in lower middle section (C). Any outlets you need to plug into are not wrapped in tape.
2
4. The extension cord mounted in the lower middle section (C) hangs freely down into the bottom section
(D). Position the cord as near to the pole as possible.
5. Locate the light set plug from the bottom section (D) and plug it into the outlet on the extension cord
hanging down from the lower middle section (C). (Fig. 7)
6. Allow branches to fall into place or gently pull branches up and out. When adjusting branches be sure that
all wires are free of branch hinges. (Fig. 8)
7. Shape the branches. Starting with tips closest to the pole, shape one tip to the right, one to the left and
one along the centre of the main stem. Repeat pattern for each branch. (Fig. 9)
8. Connect the plug of the extension cord hanging down from the bottom section (D) into the wall outlet.
Please note this tree comes with an on/off foot pedal switch for easy illumination.
TROUBLESHOOTING:
If any lights do not work on your pre-lit tree, please check the following before calling customer service:
1. If entire tree or a section of the tree does not light:
a) Make sure all extension cord plugs are secure.
b) Check that there is power at the electrical outlet.
c) Check fuses in tree’s extension cords and replace if necessary (see Fuse Replacement below).
2. If a strand of lights still does not work:
a) Check that all bulbs are tightly fitted inside the sockets and that no bulbs are broken or missing.
Replace any broken or missing bulbs with replacements bulbs provided (see Bulb Replacement
below). If all bulbs are firmly in the sockets, slightly twist the bulbs from side to side to ensure
proper connection.
b) If the lights still do not work, carefully remove each bulb one by one out of the problem light string.
Pull the bulb AND plastic base straight out of socket. Do not twist bulbs while removing from
sockets. Check the two wires at the bottom of the bulb holder. Each wire should be aligned
properly on the bulb holder to insure a proper connection in the socket. If one wire is missing or too
short, please replace bulb with a replacement bulb (provided).
 Loading...