

NOMA 052-8398-2 Owner's Manual
Hanson LED C e i l i n g F a n
OWNER’S MANUAL
Toll-free 1-866-827-4985
IMPORTANT:
For your safety please read and understand
this manual before installing or operating this product.
model no. 052-8398-2
IMPORTANT: RETAIN FOR FUTURE REFERENCE, AND READ CAREFULLY.
Toll Free 1-866-827-4985 model no. 052-8398-2
Warning: To risk of personal injury, do not bend the blade arms (also referred to as flanges) or the brackets while
balancing the blades or cleaning the fan. Do not insert foreign objects between rotating fan blades.
Warning:
for fan support” with the screws provided with the outlet box.
To reduce the risk of fire, electric shock, and personal injury, mount fan to outletbox marked ”acceptable
Safety Rules – Read and Save These Instructions
before beginning.
2. All wiring must be in accordance with the national and local electrical codes. Electrical installation should
be performed by a qualified licensed electrician.
3. WARNING: To reduce the risk of electric shock or fire, do not use this fan with any solid-state fan-speed
control device. It will permanently damage the electronic circuitry.
4.
CAUTION: To reduce the risk of personal injury, use only the screws provided with the outlet box.
5. The outlet box and support structure must be securely mounted and capable of reliably supporting a
minimum of 35 lb (15.9 kg).
Use only UL listed outlet boxes marked “FOR FAN SUPPORT.”
6. The fan must be mounted with a minimum of 7' (2.13 m) from the trailing edge of the blades to the
floor.
7. Avoid placing objects in the path of the blades.
8. To avoid personal injury or damage to the fan and other items be cautious when working around or
cleaning the fan.
9. Do not use water or detergents when cleaning the fan or fan blades. A dry dust cloth will be suitable for
most cleaning.
10. After making electrical connections, spliced conductors should be turned upward and pushed carefully
up into the outlet box. The wires should be spread apart with the grounded conductor and the
equipment-grounding conductor on one side of the outlet box and the ungrounded conductor on the
other side of the outlet box.
11. All set screws must be checked and retightened where necessary
before installation.
Warning:
To reduce the risk of fire, electric shock, or personal injury, mount to outlet box marked "acceptable for
fan support of 35 lb (15.9 kg) or less" and use mounting screws provided with the outlet box. Most outlet boxes
commonly used for the support of light fixtures are not acceptable for fan support and may need to be replaced.
Due to the complexity of this fan, a qualified licensed electrician is strongly recommended.
!
!
!
Attention: This product is equipped with a 190 W limiting device. If lamping exceeds 190 W the light kit will shut
bulbs with the correct wattage, and then turning the light kit back on.
!

3
1
Required
Helpful
Flathead
screwdriver
Crosshead
screwdriver
Safety glasses Pliers
Step ladder
Wire strippers
Wire cutters
Soft cloth
Electrical t ape
Tools Needed (not supplied)
To prevent personal injury and damage, ensure
that the hanging location allows the blades a
clearance of 7’ (2.13 m) from the floor and 30”
(76 cm) from any wall or obstruction.
This fan can be mounted with a downrod on a regular
(no-slope) or vaulted ceiling. Other installation, such as
flush mount, are not available for this fan.
downrod
installation
flush mount
installation
vaulted ceiling
angle is not to
exceed 15°.
Adjustable wrench
7’
(2.13 m)
30”
(76 cm)
3
Toll Free: 1-866-827-4985 model no. 052-6967-0
2
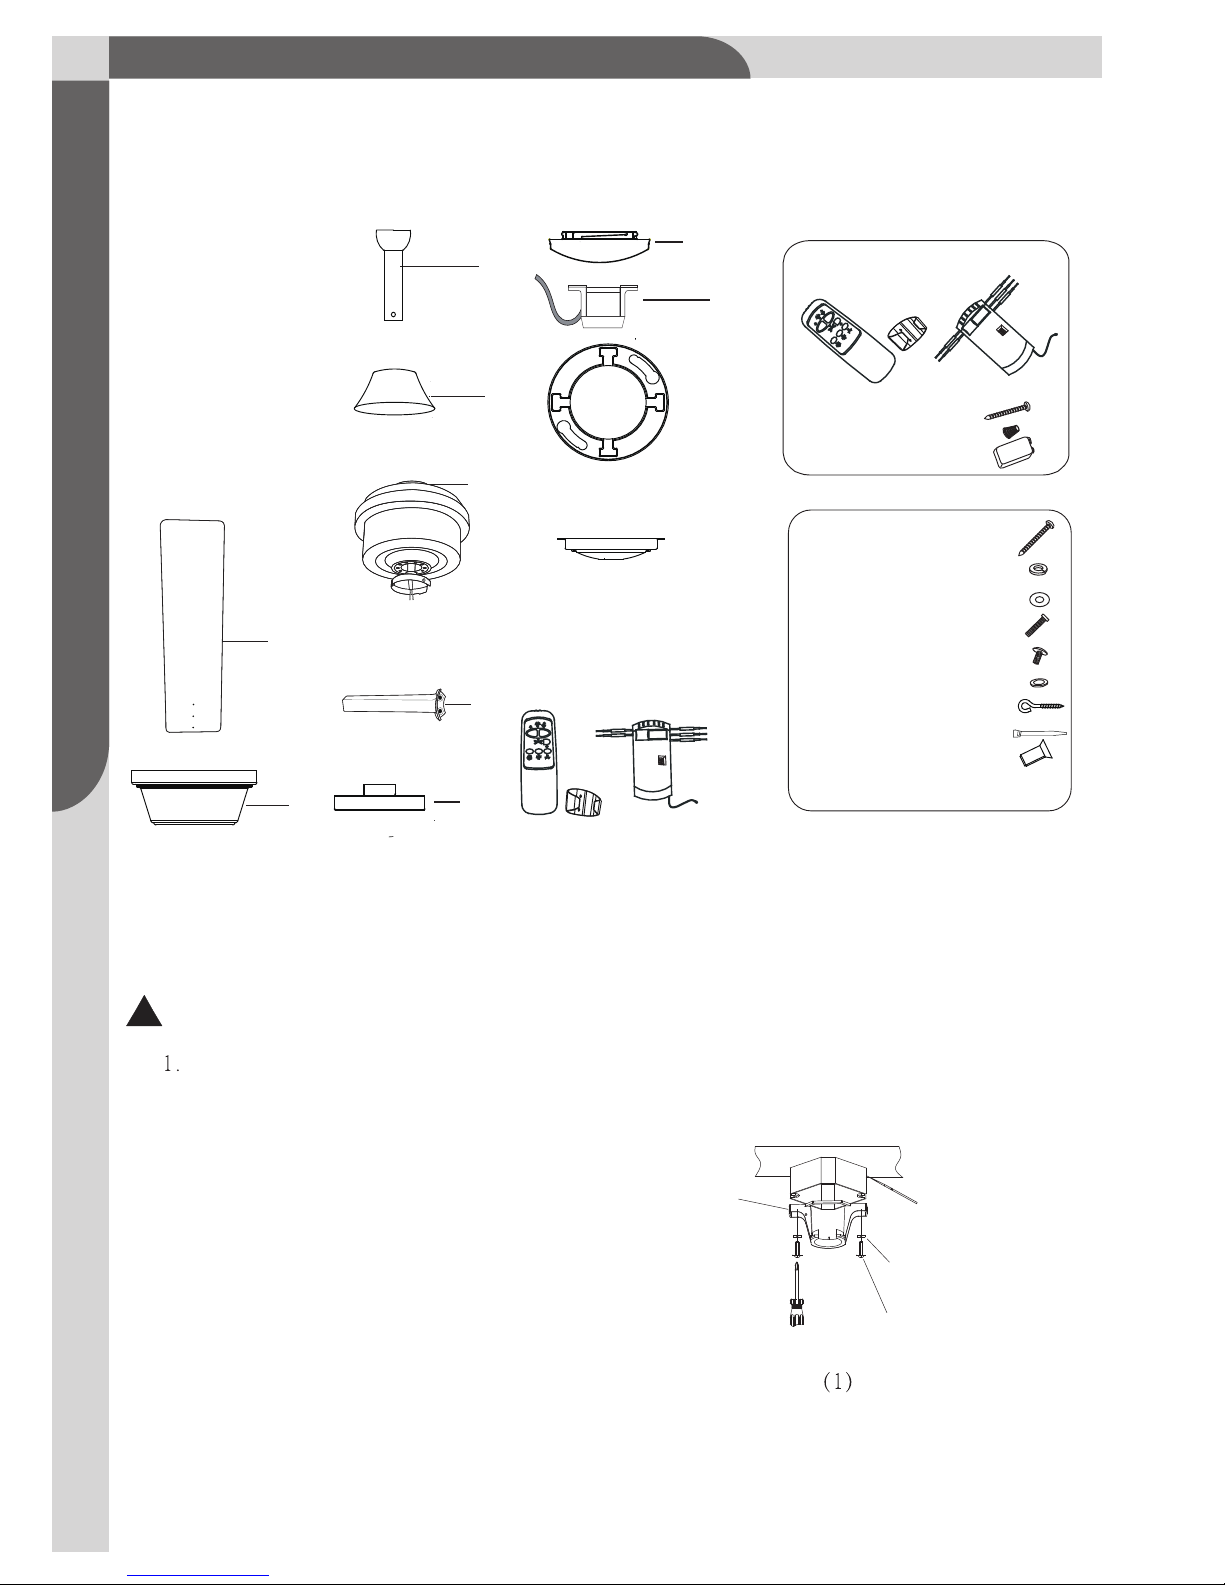
1. Set of blades (5)
2. Canopy assembly
3. Ball/downrod assembly
4. Downrod stand cover
5. Fan motor assembly
6. Blade arms (5)
7. Light kit fitter
8. Glass shade
9. Mounting bracket
10. Canopy cover
11. LED Lamp (preassembled)
12. Transmitter & Holder
13. Receiver
14. Hardware bag
1
2
3
8
9
4
5
6
11-12.Remote Control
Transmitter
& Holder
Receiver
Hardware bag
Wood screws
Wire nuts
Battery
2 pcs
6 pcs
1 pc
14.Hardware bag
Blade screws 16 pcs
16 pcs
Fibre washers
Wood screws 2 pcs
2 pcs
2 pcs
Flat washers
2 pcsSpring washers
Mounting screws
Installing Mounting Bracket
Note: Do not Mount directly to sheet.
(1) Securely attach the mounting bracket to an outlet box marked
“Acceptable for Fan Support ”, using the supplied outlet box screws
with lock washers .
!
10
Unpacking Your Fan
Unpack and inspect fan carefully to be certain all contents are included.
3
Toll Free 1-866-827-4985 model no. 052-8398-2
2
“J” hook 1 pc
Zip tie 1 pc
Blade arm screw 1 pc
7
Mounting
Bracket
Outlet Box
Lock Washer
Outlet Box Screw
11
12 13
 Loading...