

Page 1

PAMS Technical Documentation
NSW-6 Series Transceivers
Service Software
Instructions
Issue 1 12/99 Nokia Mobile Phones Ltd.
Page 2
NSW-6
Service Software Instructions
AMENDMENT RECORD SHEET
PAMS Technical Documentation
Amendment
Number
Date Inserted By Comments
12/99 OJuntune
Page 2
Nokia Mobile Phones Ltd.
Issue 1 12/99
Page 3

PAMS Technical Documentation
Service Software Instructions
CONTENTS
Service Software 5. . . . . . . . . . . . . . . . . . . . . . . . . . . . . . . . . . . . . . . .
General 5. . . . . . . . . . . . . . . . . . . . . . . . . . . . . . . . . . . . . . . . . . . . .
Hardware requirements for Windows 3.1x 5. . . . . . . . . . .
Hardware requirements for Windows 95 5. . . . . . . . . . . .
Software Environment of the Support Modules 5. . . . . . . . .
Required Servicing Equipment 6. . . . . . . . . . . . . . . . . . . . . . .
Installation 7. . . . . . . . . . . . . . . . . . . . . . . . . . . . . . . . . . . . . . . .
Mechanical Connections 7. . . . . . . . . . . . . . . . . . . . . . . . . .
Installing the Software on PC Hard Disk 8. . . . . . . . . . . .
Common Properties of the User Interface 9. . . . . . . . . . . . . . . . . .
Login Dialog 9. . . . . . . . . . . . . . . . . . . . . . . . . . . . . . . . . . . . . . . . .
Main Window 10. . . . . . . . . . . . . . . . . . . . . . . . . . . . . . . . . . . . . . . .
Menu Bar 12. . . . . . . . . . . . . . . . . . . . . . . . . . . . . . . . . . . . . . . . . . . .
Product 12. . . . . . . . . . . . . . . . . . . . . . . . . . . . . . . . . . . . . . . . . . .
Configure 13. . . . . . . . . . . . . . . . . . . . . . . . . . . . . . . . . . . . . . . . .
Tuning 13. . . . . . . . . . . . . . . . . . . . . . . . . . . . . . . . . . . . . . . . . . . .
Testing 13. . . . . . . . . . . . . . . . . . . . . . . . . . . . . . . . . . . . . . . . . . . .
Software 14. . . . . . . . . . . . . . . . . . . . . . . . . . . . . . . . . . . . . . . . . .
Dealer 14. . . . . . . . . . . . . . . . . . . . . . . . . . . . . . . . . . . . . . . . . . . .
View 14. . . . . . . . . . . . . . . . . . . . . . . . . . . . . . . . . . . . . . . . . . . . . .
Help 15. . . . . . . . . . . . . . . . . . . . . . . . . . . . . . . . . . . . . . . . . . . . . .
Mouse Cursors 16. . . . . . . . . . . . . . . . . . . . . . . . . . . . . . . . . . . . . . .
Reserved Keys 16. . . . . . . . . . . . . . . . . . . . . . . . . . . . . . . . . . . . . . .
Short Cut Function Keys 16. . . . . . . . . . . . . . . . . . . . . . . . . . . .
Alt Hot Keys 16. . . . . . . . . . . . . . . . . . . . . . . . . . . . . . . . . . . . . . .
Ctrl Hot Keys 16. . . . . . . . . . . . . . . . . . . . . . . . . . . . . . . . . . . . . .
Shift Hot Keys 16. . . . . . . . . . . . . . . . . . . . . . . . . . . . . . . . . . . . .
Key Strokes 17. . . . . . . . . . . . . . . . . . . . . . . . . . . . . . . . . . . . . . .
Help Functions 19. . . . . . . . . . . . . . . . . . . . . . . . . . . . . . . . . . . . . . .
Dialog boxes 19. . . . . . . . . . . . . . . . . . . . . . . . . . . . . . . . . . . . . . . . .
Common Dialog boxes 19. . . . . . . . . . . . . . . . . . . . . . . . . . . . . .
Note Message Box 19. . . . . . . . . . . . . . . . . . . . . . . . . . . . . . .
Query Message Box 19. . . . . . . . . . . . . . . . . . . . . . . . . . . . .
Error Message Box 20. . . . . . . . . . . . . . . . . . . . . . . . . . . . . .
Custom Dialog boxes 21. . . . . . . . . . . . . . . . . . . . . . . . . . . . . . .
Buttons 21. . . . . . . . . . . . . . . . . . . . . . . . . . . . . . . . . . . . . . . . . . . . .
Reporting Status 22. . . . . . . . . . . . . . . . . . . . . . . . . . . . . . . . . . . . .
NSW-6 FEATURES 23. . . . . . . . . . . . . . . . . . . . . . . . . . . . . . . .
Menu bar 23. . . . . . . . . . . . . . . . . . . . . . . . . . . . . . . . . . . . . . . . .
Product 23. . . . . . . . . . . . . . . . . . . . . . . . . . . . . . . . . . . . . . . . . . .
New command 23. . . . . . . . . . . . . . . . . . . . . . . . . . . . . . . . . .
NSW-6
Page No
Issue 1 12/99
Nokia Mobile Phones Ltd.
Page 3
Page 4

NSW-6
Service Software Instructions
Open... command 23. . . . . . . . . . . . . . . . . . . . . . . . . . . . . . . .
Initialise... command 23. . . . . . . . . . . . . . . . . . . . . . . . . . . . .
Normal Mode 24. . . . . . . . . . . . . . . . . . . . . . . . . . . . . . . . . . . .
Local Mode 24. . . . . . . . . . . . . . . . . . . . . . . . . . . . . . . . . . . . .
Faultlog command 24. . . . . . . . . . . . . . . . . . . . . . . . . . . . . . .
Activate Faultlog 25. . . . . . . . . . . . . . . . . . . . . . . . . . . . . . . . .
Edit Faultlog 25. . . . . . . . . . . . . . . . . . . . . . . . . . . . . . . . . . . .
FastNAM command 25. . . . . . . . . . . . . . . . . . . . . . . . . . . . . .
Exit command 25. . . . . . . . . . . . . . . . . . . . . . . . . . . . . . . . . . .
Tuning 26. . . . . . . . . . . . . . . . . . . . . . . . . . . . . . . . . . . . . . . . . . . .
AFC... command 26. . . . . . . . . . . . . . . . . . . . . . . . . . . . . . . . .
VCTCXO... command 27. . . . . . . . . . . . . . . . . . . . . . . . . . . .
Modulator Output... command 29. . . . . . . . . . . . . . . . . . . . .
Tx Power... command 30. . . . . . . . . . . . . . . . . . . . . . . . . . . .
Tx I/Q... command 33. . . . . . . . . . . . . . . . . . . . . . . . . . . . . . .
RSSI Digital (AGC)... command 34. . . . . . . . . . . . . . . . . . . .
RSSI Analog... command 36. . . . . . . . . . . . . . . . . . . . . . . . .
Rx Audio... command 38. . . . . . . . . . . . . . . . . . . . . . . . . . . .
Tx Audio... command 39. . . . . . . . . . . . . . . . . . . . . . . . . . . . .
Charging... command 40. . . . . . . . . . . . . . . . . . . . . . . . . . . .
LCD... command 41. . . . . . . . . . . . . . . . . . . . . . . . . . . . . . . . .
Testing 42. . . . . . . . . . . . . . . . . . . . . . . . . . . . . . . . . . . . . . . . . . . .
RF Controls... command 42. . . . . . . . . . . . . . . . . . . . . . . . . .
Self Tests... command 44. . . . . . . . . . . . . . . . . . . . . . . . . . . .
ADC Readings... command 46. . . . . . . . . . . . . . . . . . . . . . .
Audio... command 47. . . . . . . . . . . . . . . . . . . . . . . . . . . . . . .
User Interface... command 49. . . . . . . . . . . . . . . . . . . . . . . .
Software 50. . . . . . . . . . . . . . . . . . . . . . . . . . . . . . . . . . . . . . . . . .
Product Profile... command 50. . . . . . . . . . . . . . . . . . . . . . .
Set Default Values... command 52. . . . . . . . . . . . . . . . . . . .
Authority ID... command 53. . . . . . . . . . . . . . . . . . . . . . . . . .
A–key... command 54. . . . . . . . . . . . . . . . . . . . . . . . . . . . . . .
Flash Phone... command 55. . . . . . . . . . . . . . . . . . . . . . . . .
Dealer 56. . . . . . . . . . . . . . . . . . . . . . . . . . . . . . . . . . . . . . . . . . . .
User Settings... command 56. . . . . . . . . . . . . . . . . . . . . . . . .
Short Code Memory... command 58. . . . . . . . . . . . . . . . . . .
Calling cards... command 60. . . . . . . . . . . . . . . . . . . . . . . . .
Subscriber data programming... command 62. . . . . . . . . .
P/RSID programming... command 64. . . . . . . . . . . . . . . . . .
Intelligent Roaming Database... command 66. . . . . . . . . .
User Data Transfer... command 69. . . . . . . . . . . . . . . . . . . .
View 70. . . . . . . . . . . . . . . . . . . . . . . . . . . . . . . . . . . . . . . . . . . . . .
Quick/RF Info... command 70. . . . . . . . . . . . . . . . . . . . . . . .
Phone Identity... command 71. . . . . . . . . . . . . . . . . . . . . . . .
PAMS Technical Documentation
Appendix 1, Vocabulary 72. . . . . . . . . . . . . . . . . . . . . . . . . . . . . . . . . .
Page 4
Nokia Mobile Phones Ltd.
Issue 1 12/99
Page 5

PAMS Technical Documentation
Service Software
General
To run the After Sales SW, a parallel port software protection device
(PKD–1) has to be connected. TDF–4 box must connected to PC for
flashing purposes. The user can use PC–locals functions in modules for
testing NSW-6 mobile stations (MS). The test functions send test mes-
sages from PC to MS and receive results and show them in the PC dis-
play. The messages can be sent via M2BUS or FBUS.
Note: if this software is to be run on laptops, the power saving feature
MUST be switched off.
Hardware requirements for Windows 3.1x
The recommended minimum hardware standard to run Service Software
is any computer which is 386 33 MHz or greater with at least 4 MB of
memory and VGA type display (640 x 480). This assumes that only the
WinTesla with After Sales Support Modules is active, i.e. other Windows
packages are not running in the background.
NSW-6
Service Software Instructions
Hardware requirements for Windows 95
The recommended minimum hardware standard to run Service Software
is any computer which has Pentium processor, memory 8 MB and meets
HW requirements recommended by Microsoft.
Software Environment of the Support Modules
The Service Software user interface is intended for the following environ-
ments: Microsoft Windows 3.1x (enhanced mode) and Windows 95envi-
ronment running in enhanced mode. Support for Microsoft NT may be
added, if required. Detailed information about Windows and application
usage can be found from the Microsoft Windows Version 3.1 Users Guide
chapter one (Windows Basics) and chapter two (Application Basics).
As an ordinary Windows application, the main idea in the user interface is
that selections are made with menus, push buttons and shortcut keys.
Selections can be done by using keyboard and/or mouse. There is always
a status bar displayed at the bottom of the main window which contains
information about current actions.
Issue 1 12/99
Nokia Mobile Phones Ltd.
Page 5
Page 6

NSW-6
Service Software Instructions
Required Servicing Equipment
– Computer: At least IBM 80386 or compatible with one unused serial
port (COM1 or COM2)
mended
– Operating System: DOS Version 3.2 or later
– If PCLStart in use: DOS 6.22 and IBM 80486 or compatible
– Display: Any 80–character text display
– Service software version for 3.5” disk (product code: 0774099)
– Software protection key PKD–1 (product code: 0750018)
– Service MBUS Cable DAU–9S (product code: 0730108)
– Service Audio Box JBA–6 (product code: 0770184)
– External Antenna Cable XRC–2 (product code 0730180)
PAMS Technical Documentation
*)
, one parallel port (LPT1), hard disk recom-
– Flash Adapter FLA–9 (product code: 0770187)
*)
Note: A number of PC’s of an older generation use the Intel, National Semiconductor, or United
Microelectronics IC 8250 as the serial port UART. This is a comparatively inefficient circuit for current
purposes and does not necessarily support the M2BUS adapter at 9600 baud. The newer UART’s
NS16450 and NS16550AF of National Semiconductor offer solutions for these problems.
Page 6
Nokia Mobile Phones Ltd.
Issue 1 12/99
Page 7

PAMS Technical Documentation
Installation
Mechanical Connections
Caution: Make sure that you have switched off the PC and the printer
before making connections.
Caution: Do not connect the PKD–1 key to the serial port. You may
damage your PKD–1 !
The software controls the phone via a separate adapter connected to the
serial port of the PC, and to the telephone’s M2BUS (DAU–9S).
Attach the dongle PKD–1 to the parallel port 1 (25–pin female D–connector) of the PC. When connecting PKD–1 to the parallel port, be sure that
you insert the computer side of the PKD–1 to the PC (male side). If you
use a printer on parallel port 1, install the PKD–1 between the PC and
your printer cable.
NSW-6
Service Software Instructions
The PKD–1 should not affect devices working with it. If some errors occur
(errors in printing are possible) please try printing without the PKD–1. If
printing is OK without the PKD–1 please contact your dealer. We will offer
you a new PKD–1 in exchange for your old one.
Issue 1 12/99
Nokia Mobile Phones Ltd.
Page 7
Page 8

NSW-6
Service Software Instructions
Installing the Software on PC Hard Disk
The program is delivered on a diskette and is copy protected with a
dongle PKD–1. It must be present in parallel port when using Service
software.
The program can also be installed on the hard disk, which is recommended to obtain a maximal data access rate.
Keep the original diskette safe to enable upgrading of the program !
If you plan to use PCL Start service software, you must install it before
installing Service software, see the PCL Start installation instructions.
To install the new Service software program, follow the steps below:
1. insert the new Service software diskette
into drive A: of your computer
2. start Windows, and open File Manager
PAMS Technical Documentation
log into drive a:
3. start INSTALL.EXE and
install Service software to drive C:
type
A:
and press <Enter>
type C: and press <Enter>
Page 8
Nokia Mobile Phones Ltd.
Issue 1 12/99
Page 9
PAMS Technical Documentation
Service Software Instructions
Common Properties of the User Interface
This chapter describes how the User Interface CLF must appear to the
user.
The User Interface MUST be capable of being driven without the use of a
mouse, as the service engineer rarely has space on the bench to use a
mouse.
Login Dialog
When the Service Software application is invoked, by clicking on the Service Software icon, the Login dialog box will be displayed on the screen.
NSW-6
Nokia logo and application name bitmap (–)
Application version static text (–)
Copyright notice static text (–)
Login Box edit box (–)
OK button (default key)
Issue 1 12/99
Displays Nokia logo and name of the application.
Contains the name and version of the application.
Copyright is informed as: “Nokia Mobile Phones (c)
1995–1999. All Rights Reserved”.
The user Login ID edit box, where the user enters his faultlog
user name. (See Faultlog User Guide)
The user name is stored in memory and the dialog box is
closed. When the dialog box is closed, the application starts.
Nokia Mobile Phones Ltd.
Page 9
Page 10

NSW-6
Service Software Instructions
Cancel button (ESC)
The Dialog box is closed and application is started, but the
Faultlog feature is disabled.
Help button (F1)
Activates the Windows Help application and displays context
sensitive Help.
Main Window
PAMS Technical Documentation
Title bar
The
title bar
A title bar contains the following elements:
• Application Control–menu button
• Maximise button
• Minimise button
• Name of the application
• Restore button
The properties of these elements and their usage is described in Ref 3–
Microsoft Windows Version 3.1 Users Guide chapter one (Windows Basics) and chapter two (Application Basics).
Menu bar
menu bar
The
tions. The menu bar is a dynamic element and is dependent on the
dongle type fitted, and whether a phone is connected.
Underlined characters in menu names and options indicates that the
menu selection can be done by pressing
tions can also be selected by activating menu bar with
key ) and using arrow–keys to highlight the desired menu. In that case,
selection is done by pressing
is located at the top of the window.
is below the title bar and contains all available menu selec-
Enter
Alt+ underlined character
Alt
– key ( or
.
. Op-
F10
Page 10
Menus can also be selected by using the mouse as described in Ref
3–Microsoft Windows Version 3.1 Users Guide
Nokia Mobile Phones Ltd.
Issue 1 12/99
Page 11

PAMS Technical Documentation
Status bar
The
status bar
window. The status bar contains information about the menu selections
and events.
The left area of the status bar describes the actions of menu items as the
user uses the arrow keys to navigate through menus.
The status bar texts are explained in detailed in each of command’s description.
The right areas of the status bar indicate which of the following keys are
latched down:
Indicator Description
USER Entered Login ID.
CAP The Caps Lock key is latched down.
is displayed at the bottom of the Service Software main
NSW-6
Service Software Instructions
NUM The Num Lock key is latched down.
SCRL The Scroll Lock key is latched down.
Tool bar
The
tool bar
this document.
is NOT defined and will not be implemented until specified by
Issue 1 12/99
Nokia Mobile Phones Ltd.
Page 11
Page 12
NSW-6
Service Software Instructions
Menu Bar
The Service Software package will have two menu bar configurations.
The first, is an abbreviated version that contains the minimum number of
menus that allows package configurations when a phone is NOT connected. The second is described below:
The menu bar MUST only contain the follow menus for the Service Software package when a phone is connected:
roduct*
• P
onfigure*
• C
uning
• T
sting
• Te
oftware
• S
• D
ealer
PAMS Technical Documentation
Product
iew
• V
elp*
• H
* – always displayed, even if no phone is connected.
A menu is broken down into sections that are indicated with menu separa-
tors. Each sections identifies a logical difference from itself and other sections, i.e. between transmitter and receiver. Any items that are required to be
added to a menu lists will be added on the bottom of the appropriate menu
section list. If a new item is to be added which is common to two or more
phone types, then that menu item will become a common menu item.
The menu lists will use the Microsoft [...] symbol after an item name to indicate that selecting that item will NOT initiate an operation immediately,
i.e. a dialog box will be displayed for the user to select options or type in
data and press the OK button before the operation is performed.
The Product menu contains the following menu items:
ew Ctrl+R
• N
Page 12
pen...
• O
lose
• C
nitialize
• I
• Normal Mode F5
• Local Mode Shift+F5
aultlog
•F
• Activate Faultlog... F9
dit Faultlog...
• E
•Fast NAM (available only if fastNAM installed)
Nokia Mobile Phones Ltd.
Issue 1 12/99
Page 13
PAMS Technical Documentation
• Exit Alt+F4
Configure
The Configure menu contains the following items:
• O
ptions...
es...
• Bus
• D
irectories...
aultlog...
• F
• Phone Type Specific configuration items
(where applicable)
•Fast NAM (active if installed)
NSW-6
Service Software Instructions
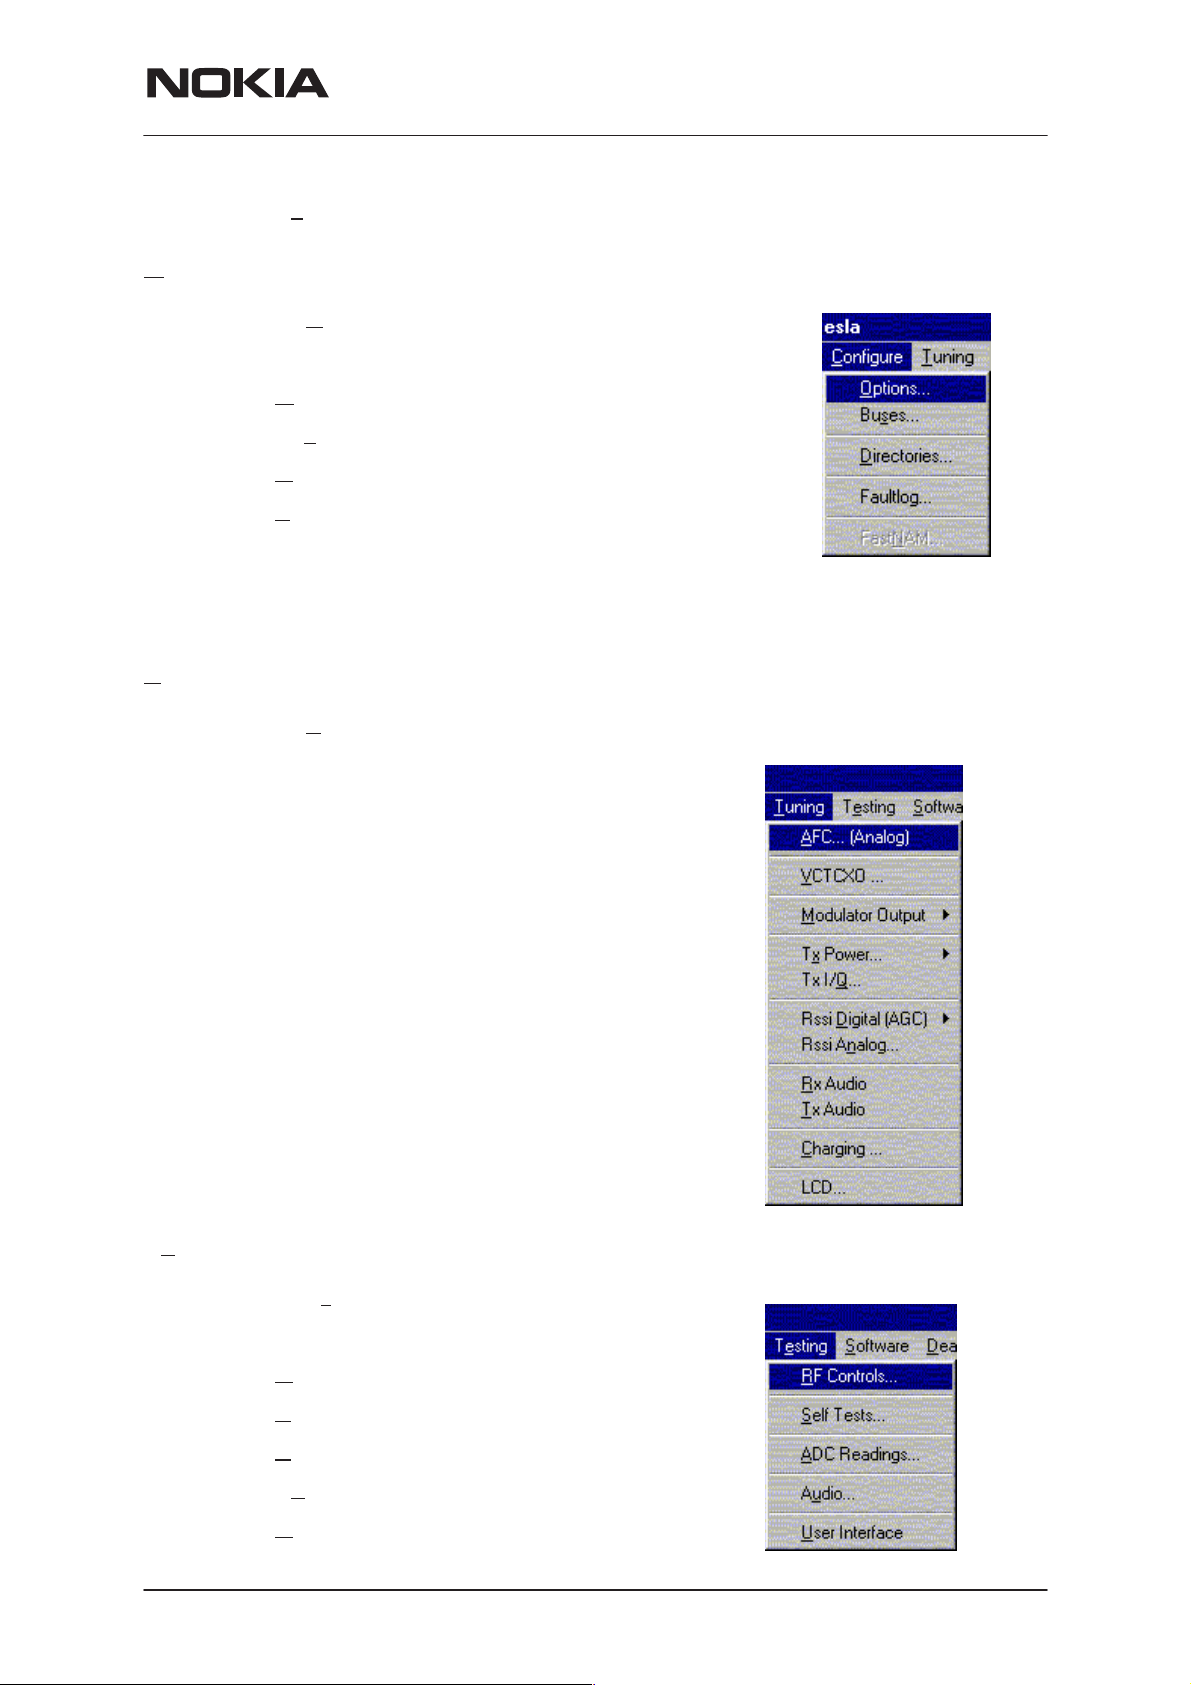
Tuning
Testing
The Tuning menu contains the following menu sections:
• AFC..(Analog)
• VCTCXO...
• Modulator Output
• Tx Power...
• Tx I/Q...
• Rssi Digital (AGC)
• Rssi Analog
• Rx Audio
• Tx Audio
• Charging...
• LCD...
The Testing menu contains the following sections:
• R
• Self Tests
• A
• Audio
• U
Issue 1 12/99
F Controls...
DC Readings
ser Interface
Nokia Mobile Phones Ltd.
Page 13
Page 14

NSW-6
Service Software Instructions
Software
The Software menu contains the following menu sections:
• P
roduct Profile...
PAMS Technical Documentation
Dealer
• Set Default V
• A
uthority ID...
• F
lash Phone...
• A key...
The Dealer menu contains the following menu sections:
• U
ser Settings...
• Short C
• Calling cards...
• Subscriber data programming..
• P/RSID programming...
• Intelligent Roaming Database...
• User Data Transfer...
alues...
ode Memory...
View
The View menu contains the following sections:
• Q
uick/RF Info...
• Phone Identity...
Page 14
Nokia Mobile Phones Ltd.
Issue 1 12/99
Page 15
PAMS Technical Documentation
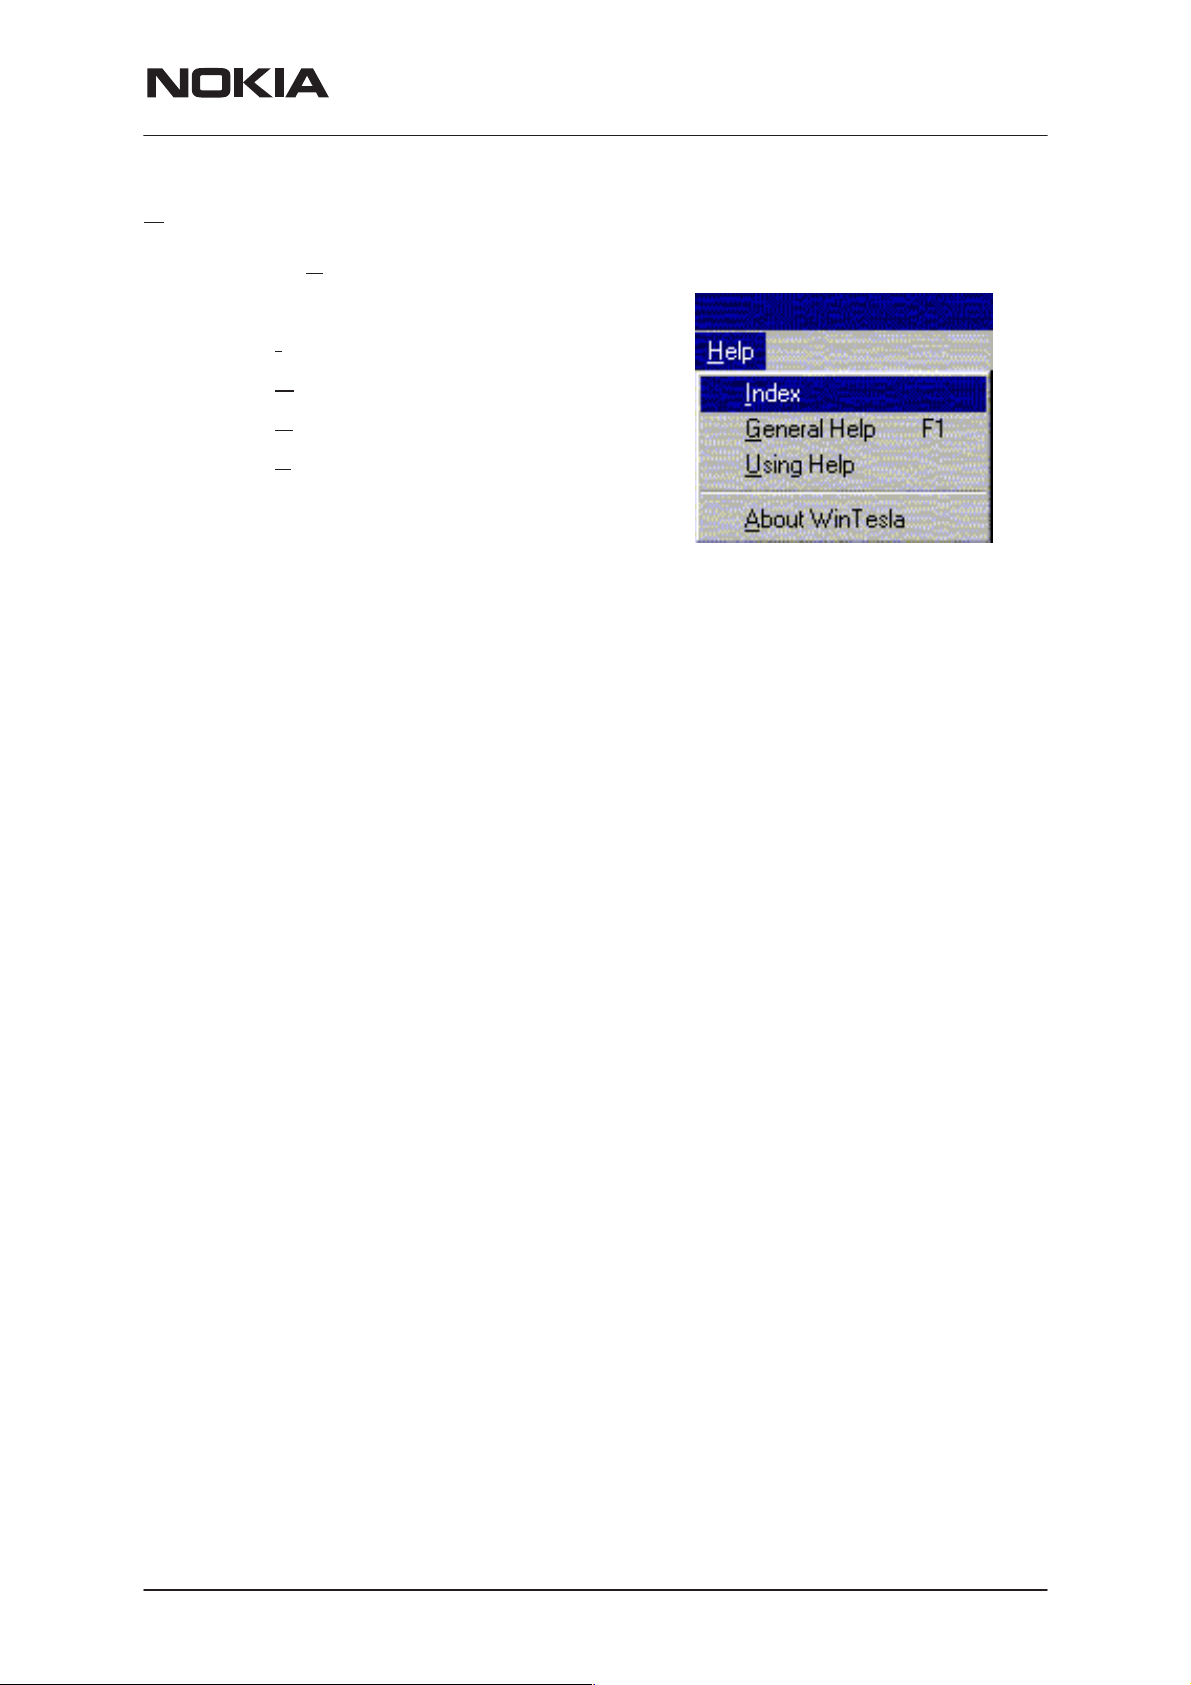
Help
The Help menu contains the following menu items:
• I
ndex
• G
eneral Help
• U
sing Help
• A
bout WinTesla
NSW-6
Service Software Instructions
Issue 1 12/99
Nokia Mobile Phones Ltd.
Page 15
Page 16

NSW-6
Service Software Instructions
Mouse Cursors
The standards Windows pointer will be used as the mouse cursor.
During time consuming tasks e.g. communication to phone, an hour glass
will be shown informing the user that a task is in progress. The application
uses the hour glass cursor to inform user that the application has taken
the control and any actions from user will be ignored.
When a function is initiated, the hour glass will be displayed and when the
function has finished the mouse pointer will return to normal.
Reserved Keys
The following Hot keys and Short Cut keys are reserved either as Microsoft standard keys or as part of the Common Look and Feel specified by
this document.
PAMS Technical Documentation
Short Cut Function Keys
Key Description Defined by
F1 Context Sensitive Help Microsoft
F5 Normal Mode NMP
Shift+F5 Local Mode NMP
F9 Activate Faultlog NMP
F10 Goto Menu Bar Microsoft
Ctrl+F4 Close Active Window Microsoft
Alt Hot Keys
Key Description Defined by
Alt+F4 Exit Active Application Microsoft
Alt+H Help Microsoft
Ctrl Hot Keys
Key Description Defined by
Ctrl+N File – New Microsoft
Ctrl+O F
Ctrl+P F
Ctrl+R P
Shift Hot Keys
Shift+F5 Local Mode NMP
Page 16
ile – Open Microsoft
ile – Print Microsoft
roduct – New NMP
Nokia Mobile Phones Ltd.
Issue 1 12/99
Page 17

PAMS Technical Documentation
Key Strokes
Key Description Defined by
Alt+P Product Menu NMP
NSW-6
Service Software Instructions
Alt+P,N N
Alt+P,O Open NMP
Alt+P,C Close NMP
Alt+P,I I
Alt+P,I,N Normal Mode NMP
Alt+P,I,L Local Mode NMP
Alt+P,F F
Alt+P,F,A Activate Faultlog NMP
Alt+P,F,E Edit Faultlog NMP
Alt+P,N Fast N
Alt+P,X Exit Application NMP
Alt+C Configure NMP
Alt+C,O O
Alt+C,D Directories NMP
Alt+C,F Faultlog NMP
ew NMP
nitialize Pop–up NMP
aultlog Pop–up NMP
AM NMP
ption NMP
Alt+C,N Fast N
Alt+C,G GPIB instruments (disabled) NMP
Alt+T Tuning Menu NMP
Alt+T,A AFC (Analog) NMP
Alt+T,V VCTCXO NMP
Alt+T,M M
Alt+T,X Tx Power NMP
Alt+T,Q Tx I/Q
Alt+T,D Rssi Digital (AGC) NMP
Alt+T,N Rssi Analog NMP
Alt+T,R R
Alt+T,T Tx Audio NMP
Alt+T,C Charging NMP
Alt+E Te
Alt+E,R R F Controls NMP
AM NMP
odulator Output NMP
NMP
x Audio NMP
sting Menu NMP
Alt+E,S S
Issue 1 12/99
elf Tests NMP
Nokia Mobile Phones Ltd.
Page 17
Page 18

NSW-6
Service Software Instructions
Alt+E,A ADC Readings NMP
PAMS Technical Documentation
Alt+E,D Aud
Alt+E,U U
Alt+S S
Alt+S,I P
Alt+S,P P
Alt+S,S P
Alt+S,V Set Default V
Alt+S,W V
Alt+S,A A
Alt+S,F F
Alt+D D
Alt+D,D P
Alt+D,U U
Alt+D,C S
Alt+D,V Set UI/DEV Default V
io NMP
ser Interface NMP
oftware Menu NMP
roduct Profile NMP
alues NMP
a NMP
uthority ID NMP
lash Phone NMP
ealer Menu NMP
ser Settings NMP
hort Code Memory NMP
NMP
NMP
NMP
alues NMP
Alt+D,E Inte
Alt+D,F System Service F
Alt+D,S S
Alt+D,R P/R
Alt+D,I I
Alt+V V
Alt+V,Q Q
Alt+V,P P
Alt+H H
Alt+H,I I
Alt+H,G G
Alt+H,U U
Alt+H,A A
rnational access code NMP
ubscriber data programming NMP
SID programming NMP
ntelligent Roaming Database NMP
iew Menu NMP
uick/RF Info NMP
hone Identity NMP
elp Menu Microsoft
ndex Microsoft
eneral Help Microsoft
sing Help Microsoft
bout WinTesla NMP
eature codes NMP
Page 18
Nokia Mobile Phones Ltd.
Issue 1 12/99
Page 19

PAMS Technical Documentation
Help Functions
The Help User Interface will be the standard Windows help tool called
WinHelp.
The context sensitive help is activated with F1–key. Help contains also
Using Help which describes how to use help facility. Refer to the Windows
manual for detailed description on the Windows Help.
Dialog boxes
The Service Software application uses many different dialog boxes. Dialog boxes are used to display data and prompt the user for input.
Dialog boxes are opened from menus or with shortcut keys. Dialog boxes
have different properties but some features are common.
All service dialog boxes must be modal, that is, the user will not be able to
start another operation without first closing the present dialog box.
NSW-6
Service Software Instructions
All dialog boxes will contain the following entities:
– Help button
– Title bar
– At least one button other than Help
– Application Control–menu Button
Common Dialog boxes
This sections describes the common dialog boxes used in the Service
Software package, and the context in which they will be used.
Note Message Box
When the user has made an illegal selection, a
will be opened and message text is displayed. The message box is also
opened when the program has some information for the user. The size of
the dialog box may vary. An information dialog box is recognized by the
!–icon.
The dialog box will also contain an OK button and a Help button.
note message box
dialog
OK button (default key):
Help button (Alt+H):
Query Message Box
Confirmations and questions are asked in
dialog box is recognized by the ?–icon.
Issue 1 12/99
Acknowledge displayed information and continue. The dialog
box is closed after selection.
Opens context sensitive help as F1–key does.
a query message box
Nokia Mobile Phones Ltd.
. A query
Page 19
Page 20

NSW-6
Service Software Instructions
The dialog box will also contain a Yes button, a No button, and a Help
button.
Yes button (Alt+Y or Y) (default key):
Accepts confirmation or question.
No button (Alt+N or N):
Denies confirmation or question.
Help button (Alt+H):
Opens context sensitive help as F1–key does.
The buttons may also be OK and Cancel. The operation of these buttons
are the same as in the Note dialog box.
Error Message Box
PAMS Technical Documentation
Error message dialog boxes use the Stop–icon. When a “Stop”–dialog
box is shown, the current operation is terminated.
The dialog box has a description about the failed operation and reason.
Pressing F1 (Help) application opens the appropriate help topic that gives
information about recommended actions.
The dialog box will also contain an OK button and a Help button.
OK button (default key):
Acknowledges displayed information and terminate current operation. The dialog box is closed after selection.
Help button (Alt+H):
Open context sensitive help as F1–key does.
Page 20
Nokia Mobile Phones Ltd.
Issue 1 12/99
Page 21

PAMS Technical Documentation
Custom Dialog boxes
All custom dialog boxes will contain the predefined buttons as defined below in the section –
require additional button types, but the addition of these non–standard
buttons should be carefully considered to minimise any inconsistencies
between implementations.
The buttons will be positioned down the right–hand side of the dialog
boxes. The default action will be OK, except where that default action
could result in an irretrievable failure.
All tuning dialogs that contain tuning results, will display the old tuned
data read from the phone before the tuning was performed, as well as the
newly tuned data.
List boxes will be used to display lists of data, such as tuning data, test
results etc.
Buttons.
NSW-6
Service Software Instructions
However, it is recognised that features may
Buttons
The use of Radio buttons should be limited and carefully considered. The
use of radio buttons defines the number of possible choices available to
the user, which may be acceptable for one project, but not for another.
All buttons must be the Microsoft style of buttons.
In general, the default button will be the action button, the Close button or
the Yes button, but this will depend on the context of the dialog box that
the button is associated with.
(action) button:
Accepts and validates entered settings and values and closes
the dialog. If the values have not been changed, then no action
will be taken. The status bar will reflect the status. The user
should only be queried, if the settings or values accepted will
over–write data that CAN NOT be reproduced.
A greyed OK button indicates that settings selected by the user
are not acceptable.
Close button:
Closes the current dialog box. Does not send or store anything
and closes the dialog. The Close button is only used for dialogs that do not set or change any data.
Cancel button (Esc):
Yes button (ALT+Y or Y):
Issue 1 12/99
Cancel operation. Does not send or store anything and closes
the dialog box.
A greyed Cancel button indicates that it is not possible to quit
from this dialog box.
Replies Yes to a question asked of the user.
Nokia Mobile Phones Ltd.
Page 21
Page 22

NSW-6
Service Software Instructions
No button (ALT+N or N):
Replies No to a question asked of the user.
Help button (ALT+H):
Opens context sensitive help as F1–key does.
Reporting Status
The status bar will be used to report the present status to the user. When
a feature is initiated, the status bar will be updated with a brief description
of the function. The status bar will also be updated at key points in a time
consuming function.
If an error is to be reported to the user, it will be displayed in the status
bar as well as displayed in a common error dialog box. This will mean the
user is not delayed from progressing on to the next operation unless an
error occurs, in which case, the user will have to acknowledge the error
by pressing the OK button.
PAMS Technical Documentation
Page 22
Nokia Mobile Phones Ltd.
Issue 1 12/99
Page 23

PAMS Technical Documentation
NSW-6 FEATURES
Menu bar
After Sales SW’s menus follows the menu structure specified in WinTesla
User Interface Specification. This specification will describe functionality
that differs from WinTesla specification.
Product
New command
Activation Status Bar Text
Alt, P, N Rescan a new phone
Ctrl+R
NSW-6
Service Software Instructions
If phone is changed (with same phone type only serial number is
changed) phone will be initialised to local mode. If phone is changed to
different phone type the current DLLs are unloaded and new ones are
loaded for that phone.
If the Quick/RF Info view is open, window will be automatically updated.
If Phone Information view is open, it will be automatically updated.
pen... command
O
Activation Status Bar Text
Alt, P, O Force load phone specific functionality
Phone is set to local mode.
Initialise... command
Activation Status Bar Text
Alt, P, I
Opens a submenu for Normal Mode and Local Mode
Issue 1 12/99
Nokia Mobile Phones Ltd.
Page 23
Page 24

NSW-6
Service Software Instructions
Normal Mode
Activation Status Bar Text
Alt, P, N Initialises phone to normal (cellular) mode
F5
When normal mode has been activated or program has been started,
self–test results will be asked from MCU. If any fault was found in the
tests, an error message is shown. If normal mode has been set successfully (no self test error has been found), and paging listening has been
started, the used AFC value is requested from MS.
Initialisation routine checks phone’s cellular type and if unsupported
phone is detected, application unloads the DLLs.
The After Sales SW sets automatically the MS state to normal mode
when needed.
PAMS Technical Documentation
If phone identification view is open, window will be automatically updated.
Also if RF Information Window is open it will be updated to quick info
view.
ocal Mode
L
Activation Status Bar Text
Alt, P, L Initialises phone to local mode
Shift+F5
Selection will change the MS state to
Testing or Tuning menus, the After Sales SW software will change automatically the MS state to local.
The After Sales SW sets automatically the MS state to normal mode
when needed.
Also if quick info view is open it will be updated to RF Information view.
aultlog command
F
Activation Status Bar Text
local
. When user selects item from
Page 24
Alt, P, F
Opens a submenu. Only enabled when user has logged in.
Nokia Mobile Phones Ltd.
Issue 1 12/99
Page 25

PAMS Technical Documentation
Activate Faultlog
Activation Status Bar Text
Alt, P, F, A
F9
Activates the faultlog. Only enabled when user has logged in.
E
dit Faultlog
Activation Status Bar Text
Alt, P, F, E
Allows user to edit faultlog entries. Only enabled when a user has logged
in.
NSW-6
Service Software Instructions
FastNAM command
Activation Status Bar Text
Alt, P, N
F8
This menu is only enabled when FastNAM functionality is included in Win-
Tesla.
Ex
it command
Activation Status Bar Text
Alt, P, X
Exits the WinTesla application.
Issue 1 12/99
Nokia Mobile Phones Ltd.
Page 25
Page 26

NSW-6
Service Software Instructions
Tuning
The tuning menu offers functions for ME adjustments.
FC... command
A
Activation Status Bar Text
Alt, T, A Open AFC Tuning dialog box
The next automatic selections are made when this tuning function is activated: – Active Unit = TX
– Operation mode = Analog
– Channel 250 (low)
– Power level 4
– low band
The AFC Tuning dialog is opened.
PAMS Technical Documentation
Page 26
AFC tuning dialog box includes the following items:
Afc scroll bar
Set calibration value to phone
RF I
nfo button (ALT+I):
The current rf state is shown
OK button (ALT+O):
Dialog box is closed and tuning
Cancel button (ESC):
Dialog box is closed and tuning
Help button (Alt+H):
Opens context sensitive help.
Nokia Mobile Phones Ltd.
is saved
is not saved
to phone.
to phone.
Issue 1 12/99
Page 27

PAMS Technical Documentation
VCTCXO... command
Starts Voltage Controlled Temperature compensated oscillator tuning
Activation Status Bar Text
Alt, T, V Open Tuning VCTCXO dialog box
The next automatic selections are made when this tuning function is acti-
vated:
– Active Unit = RX
– Operation Mode = Continuous digital
– low band
– Channel 301
– Power level OFF
Eeprom DAC value is shown.
The measurement is started when ”meas” button is pressed and it is
executed in two steps:
NSW-6
Service Software Instructions
1. User is requested to put signal generator input level –95 dB and frequency 879.030 Mhz
Issue 1 12/99
Nokia Mobile Phones Ltd.
Page 27
Page 28

NSW-6
Service Software Instructions
2. Measurement with input level is executed and the value is shown in the
list box
PAMS Technical Documentation
VCTCXO tuning dialog includes the following items:
VCTCXO List box (ALT+A):
VCTCXO value is shown
Meas button (ALT+M):
The measurement can be started by pressing this button.
RF I
nfo button (ALT+I):
The current rf state is shown
OK button (ALT+O):
Dialog is closed and tuning
Cancel button (ESC):
Dialog is closed and tuning
Help button (Alt+H):
Opens context sensitive help.
is saved
is not saved
to phone.
to phone.
Page 28
Nokia Mobile Phones Ltd.
Issue 1 12/99
Page 29

PAMS Technical Documentation
Modulator Output... command
Activation Status Bar Text
Alt, T, H or L Open Modulator Output Tuning dialog box
Starts modulator output tuning
The next automatic selections are made when this tuning function is ac-
tivated:
– Active Unit = TX
– Operation mode = Continuous Digital
– Channel 730 (low) of 1400 (high)
– Power level 2
– Selected band
NSW-6
Service Software Instructions
Modulator Output Diagram dialog box includes the following items:
Relative Gain Scroll bar
Set calibration value to phone
Old value static
Value from Eeprom
RF I
nfo button (ALT+I):
The current rf state is shown
OK button (ALT+O):
Dialog box is closed and tuning
Cancel button (ESC):
Dialog box is closed and tuning
Help button (Alt+H):
Opens context sensitive help.
is saved
is not saved
to phone.
to phone.
Issue 1 12/99
Nokia Mobile Phones Ltd.
Page 29
Page 30

NSW-6
Service Software Instructions
Tx Power... command
Activation Status Bar Text
Alt, T, X, H or L Open TX Power Tuning dialog box
Starts TX power tuning.
User is first requested to select with which values the tuning is started in
Start Tuning dialog.
PAMS Technical Documentation
Start Tuning dialog includes the following items:
Current Values in PC memory
Tuning values are load from program’s internal memory.
Phone EEPROM Values
Tuning values are load from ME’s EEPROM.
The next automatic selections are made when this tuning function is acti-
vated:
– Active Unit = TX
– Operation Mode = Continuous digital
– Selected band
– Channel 190 (low ) or 500 (high)
– Power level 6
Page 30
Nokia Mobile Phones Ltd.
Issue 1 12/99
Page 31

PAMS Technical Documentation
The TX Power Tuning dialog will be activated automatically after value
selection.
NSW-6
Service Software Instructions
TX Power Tuning dialog includes the following items:
Level DAC list box (ALT+L):
The power is presented in DAMPS level values (2..10) .DACs
can have values from –511 to 512.The tuning position is high-
lighted and can be tuned with +/– keys or left/right cursor
keys or scroll bar.
Ch A radio button: Tuning channel A. Frequency is shown.
Ch B radio button: Tuning channel B. Frequency is shown.
Ch C radio button: Tuning channel C. Frequency is shown.
Ch D radio button: Tuning channel D. Frequency is shown.
+/– buttons:
+ and – buttons will cause power DAC changing by 1steps .
++/–– buttons:
+ and – buttons will cause power DAC changing by 10 steps .
OK button (ENTER):
Dialog is closed and tuning
Cancel button (ESC):
Dialog is closed and tuning
is saved
is not saved
to phone.
to phone.
Issue 1 12/99
Nokia Mobile Phones Ltd.
Page 31
Page 32

NSW-6
Service Software Instructions
Calculate button (ALT+C):
Activate calculation
When selections are used, the power value checking is made and if it is
not succeeded, error message is shown.
Help button (Alt+H):
Opens context sensitive help.
RF I
nfo button (ALT+I):
The current rf state is shown
PAMS Technical Documentation
Page 32
Nokia Mobile Phones Ltd.
Issue 1 12/99
Page 33

PAMS Technical Documentation
Tx I/Q... command
Activation Status Bar Text
Alt, T,Q Open TX I/Q Tuning dialog box
This function is used for tuning TX I and Q branch DC offset and phase
offset.
The function opens same Start Tuning dialog as with TX Power Tuning.
Start Tuning With list box (ALT+S):
Current in PC memory
Tuning values are load from program’s internal memory.
Phone EEPROM
Tuning values are load from ME’s EEPROM.
The next automatic selections are made when this function is activated:
NSW-6
Service Software Instructions
– Active Unit = TX
– Operation Mode = analog
– Low band
– Channel 190
– Power level 4
The TX I/Q Tuning dialog is opened.
TX I/Q Tuning includes the following items:
Tune TX I DC Offset scroll bar (ALT+I):
Tune TX Q DC Offset scroll bar (ALT+Q):
Issue 1 12/99
The DC Offset is shown as DAC value.
With this selection the I branch DC Offset is tuned.
The value range is –32...31.
The operation of this function is the same as one above, ex-
cept with this selection the Q branch DC Offset is tuned.
The value range is –32...31.
Nokia Mobile Phones Ltd.
Page 33
Page 34

NSW-6
Service Software Instructions
Tune Phase Difference scroll bar (ALT+P):
The operation of this function is the same as one above, ex-
cept with this selection the Phase Offset is tuned. The value
range is –32...31.
OK button (ALT+O):
Dialog box is closed and tuning
Cancel button (ESC):
Dialog box is closed and tuning
RF I
nfo button (ALT+I):
The current rf state is shown
Help button (Alt+H):
Opens context sensitive help.
RSSI Digital (AGC)... command
PAMS Technical Documentation
is saved
is not saved
to phone.
to phone.
Activation Status Bar Text
Alt, T, D, H or L Open the Tuning AGC dialog box
Starts Automatic Gain Control calibration. This means Received Signal
Strenght indicators in digital mode.
The next automatic selections are made when this tuning function is activated:
– Active Unit = RX
– Operation Mode = Continuous digital
– Selected band
– Channel 301 (low) or 500 (high )
– Power level 2
Eeprom DAC values is shown and the measurement is started by press-
ing Meas button. Measurement is done in eleven steps:
1. User is requested to put signal generator input level –95 dB and frequency 879.030 MHz
2. Measurement with input level is executed
3. User is requested to put signal generator input level –85 dB and frequency 879.030 MHz
Page 34
4. Measurement with input level is executed
5. User is requested to put signal generator input level –75 dB and frequency 879.030 MHz
6. Measurement with input level is executed
7. User is requested to put signal generator input level –65 dB and frequency 879.030 MHz
8. Measurement with input level is executed
9. User is requested to put signal generator input level –55 dB and frequency 879.030 MHz
Nokia Mobile Phones Ltd.
Issue 1 12/99
Page 35

PAMS Technical Documentation
10. Measurement with input level is executed
11. The AGC tuning dialog will be updated when previous steps are done
NSW-6
Service Software Instructions
AGC tuning dialog includes the following items:
RF level AGC List box (ALT+R):
DAC values is shown
Meas button (ALT+M):
The measurement can be started by pressing this button.
OK button (ALT+O):
Dialog is closed and tuning
Cancel button (ESC):
Dialog is closed and tuning
RF Info button (ALT+I):
The current rf state is shown
Help button (Alt+H):
Opens context sensitive help.
is saved
is not saved
to phone.
to phone.
Issue 1 12/99
Nokia Mobile Phones Ltd.
Page 35
Page 36

NSW-6
Service Software Instructions
RSSI Analog... command
Activation Status Bar Text
Alt, T, N Open the Tuning RSSI dialog box
This function is used for tuning analog RSSI.
The next automatic selections are made when this tuning function is acti-
vated:
– Active Unit = RX
– Operation Mode = analog
– Power Level OFF
– Channel 300
– Low band
Values from Eeprom is shown and the measurement is started when the
”meas” button is pressed and it is executed in five steps:
PAMS Technical Documentation
1. User is requested to put signal generator input level –113 dB and frequency 879.300 MHz
2. Measurement with input level is executed
3. User is requested to put signal generator input level –51 dB and frequency 879.300 MHz
4. Measurement with input level is executed
5. The RSSI tuning dialog will be updated when previous steps are done
Page 36
Nokia Mobile Phones Ltd.
Issue 1 12/99
Page 37

PAMS Technical Documentation
RSSI analog tuning dialog has following items:
RSSI value list box
DAC values is shown
NSW-6
Service Software Instructions
Meas button (ALT+M):
The measurement can be started by pressing this button.
OK button (ENTER):
Dialog is closed and tuning
Cancel button (ESC):
Dialog is closed and tuning
Help button (Alt+H):
Opens context sensitive help.
is saved
to phone.
is not saved
to phone.
Issue 1 12/99
Nokia Mobile Phones Ltd.
Page 37
Page 38

NSW-6
Service Software Instructions
Rx Audio... command
Activation Status Bar Text
Alt, T, R Starts Rx audio tuning
The next automatic selections are made when this function is activated:
– Active Unit = RX
– Operation Mode = analog
– Channel 990
– Power level OFF
– low band
PAMS Technical Documentation
RX audio tuning dialog includes the following items:
alue scroll bar (ALT–V)
V
Set Calibration value to phone
K button (ENTER):
O
Dialog is closed and tuning
Cancel button (ESC):
Dialog is closed and tuning
RF Info button (ALT+I):
The current rf state is shown
Help button (Alt+H):
Opens context sensitive help.
is saved
to phone.
is not saved
to phone.
Page 38
Nokia Mobile Phones Ltd.
Issue 1 12/99
Page 39

PAMS Technical Documentation
Tx Audio... command
Activation Status Bar Text
Alt, T, T Starts Tx audio tuning
The next automatic selections are made when this function is activated:
– Active Unit = TX
– Operation Mode = analog
– Channel 990
– Power level 3
– low band
NSW-6
Service Software Instructions
RX audio tuning dialog includes the following items:
alue scroll bar (ALT–V)
V
Set Calibration value to phone
O
K button (ENTER):
Dialog is closed and tuning
Cancel button (ESC):
Dialog is closed and tuning
RF Info button (ALT+I):
The current rf state is shown
Help button (Alt+H):
Opens context sensitive help.
is saved
is not saved
to phone.
to phone.
Issue 1 12/99
Nokia Mobile Phones Ltd.
Page 39
Page 40

NSW-6
Service Software Instructions
Charging... command
Activation Status Bar Text
Alt, T, C Starts charging tuning
The next automatic selections are made when this function is activated:
Active Unit = RX
Operation Mode = analog
Power Level = OFF
Channel 300
Low band
Before charging tuning is started, the battery setting request is shown.
PAMS Technical Documentation
Eeprom DAC values is shown and the measurement is started when the
”meas” button is pressed.
Charging tuning dialog includes the following items:
Values list box:
DAC values are shown.
Meas button (ALT+M):
The measurement can be started by pressing this button.
O
K button (ENTER):
Dialog is closed and tuning
is saved
to phone.
Page 40
Cancel button (ESC):
Dialog is closed and tuning
Help button (Alt+H):
Opens context sensitive help.
Nokia Mobile Phones Ltd.
is not saved
to phone.
Issue 1 12/99
Page 41

PAMS Technical Documentation
LCD... command
Activation Status Bar Text
Alt, Opens LCD Display contrast tuning box
Command opens LCD Display Tuning dialog box which contains scrollbar
to make display adjustments.
NSW-6
Service Software Instructions
LCD Display Tuning dialog box includes the following items:
L
CD Contrast scrollbar (ALT+L):
Enables user to tune display contrast between –12 and 12.
K button (ENTER):
O
Dialog box is closed and tuning
Cancel button (ESC):
Dialog is closed and tuning
Help button (Alt+H):
Opens context sensitive help.
is saved
is not saved
to phone.
to phone.
Issue 1 12/99
Nokia Mobile Phones Ltd.
Page 41
Page 42

NSW-6
Service Software Instructions
Testing
The Testing sub menu offers functions for ME testing.
F Controls... command
R
Activation Status Bar Text
Alt, E,R Open RF Controls dialog box
This function is used for quick RF testing.
Command opens RF Controls dialog, which contains data for testing and
adjustments.
PAMS Technical Documentation
Page 42
RF Controls dialog includes the following items:
Band group:
800 radio button
Select low band
1900 radio button
Select high band
Operation mode group
Analog radio button Select analog mode
Digital radio button Select digital mode
TX group
On radio button Activate tx power
Off radio button Deactivate tx power
Nokia Mobile Phones Ltd.
Issue 1 12/99
Page 43

PAMS Technical Documentation
Comp/exp group
On radio button Set compander on
Off radio button Set expander on
Audio mode group
HF radio button Set audio handsfree mode
HP radio button Set audio hand portable mode
ST group
On radio button
Off radio button
SAT group
On radio button
Off radio button
NSW-6
Service Software Instructions
Set signalling tone on in analog mode only
Set signalling tone off in analog mode only
Set Supervisory Audio Tone on in analog mode only
Set Supervisory Audio Tone off in analog mode only
Audio path group
On radio button Set external audio path on
Off radio button Set external audio path off
Data Flow Type drop list (gray text = feature not active)
This list changes the transmission data type. List consists fol-
lowing transmissions:
* TDMA mode zero data transmission
* TDMA mode random
* Continuous digital 11
TX Power Level drop list
With this value is possible to change the transmission power.
The user can give the needed D–AMPS power value (2..10).
Channel edit box
User can enter here channel number that is used for both
transmission and receiving. The frequency of the selected
channel is shown after selection.
Slot edit box (gray text = feature not active)
Value of used time slot in digital mode only
DVCC edit box (gray text = feature not active)
Value of Digital verification color code in digital mode only
Volume drop list
Apply init button (ALT+A):
Close button (ESC)
Issue 1 12/99
Value of audio volume can be selected
Accepts INIT group values and validates them. After validation
application sends corresponding messages to ME.
Close dialog
Nokia Mobile Phones Ltd.
Page 43
Page 44

NSW-6
Service Software Instructions
Change phone button (ALT+H)
Read production serial number
Production SN static
Show production serial number
Help button (Alt+H):
Opens context sensitive help.
elf Tests... command
S
Activation Status Bar Text
Alt, E,S Open MCU Self–tests dialog box
Command is used for reading self test results and running self tests.
When the selection is made, the test result is read from ME. The test re-
sult will be shown to the user within MCU Self–test dialog.
PAMS Technical Documentation
Page 44
MCU Self–test dialog box includes following items:
Tests list box (ALT+T):
Test states are updated according to results received from the
phone. Possible test states will be one of the next:
Passed
Failed
No response
Not executed
RUNNING....
Nokia Mobile Phones Ltd.
Issue 1 12/99
Page 45

PAMS Technical Documentation
Run button (ALT+R):
User can select desired test from list and hit Run button. When
user selects test to be run the text
state field. When results are received the test state field is up-
dated according to the result.
If no response was received in the defined time, an
sage box
sponse
Run All button (ALT+A):
User can run all listed tests. The text
test state field and test is run. When results are received the
test state field is updated according to the results. When state
field is updated application moves to next test and repeats pre-
vious cycle.
Only last test is not executed (Power off Test) because it will
turn phone power off.
will be shown and the test state is changed to
.
NSW-6
Service Software Instructions
RUNNING...
is shown in test
error mes-
No re-
RUNNING...
is shown in
Close (ENTER) button:
Dialog box is closed.
Help button ( Alt+H)
Context sensitive help
Supported Self Tests
The following tests are available:
1 MCU RAM Interface................
2 MCU RAM Component...............
3 MCU EEPROM Interface...............
4 MCU ROM Checksum............
5 MCU EEPROM Component............
6 MCU CCONT Interface.....................
7 Power Off.................
8 MCU CCONT Interrupt...................
9 TXF line........................
A DSP.......................
B MCU EEPROM Checksum...................
Issue 1 12/99
Nokia Mobile Phones Ltd.
Page 45
Page 46

NSW-6
Service Software Instructions
ADC Readings... command
Activation Status Bar Text
Alt, E, A Open ADC Readings dialog box.
Command is used to read and show A/D values from phone. Command opens ADC Readings dialog.
PAMS Technical Documentation
ADC Readings dialog has static text field where measurements are updated to every second.
ADC Readings dialog has following items:
Close (ENTER) button:
Dialog box is closed and tuning
Help button ( Alt+H)
Context sensitive help
Following A/D readings are measured:
Battery Voltage.........:
Charge Voltage..........:
Battery Temperature.....:
Battery Size............:
Vibrator..................:
Acessory Detection......:
RF Temperature....................:
HOOK Info....................:
Charge Current........:
is not saved
to phone.
Page 46
Nokia Mobile Phones Ltd.
Issue 1 12/99
Page 47

PAMS Technical Documentation
Audio... command
Activation Status Bar Text
Alt, E,U Open Audio Tests dialog box
Command is used for making Audio Tests.
NSW-6
Service Software Instructions
Audio Tests dialog includes the following items:
Buzzer Volume group:
Volume On radio button (ALT+V):
Turns buzzer on.
Volume O
Internal Audio Loop group:
Input group:
Internal radio button (ALT+I):
External radio button (ALT+E):
Output group:
Int
ernal radio button (ALT+T):
Ex
ternal radio button (ALT+X):
ff radio button (ALT+O):
Turns buzzer off.
Turns on internal input.
Turns on external input.
Turns on internal output.
Turns on external output.
Issue 1 12/99
Nokia Mobile Phones Ltd.
Page 47
Page 48

NSW-6
Service Software Instructions
Loop group:
Off
radio button (ALT+F):
radio button (ALT+N):
On
JBA–6 group (Alt+4):
On radio button
Off radio button
Microphone test:
Connect a headset in the phone
Select Testing –> Audio
PAMS Technical Documentation
Turns audio loop off.
Turns audio loop on.
Activate audio box
Deactivate loop controlling
Activate loop controlling
Loop: Internal –> External
Loop ON
Now everything spoken in the mic is heard in the headset.
Close button (ESC)
Close dialog
Help button ( Alt+H)
Context sensitive help
Page 48
Nokia Mobile Phones Ltd.
Issue 1 12/99
Page 49

PAMS Technical Documentation
User Interface... command
Activation Status Bar Text
Alt, E,U Open User Interface Tests dialog box
Allows user to test all display pixels and back lights of attached phone.
Display Tests dialog includes the following items:
NSW-6
Service Software Instructions
1. Test Pattern radio button (ALT+1):
In test display 1 half of the indicators are displayed and the dis-
play is filled with chessboard letters.
2. Test Pattern radio button (ALT+2):
In test display 2 rest of the (compared to test pattern 1) indica-
tors are displayed and the display is filled with inverse chess-
board letters.
When dialog is closed the phone LCD display is cleared.
Close button (ESC)
Close dialog
Help button ( Alt+H)
Context sensitive help
Issue 1 12/99
Nokia Mobile Phones Ltd.
Page 49
Page 50

NSW-6
Service Software Instructions
Software
Product Profile... command
Activation Status Bar Text
Alt, S,P,L,H Open Product Profile settings dialog box.
Function is used for making product profile settings.
When command is activated the product profile information is read from
EEPROM and Product Profile dialog is opened.
PAMS Technical Documentation
Product Profile dialog includes the following items:
ttings list box (ALT+E):
Se
A list where user can select desired setting.
User can toggle setting with following Options drop list or by
double clicking desired setting in list box.
Options drop list (ALT+O):
List allows user to set options to each settings which are listed
in Settings list box. Possible options per setting are:
Save File button (ALT+S):
Saves all product profile setting to a file. Filename will be
asked from the user in a common file save dialog box.
Load File button (ALT+L):
Loads all product profile setting from a file. Filename will be
asked from the user in a common file open dialog box.
OK button (ENTER)
Selections are accepted and saved to EEPROM.
Cancel button (ESC)
Selections are ignored and control is returned back to main
menu.
Page 50
Nokia Mobile Phones Ltd.
Issue 1 12/99
Page 51

PAMS Technical Documentation
Help button ( Alt+H)
Context sensitive help
NSW–6 Product Profile Settings
Field test display........: On/Off
Dualmode select...........: On/Off
Calling card..............: On/Off
Encrypt voice.............: On/Off
Call forward..............: On/Off
Call forward all..........: On/Off
Call forward on busy......: On/Off
Call forward not answered.: On/Off
Call forward not reachable: On/Off
Call forward cancel all...: On/Off
Send own caller id........: On/Off
Call waiting..............: On/Off
Read text messages........: On/Off
Write text messages.......: On/Off
Emergency 9 key...........: On/Off
Call VMBX key 1...........: On/Off
Feature code set..........: On/Off
SMS Privacy...............: On/Off
SMS disp time temporary...: On/Off
Keypad cover..............: On/Off
NSW-6
Service Software Instructions
Issue 1 12/99
Nokia Mobile Phones Ltd.
Page 51
Page 52

NSW-6
Service Software Instructions
Set Default Values... command
Activation Status Bar Text Alt, S,V Set default values
Command is used for resetting default values to phone’s EEPROM.
After selection application asks confirmation:
PAMS Technical Documentation
If Yes is confirmed, the default settings are made to the phone:
Warranty info
Phone identity
Production data edit
Page 52
Nokia Mobile Phones Ltd.
Issue 1 12/99
Page 53

PAMS Technical Documentation
Authority ID... command
Activation Status Bar Text
Alt, S,A Open Authority ID dialog box
This command is used for programming software authorization data remotely and locally.
NSW-6
Service Software Instructions
The Authority ID dialog box includes the following items: MS ID edit box (ALT+M)
Mobile station security id number for remote authority id pro-
gramming
SW ID edit box (ALT+S)
Software id number may be needed later with with authority id
Not yet supported
AUTHORITY ID edit box (ALT+E)
Software authority id for remote authority id programming
READ MS ID button (ALT+E)
Pressing this button updates MS ID edit box from phone
Shall be used only for remote programming
REQ AUTH ID button (ALT+E)
Only for R&D use
PROG AUTH ID button (ALT+E)
Pressing this button updates value from AUTHORITY ID edit
box to phone. Shall be used only for remote programming
DO ALL button (ALT+E)
Pressing this button updates authority id to phone. This button
shall be used when TDF–4 (or TDD–4) is connected to PC
Issue 1 12/99
Nokia Mobile Phones Ltd.
Page 53
Page 54

NSW-6
Service Software Instructions
OK button (ENTER)
Selections are accepted and saved to EEPROM.
Cancel button (ESC)
Selections are ignored and control is returned back to main
menu.
Help button ( Alt+H)
Context sensitive help
A–key... command
Activation Status Bar Text
Opens A–key code dialog box
This command avoids programming A–key to the phone.
Not possible to calculate A–key.
PAMS Technical Documentation
If programming is successful there is text ’code ok’ otherwise
’wrong response’.
The A–key Code dialog box contains the following items:
NAM list box
Number Module for programming
A–key edit field
Value of key
Set button (ALT +L)
Write value to the phone
Page 54
Cancel button (ESC)
Closes the dialog box
Help button ( Alt+H)
Context sensitive help
Nokia Mobile Phones Ltd.
Issue 1 12/99
Page 55

PAMS Technical Documentation
Flash Phone... command
Activation Status Bar Text
Alt, S,A Open Authority ID dialog box
This command is used for flashing new software into the phone. While
flashing the phone, user is shown approximately flashing time.
NSW-6
Service Software Instructions
The Flash Phone dialog box contains the following items: File Name... edit filed:
Diplays file path to be flashed.
Flash button (ALT+L)
Starts flashing of selected file to the phone.
Select File... button (ALT+S)
Starts flashing of selected file to the phone.
Close button (ESC)
Closes the dialog button and
A key
Select prod.data
Send prod. data
__
Help button ( Alt+H)
Context sensitive help
During flashing status dialog is shown. After phone is flashed Authority ID
is set to the phone.
does not
start flashing.
Issue 1 12/99
Nokia Mobile Phones Ltd.
Page 55
Page 56

NSW-6
Service Software Instructions
Dealer
The dealer sub menu offers functions for ME settings for dealers.
ser Settings... command
U
Activation Status Bar Text
Alt, D,U Open User Setting dialog box
This command is used for reading, storing, and modifying the user settings and values.
PAMS Technical Documentation
After menu selection, the program opens a
settings from phone?”. If you answer Yes, all user settings are read from
the ME including menu settings. If reading fails, an error dialog box is
shown. If reading is OK, the User Settings and Values dialog box is
opened.
query
dialog box: “Read user
Page 56
The User Settings and Values dialog box contains the following items:
Se
curity ID edit box (ALT+E):
Edit the security code which is saved to the ME memory to-
gether with other user settings and values. Only digits are ac-
cepted for Security code. Length must be 5 digits.
Wake up Message String edit box (ALT+M):
Edit Wake up message. The message can contain up to 16
characters.
Nokia Mobile Phones Ltd.
Issue 1 12/99
Page 57

PAMS Technical Documentation
Wake up Message Graphics group
Save File... button (ALT+S):
Opens a common File Save As dialog box and asks for the
name of the file to contain user settings and values.
Load File... button (ALT+L):
Opens a common File Open dialog box, and asks for the
name of the file containing the user settings and values.
Ed
it button (ALT+D)
Starts Windows Paintbrush to edit the graphical Wake up mes-
sage bitmap.
OK button (ENTER)
Selections are accepted and saved to EEPROM.
Cancel button (ESC)
Selections are ignored and control is returned back to main
menu.
NSW-6
Service Software Instructions
Help button ( Alt+H)
Context sensitive help
Issue 1 12/99
Nokia Mobile Phones Ltd.
Page 57
Page 58

NSW-6
Service Software Instructions
Short Code Memory... command
Activation Status Bar Text
Alt, S,C Open Edit SCM dialog box.
This command is used for reading, storing and modifying the SCM val-
ues.
PAMS Technical Documentation
Page 58
Edit SCM dialog box includes the following items:
Loc statix text:
Display current location
me edit box (ALT+A):
Na
Edit the Name.
Number edit box (ALT+N):
Edit the number.
M list box (ALT+C):
SC
List for available names and numbers.
Write Phone... button (ALT+W):
Write SCM values to phone and checks the validity of names
and numbers.
Read Phone... button (ALT+R):
Read SCM values from phone.
Save File... button (ALT+S):
Nokia Mobile Phones Ltd.
Issue 1 12/99
Page 59

PAMS Technical Documentation
Opens a default Windows File Save As dialog box and asks
filename where to save SCM values.
Load File... button (ALT+L):
Opens a default Windows File Open dialog box and asks file-
name where from to load SCM values. Checks the validity of
names and numbers.
OK button (ENTER)
Selections are accepted and saved to EEPROM.
Cancel button (ESC)
Selections are ignored and control is returned back to main
menu.
Help button ( Alt+H)
Context sensitive help
Language
Edit SCM y/n
NSW-6
Service Software Instructions
Issue 1 12/99
Nokia Mobile Phones Ltd.
Page 59
Page 60

NSW-6
Service Software Instructions
Calling cards... command
Activation Status Bar Text
This dialog enables to program the calling card numbers and operator
telephone numbers used in credit card calls.
PAMS Technical Documentation
Open Calling card dialog box.
Page 60
Calling card numbers dialog includes the following items:
Calling Card drop list
Card can be selected up to four
Card name edit box (ALT+C)
Card name can be edited.
Prefix edit box (ALT+P)
Card prefix can be edited.
Access number edit box (ALT+B)
Card access number can be edited
Card number edit box (ALT+A)
Card number can be edited
Sending order drop list (ALT+S)
Sending order can be selected
Nokia Mobile Phones Ltd.
Issue 1 12/99
Page 61

PAMS Technical Documentation
Read Phone... button (ALT+R):
Read calling card data from phone and update dialog items
Write Phone... button (ALT+W):
Write data to calling card data to phone
Close... button (ESC)
Closes the dialog button.
Save File... button (ALT+S)
Opens a Windows default File Save As dialog box and asks
filename where to save settings.
Load File... button (ALT+L)
Opens a Windows default File Open dialog box and asks file-
name where to load settings.
Help button ( Alt+H)
Context sensitive help
NSW-6
Service Software Instructions
Issue 1 12/99
Nokia Mobile Phones Ltd.
Page 61
Page 62

NSW-6
Service Software Instructions
Subscriber data programming... command
Activation Status Bar Text
Alt, D,S Open Subscriber data programming dialog box.
On the upper right corner there is a drop down box, where you can select
the NAM you want to edit. The per NAM data below is updated according
to the highlighted NAM. Note that emergency numbers and lock code are
common to all NAMs.
PAMS Technical Documentation
Page 62
Subcriber data programming dialog includes the following items:
Select NAM drop list (ALT+S):
The selected position is highlighted
Number edit box (ALT+B)
The alphanumeric MIN value can be edited
Operator edit box (ALT+O):
The alphanumeric value can be edited
Home SOC edit box (ALT+O:
Numeric value can be edited if not locked
Home System ID edit box (ALT+H):
Numeric value can be edited
Nokia Mobile Phones Ltd.
Issue 1 12/99
Page 63

PAMS Technical Documentation
Primary paging ch edit box (ALT+P):
Numeric value can be edited
Secondary paging ch edit box (ALT+E):
Numeric value can be edited
Group ID Mark edit box (ALT+G):
Numeric value can be edited
Access method edit box (ALT+M):
Numeric value can be edited
Local Option edit box (ALT+L):
Numeric value can be edited
Overl. Class edit box (ALT+V):
Numeric value can be edited
Nam status edit box (ALT+N):
NAM to enable or disable can be edited
NSW-6
Service Software Instructions
Dedic. A CCH start edit box (ALT+A):
Numeric value can be edited
Dedic. B CCH start edit box (ALT+B):
Numeric value can be edited
End
Numeric value can be edited
Emergency numbers edit boxes (ALT+G):
The alphanumeric values can be edited
Lock code edit box (ALT+D):
The alphanumeric value can be edited
File Save... button (ALT+S):
Opens a default Windows File Save As dialog and asks file-
name where to save user settings and values.
File Load... button (ALT+L):
Opens a default Windows File Open dialog and asks filename
where from load user settings and values.
Read Phone... button (ALT+R):
Read selected NAM’s values from phone and update dialog
items
Write phone... button (ALT+W):
Close... button (ALT+S): Close dialog
Cancel button (ESC):
Help button ( Alt+H)
Issue 1 12/99
Write selected NAM’s values to phone
Exit without any changes
Context sensitive help
Nokia Mobile Phones Ltd.
Page 63
Page 64

NSW-6
Service Software Instructions
P/RSID programming... command
Activation Status Bar Text
Alt, D,R Open P/RSID programming dialog box.
This command is used to modify the Private and Residential System
IDentity values. The list contains up to 5 P/RSIDs.
PAMS Technical Documentation
Page 64
P/RSID programming dialog includes the following items:
P/RSID list box (ALT+P):
Index to P/RSID list up to 5
Value edit box (ALT+V)
The numeric value of P/RSID
SID edit box (ALT+I)
Nokia Mobile Phones Ltd.
Issue 1 12/99
Page 65

PAMS Technical Documentation
The Numeric value of Home system ID stored in the mobile
and uniquely associated with a MIN
SOC edit box (ALT+O)
Spesifies the System operator accociated with a P/RSID
Country code edit box (ALT+Y)
Numeric values of symbolic value which indicates if this is a
Private or Residential
Name edit box (ALT+N)
The alphanumeric designator accociated with a P/RSID
Type list box (ALT+T)
Symbolic value which indicates if this is a Private or Residential
POF List box (ALT+F)
Index to private operating frequencies list up to 4
Band list box
Symbolic Value selected POF‘s band
NSW-6
Service Software Instructions
Channel edit box
Numeric value of selected POF’s channel
DVCC edit box
Numeric value of selected POF’s module control channel
PSP List box (ALT+P)
Index to public service profiles list up to 4
Band list box
Symbolic Value selected PSP ‘s band
Channel edit box
Numeric value of selected PSP’s channel
DVCC/DCC edit box
Numeric value of selected PSP’s module control channel
Save file button
Saves file
Load file button
Loads file
Write phone button
Writes values to phone
Read phone button
Cancel button (ESC):
Help button (ESC)
Issue 1 12/99
Reads phone values
Exit without any changes
Context sensitive help
Nokia Mobile Phones Ltd.
Page 65
Page 66

NSW-6
Service Software Instructions
Intelligent Roaming Database... command
Activation Status Bar Text
Alt, D,I Open Intelligent Roaming Database dialog box.
This command is used to modify database which affects directly to the
mobiles behaviour when scanning for control channels.
IRDB includes max 82 lenght SOC/SID list. This is calculated automaticly
from tables. If selected more than max. then error code is shown when
write to phone.
PAMS Technical Documentation
Page 66
Intelligent roaming database dialog includes the following items:
Partner SOC list box (ALT+P)
Number of partner SOCs in soc_sid_list. The selected position
is highlighted and can be edited.
Partner SID list box (ALT+S)
Number of partner SIDs in soc_sid_list. The selected position
is highlighted and can be edited.
Favored SOC list box (ALT+F)
Number of favored SOCs in soc_sid_list. The selected position
is highlighted and can be edited.
Nokia Mobile Phones Ltd.
Issue 1 12/99
Page 67

PAMS Technical Documentation
Favored SID list box (ALT+I)
Number of favored SOCs in soc_sid_list. The selected position
is highlighted and can be edited.
Forbidden SOC list box (ALT+O)
Number of forbidden SOCs in soc_sid_list. The selected posi-
tion is highlighted and can be edited.
Forbidden SID list box (ALT+D)
Number of forbidden SIDs in soc_sid_list. The selected posi-
tion is highlighted and can be edited.
IR_control edit box (ALT+T)
”1”, only the systems broadcasting. HOME SID or SOC are ac-
cepted as a service providers.
”0”, all other systems, except systems broadcasting SID or
SOC set as a forbidden in a soc_sid_list, are accepted as a
service providers.
NSW-6
Service Software Instructions
Band order locked static
Band order which are not editable
Band order edit box (ALT+B)
The table tells which bands (cellular or/and PCS) and in what
order the bands are searched.
a = 800 MHz
b = 800 MHz
A = 1900 MHz
B = 1900 MHz
C = 1900 MHz
D = 1900 MHz
E = 1900 MHz
F = 1900 MHz
00 = NONE
Number of cellular edit box (ALT+ C)
Number of probability blocks to scan in cellular band.
Number of pcs edit box (ALT+ P)
Number of sub blocks to scan in PCS band
Rescan count edit box (ALT+T)
Rescan time in hyperframes (HF = 1,28 seconds).
Rescan loop edit box (ALT+C)
FREE SID/SOC static
Home alpha tag edit box (ALT+H)
Issue 1 12/99
Defines when all the band in band_order are to be scanned
Number of free elements in soc_sid_list
Alpha tag is shown on phone’s display when on service with
HOME SID or SOC. System is home system if the broadcasted
SID or SOC or both of them matches with SID/SOC in a
phone’s NAM.
Nokia Mobile Phones Ltd.
Page 67
Page 68

NSW-6
Service Software Instructions
Favored alpha tag edit box (ALT+V)
Alpha tag which is shown on the phone display when on ser-
vice with PARTNER or FAVORED system.
System is PARTNER/FAVORED system when the broadcasted
SID or SOC matches with PARTNER/FAVORED SID/SOC in a
phone’s soc_sid_list in IRDB.
Neutral alpha tag edit box (ALT+N)
Alpha tag which is shown on phone’s display when on service
with NEUTRAL.
System is NEUTRAL system when the broadcasted SID and
SOC does not match the values in NAM and neither in
soc_sid_list in IRDB.
Read Phone button (ALT+R):
Read values from the phone
Write Phone button (ALT+W):
Write values to phone and checks the validity of names and
numbers.
PAMS Technical Documentation
Save File button (ALT+S):
Opens a default Windows File Save As dialog and asks file-
name where to save values.
Load File button (ALT+L):
Opens a default Windows File Open dialog and asks filename
where from load values. Checks the validity of names and
numbers.
Cancel button (ESC)
Exit without saving any changes
Help button (ESC)
Context sensitive help
Page 68
Nokia Mobile Phones Ltd.
Issue 1 12/99
Page 69

PAMS Technical Documentation
User Data Transfer... command
Activation Status Bar Text
Alt, D, D Open User Data Transfer dialog box.
This command is used for transfer user data from phone to the file and
from file to the phone.
NSW-6
Service Software Instructions
User Data Transfer dialog comprises the following items: L
oad All button (ALT+L)
Load all user data from file to the phone.
NAM1 number is restored
ave All button (ALT+S)
S
Save all user data from the phone to the file.
Save Wakeup button (ALT+W):
Save graphical wakeup message from the phone to the file.
This file is only for FastNAM use.
H
elp button (ALT+H)
Context sensitive help.
Cancel button (ESC)
Exit without any changes
Issue 1 12/99
Nokia Mobile Phones Ltd.
Page 69
Page 70

NSW-6
Service Software Instructions
View
Quick/RF Info... command
Activation Status Bar Text
Alt, V,Q View Quick/RF information.
PAMS Technical Documentation
If phone is in
If the phone is in local mode the RF Information window is shown. Information is shown in a modeless dialog box which may be left open during other operations. It is also updated when ever needed.
normal
mode the following Quick Info is shown:
Page 70
Close... button (ALT+S):
Close dialog
Help button ( Alt+H)
Context sensitive help
Nokia Mobile Phones Ltd.
Issue 1 12/99
Page 71

PAMS Technical Documentation
Phone Identity... command
Activation Status Bar Text
Alt, V,P View Phone Identity.
Command opens the Phone Identity Information dialog box, which
shows identification information. The information is shown in a modeless
dialog box which may be left open during other operations. It is also updated when ever needed.
NSW-6
Service Software Instructions
Close... button (ALT+S):
Close dialog
Help button ( Alt+H)
Context sensitive help
Issue 1 12/99
Nokia Mobile Phones Ltd.
Page 71
Page 72

NSW-6
Service Software Instructions
Appendix 1, Vocabulary
Abreviation Description
ADC Analog to Digital Converter
AFC Automatic Frequency Control
AGC Automatic Gain Control
ASIC Custom circuit which for instance controls
communication between MCU and DSP
BBD–3 Service battery
CLF Common Look and Feel
CLI Calling Line Identification
COBBA Common Base Band Analog
DAC Digital to Analogue Converter
PAMS Technical Documentation
DATA DATA interface module
DAU–9S/P MBUS/FBUS cable
DLL Dynamic Link Library
DSP Digital Signal Processor which controls radio
interface and speech coding/decoding
EEPROM Memory for adjustment parameters (Electrically
Erasable and Programmable Read Only Memory)
ESN Electrical Serial Number
FBUS Fast serial bus
GPIB General Purpose Instrument Bus, also know as
HPIB. Specified by IEE488.2.
IMEI International Mobile Equipment Identification code
IR Infra Red transmitter
M2BUS Serial communication bus which can be connected
to accessory devices and test PC
MCU Master Control Unit processor
MDI MCU DSP Interface; message interface via ASIC
registers
Page 72
ME Mobile Equipment
MODAL A modal dialog box requires the user to complete
(dialog box) interaction within a dialog box, and close it before
continuing with any further interaction outside the
window.
MODELESS A modeless dialog box allows the user to interact
(dialog Box) with other windows and applications.
Nokia Mobile Phones Ltd.
Issue 1 12/99
Page 73

PAMS Technical Documentation
MS Mobile Station
PC IBM PS/AT or compatible personal computer
PCI Phone Controlling Interface SW for PC
PKD–1/1NS/1CS Hardware protection key (DESKEY DK2) for
RF Radio Frequency parts
RSSI Received Signal Strength Indication
RTC Real Time Clock
SW Software
TDF–4 Flash security box
Tesla Acronym, stands for Test and Service Locals
NSW-6
Service Software Instructions
protecting service software from illegal copying.
The software will not work without this key !
Application.
UI User Interface
WinTesla This Service Software program. Name copyright
Nokia Mobile Phones (1996).
Issue 1 12/99
Nokia Mobile Phones Ltd.
Page 73
Page 74

NSW-6
Service Software Instructions
PAMS Technical Documentation
This page intentionally left blank.
Page 74
Nokia Mobile Phones Ltd.
Issue 1 12/99
 Loading...