

Page 1

Check Point NG FP3 step-by-step Install guide on NOKIA IPSO
By Brandon E. Robrahn
INTRO
This document is to be used as a reference on how to install a NOKIA IP350 with Check Point NG FP3. In this
document I have provided a step-by-step reference guide on loading a NOKIA IP350 with IPSO version
3.7.1Build010, and Check Point version NG FP3. Voyager and command line were both used in this guide; this is
just one way that a NOKIA device can be configured as a Check Point Firewall. Not all of the patches and hot fixes
for these versions are shown in this document. There was only one patch applied to this device, this was simply to
show how to apply it to the NOKIA. The two vulnerabilities that have to be addressed when using this version of
Check Point and IPSO are:
1. Hot fix Accumulator 325
2. Open SSL vulnerability
After using this document as a reference guide (not a configuration guide), you should be able to put the device in
line and connect it to a management server with out any issues. This document guides you from entering in the
hostname of the firewall, and ends with applying the default filter and running CPCONFIG. Good luck with your
install and thanks for using this guide as a reference on how to configure a Check Point firewall.
After the start up script runs you will be prompt to enter a hostname, if you hit enter it will get rid of the text
so that you can type the hostname that you choose. Listed below is an actual screen shot taken from
Secure CRT of how an install is performed. I used red text in the areas where you need to type in
commands to configure this Firewall.
Please choose the host name for this system. This name will be used
in messages and usually corresponds with one of the network hostnames
for the system. Note that only letters, numbers, dashes, and dots (.)
are permitted in a hostname.
Hostname? fw-test
Hostname set to "fw-test", OK? [ y ] ? y
Please enter password for user admin: password
Please re-enter password for confirmation: password
You can configure your system in two ways:
1) configure an interface and use our Web-based Voyager via a remote
browser
2) VT100-based Lynx browser
Please enter a choice [ 1-2, q ]: 1
Select an interface from the following for configuration:
1) eth1
2) eth2
3) eth3
4) eth4
5) quit this menu
Enter choice [1-5]: 1
Enter the IP address to be used for eth1: 10.0.0.1
Page 2

Enter the masklength: 24
Do you wish to set the default route [ y ] ? y
Enter the default router to use with eth1: 10.0.0.254
This interface is configured as 10 mbs by default.
Do you wish to configure this interface for 100 mbs [ n ] ? y
This interface is configured as half duplex by default.
Do you wish to configure this interface as full duplex [ n ] ? y
You have entered the following parameters for the eth1 interface:
IP address: 10.0.0.1
masklength: 24
Default route: 10.0.0.254
Speed: 100M
Duplex: full
Is this information correct [ y ] ? y
Do you want to configure Vlan for this interface[ n ] ? n
You may now configure your interfaces with the Web-based Voyager by
typing in the IP address "131.87.68.50" at a remote browser.
Generating config files for fw-test: ipsrd hosts password group resolver snmp inetd ttys tz ntp ssmtp skey arp ndp
aggrclass acl ddr
ef syslog autosupport httpd lynx modem cron archive ipsec fmd AAA cluster xmode ssh iptune done.
ifmnetlog:eth4 .. enabling 10baseT/UTP port in half duplex mode
netlog:eth2 .. enabling 10baseT/UTP p ort i n hal f d uplex mode
netlog:eth3 .. enabling 10baseT/UTP p ort i n hal f d uplex mode
netlog:eth1 .. enabling 100baseTX/UTP port in full duplex mode
done.
Apr 28 16:08:20 fw-test [LOG_INFO] ker nel: netlog:eth4 .. enabling 10baseT/UTP port in half d upl ex mode
Apr 28 16:08:20 fw-test [LOG_INFO] ker nel: netlog:eth2 .. enabling 10baseT/UTP port in half d upl ex mode
Apr 28 16:08:20 fw-test [LOG_INFO] ker nel: netlog:eth3 .. enabling 10baseT/UTP port in half d upl ex mode
Apr 28 16:08:20 fw-test [LOG_INFO] kernel: netlog:eth1 .. enabling 100baseTX/UTP port in full duplex mode
Wed Apr 28 16:08:23 GMT 2004
IPSO (fw-test) (ttyd0)
login: admin
Password: password
Last login: Wed Apr 28 15:58:11 on tty d0
Apr 28 16:09:09 fw-test [LOG_INFO] login: DIALUP ttyd0, admin
Apr 28 16:09:09 fw-test [LOG_NOTICE] login: ROOT LOGIN (admin) ON ttyd0
Apr 28 16:09:09 fw-test [LOG_NOTICE] login: ROOT LOGIN (admin) ON ttyd0
Apr 28 16:09:09 fw-test [LOG_INFO] login: login on ttyd0 as admin
IPSO 3.7-BUILD027 #1215: 09.23.2003 052500
Terminal type? [vt100]
fw-test[admin]# cd /var/tmp
fw-test[admin]# ls -ls
total 1
1 -rw-r--r-- 1 root wheel 111 Apr 28 15:54 dhcpv4c_eth1c0.conf
0 -rw-r--r-- 1 root wheel 0 Apr 28 16:08 ipsopmdde bu g.txt
0 -rw-r--r-- 1 root wheel 0 Apr 28 15:57 ipsopmdde bu g.txt1
0 lrwxrwxrwt 1 root wheel 40 Apr 28 16:08 present -> IPSO-3 .7-BUILD027-09.23.2003-052500-1215
fw-test[admin]#
Page 3
By typing cd /var/tmp and then typing ls -ls you are changing the directory /var/tmp and listing what is in
that directory. This allows you to see what IPSO version you are currently running on your NOKIA device.
Since the IPSO version that is shown is not the current version or the version that we want to use, we are
going to change it to the correct version by installing a new IPSO image from an FTP server using
Voyager. Voyager is web based; you are able to configure almost everything via Voyager. To access the
Voyager web page, type in http://10.0.0.1 and then enter the user name and password. Any interface
that is configured on this NOKIA can be used to get access to Voyager.
NOTE: Leave the SSH connection running.
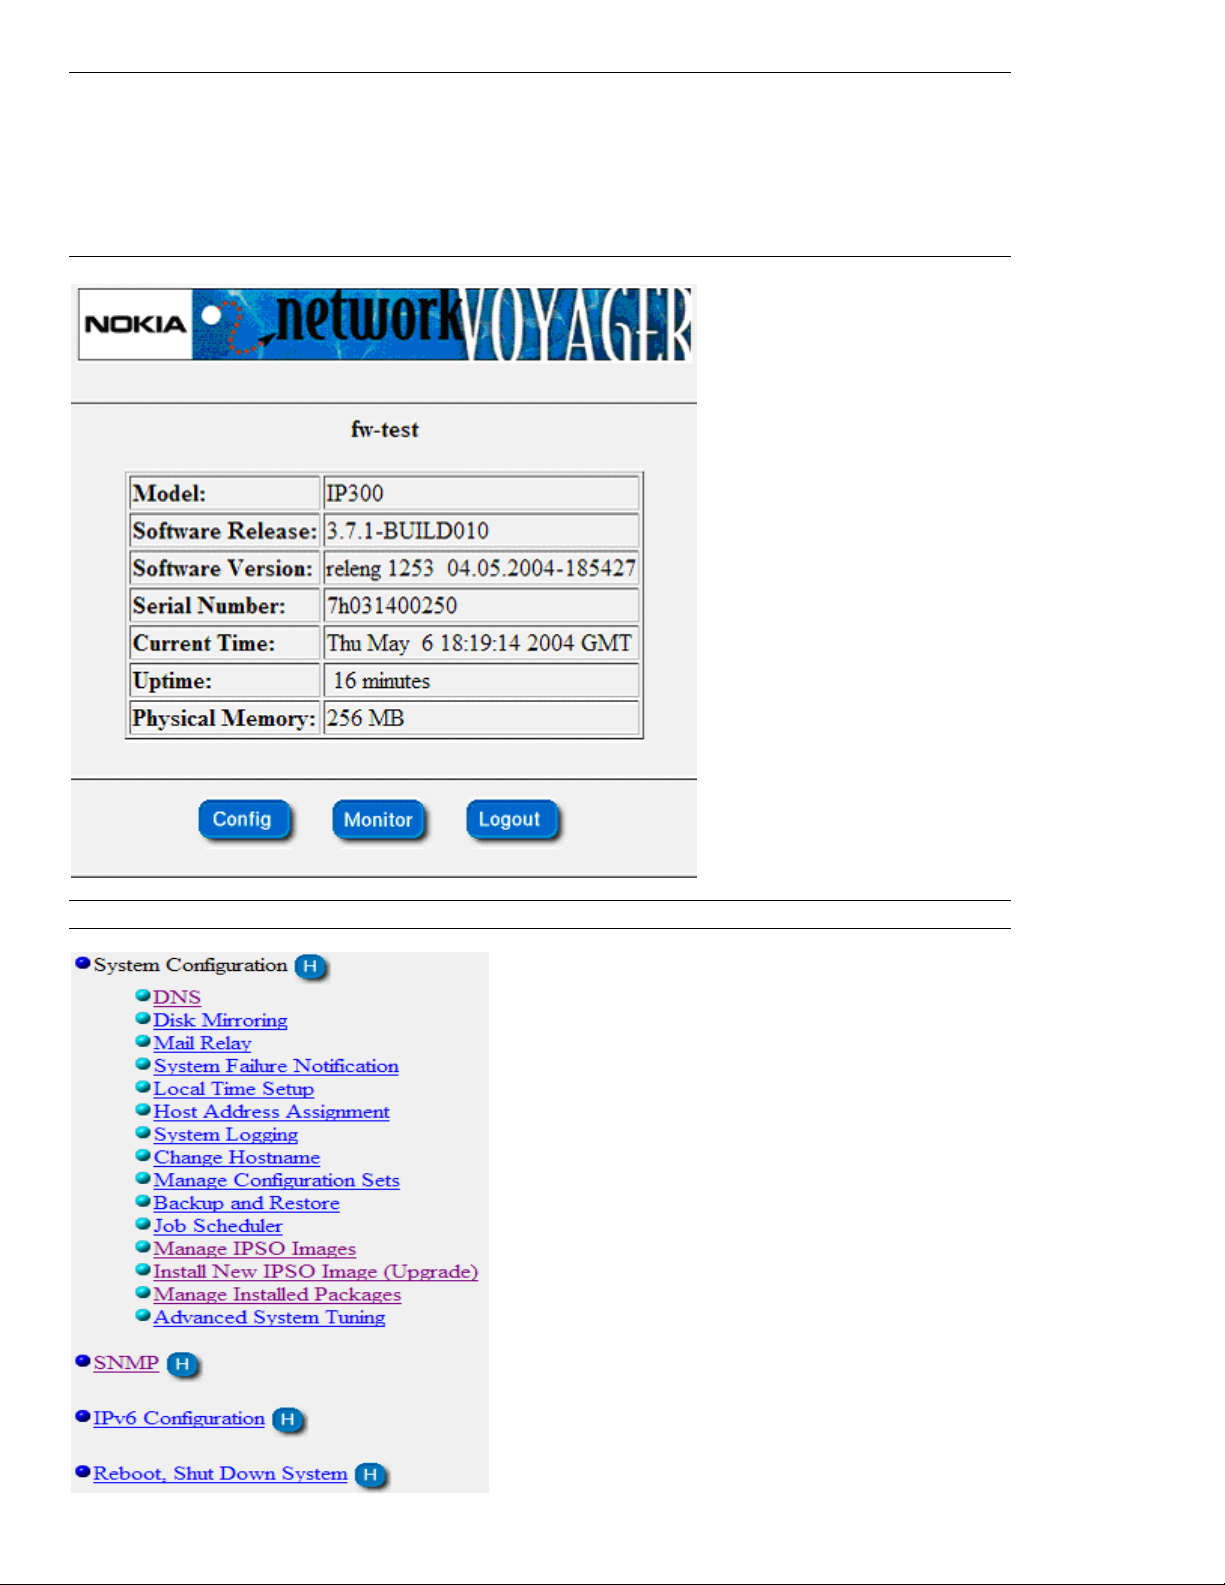
The first screen you will see will look like the one shown above. Click on the Config button to get started.
Page 4
Under the section System Configuration click on Install New IPSO Image (Upgrade).
The screen that you are on should look like the one shown above. This is where you will need to type in
the IP Address of your FTP Server. Since you will have a cross over cable hooked to your PC and the
other end hooked to the port on the NOKIA that reads ETH-1, you will use the IP Address of your PC.
NOTE: make sure that you have an FTP Server loaded on your PC. EXAMPLE: 3COM Server.
Make sure that your FTP Server is configured for Anonymous, that way you don’t have to type in a user
name and password. Type “ftp://10.0.0.2/ipso_3_7_1_Build007.tgz” I am using IPSO 3.7.1 build 007
for an example, you use whatever IPSO version that is current or that you want to use.
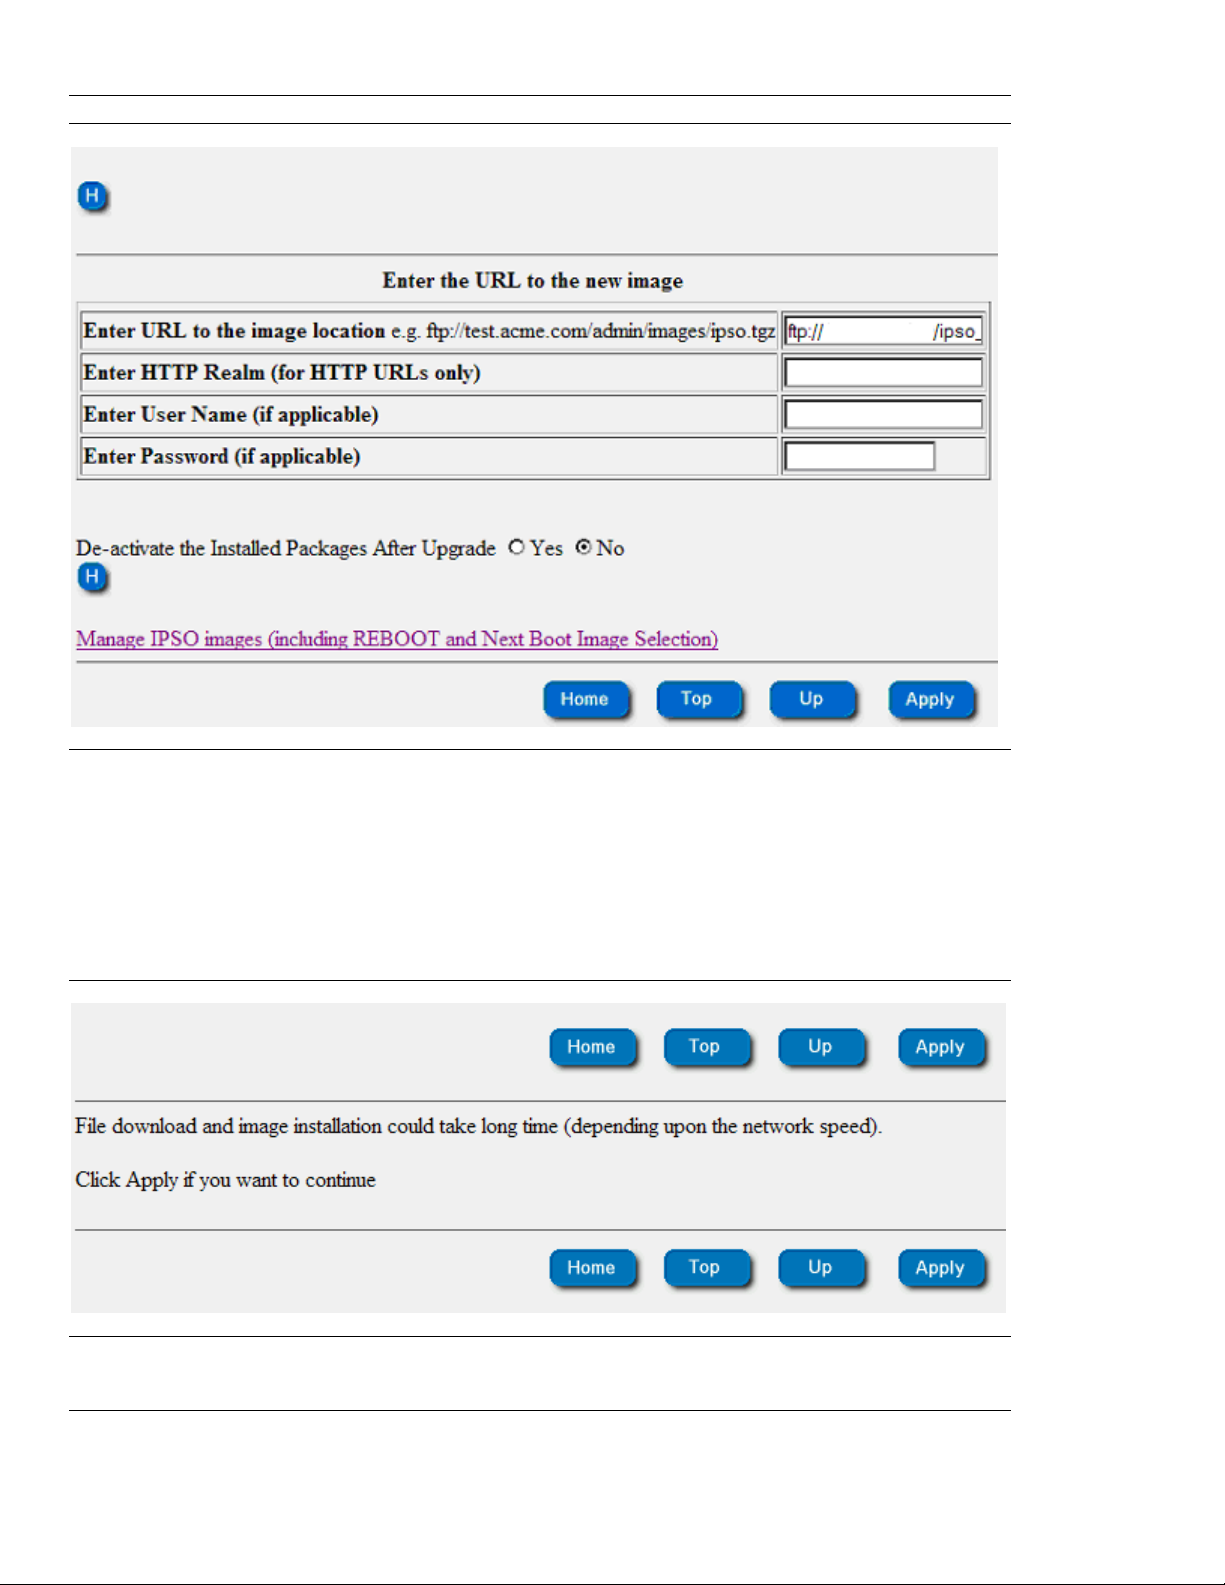
Now click on Apply.
Click on the Apply button one more time and the install should start running. This load will take a few
minutes, so don’t click on anything else just let it run. You can also look on your FTP server to see the
status of your FTP session.
Page 5

If you click on the link highlighted in Blue you should see the status of your install. When the install is
finished the screen will look like the one shown below.
The install is now complete and you need to reboot your NOKIA device. Before you reboot click on
Manage IPSO images (including REBOOT and Next Boot Image Selection) located at the
bottom of the page.
Page 6
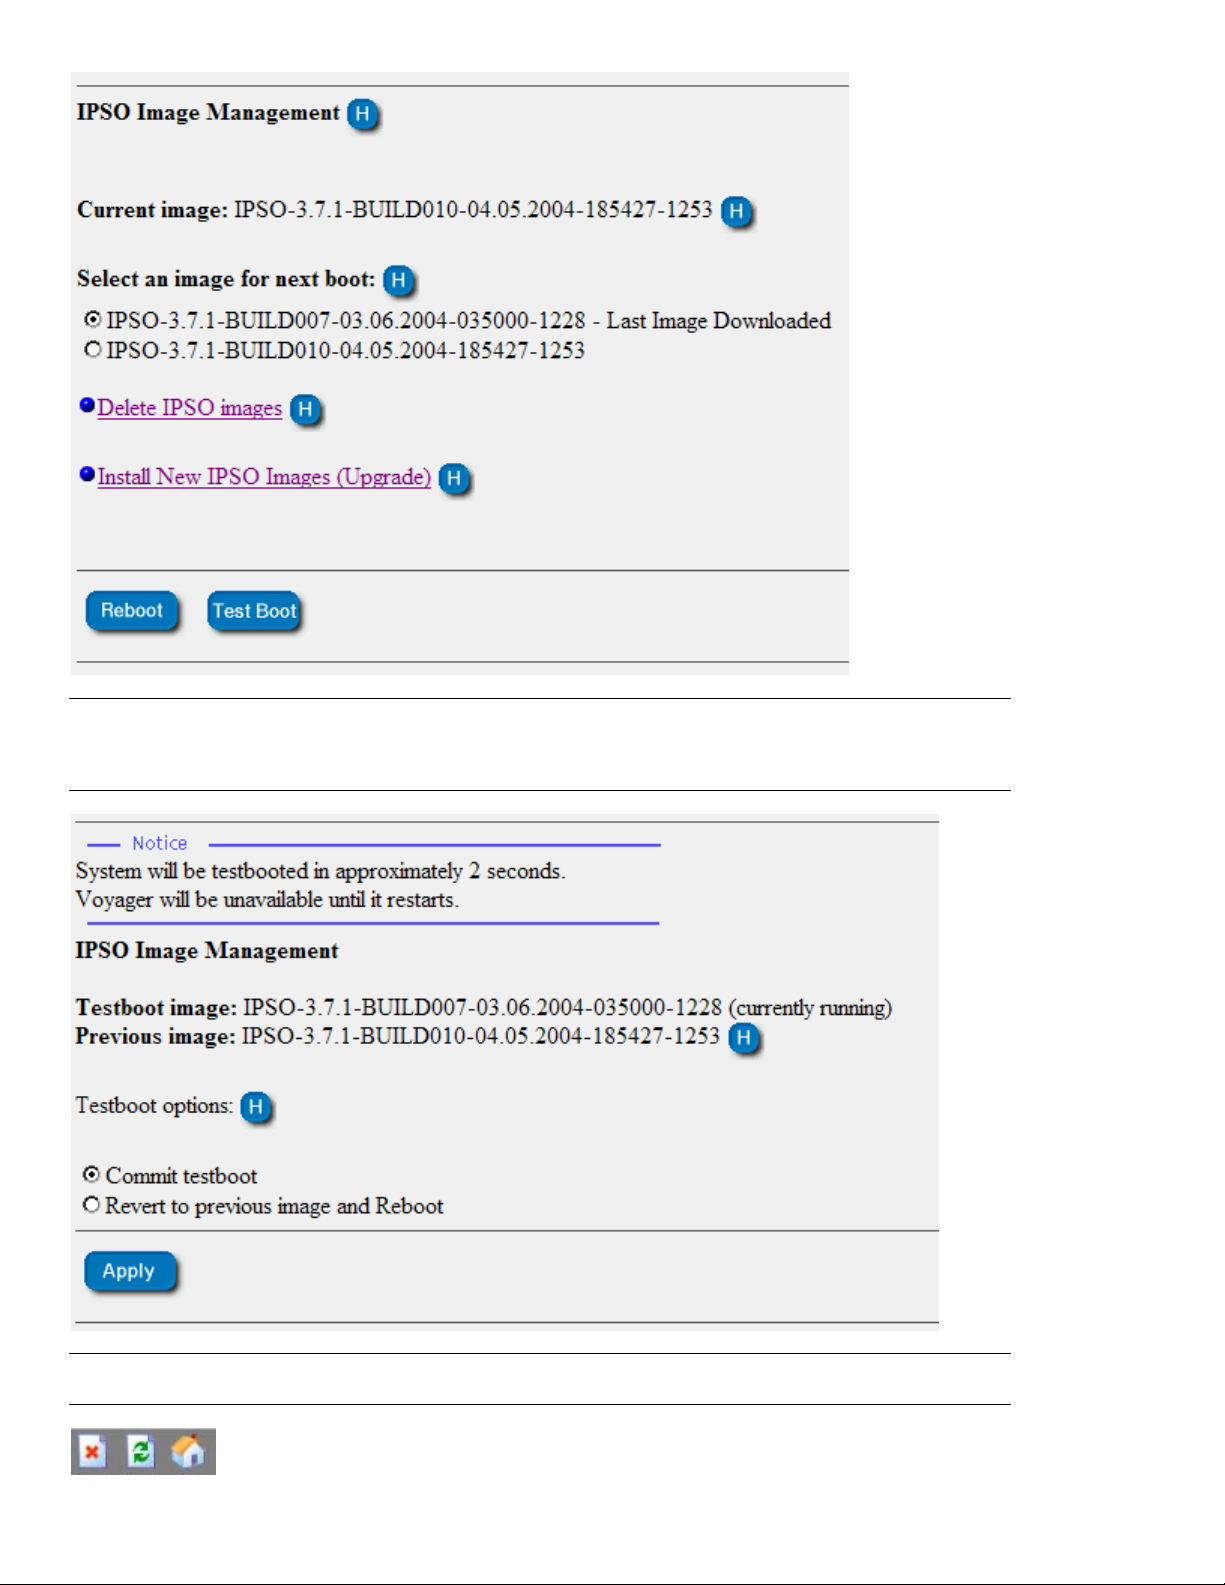
Select the radio button that reads Last Image Downloaded
. This is the IPSO version that you just
loaded. At the bottom of the page, click on Test Boot.
NOTE: Test boot is used incase something happens when you’re rebooting, this way you can revert back to the old version and no
harm was done. This is a precautionary measure.
After selecting Test Boot you will see the page shown above. Wait about 5 minutes and then hit the
Refresh button at the top of the page.
Page 7

You will now have to log back in so that you can commit to the test boot.
Click on Apply and then click on Logout. You can now switch back to your SSH connection. You will
probably need to log back in with a user name and password because the box has been rebooted.
Shown below are the steps to install Check Point NG FP3 on this NOKIA device. Follow the steps by
typing in the commands shown in red listed below.
During this process you will be asked if you want to download certain images, hot fixes, or packages.
Only choose the one that says “Do you want to download CP_FP3_IPSO.tgz”? For all of the other prompts
type “n” and wait until they have all been addressed.
NOTE: If you are using AI or some other version of Check Point then you will choose the version you want.
Page 8

IPSO (fw-test) (ttyd0)
login: admin
Password: xxxxxxxxxxx
Last login: Thu May 6 19:28:42 on ttyd0
May 6 20:03:18 fw-test [LOG_INFO] login: DIALUP ttyd0, admin
May 6 20:03:18 fw-test [LOG_NOTICE] login: ROOT LOGIN (admin) ON ttyd0
May 6 20:03:18 fw-test [LOG_NOTICE] login: ROOT LOGIN (admin) ON ttyd0
May 6 20:03:18 fw-test [LOG_INFO] login: login on ttyd0 as admin
IPSO 3.7.1-BUILD010 #1253: 04.05.2004 185427
Terminal type? [vt100]
fw-test[admin]#
fw-test[admin]#
fw-test[admin]#
fw-test[admin]# newpkg -i
Load new package from:
1. Install from CD-ROM.
2. Install from anonymous FTP server.
3. Install from FTP server with user and password.
4. Install from local filesystem.
5. Exit new package installation.
Choose an installation method (1-5): 2
Enter IP address of FTP server (0.0.0.0): 10.0.0.2
Enter pathname to the packages [ or 'exit' to exit ]: /
Loading Package List
Do you want to download cpinfo_ipso_550000007.tgz ? ['yes (default)' or 'no' or 'exit']: n
Skipping package cpinfo_ipso_550000007.tgz ...
Do you want to download cpshared_NG_FP3_53267_2_Nokia.tgz ? ['yes (default)' or 'no' or 'exit']: n
Skipping package cpshared_NG_FP3_53267_2_Nokia.tgz ...
Do you want to download CP_FP3_IPSO.tgz ? ['yes (default)' or 'no' or 'exit']: y
Processing package CP_FP3_IPSO.tgz ...
Package Description: Check Point NG Feature Pack 3 wrapper package
Would you like to :
1. Install this as a new package
2. Upgrade from an old package
3. Skip this package
4. Exit new package installation
Choose (1-4): 1
Installing CP_FP3_IPSO.tgz
CP_FP3_IPSO does not exist previously. Proceeding with Installation.
Running Pre-install script
Running Post-install script
May 6 21:31:26 fw-test [LOG_CRIT] PKG_INSTALL:
*************************************************************************
May 6 21:31:26 fw-test [LOG_CRIT] PKG_INSTALL:
*************************************************************************
May 6 21:31:26 fw-test [LOG_CRIT] PKG_INSTALL: INSTALL STARTED at Thu May 6 21:31:26 GMT 2004
Page 9

May 6 21:31:26 fw-test [LOG_CRIT] PKG_INSTALL: INSTALL STARTED at Thu May 6 21:31:26 GMT 2004
May 6 21:31:29 fw-test [LOG_CRIT] PKG_INSTALL: Trying to install CPshrd-50/cpshared_ipso.tgz
May 6 21:31:29 fw-test [LOG_CRIT] PKG_INSTALL: Trying to install CPshrd-50/cpshared_ipso.tgz
May 6 21:31:53 fw-test [LOG_CRIT] PKG_INSTALL: Trying to install CPfw1-50/fw1_ipso.tgz
May 6 21:31:53 fw-test [LOG_CRIT] PKG_INSTALL: Trying to install CPfw1-50/fw1_ipso.tgz
May 6 21:32:42 fw-test [LOG_CRIT] PKG_INSTALL: Running /tmp/pkg/CP_FP3_IPSO/CPfw150/POST_INSTALL
May 6 21:32:42 fw-test [LOG_CRIT] PKG_INSTALL: Running /tmp/pkg/CP_FP3_IPSO/CPfw150/POST_INSTALL
May 6 21:32:42 fw-test [LOG_CRIT] PKG_INSTALL: Running /tmp/pkg/CP_FP3_IPSO/CPdtps50/PRE_INSTALL
May 6 21:32:42 fw-test [LOG_CRIT] PKG_INSTALL: Running /tmp/pkg/CP_FP3_IPSO/CPdtps50/PRE_INSTALL
May 6 21:32:43 fw-test [LOG_CRIT] PKG_INSTALL: Running /tmp/pkg/CP_FP3_IPSO/CPuag50/PRE_INSTALL
May 6 21:32:43 fw-test [LOG_CRIT] PKG_INSTALL: Running /tmp/pkg/CP_FP3_IPSO/CPuag50/PRE_INSTALL
May 6 21:32:43 fw-test [LOG_CRIT] PKG_INSTALL:
*******************************************************
May 6 21:32:43 fw-test [LOG_CRIT] PKG_INSTALL:
*******************************************************
May 6 21:32:43 fw-test [LOG_CRIT] PKG_INSTALL: /etc/newpkg -S -m LOCAL -i -n CPfwbc-41/fw-1_ipso.tgz
May 6 21:32:43 fw-test [LOG_CRIT] PKG_INSTALL: /etc/newpkg -S -m LOCAL -i -n CPfwbc-41/fw-1_ipso.tgz
May 6 21:32:43 fw-test [LOG_CRIT] PKG_INSTALL:
*******************************************************
May 6 21:32:43 fw-test [LOG_CRIT] PKG_INSTALL:
*******************************************************
May 6 21:32:56 fw-test [LOG_CRIT] PKG_INSTALL:
*******************************************************
May 6 21:32:56 fw-test [LOG_CRIT] PKG_INSTALL: /etc/newpkg -S -m LOCAL -i -n CPdtps-50/polsrv_ipso.tgz
May 6 21:32:56 fw-test [LOG_CRIT] PKG_INSTALL:
*******************************************************
May 6 21:32:56 fw-test [LOG_CRIT] PKG_INSTALL: /etc/newpkg -S -m LOCAL -i -n CPdtps-50/polsrv_ipso.tgz
May 6 21:32:57 fw-test [LOG_CRIT] PKG_INSTALL:
*******************************************************
May 6 21:32:57 fw-test [LOG_CRIT] PKG_INSTALL:
*******************************************************
May 6 21:33:01 fw-test [LOG_CRIT] PKG_INSTALL:
*******************************************************
May 6 21:33:01 fw-test [LOG_CRIT] PKG_INSTALL: /etc/newpkg -S -m LOCAL -i -n CPfg1-50/fg1_ipso.tgz
May 6 21:33:01 fw-test [LOG_CRIT] PKG_INSTALL:
*******************************************************
May 6 21:33:01 fw-test [LOG_CRIT] PKG_INSTALL: /etc/newpkg -S -m LOCAL -i -n CPfg1-50/fg1_ipso.tgz
May 6 21:33:01 fw-test [LOG_CRIT] PKG_INSTALL:
*******************************************************
May 6 21:33:01 fw-test [LOG_CRIT] PKG_INSTALL:
*******************************************************
May 6 21:33:04 fw-test [LOG_CRIT] PKG_INSTALL:
*******************************************************
May 6 21:33:04 fw-test [LOG_CRIT] PKG_INSTALL: /etc/newpkg -S -m LOCAL -i -n CPrtm-50/rtm_ipso.tgz
May 6 21:33:04 fw-test [LOG_CRIT] PKG_INSTALL:
*******************************************************
May 6 21:33:04 fw-test [LOG_CRIT] PKG_INSTALL: /etc/newpkg -S -m LOCAL -i -n CPrtm-50/rtm_ipso.tgz
May 6 21:33:04 fw-test [LOG_CRIT] PKG_INSTALL:
*******************************************************
May 6 21:33:04 fw-test [LOG_CRIT] PKG_INSTALL:
*******************************************************
May 6 21:33:08 fw-test [LOG_CRIT] PKG_INSTALL:
*******************************************************
May 6 21:33:08 fw-test [LOG_CRIT] PKG_INSTALL: /etc/newpkg -S -m LOCAL -i -n CPuag-50/uag_ipso.tgz
May 6 21:33:08 fw-test [LOG_CRIT] PKG_INSTALL:
*******************************************************
Page 10

May 6 21:33:08 fw-test [LOG_CRIT] PKG_INSTALL: /etc/newpkg -S -m LOCAL -i -n CPuag-50/uag_ipso.tgz
May 6 21:33:08 fw-test [LOG_CRIT] PKG_INSTALL:
*******************************************************
May 6 21:33:08 fw-test [LOG_CRIT] PKG_INSTALL:
*******************************************************
May 6 21:33:16 fw-test [LOG_CRIT] PKG_INSTALL: Running /tmp/pkg/CP_FP3_IPSO/CPdtps50/POST_INSTALL
May 6 21:33:16 fw-test [LOG_CRIT] PKG_INSTALL: Running /tmp/pkg/CP_FP3_IPSO/CPdtps50/POST_INSTALL
May 6 21:33:21 fw-test [LOG_CRIT] PKG_INSTALL:
*************************************************************************
May 6 21:33:21 fw-test [LOG_CRIT] PKG_INSTALL:
*************************************************************************
May 6 21:33:21 fw-test [LOG_CRIT] PKG_INSTALL: ***************** **INSTALL/UPGRADE PROCESS
COMPLETED*********************
May 6 21:33:21 fw-test [LOG_CRIT] PKG_INSTALL: ***************** **INSTALL/UPGRADE PROCESS
COMPLETED*********************
May 6 21:33:21 fw-test [LOG_CRIT] PKG_INSTALL: Please do the following if the INSTALL/UPGRADE is
Successful:
May 6 21:33:21 fw-test [LOG_CRIT] PKG_INSTALL: Please do the following if the INSTALL/UPGRADE is
Successful:
May 6 21:33:21 fw-test [LOG_CRIT] PKG_INSTALL: 1) Logout and re-login.
May 6 21:33:21 fw-test [LOG_CRIT] PKG_INSTALL: 1) Logout and re-login.
May 6 21:33:21 fw-test [LOG_CRIT] PKG_INSTALL: 2) Run 'cpconfig' and configure the firewall.
May 6 21:33:21 fw-test [LOG_CRIT] PKG_INSTALL: 2) Run 'cpconfig' and configure the firewall.
May 6 21:33:21 fw-test [LOG_CRIT] PKG_INSTALL: 3) Install the new License if required.
May 6 21:33:21 fw-test [LOG_CRIT] PKG_INSTALL: 3) Install the new License if required.
May 6 21:33:21 fw-test [LOG_CRIT] PKG_INSTALL: 4) Reboot the box.
May 6 21:33:21 fw-test [LOG_CRIT] PKG_INSTALL: 4) Reboot the box.
May 6 21:33:21 fw-test [LOG_CRIT] PKG_INSTALL: ***************** **INSTALL/UPGRADE PROCESS
COMPLETED*********************
May 6 21:33:21 fw-test [LOG_CRIT] PKG_INSTALL: ***************** **INSTALL/UPGRADE PROCESS
COMPLETED*********************
May 6 21:33:21 fw-test [LOG_CRIT] PKG_INSTALL:
*************************************************************************
May 6 21:33:21 fw-test [LOG_CRIT] PKG_INSTALL:
*************************************************************************
Done installing CP_FP3_IPSO
Do you want to download fw1_NG_FP3_53225_5_N okia.tgz ? ['yes (default)' or 'no' or 'exit']: n
Skipping package fw1_NG_FP3_53225_5_Nokia.tgz ...
Do you want to download IPSO-SHF_HFA_322.tgz ? ['yes (default)' or 'no' or 'exit']: n
Skipping package IPSO-SHF_HFA_322.tgz ...
Do you want to download ipso1.tgz ? ['yes (default)' or 'no' or 'exit']: n
Skipping package ipso1.tgz ...
Do you want to download ipso2.tgz ? ['yes (default)' or 'no' or 'exit']: n
Skipping package ipso2.tgz ...
Do you want to download ipso3.tgz ? ['yes (default)' or 'no' or 'exit']: n
Skipping package ipso3.tgz ...
Do you want to download ipso4.tgz ? ['yes (default)' or 'no' or 'exit']: n
Skipping package ipso4.tgz ...
Page 11

Do you want to download ipso_3_7_1_Build007.tgz ? ['yes (default)' or 'no' or 'exit']: n
Skipping package ipso_3_7_1_Build007.tgz ...
Do you want to download ipso_3_7_1_Build010.tgz ? ['yes (default)' or 'no' or 'exit']: n
Skipping package ipso_3_7_1_Build010.tgz ...
Do you want to download RSNS_NokiaRelease_7_0_2003_62.tgz ? ['yes (default)' or 'no' or 'exit']: n
Skipping package RSNS_NokiaRelease_7_0_2003_62.tgz ...
End of new package installation
cleaning up ..done
Use Voyager to activate packages
fw-test[admin]#
You can now log back into Voyager by typing http://10.0.0.1, if you click on Config then click o n Manage
Installed Packages under System Configuration, your screen should look like the one shown below.
Page 12

The 2 applications (packages) turned on by default are the only ones that need to be turned on. Nothing
needs to be done, you’re just checking to make sure they’re turned on. If you click on UP it will take you
back to the Configuration screen.
NOTE: If you are going to be using VPNs you will also need to click on the first radio button underneath Applications.
Click on SNMP and make sure that it is turned off. If you click on UP it will take you back to the
Configuration screen.
NOTE: Your configuration may be different from the guide if you need SNMP enabled. This is up to you if you want to use it.
Under Security and Access Configuration click on Network Access and Services, make sure that Telnet
and FTP are turned off. If you click on UP it will take you back to the Configuration screen.
NOTE: Your configuration may be different from the guide if you need FTP & Telnet enabled. This is up to you if you want to use it.
Page 13

Under Security and Access Configuration click on SSH (Secure Shell), make sure that SSH is enabled.
If you click on UP it will take you back to the Configuration screen.
NOTE: This is important that this is turned on so that you can manage your NOKIA box via SSH.
Under Security and Access Configuration click on SSL Certificate Tool, here is where you configure your
SSL certificate.
After clicking on SSL Certificate Tool, you should see the screen shown below. Enter the same data
shown below into the configuration for your certificate you are creating. The pass phrase can be
whatever you choose. When
Page 14

After all of the information has been added click on Apply. This will bring up a screen that has a
certificate and a private key in it; you need to copy the entire text that is listed. After highlighting the
entire certificate right click and select “copy”. After you have copied the certificate scroll to the bottom of
the screen and click on the Voyager SSL certificate page that is shown below.
Page 15

When the Voyager SSL Certificate page comes up, Paste the copied certificate into the box that is
labeled “New server certificate”. Now click on the BACK button of the IE page that you are on, I have
noticed that if you click on up rather then back your certificate will disappear. It is a lot easier to just click
on back, this way you don’t get lost as to what you are doing.
Now you should be back to the page where you can copy the “Private Key” this is the one below the
Server Certificate. After you copy the key click on the green arrow that allows you to advance to the
previous page in IE, Netscape or whatever you are using.
Now that you are back to the area shown below, paste the Private Key in the area that reads Associated
Private Key. You will then need to type in the “Pass phrase” that you created earlier. After entering the
pass phrase, click on Apply and the screen will show “Apply Successful” at the top of the page.
Page 16

If you click on UP it will take you to the screen shown below. This is where you will choose the required
encryption for the using SSL. Choose the radio button that reads 128-bit key or stronger. After
selecting the radio button click on Apply and Save.
You should still see that same screen shown above, if you click on UP you will get the error message
“The page cannot be displayed”. You are getting this error message because you need to change the
URL to use HTTPS rather then HTTP. As soon as you put an “S” behind HTTP and hit enter you will be
back to the Voyager configuration page.
Page 17

You know need to create the “Default filter”, this is used to deny any access to the NOKIA device except
for SSH or other connections. This all depends on how you create the default filter; I will be creating the
default filter that only allows SSH connections to the NOKIA device. Shown below are the steps that
need to be taken to apply the default filter.
NOTE: The default filter is really a default policy on the NOKIA device. A policy will be applied to the device when it is pushed via
the management server.
fw-test[admin]# cd $FWDIR/lib
fw-test[admin]# cp defaultfilter.ipso $FWDIR/conf/defaultfilter.pf
fw-test[admin]# fw defaultgen
Generating default filter
defaultfilter:
Compiled OK.
fw-test[admin]# cd $FWDIR/state
fw-test[admin]# ls -ls
total 1
1 -rw-rw-r-- 1 root 80 736 May 21 17:41 defaul t .bin
fw-test[admin]# cp default.bin $FWDIR/boot
fw-test[admin]# cd $FWDIR/boot
fw-test[admin]# ls -ls
total 59
1 -rw-r--r-- 1 root 80 41 Sep 19 2002 boot.conf
1 -rw-rw-r-- 1 root 80 736 May 21 17:41 default.bin
56 -rwxr-xr-x 1 root 80 57344 Sep 19 2002 fwboot
1 drwxr-xr-x 2 root 80 512 May 6 21:33 modules
fw-test[admin]#
Now that the default filter is created you can move on to the second to last step of the configuration. All
of the appropriate patches and hot fixes should be applied at this time. I will demonstrate one for you; it is
best to use the directory /var/tmp.
NOTE: Make sure that your FTP server is running for this portion. You can get all of the current patches and hot fixes on Check
Point’s website.
fw-test[admin]# cd /var/tmp
fw-test[admin]# ls -ls
total 2
1 -rw-rw-rw- 1 root wheel 107 May 6 19:34 fetchout
0 -rw-r--r-- 1 root wheel 0 May 21 14:47 ipsopmddebug.txt
0 -rw-r--r-- 1 root wheel 0 May 6 22:10 ipsopmddebug.txt1
1 -rw-rw-rw- 1 root wheel 438 May 6 19:35 newimageout
0 lrwxrwxrwt 1 root wheel 42 May 21 15:44 present -> IPSO-3.7.1-BUILD010-04.05.2 004-185427-1253
fw-test[admin]# ftp 10.0.0.2
Connected to 131.87.68.130.
220 3Com FTP Server Version 1.1
Name (131.87.68.130:admin):
331 User name ok, need password
Password:
230 User logged in
Remote system type is Windows/NT.
ftp> hash
Hash mark printing on (1024 bytes/hash mark).
ftp> bin
200 Type set to I.
ftp> dir
200 PORT command successful.
150 File status OK ; about to open data connection
D--------- 1 owner group 0 Apr 15 11:19 .
D--------- 1 owner group 0 Apr 15 11:19 ..
---------- 1 owner group 32330013 Oct 21 10:05 CP_FP3_IPSO.tgz
---------- 1 owner group 37908646 Apr 27 19:41 ipso_3_7_1_Build010.tgz
---------- 1 owner group 285169 Apr 16 18:52 OpenSSL_HF_mar_2004_fp3_hf2_ipso.tgz
Page 18

---------- 1 owner group 21039771 Apr 28 14:10 SHF_HFA_325.ipso.tgz
#
226 Closing data connection
ftp> get SHF_HFA_325.ipso.tgz
local: SHF_HFA_325.ipso.tgz remote: SHF_HFA_325.ipso.tgz
200 PORT command successful.
150 File status OK ; about to open data connection
100% |**************************** **********************| 20546 KB 00:00 ETA
226 File transfer successful.
21039771 bytes received in 5.79 seconds (3.47 MB/s)
ftp> bye
221 Service closing control connection
fw-test[admin]# pwd
/var/tmp
fw-test[admin]# gunzip SHF_HFA_325.ipso.tgz
fw-test[admin]# tar -xvf SHF_HFA_325.ipso.tar
cpshared_HOTFIX_HFA_325_332553963_1
fw1_HOTFIX_HFA_325_332553950_1
fw-test[admin]# ./cpshared_HOTFIX_HFA_325_332553963_1
Do you want to proceed with installation of C heck Point SVN Foundation NG FP3 Support HFA 325 for Check
Point SVN Foundation NG FP3 on this computer?
If you choose to proceed, installation will perform CPSTOP.
(y-yes, else no):y
SVN Foundation: cpd is not running
SVN Foundation: cpWatchDog is not running
SVN Foundation stopped
***************************************************************************
Check Point SVN Foundation NG FP3
Check Point SVN Foundation NG FP3 Support HFA 325 installation completed successfully.
***************************************************************************
fw-test[admin]# ./fw1_HOTFIX_HFA_325_332553950_1
Do you want to proceed with installation of C heck Point VPN-1/FireWall-1 NG FP3 Support HFA 325 for Check
Point VPN-1 & FireWall-1 NG FP3 on this computer?
If you choose to proceed, installation will perform CPSTOP.
(y-yes, else no):y
SVN Foundation: cpd is not running
SVN Foundation: cpWatchDog is not running
SVN Foundation stopped
Launching post-hotfix utility
***************************************************************************
Check Point VPN-1 & FireWall-1 NG FP3
Check Point VPN-1/FireWall-1 NG FP3 Support HFA 325 installation completed successfully.
***************************************************************************
fw-test[admin]#
The very last step to configuring this firewall is to run a cpconfig. When you run a cpconfig you are
setting up what type of Check Point product you wish to run. We are going to choose an “enforcement
module” or firewall. The second part to this is setting your one time password for SIC (Secure Internal
Communication). You are also able to put your license on at this time as well; we are going to put our
license on later.
NOTE: Check Point gives you a 15 day trial license so you don’t have to apply the license right away.
fw-test[admin]# cpconfig
Welcome to Check Point Configuration Program
=================================================
Please read the following license agreement.
Hit 'ENTER' to continue...
Page 19

This End-user License Agreement (the "Agreement") is an agreement between you (b
oth the individual installing the Product and any legal entity on whose behalf s
uch individual is acting) (hereinafter "You" or " Your") and Check Point Softwar
e Technologies Ltd. (hereinafter "Check Point").
TAKING ANY STEP TO SET-UP OR INSTALL THE PRODUCT CONST ITU TES YOUR ASSENT TO AND
ACCEPTANCE OF THIS END USER LICENSE AGREEMENT. WRITTEN APPROVAL IS NOT A PREREQU
ISITE TO THE VALIDITY OR ENFORCEABILITY OF THIS AGREEMENT AND NO SOLICITATION OF
ANY SUCH WRITTEN APPROVAL BY OR ON BEHALF OF YOU SHALL BE CONSTRUED AS AN INFER
ENCE TO THE CONTRARY. IF YOU HAVE ORDERED THIS PRODUCT AND SUCH ORDER IS CONSID
ERED AN OFFER BY YOU, CHECK POINT'S ACCEPTANCE OF YOUR OFFER IS EXPRESSLY CONDIT
IONAL ON YOUR ASSENT TO THE TERMS OF THIS AGREEMENT, TO THE EXCLUSION OF ALL OT
HER TERMS. IF THESE TERMS ARE CONSIDERED AN OFFER BY CHECK POINT, YOUR ACCEPTA N
CE IS EXPRESSLY LIMITED TO THE TERMS OF THIS AGREEMENT. IF YOU DO NOT AGREE WIT
H ALL THE TERMS OF THIS AGREEMENT, YOU MUST RETURN THIS PRODUCT WITH THE ORIGINA
L PACKAGE AND THE PROOF OF PAYMENT TO THE PLACE YOU OBTAIN ED IT FOR A FULL REFUN
(Hit Space bar until end of license agreement)
Do you accept all the terms of this license agreement (y/n) ? y
Select installation type:
-------------------------
(1) Enforcement Module.
(2) Enterprise Management.
(3) Enterprise Management and Enforcement Module.
(4) Enterprise Log Server.
(5) Enforcement Module and Enterprise Log Server.
Enter your selection (1-5/a-abort) [1]: 1
Would you like to install a Check Point clustering product (CPHA, CPLS or State Synchronization)? (y/n) [n] ? n
IP forwarding disabled
Hardening OS Security: IP forwarding will be disabled during boot.
Generating default filter
Default Filter installed
Hardening OS Security: Default Filter will be applied during boot.
This program will guide you through several steps where you
will define your Check Point products configuration.
At any later time, you can reconfigure these parameters by
running cpconfig
Configuring Licenses...
=======================
Host Expiration Signature Features
Note: The recommended way of managing licenses is using SmartUpdate.
cpconfig can be used to manage local licenses only on this machine.
Do you want to add licenses (y/n) [y] ? n
Configuring Random Pool...
==========================
You are now asked to perform a short random keystroke session.
The random data collected in this session will be used in
various cryptographic operations.
Please enter random text containing at least six different
characters. You will see the '*' symbol after keystrokes that
are too fast or too similar to preceding keystrokes. These
Page 20

keystrokes will be ignored.
Please keep typing until you hear the beep and the bar is full.
[....................]
Thank you.
Configuring Secure Internal Communication...
============================================
The Secure Internal Communication is used for authentication between
Check Point components
Trust State: Uninitialized
Enter Activation Key: xxxxxxxxxx
Again Activation Key: xxxxxxxxxx
The Secure Internal Communication was successfully initialized
initial_module:
Compiled OK.
Hardening OS Security: Initial policy will be applied
until the first policy is installed
In order to complete the installation
you must reboot the machine.
Do you want to reboot? (y/n) [y] ? y
After the reboot is completed you can log back in and type in the command shutdown now. This will
shut the device down properly and you can then hit the power button in the past. If you don’t shut it down
like this you run the risk of putting the device into Single User Mode. You are all set to connect this
device to your network and get the management server configured in order to apply a license and push a
policy to this device.
About the Author
Brandon E Robrahn, CCSA, is a Firewall Administrator for a fast growing company that supports the Federal
Government. His area of infosec expertise include intrusion detection, firewall administration, and antivirus. He has been
providing support for the Federal Government for over 2 years, and has been in the IT field for over 4 years. Before providing support to
the Federal Government, he was serving his country in the United States Army for 3 years. In his spare time he enjoys spending time
with his family, and spending time outdoors.
 Loading...