

Page 1

Nokia Wireless Image Headset
HS-13W User Guide
9236004
Issue 1
Page 2
DECLARATION OF CONFORMITY
We, NOKIA CORPORATION declare under our sole responsibility that the product HS-13W is in
conformity with the provisions of the following Council Directive: 1999/5/EC.
A copy of the Declaration of Conformity can be found from
http://www.nokia.com/phones/declaration_of_conformity/.
Copyright © 2005 Nokia. All rights reserved.
Reproduction, transfer, distribution or storage of part or all of the contents in this document in
any form without the prior written permission of Nokia is prohibited.
Nokia and Nokia Connecting People are registered trademarks of Nokia Corporation. Other
product and company names mentioned herein may be trademarks or tradenames of their
respective owners.
Bluetooth is a registered trademark of Bluetooth SIG, Inc.
Nokia operates a policy of continuous development. Nokia reserves the right to make changes
and improvements to any of the products described in this document without prior notice.
Under no circumstances shall Nokia be responsible for any loss of data or income or any
special, incidental, consequential or indirect damages howsoever caused.
The contents of this document are provided "as is". Except as required by applicable law, no
warranties of any kind, either express or implied, including, but not limited to, the implied
warranties of merchantability and fitness for a particular purpose, are made in relation to the
accuracy, reliability or contents of this document. Nokia reserves the right to revise this
document or withdraw it at any time without prior notice.
The availability of particular products may vary by region. Please check with the Nokia dealer
nearest to you.
9236004
Issue 1
Page 3

Contents
Contents
Introduction ............................. 5
Bluetooth wireless technology .......... 5
Bluetooth passcode............................... 6
1. Overview............................... 7
Headset parts.......................................... 7
Standby and image modes.................. 9
Standby mode indicators ............... 10
2. Get started.......................... 11
Charge the battery .............................. 11
Switch the headset on and off ........ 12
Switch the headset on for the first
time...................................................... 13
3. Call functions..................... 14
Make a call ............................................ 14
Answer or reject an incoming call.. 16
Call waiting........................................ 16
4. Menu usage........................ 17
Move in the menu ............................... 17
Write with the text editor................ 18
Enter the time, date, and passcode 19
List of menu functions ...................... 20
5. Menu functions.................. 22
Call register .......................................... 22
Recent calls lists.............................. 22
Call duration ..................................... 23
Phone book ........................................... 23
Select the phone book view ......... 24
Save names and phone numbers 24
Edit a name or a number............... 25
Delete names and numbers.......... 25
Copy from the phone book of the
mobile phone.................................... 26
Send and receive a business card 27
Gallery.................................................... 29
Images and text files...................... 29
Shows.................................................. 31
Receive and store new images .... 32
English
3
Page 4

Settings.................................................. 33
Bluetooth connections................... 33
Time and date settings................... 35
Summary after call.......................... 36
Language............................................ 36
Automatic keyguard ....................... 36
Help text activation........................ 37
Display settings................................ 37
Tone settings..................................... 40
Voice dial settings........................... 40
Memory status ................................. 41
Download application .................... 41
Restore factory settings ................ 42
Keyguard................................................ 42
6. Battery information........... 43
Charging and discharging ................ 43
CARE AND MAINTENANCE ... 45
4
Page 5

Introduction
Introduction
The Nokia Wireless Image Headset uses Bluetooth wireless technology to
provide an easy way to manage calls and display favorite images.
The headset has its own memory for storing phone numbers and data.
Remember to make back-up copies or keep a written record of all
important information. Information stored on the headset is not stored on
your mobile phone.
You can carry your headset around your neck using the provided neck
strap, or attach it to your clothing with the clip on the back of the device.
Read this user guide carefully before using the headset. More detailed
information about general usage is given in the user guide of your mobile
phone. Do not use this user guide in place of the user guide of your phone,
since it provides important safety and maintenance information.
■ Bluetooth wireless technology
The Nokia Wireless Image Headset supports Bluetooth wireless
technology, which allows you to connect the headset to a compatible
device within 10 meters. The connection can be subject to interference
from obstructions such as walls or other electronic devices.
English
5
Page 6

Introduction
This device is compliant with Bluetooth Specification 1.1 supporting the
following profiles: Generic Access Profile, Hands-Free Profile. Generic
Object Exchange Profile, Object Push Profile and File Transfer Profile.
Here, profile means a set of Bluetooth wireless technology commands
that your phone uses for controlling the headset. Check with the
manufacturers of other devices to determine their compatibility with this
device.
There may be restrictions on using Bluetooth technology in some
locations. Check with your local authorities or service provider.
■ Bluetooth passcode
You need a Bluetooth passcode to pair the Nokia Wireless Image Headset
with compatible devices. The passcode is 0000, and you cannot change it.
In addition, use the passcode to restrict the use of the headset.
For information on entering the passcode, see "Enter the time, date, and
passcode" on page 19.
6
Page 7
1. Overview
Overview
■ Headset parts
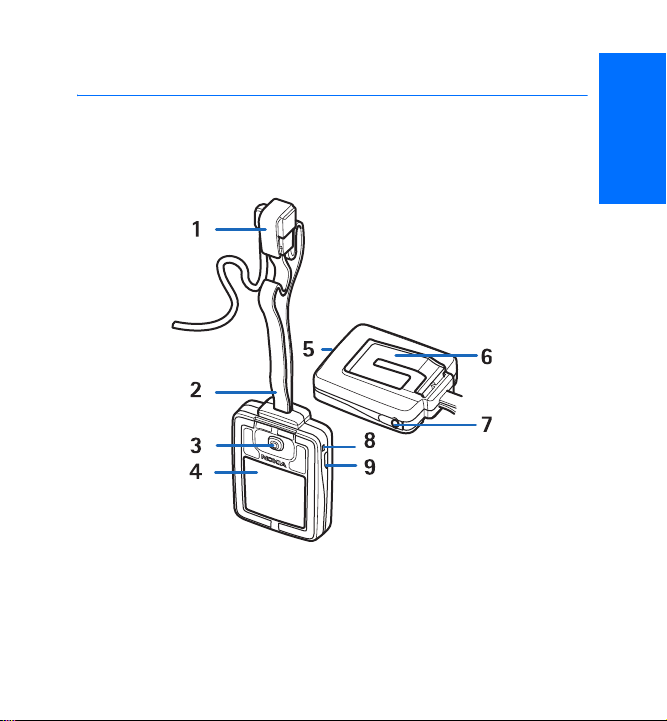
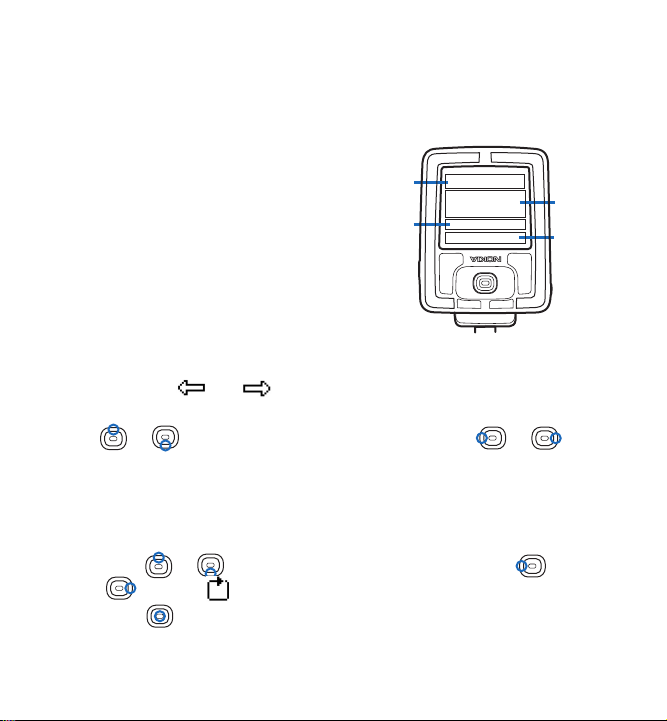
The headset has the following parts. See Figure 1 at the front of the guide.
Figure 1
• Earpiece clip (1)
•Strap (2)
English
7
Page 8
Overview
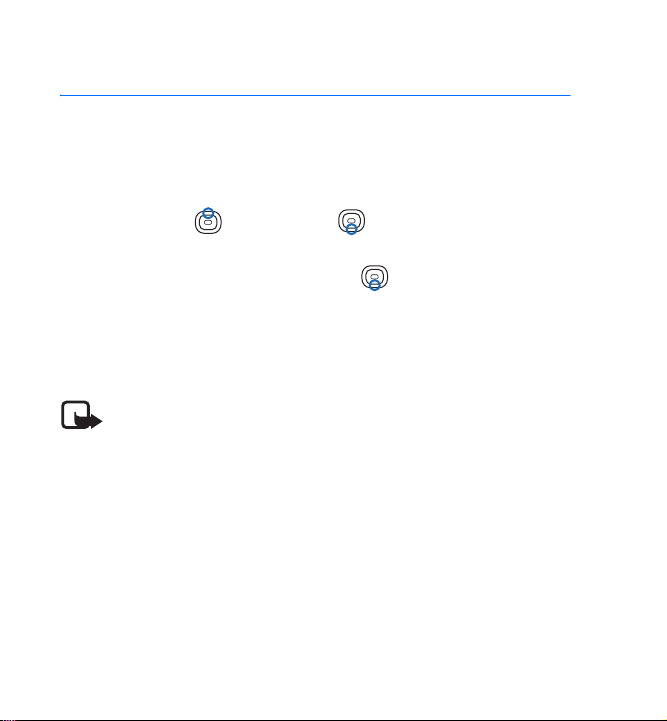
• Joystick , , , , and (3)
In the standby mode, and function as shortcuts to the
phone book.
The function of and depends on the guiding text shown on
the display, for example, Menu and Voice dial in the standby mode.
has the same function as , except when you insert data. See
"Write with the text editor" on page 18.
• Display (4)
• Buzzer (5)
• Clip (6)
• Charging connector cover (7)
• Microphone (8)
•Power key (9)
A short press of the power key turns the display lights on and allows
you to turn the audio tones on or off.
8
Page 9
Overview
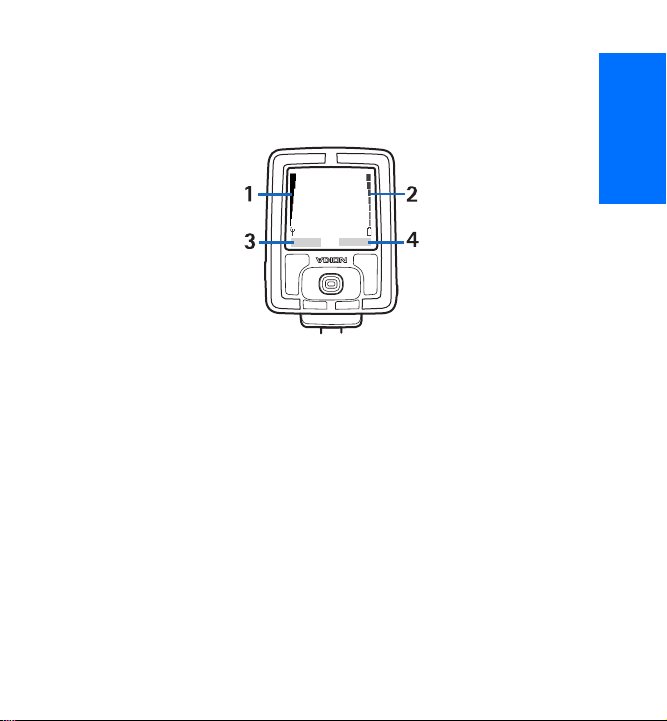
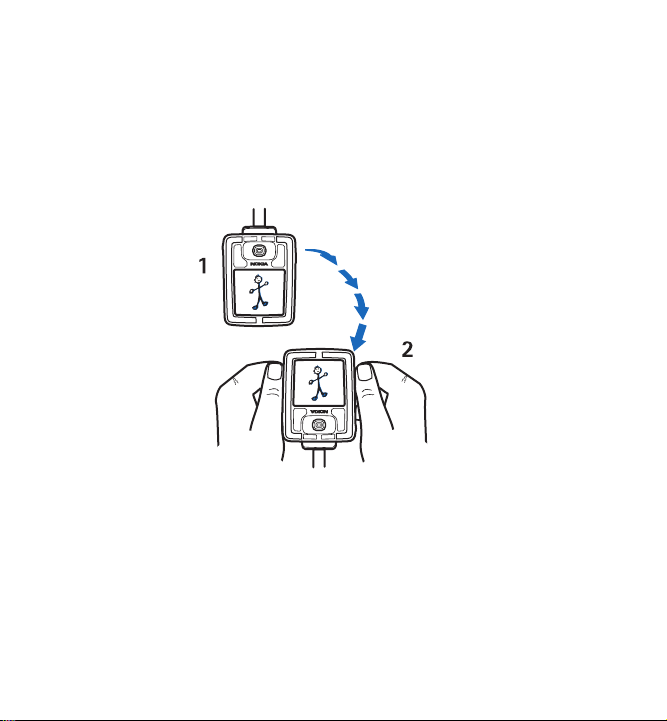
■ Standby and image modes
The headset is in the standby mode when it is ready for use and you have
not opened the menu. See Figure 2 at the front of the guide.
Figure 2
• Signal indicator (1) of the cellular network at your current location.
• Battery charge indicator (2). The higher the bar, the more power in the
battery.
• The left selection key (3) in the standby mode is Menu.
• The right selection key (4) in the standby mode is Voice dial.
The headset automatically activates the image mode when it has been in
the standby mode for 30 seconds, or when the keyguard is activated. See
"Keyguard" on page 42.
The image mode is activated only if the Image mode is enabled. See
"Image mode" on page 38.
English
9
Page 10

Overview
In the image mode, the headset displays a single image, text, or a show
stored in the headset. To define the images displayed in the image mode,
see "Image mode" on page 38.
To exit the image mode, press the joystick.
Standby mode indicators
The keypad is locked. See "Keyguard" on page 42.
The audio sounds of the headset are turned off. See "Tone
settings" on page 40.
Bluetooth is on. See "Bluetooth connections" on page 33.
The headset is connected to a device. See "Bluetooth
connections" on page 33.
10
Page 11

2. Get started
Get started
■ Charge the battery
Check the model number of any charger before use with this device. This
device is intended for use when supplied with power from the Nokia
ACP-12, ACP-8, and LCH-12 chargers.
Warning: Use only batteries, chargers, and enhancements
approved by Nokia for use with this particular model. The use of
any other types may invalidate any approval or warranty, and may
be dangerous.
When you disconnect the power cord of any accessory, grasp and pull the
plug, not the cord.
Your device and its enhancements may contain small parts. Keep them
out of reach of small children.
English
11
Page 12
Get started
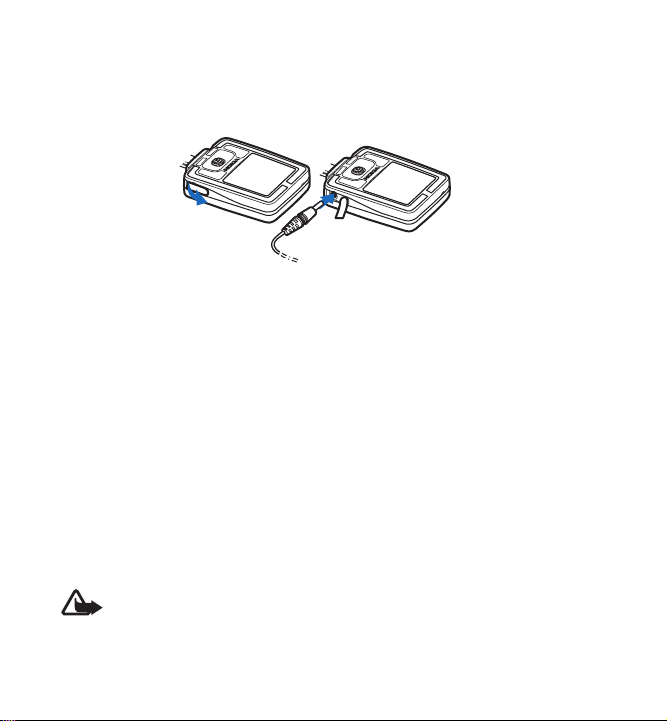
1. Open the charging connector cover on the device, and connect the
lead from the charger to the charger connector. See Figure 3 at the
front of the guide.
Figure 3
2. Connect the charger to an AC wall socket.
The text Charging is displayed briefly if the headset is switched on. The
battery charge indicator scrolls on the display until the battery is full.
If the battery is completely discharged, it may take a few minutes
before the indicator appears on the display.
You can use the headset while the charger is connected.
■ Switch the headset on and off
Press and hold the power key.
Bluetooth wireless technology is activated by default when the headset is
switched on for the first time.
Warning: Do not switch the device on when wireless use is
prohibited or when it may cause interference or danger.
12
Page 13

Get started
Switch the headset on for the first time
When you switch the headset on for the first time, you must pair it with
your mobile phone. Pairing is important, because each time you switch on
the headset, it automatically attempts to connect to the first device with
which you have paired.
Create a connection from your mobile phone to the headset using
Bluetooth wireless technology. Follow the instructions in the user guide
of your phone. The passcode of your headset is 0000.
Send the download application to the mobile phone
If the mobile phone does not have the application needed to copy the
phone book to the headset, the headset automatically attempts to send it
to the phone. Approximately 30 seconds after the first Bluetooth wireless
technology connection is established, the headset displays Send contacts
download application to phone, if the headset is in the standby mode.
Press Yes.
If you want to send the application to the phone later, press No. To send
the application later, see "Send application to phone" on page 41.
After the application is successfully downloaded to the phone, you receive
a notification in the phone inbox. Install the application as instructed in
the notification.
For more information on copying, see "Copy from the phone book of the
mobile phone" on page 26.
English
13
Page 14
Call functions
3. Call functions
■ Make a call
You can make a call by voice dialing or by using the numbers stored in the
phone book or call register.
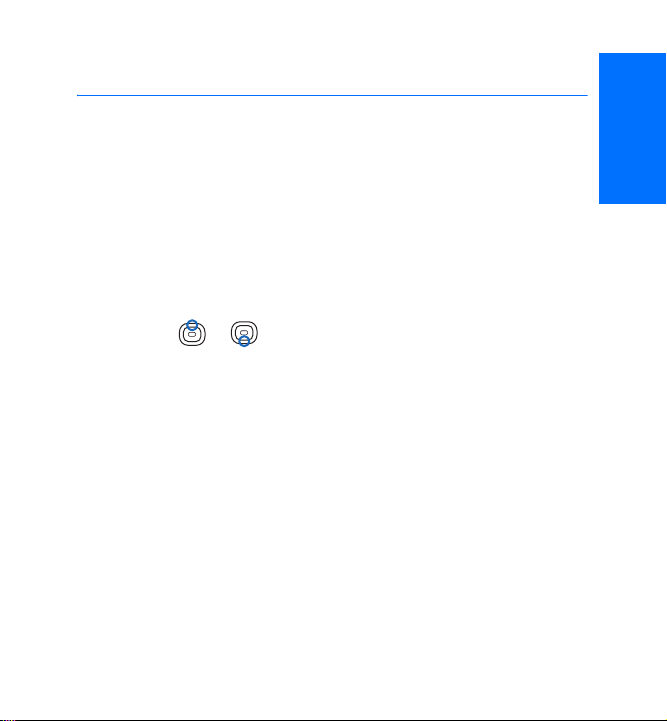
During a call, press to increase and to decrease the volume.
Make a call using the phone book
Select Menu > Contacts > Names (or press in the standby mode).
Scroll to the name or number you want, and select Options > Call.
Make a call using the call register
Select Menu > Call register > Dialled numbers, Missed calls, or Received
calls. Scroll to the name or number you want, and select Options > Call.
Note: If you use the call register to make an international call,
make sure that the number has the correct international prefix
and country code.
The call register contains the last 10 missed and last 10 received calls, and
the last 20 numbers you have called. See "Call register" on page 22.
Make a call using voice dialing
Before you use voice dialing, change the voice dialing language to the
language you speak. See "Voice dial settings" on page 40.
14
Page 15
Call functions
Press Voice dial. When the headset displays Speak now, and sounds a
tone, say the name of the person you want to call. The headset plays the
voice tag of the name, displays the name and the default number, and
automatically makes the call after a short delay.
During the delay, you can cancel the call by pressing Quit, or change the
number or person you are calling. If the displayed name is correct, but you
want to call a different number, for example, the home number instead of
the mobile phone number, press or to select the correct number.
If the displayed name is wrong, press Change, and select the correct name
from a list of similar names.
Since the headset automatically generates a voice tag each time a name
is stored in the phone book, you do not need to separately record the voice
tags.
Note: Using voice tags may be difficult in a noisy environment or
during an emergency, so you should not rely solely upon voice
dialing in all circumstances.
You can use voice dialing only if the name of the person you want to call
is in the phone book of the headset. The headset plays the voice tag only if
the voice tag playback is on. See "Voice dial settings" on page 40.
End a call
To end the call or to cancel the call attempt, press End call.
If End call is not available, for example, when the call is muted, select
Options > End call.
English
15
Page 16

Call functions
■ Answer or reject an incoming call
To answer or reject an incoming call, press Answer or Reject.
If the Answer and Reject options are not available, select Options >
Answer or Reject.
When somebody is calling you, the headset shows the caller’s name and
number, if known, or the text Call. If more than one name is found in the
headset phone book with the same phone number, only the phone
number is displayed.
Call waiting
During a call, press Answer, or select Options > Answer to answer the
waiting call. The first call is put on hold. To end the active call, select
Options > End call.
The call waiting function must be activated before you can use it. You can
activate the function from the paired mobile phone. For more
information, see the user guide of your mobile phone.
16
Page 17
Menu usage
4. Menu usage
The Nokia Wireless Image Headset offers an extensive range of functions,
which are grouped in menus. Most of the menu functions are provided
with a brief help text. To view the help text, scroll to the menu function
you want, and wait for 14 seconds. To exit the help text, press Exit. See
"Help text activation" on page 37.
■ Move in the menu
1. Press Menu.
2. Scroll with or through the menu, and select, for example,
Settings, by pressing Select.
3. If the menu contains submenus, select the one you want, for example,
Display settings.
4. If the submenu contains more submenus, select the one you want, for
example, Wallpaper.
5. Select the setting of your choice.
6. Press Back or Exit to return to the previous menu level and to exit the
menu.
Press and hold Back to exit the menu regardless of your present menu
location.
English
17
Page 18
Menu usage
■ Write with the text editor
When you need to insert data to the headset, a text editor is displayed.
The main areas of the text editor screen are:
1. Prompt area—displays the objective of the
screen.
2. Editor area—displays the text you have
entered.
3. Character area—displays all the characters
you can select from. The content of the list
varies. For example, if you are inserting a
phone number, only characters allowed in a
phone number are available.
4. Command area—displays all the available actions you can take. For
example, the and icons allow you to move the cursor in the
editor area.
Press or to move between the areas 3 and 4. Press or
to move within one area.
To insert data:
1. Select the editing mode (such as lowercase letters, uppercase letters,
and numbers):
• Press or to move to the command area, and press or
until the icon is highlighted.
• Press repeatedly until the mode you want is shown at the top
of the screen.
1
3
2
4
18
Page 19

Menu usage
2. Insert the first character:
Press to move to the character area, and press or until
the correct character is highlighted. Press to select it.
The selected character is added to the editor area.
3. Repeat step 2 until you have inserted all the text you want.
4. To save the data, select Options in the command area, press , and
select Save.
To exit the editor without saving, select Options in the command area,
press , and select Exit editor.
■ Enter the time, date, and passcode
When you need to insert the time, date, or a passcode, a special editor
appears.
To enter the date, time, or a password:
1. Press or repeatedly until the desired number appears in the
area highlighted by the cursor.
2. Select Next to move to the next number, and repeat step 1.
3. Repeat step 2 until you have entered all the requested information.
4. Select OK to approve your entry, or Back to return to the menu
without saving your entry.
English
19
Page 20
Menu usage
■ List of menu functions
1. Call register
1. Dialled numbers
2. Missed calls
3. Received calls
4. Delete recent call lists
5. Call duration
1. Last call duration
2. Received calls’ duration
3. Dialled calls’ duration
4. All calls’ duration
5. Clear timers
2. Contacts
1. Names
2. Add new contact
3. Edit name
4. Delete
5. Copy from phone
6. Add number
7. Send electronic bus. card
8. Contacts view
20
3. Gallery
1. Graphics
2. Texts
3. Shows
1. All images
2. All texts
3. My show1
4. My show2
5. Digital clock
6. Analog clock
4. Settings
1. Bluetooth
1. Bluetooth
2. Search for Bluetooth
devices
3. Active device
4. Paired devices
5. Bluetooth settings
2. Time and date settings
1. Clock
2. Date
3. Summary after call
Page 21

Menu usage
4. Headset language
5. Automatic keyguard
6. Help text activation
7. Display settings
1. Wallpaper
2. Image mode
3. Colour schemes
4. Display brightness
5. Lights
8. Tone settings
1. Headset audio
2. Incoming call alert
3. Ringing tone
4. Ringing volume
5. Keypad tones
6. Warning tones
9. Voice dial settings
1. Voice dial language
2. Repeat dialled name
3. Reset voice dial settings
10.Memory status
1. Contacts status
2. Gallery status
11.Send application to phone
12.Restore factory settings
5. Keyguard
English
21
Page 22

Menu functions
5. Menu functions
■ Call register
The headset registers the phone numbers and the
approximate length of the calls that have been missed, received, or dialed
using the headset. In addition, the call register contains the calls that
have been missed or received using the connected phone.
The headset registers missed and received calls only if the network
supports these functions, the headset and phone are switched on and
within the network service area, and the Bluetooth connection between
the phone and the headset is active.
When you press Options in the Missed calls, Received calls, and Dialled
numbers menu, you can, for example, view the date and the time of the
call.
Note: If you use the call register to make an international call,
make sure that the number has the correct international prefix
and country code.
Recent calls lists
Select Menu > Call register and one of the following:
• Dialled numbers—to view the list of the last phone numbers that you
have called or attempted to call.
22
Page 23
Menu functions
• Missed calls—to view the list of the last phone numbers from which
somebody has tried to call you (network service).
Tip: When a note about missed calls is displayed, press List to
access the list of phone numbers. Scroll to the number you would
like to call back, and select Options > Call.
• Received calls—to view the list of the last phone numbers from which
you have accepted or rejected calls (network service).
• Delete recent call lists—to delete the recent calls lists. Select whether
you want to delete all the phone numbers in the recent call lists, or
only those numbers in the missed calls, received calls, or dialed
numbers lists. You cannot undo the operation.
Call duration
Select Menu > Call register > Call duration.
Scroll to view the approximate duration of your incoming and outgoing
calls in hours, minutes, and seconds.
To clear the timers, you need the Bluetooth passcode. See "Bluetooth
passcode" on page 6.
■ Phone book
You can save names and phone numbers in the phone book in
the headset memory.
You can save a maximum of 250 names, with two numbers for each name.
English
23
Page 24

Menu functions
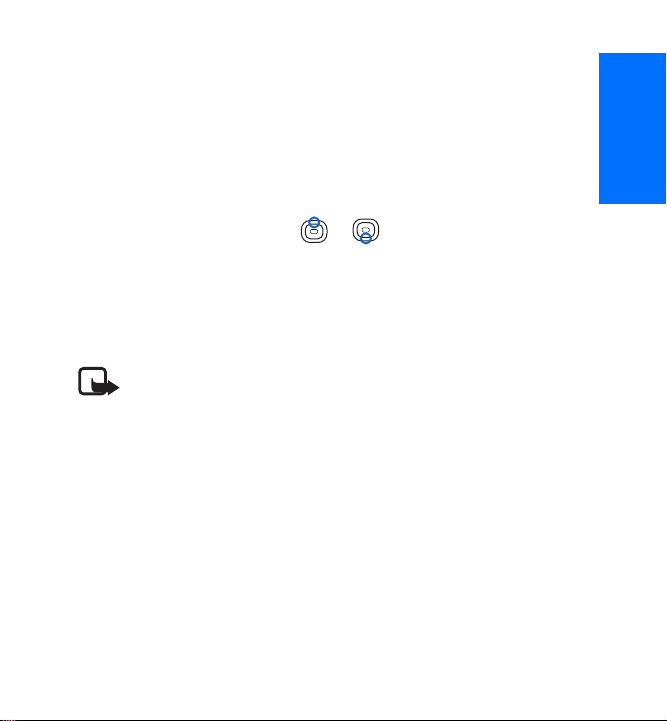
To access the phone book select Menu > Contacts, or press or in
the standby mode.
Select the phone book view
To select how names and numbers are displayed, select Menu >
Contacts > Contacts view.
Save names and phone numbers
1. Select Menu > Contacts > Add new contact.
2. Enter the name, and save it. See "Write with the text editor" on page
18.
3. Enter the phone number, and save it. See "Write with the text editor"
on page 18.
4. Press Done.
The headset automatically creates a voice tag for the new name.
Save multiple numbers per name
You can save two types of phone numbers per name in the phone book.
Add a second number
1. Select Menu > Contacts > Add number.
2. Scroll to the name to which you want to add a new number, and press
Add.
3. Select one of the following number types: General, Mobile,
Home, or Office.
24
Page 25

Menu functions
4. Enter the number, and save it.
5. To return to the menu, press Back.
The first number saved is automatically set as the default number. When
you select a name from the phone book, for example, to make a call, the
default number is used unless you select another number. The default
number is always at the top of the list.
To change the default number, select Menu > Contacts > Names. Scroll to
the name you want, and select Options > View details. Scroll to the
number you want to set as the default number, and select Options > Set
as default.
Edit a name or a number
To edit a name, select Menu > Contacts > Edit name. Scroll to the phone
book entry you want to edit, and press Edit.
To edit a number, select Menu > Contacts > Names. Scroll to the name
you want, and select Options > View details. Scroll to the number you
want to edit, and select Options > Edit number.
To enter letters or numbers, see "Write with the text editor" on page 18.
To play the voice tag to hear how the system pronounces the name of a
contact, select Options > Play voicetag.
Delete names and numbers
Select Menu > Contacts > Delete.
English
25
Page 26

Menu functions
• To delete names and numbers one by one, select One by one, and scroll
to the name and number you want to delete. Press Delete, and Yes to
confirm.
• To delete names and numbers in the phone book all at once, select
Delete all. Confirm the deletion, and enter the Bluetooth passcode. See
"Bluetooth passcode" on page 6.
Copy from the phone book of the mobile phone
You can copy names and phone numbers to the headset from the mobile
phone to which it is connected. You can copy either the whole phone book
or only selected names and numbers.
Only the name and the first two phone numbers are copied to the headset
phone book. All text items and additional phone numbers are ignored.
If your phone does not support the file transfer profile or have the phone
book download application, the headset must send the download
application to the phone to enable copying. If you did not send the
download application to the phone when you first connected the headset,
see "Send application to phone" on page 41. The phone book download
application must be running when you copy phone book entries from the
mobile phone to the headset.
Note: If the same name is in the headset and the source memory
and its name or number has changed in the source memory, then
the entry in the headset is deleted and replaced during the
copying process.
26
Page 27

Menu functions
1. Select Menu > Contacts > Copy from phone.
If the headset is not connected to a phone or the phone does not
support this function, the Copy from phone menu is unavailable.
2. Select the source memory from which you want to copy: the internal
memory of the phone (Phone) or the SIM card memory (SIM card).
If your SIM card memory is not available, SIM card is unavailable.
3. Select All entries or Selected entries.
If the phone does not support the Selected entries function, the menu
item is unavailable.
If you select Selected entries, the headset displays the list of all names
in the source memory. Scroll through the list, and mark all the entries
you want to copy by pressing Mark. To delete a selection, press
Unmark. When finished, press Done.
4. To start copying, press OK. During the copying process, you can stop by
pressing Quit.
When the copying is finished, the headset display shows how many
entries were copied and how many were not. To exit the screen, press
Back. The headset automatically creates voice tags for all the copied
names.
Send and receive a business card
You can send and receive a person’s contact information (business card)
using Bluetooth wireless technology.
English
27
Page 28
Menu functions
Receive a business card
1. When you receive a business card to the headset, a notification is
displayed.
2. To view the business card, press Show.
To discard the business card, press Exit and OK.
3. To save the business card to the phone book of the headset, select
Options > Save.
Note: If you attempt to send a business card from a mobile phone
that is currently connected to your headset, and the phone does
not support multiple simultaneous Bluetooth connections, you
must disconnect from the phone, send the business card, and
then activate the connection again.
Send a business card
1. Search for the name and phone number you want to send from the
phone book, and select Options > Send bus. card.
2. The headset searches for compatible devices and displays them as a
list. Select the device to which you want to send the business card.
Note: If you attempt to send a business card to a mobile phone
that is currently connected to your headset and cannot see the
phone in the displayed list, you must disconnect from the phone,
send the business card, and then activate the connection again.
28
Page 29

Menu functions
■ Gallery
You can save images, shows, and text items in the folders of
the Gallery.
Images and text files
To see the list of image or text files, select Menu > Gallery > Graphics or
Texts. Scroll to the desired file, press Options, and some of the following
options are available:
• Add (only visible in the Texts folder)—to create a new text file.
• Edit (only visible in the Texts folder)—to edit an existing text file.
• Open—to open the selected file.
• Delete—to delete the selected file.
• Send or Send images (only visible in the Graphics folder)—to send one
or several images files to a compatible device using Bluetooth wireless
technology. The headset searches for compatible devices, and displays
them as a list. Select the device to which you want to send the files.
If you select Send images, you must select the images to send. Scroll
through the list, and mark all the images you want to send by pressing
Mark. To delete a selection, press Unmark. When finished, press Send,
and confirm the selection.
• Rename (only visible in the Graphics folder)—to give a new name to
the file.
English
29
Page 30
Menu functions
• Set as wallpaper (only visible in the Graphics folder)—to have the
selected file displayed as wallpaper in the standby mode.
• Set image mode—to have the selected file displayed in the image
mode.
• Image orientation—to set whether the show is shown to other people
(1) or to you (2). See Figure 4 at the front of the guide.
Figure 4
• Font size (only visible in the Texts folder)—to change the font size in
the text files.
• Details (only visible in the Graphics folder)—to see the details of the
file, for example, the name of the file.
• Sort (only visible in the Graphics folder)—to sort the files and folders
by name, date, or size.
30
Page 31

Menu functions
Shows
The headset contains the following four preset shows and two shows you
can modify:
• All images shows all the images stored in the Graphics folder.
• All texts shows all the text files stored in the Texts folder.
• My show1 and My show2 are user-definable shows, and you can
modify their contents.
• Digital clock shows a digital clock with the current time.
• Analog clock shows an analog clock with the current time.
View and manage shows:
1. Select Menu > Gallery > Shows.
2. Select the desired show, and select from the following options:
• Open—to open a list of show files.
• Select images—to add new images to a user-definable show. Scroll
through the list, and mark all the images you want to add by
pressing Mark. To delete a selection, press Unmark. When finished,
press Done, and save the changes.
• Select texts—to add new text files to a user-definable show. Scroll
through the list, and mark all the text files you want to add by
pressing Mark. To delete a selection, press Unmark. When finished,
press Done, and save the changes.
• Open in sequence—to view the show.
• Clear—to delete all the images in a user-definable show.
English
31
Page 32

Menu functions
• Set image mode—to display the selected show in the image mode.
• Set image interval—to define the time that elapses before the next
file in the show is displayed. Select one of the predefined timeouts
or Other. If you select Other, enter the timeout you want. To enter
the timeout, press or repeatedly until the correct number
is shown. Select Next to move to the next number, and OK to finish.
• Image orientation—to set whether the show is shown to other
people (1) or to you (2). See Figure 4 at the front of the guide.
• Sort—to sort the images.
Receive and store new images
You can receive new images from compatible devices using Bluetooth
wireless technology, and save the received images to the Gallery.
1. When you receive files to the headset, a notification is displayed.
2. To view the list of received files, press Show.
To delete the files without viewing them, press Exit and OK to confirm.
3. Scroll to the desired file, and select from the following options:
• Save—to save the received file.
Accept the original name or define a new name for the file and
select Options in the command area, press , and select Save.
• Open or Delete—to open or delete the received file.
• Details—to see the details of the received file.
32
Page 33

Menu functions
■ Settings
Bluetooth connections
Features using Bluetooth wireless technology, or allowing such features
to run in the background while using other features, increase the demand
on battery power and reduce the battery life.
You can use Bluetooth wireless technology to connect the headset to
other compatible devices. Through the connection, you can send and
receive images and business cards.
Before you can create a connection to a compatible device, you must pair
the device with your headset. If required by the device, you must give the
device passcode to enable pairing. You can store a maximum of 10
pairings to your headset. When you attempt to connect to a device with
which you are already paired, no passcode is required.
You can have one active audio and one active data connection at a time.
When you turn on the headset, it automatically attempts to connect to
the default device (the first device the headset was connected to when it
was used the first time). If the headset does not find the default device or
the default device rejects the connection, the headset attempts to
connect to the last device to which it was connected.
Select Menu > Settings > Bluetooth and one of the following:
English
33
Page 34

Menu functions
• Bluetooth—to turn Bluetooth on or off.
Bluetooth is automatically on when you switch the device on. Even if
you turn it off, it is automatically turned on to transfer images or
business cards. If you want to establish a connection from an external
device to the headset, Bluetooth must be on.
• Search for Bluetooth devices—to search for compatible devices and
connect to them. The headset lists the found devices on the display.
When you see the device you want, press Stop, and select the device.
If the device has not been previously paired with the headset and it
requires a passcode, the headset requests it. Enter the passcode for the
device to activate the connection. To enter the numbers, see
"Bluetooth passcode" on page 6.
• Active device—to view information about the device to which the
headset is currently connected. To end the connection, select Options
> Disconnect.
• Paired devices—to view the list of devices that have been paired with
the headset. You can simultaneously have a maximum of 10 paired
devices.
To delete a pairing, select the pairing, and select Options > Delete
pairing > OK.
34
Page 35

Menu functions
• Bluetooth settings—to define additional setting.
• To define the devices to which your headset is visible, select My
headset’s visibility. If you select Shown to all, you are visible to all
devices using Bluetooth wireless technology. If you select Hidden,
only the devices you are paired with can see you, although you can
still see all the compatible devices.
• To change the headset name that is used to help compatible
devices recognize you, select My headset’s name. To enter letters
and numbers, see "Write with the text editor" on page 18.
When other devices attempt to connect to your headset, a notification is
shown on the display. Press Accept to accept and Reject to reject the
connection.
Time and date settings
Clock
Select Menu > Settings > Time and date settings > Clock.
To show or hide the time on the display in the standby mode, select Show
clock or Hide clock. To adjust the clock to the correct time, select Set the
time. See "Enter the time, date, and passcode" on page 19. To select 12-
hour or 24-hour time format, select Time format.
English
35
Page 36

Menu functions
Date
Select Menu > Settings > Time and date settings > Date.
To show or hide the date on the display in the standby mode, select Show
date or Hide date. To adjust the date, select Set the date. See "Enter the
time, date, and passcode" on page 19. You can also select the date format
and separator.
Summary after call
To display the duration of the call after each call, select Menu >
Settings > Summary after call > On.
Headset language
To select the language for the display texts, select Menu > Settings >
Headset language. After you change the language, the headset asks if you
want to change the voice dial language as well. See "Voice dial settings"
on page 40.
Automatic keyguard
You can set the headset keys to lock automatically after a preset time
delay when the headset is in the standby mode and no functions have
been used.
Select Menu > Settings > Automatic keyguard.
36
Page 37

Menu functions
• To activate the automatic keyguard, select On and the headset
displays Set delay:. Enter the time, and press OK. To enter the numbers,
press or repeatedly until the correct number is shown. Select
Next to move to the next number, and OK to finish.
• To deactivate the automatic keyguard, select Off.
See also "Keyguard" on page 42.
Help text activation
To show or hide the help texts, select Menu > Settings > Help text
activation.
See also "Menu usage" on page 17.
Display settings
Wallpaper
You can set your headset to display a background image when it is in the
standby mode. Some images are presaved in the Gallery. You can also
receive images through Bluetooth wireless technology and save them in
the Gallery. Your headset supports JPEG and GIF formats.
To select a wallpaper picture:
1. Select Menu > Settings > Display settings > Wallpaper.
2. Select Select wallpaper, and the contents of the Graphics folder in the
Gallery are shown.
English
37
Page 38

Menu functions
3. Scroll to the desired image.
4. To set the image as wallpaper, select Options > Set as wallpaper.
The wallpaper is not displayed when the image mode is activated.
To activate or deactivate the wallpaper, select Menu > Settings > Display
settings > Wallpaper > On or Off.
Image mode
Select Menu > Settings > Display settings > Image mode, and select from
the following:
• On—to enable the image mode. When the image mode is enabled, it is
activated after the image mode timeout is reached in the standby
mode, or when the keyguard is activated.
• Off—to disable the image mode.
• Select image—to display the Gallery folders. Select a folder, scroll to
the image or show you want, and select Options > Set image mode.
• Image mode timeout—to define the timeout in the standby mode after
which the image mode is activated. Select one of the predefined
timeouts or Other. If you select Other, enter the timeout you want. To
enter the timeout, press or repeatedly until the correct
number is shown. Select Next to move to the next number, and OK to
finish.
38
Page 39

Menu functions
Color schemes
You can change the color in some display components, such as indicators
and signal bars.
Select Menu > Settings > Display settings > Colour schemes. Select the
desired color scheme.
Display brightness
You can change the brightness level of the display.
Select Menu > Settings > Display settings > Display brightness. Scroll
with and to decrease and increase the brightness level, and
press OK to save the new level.
Display backlight timeout
You can define how long the display backlight stays on if the joystick is
not pressed.
Select Menu > Settings > Display settings > Lights. Select one of the
predefined timeouts or Other. If you select Other, enter the timeout you
want. To enter the timeout, press or repeatedly until the correct
number is shown. Select Next to move to the next number, and OK to
finish.
English
39
Page 40

Menu functions
Tone settings
Select Menu > Settings > Tone settings, and select from the following:
• Headset audio—to turn audio tones on or off. If the tones are off, no
incoming call alert tones, keypad tones, or warning tones are played.
This setting has no effect on the audio heard through the earpiece,
since it is routed automatically from the phone.
• Incoming call alert—to select how the phone notifies you of an
incoming voice call. The options are Ringing, Ascending, Ring once,
Beep once, and Off.
• Ringing tone—to select the ringing tone for incoming voice calls.
• Ringing volume—to set the volume for incoming voice calls.
• Keypad tones—to set the headset to sound a tone each time a key is
pressed.
• Warning tones—to set the headset to sound tones, for example, when
the battery is running out of power.
Voice dial settings
Select Menu > Settings > Voice dial settings, and select from the
following:
40
Page 41

Menu functions
• Voice dial language—to set the language for voice dialing. The correct
language enables the headset to recognize names with greater
accuracy.
After you change the language, the headset asks if you want to change
the display text language as well.
• Repeat dialled name—to set the headset to repeat the name after you
have said it to confirm your choice before dialing the number.
• Reset voice dial settings—to reset the changes. The language setting
does not change.
Memory status
Select Menu > Settings > Memory status, and select from the following:
• Contacts status—to see how many contacts are stored in the phone
book and how many new contacts can still be stored.
• Gallery status—to see how much memory is used for the Gallery files
and how much is still free for saving new images and text files.
Send application to phone
You may need the download application to download names and phone
numbers to the headset. For more information, see "Copy from the phone
book of the mobile phone" on page 26.
To send the download application to the connected phone, select Menu >
Settings > Send application to phone. To confirm, press Yes.
English
41
Page 42

Menu functions
After the application is successfully downloaded to the phone, you receive
a notification in the phone inbox. Install the application as instructed in
the notification.
Restore factory settings
To reset some of the menu settings to their original values, select Menu >
Settings > Restore factory settings. Enter the Bluetooth passcode and
press OK. See "Bluetooth passcode" on page 6.
The data you have entered or copied from a phone, such as the names and
phone numbers saved in the phone book, are not deleted.
■ Keyguard
You can lock the keys to prevent them from being
accidentally pressed.
To lock the keys, in the standby mode, select Menu > Keyguard.
The image mode is activated, if it is enabled. See "Image mode" on page
38.
To unlock the keys, press the joystick in any direction to exit the image
mode. In the standby mode, press Unlock and then OK within 1.5 seconds.
If you receive an incoming call when the keyguard is on, the keyguard is
automatically deactivated. When you end or reject the call, the keys will
automatically lock again.
To set the keyguard to automatically activate when the keys have not
been pressed for a while, see "Automatic keyguard" on page 36.
42
Page 43

6. Battery information
Battery information
■ Charging and discharging
Your device is powered by a rechargeable battery. However, talk and
standby times may vary when used with different handsets, other
Bluetooth enabled-products, usage settings, usage style and
environments. The battery can be charged and discharged hundreds of
times but it will eventually wear out. Recharge your battery only with
Nokia approved chargers designated for this device.
Unplug the charger from the electrical plug and the device when not in
use. Do not leave the battery connected to a charger. Overcharging may
shorten its lifetime. If left unused, a fully charged battery will lose its
charge over time. Temperature extremes can affect the ability of your
battery to charge.
Use the battery only for its intended purpose. Never use any charger or
battery that is damaged.
English
43
Page 44

Battery information
Leaving the battery in hot or cold places, such as in a closed car in
summer or winter conditions, will reduce the capacity and lifetime of the
battery. Always try to keep the battery between 15°C and 25°C (59°F and
77°F). A device with a hot or cold battery may not work temporarily, even
when the battery is fully charged. Battery performance is particularly
limited in temperatures well below freezing.
44
Page 45

CARE AND MAINTENANCE
CARE AND MAINTENANCE
Your device is a product of superior design and craftsmanship and should
be treated with care. The suggestions below will help you protect your
warranty coverage.
• Keep the device dry. Precipitation, humidity and all types of liquids or
moisture can contain minerals that will corrode electronic circuits.
• Do not use or store the device in dusty, dirty areas. Its moving parts
and electronic components can be damaged.
• Do not store the device in hot areas. High temperatures can shorten
the life of electronic devices, damage batteries, and warp or melt
certain plastics.
• Do not store the device in cold areas. When the device returns to its
normal temperature, moisture can form inside the device and damage
electronic circuit boards.
• Do not attempt to open the device.
• Do not drop, knock, or shake the device. Rough handling can break
internal circuit boards and fine mechanics.
• Do not use harsh chemicals, cleaning solvents, or strong detergents to
clean the device.
• Do not paint the device. Paint can clog the moving parts and prevent
proper operation.
English
45
Page 46

CARE AND MAINTENANCE
• Use only the supplied or an approved replacement antenna.
Unauthorised antennas, modifications, or attachments could damage
the device and may violate regulations governing radio devices.
All of the above suggestions apply equally to your device, battery, charger,
or any enhancement. If any device is not working properly, take it to the
nearest authorized service facility for service.
46
Page 47

诺基亚无线图像耳机 HS-13W
用户手册
第 1 版
Page 48

声明
我们诺基亚公司郑重声明产品 HS-13W 符合以下指令:1999/5/EC。
此声明的全文可经由
http://www.nokia.com/phones/declaration_of_conformity/ 找到。
版权所有 © 2005 诺基亚。保留所有权利。
在未经诺基亚事先书面许可的情况下,严禁以任何形式复制、传递、分
发和存储本文档中的任何内容。
诺基亚、Nokia 和 Nokia Connecting People 是诺基亚公司的注册商标。在
本文档中提及的其他产品或公司的名称可能是其各自所有者的商标或商
名。
Bluetooth 是 Bluetooth SIG, Inc. 的注册商标。
诺基亚遵循持续发展的策略。因此,诺基亚保留在不预先通知的情况
下,对本文档中描述的任何产品进行修改和改进的权利。
在任何情况下,诺基亚均不对任何数据或收入方面的损失,或任何特
殊、偶然、附带或间接损失承担责任,无论该损失由何种原因引起。
本文档的内容按“现状”提供。除非适用的法律另有规定,否则不对本
文档的准确性、可靠性和内容做出任何类型的、明确或默许的保证,其
中包括但不限于对适销性和对具体用途的适用性的保证。诺基亚保留在
不预先通知的情况下随时修订或收回本文档的权利。
产品的供货情况可能因地区而异。请向邻近的诺基亚指定经销商查询。
第 1 版
2
Page 49

目录
目录
简介 .................................... 5
蓝牙无线技术................................ 5
蓝牙密码........................................ 6
1. 概述 ................................ 7
耳机的组成部分............................ 7
待机状态和图像模式.................... 9
待机状态下的指示符号........... 10
2. 使用入门 ....................... 11
为电池充电.................................. 11
启动和关闭耳机.......................... 12
初次启动耳机........................... 13
3. 通话功能 ....................... 14
拨打电话...................................... 14
接听或拒绝来电.......................... 16
呼叫等待................................... 16
4. 功能表的使用 ................ 17
滚动浏览功能表.......................... 17
使用文字编辑器编写文字.......... 18
输入时间、日期和密码.............. 19
功能表.......................................... 20
5. 功能表功能 ................... 22
通话记录...................................... 22
最近通话记录 ........................... 22
通话计时 ................................... 23
通讯录 .......................................... 23
选择通讯录显示格式 ............... 23
储存姓名和电话号码 ............... 24
修改姓名或号码 ....................... 25
删除姓名和号码 ....................... 25
从手机通讯录中复制 ............... 26
发送和接收电子名片 ............... 27
多媒体资料 .................................. 28
图像和文字文件 ....................... 28
演示 ........................................... 30
接收和储存新图像 ................... 31
设置 .............................................. 32
蓝牙连接 ................................... 32
时间和日期设置 ....................... 34
通话报告 ................................... 34
耳机语言 ................................... 34
自动键盘锁 ............................... 35
帮助信息显示 ........................... 35
显示设置 ................................... 35
简体中文
3
Page 50

提示音设置 ............................... 37
声控拨号设置 ........................... 38
存储状态 ................................... 39
向手机发送应用软件 ............... 39
恢复出厂设置 ........................... 39
锁键盘.......................................... 40
6. 电池信息........................ 41
充电和放电.................................. 41
维护和保养 ........................ 42
4
Page 51

简介
简介
诺基亚无线图像耳机使用蓝牙无线技术,为用户提供一种轻松管
理通话及显示喜爱图像的全新方式。
耳机内置存储器,可储存电话号码和数据。切记为所有重要的信
息制作备份或保留一份手写记录。耳机中储存的信息不会储存在
手机中。
您可以使用提供的挂带将无线图像耳机挂在脖子上,也可以使用
耳机背面的便携夹将耳机夹在衣服上。
使用无线图像耳机 HS-13W 前,请仔细阅读本《用户手册》。有
关常规使用的更多信息,请参见所用手机的《用户手册》。手机
的《用户手册》提供了重要的安全和维护信息,请勿以此手册取
代手机的《用户手册》。
■ 蓝牙无线技术
诺基亚无线图像耳机支持蓝牙无线技术,因此您可以无线方式将
耳机连接至 10 米范围内的兼容设备。蓝牙连接可能因一些障碍
物而受到干扰,如墙壁或其他电子设备等。
此耳机符合第 1.1 版蓝牙规范且支持以下蓝牙模式:通用接入模
式、免提模式、通用对象交换模式、对象推送模式和文件传输模
式。此处,模式特指手机用以控制无线图像耳机的一组蓝牙无线
技术命令。请向其他设备的制造商咨询以确定该设备是否与此款
耳机兼容。
简体中文
5
Page 52

简介
在某些地方,使用蓝牙无线技术可能受到一些限制。请向当地主
管部门或服务供应商咨询。
■ 蓝牙密码
您需要输入蓝牙密码才能在诺基亚无线图像耳机和兼容设备之间
配对。蓝牙密码为 0000,且不能更改。
此外,使用该密码还可以限制他人使用您的耳机。
有关如何输入密码的信息,请参见第 19 页的“输入时间、日期
和密码”。
6
Page 53

1. 概述
■ 耳机的组成部分
无线图像耳机由以下部分组成。请参见图 1。
• 听筒夹 (1)
• 挂带 (2)
概述
图 1
简体中文
7
Page 54

概述
• 导航键 、、 、 和 (3)
在待机状态下,按 和 可快速打开通讯录。
和 的功能视屏幕上显示的说明文字而定,如在待机状
态下分别为功能表和声控。
和 的功能相同,但插入数据时除外。请参见第 18 页的
“使用文字编辑器编写文字”。
• 屏幕 (4)
• 蜂鸣器 (5)
• 便携夹 (6)
• 充电器插孔保护盖 (7)
• 麦克风 (8)
• 电源键 (9)
快速按电源键可打开屏幕灯光,还可以打开或关闭耳机音频。
8
Page 55

概述
■ 待机状态和图像模式
当耳机准备就绪,可供使用,且您尚未打开功能表时,它处于待
机状态。请参见图 2。
图 2
• 当前位置的蜂窝网络信号强度指示条 (1)。
• 电池电量指示条 (2)。指示条越高,电池的电量越足。
• 在待机状态下,左选择键 (3) 的功能为功能表。
• 在待机状态下,右选择键 (4) 的功能为声控。
当耳机处于待机状态下 30 秒钟或启动键盘锁后,即会自动进入
图像模式。请参见第 40 页的“锁键盘”。
仅当图像模式功能启动时,耳机才会进入图像模式。请参见第 36
页的“图像模式”。
简体中文
9
Page 56

概述
在图像模式下,耳机会显示内部储存的单幅图像、文字或幻灯
片。要定义在图像模式下显示的图像,请参见第 36 页的“图像
模式”。
要退出图像模式,请按导航键。
待机状态下的指示符号
耳机键盘已锁。请参见第 40 页的“锁键盘”。
耳机音频已关。请参见第 37 页的“提示音设置”。
蓝牙功能已启动。请参见第 32 页的“蓝牙连接”。
耳机已连接至手机。请参见第 32 页的“蓝牙连接”。
10
Page 57

使用入门
2. 使用入门
■ 为电池充电
使用任何充电器为无线图像耳机充电前,请先检查充电器的型
号1。此耳机需由诺基亚充电器 ACP-8、ACP-12 和 LCH-12 供电
方可使用。
警告:仅可使用经诺基亚认可,适用于此特定型号耳机的
电池、充电器和配件。使用其他类型的电池、充电器和配
件会违反对耳机的认可或保修条款,并可能导致危险。
切断任何配件的电源时,应握住并拔出插头,而不是拉扯电源
线。
您的耳机及其配件可能包含一些微小部件。请将其放置在小孩接
触不到的地方。
简体中文
1. 充电器的具体型号因插头类型的不同而不同。例如,对于 ACP-12,充电
器的具体型号可以是 ACP-12C,ACP-12E 等。
11
Page 58

使用入门
1. 打开耳机上的充电器插孔保护盖,然后将充电器连接线插头插
入充电器插孔。请参见图 3。
图 3
2. 将充电器插入交流电源插座。
如果耳机已启动,则会短暂显示文字正充电。电池充电指示条
会在屏幕上滚动,直至电池已完全充电。如果电池电量已完全
耗尽,则可能需要等待几分钟才能在屏幕上看到充电指示条。
充电时,耳机可正常使用。
■ 启动和关闭耳机
按住电源键。
初次启动耳机时,在默认情况下会启动蓝牙无线技术。
警告: 当禁止使用无线连接,或无线连接可能造成干扰
或危险时,请勿启动耳机。
12
Page 59

使用入门
初次启动耳机
初次启动耳机时,必须在耳机和手机之间配对。配对很重要,因
为在每次启动耳机时,它都会自动尝试连接第一部配对手机。
使用蓝牙无线技术在手机和耳机间建立连接。请按照手机《用户
手册》中的说明操作。耳机的蓝牙密码为 0000。
向手机发送下载应用软件
如果手机中未安装将通讯录复制至耳机所需的应用软件,则耳机
会自动尝试将该软件发送给手机。如果耳机处于待机状态,则在
首次建立蓝牙无线连接约 30 秒钟后,耳机屏幕上会显示向手机
发送通讯录下载应用软件?。按确认。
如果希望以后向手机发送该应用软件,请按取消。以后要发送该
应用软件时,请参见第 39 页的“向手机发送应用软件”。
该应用软件成功下载至手机后,手机的“收件箱”中会收到一条
通知。请按通知中的说明安装该应用软件。
有关复制通讯录的更多信息,请参见第 26 页的“从手机通讯录
中复制”。
简体中文
13
Page 60

通话功能
3. 通话功能
■ 拨打电话
您可以通过声控拨号或使用通讯录或通话记录中储存的号码来拨
打电话。
通话中,按 可提高音量,按 可降低音量。
使用通讯录拨打电话
选择功能表 > 通讯录 > 姓名 (或在待机状态下按 )。滚动至所
需姓名或号码,然后选择操作 > 呼叫。
使用通话记录拨打电话
选择功能表 > 通话记录 > 已拨电话、未接来电或已接来电。滚动
至所需姓名或号码,然后选择操作 > 呼叫。
注意:若使用通话记录拨打国际长途电话,请务必在电话
号码前输入正确的国际长途码和国家/地区代码。
通话记录中可包括最近 10 个未接来电、最近 10 个已接来电和最
近 20 个已拨电话的号码。请参见第 22 页的“通话记录”。
使用声控拨号功能拨打电话
使用声控拨号功能前,请将声控拨号语言更改为您所说的语言。
请参见第 38 页的“声控拨号设置”。
14
Page 61

通话功能
按声控。当耳机显示请讲话并发出提示音后,说出要呼叫的联系
人姓名。耳机会播放该姓名的声控标签,显示姓名和首选号码,
并在稍后自动拨打电话。
在这段延时内,您可以按退出取消呼叫,或更改呼叫的号码或联
系人。如果显示的姓名正确无误,但您要拨打的是除首选号码外
的其他号码,如要拨打宅电而非手机号码,请按 或 以选
择所需号码。如果显示的姓名有误,请按更改,然后从相似姓名
列表中选择正确的姓名。
当您每次在通讯录中储存姓名时,耳机都会自动生成一个声控标
签,因而您无需单独录制声控标签。
注意:在嘈杂的环境中或处于紧急状态下时,使用声控标
签可能会有一定的难度。因此您不应在所有情况下都完全
依赖声控拨号功能。
仅当您要呼叫的联系人的姓名储存在耳机的通讯录中时,才可以
使用声控拨号。仅当启动了播放声控标签的功能时,耳机才会播
放声控标签。请参见第 38 页的“声控拨号设置”。
挂断电话
要挂断电话或取消试拨,请按挂断。
如果挂断不可用,例如当通话静音时,请选择操作 > 挂断。
简体中文
15
Page 62

通话功能
■ 接听或拒绝来电
要接听或拒绝来电,请按接听或拒绝。
如果接听和拒绝选项不可用,请选择操作 > 接听或拒绝。
当有人呼叫您时,耳机会显示呼叫方的姓名和号码 (如果已知),
或显示文字来电。如果在耳机的通讯录中有多个姓名的电话号码
与来电号码相同,则仅会显示来电号码。
呼叫等待
通话中,按接听,或选择操作 > 接听可接听等待的呼叫。第一个
通话会被保留。要挂断当前通话,请选择操作 > 挂断。
呼叫等待功能必须先启动才可使用。请在配对手机中启动该功
能。有关更多信息,请参见手机的《用户手册》。
16
Page 63

功能表的使用
4. 功能表的使用
诺基亚无线图像耳机为您提供了一系列的功能,并将它们分配在
各个功能表中。功能表中的大多数功能都备有简短的帮助信息。
滚动至所需功能表功能,等待约 14 秒,就可以看到该功能的帮
助信息。要退出帮助信息,请按退出。请参见第 35 页的“帮助
信息显示”。
■ 滚动浏览功能表
1. 按功能表。
2. 按 或 滚动浏览功能表,然后按选择以选择所需功能
表,如设置。
3. 如果功能表包括子功能表,则可选择所需子功能表,如显示设
置。
4. 如果选定子功能表还包括更深一级的子功能表,请选择所需内
容,如壁纸。
5. 选择所需设置。
6. 按返回或退出可返回上一级功能表或退出功能表。
无论您当前位于哪一级功能表,按住返回均可退出功能表。
简体中文
17
Page 64

功能表的使用
■ 使用文字编辑器编写文字
当您需要在耳机中插入数据时,文字编辑器即会显示在屏幕上。
文字编辑器屏幕由以下主要区域组成:
1. 提示区 — 显示窗口的目的。
2. 编辑区 — 显示输入的文字。
3. 字符区 — 显示所有可供选择的字符。
列表的内容会各有不同。例如,当您
需要插入电话号码时,字符区只会显
示电话号码中允许使用的字符。
4. 命令区 — 显示所有可执行的操作。例
如,图标 和 表示您可以在编
辑区内移动光标。
按 或 可在 3 和 4 区域之间移动。按 或 可在一个
区域内移动。
插入数据:
1. 选择编辑模式 (如小写字母、大写字母和数字):
• 按 或 进入命令区,然后按 或 直至图标
突出显示。
• 反复按 直至所需模式显示在屏幕的顶部。
1
3
2
4
18
Page 65

功能表的使用
2. 插入第一个字符:
按 进入字符区,然后按 或 直至所需字符突出显
示。按 以选择该字符。
选定字符会增加至编辑区。
3. 重复第 2 步,直至插入所有需要的文字。
4. 要储存数据,请选择命令区中的操作,按 ,然后选择储
存。
要不储存数据就退出编辑器,请选择命令区中的操作,按
,然后选择退出编辑器。
■ 输入时间、日期和密码
当您需要插入时间、日期或密码时,会显示一个特殊的编辑窗
口。
输入日期、时间或密码:
1. 反复按 或 ,直至所需数字出现在光标突出显示的区域
中。
2. 选择下一幅移至下一个数字,并重复第 1 步操作。
3. 重复第 2 步操作直至输入所有必要的信息。
4. 选择确认以确认输入的内容,或可选择返回返回功能表且不储
存输入的内容。
19
简体中文
Page 66

功能表的使用
■ 功能表
1. 通话记录
1. 已拨电话
2. 未接来电
3. 已接来电
4. 删除最近通话记录
5. 通话计时
1. 最后通话计时
2. 打入的电话
3. 拨出的电话
4. 累计时间
5. 计时器清零
2. 通讯录
1. 姓名
2. 增加新姓名
3. 修改姓名
4. 删除
5. 从手机复制
6. 增加号码
7. 发送电子名片
8. 通讯录显示格式
20
3. 多媒体资料
1. 图案
2. 文字
3. 演示
1. 全部图像
2. 全部文字
3. 我的演示 1
4. 我的演示 2
5. 数字时钟
6. 指针时钟
4. 设置
1. 蓝牙
1. 蓝牙
2. 搜索蓝牙设备
3. 当前设备
4. 已配对设备
5. 蓝牙设置
2. 时间和日期设置
1. 时钟
2. 日期
3. 通话报告
Page 67

功能表的使用
4. 耳机语言
5. 自动键盘锁
6. 帮助信息显示
7. 显示设置
1. 壁纸
2. 图像模式
3. 颜色模式
4. 屏幕亮度
5. 灯光
8. 提示音设置
1. 耳机音频
2. 响铃方式
3. 铃声
4. 铃声音量
5. 按键音
6. 警告音
9. 声控拨号设置
1. 声控拨号语言
2. 重复拨打的姓名
3. 重设声控拨号设置
10.存储状态
1. 通讯录状态
2. 多媒体资料状态
11.向手机发送应用软件
12.恢复出厂设置
5. 锁键盘
简体中文
21
Page 68

功能表功能
5. 功能表功能
■ 通话记录
无线图像耳机会记录使用耳机的未接来电、已接来电
或已拨电话的电话号码及大致通话时间。此外,通话记录中还包
括使用连接的手机接听或未接的来电。
仅当所用网络支持相关功能,耳机和手机均已启动且在网络服务
区内,手机和耳机间已建立了蓝牙连接的情况下,耳机才会记录
未接来电和已接来电。
在未接来电、已接来电和已拨电话功能表中按操作,即可查看通
话的日期和时间等信息。
注意:若使用通话记录拨打国际长途电话,请务必在电话
号码前输入正确的国际长途码和国家/地区代码。
最近通话记录
选择功能表 > 通话记录及以下选项之一:
• 已拨电话 — 查看最近拨出或试拨过的电话号码的列表。
• 未接来电 — 查看最近未接来电的电话号码 (网络服务)。
提示:当耳机显示未接来电的提示信息时,按显示可进入
未接来电的电话号码列表。滚动至需要回电的号码,然后
选择操作 > 呼叫可拨打该号码。
22
Page 69

功能表功能
• 已接来电 — 查看最近已接听或拒绝接听来电的电话号码 (网络
服务)。
• 删除最近通话记录 — 删除最近通话记录。选择删除最近通话
记录中的全部电话号码,或仅删除未接来电、已接来电或已拨
电话列表中的电话号码。删除内容将无法恢复。
通话计时
选择功能表 > 通话记录 > 通话计时。
滚动查看来电和拨出电话的大致时间 (以时、分、秒格式显示)。
要清零计时器,您需要输入蓝牙密码。请参见第 6 页的“蓝牙密
码”。
■ 通讯录
您可以在耳机存储器的通讯录中储存姓名和电话号码。
您最多可以储存 250 个姓名,且每个姓名下最多可储存 2 个
号码。
您可以选择功能表 > 通讯录进入通讯录,或可在待机状态下按
或 。
选择通讯录显示格式
要选择姓名和电话号码的显示格式,请选择功能表 > 通讯录 > 通
讯录显示格式。
简体中文
23
Page 70

功能表功能
储存姓名和电话号码
1. 选择功能表 > 通讯录 > 增加新姓名。
2. 输入并储存姓名。请参见第 18 页的“使用文字编辑器编写文
字”。
3. 输入并储存电话号码。请参见第 18 页的“使用文字编辑器编
写文字”。
4. 按完成。
耳机会自动为新姓名创建声控标签。
为每个姓名储存多个号码
您可以为通讯录中的每个姓名储存两种类型的电话号码。
增加第二个号码
1. 选择功能表 > 通讯录 > 增加号码。
2. 滚动至需要增加新号码的姓名,然后按增加。
3. 选择以下号码类型之一: 一般、 移动电话、 住宅或
办公室。
4. 输入并储存号码。
5. 要返回功能表,按返回。
每个姓名下储存的第一个号码会自动设置为首选号码。这样,当
您从通讯录中提取姓名以拨打电话时,如未选择其他号码,则将
拨打首选号码。首选号码始终位于列表顶部。
24
Page 71

功能表功能
要更改首选号码,请选择功能表 > 通讯录 > 姓名。滚动至所需姓
名,然后选择操作 > 查看详情。滚动至要设为首选号码的号码,
然后选择操作 > 定为首选号码。
修改姓名或号码
要修改姓名,请选择功能表 > 通讯录 > 修改姓名。滚动至需要修
改的通讯录条目,然后按修改。
要修改号码,请选择功能表 > 通讯录 > 姓名。滚动至所需姓名,
然后选择操作 > 查看详情。滚动至需要修改的号码,然后选择操
作 > 修改号码。
要输入字母或数字,请参见第 18 页的“使用文字编辑器编写文
字”。
您可以播放声控标签,听听系统是如何念联系人姓名的。选择操
作 > 播放声控标签。
删除姓名和号码
选择功能表 > 通讯录 > 删除。
要逐个删除姓名和号码,请选择逐个删除,然后滚动至需要删除
的姓名和号码。按删除,然后按确认确认操作。
要一次删除通讯录中的全部姓名和号码,请选择全部删除。确认
删除,并输入蓝牙密码。请参见第 6 页的“蓝牙密码”。
简体中文
25
Page 72

功能表功能
从手机通讯录中复制
您可以从连接的手机向耳机复制姓名和电话号码。您可以复制通
讯录的全部内容,也可以只复制选定姓名和号码。
只有姓名及前两个电话号码会被复制到耳机通讯录。所有文字项
及其他电话号码都将忽略。
如果您的手机不支持“文件传输模式”或没有通讯录下载应用软
件,则耳机必须先向手机发送下载应用软件才能进行复制。如果
未在初次连接耳机时向手机发送该下载应用软件,请参见第 39
页的“向手机发送应用软件”。在从手机向耳机复制通讯录条目
时,通讯录下载应用软件必须正在运行。
注意:如果在耳机和源存储器中有相同的姓名,而源存储
器中的姓名或电话号码已更改,则在复制过程中会删除并
替换耳机中的相应条目。
1. 选择功能表 > 通讯录 > 从手机复制。
如果耳机未连接至手机,或如果手机不支持此功能,则功能表
从手机复制不可用。
2. 选择复制的源存储器:手机的内部存储器 (手机) 或 SIM 卡存
储器 (SIM 卡)。
如果 SIM 卡存储器不可用,则不会显示 SIM 卡。
3. 选择全部条目或选定条目。
如果手机不支持选定条目功能,则该功能表不可用。
若选择选定条目,则耳机会显示源存储器中所有姓名的列表。
滚动浏览列表,并按标记标记所有需要复制的条目。要取消选
择某个条目,按取消。完成标记后,按完成。
26
Page 73

功能表功能
4. 要开始复制,按确认。在复制期间,按退出可停止复制。
完成复制后,耳机屏幕上会显示已复制和未复制的条目数量。
要退出此屏幕,按返回。耳机会自动为所有复制的姓名创建声
控标签。
发送和接收电子名片
您可以使用蓝牙无线技术发送和接收个人联系信息 (电子名片)。
接收电子名片
1. 当耳机收到电子名片时,会显示一个通知。
2. 要查看电子名片,按显示。
要放弃电子名片,依次按退出和确认。
3. 要将电子名片储存至耳机通讯录,选择操作 > 储存。
注意:若您尝试从当前与耳机连接的手机发送电子名片,
而该手机不支持同时建立多个蓝牙连接,则您必须先断开
与手机的连接,发送电子名片,然后再次启动蓝牙连接。
发送电子名片
1. 在通讯录中搜索要发送的姓名和电话号码,然后选择操作 > 发
送名片。
2. 耳机会搜索兼容的设备,并以列表形式显示在屏幕上。选择接
收电子名片的设备。
注意:若您尝试向当前与耳机连接的手机发送电子名片,
但未能在显示的列表中找到该手机,则必须先断开与手机
的连接,发送电子名片,然后再次启动蓝牙连接。
简体中文
27
Page 74

功能表功能
■ 多媒体资料
您可以将图像、演示和文字内容储存在多媒体资料的
文件夹中。
图像和文字文件
要查看图像或文字文件列表,请选择功能表 > 多媒体资料 > 图案
或文字。滚动至所需文件,按操作,以下部分选项即会显示在屏
幕上:
• 增加 (仅出现在文字文件夹中) — 创建新的文字文件。
• 编辑 (仅出现在文字文件夹中) — 编辑现有文字文件。
• 打开 — 打开选定文件。
• 删除 — 删除选定文件。
• 发送或发送图像 (仅出现在图案文件夹中) — 使用蓝牙无线技
术向兼容设备发送一个或多个图像文件。耳机会搜索兼容的设
备,并以列表形式显示在屏幕上。选择接收文件的设备。
若选择发送图像,则必须选择要发送的图像。滚动浏览列表,
并按标记标记所有需要发送的图像。要取消选择某幅图像,按
取消。完成标记后,按发送,然后确认选择。
• 重新命名 (仅出现在图案文件夹中) — 重新命名文件。
• 设为壁纸 (仅出现在图案文件夹中) — 在待机状态下将选定文
件显示为壁纸。
• 设置图像模式 — 在图像模式下显示选定文件。
28
Page 75

功能表功能
• 图像显示给 — 设置将演示显示给他人 (1) 或自己 (2)。请参见
图 4。
图 4
• 字体大小 (仅出现在文字文件夹中) — 更改文字文件中的字体
大小。
• 详情 (仅出现在图案文件夹中) — 查看文件的详情,如文件
名。
• 排序 (仅出现在图案文件夹中) — 按名称、日期或大小对文件
和文件夹排序。
简体中文
29
Page 76

功能表功能
演示
耳机提供以下四个预设演示和两个可修改的演示:
• 全部图像可显示图案文件夹中储存的全部图像。
• 全部文字可显示文字文件夹中储存的全部文字文件。
• 我的演示 1 和我的演示 2 是用户可定义演示,您可以修改其内
容。
• 数字时钟可以数字时钟显示当前时间。
• 指针时钟可以指针时钟显示当前时间。
查看和管理演示:
1. 选择功能表 > 多媒体资料 > 演示。
2. 选择所需演示,然后选择以下选项:
• 打开 — 打开演示文件列表。
• 选择图像 — 将新图像增加至用户可定义演示。滚动浏览列
表,并按标记标记所有需要增加的图像。要取消选择某幅
图像,按取消。完成标记后,按完成,然后储存更改。
• 选择文字 — 将新文字文件增加至用户可定义演示。滚动浏
览列表,并按标记标记所有需要增加的文字文件。要取消
选择某个文字文件,按取消。完成标记后,按完成,然后
储存更改。
• 按顺序打开 — 查看演示。
• 清除 — 删除用户可定义演示中的所有图像。
30
Page 77

功能表功能
• 设置图像模式 — 在图像模式下显示选定演示。
• 设定图像间隔 — 定义显示演示中下一个文件之前的间隔时
间。选择一个预设延时,或选择其他。若选择其他,请输
入所需延时。要输入延时,请反复按 或 直至所需数
字显示在屏幕上。选择下一幅可移至下一个数字,选择确
认可结束输入。
• 图像显示给 — 设置将演示显示给他人 (1) 或自己 (2)。请参
见图 4。
• 排序 — 对图像排序。
接收和储存新图像
您可以使用蓝牙无线技术从兼容设备接收新图像,并将收到的图
像储存至多媒体资料。
1. 当耳机收到文件时,会显示一个通知。
2. 要查看收到文件的列表,按显示。
要不查看文件就直接删除,按退出,然后按确认确认操作。
3. 滚动至所需文件,然后选择以下选项:
• 储存 — 储存收到的文件。
接受文件的原始名称或为其定义新名称,在命令区中选择
操作,按 ,然后选择储存。
• 打开或删除 — 打开或删除收到的文件。
• 详情 — 查看收到文件的详情。
简体中文
31
Page 78

功能表功能
■ 设置
蓝牙连接
使用支持蓝牙无线技术的功能,或在使用其他功能时令其在后台
运行,都会消耗更多电池电量并可能缩短电池的使用寿命。
您可以使用蓝牙无线技术来连接耳机和其他兼容设备。通过蓝牙
连接,您可以发送和接收图像和电子名片。
您必须先在兼容设备和耳机间配对,才能连接两台设备。如果兼
容设备需要,则必须输入蓝牙密码才能配对。耳机中最多可以储
存 10 个配对信息。当您尝试连接已配对的设备时,无需再输入
蓝牙密码。
您可以同时建立一个音频连接和一个数据连接。
当您启动耳机时,它会自动尝试连接首选设备 (即在初次使用时
耳机连接的第一台设备)。如果找不到首选设备或首选设备拒绝连
接,则耳机会尝试连接它最近连接过的设备。
选择功能表 > 设置 > 蓝牙和以下选项之一:
• 蓝牙 — 启动或关闭蓝牙功能。
当您启动耳机时,蓝牙功能即会自动启动。即使关闭蓝牙功
能,它也会在您传送图像或电子名片时自动启动。若要从外置
设备向耳机建立连接,则必须先启动蓝牙功能。
32
Page 79

功能表功能
• 搜索蓝牙设备 — 搜索兼容设备并与其建立连接。耳机会在屏
幕上列出找到的设备。看到所需设备时,按停止,然后选择该
设备。
如果该设备尚未与耳机配对并要求蓝牙密码,则耳机会要求您
输入密码。输入该设备的密码以启动连接。要输入数字,请参
见第 6 页的“蓝牙密码”。
• 当前设备 — 查看耳机当前连接的设备的相关信息。要断开连
接,选择操作 > 断开连接。
• 已配对设备 — 查看已与耳机配对的设备的列表。耳机最多可
以同时拥有 10 个配对设备。
要删除配对,请选择所需配对,然后选择操作 > 删除配对 > 确
认。
• 蓝牙设置 — 定义其他设置。
要定义您的耳机会显示在哪些设备上,请选择本耳机可见性。
若选择普通,则耳机会显示在所有支持蓝牙无线技术的设备
上。若选择限制,则耳机只会显示在配对设备上,但您仍可在
耳机屏幕上看到所有兼容设备。
要更改耳机名称,以帮助兼容设备识别耳机,请选择耳机名
称。要输入字母和数字,请参见第 18 页的“使用文字编辑器
编写文字”。
当其他设备尝试连接耳机时,耳机屏幕上会显示一个通知。按接
受以接受连接请求;按拒绝以拒绝连接请求。
简体中文
33
Page 80

功能表功能
时间和日期设置
时钟
选择功能表 > 设置 > 时间和日期设置 > 时钟。
要在待机状态下的屏幕上显示或不显示时间,请选择显示时钟
或不显示时钟。要调整时钟,以显示正确的时间,请选择调整
时间。请参见第 19 页的“输入时间、日期和密码”。要选择
12 小时制或 24 小时制时间格式,请选择时间格式。
日期
选择功能表 > 设置 > 时间和日期设置 > 日期。
要在待机状态下的屏幕上显示或不显示日期,请选择显示日期或
不显示日期。要调整日期,请选择设定日期。请参见第 19 页的
“输入时间、日期和密码”。您还可以选择日期格式和分隔符。
通话报告
要在每次通话后短暂显示通话的大致时间,请选择功能表 > 设
置 > 通话报告 > 开。
耳机语言
要选择屏幕显示文字的语言,请选择功能表 > 设置 > 耳机语言。
语言更改后,耳机会询问您是否也要更改声控拨号语言。请参见
第 38 页的“声控拨号设置”。
34
Page 81

功能表功能
自动键盘锁
您可以将耳机设置为当其处于待机状态,且用户在预设延时内未
使用任何耳机功能时自动锁定键盘。
选择功能表 > 设置 > 自动键盘锁。
要启动自动键盘锁,请选择开,耳机会显示设定延时:。输入时
间,然后按确认。要输入数字,请反复按 或 直至所需数
字显示在屏幕上。选择下一幅可移至下一个数字,选择确认可结
束输入。
要关闭自动键盘锁,请选择关。
另请参见第 40 页的“锁键盘”。
帮助信息显示
要显示或不显示帮助信息,请选择功能表 > 设置 > 帮助信息显
示。
另请参见第 17 页的“功能表的使用”。
显示设置
壁纸
您可以设置耳机,使其在待机状态下显示背景图像。多媒体资料
中已预存了部分图像。您也可以通过蓝牙无线技术接收图像,并
将其储存在多媒体资料中。您的耳机支持 JPEG 和 GIF 格式。
简体中文
35
Page 82

功能表功能
选择壁纸图片:
1. 选择功能表 > 设置 > 显示设置 > 壁纸。
2. 选择选择壁纸,这会显示多媒体资料中图案文件夹的内容。
3. 滚动至所需图像。
4. 要将选定图像设为壁纸,选择操作 > 设为壁纸。
图像模式启动时,壁纸不显示。
要启动或关闭壁纸,请选择功能表 > 设置 > 显示设置 > 壁纸 > 开
或关。
图像模式
选择功能表 > 设置 > 显示设置 > 图像模式,然后选择以下选项:
• 开 — 启动图像模式。若启动了图像模式,则当耳机处于待机
状态下的时间超过图像模式的延时,或当键盘锁定时,耳机即
会进入图像模式。
• 关 — 关闭图像模式。
• 选择图像 — 显示多媒体资料文件夹。选择所需文件夹,滚动
至所需图像或演示,然后选择操作 > 设置图像模式。
• 图像模式延时 — 定义在待机状态下耳机进入图像模式前的等
待时间。选择一个预设延时,或选择其他。若选择其他,请输
入所需延时。要输入延时,请反复按 或 直至所需数字
显示在屏幕上。选择下一幅可移至下一个数字,选择确认可结
束输入。
36
Page 83

功能表功能
颜色模式
您可以更改部分屏幕显示内容的颜色,如指示符号和信号强度指
示条。
选择功能表 > 设置 > 显示设置 > 颜色模式。选择所需颜色模式。
屏幕亮度
您可以更改屏幕亮度。
选择功能表 > 设置 > 显示设置 > 屏幕亮度。按 和 以降低
和提高亮度,然后按确认以储存新亮度。
屏幕背景灯光延时
您可以定义在未按导航键的情况下,屏幕背景灯光保持亮起状态
的时间。
选择功能表 > 设置 > 显示设置 > 灯光。选择一个预设延时,或选
择其他。若选择其他,请输入所需延时。要输入延时,请反复按
或 直至所需数字显示在屏幕上。选择下一幅可移至下一
个数字,选择确认可结束输入。
提示音设置
选择功能表 > 设置 > 提示音设置,然后选择以下选项:
• 耳机音频 — 打开或关闭耳机音频。若关闭耳机音频,则耳机
不会发出来电铃声、按键音或警告音。
因为通过听筒听到的声音是从手机自动传递的,所以不受此设
置影响。
简体中文
37
Page 84

功能表功能
• 响铃方式 — 选择手机通知您接到语音来电的方式。可用选项
有连续响铃、渐强、响铃一次、蜂鸣和关。
• 铃声 — 选择语音来电的铃声。
• 铃声音量 — 设置语音来电的铃声音量。
• 按键音 — 设置耳机在每次按键时发出的提示音。
• 警告音 — 设置耳机在特定情况下发出的提示音,例如当电池
电量耗尽时。
声控拨号设置
选择功能表 > 设置 > 声控拨号设置,然后选择以下选项:
• 声控拨号语言 — 设置声控拨号的语言。正确的语言设置可帮
助耳机更加准确地识别姓名。
语言更改后,耳机会询问您是否也要更改屏幕显示文字的语
言。
• 重复拨打的姓名 — 设置耳机,使其在您说出声控标签后重复
该标签以确认您的选择,然后再拨号。
• 重设声控拨号设置 — 重新设定声控拨号设置。语言设置不更
改。
38
Page 85

功能表功能
存储状态
选择功能表 > 设置 > 耳机设置,然后选择以下选项:
• 通讯录状态 — 查看通讯录的存储状态,如储存的姓名个数,
以及还可以储存多少个新姓名。
• 多媒体资料状态 — 查看多媒体资料文件占用的大致存储空
间,以及还有多少可用空间以储存新图像和文字文件。
向手机发送应用软件
您可能需要安装下载应用软件才能将姓名和电话号码下载到耳机
中。有关更多信息,请参见第 26 页的“从手机通讯录中复
制”。
要向连接的手机发送下载应用软件,请选择功能表 > 设置 > 向手
机发送应用软件。按确认以确认操作。
该应用软件成功下载至手机后,手机的“收件箱”中会收到一条
通知。请按通知中的说明安装该应用软件。
恢复出厂设置
要将部分功能表设置恢复为出厂设置,请选择功能表 > 设置 > 恢
复出厂设置。输入蓝牙密码,然后按确认。请参见第 6 页的“蓝
牙密码”。
恢复出厂设置不会删除您输入或从手机复制的数据,如通讯录中
储存的姓名和电话号码。
简体中文
39
Page 86

功能表功能
■ 锁键盘
您可以锁定键盘以防止在无意中碰到按键。
要锁定按键,请在待机状态下选择功能表 > 锁键盘。
如果启动了图像模式,则锁定按键会使耳机进入图像模式。请参
见第 36 页的“图像模式”。
要解锁按键,请向任意方向推动导航键以退出图像模式。在待机
状态下,按开锁,然后在 1.5 秒钟内按确认。
如果在键盘锁定时接到来电,则键盘会自动解锁。当您挂断或拒
绝接听来电时,键盘会自动重新锁定。
要使键盘在指定时间内未按任何按键时自动锁定,请参见第 35
页的“自动键盘锁”。
40
Page 87

电池信息
6. 电池信息
■ 充电和放电
诺基亚无线图像耳机 HS-13W 由内置式不可拆卸充电电池供电。
但是,通话时间和待机时间可能因与不同的手机或其他支持蓝牙
技术的产品一起使用,以及因不同的电池状况、使用设置、使用
方式和环境而有所不同。电池可以充电、放电几百次,但最终会
失效。仅可使用经诺基亚认可、适用于此型号耳机的充电器为电
池充电。
充电器不用时,请断开其与耳机的连接,并从电源插座上拔出充
电器插头。不要使电池长时间连接充电器。过度充电会缩短电池
的使用寿命。如果已完全充电的电池搁置不用,电池本身在一段
时间后会放电。温度过高或过低也会影响电池的充电能力。
不要将电池挪作它用。切勿使用任何受损的充电器或电池。
如果把电池放在过热或过冷的地方,如在夏天或冬天将电池放在
封闭的汽车里,会减少电池的容量和寿命。应尽量将电池温度保
持在 15 °C 和 25 °C (59 °F 和 77 °F) 之间。耳机电池过冷或过热可
能会使其暂时无法工作,即使电池电量充足。当温度低于冰点
时,电池的性能尤其受到限制。
简体中文
41
Page 88

维护和保养
维护和保养
您的耳机是具有优良设计和工艺的产品,应小心使用。下列建议将帮助
您有效使用保修服务。
• 保持耳机干燥。雨水、湿气和各种液体或水分都可能含有矿物质,会
腐蚀电子线路。
• 不要在有灰尘或肮脏的地方使用或存放耳机。这样会损坏它的可拆卸
部件和电子元件。
• 不要将耳机存放在过热的地方。高温会缩短电子设备的寿命、毁坏电
池、使一些塑料部件变形或熔化。
• 不要将耳机存放在过冷的地方。否则当耳机的温度升高至常温时,其
内部会形成潮气,这会毁坏电路板。
• 不要试图拆开耳机。
• 不要扔放、敲打或振动耳机。粗暴地对待耳机会毁坏内部电路板及精
密的结构。
• 不要用烈性化学制品、清洗剂或强洗涤剂清洗耳机。
• 不要用颜料涂抹耳机。涂抹会在可拆卸部件中阻塞杂物从而影响正常
操作。
• 更换天线时,只能使用配套的或经认可的天线。未经认可的天线、改
装或附件会损坏耳机并违反无线电设备的有关规定。
上述所有建议都同等地适用于您的耳机、电池、充电器或各个配件。如
果任何设备不能正常工作,请将其送至距离您最近的授权维修机构进行
维修。
42
Page 89

Nokia
無線圖像耳機
的用戶指南
(HS-13W)
第
版
1
Page 90

一致性聲明
本公司
(NOKIA CORPORATION)
的規定:
Directive)
一份一致性聲明的副本可於
內找到。
1999/5/EC.
聲明產品
http://www.nokia.com/phones/declaration_of_conformity/
HS-13W
符合下列說明委員會
(Council
Nokia
版權所有。
的註冊商標。本文件中所提及
的註冊商標。
保留對本文件中所描述產品作出改變和改進的權
Nokia
恕不負責。
保留隨時修訂或收回本文件之權利,恕不預先通知。
Nokia
Nokia
經銷商查
Copyright © 2005 Nokia.
未取得
份或全部內容。
Nokia 和 Nokia Connecting People 是 Nokia Corporation
的其他產品與公司名稱可能分別為其各自擁有者之商標或註冊名稱。
Bluetooth 是 Bluetooth SIG, Inc.
Nokia
利,恕不預先通知。
在任何情況下,對資料遺失、收益損失或因此所造成任何特別、意外、隨之而來或
非直接的損壞,
本文件的內容以 「現有形式」提供。除所適用的法律外,有關本文件內容的正確性
與可靠性,不論是明示或默示性,包括但不僅限於,對特殊目的的商用性與適用性
都不提供任何保證。
特定的產品的供應可能根據地區的不同而有所分別。請向您就近的
詢。
第
1
的事先書面同意,嚴禁以任何形式複製、傳輸、分發或儲存本文件部
Nokia
奉行持續研發的政策。
版
Page 91

目錄
簡介
..................................... 5
藍芽無線技術
藍芽密碼
.......................... 5
.................................. 6
1.概覽.................................. 7
耳機部件
待機及圖像模式
待機模式指示符號
2.
為電池充電
開啟或關閉耳機
第一次開啟耳機
3.
撥打電話
接聽或拒絕來電
來電等候
4.
在功能表中移動
使用文字編輯器編寫
輸入時間、日期和密碼
功能表
.................................. 7
...................... 9
.................... 10
使用須知
........................ 11
............................ 11
.................... 12
........................ 12
通話功能
........................ 14
................................ 14
.................... 15
.................................... 16
功能表使用
..................... 17
.................... 17
.................................... 20
............ 18
........ 19
功能表功能
5.
通話記錄
最近通話列表
通話時間
通訊錄
..................................... 23
選擇通訊錄檢視
儲存姓名及電話號碼
編輯姓名或電話號碼
刪除姓名及電話號碼
從手機的通訊錄中複製
發送及接收名片
多媒體資料
圖像及文字檔案
顯示
............................................ 30
接收及儲存新圖像
設定
......................................... 32
藍芽連接
時間及日期設定
通話總結
語言
............................................ 35
自動鍵盤鎖
說明訊息顯示
顯示設定
提示音設定
.................... 22
................................. 22
............................ 22
.................................... 23
........................ 24
........................ 27
............................. 28
........................ 28
.................... 31
.................................... 32
........................ 34
.................................... 35
................................ 35
............................ 35
.................................... 36
................................ 38
................ 24
................ 25
................ 26
............ 26
中文香港
3
Page 92

語音撥號設定
記憶體狀態
下載應用程式
原廠設定
鍵盤
......................................... 40
電池資料
6.
充電與放電
保養及維修
............................ 38
................................ 39
............................ 39
.................................... 40
......................... 41
............................. 41
......................... 42
4
Page 93

簡介
簡介
無線圖像耳機使用藍芽無線技術,提供管理通話及顯示您
Nokia
最喜愛圖像的簡易方法。
耳機備有自己的記憶體可儲存電話號碼和數據。請記住為重要資
料備份或保留其手寫記錄。儲存於您耳機內的資料並未儲存在您
的流動電話內。
您可以使用隨附的頸繩將耳機掛在頸上,或利用裝置背面的夾子
將耳機掛在衣服上。
在使用無線圖像耳機前請仔細閱讀本用戶指南。您的流動電話用
戶指南提供更多有關一般使用的詳細資料。請不要以本指南取代
您手機的用戶指南,用戶指南提供了重要的安全和保養資料。
■ 藍芽無線技術
無線圖像耳機支援藍芽無線技術,讓您可以連接在耳機
Nokia
米以內的兼容裝置。連接可能會受到如牆壁或其他電子裝置等障
礙物的干擾。
本裝置兼容於
般接入操作模式、免提操作模式。一般物件交換操作模式、物件
推動操作模式及檔案傳輸操作模式。在此,操作模式指的是您手
機用來控制耳機的一組藍芽無線技術指令。請向其他藍芽裝置的
製造商查詢,以確定其與此裝置之間的兼容性。
一些地區可能會對使用藍芽技術有所限制。請向您當地的授權機
構或服務供應商查詢。
Bluetooth Specification 1.1
及支援以下操作模式:一
10
中文香港
5
Page 94

簡介
■ 藍芽密碼
您需要藍芽密碼為
碼為
此外,使用密碼以限制耳機的使用。
如要獲取密碼輸入的資料,請參閱 「輸入時間、日期和密碼」,
刊於第
,而且您不可以更改此密碼。
0000
頁。
19
無線圖像耳機與兼容裝置進行配對。密
Nokia
6
Page 95

概覽
1.
■ 耳機部件
無線耳機包括以下部件。請參閱圖 1。
圖
概覽
1
中文香港
• 聽筒夾
• 耳機繩
• 控制桿 、、、 及
(1)
(2)
(3)
7
Page 96

概覽
在待機模式下, 及
功能視乎螢幕上顯示的指引文字而定,例如:待機
及
功能是通訊錄的快捷操作。
模式下的功能表及聲控。
擁有相同的功能 (除了在插入數據時)。請參閱
與
「使用文字編輯器編寫」,刊於第
• 螢幕
(4)
• 蜂鳴器
• 固定夾
• 充電器插孔蓋
• 麥克風
• 電源鍵
(5)
(6)
(7)
(8)
(9)
18 頁)
。
快速按電源鍵可開啟螢幕燈,並允許您開啟或關閉音效。
8
Page 97

概覽
■ 待機及圖像模式
當耳機已準備就緒,等待使用且您沒有開啟任何功能表時,耳機
便處於待機模式下。請參閱圖 2。
圖
2
• 您當前所處位置流動網絡的訊號指示符號
• 電池電量指示符號
• 待機模式中的左選擇鍵
• 待機模式中的右選擇鍵
當耳機處於待機模式下大約
將自動啟動圖像模式。請參閱 「鍵盤」,刊於第
僅當圖像模式可用時,圖像模式才會啟動。請參閱 「圖像模
式」,刊於第
36
頁。
。指示條越高,表示電池電力越充足。
(2)
是功能表。
(3)
是聲控。
(4)
秒,或當鍵盤鎖已啟動時,耳機
30
(1)
。
40
頁。
中文香港
9
Page 98

概覽
在圖像模式下,耳機會顯示單個圖像、文字或耳機內儲存的顯
示。要定義圖像模式下顯示的圖像,請參閱 「圖像模式」,刊於
第
頁。
36
要退出圖像模式,按控制桿。
待機模式指示符號
鍵盤已鎖定。請參閱 「鍵盤」,刊於第
耳機的音效聲音已關閉。請參閱 「提示音設定」,刊
於第
38
頁。
已啟動藍芽。請參閱 「藍芽連接」,刊於第
耳機已連接至裝置。請參閱 「藍芽連接」,刊於
第
頁。
32
40
頁。
32
頁。
10
Page 99

使用須知
使用須知
2.
■ 為電池充電
使用本手機前請先檢查充電器的型號。此裝置適用的充電器為
Nokia ACP-12、ACP-8 和 LCH-12
警告:只能使用經
池、充電器和增強配套。使用其他未經認可的配件,可能
會令保養失效,甚至造成危險。
切斷任何配件電源時,請握住插頭並拔出,不要拉電線。
您的裝置及其增強配套可能包括細小配件。請將配件置於兒童無
法觸及的地方。
打開裝置的充電器插孔蓋,用電線連接充電器至充電器插孔。
1.
請參閱圖 3。
。
認可的、供本特定型號使用的電
Nokia
圖
3
中文香港
11
Page 100

使用須知
將充電器連接到牆上的交流電源插座。
2.
如果耳機已開啟,會簡單顯示充電中的字樣。電池充電指示符
號在螢幕上捲動,直至電池已充滿。如果電池已完全沒電,指
示符號可能在數分鐘後才顯示出來。
連接充電器時仍可使用耳機。
■ 開啟或關閉耳機
按住電源鍵。
當耳機第一次開啟時,預設會啟動藍芽無線技術。
警告:當禁止使用無線裝置,或可能造成干擾或危險時,
請勿開啟裝置。
第一次開啟耳機
當您第一次開啟耳機時,您需要為耳機與您的手機進行配對。配
對是非常重要的,因為當您每次開啟耳機時,耳機會自動嘗試連
接至您已與其配對的第一個裝置。
使用藍芽無線技術為您手機與耳機建立連接。依照您手機用戶指
南內的指引。您耳機的密碼是
0000
。
12
 Loading...