

Page 1
Using Nokia Maps
Page 2

Nokia E90 Communicator
Using Nokia Maps
Legal Notice
Nokia E90 Communicator Using Nokia Maps
Copyright © 2007 Nokia. All rights reserved. Portions of the Nokia Maps software are
© 1996–2002 The Free Type Project. All rights reserved.
Nokia, Nokia Connecting People, Eseries and E90 Communicator are trademarks or
registered trademarks of Nokia Corporation. Other product and company names
mentioned herein may be trademarks or tradenames of their respective owners.
Reproduction, transfer, distribution or storage of part or all of the contents in this
document in any form without the prior written permission of Nokia is prohibited.
Nokia operates a policy of ongoing development. Nokia reserves the right to make
changes and improvements to any of the products described in this document
without prior notice.
Copyright © 2007 Nokia. All rights reserved.
To the maximum extent permitted by applicable law, under no circumstances shall
Nokia or any of its licensors be responsible for any loss of data or income or any
special, incidental, consequential or indirect damages howsoever caused.
The contents of this document are provided "as is". Except as required by applicable
law, no warranties of any kind, either express or implied, including, but not limited
to, the implied warranties of merchantability and fitness for a particular purpose, are
made in relation to the accuracy, reliability or contents of this document. Nokia
reserves the right to revise this document or withdraw it at any time without prior
notice.
The availability of particular products and applications and services for these
products may vary by region. Please check with your Nokia dealer for details, and
availability of language options.
Copyright to the Windows screenshots belongs to Microsoft.
Page 3

Contents
Introduction............................................... 4
System requirements............................................................4
GPS ............................................................................................4
Positioning methods and server........................................5
Getting started.......................................... 6
Internal GPS receiver............................................................6
Setting up network connections.......................................6
Getting started with the map............................................6
Choosing and finding locations ............... 9
Choosing a location from the map...................................9
Searching for an address.....................................................9
Working with results lists .................................................10
Choosing a contact.............................................................10
Searching for a location nearby......................................10
Searching for a location at a remote position............11
Choosing a landmark..........................................................11
Planning a route ..................................................................11
Saving a location.................................................................12
Sharing a location...............................................................13
Extra services .......................................... 14
Turn-by-turn navigation...................................................14
Purchasing navigation................................................14
Using navigation..........................................................15
Guides.....................................................................................16
Downloading a guide..................................................16
Searching or browsing a guide................................16
Settings.................................................... 17
Network settings.................................................................17
Routing settings ..................................................................17
General settings...................................................................18
Map .........................................................................................18
Using Nokia Map Loader........................ 19
PC requirements ..................................................................19
Installing Nokia Map Loader............................................19
Downloading maps .............................................................20
Troubleshooting....................................... 22
Shortcuts ................................................. 24
Copyright © 2007 Nokia. All rights reserved.
Nokia E90 Communicator Using Nokia Maps
Page 4

Introduction
With Nokia Maps, you can see the current location on the
map, browse maps for different cities and countries,
search for addresses and different points of interest, plan
Introduction
routes from one location to another, and save locations as
landmarks and send them to compatible devices.
The use of Nokia Maps requires downloading of map data.
The maps are free of charge. However, your service
provider might charge for the transfer of the map data.
Please ask your provider for details.
You can also purchase extra services such as city guides
and a turn-by-turn navigation service with voice
guidance.
System requirements
• Nokia E90 Communicator.
• Packet data connectivity.
• Device memory or compatible memory card with at
least 5 MB of free space.
Copyright © 2007 Nokia. All rights reserved.
4
GPS
The Global Positioning System (GPS) is operated by the
government of the United States, which is solely
responsible for its accuracy and maintenance. The
accuracy of location data can be affected by adjustments
to GPS satellites made by the United States government
and is subject to change with the United States
Department of Defense civil GPS policy and the Federal
Radionavigation Plan. Accuracy can also be affected by
poor satellite geometry. Availability and quality of GPS
signals may be affected by your location, buildings, natural
obstacles, and weather conditions. The integrated GPS
receiver of your Nokia E90 Communicator works best
outdoors since this allows reception of GPS signals.
GPS should only be used as a navigation aid. It should not
be used for precise location measurement and you should
never rely solely on location data from the GPS receiver for
positioning or navigation.
Page 5
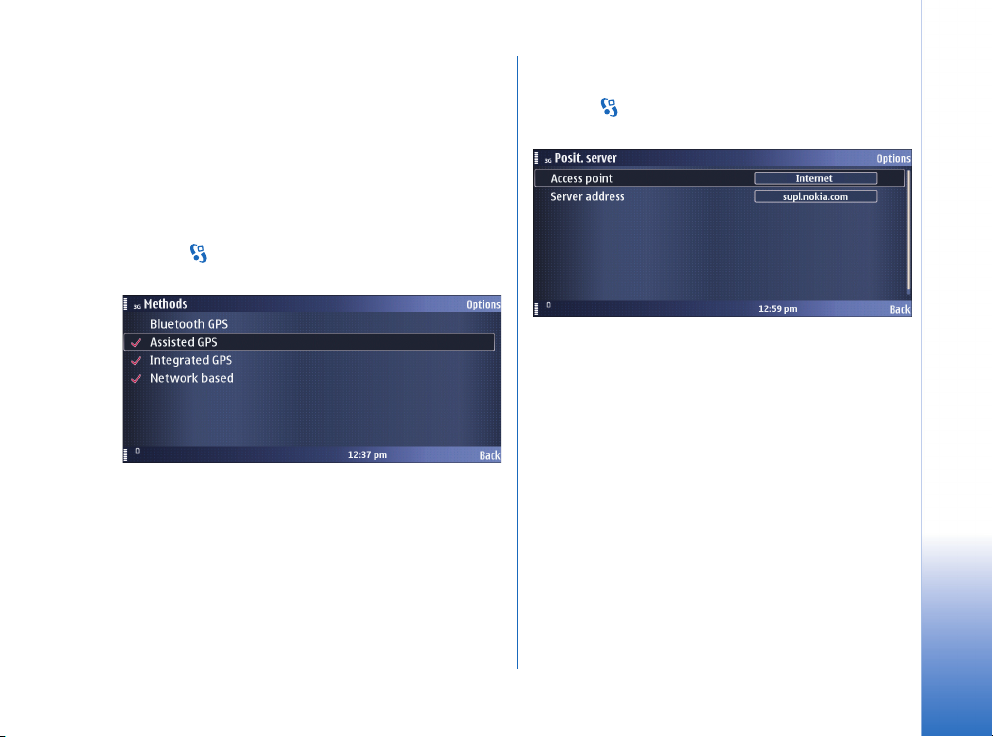
Positioning methods and server
The integrated GPS receiver of your Nokia E90
Communicator may have difficulties providing reliable
positions in some environments. Therefore it is suggested
that before using Nokia Maps you also activate the
Assisted GPS (A-GPS) that uses assistance servers with
good satellite signal to provide positioning information.
To set the active positining methods:
1 Select > Tools > Settings > General > Positioning >
Positioning methods.
2 Select the methods you want to use by scrolling to the
method and selecting Options > Enable. Make sure have
Assisted GPS and Integrated GPS enabled.
3 Select Back to accept the settings.
In addition to the positioning methods, set also the
positioning server used to access GPS data.
1 Select > Tools > Settings > General > Positioning >
Positioning server.
Introduction
2 In Access point, press the scroll key and select an access
point that is available in the environment where you
plan to use Nokia Maps. Note that a wireless LAN
access point is usually not ideal for navigating.
In Server address, press the scroll key and type in the
address of your positioning server. The default server
is supl.nokia.com.
3 Select Back to accept the settings.
Copyright © 2007 Nokia. All rights reserved.
5
Page 6
Getting started
Select > GPS > Maps.
Getting started
Internal GPS receiver
Your Nokia E90 Communicator has an internal GPS
receiver. You can use it for detecting your current position
and for turn-by-turn navigation (extra service). The GPS
receiver takes its power from the battery. Using the GPS
receiver may drain the battery faster.
Setting up network connections
When you use Nokia Maps for the first time, you may need
to define an internet access point for downloading map
information for your current location.
Copyright © 2007 Nokia. All rights reserved.
6
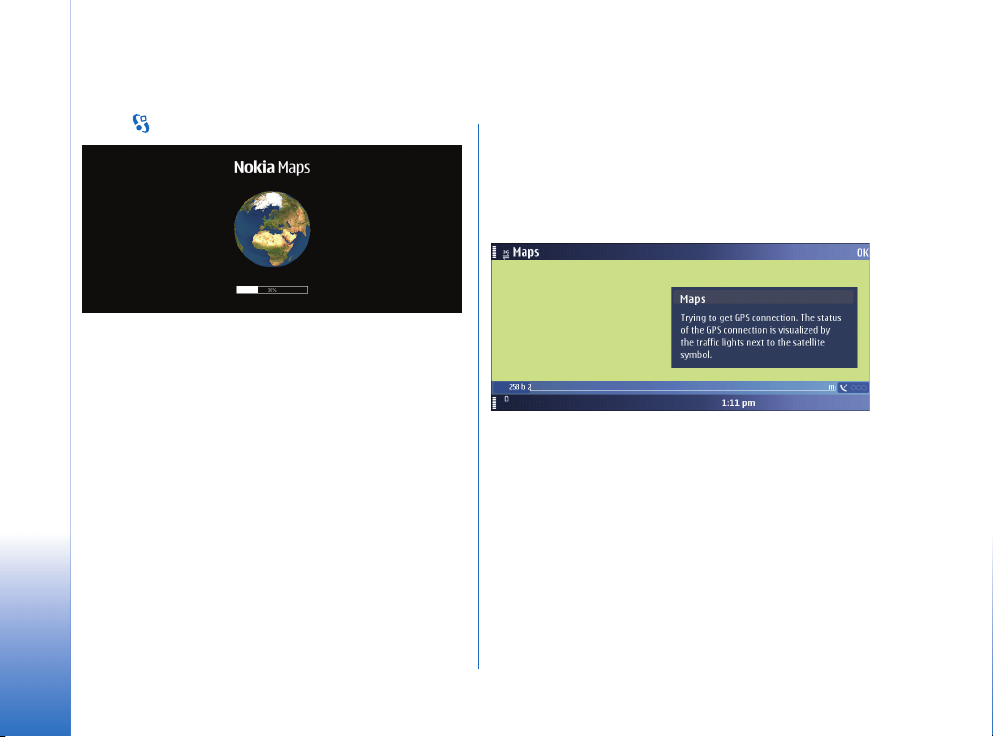
Getting started with the map
When you open Nokia Maps, you see an overview of the
globe. To find your GPS position, press 0 or select Options >
Find place > GPS position. When the device asks for
confirmation to search for GPS signal, answer OK.
This starts searching for a satellite signal, and Nokia Maps
starts to locate your device, and zooms in to your current
location. At the same time, Nokia Maps downloads the
map of your current location. The maps are automatically
saved in the device memory or on a compatible memory
card (if inserted).
You can browse the map, show information about the
different locations shown on it and, for example, choose
them for route planning and turn-by-turn navigation
(extra service).
Page 7
Digital cartography may be inaccurate and incomplete to
some extent. Never rely solely on the cartography that you
download for use in this device.
Downloading maps may involve the transmission of large
amounts of data through your service provider's network.
Contact your service provider for information about data
transmission charges.
You can also use Nokia Map Loader. This PC application
allows you to select and download maps of available
regions or countries to your PC and transfer them to your
Nokia E90 Communicator. You can also download voice
skins for turn-by-turn navigation. For more information,
see “Using Nokia Map Loader”, p. 19 and maps.nokia.com.
1
2
3
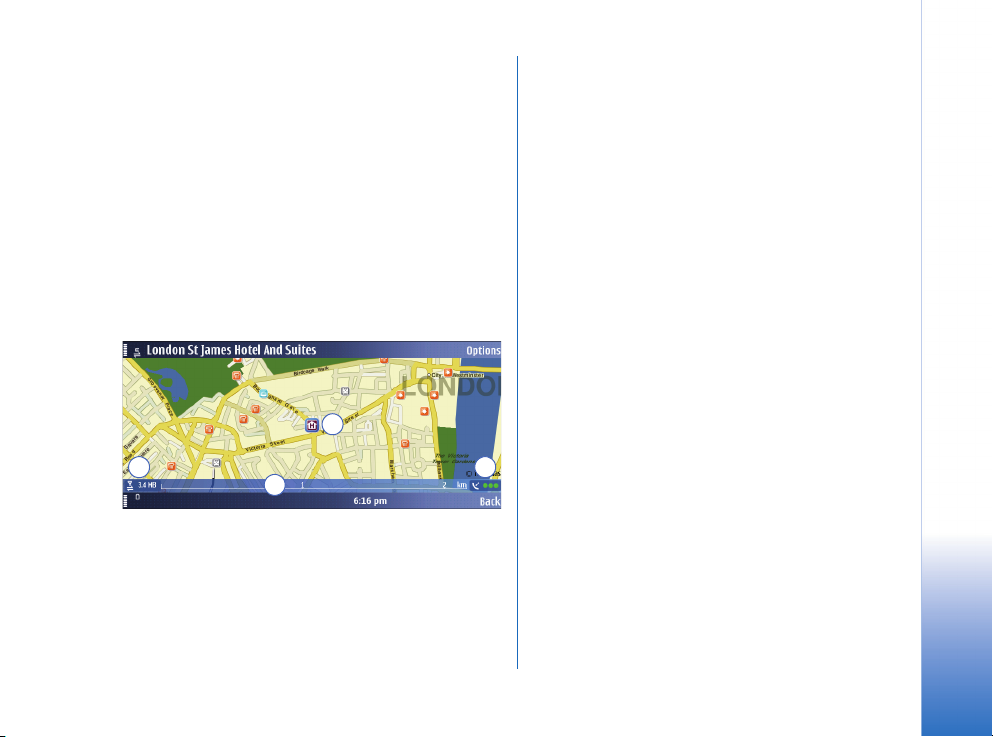
The details of the map are explained in the following:
4
1 GPS position / selected location – The blue square
indicates your current GPS position or a selected
position on the map. The map not only shows streets
and squares, but also points of interest such as
restaurants, cultural attractions, car parks, and so on.
You can define the depth of detail of the map by
choosing which types of locations are displayed.
One-way streets are marked with a red arrow pointing
in the direction in which the street can be driven.
2 Data transfer indicator and data counter – The data
transfer indicator shows any data transfer activity on
your device. The indicator blinks when data is being
transferred. The data counter displays the amount of
data transferred in the current session.
3 Scale bar – The scale bar shows the scale depending
on the actual zoom level. Through the scale bar, you
may estimate the distance between two points on the
map. The system of measurement used is displayed in
the middle of the scale bar (metric or imperial). You
can change the system of measurement in the Settings.
4 GPS signal indicator – The GPS indicator shows the
availability of the GPS signal, as well as its strength.
The strength is indicated by traffic lights next to the
satellite symbol. The more lights there are visible, the
stronger the signal.
When the device is searching for a GPS position, the
lights are blinking yellow.
When a GPS signal is detected, the lights appear
green. When no GPS signal is detected, the lights
appear red.
The map is oriented towards north by default. However,
during navigation, the orientation may change, for
example to improve the visibility of turns. Therefore, a
compass rose appears on the map during navigation,
displaying the orientation of the map.
Getting started
Copyright © 2007 Nokia. All rights reserved.
7
Page 8

One-way streets are marked with blue arrows pointing in
the driving direction.
Note the difference between "GPS position" (your actual
geographic position) and "selected" location/position,
which is any other than the GPS position. You may return
to the "GPS position" at any time by selecting GPS pos..
• To zoom in, press left Shift in the Nokia E90
Getting started
Communicator keyboard, or press * in the cover phone
keyboard.
• To zoom out, press right Shift in the Nokia E90
Communicator keyboard, or press # in the cover phone
keyboard.
• To find a location nearby, start typing.
Select Find to start searching.
• To find a city or an address, select Options >
Find place > Address. To choose a location from a list of
landmarks, select Options > Find place > Landmark.
• To send a location in a text message, multimedia
message, e-mail, or using Bluetooth or infrared
connectivity, or to save a location as a landmark or
image, select Options > Use this place > Send or Save.
• To be guided to a location turn by turn or to plan a
route, select Options > Use this place > Route from or
Route to.
• To change the map colours, zoom in or out, and toggle
between 2D and 3D views, select Options > Map
options.
Copyright © 2007 Nokia. All rights reserved.
8
Page 9

Choosing and finding locations
Choosing a location from the map
In addition to streets, squares, and parks, the map also
contains locations such as car parks, petrol stations, and
public transport. You can select these for turn-by-turn
navigation (extra service), routing, and so on. The name of
the selected location or street is shown in the upper edge
of the screen.
When browsing to a certain direction, map information
may not be available on your device for that area. Wait
while Nokia Maps downloads the required map data.
• To return to your GPS (or last known) position, choose
GPS pos..
When you place the cursor near a symbol, Nokia Maps
automatically focuses on this location and centres it on
the screen.
You can choose the location for planning your route and
for turn-by-turn navigation (extra service). You can also
send the location in a text or multimedia message, save it
as a landmark or as an image, or search for nearby point of
interests. If a phone number is saved for a location, you can
also call this phone number directly.
If no location is selected when you press the scroll key, the
context-menu opened applies to the nearest street.
Searching for an address
Select Options > Find place > Address.
The address search allows you to search for specific cities
or streets. The search results can, for example, be
displayed on the map and be used for route planning or
turn-by-turn navigation (extra service).
You can enter the address details, such as Number, Street,
City/Zip code, and Country/Region. You do not need to enter
the complete name of the location; enter a meaningful
part of the name with at least 2 to 3 characters. Note that
you cannot use wildcards. Note also that the address is not
completed automatically since the search function does
not have network access until you start the search. To
start searching, select Options > Search.
Copyright © 2007 Nokia. All rights reserved.
Choosing and finding locations
9
Page 10

Working with results lists
• To display the location on the map, press the scroll key
or select Options > Use this place > Show on map.
• To switch between the search results once in the map
view, scroll up or down.
• To plan a route to or from the location, select
Options > Use this place > Route from or Route to.
• To navigate to the location (extra service), select
Options > Use this place > Navigate to.
• To send the location, select Options > Use this place >
Send.
• To save the location as a landmark or as an image,
select Options > Use this place > Save.
Choosing and finding locations
Choosing a contact
Another way of finding an address is to use one of your
contacts if you have saved an address for it.
1 Select Options > Find place > Address > Options > Select
from contacts.
2 Select the contact from the list, and OK. Add further
details to the search if necessary.
3 To start searching, select Options > Search. Nokia Maps
searches its database for the address you have entered
and displays the results.
Searching for a location nearby
If you are looking for a certain location in your
surroundings, you can find it through the search function.
To use the search function, just start typing.
With the search function, you can find points of interest
as well as city guide entries. You cannot search for
addresses.
• Enter the name of the location you are looking for, and
select Find.
You do not need to enter the complete name of the
location; you can also enter a meaningful part of the name
with at least three characters. You cannot use wildcards.
An alternative way of starting the location search is
through Options > Find place > Keyword search.
10
Copyright © 2007 Nokia. All rights reserved.
Page 11

Searching for a location at a remote position
The search function finds locations near the focus
indicator. If you want to find locations at a remote
location, you need to display the remote location on the
map first.
For example, assume you live in New York City and are
planning to spend a week with a friend in London. To find
a cinema close to your friend's apartment, do the
following:
• Find your friend's address through an address search, or
by using one of your contacts.
• To select your friend's address in the list, select
Options > Use this place > Show on map.
• To find cinemas near your friend's place, type "cinema".
You can also search a guide (by selecting Options >
Extra services. For more information about guides, see
“Guides”, p. 16.
Alternatively, you can also move the focus indicator to
your friend's apartment and start searching as described
above or choose a location from by category, as described
below.
Choosing a landmark
To show a previously saved landmark on the map, select
Options > Find place > Landmark.
To edit the details of a landmark, select Options > Use this
place > Edit landmark.
Planning a route
With the route planner you can calculate a route from
your current (or last known) location to a destination of
your choice.
It is also possible to plan a route starting at a remote
location, for example if you live in New York City, and plan
to travel in London on the weekend.
To select a starting point and destination, select Options >
Use this place > Route from or Route to.
You can use your GPS position, landmarks, recent
locations, the map, or the address search.
Choosing and finding locations
Copyright © 2007 Nokia. All rights reserved.
11
Page 12

To select the route settings, select Options > Settings. Once
you have set your starting point and destination, you may
select the route settings, for example, the type of route or
the transport mode.
Once you have set a starting point and destination, and
selected your settings, you can show your route. To
display the itinerary, select Options > Show route.
The Itinerary tab lists the single waypoints of a route, and
shows the turns and the distance between them.
Choosing and finding locations
To switch between the Itinerary and Summary tabs, scroll
left or right.
Select Options and from the following:
• Show on map – To show a waypoint on the map.
To switch between waypoints, scroll up or down.
• Start navigation – To start turn-by-turn navigation
(extra service) with GPS.
• Start simulation – To run a simulation of turn-by-turn
navigation without GPS.
Saving a location
You can save your favourite destinations as landmarks to
quickly access them when planning your route.
The Save command is in different context-sensitive menus
throughout the application. The following procedure is
just an example.
1 Browse the map.
2 To open the context-sensitive menu, press the scroll
key.
3 Select Save > As landmark.
4 Edit the name of the landmark if necessary, and select
OK.
5 Choose a category for the landmark, and select OK.
You can also take a screenshot of the map (Save >
As image). The image is saved in your device's default
gallery folder.
12
Copyright © 2007 Nokia. All rights reserved.
Page 13

Sharing a location
You can share any location with your friends by sending it
for example in a text, multimedia, or e-mail message, or by
using Bluetooth or infrared connectivity. The information
about the location is sent as a geocode and text (except in
text messages, in which it is sent as text only).
The Send command is in different context-sensitive menus
throughout the application. The following procedure is just
an example.
To share a location, do the following:
1 Browse the map.
2 To open the context-sensitive menu, press the scroll
key.
3 Select Send.
4 Select the sending method (for example, as a text or
multimedia message, or via Bluetooth or infrared).
5 Compose your message as usual.
You can also take a screenshot of the map to send it, for
example in a multimedia or e-mail message. See “Saving a
location”, p. 12.
Choosing and finding locations
Copyright © 2007 Nokia. All rights reserved.
13
Page 14

Extra services
Turn-by-turn navigation
Turn-by-turn navigation guides you along the shortest or
Extra services
quickest route from A to B – turn by turn, with voice
guidance and in 3D view.
The turn-by-turn navigation is an extra service and needs
to be purchased prior to its use.
Purchasing navigation
To purchase turn-by-turn navigation:
1 Select Options > Extra services > Add navigation.
Select Accept to accept the terms and conditions.
2 Select Purchase, and then select the region for which
you want to acquire a turn-by-turn navigation license
and how long you want to use the service. You can
choose between paying securely with your credit card
and having the amount charged to your phone bill.
14
Copyright © 2007 Nokia. All rights reserved.
Note: The first time you are purchasing a
navigation license with a Nokia E90
Communicator, you activate a free 3-day
navigation trial license. This trial license is
valid for navigation on all supported
navigable maps, allowing you to test the
navigation function prior to purchasing it.
You are not charged for using the 3-day
navigation trial license, but note that data
transfer costs may arise due to
downloading of map data.
Tip: You may need to update your
navigation license if for example the device
software has been updated. In this case,
when you are asked to select the length of
the license, select Options > Update and
confirm by selecting Yes. This connects to
the license server and checks your licenses
and regains them for the remaining time of
your navigation license. The update is free
of charge.
3 If you select to have the payment charged to your
phone bill, the device will send rate SMS messages.
If you select to pay with a credit card, enter your credit
card details:
• Select the type of your card (VISA, Master Card, or
AMEX), and press the scroll key.
Page 15

• Enter the Card number, Card verification number,
Expiration month and Expiration year.
• Select Options > Purchase. Confirm the payment by
selecting OK.
• To get a receipt of the transaction and a license
code, enter your name and e-mail address.
Select OK.
After the payment is processed, the turn-by-turn
navigation features are activated.
Using navigation
To navigate, do the following:
1 Choose or search a location for navigation.
2 Select Options > Use this place > Navigate to command.
Navigation starts, provided you have a GPS connection.
3 If you use turn-by-turn navigation for the first time,
you are prompted to choose the language for the voice
guidance. Wait while the voice guidance files are
downloaded.
Tip: You can also download voice guidance
files using Nokia Map Loader. This way you
can avoid data transfer costs for your
mobile device. For more information, see
“Using Nokia Map Loader”, p. 19.
By default, the route is displayed in black. The red arrow
shows the directions, and the blue arrow shows your GPS
position. Turns are displayed in the upper left corner and
indicated through voice guidance.
You can browse the map while navigating. Choose a new
destination if you change your mind.
Select Options and from the following:
• Alternative route – To calculate an alternative route.
• Voice guidance > Repeat command – To repeat voice
guidance.
• Voice guidance > Volume – To adjust the volume of
voice guidance. A volume bar appears on the screen.
To increase the volume, scroll up;
to decrease the volume, scroll down.
Extra services
Copyright © 2007 Nokia. All rights reserved.
15
Page 16

• Map options – To adjust display settings.
• Map options > Arrow mode – To show the upcoming
turns in arrow mode. To return to the navigation map,
select Options > Map options > Map mode.
• Stop navigation – To stop the turn-by-turn navigation.
When calculating the route, your routing settings are
Extra services
taken into account.
Turn-by-turn navigation is not available in the pedestrian
mode.
Guides
The guides contain detailed information about locations,
such as descriptions, contact information, prices, opening
times, and so on. A location found in a guide may, for
example, be displayed on a map and be used for route
planning and turn-by-turn navigation (extra service).
Guides are an extra service and need to be purchased prior
to their use.
Downloading a guide
1 Select Options > Extra services > Guides.
The My guides list is displayed.
2 Scroll right to get to Nearest guides. You may be asked
if you want to update the guide catalogue. Confirm if
you want to update the catalogue.
In the city guide shop, any city guides available for
your region are displayed. To see city guides for other
regions or countries, or by vendor, scroll right.
3 Choose a guide from the list, and select OK. Confirm if
you want to download the guide.
4 Choose your payment option, and select OK.
5 Enter your payment details.
6 Confirm the payment by selecting OK. You may be
prompted to choose your internet access point for
processing the payment. After the payment is
processed, a confirmation is displayed on the screen.
Select OK.
7 To get a receipt of the transaction and a license code,
enter your name and e-mail address. Select OK.
The guide is now activated. You are now ready to browse
or search it.
Searching or browsing a guide
To open and browse a city guide, do the following:
1 Select Options > Extra services > Guides.
2 After opening the guide, scroll right to open Find.
3 Enter a Name.
4 To start searching, select Options > Search.
To narrow the scope of your search, select Category/
Subcategory. You may add a starting point for your search
(Location), as well as the size of the area within which the
application searches around the starting point (Distance).
16
Copyright © 2007 Nokia. All rights reserved.
Page 17

Settings
Network settings
Select Options > Settings > Network, and from the
following:
• Max memory card use – You can limit the amount of map
information that can be stored on a compatible
memory card. Drag the slide bar left or right to decrease
or increase the amount of space the map information
may use. When the storage limit is reached, the most
seldom used information is deleted.
• Use network – To allow Nokia Maps to establish an
internet connection whenever needed, for example, for
downloading map information, select When needed.
To deny network usage, select Never.
• Default access point – Select one of the internet access
points defined in your device's network settings.
• Roaming warning – Select to be warned when your
device registers to a network other than the service
provider of your own.
Routing settings
Select Options > Settings > Routing, and from the
following:
• Transport mode – To regard one-way streets as normal
streets and also choose paths leading through parks,
and so on, select On foot.
• Route selection – Select whether to calculate the route
by fastest or shortest route.
You can also choose to allow or avoid motorways, tunnels,
ferries, and toll roads.
There may be some city areas with restricted access (for
example the London Congestion Zone in Central London)
that are regarded as toll roads by Nokia Maps. Therefore,
if you choose to avoid toll roads, you are not guided
through these areas. However, there is no warning if you
enter these zones accidentally.
Copyright © 2007 Nokia. All rights reserved.
Settings
17
Page 18

General settings
Select Options > Settings > General, and from the
following:
Settings
• Systems of measurement – Select between metric
(km, m) and imperial (mi, yd).
• Backlight – Select between Default, Always on, or
On during navigation.
• Voice guidance – Select the language used for voice
guidance navigation.
Map
Select Options > Map options, and from the following to
adjust viewing options for the map:
• Zoom in / Zoom out – To increase or reduce the size of
the map.
• 2D/3D – To toggle between the 2D and 3D views.
• Change map colours – To change the colour scheme of
the map.
To choose which kinds of elements are displayed on the
map:
1 Select Options > Map options > Categories.
2 Mark any category you want to have displayed on the
map. Unmark those that should be hidden.
3 To select or deselect all categories, select Options >
Mark all / Unmark all.
18
Copyright © 2007 Nokia. All rights reserved.
Page 19

Using Nokia Map Loader
Nokia Map Loader is a PC application that allows yous to
download maps to your Nokia E90 Communicator. This will
save you costs on data transfer and allow you to download
maps for whole countries or areas in a single operation.
Nokia Map Loader will download maps from a Map server,
through PC to one of the following:
• A memory card connected to your Nokia E90
Communicator via USB in data transfer mode.
• A memory card plugged into a PC via a memory card
reader.
The Map Loader downloads and caches the list of available
maps from the map server each time you start the
application.
During the startup the application looks for a memory card
that used with the Nokia Maps application before.
The Map Loader identifies a compatible memory card by
searching for a cookie during the startup. The cookie is a
file written by the maps application onto the memory card.
The cookie contains information like size of the memory
card, path to the map data on the memory card.
The Map Loader will only download a map of an entire
country if the file size of the map is smaller than 60 MB.
Maps larger than that will be split up into smaller regions.
PC requirements
Nokia Map Loader requires the following applications and
hardware to be available on the PC:
• Windows XP operating system.
Support for Windows Vista will be communicated
later.
• Microsoft .NET-Framework 3.0 installed. This will be
installed by the Map Loader if necessary.
• At least 800 x 600 screen resolution.
• An Internet connection for downloading map data.
Note: You cannot choose the language of the
user interface. The installer will identify the
language of your Windows operating system.
If the Windows operating system language is
not supported by the Map Loader, the
application will be installed with the English
user interface.
Installing Nokia Map Loader
To install Nokia Map Loader on a PC:
1 Download Nokia Maps Loader from
http://maps.nokia.com.
Copyright © 2007 Nokia. All rights reserved.
Using Nokia Map Loader
19
Page 20

2 Run the Nokia Map Loader exe file and click Next on
the Welcome page.
Using Nokia Map Loader
3 Read and accept the license agreement, and click
Next.
4 Select a folder for the application and click Install.
5 Click Finish to complete the installation.
Downloading maps
To get connected:
1 Connect your Nokia E90 Communicator to your PC
using the USB cable. It is recommended that you use
your device memory card through a memory card
reader.
Note: You must use the Maps application
on the Nokia E90 Communicator at least
once before you use the Map Loader
application. This is to ensure that the Maps
Application Cookie is stored on the device
memory card.
2 Start Nokia Map Loader.
3 Select a region. To add a map to the list of selected
maps, click the + symbol.
To remove a map from the list of selected maps, click
the – symbol.
The Total selected indicates the total file size of the
selected maps. The Space left for Maps data shows
the amount of free space on the device.
4 Click Download to download the selected maps to your
device, or Delete maps from storage to delete map
content on your device.
20
Copyright © 2007 Nokia. All rights reserved.
Page 21

5 A progress indicator shows the status of the download
and informs when the download is complete.
6 Click OK.
Copyright © 2007 Nokia. All rights reserved.
Using Nokia Map Loader
21
Page 22

Troubleshooting
Q: Why can’t I hear voice guidance via my Nokia 616 Car
Kit?
A: If you are navigating using Nokia Maps and Nokia 616
Car Kit, and you don’t hear the voice guidance via
Troubleshooting
Nokia 616 Car Kit, do the following:
• Make sure you are using the Bluetooth Handsfree
mode in the Nokia E90 Communicator. To do this,
check the Bluetooth settings and set Remote SIM mode
to Off.
• In the Nokia 616 Car Kit, press the speaker button ( )
twice to set the loudspeaker mode to Loudspeaker
always active, indicated by the icon on the
Nokia 616 Car Kit display.
•The Loudspeaker always active mode is available in the
Nokia 616 Car Kit with the latest software version, so
check the software versions of your Nokia 616 Car Kit
by dialling *#0000#. Turn the Navi wheel to check the
separate software version of the display unit.
Software versions should be 4.57 (Nokia 616 Car Kit
main unit) and 4.13 (the display unit) or later.
22
Copyright © 2007 Nokia. All rights reserved.
Q: What happens to purchased navigation features if I
change my mobile device?
A: In the event of a mobile device change, please contact
Nokia Customer Care via www.nokia.com/support.
Before calling Nokia Customer Care, please make sure that
you have the following information available:
• Date of your license purchase.
• License type, that is, navigation region and length of
the license.
• Contact information (telephone number and/or email
address).
• Order code and license code, if available.
You get these from the email receipt of your purchase.
• Current IMEI code. To see your IMEI, please enter
*#06# on your device.
• Previous IMEI code if your mobile device was
exchanged.
•Payment method. Do not give your credit card details.
• Phone number, including country and network provider
code.
Page 23

Q: Why will the Map Loader application not start?
A: To ensure that Nokia Map Loader is functioning
properly, do the following:
• Make sure that you have the latest version of Nokia
Map Loader.
You can check the version number in the bottom right
hand corner of the application window.
You can download the latest version in
maps.nokia.com.
• Make sure that the device is connected to the PC via
USB cable in data transfer mode and using a memory
card.
If you receive an error message that memory card is in
use, check the following:
1 Check that no application using the memory card as
storage (such as Maps or Gallery) is open. Press
for a few seconds to see which applications are
open. Close all applications.
2 Check that you are using the memory card as
message storage. Select > Messaging >Options >
Settings > Other > Memory in use.
• Make sure that there is a memory card inserted in your
Nokia E90 Communicator.
• Check that the device and the memory card have been
used with the Maps application at least once.
• Make sure that there is enough free memory on your
memory card for the selected content.
If you download a lot of data, the download time may
be quite long as the maps are downloaded from a
server. The connection speed may be affected by server
congestion, the Internet connection speed, and the
USB speed. Note that memory card reader is faster
than USB cable connection.
For more information, see maps.nokia.com.
Troubleshooting
Copyright © 2007 Nokia. All rights reserved.
23
Page 24

Shortcuts
Shortcuts
Map view
* Zoom in (the cover phone keyboard)
# Zoom out (the cover phone keyboard)
0 Get GPS signal and find your current location
Shift
left
Shift
right
Space
Zoom in (the Communicator keyboard)
Zoom out (the Communicator keyboard)
Switch between 2D and 3D modes (the
Communicator keyboard)
Turn-by-turn navigation view
* Zoom in (the cover phone keyboard)
# Zoom out (the cover phone keyboard)
Shift
left
Shift
right
1
2 Switch map colours
3 Send current location
4 Repeat voice guidance
5 Choose alternative route
6 Show satellite info
7Mute volume
Zoom in (the Communicator keyboard)
Zoom out (the Communicator keyboard)
Switch between 2D and 3D modes
(the Communicator keyboard)
24
Copyright © 2007 Nokia. All rights reserved.
 Loading...