


Nokia C7–00 User Guide
Issue 1.0

2Contents
Contents
Safety 5
Get started 6
Keys and parts 6
Insert the SIM card and battery 8
Insert or remove a memory card 9
Charging 11
Switch the device on or off 12
Nokia account and Nokia's Ovi
services 12
Device set-up 13
Copy contacts or pictures from your old
device 13
Lock or unlock the keys and screen 14
Antenna locations 15
Change the volume of a call, song, or
video 15
Attach the wrist strap 15
Headset 16
Use the in-device user guide 16
Install Nokia Ovi Suite on your PC 17
Explore Nokia's Ovi internet
services 18
Ovi by Nokia 18
About Ovi Mail 18
About Ovi Maps 19
About Ovi Music 19
About Ovi Store 19
Basic use 19
Touch screen actions 19
Interactive home screen elements 22
Switch between open applications 23
Write text 23
Display indicators 26
Set the notification light to blink for
missed calls or messages 28
Flashlight 28
Search in your device and on the
internet 28
Use your device offline 29
Prolong battery life 29
Personalisation 30
Profiles 30
Change your theme 31
Home screen 32
Organise your applications 34
Telephone 35
Call a phone number 35
Answer a call 35
Search for a contact 35
Reject a call 36
Call a contact 36
Mute a call 36
Answer a waiting call 37
Make a video call 37
Answer a video call 38
Reject a video call 39
Make a conference call 39
Use speed dial 40
Use your voice to call a contact 40
Make calls over the internet 41
Call the last dialled number 42
Record a phone conversation 42
Turn to silence 42
View your missed calls 42
Call your voice mailbox 43
Divert calls to your voice mailbox or
another phone number 43
Prevent making or receiving calls 44
Allow calls only to certain numbers 44
Video sharing 45
Contacts 46
About Contacts 46
Save phone numbers and mail
addresses 47

Contents 3
Save a number from a received call or
message 47
Contact your most important people
quickly 47
Set a ringing tone for a specific
contact 48
Send your contact information using My
Card 48
Create a contact group 49
Send a message to a group of
people 49
Contacts stored on the SIM card 49
Back up your contacts to Ovi by
Nokia 49
Messaging 50
About Messaging 50
Send a message 50
Send a message to a contact 51
Send an audio message 51
Receive messages 51
View a conversation 52
Listen to a text message 52
Change language 53
Mail 53
Mail 53
Open mail from the home screen 56
Internet 56
About Web 56
Browse the web 56
Add a bookmark 57
Subscribe to a web feed 57
Discover nearby events 57
Social networks 58
About Social 58
See your friends' status updates in one
view 58
Post your status to social networking
services 59
Link your online friends to their contact
information 59
See your friends' status updates in the
home screen 59
Upload a picture to a service 60
Share your location in your status
update 60
Contact a friend from a social
networking service 61
Add an event to your device
calendar 61
Camera 61
About Camera 61
Take a picture 61
Save location information to your
pictures and videos 62
Picture tips 62
Record a video 63
Send a picture 63
Your pictures and videos 63
About Photos 63
View pictures and videos 64
Edit the pictures you have taken 64
Video editor 65
Print a picture you have taken 66
View pictures and videos on a TV 66
Videos and TV 67
Videos 67
Watch Web TV 67
Music and audio 68
Music player 68
Protected content 70
Record sounds 71
Play music through a radio 71
FM radio 72
Maps 74
Maps overview 74

4Contents
My position 74
Find places 78
Favourites 79
Share location 81
Drive and Walk 82
Office 87
Quickoffice 87
Read PDF documents 87
Make a calculation 88
Write notes 88
Translate words from one language to
another 88
Open or create zip files 89
Time management 89
Clock 89
Calendar 91
Device management 93
Keep your device software and
applications up to date 93
Manage files 94
Increase available memory for more
content 95
Manage applications 96
Synchronise content 97
Copy contacts or pictures between
devices 98
Protect your device 99
Connectivity 100
Internet connections 100
Wireless LAN 101
Bluetooth 102
USB data cable 104
Close a network connection 106
Store your files on a remote drive 106
Access codes 108
Troubleshooting 108
Restore original settings 108
What to do when the memory is
full? 108
Message indicator blinking 109
A contact appears twice in the contacts
list 109
Unreadable characters while browsing
the web 109
Prepare your device for recycling 109
Green tips 110
Save energy 110
Recycle 110
Product and safety information 110
Index 118
Find more help 107
Support 107
Safety 5
Safety
Read these simple guidelines. Not following them may be dangerous or illegal. Read
the complete user guide for further information.
SWITCH OFF IN RESTRICTED AREAS
Switch the device off when mobile phone use is not allowed or when it may
cause interference or danger, for example, in aircraft, near medical
equipment, fuel, chemicals, or blasting areas.
ROAD SAFETY COMES FIRST
Obey all local laws. Always keep your hands free to operate the vehicle while
driving. Your first consideration while driving should be road safety.
INTERFERENCE
All wireless devices may be susceptible to interference, which could affect
performance.
QUALIFIED SERVICE
Only qualified personnel may install or repair this product.
KEEP YOUR DEVICE DRY
Your device is not water-resistant. Keep it dry.
GLASS PARTS
The front cover of the device is made of glass. This glass can break if the device
is dropped on a hard surface or receives a substantial impact. If the glass
breaks, do not touch the glass parts of the device or attempt to remove the
broken glass from the device. Stop using the device until the glass is replaced
by qualified service personnel.
PROTECT YOUR HEARING
Listen to a headset at a moderate level, and do not hold the device near your
ear when the loudspeaker is in use.

6Get started
Get started
Keys and parts
Top
1 Micro USB connector
2 Charging indicator light
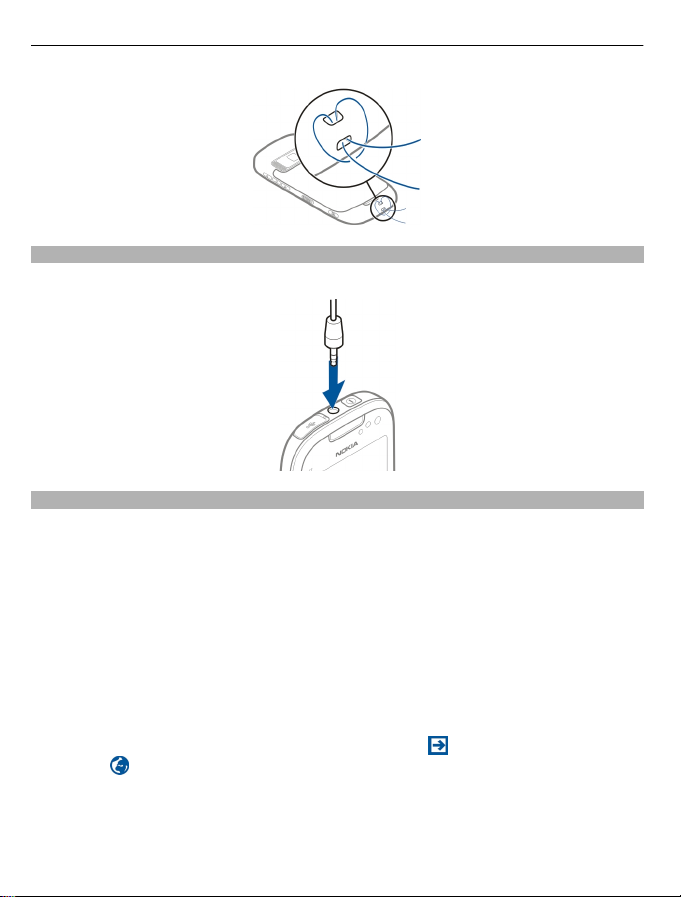
3 Nokia AV connector (3.5 mm)
4 Power key
Front
1 Earpiece
2 Call key
3 Microphone
4 Menu key
5 End key
6 Secondary camera lens

Sides
1 Charger connector
2 Volume up/Zoom in key
3 Voice key
4 Volume down/Zoom out key
5 Lock switch
6 Camera key
Back
Get started 7
1 Loudspeaker
2 Camera lens
3 Camera flash
4 Secondary microphone
5 Wrist strap hole
8Get started
Touch screen
To control your device, lightly touch the screen with your fingertips. The screen does
not respond when you use your fingernails.
If your fingertips are cold, the screen may not respond to your touch.
To avoid scratching the touch screen, never use a pen, pencil, or other sharp object to
write on the touch screen.
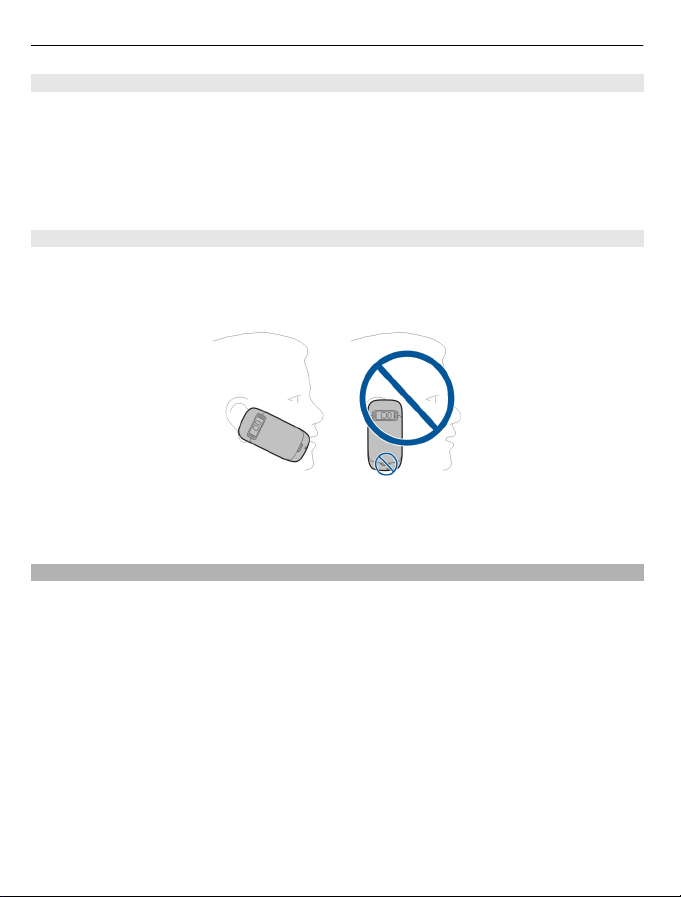
Noise cancellation
If you are calling from a noisy environment, your device filters out background noise to
make your voice sound clearer to the person at the other end of the line.
Noise cancellation is not available when using the loudspeaker or a headset.
For the best noise cancellation, hold the device with the earpiece to your ear and the
main microphone towards your mouth. Do not cover the secondary microphone at the
back of the device.
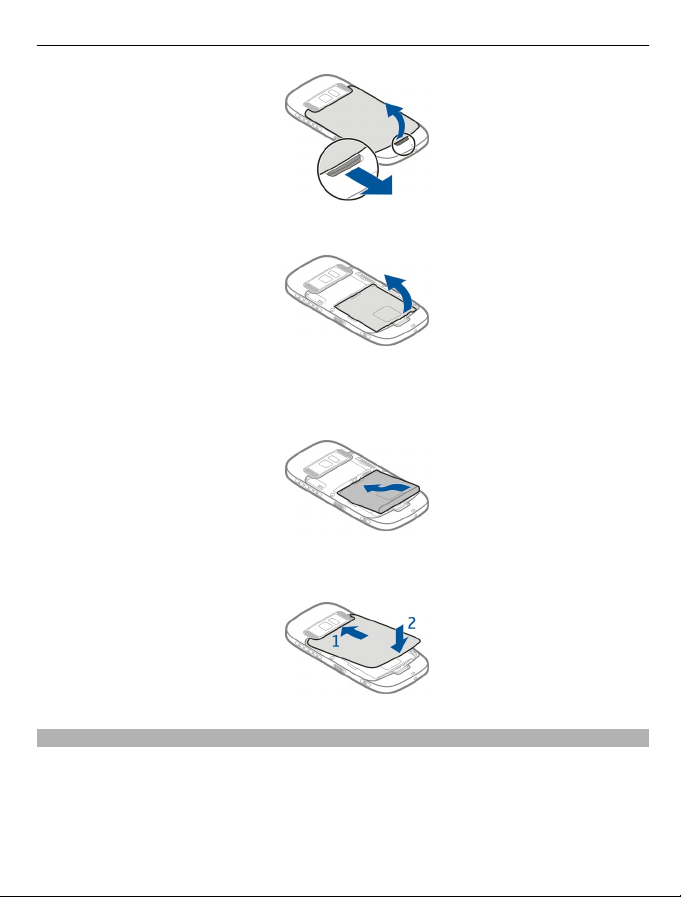
Insert the SIM card and battery
Important: Do not use a micro-SIM or a micro-SIM with an adapter in this device. This
device does not support use of micro-SIM cards, and use of incompatible SIM cards may
damage the card or the device, and may corrupt data stored on the card.
Follow the instructions carefully, to avoid damaging the back cover.
Safe removal. Always switch the device off and disconnect the charger before removing
the battery.
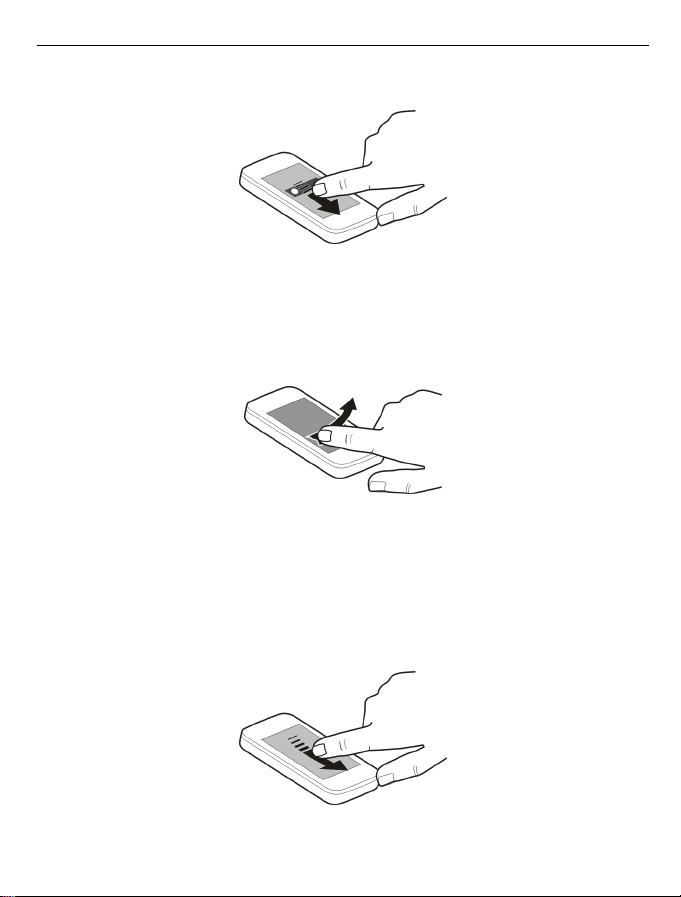
1 Unlock the back cover release latch, and lift the back cover.
Get started 9
2 If the battery is inserted, lift the battery out.
3 Insert a SIM card. Use the diagram printed on the device to correctly align the card.
4 Line up the contacts of the battery and the battery compartment, and insert the
battery.
5 To replace the back cover, direct the top locking catches toward their slots, and
press down until the cover locks into place.
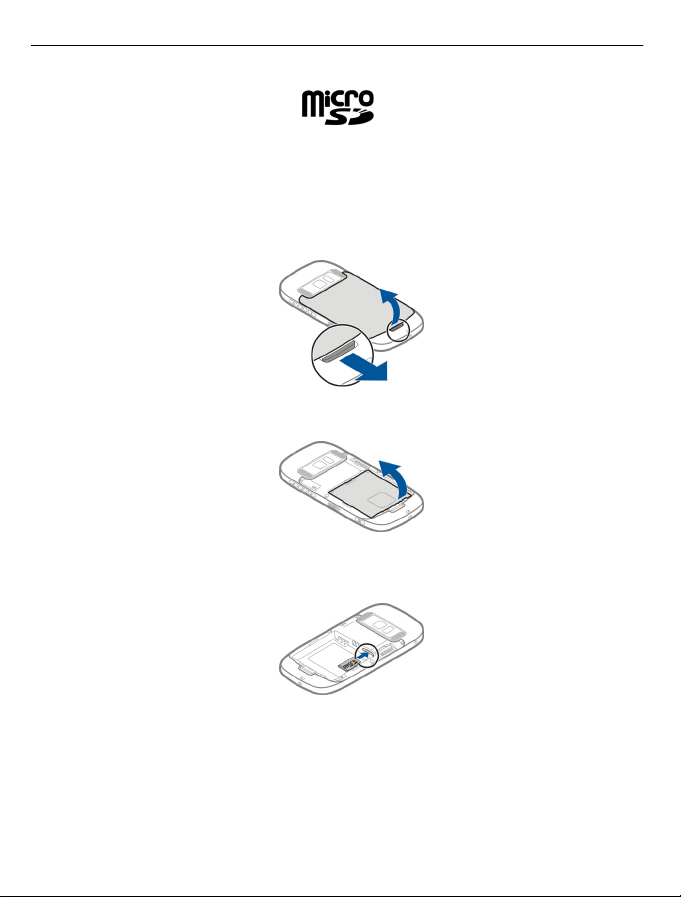
Insert or remove a memory card
Use only compatible MicroSD cards approved by Nokia for use with this device. Nokia
uses approved industry standards for memory cards, but some brands may not be fully
compatible with this device. Incompatible cards may damage the card and the device
and corrupt data stored on the card.
10 Get started
Keep all memory cards out of the reach of small children.
Switch off the device before inserting a memory card.
Insert a memory card
1 Remove the back cover of the device.
2 If the battery is inserted, lift the battery out.
3 Insert a compatible memory card into the slot. Make sure the contact area of the
card is facing down.
4 Push the card in, until it clicks.
5 Replace the battery and the back cover. Make sure the cover is properly closed.
Remove a memory card
1 Switch the device off.
2 Remove the back cover of the device.
3 If the battery is inserted, lift the battery out.
Get started 11
4 Push the card in, until you hear a click.
5 Pull the card out.
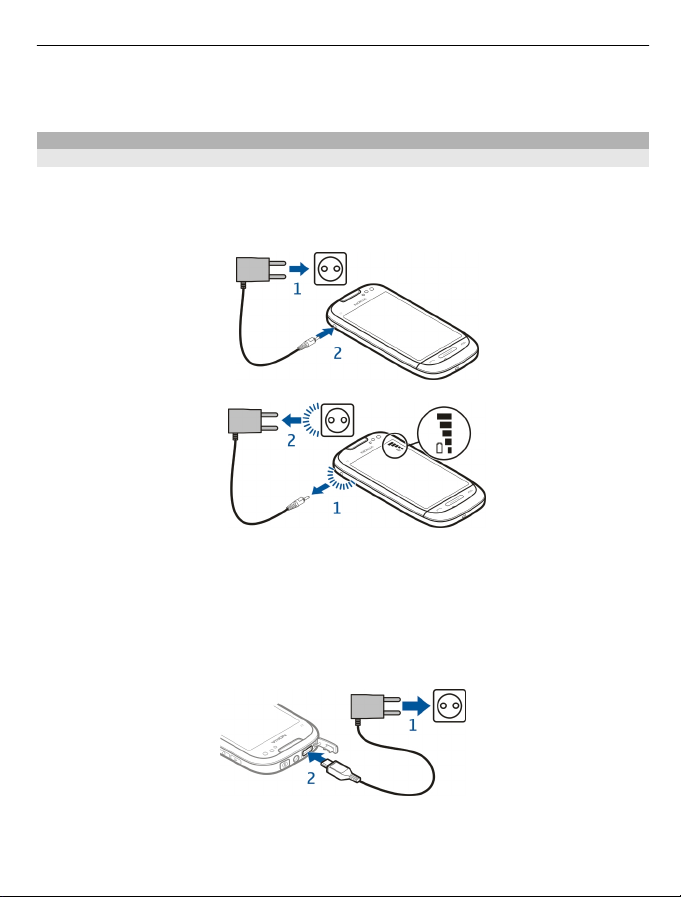
Charging
Charge the battery
Your battery has been partially charged at the factory, but you may need to recharge it
before you can switch on your device for the first time.
If the device indicates a low charge, do the following:
1
2
You do not need to charge the battery for a specific length of time, and you can use the
device while it is charging.
If the battery is completely discharged, it may take several minutes before the charging
indicator appears on the display or before any calls can be made.
Tip: You can also use a compatible USB charger to charge your battery.
12 Get started
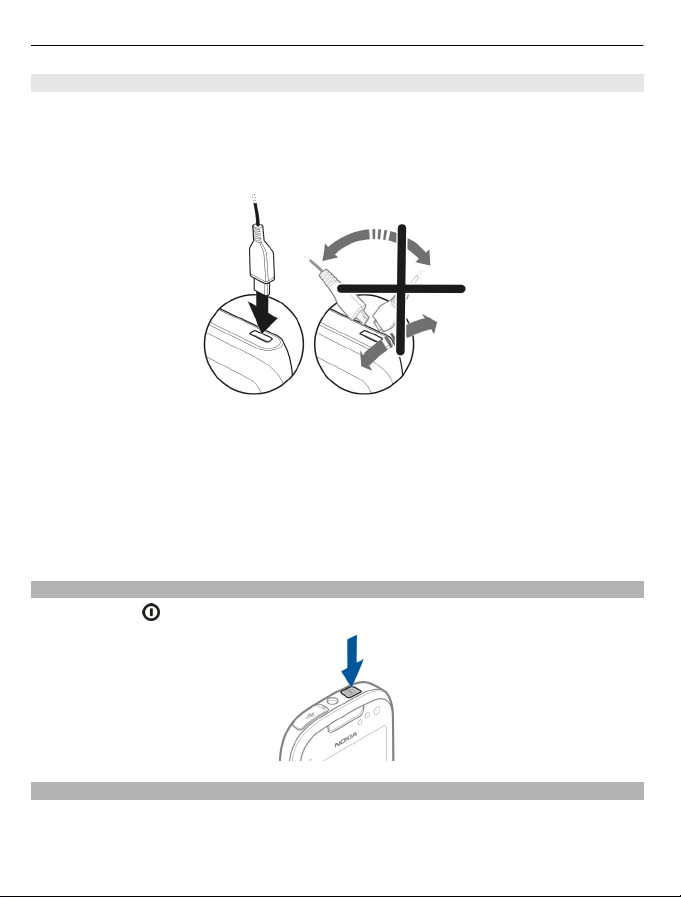
Charge the battery over USB
Battery low, but you don't have a charger with you? You can use a compatible USB cable
to connect to a compatible device, such as a computer.
To avoid breaking the charger connector, be careful when connecting or disconnecting
the charger cable.
If connected to a computer, you can synchronise your device while charging.
Charging over USB can take longer to start, and may not work if you connect through a
non-powered USB hub. Your device charges more quickly when connected to a wall
outlet.
When the battery is charging, the charging indicator light next to the USB connector is
lit. When the battery charge is low, the charging indicator light flashes. It may take a
while for charging to start.
Switch the device on or off
Press and hold
.
Nokia account and Nokia's Ovi services
When you switch on your device for the first time, you can create a Nokia account, so
you can access Nokia's Ovi services.
Get started 13
With Ovi services and your Nokia account, you can, for example:
• See your friends' statuses in different social networking services
• Download games, applications, videos, pictures, themes, and ringing tones from
Ovi Store
• Get to where you want to go with free walk and drive navigation
• Back up and manage your contacts in the Ovi internet service
To learn more about Ovi, go to www.ovi.com.
To create a Nokia account later, use your device to access an Ovi service, and you are
prompted to create an account.
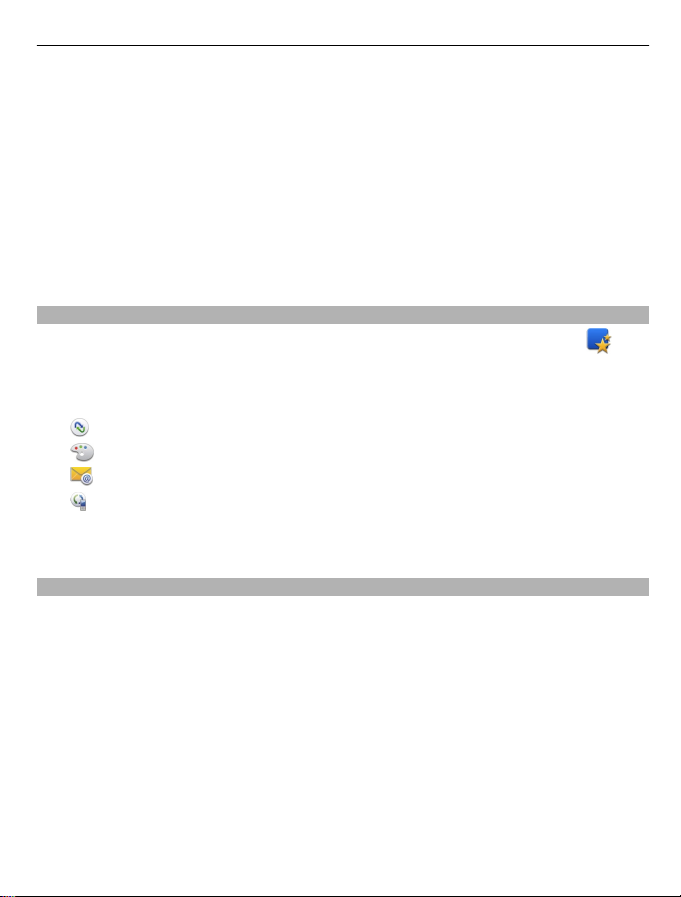
Device set-up
To define some basic settings for your device, select the Phone setup shortcut
is in one of your home screens. To switch between home screens, swipe left or right.
With Phone setup, you can do the following:
•
Copy contacts, pictures, and other content from your previous Nokia device
•
Personalise your device, by changing the ringing tone and visual theme
•
Set up mail
•
Update your device software
To define the settings later, you can also select Menu > Applications > Tools > Phone
setup.
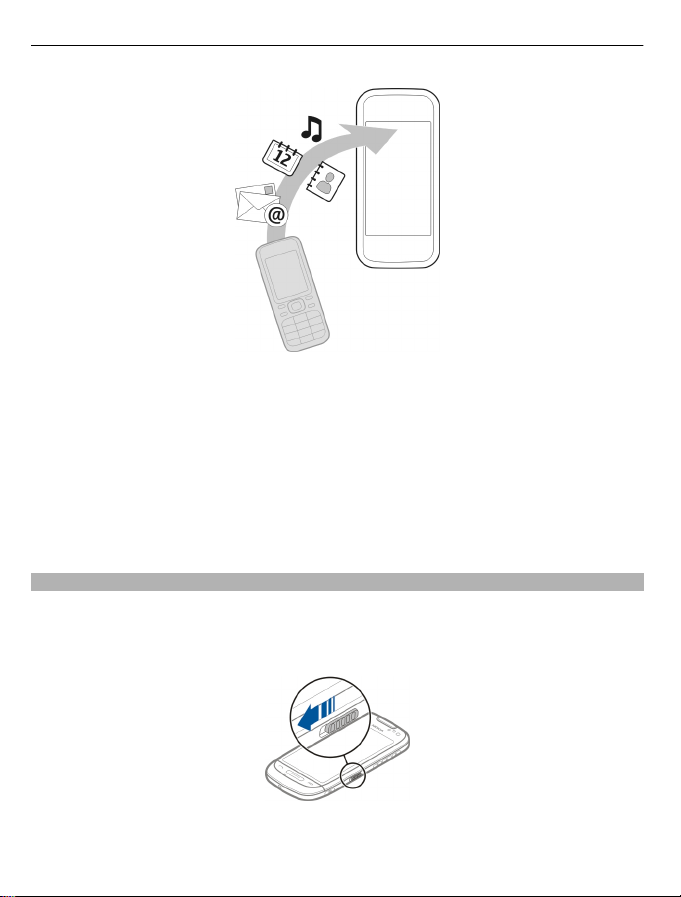
Copy contacts or pictures from your old device
Want to copy important information from your previous compatible Nokia device and
start using your new device quickly? Use the Phone switch application to copy, for
example, contacts, calendar entries, and pictures to your new device, free of charge.
Select Menu > Applications > Tools > Phone setup and Data transfer.
that
14 Get started
If your old Nokia device does not have the Phone switch application, your new device
sends it in a message. Open the message in the old device, and follow the instructions.
1 Select the device you want to connect to, and pair the devices. Bluetooth needs to
be activated.
2 If the other device requires a passcode, enter the passcode. The passcode, which
you can define yourself, must be entered in both devices. The passcode in some
devices is fixed. For details, see the user guide of the device.
The passcode is valid only for the current connection.
3 Select the content and OK.
Lock or unlock the keys and screen
To avoid accidentally making a call when your device is in your pocket or bag, lock the
keys and screen of your device.
Slide the lock switch.
Tip: If the lock switch is out of reach, to unlock the device, press the menu key, and
select Unlock.

Get started 15
Set the keys and screen to lock automatically
1 Select Menu > Settings and Phone > Display > Screen/keylock time-out.
2 Define the length of time after which the keys and screen are locked automatically.
Antenna locations
Avoid touching the antenna area unnecessarily while the antenna is transmitting or
receiving. Contact with antennas affects the communication quality and may cause a
higher power level during operation and may reduce the battery life.
Change the volume of a call, song, or video
Use the volume keys.
You can adjust the volume during a call or when an application is active.
The built-in loudspeaker allows you to speak and listen from a short distance without
having to hold the device to your ear.
Activate or deactivate the loudspeaker during a call
Select
or .
Attach the wrist strap
Thread the wrist strap as shown, and tighten it.
16 Get started
Headset
You can connect a compatible headset or compatible headphones to your device.
Use the in-device user guide
Select Menu > Applications > User guide.
Open the user guide from an application
Select Options > User guide. This is not available for every application.
Search the user guide
When the user guide is open, select Options > Search, and enter a letter or a word in
the search field.
Switch between the user guide and an application
Press and hold the menu key, swipe left or right, and select the desired application.
Links to related topics may be at the end of instructions.
topic, and
indicates a link to a web page.
indicates a link to a related
Install Nokia Ovi Suite on your PC 17
Install Nokia Ovi Suite on your PC
With the Nokia Ovi Suite PC application, you can manage content on your device, and
keep it in sync with your computer. You can also update your device with the latest
software, and download maps.
Download the latest version of Nokia Ovi Suite from www.ovi.com/suite.
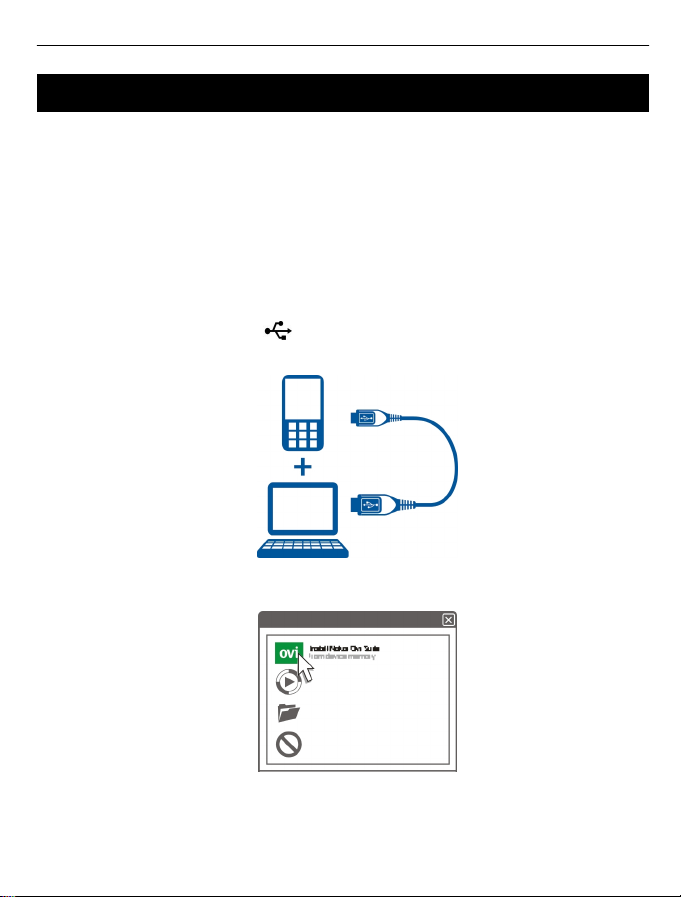
If you cannot connect to the internet, to install Ovi Suite and Nokia Ovi Player from your
device:
1 Use a compatible USB data cable to connect your device to your computer.
If you are using Windows XP or Windows Vista on your computer, set the USB mode
of your device to Nokia Ovi Suite. On your device, select the notification area in the
top right corner, and select
Your device mass memory appears as a removable disk on your PC.
2 On your computer, select Install Nokia Ovi Suite.
> USB > Mass storage.
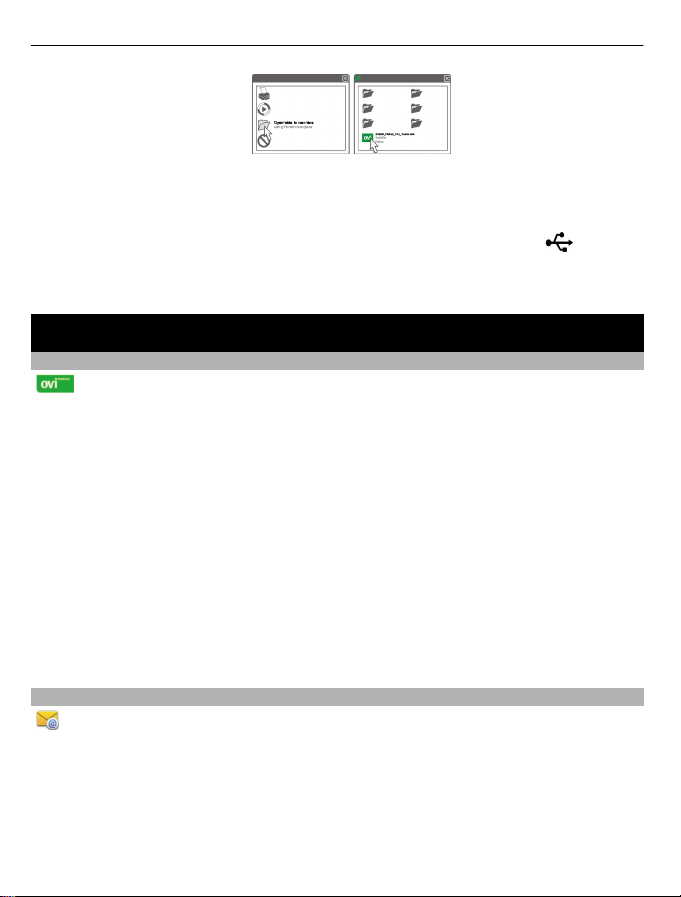
If the installation window does not open automatically, open the installation file
manually. Select Open folder to view files, and double-click
Install_Nokia_Ovi_Suite.exe.
18 Explore Nokia's Ovi internet services
3 Follow the instructions.
4 When the installation is complete, if you are using Windows XP or Windows Vista
on your computer, set the USB mode of your device to Nokia Ovi Suite. On your
device, select the notification area in the top right corner, and select
Media transfer.
To learn more about Ovi Suite, go to www.ovi.com/suite.
> USB >
Explore Nokia's Ovi internet services
Ovi by Nokia
With Ovi by Nokia, you can find new places and services, and stay in touch with
your friends. You can do, for example, the following:
• Download games, applications, videos, and ringing tones to your device
• Find your way with free walk and drive navigation, plan trips, and view locations
on a map
• Get a free Ovi Mail account
• Buy music
Some items are free of charge, others you may need to pay for.
The available services may also vary by country or region, and not all languages are
supported.
To access Nokia's Ovi services, go to www.ovi.com, and register your own Nokia account.
For more help and information, go to www.ovi.com.
About Ovi Mail
With Ovi Mail, you can easily access your mail from popular webmail providers. If
you register for a Nokia account, you can also get a free mail account from Ovi, and use
it on your mobile device or computer. The anti-spam protection helps keep your mailbox
in order, and the virus protection increases security.

Basic use 19
About Ovi Maps
With Ovi Maps on your mobile device, you can you can quickly see where you are on
a map and get to where you want to go with free drive and walk navigation. You can
also use Ovi Maps on your PC.
You can do the following:
• Search for addresses, places of interest, and services
• View place details, such as the weather forecast, if available
• Save your favourite places, and organise them into collections at www.ovi.com
• Synchronise your saved items with your mobile device, and access them on the go
To use the Ovi Maps internet service, go to www.ovi.com.
About Ovi Music
With Ovi Music, you can purchase and download songs to your device and your
computer, and copy the songs between the two. To manage your music collection and
downloads, you can install Ovi Player on your compatible PC, or use your internet
browser to download music.
To start discovering music, select Menu > Music > Ovi Music or go to www.ovi.com.
About Ovi Store
With Ovi Store, you can download mobile games, applications, videos, pictures,
themes, and ringing tones to your device. Some items are free of charge; others you
need to pay for with your credit card or in your phone bill. The availability of payment
methods depends on your country of residence and your network service provider. Ovi
Store offers content that is compatible with your mobile device and relevant to your
tastes and location.
Select Menu > Store or go to www.ovi.com.
Basic use
Touch screen actions
To interact with the user interface, tap or tap and hold the touch screen.
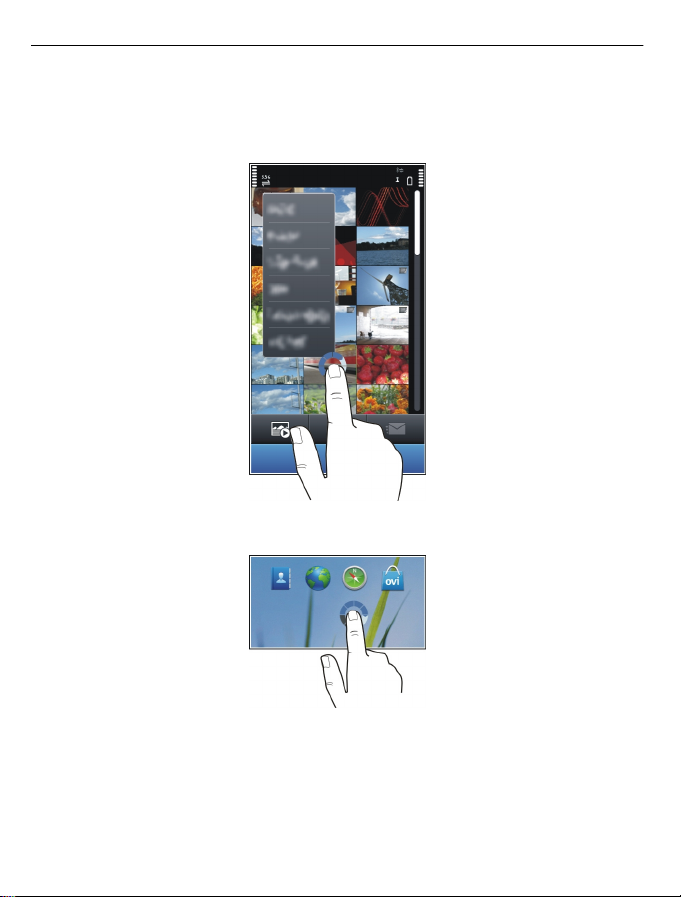
Open an application or other screen element
Tap the application or element.
20 Basic use
Access functions quickly
Tap and hold the item. A pop-up menu with available options opens. For example, to
send an image or delete an alarm, tap and hold the image or alarm, and from the popup menu, select the appropriate option.
If you tap and hold the home screen, editing mode is activated.
Basic use 21
Drag an item
Tap and hold the item, and slide your finger across the screen. The item follows your
finger.
You can drag items in the home screen or the main menu, when you have activated
editing mode.
Swipe
Place a finger on the screen, and steadily slide your finger in the desired direction.
For example, when you are viewing a picture, to view the next picture, swipe left.
Scroll in a list or menu
Place your finger on the screen, slide it quickly up or down the screen, then lift your
finger. The content of the screen scrolls with the speed and direction it had at the
moment of release. To select an item from a scrolling list and to stop the movement,
tap the item.
22 Basic use
Zoom in
Place two fingers on an item, such as a picture or web page, and slide your fingers apart.
Zoom out
Place two fingers on the item, and slide your fingers together.
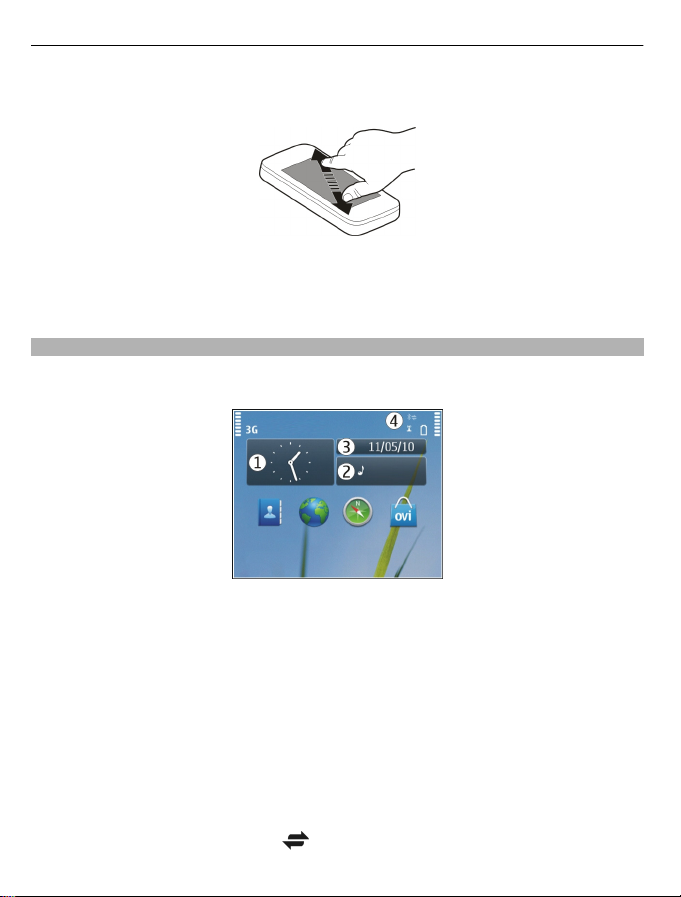
Interactive home screen elements
The home screen elements are interactive. For example, you can change the date and
time, set alarms, write calendar entries, or edit the profiles directly in the home screen.
Set an alarm
Select the clock (1).
Activate or edit profiles
Select the profile (2).
View or edit your schedule
Select the date (3).
View available WLANs or missed events
Select the notification area (4).
Modify the connectivity settings
Select the notification area (4) and
.
Basic use 23
In most other views, you can select the notification area (4), and do the following:
• Modify the connectivity settings.
• Open the Clock application, and set an alarm.
• View the battery status, and activate power saving mode.
• View notifications of missed calls or received messages.
• Open the WLAN wizard, and connect to a WLAN.
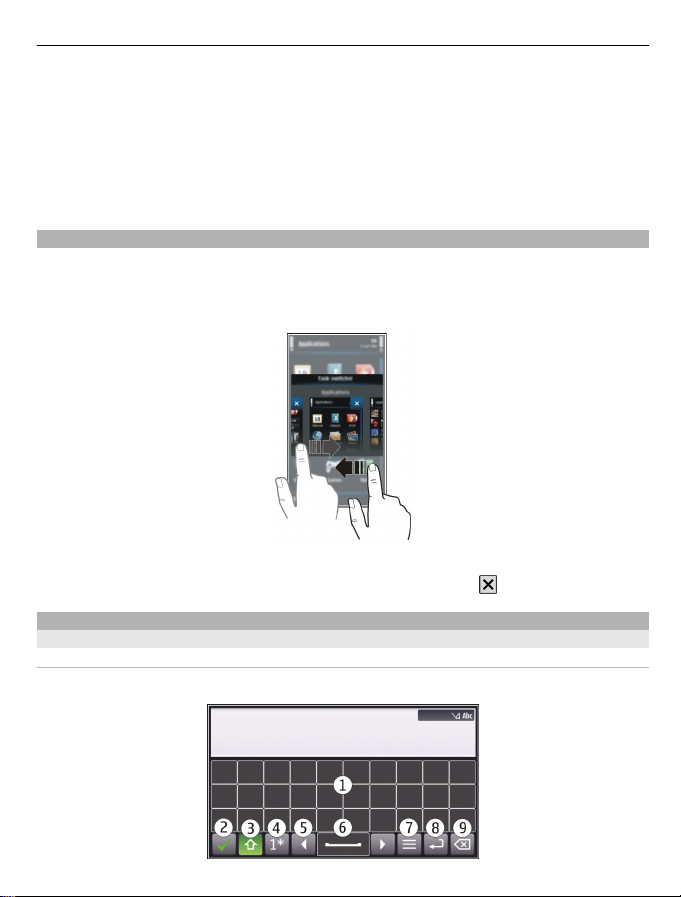
Switch between open applications
You can see which applications and tasks are open in the background, and switch
between them.
Press and hold the menu key, swipe left or right, and select the desired application.
Applications running in the background increase the demand on battery power and use
memory. To close an application that you are not using, select
.
Write text
Enter text with the virtual keyboard
Use the virtual keyboard
Select a text input field, and turn your device so it is horizontal.
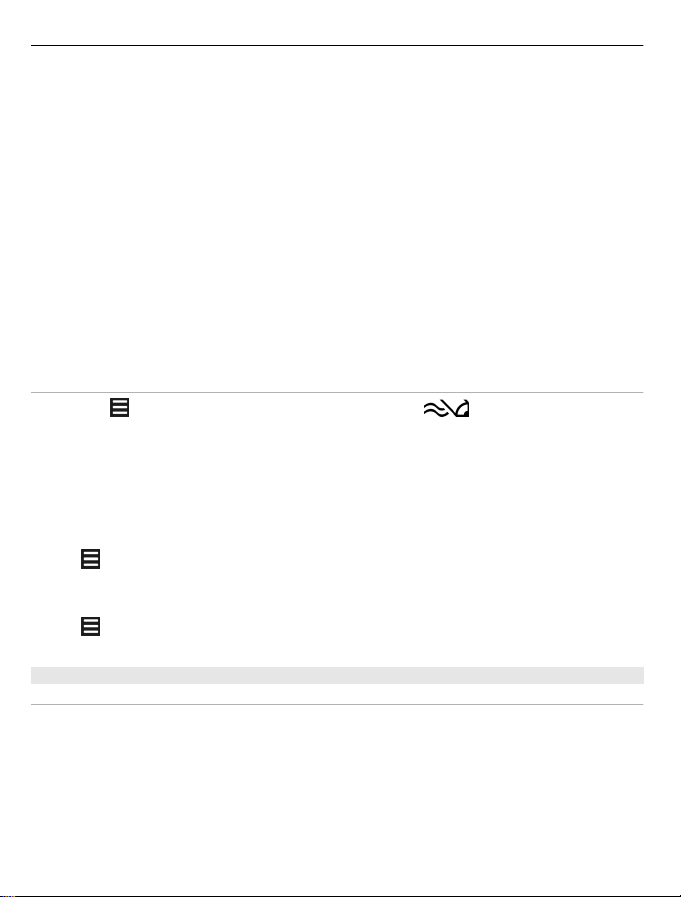
24 Basic use
1 Virtual keyboard
2 Close key - Close the virtual keyboard.
3 Shift and caps lock key - To enter an upper case character when writing in lower
case, or vice versa, select the key before entering the character. To activate caps
lock mode, select the key twice. A line under the key indicates that caps lock mode
is activated.
4 Character range - Select the desired character range, such as numbers, or special or
accented characters.
5 Arrows keys - Move the cursor left or right.
6 Space bar - Insert a space.
7 Input menu - Activate predictive text input or change the writing language.
8 Enter key - Move the cursor to the next row or text input field. Additional functions
are based on the current context. For example, in the web address field of the web
browser, it acts as the Go icon.
9 Backspace key - Delete a character.
Activate predictive text input with the virtual keyboard
1 Select > Input options > Activate prediction. is displayed.
2 Start writing a word. Your device suggests possible words as you write. When the
correct word is displayed, select the word.
3 If the word is not in the dictionary, the device suggests an alternative word from
the dictionary. To add the new word to the dictionary, select the word you have
written.
Deactivate predictive text input mode
Select
Modify the text input settings
Select
> Input options > Deactivate prediction.
> Input options > Settings.
Enter text with the virtual keypad
Use the virtual keypad
Select a text input field, and turn your device so it is vertical.
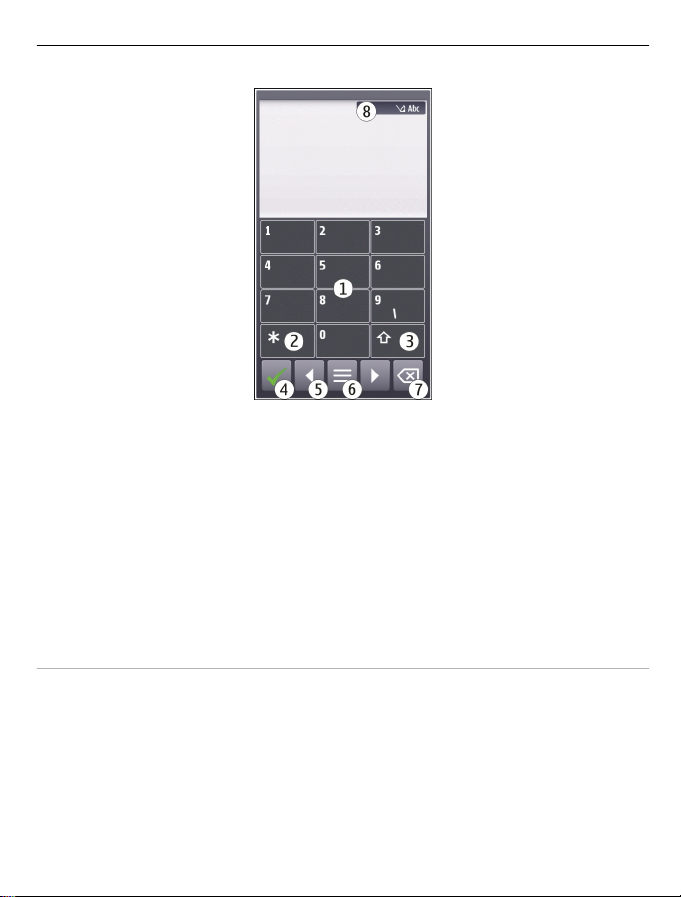
Basic use 25
1 Number keys
2* - Enter a special character, or when predictive text input mode is activated and
the word underlined, cycle through the word candidates.
3 Shift key - Change the character case. To activate or deactivate predictive text input
mode, quickly select the key twice. To switch between the letter and number modes,
select and hold the key.
4 Close key - Close the virtual keypad.
5 Arrow keys - Move the cursor left or right.
6 Input menu - Activate predictive text input or change the writing language.
7 Backspace key - Delete a character.
8 Text input indicator (if available) - Indicates the character case, and if letter or
number mode or predictive text input mode is activated.
Activate traditional text input with the virtual keypad Quickly select # twice.
Enter a character
1 Select a number key (1-9) repeatedly, until the desired character is displayed. There
are more characters available than are visible on the key.
2 If the next letter is located on the same key, wait until the cursor is displayed or
move the cursor forward, and select the key again.
Insert a space
Select 0.
26 Basic use
Move the cursor to the next line
Quickly select 0 three times.
Activate predictive text input with the virtual keypad
Predictive text input is based on a built-in dictionary to which you can add new words.
Predictive text input is not available for all languages.
1 Select
2 To write the desired word, use the keys 2-9. Select each key once for each letter. For
example, to write Nokia when the English dictionary is selected, select 6 for N, 6 for
o, 5 for k, 4 for i, and 2 for a.
The word suggestion changes after each key selection.
3 If the word is not correct, select * repeatedly, until the correct match is displayed.
If ? is displayed after the word, the word is not in the dictionary. To add a word to
the dictionary, select *, enter the word using traditional text input mode, and select
OK.
4 To insert a space, select 0. To insert a common punctuation mark, select 1, and then
select * repeatedly, until the correct punctuation mark is displayed.
5 Start writing the next word.
Deactivate predictive text input
Quickly select # twice.
Define the writing language
Select Menu > Settings and Phone > Touch input > Writing language.
Change the language when using the keyboard
Select
Change the language when using the keypad
Select
> Activate predictive text.
> Input options > Writing language.
> Writing language.
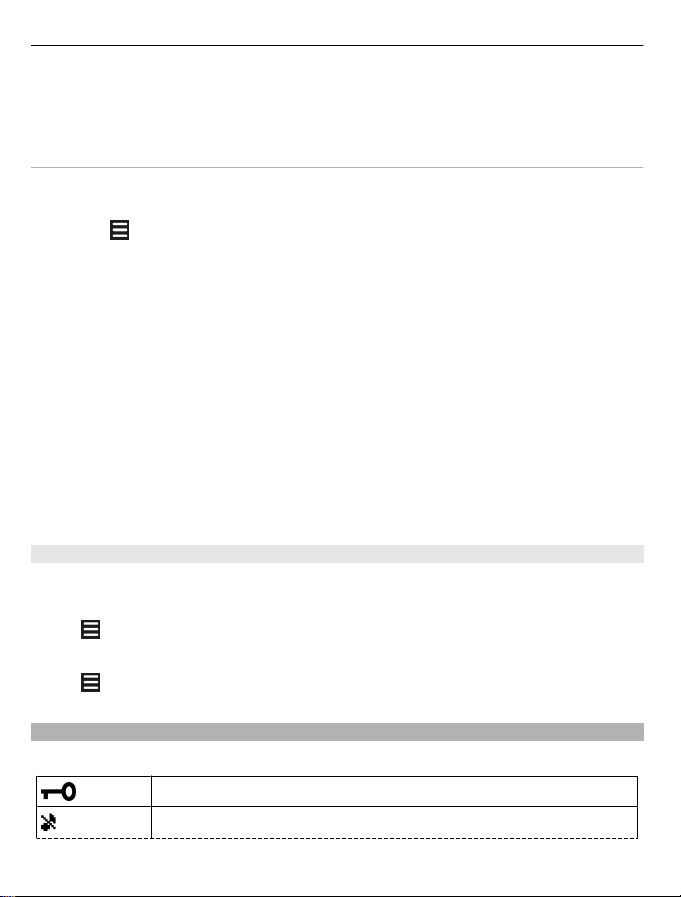
Display indicators
General indicators
The touch screen and keys are locked.
The device alerts silently for incoming calls or messages.

You have set a clock alarm.
A timed profile is activated.
You have a missed calendar event.
Call indicators
Someone has tried to call you.
You are using your second phone line (network service).
You have set your device to divert incoming calls to another number
(network service). If you have two phone lines, a number indicates
the active line.
Your device is ready for an internet call.
You have an ongoing data call (network service).
Messaging indicators
You have unread messages. If the indicator is blinking, the SIM card
memory for messages may be full.
You have received new mail.
You have messages waiting to be sent in the Outbox folder.
Network indicators
Your device is connected to a GSM network (network service).
Your device is connected to a 3G network (network service).
You have a GPRS packet data connection (network service). indicates
that the connection is on hold and
established.
You have an EGPRS packet data connection (network service).
indicates that the connection is on hold and that a connection is
being established.
You have a 3G packet data connection (network service). indicates
that the connection is suspended and
established.
Basic use 27
that a connection is being
that a connection is being
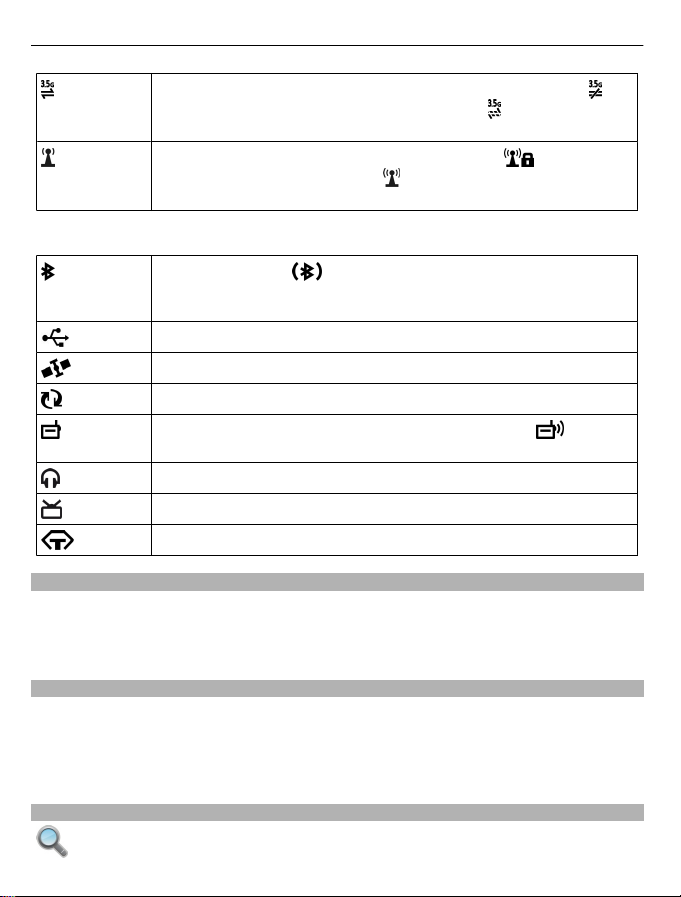
28 Basic use
You have an HSDPA packet data connection (network service).
indicates that the connection is suspended and that a connection
is being established.
A WLAN connection is available (network service). indicates that
the connection is encrypted and
encrypted.
Connectivity indicators
Bluetooth is active. indicates that your device is sending data. If
the indicator is blinking, your device is trying to connect to another
device.
You have connected a USB cable to your device.
GPS is active.
The device is synchronising.
The FM transmitter is active, but it is not transmitting. indicates
that the FM transmitter is transmitting.
You have connected a compatible headset to the device.
You have connected a compatible TV-out cable to the device.
You have connected a compatible text phone to the device.
Set the notification light to blink for missed calls or messages
Your device has a notification light in the menu key. When the light blinks, you have
missed a call or a message has arrived.
Select Menu > Settings and Phone > Notif. lights > Notification light.
that the connection is not
Flashlight
The camera flash can be used as a flashlight. To switch the flashlight on or off, slide and
hold the lock switch for two seconds. The flashlight can only be used when all
applications are closed.
Do not shine the flashlight in anyone's eyes.
Search in your device and on the internet
With the Search application, you can find any item in your device.

Basic use 29
1 Select Menu > Applications > Search.
2 Enter a search word in the search field, or browse the content categories.
Tip: You can add a search widget to the home screen. With the search widget, you can
also search the internet. Tap and hold the home screen, and select
widget from the list.
Use your device offline
In radio sensitive environments, where you are not allowed to make or receive calls,
you may still be allowed to access your calendar, contacts list, and offline games if you
activate the offline profile.
In the home screen, select the profile and Offline.
When the offline profile is activated, your connection to the cellular network is closed.
All radio frequency signals between the device and the cellular network are prevented.
If you try to send a message, it is placed in the Outbox folder, and is sent only when
another profile is activated.
You can also use your device without a SIM card. If you remove the SIM card, the offline
profile is activated.
Important: In the offline profile you cannot make or receive any calls, or use other
features that require cellular network coverage. You may be able to call the official
emergency number programmed into your device.To make calls, you must first change
to another profile.
When you use the offline profile, you can still use WLAN, for example, to read your mail
or browse the internet. You can also use Bluetooth connectivity. Remember to comply
with any applicable safety requirements when you establish and use WLAN or Bluetooth
connections.
and the search
Prolong battery life
Many features in your device increase the demand on battery power and reduce the
battery lifetime. To save battery power, note the following:
• Always charge the battery fully.
• Activate power saving mode. Press the power key, and select Activate power
saving. The device settings, such as Network mode and the screen saver, are
optimised. To deactivate power saving mode, press the power key, and select
Deactivate power saving.
• Set your device to retrieve mail less frequently. Select Menu > Applications >
Mail > Settings, your mailbox, and Synchronisation > Retrieval frequency. If
you have additional mailboxes, you may need to set the retrieval frequency
separately for each mailbox.

30 Personalisation
• Mute unnecessary tones, such as key tones.
• Use wired headphones, rather than the loudspeaker.
• Deactivate the background animation effects. Select Menu > Settings and
Themes > General > Options > Theme effects > Off.
• Deactivate the Big clock screen saver. Select Menu > Settings and Themes >
Screen saver > None.
• Activate a dark theme. Select Menu > Settings and Themes > General.
• Change the length of the time-out period after which the device display switches
off. Select Menu > Settings and Phone > Display > Light time-out. To adjust the
light sensor that observes lighting conditions and adjusts the display brightness, in
the display settings, select Light sensor.
• If the signal strength of the cellular network varies in your area, it increases the
demand on battery power.
• If the network mode is set to use both GSM and 3G (dual mode) networks, the device
searches for the 3G network. To set your device to use only the GSM network, select
Menu > Settings and Connectivity > Network > Network mode > GSM.
• Deactivate Bluetooth when not needed. Select Menu > Settings and
Connectivity > Bluetooth > Off.
• Stop your device from scanning for available WLANs in the background. Select
Menu > Settings
WLAN availability > Never.
• When connecting to the internet, use a WLAN connection, rather than a packet data
(GPRS or 3G) connection.
• Set the packet data connection to be established only when needed. Select
Menu > Settings and Connectivity > Admin. settings > Packet data > Packet
data connection > When needed.
• When you are listening to music, and do not want to make or receive calls, activate
the offline profile.
• Close the applications you are not using. Press and hold the menu key, swipe until
the desired application is displayed, and select
and Connectivity > WLAN > Options > Settings > Show
.
Personalisation
Profiles
About profiles
Select Menu > Settings and Profiles.
Waiting for a call but can't let your phone ring? Your device has various settings groups
called profiles, which you can personalise for different events and environments. You
can also create your own profiles.

Personalisation 31
You can personalise the profiles in the following ways:
• Change the ringing and message alert tones.
• Adjust the volume of ringing and key tones.
• Mute key tones and warning tones.
• Activate vibrating alerts.
• Set the device to say the name of the contact who is calling.
Personalise your tones
You can personalise your device tones for each profile.
Select Menu > Settings > Profiles.
1 Select the desired profile.
2 Select Personalise and the desired option.
Tip: Download ringing tones from Ovi Store. To learn more about Ovi Store, go to
www.ovi.com.
Silence your device
When the silent profile is activated, all ringing and alert tones are muted. Activate this
profile when you are at the cinema or in a meeting.
In the home screen, select the profile and Silent.
Change your profile for meetings or outdoor use
When the meeting profile is activated, your device discreetly beeps once instead of
ringing. When the outdoor profile is activated, the ringing tone is louder, so you won't
miss a call in a noisy environment.
In the home screen, select the profile and Meeting or Outdoor.
Create a new profile
How can you make your device meet your needs at work or college or home? You can
create new profiles for different situations, and give them appropriate names.
1 Select Menu > Settings > Profiles and Options > Create new.
2 Define your profile settings, and select Profile name.
3 Enter a name for the profile.
Change your theme
With themes, you can change the colours and look of your display.

32 Personalisation
Select Menu > Settings > Themes.
Select General and a theme.
Some themes include background animation effects. To save battery power, select
General > Options > Theme effects > Off.
Tip: Download themes from Ovi Store. To learn more about Ovi Store, go to
www.ovi.com.
Home screen
About the home screen
In the home screen, you can quickly access your most frequently used applications and
create shortcuts for different features. You can view your favourite contacts, and quickly
call, start conversations, or send messages to them. You can also control applications,
such as Music.
You can have more than one home screen page, for example, separate home screens
for work and private life.
The home screen elements are interactive. For example, if you select the clock, the
Clock application opens.
Switch between home screens
You can have more than one home screen. For example, create separate home screens
for work and private life, and personalise them to have different content.
To switch to another home screen, swipe left or right.
indicates which home screen you are in.
Personalise the home screen
Want to see your favourite landscape or pictures of your family in the home screen
background? You can change this wallpaper, and rearrange items in the home screen,
to personalise it to your liking.

Personalisation 33
Rearrange items in the home screen
1 Tap and hold the home screen.
2 Drag and drop items to a new location.
Change the wallpaper
1 Tap and hold the home screen.
2 Select Options > Change wallpaper.
3 Select the desired picture.
Tip: Download more background images from Ovi Store. For details, go to
www.ovi.com.
Add items to the home screen
Want to open your favourite applications directly from the home screen? You can create
shortcuts to your most used features. You can also add mini-applications (widgets), that
display helpful information, such as the current weather conditions.
Add a shortcut to the home screen
You can add shortcuts to applications, web bookmarks, or actions, such as writing a
message.
1 Tap and hold the home screen.
2 Select the shortcut widget and Settings.
3 Select the shortcut you want to define, and select Application or Bookmark and
the desired item.
Tip: To remove a shortcut, replace it with another one.
Add a widget to the home screen
1 Tap and hold the home screen.
2 Select
Tip: To download more widgets, select Store.
and the desired widget from the list.

34 Personalisation
Using the service or downloading content may cause transfer of large amounts of data,
which may result in data traffic costs.
Remove a widget from the home screen
1 Tap and hold the home screen.
2 Select the widget, and from the pop-up menu, select Remove.
Add your important contacts to the home screen
Add your most important contacts to the home screen, so you can quickly call or send
messages to them.
The contacts need to be stored in your device memory.
1 In the Favourite contacts widget, select
2 To mark the contacts to add to the home screen, select the desired contacts. You
can add up to 20 contacts to the widget.
Call or send a message to a contact
In the widget, select the contact.
Remove a contact from the home screen
In the widget, select
widget, but remains in your contacts list.
Organise your applications
Want to open your most used applications more quickly? In the main menu, you can
organise your applications and hide less used applications in folders.
Press the menu key, and select Options > Organise.
Create a new folder
Select Options > New folder.
Move an application to a folder
Select and hold the application, and from the pop-up menu, select Move to folder and
the new folder.
and the contact to remove. The contact is deleted from the
.
Tip: You can also drag and drop applications and folders.

Telephone 35
Telephone
Call a phone number
1 In the home screen, select Call to open the dialler, and enter the phone number.
To enter the + character, used for international calls, select * twice.
2 To make the call, press the call key.
3 To end the call, press the end key.
Tip: To call a contact, in the home screen, select Call, and start entering the contact's
name.
Answer a call
When a call arrives, press the call key.
Search for a contact
You can search for a contact you have saved in the contacts list.
In the home screen, select Call, and start entering the contact's first or second name.
When entering the characters, select each number key once for each letter. For example,
to search for Nokia, enter 6, 6, 5, 4, and 2.
Call the found contact
Select the contact.
Send a message to the contact
Select and hold the contact, and in the contact card, select Message.

36 Telephone
Make a video call to the contact
Select and hold the contact, and in the contact card, select Video call.
Deactivate contact search
Select Options > Contact search > Off.
Reject a call
When a call arrives, press the end key.
Send a reject call text message
1 When a call arrives, select Silence > Send msg., and edit the message, informing
that you cannot answer the call.
2 To send the message, select
3 Reject the call.
Write a standard reject call text message
Select Menu > Settings and Calling > Call > Message text, and write the message.
Tip: You can automatically divert rejected calls to your voice mailbox or another phone
number (network service). Select Menu > Settings and Calling > Call divert > Voice
calls > If busy > Activate > To voice mailbox or To other number.
Call a contact
Select Menu > Contacts.
1 To search for a contact, enter the first letters or characters of the first or second
name in the search field.
2 Select the contact.
3 In the contact card, select Voice call.
4 If the contact has more than one phone number, select and hold Voice call, and
select the desired number.
.
Mute a call
You can mute the microphone in your device during a call.
Press the voice key.
The menu key light changes from white to red when the microphone is muted.

Telephone 37
Answer a waiting call
With Call waiting (network service), you can answer a call when you have another call
in progress.
Press the call key. The first call is put on hold.
Activate, deactivate, or check the status of the service
Select Menu > Settings and Calling > Call > Call waiting > Activate, Deactivate, or
Check status.
Swap between an active call and a call on hold
Select Options > Swap.
Connect the call on hold to the active call
Select Options > Transfer. You disconnect yourself from the calls.
End an active call
Press the end key.
End both calls
Select Options > End all calls.
Make a video call
When you make a video call (network service), you can see a live, two-way video
between you and the recipient of the call.
To make a video call, you need to be in a 3G network.

38 Telephone
For information on availability and costs, contact your service provider.
Video calls can only be made between two parties. Video calls cannot be made while
another voice, video, or data call is active.
1 Select Menu > Contacts, and search for a contact.
2 Select the contact, and in the contact card, select Video call.
The secondary camera on the front of your device is used by default for video calls.
Starting a video call may take a while. If the call is not successful (for example, video
calls are not supported by the network, or the receiving device is not compatible),
you are asked if you want to try a normal call or send a message instead.
The video call is active when you see two videos, and hear the sound through the
loudspeaker. The call recipient may deny video sending (indicated with
only hear the voice of the caller, and may see an image or a grey screen.
3 To end the video call, press the end key.
Indicators
You are not receiving video (the recipient is not sending video or the network
is not transmitting it).
You have denied video sending from your device.
Send an image rather than live video
Select Menu > Settings and Calling > Call > Image in video call.
If you do not send live video, the call is still charged as a video call.
Answer a video call
When a video call arrives,
1 Press the call key.
2 To start sending live video, select Yes.
If you do not start sending video, you only hear the voice of the caller. A grey screen
replaces your own video.
Start sending live video during a video call
Select Options > Enable > Sending video.
is displayed.
), and you
Replace the grey screen with a picture
1 Select Menu > Settings and Calling > Call > Image in video call.
2 Select User defined and a picture.

Telephone 39
Reject a video call
When a video call arrives,
Press the end key.
Make a conference call
Your device supports conference calls (network service) between a maximum of six
participants, including yourself. Video conference calls are not supported.
1 Make a call to the first participant.
2 To make a call to another participant, select Options > New call. The first call is
put on hold.
3 When the new call is answered, to add the first participant to the conference call,
select
Add a new participant to a conference call
Make a call to another participant, and add the new call to the conference call.
Have a private conversation with a conference call participant
Select
Go to the participant, and select
The other participants continue the conference call.
To return to the conference call, select
Drop a participant from a conference call
Select
End an active conference call
Press the end key.
.
.
, go to the participant, and select .
is displayed.
. The conference call is put on hold on your device.
.

40 Telephone
Use speed dial
You can quickly call your friends and family when you assign your most-used phone
numbers to the number keys of your device.
Select Menu > Settings and Calling > Speed dialling.
Assign a phone number to a number key
1 Select the number key to which you want to assign the phone number.
1 is reserved for the voice mailbox.
2 Select the phone number from your contacts list.
Remove or change a phone number assigned to a number key
Select and hold the assigned key, and from the pop-up menu, select Remove or
Change.
Make a call
In the home screen, select Call to open the dialler, and select and hold the assigned
number key.
Use your voice to call a contact
With the Voice commands application, you can use your voice to make calls or control
your device.
Voice commands are not dependent on the speaker’s voice. Commands are
automatically created by your device.
When entering contacts or editing voice commands, do not use very short or similar
names for different contacts or commands.
Note: Using voice tags may be difficult in a noisy environment or during an emergency,
so you should not rely solely upon voice dialling in all circumstances.
When you use voice dialling, the loudspeaker is in use. Hold the device at a short distance
away when you say the voice command.
1 In the home screen, press and hold the call key. If a compatible headset with the
headset key is attached, press and hold the headset key.
2 A short tone sounds, and Speak now is displayed. Say clearly the name that is saved
for the contact.
3 The device plays a synthesised voice command for the recognised contact in the
selected device language, and displays the name and number. To cancel the voice
dialling, select Quit.

Telephone 41
Listen to a voice command for a contact
1 Select a contact and Options > Voice tag details.
2 Select a contact detail.
If several numbers are saved for a name, you can say also the name and the number
type, such as mobile or telephone.
Tip: You can also use the voice key to start voice dialling in the home screen. Press and
hold the voice key.
Make calls over the internet
About internet calls
With the internet call network service, you can make and receive calls over the internet.
Internet call services may support calls between computers, between mobile phones,
and between a VoIP device and a traditional telephone.
Some internet call service providers allow free internet calls. For availability and
connectivity costs, contact your internet call service provider.
To make or receive an internet call, you must be in the service area of a WLAN or have
a packet data (GPRS) connection in a 3G network, and be signed in to an internet call
service.
Install an internet call service
You can search for internet call services from Ovi Store. For details, go to
www.ovi.com.
1 Download an installation widget for the internet call service.
2 To start the installation, select the installation widget.
3 Follow the instructions.
When an internet call service has been installed, a tab for the service is displayed in the
contacts list.
Make an internet call
When you are signed into a internet call service, you can make a call from the friends
list or the contacts list.
Select Menu > Contacts.
Call a contact in the friends list
1 Open the internet call service tab, and sign in to a internet call service.
2 Select a contact from the friends list, and select Internet call.

42 Telephone
Make an internet call to a phone number or SIP address
1 In the home screen, select Call to open the dialler, and enter the number.
2 Select Options > Call > Internet call.
Call the last dialled number
Trying to call someone, but they are not answering? It is easy to call them again. In the
call log, you can see information about the calls you have made and received.
In the home screen, select Call to open the dialler, and select
number, select the number from the list.
Record a phone conversation
With the Recorder application, you can record phone conversations.
1 During an active voice call, select Menu > Applications > Office > Recorder.
2 To start recording, select
3 To stop recording, select
folder in the File manager application.
Both parties hear a tone at regular intervals during the recording.
Turn to silence
If your device rings in a situation where you do not want to be disturbed, you can silence
the ringing tone.
Activate the turn to silence feature
1 Select Menu > Settings and Phone > Sensor settings > Sensors > On.
2 Select Turning control > Silence calls.
When your device rings, turn your device display down.
.
. The sound clip is automatically saved to the Sound files
. To call the last dialled
View your missed calls
In the home screen, you can see when you have missed calls. To view the phone number,
select Show. The caller's name is displayed if stored in the contacts list.

Telephone 43
Missed and received calls are logged only if supported by the network, and the device
is switched on and within the network service area.
Call back the contact or number
Select the contact or number.
To view the missed calls list later, in the home screen, select Call to open the dialler,
select
Call your voice mailbox
You can divert your incoming calls to your voice mailbox (network service). People can
leave you a message, for example, when you have not answered the call.
In the home screen, select Call to open the dialler, and select and hold 1.
Change the phone number of your voice mailbox
1 Select Menu > Settings and Calling > Call mailbox.
2 Select and hold a mailbox, and from the pop-up menu, select Change number.
3 Enter the number (obtained from your network service provider), and select OK.
Divert calls to your voice mailbox or another phone number
If you cannot answer your calls, you can divert incoming calls to your voice mailbox or
another phone number.
Select Menu > Settings and Calling > Call divert > Voice calls.
Call divert is a network service. For details, contact your service provider.
Divert all voice calls to your voice mailbox
Select All voice calls > Activate > To voice mailbox.
Divert all voice calls to another phone number
1 Select All voice calls > Activate > To other number.
2 Enter the number, or select Find to use a number saved in your contacts list.
Several diverting options, such as If busy and If not answered can be active at the
same time.
In the home screen,
Call barring and call diverting cannot be active at the same time.
, and open the missed calls tab .
indicates that all calls are diverted.

44 Telephone
Prevent making or receiving calls
Sometimes you may want to restrict the calls that can be made or received with your
device. With call barring (network service), you can, for example, restrict all outgoing
international calls or incoming calls when you are abroad.
Select Menu > Settings and Calling > Call barring.
To modify the settings, you need the barring password from your service provider.
Prevent making calls
1 If an internet call service is installed, select Cellular call barring.
2 To prevent making any calls or international calls, select Outgoing calls or
International calls. To prevent making international calls, but allow calls to your
home country, select International calls except to home country.
3 Select Activate. Call barring affects all calls, including data calls.
Prevent receiving calls
1 If an internet call service is installed, select Cellular call barring.
2 To prevent receiving any calls or international calls when you are abroad, select
Incoming calls or Incoming calls when roaming.
3 Select Activate.
Prevent anonymous internet calls
Select Internet call barring > Anonymous call barring > On.
Allow calls only to certain numbers
With the fixed dialling service, you can restrict calls, and only allow calls to certain phone
numbers. For example, you can allow your children to call only family members or other
key numbers.
Select Menu > Contacts and Options > SIM numbers > Fixed dial contacts.
Not all SIM cards support the fixed dialling service. You need your PIN2 code from your
service provider.
Activate fixed dialling
Select Options > Activate fixed dialling. Enter the PIN2 code.
Select the people to whom calls are allowed
1 Select Options > New SIM contact.
2 Enter the PIN2 code.

Telephone 45
3 Enter the contact name and phone number to which calls are allowed, and select
Done. To add a contact from the contacts list to the fixed dialling list, select Add
from Contacts and a contact.
To send a text message to a SIM contact while the fixed dialling service is active, you
need to add the text message centre number to the fixed dialling list.
Video sharing
About video sharing
With video sharing (network service), you can share live or recorded video from your
device to another compatible device, during a voice call.
When you activate video sharing, the loudspeaker is automatically activated. If you do
not want to use the loudspeaker, you can use a compatible headset.
Video sharing requirements
To share video, both you and the recipient must:
• Be in a 3G network. If either of you move outside the 3G network, the voice call
continues.
• Have the video sharing feature activated.
• Have person-to-person connections set up.
For more information on the service, 3G network availability, and fees associated with
using this service, contact your service provider.
Set up video sharing
To set up video sharing, you need person-to-person and 3G connection settings.
A person-to-person connection is also known as a Session Initiation Protocol (SIP)
connection. The SIP profile settings must be configured in your device before you can
use video sharing. Contact your service provider for the SIP profile settings, and save
them to your device. Your service provider may send you the settings in a configuration
message or give you a list of the needed parameters.
Set up a person-to-person connection
Select Menu > Settings and Connectivity > Admin. settings > SIP settings.
Use a 3G connection
For details about networks, contact your service provider.
Add a SIP address to a contact
1 Select Menu > Contacts.

46 Contacts
2 Select a contact or create a new contact.
3 Select Options > Edit.
4 Select Options > Add detail > Share video.
5 Enter the SIP address in the format username@domainname (you can use an IP
address instead of a domain name).
If you do not know the SIP address for the contact, you can use the phone number
of the recipient, including the country code, to share video (if supported by the
network service provider).
Share live or recorded video
During an active voice call, select Options > Share video.
1 To share live video, select Live video.
To share a video, select Video clip and the desired video. Your device checks if the
video must be converted. If needed, the video is automatically converted.
2 Select the desired SIP address or phone number that is stored in the contact card
for the recipient. If the SIP address or phone number is not available, manually enter
the details, and select OK. If entering a phone number, you need to enter the country
code. The invitation is sent to the SIP address.
If you access another application while sharing a video, the sharing is paused.
Continue sharing
In the home screen, select Options > Resume video sharing.
Stop sharing video
Select Stop. To end the voice call, press the end key. When you end the call, video sharing
also ends.
Save the live video you shared
Select Yes when prompted.
Accept a video sharing invitation
Select Yes. Video sharing begins automatically.
Contacts
About Contacts
Select Menu > Contacts.
With Contacts, you can save and organise your friends' phone numbers, addresses, and
other contact information.

Contacts 47
Save phone numbers and mail addresses
You can save your friends' phone numbers, mail addresses, and other information to
your contacts list.
Select Menu > Contacts.
Add a contact to the contacts list
1 Select Options > New contact.
2 Select a field, and enter the details. To close the text input, select
Edit contact information
1 Select a contact.
2 Open the contact card tab
3 Select a contact detail.
Add details about a contact
Select a contact and Options > Edit > Options > Add detail.
Save a number from a received call or message
Have you received a call or a message from a person whose phone number is not yet
saved in the contacts list? You can easily save the number in a new or existing contact
list entry.
Save a number from a received call
1 Select Menu > Applications > Log.
2 Select Recent calls > Received calls.
3 Select and hold a phone number, and from the pop-up menu, select Save to
Contacts.
4 Select whether you want to create a new contact list entry or update an existing
one.
Save a number from a received message
1 Select Menu > Messaging.
2 Select Inbox and a message.
3 Select the phone number and Save to Contacts.
4 Select whether you want to create a new contact list entry or update an existing
one.
.
.
Contact your most important people quickly
You can set your most important contacts as favourites. Your favourites are at the top
of the contacts list, so you can contact them quickly.

48 Contacts
Select Menu > Contacts.
Set a contact as a favourite
Select and hold a contact, and from the pop-up menu, select Add to favourites.
Remove a contact from favourites
Select and hold a contact, and from the pop-up menu, select Remove from
favourites. The contact is not deleted from your standard contacts list.
Set a ringing tone for a specific contact
Want to be able to hear that a particular person is calling you? You can set a ringing
tone specifically for that person.
Select Menu > Contacts.
Set a ringing tone for a contact
1 Select a contact and Options > Edit.
2 Select the Ringing tone field and a ringing tone.
Set a ringing tone for a contact group
1Open the Groups tab.
2 Select and hold the title of a group, and from the pop-up menu, select Ringing
tone.
3 Select a ringing tone from the list.
The ringing tone only applies to the members of the group at the time that the ringing
tone is set.
Send your contact information using My Card
My card is your electronic business card. With My card, you can send your contact
information to others.
Select Menu > Contacts.
Send your contact information as a business card
Select and hold My card, and from the pop-up menu, select Send as business card.
Edit your contact information in My Card
Select My card, and the detail to edit.

Contacts 49
Create a contact group
When you have created contact groups, you can send a message to several people at
the same time. For example, you can assign the members of your family to one group.
Select Menu > Contacts.
1 Open the Groups tab.
2 Select Options > New group.
3 Enter a name for the group, and select OK.
4 Select the group and Options > Add members.
5 To mark the contacts you want to add to the group, select them.
Send a message to a group of people
Would you like to send a message to all your family members quickly? If you have
assigned them to a group, you can send a message to all of them at the same time.
Select Menu > Contacts.
1 Open the Groups tab.
2 Select and hold a group title, and from the pop-up menu, select Create message.
Contacts stored on the SIM card
If you hav e contacts stored on your SIM card, you can copy them to your device. You can
add more details to contacts that are stored on your device.
Select Menu > Contacts.
View contacts stored on your SIM card
Select Options > Settings > Contacts to display > SIM memory.
Contacts stored on a SIM card are indicated with
If you copy the contacts to your device, you can add further details to the entries, such
as alternative phone numbers, addresses, or a picture.
Copy all SIM contacts to your device
Select Options > SIM numbers > Copy all to phone.
Back up your contacts to Ovi by Nokia
If you back up your contacts to Ovi by Nokia, you can easily copy your contacts to a new
device. If your device is stolen or damaged, you can still access your contacts list online.
.

50 Messaging
Select Menu > Contacts and Options > Ovi sync.
If you allow automatic synchronisation, all the changes you make in the contacts list
are automatically backed up to Ovi by Nokia.
You need a Nokia account to use Ovi. If you do not have an account, create one at
www.ovi.com.
If you use Ovi Sync to automatically synchronise your contacts with Ovi, do not allow
synchronisation with any other service, such as Mail for Exchange, as there may be
conflicts.
Messaging
About Messaging
Select Menu > Messaging.
You can send and receive various kinds of messages:
• Text messages
• Audio messages
• Multimedia messages that contain pictures and videos
• Group messages
Messaging requires network support.
You can send text messages that are longer than the character limit for a single message.
Longer messages are sent as two or more messages. Your service provider may charge
accordingly.
Characters with accents, other marks, or some language options, take more space, and
limit the number of characters that can be sent in a single message.
Send a message
With text and multimedia messages, you can quickly contact your friends and family.
In a multimedia message, you can attach pictures, videos, and sound clips that you want
to share.
Select Menu > Messaging.
1 Select New message.
2 To select recipients from the contacts list, select the To title. To enter the recipient’s
phone number manually, enter the number in the To field.
3 To add an attachment, select
.

Messaging 51
4 Select .
Sending a message with an attachment may be more expensive than sending a normal
text message. For more information, contact your service provider.
If the item you inserted in a multimedia message is too large for the network, the device
may automatically reduce the size.
Only compatible devices can receive and display multimedia messages. Messages may
look different in different devices.
Send a message to a contact
Select Menu > Contacts.
1 To search for a contact, enter the first letters or characters of the first or second
name in the search field.
2 Select the contact.
3 In the contact card, select Message.
4 If the contact has more than one phone number, select and hold Message, and
select the desired number.
Send an audio message
You can record a sound clip, such as a birthday song, and send it to your friend as an
audio message.
Select Menu > Messaging.
1 Select Options > Create message > Audio message.
2 To record the message, select
3 To select the recipient from the contacts list, select the To title. To enter the
recipient's phone number manually, enter the number in the To field.
4 Select
.
.
Receive messages
When you receive a message, you can open it directly from the home screen. Later, you
can find the message in the Conversations folder or in the Inbox folder in Messaging.
Select Menu > Messaging.
When you receive a message,
To open the message, select Show. By default, the message is opened in the
Conversations view.
and 1 new message are displayed in the home screen.

52 Messaging
Reply to a received message in the Conversations view
Select the text input field at the bottom of the display, write a message, and select
.
Open a message in the Inbox folder
Select Inbox and a message.
Reply to a received message in the Inbox view
Open a message, and select
Forward a message in the Inbox view
Open a message, and select
Save a received multimedia item
Select and hold the item, and from the pop-up menu, select Save. The item can be
viewed in the corresponding application. For example, to view saved pictures, open
Photos.
View a conversation
You can see the messages you have sent to and received from a particular contact from
a single view, and continue the conversation from that view.
Select Menu > Messaging.
Select Conversations and a contact. All messages sent to and received from that contact
are displayed.
Reply to a message in a conversation
1 Open the conversation.
2 Select the text input field at the bottom of the display, and write a message.
3 To add attachments or more recipients, select Options > Add.
4 To send the message, select
When you send a new message, it is added to the current conversation. If no
conversation exists, a new conversation is started.
When you open a received message from the home screen, by default, the message
opens in the Conversations view. If you want messages to open in the Inbox view, select
Options > Message view > Inbox.
.
.
.
Listen to a text message
You can set your device to read your text messages aloud.

Mail 53
1 Select Menu > Messaging.
2 Select Inbox.
3 Select and hold a message, and from the pop-up menu, select Listen.
Select Menu > Applications > Office > Msg. reader.
Change the language
Select Language and a language.
Download an additional language
Select Options > Download languages.
Change the voice
Select
Change language
You can change the device language and the language in which you write your messages
and mails. You can also activate predictive text input.
Select Menu > Settings and Phone > Language.
Change the device language
Select Phone language.
Change the writing language
Select Writing language.
Activate predictive text input
Select Predictive text.
. To preview a voice, select and hold the voice, and select Play voice.
Mail
About Mail
Select Menu > Applications > Mail.
With Mail, you can add several mailboxes and access them directly from your home
screen. In the main mail view, you can switch from one mailbox to another.
If you do not have a mail account, you can create one at www.ovi.com.

54 Mail
1 Write a mail.
2 Switch between your mailboxes.
3 Sort your mail by, for example, date.
4 Mail in current mailbox.
Mail contains interactive elements. Select and hold, for example, a mail to view a popup menu.
Add a mailbox
You can add several mailboxes to your device.
Select Menu > Applications > Mail.
Add a mailbox
Select New, and follow the instructions.
Add a mail widget to the home screen
In the home screen, tap and hold an empty area.
Select
and the desired widget from the list.
Delete a mailbox
Select Options > Delete mailbox and the mailbox.

Mail 55
Read mail
You can use your device to read and reply to mail.
Select Menu > Applications > Mail.
Read a mail
Select a mail. To zoom in or out, pinch the screen.
Open or save an attachment
Select the attachment, and from the pop-up menu, select the appropriate option. If there
is more than one attachment, you can save them all at once.
Reply to a mail
Select Options > Reply.
Forward a mail
Select Options > Forward.
Tip: If there is a web address in a mail and you would like to open the address in the
device browser, or add it to your bookmarks, select the address, and from the pop-up
menu, select the desired option.
Tip: To open the next or previous mail, use the arrow icons.
Send a mail
You can use your device to write and send mail, and attach files to your mail.
Select Menu > Applications > Mail.
1 Select
2 To add a recipient from your contacts list, select the To, Cc, or Bcc icon. To enter a
mail address manually, select the To, Cc, or Bcc field.
3 To add an attachment to the mail, select
4 To send the mail, select
.
.
.

56 Internet
Open mail from the home screen
You can have several mail widgets in the home screen, depending on your device. Each
mail widget contains one mailbox. In the widget, you can see if you have received new
mail and the number of unread mails.
Add a mail widget to the home screen
In the home screen, select New mailbox, and follow the instructions.
Add another mail widget to the home screen
Tap and hold the home screen, and select
Open a mail
In the mail widget, select a mail.
, and the desired widget from the list.
Internet
About Web
Select Menu > Web.
With the Web application, you can view web pages on the internet.
To browse the web, you must have an internet access point configured in your device
and be connected to a network.
Browse the web
Select Menu > Web.
Tip: If you do not have a flat-rate data plan from your service provider, to save data
costs in your phone bill, you can use a wireless local area network (WLAN) to connect
to the internet.
Go to a web page
From the toolbar, select
Zoom in or out
Place two fingers on the screen, and slide your fingers together or apart.
, and enter a web address.
A cache is a memory location that is used to store data temporarily. If you have, or have
tried to, access confidential information or a secure service, requiring passwords, clear
the cache after each use.

Internet 57
Empty the cache
Select Options > Clear privacy data > Cache.
Add a bookmark
If you visit the same websites all the time, add them to your Bookmarks view, so you
can easily access them.
Select Menu > Web.
While browsing, select
Go to a bookmarked website while browsing
Select
Subscribe to a web feed
You don't have to visit your favourite websites regularly to keep up with what's new on
them. You can subscribe to web feeds and get links to latest content automatically.
Select Menu > Web.
and a bookmark.
> .
Web feeds on web pages are usually indicated with
example, the latest news headlines or blog entries.
Subscribe to a feed
Go to a blog or web page that contains a web feed, and select Options > Subscribe to
web feeds.
Manually update a feed
In the Web feeds view, select the feed.
Set a feed to automatically update
In the Web feeds view, select and hold the feed, and from the pop-up menu, select
Edit > Automatic updates.
Discover nearby events
Are you looking for interesting things to do near your current location? With Here and
now, you can get information about, for example, the weather, events, cinema times,
or restaurants nearby.
Select Menu > Web.
1 Select Here and now.
. They are used to share, for

58 Social networks
2 Browse the available services, and for more information, select the service.
Some content is generated by third parties and not Nokia. The content may be
inaccurate and is subject to availability.
Some services may not be available in all countries, and may be provided only in selected
languages. The services may be network dependent . For more information, contact your
network service provider.
Using the service or downloading content may cause transfer of large amounts of data,
which may result in data traffic costs.
Social networks
About Social
Select Menu > Social, sign in to Ovi by Nokia, and then sign in to your relevant social
networking services.
With the Social application, you can enhance your social networking experience. When
signed in to social networking services through Ovi by Nokia, you can do the following:
• See your friends' status updates from multiple services in one view
• Post your own status update to multiple services at the same time
• Instantly share pictures you take with the camera
• Link your online friends' profiles to their contact information in your device
• Add your location information to your status update
• Add events from the service calendar to your device calendar
Only those features that are supported by the social networking service are available.
Using social networking services requires network support. This may involve the
transmission of large amounts of data and related data traffic costs. For information
about data transmission charges, contact your service provider.
The social networking services are third party services and not provided by Nokia. Check
the privacy settings of the social networking service you are using as you may share
information with a large group of people. The terms of use of the social networking
service apply to sharing information on that service. Familiarise yourself with the terms
of use and the privacy practices of that service.
See your friends' status updates in one view
When you are signed in to social networking services through the Social application,
you can see your friends' status updates from all those services in a single view. You do
not have to switch between different applications to see what everyone is up to.

Social networks 59
Select Menu > Social.
1 Sign in to Ovi by Nokia with your Nokia account user name and password.
2 Select a service, and sign in.
3 Select Add account.
4 Select another service, and sign in.
5 Select All activity.
Select the services included in the view
Select the account switcher icon, next to the status update field. It indicates which
services are included in the view.
Post your status to social networking services
With the Social application, you can post your status update to social networking
services.
Select Menu > Social.
Write your status update in the text field.
Link your online friends to their contact information
You can link your online friends' profiles from social networking services to their contact
information in your device. After linking, you can view their contact information directly
from the Social application, and see their latest status updates in your contacts list.
Select Menu > Social.
1 Select an online friend's profile picture.
2 From the pop-up menu, select Add profile to contact.
3 From your contacts list, select the contact to which to link the profile.
See your friends' status updates in the home screen
When you sign in to social networking services through Ovi by Nokia, you can see your
online friends' status updates directly in the home screen.
Browse updates in the home screen
When you are signed into a service, you can see updates in the Social widget.
Open the Social application from the home screen
Select the Social widget. If you are signed in, the status updates view opens. If you are
not signed in, the sign-in view opens.

60 Social networks
Upload a picture to a service
With the Social application, you can upload pictures to social networking services.
Select Menu > Social.
1 Select
2 Select to upload a picture.
3 To mark the items to upload, select the items.
4 If uploading a single picture, you can add a caption and a tag with a comment to a
particular section of the picture.
Take a picture and upload it
1 Select
2 Select the option for uploading a picture from the camera.
3 Take a picture.
4 Add a caption and a tag with a comment to a particular section of the picture.
To upload a picture, the feature needs to be supported by the social networking service.
Share your location in your status update
With the Social application, you can let your friends know where you are, so they can
find you.
Select Menu > Social.
1 Select the text input field at the top of the display.
2 Add your location. The device uses GPS to determine your current location, and
searches for landmarks near you.
3 If several landmarks are found, select one from the list.
Location sharing is available only if it is supported by the service.
Before sharing your location, always carefully consider with whom you are sharing.
Check the privacy settings of the social networking service you are using, as you might
share your location with a large group of people.
The applicable terms of use of the social networking service may apply to sharing your
location to the service. Familiarise yourself with the terms of use and the privacy
practices of the service, and use appropriate consideration before disclosing your
location data to others or viewing the location of others.
.
.

Camera 61
Contact a friend from a social networking service
When commenting your friend's status is not enough, you can call or send a message
to the friend.
Select Menu > Social.
1 Select a friend's profile picture.
2 From the pop-up menu, select View contact info.
3 Select a communication method.
This feature is available if you have linked your online friends to their contact
information in your device.
The available communication methods vary. To call or send a text message to a friend,
the feature needs to be supported by the service.
Add an event to your device calendar
When responding to invitations to events in a social networking service, you can add
the events to your device calendar, so you can view upcoming events even if you are
not online.
Select Menu > Social and a service, and sign in.
1 Select an invitation to an event.
2 Add the event to your device calendar.
This feature is available only if supported by the service.
Camera
About Camera
Select Menu > Applications > Camera.
Why carry a separate camera if your device has all you need for capturing memories?
With the Camera application, you can easily take pictures or record videos. You can later
use your device to view or edit the pictures and videos, share them on the internet, or
send them to compatible devices.
Take a picture
Press and hold the camera key.
1 To activate the face tracking feature, select
detects and draws rectangles around faces, even when they are moving.
> Face detect.. The face tracker

62 Camera
2 Press the camera key. Do not move the device before the picture is saved and the
final picture displayed.
Save location information to your pictures and videos
If you sometimes struggle to remember exactly where you were when you took a
particular picture or video while hiking or travelling, you can set your device to
automatically record the location.
Press and hold
Activate the location recording feature
Select Options > Settings > Save location info > Yes.
It may take several minutes to obtain the coordinates of your location. The availability
and quality of GPS signals may be affected by your location, buildings, natural obstacles,
and weather conditions. If you share a file that includes location information, also the
location information is shared, and your location may be visible to third parties viewing
the file. This feature requires network service.
Location information indicators:
— Location information is unavailable. Location information may not be saved to
pictures or videos.
— Location information is available. Location information is saved to pictures or
videos.
Location information can be attached to an image or a video clip if location coordinates
can be determined via network and GPS. If you share an image or a video clip which has
location information attached, the location information is visible to others that view
the image or the video clip. You can deactivate geotagging in the camera settings.
.
Picture tips
Select Menu > Applications > Camera.
When taking a picture, note the following:
• Use both hands to keep the camera steady.
• When you zoom in, the image quality may decrease.

Your pictures and videos 63
• The camera activates battery saving mode after about a minute of inactivity. To
activate the camera again, press
• You can set the user defined scene to be used as the default scene every time you
open the Camera application. Select
Modify the settings, and select Set as default scene mode > Yes.
• Keep a safe distance when using the flash. Do not use the flash on people or animals
at close range. Do not cover the flash while taking a picture.
Record a video
Besides taking pictures with your device, you can also capture your special moments as
videos.
Press and hold
1 To switch from image mode to video mode, if necessary, select
2 To start recording, press
3 To pause recording, select Pause. If you pause recording and do not press any key
within one minute, the recording stops.
To zoom in or out, use the volume keys.
4 To stop recording, press
Send a picture
You can send pictures to your friends as a multimedia or mail message, or through
Bluetooth connectivity.
1 Take a picture.
2 Select Options > Send.
3 Select the desired sending method.
.
briefly.
> Scene mode > User defined > Edit.
.
. A red record icon is displayed.
. The video is automatically saved in Photos.
Your pictures and videos
About Photos
Select Menu > Photos.
The Photos application is the place from where you can view all pictures and videos on
your device. You can easily watch videos, or browse through pictures, and print out the
best shots.
You can also view the pictures and videos on a compatible TV.
To manage your media files more effectively, add tags to the files, or organise them in
categories.

64 Your pictures and videos
View pictures and videos
Select Menu > Photos.
Browse the pictures and videos
Select a folder, and swipe up or down.
View a picture in full screen mode
Select the picture, and turn your device to landscape mode.
To browse pictures in full screen mode, swipe left or right.
To view the zoom slider, tap the picture. Alternatively, place two fingers on the screen,
and to zoom in, slide your fingers apart. To zoom out, slide your fingers together.
View your pictures as a slide show
Select a picture and Options > Slide show > Play. The slide show starts from the
selected picture.
Play a video
Select a folder and a video.
Pictures and videos can also be sent to you from a compatible device. To be able to view
a received picture or video in Photos, you must first save it.
Edit the pictures you have taken
With Photo editor, you can add effects, text, clip art, or frames to your pictures.
Select Menu > Applications > Photo editor and a picture.
1 To insert effects, select the desired option from the extended toolbar.
2 To save the edited picture, select Options > Save. The edited picture does not
replace the original picture.
To later view your edited pictures, select Menu > Photos.

Your pictures and videos 65
Video editor
About Video Editor
Select Menu > Applications > Video Editor.
You can combine pictures and videos with sounds, effects, and text, and easily turn them
into short movies or slideshows.
The following file formats are supported: MPEG4, H263, H263 BL, WMV, JPEG, PNG, BMP,
GIF, MP3, AAC/AAC+eAAC+, WAV, and AMR-NB/AMR-WB.
Save the sound files that you want to use in a movie to the Sound files folder on your
device.
You cannot add a DRM protected sound file to a movie.
Create a movie
With Storyboard, you can easily create short movies from videos and pictures.
Select Menu > Applications > Video Editor.
1 Select Storyboard.
2 To add videos and pictures to your movie, select Select media. To view the files
you have selected, swipe right or left.
3 To add transitions between videos and pictures, select +.
4 To activate editing mode, select a video or picture. In editing mode, you can cut the
length of the video or define how long a picture is displayed.
5 To add sounds to your movie, select Set background music.
6 To add text or subtitles to your movie, select Add text.
7 Save your movie.
Create a slideshow
The Video Editor application contains templates for different occasions. You can use
them to create slideshows of events, such as anniversaries or parties.
Select Menu > Applications > Video Editor.
1 Select Music video.
2 Select a template to use for the slideshow. When you select a template, a preview
is displayed.
3 Select the pictures to use.
4 Select the sounds to play in the background.
5 Add a title.
6 Preview and save your slideshow.

66 Your pictures and videos
Print a picture you have taken
You can print your pictures directly using a compatible printer.
1 Use a compatible USB data cable to connect your device to a printer in Media transfer
mode.
2 Select the picture to print.
3 Select Options > Print.
4 To use the USB connection to print, select Print > Via USB.
5 To print the picture, select Options > Print.
Tip: You can also use a Bluetooth printer. Select Print > Via Bluetooth. Change the
selected printer to Bluetooth, and follow the instructions on the display.
Tip: When the USB cable is connected, you can change the USB mode. In the top right
corner of the browsing view, select
View pictures and videos on a TV
You can view pictures and videos on a compatible TV, making it easier for you to show
them to your family and friends.
You need to use a Nokia Video Connectivity Cable (sold separately), and may need to
modify the TV-out settings and aspect ratio. To modify the TV-out settings, select
Menu > Settings and Phone > Accessories > TV-Out.
1 Connect a Nokia Video Connectivity Cable to the video input of a compatible TV. The
colour of the plugs must match the colour of the sockets.
2 Connect the other end of the Nokia Video Connectivity Cable to the Nokia AV
Connector of your device. You may need to select TV-Out cable as the USB mode.
3 Browse for the file you want to view.
> USB.

Videos and TV 67
Videos and TV
Videos
About Videos
With the Videos application, you can watch videos on your device.
Tip: Get new videos from Ovi Store. To learn more about Ovi Store, go to
www.ovi.com.
Using a packet data access point to download a video may involve the transmission of
large amounts of data through your service provider's network. For information about
data transmission charges, contact your service provider.
Play a video
Select Menu > Videos & TV.
Select the video.
Use the video player controls
Tap the screen.
Copy a video from your PC
Do you have videos on your PC that you want to watch on your device? Use a USB data
cable to copy videos between your computer and your device.
1 Use a compatible USB data cable to connect your device to your computer.
2 Open Nokia Ovi Suite on your computer, and follow the displayed instructions.
In your device, videos that are in a supported format are displayed in Videos.
Watch Web TV
With On demand Web TV, you can keep up with the news and catch up on the latest
episodes of your favourite TV series.
Select Menu > Videos & TV.
To stream content over the air using Web TV, you need to use a 3G, 3.5G, or WLAN
connection. Using Web TV services may involve the transmission of large amounts of
data. For information about data transmission charges, contact your network service
provider.
The selection of pre-installed Web TV services depends on the country and network
service provider. The content of the Web TV services varies by service.

68 Music and audio
1 Select a Web TV application. To browse Web TV content in the Web TV application,
swipe the screen.
2 To start playback, select the thumbnail image.
3 To show or hide the controls during playback, tap the screen.
4 To adjust the volume, use the volume keys.
Add a Web TV widget to your home screen
Tap and hold the home screen, and select
Find more Web TV applications
Download Web TV applications from Nokia's Ovi Store. To learn more about Ovi Store,
go to www.ovi.com. Downloaded applications are saved in the Applications folder, but
you can move them to another folder, such as a dedicated Web TV folder.
and the desired Web TV application.
Music and audio
Music player
About Music player
Select Menu > Music > Music player.
With the Music player application, you can listen to music and podcasts while on the
move.
Tip: Get more music from Ovi Music. Select Options > Go to Music store. To learn more
about Ovi, go to www.ovi.com.
Play music
Select Menu > Music > Music player.
1 Select Options and the desired view. You can browse songs by song or album.
In the album view, to browse the album covers, turn your device so it is horizontal,
and swipe left or right.
2 Select a song or album.

Music and audio 69
Tip: To listen to the songs in a random order, select .
Pause and resume playback
To pause playback, select
; to resume, select .
Fast-forward or rewind a song
Select and hold
or .
Tip: When listening to music, you can return to the home screen, leaving Music player
application playing in the background.
Create a playlist
Want to listen to different music for different moods? With playlists, you can create
selections of songs to play in a specific order.
Select Menu > Music > Music player.
1 Select Options > Playlists.
2 Select Options > New playlist.
3 Enter a name for the playlist, and select OK.
4 Select the songs to add to the playlist, in the order you want them to play.
Add a song to a playlist
Select and hold the song, and from the pop-up menu, select Add to playlist.

70 Music and audio
Remove a song from playlist
In the playlist view, select and hold the song, and from the pop-up menu, select
Remove.
This does not delete the song from the device; it only removes it from the playlist.
Play a playlist
Select Options > Playlists and the playlist.
Tip: Music player automatically creates a playlist for the most played songs, recently
played songs, and recently added songs.
Copy music from your PC
Do you have music on your PC that you want to listen on your device? Nokia Ovi Player
is the fastest way to transfer music on your device, and you can use it to manage and
synchronise your music collection.
1 Use a compatible USB data cable to connect your device to your computer.
2 On your device, select the notification area in the top right corner, and select
> USB > Media transfer.
3 On your computer, open Nokia Ovi Player. For more information, see the Ovi Player
help.
Download the latest version of Ovi player from www.ovi.com.
Some music files can be protected by digital rights management (DRM) and cannot be
played on more than one device.
Protected content
Digital rights management (DRM) protected content, such as pictures, videos, or music,
comes with an associated licence that defines your rights to use the content.
You can view the details and status of the licences, and reactivate and remove licences.

Music and audio 71
Manage digital rights licences
Select Menu > Settings > Phone > Phone mgmt. > Security settings > Protected
content.
Record sounds
You can use your device recorder to record sounds from nature, such as birds singing,
as well as voice memos. You can send the recorded sound clips to your friends.
Select Menu > Applications > Office > Recorder.
Record a sound clip
Select
Stop recording
Select
manager application.
Send a recorded sound clip as an audio message
Select Options > Send.
Play music through a radio
About the FM transmitter
With the FM transmitter, you can play songs stored in your device through any
compatible FM radio, such as a car radio or a home stereo system.
The operating distance of the FM transmitter is approximately 2 metres (6 feet).
Obstructions, such as walls, other electronic devices, or public radio stations may cause
interference to the transmission. The operating frequency of the FM transmitter varies
by region.
FM transmitter may cause interference to nearby FM radios operating on the same
frequency. To avoid interference, always search for a free FM frequency on the receiving
radio before activating the FM transmitter.
The FM transmitter cannot be used at the same time as the FM radio of your device.
Note: FM transmitter can not be used in Greece. For more information, contact you local
operator and go to www.nokia.com/fmtransmitter.
.
. The sound clip is automatically saved to the Sound files folder in the File
Select Menu > Music > FM transmit.

72 Music and audio
Play music through a radio
Do you want to listen to music at a higher volume, or through better quality hi-fi stereo
speakers? You can play music through an FM radio.
1 Tune the receiving radio to a free frequency.
2 Select Menu > Music > Music player.
3 Select a song or a playlist to be played.
4Go to Now playing view, and select Options > FM transmitter.
5 To activate the FM transmitter, select FM transmitter > On.
6 Enter the frequency to which you tuned the receiving radio.
Example: If the frequency 107.8 MHz is free in your area and you tune your FM radio to
that frequency, also tune the FM transmitter to 107.8 MHz.
To adjust the volume, use the volume function in the receiving radio.
Tip: You can buy more music at www.ovi.com.
FM radio
About FM radio
Select Menu > Music > Radio.
You can listen to FM radio stations using your device - just plug in a headset, and select
a station!
To listen to the radio, you need to attach a compatible headset to the device. The headset
acts as an antenna.
Find and save radio stations
Search for your favourite radio stations, and save them, so you can easily listen to them
later.

Music and audio 73
Select Menu > Music > Radio.
From the toolbar, select
To find radio stations, you can use the automatic scanning, or you can set a frequency
manually. The first time you open the FM radio, the application automatically searches
for radio stations audible at your location.
Scan for all available stations
1 From the toolbar, select
2 To save all found stations, from the toolbar, select
and hold the station title, and from the pop-up menu, select Save.
Set a frequency manually
1 From the toolbar, select
2 Use the up and down arrow icons to enter a frequency.
Listen to the radio
You can enjoy your favourite FM radio stations on the go.
Select Menu > Music > Radio.
Listen to a saved station
From the toolbar, select
Go to the next or previous saved station
Swipe right or left. Alternatively, select
Scan for another available station
Swipe up or down. Alternatively, select and hold
> .
.
. To save a single station, select
Tune manually.
> , and select a station from the list.
or .
or .
Listen to the radio using the loudspeaker
Select Options > Activate loudspeaker. You still need to have a headset attached.
You can make or answer a call while listening to the radio. The radio is automatically
muted during an active call.
Tip: To search and buy music from Ovi Music, from the toolbar, select
The quality of the radio broadcast depends on the coverage of the radio station in the
area.
> .

74 Maps
Reorder the list of saved stations
You can reorder the list of saved stations, so that your favourites are at the top.
Select Menu > Music > Radio.
The stations you have saved are listed in the Station list view.
Move a station on the list
1 From the toolbar, select
2 Select and hold the station title, and from the pop-up menu, select Move.
3 Select the new place on the list.
> .
Maps
Maps overview
Select Menu > Maps.
Welcome to Maps.
Maps shows you what is nearby, helps you plan your route, and guides you where you
want to go.
• Find cities, streets, and services.
• Find your way with turn-by-turn directions.
• Synchronise your favourite locations and routes between your mobile device and
the Ovi Maps internet service.
• Check weather forecasts and other local information, if available.
Some services may not be available in all countries, and may be provided only in selected
languages. The services may be network dependent . For more information, contact your
network service provider.
Using the service or downloading content may cause transfer of large amounts of data,
which may result in data traffic costs.
Almost all digital cartography is inaccurate and incomplete to some extent. Never rely
solely on the cartography that you download for use in this device.
Some content is generated by third parties and not Nokia. The content may be
inaccurate and is subject to availability.
My position
View your location and the map
Se e y ou r cur re nt loc at io n on t he ma p, a nd br ows e m ap s of d if fe ren t c it ies an d c oun tr ie s.

Maps 75
Select Menu > Maps and My position.
marks your current position, if available. When your device is searching for your
position,
blinks. If your position is not available, indicates your last known
position.
If only cell ID based positioning is available, a red halo around the positioning icon
indicates the general area you might be in. In densely populated areas, the accuracy of
the estimate increases, and the red halo is smaller than in lightly populated areas.
Move on the map
Drag the map with your finger. By default, the map is oriented north.
View your current or last known location
Select
.
Zoom in or out
Select + or -.
If you browse to an area not covered by the maps that are stored on your device and
you have an active data connection, new maps are automatically downloaded.
Map coverage varies by country and region.

76 Maps
Map view
1 Selected location
2 Indicator area
3 Point of interest (for example, a railway station or a museum)
4 Information area
Change the look of the map
View the map in different modes, to easily identify where you are.
Select Menu > Maps and My position.
Select
and from the following:
Map view — In the standard map view, details such as location names or motorway
numbers, are easy to read.
Satellite view — For a detailed view, use satellite images.
Terrain view — View at a glance the ground type, for example, when you are travelling
off-road.
3D view — For a more realistic view, change the perspective of the map.
Landmarks — Display prominent buildings and attractions on the map.
Night mode — Dim the colours of the map. When travelling at night, the map is easier
to read in this mode.

Maps 77
Download and update maps
To avoid mobile data transfer costs, download the latest maps and voice guidance files
to your computer, and then transfer and save them to your device.
Use the Nokia Ovi Suite application to download the latest maps and voice guidance
files to your compatible computer. To download and install Nokia Ovi Suite on your
compatible computer, go to www.ovi.com.
Tip: Save new maps to your device before a journey, so you can browse the maps
without an internet connection when travelling abroad.
To ma ke sure you r device does not us e an internet connection, in the main menu, select
> Internet > Connection > Offline.
Use the compass
When the compass is activated, both the arrow of the compass and the map rotate
automatically in the direction to which the top of your device is pointing.
Select Menu > Maps and My position.
Activate the compass
Select
Deactivate the compass
Select
The compass is active when there is a green outline. If the compass needs calibration,
the outline of the compass is red or yellow.
Calibrate the compass
Rotate the device around all axes in a continuous movement until the outline of the
compass turns green.
.
again. The map is oriented north.

78 Maps
The compass has limited accuracy. Electromagnetic fields, metal objects, or other
external circumstances may also affect the accuracy of the compass. The compass should
always be properly calibrated.
About positioning methods
Maps displays your location on the map using GPS, A-GPS, WLAN, or cell ID based
positioning.
The Global Positioning System (GPS) is a satellite-based navigation system used for
calculating your location. Assisted GPS (A-GPS) is a network service that sends you GPS
data, improving the speed and accuracy of the positioning.
Wireless local area network (WLAN) positioning improves position accuracy when GPS
signals are not available, especially when you are indoors or between tall buildings.
With cell ID based positioning, the position is determined through the antenna tower
your mobile device is currently connected to.
Depending on the available positioning method, the accuracy of positioning may vary
from a few metres to several kilometres.
When you use Maps for the first time, you are prompted to define the internet access
point to use to download map information, use A-GPS, or connect to a WLAN.
The availability and quality of GPS signals may be affected by your location, satellite
positions, buildings, natural obstacles, weather conditions and adjustments to GPS
satellites made by the United States government. GPS signals may not be available inside
buildings or underground.
Do not use GPS for precise location measurement, and never rely solely on the location
information provided by GPS and cellular networks.
Note: Using WLAN may be restricted in some countries. For example, i n France, you are
only allowed to use WLAN indoors. For more information, contact your local authorities.
Find places
Find a location
Maps helps you find specific locations and businesses.
Select Menu > Maps and Search.
1 Select the search field, and enter search words, such as a street address or postcode.
2 Select
3 Select an item from the list of proposed matches.
. To clear the search field, select .

Maps 79
The location is displayed on the map. To view the other locations of the search result
list on the map, select one of the arrows beside the information area (
Return to the list of proposed matches
Select List.
Search for different types of nearby places
Select Browse categories and a category, such as shopping, accommodation, or
transport.
If no search results are found, ensure the spelling of your search terms is correct.
Problems with your internet connection may also affect results when searching online.
To avoid data transfer costs, you can also get search results without an active internet
connection, if you have maps of the searched area stored on your device.
View location details
View more information about a specific location or place, such as a hotel or restaurant,
if available.
Select Menu > Maps and My position.
View the details of a place
Select a place, its information area (
When you find a place that does not exist or contains inappropriate information or
incorrect details, such as the wrong contact information or location, it is recommended
that you report it to Nokia.
The available options may vary.
), and Show details.
).
Favourites
Save places and routes
Save addresses, places of interest, and routes, so they can be quickly used later.
Select Menu > Maps.
Save a place
1 Select My position.
2 Tap the location. To search for an address or place, select Search.
3 Tap the location's information area (
4 Select Save place.
).

80 Maps
Save a route
1 Select My position.
2 Tap the location. To search for an address or place, select Search.
3 Tap the location's information area (
4 To add another route point, select Add to route.
5 Select Add new route point and the appropriate option.
6 Select Show route > Options > Save route.
View your saved places and routes
Select Favourites > Places or Routes.
View and organise places or routes
Use your Favourites to quickly access the places and routes you have saved.
Group the places and routes into a collection, for example, when planning a trip.
Select Menu > Maps and Favourites.
View a saved place on the map
1 Select Places.
2 Go to the place.
3 Select Map.
To return to the list of saved places, select List.
Create a collection
Select Create new collection, and enter a collection name.
).
Add a saved place to a collection
1 Select Places and the place.
2 Select Organise collections.
3 Select New collection or an existing collection.
If you need to delete places or routes, or add a route to a collection, go to the Ovi Maps
internet service at www.ovi.com.
Send places to your friends
When you want to share place information with your friends, send these details directly
to their devices.
Select Menu > Maps and My position.

Maps 81
Send a place to your friend's compatible device
Select a location on the map, tap the location's information area (
Send.
Synchronise your Favourites
Plan a trip on your computer at the Ovi Maps website, synchronise the saved places,
routes, and collections with your mobile device, and access the plan on the go.
To synchronise places, routes, or collections between your mobile device and the Ovi
Maps internet service, you need a Nokia account. If you do not have one, in the main
view, select Accounts > Nokia account > Create new account.
Synchronise saved places, routes, and collections
Select Favourites > Synchronise with Ovi. If you do not have a Nokia account, you are
prompted to create one.
Set the device to synchronise Favourites automatically
Select
device starts the synchronisation when you open or close the Maps application.
Synchronising requires an active internet connection, and may involve the transmission
of large amounts of data through your service provider’s network. For information
about data transmission charges, contact your service provider.
To use the Ovi Maps internet service, go to www.ovi.com.
Share location
Publish your current location to Facebook, together with text and a picture. Your
Facebook friends can see your location on a map.
Select Menu > Maps and Share loc..
To share your location, you need a Nokia account and a Facebook account.
1 Sign in to your Nokia account, or, if you do not yet have one, select Create new
2 Sign in to your Facebook account.
3 Select your current location.
4 Enter your status update.
5 To attach a picture to your post, select Add a photo.
6 Select Share location.
> Synchronisation > Synchronisation > At start-up and shut-d.. The
account.
), and select

82 Maps
Manage your Facebook account
In the main view, select Accounts > Share location settings > Facebook.
Sharing your location and viewing the location of others requires an internet
connection. This may involve the transmission of large amounts of data and related
data traffic costs.
The Facebook terms of use apply to sharing your location on Facebook. Familiarise
yourself with the Facebook terms of use and the privacy practices.
Before sharing your location to others, always consider carefully with whom you are
sharing it. Check the privacy settings of the social networking service you are using as
you might share your location with a large group of people.
Drive and Walk
Get voice guidance
Voice guidance, if available for your language, helps you find your way to a destination,
leaving you free to enjoy the journey.
Select Menu > Maps and Drive or Walk.
When you use drive or walk navigation for the first time, you are asked to select the
language of the voice guidance, and download the appropriate files.
If you select a language that includes street names, also the street names are said aloud.
Voice guidance may not be available for your language.
Change the voice guidance language
In the main view, select
the appropriate option.
Deactivate voice guidance
In the main view, select
None.
and Navigation > Drive guidance or Walk guidance and
and Navigation > Drive guidance or Walk guidance and
Repeat the voice guidance for car navigation
In the navigation view, select Options > Repeat.
Adjust the volume of the voice guidance for car navigation
In the navigation view, select Options > Volume.

Maps 83
Drive to your destination
When you need turn-by-turn directions while driving, Maps helps you get to your
destination.
Select Menu > Maps and Drive.
Drive to a destination
Select Set destination and the appropriate option.
Drive to your home
Select Drive home.
When you select Drive home or Walk home for the first time, you are prompted to
define your home location. To later change the home location, do the following:
1 In the main view, select
.
2 Select Navigation > Home Location > Redefine.
3 Select the appropriate option.
Tip: To drive without a set destination, select Map. Your location is displayed on the
centre of the map as you move.
Change views during navigation
Swipe the screen to select 2D view, 3D view, Arrow view, or Route overview.
Obey all local laws. Always keep your hands free to operate the vehicle while driving.
Your first consideration while driving should be road safety.

84 Maps
Navigation view
1 Route
2 Your location and direction
3 Compass
4 Information bar (speed, distance, time)
Get traffic and safety information
Enhance your driving experience with real-time information about traffic events, lane
assistance, and speed limit warnings, if available for your country or region.
Select Menu > Maps and Drive.
View traffic events on the map
During drive navigation, select Options > Traffic info. The events are displayed as
triangles and lines.
Update traffic information
Select Options > Traffic info > Update traffic info.
When planning a route, you can set the device to avoid traffic events, such as traffic
jams or roadworks.
Avoid traffic events
In the main view, select
> Navigation > Reroute due to traffic.

Maps 85
The location of speed cameras may be shown on your route during navigation, if this
feature is enabled. Some jurisdictions prohibit or regulate the use of speed camera
location data. Nokia is not responsible for the accuracy, or the consequences of using
speed camera location data.
Walk to your destination
When you need directions to follow a route on foot, Maps guides you over squares, and
through parks, pedestrian zones, and even shopping centres.
Select Menu > Maps and Walk.
Walk to a destination
Select Set destination and the appropriate option.
Walk to your home
Select Walk home.
When you select Drive home or Walk home for the first time, you are prompted to
define your home location. To later change the home location, do the following:
1 In the main view, select
2 Select Navigation > Home Location > Redefine.
3 Select the appropriate option.
Tip: To walk without a set destination, select Map. Your location is displayed on the
centre of the map as you move.
Plan a route
Plan your journey, and create your route and view it on the map before setting off.
Select Menu > Maps and My position.
Create a route
1 Tap the location of your starting point. To search for an address or place, select
Search.
2 Tap the location's information area (
3 Select Add to route.
4 To add another route point, select Add new route point and the appropriate
option.
Change the order of the route points
1 Select a route point.
.
).

86 Maps
2 Select Move.
3 Tap the place where you want to move the route point to.
Edit the location of a route point
Tap the route point, and select Edit and the appropriate option.
View the route on the map
Select Show route.
Navigate to the destination
Select Show route > Options > Start driving or Start walking.
Change the settings for a route
The route settings affect the navigation guidance and the way the route is displayed on
the map.
1 In the route planner view, open the Settings tab. To get to the route planner view
from the navigation view, select Options > Route points or Route point list.
2 Set the transportation mode to Drive or Walk. If you select Walk, one-way streets
are regarded as normal streets, and walkways and routes through, for example,
parks and shopping centres, can be used.
3 Select the desired option.
Select the walking mode
Open the Settings tab, and select Walk > Preferred route > Streets or Straight line.
Straight line is useful on off-road terrain as it indicates the walking direction.
Use the faster or shorter driving route
Open the Settings tab, and select Drive > Route selection > Faster route or Shorter
route.
Use the optimised driving route
Open the Settings tab, and select Drive > Route selection > Optimised. The optimised
driving route combines the advantages of both the shorter and the faster routes.
You can also choose to allow or avoid using, for example, motorways, toll roads, or
ferries.

Office 87
Office
Quickoffice
About Quickoffice
Select Menu > Applications > Office > Quickoffice.
Quickoffice consists of the following:
• Quickword for viewing Microsoft Word documents
• Quicksheet for viewing Microsoft Excel worksheets
• Quickpoint for viewing Microsoft PowerPoint presentations
Not all file formats or features are supported.
To purchase the editor version of Quickoffice, select Updates and upgrades.
Read Microsoft Word, Excel, and PowerPoint documents
With Quickoffice, you can view Microsoft Office documents, such as Word documents,
Excel worksheets, or PowerPoint presentations.
Select Menu > Applications > Office > Quickoffice.
Open a file
Select the memory where the file is stored, browse to the correct folder, and select the
file.
Sort files
Select Options > Sort by.
Send files to a compatible device
Select
and the sending method.
Not all formats or features are supported.
Read PDF documents
With Adobe Reader, you can read PDF documents.
Select Menu > Applications > Office > Adobe PDF.

88 Office
Open a file
Select the memory where the file is stored, browse to the correct folder, and select the
file.
Make a calculation
Select Menu > Applications > Office > Calculator.
1 Enter the first number of the calculation.
2 Select a function, such as add or subtract.
3 Enter the second number of the calculation.
4 Select =.
Save or retrieve the result of a calculation
Select Options > Memory > Save or Recall.
Write notes
About Notes
Select Menu > Applications > Office > Notes.
You can write notes, such as meeting memos, and save received plain text files (TXT
files) to the Notes application.
Make a shopping list
Shopping lists on paper are easy to lose. Instead of writing them on paper, you can make
your shopping lists with Notes. This way, you always have the list with you! You can
also send the list to, for example, a family member.
Select Menu > Applications > Office > Notes.
1 Select Options > New note.
2 Enter text in the note field.
Send the list
Open the note, and select Options > Send and the sending method.
Translate words from one language to another
You can translate words from one language to another. Not all languages may be
supported.
Select Menu > Applications > Office > Dictionary.

Time management 89
1 Enter text in the search field. Suggestions of words to translate are displayed.
2 Select the word from the list.
Change the source or target language
Select Options > Languages > Source or Target.
Download more languages from the internet
Select Options > Languages > Download languages.
English is preinstalled, and you can add two additional languages.
Open or create zip files
With Zip manager, you can open and extract files from zip files. You can also create new
zip files, to store and compress files.
Select Menu > Applications > Office > Zip.
Time management
Clock
About the clock
Select Menu > Applications > Clock.
Set and manage alarms, and check local times in different countries and cities.
Set the time and date
In the home screen, select the clock and Options > Settings > Time or Date.
Tip: To view the time and date when the screen and keys are locked, press and hold the
menu key.
Set an alarm
You can use your device as an alarm clock.
In the home screen, select the clock.
1 Select New alarm.
2 Set the alarm time, and enter a description.
3 To set the alarm to sound, for example, at the same time every day, select
Repeat.

90 Time management
Remove an alarm
Select and hold the alarm, and from the pop-up menu, select Delete alarm.
Snooze an alarm
When an alarm sounds, you can snooze the alarm. This pauses the alarm for a defined
length of time.
When the alarm sounds, select Snooze.
Set the length of the snooze time
In the home screen, select the clock and Options > Settings > Alarm snooze time,
and set the length of time.
You can snooze alarms also by turning your device display down. To use this feature,
you must first activate the sensors.
Activate the sensors
Select Menu > Settings and Phone > Sensor settings > Sensors > On.
Activate turning control for snoozing
Select Menu > Settings and Phone > Sensor settings > Turning control > Snoozing
alarms.
Update the time and date automatically
You can set your device to update the time, date, and time zone automatically.
In the home screen, select the clock and Options > Settings > Automatic time
update > On.
Automatic update is a network service.
Change the time zone when travelling
You can set the clock to the local time when travelling abroad.

Time management 91
In the home screen, select the clock, and open the world clock tab.
Add a location
Select Options > Add location and a location.
Set your current location
Select and hold a location, and from the pop-up menu, select Set as current location.
The time in your device is changed according to the selected location. Make sure the
time is correct.
Check the time in different cities
To view the time in different locations, add them to your world clock tab. You can also
add pictures for the locations, for example, a picture of your friend who lives in the city
in question, or a view from your favourite tourist attraction.
In the home screen, select the clock, and open the world clock tab.
Add a location
Select Options > Add location and a location. You can add up to 15 locations.
Add a picture for a location
Select and hold a location, and from the pop-up menu, select Change image and a
picture.
Calendar
About the calendar
Select Menu > Calendar.
With your device calendar, you can do the following:
• Keep your schedules organised
• Add reminders for anniversaries and other important dates
• Keep your to-do list up to date
You can have separate calendars for free time and work.
View your schedule for the week
You can browse your calendar entries in different views. To easily check all the entries
for a particular week, use the week view.
In the home screen, select the date.

92 Time management
From the toolbar, select > .
Add a task to your to-do list
Do you have important tasks to handle at work, library books to return, or maybe an
event you want to attend? You can add tasks (to-do notes) to your calendar. If you have
a particular deadline, set a reminder.
Select Menu > Calendar.
1 Go to the desired date, and select
2 Select the entry type field and To-do note.
3 Fill in the fields. To close the text input dialog, select
4 To add a reminder for the task, select Alarm > On.
Add an appointment
Save your important appointments to your calendar as meeting entries.
In the home screen, select the date.
1 Go to the desired date, and select
2 Fill in the fields. To close the text input dialog, select
3 To repeat the meeting entry at regular intervals, select Repeat and the time
interval. Select Repeat until, and enter the end date.
Remember a birthday
You can add a reminder for birthdays and other special dates. The reminders are
repeated annually.
In the home screen, select the date.
1 Go to the desired date, and select Options > New entry > Calendar entry
type > Anniversary.
2 Fill in all the fields. To close the text input dialog, select
.
.
. The meeting entry is selected as default.
.
.
Use separate calendars for work and free time
You can have more than one calendar. Create one for work and another for your free
time.
In the home screen, select the date.
Create a new calendar
1 Select Options > Manage calendars.
2 Select Options > Create new calendar.

Device management 93
3 Enter a name, and set a colour code for the calendar.
4 Define the visibility for the calendar. When a calendar is hidden, the calendar entries
and reminders are not displayed in different calendar views or in the home screen.
Modify calendar settings
In the Manage calendars view, select the desired calendar.
Add an entry to a particular calendar
1 Go to the desired date, and select
2 Select the desired entry type.
3 Select Calendar entry saved to and the calendar you want to save the entry to.
In different calendar views, the colour codes indicate to which calendar an entry is
saved.
.
Device management
Keep your device software and applications up to date
About device software and application updates
With device software updates and application updates, you can get new features and
enhanced functions for your device. Updating the software may also improve your
device performance.
It is recommended that you back up your personal data before updating your device
software.

94 Device management
Warning:
If you install a software update, you cannot use the device, even to make emergency
calls, until the installation is completed and the device is restarted.
After you update your device software or applications, the instructions in the user guide
may no longer be up to date.
Update device software and applications using your device
You can check if there are updates available for your device software or for
individual applications, and then download and install them to your device (network
service). You can also set your device to automatically check for updates and notify you
when important or recommended updates are available.
Select Menu > Applications > Tools > SW update.
If there are available updates, select which updates to download and install, and select
.
Set your device to automatically check for updates
Select Options > Settings > Auto-check for updates.
Update device software using your PC
You can use the Nokia Software Updater PC application to update your device software.
To update your device software, you need a compatible PC, a high-speed internet
connection, and a compatible USB data cable to connect your device to the PC.
To get more information and to download the Nokia Software Updater application, go
to www.nokia.com/softwareupdate.
Manage files
About File manager
Select Menu > Applications > Office > File mgr..
With File manager, you can browse, manage, and open files on your device.
View the files stored in your device
Select Menu > Applications > Office > File mgr. and the desired memory.
The folders on the root of the memory are displayed.

Device management 95
Organise files
You can use the File manager application to delete, move, copy, or create new files and
folders. If you organise your files into their own folders, it might help you find the files
in future.
Select Menu > Applications > Office > File mgr..
Create a new folder
In the folder where you want to create a sub-folder, select Options > Organise > New
folder.
Copy or move a file to a folder
Select and hold the file, and from the pop-up menu, select the appropriate option.
Format the mass memory
Want to delete all content from your device mass memory? When you format the mass
memory, all the data on it is deleted.
Back up all data you want to keep before formatting the mass memory. All data is
permanently deleted.
1 Select Menu > Applications > Office > File mgr..
2 Select and hold the mass memory, and from the pop-up menu, select Format.
Do not format the mass memory using PC software, because it may cause degraded
performance.
You can use Nokia Ovi Suite to back up data to a compatible computer. Digital rights
management (DRM) technologies may prevent some backup data from being restored.
For more information about DRM used for your content, contact your service provider.
Increase available memory for more content
Do you need to increase the available device memory, so you can install more
applications, and add more content?
Transfer data to the mass memory or to a compatible computer.
You can also remove the following if no longer needed:
• Text, multimedia, and mail messages
• Contact entries and details
• Applications
• Installation files (.sis or .sisx) for installed applications. Back up the files to a
compatible computer.

96 Device management
• Pictures and videos in Photos. Back up the files to a compatible computer.
Tip: If expired trial or demo applications are installed, remove them.
Manage applications
About Application manager
Select Menu > Settings and Application manager.
With Application manager you can view details of installed applications, remove
applications, and define installation settings.
You can install the following types of applications:
• Java™ ME applications that have the .jad or .jar file extension
• Applications, compatible with the Symbian operating system, that have the .sis
or .sisx file extension
• Widgets that have the .wgz file extension
Only install applications that are compatible with your device.
Remove an application from your device
You can remove installed applications that you no longer need or use, to increase the
amount of available memory.
Select Menu > Settings and Application manager.
1 Select Installed apps..
2 Select and hold the application to remove, and from the pop-up menu, select
Uninstall.
If you remove an application, you can only reinstall it if you have the original installation
file or a full backup of the removed application. You may not be able to open files created
with a removed application.
If an installed application depends on a removed application, the installed application
may stop working. For details, see the user documentation of the installed application.
After you install applications to a compatible memory card, installation files (.sis, .sisx)
remain in the device memory. The files may use large amounts of memory and prevent
you from storing other files. To maintain sufficient memory, use Nokia Ovi Suite to back
up installation files to a compatible PC, then use the file manager to remove the
installation files from the device memory. If the .sis file is a message attachment, delete
the message from the Messaging inbox.

Device management 97
Synchronise content
About Sync
Select Menu > Settings and Connectivity > Data transfer > Sync.
With the Sync application, you can synchronise your contacts, notes, and other content
between your device and a remote server. After the synchronisation, you have a backup of your important data on the server.
Synchronise content between your device and a remote server
Would you like to have your calendar, notes, and other content backed up and at hand,
whether you are sitting by your computer or on the go with your mobile device? With
the Sync application, you can synchronise the important content between your device
and a remote server.
Select Menu > Settings and Connectivity > Data transfer > Sync.
You may receive synchronisation settings as a configuration message from your service
provider. The synchronisation settings are saved as a synchronisation profile. When you
open the application, the default or previously used synchronisation profile is displayed.
Include or exclude content types
Select a content type.
Synchronise data
Select Options > Synchronise.
Tip: To synchronise content between your device and Ovi, you can use the Ovi Sync
application.

98 Device management
About Ovi Sync
Select Menu > Applications > Tools > Ovi sync.
With Ovi Sync, you can synchronise contacts, calendar entries, and notes between your
device and Ovi by Nokia. This way you always have a backup of your important content.
To use Ovi Sync, you need a Nokia account. If you do not have a Nokia account, create
one at www.ovi.com.
If you use Ovi Sync to automatically synchronise your contacts with Ovi, do not allow
synchronisation with any other service, such as Mail for Exchange, as there may be
conflicts.
Back up content to Ovi
Would you like to have your calendar entries, notes, and other content on your device
backed up on Ovi? With the Ovi Sync application, you can synchronise the content
between your device and Ovi manually or automatically.
Select Menu > Applications > Tools > Ovi sync.
When you open the application for the first time, the synchronisation wizard helps you
define the settings and select the content to synchronise.
Define the content to synchronise
Select Options > Sync settings > Items to synchronise.
Synchronise manually
Select Synchronise.
Synchronise automatically
1 To activate automatic synchronisation, select Options > Sync settings > Auto-
sync.
2 To define how often to synchronise, select Options > Sync settings > Scheduled
sync interval.
Copy contacts or pictures between devices
With the Phone switch application, you can use Bluetooth to synchronise and copy
content between two compatible Nokia devices, free of charge.
Select Menu > Settings > Connectivity > Data transfer > Phone switch.
1 Select from the following:
— Synchronise content between two devices.

Device management 99
— Copy content from another device.
— Copy content to another device.
2 Select the device you want to connect to, and pair the devices. Bluetooth needs to
be activated.
3 If the other device requires a passcode, enter the passcode. The passcode, which
you can define yourself, must be entered in both devices. The passcode in some
devices is fixed. For details, see the user guide of the device.
The passcode is valid only for the current connection.
4 Select the content and OK.
Tip: If you save the details, it is easier to later exchange the same content with the same
device.
Protect your device
Set your device to lock automatically
Want to protect your device against unauthorised use? Define a lock code, and set your
device to lock itself automatically when you're not using it.
1 Select Menu > Settings and Phone > Phone mgmt. > Security settings >
Phone and SIM card.
2 Select Lock code, and enter a lock code. A minimum of 4 characters is required, and
numbers, symbols, and upper and lower case letters can be used.
Keep the lock code secret and in a safe place separate from your device. If you forget
the lock code and your device is locked, your device will require service. Additional
charges may apply, and all the personal data in your device may be deleted. For
more information, contact a Nokia Care point or your device dealer.
3 Select Phone autolock period, and define the length of time after which the device
is locked automatically.
Lock your device manually
In the home screen, press
Unlock your device
Slide the lock switch, enter the lock code, and select OK.
If the lock switch is out of reach, press the menu key, and select Unlock.
, select Lock phone, and enter the lock code.
Lock your device remotely
Forgot your device at work and want to lock it to prevent unauthorised use? You can
lock your device remotely using a predefined text message.

100 Connectivity
Enable remote locking
1 Select Menu > Settings and Phone > Phone mgmt. > Security settings >
Phone and SIM card > Remote phone locking > Enabled.
2 Enter the text message content. It can be 5-20 characters, and both upper and lower
case letters can be used.
3 Enter the same text again to verify it.
4 Enter the lock code.
Send the lock message
To lock the device remotely, write the predefined text, and send it to your device as a
text message.
To unlock your device, you need the lock code.
Connectivity
Internet connections
Define how your device connects to the internet
Your device automatically checks for and connects to an available known network when
a network connection is needed. Selection is based on the connection settings, unless
there are application-specific settings applied.
Select Menu > Settings and Connectivity > Settings.
Automatically switch to a known wireless local area network (WLAN) connection
when available
Select Switch to WLAN > Known WLANs only .
You can also connect to WLANs manually using the WLAN wizard application.
Only use a WLAN connection
For WLAN connections when in your home network, select Data use in home
netw. > WLAN only. For WLAN connections when outside your home network, select
Data use when roaming > WLAN only.
Automatically use a packet data connection when in your home network
Select Data use in home netw. > Automatic.
To set the device to request confirmation before connecting, select Data use in home
netw. > Always ask.
Request confirmation before using a packet data connection when outside your
home network
Select Data use when roaming > Always ask.
 Loading...