

Page 1
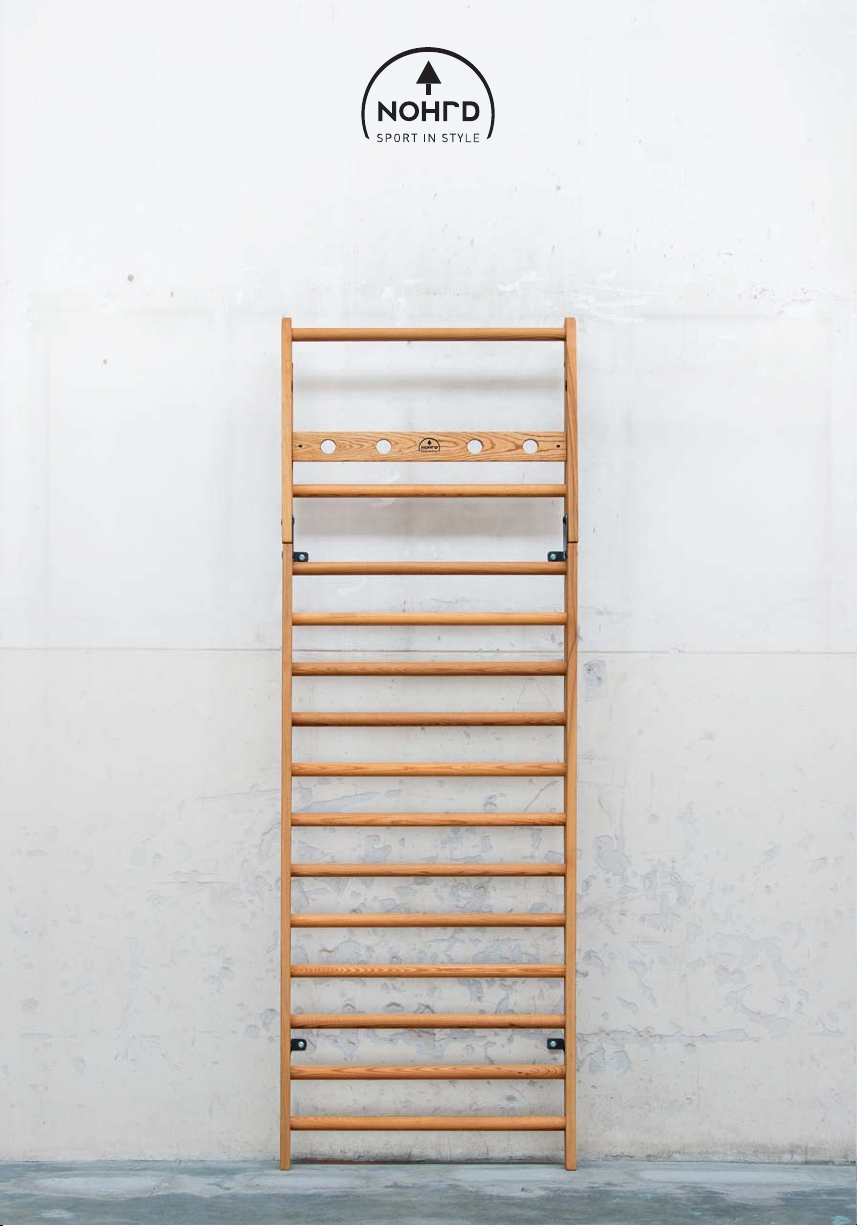
Wallbars
Aufbauanleitung
Manual
Page 2
2
Inhalt Seite/n
Content Pages
Produktdetails / Hinweise 3
Production details / General Information
Sicherheitshinweise 4-5
Safety Instructions
Handhabung 6-7
Handling Instructions
Montagehinweise / Service 8-9
Assembly Instructions / Service
Teileliste 10-11
Parts
Aufbauanleitung 12-31
Assembly
Page 3
3
Modellbezeichnung:
Wallbars
Model:
Wallbars
Maße, Gewicht:
Breite: 80 cm
Höhe: 230 cm
Tiefe: 13 cm
Gewicht 10 Sprossen: 19 kg
Gewicht 14 Sprossen: 21 kg
alien:
Materi
Holz, Kunststoff, Metall
Anlieferung:
Lieferung in 1 Karton
Funktionen / Anwendungsbereich:
Kraft- und Koordination
Wichtige Hinweise:
Das Gerät darf nur mit einer Wandhalterung verwendet werden.
Holz ist ein Naturmaterial und kann bei
der Benutzung Geräusche von sich geben.
Vorsicht vor Splittern. Das Holz kann
Unregelmäßigkeiten in der Farbe und in
der Form haben. Dies ist kein Grund zur
Beanstandung.
Wir empfehlen den Zusammenbau mit
zwei Personen vorzunehmen. Achten Sie
auf ge-nügend Platz zum Aufbauen. Wir
empfehlen das Verpackungsmaterial
aufzubewahren. Bei nicht Aufbewahrung,
bitte fachgerecht entsorgen.
Hinweis: Das Transportgewicht, sowie die
Menge der Sprossen und des Befestigungsmaterials variieren je nach gewünschter
Ausführung (10er Wallbars oder 14er
Wall-bars, s. Seiten 10 - 11).
Warnhinweis:
Nicht geeignet für Kinder unter 36 Monaten, da Erstickungsgefahr wegen verschluckbarer Kleinteile! Benutzung unter
unmittelbarer Aufsicht von Erwachsenen!
Montage durch eine erwachsene Person
und nur an feste Wände! Nicht für Personen über 120 kg geeignet.
Measurements:
Width: 80 cm
Height: 230 cm
Depth: 13 cm
Weight : 10 bars: 19 kg
14 bars: 21 kg
Materials:
Wood, Plastic, Metal
Delivery:
1 box
Function:
Strength and Coordination
Important Notes:
Please note that wood is a natural material,
and as such the Wallbars may show
irregularities in the pattern, colour and
shape. Wood can cause splinters.
Over time wood will settle, and is likely to
move. It is essential to check all fittings
regularly and to ensure that bolts do not
become loose.
We recommend assembling the Wallbars
unit with two adults. Ensure that you have
enough space to build the unit
comfortably. We recommend keeping the
packaging material until the unit is
satisfactorily in use.
WARNING:
This Wallbars are not suitable for children
under the age of 36 months as it contains
small parts that can be swallowed. Children
over 36 months should only use the Wall
Bars under adult supervision.
The assembly and attachment of the
Wallbars to the wall needs to be performed
by an adult. The Wall Bars are not suitable
for use by anyone weighing over 120 kg.
Page 4
4
Sicherheitshinweise:
Bitte lesen und beachten Sie unbedingt die folgenden Hinweise
zur Handhabung, zum Umgang mit
dem Gerät, sowie zur Wartung des
Gerätes.
Bitte bewahren Sie diese an geeigneter Stelle auf, um im Bedarfsfall
nachschlagen zu können.
Bei Beachtung der Sicherheitshinweise sowie der Montage- und
Inbetriebnahme-Anleitung ist der
Betrieb des Gerätes sicherheitstechnisch unbedenklich.
1. Das Gerät ist für ausgewachsene
Personen bestimmt und darf nur für
den bestimmungsgemäßen Zweck
des Körpertrainings verwendet werden. Wird dies nicht beachtet, kann
der Hersteller durch nicht bestimmungsgemäßen Gebrauch, nicht
verantwortlich gemacht werden.
2. Die Sicherheit kann durch beschädigte Bauteile beeinträchtigt sein.
Deshalb unterlassen Sie die Verwendung des Gerätes, im Falle, dass
eines der Originalbauteile nicht
funktionsfähig, beschädigt oder
verschlissen ist. Ersetzen Sie das
defekte Teil nur mit Original-Ersatzteilen vom Hersteller.
3. Bei falsch ausgeführten Reparaturen oder Ersatzteilen, die nicht
vom Hersteller stammen, können
Gefahren entstehen.
4. Selbstständige Eingriffe oder Manipulationen des Gerätes, können zu
Beschädigungen oder Beeinträchtigungen in der Nutzung führen oder
sogar gesundheitliche Schäden zur
Folge haben. Änderungen am Gerät
sollten ausschließlich von Fachpersonal durchgeführt werden.
5. Holz ist ein natürliches Material
und gibt dem Druck von Schrauben
leicht nach. Ziehen Sie deshalb
regelmäßig (mindestens alle 2
Monate) die Verbindungsschrauben
mit dem mitgelieferten Werkzeugen
nach. Kontrollieren Sie das Gerät
auf Fehler.
6. Alle Personen, vor allem Kinder,
sind auf die Gefahren der Nutzung
des Gerätes vorher hinzuweisen.
Kinder sollten das Gerät nie ohne
Aufsicht einer erwachsenen Person
nutzen.
7. Konsultieren Sie vor Nutzung des
Gerätes Ihren Hausarzt und überprüfen Sie Ihren Gesundheitszustand. Die falsche körperliche
Nutzung des Gerätes kann
zu Gesundheitsschäden führen.
Vor allem die übermäßige körperliche Beanspruchung kann gefährlich
sein. Bauen Sie Ihr Trainingsprogramm über einen längeren Zeitraum auf.
Page 5
5
Safety Instructions:
Please carefully read the following safety
instructions to ensure the correct use,
handling and maintenance of your new
fitness equipment. Keep this manual in
a safe place for future reference
1. The Wallbars are intended for adult
use only. The Wallbars are piece of
equipment designed to improve physical
fitness and should be used only for this
purpose. The manufacturer accepts no
liability for improper use of the Wallbars.
2. Damaged parts can affect the safety of
the Wallbars. You should not use the
Wallbars if any parts show wear,
damage, or are not fully functional. All
replacements parts must be sourced
directly from the manufacturer.
3. Incorrect repair work or spare parts
that are not from the manufacturer can
lead to damages, and physical injury. In
this case the manufacturer can not be
made liable.
5
ood is a natural material. Due to
. W
the movement of the wood over time all
bolts and screws must be checked, and
where appropriate tightened, on a
regular (minimum every two months)
basis. Please use the tools that you
received with the machine to do this.
Doing this will increase the lifespan of
your Wallbars.
6. Before you start using the Wallbars
make sure that you are in good physical health, where appropriate consult
your doctor.
4. Manipulation or changes from the
original design of the Wallbars can lead
to damages and/or physical injuries.
Changes of the machine should only be
carried out by professional employees
from the manufacturer.
Page 6
6
Handhabung:
Bitte lesen Sie diese Handhabungshinweise sorgfältig durch! Die hier
genannten Informationen helfen
Ihnen, das Gerät richtig zu verwen-den
und zu warten.
1. Nehmen Sie das Gerät erst in Betrieb, wenn die Montage komplett und
nach Anleitung erfolgt ist.
2. Erlernen Sie vor dem ersten Training die möglichen Einstellungsmöglichkeiten des Gerätes und nehmen
Sie die, für Ihre physischen
Gegebenheiten, richtigen Einstellun-gen
vor.
3. Vergewissern Sie sich vor jedem
Training, dass die Schrauben gut angezogen sind.
4. Stellen Sie das Gerät an einem
trockenen Ort auf. In Feuchträumen
können Metallteile des Gerätes rosten.
6. Kinder sollten das Gerät niemals ohne
Beaufsichtigung einer erwach-senen
Person nutzen. Während des Trainings
hat der Trainierende dafür zu sorgen,
dass keine andere Perso-nen
(insbesondere Kinder) den Trainingsablauf stören oder in das Gerät
greifen.
7. Für das Training empfehlen wir
geeignete Trainingskleidung und
Trainingsschuhe.
8. Sollte das Holz durch Schuhe oder
andere Gegenstände verunreinigt sein,
empfehlen wir Ihnen unser Pflegeset.
Die Verunreinigung kann mit dem
Schleifvlies entfernt werden und
anschließend wird die Stelle neu geölt.
Verwenden Sie nur Original-Öl des
Herstellers.
5. Nach jedem Training sollte das Gerät
mit einem feuchten und fri-schen Tuch
abgewischt werden. Verwenden Sie für
die Reinigung niemals aggressive oder
ätzende Reinigungsmittel.
Page 7
7
Handling Instructions:
Please read these handling
instructions carefully. The following
nformation will help you to use the
i
machine correctly.
1. Start using the Wallbars only
after fully assembling and reading the
safety instructions.
2. Learn about all different adjustment
possibilities your Wallbars have. Adjust
the machine to your physical conditions.
3. Check all fixings before using the
machine.
4. Keep the machine in a dry area.
Humidity (Swimming pool area or
similar) can lead to corrosion of metal
parts.
5. After every work out the Wallbars
should be cleaned with a moist cloth. Do
not use chemicals as they can damage the
surface of the material.
7. We recommend wearing suitable
training clothing and footwear when
exercising.
8. For maintaining the wooden
elements of your Wallbars we
recommend the use of our
maintenance kit.
6. Children must only use the Wallbars
under the supervision of a responsible
adult. Please ensure that when using the
Wallbars the space is clear around you,
and there is no risk of injury to yourself or
other people. Moving ropes, bungees,
weight stacks or other moving parts can
lead to severe physical injury.
Page 8
8
ntagehinweise:
Mo
Service:
Packen Sie das Gerät zuerst kom-plett
aus und überprüfen Sie ob
Transportschäden vorliegen. Das
Verpackungsmaterial sollte erst nach
kompletter Montage und zufriedenstellender Inbetriebnahme des
Gerätes fachgerecht entsorgt werden, da
dieses eventuell als
Transportverpackung für Rücksendungen dienen kann.
Prüfen Sie die Vollständigkeit der
Lieferung. Den Lieferumfang entnehmen Sie der nachstehenden
Teileliste. Sollten Teile fehlen oder
defekt angeliefert sein, wenden Sie sich
bitte an den Fachhändler oder den
Hersteller.
Sie sollten genügend Platz für den
Aufbau haben und die Montage sollte
ausschließlich durch eine er-wachsene
Person durchgeführt wer-den. Im
Zweifelsfall nehmen Sie die Hilfe einer
weiteren erwachsenen, technisch
begabten Person hinzu. Lesen Sie zuerst
die Montage-anleitung durch.
WaterRower GmbH OttoHahn-Straße 75 48529
Nordhorn
Telefon 0 59 21 - 17 98 400
[email protected]
www.nohrd.de
Nutzen Sie, wenn vorhanden, Ihr
Smartphone, um den QR Code auf der
Titelseite einzulesen (falls vor-handen)
und das Aufbauvideo anzuschauen.
Montieren Sie das Gerät nach Montageanleitung und folgen Sie der Bebilderung. Achten Sie auf Hinweise bei
den Bildern. Kontrollieren Sie nach
vollständiger Montage alle
Schraubverbindungen nochmals
sorgfältig nach.
Page 9
9
Assembly Instructions:
Service:
Unpack your machine carefully and
check for damages that may have
occurred in transportation. Keep the
packaging material until you have
successfully assembled the machine.
Check that all boxes have been delivered.
The delivery contents are listed on the
parts list in this manual. If you find
damaged parts or if parts are missing,
please contact your local dealer or the
manufacturer.
Make sure that you have enough space to
complete the assembly. The assembly
should be done by at least one adult.
Please read the assembly manual
carefully. Use your smart phone to scan
the QR code on the first page of this
manual (if available) to watch the
assembly video.
Assemble the machine by following the
steps in the manual. Read and follow
carefully the alerts.
Recheck all fixings after having
completed the assembly.
Machines that require wall assembly can
only be attached to load bearing walls.
Plywood or plaster walls are not suitable.
WaterRower GmbH
Otto-Hahn-Straße 75
48529 Nordhorn
GERMANY
Telefon +49 (0) 59 21 - 17 98 400
[email protected]
www.nohrd.de
Page 10
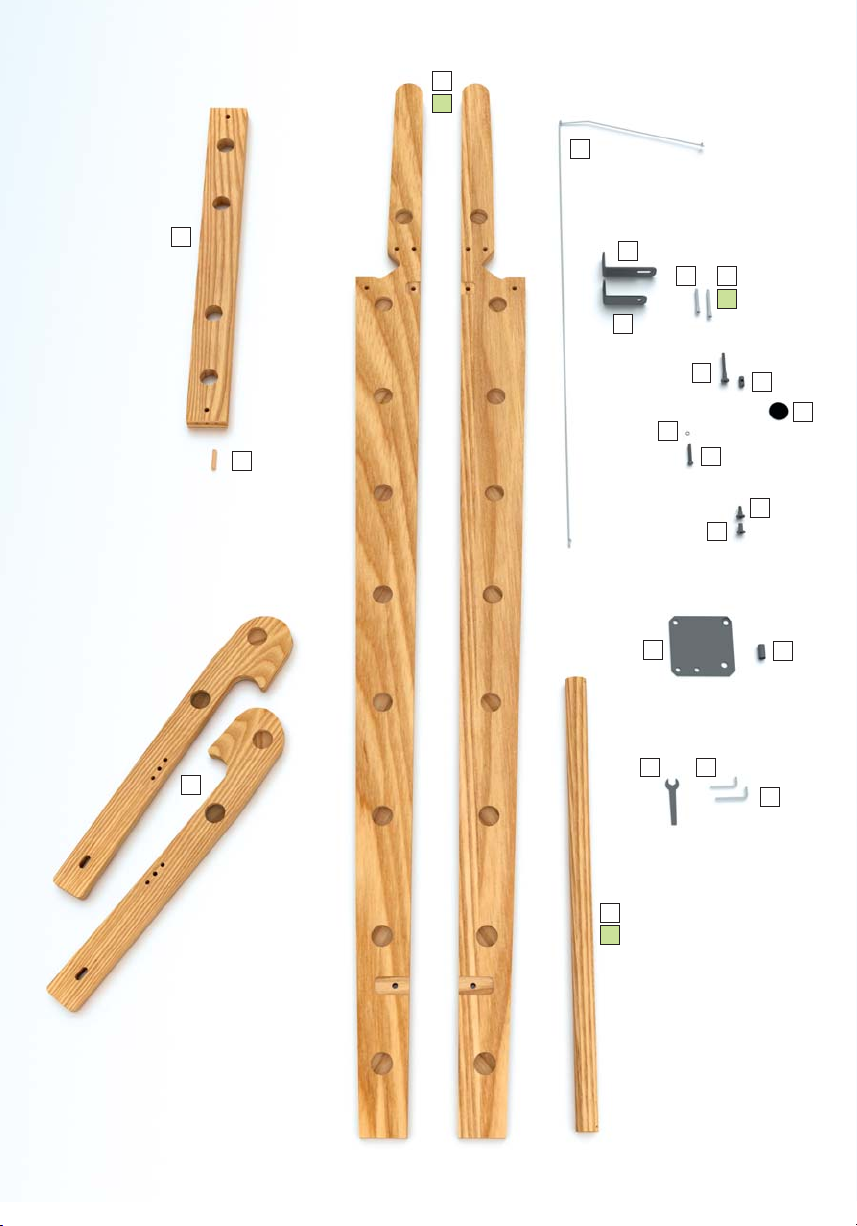
A
A
B
V
C
D
E
F
G H
H
I
J
K
L
M
N
O
P
Q
T
R S
U
U
10
Page 11
11
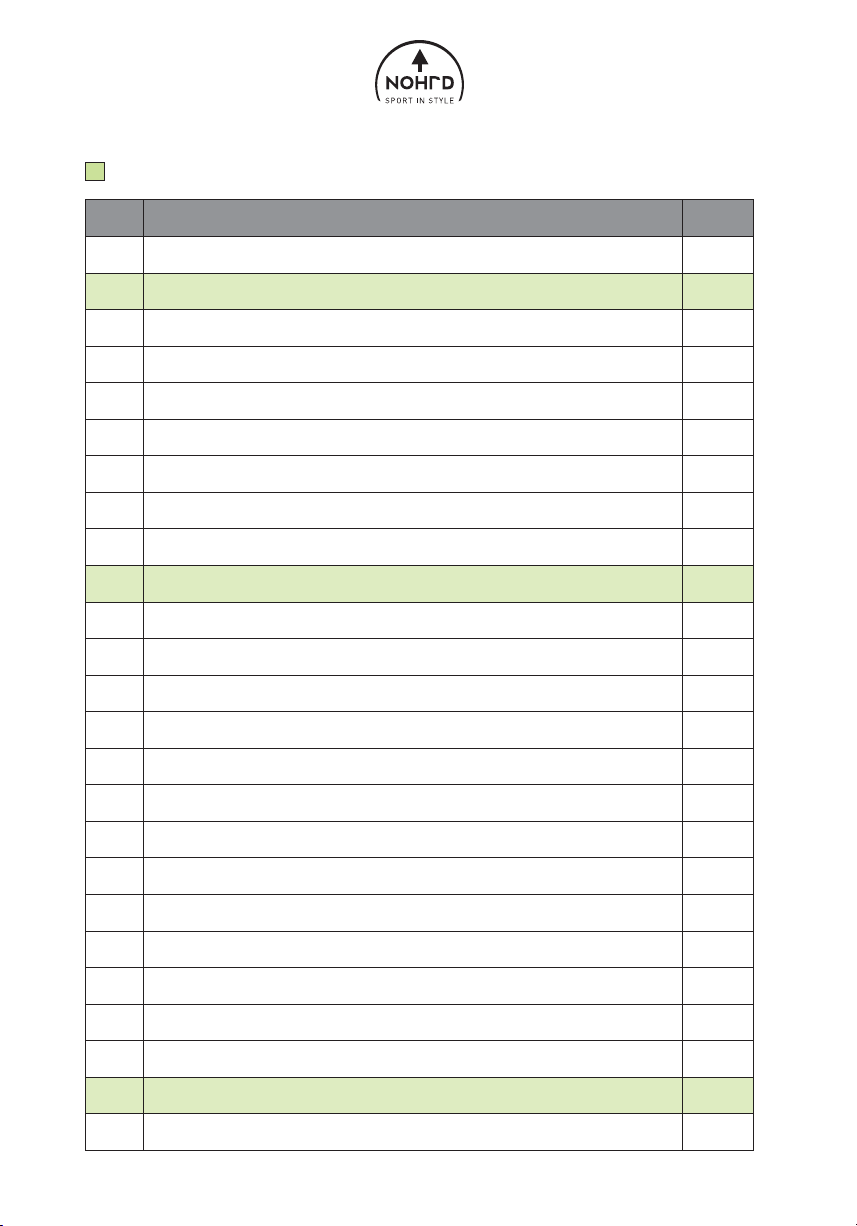
Teileliste
/ Parts
Pos.
Pos.
Einzelteile
Parts
Menge
Amount
A
Wange (links/rechts) für 10er Wallbars
Side string (left/right)
2
A
Wange (links/rechts) für 14er Wallbars
Side string (left/right) for 14 bars
2
B
Querholm Ausklapper
Beam
1
C
Dübel für Querholm
Peg for beam
4
D
Sicherungsseil
Security rope
2
E
Wandbefestigung unten
Long wallbracket
2
F
Wandbefestigung oben
Short wallbracket
2
G
50 mm Schraube
50 mm bolt
10
H
70 mm Schraube für 10er Wallbars
70 mm bolt
10
H
70 mm Schraube für 14er Wallbars
70 mm bolt for 14 bars
18
I
60 mm Schraube für Ausleger
60 mm bolt
2
J
Quergewindebolzen
Cross dowel
2
K
Plastikkappe
Plastic cap
2
L
Unterlegscheibe
Washer
4
M
Schraube für Wandbefestigung inkl. Dübel
Bolt and screw anchors
4
N
Flachkopfschraube
Pan head screw
10
O
Rundmutter
Round nut
10
P
Metallplatte
Metal plate
2
Q
Abstandshalter
Metal tube
2
R
13er Maulschlüssel
13 mm jaw spanner
1
S
5er Inbus-Schlüssel
Nr. 5 Allen key
2
T
4er Inbus-Schlüssel
Nr. 4 Allen key
1
U
Sprossen für 10er Wallbars
Dowels for 10 Wallbars
10
U
Sprossen für 14er Wallbars
Dowels for 14 Wallbars
14
V
Kippholme (links/rechts) für Ausleger
Folding arm (left/right)
2
abweichend von der Zeichnung links: für 14er Wallbars mit 14 Sprossen
Deviant from the drawing on the left for Wallbars with 14 bars
Page 12
12
1
1.1 1.2
A
A
U (4x)
U
G (4x)
Page 13
13
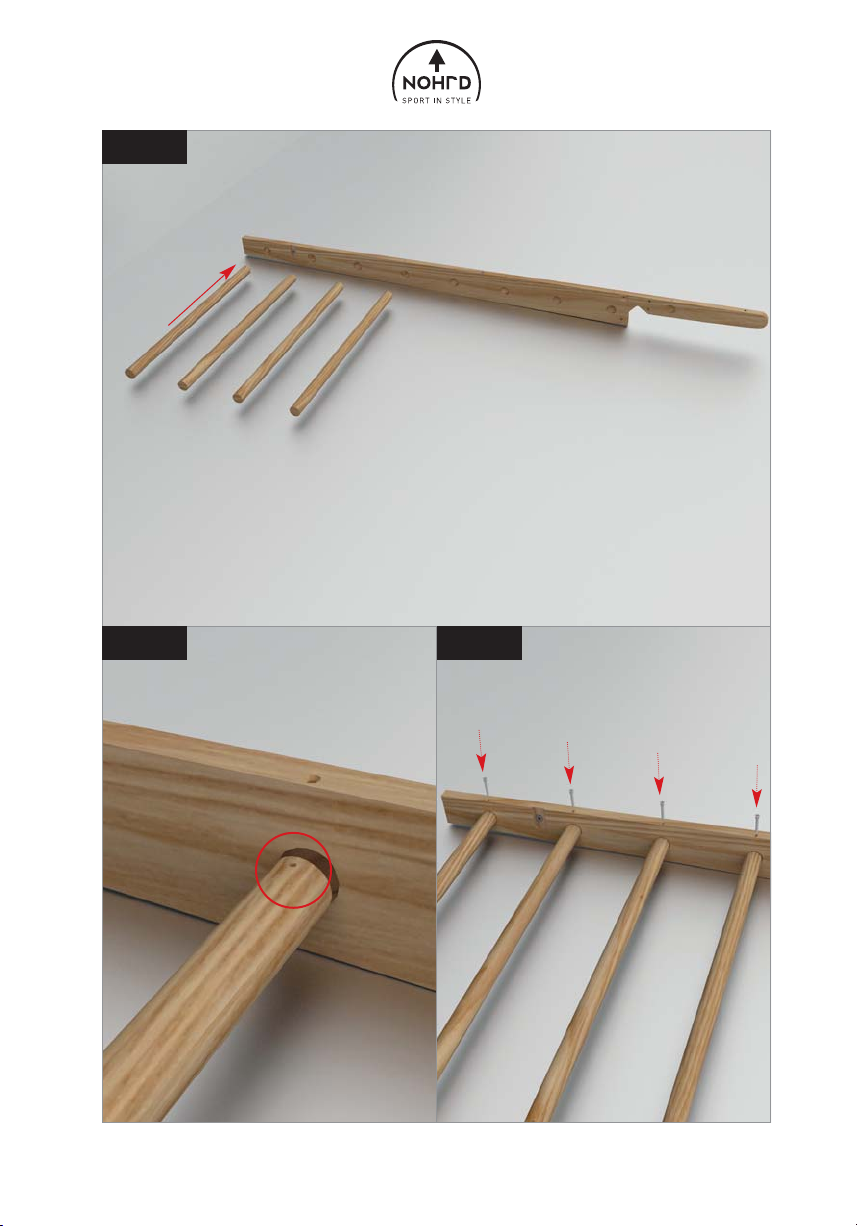
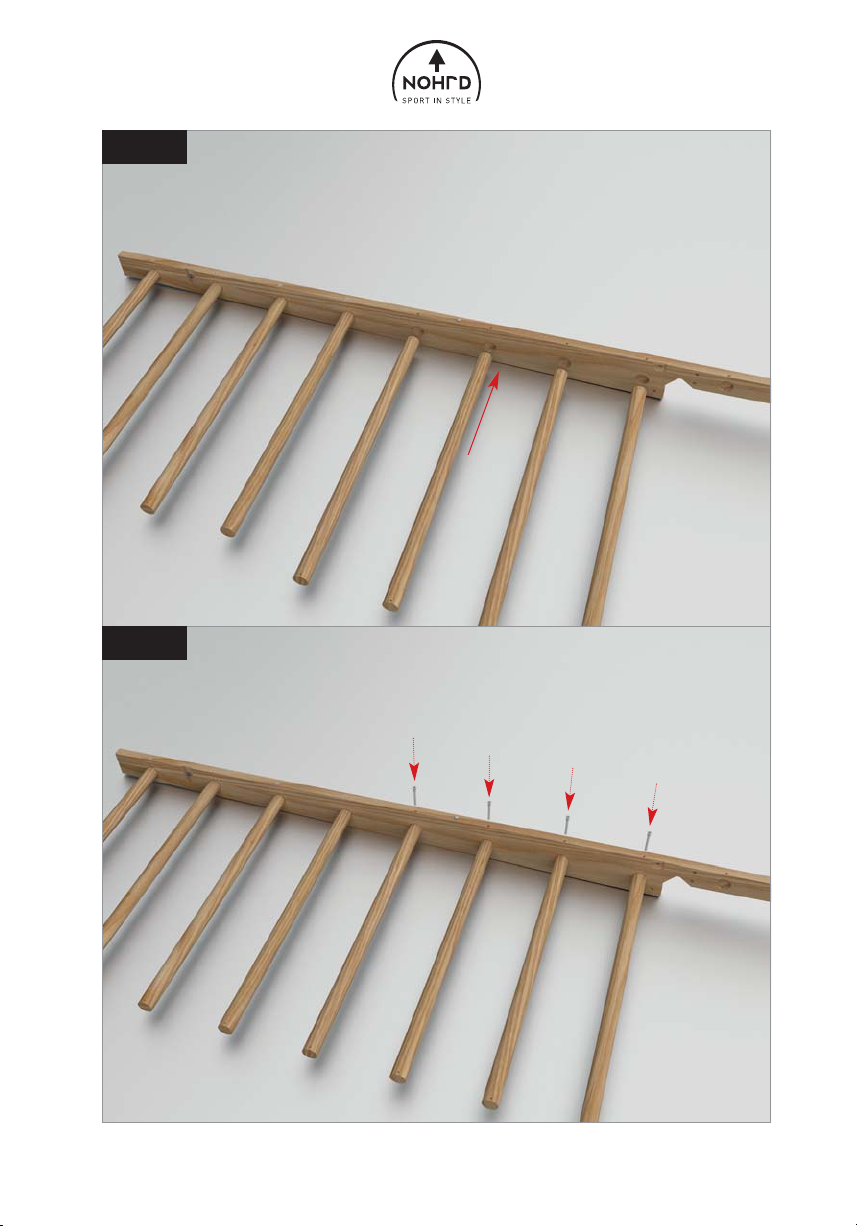
Schritt 1
Legen Sie die linke Seitenwange (A) mit der Rückseite nach oben auf den Boden und
führen Sie 4 x Stangen (U) ein.
Achten Sie dabei darauf, dass das Bohrloch nach oben zeigt.
Fixieren Sie die 4 Stangen (U)
mit dem 4mm Inbus-Schlüssel (T) und mit
4 x 50 mm Schrauben (G).
ACHTUNG: Achten Sie darauf, dass sie die kurzen Befestigungsschrauben (G) dafür
verwenden und nicht die verwechselbaren langen Schauben (H)!
Step 1
Lay the side string (A) with it’s back showing upward on the floor and insert
4x wood dowels (U) into the side bracket (A).
Make sure the drill holes of the dowels point upwards.
Tighten with the Allen key the wood dowels (U) and use 4 x the short bolts (G).
ATTENTION: Make sure you are using the short bolts (G).
Please do not mix up with the long bolts (H)!
Page 14
14
2
2.1
A
U
10 Sprossen: U (4x)
14 Sprossen: U (8x)
10 dowel: U (4x)
14 dowel: U (8x)
10 Sprossen: H (4x)
14 Sprossen: H (8x)
10 dowel: H (4x)
14 dowel: H (8x)
H
Page 15
15
Schritt 2
Führen Sie jetzt die nächsten Stangen (U) (bei einer 10er Sprossenwand sind es 4
Stangen, bei einer 14er Sprossenwand sind es 8 Stangen) ein.
Verwenden Sie nun die langen 70 mm Befestigungsschrauben (H).
tep 2
S
Insert the next dowels (U) into the side string (A).
Use 4 dowels when you have a 10 dowel wallbars and 8 dowels when you have a 14
dowel wallbars.
Use the long bolts (H) to fix the dowels to the side bracket.
Page 16
16
3
3.1
U
A
G
50 mm
Page 17
17
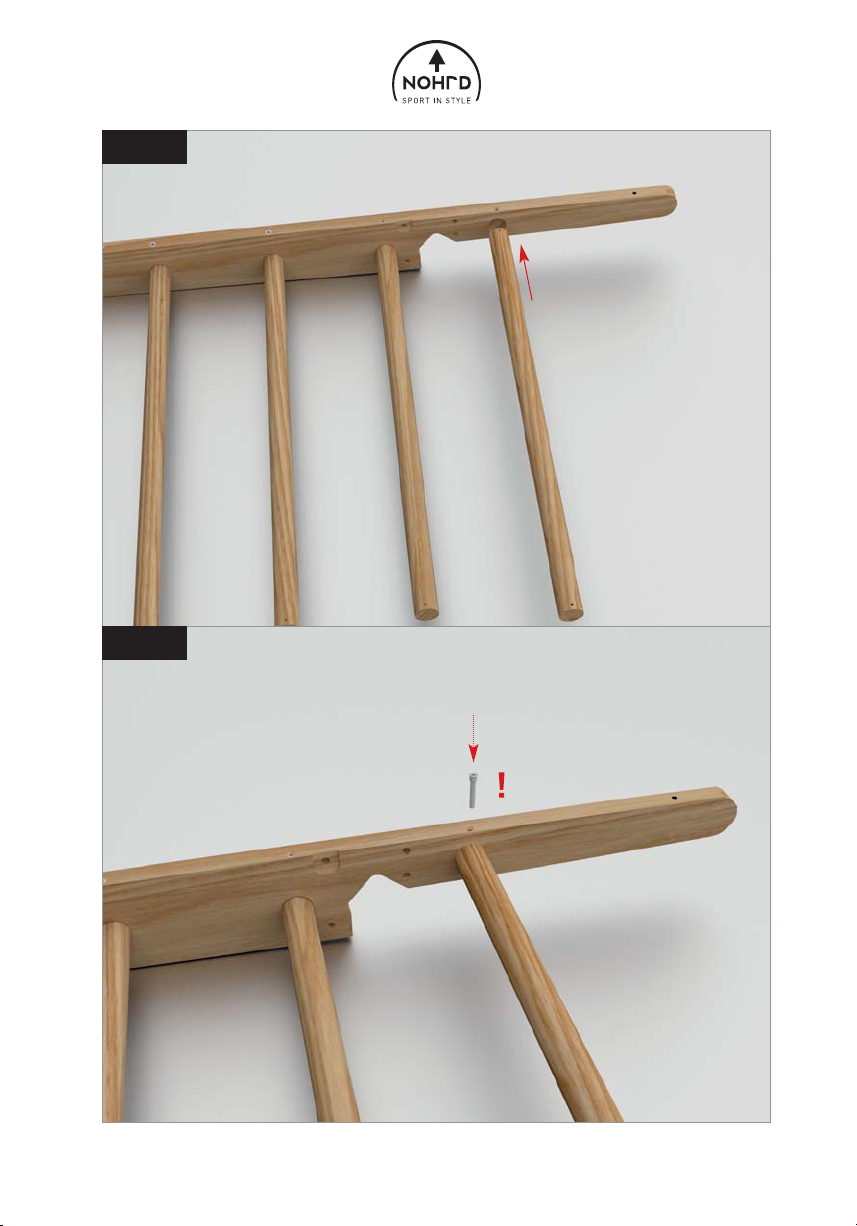
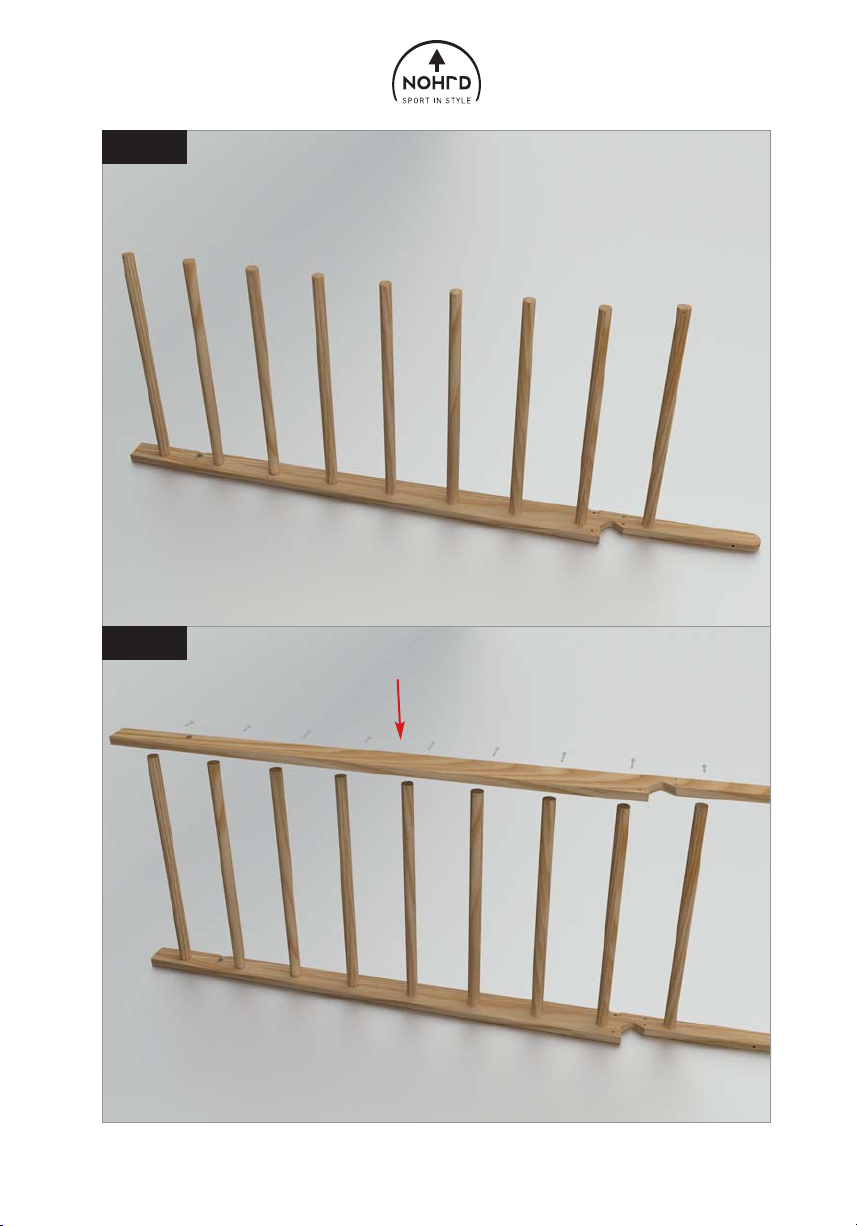
Schritt 3
Führen Sie nun die letzte Stange (U) in die Wange (A) ein.
Fixieren Sie diese wieder mit der kurzen 50 mm Befestigungsschraube (G).
tep 3
S
Now insert the last dowel (U) into the side string (A).
Fix this dowel with a short bolt (G).
Page 18
18
4
4.1
A
A
G
G
G
G
H
H
H
H
G
A
10 Sprossen: G (5x)
14 Sprossen: G (5x)
10 dowel G (5x)
14 dowel: G (5x)
10 Sprossen: H (4x)
14 Sprossen: H (8x)
10 dowel: H (4x)
14 dowel: H (8x)
Page 19
19
Schritt 4
Stellen Sie die Sprossenwand nun auf seitlich auf.
Legen Sie die zweite Wange auf die Sprossen und führen Sie alle Stangen ein.
Befestigen Sie diese nun mit den dementsprechenden Befestigungsschrauben (G) und
(H).
ACHTUNG: Die unteren 4 Sprossen und die oberste Sprosse werden mit den kurzen
50 mm Befestigungsschrauben (G) montiert.
tep 4
S
Stand the wallbar on its side.
Insert the second side string into the dowels. Tighten the dowels with the bolts
(G) and (H).
ATTENTION: The four first dowels and the last dowel need to be attached
with the short bolts (G).
Page 20
20
5
5.1
5.3
5.2
H
H
U
B
V
V
I
J
J
I
✔
Page 21
21
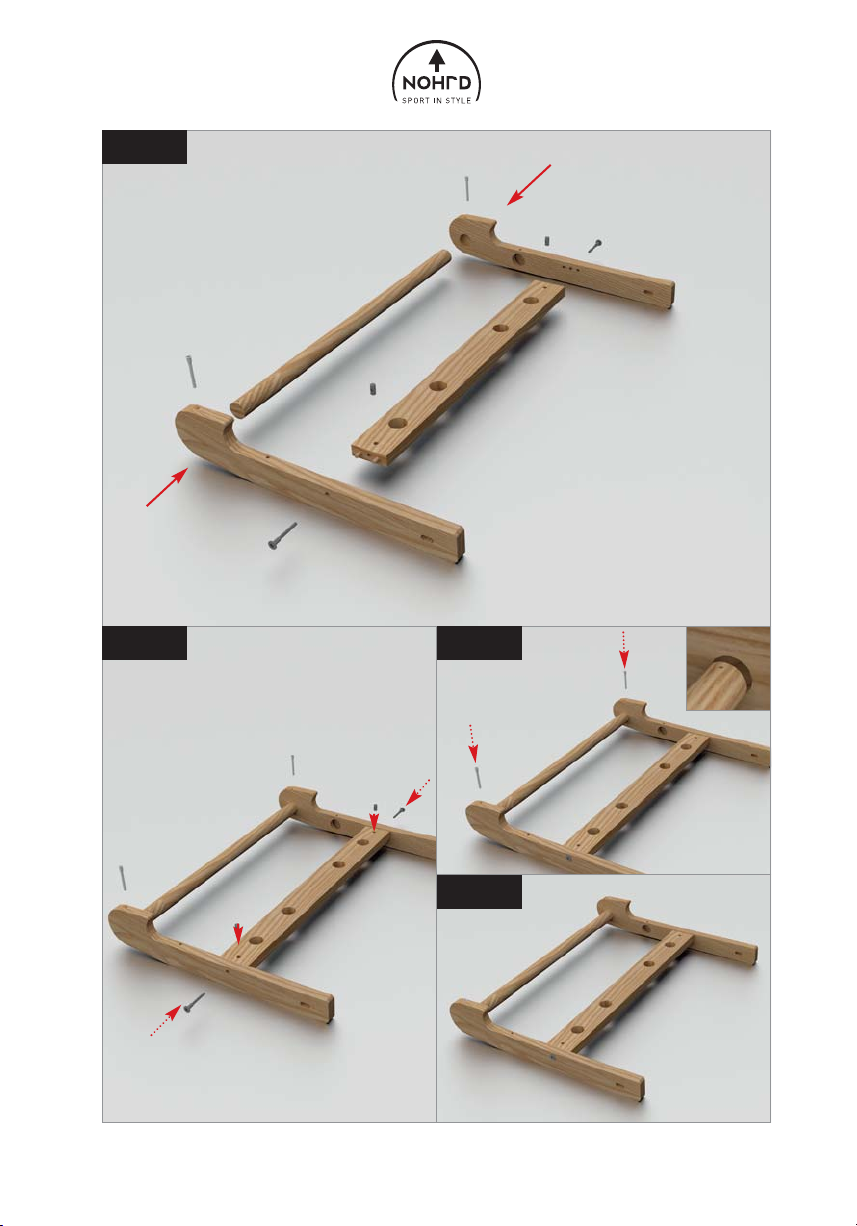
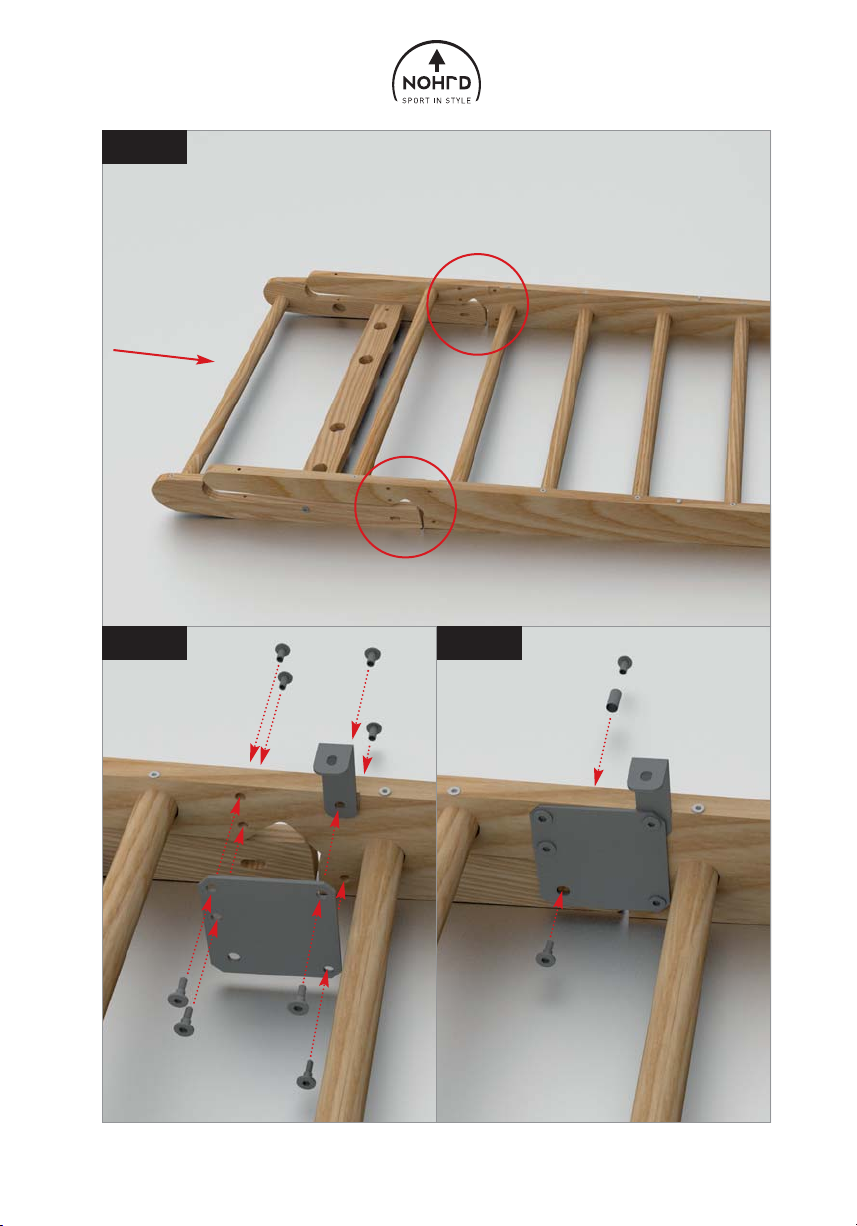
Schritt 5
Setzen Sie nun den Ausleger wie abgebildet zusammen.
In die dafür vorgesehenen Löcher am Querholm (B) werden die beiden metallenen
Quergewindebolzen (J)
eingesteckt.
(Es kann produktionstechnisch vorkommen, dass diese bereits vormontiert sind).
Danach befestigen Sie den Querholm (B) an den beiden Kippholmen (V) mit den 60 mm
Schrauben (I).
Die Befestigung des Rundstabes (U) erfolgt mit den langen 70 mm Befestigungs-schrauben
(H).
Step 5
Now assemble the folding arm assembly as in the following pictures.
Reinsert the metal cross dowels (J) into the holes in the wooden beam (B) in the event that hey
have fallen out during transportation. Now fix the beam to the folding arms (V) with the
bolts (I).
Fix the last wooden dowel (U) with the long bolts (H).
Page 22
22
6
6.1 6.2
Q
F
P
N (4x)
O (4x)
N
O
Page 23
23
Schritt 6
Legen Sie nun, wie abgebildet, die Kippholm-Vorrichtung unter die Sprossenwand.
Verschrauben Sie zuerst die Metallplatte (P) und die kurze Wandhalterung (F)
mit dem
Hauptholm (A). Dazu verwenden Sie 4 x Flachkopfschrauben (N) und 4 x Rund-muttern
(O) und den 5er Inbus-Schlüssel (S).
Nutzen Sie dazu auch den zweiten Inbus-Schlüssel (S), damit die Flachkopfschrau-ben und
Rundmuttern angezogen werden können.
Hinweis: Die Schrauben vorerst nur handfest anziehen. Nach der kompletten Montage und
Befestigung an der Wand, den Kippholm kurz ausklappen und
leicht belasten, damit dieser in seine endgültige Position rutscht. Danach alle Schrauben fest
anziehen.
Befestigen Sie nun die Kippholme an der Metallplatte (P). Stecken Sie zuerst
den Abstandhalter (Q) in das längliche Bohrloch. Anschließend schrauben Sie
mit 1 x Flachkopfschraube (N) und 1 x Rundmutter (O) die Kippholme fest an die
Metallplatte (P).
Wiederholen Sie den Vorgang für die gegenüberliegende Seite.
Step 6
Attach the folding arm assembly to the body of the WallBars.
Fix the metal plate (P) and the short wall bracket (F) to the side string (A) by using
4 x pan head screw (N) and 4 x round nuts (O). Use the second allen key (S) to fasten the
screws.
Note: After completeling assembly and mounting the Wall Bars to the wall, fold out the arm
and carefully pull it into its final position. Tighten the screws firmly.
Fix the folding arm assembly to the metal bracket (P) by inserting the small metal tube (Q)
first and then tighten with 1 x pan head screw (N) and 1 x round nut (O).
Page 24
24
7
7.1 7.2
✔
E
Page 25
25
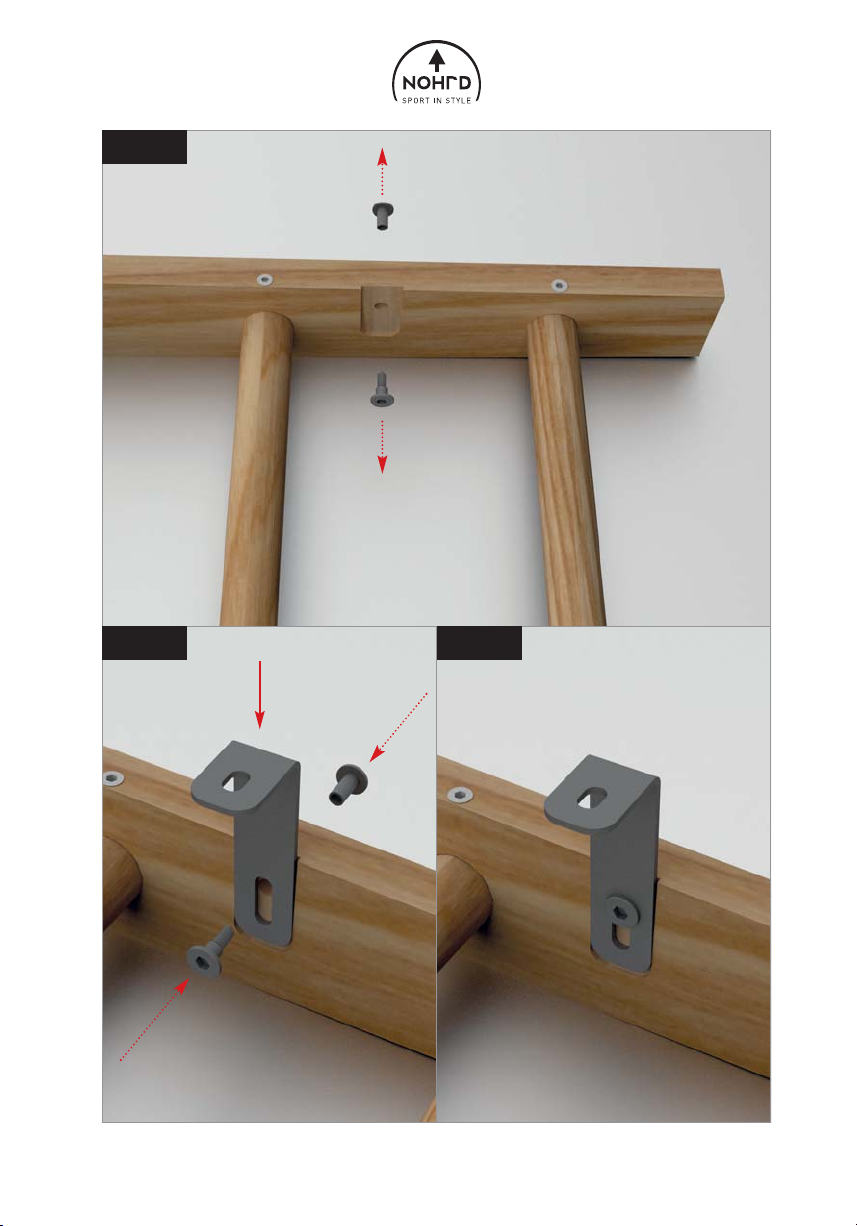
Schritt 7
Entfernen Sie zuerst die beiden eingesetzten Flachkopfschrauben und Rundmuttern mit den
5er Inbus-Schlüsseln (S)
.
Setzen Sie nun die lange Wandhalterung
(E) ein und verschrauben Sie diese wieder mit den
in Schritt 7 entfernten Flachkopfschrauben und Rundmuttern.
tep 7
S
Unscrew first the two pan head screws and round nuts.
Put the long wallbracket (E ) in place and tighten with the two pan head screws and
round nuts you unscrewed in step 7.
Page 26
8.2 8.3
8 8.1
26
4 x (2 x oben, 2 x unten)
4 x (2 x top, 2 x bottom)
10 mm Bohrloch
10 mm drill hole
M
M
L
Page 27
27
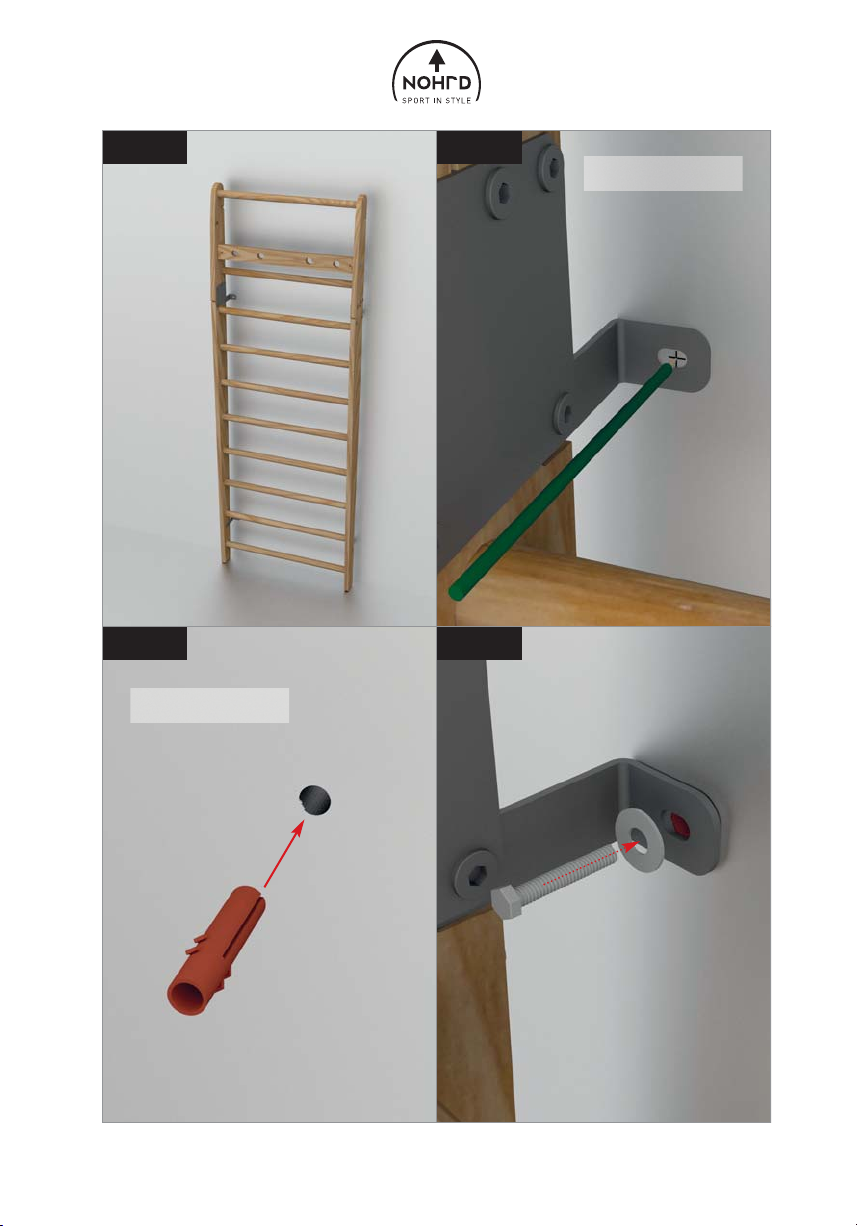
Schritt 8
Befestigen Sie nun die Sprossenwand an einer festen Wand
(Stein, Beton, Massiv-Holz).
ACHTUNG: Nicht geeignet sind z. B. Leichtbauwände aus Holz oder Rigibs.
Der Hersteller übernimmt keine Haftung für Schäden die auftreten, im Falle dass die
Wallbar falsch oder nicht fachgerecht montiert wurde.
Halten Sie die Sprossenwand gegen die Wand und zeichnen Sie die Bohrlöcher an.
Bohren Sie nun mit einem 10 mm Bohrer die Löcher.
Stecken Sie die mitgelieferten Dübel in die Löcher.
Schrauben Sie nun die Sprossenwand mit den Schrauben (M)
und den Unterleg-scheiben
(L) fest. Verwenden Sie hierfür den Maulschlüssel (R). Ziehen Sie dazu die Schrauben fest
an und vergewissern Sie sich von der Festigkeit.
Step 8
Now mount the WallBars to a load bearing wall.
ATTENTION: You should never fix the WallBars against a light plywood or
plasterboard wall. The manufacturer can not be made liable for wrongly
fixed WallBars. If in doubt we recommend consulting a building professional.
Hold the WallBars against the wall and mark the position of the drill holes.
Drill the holes for the fixings with a 10 mm drill. Insert the screw anchors.
Fix the WallBars to the wall with the bolts (M) and the washer (L).
Tighten the screws thoroughly and recheck the WalllBars are fixed tightly to the wall.
Page 28
28
9
9.1
9.2
✔
D
D
D
A
A
A
A
Page 29
29
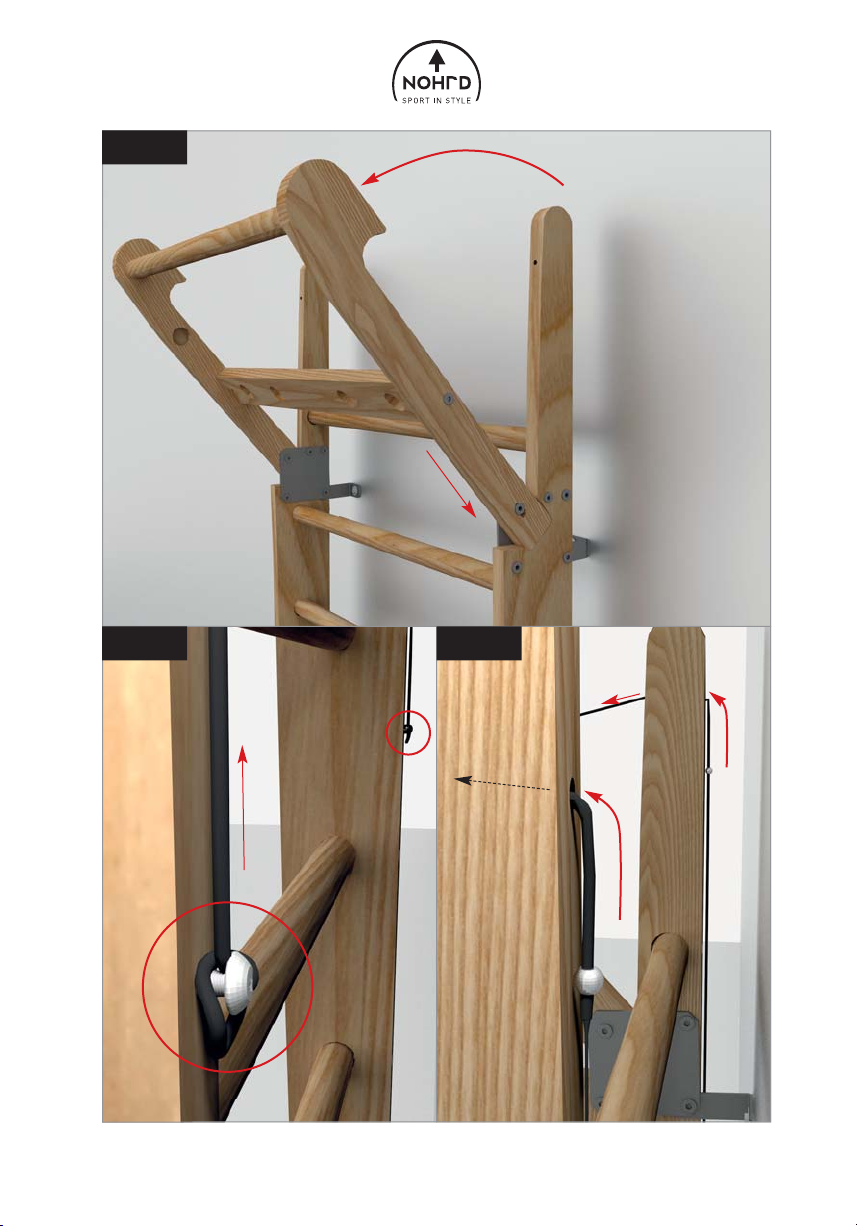
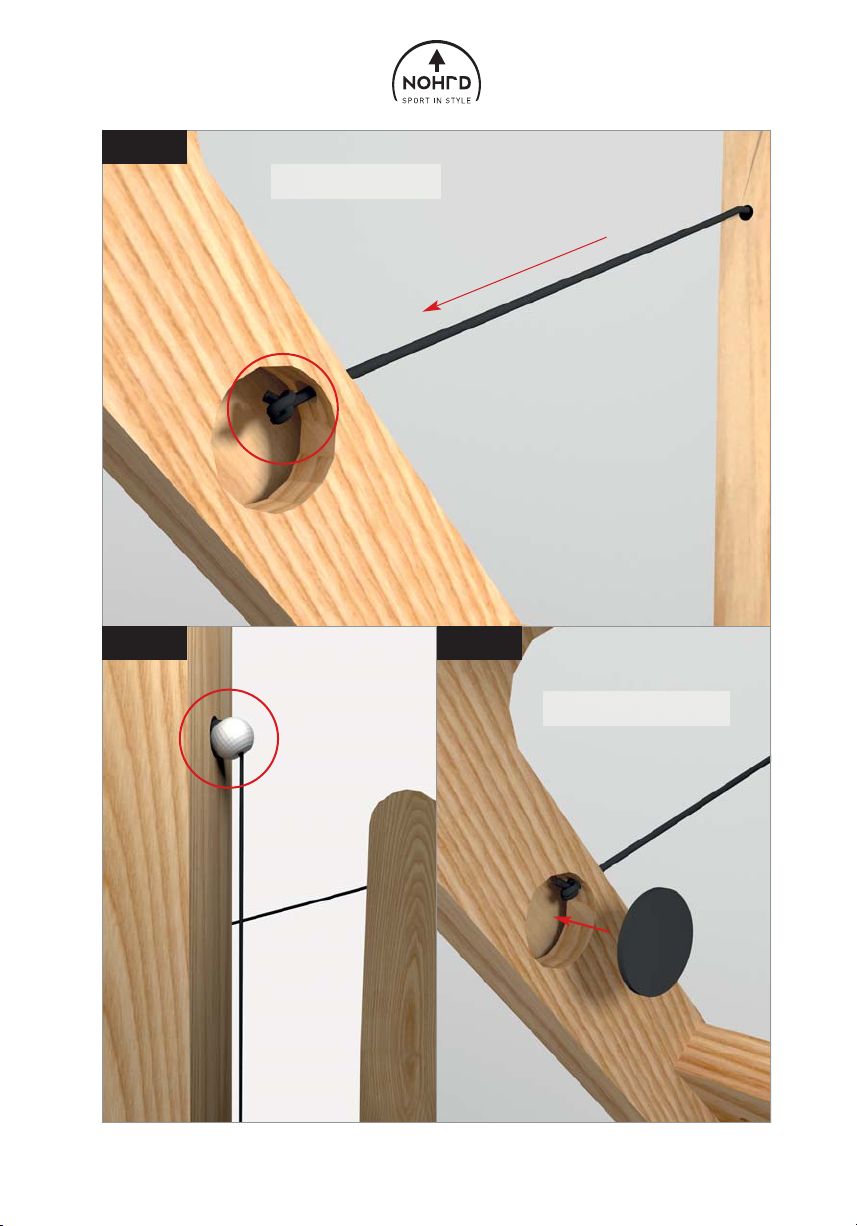
Schritt 9
Klappen Sie nun den Ausleger aus, indem Sie diesen leicht anheben.
Diesen anschließend fest einrasten.
Hängen Sie nun das Ende des Gummibandes (D) in die Halterungsschrauben an der
Rückseite der Wangen (A) ein.
Führen Sie das Sicherungsseil (D) durch die Wangen (A) wie abgebildet.
ACHTUNG: Die oberste Sprosse nur im ausgeklappten Zustand belasten.
Ansonsten Verletzungsgefahr.
HINWEIS: Durch die Ausleger-Arretierung (separates Zubehör, im Internet
unter www.nohrd.de bestellbar) lässt sich der Ausleger im eingeklappten
Zustand fixieren und belasten.
Step 9
Fold out the folding arm assembly by slightly lifting it up.
Attach the loop at the end of the bungee to the screw at the back of the wooden
string (A).
Thread the security rope through the hole in the wooden string (A).
Attention: Only use when the side arms are folded out. Do not hang on the top bar, when
folded in! Risk of injury!
Page 30
30
10
10.1 10.2
Knoten am Ende machen.
Make a knot at the end.
Das Seil muss stramm sein.
The rope must be tight.
✔
Page 31
31
Schritt 10
Führen Sie das Sicherungsseil durch den Kippholm (V) und machen Sie einen festen Knoten
am Ende des Seils.
Stellen Sie sicher, dass die Seilstopper an der Rückseite der Wangen (A) am Loch anschlagen.
Sollte dies nicht der Fall sein, lösen Sie die Seilstopper und bringen Sie diese in Position.
Es ist wichtig, dass im ausgeklappten Zus
tand des Auslegers, die Seilstopper stramm am
Loch anschlagen.
Verschließen Sie das Knotenloch am Kippholm (V) mit der Kunststoff-Verschlusskappe.
Step 10
Thread the security rope through the hole in the folding arm (V) and make a tight
knot at the end of the rope.
Now make sure the stopper at the back of the security rope is tight. To check this, fold out the
folding arm assembly. Make sure the security rope is tight and the stopper at the back of the
wooden bracket (A) is tight.
Use the plastic cap to cover the holes on side of the folding arm (V).
Page 32
WaterRower GmbH · Otto-Hahn-Straße 75 · 48529 Nordhorn · Germany
Telefon +49 (0) 59 21 - 17 98 400 · Fax +49 (0) 59 21 - 17 98 411
www.nohrd.de · [email protected] · www.nohrd.com
Preise im Online-Shop ersichtlich: www.nohrd.de
Please order online. Prices available in the online shop: www.nohrd.com
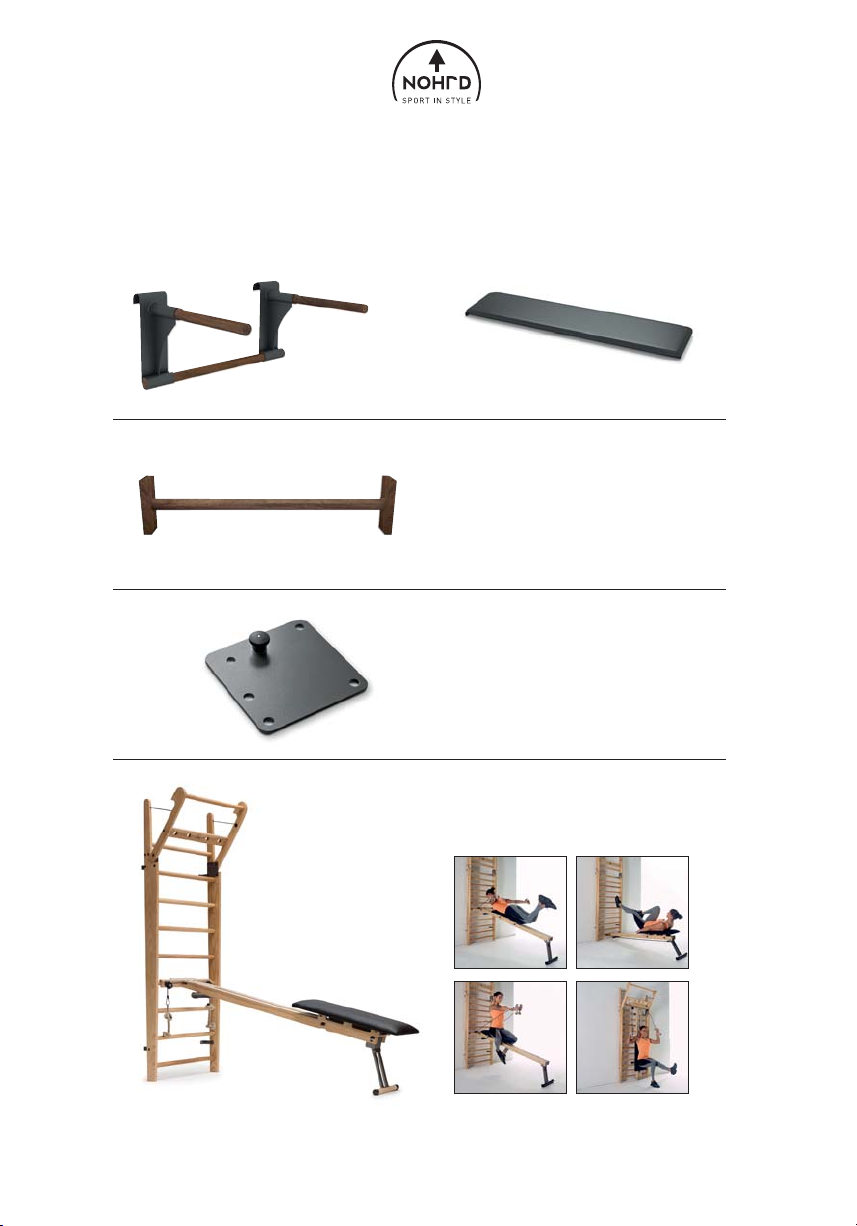
Verfügbares Zubehör / Available Accessory
Multi-Adapter
Multi-Adapter
21,5 cm Wallbars Verlängerung
21,5 cm Wallbars extension
Ausleger-Arretierung
Folding arm assembly fixation bracket
Schrägbank
Slanted bench
Combi-Trainer
Combi-Trainer
 Loading...