

Noctua NM-AM4 UxS| Installation Manual
Dear cus tomer,
Congratulations on choosing a Noctua cooler for your A MD AM4 system.
We always like to think of our coolers as safe long-term investments: Not
only are they built to last, we also provide upgrade kits so that you can
keep using your trusty Noctua he atsink when you do a system upgrade.
Enjoy your Noc tua cooler on AM4!
Yours sincerely,
Roland Mos sig, Noctua CEO
This SecuFirm2™ Mounting-Kit for A M4 is compatible with the NH-U14S,
NH-U12S and NH-U9S. For detailed, up to date compatibility information
please visit: www.noctua.at/am4
This manual will guide you through the installation process step by step
using an NH-U12S heat sink as an example. The ins tallation procedure is
identical for all compatible models.
Prior to installing the cooler, please consult the compatibility list on our
website www.noctua.at/compatibility and verify that the cooler is fully
compatible with your motherboard. Please also make sure that your
PC case of fers sufficient clearance for the cooler and that there are no
compati bility issue s with any other comp onents (e.g. tall RA M modules).
Double check that the heatsink and fan clips do not make contact with
the VGA card or other PCIe cards. Noctua cannot be held responsible for
any damage or losses caused by compatibility issues.
Step 1
Removing the stock retention module
First remove the motherboard’s stock CPU cooler retention module by
unscrewing it from the backplate. The SecuFirm2™ mounting system will
install directly to the stock backplate, so please keep it in place.
If your motherboard does not include a stock backplate, please contact our
customer support at support@noctua.at.
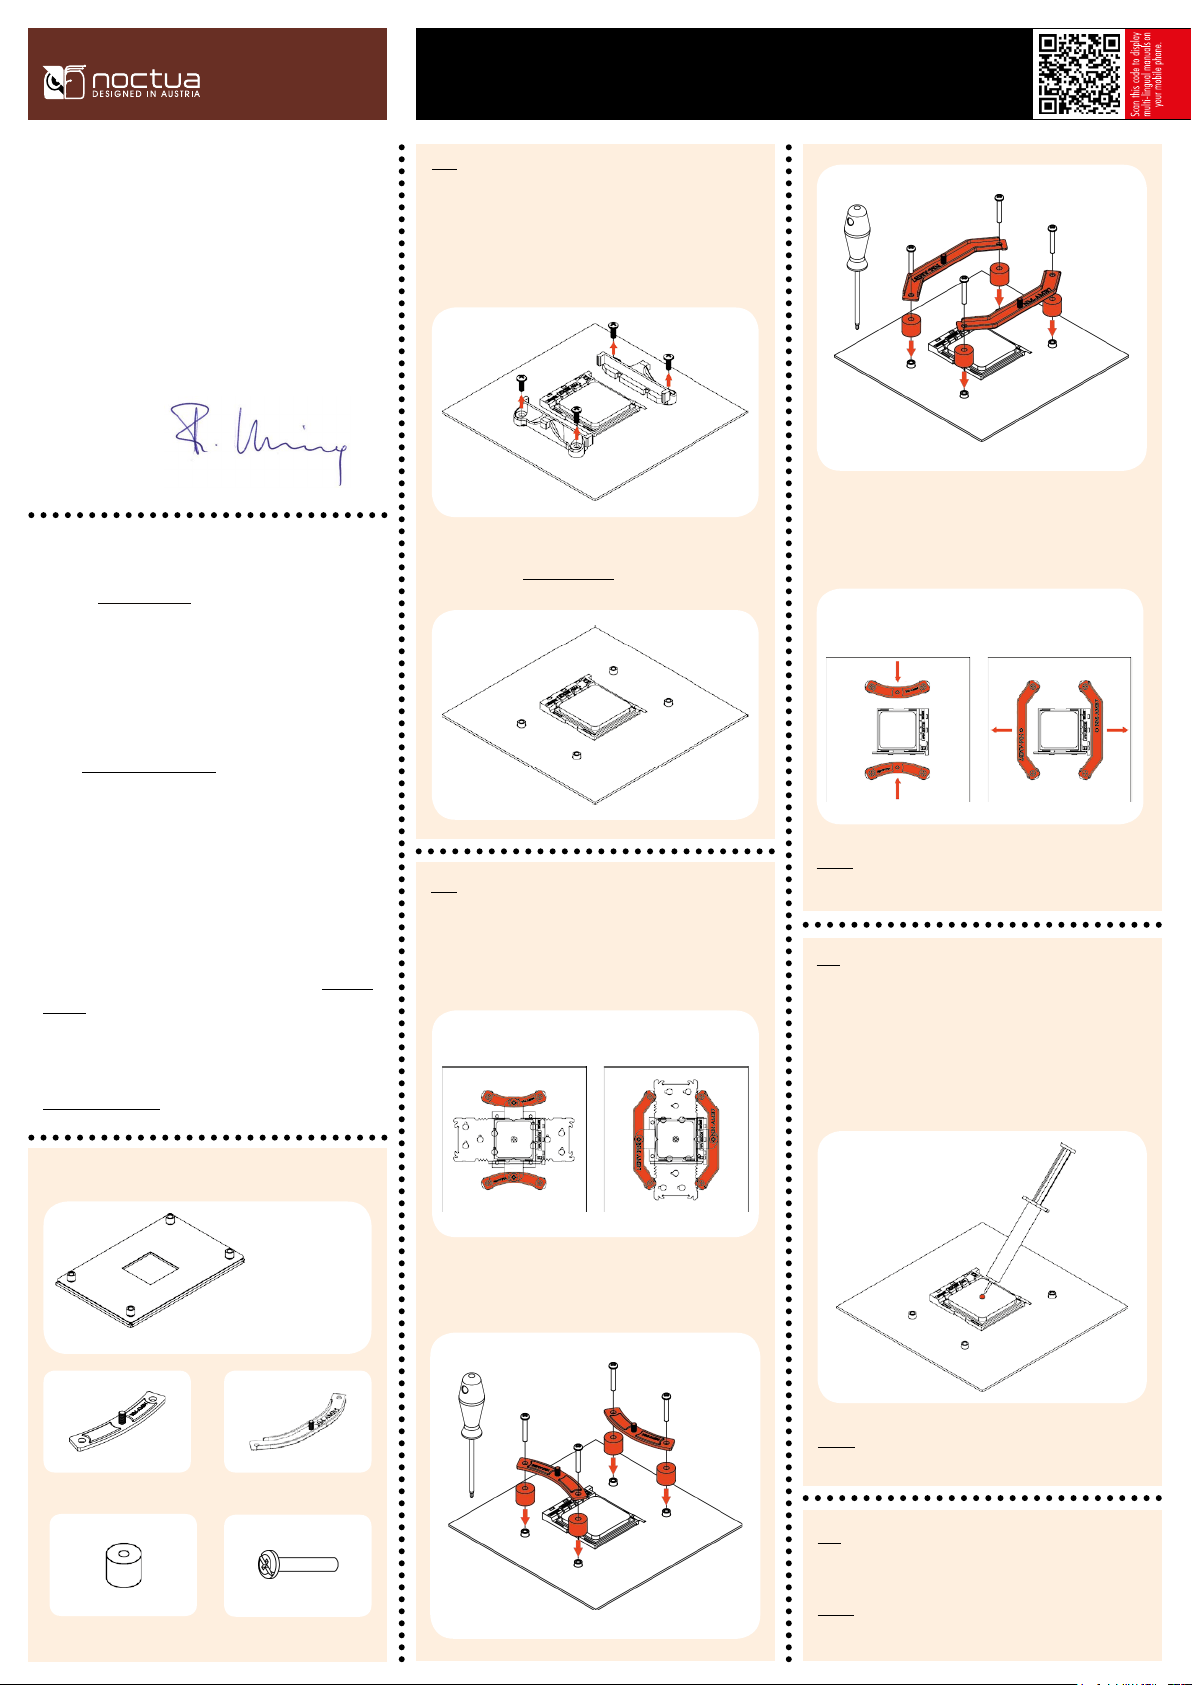
Step 2
Attaching the mounting bars
NM-AMB7
For the short NM-AMB6 mounting bars, make sure that the curved sides
are pointing inwards. For the long NM-AMB7 mounting bars, make sure
that the curved sides are pointing outwards.
NM-AMB7 mounting barsNM-AMB6 mounting bars
Caution: Gently tighten the screws until they stop, but don’t use excessive
force (max. torque 0.6 Nm).
Should you encounter any difficulties, please check the FAQs on our
website and don’t hesitate to contact our support team at support@
noctua.at. Noctua cannot be held responsible for any damage or losses
caused by compatibility issues.
Multilingual versions of this manual are available on our website:
www.noctua.at/manuals
Required mounting parts:
AMD stock backplate
(pre-installed on the motherboard)
2x NM-AMB6 mounting bars
2x NM-AMB7 mounting bars
Choose either the short NM-AMB6 or the long NM-AMB7 mounting bars
according to the desired final orientation of the cooler.
Orientation NM-AMB7Orientation NM-AMB6
First put the plastic spacers onto the screw threads of the backplate, then
fix the mounting bars using the four long screws.
Step 3
Applying thermal paste
If there are residual traces of thermal paste or thermal pads on your CPU
on the base of the heatsink, please clean them off first. Then press a small
drop (4-5mm diameter) of thermal compound (e.g. Noctua NT-H1) onto
the centre of the heatspreader.
Caution: Applying too much thermal paste will lower heat conductivity and
cooling performance!
Step 4
Fastening the heatsink to the CPU
4x NM-APS4 plastic spacers
4x NM-ALS1 screws
NM-AMB6
Caution: If you’re using the cooler for the first time, please take off the
protection cover at the bottom side of the heatsink first!

Noctua NM-AM4 UxS| Installation Manual
Put the heatsink onto the CPU and screw it to the screw threads of the
mounting bars. Please note that with some cooler models, it may be
necessary to remove the fan(s) in order to reach the screws.
NM-AMB6
Warranty, Support and FAQs
Even with high-grade products and strict quality control, the possibility of
defects cannot be eliminated entirely. Therefore, we aim at providing the
highest possible level of reliability and convenience by offering a warranty
period of 6 years and direct, fast and straightforward RMA service.
Should you encounter any problems with your Noctua product, please
check the FAQs on our website (www.noctua.at/faqs) and don’t hesitate to
contact our support team at support@noctua.at.
NM-AMB7
Caution: Tighten the screws until they stop.
Step 5
Installing the fan
Install the fan as described in the cooler manual. If you don’t have it at
hand, you can download it at www.noctua.at/manuals.
Should I take the cooler off before transporting
my system?
As it is not possible to reliably calculate or control the forces that
act upon a system during transport (e.g. in shipping), we generally recommend, for safety reasons, taking off coolers with a total
weight of more than 700g (incl. fan). If the weight of the heatsink
without fan is below 700g and the total weight including fan is
above 700g, we recommend taking off the fan from the heatsink
in order to reduce the weight below 700g. Noctua cannot be held
responsible for any damage that may arise due to excessive stress
during transport if you keep the heatsink installed.
 Loading...