


INTRODUCTION
ENGLISH ........................................................................................ 04
SVENSKA ....................................................................................... 06
DEUTSCH .......................................................................................08
FRANÇAIS .......................................................................................10
ESPAÑOL ........................................................................................12
ABOUT NOC S
Nocs offers audio products and accessories for portable multimedia
devices. We believe in lasting design and moderate pricing.
CON TACT
For further information about the Nocs brand and line-up, please
send us an e-mail at info@nocs.se or contact us through any of below
services.
www.nocs.se
www.facebook.com/nocssthlm
www.twitter.com/nocssthlm
Nocs AB
Frejgatan 17
113 49 Stockholm
Sweden
SAFETY INSTRUC TIONS
Read, follow and keep these ins tructions.1.
Do not use this device near any sort of liquids.2.
Do not expose this device to dripping or splashing and ensure that 3.
no objects lled with liquids are placed on the device.
Do not block the vent holes. 4.
Install according to manufacturer’s instructions.5.
Do not install near heat sources such as radiators, or other 6.
devices that produce heat.
Protect the power cord from all wear and tear. 7.
Only use cables/power supplies/accessories specied by the 8.
manufacturer.
Unplug this device during lightning storms or when unused for 9.
long periods of time.
Refer all servicing to quali ed service personnel. 10.
WARN ING: To reduce the risk of re or electrical shock, do not expose
this device to rain or moisture.
WARN ING: Maximum recommended operating temperature is 40°C
WARN ING: No naked ame sources – such as candles – should be
placed on the device.
WARN ING: This device is intended to be operated ONLY from the
voltages listed on the rear panel of the right side speaker.
RoHS C OMPLIA NCE
The Ro HS mark indicates that this device conforms to European
Directive 2002/95/EC RoHS concerning Restrictions of Hazardous
Substances.
WEEE MARK
The WE EE mark indicates that this device conforms to European
Directive 2002 /96/EC WEEE concerning Waste Electrical and
Electronic Equipment. This device must not be disposed together with
the domestic waste. This device has to be disposed at an authorized
place for recycling of electrical and electronic appliances. By
collecting and recycling waste, you help save natural resources, and
make sure the device is disposed in an environmental friendly and
healthy way. Note: The W EEE mark applies only to countries within the
European Union (EU) and Norway.
RADIO FR EQUENCY INTERFER ENCE REQUIRE MENTS - FCC
Note: This equipment has been tested and found to comply with the
limits for a Class B digital device, pursuant to Part 15 of the FCC rules.
These limits are designed to provide reasonable protection against
harmful interference in a residential installation. This equipment
generates, uses and can radiate radio frequency energy and, if not
installed and used in accordance with the instructions, may cause
harmful interference to radio communications. However there is no
guarantee that interference will not occur in a particular installation. If
this equipment does cause harmful interference to radio or television
reception, which can be determined by turning the equipment off and
on, the user is encouraged to try to correc t the interference by one or
more of the following measures:
Reorient or relocate the receiving antenna. •
Increase the separation between the equipment and receiver. •
Connec t the equipment into an outlet on a circuit different •
from that to which the receiver is connected.
Consult the dealer or an experienced radio/TV technician for help. •
RADIO TR ANSMITTERS (PA RT 15)
FCC ID: A48-NS2AM. This device complies with Part 15 of the F CC
Rules. Operation is subject to the following two conditions: (1) this
device may not cause harmful interference, and (2) this device must
accept any inter ference received, including interference that may
cause undesired operation. Changes or modications not expressly
approved by the party responsible for compliance could void the user’s
authority to operate the equipment.
REDU CING RADIATION EXPOS URE - USE PROPERLY
Only operate the device in accordance with the instructions supplied.
This device complies with FCC radiation exposure limits set forth
for an uncontrolled environment. In order to avoid the possibility of
exceeding the FCC radio frequency exposure limits, human proximity
to the antenna shall not be less than 20 cm (8 inches) during normal
operation.
RADIO FREQUE NCY INTERFER ENCE REQUIRE MENTS - CA NADA
This Class B digital apparatus complies with C anadian ICES-003.
02 / INTRODUCTION
RADIO TR ANSMITTERS
IC: 10076A-NS2AM. This device complies with RSS 210 of Industry &
Science Canada. Operation is subject to the following t wo conditions:
(1) this device may not cause harmful interference and (2) this device
must accept any interference received, including interference that
may cause undesired operation. Product label: The Term “IC:” before
the radio certication only signies that Industr y Canada technical
specications were met.
EU COM PLIANCE INFORMATION:
Eligible to bear the CE mark, Conforms to European Union Low Voltage
Directive 2006/95/ EC; Conforms to European Union EMC Directive
2004/108/EC, C onforms to Euro pean Union R&T TE Directive 19 99/5/EC.
Hereby, Nocs AB, declares that this wireless speaker NS2 is in
compliance with the essential requirements and other relevant
provisions of Directive 1999/5/EC. The declaration of conformit y may
be consulted at ww w.nocs.se/pages/support.
WI-FI
The product is g/ h Wi-Fi certied.
TECH NICAL SP ECIFICATIONS
Power output ..............................................................70W peak power
Frequency response ......................................................20 Hz - 20 kHz
Woofers ....................................................3” Kevlar with dual magnets
Twee ters ........................................................................ 3/4” silk dome
Digital Signal Processor...............................................................32-bit
Total Harmonic Distortion .........................................................<0.15%
Signal-to-Noise Ratio ................................................................> 85dB
Amplier type ............................................................................Class D
Crosstalk....................................................................................<50 dB
Impedance ............................................................................ 20k Ohms
Dimensions ..............................................H: 160 x W: 110 x D: 140 mm
Weight ..........................................................................................3.0 kg
COMPATIBILITY
AirPlay works with iPhone 4S, iPhone 4, iPhone 3GS, iPod touch (2nd,
3rd, and 4th generation), iPad 2 and iPad with iOS 4.3.3 or later, or Mac
and PC with iTunes 10.2.2 or later.
IN THE BOX
NS2 Air Monitors ›
Power supply ›
Power cord ›
Speaker cables ›
User manual ›
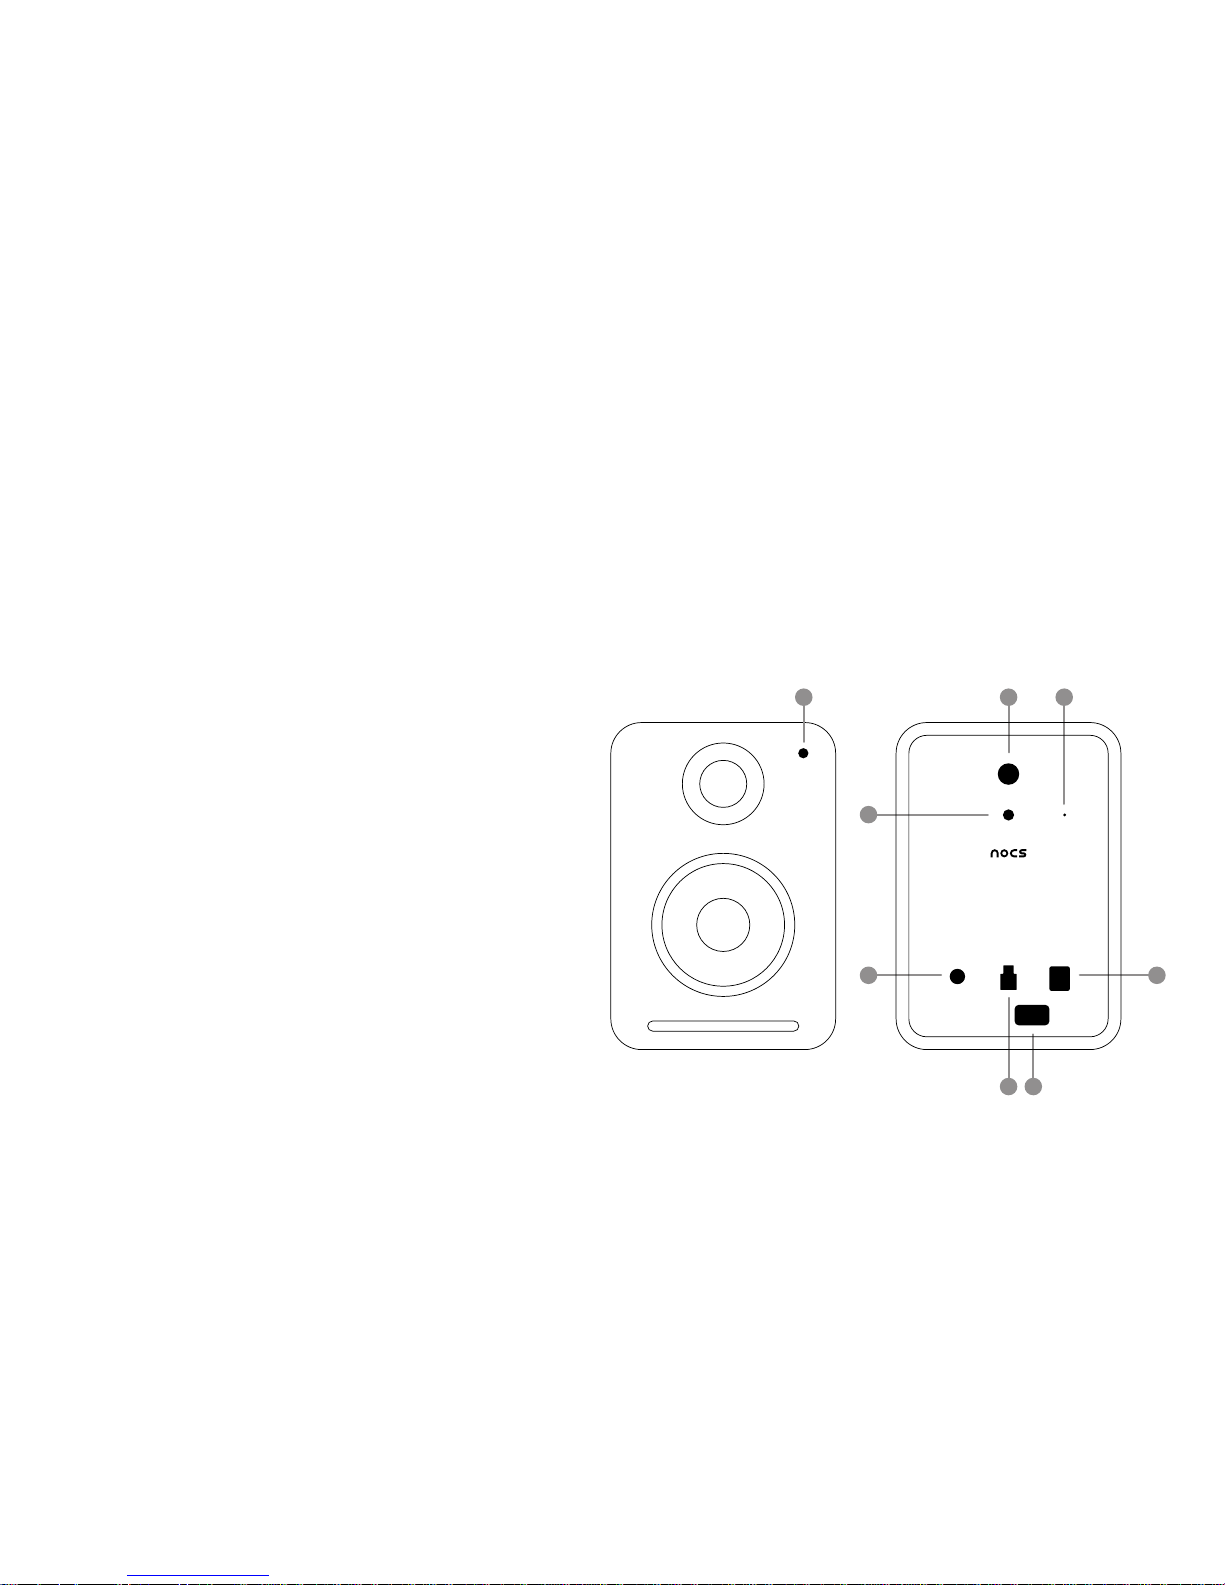
UNBOXING
When unboxing the NS2 for the rst time, it is advised to spend time
getting familiar with the product.
LED1.
Power button2.
Setup button3.
Reset 4.
AUX in5.
Speaker 6.
DC in7.
Service port8.
03 / INTRODUCTION
2 4
3
5
6 8
7
1

ENGLISH
The Nocs NS2 Air Monitors are a set of active speakers with AirPlay
technology, allowing you to stream music wirelessly from your Mac, PC,
iPod touch, iPhone and iPad. Turn your device into the ultimate music
experience and enjoy the powerful sound from the NS2.
1. ABOUT AirPlay
AirPlay is a revolutionary technology that lets you stream music wirelessly
from your Mac, PC or iOS device.
2. GETTING STARTED
The NS2 has been designed to offer a simple and convenient AirPlay
solution.
2.1 UNBOXING AND CONNECTING
When unboxing the NS2 for the rst time, it is advised to get familiar
with the product. After unboxing the NS2, the power supply needs to be
connected to the right side speaker and the two speakers connected
using one of the two supplied speaker cables.
2.2 SWITCHING ON AND OFF
Switch on the NS2 by pressing the “Power” button located on the ›
right side speaker’s rear panel.
If the NS2 has not been setup before, the LED ashes green quickly ›
for about 30 seconds while booting up, followed by ashing green
slowly to indicate that the NS2 is ready to be setup.
If the NS2 has already been properly setup, the LED ashes green ›
quickly for about 30 seconds while booting up, followed by ashing
green slowly for 5 seconds. When the LED turns solid green followed
by a beep, the NS2 is connected to the wireless network.
To switch off, press the “Power” button. ›
2.3 UNDERSTANDING THE LED INDICATOR
See separate table.
3. FIRST TIME SETUP
The NS2 needs to be connected to the same wireless network as the
Mac, PC or iOS device.
Note 1. The NS2 supports DHCP and will automatically re-connect to the
wireless network after the rst-time setup.
Note 2. Moving the NS2 to a new wireless network or changing the
wireless network settings requires a new setup.
3.1 AUTOMATIC SETUP USING WI-FI PROTECTED SETUP, WPS
If the wireless router supports WPS the setup is automatic.
Switch on the NS2.A.
The LED ashes green quickly for about 30 seconds while booting B.
up.
The LED ashes green slowly to indicate that the NS2 is ready for C.
setup.
Press the “WPS” button on the wireless router.D.
Press the “Setup” button on the right side speaker’s rear panel for E.
one second.
The LED ashes green/amber slowly to indicate that the NS2 enters F.
WPS mode.
The NS2 automatically connects to the wireless network. If the G.
wireless signal isn’t strong enough, the NS2 will keep trying to
connect while the LED ashes green/amber slowly.
The LED turns solid green followed by a beep to indicate that the H.
NS2 is connected to the wireless network.
If you wish to change the name of the NS2 you open its IP address I.
in a browser, then type in your selected name in the “AirPlay device
name” box and press “Update”. Please see the router manual for
instructions on how to retrieve IP addresses. For AirPort Express
open AirPort Utility > Select the AirPort Express > Advanced >
Logs and Statistics > DHCP Clients and locate the NS2 in the list
of clients.
Note 1. WPS requires an encrypted network.
Note 2. If the automatic setup fails, please run the manual setup instead.
3.2 MANUAL SETUP USING MAC, PC OR iOS DEVICE
If the wireless router does not support WPS, a manual setup is required.
Make sure you know the name and password of the wireless network
before you start.
Switch on the NS2.A.
The LED ashes green quickly for about 30 seconds while booting up. B.
The LED ashes green slowly indicating that the NS2 is ready for
setup.
Press and hold the “Setup” button for 5 seconds. The LED ashes C.
green/amber slowly indicating that the NS2 has entered manual
setup mode.
Connect your Mac, PC or iOS device to the “NOCS_NS2_Setup“ D.
wireless network.
Open http://192.168.1.1 in a browser.E.
If you wish to change the name of the NS2, type in the selected F.
name in the “AirPlay device name” box and click “Update”, then
return to the “Network Conguration”.
Select the wireless network (SSID) to which the NS2 should be G.
connected and enter the network password. Use “Advanced”
settings if needed. Press “Apply”.
The LED ashes green quickly while the NS2 is rebooting, followed H.
by ashing green slowly while connecting.
The LED turns solid green followed by a beep to indicate that the I.
NS2 is connected to the wireless network.
Note 1. It is recommended that the DHCP checkbox remains checked.
Note 2. In areas with a lot of Wi-Fi interference, connecting to the NS2
wireless network sometimes requires more than one attempt.
4. USAGE
Once the setup is nished, the NS2 can be fully operated from a Mac,
PC or iOS device.
4.1 MAC OR PC
A Mac or PC can output audio from iTunes by selecting the NS2 from the
device menu in the bottom right corner of the program window.
COLOR MEANING
No color Off
Solid green Connected
Slow ashing green Connecting
Fast ashing green Booting up
Solid amber Network problem
Slow Flashing amber Firmware update
Fast ashing amber Firmware error
Flashing green/amber Setup mode
04 / ENG LISH

4.2 iOS DEVICES
An iPod touch, iPhone or iPad can output audio from any application that
supports the standard iOS volume controls by selecting the NS2 from the
AirPlay symbol next to the volume control.
4.3 AUTOMATIC INPUT SWITCHING
The NS2 automatically switches to AirPlay when an audio stream ›
is detected.
The AirPlay connection overrules the AUX connection, meaning the ›
AirPlay connection needs to be turned off from the Mac, PC or iOS
device before the AUX connection can be activated.
5. FIRMWARE UPDATE
The latest rmware is available from the NS2 section at the Nocs web
site. To update the rmware, please follow below steps.
Open the AirPlay IP address in a browser. A. See section 3.1, “I” for
further instructions.
Select “Firmware update”.B.
Select “Proceed”.C.
Await the 30 seconds countdown, the page will automatically D.
refresh once nished.
Locate the rmware update le on your hard drive.E.
Select “Upload”. F.
Select “Proceed” to upload the rmware le. The page will G.
automatically refresh to display the current status during update.
Select “Close” to close the setup page.H.
Note. In some cases the NS2 needs to be setup again after the update
is nished.
6. FACTORY RESET
To reset the NS2 to factory settings, please follow below instruction.
Switch on the NS2.A.
The LED ashes green quickly for about 30 seconds while booting B.
up.
Locate the “Reset” hole on the right side speaker’s rear panel. C.
Use a paperclip or similar to press the “Reset” button, hold for 2 D.
seconds.
The LED ashes ve times slowly in green/amber.E.
The LED ashes green quickly for about 30 seconds while booting F.
up, followed by ashing green slowly indicating that the NS2 is
ready to be setup.
7. CLEANING THE SPEAKERS
Always use a dry, clean and lint-free cloth without cleaning agents. Never
directly touch the speaker elements.
8. TROUBLESHOOTING AND SUPPORT
NS2 does not reconnect to the wireless network after setup
Restart the wireless network by unplugging the wireless router. ›
Restart the NS2. ›
NS2 is connected to the wireless network (LED is solid green) but will not
play music from your Mac, PC or iOS device.
Switch Wi-Fi on and off in the “Settings” application on the iOS ›
device.
Restart the music application you are using on the Mac, PC or iOS ›
device.
Restart the Mac, PC or iOS device. ›
Make sure you have the required version of iTunes or iOS installed. ›
NS2 Setup page (http://192.168.1.1) will not open on my Mac, PC or
iOS device.
Disconnect and re-connect to the “NOCS_NS2_Setup” wireless ›
network.
Disable the rewall protection before starting the setup. Make sure ›
to re-enable the rewall after you have nished.
9. RECYCLING
Contact a local recycling center for information regarding how to proceed
when it is time to discard the product.
10. FAQ
Please visit the Nocs webpage for the latest FAQ.
WARRANTY
Nocs warrants that this product is free from manufacturing and material
defects at the time of purchase and during the coming one (1) year. The
warranty does not limit binding legislation or the consumer’s statutory
right. The warranty is valid provided that the party selling the product
does not issue other warranties and that the following terms and
conditions are met:
TERMS AND CONDITIONS
The warranty is valid provided that the owner can provide a receipt ›
with the date and place of purchase.
The warranty is valid provided that the product has been purchased ›
from an authorized reseller.
The warranty is valid provided that the product is not damaged due ›
to improper treatment such as heat, cold, humidity, magnetism,
abnormal wear, modication or force majeure.
The warranty is valid provided that the product is not damaged as a ›
result of misinterpretation of the instructions.
The warranty is valid provided that the product has not been put ›
through service, modication or any other kind of handling by an
unauthorized person.
The warranty is valid provided that the serial numbers are unaltered ›
and readable.
The warranty is limited to the replacement of the product and does ›
not include transportation, handling or any other incremental costs.
The warranty is limited to the original owner of the product. ›
The warranty is applicable only to defects related to the materials ›
and workmanship as of the time of purchase and a reasonable
amount of wears during the following one year.
HOW TO CLAIM WARRANTY
In case you have concerns regarding your Nocs product, contact the point
of purchase. A valid warranty claim requires a receipt with the date and
place of purchase. Never send products directly to Nocs.
ENGLISH / 05

SVENSKA
Nocs NS2 Air Monitors är ett par aktiva högtalare med AirPlay-teknik,
som gör att du kan spela upp musik direkt och trådlöst från din Mac, PC,
iPod touch, iPhone och iPad. Förvandla din enhet till den ultimata musikupplevelsen och njut av det kraftfulla ljudet från NS2.
1. OM AirPlay
AirPlay är en revolutionerande teknik som möjliggör uppspelning av
musik från en Mac-, PC- eller iOS-enhet via trådlös anslutning.
2. KOMMA IGÅNG
NS2 har utformats för att fungera som en enkel och smidig AirPlaylösning.
2.1 PACKA UPP OCH ANSLUTA
När du packar upp NS2 för första gången rekommenderar vi att du
bekantar dig med produkten. När du har packat upp NS2 ska du ansluta
nätsladden till den högra högtalaren och ansluta de två högtalarna med
varandra med hjälp av någon av de två medföljande högtalarkablarna.
2.2 STÄNGA AV OCH SLÅ PÅ
Aktivera NS2 genom att trycka på “Power”-knappen som sitter på ›
baksidan av den högra högtalaren.
Om NS2 inte har installerats blinkar lysdioden snabbt grönt i cirka ›
30 sekunder medan enheten startas. Därefter blinkar den långsamt
grönt för att indikera att NS2 är redo för installation.
Om NS2 har installerats tidigare blinkar lysdioden grönt i cirka 30 ›
sekunder medan enheten startas. Därefter blinkar den långsamt
grönt i cirka 5 sekunder. När lysdioden lyser med ett fast, grönt ljus
följt av ett pip, är NS2 ansluten till det trådlösa nätverket.
Om du vill stänga av enheten trycker du på “Power”-knappen. ›
2.3 SÅ FUNGERAR LYSDIODEN
Se separat tabell.
3. FÖRSTA INSTALLATIONEN
NS2 måste anslutas till samma trådlösa nätverk som Mac-, PC- eller
iOS-enheten.
Anmärkning 1. NS2 stödjer DHCP och återansluter automatiskt till det
trådlösa nätverket efter den första installationen.
Anmärkning 2. Om NS2 yttas till ett annat trådlöst nätverk eller om
inställningarna för det trådlösa nätverket ändras, måste installationen
göras om.
3.1 AUTOMATISK INSTALLATION MED WPS (WI-FI PROTECTED SETUP)
Om den trådlösa routern har stöd för WPS sker installationen automatiskt.
Aktivera NS2.A.
Lysdioden blinkar snabbt grönt i cirka 30 sekunder medan NS2 B.
startas.
Lysdioden blinkar långsamt grönt för att indikera att enheten är redo C.
för installation.
Tryck på “WPS”-knappen på den trådlösa routern.D.
Tryck på “Setup”-knappen på baksidan av den högra högtalaren E.
i en sekund.
Lysdioden blinkar långsamt grönt/gult för att indikera att NS2 F.
övergår till WPS-läge.
NS2 ansluter automatiskt till det trådlösa nätverket. Om den trådlösa G.
signalen inte är tillräckligt stark, fortsätter NS2 att försöka ansluta
medan lysdioden blinkar långsamt grönt/gult.
När lysdioden lyser med ett fast, grönt ljus följt av ett pip, betyder det H.
att NS2 är ansluten till det trådlösa nätverket.
Om du vill ändra namnet på NS2 öppnar du IP-adressen för enheten I.
i en webbläsare, skriver in det namn du vill använda i rutan ”AirPlay
device name” och klickar på “Update”. I handboken till routern nns
anvisningar för hur du hämtar IP-adresser. För AirPort Express öppnar du AirPort Utility, väljer AirPort Express > Advanced > Logs
and Statistics > DHCP Clients och letar reda på NS2 i listan över
klienter.
Anmärkning 1. WPS kräver ett krypterat nätverk.
Anmärkning 2. Om den automatiska installationen misslyckas kan du
installera manuellt i stället.
3.2 MANUELL INSTALLATION MED EN MAC-, PC- ELLER iOS-ENHET
Om den trådlösa routern inte har stöd för WPS måste du installera manuellt. Kontrollera att du känner till det trådlösa nätverkets namn och lösenord innan du börjar.
Aktivera NS2.A.
Lysdioden blinkar snabbt grönt i cirka 30 sekunder medan NS2 B.
startas.
Lysdioden blinkar långsamt grönt för att indikera att enheten är redo C.
för installation.
Håll “Setup”-knappen intryckt i 5 sekunder. Lysdioden blinkar lång-D.
samt grönt/gult för att indikera att NS2 har övergått till läget för
manuell installation.
Anslut din Mac-, PC- eller iOS-enheten till det trådlösa nätverket E.
“NOCS_NS2_Setup”.
Öppna http://192.168.1.1 i en webbläsare.F.
Om du vill ändra namnet på NS2 skriver du önskat namn i rutan G.
”AirPlay device name” och klickar på ”Update”. Återgå sedan till
“Network Conguration”.
Välj det trådlösa nätverk (SSID) som NS2 ska anslutas till och ange H.
lösenordet till nätverket. Använd inställningarna under “Advanced”
om det behövs. Klicka på “Apply”.
Lysdioden blinkar snabbt grönt medan NS2 startas om, och sedan I.
långsamt grönt medan produkten ansluts.
När lysdioden lyser med ett fast, grönt ljus följt av ett pip, betyder det J.
att NS2 är ansluten till det trådlösa nätverket.
Anmärkning 1. Vi rekommenderar att du låter rutan för DHCP vara fortsatt
ikryssad.
Anmärkning 2. I områden där omfattande Wi-Fi-störningar förekommer
kan det ibland krävas era försök innan NS2 kan anslutas till ett trådlöst
nätverk.
4. ANVÄNDNING
När installationen är klar kan du börja använda NS2 från en Mac-, PCeller iOS-enhet.
FÄRG BETYDELSE
Ingen färg Avstängd
Fast grönt Ansluten
Blinkar långsamt grönt Ansluter
Blinkar snabbt grönt Startar
Fast gult Nätverksproblem
Blinkar långsamt gult Firmware-uppdatering pågår
Blinkar snabbt gult Firmware-fel
Blinkar grönt/gult Installations-läge
06 / SVENSK A

4.1 MAC ELLER PC
En Mac eller PC kan sända ljud från iTunes genom att du väljer NS2 från
menyn för enheten, längst ned till höger i programfönstret.
4.2 iOS-ENHETER
En iPod touch, iPhone eller iPad kan sända ljud från alla program som
stödjer standardvolymkontrollerna för iOS genom att du väljer NS2 från
AirPlay-ikonen bredvid volymkontrollen.
4.3 AUTOMATISK VÄXLING MELLAN INDATA
NS2 övergår automatiskt till AirPlay när en ljudström upptäcks. ›
AirPlay-anslutningen åsidosätter AUX-anslutningen, vilket innebär ›
att du måste stänga av AirPlay-anslutningen via Mac-, PC- eller
iOS-enheten om du vill aktivera AUX-anslutningen.
5. UPPDATERA FIRMWARE
Den senaste rmware-versionen nns tillgänglig via NS2 produktsida på
Nocs webbplats. Om du vill uppdatera rmware följer du anvisningarna
nedan:
Öppna IP-adressen för AirPlay i en webbläsare.A. I avsnitt 3.1 “I” nns
mer instruktioner för hur du går till väga.
Välj “Firmware update”.B.
Välj “Proceed”.C.
Vänta 30 sekunder. Sidan uppdateras automatiskt när det är D.
färdigt.
Leta reda på rmware-uppdateringslen på hårddisken.E.
Välj “Upload”. F.
Välj “Proceed” för att överföra rmware-len. Sidan uppdateras G.
automatiskt under uppdateringen så att aktuell status visas.
Välj “Close” för att stänga installationssidan.H.
Anmärkning. Ibland måste NS2 återinstalleras när uppdateringen har
slutförts.
6. ÅTERSTÄLLNING TILL FABRIKSINSTÄLLNINGARNA
Om du vill återställa NS2 till fabriksinställningarna följer du instruktionerna nedan.
Aktivera NS2.A.
Lysdioden blinkar snabbt grönt i cirka 30 sekunder medan B.
produkten startas.
Leta reda på “Reset”-knappen på baksidan av den högra högta-C.
laren.
Tryck på “Reset”-knappen med ett gem eller dyligt, håll den D.
nedtryckt i 2 sekunder.
Lysdioden blinkar långsamt fem gånger i grönt/gult.E.
Lysdioden blinkar snabbt grönt i cirka 30 sekunder medan omstart F.
pågår. När NS2 är redo för installation börjar lysdioden att blinka
långsamt grönt.
7. RENGÖRA HÖGTALARNA
Använd alltid en torr, ren och luddfri trasa utan rengöringsmedel. Vidrör
aldrig högtalarelementen.
8. FELSÖKNING OCH SUPPORT
NS2 ansluter inte till det trådlösa nätverket efter installation
Starta om det trådlösa nätverket genom att dra ur och återanslut ›
den trådlösa routerns nätsladd.
Starta om NS2. ›
NS2 är ansluten till det trådlösa nätverket (lysdioden lyser med ett fast,
grönt ljus) men det går inte att spela upp musik från en Mac-, PC- eller
iOS-enhet.
Aktivera och inaktivera Wi-Fi i Settings-applikationen på iOS- ›
enheten.
Starta om musikprogrammet som används på Mac-, PC- eller iOS- ›
enheten.
Starta om Mac-, PC- eller iOS-enheten. ›
Kontrollera att den version av iTunes eller iOS som krävs är install- ›
erad.
Det går inte att öppna installationssidan för NS2 (http://192.168.1.1) på
min Mac-, PC- eller iOS-enhet.
Koppla från och återanslut till det trådlösa nätverket “NOCS_NS2_ ›
Setup”.
Inaktivera brandväggen innan du påbörjar installationen. Kom ihåg ›
att aktivera brandväggen igen när installationen har slutförts.
9. ÅTERVINNING
Kontakta en lokal återvinningsstation för information om hur du går
tillväga när det är dags att kassera produkten.
10. VANLIGA FRÅGOR
På Nocs webbplats hittar du de senaste vanliga frågorna.
GARANTI
Nocs garanterar att denna produkt är fri från tillverknings- och materialfel
vid inköpstillfället och under det efterföljande (1) året. Garantin begränsar
inte bindande lagstiftning eller lagstadgad konsumenträtt. Garantin gäller
förutsatt att försäljaren inte utfärdar andra garantier för produkten och att
följande villkor och bestämmelser uppfylls:
VILLKOR OCH BESTÄMMELSER
Garantin gäller förutsatt att ägaren kan uppvisa ett kvitto av vilket ›
datum och plats för inköpet framgår.
Garantin gäller förutsatt att produkten har köpts av en auktoriserad ›
återförsäljare.
Garantin gäller förutsatt att produkten inte har skadats till följd av ›
felaktig hantering som inbegriper till exempel värme, kyla, luftfuktighet, magnetism, onormalt slitage, ändring eller force majeure.
Garantin gäller förutsatt att produkten inte har skadats till följd av ›
felaktig tolkning av instruktionerna.
Garantin gäller förutsatt att produkten inte har varit föremål för ser- ›
vice, ändring eller annan typ av hantering som utförts av en ickebehörig person.
Garantin gäller förutsatt att produktens serienummer är oförändrad ›
och läsbart.
Garantin är begränsad till byte av produkten och omfattar inte trans- ›
port, hantering eller andra tillkommande kostnader.
Garantin gäller endast för produktens ursprungliga ägare. ›
Garantin gäller endast för defekter som kan härröras till material och ›
utförande, från och med inköpstillfället och för en rimlig slitagenivå
under ett år därefter.
SÅ HANTERAR DU ETT GARANTIÄRENDE
Kontakta inköpsstället om du har frågor som rör din produkt från Nocs.
För ett giltigt garantiärende krävs ett kvitto av vilket datum och plats för
inköpet framgår. Skicka aldrig produkter direkt till Nocs.
SVENSK A / 07

DEUTSCH
Die Nocs NS2 Air Monitors sind ein Satz aktiver Lautsprecher mit der
AirPlay-Technologie, die es Ihnen ermöglicht, Musik ohne Kabel von
Ihrem Mac, PC, iPod touch, iPhone und iPad zu streamen. Holen Sie
aus Ihrem Gerät das ultimative Musikerlebnis und genießen Sie den
fantastischen Klang des NS2.
1. ÜBER AirPlay
AirPlay ist eine revolutionäre Technik, mit der Sie Musik kabellos von
Ihrem Mac, PC oder iOS-Gerät streamen können.
2. ERSTE SCHRITTE
Das NS2 wurden dazu gebaut, eine einfache und komfortable AirPlayLösung zu bieten.
2.1 AUSPACKEN UND ANSCHLIESSEN
Es wird empfohlen, sich beim erstmaligen Auspacken des NS2 mit
dem Produkt vertraut zu machen. Nach dem Auspacken des NS2 muss
die Stromversorgung an den rechten Lautsprecher angeschlossen
werden; anschließend sind die beiden Lautsprecher mit einem der zwei
mitgelieferten Lautsprecherkabel aneinander anzuschließen.
2.2 EIN- UND AUSSCHALTEN
Schalten Sie das NS2 ein, indem Sie die Taste “Power” auf der ››
Rückseite des rechten Lautsprechers drücken.
Wenn das NS2 vorher noch nicht eingerichtet wurde, blinkt die LED ››
während des Hochfahrens etwa 30 Sekunden lang grün und schnell;
anschließend blinkt sie langsam, um anzuzeigen, dass die NS2 zur
Einrichtung bereit sind.
Wenn das NS2 bereits ordnungsgemäß eingerichtet wurde, blinkt ››
die LED während des Hochfahrens für etwa 30 Sekunden grün und
schnell und anschließend für etwa 5 Sekunden langsam. Sobald die
LED durchgängig grün leuchtet und ein Piepton zu hören ist, ist das
NS2mit dem Funknetzwerk verbunden.
Drücken Sie zum Ausschalten auf die Taste “Power”.››
2.3 BEDEUTUNG DER LED-ANZEIGE
Siehe separate Tabelle.
3. ERSTEINRICHTUNG
Das NS2 muss mit dem gleichen Funknetzwerk wie der Mac, PC bzw. das
iOS-Gerät verbunden sein.
Hinweis 1. Das NS2 unterstützt DHCP und verbindet sich nach der
Ersteinrichtung automatisch mit dem Funknetzwerk.
Hinweis 2. Wird das NS2 in die Nähe eines anderen Netzwerks
gebracht, oder werden die Funknetzwerkeinstellungen geändert, ist eine
Neueinrichtung erforderlich.
3.1 AUTOMATISCHE EINRICHTUNG MIT WPS (WI-FI PROTECTED SETUP)
Wenn der Wireless-Router WPS unterstützt, erfolgt die Einrichtung
automatisch.
Schalten Sie das NS2 ein.A.
Die LED blinkt während des Hochfahrens 30 Sekunden lang grün B.
und schnell.
Die LED blinkt grün und langsam, um anzuzeigen, dass das NS2 für C.
die Einrichtung bereit ist.
Drücken Sie die “WPS”-Taste auf dem Wireless-Router.D.
Drücken Sie eine Sekunde lang die “Setup”-Taste auf der Rückseite E.
des rechten Lautsprechers .
Die LED blinkt langsam grün/gelb, um anzuzeigen, dass die NS2 in F.
den WPS-Modus geht .
Das NS2 verbindet sich automatisch mit dem Funknetzwerk. G.
Wenn das Funksignal nicht stark genug ist, versucht das NS2, die
Verbindung herzustellen; die LED blinkt dabei langsam grün/gelb.
Wenn die LED durchgängig grün leuchtet und ein Piepton zu H.
hören ist, wird angezeigt, dass das NS2 an das Funknetzwerk
angeschlossen ist.
Wenn Sie den Namen des NS2 ändern wollen, öffnen Sie die IP-I.
Adresse in einem Browser, geben Sie den gewünschten Namen in
das Feld “AirPlay device name“ ein und drücken Sie “Update”. Im
Handbuch des Routers nden Sie Anweisungen zum Beziehen von
IP-Adressen. Für AirPort Express öffnen Sie AirPort Utility > Select
the AirPort Express > Advanced > Logs and Statistics > DHCP
Clients und suchen Sie das NS2 in der Client-Liste.
Hinweis 1. WPS erfordert ein verschlüsseltes Netzwerk.
Hinweis 2. Wenn die automatische Einrichtung fehlschlägt, führen Sie
stattdessen die manuelle Einrichtung durch.
3.2 MANUELLE EINRICHTUNG MIT MAC, PC ODER iOS-GERÄT
Wenn der Wireless-Router WPS nicht unterstützt, ist eine manuelle
Einrichtung erforderlich. Bevor Sie beginnen, müssen Sie den Namen und
das Passwort des Funknetzwerks kennen.
Schalten Sie das NS2 ein.A.
Die LED blinkt während des Hochfahrens 30 Sekunden lang grün B.
und schnell.
Die LED blinkt grün und langsam, um anzuzeigen, dass das NS2 für C.
die Einrichtung bereit ist.
Drücken und halten Sie die Taste “Setup” 5 Sekunden lang. Die D.
LED blinkt langsam grün/gelb, um anzuzeigen, dass das NS2 zum
manuellen Einrichtungsmodus gewechselt hat.
Schließen Sie Ihren Mac, PC bzw. Ihr iOS-Gerät an das Funknetzwerk E.
“NOCS_NS2_Setup” an.
Öffnen Sie http://192.168.1.1 in einem Browser.F.
Wenn Sie den Namen des NS2 ändern wollen, geben Sie den G.
gewünschten Namen in das Feld “AirPlay device name“ ein
und klicken Sie auf “Update“; wechseln Sie dann zu “Network
Conguration” zurück.
Wählen Sie das Funknetzwerk (SSID), mit dem das NS2 verbunden H.
werden soll, und geben Sie das Netzwerkkennwort ein. Falls
erforderlich, verwenden Sie die “Advanced”-Einstellungen. Drücken
Sie “Apply”.
Die LED blinkt schnell und grün, während das NS2 neu hochfährt, I.
und danach während der Verbindungseinrichtung langsam und
grün.
Wenn die LED durchgängig grün leuchtet und ein Piepton zu J.
hören ist, wird angezeigt, dass das NS2 an das Funknetzwerk
angeschlossen ist.
FARBE BEDEUTUNG
Keine Anzeige Ausgeschaltet
Grün durchgängig leuchtend Verbunden
Langsam grün blinkend Verbindungsaufbau
Schnell grün blinkend Hochfahren
Durchgängig gelb leuchtend Netzwerkproblem
Langsam gelb blinkend Firmwareaktualisierung
Schnell gelb blinkend Firmwarefehler
Grün/gelb blinkend Einrichtungsmodus
08 / DEU TSCH

Hinweis 1. Es wird empfohlen, das Kontrollkästchen DHCP aktiviert zu
lassen.
Hinweis 2. In Bereichen mit starken Wi-Fi-Störungen kann es vorkommen,
dass das Verbinden des NS2 an ein Funknetzwerk mehrfach versucht
werden muss.
4. VERWENDUNG
Nach Abschluss der Einrichtung kann das NS2 von einem Mac, PC oder
iOS-Gerät aus betrieben werden.
4.1 MAC ODER PC
Ein Mac oder PC kann Audio aus iTunes ausgeben, indem das NS2 aus
dem Gerätemenü in der unteren rechten Ecke des Programmfensters
gewählt wird.
4.2 iOS-GERÄTE
Ein iPod touch, iPhone oder iPad kann Audio aus jeder Applikation
ausgeben, welche die Standard-iOS-Lautsprechersteuerung unterstützt,
indem aus dem AirPlay-Symbol neben der Lautstärkeregelung NS2
gewählt wird.
4.3 AUTOMATISCHE EINGANGSUMSCHALTUNG
Das NS2 schaltet automatisch auf AirPlay, wenn ein Audiostream ›
erkannt wird.
Die AirPlay-Verbindung setzt die AUX-Verbindung außer Kraft, was ›
bedeutet, dass die AirPlay-Verbindung des Mac, PC oder iOSGerätes ausgeschaltet werden muss, bevor die AUX-Verbindung
aktiviert werden kann.
5. FIRMWARE-AKTUALISIERUNG
Die neueste Firmware ist im Bereich NS2 der Nocs-Website verfügbar.
Führen Sie zur Aktualisierung der Firmware die folgenden Schritte aus.
Öffnen Sie die AirPlay-IP-Adresse in einem Browser. A. In Abschnitt 3.1
“I” nden Sie weitere Anweisungen dazu.
Wählen Sie “Firmware update”.B.
Wählen Sie “Proceed”.C.
Warten Sie den Countdown von 30 Sekunden ab; die Seite wird D.
nach Ablauf automatisch aktualisiert.
Suchen Sie die Firmware-Aktualisierung auf Ihrer Festplatte.E.
Wählen Sie “Upload”. F.
Wählen Sie “Proceed”, um die Firmwaredatei hochzuladen. Die Seite G.
wird automatisch aktualisiert, um den aktuellen Status während des
Hochladens anzuzeigen.
Wählen Sie “Close”, um die Einrichtungsseite zu beenden.H.
Hinweis. In einigen Fällen muss das NS2 nach Ende der Aktualisierung
neu eingerichtet werden.
6. WIEDERHERSTELLEN DER WERKSEINSTELLUNGEN
Befolgen Sie die nachstehenden Anweisungen, um das NS2 auf die
Werkseinstellungen zurückzusetzen.
Schalten Sie das NS2 ein.A.
Die LED blinkt während des Hochfahrens 30 Sekunden lang grün B.
und schnell.
Die “Reset”-Öffnung bendet sich auf der Rückseite des rechten C.
Lautsprechers.
Drücken Sie mit einer Büroklammer o. ä. 2 Sekunden lang auf die D.
“Reset”-Taste.
Die LED blinkt fünf mal grün/gelb.E.
Die LED blinkt während des Hochfahrens etwa 30 Sekunden lang F.
grün und schnell, und danach grün und langsam, um anzuzeigen,
dass das NS2 bereit für die Einrichtung ist.
7. REINIGUNG DER LAUTSPRECHER
Verwenden Sie immer ein trockenes, sauberes und fusselfreies Tuch
ohne Reinigungsmittel. Berühren Sie niemals die Lautsprecherelemente.
8. FEHLERSUCHE UND KUNDENDIENST
Das NS2 verbindet sich nach der Einrichtung nicht erneut mit dem
Funknetzwerk
Starten Sie das Funknetzwerk neu, indem Sie den Netzstecker des ›
Wireless-Routers herausziehen und wieder einstecken.
Starten Sie das NS2 erneut. ›
Das NS2 ist mit dem Funknetzwerk verbunden (LED leuchtet durchgängig
grün), spielt aber keine Musik aus Ihrem Mac, PC oder iOS-Gerät ab.
Schalten Sie Wi-Fi in der Applikation “Settingsdes” iOS-Gerätes ein ›
und aus.
Starten Sie die Musikapplikation Ihres Mac, PC oder iOS-Gerätes ›
neu.
Starten Sie den Mac, PC oder das iOS-Gerät neu. ›
Die richtige Version von iTunes oder iOS muss installiert sein. ›
Die NS2-Einrichtungsseite (http://192.168.1.1) kann von meinem Mac,
PC oder iOS-Gerät aus nicht geöffnet werden.
Trennen Sie die Verbindung zum Funknetzwerk “NOCS_NS2_Setup“ ›
und stellen Sie sie wieder her.
Deaktivieren Sie vor Beginn der Einrichtung Ihre Firewall. ›
Reaktivieren Sie die Firewall nach Ende der Einrichtung wieder.
9. ENTSORGUNG
Wenn Sie das Produkt entsorgen wollen, wenden Sie sich an ein lokales
Entsorgungszentrum, um diesbezügliche Informationen zu erhalten.
10. Häug gestellte Fragen
Die jüngsten häug gestellten Fragen nden Sie auf der Nocs-Website.
GARANTIE
Nocs garantiert, dass dieses Produkt zum Zeitpunkt des Kaufs und während
eines (1) Jahres danach frei von Herstellungs- und Materialfehlern ist. Die
Garantie begrenzt die verbindliche Rechtssprechung und die gesetzlichen
Rechte des Kunden nicht. Diese Garantie ist gültig, vorausgesetzt dass
die das Produkt vertreibende Partei keine anderen Garantien ausgibt und
dass folgende Bedingungen erfüllt sind:
ALLGEMEINE BEDINGUNGEN
Die Garantie ist gültig, wenn der Eigentümer einen Kaufbeleg mit ››
Datum und Ort des Kaufes vorlegen kann.
Die Garantie ist gültig, wenn das Produkt von einem autorisierten ››
Händler erworben wurde.
Die Garantie ist gültig, wenn das Produkt nicht aufgrund von ››
unsachgemäßer Behandlung wie z. B. durch Hitze, Kälte,
Feuchtigkeit, Magnetismus, übermäßigen Verschleiß, unbefugte
Änderungen oder höhere Gewalt beschädigt wurde.
Die Garantie ist gültig, wenn das Produkt nicht aufgrund einer ››
Fehlinterpretation der Anweisungen beschädigt wurde.
Die Garantie ist gültig, wenn das Produkt nicht durch eine unbefugte ››
Person instandgesetzt, verändert oder auf andere Weise behandelt
wurde.
Die Garantie ist gültig, wenn die Seriennummern unverändert und ››
lesbar sind.
Die Garantie ist auf das Ersetzen des Produktes begrenzt und ››
umfasst keine Transport-, Handling- oder andere zusätzliche
Kosten.
Die Garantie ist auf den Erstbesitzer des Produktes beschränkt.››
DEUTSCH / 0 9

Die Garantie bezieht sich nur auf Material- und Verarbeitungsmängel ››
ab dem Zeitpunkt des Kaufs sowie auf einen vertretbaren Verschleiß
während eines darauffolgenden Jahres.
ERLANGEN VON GARANTIELEISTUNGEN
Wenn Sie Probleme mit Ihrem Nocs-Produkt haben, wenden Sie sich
an Ihre Verkaufsstelle. Ein gültiger Garantieanspruch erfordert einen
Kaufbeleg mit Datum und Ort des Kaufes. Senden Sie niemals Produkte
direkt an Nocs.
FRANÇAIS
Les Nocs NS2 Air Monitors sont un ensemble de haut-parleurs actifs
utilisant la technologie AirPlay, ils vous permettent de diffuser de
la musique sans l depuis votre Mac, PC, iPod touch, iPhone et iPad.
Transformez votre appareil en une expérience musicale ultime et protez
du son puissant des NS2.
1. PRÉSENTATION d’AirPlay
AirPlay est une technologie révolutionnaire qui vous permet de diffuser la
musique sans l depuis votre Mac, PC ou appareil iOS.
2. DÉMARRAGE
Le NS2 a été conçu pour offrir une solution AirPlay simple et pratique.
2.1 DÉBALLAGE ET CONNEXION
Si vous déballez un NS2 pour la première fois, nous vous conseillons de
vous familiariser avec le produit. Après avoir déballé le NS2, vous devez
brancher son alimentation sur le haut-parleur droit et connecter les deux
haut-parleurs au moyen de l’un des deux câbles de haut-parleur fournis.
2.2 MARCHE ET ARRÊT
Allumez le NS2 en appuyant sur le bouton “Power” du panneau ›
arrière du haut-parleur droit.
Si le NS2 n’a pas déjà été conguré, la DEL clignote rapidement en ›
vert pendant 30 secondes au démarrage, puis clignote lentement en
vert pour indiquer que le NS2 est prêt à être conguré.
Si le NS2 a déjà été correctement conguré, la DEL clignote en ›
vert rapidement pendant environ 30 secondes au démarrage, puis
clignote lentement en vert pendant 5 secondes. Lorsque la DEL
devient verte et xe et qu’un bip est émis, le NS2 est connecté au
réseau sans l.
Pour éteindre, appuyez sur le bouton “Power”. ›
2.3 SIGNIFICATION DU TÉMOIN À DEL
Voir le tableau joint.
3. CONFIGURATION INITIALE
Le NS2 doit être connecté au même réseau sans l que le Mac, le PC
ou l’appareil iOS.
Note 1. Le NS2 reconnaît le DHCP et se reconnecte automatiquement au
réseau sans l après la conguration initiale.
Note 2. Le déplacement du NS2 dans un nouveau réseau sans l ou la
modication des paramètres du réseau sans l requièrent une nouvelle
conguration.
3.1 CONFIGURATION AUTOMATIQUE PAR WPS
Si le routeur sans l prend en charge la WPS (Wi-Fi Protected Setup), la
conguration est automatique.
Allumez le NS2.A.
La DEL clignote rapidement en vert pendant 30 secondes au B.
démarrage.
La DEL clignote lentement en vert pour indiquer que le NS2 est C.
prêt à être conguré.
Appuyez sur le bouton “WPS” du routeur sans l.D.
Appuyez sur le bouton “Setup” du panneau arrière du haut-E.
parleur droit pendant une seconde.
La DEL clignote lentement en vert/ambre pour indiquer que le F.
NS2 passe au mode WPS.
Le NS2 se connecte automatiquement au réseau sans l. Si le G.
signal sans l n’est pas assez fort, le NS2 continuera à essayer
de se connecter tandis que la DEL clignote lentement en vert/
ambre
Lorsque la DEL devient verte et xe et qu’un bip est émis, cela H.
indique le NS2 est connecté au réseau sans l.Si vous souhaitez
modier le nom du NS2, vous appelez son adresse IP dans
un navigateur, saisissez le nom de votre choix dans le champ
“AirPlay device name” puis cliquez sur “Update”. Consultez le
manuel du routeur pour savoir comment obtenir les adresses IP.
Avec AirPort Express, ouvrez AirPort Utility > Select the AirPort
Express > Advanced > Logs and Statistics > DHCP Clients puis
trouvez le NS2 dans la liste des clients.
Notez 1. Le WPS requiert un réseau chiffré.
Note 2. Si la conguration automatique échoue, exécutez la conguration
manuelle à la place.
3.2 CONFIGURATION MANUELLE AVEC UN MAC, PC OU APPAREIL iOS
Si le routeur sans l ne prend pas en charge la WPS, vous devez effectuer
une conguration manuelle. Vous devez connaître le nom et le mot de
passe du réseau sans l avant de démarrer.
Allumez le NS2.A.
La DEL clignote rapidement en vert pendant 30 secondes au B.
démarrage.
La DEL clignote lentement en vert pour indiquer que le NS2 est prêt C.
à être conguré.
Enfoncez et maintenez le bouton “Setup” pendant 5 secondes. La D.
DEL clignote lentement en vert/ambre pour indiquer que le NS2
passe au mode de conguration manuelle.
Connectez votre Mac, PC ou appareil iOS au réseau sans l E.
“NOCS_NS2_Setup”.
Ouvrez http://192.168.1.1 dans un navigateur.F.
Si vous souhaitez modier le nom du NS2, entrez le nom de votre G.
choix dans le champ “AirPlay device name” puis cliquez sur
“Update”, revenez ensuite à “Network Conguration”.
Sélectionnez le réseau sans l (SSID) auquel le NS2 doit se H.
connecter puis entrez le mot de passe du réseau. Utilisez les
réglages “Advanced” si nécessaire. Cliquez sur “Apply”.
COULEUR DESCRIPTION
Éteint Hors tension
Vert xe Connecté
Clignotement vert lent Connexion
Clignotement vert rapide Démarrage
Ambre xe Problème de réseau
Clignotement ambre lent Mise à jour du microprogramme
Clignotement ambre rapide Erreur du microprogramme
Clignotement vert/ambre Mode de conguration
10 / FRA NÇAIS

La DEL clignote rapidement en vert pendant le redémarrage du NS2, I.
puis clignote lentement en vert pendant la connexion.
Lorsque la DEL devient verte et xe et qu’un bip est émis, cela J.
indique le NS2 est connecté au réseau sans l.
Note 1. Il est recommandé de laisser la case DHCP cochée.
Note 2. Dans les zones présentant de nombreuses interférences Wi-
Fi, la connexion au réseau sans l du NS2 peut demander plusieurs
tentatives.
4 UTILISATION
Une fois la conguration terminée, le NS2 peut être entièrement piloté
depuis un Mac, un PC ou un appareil iOS.
4.1 MAC OU PC
Un Mac ou un PC peut émettre de l’audio depuis iTunes en sélectionnant
le NS2 dans le menu des dispositifs du coin inférieur droit de la fenêtre
du programme.
4.2 APPAREILS iOS
Un iPod touch, un iPhone ou un iPad peuvent émettre de l’audio depuis
n’importe quelle application prenant en charge les commandes de
volume iOS standard en sélectionnant le NS2 depuis le symbole AirPlay à
côté de la commande de volume.
4.3 COMMUTATION D’ENTRÉE AUTOMATIQUE
Le NS2 commute automatiquement sur AirPlay lorsqu’un ux audio ›
est détecté.
La connexion AirPlay a la priorité sur la connexion AUX., ce qui ›
signie que la connexion AirPlay doit être arrêtée depuis le Mac, PC
ou appareil iOS avant de pouvoir activer la connexion AUX.
5. MISE À JOUR DU MICROPROGRAMME
Le microprogramme le plus récent est disponible dans la section NS2
du site Web de Nocs. Pour mettre à jour le microprogramme, suivez les
étapes ci-dessous.
Ouvrez l’adresse IP AirPlay dans un navigateur. A. Consultez la section
3.1 I pour plus d’informations.
Sélectionnez “Firmware update”.B.
Sélectionnez “Proceed”.C.
Patientez pendant le décompte de 30 secondes, la page s’actualise D.
automatiquement à la n.
Trouvez le chier de mise à jour du microprogramme sur votre E.
disque dur.
Sélectionnez “Upload”. F.
Sélectionnez “Proceed” pour charger le chier du microprogramme. G.
La page s’actualise automatiquement pour afcher le statut actuel
pendant la mise à jour.
Sélectionnez “Close” pour fermer la page de conguration.H.
Note. Dans certains cas, le NS2 doit être à nouveau conguré une fois la
mise à jour terminée.
6. RÉINITIALISATION D’USINE
Pour réinitialiser le NS2 aux paramètres d’usine, suivez les instructions
ci-dessous.
Allumez le NS2.A.
La DEL clignote rapidement en vert pendant 30 secondes au B.
démarrage.
Trouvez le trou “Reset” du panneau arrière du haut-parleur droit. C.
Utilisez un trombone ou un équivalent pour appuyer sur le bouton D.
“Reset”, maintenez-le enfoncé pendant 2 secondes.
La DEL clignote lentement cinq fois en vert/ambre.E.
La DEL clignote rapidement en vert pendant 30 secondes pendant le F.
démarrage, puis clignote lentement en vert pour indiquer que le NS2
est prêt à être conguré.
7. NETTOYAGE DES HAUT-PARLEURS
Utilisez toujours un chiffon non pelucheux sec, propre et sans produit de
nettoyage. Touchez jamais directement les éléments des haut-parleurs.
8. DÉPANNAGE ET SUPPORT
Le NS2 ne se reconnecte pas au réseau sans l après la conguration
Redémarrez le réseau sans l en débranchant le routeur sans l ›
Redémarrez le NS2. ›
Le NS2 est connecté au réseau sans l (la DEL est verte et xe) mais ne
joue pas la musique de votre Mac, PC ou appareil iOS.
Commutez le Wi-Fi dans l’application “Settings” de l’appareil iOS ›
Redémarrez l’application musicale que vous utilisez sur le Mac, PC ›
ou l’appareil iOS.
Redémarrez le Mac, PC ou appareil iOS. ›
Vériez que la version d’iTunes ou d’iOS installée est la bonne. ›
La page de conguration du NS2 (http://192.168.1.1) ne s’ouvre pas sur
mon Mac, PC ou appareil iOS.
Déconnectez-vous du réseau sans l “NOCS_NS2_Setup” puis ›
reconnectez-vous.Désactivez la protection du pare-feu avant de
démarrer la conguration. N’oubliez pas de réactiver le pare-feu
lorsque vous ayez terminé.
9. RECYCLAGE
Contactez un centre local de recyclage pour obtenir des informations sur
la façon procéder lorsque le moment de jeter le produit est arrivé.
10. FAQ
Visitez la page Web de Nocs pour consulter la toute dernière FAQ.
GARANTIE
Nocs garantit que ce produit est exempt de défauts de fabrication et
de matériau au moment de l’achat et pendant l’année qui suit (1 an).
Cette garantie ne limite pas l’obligation légale ni les droits statutaires du
consommateur. Cette garantie est valable à condition que la partie cédant
le produit n’émette pas d’autres garanties et que les termes et conditions
suivants soient réunis :
TERMES ET CONDITIONS
La garantie est valide sous réserve que le propriétaire puisse fournir ›
un reçu portant la date et le lieu de l’achat ;
La garantie est valide sous réserve que le produit ait été acheté à ›
un revendeur autorisé ;
La garantie est valide sous réserve que le produit ne soit pas ›
endommagé suite à un traitement inapproprié comme la chaleur,
le froid, l’humidité, le magnétisme, une usure anormale, une
modication ou un cas de force majeure ;
La garantie est valide sous réserve que le produit ne soit pas ›
endommagé suite à une mauvaise interprétation des instructions ;
La garantie est valide sous réserve que le produit n’ait pas été mis ›
en service, modié et n’ait subi aucune autre manipulation par une
personne non autorisée ;
La garantie est valide sous réserve que les numéros de série soient ›
inchangés et lisibles.
La garantie est limitée au remplacement du produit et n’inclut pas le ›
transport, la manutention ni les autres coûts additionnels.
FRANÇA IS / 11

La garantie est limitée au propriétaire initial du produit. ›
La garantie ne s’applique qu’aux défauts concernant les matériaux ›
et la main d’œuvre au moment de l’achat et à une usure raisonnable
pendant l’année suivante.
COMMENT FAIRE VALOIR VOTRE GARANTIE
Si vous avez des soucis avec votre produit Nocs, contactez votre point
d’achat. Une réclamation sous garantie requiert un reçu portant la date et
le lieu de l’achat. N’envoyez jamais directement le produit à Nocs.
ESPAÑOL
Nocs NS2 Air Monitors es un juego de altavoces activos con tecnología
AirPlay, que le permite transmitir música por secuencias (streaming) de
modo inalámbrico desde su Mac, PC, iPod touch, iPhone e iPad. Convierta
su dispositivo en una nueva experiencia musical y disfrute del potente
sonido del NS2.
1. ACERCA DE AirPlay
AirPlay es una tecnología revolucionaria que le permite transmitir música
por secuencias de modo inalámbrico desde su dispositivo Mac, PC o
iOS.
2. INTRODUCCIÓN
El NS2 está diseñado para ofrecer un sistema AirPlay sencillo y práctico.
2.1 DESEMBALAJE Y CONEXIÓN
Al desembalar el NS2 por primera vez, es aconsejable familiarizarse con
el producto. Después de desembalar el NS2, conecte la fuente de alimentación al altavoz derecho y conecte los dos altavoces mediante uno
de los dos cables de altavoz suministrados.
2.2 ENCENDIDO Y APAGADO
Para encender el NS2 presione el botón “Power” situado al lado ›
derecho del panel trasero del altavoz.
Si el NS2 no ha sido instalado previamente, el indicador LED par- ›
padeará en verde rápidamente unos 30 segundos durante el arranque, y seguirá un parpadeo en verde lentamente para indicar que
el NS2 está listo para su instalación.
Si el NS2 ya se ha instalado correctamente, el LED parpadea en ›
verde rápidamente durante unos 30 segundos mientras se inicia, y
seguirá con un parpadeo en verde lentamente durante 5 segundos.
Cuando el LED se quede verde permanente y suene un bip, el NS2
estará conectado a la red inalámbrica.
Para apagar, presione el botón “Power”. ›
2.3 SIGNIFICADO DEL INDICADOR LED
Consulte la tabla separada.
3. INSTALACIÓN INICIAL
El NS2 se debe conectar a la misma red inalámbrica que el dispositivo
Mac, PC o iOS.
Nota 1. El NS2 es compatible con DHCP y se reconecta automáticamente
a la red inalámbrica después de la instalación inicial.
Nota 2. Si el NS2 se cambia a una nueva red inalámbrica o si se cambia la
conguración de la red inalámbrica, requerirá una nueva instalación.
3.1 INSTALACIÓN AUTOMÁTICA CON WPS (WI-FI PROTECTED SETUP)
Si el enrutador inalámbrico es compatible con WPS, la instalación será
automática.
Encienda el NS2.A.
El indicador LED parpadeará en verde rápidamente unos 30 segun-B.
dos durante el arranque.
El LED parpadea en verde lentamente para indicar que el NS2 está C.
listo para la instalación.
Pulse el botón “WPS” del enrutador inalámbrico.D.
Pulse durante un segundo el botón “Setup” del lado derecho del E.
panel trasero del altavoz.
El LED parpadea en verde/ámbar lentamente para indicar que el F.
NS2 pasa al modo WPS.
El NS2 se conecta automáticamente a la red inalámbrica. Si la se-G.
ñal inalámbrica no tiene suciente intensidad, el NS2 seguirá intentando conectarse mientras el indicador LED parpadea en verde/
ámbar lentamente.
El LED permanece iluminado en verde y luego suena un bip para H.
indicar que el NS2 está conectado a la red inalámbrica.
Si desea cambiar el nombre del NS2 escriba su dirección IP en I.
un explorador, luego escriba el nombre que desee en el recuadro
“AirPlay device name” y pulse “Update”. Consulte en el manual del
enrutador las instrucciones para obtener las direcciones IP. Para
AirPort Express, abra AirPort Utility > Select the AirPort Express >
Advanced > Logs and Statistics > DHCP Clients y localice el NS2
en la lista de clientes.
Nota 1. WPS requiere una red cifrada.
Nota 2. Si falla la instalación automática, realice una la instalación
manual.
3.2 INSTALACIÓN MANUAL CON UN DISPOSITIVO MAC, PC O iOS
Si su enrutador inalámbrico no admite WPS, deberá hacer una instalación
manual. Antes de empezar, asegúrese de que conoce el nombre y la contraseña de la red inalámbrica.
Encienda el NS2.A.
El indicador LED parpadea en verde rápidamente unos 30 segundos B.
durante el arranque.
El LED parpadea en verde lentamente para indicar que el NS2 está C.
listo para la instalación.
Mantenga pulsado el botón “Setup” durante 5 segundos. El LED D.
parpadea en verde/ámbar lentamente para indicar que el NS2 ha
entrado en el modo de instalación manual.
Conecte su dispositivo Mac, PC o iOS a la red inalámbrica E.
“NOCS_NS2_Setup”.
Abra http://192.168.1.1 en un explorador.F.
Si desea cambiar el nombre del NS2, escriba el nombre que desee G.
en el recuadro “AirPlay device name”, haga clic en “Update” y luego
regrese a “Network Conguration”.
Seleccione la red inalámbrica (SSID) a la que desea conectar el NS2 H.
y escriba la contraseña de red. Use la conguración “Advanced“ si
fuera necesario. Pulse “Apply”.
COLOR SIGNIFICADO
Sin color Apagado
Verde permanente Conectado
Verde intermitente lento Estableciendo conexión
Verde intermitente rápido Iniciándose
Ámbar permanente Problema de red
Ámbar intermitente lento Actualización del rmware
Ámbar intermitente rápido Error de rmware
Verde/ámbar intermitente Modo Instalación
12 / ESPAÑ OL

El indicador LED parpadea en verde rápidamente mientras se está I.
reiniciando el NS2 y sigue con un parpadeo en verde lentamente
mientras se conecta.
El LED permanece iluminado en verde y luego suena un bip para J.
indicar que el NS2 está conectado a la red inalámbrica.
Nota 1. Es recomendable que la casilla de vericación DHCP permanezca
seleccionada.
Nota 2. En áreas con muchas interferencias Wi-Fi, la conexión a la red
inalámbrica NS2 a veces requiere más de un intento.
4. UTILIZACIÓN
Una vez que nalice la instalación, el NS2 se podrá usar plenamente
desde un dispositivo Mac, PC o iOS.
4.1 MAC O PC
Un Mac o un PC puede enviar audio desde iTunes si se selecciona NS2
en el menú de dispositivos de la esquina inferior derecha de la ventana
del programa.
4.2 DISPOSITIVOS iOS
Un iPod touch, iPhone o iPad pueden enviar audio desde cualquier aplicación que tenga soporte para los controles estándar de volumen de iOS
si se selecciona NS2 en el símbolo AirPlay que hay junto al control de
volumen.
4.3 CAMBIO AUTOMÁTICO DE ENTRADA
El NS2 cambia automáticamente a AirPlay cuando se detecta una ›
secuencia de audio.
La conexión AirPlay tiene prioridad sobre la conexión AUX. Por ello ›
es preciso desactivar la conexión AirPlay en el dispositivo Mac, PC o
iOS antes de activar la conexión AUX.
5. ACTUALIZACIÓN DEL FIRMWARE
Se puede descargar el rmware más reciente desde la sección NS2 del
sitio web de Nocs. Para actualizar el rmware, siga estos pasos.
Abra la dirección IP de AirPlay en un explorador. A. Vea en la sección
3.1 I instrucciones adicionales.
Seleccione “Firmware Update”.B.
Seleccione “Proceed”.C.
Espere hasta que concluya la cuenta atrás de 30 segundos. La pá-D.
gina se actualizará automáticamente cuando nalice.
Busque en el disco duro el archivo de actualización del rmware.E.
Seleccione “Upload” F.
Seleccione “Proceed” para cargar el archivo de rmware. La página G.
se actualizará automáticamente para mostrar el estado actual durante la actualización.
Seleccione “Close” para cerrar la página de instalación.H.
Nota. En algunos casos, es preciso instalar de nuevo el NS2 después de
nalizar la actualización.
6. RESTABLECER VALORES PREDETERMINADOS DE FÁBRICA
Para restablecer los valores predeterminados de fábrica del NS2, siga
estas instrucciones.
Encienda el NS2.A.
El indicador LED parpadea en verde rápidamente unos 30 segundos B.
durante el arranque.
Localice el oricio “Reset” del lado derecho del panel trasero del C.
altavoz.
Use un sujetapapeles o similar para presionar el botón “Reset” du-D.
rante 2 segundos.
El indicador LED parpadea cinco veces despacio en verde/ámbar.E.
El indicador LED parpadea en verde rápidamente unos 30 segundos F.
durante el arranque y luego parpadea en verde lentamente para
indicar que el NS2 está listo para su instalación.
7. LIMPIEZA DE LOS ALTAVOCES
Use siempre un paño seco, limpio y sin pelusas ni productos de limpieza.
Nunca toque directamente los componentes de altavoz.
8. RESOLUCIÓN DE PROBLEMAS Y SOPORTE TÉCNICO
NS2 no se reconecta a la red inalámbrica después de la instalación
Desenchufe el enrutador inalámbrico para reiniciar la red inalám- ›
brica.
Reinicie el NS2. ›
NS2 está conectado a la red inalámbrica (el indicador LED luce en verde
permanente) pero no reproduce la música de su dispositivo Mac, PC o
iOS.
Active y desactive Wi-Fi en la aplicación “Settings” del dispositivo ›
iOS.
Reinicie el software de música que está usando en el dispositivo ›
Mac, PC o iOS.
Reinicie el dispositivo Mac, PC o iOS. ›
Asegúrese de que tiene instaladas las versiones correctas de iTunes ›
e iOS.
No se abre la página de instalación de NS2 (http://192.168.1.1) en mi
dispositivo Mac, PC o iOS.
Desconecte y conecte de nuevo “NOCS_NS2_Setup” a la red ina- ›
lámbrica.
Desactive la protección del rewall antes de empezar la instalación. ›
Asegúrese de habilitar de nuevo el rewall después de nalizar.
9. RECICLAJE
Cuando llegue el momento de desechar el producto, póngase en contacto
con su centro de reciclaje local para solicitar información.
10. P+F
Visite la página web de Nocs para consultar las Preguntas más frecuentes.
GARANTÍA
Nocs garantiza que este producto no tiene defectos de materiales ni fabricación en el momento de la compra y durante un (1) año a partir de ese
momento. Esta garantía no limita la legislación aplicable ni los derechos
legales del consumidor. Esta garantía es válida siempre que la parte que
venda el producto no emita otras garantías, y siempre que se cumplan
los siguientes términos y condiciones:
TÉRMINOS Y CONDICIONES
Esta garantía es válida a condición de que el cliente pueda presentar ›
un recibo con la fecha y el lugar de compra.
Esta garantía es válida a condición de que el producto haya sido ›
comprado a un distribuidor autorizado.
Esta garantía es válida a condición de que el producto no se haya ›
dañado a causa de tratamientos inadecuados como calor, frío,
humedad, magnetismo, desgaste anormal, modicación o causas
de fuerza mayor.
Esta garantía es válida a condición de que el producto no se haya ›
dañado como resultado de una mala interpretación de las instrucciones.
Esta garantía es válida a condición de que el producto no haya sido ›
ESPAÑOL / 13

sometido a reparación, modicación ni ninguna otra clase de manipulación por personas no autorizadas.
Esta garantía es válida a condición de que los números de serie ›
estén inalterados y legibles.
Esta garantía está limitada a la sustitución del producto y no ›
incluye el transporte, la manipulación ni ningún otro coste adicional.
Esta garantía está limitada al titular original del producto. ›
Esta garantía es aplicable solamente a defectos relacionados con ›
los materiales y la fabricación desde el momento de la compra
con un uso y desgaste razonable durante el año siguiente.
CÓMO UTILIZAR LA GARANTÍA
Para cualquier asunto relativo a productos Nocs, póngase en contacto con su punto de compra. Una solicitud de garantía válida precisa
disponer del recibo con la fecha y el lugar de compra. Nunca envíe
ningún producto directamente a Nocs.
14 / ESPAÑ OL


© 2012 Nocs A B. All rights reserved.
Nocs
®
and the Nocs logo are trademarks of Nocs AB.
AirPlay, the AirPlay logo, iPhone, iPod touch and iPad are trademarks
of Apple Inc., registered in the U.S. and other countries.
 Loading...