

Page 1
GB70
User Guide
DANGER
INT
PRIOR TO USE, READ AND UNDERSTAND
PRODUCT SAFETY INFORMATION.
Failure to follow the instructions may result
in ELECTRICAL SHOCK, EXPLOSION,
or FIRE, which may result in SERIOUS
INJURY, DEATH, DAMAGE TO DEVICE or
PROPERTY. Do not discard this information.
Welcome. Thank you for buying the NOCO Genius
Boost™ GB70. Read and understand the User Guide
before operating the product. For questions regarding our
jump starter, view our comprehensive support information
at www.no.co/support. To contact NOCO for personalized
support (not available in all areas), visit www.no.co/connect.
What’s In The Box.
• GB70 Lithium Jump Starter w/HD Battery Clamps
®
• Micro USB Cable
• 12V Female Plug (OUT)
• 12V Male Plug (IN)
• 12V XGC Cable
• User Guide & Information Guide and Warranty
Page 2

Contacting NOCO.
Phone:
Email:
Mailing Address:
About GB70.
ultra-compact and portable lithium-ion jump starter for highdisplacement gas and diesel engines in cars, trucks, boats
and more. Safe to use on engines of any size. It’s extremely
safe for anyone to use. It features spark proof technology
and reverse polarity protection. The GB70 can instantly
jump start most single-battery applications, up to 40 times
on a single charge. The GB70 is also equipped with a USB
battery pack, 12V OUT port and LED flashlight, making it
the ultimate emergency tool.
1.800.456.6626
support@no.co
30339 Diamond Parkway, #102
Glenwillow, OH 44139
United States of America
The NOCO Genius® Boost™ GB70 is an
Getting Started. The GB70 comes partially charged
out of the box and needs to be fully charged prior to use.
Carefully read and understand the vehicle owner’s manual
on specific precautions and recommended methods for
jump starting the vehicle. Make sure to determine the
voltage and chemistry of the battery by referring to your
battery owner’s manual prior to using this product. The
GB70 is for jump starting 12-volt lead-acid batteries only.
Connecting to the Battery.
Before connecting to the battery, verify that you have a 12volt lead-acid battery. The GB70 is not suitable for any other
type of battery. Identify the correct polarity of the battery
terminals on the battery. The positive battery terminal is
typically marked by these letters or symbol (POS,P,+).
The negative battery terminal is typically marked by these
letters or symbol (NEG,N,-). Do not make any connections
to the carburetor, fuel lines, or thin, sheet metal parts. The
below instructions are for a negative ground system (most
common). If your vehicle is a positive ground system (very
uncommon), follow the below instructions in reverse order.
1.) Connect the positive (red) HD battery clamp to the
positive (POS,P,+) battery terminal.
Page 3

2.) Connect the negative (black) HD battery clamp
to the negative (NEG,N,-) battery terminal or vehicle
chassis.
3.) When disconnecting, disconnect in the reverse
sequence, removing the negative first (or positive first
for positive ground systems).
Jump Starting.
1.) Verify the voltage and chemistry of the battery.
2.) Confirm the HD battery clamps are connected to
the correct polarity battery terminals.
3.) Make sure all of the vehicle’s power loads
(headlights, radio, air conditioning, etc.) are turned off
before attempting to jump start the vehicle.
4.) Press the Power Button to begin jump starting. All
LEDs will flash, indicating that all LEDs are properly
functioning. If you are properly connected to the
battery, the White Boost LED will illuminate and the
charge level LEDs will chase. If the battery clamps are
connected in reverse, the Red Error LED will illuminate.
Reverse the connections to clear this error and then
the White Boost LED will illuminate. The White Boost
LED is illuminated, when the GB70 is ready to jump
start your vehicle.
5.) Try starting the vehicle. Most vehicles will
immediately start. Some vehicles may require the
GB70 to be connected for up to 30 seconds before
starting. If the vehicle does not start right away, wait
20-30 seconds and try again. Do not attempt more
than five (5) consecutive jump starts within a fifteen
(15) minute period. Allow the GB70 to rest for fifteen
(15) minutes before attempting to jump start the
vehicle again.
6.) Once you have started your vehicle, disconnect the
battery clamps, and remove the GB70.
Page 4

Low Voltage Batteries & Manual Override
The GB70 is designed to jump start 12-volt lead-acid
batteries down to 2-volts. If your battery is below 2-volts,
the Boost LED will be “Off”. This is an indication that the
GB70 can not detect a battery.
If you need to jump start a battery below 2-volts there is a
Manual Override feature, which allows you to force “On” the
jump start function.
CAUTION. USE THIS MODE WITH EXTREME CARE. THIS
MODE IS FOR 12-VOLT LEAD-ACID BATTERIES ONLY.
BOTH THE SPARK PROOF AND REVERSE POLARITY
PROTECTION FEATURES ARE DISABLED. PAY VERY
CLOSE ATTENTION TO THE POLARITY OF THE BATTERY
BEFORE USING THIS MODE. DO NOT ALLOW THE
POSITIVE AND NEGATIVE BATTERY CLAMPS TO TOUCH
OR CONNECT TO EACH OTHER AS THE PRODUCT
WILL GENERATE SPARKS. THIS MODE USES VERY
HIGH CURRENT (UP TO 2000 AMPS) THAT CAN CAUSE
SPARKS AND HIGH HEAT IF NOT USED PROPERLY. IF
YOU ARE UNSURE ABOUT USING THIS MODE, DO NOT
ATTEMPT AND SEEK PROFESSIONAL HELP.
Before using the Manual Override feature, make sure the
HD battery clamps are connected to the correct polarity
battery terminals. To use the Manual Override feature, press
and hold the Manual Override Button (a red exclamation
point icon inside a red circle) for three (3) seconds. The
White Boost LED will flash “On” and “Off” indicating you
have successfully entered into Manual Override and it is
ready to jump start your vehicle. If connected in reverse
polarity, the Red Error LED will illuminate and the unit will
not operate.
CAUTION: POWER THE GB70 “OFF” BEFORE
DISCONNECTING THE BATTERY CLAMPS. THIS WILL
ENSURE YOUR SAFETY. REMEMBER BOTH THE
SPARK PROOF AND REVERSE POLARITY PROTECTION
FEATURES ARE DISABLED.
Most vehicles will immediately start. Some vehicles may
require the GB70 to be connected for up to 30 seconds
Page 5
before starting. If the vehicle does not start right away,
wait 20-30 seconds and try again. Do not attempt
more than five (5) consecutive jump starts within a
fifteen (15) minute period. Allow the GB70 to rest for
fifteen (15) minutes before attempting to jump start the
vehicle again.
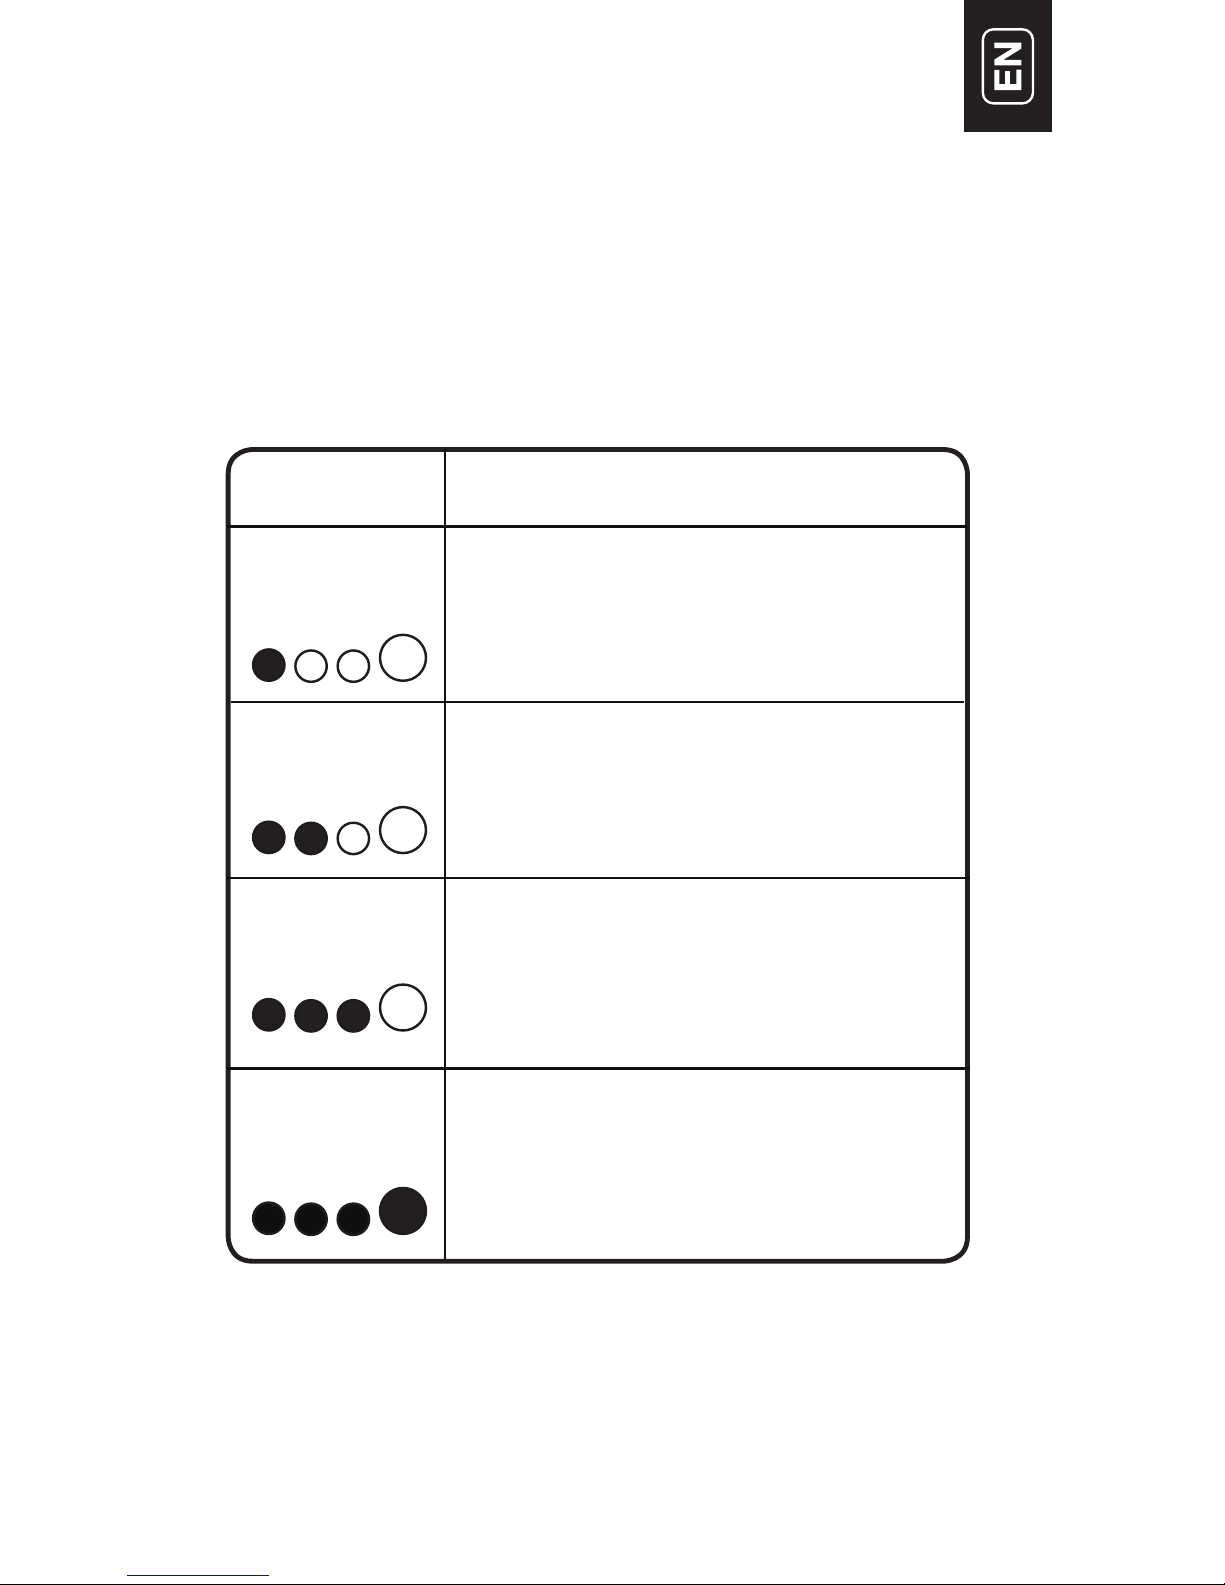
Understanding Charge LEDs.
The GB70 has four (4) Charge LEDs - 25%, 50%, 75%
and 100%. These Charge LEDs indicate the internal
battery’s state-of-charge (SOC). See below:
LED Explanation
25%
Red LED
25% 50% 75% 100%
50%
Red LED
25% 50% 75% 100%
75%
Yellow LED
25% 50% 75% 100%
100%
Green LED
25% 50% 75% 100%
The 25% Charge LED will be solid
when the internal battery is 25% or
less charged.
The 50% and 25% Charge LEDs will
be solid when the internal battery is
more than 25% but less than 50%
charged.
The 75%, 50%, and 25% Charge
LEDs will be solid when the internal
battery is more than 50% but less
than 75% charged.
All four (100%, 75%, 50%, and 25%)
Charge LEDs will be solid when the
internal battery is more than 75% up
to 100% charged.
The above charge states apply when the GB70 is NOT
connected to a power supply and recharging.
Page 6
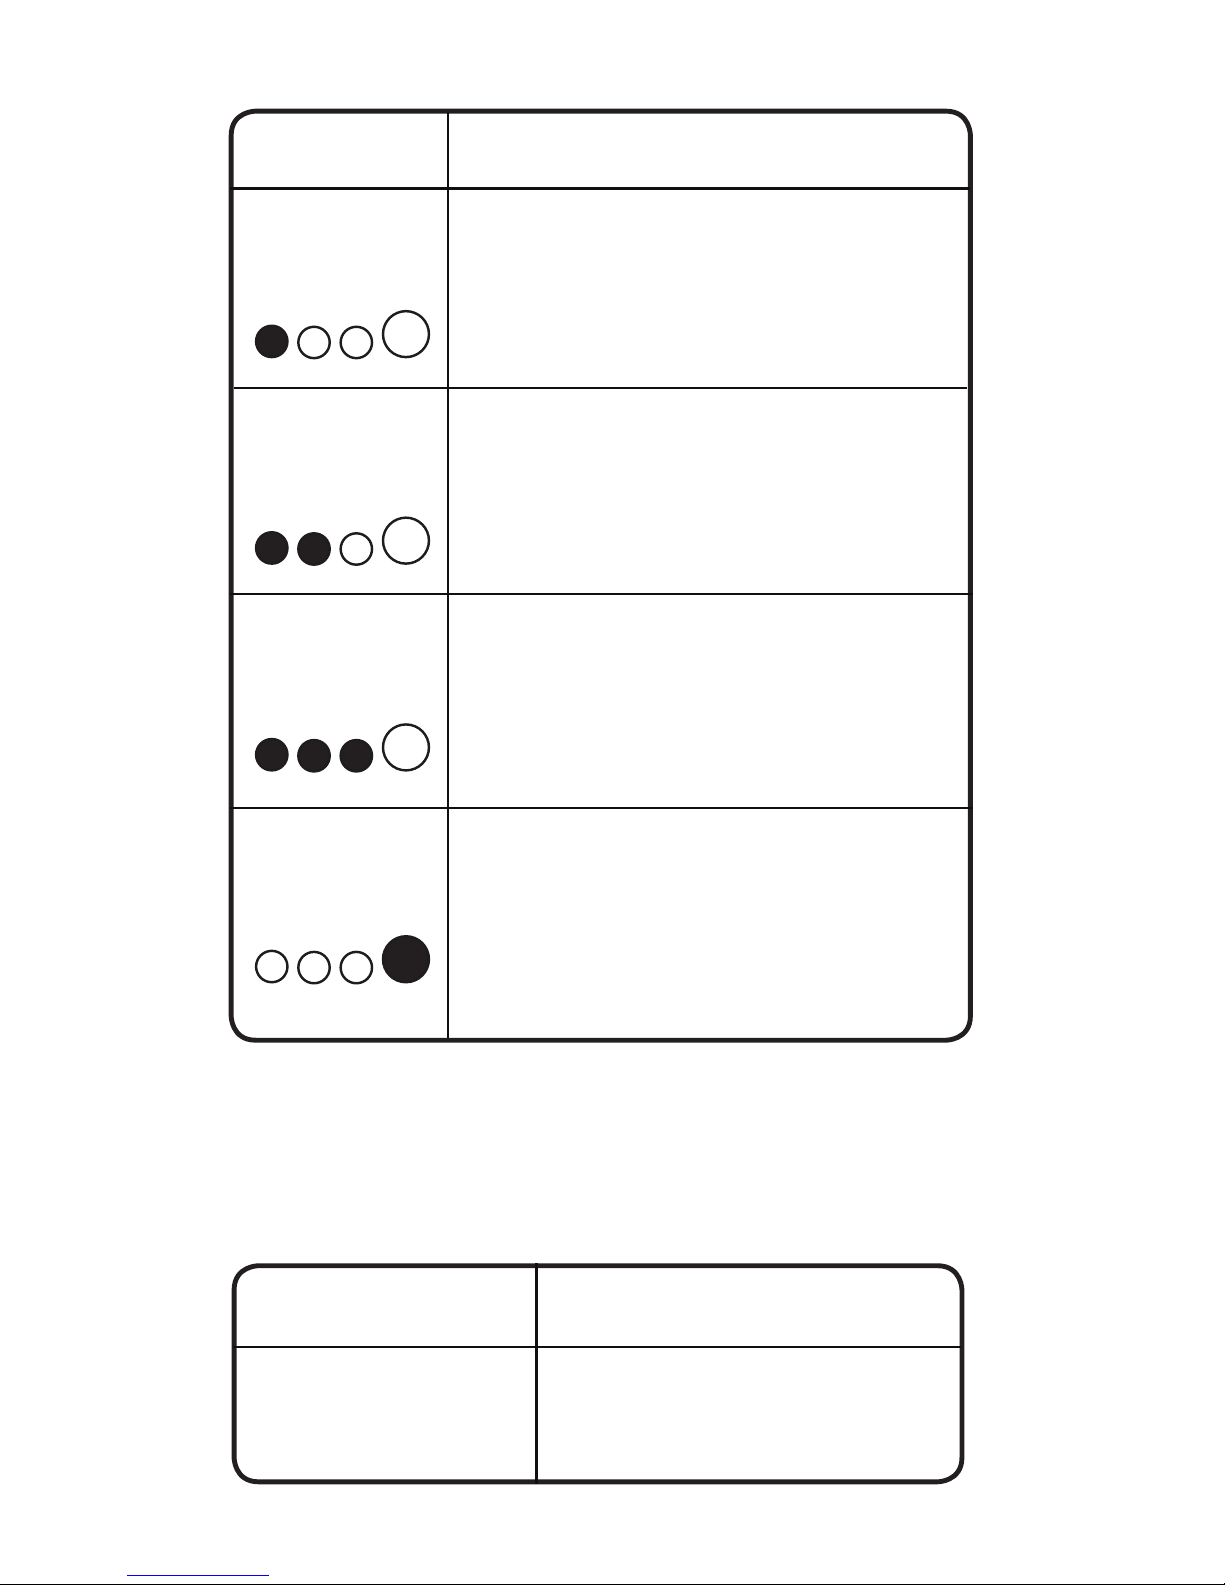
When Recharging the GB70.
LED Explanation
25%
Red LED
25% 50% 75% 100%
50%
Red LED
25% 50% 75% 100%
75%
Yellow LED
25% 50% 75% 100%
The 25% Charge LED will slowly
pulse “On” and “Off”, when the
battery is less than 25% charged.
When the battery is 25% charged,
the Red Charge LED will be solid.
The 50% Charge LED will slowly
pulse “On” and “Off”, when the
battery is less than 50% charged.
When the battery is 50% charged,
the Red Charge LED will be solid.
The 75% Charge LED will slowly
pulse “On” and “Off”, when the
battery is less than 75% charged.
When the battery is 75% charged,
the Yellow Charge LED will be solid.
100%
Green LED
25% 50% 75% 100%
The 100% Charge LED will slowly
pulse “On” and “Off”, when the battery
is less than 100% charged. When the
battery is fully charged, the Green LED
will be solid, and the 25%, 50% and
75% Charge LEDs will turn “Off”.
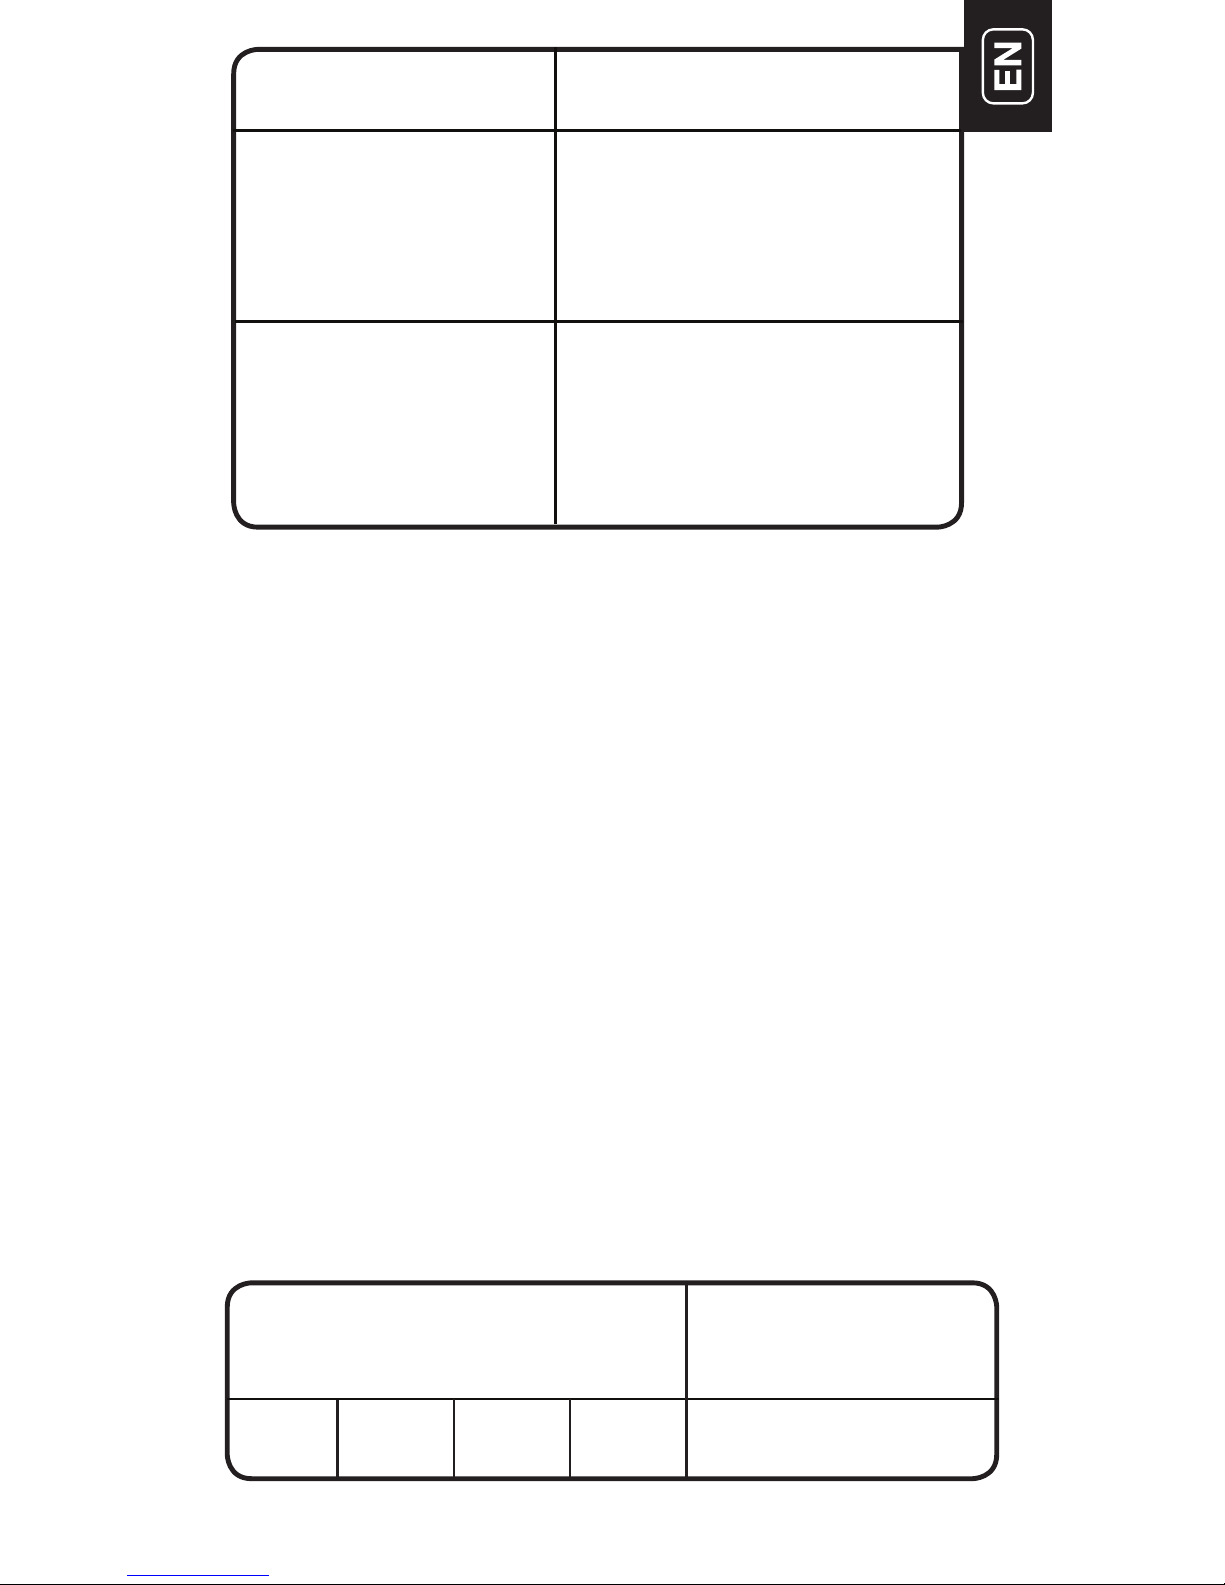
Understanding Error Conditions.
The GB70 shall display an Error Condition when a reverse
polarity condition is present, a battery below two (2) volts,
or the internal battery overheating. When one of these Error
Conditions are present, the following will happen:
Error Reason/Solution
Error LED
Solid Red
Reverse polarity/
Reverse the battery
connections.
Page 7
Error Reason/Solution
Error LED
Blinking Red
w/Cables Connected
Properly
Boost Light Does
Not Come On
w/Cables Connected
Properly
The internal battery is too
hot/
Allow the unit to cool.
Bring the unit into cooler
environment.
Connected battery is below
2-volts/
Remove all loads, and
try again, or use Manual
Override Mode.
Charging the GB70.
12V Fast Charge (36W):
Connect the 12V Cable to the “12V IN” port on the
GB70, and the other end to the Male 12 Plug. Plug into
a powered 12V AUX Plug (Cigarette Lighter Port.)
USB Charging (Up to 10W):
Connect the GB70 using the included USB Charge
Cable to the USB IN port and a powered USB port, like
an AC adapter, car charger, laptop and more. The USB
IN port is rated at 2.1 Amps to ensure safe and efficient
charging of the internal lithium battery.
Due to FCC regulations, we do not recommend
charging and discharging the unit at the same time.
Charging Times.
The time to recharge a GB70 will differ based on the
discharge level and the power source used. Actual
results may vary due to battery conditions.
USB Charger Rating 12V Fast Charge
.5A
1A
2A 3A @ 12V (36W)
Time
28hr
14hr
7hr 2-3hr
Page 8

Charging Your USB Devices.
You can recharge virtually any USB device, like a
smartphone. Connect the included USB Charge Cable to
the USB OUT port and connect to your USB device.
The number of times you can recharge a USB device will
vary between devices. For recharge times, contact your
device manufacturer.
Powering Your 12V Devices.
Connect the 12V Cable to the “12V OUT” port on the
GB70, and the other end to the Female 12V Plug (12V AUX/
Cigarette Lighter Port.) Plug-in any standard 12V device (Up
to 15A) with a 12V plug and turn the GB70 “On” to start
powering your device.
LED Flashlight.
The GB70 has an integrated ultra-bright LED flashlight. It
has seven (7) light modes that effect its performance and
longevity: 100%, 50%, 10%, SOS, Blink, Strobe, and Off.
To turn the flashlight “On” and “Off”, use the Power button
with the light bulb icon. Press once to turn the flashlight
“On” at 100% luminosity, again for 50% luminosity (within
3 seconds), again for 10% luminosity (within 3 seconds),
again for SOS (within 3 seconds), again for Blink (within 3
seconds), again for Strobe (within 3 seconds) and again
for “Off”. If a light mode is not selected within 3 seconds,
it will remain “On” in the current light mode, and the next
selection will turn the flashlight “Off”.
Depending on the mode selection, the GB70 will have
various levels of output and runtime. Selecting a lower
power level when using the GB70 for extended periods of
time will prolong battery life.
Modes:
100% > 50% > 10% > SOS > Blink > Strobe > Off
Page 9

Technical Specifications.
Internal Battery:
Peak Current Rating:
joules
3S
Operating Temperature:
Charging Temperature:
Storage Temperature:
Micro USB (Input):
USB (Output):
12V (Input)
12V (Output)
Lithium Ion
2000A
15700+
:
-30°C to +50°C
0ºC to +40ºC
-20ºC to +50ºC (Avg Temp.)
5V, 2.1A
5V, 2.1A
12V, 3A
12V, 15A
Housing Protection:
Cooling:
Dimensions (L x W x H):
Weight:
IP65 (w/Ports Closed)
Natural Convection
8.6 x 6 x 2.5 Inches
5 Pounds
Energy Saving Auto Shut Off.
The GB70 has a built in energy saving feature that will
automatically turn the unit off after seven (7) hours. To
continue using, simply power on the unit again.
Page 10

1
2
7
5
6
3
4
Page 11

User Interface.
1. Internal Battery Level
Indicates the charge level of the internal battery.
2. Error LED
Illuminates Red if reverse polarity is detected, or blinks
“On” and “Off” when the internal battery temperature is
too high.
3. Power Button
Push to turn unit “On” & “Off”.
4. Power LED
Illunimates White when unit is “On”.
5. Boost LED
Illuminates White when Boost is active. If the unit is
connected properly to a battery, the GB70 will automatically
detect a battery and go into Boost mode (LED flashes White
when Manual Overide feature is active).
6. Manual Override Button
To enable, push and hold for three (3) seconds.
WARNING: Disables safety protection and manually
forces Boost “On”. Only for use when a battery is too
low to be detected.
7. Light Mode Button
Toggles the ultra-bright LED light through 7 light modes:
100% > 50% > 10% > SOS > Blink > Strobe > Off
Page 12

INT
30339 Diamond Parkway, #102
Glenwillow, OH 44139
United States of America
1.800.456.6626
support@no.co
no.co
GB70.07282015A
Page 13

Important Product Information
Guide and Limited Warranty
DANGER
READ AND UNDERSTAND ALL SAFETY
INFORMATIOIN BEFORE USING THIS
PRODUCT. Failure to follow these safety
instructions may result in ELECTRICAL
SHOCK, EXPLOSION, FIRE which may
result in a SERIOUS INJURY, DEATH, or
PROPERTY DAMAGE.
Electrical Shock. Charger is an electrical
device that can shock and cause serious
injury. Do not cut power cords. Do not
submerge in water or get wet.
Explosion. Unmonitored, incompatible, or
damaged batteries can explode if used with
charger. Do not leave charger unattended
while in use. Do not attempt to charge a
damaged or frozen battery. Use charger
only with batteries of recommended voltage.
Operate charger in well ventilated areas.
Fire. Charger is an electrical device that
emits heat and is capable of causing burns.
Do not cover charger. Do not smoke or use
any source of electrical spark or re when
operating charger. Keep charger away from
combustible materials.
Page 14

DANGER
Eye Injury. Wear eye protection when
operating charger. Batteries can explode
and cause ying debris. Battery acid can
cause eye and skin irritation. In the case of
contamination of eyes or skin, ush affected
area with running clean water and contact
poison control immediately.
Explosive Gases. Working in the vicinity
of a lead-acid or lithium-ion battery is
dangerous. Batteries generate explosive
gases during normal battery operation. To
reduce risk of battery explosion, follow all
safety information instructions and those
published by the battery manufacturer and
manufacturer of any equipment intended
to be used in the vicinity of battery. Review
cautionary markings on these products and
on engine.
Important Safety Warnings
Proposition 65. Battery posts, terminals, and related
accessories contain chemicals, including lead. These
materials are known to the State of California to cause
cancer and birth defects and other reproductive harm.
Personal Precaution. Only use charger as intended.
Someone should be within range of your voice or close
enough to come to your aid in case of emergency. Have
a supply of clean water and soap nearby in the case of
battery acid contamination. Wear complete eye protection
and protective clothing while working near a battery. Always
wash hands after handling batteries and related materials.
Do not handle or wear any metal objects when working
with batteries including; tools, watches or jewelry. If metal is
dropped onto battery, it may spark or create a short circuit
resulting in electrical shock, re, explosion which may result
in injury, death or property damage.
Page 15

Minors. If the charger is intended by “Purchaser” to
be used by a minor, purchasing adult agrees to provide
detailed instructions and warnings to any minor prior
to use. Failure to do so is the sole responsibility of the
“Purchaser,” who agrees to indemnify NOCO for any
unintended use or misuse by a minor.
Choking Hazard. Accessories may present
a choking hazard to children. Do not leave children
unattended with charger or any accessory. The charger
is not a toy.
Handling. Handle charger with care. The charger
can become damaged if impacted. Do not use a
damaged charger, including, but not limited to, cracks
to the casing or damaged cables. Do not use charger
with a damaged power cord or with loose electrical
outlets. Humidity and liquids may damage charger. Do
not handle charger or any electrical components near
any liquid. Store and operate charger in dry locations.
Do not operate charger if it becomes wet. If charger is
already operating and becomes wet, disconnect it from
the electrical outlet and battery and discontinue use
immediately. Do not disconnect the charger from an
electrical outlet by pulling on the AC cable.
Modications. Do not attempt to alter, modify or
repair any part of the charger. Disassembling charger
may cause injury, death or damage to property. If
charger becomes damaged, malfunctions or comes in
contact with any liquid, discontinue use, and contact
NOCO. Any modications to the charger will void your
warranty.
Accessories. This charger is only approved for
use with NOCO accessories. NOCO is not responsible
for user safety or damage when using accessories not
approved by NOCO.
2
Page 16

Extension Cords. Using an improper extension cord
could result in re and electrical shock which may result in
injury, death or damage to device and property. If extension
cord must be used, make sure that: (1) The pins on the
extension cord plug have the same number, size, and shape
as those of the AC power cord plug on the charger; (2) The
extension cord is properly wired and is in good condition; (3)
The wire size is as specied in Table 1 below.
Recommended Minimum AWG Size For
Extension Cords For Battery Chargers
AC Input Rating,
Amperes*
Equal To
Or Greater
Than
0
2
3
4
5
6
8
10
But Less
Than
2
3
4
5
6
8
10
12
25
(7.6)
18
18
18
18
18
18
18
16
AWG Size of Cord
Length Of Cord, Feet (m)
50
(15.2)
18
18
18
18
16
16
14
14
100
(30.5)
18
16
16
14
14
12
12
10
150
(45.6)
16
14
14
12
12
10
10
8
12
14
16
18
14
16
18
20
*If the input rating of a charger is given in watts rather
than amperes, the corresponding ampere rating is to
be determined by dividing the wattage rating by the
16
16
14
14
12
12
12
12
voltage rating - for example:
1250W+125V = 10 Amperes
10
10
8
8
8
8
8
6
Page 17

Location. Locate the charger as far away from the
battery as possible. Do not place the charger directly
above the battery as gases from battery will corrode
and damage charger. Prevent battery acid from coming
in contact with the charger. Do not operate the charger
in a closed-in area or an area with restricted ventilation.
Do not set a battery on top of charger. Position cable
leads to avoid accidental damage by moving vehicle
parts (including hoods and doors), moving engine parts
(including fan blades, belts, and pulleys), or what could
become a hazard that may cause injury or death.
Operating Temperature. The charger is
designed to work in ambient temperatures between
32° and 104° F (0° and 40° C) and stored in
temperatures between 0° and 130° F (-17° and 54° C).
Do not store or operate outside of these temperature
ranges. Do not charge a frozen battery. Discontinue
use of charger immediately if the battery becomes
excessively warm.
Storage. Do not use or store your charger in areas
with high concentrations of dust or airborne materials.
Store your charger on at; secure surfaces so it’s not
prone to falling. Store your charger in a dry location.
Compatibility. The charger is only compatible
with lead-acid and lithium-ion batteries (excluding
model G750, which is for lead-acid batteries only).
Do not attempt to use charger with any other type
of battery. Charging other battery chemistries may
result in injury, death or property damage. Contact the
battery manufacturer prior to attempting to charge the
battery. Do not charge a battery if you are unsure of
the battery’s specic chemistry or voltage. The charger
features specialized charge modes for charging
specialized batteries. Failure to understand the
operation of the charging modes may result in injury,
death or property damage.
4
Page 18

Lithium Charging. Misusing a lithium-ion battery may
cause the battery to get hot, rupture, or ignite, causing
serious injury, death or property damage. Not all lithiumion batteries are the same chemistry or contain battery
management systems. Contact the lithium-ion battery
manufacturer before attempting to charge. The “Purchaser”
assumes all risks associated with lithium-ion batteries.
Cleaning. Unplug the charger before attempting any
maintenance or cleaning. Clean and dry charger immediately
if it comes in contact with liquid or any type of contaminant.
Before cleaning, disconnect charger from electrical outlet and
battery. Use a soft, lint-free (microber) cloth. Avoid getting
moisture in openings.
Explosive Atmospheres. Obey all signs and
instructions. Do not operate charger in any area with a
potentially explosive atmosphere, including fueling areas or
areas which contain chemicals or particles such as grain, dust
or metal powders.
High-Consequence Activities. This device is not
intended for use where the failure of the device could lead to
injury, death or severe environmental damage.
Radio Frequency Interference. Charger is
designed, tested, and manufactured to comply with
regulations governing radio frequency emissions. Such
emissions from the charger can negatively affect the operation
of other electronic equipment, causing them to malfunction.
NOCO Genius Battery Charger Five (5) Year Limited Warranty.
The NOCO Company (“NOCO”) warrants that its products
(the “Product”) will be free from defects in material and
workmanship for a period of ve (5) years from the date of
purchase (the “Warranty Period”). For defects reported during
the Warranty Period, NOCO will, at its discretion, and subject
to NOCO’s technical support analysis, either repair or replace,
for the fees set forth below. Replacement parts and products
will be new or serviceably used, comparable in function
and performance to the original part and warranted for the
remainder of the original Warranty Period.
Page 19

THE FOREGOING LIMITED WARRANTY IS IN LIEU
OF AND EXCLUDES ALL OTHER WARRANTIES
NOT EXPRESSLY SET FORTH HEREIN, WHETHER
EXPRESS OR IMPLIED BY OPERATION OF LAW OR
OTHERWISE, INCLUDING, BUT NOT LIMITED TO,
ANY IMPLIED WARRANTIES OF MERCHANTABILITY
OR FITNESS FOR A PARTICULAR PURPOSE.
NOCO’S LIABILITY UNDER THIS LIMITED WARRANTY
IS EXPRESSLY LIMITED TO REPLACEMENT (IN
THE FORM AND UNDER THE TERMS ORIGINALLY
SHIPPED), OR TO REPAIR, WHETHER SUCH
CLAIMS ARE FOR BREACH OF WARRANTY OR
FOR NEGLIGENCE. NOCO SHALL NOT BE LIABLE
FOR ANY INCIDENTAL, CONSEQUENTIAL, OR
SPECIAL LOSSES, DAMAGES OR EXPENSES OF
ANY KIND, INCLUDING, WITHOUT LIMITATION,
ANY SUCH LOSSES, DAMAGES, OR EXPENSES
ARISING DIRECTLY OR INDIRECTLY FROM THE
SALE, HANDLING, OR USE OF THE PRODUCT FROM
ANY OTHER CAUSE RELATING THERETO, OR FROM
PERSONAL INJURY OR LOSS OF PROFIT.
Some states, provinces and countries do NOT allow
the exclusion or limitation of incidental or consequential
damages or length of an implied warranty so the
above limitation(s) or exclusion(s) may NOT apply. This
Limited Warranty gives you specic legal rights and you
may also have other legal rights, which vary by state,
province and country.
6
Page 20

Limited Warranty.
This Limited Warranty is made to the original purchaser from
NOCO and does NOT extend to any other person or entity
and is NOT assignable. It is the obligation of the original
purchaser to:
1.) Request and obtain a return merchandise authorization
(RMA) number from NOCO Support at support@no.co.
2.) Forward the Product, including RMA number, payment for
any applicable fees, and Proof of Purchase prepaid, to:
The NOCO Company
Attn: Warranty Department
30339 Diamond Parkway, #102
Glenwillow, OH 44139 USA
THE COSTS OF TRANSPORTING PRODUCTS TO NOCO
FOR WARRANTY SERVICE IS THE RESPONSIBILITY OF THE
ORIGINAL PURCHASER. THIS LIMITED WARRANTY IS VOID
UNDER THE FOLLOWING CONDITIONS:
1.) The Product is misused, subjected to careless handling,
or operated under conditions of extreme temperature, shock,
or vibration beyond NOCO’s recommendations for safe and
effective use.
2.) The Product has NOT been installed, operated, or
maintained in accordance with approved procedures.
3.) The Product is disassembled, altered, or repaired by
anyone, except NOCO.
4.) The electrical connections to either the AC input or the DC
output of the charger are modied without the express written
consent of NOCO.
5.) The Product is subject to improper storage or accident.
6.) The original purchaser fails to register the product.
Page 21

THIS LIMITED WARRANTY DOES NOT COVER:
1.) Normal wear and tear.
2.) Cosmetic damage that does NOT affect functionality.
3.) Products where the NOCO serial number is missing,
altered, or defaced.
LIMITED WARRANTY FEES
These fees apply only to Product during the Warranty
Period. The Limited Warranty is void either by elapsed
time from date of purchase or from the conditions
listed earlier in this document. Return Product with the
appropriate documentation along with a check for the
applicable fees, as set forth below. Make checks payable
to The NOCO Company.
With Receipt:
0-2.5 Years: NO Charge
2.5-5 Years: 35% of MSRP
[Exact amount will be veried when RMA is issued]
NO Receipt:
0-5 Years: 45% of MSRP [Exact amount will be veried
when RMA is issued]
REGISTERING YOUR NOCO PRODUCT
You must register your NOCO product in order to validate
the Limited Warranty. You can register the battery charger
online. To register your product online, please visit: no.co/
register.
Complete the requested information and click “submit.”
8
Page 22

30339 Diamond Parkway, #102
Glenwillow, OH 44139
United States of America
1.800.456.6626
support@no.co
no.co
NPD02042014B
 Loading...