


· Fahrfertige Modellbahnanlage im Aluprofil-Koffer
(Außenmaße Koffer: 79,5 x 54,5 cm, 16 cm hoch)
· Gelände aus Struktur-Hartschaum, komplett ausgeschmückt
· Zwei Bahnstromkreise, fahrfertig montiert
· Steuerpult mit zwei Fahrreglern
· Besondere Fahrfunktionen:
- Langsamfahrt für jedes Gleis einstellbar
- Geschwindigkeits-Synchronisierung zwischen den
Bahnstromkreisen einstellbar
· Vier beleuchtete Gebäude. Lichter einzeln schaltbar oder über Licht-
Automatik zu betreiben – beim Modell »Garmisch« zusätzlich ein
beleuchteter Weihnachtsbaum.
· Anschluss erfolgt über beiligendes Steckernetzgerät
(Eingang: 100 – 240 V, Ausgang: 12 V Gleichstrom, 1 A)
· Hinweis Zugzusammenstellung: Wegen der engen Radien sollten
die eingesetzten Waggons nicht länger als 9 cm sein
Produktdetails
»Berchtesgaden« und »Garmisch«
88400 ∙ 88401 ∙ 88405 ∙ 88406 Betriebsanleitung für Modellbahnkoffer
Instruction Manual for Model Railway Briefcase Layouts
»Berchtesgaden« & »Garmisch«
· Ready-to-run model railway layout in an aluminium briefcase
(outer dimensions briefcase: 79.5 x 54.5 cm, 16 cm high)
· Structured hard foam layout, completely decorated
· Two train circuits, ready assembled
· Control box with 2 train controllers
· Special speed functions:
- adjustable slow speed for each track
- tunable speed synchronization of both track courses
· Four illuminated houses. The lights can be switched individually or
by automatic light operation – the model »Garmisch« includes an
illuminated Christmas Tree.
· Connection is made by included power supply (input: 100 – 240 V,
output: 12 V DC, 1 A)
· Note for train combination: Please make sure that wagons
are not longer than 9 cm because of the tight radius
Product Details
»Berchtesgaden« and »Garmisch«
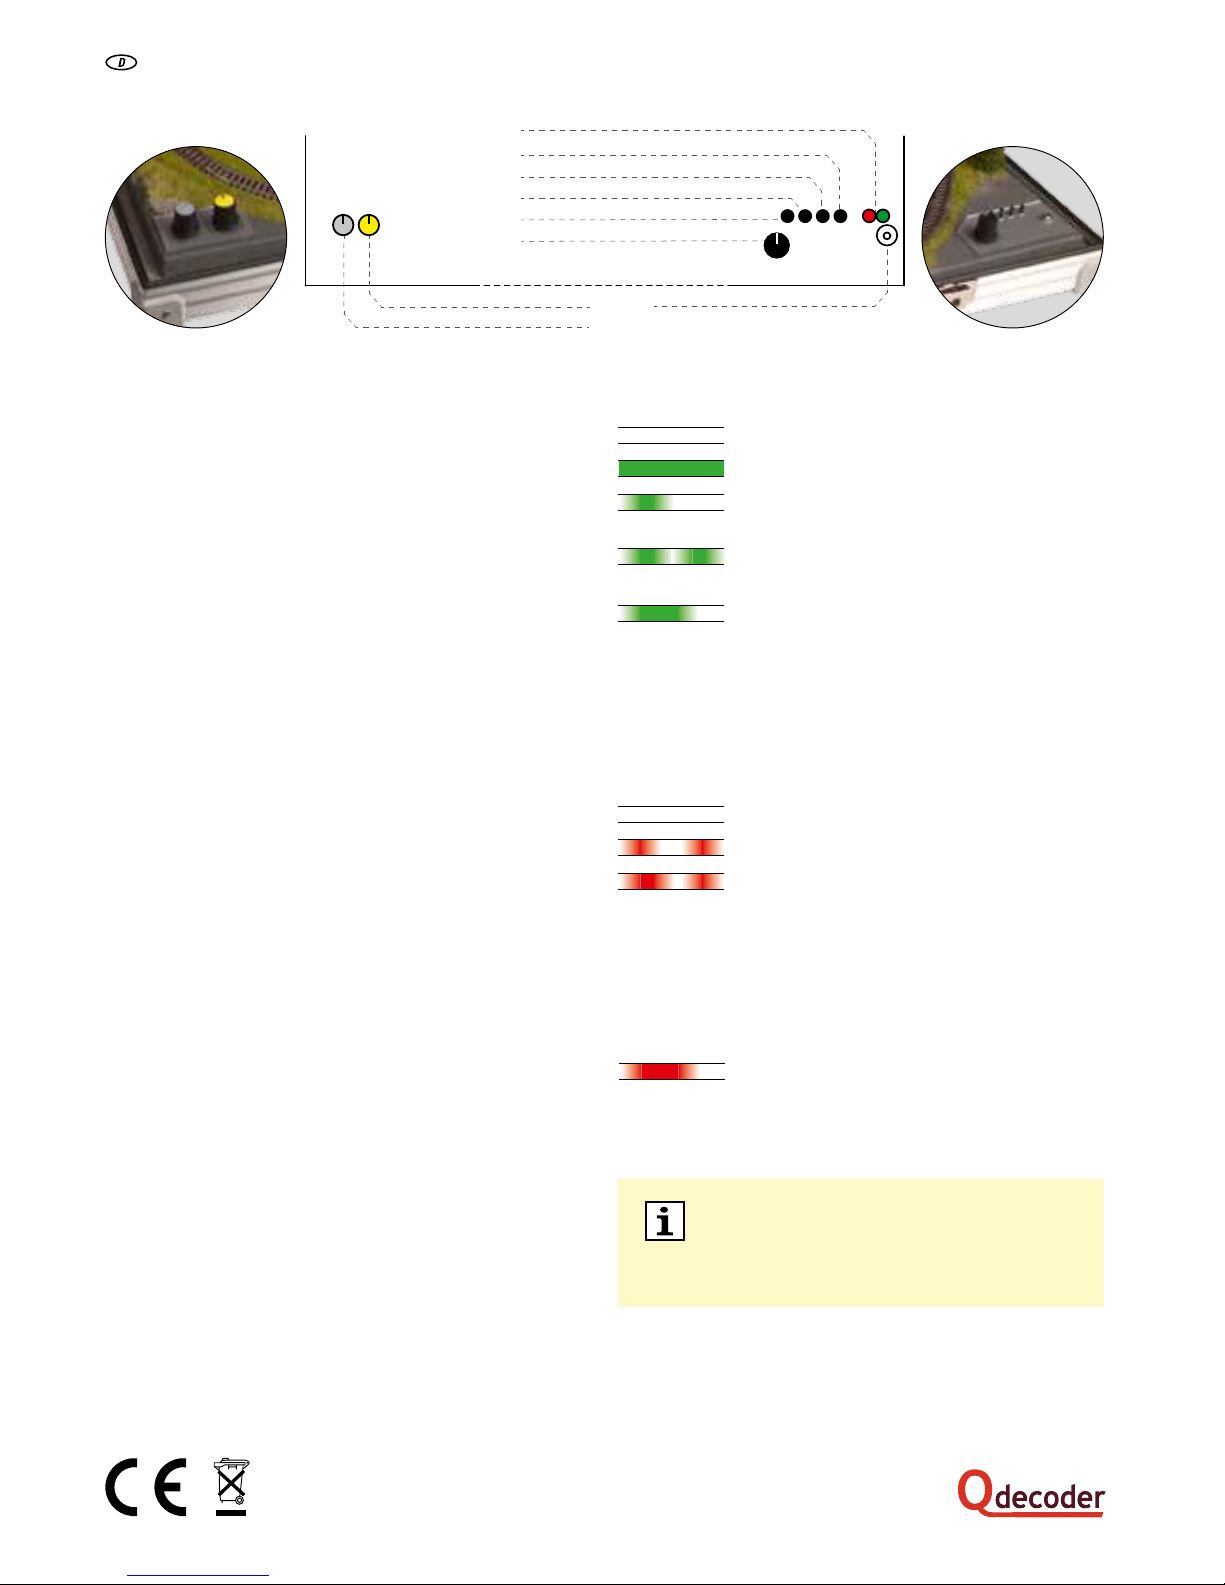
Taster für die Lichtsteuerung
Helligkeitsregler Hausbeleuchtung
Fahrregler für den Innenkreis (Gleis 2)
Netzteilanschluss
LEDs
Fahrregler für den Außenkreis (Gleis 1)
Taster für den äußeren Gleiskreis (Gleis 1)
Taster für den inneren Gleiskreis (Gleis 2)
Ein- / Ausschalter (Reset-Taste)
Reset bei einem Kurzschluss:
1. Beseitigen Sie die Ursache für den Kurzschluss
2. Drehen Sie beide Fahrregler auf die Mittelposition (0)
3. Drücken Sie den Ein- / Ausschalter (Reset-Taste)
Die grüne LED
aus Anlage ausgeschaltet
Dauerlicht Anlage eingeschaltet
1 x kurzes Blinken Langsamfahrt
auf dem äußeren Gleiskreis (Gleis 1)
2 x kurzes Blinken Langsamfahrt
auf dem inneren Gleiskreis (Gleis 2)
langes Blinken Übergangsfahrt
Die Kombination der Blinkpulse zeigt mehrere eingschaltete
Sonderfunktionen an.
Die rote LED
aus Anlage fehlerfrei
kurze Pulse Nicht zuordenbarer Kurzschluss
2 x kurzes Blinken Kurzschluss
2 x langes Blinken im inneren Gleiskreis (Gleis 2)
5 x kurzes Blinken
2 x langes Blinken Kurzschluss
7 x kurzes Blinken im äußeren Gleiskreis (Gleis 1)
4 x langes Blinken Kurzschluss in beiden oder
5 x kurzes Blinken zwischen beiden Gleiskreisen
langsames Blinken Überspannung
(2 Sekunden) Wechseln Sie das Netzteil
Ein- und Ausschalten der Anlage
∙ Schließen Sie das beiliegende Netzteil an, indem Sie es zuerst mit dem
Netzteilanschluss an der Kofferanlage verbinden und anschließend in eine Steckdose
(Eingangsspannung 100 – 240 V) einstecken. Soblad die grüne LED dauerhaft
leuchtet, ist die Anlage einsatzbereit.
∙ Mit dem rechten schwarzen Fahrregler steuern Sie die Geschwindigkeit und
Fahrtrichtung der Lokomotive im Außenkreis (Gleis 1).
∙ Mit dem linken grauen Fahrregler steuern Sie die Geschwindigkeit und Fahrtrichtung
der Lokomotive im Innenkreis (Gleis 2).
∙ Mit dem gelben Regler dimmen Sie durch Drehen die Helligkeit der Hausbeleuchtung.
∙ Bei langem Drücken des Ein- / Ausschalters wird die Anlage ausgeschaltet.
∙ Bei erneutem kurzen Drücken des Ein- / Ausschalters wird die Anlage wieder
eingeschaltet.
Stadtbeleuchtung
Drücken Sie den Taster für die Lichtsteuerung, um die Häuser Ihrer Anlage zu
beleuchten. Durch erneutes Drücken wird die Beleuchtung wieder ausgeschaltet.
Lichtautomatik aktivieren: Wenn Sie den Taster für die Lichtsteuerung lange drücken,
werden die Hausbeleuchtungen in einer zufälligen Folge ein- und wieder ausgeschaltet
und bringen so noch mehr Leben auf die Anlage.
Die Beleuchtung in den Häusern kann auch einzeln ein- und aus geschaltet werden,
indem der Lichttaster zwei Mal (für das erste Haus) bis fünf Mal (für das vierte Haus)
kurz hintereinander gedrückt wird.
Langsamfahrt
Verschiedene Lokomotiven fahren trotz ähnlicher Einstellung am Fahrregler oft
unterschiedlich schnell. Bei besonders schnellen Fahrzeugen oder für besonders
präzise Rangierbewegungen kann die Maximalgeschwindigkeit eines Gleises
herabgesetzt werden.
Drücken Sie zur Aktivierung der Langsamfahrt den Taster für den entsprechenden
Gleiskreis einmal kurz. Die grüne LED blinkt nun in einem (Langsamfahrt aktiviert
auf Gleis 1) bzw. zwei (Langsamfahrt aktiviert auf Gleis 2) kurzen Intervallen. Durch
erneutes Drücken des Tasters wechseln Sie zur normalen Geschwindigkeit zurück.
Übergangsfahrt
Innen- und Außenkreis Ihrer Anlage werden von zwei Fahrreglern auf unabhängigen
Stromkreisen gesteuert. Um beim Fahren aus einem Kreis in den anderen ein
elektrisches Überbrücken der beiden Stromkreise durch die Lokomotive und dadurch
einen Kurzschluss zu vermeiden, können die beiden Gleiskreise zusammengeschaltet
werden. Alle Triebfahrzeuge werden dann über den Fahrregler des Außenkreises
(Gleis 1) gesteuert. Bitte beachten Sie, dass in diesem Modus keine unabhängige
Steuerung von zwei Lokomotiven auf den beiden unabhängigen Gleiskreisen mehr
möglich ist, bis Sie in den Normalmodus zurückkehren.
Drücken Sie zum Aktivieren der Übergangsfahrt den Taster für den äußeren Gleiskreis
(Gleis 1) einmal lang. Die grüne LED blinkt nun in einem langen Intervall. Durch
erneutes langes Drücken wechseln Sie zur Einzelsteuerung zurück.
Hinweis: Eine eventuell eingeschaltete Langsamfahrt bleibt beim Schalten der
Übergangsfahrt erhalten.
Modellbauartikel, kein Spielzeug!
Model building item, not a toy! Not suitable for children under 14 years!
Article de modélisme. Ceci n’est pas un jouet.
Articolo di modellismo, non è un giocattolo!
Artículo para modelismo ¡No es un juguete!
Artigo para modelismo. Este artigo não é um brinquedo!
Výrobek urĉený pro modeláře, nejedná se o hračku!
Modelbouwartikel, geen speelgoed!
Elektro- und Elektronikaltgeräte sowie verbrauchte
Batterien gehören nicht in den Hausmüll,
sondern müssen fachgerecht entsorgt werden.
Inbetriebnahme Ihres Modellbahn-Koffers
gesteuert durch
Steckernetzgerät für Fahrregler
Ein zu dieser Anlage passendes Steckernetzgerät
ist einzeln unter der Art.-Nr. 88172 erhältlich.

Button for light control
Controller for house lighting
Speed controller for the inner circuit (track 2)
Power adapter
LEDs
Speed controller for the outer circuit (track 1)
Button for the outer track circuit (track 1)
Button for the inner track circuit (track 2)
On/Off button (reset button)
Reset in case of an electrical short:
1. Eliminate the cause of the short.
2. Turn both speed controllers on center position (0).
3. Press the On / Off button (reset button).
Power Pack for Speed Controller
A suitable power pack for this layout is available under the ref. 88171.
The green LED
off railway switched off
permanent on railway switched on
1 x short pulse slow speed
on the outer circuit (track 1)
2 x short pulses slow speed
on the inner circuit (track 2)
long pulses transition drive
A combination of pulses indicates more than one activated special function.
The red LED
off railway runs properly
very short pulses non assignable electrical short
2 x short pulses electrical short
2 x long pulses in the inner circuit (track 2)
5 x short pulses
2 x long pulses electrical short
7 x short pulses in the outer circuit (track 2)
4 x long pulses electrical shorts on both circuits
5 x short pulses or short between the two circuits
slow pulses over voltage
(2 seconds) change the power adapter
controlled by
Switching on and off
∙ Connect the included power supply as follows: First plug it into the power adapter on
the briefcase, then into a power socket (input 100 – 240 V). As soon as the green LED
is permanently on the layout is ready for operation.
∙ The black knob on the right controls the speed on the outer track circuit (track 1).
∙ The grey knob on the left controls the speed on the inner track circuit (track 2).
∙ Turning the yellow knob you can dim the house lighting.
∙ Pressing the On / Off button for a longer time (1 second) switches the layout off.
∙ Pressing the On / Off button again switches the layout on.
City Lighting
Press the button for the light control to illuminate the houses on your layout. Pressing
this button again you can turn off the lighting.
Activating the automatic light control: If you press the light control button longer,
the house lighting will turn on and off in a random order thus adding more life to the
layout.
The lighting in the houses can be turned on and off individually as well: Press the light
control button twice (for the first house) up to five times (for the fourth house) in quick
succession.
Slow Speed
Different locomotives run often differently fast in spite of similar adjustments of the
speed control. If you run particularly fast trains or if you want to make very precise
shunting movements you can reduce the maximum speed of a track.
To activate the low speed mode briefly press the button for the respective track once.
Now the green LED is flashing in one short puls (low speed on track 1) or in two short
pulses (low speed on track 2). Pressing this button again you can turn back to normal
speed.
Transition Drive
The inner and the outer track circuit of your layout are controlled independently by
two speed controllers. If you connect the two circuits you can avoid a short caused
by an electrical bypass when a train is changing from one circuit into the other. In this
case all railway traction vehicles will be controlled by the speed control button of the
outer circuit (track 1). Please consider that in this mode it is not possible to control two
locomotives independently on the two circuits until you change into the normal mode.
To activate the transition drive just press the button for the outer ciruit (track 1) once
longer. Now the green LED is flashing in a long pulse. Pressing this button longer again
you can return to the individual control mode.
Note: The slow speed mode remains activated also in case of a transition drive.
How to Operate Your Briefcase Layout
Modellbauartikel, kein Spielzeug!
Model building item, not a toy! Not suitable for children under 14 years!
Article de modélisme. Ceci n’est pas un jouet.
Articolo di modellismo, non è un giocattolo!
Artículo para modelismo ¡No es un juguete!
Artigo para modelismo. Este artigo não é um brinquedo!
Výrobek urĉený pro modeláře, nejedná se o hračku!
Modelbouwartikel, geen speelgoed!
Old electrical equipment and used batteries must not be
disposed of as part of your household waste,
but have to be disposed of professionally.

954
954
914
914
957
914
914
954
03
904
904
912
912
912
912
912
912
91
2
912
912
914
914
904
09
912
912
912
912
912
16
16
09
914
914
16
912
912
912
912
912
912
07
09
03
03
Trennung ∙ Disconnectio
n
9170
04
9170
9120
9175
912
0
9170
9100
9120
9120
9120
9120
9120
9120
22
22
22
22
9101
22
22
9120
9120
9120
22
22
22
22
9120
9120
9120
9120
02
02
04
Trennung ∙ Disconnectio
n
NOCH GmbH & Co. KG ∙ Lindauer Straße 49 ∙ D-88239 Wangen im Allgäu ∙ E-Mail: info@noch.de ∙ www.noch.de ∙ www.noch.com 04/ 2018
Gleisplan ∙ Track Plan
Minitrix
®
Gleisplan ∙ Track Plan
Fleischmann® N-Gleis mit Gleisbettung ∙ N Scale Track with Trackbed
Stück / Pieces Art.-Nr. / Ref.
3 149 03
3 149 04
1 149 07
3 149 0 9
20 14912
8 14914
3 14916
3 149 54
1 149 57
Stück / Pieces Art.-Nr. / Ref.
2 9102
2 9104
10 9122
1 9100
1 9101
15 9120
3 9170
1 9175
Hinweis:
Aus Platzgründen wurde die Vornummer 14 bzw.
149 teils weggelassen. So entspricht z. B. das
Gleis »912« der Art.-Nr. 14912 und das Gleis
»07« der Art.-Nr. 14907.
Wie viele der einzelnen Gleise benötigt werden,
entnehmen Sie der Tabelle.
Note:
Due to lack of space the pre-numbers 14 or 149
are partly omitted. For example the ref. »912«
means track ref. 14912 and »07« is track
re f. 14 907.
The required quantity of the respective track is
listed in the table.
Hinweis:
Aus Platzgründen wurde die Vornummer 91 teils
weggelassen. So entspricht z. B. das Gleis »04«
der Art.-Nr. 9104. Wie viele der einzelnen Gleise
benötigt werden, entnehmen Sie der Tabelle.
Note:
Due to lack of space the pre-numbers 91 are
partly omitted. For example the ref. »04« means
track ref. 9104.
The required quantity of the respective track is
listed in the table.
 Loading...