

NOCH 66310 Instruction Manual

66310 Sägewerk mit Sägegatter H0
Scierie + Banc de Sciage H0 Aserradero con banco de sierra H0
Houtzagerij met micro-motion zaagmachine H0
• Sawmill + Reciprocating Saw H0
•
Deutsch:
Vor Gebrauch die Sicherheitshinweise und Anleitung genau lesen und beachten.
Bei diesem Produkt handelt es sich um einen Modellbau-Bastelartikel und nicht um ein Spielzeug. Für die fachgerechte
Anwendung bzw. Weiterverarbeitung ist Werkzeug und Zubehör wie ein scharfes Bastelmesser, eine scharfe Schere und
spezielle Kleber nötig. Die fachgerechte Weiterverarbeitung dieses Modellbauproduktes birgt daher ein Verletzungsrisiko! Das
Produkt gehört aus diesem Grund nicht in die Hände von Kindern!
Dieses Produkt sowie Zubehör (Klebstoffe, Farben, Messer usw.) unbedingt außer Reichweite von Kindern unter 3 Jahren
halten. Lassen Sie Kinder nur unter fachkundiger Aufsicht von erwachsenen Modellbauern diese Bausätze bearbeiten.
Beim Basteln mit diesem Produkt unbedingt beachten: Nicht essen, trinken oder rauchen. Farben und Klebstoffe nicht mit
Augen, Haut oder Mund in Berührung bringen. Dämpfe nicht einatmen. Von Zündquellen fernhalten. Die Anleitung und Hinweise
des Herstellers genau beachten. Erste Hilfe bei Augenkontakt: Auge unter fließendem Wasser ausspülen und dabei offen
halten. Umgehend ärztliche Hilfe konsultieren. Diese Information gut aufbewahren.
Das Produkt darf nur mit einer maximalen Spannung von 16 V AC/DC betrieben werden. Bitte beachten Sie die
Sicherheitshinweise und Betriebsanleitung Ihrer Digitalsteuerung!
Herzlichen Dank, dass Sie sich für ein hochwertiges Produkt von NOCH entschieden haben. Wir wünschen Ihnen viel Spaß
damit.
Auf dem micro-motion Sägegatter wird richtig Holz gesägt. Das Modell führt zwei Bewegungen aus: Das Sägegatter hebt und
senkt sich, während ein kleiner Sägebock auf Schienen den zu sägenden Holzstamm nachschiebt. Unterstützt wird die
Bewegung durch eine effektvolle LED/Beleuchtung.
1. Anschluss des Multiprotokolldekoders an die Stromversorgung
Der Digital-Decoder erkennt Märklin/Motorola (MM) und DCC/NMRA Schaltbefehle automatisch. Zusätzlich ist die Auslösung
des Decoders durch den rotenTaster (Auslöser) möglich.
Stromanschluss beim Drei-Leiter-Gleis mit Mittelleiter: rotes Kabel (B) an den Mittelleiter und schwarzes Kabel (0) an das Gleis
anschließen. Achtung: Hier muss die Polarität beachtet werden. Beim Zwei-Leiter-Gleis braucht die Polarität nicht beachtet zu
werden.
Hinweis: Der Antrieb ist NICHT für permanenten Dauerbetrieb ausgelegt! Den Taster-Anschluss niemals direkt mit dem Trafo
verbinden! EIN MANUELLES VERSCHIEBEN DES SÄGEGATTERS ZERSTÖRT DEN ANTRIEB!
®
ACHTUNG: Den Taster-Anschluss niemals direkt mit dem Trafo verbinden! Decoder nicht
auf elektrisch leitendem Untergrund betreiben! Kurzschluss- und Zerstörungsgefahr!
NOCH GmbH & Co. KG - Lindauer Straße 49 - D-88239 Wangen im Allgäu
info@noch.de - www.noch.de - Stand 03 / 2013
ACHTUNG:
Den Taster niemals mit Trafo direkt
verbinden!
Attention:
Never connect red button to current
supply!
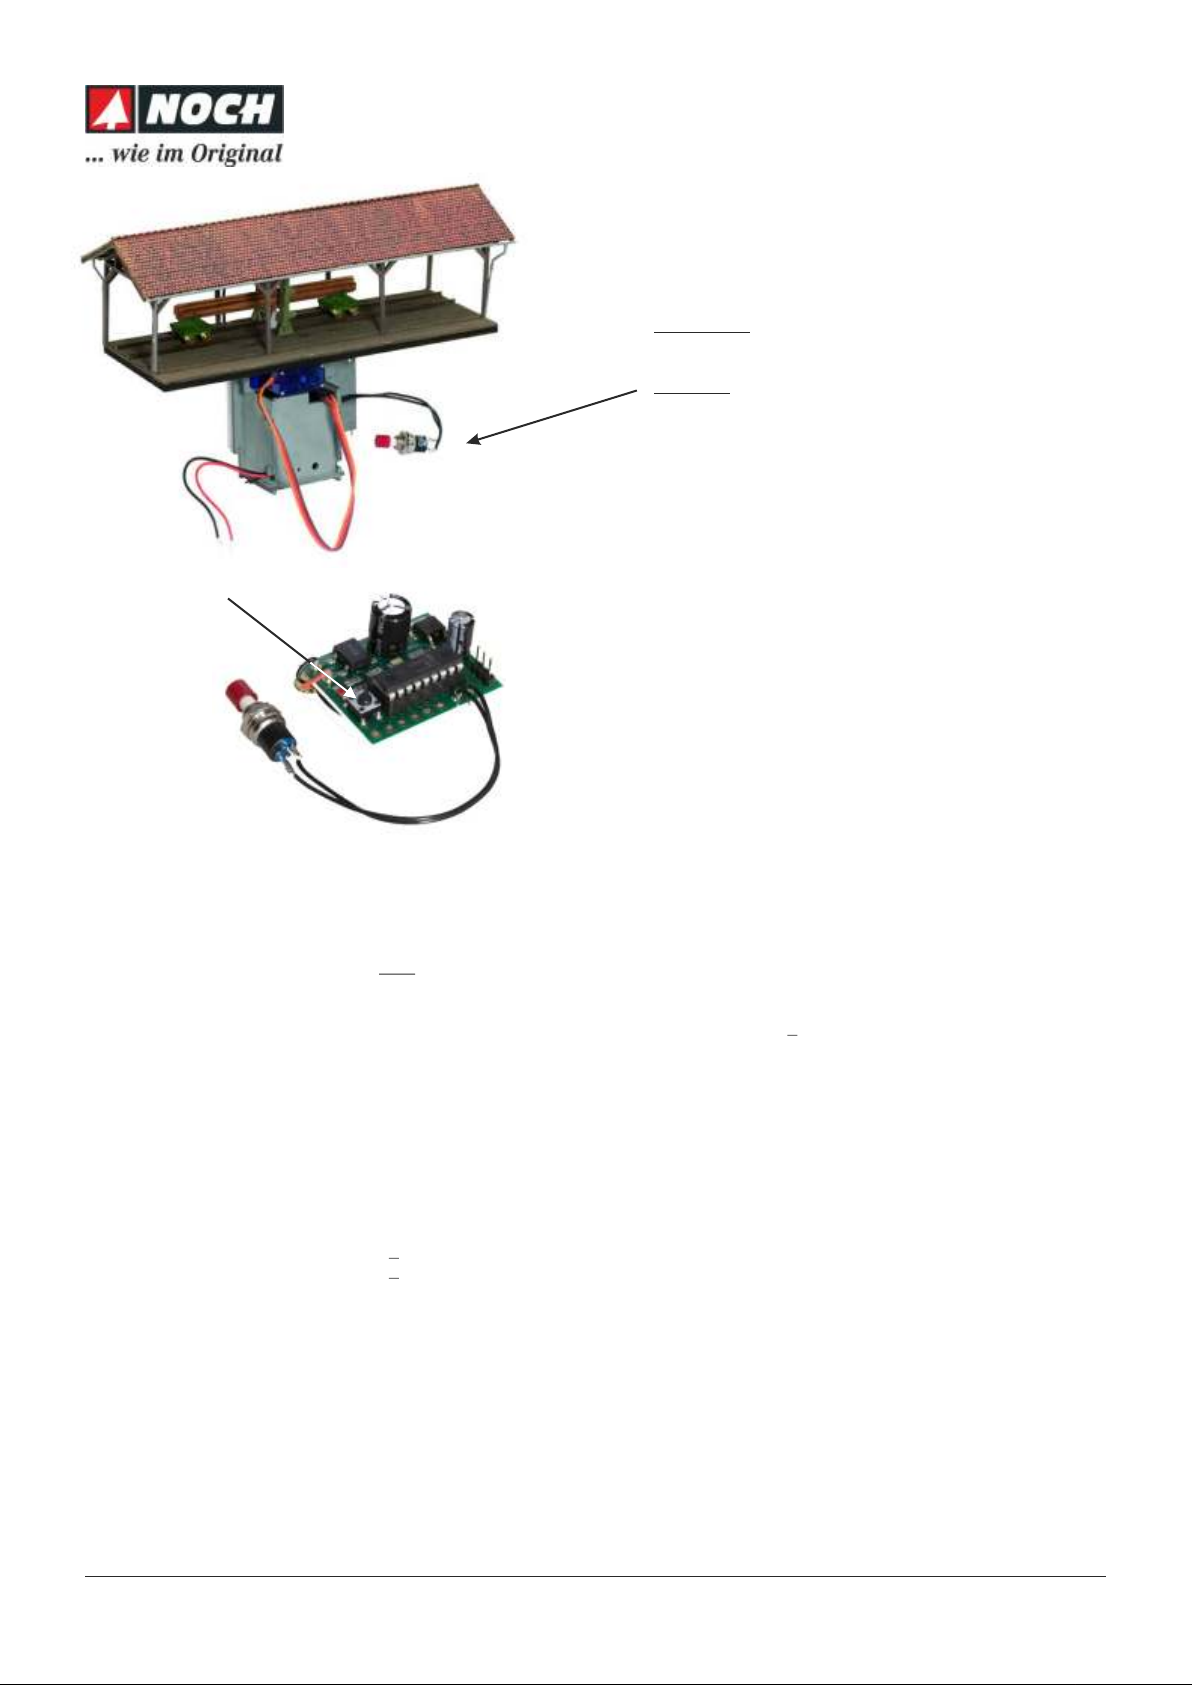
Programmier-Taster auf Decoder
Pushbutton on the decoder
bevor der Decoder mit Strom versorgt wird. Das nachstehend
beschriebene Verfahren ist genau einzuhalten.
2. Programmierung einer "Digitalzentrale" auf eine Weichen- oder
Signaladresse
Der Anschluss des Decoders erfolgt an das Hauptgleis, nicht an das
Zur Programmierung ist die Taste auf dem Decoder (Bild) zu drücken
Programmiergleis. Wichtig: Während der Programmierung darf auf der
Digitalzentrale keine Lok mit der Adresse 72 im Märklin/Motorola -
®
Format und keine Lok mit der Adresse 72 im DCC/NMRA-Format aktiv
Angeschlossener
Taster (Auslöser)
Manual release pushbutton
sein. Bitte überprüfen Sie dies vor der weiteren Programmierung.
Führen Sie zunächst einen Neustart der Digitalzentrale durch,
indem Sie den Netzstecker ziehen.
Schalten Sie die Digitalzentrale anschließend wieder ein. Nun
programmieren Sie den Decoder.
Schalten Sie die Spannung am Gleis hierzu aus („STOP“ Taste drücken). Den Taster am Programmier-Decoder gedrückt halten
(Bild), während Sie den Strom am Gleis wieder einschalten. Die rote LED des Decoders leuchtet jetzt. Nun kann der Taster
wieder los gelassen werden. Der Decoder kann nun auf eine Adressgruppe von vier aufeinander folgenden Adressen
programmiert werden (zum Beispiel: 1 - 4, 5 - 8, 9 - 12 usw.). Der Decoder erkennt automatisch, ob es sich um eine
Märklin/Motorola oder um eine DCC Adresse handelt. Richten Sie jetzt das Sägegatter als Funktionsartikel ein.
®
Wichtig: Mit der Anwahl der jeweils ersten Adresse einer Vierer-Adressgruppe legen Sie nun die gewünschte ViererAdressgruppe fest. Senden Sie hierzu die erste Zahl der Gruppe als Schaltbefehl (z . B. 1, 5, 9 usw.), woraufhin die rote LED
erlischt.
Je nach eingesetzter Digitalzentrale ist als höchste Adresse im Märklin/Motorola Format die Adresse 317 und im DCC Format
®
die Adresse 2045 auswählbar. Nicht alle Digitalzentralen senden den ganzen Adressbereich.
Der Decoder prüft während des Einlesens der Adresse die Schaltbefehle. Es kann vorkommen, dass Sie den Schaltbefehl
mehrfach senden müssen. Insbesondere dann, wenn während des Einlesens mehrere Loks in den unterschiedlichsten
Digitalformaten aktiv sind. Sobald die rote LED erlischt, ist der Decoder programmiert.
Bei einigen Multiprotokoll-Zentralen ist es erforderlich, das Digitalformat des gespeicherten Magnetartikels zu ändern. Rufen Sie
dazu den Magnetartikel auf und wechseln Sie das Datenformat (Märklin/Motorola <> DCC/NMRA).
®
Ist der Decoder richtig programmiert, stehen folgende Funktionen zur Verfügung:
1. Adresse einer Adressgruppe: (z. B. 1, 5, 9): Das Sägegatter wird bewegt.
2. Adresse einer Adressgruppe: (z. B. 2, 6, 10): Das Licht kann ein- und ausgeschaltet werden.
Nach Beendigung der Bewegung des Sägegatters wird das Licht immer ausgeschaltet. Das leichte Flackern der LED ist
3. Märklin Mobile Station 60652 (feste Lok-Adresse):
®
1. Richten Sie eine Lok mit der Adresse 72 ein.
2. Rotes Kabel am Mittelleiter und schwarzes Kabel am Gleis anschließen. Wichtig: Dabei Polarität beachten.
3. „STOP“ auf der Mobile Station drücken (Strom AUS). Nun die Taste auf dem Decoder gedrückt halten (Bild 2) und STOP auf
der Mobile Station erneut drücken (Strom EIN).
4. Rote LED geht an und aus.
Der Decoder ist nun auf die Lok-Adresse 72 programmiert. Die Taste „Beleuchtung“ schaltet die Funktion und das Sägegatter
wird bewegt, das Licht geht an.
NOCH GmbH & Co. KG - Lindauer Straße 49 - D-88239 Wangen im Allgäu
info@noch.de - www.noch.de

4. ROCO Lokmaus 2 (feste Lok-Adresse):
1. Richten Sie eine Lok mit der Adresse 72 ein.
2. Schwarzes Kabel am Gleis anschließen.
3. Adresse senden: Dazu Taste F1 mehrfach drücken.
4. Taste auf dem Decoder gedrückt halten (Bild) und rotes Kabel mit dem Gleis verbinden (Strom EIN).
5. Rote LED geht an und aus.
Der Decoder ist nun auf die Lok-Adresse 72 programmiert. Die Taste F1 schaltet die Funktion (Sägegatter bewegt sich, Licht
geht an).
Anmerkung: Damit die Adresse gesendet wird, ist das Verfahren genau einzuhalten. Bitte nicht die „STOP“ Taste benutzen.
5. Decoder-Adresse vergessen und Decoder RESET
Haben Sie einmal die Adresse des Decoders vergessen, können Sie das vorstehend beschriebene Verfahren wiederholen.
Haben Sie eine Digitaladresse im Decoder gespeichert und wollen das Sägegatter dann wieder analog direkt an einem
Modelleisenbahn-Transformator betreiben, müssen Sie die Digitaladresse löschen. Schalten Sie dazu den Strom aus und
schließen Sie den roten Taster zur analogen Auslösung an. Halten Sie den externen Taster zur Auslösung und den Taster auf
dem Decoder gleichzeitig gedrückt. Dann schalten Sie den Strom ein. Jetzt hat der Decoder seine Digitaladresse vergessen
und Sie können den Decoder mit dem externen Taster auslösen.
6. Analoger Betrieb
Das Auslösen über den angeschlossenen Taster ist jederzeit möglich. Sie können auch ein vorhandenes Stellpult verwenden.
ACHTUNG: Das Stellpult darf keine Verbindung zum Bahnstrom oder zum Transformator haben.
Hinweis: Der Antrieb ist NICHT für permanenten Dauerbetrieb ausgelegt! Wird der Taster dauernd gedrückt oder
kurzgeschlossen wird die Drehbewegung unterbrochen und die LED blinkt schnell.
7. Problembehandlung: Was tue ich, wenn der Funktionsartikel nicht funktioniert?
Sollte die Programmierung beim ersten Mal nicht funktionieren:
1. Anleitung genau lesen / Decoder-Programmierung wiederholen. 3 Sekunden warten vor neuem Einlesen
2. Tasten auf der Digitalzentrale länger und langsamer drücken / Tasten mehrfach drücken.
3. Datenformat des eingerichteten Magnetartikels wechseln (Märklin/Motorola <> DCC/NMRA).
8. Ausrichten des Baumstammes
Wird das Sägegatter / Sägewerk während des Betriebes ausgeschaltet (Strom wird abgeschaltet), verbleibt es in der aktuellen
Position. Möchte man den Baumstamm wieder von Anfang an zersägen lassen, so ist das Sägegatter erneut auf Anfang zu
stellen: Dazu Sägegatter solange laufen lassen bis es die vordere Position wieder erreicht hat. Dann Strom ausschalten. Nach
Einschalten des Stromes fängt die Säge wieder an der Ausgangsstellung an. EIN MANUELLES VERSCHIEBEN DES
SÄGEGATTERS ZERSTÖRT DEN ANTRIEB!
English:
Safety Precautions: Read and follow these safety precautions and instructions carefully before use.
This product is a model building item and not a toy. For appropriate application and use, tools like a sharp cutter, a sharp pair of
scissors and special glue are necessary. Therefore, appropriate work with this model building product does pose risk of injury!
For that reason this product is not for children! Keep this product as well as all accessories (glue, paints, cutter etc.) out of reach
of children under 3 years of age! Let children build this kit only if supervised by a competent adult modeller. For the use of paints
and glues please follow these safety precautions carefully: Do not eat, drink or smoke. Avoid any contact with eyes, skin or
mouth. Do not breathe any vapours. Keep away from ignition sources. Follow the instructions and safety precautions of the
manufacturer carefully. First aid for contact with eyes: Flush the eye with clean water holding the eyelid open. Immediately
consult medical advice. Keep these instructions safe.
This product is allowed to be operated with a maximal voltage of 16 V AC/DC. Please carefully read and follow the safety
precautions and instructions before using your command unit!
Congratulations on the purchase of a high-quality NOCH product. We wish you a lot of fun with our sawmill and our
reciprocating saw.
The micro-motion sawmill / micro-motion reciprocating saw realistically imitate wood sawing. The models demonstrate two
movements. The reciprocating saw moves up and down while a small sawhorse on tracks feeds it with the log that has to be
sawn. This motion is highlighted with effective lighting.
1. How to connect the multi-protocol digital decoder to the current supply:
The digital decoder automatically recognizes the Märklin/Motorola (MM) format and DCC/NMRA format switching commands for
locomotives. Additionally the decoder can be released by the red pushbutton. Electrical connection for a third-rail-track with
center rail: Connect the red cable (B) to the center rail and the black cable (0) to the track. Attention: Pay attention to the
polarity! Using a double-rail-track you do not have to pay attention to the polarity. Servo connection: Orange cable to the outside
(see picture).
Note: The motor is NOT designed for non-stop operation! Do NOT connect the manual release pushbutton directly to
the transformer! A PUSHING BY HAND DESTROYS THE MOTOR!
NOCH GmbH & Co. KG - Lindauer Straße 49 - D-88239 Wangen im Allgäu
info@noch.de - www.noch.de

For programming press the pushbutton on the decoder (see picture) before connecting the decoder to the current supply.
Please strictly adhere to the following procedure:
2. How to programme a turnout or signal address on the digital station:
The decoder has to be connected to the main track, not to the programming track. Important: While programming please make
sure that neither a locomotive with address 72 in the Märklin data format nor a locomotive with address 72 in the DCC/NMRA
format are activated on the command unit. Please check this before you continue to programme. In addition we recommend
making a restart of the command unit without deleting the existing database (ATTENTION: Do not make a complete reset of the
system! Please follow the instruction manual of your command unit!). Switch off the power on the track (press button “STOP”).
Keep the pushbutton on the decoder (see picture) pressed when you switch on the power on the track again. The red LED of
the decoder flashes now. The decoder can only be programmed with an address group of 4 successive addresses (Example:
1 - 4, 5 - 8, 9 - 12, etc.). The decoder automatically recognizes whether it is a Märklin/Motorola or a DCC address. Now enter
the address for the sawmill / reciprocating saw as a magnetic item.
Important: The first address of the group of 4 successive addresses always controls the function. Send a switching command
and the red LED will go out (in our example: 1, 5, 9, etc.). Depending on the used command unit the highest address which can
be chosen in the Märklin/Motorola format is address 317 and address 2045 in the DCC format. Not all command units send the
complete address range. The decoder checks the switching commands while importing the address. It may happen that you
have to send the switching command several times, especially if various locomotives are activated in different digital formats
while importing. As soon as the red LED goes out, the programming of the decoder is finished. To release the decoder it is
necessary to change the digital format of the memorized magnetic item on some multi-protocol command units. For this purpose
call up the magnetic item and change the data format (Märklin/Motorola <> DCC/NMRA).
Once the decoder is correctly programmed you can choose the following functions:
Address 1 in a group of addresses: The reciprocating saw starts to move. Address 2 in a group of addresses: The light can be
switched on/off. After the reciprocating saw has stopped to move the light is always switched off. In order to support the effect,
the lighting flickers with the move of the reciprocating saw.
3. Märklin Mobile Station 60652 (firm locomotive address):
1. Install a locomotive with address 72.
2. Connect the red cable to the center track and the black cable to the track. Important: Pay attention to the polarity!
3. Press “STOP” on the mobile station (power OFF). Now keep the pushbutton pressed on the decoder (see picture 2) and
press again STOP on the mobile station (power ON).
4. Red LED goes on and out.
The decoder is now programmed with the locomotive address 72. The button “lighting” releases the function and the
reciprocating saw starts to move.
4. ROCO Lokmaus 2 (firm locomotive address):
1. Install a locomotive with address 72.
2. Connect the black cable to the track.
3. Send address: For this purpose press button F1 several times.
4. Keep the button pressed on the decoder (see picture) and connect the red cable to the track (power ON).
5. Red LED goes on and out.
The decoder is now programmed with the locomotive address 72. The button F1 releases the function (the reciprocating saw
moves). Note: Please strictly adhere to this procedure to ensure that the address will be sent. Do not use the button “STOP”.
5. You do not remember your decoder address and have to make a decoder RESET
In case you do not remember your decoder address, you can repeat the procedure previously described. If you have memorized
a digital address in your decoder but if you want to analogically operate the reciprocating saw directly with a model railroad
transformer, you have to cancel the digital address. For that purpose switch off the current and connect the pushbutton for the
analog release. Keep the manual release pushbutton as well as the button on the decoder pressed at the same
time and then switch on the current. Now the digital address of the decoder is deleted and you can release the decoder with the
manual release pushbutton.
6. Analog Operation
The release is possible any time with the enclosed pushbutton, however you can also use a control box. ATTENTION: Make
sure that the control box does not have any connection to the traction current or to the transformer. NOTE: The motor is NOT
designed for non-stop operation! If the pushbutton is constantly pressed or short-circuited the sawmill / reciprocating saw
pauses and the red LED of the decoder flashes quickly.
7. Problem Handling: What can I do when the sawmill / reciprocating saw do not work?
In case the programming does not properly work at first time:
1. Carefully read the instructions and repeat the decoder programming. Please wait 3 seconds before you start programming
again.
2. Press the buttons on the command unit longer and more slowly / press the buttons several times.
3.Change the data format of the memorized magnetic item (Märklin/Motorola DCC/NMRA).
NOCH GmbH & Co. KG - Lindauer Straße 49 - D-88239 Wangen im Allgäu
info@noch.de - www.noch.de

8. How to place the log
If you switch off the reciprocating saw / sawmill during operation (current switch-off), it stops in the position where it is. If you
want the log to be cut from the beginning again, you have to restart the sawmill / reciprocating saw: For this let the reciprocating
saw run until it has reached the first position. Then switch off the current. After having switched on the current, the reciprocating
saw starts from the original position. A PUSHING BY HAND DESTROYS THE MOTOR!
Français
Avant d'utiliser ce produit, veuillez lire et suivre attentivement les consignes de sécurité et le mode d'emploi. Cet article est un
produit de bricolage pour modélisme et n'est pas un jouet. Pour le montage, des outils tels une lame aiguisée, des ciseaux
aiguisés ainsi qu'une colle spéciale sont nécessaires. De ce fait, un risque de blessure est possible! Pour cette raison, tenir ce
produit hors de portée des enfants! Tenir absolument ce produit et les accessoires (colle, peintures, lames etc.) hors de portée
des enfants de moins de 3 ans! Ne pas laisser les enfants assembler ces kits sans surveillance d'un adulte compétent. Pour
l'utilisation des colles et des peintures, veuillez suivre les précautions suivantes: Ne pas manger, boire ou fumer lors de la
manipulation. Eviter tout contact avec les yeux, la peau et la bouche. Ne pas inhaler les vapeurs. Tenir à l'écart des sources
inflammables. Veuillez suivre attentivement le mode d'emploi et les indications du fabricant. Premiers secours en cas de contact
avec les yeux: Rincer immédiatement et abondamment à l'eau en les maintenant ouverts et consulter un ophtalmologiste.
La mise en route de ce produit doit s'opérer uniquement avec une tension au maximum de 16 V en courant alternatif ou continu.
Veuillez lire attentivement le mode d'emploi de votre commande digitale !
Nous vous remercions d'avoir acheté un produit NOCH de haute qualité et vous souhaitons beaucoup de plaisir lors de son
utilisation.
La scierie et le banc de sciage NOCH micro-motion imitent de manière réaliste le sciage du bois. Le modèle permet deux
mouvements: Le banc de sciage permet de se lever et se baisser pendant le petit chevalet de sciage sur des glissières passe la
grume à scier. Ce mouvement est accentué par un éclairage effectif.
1. Raccordement du décodeur multiprotocole à l'alimentation en courant
Le décodeur numérique accepte automatiquement des formats Märklin/Motorola (MM) ainsi que DCC/NMRA. De plus, le
décodeur peut être commandé par la touche rouge. Branchement d'un système à 3 rails en courant alternatif : raccorder le fil
rouge (B) au conducteur neutre et le fil noir (0) au rail. Attention : bien respecter la polarité. En utilisant un système à 2 rails, il
ne faut pas respecter la polarité. Branchement du servo : fil orange à l'extérieur (voir photo).
ATTENTION : Le moteur n'est pas conçu pour un fonctionnement en continu. Ne jamais brancher la touche
d'actionnement directement au transformateur! UNE OPÉRATION MANUELLE DÉTRUIT LE MOTEUR DU BANC DE
SCIAGE !
Pour la programmation, appuyez sur la touche du décodeur (voir image) avant de raccorder le décodeur à l'alimentation en
courant. Veuillez respecter scrupuleusement ce procédé.
2. Programmation d'une adresse d'aiguillage ou de signal
Le raccordement du décodeur se fait à la voie principale et non pas à la voie de programmation. Important : Veillez à ce
qu'aucune locomotive avec l'adresse 72 sous format Märklin/Motorola ou DCC/NMRA soit active sur la centrale numérique
pendant la programmation. Vérifiez bien ceci avant chaque programmation. D'autre part, il convient d'effectuer un nouveau
démarrage de la centrale numérique sans effacer les données déjà entrées. (Attention : Il ne s'agit pas d'un reset total ! Veuillez
lire les instructions de votre centrale numérique !)
Mettez le rail hors tension (appuyez sur la touche « STOP »). Maintenez la touche du décodeur enfoncée (voir photo) durant la
nouvelle mise sous tension du rail. A présent, la LED rouge s'illumine. Le décodeur permet uniquement de programmer un seul
domaine de valeurs de 4 adresses consécutives (ex : 1 4, 5 8, 9 12 etc.). Le décodeur sait automatiquement s'il s'agit d'une
adresse sous format Märklin/Motorola ou du DCC. Ensuite entrez l'adresse de la scierie / du banc de sciage.
Important : Seule la première adresse de chaque plage de valeurs peut activer la fonction. Passez un ordre de commande et la
LED rouge va s'éteindre (ex. : 1,5,9 etc). En fonction de la centrale numérique utilisée, la valeur la plus haute à choisir est
l'adresse 317 sous format Märklin/Motorola et 2045 sous format DCC. Toutes les centrales numériques ne permettent pas
d'envoyer le l’entier domaine d'adresses. En lisant les données de la configuration, le décodeur contrôle les ordres de
commande. Il peut arriver qu'il faille passer l'ordre de commande plusieurs fois, particulièrement si plusieurs locomotives sont
activées sous les différents formats numériques pendant l'enregistrement. Dès que la LED rouge s'éteint le décodeur est
programmé. Pour certaines centrales multiprotocoles il faut changer le format numérique de l'article magnétique enregistré afin
de commander le décodeur. Pour cela activez cet article magnétique et changez le format (Märklin/Motorola <> DCC/NMRA).
Si le décodeur est programmé correctement, les fonctions suivantes sont possibles :
1ère adresse d'une plage de valeur : Le banc de sciage se laisse mouver. 2ème adresse d'une plage de valeur : l'éclairage se
laisse allumer ou éteindre. Après l'achèvement du mouvement du banc de sciage, la lumière est toujours éteinte. Pour
accentuer l'effet, la lumière vacille pendant le mouvement du banc de sciage.
NOCH GmbH & Co. KG - Lindauer Straße 49 - D-88239 Wangen im Allgäu
info@noch.de - www.noch.de

3. Märklin Mobile Station 60652 (adresse de locomotive fixe)
1. Entrez l'adresse 72 pour la locomotive
2. Raccordez le fil rouge au conducteur neutre et le fil noir au rail. Important : faites attention à la polarité.
3. Appuyer sur la touche « STOP » de la centrale « Mobile Station » (hors tension). En maintenant la touche enfoncée sur le
décodeur, appuyez simultanément sur le bouton « STOP » de la centrale « Mobile Station » (sous tension).
4. La LED rouge clignote
Le décodeur est maintenant programmé à l'adresse 72. La touche « éclairage » active la fonction et le banc de sciage
commence le mouvement.
4. ROCO Lokmaus 2 (adresse de locomotive fixe)
1. Entrez l'adresse 72 pour la locomotive
2. Raccordez le fil noir au rail,
3. Envoyez l'adresse : appuyer la touche F1 plusieurs fois.
4. Maintenez la touche enfoncée sur le décodeur et liez le fil rouge avec le rail (sous tension)
5. La LED rouge clignote
Le décodeur est maintenant programmé à l'adresse 72. La touche « éclairage » active la fonction (le banc de sciage se mouve).
Remarque: Pour s'assurer que l'adresse est envoyée, il faut bien respecter ce procédé. Ne pas utiliser la touche «STOP».
5. En cas d'oubli de l'adresse du décodeur et reset du décodeur
Si vous avez oublié l'adresse de votre décodeur, il convient de répéter le procédé comme décrit. Si vous avez enregistré une
adresse numérique dans le décodeur alors que vous désirez commander le décodeur de manière conventionnelle avec un
transformateur, il faut effacer l'adresse numérique. Mettez hors tension et branchez la touche rouge pour l'actionnement
analogique. Maintenez enfoncée simultanément la touche ainsi que la touche sur le décodeur. Maintenant mettez sous tension.
Le décodeur a oublié son adresse numérique et vous pouvez opérer le décodeur avec la touche externe.
6. Opération conventionnelle
L'opération par la touche externe est toujours possible. Vous pouvez également utiliser un pupitre de commande. Attention :
Veillez à ce que le pupitre de commande ne soit pas connecté à la voie ou au transformateur.
Indication : Le moteur n'est pas conçu pour un fonctionnement en continu! En appuyant la touche en continu ou en cas d'un
court-circuit, la scierie / le banc de sciage marque une pause et le LED sur le décodeur clignote rapidement.
7. Traitement des problèmes Que faire si le produit ne fonctionne pas ?
Si la programmation ne fonctionne pas pour la première fois :
1. Lire attentivement le mode d'emploi / répéter le mode de programmation du décodeur. Après 3 secondes démarrer à
nouveau la configuration
2. Appuyer plus longuement et plus lentement les touches sur la centrale numérique / appuyer plusieurs fois sur les touches.
3. Changer le format de données de l'article magnétique installé (Märklin/Motorola <> DCC/NMRA)
8. Alignement de la grume
Eteignant la scie / le banc de sciage pendant le fonctionnement (mise hors circuit), le chevalet s'arrête à la position où il se
trouve actuellement. Si on veut laisser scier la grume dès le début, il faut mettre la scie / le banc de sciage au début en le
laissant marcher jusqu'il a arrivé à la position de départ. Ensuite mettez hors tension. Après avoir encore allumé, la scie
commence de nouveau à la position initiale. UNE OPÉRATION MANUELLE DÉTRUIT LE MOTEUR DU BANC DE SCIAGE !
Español
Antes de utilizar este producto, leer atentamente las instrucciones de seguridad y el modo de empleo. Este producto es un
artículo de bricolaje para modelismo y no un juguete. Para la utilización o elaboración posterior correcta se necesitan
herramientas y accesorios como un cuchillo afilado, tijeras puntiagudas y pegamento especial. El tratamiento correcto de este
producto posee riesgos escondidos de lesión. ¡Por eso mantener este producto fuera del alcance de los niños! ¡En ningún
momento dejar el producto así como los accesorios (pegamento, colores, cuchillos, etc.) al alcance de niños menores de 3
años! La utilización de este producto por niños deberá realizarse solo bajo vigilancia de un adulto modelista.
Durante el bricolaje con este producto atender en todo caso las indicaciones siguientes: no comer, beber ni fumar. Evitar el
contacto de colores o pegamento con la piel, boca y los ojos. Evitar la inhalación de vapores. No exponer a fuentes de calor.
Seguir exactamente las instrucciones e indicaciones del fabricante. En caso de contacto con los ojos lavar con abundante agua
manteniendo los párpados abiertos y buscar atención medica inmediatamente.
Guardar estas instrucciones para futura referencia.
La tensión máxima de funcionamiento para el producto es de 16 V CA/CC. Por favor sigue las instrucciones de seguridad y de
manejo de su panel de control digital.
Muchas gracias por haber elegido este producto de alta calidad de NOCH. ¡Le deseamos que disfrute!
El aserradero con banco de sierra de la gama micro-motion assiera madera realmente. El modelo efectua dos movimientos:
Subiendo y bajando el banco de sierra, mientras un caballete en vías mueve un tronco a través. El movimiento está
acompañado por iluminación LED espectacular.
NOCH GmbH & Co. KG - Lindauer Straße 49 - D-88239 Wangen im Allgäu
info@noch.de - www.noch.de

1. Conectar el decodificador digital de protocolo multiple a la corriente:
El decodificador digital reconoce automáticamente las señales (ordenes) que recibe de los sistemas Märklin/Motorla (MM) o
estándar DCC/NMRA. Adicionalmente se puede también activar el decodificador manualmente mediante el botón pulsador rojo.
Para conectar un sistema de tres carriles con conductor neutro a la corriente se debe: conectar el cable rojo (B) al conductor
neutro y el cable negro (0) a la vía. Atención: Respeten la polaridad al conectar. Para sistemas de dos carriles no hay que
respetar la polaridad. Conectar el servo: cable de color naranja hacia fuera (véase imagen)
¡Indicación: El articulo no esta expuesto para marcha continua! ¡Atención: Nunca conectar el pulsador con el transformador en
directo! Nunca mover el banco de sierra con la mano sino el mando se estropea.
Para programar el decodificador pulsar la tecla del decodificador (véase imagen) antes de encender la corriente. Seguir el
procedimiento siguiente exactamente como se le describe.
2. Programación de una central digital para una dirección de aguja o señal.
Conectar el decodificador solamente a la vía principal y nunca a la vía de programación. Importante: Durante el proceso de
programación no se debe de tener activado en la central digital una locomotora con dirección 72 en formato Märklin/Motorla asi
como DCC/NMRA. Compruebe esto por favor antes de continuar con la programación. Reanudar ahora el sistema sin borrar
los datos existentes. (¡Atención: aqui no se habla de un reset total del sistema!) Sigue las instrucciones de su central digital
para la reanudación.
Apagar la tension de la via (pulsando la tecla “STOP”). Mantener pulsado el pulsador del decodificador (véase imagen) y
encender al mismo tiempo la corriente de la vía. La LED roja del decodificador se iluminará ahora. El decodificador se puede
programar solamente a un grupo de cuatro direcciones seguidas (p.e. 1-4, 5-8, 8-12 etc.) El decodificador reconoce
automáticamente si se trata de una dirección Märklin/Motorola o DCC estándar. Memorize ahora la dirección del aserradero
como árticulo de función.
Importante: Siempre es la primera dirección del grupo de los cuatro que regula la función. Mandar ahora una orden de mando
con lo cual se apaga la LED roja (en nuestro ejemplo es la 1, 5, 9, etc.) Depende de la central digital que se utiliza se tiene un
valor de dirección maximo de 317 para el sistema Märklin/Motorola y un valor máximo de 2045 para el sistema DCC. No todas
centrales digitales mandan el sector completo de direcciones. El decodificador comprueba la orden de mando durante el
proceso de memorización de la dirección. Puede occurir que tenga que mandar la orden de mando varias vezes. Sobre todo si
están activadas varias locomotoras de diferentes formatos digitales durante el proceso de acopio de la dirección. En cuanto se
apaga la LED roja el decodificador está programado. En algunas centrales digitales de multiprotocolo es necesario de cambiar
el formato digital del articulo magnetico memorizado. Activar para ello el articulo magnetico y cambiar el formato de datos
(Märklin/Motorola <> DCC/NMRA).
Si el decodificador fue programado de forma correcta, se tiene las siguientes funciones a disposición:
1. Dirección de un grupo de direcciones: El banco de sierra se mueve.
2. Dirección de un grupo de direcciones: Apagar y enceder la LED.
Despúes de que se acabe el movimiento del banco de sierra la LED se apaga automáticamente. Para soportar el efecto de
serrar la LED parpadea con el movimiento del banco de sierra.
3. Märklin Mobile Station 60652 (dirección de locomotora fija):
1. Programar una locomotora a la dirección 72
2. Conectar el cable rojo al conductor neutro y el cable negro a la vía. Importante: Tenga en cuenta la polaridad.
3. Presionar la tecla „STOP“ en la Mobile Station (La corriente esta en OFF). Mantenga ahora pulsado el pulsador del
decodificador (véase imagen) y pulsar de nuevo le tecla STOP en la Mobile Station (corriente está en ON).
4. La LED roja se ilumina y se apaga en continuación. El decodificador esta ahora programado a la dirección 72. La tecla
“iluminación“ pone la función en marcha y el banco de sierra se empieza a mover.
4. ROCO Lokmaus 2 (dirección de locomotora fija):
1. Programar una locomotora a la dirección 72
2. Conectar el cable negro a la vía.
3. Mandar ahora la dirección: Pulsar la tecla F1 varias veces.
4. Mantenga pulsado el pulsador del decodificador y conecte el cable rojo con la vía (corriente esta en ON)
5. La LED roja se ilumina y se apaga en continuación.
El decodificador está ahora memorizado a la dirección 72 de la locomotora. La tecla F1 pone la función en marcha. (El banco
de sierra se mueve)
Indicación: Para asegurar que la dirección se memorize, es imprescindible de seguir exactamente dichas instrucciones. Por
favor no pulse la tecla “STOP”.
5.Olvido de la dirección del decodificador y RESET del decodificador
Si se ha olvidado la dirección del decodificador, simplemente repetir el procedimiento anterior. Si se ha memorizado una
dirección digital en el decodificador y se quiere conectarlo posteriormente de manera convencional análoga a un transformador
se tiene que borrar primero la dirección digital. Apague para ello la corriente y conecte el pulsador rojo para la activación
manual análoga. Pulsar el pulsador externo y el pulsador del decodificador al mismo tiempo. Poner la corriente en marcha. El
decodificador ha borrado ahora la dirección digital y desde luego se puede activar el decodificador manualmente mediante el
pulsador externo.
NOCH GmbH & Co. KG - Lindauer Straße 49 - D-88239 Wangen im Allgäu
info@noch.de - www.noch.de

6. Activación manual (análoga)
Siempre se tiene la posibilidad de activar manualmente el movimiento con el botón pulsador adjunto. Se puede usar para ello
también un pupitre de mando. Atencíon: El pupitre de mando no debe ser conectado a la vía o al transformador.
Indicación: El articulo no esta expuesto para marcha continua! Si se pulsa el interruptor de modo seguido o se produce un
cortocircuito el movimiento se para automáticamente y la LED roja del decodifcador parpadea.
7. Tratamiento de problemas ¿Que puedo hacer sí el producto no funciona?
Si la programación no funciona por primera vez:
1. Leer atentamente las instrucciones de manejo / Repetir la programación del decodificador. Esperar tres segundos antes de
introducir los datos de nuevo.
2. Púlsar las teclas de la central digital más lento y con más tiempo. / Pulsar las teclas varias veces.
3. Cambiar el formato memorizado del árticulo magnetico (Märklin/Motorola DCC/NMRA).
8. Posicionar el aserradero
Apagando el aserradero (mediante la corriente) se le quedará en la posición última. Si se quiere posicionar el aserradero al
principio se tiene que ponerlo otra vez en marcha hasta lograr la posición deseada. Ahora apagar el aserradero. Cuando se
pone el aserradero otra vez en marcha se encuentra ahora en el principio. ¡ATENCION: NUNCA MOVER EL ASERRADERO
MANUALMENTE ASI SE DESTRUYE EL MANDO!
Nederlands
Voor gebruik de veiligheidswaarschuwingen en instructies goed lezen en in acht nemen. Dit product is een modelbouw-hobbyartikel en geen speelgoed. Voor de juiste toepassing en verwerking zijn gereedschappen en andere accessoires zoals een
scherp mes, een scherpe schaar en speciale lijm nodig. Onvakkundige verwerking van dit modelbouwproduct vormt kans op
letsel! Daarom buiten bereik van kinderen houden! Dit product en de accessoires (lijm, verf, messen enz.) absoluut buiten
bereik van kinderen onder de 3 jaar houden! Laat kinderen alleen onder vakkundige begeleiding van een volwassen
modelbouwer deze bouwset bewerken. Let bij het in elkaar zetten van dit product absoluut op: niet eten, drinken of roken. Verf
en lijm niet in aanraking brengen met ogen, huid of mond. Niet inademen. Verwijderd houden van ontstekingsbronnen. De
handleiding en instructies van de fabrikant nauwkeurig opvolgen. Eerste hulp bij oogcontact: ogen open houden en met
stromend water uitspoelen en direct een arts raadplegen. Voor het inbouwen in het landschap eerst de werking controleren.
Het product mag alleen met een maximale spanning van 16V AC/DC worden gebruikt. Let op de veiligheidseisen en de
handleiding van uw digitale besturing! Decoder niet op een elektrisch geleidende ondergrond plaatsen! Kortsluitgevaar! Wij
wensen u daarmee veel plezier. Hartelijk dank, dat u voor een hoogwaardig product van NOCH hebt gekozen.
In de micro-motion houtzagerij wordt echt hot gezaagd. Het model heeft twee bewegingen: de pendelzaagmachine gaat op en
neer, terwijl een kleine zaagbok op rails de te zagen stam voortduwt. De beweging wordt geaccentueerd door een effectvolle
verlichting.
1. Aansluiten van de multiprotocoldecoder op de voeding
De digitale decoder herkent Märklin Motorola (MM) en DCC/NMRA schakelopdrachten voor locs en magneetartikelen
volautomatisch. Bovendien is het mogelijk om door het indrukken van de rode drukknop de beweging te starten.
Aansluiten bij drie geleiderrails met middengeleider: rode draad (B) op de middengeleider en zwarte draad (0) op de rails
aansluiten. Let op: hier dient rekening gehouden te worden met de polariteit. Bij twee geleider rails hoeft men niet op de
polariteit te letten. Servo aansluitingen: oranje draad naar buiten (foto).
Aanwijzing: de aandrijving is niet geschikt voor continu bedrijf! De drukknop nooit direct op de trafo aansluiten! Het handmatig
verschuiven van de zaagmachine kan de aandrijving stuk maken!
Om te programmeren moet de drukknop op de decoder (foto) worden ingedrukt voordat de decoder op de voeding wordt
aangesloten. De navolgende beschrijving dient exact te worden opgevolgd.
2. Programmeren van een „digitale centrale“ op een wissel- of seinadres
De decoder wordt aangesloten op het hoofdspoor en niet op het programmeerspoor. Belangrijk: Tijdens het programmeren mag
er op de digitale unit geen loc actief zijn met het adres 72 in Märklin-Motorola-format en geen loc met adres 72 in DCC/NMRAformat. Controleer dit voor u verder gaat met programmeren. Verder moet u de digitale centrale opnieuw starten, zonder de
reeds aanwezige databestanden te wissen (LET OP: hier is geen totale reset van het systeem bedoeld! Kijk in het handboek
van uw digitale centrale!).
Schakel de railspanning uit („STOP“-toets indrukken). De drukknop op de decoder ingedrukt houden (foto), tijdens het weer
inschakelen van de stroom op de rails. De rode LED van de decoder licht op. De decoder kan uitsluitend worden
geprogrammeerd op een adresgroep van vier opeenvolgende adressen (voorbeeld: 1-4, 5-8, 9-12, enz.). De decoder herkent
automatisch of het om een Märklin/Motorola of een DCC adres gaat. Maak nu voor de houtzagerij een functieartikel aan.
Belangrijk: Het eerste adres van een adresgroep van vier schakelt steeds de functie. Stuur nu een schakelopdracht waarna de
rode LED dooft (in ons voorbeeld: 1,5,9, enz.). Afhankelijk van het gebruik van de digitale centrale is het hoogst te kiezen adres
bij Märklin/Motorola format het adres 317 en bij DCC format het adres 2045. Niet alle centrale zenden het hele adresbereik.
NOCH GmbH & Co. KG - Lindauer Straße 49 - D-88239 Wangen im Allgäu
info@noch.de - www.noch.de
 Loading...