

Page 1

www.nkrowing.com.au
1
The Most Relied-Upon
Pocket Weather Instruments
in the World
Making Work & Play
Easier & Safer
COX-BOXTM SYSTEM
INSTALLATION, MAINTENANCE AND
TROUBLESHOOTING GUIDE
Thank you for purchasing this NK CoxBox. PLEASE take a moment to review these instructions before
installiation & use. Your CoxBox system should provide you with years of trouble-free service, but we are
always here to help if a problem arises. To order parts or accessories or obtain technical support, please
call 02 6258 9380. You may also e-mail questions to our support representatives at [email protected] or
visit NK online at www.nk.com.au
Page 2

www.nkrowing.com.au
2
COX-BOX OPERATION
On/Off
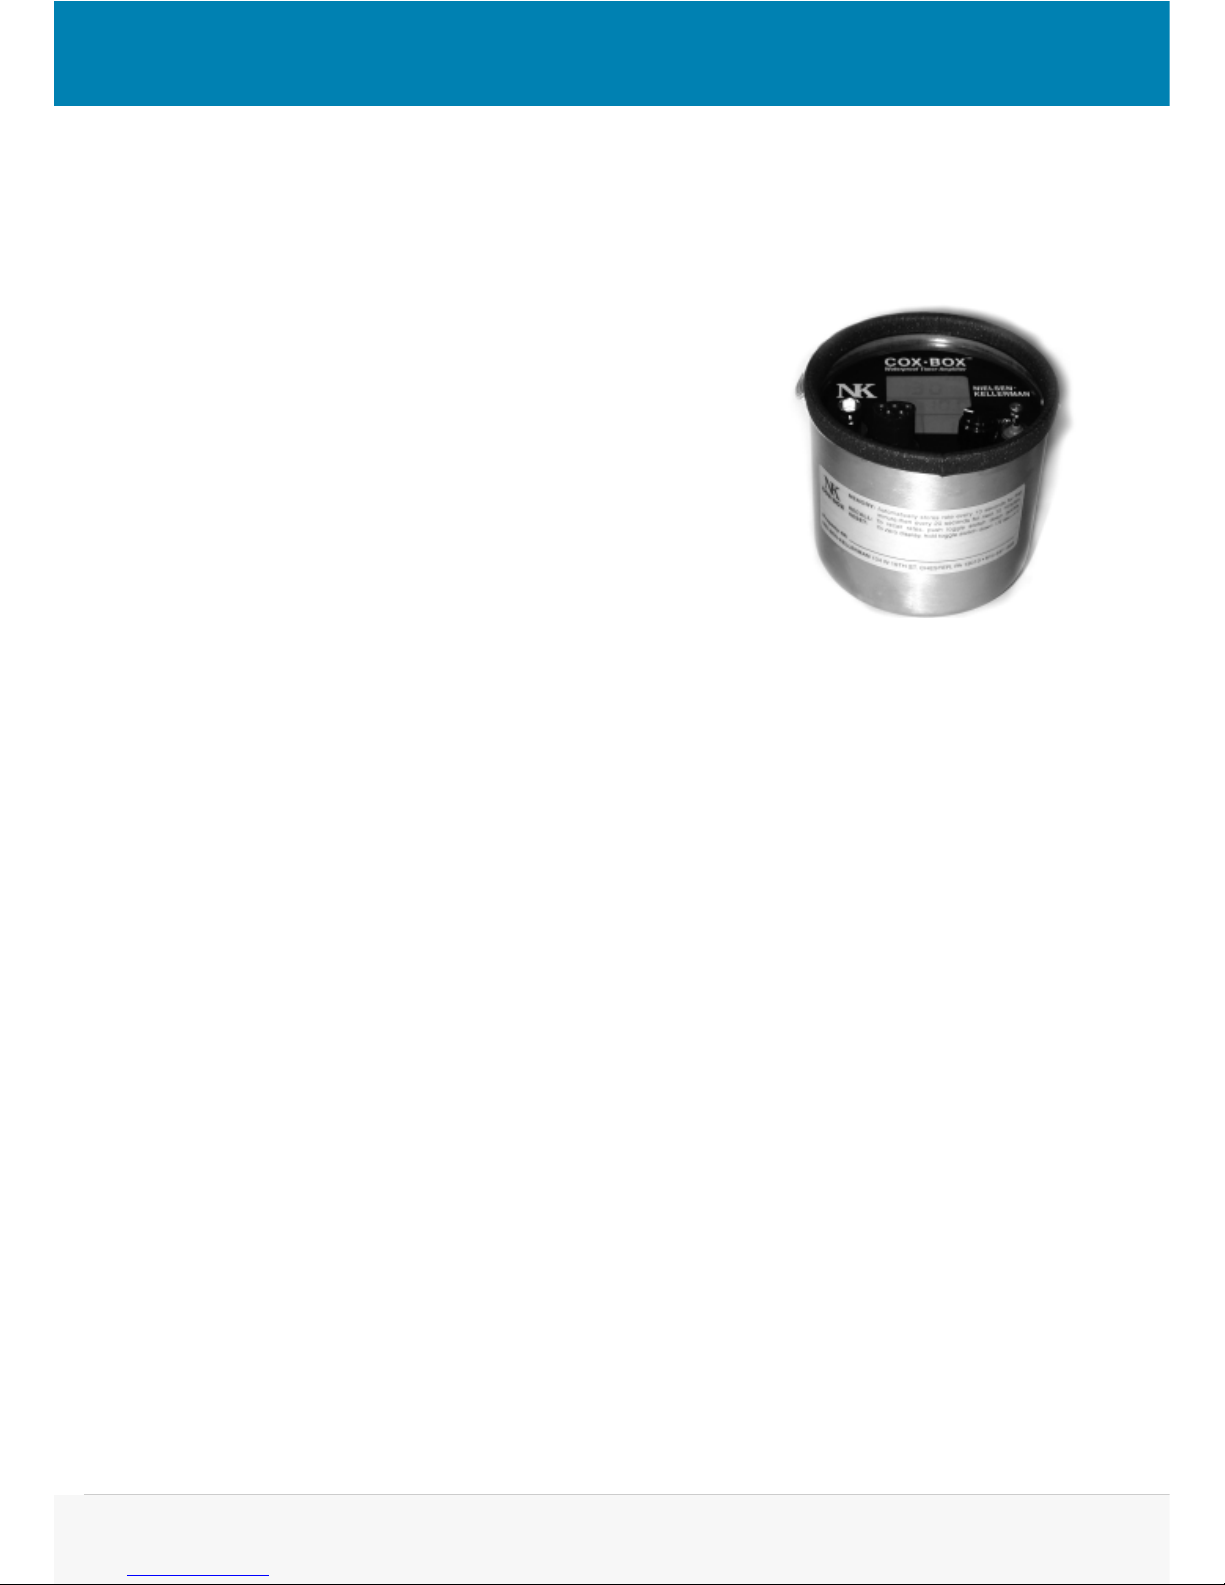
To use your Cox-Box, simply place the unit in the cup bracket and plug it into the wiring harness. Be sure to align the
plug and receptacle properly! There is an arrow molded into the rubber for help visually aligning the parts. The P5 can
be damaged because of frequent improper alignment.
The large knob turns the unit on and off, and controls the volume. Turn the knob clockwise to turn the Cox-Box on.
Find an appropriate volume so that everyone in the crew can hear the coxswain. Adjusting the speakers slightly may
help with this. Keep the volume as low as possible to prolong the battery life.
Pausing/Stopping Timer
If you do not want the timer to run, fl ip the toggle switch up to “HOLD”—this freezes the time display—the rate
meter and counter will continue to operate. When ready for the timer to begin or resume, set the toggle switch
back to “RUN.” Putting the unit in hold is useful to start and stop the timer (for example, just prior to or immediately
following a race) or to pause the time (in between pieces or while turning). The timer will not start unless the Cox-Box
is in Ready Mode.
While the timer is running, the unit will store stroke rates in the memory. The data will not store if the unit is in “HOLD”
mode.
If any of these functions do not work properly, review each step of the installation, checking all distances
and alignments. Also review the “Troubleshooting” section for help pinpointing the problem.
If you still are having problems, please contact our Repair Department
on 02 6553 2473 or write to [email protected]
Recalling the Memory
The Cox-Box unit will store stroke rates during a timed piece for up to 25 minutes and 40 seconds (81 points of
memory—in increments of 10 seconds for the fi rst minute [0, 10, 20…] then every 20 seconds thereafter).
Each time you push the toggle switch down, the unit will scroll through each of the stored data points. The increments
will continue until the time at which the unit was stopped or 25:40 is reached.
If the Cox-Box unit is turned off and back on again—the memory is not lost. To clear memory, you must press the
toggle switch down and hold it for at least ½ second.
?
Additional Information
Never attempt to repair the Cox-Box unit yourself. The units are specially sealed to make them watertight.
Breaking this seal often causes very expensive damage and will void the warranty. The only accessory that
we will repair is the microphone. We do encourage and will support experienced individuals to repair and
maintain wiring harnesses and speakers.
Page 3
www.nkrowing.com.au
3
CARING FOR YOUR COX-BOX SYSTEM
Nielsen-Kellerman equipment is designed, built and tested to withstand the rigors of everyday use, but it is not
invincible and it can be damaged. The following information is intended to help you maintain your equipment and
prevent unnecessary repairs.
Charging
• Place the unit on charge whenever it is not in use, but do not leave the unit charging indefi nitely. The unit should
never be charged continuously for longer than 2 days.
• If the battery light comes on, be sure to charge the unit for at least 12 hours.
• Do not continue to use a unit with the low battery warning light illuminated. Repeated use with the low battery
light on may damage the batteries and unit.
• Under normal conditions, a fully charged battery should last at least 4 hours. If your unit is not providing this much
operational time, it may be time to return it to NK to have new batteries installed. We expect our batteries to need
replacement after three years of normal full-season use.
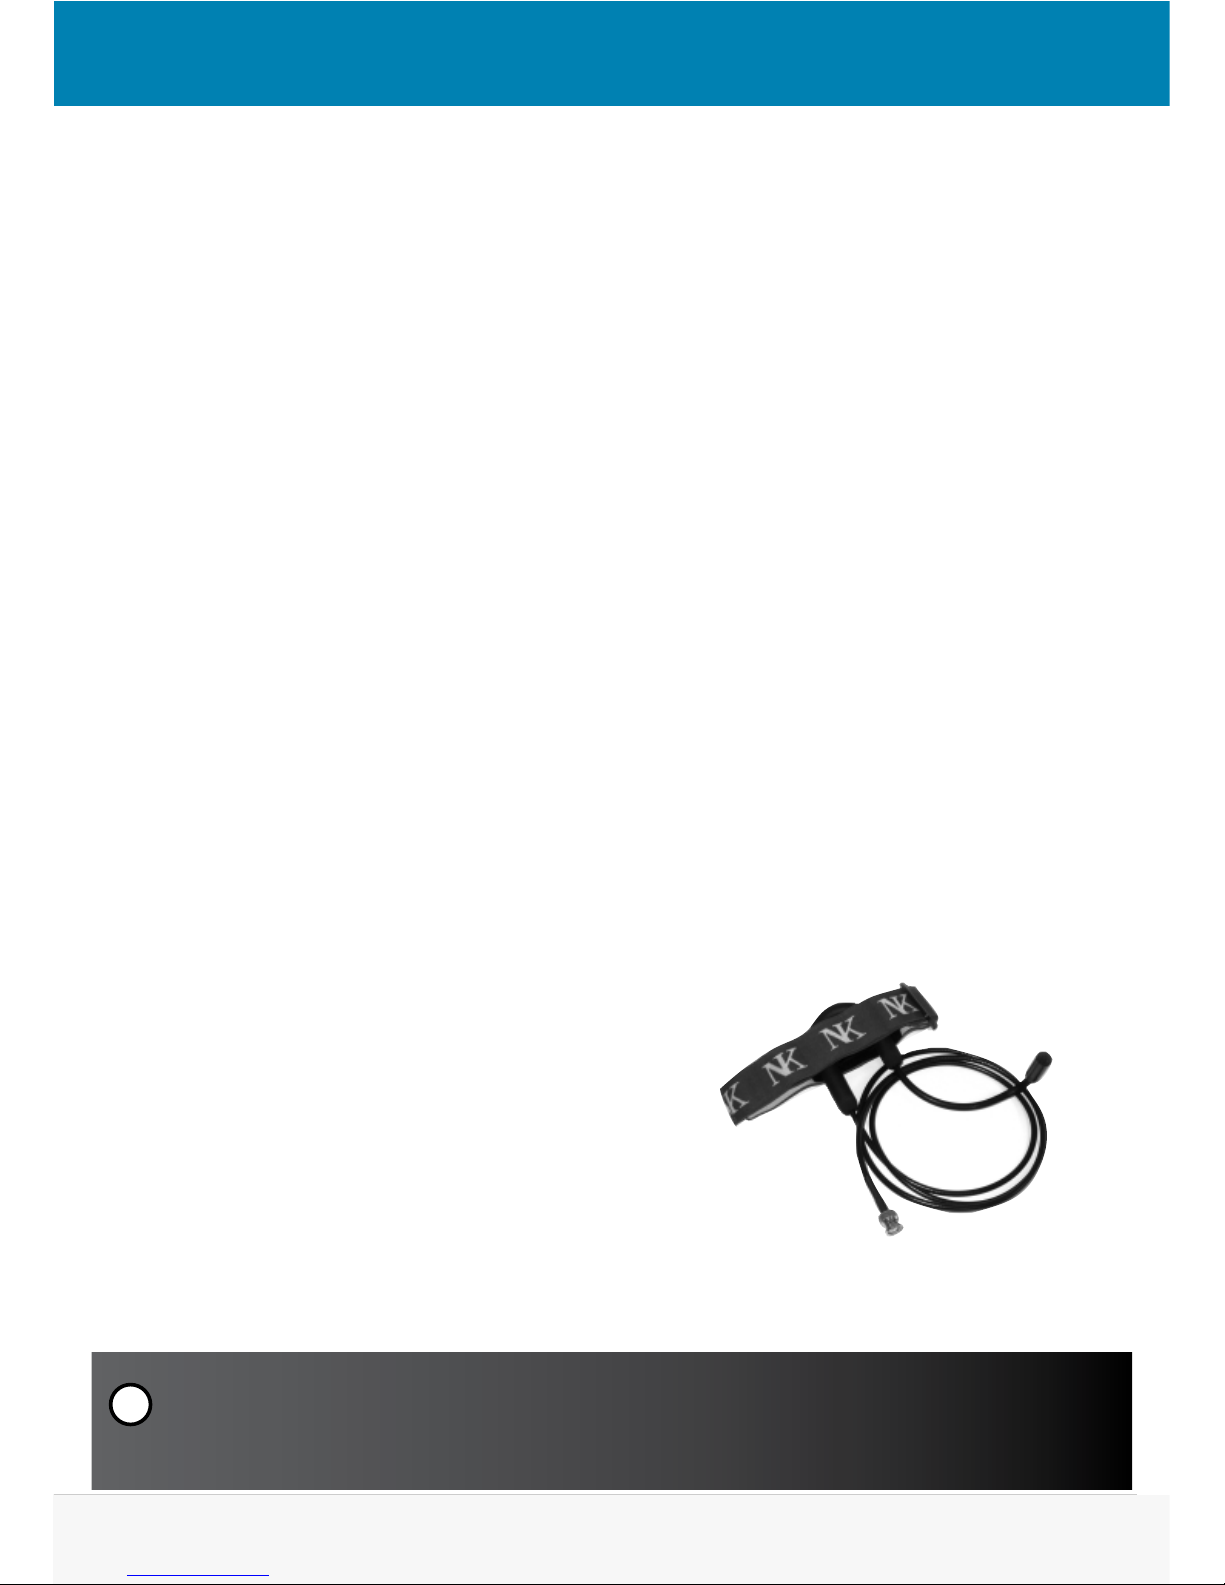
Care of Your Microphone
Your microphone is shipped attached to a headband and ready for use. The microphone is fully waterproof, and
may be fully immersed, but it will not fl oat on its own. Unless it is attached to a Cox-Box, the microphone will
sink. Microphones should be treated with care.
• Do not attempt to bend the aluminum boom or twist the mouthpiece.
• Do not drop the microphone.
• Do not yank or pull on the microphone cable when disconnecting from the Cox-Box.
• Do not tighten the bayonet connector on the microphone to the panel jack on the Cox-Box. Just slip it into
place.
• Do not carry the Cox-Box by the microphone.
Often, when a customer attempts to replace a microphone BNC, the
replacement connector pin is of an incorrect diameter and damages
the center conductor of the Cox-Box panel mount BNC.
NOTE: The NK warranty covers defects in materials and workmanship. It DOES NOT cover damage
caused by abuse, misuse, or attempts to repair the microphone on your own.
!
Page 4
www.nkrowing.com.au
4
REGULAR MAINTENANCE SCHEDULE AND TIPS
Daily Maintenance
1. If you row on salt water, rinse the Cox-Box off with fresh water and dry it after every use.
2. Charge the unit whenever it is not in use, but do not leave the unit on
charge indefi nitely. The unit should not be charged for longer than 2
days straight.
3. Slip the metal microphone bayonet on the Cox-Box panel jack
without twisting to lock it. Do not tighten it fully.
4. Inspect the toggle-switch seal for integrity. This is especially
important if you row in salt water and wash your unit regularly.
Once a Month
This maintenance is easy to perform with a Cox-Box Maintenance Kit,
available from NK.
1. Wash the Cox-Box display panel with warm water and mild soap.
Rinse well and dry.
2. Use the drill bit from the Cox-Box Maintenance kit to clean out the metal sockets inside the rubber plug on the
unit. Rotate the bit inside the sockets to dislodge any dirt or debris.
3. Check the inside of the rubber plug on the wiring harness for any dirt. Inspect the wires leading to the plug for
any nicks or cuts. If these exist, contact NK about repairing them.
4. Apply silicone grease to the outside of the rubber plug on the Cox-Box. This helps to minimize the damage done
by repeatedly removing the unit from the boat. Try not to get silicone into the plug itself.
5. Microphone BNC and Panel BNC Connector: You can greatly reduce microphone static with regular maintenance
of these connectors. Use the provided small screwdriver to gently spread the contact fi ns in the center of the mic
BNC. The Socket Maintenance kit includes instructions and photos of this step. Use the syringe to run a generous
bead of Nyogel on the inside diameter of the BNC connector on the Cox-Box panel. This grease will transfer to the
mic BNC when it is next connected.
6. Inject a small amount of electrical contact grease (Nyogel) into the sockets on the rubber Cox-Box plug. Connect
the unit to the harness. This will coat the pins with Nyogel and push some Nyogel deeper into the sockets,
protecting them as well.
End of the Season
1. Inspect the toggle switch seal. Perform this step before washing the unit.
2. Wash the Cox-Box with fresh water and dry it carefully.
3. Repeat the cleaning and lubricating steps under “Once a Month” maintenance.
4. Fully charge the Cox-Box then unplug it and store it in a cool, dry place.
Page 5

www.nkrowing.com.au
5
Inspecting the Toggle Switch
After several years of use, the gray rubber seal around the ON/OFF toggle switch may crack, tear, or otherwise
lose its ability to properly seal the switch. If this happens, water may enter the unit, potentially doing
permanent damage. Examine this seal regularly for any signs of splitting, tearing, or incomplete sealing
around the toggle lever when it is moved to the two extremes. If such damage is noticed, the unit should be
immediately returned to NK.
Battery Life
The life of your battery depends upon many things: the age of the battery pack, the volume and used by the
coxswain and the extent of charge. Here are some performance guidelines that should help you plan your
Cox-Box use.
• A fully charged battery will power a Cox-Box with NO audio (volume turned all the way down) for 16 hours.
• With the volume turned all the way up, the battery can supply power for 50 minutes of continuous talk.
• Therefore, with an average volume setting and a coxswain talking less than half the time, a fully charged
Cox-Box will provide at least two to three hours of power, and usually more.
• Having the Coxswain turn the volume down as low as possible will help prolong the battery life.
• A fully drained Cox-Box battery requires 12 hours on charge to attain maximum capacity.
• It is not necessary to try to discharge the Cox-Box batteries fully between charging — there is virtually no
memory effect in modern nickel cadmium batteries.
• If your Cox-Box unit is more than three years old, the battery performance will decrease. Simply return the
unit to NK for a new battery replacement. If you would like to determine the age and/or repair history of a unit,
please send an e-mail to [email protected]
Avoid overcharging your Cox-Box. NK chargers are current-limiting and help prevent battery damage from
overcharging. However, leaving the unit plugged in for many days or weeks (past full charge) may still cause
damage. Please be sure to unplug and store your units during your off season breaks.
TROUBLESHOOTING
A Cox-Box system consists of four major components: the Cox-Box unit, the microphone, the wiring and the
speakers. All of these components must function for your system to work properly. If you are having a problem
with your system, the best diagnostic tool is to swap out each component, one at a time, with a working
component. When the problem disappears, you know you have pinpointed the trouble area.
If problems persist after checking the unit against this guide, please call our Repairs Department on
?
02 6553 2473 or e-mail [email protected]
Page 6
www.nkrowing.com.au
6
Cox-Box Will Not Take or Hold a Charge
—Is the Cox-Box being charged correctly?
Review the “Charging” section under Maintenance above and confi rm that proper procedures are being
observed when charging the Cox-Box.
—Is the correct charger being used?
Our chargers are rated 12VDC and 300mA and are sent to the user with a special plug attached. We
recommend that all chargers be purchased from NK, and that you do not modify a charger purchased
elsewhere for use with a Cox-Box.
—Is the charger working?
• Is the red LED illuminated when the charger is plugged in?
• Is the charger warm? A normal charger will be very warm after less than one hour’s operation. If the
charger is not warm then it is not operating correctly. However, chargers can be warm, but not work
properly.
• Does the unit charge with a different charger? If so, then the fi rst charger is bad. If you suspect that your
charger is not working correctly you can perform the following test:
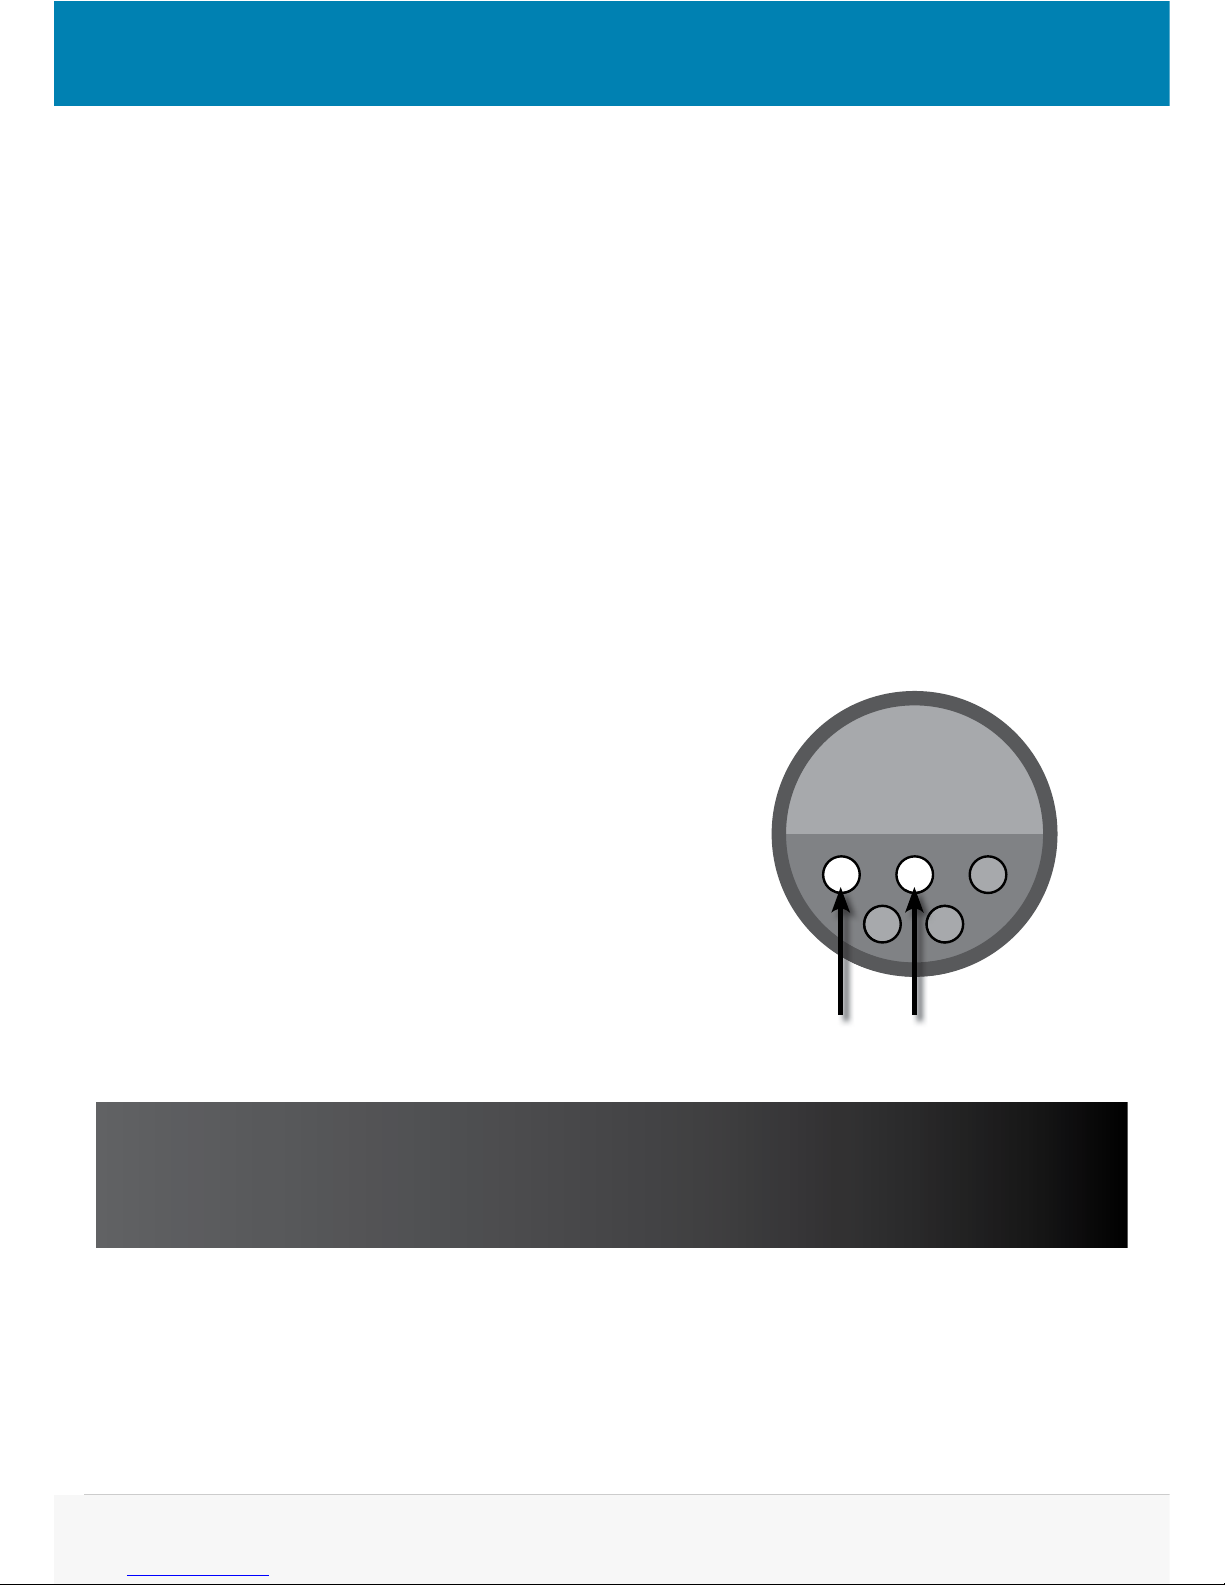
Obtain a multimeter—almost any type will do. Turn the multimeter on and set it at 20 VDC. After
plugging the charger in (be VERY careful, the charger is ON!),
place the positive lead from the multimeter on the plus pin,
and the negative lead from the multimeter onto the ground
pin. The multimeter should read between 13.5V -15V. Any
deviation from this range indicates that the charger is not
working. If you do not get any voltage reading on the multimeter, the internal transformer is damaged the charger must
be replaced.
!
—Have the batteries exceeded their lifespan?
A Cox-Box Battery is expected to provide 3 years of normal use (daily practices for approximately six to nine
months of the year). If you know your unit’s batteries are older than three years, we recommend that the unit
be returned to NK for new batteries and servicing. We can often check our records to determine the age of
your unit’s batteries.
NOTE: NK NO LONGER REPAIRS CHARGERS!
If you wish to repair a charger plug, you may obtain pins and instructions from NK. However, for most
people, the most cost- and time-effective approach is simply replacement.
ground plus
Page 7

www.nkrowing.com.au
7
No Stroke Rate or Intermittent/Incorrect Reading
—Is the switch in the HOLD position?
If the toggle switch is in the HOLD (top) position, the unit will not read. Place the switch in the RUN (middle)
position.
—Is there a problem with the unit?
When there is no reading or there are irregular readings, the problem usually
lies with the sensor, not the unit itself. To test the unit:
• Turn the unit on; clear the memory and place in ready mode.
• Using a bent paperclip (unfolded into a “U” shape) repeatedly poke into
the two exterior holes of the CB plug (“A” & “D” sockets of the P5).
• The stroke rate should update every other poke. If this happens, the CoxBox is functioning properly and the problem exists with the rate sensor
in the wiring harness. Order a replacement rate sensor (NK Part No. 0212)
and install it according to the directions supplied.
E
CB
DA
• If the rate does not update during this test, check the sockets to confi rm that they are the same height
within the plug and have not been pushed into the plug. If the sockets have become recessed, gently use
a pair of needle-nose pliers to work the socket out to the same level as the other sockets.
• Use the Socket Maintenance Kit (NK Part No. 0242) to clean any imbedded dirt or debris from the sockets
and inject a small amount of Nyogel into the sockets to prevent corrosion and ensure good electrical
contact.
• If the stroke updates, but the timer does not reset, clear the display with the toggle switch. If this does not
solve the problem, your switch may be faulty.
—Is the wiring intact?
Check the wiring for pin alignment and cuts or nicks. Check the sensor and seat magnet placement for proper
positioning and security.
No Audio/Intermittent Audio/Static
—Is the wiring clean of cuts or nicks?
Cuts or nicks in the wiring are the most frequent causes of audio problems. Be sure that all of the connectors
(pins, sockets, plugs, receptacles) are not damaged and are positioned properly.
— Is the microphone working properly?
The microphone may be the cause of failure. Test the system with a microphone you know is good. Note: A
damaged microphone often causes static.
— Are the connectors (pins, sockets, plugs, receptacles) properly positioned?
See installation.
— Are the speakers working properly?
Be sure all of the speakers are plugged in properly and are in working order (replace one at a time with a
known good speaker to test). If you are getting a loud squealing noise, try pointing the speakers away from
the coxswain to minimize feedback.
Page 8

www.nkrowing.com.au
8
Cox-Box Maintenance
If you row, cox or coach a coxed boat, you know the CoxBox is an important part of every practice or race. Though designed to perform in conditions that
would destroy most electronics in minutes, there are a few things you can do to help your CoxBox last longer and perform better. For every waterproof
electronic product, the connections are the potential trouble spots. NK sells a complete Cox-Box Maintenance Kit with everything needed to make it easy to
maintain the connections on your equipment. Follow these steps to keep your Cox-Box, Cox-Vox, Microphones & Wiring static-free and reliable for years.
Cox-Box Panel Connectors - MONTHLY WASH the Cox-Box panel with warm water and mild soap. RINSE well. DRY thoroughly
ROTATE DRILL BIT
inside metal sockets of
rubber P5 connector
to dislodge dirt and
corrosion and lift debris
out of sockets.
APPLY
ELECTRICAL
CONTACT GREASE
from syringe inside
metal sockets. Avoid
over filling sockets or
getting into rubber.
APPLY GREASE
from syringe
inside metal BNC
connector in a small
bead between white
conductor and metal
can.
USE FOAM SWAB to
apply SILICONE from
small plastic tub to...
OUTSIDE OF P5
until a visible film of
SILICONE covers
surface. (Keep foam
swab in provided bag
for future use.)
INSPECT rubber boot
around toggle switch
for tears or damage.
RETURN to NK if
any visible damage.
12
Tips to Help You Get the Most From Your Cox-Box
· Make sure that the CoxBox is carried by the handle, and NEVER by the microphone. After use, detach the microphone, and do not store the unit with the
mic attached. When attaching the mic to the CoxBox unit, avoid twisting the BNC connection down until it locks. Instead, connect the mic, and twist the
socket just enough to keep it attached.
· Keep your CoxBox clean by rinsing it off after use, ESPECIALLY if you row in salt water.
· Store your CoxBox in a cool, dry place. Avoid leaving it in severe heat or cold (such as the dashboard of a car or an unheated boathouse in the winter)
which can greatly shorten the life of the rechargeable battery pack.
CHARGING
· Recharging: Recharge a regularly-used CoxBox whenever possible to ensure that it will have enough power for the next practice. A fully drained CoxBox
battery pack requires 12 hours on charge to attain maximum capacity. At the end of the season, charge the unit for 12 hours, disconnect the microphone
and charger, and store in a cool dry place until ready to use next season.
· Memory Effect: It is not necessary to try to discharge the CoxBox batteries fully between charging - there is virtually no memory effect in modern nickel
cadmium batteries.
· Avoid Overcharging: NK chargers are current-limiting and help prevent battery damage from overcharging. However, leaving the unit plugged in for
many days or weeks (past full charge) may still cause damage. So PLEASE be sure to unplug and store your units during your off season breaks.
BATTERY LIFE
The life of your battery depends upon many things: the age of the battery pack, the volume and talkativeness of the coxswain, and the extent of charge.
Here are some performance guidelines that should help you plan your CoxBox use.
· A fully charged battery will power a CoxBox with NO audio (volume turned all the way down) for 16 hours.
· With the volume turned all the way up, the battery can supply power for 50 minutes of continuous talk.
· Therefore, with an average volume setting and a coxswain talking less than half the time, a fully-charged CoxBox will provide at least two to three hours of
power, and usually more.
· Having the Coxswain turn the volume down as low as possible will help prolong the battery life.
· If your CoxBox unit is more than three years old, the battery performance will decrease. Simply return the unit to NK for a new battery replacement. If
you're not sure how old your unit is, give the Service Department at NK a call and they can research your unit's serial number to tell you when it was last
serviced.
Visit www.nk.com.au for more maintenance and troubleshooting tips, or contact NK email support on [email protected]
Microphone - MONTHLY or As Needed
GENTLY SPREAD GROUND CONDUCTOR "FINS" of the microphone BNC away from the center white insulator using the small
screwdriver. A slight gap between the fins and insulators should remain. Slip the BNC onto the greased Cox-Box panel BNC to transfer
grease into the body of the microphone BNC. INSPECT cable for intact heat shrink and connection to BNC. Return to NK for repair
if there is visible damage.
REMEMBER! DO NOT lock the BNC ring when plugging in to the Cox-Box. DO NOT carry the Cox-Box by the microphone. DO
NOT bend the microphone boom, twist the mouthpiece or twist or yank the cable.
ROTATE DRILL BIT
inside metal sockets of
rubber P2 connectors
to dislodge dirt and
corrosion and lift debris
out of sockets.
APPLY ELECTRICAL
CONTACT GREASE
from syringe inside P2
metal sockets. Avoid
over filling sockets or
getting onto rubber.
USE FOAM SWAB
to apply SILICONE to
outside of P2 connectors.
Reconnect all P2/R2
connectors firmly.
Speaker/Harness Connectors - TWICE A YEAR (End of Season)
Page 9
www.nkrowing.com.au
9
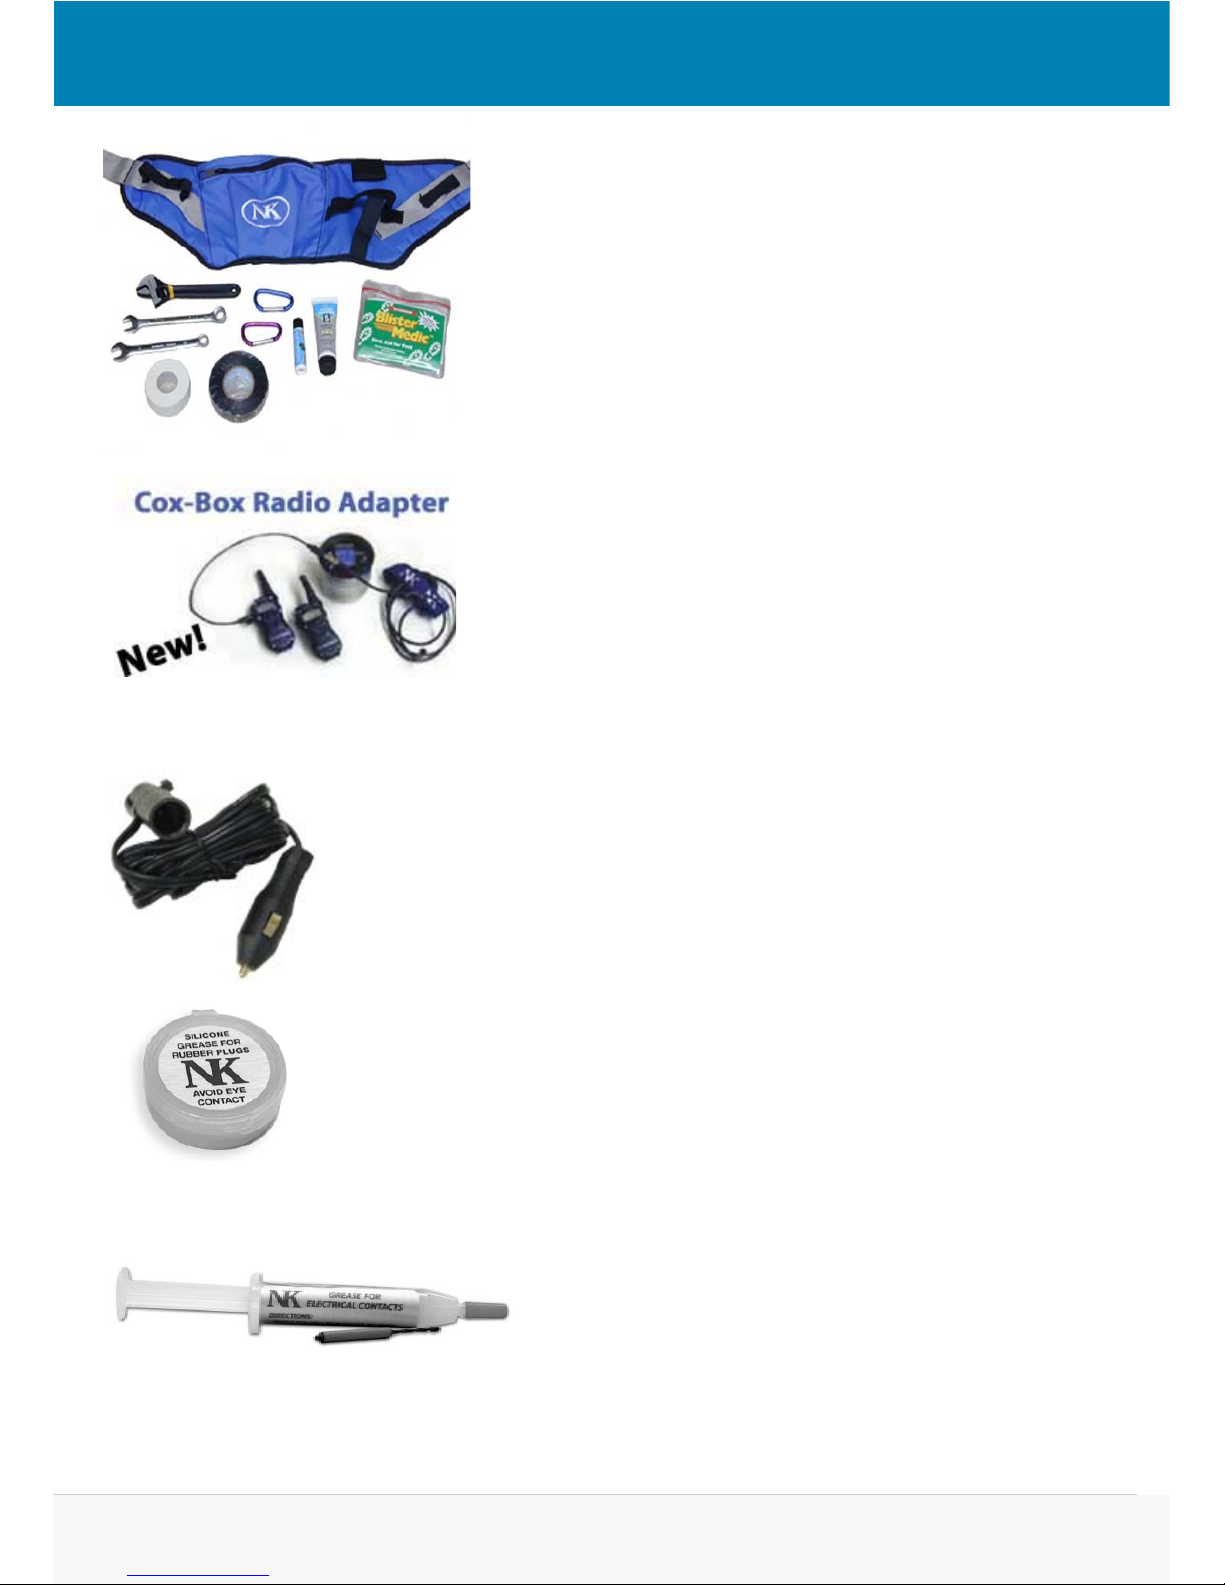
New from Nielsen-Kellerman: the Coxswain’s Kit. Everything
the prepared coxswain needs for practice. Kit Includes: Custom
Pack with pouch and external CoxBox holder, one adjustable
wrench, one 7/16” wrench, one 10mm wrench, athletic tape,
electrical tape, Blister Medic first aid kit, 2 Carabineers, a tube of
waterproof sun block and lip balm. NK PART 4050
With the growing use of licence free, 2-way radios, NK have made
a
vailable a special connector that allows a 2-way radio system to be
used through an existing NK Cox-Box or Cox-Vox system. The radio
to microphone ‘T’ piece connector fits on the BNC microphone
input of the amp unit. One end connects to a 2-way radio, the
other is used to connect the existing microphone. The coach (with
another 2-way radio) can then communicate to the crew discreetly.
With multi-channels available, it is possible for the coach to speak
to a number of crews at once or by switching channels, to just one crew individually.
Charge your Cox-Box from any car or truck cigarette lighter. Great when traveling to
regattas! CAR CHARGER – NK PART 0234 –
SILICONE GREASE – NK PART 0241 –Silic
one is the proper grease for lubricating
all rubber plugs and receptacles in your Cox-Box system. This grease will ensure that
the plugs will connect and disconnect easily and will not swell or crack. Note: please
do NOT use petroleum jelly or other lubricants that may cause the rubber to wear
prematurely.
SOCKET MAINTENANCE KIT – NK PART 0242 –
NK developed this kit to make it easy for you to care for the
metal connectors inside your Cox-Box P5 connector as well
as the P2 connectors on the NK speakers. The kit includes a
specially sized drill bit for cleaning corrosion and dirt from
inside the sockets, as well as a syringe loaded with Nyogel
for injecting into the sockets. Regular use of these tools will
ensure long life and reliable performance of the connectors. One kit will allow you to maintain numerous CoxBoxes for at least a season.
Page 10
www.nkrowing.com.au
10
LAY OUT THE PARTS OF YOUR SYSTEM
Uncoil the wiring harness and lay it out in the shell. If you are installing your COX BOX in a sectional
shell, the harness should be equipped with a plug/receptacle pair which should be within a foot of
the sectional bulkheads.
NSTALL THE STROKE SENSOR (CoxBox system only)
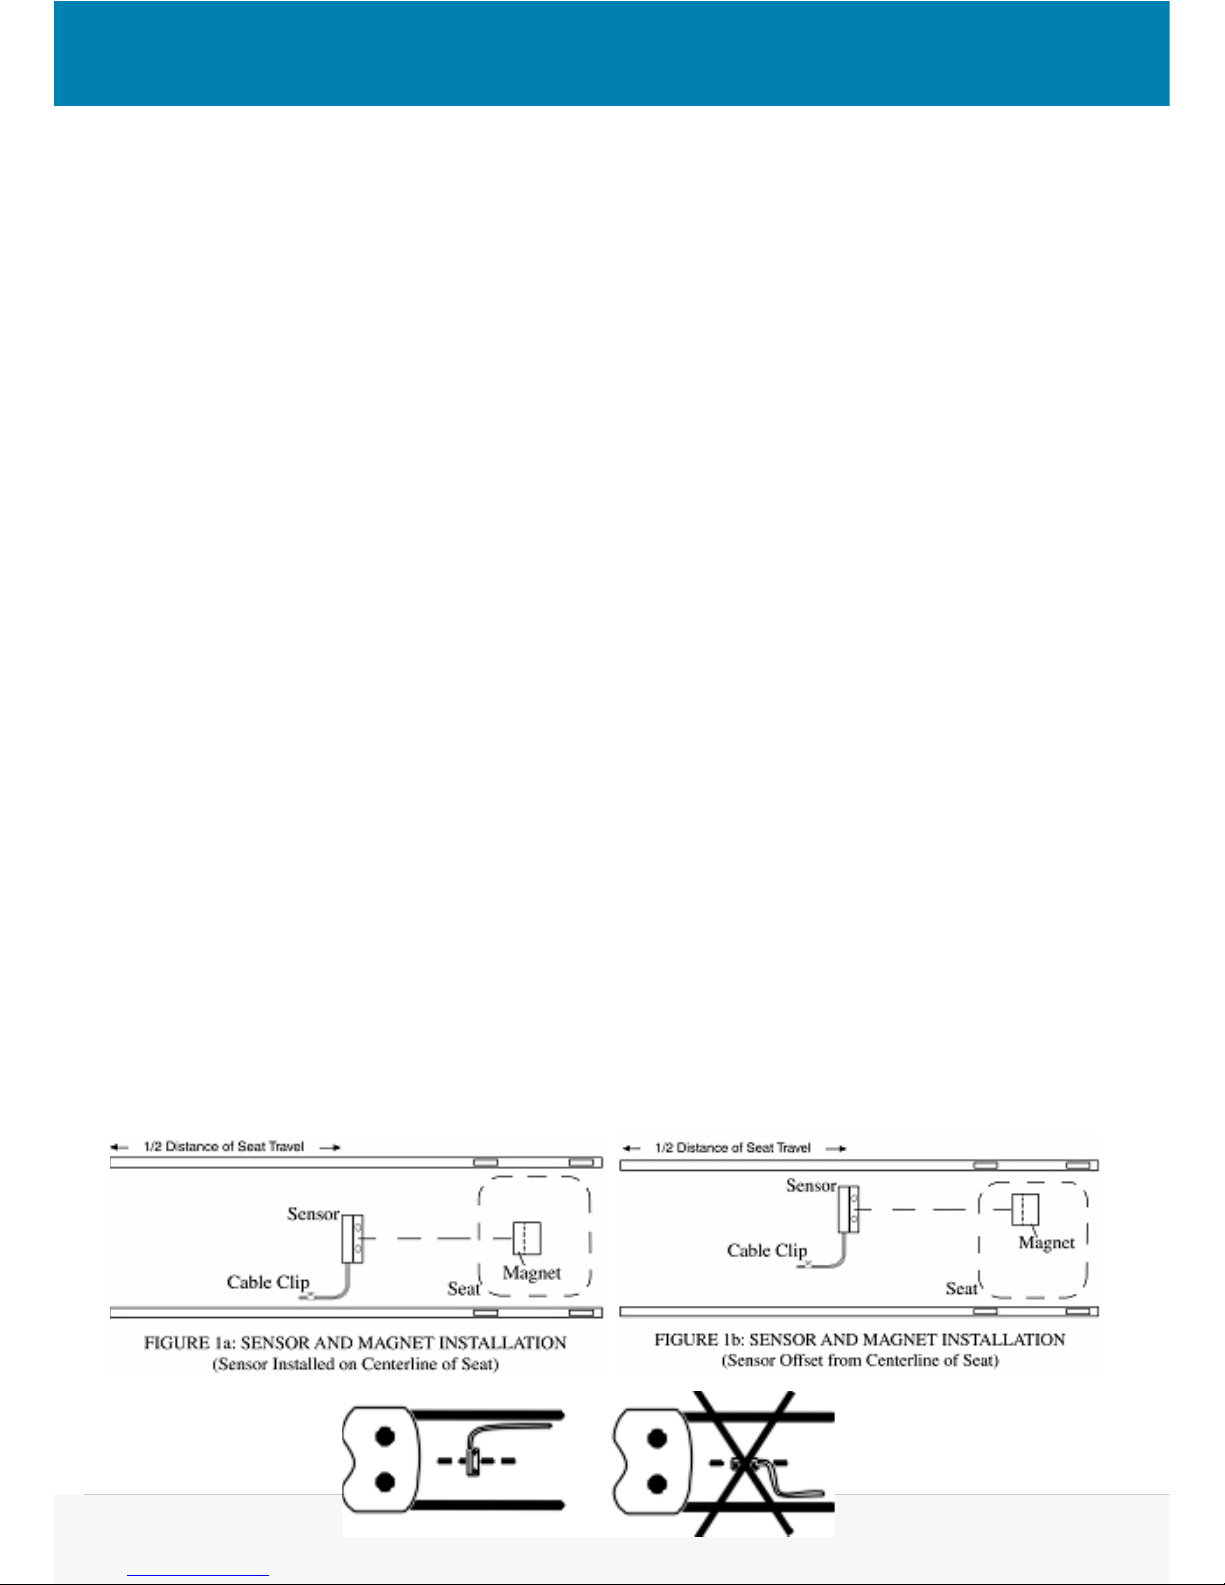
1. Refer to FIGS 1a, 1b. Note the position of the sensor – it should be close to the center of the
seat travel and it MUST be perpendicular to the length of the shell.
It is not necessary for the sensor and magnets to be centered between the rails as shown
in Figure 1a. They may be positioned off center as shown in Fig 1b. It is essential however
that the magnet passes directly over the sensor.
INSTALLING YOUR SYSTEM
Check that you received everything required. If you purchased a complete CoxBox system you should
have received the following items:
Carrying bag .......................................................................................................(1)
CoxBox (or Cox Vox) control unit ............................................................... (1)
microphone.........................................................................................................(1)
charger ..................................................................................................................(1)
speakers ............................................................................... (as ordered 2 or 3)
mounting cup ....................................................................................................(1)
harness, with sensor installed.......................................................................(1)
“Do’s & Don’ts” card ..........................................................................................(1)
hardware pack with magnet ........................................................................(1)
NOTE: The double-sided “VHB” tape provided for mounting is epoxy based and requires 12 hours of cure
time. Do not get this tape wet while curing for best results.
Page 11
www.nkrowing.com.au
11
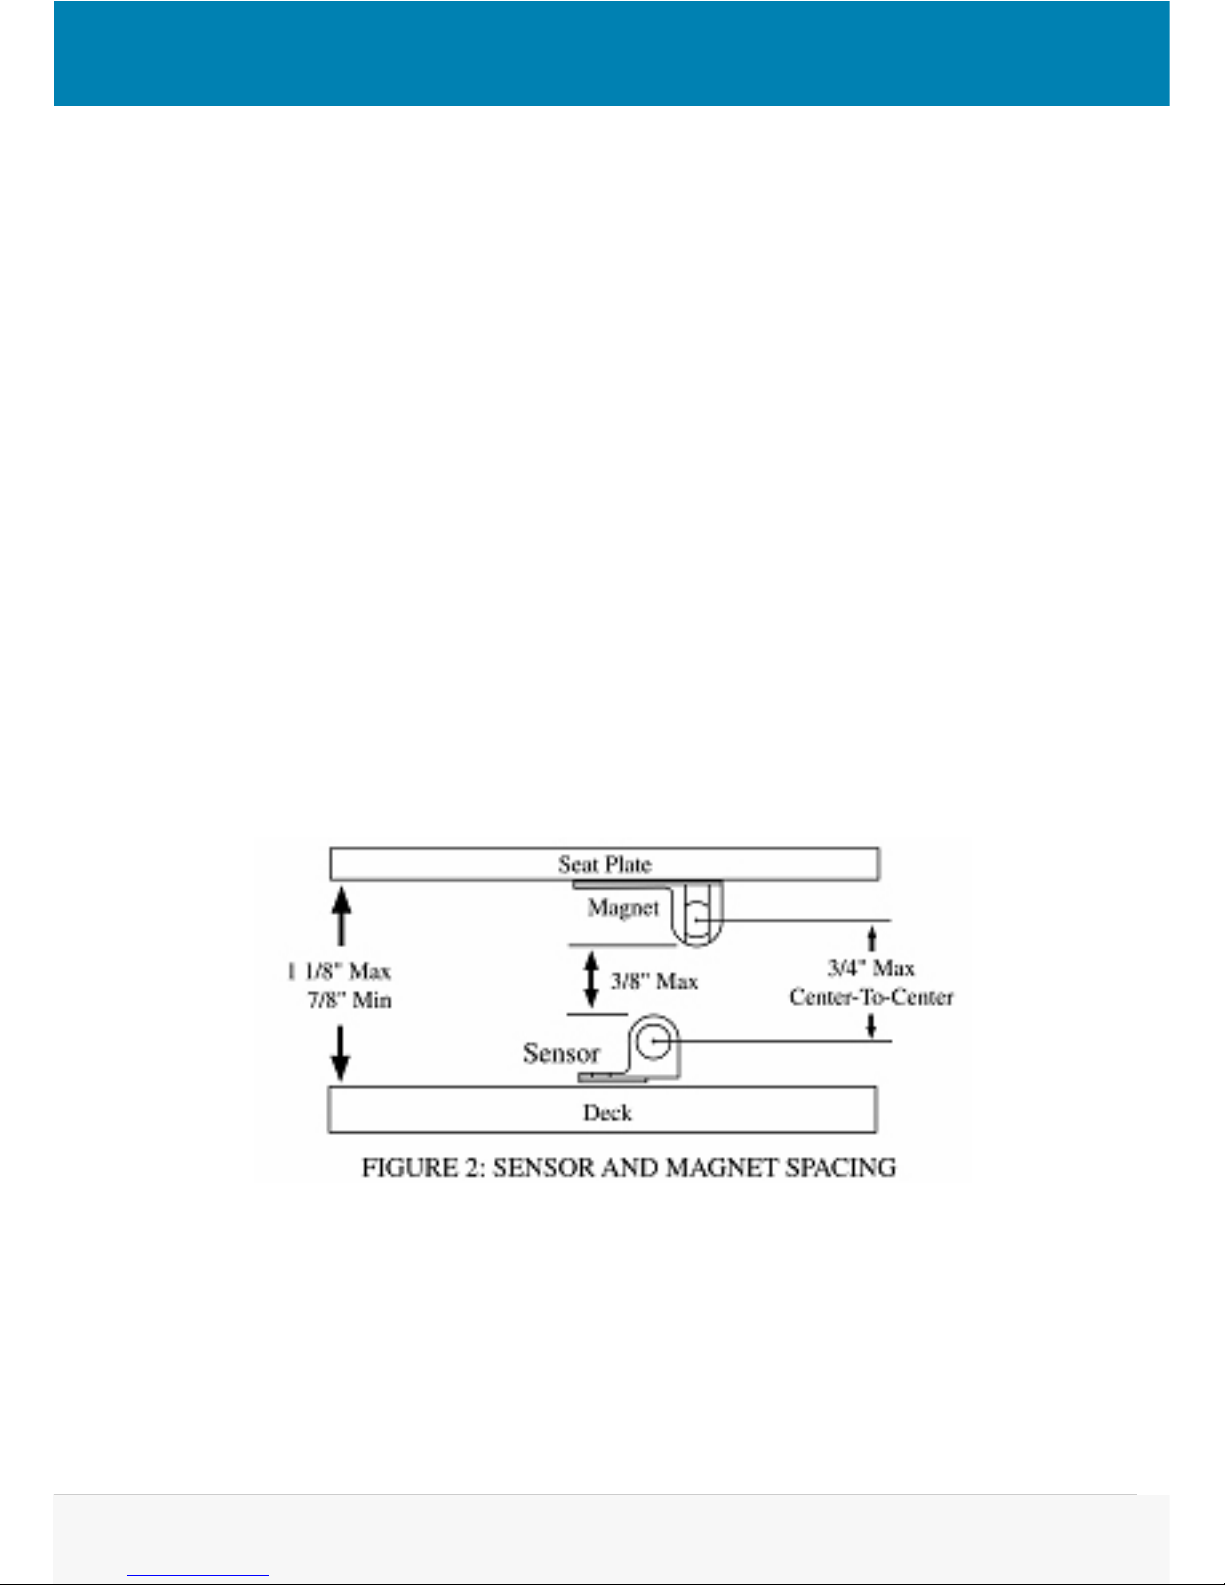
2. The spacing between the stroke sensor and the magnet assembly is critical. If the
magnet passes too far from the sensor the sensor may fail to register every stroke,
resulting in low readings. If the magnet is too close to the sensor, it may strike the
sensor and knock one or both out of place.
Because the distance between the seat plate (to which the magnets will be attached)
and the deck (to which the sensor will be attached) varies considerably from shell to
shell, you should start by measuring this distance. Refer to FIG 2.
• If the distance measured as in FIG 2 is between 7/8” and 1 1/8” you may mount the
sensor and magnet with no further adjustment.
• If the distance measured as in FIG 2 is GREATER than 1 1/8” then you will need to
make a spacer of appropriate thickness. You may choose to shim the sensor or the
magnet, whichever is easier. DO NOT use any magnetic material for your shim.
• If the distance measured in FIG 2 is LESS than 7/8” then you will have to remove
material from either the seat or the deck OR try mounting the magnet on the upper
side of the seat plate.
You can install the sensor and magnets semi-permanently by using the 3M VHB (Very
High Bond) tape supplied. Should you wish to make a temporary installation, use
the screws provided and DO NOT peel away the protective layer from the VHB tape.
FOLLOW STEPS 3-4 FOR DOUBLE SIDED TAPE INSTALLATION OF THE SENSOR. FOR
THE MOST SECURE INSTALLATION USE TAPE AND SCREWS.
3. Check that the sensor cable is routed conveniently. Use a solvent to clean the area of the
deck to which you will attach the sensor. This is essential for a good bond. Peel away the
protective layers of the VHB double-sided tapes, and firmly press the sensor onto the
cleaned area of the deck.
4. Using two cable clips provided, secure the sensor wire.
PLEASE NOTE: The sensor must be installed at the CENTRE of the seat travel. If the sensor is too close to
either end of the seat travel, the COX BOX may indicate ONE-HALF the correct stroke rate.It is essential
that the holes in the magnet assembly pass directly over the holes in the sensor. The dashed horizontal
line in each figure indicates the correct alignment. If the sensor and magnet are installed offset from
the centerline of the seat as in Fig. 1b, the holes of the magnet assembly MUST still pass directly over
the holes of the sensor.
Page 12
www.nkrowing.com.au
12
INSTALL THE MAGNET
1. Remove and inspect the seat plate to find an appropriate place to mount the magnet.
2. Use a solvent to clean the area to which you will attach the magnet. This is essential if a
good bond is to be obtained.
3. Determine the exact location of the magnet assembly on the seat plate. Peel away the
protective layer of the VHB double-sided tape and install the magnet assembly.
4. If possible, use #8 screws to secure the magnet to the seat plate.
5. Return the stroke seat to its slide and check that the clearance between the magnet and
sensor is no more than 3/8” (refer to FIG 2). Check also that the magnets pass directly over the
sensor (refer to FIGS 1a, 1b).
INSTALL THE LOUDSPEAKERS
The NK loudspeakers are factory assembled and waterproofed using silicone-based protective
coatings. Rain, fresh water, and salt water should not harm the speakers, but we strongly recommend
that you install and angle the speakers so that any water which gets in can run out again. The plug-in
feature of NK speakers makes replacement very easy.
1. Install the speakers using #6 x 1/2” panhead screws and the metal bracket (attached to the
speaker). We have supplied SIX screws; you will not use all of them unless you are installing a
three speaker system. Remember, it is best if the speakers are angled downward to let water
run out.
2. Connect the speakers to the wiring harness. Use the remaining six cable clips to secure the
wiring harness. We suggest you use the #6 x ½” brass screws supplied to fully secure these
clips.
INSTALL THE MOUNTING CUP
Decide where you want to secure the cup and mark off the surface using the cup as a template. Drill
two pilot holes for the #8 x ½” panhead screws and secure the cup. Do NOT over tighten the screws!
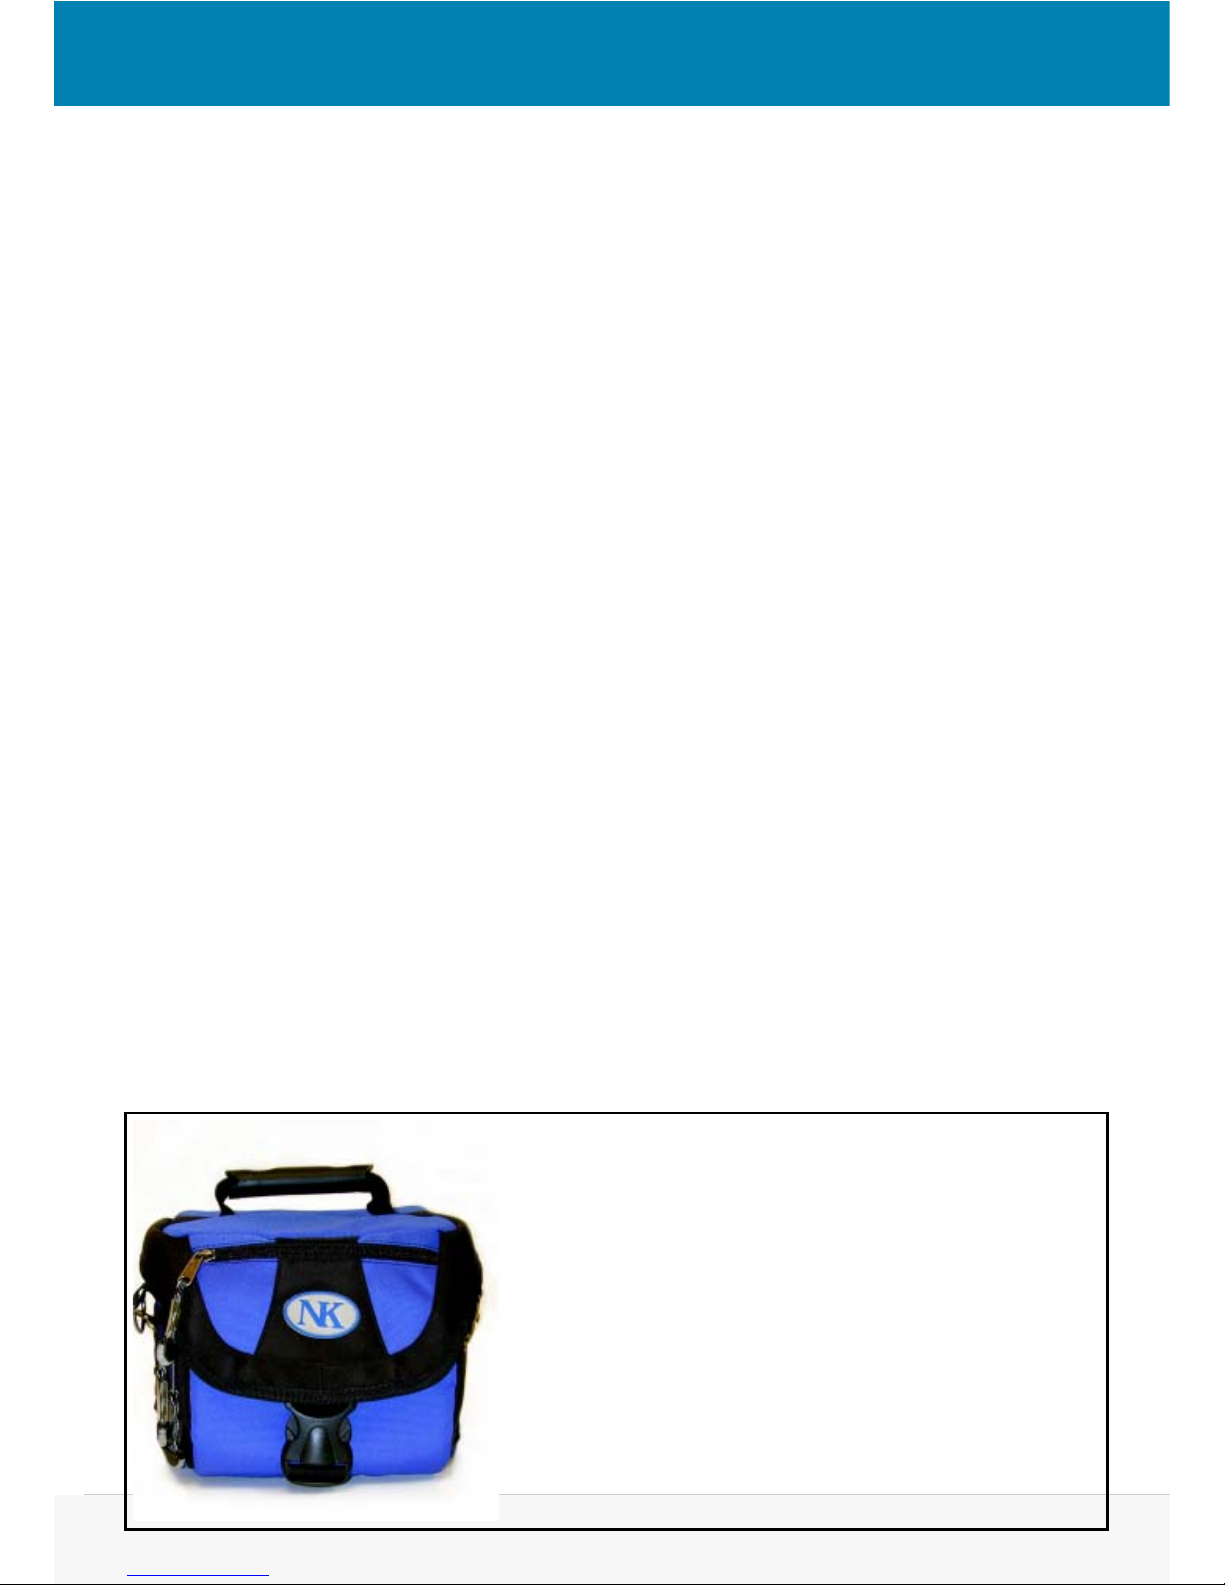
This new NK Gear Bag is a great replacement for your old black CoxBox Carry Case.
It features multiple compartments with adjustable dividers that can
easily swallow up a Cox-Box, mic, charger, SpeedCoach, Maintenance Kit, tools and more.
Water-resistant construction and sturdy padding throughout will
keep all your gear protected, and a padded shoulder strap lets you
load the bag up and still carry everything hands-free.
Available NOW. Part #0117
Page 13
www.nkrowing.com.au
13
TEST AND USE YOUR SYSTEM
1. With the control unit OFF and the toggle switch set to its RUN (middle) position, connect
the large, 4-pin receptacle of the wiring harness to the rubber plug on the front panel of the
control unit.
2. Connect the microphone.
3. Turn the control unit ON. The COX BOX display should now be on, the clock will NOT be
running, the RATE and COUNT windows will be showing 0’s and the display light will be on.
4. Push the toggle switch level down and hold it for ½ second. The display should show all
zeroes and “READY”, “STO P”.
5. Slide the seat over the sensor – the clock should start to run and as you continue to slide the
seat back and forth, the ratemeter and counter will register. Continue to slide the seat for at
least 20 seconds, then push the toggle switch momentarily down (“ZERO”). This stops the
timer.
6. Each additional time you push the toggle switch down the time will increment by 10 seconds
(0, 10, 20 …) and the strokerate at the selected time will also be displayed. After 1 minute,
rates are stored every 20 seconds for the next 10 minutes. The last time recalled from memory
is the time at which the timer was stopped.
7. Now turn the COX BOX off then back on again – the memory is not lost. To clear memory, you
must press the toggle switch down and hold it for at least ½ second.
8. After clearing memory, move the stroke seat again to start the timer. Flip the toggle switch up
to “HOLD” – this freezes the time display – the ratemeter and counter continue to operate. Set
the toggle back to “RUN” and the timer will continue to run.
9. Speak into the microphone and adjust the volume. You should hear your amplified voice from
the speakers.
10. Disconnect the harness. Plug the charger into an appropriate outlet and connect the plug to
the rubber plug on the front panel. The charging indicator lamp (at about 4 o’clock to the
plug) should come on to confirm charging. IF THIS LIGHT IS NOT ON, THE BATTERIES ARE
NOT CHARGING.
Airline Travel
With increased airport security, traveling with your Cox-Box is trickier than ever. We recommend you check
the Cox-Box in with your luggage. Include product literature that explains what the Cox-Box is. Brochures
can be obtained from NK, or product literature can be printed from the website.
You certainly do not want to try to carry them onto an airplane. Cox-Boxes have been thrown into bomb
chutes, even before 9/11.
Page 14
www.nkrowing.com.au
14
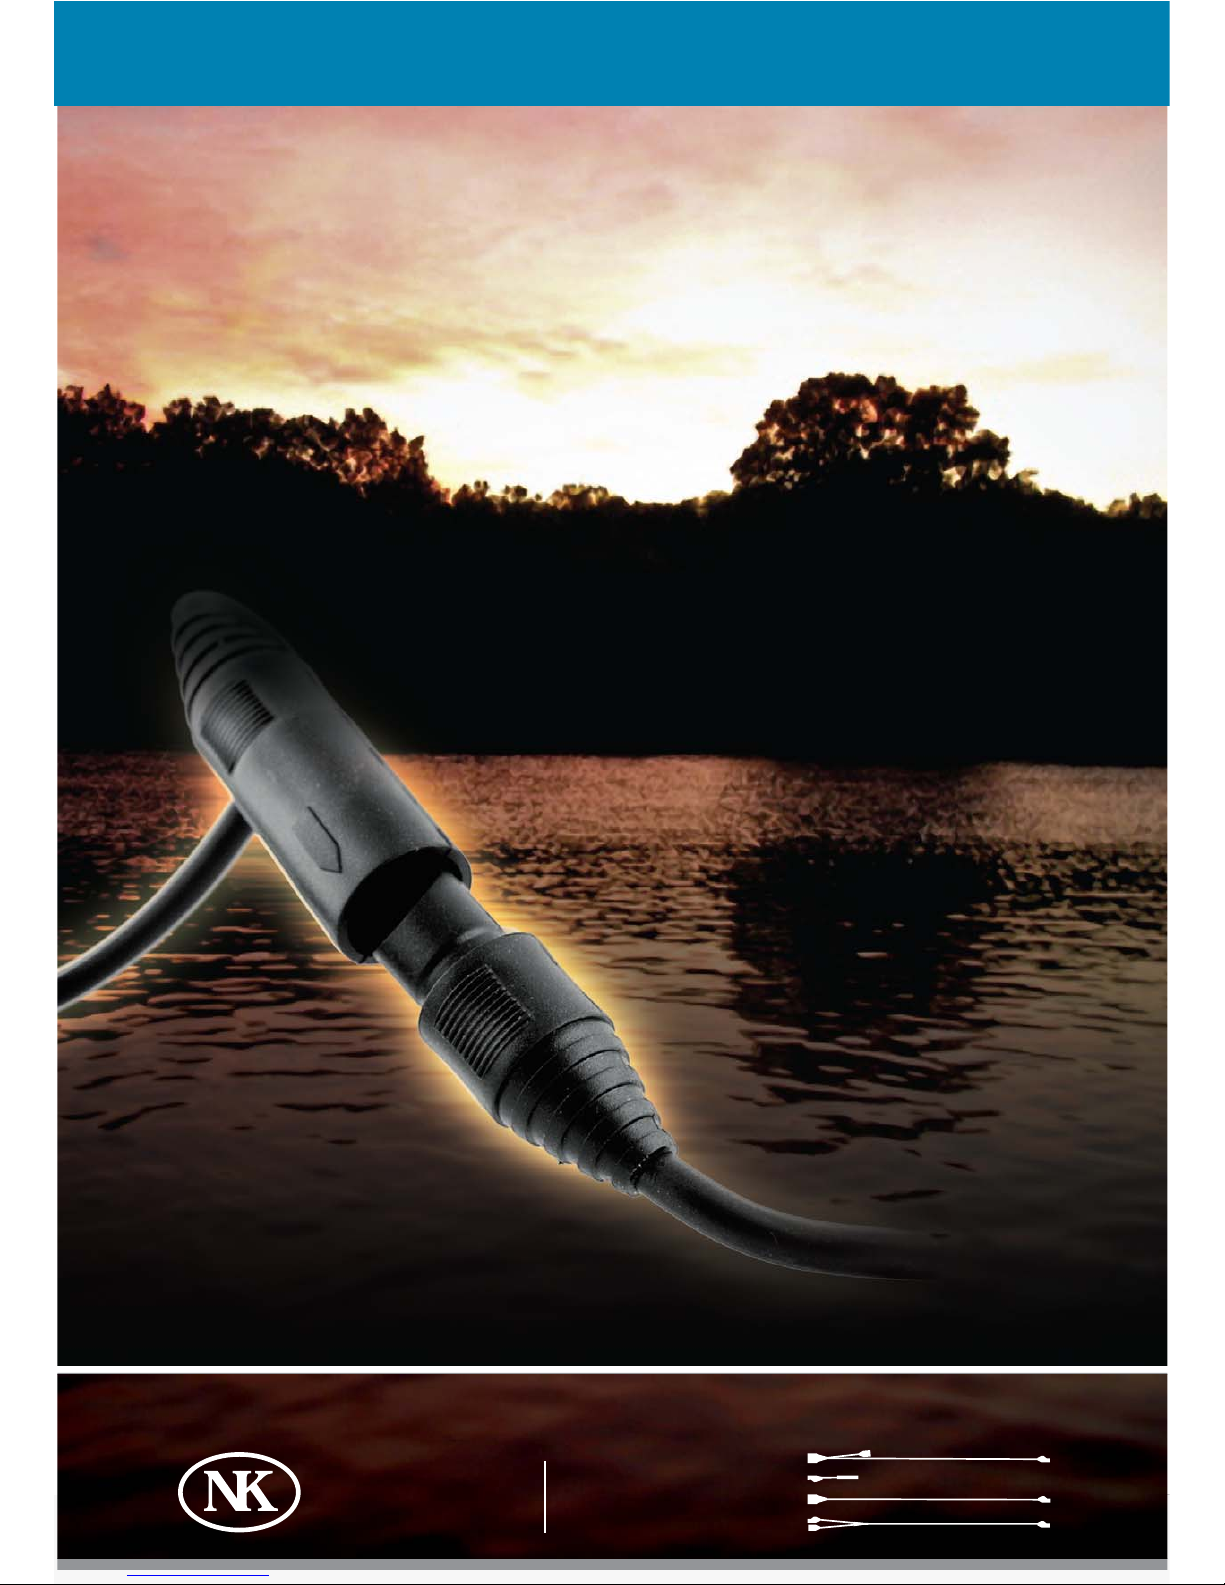
Wiring built as tough
as your workouts.
Nielsen-Kellerman’s
All New Modular Harness System
You want to spend your time on rowing, not repairs.
The unique engineering of NK’s modular harness
ensures improved durability and flexibility.
•
Fully molded and sealed
design to stand up to the
harsh demands of rowing
and environmental exposure.
•
Build EVERY harness you
need from three simple
pieces. Even add on pieces as
your budget allows.
• Affordable modules
eliminate the need for
repairs - simply plug in a new
section if needed.
•
Plug-in rate sensor for
instant repairs and
trouble-shooting.
• NK proprietary gold-plated
pins and sockets
resist corrosion.
• Lighter than the HD harness
system
(24oz/680g for
8-3 harness).
• Fully compatible with all NK
speakers and Cox-Box systems.
• Full 3
-year warranty:
Date coded with month
and year.
MODULARHARNESS
COMPONENTS
(SEE BACK FOR TYPICAL CONFIGURATIONS)
1. A+ (AUDIO & RATE SENSOR)
2. R (RATE SENSOR)
3. A (AUDIO)
4. M (MULTI-SPEAKER)
www.nkrowing.com.au
Page 15

www.nkrowing.com.au
15
NK Rowing Electronics Warranty & Service
NK does not believe in "disposable electronics." We know our products don't lead a pampered life, and we
design them for years of performance in tough conditions. We guarantee every NK product to be free of
defects in materials and workmanship for a period of TWO YEARS from your date of purchase. We will repair
or replace any defective product or part when notified within the warranty period, and will return the product
via domestic ground shipping at no charge. The following issues do not result from a manufacturing defect
and are not covered under this warranty: damage due to improper use or neglect, including corrosion; impact
damage; modifications or attempted repairs by someone other than an authorized NK repair agent; normal
wear and tear; failed batteries. NK wants you to be an NK customer for life, so we take care of you even beyond
the terms of the normal product warranty with our Customer Care Program. Trade-in any NK display unit, no
matter the age or condition, and receive a generous discount on the replacement product.
Visit www.nk.com.au at any time for detailed product specifications & troubleshooting guides.
CUSTOMER CARE
NK wants you to be a customer for life, so we take care of you even beyond the terms of your product’s
warranty. We offer you a quick & economical service for the repair of your NK rowing equipment.
COX BOX overhaul: $195.00 inc GST
COX VOX overhaul: $165.00 inc GST
This is not just a simple repair, it is a major overhaul of your unit. Typically, this unit will function perfectly
for the next 5 to 8 years (provided you follow our guidelines for care of the unit). Replaced items include:
ALL seals, battery, panel rubber connector, all GOLD pins on connector, panel BNC, upgrade charge circuit,
upgrade LCD lamp, supply silicone lubricant. Any further items that require repair are subject to the
Customer Care Pricing chart. All repairs have a ONE YEAR warranty. Optionally, we can replace the can with
a STAINLESS STEEL one for increased durability ($50.00 inc GST). Should your Aluminium can be excessively
dented, then we must replace it with a stainless steel unit as above. We can also repair your crackling
microphone ($38.50 inc GST). Should your unit not be economical repair, then we can offer you a NEW unit,
with a TWO YEAR warranty at our customer care price. That is, you send us your old unit & we sell you a new
unit at a discounted price (call us for exact prices). No ifs, no butts, that is a brand new unit. We do ask that
the unit that you are sending to us has a valid serial number and must not have been repaired or attempted
to be repaired by anyone other than us. This offer excludes products that have been physically abused.
Customer must pay freight to have the unit delivered.
Customer Care Pricing Chart (all prices include GST)
Please check our web site or call us.
* Customer Care policy is valid only for components listed above for as long as we manufacture them and does not cover product upgrades. All other
parts and accessories are covered under warranty up to one year from date of purchase.
MODULAR harness has a 3 year warranty.
Units purchased prior to 1st January 2004 are covered by a one year warranty.
Warranty covers defects in materials & workmanship. Excludes damage due to improper use or neglect (including corrosion), modifications or attempted
repairs by someone other than NK, impact damage, failed batteries & normal wear & tear.
Units must have been purchased in Australia from an authorised Nielsen Kellerman agent.
Except as otherwise provided herein, no other warranties, expressed or implied, are made with respect to these products, including, but not limited to, any
implied warranty of merchantability or fitness for a particular purpose. NK assumes no liability for any damages, losses or expenses resulting directly or
indirectly from product use.
All prices & services offered are subject to change.
Details are correct as at 1st May 2009
NOTE: The NK warranty covers defects in materials and workmanship. It DOES NOT cover damage
caused by abuse, misuse, or attempts to repair the microphone on your own.
!
Page 16

www.nkrowing.com.au
16
COX-BOX OWNERS MANUAL 01 MAY 2009 E&OE
Marc Douez
David McGrath
Contact Info:
Delivery Address
(Please send all parcels to this address)
Nielsen Kellerman Australia Pty Ltd
'Remo' 206 Cowans Lane
Oxley Island NSW 2430 AUSTRALIA
 Loading...