

Page 1

C R I B A S S E M B L Y I N S T R U C T I O N S
Standard Cribs Klimer Cribs
1965, 1970, 1980, 1981, 1983 1972, 1982, 1992
2065, 2070, 2080, 2081, 2083 2072, 2082, 2092
GENERAL OPERATING & MAINTENANCE MANUAL
Y
ou have just received one of the finest cribs available today. We want to make certain that you get the ultimate in-service and installation from your purchase. Your crib has been designed to give you years of satisfaction when used properly, so be sure to read
and understand this manual before placing the crib into service. Complete and mail the enclosed warranty card within 15 days to
validate warranty.
If you received your crib unassembled as a direct shipment from the factory, please unpack it carefully. Do not misplace any of the
parts or assembly hardware. After removing the crib from the carton, examine it to make certain that it has not been damaged in
shipment. Your assembly instructions contain a Parts Checklist. Use the packing list to determine the model # of your crib (circle it
above) . Then find the column listing your crib parts. The first section list the parts you received for assembling the crib. The second section lists the factory assembled parts.
OPERATING INSTRUCTIONS
RAISING AND LOWERING SIDE GATES: Grasp both handles firmly. Lift upward and squeeze handles. Move side gate to desired
location. Release, making certain that side gate locks into place. Please note that as a safety feature, you must lift up on the handles before squeezing the handles.
CRANK (CG) MODELS: CG Models are equipped with gatch panels that are operated by two cranks. One crank raises and lowers
the head end and the second operates the foot end (knee gatch).
VINYL UPPER SECTION MODEL (KLIMERS)
tional clear top. To slide the vinyl sides (portion above side gate) out of the way, squeeze the (2) two tabs
WHEEL LOCKS: All models come with (4) four casters; 2 swivel and 2 braking. Operate the brakes by pressing down on the lever
attached to the caster. To release, press opposite side of the brake lever.
: The upper portion of the Klimer crib comes with clear vinyl extensions and an op-
CRIB MAINTENANCE
Your NK crib is designed to give you many years of trouble free operation with a minimal amount of service. However, an annual
inspection is recommended just to ensure everything is functioning properly.
LUBRICATION: All working parts on your NK MEDICAL crib were well lubricated before leaving the factory. Every year or so, dependent upon usage, some parts may require additional lubrication. The 5” inch casters (3” on neonatal units) may require 5 – 6
drops of #10 spindle or equivalent oil and the crank mechanism may require some axle grease applied sparingly to the screw gear.
Should the side gates require lubrication, use a light spray of silicon lubricant.
CLEANING: Your chrome plated or powder coated crib will stand up to most industrial cleaners. However, care must be taken with
the vinyl top. Avoid use of strong detergents or solvents. Use of mild soap and water will keep the vinyl looking new for many years
to come.
NK Medical Products, Inc.
Page 1 Rev 2 / 2009
Page 2

ANNUAL CRIB MAINTENANCE
⇒ Check to ensure that crib is free from tape and adhesives (especially on slide rods)
⇒ Check to ensure that deck handles are fully functional and handles are secure
⇒ Check to ensure that crib end caps are covering top corners, corner locks are screwed tight, casters
are secure, swivel and roll smoothly
⇒ Check to ensure that crib side gates operate smoothly; safety lock blocks (each end of top horizontal
square tube) are secure and offsets are pointing up; white slide rod guides (top and bottom of each
horizontal tube) are secure; handle assembly is secure and can only be squeezed when gate is lifted
for raising or lowering
FOR CRIBS SHIPPED FACTORY ASSEMBLED:
TEST each of the operational items before putting the crib into service:
A) Side Gates
A1) Locking mechanism and lock positions
A2) Operates smoothly
A3) Adjust securing screws at the center and top of the slide rod for smooth opera-
tion of side gates.
B) Vinyl Panels (if applicable)
B1) Locking mechanism and lock positions.
B2) Secured to corner.
C) Crank mechanism should turn smoothly (gatch deck cribs)
C1) Backrest panel should move freely.
C2) Leg rest panel should move freely.
C3) Manual leg rest support should be attached.
D) Casters
D1) Check the swivel feature.
D2) Check the side brake
IMPORTANT: If at any time you have questions or concerns about the safe operation of your NK crib, take unit OUT OF SERVICE and immediately contact
NK Medical Products for service instructions.
NK Medical Products, Inc.
Page 2 Rev 2 / 2009
Page 3
PACKAGING
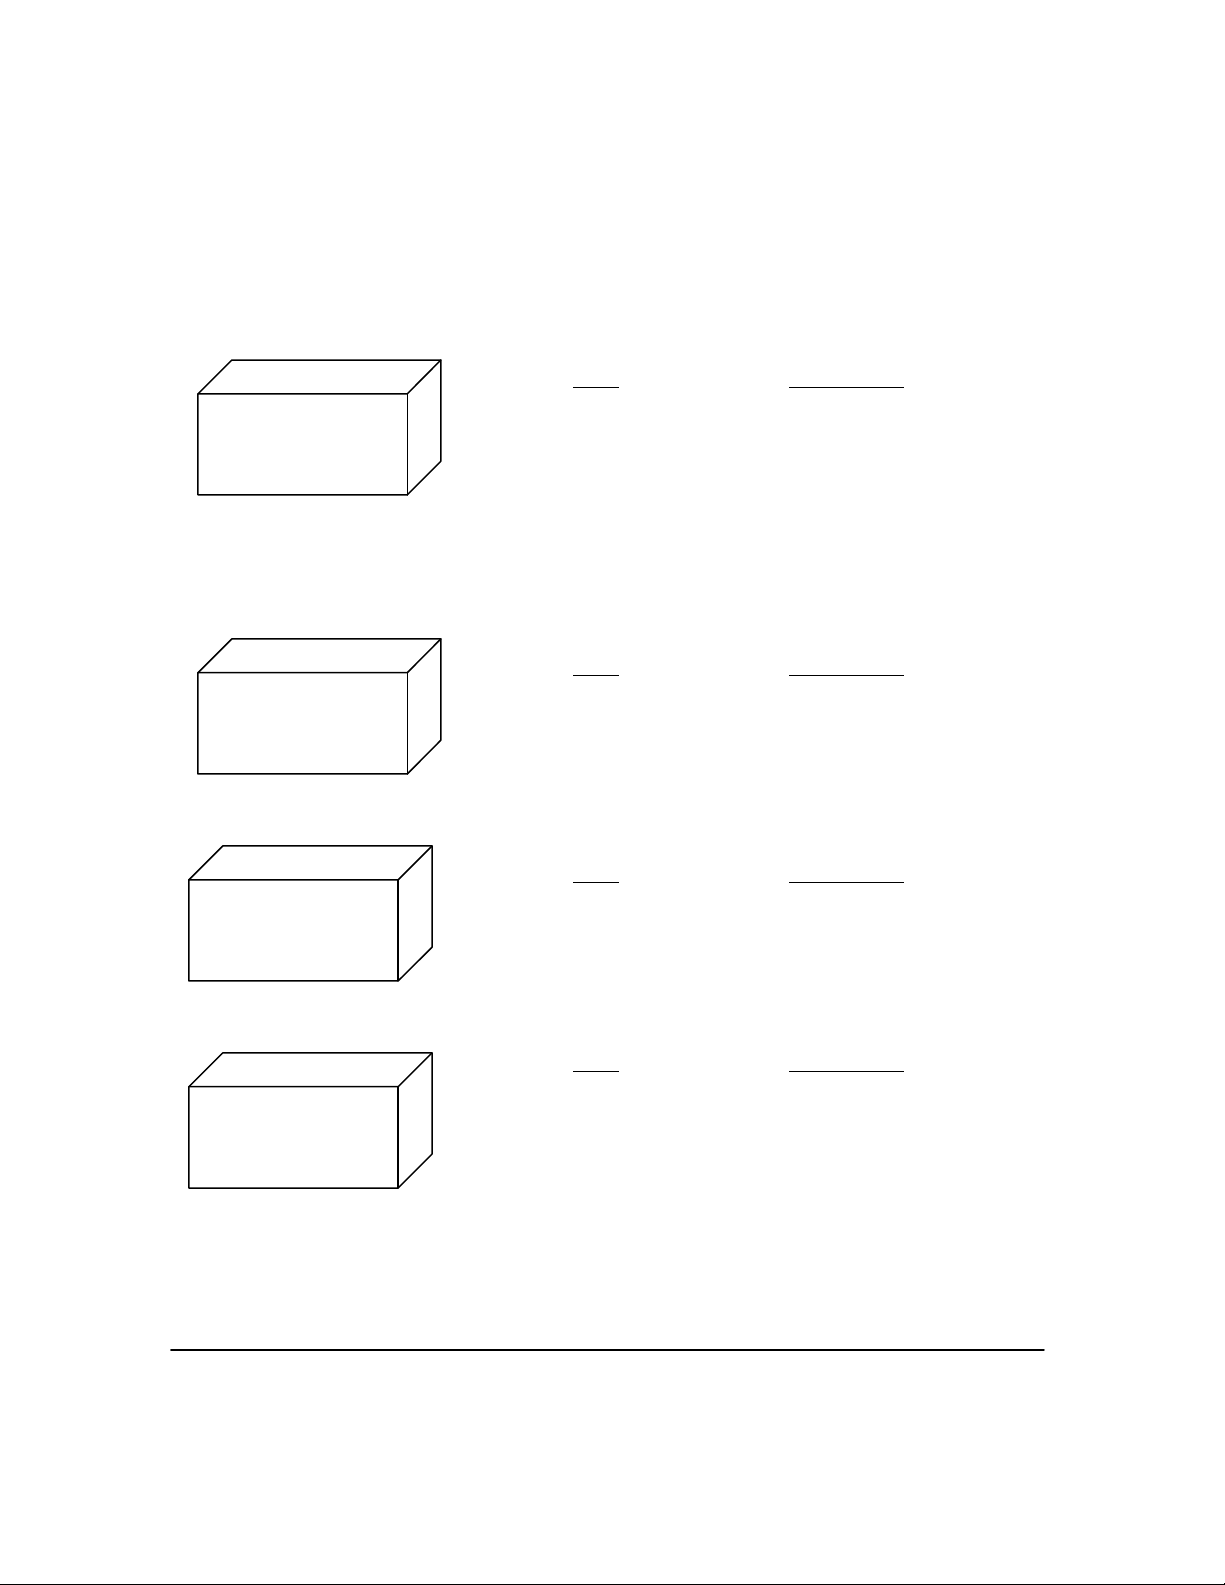
The basic unassembled crib without a mattress and accessories is shipped in three (3) cartons.*
The contents of each carton is listed below. For knocked down cribs, some assembly is required.
Optional accessories would ship in Box 4.
Contents of Box 1
Pieces Item Description
BOX 1
BOX 2
BOX 3
2 End Frames
1 Assembly Hardware Kit Consisting of
slide rod rubber bushings
and washers
1 Assembly Manual & Warranty Card
1 Assembly hardware kit consisting of
(4) slide rod springs, washers (8), cast
ers (4), 2 swivel, 2 braking
4 Vinyl Panels (for Klimer cribs only)
Contents of Box 2
Pieces Item Description
1 Crib Sleeping Surface
Contents of Box 3
Pieces Item Description
2 Crib Side Gates
Contents of Box 4
Pieces Item Description
1 Under Crib Storage Bin
BOX 4
1 Mattress
*Assembled cribs ship in one (1) carton.
NK Medical Products, Inc.
Page 3 Rev 2 / 2009
Page 4
GENERAL INFORMATION
♦ The assembly of a crib will require two people.
♦ The exterior of the crib is protected with one of three corrosion resistant finishes. Available finishes are: Powder Coated Epoxy
(Prefix E), Chrome (Prefix C) and Stainless Steel (Prefix S)
♦ Complete and return the product warranty card to NK Medical Products, Inc. Include the serial number which is located at the foot
of the crib.
♦ The illustrations and instructions in this manual encompass the Klimer Crib Assembly. If you have purchased a standard crib, follow
the same instructions EXCEPT skip Step #4 for the curtain assembly.
TOOLS REQUIRED
⇒ Rubber headed mallet (2 pound size)
⇒ Phillips Head screwdriver (medium size)
⇒ Hexagon key wrench (7/64”)
ASSEMBLY INSTRUCTIONS
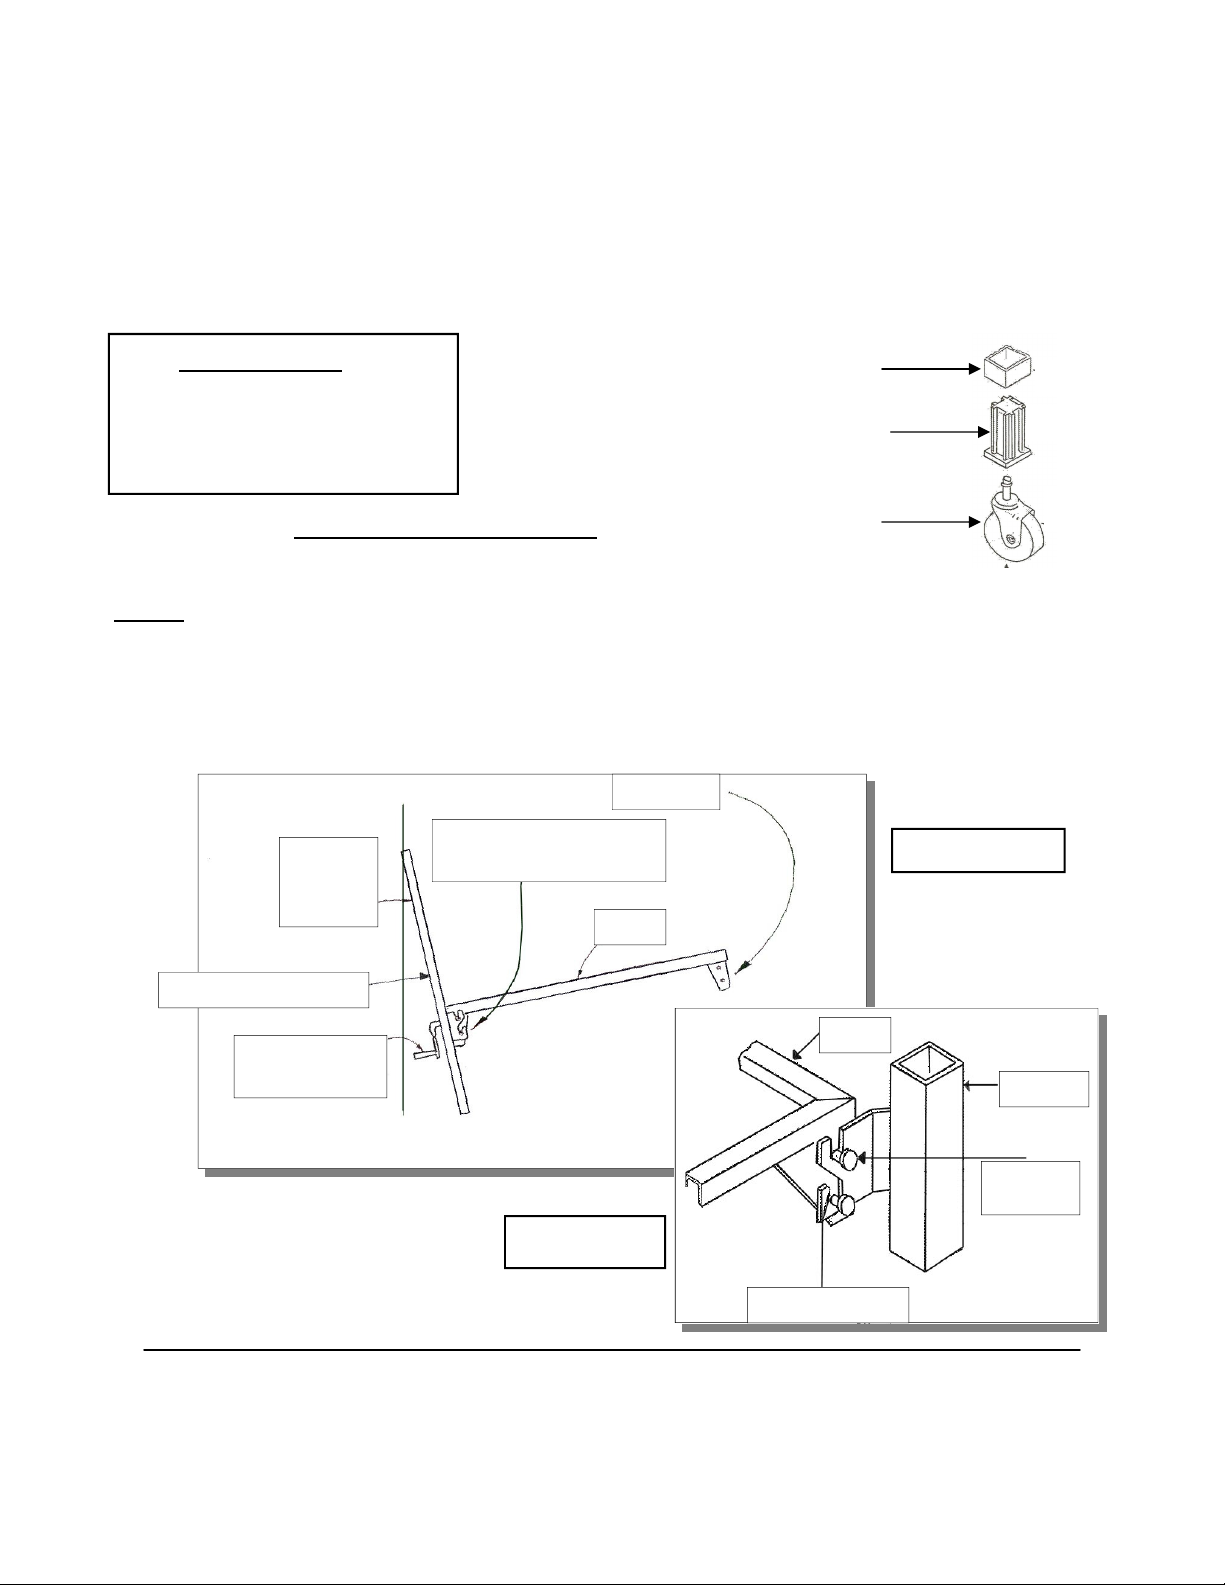
End Post
Caster
Socket
5” Caster
Step #1 Carefully unpack crib and use parts list to identify all crib components. Insert crib casters stems into crib end sockets
(brake casters in right leg and swivels in left leg) Engage locking caster. Lean end with the serial number facing out at
a slight angle. Two persons will pick up the deck and slip into lock pins and taper lock slot. Once the pins are in,
slightly tap down with the rubber head mallet to secure the pin location. Refer to Figure #1.
Head End
End Frame
Foot End
Lock Pins & Taper Lock
Slot (See Fig #2)
Deck
Figure #1
Serial # Facing Out
Deck
Crank Handles
(Gatch Deck Option)
Corner Lock
Figure #2
Taper Lock Slots
NK Medical Products, Inc.
Page 4 Rev 2 / 2009
End Frame
Pins
Page 5
ASSEMBLY INSTRUCTIONS (Cont.)
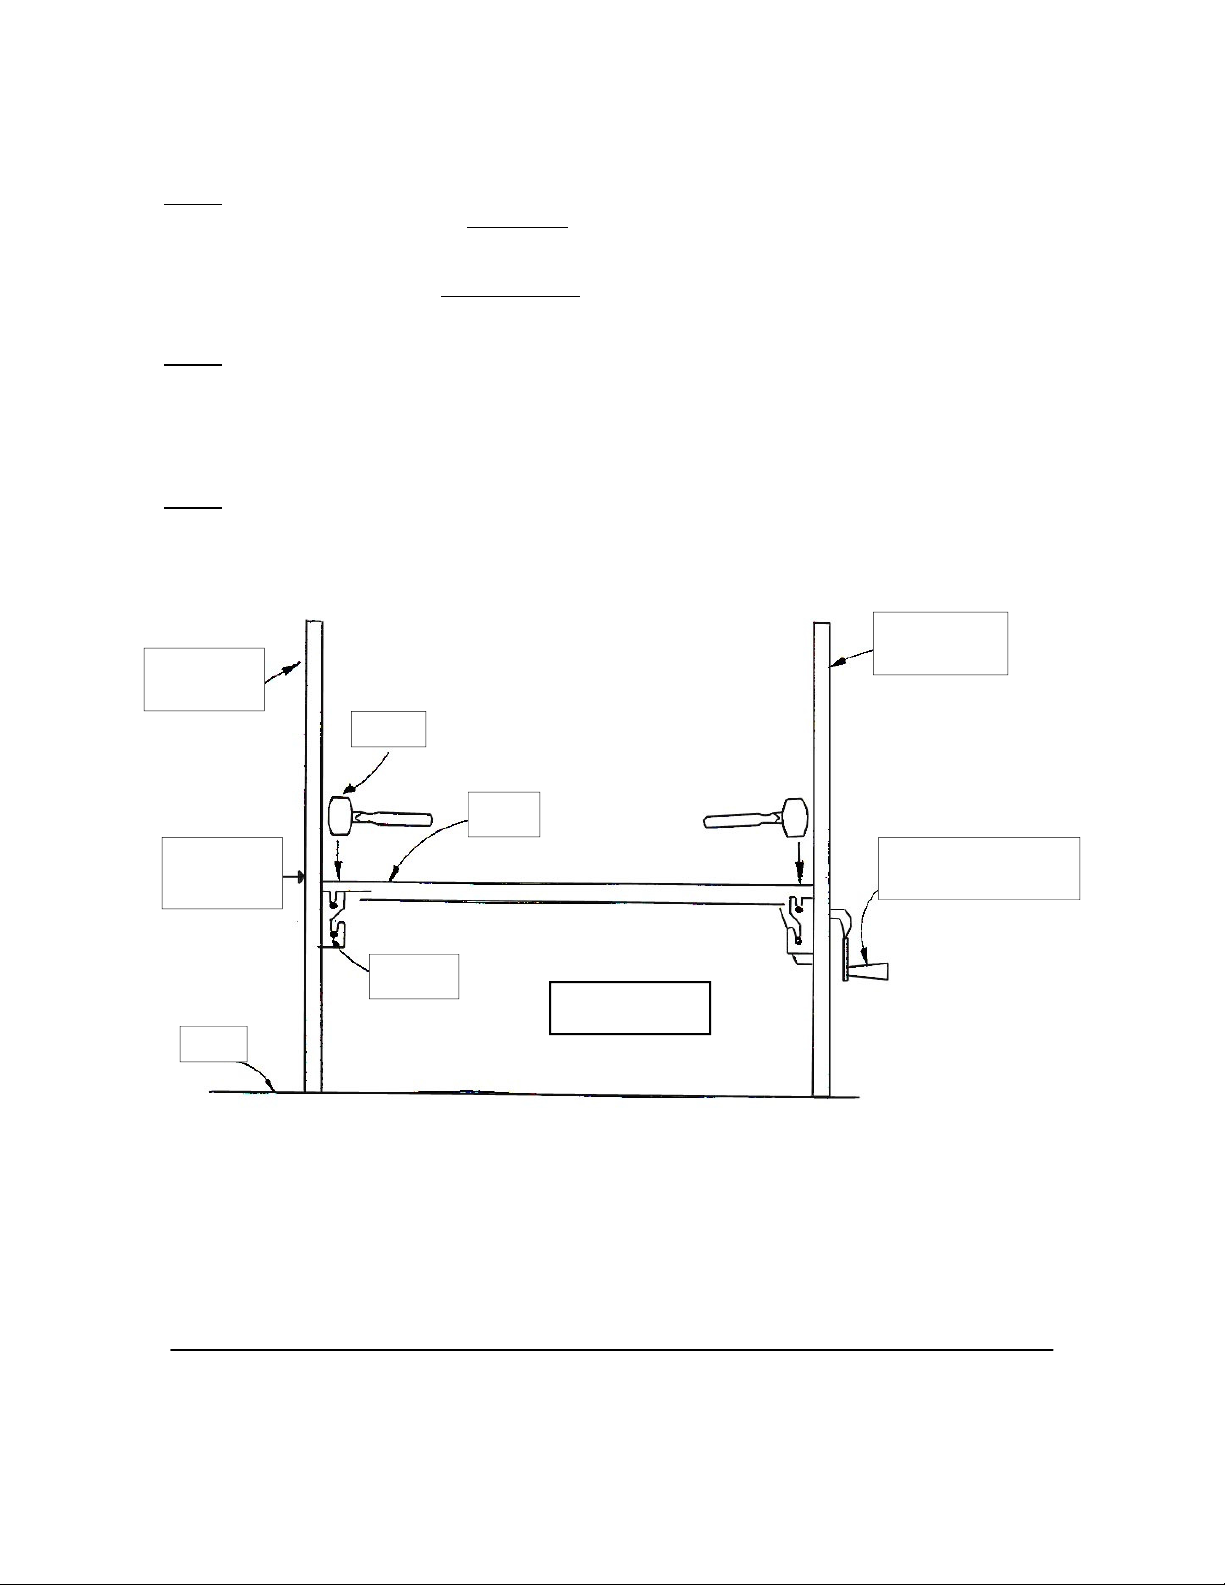
Step #2 Repeat Step #1 with regard to the lock pins and taper lock slot for the opposite end. This will be the
head end of the crib. IMPORTANT: You will now have the crank end (on the gatch deck option) at the
foot end of the crib. Make sure all lock pins are secure in the taper lock slots. Use the rubber mallet to
drive the lock pins into the taper lock slots. Hit the mallet on each corner of the gatch directly above the
pins. At least two heavy mallet blows will be required to lock the pins into the taper lock slots. The crib
assembly now looks like Figure #3.
Working one side at a time, insert the slide tube (squared end first) through the top end of side gate.
Step #3
Squeeze side gate handle and position gate at lowest holes in slide tube. Install washer (concave
down), rubber bushing, washer (concave up) over squared bottom end of slide rod and insert into bottom guide brackets. Temporarily engage top of slide rod into top end bracket. Check to insure side
gate handles are facing out. Repeat this step for the second side.
Step #4 To install side curtains on Klimer cribs follow this step on both sides of crib. Slide bottom tube of top
side assembly over the top of slide rods, followed by curtain straps and finish by snapping top “C” channel over top of slide rods. Pull “C” channel down and push in to lock full crib side assembly under and
into the Top End Guide Brackets.
End Frame
End Frame
Head End
Foot End
NK Label
Facing Out
Floor
Mallet
Deck
Crank Handles
(Gatch Deck Option)
Lock Pins
Figure #3
NK Medical Products, Inc.
Page 5 Rev 2 / 2009
Page 6

ASSEMBLY INSTRUCTIONS (Cont.)
Step #5 For cribs with optional vinyl Klimer top (Model C19, C20 or C21): Cut and place a piece of cardboard
across the top of the crib. Unroll vinyl top, slide end channels through end vinyl fold and place assembly on top of crib with “C” channel opening upward. Insert 1/4-20 x 1-1/4” Phillips round head
screws through “C” channels, top end bracket and loosely screw into top of slide rods. Remove cardboard.
Step #6
Step #7
Finish crib assembly by loosely attaching center of Klimer crib slide rods using screw and acorn nuts
to Center Guide Bracket. Then tightly secure top of slide rods with screws and washers to Top End
Bracket. Follow by tightening screws and acorn nut at center bracket. Finish by tightening all screws
on crib.
TEST each of the operational items before putting the crib into service:
A) Side Gates
A1) Locking mechanism and lock positions
A2) Operates smoothly.
A3) Adjust securing screws at the center and top of the slide rod for smooth operation
of side gates.
B) Vinyl Panels on Klimer Cribs (if applicable)
B1) Locking mechanism and lock positions.
B2) Secured to corner.
C) Crank mechanism should turn smoothly (gatch deck cribs)
C1) Backrest panel should move freely.
C2) Leg rest panel should move freely.
C3) Manual leg rest support should be attached.
D) Casters
D1) Check the swivel feature.
D2) Check the side brake
IMPORTANT: If at any time you have questions or concerns about the safe operation of your NK crib, take unit OUT OF SERVICE and immediately contact NK
Medical Products for service instructions.
NK Medical Products, Inc.
Page 6 Rev 2 / 2009
Page 7
ASSEMBLY INSTRUCTIONS (Cont.)
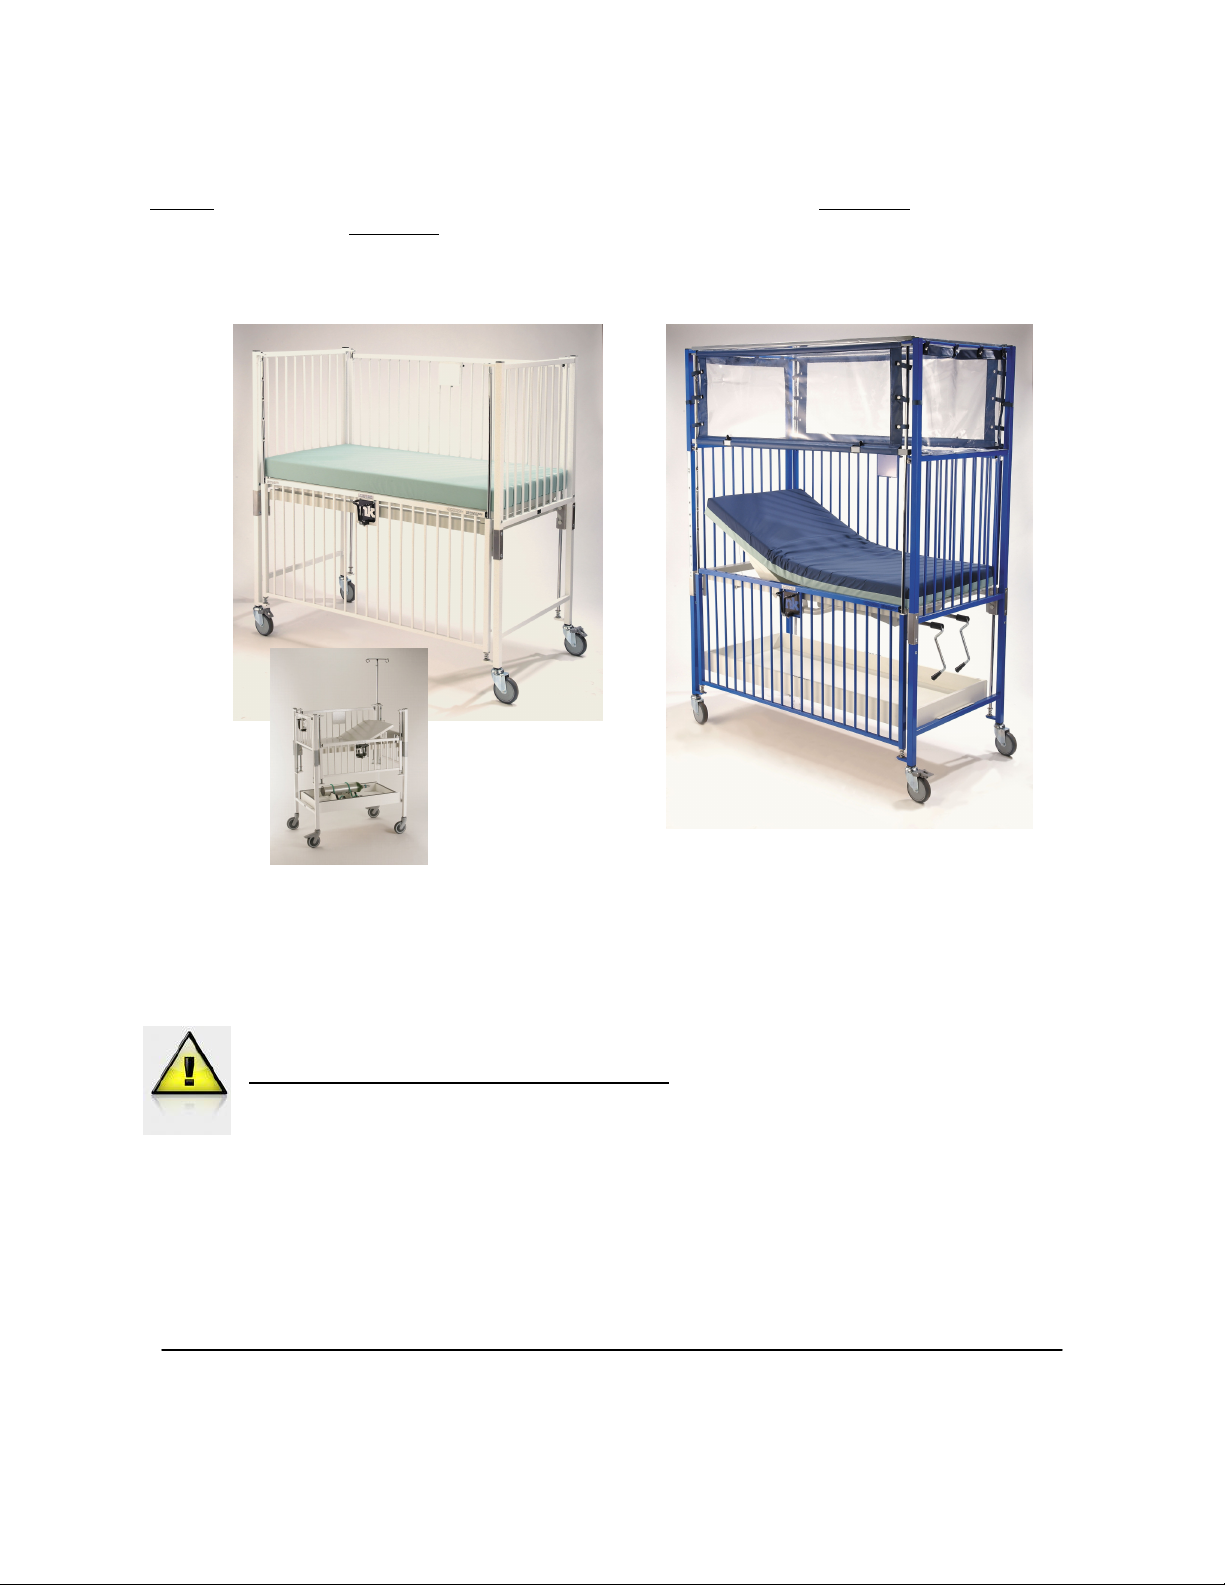
Step #8 The crib is now completely assembled. Your crib should look like Diagram A if it’s a standard
crib or Diagram B if it’s a Klimer crib.
Diagram A Diagram B
Congratulations!!
With the addition of bedding materials, your crib is now ready for service. Facilities personnel of your local
NK representative can now review the operation of the crib with your staff.
Sanitize Prior to Placing Poduct into Service. Although products are cleaned prior to ship-
ment, we recommend sterilization prior to usage. See Page 1 for cleaning instructions.
NK Medical Products, Inc.
Page 7 Rev 2 / 2009
Page 8
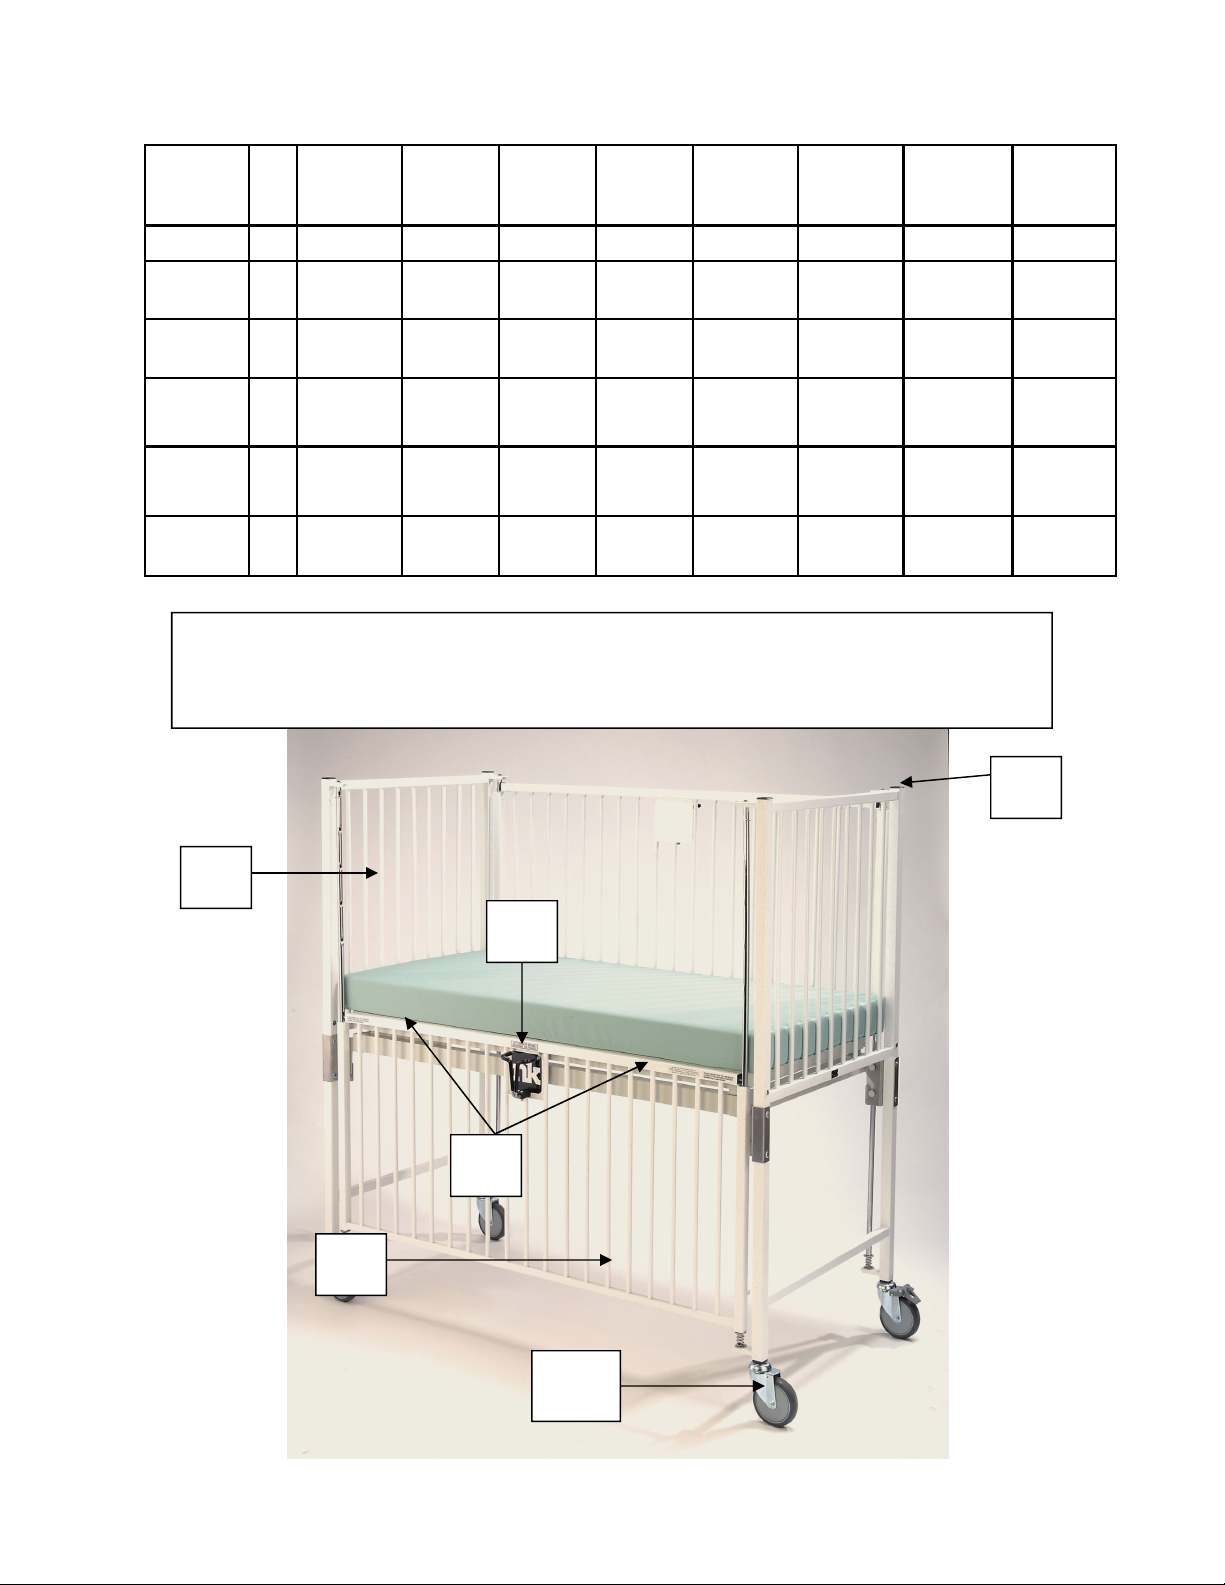
STANDARD CRIB MAJOR PARTS LIST
Description Dia-
Crib Side * 1 NK1965 NK1065 NK1068 NK1069 NK1065 NK1068 NK1069
Crib End * 2 NK1165 NK1123 NK1123 NK1126 NK1073/1136 NK1073/1136 NK1106/1138
Caster Set 3 8780 (3”) 908565 (5”) 908565 (5”) 908565 (5”) 908565 (5”) 908565 (5”) 908565 (5”)
Handle
Assembly
Squeeze
Assembly
Black End
Caps
Model E1965
gram
(24”x36”)
#
4 HA1000 HA1000 HA1000 HA1000 HA1000 HA1000 HA1000
5 SA1051-2 SA1051-3 SA1051-4 SA1051-5 SA1051-3 SA1051-4 SA1051-5
6 SQR1-1/414x2 SQR1-
Model 1980
(30”x44”)
1/414x2
Model 1981
(30”x60”)
SQR1-
1/414x2
Model 1983
(36”x72”)
SQR1-
1/414x2
Model 2065
(24”x36” ICU)
NK1965
NK2026/2027
8780 (3”)
HA1000
SA1051-2
SQR1-1/414x2
Model 2080
(30”x44” ICU)
SQR1-1/414x2 SQR1-1/414x2 SQR1-1/414x2
Model 2081
(30”x60” ICU)
Model 2083
(36”x72” ICU)
* When ordering crib sides or ends, please specify finish by adding suffix of “E” for Epoxy Confetti
or “C” for Chrome. For example, NK1068-E for Confetti Finish crib side for Model 1981 Crib
2
6
4
5
1
NK Medical Products, Inc.
10123 Main Street, Clarence, NY 14031 P: 716.759.7200 F: 716.759.0700
Toll Free: 800.274.2742 Email: info@nkmedicalproducts.com
Page 8 Rev 2 / 2009
3
www.nkmedicalproducts.com
Page 9
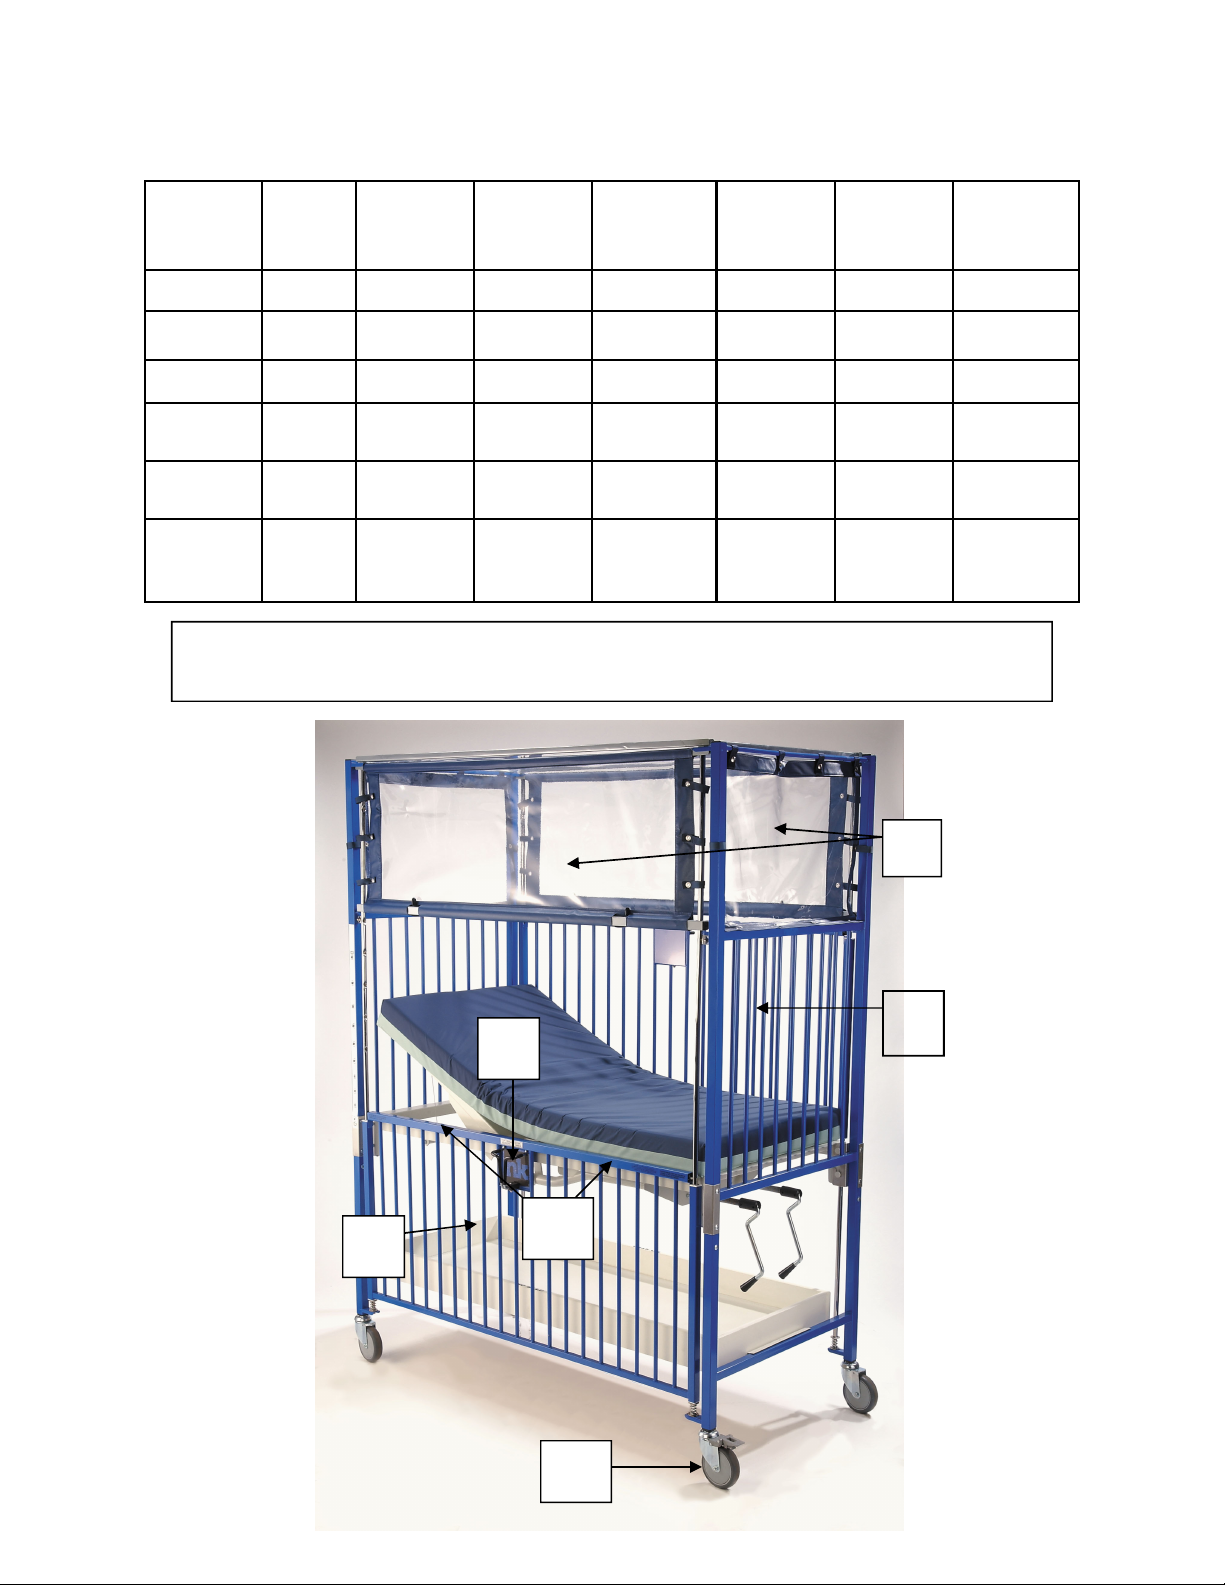
KLIMER CRIB MAJOR PARTS LIST
Description Diagram # Model 1972
(30”x44”)
Crib Side * 1 NK1065 NK1068 NK1069 NK1065 NK1068 NK1069
Crib End * 2 NK2202 NK2202 NK2115 NK2202 NK1073 NK1106
Caster Set 3 8780 (3”) 908565 (5”) 908565 (5”) 908565 (5”) 908565 (5”) 908565 (5”)
Handle
Assembly
Squeeze
Assembly
Vinyl Sides/
Ends (Kit)
4 HA1000 HA1000 HA1000 HA1000 HA1000 HA1000
5 SA1051-2 SA1051-3 SA1051-4 SA1051-2 SA1051-3 SA1051-4
6
NK90011-3N/
NK90011-6N
Model 1982
(30”x60”)
NK90011-4N/
NK90011-6N
Model 1992
(36”x72”)
NK90011-12N/
NK90011-11N
Model 2072
(30”x44” ICU)
NK90011-3N/
NK90011-6N
Model 2082
(30”x60” ICU)
NK90011-4N/
NK90011-1N
Model 2092
(36”x72” ICU)
NK90011-12N/
NK90011-11N
* When ordering crib sides or ends, please specify finish by adding suffix of “E” for Epoxy Confetti
or “C” for Chrome. For example, NK1068-E for Confetti Finish crib side for Model 1982 Crib
6
2
4
5
1
NK Medical Products, Inc.
10123 Main Street, Clarence, NY 14031 P: 716.759.7200 F: 716.759.0700
Toll Free: 800.274.2742 Email: info@nkmedicalproducts.com
Page 9 Rev 2 / 2009
www.nkmedicalproducts.com
3
 Loading...