

Njoy UPCMTLS665TCAAZ01B, UPCMTLS685TCAAZ01B, UPCMTLS610HCAAZ01B, UPCMTLS615HCAAZ01B, UPCMTLS620HCAAZ01B User guide
...Page 1
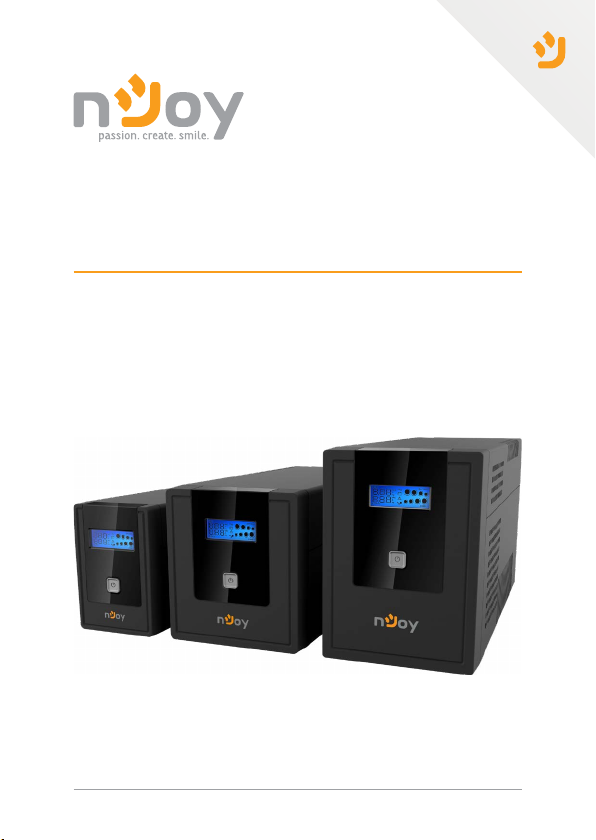
Cadu Series User Manual
UPCMTLS665TCAAZ01B
UPCMTLS685TCAAZ01B
UPCMTLS610HCAAZ01B
UPCMTLS615HCAAZ01B
UPCMTLS620HCAAZ01B
Before using this product, carefully read all product documentaon and retain it for future reference.
Manual de ulizare
627.10.23.0
Page 2

Thank you for purchasing our products!
Please read this manual before using the product.
nJoy is a brand of power and backup protecon products that create
soluons for mulple levels of environment complexity, residenal
This UPS will protect your electronic equipment from physical
damage and will provide emergency baery backup power to
prevent data loss in the event of power problems.
The following models belong to the Cadu Series UPS:
to industrial
600 VA
800 VA
1000 VA
1500 VA
2000 VA
2
Cadu 650
Cadu 850
Cadu 1000
Cadu 1500
Cadu 2000
Page 3
Package contents
1
UPS unit
Power cord
USB cable
Product overview
2
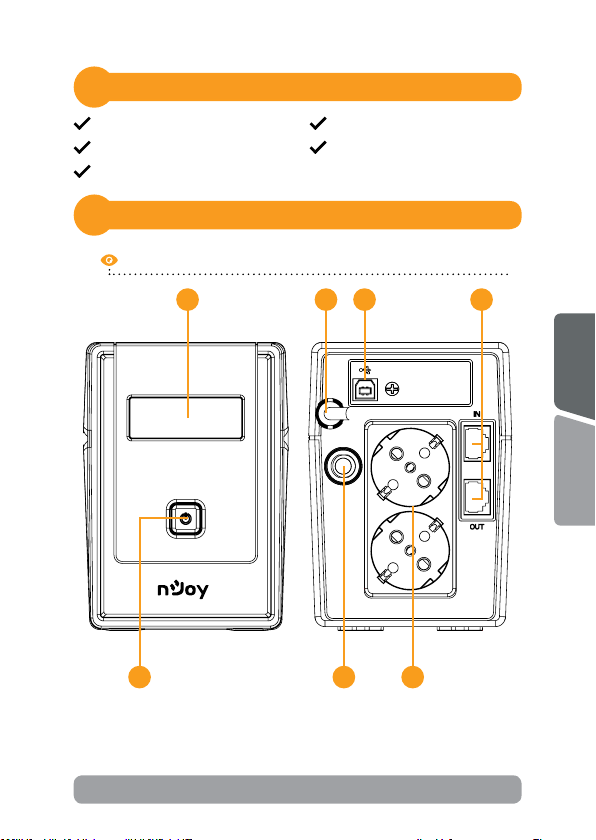
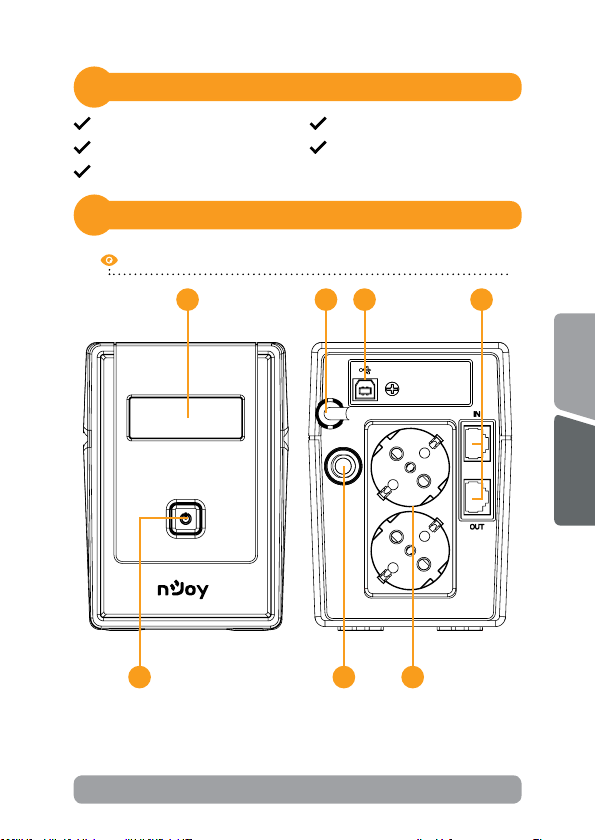
Cadu 650/850 - Front view / Back view
2 76
User manual
Warranty card
431
5
English
Romana
NOTE!
Before installaon, please inspect the unit. Be sure that nothing inside the
package is damaged. Keep the original package in a safe place for future use.
3
Page 4
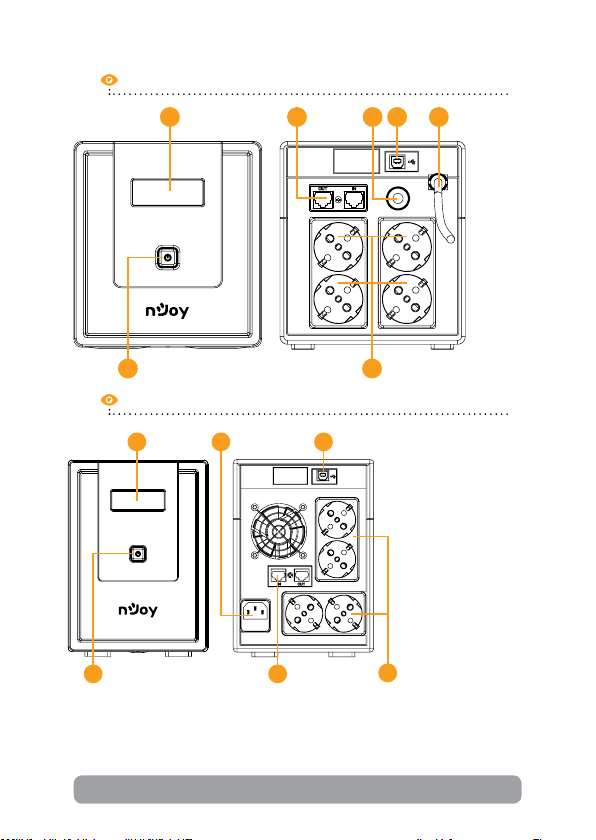
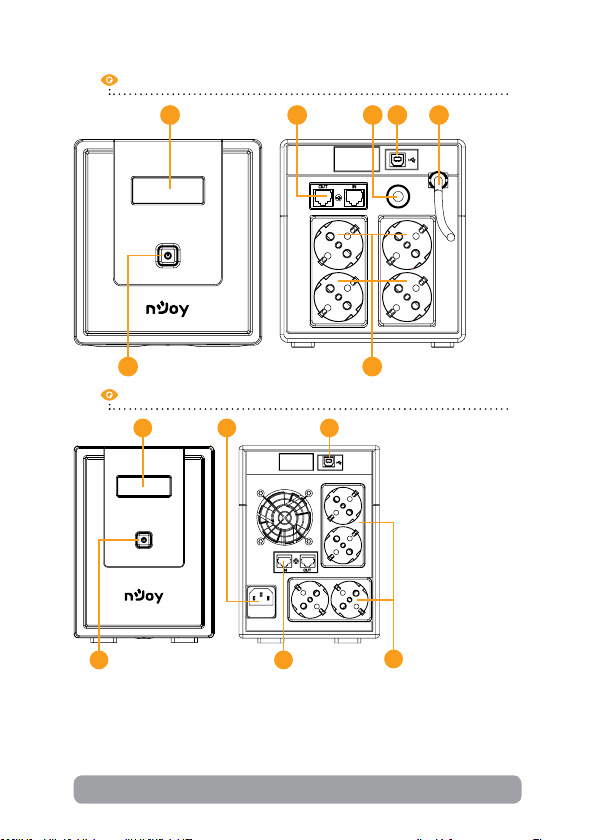
Cadu 1000 - Front view / Back view
1
2
5
446 3
7
Cadu 1500/2000 - Front view / Back view
1
2 5
1. LCD display: Indicate status informaon, sengs and events. It
auto-dims to 20% brightness aer 20 seconds in normal condions.
It brightens up when power buon is shortly pressed or when
abnormal condion occurs ( Baery mode, Fault & Alarm).
3
7
4
Page 5

2. Power on/o buon: Short press Power buon for LCD brighten,
long press Power buon to turn the UPS ON or OFF. Shortly double
press this buon to mute all alarms. To reacvate the alarms repeat
the acon. (feature implemented only aer April 2023).
3. Input power cord: Connect to ulity power.
4. HID USB port: Allows the UPS to appear in Windows like a baery
icon. When the power is out, you can sll see the baery level and
adjust its sengs. Also Windows power management opons are
available. In case you need more advanced local management we
recommend you to install and use “ViewPower” soware.
5. 1Gb/s Network, Modem or Phone surge protecon
6. Input circuit breaker: This provides opmal overload protecon.
7. AC outlet: The UPS provides outlets for connected equipment to
insure temporary uninterrupted operaon during a power failure
and against surges and spikes.
Important safety warnings
3
Please comply with all warnings and operang instrucons in this manual
strictly. Save this manual properly and carefully read the following
instrucons before installing the unit. Do not operate this unit before
reading through all safety informaon and operang instrucons carefully:
Transportaon
• Please transport the UPS system only in the original package to
protect against shock and impact.
Preparaon
• Condensaon may occur if the UPS system is moved directly from cold
to warm environment. The UPS system must be absolutely dry before
being installed. Please allow at least two hours for the UPS system to
acclimate to the environment.
• Do not install the UPS system near water or in moist environments.
• Do not install the UPS system where it would be exposed to direct
sunlight or near heat sources.
• Do not block venlaon holes in the UPS housing.
English
Romana
5
Page 6

Installaon
• Do not connect appliances or devices which would overload the UPS
system (e.g. laser printers) to the UPS output sockets.
• Place cables in such a way that no one can step on or trip over them.
• Do not connect domesc appliances such as hair dryers to UPS output
sockets.
• The UPS can be operated by any individuals with no previous
experience.
• Connect the UPS system only to an earthed shockproof outlet which
must be easily accessible and close to the UPS system.
• Please use only VDE-tested, CE-marked mains cable (e.g. the mains
cable of your computer) to connect the UPS system to the building
wiring outlet (shockproof outlet).
• Please use only VDE-tested, CE-marked power cables to connect the
loads to the UPS system.
• When installing the equipment, it should ensure that the sum of
the leakage current of the UPS and the connected devices does not
exceed 3.5mA.
Operaon
• Do not disconnect the mains cable on the UPS system or the building
wiring outlet (shockproof socket outlet) during operaons since this
would cancel the protecve earthing of the UPS system and of all
connected loads.
• The UPS system features its own, internal current source (baeries).
The UPS output sockets or output terminals block may be electrically
live even if the UPS system is not connected to the building wiring
outlet.
• In order to fully disconnect the UPS system, rst press the OFF/Enter
buon to disconnect the mains.
• Prevent uids or other foreign objects from entering the inside of the
UPS system.
• WARNING: This is a category C2 UPS product. In a residenal
environment, this product may cause radio interference, in which case
the user may be required to take addional measures.
6
Page 7

Maintenance, service and faults
• The UPS system operates with hazardous voltages. Repairs may be
carried out only by qualied maintenance personnel.
• Cauon - risk of electric shock. Even aer the unit is disconnected
from the mains (building wiring outlet), components inside the UPS
system are sll connected to the baery and electrically live and
dangerous.
• Before carrying out any kind of service and/or maintenance,
disconnect the baeries and verify that no current is present and no
hazardous voltage exists in the terminals of high capability capacitor
such as BUS-capacitors.
• Only persons are adequately familiar with baeries and with the
required precauonary measures may replace baeries and supervise
operaons. Unauthorized persons must be kept well away from the
baeries.
• Cauon - risk of electric shock. The baery circuit is not isolated
from the input voltage. Hazardous voltages may occur between the
baery terminals and the ground. Before touching, please verify that
no voltage is present!
• Baeries may cause electric shock and have a high short-circuit
current. Please take the precauonary measures specied in this
manual and any other measures necessary when working with
baeries: remove wristwatches, rings and other metal objects, use
only tools with insulated grips and handles.
• When changing baeries, install the same number and same type of
baeries.
• Do not aempt to dispose of baeries by burning them. This could
cause baery explosion.
• Do not open or destroy baeries. Escaping electrolyte can cause injury
to the skin and eyes. It may be toxic.
• Please replace the fuse only with the same type and amperage in order
to avoid re hazards.
• Do not dismantle the UPS system.
English
Romana
7
Page 8
Installing your UPS system
4
4.1 Hardware installaon guide
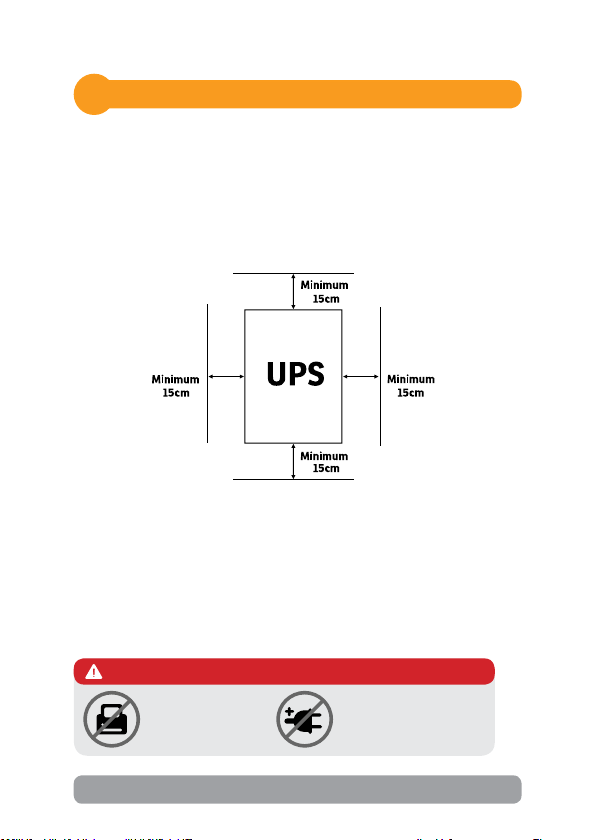
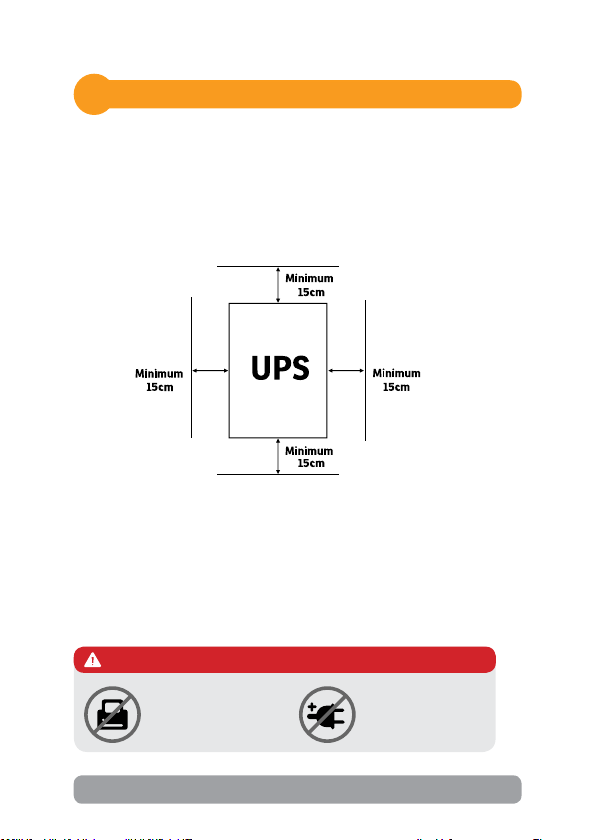
1. Placement & Storage condions
Install the UPS in a protected area that is free of excessive dust and
has adequate air ow. Please place the UPS away from other units at
least 15 cm to avoid interference. Do NOT operate the UPS where the
temperature and humidity is outside the specic limits. (Please check the
specs for the limitaons.)
2. Connect to ulity and charging
Plug in the AC input cord to the wall outlet. For the best results, suggest
to charge the baery at least 6 hours before inial use. The unit charges
its baery while connecng to the ulity.
3. Connect the loads
Plug in the loads to output receptacles on the rear panel of the UPS.
Simply turn on the power switch of UPS unit, then devices connected to
the UPS will be protected by UPS unit.
CAUTION
Do NOT plug LASER
PRINTERS into any of
the outlets.
Do NOT plug any SURGE
STRIPS into any of the
outlets.
8
Page 9
4. Connect communicaon cable
To allow for unaended UPS shutdown/start up and status monitoring,
connect the communicaon cable one end to the USB port and the other
to the communicaon port of your PC. With the monitoring soware
installed, you can schedule UPS shutdown/start up and monitor UPS
status through PC.
5. Connect Modem/Phone /Network for surge protecon
Connect a single modem/phone line into surge protected “IN” outlet
on the back panel of the UPS unit. Connect from “OUT” out let to the
computer with phone line cable.
6. Turn On/O the unit
Turn on the UPS unit by pressing the power switch. Turn o the UPS unit
by pressing again the power switch.
4.2 Soware installaon guide
Install soware: For opmal computer system protecon, install the UPS
monitoring soware from hps://www.power-soware-download.com/
viewpower.html to fully manage the UPS.
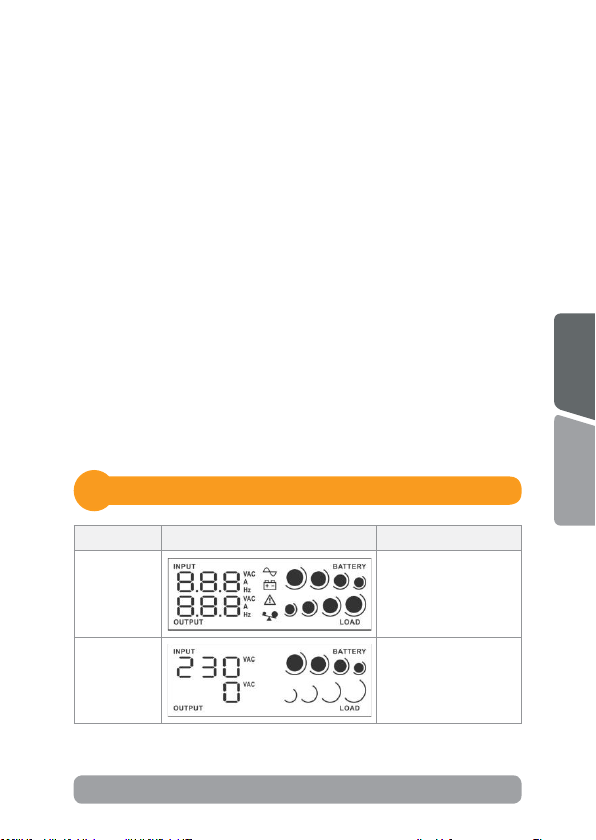
LCD display indicators
5
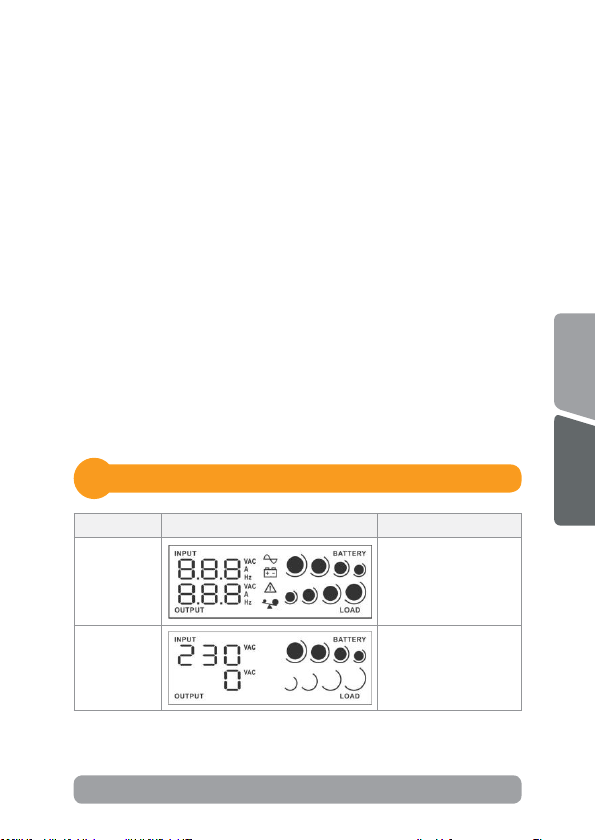
UPS Mode LCD display Descripon
UPS Power
on
Standby
Mode
When UPS is powered
on, it will enter this
mode for few seconds.
In standby mode,
no output power is
available.
9
English
Romana
Page 10
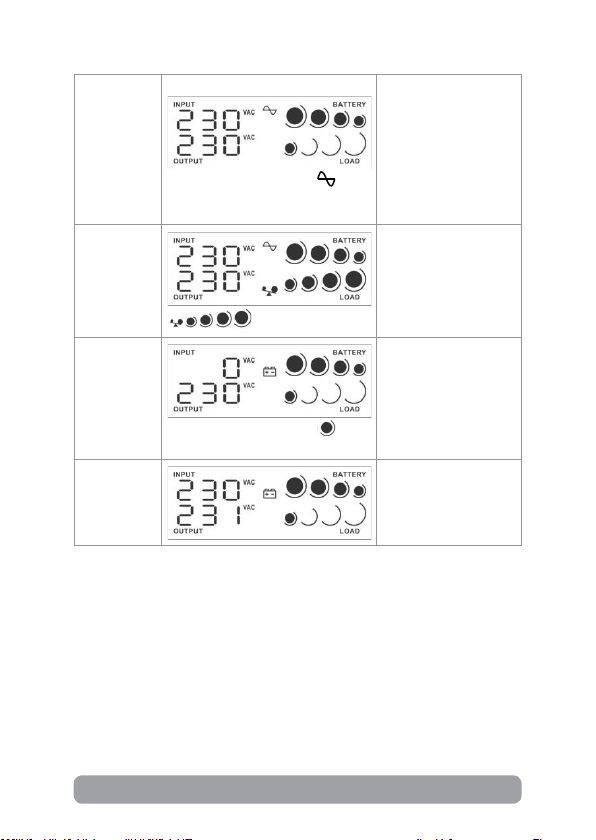
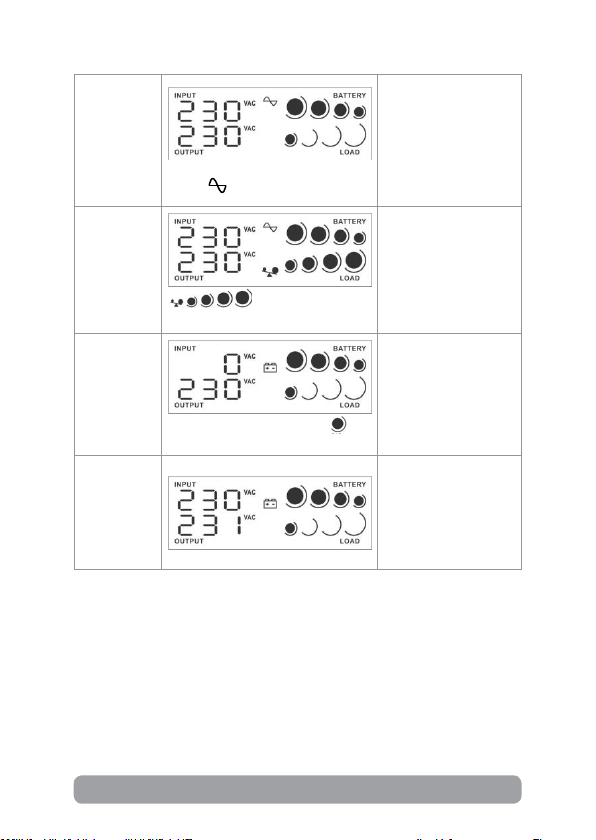
AC Mode
When AVR is funconing, icon
will ash every second.
When the input
voltage is within
acceptable range, UPS
will provide stable AC
power to output. The
UPS will also charge
the baeries in AC
mode.
Overload in
AC mode
Baery
Mode
Self-Test
Mode
10
Icons will ash.
When baery level is low, icon
will ash every second .
When overload occurs,
alarm will beep every
0.5 second.
Alarm will beep every
10 seconds.
This funcon is only
acvated via soware
for the model with
communicaon port.
Page 11
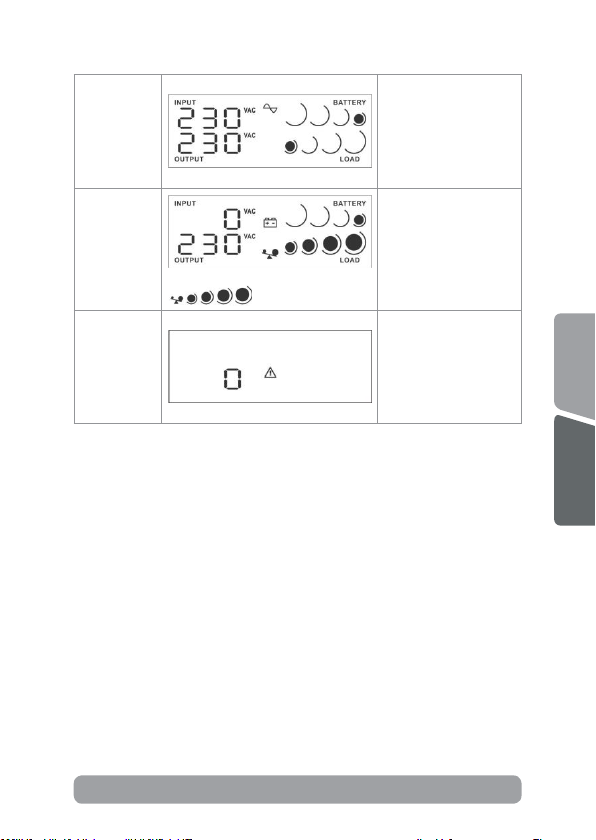
Baery
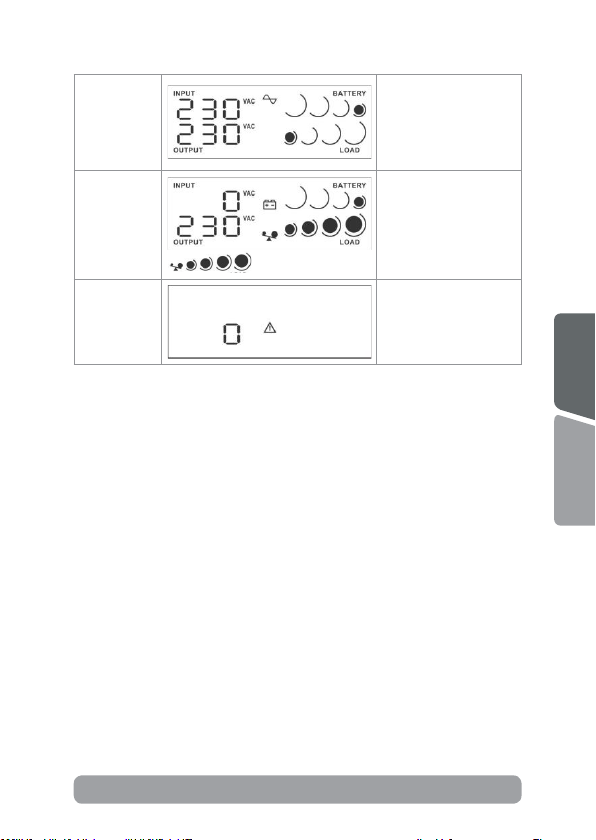
replacement
alarm
Alarm will beep every
2 seconds. Only
available for the model
with communicaon
funcon.
Overload
in baery
mode
Fault mode
When overload occurs,
alarm will beep every
0.5 second.
Icons will ash.
A fault occurs in
the UPS. Alarm will
connue beeping.
English
Romana
11
Page 12

Troubleshooting6
Problem Possible cause Soluons
Charge the UPS at least 6
hours.
Replace the baery with the
same type of baery.
Press the power switch
again to turn on the UPS.
Remove some loads rst.
Before reconnecng
equipment, please verify
that the load matches the
UPS capability specied in
the specs.
Charge the UPS at least 6
hours.
Replace the baery with the
same type of baery.
Reconnect the power cord
properly.
No LCD
display on the
front panel.
Alarm
connuously
sounds when
the mains is
normal.
When power
fails, back
up me is
shorten.
The mains is
normal, but
the unit is on
baery mode.
Low baery.
Baery fault.
The UPS is not
turned on.
The UPS is overload.
The UPS is overload. Remove some crical load.
Baery voltage is
too low.
Baery defect. It
might be due to
high temperature
operaon
environment, or
improper operaon
to baery.
Power cord is loose.
NOTE!
If any abnormal situaons occur that are not listed above, please call for
service immediately.
12
Page 13
Disposal of Old Electrical & Electronic Equipment
(Applicable in the European Union and other European countries with
separate collecon systems)
This symbol on the product or on its packaging indicates that this product shall not be
treated as household waste.
Instead it shall be handed over to the applicable collecon point for the recycling of
electrical and electronic equipment.
By ensuring this product is disposed of correctly, you will help prevent potenal
negave consequences for the environment and human health, which could otherwise
be caused by inappropriate waste handling of this product.
The recycling of materials will help to conserve natural resources.
13
English
Romana
Page 14

Multumim pentru ca a ales produsele noastre!
Va rugam ci cu atene manualul de ulizare inainte de a
nJoy este un brand de solui UPS dedicate protecei si
rezervei de energie din diferite medii de ulizare, de la
UPS-ul va protejeaza echipamentele electronice de daune zice
si ofera o baterie de rezerva pentru a preveni pierderile de date in
Din seria Cadu fac parte urmatoarele modele:
600 VA
800 VA
1000 VA
1500 VA
2000 VA
pune in funcune acest produs.
rezidenal la industrial.
cazul intreruperilor accidentale ale energiei electrice.
Cadu 650
Cadu 850
Cadu 1000
Cadu 1500
Cadu 2000
14
Page 15
Connutul pachetului
1
Unitatea UPS
Cablu de alimentare
Cablu USB
Prezentarea produsului
2
Cadu 650/850 - Vedere din fata / Vedere din spate
2 76
NOTA!
Inainte de instalare inspecta unitatea. Fi siguri ca nimic din interiorul
pachetului nu este stricat. Tine pachetul original intr-un loc sigur pentru o
ulizare ulterioara.
Manual de utilizare
Certificat de garantie
431
5
15
English
Romana
Page 16
Cadu 1000 - Vedere din fata / Vedere din spate
5
46 31
2
7
Cadu 1500/2000 - Vedere din fata / Vedere din spate
431
2 5
1. Asaj LCD: Indica informai despre stare, setari si evenimente. Reduce
automat luminozitatea la 20% dupa 20 de secunde in condii normale
de funconare. Se lumineaza atunci cand butonul de alimentare este
apasat scurt sau cand apare un eveniment (funconare pe mod baterie
sau avarie).
7
16
Page 17

2. Buton oprit/pornit: Apasa scurt acest buton pentru a acva
ecranul LCD, apasa lung butonul pentru a porni sau opri UPS-ul.
Apasa scurt, de 2 ori consecuv acest buton pentru a dezacva
toate alarmele. Pentru a reacva alarmele sonore, repeta acunea.
(Aceasta opune este valabila pentru modelele produse incepand cu
aprilie 2023).
3. Cablu de alimentare: Conecta-l la retea.
4. Port HID USB: Permite UPS-ului sa apara in Windows ca o baterie.
In momentul intreruperii curentului ai opunea de a vedea nivelul
bateriei, care este incarcarea plus al parametrii. Se pot folosi opunile
din Windows legate de controlul bateriei. Pentru opuni exnse se
recomanda instalarea soware-ului ViewPower.
5. Protece linia de modem/telefon si retea de pana la 1Gb/s.
6. Siguranta pentru curentul de intrare: Siguranta protejeaza in caz de
supraincarcare.
7. Prize AC: UPS-ul are prize pentru conectarea echipamentelor pentru
a asigura funconarea temporara a acestora in cazul unei caderi sau
variai de tensiune.
Averzari de siguranta
3
English
Va rugam sa respecta toate aversmentele si instrucunile de ulizare din
acest manual. Pastra acest manual in mod corespunzator si ci cu atene
urmatoarele instrucuni inainte de instalarea aparatului. Nu folosi aceasta
unitate inainte de a ci toate instrucunile de siguranta si de ulizare cu
atene:
Transport
• Va rugam sa transporta sistemul UPS numai in ambalajul original
pentru a-l proteja impotriva socurilor.
Pregare
• Condensul poate aparea daca sistemul UPS este mutat dintr-un mediu
rece in unul cald. Sistemul UPS trebuie sa e uscat inainte de a
instalat. Va rugam sa aloca cel pun doua ore pentru ca sistemul UPS
sa se aclimazeze cu mediul unde dori sa il instala.
• Nu instala sistemul UPS langa apa sau in medii umede.
17
Romana
Page 18

• Nu instala sistemul UPS acolo unde ar expus la lumina directa a
soarelui sau in apropierea surselor de incalzire.
• Nu bloca oriciile de venlae ale carcasei UPS-ului.
Instalare
• Nu conecta aparate sau dispozive care ar suprasolicita sistemul UPS
(de exemplu: imprimantele laser) la mufele de iesire UPS.
• Instala cablurile in asa fel incat nimeni sa nu calce pe ele.
• Nu conecta aparate de uz casnic, cum ar uscatoare de par la prizele
de iesire UPS.
• UPS-ul poate folosit de orice persoana, fara a necesita nici o
experienta anterioara.
• Conecta sistemul UPS numai la o priza cu impamantare, care trebuie
sa e usor accesibila si aproape de sistemul UPS.
• Va rugam sa folosi numai cabluri de alimentare testate VDE si cu
marcaj CE (de exemplu: cablul de alimentare de la computer) pentru a
conecta sistemul UPS.
• La instalarea echipamentului, trebuie sa va asigura ca totalul
curentului de scurgere al UPS si al dispozivelor conectate nu
depaseste 3,5 mA.
Operare
• Nu deconecta cablul de alimentare de la sistemul UPS sau de la priza
cladirii in mpul ulizarii, deoarece acest lucru ar anula impamantarea
de protece a sistemului UPS si a tuturor sarcinilor conectate.
• Sistemul UPS are propria sursa de curent intern (baterii). Prizele de
iesire sau terminale de iesire pe categorii pot incarcate electric, chiar
daca sistemul UPS nu este conectat la sistemul electric al cladirii.
• Pentru a deconecta complet sistemul UPS, apasa mai intai butonul
OFF/Enter pentru a deconecta sursa de alimentare.
• Nu lasa sa ajunga in interiorul unitai UPS orice obiect strain sau lichide.
• ATENTIE: Acesta este un produs UPS de clasa C2. In mediul casnic, acest
produs poate cauza interferenţe radio, caz cand poate necesar sa se ia
masuri suplimentare.
Intrenere, service si defecte
18
Page 19

• Sistemul UPS funconeaza cu tensiuni periculoase. Reparaile pot
efectuate numai de catre personalul de intrenere calicat.
• Atene - risc de soc electric. Chiar si dupa ce aparatul este deconectat
de la reteaua electrica, componentele din interiorul sistemului UPS
sunt inca conectate la baterie si sunt incarcate electric si periculoase.
• Inainte de a efectua orice fel de service si / sau intrenere, deconecta
bateriile si verica sa nu existe curent sau tensiune periculoasa
in terminalele condensatorului de mare capacitate, cum ar
condensatorul BUS.
• Numai persoanele care sunt familiarizate in mod adecvat cu baterii si
cu masurile de precaue necesare pot inlocui bateriile si supraveghea
operaunile. Persoane neautorizate trebuie sa e nute departe de
baterii sistemului UPS.
• Atene - risc de soc electric. Circuitul bateriei nu este izolat de
tensiunea de intrare. Tensiuni periculoase pot aparea intre bornele
bateriei si pamant. Inainte de a ange, va rugam sa verica ca nu
exista tensiune!
• Bateriile pot provoca soc electric. Va rugam sa lua masurile de
precaue specicate mai jos, precum si orice alte masuri necesare
atunci cand se lucreaza cu bateriile sistemului: da-va jos ceasurile
de mana, inelele si alte obiecte metalice si folosi doar instrumente cu
manere izolate.
• La schimbarea bateriilor, instala acelasi numar si acelasi p de baterii.
• Nu incerca sa distruge bateriile prin arderea lor. Acest lucru poate
cauza explozia bateriilor.
• Nu deschide sau distruge bateriile. Scurgerea electrolilor poate
provoca leziuni la nivelul pielii si ochilor si poate toxic.
• Va rugam sa inlocui siguranta numai cu acelasi p de siguranta si
amperaj pentru a evita pericolele de incendiu.
• Nu dezasambla sistemul UPS.
English
Romana
19
Page 20
Instalarea sistemului de UPS
4
4.1 Ghid de instalare Hardware
1. Condii de depozitare
Instala UPS-ul intr-o zona lipsita de praf si aerisita. Va rugam aseza
UPS-ul la cel pun 15 de cm de alte echipamente pentru a evita orice fel
de interferente. Nu pune in funcune UPS-ul in condii de umiditate si
temperatura ridicate (Consulta specicaile pentru limitari).
2. Conectarea la retea si incarcarea
Conecta cablul de alimentare la priza din perete. Pentru o funconare
fara cusur, incarca bateriile pentru cel pun 6 ore inainte de prima
ulizare. UPS-ul se incarca automat cat este conectat la retea.
3. Conecta echipamentele
Conecta echipamentele la prizele UPS-ului de pe panoul din spate.
Porni UPS-ul de la butonul de ON, iar echipamentele conectate vor
protejate.
ATENTIE
NU conecta
imprimante laser la
nici una din prizele
UPS-ului.
NU conecta alte
ACCESORII CU
PROTECTIE la
niciuna din prize.
20
Page 21
4. Conectare pentru cablul de comunicare USB
Pentru a permite inchiderea si pornirea fara asistenta a UPS-ului plus
monitorizarea lui, conecta cablul de comunicare la portul USB si la PC.
Cu programul de monitorizare instalat se poate verica oricand statusul
UPS-ului si programarea lui.
5. Conectare modem/linie de telefon pentru protece
Conecta o singura linie de telefon/conexiune internet pe care o dori
protejata in priza IN de pe spatele UPS-ului, apoi de la priza OUT conecta
cablul la computer.
6. Opri/porni UPS-ul
Porni UPS-ul apasand butonul de pornire, iar pentru a-l snge apasa
acelasi buton.
4.2 Ghid de instalare Soware
Instala programul de management: pentru o congurare completa a
UPS-ului este recomandata instalarea programului de management de la
urmatorul link hps://www.power-soware-download.com/viewpower.html
Asare ecran LCD
5
Mod UPS Asaj LCD Descriere
Cand UPS-ul porneste
UPS pornit
va intra in aceasta
stare pentru cateva
secunde.
English
Romana
Mod In
Asteptare
In acest mod nu exista
tensiune la prizele
UPS-ului.
21
Page 22
Mod AC
Cand AVR-ul funconeaza,
icoana
va lumina intermitent.
Cand tensiunea de
intrare este in limite
acceptabile UPS-ul va
oferi tensiune, in plaja
de lucru, la prizele de
iesire. UPS-ul incarca
bateriile in acest mod.
Supraincarcare in
mod AC
Mod Baterie
Mod AutoTest
22
intermitent.
Cand bateria e slaba, icoana va
lumina intermitent.
Icoanele vor lumina
Cand apare
supraincarcarea alarma
va suna la ecare 0.5
secunde.
Alarma va suna la
ecare 10 secunde.
Aceasta funce
este acvata doar
prin intermediul
programului pentru
modelul cu port de
comunicare.
Page 23
Aversment
schimbare
baterii
Alarma va suna la
ecare 2 secunde.
Aceasta funce este
disponibila doar pentru
modelul cu funce de
comunicare.
Supraincarcare in
mod baterie
Mod Eroare
intermitent.
Icoanele vor lumina
Cand apare
supraincarcarea alarma
va suna la ecare 0.5
secunde.
Cand apare o eroare
UPS-ul va suna
intermitent.
23
English
Romana
Page 24

Probleme si solutii6
Problema Posibila cauza Solui
Incarca UPS-ul cel pun
6 ore.
Inlocuieste bateriile cu
unele de acelasi fel.
Apasa butonul de pornire.
Deconecta o parte din
echipamente de la prizele
UPS-ului. Asigura-va ca
incarcarea nu depaseste
valoarea acceptata de UPS.
Deconecteaza din
echipamente.
Incarca UPS-ul cel pun
6 ore.
Inlocuieste bateriile cu
unele de acelasi fel.
Conecteaza cablul de
alimentare corect.
Nicio
informae pe
eranul LCD.
Alarma suna
connuu cand
tensiunea
la priza e
normala.
UPS-ul nu mai
e alimentat
de la priza,
perioada de
back-up este
mai scurta.
Tensiunea de
incarcare e
normala dar
UPS-ul e in
modul Baterie.
Baterie slaba.
Eroare la baterie.
UPS-ul nu este
pornit.
UPS-ul este
supraincarcat.
UPS-ul este
supraincarcat.
Voltajul bateriilor
este prea mic.
Defect la
baterie datorata
temperaturilor
ambientale ridicate
sau bateriile nu
funconeaza corect.
Cablul de alimentare
nu e conectat corect.
NOTA!
Daca apar situai iesite din comun care nu sunt in tabelul de mai sus, suna
imediat la service-ul specializat.
24
Page 25
Dezafectarea echipamentelor electrice si electronice vechi
(Se aplica pentru ţarile membre ale Uniunii Europene si pentru alte tari
europene cu sisteme de colectare separata).
Acest simbol aplicat pe produs sau pe ambalajul acestuia indica faptul ca acest produs
nu trebuie tratat ca pe un deseu menajer.
El trebuie predat punctelor de reciclare a echipamentelor electrice si electronice.
Asigurandu-va ca acest produs este dezafectat in mod corect, veţi ajuta la prevenirea
posibilelor consecinte negave asupra mediului si a sanatai umane, care ar putut
surveni daca produsul ar fost dezafectat in mod necorespunzator.
Reciclarea materialelor va ajuta la conservarea resurselor naturale.
25
English
Romana
Page 26

Memo
26
Page 27

Memo
27
Page 28

 Loading...