

Njoy PWUP-LI060H1-AZ01B, PWUP-LI080H1-AZ01B, PWUP-LI100H1-AZ01B, PWUP-LI150H1-AZ01B, PWUP-LI200H1-AZ01B User guide
...Page 1
Horus Plus Series
PWUP-LI060H1-AZ01B
PWUP-LI080H1-AZ01B
PWUP-LI100H1-AZ01B
PWUP-LI150H1-AZ01B
PWUP-LI200H1-AZ01B
User Manual
Bedienungsanleitung
Használati útmutató
Ръководство на потребителя
Korisničko uputstvo
Manual de utilizare
Before using this product, carefully read all product documentation and retain it for future reference.
641.34.22.1
Page 2

Thank you for purchasing our products!
Please read this manual before using the product.
nJoy is a brand of power and backup protecon products that
create soluons for mulple levels of environment complexity,
This UPS will protect your electronic equipment from physical
damage and will provide emergency baery backup power to
prevent data loss in the event of power problems.
The following models belong to the Horus Plus Series:
residenal to industrial.
600VA
800VA
1000VA
1500VA
2000VA
Horus Plus 600
Horus Plus 800
Horus Plus 1000
Horus Plus 1500
Horus Plus 2000
2
Page 3
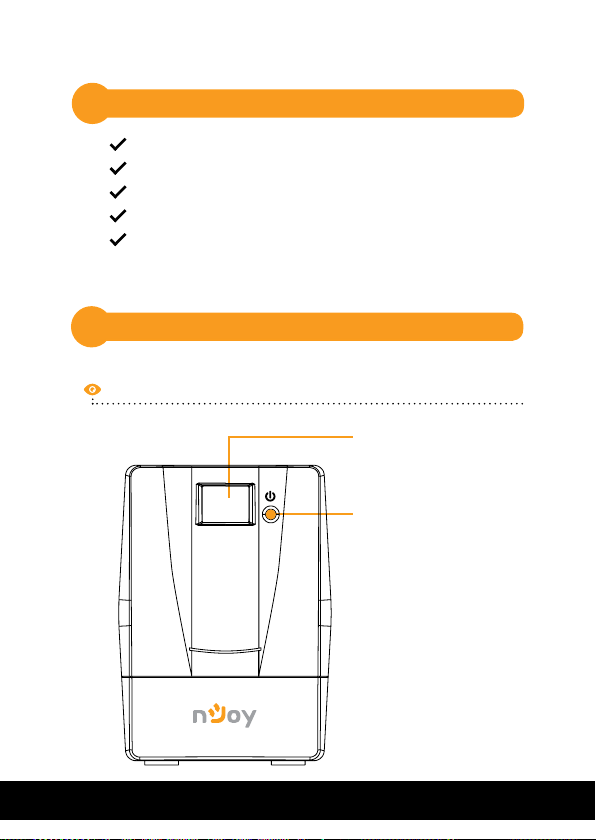
Package Contents
1
UPS Unit
User Manual
USB Cable
Power Cord
Warranty Card
Product Overview
2
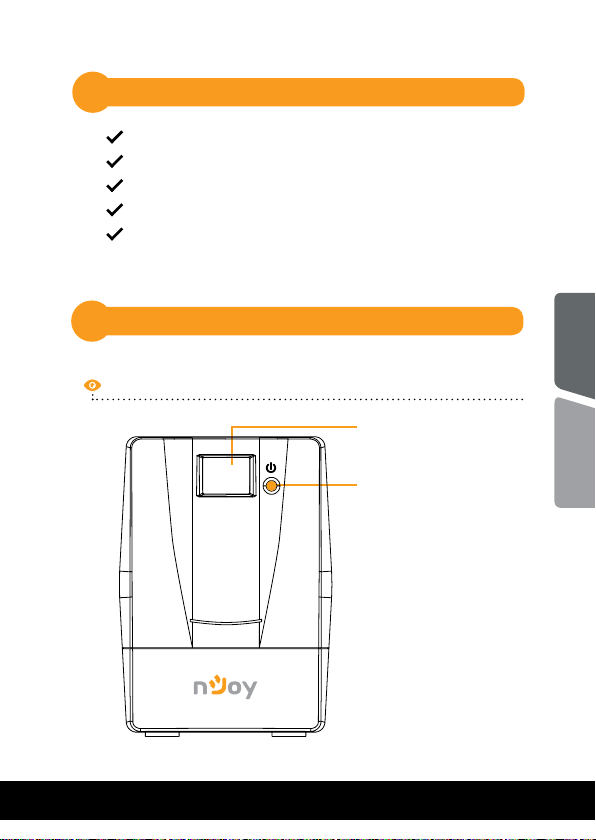
Front View
English
Touch screen LCD panel
Power switch
Romana
3
Page 4
4
5
3
2
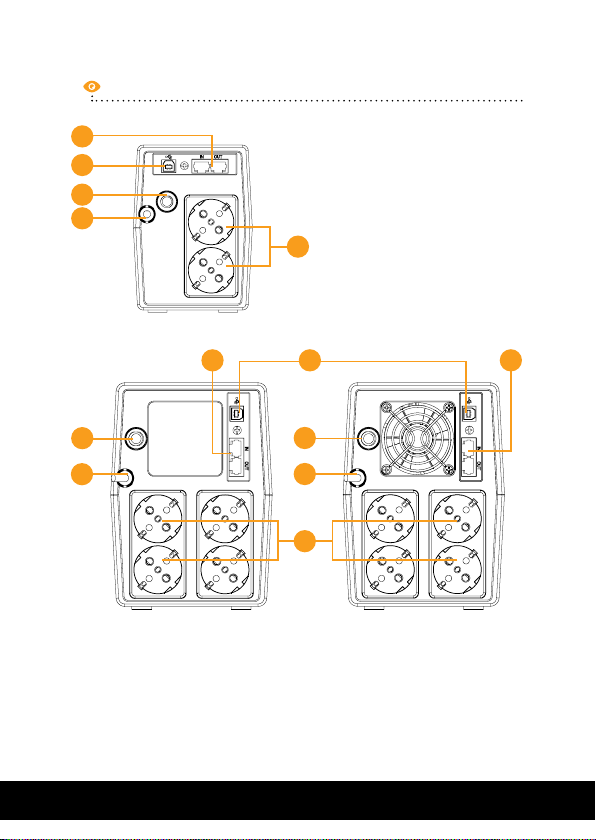
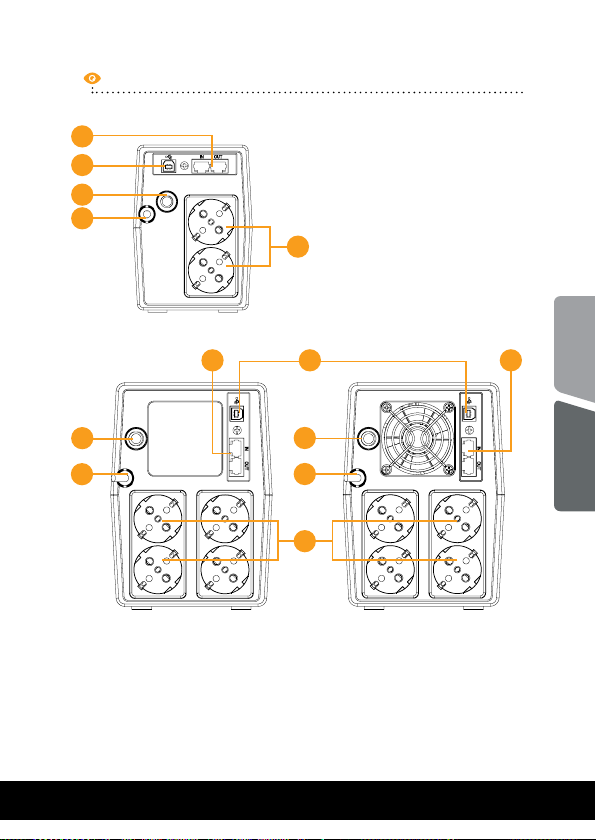
Back View
600 / 800
1
3
2
1. Battery backup outlets
2. AC input
3. Circuit breaker
4
5
3
2
1
1000 1500 / 2000
4. RJ-11 surges protection
(+RJ45 - Horus Plus 1000,
1500, 2000)
5. USB port
44
Page 5
Touch screen LCD Display
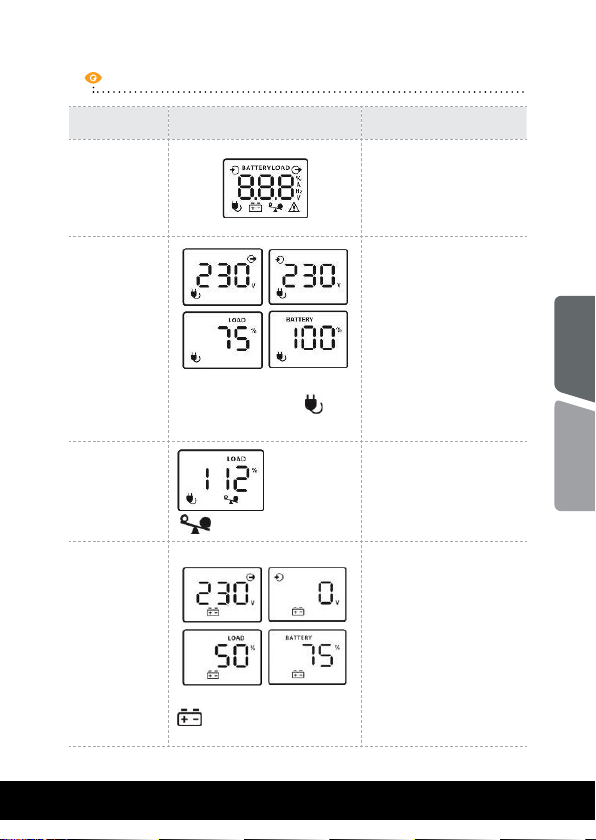
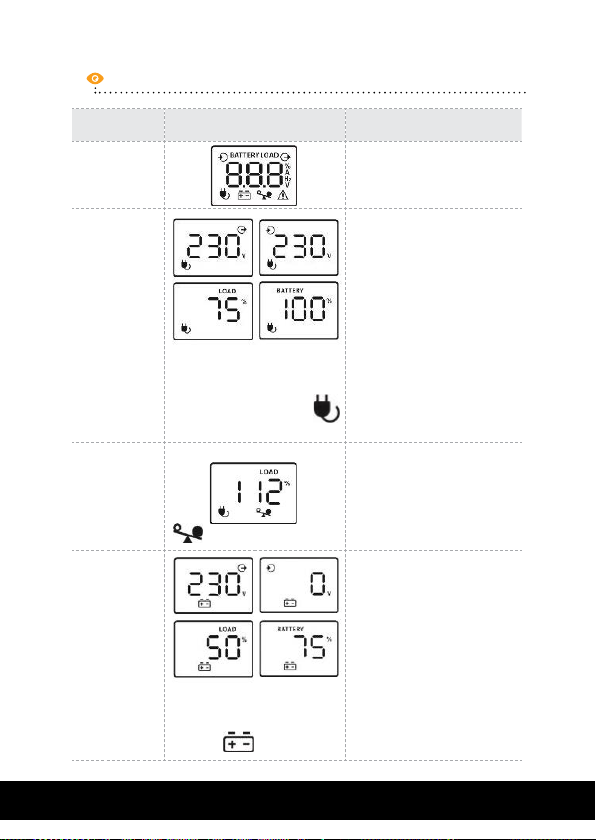
UPS Mode LCD Display Description
When UPS is ON,
UPS Power
ON
it will enter this
mode for 4
seconds
LCD information will
be displayedin the
following order when
AC Mode
When AVR is functioning, a
plug icon will flash
every second
LCD is touched:
1. Output voltage
2. Input voltage
3. Load level
4. Battery capacity
English
Overload in
AC Mode
Battery
Mode
icon will flash
When battery level is low,
battery icon will flash
When overload
occures, alarm
will beep every 0.5
seconds.
Alarm will beep
every 10 seconds and
LCD information will
be displayed in the
following order when
LCD is touched:
1. Output voltage
2. Input voltage
3. Load level
4. Battery capacity
Romana
5
Page 6
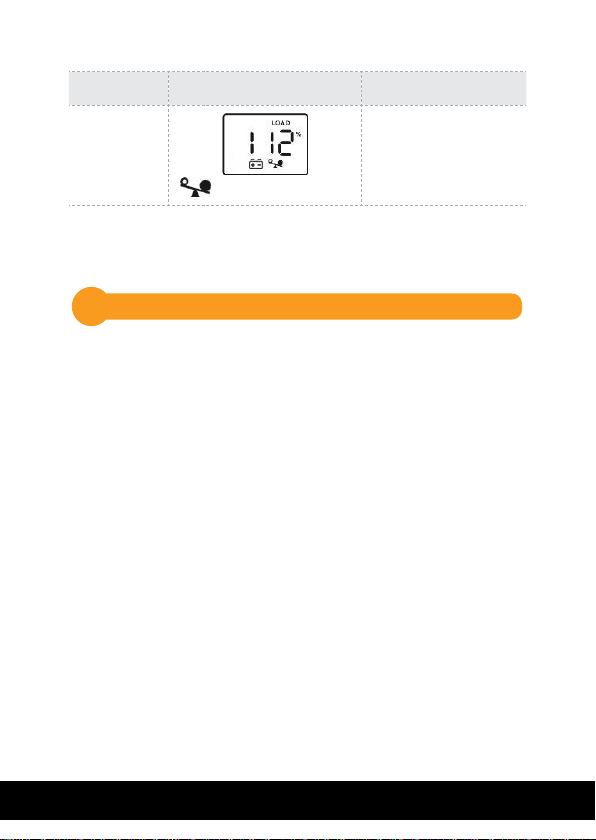
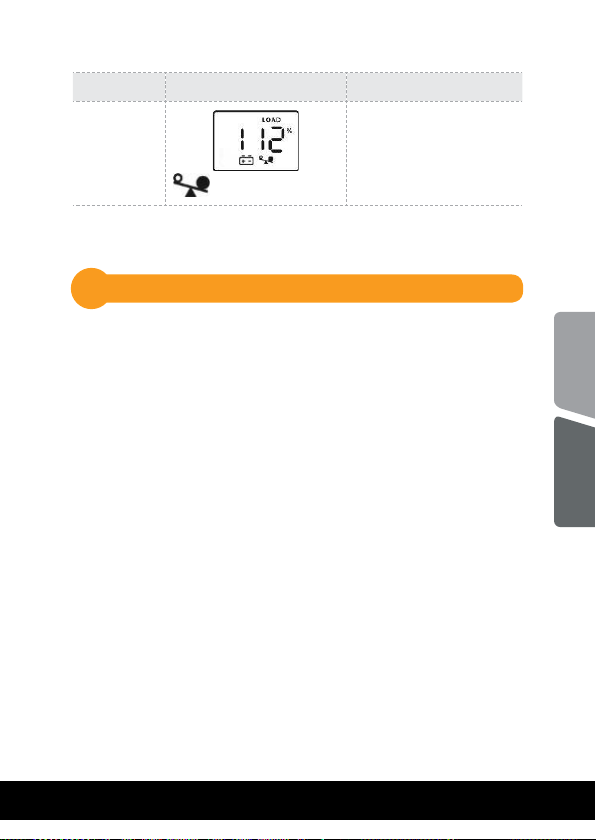
UPS Mode LCD Display Description
Overload
in Battery
Mode
icon will flash
When overload
occurs, alarm will
beep every 0.5
seconds.
NOTE: If backlight shuts o, you may activate it by touching the
screen.
Installation3
The UPS can protect your equipment from all power problems
such as surge, blackouts, brownouts and line noise. When AC
power is present and the ON/OFF switch is turned ON, the
UPS is always charging the battery and provides power to the
equipment from AC line directly. A reliable built-in battery
can provide stable power in order for you to complete your
work, save your data and safely shut down your system when
there is a utility power blackout.
The UPS is simple to operate and install. Please read the
following steps before connecting any equipments to this UPS:
6
Page 7
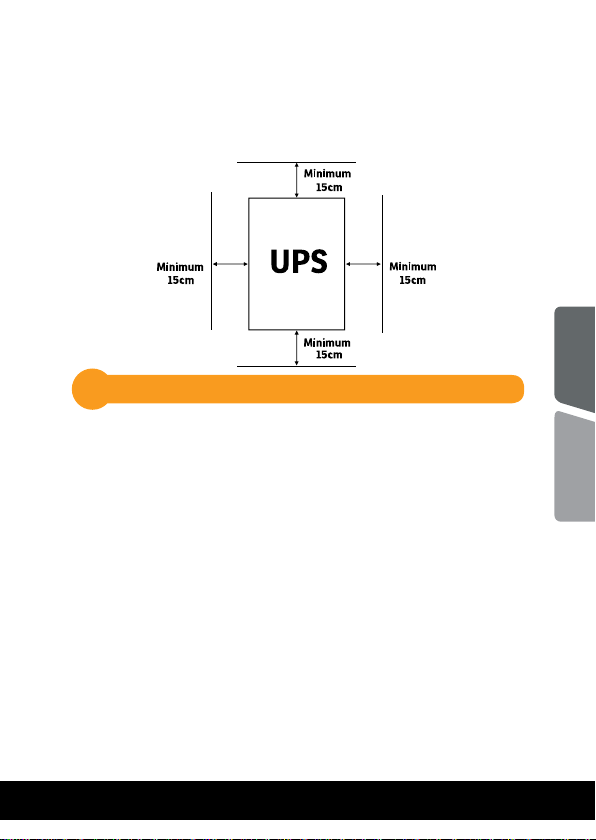
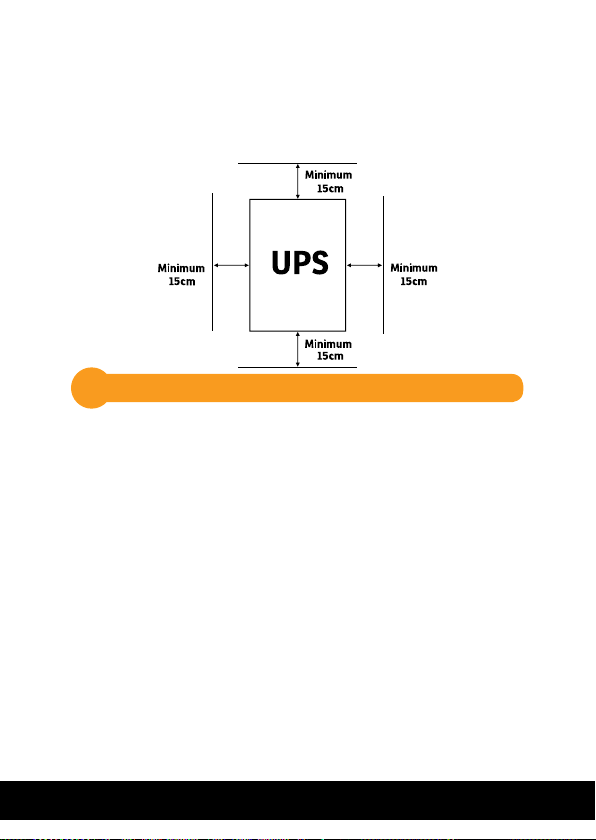
Positioning
For optimal ventilation of the UPS, please place it 15cm
distance from any wall or object.
Connecting your equipment and rst usage3.1
Step 1.
Connect the UPS to a grounded AC power outlet.
Step 2. Please turn ON the ON/OFF switch and charge the
battery at least 6 hours for a full load before you
start to use the UPS.
Step 3. Plug your PC or peripheral equipment (printer, tv,
scanner, fax, speakers etc.) into the power outlets
of the UPS (these will provide emergency battery
backup power during blackouts as well as surge
protection from surges and spikes). Do not attach
powerfull sound sistems and woofers or non
computer-related items, such as medical
equipment, life-support equipment, microwave
ovens, or vacuum cleaners to the UPS !
English
Romana
7
Page 8
Step 4. Connect the phone/network/internet cables to the
RJ11/RJ45 outlet.
Step 5. For optimal computer system protection, install
the UPS monitoring software from https://www.
power-software-download.com/viewpower.html
to fully manage the UPS.
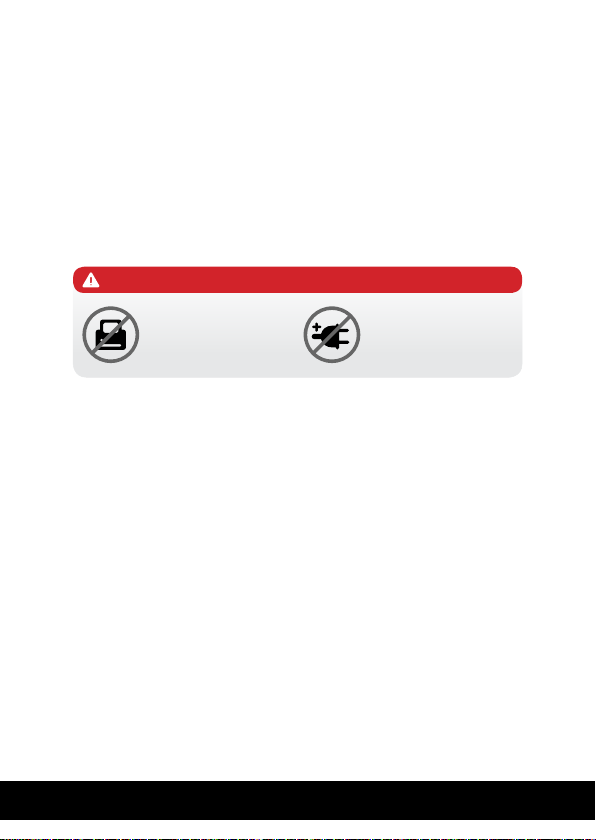
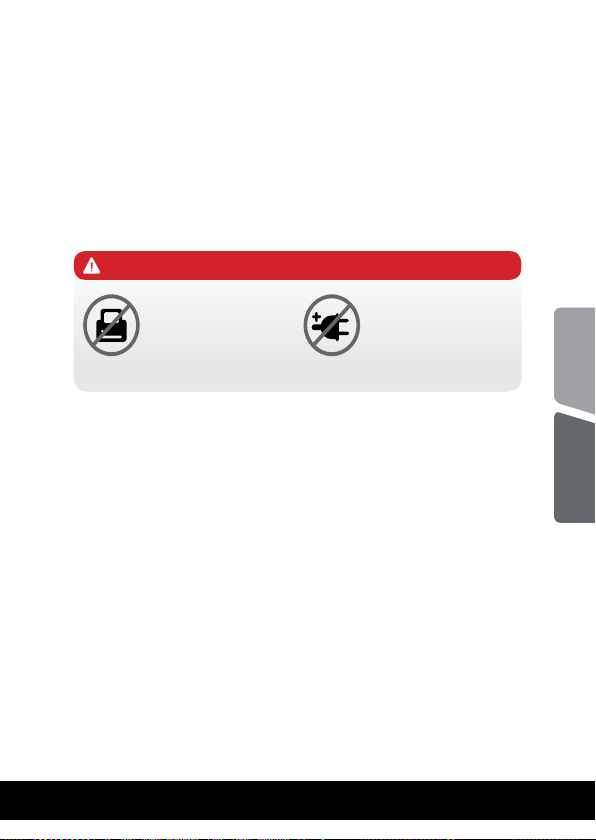
CAUTION
Do NOT plug LASER
PRINTERS into any
of the outlets.
Do NOT plug any
SURGE STRIPS into
any of the outlets.
8
Page 9

General Specications3.2
ǘ Automatic voltage regulation
Regulates the input voltage and eliminates the
problems created by under-voltage or over-voltage
uctuations. It also protects against spikes and surges
that comprise over 80% of power problems.
ǘ Auto restart
The UPS will restart automatically and will start charging
the batteries once the electricity is back on.
ǘ Cold Start Function
When the UPS is OFF and there is no connection to the
power utility, it’s still possible to start the UPS unit
using the remaining battery power.
ǘ USB Port
The built-in USB port connects to your computer,
automatically saves your data and shuts down your
computer (with the help of the included software) in
case of a power failure.
ǘ Software
Your personal computer can receive the status of the
UPS regarding the utility power line, utility power
failure, on battery and low battery by signals that are
sent through the USB port with the help of the software
on your CD.
English
Romana
9
Page 10
Important Safety Warnings4
Place the UPS indoors in an area that has adequate
airow and no excessive dust. Do NOT allow the UPS
to be exposed to moisture, rain, excessive heat or
direct sunlight.
The use of the UPS is NOT recommended in life
support applications where failure of this equipment
can reasonably be expected or when its safety or
eectiveness could be aected signically.
Please always disconnect the input power cord from
the wall outlet before replacing the battery.
Do NOT dispose of the battery in a re. The battery
may explode.
Do NOT open or damage the battery. It contains an
electrolyte that is toxic and harmful to the skin and
eyes.
Proper disposal of the battery is required. Please
follow your local laws/regulations regarding battery
disposals.
Use tools with insulated handles to replace the
battery to avoid personal injury. Due to energy
hazard, please remove wrist watches and hand
jewerly when replacing the battery.
10
Page 11
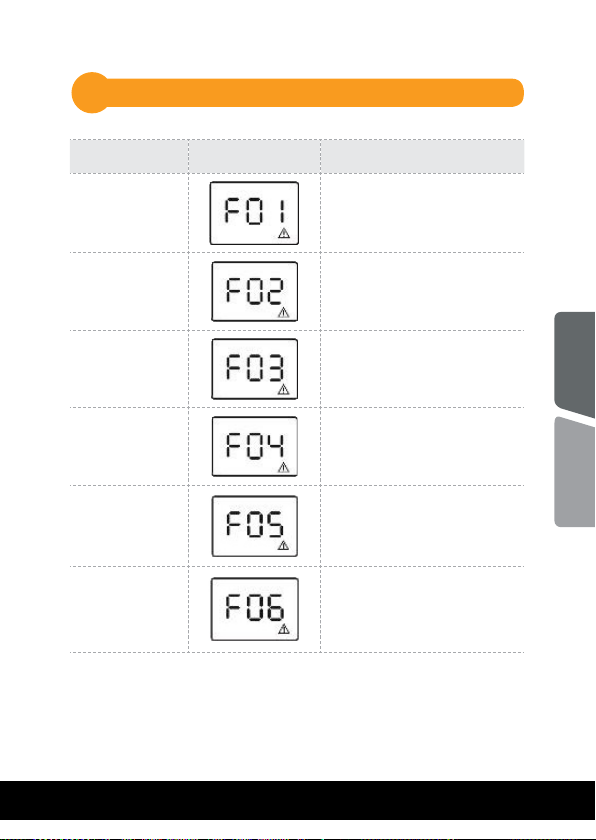
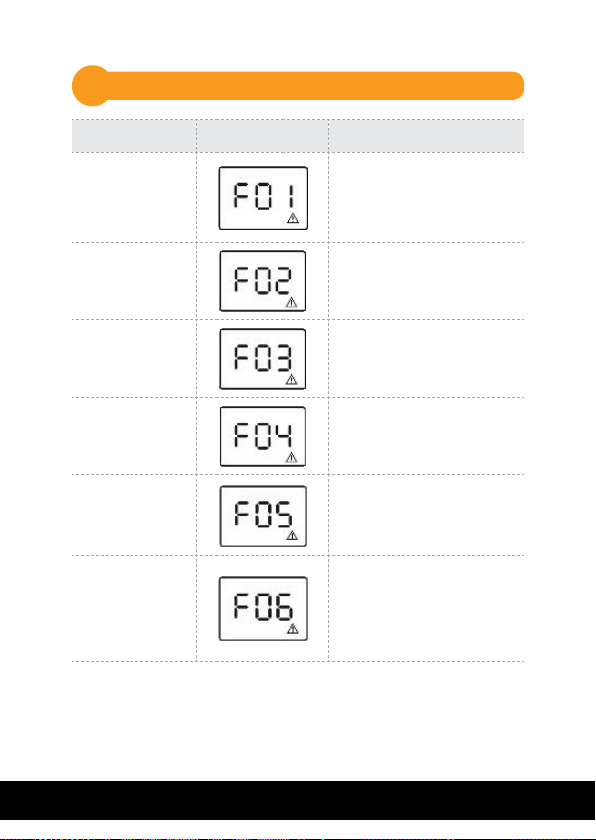
Fault Code Table5
UPS Mode LCD Display Description
Output Short
Circuit
Overload fault
Overcharge
Bad or severely discharged
battery
High output
voltage
Over-temperature
Disconnect short-circuited
loads and restart UPS.
Disconnect all output loads
and restart the UPS again.
Call for service
immediately.
Please replace the battery.
Call for service
immediately.
1. Turn off the unit and wait
for cooling.
2. Remove excessive loads
and wait for cooling.
English
Romana
11
Page 12

Troubles and solutions6
Problem Possible Cause Solutions
Nothing is
displayed on
LCD panel.
The UPS is
always on
battery mode.
The UPS
continuously
beeps.
Backup time
is too short.
The UPS is not
switched on.
Battery voltage
is too low.
Battery fault. Replace the battery.
Power cord loose
or no mains
power.
Please check the
fault code for the
details.
Battery voltage
is too low.
Overload.
Battery fault. Replace the battery.
Press the power switch again
to turn on the UPS.
Charge the battery at least
6 hours.
Check mains power and replug the power cord.
Please check the fault code
for the details.
Charge the battery at least
6 hours.
Remove some unnecessary
loads. Before reconnecting
equipment, please verify
that the load matches the
UPS capability specied in
the specications.
12
Page 13
Disposal of Old Electrical & Electronic Equipment
(Applicable in the European Union and other European countries with
separate collection systems)
This symbol on the product or on its packaging indicates that this product shall not be
treated as household waste.
Instead it shall be handed over to the applicable collection point for the recycling of
electrical and electronic equipment.
By ensuring this product is disposed of correctly, you will help prevent potential negative
consequences for the environment and human health, which could otherwise be caused
by inappropriate waste handling of this product.
The recycling of materials will help to conserve natural resources.
English
Romana
13
Page 14
Conținutul pachetului1
Unitatea UPS
Manual de utilizare
Cablu USB
Cablu de alimentare
Certicat de garanție
Prezentarea produsului2
Vedere din fața
Ecran LCD cu touch screen
Buton
Pornit/ Oprit
14
Page 15
Vedere din spate
4
5
3
2
600 / 800
1
3
2
1000 1500 / 2000
1. Prize pentru alimentarea
echipamentelor
2. Alimentare UPS
3. Intrerupator circuit (siguranța)
5
3
2
1
4. RJ11 - protecție linie telefonica
(+RJ45 - Horus Plus 1000, 1500,
2000)
5. Port USB
44
English
Romana
15
Page 16
Asaj LCD
Mod UPS
UPS Pornit
Modul AC
Suprasarcina in
modul AC
Modul
Baterie
Asaj LCD
Cand AVR-ul
funcționeaza, va palpai
o icoana sub forma
de stecher la fiecare
secunda.
icoana va palpai.
Cand nivelul bateriei
este scazut icoana sub
forma de baterie va palpai.
Descriere
Cand UPS-ul este
pornit va intra in acest
mod pentru 4 secunde.
Informațiile vor fi afisate pe LCD la atingere
in urmatoarea ordine:
1. Tensiunea la iesire
2. Tensiunea la intrare
3. Nivelul de incarcare
4. Capacitatea bateriei
Cand apare
suprasarcina, alarma
va suna la fiecare 0.5
secunde.
Alarma va suna la
fiecare 10 secunde iar
pe ecran vor fi afisate la
atingere urmatoarele
informații in ordine:
1. Tensiunea la iesire
2. Tensiunea la intrare
3. Nivelul de incarcare
4. Capacitatea bateriei
16
Page 17
Mod UPS
Asaj LCD
Descriere
Suprasarcina
in Modul
Baterie
NOTA:
Daca lumina de fundal se stinge, o puteți activa prin
atingerea ecranului.
icoana va palpai.
Cand apare
suprasarcina, alarma
va suna la fiecare 0.5
secunde.
Instalarea3
UPS-ul va poate proteja echipamentul de toate problemele
legate de tensiunea electrica cum ar : supra-sarcina,
uctuații de tensiune, caderi de tensiune si zgomotul de pe
rețea. Cand curentul este prezent la rețeaua de alimentare
si comutatorul (ON/OFF) este pornit (ON) UPS-ul isi
incarca bateria si asigura echipamentului energia necesara
funcționarii direct de la rețea. Bateria poate oferi energia
necesara pentru a va naliza munca, salva datele si opri in
siguranța computerul atunci cand apar caderi de tensiune.
UPS-ul este simplu de folosit si de instalat. Urmați pasii de
mai jos inainte de a conecta echipamentul la UPS:
English
Romana
17
Page 18
Poziționare
Pentru o ventilație optima a UPS-ului, va rugam sa il
plasați la 15 cm distanța de orice perete sau obiect
3.1
Conectarea echipamentelor si prima folosire
Pasul 1. Conectați UPS-ul la o priza cu impamantare.
Pasul 2. Apasați butonul de pornire astfel incat sa e in
modul ON si lasați bateria la incarcat cel puțin
6 ore inainte de a folosi UPS-ul.
Pasul 3. Conectați echipamentele electronice
(calculator, TV, imprimanta, centrale, scanner,
fax, boxe etc.) la prizele cu protecție
vor furniza energia necesara pentru funcționarea
continua in siguranța a echipamentelor). Nu
conectați sisteme de sunet puternice (cu
woofer) sau electronice care nu sunt legate de
computer, cum ar echipamentele medicale,
aparate de susținere a vieții, cuptoare cu
microunde sau aspiratoare!
(acestea va
18
Page 19
Pasul 4. Conectați cablul liniei telefonice/cablul de
rețea (internet) la mufa corespunzatoare a
UPS-ului (RJ11/RJ45).
Pasul 5. Pentru o protecție optima a sistemului
instalați software-ul de monitorizare de
la urmatorul link: https://www.power-
software-download.com/viewpower.html
ATENȚIE
NU conectați
imprimante laser la
niciuna din prizele
UPS-ului.
NU conectați alte
ACCESORII CU
PROTECȚIE la
niciuna din prize.
English
Romana
19
Page 20

Specicații generale3.2
ǘ
Reglaj automat al tensiunii
AVR-ul este proiectat pentru a mentine un nivel
constant de tensiune. Acesta va elimina varfurile
de inalta sau joasa tensiune produse de compania
de electricitate care pot afecta sau chiar deteriora
electronicele tale.
ǘ Repornire automata
UPS-ul va reporni automat si va incepe sa reincarce
bateriile de indata ce este repusa in funcțiune rețeaua
de electricitate.
ǘ Funcția de pornire la rece
UPS-ul poate si pornit atunci cand nu exista o
conexiune la rețeaua de electricitate atat timp cat
bateria este incarcata.
ǘ Port USB
Prin portul USB se face conexiunea cu computerul.
Acest port permite cu ajutorul softului stingerea
automata a computerului si salvarea sierelor in
cazul caderilor de tensiune pe rețeaua electrica.
ǘ Programul de management
Computerul dumneavoastra primeste semnal de la UPS
tot prin cadrul acestui port USB atunci cand bateria
este descarcata sau sunt alte probleme cu UPS-ul.
Computerul va poate informa despre starea UPS-ului
daca instalați programul de management aat pe CD.
20
Page 21
4
Instrucțiuni de siguranța
Poziționati UPS-ul intr-un loc aerisit si lipsit de
praf. NU permiteți ca UPS-ul sa e expus la ploaie,
umiditate, caldura excesiva sau direct in razele solare.
NU este recomandata folosirea UPS-ului impreuna
cu echipamente de susținere a vieții.
Intotdeauna deconectați UPS-ul de la rețeaua de
electricitate inainte de schimbarea bateriei.
NU aruncați bateria in foc intrucat aceasta poate
exploda.
NU desfaceți si nu loviți bateria. Aceasta conține
materiale toxice si nocive pentru piele si ochi.
Aruncarea bateriei se face in condiții speciale. Va
rugam sa consultați legile si reglementarile locale
cu privire la eliminarea bateriilor.
Utilizați ustensile cu manere izolate pentru
inlocuirea bateriei pentru a evita accidentarea. Din
cauza potențialelor pericole va rugam sa inlaturați
orice ceas sau bijuterie de mana cand inlocuiți
bateria.
English
Romana
21
Page 22
Tabel de erori5
Mod UPS
Scurtcircuit la
iesire
Supraincarcare
UPS
Supraincarcare
baterie
Baterie defecta sau foarte
descarcata
Tensiune mare
la iesire
Supraincalzire
Asaj ecran
Descriere
Deconectați echipamentele electronice care
genereaza scurtcircuit si
reporniți UPS-ul.
Deconectați toate
aparatele conectate si
restartați UPS-ul.
Sunați la service imediat.
Schimbați bateria.
Sunați la service imediat.
1. Opriți unitatea si
asteptați sa se raceasca.
2. Indepartați sarcina ex-
cesiva si asteptați sa se
raceasca unitatea UPS.
22
Page 23

6
Probleme si soluții
Problema
LED-ul nu
este aprins.
UPS-ul
ramane
permanent
in “pe
baterie”.
Alarma
UPS-ului
suna
continuu.
Descarcare
rapida a
bateriei.
Cauza Posibila
UPS-ul nu este
pornit.
Baterie descarcata.
Baterie defecta. Inlocuiți bateria.
Cablu de
alimentare este
scos din priza
sau nu este
curent la priza.
UPS-ul este in
suprasarcina.
Baterie descarcata.
UPS-ul este in
suprasarcina.
Soluții
Reporniți UPS-ul apasand
butonul de pornire.
Incarcați bateria cel puțin 6
ore.
Vericați prezența tensiunii
rețelei si conectați cablul de
alimentare la priza.
Deconectați echipamentele de
la UPS. Inainte de a reconecta
echipamentele vericați
consumul acestora astfel incat
sa nu depaseasca maximul
capacitații UPS-ului.
Incarcați bateria cel puțin
6 ore.
Deconectați echipamentele de
la UPS. Inainte de a reconecta
echipamentele vericați ca
acestea sa nu depaseasca
capacitatea UPS-ului.
English
Romana
Baterie defecta. Inlocuiți bateria.
23
Page 24
Dezafectarea echipamentelor electrice si electronice vechi
(Se aplica pentru ţarile membre ale Uniunii Europene si pentru alte țari
europene cu sisteme de colectare separata).
Acest simbol aplicat pe produs sau pe ambalajul acestuia indica faptul ca acest produs
nu trebuie tratat ca pe un deseu menajer.
El trebuie predat punctelor de reciclare a echipamentelor electrice si electronice.
Asigurandu-va ca acest produs este dezafectat in mod corect, veţi ajuta la prevenirea
posibilelor consecințe negative asupra mediului si a sanatații umane, care ar putut
surveni daca produsul ar fost dezafectat in mod necorespunzator.
Reciclarea materialelor va ajuta la conservarea resurselor naturale.
Page 25

Memo
Page 26
EU Declaration of Conformity
We, manufacturer / importer
DAI-TECH SRL
28 Popa Sapca
300057, Timisoara
Romania
declare that the products
PWUP-LI060H1-AZ01B, PWUP-LI080H1-AZ01B, PWUP-LI100H1-AZ01B,
PWUP-LI150H1-AZ01B, PWUP-LI200H1-AZ01B
UPS Horus Plus Series:
are in conformity with
(EC conformity marking)
Tested with the listed standards, the above mentioned products were found
in compliance with 2004/108/EC EMC Directive and with 2006/95/EC LVD
EN 62040 – 2: 2006
IEC 61000 – 4 – 2: 2001
IEC 61000 – 4 – 3: 2002
IEC 6100 – 4 – 4: 2004
Directive.
IEC 6100 – 4 – 5: 2005
IEC 6100 – 2 – 2: 2002
EN 62040 – 1 - 1: 2003
IEC 60950 – 1: 2001
and in conformity with
(RoHS conformity marking) in accordance with European Directive
2011/65/EU.
Stamp
May 13, 2016
Timisoara
Date and location Signature and name
Tommy Lee
Page 27
Declarație UE de conformitate
Noi, in calitate de producator / importator
DAI-TECH SRL
28 Popa Sapca
300057, Timisoara
Romania
declaram ca urmatoarele produse
PWUP-LI060H1-AZ01B, PWUP-LI080H1-AZ01B, PWUP-LI100H1-AZ01B,
PWUP-LI150H1-AZ01B, PWUP-LI200H1-AZ01B
Testate in standardele acceptate, produsele menționate sunt conforme cu
directiva 2004/108/EC EMC si cu directiva 2006/95/EC LVD .
UPS Horus Plus Series:
sunt conforme cu
(simbolul de conformitate europeana)
EN 62040 – 2: 2006
IEC 61000 – 4 – 2: 2001
IEC 61000 – 4 – 3: 2002
IEC 6100 – 4 – 4: 2004
(simbolul de conformitate RoHS ) in acord cu directiva europeana
2011/65/EU.
Stampila
IEC 6100 – 4 – 5: 2005
IEC 6100 – 2 – 2: 2002
EN 62040 – 1 - 1: 2003
IEC 60950 – 1: 2001
si in conformitate cu
Mai 13, 2016
Timisoara
Data si locația
Tommy Lee
Semnatura si nume
Page 28

 Loading...