


Predator
MX
Features of the Predator MX
• Lightweight extruded aluminium housing
• Microstepping motors
• Pure dichroic colours (8 solid colours or 7 split colour)
• 7 gobos (squares, tunnel, dots, star, triangle, segments, circle)
• External focusing
• Internal power factor correction
• Blackout/strobe shutter (strobe in any colour)
• Long life/high output CSS575 metal halide lamp (supplied)
• 0-10V Analogue control
• Stand-alone operation using internal microphone

User Guide Predator MX
IMPORTANT
Installer and Users please note:
These instructions should be read carefully and left
with the user of the product for future reference.
Installation
Fix the Predator MX with the hanging bracket provided. To conform
to Health & Safety Regulations, a safety chain must also be employed.
The Predator MX must be installed by a competent electrician
in accordance with the current IEE wiring regulations.
Connect the Predator MX to the mains supply with the lead
provided. The wires are colour-coded as follows:
• Brown = Live (phase)
• Blue = Neutral
• Green/Yellow = Earth
• The Predator MX must be earthed for safe and reliable operation.
The supply must be fitted with an isolating switch, or plug and
socket, and protected by fuse or circuit breaker rated at between 6A
and 16A. If the Predator MX circuit is connected via an MCB then it is
recommended that a time-delay MCB is used (Type 3 or Type C to
BS3871). This will reduce the possibility of "nuisance tripping" due to the
large inrush current of the power factor correction capacitors.
1.2m
It is also possible to connect the Predator MX to a switching pack
such as the NJD SP10000 but this is not recommended. If connecting
via a power pack, ensure that the outputs of the power pack have
sufficient capacity to switch the VA rating of the Predator MX. The
Predator MX should not be connected to a dimming pack or light
dimmer. The Predator MX is an inductive load.
The Predator MX is supplied with its handle pre-assembled. The
handle can be lengthened by removing the four pozidriv screws fixing the
three sections together and re-assembling in a different position. The Ushaped piece can also be fitted at right angles to the side pieces so that
the Predator MX can be fixed to a wall.
By removing the handle completely, and re-assembling the other way
round, the Predator MX can be tilted in the opposite direction.
Fix the Predator MX securely, and fit a safety chain. Tighten the
© N.J.D. Electronics 1997 -Page 2-
This symbol means that, in order to reduce the risk of
fire, the Predator MX should be installed more than 0.8
metres from any object that it is illuminating.

User Guide Predator MX
handle fixing screws with the Allen key provided.
The Predator MX should be operated with the fan at the lower end
and the mirror at the upper end. Operating the other way up may reduce
lamp life.
Adjust the hanging bracket until the light beams are in the best
position. The Predator MX may be moved whilst it is operating, the lamp
is not vulnerable mechanical damage . It is recommended that the
Predator MX is allowed to cool for 5 minutes after switching off before
moving.
Changing the lamp.
Disconnect from the mains supply. Slacken the knob on the lamp
cover and remove the lamp/reflector assembly. Remove the lamp from
the reflector, holding it with a cloth to avoid getting fingerprints on the
glass. Replace with a new lamp, type CSS575, being careful not to touch
the glass envelope of the lamp. Replace the cover and tighten the lidfixing knobs. The lamp has a life of around 1000 hours running at 230V,
it is recommended that it is changed after 1000 hours use as there is a
slight chance that the glass envelope may explode at the end of its life.
Changing the fuse
If the fuse blows, replace with a new fuse type 20mm x 5mm 8
Amp Anti-surge, High breaking capacity. This type of fuse has a ceramic
case. Do not replace with any other type or value of fuse. If the new fuse
blows, consult a dealer. The fuse is located in a small drawer beneath
the mains inlet connector (remove the mains cable to gain access).
Focusing.
To focus slacken the two focusing controls on the front of the unit,
move forwards or backwards as required, and re-tighten the screw when
the best image is obtained.
Cleaning.
The Predator MX should be cleaned periodically as the light output
will become less intense as smoke fluid residues build up on the mirror
and lenses.
Disconnect from the mains
supply and remove the cover
as follows: Remove the 6
screws at the positions
indicated by the arrows using
a #2 Pozidriv screwdriver.
The top section of the cover
© N.J.D. Electronics 1997 -Page 3-

User Guide Predator MX
can be lifted off vertically to gain access to the optics.
Clean the lens and the mirror using a soft lint-free cloth and
methylated spirit, isopropyl alcohol or hi-fi cleaning fluid. Also, make sure
that the fan is not becoming obstructed.
The Predator MX has a thermal switch which will cut off power if it
overheats due to the ventilation being obstructed.
Setting up.
The Predator MX may be operated in one of four different Modes.
1) Independent (internal microphone) see page 5
The Predator MX will move to each bass beat, going through a
sequence of patterns at random, including up/down, side-to-side, square,
octogon, diamond, figure-of-eight, random and chevron, along with colour
and gobo changing.
2) Synchronized (internal microphone) see page 6
The Predator MX will perform the above pattens either synchronised
together, or with the movement mirrored. In addition, the colours and
gobos will operate in one of three modes: random, synchronised or
chasing. The movement can be reversed by setting the control switches
in order that two rows of Predator MXs can be set up opposed to each
other, and will continue to move in synchrony.
3) Externally controlled from any DMX controller such as
Merlin, IQ-MX80, IQ-MX60 or IQ-MX40. see page 7
The IQ-MX80 has 10 preset programs, 10 user-programmable
programs, real-time programming and a joystick. and can control any
number of Predator MXs and Predator HXs arranged as up to 16
channels.
The IQ-MX40 can control 4 channels of Predator MXs and has a
total of 256 selectable functions including fourteen patterns, each with
selectable colour/gobo, four different colour/gobo change modes (fill,
random, shift and sync), and four different run-sequences of colours and
gobos.
With a programmable DMX controller such as Merlin, up to 32
channels of Predator MXs can be controlled, there is no limit to the
number of Predator MXs on each channel. The beam can be positioned
to an accuracy of 0.7°, and the colour/gobo can be selected.
4) Analogue control from a 0-10V output controller (Touch
panel, or AR1 remote controller) see page 10.
0-10V can be used to directly control the colour and movement, or
to select the sound animated patterns.
© N.J.D. Electronics 1997 -Page 4-
User Guide Predator MX
Independent mode.
If the Predator MX is to be operated in the “independent” mode,
then proceed as follows:
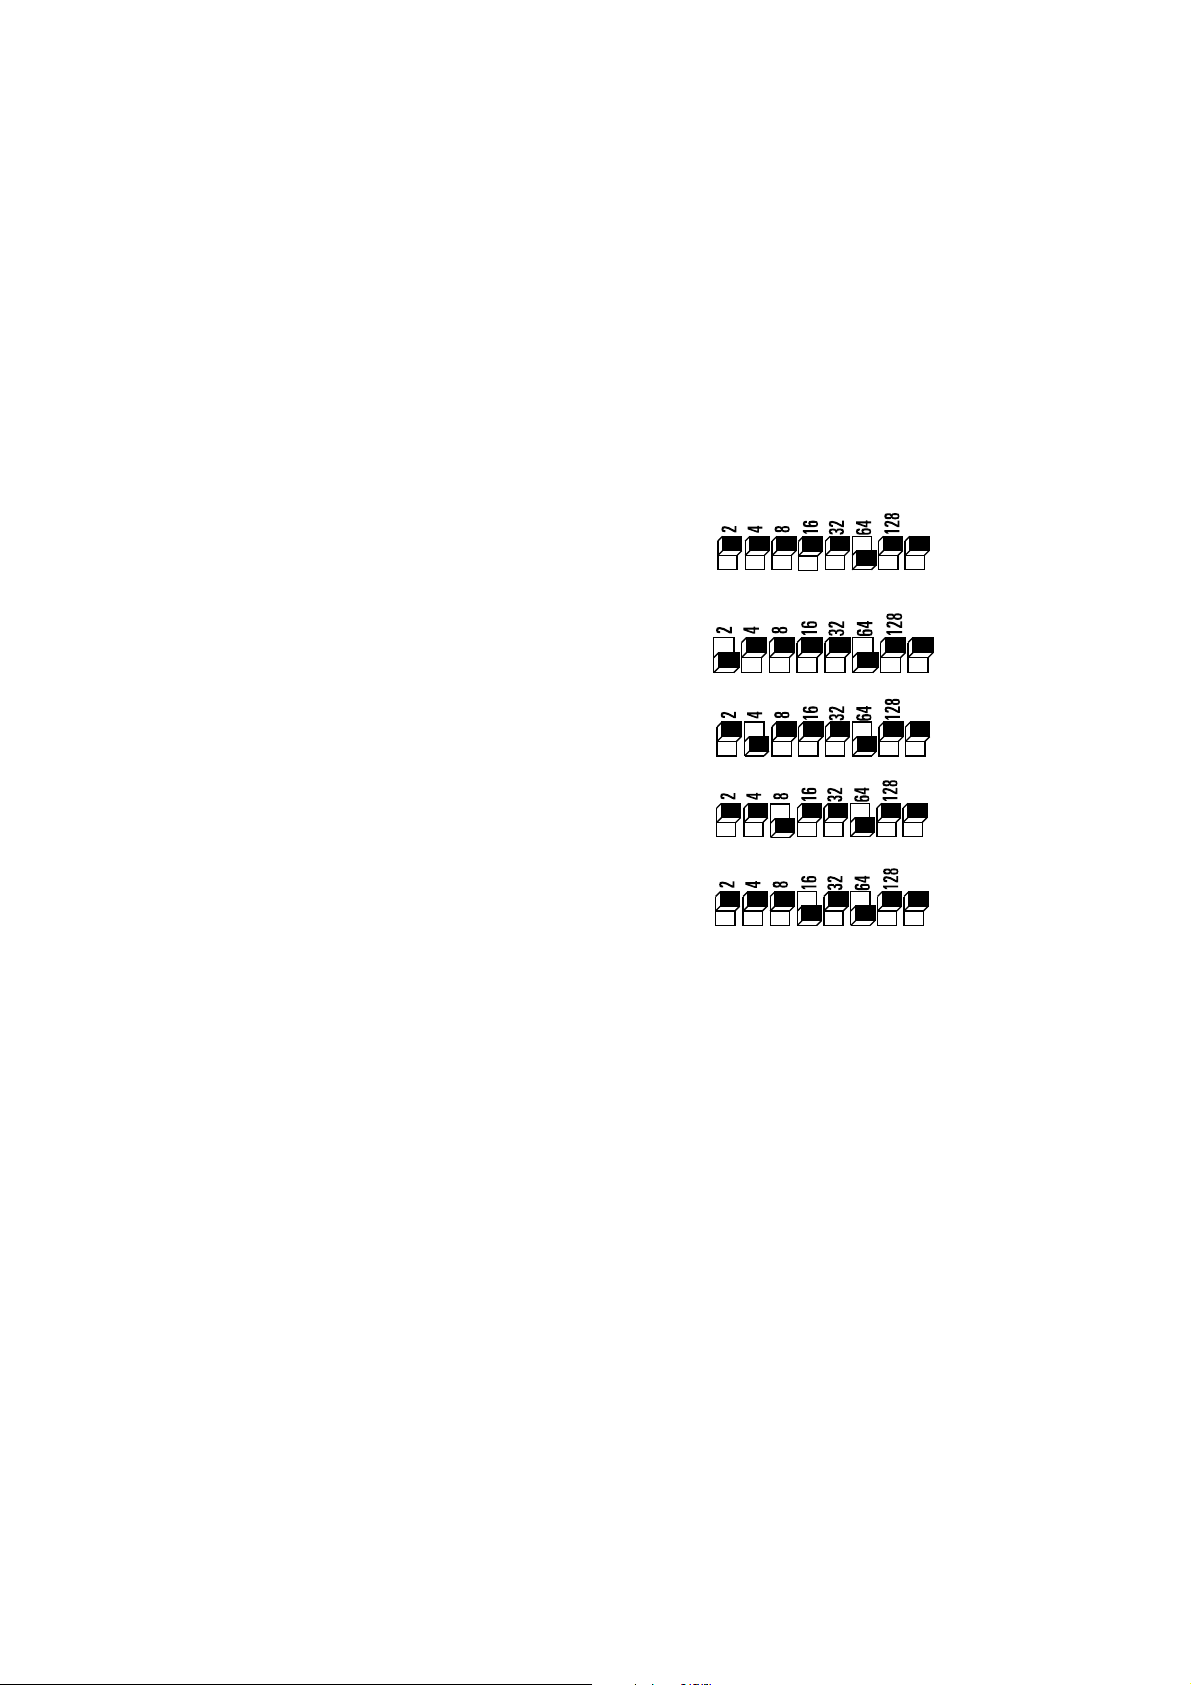
1) To allow the Predator MX to select an operating mode at random
(i.e. change colour to sound, rotate to sound etc.) set all the DMX
address switches to OFF.
2) If you wish to select the operating mode
turn switch “64” ON, then turn the following
switches on to decide which operating mode
you would like
X-REV
To select all gobos and magenta, yellow,
cyan or pink turn switch 2 ON.
To select colours with no gobos (red,
X-REV
green, blue and white) turn switch 4 ON.
To select change-colour-to-sound, beam
X-REV
stationary, turn switch 8 ON.
To select flash-to-sound, turn switch 16
X-REV
ON.
If more than one of the switches is turned
on, then the Predator MX will sequence through the selected operating
modes in turn. Switches "16", “32” and “128” must be turned OFF.
MODE
© N.J.D. Electronics 1997 -Page 5-
 Loading...