

Page 1
1 / 52
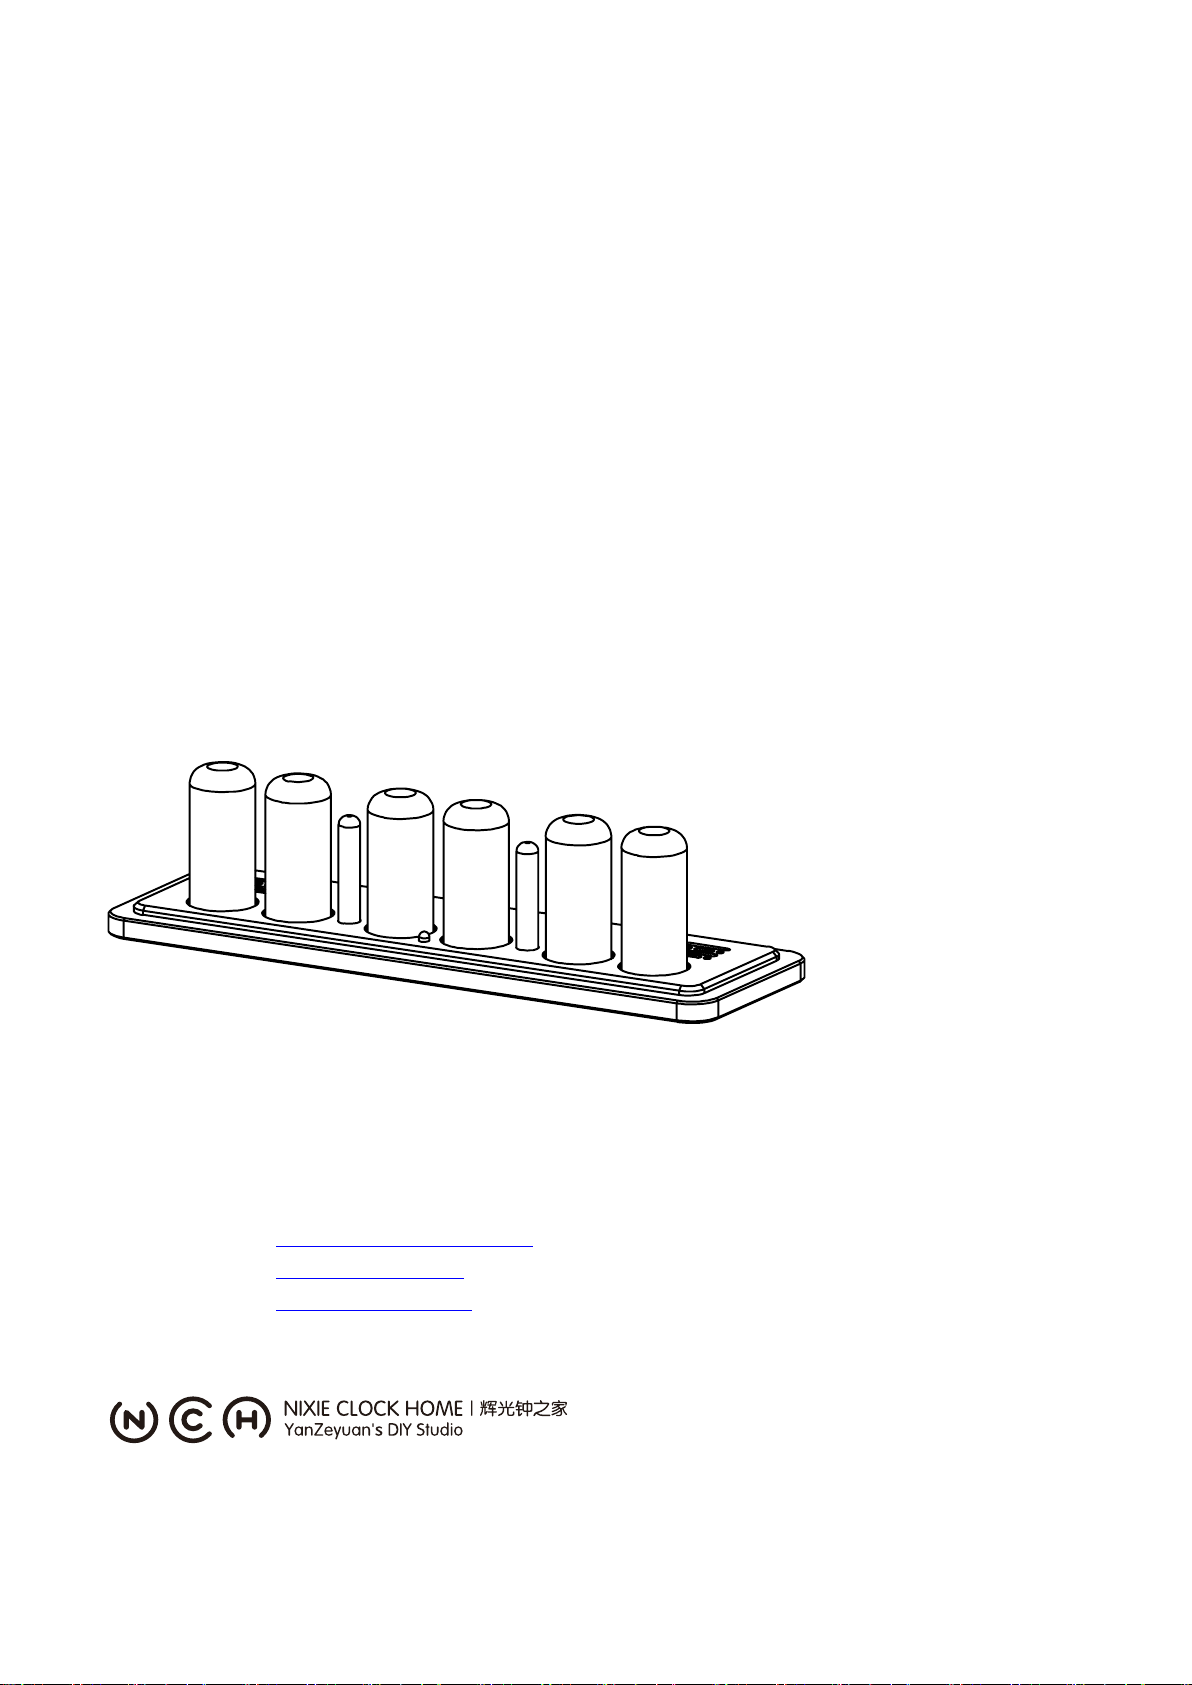
Omnixie Plus
User manual v1.0.3
Designer: Yan Zeyuan. China
Website: http://www.nixieclock.org
http://www.nixie.ai
E-mail: [email protected]
© 2019-06-28 NCH
Web v1.1.2
Software v1.3.6
Hardware v1.3.1
Page 2

2 / 52
Attention
◇ Attention: To prevent accidental damage, do not place the Omnixie on
an uneven surface.
◇ Warning: The Omnixie has an internal high voltage circuit. DO NOT
open; DO NOT touch the components while the Omnixie is operating.
◇ Warning: In order to ensure normal operation, please use only the
included power adapter and USB cable.
◇ Warning: The Omnixie is for indoor use only.
◇ Warning: Please keep out of the reach of children.
Page 3

3 / 52
Contents
Introduction
Package Contents……..……………………………………………………….……………………….…………… 5
Appearance.…………………………………………………………………………………………………….……… 6
Dimension………...…………………………………………………………………….……………………………….. 7
Technical Specifications………………………………………………………….………………………………… 8
Features………...……………………………………………………………………….……………………………….. 9
IR Remote…………….………………………………………………………………….……………………………… 10
Power Adapter.….….………………………………………………………………….……………………………… 10
Get Ready Before Use
Install Nixie Tubes……..…………………………………………………………………………………………….. 11
Plug In Power Cable…..…………………………………………………………………………………………….. 11
WIFI Status Indicator……………...…………………………………………………………………………...…… 11
Cleaning…….…...……………………………………………………………………………………………………….. 11
WIFI Connection
WIFI Introduction......………….……………………………….………………….………………………………… 12
WIFI Configuration with iPhone……………………………………………………………..…………...…… 15
Open Dashboard on iPhone…………………………………………………………..………………...…….… 17
WIFI Configuration with Android……………………………………………………………………………… 19
Open Dashboard on Android……………………………………………………………………………...…… 21
WIFI Configuration with Microsoft Windows………………………………….…………………...…… 23
Open Dashboard on Microsoft Windows…………………………………….……………………...…… 25
Setup the Omnixie Using the Omnixie Dashboard
Introduction of the Dashboard………………………………………………………………………………… 27
Set Language of the Dashboard…………………..….………………………………….……………...…… 27
WIFI Setup……………………….……………………………………….………………………………………...…… 28
System Status……..…………………..……………………….……….………………………………………...…… 29
NTP Setup……..…………………………………………………………………………………………………...…… 30
General Setup…….…………………..……………………….……….………………………………………...…… 31
Display Setup……..…………………..……………………….……….………………………………………...…… 32
Setup Alarms…….………..…………..……………………….……….………………………………………...…… 33
Advanced Setup……………………..……………………….……….………………………………………...…… 34
Upgrade Firmware…………………..……………………….……….………………………………………...…… 35
Page 4

4 / 52
Setup the Omnixie with IR Remote
Power On/Off…..…….………………………………………………………….…………………………………..… 37
Set Brightness.………………………………………………………………………………………………………… 37
Talking Clock……………………………………………………………………………………………………… 38
Set Volume…….………………………………………………………………………………………………………… 38
Display Time…….……………………………………………………………………………………………………… 39
Set Time..………………………………………………………………………………………………………………… 40
Display Date…………………………………………………………………………………………………………..… 41
Set Date…………………………………………………………………………………………………………………… 42
Display Alarms….……………………………………………………………………………………………………… 43
Set Alarms……..………………………………………………………………………………………………………… 44
Set Auto On/Off Time……………………………………………………………………………………………… 45
System Menu…………..……………………………………………………………………………………………… 46
Menu Setup
Menu 1 Set Time Format……...………………………………………………….……………………………… 47
Menu 2 Set Date Format..…….………………………………………………….……………………………… 47
Menu 3 Set Interval of Time Display………………………………………………………………………… 47
Menu 4 Set Interval of Date Display……………………………………….……..………………………… 48
Menu 5 Set Leading Zero……..………………………………………………….……………………………… 48
Menu 6 Set Switching Effects of the Digits...…………………………….……………………………… 48
Menu 7 Set Switching Speed of the Digits……………………………….……………………………… 49
Menu 8 Set Colons Animation Effects……..……………………………….……………………………… 49
Menu 9 Set Alarm Sound Tone..……………………………………………….……………………………… 49
Menu 10 Set Alarm Volume.….…………………………………………….……………………………… 50
Menu 11 Set Talking Clock Language…….…………………………….……………………………… 50
Menu 12 Set Interval of Talking Clock……..………………………….……………………………… 50
Menu 13 Set Backlight Effects……………………..……………………….……………………………… 51
Menu 14 Set Backlight Color……………….……………………………….……………………………… 51
Menu 15 Set Interval of CP Prevention……………..……………………………………….………… 51
Menu 16 Set Running Time of CP Prevention……..…………………………………….………… 52
Menu 17 Display Firmware Version………………..…………………….……………………………… 52
Reference
Special Remarks……………………...……………………….……….………………………………………...…… 52
Page 5
5 / 52
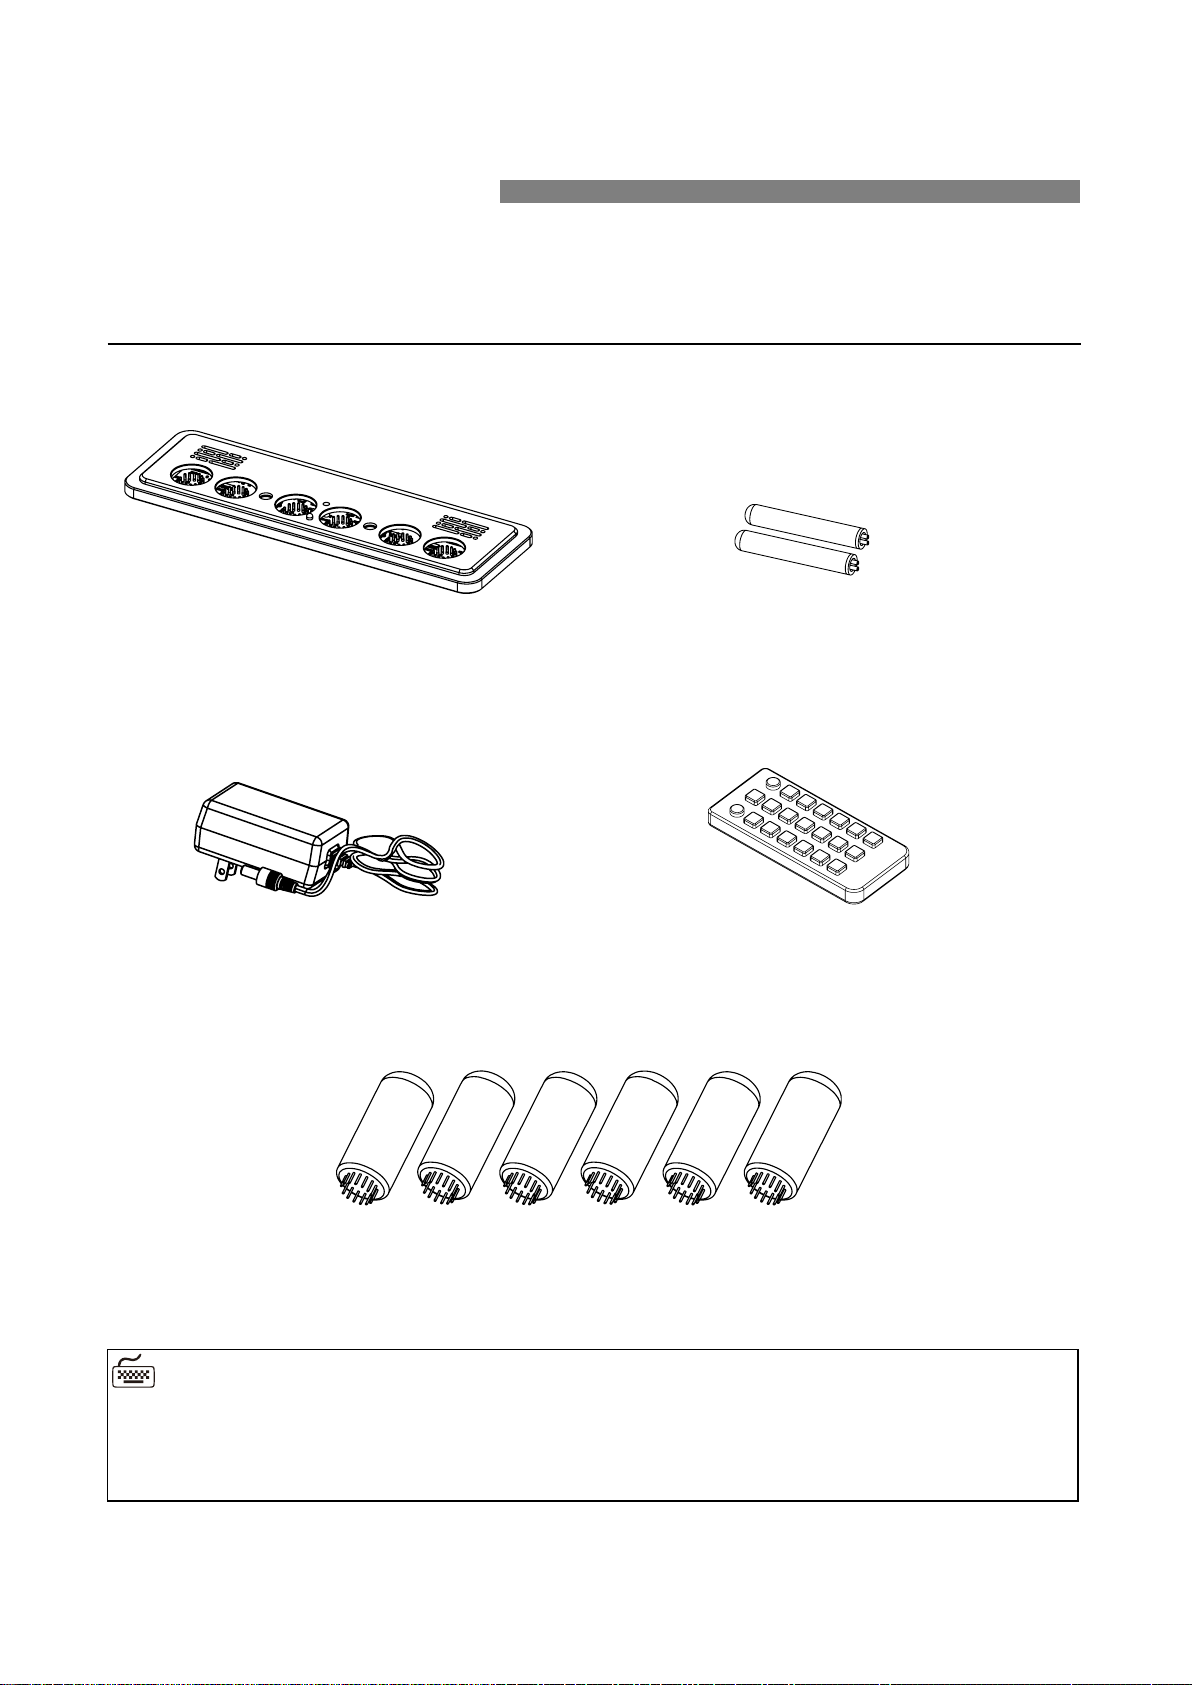
Package Contents
Before getting started, please check the contents of the package. If any parts are
missing, please contact the seller. Package consists of the following items:
Omnixie Plus Clock base Colon tubes
Power adapter IR Remote Controller
Nixie Tubes (optional)
◼ The included power adapter can handle high current and therefore allow normal
operation. DO NOT use other type of power adapter.
Page 6
6 / 52
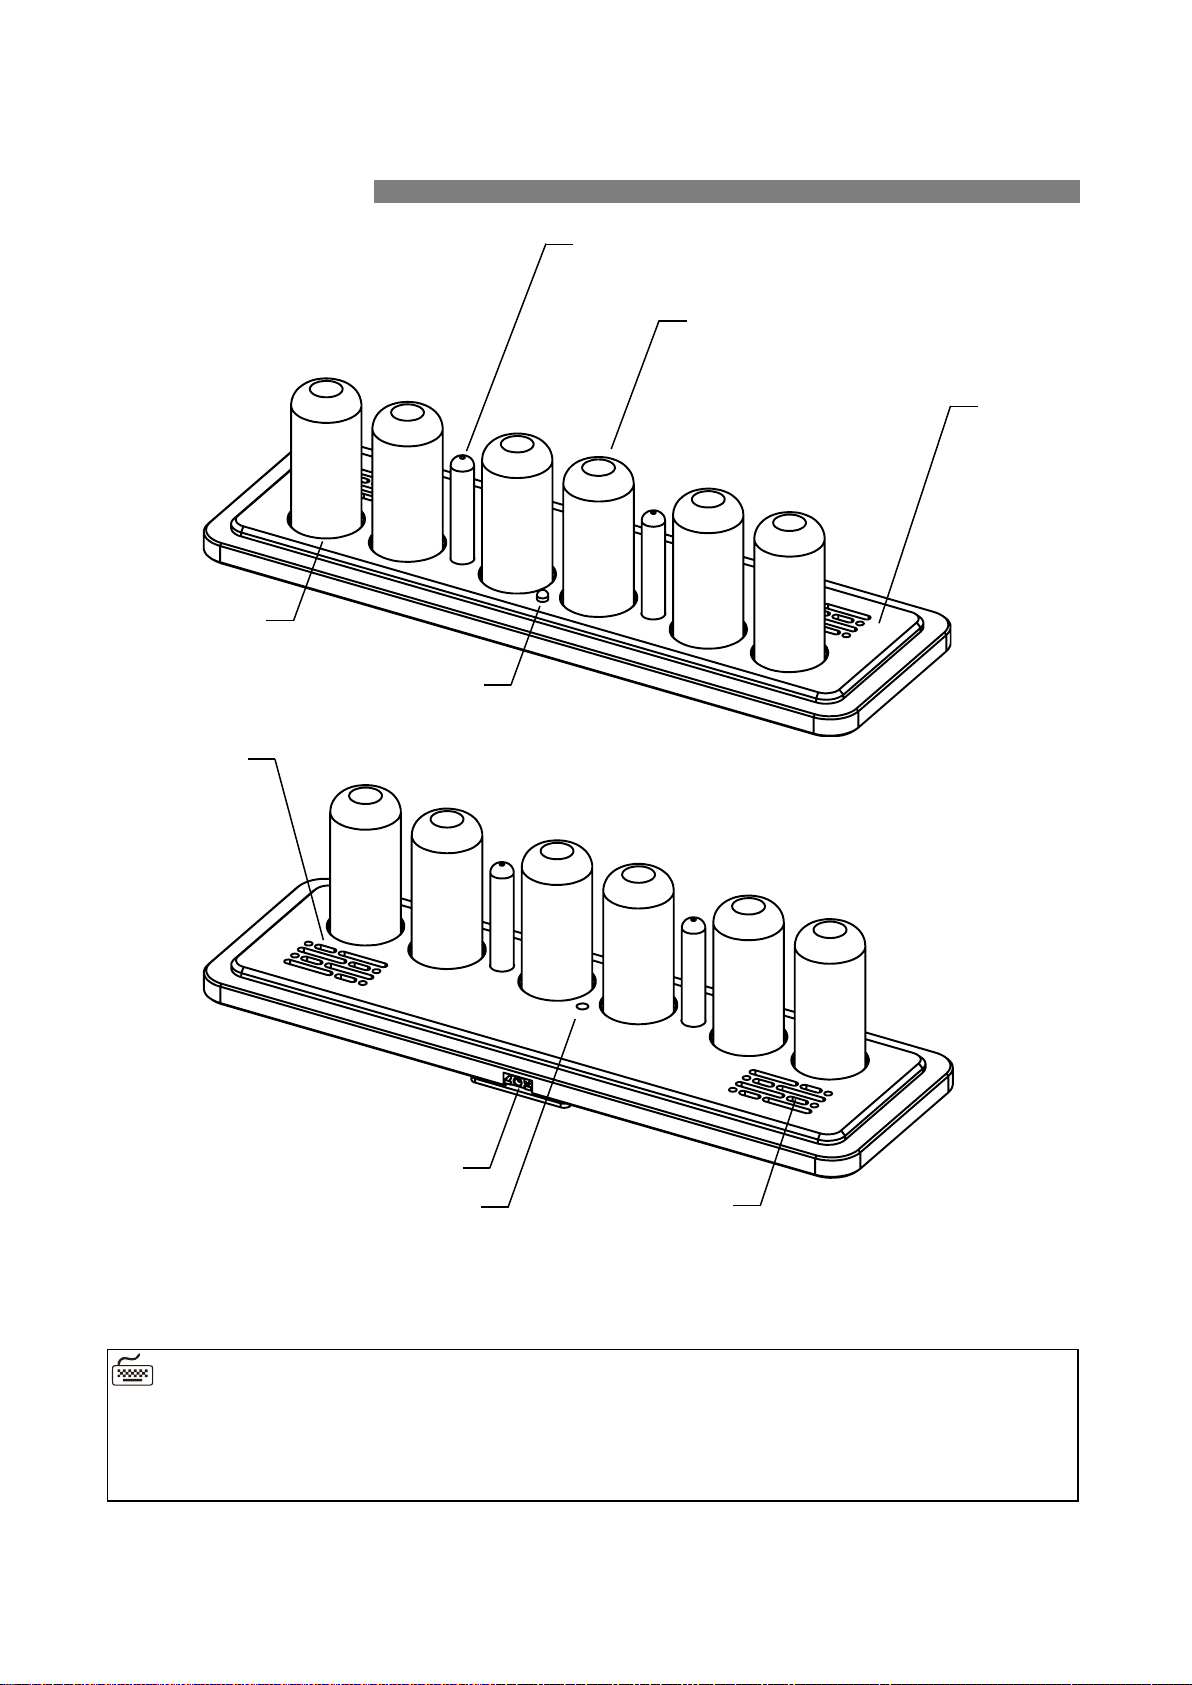
Appearance
IR Receiver
Speaker
Nixie Tubes (6pcs)
Light Sensor
Aluminium
alloy plate
Colons (2pcs)
Power Socket
◼ Over three tube variations were designed for the Omnixie, each type of tube has a
different appearance.
WIFI Status Indicator
(Underneath)
Backlights (6pcs)
Page 7
7 / 52
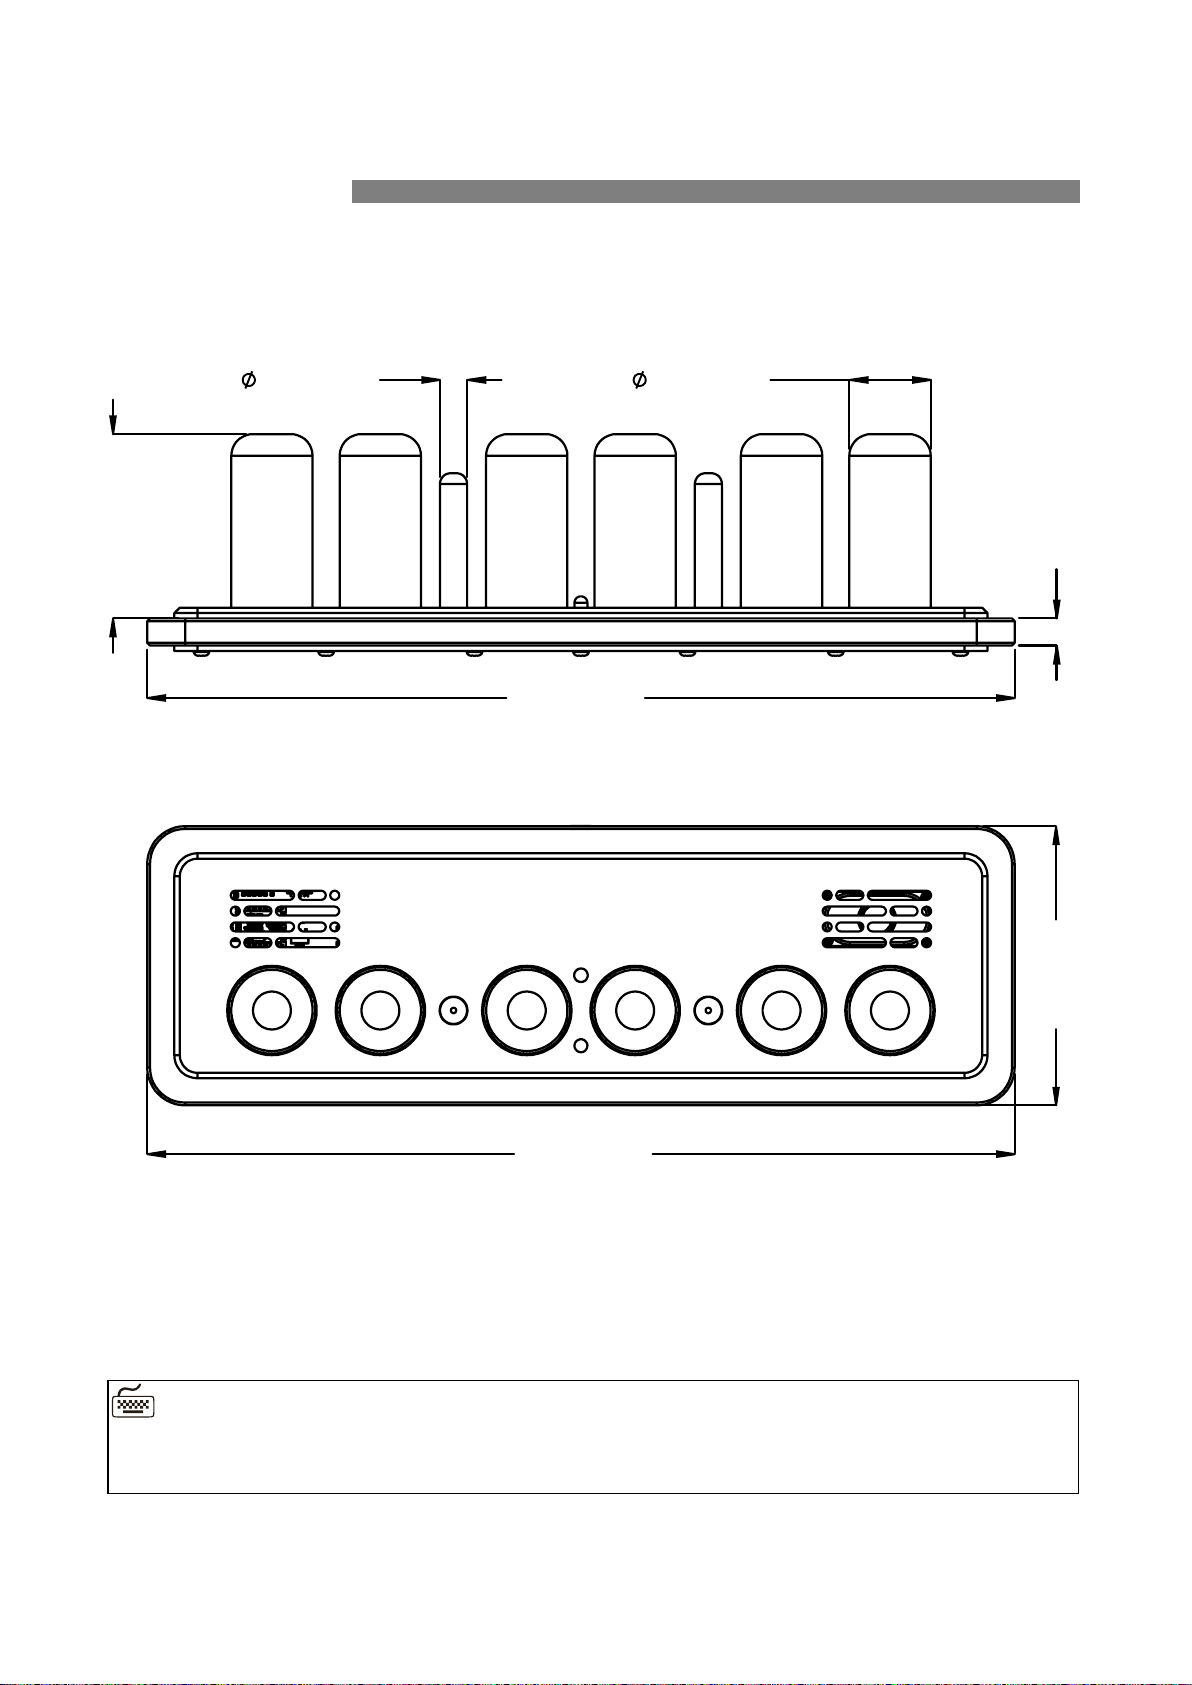
Dimension
◼ Different types of Nixie tubes have different heights. (The dimension listed above is
for your reference only)
Page 8
8 / 52
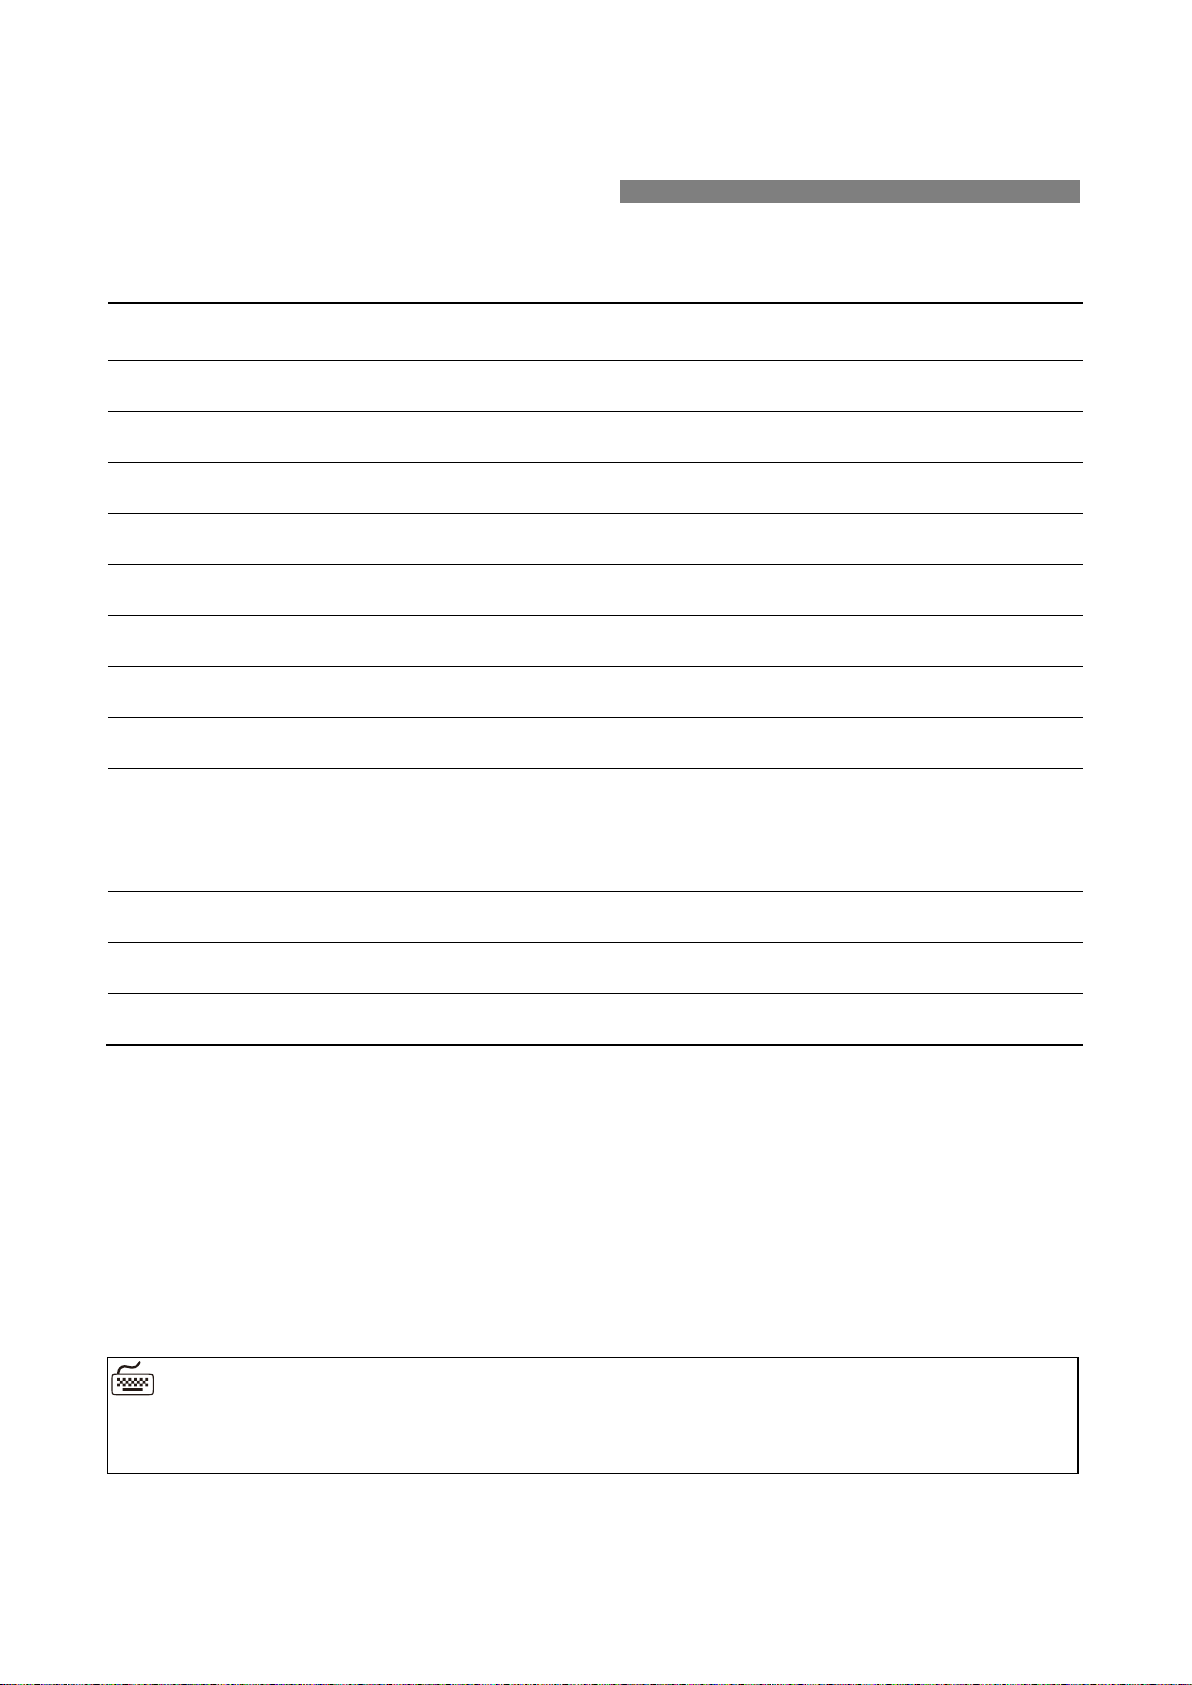
Technical Specifications
Name
Specifications
Nixie Tubes Omnixie Plus IN
IN-18 (Rovno made in Soviet Union)
Omnixie Plus ZM
ZM1040/ZM1042(Mullard/Philips/Tesla/Siemens/Valvo.Ultron)
Power input
DC12V 600mA(Max) / DC3.5-1.35
WIFI
IEEE 802.11 b/g/n
Frequency range
2.412GHz – 2.484GHz
Antenna
Built-in PCB board antenna
Dimension
Base 320mm(L) x 103mm(W) x 10mm(H)
Height of Nixie tubes 62mm – 71mm(Based on tube types)
Material of housing
Aluminum panel
Hardwood frame
Stainless steel base plate.
Operation temperature
0℃ - 60℃
Weight
~9120g (Only the Omnixie clock)
~1100g (Complete packaging)
◼ The Omnixie will be compatible with additional Nixie tubes, please visit our website
for more information.
Page 9

9 / 52
Features
Name
Description
Swappable Nixie tubes
and colon tubes
Compatible with dozens of different types of Nixie tubes, gold-plated
connectors ensure stable and reliable connection with easy tube replacement.
WIFI synchronization
Built-in WIFI module, connect to router automatically and sync date and time
from NTP server (NTP time accuracy can reach 1-50ms) after initial setup, never
worry about the accuracy, leap year, leap seconds. Daylight saving time can be
automatically adjusted. High-precision network time please refer to
https://time.is
Web configuration
(Support iOS, Android,Mac
OS, Windows)
Built-in web server, open any web browser to access the interface page
(Dashboard) to configuration of all Omnixie features including WIFI parameter
settings, NTP settings, system status, general settings, display settings, alarm
settings and firmware upgrade.
DHCP 、 mDNS 、 SSDP
support
Support DHCP settings for external network access, supports mDNS for
browser domain name access (no need to remember device IP address),
supports SSDP for fast network discovery.
OTA firmware upgrade
The system firmware can be upgraded directly through the Web interface
without any special equipment.
Support GMT setting
Supports GMT time zone setting. The system will automatically convert the
local date and time according to the GMT time zone settings.
Support DST setting
Supports DST settings. Customize the start and end dates for daylight saving
time to adapt to different countries daylight saving time rules.
Brightness adjustable
8 brightness levels for Nixie tubes and backlights, which can also be
automatically adjusted according to ambient light conditions (to allow sleep
at night).
Talking clock
Intelligent speech system in English, Chinese Mandarin, Japanese and German.
The interval and alarm music are user customizable.
Alarm
Four individually configurable alarm clocks, supports snooze function.
(weekend activation optional)
Music key tone and
alarm
Variety of key tone sound effects for easy setting confirmation. 12 kinds of
alarm music, the alarm volume can be set independently.
Switch On/Off
automatically
On and Off time can be set for longer tube lifetime.
IR remote
IR remote controller operation.
Volume adjustable
8 volume levels. Independent Alarm volume, mute does not affect the alarm
sound.
Digits transition effects
1. Normal 2. Fade in-out 3. Crossfading 4. Slot machine.
Transition speed adjustable
Ten speeds available for the transition.
Colons effects
1. Fade in-out 2. Blinking 3. Always on 4. Always off
Background light effects
1. Always on 2. Fade in-out 3. Always off
Background light color
scheme
15 types of background light color scheme can be configured.
Page 10
10 / 52
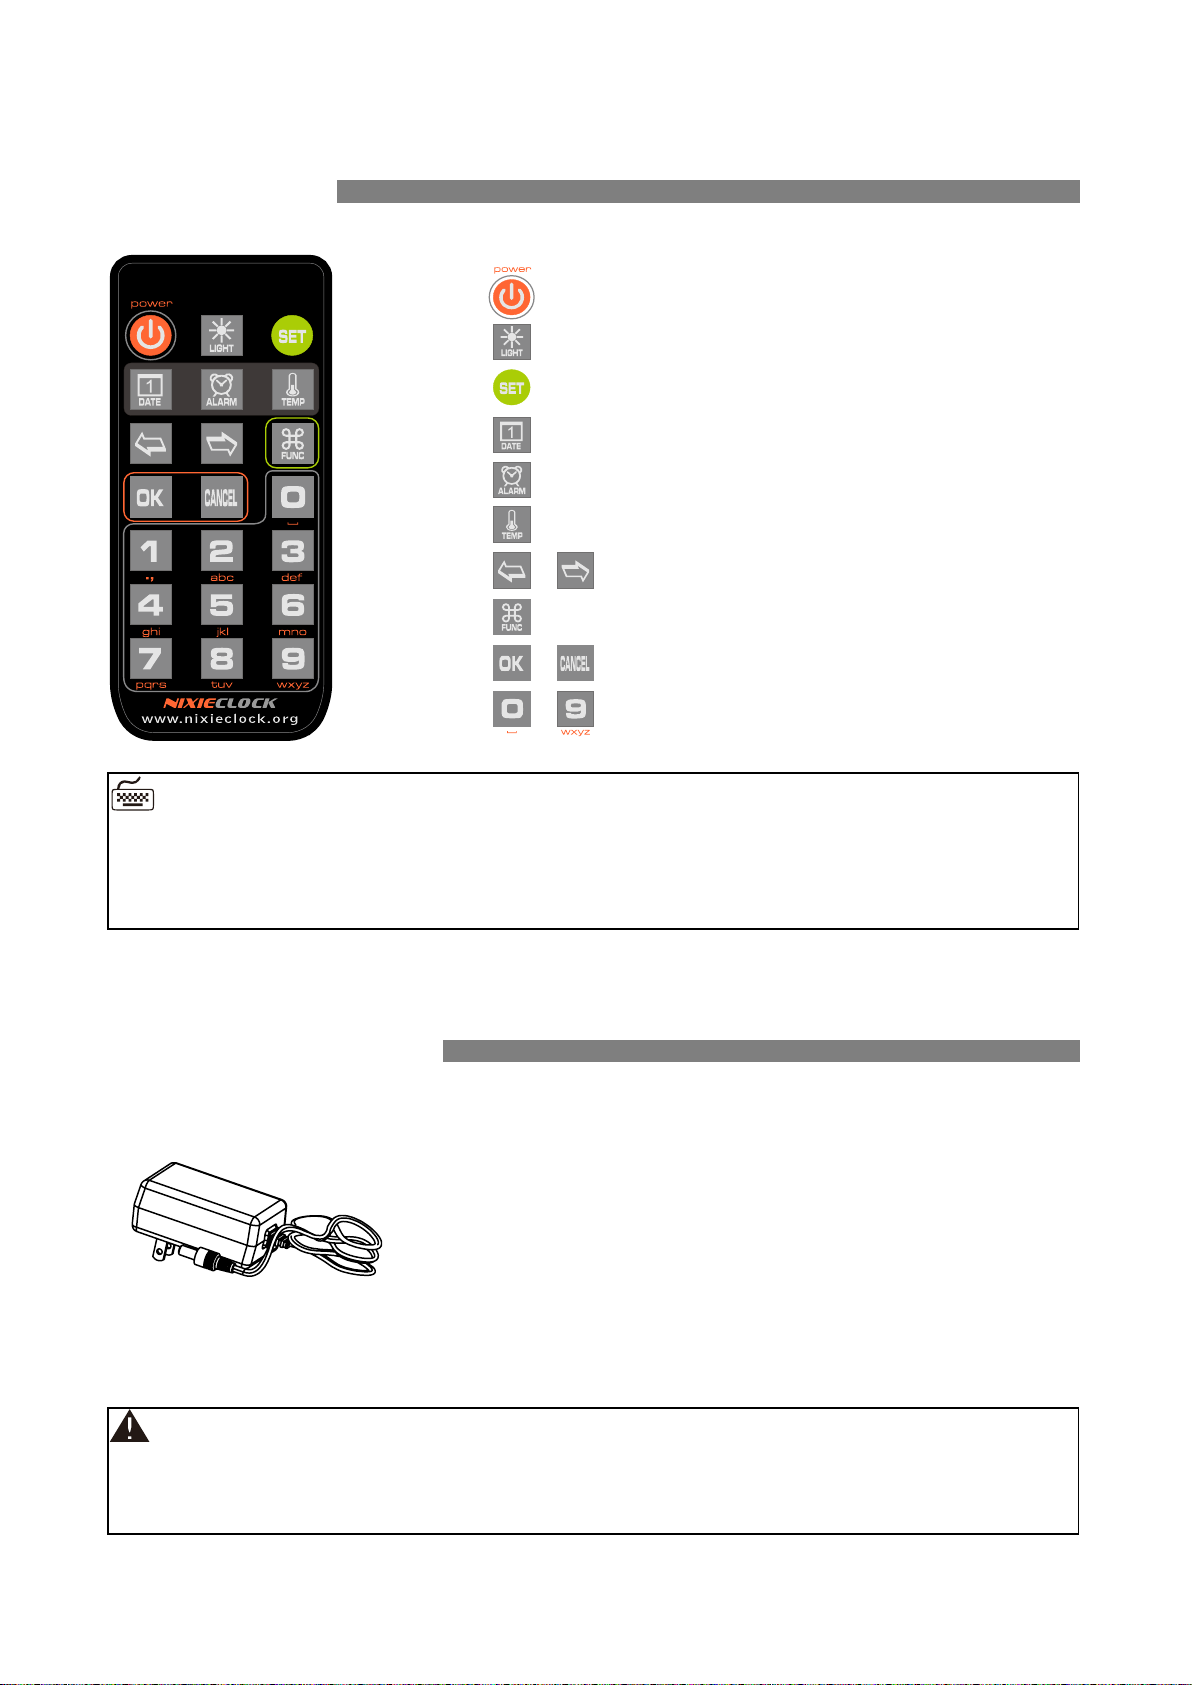
IR Remote
Power Adapter
Power Power ON/OFF
LIGHT Set Brightness
SET Enter setup
DATE Display date
ALARM Display alarm
TEMP --NOT IN USE-LEFT/RIGHT Move cursor position
FUNC Enter menu
OK/CANCEL Save/Abort
NUMBER Enter numbers
◼ The IR remote uses (1) CR2025 cell. Transportation rules may not permit shipment with
lithium battery installed. Please insert battery or remove the protective insulator to
operate.
◼ In order to insure proper operation, only use the supplied power adapter and high
current USB cable.
⚫ Input: 100-240VAC, ~180mA, 50/60Hz.
⚫ Standard DC3.5/1.35 output.
⚫ Output DC 12V, Max 1A.
-
Page 11
11 / 52
Get Ready Before Use
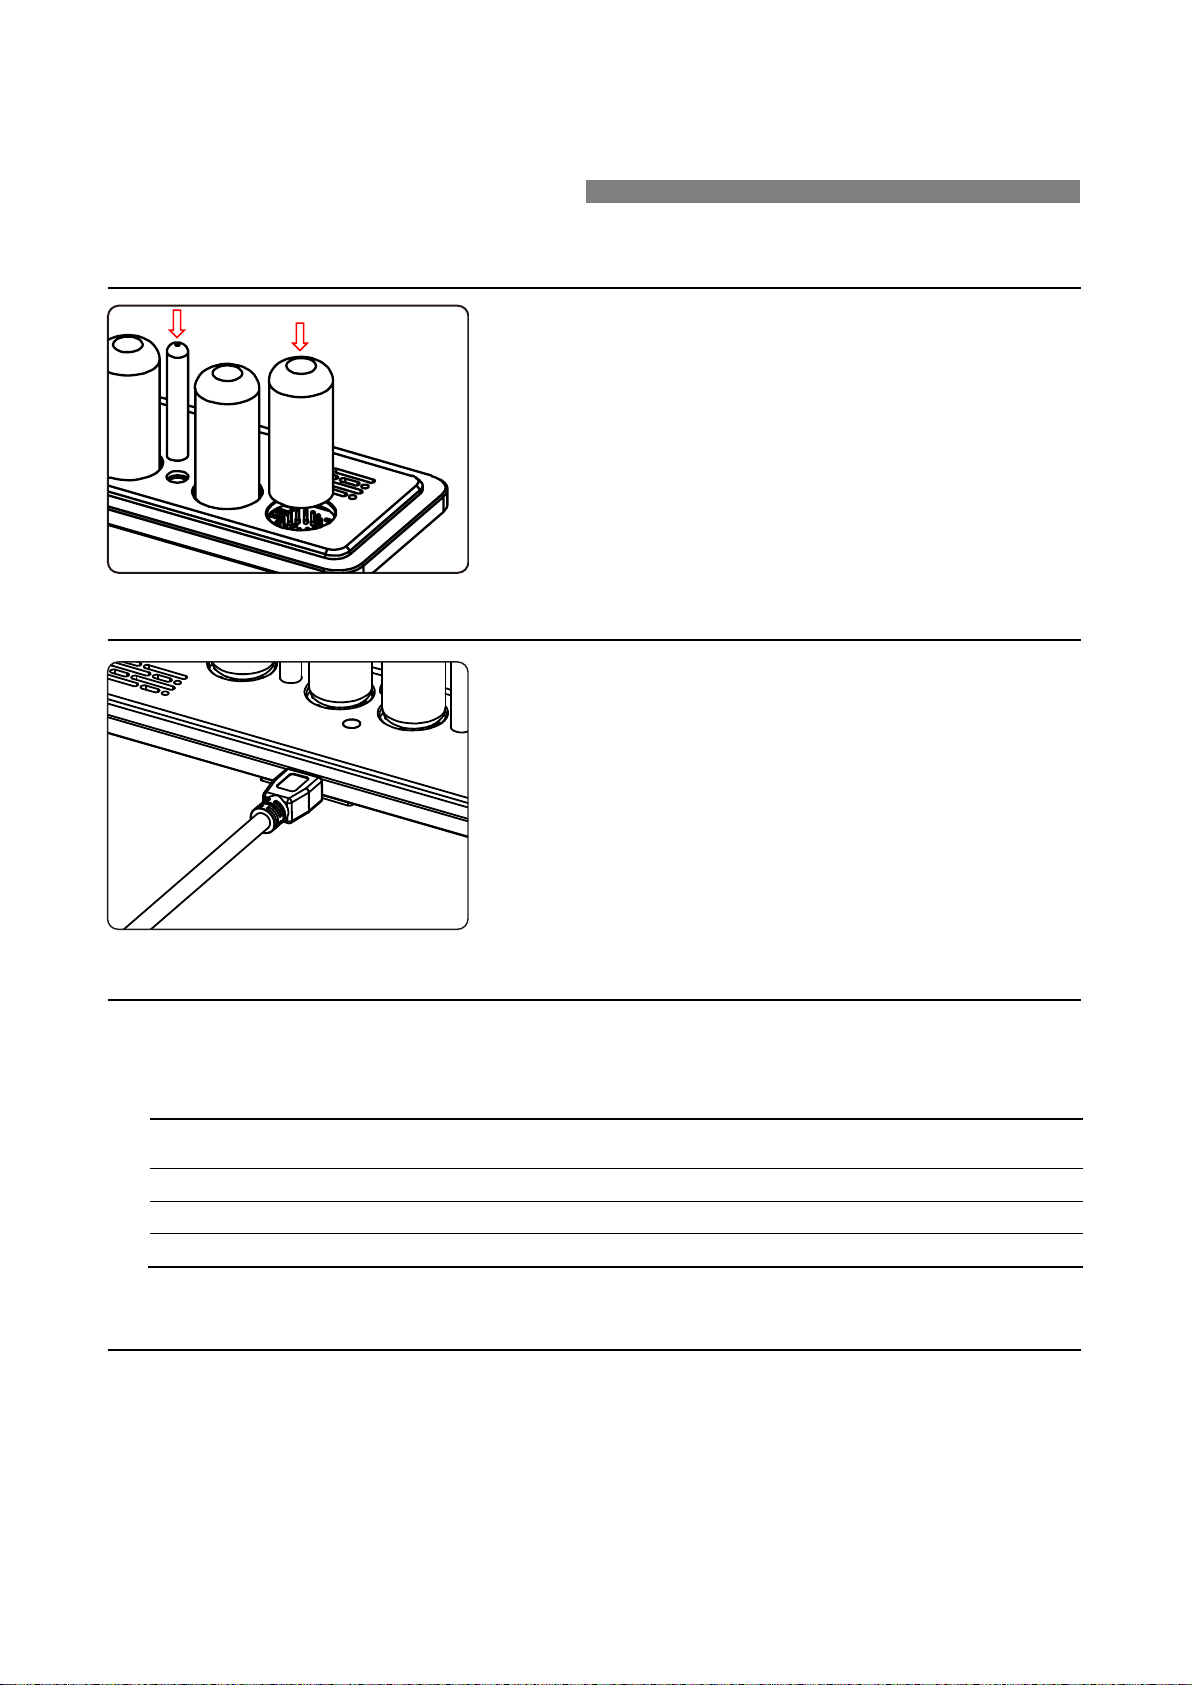
Install Nixie tubes (Skip this section if Nixie tubes are installed)
Plug in Power Cable
WIFI Status Indicator
The color of Omnixie`s WIFI status indicates the current WIFI link status with the
following color information:
Color
Status
Red
WIFI router not connected, waiting for configuration.
Yellow
WIFI connected, but the NTP server is not connected.
Green
WIFI connected, and the NTP server is connected.
Cleaning
Consider the notes bellow before cleaning the Omnixie.
⚫ Please power off and disconnect USB cable before cleaning.
⚫ Do not use any cleaning agent or wet wiper.
⚫ We suggest use soft cloth or brush to avoid scratching the housing finish.
⚫ Plug the power plug into the socket
on the back of the Omnixie to turn on
the power.
⚫ The Omnixie will start working
immediately after power is applied.
⚫ Face the dights of Nixie tube, align the
pins with the sockets and gently insert
the tube.
⚫ Adjust the vertical angle of the Nixie
tubes after all tubes are inserted.
⚫ If a tube cannot be easily inserted,
please check whether the pins are
misaligned or bent.
⚫ Face the neons of colon tube, align
the pins with the sockets and insert.
Page 12
12 / 52
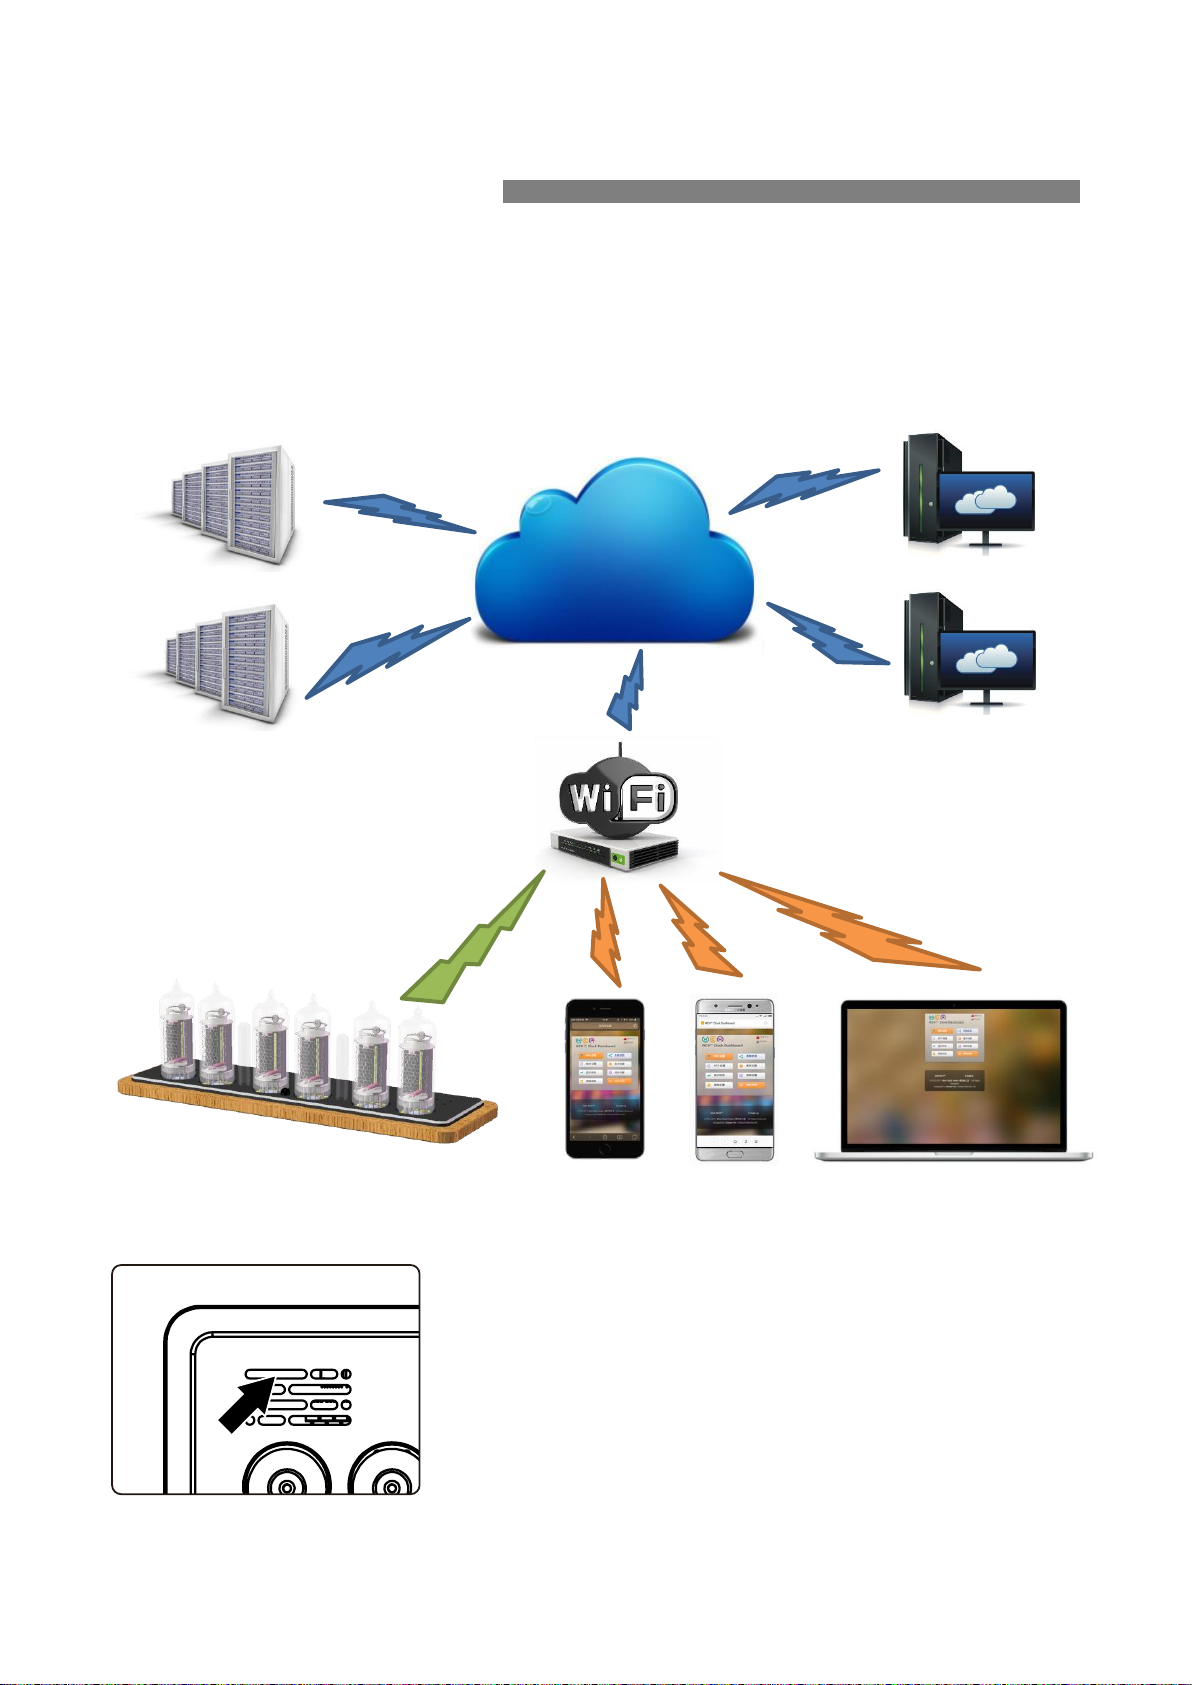
WIFI Introduction
The Omnixie can connect to routers via WIFI and access NTP time servers to get
accurate network time (NTP servers are located all over the world and choose the
fastest connected server based on your location). Additionally, a phone or computer
can use the same WIFI connection to set all features of the Omnixie.
⚫ For the first connection, about 10 seconds
after the Omnixie is powered on, the WIFI
status indicator will light up in red to
indicate that the Omnixie WIFI is not
connected to any network and is waiting for
configuration. At this point you can use any
of the following methods to connect and
configure the WIFI network.
Internet
NTP Server
NTP Server
NTP Server
NTP Server
WIFI router
IPhone Android PC or Mac
Omnixie Clock
Page 13

13 / 52
⚫ The Omnixie needs to be set to use your home network and requires a “one time”
setup.
⚫ On first power-up, the clock creates a WiFi hotspot for the initial configuration.
⚫ On your phone or PC: Go to the WiFi settings and look for an SSID like:
NCHxxxxxx. This is your Omnixie clock.
⚫ Temporarily connect to the clock WiFi SSID and a configuration window should
open, or simply browse to http://192.168.4.1
⚫ Teach your Omnixie to connect and use your own WiFi network by selecting your
home SSID and providing the network password.
⚫ When completed, the Omnixie will reboot and automatically connect to your WiFi.
⚫ Your phone or PC will automatically reconnect back to your home network.
⚫ Omnixie configuration will now use your WiFi network. Use your phone or PC
browser to view your Omnixie for complete clock configuration information.
Detailed steps for Android, iOS and Windows PC follow.
WIFI Introduction
Page 14
14 / 52
WIFI Configuration with iPhone
iPhone
Other iOS devices can refer to this method.
Page 15
15 / 52
WIFI Configuration with iPhone
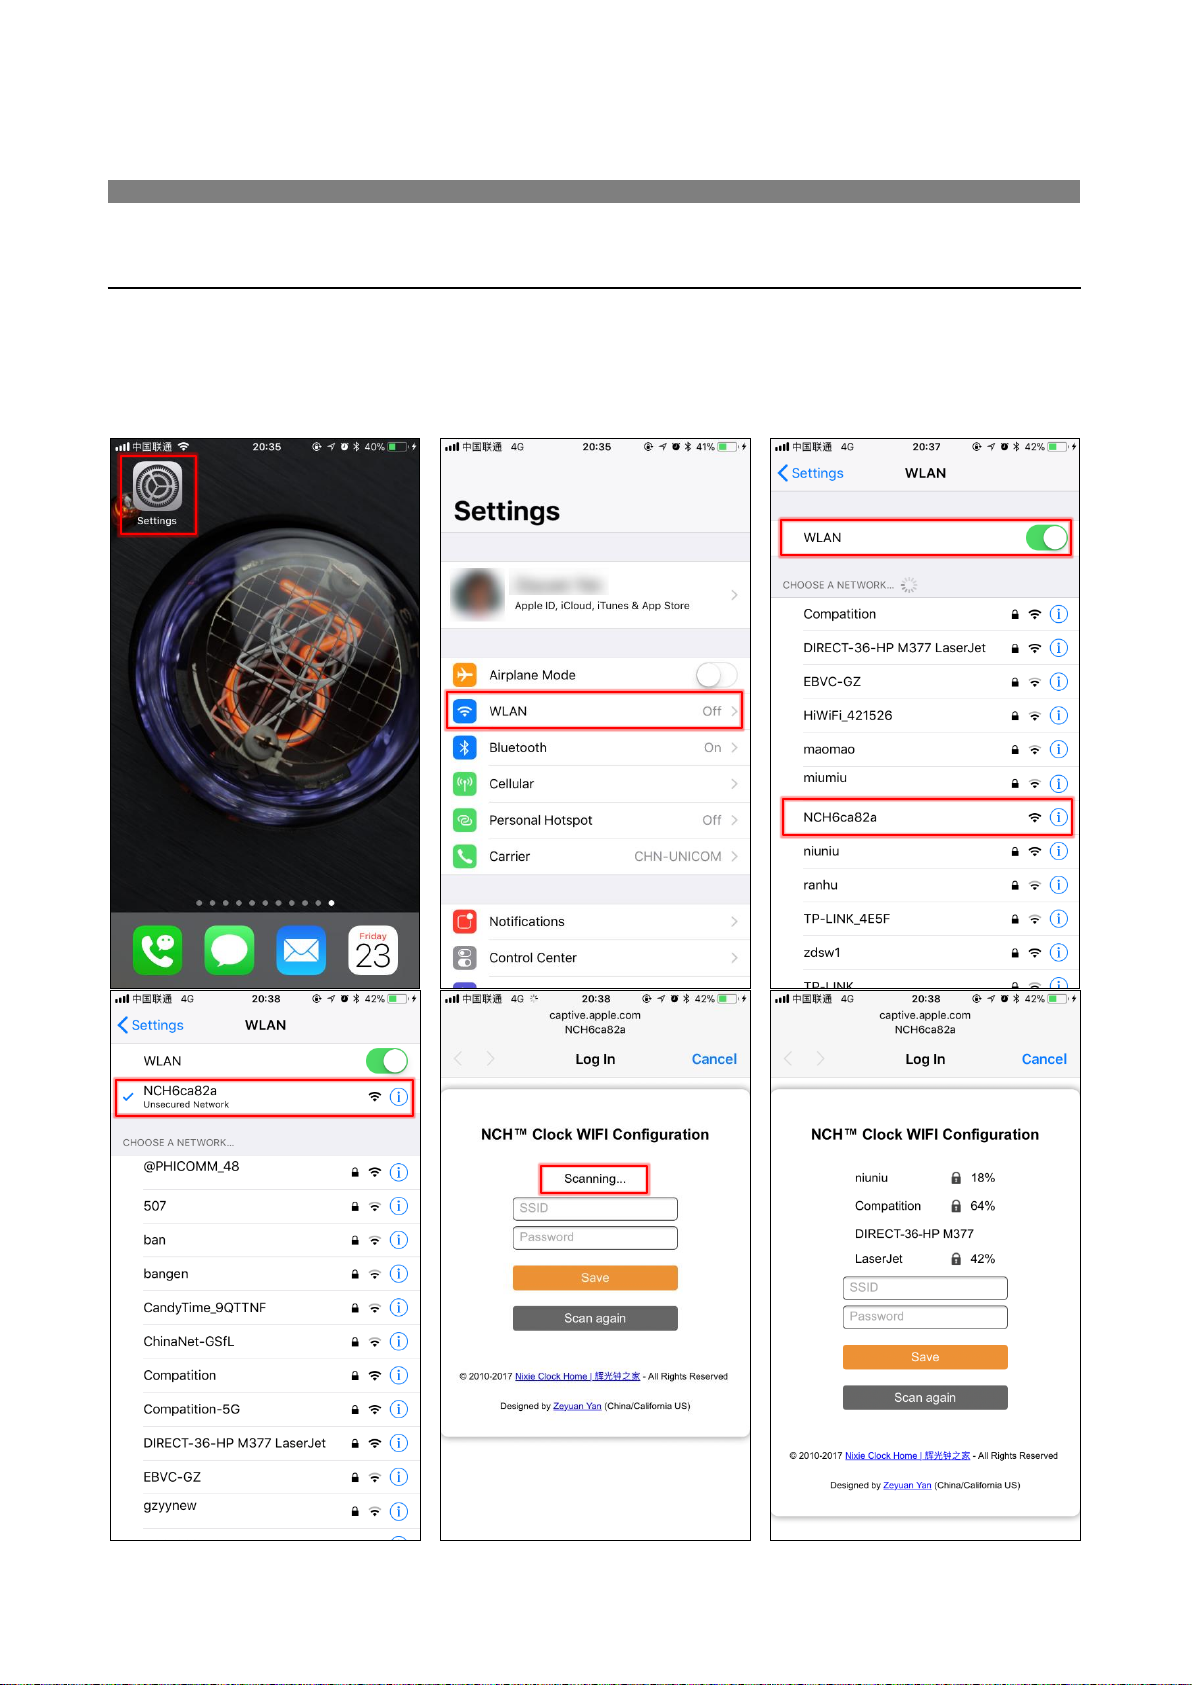
Open the Settings->WLAN, turn on WLAN, select NCHxxxxxx (xxx is a serial # of your
clock) in the list. After the network is connected, the WIFI configuration interface will
pop up automatically and start to scan the available WIFI networks as shown in the
following figure:
7
WIFI Connection
Page 16
16 / 52
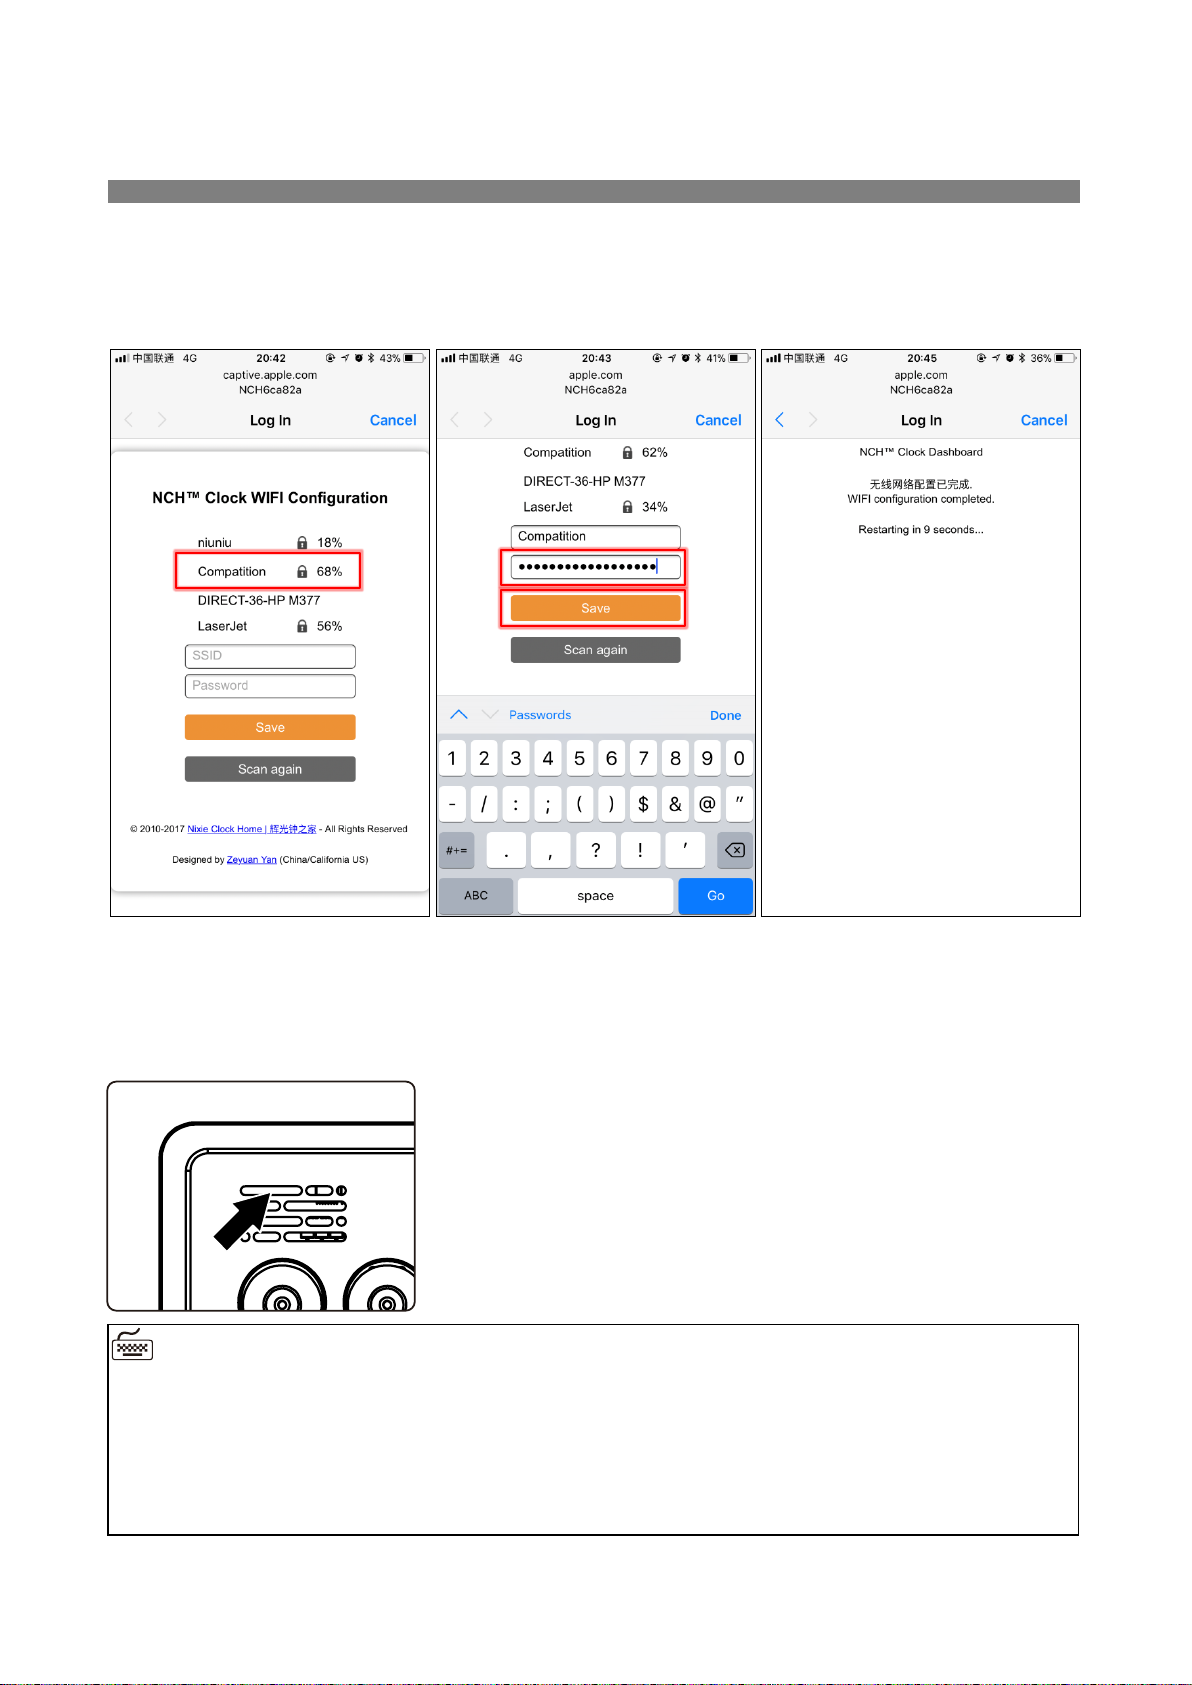
After scanning, all nearby available WIFI networks will display, click the WIFI name and
enter the password, then click Save button to save the configuration. If no nearby WIFI
networks are displayed, please click Scan again button to rescan.
After the WIFI configuration is completed, The Omnixie will reboot and connect to the
WIFI automatically. If the connection is successful, the WIFI status indicator will light
yellow or green. If WIFI status indicator still red after rebooting, it indicates that the
WIFI password just entered is incorrect, please select again to make settings.
WIFI Connection
◼ Omnixie`s network name starts with NCH followed by 6-digit identifier.
◼ For more information of colors of WIFI status indicator, please refer to Get Ready
Before Use-> WIFI Status Indicator.
◼ To reset WIFI settings please refer to Setup the Omnixie using the Omnixie
Dashboard -> Advanced Setup.
Page 17
17 / 52
Open Dashboard with iPhone
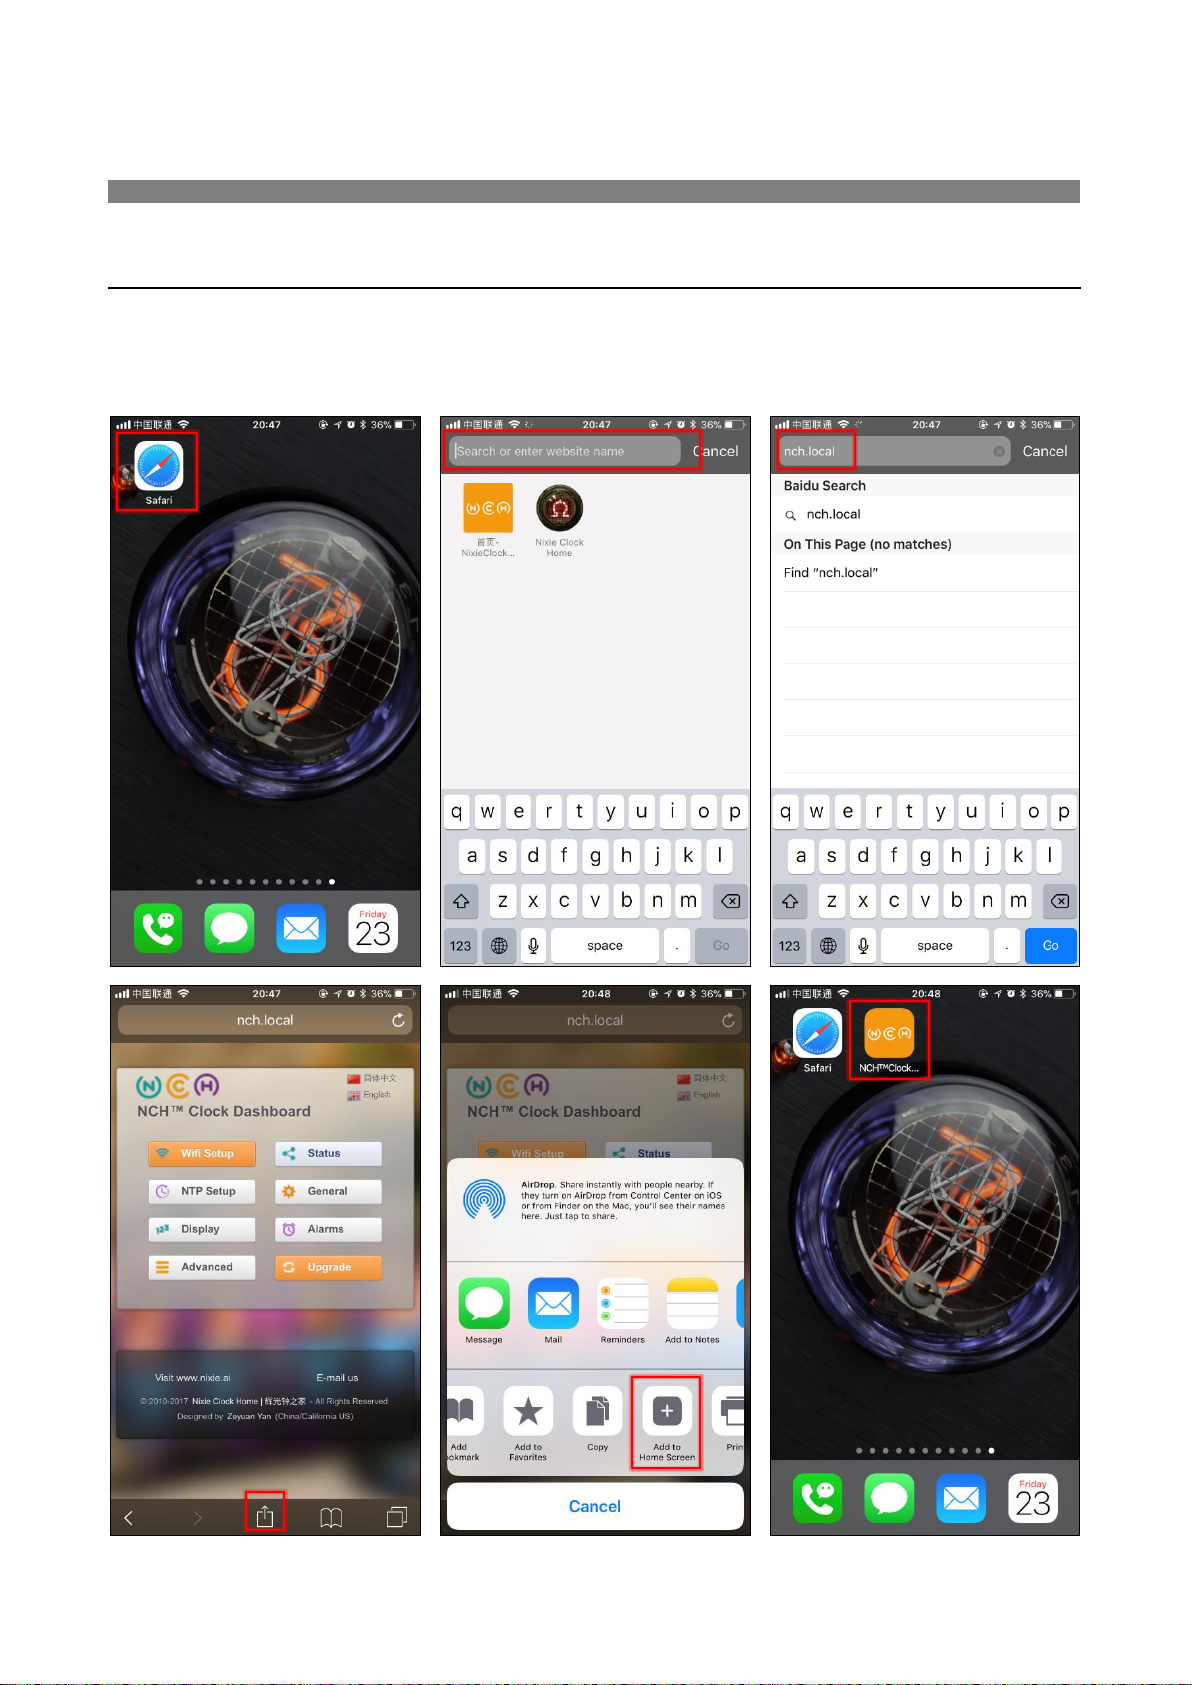
Method one: Open Safari, type nch.local to open Dashboard.
Method two: After open Dashboard, click MENU button below, click Add to Home
Screen button, then you can open Dashboard on the phone desktop as an App.
WIFI Connection
Page 18
18 / 52
WIFI Configuration with Android
Android
Page 19
19 / 52
WIFI Configuration with Android
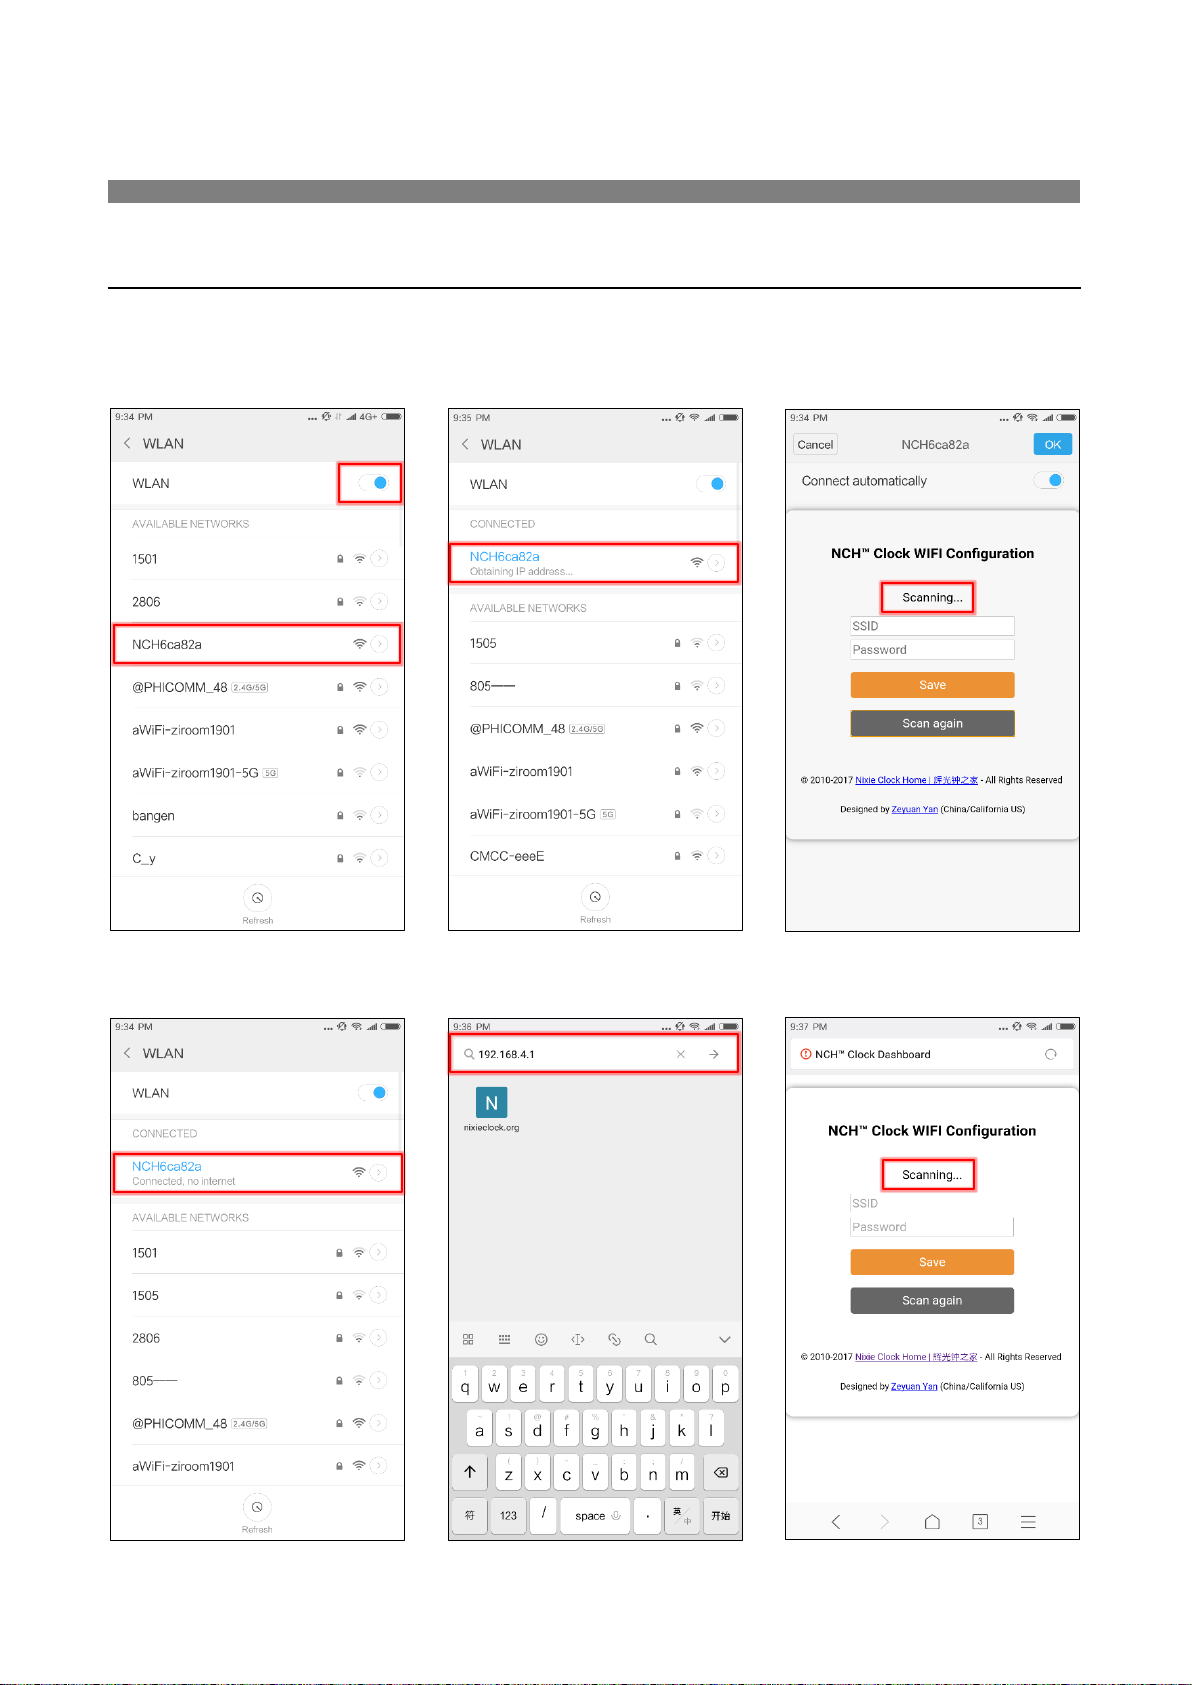
Open the Settings->WLAN, enable WLAN, select NCHxxxxxx in the list. After network
is connected, the WIFI configuration interface will pop up automatically and start to
scan the available WIFI networks as shown in the following figure:
If WIFI configuration interface does not pop up automatically, please open browser
and type 192.168.4.1 to open WIFI configuration interface.
WIFI Connection
Page 20
20 / 52
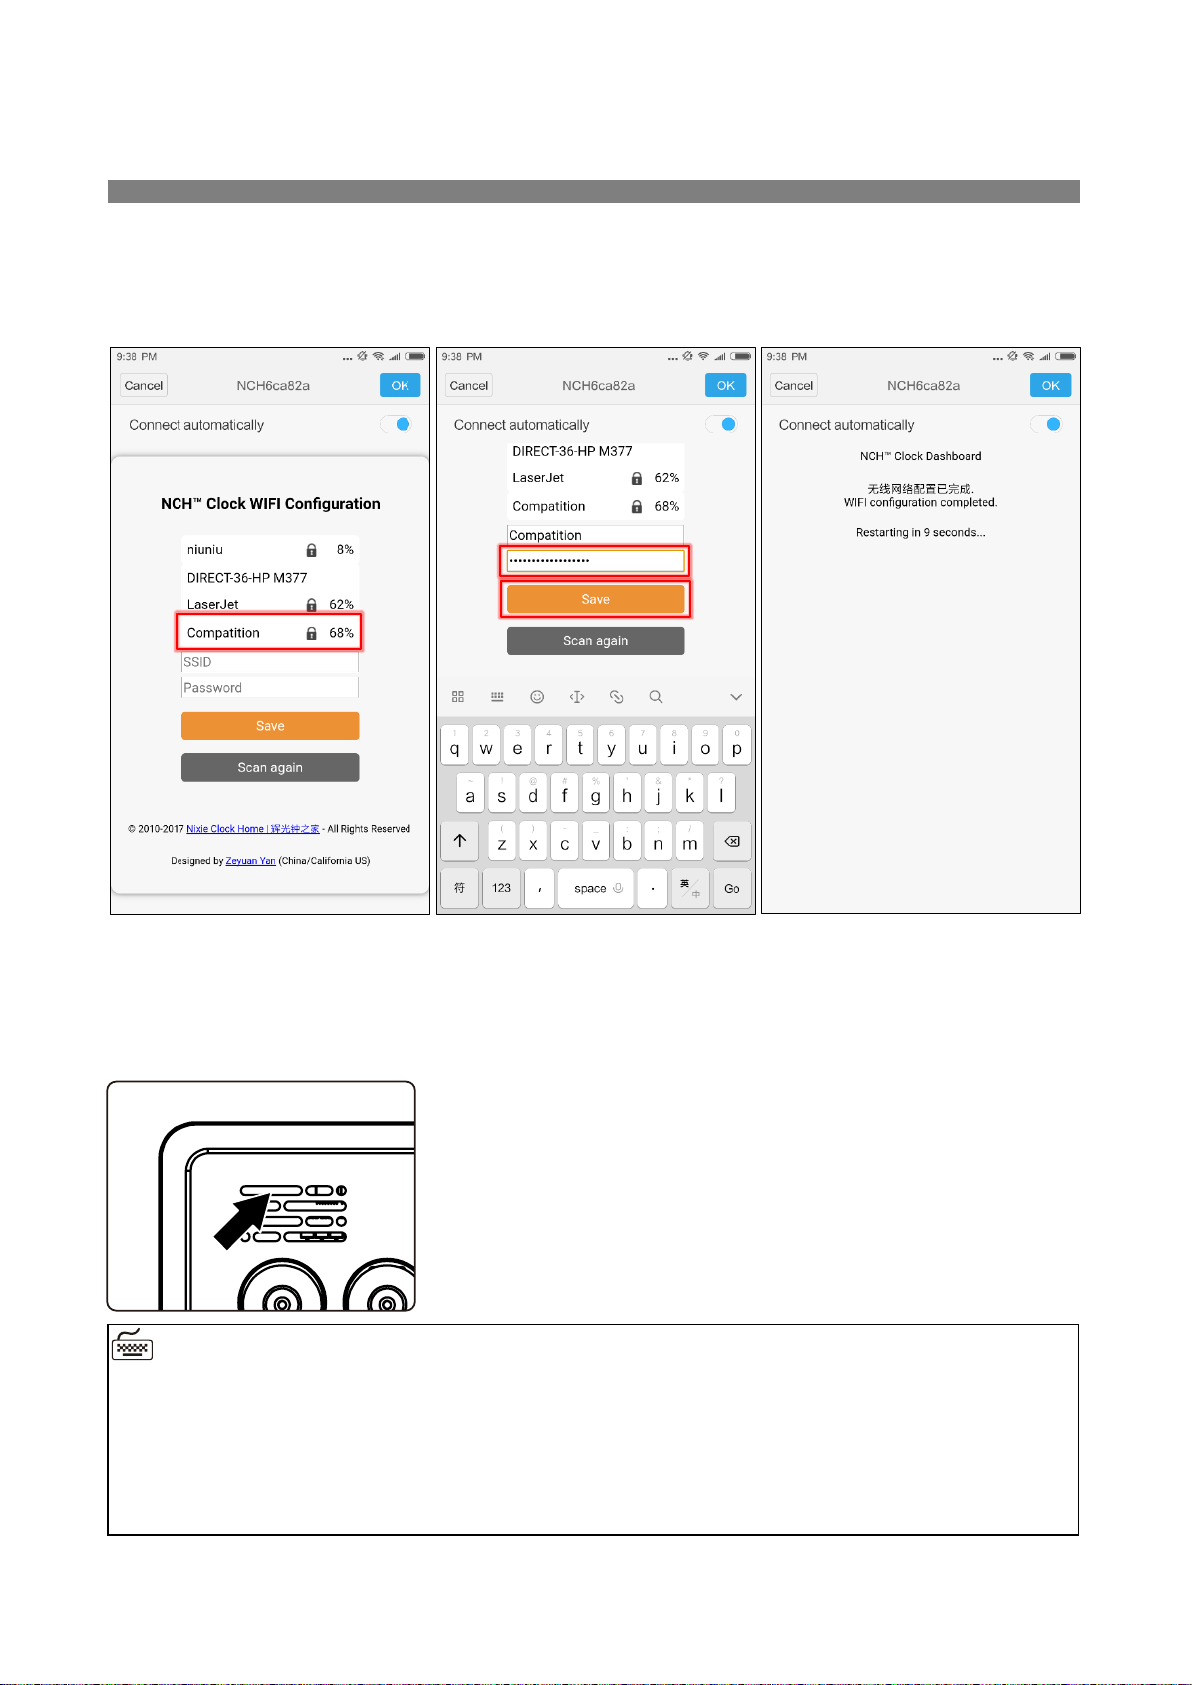
After scanning, all nearby available WIFI networks will display, click the WIFI name and
enter the password, then click Save button to save the configuration. If no nearby WIFI
networks are displayed, please click Scan again button to rescan.
After the WIFI configuration is completed, The Omnixie will reboot and connect to the
WIFI automatically. If the connection is successful, the WIFI status indicator will light
yellow or green. If WIFI status indicator still red after rebooting, it indicates that the
WIFI password just entered is incorrect, please select again to make settings.
WIFI Connection
◼ Omnixie`s network name starts with NCH followed by 6-digit identifier.
◼ For more information of colors of WIFI status indicator, please refer to Get Ready
Before Use-> WIFI Status Indicator.
◼ To reset WIFI settings please refer to Setup the Omnixie using the Omnixie
Dashboard -> Advanced Setup.
Page 21
21 / 52
Open Dashboard on Android
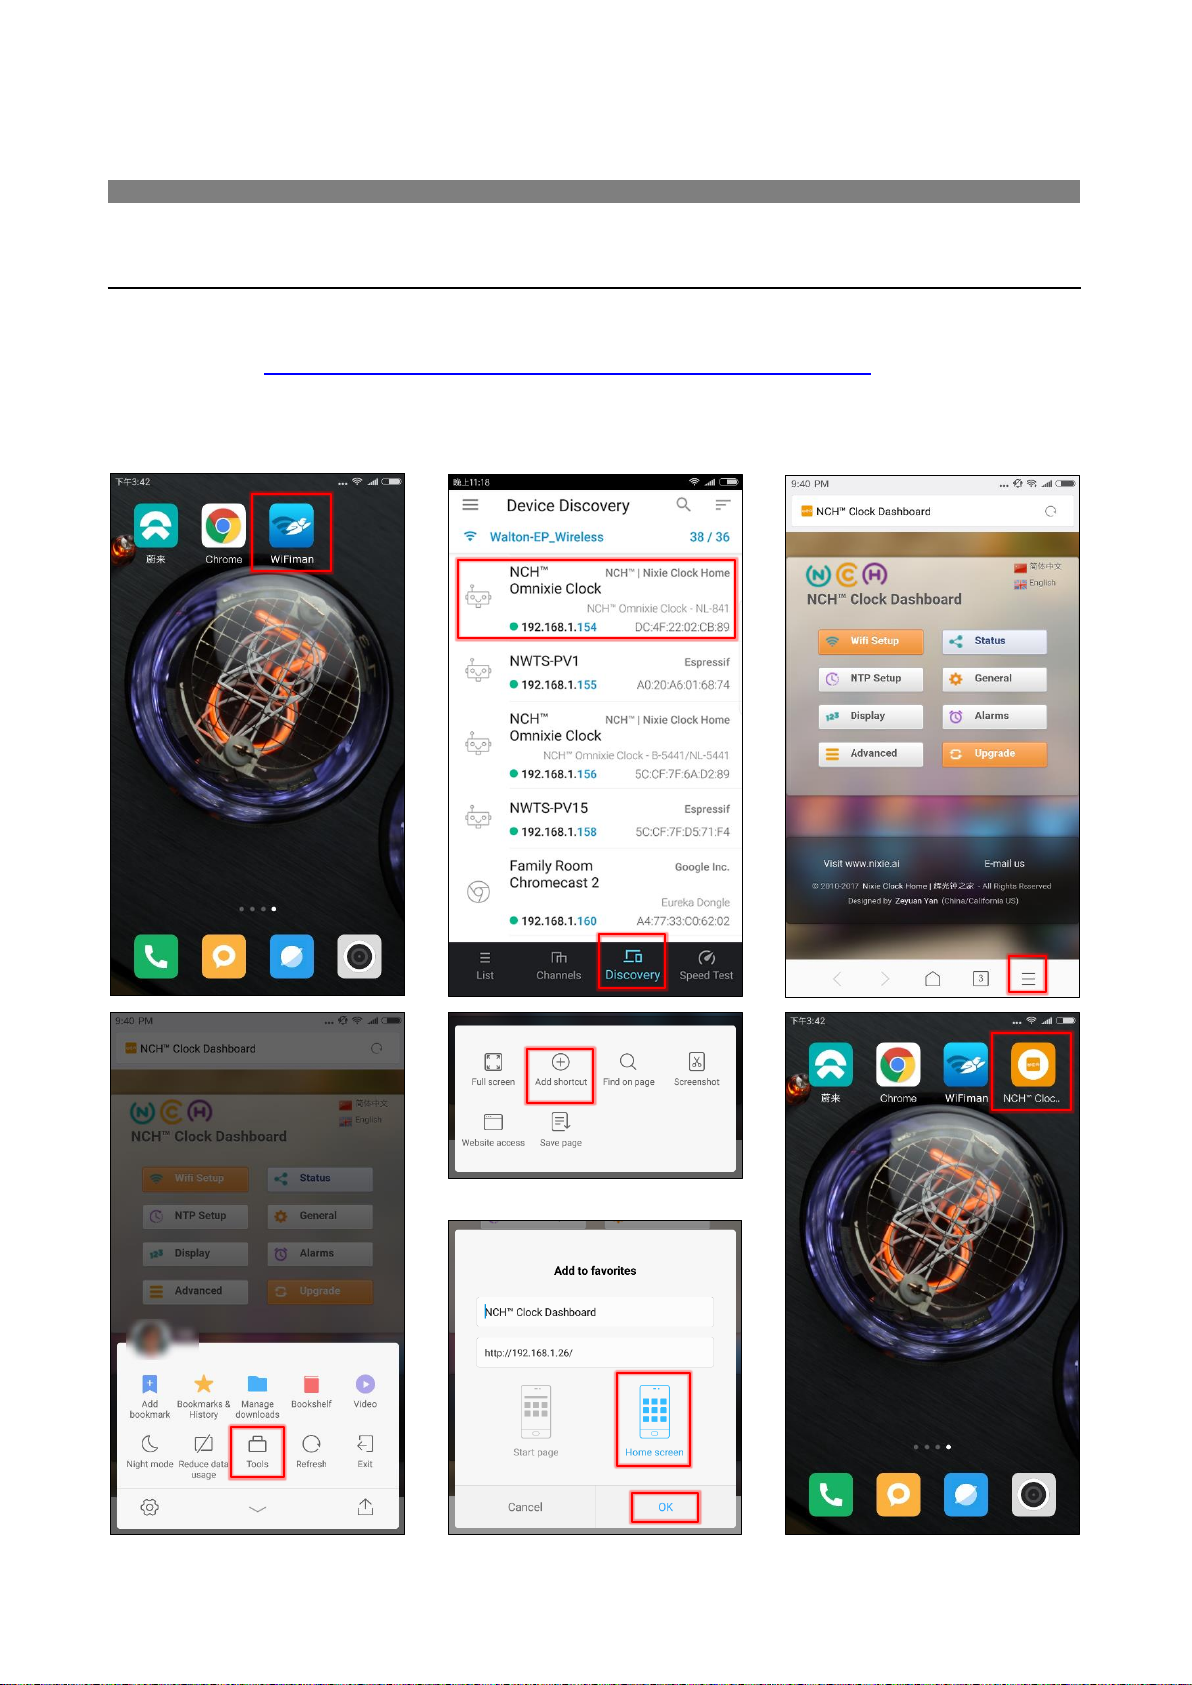
Please download WiFiman (freeware) from the Google Play Store. Or download at
NCH website http://www.nixieclock.org/upload/WiFiman-1.1.2.apk
Method one: Open WiFiman, click Discovery, then click NCH, The Dashboard shows up.
Method two: After open Dashboard, click menu button, click Tools button, click Add
shortcut, click OK, then you can open Dashboard on the phone desktop as an App
WIFI Connection
Page 22
22 / 52
WIFI Configuration with Windows
Windows
Page 23
23 / 52
WIFI Configuration with Microsoft Windows
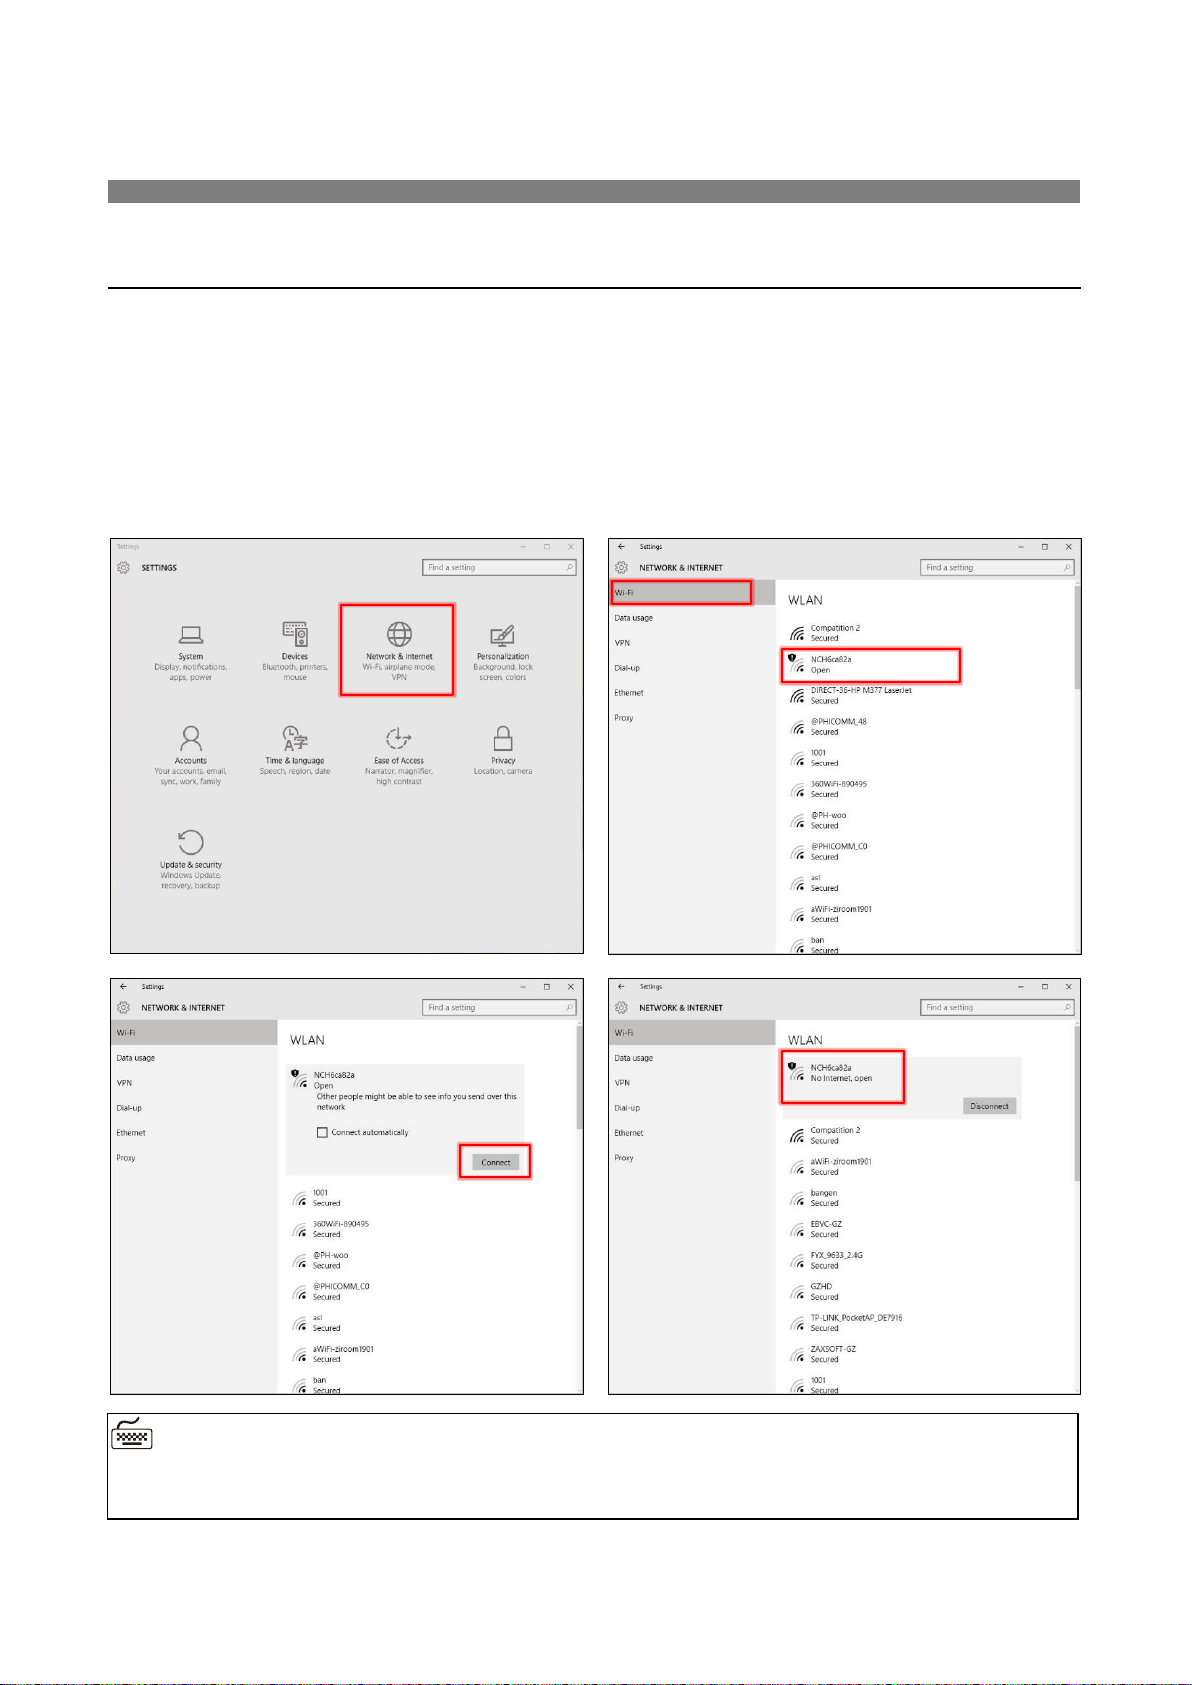
Open the Start->Settings->Network and Internet->WLAN using a computer with
Windows 10 installed, then select the network NCHxxxxxx in the WLAN list on the
right. Waiting for the network connection, WIFI configuration page will pop up
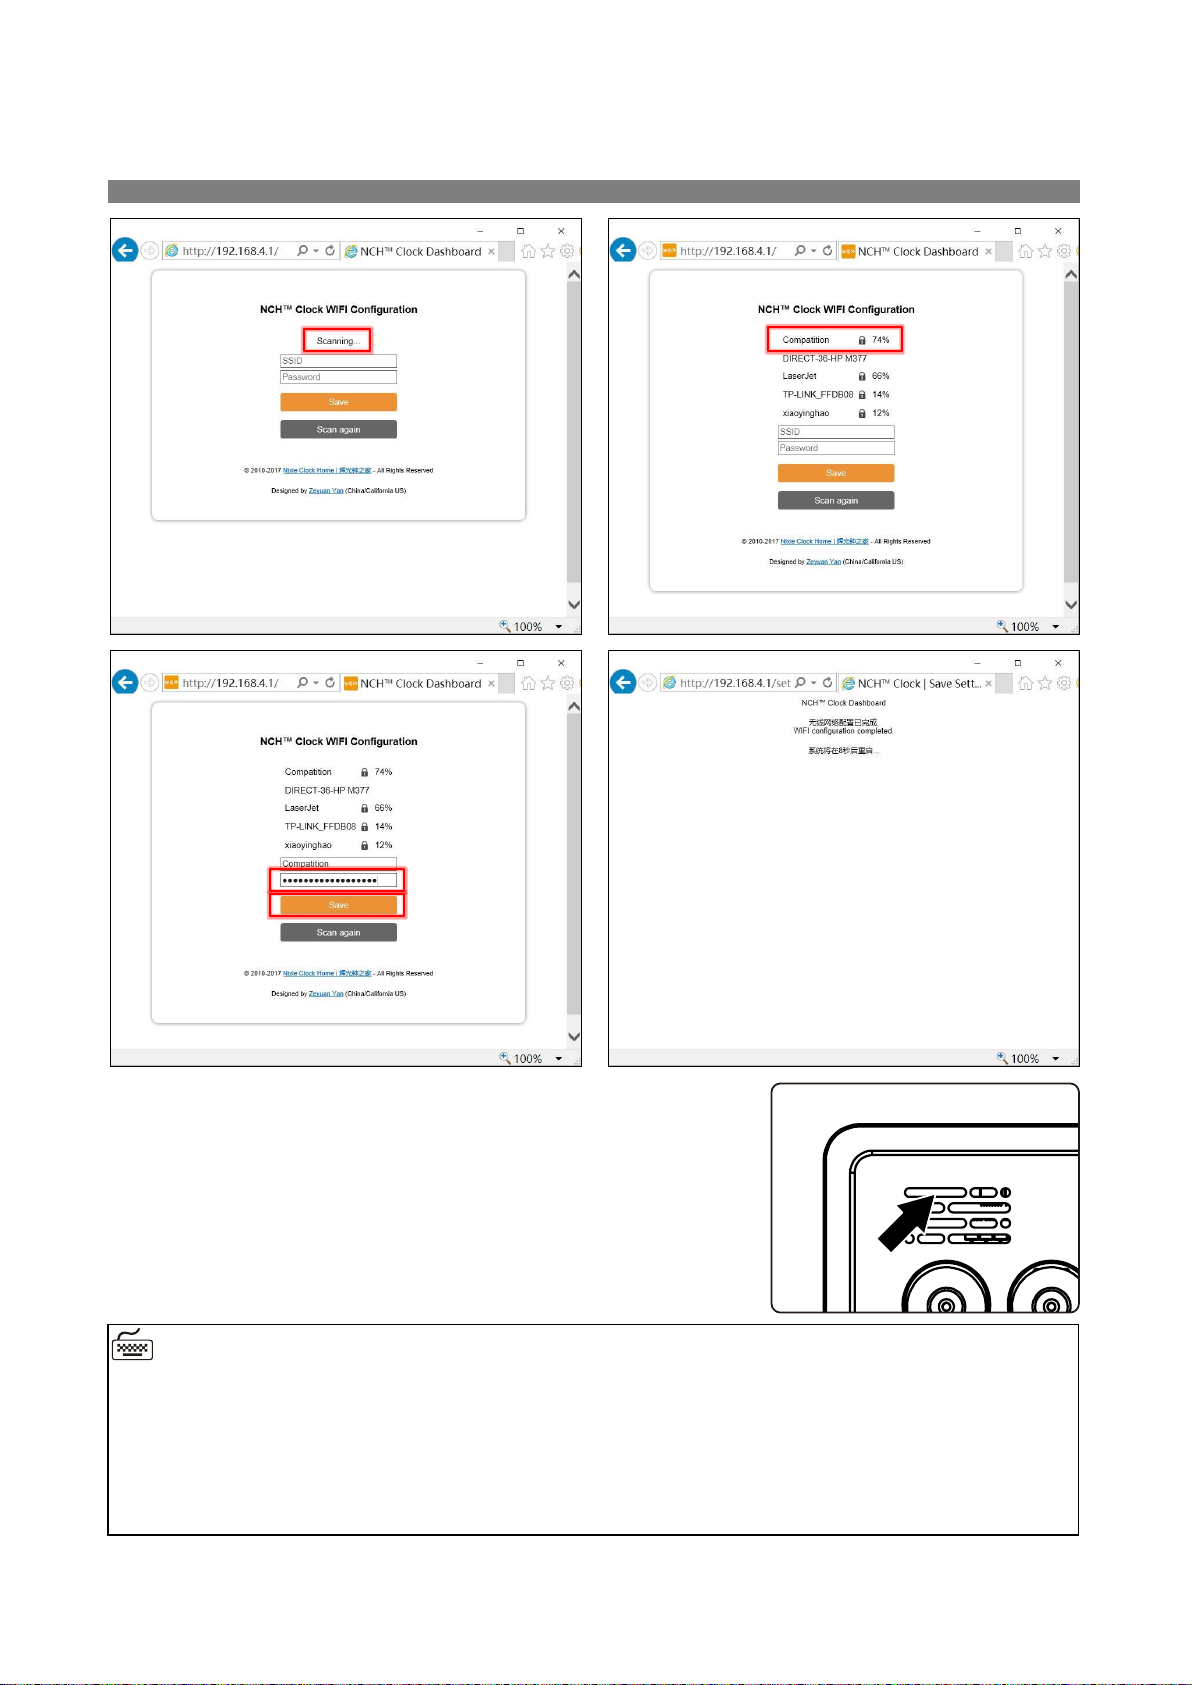
automatically and start scanning available WIFI networks. If the WIFI configuration
interface does not pop up automatically, please open any browser and enter
192.168.4.1 to open the WIFI configuration interface as shown below:
WIFI Connection
◼ Omnixie`s network name starts with NCH followed by 6-digit indetifier.
Page 24
24 / 52
After the WIFI configuration is completed, The Omnixie
Will reboot and connect to the WIFI automatically. If the
connection is successful, the WIFI status indicator will
light yellow or green. If WIFI status indicator still red
after rebooting, it indicates that the WIFI password just
entered is incorrect, please select again to make settings.
WIFI Connection
◼ Omnixie`s network name starts with NCH followed by 6-digit identifier.
◼ For more information of colors of WIFI status indicator, please refer to Get Ready
Before Use-> WIFI Status Indicator.
◼ To reset WIFI settings please refer to Setup the Omnixie using the Omnixie
Dashboard -> Advanced Setup.
Page 25
25 / 52
Open Dashboard on Microsoft Windows
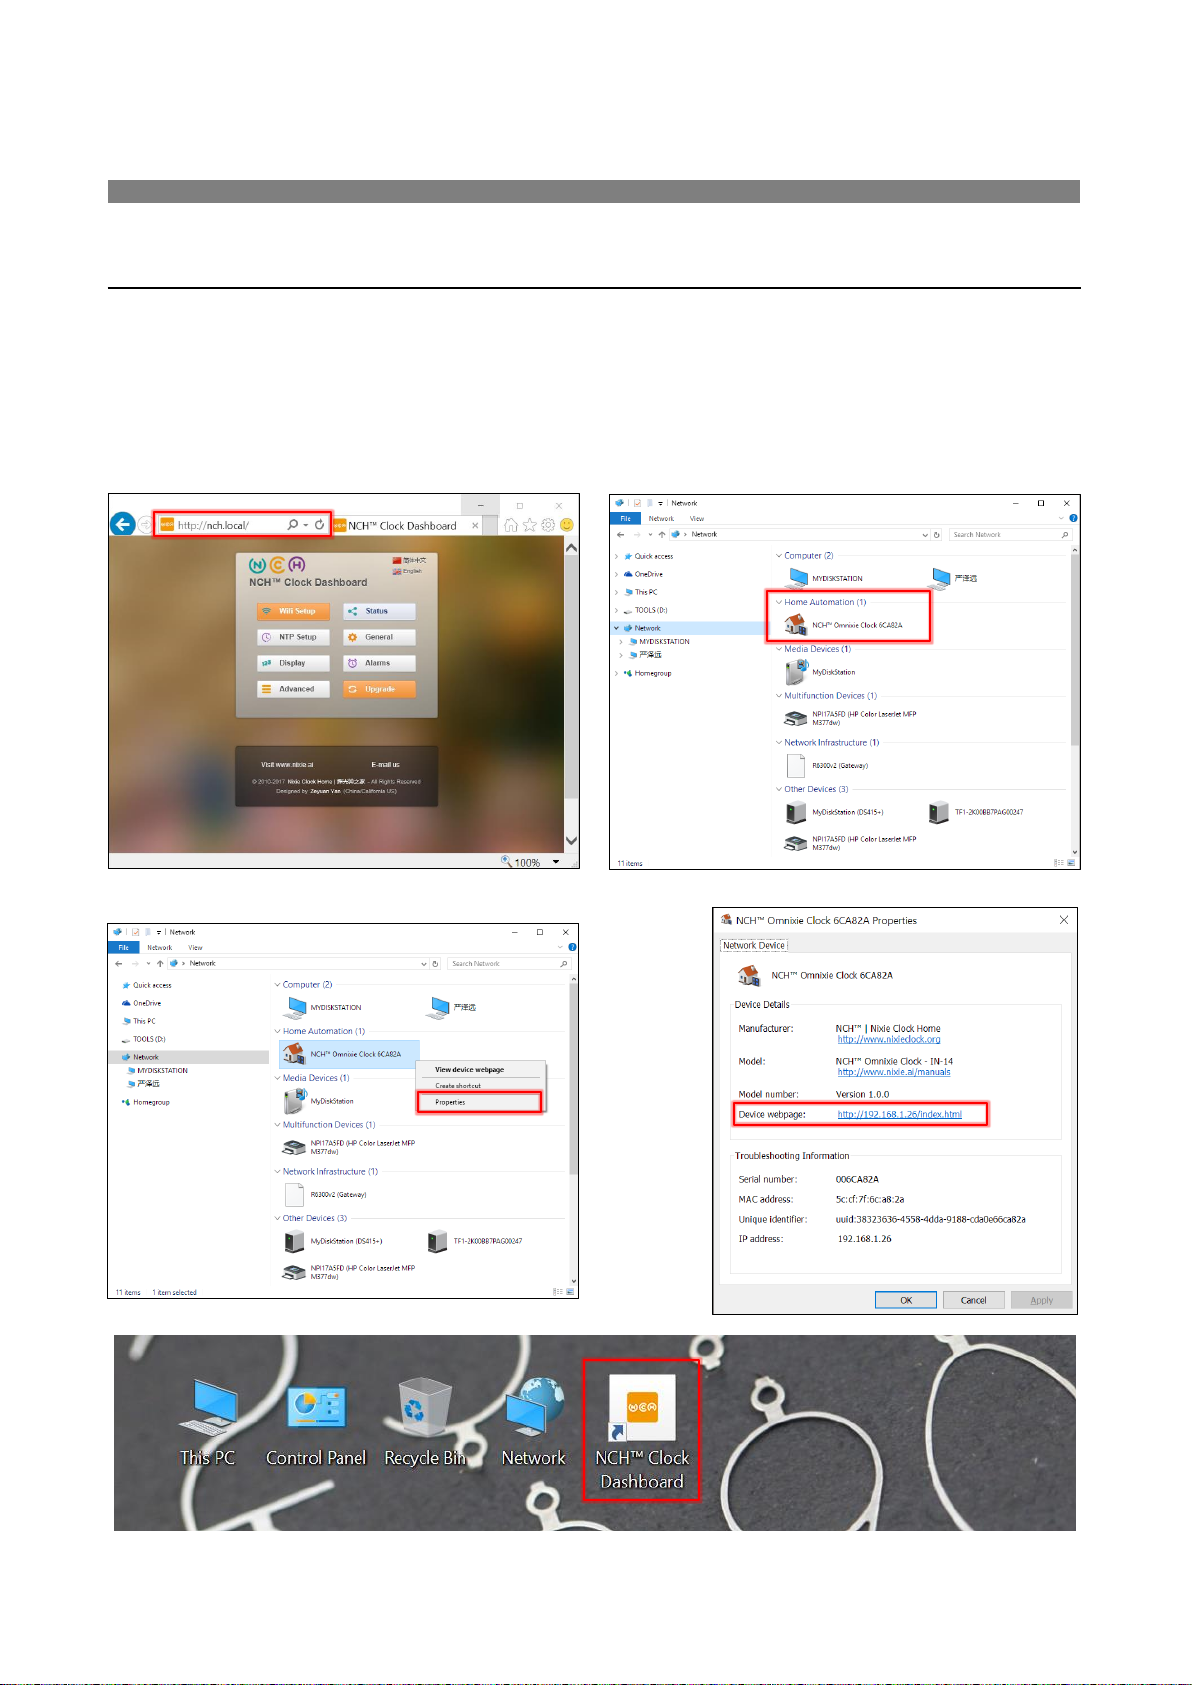
Method one: Open the browser, enter nch.local to open the Omnixie dashboard.
Method two: Open the Network, in the Home Automation category will see the
Omnixie`s icon, double-click the icon to open the Omnixie Dashboard. You can also
right-click the icon to see the Omnixie device properties. You can also set the page
address as a shortcut on the desktop.
WIFI Connection
Page 26

26 / 52
Setup the Omnixie using the
Omnixie Dashboard
NCH™ Clock Dashboard
Page 27
27 / 52
Set the Omnixie using the Dashboard
Introduction of the Dashboard
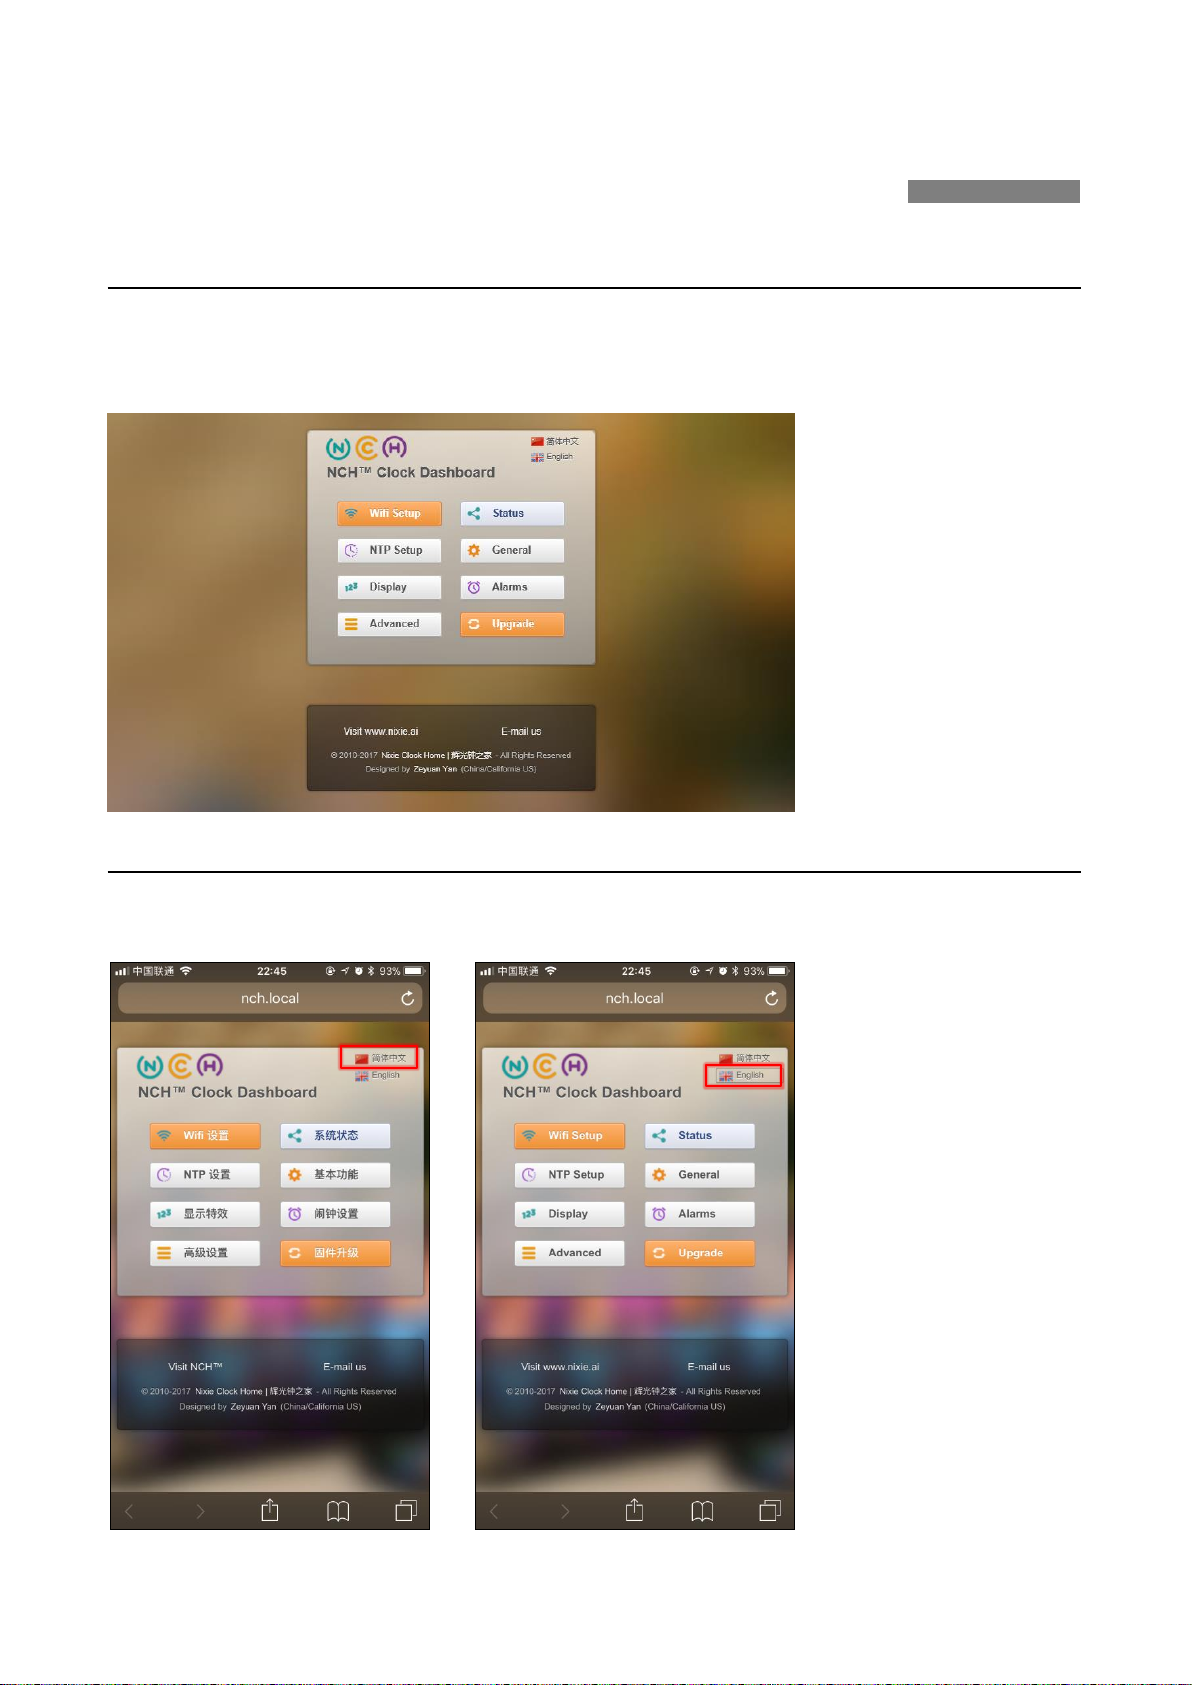
The Dashboard is an interface for remote control and operation of the Omnixie, it
includes eight functional modules: WIFI Setup, System Status, NTP Setup, General
Setup, Display Setup, Set Alarms, Advanced Setup, Upgrade Firmware.
Set Language of the Dashboard
Click the language button in the upper right corner to switch Dashboard language as
shown below:
Page 28
28 / 52
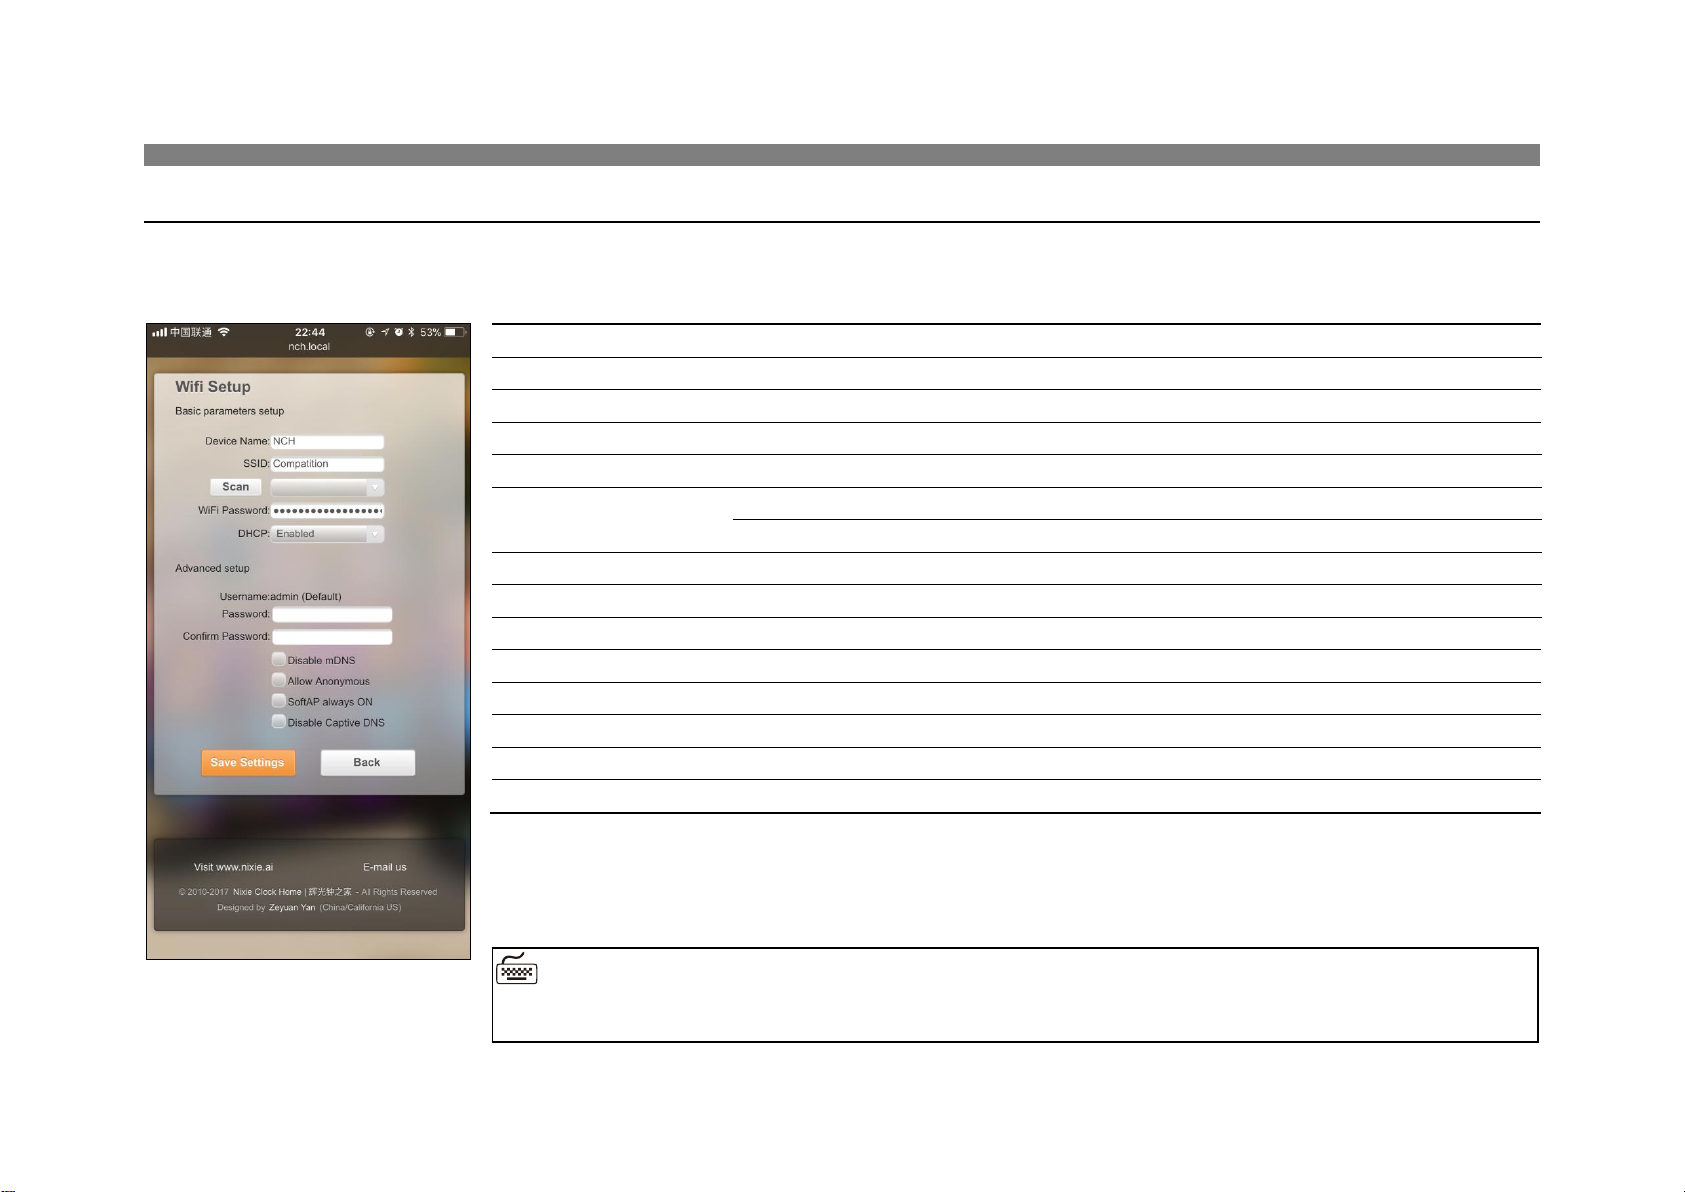
WIFI Setup
Wifi network parameter setting.
Name
Option
Description
Device Name
The default is NCH, network name of the Omnixie.
SSID
The name of the connected network, this is usually the SSID name of the connected router.
Scan
Click Scan button and select the name in the list if you want to connect a different router.
WiFi Password
The password of the network.
DHCP
Enabled
Default
Disabled
Username
admin, cannot be changed.
Password
Access password for the Omnixie Dashboard.
Confirm Password
Repeat password.
Disable mDNS
Multicast DNS. (Advanced network settings)
Allow Anonymous
(Advanced network settings)
SoftAP always ON
(Advanced network settings)
Disable Captive DNS
(Advanced network settings)
◼ “Advanced network settings” items usually do not need to be set.
Setup the Omnixie using the Omnixie Dashboard
Page 29
29 / 52
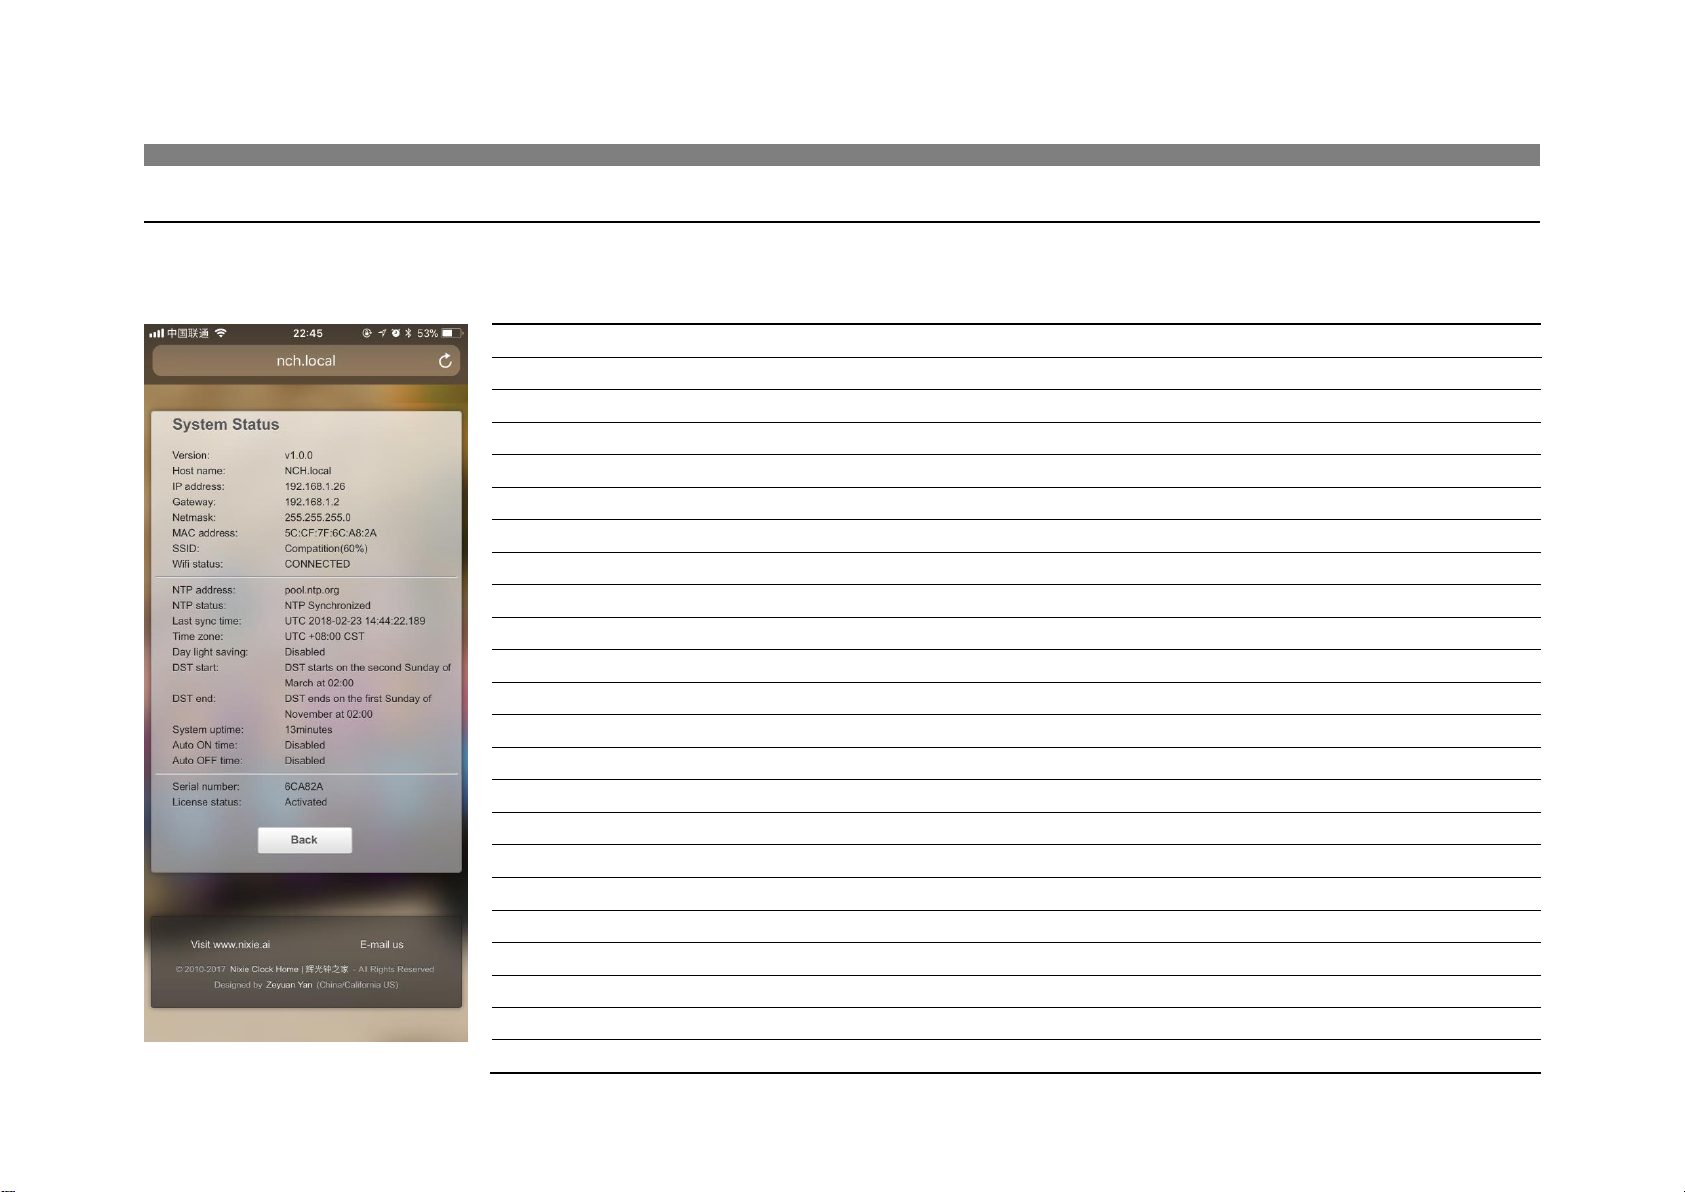
System Status
View operating parameters of the Omnixie system.
Name
Description
Version
System version
Host name
Configurable
IP address
Configurable
Gateway
Configurable
Net mask
Configurable
MAC address
Unique
SSID
Configurable
Wifi status
Connect status
NTP address
Configurable
NTP status
Connect status
Last sync time
The latest time of sync with NTP
Time zone
Configurable
Day light saving
Configurable
DST start
Configurable
DST end
Configurable
System uptime
System uptime from power up
Auto ON time
Configurable
Auto OFF time
Configurable
Serial number
Unique
License status
Software license
Setup the Omnixie using the Omnixie Dashboard
Page 30
30 / 52
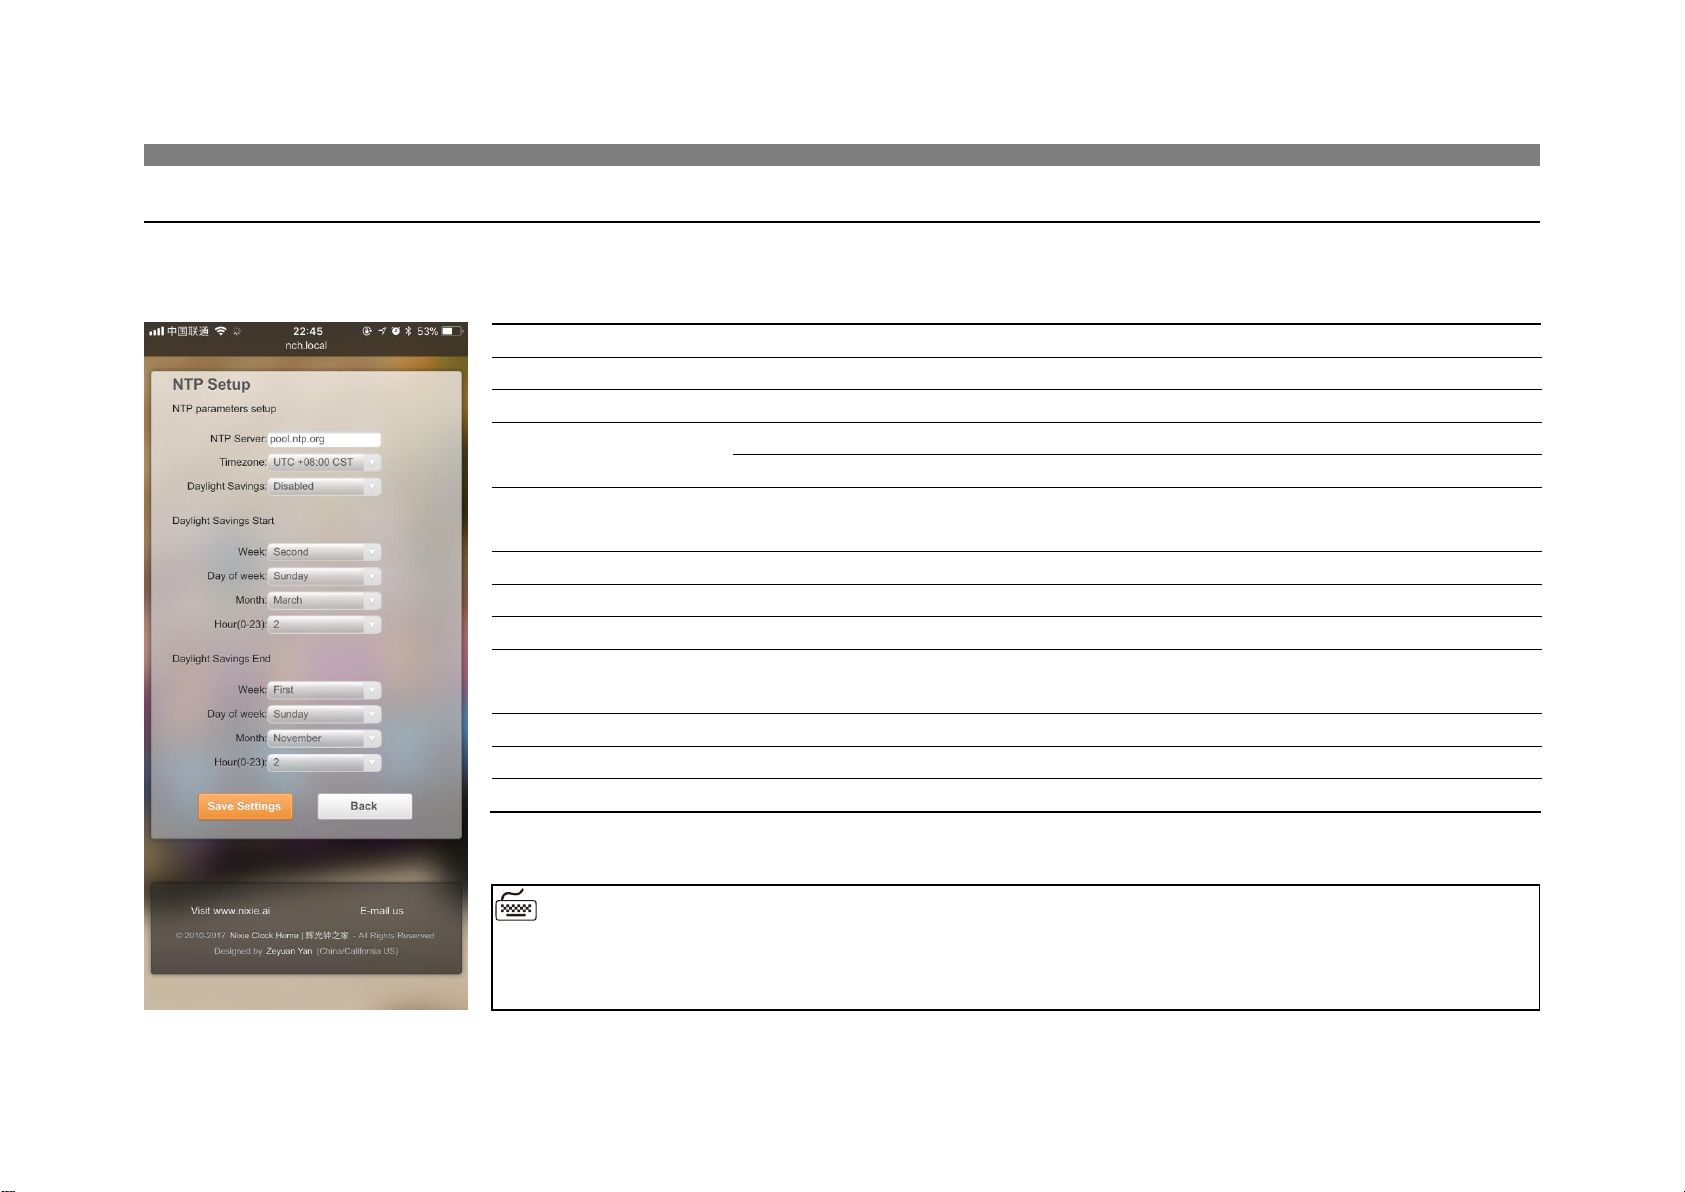
NTP Setup
NTP parameters setting.
Name
Option
Description
NTP Server
Default pool.ntp.org is a commonly used NTP server pool.
Time zone
UTC+14:00 – UTC-11:00
Default UTC +08:00 CST
Daylight Savings
Enabled
Disabled
Default
Week of DST Start
First, Second, Third, Fourth,
Last
Default Second
Day of week of DST Start
Sunday – Saturday
Default Sunday
Month of DST Start
January – December
Default March
Hour of DST Start
0 – 23
Default 2
Week of DST End
First, Second, Third, Fourth,
Last
Default First
Day of week of DST End
Sunday – Saturday
Default Sunday
Month of DST End
January – December
Default November
Hour of DST End
0 – 23
Default 2
◼ Please set the time zone correctly, Omnixie will automatically convert the local date and time
according to UTC time.
Setup the Omnixie using the Omnixie Dashboard
Page 31
31 / 52
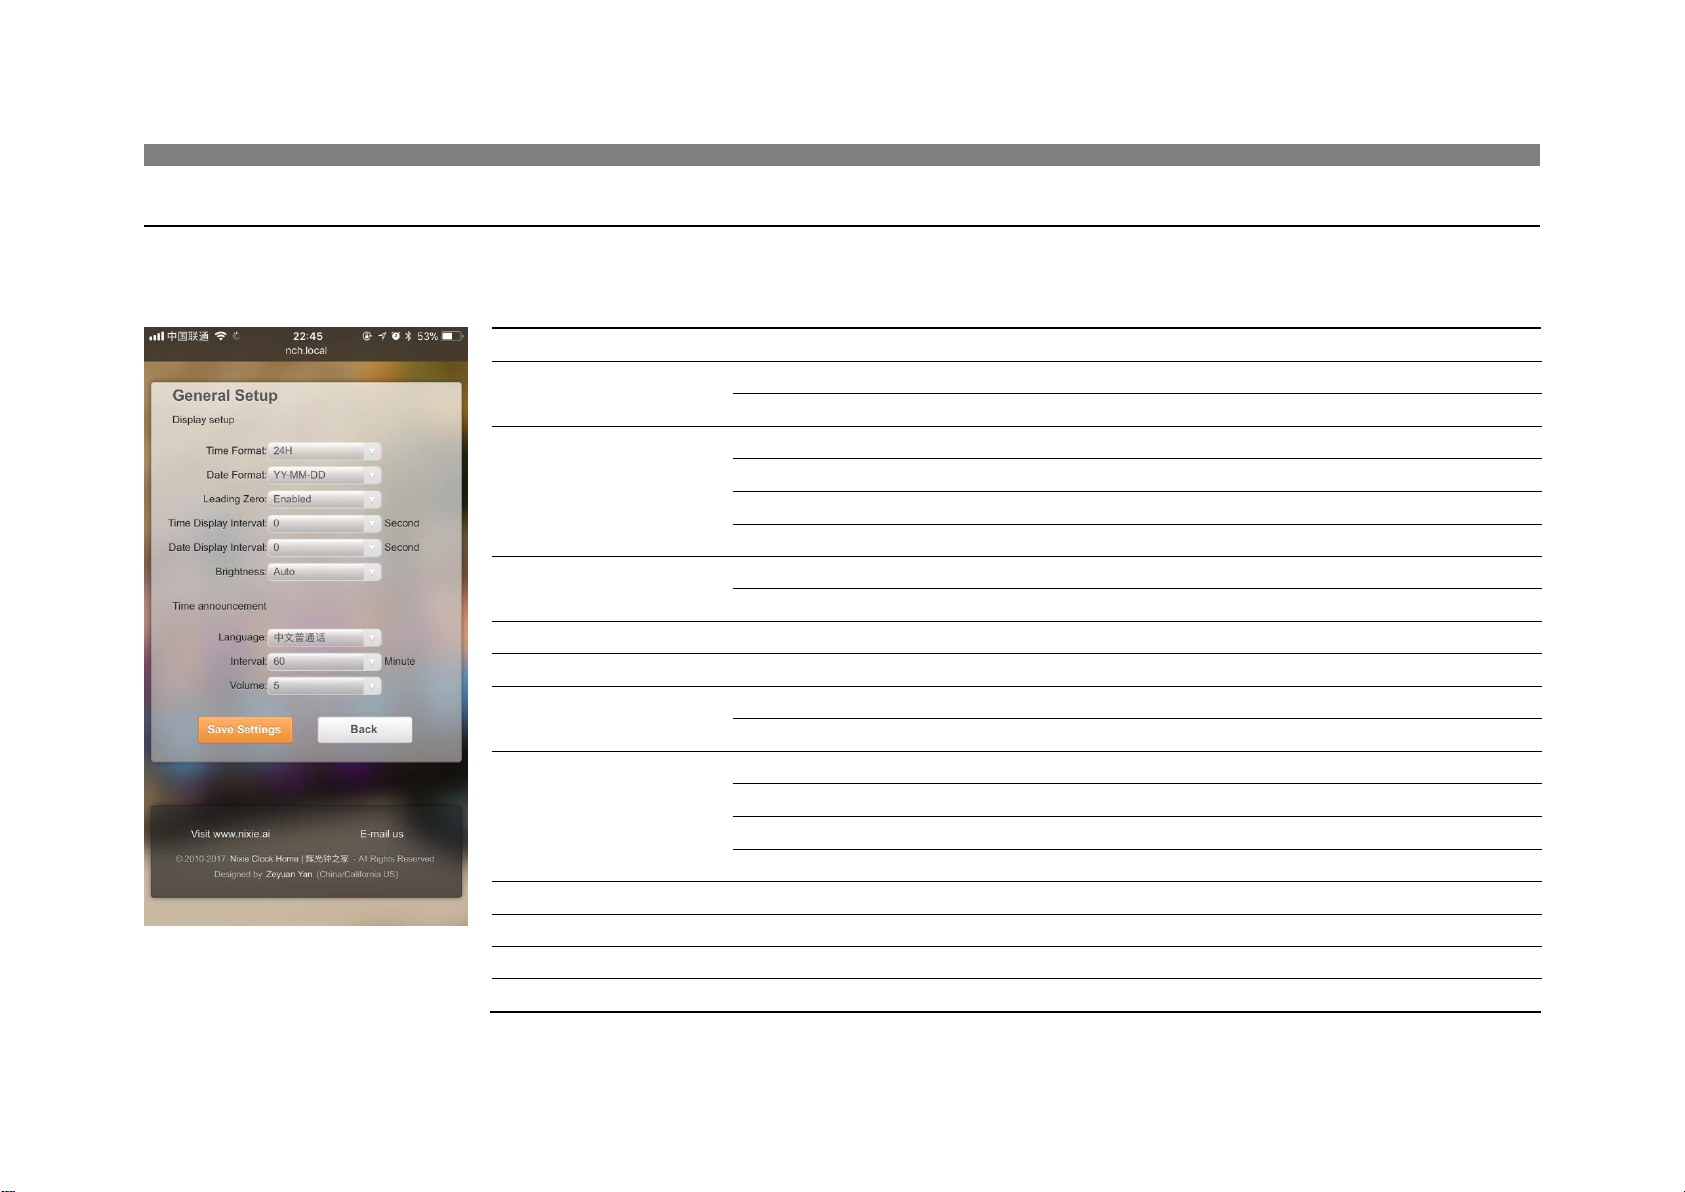
General Setup
Set the basic function parameters of the Omnixie.
Name
Option
Description
Time Format
24H
Default
12H
Date Format
YY-MM-DD
Default
YY-DD-MM
DD-MM-YY
MM-DD-YY
Leading Zero
Enabled
Default
Disabled
Time Display Interval
0 - 60 sec
Default 0 sec
Date Display Interval
0 - 60 sec
Default 0 sec
Brightness
Auto
Default
1(Darkest)-8(Brightest)
Language
中文普通话(Chinese mandarin)
Default
English
日本語 (Japanese)
Deutsch
Interval
Disable
1.2.3.5.10.15.20.30.60 Min
Default 60 Min
Volume
Mute
1(Min) – 8(Max)
Default 5
Setup the Omnixie using the Omnixie Dashboard
Page 32
32 / 52
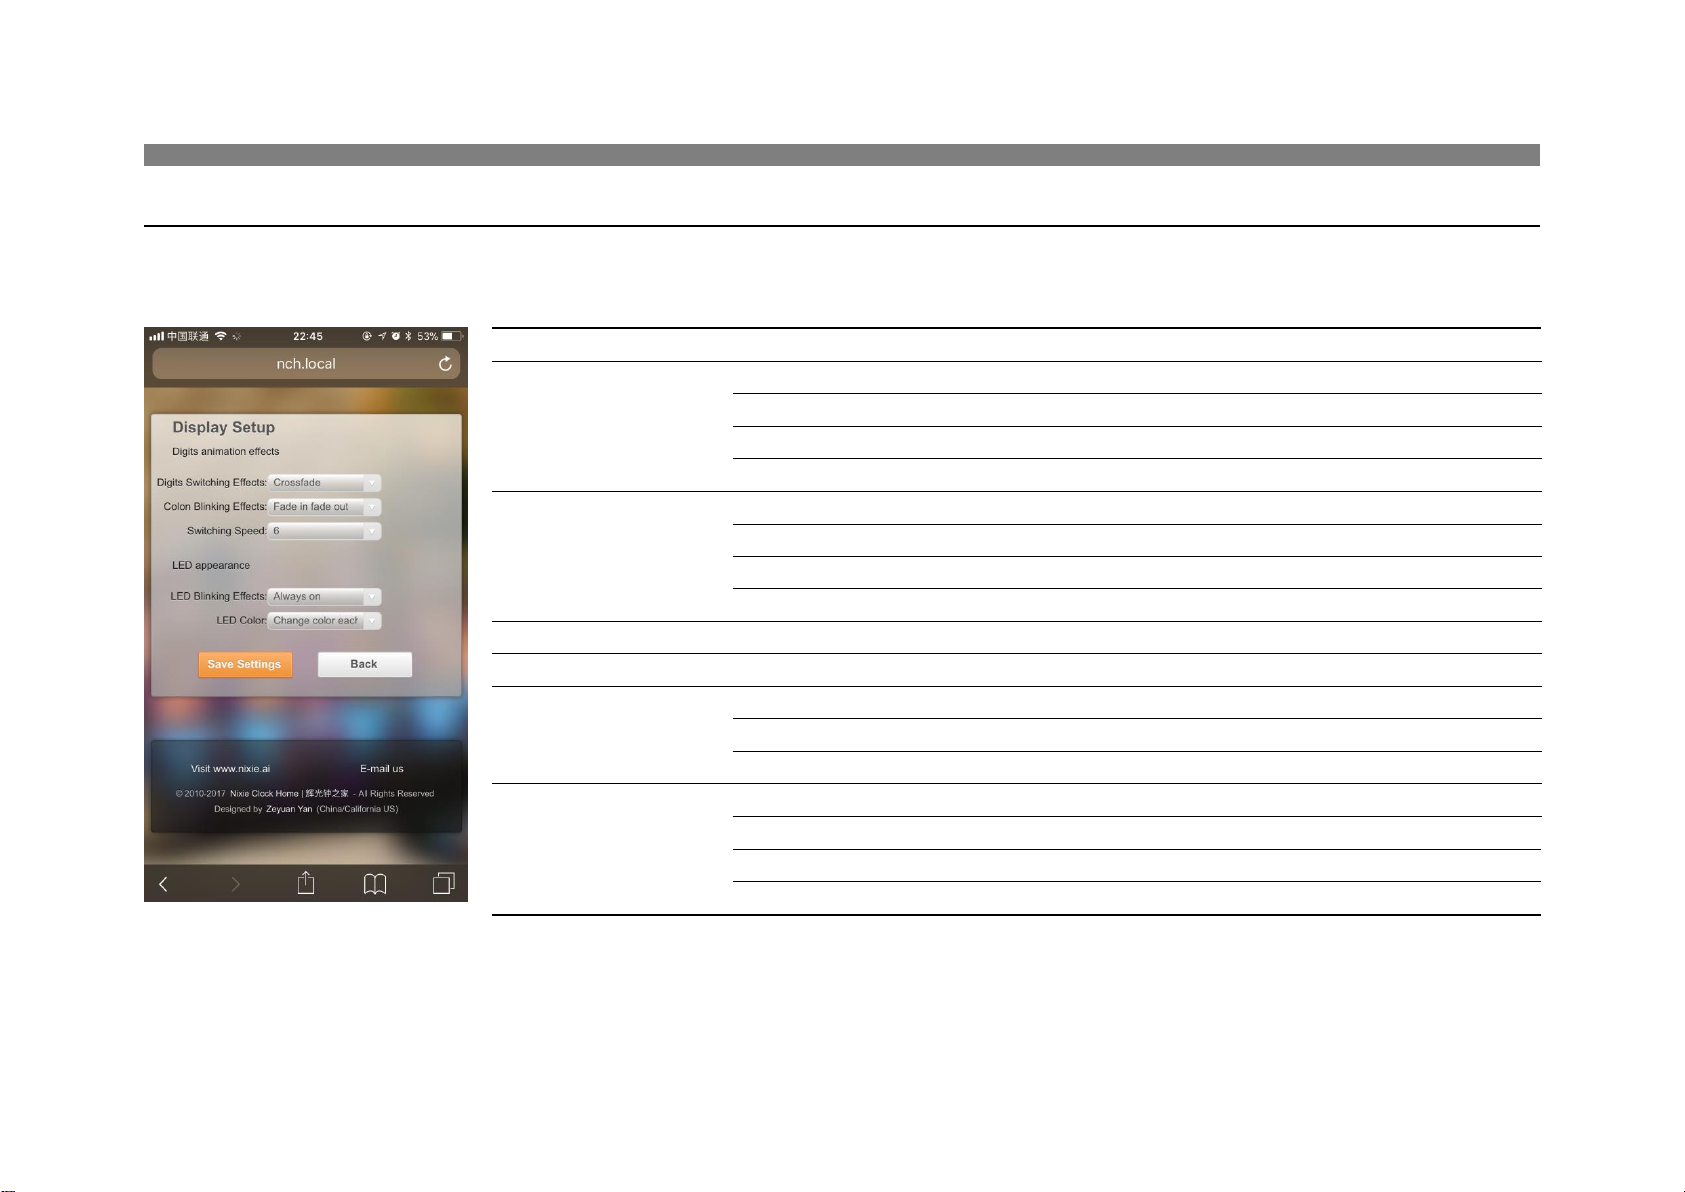
Display Setup
Set digits and LED backlight display effects.
Name
Option
Description
Digits Switching Effects
Normal
Fade in fade out
Corssfade
Default
Flip
Colon Blinking Effects
Fade in fade out
Default
Blink
Always on
Always off
Switching Speed
0(Fastest) – 9(Slowest)
Default 6
LED Blinking Effects
Always off
Crossfade
Always on
Default
LED Color
Change color together
Default Change color each L->R
Red, Orange, Green, Purple, Blue, Cyan, White
Change color each/all(L->R, R->L, Out->In, In->Out)
Rainbow days Base-light color will following rainbow colors from Monday-Sunday
Setup the Omnixie using the Omnixie Dashboard
Page 33
33 / 52
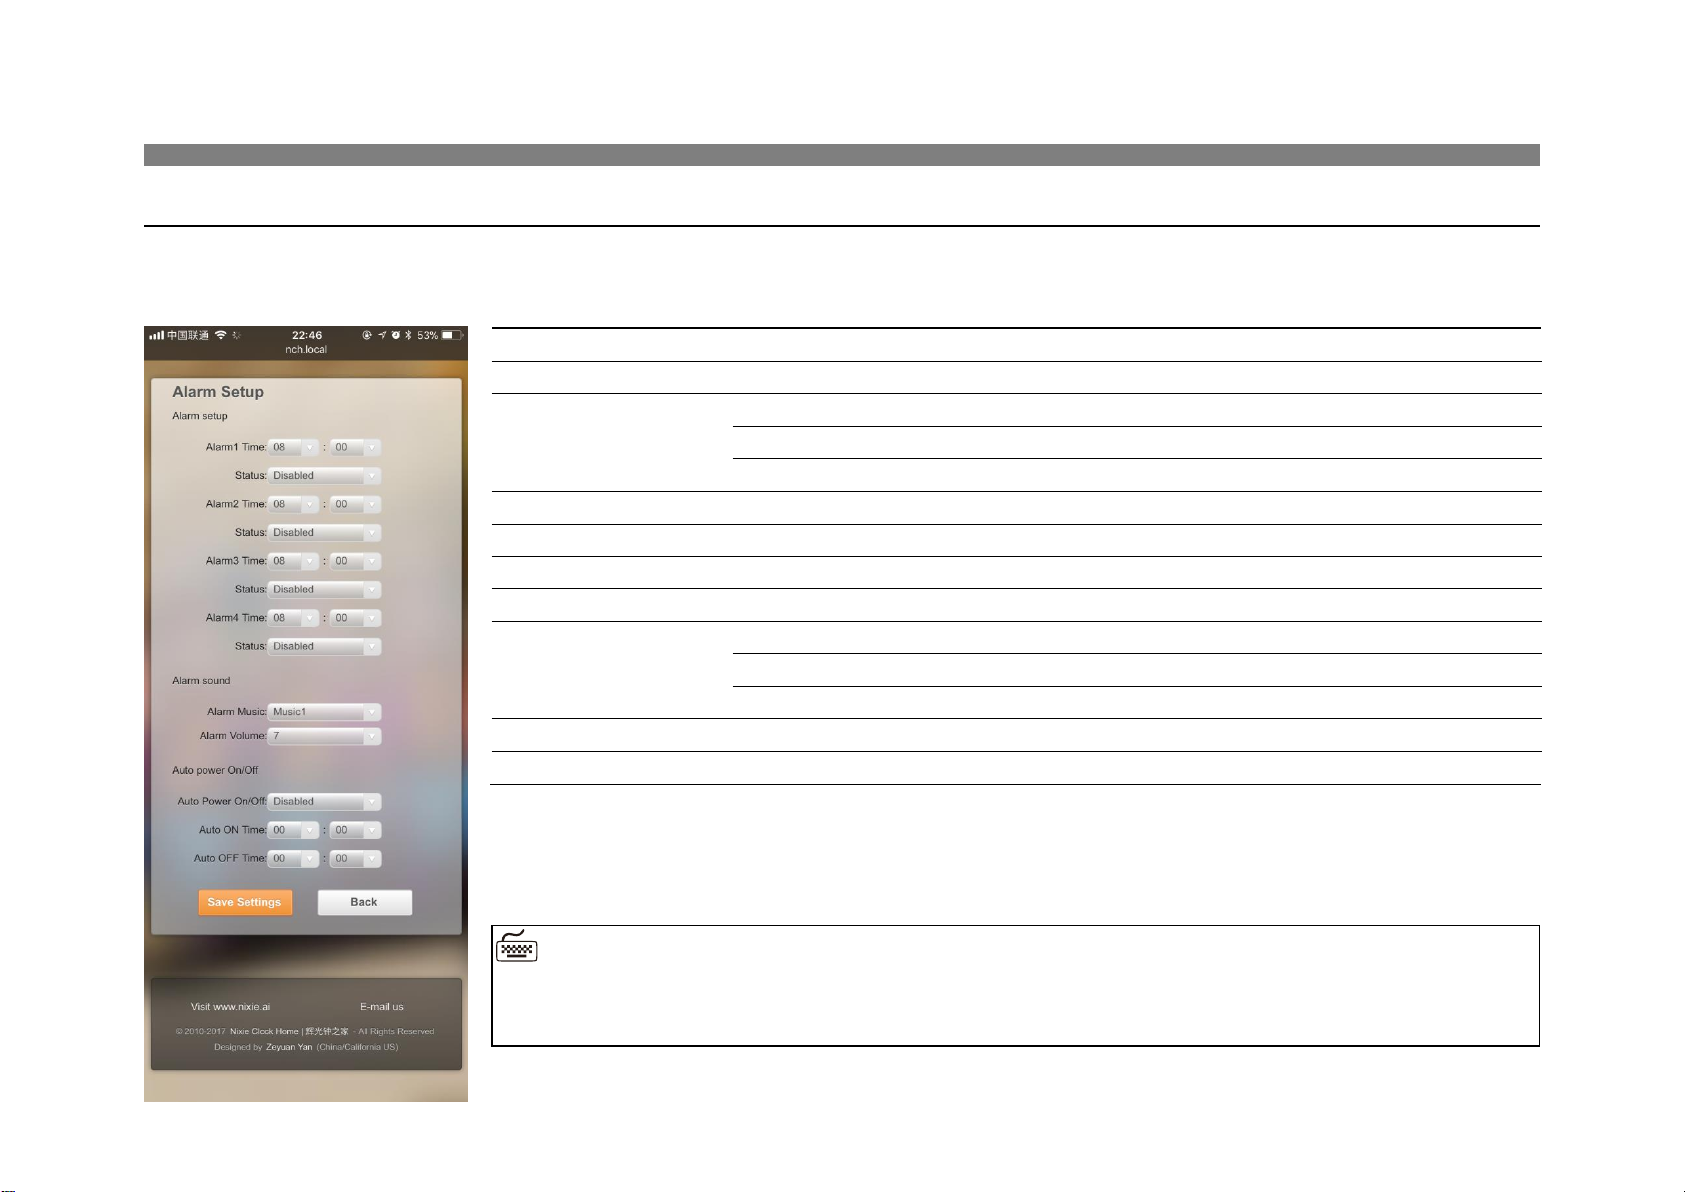
Setup Alarms
Setup alarms and automatic On/Off parameters.
Name
Option
Description
Alarm 1/2/3/4 Time
Set Hour and Minute of Alarms
Status
Disabled
Default
Enabled (Only working days)
Enabled (All days)
Alarm Music
Music 1 – Music 12
Default Music 1
Alarm Volume
1(Min) – 8(Max)
Default 7
Auto Power On/Off
Disabled
Default
Enabled (Only working days)
Enabled (Everyday)
Auto ON Time
Hour and Minute of Auto On
Auto OFF Time
Hour and Minute of Auto Off
Setup the Omnixie using the Omnixie Dashboard
◼ The working days means Monday – Friday.
◼ Alarm Volume is different with General Setup -> Volume.
Page 34
34 / 52
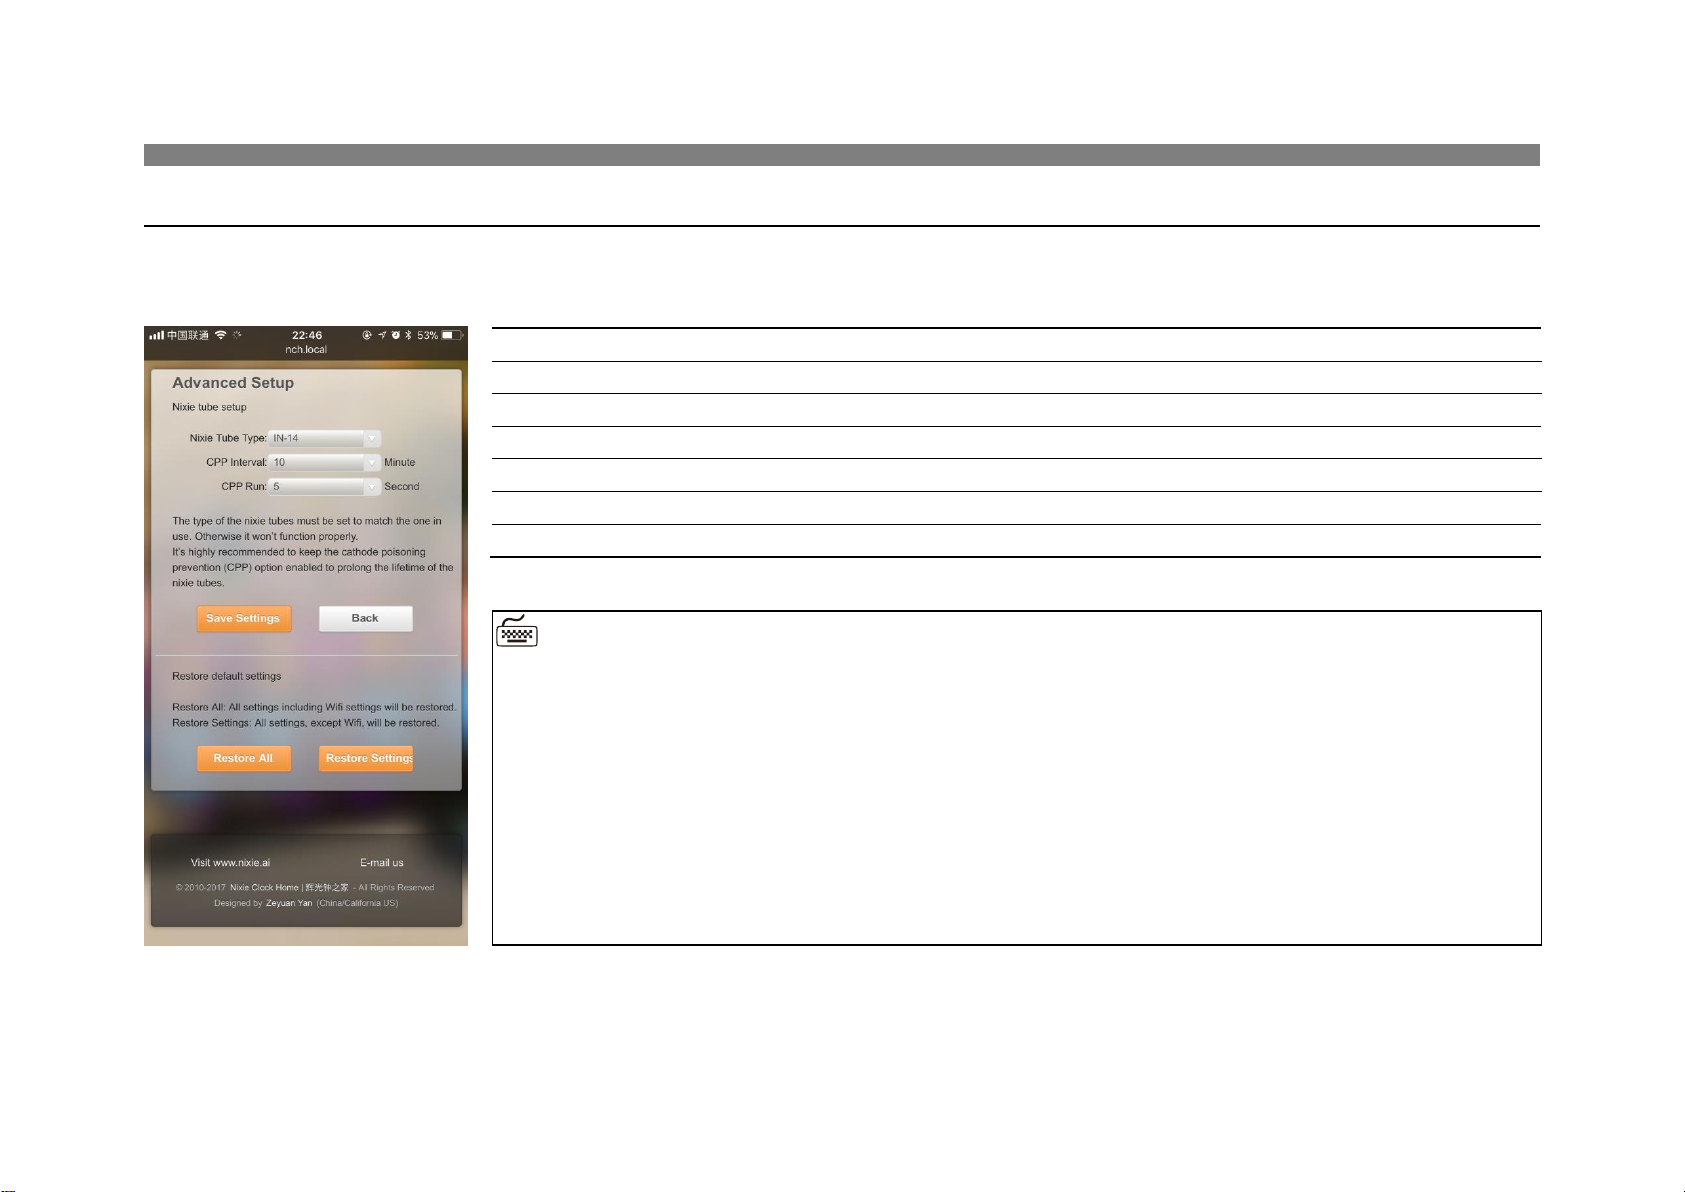
Advanced Setup
Set relevant parameter of Nixie tube and default settings.
Name
Option
Description
Nixie Tube Type
Compatible Nixie tubes
Selected the correct Nixie tube type.
CPP interval
Interval of the cathode poisoning prevention. Default 10 Minutes
CPP Run
Running time of the cathode poisoning prevention. Default 5 Seconds
Restore all
Restore all settings including Wifi settings.
Restore Settings
Restore all settings except Wifi settings.
Setup the Omnixie using the Omnixie Dashboard
◼ Nixie tubes have an unwanted side effect called ‘cathode poisoning’ (CP) which causes
metal molecules from the glowing cathodes (digits) and attach to non-glowing cathodes. This
will cause deterioration and finally failure of the tube. To avoid this effect, non/seldom glowing
cathodes need to be periodically switched on. Since cathode poisoning varies between
different types of tubes, there is an adjustable cathode poisoning prevention setting.
◼ The cathode poisoning prevention function default settings are to run every 10 minutes
for 5 seconds duration. The switch on of the non-glowing digits will be achieved by a fast
sequential scrolling through the digits (slot machine effect). This feature can be adjusted in
duration and frequency of scrolling.
Page 35
35 / 52
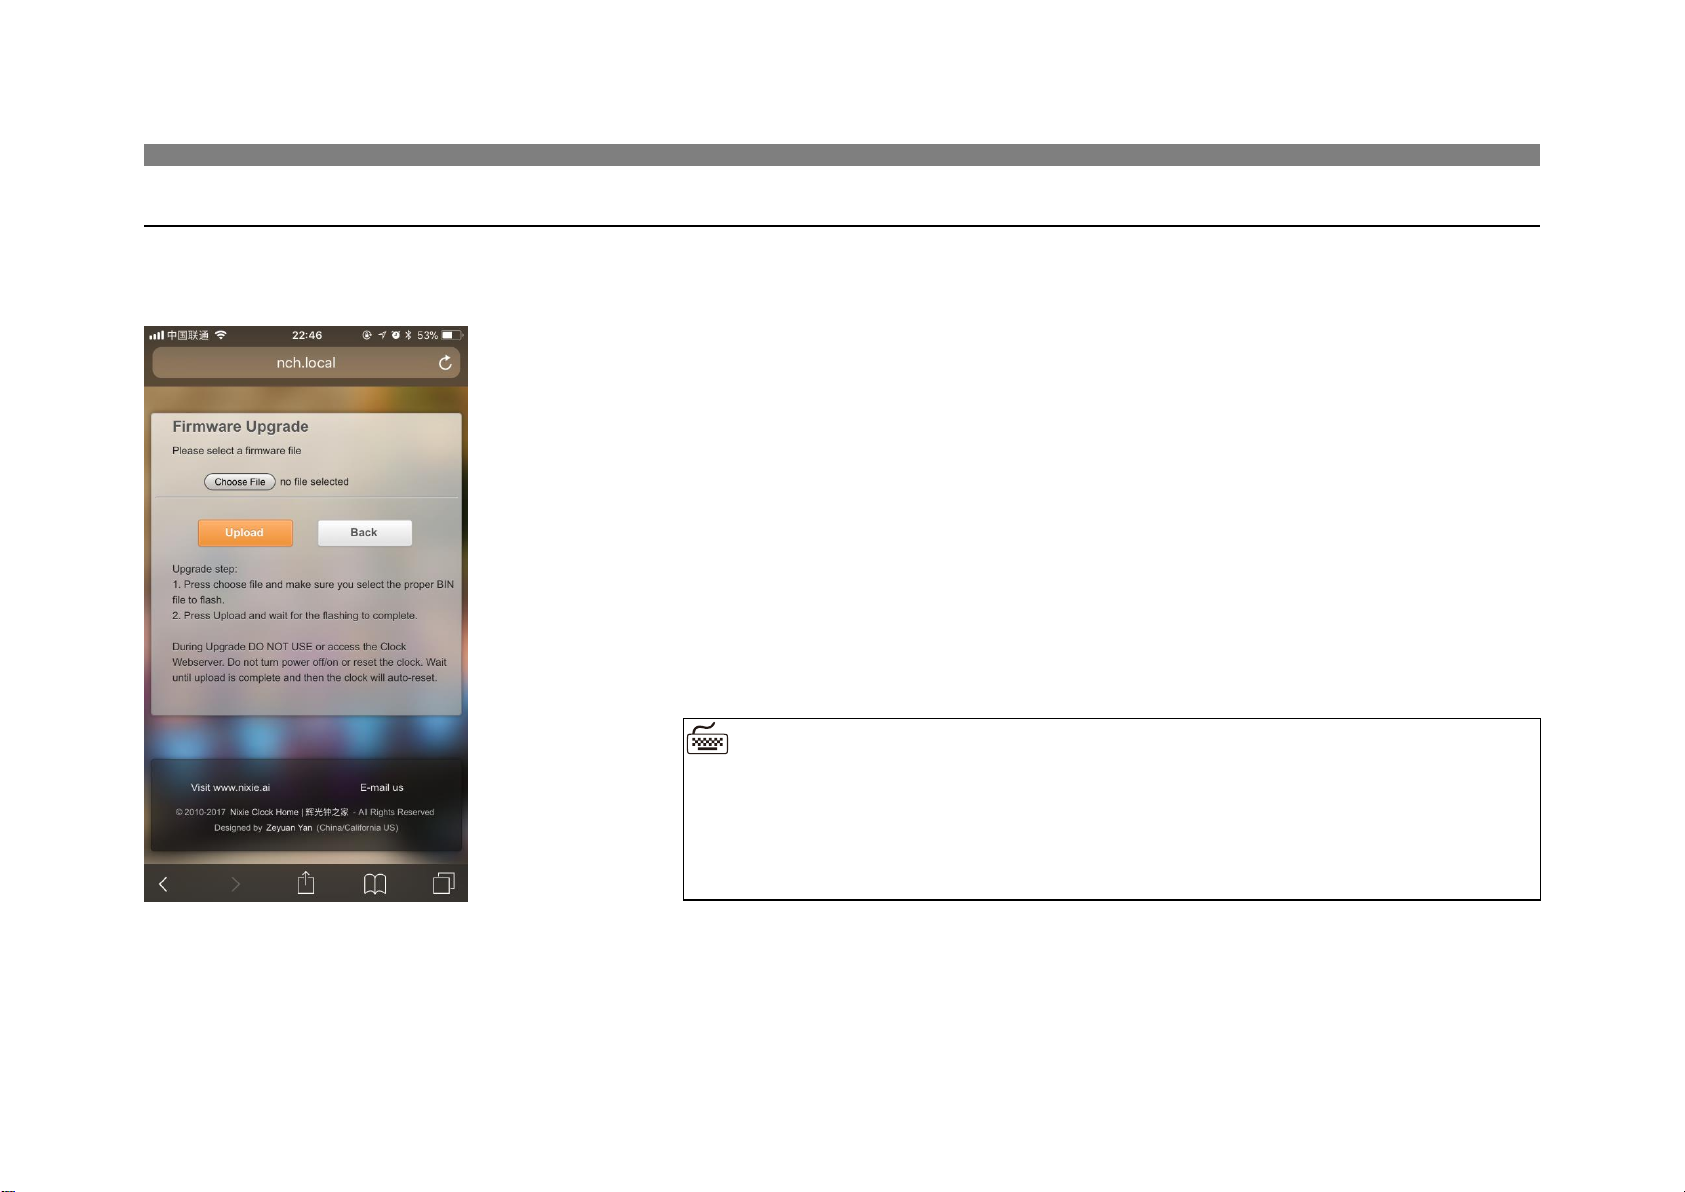
Upgrade Firmware
The Omnixie firmware can be upgraded via browser.
Setup the Omnixie using the Omnixie Dashboard
◼ Do NOT access the Dashboard page during the upgrade process, do NOT
power off, the Omnixie will automatically restart after the upgrade is
completed.
◼ Wifi network parameters need to reconfigure after upgrading.
Upgrade steps:
1. Click the Choose File button to select the upgrade file, make sure the
file is the Bin file used for upgrade.
2. Clock the Upload button to start the upgrade and wait patiently for
complete.
Page 36
36 / 52
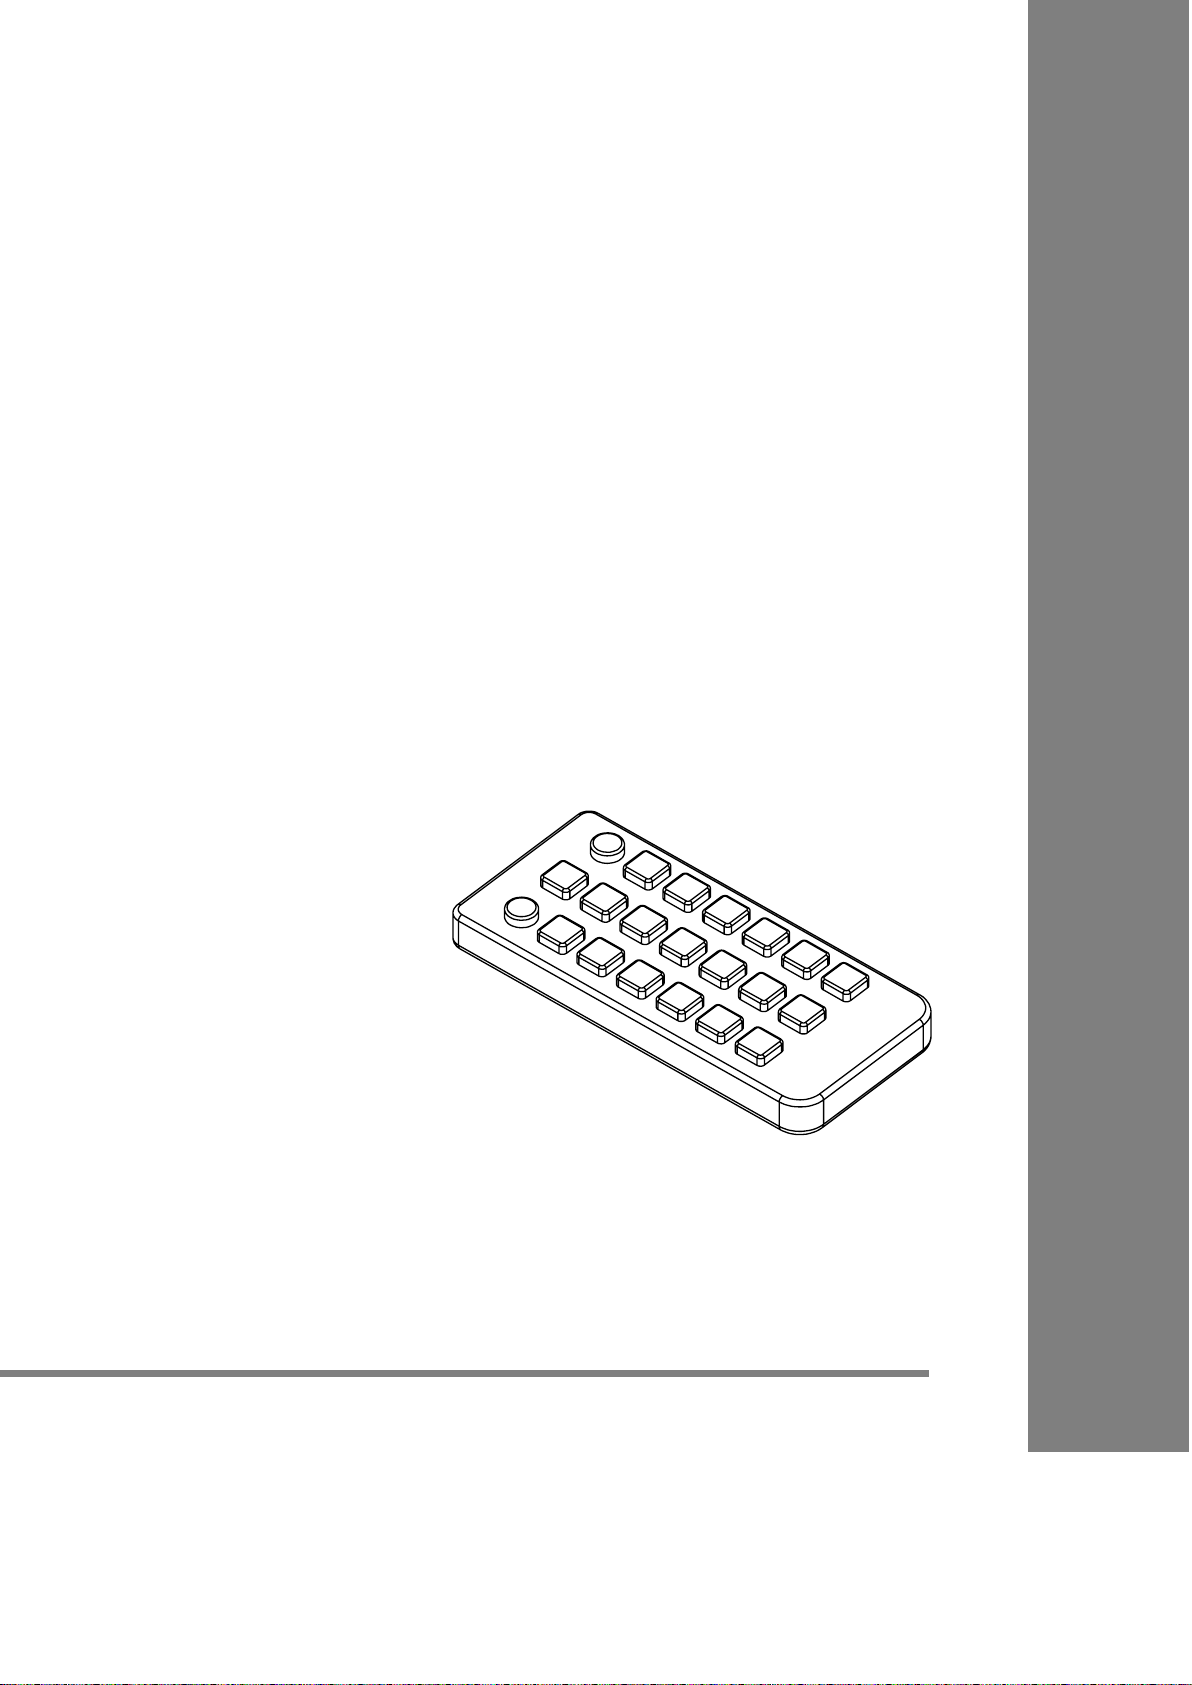
Setup the Omnixie with IR Remote
IR remote
Page 37
37 / 52
Basic Operations
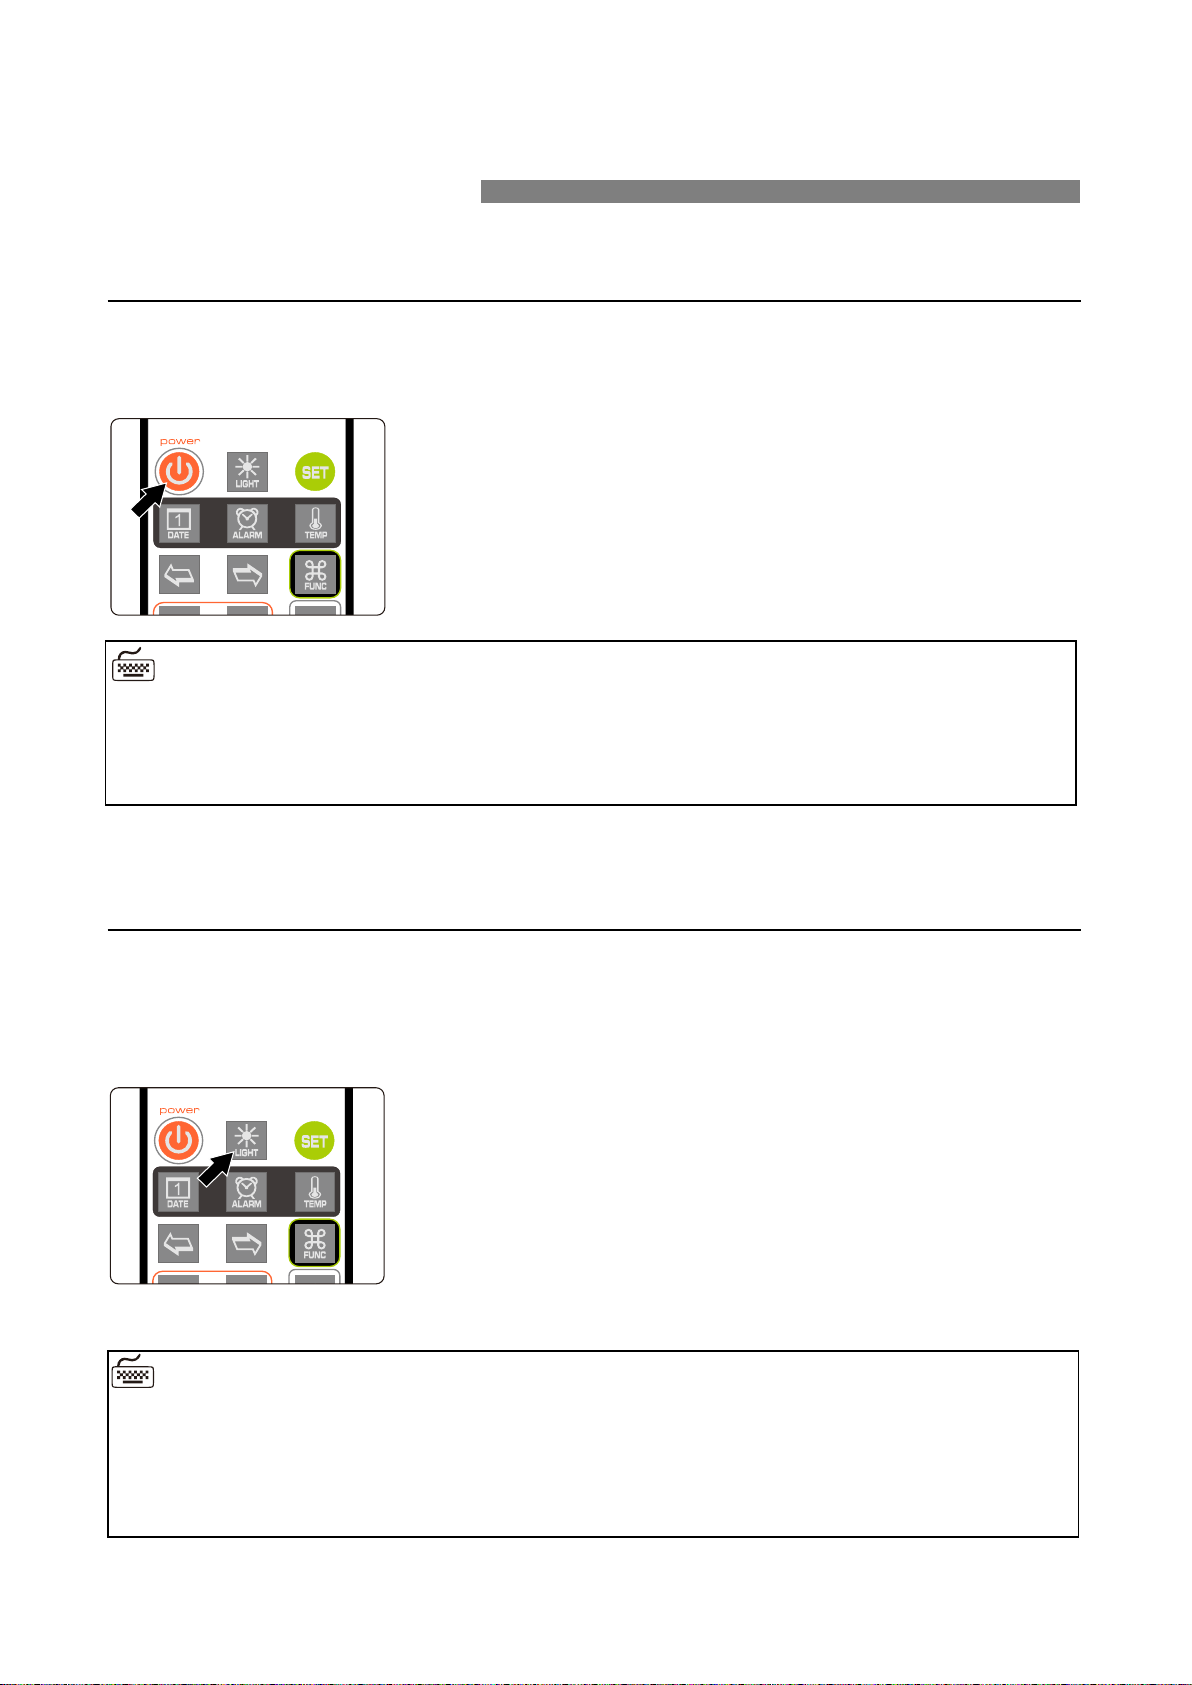
Power On/Off
Toggle the Omnixie on/off by pressing POWER button on IR remote controller.
Set Brightness
Brightness of tubes and backlight can be set to eight levels or automatically adjusted
according to ambient light conditions.
⚫ Press POWER button of IR remote to power off.
⚫ Press POWER button again to power on.
◼ With the Omnixie display off, the high voltage power to the tubes is completely
removed for long tube life.
◼ During long periods of non-use, please disconnect the power.
12;34;56
12;34;56
12;34;56
34;56;78
00;00;00
Level 1 (the darkest)
Level 2
Level 3
Level 8 (the brightest)
Automatic
◼ When brightness is set to automatic, the ambient light controls the brightness of tubes
so that the clock will not disturb your sleep at night.
◼ The brightness of back light will be adjusted to the lowest brightness in automatic
mode.
Page 38
38 / 52
Talking Clock
Internal phonetic chip can speak the clock time.
Set Volume
Volume of talking clock or other sound effects can be set to eight levels.
Basic Operations
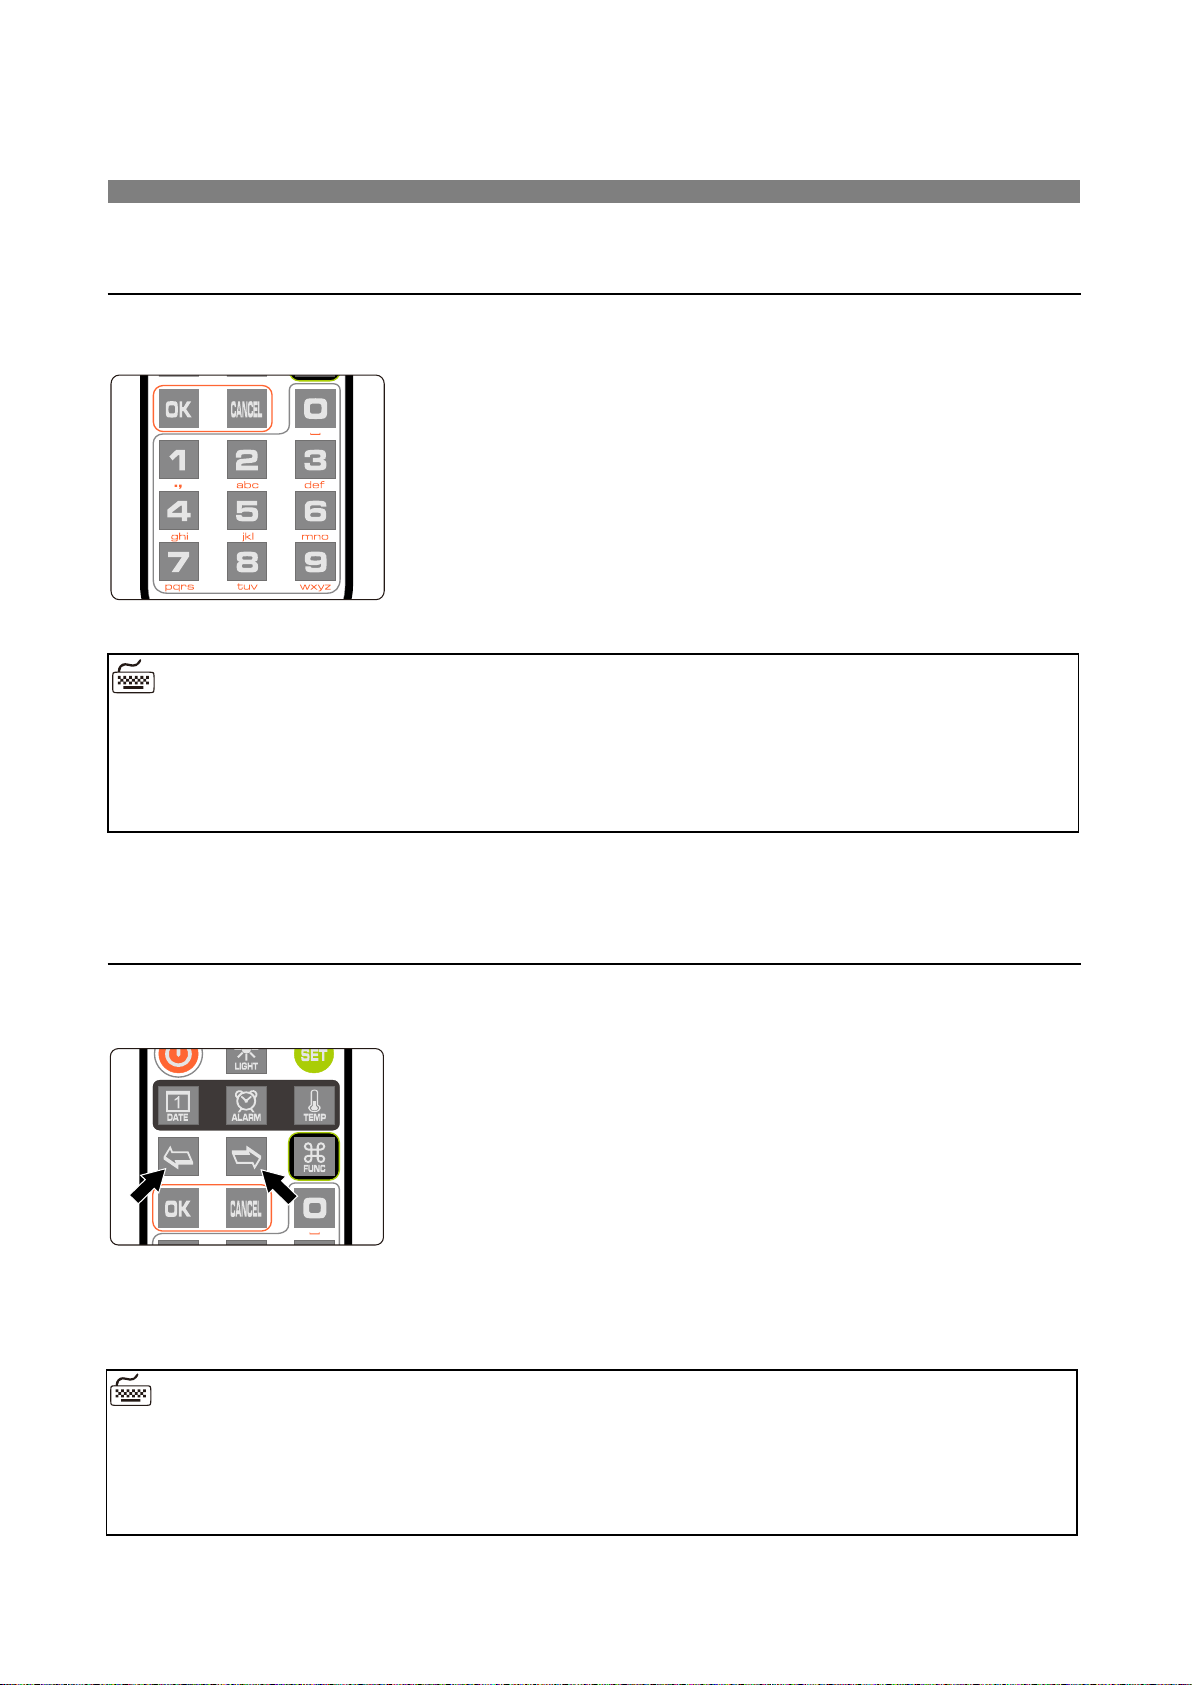
⚫ Press OK button or 0-9 button to trigger talking
clock.
⚫ Set the time interval of automatic talking clock by
following MENU 12.
◼ Talking clock can be triggered any time.
◼ Built-in speech system in English, Chinese Mandarin, Japanese and German. Speech
system setup at MENU 11.
◼ Volume of talking clock is controlled by the system volume.
01;23;45
01;23;45
34;56;78
⚫ Press LEFT/RIGHT button to set volume.
Mute
Minimum volume
Maximum volume
◼ This volume setting is only for talking clock and sound effect during operating. The
volume of alarms is independent.
◼ To set volume of alarms please consult MENU 10.
Page 39
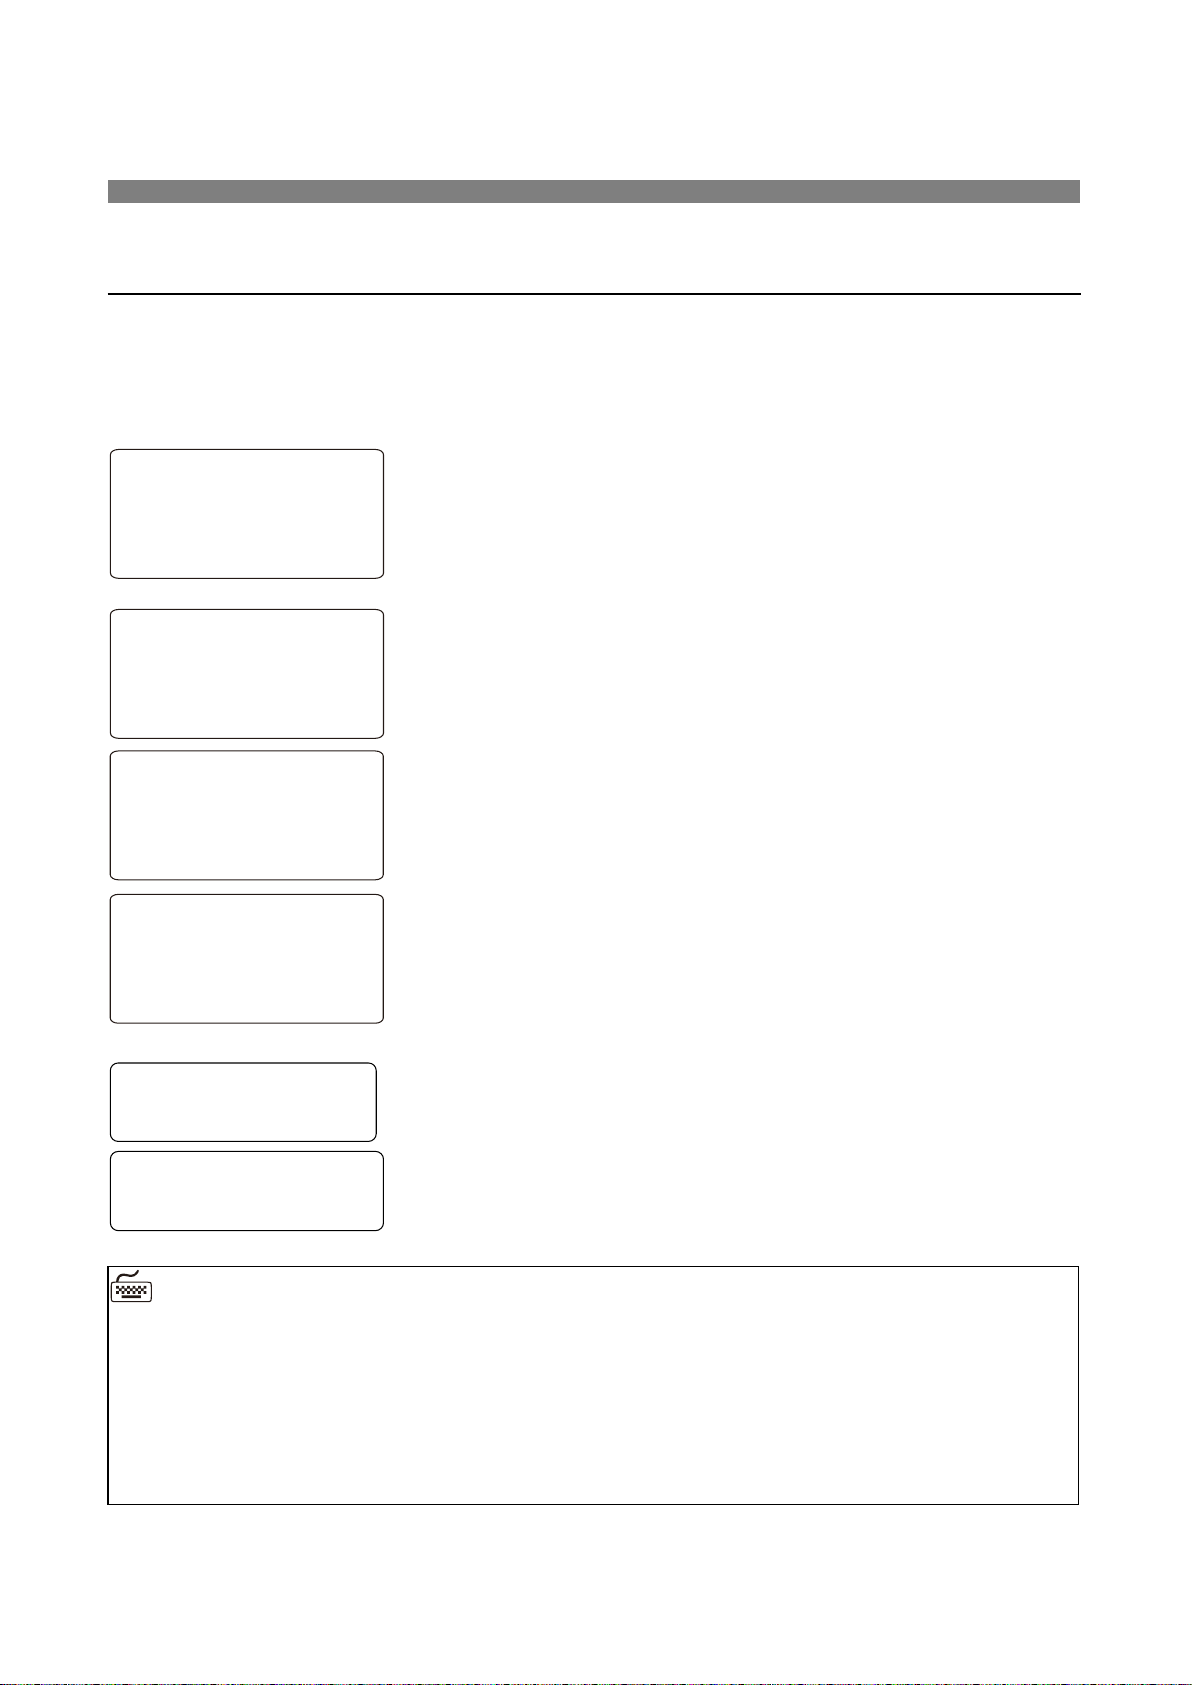
39 / 52
Display Time
⚫ The Omnixie will display real time after power on.
E.g.: now time is PM 08:15:30, will display:
20:15:30
◼ To set 12/24 time format, please use MENU 1.
◼ To set leading zero, please use MENU 5.
◼ To control digital switching effect setting, please use MENU 6.
◼ To control digital switching speed setting, please use MENU 7.
◼ To set colon display effect, please use MENU 8.
⚫ Digits on the left are HOURS; dights in the middle
are MINUTES; digits on right are SECONDS.
08:15:30
⚫ Time will display as shown left when time format
set to 12H.
20:15:30
)8:15:30
⚫ Time will display as shown left when time format
set to 24H.
⚫ Time will display as shown left when Leading Zero
Disabled.
20:15:30
⚫ Date will display for seconds with set interval.
⚫ To set the interval, please consult MENU 3 and
MENU 4.
17:01:01
Basic Operations
Page 40
40 / 52
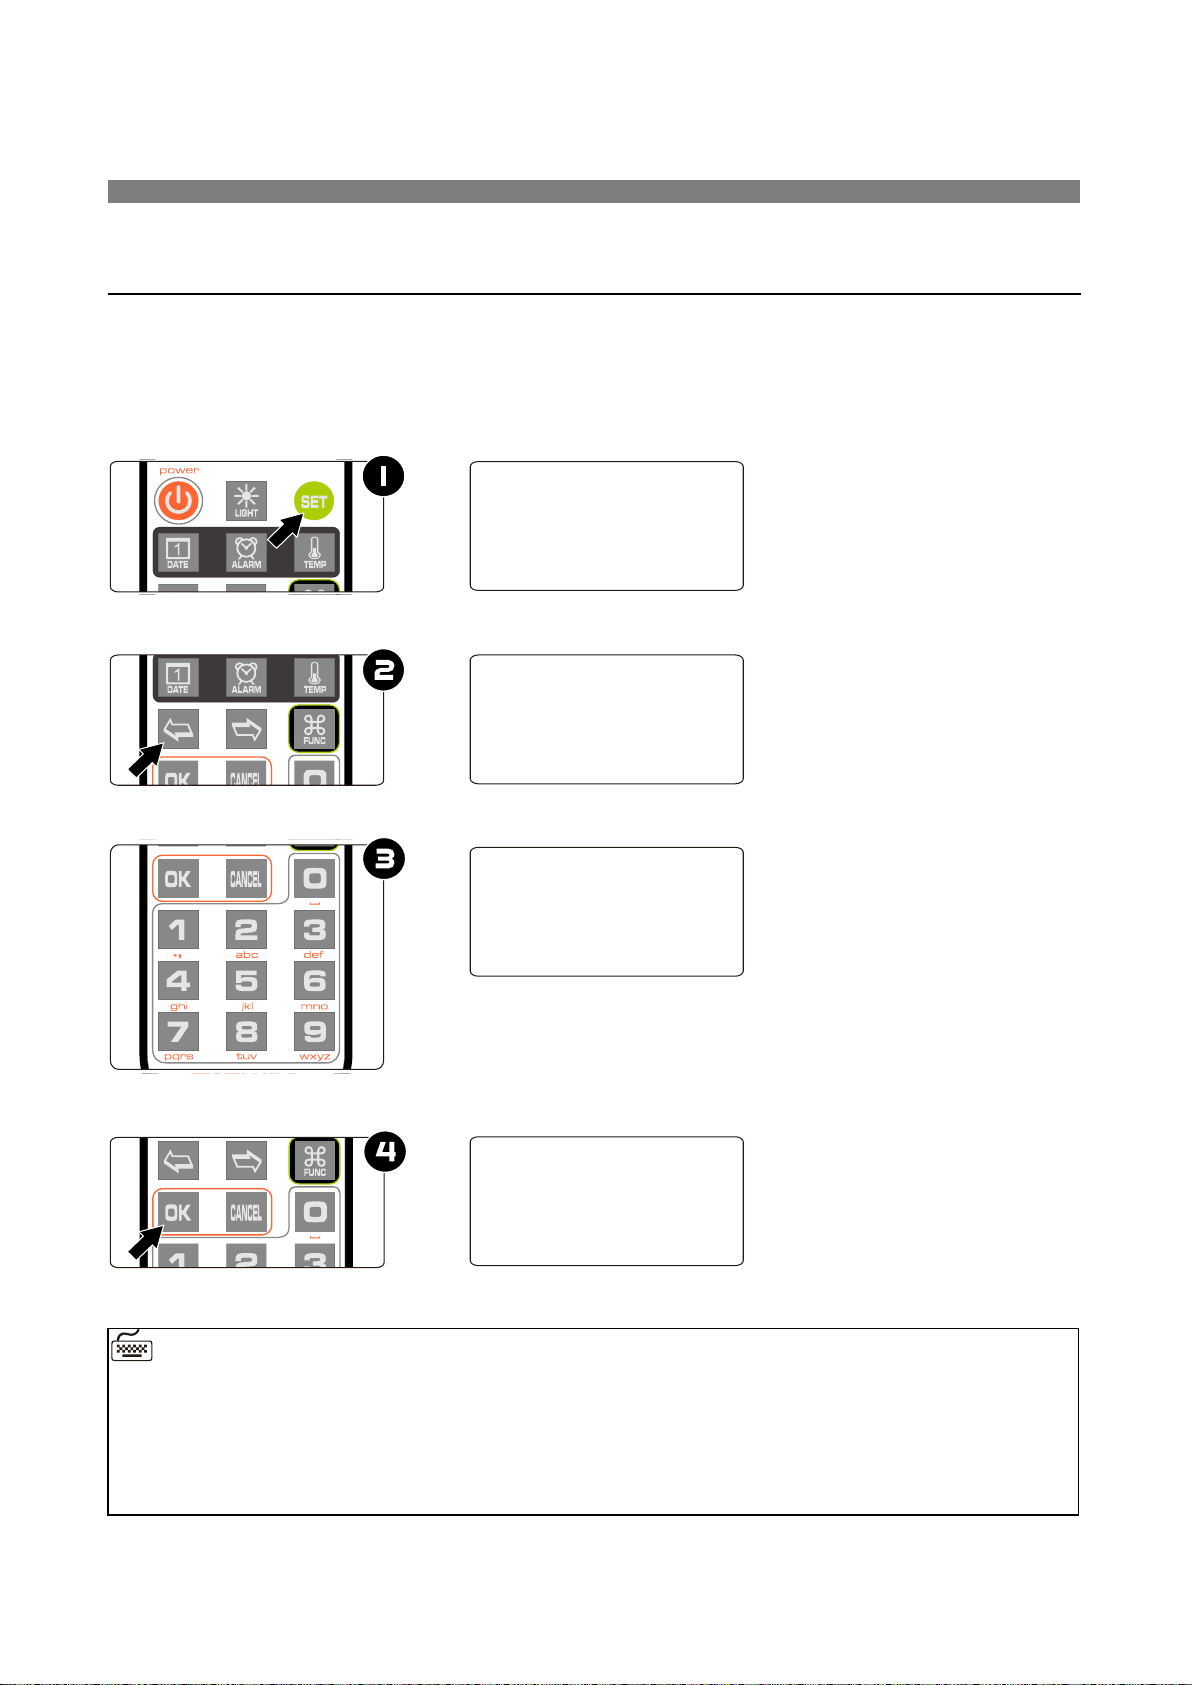
Set Time
Time can be set manually or synchronized from NTP server via WIFI.
To set time manually:
⚫ Press SET button enter time setting mode, 2 digits on the right start blinking.
⚫ Press LEFT/RIGHT button select position of setting.
⚫ Press 0-9 button input HOUR, MINUTE or SECOND.
⚫ Press OK button to save setting, press CANCEL button to abort.
20:15:30
◼ Time will display in 24 hour mode HH:MM:SS during setting mode.
◼ Any digits can be input during setting, but system will check if the time entry is valid
when you save it. Invalid times will not be saved.
20:15:30
20:18:30
20:18:30
Basic Operations
Page 41
41 / 52
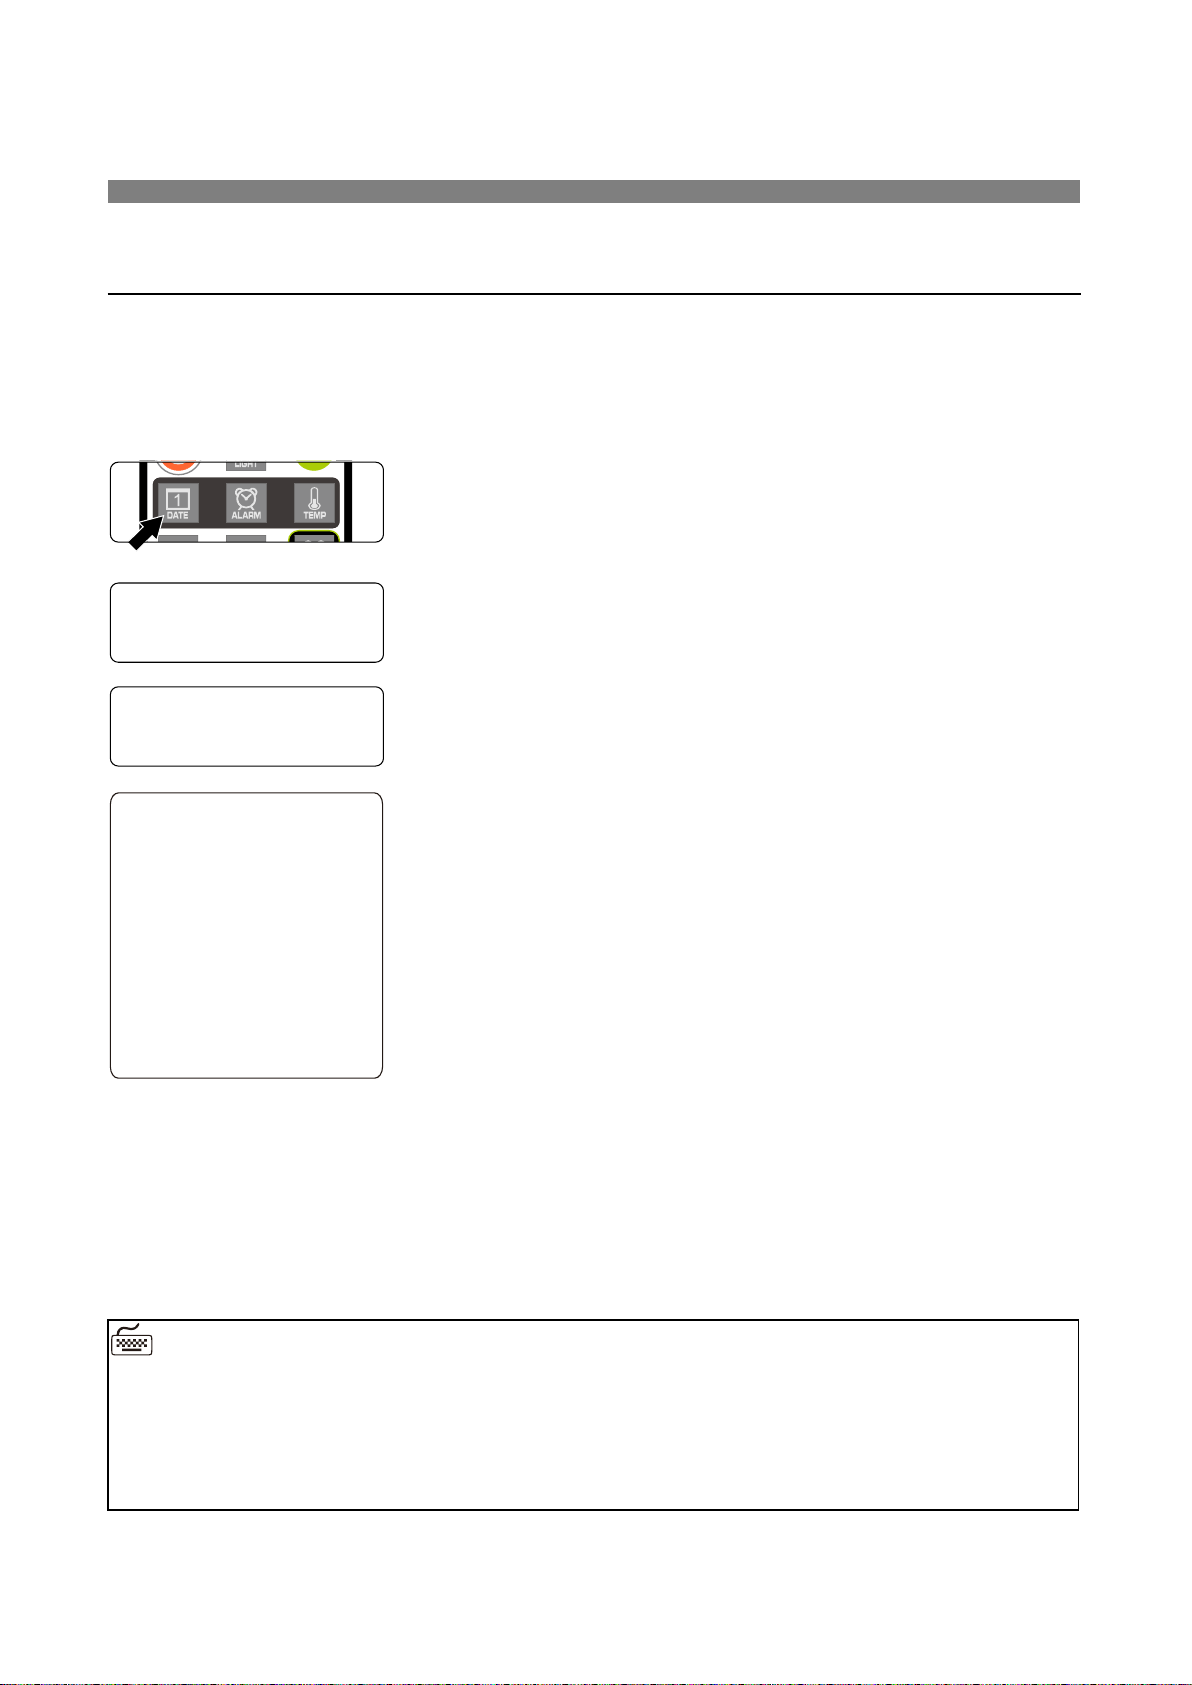
Display Date
Omnixie can display year, month, day and Chinese lunar date.
⚫ Press DATE button once to display date; press twice to display Chinese lunar date.
E.g.: Now date is Dec 1, 2016, Chinese lunar date is 2016-11-03.
Basic Operations
◼ After 3 seconds of display date, the Omnixie will return to time display mode.
◼ Date and time can be displayed alternately, please consult MENU 3 and MENU 4.
◼ Date format can show YY-MM-DD, YY-DD-MM, DD-MM-YY or MM-DD-YY, please
consult MENU 2 to set the date format.
⚫ Press DATE button once, display date.
⚫ Press DATE button twice, display Chinese lunar
date 2016-11-03, shown left.
16;12;01
⚫ Display date 2016-12-01, shown left.
16;11;03
16;12;01
16;01;12
01;12;16
12;01;16
⚫ Date format set to YY-MM-DD, shown left.
⚫ Date format set to YY-DD-MM, shown left.
⚫ Date format set to DD-MM-YY, shown left.
⚫ Date format set to MM-DD-YY, shown left.
Page 42
42 / 52
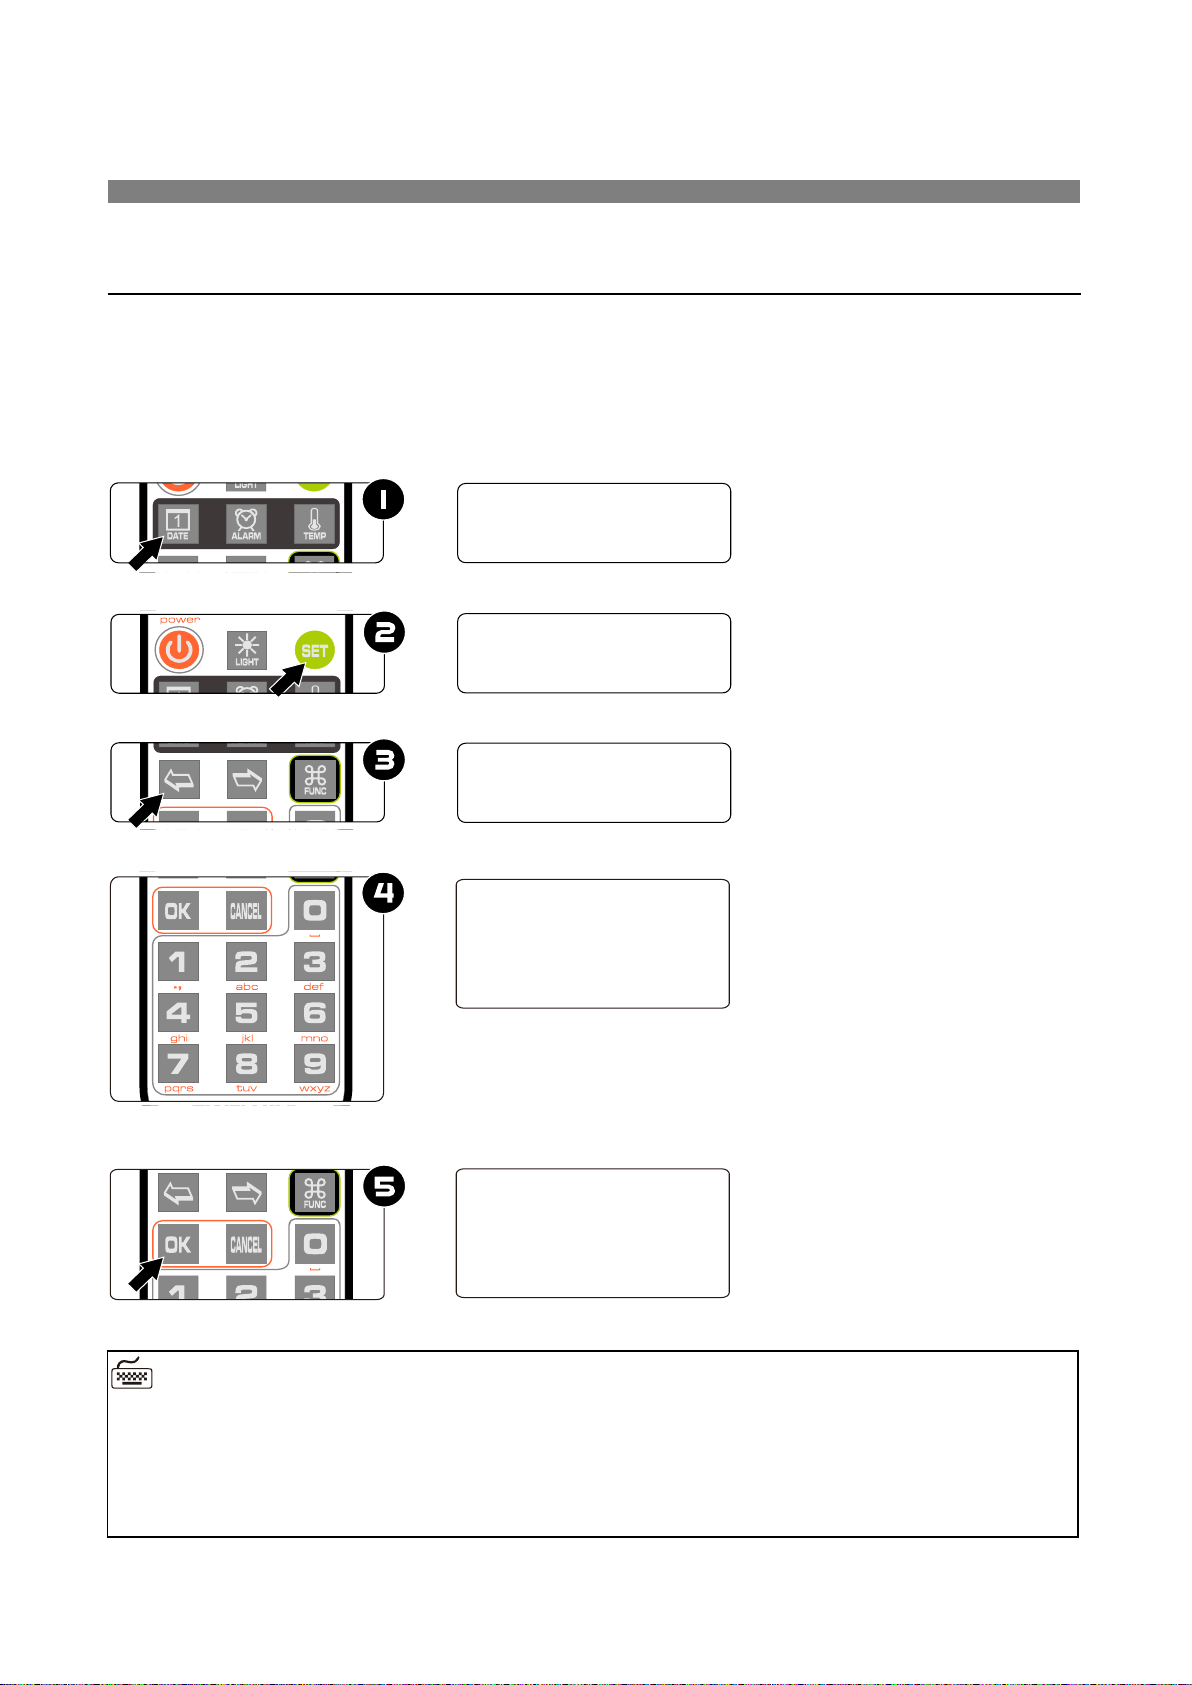
Set Date
Date can be set manually or synchronized by NTP server via WIFI.
To set date manually:
⚫ Press DATE button to show the date.
⚫ Press SET button to enter set date mode, 2 digits on the left start blinking.
⚫ Press LEFT/RIGHT button to select setting position.
⚫ Press 0-9 button to enter YEAR, MONTH or DAY.
⚫ Press OK button to save setting, press CANCEL to abort.
Basic Operations
16;12;01
◼ In setting mode, the date format always displayed as YY-MM-DD.
◼ Any digits can be input during setting, but system will check if the date entry is valid
when you save it. Invalid dates will not be saved.
◼ Chinese lunar date does not need to be set, the system will calculate it automatically.
16;12;01
16;12;02
16;12;02
16;12;01
Page 43
43 / 52
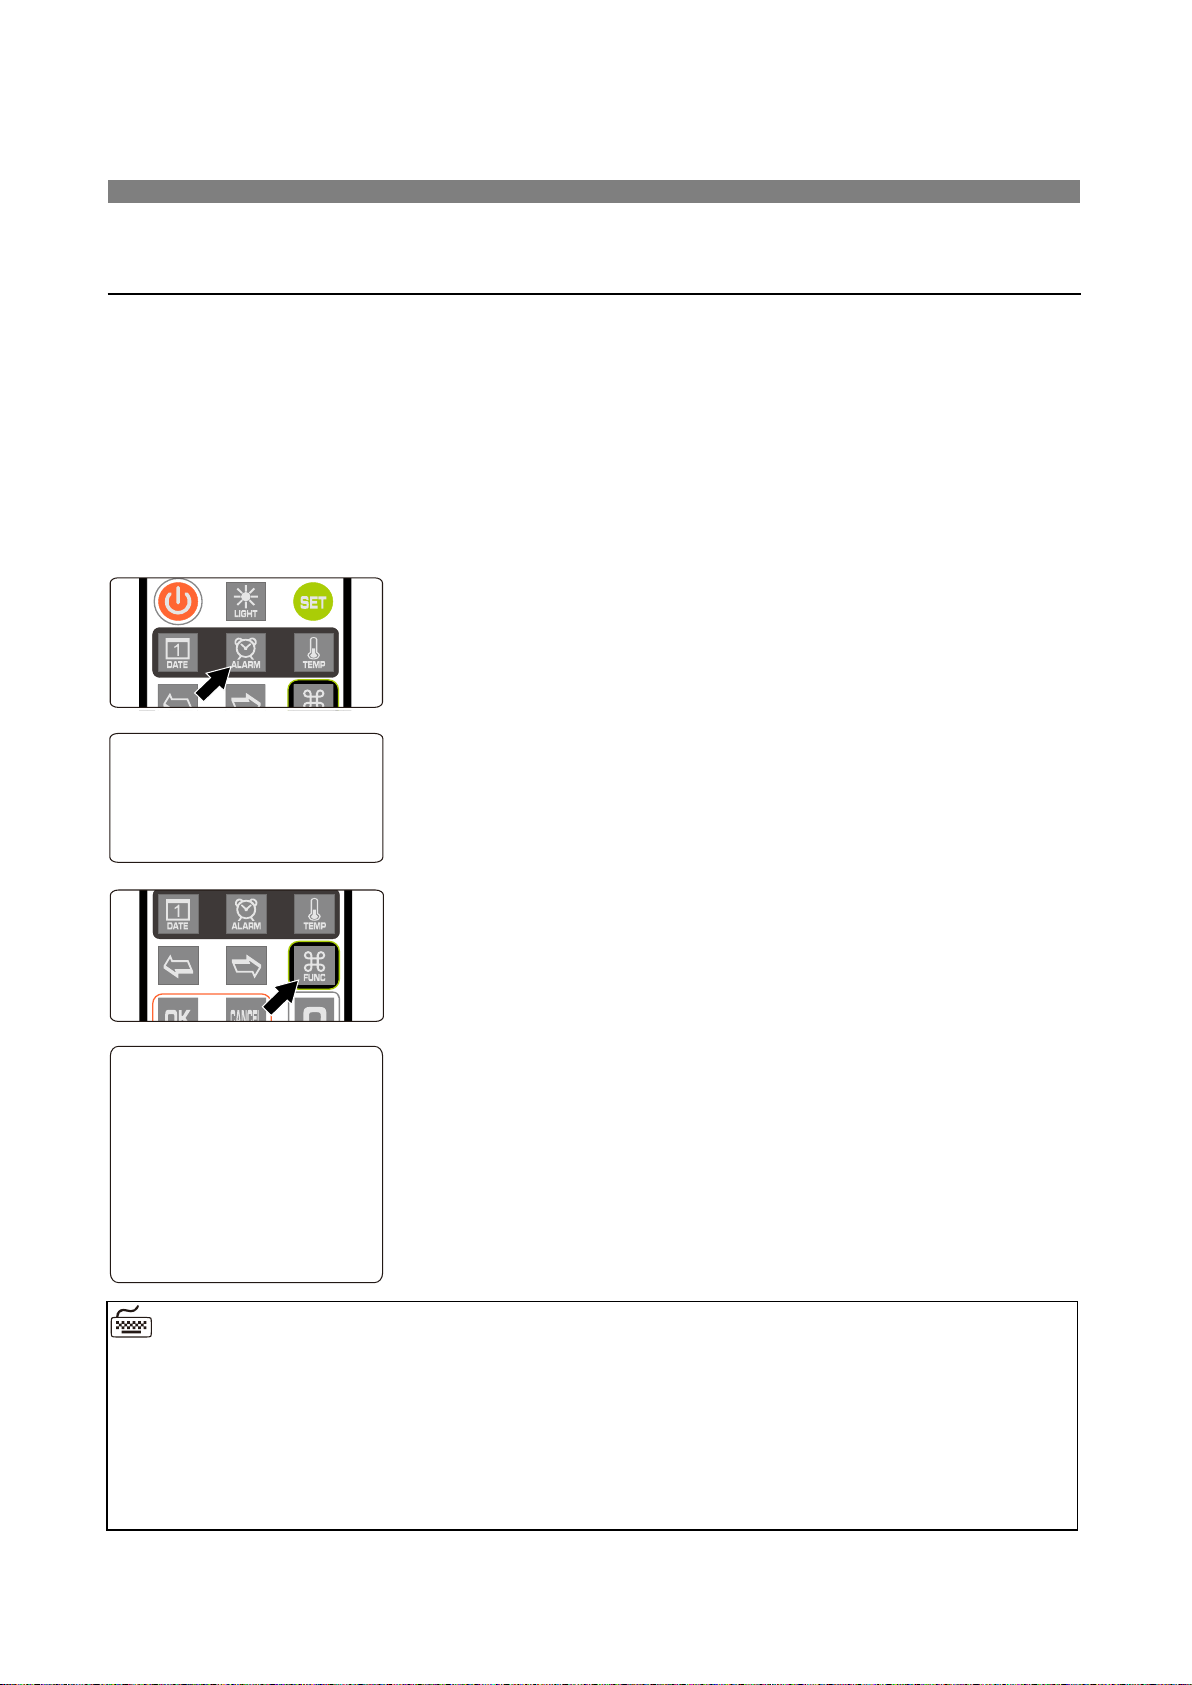
Display Alarms
The Omnixie can support 4 alarms, each can be active in working days or every day
separately.
⚫ Press ALARM button to check alarm 1, press twice/three times/four times to check
alarm 2/3/4.
E.g.: Alarm 1 set to 7:00 AM.
Basic Operations
1):07:00
⚫ Press ALARM button to display alarm 1 as shown
left.
⚫ Press FUNC button during display alarm to
activate or disable alarm.
◼ The Omnixie will return to time display mode from display alarm after 3 seconds.
◼ Alarm will sound for 60s.
◼ When the alarm sounds, you can press 0-9 button to snooze, the alarm will alarm again
after 1-10 minutes (1-9 button for 1-9 minutes and 0 for 10 minutes), or press any
other button to stop the alarm.
⚫ Alarm disabled as shown left.
⚫ Alarm activated in working days as shown left.
⚫ Alarm activated every day as shown left.
1);07;00
1):07:00
1):07:00
Page 44
44 / 52
Set Alarms
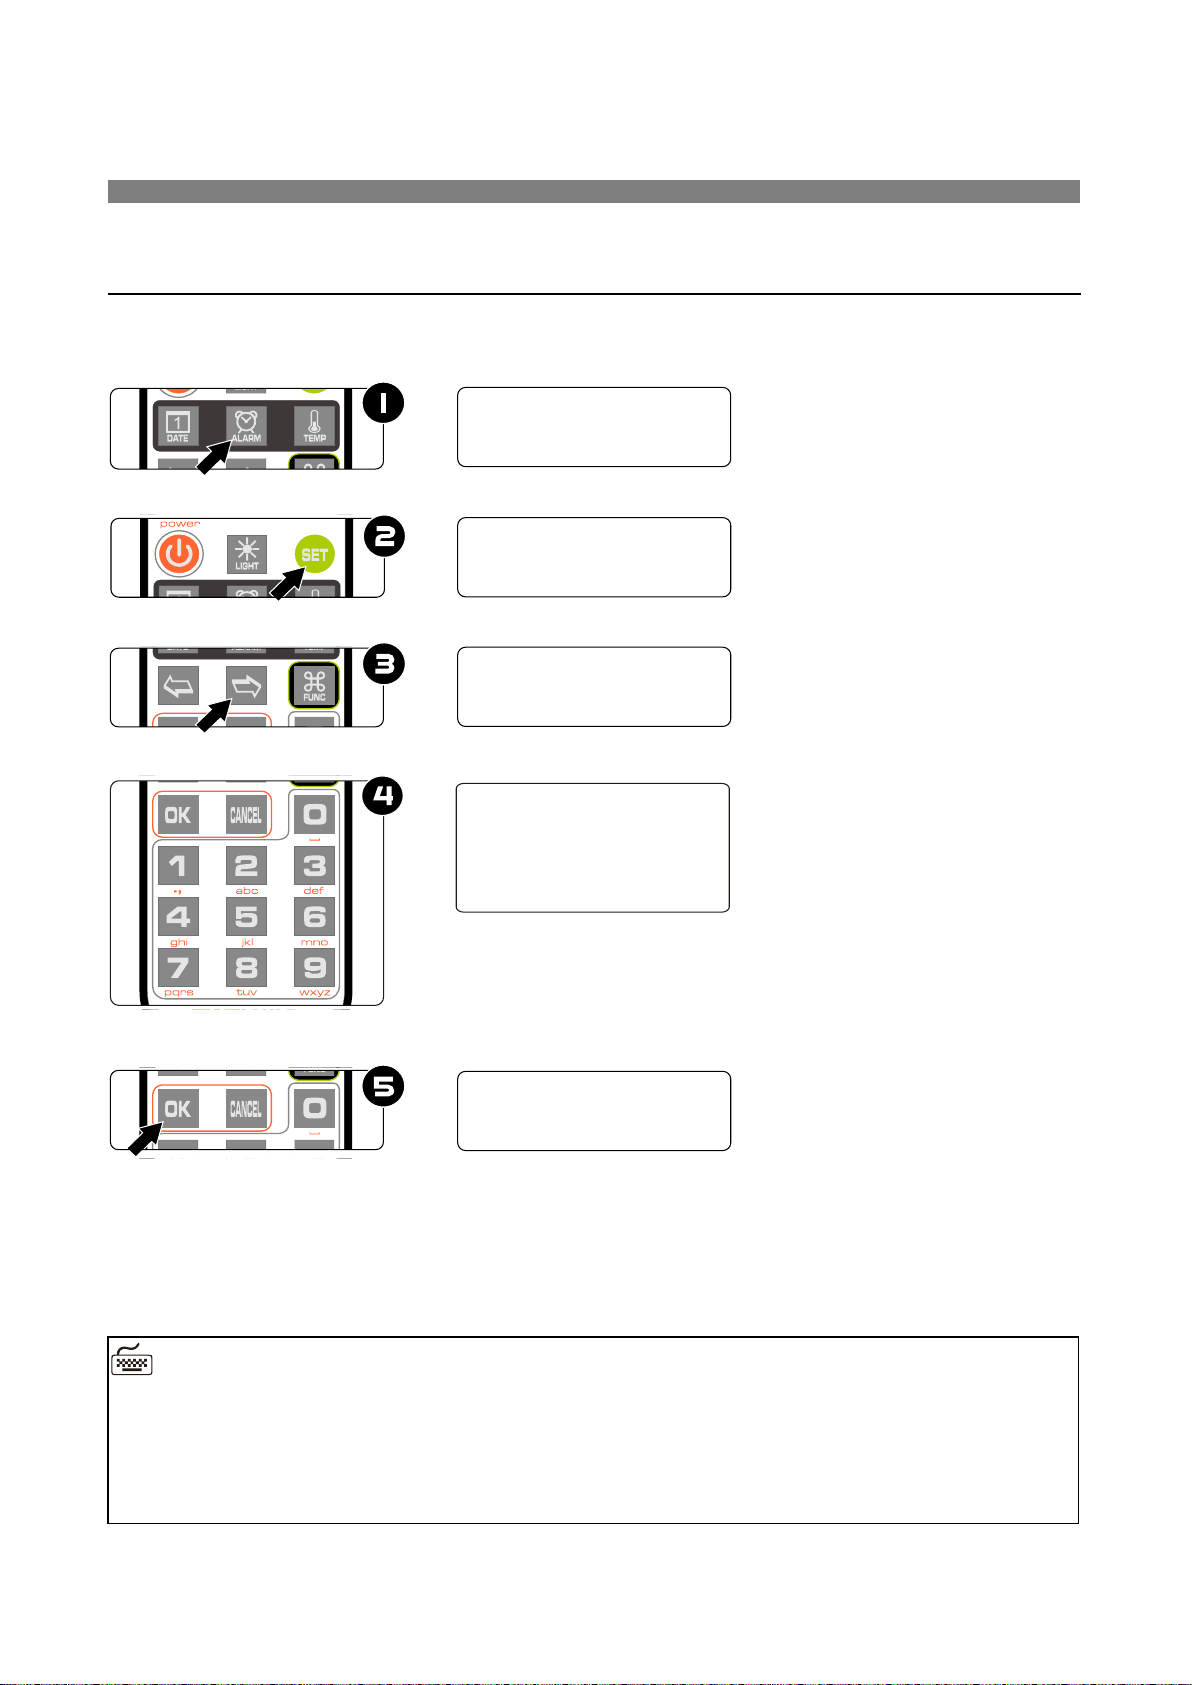
⚫ Press ALARM button to select alarm, digits on the left will show alarm number, 1
means alarm 1, 2 is alarm 2.
⚫ Press SET button to enter alarm set mode, HOUR blinks during setting.
⚫ Press LEFT/RIGHT button to select set position.
⚫ Press 0-9 button to input HOUR or MINUTE.
⚫ Press OK button to save setting, press CANCEL to abort.
Basic Operations
1);07;00
◼ Any digits can be input during setting, but system will check if the alarm time entry is
valid when you save it. Invalid alarm times will not be saved.
◼ Consult DISPLAY ALARMS for information on how to enable/disable alarm.
1);07;00
1);07;30
1);07;00
1);07;30
Page 45
45 / 52
Set Auto On/Off time
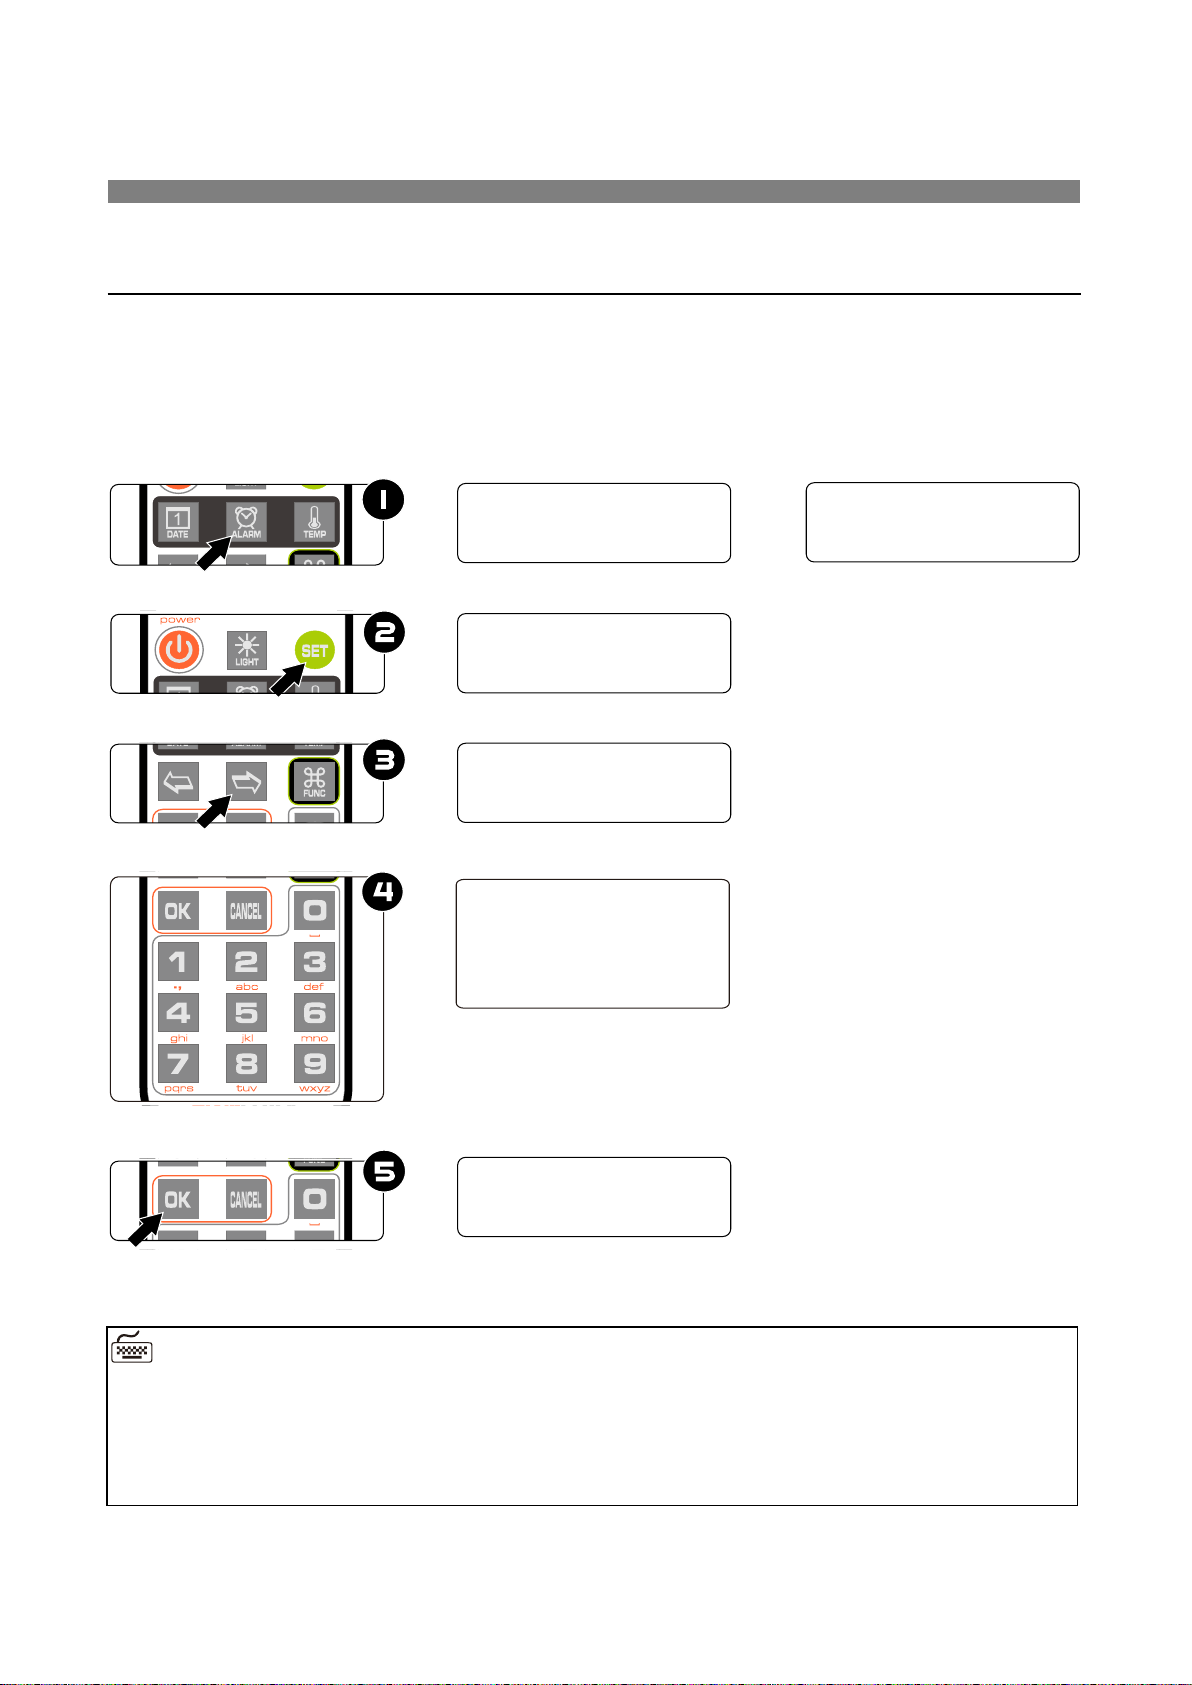
Press ALARM button 5 times to display AUTO ON time, press 6 times to display AUTO
OFF time. Colon blinking means active on working days, colon always on means active
every day, colon does not light up means disabled.
E.g.: AUTO ON time set to 8:00 AM, AUTO OFF time set to 10:00 PM.
⚫ Press SET button to enter auto on/off time setting mode, HOUR blinks.
⚫ Press LEFT/RIGHT button to select setting position.
⚫ Press 0-9 to input HOUR or MINUTE.
⚫ Press OK button to save setting, press CANCEL to abort.
Basic Operations
5):08:00
◼ Any digits can be input during setting, but system will check if the time entry is valid
when you save it. Invalid times will not be saved.
◼ The Omnixie default will check auto on/off mode and time every minute.
5);08;00
5);08;30
5);08;00
5):08:30
6):22:00
Page 46
46 / 52
System Menu
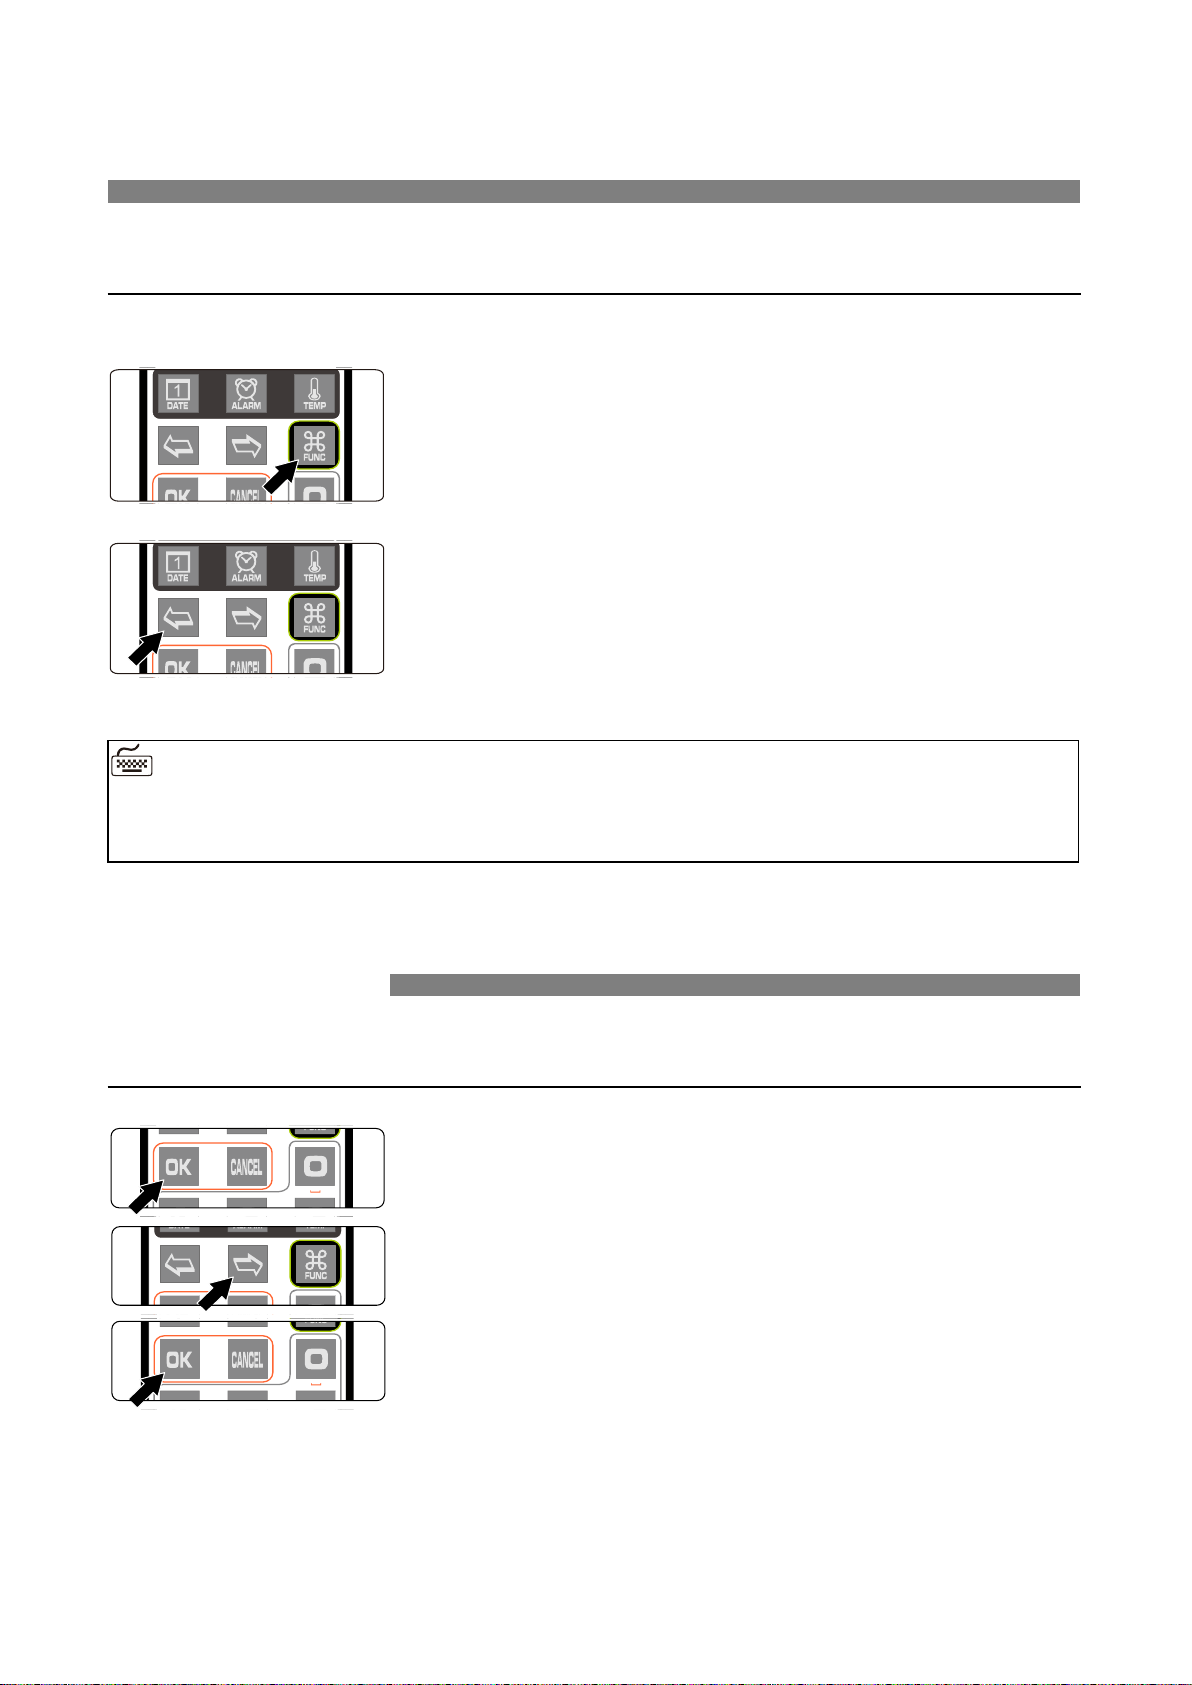
There are 17 different items in the menu for setting system parameter.
Menu Setup
There are 17 items in the menu to set parameters.
Basic Operations
◼ The Omnixie will return to time display mode after 3 minutes if there are no menu
operations.
⚫ Press LEFT/RIGHT to select menu items.
⚫ Press SET button to set current menu item.
⚫ Press FUNC button to enter menu.
⚫ Press SET button to enter setting mode.
⚫ Press LEFT/RIGHT button to change setting
position.
⚫ Press OK to save setting.
⚫ Press CANCEL to abort.
Page 47

47 / 52
Menu 1 Set Time Format
Menu 2 Set Date Format
Menu 3 Set Interval of Time Display
Display
Parameter
Remarks
01;));24
24 hour
Default
01;));12
12 hour
Display
Parameter
Remarks
02;));)1
YY-MM-DD
Default
02;));)2
YY-DD-MM
02;));)3
DD-MM-YY
02;));)4
MM-DD-YY
Display
Parameter
Remarks
03;));00
0 second
Default
03;));01
0 - 60 seconds
03;));60
60 seconds
Menu Setup
02;));)1
03;));00
01;));24
Page 48

48 / 52
Menu 4 Set Interval of Date Display
Menu 5 Set Leading Zero
Menu 6 Set Switching Effects of the Digits
Display
Parameter
Remarks
04;));00
0 second
Default
04;));01
0 - 60 seconds
04;));60
60 seconds
Display
Parameter
Remarks
05;));)1
On E.g.:
Default
05;));)2
Off E.g.:
Display
Parameter
Remarks
06;));)1
Normal
06;));)2
Fade in-out
06;));)3
Cross-fading
Default
06;));)4
Slot machine
Menu Setup
04;));00
06;));03
05;));)1
08:30:00
)8:30:00
Page 49

49 / 52
Menu 7 Set Switching Speed of the Digits
Menu 8 Set Colons Animation Effects
Menu 9 Set Alarm Sound Tone
Display
Parameter
Remarks
07;));01
01 Fastest
07;));07
01-10 10 level in total
Default 07
07;));10
10 Slowest
Display
Parameter
Remarks
08:)):)1
Fade in-out
Default
08:)):)2
Blinking
08:)):)3
Always on
08;));)3
Always off
Display
Parameter
Remarks
09;));01
No.01 to No.12
Default No.01
07;));07
Menu Setup
08:)):)1
09;));01
Page 50

50 / 52
Menu 10 Set Alarm Volume
Menu 11 Set Talking Clock Language
Menu 12 Set Interval of Talking Clock
Display
Parameter
Remarks
10;));)7
Level 1(Min) to 8 (Max)
Default 7
Display
Parameter
Remarks
11;));)1
Chinese Mandarin
Default
11;));)2
English
11;));)3
Japanese
11;));)4
German
Display
Parameter
Remarks
12;));00
Talking clock disabled
12;));01
0,1,2,3,5,10,15,20,30,60 Minutes
12;));60
60 Minutes
Default
12;));60
Menu Setup
10;));)7
11;));)1
Page 51
51 / 52
Menu 13 Set Backlight Effects
Menu 14 Set Backlight Color
Menu 15 Set Interval of CP prevention
Display
Parameter
Remarks
13;));01
Backlight disabled
13;));02
Fade in-out
13;));03
Always on
Default
Display
Parameter
Remarks
14;));09
No.01-No.15
(Preview when setting)
Default 09
Display
Parameter
Remarks
15;));00
CP disabled
Not
recommended
15;));10
0,1,2,3,5,10,15,20,30,60 Minutes
15;));60
Max 60 Minutes
Default 10 Mins
Menu Setup
14;));09
13;));)3
15;));10
◼ Nixie tubes have an unwanted side effect called ‘cathode poisoning’ (CP) which
causes metal molecules from the glowing cathodes (digits) and attach to non-glowing
cathodes. This will cause deterioration and finally failure of the tube. To avoid this
effect, non/seldom glowing cathodes need to be periodically switched on. Since
cathode poisoning varies between different types of tubes, there is an adjustable
cathode poisoning prevention setting.
Page 52

52 / 52
Menu 16 Set Running Time of CP Prevention
Menu 17 Display Firmware Version
Special Remarks
⚫ These Nixie Tubes were produced between 1960 to 1980, and there may be some
differences between tubes and manufacturing lots. This is normal, and will not
have any effect on the tube operation.
⚫ The Omnixie will become warm or little hot during operation due to the internal
DC-DC converter circuitry. This is normal operation and no cause for concern.
⚫ The bottom plate of the Omnixie is made from stainless steel and is heavy. Please
take care not to drag the unit by the Micro-USB cable to avoid damage to the
Micro-USB socket.
Display
Parameter
Remarks
16;));05
05-30 Seconds
Default 5 Seconds
Display
Parameter
Remarks
17;)1;22
v1.2.2
Designer: Yan Zeyuan. China
Website: http://www.nixieclock.org
http://www.nixie.ai
E-mail: [email protected]
Menu Setup
16;));05
17;)1;22
 Loading...