

Page 1
PSM-NIT-08008E
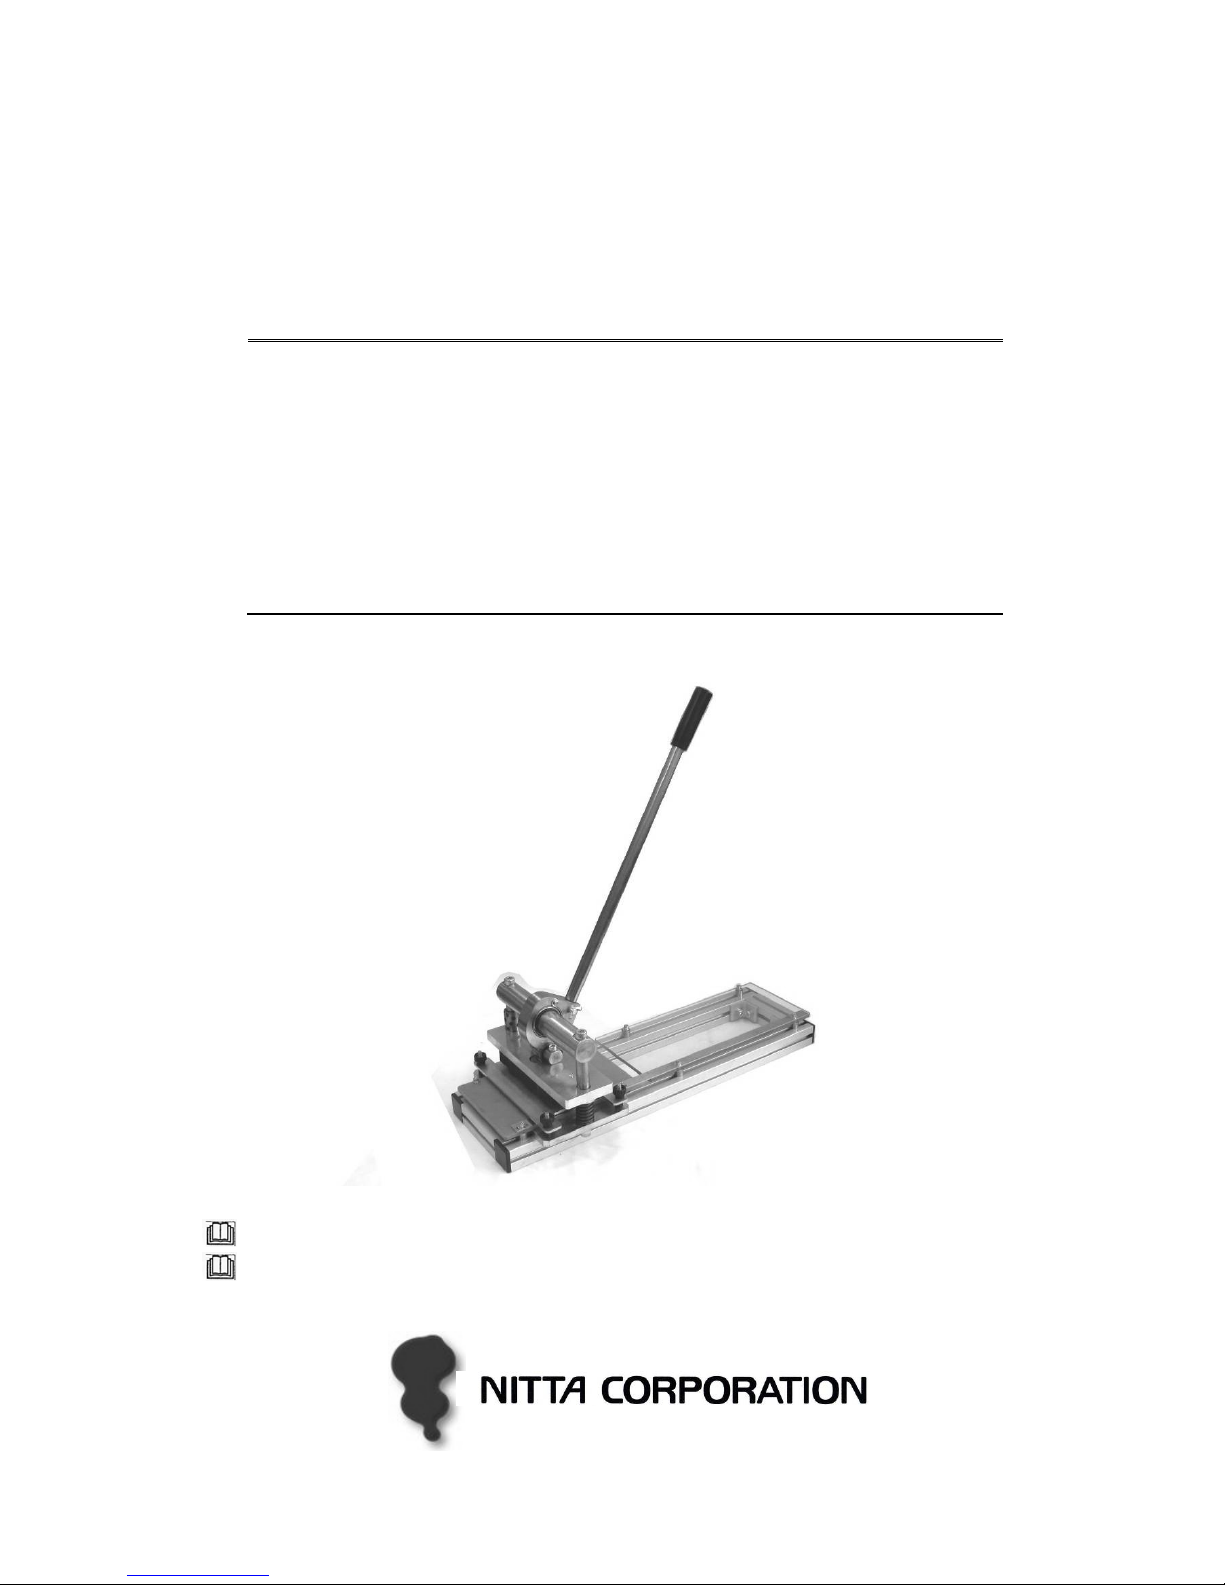
PolySprint™
Follow this manual when using Nitta PolySprint™ Finger Puncher.
Please pass this manual to PolySprint™ Finger Puncher users for a safe and
trouble-free operation.
FFiinnggeerr PPuunncchheerr
F
F
P
P3300--1100--110000
Operation Manual
Page 2

- 1 -
Contents
1. Safety Precautions ・・・・・・・・・・・・・・・・ 2
2. Confirmation of Product ・・・・・・・・・・・・・・ 3
3. Specifications ・・・・・・・・・・・・・・・・・・ 4
4. Use Environment ・・・・・・・・・・・・・・・・・ 4
5. Storage Environment ・・・・・・・・・・・・・・・ 4
6. Name of Each Part ・・・・・・・・・・・・・・・・ 5
7. How to Make a Finger Joint ・・・・・・・・・・・・ 6
8. Troubleshooting ・・・・・・・・・・・・・・・・・ 9
9. Maintenance ・・・・・・・・・・・・・・・・・・・ 9
10. Maintenance Record ・・・・・・・・・・・・・・・・ 12
11. Inspection ・・・・・・・・・・・・・・・・・・・・ 12
Page 3
- 2 -
1. Safety Precautions
Please go over these safety precautions carefully to secure a correct and safe
operation of the PolySprint™ Finger Puncher FP30-10-100.
Disregarding instructions marked with this symbol may lead
to death or serious injury.
Disregarding instructions marked with this symbol may lead
to injury or property damage.
WARNING
Do not use the PolySprint™ Finger Puncher for any application other than
the intended purpose of making belts endless.
Use for any unintended purpose may cause an unexpected accident.
A person with experience and skills should always operate, maintain and
inspect the PolySprint
™ Finger Puncher.
Handling by an inexperienced person may cause injury.
Do not dismantle or remodel the PolySprint
™ Finger Puncher under any
circumstance. Please note the Finger Puncher uses a sharp blade.
Dismantling or remodeling the PolySprint
™ Finger Puncher may cause
physical injury.
For repair or inspection, please contact Nitta, your local distributor or agent in
your area.
Use a dry cloth for cleaning the PolySprint
™ Finger Puncher. To prevent
fire, do not use alcohol, benzine, thinner or any other inflammable solvent.
CAUTION
WARNING
WARNING
WARNING
WARNING
WARNING
Page 4
- 3 -
1. Safety Precautions- Continued-
Caution
Do not use the PolySprint™ Finger Puncher under the following conditions:
・ Under a corrosive gas en vironment
・ Under an ambient temperature of 5℃ or below
・ Under an ambient temperature of 40℃ or above
・ Under a high humidity environment (humidity surpassing 85%)
・ In places exposing the puncher to steam or water drops
To prevent physical injury, use the PolySprint
™ Finger Puncher on a stable
working bench or table that will not collapse.
Before using the PolySprint
™ Finger Puncher, be sure to inspect the
puncher in accordance with the procedure described on page 12 to help
prevent injury.
2. Confirmation of Product
Thank you for choosing our PolySprint™ Finger PuncherFP30-10-100.
Check that the product is exactly what you have ordered. Use of the
wrong product may cause injury.
2-1)Confirmation of Product
Confirm the following items upon accepting delivery of your order. Contact Nitta, your local
distributor or agent in your area if you find any deficiency or defect in your item.
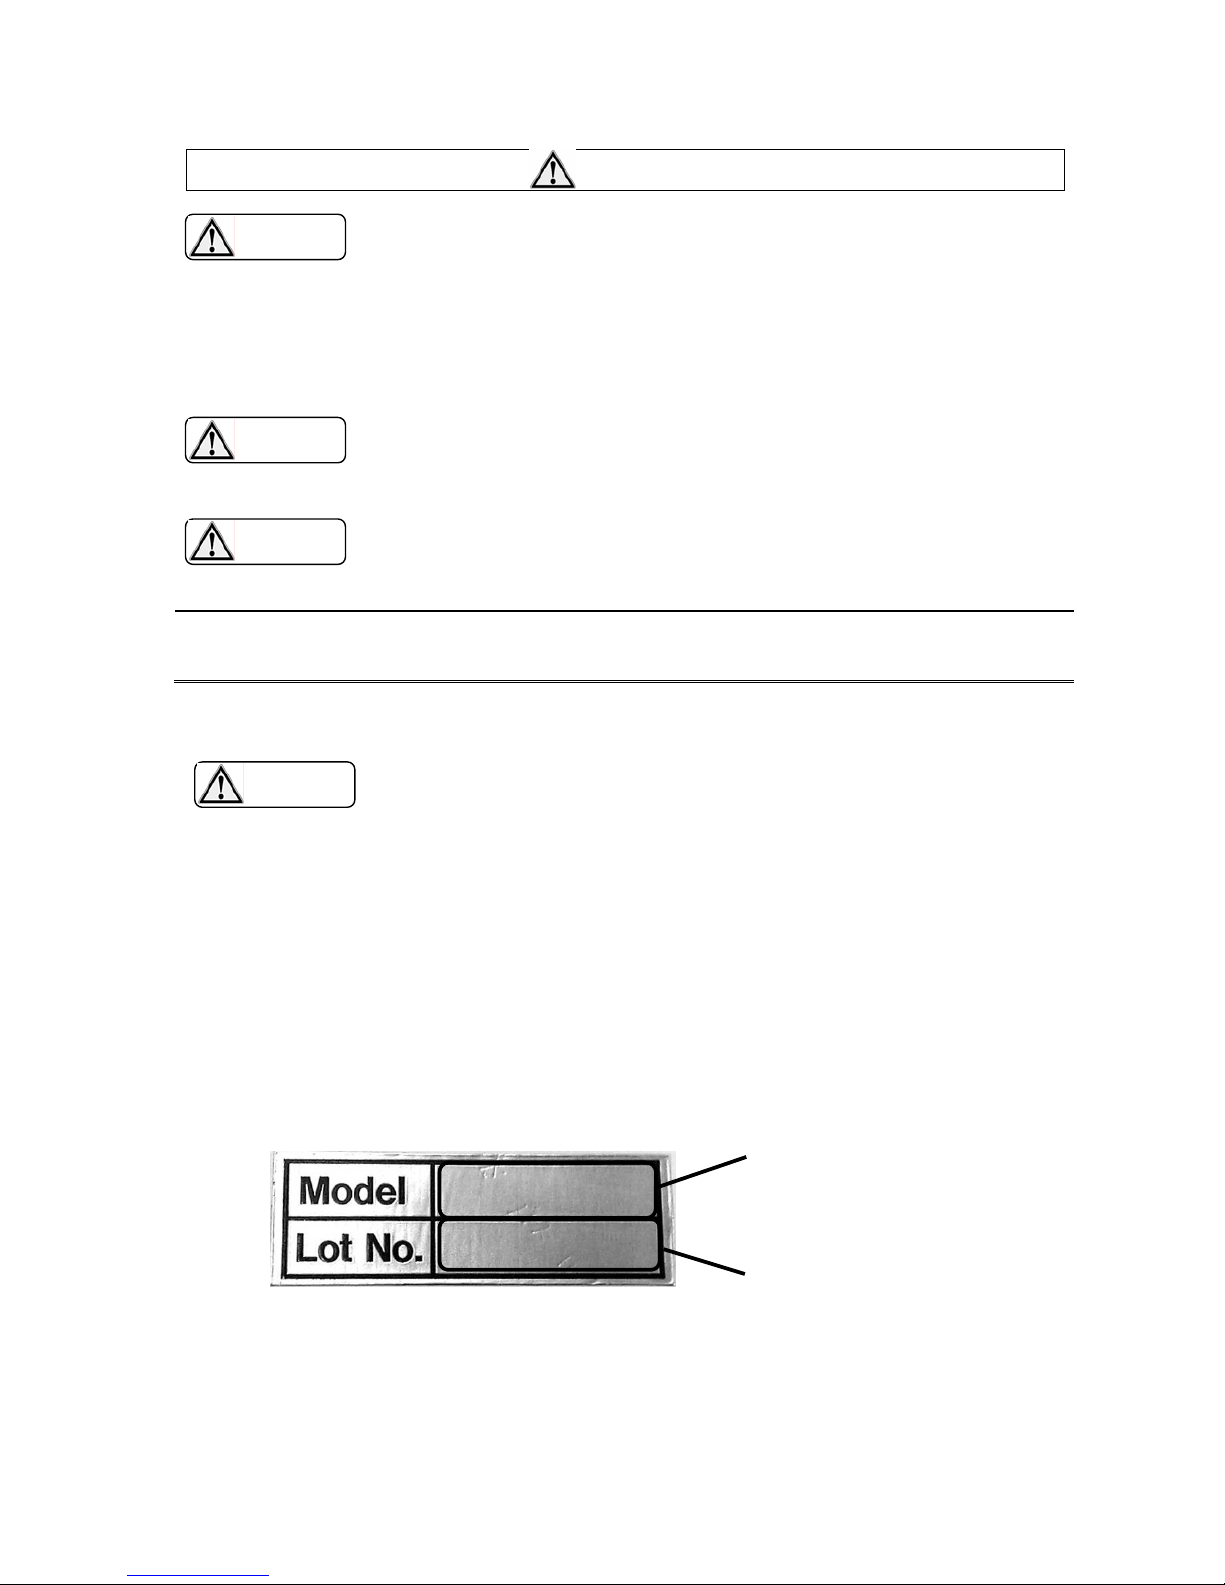
① Are descriptions on the face plate the same as those of your order item? Please
confirm the model type.
② Has the product been damaged during transportation?
③ Has a nut or screw slackened?
2-2)How to Read Face Plate
2-3)Inquiries
When making inquiries, please inform our sales representative of the model type and the
production serial number.
CAUTION
CAUTION
CAUTION
①Model type
②Production serial number
FP30-10-100
050001
CAUTION
Page 5
- 4 -
3. Specifications
3-1)Outline of Finger Puncher
① PolySprint™ Finger Puncher is exclusively designed for manually punching finger
spliceable Nitta PolySprint
™ belts with a cutting blade assembly.
② PolySprint
™ Finger Puncher is compatible with the following endless specifications:
Joint specifications: finger geometry 30mm long x 10mm pitch
Maximum belt width: up to 50mm
Maximum belt thickness: up to 2mm (2 plies or less)
.
3-2)Major Specifications of Finger Puncher
4. Use Environment
Ambient Temperature
5-40℃ (no condensation)
Ambient Humidity 15-85%RH
Place of Use Indoors (free from dust, water)
Environment No inflammable, combustible or corrosive gas; no steam
Use the PolySprint™ Finger Puncher under the above conditions.
5. Storage Environment
Ambient Temperature
5-40 ℃ (no condensation)
Ambient Humidity 15-85%RH
Place of Use Indoors (free from dust, water)
Environment No inflammable, combustible or corrosive gas; no steam
When the PolySprint™ Finger Puncher is not in use, it should be stored
under the above conditions.
Type FP30-10-100
Outer Dimension Puncher Body: 200 mm wide x 500 mm long x 504 mm* high
*170 mm when the lever is removed.
Weight 7.2kg
CAUTION
CAUTION
Page 6
- 5 -
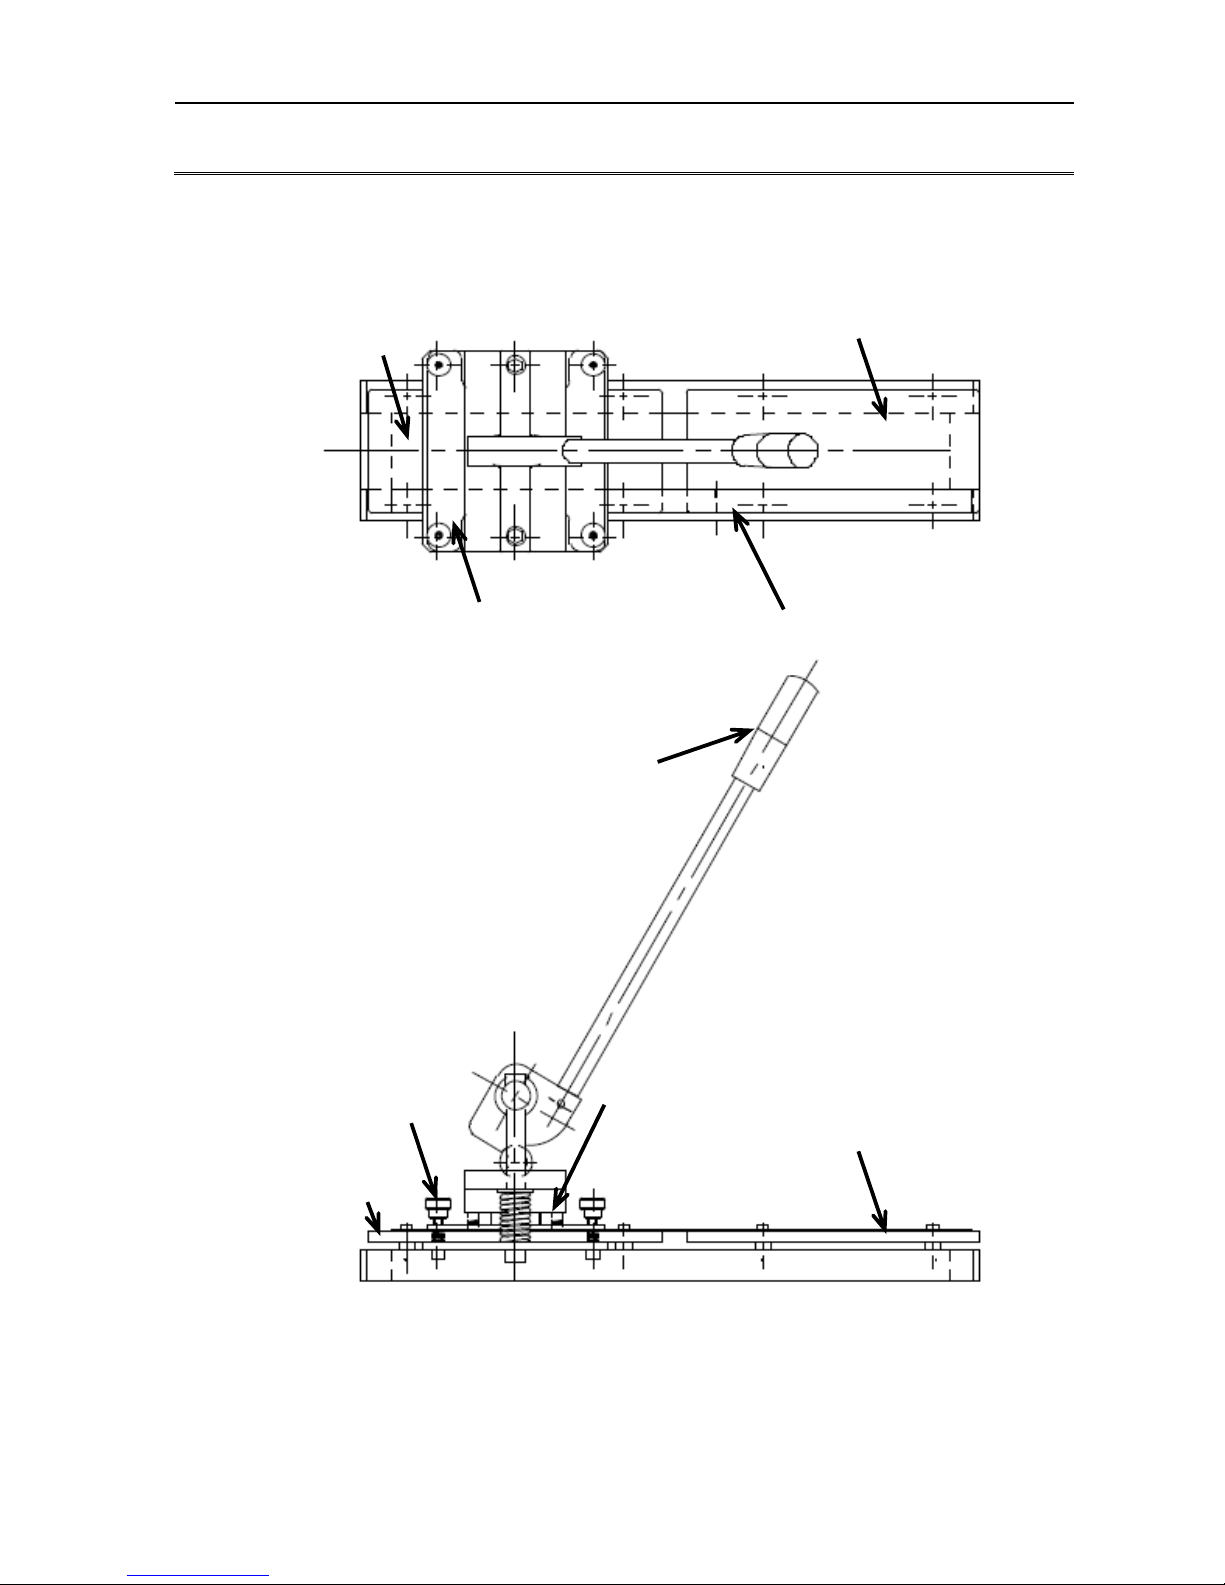
6. Name of Each Part
Handle
Knob
Cutting Sheet
Eject Plate
Clear Sheet
Belt Guide
Clear Sheet
Cutting Sheet
Cutting Blade
Page 7
- 6 -
7. How to Make a Finger Joint
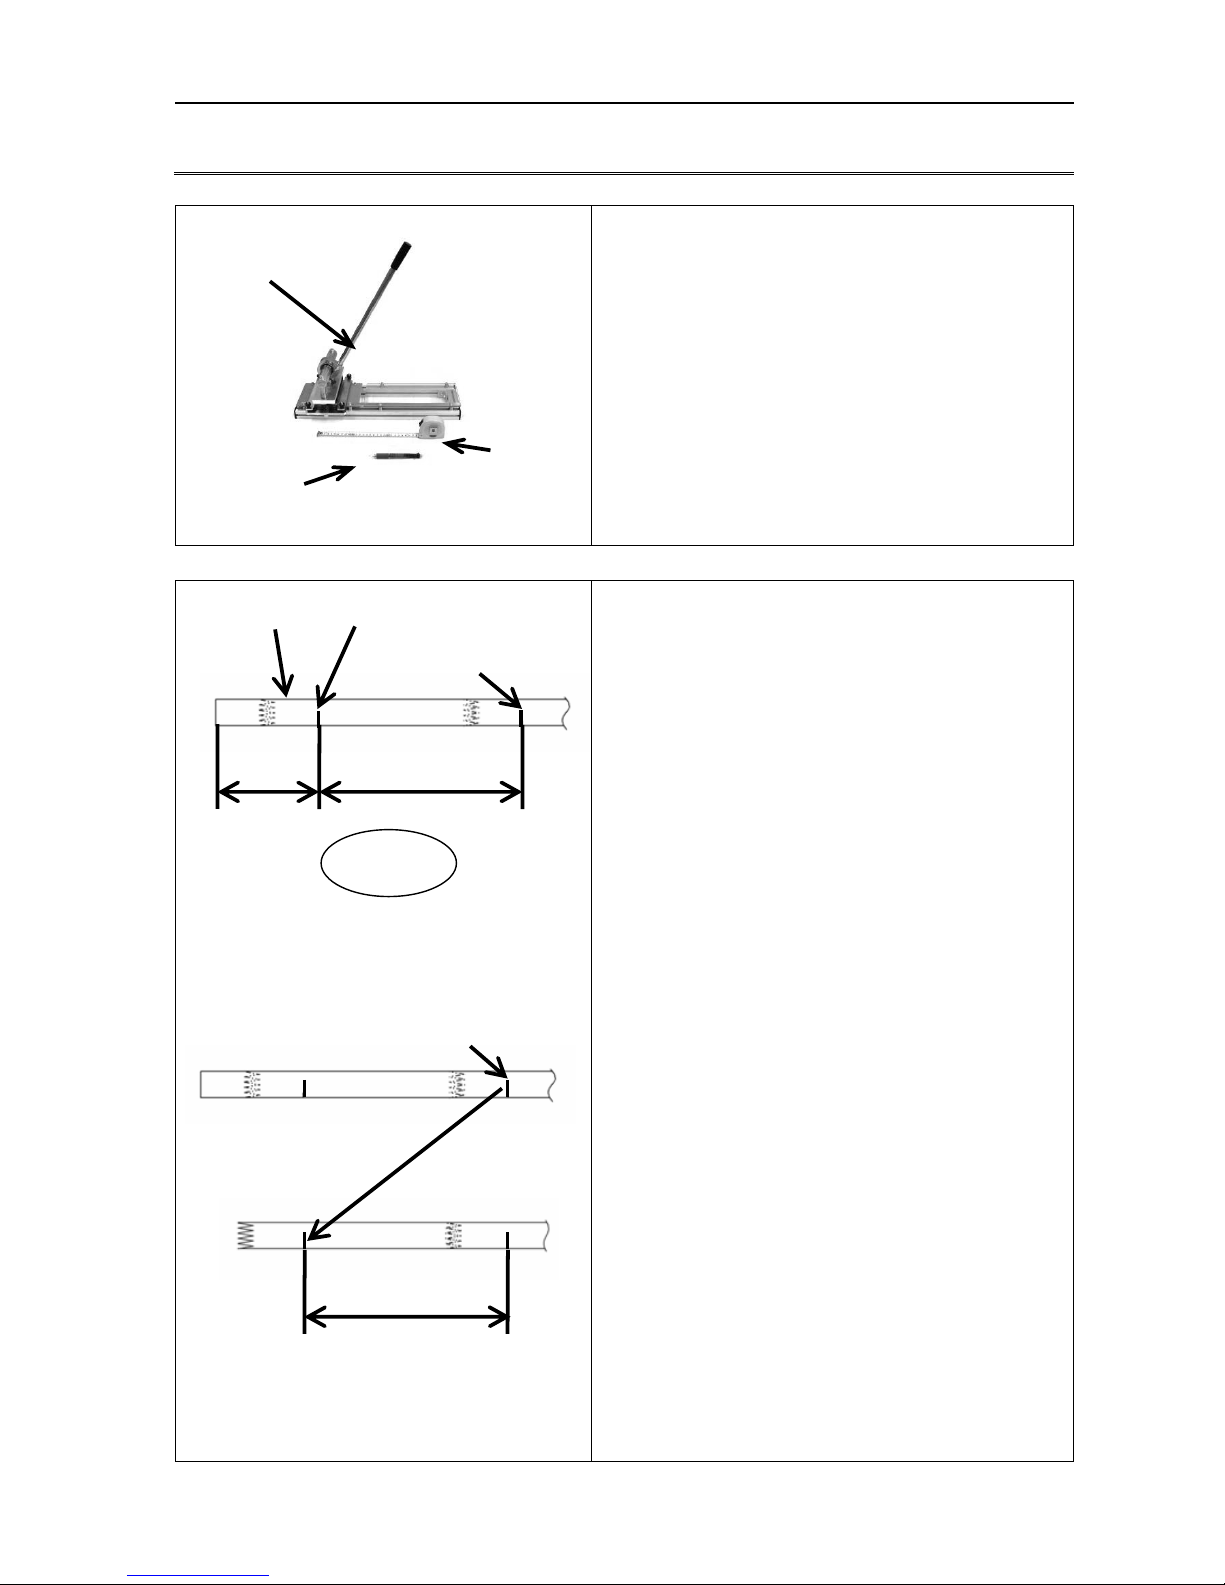
7-1) Required Tool (tool prepared in advance)
a. Finger Puncher (FP30-10-100)
b. Tape Measure or Ruler
(for measurement of belt length)
c. Ballpoint Pen or Felt Pen (for marking)
7-2) How to Measure Belt Length
① Set the belt along a tape measure or ruler and
make the first mark 200mm from the edge of the
belt. (See diagram to left.)
② Based on the first mark, make a second mark at
the ending point of the required belt length. (Put
both marks on the front side, i.e. on the operator
side.)
※ When consecutively making endless belts,
obtain required belt length and from the
second mark made at the preceding finger
joint, measure out the required belt length
and make another mark. Repeat the above
process. By doing this, punching can always
be made at the right position and there will
be no wasted belt.
Second Mark
200mm L= endless length
Belt
First Mark
Operator
L= endless length
Second Mark
a.
b.
c.
Page 8
- 7 -
7-3) How to Make a Finger Joint
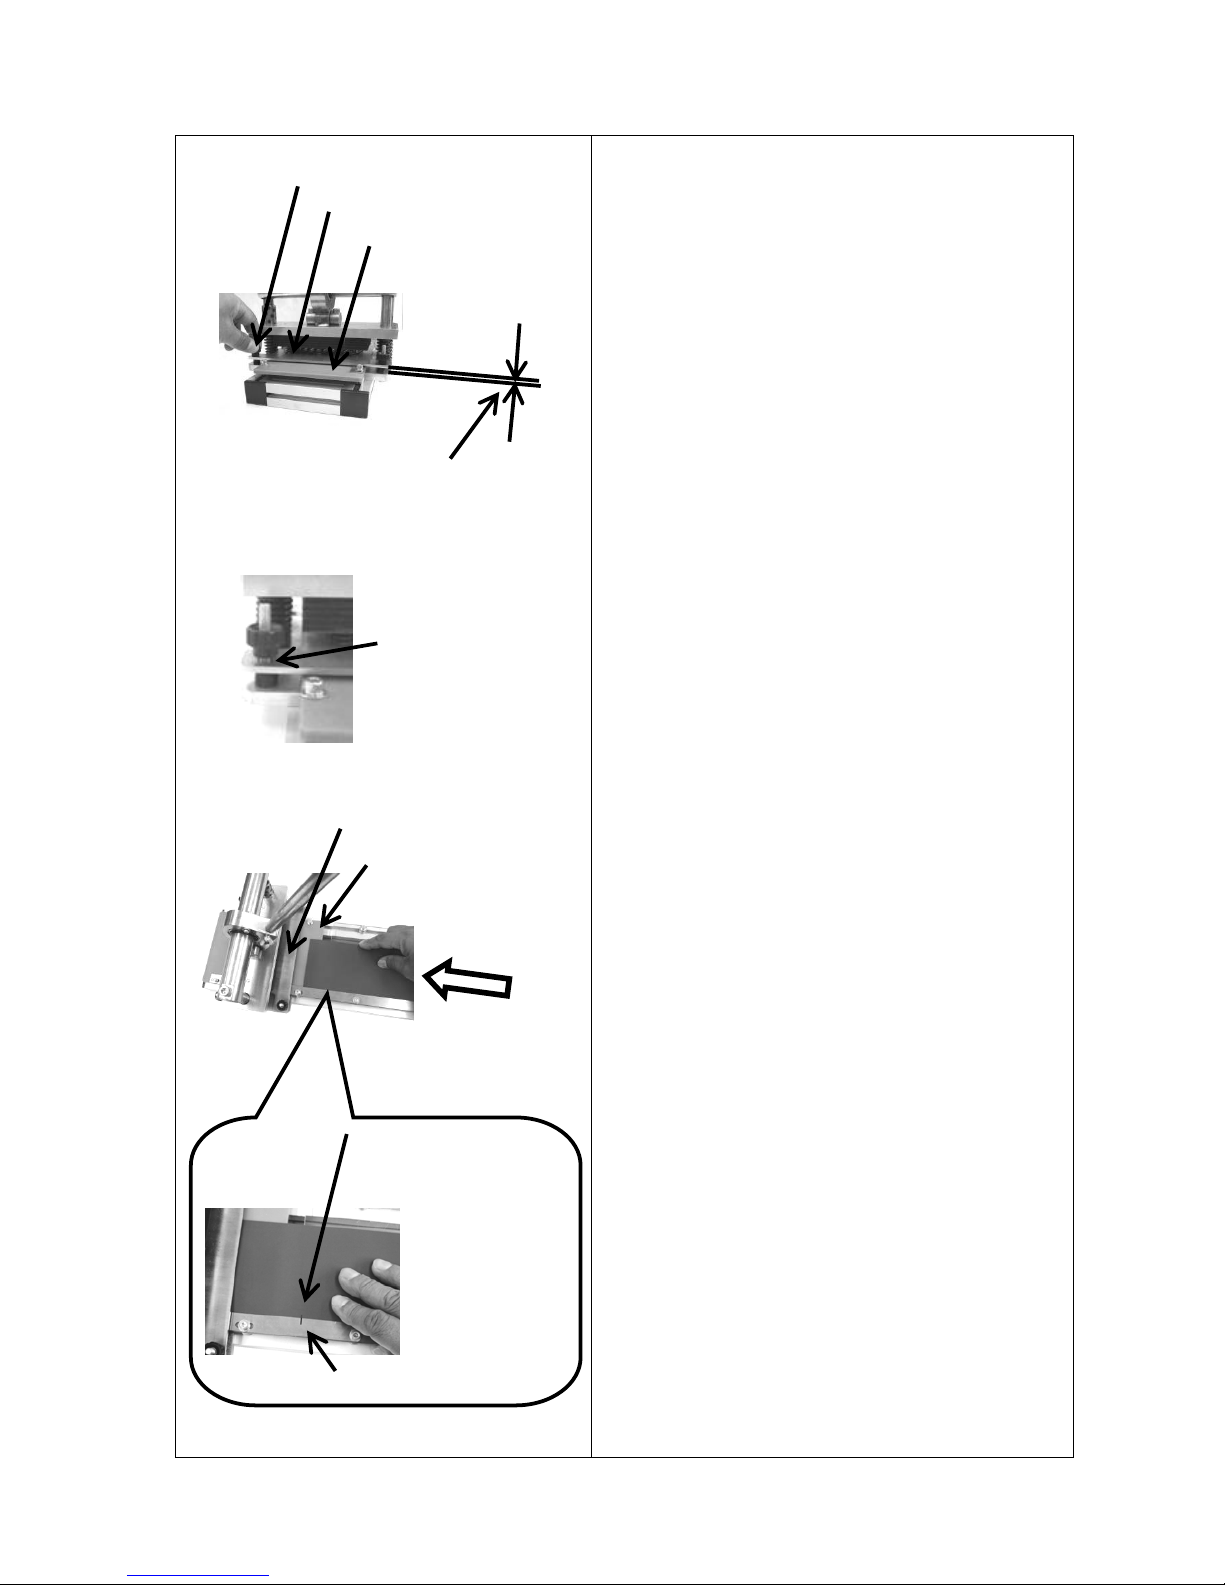
① Adjustment of Eject Plate
Adjust the clearance between the eject plate
and the cutting sheet to be equal to the belt
thickness + about 0.5 mm. Make adjustment by
turning the four knobs. The eject plate, when
adjusted to the proper height for the belt, fulfills
its functions.
※ When processing belts with the same
thickness, make an adjustment once before
use; no further adjustment is necessary
thereafter.
※ Avoid any clearance between the knobs and
the eject plate. When the eject plate is not
adjusted to the proper height for the belt, the
belt may sometimes get stuck on the cutting
blade after punching.
② Inserting the Belt
Insert the belt between the eject plate of the
finger puncher and the cutting sheet, and line up
the first mark on the belt with the cutting guide
indicator of the finger puncher.
※ Insert the belt along the belt guide.
No clearance
Eject Plate
Cutting Sheet
Knob
Belt thickness
+ about 0.5 mm
Insert
Eject Plate
Cutting Sheet
Fit the mark on the
belt with the cutting
g
uide indicato
r
.
Cutting guide indicato
r
Page 9
- 8 -
7-3) How to Make a Finger Joint - Continued-
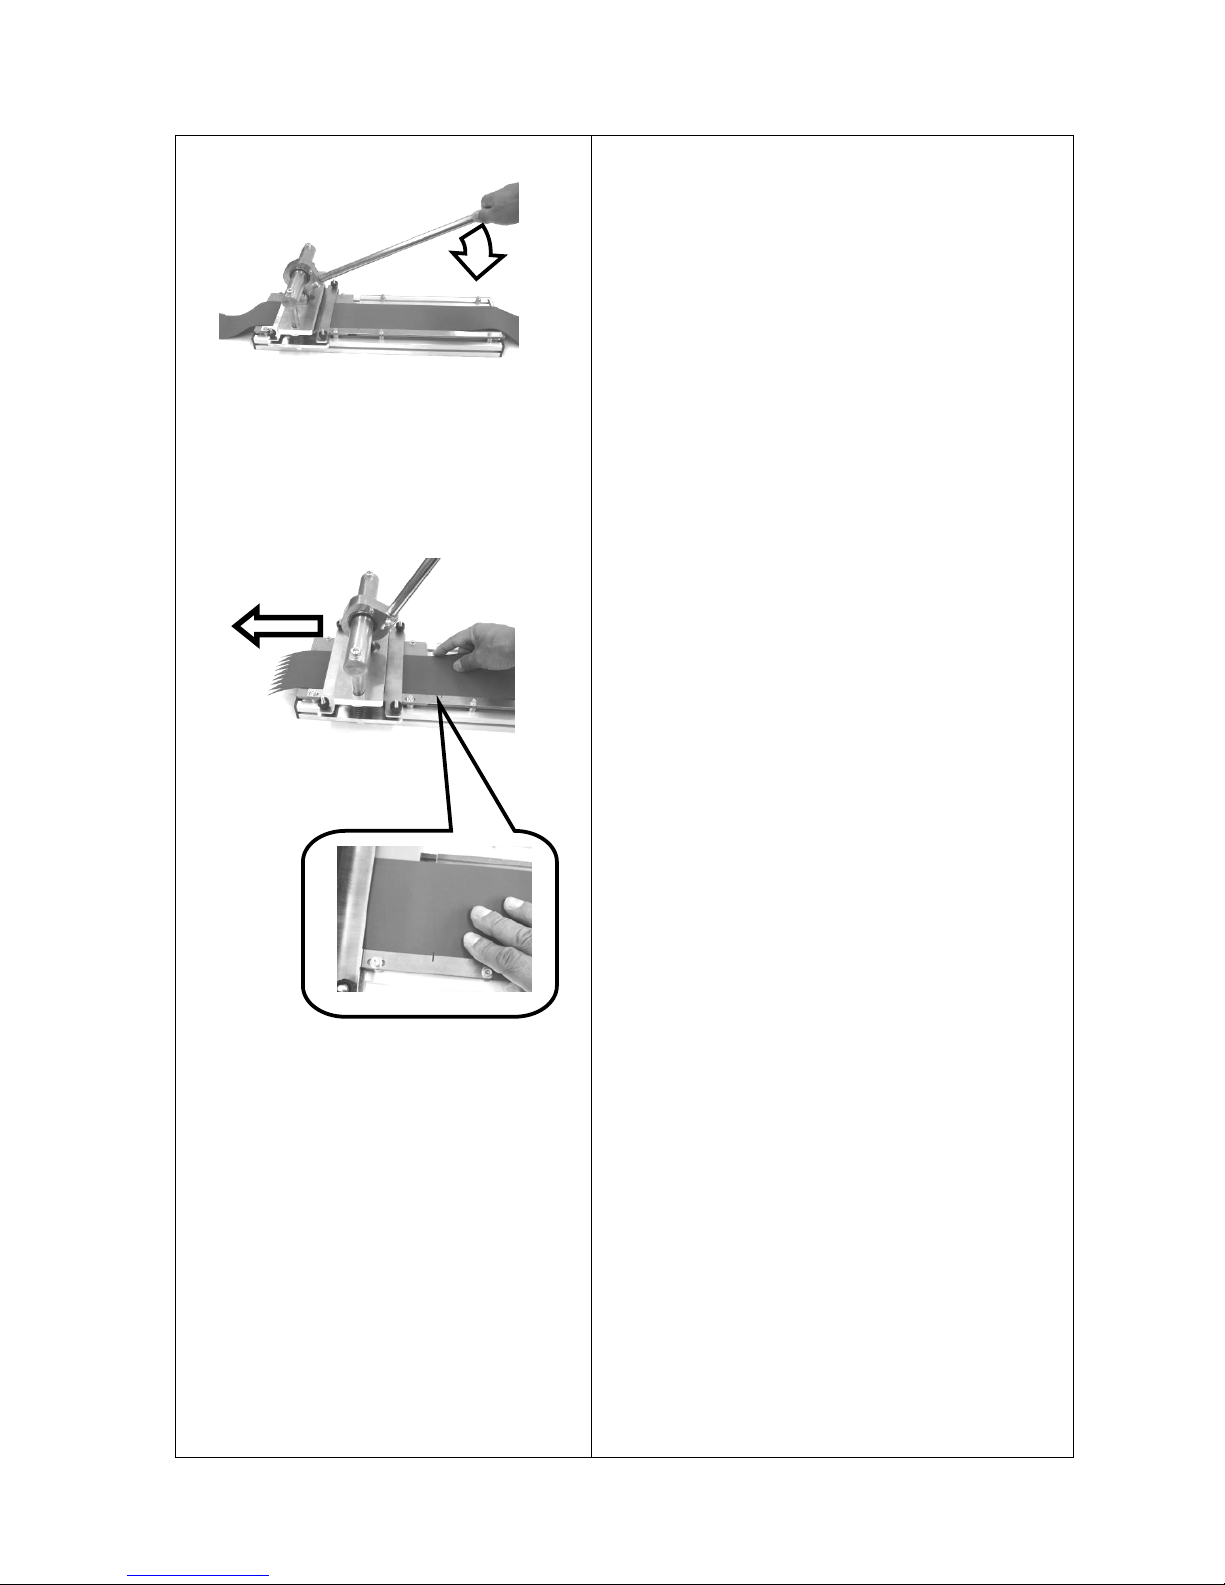
③ Hold the finger puncher in place with one hand
and push down the handle with the other hand
to punch the belt. (See diagram to left.)
※ Push down the handle of the finger puncher,
and the eject plate also comes down and
fixes the belt.
※ Do not put your hands close to the cutting
blade.
④ Fit the second mark made on the belt with the
cutting guide indicator of the finger puncher and
punch out the belt to obtain the required endless
length. (The belt from edge to edge will be
endless length + 30 mm.)
※ When punching a long belt, you can insert
the rear–edge of the belt from the other side
of the finger puncher to avoid pulling the
entire belt through the finger puncher.
Page 10
- 9 -
8. Troubleshooting
If there are any finger joints which are not cut out properly when a belt is punched,
follow the directions described in the “Maintenance” section on pages 9-11.
If the problem is not solved after following these directions, please contact Nitta,
your local distributor or agent in your area for advice.
9. Maintenance
9-1) How to Perform Maintenance
You can change the position of the cutting sheet and both sides of the cutting
sheet can be used. Adjusting the position may solve any problems where a
portion of the finger joint is not cut out.
The cutting sheet is consumable. Specify the cutting sheet for FP30-10-100 Finger
Puncher when you order a new one.
9-2) Required Tool
Hexagon wrench (3 mm)
9-3-1) How to change the position of the cutting sheet
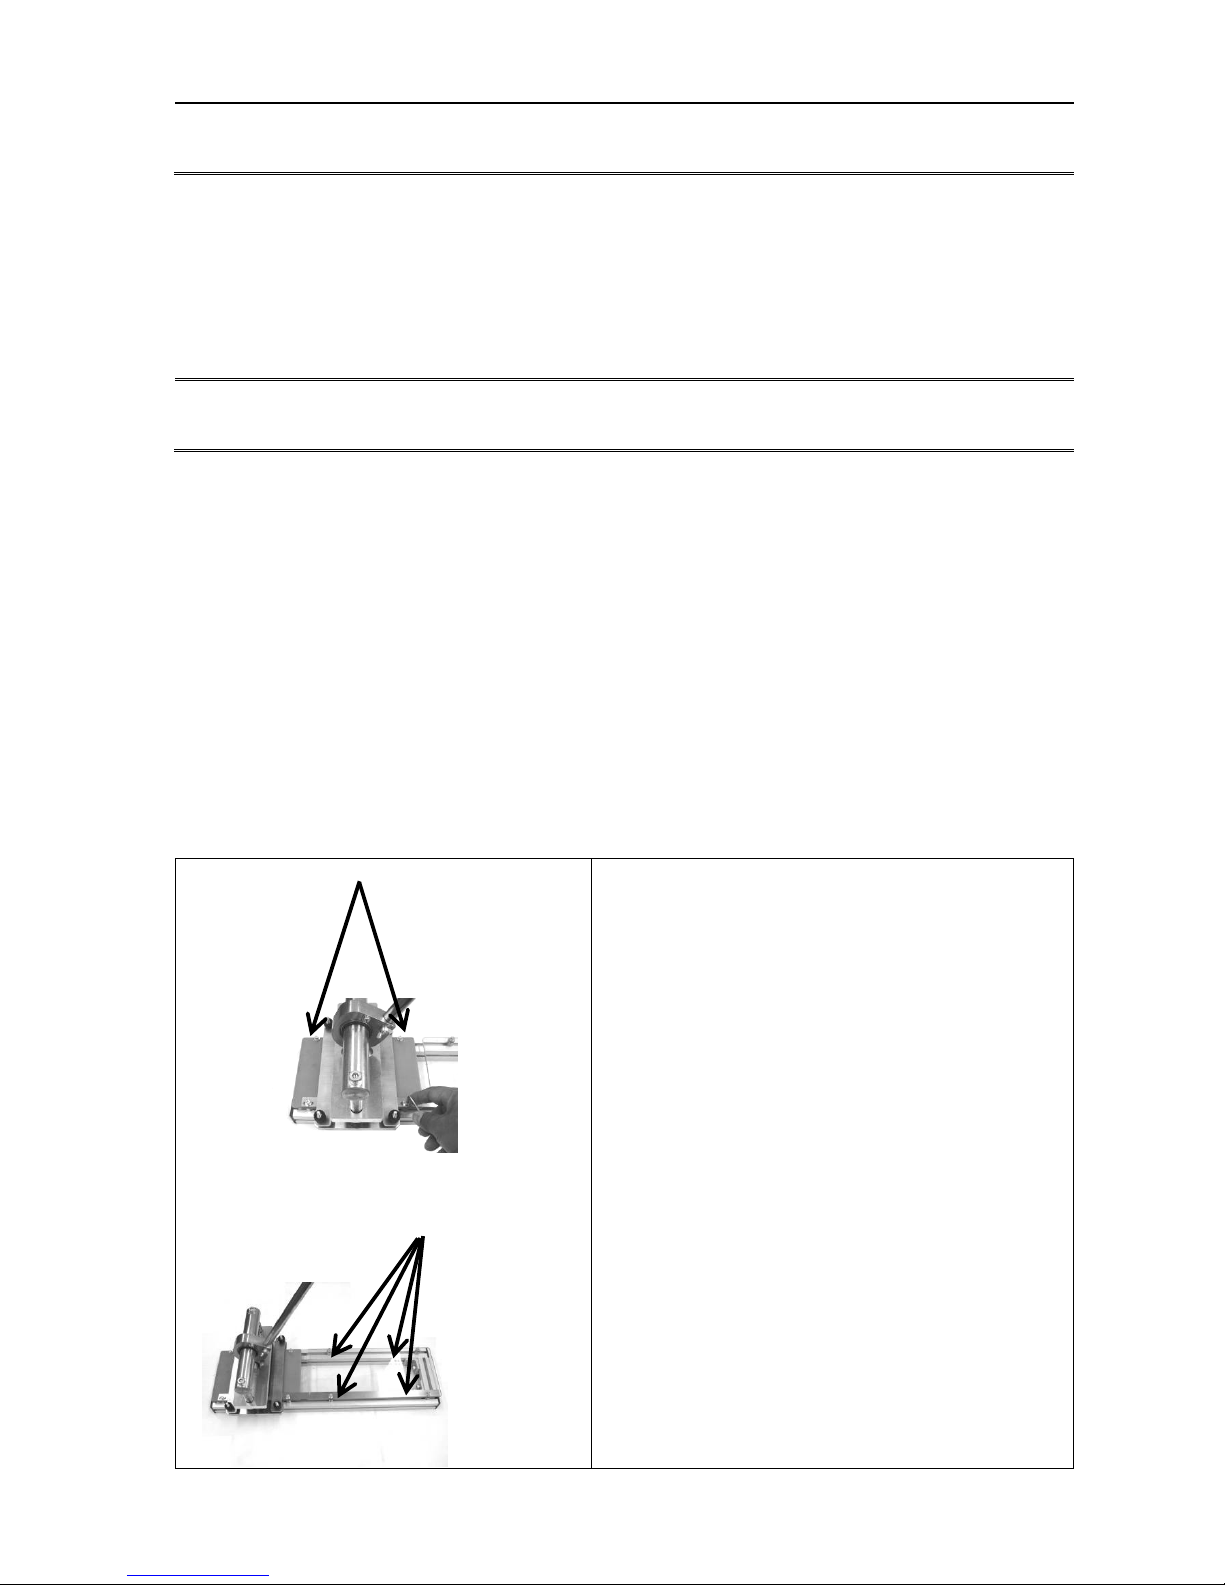
① Loosen the four hexagon socket head cap
screws for the cutting sheet by using a hexagon
wrench.
※ Do not pull out hexagon socket head cap
screws. Just loosening hexagon socket
head cap screws is enough.
※ Do not loosen hexagon socket head cap
screws fixing the clear sheet.
Hexagon socket head
cap screws
Hexagon
socket head
cap screws
for fixing the
clear sheet
Page 11
- 10 -
9-3-1) How to change the position of the cutting sheet - Continued-
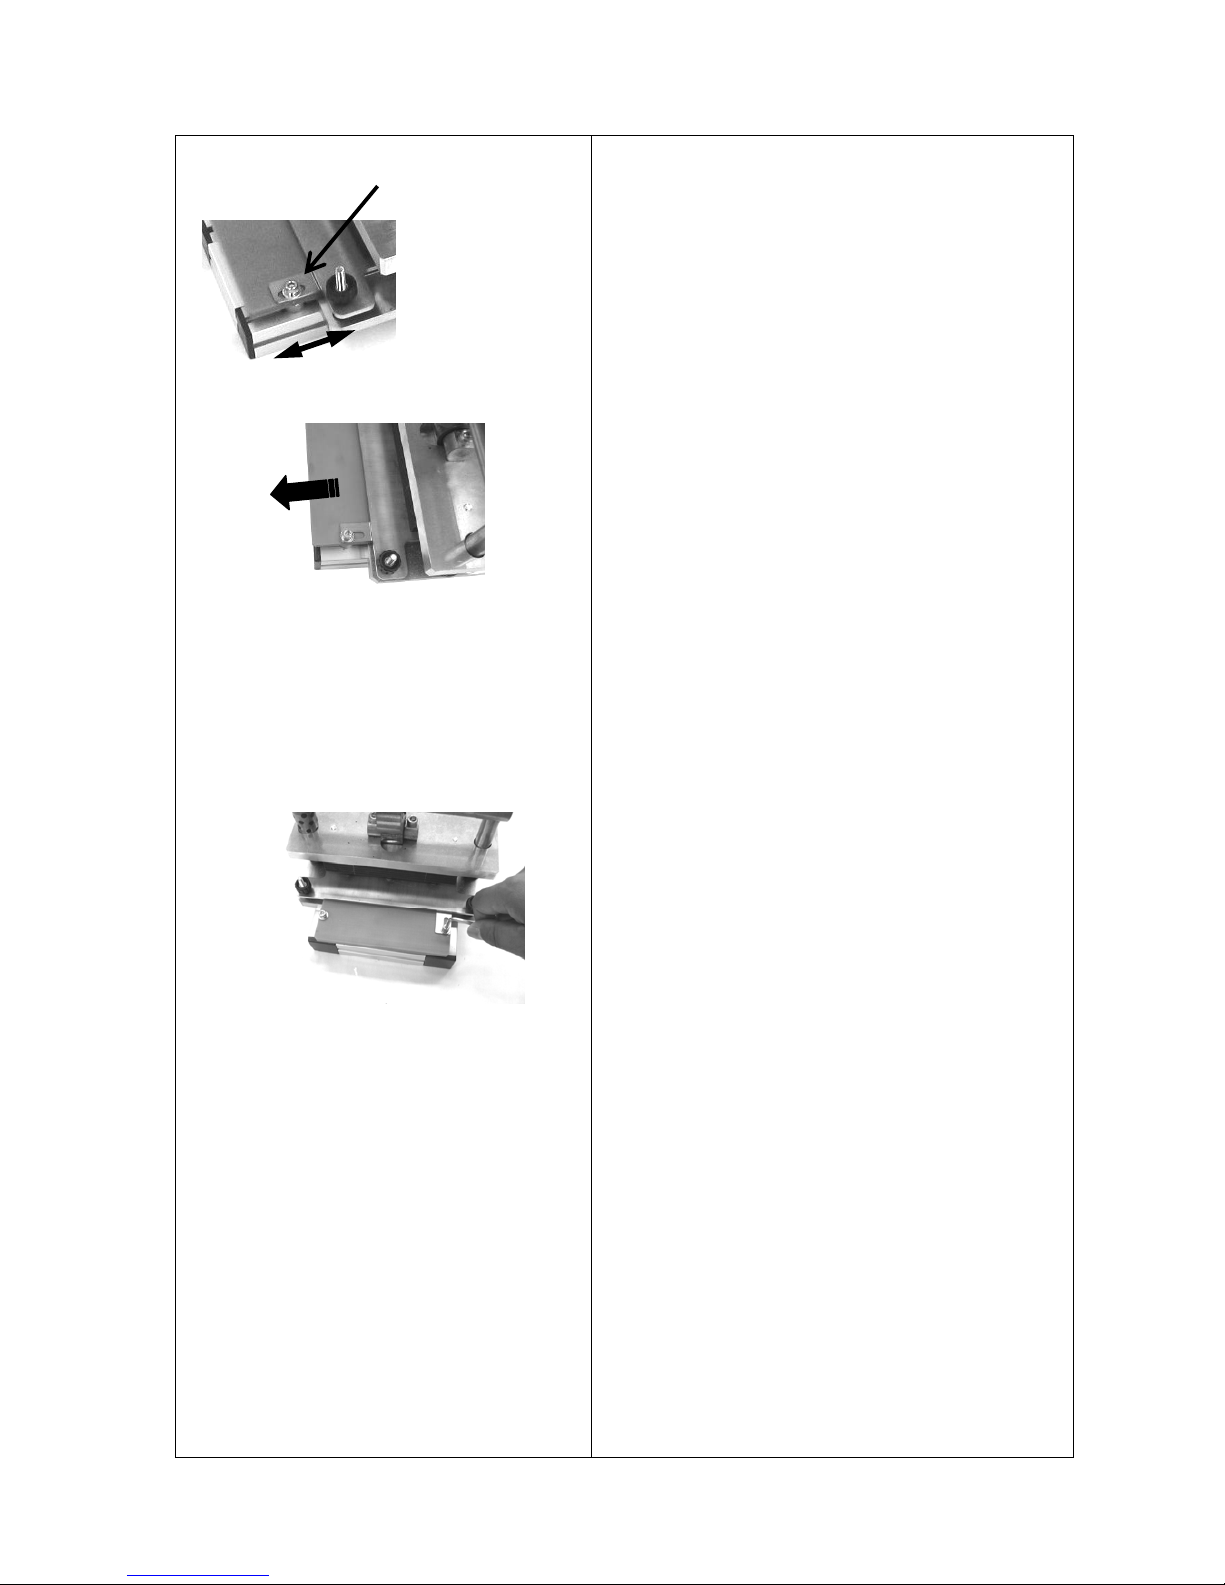
② Change the position of the cutting sheet by
sliding it forward or back in the hole on the belt
guide.
※ At the time of shipping, the cutting sheet is
set in the center of the hole on the belt
guide.
※ The picture at left shows an example of
sliding the cutting sheet forward in the hole.
Make sure it’s set at the very edge of the
hole.
※ Both sides of the cutting sheet can be used
and it can be set in any of the three
positions; forward, center and back.
③ Securely tighten the four loosened hexagon
socket head cap screws.
Belt Guide
Page 12
- 11 -
9-3-2) How to reverse the cutting sheet
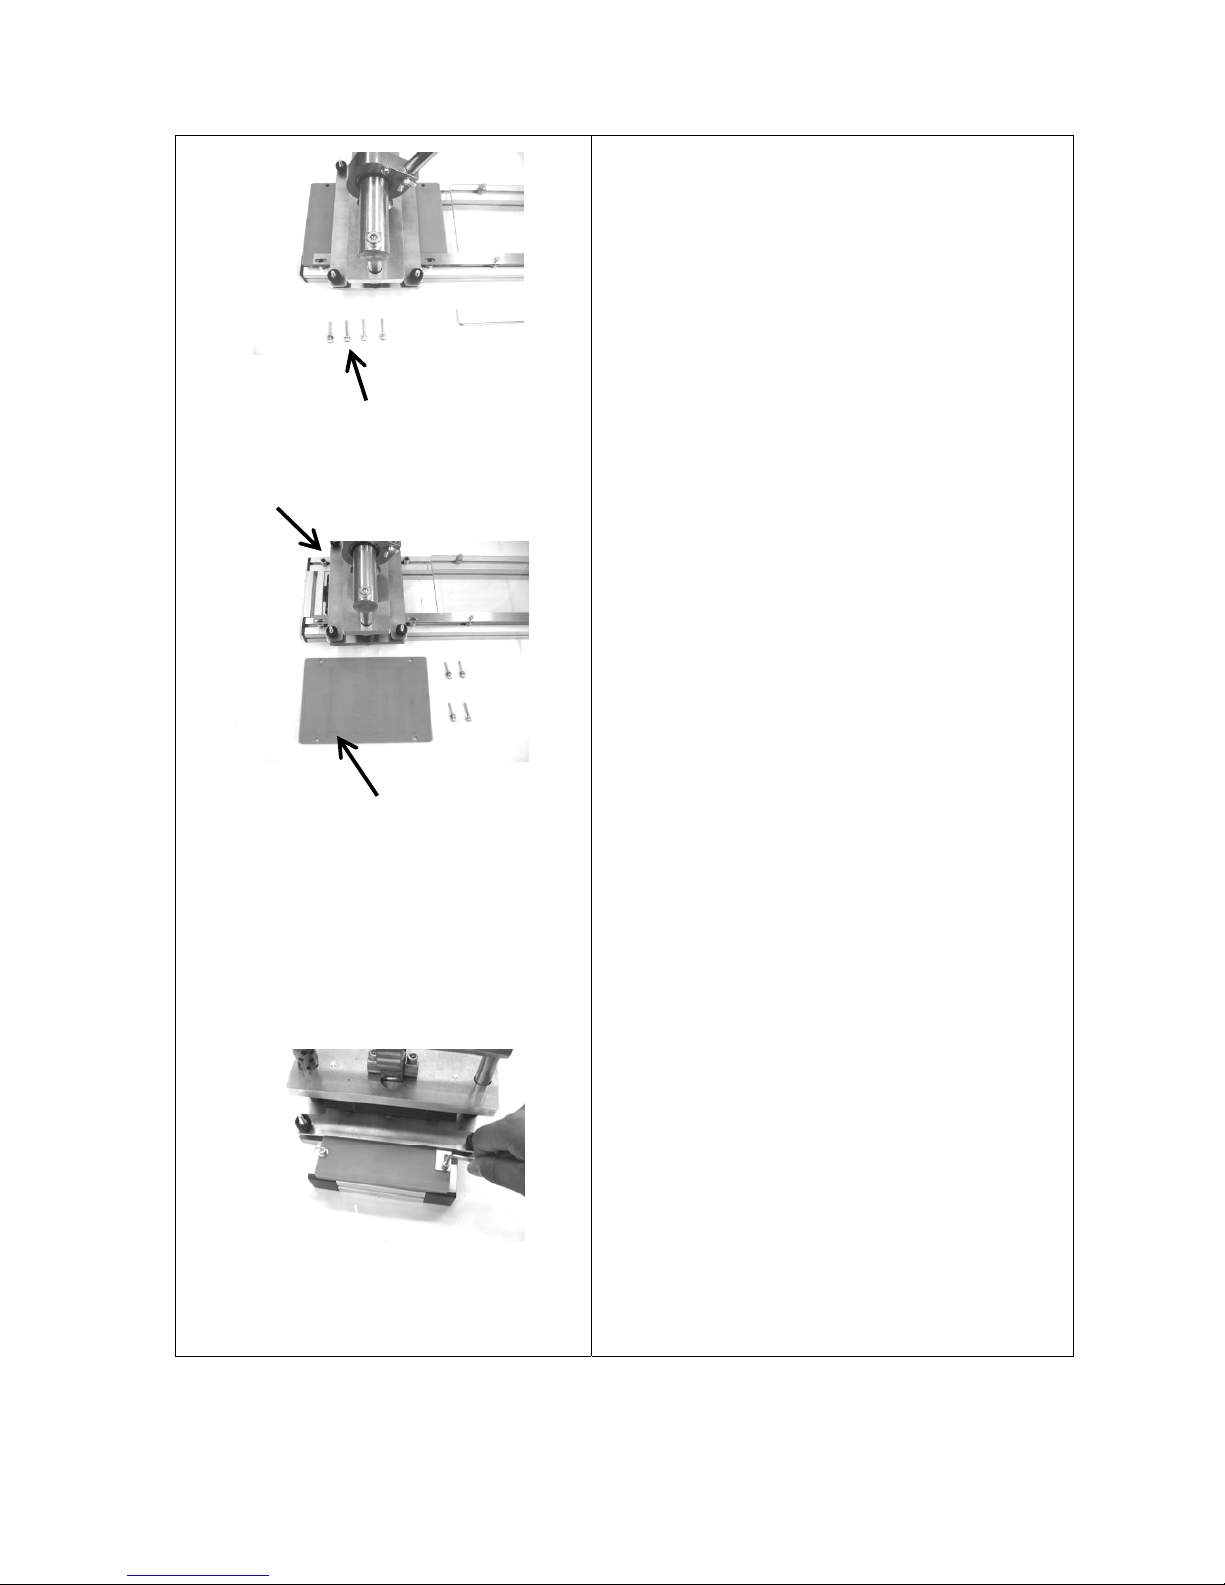
① Loosen the four hexagon socket head cap
screws which hold the cutting sheet in place and
take them out.
※ Never loosen hexagon socket head cap
screws which hold the clear sheet.
※ Be careful not to lose hexagon socket head
cap screws taken out of the finger puncher.
② Take out the cutting sheet from the finger
puncher.
※ Collars may sometimes drop when the
cutting sheet is taken out. Be careful not
to lose any collar.
③ Reverse the cutting sheet to turn the unused
side up and insert it back to the finger puncher.
④ Securely tighten the four hexagon socket head
cap screws.
Shown on the next page is a table for keeping maintenance records.
Cutting Sheet
Collar
Hexagon socket
head cap screws
Page 13
- 12 -
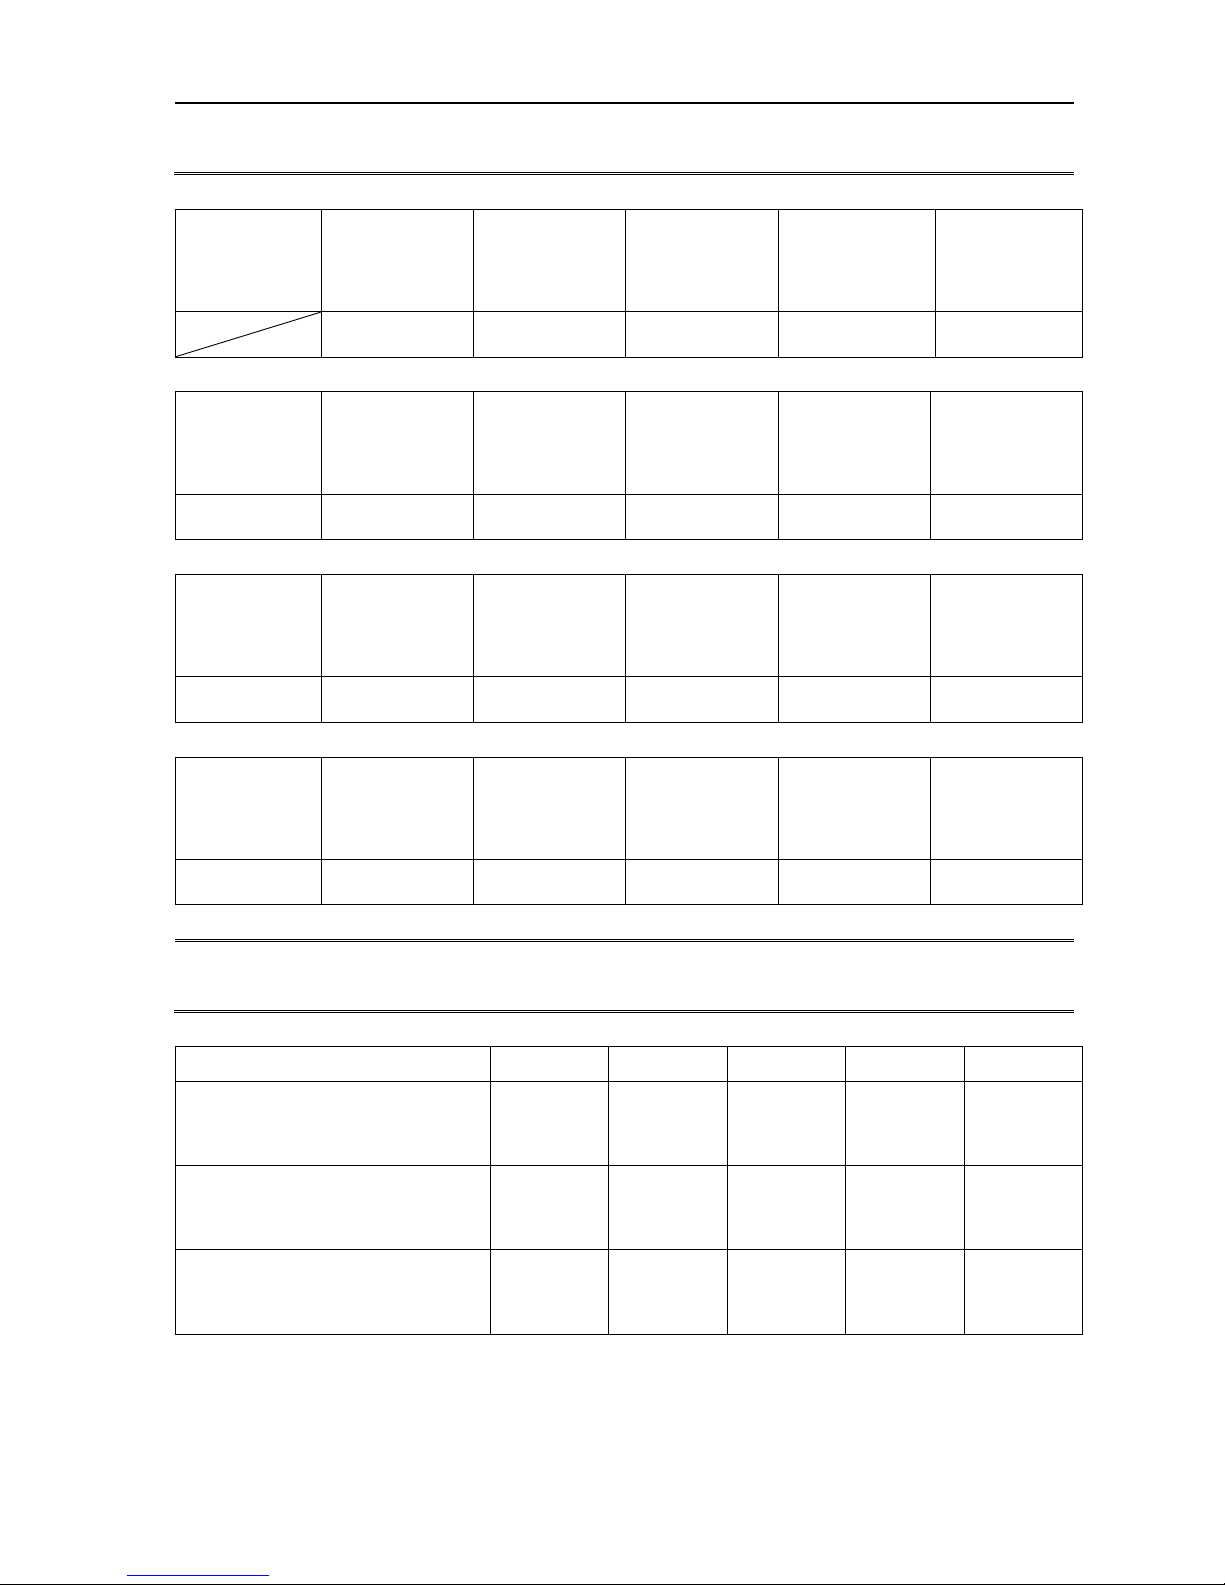
10. Maintenance Record
When shipped
from Nitta
The cutting sheet
was slid forward.
The cutting sheet
was slid back.
The cutting sheet
was reversed and
set in the center.
The cutting sheet
was slid forward.
The cutting sheet
was slid back.
The cutting sheet
was replaced and
set in the center.
The cutting sheet
was slid forward.
The cutting sheet
was slid back.
The cutting sheet
was reversed and
set in the center.
The cutting sheet
was slid forward.
The cutting sheet
was slid back.
The cutting sheet
was replaced and
set in the center.
The cutting sheet
was slid forward.
The cutting sheet
was slid back.
The cutting sheet
was reversed and
set in the center.
The cutting sheet
was slid forward.
The cutting sheet
was slid back.
The cutting sheet
was replaced and
set in the center.
The cutting sheet
was slid forward.
The cutting sheet
was slid back.
The cutting sheet
was reversed and
set in the center.
The cutting sheet
was slid forward.
The cutting sheet
was slid back.
11. Inspection
Inspection items date/staff date/staff date/staff date/staff date/staff
The puncher body is free of
damage or destruction.
All screws of the puncher body
are tightened.
The belt can be completely
punched out.
Make a copy of this page and use it for inspection prior to each use.
Page 14
- 13 -
Aug,2014 Rev2 FP30-10-100-E
 Loading...