

Page 1

Read Chapter 1: Installation, to:
• Follow the steps to connect Voice Mail to your telephone system
• Follow the basic programming steps to get Voice Mail up and running
• Perform several Advanced Setup Options.
Read Chapter 2: Features, to:
• Find out more about the Voice Mail features
• Each feature descrip tion will tell you how to use the feature and customize the feature’s programming. You’ll also find out to which Voice Mail software versions the feature is applicable.
Read Chapter 3: Programming, to:
• Learn about eve ry Voice Mail programmable option
• Each program desc ripti on also provi de s the a v aila bl e data entry opti ons, the def ault setting, and the
Voice Mail software version to which the program is applicable.
Read Chapter 4: Voice Prompts, to:
• Review the Voice Mail prerecorded voice prompts. You’ll find this an in valuable tool if you ever
need to tailor the prerecorded prompts.
Also read Chapter 5: Maintenance, to learn how to:
• Reinstall the W indows NT Server Version 4.0 and NT Voice Mail software, if you had to replace
your hard drive
• Upgrade y our cur rent NT Voice Ma il softw are
• Perform optional proce dures to help you bypass potential trouble spots or improve the performance of your NT Voice Mail system.
NVM-NT
Voice Mail
with Automated Attendant
System Guide
Part No. 17720INS01
Issue 1-0, January 2000
Page 2

This manual has been developed by Nitsuko America. It is intended for the use of its c ustomers and service personnel, and should
be read in it s e ntirety before atte mpt ing to install or program the system. Any co mments or suggestions for improving this manual
would be appreciated. Forward your remarks to:
Nitsuko America , Telecom Division
4 Forest Parkway
Shelton, CT 0 6484
Attention: Manager, Technical P ublications
Nothing contained in this manual shall be deemed to be , and this manual does not constitute, a warranty of, or representation with
respect to, any of the equipment covered. This manual is subject to change without notice, and Nitsuko America has no obligation
to provide any updates or corrections to this manual. Further, Nitsuko America also reserves the right, without prior notice, to
make change s in equipment desi gn or components as it deems appropriat e. No representation is made that this manual is compl ete
or accurate in all respects, and Nitsuko America shall not be liable for any errors or omissions. In no eve nt shall Nitsuko America
be liable for an y incidental or consequent ial damages in connection with the use of this manual. This document c ontains proprietary information that is protected b y copyright. All rights are reserved. No part of this document may be phot ocopied or reproduced without prior written consent of Nitsuko America.
2000 by Nitsuko Ameri ca . All Rights Reserved
Printed in U.S.A.
Page 3

Table of Contents
Chapter 1: Installation
Table of Contents
Chap ter 1: I nsta llatio n
Installing the NT Voice Mail . . . . . . . . . . . . . . . . . . . . . . . . . . . . . . . . . . . . . . . . . . . . . . . . . . .1
Step 1: Find Out What You Need . . . . . . . . . . . . . . . . . . . . . . . . . . . . . . . . . . . . . . . . . . . . . . . . . . . . 2
Step 2: Program the Telephone System . . . . . . . . . . . . . . . . . . . . . . . . . . . . . . . . . . . . . . . . . . . . . . . . 3
Step 3: Connect the PC Attachments to the NT Voice Mail . . . . . . . . . . . . . . . . . . . . . . . . . . . . . . . . 4
Step 4: Connect the NT Voice Mail to a Telephone System . . . . . . . . . . . . . . . . . . . . . . . . . . . . . . . . 6
Step 5: Start up the NT Voice Mail System . . . . . . . . . . . . . . . . . . . . . . . . . . . . . . . . . . . . . . . . . . . . 1 0
Step 6: Install a Phone System in the NT Voice Mail System . . . . . . . . . . . . . . . . . . . . . . . . . . . . . . 11
Phone Installation Wizard - 1 of 5 . . . . . . . . . . . . . . . . . . . . . . . . . . . . . . . . . . . . . . . . . . . . . 11
Phone Installation Wizard - 2 of 5 . . . . . . . . . . . . . . . . . . . . . . . . . . . . . . . . . . . . . . . . . . . . . 12
Number of Voice Ports . . . . . . . . . . . . . . . . . . . . . . . . . . . . . . . . . . . . . . . . . . . . . . . . . . 12
Mailbox Default Security Code . . . . . . . . . . . . . . . . . . . . . . . . . . . . . . . . . . . . . . . . . . . . 13
Phone Installation Wizard - 3 of 5 . . . . . . . . . . . . . . . . . . . . . . . . . . . . . . . . . . . . . . . . . . . . . 14
Default Mailbox Language . . . . . . . . . . . . . . . . . . . . . . . . . . . . . . . . . . . . . . . . . . . . . . . 15
Default Compression Rate . . . . . . . . . . . . . . . . . . . . . . . . . . . . . . . . . . . . . . . . . . . . 15
Phone Installation Wizard - 4 of 5 . . . . . . . . . . . . . . . . . . . . . . . . . . . . . . . . . . . . . . . . . . . . . 16
Phone Installation Wizard - 5 of 5 . . . . . . . . . . . . . . . . . . . . . . . . . . . . . . . . . . . . . . . . . . . . . 18
Step 7: Test the NT Voice Mail . . . . . . . . . . . . . . . . . . . . . . . . . . . . . . . . . . . . . . . . . . . . . . . . . . . . . 19
Step 8: Tell Subscribers: Extensions/Mailbox Security Code . . . . . . . . . . . . . . . . . . . . . . . . . . . . . . 20
Basic Programming for the NT Voice Mail . . . . . . . . . . . . . . . . . . . . . . . . . . . . . . . . . . . . .21
Step 1: Modify Time and Date . . . . . . . . . . . . . . . . . . . . . . . . . . . . . . . . . . . . . . . . . . . . . . . . . . . . . . 21
Step 2: Assign Extensions to the Voice Mail Ports . . . . . . . . . . . . . . . . . . . . . . . . . . . . . . . . . . . . . . 22
Step 3: Check the Default Automated Attendant . . . . . . . . . . . . . . . . . . . . . . . . . . . . . . . . . . . . . . . . 23
Step 4: Assign Answering Schedules Tables . . . . . . . . . . . . . . . . . . . . . . . . . . . . . . . . . . . . . . . . . . . 25
Step 5: Fill out the AST Worksheet . . . . . . . . . . . . . . . . . . . . . . . . . . . . . . . . . . . . . . . . . . . . . . . . . . 26
Step 6: Create and/or Customize Call Routing Mailboxes . . . . . . . . . . . . . . . . . . . . . . . . . . . . . . . . 28
Step 7: Program the ASTs . . . . . . . . . . . . . . . . . . . . . . . . . . . . . . . . . . . . . . . . . . . . . . . . . . . . . . . . . 29
Step 8: Modify Welcome Messages . . . . . . . . . . . . . . . . . . . . . . . . . . . . . . . . . . . . . . . . . . . . . . . . . . 3 0
Use the Default Welcome Message . . . . . . . . . . . . . . . . . . . . . . . . . . . . . . . . . . . . . . . . . . . . 30
Record Your Own Welcome Message . . . . . . . . . . . . . . . . . . . . . . . . . . . . . . . . . . . . . . . . . . 30
Use No Welcome Message . . . . . . . . . . . . . . . . . . . . . . . . . . . . . . . . . . . . . . . . . . . . . . . . . . 31
Step 9: Modify the Dial Action Tables . . . . . . . . . . . . . . . . . . . . . . . . . . . . . . . . . . . . . . . . . . . . . . . 32
Recording a Name for a Mailbox . . . . . . . . . . . . . . . . . . . . . . . . . . . . . . . . . . . . . . . . . . . . . 36
Assigning a Directory List to a Mailbox . . . . . . . . . . . . . . . . . . . . . . . . . . . . . . . . . . . . . . . . 36
Assigning a Call Routing Mailbox to Directory List . . . . . . . . . . . . . . . . . . . . . . . . . . . . . . . 36
Setting up a DAT for DIRF or DIRL . . . . . . . . . . . . . . . . . . . . . . . . . . . . . . . . . . . . . . . . . . . 37
Setting up a DAT for Call Transfers to the Mailboxes . . . . . . . . . . . . . . . . . . . . . . . . . . . . . 37
Setting up a DAT for Call Transfers to Other Mailboxes (Optional) . . . . . . . . . . . . . . . . . . 37
Step 10: Record an Instruction Menu . . . . . . . . . . . . . . . . . . . . . . . . . . . . . . . . . . . . . . . . . . . . . . . . . 3 8
Use the Default Instruction Menu . . . . . . . . . . . . . . . . . . . . . . . . . . . . . . . . . . . . . . . . . . . . . 38
Record Your Own Instruction Menu . . . . . . . . . . . . . . . . . . . . . . . . . . . . . . . . . . . . . . . . . . 38
Use No Instruction Menu . . . . . . . . . . . . . . . . . . . . . . . . . . . . . . . . . . . . . . . . . . . . . . . . . . . 38
Step 11: Record Names for the Subscriber Mailboxes . . . . . . . . . . . . . . . . . . . . . . . . . . . . . . . . . . . . 40
NT System Guide
i
Page 4

Table of Contents
Chapter 1: Installation
Advanced Setup Options for the NT Voice Mail . . . . . . . . . . . . . . . . . . . . . . . . . . . . . . . . .41
Configure a Computer at the Remote Location . . . . . . . . . . . . . . . . . . . . . . . . . . . . . . . . . . . . . . . . . 41
Accessing the NT Voice Mail Modem . . . . . . . . . . . . . . . . . . . . . . . . . . . . . . . . . . . . . . . . . 45
Connect the NT Voice Mail to Your LAN . . . . . . . . . . . . . . . . . . . . . . . . . . . . . . . . . . . . . . . . . . . . . 46
10/100 PCI Network (LAN) Card . . . . . . . . . . . . . . . . . . . . . . . . . . . . . . . . . . . . . . . . . . . . . 46
Status LEDs . . . . . . . . . . . . . . . . . . . . . . . . . . . . . . . . . . . . . . . . . . . . . . . . . . . . . . . . . . . 47
LAN Parameters . . . . . . . . . . . . . . . . . . . . . . . . . . . . . . . . . . . . . . . . . . . . . . . . . . . . . . . 47
ii
NT System Guide
Page 5

Table of Contents
Chapter 2: Features
Chap ter 2: F eatur es
The NT Voice Mail Features . . . . . . . . . . . . . . . . . . . . . . . . . . . . . . . . . . . . . . . . . . . . . . . . . .49
Introducing the NT Voice Mail System . . . . . . . . . . . . . . . . . . . . . . . . . . . . . . . . . . . . . . . . . . . . . . . 49
About the NT Voice Mail System . . . . . . . . . . . . . . . . . . . . . . . . . . . . . . . . . . . . . . . . . . . . . 49
About the Automated Attendant . . . . . . . . . . . . . . . . . . . . . . . . . . . . . . . . . . . . . . . . . . . . . . 49
About the Features Chapter . . . . . . . . . . . . . . . . . . . . . . . . . . . . . . . . . . . . . . . . . . . . . . . . . . 49
NT Voice Mail Compatibility . . . . . . . . . . . . . . . . . . . . . . . . . . . . . . . . . . . . . . . . . . . . . . . . 51
System Features . . . . . . . . . . . . . . . . . . . . . . . . . . . . . . . . . . . . . . . . . . . . . . . . . . . . . . . . . . . 5 2
Caller ID . . . . . . . . . . . . . . . . . . . . . . . . . . . . . . . . . . . . . . . . . . . . . . . . . . . . . . . . . . . . . 52
Caller ID Automatic Transfer . . . . . . . . . . . . . . . . . . . . . . . . . . . . . . . . . . . . . . . . . . . . . 52
Centralized Voice Mail (Remote Tenant Service) . . . . . . . . . . . . . . . . . . . . . . . . . . . . . . 52
FAX Mail . . . . . . . . . . . . . . . . . . . . . . . . . . . . . . . . . . . . . . . . . . . . . . . . . . . . . . . . . . . . . 54
About Sending a FAX to a Mailbox . . . . . . . . . . . . . . . . . . . . . . . . . . . . . . . . . . . . . 54
About Checking and Printing FAX Messages . . . . . . . . . . . . . . . . . . . . . . . . . . . . . 54
NVM-Desktop Messaging . . . . . . . . . . . . . . . . . . . . . . . . . . . . . . . . . . . . . . . . . . . . . . . . 55
Tenant Service . . . . . . . . . . . . . . . . . . . . . . . . . . . . . . . . . . . . . . . . . . . . . . . . . . . . . . . . . 5 5
Voice Mail Networking . . . . . . . . . . . . . . . . . . . . . . . . . . . . . . . . . . . . . . . . . . . . . . . . . . 55
Voice Prompts . . . . . . . . . . . . . . . . . . . . . . . . . . . . . . . . . . . . . . . . . . . . . . . . . . . . . . . . . 55
Automated Attendant Features . . . . . . . . . . . . . . . . . . . . . . . . . . . . . . . . . . . . . . . . . . . . . . . 57
Answering Schedule Override . . . . . . . . . . . . . . . . . . . . . . . . . . . . . . . . . . . . . . . . . . . . . 57
Automatic Routing for Rotary Dial Callers . . . . . . . . . . . . . . . . . . . . . . . . . . . . . . . . . . . 57
Call Announcing . . . . . . . . . . . . . . . . . . . . . . . . . . . . . . . . . . . . . . . . . . . . . . . . . . . . . . . 57
Call Blocking . . . . . . . . . . . . . . . . . . . . . . . . . . . . . . . . . . . . . . . . . . . . . . . . . . . . . . . . . . 5 8
Call Parking/Paging . . . . . . . . . . . . . . . . . . . . . . . . . . . . . . . . . . . . . . . . . . . . . . . . . . . . . 58
Call Queuing . . . . . . . . . . . . . . . . . . . . . . . . . . . . . . . . . . . . . . . . . . . . . . . . . . . . . . . . . . 59
Call Waiting . . . . . . . . . . . . . . . . . . . . . . . . . . . . . . . . . . . . . . . . . . . . . . . . . . . . . . . . . . . 59
External Extension . . . . . . . . . . . . . . . . . . . . . . . . . . . . . . . . . . . . . . . . . . . . . . . . . . . . . . 59
Flexible Answering Schedules . . . . . . . . . . . . . . . . . . . . . . . . . . . . . . . . . . . . . . . . . . . . . 60
Flexible Call Routing . . . . . . . . . . . . . . . . . . . . . . . . . . . . . . . . . . . . . . . . . . . . . . . . . . . . 60
Transfer to an Extension: Screened or Unscreened . . . . . . . . . . . . . . . . . . . . . . . . . 60
Transfer to an Automatic Call Distribution Group . . . . . . . . . . . . . . . . . . . . . . . . . . 61
Go to a mailbox . . . . . . . . . . . . . . . . . . . . . . . . . . . . . . . . . . . . . . . . . . . . . . . . . . . . 61
Select Voice Prompts in Another Language . . . . . . . . . . . . . . . . . . . . . . . . . . . . . . . 61
Leave a Quick Message . . . . . . . . . . . . . . . . . . . . . . . . . . . . . . . . . . . . . . . . . . . . . . 61
Access the Directory Dialing feature . . . . . . . . . . . . . . . . . . . . . . . . . . . . . . . . . . . . 61
Access (Log Onto) the Voice Mail System . . . . . . . . . . . . . . . . . . . . . . . . . . . . . . . 62
Hang up the Call . . . . . . . . . . . . . . . . . . . . . . . . . . . . . . . . . . . . . . . . . . . . . . . . . . . . 62
Undefined Routing . . . . . . . . . . . . . . . . . . . . . . . . . . . . . . . . . . . . . . . . . . . . . . . . . . 62
Forced Unscreened Transfer . . . . . . . . . . . . . . . . . . . . . . . . . . . . . . . . . . . . . . . . . . . 62
Interactive Messaging (Script Prompting) . . . . . . . . . . . . . . . . . . . . . . . . . . . . . . . . . . . . 62
Status Monitor . . . . . . . . . . . . . . . . . . . . . . . . . . . . . . . . . . . . . . . . . . . . . . . . . . . . . . . . . 6 3
Transfer Calls to a FAX Machine . . . . . . . . . . . . . . . . . . . . . . . . . . . . . . . . . . . . . . . . . . 63
NT System Guide
iii
Page 6

Table of Contents
Chapter 2: Features
Mailboxes . . . . . . . . . . . . . . . . . . . . . . . . . . . . . . . . . . . . . . . . . . . . . . . . . . . . . . . . . . . . . . . . 64
Announcement Mailbox . . . . . . . . . . . . . . . . . . . . . . . . . . . . . . . . . . . . . . . . . . . . . . . . . 64
ACD Announcement Mailbox . . . . . . . . . . . . . . . . . . . . . . . . . . . . . . . . . . . . . . . . . 64
Call Routing Mailbox . . . . . . . . . . . . . . . . . . . . . . . . . . . . . . . . . . . . . . . . . . . . . . . . . . . 64
Directory Dialing Mailbox . . . . . . . . . . . . . . . . . . . . . . . . . . . . . . . . . . . . . . . . . . . . . . . . 65
Distribution Mailbox . . . . . . . . . . . . . . . . . . . . . . . . . . . . . . . . . . . . . . . . . . . . . . . . . . . . 66
FAX Mailbox (FAX-On-Demand) . . . . . . . . . . . . . . . . . . . . . . . . . . . . . . . . . . . . . . . . . 66
FAX “Callbacks” . . . . . . . . . . . . . . . . . . . . . . . . . . . . . . . . . . . . . . . . . . . . . . . . . . . 66
FAX “Same-Call” Transactions . . . . . . . . . . . . . . . . . . . . . . . . . . . . . . . . . . . . . . . . 66
FAX Documents . . . . . . . . . . . . . . . . . . . . . . . . . . . . . . . . . . . . . . . . . . . . . . . . . . . . 66
About FAX Distribution Lists . . . . . . . . . . . . . . . . . . . . . . . . . . . . . . . . . . . . . . . . . 67
Future Delivery Mailbox . . . . . . . . . . . . . . . . . . . . . . . . . . . . . . . . . . . . . . . . . . . . . . . . . 67
Flexible Mailbox Numbering Plan . . . . . . . . . . . . . . . . . . . . . . . . . . . . . . . . . . . . . . . . . 67
Variable Length Mailbox Numbers . . . . . . . . . . . . . . . . . . . . . . . . . . . . . . . . . . . . . . . . . 67
Guest Mailbox . . . . . . . . . . . . . . . . . . . . . . . . . . . . . . . . . . . . . . . . . . . . . . . . . . . . . . . . . 68
Interactive Mailbox . . . . . . . . . . . . . . . . . . . . . . . . . . . . . . . . . . . . . . . . . . . . . . . . . . . . . 68
Message Center Mailbox . . . . . . . . . . . . . . . . . . . . . . . . . . . . . . . . . . . . . . . . . . . . . . . . . 68
Network Mailbox . . . . . . . . . . . . . . . . . . . . . . . . . . . . . . . . . . . . . . . . . . . . . . . . . . . . . . . 69
Next Call Routing Mailbox . . . . . . . . . . . . . . . . . . . . . . . . . . . . . . . . . . . . . . . . . . . . . . . 69
Security Code (Default) . . . . . . . . . . . . . . . . . . . . . . . . . . . . . . . . . . . . . . . . . . . . . . . . . . 69
Subscriber Mailbox . . . . . . . . . . . . . . . . . . . . . . . . . . . . . . . . . . . . . . . . . . . . . . . . . . . . . 70
System Administrator Mailbox . . . . . . . . . . . . . . . . . . . . . . . . . . . . . . . . . . . . . . . . . . . . 70
Trunk Mailbox . . . . . . . . . . . . . . . . . . . . . . . . . . . . . . . . . . . . . . . . . . . . . . . . . . . . . . . . 70
System Messaging and Recording Options . . . . . . . . . . . . . . . . . . . . . . . . . . . . . . . . . . . . . . 71
Announcement Message . . . . . . . . . . . . . . . . . . . . . . . . . . . . . . . . . . . . . . . . . . . . . . . . . 71
Automatic Message Erase/Save . . . . . . . . . . . . . . . . . . . . . . . . . . . . . . . . . . . . . . . . . . . . 71
Broadcast Message . . . . . . . . . . . . . . . . . . . . . . . . . . . . . . . . . . . . . . . . . . . . . . . . . . . . . 71
Directory Dialing Message . . . . . . . . . . . . . . . . . . . . . . . . . . . . . . . . . . . . . . . . . . . . . . . 72
Distribution List . . . . . . . . . . . . . . . . . . . . . . . . . . . . . . . . . . . . . . . . . . . . . . . . . . . . . . . . 7 2
First Time Tutorial . . . . . . . . . . . . . . . . . . . . . . . . . . . . . . . . . . . . . . . . . . . . . . . . . . . . . . 72
Instruction Menu . . . . . . . . . . . . . . . . . . . . . . . . . . . . . . . . . . . . . . . . . . . . . . . . . . . . . . . 72
Interactive Prompts . . . . . . . . . . . . . . . . . . . . . . . . . . . . . . . . . . . . . . . . . . . . . . . . . . . . . 73
Mailbox Name . . . . . . . . . . . . . . . . . . . . . . . . . . . . . . . . . . . . . . . . . . . . . . . . . . . . . . . . . 73
Message Length . . . . . . . . . . . . . . . . . . . . . . . . . . . . . . . . . . . . . . . . . . . . . . . . . . . . . . . . 73
Message Listen Mode . . . . . . . . . . . . . . . . . . . . . . . . . . . . . . . . . . . . . . . . . . . . . . . . . . . 74
Message Notification . . . . . . . . . . . . . . . . . . . . . . . . . . . . . . . . . . . . . . . . . . . . . . . . . . . . 74
Message Playback Direction . . . . . . . . . . . . . . . . . . . . . . . . . . . . . . . . . . . . . . . . . . . . . . 75
Message Retention . . . . . . . . . . . . . . . . . . . . . . . . . . . . . . . . . . . . . . . . . . . . . . . . . . . . . . 75
Message Storage Limit . . . . . . . . . . . . . . . . . . . . . . . . . . . . . . . . . . . . . . . . . . . . . . . . . . 75
Message Waiting Lamp . . . . . . . . . . . . . . . . . . . . . . . . . . . . . . . . . . . . . . . . . . . . . . . . . . 75
Music On Hold . . . . . . . . . . . . . . . . . . . . . . . . . . . . . . . . . . . . . . . . . . . . . . . . . . . . . . . . . 76
Recording Conversation Beep . . . . . . . . . . . . . . . . . . . . . . . . . . . . . . . . . . . . . . . . . . . . . 76
Voice Compression Rate . . . . . . . . . . . . . . . . . . . . . . . . . . . . . . . . . . . . . . . . . . . . . . . . . 76
Welcome Message . . . . . . . . . . . . . . . . . . . . . . . . . . . . . . . . . . . . . . . . . . . . . . . . . . . . . . 76
iv
NT System Guide
Page 7

Table of Contents
Chapter 2: Features
System Administration and Maintenance . . . . . . . . . . . . . . . . . . . . . . . . . . . . . . . . . . . . . . . 77
Local Backup . . . . . . . . . . . . . . . . . . . . . . . . . . . . . . . . . . . . . . . . . . . . . . . . . . . . . . . . . 77
Local Restore . . . . . . . . . . . . . . . . . . . . . . . . . . . . . . . . . . . . . . . . . . . . . . . . . . . . . . . . . 77
Deleting Mailbox Security Code . . . . . . . . . . . . . . . . . . . . . . . . . . . . . . . . . . . . . . . . . . . 77
Port Activities (formerly Diagnostics) . . . . . . . . . . . . . . . . . . . . . . . . . . . . . . . . . . . . . . . 78
Erasing All Messages . . . . . . . . . . . . . . . . . . . . . . . . . . . . . . . . . . . . . . . . . . . . . . . . . . . . 78
Trace Viewer . . . . . . . . . . . . . . . . . . . . . . . . . . . . . . . . . . . . . . . . . . . . . . . . . . . . . . . . . . 7 8
Programming the NT Voice Mail . . . . . . . . . . . . . . . . . . . . . . . . . . . . . . . . . . . . . . . . . . 78
Reports . . . . . . . . . . . . . . . . . . . . . . . . . . . . . . . . . . . . . . . . . . . . . . . . . . . . . . . . . . . . . . . 79
Ports In/Out of Service . . . . . . . . . . . . . . . . . . . . . . . . . . . . . . . . . . . . . . . . . . . . . . . . . . 80
Port Self Test . . . . . . . . . . . . . . . . . . . . . . . . . . . . . . . . . . . . . . . . . . . . . . . . . . . . . . . . . . 81
Screen Saver . . . . . . . . . . . . . . . . . . . . . . . . . . . . . . . . . . . . . . . . . . . . . . . . . . . . . . . 81
Shutting Down the System . . . . . . . . . . . . . . . . . . . . . . . . . . . . . . . . . . . . . . . . . . . . . . . 81
System Re-initialization . . . . . . . . . . . . . . . . . . . . . . . . . . . . . . . . . . . . . . . . . . . . . . . . . . 82
System Time and Date . . . . . . . . . . . . . . . . . . . . . . . . . . . . . . . . . . . . . . . . . . . . . . . . . . . 82
System Version Number . . . . . . . . . . . . . . . . . . . . . . . . . . . . . . . . . . . . . . . . . . . . . . . . . 82
User Features . . . . . . . . . . . . . . . . . . . . . . . . . . . . . . . . . . . . . . . . . . . . . . . . . . . . . . . . . . . . . 83
Auto Forward . . . . . . . . . . . . . . . . . . . . . . . . . . . . . . . . . . . . . . . . . . . . . . . . . . . . . . . . . . 83
Auto Help . . . . . . . . . . . . . . . . . . . . . . . . . . . . . . . . . . . . . . . . . . . . . . . . . . . . . . . . . . . . 83
Auto Time-Stamp . . . . . . . . . . . . . . . . . . . . . . . . . . . . . . . . . . . . . . . . . . . . . . . . . . . . . . 83
Call Announcing . . . . . . . . . . . . . . . . . . . . . . . . . . . . . . . . . . . . . . . . . . . . . . . . . . . . . . . 83
Calling Automated Attendant . . . . . . . . . . . . . . . . . . . . . . . . . . . . . . . . . . . . . . . . . . . . . 84
Calling a Mailbox . . . . . . . . . . . . . . . . . . . . . . . . . . . . . . . . . . . . . . . . . . . . . . . . . . . . . . 84
Call Waiting . . . . . . . . . . . . . . . . . . . . . . . . . . . . . . . . . . . . . . . . . . . . . . . . . . . . . . . . . . . 84
Checking/Deleting a Message . . . . . . . . . . . . . . . . . . . . . . . . . . . . . . . . . . . . . . . . . . . . . 85
Exiting a Mailbox . . . . . . . . . . . . . . . . . . . . . . . . . . . . . . . . . . . . . . . . . . . . . . . . . . . . . . 85
Forwarding Calls to a Mailbox . . . . . . . . . . . . . . . . . . . . . . . . . . . . . . . . . . . . . . . . . . . . 85
Getting Recorded Help . . . . . . . . . . . . . . . . . . . . . . . . . . . . . . . . . . . . . . . . . . . . . . . . . . 85
Getting the Time and Date . . . . . . . . . . . . . . . . . . . . . . . . . . . . . . . . . . . . . . . . . . . . . . . . 85
Listening to Messages . . . . . . . . . . . . . . . . . . . . . . . . . . . . . . . . . . . . . . . . . . . . . . . . . . . 86
Listening Options . . . . . . . . . . . . . . . . . . . . . . . . . . . . . . . . . . . . . . . . . . . . . . . . . . . . . . . 86
Paging Message . . . . . . . . . . . . . . . . . . . . . . . . . . . . . . . . . . . . . . . . . . . . . . . . . . . . . . . . 87
Recording and Sending a Message . . . . . . . . . . . . . . . . . . . . . . . . . . . . . . . . . . . . . . . . . 87
Recording a Confidential Message . . . . . . . . . . . . . . . . . . . . . . . . . . . . . . . . . . . . . . . . . 88
Recording a Future Delivery Message . . . . . . . . . . . . . . . . . . . . . . . . . . . . . . . . . . . . . . . 88
Recording an Urgent Message . . . . . . . . . . . . . . . . . . . . . . . . . . . . . . . . . . . . . . . . . . . . . 88
Recording Options . . . . . . . . . . . . . . . . . . . . . . . . . . . . . . . . . . . . . . . . . . . . . . . . . . . . . . 89
Requesting a Return Receipt . . . . . . . . . . . . . . . . . . . . . . . . . . . . . . . . . . . . . . . . . . . . . . 89
Security Code . . . . . . . . . . . . . . . . . . . . . . . . . . . . . . . . . . . . . . . . . . . . . . . . . . . . . . . . . . 89
Transfer to a Mailbox . . . . . . . . . . . . . . . . . . . . . . . . . . . . . . . . . . . . . . . . . . . . . . . . . . . 90
NT System Guide
v
Page 8

Table of Contents
Chapter 3: Programming
Chapter 3: Programming
Understanding the NT Voice Mail Main Screen . . . . . . . . . . . . . . . . . . . . . . . . . . . . . . . . . .91
About the Programming Chapter . . . . . . . . . . . . . . . . . . . . . . . . . . . . . . . . . . . . . . . . . . . . . . . . . . . . 91
The NT Voice Mail Main Screen . . . . . . . . . . . . . . . . . . . . . . . . . . . . . . . . . . . . . . . . . . . . . . . . . . . . 92
Menu Bar Items . . . . . . . . . . . . . . . . . . . . . . . . . . . . . . . . . . . . . . . . . . . . . . . . . . . . . . . . . . . 92
File . . . . . . . . . . . . . . . . . . . . . . . . . . . . . . . . . . . . . . . . . . . . . . . . . . . . . . . . . . . . . . . . . . 93
Install . . . . . . . . . . . . . . . . . . . . . . . . . . . . . . . . . . . . . . . . . . . . . . . . . . . . . . . . . . . . 93
Navigating the Screens . . . . . . . . . . . . . . . . . . . . . . . . . . . . . . . . . . . . . . . . . . . . . . . . . . . . . 96
Using the Options Buttons . . . . . . . . . . . . . . . . . . . . . . . . . . . . . . . . . . . . . . . . . . . . . . . . 97
Saving Your Database . . . . . . . . . . . . . . . . . . . . . . . . . . . . . . . . . . . . . . . . . . . . . . . . . . . 98
Exiting from the Programming Window . . . . . . . . . . . . . . . . . . . . . . . . . . . . . . . . . . . . . 98
Installing the Ports . . . . . . . . . . . . . . . . . . . . . . . . . . . . . . . . . . . . . . . . . . . . . . . . . . . . . . . . .99
Voice Mail Ports . . . . . . . . . . . . . . . . . . . . . . . . . . . . . . . . . . . . . . . . . . . . . . . . . . . . . . . . . . . . . . . . . 99
Install Voice Mail Ports Dialog Box . . . . . . . . . . . . . . . . . . . . . . . . . . . . . . . . . . . . . . . . . . . 99
SMDI Installation . . . . . . . . . . . . . . . . . . . . . . . . . . . . . . . . . . . . . . . . . . . . . . . . . . . . . . . . .101
Installing SMDI . . . . . . . . . . . . . . . . . . . . . . . . . . . . . . . . . . . . . . . . . . . . . . . . . . . . . . . . . . . . . . . . . 101
SMDI . . . . . . . . . . . . . . . . . . . . . . . . . . . . . . . . . . . . . . . . . . . . . . . . . . . . . . . . . . . . . . . . . . . . . . . . . 101
Viewing Installation Settings . . . . . . . . . . . . . . . . . . . . . . . . . . . . . . . . . . . . . . . . . . . . . . . .103
Installation Settings . . . . . . . . . . . . . . . . . . . . . . . . . . . . . . . . . . . . . . . . . . . . . . . . . . . . . . . . . . . . . . 103
Installation Settings Dialog Box . . . . . . . . . . . . . . . . . . . . . . . . . . . . . . . . . . . . . . . . . . . . . 103
Customizing Answering Schedule Tables . . . . . . . . . . . . . . . . . . . . . . . . . . . . . . . . . . . . .105
Answering Schedule Tables . . . . . . . . . . . . . . . . . . . . . . . . . . . . . . . . . . . . . . . . . . . . . . . . . . . . . . . 105
AST Trunk Mailbox/Port Assignment . . . . . . . . . . . . . . . . . . . . . . . . . . . . . . . . . . . . . . . . . 105
Creating and Programming ASTs . . . . . . . . . . . . . . . . . . . . . . . . . . . . . . . . . . . . . . . . . . . . 106
Genera l Tab . . . . . . . . . . . . . . . . . . . . . . . . . . . . . . . . . . . . . . . . . . . . . . . . . . . . . . . . . . . . . 1 0 8
Schedule # . . . . . . . . . . . . . . . . . . . . . . . . . . . . . . . . . . . . . . . . . . . . . . . . . . . . . . . . . . . 108
Day(s)or Date . . . . . . . . . . . . . . . . . . . . . . . . . . . . . . . . . . . . . . . . . . . . . . . . . . . . . . . . . 108
Time . . . . . . . . . . . . . . . . . . . . . . . . . . . . . . . . . . . . . . . . . . . . . . . . . . . . . . . . . . . . . . . . 108
The Mailbox . . . . . . . . . . . . . . . . . . . . . . . . . . . . . . . . . . . . . . . . . . . . . . . . . . . . . . . . . . 109
Call Routing Mailbox . . . . . . . . . . . . . . . . . . . . . . . . . . . . . . . . . . . . . . . . . . . . . . . 109
Message Center Mailbox . . . . . . . . . . . . . . . . . . . . . . . . . . . . . . . . . . . . . . . . . . . . 111
Announcement Mailbox . . . . . . . . . . . . . . . . . . . . . . . . . . . . . . . . . . . . . . . . . . . . . 112
Interactive Mailbox . . . . . . . . . . . . . . . . . . . . . . . . . . . . . . . . . . . . . . . . . . . . . . . . . 112
Directory Dialing Mailbox . . . . . . . . . . . . . . . . . . . . . . . . . . . . . . . . . . . . . . . . . . . 112
Subscriber Mailbox . . . . . . . . . . . . . . . . . . . . . . . . . . . . . . . . . . . . . . . . . . . . . . . . . 113
How the Automated Attendant Routes a Trunk Call . . . . . . . . . . . . . . . . . . . . . . . . . . . . . . 114
Customizing Caller I.D. Tables . . . . . . . . . . . . . . . . . . . . . . . . . . . . . . . . . . . . . . . . . . . . . .115
Caller I.D. AutomaticTransfer . . . . . . . . . . . . . . . . . . . . . . . . . . . . . . . . . . . . . . . . . . . . . . . . . . . . . 115
Genera l Tab . . . . . . . . . . . . . . . . . . . . . . . . . . . . . . . . . . . . . . . . . . . . . . . . . . . . . . . . . . . . . 1 1 6
Caller I.D. Match . . . . . . . . . . . . . . . . . . . . . . . . . . . . . . . . . . . . . . . . . . . . . . . . . . . . . . 116
Caller I.D. Action . . . . . . . . . . . . . . . . . . . . . . . . . . . . . . . . . . . . . . . . . . . . . . . . . . . . . 117
vi
NT System Guide
Page 9

Table of Contents
Chapter 3: Programming
Customizing Callout Options . . . . . . . . . . . . . . . . . . . . . . . . . . . . . . . . . . . . . . . . . . . . . . .119
Callout Options . . . . . . . . . . . . . . . . . . . . . . . . . . . . . . . . . . . . . . . . . . . . . . . . . . . . . . . . . . . . . . . . . 119
Message Notification . . . . . . . . . . . . . . . . . . . . . . . . . . . . . . . . . . . . . . . . . . . . . . . . . . . . . . 119
Genera l Tab . . . . . . . . . . . . . . . . . . . . . . . . . . . . . . . . . . . . . . . . . . . . . . . . . . . . . . . . . . . . . 1 2 1
General (Non-Pager) Callouts . . . . . . . . . . . . . . . . . . . . . . . . . . . . . . . . . . . . . . . . . . . . 121
Times (minutes) . . . . . . . . . . . . . . . . . . . . . . . . . . . . . . . . . . . . . . . . . . . . . . . . . . . 121
Number of Rings . . . . . . . . . . . . . . . . . . . . . . . . . . . . . . . . . . . . . . . . . . . . . . . . . . 121
Number of Attempts . . . . . . . . . . . . . . . . . . . . . . . . . . . . . . . . . . . . . . . . . . . . . . . . 122
Pager Callouts . . . . . . . . . . . . . . . . . . . . . . . . . . . . . . . . . . . . . . . . . . . . . . . . . . . . . . . . 122
Wait between (minutes) . . . . . . . . . . . . . . . . . . . . . . . . . . . . . . . . . . . . . . . . . . . . . 122
Send until Acknowledged . . . . . . . . . . . . . . . . . . . . . . . . . . . . . . . . . . . . . . . . . . . . 122
Callout Report . . . . . . . . . . . . . . . . . . . . . . . . . . . . . . . . . . . . . . . . . . . . . . . . . . . . . 123
Option a l Ta b . . . . . . . . . . . . . . . . . . . . . . . . . . . . . . . . . . . . . . . . . . . . . . . . . . . . . . . . . . . . 124
Network Callouts . . . . . . . . . . . . . . . . . . . . . . . . . . . . . . . . . . . . . . . . . . . . . . . . . . . . . . 124
Wait between (minutes) . . . . . . . . . . . . . . . . . . . . . . . . . . . . . . . . . . . . . . . . . . . . . 124
Number of Attempts . . . . . . . . . . . . . . . . . . . . . . . . . . . . . . . . . . . . . . . . . . . . . . . . 124
Fax Callouts . . . . . . . . . . . . . . . . . . . . . . . . . . . . . . . . . . . . . . . . . . . . . . . . . . . . . . . . . . 125
Wait between (minutes) . . . . . . . . . . . . . . . . . . . . . . . . . . . . . . . . . . . . . . . . . . . . . 125
Number of Attempts . . . . . . . . . . . . . . . . . . . . . . . . . . . . . . . . . . . . . . . . . . . . . . . . 125
Delay before Fax Carrier Detect (seconds) . . . . . . . . . . . . . . . . . . . . . . . . . . . . . . 125
Hotel/Motel . . . . . . . . . . . . . . . . . . . . . . . . . . . . . . . . . . . . . . . . . . . . . . . . . . . . . . . . . . 125
Snooze Alarm (minutes) . . . . . . . . . . . . . . . . . . . . . . . . . . . . . . . . . . . . . . . . . . . . . 125
Rings per Wake-Up Call . . . . . . . . . . . . . . . . . . . . . . . . . . . . . . . . . . . . . . . . . . . . . 126
Caller ID . . . . . . . . . . . . . . . . . . . . . . . . . . . . . . . . . . . . . . . . . . . . . . . . . . . . . . . . . . . . 126
Insert Leading “1” . . . . . . . . . . . . . . . . . . . . . . . . . . . . . . . . . . . . . . . . . . . . . . . . . . 126
Make Call Suffix Digits . . . . . . . . . . . . . . . . . . . . . . . . . . . . . . . . . . . . . . . . . . . . . 127
Customizing Dial Action Tables . . . . . . . . . . . . . . . . . . . . . . . . . . . . . . . . . . . . . . . . . . . . .129
Dial Action Tables . . . . . . . . . . . . . . . . . . . . . . . . . . . . . . . . . . . . . . . . . . . . . . . . . . . . . . . . . . . . . . 129
Key Actions and Key Numbers . . . . . . . . . . . . . . . . . . . . . . . . . . . . . . . . . . . . . . . . . . . . . . 129
Genera l Tab . . . . . . . . . . . . . . . . . . . . . . . . . . . . . . . . . . . . . . . . . . . . . . . . . . . . . . . . . . . . . 1 3 1
Key Action . . . . . . . . . . . . . . . . . . . . . . . . . . . . . . . . . . . . . . . . . . . . . . . . . . . . . . . . . . . 131
Undefined Routing . . . . . . . . . . . . . . . . . . . . . . . . . . . . . . . . . . . . . . . . . . . . . . . . . 131
Screened Transfer to an Extension . . . . . . . . . . . . . . . . . . . . . . . . . . . . . . . . . . . . . 131
Monitored Transfer . . . . . . . . . . . . . . . . . . . . . . . . . . . . . . . . . . . . . . . . . . . . . . . . . 134
Unscreened Transfer to an Extension . . . . . . . . . . . . . . . . . . . . . . . . . . . . . . . . . . . 136
Record a Message/Quick Message . . . . . . . . . . . . . . . . . . . . . . . . . . . . . . . . . . . . . 137
Record a Message for a Distribution List . . . . . . . . . . . . . . . . . . . . . . . . . . . . . . . . 138
Directory Dialing by First/Last Name . . . . . . . . . . . . . . . . . . . . . . . . . . . . . . . . . . 138
Log On to a Mailbox . . . . . . . . . . . . . . . . . . . . . . . . . . . . . . . . . . . . . . . . . . . . . . . 141
Hang up . . . . . . . . . . . . . . . . . . . . . . . . . . . . . . . . . . . . . . . . . . . . . . . . . . . . . . . . . . 141
Go to a Mailbox . . . . . . . . . . . . . . . . . . . . . . . . . . . . . . . . . . . . . . . . . . . . . . . . . . . 142
Go to Language 1 or Language 2 . . . . . . . . . . . . . . . . . . . . . . . . . . . . . . . . . . . . . . 143
Record FAX Mail Messages . . . . . . . . . . . . . . . . . . . . . . . . . . . . . . . . . . . . . . . . . 144
NT System Guide
vii
Page 10

Table of Contents
Chapter 3: Programming
Customizing Dial Action Tables (cont’d)
Key Action (cont’d)
Interactive Voice Response . . . . . . . . . . . . . . . . . . . . . . . . . . . . . . . . . . . . . . . . . . 144
Key Number . . . . . . . . . . . . . . . . . . . . . . . . . . . . . . . . . . . . . . . . . . . . . . . . . . . . . . . . . . 145
For a Dialpad Key . . . . . . . . . . . . . . . . . . . . . . . . . . . . . . . . . . . . . . . . . . . . . . . . . . 145
For a Dialpad Key (cont’d) . . . . . . . . . . . . . . . . . . . . . . . . . . . . . . . . . . . . . . . . . . . 146
For the TIMEOUT Function . . . . . . . . . . . . . . . . . . . . . . . . . . . . . . . . . . . . . . . . . . 148
Example of a Dial Action Table . . . . . . . . . . . . . . . . . . . . . . . . . . . . . . . . . . . . . . . . . . . . . 149
Customizing Distribution Lists . . . . . . . . . . . . . . . . . . . . . . . . . . . . . . . . . . . . . . . . . . . . . .151
Distribution Lists . . . . . . . . . . . . . . . . . . . . . . . . . . . . . . . . . . . . . . . . . . . . . . . . . . . . . . . . . . . . . . . . 151
Distribution Mailbox . . . . . . . . . . . . . . . . . . . . . . . . . . . . . . . . . . . . . . . . . . . . . . . . . . . . . . 151
Genera l Tab . . . . . . . . . . . . . . . . . . . . . . . . . . . . . . . . . . . . . . . . . . . . . . . . . . . . . . . . . . . . . 1 5 2
Index . . . . . . . . . . . . . . . . . . . . . . . . . . . . . . . . . . . . . . . . . . . . . . . . . . . . . . . . . . . . . . . 152
Mailbox Number . . . . . . . . . . . . . . . . . . . . . . . . . . . . . . . . . . . . . . . . . . . . . . . . . . . . . . 152
Customizing Fax On-Demand . . . . . . . . . . . . . . . . . . . . . . . . . . . . . . . . . . . . . . . . . . . . . . .155
FAX-On-Demand . . . . . . . . . . . . . . . . . . . . . . . . . . . . . . . . . . . . . . . . . . . . . . . . . . . . . . . . . . . . . . . 155
FAX Documents . . . . . . . . . . . . . . . . . . . . . . . . . . . . . . . . . . . . . . . . . . . . . . . . . . . . . . . . . 155
Fax Document Slot Options Dialog Box . . . . . . . . . . . . . . . . . . . . . . . . . . . . . . . . . . . . . . . 157
Document Number . . . . . . . . . . . . . . . . . . . . . . . . . . . . . . . . . . . . . . . . . . . . . . . . . . . . . 157
Notes . . . . . . . . . . . . . . . . . . . . . . . . . . . . . . . . . . . . . . . . . . . . . . . . . . . . . . . . . . . . . . . 157
Tenant . . . . . . . . . . . . . . . . . . . . . . . . . . . . . . . . . . . . . . . . . . . . . . . . . . . . . . . . . . . . . . 158
Security Code Required . . . . . . . . . . . . . . . . . . . . . . . . . . . . . . . . . . . . . . . . . . . . . . . . . 158
Clear Slot . . . . . . . . . . . . . . . . . . . . . . . . . . . . . . . . . . . . . . . . . . . . . . . . . . . . . . . . . . . . 158
Load DCX File . . . . . . . . . . . . . . . . . . . . . . . . . . . . . . . . . . . . . . . . . . . . . . . . . . . . . . . . 158
Fax Distribution List Options Dialog Box . . . . . . . . . . . . . . . . . . . . . . . . . . . . . . . . . . . . . . 160
Options . . . . . . . . . . . . . . . . . . . . . . . . . . . . . . . . . . . . . . . . . . . . . . . . . . . . . . . . . . . . . . 160
Tenant . . . . . . . . . . . . . . . . . . . . . . . . . . . . . . . . . . . . . . . . . . . . . . . . . . . . . . . . . . . 160
Start Transmission . . . . . . . . . . . . . . . . . . . . . . . . . . . . . . . . . . . . . . . . . . . . . . . . . 161
Document Number . . . . . . . . . . . . . . . . . . . . . . . . . . . . . . . . . . . . . . . . . . . . . . . . . 161
FAX Numbers . . . . . . . . . . . . . . . . . . . . . . . . . . . . . . . . . . . . . . . . . . . . . . . . . . . . . 161
Current Fax Port Dialog Box . . . . . . . . . . . . . . . . . . . . . . . . . . . . . . . . . . . . . . . . . . . . . . . . 163
Tenant . . . . . . . . . . . . . . . . . . . . . . . . . . . . . . . . . . . . . . . . . . . . . . . . . . . . . . . . . . . . . . 163
Extension . . . . . . . . . . . . . . . . . . . . . . . . . . . . . . . . . . . . . . . . . . . . . . . . . . . . . . . . 164
In Service . . . . . . . . . . . . . . . . . . . . . . . . . . . . . . . . . . . . . . . . . . . . . . . . . . . . . . . . 164
Allow Fax Callouts . . . . . . . . . . . . . . . . . . . . . . . . . . . . . . . . . . . . . . . . . . . . . . . . . 164
Customizing Mailbox Options . . . . . . . . . . . . . . . . . . . . . . . . . . . . . . . . . . . . . . . . . . . . . . .167
Mailbox Options . . . . . . . . . . . . . . . . . . . . . . . . . . . . . . . . . . . . . . . . . . . . . . . . . . . . . . . . . . . . . . . . 167
Default Numbering Plan . . . . . . . . . . . . . . . . . . . . . . . . . . . . . . . . . . . . . . . . . . . . . . . . 167
Variable length of Mailbox Numbers . . . . . . . . . . . . . . . . . . . . . . . . . . . . . . . . . . . . . . 168
Creating and Accessing Mailboxes . . . . . . . . . . . . . . . . . . . . . . . . . . . . . . . . . . . . . . . . 168
Understanding the Mailbox Options Screen . . . . . . . . . . . . . . . . . . . . . . . . . . . . . . . . . 174
Using the Options Buttons . . . . . . . . . . . . . . . . . . . . . . . . . . . . . . . . . . . . . . . . . . . . . . . 175
The Copy Button . . . . . . . . . . . . . . . . . . . . . . . . . . . . . . . . . . . . . . . . . . . . . . . . . . 176
Deleting a Mailbox . . . . . . . . . . . . . . . . . . . . . . . . . . . . . . . . . . . . . . . . . . . . . . . . . . . . 178
viii
NT System Guide
Page 11

Table of Contents
Chapter 3: Programming
Customizing Mailbox Options (cont’d)
ACD Announcement Mailboxes . . . . . . . . . . . . . . . . . . . . . . . . . . . . . . . . . . . . . . . . . . . . . . . . . . . . . . 180
Description . . . . . . . . . . . . . . . . . . . . . . . . . . . . . . . . . . . . . . . . . . . . . . . . . . . . . . . . . . . . . . . . . . . . 180
ACD Announcement Mailboxes - General Properties Page . . . . . . . . . . . . . . . . . . . . . . . . . . . . . . . . 181
Genera l P ro p e rt ies Page . . . . . . . . . . . . . . . . . . . . . . . . . . . . . . . . . . . . . . . . . . . . . . . . . . . . . . . . . . 1 8 1
Options . . . . . . . . . . . . . . . . . . . . . . . . . . . . . . . . . . . . . . . . . . . . . . . . . . . . . . . . . . . . . . 181
Mailbox Type . . . . . . . . . . . . . . . . . . . . . . . . . . . . . . . . . . . . . . . . . . . . . . . . . . . . 181
Name . . . . . . . . . . . . . . . . . . . . . . . . . . . . . . . . . . . . . . . . . . . . . . . . . . . . . . . . . . . 181
Department . . . . . . . . . . . . . . . . . . . . . . . . . . . . . . . . . . . . . . . . . . . . . . . . . . . . . . . 181
ACD Announcement Mailboxes - General Properties Page . . . . . . . . . . . . . . . . . . . . . . . . . . . . . . . . 182
Next Call Routing Mailbox . . . . . . . . . . . . . . . . . . . . . . . . . . . . . . . . . . . . . . . . . . 182
Tenant . . . . . . . . . . . . . . . . . . . . . . . . . . . . . . . . . . . . . . . . . . . . . . . . . . . . . . . . . . . 182
Directory List . . . . . . . . . . . . . . . . . . . . . . . . . . . . . . . . . . . . . . . . . . . . . . . . . . . . . . . . . 182
Announcement Mailboxes . . . . . . . . . . . . . . . . . . . . . . . . . . . . . . . . . . . . . . . . . . . . . . . . . . . . . . . . . . 1 8 3
Description . . . . . . . . . . . . . . . . . . . . . . . . . . . . . . . . . . . . . . . . . . . . . . . . . . . . . . . . . . . . . . . . . . . . 183
Announcement Mailboxes - General Properties Page . . . . . . . . . . . . . . . . . . . . . . . . . . . . . . . . . . . . 184
Genera l P ro p e rt ies Page . . . . . . . . . . . . . . . . . . . . . . . . . . . . . . . . . . . . . . . . . . . . . . . . . . . . . . . . . . 1 8 4
Options . . . . . . . . . . . . . . . . . . . . . . . . . . . . . . . . . . . . . . . . . . . . . . . . . . . . . . . . . . . . . . 184
Mailbox Type . . . . . . . . . . . . . . . . . . . . . . . . . . . . . . . . . . . . . . . . . . . . . . . . . . . . 184
Security Code . . . . . . . . . . . . . . . . . . . . . . . . . . . . . . . . . . . . . . . . . . . . . . . . . . . . . 184
Name . . . . . . . . . . . . . . . . . . . . . . . . . . . . . . . . . . . . . . . . . . . . . . . . . . . . . . . . . . . 184
Department . . . . . . . . . . . . . . . . . . . . . . . . . . . . . . . . . . . . . . . . . . . . . . . . . . . . . . . 185
Next Call Routing Mailbox . . . . . . . . . . . . . . . . . . . . . . . . . . . . . . . . . . . . . . . . . . 185
Tenant . . . . . . . . . . . . . . . . . . . . . . . . . . . . . . . . . . . . . . . . . . . . . . . . . . . . . . . . . . . 185
Directory List . . . . . . . . . . . . . . . . . . . . . . . . . . . . . . . . . . . . . . . . . . . . . . . . . . . . . 185
Announcement . . . . . . . . . . . . . . . . . . . . . . . . . . . . . . . . . . . . . . . . . . . . . . . . . . . . . . . . 186
Repeat Count . . . . . . . . . . . . . . . . . . . . . . . . . . . . . . . . . . . . . . . . . . . . . . . . . . . . . 186
Hang Up After . . . . . . . . . . . . . . . . . . . . . . . . . . . . . . . . . . . . . . . . . . . . . . . . . . . . 186
Call Routing Mailboxes . . . . . . . . . . . . . . . . . . . . . . . . . . . . . . . . . . . . . . . . . . . . . . . . . . . . . . . . . . . . 187
Description . . . . . . . . . . . . . . . . . . . . . . . . . . . . . . . . . . . . . . . . . . . . . . . . . . . . . . . . . . . . . . . . . . . . 187
Call Routing Mailboxes - General Properties Page . . . . . . . . . . . . . . . . . . . . . . . . . . . . . . . . . . . . . . 189
Genera l P ro p e rt ies Page . . . . . . . . . . . . . . . . . . . . . . . . . . . . . . . . . . . . . . . . . . . . . . . . . . . . . . . . . . 1 8 9
Options . . . . . . . . . . . . . . . . . . . . . . . . . . . . . . . . . . . . . . . . . . . . . . . . . . . . . . . . . . . . . . 189
Mailbox Type . . . . . . . . . . . . . . . . . . . . . . . . . . . . . . . . . . . . . . . . . . . . . . . . . . . . 189
Name . . . . . . . . . . . . . . . . . . . . . . . . . . . . . . . . . . . . . . . . . . . . . . . . . . . . . . . . . . . . 189
Department . . . . . . . . . . . . . . . . . . . . . . . . . . . . . . . . . . . . . . . . . . . . . . . . . . . . . . . 190
Tenant . . . . . . . . . . . . . . . . . . . . . . . . . . . . . . . . . . . . . . . . . . . . . . . . . . . . . . . . . . . 190
Directory List . . . . . . . . . . . . . . . . . . . . . . . . . . . . . . . . . . . . . . . . . . . . . . . . . . . . . 190
NT System Guide
ix
Page 12

Table of Contents
Chapter 3: Programming
Customizing Mailbox Options (cont’d)
Call Routing Mailboxes - Call Handling Properties Page . . . . . . . . . . . . . . . . . . . . . . . . . . . . . . . . . 191
Call Handling Properties Page . . . . . . . . . . . . . . . . . . . . . . . . . . . . . . . . . . . . . . . . . . . . . . . . . . . . . 1 9 1
Options . . . . . . . . . . . . . . . . . . . . . . . . . . . . . . . . . . . . . . . . . . . . . . . . . . . . . . . . . . . . . . 191
Dial Action Table . . . . . . . . . . . . . . . . . . . . . . . . . . . . . . . . . . . . . . . . . . . . . . . . . 191
Delay (rings or seconds) before Redirect Transfer . . . . . . . . . . . . . . . . . . . . . . . . 192
Directory List to Use . . . . . . . . . . . . . . . . . . . . . . . . . . . . . . . . . . . . . . . . . . . . . . . 192
Time Limit for Dialing Commands . . . . . . . . . . . . . . . . . . . . . . . . . . . . . . . . . . . . 193
Play Default Messages . . . . . . . . . . . . . . . . . . . . . . . . . . . . . . . . . . . . . . . . . . . . . . 193
Directory Dialing Mailboxes . . . . . . . . . . . . . . . . . . . . . . . . . . . . . . . . . . . . . . . . . . . . . . . . . . . . . . . . 194
Description . . . . . . . . . . . . . . . . . . . . . . . . . . . . . . . . . . . . . . . . . . . . . . . . . . . . . . . . . . . . . . . . . . . . 194
Directory Dialing Mailboxes - General Properties Page . . . . . . . . . . . . . . . . . . . . . . . . . . . . . . . . . . . 197
Genera l P ro p e rt ies Page . . . . . . . . . . . . . . . . . . . . . . . . . . . . . . . . . . . . . . . . . . . . . . . . . . . . . . . . . . 1 9 7
Options . . . . . . . . . . . . . . . . . . . . . . . . . . . . . . . . . . . . . . . . . . . . . . . . . . . . . . . . . . . . . . 197
Mailbox Type . . . . . . . . . . . . . . . . . . . . . . . . . . . . . . . . . . . . . . . . . . . . . . . . . . . . 197
Name . . . . . . . . . . . . . . . . . . . . . . . . . . . . . . . . . . . . . . . . . . . . . . . . . . . . . . . . . . . . 197
Department . . . . . . . . . . . . . . . . . . . . . . . . . . . . . . . . . . . . . . . . . . . . . . . . . . . . . . . 198
Tenant . . . . . . . . . . . . . . . . . . . . . . . . . . . . . . . . . . . . . . . . . . . . . . . . . . . . . . . . . . . 198
Directory List . . . . . . . . . . . . . . . . . . . . . . . . . . . . . . . . . . . . . . . . . . . . . . . . . . . . . 198
Directory Dialing Mailboxes - Call Handling Properties Page . . . . . . . . . . . . . . . . . . . . . . . . . . . . . 199
Call Handling Properties Page . . . . . . . . . . . . . . . . . . . . . . . . . . . . . . . . . . . . . . . . . . . . . . . . . . . . . 1 9 9
Options . . . . . . . . . . . . . . . . . . . . . . . . . . . . . . . . . . . . . . . . . . . . . . . . . . . . . . . . . . . . . . 199
Dial Action Table . . . . . . . . . . . . . . . . . . . . . . . . . . . . . . . . . . . . . . . . . . . . . . . . . 199
Delay (rings or seconds) before Redirect Transfer . . . . . . . . . . . . . . . . . . . . . . . . 200
Directory List to Use . . . . . . . . . . . . . . . . . . . . . . . . . . . . . . . . . . . . . . . . . . . . . . . 200
Time Limit for Dialing Commands . . . . . . . . . . . . . . . . . . . . . . . . . . . . . . . . . . . . 201
Distribution Mailboxes . . . . . . . . . . . . . . . . . . . . . . . . . . . . . . . . . . . . . . . . . . . . . . . . . . . . . . . . . . . . . 202
Description . . . . . . . . . . . . . . . . . . . . . . . . . . . . . . . . . . . . . . . . . . . . . . . . . . . . . . . . . . . . . . . . . . . . 202
Distribution Mailboxes - General Properties Page . . . . . . . . . . . . . . . . . . . . . . . . . . . . . . . . . . . . . . . 203
Genera l P ro p e rt ies Page . . . . . . . . . . . . . . . . . . . . . . . . . . . . . . . . . . . . . . . . . . . . . . . . . . . . . . . . . . 2 0 3
Options . . . . . . . . . . . . . . . . . . . . . . . . . . . . . . . . . . . . . . . . . . . . . . . . . . . . . . . . . . . . . . 203
Mailbox Type . . . . . . . . . . . . . . . . . . . . . . . . . . . . . . . . . . . . . . . . . . . . . . . . . . . . 203
Name . . . . . . . . . . . . . . . . . . . . . . . . . . . . . . . . . . . . . . . . . . . . . . . . . . . . . . . . . . . . 203
Department . . . . . . . . . . . . . . . . . . . . . . . . . . . . . . . . . . . . . . . . . . . . . . . . . . . . . . . 204
Distribution List . . . . . . . . . . . . . . . . . . . . . . . . . . . . . . . . . . . . . . . . . . . . . . . . . . . 204
Tenant . . . . . . . . . . . . . . . . . . . . . . . . . . . . . . . . . . . . . . . . . . . . . . . . . . . . . . . . . . . 204
Directory List . . . . . . . . . . . . . . . . . . . . . . . . . . . . . . . . . . . . . . . . . . . . . . . . . . . . . 205
Future Delivery Mailboxes . . . . . . . . . . . . . . . . . . . . . . . . . . . . . . . . . . . . . . . . . . . . . . . . . . . . . . . . . . 206
Description . . . . . . . . . . . . . . . . . . . . . . . . . . . . . . . . . . . . . . . . . . . . . . . . . . . . . . . . . . . . . . . . . . . . 206
Future Delivery Mailboxes - General Properties Page . . . . . . . . . . . . . . . . . . . . . . . . . . . . . . . . . . . . 207
Genera l P ro p e rt ies Page . . . . . . . . . . . . . . . . . . . . . . . . . . . . . . . . . . . . . . . . . . . . . . . . . . . . . . . . . . 2 0 7
Options . . . . . . . . . . . . . . . . . . . . . . . . . . . . . . . . . . . . . . . . . . . . . . . . . . . . . . . . . . . . . . 207
Mailbox Type . . . . . . . . . . . . . . . . . . . . . . . . . . . . . . . . . . . . . . . . . . . . . . . . . . . . 207
Security Code . . . . . . . . . . . . . . . . . . . . . . . . . . . . . . . . . . . . . . . . . . . . . . . . . . . . . 207
Name . . . . . . . . . . . . . . . . . . . . . . . . . . . . . . . . . . . . . . . . . . . . . . . . . . . . . . . . . . . 207
x
NT System Guide
Page 13

Table of Contents
Chapter 3: Programming
Customizing Mailbox Options (cont’d)
Future Delivery Mailboxes - General Properties Page . . . . . . . . . . . . . . . . . . . . . . . . . . . . . . . . . . . . 208
Department . . . . . . . . . . . . . . . . . . . . . . . . . . . . . . . . . . . . . . . . . . . . . . . . . . . . . . . 208
Directory List . . . . . . . . . . . . . . . . . . . . . . . . . . . . . . . . . . . . . . . . . . . . . . . . . . . . . 208
Number of Messages . . . . . . . . . . . . . . . . . . . . . . . . . . . . . . . . . . . . . . . . . . . . . . . 208
Guest Mailboxes . . . . . . . . . . . . . . . . . . . . . . . . . . . . . . . . . . . . . . . . . . . . . . . . . . . . . . . . . . . . . . . . . . 209
Description . . . . . . . . . . . . . . . . . . . . . . . . . . . . . . . . . . . . . . . . . . . . . . . . . . . . . . . . . . . . . . . . . . . . 20 9
Guest Mailboxes - General Properties Page . . . . . . . . . . . . . . . . . . . . . . . . . . . . . . . . . . . . . . . . . . . . 2 1 0
Genera l P ro p e rt ies Page . . . . . . . . . . . . . . . . . . . . . . . . . . . . . . . . . . . . . . . . . . . . . . . . . . . . . . . . . . 2 1 0
Options . . . . . . . . . . . . . . . . . . . . . . . . . . . . . . . . . . . . . . . . . . . . . . . . . . . . . . . . . . . . . . 210
Mailbox Type . . . . . . . . . . . . . . . . . . . . . . . . . . . . . . . . . . . . . . . . . . . . . . . . . . . . 210
Security Code . . . . . . . . . . . . . . . . . . . . . . . . . . . . . . . . . . . . . . . . . . . . . . . . . . . . . 210
Name . . . . . . . . . . . . . . . . . . . . . . . . . . . . . . . . . . . . . . . . . . . . . . . . . . . . . . . . . . . 211
Department . . . . . . . . . . . . . . . . . . . . . . . . . . . . . . . . . . . . . . . . . . . . . . . . . . . . . . . 211
Extension . . . . . . . . . . . . . . . . . . . . . . . . . . . . . . . . . . . . . . . . . . . . . . . . . . . . . . . . 211
Next Call Routing Mailbox . . . . . . . . . . . . . . . . . . . . . . . . . . . . . . . . . . . . . . . . . . 212
Tenant . . . . . . . . . . . . . . . . . . . . . . . . . . . . . . . . . . . . . . . . . . . . . . . . . . . . . . . . . . . 212
Directory List . . . . . . . . . . . . . . . . . . . . . . . . . . . . . . . . . . . . . . . . . . . . . . . . . . . . . 212
Number of Messages . . . . . . . . . . . . . . . . . . . . . . . . . . . . . . . . . . . . . . . . . . . . . . . 213
Bilingual Mode . . . . . . . . . . . . . . . . . . . . . . . . . . . . . . . . . . . . . . . . . . . . . . . . . . . . 213
Guest Mailboxes - Message Notification Properties Page . . . . . . . . . . . . . . . . . . . . . . . . . . . . . . . . . 214
Message Notification Properties Page . . . . . . . . . . . . . . . . . . . . . . . . . . . . . . . . . . . . . . . . . . . . . . . 214
Options . . . . . . . . . . . . . . . . . . . . . . . . . . . . . . . . . . . . . . . . . . . . . . . . . . . . . . . . . . . . . . 214
Message Notification/Fax Callback . . . . . . . . . . . . . . . . . . . . . . . . . . . . . . . . . . . . 215
Local Callouts . . . . . . . . . . . . . . . . . . . . . . . . . . . . . . . . . . . . . . . . . . . . . . . . . . . . . 215
Long Distance Calls . . . . . . . . . . . . . . . . . . . . . . . . . . . . . . . . . . . . . . . . . . . . . . . . 216
Notification Number 1-3 . . . . . . . . . . . . . . . . . . . . . . . . . . . . . . . . . . . . . . . . . . . . . 216
Call Type . . . . . . . . . . . . . . . . . . . . . . . . . . . . . . . . . . . . . . . . . . . . . . . . . . . . . . . . 217
Notification Mode . . . . . . . . . . . . . . . . . . . . . . . . . . . . . . . . . . . . . . . . . . . . . . . . . . 218
Security Code Required . . . . . . . . . . . . . . . . . . . . . . . . . . . . . . . . . . . . . . . . . . . . . 218
Guest Mailboxes - Messaging Properties Page . . . . . . . . . . . . . . . . . . . . . . . . . . . . . . . . . . . . . . . . . . 219
Messaging Properties Page . . . . . . . . . . . . . . . . . . . . . . . . . . . . . . . . . . . . . . . . . . . . . . . . . . . . . . . . 219
Options . . . . . . . . . . . . . . . . . . . . . . . . . . . . . . . . . . . . . . . . . . . . . . . . . . . . . . . . . . . . . . 219
Message Playback . . . . . . . . . . . . . . . . . . . . . . . . . . . . . . . . . . . . . . . . . . . . . . . . . . 220
Message List Mode . . . . . . . . . . . . . . . . . . . . . . . . . . . . . . . . . . . . . . . . . . . . . . . . . 220
Auto Forwarding . . . . . . . . . . . . . . . . . . . . . . . . . . . . . . . . . . . . . . . . . . . . . . . . . . . 221
Auto Erase/Save of Messages . . . . . . . . . . . . . . . . . . . . . . . . . . . . . . . . . . . . . . . . . 221
Message Retention . . . . . . . . . . . . . . . . . . . . . . . . . . . . . . . . . . . . . . . . . . . . . . . . . 222
Urgent Message Return Time . . . . . . . . . . . . . . . . . . . . . . . . . . . . . . . . . . . . . . . . . 222
Recording Conversation Beep . . . . . . . . . . . . . . . . . . . . . . . . . . . . . . . . . . . . . . . . 222
Ask Caller’s Number . . . . . . . . . . . . . . . . . . . . . . . . . . . . . . . . . . . . . . . . . . . . . . . 223
Record Reply Only . . . . . . . . . . . . . . . . . . . . . . . . . . . . . . . . . . . . . . . . . . . . . . . . . 223
NT System Guide
xi
Page 14

Table of Contents
Chapter 3: Programming
Customizing Mailbox Options (cont’d)
Guest Mailboxes - Lamp/Logon/Transfer Properties Page . . . . . . . . . . . . . . . . . . . . . . . . . . . . . . . . 224
Lamp/Logon/Transfer Properties Page . . . . . . . . . . . . . . . . . . . . . . . . . . . . . . . . . . . . . . . . . . . . . . . 224
Lamp Options . . . . . . . . . . . . . . . . . . . . . . . . . . . . . . . . . . . . . . . . . . . . . . . . . . . . . . . . 224
Message Wait Lamp . . . . . . . . . . . . . . . . . . . . . . . . . . . . . . . . . . . . . . . . . . . . . . . . 225
Access Digit/Lamp On String . . . . . . . . . . . . . . . . . . . . . . . . . . . . . . . . . . . . . . . . . 225
Access Digit/Lamp Off String . . . . . . . . . . . . . . . . . . . . . . . . . . . . . . . . . . . . . . . . 226
Logon Options . . . . . . . . . . . . . . . . . . . . . . . . . . . . . . . . . . . . . . . . . . . . . . . . . . . . . . . . 226
Use Remote Logon As Direct Logon . . . . . . . . . . . . . . . . . . . . . . . . . . . . . . . . . . . 226
First Log In Option . . . . . . . . . . . . . . . . . . . . . . . . . . . . . . . . . . . . . . . . . . . . . . . . . 227
First Log In Announcement Mailbox . . . . . . . . . . . . . . . . . . . . . . . . . . . . . . . . . . . 227
Transfer Options . . . . . . . . . . . . . . . . . . . . . . . . . . . . . . . . . . . . . . . . . . . . . . . . . . . . . . 228
Forced Unscreened Transfer . . . . . . . . . . . . . . . . . . . . . . . . . . . . . . . . . . . . . . . . . . 228
Transfer-Only Mailbox . . . . . . . . . . . . . . . . . . . . . . . . . . . . . . . . . . . . . . . . . . . . . . 228
External Extension Enabled . . . . . . . . . . . . . . . . . . . . . . . . . . . . . . . . . . . . . . . . . . 229
External Extension Number . . . . . . . . . . . . . . . . . . . . . . . . . . . . . . . . . . . . . . . . . . 229
Interactive Mailboxes . . . . . . . . . . . . . . . . . . . . . . . . . . . . . . . . . . . . . . . . . . . . . . . . . . . . . . . . . . . . . . 2 3 0
Description . . . . . . . . . . . . . . . . . . . . . . . . . . . . . . . . . . . . . . . . . . . . . . . . . . . . . . . . . . . . . . . . . . . . 230
Interactive Mailboxes - General Properties Page . . . . . . . . . . . . . . . . . . . . . . . . . . . . . . . . . . . . . . . . 232
Genera l P ro p e rt ies Page . . . . . . . . . . . . . . . . . . . . . . . . . . . . . . . . . . . . . . . . . . . . . . . . . . . . . . . . . . 2 3 2
Options . . . . . . . . . . . . . . . . . . . . . . . . . . . . . . . . . . . . . . . . . . . . . . . . . . . . . . . . . . . . . . 232
Mailbox Type . . . . . . . . . . . . . . . . . . . . . . . . . . . . . . . . . . . . . . . . . . . . . . . . . . . . 232
Name . . . . . . . . . . . . . . . . . . . . . . . . . . . . . . . . . . . . . . . . . . . . . . . . . . . . . . . . . . . 232
Department . . . . . . . . . . . . . . . . . . . . . . . . . . . . . . . . . . . . . . . . . . . . . . . . . . . . . . . 232
Next Call Routing Mailbox . . . . . . . . . . . . . . . . . . . . . . . . . . . . . . . . . . . . . . . . . . 233
Tenant . . . . . . . . . . . . . . . . . . . . . . . . . . . . . . . . . . . . . . . . . . . . . . . . . . . . . . . . . . . 233
Directory List . . . . . . . . . . . . . . . . . . . . . . . . . . . . . . . . . . . . . . . . . . . . . . . . . . . . . 234
Interactive Mailboxes - Interactive Properties Page . . . . . . . . . . . . . . . . . . . . . . . . . . . . . . . . . . . . . . 235
Interactive Pro p erties Pag e . . . . . . . . . . . . . . . . . . . . . . . . . . . . . . . . . . . . . . . . . . . . . . . . . . . . . . . . 235
Interactive Options . . . . . . . . . . . . . . . . . . . . . . . . . . . . . . . . . . . . . . . . . . . . . . . . . . . . . 235
Responses, Silence Limit for: . . . . . . . . . . . . . . . . . . . . . . . . . . . . . . . . . . . . . . . . . 236
Responses, Mailbox for . . . . . . . . . . . . . . . . . . . . . . . . . . . . . . . . . . . . . . . . . . . . . 236
Responses, Review Mode for . . . . . . . . . . . . . . . . . . . . . . . . . . . . . . . . . . . . . . . . . 236
Responses, Record Incomplete . . . . . . . . . . . . . . . . . . . . . . . . . . . . . . . . . . . . . . . . 237
Time Limit for Dialing Commands Responses . . . . . . . . . . . . . . . . . . . . . . . . . . . 238
Closing Announcement Mailbox . . . . . . . . . . . . . . . . . . . . . . . . . . . . . . . . . . . . . . 238
Reference Number for Call . . . . . . . . . . . . . . . . . . . . . . . . . . . . . . . . . . . . . . . . . . . 238
Message Center Mailboxes . . . . . . . . . . . . . . . . . . . . . . . . . . . . . . . . . . . . . . . . . . . . . . . . . . . . . . . . . . 239
Description . . . . . . . . . . . . . . . . . . . . . . . . . . . . . . . . . . . . . . . . . . . . . . . . . . . . . . . . . . . . . . . . . . . . 239
xii
NT System Guide
Page 15

Table of Contents
Chapter 3: Programming
Customizing Mailbox Options (cont’d)
Message Center Mailboxes - General Properties Page . . . . . . . . . . . . . . . . . . . . . . . . . . . . . . . . . . . . 241
Genera l P ro p e rt ies Page . . . . . . . . . . . . . . . . . . . . . . . . . . . . . . . . . . . . . . . . . . . . . . . . . . . . . . . . . . 2 4 1
Options . . . . . . . . . . . . . . . . . . . . . . . . . . . . . . . . . . . . . . . . . . . . . . . . . . . . . . . . . . . . . . 241
Mailbox Type . . . . . . . . . . . . . . . . . . . . . . . . . . . . . . . . . . . . . . . . . . . . . . . . . . . . 241
Security Code . . . . . . . . . . . . . . . . . . . . . . . . . . . . . . . . . . . . . . . . . . . . . . . . . . . . . 241
Name . . . . . . . . . . . . . . . . . . . . . . . . . . . . . . . . . . . . . . . . . . . . . . . . . . . . . . . . . . . 242
Department . . . . . . . . . . . . . . . . . . . . . . . . . . . . . . . . . . . . . . . . . . . . . . . . . . . . . . . 242
Extension . . . . . . . . . . . . . . . . . . . . . . . . . . . . . . . . . . . . . . . . . . . . . . . . . . . . . . . . 242
Next Call Routing Mailbox . . . . . . . . . . . . . . . . . . . . . . . . . . . . . . . . . . . . . . . . . . 243
Tenant . . . . . . . . . . . . . . . . . . . . . . . . . . . . . . . . . . . . . . . . . . . . . . . . . . . . . . . . . . . 244
Directory List . . . . . . . . . . . . . . . . . . . . . . . . . . . . . . . . . . . . . . . . . . . . . . . . . . . . . 244
Number of Messages . . . . . . . . . . . . . . . . . . . . . . . . . . . . . . . . . . . . . . . . . . . . . . . 244
Bilingual Mode . . . . . . . . . . . . . . . . . . . . . . . . . . . . . . . . . . . . . . . . . . . . . . . . . . . . 245
Message Center Mailboxes - Message Notification Properties Page . . . . . . . . . . . . . . . . . . . . . . . . . 246
Message Notification Properties Page . . . . . . . . . . . . . . . . . . . . . . . . . . . . . . . . . . . . . . . . . . . . . . . 246
Options . . . . . . . . . . . . . . . . . . . . . . . . . . . . . . . . . . . . . . . . . . . . . . . . . . . . . . . . . . . . . . 246
Message Notification/Fax Callback . . . . . . . . . . . . . . . . . . . . . . . . . . . . . . . . . . . . 247
Local Callouts . . . . . . . . . . . . . . . . . . . . . . . . . . . . . . . . . . . . . . . . . . . . . . . . . . . . . 247
Long Distance Calls . . . . . . . . . . . . . . . . . . . . . . . . . . . . . . . . . . . . . . . . . . . . . . . . 248
Notification Number 1-3 . . . . . . . . . . . . . . . . . . . . . . . . . . . . . . . . . . . . . . . . . . . . . 248
Call Type . . . . . . . . . . . . . . . . . . . . . . . . . . . . . . . . . . . . . . . . . . . . . . . . . . . . . . . . 249
Notification Mode . . . . . . . . . . . . . . . . . . . . . . . . . . . . . . . . . . . . . . . . . . . . . . . . . . 250
Security Code Required . . . . . . . . . . . . . . . . . . . . . . . . . . . . . . . . . . . . . . . . . . . . . 250
Message Center Mailboxes - Messaging Properties Page . . . . . . . . . . . . . . . . . . . . . . . . . . . . . . . . . . 251
Messaging Properties Page . . . . . . . . . . . . . . . . . . . . . . . . . . . . . . . . . . . . . . . . . . . . . . . . . . . . . . . . 251
Options . . . . . . . . . . . . . . . . . . . . . . . . . . . . . . . . . . . . . . . . . . . . . . . . . . . . . . . . . . . . . . 251
Message Playback . . . . . . . . . . . . . . . . . . . . . . . . . . . . . . . . . . . . . . . . . . . . . . . . . . 252
Message List Mode . . . . . . . . . . . . . . . . . . . . . . . . . . . . . . . . . . . . . . . . . . . . . . . . . 252
Auto Forwarding . . . . . . . . . . . . . . . . . . . . . . . . . . . . . . . . . . . . . . . . . . . . . . . . . . . 253
Auto Erase/Save of Messages . . . . . . . . . . . . . . . . . . . . . . . . . . . . . . . . . . . . . . . . . 253
Message Retention . . . . . . . . . . . . . . . . . . . . . . . . . . . . . . . . . . . . . . . . . . . . . . . . . 254
Urgent Message Return Time . . . . . . . . . . . . . . . . . . . . . . . . . . . . . . . . . . . . . . . . . 254
Recording Conversation Beep . . . . . . . . . . . . . . . . . . . . . . . . . . . . . . . . . . . . . . . . 254
Ask Caller’s Number . . . . . . . . . . . . . . . . . . . . . . . . . . . . . . . . . . . . . . . . . . . . . . . 255
Message Center Mailboxes - Lamp/Logon/Transfer Properties Page . . . . . . . . . . . . . . . . . . . . . . . . 256
Lamp/Logon/Transfer Properties Page . . . . . . . . . . . . . . . . . . . . . . . . . . . . . . . . . . . . . . . . . . . . . . . 256
Lamp Options . . . . . . . . . . . . . . . . . . . . . . . . . . . . . . . . . . . . . . . . . . . . . . . . . . . . . . . . 256
Message Wait Lamp . . . . . . . . . . . . . . . . . . . . . . . . . . . . . . . . . . . . . . . . . . . . . . . . 257
Access Digit/Lamp On String . . . . . . . . . . . . . . . . . . . . . . . . . . . . . . . . . . . . . . . . . 257
Access Digit/Lamp Off String . . . . . . . . . . . . . . . . . . . . . . . . . . . . . . . . . . . . . . . . 258
Logon Options . . . . . . . . . . . . . . . . . . . . . . . . . . . . . . . . . . . . . . . . . . . . . . . . . . . . . . . . 258
Use Remote Logon As Direct Logon . . . . . . . . . . . . . . . . . . . . . . . . . . . . . . . . . . . 258
NT System Guide
xiii
Page 16

Table of Contents
Chapter 3: Programming
Customizing Mailbox Options (cont’d)
Transfer Options . . . . . . . . . . . . . . . . . . . . . . . . . . . . . . . . . . . . . . . . . . . . . . . . . . . . . . 259
Forced Unscreened Transfer . . . . . . . . . . . . . . . . . . . . . . . . . . . . . . . . . . . . . . . . . . 259
Transfer-Only Mailbox . . . . . . . . . . . . . . . . . . . . . . . . . . . . . . . . . . . . . . . . . . . . . . 259
Alternate Next CRMB Dial Option . . . . . . . . . . . . . . . . . . . . . . . . . . . . . . . . . . . . 260
External Extension Enabled . . . . . . . . . . . . . . . . . . . . . . . . . . . . . . . . . . . . . . . . . . 261
External Extension Number . . . . . . . . . . . . . . . . . . . . . . . . . . . . . . . . . . . . . . . . . . 261
Subscriber Mailboxes . . . . . . . . . . . . . . . . . . . . . . . . . . . . . . . . . . . . . . . . . . . . . . . . . . . . . . . . . . . . . . 2 6 3
Description . . . . . . . . . . . . . . . . . . . . . . . . . . . . . . . . . . . . . . . . . . . . . . . . . . . . . . . . . . . . . . . . . . . . 263
Subscriber Mailboxes - General Properties Page . . . . . . . . . . . . . . . . . . . . . . . . . . . . . . . . . . . . . . . . 265
Genera l P ro p e rt ies Page . . . . . . . . . . . . . . . . . . . . . . . . . . . . . . . . . . . . . . . . . . . . . . . . . . . . . . . . . . 2 6 5
Options . . . . . . . . . . . . . . . . . . . . . . . . . . . . . . . . . . . . . . . . . . . . . . . . . . . . . . . . . . . . . . 265
Mailbox Type . . . . . . . . . . . . . . . . . . . . . . . . . . . . . . . . . . . . . . . . . . . . . . . . . . . . 265
Security Code . . . . . . . . . . . . . . . . . . . . . . . . . . . . . . . . . . . . . . . . . . . . . . . . . . . . . 265
Name . . . . . . . . . . . . . . . . . . . . . . . . . . . . . . . . . . . . . . . . . . . . . . . . . . . . . . . . . . . 266
Department . . . . . . . . . . . . . . . . . . . . . . . . . . . . . . . . . . . . . . . . . . . . . . . . . . . . . . . 266
Extension . . . . . . . . . . . . . . . . . . . . . . . . . . . . . . . . . . . . . . . . . . . . . . . . . . . . . . . . 266
Next Call Routing Mailbox . . . . . . . . . . . . . . . . . . . . . . . . . . . . . . . . . . . . . . . . . . 267
Tenant . . . . . . . . . . . . . . . . . . . . . . . . . . . . . . . . . . . . . . . . . . . . . . . . . . . . . . . . . . . 268
Directory List . . . . . . . . . . . . . . . . . . . . . . . . . . . . . . . . . . . . . . . . . . . . . . . . . . . . . 268
Number of Messages . . . . . . . . . . . . . . . . . . . . . . . . . . . . . . . . . . . . . . . . . . . . . . . 269
Bilingual Mode . . . . . . . . . . . . . . . . . . . . . . . . . . . . . . . . . . . . . . . . . . . . . . . . . . . . 269
Subscriber Mailboxes - Message Notification Properties Page . . . . . . . . . . . . . . . . . . . . . . . . . . . . . 270
Message Notification Properties Page . . . . . . . . . . . . . . . . . . . . . . . . . . . . . . . . . . . . . . . . . . . . . . . 270
Options . . . . . . . . . . . . . . . . . . . . . . . . . . . . . . . . . . . . . . . . . . . . . . . . . . . . . . . . . . . . . . 270
Message Notification/Fax Callback . . . . . . . . . . . . . . . . . . . . . . . . . . . . . . . . . . . . 271
Local Callouts . . . . . . . . . . . . . . . . . . . . . . . . . . . . . . . . . . . . . . . . . . . . . . . . . . . . . 271
Long Distance Calls . . . . . . . . . . . . . . . . . . . . . . . . . . . . . . . . . . . . . . . . . . . . . . . . 272
Notification Number 1-3 . . . . . . . . . . . . . . . . . . . . . . . . . . . . . . . . . . . . . . . . . . . . . 272
Call Type . . . . . . . . . . . . . . . . . . . . . . . . . . . . . . . . . . . . . . . . . . . . . . . . . . . . . . . . 273
Notification Mode . . . . . . . . . . . . . . . . . . . . . . . . . . . . . . . . . . . . . . . . . . . . . . . . . . 274
Security Code Required . . . . . . . . . . . . . . . . . . . . . . . . . . . . . . . . . . . . . . . . . . . . . 275
Subscriber Mailboxes - Messaging Properties Page . . . . . . . . . . . . . . . . . . . . . . . . . . . . . . . . . . . . . . 276
Messaging Properties Page . . . . . . . . . . . . . . . . . . . . . . . . . . . . . . . . . . . . . . . . . . . . . . . . . . . . . . . . 276
Options . . . . . . . . . . . . . . . . . . . . . . . . . . . . . . . . . . . . . . . . . . . . . . . . . . . . . . . . . . . . . . 276
Message Playback . . . . . . . . . . . . . . . . . . . . . . . . . . . . . . . . . . . . . . . . . . . . . . . . . . 277
Message List Mode . . . . . . . . . . . . . . . . . . . . . . . . . . . . . . . . . . . . . . . . . . . . . . . . . 277
Auto Forwarding . . . . . . . . . . . . . . . . . . . . . . . . . . . . . . . . . . . . . . . . . . . . . . . . . . . 278
Auto Erase/Save of Messages . . . . . . . . . . . . . . . . . . . . . . . . . . . . . . . . . . . . . . . . . 278
Message Retention . . . . . . . . . . . . . . . . . . . . . . . . . . . . . . . . . . . . . . . . . . . . . . . . . 279
Urgent Message Return Time . . . . . . . . . . . . . . . . . . . . . . . . . . . . . . . . . . . . . . . . . 279
Conversation Record Beep . . . . . . . . . . . . . . . . . . . . . . . . . . . . . . . . . . . . . . . . . . . 279
Ask Caller’s Number . . . . . . . . . . . . . . . . . . . . . . . . . . . . . . . . . . . . . . . . . . . . . . . 280
xiv
NT System Guide
Page 17

Table of Contents
Chapter 3: Programming
Customizing Mailbox Options (cont’d)
Subscriber Mailboxes - Lamp/Logon/Transfer Properties Page . . . . . . . . . . . . . . . . . . . . . . . . . . . . 281
Lamp/Logon/Transfer Properties Page . . . . . . . . . . . . . . . . . . . . . . . . . . . . . . . . . . . . . . . . . . . . . . . 281
Lamp Options . . . . . . . . . . . . . . . . . . . . . . . . . . . . . . . . . . . . . . . . . . . . . . . . . . . . . . . . 281
Message Wait Lamp . . . . . . . . . . . . . . . . . . . . . . . . . . . . . . . . . . . . . . . . . . . . . . . . 282
Access Digit/Lamp On String . . . . . . . . . . . . . . . . . . . . . . . . . . . . . . . . . . . . . . . . . 282
Access Digit/Lamp Off String . . . . . . . . . . . . . . . . . . . . . . . . . . . . . . . . . . . . . . . . 283
Logon Options . . . . . . . . . . . . . . . . . . . . . . . . . . . . . . . . . . . . . . . . . . . . . . . . . . . . . . . . 283
Use Remote Logon As Direct Logon . . . . . . . . . . . . . . . . . . . . . . . . . . . . . . . . . . . 283
First Log In Option . . . . . . . . . . . . . . . . . . . . . . . . . . . . . . . . . . . . . . . . . . . . . . . . . 284
First Log In Announcement Mailbox . . . . . . . . . . . . . . . . . . . . . . . . . . . . . . . . . . . 284
Transfer Options . . . . . . . . . . . . . . . . . . . . . . . . . . . . . . . . . . . . . . . . . . . . . . . . . . . . . . 285
Forced Unscreened Transfer . . . . . . . . . . . . . . . . . . . . . . . . . . . . . . . . . . . . . . . . . . 285
Transfer-Only Mailbox . . . . . . . . . . . . . . . . . . . . . . . . . . . . . . . . . . . . . . . . . . . . . . 285
Alternate Next CRMB Dial Option . . . . . . . . . . . . . . . . . . . . . . . . . . . . . . . . . . . . 286
External Extension Enabled . . . . . . . . . . . . . . . . . . . . . . . . . . . . . . . . . . . . . . . . . . 287
External Extension Number . . . . . . . . . . . . . . . . . . . . . . . . . . . . . . . . . . . . . . . . . . 288
Subscriber Mailboxes - Subscriber Properties Page . . . . . . . . . . . . . . . . . . . . . . . . . . . . . . . . . . . . . . 289
Subsc ri b e r Properties Page. . . . . . . . . . . . . . . . . . . . . . . . . . . . . . . . . . . . . . . . . . . . . . . . . . . . . . . . . 289
Options . . . . . . . . . . . . . . . . . . . . . . . . . . . . . . . . . . . . . . . . . . . . . . . . . . . . . . . . . . . . . . 289
Park/Paging String . . . . . . . . . . . . . . . . . . . . . . . . . . . . . . . . . . . . . . . . . . . . . . . . . 290
Call Waiting String . . . . . . . . . . . . . . . . . . . . . . . . . . . . . . . . . . . . . . . . . . . . . . . . . 292
Call Announcing . . . . . . . . . . . . . . . . . . . . . . . . . . . . . . . . . . . . . . . . . . . . . . . . . . . 294
System Administrator . . . . . . . . . . . . . . . . . . . . . . . . . . . . . . . . . . . . . . . . . . . . . . . 296
Call Queuing . . . . . . . . . . . . . . . . . . . . . . . . . . . . . . . . . . . . . . . . . . . . . . . . . . . . . . 296
Block Auto Attendant . . . . . . . . . . . . . . . . . . . . . . . . . . . . . . . . . . . . . . . . . . . . . . . 298
Trunk Mailboxes . . . . . . . . . . . . . . . . . . . . . . . . . . . . . . . . . . . . . . . . . . . . . . . . . . . . . . . . . . . . . . . . . . 299
Description . . . . . . . . . . . . . . . . . . . . . . . . . . . . . . . . . . . . . . . . . . . . . . . . . . . . . . . . . . . . . . . . . . . . 299
Trunk Mailboxes - General Properties Page . . . . . . . . . . . . . . . . . . . . . . . . . . . . . . . . . . . . . . . . . . . . 300
Genera l P ro p e rt ies Page . . . . . . . . . . . . . . . . . . . . . . . . . . . . . . . . . . . . . . . . . . . . . . . . . . . . . . . . . . 3 0 0
Options . . . . . . . . . . . . . . . . . . . . . . . . . . . . . . . . . . . . . . . . . . . . . . . . . . . . . . . . . . . . . . 300
Mailbox Type . . . . . . . . . . . . . . . . . . . . . . . . . . . . . . . . . . . . . . . . . . . . . . . . . . . . 300
Name . . . . . . . . . . . . . . . . . . . . . . . . . . . . . . . . . . . . . . . . . . . . . . . . . . . . . . . . . . . . 300
Department . . . . . . . . . . . . . . . . . . . . . . . . . . . . . . . . . . . . . . . . . . . . . . . . . . . . . . . 300
Extension . . . . . . . . . . . . . . . . . . . . . . . . . . . . . . . . . . . . . . . . . . . . . . . . . . . . . . . . 301
Tenant . . . . . . . . . . . . . . . . . . . . . . . . . . . . . . . . . . . . . . . . . . . . . . . . . . . . . . . . . . . 301
Directory List . . . . . . . . . . . . . . . . . . . . . . . . . . . . . . . . . . . . . . . . . . . . . . . . . . . . . 301
Bilingual Mode . . . . . . . . . . . . . . . . . . . . . . . . . . . . . . . . . . . . . . . . . . . . . . . . . . . . 302
Answering Schedule Table . . . . . . . . . . . . . . . . . . . . . . . . . . . . . . . . . . . . . . . . . . . 302
Using Trunk Mailboxes for ACD Overflow . . . . . . . . . . . . . . . . . . . . . . . . . . . . . . 302
NT System Guide
xv
Page 18

Table of Contents
Chapter 3: Programming
Customizing Port Options . . . . . . . . . . . . . . . . . . . . . . . . . . . . . . . . . . . . . . . . . . . . . . . . . .303
Port Options . . . . . . . . . . . . . . . . . . . . . . . . . . . . . . . . . . . . . . . . . . . . . . . . . . . . . . . . . . . . . . . . . . . 303
Genera l Tab . . . . . . . . . . . . . . . . . . . . . . . . . . . . . . . . . . . . . . . . . . . . . . . . . . . . . . . . . . . . . 3 0 4
Options . . . . . . . . . . . . . . . . . . . . . . . . . . . . . . . . . . . . . . . . . . . . . . . . . . . . . . . . . . . . . . 304
Tenant . . . . . . . . . . . . . . . . . . . . . . . . . . . . . . . . . . . . . . . . . . . . . . . . . . . . . . . . . . . 304
Extension . . . . . . . . . . . . . . . . . . . . . . . . . . . . . . . . . . . . . . . . . . . . . . . . . . . . . . . . 305
Answering Schedule Table . . . . . . . . . . . . . . . . . . . . . . . . . . . . . . . . . . . . . . . . . . . 305
In Service . . . . . . . . . . . . . . . . . . . . . . . . . . . . . . . . . . . . . . . . . . . . . . . . . . . . . . . . 306
Status Monitor . . . . . . . . . . . . . . . . . . . . . . . . . . . . . . . . . . . . . . . . . . . . . . . . . . . . 306
Self Test . . . . . . . . . . . . . . . . . . . . . . . . . . . . . . . . . . . . . . . . . . . . . . . . . . . . . . . . . 307
Callo u ts . . . . . . . . . . . . . . . . . . . . . . . . . . . . . . . . . . . . . . . . . . . . . . . . . . . . . . . . . . . . . 307
Allow Lamp . . . . . . . . . . . . . . . . . . . . . . . . . . . . . . . . . . . . . . . . . . . . . . . . . . . . . . 307
Allow Notification/Wake-Up . . . . . . . . . . . . . . . . . . . . . . . . . . . . . . . . . . . . . . . . . 308
Allow Network . . . . . . . . . . . . . . . . . . . . . . . . . . . . . . . . . . . . . . . . . . . . . . . . . . . . 308
Clear Port’s Failure . . . . . . . . . . . . . . . . . . . . . . . . . . . . . . . . . . . . . . . . . . . . . . . . . . . . 308
Do Immediate Self Test of Port (s) . . . . . . . . . . . . . . . . . . . . . . . . . . . . . . . . . . . . . . . . 309
Customizing System Options . . . . . . . . . . . . . . . . . . . . . . . . . . . . . . . . . . . . . . . . . . . . . . .311
System Options . . . . . . . . . . . . . . . . . . . . . . . . . . . . . . . . . . . . . . . . . . . . . . . . . . . . . . . . . . . . . . . . . 311
General 1 Tab . . . . . . . . . . . . . . . . . . . . . . . . . . . . . . . . . . . . . . . . . . . . . . . . . . . . . . . . . . . . 311
Mailbox Default Security Code . . . . . . . . . . . . . . . . . . . . . . . . . . . . . . . . . . . . . . . . . . . 311
MWI Lamp Update Time . . . . . . . . . . . . . . . . . . . . . . . . . . . . . . . . . . . . . . . . . . . . . . . 311
First Trunk Equipment No./Trunk Mailbox Offset . . . . . . . . . . . . . . . . . . . . . . . . . . . . 312
First Trunk Equipment No. . . . . . . . . . . . . . . . . . . . . . . . . . . . . . . . . . . . . . . . . . . . 312
Trunk Mailbox Offset . . . . . . . . . . . . . . . . . . . . . . . . . . . . . . . . . . . . . . . . . . . . . . . 313
Attendant Mailbox . . . . . . . . . . . . . . . . . . . . . . . . . . . . . . . . . . . . . . . . . . . . . . . . . . . . . 313
Incoming Network Call Mode . . . . . . . . . . . . . . . . . . . . . . . . . . . . . . . . . . . . . . . . . . . . 313
Default Bilingual Mode . . . . . . . . . . . . . . . . . . . . . . . . . . . . . . . . . . . . . . . . . . . . . . . . . 314
Tenant . . . . . . . . . . . . . . . . . . . . . . . . . . . . . . . . . . . . . . . . . . . . . . . . . . . . . . . . . . . . . . 314
Intertenant Messaging . . . . . . . . . . . . . . . . . . . . . . . . . . . . . . . . . . . . . . . . . . . . . . . 314
Number of Tenants . . . . . . . . . . . . . . . . . . . . . . . . . . . . . . . . . . . . . . . . . . . . . . . . . 314
Eliminate Recording Silence . . . . . . . . . . . . . . . . . . . . . . . . . . . . . . . . . . . . . . . . . . . . 315
Enabled . . . . . . . . . . . . . . . . . . . . . . . . . . . . . . . . . . . . . . . . . . . . . . . . . . . . . . . . . . 315
Delay before (msec) . . . . . . . . . . . . . . . . . . . . . . . . . . . . . . . . . . . . . . . . . . . . . . . . 315
General 2 Tab . . . . . . . . . . . . . . . . . . . . . . . . . . . . . . . . . . . . . . . . . . . . . . . . . . . . . . . . . . . . 316
Mailbox Logon . . . . . . . . . . . . . . . . . . . . . . . . . . . . . . . . . . . . . . . . . . . . . . . . . . . . . . . 316
Time Limit (seconds) . . . . . . . . . . . . . . . . . . . . . . . . . . . . . . . . . . . . . . . . . . . . . . . 316
Attempt Limit . . . . . . . . . . . . . . . . . . . . . . . . . . . . . . . . . . . . . . . . . . . . . . . . . . . . . 317
Dialing Commands . . . . . . . . . . . . . . . . . . . . . . . . . . . . . . . . . . . . . . . . . . . . . . . . . . . . 317
Minimum Entry . . . . . . . . . . . . . . . . . . . . . . . . . . . . . . . . . . . . . . . . . . . . . . . . . . . 317
Play Extension Number . . . . . . . . . . . . . . . . . . . . . . . . . . . . . . . . . . . . . . . . . . . . . 317
Schedule Number to Use . . . . . . . . . . . . . . . . . . . . . . . . . . . . . . . . . . . . . . . . . . . . . . . . 318
Day Mode . . . . . . . . . . . . . . . . . . . . . . . . . . . . . . . . . . . . . . . . . . . . . . . . . . . . . . . . 318
Night Mode . . . . . . . . . . . . . . . . . . . . . . . . . . . . . . . . . . . . . . . . . . . . . . . . . . . . . . . 318
xvi
NT System Guide
Page 19

Customizing System Options (cont’d)
Call Queuing . . . . . . . . . . . . . . . . . . . . . . . . . . . . . . . . . . . . . . . . . . . . . . . . . . . . . . . . . 319
Hold Timer (seconds) . . . . . . . . . . . . . . . . . . . . . . . . . . . . . . . . . . . . . . . . . . . . . . . 319
Number of Idle Ports . . . . . . . . . . . . . . . . . . . . . . . . . . . . . . . . . . . . . . . . . . . . . . . 319
Miscellaneous . . . . . . . . . . . . . . . . . . . . . . . . . . . . . . . . . . . . . . . . . . . . . . . . . . . . . . . . 319
Port Self Test Timer (Minutes) . . . . . . . . . . . . . . . . . . . . . . . . . . . . . . . . . . . . . . . . 319
Greeting for Quick Msg/Mailbox Transfer . . . . . . . . . . . . . . . . . . . . . . . . . . . . . . . 320
Sub-Attendant Lamp Control Method . . . . . . . . . . . . . . . . . . . . . . . . . . . . . . . . . . 320
Restore Lamp On . . . . . . . . . . . . . . . . . . . . . . . . . . . . . . . . . . . . . . . . . . . . . . . . . . 320
Dial StringsTab . . . . . . . . . . . . . . . . . . . . . . . . . . . . . . . . . . . . . . . . . . . . . . . . . . . . . . . . . . 321
Hold Retrieval Strings . . . . . . . . . . . . . . . . . . . . . . . . . . . . . . . . . . . . . . . . . . . . . . . . . . 321
RNA . . . . . . . . . . . . . . . . . . . . . . . . . . . . . . . . . . . . . . . . . . . . . . . . . . . . . . . . . . . . 322
Busy . . . . . . . . . . . . . . . . . . . . . . . . . . . . . . . . . . . . . . . . . . . . . . . . . . . . . . . . . . . . 322
External Hold Retrieval Strings . . . . . . . . . . . . . . . . . . . . . . . . . . . . . . . . . . . . . . . . . . . 323
RNA . . . . . . . . . . . . . . . . . . . . . . . . . . . . . . . . . . . . . . . . . . . . . . . . . . . . . . . . . . . . 323
Busy . . . . . . . . . . . . . . . . . . . . . . . . . . . . . . . . . . . . . . . . . . . . . . . . . . . . . . . . . . . . 323
Transfer Strings . . . . . . . . . . . . . . . . . . . . . . . . . . . . . . . . . . . . . . . . . . . . . . . . . . . . . . . 324
Lamp Strings . . . . . . . . . . . . . . . . . . . . . . . . . . . . . . . . . . . . . . . . . . . . . . . . . . . . . . . . . 324
On . . . . . . . . . . . . . . . . . . . . . . . . . . . . . . . . . . . . . . . . . . . . . . . . . . . . . . . . . . . . . . 324
Off . . . . . . . . . . . . . . . . . . . . . . . . . . . . . . . . . . . . . . . . . . . . . . . . . . . . . . . . . . . . . . 325
Miscellaneous Strings . . . . . . . . . . . . . . . . . . . . . . . . . . . . . . . . . . . . . . . . . . . . . . . . . . 325
Hang Up . . . . . . . . . . . . . . . . . . . . . . . . . . . . . . . . . . . . . . . . . . . . . . . . . . . . . . . . . 325
Call Pickup . . . . . . . . . . . . . . . . . . . . . . . . . . . . . . . . . . . . . . . . . . . . . . . . . . . . . . . 326
Ringdown . . . . . . . . . . . . . . . . . . . . . . . . . . . . . . . . . . . . . . . . . . . . . . . . . . . . . . . . 326
Off Hook Call Announce . . . . . . . . . . . . . . . . . . . . . . . . . . . . . . . . . . . . . . . . . . . . 327
Timers Tab . . . . . . . . . . . . . . . . . . . . . . . . . . . . . . . . . . . . . . . . . . . . . . . . . . . . . . . . . . . . . . 328
Message Length . . . . . . . . . . . . . . . . . . . . . . . . . . . . . . . . . . . . . . . . . . . . . . . . . . . . . . . 328
Subscriber . . . . . . . . . . . . . . . . . . . . . . . . . . . . . . . . . . . . . . . . . . . . . . . . . . . . . . . . 328
Nonsubscriber . . . . . . . . . . . . . . . . . . . . . . . . . . . . . . . . . . . . . . . . . . . . . . . . . . . . . 329
Call Announce . . . . . . . . . . . . . . . . . . . . . . . . . . . . . . . . . . . . . . . . . . . . . . . . . . . . 329
Timers (seconds) . . . . . . . . . . . . . . . . . . . . . . . . . . . . . . . . . . . . . . . . . . . . . . . . . . . . . . 329
Silence Limit for Recording . . . . . . . . . . . . . . . . . . . . . . . . . . . . . . . . . . . . . . . . . . 329
Message Backup/Go-Ahead Time . . . . . . . . . . . . . . . . . . . . . . . . . . . . . . . . . . . . . 329
Page/Meet-me Page Hold Timer . . . . . . . . . . . . . . . . . . . . . . . . . . . . . . . . . . . . . . 331
Wait Protocol Digit (seconds) . . . . . . . . . . . . . . . . . . . . . . . . . . . . . . . . . . . . . . . . . . . . 331
For First . . . . . . . . . . . . . . . . . . . . . . . . . . . . . . . . . . . . . . . . . . . . . . . . . . . . . . . . . 331
For Subsequent . . . . . . . . . . . . . . . . . . . . . . . . . . . . . . . . . . . . . . . . . . . . . . . . . . . . 331
After Last . . . . . . . . . . . . . . . . . . . . . . . . . . . . . . . . . . . . . . . . . . . . . . . . . . . . . . . . 332
Timers (1 = 10 msec) . . . . . . . . . . . . . . . . . . . . . . . . . . . . . . . . . . . . . . . . . . . . . . . . . . . 332
Flash Timer . . . . . . . . . . . . . . . . . . . . . . . . . . . . . . . . . . . . . . . . . . . . . . . . . . . . . . . 332
Hang Up Timer . . . . . . . . . . . . . . . . . . . . . . . . . . . . . . . . . . . . . . . . . . . . . . . . . . . . 332
Table of Contents
Chapter 3: Programming
NT System Guide
xvii
Page 20

Table of Contents
Chapter 3: Programming
Customizing Tenant Options . . . . . . . . . . . . . . . . . . . . . . . . . . . . . . . . . . . . . . . . . . . . . . .335
Tenant Options . . . . . . . . . . . . . . . . . . . . . . . . . . . . . . . . . . . . . . . . . . . . . . . . . . . . . . . . . . . . . . . . . 335
Tenant Options Dialog Box . . . . . . . . . . . . . . . . . . . . . . . . . . . . . . . . . . . . . . . . . . . . . . . . . 336
Genera l Tab . . . . . . . . . . . . . . . . . . . . . . . . . . . . . . . . . . . . . . . . . . . . . . . . . . . . . . . . . . . . . 3 3 7
String s . . . . . . . . . . . . . . . . . . . . . . . . . . . . . . . . . . . . . . . . . . . . . . . . . . . . . . . . . . . . . . 3 3 7
Site ID . . . . . . . . . . . . . . . . . . . . . . . . . . . . . . . . . . . . . . . . . . . . . . . . . . . . . . . . . . . 337
Site’s NetworkTelephone Number . . . . . . . . . . . . . . . . . . . . . . . . . . . . . . . . . . . . . 337
Fax Detect Dial String . . . . . . . . . . . . . . . . . . . . . . . . . . . . . . . . . . . . . . . . . . . . . . 337
Digital Pager Callback Number . . . . . . . . . . . . . . . . . . . . . . . . . . . . . . . . . . . . . . . 338
Timers (seconds) . . . . . . . . . . . . . . . . . . . . . . . . . . . . . . . . . . . . . . . . . . . . . . . . . . . . . . 338
Digital Pager Callback Number . . . . . . . . . . . . . . . . . . . . . . . . . . . . . . . . . . . . . . . 338
Delay before Pager Announcement . . . . . . . . . . . . . . . . . . . . . . . . . . . . . . . . . . . . 338
Remote Tenant . . . . . . . . . . . . . . . . . . . . . . . . . . . . . . . . . . . . . . . . . . . . . . . . . . . . . . . . 338
Enabled . . . . . . . . . . . . . . . . . . . . . . . . . . . . . . . . . . . . . . . . . . . . . . . . . . . . . . . . . . 338
Access Digits . . . . . . . . . . . . . . . . . . . . . . . . . . . . . . . . . . . . . . . . . . . . . . . . . . . . . 340
Access Digits Tab . . . . . . . . . . . . . . . . . . . . . . . . . . . . . . . . . . . . . . . . . . . . . . . . . . . . . . . . 341
Access Digits before . . . . . . . . . . . . . . . . . . . . . . . . . . . . . . . . . . . . . . . . . . . . . . . . . . . 341
Local Callout . . . . . . . . . . . . . . . . . . . . . . . . . . . . . . . . . . . . . . . . . . . . . . . . . . . . . 341
Long Distance Callout . . . . . . . . . . . . . . . . . . . . . . . . . . . . . . . . . . . . . . . . . . . . . . 342
Access Digits before Network . . . . . . . . . . . . . . . . . . . . . . . . . . . . . . . . . . . . . . . . . . . . 342
Local Callout . . . . . . . . . . . . . . . . . . . . . . . . . . . . . . . . . . . . . . . . . . . . . . . . . . . . . 342
Long Distance Callout . . . . . . . . . . . . . . . . . . . . . . . . . . . . . . . . . . . . . . . . . . . . . . 343
Access Digits before Fax . . . . . . . . . . . . . . . . . . . . . . . . . . . . . . . . . . . . . . . . . . . . . . . . 343
Local Callout . . . . . . . . . . . . . . . . . . . . . . . . . . . . . . . . . . . . . . . . . . . . . . . . . . . . . 343
Long Distance Callout . . . . . . . . . . . . . . . . . . . . . . . . . . . . . . . . . . . . . . . . . . . . . . 344
Fax On-Demand Cover Page Tab . . . . . . . . . . . . . . . . . . . . . . . . . . . . . . . . . . . . . . . . . . . . 345
From . . . . . . . . . . . . . . . . . . . . . . . . . . . . . . . . . . . . . . . . . . . . . . . . . . . . . . . . . . . . . . . . 345
Include Cover Page with Documents . . . . . . . . . . . . . . . . . . . . . . . . . . . . . . . . . . . . . . . 345
Cover Page Text . . . . . . . . . . . . . . . . . . . . . . . . . . . . . . . . . . . . . . . . . . . . . . . . . . . . . . . 346
Viewing and Printing Reports . . . . . . . . . . . . . . . . . . . . . . . . . . . . . . . . . . . . . . . . . . . . . . .347
Reports . . . . . . . . . . . . . . . . . . . . . . . . . . . . . . . . . . . . . . . . . . . . . . . . . . . . . . . . . . . . . . . . . . . . . . . 347
Multiple Reports . . . . . . . . . . . . . . . . . . . . . . . . . . . . . . . . . . . . . . . . . . . . . . . . . . . . . . . . . 347
Auto Attendant Report . . . . . . . . . . . . . . . . . . . . . . . . . . . . . . . . . . . . . . . . . . . . . . . . . . . . . 349
Auto Attendant Port Report . . . . . . . . . . . . . . . . . . . . . . . . . . . . . . . . . . . . . . . . . . . . . . 349
Auto Attendant Trunk Report . . . . . . . . . . . . . . . . . . . . . . . . . . . . . . . . . . . . . . . . . . . . 350
Answering Schedules Report . . . . . . . . . . . . . . . . . . . . . . . . . . . . . . . . . . . . . . . . . . . . . . . . 351
Caller I.D. Table Report . . . . . . . . . . . . . . . . . . . . . . . . . . . . . . . . . . . . . . . . . . . . . . . . . . . 352
Callo u t Report . . . . . . . . . . . . . . . . . . . . . . . . . . . . . . . . . . . . . . . . . . . . . . . . . . . . . . . . . . . 352
Callout Options Report . . . . . . . . . . . . . . . . . . . . . . . . . . . . . . . . . . . . . . . . . . . . . . . . . 352
Callout Log Report . . . . . . . . . . . . . . . . . . . . . . . . . . . . . . . . . . . . . . . . . . . . . . . . . . . . 353
Dial Action Table Report . . . . . . . . . . . . . . . . . . . . . . . . . . . . . . . . . . . . . . . . . . . . . . . . . . . 354
Distribution Lists Report . . . . . . . . . . . . . . . . . . . . . . . . . . . . . . . . . . . . . . . . . . . . . . . . . . . 355
xviii
NT System Guide
Page 21

Table of Contents
Chapter 3: Programming
Viewing and Printing Reports (cont’d)
FAX Repo rt . . . . . . . . . . . . . . . . . . . . . . . . . . . . . . . . . . . . . . . . . . . . . . . . . . . . . . . . . . . . . 356
Fax Documents Report . . . . . . . . . . . . . . . . . . . . . . . . . . . . . . . . . . . . . . . . . . . . . . . . . 356
Fax Distribution Report . . . . . . . . . . . . . . . . . . . . . . . . . . . . . . . . . . . . . . . . . . . . . . . . . 356
Fax Ports Report . . . . . . . . . . . . . . . . . . . . . . . . . . . . . . . . . . . . . . . . . . . . . . . . . . . . . . 357
Mailbox Report . . . . . . . . . . . . . . . . . . . . . . . . . . . . . . . . . . . . . . . . . . . . . . . . . . . . . . . . . . 358
Mailbox Options Report . . . . . . . . . . . . . . . . . . . . . . . . . . . . . . . . . . . . . . . . . . . . . . . . 358
Mailbox Directory List Report . . . . . . . . . . . . . . . . . . . . . . . . . . . . . . . . . . . . . . . . . . . 359
Mailbox Numeric List Report . . . . . . . . . . . . . . . . . . . . . . . . . . . . . . . . . . . . . . . . . . . . 360
Mailbox Access Count Report . . . . . . . . . . . . . . . . . . . . . . . . . . . . . . . . . . . . . . . . . . . . 361
Mailbox Call Flags Report . . . . . . . . . . . . . . . . . . . . . . . . . . . . . . . . . . . . . . . . . . . . . . . 362
Message Usage Report . . . . . . . . . . . . . . . . . . . . . . . . . . . . . . . . . . . . . . . . . . . . . . . . . . . . . 363
Port Report . . . . . . . . . . . . . . . . . . . . . . . . . . . . . . . . . . . . . . . . . . . . . . . . . . . . . . . . . . . . . . 365
Port Options Report . . . . . . . . . . . . . . . . . . . . . . . . . . . . . . . . . . . . . . . . . . . . . . . . . . . . 365
Port Usage Report . . . . . . . . . . . . . . . . . . . . . . . . . . . . . . . . . . . . . . . . . . . . . . . . . . . . . 366
System Options Report . . . . . . . . . . . . . . . . . . . . . . . . . . . . . . . . . . . . . . . . . . . . . . . . . . . . 367
Performing a Local Backup . . . . . . . . . . . . . . . . . . . . . . . . . . . . . . . . . . . . . . . . . . . . . . . . .369
Local Backup . . . . . . . . . . . . . . . . . . . . . . . . . . . . . . . . . . . . . . . . . . . . . . . . . . . . . . . . . . . . . . . . . . 369
Backup Dialog Box . . . . . . . . . . . . . . . . . . . . . . . . . . . . . . . . . . . . . . . . . . . . . . . . . . . . . . . 370
Performing a Local Restore . . . . . . . . . . . . . . . . . . . . . . . . . . . . . . . . . . . . . . . . . . . . . . . .373
Local Restore . . . . . . . . . . . . . . . . . . . . . . . . . . . . . . . . . . . . . . . . . . . . . . . . . . . . . . . . . . . . . . . . . . 373
Restore Dialog Box . . . . . . . . . . . . . . . . . . . . . . . . . . . . . . . . . . . . . . . . . . . . . . . . . . . . . . . 373
Changing the Port Status . . . . . . . . . . . . . . . . . . . . . . . . . . . . . . . . . . . . . . . . . . . . . . . . . .375
Ports In/Out of Service . . . . . . . . . . . . . . . . . . . . . . . . . . . . . . . . . . . . . . . . . . . . . . . . . . . . . . . . . . . 375
Port In/Out Services Dialog Box . . . . . . . . . . . . . . . . . . . . . . . . . . . . . . . . . . . . . . . . . . . . . 375
Testing/Clearing Ports Immediately . . . . . . . . . . . . . . . . . . . . . . . . . . . . . . . . . . . . . . . . . .377
Immediate All Ports Self Test . . . . . . . . . . . . . . . . . . . . . . . . . . . . . . . . . . . . . . . . . . . . . . . . . . . . . . 3 7 7
Adjusting Data Transmission Protocol . . . . . . . . . . . . . . . . . . . . . . . . . . . . . . . . . . . . . . .379
Serial Communications Ports . . . . . . . . . . . . . . . . . . . . . . . . . . . . . . . . . . . . . . . . . . . . . . . . . . . . . . 3 7 9
Com Port Selection — 1 of 2 Dialog Box . . . . . . . . . . . . . . . . . . . . . . . . . . . . . . . . . . . . . . 380
Baud Rate . . . . . . . . . . . . . . . . . . . . . . . . . . . . . . . . . . . . . . . . . . . . . . . . . . . . . . . . . . . . 380
Parity . . . . . . . . . . . . . . . . . . . . . . . . . . . . . . . . . . . . . . . . . . . . . . . . . . . . . . . . . . . . . . . 381
CTS/RTS Flow Control . . . . . . . . . . . . . . . . . . . . . . . . . . . . . . . . . . . . . . . . . . . . . . . . . 381
Number Of Stop Bits . . . . . . . . . . . . . . . . . . . . . . . . . . . . . . . . . . . . . . . . . . . . . . . . . . . 382
XON/XOFF Flow Controll . . . . . . . . . . . . . . . . . . . . . . . . . . . . . . . . . . . . . . . . . . . . . . 382
Word Length . . . . . . . . . . . . . . . . . . . . . . . . . . . . . . . . . . . . . . . . . . . . . . . . . . . . . . . . . 382
Com Port Selection — 2 of 2 Dialog Box . . . . . . . . . . . . . . . . . . . . . . . . . . . . . . . . . . . . . . 383
NT System Guide
xix
Page 22

Table of Contents
Chapter 3: Programming
Using Call Adaptation Options . . . . . . . . . . . . . . . . . . . . . . . . . . . . . . . . . . . . . . . . . . . . . .385
Call Adaptation Options . . . . . . . . . . . . . . . . . . . . . . . . . . . . . . . . . . . . . . . . . . . . . . . . . . . . . . . . . . 385
Tone Tab . . . . . . . . . . . . . . . . . . . . . . . . . . . . . . . . . . . . . . . . . . . . . . . . . . . . . . . . . . . . . . . 386
Freq1 . . . . . . . . . . . . . . . . . . . . . . . . . . . . . . . . . . . . . . . . . . . . . . . . . . . . . . . . . . . . . . . 386
Dev 1 . . . . . . . . . . . . . . . . . . . . . . . . . . . . . . . . . . . . . . . . . . . . . . . . . . . . . . . . . . . . . . . 38 6
Freq2 . . . . . . . . . . . . . . . . . . . . . . . . . . . . . . . . . . . . . . . . . . . . . . . . . . . . . . . . . . . . . . . 386
Dev2 . . . . . . . . . . . . . . . . . . . . . . . . . . . . . . . . . . . . . . . . . . . . . . . . . . . . . . . . . . . . . . . . 387
OnTim e . . . . . . . . . . . . . . . . . . . . . . . . . . . . . . . . . . . . . . . . . . . . . . . . . . . . . . . . . . . . . 387
OnDev . . . . . . . . . . . . . . . . . . . . . . . . . . . . . . . . . . . . . . . . . . . . . . . . . . . . . . . . . . . . . . 387
OffTime . . . . . . . . . . . . . . . . . . . . . . . . . . . . . . . . . . . . . . . . . . . . . . . . . . . . . . . . . . . . . 387
OffDev . . . . . . . . . . . . . . . . . . . . . . . . . . . . . . . . . . . . . . . . . . . . . . . . . . . . . . . . . . . . . . 387
RepCnt . . . . . . . . . . . . . . . . . . . . . . . . . . . . . . . . . . . . . . . . . . . . . . . . . . . . . . . . . . . . . . 387
Type/PCPM Code . . . . . . . . . . . . . . . . . . . . . . . . . . . . . . . . . . . . . . . . . . . . . . . . . . . . . 388
Global Parameters . . . . . . . . . . . . . . . . . . . . . . . . . . . . . . . . . . . . . . . . . . . . . . . . . . . . . . . . . . . . . . . 389
Global Parameters Tab . . . . . . . . . . . . . . . . . . . . . . . . . . . . . . . . . . . . . . . . . . . . . . . . . . . . . 389
DTMF - Interdigit Delay . . . . . . . . . . . . . . . . . . . . . . . . . . . . . . . . . . . . . . . . . . . . . . . . 389
DTMF - Duration for Dialing . . . . . . . . . . . . . . . . . . . . . . . . . . . . . . . . . . . . . . . . . . . . 389
Flash Character . . . . . . . . . . . . . . . . . . . . . . . . . . . . . . . . . . . . . . . . . . . . . . . . . . . . . . . 390
Flash Time . . . . . . . . . . . . . . . . . . . . . . . . . . . . . . . . . . . . . . . . . . . . . . . . . . . . . . . . . . . 390
Inter-ring Delay . . . . . . . . . . . . . . . . . . . . . . . . . . . . . . . . . . . . . . . . . . . . . . . . . . . . . . . 390
Minimum Offhook Time . . . . . . . . . . . . . . . . . . . . . . . . . . . . . . . . . . . . . . . . . . . . . . . . 390
Minimum Loop Current Off . . . . . . . . . . . . . . . . . . . . . . . . . . . . . . . . . . . . . . . . . . . . . 390
Offhook Delay . . . . . . . . . . . . . . . . . . . . . . . . . . . . . . . . . . . . . . . . . . . . . . . . . . . . . . . . 390
Pause Time (when dialing) . . . . . . . . . . . . . . . . . . . . . . . . . . . . . . . . . . . . . . . . . . . . . . 390
Ring-Off Interval . . . . . . . . . . . . . . . . . . . . . . . . . . . . . . . . . . . . . . . . . . . . . . . . . . . . . . 390
Ring-On Interval . . . . . . . . . . . . . . . . . . . . . . . . . . . . . . . . . . . . . . . . . . . . . . . . . . . . . . 390
Silence Non-silence Debounce . . . . . . . . . . . . . . . . . . . . . . . . . . . . . . . . . . . . . . . . . . . 390
Channel Parameters Tab . . . . . . . . . . . . . . . . . . . . . . . . . . . . . . . . . . . . . . . . . . . . . . . . . . . 391
DTMF Edge . . . . . . . . . . . . . . . . . . . . . . . . . . . . . . . . . . . . . . . . . . . . . . . . . . . . . . . . . . 391
DTMF Talk . . . . . . . . . . . . . . . . . . . . . . . . . . . . . . . . . . . . . . . . . . . . . . . . . . . . . . . . . . 391
DTMF Debounce . . . . . . . . . . . . . . . . . . . . . . . . . . . . . . . . . . . . . . . . . . . . . . . . . . . . . . 392
Answer Ring Count . . . . . . . . . . . . . . . . . . . . . . . . . . . . . . . . . . . . . . . . . . . . . . . . . . . . 392
No Answer Time . . . . . . . . . . . . . . . . . . . . . . . . . . . . . . . . . . . . . . . . . . . . . . . . . . . . . . 392
Max Answer . . . . . . . . . . . . . . . . . . . . . . . . . . . . . . . . . . . . . . . . . . . . . . . . . . . . . . . . . . 392
Hedge . . . . . . . . . . . . . . . . . . . . . . . . . . . . . . . . . . . . . . . . . . . . . . . . . . . . . . . . . . . . . . . 392
Low Glitch . . . . . . . . . . . . . . . . . . . . . . . . . . . . . . . . . . . . . . . . . . . . . . . . . . . . . . . . . . . 392
High Glitch . . . . . . . . . . . . . . . . . . . . . . . . . . . . . . . . . . . . . . . . . . . . . . . . . . . . . . . . . . 392
Answer Deglitch . . . . . . . . . . . . . . . . . . . . . . . . . . . . . . . . . . . . . . . . . . . . . . . . . . . . . . 392
Dtn Pres . . . . . . . . . . . . . . . . . . . . . . . . . . . . . . . . . . . . . . . . . . . . . . . . . . . . . . . . . . . . . 39 2
Dtn NPre s . . . . . . . . . . . . . . . . . . . . . . . . . . . . . . . . . . . . . . . . . . . . . . . . . . . . . . . . . . . . 392
Dtn Deboff . . . . . . . . . . . . . . . . . . . . . . . . . . . . . . . . . . . . . . . . . . . . . . . . . . . . . . . . . . . 392
Max InterRing . . . . . . . . . . . . . . . . . . . . . . . . . . . . . . . . . . . . . . . . . . . . . . . . . . . . . . . . 393
IntFlag . . . . . . . . . . . . . . . . . . . . . . . . . . . . . . . . . . . . . . . . . . . . . . . . . . . . . . . . . . . . . . 393
xx
NT System Guide
Page 23

Using Call Adaptation Options (cont’d)
Channel Parameters 2 Tab . . . . . . . . . . . . . . . . . . . . . . . . . . . . . . . . . . . . . . . . . . . . . . . . . . 394
LCD Delay . . . . . . . . . . . . . . . . . . . . . . . . . . . . . . . . . . . . . . . . . . . . . . . . . . . . . . . . . . . 394
LCD Delay 1 . . . . . . . . . . . . . . . . . . . . . . . . . . . . . . . . . . . . . . . . . . . . . . . . . . . . . . . . . 394
Max Silence . . . . . . . . . . . . . . . . . . . . . . . . . . . . . . . . . . . . . . . . . . . . . . . . . . . . . . . . . . 394
Max Sound . . . . . . . . . . . . . . . . . . . . . . . . . . . . . . . . . . . . . . . . . . . . . . . . . . . . . . . . . . . 394
Start Delay . . . . . . . . . . . . . . . . . . . . . . . . . . . . . . . . . . . . . . . . . . . . . . . . . . . . . . . . . . . 394
Call Parameters 1 Tab . . . . . . . . . . . . . . . . . . . . . . . . . . . . . . . . . . . . . . . . . . . . . . . . . . . . . 395
CallProgDly . . . . . . . . . . . . . . . . . . . . . . . . . . . . . . . . . . . . . . . . . . . . . . . . . . . . . . . . . . 395
MonPauseDur . . . . . . . . . . . . . . . . . . . . . . . . . . . . . . . . . . . . . . . . . . . . . . . . . . . . . . . . 395
MinMsgLength . . . . . . . . . . . . . . . . . . . . . . . . . . . . . . . . . . . . . . . . . . . . . . . . . . . . . . . 395
OnHook Duration . . . . . . . . . . . . . . . . . . . . . . . . . . . . . . . . . . . . . . . . . . . . . . . . . . . . . 396
UseSoundAsDialTone . . . . . . . . . . . . . . . . . . . . . . . . . . . . . . . . . . . . . . . . . . . . . . . . . . 396
UTransferDelay . . . . . . . . . . . . . . . . . . . . . . . . . . . . . . . . . . . . . . . . . . . . . . . . . . . . . . . 396
ConversationLength . . . . . . . . . . . . . . . . . . . . . . . . . . . . . . . . . . . . . . . . . . . . . . . . . . . . 396
LampRefreshInterval . . . . . . . . . . . . . . . . . . . . . . . . . . . . . . . . . . . . . . . . . . . . . . . . . . . 396
InRings . . . . . . . . . . . . . . . . . . . . . . . . . . . . . . . . . . . . . . . . . . . . . . . . . . . . . . . . . . . . . . 396
Call Parameters 2 Tab . . . . . . . . . . . . . . . . . . . . . . . . . . . . . . . . . . . . . . . . . . . . . . . . . . . . . 397
Dtmf Timeout . . . . . . . . . . . . . . . . . . . . . . . . . . . . . . . . . . . . . . . . . . . . . . . . . . . . . . . . 397
Prompt Delay . . . . . . . . . . . . . . . . . . . . . . . . . . . . . . . . . . . . . . . . . . . . . . . . . . . . . . . . . 397
Welcome Delay . . . . . . . . . . . . . . . . . . . . . . . . . . . . . . . . . . . . . . . . . . . . . . . . . . . . . . . 397
Dial Tone Wait Dur . . . . . . . . . . . . . . . . . . . . . . . . . . . . . . . . . . . . . . . . . . . . . . . . . . . . 397
Pcpm Pause Dur . . . . . . . . . . . . . . . . . . . . . . . . . . . . . . . . . . . . . . . . . . . . . . . . . . . . . . . 398
Pcpm Wait Dur . . . . . . . . . . . . . . . . . . . . . . . . . . . . . . . . . . . . . . . . . . . . . . . . . . . . . . . 398
Start PCPM . . . . . . . . . . . . . . . . . . . . . . . . . . . . . . . . . . . . . . . . . . . . . . . . . . . . . . . . . . 398
Normal Gain . . . . . . . . . . . . . . . . . . . . . . . . . . . . . . . . . . . . . . . . . . . . . . . . . . . . . . . . . 398
Dial Tone String . . . . . . . . . . . . . . . . . . . . . . . . . . . . . . . . . . . . . . . . . . . . . . . . . . . . . . . 398
Flash String . . . . . . . . . . . . . . . . . . . . . . . . . . . . . . . . . . . . . . . . . . . . . . . . . . . . . . . . . . 398
Agc Disable . . . . . . . . . . . . . . . . . . . . . . . . . . . . . . . . . . . . . . . . . . . . . . . . . . . . . . . . . . 398
Loop Drop . . . . . . . . . . . . . . . . . . . . . . . . . . . . . . . . . . . . . . . . . . . . . . . . . . . . . . . . . . . 398
Table of Contents
Chapter 3: Programming
Setting up Integration Strings . . . . . . . . . . . . . . . . . . . . . . . . . . . . . . . . . . . . . . . . . . . . . . .399
Integration Strings for Generic System . . . . . . . . . . . . . . . . . . . . . . . . . . . . . . . . . . . . . . . . . . . . . . . 399
Integration Strings Dialog Box . . . . . . . . . . . . . . . . . . . . . . . . . . . . . . . . . . . . . . . . . . . . . . 399
Using Setup Service Location . . . . . . . . . . . . . . . . . . . . . . . . . . . . . . . . . . . . . . . . . . . . . . .401
Setup Service Location . . . . . . . . . . . . . . . . . . . . . . . . . . . . . . . . . . . . . . . . . . . . . . . . . . . . . . . . . . . 401
Voice Mail Service Location Dialog Box . . . . . . . . . . . . . . . . . . . . . . . . . . . . . . . . . . . . . . 402
Adjusting Options . . . . . . . . . . . . . . . . . . . . . . . . . . . . . . . . . . . . . . . . . . . . . . . . . . . . . . . .403
Voice Mail Events and Interface Options . . . . . . . . . . . . . . . . . . . . . . . . . . . . . . . . . . . . . . . . . . . . . 403
Options Dialog Box . . . . . . . . . . . . . . . . . . . . . . . . . . . . . . . . . . . . . . . . . . . . . . . . . . . . . . . 404
Field Validation Warning . . . . . . . . . . . . . . . . . . . . . . . . . . . . . . . . . . . . . . . . . . . . . . . 404
Days to keep trace messages . . . . . . . . . . . . . . . . . . . . . . . . . . . . . . . . . . . . . . . . . . . . . 404
Autosave . . . . . . . . . . . . . . . . . . . . . . . . . . . . . . . . . . . . . . . . . . . . . . . . . . . . . . . . . . . . 404
Cancel Warning . . . . . . . . . . . . . . . . . . . . . . . . . . . . . . . . . . . . . . . . . . . . . . . . . . . . . . . 405
Auto Correct Invalid Field . . . . . . . . . . . . . . . . . . . . . . . . . . . . . . . . . . . . . . . . . . . . . . . 405
NT System Guide
xxi
Page 24

Table of Contents
Chapter 3: Programming
Adjusting Options (cont’d)
Options Dialog Box (cont’d)
Info Text Color . . . . . . . . . . . . . . . . . . . . . . . . . . . . . . . . . . . . . . . . . . . . . . . . . . . . . . . 405
Event Codes Filter for Trace Database . . . . . . . . . . . . . . . . . . . . . . . . . . . . . . . . . . . . . 406
Using Port Activities . . . . . . . . . . . . . . . . . . . . . . . . . . . . . . . . . . . . . . . . . . . . . . . . . . . . . .409
Port Activities . . . . . . . . . . . . . . . . . . . . . . . . . . . . . . . . . . . . . . . . . . . . . . . . . . . . . . . . . . . . . . . . . . 409
Call St a t e . . . . . . . . . . . . . . . . . . . . . . . . . . . . . . . . . . . . . . . . . . . . . . . . . . . . . . . . . . . . 410
Port State . . . . . . . . . . . . . . . . . . . . . . . . . . . . . . . . . . . . . . . . . . . . . . . . . . . . . . . . . . . . 410
Mailbox . . . . . . . . . . . . . . . . . . . . . . . . . . . . . . . . . . . . . . . . . . . . . . . . . . . . . . . . . . . . . 410
Tone Type . . . . . . . . . . . . . . . . . . . . . . . . . . . . . . . . . . . . . . . . . . . . . . . . . . . . . . . . . . . 410
Prompt . . . . . . . . . . . . . . . . . . . . . . . . . . . . . . . . . . . . . . . . . . . . . . . . . . . . . . . . . . . . . . 410
Digit . . . . . . . . . . . . . . . . . . . . . . . . . . . . . . . . . . . . . . . . . . . . . . . . . . . . . . . . . . . . . . . . 411
Using the Real Trace . . . . . . . . . . . . . . . . . . . . . . . . . . . . . . . . . . . . . . . . . . . . . . . . . . . . . .413
Real Trace . . . . . . . . . . . . . . . . . . . . . . . . . . . . . . . . . . . . . . . . . . . . . . . . . . . . . . . . . . . . . . . . . . . . . 413
Trace Dialog Box . . . . . . . . . . . . . . . . . . . . . . . . . . . . . . . . . . . . . . . . . . . . . . . . . . . . . . . . . 41 4
Port . . . . . . . . . . . . . . . . . . . . . . . . . . . . . . . . . . . . . . . . . . . . . . . . . . . . . . . . . . . . . . . . . 41 5
Mailbox . . . . . . . . . . . . . . . . . . . . . . . . . . . . . . . . . . . . . . . . . . . . . . . . . . . . . . . . . . . . . 415
Event . . . . . . . . . . . . . . . . . . . . . . . . . . . . . . . . . . . . . . . . . . . . . . . . . . . . . . . . . . . . . . . 415
Time . . . . . . . . . . . . . . . . . . . . . . . . . . . . . . . . . . . . . . . . . . . . . . . . . . . . . . . . . . . . . . . . 415
Line No. . . . . . . . . . . . . . . . . . . . . . . . . . . . . . . . . . . . . . . . . . . . . . . . . . . . . . . . . . . . . . 415
Term Type . . . . . . . . . . . . . . . . . . . . . . . . . . . . . . . . . . . . . . . . . . . . . . . . . . . . . . . . . . . 415
PCPM Type . . . . . . . . . . . . . . . . . . . . . . . . . . . . . . . . . . . . . . . . . . . . . . . . . . . . . . . . . . 416
Digit . . . . . . . . . . . . . . . . . . . . . . . . . . . . . . . . . . . . . . . . . . . . . . . . . . . . . . . . . . . . . . . . 416
Error Code . . . . . . . . . . . . . . . . . . . . . . . . . . . . . . . . . . . . . . . . . . . . . . . . . . . . . . . . . . . 416
Trace String . . . . . . . . . . . . . . . . . . . . . . . . . . . . . . . . . . . . . . . . . . . . . . . . . . . . . . . . . . 416
Using the Trace Viewer . . . . . . . . . . . . . . . . . . . . . . . . . . . . . . . . . . . . . . . . . . . . . . . . . . . .417
Trace Viewer . . . . . . . . . . . . . . . . . . . . . . . . . . . . . . . . . . . . . . . . . . . . . . . . . . . . . . . . . . . . . . . . . . . 417
Select Query Dialog Box . . . . . . . . . . . . . . . . . . . . . . . . . . . . . . . . . . . . . . . . . . . . . . . . . . . 417
Trace Viewer Dialog Box . . . . . . . . . . . . . . . . . . . . . . . . . . . . . . . . . . . . . . . . . . . . . . . . . . 419
Trace Time . . . . . . . . . . . . . . . . . . . . . . . . . . . . . . . . . . . . . . . . . . . . . . . . . . . . . . . . . . . 420
Port . . . . . . . . . . . . . . . . . . . . . . . . . . . . . . . . . . . . . . . . . . . . . . . . . . . . . . . . . . . . . . . . . 42 0
Mailbox . . . . . . . . . . . . . . . . . . . . . . . . . . . . . . . . . . . . . . . . . . . . . . . . . . . . . . . . . . . . . 420
Trace String . . . . . . . . . . . . . . . . . . . . . . . . . . . . . . . . . . . . . . . . . . . . . . . . . . . . . . . . . . 420
Digit . . . . . . . . . . . . . . . . . . . . . . . . . . . . . . . . . . . . . . . . . . . . . . . . . . . . . . . . . . . . . . . . 420
Event Code . . . . . . . . . . . . . . . . . . . . . . . . . . . . . . . . . . . . . . . . . . . . . . . . . . . . . . . . . . . 420
PCPM Type . . . . . . . . . . . . . . . . . . . . . . . . . . . . . . . . . . . . . . . . . . . . . . . . . . . . . . . . . . 420
Term Type . . . . . . . . . . . . . . . . . . . . . . . . . . . . . . . . . . . . . . . . . . . . . . . . . . . . . . . . . . . 421
Using Message Status . . . . . . . . . . . . . . . . . . . . . . . . . . . . . . . . . . . . . . . . . . . . . . . . . . . . .423
Message Status . . . . . . . . . . . . . . . . . . . . . . . . . . . . . . . . . . . . . . . . . . . . . . . . . . . . . . . . . . . . . . . . . 423
Select Mailbox Number Dialog Box . . . . . . . . . . . . . . . . . . . . . . . . . . . . . . . . . . . . . . . . . . 424
xxii
NT System Guide
Page 25

Table of Contents
Chapter 3: Programming
Using Message Status (cont’d)
Message Status Dialog Box . . . . . . . . . . . . . . . . . . . . . . . . . . . . . . . . . . . . . . . . . . . . . . . . . 424
Attribute . . . . . . . . . . . . . . . . . . . . . . . . . . . . . . . . . . . . . . . . . . . . . . . . . . . . . . . . . . . . . 425
Name . . . . . . . . . . . . . . . . . . . . . . . . . . . . . . . . . . . . . . . . . . . . . . . . . . . . . . . . . . . . . . . 425
Total . . . . . . . . . . . . . . . . . . . . . . . . . . . . . . . . . . . . . . . . . . . . . . . . . . . . . . . . . . . . . . . . 425
Not He ar d . . . . . . . . . . . . . . . . . . . . . . . . . . . . . . . . . . . . . . . . . . . . . . . . . . . . . . . . . . . . 425
Latest Message . . . . . . . . . . . . . . . . . . . . . . . . . . . . . . . . . . . . . . . . . . . . . . . . . . . . . . . . 425
Using the Options on the System Administration Menu . . . . . . . . . . . . . . . . . . . . . . . . .427
Recording a Welcome Message . . . . . . . . . . . . . . . . . . . . . . . . . . . . . . . . . . . . . . . . . . . . . . . . . . . . . . 428
Recording an Instruction Menu . . . . . . . . . . . . . . . . . . . . . . . . . . . . . . . . . . . . . . . . . . . . . . . . . . . . . . 4 2 9
Recording a Directory Dialing Message . . . . . . . . . . . . . . . . . . . . . . . . . . . . . . . . . . . . . . . . . . . . . . . 4 3 1
Recording an Announcement Message . . . . . . . . . . . . . . . . . . . . . . . . . . . . . . . . . . . . . . . . . . . . . . . . 4 3 3
Recording Mailbox Names . . . . . . . . . . . . . . . . . . . . . . . . . . . . . . . . . . . . . . . . . . . . . . . . . . . . . . . . . . 434
Overriding the Answering Schedule . . . . . . . . . . . . . . . . . . . . . . . . . . . . . . . . . . . . . . . . . . . . . . . . . . 435
Record i n g Music On Hol d . . . . . . . . . . . . . . . . . . . . . . . . . . . . . . . . . . . . . . . . . . . . . . . . . . . . . . . . . . 436
Record i n g Interacti v e Prompts . . . . . . . . . . . . . . . . . . . . . . . . . . . . . . . . . . . . . . . . . . . . . . . . . . . . . . . 43 7
Customizing the System Voice Prompts . . . . . . . . . . . . . . . . . . . . . . . . . . . . . . . . . . . . . . . . . . . . . . . . 439
Setting the System Time . . . . . . . . . . . . . . . . . . . . . . . . . . . . . . . . . . . . . . . . . . . . . . . . . . . . . . . . . . . . 440
Setting the System Date . . . . . . . . . . . . . . . . . . . . . . . . . . . . . . . . . . . . . . . . . . . . . . . . . . . . . . . . . . . . 441
Getting the System Version Number . . . . . . . . . . . . . . . . . . . . . . . . . . . . . . . . . . . . . . . . . . . . . . . . . . 442
Preparing for Power-Down: Shutting Down the System . . . . . . . . . . . . . . . . . . . . . . . . . . . . . . . . . . 443
Erasing All Messages . . . . . . . . . . . . . . . . . . . . . . . . . . . . . . . . . . . . . . . . . . . . . . . . . . . . . . . . . . . . . . 444
Deleting Security Codes . . . . . . . . . . . . . . . . . . . . . . . . . . . . . . . . . . . . . . . . . . . . . . . . . . . . . . . . . . . . 445
NT System Guide
xxiii
Page 26

Table of Contents
Chapter 4: Voice Prompts
Chapter 4: Voice Prompts
Voice Prompts . . . . . . . . . . . . . . . . . . . . . . . . . . . . . . . . . . . . . . . . . . . . . . . . . . . . . . . . . . .447
NT System Voice Prompts . . . . . . . . . . . . . . . . . . . . . . . . . . . . . . . . . . . . . . . . . . . . . . . . . . . . . . . . 447
xxiv
NT System Guide
Page 27

Table of Contents
Chapter 5: Maintenance
Chap ter 5: M ainte nance
About the Maintenance Chapter . . . . . . . . . . . . . . . . . . . . . . . . . . . . . . . . . . . . . . . . . . . . . . . . . . . . 503
Reinstalling NT Voice Mail Software . . . . . . . . . . . . . . . . . . . . . . . . . . . . . . . . . . . . . . . . . 503
Windows NT Server Version 4.0 Setup Procedure . . . . . . . . . . . . . . . . . . . . . . . . . . . . . . . 504
Installing and/or Configuring Other Software . . . . . . . . . . . . . . . . . . . . . . . . . . . . . . . . . .508
Installing the Modem Driver . . . . . . . . . . . . . . . . . . . . . . . . . . . . . . . . . . . . . . . . . . . . . . . . 509
Installing the Video Driver . . . . . . . . . . . . . . . . . . . . . . . . . . . . . . . . . . . . . . . . . . . . . . . . . 510
Installing Windows NT RAS Service . . . . . . . . . . . . . . . . . . . . . . . . . . . . . . . . . . . . . . . . . 511
Installing the NT Server Service Pack 5 . . . . . . . . . . . . . . . . . . . . . . . . . . . . . . . . . . . . . . . 512
Installing the Internet Explorer 4.01 SP1 . . . . . . . . . . . . . . . . . . . . . . . . . . . . . . . . . . . . . . . 513
Installing RAXCO InstaNT Utilities for Windows NT . . . . . . . . . . . . . . . . . . . . . . . . . . . . 514
Installing and Configuring REMOTELY POSSIBLE . . . . . . . . . . . . . . . . . . . . . . . . . . . . . 516
Installing Dialogic System Software . . . . . . . . . . . . . . . . . . . . . . . . . . . . . . . . . . . . . . . . . . 518
Installing Other Software . . . . . . . . . . . . . . . . . . . . . . . . . . . . . . . . . . . . . . . . . . . . . . . . . . 520
Seattle Labs Remote NT . . . . . . . . . . . . . . . . . . . . . . . . . . . . . . . . . . . . . . . . . . . . . . . . 520
Fax Board Driver Software . . . . . . . . . . . . . . . . . . . . . . . . . . . . . . . . . . . . . . . . . . . . . . 522
Windows Scripting Host . . . . . . . . . . . . . . . . . . . . . . . . . . . . . . . . . . . . . . . . . . . . . . . . 523
Microsoft Data Engine . . . . . . . . . . . . . . . . . . . . . . . . . . . . . . . . . . . . . . . . . . . . . . . . . . 523
MSDE Service Pack 1 . . . . . . . . . . . . . . . . . . . . . . . . . . . . . . . . . . . . . . . . . . . . . . . . . . 524
HASP Dongle Device Driver . . . . . . . . . . . . . . . . . . . . . . . . . . . . . . . . . . . . . . . . . . . . . 525
Software Program for NT Service . . . . . . . . . . . . . . . . . . . . . . . . . . . . . . . . . . . . . . . . 526
Feature Files and Dongle . . . . . . . . . . . . . . . . . . . . . . . . . . . . . . . . . . . . . . . . . . . . . . . . 527
Configuring NT Security . . . . . . . . . . . . . . . . . . . . . . . . . . . . . . . . . . . . . . . . . . . . . . . . 528
Running the VMServer Program . . . . . . . . . . . . . . . . . . . . . . . . . . . . . . . . . . . . . . . . . 532
Installing the NT Configuration Program . . . . . . . . . . . . . . . . . . . . . . . . . . . . . . . . . . . . . . 533
Windows NT Client Computer . . . . . . . . . . . . . . . . . . . . . . . . . . . . . . . . . . . . . . . . . . . 533
Installing NT Configuration Program . . . . . . . . . . . . . . . . . . . . . . . . . . . . . . . . . . . . . . . . . 536
Windows 95/98 Client Computer . . . . . . . . . . . . . . . . . . . . . . . . . . . . . . . . . . . . . . . . . 536
Upgrading NT Voice Mail Software . . . . . . . . . . . . . . . . . . . . . . . . . . . . . . . . . . . . . . . . . . 540
Optional Procedures . . . . . . . . . . . . . . . . . . . . . . . . . . . . . . . . . . . . . . . . . . . . . . . . . . . . . . . 541
Reformatting Remaining Unused Disk Space . . . . . . . . . . . . . . . . . . . . . . . . . . . . . . . . 541
Installing and Configuring PerfectDisk NT . . . . . . . . . . . . . . . . . . . . . . . . . . . . . . . . . . 542
NT System Guide
xxv
Page 28

Table of Contents
Chapter 5: Maintenance
xxvi
NT System Guide
Page 29

Installin g the N T Voice Ma il
About the Installation Chapter
Chapter 1: Installation consists of th ree sections:
1. Installing the NT Voice Mail
2. Basic Programming for the NT Voice Mail
3. Advan ced Setup O p tions for the N T Voice Mail
Installing the NT Voice Mail
Chapter 1:
Installation
Installing the NT Voice Mail
This sectio n provides step-by-step instructions for getting your NT Voice Mail up and running
fairly qui ckly. The follow ing parag raphs pro vide you with basi c informati on for inst al ling the ha rdware for your NT Voice Mail and connecting it to a phone system. It also explains how to start up
the NT Voice Mail, and then install a phone system from the Voice Mail Main Menu Screen. Once
these steps are completed, you will be instructed to test the Automated Attendant.
Chapter 1: Installation
NT System Guide
1
Page 30

Installing the NT Voice Mail
Step 1: Find Out What You Need
Step 1: Find Out What You Need
Equipment Requirements
You should have received the following items with your Voice Mail system:
NT cabinet and power cord. The cabinet contains:
Q
- Various types of Pri nted Circuit Cards depending on your system’s configuration. These
cards include Dialogic Voice Card(s), Ethernet (LAN) Card, Modem Card and FAX
Card(s)
- Microsoft NT Server 4.0 with Service Pack 5
- CD ROM Drive
- SuperDisk Drive
- Power Su pp ly
- Hard Drive (5.1 GB or larger)
-128 MB RAM
Color Monitor
Q
Keyboard
Q
Mouse
Q
Hasp Dongle
Q
Blank SuperDisk
Q
RJ-11 Line cord
Q
Backup Software and applicable manuals
Q
It is recommended that you also have the following equipment for installation:
A UPS (uninterrupted power source) and cable are recommended to maintain power during an
Q
outage
Surge pro t ec to r
Q
Parallel printer (opti onal) that is compatible with IBM PC XT or AT for printing reports
Q
You also need all of the equipment necessary to ins tall the phone system (including the manuals).
For analog integrations, the Voice Mail requires 1 analog/OPX 2500 set port per Voice Mail port.
This port should generate standard ring vol tage. The port should also have suff icient DTMF
receivers to handle the estimated system traffic.
Site Requirements
Dust-free site, far awa y from large motors
Q
Adequate rear ventilation for cabinet
Q
A table or stand for the cabinet, no more than 25 feet from the cabin et
Q
Temperature of 50 — 104°F (10 — 40°C)
Q
Non-condensi ng humi dity of 28 — 85%.
Q
Electrical Requirements
A dedicated and grounded three-prong outlet (105 — 120 VAC, 60 HZ), loca ted not more than
5 feet from the cabinet.
NT System Guide
2
Chapter 1: Installation
Page 31

Installing the NT Voice Mail
Step 2: Program the Telephone System
Step 2: Program the Telephone System
For the NT Voice Mail to wor k properly, your telephone system must be equipped with c ompatible
hardware. I t m ust also be programmed for Voice Mail. See the Phone System Integration Guide for
a list of the required programs.
Chapter 1: Installation
NT System Guide
3
Page 32
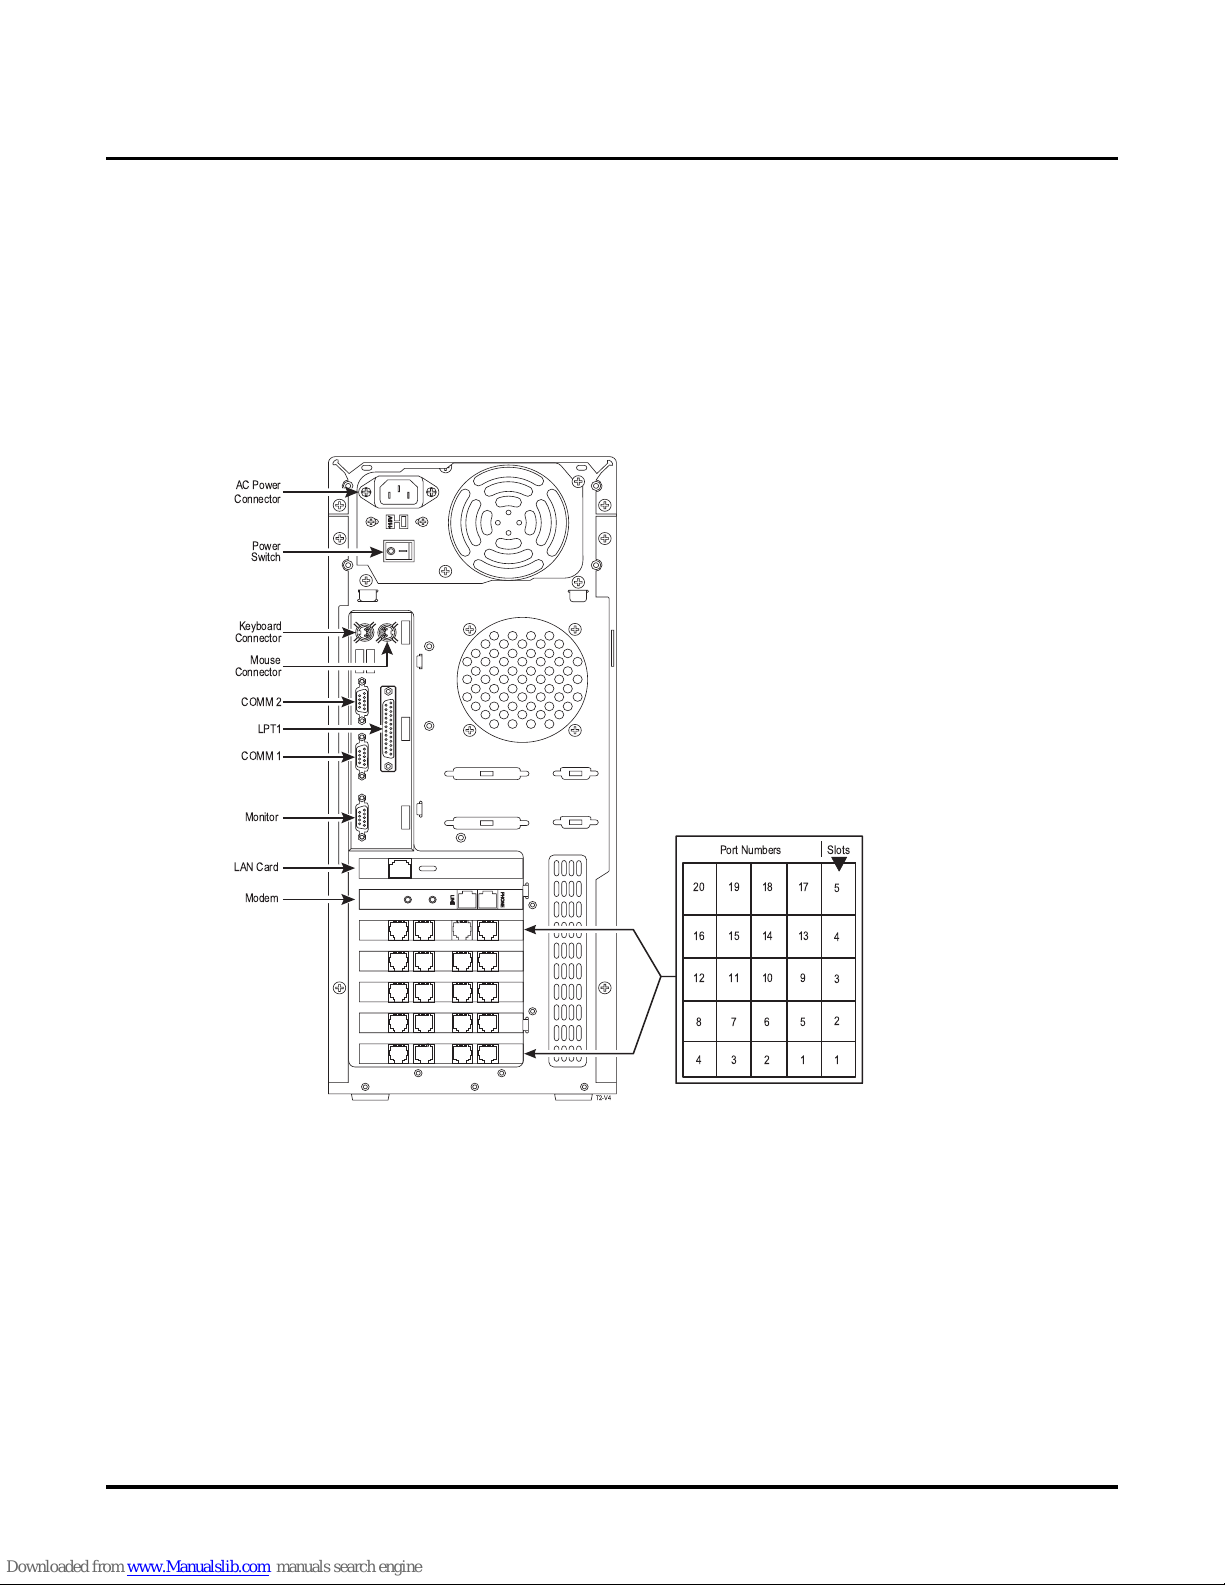
Installing the NT Voice Mail
Step 3: Connect the PC Attachments to the NT Voice Mail
Step 3: Connect the PC Attachments to the NT Voice Mail
Figures 1-1 and 1-2 are back views of the NT cabinet. They show the location of the connectors
and the power switch. These figures also show a layout of th e c ards as they appea r on the inside of
the cabinet.
The number of ports in your system determines if you r ca binet looks like Figure 1-1 or Figu re 1-2.
If your system has 20 ports or less, the layout of your cabinet is similar to the one shown in Figure
1-1. If your system has more than 20 ports, the layout is similar to Figure 1-2.
Step 3 shows you where to connect your keyboard, mouse, monitor and Hasp Dongle.
AC Power
Connector
Power
Switch
Keyboard
Connector
Mouse
Connector
COMM 2
LPT1
COMM 1
Monitor
LAN Card
Modem
SlotsPort Numbers
20 19 1718
16 15 1314
12 11 910
87 56
43 12
T2-V4
5
4
3
2
1
Figure 1-1: Layout of the NT Voice Mail Cabinet
NT System Guide
4
Chapter 1: Installation
Page 33
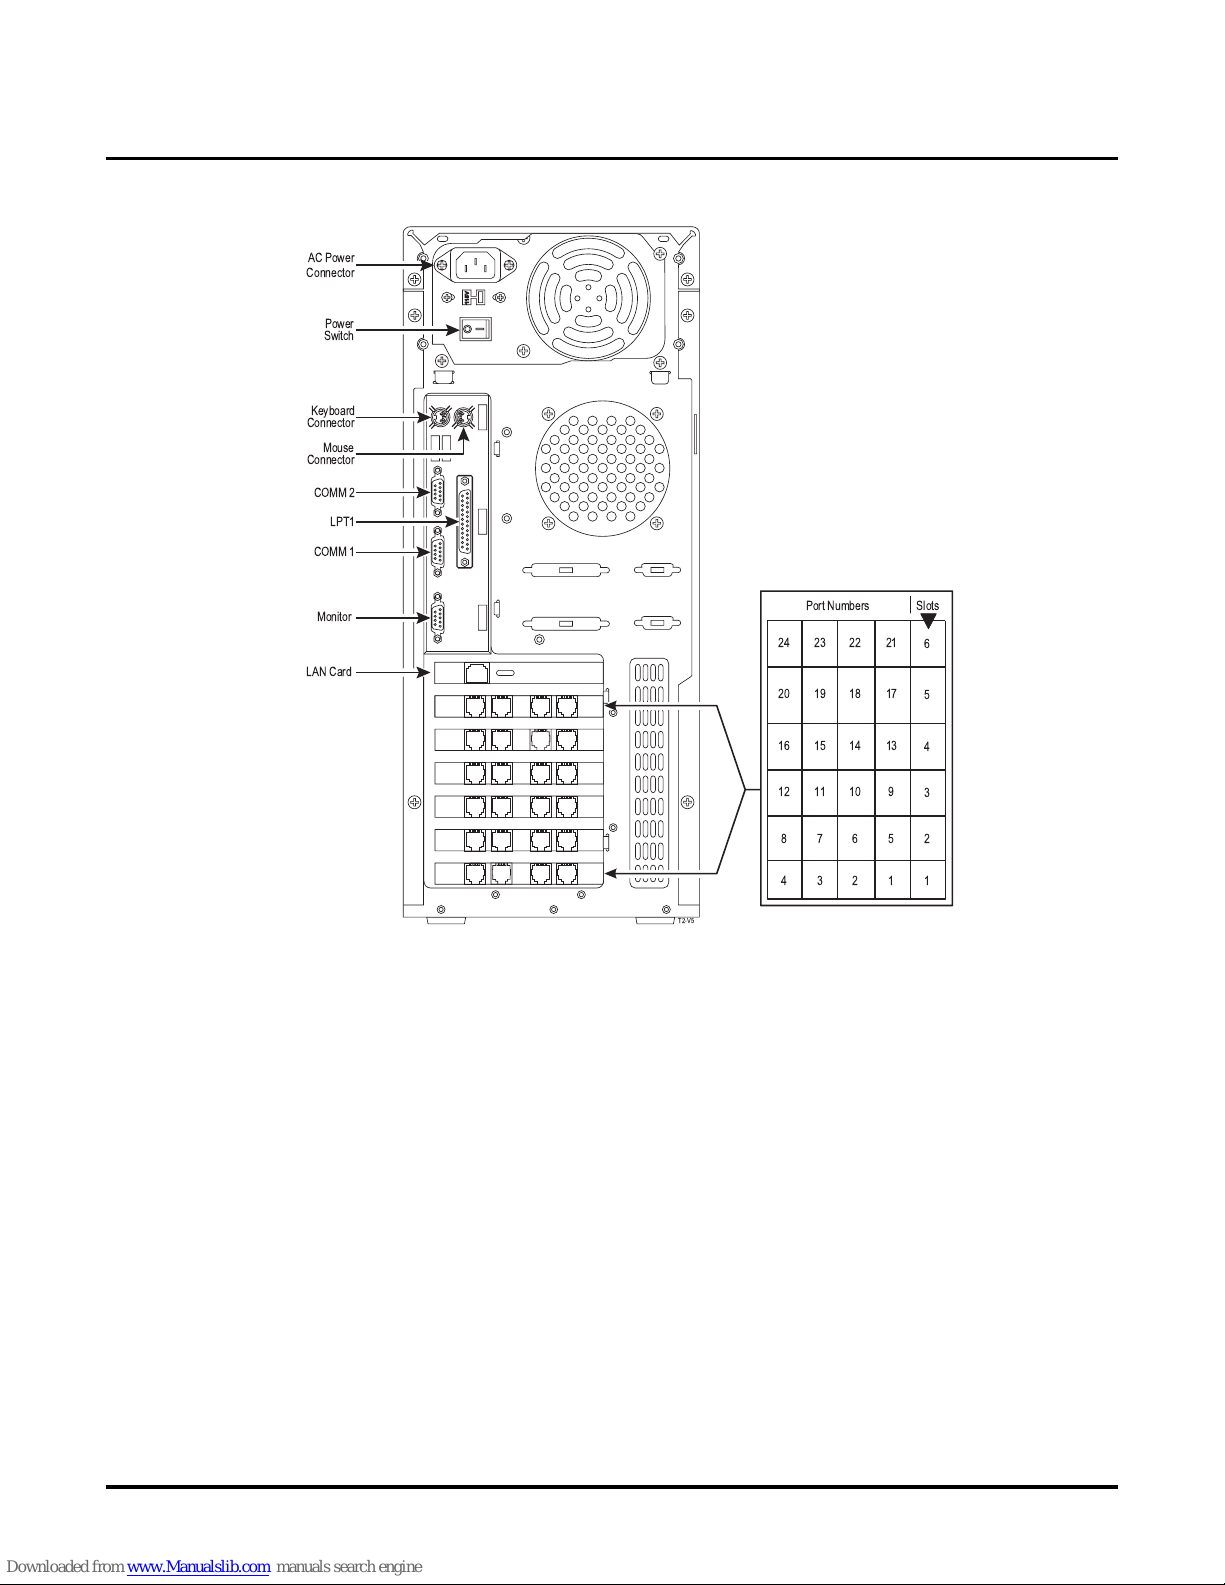
Installing the NT Voice Mail
Step 3: Connect the PC Attachments to the NT Voice Mail
AC Power
Connector
Power
Switch
Keyboard
Connector
Mouse
Connector
COMM 2
LPT1
COMM 1
Monitor
24 23 2122
LAN Card
20 19 1718
16 15 1314
12 11 910
87 56
43 12
T2-V5
SlotsPort Numbers
6
5
4
3
2
1
Figure 1-2: Layout of the NT Voice Mail Cabinet
To connect the PC attachments to the NT Voice Mail:
1. Plu g the cable on the keyboard into the connector de s ignated for the keyboard on the back
of the cabinet. See Figures 1-1 and 1-2.
2. Plug the cable on the mouse into the connector designated for the mouse. See Figures 1-1
and 1-2.
3. Plug the monitor’s cable into the 9- pin connector designated for the moni tor. See
Figures 1-1 and 1-2.
4. Plu g the Hasp Dongle into the LPT1 co nnector. Tighten with attached screws. (The Hasp
Dongle unlocks various features. It is required for the Voice Mail to operate properly.)
Chapter 1: Installation
NT System Guide
5
Page 34
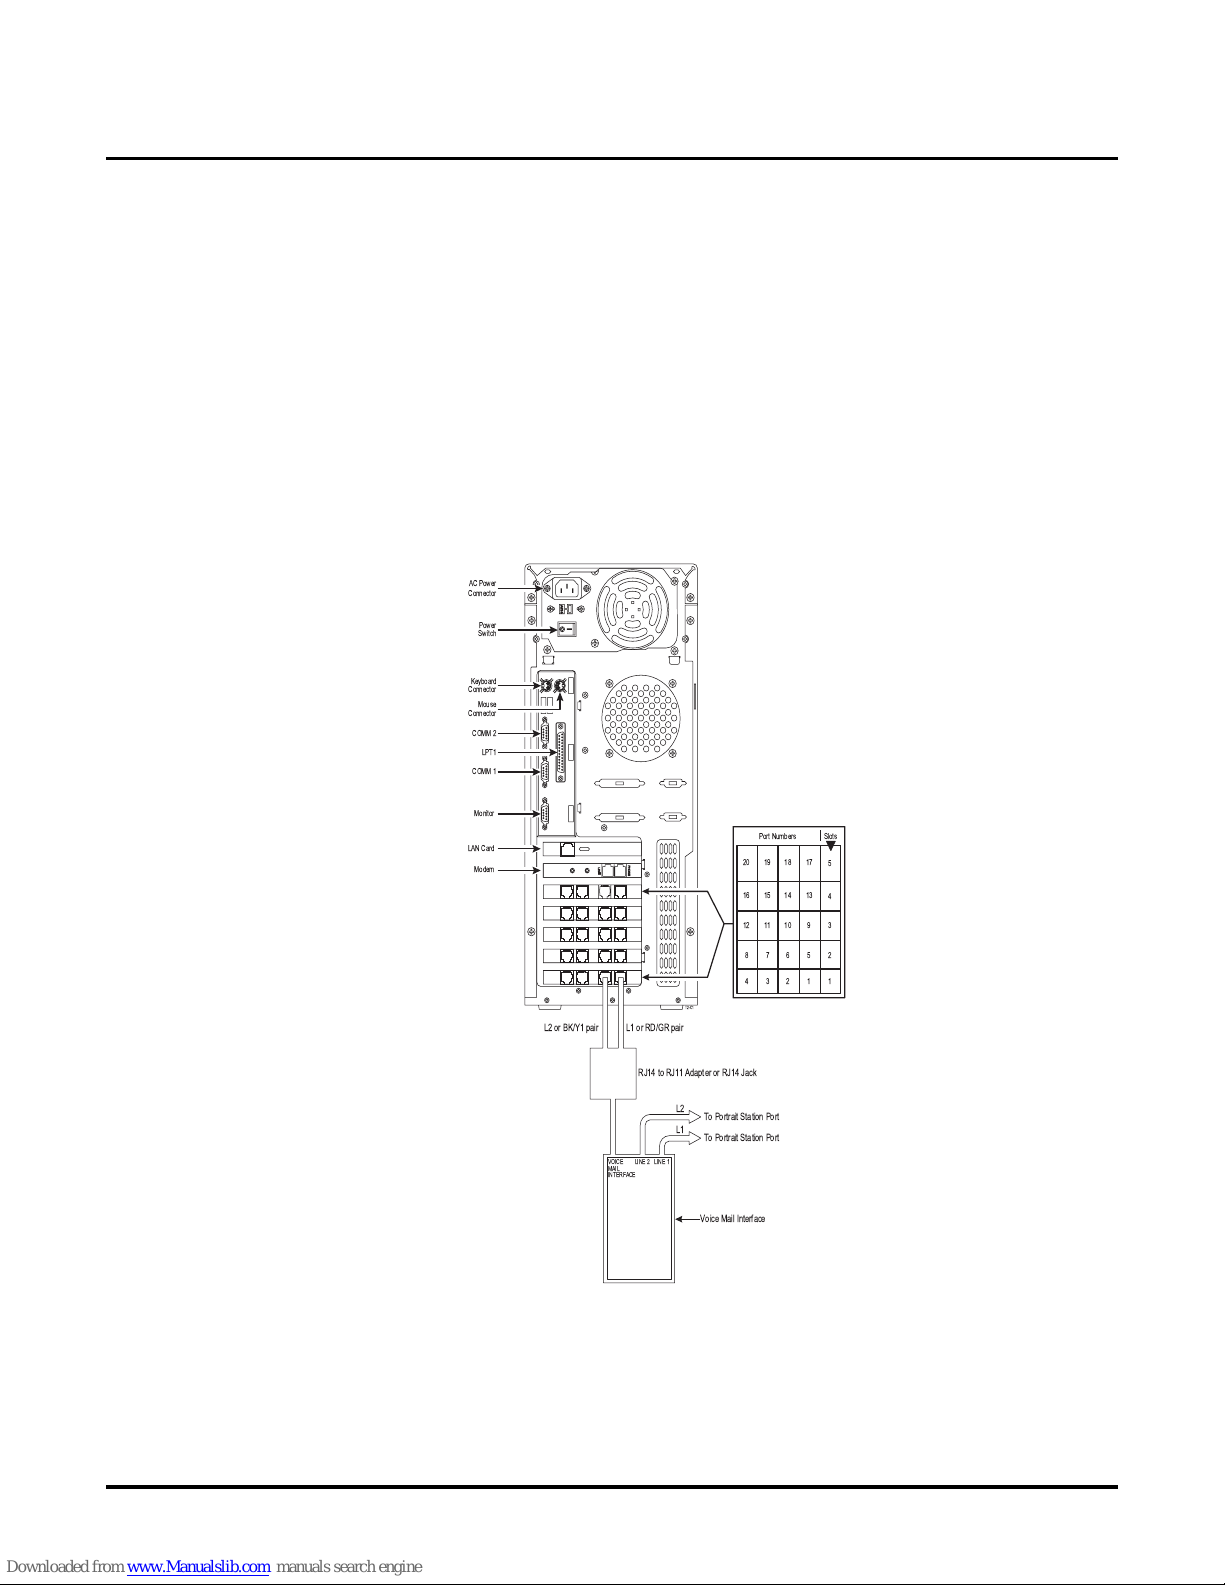
Installing the NT Voice Mail
Step 4: Connect the NT Voice Mail to a Telephone System
Step 4: Connect the NT Voice Mail to a Telephone System
The followi ng paragraphs tell you how to connect your NT Voice Mail to a telephone system.
To connect a Portrait Phone System to the NT Voice Mail:
1. Plu g one end of a modular line cord into Port 1 on the Voice Mail. Plug the other end into
an RJ14 to RJ11 adapter or an RJ14. See Figure 1-3.
2. Using a 4-wire modular line cord, connect the adapter into a Voice Mail Interface Unit.
The line cord’s RD/GR pair corresp onds to P ort 1 on the Voice Mail.
3. Using another 4-wire m odular line cord, connect L1 on the Voice Mail Interface Unit to a
Station Port on the Po rtrait. (Be sure to connect L1 to the Station Port based on the Portrait Setup you have. See the manual for the Portrait Phone System).
4. Repeat steps 1 through 3 for each Voice Mail Port.
AC Power
Connector
Power
Switch
Keyboard
Connector
Mouse
Connector
COMM 2
LPT1
COMM 1
Monitor
LAN Card
Modem
L2 or BK/Y1 pair L1 or RD/GR pair
RJ14 to RJ11 Adapter or RJ14 Jack
LINE 2 LINE 1
VOICE
MAIL
INTERFACE
T2-C1
L2
To Portrait Station Port
L1
To Portrait Station Port
Voice Mail Interface
20 19 1718
16 15 1314
12 11 910
87 56
43 12
SlotsPort Numbers
5
4
3
2
1
Figure 1-3: Connecting the NT Voice Mail to a Portrait Phone System
NT System Guide
6
Chapter 1: Installation
Page 35
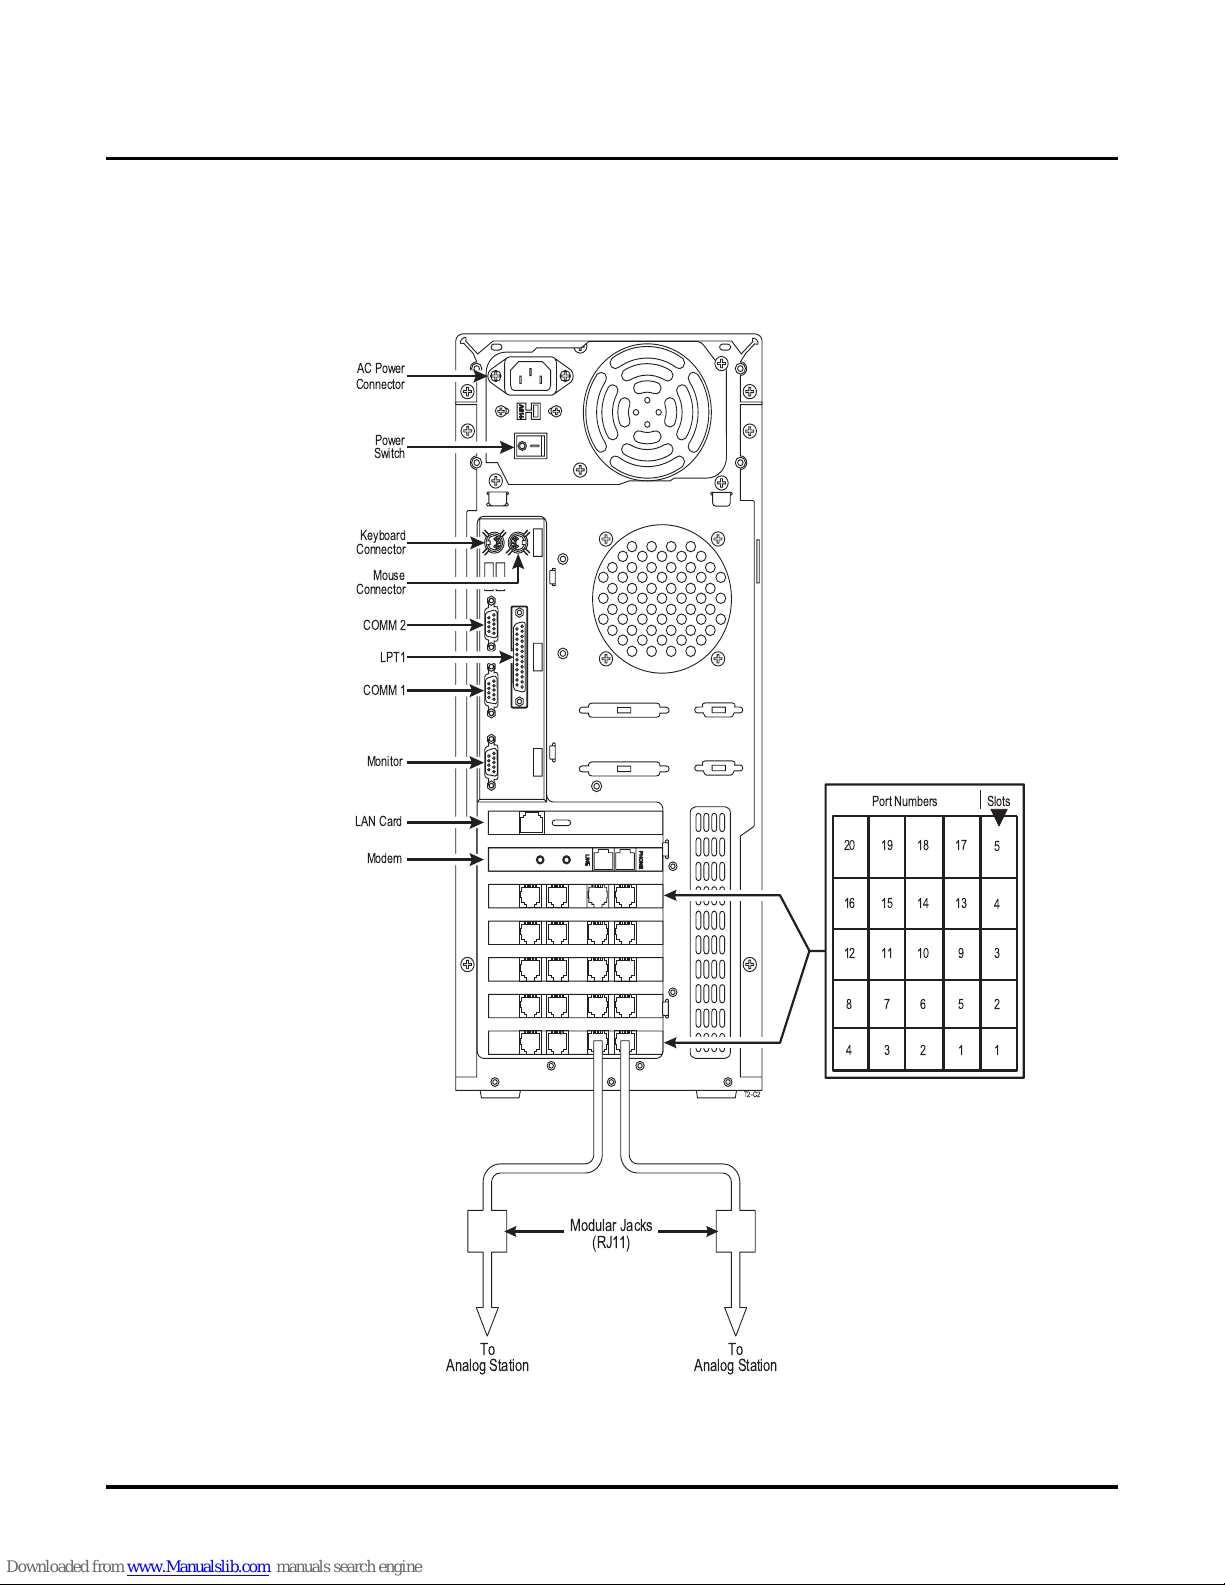
Installing the NT Voice Mail
Step 4: Connect the NT Voice Mail to a Telephone System
To connect a 28i pr 124i Phone System to the NT Voice Mail:
1. Plu g one end of a modular line cord into Port 1 on the Voice Mail. Plug the other end into
an to RJ11 modular jack. See Figure 1-4.
2. Repeat st ep s 1 f or ea ch Voice Mail Port.
AC Power
Connector
Power
Switch
Keyboard
Connector
Mouse
Connector
COMM 2
LPT1
COMM 1
Monitor
LAN Card
Modem
Modular Jacks
(RJ11)
T2-C2
20 19 1718
16 15 1314
12 11 910
87 56
43 12
SlotsPort Numbers
5
4
3
2
1
Figure 1-4: Connecting the NT Voice Mail to a 28i or 124i Phone System
Chapter 1: Installation
To
Analog Station
To
Analog Station
NT System Guide
7
Page 36
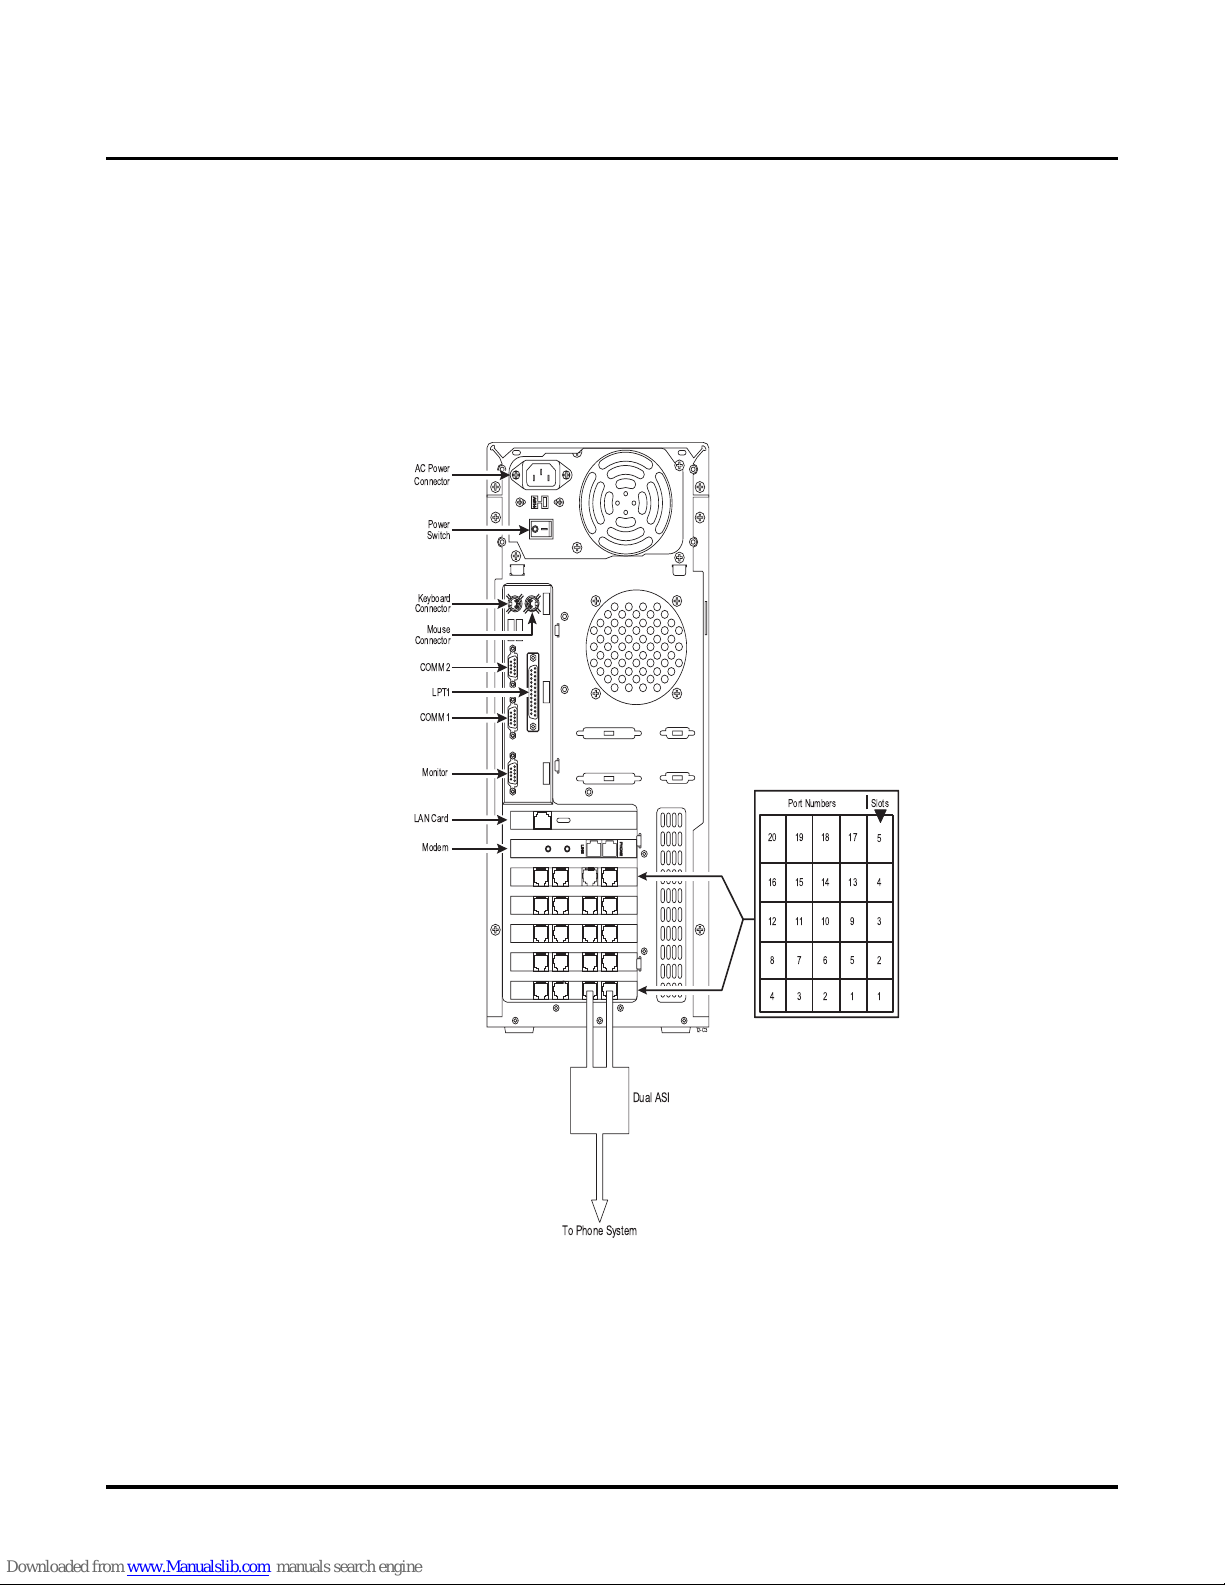
Installing the NT Voice Mail
Step 4: Connect the NT Voice Mail to a Telephone System
To connect any other phone system to the NT Voice Mail:
1. Plu g one end of a modular line cord into Port 1 on the Voice Mail. Plug the other end into
an ASI or dual ASI. See Figure 1-5.
2. Plu g another modular line cord into Port 2 on the Voice Mail. Plug the other end into an
ASI or the dual ASI.
3. Connect the ASI or dual ASI to the phone system. Figure 1-5 shows connecting a Dual
ASI.
4. Repeat steps 1 through 3 for all Voice Mail Ports.
AC Power
Connector
Power
Switch
Keyboard
Connector
Mouse
Connector
COMM 2
LPT1
COMM 1
Monitor
LAN Card
Modem
20 19 1718
16 15 1314
12 11 910
87 56
43 12
T2-C3
Dual ASI
To Phone System
SlotsPort Numbers
5
4
3
2
1
Figure 1-5: Connecting the NT Voice Mail to Any Phone System
NT System Guide
8
Chapter 1: Installation
Page 37
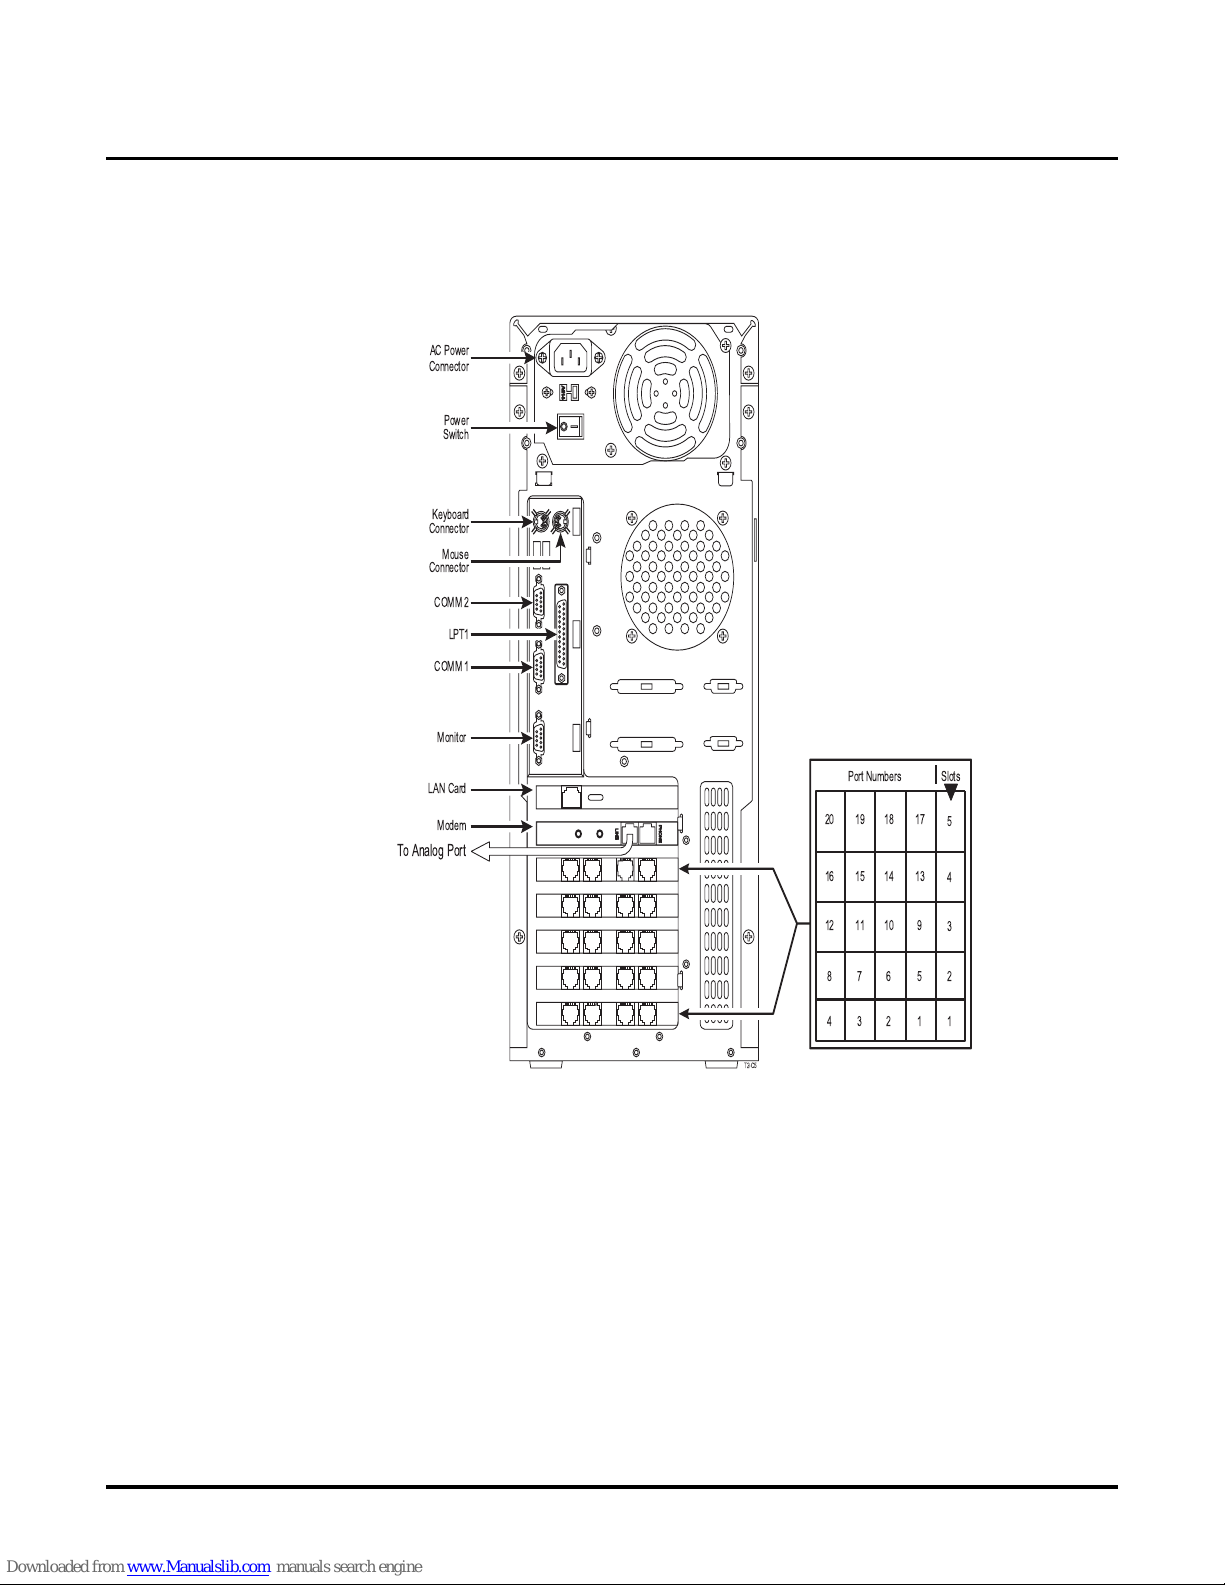
Installing the NT Voice Mail
Step 4: Connect the NT Voice Mail to a Telephone System
To connect the Voice Mail’s internal modem (if the Modem Card is installed):
1. Plug one end of a modular line cord into the LINE connector on the Modem Card. See
Figure 1-6.
2. Connect the other end to an analog port.
AC Power
Connector
Power
Switch
Keyboard
Connector
Mouse
Connector
COMM 2
LPT1
COMM 1
Monitor
LAN Card
Modem
20 19 1718
To Analog Port
16 15 1314
12 11 910
87 56
43 12
T2-C5
Figure 1-6: Connecting the NT Voice Mail Internal Modem
SlotsPort Numbers
5
4
3
2
1
Chapter 1: Installation
NT System Guide
9
Page 38

Installing the NT Voice Mail
Step 5: Start up the NT Voice Mail System
Step 5: Start up the NT Voice Mail System
To start up the NT Voice Mail:
1. Plug the surge protector into the outlet dedicate d to the Voice Mail.
2. Plu g the power cord into the AC Power Connector at the back of the cabinet and into the surge
protector.
3. Turn on the Voice Mail’s power switch.
4. When the computer’s desktop appears on the monitor, double-click t he My Computer icon on
the desktop.
5. Double-cli ck the Control Panel icon on the My Computer window.
6. Double-cli ck the Servic es icon on the Control Panel window.
7. On the Services window:
Select VMService from the scroll lis t, and click the Start button.
After the Services Control message is displaye d, the status of VMService will read, Started.
8. Click the Close button on the dialog box to remove it from the screen.
9. Click the X in the upper right corner of the Control Panel window and then the My Com-
puter window.
10. Click the NT Configuration icon on the desktop to display a window similar to shown below.
After you install a phone system, this screen changes and shows a menu bar that you will This
is the system’s Main Menu Screen that you will use to configure the NT Voice Mail
system. For directions, see the following chapters in this guide.
NT System Guide
10
Chapter 1: Installation
Page 39
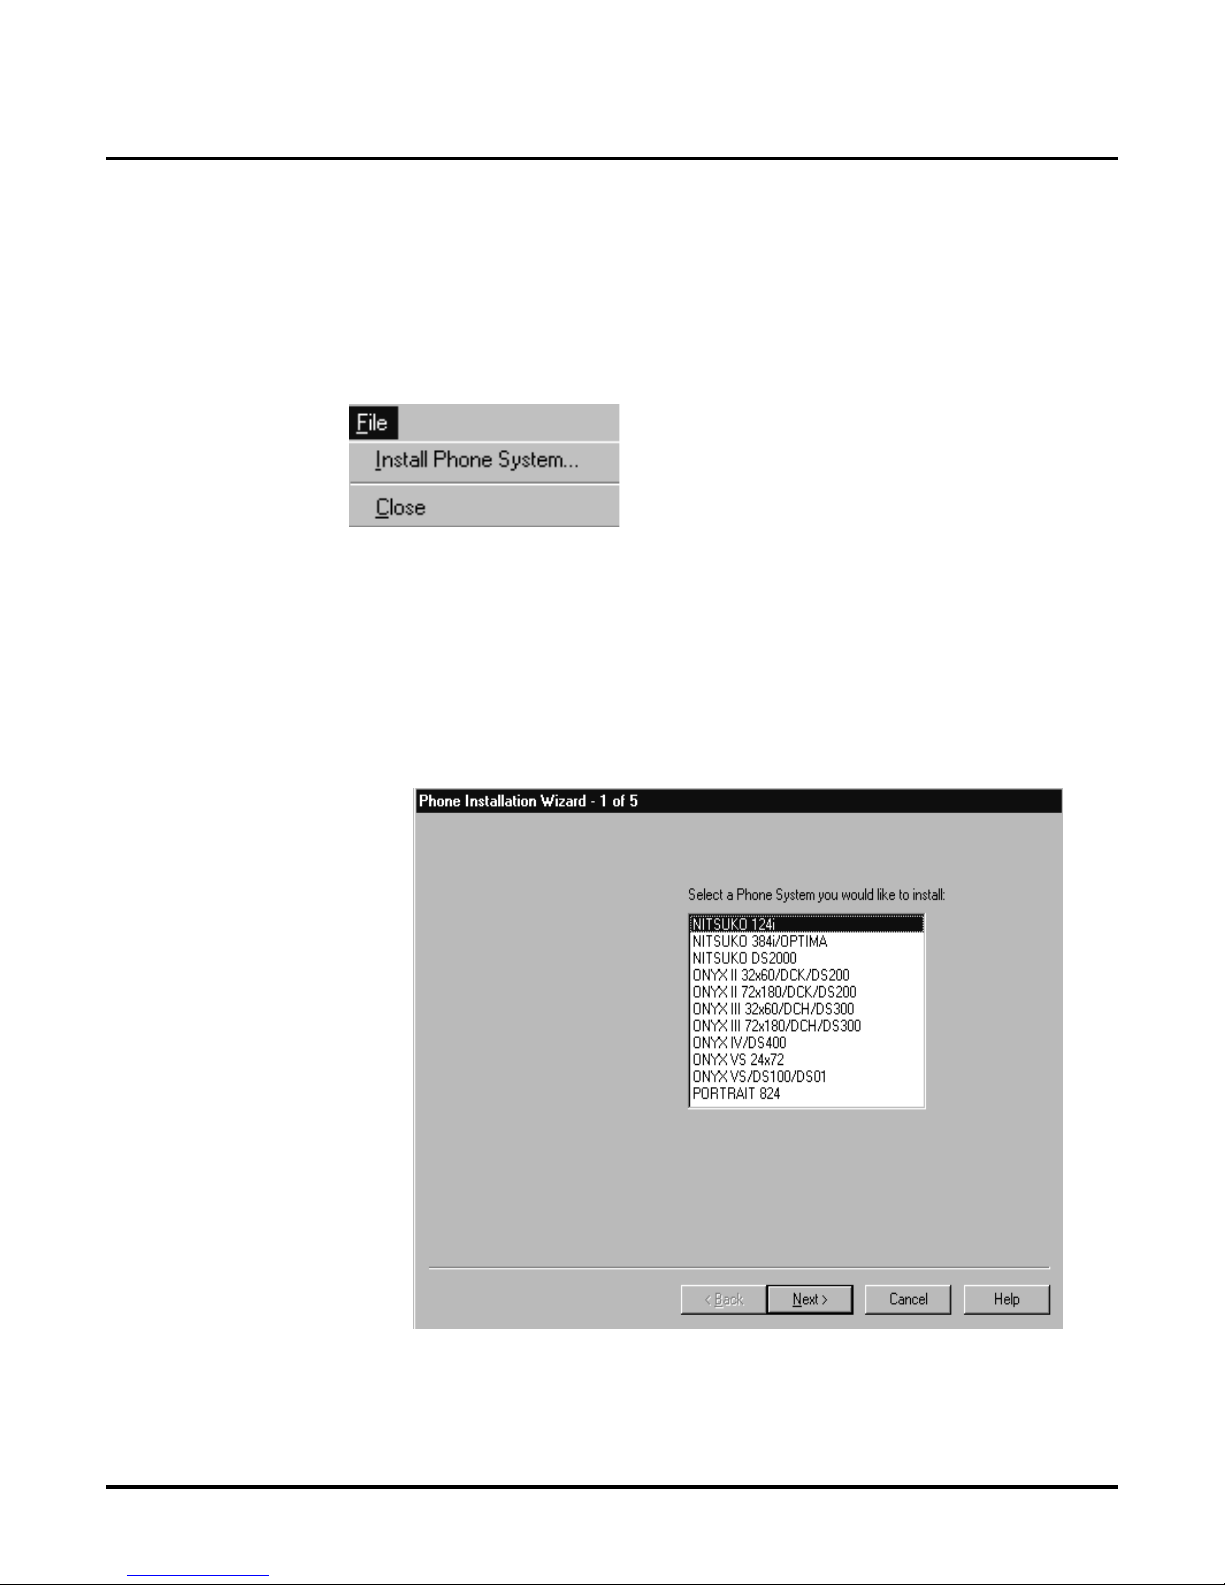
Installing the NT Voice Mail
Step 6: Install a Phone System in the NT Voice Mail System
Step 6: Install a Phone Syste m in th e NT Voice Ma il Syste m
Install Phone System
to be installe d with the Voice Mail. You can then select the default databas e for your phone syst em,
a default security code for Subscriber Mailboxes, Voice Compression Rate and the voice prompt
language (for bilingual systems).
To install a phone system in the NT Voice Mail:
1. Click File on the menu bar to display the
2. From the
File
(accessed when you click on
menu.
File
menu, select Install Phone System:
), enables you to select a phone sys tem
File
Phone Installation Wizard - 1 of 5
You will see the Phone Installation Wi zard - 1 of 5 dia log box, which dis plays the f irst of 5 pages
for the Phone Installation Wizard. This Wizard prompts you to enter the parameters that will make
the Voice Mail compatible wit h the phone system that you want to install.
Which phone systems are displayed on the scroll li st of this dialog box depends on how your Voice
Mail system was configured by the manufacturer. The Voice Mail manufacturer’s logo will appear
on the left side of the screen. Shown below is an ex ample of a GENERIC dialog box that you mi ght
see.
Chapter 1: Installation
NT System Guide
11
Page 40
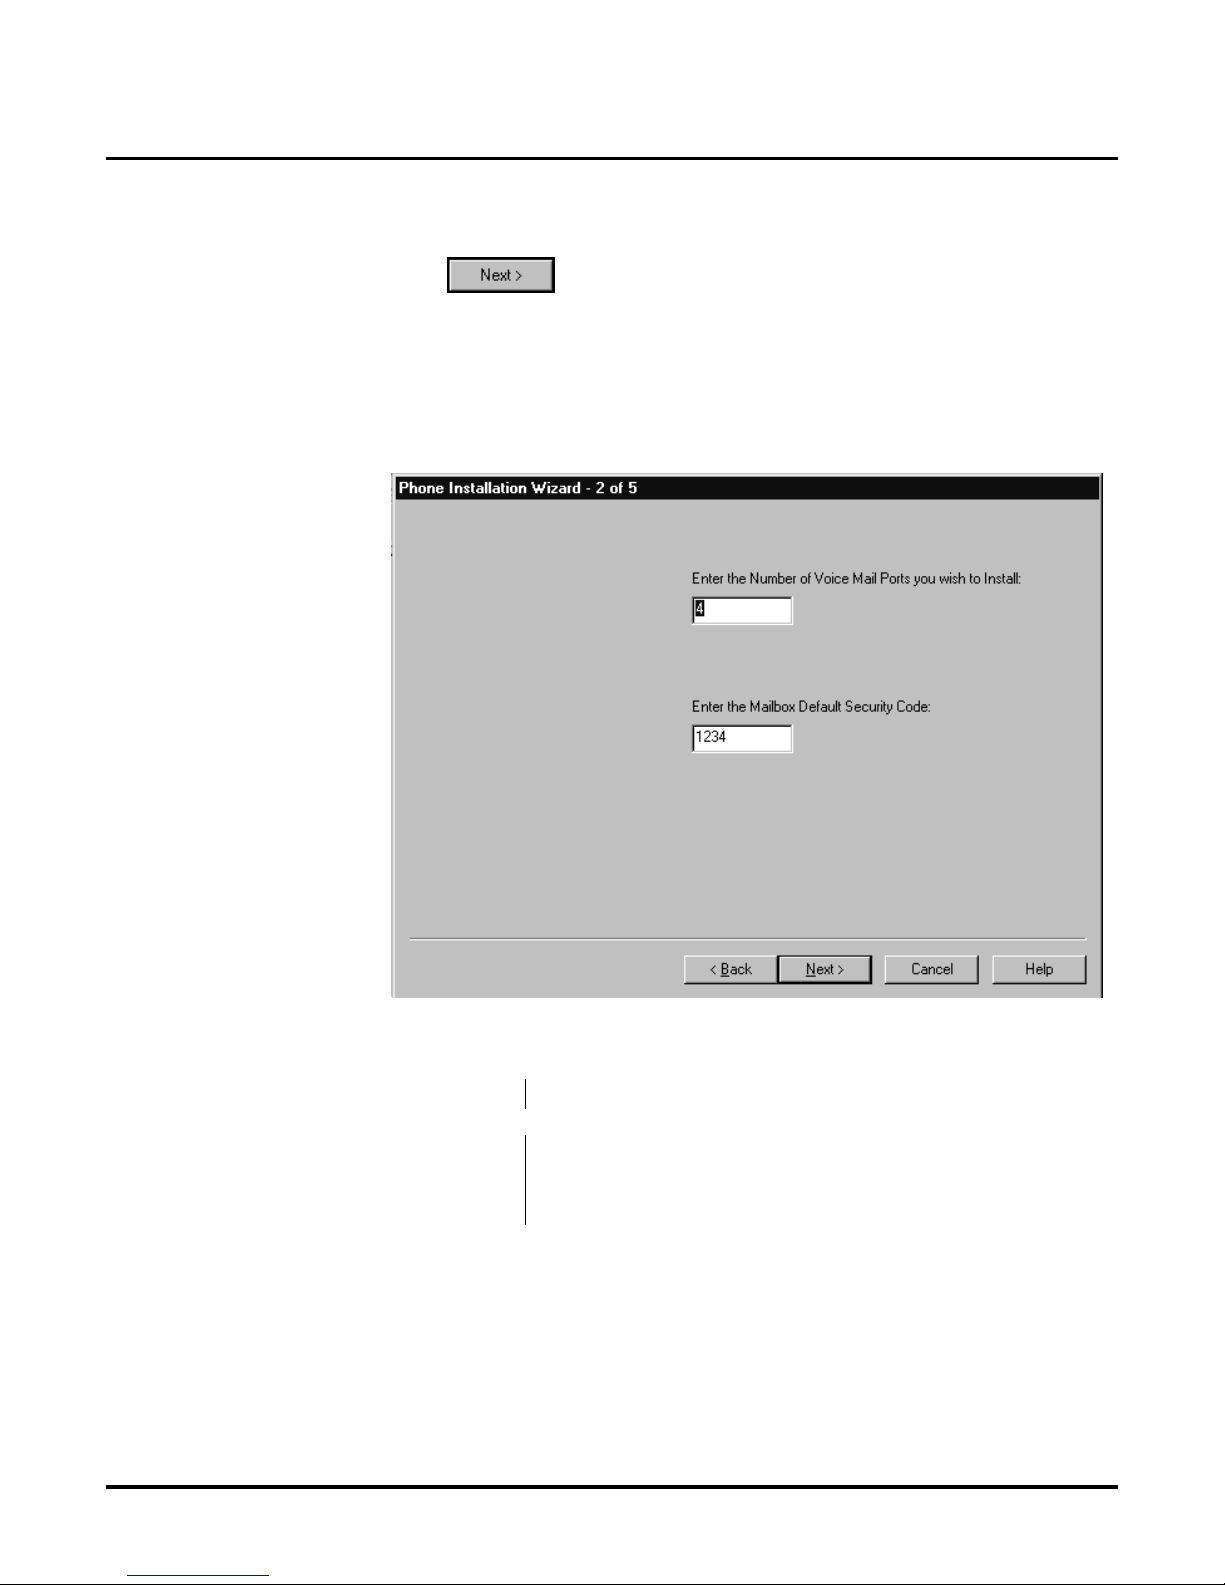
Installing the NT Voice Mail
Step 6: Install a Phone System in the NT Voice Mail System
From the
1. From the scroll-down li st, select the name of the phone system you want to install .
If the phone system you wan t to install does not appear on the lis t, select GENERIC.
2. Click the button to reach the Phone Installation Wizard - 2 of 5 dial og box
(shown below).
Phone Installation Wizard - 1of 5
Phone Installation Wizard - 2 of 5
dialog box:
The Phone Installation Wizard - 2 of 5 dialog box displays each of the following fields:
Number of Voice Ports
Availability: All phone systems
This is the maxim um number of Voice Ports you plan to install in the Voice Mail system.
Default: Depends on the number of ports shipped with the Voice Mail system.
Entries: 1-24
Notes: You can change this entry later if you add more ports. See page 99.
NT System Guide
12
Chapter 1: Installation
Page 41

Installing the NT Voice Mail
Step 6: Install a Phone System in the NT Voice Mail System
Mailbox Default Security Code
Availability: All phone systems
This is the Se curity Code assigned to each Subscriber Mailbox that you manually crea te, after
you start up the system for the first time.
Default: None
Entries:
Notes: Subscribers must enter thi s Security Code in order to call (log on to)
Up to 6 digits (0
their mailbox for the first time. After logging on, the Subsc riber can
change the Security Code .
9)
–
From the
1. In the Num b er o f Voice Mail Ports box, enter the number of ports that you wish to install.
2. In the Mailbox Default Security Co de box, enter the Security Code you want to assign t o each
Subscriber Mailbox.
3. Click the button to reach the Phone Installation Wizard - 3 of 5 dialog box
shown on the next page.
Phone Installation Wizard - 2 of 5
dialog box:
Chapter 1: Installation
NT System Guide
13
Page 42
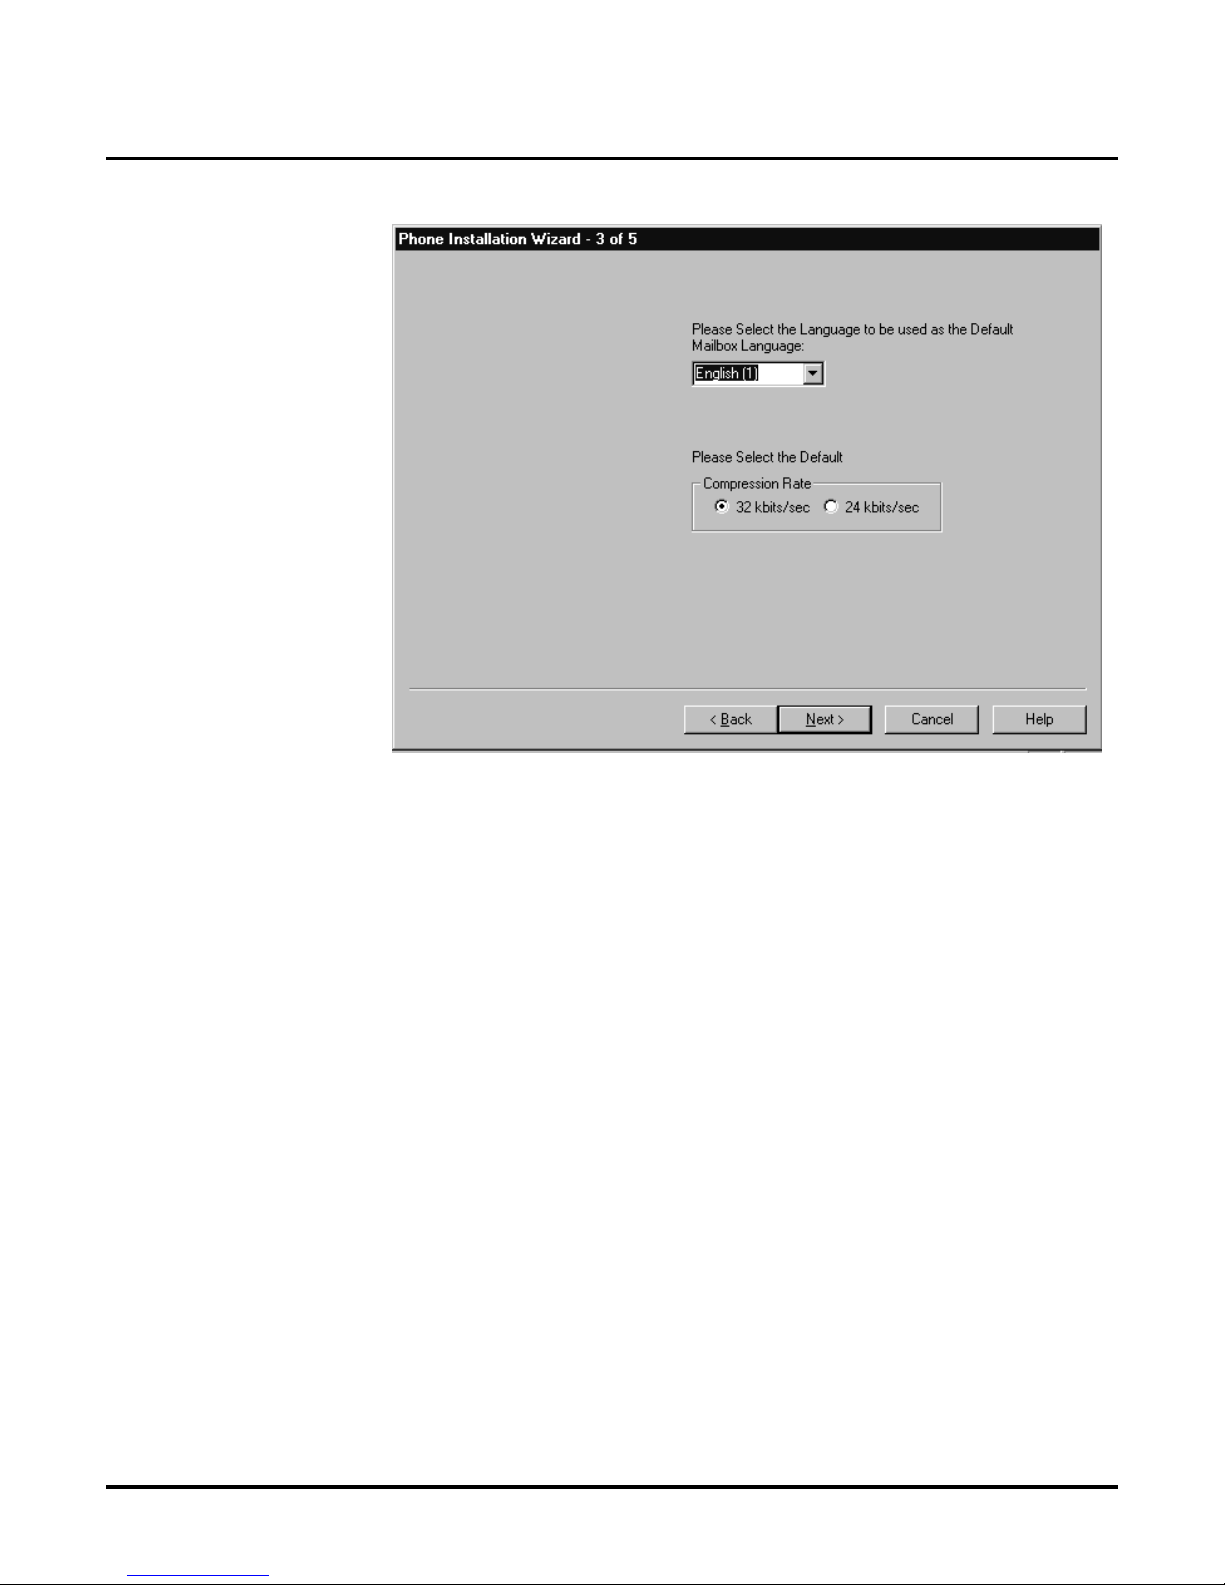
Installing the NT Voice Mail
Step 6: Install a Phone System in the NT Voice Mail System
Phone Installation Wizard - 3 of 5
The Phone Installation Wizard - 3 of 5 dialog box displays each of the following fields:
NT System Guide
14
Chapter 1: Installation
Page 43

Installing the NT Voice Mail
Step 6: Install a Phone System in the NT Voice Mail System
Defaul t Mailbox Language
Availability: For any Voice Mail system usi ng voice prompts in 2 language mode s.
This identifies the language that the Voice Mail will use f o r all system voice prompts tha t play
to an Automated Attendant ca ller on any port, to a caller who reaches the Voice Mail by dialing a Voice Mail extension number from an extension, or to a caller sent to the Voice Mail by
the phone system as in a call forward.
Five languages are available for voice prompts and greetings: two types of American English,
one Spanish, one French Canadian, and UK (British English).
However, only two languages are currently installed in your Voice Mail System. They are
American English Mneumonic and American English Nume ric. (American English Mneumonic promp ts use lette rs, su ch as: To listen to a m essage, pr es s L. Americ an En glish Numeric
prompts use numbers, such as: To listen to a message, press 5). American English Mneu-
monic is sho wn in t his Phone Ins tall ation Wizard as Eng lish (1 ). America n Engli sh Numeric is
shown as English (2)
To access any of the oth er la nguages, you must re-instal l the Voice Mail software using the
Voice Mail Software CD or diskettes. See page for more information.
Default: English (1)
Entries: English (1)
English (2)
Mneumonic
–
Numeric
–
Notes: N/A
Default Compression Rate
Availability: All phone systems
The value for Default Compression Rate specifies how the Voice Mail will compress voice
messages to favor either sound quality or storage capacit y. In most configurations, the 32kbits/
sec setting favors sound quality but downgrades the storage capacity . The 24kbits/sec setting
fav ors storage capacity but downgrades sound qua lity. Since the hard disk has a very large
storage capacity, it is highly recommended that you k eep the default val ue of 32kbits/sec.
Default: 32kbits/sec
Entries: 32kbits/sec
24kbits/sec
Notes: Changing the compression rate will erase all recorded me ssages,
including greetings and rerecord prompts.
From the
1. From the scroll-down li st, select the langua ge you want used as the Default Mailbox
Language in your Voice Mail system.
2. Cl ick to set the Default Compression Rate value that you prefer.
3. Click the button to reach the Phone Installa tion Wizard - 4 of 5 dialog box
shown on the next page.
Phone Installation Wizard - 3 of 5
dialog box:
Chapter 1: Installation
NT System Guide
15
Page 44
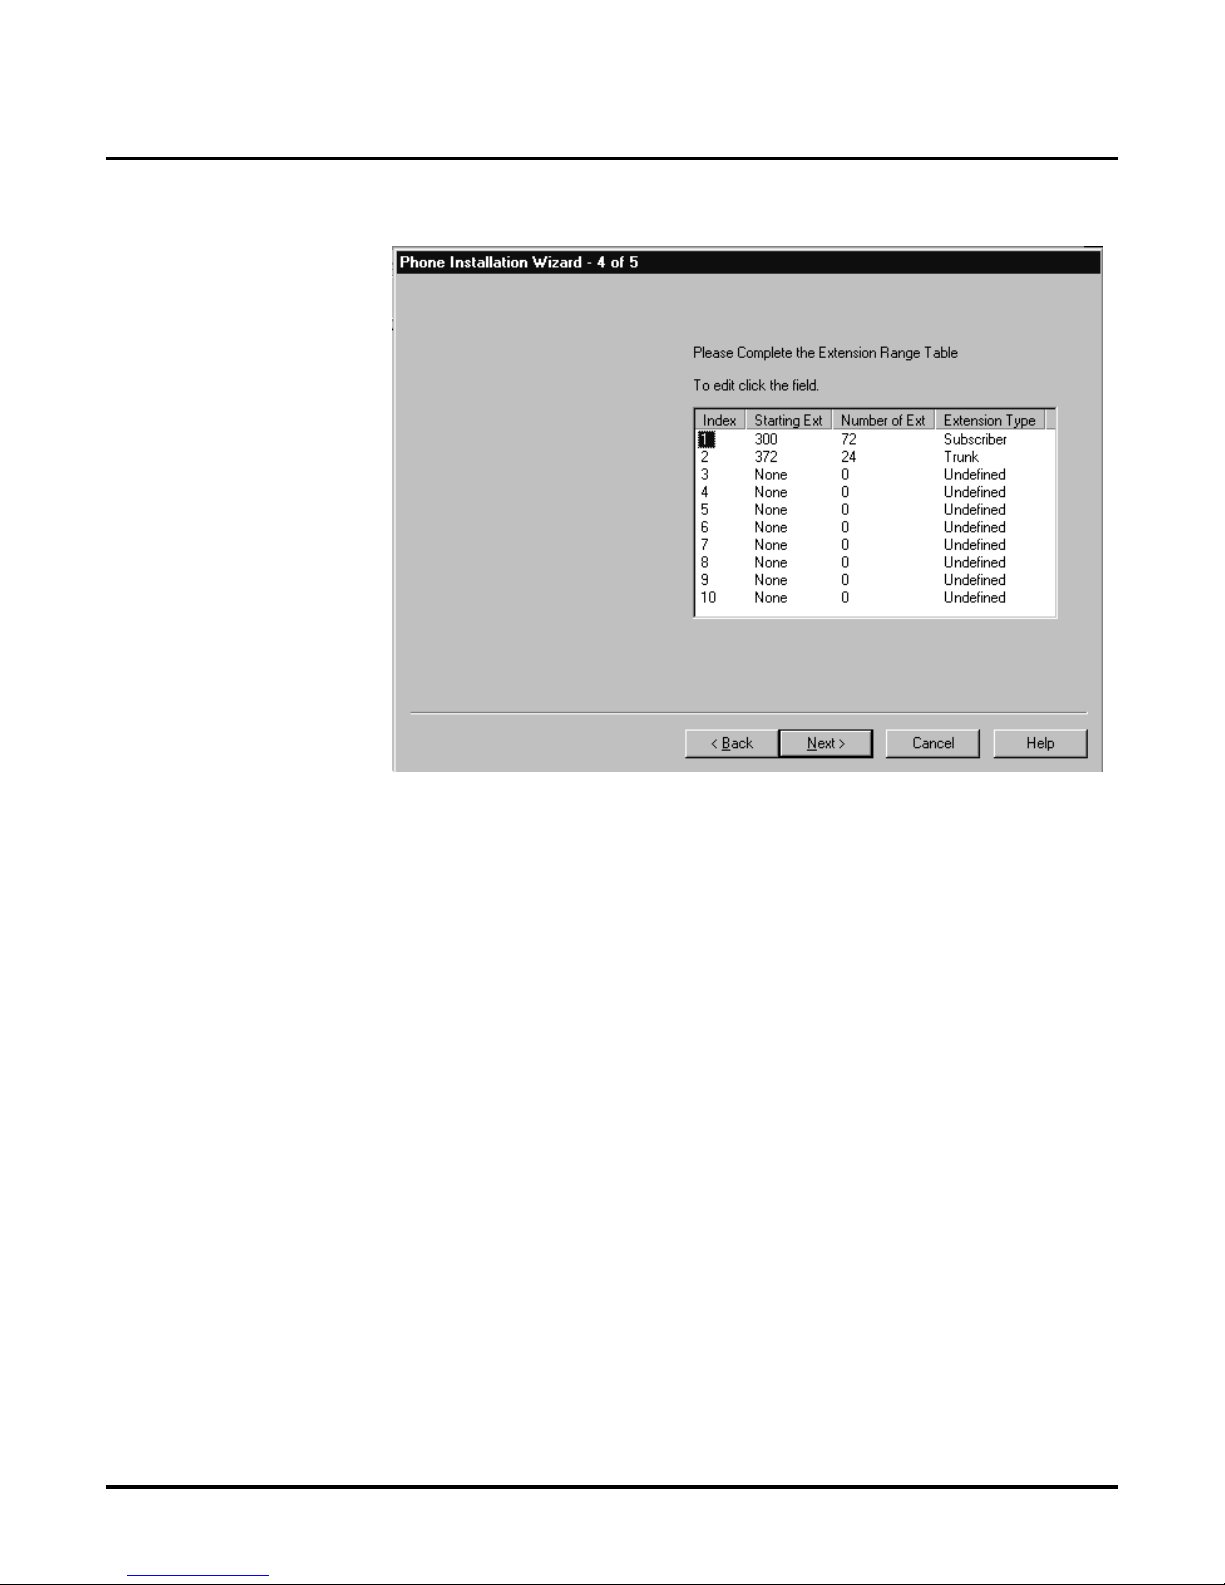
Installing the NT Voice Mail
Step 6: Install a Phone System in the NT Voice Mail System
Phone Installation Wizard - 4 of 5
NT System Guide
16
Chapter 1: Installation
Page 45

Installing the NT Voice Mail
Step 6: Install a Phone System in the NT Voice Mail System
The Phone Installation Wizard - 4 of 5 dialog box displays the Extension Range Table. You can
use this table to help you create a range of numbers for certain mailbox types in your Voice Mail
system. When thi s dialog box is first di splayed on your screen, it shows the default num ber of
extensi ons/ma ilb ox es and the start ing e xtens ion for the Subs criber Mail box es and Trunk Mailbox es
installed with your phone system. It also shows mailboxes that ar e undefined (not assigned with a
mailbox type. You can change the defaults by using this table.
(For a complete lis t of mailbox types and a descripti on of each type, see the Customizing Mail-
boxes section later in this guide.)
Creating Subscriber Mailboxes
It is recommended that you us e the table to create a Subscriber Mailbox for each exten si on that is
currently in your phone system. Although the system supports variable le ngth for extensions or
mailboxes , it is recommended that you keep all of your mailbox numbers the same length if poss ible. And if you want to create a 3-digit mailbox number that has a leading digit of 4, all mailbox
numbers with th e leading digit of 4 must have thre e digits. For example, if you are creating Sub-
scriber Mailbox 432, the only mai lbox numbers tha t you can hav e wit h the le ading di git of 4 will be
400
499, rather than 40–49 or 4000–4999.
–
Creating Trunk Mailboxes
You will need trunk mailboxes in your Voice Mail system only if your phone system sends Trunk
I.D. to the Voice Mail as part of the integration protocol and if you would like each line to answer
with a special Welcome Message . (For more information about Trunk Mailboxes, see the Customiz-
ing Mailboxes section, starting on page page 299. For more information about setting up Welcome
Messag es , s ee Welcome Message on pag e 109 of th e Customizing Answering Schedule Tables sec-
tion.)
Later you will be able to cus tomize your mailbox setup by adding mailboxes that you did not even
consider cre ating here, editing the properties of existing mailboxes, and deleting those mailboxes
that are no longer needed. (For instructions, see the Customizing Mailboxes section later in this
guide.)
When you are done using this table:
Click the button to reach the Phone Installation Wizard - 5 of 5 dialog box shown
on the next page.
Chapter 1: Installation
NT System Guide
17
Page 46
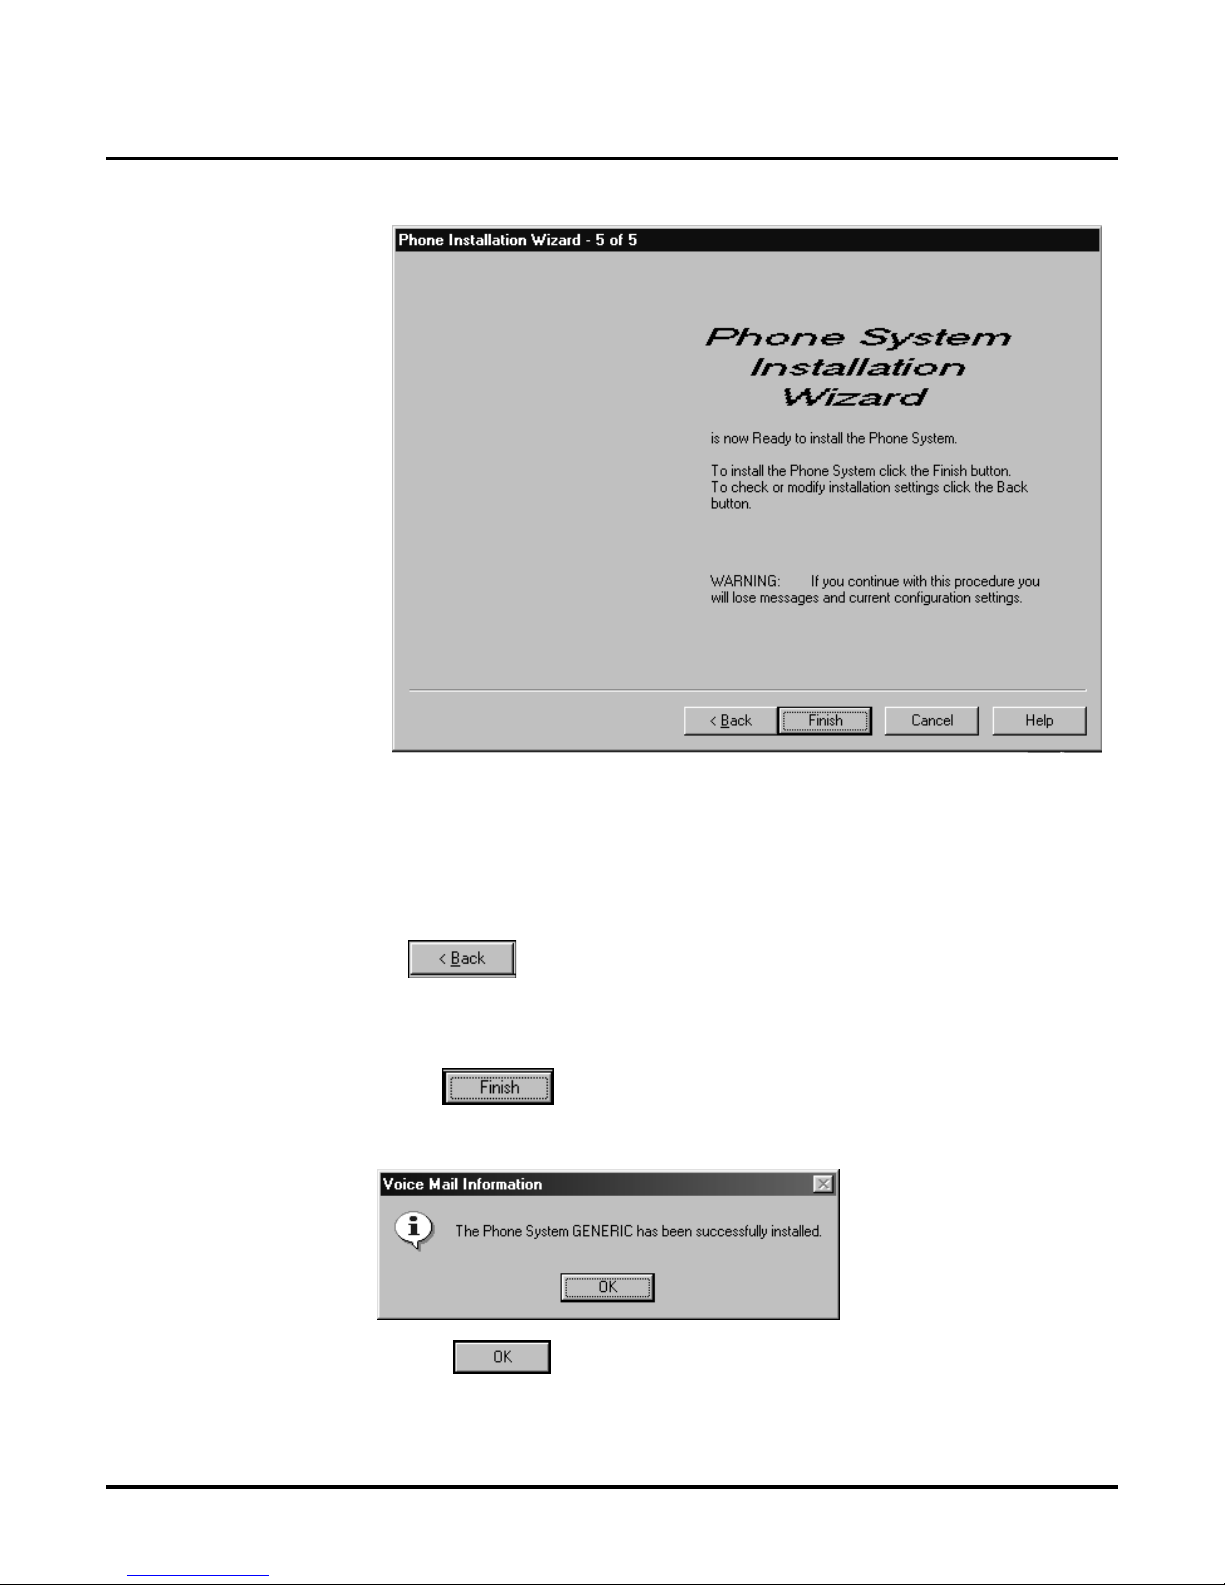
Installing the NT Voice Mail
Step 6: Install a Phone System in the NT Voice Mail System
Phone Installation Wizard - 5 of 5
The Phone Installation Wizard - 5 of 5 dialog box helps you to finish installing the phone system
that you selected on the first Phone In st allation Wizard dialog box. But finishing the installation
will result in your losing messages, rerecord pro mpt s, and current configuration settings. This loss
does not apply to the mailbox settings you created on the Extension Range Table.
To check or modify any of your instal lation settings before you finish:
Click the button until you reach the setting.
To finish the installation:
1. Click the button. You see a dialog box telling you that your phone system was
successfully in st al led. For example:
2. Cl ick the button to return to the NT Voice Mail Main Screen.
NT System Guide
18
Chapter 1: Installation
Page 47

Step 7: Test the NT Voice Mail
Once the Voice Mail has been installed, per f or m the follo wing tests to confirm that it is operating
correctly.
Automated Attendant Test
1. Call into a trunk that you ha ve assigned to the Voice Mail.
2. Listen for the prompt:
Thank you for cal li ng. If y ou are c allin g from a Touch T on e phone , please dial th e ext ension
number you wish to reach or dial 0 for assistance. If y ou are calling from a rotary dial
phone, please stay on the line for assistance.
Voice Mail Test
1. Dial a Voice Mail extension number from any extension.
Depending on which phon e sy st em is installed, you will hear one
(A) Thank you for calling. If you ...
(B) Please enter your mailbox number.
2. If you hear Prompt A:
#
Press
, wait for the Please enter your mailbox number prompt, and then go to step 3.
But if you hear Prompt B, go directly to step 3.
3. Dial the mailbox number, which is the same as the extension number you are using.
4. Listen for eit h er of th e se pr o m pt s :
You have ___ messages (if you did not install a default Security Code) or Please enter your
security code.
If you do not h ear either of these voice prompts, che ck the equipment connections and the telephone system programmi ng for the Voice Mail.
Installing the NT Voice Mail
Step 7: Test the NT Voice Mail
of these prompts:
Chapter 1: Installation
NT System Guide
19
Page 48

Installing the NT Voice Mail
Step 8: Tell Subscribers: Extensions/Mailbox Security Code
Step 8: Tell Subscribers: Extensions/Mailbox Security
Code
To reach a Subscriber Mailbox from an extension, a Subscriber must dial one of the Voice Mail
extension numbers. Let Subscriber s know what these numbers are, even when extensions have
Message Waiting keys.
Also let Subscr ibers know if there is any Mailbox Default Security Code in your Voice Mail
system.
NT System Guide
20
Chapter 1: Installation
Page 49

Basic Programming for the NT Voice Mail
Step 1: Modify Time and Date
Basic Programming for t he NT Voice Mail
Basic Programming for the NT Voice Mail
This section explains the initial programming that will help you to get your NT Voice Mail “u p and
running.” For further programming instructions, see Chapter 3 (Programming) beginning on
page 91. To pr ogram t his Voice Mail, you nee d to ha v e a good w orki ng kno wled ge of W indo ws NT
(including its operation and terminology).
Step 1: Modify Time and Date
The NT Voice Mail has a calendar and an internal clock. The date on the calendar and the time on
the clock must be set in order for the Voice Mail to work correctly.
The default setting for the date is the current Date in USA. The default setting for the time is USA
Eastern Time. However, if these settings are different in the plac e where your Voice Mail is
located, you may wish to change (modi fy) them, so that they m atch the actual date and time of your
location. In this case, use the spaces bel ow to enter the date and time to be modified.
Date: _______________________
Time: ________________________
To modify the default date and/or time settings:
1. Double-cli ck the My Computer icon on the desktop.
2. Double-cli ck the Control Panel icon on the My Computer window.
3. Double-click the icon on the Control Panel window.
4. Res et the month, year, and date on the Date panel at th e left of the Date /Ti m e Pro p er t ie s
window.
5. To reset the time on the Time panel at the right of the Date /Time Pr operties
window:
Click to set the time on the scroll-down windo w below the clock.
6. To change the clock’s ti me zone:
a. Click the Time Zone tab.
b. Select a time zo ne from the Time Zone scroll-down list.
c. If you wish, enable Automatically adjust clock for daylight savings changes.
d. Click the OK button.
7. Call System Administrator Mailbox: Dial S A (7 2) and T I (8 4)
Check the time and date that you set or reset above.
For more information about the time and date used b y the NT Voice Mail, see System Time and
Date on page 82 in Chapter 2 (Features) of this guide.
Chapter 1: Installation
NT System Guide
21
Page 50

Basic Programming for the NT Voice Mail
Step 2: Assign Extensions to the Voice Mail Ports
Step 2: Assign Extensions to the Voice Mail Ports
A Voice Mail extension is physically connected to a Voice Mail port. For certain features to work
properly, you must assign a Voice Mail extension to each port.
The table below lists the Voice Mail ports that you may curre ntly have installed in your system.
You can use this ta ble as a worksheet for assigning extensions to ports: In the Extension Number
column next to each port number, fill in the number of the e x tension that you plan to assign to the
port.
Port Number Extension Number
1
2
3
4
5
6
7
8
9
10
12
13
14
15
16
17
18
19
20
21
22
23
24
To assign an extension to a port:
1. Click Customize on the menu bar of theVoice Mail Main Screen.
2. Select Port Options on the Customize menu.
3. On the General tab for each port:
Enter in the Extension field the number of the extension that you are assigning to the port.
4. Click the Next button to move on to the e xtension assignment for the next port.
5. When you have finished your extension assignments for all your Voice Mai l ports, click the
OK button to save your assignments.
NT System Guide
22
Chapter 1: Installation
Page 51

Basic Programming for the NT Voice Mail
Step 3: Check the Default Automated Attendant
Step 3: Check the Default Automated Attendant
The Automated Att end ant of the Voice Mail answers inc oming c alls to a mailbo x by pl ay ing for the
caller any recorded message for that mailbox. A typical mailbox message may begin: Thank you
for calling the ABC company.
Call Routing Mailboxes
To answer calls, the Automated Attendant can us e up to 17 different Call Routing Mailboxe s
(depending on the confi gura tion of your s yste m). Each Call Rout ing Mailb ox le ts calle rs rout e their
own calls to an extension, a mailbox, or the Automated Attendant by pre ssing a dialpad key (0
*,#) or several keys on a Touch Tone phone.
The Call Routing Mailbox uses each of the following to help in routing calls:
a Dial Action Table
Q
to assign a routing option (action) to each dialp ad key. For example, if you assign the action
“Screened tra n sfer to 306” to key 7, the ca ller would be able to press K ey 7 in order to transfe r
to extension 306. Typically, the NT Voice Mail can accommodate up to 500 Dial Action Tables.
a recorded Welcome Message and Instruction Menu
Q
to greet c aller s and let t hem t hem know their call- rout ing options , whic h ha ve been progr ammed
in the Di al Ac tion Table.
Answering Schedule Tables
An AST is a table that you program with the schedules for business and non-business hours at the
company wher e the Voice Mail sys tem is located. The AST points to a mai lbox you have created,
which is typic ally a Call Routing Mailbox. Using your ASTs helps the Automa ted Attendant to
answer inbound ca lls and greet callers differently, depending on the day/date and time when the
call entered the V oice Mail system.
After you assign an AST to a T r unk Mailbox or a port or both, the AST will tell the Automated
Attendant how to route an inbound call to the mailbox containing a timely greeting for the caller. If
you assign the AST to a port, the Voice Mail will use your AST to answer all calls directed to that
port. But if you assign an AST to a Trunk Mailbox and the con nec ted phone system is supplyin g
incoming trunk I.D. for individual lines , the Voice Mail will use the AST for the Trunk Mailbo x to
answer all calls entering on the trunk to which the mailbox is assigned.
However, when an AST is assigned to both
Tru nk Mailbox always takes precede nce over the AST assignment to the port: The Voice Mail will
use the AST for the Trunk Mailbox to answer all calls entering on the trunk and ignore the AST
assigned to the port. For mo re informati on about us ing an AST in a T runk Mai lbox, s ee Trunk Mail-
box on page 299 the Customizing the Mailbo xes section in Chapter 3 (Programming).
a Trunk Mailbox and a port, the AST assignment to the
9,
–
You can creat e and program up to 50 ASTs in your Voice Mail system. Each AST may co ntain up
to 20 schedules for delivering gree tings to outside callers. After a call reaches the mailbox poi nted
to by an AST schedule, the caller will hear the greeting recorded for that m ailbox. For more information about usi ng an AST in a Trunk Mailbox, see the f lowchart in the Customiz in g An swering
Schedule T ab les on page 105 in Chapter 3 (Programming).
Default Settings for Call Routing Mailboxes
To display default settings for your Call Routing Mailboxes:
1. Click Reports on the menu bar of the Voice Mail Main Screen.
2. Select Mailbox on the Reports menu.
3. Se lect Numeric List on the Mailbox menu.
4. On the Mailbox Numeric List Report dialog box:
Click on the to remove it from e very Mailbox Type except
the OK button.
Chapter 1: Installation
Call Routin g Mailbox, and click
NT System Guide
23
Page 52
Basic Programming for the NT Voice Mail
Step 3: Check the Default Automated Attendant
How the Default Automated Attendant Handles Calls
Belo w is an example of how the Automa ted Attendant might handl e a call.
(1)
The call rings in on Port 1 on Wednesday (a workweek day) at 5:30 PM.
(2)
The Automated Attendant looks at Answering Schedule Table 1, assigned to each port, to find
out which Call Rout ing Mail box ( CR) and Dia l Acti on Table (DAT) should ans wer the c all. AST
1 contains thes e AST sche dules:
Schedule 1: Workweek Morn Mon — Fri, starting at 9 AM CR_11 DAT 1
Schedule 2: Workweek Aft Mon — Fri, starting at 12 PM CR_12 DAT 1
Schedule 3: Workweek Eve Mon — Thu, starting at 5 PM CR_13 DAT 2
Schedule 4: Weekends Fri, starting at 5 PM CR_14 DAT 2
(To work with ASTs, see Steps 5 — 7 on the follo wing pages.)
(3)
Since the call entered the Voice Mail during the Workweek Evening time period, the Automated
Attendant plays the Welcome Message for Call Routing Mail_13. Thank you for calling is the
default Welcome Message.
(To modify the Welcome Messages, see Step 8 on one of the following pages .)
(4)
The Automate d Attendant pla ys the Instruction Menu for Call Routing Mailbox_13. The defa ult
Instruc tion Menu is: If you are calling from a Touch Tone phone, please dial the extension
number you w ish to reach or dial 0 for assistance. If you are calling from a rotary dial phone,
please stay on the line for assistance.
(To modify the Instruction Menus, see Step 10 on one of the following pages.)
(5)
The caller presses a dialpad key.
(6)
The Automated Attendant uses Dial Action Table 2, assigned to Call Routing Mailbox_13.
These are the default routing options in DAT 1 and DAT 2:
Key 0 Unscreened Transfer to f irs t extension in the numbering plan. If the extension does
not pick up, the call is rerouted acc ording to phone system programming.
Key 1— 8 Either Undef ined Routing or Screene d Transfer to an y extension the call er dials.
Screened Transfer is assigned to only the keys that match the first digit of the
extension numbers. For example, if the ext ens ions are numbered 21 through 36,
Screened Transfer would be assigned to Keys 2 & 3, while Unde fined Routing
would be assigned to Keys 4 — 8.
Key 9 Hangs up the call.
Key # Logs on to Voice Mail
TIMEOUT Unscreened Transfer to ope r ator (zero) if the caller waits mor e than 5 seconds
after the Instruction Menu finshes playing to dial a code.
NT System Guide
24
Chapter 1: Installation
Page 53

Basic Programming for the NT Voice Mail
Step 4: Assign Answering Schedules Tables
Step 4: Assign Answering Schedules Tables
As stated in Step 3 of this sec tion, you can ass ign an Ans wering S chedul e Table to a port or a T runk
Mailbox (if your phone system allows the use of Trunk Mailboxes) or both.
The Voice Mail can accommodate up to 50 ASTs. Here are some guidelines in figuring out how
many ASTs you will need:
If you want the Automated Attendant to answer all incom ing lines in the same way, you need
only one AST, and you simply assign it to each port. (Since AST 1 is already assigned to each
port by default, you don’t have to make any AST assignments to this port.)
But if you want the Automated Attendant to answer some trunks differentl y than others, you
assign the desire d AST (1— 50) to the Trunk Mailbox assigned to the trunk, but only if the
Voice Mail provides Trunk Mailboxes for your phone system. To find out if Trunk Mailboxes
are allowed, see the Phone System Integration Guide.
To assign an AST to a port:
1. Click Customize on the men u bar.
2. Se lect Port Options on the Customize menu.
3. Enter the number for the AST (1— 50) in the Answe ring Schedule Table box.
To assign an AST to a Trunk Mailbox:
1. Click Customize on the men u bar.
2. Se lect Mailbox Options on the Customize menu.
3. Select Edit on the Mailbox Options menu.
4. On the Mailbox Range dia log box:
Click on the to remove it from e very Mailbox Type except
OK button.
5. Enter the number for the AST (1— 50) in the Answe ring Schedule Table box.
Trunk Mailbox, and click the
Chapter 1: Installation
NT System Guide
25
Page 54

Basic Programming for the NT Voice Mail
Step 5: Fill out the AST Worksheet
Step 5: Fill out the AST Worksheet
Before you begin programming Answering Schedule Tables, fin d out how man y different greetings
the customer wants for the port or trunk. The number of greetings will de termine how many schedules belong in the AST. For example, suppose the customer wants a special greeting for mornings,
for afternoons, for evenings, for weekends, and for holidays. In this case, five schedules would
belong in the AST. Like wis e, de termi ne the t ime when e ach gre eting sho uld b e gin to ta k e ef fect a nd
which Call Routing Mailbox will answer the call.
Therefore, you must include the information indicated below for each schedule (1
enter in an AST:
Date or day(s) that the mailbox should s tart answering th e call
Q
This may be a single day, such as Fr,
or a single date, such as, such as 8/27,
or a range of days, such as Mo
Howe v er, do not en ter any range that brid ges Sunday, such as F r
Sunday-bridg ing range to 2 separate schedules: one for F r
and one for Mo–Fr (regular busine ss hours).
Time of day that th e mail box shoul d start answeri ng the cal l ente red as hour s and minute s in the
Q
HH:MM format, where HH represents the hour (00
Number of the Call Routing Mailbox that will answer the call.
Q
Fr.
–
23) and MM the minutes (00–59).
–
20) that you
–
Rather, convert your
–Mo.
Su (for non-regular busine ss hours)
–
For exampl e: Suppose you are programming AST #1. If the Automated Attendant should answer
calls starting at 10AM on Monday through Friday and using Call Routing Mailbox 600. Your
Schedule 1 in AST #1 would look like this:
Answering Schedule Table #1
Schedule 1 Day/Date: Mo–Fr
Schedule 1 Time: 10:00
Schedule 1 Mailbox: 600
To display a list of current default settings for AST schedules:
1. Click Reports on the menu bar.
2. Se lect Port on the Reports menu.
3. On the Answering Schedules Report dialog box:
a. Enter in th e Starting AST box the number of the first AST you would like to see listed.
b. Enter in the Ending AST box the num ber of the last AST you would like to see listed.
c. Click the OK button.
You might see a list of default schedules for Answering Schedule Ta ble #1 that looks like this:
Schedule 1 Day/Date: Mo–Fr
Schedule 1 Time: 08:00
Schedule 1 Mailbox: 811
Schedule 2 Day/Date: Mo–Fr
Schedule 2 Time: 12:00
Schedule 2 Mailbox: 812
Schedule 3 Day/Date: Mo–Th
Schedule 3 Time: 17:00
Schedule 3 Mailbox: 813
Schedule 4 Day/Date: Fr
Schedule 4 Time: 17:00
Schedule 4 Mailbox: 814
NT System Guide
26
Chapter 1: Installation
Page 55

Basic Programming for the NT Voice Mail
Step 5: Fill out the AST Worksheet
Use the AST worksheet below to plan how you want to modify your defa ult settings for your AST
schedules, so that they will be programmed with the schedules for busi ness and non-bu si nes s hours
at the company where your Voice Mai l system is located.
Answering Schedule Table #____
Schedule 1 Day/Date_____ Schedule 11 Day/Date_____
Schedule 1 Time_____ Schedule 11 Time_____
Schedule 1 Mailbox_____ Schedule 11 Mailbox_____
Schedule 2 Day/Date_____ Schedule 12 Day/Date_____
Schedule 2 Time_____ Schedule 12 Time_____
Schedule 2 Mailbox_____ Schedule 12 Mailbox_____
Schedule 3 Day/Date_____ Schedule 13 Day/Date_____
Schedule 3 Time_____ Schedule 13 Time_____
Schedule 3 Mailbox_____ Schedule 13 Mailbox_____
Schedule 4 Day/Date_____ Schedule 14 Day/Date_____
Schedule 4 Time_____ Schedule 14 Time_____
Schedule 4 Mailbox_____ Schedule 14 Mailbox_____
Schedule 5 Day/Date_____ Schedule 15 Day/Date_____
Schedule 5 Time_____ Schedule 15 Time_____
Schedule 5 Mailbox_____ Schedule 15 Mailbox_____
Schedule 6 Day/Date_____ Schedule 16 Day/Date_____
Schedule 6 Time_____ Schedule 16 Time_____
Schedule 6 Mailbox_____ Schedule 16 Mailbox_____
Schedule 7 Day/Date_____ Schedule 17 Day/Date_____
Schedule 7 Time_____ Schedule 17 Time_____
Schedule 7 Mailbox_____ Schedule 17 Mailbox_____
Schedule 8 Day/Date_____ Schedule 18 Day/Date_____
Schedule 8 Time_____ Schedule 18 Time_____
Schedule 8 Mailbox_____ Schedule 18 Mailbox_____
Schedule 9 Day/Date_____ Schedule 19 Day/Date_____
Schedule 9 Time_____ Schedule 19 Time_____
Schedule 9 Mailbox_____ Schedule 19 Mailbox_____
Schedule 10 Day/Date_____ Schedule 20 Day/Date_____
Schedule 10 Time_____ Schedule 20 Time_____
Schedule 10 Mailbox_____ Schedule 20 Mailbox_____
Chapter 1: Installation
NT System Guide
27
Page 56

Basic Programming for the NT Voice Mail
Step 6: Create and/or Customize Call Routing Mailboxes
Step 6: Create and/or Customize Call Routing Mailboxes
Before you can program the number of a Call Routing Mailbox in to an AST, you must make sure
that the mailbox exists. This step shows you ho w to create and/or cus tomize the Call Routing Mailboxes that you se lected for the ASTs in Step 5 on the prev ious two pages.
There are a cer ta in number of de fa ult Cal l Rou tin g Mailbox e s in your Voice Mail system. T he e xact
number depends on the NT Voice Mail model and the extension numbering plan for the phone system installed in your Voice Mail.
To see a n u me ric al li st of default Call Ro ut ing M ailboxes in your Voice
Mail:
1. Click Reports on the menu bar.
2. Se lect Mailbox on the Reports menu.
3. Se lect Numeric List on the Mailbox menu.
4. On the Mailbox Numeric List Report dialog box:
Click to remove the check mark from every Mailbox Type listed except
click the OK button.
As shown in the example in Step 5 near the bottom of page 26, each default AST points to 4 of
the default Call Routing Mailboxes
schedule in an AST. For more information about Call Routing Mailboxes , s ee Customizing
Answering Schedule Tables in Chapte r 3 (Programming) on page 105.
one for each morning, afternoon , e vening, and weekend
—
Call Routin g, and
A Call Routing Mail box contains a Dial Action Table and 7 other pro grammable options. The
default values for these options should be fine to get your basic system up and running.
To review the routing options assigned to the keys in a Dial Action
Table:
See Box 6 at the bottom of page 24 in Step 3: Check the Default Automated Attendant.
To modify the defaults in a Dial Action Table:
At this point, the only i te m in an y Call Rout ing Mailbox th at yo u may need to c hang e is the num ber
that identifies the Dial Action Table assigned to the Call Routing Mailbox (1— 500). But keep in
mind that Call Routing Mailbox A should have a different Dial Action Table number than Call
Routing Mail box B only if A provides a different set of dialing options tha n B. Use the worksheet
below to help you plan the number of the DAT to be assigned to each Call Routing Mailbox.
Call Routing Mailbox_______DAT________
Call Routing Mailbox_______DAT________
Call Routing Mailbox_______DAT________
Call Routing Mailbox_______DAT________
Call Routing Mailbox_______DAT________
Call Routing Mailbox_______DAT________
Call Routing Mailbox_______DAT________
Call Routing Mailbox_______DAT________
Call Routing Mailbox_______DAT________
Call Routing Mailbox_______DAT________
NT System Guide
28
Chapter 1: Installation
Page 57

Basic Programming for the NT Voice Mail
Step 7: Program the ASTs
Once you have finished the procedure in Step 6, you are re ady to enter the data writ ten on the AST
workshe et into the NT Voice Mail system.
To create (program) a new AST schedule:
1. From the Voice Mail Main Screen, click Customize on the menu bar; select Answering Sched-
ule Tables on the Customize menu.
2. Select the number of the schedule (1
3. Clic k th e Day (s) or Date bo x for t hat sche dule, and en ter the appropri at e single day or ra nge of
days or date.
4. Click the Time box for that schedule, and enter the appropriate starting time.
5. Click the Mailbox Number box for that schedule, and enter the number of the mailbox to
which the schedule points.
6. Pre s s Tab to reach the Day(s) or Date box for the next schedule.
7. Repeat steps 2
8. Click the OK button to save your new AST schedule.
Or, to change a value in an existing AST schedule:
1. From the Voice Mail Main Screen, click Customize on the menu bar; select Answering Sched-
ule Tables on the Customize menu.
2. Select the schedule containing the value you want to change.
3. Click the box containing the value you want to change.
The box will be highlighted.
4. Ente r the new value in the box.
4 until you have finished adding all schedules you need on the AST.
–
–
Step 7: Program the ASTs
20).
5. Click the button to h ave the Voice Mail apply your changed value immediately.
6. Repeat these 4 steps for each value that you want to change.
7. When you have finished, click the OK button to save your changes.
Chapter 1: Installation
NT System Guide
29
Page 58

Basic Programming for the NT Voice Mail
Step 8: Modify Welcome Messages
Step 8: Modify Welcome Messages
A W el com e Me ssa ge co nsis ts o f both a greeting to outside callers after they dial the Voice Mail system and
Instruction Men Separately (see Step 10 on page 38).
You can set up the Welcome Mess age in your Voice Mail system in one of these ways:
Q
Q
Q
a list of their call-routing options (Instruction Menu). However, you must also record the
use the default Welcome Message
record your own Welcome Message
use no Welcome Message.
Use the Default Welcome Message
If you are using the default Welcome Message, outside callers will first hear the greeting, Thank
you for call ing. They will then he ar the Instruction Menu: If you are calling from a Touch Tone
phone, please dial the extension numbe r yo u wi sh to reach or dial 0 for assistance. If you are
calling from a rotar y dial phone, please stay on the lin e for assistance.
Recor d You r Own Welcome Message
You can personalize the greeting in the recording of your company’s Welcome Message to say:
Thank you for calling (name of your co mpa ny). Or you can personalize a Welcome Message for
workweek mornings to say: Good morning. Thank you for calling the XYZ company.
The Instruction Menu is a list of call-routing options that tells callers who reach the Automated
Attendant how to route their calls from the dia lpad keys to their inte nded destinations. You can
personalize the dialing instructions in the Instruction Menu, so that they are keyed to the de partments in your company. Callers hear options such as: Press 1 for Sales. Press 2 for Accounting.
Press 3 for Marketing. .. If yo u kno w th e ext ens io n numb er o f the p er so n you are t ryi ng to re ac h,
you may dial i t a t any tim e. T hese are option s tha t you hav e alrea dy programm ed in th e Dial Ac tion
Table assigned to the Call Routing Mailbox you are using.
You need to record an Instruction Menu for each Dial Actio n Table that you use in Step 9: Modify
the Dial Action Tables. If you progra m two d if feren t Dia l Acti on Tables, for example, you wi ll need
to record two different Instruction Menus.
When you record each Instruction Menu, you will need to enter the number of the Call Routing
Mailbox associated with the Dial Action Table. Therefore, if Call Routing Mailboxes 600 and 601
both use Dial Acti on Table 1, you can record a menu for Call Rout ing Mail box 600 and then c opy it
to Call Routing Mailbox 601. No need to record the same Instruction Menu twice.
If there are more than 3 Instruction Menus to record, you may want to make copies of this page, so
that you hav e the number of the forms you need.
DAT____ for CRMB ____
_______________________________________________________________________________
_______________________________________________________________________________
_______________________________________________________________________________
___________________________________________________________________________
DAT____ for CRMB ____
_______________________________________________________________________________
_______________________________________________________________________________
_______________________________________________________________________________
___________________________________________________________________________
DAT____ for CRMB ____
_______________________________________________________________________________
_______________________________________________________________________________
_______________________________________________________________________________
_______________________________________________________________________________
NT System Guide
30
Chapter 1: Installation
Page 59

Basic Programming for the NT Voice Mail
Step 8: Modify Welcome Messages
Use No Welcome Message
Instead of using either the def ault Welcome Message or recording your own, you may prefer to use
no Welcome Message at all. In this case, outside callers will hear no greeting or list of call-routing
instructions after they dial into your Voice Mail system.
To use the default Welcome Message:
1. From the Voice Mail Main Screen, click Customize on the menu bar, and select Mailbox
Options on the Customize menu.
2. Se lect Edit on the Mailbox Options menu.
3. On the Mailbox Range dialog box:
Enter in to th e Start Number box the num ber of the Cal l Ro uting Mai lbox you used in Ste p 6 of
the above pr ocedure, and click the OK b utton.
4. Click to select the Call Handling tab.
5. Make sure that a appears in the Play Default Messages check box.
This is the default setting for Play Default Messages.
6. Click the OK button.
To record a Welcome Message:
1. Log onto a System Administrator Mailbox.
2. Dial the Security Code, if requir ed.
3. Pre s s S A (7 2) for the System Administrator Menu.
4. Press W (9) for the Welcome Message.
5. Follow the voice prompts for recording the Welcome Message.
6. When finished: Dial the number of the Call Routing Mailbox to which the DAT is assigned.
Your Welcome Message wil l now override the default Welcome Message, regardless of the
current setting for Play Default Messages.
To use no Welcome Message:
1. From the Voice Mail Main Screen, click Customize on the menu bar, and select Mailbox
Options on the Customize menu.
2. Se lect Edit on the Mailbox Options menu.
3. On the Mailbox Range dialog box:
Enter into the Start Number box the number of the Call Routing Mailbox that you are using,
and click the OK button.
4. Click to select the Call Handling tab.
5. Remove the from the Play Default Mes sages check box.
6. Click the OK button.
Chapter 1: Installation
NT System Guide
31
Page 60

Basic Programming for the NT Voice Mail
Step 9: Modify the Dial Action Tables
Step 9: Modify the Dial Action Tables
You must cus tomize the routing options for each Dial Action Table (DAT) number that you used in
Step 6. The table below shows the some of the routing options that the NT Voice Mail provides for
each key listed in 3 DATs (1
3). The ta ble also shows how to enter ea ch r o uting option in the DAT.
–
Key
Key 0 Unscreened transfer to first extension in the
numbering plan
Keys 1
Key 9 Hang up Action: HUP
8
–
Either Undefined Routing (UND) or Transfer
(TRF) to any extension the caller dials. Transfer is
assigned only to the keys that match the first digit
of the extension numbers. For example, if the
extensions are 21
Keys 2
Keys 4
key, the Automated Attendant says, That is an
invalid ent r y and then repeats the dialing entries.
3. Undefined Routing will be assigned to
–
8. If a caller pr ess es an Undefi ned Routing
–
Routing Options DAT Entry
Action: UTRF
Number: EEE
(EEE = ext. number)
Action: UND
Number: None
Action: TRF
36, Transfer will be assigned to
–
Number: XX (2-digit
extension)
Action: TRF
Number: XXX (3-digit
extension)
Number: None
Key * Quick Message, where the Automated Attendant
Key # Log onto Voice Mail Action: LOGON
TIMEOUT If the caller doesn’ t di al an yth ing else from the dial
NT System Guide
32
plays a greeting followed by a beep and then goes
into the Record Mode so that the caller can record
a message and send it immediately to a caller at a
mailbox/extension number of any length.
pad within a programmed time frame, the Automated At tendan t w il l m a ke an Unscr e en ed Transfer to the first extensio n in the numbering plan.
Chapter 1: Installation
Action: REC1
Number: IV
Number: None
Action: UTRF
Number: EEE
(EEE = ext. number)
Page 61

Basic Programming for the NT Voice Mail
Step 9: Modify the Dial Action Tables
To plan modifications to the default settings:
The table below explains ho w to assign certain call routing options to Ke y Z, which is what we are
arbitrar i ly calling th e key di al ed by the ca l le r.
To assign this call routing option to Key Z: Enter this in Dial Action Table for Key Z:
Screened transfer to a s p ecific e xtension Action: TRF
Number : Num ber of exten s i o n
Unscreened transfer to a specific ex tension Action: UTRF
Number : Num ber of exten s i o n
Transfer to any extension that the caller dials,
where the dialed extension numbers start with
the digit Z
Go to a specific mailbox Action: GOTO
Go to a specific mailbox to hear all vo ic e
prompts in Language 1 or Language 2
Go to any mailbox that the caller dials, when
the dialed mailbox number starts with the digit
Z
Log on to a mailbox and Voice Mail Action: LOGON
Number: None
Note: After pressing K ey Z, callers must dial their mailbox numbers to logon to their mailboxes.
Leave a (quick) message in a mailbox having a Action: REC1
2-digit or 3-di git extension number assoc iated Number: IXX (2-digit ext)
with it. IXXX (3-digit ext)
Note: After p ressing K e y Z, calle rs mus t dial the e xt ension a sso ciated wi th t he ma ilbox n umber t o
leave a mess ag e in th a t m a il b ox .
Access a Name Directory of first names Action: DIRF
Action: TRF or UTRF
Number: XX (2-digit ext) or XXX (3-digit ex t)
Number: Mailbox number
Action: LANG1/LANG2
Number: Mailbox number
Action: GOTO
Number: XXX
Number: None
Access a Name Directory of last names Action: DIRL
Number: None
Note: After pressing K ey Z, callers can dial an extension user’s first or last name to transfer to
that extension.
Hang up the call Action: HUP
Undefined Routing Action: UND
Number: None
Note: When callers pres s Key Z, the Automated Attendant says, That is an invalid entry.
Chapter 1: Installation
Number: None
NT System Guide
33
Page 62

Basic Programming for the NT Voice Mail
Step 9: Modify the Dial Action Tables
To plan modifications to the default settings (cont’d)
If you are using more than three Dial Action Tables, you may want to make copies of this page, so
that you have the number of forms you need to set up each one.
Dial Action Table #___ Dial Action Table #___ Dial Action Table #___
Key 0 Action ____
Key 0 Number ___ _
Key 1 Action ____
Key 1 Number ___ _
Key 2 Action ____
Key 2 Number ___ _
Key 3 Action ____
Key 3 Number ___ _
Key 4 Action ____
Key 4 Number ___ _
Key 5 Action ____
Key 5 Number ___ _
Key 6 Action ____
Key 6 Number ___ _
Key 7 Action ____
Key 7 Number ___ _
Key 8 Action ____
Key 8 Number ___ _
Key 9 Action ____
Key 9 Number ___ _
Key 0 Action ____
Key 0 Number ____
Key 1 Action ____
Key 1 Number ____
Key 2 Action ____
Key 2 Number ____
Key 3 Action ____
Key 3 Number ____
Key 4 Action ____
Key 4 Number ____
Key 5 Action ____
Key 5 Number ____
Key 6 Action ____
Key 6 Number ____
Key 7 Action ____
Key 7 Number ____
Key 8 Action ____
Key 8 Number ____
Key 9 Action ____
Key 9 Number ____
Key 0 Action ____
Key 0 Number ____
Key 1 Action ____
Key 1 Number ____
Key 2 Action ____
Key 2 Number ____
Key 3 Action ____
Key 3 Number ____
Key 4 Action ____
Key 4 Number ____
Key 5 Action ____
Key 5 Number ____
Key 6 Action ____
Key 6 Number ____
Key 7 Action ____
Key 7 Number ____
Key 8 Action ____
Key 8 Number ____
Key 9 Action ____
Key 9 Number ____
TIMEOUT Action ____
TIMEOUT Number ____
To program a DAT:
1. Click Customize on the menu bar, and select Dial Action Tables on the Customiz e menu.
2. On the Dial Action Table Options dialog box:
a. Leave Key 9, Key *, and Key # set to their current actions and numbers without chan ging
them.
b. Select from the Action scroll list for each Key 0
key.
c. For each Key 0
Enter either a specif ic extension/mailbox or a representation of an extension/m ailbox, like
XXX, where you want the call to be transferred when the caller dials that digit.
3. When you have finished programming this DAT, click the Next button to move to next DAT.
4. When you have finished all your DAT programming, click the OK button to save your
changes.
NT System Guide
34
TIMEOUT Action ____
TIMEOUT Number ____
8 the action that you would prefer for that
–
8:
–
TIMEOUT Action ____
TIMEOUT Number ____
Chapter 1: Installation
Page 63

Basic Programming for the NT Voice Mail
Step 9: Modify the Dial Action Tables
To program the GOTO option:
1. Click Customize on the menu bar, and select Dial Action Tables on the Customiz e menu.
2. Deci de which key you are going to use to program your GOTO.
3. Se lect GOTO from the Action scroll list for that key.
4. In the Number box for that key:
Enter the number of the mailbox or extension where you wa nt to a call to be directed.
5. When you have finished programming this DAT, click the Next button to move to the next
DAT .
6. When you have finished all your DAT programming, click the OK button to save your
changes.
To program the LANG1 or LANG2 option:
1. Click Customize on the men u bar, and select Dial Action Tables on the Customize menu.
2. Decide which DAT key you are going to use to program your LANG1 or LANG2.
3. Select LANG1 or LANG2 from the Action scroll list for that key.
4. In the Number box for that key:
Enter the number of the mailbox or extension where the sysatem voice prompts will be heard
in the languag e yo u se l ec ted.
5. When you have finished programming this DAT, click the Next button to move to the next
DAT .
6. When you have finished all your DAT programming, click the OK button to save your
changes.
To program Directory Dialing by first name or last name:
When you program the 5-step sequence listed below , you are creating a set of pointers, which link
the following: a DAT, a Call Routing Mailbox, a Director y List, and a Subscriber Mailbox, Guest
Mailbox, Messa ge Center Mailbox, or another type of named mailbox. The DAT points to a Call
Routing Mailbox. The Call Routing Mailbox points to a Directory List. The Direct ory List in turn
points to the named mail box. These poi nters creat e a chain tha t will di rectl y rout e a call di aled fro m
a Touch Tone keypad to a mailbox or extension in your Voice Mail system.
This set of pointers establishes the framework for programming Directory Dialing by either first
name (DIRF) or last name (DIRL) . When Directory Dialing is programmed by first name, a caller
will reach Alice Smith’s mailbox by dialing A-L-I. But when Directory Dial ing is programmed by
last name, the caller will reach her mailbox by di aling S-M-I.
1. Decide which Directory Dialing scheme (DIRF or DIRL) you want to apply to mailbox
names, and then use this Directory Dialing scheme when you are recording a name for every
mailbox in your Voice Mail system.
2. Assign the same Directory List to every mailbox.
3. Assign a Call Routing Mailbox to the Directory List
4. Set up a DAT for DIRF or DIRL
5. Se t up the DAT to tran sfer calls to the mai lboxes.
Chapter 1: Installation
NT System Guide
35
Page 64

Basic Programming for the NT Voice Mail
Step 9: Modify the Dial Action Tables
To program Directory Di aling by first name or last name (cont’d):
Recording a Name for a Mailbox
1. Select the Directory Dialing scheme (DIRL or DIRL) you want to apply to the mailbox names
in your Voic e M ai l s y stem.
2. Log onto the System Administrator Mailbox.
3. Dial the Security Code, if requir ed.
4. Pre s s S A (7 2) for the System Administrator Menu.
5. Press N (6) to enter the Recording Mode for recording the name.
6. Follow th e vo ice prompts.
Make sure that you record the mailbox name according to the same scheme you selected in
Step 1 above.
7. Repe at Step 6 in order to record a name for every other mai lbox in your system.
Assigning a Directory List to a Mailbox
1. Click Customize on the men u bar, and select Mailbox Options on the Customize menu.
2. Se lect Edit on the Mailbox Options menu.
3. Click to select the Gener al tab.
4. Assign a desired value to the Directory List, and enter that value in the Directo ry Li s t box.
5. Click the Next button, and repeat Step 4 for the next mailbox to which you are assigning the
Directory List.
6. Repeat Step 5 until you hav e assigned the Directory L is t to every mailbox in your Voice Mail
system.
7. Click the OK button to save your assignments.
Assigning a Call Routing Mailbox to Directory List
1. Click Customize on the men u bar, and select Mailbox Options on the Customize menu.
2. Se lect Edit on the Mailbox Options menu.
3. On the Mailbox Range dialog box:
Click to unchec k every Mailbox Type except
4. On the Mailbox Options dialog box :
Click to sele ct the Call Handling tab.
5. In the Directory List to Use box on the Call Handling tab:
Enter the number of the Direc tory List that you used in the pre vious procedure.
6. In the Dial Action Table box on the Call Handling tab:
Enter the number of the DAT that you pla n to as sign to the Call Routing Mailbox.
7. Click the OK button to save your assignments.
Call Routing , and click the OK button.
NT System Guide
36
Chapter 1: Installation
Page 65

Basic Programming for the NT Voice Mail
Step 9: Modify the Dial Action Tables
To program Directory Di aling by first name or last name (cont’d):
Setting up a DAT for DIRF or DIRL
1. Click Customize on the men u bar, and select Dial Action Tables on the Customize menu.
2. If you have assigned any DAT other than DAT 1 in Step 6 of the previous procedure, click the
Next button until that DAT appears on your screen.
3. F or any DAT key 0
Voice Ma il :
a. Select your Directory Dialing scheme (DIRF/DIRL) on the Action scroll bar for the key.
b. Make sure that the Number for the key is set to None.
4. Click the OK button to save your assignments.
8 that does not match the f irst digit of the extensions/mailboxes in your
–
Setting up a DAT for Call Transfers to the Mailboxes
1. Click Customize on the men u bar, and select Dial Action Tables on the Customize menu.
2. If you have assigned any DAT other than DAT 1 in Step 6 of the previous procedure, click the
Next button until that DAT appears on your screen.
3. F or the DAT key that matches the first digit of the extension/ mailbox numbers in your Voice
Mail system:
Make sure tha t the Action is set to TRF or UTRF or GOTO.
4. F or the DAT key that matches the first digit of the extension/ mailbox numbers in your Voice
Mail system:
Make sure that the Number for the key contains as many x’s as there are digits in each Voice
Mail extension/mailbox number. For example: You would enter XX for a Voice Mail system
with 2-digit mailbox numbers and XXX for a Voice Mail sys tem with 3-digit mailbox numbers.
5. Click the OK button to save your assignments.
Setting up a DAT for Call Transfers to Other
Mailboxes (Optional)
If the number of extensio ns /mailbox e s in your Voice Mail system is greater than 100, you will need
to program tra nsfers t o the second s et of m ailbox es /ext ensi ons not c o vere d b y your progra mming in
the procedure above.
1. Click Customize on the menu bar, and s elect Dial Action Tables on the Customize menu.
2. If you have assigned any DAT other than DAT 1 in Step 6 of the previous procedure, click the
Next button until that DAT appears on your screen.
3. F or the DAT key that matches the first digit of the extension/ mailbox numbers in your Voice
Mail system:
Make sure tha t the Action is set to TRF or UTRF or GOTO.
4. For the DAT key that matches the first digit of the remaining extension/mailbox numbers in
your Voice Mail system:
Make sure that the Number for the key contains as many x’s as there are digits in each Voice
Mail extension/mailbox number. For example: You would enter XX for a Voice Mail system
with 2-digit mailbox numbers and XXX for a Voice Mail system with 3-digit numbers.
5. Click the OK button to save your assignments.
Chapter 1: Installation
NT System Guide
37
Page 66

Basic Programming for the NT Voice Mail
Step 10: Record an Instruction Menu
Step 10: Record an Instruction Menu
In addition to the Welcome Message, there is a list of call-routing options that repeats those
in the Instruction Menu part of your Welcome Message (see Step 8).
If a caller dials an invalid entry after listening to the Welcome Message, the Automated Attendant
will repeat only the Instruction Menu but not the gr eeting to callers. An invali d entry is any digit or
character (0
undefined (UND). Before he aring the repeat ed Instruc tio n Menu, ca llers will hea r the prom pt, That
is an invalid entry.
You can set up this Instruction Menu in your Voice Mail system in one of thes e ways:
use the default Instruction Menu
Q
record your own Instruction Menu
Q
use no Instruction Menu.
Q
9, *, #) dialed by the cal ler, when the D AT Key Action for that digit or character is
–
Use the Default Instruction Menu
If you are using the default Instruction Menu, callers will hear: If you are calling from a Touch
Tone phone, ple ase dial the extension num ber you wish to reach or dial 0 for ass istance. If you
are calling from a rotary dial phone, please stay on the line for assistance.
Record Your Own Instruction Men u
Or you can personaliz e the Instruction Menu, so that it matches the various departments in your
company . Then callers will hear options such as: Press 1 for Sales. Press 2 for Accounting. Press
3 for Marketing... If you know the extension number of the person you are trying to reach, you
may dial it at any time. These are options that you have already programmed in the Dia l Action
Table assigned to the Call Routing Mailbox you are using.
You need to record an Instruction Menu for each Dial Action Table that you use in Ste p 9. If you
program two different Dial Action Tables, for example, you will need to re cord two different
Instruction Menus.
When you record each Instruction Menu, you will need to enter the number of the Call Routing
Mailbox associated with the Dial Action Table. Be sure that this number is different from any Call
Routing Mailbox num ber you used previously in S tep 8 when you recorded your Welcome Messages.
Use No Instruction Menu
Instead of using eithe r the default Instruction Menu or recording your own, you may prefer to use
no Instruction Menu at all. In this case, after callers dial invalid entries and hear the That is an
invalid ent r y prompt, the prompt will not be followed by a list of call-routing options.
To use the default Instruction Menu:
1. Click Customize on the menu bar, and select Mailbox Options on the Customize menu.
2. Se lect Edit on the Mailbox Options menu.
3. On the Mailbox Range dialog box:
Enter in to th e Start Number box the num ber of the Cal l Ro uting Mai lbox you used in Ste p 6 of
the above pr ocedure, and click the OK b utton.
4. Click to select the Call Handling tab.
5. Make sure that a appears in the Play Default Messages check box.
This is the default setting for Play Default Messages.
6. Click the OK button.
NT System Guide
38
Chapter 1: Installation
Page 67

Basic Programming for the NT Voice Mail
Step 10: Record an Instruction Menu
To record a Instruction Menu:
1. Log onto the System Administrator Mailbox.
2. Dial the Security Code, if requir ed.
3. Pre s s S A (7 2) for the System Administrator Menu.
4. Press I (4) for the Instruction Menu Mailbox.
5. Follow the voice prompts for recording the Instruction Menu.
6. When finished: Dial the number of the Call Routing Mailbox to which the DAT is assigned.
Your Instruction Menu will now override the default Instruction Menu, regardless of the current setting for Play Default Messages.
To use no Instruction Menu:
1. Click Customize on the menu bar, and select Ma ilbox Options on the Customize menu.
2. Se lect Edit on the Mailbox Options menu.
3. On the Mailbox Range dialog box:
Enter into the Start Number box the number of the Call Routing Mailbox that you are using,
and click the OK button.
4. Click to select the Call Handling tab.
5. Remove the from the Play Default Mes sages check box.
6. Click the OK button.
Chapter 1: Installation
NT System Guide
39
Page 68

Basic Programming for the NT Voice Mail
Step 11: Record Names for the Subscriber Mailboxes
Step 11: Record Names for the Subscriber Mailboxes
A name should be recorded to id entify each Subscriber Mailbox in the Voice Mail system. The
name recording may last up to 10 seconds. Either the System Administrator or the Subscriber to
whom the mailbox belongs may record the name for each Subscriber Mailbox.
Once a Subscriber Mailbox name is recorded, the Automated Attendant will play the name to callers rather than the Subscriber Mailbox number or exte ns ion number in the voice prompt. For example: Suppose you recorded the name “Joe Smith” for Subscriber Mailbox 303. If a transfer to
extensi on 303 is incomplete becaus e that extension is busy, the Automated Attendant will prompt
Joe Smith is busy rather than Extension 303 is busy.
To record a name for a Subscriber Mailbox (System Administrator):
1. Log onto the System Administrator Mailbox.
2. Dial the Security Code, if requir ed.
3. Pre s s S A (7 2) for the System Administrator Menu.
4. Press N (6) to enter the Recording Mode for recording the name.
5. Dial the mailbox number.
6. Follow th e vo ice prompts.
To record a name for a Subscriber Mailbox (Subscriber):
Subscribers ma y record their own mailbox names instead of the System Administrator:
1. Call your own mailbox.
2. Pre s s 0 for the Main Menu.
3. Pre s s R N (7 6) to enter the Re cording Mode for recording the name.
For further instruct ions, see the User’s Guide.
NT System Guide
40
Chapter 1: Installation
Page 69
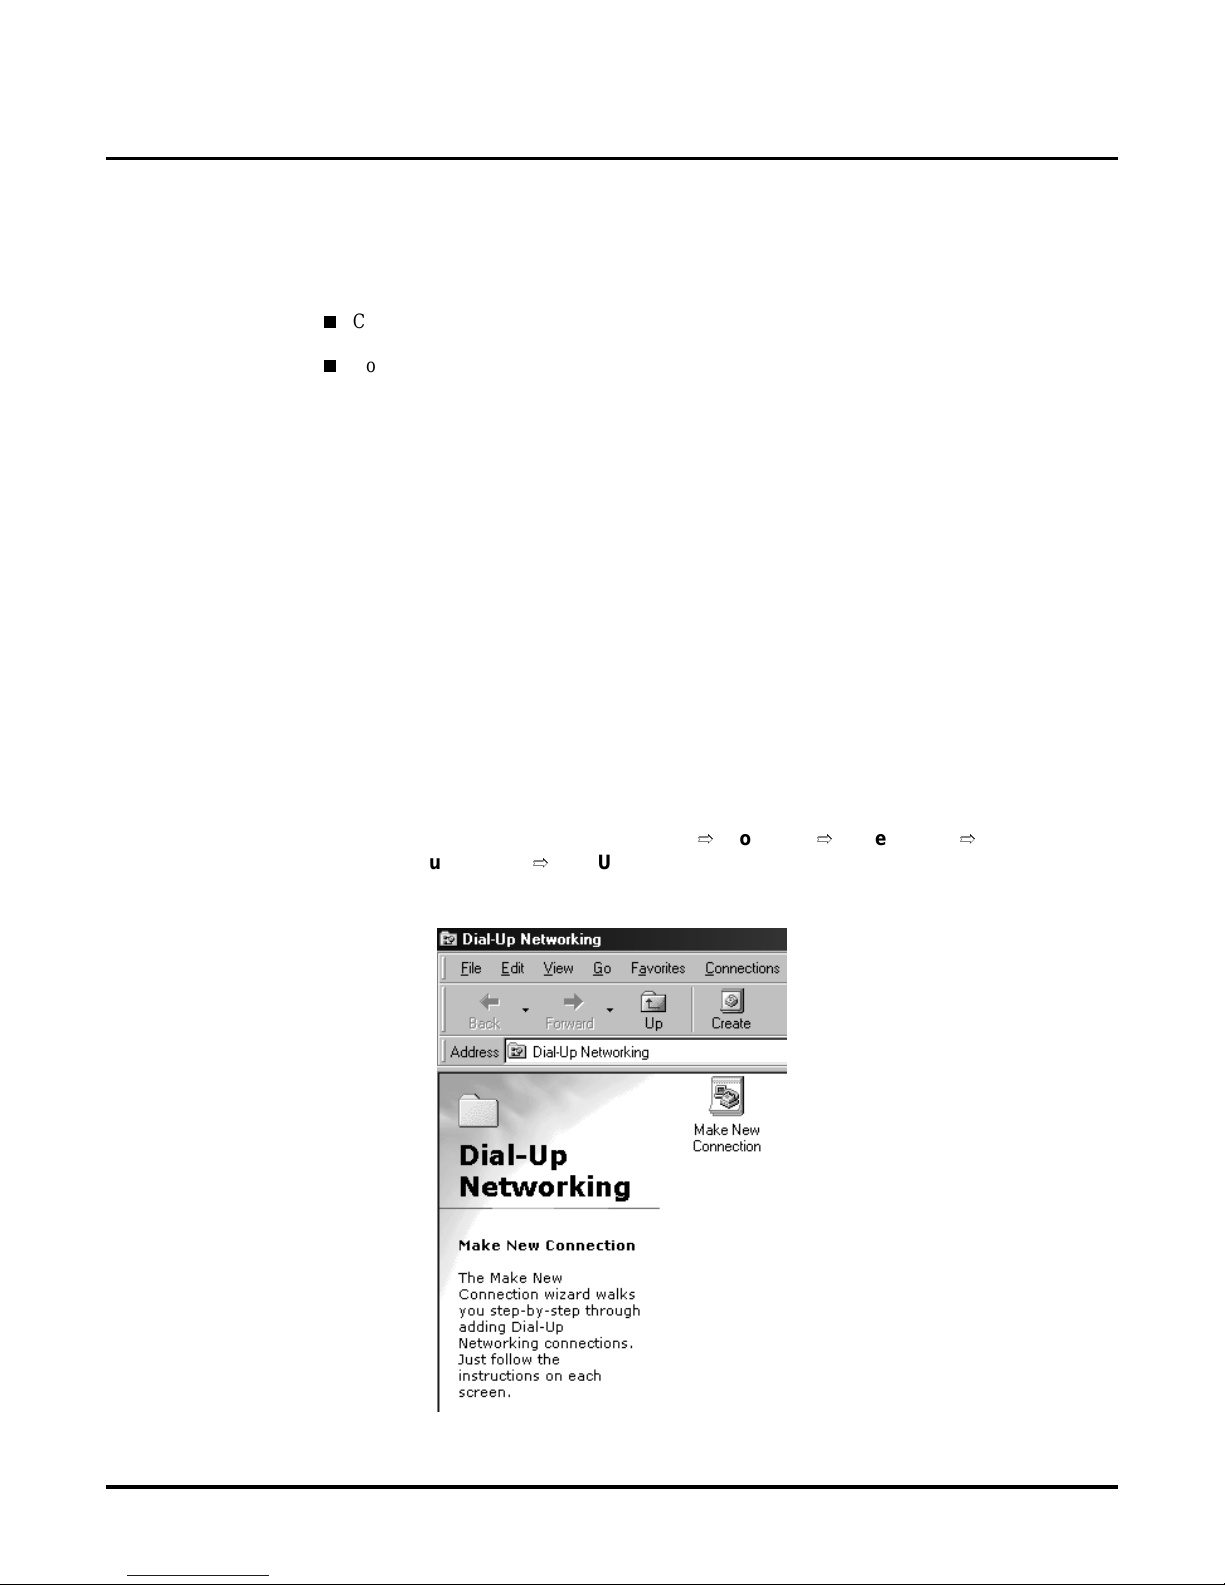
Advanced Setup Options for the NT Voice Mail
Configure a Computer at the Remote Location
Advanced Setup Options for the N T Voice Mail
Advanced Setup Options for the NT Voice Mail
This section explains how to:
Configure a computer at a rem ote location for ac cessing the NT Voice Mail through a modem.
Q
(This setu p assumes you have already connected the Voice Mail’s int ernal modem, see page 9).
Connect the NT Voice Mail to your LAN.
Q
To program this Voice Mail, you need to have a good working knowledge of Windows NT (including its operation and terminology). In addition, contact your LAN Administrator/Manager when
connecting th e NT Voice Mail to your LAN.
Configure a Computer at the Remote Location
You can use a co mputer at a different location to access the N T Voice Mail (usi ng the Voice Mail ’s
internal modem) . T his set up is useful for troubleshooting and programming purpos es . You access
the NT through a program called Remote Access Service (RAS) which serves as a Remote Connection Manager. RAS is set up and configured for you at the factory. It does not require an y additional configuration.
The NT Voice Mail Server has been configured at the factory for a user account and permissions
specif ic to th is app lic at ion . (Spe ci f ics a re p ro vide d in t he f oll ow ing proce dure) . I t is re comm end ed
that you maintain these factory configurations unless you have experience in NT System Administration.
It is highly recommended that the computer at the remote location must have Windows NT
Note:
operating software as well as a modem that is already inst alled and configured for us e.
To set up a computer to access the NT Voice Mail:
1. From the computer’s des ktop, click Start
Communications ¿Dial-Up Networking. A portion of the screen that you see is shown
belo w:
Programs ¿Accessories
¿
¿
Chapter 1: Installation
NT System Guide
41
Page 70
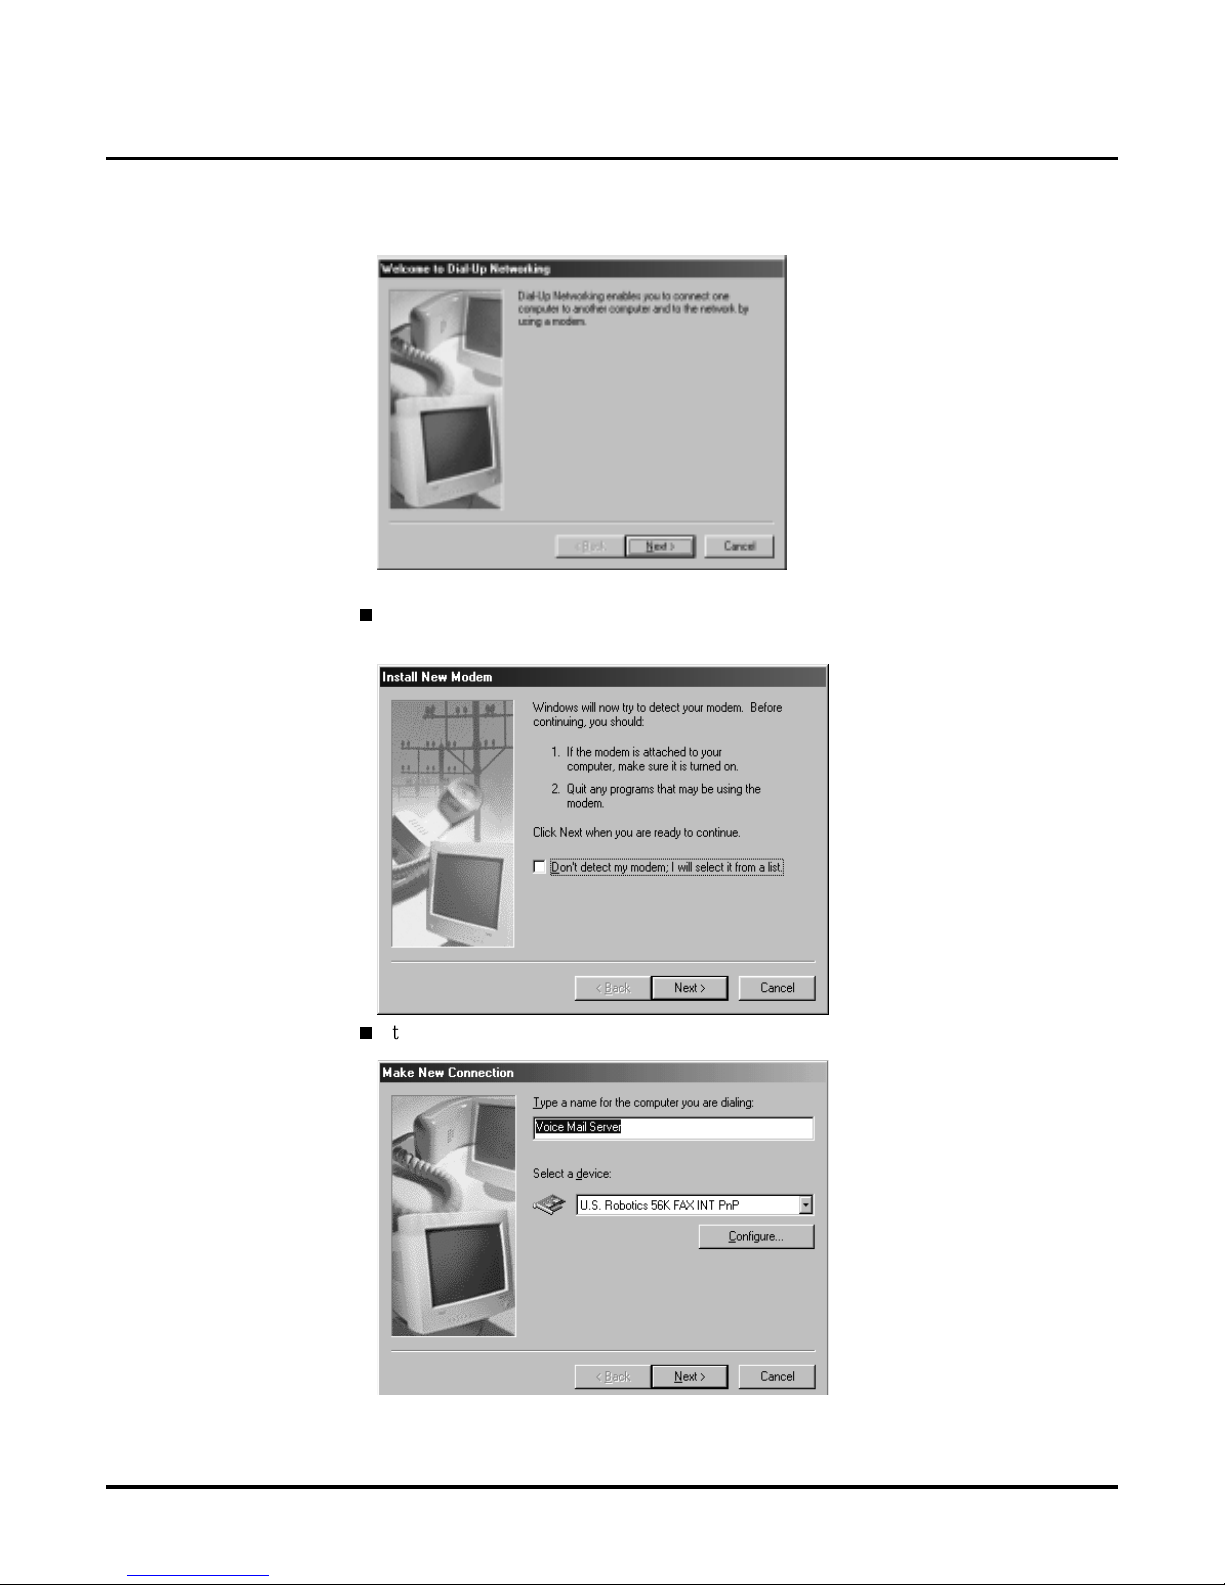
Advanced Setup Options for the NT Voice Mail
Configure a Computer at the Remote Location
2. Double-cli ck the
Connection Wizard.
3. Click
Next
You see the following if your modem is not connected and turned on. See your Network
Q
Administrator.
Make New Connection
.
icon. You see the first page of the Make New
Otherwise, you see the fol lowing:
Q
4. In the Type a name for the computer you are dialing field, enter a name for the NT
Voice Mail. In the above example, V oice Mail Server was entered.
NT System Guide
42
Chapter 1: Installation
Page 71
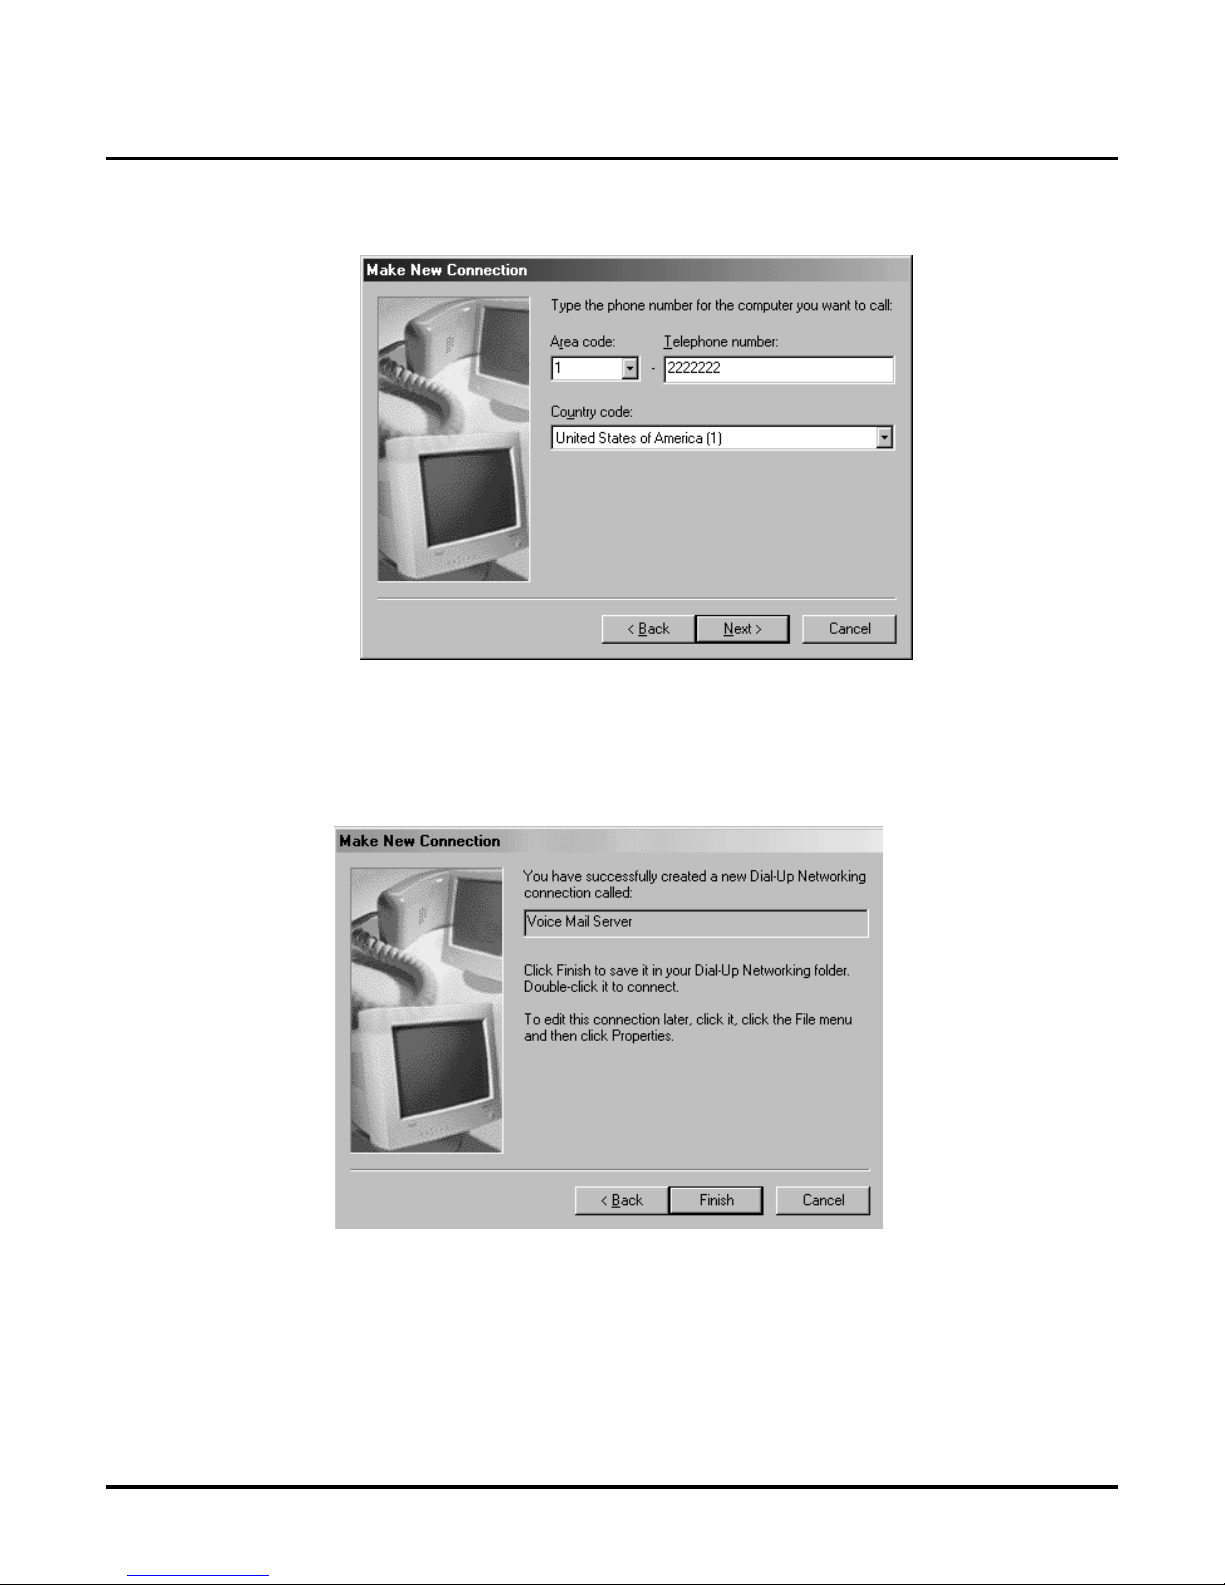
Advanced Setup Options for the NT Voice Mail
Configure a Computer at the Remote Location
5. In the
6. In the
7. In the
8. In the
Select a device
change any options for your modem. When you are done, click
Area code
Telephone numbe r
the NT Voice Mail’s internal modem.
Country code
You see:
field, enter your computer’s modem device. Click Configure to
field, enter the ar ea code for th e NT Voice Mail’s modem.
field, ent er the phone number of the telephone line connected to
field, select the coun tr y code of the NT Voice Mail’ s internal modem .
Next
.
9. Click
Finish
Chapter 1: Installation
. You see:
NT System Guide
43
Page 72
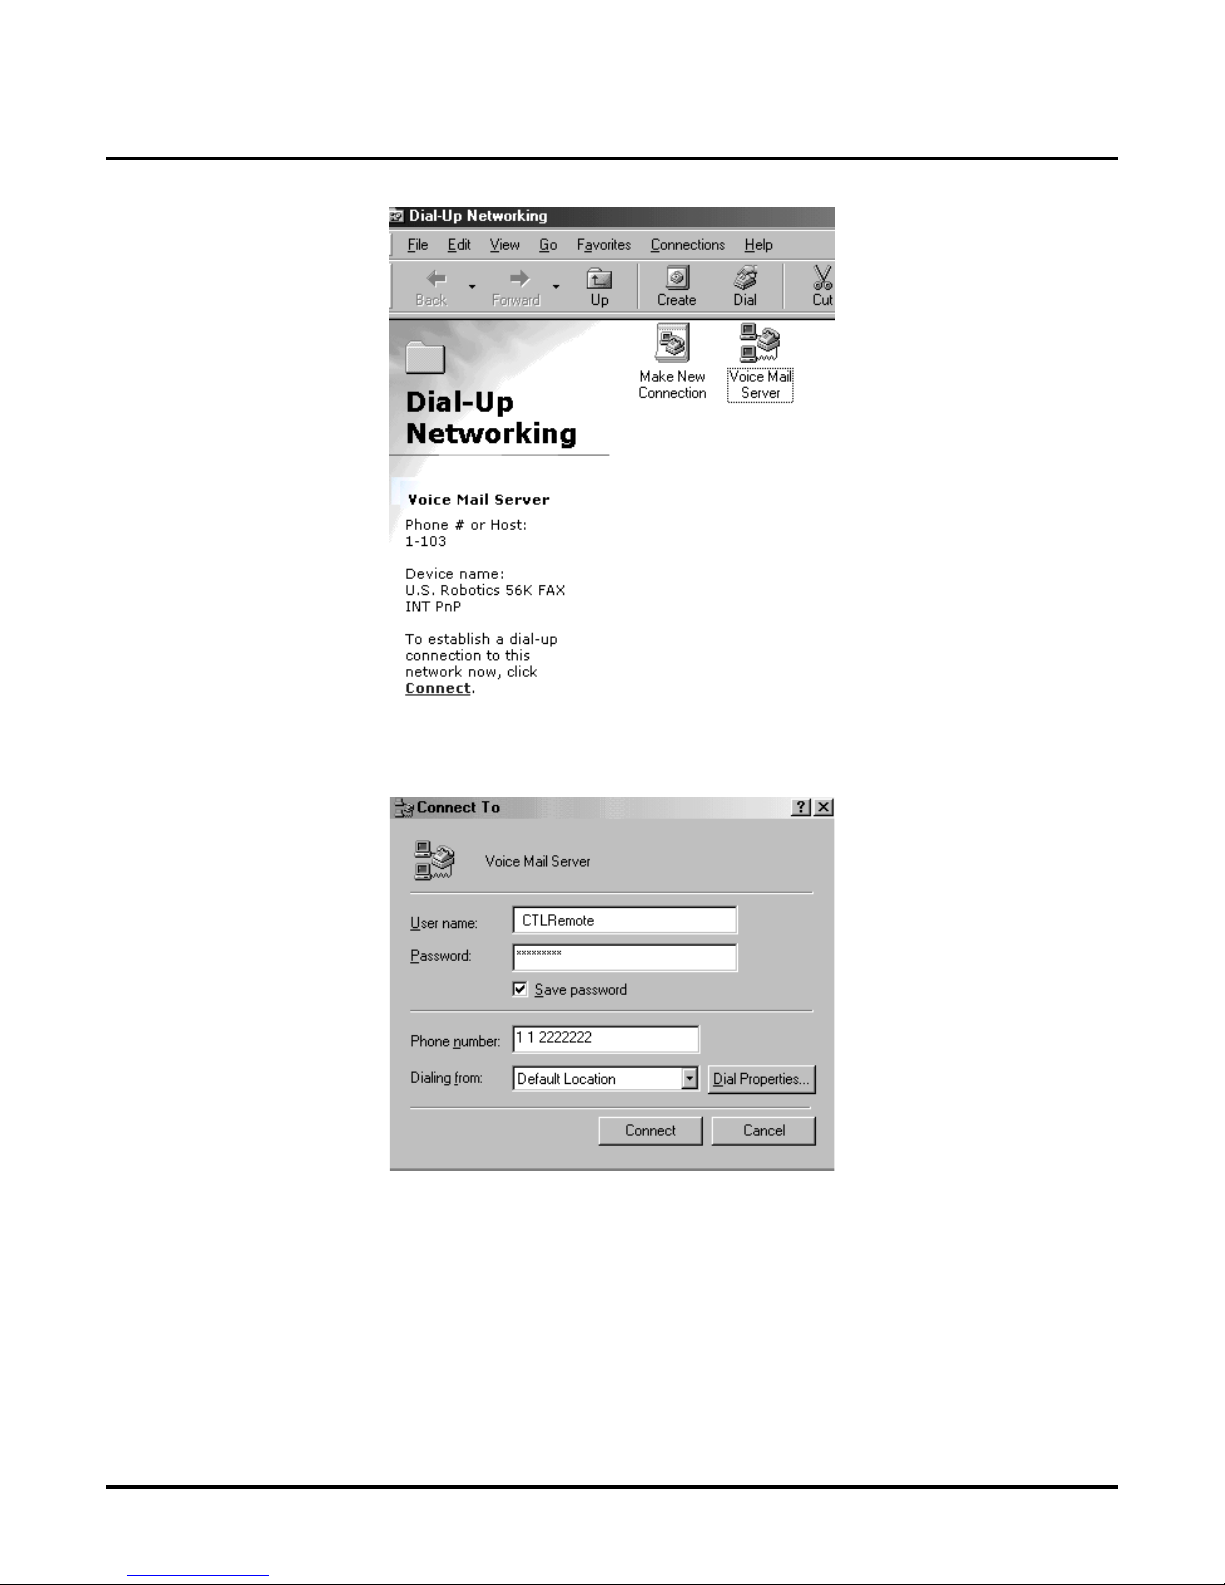
Advanced Setup Options for the NT Voice Mail
Configure a Computer at the Remote Location
10. Double-click the new icon for the connection you just made. You see:
11. In the
12. In the
13. Click the
User Name
Voice Mail Server for remote computers. The NT Voice Mail is shipped with CTLRemote as
the User Account. The user acc ount, CTL Remote, has already been configured for dial in per-
mission . Verify with the NT Administrator at the site where the Voice Mail is located that this
User Name has not changed.
Password
is shipped with the crossroad as the password. Verify with the NT Administrator at the site
where the Voice Mail is located that this password has not changed.
Save password
time.
field, enter the name of the NT User Acco unt that was created in the NT
field, enter the password for the NT Vo ice Mail Server. The NT Voice Mail
radio box so that you do not have to re-enter the password each
NT System Guide
44
Chapter 1: Installation
Page 73

Advanced Setup Options for the NT Voice Mail
Configure a Computer at the Remote Location
14. Click
Connect
. You will connect to the NT Voice Mail.
Accessing the NT Voice Mail Modem
After configuring the NT Voice Mail and the remote computer, it is simple to connect to Voice
Mail’s Internal modem:
To connect to the NT Voice Mail (using the modem):
1. From the remote computer’s desktop, click
munications
2. Double-click the icon for the NT Voice Mail connection.
¿
Dial-Up Networking
.
Start
¿
Programs
¿
Accessories
¿
Com-
Chapter 1: Installation
NT System Guide
45
Page 74
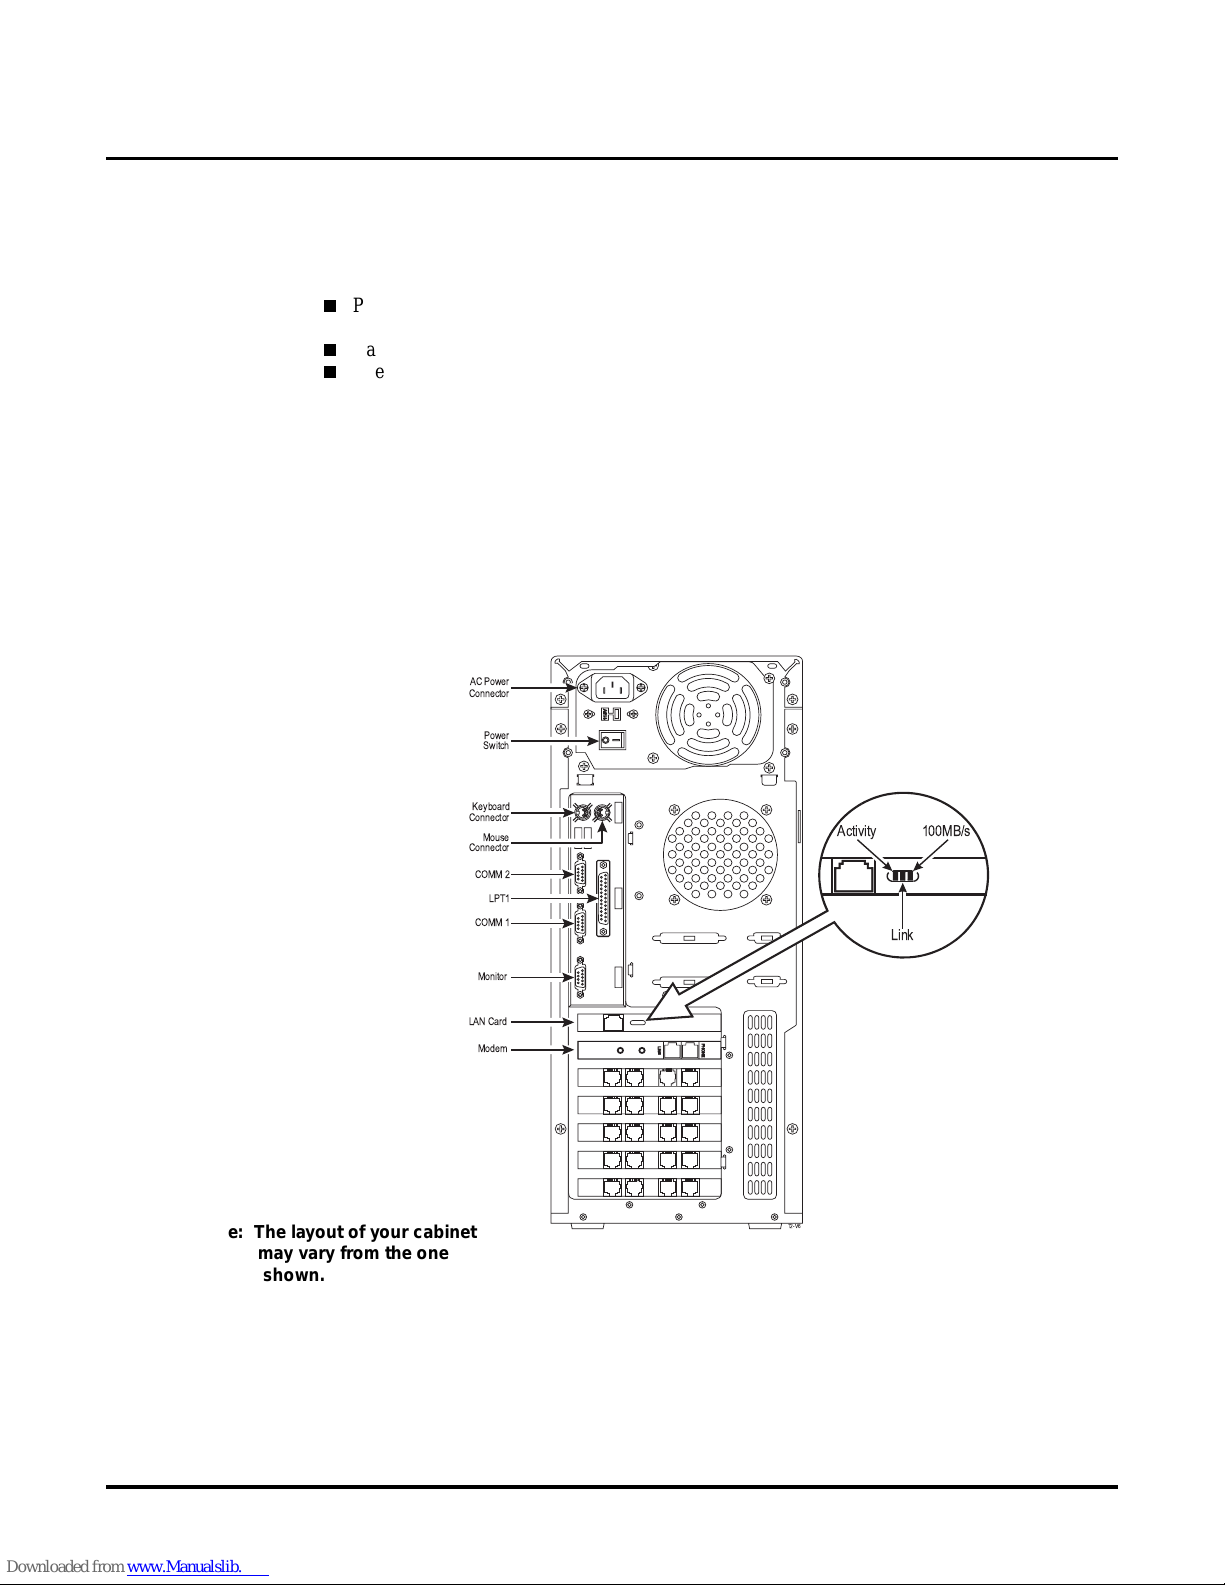
Advanced Setup Options for the NT Voice Mail
Connect the NT Voice Mail to Your LAN
Connect the NT Voice Mail to Your LAN
Connecting to a LAN shoul d be done by your LAN Manager (someone who is knowledgeable in
config uring LANs). Connect the NT Voice Mail to your LAN if you want to:
Program the Voice Mail from a local computer that is also connected to your LAN. (This
Q
method does not require using the modem).
Back up the database to a local server.
Q
Use the NVM-Desktop Messaging option.
Q
T o con nect your NT Voice to a LAN, your system must be TCP/IP compatible and hav e an ethernet
connection.
10/100 PCI Network (LAN) Card
Your NT Voice Mail is equipped with a 10/100 PCI Network (LAN) Card that is set for auto negotiation. This a llows the card to automat ically detect whether you are conne cted to a 10 or
100 Mbps hub. The card is equip ped wi th an RJ-45 connector (whic h req uires twisted pai r et hernet
cable). See Figure 1-7.
Note: The layout of your cabinet
may var y fro m th e one
shown.
AC Power
Connector
Power
Switch
Keyboard
Connector
Mouse
Connector
COMM 2
LPT1
COMM 1
Monitor
LAN Card
Modem
Activity
T2-V6
100MB/s
Link
Figure 1-7: NT Vo ice Mail with Network Card
NT System Guide
46
Chapter 1: Installation
Page 75

Advanced Setup Options for the NT Voice Mail
Connect the NT Voice Mail to Your LAN
Status LEDs
The Network Card ha s thre e sta tus LEDs: Link, Ac ti vit y (Acti vi ty) and 100 N. Aft er conne cting to
the LAN, you may see these LEDs ligh t.
The Acti vity LED bl inks whe n dat a is tra nsmi tted or r eceived from the e thernet cable. The Act ivi ty
LED is off when the po wer on the hu b is of f or when no data is bei ng trans mitt ed. The Link LE D is
associate d with the RJ-45 connector to indicate a connection with the twisted pair lin k. When no
network data is received, the connector will detec t link-integrity pulses (which should be sen t periodically from the LAN.) The LED lights when either a data packet or li nk-integrity pulse is
receiv ed. When no data packet is rece ived and the connector does not detect a link-integrity pul se ,
the LED turns off to indicate a link failure. (The transmit and re ce ive functi on of the RJ-45 connector is also disabled.) The Link LED is also off when: no twisted pair is connected, the hub has no
power sour ce, t he twis t ed pair is f aul ty, or the twist ed-pair wire exc eeds the re commended l engt h.
The 100 Mbps LED lights if you con nect the card to a 100 Mbps hub.
LAN Parameters
Record the following 3 LAN paramet ers:
O
Server Service Number assigned to the NT V oice Mail
By default, th e Serve r Serv ice Number f or the NT Voice Mail is 2000. If this numbe r does n ot
conflict with a Server Service Number (Port Number) of another comput er on the LAN, it is
suggested tha t you use 2000. Using 2000 reduces the amount of prog ramming you ha ve to do
later on. (Consult the LAN Administrator.)
O
IP Address for the NT Voice Mail
By default, the IP Address for the NT Voice Mail is 192.0.4.14. If you did not have an existing TCP/IP network when you purchased the NT Voice Mail, it is recommended that you use
the default I P Address. If you alrea dy hav e a TCP/IP network in place, change the IP Address
for the NT Voice Mail to be compatible with your ex isting network. (Consult the L AN
Administrator ) .
O
Subnet Mask for the NT Voice Mail
By default, it is 255.255. 255.0. If you did not have an existing TCP/IP net w ork when you purchased the NT Voice Mail, it is recommended that you use the default Subnet Mask. If you
already have a TCP/IP network in place, change the Subnet Mask Address for the NT Voice
Follow the voice pr o mpts to continu e.
To connect the NT Voice Mail Network Card to your LAN:
1. Make sure that the NT Voice Mail is properly connected to your phone system.
2. Using twisted pair ethernet cable, connect the NT Voice Mail Card to your LAN.
Chapter 1: Installation
NT System Guide
47
Page 76

Advanced Setup Options for the NT Voice Mail
To enter the LAN Parameters:
1. On th e NT Voice Mail’s desktop, click
2. Double-click
3. Select the Protoco ls tab on the
4. Double-click
5. If you are using values other than those already setup for you, sele ct the
address
6. Ask your Network Administrator for the correct IP Address for your network, and enter it in
the
IP address
7. Ask yo ur Network Administrator for the correct Subnet Mask for your network, and enter it in
the
Subnet Mask
8. Click the OK button. You will see a dialog box te lling you that you must s hut down the Voice
Mail and then restart the computer before the new settings will take effect. The dialog box will
also ask you if you want to res tart your computer now.
9. Click the
10. Follow the screen prompts.
Network
TCP/IP Protocol
radio box.
button.
Yes
.
Network
.
field .
field.
¿
Start
dialog box.
Settings
¿
Control Panel
.
Specify an IP
NT System Guide
48
Chapter 1: Installation
Page 77

The NT Voice Mail Features
The NT Voice Mail Features
About the NT Voice Mail System
Chapter 2:
Features
Introducing the NT Voice Mail System
About the NT Voice Mail System
The NT Voice Mail system provides a fully-integrated Automated Attendant and Voice Mail for
your telephone system. Outside callers can use the system to leave recorded messages for the
people in your company. Inside callers can use it to leave recorded messages for ea ch other. The
Voice Mail then st o r es each voi ce message in th e voice mai lb o x of the intended recipient.
Voice Mail subscribers acces s the sys t em by calli ng their o wn v oic e mailbo xe s from eit he r insid e or
outside the company. After calling, subscri bers press codes on their Touch Tone phones in order to
listen to their m essages and use other Voice Mail features like the Autom ated Attendant.
About the Automated Attendant
The chief function of the Automated Attendant is to answer your company's incoming cal ls . You
can program the Automated Attendant to an swer all lines or only some lines. One common setup is
to have the Automated Attendant greet an outside caller with a recorded Welcome Message, which
normally includ es a greet ing and Inst ructio n Menu. A typi cal Welcome Message would say: Thank
you for calling company ABC. Please dial the extension number you wish to reach. Or dial 1 for
sales, dial 2 for customer service. After hear ing th e Welcome Message, ca lle rs can route th eir o wn
calls by dialing either the desired extension number or the code specified in the Instruction Menu.
You can use the Flexible Answering Schedules feature to have the Automated Attendant greet
callers one way during the day a nd another way at night. You simply program the day (or date) and
time that a specific company greeting should play. (For instructions, see Customizing Answering
Schedule T ab les sta r ting on page 105.)
About the Features Chapter
This ch apt er pr es en ts the f ea tur es av a il abl e on t he NT Voice Mail sys t em. T he e x ac t mix of fe at ur es
avai la ble on your Voice Mail
how th e system was configured in the factory, how t h e system was s et up by the Sy stem Administrator or installer, and which phone system was installed.
Chapter 2: Features
as well as the system specifications — depends on seve ral fa ctors :
—
NT System Guide
49
Page 78

The NT Voice Mail Features
About the Features Chapter
Specifications
Ports
Voice Storage 250 hours
Mailboxes
Tenants 4
Answer Schedule Tables 16
Dial Action Tables 100
Telephone System Interface
Direct Terminal Access 14” VGA Monitor and Keyboard
Remote Terminal Access
(For information about the Rem ote
Client, see Remote Client later in
this guide.)
Electrical Requirements 10 5-120 VAC, 60 Hz
Environmental Requirements
Room Temperature
Humidity
Dust
Reliabili t y Designed to meet 50,000 hours MTBF
Safety Approvals UL, CSA
EMI Emissions C om p li es w i th FC C pa r t 15 cl ass A,
Registratio ns
FCC
DOC
Cabinet Dimensions
Width
Length
Height
Weight
4 to 24-ports
Up to 4000
• A Mitel phone system requires a D42-SX card. A Norstar phone
• Centrex insta ll ati on s re quir e 1 li gh ten in g- pro tec ted CO l ine pe r
• Other ph on e sy stem s re quir e 1 Anal og Sta tio n Po rt /OP X of f the
• an Inte rnal 56 k Mo dem
• a dedicated phone line
• Window NT remote access service
• Dial-u p Net wo rki ng on th e R emote si de.
50-104° F (10-40°
20-85% non-condensing
No visible accum ulation within 24 hours
SOR - 88475 class A
Complies with FCC part 68 REG # 1A92PJ-10975-VM-E
Complies with DOC CS03
7 1/4"
18"
17"
27 lbs
system re quir es a D42NS card. E ach car d pro vides 4 digit al po rts,
giving a total 4 V oice Mail ports.
Voice Mail port.
phone s yst em ( with D TM F deco der) pe r Voice Mai l port .
C)
These are general specifications for the NT Voice Mail system. The specifications of your Voice
Mail depend on how the system was configured in the factory.
NT System Guide
50
Chapte r 2: Fe at ur es
Page 79

The NT Voice Mail Features
NT Voice Mail Compatibility
The NT Voice Mail system operates in conjunc tion with the phone system that you install. To see a
list of phone systems that you can install with your Voice Mail system:
1. Click File on the NT Voice Mail menu bar.
2. Select Install on the File menu.
3. Select Phone System on the Install menu.
You will see a list of phone systems on the Phone Installation Wizard -1 of 5 dialog box.
The NT Voice Mail system contains a default databas e that is compatible with your installed phone
system. This compatibility reduces the amount of time that you have to s pend programming the
system.
NT Voice Mail Compatibility
Chapter 2: Features
NT System Guide
51
Page 80

The NT Voice Mail Features
System Features
System Features
Depending on how the system is set up, the following features are available:
Caller ID
Availability: If supplied by the CO, supported by the phone system (such as the124i/
384i, ONYX VS and ONYX IV with sofware 3.0 or higher), and installed
by the manufacturer.
Caller ID helps the Voice Mail to identify the trunk that an outside caller uses to leave a message.
Caller ID enhances the Voice Mail’s listen ing options as follows:
The message recipient can pres s TI and hear the outsi de telephone number of the message
O
sender.
The message recipient can pres s MC to make an immediate call to the message sender ’s tele-
O
phone number as long as tht numbe r is a “dialable number.” A dialable number is a number
that includes all the digits that must be dialed to reach t he message sender. These include a
“1” and area code if applicable. The Central Office handlin the call determines what type of
Caller ID digits are sent.
Caller ID Automatic Transfer
Availability: If supplied by the CO, supported by the phone system (such as the124i/
384i, ONYX VS and ONYX IV with software version 3.0 or higher), and
installed by the manufacturer.
With Caller ID Automatic Trans fer, the Automat ed Atte ndan t kno ws where to tra nsfe r a ca ll by just
looking at the caller’s telephone number (the Caller ID). The outs ide caller does not hear the Automated Attenda nt Welcome Mes sage (or Ins tructi on Menu). The Voice Mail will i mmediatel y di rect
the call to the required destination, without the caller dialing additional digits.
See Customizing Caller I.D. Tables on page 115.
Centralized Voice Mail (Remote Tenant Service)
Availability: Fo r ONYX IV and 384i only.
The Voice Mail can serve up to 4 phone systems, where 3 of them are in remote locations. One of the
phone systems is designated as the Master and the others as the Slaves. The Mas ter provides the remote
Slave extens ions with access to Voice Mail f eatures via Tie Lin es.
Inbound calls to the Master can be answered by the Voice Mail Automated Attendant and then
transferred to any extension in the Master or Slaves. If the extension user does not answer, the call
retur n s to the Voice Mail. Then the caller can either leave a message or return to th e Automated
Attendan t — which is how a call transfer normally works. This arr angement trea ts the Slave extensions as parts of the Master system.
From the Voice Mail: Local or remote users do not have to dial any special digits in order to access
the Voice M ai l f eat u r es. They sim p ly press thei r MSG keys to reach their mailboxes and then
access th e Voice Mail Mai n M en u .
To leave a message for an extension within the same phone system, press the MSG key. If the
called e xtension is in another phone system, press RS (Record and Send) to leave a message there.
NT System Guide
52
Chapte r 2: Fe at ur es
Page 81

The NT Voice Mail Features
System Features
To set up Centralized Voice Mail:
Phone Programming for the Master ONYX IV
All syst ems must be equipped with ei ther T1 or Analog Tie Lines.
Q
Make sure that the extension numbers in the Mast er and in the Slaves do not overlap.
Q
Connect the Voice Mail to the Master ONYX IV in the usual way. Do all the normal Voice Mail
Q
programming to this system.
Connect a Tie Line (or Tie Line Group) between the Master and each Slave. Do all the normal
Q
Tie Line programming. Be sure to assign each Tie Line to a Trun k Group Access Code.
All Tie Lines for voice mail access must be grouped in a single terminal rotary with a common
Q
first trunk (EA program).
Two-digit acc es s codes, such as 90-99, must be assigned to the Tie Line Group.
Q
All Dial Action Tables for the Automated Attendant are supported, such as call by name, by
Q
extension, and by group.
A call ringing in to the Mas ter system (local trunk) can be redirec ted to any sys tem, without the
Q
caller b eing aware of th e transfer.
Phone Programming for Each Slave ONYX IV
Make sure that the extension numbers in the Mast er and in the Slaves do not overlap.
Q
Q
QP, Mailbox Installed: Enter Y.
Q
QP, VM Master Station: Enter the e xtension number of the 1st Tie Line in the Tie Line Gr oup
that terminates to the Master ONYX IV.
Q
QP, IMMEDIATE MSG-LAMP OFF: Enter Y if you want the MSG lamp to go out as soon as
the user presse s the MSG key to acces s thei r mailbox. Othe rwise, t here wil l be a slig ht dela y (as
the Voice Mail updates the lamp information) and the MSG lamp may still be on after the user
listen to messages.
If you wish, you can terminate a trunk to the VM Master Station Number, so that a trunk that normally rings a Slave ONYX IV can be answered by the V oice Mail. However, this scenario uses both
outgoing and in coming T ie Lines — fr om the Sl av e t o the Mast er and t hen b ack ag ain. You may not
want to have the Tie Lines occupied like this during the day, but you may wan t to terminate a trunk
to the VM Master only for Night Mode calls.
the Automated Atte ndant will look at your AST assignment(s).
If the table does not contai n a match for th e Calle r ID,
Voice Mail Programming
If several tenants share an ONYX IV phone system: In System Options, Tenant, enable
Q
Intertenant Mess aging , and enter the number of remote tenants in the Number of Tenants box.
(Also decide which tenant number will be assigned to each ONYX IV phone system.) See
page 314.
Enable Rem ote Tenant on the General tab of the Tenant Options dialog box. See page 338.
Q
Enter the acc es s digits in the Access Digits box the enter the Trunk Group Access code for the
Tie Li ne that connects the tenant to the Master. See page 340.
As much as possible when any phone system is installed in the Voice Mail, crea te Subscriber
Q
Mailbox numbers tha t m atch the extension numbe rs in the phone system.
Voice Mail Programming for the 384i only
For each Subscr iber in Mailbox Options, set the Access Digit/Lamp String On String and
Q
Access Digit/Lamp Off String on page 282.
Notes:
(1) All the fe atures in th e U ser's Guid e are available to the Master sy stem. The following are not
available to the Slaves: Call Parking, Call Waiting, Call Queuing, Record a Conversation.
(2) Unscreened tra ns f ers (UTRFs) should not be us ed unle ss ex te nsion use rs are forwar ding the ir
calls to the VM Master number or the phone system is programmed to send (hunt) in com plete
transfers to the Voice Mail. Ot her w ise, a caller whose tran sfer is incomplete will retu r n to the
Voice Mail, but th e Voice Mail will not know where the call came from (because there is no
protocol), so the caller won't be able to press 1 to leave a message. If the called remote station
forwards the call back t o th e Voice Mail, one more T ie Line will be neede d. A CD a pplic ations
are supported only in the Master system.
Chapter 2: Features
NT System Guide
53
Page 82

The NT Voice Mail Features
System Features
FAX Mail
Availability: O nly when the FAX option is purchased and installed.
The FAX Mail Option lets a calle r use the Voice Mail to send a FAX to a Subsc r ib er, Guest, or
Message Center Mailbox. The Voice Mail stores the faxed document as if it were a message
hence the name FAX Message. The re ci pie nt w ho is re ad y to re ad t h e FAX simply sends it to a FAX
Machin e. What's nice about FAX Mail is that a FAX Message
stays priv at e until th e recipi en t is rea dy to send it to a FAX machine. In additi on, your company
—
does not n eed a separate FAX number. When callers reach the Voice Mail, they simply dial a few
codes in order to send a FAX.
About Sending a FAX to a Mailbox
To send a FAX to a mailbox, callers must call from a FAX telephone — a phone connected to
a FAX m a ch ine. Wh en th e Voice Mail Aut omate d A t te ndant an sw ers, the callers wi ll hear
recorded instructions for sending a FAX to a someone’s mailbox. Once a call er selects the
mailbox to receive the FAX, the Voice Mail plays either of the following, depending on how it
has been programmed:
Q
FAX carrier tone
After they hear this tone, callers can press the
sending the FAX.
This set of voice prompts: John Smith (or mailbox number) will receive this FAX Mes-
Q
sage. If you wish, you can record a comment at the tone and pr es s the pound key when
you are don e . O therwis e, press only th e po u nd key. When the caller presses the pound
key, the Voice Mail says: T o send the document to be stored, press the
your FAX machine when you hear the tone. Callers pres s th e START ke y when the y hear
the FAX carrier tone, and then they ha ng up.
START
—
unlike a regu lar faxed document
—
key on their FAX machines to sta rt
START
key on
About Checking and Printing FAX Messages
To check for FAX Messages, a mailbox users s im ply calls their mailboxes and presses L to listen. If there is a FAX Message,the Voice Mail plays the recorded comment (if there is one) and
then says This X-page FAX Message arrived on (date/time) from (c aller's extension number ,
if caller sent the FAX from an extension). The message has been saved. Then mailbox users
have the following options:
Leave it in their mailboxes until they are ready to send it to a FAX machine for a readout.
Q
Erase it
Q
Use the MF (7 2) command to forward it to anot her mailbox (Subscriber, Guest, or Mes-
Q
sage Center).
Send it to a FAX machine to get a rea dout. To do this, they use the MF command to for-
Q
ward the FAX Message to a FAX Delivery Mai lbox, whic h in tu rn sends the d ocumen t to a
FAX Machine. A FAX Delivery Mailbox can s end the FAX to a pre-designated FAX
Machin e o r to any FAX number that the mailbox user enters. For example, if mailbox
users are awa y on business and find a FAX Message in their mailboxes, they can have the
Voice Mail send the FAX Message to their hotel's FAX machine.
Use the
Q
from an internal mailbox.
Use the RE (7 3) command to record a reply to the FAX sender, only if the FAX was sent
Q
from an internal mailbox.
For instr uctions about setting up FAX Mail, see the FAX Mail Setup Guide.
(6 2) command to make a call to the FAX sender , only if the FAX was sent
MC
NT System Guide
54
Chapte r 2: Fe at ur es
Page 83

The NT Voice Mail Features
System Features
NVM-Desktop Messaging
Availability: A ll NT Voice Mail systems unless otherwise noted.
NVM-Desktop Messaging is an add-on option for the NT Voice Mail system that provides onscreen Voice Mail, FAX Mail, and E-Mail capability. To support 64 or fewer client workst ations,
NVM-Desktop Messagi ng requires a minimum of 8 MB of RAM. But for 65 or more workstat ions,
NVM-Desktop Messagin g requires a minimum of 12 MB of RAM. See the documenta tion for this
option.
Tenant Service
Up to four different businesses or tenants can share one NT Voice Mail system, which you can
program either to allow or prevent intertenant calling.
In the Programming Chapter, see also:
Customizi ng Tenant Options starting on page335.
Voice Mail Networking
Availability: Intended for Voice Mail systems us ing AMIS Networking
The V oice Mail Networking option lets NT Voice Mail mailbox users exchange messages with
mailbox users at another Voice Mail System that allows AMIS Networking, so that NT Voice Mail
mailbox users can:
call their NT Voice Mail mailboxes and record a message for someone at a remote AMIS-
Q
compatible Voice Mail System. The Voice Mail collects all th e recorded “network messages”
and sends them to the ot her Voice Mail systems at the pre-programmed time(s).
receive messages from other AMIS-compatible Voice Mail systems.
Q
While listenin g to a N etwork mes sage, NT Voice Mail mailbox us ers ca n:
record a reply , which will automati cally be delivered to the message sender at the other Voice
Q
Mail System.
make an immediate call to the message sender at the other Voice Mail System without first exit-
Q
ing their mailboxes.
Forward the message to another mailbox.
Q
(For detailed information about Voice Mail Networking, see the V oice Mail Network ing Guide.)
Voice Prompts
Availability: A ll NT Voice Mail systems unless otherwise noted.
The NT Voice Mail provides v o ice pro mpts to gui de peop le in usi ng the s ystem. The reco rded v oic e
prompts are st ep-by-step instr uctions telling ca llers what codes to press on their Touch Tone phone
to access the NT Voice Mail features. Generally, the codes are easy to remember, because they
match the firs t letter(s) of the feature name. These prompts illustrate the coding: To
messages, press
to listen to the entire voice prompt before dialing a code.
If a caller for gets wha t code to press or presses a code a nd hears t he prompt, That is an invalid entr y, the
caller should just wait a few seconds without pressing any digits. The NT Voice Mail will repeat the
choices or play the voice prompt, For a help messa ge, pr es s z ero. When the caller press es zero, the
Voice Mail will provide a recorded help message.
A user can turn off some of the voice prompts, if desired. Users frequently do this when they
become familiar with the system and don’t want to be interrupted by unnec essary prompts.
Chapter 2: Features
. To Record and Send a message, press
L (5)
isten to your
L
(7 7). The caller does not have
R S
NT System Guide
55
Page 84

The NT Voice Mail Features
System Features
Voice Prompts (cont’d)
Voice Mail Customization
If desired, the System Adminis trator cancustomize all the system voice prompts by re-recording them so that company greetings, names, and prompts are recorded in the same voice.
Bilingual Voice Prompts
The NT Voice Mail can accomodate voice prompts in two languages. These languages are
config ured at the fa ctory a s tw o v ersi ons of Ameri can E ngli sh: Mne umoni c (which uses le tters
in the prompts) and Numeric (which uses numbers in the prompts) . In programming, you can
change which language (Mneumonic English or Nume ric English) is to be used as the default
mailbox language . You can make this selection on a s ystem-wide basis or on a mailbox-by mailbox basis when you configure Mailbox Options.
You can set up the voice prompts so that:
a language plays on a specific trunk. This setting overrides the system-wide setting.
O
a language i s assigned to a dialpad key. This setup allows cal lers to press a key to select a
O
different language.
a language i s ass igned to a Subsc ribe r, Guest or Message Cent er Mail box. The Voice Mail
O
plays the assigne d language when callers reach the se mailboxes.
Programming
Q
Customize
Guest (see page 213), Message Center (see pa ge 245), Subscribe r (se e page 269) or Trunk (see
page 302) Mailbox.
Q
Customize
guage on a system-wide basis (see page 314).
Q
Customize
box to a key (see page 143).
See also Customizing the System Voice Prompts on page 439.
In the User's Guide, see also Changing Auto Help.
¿
Mailbox Options
¿
System Options
¿
Dia l Actio n Tables
¿
¿
to select the language (
Edit
General (D e fa ul t Bil in gual Mode)
¿
General
to assign LANG1 or LANG2 and a mail-
Bilingual Mode
) for a
to select the lan-
NT System Guide
56
Chapte r 2: Fe at ur es
Page 85

The NT Voice Mail Features
Automated Attendant Features
Au tomat ed Atten dant Featu res
Your NT Voice Mail system may contain the following features.
Answering Schedule Overri de
Availability: A ll NT Voice Mail systems unless otherwise noted.
Lets the System Administrator at any Touch Tone Telephone ove rride the answering schedul e that
is curr ently in effect. For example, if the company must cl o se due to bad weather , the Syste m
Administrator can re-route incoming calls to an announcement that says: Our offices are closed
due to the inclement weathe r. Please call again tomorrow.
Programming
Customize, Mailbox Options, Add
Q
Make an ove rride mailbox.
Call System Administrator Mail box: Dial SA (7 2 ) and enter code for message type.
Q
Record message for overri de mailbox.
Call System Administrator Mail box: Dial SA (7 2 ) and then SO (7 6)
Q
Turn on Answering Schedule Override.
Automatic Routing for Rotary Dial Callers
Availability: A ll NT Voice Mail systems unless otherwise noted.
Handles any Automated Attendant callers who are using a rotary dial phone, so that they cannot
press a dialpad ke y to route their ow n calls. The NT Voice Mail automatically sends these callers t o
whichev er destina tio n the Sys tem Administ rator c hooses . Typical destinations i nclude the c ompan y
operator or a Messa ge Center Mailbox. A Message Ce nter Mailbox lets the cal ler leave a message
without dialing codes.
Programming
Customize, Mailbox Options, Edit, Mailbox #
Q
Customiz e Call Routing Mailbox.
Customize, Dial Action Tables
Q
Assign Action and Number to TIMEOUT.
Customize, Answer Schedule Tables
Q
Assign Call Routing Mailbox to AST.
Call Announcing
Availability: A ll NT Voice Mail systems unless otherwise noted.
Lets the Automated Attendant screen calls for Subscribers (extension users). First, the Auto Attendant asks a call er to record their na me. Then the Auto At tendan t call s the Subscri ber and a nnounc es
who is calling by playing the recorded name . The Subscriber can accept the call or send it back to
the Auto Atte ndant. Callers who return to the Auto Attendant can either leave messages or use a
different routing option.
Programming
Customize, Dial Action Tables
Q
Set Action to TRF to allow screened transfers.
Customize, Mailbox Options, Edit, Mailbox #, Subscriber tab
Q
Disable Block Auto Attendant.
Customize, Port Options
Q
Make sure that an extension number is assign ed to each port.
Customize, System Options, Dial St ri ngs tab
Q
Make sure that the Ringdown string is correct.
Call Subscriber Mailbox: Dial OP (6 7) and then CA (2 2)
Q
Turn on Call An nouncing.
Turn off Mailbox Greeting (G or 4) and Paging Me ssage (PG or 74).
Chapter 2: Features
NT System Guide
57
Page 86

The NT Voice Mail Features
Automated Attendant Features
Call Blocking
Availability: A ll NT Voice Mail systems unless otherwise noted.
Prevents a Subscriber exte nsion from receiving Automated Attendant calls. After announcing
Extension XXX is not available, the Automated Atte ndant lets the caller leave a me ssage or use a
different option.
Programming
Customize, Mailbox Options, Edit, Mailbox #, Subscriber tab
Q
Click to check the Block Au to Attendant check box.
(Optional) Customize, Mailbox Options, Edit, Mailbox #
Q
To reroute blocked ca llers, assign Next Call Routing Mailbox to Subscriber Mailbox. Then
enter reroute destination for Key 0 in the Dial Action Table for the Next Call Rout ing Mailbox.
Call Parking/Paging
Availability: A ll NT Voice Mail systems unless otherwise noted.
Parks (holds) a ca ller at a Subscriber ext ension and then pages the Subscriber by playing the
Subscriber's recorded Paging Message over a page zone in the phone system. For example: John
Smith would record a Paging Message something like this: John Smith. You have a call parked at
your extension. After the Paging Message pla ys, the Subscriber can pick up the call from any
extension by dialing the pickup code used in the phone system.
Call Pa rking/Paging applies to two types of callers:
Auto Attendant callers who transfer to the Subscriber extension.
Q
callers who dial the Subscriber's direct line while only unanswered call s a re forwarded to the
Q
Subscriber Mailbox.
If the Subscr iber’s Paging Message is ON, the Voice Mail immediately parks an Automa ted
Attendant caller and pages the Subscriber wit hout ringing the extension. Howev er, if the Subscriber’s Paging Messa ge is OFF, the Voice Mail rings the Subscriber’ s extension. If the extension
does not answer af ter a pre- progra mmed number of ri ngs, th e Voice Mail says: Extension XXX (or
name) does not answer. Then the Voice Mail lets the caller leave a message, park and page, or
select other rout ing options.
Call Pa rking/Paging is very useful for Subscribe rs who ar eoft en a way from their desks.
Programming
Customize, Dial Action Tables
Q
Set Action to TRF to allow screened transfers.
Customize, Mailbox Options, Edit, Mailbox #, Subscriber tab
Q
Enter Park/Paging String and disable Block Auto Attendant.
Customize, System Options, Timers tab
Q
Set Page/Meet-Me-Page Hold Timer.
Set Flash Timer if the string requires one.
Call Subscriber Mailbox: Dial PG (7 4).
Q
Record and turn on P agin g Message (PG).
Turn off Mailbox Greeting (G or 4).
NT System Guide
58
Chapte r 2: Fe at ur es
Page 87

The NT Voice Mail Features
Automated Attendant Features
Call Queuing
Availability: A ll NT Voice Mail systems unless otherwise noted.
Lets Automated Atte ndant callers queue (wait in line) for a Subscriber extension when it is busy.
The NT Voice Mail tells the waiting callers their place in the queue so they have a general idea of the
wait time, and the NT V oi ce Mail plays music while they wait . Callers who choose not to wait have these
options: They can leave a message for the Subscriber, return to the Automated Attendant, or hang up.
Programming
Customize, Dial Action Tables
Q
Set Action to TRF to allow screened transfers.
Customize, Mailbox Options, Edit, Mailbox #, Subscriber tab
Q
Enable Call Queuing and disable Block Auto Attendant.
Customize, System Options, General 2 tab
Q
Set the Call Queuing Hold Timer and Call Queuing Number of Idle Ports.
(Optional) Call System Administrator Mailbox: Dial SA (7 2) and MH (6 4).
Q
Record substitute for default Music On Hold.
Call Waiting
Availability: A ll NT Voice Mail systems unless otherwise noted.
Lets an Automated Attendant caller send be ep s as a signal to a busy Subscriber extension and then
wait for a reply. If the Subscriber does not pick up the call, the NT Voice Mail lets the caller leave a
message.
Programming
Customize, Dial Action Tables
Q
Set Action to TRF to allow screened transfers.
Customize, Mailbox Options, Edit, Mailbox #, Subscriber tab
Q
Enter Call Waiting String and disable Block Auto Attendant.
Customize, System Options, Timers tab
Q
Set Flash Timer if the string requires one.
Call Subscriber Mailbox: Dial OP (6 7) and CW (2 9).
Q
Turn on Call Wai ting.
Turn off Mailbox Greeting (G or 4) and Paging Me ssage (PG or 74).
External Extension
Availability: A ll NT Voice Mail systems unless otherwise noted.
Lets an Automated Attendant call be transf erred over a Centrex line from the Subscriber, Guest, or
Message Center Ma ilbox to a Centre x extension or outsi de telephone. For example, a Subscriber is
working at home during a particular week. Automated Attendant calls to the Subscr iber’ s mail box
are place d on hold, while the NT Voice Mail obtains dial tone and dials the Subscrib er’s home number. The call is transferred only when the Subscriber answers.
Programming
Customize, Mailbox Options, Edit, Mailbox #, Lamp/Logon/Transfer tab
Q
Enable External Extension.
Enter External Extension Number.
Chapter 2: Features
NT System Guide
59
Page 88

The NT Voice Mail Features
Automated Attendant Features
Flexible Answering Schedules
Availability: A ll NT Voice Mail systems unless otherwise noted.
Lets the System Administrator program the Automated Attendant to greet callers in a variety of ways: one
way duri ng th e weekd ay s, anot her w a y at n ig ht, an othe r w ay du ri ng th e wee k ends , e tc. The Syst em
Administrator simply records the greetings, then programs the day or date and time that each one should
play. For example, the System Administrator could program this set of greetings for a line:
Starting at 9 AM, Monday - Friday, the Automated Attendant says :
Q
Thank you for calling ABC company (W).
Please dial the extension you wish to reach, or stay on the line for assistance (I).
Starting at 5PM, Monday - Thursday, the Automated Attendant says:
Q
Thank you for calling ABC Compan y. Our office is close d an d will re-open at 9:00 tomorrow
morning. To leave a message, press one. Other wise, please call again tomorrow.
Starting at 5PM, Friday, the Automated Attendant says:
Q
Thank yo u for ca lling ABC co m p a ny. Our offi c es ar e cl osed for the we ekend . Our normal
busine ss hours are 9:00 AM to 5:00 PM, Monday throu gh F r i day . We look forward to help ing
you the n .
The NT Voice Mail allo ws 16 sets of greetings (like the se t of three abov e) . Each set can have 20
day/date/ tim e schedules. If desired, t he Voice Ma il can play one set of greetings for your Sales line,
another for your Marke ting line, and a third for the Customer Service line. Or the the Voice Mail
can play the same set of greetings for all lines that use a particular port.
Programming
Customize, Mailbox Options, Edit, Mailbox #
Q
Create at le as t two Call Routing Mailbo xes: one for a W elcome Message and one for an
Instruction Menu
Call the System Administrator Mailbox: Dial SA (7 2) and the code for the messa ge.
Q
Record a message for each Call Routing Mailbox
Customize, Answering Schedule Tables
Q
Create ti me/da y/ dat e sc hed ule s. ( For instr uct ions , s e e C ustomi zing A nswer ing Sc hedul e Tables
later in this guide.)
Customize, Port Options
Q
Assign an AST to a port.
(Optional) Customize, Mailbox Options, Edit, Mailbox #
Q
Assign an AST to a Trunk Mailbox.
Flexible Call Routing
Availability: A ll NT Voice Mail systems unless otherwise noted.
Lets Automated Attendant callers press one or more keys on their Touch Tone phones to route
(send) their ow n ca lls to an extension or department. The System Administrator can set up a menu
of routing options for callers. Routing options include:
Transfer to an Extension: Screened or Unscreened
Either a Scre en e d or an Un scr e en ed Tran sf er ca n tran s fer (reroute) a call to an extens i o n . Th e
basic difference between the transfer types lies in how the Voice Mail handles incom p lete
transfers:
NT System Guide
60
Chapte r 2: Fe at ur es
Page 89

The NT Voice Mail Features
Automated Attendant Features
Flexible Call Routing (cont’d)
Q
In a screened transfer (TRF):
The NT Voice Mail transfers the call to the extension and then checks to see whether or
not the extension picked up the call. If the extension user does not pick up the call, the NT
Voice Mail plays the e x tens ion st atus messa ge (Ext ens ion X XX i s b usy ) a nd lets t he calle r
leave a message or select a different routing option. After leaving a message, the caller can
return to the Autom ate d Attendant, dial another extension, and sometim es perform more
functions, depending on how the extension's Next Call Routing Mailbox is programmed.
If the exte nsion user's mailb ox greeting is recorded and turned on, the NT Voice Mail will
not make t h e screened transfer; the Voice Ma il immediately plays the greeting and t hen
lets the call er leave a message or dial another routing option. However, if the greeting is
off and the extension user does not pick up after call transfer , the NT Voice Mail will play
the greeting in st ead of the extension status me ssage.
Q
In an unscreened transfer (UTRF):
The NT Voice Mail transfers the call to the extension and releases it. If the extension user
does not pick up, the una nswered call is handled by the phone system.
Note: A Subscriber, Guest, or Message Center extension can be specially programmed, so that it
receives only Automated Attendant transfers (“Transfer-only”). As a result of these transfers,
calle rs do not get a cha nce to leave a messa ge, when the tran sf er is inco mpl et e. This ap p licat io n
is typically used for transfers to FAX machines.
Programming
Customize, Dial Action Tables
Q
Assign an Action and Number to each dialpad key (0
(DAT). TIMEOUT is reserve d for the a ction t hat the NT Voice Mail should perform if the ca ller
does not press one of these keys.
(For instructions, see Cus tomizing Dial Actio n Tables in the Programming Guide.)
Customize, Mailbox Options, Edit, Mailbox
Q
Assign a DAT to a Call Routin g Mailbox.
Customize, Answering Schedule Tables
Q
Assign the Call Routing Mailbox to an Answering Schedule Table (AST).
#
9, *, and #) in the Di al Ac ti o n Table
–
Transfer to an Automatic Call Distribution Group
When all extensions in the group are busy, the caller can w ait for an availab le e xtension.
Go to a mailbox
The caller who accesses a mailbox can use the features programmed for that mai lbox.
Select Voice Prompts in Another Language
The Automated Attendant caller can press a s ingle code to switch from one language to
another.
Leave a Quick Message
A caller dials a single-digit code and someone’s extension number in order to leave a message
in that person's mailbox. There is no need to call the person's extension first. After leaving the
message, the caller can either return to the Automated Attendant or reroute the call to a pr eprogrammed destination.
Access the Directory Dialing feature
A caller dials the f irst few letters of a person's name to connect to that person's extension. Or
the caller could dial
ules.
TRAIN
, for example, to connect to an announcement about train sc hed-
Chapter 2: Features
NT System Guide
61
Page 90

The NT Voice Mail Features
Automated Attendant Features
Flexible Call Routing (Cont’d)
Access (Log Onto) the Voice Mail System
Callers dial a single-digit co d e and then thei r own mailbox numbers in order to acces s their
own messages as well as all of th e Voice Mail feature s.
Hang up the Call
When a ca ll er presses th e H angup key, the NT Voice Ma il s ay s G ood-bye and terminates the
call.
Undefined Routing
Occasionally, the caller may dial an invalid entry: any digit or character (0–9, *, #) dialed by
the caller, when the DAT Key Action for that dig it or character is undefined (UND). After a
caller pre sses the unde f ined k e y, the NT Voice Mail will s ay Th at is an invalid entr y an d rep ea t
the dialing instru ctions.
For more informati on about Dialing Action Tables (D ATs), see Customizing the Dial Action
Tables starting on page 129.
Forced Unscreened Transfer
Forces each Automated Attendant call as an unscreened transfer to a particular Subscriber
extensi on and releases it. Then if the extension user does not pick up, the phone system will
handle the call.
Programming
Customize, Dialing Action Tables
Q
Set Action to TRF to allow s cr ee n ed tr an s f e r s .
Customize, Mailbox Options, Edit, Mailbox #, Lamp/Logon/Transfer tab
Q
Enable Forced Unscreened Transfer.
Interacti ve Messaging (Scr ip t Promp ti ng )
Availability: A ll NT Voice Mail systems unless otherwise noted.
Lets the Auto Attendant act as an order taker or poll taker. Before Interactive Messaging begins, the
System Administrator can record up to interactive prom pts. During Interactive Messaging, the Auto
Attendant asks a question and the caller’s response is recorded. The Voice Mail stores the responses i n a
mailbox. If desired, the Voice Mail can play back t he responses, so th at call ers can re vie w what they said
and change it when neces sa ry.
Programming
Customize, Mailbox Options, Add/Edit, Mailbox #
Q
Create/Customize an Interactive Mai lb ox.
Call System A d ministrator Mailbox: Dial SA (7 2) and IP (4 7).
Q
Record Interactive Prompts.
Customize, Dial Action Tables
Q
Place number of Interact ive Mailbox in a DAT
(for instructions, see Customizing Dial Action Tables section of the Programming chapter,
starting on page 129).
OR
Customize, Answering Schedule Tables
Place number of Interact ive Mailbox in an AST
(for instructions, see Customizing Answering Schedule Tables section of the Programming
chapter, starting on page 105).
In the Programming Guide, see also
Customizin g Mailbox Options, Int eractive Mailbox on page 230.
NT System Guide
62
Chapte r 2: Fe at ur es
Page 91

The NT Voice Mail Features
Automated Attendant Features
Status Monitor
Availability: Only on certain ONYX phone syste ms
Speeds up Automate d Attendant transfers. Since the NT Voice Mail knows the status of an extension witho u t calling it, it do es not take the time to call extensions that are bu sy, in Do Not Disturb,
or extensions that do not exist. The NT Voice Mail immediately tells the caller the extension status
and gives the caller other dialing options.
Status Monitor requires a dedicated port. The NT Voice Mail wil l not be able to use the “Status
Monitor” port for calls.
Programming
Customize, Port Options
Enable Status Monitor.
Transfer Calls to a FAX Machine
Availability: All NT Voice Mail systems having a FAX machine.
Lets the Automated Attendant handle an incoming FAX transmission. When the Automated Atten-
dant detec ts FAX carrier tone instead of the expecte d Touch T o ne digi t, the Voice Mail transfers the
call to the company FAX machine, connected to an extension in phone system, so that the FAX
transmission can come through.
Programming
Customize, Mailbox Options, Add, Mailbox #
Q
Create an Interactive Mailbox.
Customize, Mailbox Options, Edit, Mailbox #
Q
Customize the Interactive Mailbox.
Call System A d ministrator Mailbox: Dial SA (7 2) and IP (4 7).
Q
Record Interactive Prompts.
Customize, Dial Action Tables
Q
Place number of Interact ive Mailbox in a DAT
(for instructions, see Customizing Dial Acti on T ables, starting on page 129).
OR
Customize, Answering Schedule Tables
Place number of Interact ive Mailbox in an AST
(for instructions, see Customizing Answering Schedule Tables, starting on page 105).
Chapter 2: Features
NT System Guide
63
Page 92

The NT Voice Mail Features
Mailboxes
Mailboxes
Your NT Voice Mail system may contain one or more of the fol lowing mailbox types. In addition,
these pages also describe features that are available to the mailboxes.
Announcement Mailbox
Availability: A ll NT Voice Mail systems unless otherwise noted.
Plays announcem ents recorded by the System Adminis trator to Automated Attendant callers.
Typical announcements include meeting schedules and new product infor ma tion. The
announcement c an pla y up to 10 t imes. Afte r the an nouncemen t, the Voice Mail says Good-bye
and hang up or return s t he ca ller to the Automated Attendant dialing options.
Programming
Customize, Mailbox Options, Add/Edit, Mailbox #
Q
Create/Cus tomize an Announcement Mai lbox. See page 183.
Call System Administrator Mail box: Dial SA (7 2) and AN (2 6).
Q
Record Announcement.
ACD Announcement Mailbox
Availability: A ll NT Voice Mail systems unless otherwise noted..
ACD re pres ent s Auto matic Call Di strib u tio n. An ACD Announcement Mailbox lets you re cord
a customized ACD Announcement for an ACD group. A typical ACD Announcement says:
Thank you for calling. All our technicians are curr ently with customers. Please hold, and a
technician will be with you shortly.
Programming
Customize, Mailbox Options, Add/Edit, Mailbox #
Q
Create/Cus tomize an Announcement Mai lbox. See page 180.
Call System Administrator Mail box: Dial SA (7 2) and AN (2 6).
Q
Record Announcement.
Call Routing Mailbox
Availability: A ll NT Voice Mail systems unless otherwise noted.
Lets callers press a dialpad key (0–9, *, #) to route their own calls to the desired locations or
features. The Cal l Routing Mailbox is the core of the Automated Attendant, because it provides callers with “secondary” routing options. You can assign a Call Routing Mailbox to a
Subscriber, Message Center, Intera ctive, or FAX Mailbox.
Each Call Routing Mailbox contains a Dial Action Ta ble (DAT), which tells the Automated
Attendant ho w t o handl e the d igi ts diale d du ring an inboun d call . You have pre vi ously assigne d
both an actio n
the DAT. For example: You could assign “Screened Tran sfer to 306” to Key 1, so tha t the
Automated Attendant would transfer a call to extension 306 when the call er presses Key 1. In
the DAT, you c an al so assign an action and number to the tim eout function (TIMEOUT). The
NT Voice Mail allows up to 100 Dial Action Tables. (For more informat ion about how a DAT
functions, see Customizing Dial Action Tables, starting on page 129.)
Each Call Routing Mailbox may also contain either a recorded Welcome Messa ge or a
recorded sepa rate Instruction Menu . T he Welcome Message now co nsists of both a greeting to
callers and a list of their call-routing options (Instruction Menu). The separate Instruction
Menu is a list of call-routing options that duplicates those in the Welcome Message without
repeating the gree ting to callers. (For information about how to s et up a Welcome Message or
Instructio n Menu for a Ca ll Routing Mailbox, see Call Routing Mailbox on page 109.)
a specific ro uti ng option — and a number to each dia lpad k e y (0–9, *, #) in
—
NT System Guide
64
Chapte r 2: Fe at ur es
Page 93

The NT Voice Mail Features
Mailboxes
Call Routing Mailbox (Cont’d)
Programming
Customize, Mailbox Options, Add/Edit, Mailbox #
Q
Create/Cus tomize a Call Routing Mailbox. See page 187.
Customize, Dial Action Tables
Q
Set up Actions and Numbers in DAT
(for instructions, see Customizing Dial Action Tables, st ar ti ng on pa ge129. ).
Call System Administrator Mail box: Dial SA (7 2) and W (9)
Q
Record Welcome Message.
Call System Administrator Mail box: Dial SA (7 2 ) and I (4)
Q
Record Instruction Message.
Directory Dialing Mailbox
Availability: A ll NT Voice Mail systems unless otherwise noted.
Lets Automated Atte ndant callers press a dialp ad key to route their own ca lls. A Directory
Dialing Mailbo x functions much like a Call Routing Mailbox (see above) . The difference
between the two mailbox types lies in the way that th ey handle name-dialing
extension or ma ilbox by dialing its programmed name). A Directory Dialing Mail box lets a
caller name-dial right away, while a Call Routing Mailbox requires that a caller dial the code
for name-dialing before dialing the extension or mailbox name.
acce ssing an
—
The Director y Dialin g Messa ge tell s the cal ler what name to dial. A sample messag e might be:
For customer se rvice , dial S-E-R-V.
Programming
Customize, Dial Action Tables
Q
Set up Actions and Numbers in DAT
(for instructions, see Customizing Dial Action Tables, start i ng o n pag e129.).
Customize, Mailbox Options, Add/Edit, Mailbox #
Q
Create/Customize a Directory Dialing Mailbox. See page 194.
Assign it a DAT
Create /customize mailboxes to be called.
Call System Administrator Mail box: Dial SA (7 2) and DD (3 3)
Q
Record Directory Di aling Messa g e.
Customize, System Options, General 2 tab
Q
Set Minimum Entry for Directory Dialing (minimum number of letters in the mailbox
owner’s name that the caller must dial before the Voice Mail will look for the mailbox
owner in the dire ctory).
Chapter 2: Features
NT System Guide
65
Page 94

The NT Voice Mail Features
Mailboxes
Distribution Mailbox
Availability: A ll NT Voice Mail systems unless otherwise noted.
Lets someone record a message once and have the Voice Mail send (distribute) it to ev eryone
whose mailbox is lis ted on a Distribution List. To s end the message after recording it, the person simply enters the Distribution Mailbox number or name associated with the Distribution
List.
The NT Voice Mail can accommodate up to 100 dif f erent distribution lists. However, the total
number of mailboxes on all lists combined cannot exceed the tota l number of mailboxe s in the
Voice Mail system.
Programming
Customize, Mailbox Options, Add/Edit, Mailbox #
Q
Create/Customize a Distribution Mailbox. See page 202
Customize, Distribution Lists
Q
Customize Dis tribution List. See page 151.
FAX Mailbox (FAX-On-Demand)
Availability: Re quires that the FAX option and at least one FAX PCB (card) are
purchased and installed in the NT Voice Mail system.
Provides the FAX-On-Demand feature, which st ores FAX documents on its hard dis k and then
send them to callers on request. Callers simply pr ess one or more dialpad keys to select the
documents that they wish to receive. The Automated Attendant then sends the requested document to ea ch caller's FAX machine. The Voice Ma i l can sen d FAX documents by FAX Call-
backs and/or FAX Same-Call Transactions. The FAX-On-Demand feature also provides FAX
Distribution Lists for scheduled FAX calls.
FAX “Callbacks”
The Automated Attendant requests the caller's FAX number, calls back the person at that number , and then FAXes the document. If the callback doesn't go through, the NT Voice Mail will
retry the call. Both the amount of time that the NT Voice Mail waits before retrying and the
number of retrie s is programmable. In addition, you can allow or prevent long distance callbacks. If you allow long distance callbacks, you can still restrict callbacks to four different
areas codes. This prevents, for example, callbacks to overseas numbers.
FAX “Same-Call” Transactions
The NT Voice Mail can FAX the document to an online caller, as long as the caller is us ing a
FAX telephone.
FAX Documents
A caller can order up to 10 FAX documents in any one session, without restriction on th e num ber of pages in a document. If desired, you can record an announcement that lists all FAX document s th at have been loaded in to th e Voice Mail s y ste m . You can also requ i r e th a t th e caller
enter a securit y code for acc es s to any document containing s ensitive information.
As long as a document is in the DCX format, you can load the document into the system from
a floppy disk. You can also enter a FAX document by faxxing it in.
NT System Guide
66
Chapte r 2: Fe at ur es
Page 95

The NT Voice Mail Features
Mailboxes
About FAX Distribution Lists
Included in the feature are 16 FAX D istribution Lists. A FAX D is t r ibution L ist lets th e NT
Voice Mail send up to 10 differ ent FAX documents to 100 FAX number s (m ax i m u m) on th e
date and at the time you select. This makes it easy to send updates about several products to
each of your branch offices.
The system must be equippe d with a FAX PCB. The NT Voice Mail can accom modate up to
two FAX PCBs. With two FAX PCBs, the Voice Mai l can send two FAX documents simulta-
neously.
Programming
See the documentation provided with your FAX Card.
Future Delivery Mailbox
Availability: A ll NT Voice Mail systems unless otherwise noted.
Lets someone record a message a nd have the Voice Mail send it to any mailbox at a future date
and time. This feature makes it easy to remind other people of appointments and meetings.
Programming
Customize, Mailbox Options, Add/Edit, Mailbox #
Q
Create/Customize a Future Delivery Mailbox. See page 206
Call Subscriber Mailbox: Dial FD (3 3 ).
Q
Record Future Delivery Message.
Flexible Mailbox Numbering Plan
Availability: A ll NT Voice Mail systems unless otherwise noted.
Lets the System Administrator num ber the mailboxe s to match the current extension and trunk
numbering plan.
In the Programming Guide, see also
Customizin g Mailbox Options, Creating and Accessing a Mailbox on page 168.
Variable Length Mailbox Numbers
Availability: A ll NT Voice Mail systems unless otherwise noted.
Mailbox numbers in your Voice Mail can be either of a f ixed or a variable length. When set up
for variable length mailbox numbers, the Voice Mail can simultaneously accommodate, for
example, 2-digit, 3-digit, and 4-digit mailbox numbers.
In the Programming Guide, see also
Customizin g Mailbox Options, Variable Length of Mailbox Numbers on page 168.
Chapter 2: Features
NT System Guide
67
Page 96

The NT Voice Mail Features
Mailboxes
Guest Mailbox
Availability: A ll NT Voice Mail systems unless otherwise noted.
Lets an outside vendor have a mailbox for rec eiving and (option ally) sending messages. To
streamline the communication between the v endor and company employe es , a gues t ca n use a
Guest Mailbox from inside or outside the company.
Programming
Customize, Mailbox Options, Add/Edit, Mailbox #
Q
Create/Customize a Guest Mailbox. See page 209.
Interacti ve Mailbox
Availability: A ll NT Voice Mail systems unless otherwise noted.
Lets the Automated Attendant ac t as an order taker or a poll taker. The Automated Attendant
either asks a ques tion or requests information froma caller; then theVoice Mail records the
caller’s response. If desi red, you can have the Automated Attendant play back responses to
callers, so that they can review what they said and change it, if necessary.
The System Administrator records the questions that the Automated Attendan t sh ould ask.
The NT Voice Mail stores the responses in a mailbo x. Th e System Administrator then calls
that mailbox to listen to th e responses.
Programming
Customize, Mailbox Options, Add/Edit, Mailbox #
Q
Create/Cus tomize an Interactive Mailbox. See page 230.
Call System Administrator Mail box: Dial SA(7 2) and IP (4 7)
Q
Record Interactive Prompts.
Message Center Mailbox
Availability: A ll NT Voice Mail systems unless otherwise noted.
Lets an A u to m ated At te n dant call er le ave a m es sage in a co mmon ma il b ox w it h o ut di aling
codes. A Message Ce nter Mailbox is prim arily for call ers who a re usi ng a rota ry dia l phone. At
some point in the day, someone in the company must call the Message Center Mailbox and forward each message to the mailbox of the message recipient.
Programming
Customize, Mailbox Options, Add/Edit, Mailbox #
Q
Create/Cus tomize a Message Center Mai lbox. See page page 239.
Call System Administrator Mail box: Dial SA(7 2) and W (9)
Q
Record Welcome Message.
NT System Guide
68
Chapte r 2: Fe at ur es
Page 97

The NT Voice Mail Features
Mailboxes
Network Mailbox
Availability: Voice Mail systems that allow AMIS Netw or king.
Provides the Voice Mail Networking option, so that NT Voice Mail users can exchange messages with a ny other Voice Mail system that a llows AMIS Networking. Mailbox users c an call
their mailboxes and record a message for someone who is using a different Voice Mail system.
The NT Voice Mail collects all of the recorded “network messages” in the Network Mailbox
and sends the m to the other Voice Mail systems at the pre-programmed time(s ). Mailbox users
can also receive messages from other AMIS-compatible Voice Mail systems.
The use of this mailbox makes it easy to transfer messages between the NT Voice Mail installation site and its branch offices, corporate offices, vendors, and customers.
See the information that came with your AMIS Networking option.
Next Call Routing Mailbox
Availability: A ll NT Voice Mail systems unless otherwise noted.
Provides callers with routin g and dialing options after they contact a Subscriber, Message
Center, Interactive, or FAX Mailbox and leave a message there. Most importantly: Callers can
dial another extension number after leaving a message.
By letting callers re-route their calls, the Next Call Routing Mailbox serves as a secondary
Automated Attenda n t . For example: Once th e callers enter a mailbox to leave a message, the
Next Call Rout ing Mai lbox lets them re- route t heir call s to a pre -pro grammed d estinat ion , such
as the operator (by pressing 0 after the beep).
Programming
Customize, Dial Action Tables
Q
Set up Actions and Numbers in DAT
Customize, Mailbox Options, Add/Edit, Mailbox #
Q
Create/Cus tomize a Next Ca ll Routing Mailbox for a Subscribe r, Message C enter, Inte ractive, or FAX Mailbox.
Assign a D AT to the Next Call Routing Mailbox.
Call System Administrator Mail box: Dial SA (7 2 ) and W (9)
Q
Record a Welcome Messag e.
Call System Administrator Mail box: Dial SA (7 2) and I (4)
Q
Record Instruction Menu.
See also Customizing Mailbox Options, Next Call Ro uting Mailbox on page 185.
Security Code (Default)
Availability: A ll NT Voice Mail systems unless otherwise noted.
The Mailbox Default Security Code assi gned to all Subscriber Mai lboxes during installation.
To call (log on to) their mailboxes for the first time, Subs cribers must dial this code. But once
logged on, a Subsc r iber can change it.
Programming
Customize System Options, General 1 tab
Q
Enter up to 6 digits in the Mailbox Default Security Code box in order to assign a Mail-
box Default Security Code to any Subscriber Mailboxes that you create during or after
installation.
Chapter 2: Features
NT System Guide
69
Page 98

The NT Voice Mail Features
Mailboxes
Subscriber Mailbox
Availability: A ll NT Voice Mail systems unless otherwise noted.
A Subscriber Mail box is assigned to an extensi on, so that an extension user (Subscriber) can
access the NT Voice Mail features. Extension users call their Subscriber Mailboxes from their
own extensions, someone else's extension or from outside the company.
Programming
Customize, Mailbox Options, Add/Edit, Mailbox #
Q
Create/Cus tomize a Subscriber Mai lbox. See page 263.
System Administrator Mailbox
Availability: A ll NT Voice Mail systems unless otherwise noted.
A System Administrat or Mailbox is a special Subscriber Mailbox that provi des access to the
features on the System Adminis trator Menu. The System Administrator uses the System
Administrator Menu to record Announcement Messages, Broadcast Messages, Instruction
Menus, Mailbox Names. You can program any Subscriber Mailbox as a System Administrator
Mailbox (see Progr amming below).
Programming
Customize, Mailbox Options, Edit, Mailbox #, Subscriber
Q
Set System Administrator to INTRA for the whole system or to INTER for a n individual
tenant. See page 289.
Trunk Mailbox
Availability: A ll NT Voice Mail systems unless otherwise noted.
A Trunk Mailbox lets a trunk have its own answering schedule, including com pany greeting
and dialing options, when it is assigned to a trunk number in a telephone system that supports
it.
Programming
Customize, Mailbox Options, Add/Edit, Mailbox #
Q
Create/Customize a Trunk Mailbox. See page 299.
NT System Guide
70
Chapte r 2: Fe at ur es
Page 99

The NT Voice Mail Features
System Messaging and Recording Opti ons
System Messaging and Recording Options
Announcement Message
Availability: A ll NT Voice Mail systems unless otherwise noted.
Recorded by the Sy st em Admi nistrator, this message plays in an Announceme nt or ACD
Announcement Mailbox. Typical announcement messages include meeting schedules, movie
listings, daily specials, and new product information. Each announcement can play up to 10
times. After the announcement plays, the NT Voice Mail can eith er say Good-bye and hang up
or return the caller to the Automated Attendant dialing options.
Programming
Customize, Mailbox Options, Add/Edit, Mailbox #
Q
Create/Cus tomize an Announcement Mai lbox. See page 183.
Call System Administrator Mail box: Dial SA (7 2) and AN (2 6)
Q
Record Announcement.
Automatic Message Erase/Save
Availability: A ll NT Voice Mail systems unless otherwise noted.
Lets the NT Voice Mail automati cally either erase or sa ve each mess age in a Subscr ib er, Message Center, or Guest Mailbox, which someone has listene d to all the way through.
Programming
Customize, Mailbox Options, Edit, Mailbox #, Messaging tab
Q
Set Auto Erase/Save of Messages to Erase to have the Voice Mail delete each message.
OR
Set Auto Erase/Save of Messages to Save to have the Voice Mail keep each message.
Broadcast Message
Availability: A ll NT Voice Mail systems unless otherwise noted.
Plays t o all Subscriber, Message Center, Guest, and Future Delivery Mailboxes. The NT Voice
Mail plays the Broadcast Message when someone calls (logs on to) one of these mailboxes,
right before the prompt, You have (number of) messages. A Broadcast Message can distribute
voice messages to all system users and therefore ser ves as a bu lletin boa r d for listene rs.
Programming
Call System Administrator Mail box: Dial SA (7 2) and BR (2 7)
Q
Record Broadcas e Message.
Chapter 2: Features
NT System Guide
71
Page 100

The NT Voice Mail Features
System Messaging and Recording Options
Directo ry D iali ng Mes sag e
Availability: A ll NT Voice Mail systems unless otherwise noted.
Tells a caller what letters (name) to dial to call an extension or mailbox. The System Administrator can record a Direc tory Dialing Message for an Extension Name Directory in a Call Routing Mailbox or for a Direc tory Dialing Mailbox itself. For example, if you set up a Directory
Dialing Mailbox to provide information about new products, you may wish to record: For
information on software, dial S F, then press the pound key. For information on hardware,
dial H D then press the poun d key. To exit, press only the pound key.
Programming
Call System Administrator Mail box: Dial SA (7 2) and DD (3 3)
Q
Record a D i r ectory Dialing Messag e.
Distribution List
Availability: A ll NT Voice Mail systems unless otherwise noted.
Lets a caller record a message once and send it to every mailbox that you place on the list by
entering just the Distribution Mailbox number or name assigned to the list.
Programming
Customize, Mailbox Options, Add/Edit, Mailbox #
Q
Create/Customize a Distribution Mailbox. See page 202.
Customize, Distribution Lists
Q
Customize Dis tribution List.
First Time Tutorial
Availability: A ll NT Voice Mail systems unless otherwise noted.
Plays an Announcement Message when someone logs onto a Subscriber or Guest Mailbox for
the first tim e. The NT Voice Mail allo ws one of two options:
Option 1 plays the Announcement Message only.
Q
Option 2 plays the Announcement Message, then expla ins how to record a Mailbox Greet-
Q
ing/Name, and assign a Mailbox Security Code.
Programming
Customize, Mailbox Options, Edit, Mailbox #, Lamp/Logon/Transfer tab
Q
Select either Option 1 or Option 2 for First Log In Option.
Enter the number of digits (1
7) for First Log In Announcement Mailbox.
–
Instruction Menu
Availability: A ll NT Voice Mail systems unless otherwise noted.
Tells Automated Attendant callers what dialpad keys to press in order to route their calls.
These i n struction s are recor d ed by a System Administr ator. They are based on entries made
in the Dial Action Table, which is assigned to a Call Routing Mailbox or Directory Dialing
Mailbox.
Programming
Customize, Mailbox Options, Add/Edit, Mailbox #
Q
Create/Customize a Call Routing Mailbox.
Call System Administrator Mail box: Dial SA (7 2) and I (4)
Q
Record Instruction Message.
NT System Guide
72
Chapte r 2: Fe at ur es
 Loading...