

Page 1

Digital
System
Multibutton Telephone Feature Handbook
Page 2

● In Edit ➮ Preferences ➮ General, set the following:
– Default Magnification = Fit Width
– Display Splash Screen at Startup = Disabled (box not checked)
– Display Open Dialog Box at Startup = Disabled (box not checked)
● For easiest reading on-screen, select View ➮ Fit Width (or Ctrl K). This option
is automatically enabled if you set the
Default Magnification
in General
Preferences as described above.
● To return to the opening screen at any time, press Home.
To scroll up or down on a page, press PageDown or PageUp.
To navigate between pages, press –>or <–.
● To increase the speed with which your Acrobat files load, try one of the following:
– In Windows 3.1, add
ACROREAD.EXE
to your Startup Group (with the Run
Minimized box checked).
– In Windows 95, add
ACROREAD.EXE
to the Windows\Start
Menu\Programs\StartUp folder (with Run Minimized selected).
You’ll have to maximize the first Acrobat file you run.
Page 3

● Provides on-line viewing and printing.
● Extensive search and navigation capabilities.
● Ensures more timely turnaround of documents.
● When we provide an Acrobat manual with a product (e.g., Nitsuko TAPI Driver),
you are assured of having the most up-to-date manual available.
● With the installation of a PC fax/modem, it makes faxing of any brochure, user
guide, proposal or manual quick and easy.
● Acrobat Reader programs for Macintosh, DOS and UNIX platforms also can be
provided, if required.
● For Technical Support for the Acrobat Reader, contact:
Adobe Systems, Inc.
1585 Charleston Road
P.O. Box 7900
Mountain View, CA 94039-7900
Telephone Number: 415-961-4400
Adobe FaxY1 (technical/product information by fax): 206-628-5737
Adobe Electronic Bulletin Board (on-line information): 206-623-6984
URL: http://www.adobe.com
● To return to the opening screen, press the HOME key.
Page 4

Contents
●
Using Your Telephone
●
Basics
●
Features
Page 5

Table of Contents
Your system may restrict you from using some of the features listed in
this handbo ok . As k yo ur communicat ion s manager which f eatures you
can use. Then, check in the box next to the feature’s name. Also, if your
system does not use the standard numbering plan, feature access codes
may be different tha n described.
Using Your Telephone . . . . . . . . . . . . . . . . . . . . . . . . . . . . . . . . . . . . . . . 1
Your multibutton telephone . . .. . . . . . . . . . . . . . . . . . . . . . . . . . . 1
Using a programmable key with three functions . . . . . . . . . . . . . 1
If your phone has an alphanumeric display . . . . . . . . . . . . . . . . . 2
Your phone’s key lights . . .. . . . . . . . . . . . . . . . . . . . . . . . . . . . . . 2
Using Handsfree instead of the handset . . . . . . . . . . . . . . . . . . . . 3
Dialing codes to use features . . . . . . . . . . . . . . . . . . . . . . . . . . . . 3
If you have a DSS Console . . . . . . . . . . . . . . . . . . . . . . . . . . . . . . 4
Customize with user-programmable features . . . . . . . . . . . . . . . . 4
Basics . . . . . . . . . . . . . . . . . . . . . . . . . . . . . . . . . . . . . . . . . . . . . . . . . . . . 7
Handsfree . . . . . . . . . . . . . . . . . . . . . . . . . . . . . . . . . . . . . . . . . . . 7
Outside Calls . . . . . . . . . . . . . . . . . . . . . . . . . . . . . . . . . . . . . . . . . 7
Intercom Calls . . . . . . . . . . . . . . . . . . . . . . . . . . . . . . . . . . . . . . . . 9
Hold. . . . . . . . . . . . . . . . . . . . . . . . . . . . . . . . . . . . . . . . . . . . . . . 10
Transfer . . . . . . . . . . . . . . . . . . . . . . . . . . . . . . . . . . . . . . . . . . . . 12
Features . . . . . . . . . . . . . . . . . . . . . . . . . . . . . . . . . . . . . . . . . . . . . . . . . 14
Account Codes . . . . . . . . . . . . . . . . . . . . . . . . . . . . . . . . . . . . . . 14
Alarm. . . . . . . . . . . . . . . . . . . . . . . . . . . . . . . . . . . . . . . . . . . . . . 15
Alternate Attendan t . . . . . . . . . . . . . . . . . . . . . . . . . . . . . . . . . . . 16
Automatic Call Distribution . . . . . . . . . . . . . . . . . . . . . . . . . . . . 17
Background Music . . . . . . . . . . . . . . . . . . . . . . . . . . . . . . . . . . . 19
Call Forwarding . . . . . . . . . . . . . . . . . . . . . . . . . . . . . . . . . . . . . 20
Call Forward System Cancel. . . . . . . . . . . . . . . . . . . . . . . . . . . . 21
Call Timer . . . . . . . . . . . . . . . . . . . . . . . . . . . . . . . . . . . . . . . . . . 21
Callback. . . . . . . . . . . . . . . . . . . . . . . . . . . . . . . . . . . . . . . . . . . . 22
Caller ID . . . . . . . . . . . . . . . . . . . . . . . . . . . . . . . . . . . . . . . . . . . 23
i
Page 6

Camp-On . . . . . . . . . . . . . . . . . . . . . . . . . . . . . . . . . . . . . . . . . . . 24
Conference . . . . . . . . . . . . . . . . . . . . . . . . . . . . . . . . . . . . . . . . . . 25
Conference, Unsupervised . . . . . . . . . . . . . . . . . . . . . . . . . . . . . 26
Dialing Number Preview . . . . . . . . . . . . . . . . . . . . . . . . . . . . . . . 26
Direct Station Selection . . . . . . . . . . . . . . . . . . . . . . . . . . . . . . . . 27
Directed Call Pickup . . . . . . . . . . . . . . . . . . . . . . . . . . . . . . . . . . 28
Directory Dialing . . . . . . . . . . . . . . . . . . . . . . . . . . . . . . . . . . . . . 29
Display Messages. . . . . . . . . . . . . . . . . . . . . . . . . . . . . . . . . . . . . 30
Do Not Disturb. . . . . . . . . . . . . . . . . . . . . . . . . . . . . . . . . . . . . . . 31
Door Box . . . . . . . . . . . . . . . . . . . . . . . . . . . . . . . . . . . . . . . . . . . 31
Flash . . . . . . . . . . . . . . . . . . . . . . . . . . . . . . . . . . . . . . . . . . . . . . . 32
Forced Line Disconnect . . . . . . . . . . . . . . . . . . . . . . . . . . . . . . . . 33
Group Call Pickup . . . . . . . . . . . . . . . . . . . . . . . . . . . . . . . . . . . . 33
Group Listen . . . . . . . . . . . . . . . . . . . . . . . . . . . . . . . . . . . . . . . . 34
Group Ring. . . . . . . . . . . . . . . . . . . . . . . . . . . . . . . . . . . . . . . . . . 34
Headset. . . . . . . . . . . . . . . . . . . . . . . . . . . . . . . . . . . . . . . . . . . . . 35
Hotline . . . . . . . . . . . . . . . . . . . . . . . . . . . . . . . . . . . . . . . . . . . . . 36
Intrusion (Barge-In) . . . . . . . . . . . . . . . . . . . . . . . . . . . . . . . . . . . 37
Last Number Redial . . . . . . . . . . . . . . . . . . . . . . . . . . . . . . . . . . . 38
Line Callback . . . . . . . . . . . . . . . . . . . . . . . . . . . . . . . . . . . . . . . . 38
Meet-Me Co nference . . . . . . . . . . . . . . . . . . . . . . . . . . . . . . . . . . 39
Message Waiting . . . . . . . . . . . . . . . . . . . . . . . . . . . . . . . . . . . . . 40
Micropho ne Mute. . . . . . . . . . . . . . . . . . . . . . . . . . . . . . . . . . . . . 41
Monitor. . . . . . . . . . . . . . . . . . . . . . . . . . . . . . . . . . . . . . . . . . . . . 41
Night Answer . . . . . . . . . . . . . . . . . . . . . . . . . . . . . . . . . . . . . . . . 42
Off-Hook Signaling . . . . . . . . . . . . . . . . . . . . . . . . . . . . . . . . . . . 43
Operator Assistance . . . . . . . . . . . . . . . . . . . . . . . . . . . . . . . . . . . 44
Page, Zone . . . . . . . . . . . . . . . . . . . . . . . . . . . . . . . . . . . . . . . . . . 45
Park. . . . . . . . . . . . . . . . . . . . . . . . . . . . . . . . . . . . . . . . . . . . . . . . 47
Personal Greeting. . . . . . . . . . . . . . . . . . . . . . . . . . . . . . . . . . . . . 48
Prime Line Selection . . . . . . . . . . . . . . . . . . . . . . . . . . . . . . . . . . 49
Privacy Groups. . . . . . . . . . . . . . . . . . . . . . . . . . . . . . . . . . . . . . . 50
Removing Lines and Extensions . . . . . . . . . . . . . . . . . . . . . . . . . 50
Ringing Line Preference . . . . . . . . . . . . . . . . . . . . . . . . . . . . . . . 51
Save . . . . . . . . . . . . . . . . . . . . . . . . . . . . . . . . . . . . . . . . . . . . . . . 51
Selectabl e Display Messages. . . . . . . . . . . . . . . . . . . . . . . . . . . . 52
Speed Dial . . . . . . . . . . . . . . . . . . . . . . . . . . . . . . . . . . . . . . . . . . 53
Station Call Coverage . . . . . . . . . . . . . . . . . . . . . . . . . . . . . . . . . 59
ii
Page 7

Telemarketing Dial . . . . . . . . . . . . . . . . . . . . . . . . . . . . . . . . . . . 61
Time and Date . . . . . . . . . . . . . . . . . . . . . . . . . . . . . . . . . . . . . . . 61
Voice Mail . . . . . . . . . . . . . . . . . . . . . . . . . . . . . . . . . . . . . . . . . . 62
Voice Prompting Messages . . . . . . . . . . . . . . . . . . . . . . . . . . . . . 65
Volume Controls . . . . . . . . . . . . . . . . . . . . . . . . . . . . . . . . . . . . . 67
Walking Class of Service . . . . . . . . . . . . . . . . . . . . . . . . . . . . . . 68
Charts and Il lustrations . . . . . . . . . . . . . . . . . . . . . . . . . . . . . . . . 69
iii
Page 8

iv
Page 9

DS01 Multibutton Feature Handbook
Using Y our Telephone
Your multibutton telephone . . .
Your multibutton telephone,
available in taupe or graphite, gives
you quick acces s t o yo ur sy s t em ’s
features. For example, place or
answer a Message Waiting just by
pressing MSG. Or, press DND to
quickly put your ph one in Do Not
Disturb. If a call is ringing your
phone, all you have to do is press
the flashing line key to answer it.
For an illustration of all the keys on
your phone and what they do, turn
to page 72 at the back of this guide.
Using a programmable key with three functions . . .
ICM
DIAL
DSS
(keys 1-15)
Speed Dial
(keys 1-16)
Feature
(keys 1-16)
Your multibutton telephone has 16
programmable keys. Each of your
programmable keys may have up to
three functions. A single key can be
a line, Speed Dial and Direct
Station Selection (DSS) key. When
you just press the key, you get its
first level function (e.g., line key).
When you press ICM, the key
automatically turns into a DSS key.
Press DIAL, and the key become s a
Speed Dial key.
Your communications manager can tell you the functions of your
programmabl e k eys.
1
Page 10

If your phone has an alphanumeric display . . .
Your telephone’s Alphanumeric
Display helps yo u us e features and
tells you about your calls. For
FRI 08/18 03:34P
example, a ringing outside line
may show you the number of the
caller before you answer. You can
also adjust the brightness of your
display . To find out how, turn to
page 30.
Your phone’s key lights . . .
The lights in your phone’s keys
help you use the features. The w ay
they flash tells you about your call.
Depending on the mo de l of yo ur
phone, your key lights can be red
or both red and gree n. To find out
more about your key lights, turn to
page 70 in the charts section at the
back of this guide.
HOLD MIC/DND
CONF
MSG
ICM
MICROPHONE
MUTE
INCOMING CALL
HF
MESSAGE
WAITING
2
Page 11

Using Handsfree instead of the handset . . .
Your telephone may have a
Speakerphone for Handsfree
operation. This means you can
place and answer calls just by
pressing HF. If your phone has
Automatic Handsfree, you can
press a line key fo r a Han dsf ree
call without first pressing HF.
With Monitor, you can press HF to
place a call but must lift the
handset to talk or answer. Turn to
page 7 for more on using the
Handsfree options.
Dialing codes to use features . . .
You can call co- workers, place
outside calls and use many features
by dialing feature access codes.
Often, the code you dial is the first
letter in the feature’s name. For
example, dial
Callback
to leave a
C
on a busy co-wor k e r ’s
phone. To find out the codes to dial
for outside lines and co-workers,
turn to the chart on page 69.
GHI
AB
JKL
K
C
A
B
L
L
A
C
DEF
DIAL
MNO
LAST
VOL
UP
3
Page 12

If you have a DSS Console . . .
You may have a DSS Console next
to your phone. When you fir s t us e
your DSS Console, many of the
keys are programmed for you. By
just pressing a key, you can easily
call (Hotline) co-workers, Park
calls or use Page. For an
illustration of the initial layout of
ALL CALL
PAGE
PARK ORBIT 60
your DSS Console, turn to page 73.
To find out more on what your
DSS Console can do, talk to your
communications manager.
Customize with user-programmable features . . .
You can customize selected
features from yo ur phone. For an
easy-to-use chart that shows your
Head Set
Night Ring
G I
M O
N
PR
H
PR
P S
D
S
customizing options, turn to page
S
76 in the charts section at the back
of this book. Ask your
R
communications manager if you
have an access level that allows
user-programming.
EF
Speed Dial
The symbol
all user-pro grammable feat ur es .
in this guide marks
4
Page 13

Know when to use your features . . .
Look up what you want to do
Calling a co-worker
Outside calls
Handling and rerouting
your calls
When your call can’t go through
The power of digital voi ce
processing
Placing calls quickly
Then turn to page
Intercom Calls..............................9
Paging......................................... 45
Door Box.................................... 31
Placing and Answering ................ 7
Prime Line Selection............. ..... 49
Ringing Line Preference............51
Account Codes...........................14
Dialing Number Preview ...........26
Call Timer .................................. 21
Flash. ...................................... ....32
Handsfree... ..................................7
Hold............................................10
Transf er.. ....................................12
Park...... .......................... .............47
Call Forwarding ......................... 20
Selectable Display Messages..... 52
Volume Controls ........................67
Camp-On.................................... 24
Off-Hook Signalin g. .............. .....43
Callback............................... .......22
Line Callback.............................38
Message W a iting.... ................ ....40
Voice Mail.................................. 62
Whisper Page ............................. 43
Intrusion.....................................37
Personal Greeting.......................48
Operator Assistance.................... 44
Voice Prompting Messages........65
Speed Dial.................. .. ..............53
Last Number Redial ................... 38
Save............................................51
Directory Dialing. .. .. ..................29
+
5
Page 14

Know when to use your features . . .
Look up what you want to do
When you work in grou ps
If you need privacy
Have a telephone meeting
Streamlining your telephone
Advanced call processing
Features just for attendants
Then turn to page
Privacy Groups...........................50
Group Call Pickup..................... 33
Group Ring.......... .. .............. .......34
Directed Call Pickup .................. 28
Do Not Disturb........................... 31
Microphone Mute ...................... 41
Headset....................................... 35
Background Music..................... 19
Conference................................. 25
Unsupervised Conference.......... 26
Group Listen .............................. 34
Meet Me Conference..................39
Hotline................... .. .. .............. .. .36
Direct Stati on Selection . ............ 27
Station Call Coverage ................ 59
Automatic Call Distribution.......17
Caller ID.............. .. .............. .......23
Telemarketing Dial.....................61
Walking Class of Service........... 68
Alarm ......................................... 15
Alternate Attendant................. ...16
Monitor......... ........ .......... .......... ..41
Night Answer.... ............ ............ .42
Removing Lines and Ext............50
Forced Line Disconnect.............3 3
Time and Date............................ 61
Call Forward System Cancel .....21
+
6
Page 15

To talk Handsfree:
To hang up a Handsfree call:
To change a handset call
into a Handsfree call:
To change a Handsfree call
into a handset call:
User-Programmable
Feature:
To place an outside call:
Outside Calls
Basics
Handsfree
Handsfree lets you place or answer calls without lifting the handset.
When you see the instruction, "Lift Handset," you can press HF instead.
If MIC/DND lights when you press HF, your phone has Monitor, not
•
Handsfree. You can listen to your call, but you must lift the handset
to speak.
If your phone has Automatic Handsfree, you can press a key without
•
first pressing HF.
If you are an attend an t, you do not have Han ds f ree.
•
Speak toward phone.
1.
Press HF.
1.
Press HF. Hang up.
1.
Lift the handset.
1.
Outside Calls
You can place an outside call by dialing a code or by pressing a line key.
You can also answer an outside call using a line key. You may have line
keys on your phone and on your DSS Console.
You can change the lines that ring your phone.
Refer to Ring Assign ment and Del aye d Rin g
Assignment in User-Programmable Features
(page 76).
Lift handset.
1.
Press a line key.
2.
7
Page 16

To answer an outside call:
Outside Calls
-The line key lights and you hear dial
tone. You may also be a ble to pr es s a
line group (line ro tary) k ey. These keys
are also called outbound loop keys.
Your communications manager can tell
you which keys are line keys.
Dial number.
3.
-If your system is behind a PBX or
Centrex, you may have to dial 9 before
your number. Check with your
communications manager.
OR
Lift handset.
1.
Press ICM.
2.
-You hear dial tone.
Dial line access code (e.g., 801).
3.
-You hear dial tone.
-You may also be able to dia l a lin e
group access code (9, or 90 -9 8). If you
have Direct Line Access, you can dial
the outside line extension number (e.g.,
372).
-If your system has ARS (Automat i c
Route Selection), 9 is normally your
ARS access code.
Dial number.
4.
-If your system is behind a PBX or
Centrex, you may have to dial 9 before
your number. Check with your
communications manager.
8
A line key flashes and your phone rings.
1.
-The line key may be a line group
(incoming line rotary) key. These keys
are also called inbound loop keys.
Lift handset.
2.
Page 17

To place an Intercom call:
Intercom Calls
-If you are not connected to the caller,
press the flashing line key. The line key
lights.
-To answer a call ringing the paging
speakers, see the Night Answer feature.
Interco m Calls
You can voice-announce your Intercom call or have the called extension
ring. When you voi c e- announce, the othe r pa rt y hears you over the phone
speaker and can speak Handsfree. Keep in mind that you may not be able
to voice-announce to some extensions.
Method 1
(You can program this on a One- Touch Speed
Dial key. See page 54.)
Lift handset.
1.
Press ICM.
2.
-You hear dial tone.
Dial extension number or press DSS key.
3.
-You hear ringing. Wait for the party to
answer.
OR
-You hear two beeps and can begin
speaking.
-To for ce the phone to r ing, dial 1 before
you dial the extension number. You cannot
force ringing if you use a DSS key.
Method 2
Lift handset.
1.
Press Hotline key.
2.
-You hear ringing. Wait for the party to
answer.
OR
9
Page 18

To answer a ringing
Intercom call:
To answer a voice-announced
Intercom call:
User-Programmable
Feature:
Hold
-You hear two beeps and can begin
speaking.
-You can also place an Intercom call by
pressing a Station Call Coverage key.
Refer to the Station Call Coverage
feature.
(The ICM key flashes. If you are an attendant,
the HF key flashes instead.)
Lift handset.
1.
(If you are an attendant, you cannot receive
voice-announce d calls.)
Listen for two beeps.
1.
-ICM flashes.
Speak toward phone.
2.
Use Voice Announce in User-P rogramma ble
Features to disable or enable voice-announced
Intercom calls to your extension.
Hold
This feature is always available.
)
Hold lets you place a call in a temporary waiting state. While the call is
on Hold, you can place and receive other calls. There are two types of
Hold for outside calls: System Hold and Exclusive Hold. You can retrieve
a call from System Hold at any extension. You can retrieve a call fr om
Exclusive Hold only at the extension that placed it on Hold.
If you are an attendant, your phone has Automatic Hold. This means the
system places your outside call on Hold automatically when you press:
ICM or CONF
•
A Line, Call Coverage, Hotline or Page key
•
10
Page 19

Things to remember about
Hold:
If a call remains on Hold too long, it recalls
To place your call on Hold:
To retrieve an outside call
from Hold:
1.
the extension that placed it on Hold. If unanswered, the call may ring other extensions.
If a call is on a line that does not appear on
2.
your phone, you ca n only place the ca ll on
Exclusive Hold.
If you place an Intercom call while you are
3.
on an outside call, you automatically place
the outside call on System Hold. (If you
have a DSS Cons ol e , press ICM or HOLD
before pressing a DSS key.)
(Do Not Hang Up.)
Press HOLD.
1.
-Press HOLD again to place an outside
call on Exclusive Hold.
-The line key flashes for an outside call.
-The HOLD key flashes when the line
does not appear on your phone and for
an Intercom call.
Hang up.
2.
Hold
For a line that appears on your phone:
1. Lift handset.
2. Press the flashing line key.
OR
For a line you placed on Hold that does not
appear on your phone:
Lift handset.
1.
Press HOLD.
2.
OR
For a line somebody else placed on System
Hold that does not appear on your phone:
Lift handset.
1.
Press ICM.
2.
Press *.
3.
11
Page 20

To retrieve an Intercom call
from Hold:
To Transfer your call:
Transfer
Dial line access code (e.g., 801) or exten-
4.
sion number.
At your extension: Lift handset.
1.
-If you have Prime Line Selection, press
ICM before going to the ne xt s tep.
Press HOLD.
2.
-You cannot put a Handsfree Interco m
call on Hold.
Transfer
This feature is always available.
)
You can Transfer an outside call to another extension. If the other party
does not answer the transferred call, you can retrieve it. You cannot
Transfer Intercom calls.
(Do Not Hang Up.)
Press ICM and dial the extension number.
1.
-You can press a DSS key instead of
dialing the extension number. If you are
an attendant, yo u ca n al s o press a DSS
Console key.
OR
Press Hotline key.
1.
-To Transfer the call using a Station Call
Coverage key, refer to the Station Call
Coverage feature.
Announce the call.
2.
-If you hear ringing, wait for party to
answer before announcing call. To
Transfer the call unannounce d, skip this
step.
12
Page 21

To retrieve the transferred
call:
Transfer
-If you hear busy to ne, you can dial C t o
wait in line. Refer to the Camp-On
feature on page 24. Also, your display
shows, "HOLD/W AIT." This indicates
the number of calls on Hold or alre ad y
camped-on to the busy extension.
Hang up.
3.
1. Lift handset.
2. Press the flashing line key for the call.
OR
Retrieve call from Hold.
1.
13
Page 22

To ente r an Account Code
when placing an outside call :
To enter an Account Code
for the call you are on:
Account Codes
Features
Account Codes
For billing or other purposes, you can enter an Account Code (a number up
to 10 digits long) to categorize your outside call. This Account Code is
included in a report that the system generates. You can enter an Account
Code manually as described below, or you can program a One-Touch Speed
Dial key for Account Code entry (see page 54). This eliminates the need to
place your call on Hold while you enter the number.
If your system has Mandatory Account Codes, you
must
enter an
Account Code for each long distance call you place. If your Account
Codes are al so Verifiable, you
enter a code from a list programmed
must
into your phone s y st em . As k yo ur communication s ma nager which type
of Account Codes you have.
(You can program this on a One- Touch Speed
Dial key. See page 54.)
Place call.
1.
Press PGM# immediately after dialing the
2.
number.
Enter Account Code.
3.
Press PGM#.
4.
(You can program this on a One- Touch Speed
Dial key. See page 54.)
Do not hang up.
1.
Press ICM.
2.
Press PGM#.
3.
Enter Account Code.
4.
Press PGM#.
5.
Press HOLD.
6.
-You are reconnected to your call.
14
Page 23

To see the cause of an Alarm:
Alarm
Alarm
This feature is for attendants only .
)
Your telephone display may show an alarm message. Alarm messages
occur when a telephone is unplugged or fails, when a line fails or when a
printed circuit card in the system equipment fails. Telephone and line
failures display as Minor Alarms. Printed circuit card failures display as
Major Alarms. Your display also shows you which extension or card
failed. Report alarms to your communications manager.
When an alarm dis pl a ys , your phone does not ri ng nor mally for incoming
calls. If your phone has Off-Hook Ringing, it rings with a single beep
(repeated). If your phone does not have Off-Hook Ringing, calls do not
ring while the alarm displays. Your communications manager can tell you
if you have Off-Hook Ringing.
(Do not lift the handset.)
Press MSG.
1.
-Display shows cause of A l ar m. For
example: "STA 305 FAILED" or "LINE
02 FAILED."
Press MSG to see if there is more than one
2.
failure.
-When you see the first failure message
again, you have gone through the entire
list.
Lift and replace handset to clear the alarm
3.
display.
15
Page 24

To assign the Alternate
Attendan t:
To cancel the Alternate
Attendant assignment:
Alternate Attendant
Alternate Attendant
This feature is for attendants only .
)
Alternate Attendant allows you to reroute your incoming calls to another
extension (your Alternate Attendant). Y o u may want to reroute calls when
you are busy or yo u mu st le ave your phone. Outside calls ring at both
your extension and the Altern ate Atten dant. The MIC/DND a nd MSG
keys flash slowly while the Alternate Attendant is assigned.
When you assign the Alternate Attendant, you cancel your Selectable
Display Message (if any). The Alternate Attendant must be a ke yset. You
cannot assign another attendant as your Alternate Attendant.
(You can program this on a One- Touch Speed
Dial key. See page 54.)
Lift handset.
1.
Press ICM.
2.
Press PGM#.
3.
Dial Alternate Attendant’ s extension num-
4.
ber .
Dial 3.
5.
-Your display shows, "ALT OPR
ASSIGNED."
Hang up.
6.
16
Press MIC/DND.
1.
-Your display shows, "CANCEL ALT
OPR." To return to the Time and Date
display, lift and r eplace the handset.
Page 25

To become On or Off Duty:
To monitor the status of
your ACD group:
Automatic Call Distribution
Automatic Call Distribution
ACD Member (Agent)
Your extension may be in an Automatic Call Distribution group. The
members of your ACD group share responsibility for answering the
group’s calls. ACD e v e nl y dis t r i butes the cal ls am on g t h e group
members. Normally, the member (agent) that has been idle the longest
gets the next call.
From time to time, you may need to temporarily remove yourself from
the group (for example, when you go to lunch). When you become Off
Duty, ACD no longer sends c a ll s t o yo ur extensio n. When you become
On Duty, you’ll a ga in start to re ce ive ACD calls.
Lift handset.
1.
Press ICM.
2.
Dial 6 to go Off Duty; dial 4 to go On Duty.
3.
Dial PGM#.
4.
ACD Supervisor
You may be an ACD supervisor. If you are, you should have a display
keyset. You should also have a DSS Console with a Hotline key for each
group member and your ACD group master number. As a supervisor,
you can:
Monitor the st atus of your grou p o n y our DSS Console. You can be
•
the supervisor of more than one ACD group.
Be notified when all agents are busy, and how long calls have been
•
waiting for an available agent. Your telephone display shows this information.
Make agent s On or Off Duty.
•
(Optional) Record the announcements that your group’s callers hear.
•
Your communicatio ns ma nager can tell yo u if you need to record any
announcements. To record announcements, your system must have a
VMU Module.
Watch your DSS Console.
17
Page 26

To make agents on and off
duty (supervisors only):
To record announcements
for your ACD callers:
Automatic Call Distribution
-If Agent’s k ey is Agent is
OFF. . . . . . . . . . . . Idle
ON. . . . . . . . . . . . . Busy
Flashing Slow . . . . Off Duty
Flashing Fast . . . . . In DND
AND
On your DSS Console, press the Hotline
1.
key for your ACD group master number.
Watch your telephon e display.
2.
-Your display shows information for the
group selected in the previous step. For
example, if your display shows, "02
L-04 00:47," you have two calls waiting
(02). The call on line 4 (L-04) has been
waiting longest: 47 seconds (00:47).
Lift handset.
1.
Press ICM, then PGM#.
2.
Press DSS key for agent you’ll change.
3.
Dial 7 to remove agent; 4 to install.
4.
Lift handset
1.
Press ICM, then PGM#.
2.
Dial MV (Master Voice Message).
3.
Enter the number of the message you want
4.
to record (00, 02-07).
-Your communications manager can tell
you which message to record. Message
00 is the standard ACD All Agents Busy
message.
-The system prompts, "Please start
recording."
After you hear the beep, speak clearly and
5.
directly into the handset.
-The announcement ca n be up t o 16
seconds.
18
Page 27

To listen to a previously
recorded announcement:
To erase all your recorded
announcements (including
OPA announcements):
To turn Background Music
on or off:
Background Music
Hang up when through recording.
6.
Lift handset
1.
Press ICM.
2.
Press PGM#.
3.
Dial MVL (Message Voice Listen).
4.
Dial the message num be r (0 0,02-07).
5.
Lift handset.
1.
Press ICM.
2.
Press PGM#.
3.
Dial MV and press PGM#.
4.
-Your display shows, "DELETE ALL
MSG?"
To erase messages, dial Y.
5.
- Your display shows, "COMPLETED."
OR
To quit without erasing, dial N.
- Your display shows, "ABORTED."
Hang up.
6.
Background Music
You can receive Background Music over your telephone’s speaker. The
music stops whenever a call comes in or you lift the handset. You can
turn the music on or off only when your telephone is not in use. T o have
Background Music, your system must have an optional music source
connected.
The volume setting for Background Music also sets incoming ringing and
paged announce ment level s over the telephone’s speaker.
(Do not lift handset.)
1. Press HOLD.
19
Page 28

To adjust the volume of
Background Music:
To forward calls:
To cancel Call Forwarding:
Call Forwarding
Press VOL UP or V OL DN while fe ature is
1.
active or telephone is idle.
Call Forwarding
With Call Forwarding, you can reroute your incoming calls to another
extension or to an outside number. If you are an attendant, you cannot use
Call Forwarding. Use Alternate Attendant inste ad (se e page 16).
(This may be programmed on a One-Touch
Speed Dial key. See page 54.)
Press ICM.
1.
Press PGM#.
2.
Dial extension number to receive calls.
3.
Do one of the following:
4.
-Dial 1 to forward calls not answered.
-Dial 2 to forward calls not answered or
when busy.
-Dial 3 to forward all calls.
-Dial 4 to have V oice Mail screen your
calls (i.e., emulate a personal
answering machine). Turn to page 62
for more on this option.
Press HF to hang up.
5.
-MSG flashes slowly. A voice prompt
may remind you that your calls are
forwarded.
20
Press ICM.
1.
Press PGM#.
2.
Press HF to hang up.
3.
-MSG goes out.
Page 29

To forward calls to an
outside number:
To cancel all Call Forwarding:
Call Timer
Off-Premise Call Forwarding
You can reroute your calls to an outside (off-premise) telephone number.
For example, you can forward your calls to your cellular car phone if you
have to be on t he road.
Press ICM
1.
Press PGM#.
2.
Dial 1.
3.
Dial line number (e.g., 01).
4.
-You may also be able to dia l a lin e
gr ou p co de (9, 90-98).
Dial telephone number that is to receive
5.
calls.
Press HF to hang up.
6.
Call Forward System Cancel
This feature is for attendants only .
)
Call Forwarding reroutes incoming calls to another extension, or to an
outside number. As the a ttendant, you cannot use Call Forwa rding (see
the Alternate Attendant feature on page 16 instead). You can, however ,
cancel all Call Forwarding for the system (including Selectable Display
Messages). This also cancels Do Not Disturb for the system.
Lift handset.
1.
Press ICM.
2.
Press PGM#.
3.
Press *.
4.
Hang up.
5.
Call Timer
With Call Timer, you can use your phone’s display to time your outside
calls. You can time either incoming or outgoing calls.
21
Page 30

To start the Call Timer (if
you have a Timer key):
To stop the Call Timer (if
you have a Timer key):
To request a Callback (after
calling a busy extension):
To answer when Callback
rings you back:
Callback
Press Timer key.
1.
-The Timer key is ON. Your display
starts timing your call. Press the Timer
key before you place or answer your
call — or while idle. If your phone has
Auto Timer, it starts automatically for
outside calls. Y ou don’t have to press
the Time r k ey.
Press Timer key.
1.
-The Timer key is OFF. Y ou can stop the
timer before or after you hang up. To
restart the timer from 00:00, press the
Timer key again.
Callback
When you call a busy extension, you may leave a Callback request for a
return call. You do not have to repeatedly call the busy e xtension back,
hoping to find it idle. You will note that the Callback ring cadence is
longer than oth er ri ng i ng signals. If you are a n att e ndant, you cannot us e
Callback. To leave a Callback for an outside line, see the Line Callback
feature on page 38 .
(Do not hang up.)
Dial C.
1.
-You hear ringing.
Hang up.
2.
-You can use your phone f or oth er ca l ls
while you wait for Callback to ring you
back.
22
Lift handset.
1.
-If you hear ringing, wait for party to
answer.
OR
Page 31

To cancel a Callback
request to a specific
extension:
To cancel all your Callbacks
simultaneously:
To answer a Caller ID call
(with the pre-answer display
disabled):
To answer a Caller ID call
(with the pre-answer display
enabled):
Caller ID
-If you hear two beeps, go ah ea d an d
speak.
Call busy extension again.
1.
-You hear busy tone.
Press *.
2.
Hang up.
3.
(This also cancels your Line Callbacks.)
Lift handset.
1.
Press ICM.
2.
Press *.
3.
Press FTR.
4.
Hang up.
5.
Caller ID
If your phone has a display, Caller ID can show your incoming caller’s
number and optional name. The Caller ID information will show as either
a
post-answer
see the caller’s number and optional name
pre-answer display lets you see the caller’s number and optional name
before
preview incoming calls before you answer them. The Caller ID
pre-answer display is available only if your telephone does not have
Automatic Handsfree (see page 7). Check with your communications
manager.
or
pre-answe
r display. With the post-answer display, you’ll
you answer the call. The
after
you answer the call. You can also use the pre-answer display to
Lift handset or press flashing line key.
1.
-You see the incoming caller’s name and
number and you answe r the ca l l.
(Your phone must have Automatic Handsfree
disabled to use this feature. )
Press the flashing line key to display the in-
1.
coming caller’s phone number.
23
Page 32
To re-display the Caller ID
information for the call you
are on:
When you see . . .
It means . . .
Camp-On
-You can press another flashing line key
instead of going to the next step.
Press the flashing line key again to display
2.
the incoming caller’s name.
-If the telephone company does not offer
the name option, you skip to the next step.
-You can press another flashing line key
instead of going to the next step.
Lift the handset to answer the call.
3.
-If you previewed several ringing lines,
you’ll answer the call on the most
recently pressed line key.
Press the line key for the call.
1.
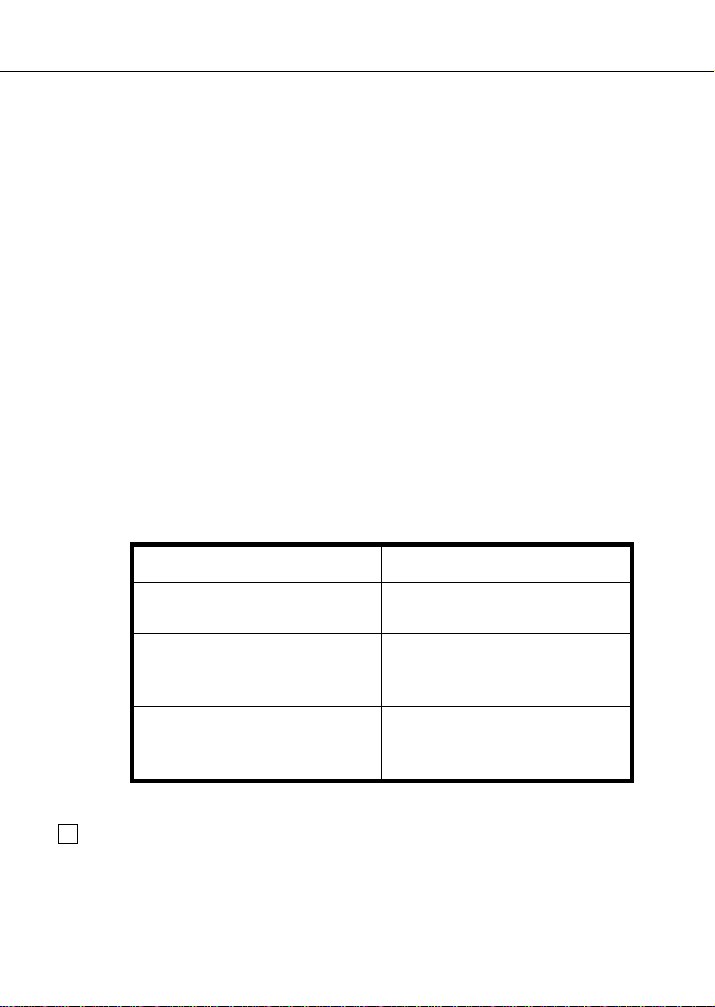
Under certain conditions, you may see one of the following messages in
place of the normal Caller ID information.
PRIVATE Your caller has blocked
Caller ID.
OUT OF AREA You caller has dialed from
an area that does not support
Caller ID
UNAVAILABLE Your telephone compan y’s
Caller ID service is out or
order
Camp-On
Camp-On allows you to call a busy extension or line and wait off-hook
until that extension or line becomes free.
24
Page 33

To Camp-On to a busy
extension or line:
To answer a Camp-On:
To return to the first call
and switch (split) between
calls:
To set up a Conference:
Conference
(Do Not Hang Up.)
Dial C.
1.
-If you Camp-On to a busy extension...
You hear ringing in your handset. When
the party is free, their phone rings.
OR
-You hear two beeps and you can begin
speaking.
-If you Camp-On to a busy line...
Busy tone stops. When you hear dial
tone, dial your outside call.
(You hear two beeps while yo u ar e on a c all . )
(Do not hang up.)
Press ICM.
1.
-Your f irst call goes on Hold. You
connect to the calling party.
Press ICM.
1.
Press * and dial S (dial pad key 7).
2.
Conference
This feature is always available.
)
Conference allows you to converse jointly with two inside parties, two
outside parties or one of each.
Place first call.
1.
Press CONF.
2.
Place next call.
3.
Press CONF.
4.
-The CONF key lights and the three
parties are Conferenced.
25
Page 34

To cancel a Conference:
To set up an Unsupervised
Conference:
To dial using DNP:
Conference, Unsupervised
Hang up.
1.
-If your Conference include d an
Intercom call, your callers continue to
converse after you hang up.
OR
Place Conference on Hold.
1.
Disconnect one of y our callers.
2.
Hang up on your remaining caller.
3.
Conference, Unsupervised
Use Unsupervised Conference when you want to join two outside callers
in a Conference — then leave the Conference and allow them to talk
privately. Once you set up this type of Conference, it continues until one
of the outside callers ha ng s up . You cannot rejoin the Confer en ce or
terminate it from your phone.
Place or answer first outside call.
1.
-Y ou talk to the first caller.
Press CONF.
2.
Place or answer second outside call.
3.
-You talk to the second caller.
Press CONF again.
4.
-Y ou talk to both callers.
Hang up.
5.
-Your callers talk privately with each
other. You cannot rejoin the Conference.
Dialing Number Preview
Dialing Number Preview (DNP) allows you to dial, review, and correct a
number before the system dials it o ut for you. You can only use Dialing
Number Preview if you have a display telephone.
Lift handset
1.
-This is optional unless you are an
attendant.
26
Page 35

To correct digits:
To exit DNP at any time:
Direct Station Selection
Press *.
2.
-Your display shows, "DIAL PREVIEW."
Dial number.
3.
-Your display shows digits dialed, with a
cursor (-) after the last digit.
Press DN to move the cursor left to the in-
1.
correct digit. Press UP to move the cursor
to the right, one digit at a time.
Dial correct digit.
2.
-Your display shows the new digit and
the cursor moves one space to the right.
Press FTR to move the cursor to the end of
3.
the digits.
-The system dials only the digits up to
the cursor.
Press DIAL.
4.
-The system automatically selects a line
and dials the number.
OR
-Your display shows, "SELECT IDLE
LINE," and you must press a line key.
The system then dials the number.
Press HF.
1.
Direct Station Selection
Direct Station Selection keys (the third-level function of programmable
keys 1-15) provide easy access to other extensions. They also act as busy
lamps, indicating the status of an associated extension.
When the key is... The extension is...
OFF Idle
ON Busy
27
Page 36

User-Programmable
Feature:
To program your DSS keys:
To call an extension using a
DSS key:
Directed Call Pickup
When the key is... The extension is...
Flashing DND
Also refer to DSS in User-Pr ogra mm ab le
Features (page 76). When p ro gr am min g DSS
keys, you can us e the User-Programmable
Feature or the procedure belo w. If a DSS key
is also a Station Call Coverage key, changing
DSS also changes the Call Coverage
assignment.
Lift handset.
1.
Press ICM, then PGM#.
2.
Press the desired DSS key.
3.
Dial the extension number you want as-
4.
signed to the key.
-To clear a DSS key, press *.
-Program additional keys by repeating
the last three steps. All unprogrammed
keys call extension 300.
Hang up.
5.
Lift handset.
1.
Press ICM.
2.
-The key lig hts s ho w yo u t he status of the
assigned extensions.
Press the DSS key for the desired extension.
3.
Directed Call Pickup
Directed Call Pickup allows you to answer a call ringing another
extension. You may also have Call Coverage keys on your phone. Y ou can
use these keys instead of Directed Call Pickup to answer a call to the
covered extension. Refer to the Station Call Coverage feature on page 59.
28
Page 37

To Pickup a call ringing at
another phone:
To dial a number using
Directory Dialing:
Directory Dialing
(You can program this on a One- Touch Speed
Dial key. See page 54.)
Lift handset.
1.
Press ICM.
2.
Press *.
3.
Dial ringing extension number.
4.
-You are connected to the caller.
-This procedure also picks up a call on
System Hold or Parked at the extension
you dial. Refer to the Hold (page 10)
and Park (page 47) features.
Directory Dialing
Directory Dialing lets you call a Speed Dial or Intercom number by
selecting the name associated with the number. There are three types of
directories:
Intercom (dials extension numbers)
•
Personal (dials yo ur Pe rs o nal Speed Dial number s)
•
Company-wide (dials the first 100 System Speed Dial numbers)
•
Lift handset (attendant only).
1.
Select type of directory.
2.
-For Intercom Directory, di al I. Your
display shows, "INTERCOM
DIRECTORY."
OR
For P er s onal Di rectory, di al P. Your
display shows, "PERSONAL DIR."
OR
For Company-wide Directory, dial C.
Your display shows, "COMPANY WIDE
DIR."
-If your display shows, "NO RA M
INSTALLED" when you press P or C,
you can only use Intercom Directory
Dialing.
29
Page 38

To cancel Directory Dialing
at any time:
To adjust the brightness of
your telephone display:
Display Messages
Dial the first letter of the desired name.
3.
-To enter a Q or a Z, press 0 (zero).
Dial the digit (1, 2 or 3) that identifies the
4.
desired letter .
-The display shows the first name
beginning with that letter. If there are
none, the display shows: X-UNLISTED
NAME (X is the letter you enter e d).
Press UP or DN to scroll through the
5.
names beginning with this letter. Stop at the
desired name .
-To begin with the first name in the list
(so you can scroll thr ough all the
names), press PGM#.
Press DIAL.
6.
-The system dials the number stored with
that name.
-If you are transferring, pressing DIAL
initiates a screened transfer. For an
unscreened Transfer, hang up instead .
Hang up.
1.
Display Messages
Messages appear in the display window to provide helpful information at
a glance. When your phone is not in use, the date and time display. When
you use your phone, messages di s play to explain what is happening or t o
help you remember what to do next. If you have a questio n about the
displays, check with your communi cations manager .
Press VOL UP or V OL DN while y our
1.
phone is idle.
30
Page 39

To put your phone in Do Not
Disturb:
To cancel Do Not Disturb:
To Over ride your Hotline
partner’s DND:
Door Box
-Your phone must be idle (not ringing),
with Background Music off.
Do Not Disturb
Do Not Disturb (DND) blocks Page or ri ng ing at you r e x ten s ion . If you
call an extension tha t is in DND, yo u h ea r a reorder tone. You may be
able to override DND. If you are an attendant, you cannot place your
phone in DND.
Press MIC/DND until it flashes.
1.
Press MIC/DND until it goes out.
1.
(The Hotline key for your partner flashes on
your phone.)
Lift handset.
1.
Press Hotline key twice.
2.
-The phone rings if idle; wait for an answer.
OR
Place Intercom call to extension in DND.
1.
Dial I.
2.
-The phone rings if idle; wait for an answer.
Door Box
Your system may have Door Boxes. A Door Box is a se lf-contained
Intercom unit typically used to monitor entrance doors. A visitor at the
door can press the Door Box call button (like a door bell). The Door Box
then sends chimes to certain extensions. If you receive Door Box chimes,
you can just lift the handset to answer them. You can then talk to the
visitor at the door.
31
Page 40

To answer the Door Box
chimes:
To call the Door Box:
To flash the line you are on:
Flash
Door Boxes com e i n ha nd y at deli v e ry entrances. Your company does n ’t
need to have someone at the door to monitor the entrance. You can just
answer the Door Box instead. If the door has an electric strike connected
to a Relay Box, you ca n us e your phone to rele a s e t he doo r.
Lift handset.
1.
-If you have a Call Coverage or Hotline
key for the Door Box, you can press it
instead.
Lift handset.
1.
Press ICM.
2.
-If you have a Call Coverage or Hotline
key for the Door Box, you can pr es s it
instead.
Dial Door Box extension number.
3.
-Your system can onl y ha ve Door Bo xes
at extensions 310, 311, 322 and 323.
(Optional) Press and hold FTR to release
4.
the door.
-You can have Relay Boxes for the Door
Boxes at extensions 31 1, 322 and 323
only.
Flash
While you are on an outside (CO) call, Flash allows you to regain dial
tone without giving up control of the line. You can then place another
call. Flash also allows access to PBX features when using a PBX line.
(Do Not Hang Up.)
Press FTR.
1.
Dial number.
2.
32
Page 41

To disconnect a line:
To answer a call ringing in a
Pickup Group from a phone
within that Pickup Group:
Group Call Pickup
Forced Line Disconnect
This feature is for attendants only .
)
Forced Line Disconnect allows you to disconnect a call on an outside
line. This may be necessary, for example, when a call is terminated but
the line remains locked up (line key stays lit).
Lift handset.
1.
Press desired line key.
2.
Press PGM#.
3.
Hang up.
4.
OR
Lift handset.
1.
Press ICM.
2.
Dial line access code (e.g., 801).
3.
Press PGM#.
4.
Hang up.
5.
Group Call Pickup
Your extensio n m a y be in a group wit h s ome of your c o-workers’
extensions so you can easily pick up each other’s calls. You can answer a
call that is ringing any extension in the group by dialing a Group Call
Pickup acces s co de. You may hav e Group Call Pi c ku p keys on yo ur
phone, which you can a l so u se to an swer ca lls. You don’t have to b e a
group member to have Group Call Pickup keys.
(You can program this on a One- Touch Speed
Dial key. See page 54.)
Lift handset.
1.
Press ICM.
2.
Press * and dial 1.
3.
-Y ou a re connected to the caller. Y ou r
display shows, "P (+ name)" or
"PICKUP FROM (+ extension
number)."
OR
33
Page 42

User-Programmable
Feature:
To initiate Group Listen:
To cancel Group Listen:
To place a call to a Ring
Group:
Group Listen
Lift handset.
1.
Press the flashing Group Call Pickup key.
2.
-The key flashes when a call is ringing
the group.
-Y ou a re connected to the caller. Y ou r
display shows, "P (+ name)" or
"PICKUP FROM (+ extension
number)."
Use Ring Assignme nt/De lay ed R ing
Assignment in User-Programmable Features
(page 76) to assign Pi ck up Grou p k ey ringing.
Group Listen
Group Listen lets you talk into your handset and have your caller’s voice
broadcast thr ough you r t elephone speake r. With Group L i s ten , o t he rs i n
your work area can listen to your conversation. If you are an attendant,
you cannot use Gr ou p Lis t en.
Establish handset call.
1.
Press HF (but do not hang up).
2.
-HF lights.
(Do not hang up.)
Press HF.
1.
-HF goes out.
Group Ring
During installation, certain extensions in your system were arranged into
Ring Groups. When you call a Ring Group number, all extensions in the
Ring Group ring. You can also answer a Ring Group call.
34
(You can program this on a One- Touch Speed
Dial key. See page 54.)
Page 43

To answer a Ring Group call
at any phone:
To answer a Ring Group call
ringing your group:
To install the headset:
To operate a Headset:
To answer a call using the
headset:
Headset
Lift handset and press ICM.
1.
Dial Ring Group number (e.g., 396).
2.
-You hear ringing; wait for an answer.
(You can program this on a One- Touch Speed
Dial key. See page 54.)
Lift handset and press *.
1.
Dial Ring Group number (e.g., 396).
2.
-You are connected to the caller.
Lift handset.
1.
-The ICM key or a L i ne key lig ht s.
Headset
If you have a Headset, you can use it instead of the handset. Using the
headset frees up yo ur han ds fo r oth e r wor k.
Leave the handset in the cradle.
1.
Unplug the hands et an d plug in the headset .
2.
For Non-attendant Keysets
Use the HF key to hang up calls in place of
the handset.
Press HF whenever you see the instruction,
1.
"Lift handset."
Press HF whenever you see the instruction,
2.
"Hang up."
For Attendants
Press RLS on the DSS Console.
1.
-If you have Ringing Line Preference
(page 51), this answers the call.
Press the flashing line or Intercom loop key.
2.
35
Page 44
To place a call using the
headset:
User-Programmable
Feature:
User-Programmable
Feature:
To place a call using a
Hotline key:
Hotline
Press RLS on the DSS Console.
1.
Press the flashing line or Intercom loop
2.
key .
-If you have Ringing Line Preference,
press the line or Intercom loop key
before pre s s i ng R L S.
You can allow or deny Headset operation for
your phone. Refer to Headset in
User-Programmable Features.
Hotline
Hotline gives you one-button calling and Transfer to another extension
(your Hotline partner). The Hotline key on your phone shows the status
of your partner’s extension.
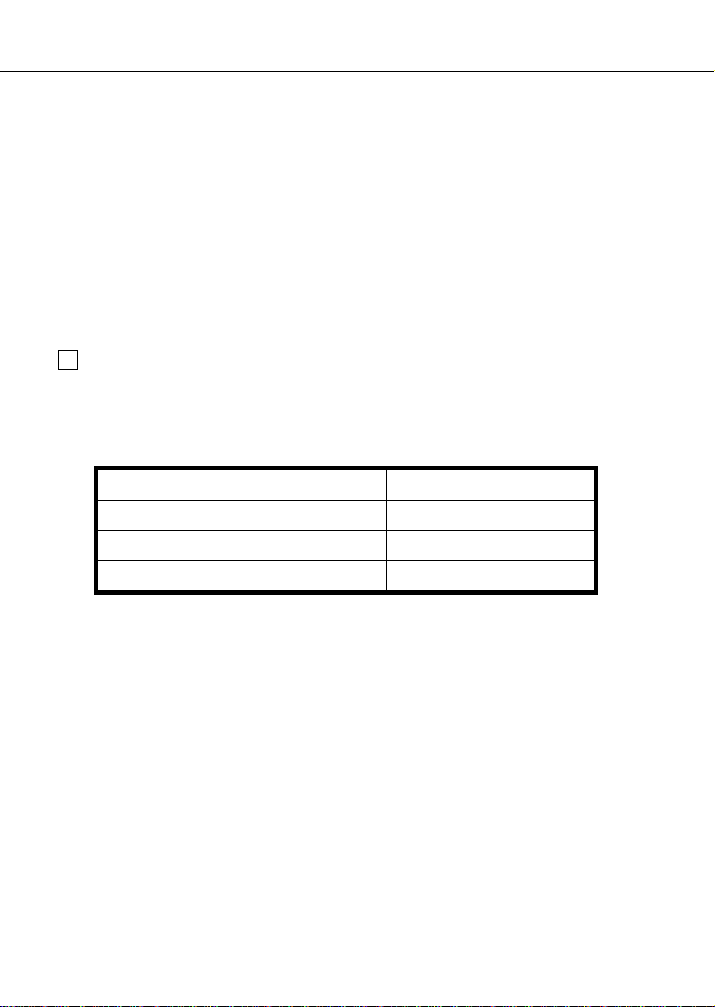
When the Hotline key is ... Your partner is ...
OFF Idle
ON Busy
Flashing DND
You may be able to overrid e an extension in Do Not Di s tur b us i n g yo ur
Hotline key. Refer to the Do Not Disturb feature on page 31.
You can use Hotline in User- Programmable
Features (page 76) to change your Hotline
assignment.
Lift handset.
1.
Press the Hotline key.
2.
-If the Hotline key to your partner is lit,
see the Off-Hook Signaling feature on
page 43.
36
Page 45

To transfer the call you are
on using a Hotline key:
(Do Not Hang Up.)
To answer a call from your
Hotline partner:
To intrude on a busy
extension:
Press the Hotline key.
1.
-If your partner does n’t answer, you can
press another Hotline key instead of
going to step 2.
Hang up, or wait for an answer.
2.
(ICM flashes.)
If you are not an attendant...
Listen for two beeps.
1.
Speak toward the phone.
2.
If you are an attendant...
Lift handset.
1.
Press HF (Intercom loop key).
2.
Intrusion (Barge-In)
Intrusion allows you to break into another conversation.
Intrusion (Barge-In)
CAUTION:
Unauthorized intrusion on calls using this feature may be
interpreted as an invasion of privacy.
(Do Not Hang Up.)
Dial I (dial pad key 4).
1.
-Busy party hears two s ho r t be e ps .
-You cannot Intrude on a Conference
call.
-If you hear fast bus y to ne , you cannot
Intrude.
Wait about four seconds, until the CONF
2.
key lights.
-You and the other two parties are in
Conference.
37
Page 46

To place a call using Last
Number Redial:
To request a Callback for an
outside line on a line key:
To request a Callback after
dialing a code for an
outside line:
Last Number Redial
Last Number Redial
This feature is always available.
)
With Last Number Redial, you can easily call the last outside number
you dialed. Each time you place an outside call, the system saves the
number you dial e d (up to 24 digits). You can redial the call whet he r it
was answered, unanswered or busy. Redial uses the same line to dial out
unless you select a different line.
Lift handset.
1.
-T o select a dif ferent line, press a line key
Press DIAL.
2.
Press LAST.
3.
-If you hear busy tone, press an idle line
key. Your call dials out automatically .
Line Callback
You can leave a Callback request for a busy outside line. The system
rings you when the outside line is available. You do not need to keep
checking the line, hoping to find it idle. You will note that the Callback
ring cadence is longer than other ringing signals. To leave a Callback for
an extension, see the Callback fe at u re on page 22. If you are an a tt en da nt ,
you cannot use th e Li n e Callback feat ur e.
38
Press illuminated line key.
1.
-You hear busy tone.
Dial C.
2.
-Busy tone stops.
Hang up.
3.
-Use your phone for other ca ll s while
you wait for Callback to ring you back.
Dial C and hang up.
1.
Page 47

To answer when Callback
rings you back:
To cancel a Callback
request to a specific line:
To cancel all your Callbacks
simultaneously:
To set up a Meet-Me
Conference:
To join a Meet-Me
Conference:
Meet-Me Conference
-You can use your phone f or oth er ca l ls
while you wait for Callback to ring you
back.
Lift handset.
1.
-You hear dial tone on the line you
requested.
Place call.
2.
Try to access busy line again.
1.
-You hear busy tone.
Press * and hang up.
2.
(This also cancels your Intercom Callbacks.)
Lift handset.
1.
Press ICM and dial *.
2.
Press FTR.
3.
Hang up.
4.
Meet-Me Conference
Meet-Me Conference allows you to set up a Conference with up to two
other inside parties. Each party joins the Conference by dialing a
Meet-Me Conference access code. Also see Conf er en ce on page 25.
Page desired parties and announce Meet-
1.
Me Conference code (11 or 12).
Press ICM.
2.
Dial Meet-Me Conference access code.
3.
Lift handset and press ICM.
1.
Dial announced Meet-Me Con fe re nc e ac-
2.
cess code (11 or 12) .
-The CONF key lights when the three
parties join the Meet-Me Conference.
39
Page 48

To leave a Message Waiting
after calling an extension:
To answer a Message
Waiting left at your
extension:
To select the message you
want to answer (from your
display phone):
To cancel all the messages
left on your phone:
Message Waiting
Message Waiting
You can leave a Message Waiting indication at a busy or unanswered
extension requesting a return call. The indication is a flashing MSG key
and an optional voice reminder message. If you are an attendant, another
extension user cannot leave a Message Waiting at your extension. Also
see Voice Mail on page 62.
(Do Not Hang Up.)
Press MSG.
1.
-You hear dia l t o ne. You c annot leave a
Message Waiting while using Whisper
Page. Se e Off-Hook Signaling on page
43.
Hang up.
2.
(Your MSG key flashes fast.)
Lift handset and press MS G.
1.
-The system calls the extension that left
you the message. Your MSG key
continues to flash if you have additional
Messages Waiting.
(Do not lift handset.)
Press MSG.
1.
-Your display shows the extension which
left you the message. Press MSG again
until you see the message you want to
answer.
Lift handset.
2.
Press MSG.
3.
-The system calls the extension you
selected.
40
(This also cancels your Intercom and Line
Callbacks.)
Page 49

To activate Microphone
Mute:
To deactivate Microphone
Mute:
To monitor a call:
Monitor
-You cannot cancel a Message Waiting
you left at an individual extension.
Press ICM.
1.
Press PGM#.
2.
Press *.
3.
Press HF to hang up.
4.
Microphone Mute
Microphone Mute allows you to turn off your phone’s Handsfree
microphone at any time. When you activate Microphone Mute, you can
still listen to your caller but your caller cannot hear your voice. If you are
an attendant, you cannot use Microphone Mute.
Press MIC/DND until it lights.
1.
-You can do this while on a call or when
your phone is idle (to turn off
Handsfree reply to a voice-announced
call).
Press MIC/DND until it goes out.
1.
-If MIC/DND flashes fast, your phone is
in Do Not Disturb instead on page 31.
Monitor
This feature is for attendants only.
)
Monitor allows you to listen to somebody else’s phon e conversation,
without them hearing you or knowing you are on the line. When you
monitor someone on an outside call, you hear both parties. However,
when you monitor someone on an inside call, you only hear their caller.
You cannot Monitor a Conference call.
CAUTION:
interpreted as an invasion of privacy.
Unauthorized monitoring of calls using this feature may be
Lift handset and press ICM.
1.
41
Page 50

To place the system in
Night Answer (attendants
only):
To take the system out of
Night Answer (attendants
only):
User-Programmable
Feature:
To answer a call during
Night Answer:
Night Answer
Dial the extension number.
2.
Dial M.
3.
-You hear the conversation.
Night Answer
This feature is for attendants only .
)
If you are an attend an t, you ca n p lace the system in Night Answer. While
in Night Answer, the system reroutes incoming calls to preselected
extensions or through the paging system. The MIC/DND key flashes only
at your extension while the system is in Night Answer.
Press MIC/DND.
1.
-The MIC/DND key flashes. Your display
shows, "NIGHT MODE ON."
Press MIC/DND.
1.
-The MIC/DND key goes out. Your
display shows, "NIGHT MODE OFF."
42
You can change the lines that ring your phone
at night. Refer to Night Ring in
User-Program ma ble Features (see page 76 ).
(You can program this on a One- Touch Speed
Dial key. See page 54.)
Lift handset.
1.
Press ICM.
2.
Press *.
3.
Dial 0.
4.
-You are connected to the caller.
OR
Lift handset.
1.
Press flashing line key.
2.
Page 51

User-Programmable
Feature:
To respond to a Whisper
Page signal:
To respond to an Off-Hook
Signal (one beep over your
speaker):
To signal an off-hook
extension:
Off-Hook Signaling
Off-Hook Signaling
While on a call, Off-Hook Signaling alerts you whe n yo u have another
call waiting to be answered. The off-hook signal is a tone through the
speaker when the call is ringing in. You can answer the waiting call.
Off-Hook Signaling also allows you to signal a busy extension when you
want to talk to them. If the busy party is on a handset call, they hear your
voice in their handset (called Whisper Page) or beeps over the speaker.
The party can select to talk to you or their initial caller. If the busy party
is on a Handsfree call, th e y he ar a beep. You cannot use Whisper Page if
you are an attendant.
You can allow or deny Whisper Page for your
extension. Refer to Whisper Page in
User-Programmable Features (page 76).
Whisper Page
(You hear two beeps bef ore your caller’s
voice.)
Press and hold MIC/DND.
1.
-To talk to the first party, release
MIC/DND.
Off-Hook Signa l i n g
(Do Not Hang Up.)
(Optional) Press HOLD to save your first
1.
call.
-If you are an attendant, your phone
saves outside calls automatically. You
can skip this step.
Press the flashing ICM or line key.
2.
Lift handset.
1.
Use DSS or Hotline.
2.
43
Page 52

To record an OPA message:
Operator Assistance
-If the called party is busy on a handset
call and you press a DSS or Hotline
key, Off-Hook Signaling is automatic. If
the called party is busy on a Handsfree
call and you press a DSS or Hotline
key, Camp-On is automatic. See page
24 for more on Camp-On.
OR
Lift handset.
1.
Press ICM.
2.
Dial extension number.
3.
When you hear ring-busy, dial 1.
4.
-If you hear several beep tones, go
ahead and speak. If you he ar ringing
instead, wait for called party to answer.
Operator Assistance
Operator Assistance (OP A) automatically answers outside calls and
provides dialing options to the outside callers. OPA lets an outside caller
dial an extension or hunt group directly. You or a co-worker do not have
to screen the call.
When OPA answers a call, the caller hears a recording of their dialing
options. For example, the announcement co ul d s a y, "Hello. You have
reached XYZ Corpor at ion. Dial 4 for Technical Service or 5 f or S al e s ."
You may be able to record the messages callers hear. Before recording,
check with your commu ni c at io ns manager to find out about the OPA
messages. To use Operator Assistance, your system must have a VMU
Module.
44
Lift handset.
1.
Press ICM.
2.
Press PGM#.
3.
Dial MV.
4.
Dial the OPA message number (02-07 ) yo u
5.
want to record.
Page 53

To listen to a previously
recorded OPA message:
To erase all OPA messages
(including the ACD overflow
message):
To call into the system
using Operator Assistance:
Page, Zone
-Your communications manager can tell
you about each message.
Wait for instructions, then begin recording.
6.
Hang up.
7.
Lift handset.
1.
Press ICM.
2.
Press PGM#.
3.
Dial MVL.
4.
Dial the message num be r (0 2- 07) you want
5.
to hear .
-Your communications manager can tell
you about the messages.
Hang up.
6.
Lift handset.
1.
Press ICM.
2.
Press PGM#.
3.
Dial MV.
4.
Press PGM#.
5.
Dial Y.
6.
-To exit the procedur e without erasing
the messages, dial N.
Hang up.
7.
Dial system telephone number.
1.
After OPA answers, dial announced option:
2.
Dial single-digit option
OR
Dial 3 plus the extension you wish to reach.
Page, Zone
You can make an announ ce ment (Page) t o oth e r extensions an d e xternal
speakers.
45
Page 54
User-Programmable
Feature:
To make an All Call Page or
a Zone Page:
Page, Zone
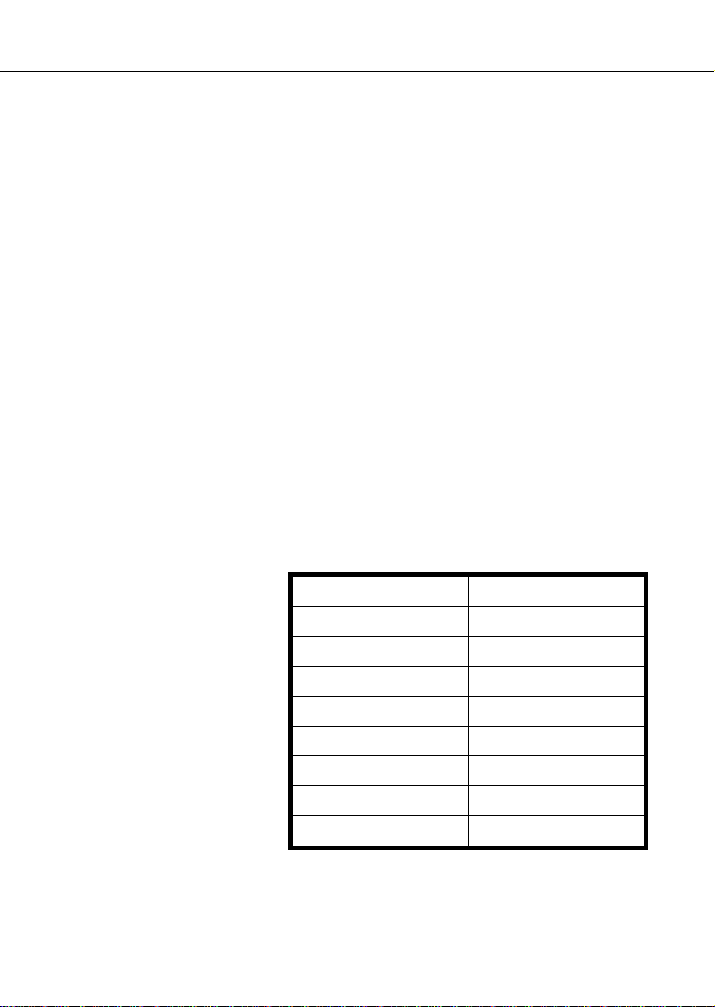
Your system can hav e u p to s even Internal Paging Zo nes and an All Call
Paging Zone. When you Page an Int ernal Zone, on l y those teleph on es in
the zone rece ive the announcement. Wh en yo u m ak e an All Call Page, all
phones recei v e the announcement.
Additionally, your system may have External Paging Zones. If you page
to an internal zone, the announce me nt broadcasts over the co rr esp ondin g
external zone as well. Your system can have up to two external zones
(zones 1 and 2). Al l Call Paging is broadcast to both External Paging
Zones (speakers). Y our communications manager can tell you if your
system has this capability.
You can allow or deny Pages to your phone.
Refer to Page in User-Programmable Features
on page 76.
(You can program this on a One- Touch Speed
Dial key. See page 54.)
Lift handset.
1.
Press ICM.
2.
Dial Page Zone access code, as fo llows:
3.
Page Zone Access Code
All Call 1 *
12 *
23 *
34 *
45 *
56 *
67 *
78 *
-You hear two beeps.
46
Page 55

To Park the call you are on:
Park
-If your system has a PCU Module, you
may have codes for additional External
Page Zones. Check with your
communications manager.
Make announcement.
4.
Hang up.
5.
OR
Lift handset.
1.
Press Page key.
2.
-You hear two beeps. If the zone is busy,
you hear fast busy tone instead.
-You may have Page Zone keys on your
phone and your DSS Console. The key
is lit when the zone is busy.
Make announcement.
3.
Hang up.
4.
Park
When you must transfer an outside call to someone you cannot readily
locate, use Park. Park puts the call in a special holding state (called an
Orbit) so you can page the person. The per s on you pag e can then pick up
the call from any extension.
There are two types of Park Orbits: System P ar k a nd Per son al Park. With
System Par k, you ma y P a rk a call in one of ten s ys tem orbits (60-69 ).
With Personal Park, you can Park a call at an extension. In either case,
the call recalls to you if not picked up.
(Do Not Hang Up.)
Press ICM.
1.
Dial Park Orbit access code. To use System
2.
Park, dial 60 -6 9.
-To use Per s on al Park, dial * and t he
extension number.
-You hear dial tone. If you hear busy
tone, press ICM and dial another orbit.
47
Page 56

To pick up a Parked call:
Personal Greeting
Page party to receive call and announce the
3.
Park Orbit access code.
Hang up.
4.
OR
Press the Park Orbit key .
1.
-You hear dial tone. The key flashes for
calls you parked and is on for calls
co-workers have p a r ked.
Page party to receive call.
2.
Hang up.
3.
(You can program this on a One- Touch Speed
Dial key. See page 54.)
Lift handset.
1.
Press ICM.
2.
Dial Park Orbit access code.
3.
-To use System Park, dial 60-69. To use
Personal Park, dial * and the extension
number. Y ou are connected to the party.
Your display shows, "CALL FROM
ORBIT."
OR
Lift handset.
1.
Press Park Orbit key.
2.
-Y ou a re connected to the party. Y ou r
display shows, "CALL FROM ORBIT."
You may have P ark Orbit keys on your
phone and on your DSS Console.
Personal Greeting
You can record a Person al Greeting (i.e. , br i ef message) for your
extension. When you leave your extension unattended, callers hear your
Personal Greeting. After the caller listens to your message, you can
optionally have the call forwarded to another extension. If you are an
attendant, you ca nn ot us e Pe rs o na l Greeting. Personal Greeting require s a
VMU Module.
48
Page 57

To record a Personal
Greeting:
To cancel your Greeting:
User-Programmable
Feature:
Prime Line Selection
Lift handset.
1.
Press ICM.
2.
Press PGM#.
3.
Dial M V.
4.
-Dial A for all calls.
-Dial I for internal calls only.
The system prompts, "Please start record-
5.
ing."
After you hear the beep, speak clearly and
6.
directly into the handset.
(Optional) Enter three-digit extension
7.
where calls will be transferred. Intercom
dial tone will be heard.
Hang up when you are through.
8.
-The Message W aiting key flashes slowly .
Lift handset.
1.
Press ICM.
2.
Press PGM#.
3.
Hang up.
4.
Prime Line Selection
With Prime Line Selection, you automatically connect to an outside line
when you lift the handset. You can use your Prime Line for placing or
answering calls. Prime Line Selection simplifies handling calls on your
most frequently-used line. Check with your communications manager to
see if you have a Prime Line.
You may be able to assign Prime Lines from
your phone. Refer to Prime Line in
User-Programmable Features on page 76.
49
Page 58

To join a conversation with
a member of your Privacy
Group:
To select privacy for the call
you are on:
To remove a line or
extension from service:
Privacy Groups
Privacy Groups
If your extension is in a Privacy Group, you can enter another group
member’s outside call unannounced and uninvited. Each member of the
group can select Privacy. This prevents members from entering the call.
Lift handset.
1.
Press the desired line key.
2.
-The line and CO NF key s l i g ht . You are
connected to the two parties. No more
than two extensions in the Privacy
Group can join the same call. You
cannot enter a Conference call using
these steps.
(Do Not Hang Up.)
Press the line key of the call you are on.
1.
-Y ou have privacy for the call.
Removing Lines and Extensions
This feature is for attendants only .
)
If a line or extension is causing an Alarm, you can remove it from service
until service personnel resolve the problem. This pre vents further Alarms
on this line or extension. After it is repaired, you can place the line or
extension back in service.
50
Lift handset.
1.
Press ICM.
2.
Press PGM#.
3.
Dial extension number or line extension
4.
number.
-For example, line 801 is line extension
number 372.
Dial 0.
5.
Hang up.
6.
Page 59

To place a line or extension
back into service:
User-Programmable
Feature:
To answer an outside call:
To Save a number any time
after placing a call:
Save
Lift handset.
1.
Press ICM.
2.
Press PGM#.
3.
Dial extension number or line extension
4.
number (e.g., 37 2) .
Ringing Line Preference
Ringing Line Preference lets you answer outside calls by just lifting the
handset. Ringing Line Preference simplifies the way you answer calls.
This helps if you use your phone pr imarily for answering calls. If more
than one call is ringing, Ringing Line Preference answers the call on the
lowest numbered line first.
You can allow or deny Ringing Line
Preference for your extension. Refer to
Ringing Line Preference in UserProgrammable Features on page 76.
Lift handset.
1.
-The line key is lit.
-To place a call instead of answering the
ringing call, preselect a line before
lifting the handset.
Save
You can Save the last number you dial and redial it easily later on. Save
normally uses the same line to dial the call unless you select a different
line. The system stores the saved number until you Save another number
in its place.
(Do Not Hang Up.)
Press DIAL.
1.
Press SAVE.
2.
-The number you Save can be up to 24
digits long.
51
Page 60

To dial a saved number:
To select a Display
Message:
Selectable Display Messages
Lift handset.
1.
-T o select a dif ferent line, press a line
key.
Press DIAL.
2.
Press SAVE.
3.
-The system uses the same line and dials
the number.
-If you hear busy tone, press an idle line
key. Your call dials out automatically .
Selectable Display Messages
You can choose preprogrammed Selectable Display Messages for your
extension. Co-workers (with display telephones) calling your extension
see the message you select. Your communications manager can tell you
about the programmed messages — and the codes you dial to select them.
Your system has 16 Selectable Display Messages (00-15).
For example, assume your system has the message, "AWAY ON
BUSINESS." You could select this mes s a ge before going out of to wn o n
business. Optionally, you can add digits to the end of the first eight
messages. You can use these digits to provide your callers with a phone
number where you can be reached.
52
(You can program this on a One- Touch Speed
Dial key. See page 54.)
Lift handset.
1.
Press ICM.
2.
Press PGM#.
3.
Dial M.
4.
Dial 00-63 to choose on e of th e me s s ag es .
5.
-You may add digits to the end of
messages 00-07.
Hang up.
6.
-MSG flashes slowly.
Page 61

To select a Display Message
(by scrolling through the
messages):
To cancel a Display
Message:
Speed Dial
Lift handset.
1.
Press ICM.
2.
Press PGM#.
3.
Dial M.
4.
Scroll through the messages using VOL UP
5.
or VOL DN.
-You may add digits to the end of
messages 00-07.
Press DIAL and SAVE.
6.
-You hear dial tone.
-If you append a message (00-07), skip
this step.
Hang up.
7.
-MSG flashes slowly.
(You can program this on a One- Touch Speed
Dial key. See page 54.)
Lift handset.
1.
Press ICM.
2.
Press PGM#.
3.
Hang up.
4.
-MSG goes out.
Speed Dial
Speed Dial gives you quick access to freq uently called numbers. There
are two types of Speed Dial: Personal and System. Each Speed Dial
number can be u p t o 16 di g i t s lon g. You can chain (link) two Speed Di al
numbers to access longer numbers (up to 32 digits).
53
Page 62

Speed Dial
Personal Speed Dial
Personal Spee d Di a l nu mb er s ar e reserved fo r yo ur own use . You can
store up to 20 Personal Speed Dial numbers in memory locations called
bins. Your Personal Speed Dial bins are numbered 50-59 and 20-29. By
pressing DIAL, your programmable keys become Personal Speed Dial
keys for bins 50 -5 9 and 20-25.
One-Touch Speed Dial Keys
Your phone may have k e y s pro gr ammed for One-Touch Speed Dial. Just
press these One-Touch Speed Dial keys to dial the s tored number. (If you
have a DSS Console, you can also have One-Touch Speed Dial keys on
your console.)You can also store certain Intercom features under your
One-Touch Speed Dial keys. This simplifies accessing features that you
use often. Just press the One-Touch Speed Dial key to use the key’s
programmed feature. You can store any feature that uses the digits 0-9, #
and *. Ask your co mm un i cations manage r if you have any One-Touc h
Speed Dial keys . If you do, you can change the numbers store d fo r t ho se
keys. See the instructions for storing Perso nal Speed Dial numbers on
page 55 for more.
Storing Names
Optionally, you can store a name with each Personal Speed Dia l number.
The name displays on your telephone as the number dials out. You can
also use this name with the Directory Dialing feature.
Storing a Pause, Delay or Flash
You can stor e a
in a Speed Dial bin by pressing HOLD where you
Pause
want the Pause to occur. When you use the stored number, the system
stops dialing when it encounters the pause and waits for a second dial
tone. If the second dial tone occurs, dialing continues. You might want to
use a Pause if your Speed Dial numb er calls a dial-up service (like a
banking service) that automatically returns second dial tone. The pause
ensures that your number doesn’t dial out too soon. (If you don’t get
second dial tone, you can always dial * to force the remaining digits to
dial out.)
54
Page 63

User-Programmable
Feature:
To store a Personal Speed
Dial number:
Speed Dial
In some cases, yo u may want to store a
in lieu of a Pause. A Delay
Delay
is a fixed wait interval that doesn’t monitor for second dial tone. Use
Delay, for example, if you’re not sure the dial-up service will return
second dial tone . After the first p a r t of your Speed Dial b in d i als o ut , t he
system waits the Delay interval and then dials the remaining digits. To
enter a Delay while programming the Speed Dial bin, press DIAL where
you want the Delay to occur.
You can also store a
command in a Speed Dial bin. Y ou might
Flash
want to do this if your system is behind a Ce ntrex or PBX and you need
to use certain Centrex or PBX features. For example, a Flash command
frequently initiates a PBX Transfer. To enter the Flash command while
programming the Speed Dial bin, press MSG where you want the Flash
to occur.
System Speed Dial
System Speed Dial numbers are accessible from any extension. If you are
an attendant, you normally can store or change these System Speed Dial
numbers. If you are no t an atte ndant, you normally cannot change these
numbers. Chec k wi th yo ur communicatio ns manager to see what yo ur
System Speed Dial numbers are .
Using Person a l Spe ed Di al
You can also use Speed Dial in
User-Programmable Features to store
Personal Speed Dial numbers . See page 54.
You must use the User-Programmable
procedure to stor e numbers on One-Touch
Speed Dial keys.
Lift handset and press DIA L.
1.
-If you are not an attendant, skip this
step if you are programming a
One-Touch Speed Dial key.
Press PGM#.
2.
-Your display shows, "ENTER BIN #".
55
Page 64

To program a name for a
Speed Dial number (when
your display shows PROGM
NAME Y/N ?):
Speed Dial
Dial Personal Speed Dial bin nu mb er (50 -
3.
59, 20-29), press Speed Dial bin key (1-
16), or press One-Touch Speed Dial key.
-Your display shows, "LINE
[01-nn,9X]."
-If you are an attendant, you cann ot us e
this procedure to store numbers in
One-Touch Speed Dial keys.
-Your first Personal Speed Dial key is
bin 50; your last i s bi n 29 .
-If your display shows, "PROGM NAME
Y/N," see instructions below for name
programming.
Dial line number (e.g., 01), press line key
4.
or press ICM (to store an Intercom feature).
-You may also be able to dia l a lin e
gr ou p co de (9, or 90-98) or press a
loop key.
-If you are storing an outside number,
your display shows, "TEL NUMBER."
-If you are storing a feature code, your
display shows, "ENTER FEAT. CODE."
Dial number.
5.
-To enter a pause, press HOLD. To enter
a Flash, press MSG. To enter a Delay,
press DIAL.
-For example, to have the system dial 9,
pause and then dial 926 5400, enter: 9
(HOLD) 9265400.
Hang up.
6.
56
Press Y to program the name, N to leave
1.
the name as it is.
-If you press Y , the display shows the
current name.
Dial the first letter of the desired name.
2.
Page 65

-To enter a blank (a space), a Q, or a Z,
To call a Personal Speed
Dial number:
press 0 (zero) . To erase a name, pres s * .
Dial the digit (1, 2 or 3) that identifies the
3.
desired letter .
Repeat the above two steps for additional
4.
letters.
-You can corr ect a name as you enter i t.
Press VOL DN to backspace (erase)
over a character, then enter the correct
letters.
Press PGM# when finished.
5.
Lift handset.
1.
-You can preselect a line by pressing a
line key. If you preselect, you must press
ICM instead of DIAL before dialing a
bin number.
Press DIAL.
2.
Dial Personal Speed Dial bin nu mb er or
3.
press Personal Speed Dial key.
-The Speed Dial key does not light.
-If the number includes a pause, you can
press * to force dialing to continue.
-If you hear busy tone, press an idle line
key. Your call dials out automatically.
OR
Lift handset.
1.
-You can preselect a line by pressing a
line key.
Press One-Touch Speed Dial key .
2.
-If the number includes a paus e , press *
to force dialing to continue.
-If you hear busy tone, press an idle line
key. Your call dials out automatically.
Speed Dial
57
Page 66

User-Programmable
Feature:
To store a System Speed
Dial number:
To call a System Speed Dial
number:
Speed Dial
Using System Speed Dial
You can also use Speed Dial in
User-Programmable Features to store System
Speed Dial nu mbers. See page 76.
Lift handset.
1.
Press DIAL.
2.
Press PGM#.
3.
Dial System Speed Dial bin number (e.g.,
4.
700).
-If you display shows, "PROGM NAME
Y/N," see instructions above for name
programming.
Dial line number (e.g., 01) or press line
5.
key.
-You may also be able to dia l a lin e
gr ou p access code (9, or 90 -9 8) or
press a loop key.
Dial number.
6.
-To enter a pause, press HOLD. To enter
a Flash, press MSG. To enter a Delay,
press DIAL. For example, to have the
system dial 9, pause and then dial 926
5400, enter: 9 (HOLD) 9265400.
Hang up.
7.
58
Lift handset.
1.
-You can preselect a line by pressing a
line key. If you preselect, press ICM
instead of DIAL before dialing a bin
number.
Press DIAL.
2.
Dial System Speed Dial bin number.
3.
-If the number includes a pause, you can
press * to force dialing to continue.
Page 67

To chain two Speed Dial
numbers:
Station Call Coverage
-If you hear busy tone, press an idle line
key. Your call dials out automatically.
OR
Lift handset.
1.
-You can preselect a line by pressing a
line key.
Press System Speed Dial key (One-Touch
2.
key for System Speed Dial).
-The Speed Dial key does not light.
-If the number includes a paus e ,you can
press * to force dialing to continue.
-If you hear busy tone, press an idle line
key. Your call dials out automatically .
Place first call using Speed Dial.
1.
-Wait for number to dial out.
Press DIAL.
2.
Press Speed Dial key of second number.
3.
-Do not dial a bin number.
OR
Place first call using Speed Dial.
1.
-Wait for number to dial out.
Press One-Touch Speed Dial key of second
2.
number.
OR
Place first call using Speed Dial.
1.
-Wait for number to dial out.
Press ICM.
2.
Dial Speed Dial bin num ber (50-59, 20-29) .
3.
Station Call Coverage
A Station Call Co v erage key gives you one-touch call pi c ku p, Tran s fe r
and Intercom for the assigned extension. A Call Coverage key also shows
you the status of th e covered extension.
59
Page 68

To place a call to your
covered extension:
To Transfer a call to a
covered extension:
Station Call Coverage
When the key is . . . The covered phone is . . .
Flashing Slowly Ringing
Flashing Fast In DND
OFF Idle
ON Busy
Press Call Coverage key.
1.
If you hear two beeps, go ahead and speak.
2.
If you hear ringing, wait for called pa rty to
3.
answer.
Press Call Coverage key.
1.
If you hear two beeps, announce call.
2.
OR
If you hear ringing, wait for called pa rty to
answer before announcing ca ll.
OR
Hang up to Transfer the call unannounced.
OR
If you hear ring/busy, dial 1 to send OffHook Signaling. Refer to the Off-Hook Signaling feature.
60
Page 69

To pick up a call ringing a
covered extension:
Press flashing Call Coverage key.
User-Programmable
Feature:
To use Telemarketing Dial:
User-Programmable
Feature:
1.
Time and Date
Use Ring Assignme nt an d Dela yed Ri ng
Assignment in User-Programmable Features
(page 76) to program ringing for your Call
Coverage keys. To change a Call Coverage
Key extension assignment, use DSS
programming. See DSS in
User-Programmable Features (page 76).
T elem arketing Dial
Telemarketing Dial lets you use your PC to dial a call and then pick up
the call from your telephone after it goes through. If you have
auto-dialing or database dialing capabilities in your PC, you can now use
those features to place your voice calls. To use T ele ma rke ting Dial, you
must have your PC connected to a modem and an Analog Station
Interface (ASI). You must also have a Call Co v era ge ke y fo r the ASI . Ask
your communic ati o ns manager if you ca n u s e Telemarket in g Di al.
Use your PC’s communications software
1.
Directory Dialing feature to place the call.
-Listen to the call dialing out through
your modem.
When the called party answers, press the
2.
Call Coverage key for your PC.
-The call will be in the Privacy Release
mode (the line key flashes fast). To
enable privacy, press the line key.
Time and Date
The time and dat e appear on display phones.
You may be able to set the time and date using
Time and Date in User-Programmable
61
Page 70

To set the time:
To set the date:
Voice Mail
Features (page 76). If you are an attendant,
you can also use the proced ure below.
Lift handset.
1.
Press ICM.
2.
Press PGM#.
3.
-Your display shows, "DSS,EXT,6,9,8?."
Dial T.
4.
-Your display shows, "SET TIME
HHMMSS."
Enter the hour (00-23: 0=12 midnight;
5.
12=12 noon; 23=11 P.M.)
Enter the minutes (00-59).
6.
Enter the seconds (00-59).
7.
Hang up.
8.
Lift handset and press ICM.
1.
Press PGM#.
2.
-Your display shows, "DSS,EXT,6,9,8?."
Dial 9.
3.
-Your display shows, "SET DATE
MMDDYY."
Enter the month (01-12, 01=January;
4.
12=December).
Enter the day of the month (01-31).
5.
Enter the last two digits of the year (00-99).
6.
Hang up.
7.
Voice Mail
Your system may have Voice Mail (Integrated Voice Messaging).
Integrated Voice Messaging lets you exchange recorded messages with
co-workers. It also lets your outside callers leave recorded messages for
you. You and ev ery other user has a mail bo x whi c h holds your recorded
messages. You "call your mailbox" to listen to your messages and use
other Integr ate d Voice Messaging featu res .
62
Page 71

Voice Mail
Call Forwarding to Voice Mail
When you forward your phone to V oice Mail, your incoming calls
automatically go to your mailbox. Your callers can leave a message
instead of calling back later . You can choose one of three different Call
Forwarding to Voice Mail modes:
Forward call s yo u do not an s wer
•
Forward calls when you are busy and calls you do not answer
•
Forward all your calls
•
Personal Answering Machine Emulation
Your mailbox may be able to emulate a personal answering machine. This
lets you screen your calls, just like your answering machine at home. You
can let the message go through or lift the handset to pick up the call.
Leavin g a Message
When you call a co-worker and their phone is unanswered, busy or in Do
Not Disturb, you can easily leave a message in their mailbox. You don’t
have to call back later.
T ransf er to Voice Mail
Transfer a call to your own or a co-worker’ s m ailbox. After the Transfer
goes through, your caller can leave a message in the mailbox.
Message Center
A Message Center is a mailbox shared by you and your co-workers. If
your phone has a Message Center key, you can leave messages for your
co-workers or listen to messages they have left. For example, you could
be part of a Customer Service gr oup with a Message Center for each of
your company’s products. When all members of your group are busy,
your dispatcher can send callers to the appropriate Message Center. Later
on, you can easi ly retrie v e all messages for a particular product. Ask your
communications manager if your phone has a Message Center key.
63
Page 72

To call your mailbox:
To call a Message Center:
To forward calls to your
mailbox:
Voice Mail
Conver sat i on Rec or d
While on a call, you can press your Record key to record the conversation in
your mailbox. Voice Mail stores the con versation like any other v oice
message. You can then save, edit or delete the recorded conversation. Ask
your communications manager if you have a record ke y.
Lift handset.
1.
Press MSG.
2.
When Integrated Voice Messaging answers,
3.
dial your security cod e.
-Your communications manager can tell
you your security code. Refer to your
Voice Mail User Guide for the specifics.
You can have a One-Touch Speed Dial
key for simplified security code entry.
See page 54.
(If the Message Center key flashes fast, it has
messages waiting.)
-You cannot press the flashing Message
Center key to see the number of
messages waiting.
Lift handset.
1.
Press the Message Center key.
2.
-You log onto the Message Center
mailbox. Y ou have all the options
available to any other mailbox
subscriber.
64
Lift handset.
1.
Press ICM.
2.
Press PGM#.
3.
Press MSG.
4.
Dial Call Forwarding option.
5.
-Dial 1 to forward calls not answered.
Page 73

To cancel Call Forwarding:
To Transfer a call to
someone else’s mailbox:
To record your
conversation:
Voice Prompting Messages
-Dial 2 to forward calls not answered or
when busy.
-Dial 3 to forward all calls.
-Dial 4 to have V oice Mail screen your
calls (i.e., emulate a personal
answering machine).
Hang up.
6.
-MSG flashes slowly.
Lift handset.
1.
Press ICM.
2.
Press PGM#.
3.
Hang up.
4.
-MSG goes out.
Press ICM.
1.
Press MSG.
2.
Dial extension number.
3.
-If you dial the Voice Messaging System
master number, your outside caller can
select the mailbox they want.
Hang up.
4.
(Your telephone must have a record key.)
Press Record key.
1.
-After a few seconds, you hear two beeps
and an announcement when Voice Mail
starts recording your call. The record
key flashes fast while recording.
Voice Prompting Messages
The system plays Voice Prompting Messages to inform a user of the
status of their call. See your communications manager for a complete
explanation of these messages.
65
Page 74
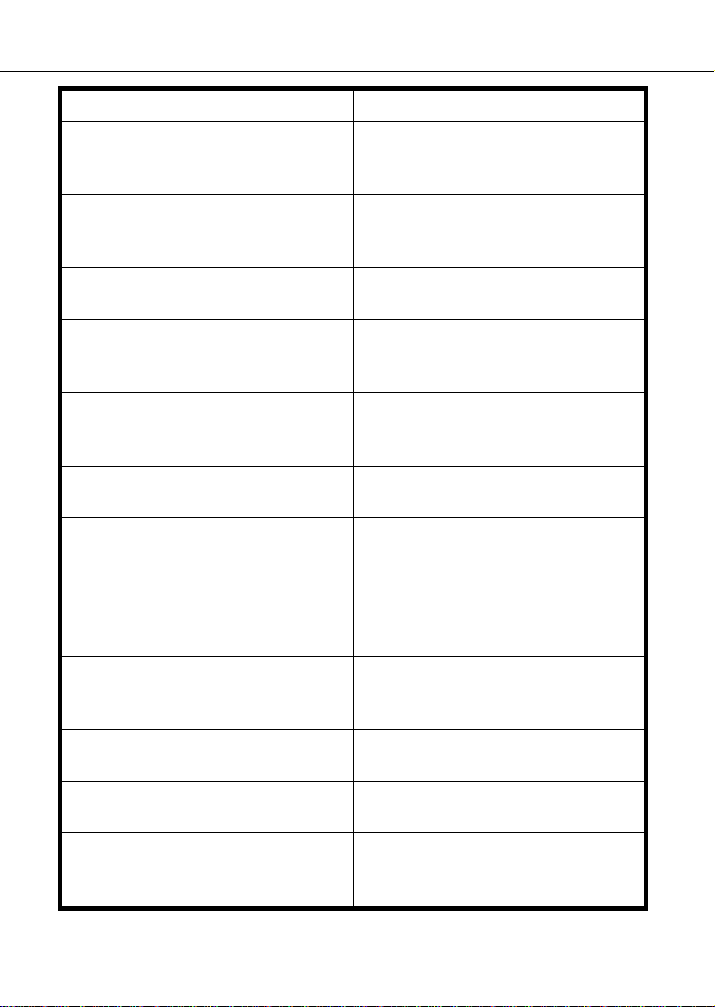
Voice Prompting Messages
Voice Prompt Description
All lines are busy. For automatic
Callback, please press the
Callback key.
Audio file is full.
Please do not disturb.
Please hold on, all lines are busy.
Your call will be answered when
a line becomes free.
Please hold on, your call is being
rerouted.
Please start recording.
Recordin g finished.
The lowest cost line is busy.
Please wait for the next one.
The number you have dialed is
not in service.
The time is ....
This is station ....
Plays when trying to place a call
when all lines in the group are
busy.
Plays when trying to record a
Personal Greeti n g whe n al l
memory has been used.
Plays when calling an extension
in DND.
Plays when calling a busy UCD
or ACD hu nt grou p.
Plays when calling an extension
that is Call Forwarded
off-premise.
Plays to prompt the user to record
a Personal Greeting.
Plays to alert the user that the
time allotted for recording a
Personal Greeti ng is up. Als o
plays when the user has paused
too long while recording a
Personal Greeti n g.
Plays when placing an ARS ca ll
when all lines in a line group are
busy.
Plays when calling a valid, but
inoperative extension.
Plays the time after dialing T
(digit 8) on an idle telephone.
Plays the extension number after
dialing N (digit 6) on an idle
telephone.
66
Page 75
To adjust the volume of
Background Music,
incoming ringing and paged
announcements:
To adjust the handset
volume:
Volume Controls
Voice Prompt Description
You have a message.
Plays to alert the user that
someone has left a Message
Waiting (controlled by system
programming ).
Your call cannot go through.
Please call the operator.
Yo ur calls have been forwarded.
Plays when trying to place a
restricted call.
Plays to alert the user that the
extension’s calls have been
forwarded (con trolled by system
programming ).
Vacant number.
Plays when calling an invalid (not
installed) extension.
Volume Controls
Your telephone has th re e volume adjustments: Background Music,
handset and Handsfree. The Backgro und Music ad justmen t also ad justs
incoming ringing and paged announceme nts. If you are an attendant, you
don’t have Handsfree or the Handsfree volu me adjustment.
Press VOL UP or V OL DN while fe ature is
1.
active or telephone is idle.
-Pressing VOL UP or VOL DN while
idle adjusts the display brightness. Your
phone must be idle (not ringing), with
Background Music off.
Press VOL UP or V OL DN while on a
1.
handset call.
67
Page 76

To adjust the Handsfree
(speaker) volume:
To place a call from a
restricted extension:
Walking Class of Service
-When you hang up, the volume level for
outside calls may revert to a mid-range
value. The volume level for Interc om
calls, however, stays at the set value
until you change it.
Press VOL UP or V OL DN while on a
1.
Handsfree call.
-When you hang up, the volume level for
outside calls may revert to mid-range.
The volume level for Intercom calls,
however, stays at a set value until you
change it.
-The volume level setting for the
previous Handsfree Intercom call
determines the volume of your incoming
voice announce ments.
Walking Class of Service
If you try to place a call from a co-worker’s phone and the system
prevents it, you can use Walking Class of Service. Walking Class of
Service allows you to temporarily override dialing restrictions when you
use someone else’s extension. Walking Class of Service lets you make the
call as you would at your own extension.
68
Lift handset and press ICM.
1.
Press PGM# twice.
2.
Dial Walking Class of Service code.
3.
-See your communications manager for
your code.
Dial line access code (e.g., 801), or press
4.
line key.
-You may also be able to dia l a lin e
group access code (9, 90-98).
Dial telephone number .
5.
Page 77
Your System’s Dialing Plan
Charts and Illustrations
Charts and Illustrations
This section contains handy charts and illustrations for your reference.
You’ll find:
The dialing plan (the numbers you dial) — see below
•
Flash rates for graphite telephones with dual color (red and green)
•
LEDs — see page 70
Flash rates for telephones with single color (red) LEDs — see page
•
71
Multibutton telephone key layout — see page 72
•
DSS Console key layouts for (page 73)
•
Feature Quick Re ference Guide — see pa ge 75
•
User-Programmin g ch ar t — see pag e 76
•
This chart shows the numbers you dial for ext ensions, outsi de lines, Ring
Groups and Selectable Display Messages.
Without AUX With AUX
Extensions
Outside Lines
Outside Line Codes
Outside Line Groups
Outside Line Extensions
Ring Groups
Selectable Display Messages
300-323 300-371
801-808 801-824
01-08 01-24
9, 90-98 9, 90-98
348-355 372-395
364-371 396-403
00-15 00-15
69
Page 78
Graphite Phone with Dual Color LEDs
Charts and Illustrations
Your phone is idle (not on a call)
Outside Calls
An outside line is busy
An outside call is ringing your
phone
And then you answer it
Or answer it with Privacy released
You place the outside call on Hold
Or a co-worker places it on Hold
Or you place the outside call on
Exclusive Hold
If a call on Hold recalls to you
Intercom Calls
An Intercom call rings your phone
Yo u answer the Intercom call
You pla ce the Intercom call on
Hold
And then it recalls to you
Miscellaneou s Fe atu r es
All LEDs out (dark)
The line key is
The line key flashes
it’s shared,
Flashing Green
The line key is
The line key flashes
On Red
Slowly Red
then
Off
Quickly
if it’s just for you
On Green
Quickly Green
The line key is On then
Flashing Green
The line key flashes
Moderately Red
The line key is On then
Flashing Green
The line key is
Off
then
Flashing Green
ICM flashes
ICM flashes
HOLD flashes
then
On
ICM flashes
Slowly Green
Quickly Red
Quickly Green
Slowly Green
if
Slowly
Quickly
Quickly
You activate Microphone Mute
You activate Do Not Disturb
You have a Message Waiting
You activate Ca ll Forwarding,
Personal Greetin g or Se l ectable
Display Messaging
70
MIC/DND is
On Red
MIC/DND flashes
MSG flashes
MSG flashes
Quickly Red
Slowly Green
Quickly Red
Page 79
Phone with Single Color (Red) LEDs
Charts and Illustrations
Your phone is idle (not on a call)
Outside Calls
An outside line is busy
An outside call is ringing your
phone
And then you answer it
Or answer it with Privacy released
You place the outside call on Hold
Or a co-worker places the call on
Hold
Or you place the outside call on
Exclusive Hold
If a call on Hold recalls to you
Intercom Calls
An Intercom call rings your phone
Yo u answer the Intercom call
You pla ce the Intercom call on
Hold
And then it recalls to you
Miscellaneou s Fe atu r es
All LEDs out (dark)
The line key is
The line key flashes
shared,
On
then flashing
Off
Slowly
Quickly
if it’s
if it’s just for you
The line key is
The line key flashes
On
Quickly
The line key is On then flashing
Moderately
The line key flashes
Moderately
The line key is On then flashing
Quickly
The line key is
then flashing
Off
Quickly
ICM flashes
ICM flashes
Slowly
Quickly
HOLD is ON then flashes
Quickly
ICM flashes
Slowly
You activate Microphone Mute
You activate Do Not Disturb
You have a Message Waiting
You activate Ca ll Forwarding,
Personal Greetin g or Se l ectable
Display Messaging
MIC/DND is
On
MIC/DND flashes
MSG flashes
MSG flashes
Quickly
Slowly
Quickly
71
Page 80
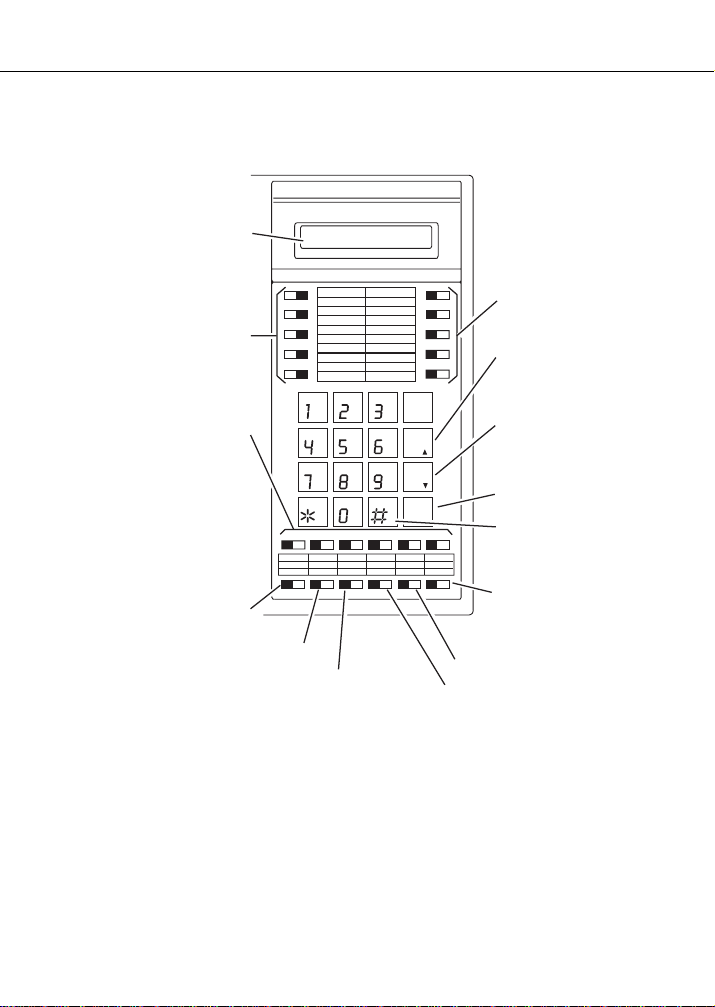
Charts and Illustrations
Display
N1870 - 16
FRI 08/18 03:34P
Programmable
Feature Keys
Programmable
Feature Keys
Hold,
Background Music
Conference
1
2
3
4
5
ABC
GHI
JKL
PRS
TUV
11 12 13 14 15 16
HOLD MIC/DND ICMCONF
DEF
MNO
WXY
PGM
DIAL
LAST
VOL
UP
SAVE
VOL
DN
FTR
MSG
6
7
8
9
10
Programmable
Feature Keys
Last Number Redial
or
Volume Up
Save
or
Volume Down
Feature, Flash
Programming Mode
HF
Handsfree
Intercom Loop Key
(Attendant)
Message Waiting
Do Not Disturb,
Microphone Mute
Intercom
Night Answer Key
(Attendant)
Your Multibutton Telephone
72
Page 81
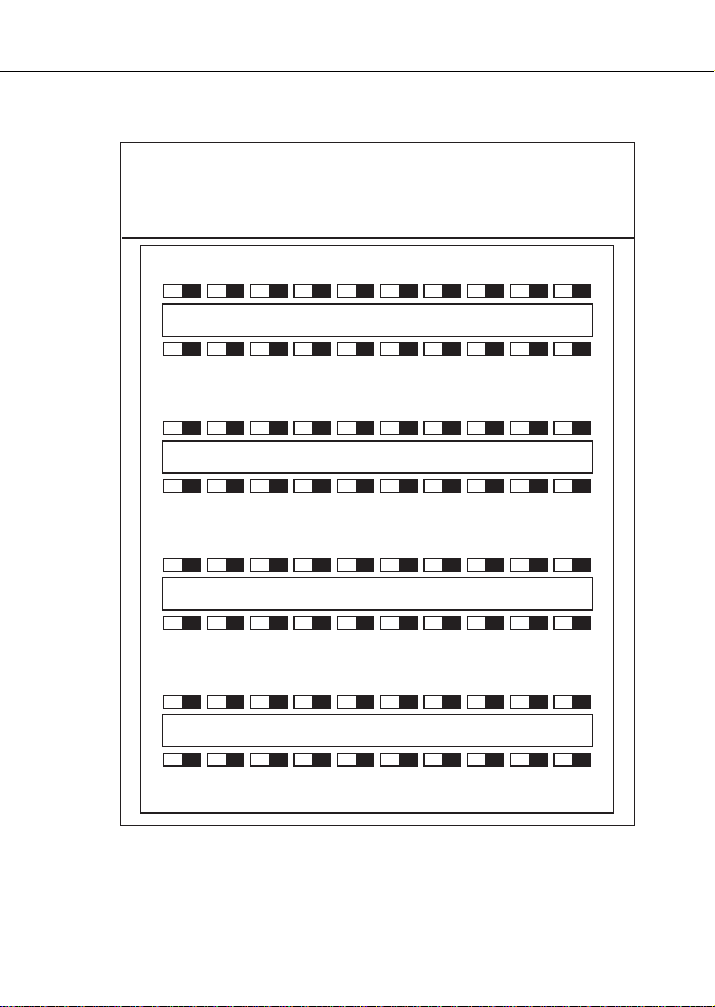
Charts and Illustrations
301 302 303 304 305 306 307 308 309 310
311 312 313 314 315 316 317 318 319 320
321 322 323 324 325 326 327 328 329 330
331 332 333 334 335 336 337 338 339 340
341 342 343 344 345 346 347
N1850 - 50
PAGE PAG 1 PAG 2 PAG 3 60 61 62 RLS
Your DSS Console
73
Page 82

Charts and Illustrations
74
Page 83
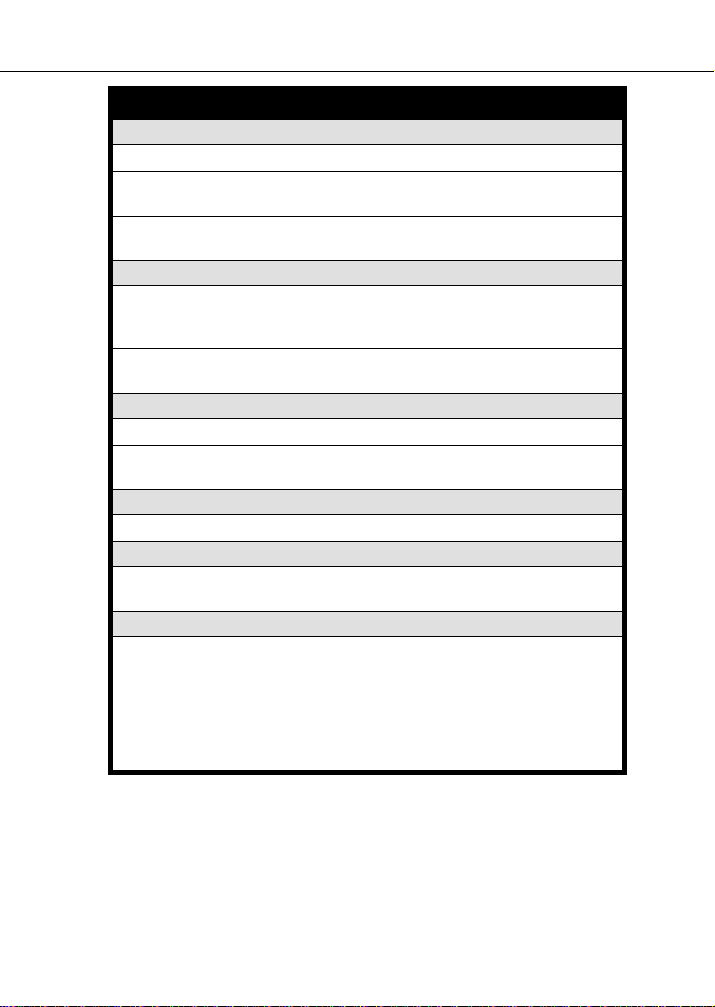
QUICK REFERENCE
OUTSIDE CALLS
Placing:
Answering:
Answering ringing over
paging speakers:
INTERCOM CALLS
Placing:
Answering:
HOLD
Placing call on Hold:
Retrieving call:
TRANSFER
Transferring outside call:
CONFERENCE
Setting up a three-way
conv ersation:
RESPONDING TO SIGNAL TONES
Two tones during
handset call:
One tone during
speakerphone call:
Fast busy or warble tone
anytime:
Lift handset + Line key + Dial number
Lift handset (if not connected, press flashing
key)
Lift handset + ICM + Dial * 0
Lift handset + ICM + Dial extension (if you
hear ring-busy, you may be able to dial 1 to get
through)
If ringing, lift handset. If announced, speak
toward phone or lift handset.
HOLD + Hang up
Lift handset + Flashing line key for outside call
(or ICM, then HOLD key)
ICM + Dial ext. + Announce call + Hang up
Establish an outside/Intercom call + CONF +
Establish next call + CONF
Then you hear a co-worker’s voice over your
call. To reply, press and hold MIC/DND.
This means a call is waiting to be answ ered .
Press HOLD + Flashing ICM or line key.
This means you made a mistake in placing a
call or using a feature. Hang up and start over.
Charts and Illustrations
75
Page 84
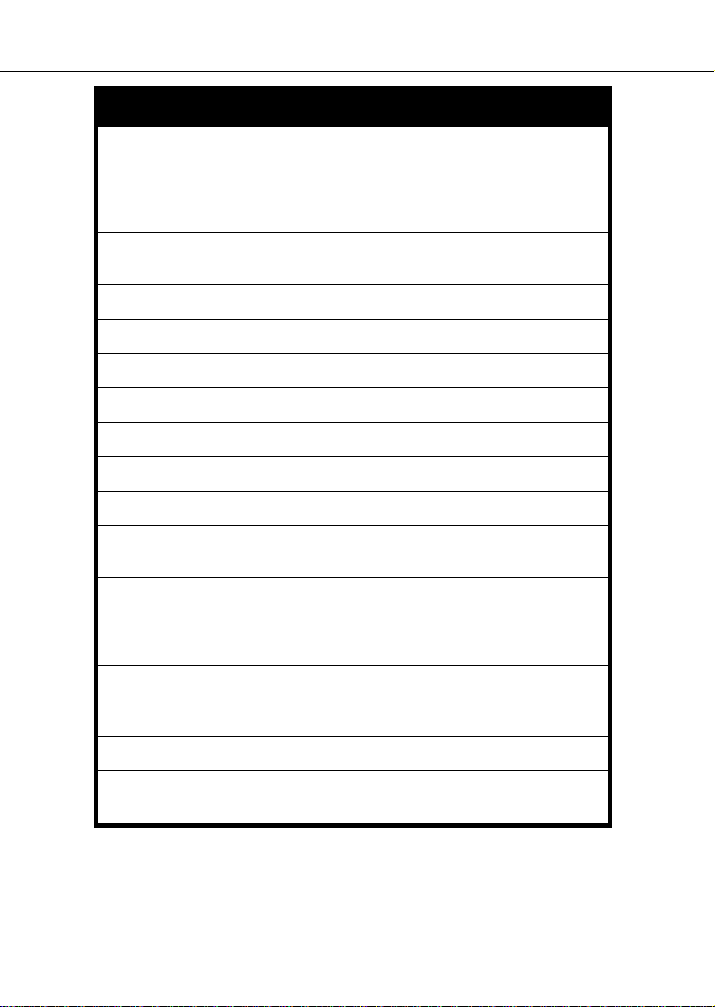
DS01 USER-PROGRAMMABLE FEATURES
Charts and Illustrations
To program a feature, press PGM# and the feature’s code. For example, to
set Night Ring, press PGM# and dial NR. The remaining steps vary with
each feature. Your access level determines the features you can program. See
your communications manager. Note that enabling RA or NR disables DRA
and vice versa. To disable ringing, disable NR, RA
DELAYED RING
ASSIGNMENT
HEADSET
HOTLINE
NIGHT RING
PRIME LINE
RING ASSIGNMENT
RINGING LINE
PREFERENCE
SPEED DIAL
TIME AND DATE
VOICE ANNOUNCE
WHISPER PAGE
PGM +
DSS
PGM# +
PGM# + HS + Y(es) or N(o) + SAVE
PGM# + HL + Hotline key + ext. + SAVE
PGM# + NR + Line key +Y(es) or N(o) + SAVE
PAGE
PGM# + VP + Y(es) or N(o) + SAVE
PGM# +
PGM# + RA +Line key + Y(es) or N(o) + SAVE
PGM# +
PGM# + SD + One-Touch Speed key (or bin +
PGM#) + (Display set only) Name or PGM# + line
key (or line/group code + PGM#) or ICM + number
(32 digits max.) + SA VE
PGM# + TD + Month (01-12) + PGM# + Date
(1-31) + PGM# + Y ear (2 digits) + PGM# + Hour
(00-23) + PGM# + Minutes (00-59) + SAVE
PGM# + VA + Y(es) or N(o) + SAVE
PGM# + VO + Y(es) or N(o) + SAVE
+ Line key +Y(es) or N(o) + SAVE
DRA
+ DSS key + ext. + SAVE
DSS
+ Line key + Y(es) or N(o) + SAVE
PLA
+ Y(es) or N(o) + SAVE
RLP
and
DRA.
76
Page 85

Charts and Illustrations
77
Page 86

Index
A
Account Codes, 14
Mandatory, 14
Verifiab le, 1 4
ACD
Agent (Member), 17
Announcements, 18
Group Status, 17
On and Off Duty, 17
Recording Anno unce ments, 18
Supervisor, 17
ACD Agent , Removing fr om S ervice, 17, 18
Add-On Conference, 25
Alarm, 15
Alphanumeric Displa y
Display Brightness, 30
Introduction to, 2
Messages, 30
Alternate Attendant, 16
Answering Intercom Calls, 10
Answering Machin e Em ul a t ion , 63
Answering Outside Calls, 8
ARS, 8
Assigned Night Answer
See Night Answer
Attendant Alarm Messages, 15
Attendant Call Forwarding Cancel, 21
Attendant Features Only
Alarm, 15
Alternate Attendant, 16
Call Forwarding Cancel, 21
Forced Line Disconnect, 33
Monitor, 41
Night Answer, 42
Attendant Monitor
Index
Index - 1
Page 87

Index
See Monitor
Attendant, Features not available to
Call Forwa rding, 20
Callback, 22
Do Not Disturb, 31
Group Listen, 34
Handsfree, 7
Handsfree Volume Adjustment, 67
ICM Key, 10
Line Callback, 38
Message Waiting, Receiving, 40
Microphone Mute, 41
Personal Greeting, 48
Voice-announced ca lls, 10
Whisper Page, 43
Audio Prompts, 65, 66
Audio Volumes, 67
Automated Attendant, 44
Automatic Redial
See Last Number Redial
Automatic Route Selection, 8
B
Background Music
Volume Control, 67
Barge In, 37
Brightness
Adjusting the Display, 31
C
Index - 2
Call Coverage, 59, 60
Call Forwarding, 20
Cancelling, 20
Off-Premise, 21
On-Premise, 20
To mailbox, 64
Call Forwarding at Attendant
See Alternate Attendant
Page 88

Call Forw arding Cancel, 21
Call Park, 47
Call Pickup
Group, 33
Group Ring, 34
Hotline, 36
Call Pickup, Directed, 2 8
Call Timer, 21
Auto, 22
Manual, 22
Call W aiting
See Camp-On
Callback, 22
Cancelling, 23
Line, 38
Called Number Delivery (CND)
See Caller ID
Called Number Identification (CNI)
See Caller ID
Caller ID, 23
Error Messages, 24
Post-Answer Display, 23
Pre-Answer Display, 23
Calling a Message Center, 64
Calling your mailbox, 64
Camp-On, 24
Centrex Feature Keys
See your commu ni c at i o ns ma nager.
Chaining Speed Dial Numbers, 59
Class of Service
See Walking Class of Service
Conference, 25
Meet Me, 39
Unsupervised, 26
Conversation Record Key, 64
Index
Index - 3
Page 89

Index
D
Database Dialing
See Telemarketing Dial
Date and T ime, 61
Delayed Ringing, 76
Dialing 9 or 90-98, 8
Dialing Behind a PBX or Cen t rex, 8
Dialing from the PC
See Telemarketing Dial
Dialing Number Preview, 26
Dialing Plan, 69
Digital Door Box, 31
Direct Line Access, 8
Direct Station Selection, 27
Directed Call Pickup, 28
Directory Dialing, 29
Company-wide, 29
Intercom, 29
Personal, 29
Disabling Lines and Extensions, 50
Display
Adjusting the display brightness, 31
Display Message s , 30 , 52
DND
See Do Not Disturb
Do Not Disturb, 31
Door Box, 31
DSS
See Direct Station Selection
E
Index - 4
Exclusive Hold, 10
Executive Override
See Intrusion
Extension Speed Dial, 54
External Paging, 45, 46
Page 90

F
Flash, 32
Flash Rates
Call Coverage key, 60
Group Call Pic ku p Key, 34
Hotline Key, 36
Page key, 47
Park key, 48
Personal Speed Dial key , 57
Record Key, 65
System Speed Dial key, 59
Timer key, 22
Forced Acco unt Co des
See Account Codes, Man dator y
Forced Trunk Disconnect, 33, 41
Forwarding calls to your mailbox, 64
G
Group Call Pickup, 33
Group Listen, 34
Group Ring, 34
Groups
Call Pickup, 33
Privacy, 50
Index
H
Headset Mode, 35
Hold, 10, 11
Exclusive Hold, 10
Intercom, 12
System Hold, 10
Hotline, 36
I
Intercom, 9
Internal Paging, 45, 46
Intrusion, 37
Index - 5
Page 91

Index
L
Last Number Redial, 38
Line Callback, 38
Line Rotaries
Inbound, 8
Outbound, 8
Loop Keys
Inbound, 8
Outbound, 8
M
Mandatory Accoun t Code s, 14
Meet Me Conference, 39
Message Center, 63
Message Waiting, 40
Microphone Mute, 41
Monitor, 41
Multi-Line Conference, 25
Multi-Party Conference, 25
Music On Hold
Volume Control, 67
N
Night Answer, 4 2
Night Service
See Night Answer
Number Save, 51
O
Index - 6
Off-Hook Signaling, 43
Off-Premise Call Forw ar din g, 21
One-Touch Speed Dial keys, 54
Operator Assistance, 44
Outside Calls
Answering, 8
Overriding Toll Restriction, 68
Page 92

P
Page, Zone, 45, 46
Paging
Volume Control, 67
Park, 47
PBX/Centrex Dialing, 8
PC Dialing
See Telemarketing Dial
Personal Answeri ng Mac hin e Emu latio n, 63
Personal Greeti n g, 48
Personal Speed Dial, 54
Placing Intercom Calls, 9
Placing Outside Calls, 7
Prime Line Selection, 49
Privacy, 50
Privacy Groups, 50
Privacy Release, 50
Prompts, Voice, 65, 66
R
Record Key (for Voice Mail), 64
Recording
ACD (All Agents Busy ) Ov erflow Announcement, 18
OPA Messages, 44
Personal Greeting, 49
Redial, Last Number, 38
Removing ACD Agent from Service, 17, 18
Removing Lines and Extensions from Service, 50
Ring Groups, 34
Ringing
Volume Control, 67
Ringing Assignments, 76
Ringing Line Preference, 51
Ringing, Off-Hook
See Off-Hook Signaling
Rotaries, Line, 8
Index
Index - 7
Page 93

Index
S
Save, 51
Selectable Display Messages, 52
Setting the Time and Date, 61
Silent Monitor
See Monitor
Speed Dial, 53, 54, 55, 56, 57, 58
Chaining Numbers, 59
One-Touch Speed Dial Keys, 54
Personal Speed Dial, 53, 54, 55, 56, 57, 58
Storing a Pause, Delay or Flash, 54
Storing Intercom Features, 54
Storing Names, 54
System Speed Dial, 55
Using Personal S pe ed Dial, 55
Using System Speed Dial, 58
Split
Between Camped-On Calls, 25
Station Call Coverage, 59, 60
Station-to-Station Calling
See Intercom
Supervisor, ACD, 17
System Hold, 10
System Speed Dial, 55
T
Index - 8
Tandem Trunking, 26
Telemarketing Dial, 61
Text Messaging
See Selectable Display Messages
Tie Lines
See your Communications Manager
Time and Dat e , 61
Timed Flash, 32
Toll Restriction Override, 68
Transfer, 12, 13
To mailbox, 63, 65
Transferring Intercom Calls, 12
Page 94

Trunk Queuing
See Line Callback
U
Universal Night Answer
See Night Answer
Unsupervised Confer ence, 26
User Programming
Call Coverage Keys, 61
Chart, 76
Delayed Ring Assignment, 7
Direct Station Selection, 28
Headset Operation, 36
Hotline Assignments, 36
Intercom V oice Announcements, 10
Night Ringing, 42
Paging, 46
Pickup Group Ringing, 34
Prime Line Selection, 49
Ring Assignme nt, 7
Ringing for Outside Calls, 7
Ringing Line Preference, 51
Speed Dial, One-Touch Speed Dial keys, 55
Speed Dial, Personal Speed Dial Numbers, 55
System Speed Dial, 58
Time and Date, 61
Voice Over, 43
Using Headsets, 35
Using Personal Speed Dial, 55
Using System Speed Dial, 58
Index
V
Verifiable Accoun t Co des , 14
VMU
Operator Assistance, 44
Personal Greeting, 48
Voice Prompting Messages, 65, 66
Voice Mail
Index - 9
Page 95

Index
Answering Machine Emulation, 63
Calling your mailbox, 64
Forwarding to mailbox, 63, 64
Leaving a message, 63
Message Cent e r, 63
Record Key, 64
Transferring to mailbox, 63
Voice Module Unit
See VMU
Voi ce Ove r, 43
Voice Prompting Mes s ages, 65, 66
Voice-Announce d Calls, 10
Volume Controls, 67
W
Walking Class of Service, 68
Whisper Page, 43
Z
Zone Paging, 45, 46
Index - 10
Page 96

4 Forest Parkway, Shelton, CT 06484
Digital
TEL: 203-926-5400 FAX: 203-929-0535
Multibutton Telephone
Feature Handbook
Part No. N1870MFH03 June 1994
Issue 1-0 Printed in U.S.A.
N1870MFH03
Page 97

This manual has been developed by Nitsuko America. It is intended for
the use of its customers and service personnel, and should be read in its
entirety before attempting to install or program the system. Any
comments or suggestions for improving this manual would be
appreciated. Forward your remarks to:
Nitsuko America, T elecom Di vision
4 Forest Parkway
Shelton, CT 06484
Attention: Manager, Technical Publications
Nothing contained in this manual shall be deemed to be, and this manual
does not constitute, a warranty of, or representation with respect to, any
of the equipment covered. This manual is subject to change without
notice and Nitsuko America has no obligation to provide any updates or
corrections to this manual. Further, Nitsuko America also re serv e s the
right, without prior notice, to make changes in equipment design or
components as it deems appropriate. No representation is made that this
manual is complete or accurate in all respects and Nitsuko America shall
not be liable for any errors or omissions. In no event shall Nitsuko
America be liable for any incidental or consequential damages in
connection with the use of this manual. This document contains
proprietary information that is protected by copyright. All rights are
reserved. No part of this document may be photocopied or reproduced
without prior written consent of Nitsuko America.
©1994 by Nitsuko America. All Rights Reserved.
Printed in U.S.A.
 Loading...