

Page 1
Page 2

© Copyright 2009, NITGEN&COMPANY Co., Ltd.
All rights reserved. `
z
Unauthorized reproduction of part or all of this manual’s content in any form is
prohibited.
z
Product specifications may change without prior notice to improve functionality.
z
NITGEN&COMPANY the NITGEN logo are registered trademarks of
NITGEN.&COMPANY
z
Other names and trademarks belong to respective companies.
z
The font used in this product is Naver’s “Nanum”.
NITGEN&COMPANY Customer Service Center
Tel: +82.2.513.2150
Fax: +82.2.513.2191
Email: [email protected]
Page 3

3
Table of Contents
CHAPTER 1 GETTING STARTED
..................................................................4
P
RODUCT INTRODUCTION
............................................................................................5
P
RODUCT COMPONENTS
.............................................................................................6
S
YSTEM CONFIGURATION
............................................................................................7
P
RODUCT DESCRIPTION
..............................................................................................9
T
OUCH SCREEN USAGE
............................................................................................12
CHAPTER 2 ADMINISTRATOR MENU
........................................................14
E
NTERING ADMINSTRATOR MENU
..............................................................................15
U
SER MANAGEMENT
.................................................................................................19
UI & S
OUND SETTING
...............................................................................................29
N
ETWORK SETTING
...................................................................................................33
S
ERIAL CONNECTION
................................................................................................37
A
UTHENTICATION OPTION SETTING
...........................................................................38
T
ERMINAL INFORMATION DISPLAY
.............................................................................49
USB M
EMORY CONNECTION
.....................................................................................53
T
ERMINAL INITIALIZATION
..........................................................................................54
CHAPTER 3 GENERAL USER
......................................................................56
D
OOR OPENING
........................................................................................................57
A
UTHENTICATION IN ATTENDANCE MODE
..................................................................59
C
HANGING USER INFORMATION
.................................................................................61
APPENDIX
............................................................................................................62
A
PPENDIX
.................................................................................................................63
T
ROUBLESHOOTING
..................................................................................................63
F
IRMWARE UPDATE
...................................................................................................67
P
RODUCT SPECIFICATIONS
.......................................................................................68
Page 4

4
Chapter 1 Getting Started
Product Introduction - 5
Product Components - 6
System Configuration - 7
Product Description - 9
Touch Screen Usage - 12
Page 5
5
Product Introduction
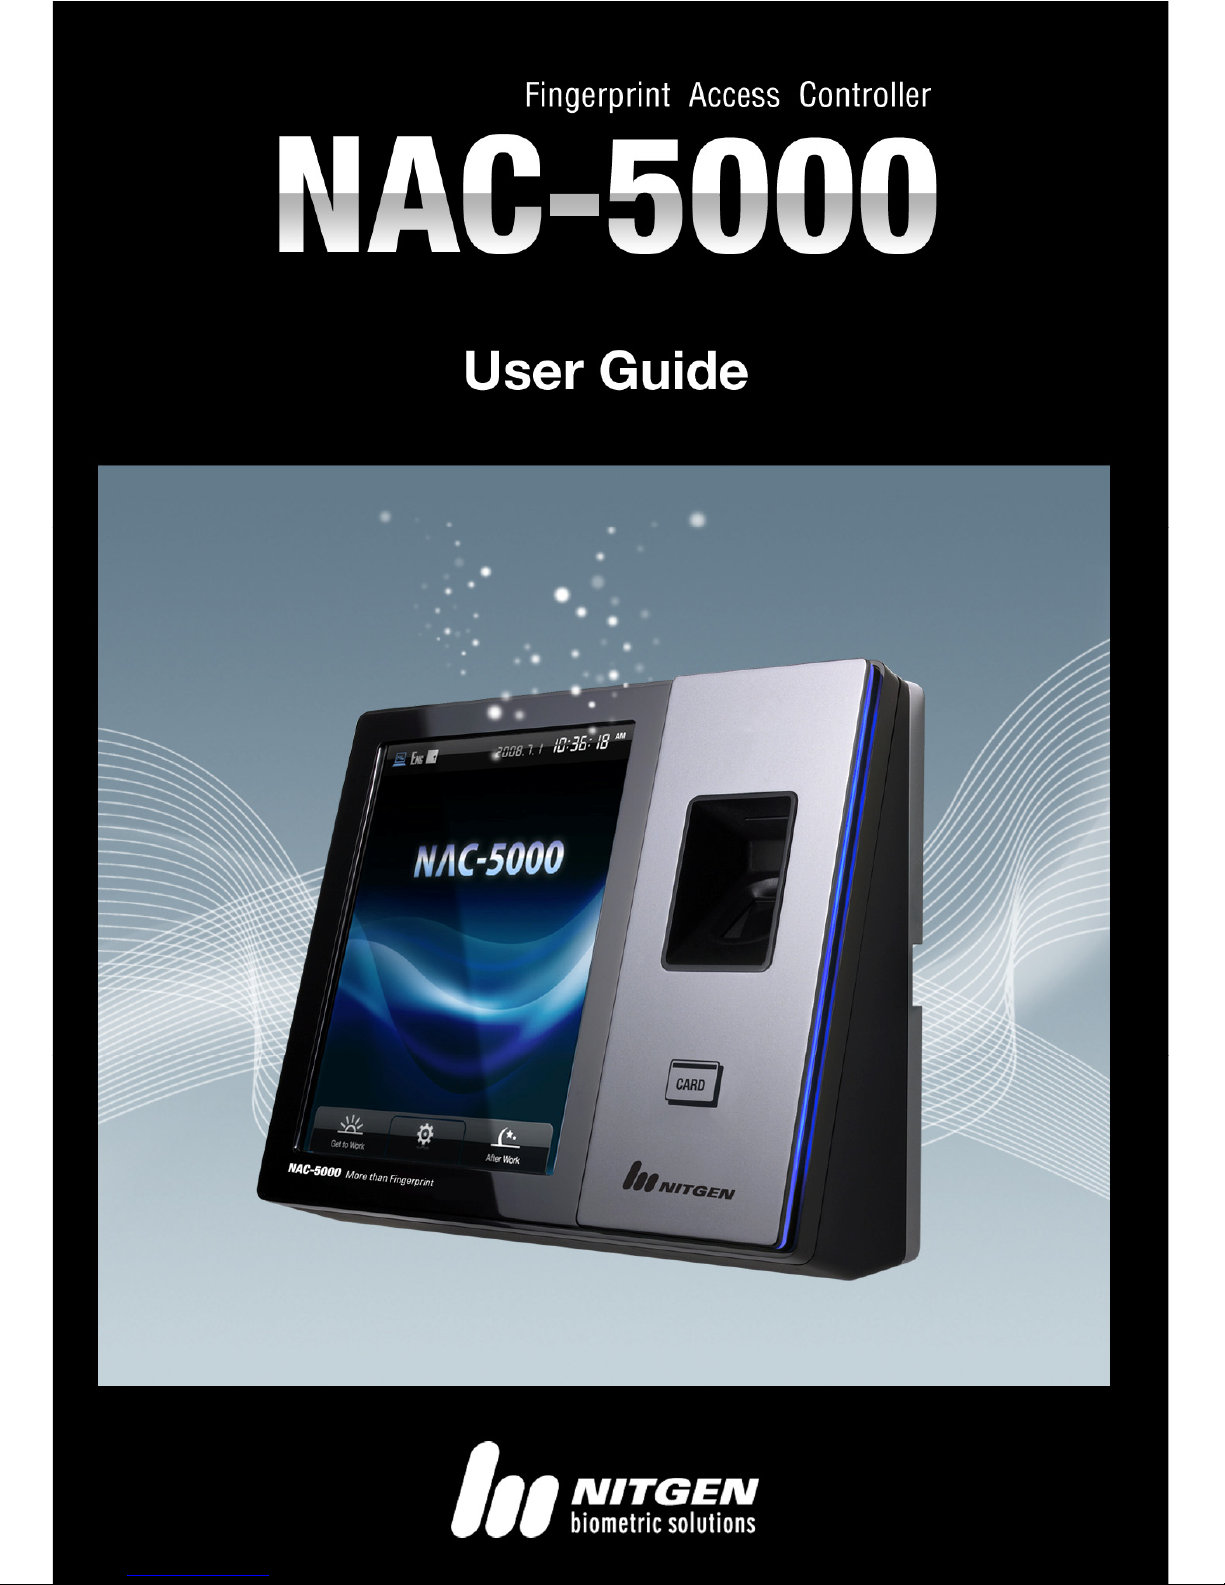
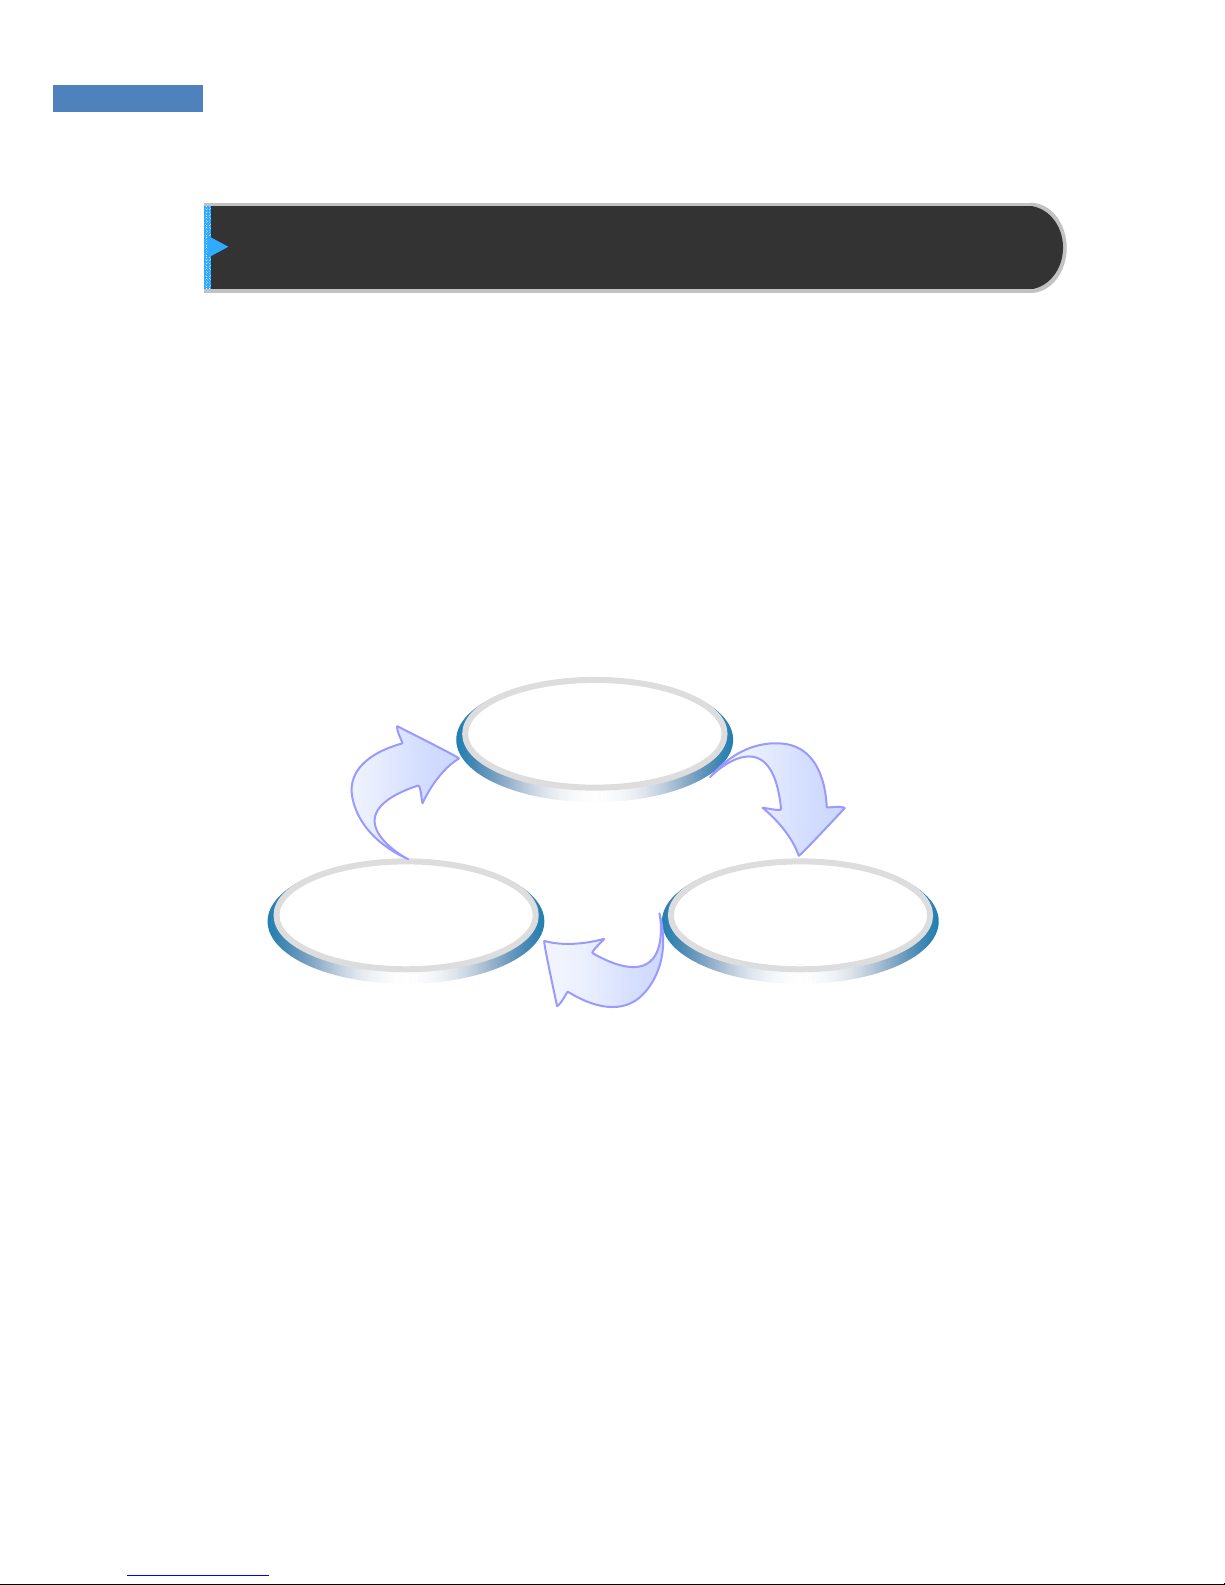
The NAC-5000 Access Control System developed by NITGEN
combines the company’s core technologies such as fingerprint
recognition algorithms, optical sensors, embedded design, and
software applications.
The NAC-5000 allows administrators to remotely monitor and
manage geographically dispersed terminals for maximum
efficiency.
For greater user convenience, the NAC-5000 has a 5.7” TFT-LCD
touch screen. The NAC-5000 also offers functions such as RF
card, password, and fingerprint recognition which can be
combined as desired.
Biometric
technology
Ergonomic
Design
User-friendly
software
Page 6
6
Product Components
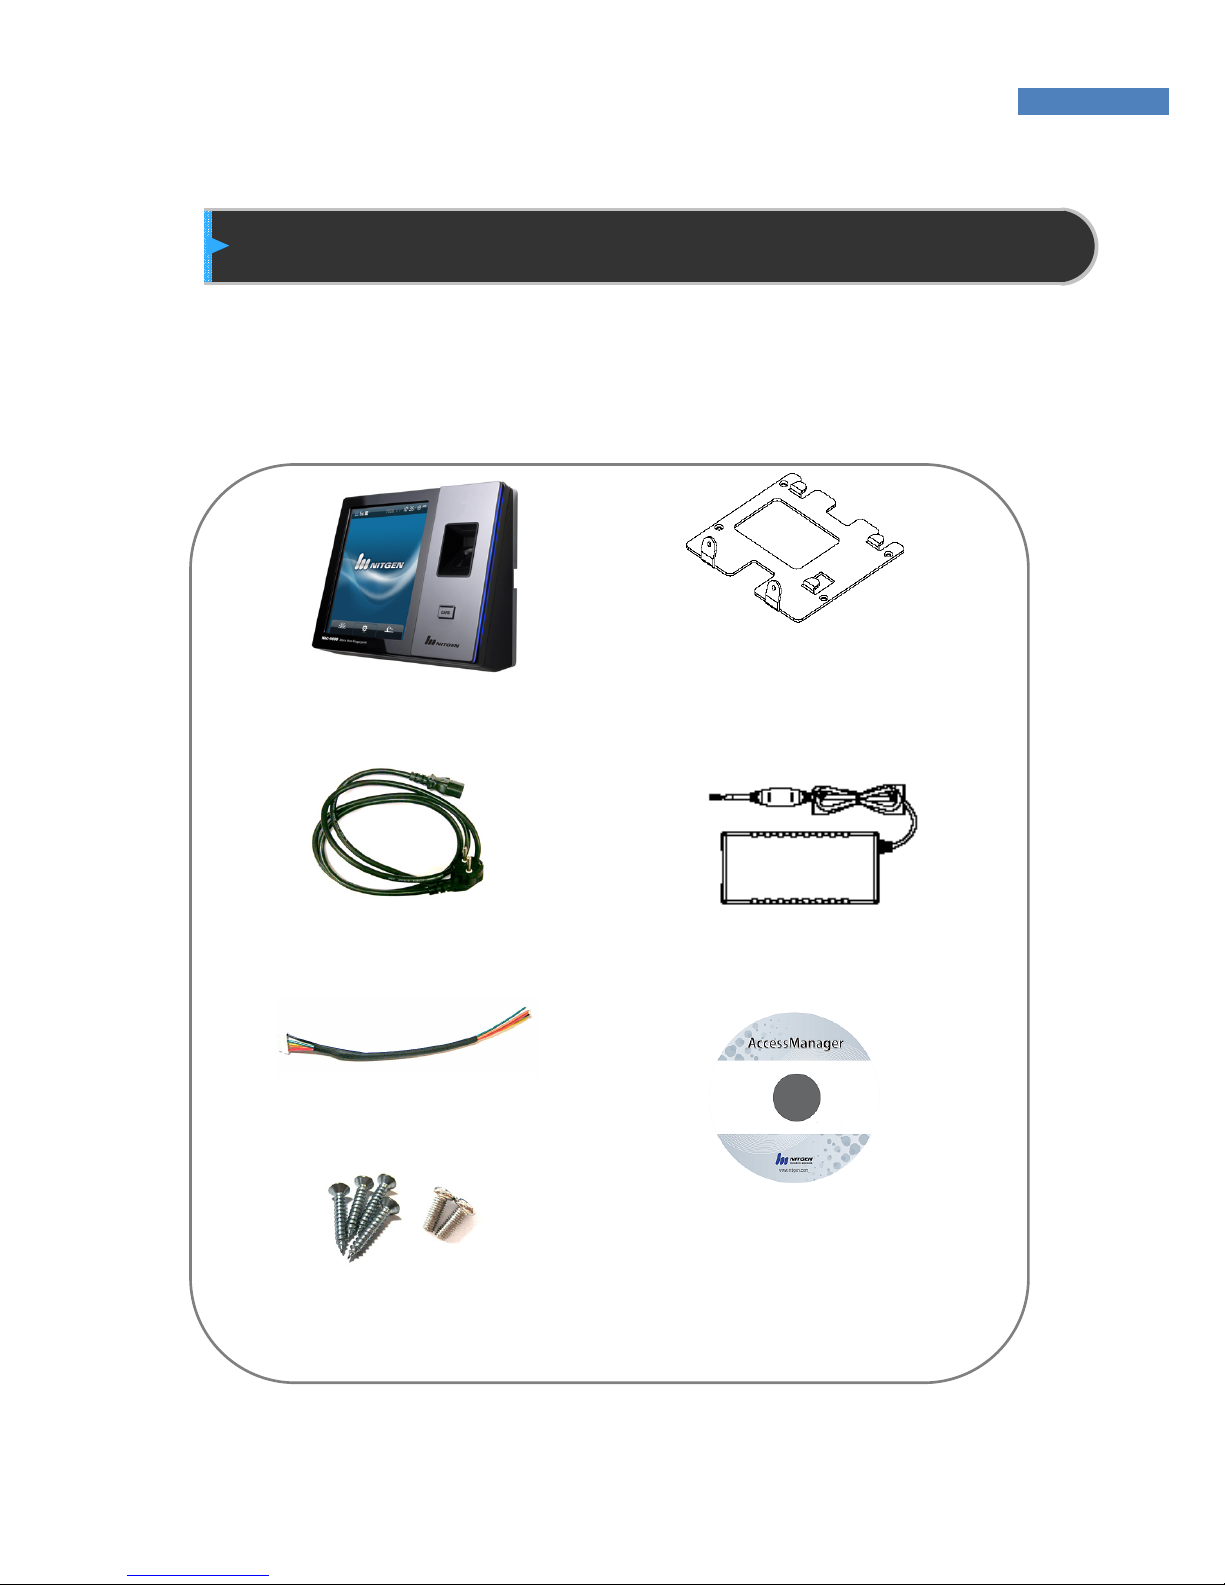
The NAC-5000 includes the following components. For detailed
information about installation, see the installation guide. If any of the
following items is missing, contact the Customer Support Team.
NAC-5000 Terminal Installation Bracket
Power Cord Adapter
Door/AUX Cable
Software CD
Bolts
Page 7
7
System Configuration
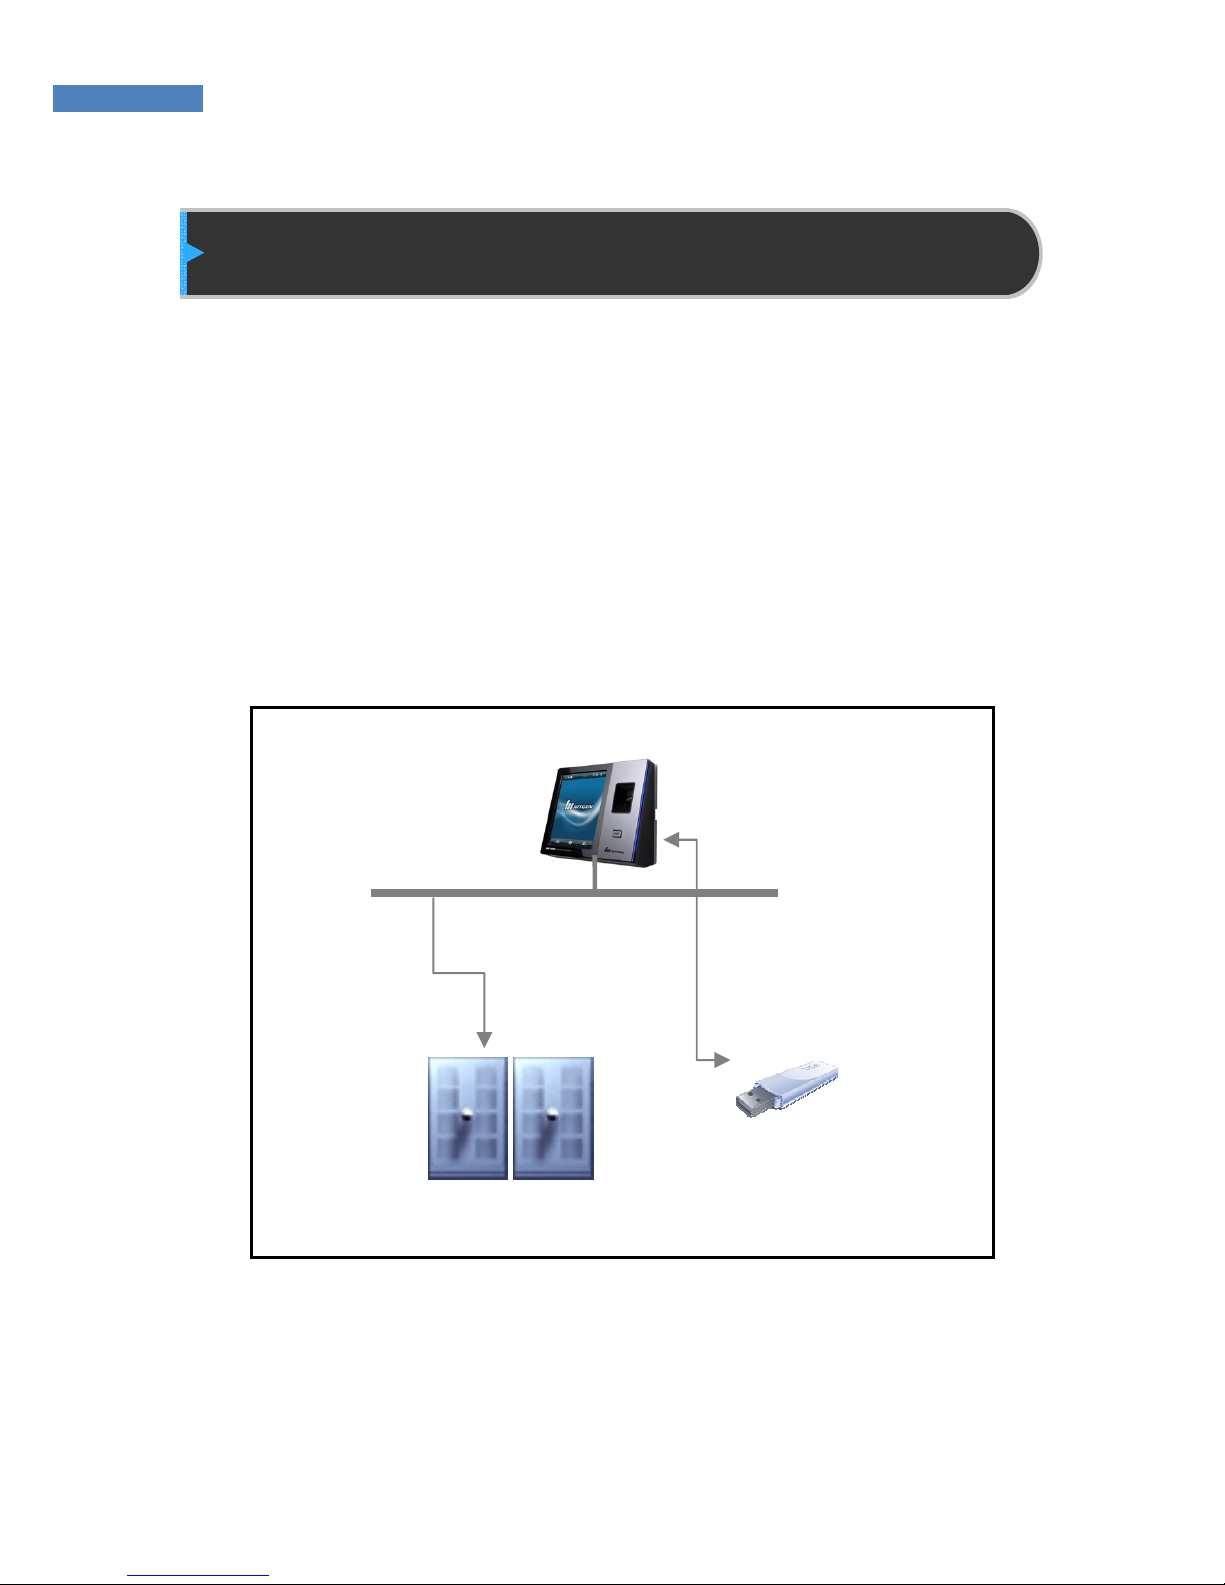
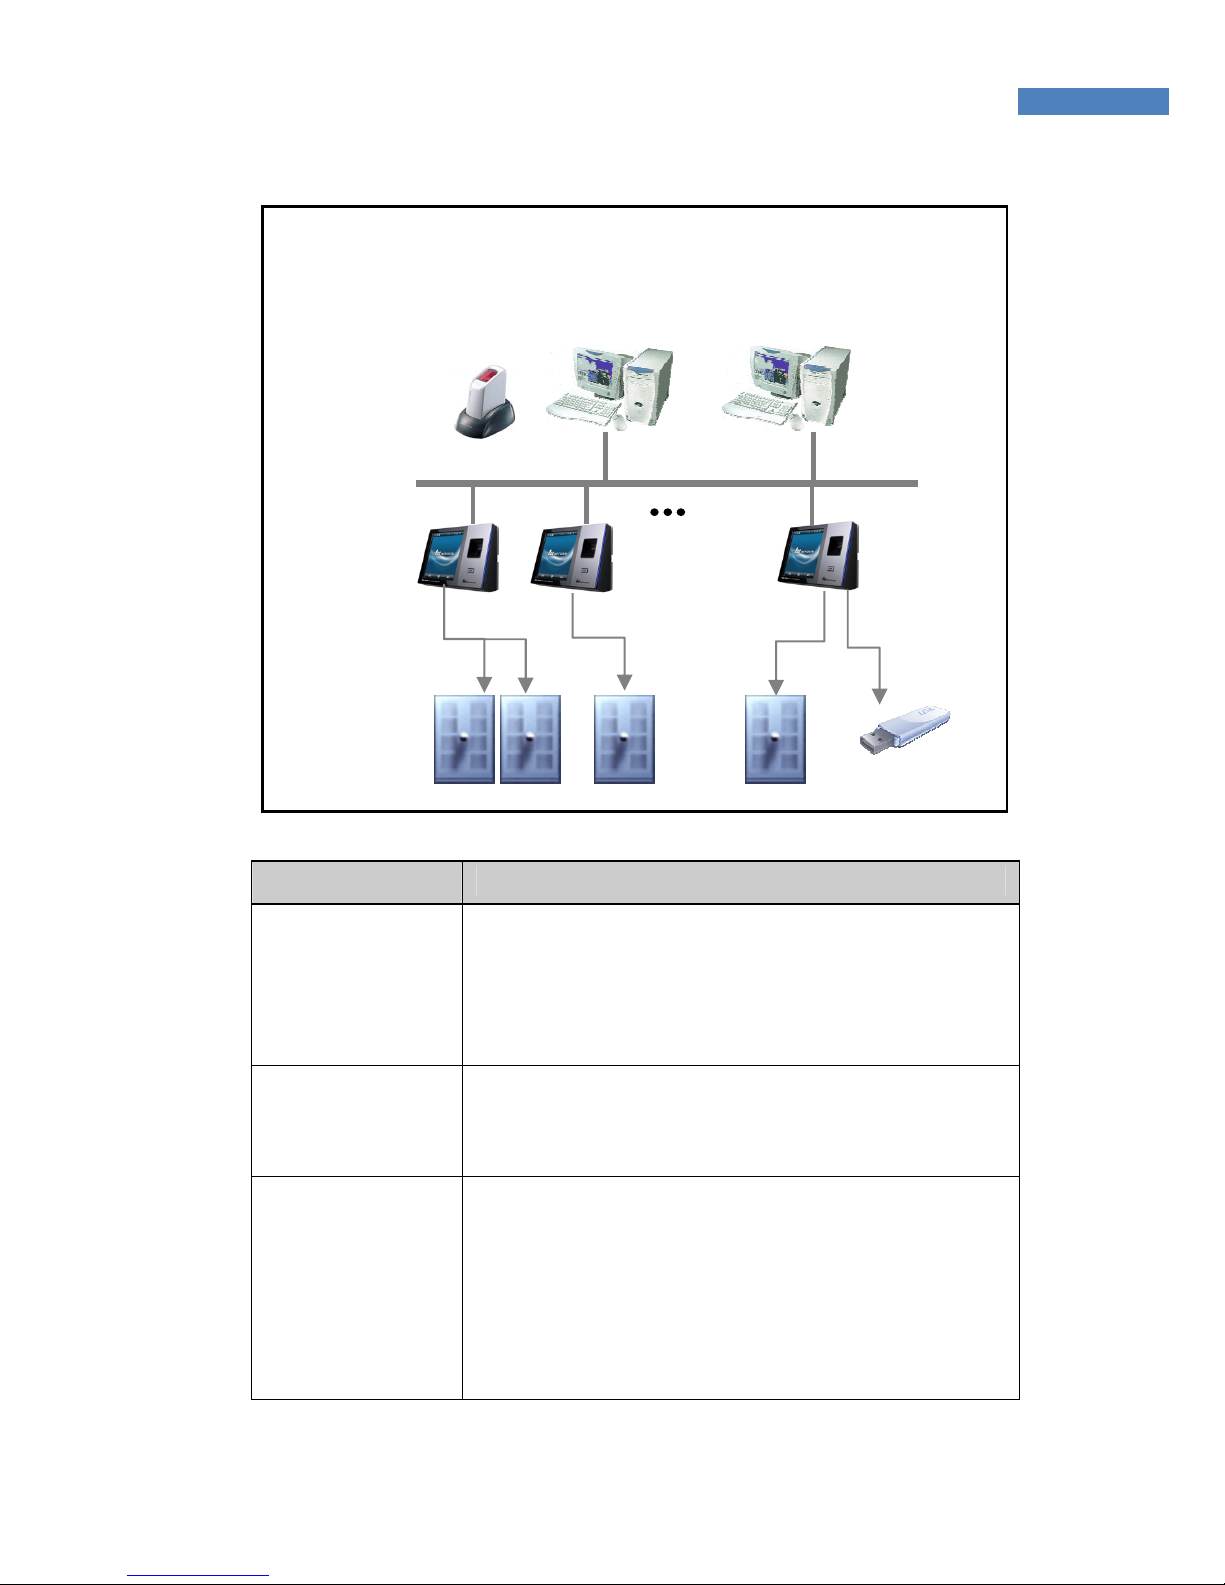
The Access Control Terminal (NAC-5000) can function either in the
network or stand-alone mode. In stand-alone mode, all functions are
available and the terminal does not need to be connected to the
network. In network mode, multiple terminals are connected to the
server through TCP/IP links and the terminals can be managed by
the administrator.
To use NAC-5000 in network mode, a server and a management
program (AccessManager Professional) must be installed.
Stand-alone Mode
Page 8
8
Item Functions
Server PC
1. Server S/W:AccessManager Professional
2. Terminal management, communication
and log data collection
3. User profile and log data DB
4. Authentication
Client PC
1. Client S/W: AccessManager
2. User registration and management
3. Terminal status and event monitoring
Terminal
(NAC-5000)
1. User registration, modification, deletion
and checking
2. Consecutive registration of card-only
users
3. Warning/Alarm handling
4. Announcements (To be included in future)
5. Door control
TCP/IP
Server PC
Client PC
Network Mode
Page 9
9
Product Description
.
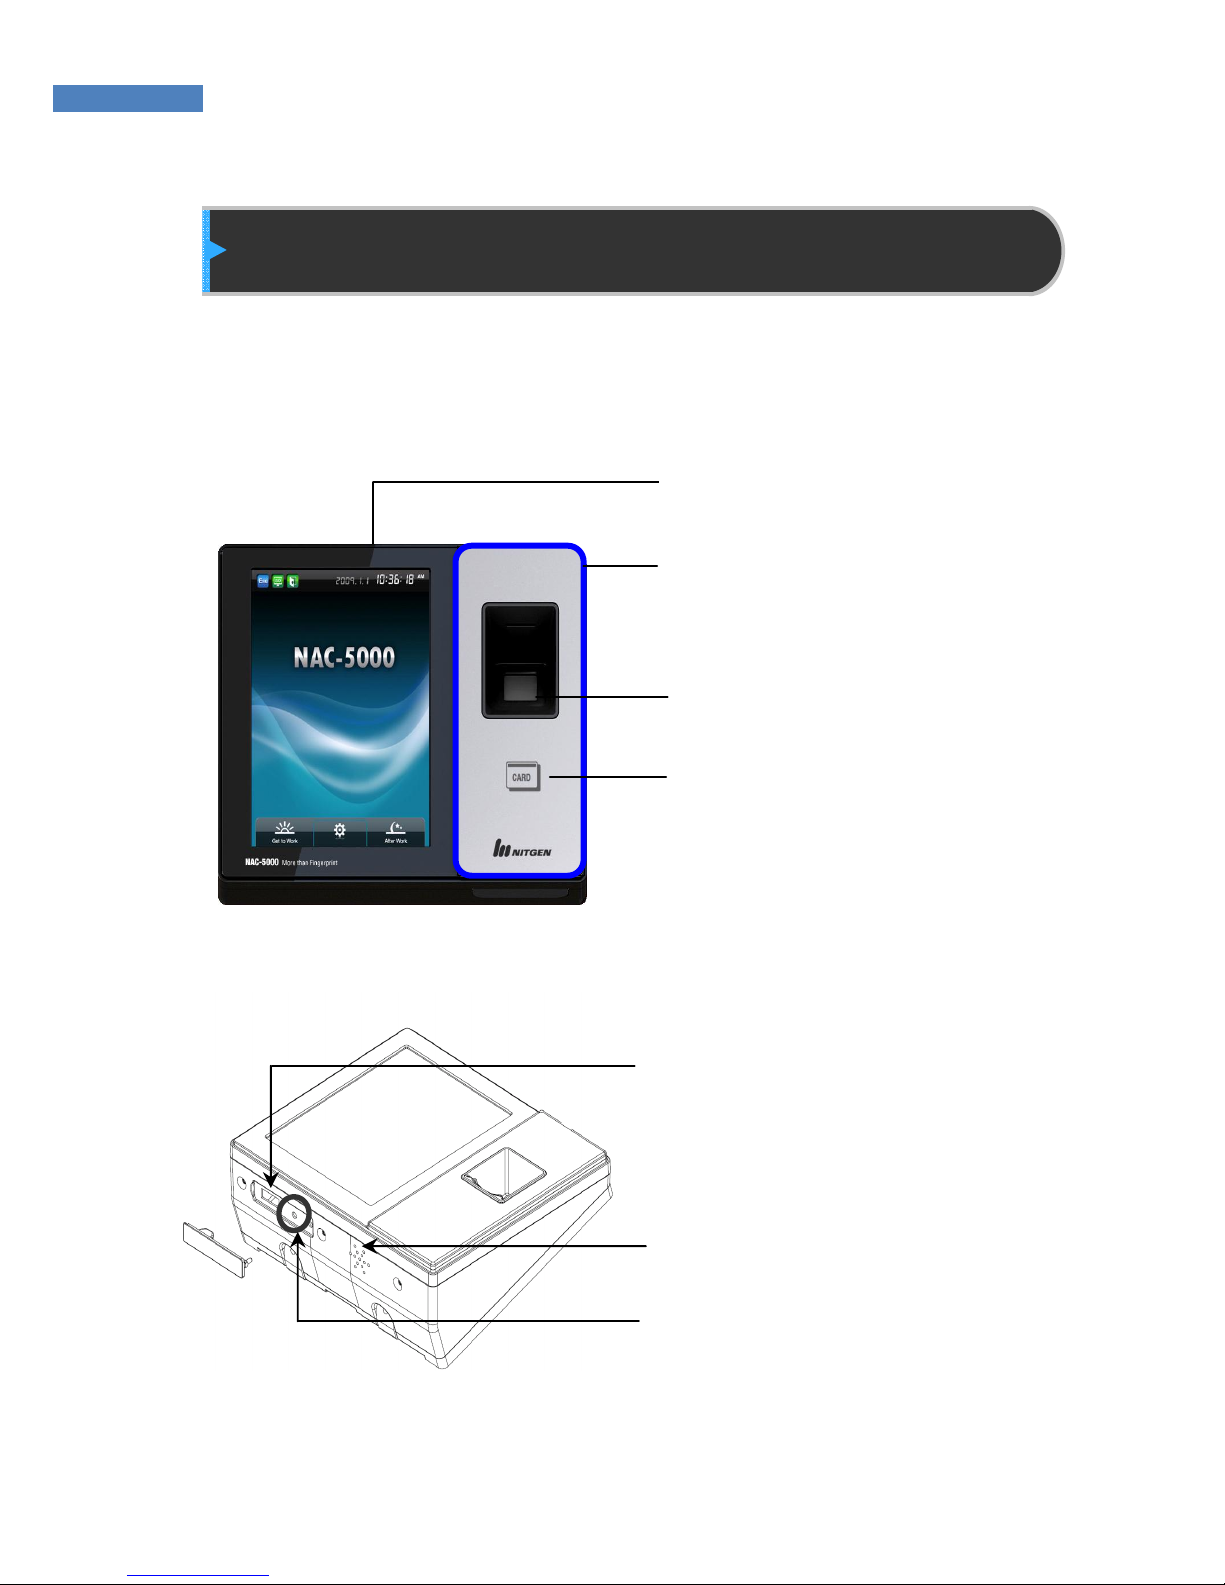
③ Fingerprint Input: The user places
his/her finger for authentication.
④ Card Input: The user places his/her card
for authentication.
⑥ Speakers: emits voice instructions,
alarms, and other sounds.
⑤ USB Input: USB memory
connection port
⑦ Reset button: Resets
the terminal.
② LED: If the terminal operates normally, the
LED will be blue.
① Touch Screen LCD: The user can
handle all inputs by touching.
Page 10
10
LCD Screen
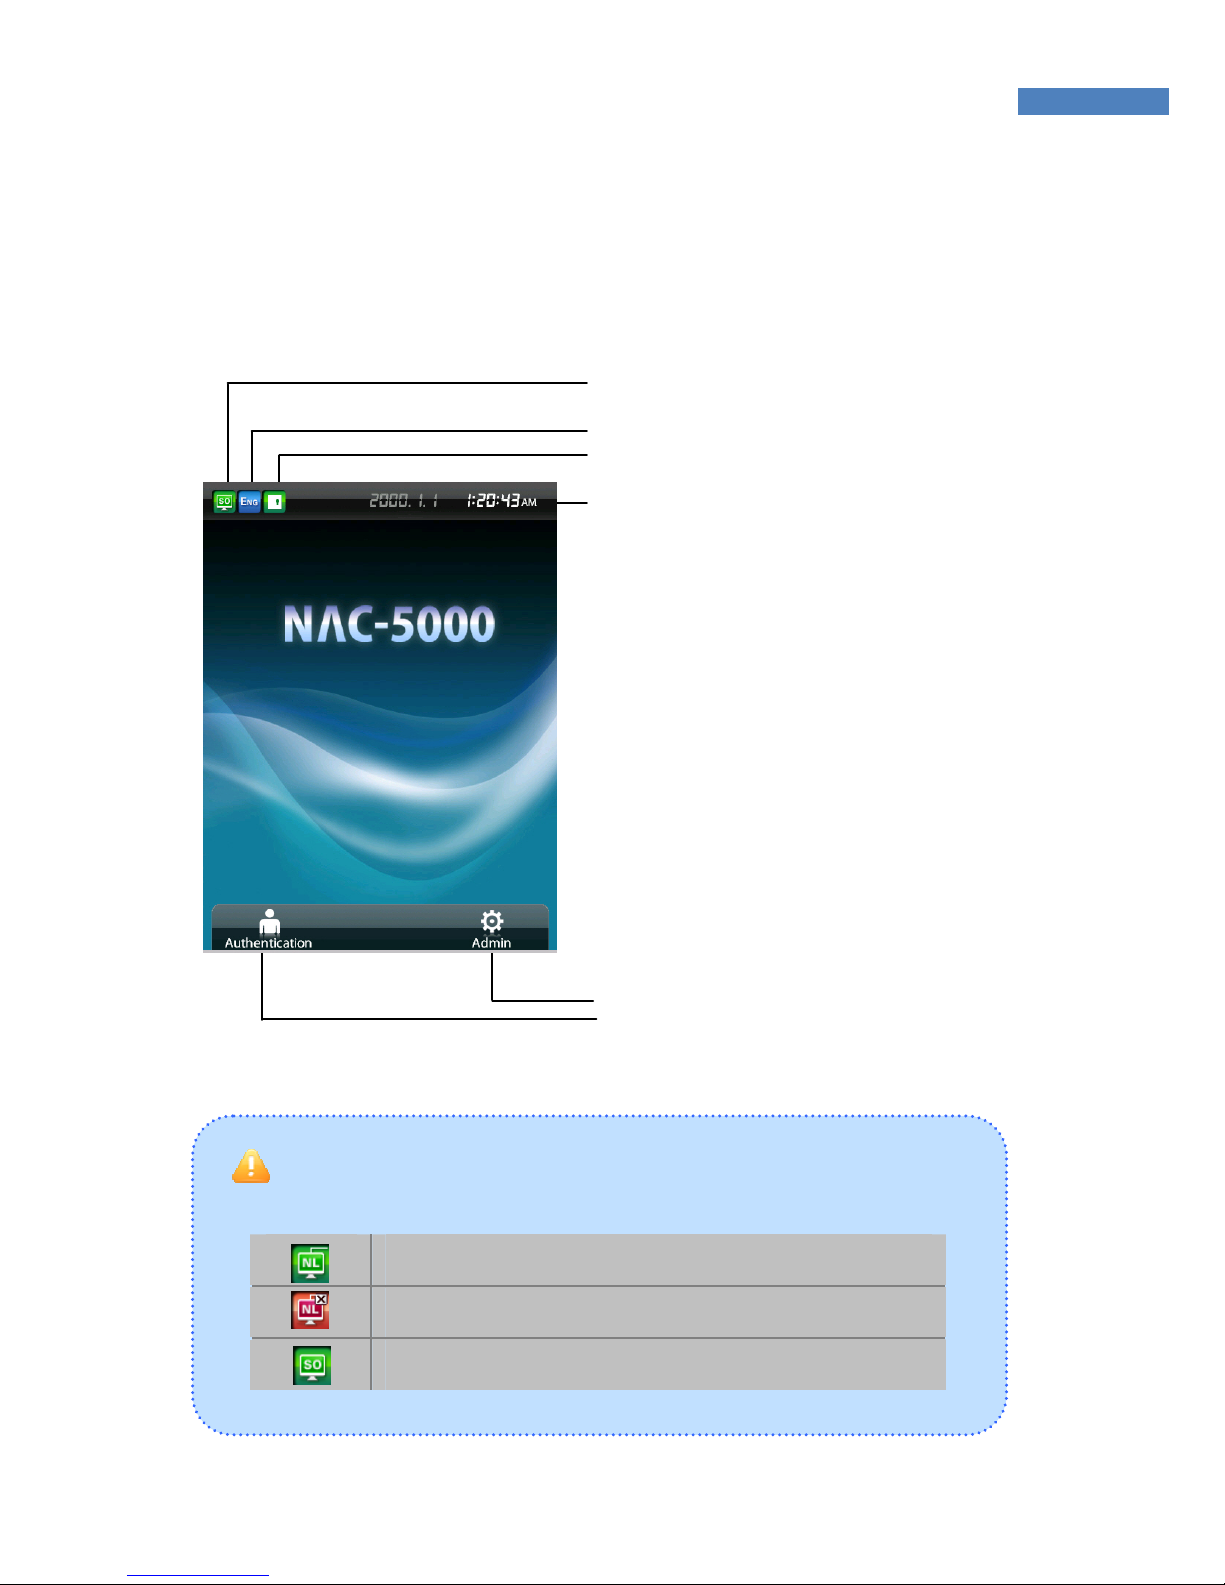
The following symbols are displayed depending on the network
connection status and the mode.
Connected to the network in network mode.
Not connected to the network in network mode.
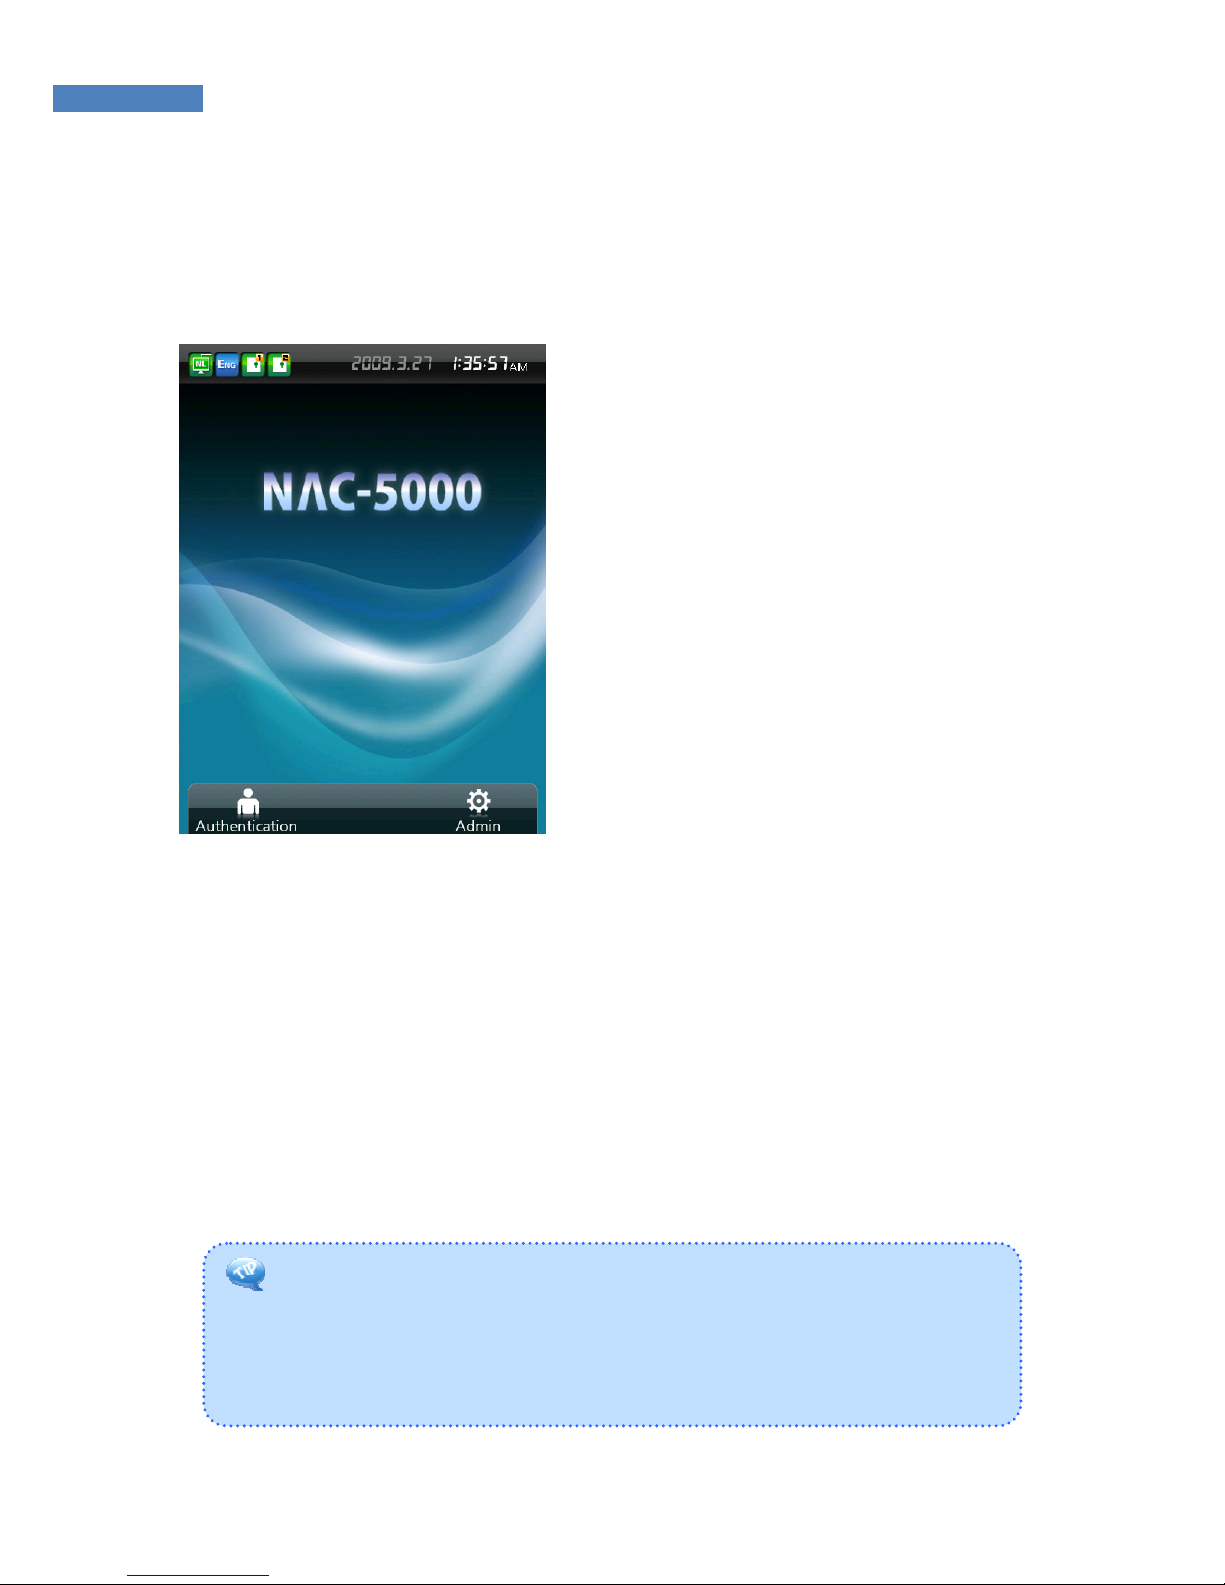
Stand-alone mode.
① Network connection status
② Language: Language used on the LCD
③ Door status: Displays whether door is open.
④ Time: Displays the present time.
⑤ Administrator Menu: Entrance Admini-
strator menu.
⑥ Authentication button: Authenticates
users before opening the door.
Page 11
11
Fingerprint Reading
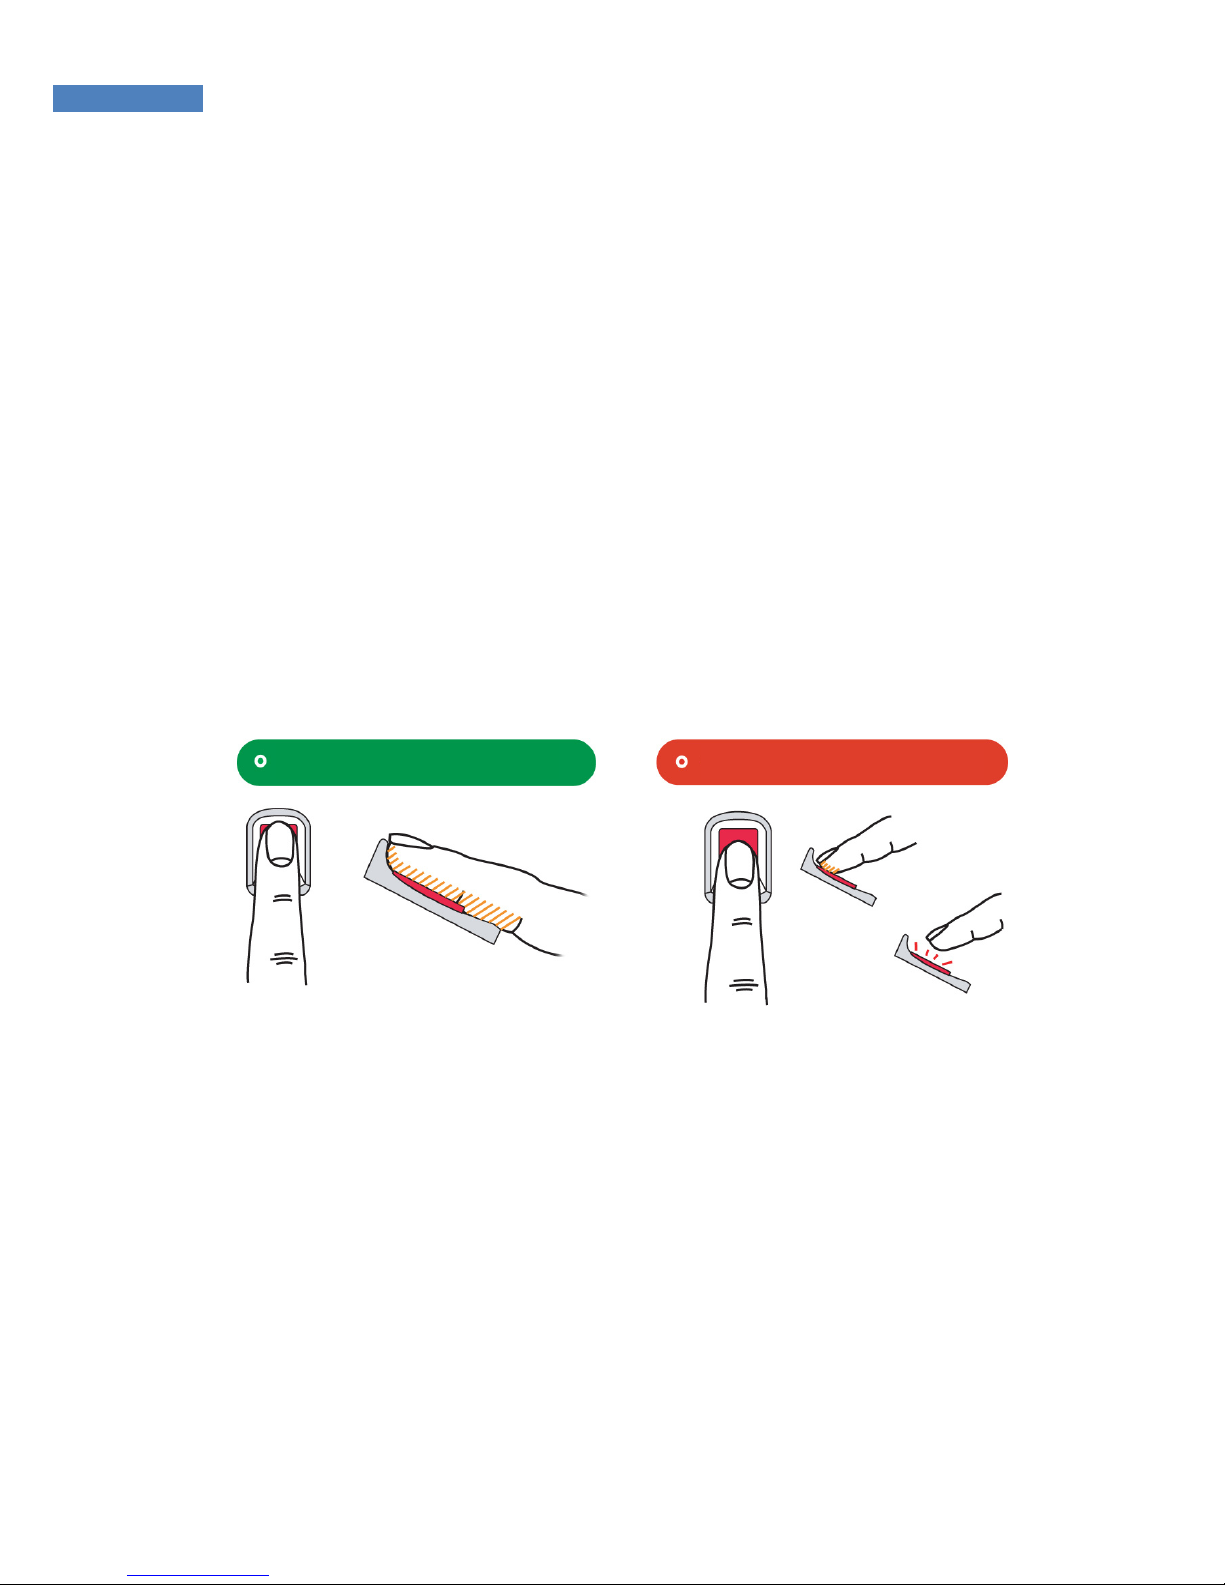
Scan fingerprints as described below for fingerprint registration and
authentication to prevent authentication errors.
① Maximize the finger area scanned and press evenly (70 ~ 80%
of full pressure).
② Place the “core” of the fingerprint at the center of the scanner.
The core is usually opposite the whitish half-moon on the bottom
of the fingernail. Therefore, place the half-moon part at the
center of the scanner when scanning.
Correct Incorrect
Page 12

12
Touch Screen Usage
When using the touch screen, use the end of the finger or the nail
because the screen may not recognize larger finger surfaces. If the
locations of the finger’s contact and removal are different, the touch
function may not work properly.
If the touch function is slow to respond or does not work, change the
touch sensitivity by referring to “Chapter 2 Administrator Menu –
Terminal Initialization – Touch Calibration.”
Grime or dust on the touch screen may result in less sensitivity. Keep
the touch screen clean.
Page 13
13
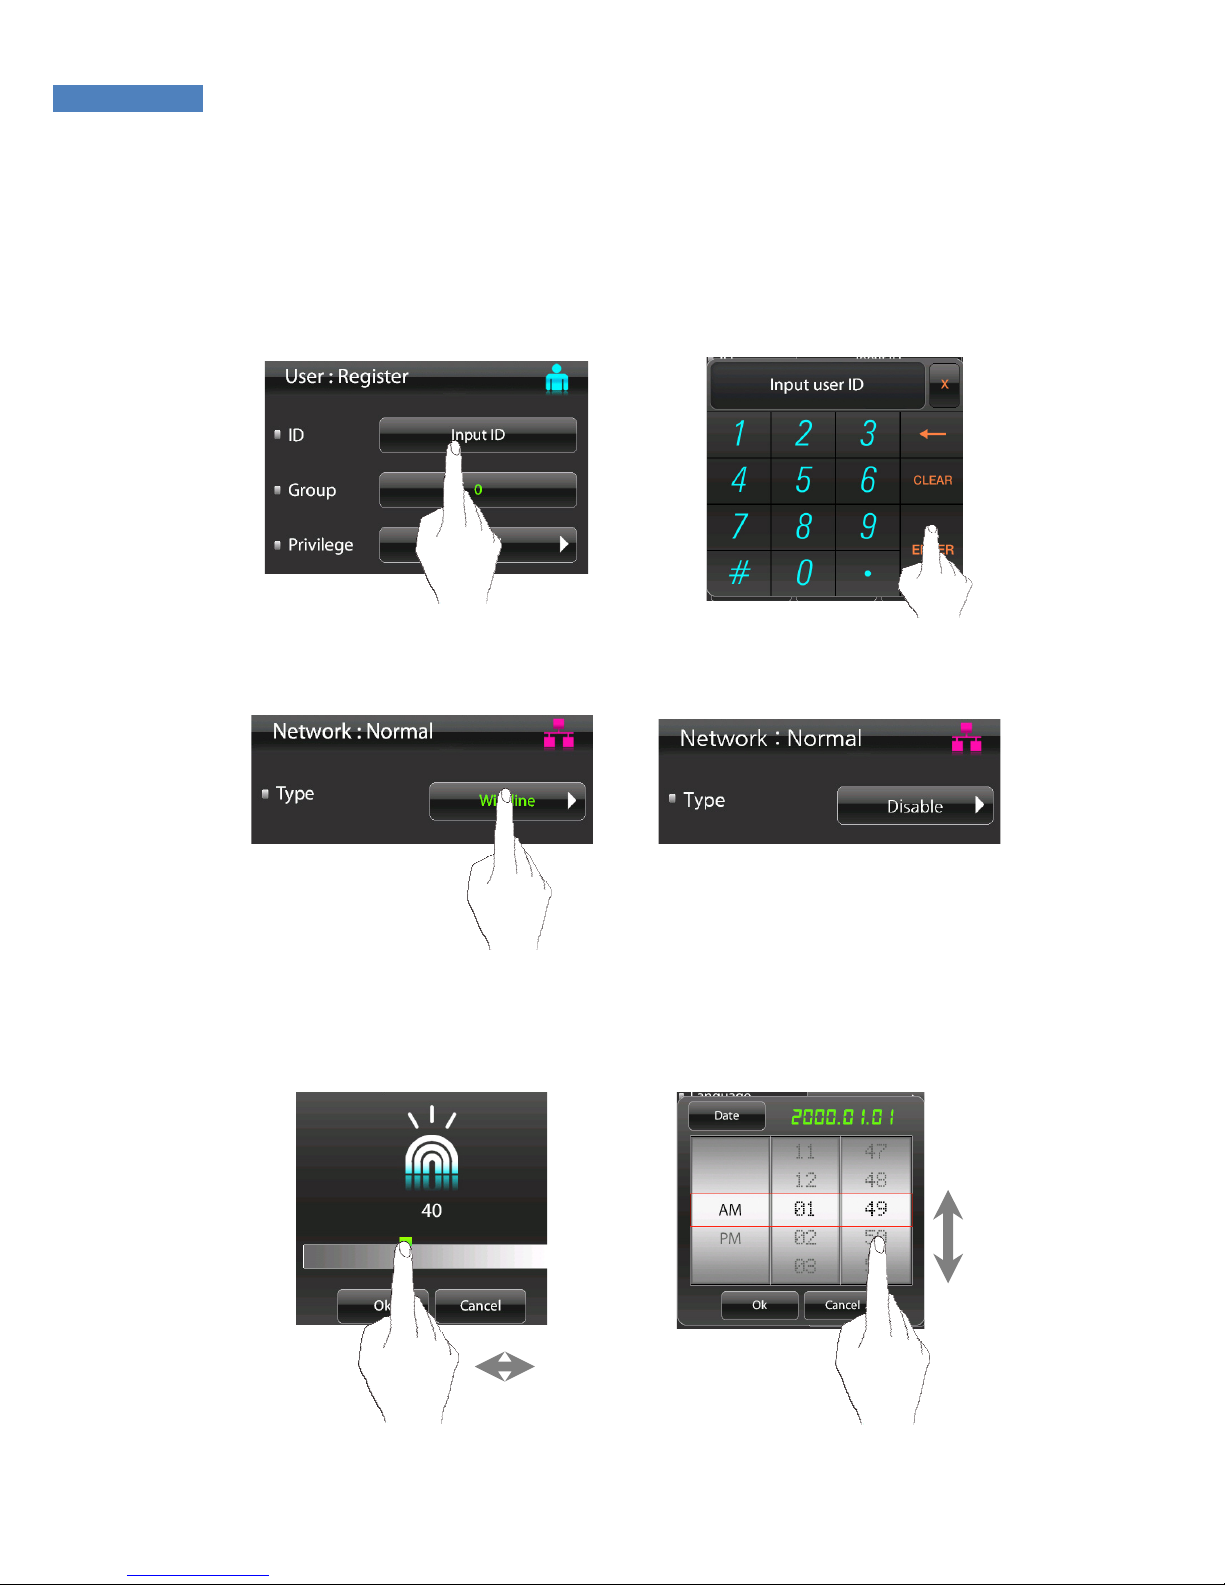
Touch Menu Setting
① To directly enter values in the Adminstrator menu, press the
Input ID button, enter the data, and press the “Enter” button.
② If the default setting is already displayed, enter the new value
to change it.
③ To change options such as sensor brightness, sound volume,
or the date, press the arrows or numbers and move the finger
up and down or left and right.
Page 14

Chapter 2 Administrator Menu
Entering Adminstrator Menu -15
User Management - 19
UI & Sound Setting - 29
Network Setting - 33
Serial Connection - 37
Authentication Option Setting - 38
Terminal Information Display - 49
USB Memory Connection - 53
Terminal Reset - 54
Page 15
15
1. If no administrater was designated and only general users were
registered in network mode, all users will be allowed to enter the
Management menu.
2. If 1:N authentication is used, an administrator with a registered
fingerprint can enter the Adminstrator menu using fingerprint
authentication without entering his ID.
Entering Administrator Menu
Terminal users include general users and administrators. General
users are only allowed to open the door while the administrator can
use the Administrator menu to control the door as well as the
terminal’s functions.
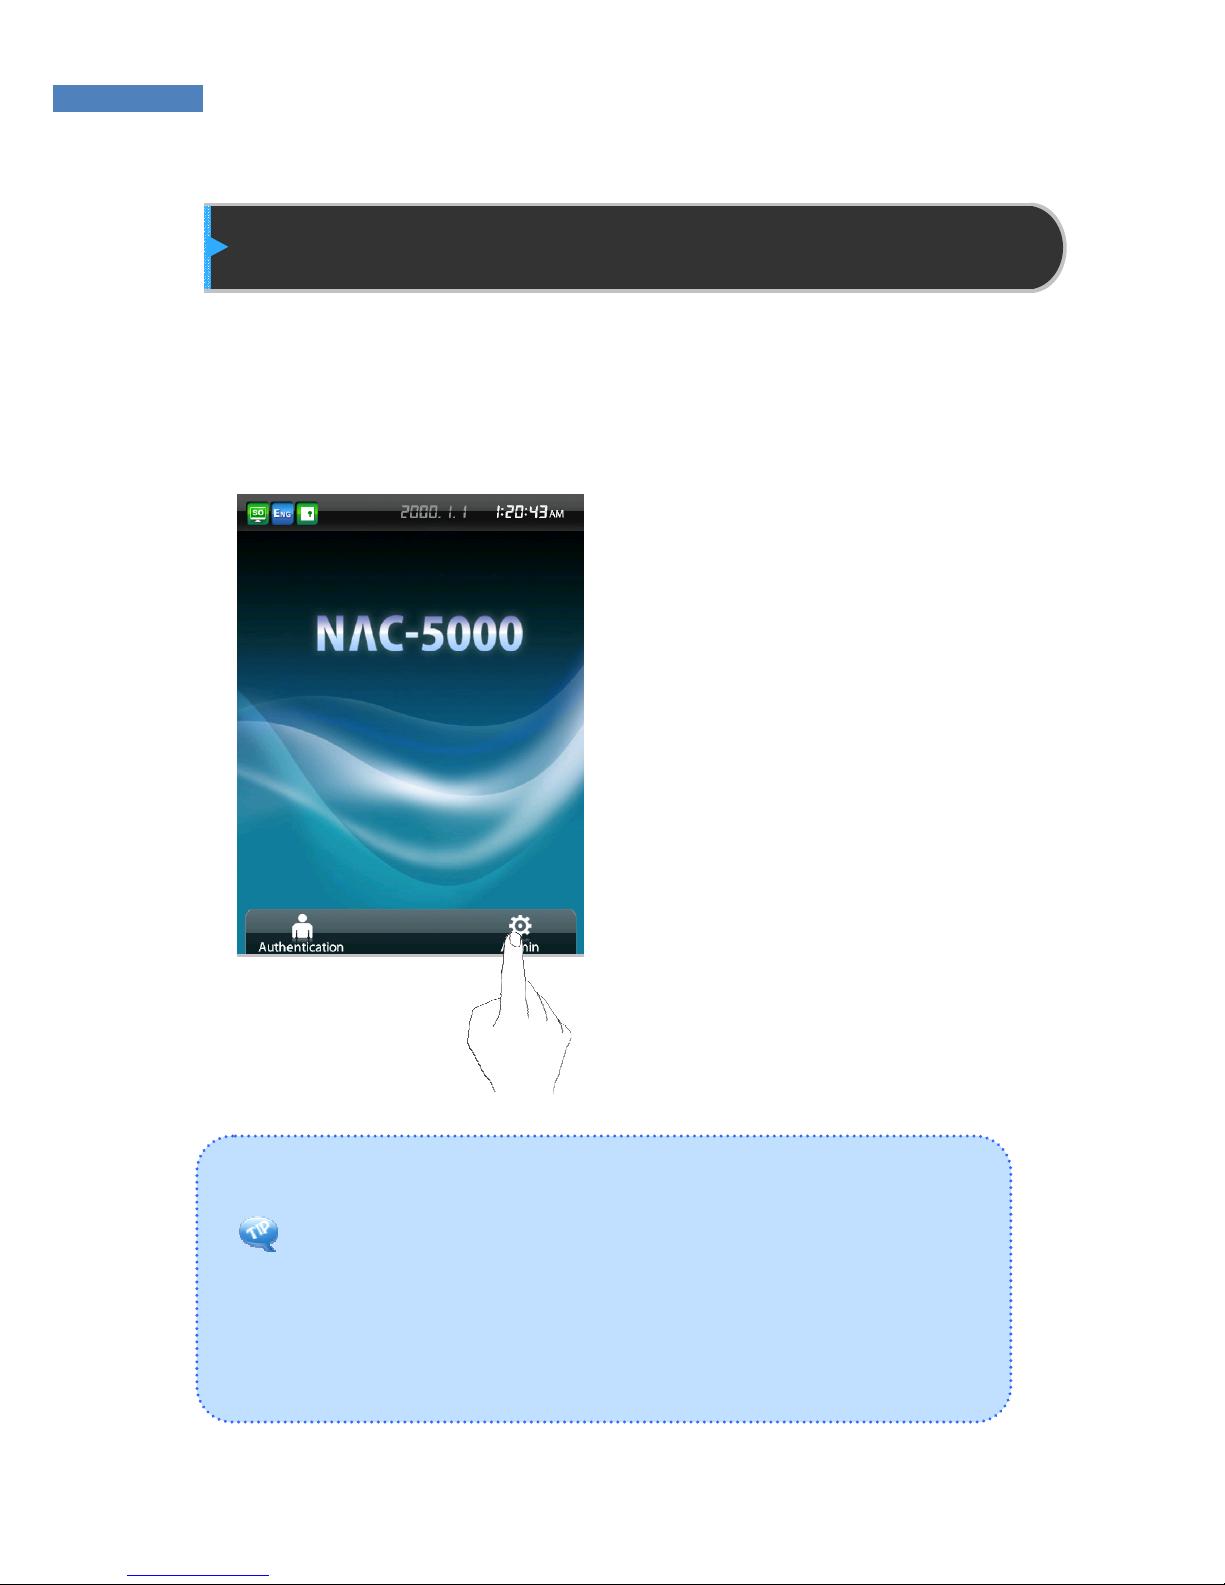
1. To enter the Administrator
menu, touch the “Admin”
button at the lower right of
the screen.
2. Input the administrator ID and
follow the authentication
process. The Administrator
menu will be displayed.
Because no users have yet
been registered, any user
can enter the Adminstrator
menu. At least one
administrator for should be
registered for security
purposes.
Page 16
16
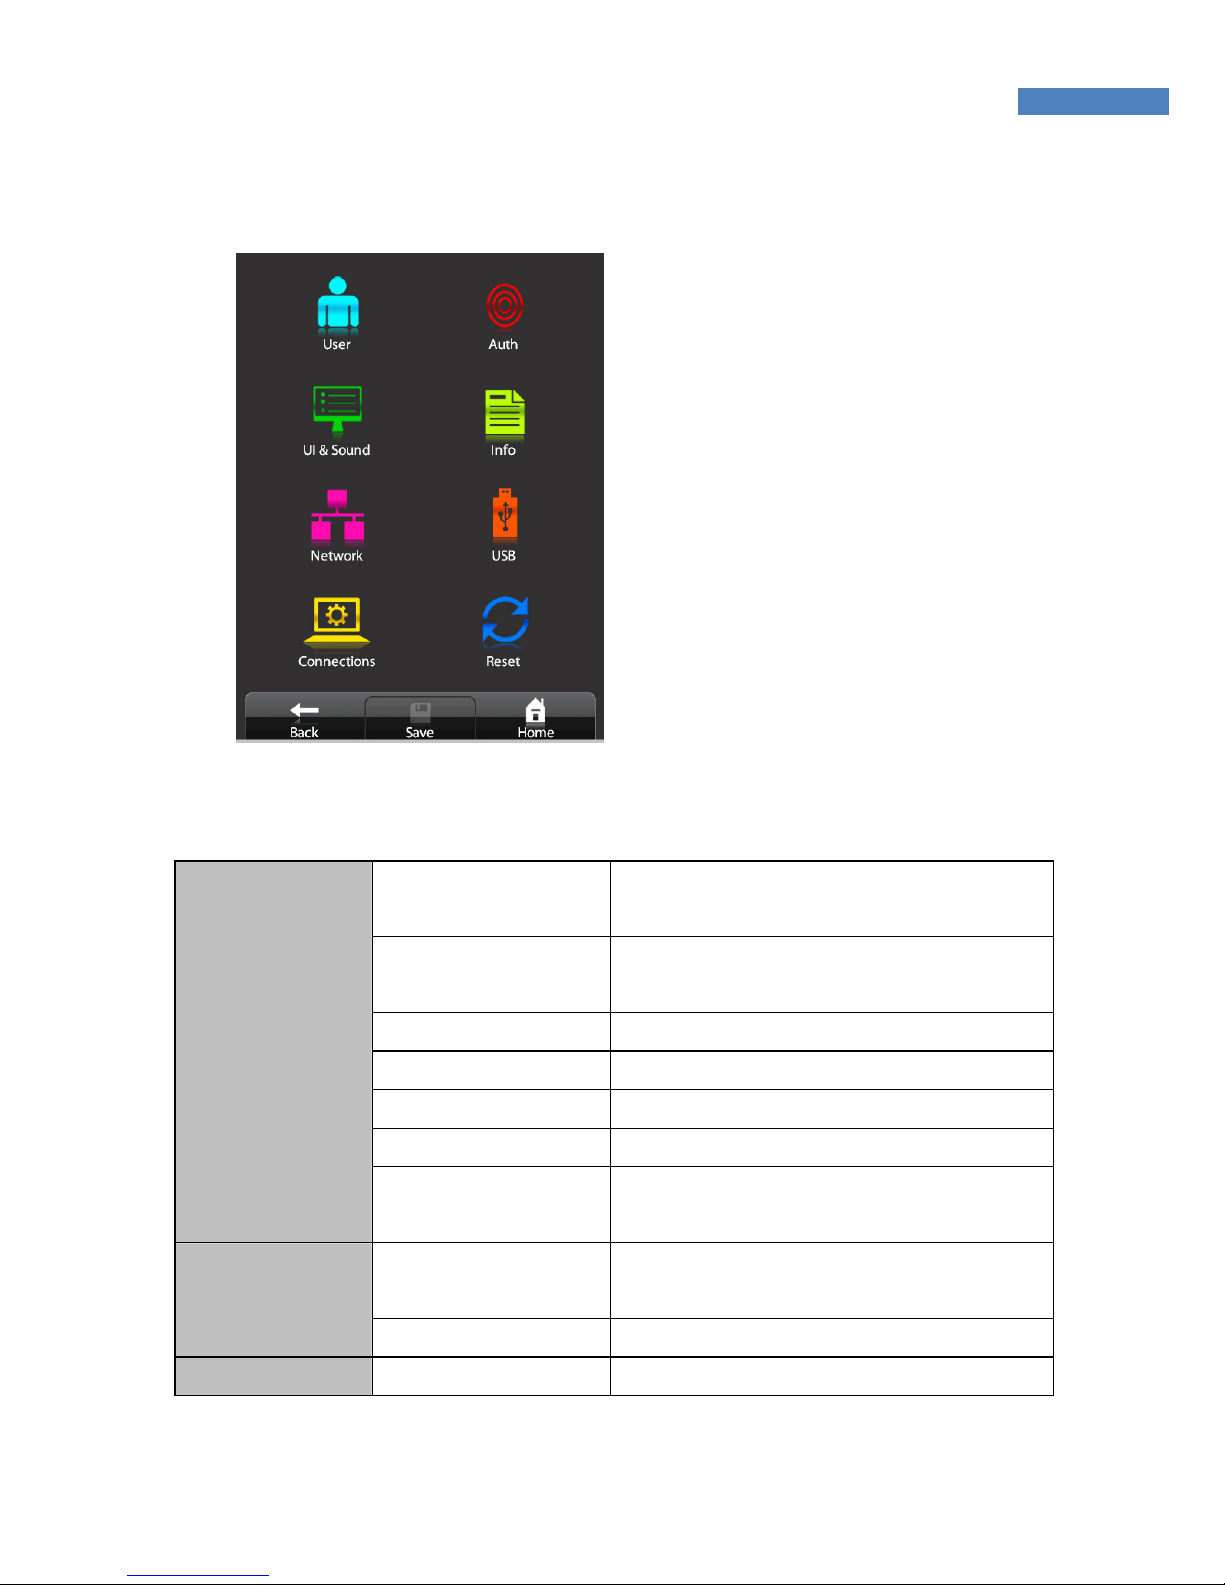
The Administrator menu has eight submenus as shown below.
The following describes each sub menu:
User Register
ID, Group, privilege, Fingerprint
Authentication, Authentication Type
Modify
ID, Group, privilege, Fingerprint,
Authentication, , Authentication Type
Delete Enter the user ID
Delete all
List
Card-Only
User
Terminal User
Validation
Enter the user ID
Display
Language, Main view, LCD Brightness,
User image, Time&Date
UI & Sound
Sound Voice, Effect, Volume
Network Normal Type, Encryption, Ping Time
Page 17

17
TCP/IP
Terminal ID, DHCP, Terminal IP, Server
IP, Subnet mask, Gateway, Port
Serial
Connection
Wiegand, 485 Connection Settings
Default
1:1, 1:N Security level, Saving Logs,
1:N Authentication, 1:N Authentication
Time
Door
Door, Function selection, Result signal,
Time of Opening the door, Door
warning time
Card Card Type, SOC Type
Time and
Attendance Mode
T&A Type ,T&A Auth Only
Sensor
Type, Authentication Time out, LFD
level, Sensor Option
Camera Not currently available
Authentication
Fixed Option
Template count per fingerpring,
ID length
Normal
Terminal ID, User/Template, Admin,
F/W, Network, T&A, Card
Time Zone Type, Terminal Time Zone Code
Log Not currently available
Infomation
SelfTest
Sensor, RTC, NetWork, Option DB,
User DB, Log DB
Log Download Not currently available
User Download Not currently available
USB
User upload Not currently available
User Data
Log Data
Option Data
Reboot
Reset
Touch Calibration
Page 18
18
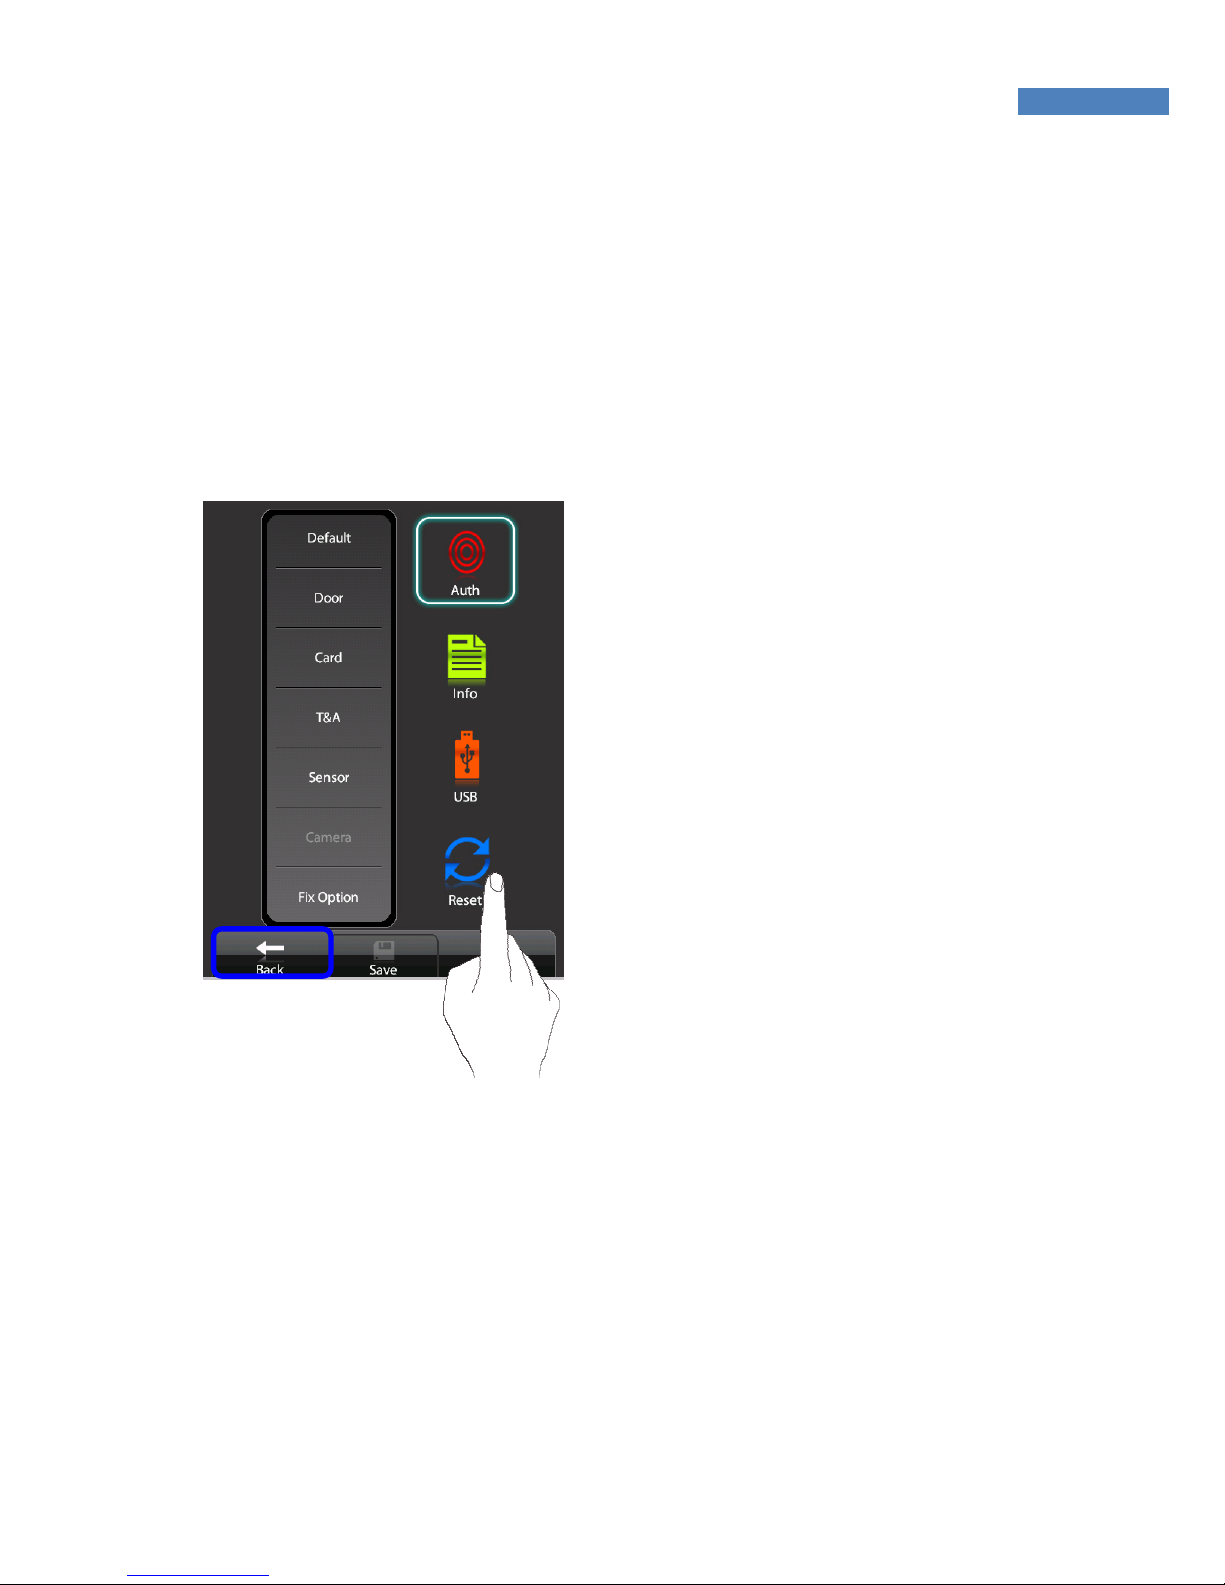
Using Administrator Menu
To select a submenu of the Administrator menu, touch an icon. To
exit the Administrator menu, touch the “Back” button at the lower-left
of the screen.
To close the Administrator submenu, touch any blank area on the
screen.
Page 19
19
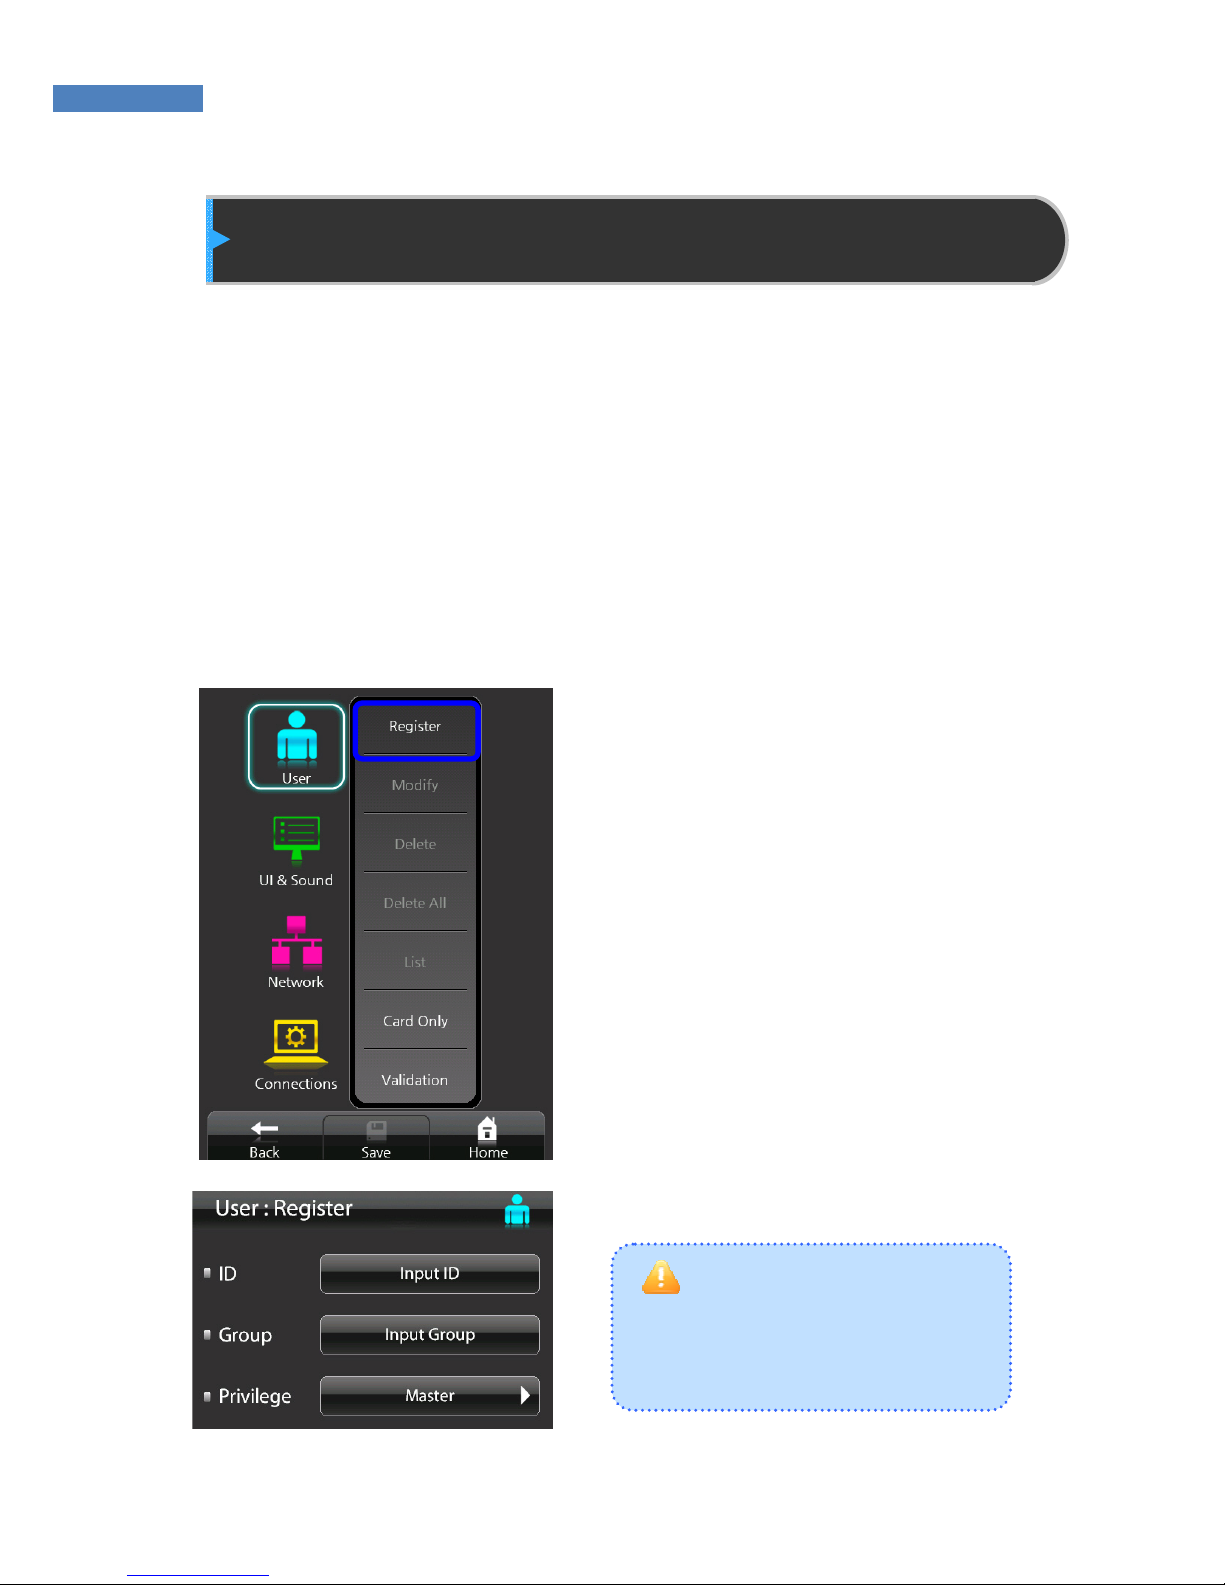
The first person to be registe-
red at the terminal is automatically
registered as the administrator.
User Management
The administrator can register, delete, change, or search users with
the User menu.
User Registration
The maximum number of users that can be registered in the is
100,000 templates, and in the case of RF card or if the users use
passwords, up to 100,000 people can register. For example, if the
terminal is registered with 5,000 users and 100,000 fingerprint
templates, additional 95,000 users with passwords or RF cards can
be registered.
1. Touch Administrator menu ->
User -> “Add” to register a user.
2. Touch “Enter ID” button and
enter the user ID. Then, touch
the “Input group code” button
and enter the group ID.
Page 20
20
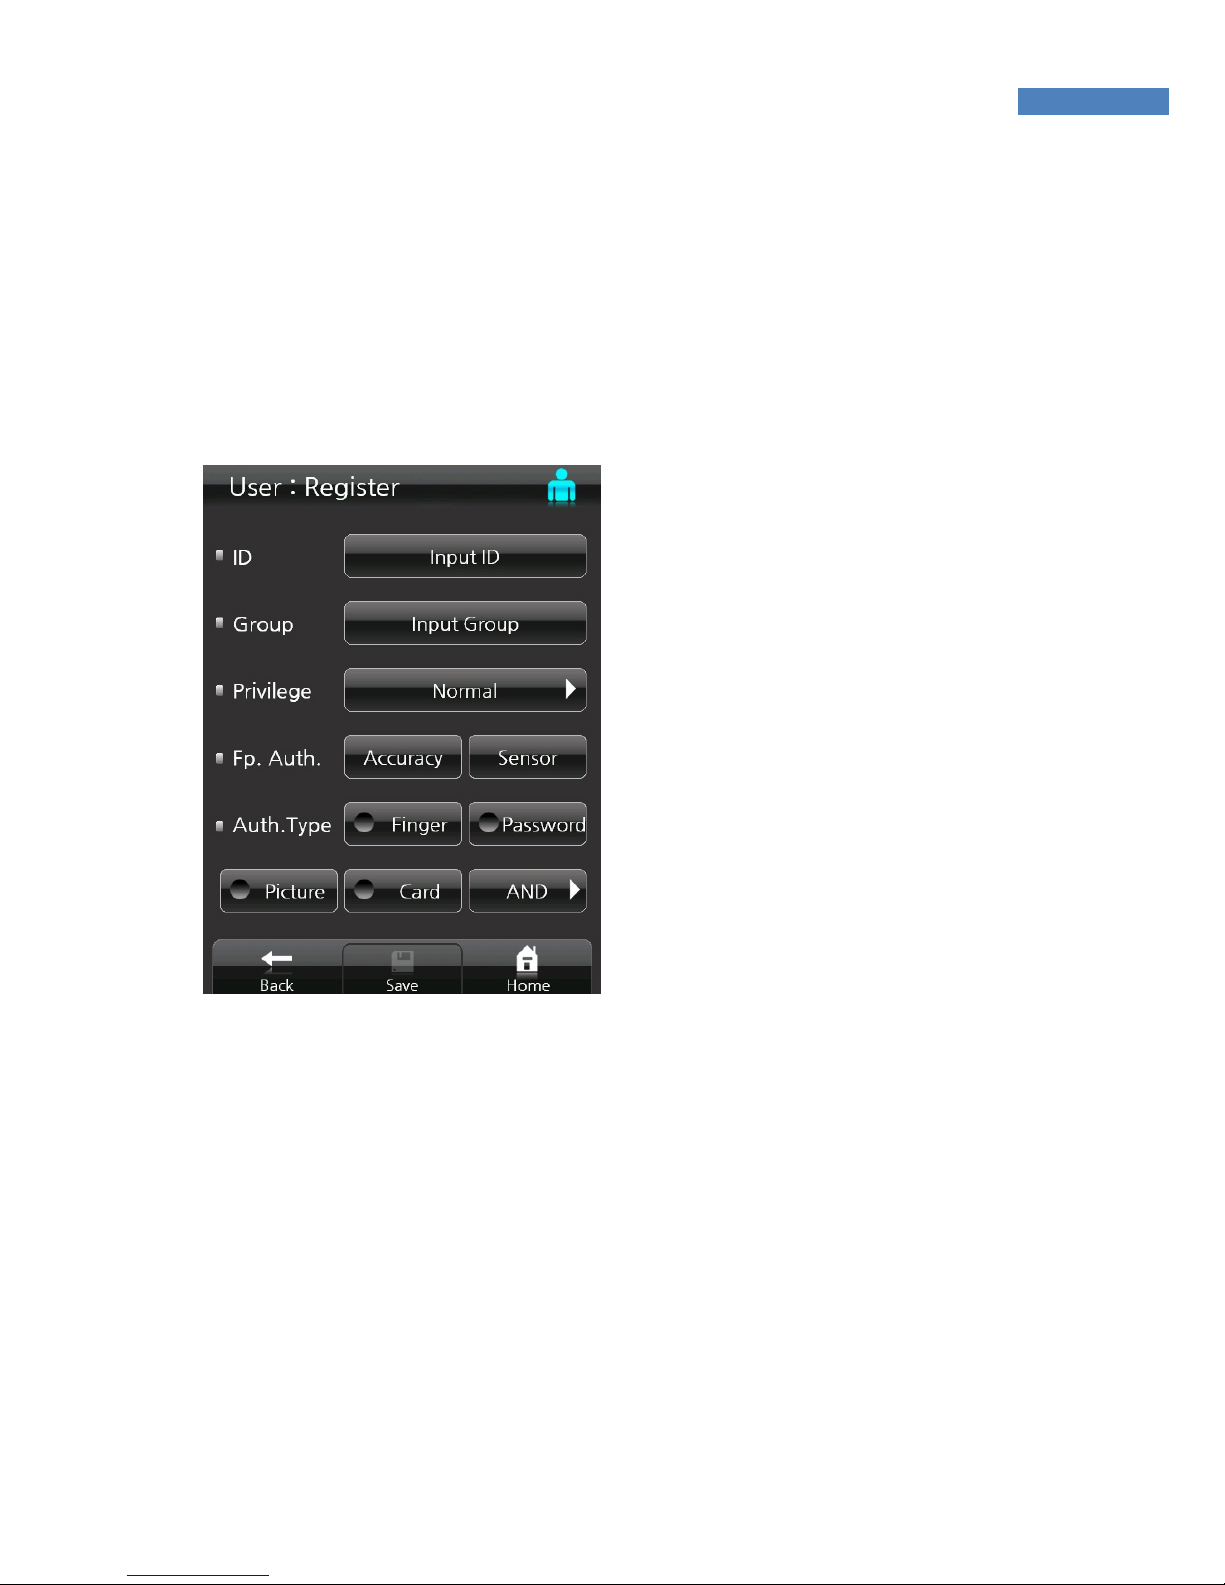
3. In “Authority” touch the “Administrator” button to change the
authority. Select General User or Administrator.
General User: Door Control Authority
Administrator: Door Control + Administrator Menu Authority
4. Fingerprint Authentication –
Set the “Security Level”
when the user’s fingerprint
rejection rate (FRR) or other
users’ fingerprint recognition
error rate (FAR) is high.
In case a user’s fingerprint
is recognized as a different
user’s, set the security level
6 or higher. If the user’s
fingerprint is not recognized
well, reduce the security
level 4 or lower.
If the user’s fingerprint is
too dry, lower the sensor
setting below the default – brightness, contrast, and gain.
If the user’s fingerprint is humid, raise the sensor setting above the
default. Depending on the fingerprint state, change the options.
The new setting is applied upon the registration of the fingerprint and
is valid only for 1:1 authentication.
If the user uses the default “Security Level” and “Sensor” setting
without changing the options, the settings that the user made by
selecting Admin – Authentication – Basic menus will be applied.
Page 21
21
In order to restore the default security level, click the current setting
again.
Security Level Range: 1 ~ 9
Default Sensor Setting: Brightness: 40 / Contrast: 20 / Gain: 2
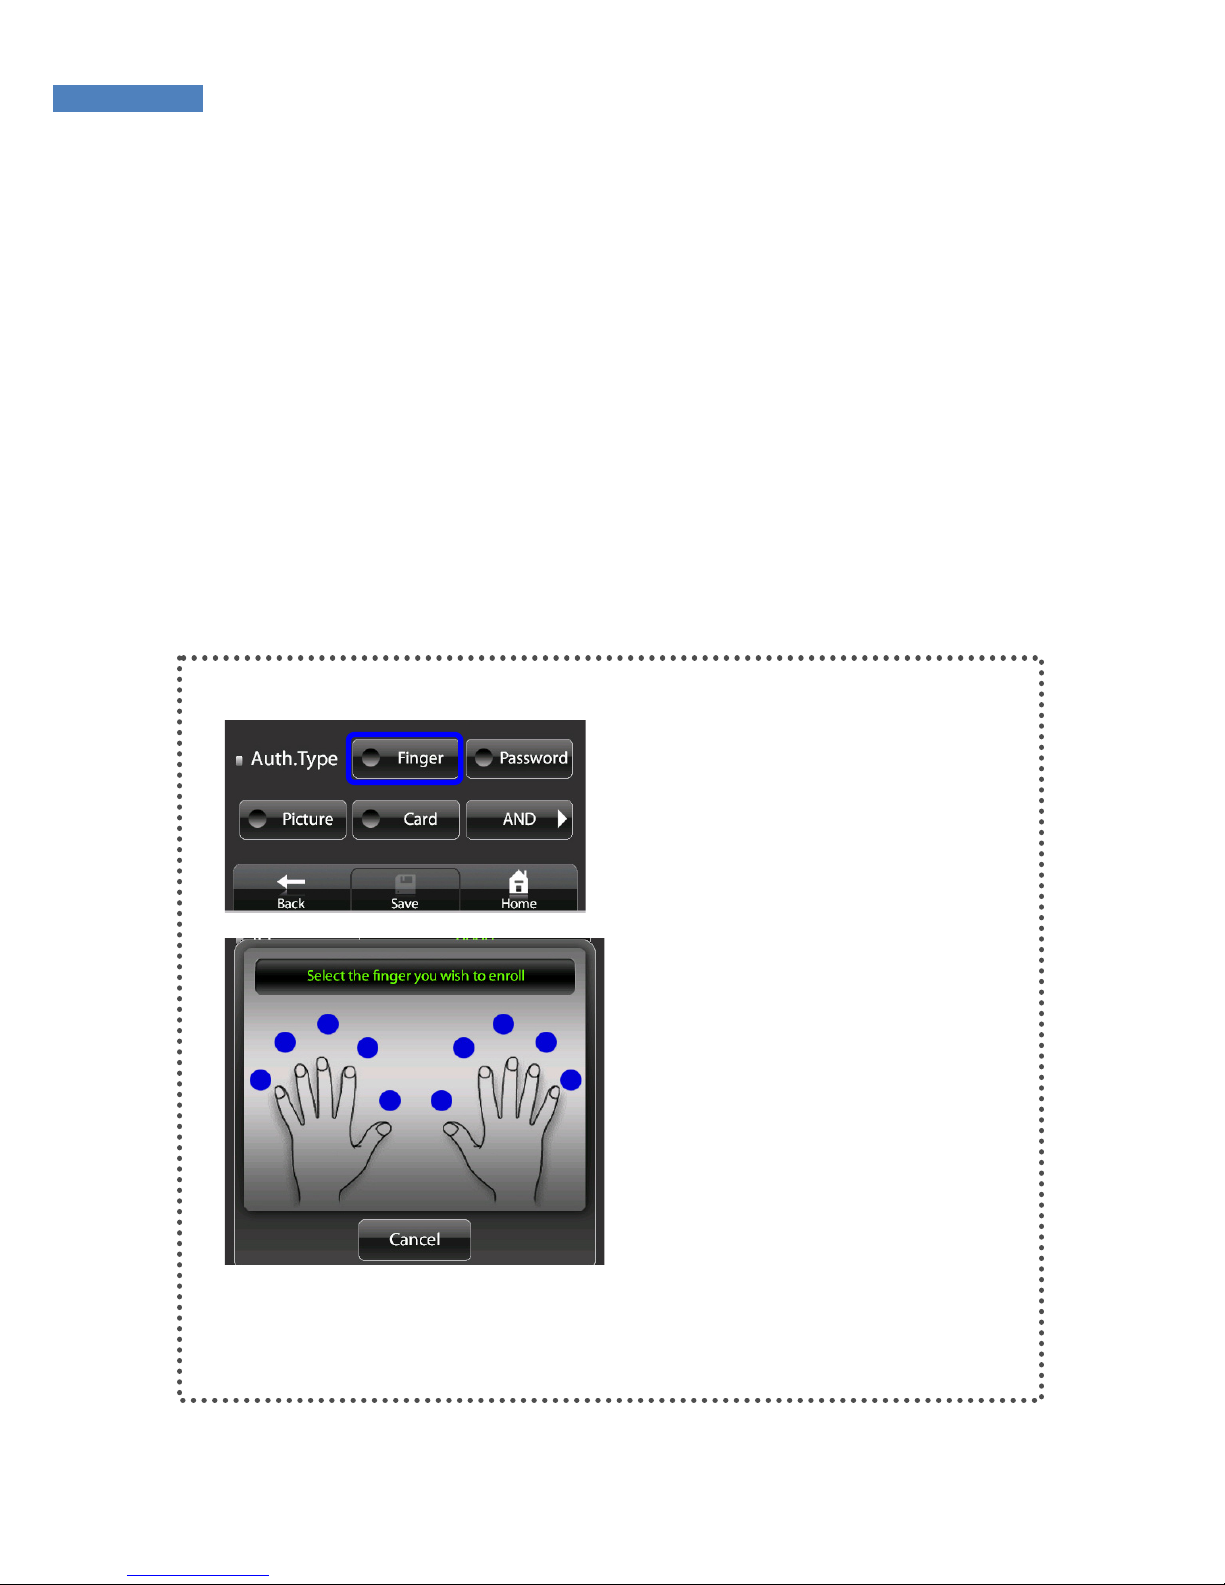
5. The user can be registered using fingerprint, password, or card
authentication. More than one authentication method must be used
to register. After registering, select the authentication checking
method and touch the “Save” button to finish the registration.
Fingerprint Authentication
① Touch the “Fingerprint” button
in “authentication method”. The
fingerprint registration screen will
appear. Select a finger to register.
Page 22
22
Notes on setting Security Level/Sensor Options
▪Setting the sensor serial data may affect the authentication rate. It is
recommended that the default sensor setting be used.
▪If individual options are not set, server settings will be only be applied to
server-authenticated users in network mode.
▪Individual user settings are not applied during 1:N authentication, they are
applied after the user registration process is completed.
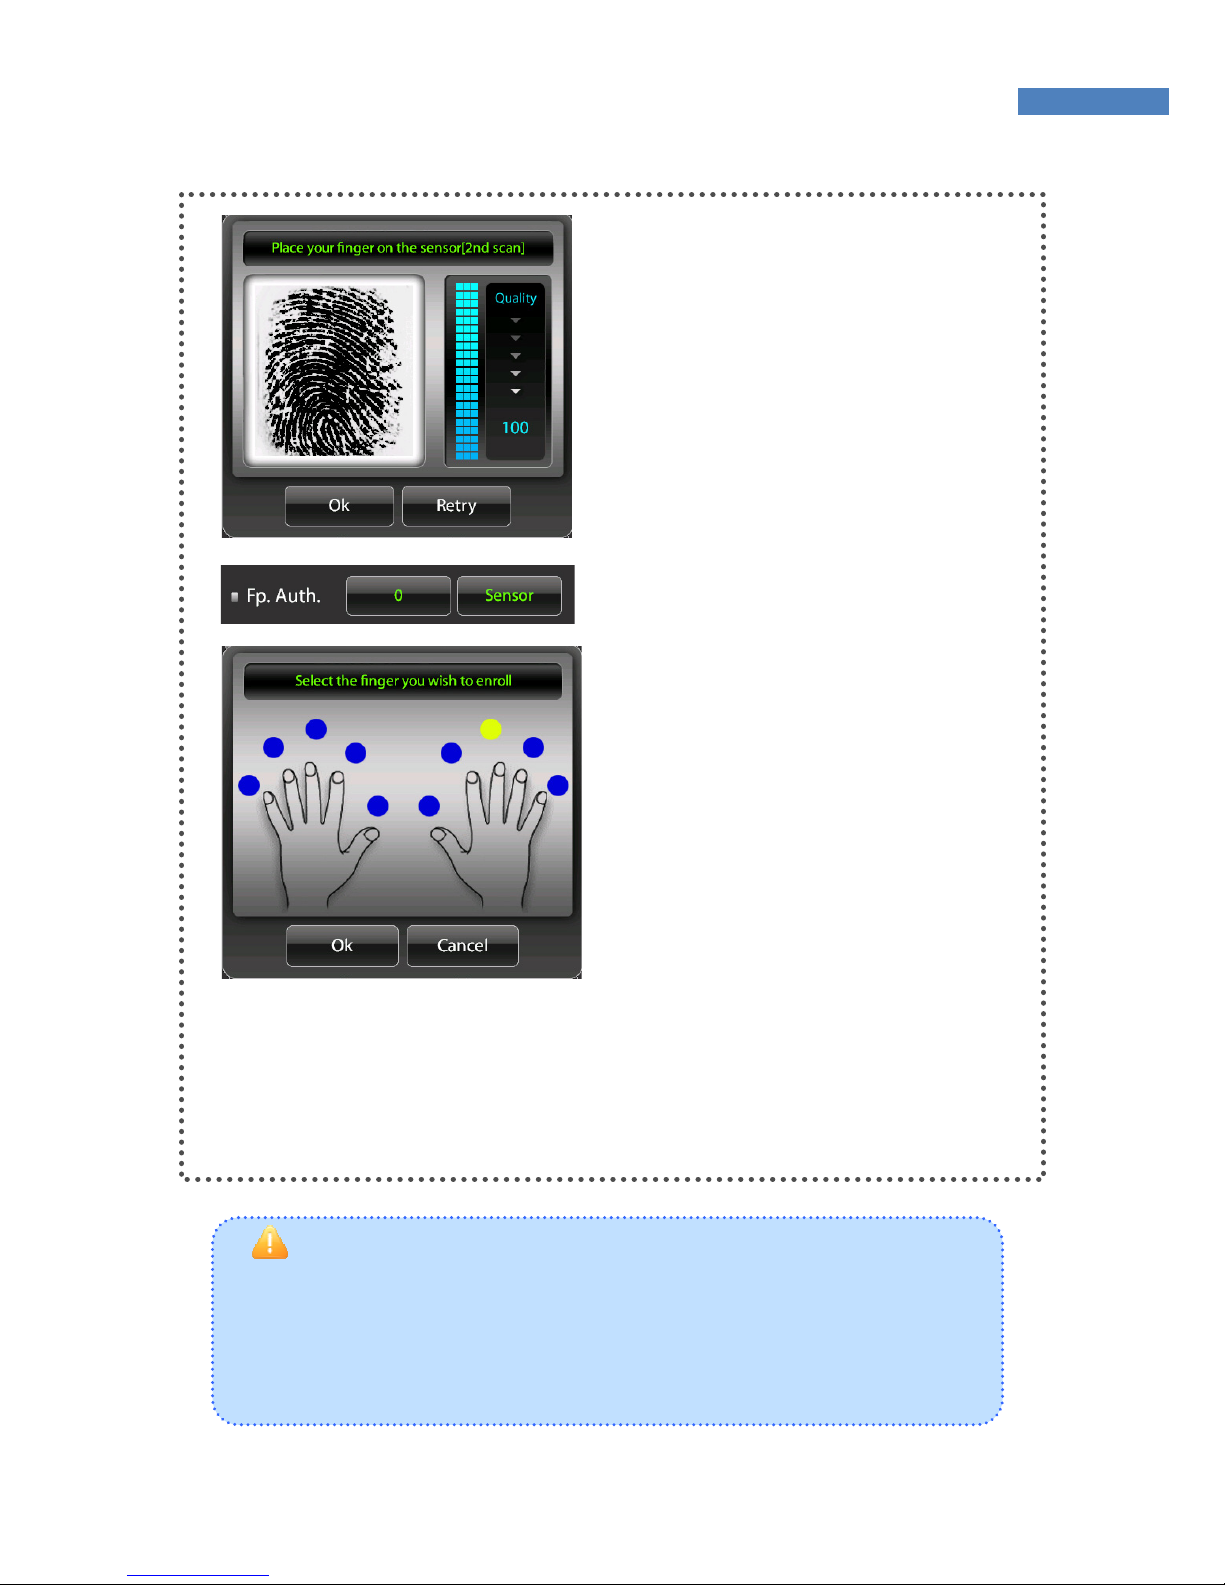
② Place a finger on the sensor.
The fingerprint will be displayed
with a quality indicator. The
fingerprint must score at least 30
points to be registered and the
likelihood of authentication rises
with the score. Place the core of
the fingerprint on the sensor.
③ After a fingerprint is registered,
the “Security Level” and “Sensor”
menus will be activated on the
“Fingerprint Authentication” menu.
Security Level 0 will use the
terminal’s default sensor setting.
(the user can set the security level
in Administrator menu ->
Authentication -> Default.)
④ After the fingerprint is properly registered, the blue dot above
the finger will turn yellow as shown in the figure. To change the
fingerprint, press the yellow dot, and press “no” when asked
whether to delete the fingerprint.
Page 23
23
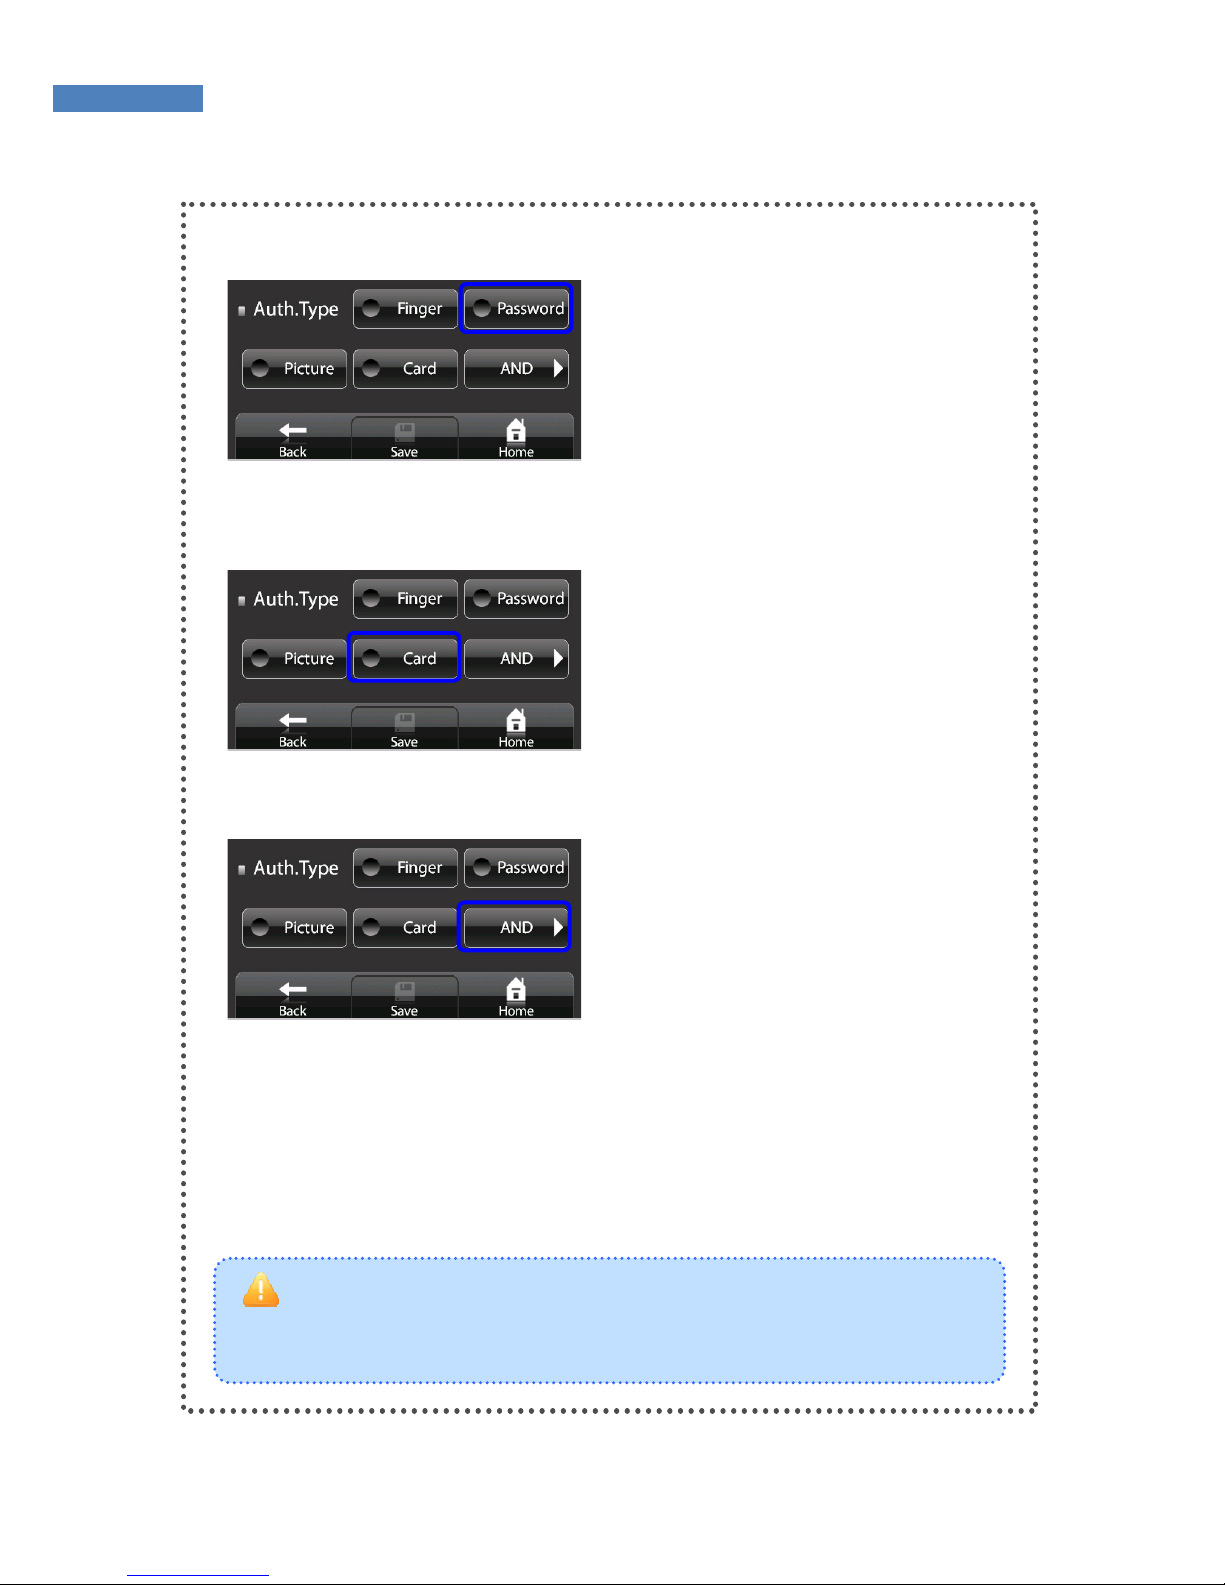
Photo authentication is not currently supported. This function will soon
be available.
Password Authentication
Touch the “Password” button and
enter the password (four to eight
digits.)
Card Authentication
Press the “Card” button and place
the card on the card reader.
Combined Authentication
To combine authentication
methods, press the “AND” button.
For higher security level or
convenience, select “OR.”
Page 24
24
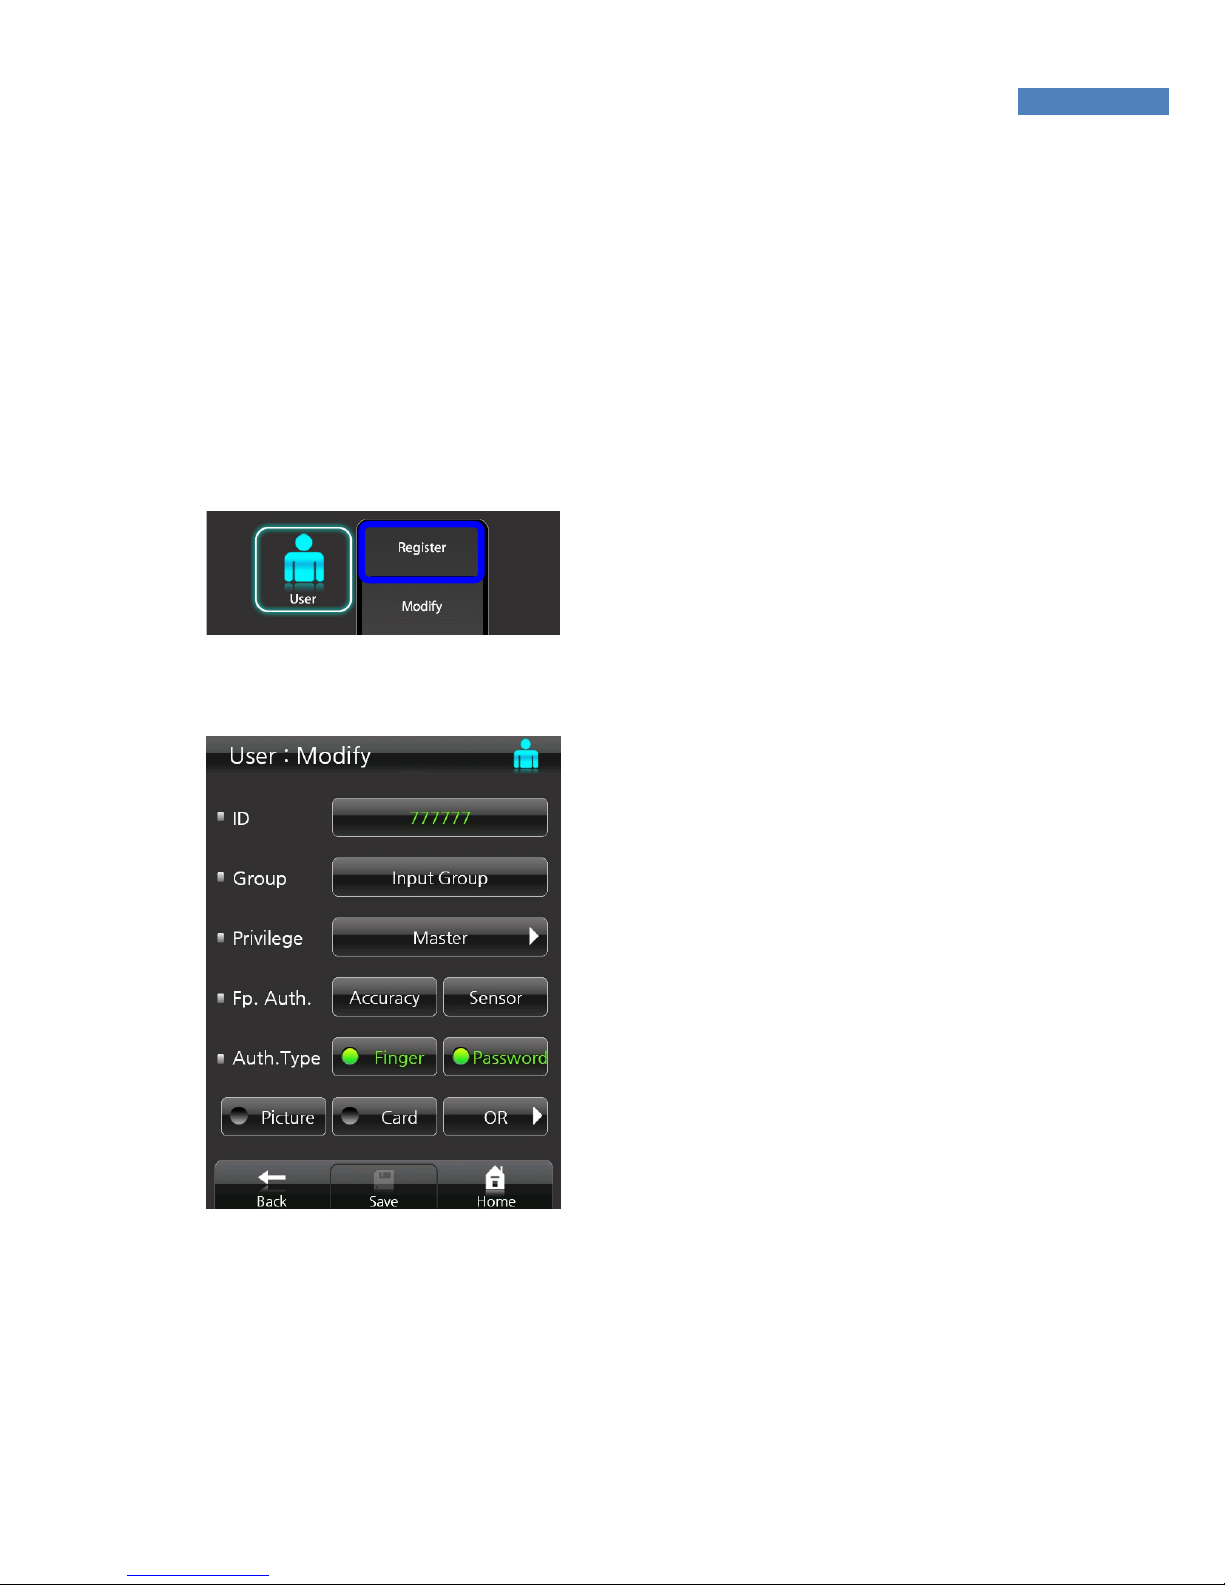
User Change
User IDs are unique and cannot be changed. However, group,
authority, fingerprint, and authentication methods can be changed in
the “change user” menu. Users can only be changed in stand-alone
mode. In network mode, the server management program must be
used to change users.
1. Select “User” -> “Change” and
enter the user ID. Press the
“Register” button. The newly
registered user data will be
displayed.
2. Select group, authority, fingerprint,
or authentication method, and enter
the new value. Press the “Save”
button to store the new value.
3. Fingerprint Authentication –
Change the “Security Level” when
the user’s fingerprint rejection rate
(FRR) or other users’ fingerprint
recognition error rate (FAR) is high.
In case a user’s fingerprint is
recognized as a different user’s, set
the security level 6 or higher.
If the user’s fingerprint is not recognized well, reduce the security
level 4 or lower.
If the user’s fingerprint is too dry, lower the sensor setting below
Page 25

25
the default – brightness, contrast, and gain. If the user’s fingerprint
is humid, raise the sensor setting above the default. Depending on
the fingerprint state, change the options. The new setting is applied
upon the registration of the fingerprint and is valid only for 1:1
authentication.
If the user uses the default “Security Level” and “Sensor” setting
without changing the options, the settings that the user made by
selecting Admin – Authentication – Basic menus will be applied.
In order to restore the default security level, click the current setting
again.
Security Level Range: 1 ~ 9
Default Sensor Setting: Brightness: 40 / Contrast: 20 / Gain: 2
Page 26
26
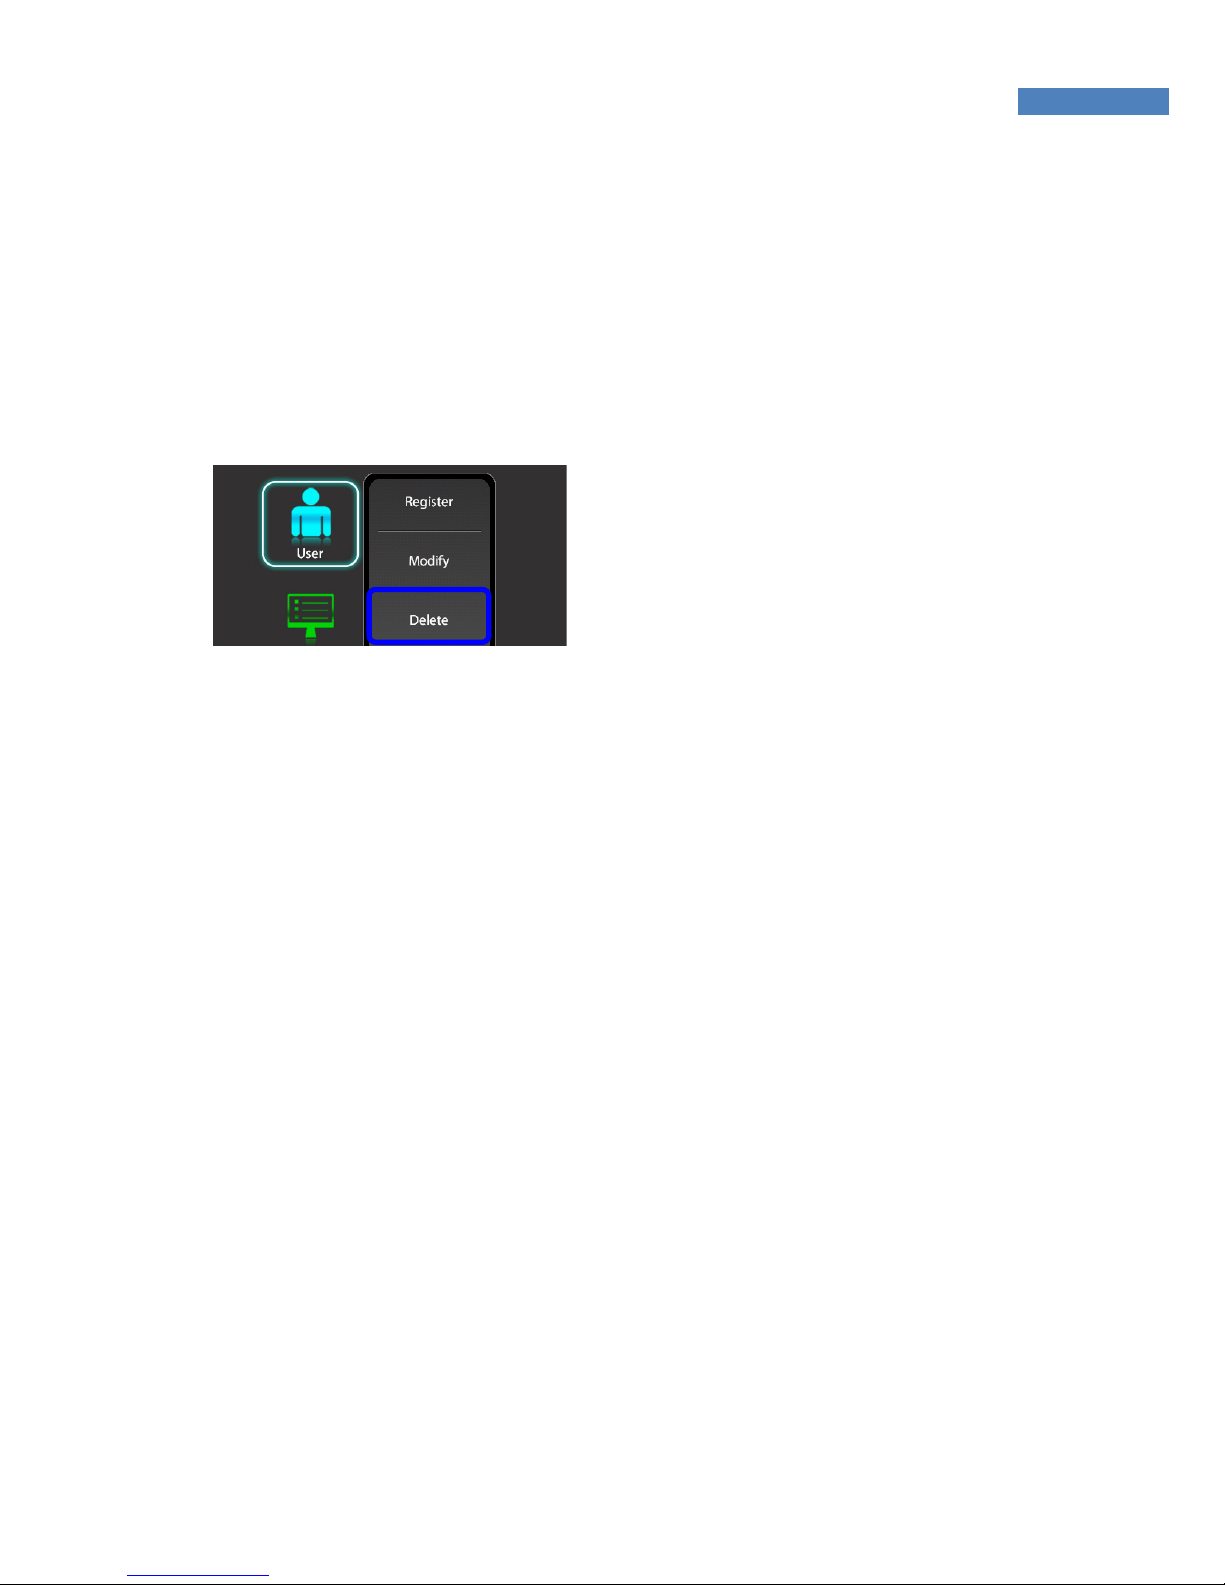
User Deletion
In network mode, the User menu does not support deletion of certain
or all users. The administrator can only delete all users registered at
a certain terminal by selecting “Manage -> Reset -> User
Information.”
1. In order to delete a user from
the terminal, select Admin User-and Delete and enter the user
ID to delete. Then, ”Do you want to
delete the user?” message will
show up. Select “Yes”
2. To delete all registered users,
press “Delete All”.
Page 27
27
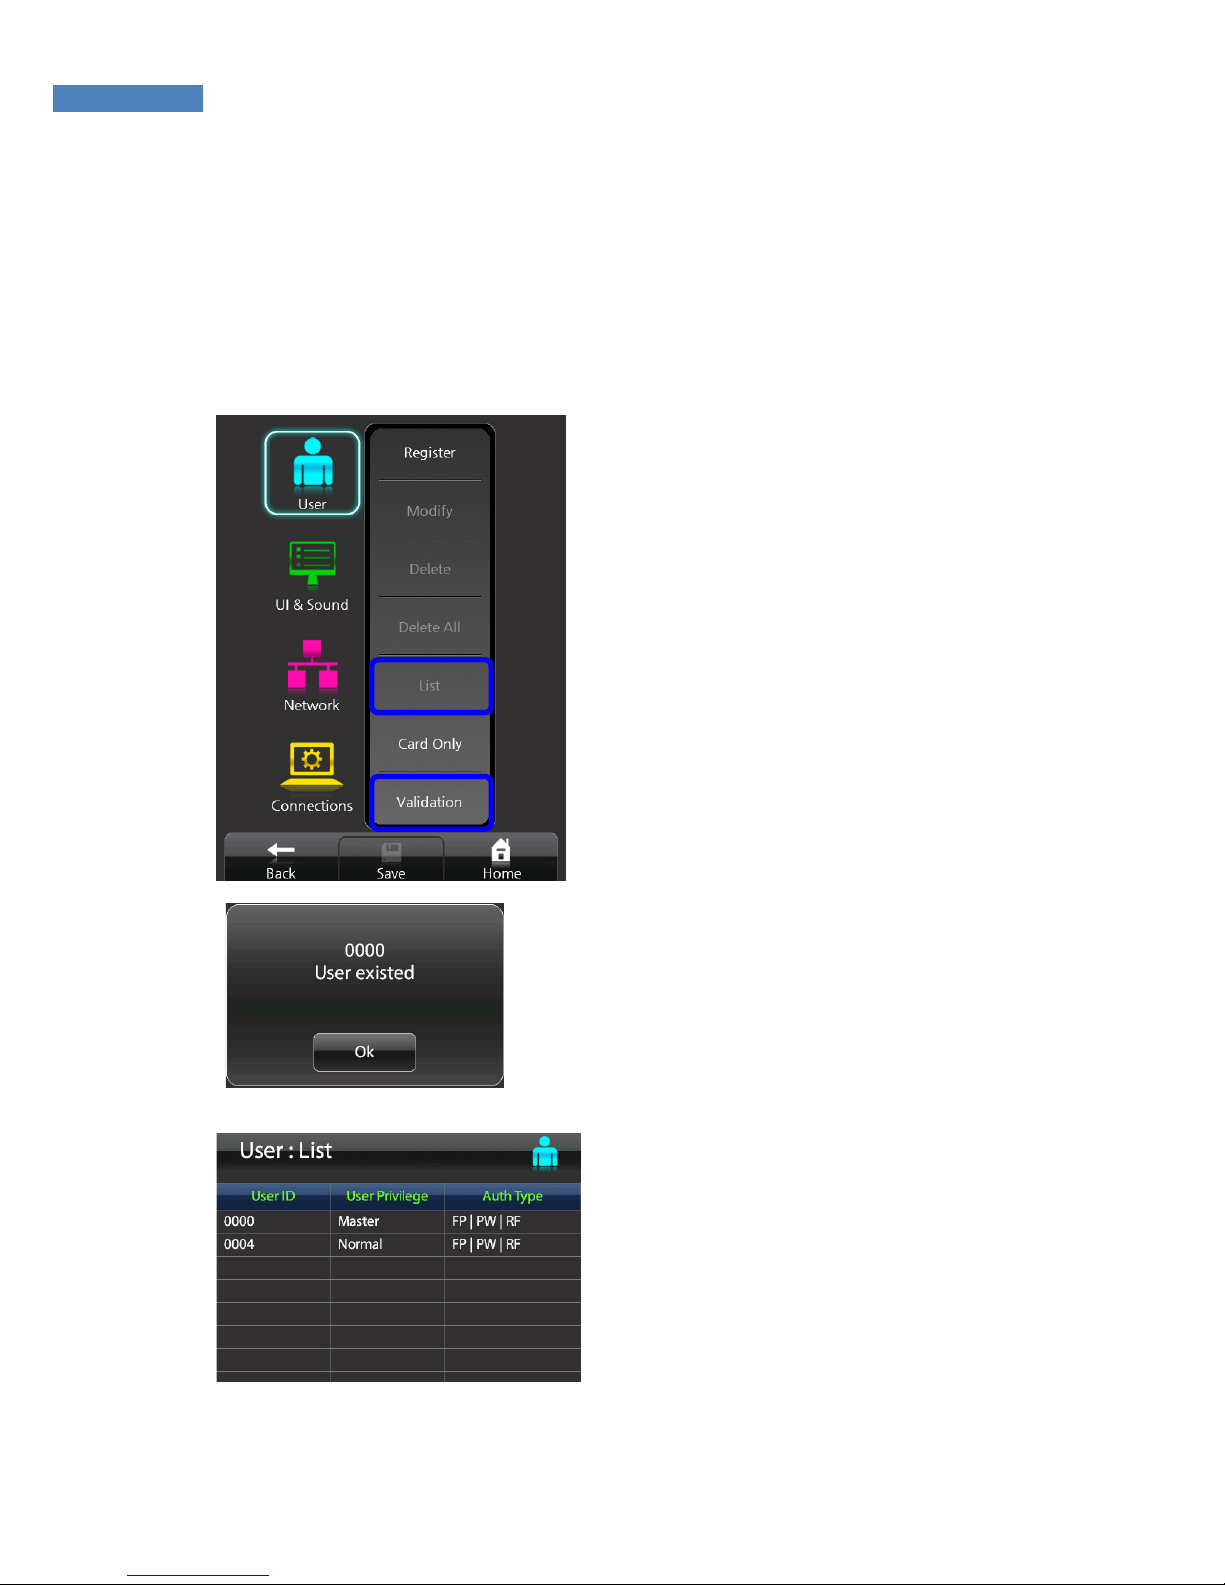
User List/Validation
The administrator can check the users registered at the terminal with
the “User List” and “User Validation” menus. The user list search
function is not currently supported but will be added soon.
1. To check the registered users,
select User -> User Checking.
2. Enter the user ID to search,
and press “Enter”.
The user search results will be
displayed.
3. To check the list of all users
registered at the terminal,
select User -> User List.
4. If there are many registered
users, users on the next page
can be viewed by pressing the
button at the bottom of the
screen.
Page 28
28
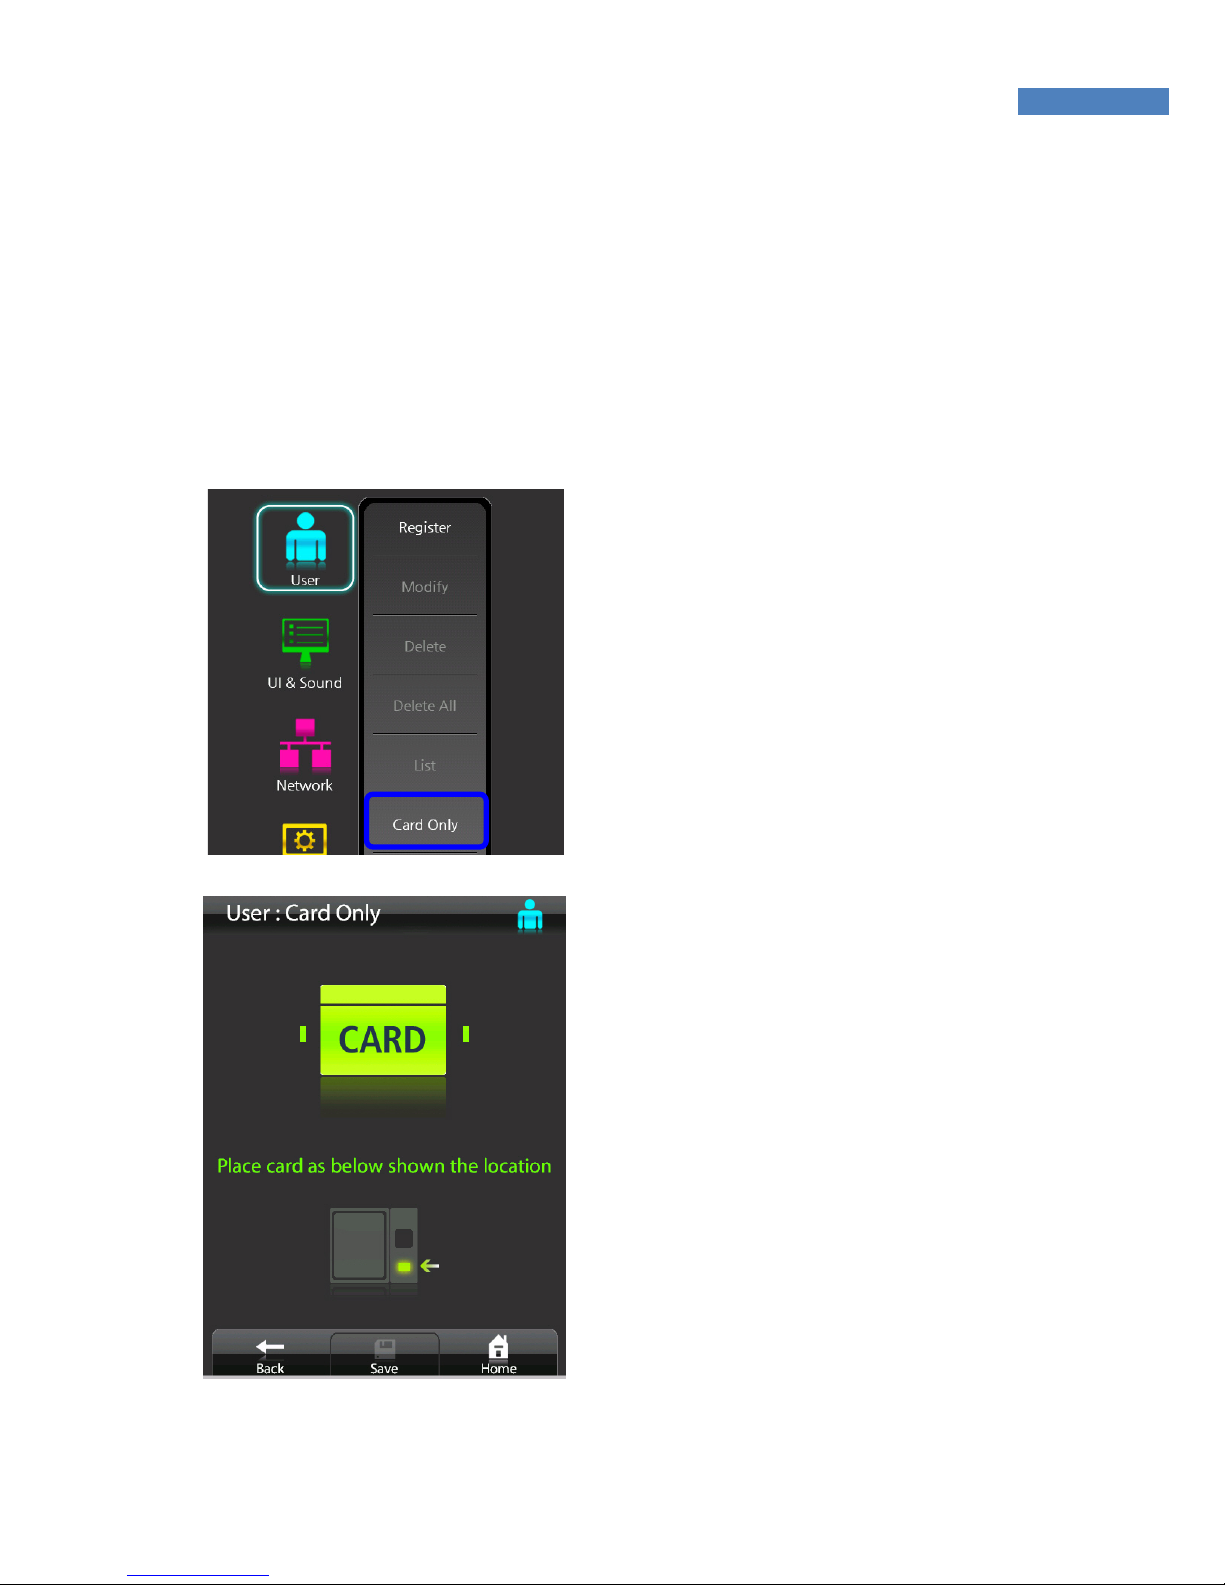
Card-only User Registration
The NAC-5000 allows door access to be controlled only by card
authentication, and not fingerprints or passwords. The card-only
feature is provided for the operator in order to conveniently register
users. At present, the card-only feature can be used in the network
mode only and will be soon available in the stand-alone mode.
1. Select User -> Card Only. A
“Place the card” message will
appear.
2. Place the card on the card
scanner. A card ID will automatically be created and user
registration will be completed.
3. To authenticate with the
registered card, place with
card on the card reader
without entering an ID.
Page 29
29
UI & Sound Setting
The user can change the background display, language, time, and
sound .
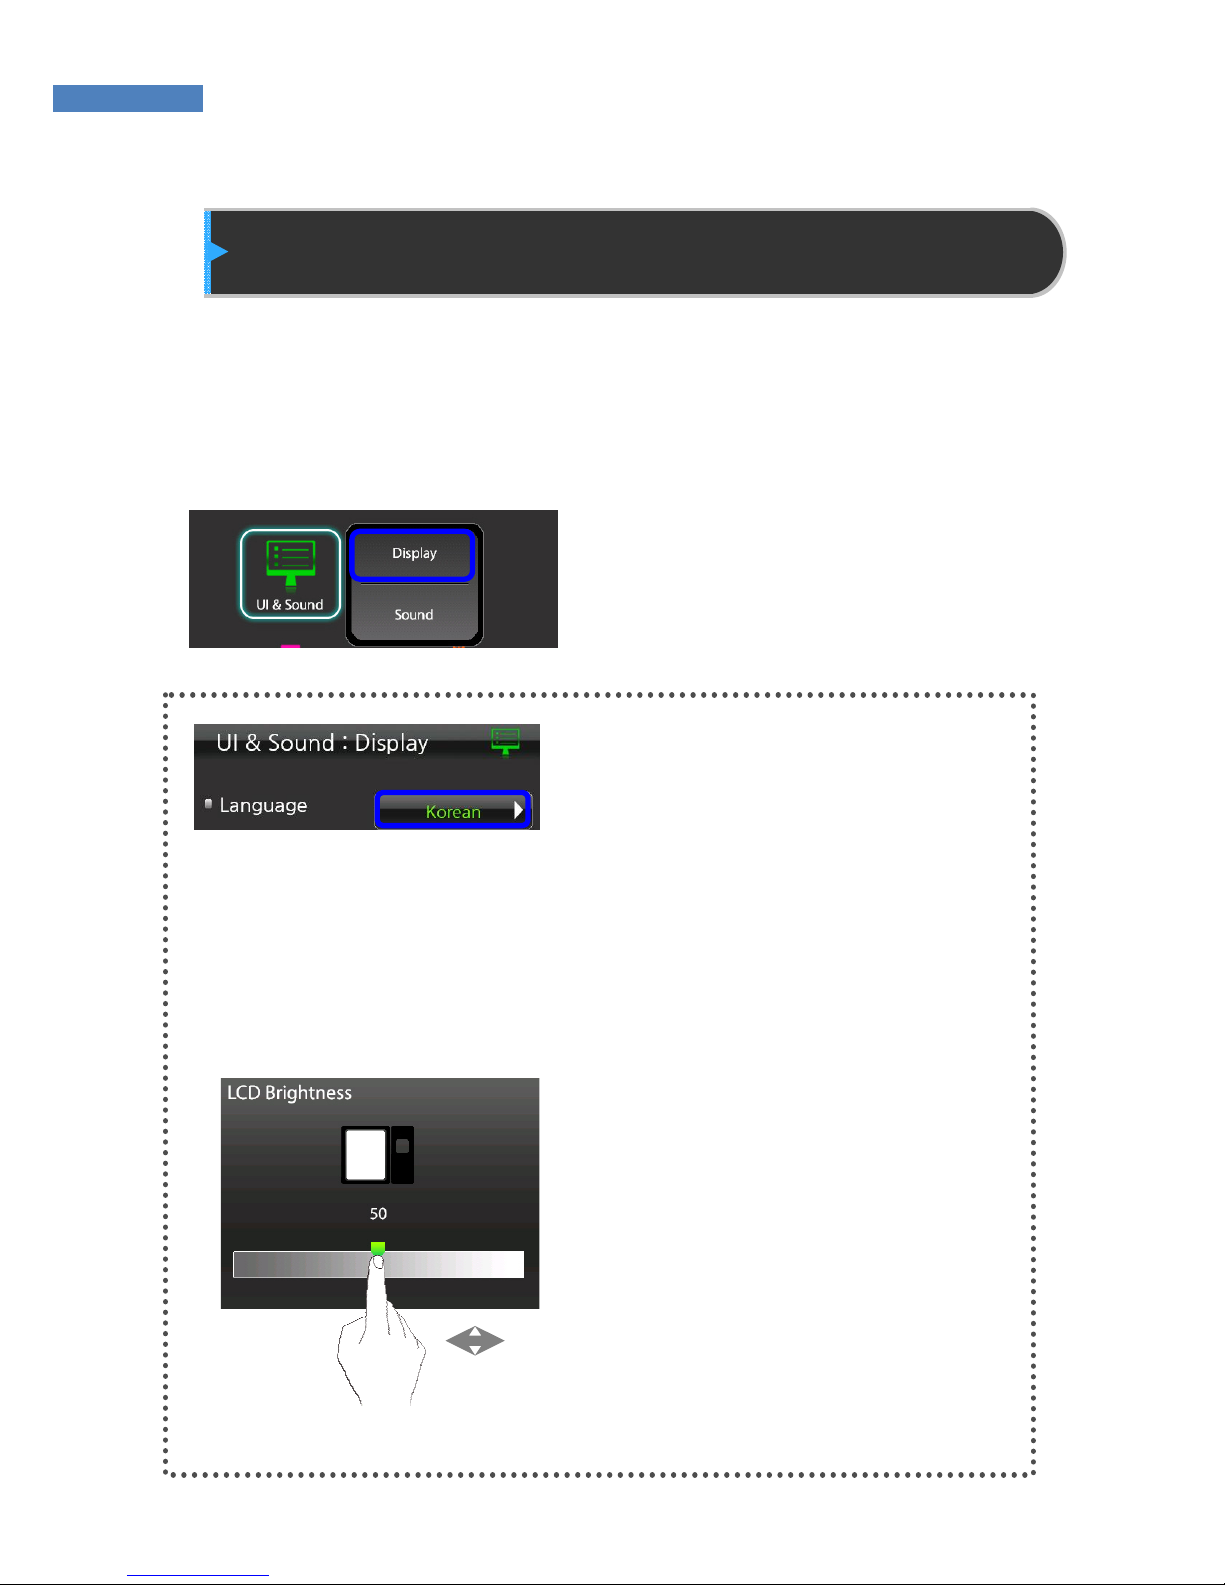
Display Setting
To change the display, date, or
time, select “UI&Sound” ->
“Display”
Language
Press the “Language” button to select the language displayed on the
screen. The NAC-5000 supports
Korean, English, Portuguese,
Brazilian, Spanish, French,
Indonesian.
LCD Brightness
(will be available)
LCD brightness can be set
between 0 and 100. The default
value is 50. By moving his finger
right or left on the slider, the user
can select the brightness.
Page 30
30
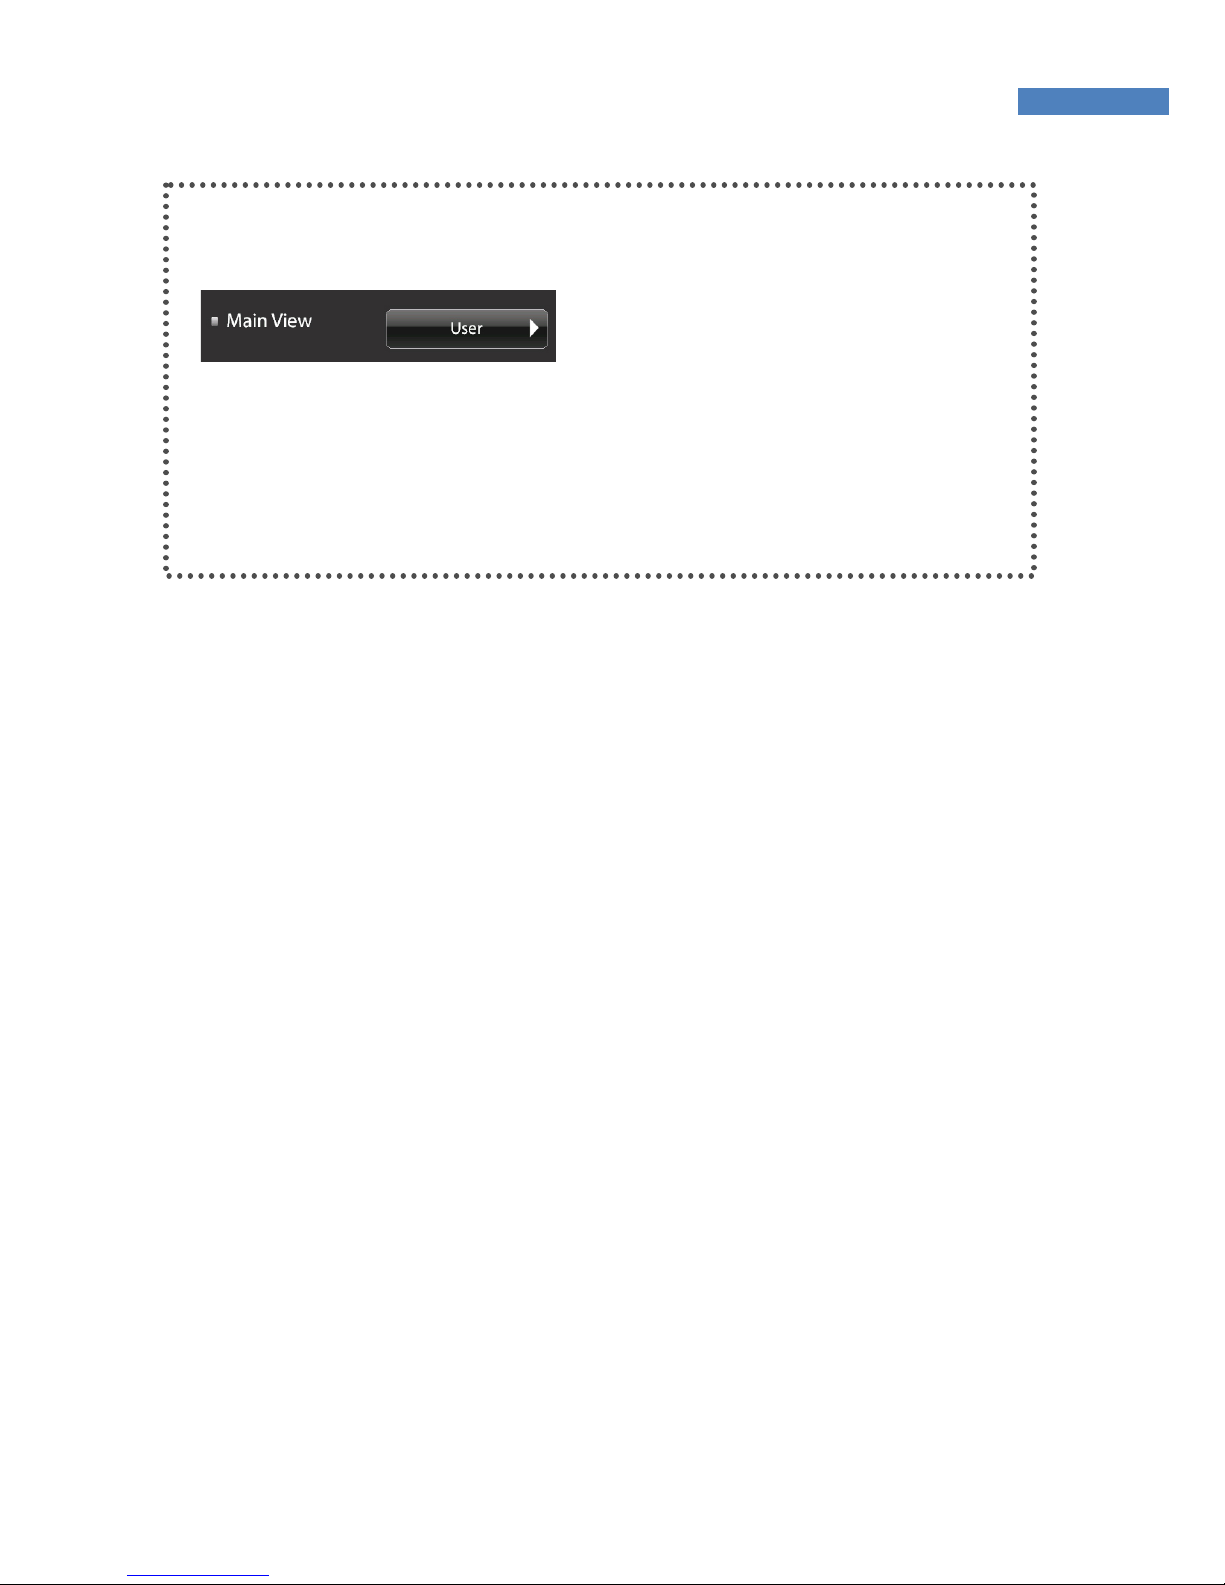
Background
The user can select a default
image, flash image, or user image
as the background screen. By
pressing “User”, the user can
change this option.
Page 31
31
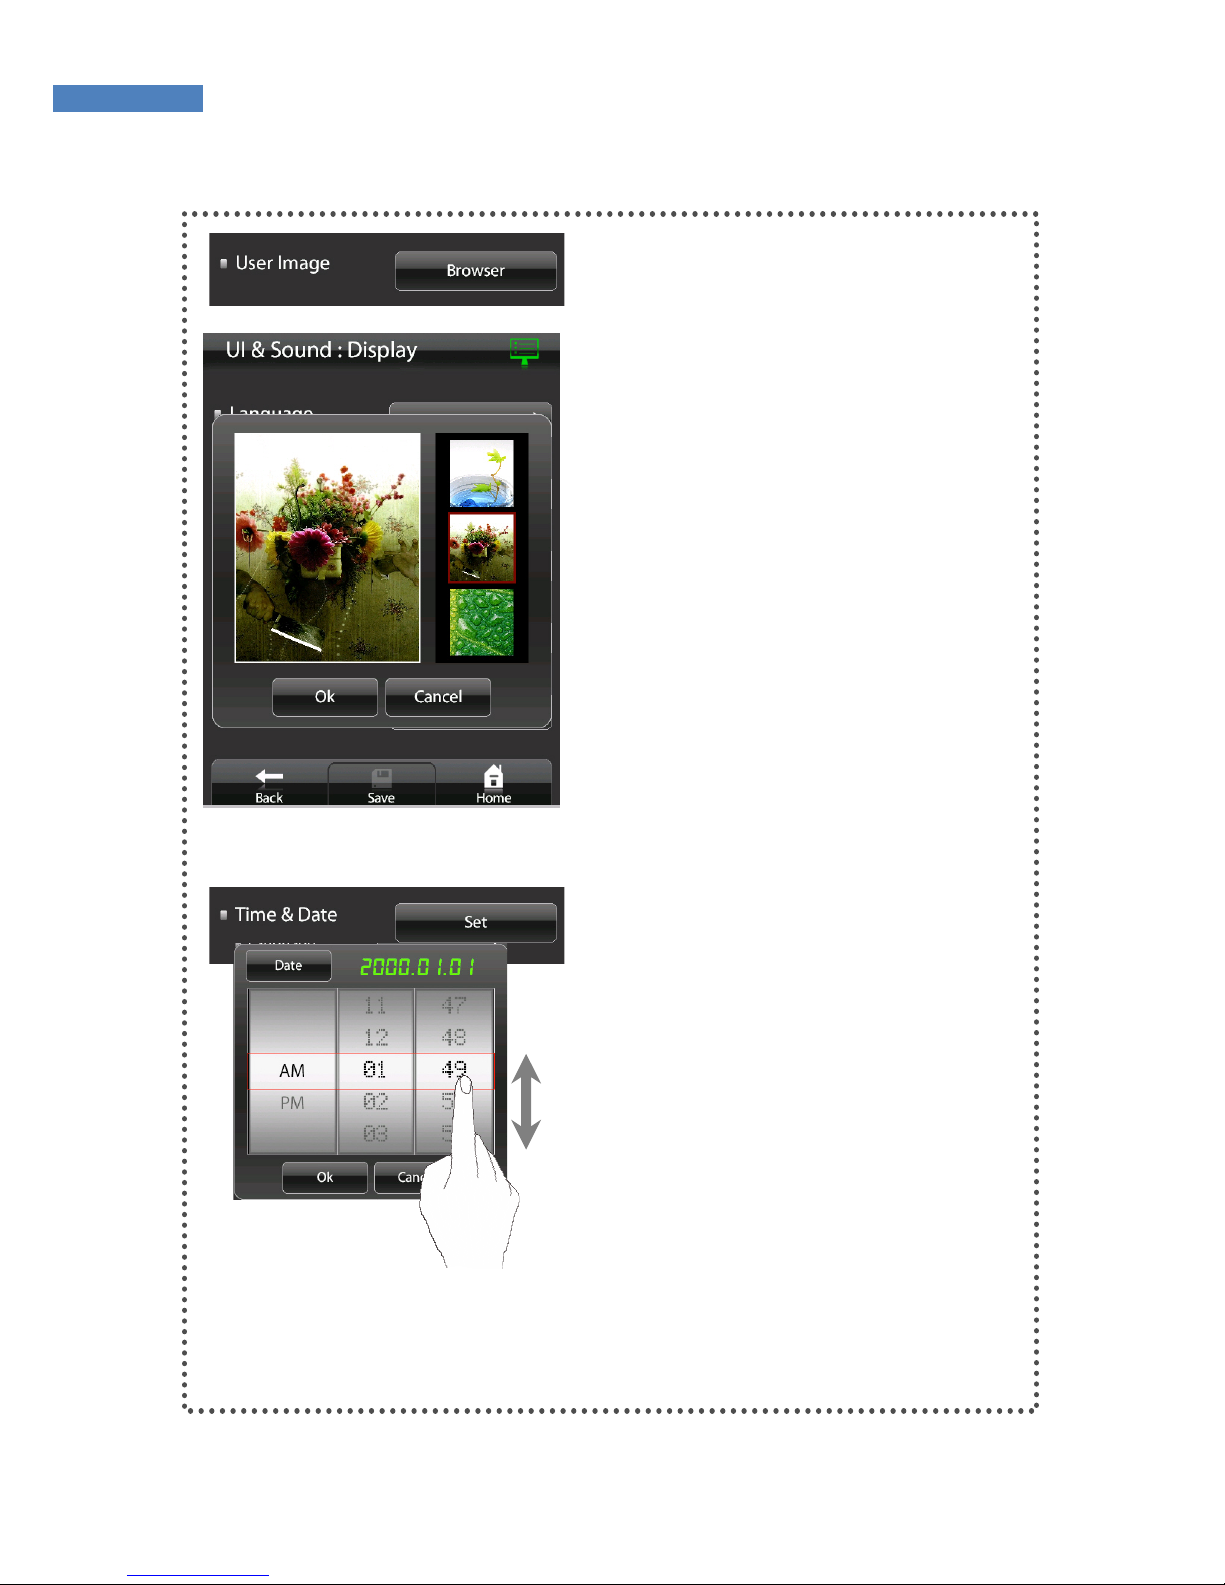
User Image
If a user image is set as the
background screen, the “User
Image” menu is activated. Press
the “Search” button to edit or
configure an image.
Date and Time
Press “Date and Time” -> “Setting”.
Select AM or PM and enter the
time or date by scrolling on the
screen.
Page 32
32
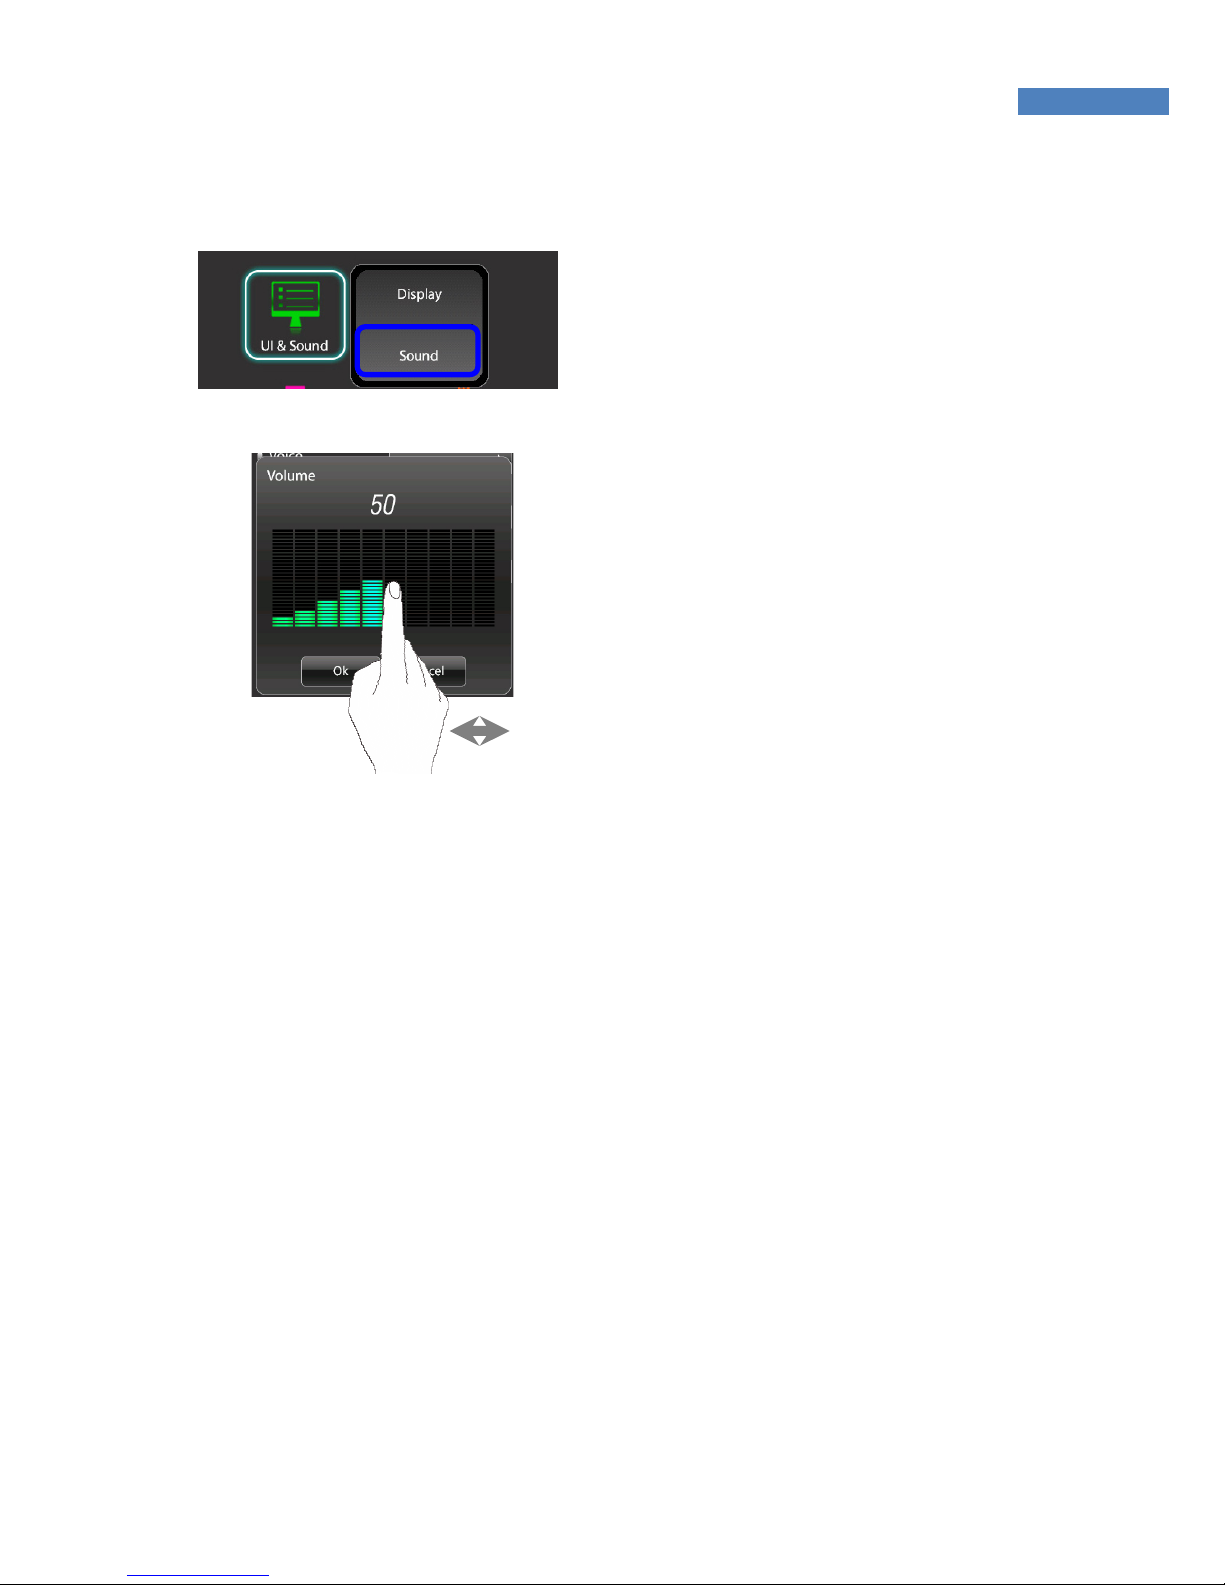
Sound
Press “UI & Sound” -> “Sound” to
turn sound on or off or control the
volume.
By touching the volume bars, the
user can adjust the volume.
Page 33
33
In stand-alone mode, all
operations including user registration
and authentication are done on the
terminal.
Network Setting
The NAC-5000 terminal can function either in network or stand-alone
mode. At present, only wired networks are supported but support for
wireless networks will soon be available.
Stand-alone Mode
In stand-alone mode, the administrator can use all functions of the
terminal without connecting to a network.
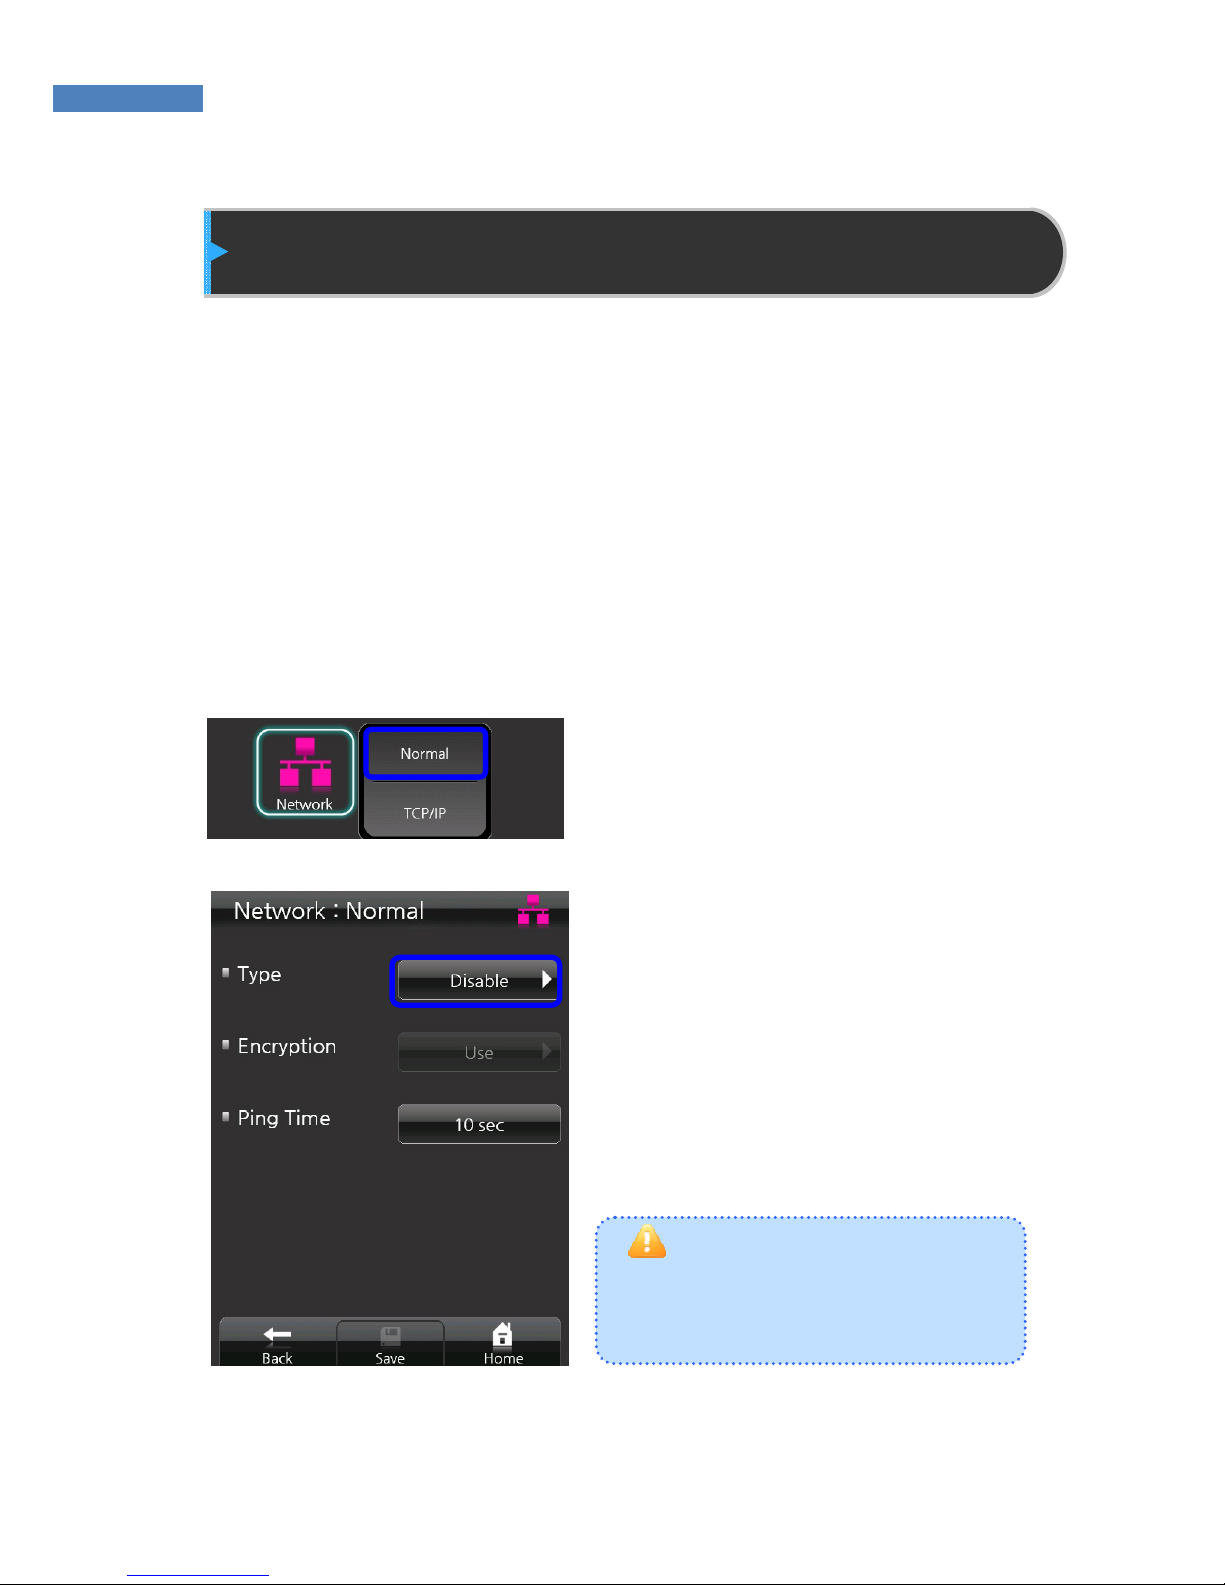
1. To use the terminal in
stand-alone mode, select
“Network” -> “Normal” and
“Network Setting”.
2. Press “Type” -> “Wired” and
“Disable”. Press “Save” at the
bottom of the screen to activate
stand-alone mode.
Page 34
34
Network Mode
In network mode, terminals can be conveniently and efficiently
managed through TCP/IP communication with the server. In
network mode, user authentication and DB management are done by
the server while user registration and door control are done by the
terminal. To use network mode, install a management program
(AccessManager Professional, AccessManager) in the server/client
system.
If there is a user on the terminal, network mode cannot be used.
Before switching to network mode, all registered users on the
terminal should be deleted.
Normal Setting
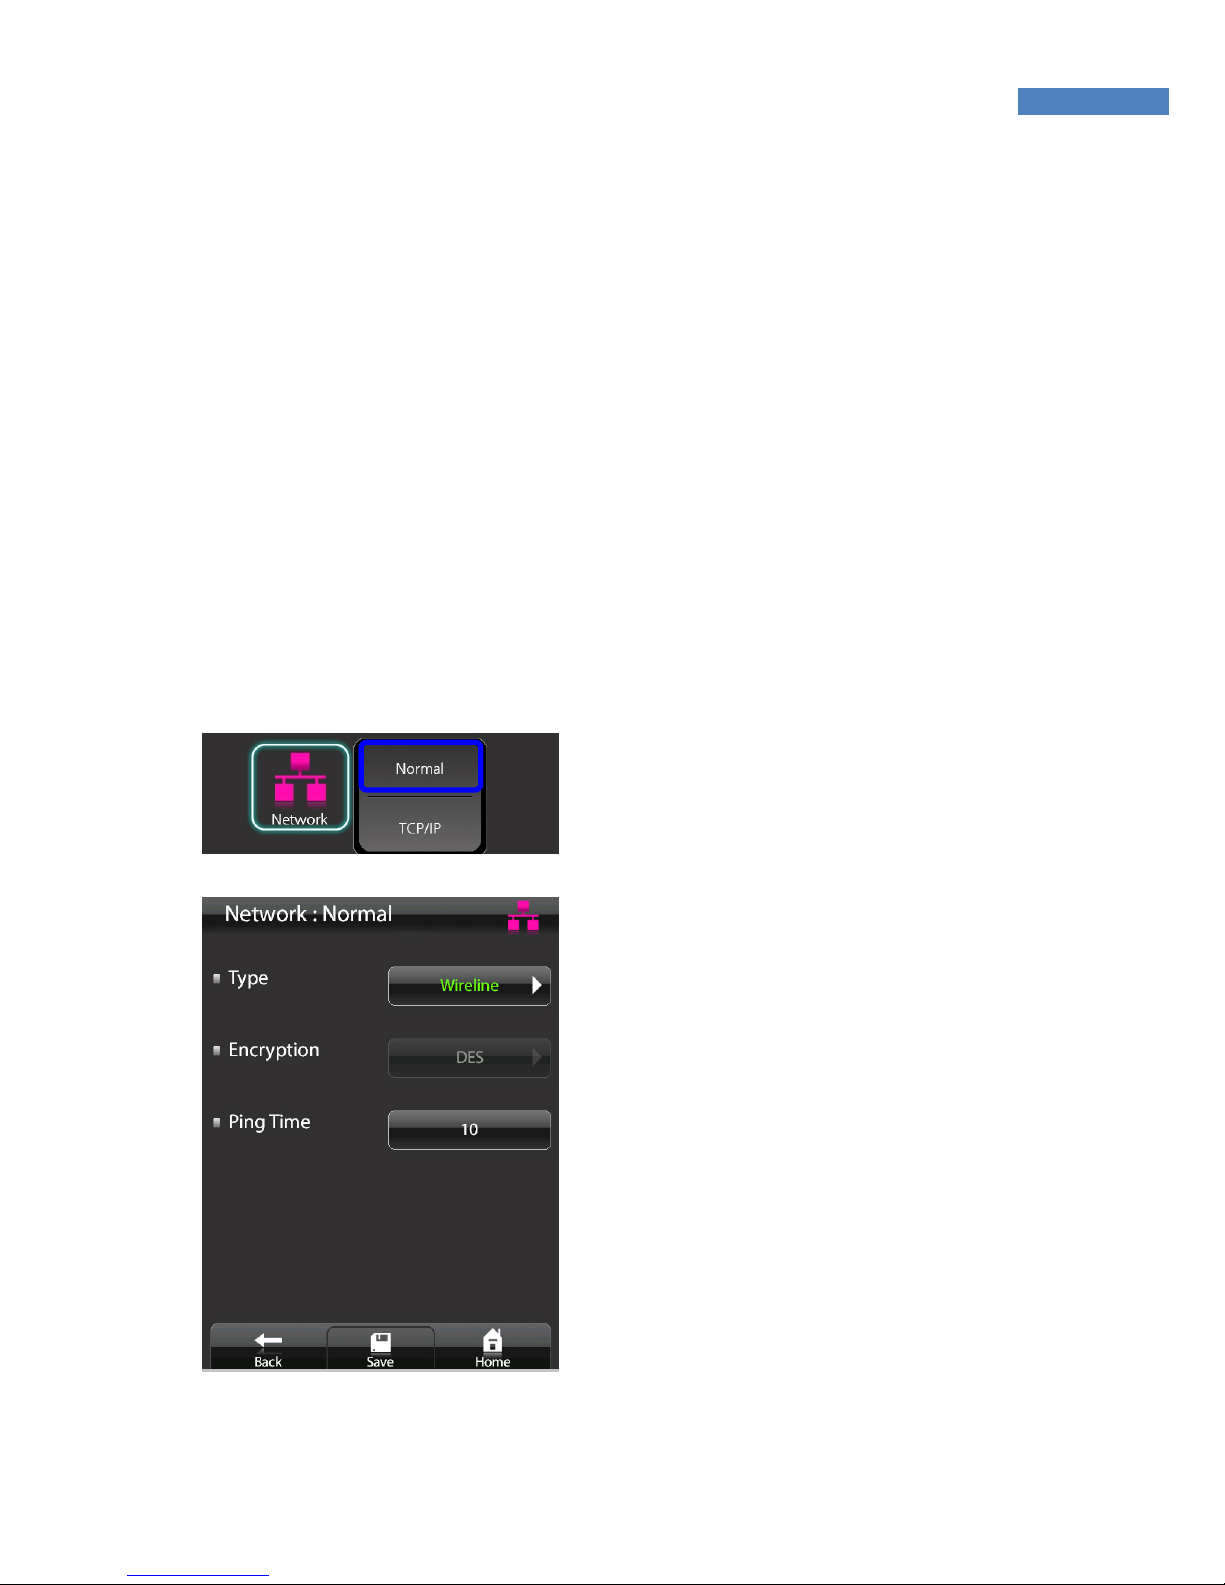
1. To use network mode, select
“Network” -> “Normal”, and
change “Disable” into “Wired.”
2. The “Encryption” field shows
whether the data exchanged
between terminal servers are
encrypted.
3. “Ping Time” checks communicat-
ion between terminal servers.
The default value is 10 seconds,
it can be set from 2 to 20
seconds.
PING tests are conducted at
predetermined times.
4. After completing network config-
uration, press “Save” at the
bottom of the screen.
Page 35
35
What is DHCP (Dynamic Host Configuration Protocol)?
The DHCP server automatically allocates and manages settings for TCP/IP
communication. If DHCP is on, related information such as terminal IP,
subnet mask, and gateway are automatically allocated.
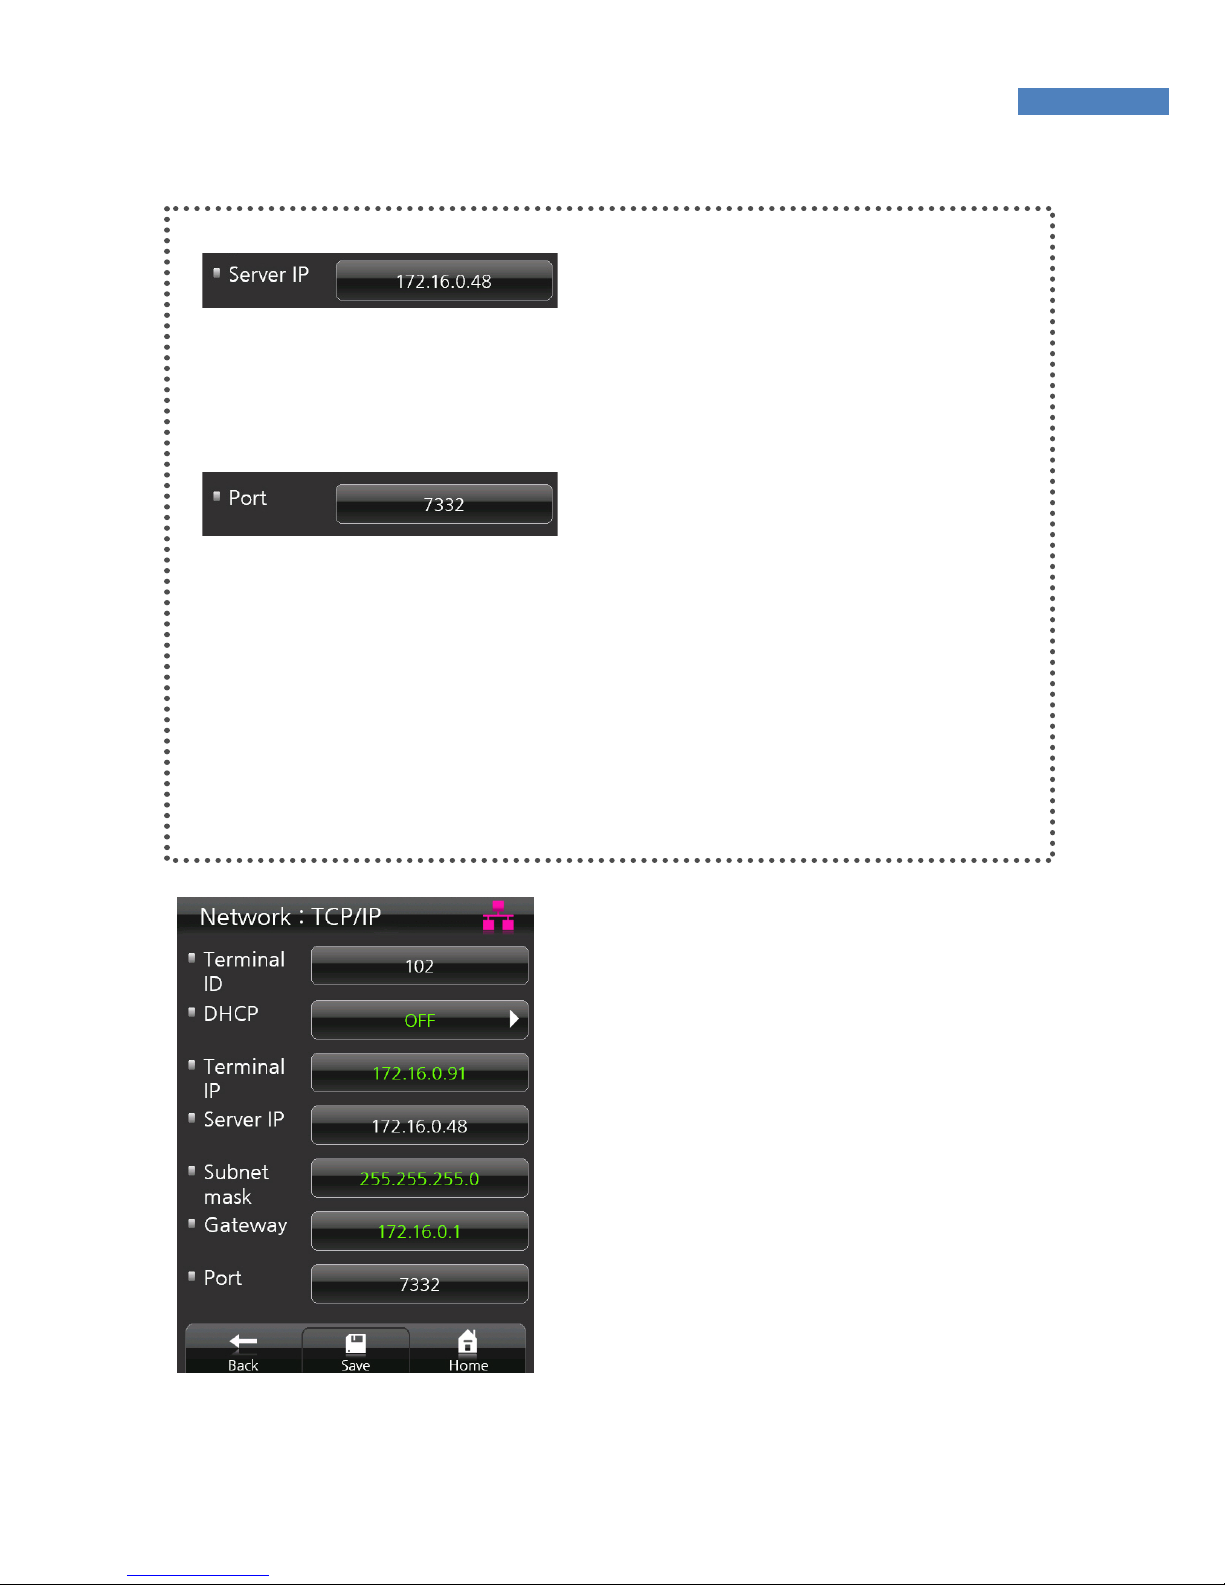
TCP/IP Setting
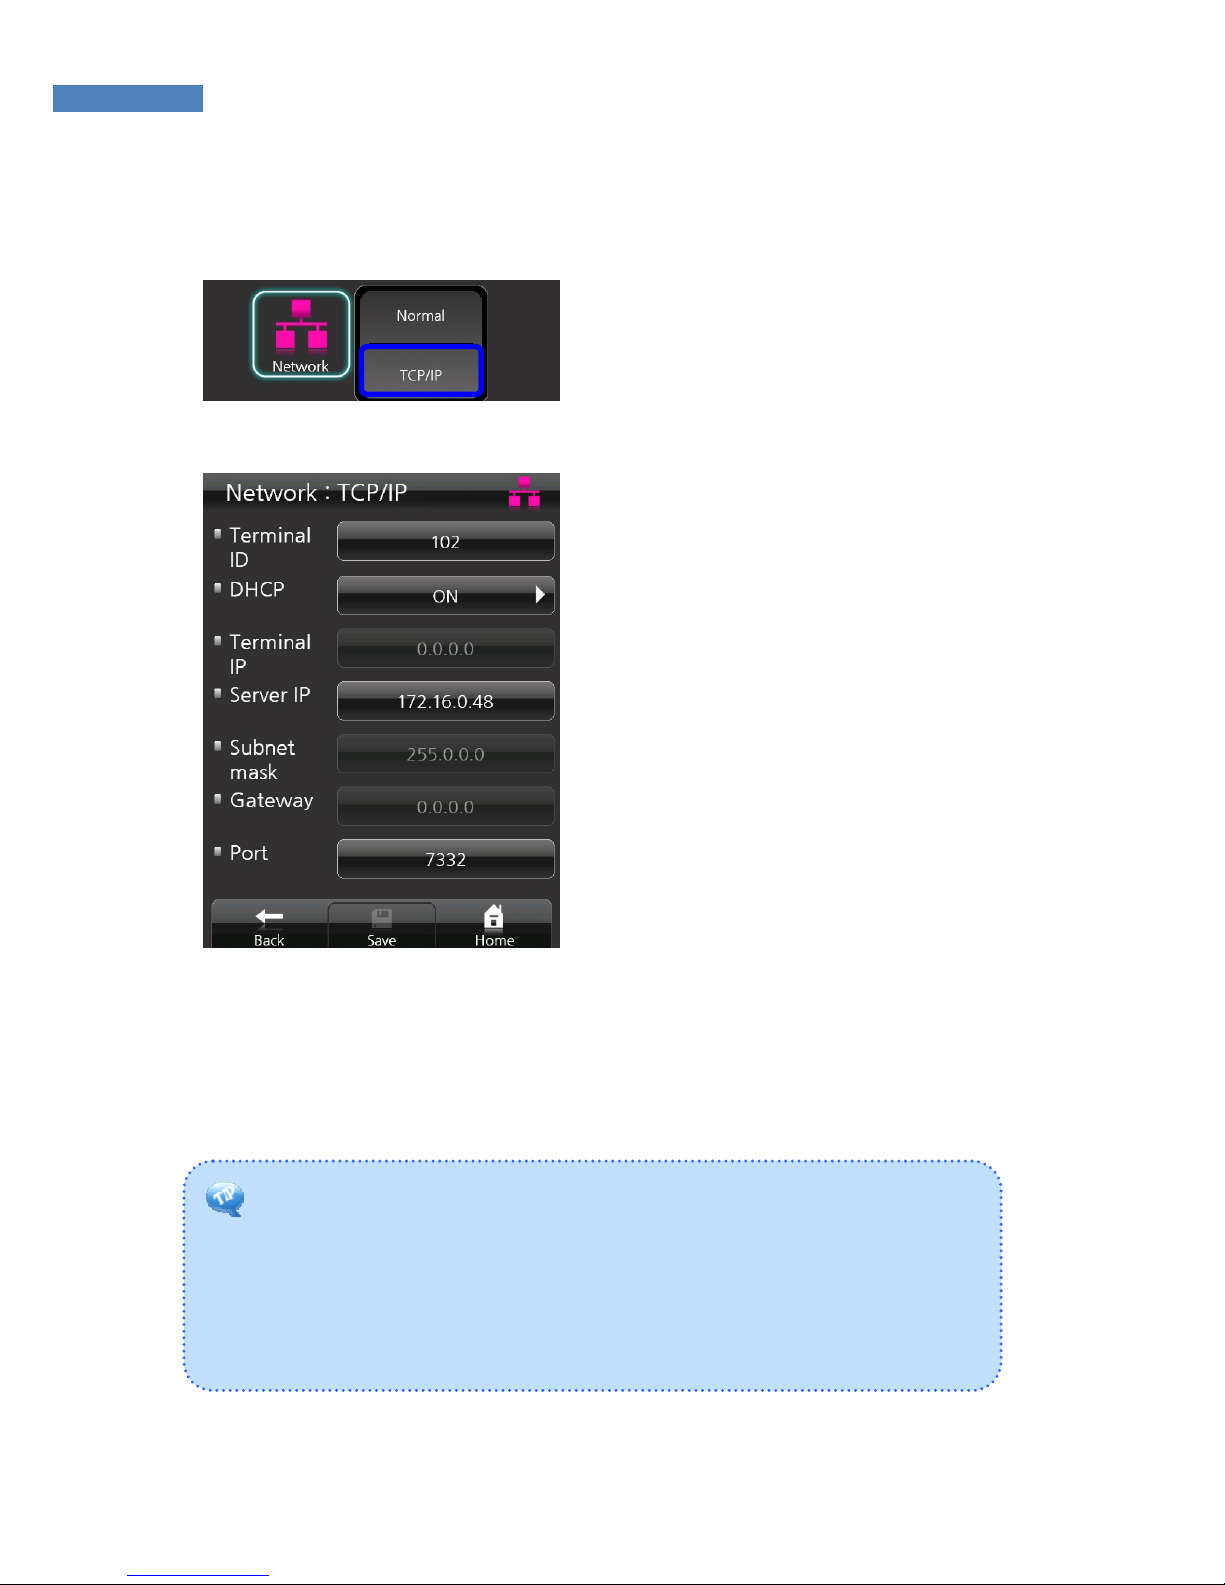
1. After selecting network mode,
TCP/IP must be configured to
connect to the server. Select
“Network” -> “TCP/IP”, and enter
the network information.
2. Enter a unique terminal ID
between 1 and 2000. The same
terminal ID cannot be used in the
same server.
3. Press “on” in the “DHCP” menu
to decide to use DHCP. When
using DHCP, enter into the
server IP and port information of
the server with AccessManager
Professional installed.
Page 36
36
Server IP Setting
Enter the IP of the server with
AccessManager Professional
installed. When inputting the server
IP, touch “.” to move to the next field.
Port Setting
Enter the port number to be used for
communication between the server
and the terminal. The default value
is “7332” and the user can choose
between 2000 and 65535. When
changing the port data in the
terminal, change the communication
setting of AccessManager
Professional accordingly.
4. If the DHCP option is deactivated,
the terminal IP, subnet mask, and
gateway must be inputted
manually. For more information,
contact the service team.
5. Save the network setting data by
pressing “Save” at the bottom of
the screen.
Page 37

37
Serial Connection
Through serial connection, other devices such as RF card readers
can be controlled. This function will soon be available.
Page 38
38
Authentication Option Setting
Authentication options, sensor options, attendance mode, and card
use can be configured.
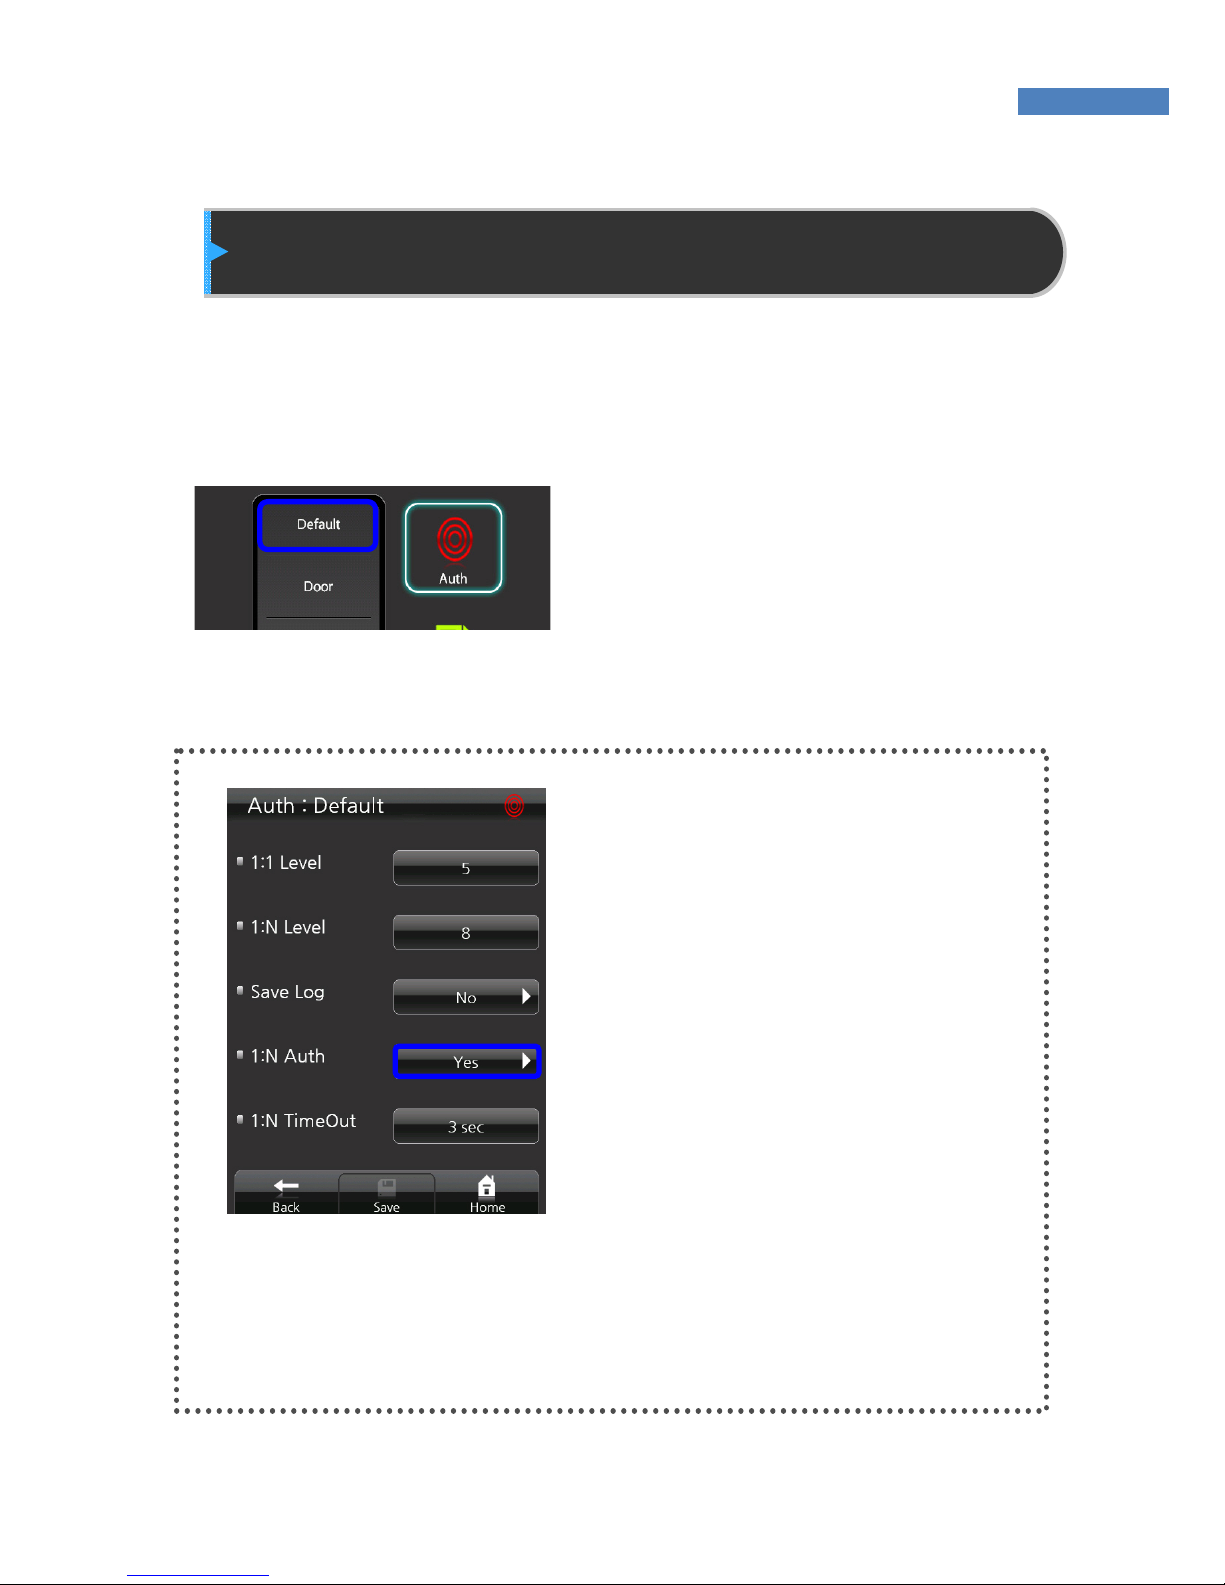
Default
In the basic authentication menu,
settings related to authentication
level, saving of logs, and the use of
1:N authentication can be configured.
Settings can be changed by pressing
“Authentication” -> “Default”.
Setting 1:1/1:N Authentication
Method
The NAC-5000 supports 1:1 and 1:N
authentication methods. In 1:1
authentication, an ID must be
inputted for authentication. In 1:N
authentication, user ID is not
entered, and authentication is done
by searching all users.
1:1 is recommended for fast authentication, and 1:N authentication is
recommended to simplify the
authentication procedure.
To use 1:N authentication, select
1:N Authentication and change “No”
to “Yes.”
Page 39
39
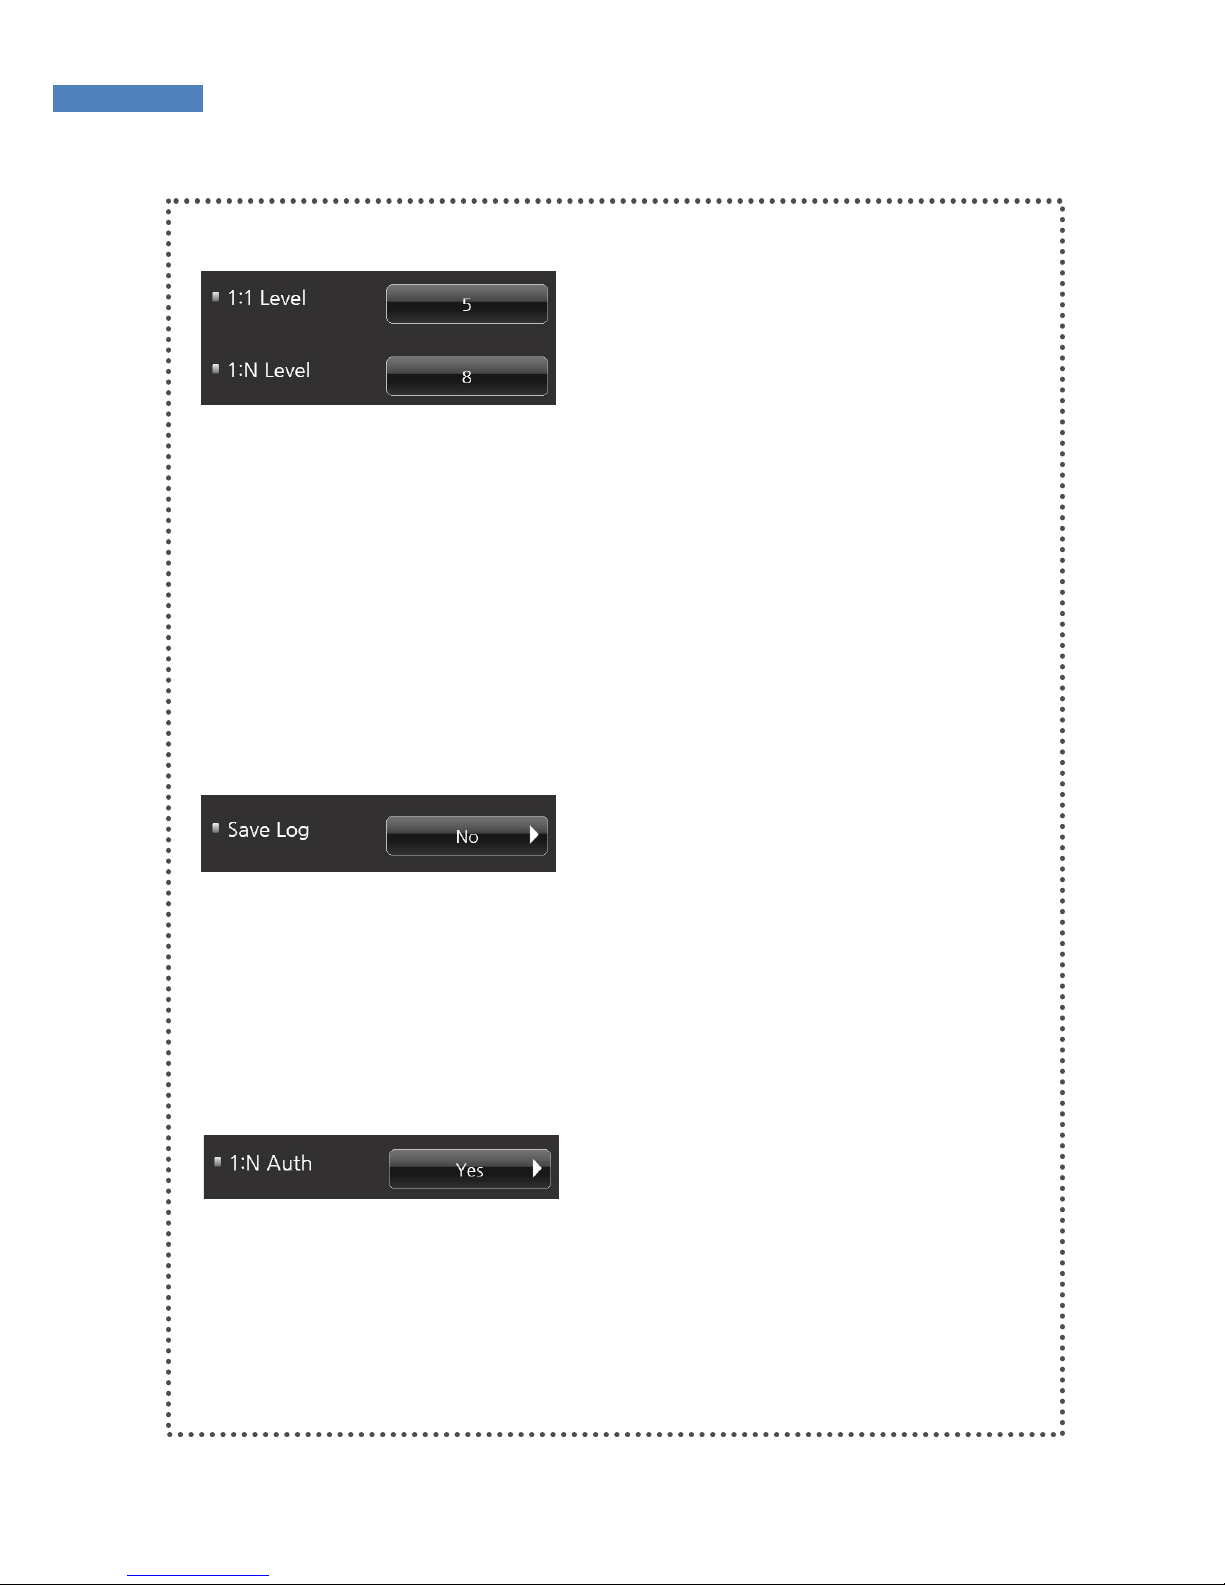
Authentication Security Level
The security level is set according to the authentication method. The
security level for 1:1 authentication is between 1 and 9, and the
default is 5. The security level for 1:N authentication is between 5
and 9, and the default is 8. If the security level is too high,
authentication failure rate may rise, and if it security level is too low,
the misreading rate may rise. Therefore, the default level should be
used. This level applies to all users except those who chose different
security levels when registering.
Saving Logs
The administrator can save logs that arise during user authentication.
To save logs, select “Save Logs” and change “No” to “Yes.” The logs
can be checked by selecting “Admin” -> “Information” -> “Log”, or by
using the “AccessManager” program.
1:N Authentication Time
If 1:N authentication is being used, the time can be set during which
all user fingerprints are searched. The input value can be between
three to nine seconds, with the default being three seconds. If the
search fails after the specified time, a “Matching timeout” error will
occur.
Page 40
40
Door
Using this function, you can control two doors or control devices
such as fire alarms or lighting.
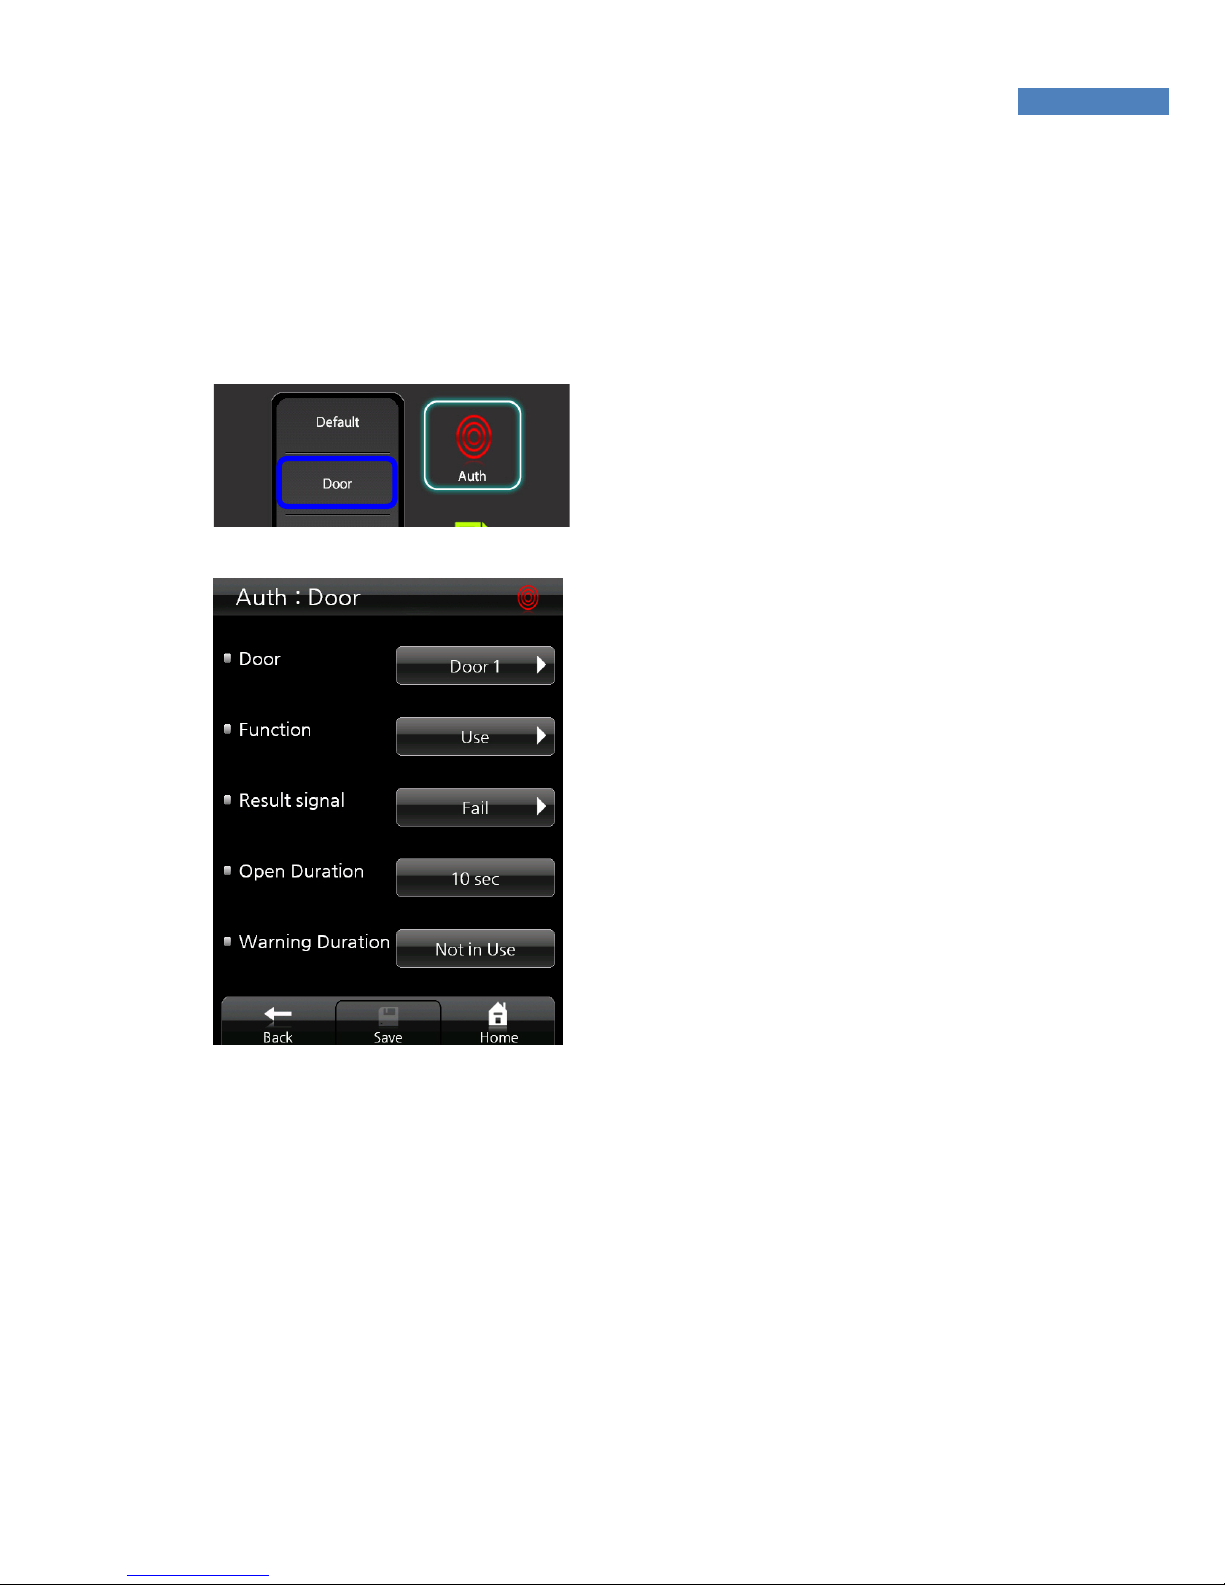
1. Select “Auth->Door “ to
control the doors and
devices such as fire alarms
or lighting.
2. Select the “Door1” or
“Door2” which you want to
configure.
3. Set the function to “Use” .
It means the Door1 will be
controlled by this terminal.
If you install the other
devices such as fire alarm
or light alarm, select the
device corressponding with
installed devices.
4. Select the “Fail” or
“Success” in “Results
signal”. The doors and
lighting only will be
controlled by selected
result signal. If you select
the “Success”, the door will
opened or light alert will
flashed when
authentication succeed.
5. Enter the open duration time between 5 and 20 to set the
opening door time or alert time of the lighting. (Duration time not
supports the fire alarm)
Page 41
41
However, in case of connecting the fire alarm, messeage and beep
will occured on the terminal when fire alarm system detects the event
of a fire or other emergency.
6. Enter the time between 5 and 20
in “Warning Duration”. The alert
messeage will displayed on the
screen when light alarm or
openig the door status are not
terminated in normal over
specified time in open duration.
Select the devices “Fire alarm” or “light Alarm”
You can choose devices correspondg with what you installed device
phsically in “Function”
Page 42
42
Card
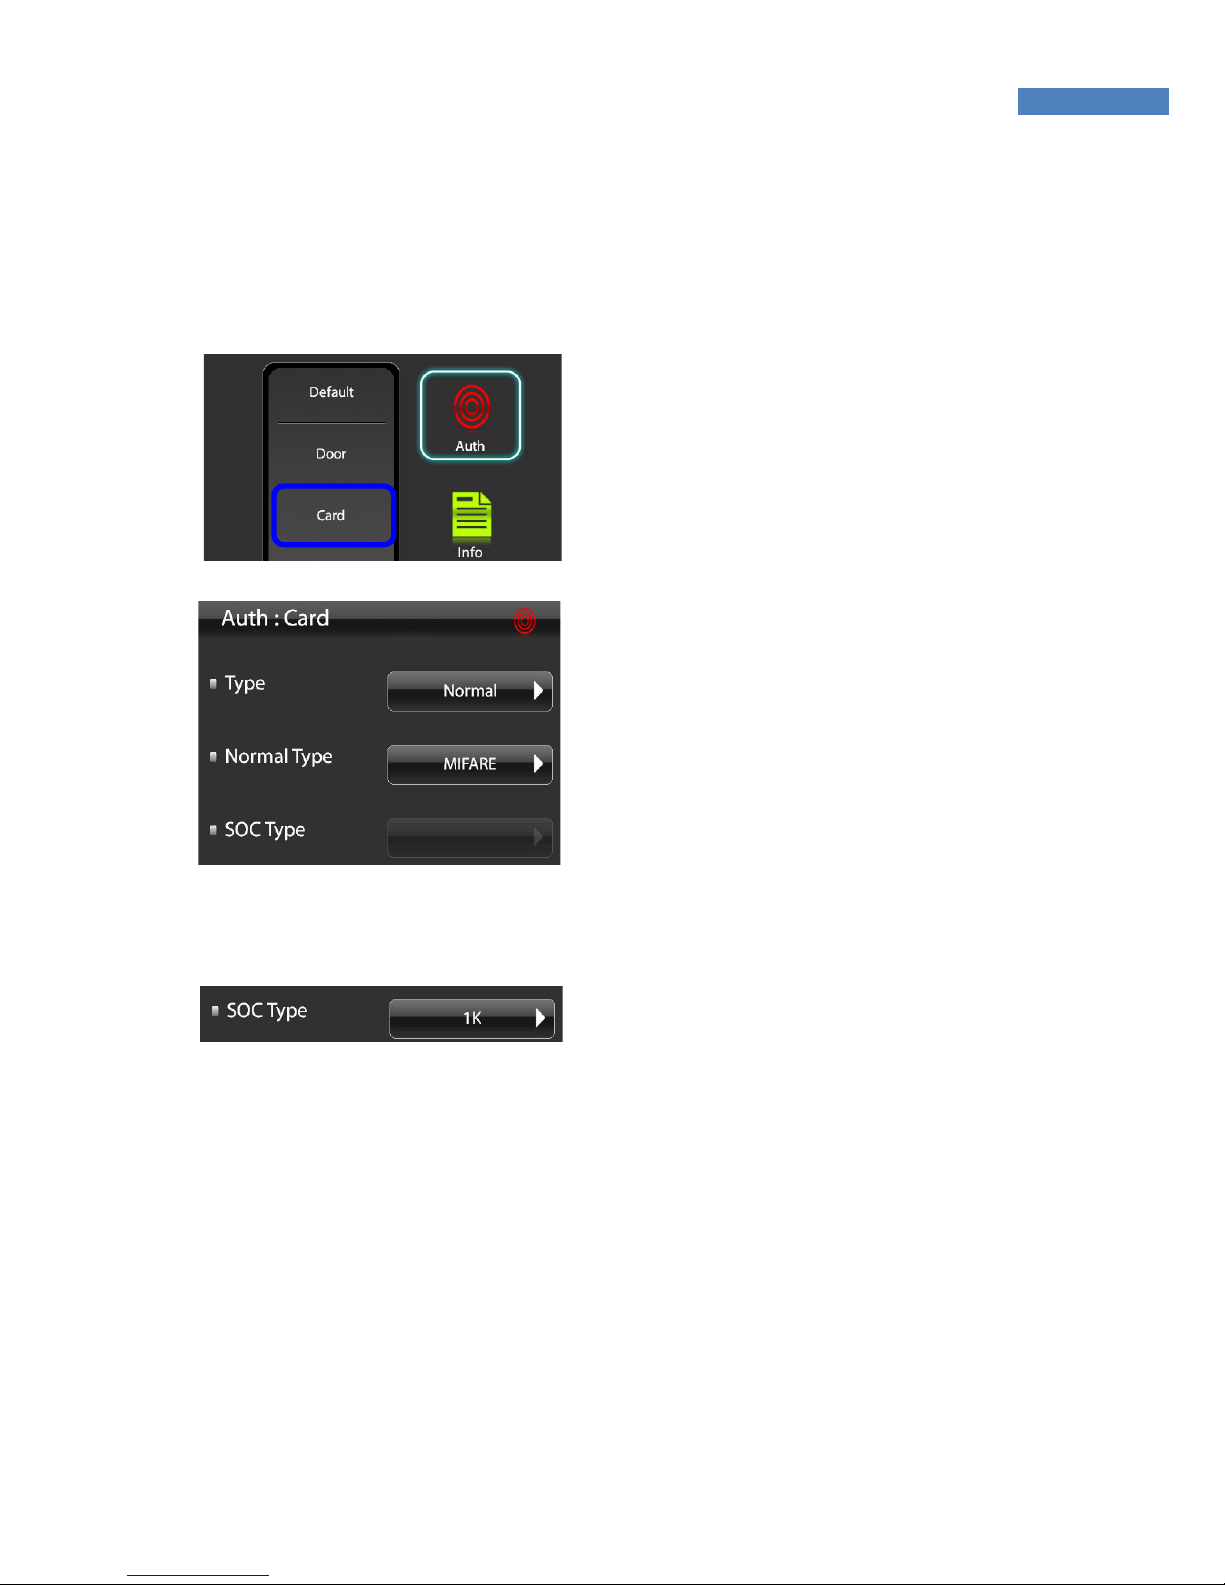
To use card authentication to authenticate users, do the following.
The card authentication type has normal and SOC modes.
1. To use card authentication, select
“Authentication” -> “Card”.
2. Press “Card Type” and change
“Disable” into “Normal.”
3. Select the card type – MIFARE,
HID35Bit, HID/EM26Bit,
HID37Bit or SOC. (At present,
MIFARE and HID/EM 26Bit are
supported )
If SOC was selected, the “SOC
Type” menu will be activated.
Select “1K” or “4K” depending on
the SOC Card type to use.
Page 43
43
Time and Attendance mode
Time and attendance mode, the user must press a function key and
perform the user authentication process when opening the door. The
entry logs will be sent with the function key data to the server
management program.
Depending on the function key, user attendance records can be
classified into “Coming to work”, “Leaving work”, “Going out”, and
“Returning” for efficient attendance management.
Time and Attendance Mode Setting
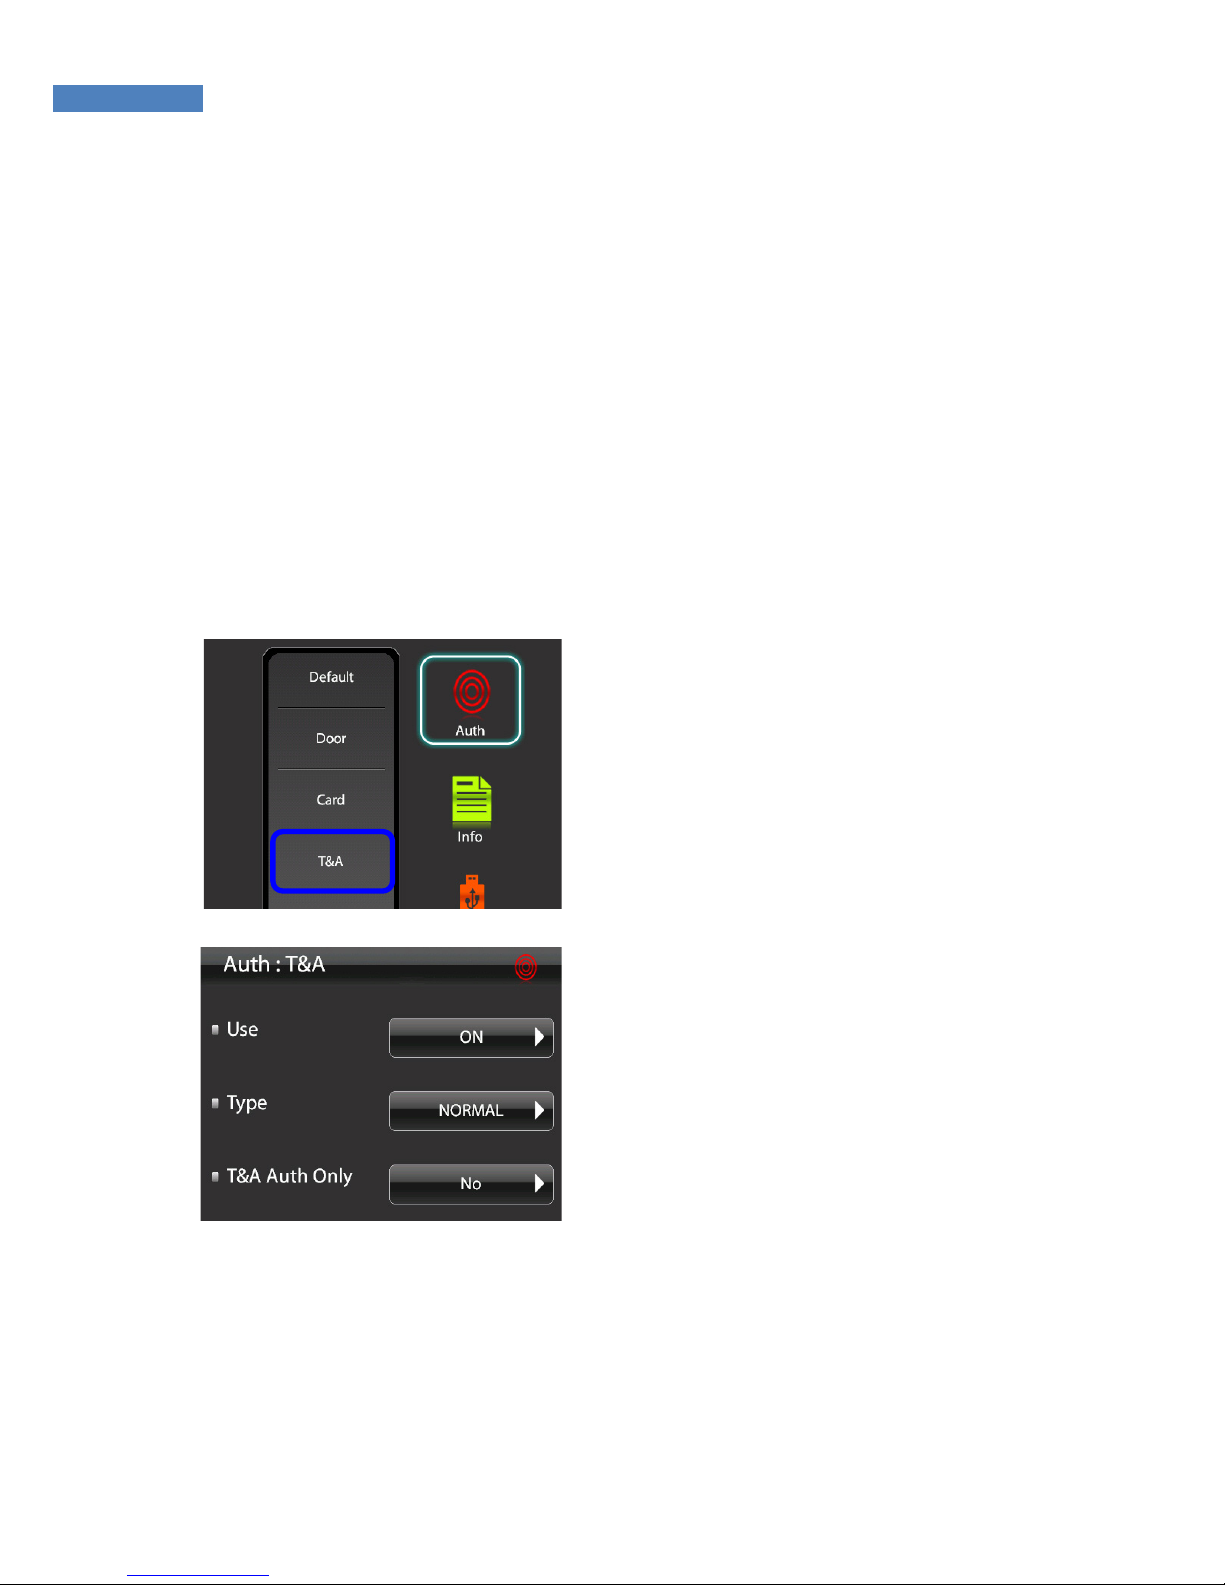
1. To use the attendance mode,
select “Authentication” -> “T&A
Mode”.
2. Press “Use” -> “Off” and change
it to “On”.
3. Select the type: Simple, Normal,
or Extended. “Simple” supports
two function keys, “Normal”
supports four, and “Extended”
supports 100. The default setting
for Simple and Normal are as
follows:
F1: Coming to work
F2: Leaving work
F3: Going out
F4: Returning
For the Extended type, function keys can be freely configured
depending on the S/W requirements.
Page 44

44
4. To allow entry only through Time and attendance authentication,
select “Allow only Time and Attendance Authentication” -> “Yes.”
When “Allow only Time and Attendance Authentication” mode is
activated, users must press the function key to open the door.
5. After finishing configuration, press “Save”.
Page 45
45
Sensor
Settings related to fingerprint sensor options such as sensor type,
fingerprint capture time, LFD precision, and sensor brightness can
be configured. If the options are set to the terminal’s default values,
the settings will apply to all users who didn’t make individual sensor
configurations when registering.
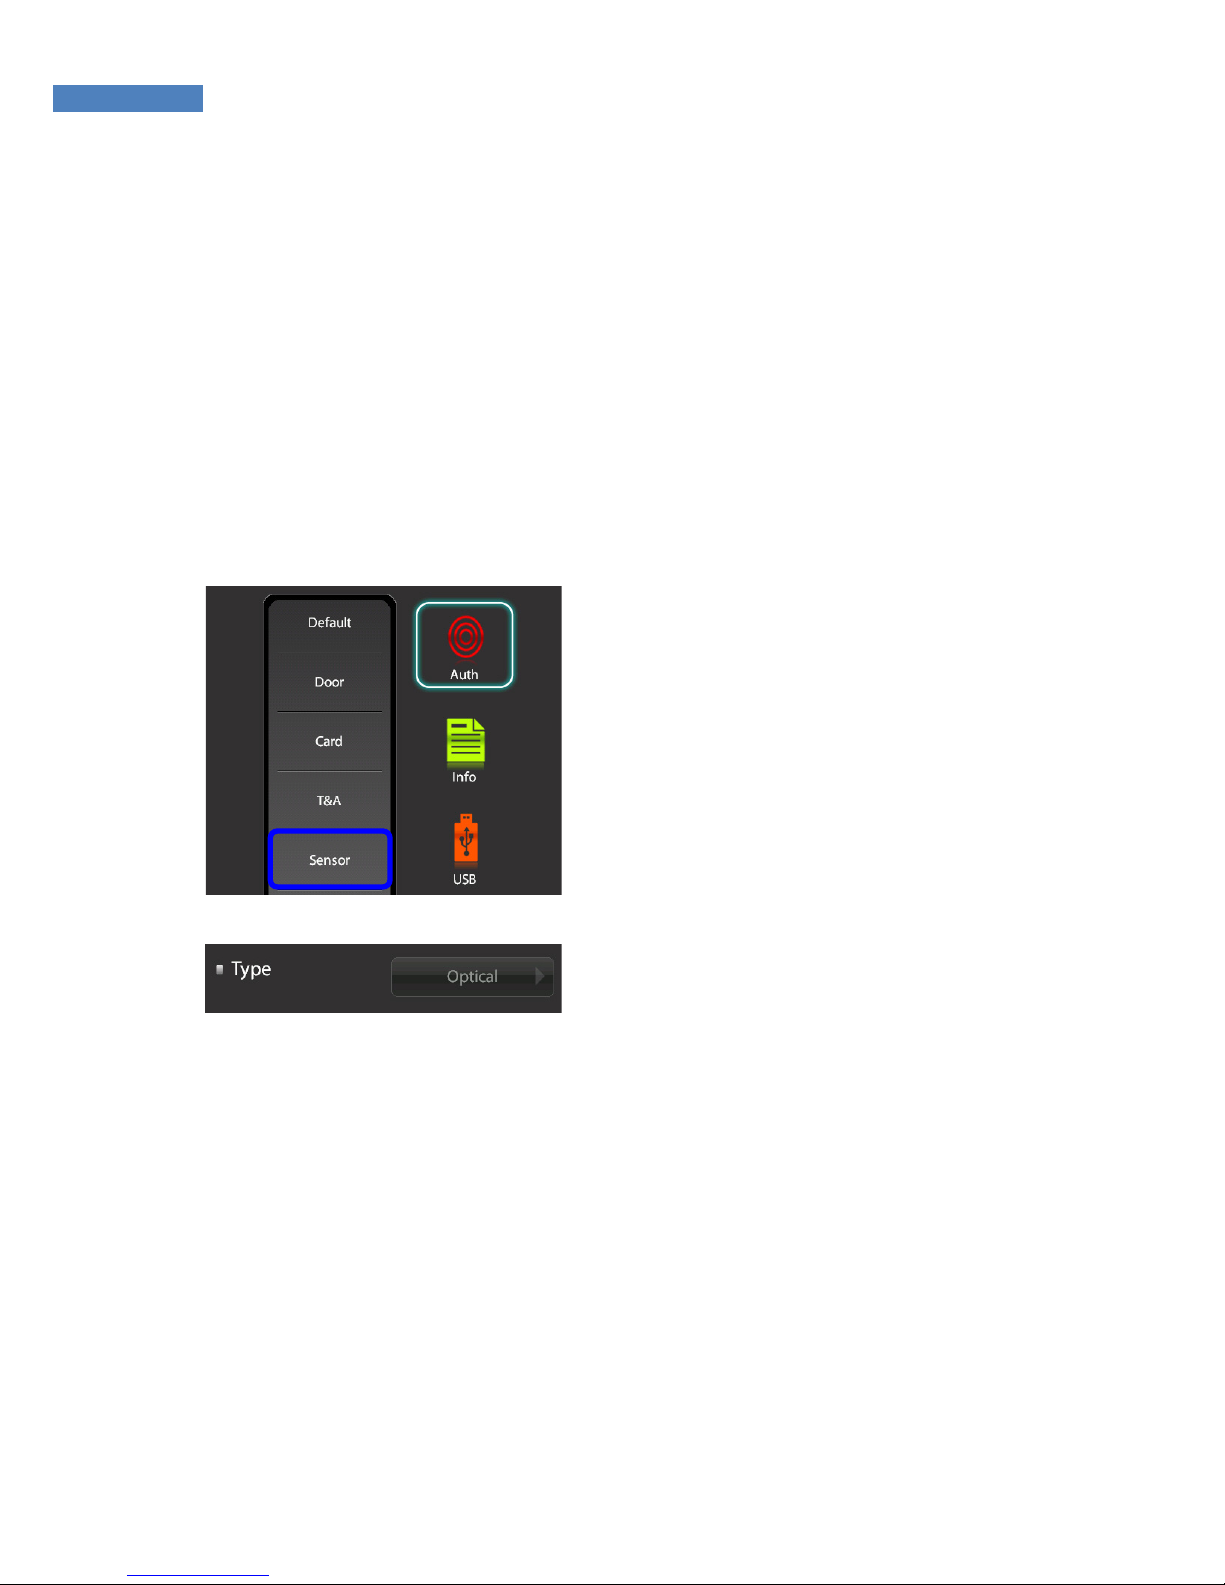
Sensor Type
1. To change the sensor type,
select “Authentication” ->
“Sensor”.
2. Select “Type” -> ”Optical”, and
select the sensor type: optical or
semiconductor. At present, only
the optical type is available and
the semiconductor type will soon
be supported.
Page 46
46
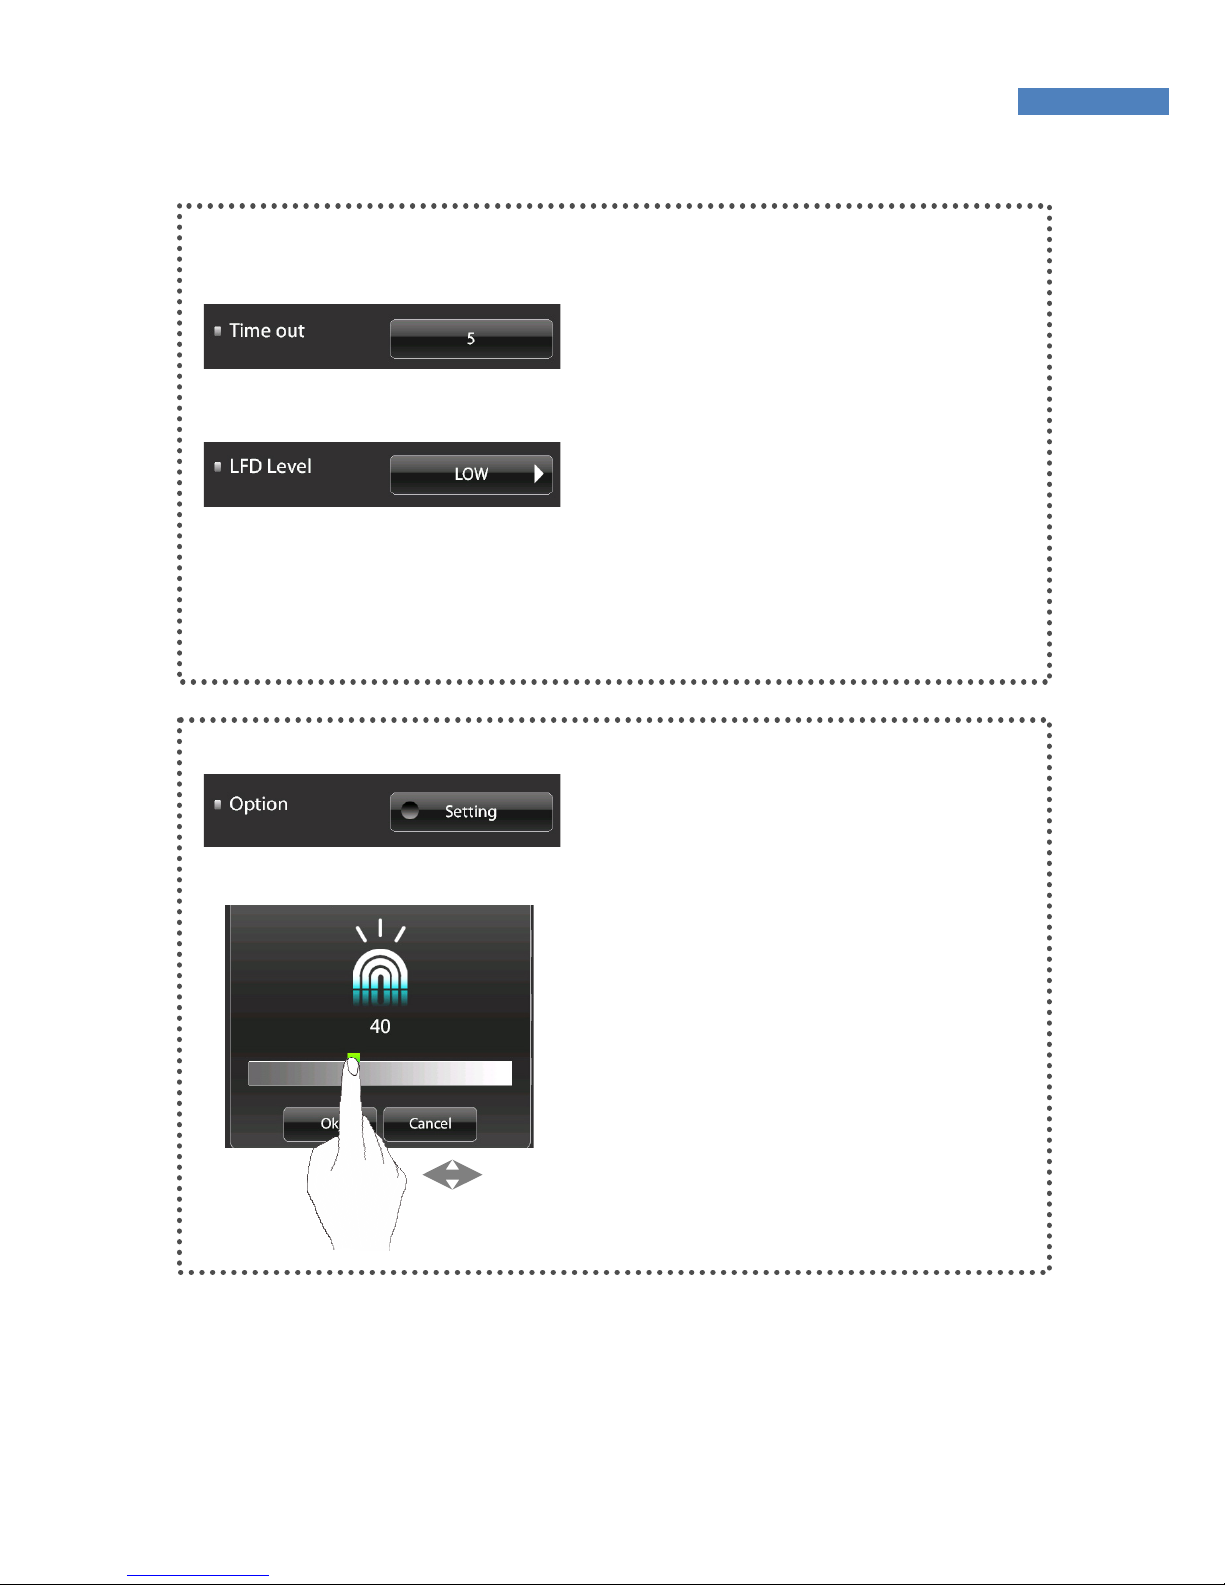
Authentication Limit Time
The fingerprint input waiting time is
between 3 and 9 seconds, and the
default is 5 seconds.
LFD (Live Finger Detection)
Precision
Sets whether to distinguish fake
fingerprints, to what degree of
precision. Select “Low”, “Middle”,
“High”, or “Do not use”.
Sensor Option
If the fingerprint is too bright or dark,
the brightness, contrast, and gain
can be adjusted. In 1:N mode, the
terminal’s basic sensor settings will
be applied even though individual
sensor options were set during user
registration.
Select the “Brightness”, “Contrast”, or
“Gain” tab, and select the value by
moving your finger on the slider.
Page 47

47
Camera
The terminal camera can take photos of users and add the photos to
user profiles. This function is not currently available but will soon be
supported.
Page 48
48
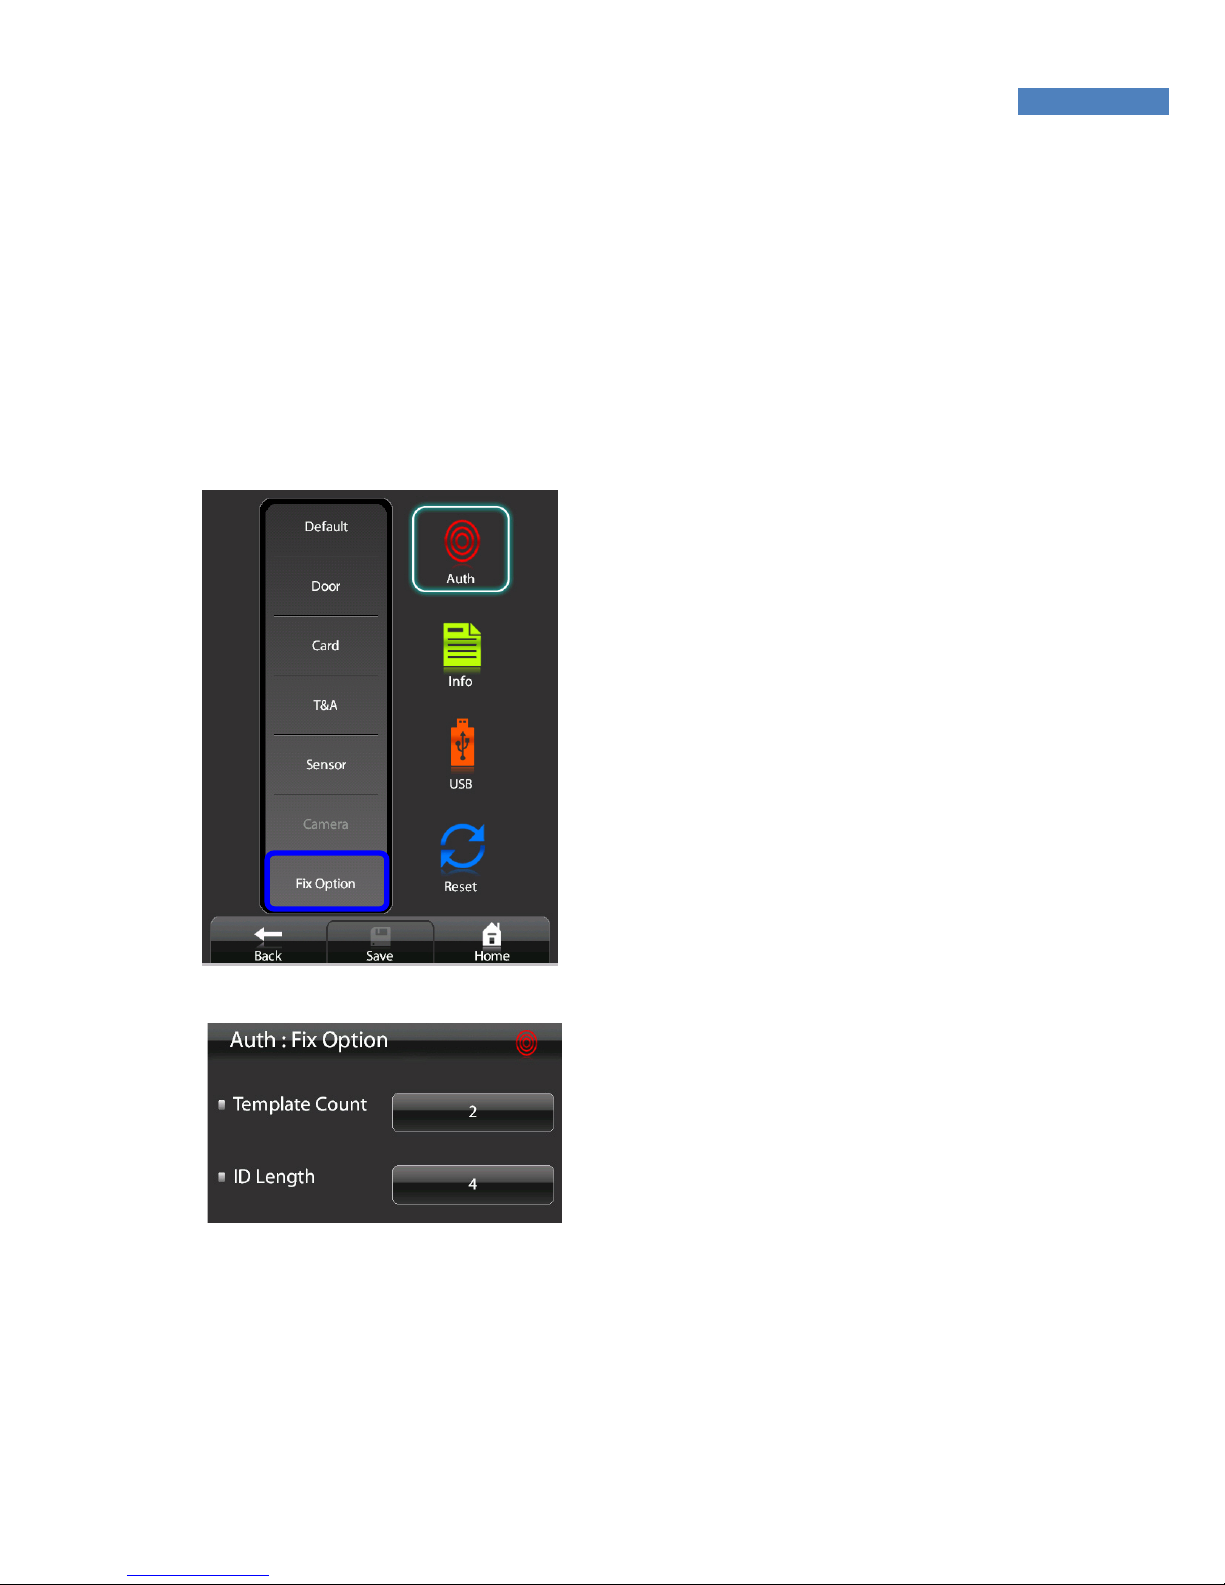
Fixed Option
In the “Fixed Option” menu, the number of fingerprint scans to be
inputted during fingerprint registration and the ID length can be
configured. These settings cannot be changed of registered users
already exist. To change these settings, the administrator must
delete all users registered at the terminal.
1. To change the ID length and the
number of fingerprint scans,
select “Authentication” -> ”Fixed
Option.”
2. To change the number of
fingerprint scans required for
user fingerprint registration,
select “Template Count” and
input the number. The default is
2, and the administrator can
choose 1 or 2.
3. To change the ID length required
for user fingerprint registration,
select “ID Length” and input the
length. The default is 4, and the
administrator can select a length
between 4 and 20.
4. Save the setting by pressing
“Save” at the bottom of the
screen.
Page 49
49
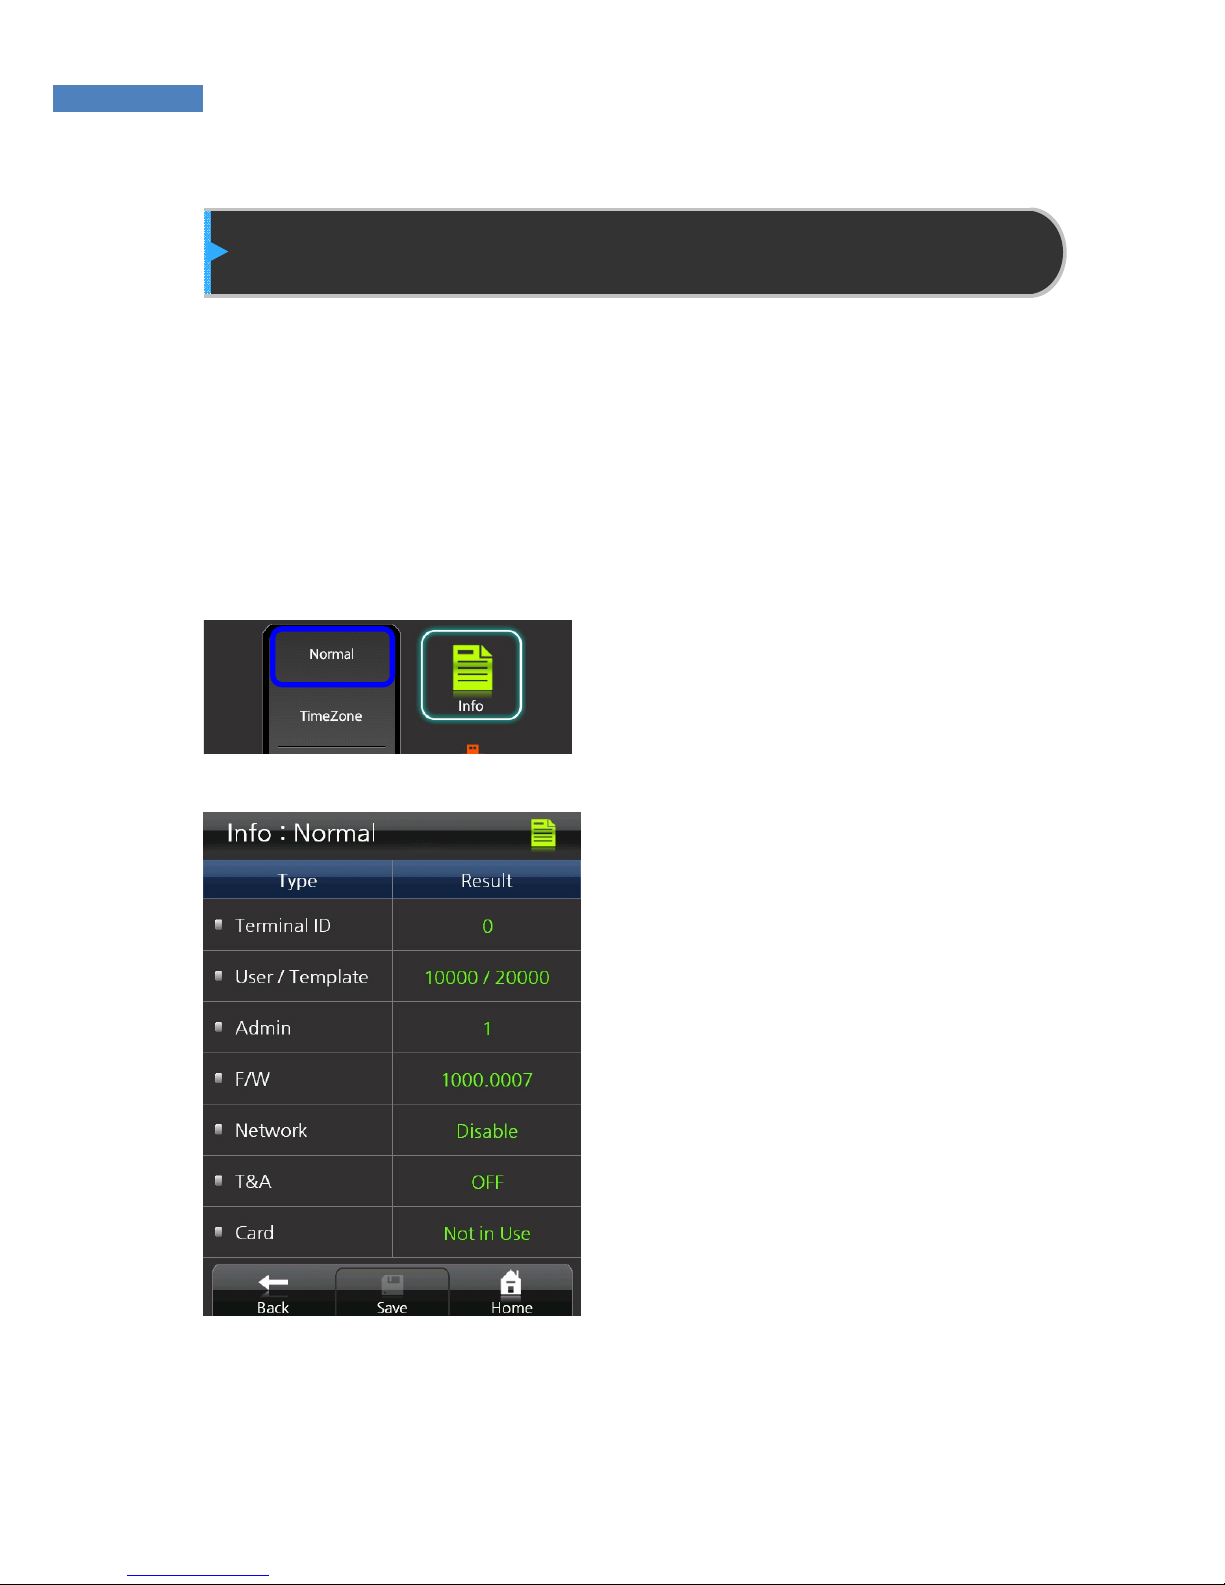
Terminal Information Display
The administrator can check the terminal ID, mode status, firmware
version, number of users, time zone, logs, and other Normal terminal
information. Self-diagnosis can also be performed to check whether
the terminal is working properly.
Normal
To view terminal information,
select Information -> Normal.
The administrator can only view
information, and cannot make
changes.
Page 50
50
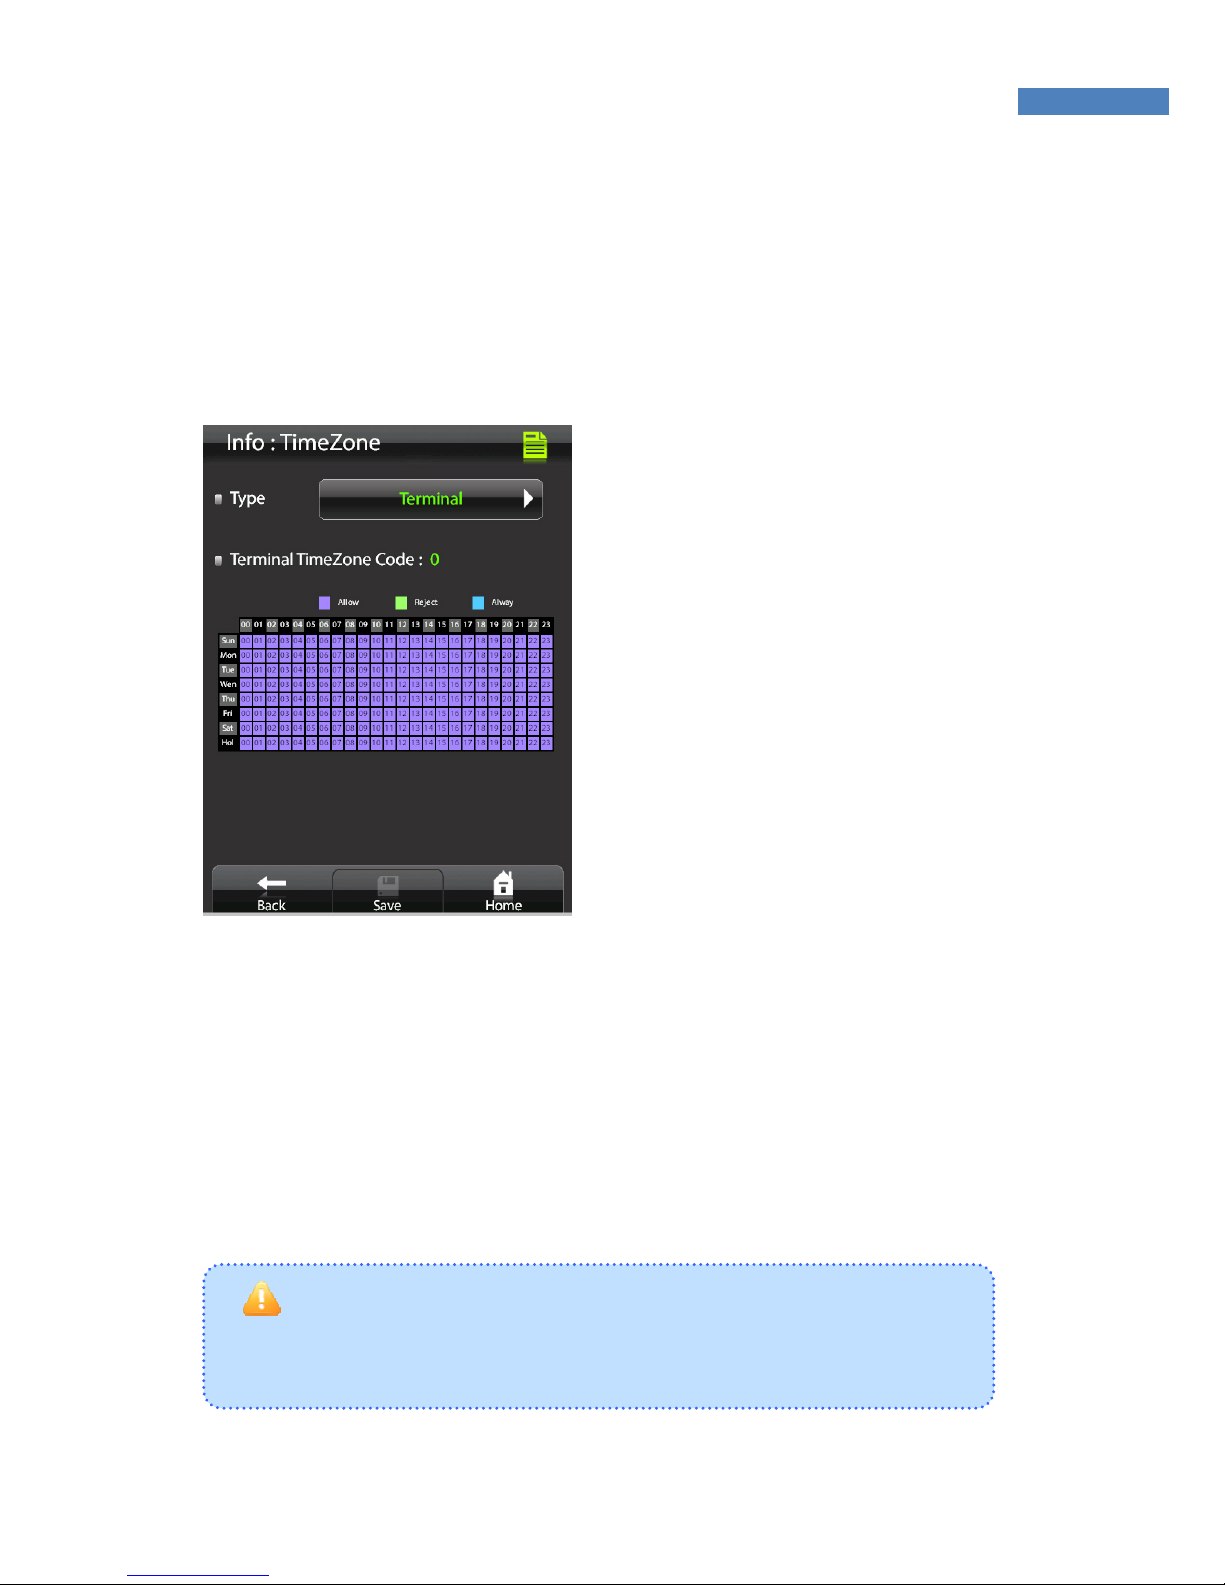
Time Zone
The “Time Zone” menu is used to restrict or allow entry during certain
time periods. Using this function, you can check individual user
timezone or terminal settings.
1. Select the “Info->TimeZone” to
view timezone information.
2. Select the “Terminal” or “User”
that you want check in the “Type”.
3. In the below table, displayed
timezone with days and hours.
You can check the individual or
terminal time zone which is being
set by AccessManager.
The timezone has 3 status as below.
Allow : User or Terminal is available to access time
Reject : User or Terminal is not available to access time
Opened : Door is opened during specifed time
Caution to set Timezone
Timezone can be set through AccessManager Professional which is
not available through terminal
Page 51

51
Log
Terminal user authentication logs can be checked. This feature is not
currently available, but will soon be supported.
Page 52
52
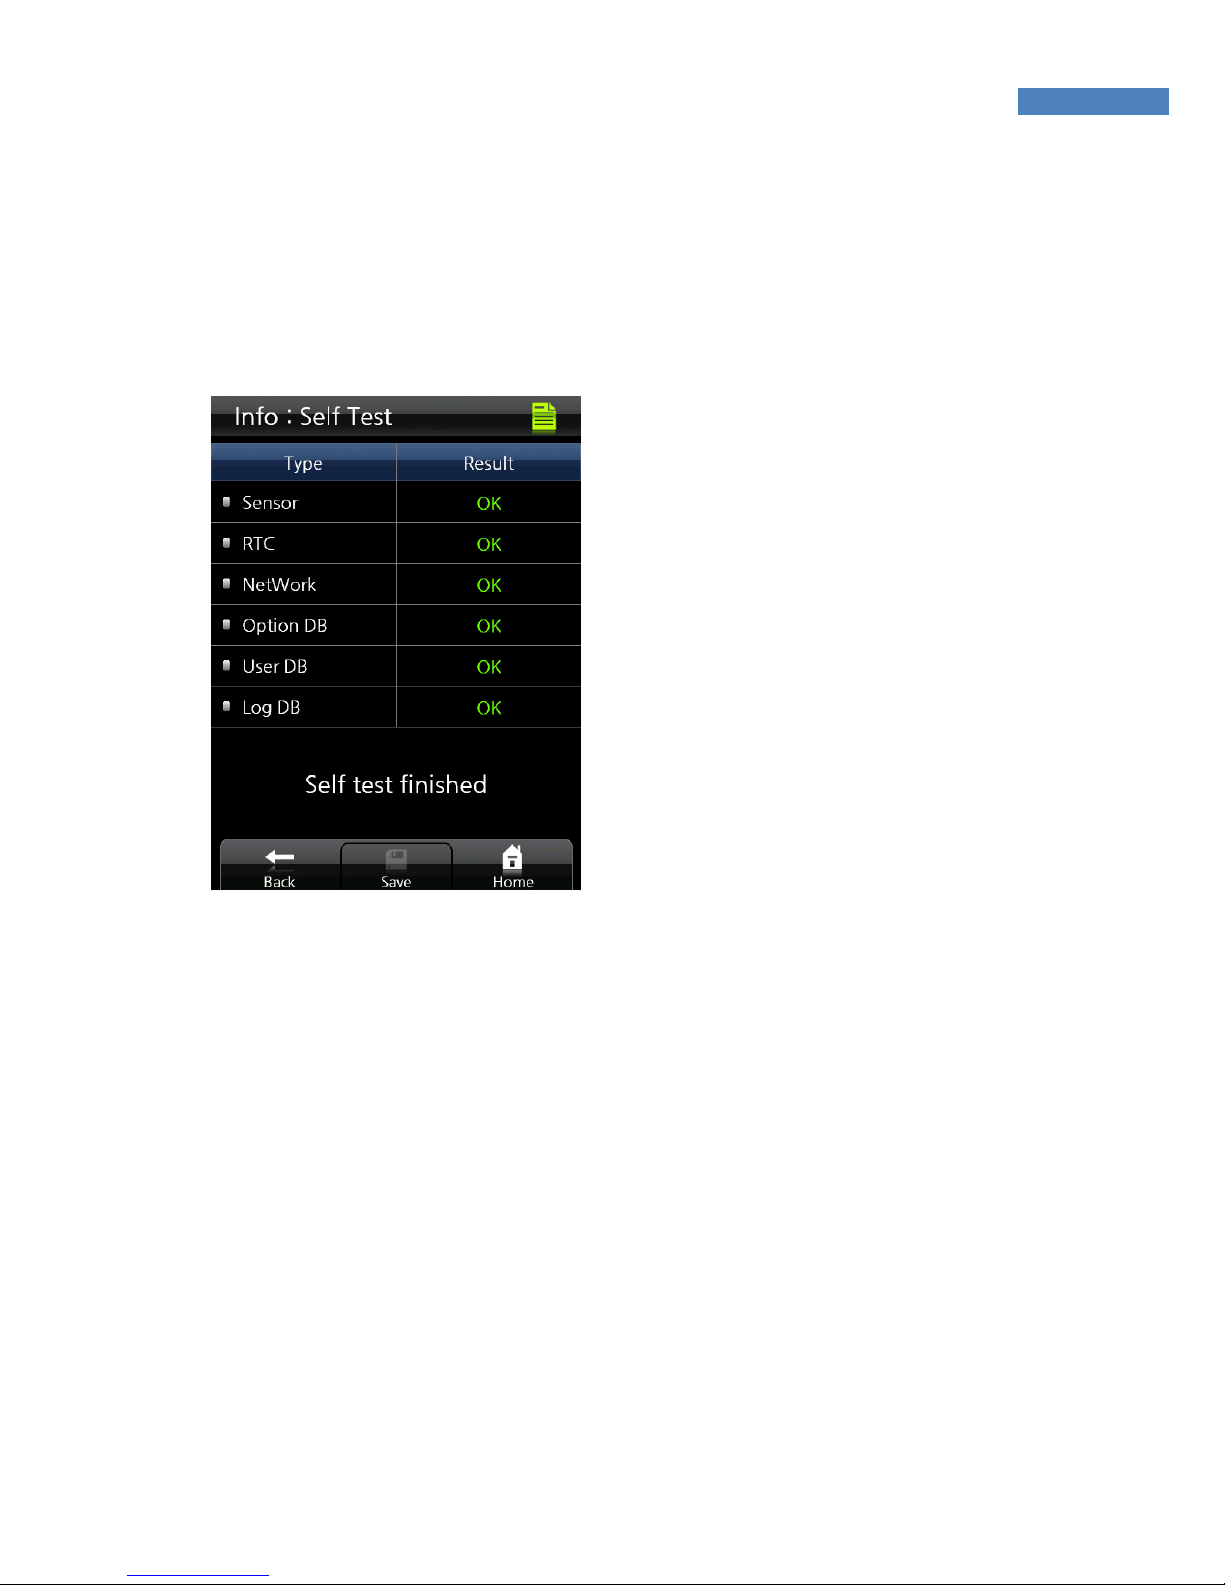
Self Test
Using the self test function, the terminal can test itself for problems
with sensor, time, network and DB.
To perform self-test, select
“Information” -> “Self Test.” The
terminal will check for problems in
sensor and time configuration.
Page 53
53
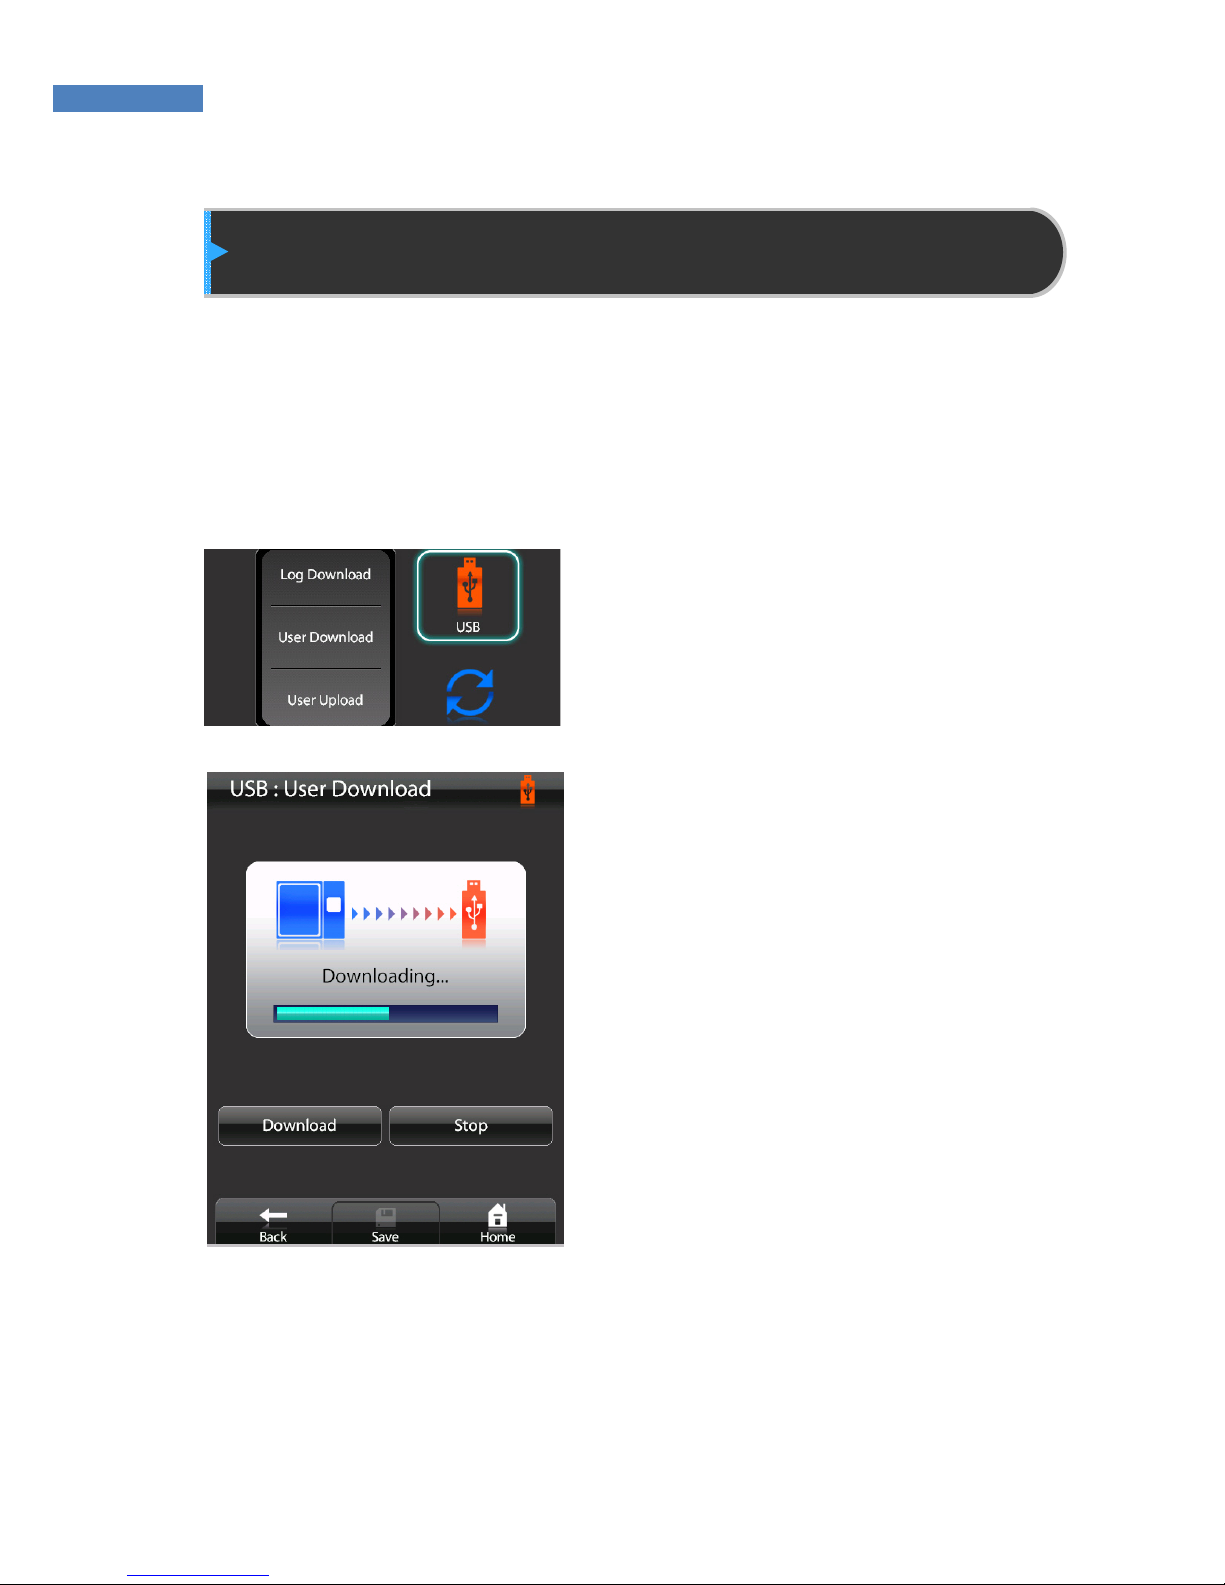
USB Memory Connection
User and log data can be uploaded or downloaded by connecting a
USB memory device to the terminal. When uploading data from the
USB device to the terminal, the data will be added to the existing DB.
This feature is not currently available, but will soon be supported.
1. Select “USB” and the operation
to perform – Log Download, User
Download, User Upload.
2. Select “Download” or “Upload” to
start the operation.
3. The administrator can stop the
operation by pressing “Stop”.
4. After the upload/download is
complete, press “Save”.
Page 54
54
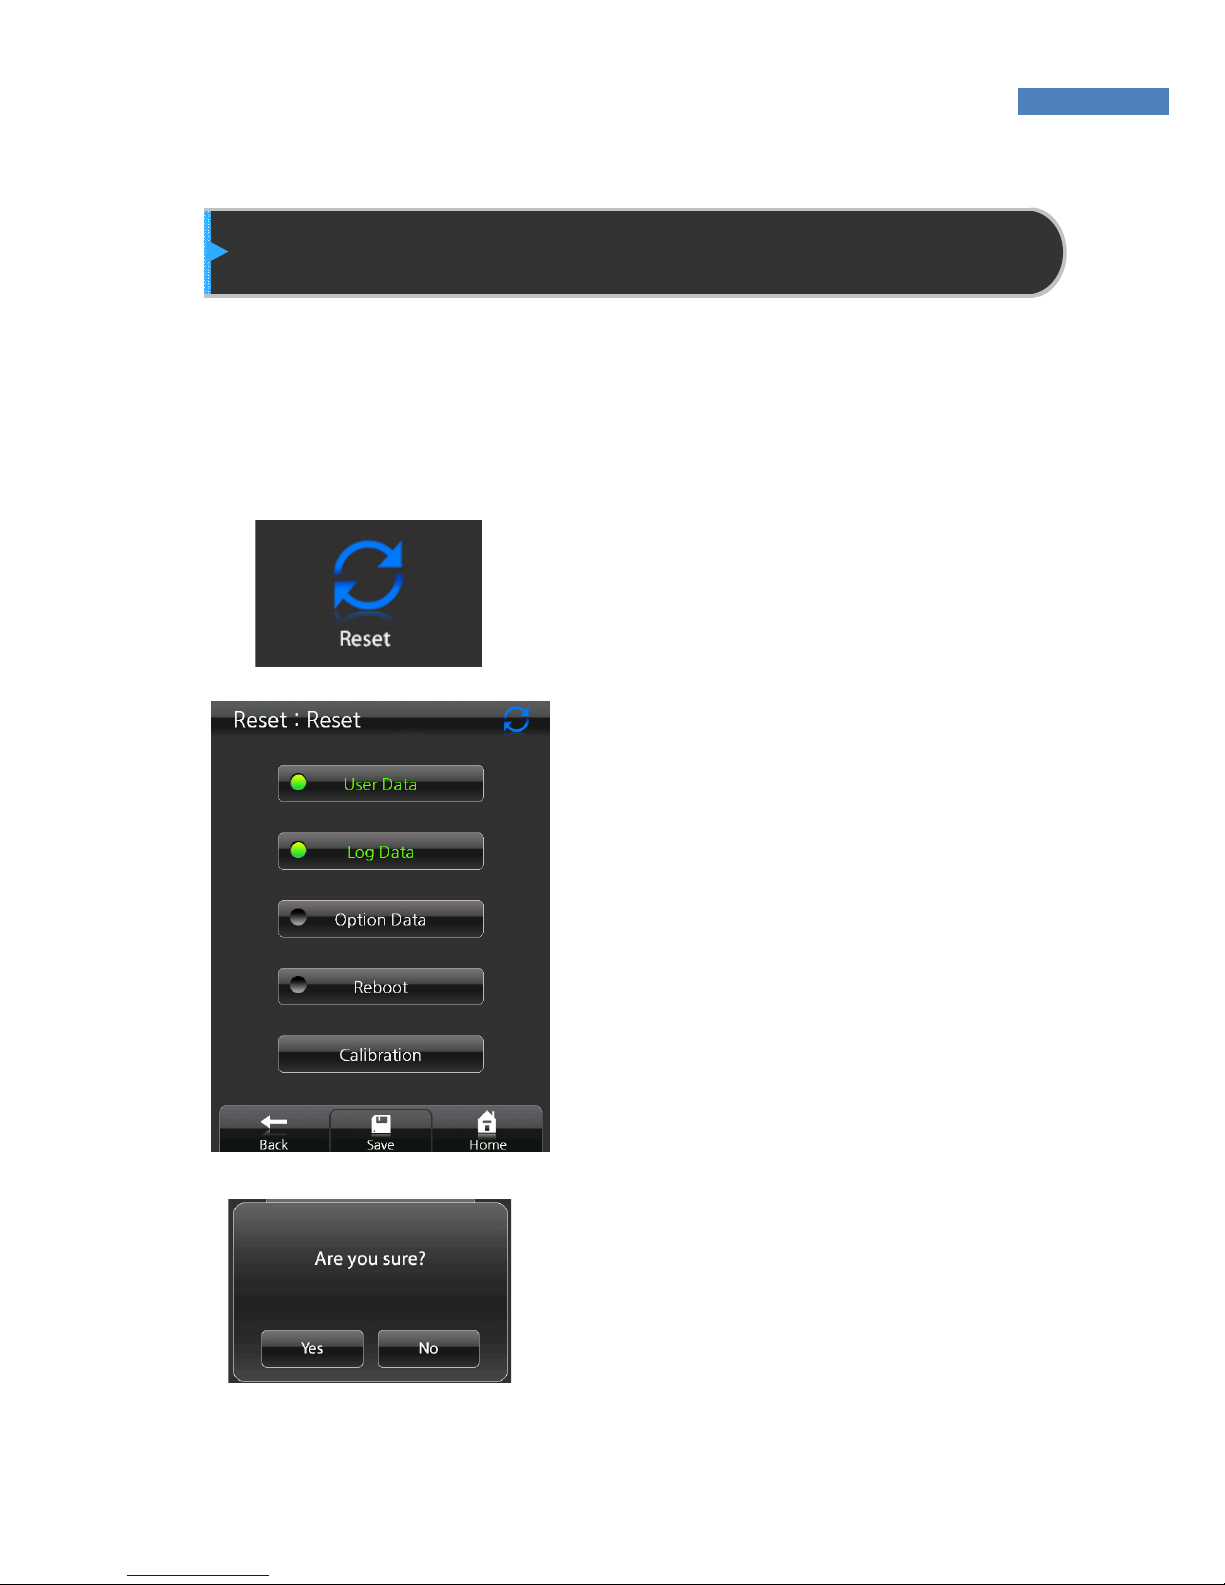
Terminal Reset
Using the “Reset” menu, the terminal’s user, log, and serial data can
be returned to factory settings, and touch sensitivity can be adjusted.
Reset will delete all the data in the terminal DB.
Reset
1. To reset the terminal data, select
“Reset”.
2. The administrator can reset two
types of data at the same time.
By pressing a submenu again, it
will be unselected.
3. Press “Save” at the bottom of the
screen, and press “Yes” to start
Reset.
4. By selecting “User”, “Log”, and
“Option Info”, and “Restart” at the
same time, the terminal will be
restarted after reset.
Page 55

55
Touch Calibration
If response to the touch function is slow or does not work properly,
touch sensitivity can be adjusted with the “Touch Calibration” menu.
1. Select “Reset” and “Touch
Calibration”. The screen shown
on the right will appear. Carefully
press the “+” at the center of the
screen, and keep pressing for a
while.
2. After the “+” symbol moves,
repeat above Step 1 for the
wanted position.
3. After completing calibration,
touch the screen once and save
the calibration data. If no action
is taken for 30 seconds, the
calibration will be cancelled and
the previous setting will be
restored.
Page 56

56
Chapter 3 General User
Door Opening - 57
Authentication in Attendance Mode - 59
Changing User Information -61
Page 57
57
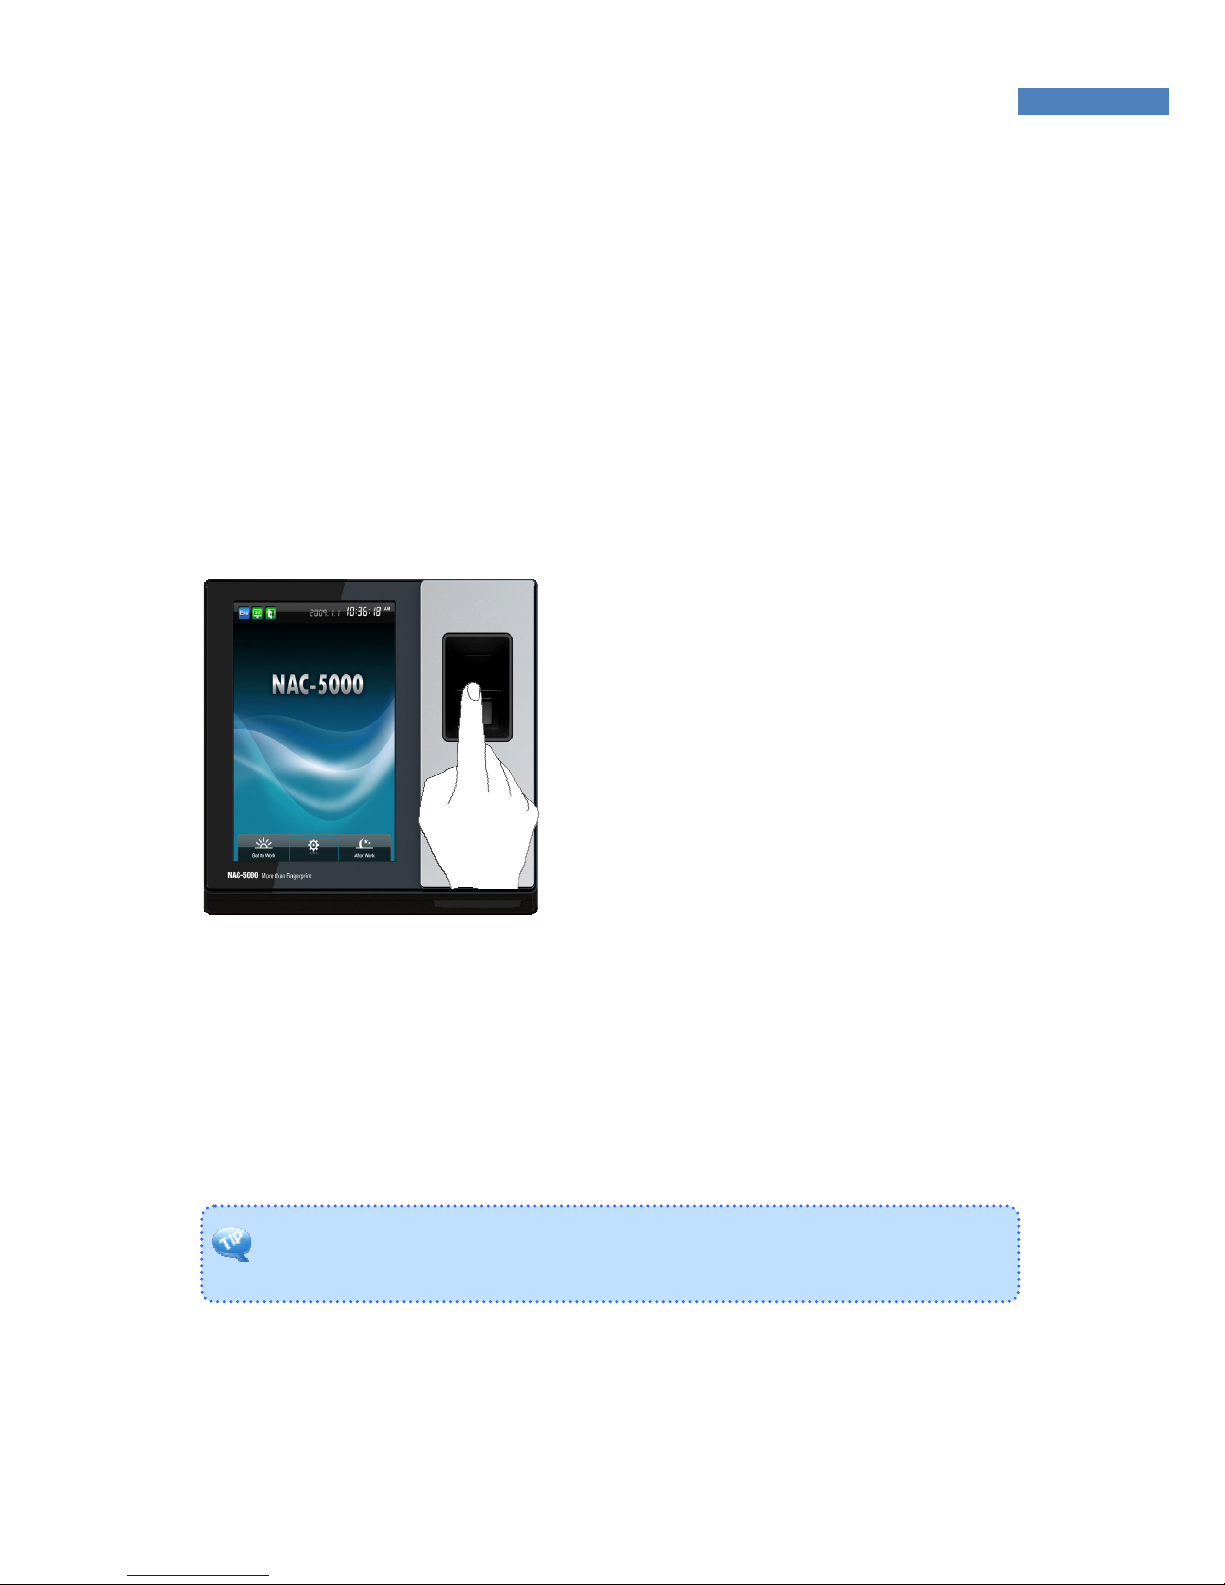
Door Opening
A user registered at the terminal can open the door in two ways
depending on whether 1:N authentication is used.
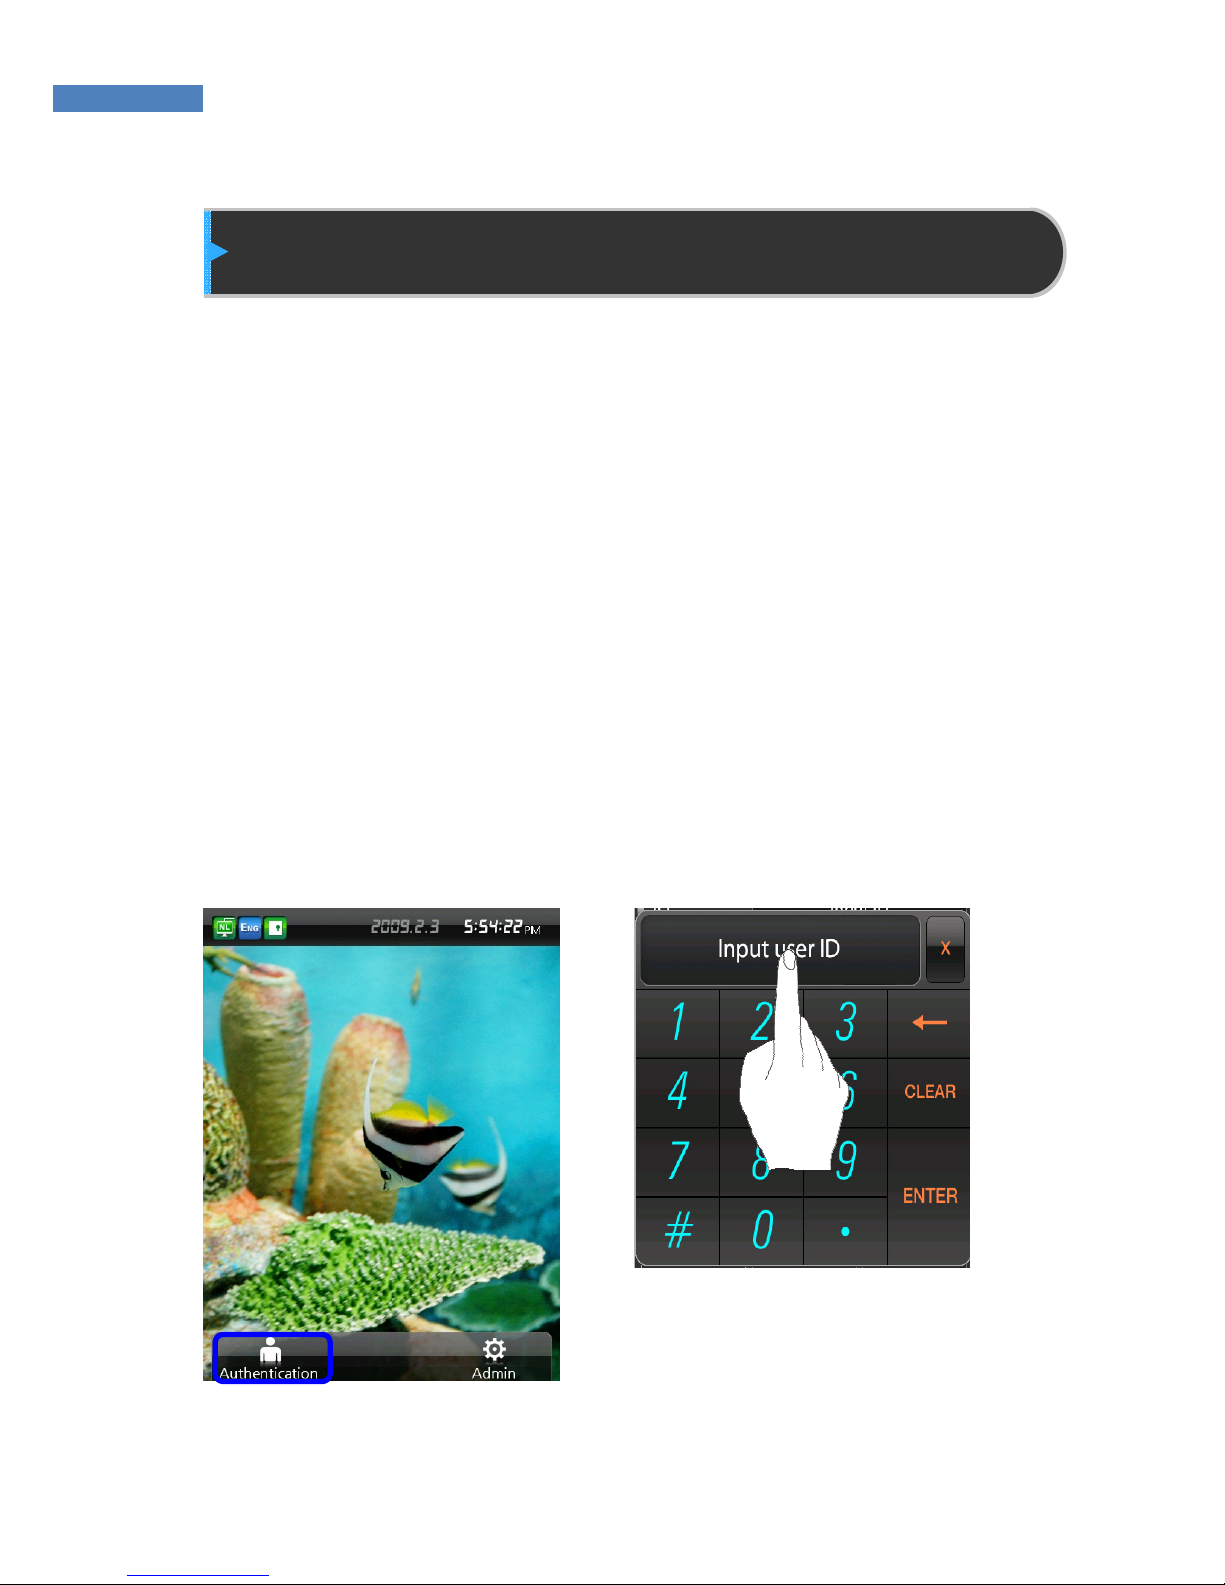
1:1 Authentication
The user enters his ID and scans his fingerprint, and the scanned
fingerprint is compared 1:1 to the registered fingerprint that matches
the ID. This method allows for quick authentication.
In 1:1 authentication mode, the user presses “Authentication” on the
lower left, and enters his ID. Then, the user continues the
authentication process using the registered means – fingerprint, card,
or password.
Page 58
58
In 1:N authentication, the password user is authenticated in
the same wa
y
s as in 1:1 authentication.
1:N Authentication
In 1:N authentication, the user does not need to input his ID. Instead,
the scanned fingerprint is authenticated by searching all fingerprints
in the DB. The process is simpler than 1:1 authentication, but if there
are a lot of users, it may take more time.
① Fingerprint Authentication
The user is authenticated by scanning his fingerprint without entering
his ID.
② Card Authentication
The user is authenticated only by scanning his card without entering
his ID.
If 1:N authentication is not activated, the user will be asked to input
his ID after he presses “Authentication” on the terminal.
Page 59

59
Authentication in Attendance Mode
In attendance mode, all users shall press the functions keys in order
to be authenticated. All logs are transmitted to the server. If the users
do not press function keys, the attendance types –coming to
office,leaving office ,leave,and return –may not be recorded so that
the user shall press the fuction keys in order to be authenticated .
Using Attendance Mode
General/Simple
In attendance mode, function keys
are displayed on the lower-right of
the initial screen.
1. In Simple or General
Attendance mode, the user
must press a function key and
input his ID to be authenticated.
Function keys are as follows:
F1: Coming to work
F2: Leaving work
F3: Going out
F4: Returning
2. After the user presses a function
key, the key will be included in
the server log data which will be
used by the attendance
management program.
Admin
F1 F2
[Attendance Mode - Simple]
Admin
F1 F2 F4 F3
[Attendance Mode - General]
Page 60
60
To use 1:N authentication in attendance mode, enter the
attendance key and perform authentication without inputting an ID.
The user must select function keys even when the “Allow Only
Attendance Mode” option is selected.
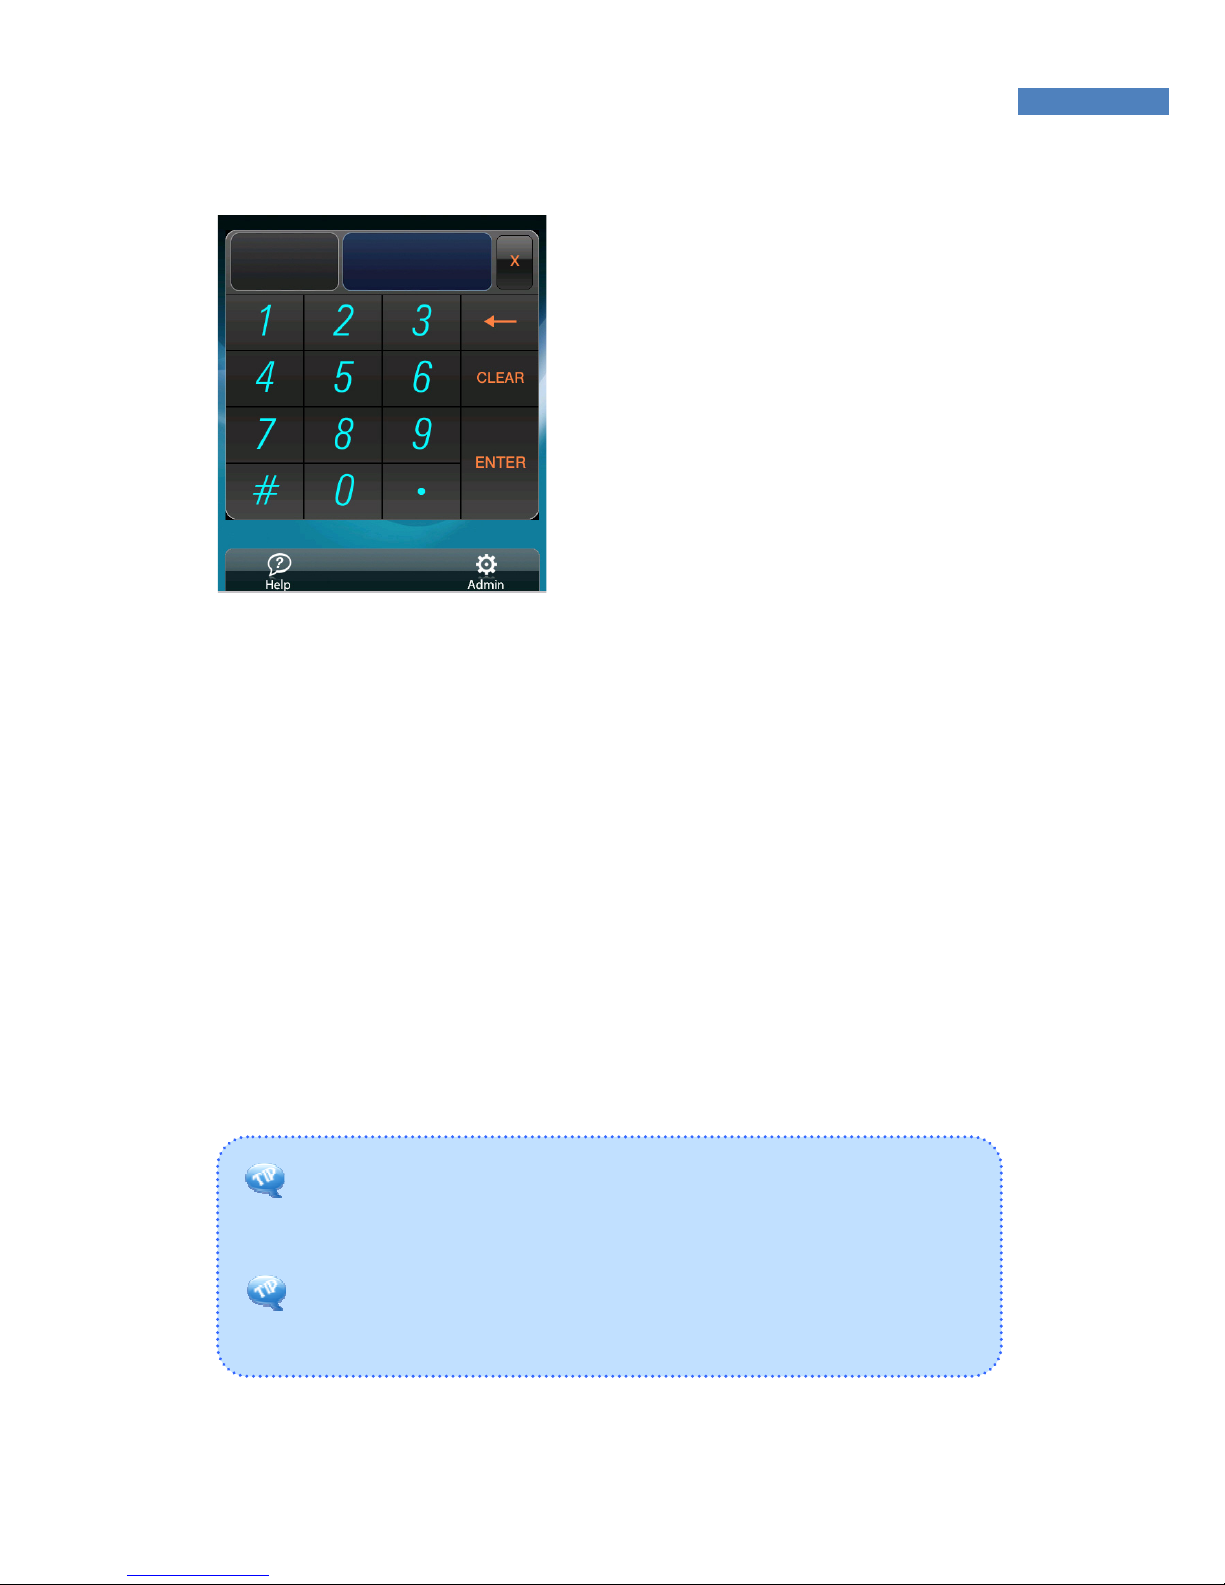
Using Extended Attendance
Mode
In Extended Attendance Mode, the
initial main screen will be displayed
as shown on the left.
1. Select a function key, and press
“Enter.”
2. Enter the user ID and press
“Enter”to perform authentication.
Page 61

61
Changing User Information
The administrator can change passwords, fingerprints, and card
information of registered users using the terminal’s Adminstrator
menu or the server program. To change user information, contact the
administrator.
Page 62

62
Appendix
Troubleshooting - 63
Firmware Update - 67
Product Specifications -68
Page 63

63
Appendix
Troubleshooting
<If the Touch function does not work properly>
1. Check if there is any dust on the touch sensor, and clean the
sensor with soft towel or paper.
2. If the area of the finger touching the screen is large,
sensitivity may drop. Use your fingertip when touching the
screen.
3. Scratches or damage to the touch sensor may result in
malfunctioning. Check for scratches or damage to the touch
screen.
4. Adjust the sensitivity of the touch screen by selecting
“Manage Menu -> Reset -> Touch Calibration”.
5. The device is designed to respond when your finger is
removed from the touch screen. If the position where the
finger was placed is different from the position where the
finger was removed, the touch function may not work
properly.
Page 64

64
<If fingerprint authentication takes too long>
1. If the terminal uses 1:N authentication in network mode,
server overload may occur, resulting in slow authentication
and recognition. In this case, a dedicated server should be
used.
2. Check if the finger and the sensor are clean. Clean the finger
and the sensor. If the user’s finger is hurt, the user must
register another fingerprint.
3. If the fingerprint is not clean, lower the security level of the
user and use the 1:1 authentication method.
4. Input the user’s ID in 1:1 mode and check if the user exists.
Page 65

65
<If fingerprint is not registered>
If the finger is too dry or humid, fingerprint image quality may be
poor and may not register. Dry or moisturize the finger before
registering the fingerprint.
<If RF card authentication fails>
1. Select “Admin”, “Authentication -> Card Setting” and check if
the card setting matches the actual card.
2. In attendance mode, check if the “Allow Only Attendance
Authentication” option is selected. If so, the user must enter
the attendance number to be authenticated.
<If network connection cannot be established>
1. Select “Admin –> Network and check if the network setting is
correct.
2. Check the TCP/IP setting.
① IP of the server where AccessManager Professional is
installed.
② The server and the terminal must use the same port.
④ Related settings if DHCP is not used.
3. Synchronize the terminal and the server settings.
Page 66

66
<If the door does not open after authentication>
1. Check the time period during which access is allowed.
2. Select Admin – Authentication -> Door and check if the door
is set to Open.
<If users cannot be registered>
In default configuration, this product operates in network mode
which requires a proper network connection for user registration.
Check the network connection, or disable network mode to not use
the network.
<If the product is unstable or does not function>
1. Select Admin –> Information –> General/Self-test, and
check for problems.
2. In the terminal by selecting Adminstrator Menu –> Reset.
3. Restart the server if the server management program is in
use.
4. If the terminal buttons do not function, restart the terminal by
opening the rubber cover near the bottom of the product and
use a pointed item like a ballpoint pen to press the small
button next to the USB slot for two or three seconds.
5. If the problem remains after the above actions are taken,
contact the Customer Support Team.
Page 67

67
Firmware Update
NAC-5000 firmware can be updated through the USB port. Do the
following to update firmware.
1. Store firmware cab file under the root folder of the USB memory.
2. Connect a USB memory to the terminal USB port.
3. Restart the system by using the power switch of the terminal or by
selecting Admin – Reset-Reboot.
4. When the system is restarted, the firmware will be loaded from the
USB memory and will be automatically updated.
The administrator can also update the firmware using “AccessManager“,
a server management program. For more information, see the
AccessManager Professional manual.
Page 68

68
Product Specifications
Item Description
LCD 14.52cm(5.7”) Touch Screen TFT-LCD
High Color(16Bit), 640(H) x 480(W)
CPU 624MHz 32Bit RISC
Memory 256MB RAM
Sensor OPP06 Optical, 500DPI(LFD, Auto-On)
Authentication Rate 1:1 – Less than 1 second / 1:N -
FAR/FRR 0.001% /0.1%
Number of users 100,000 fingerprint templates
(Two templates per user)
Communication
Method
TCP/IP, RS-232, RS-485, Wiegand
Dimensions 146.5(L) x 167.4(W) x 67(H) mm
Power
Input: AC 100V ~ 240V, 50/60 Hz
Output: DC 12V, 3A (24V supports serial.)
Door UP to two doors can be connected. (Dead
Bolt, Strike, EM Lock, Automatic Door, Fire
Alarm)
Serial Emergency power supply unit (12V/2.9A),
Camera, RM Module, Wireless Network
Supplementary
Features
Voice announcement, USB Port,
Warning/Alarm
Page 69

69
WARNING
This is a class A product. In a domestic environment this product may cause radio
interference in Which case the user may be required to take adequate measures.
INFORMATION TO THE USER (15.105(a))
For Class A digital device
INFORMATION TO THE USER
This equipment has been tested and found to comply with the
limits for a Class A digital device, pursuant to part 15 of the
FCC Rules. These limits are designed to provide reasonable
protection against harmful interference when the equipment is
operated in a commercial environment. This equipment
generates, uses, and can radiate radio frequency energy and,
if not installed and used in accordance with the instruction
manual, may cause harmful interference to radio
communications. Operation of this equipment in a residential
area is likely to cause harmful interference in which case the
user will be required to correct the interference at his own
expense.
WARNING(Part 15.21)
Any changes or modifications not expressly approved by the
manufacturer could void the user’s authority to operate the
equipment.
 Loading...