

Page 1
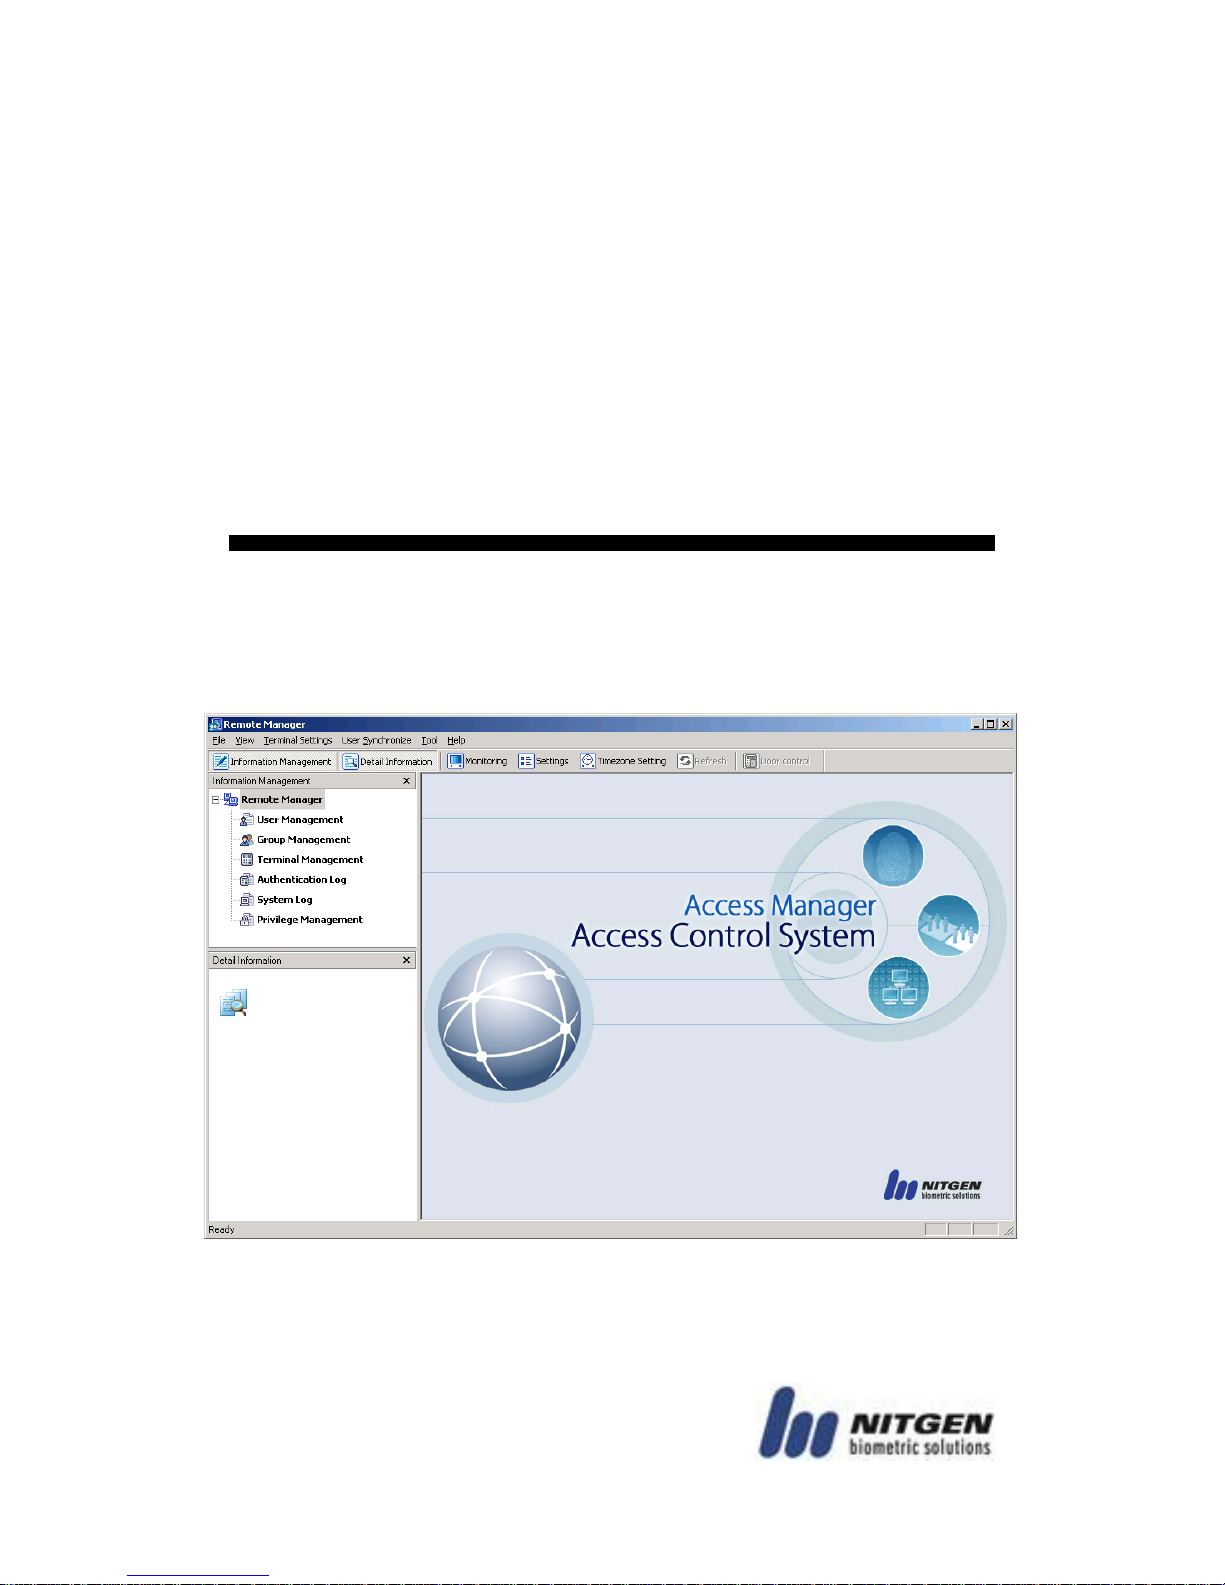
Access Controller
NAC-3000 / NAC-3000+ / NAC-2500 / NAC_2500+ /
FINGKEY-ACCESS / Dedicated to RF card
SOFTWARE MANUAL
Page 2
- -
2
Copyright 2003-2009, NITGEN Co., Ltd.
All rights reserved.
To Contact Us
Tel. +82-2-556-7115
Fax. +82-2-556-7118
E-mail: [email protected]
URL: http://www.nitgen.com
Features and specifications are subject to change without notice. No
part of this guide may be copied or reproduced for any purpose without
the prior written authorization from NITGEN.
NITGEN holds the copyright on the brands NITGEN and NITGEN logo.
Page 3

-3-
Table of Contents
Chapter 1 Before You Start -------------------------------------------------- 4
1.1 About the product ------------------------------------------------------- 5
1.2 How to input fingerprint ---------------------------------------------- 10
1.3 Authentication types --------------------------------------------------11
Chapter 2 Installation -------------------------------------------------------- 13
Chapter 3 Program Introduction------------------------------------------ 21
3.1 Program overview ----------------------------------------------------- 22
3.2 Basic setting and running ------------------------------------------- 23
3.3 About menu ------------------------------------------------------------- 41
Chapter 4 How to Use the Program ------------------------------------- 46
4.1 Terminal Management ----------------------------------------------- 47
4.2 User Management ---------------------------------------------------- 74
4.3 Group Management -------------------------------------------------- 85
4.4 Log Management ----------------------------------------------------- 90
4.5 Program Options ------------------------------------------------------ 95
4.6 Timezone Setting ---------------------------------------------------- 101
4.7 Privilege Management --------------------------------------------- 110
4.8 Anti Pass Back ------------------------------------------------------- 118
4.9 Terminal Monitoring --------------------------------------------------125
4.10 Watchdog -------------------------------------------------------------131
APPENDIX.1 How to register RF Card -------------------------------- 133
APPENDIX.2 FAQ ( Frequently Asked Question ) ---------------- 135
Page 4

- -
4
Chapter 1
Before You Start
1.1
About the product
- 5
1.2
How to input fingerprint
- 10
1.3
Authentication types
- 11
Page 5

-5-
1.1 About the product
Overview
Biometric systems are recently used in various authentication
systems. They are increasingly used not only in environments that
require high level of security but also in many other places
because they are convenient and economical. Among various
biometric systems, the fingerprint recognition system takes up
most of the market because it is easy to use as well as economical
and capable of developing various types of applications. NITGEN,
a global leader in the fingerprint recognition industry, provides
various fingerprint authentication solutions such as PC security,
knowledge management, vaulting service, access control,
electronic approval, and financial payment. NITGEN actively
responds to customer needs through continuous research,
development and quality management.
The NITGEN access control system is an advanced product in
which core technologies of NITGEN recognized worldwide such as
fingerprint recognition algorithm, optical sensors, embedded
design technology, and software application technology are
organically combined and optimized. In addition, unlike other
existing access control systems that use passwords or ID cards
only, it is free from such risks as loss of password and abuse or
duplication of card, providing excellent convenience and security. It
is designed to maximize operational efficiency, enabling integrated
monitoring and systematic management of terminals which have
been operated independently on a remote location via the network.
The NITGEN access control system can use various combinations
of RF card, password and fingerprint authentication. Designed to
meet both universal uses and specific uses, it can be used in
various customer environments including enterprises and
Page 6

- -
6
government agencies due to such convenient built-in features as
group ID, short ID, 1:N Authentication, interphone and voice
instruction.
This manual describes how to install and use Access Manager that
can monitor and manage terminals in connection with the access
control terminal (NAC-3000, NAC3000+, NAC-2500, NAC-2500+,
FINGKEY-ACCESS, Dedicated to RF card)
Page 7
-7-
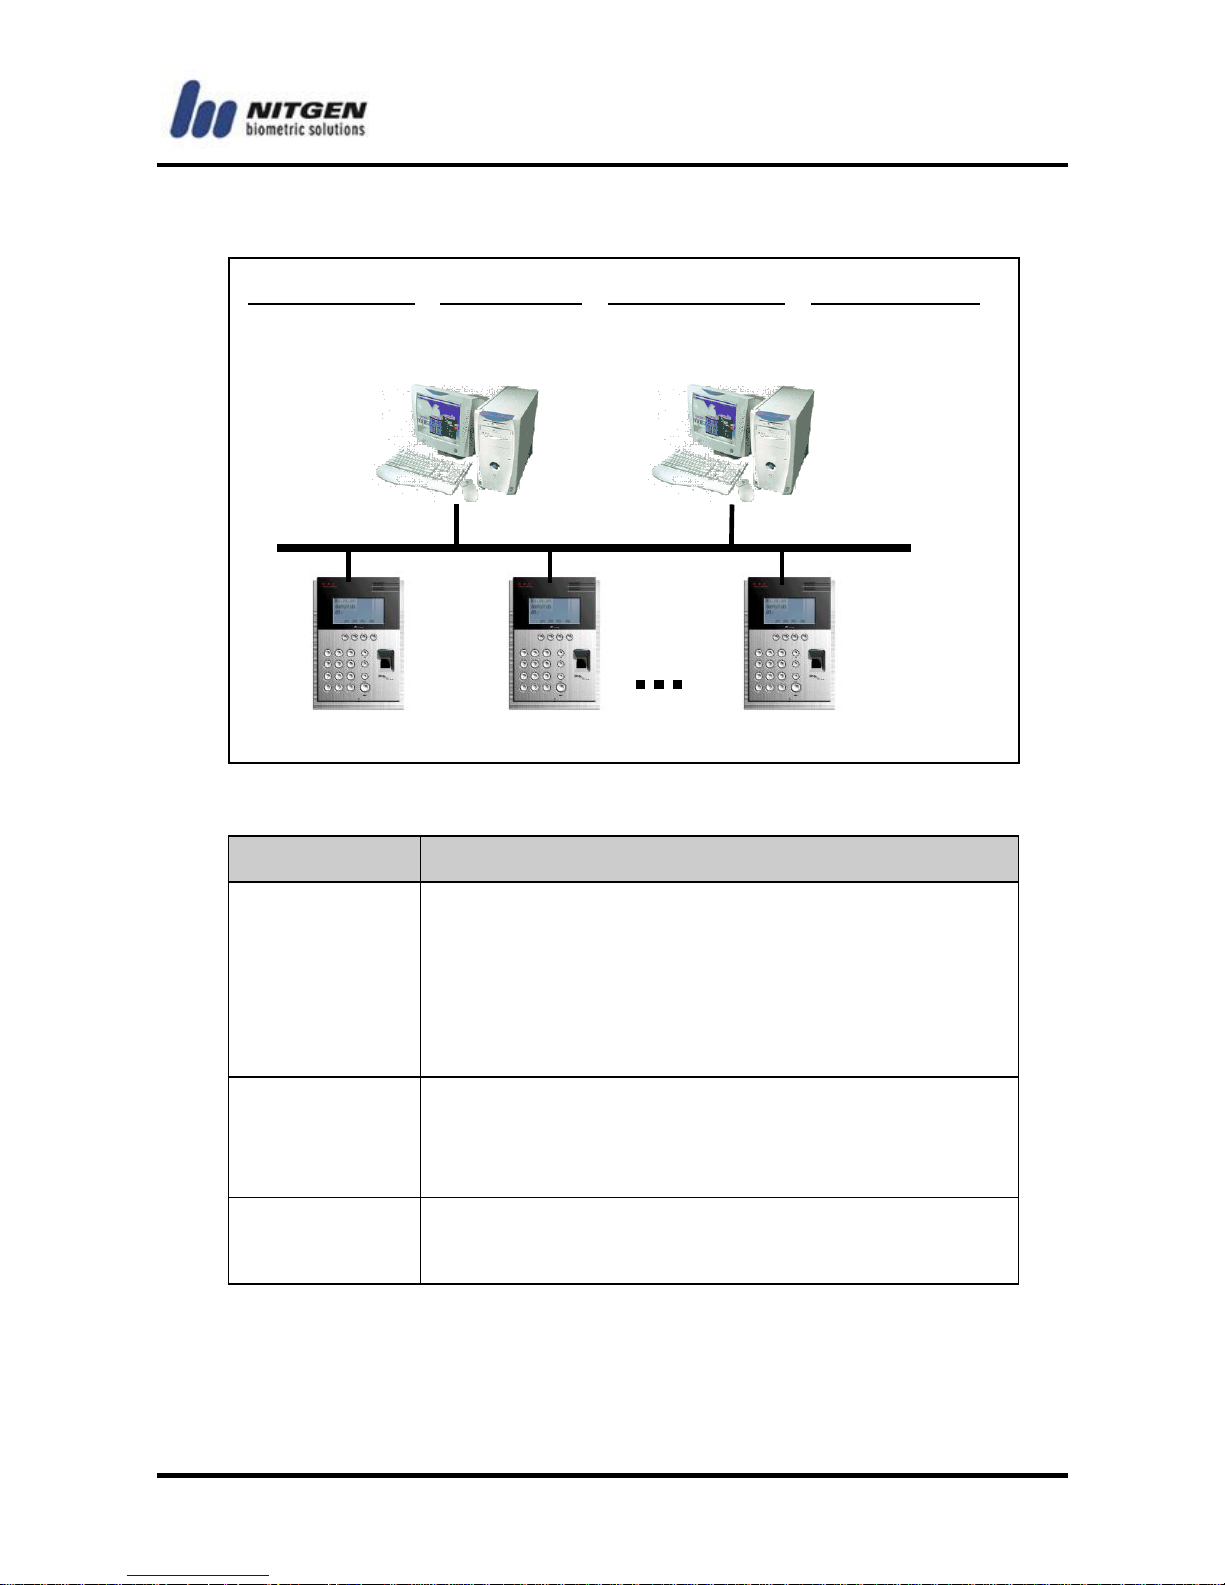
Product configuration
Component
Main Features
Server PC
1. Server s/w: Access Sever
2. Terminal communication and log data
collection
3. User information and log database
4. Performing authentication
Client PC
1. Client s/w: Remote Manager/Remote Monitor
2. User registration and management
3. Monitoring terminal status and events
Terminal
1. Performing user authentication
2. Door control
Network
Server PC
Terminals
Client PC
Access Server
Remote Manager
Remote Monitor
Access Manager = Access Server + Remote Manager + Remote Monitor
Page 8

- -
8
You can use all features with the NITGEN access control terminal
(NAC-3000, NAC-3000+, NAC-2500, NAC_2500+, FINGKEYACCESS, Dedicated to RF card) only. If you use it with Access
Manager in network environment, you can manage a number of
terminals more easily and efficiently. You can also use the server
and client software in one PC.
Main specifications
Section
Content
Access terminal
Connection allowed up to 255 terminals
Connection
Simultaneous server access up to 8 Clients
Number of
users to
register
10,000 users (MDB) /
30,000 users (SQL)
Network
10 Mbps, TCP/IP
Authentication
type
Fingerprint, password and RF card (optional)
Algorithm
( Fingerprint )
FRR: 0.1 % or less, FAR: 0.001 % or less
Authentication
speed
1:1 mode: Less than 1 second
1:N mode: Avg. 2.5sec ( 1,000FP , Server )
Avg. 2sec ( 500FP, Terminal )
Avg. 1sec ( 300FP, Terminal )
* Pentium IV 1 GHz, 512 MB RAM
Page 9
-9-
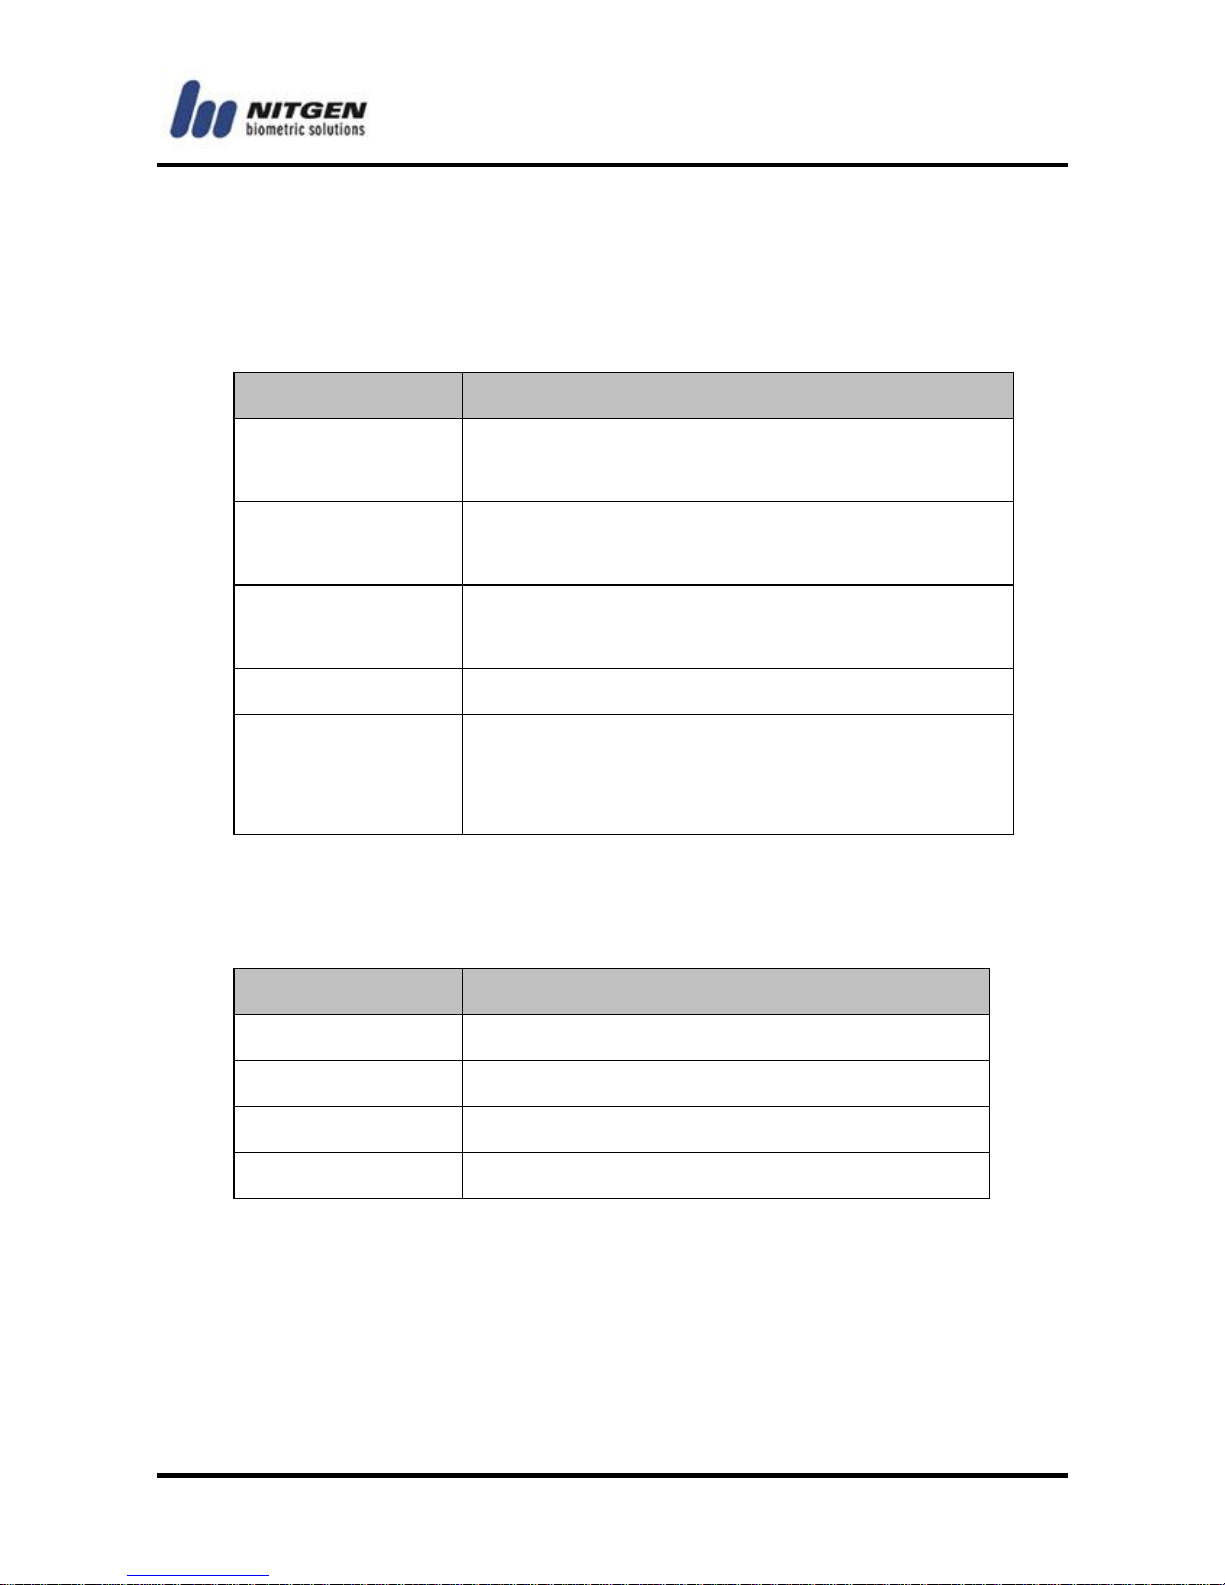
System environment
Server system (Access Server)
Client system (Remote Manager/Remote Monitor)
Fingerprint recognition device (USB Type)
To authenticate manager fingerprint or enroll user fingerprint on a
PC, you must install the NITGEN fingerprint recognition mouse or
the fingerprint recognition hamster.
Section
Content
O/S
MS Windows 98SE/ME/2000/XP/2003
( Winows 2000 or later Recommended )
CPU
Pentium III 500 MHz or later
(Pentium IV 1 GHz or later Recommended)
RAM
128 MB or more
( 256 MB or later Recommended)
Hard disk space
5 GB or more
Database
MDB / MS-SQL Server 2000 & 2005
( Regard to the manual “MSSQL Setup
Guide”. )
Section
Content
O/S
MS Windows 98SE/ME/2000/XP/2003
CPU
Pentium II or later
RAM
64 MB or more
Hard disk
1 GB or more
Page 10
- -
10
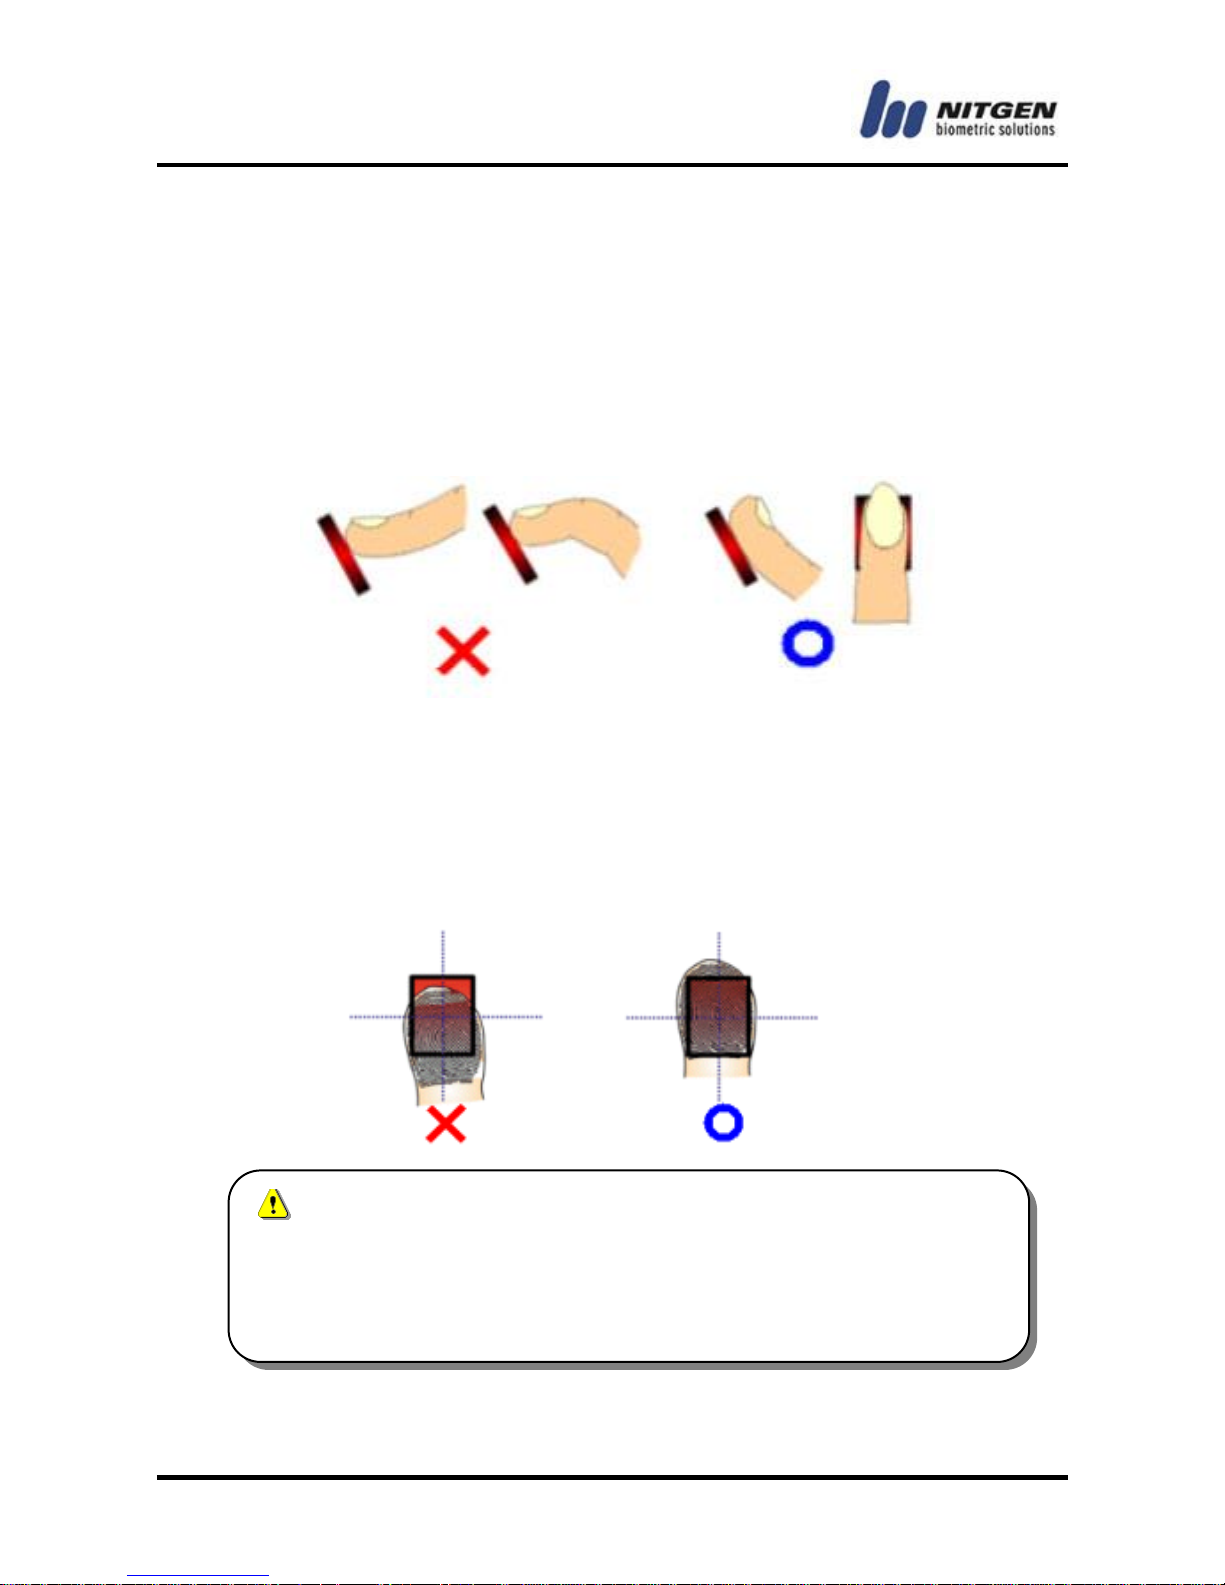
1.2 How to input fingerprint
When you enroll and authenticate user fingerprint, do the
followings to avoid authentication error:
Press your finger evenly to maximize the input area. If we say
the weakest push as 0%, and the strongest push as 100%, apply
50~70% of force.
Make sure that the core of the fingerprint is at the center. In
general, the core of the fingerprint is on the same line as the
lunula of the fingernail. So locate the lunula of the fingernail at
the center of the fingerprint input window.
The recognition performance of the fingerprint recognition
device largely depends on the skill of the user. Follow the
fingerprint input method described above to improve
recognition performance.
Page 11

-11-
1.3 Authentication types
With the NITGEN access control system, you can use fingerprints,
passwords, and RF cards (optional) for authentication. Depending
on customer environment, you can use one of the following
authentication types as you need.
Fingerprint authentication
Use fingerprints to validate access authentication with the following
types:
1:1 authentication
In this mode, you should input ID first and then your fingerprint.
The enrolled fingerprint corresponding to the ID will be compared
to the entered fingerprint on a 1:1 basis. The 1:1 authentication
type takes a short time regardless of the number of users. There is
no need to make any special settings in the system. After entering
the ID, enter the fingerprint to perform authentication.
1:N authentication
In this mode, you need to enter only fingerprint without ID. Though
the authentication procedure is simple, this method will take a little
longer than the 1:1 authentication if there are many users. There is
no need to make any special settings in the system.
Short ID (SID) authentication
The user ID can be 4 - 15 digits long depending on the initial
setting. This method simplifies ID input procedure. Instead of
entering the entire registered ID, you can enter only the first part of
the ID for authentication. For example, if the user ID is 1234567,
enter 12 only and then the fingerprint. Then the system will
perform 1:N authentication for all IDs that start with 12xxxxx. There
is no need to make any special settings in the system.
Page 12
- -
12
Group authentication
For group authentication, you can specify a group ID of 1 - 4 digits
long for each user group. You will enter a group ID and a
fingerprint for authentication. For example, you can use the unit
number for public housing like an apartment as a group ID. You
can specify a group ID when you register a user. Unlike other
methods, you must enter the group ID, and then press F1
before entering the fingerprint to perform group authentication.
( NAC-3000 only support the function of “Group authentication”.)
Password authentication
A password of 4 - 8 digits long is used to validate access
authentication. You can use this method in such a special case as
when the fingerprints are damaged.
RF card authentication (optional)
The RF card of a user is used to identify the user. The card
number must be registered into the system to use the card.
The dedicated terminal to RF card supports user
authorized type of password and RF card ID.
Page 13

-13-
Chapter 2
Installation
Page 14

- -
14
Preparation before installation
1. Fingerprint sensor (USB Type)
To authenticate manager's fingerprint or register user's
fingerprint on a server or client PC with the program, NITGEN
fingerprint sensor and driver (Easy Installation v.1.32 or later)
must be installed.
For more information on how to install, please refer to the
enclosed manual (“Driver Installation for fingerprint sensor”) with
the fingerprint sensor product.
2. Server and client PCs
If you have to register a lot of users or manage a lot of te
rminals, we recommend installing the program on a stable
PC. We also strongly recommend using the server for acce
ss controller management only.
3. Network
TCP/IP protocol should be installed on the server and Client
PCs. Contact your network administrator to check if a fixed IP
address has been assigned to the server PC.
Page 15
-15-
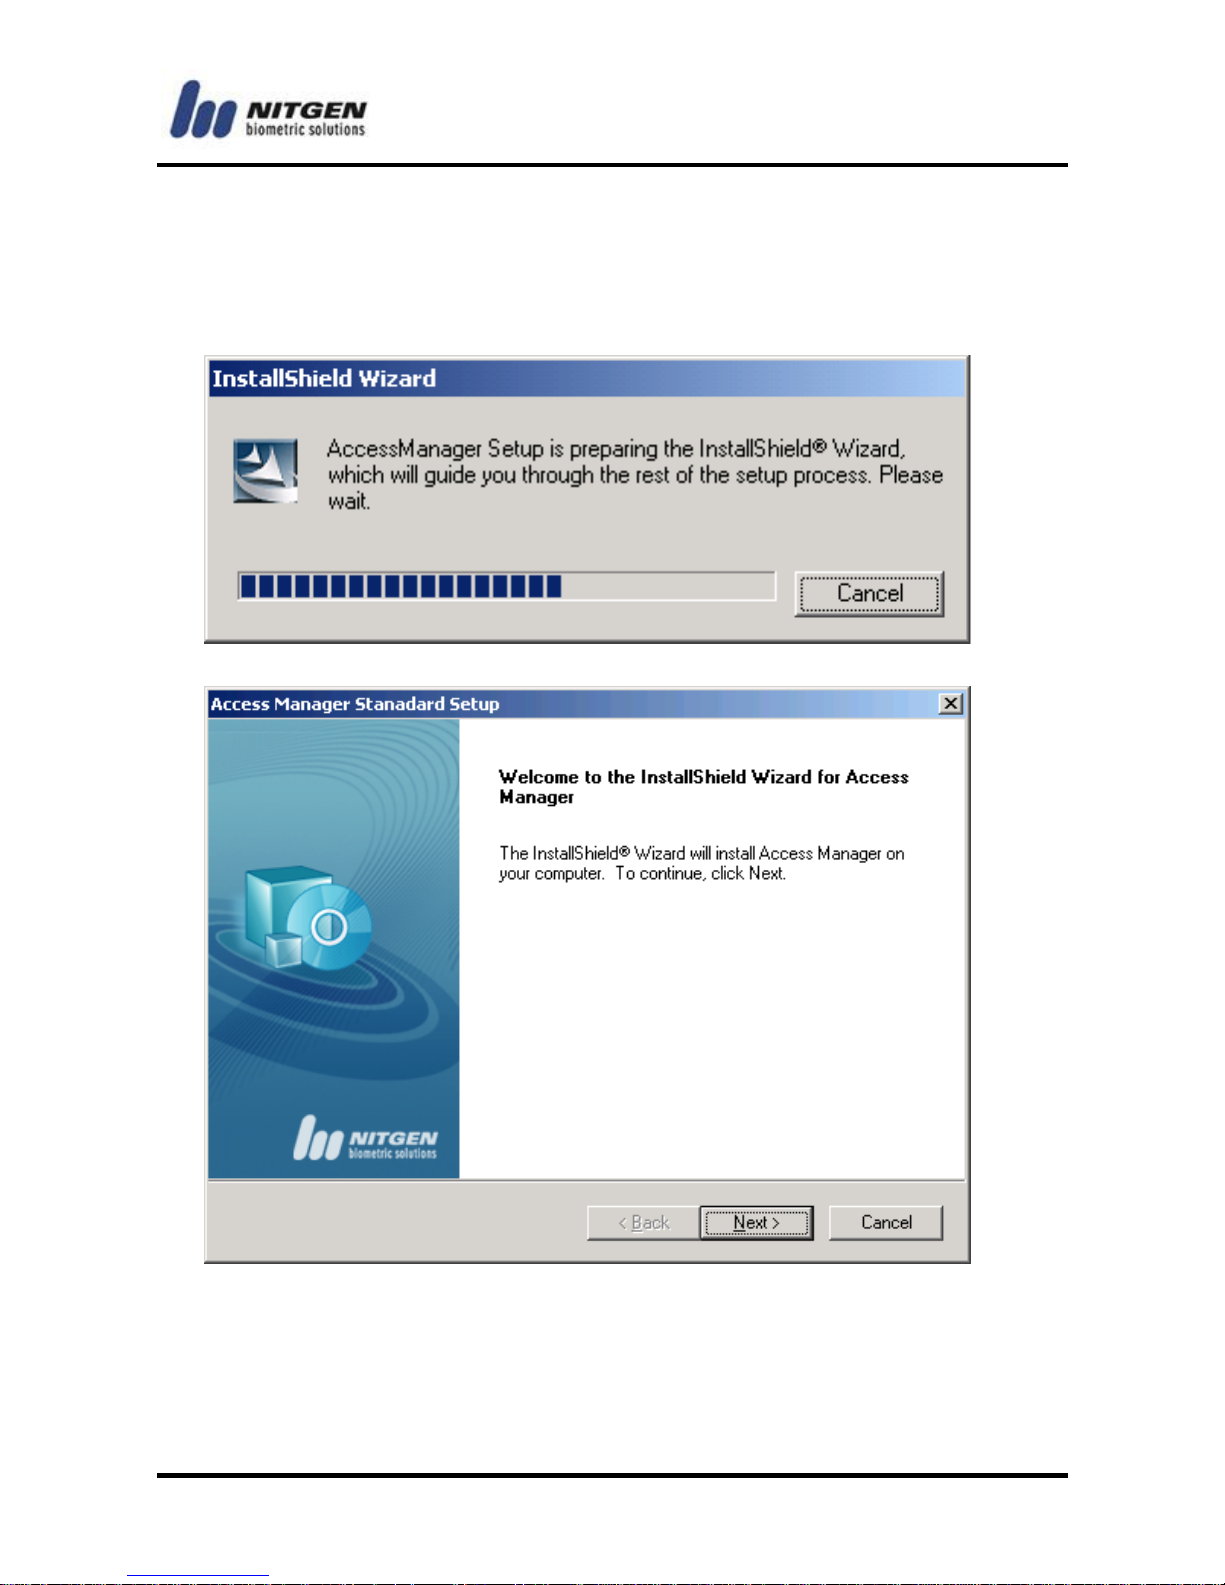
Installation
Run Setup.exe from the Access Manager folder in the CD, and the
installation is proceeding as below:
Click <NEXT> to continue the installation.
Page 16
- -
16
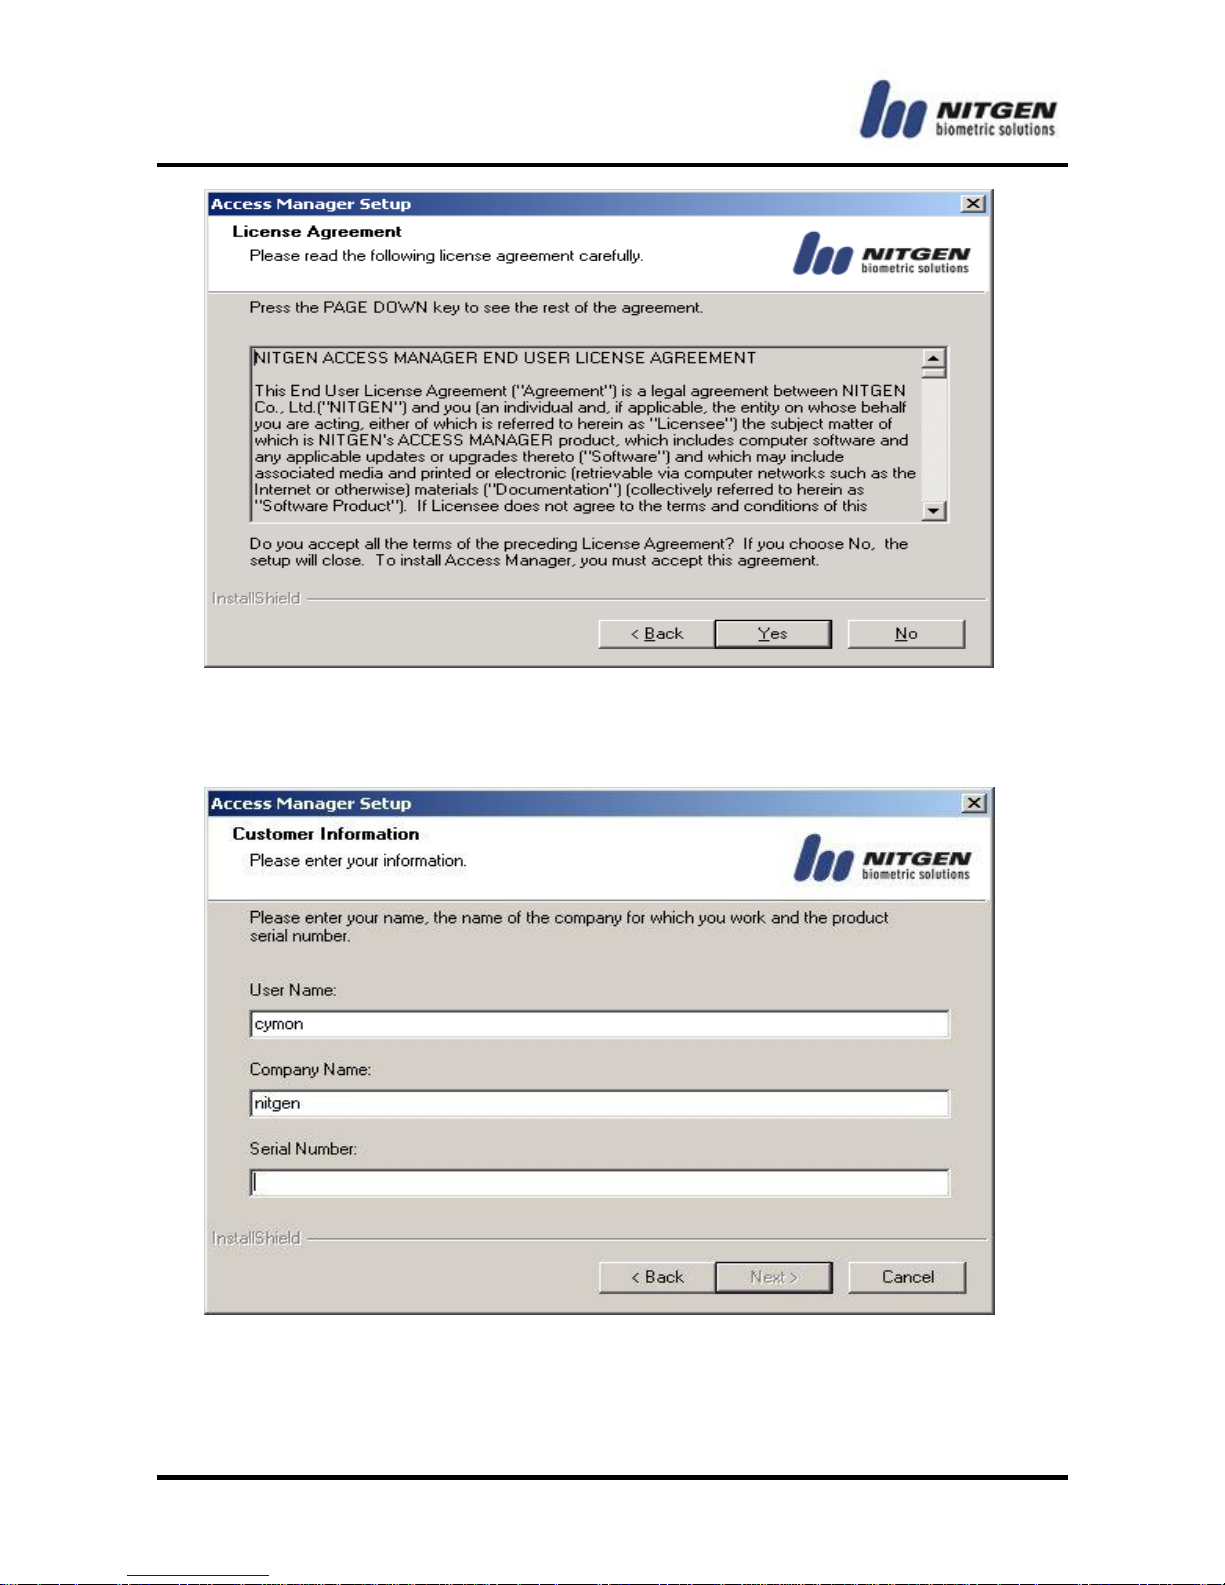
Click <YES> to accept the license agreement and continue the
installation. If you click <NO>, the setup will be canceled.
Enter your information and the Product Serial Number and Click
<NEXT> to continue the installation.
Page 17
-17-
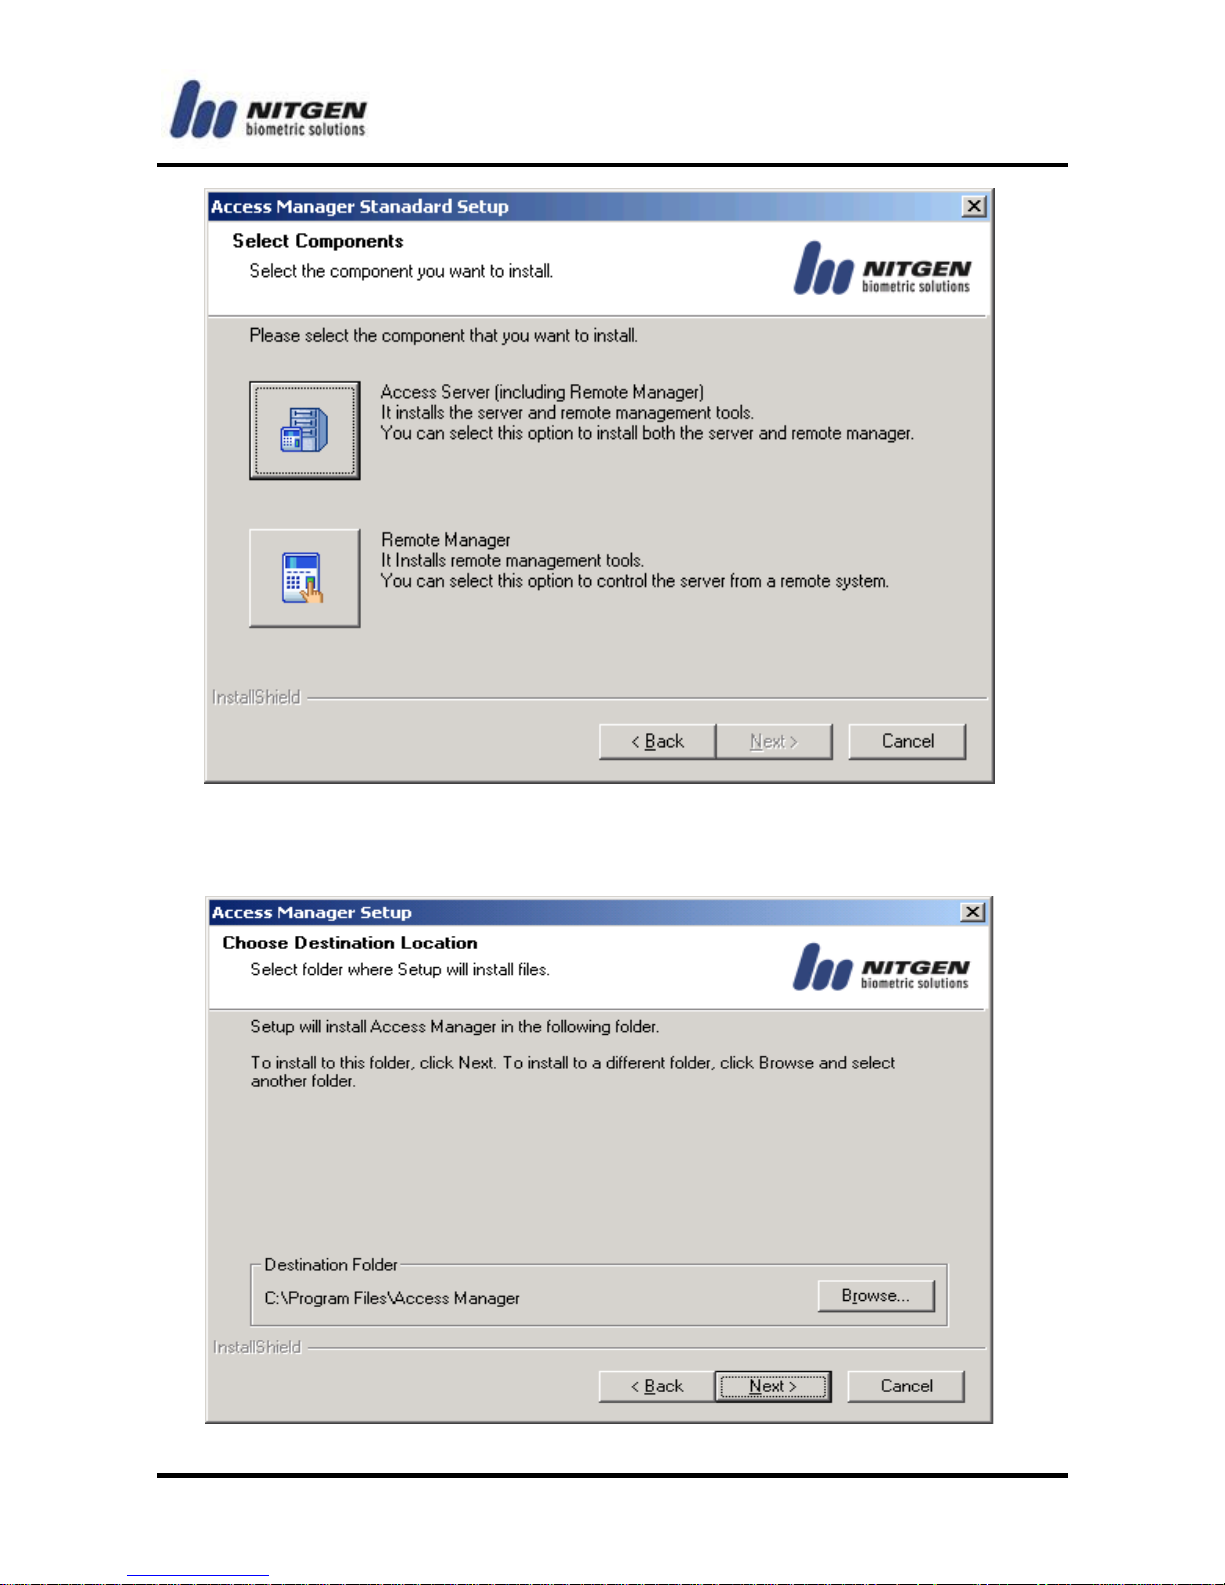
Click the <Access Server> to install the program on the server PC.
Or click the <Remote Manager> to install it on the remote client PC.
Page 18
- -
18
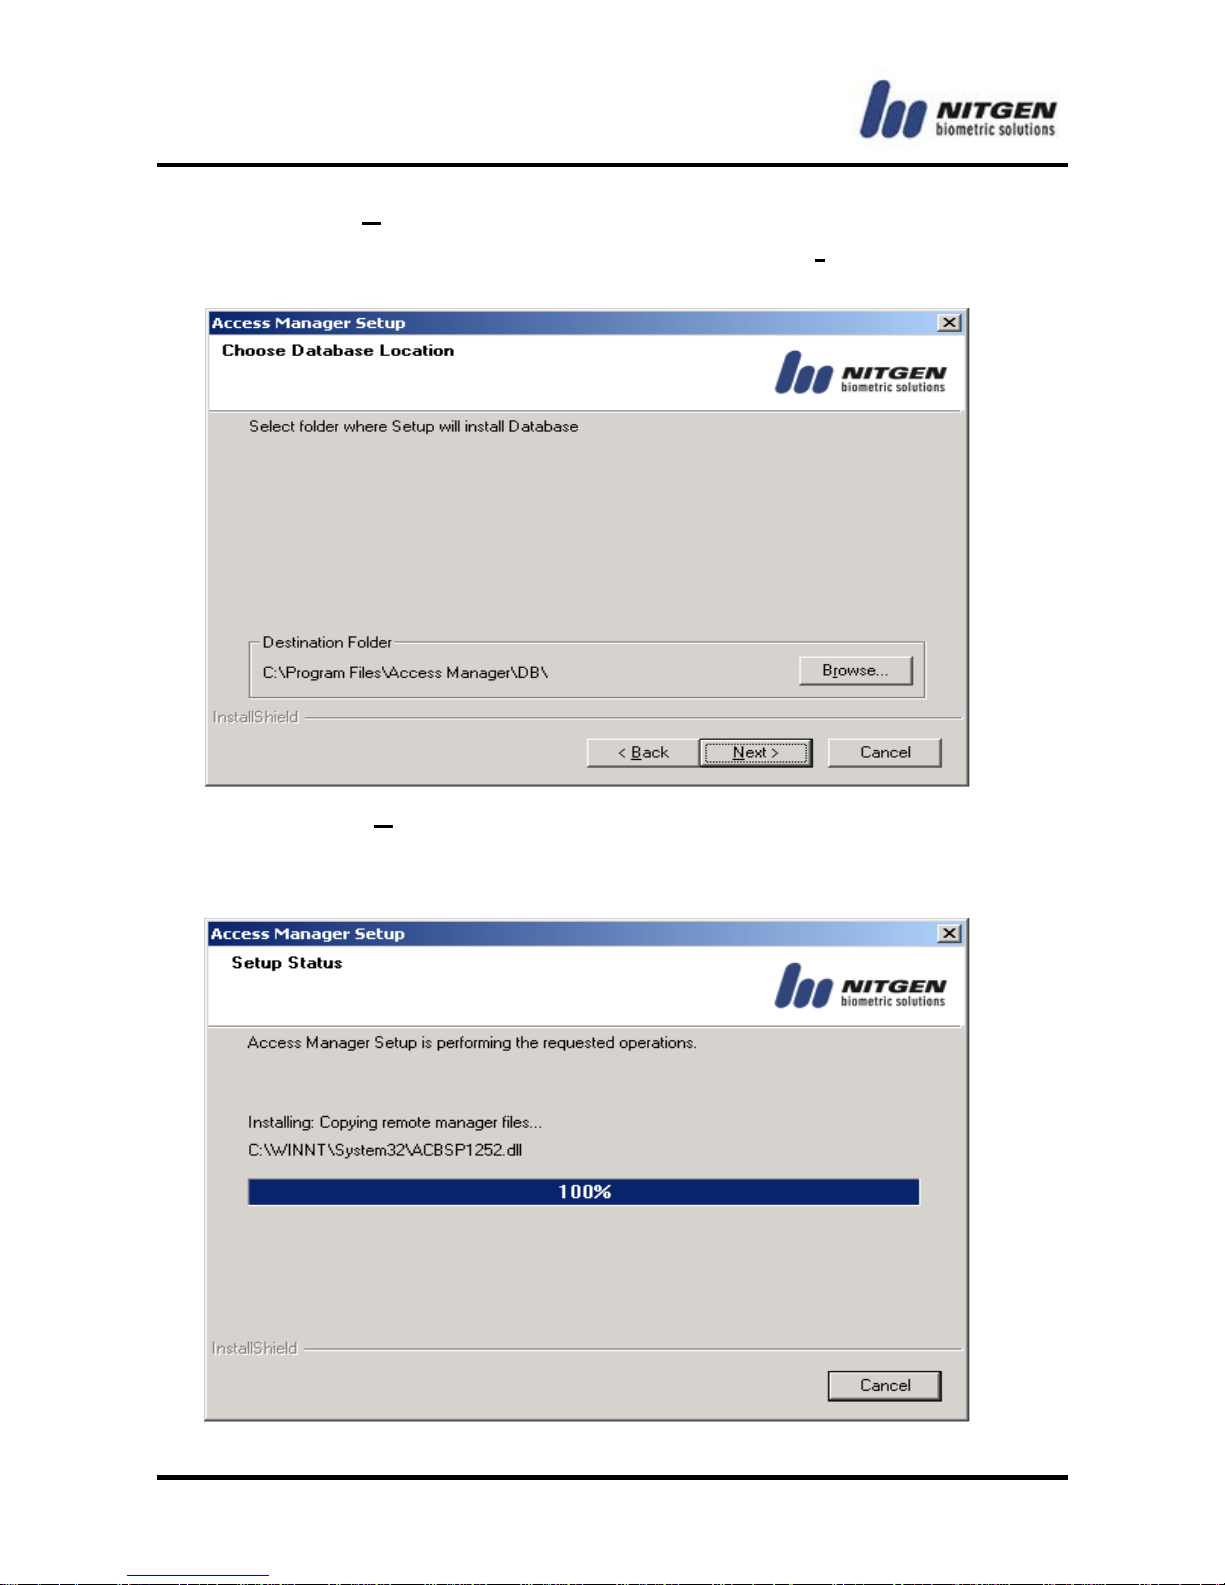
If you click <Next>, Access Manager will be installed in the default
location. To install it in a different location, click <Browse> to locate
another folder.
If you click <Next>, the database will be installed in the default
location. To install it in a different location, click <Browse> to locate
another folder.
Page 19
-19-
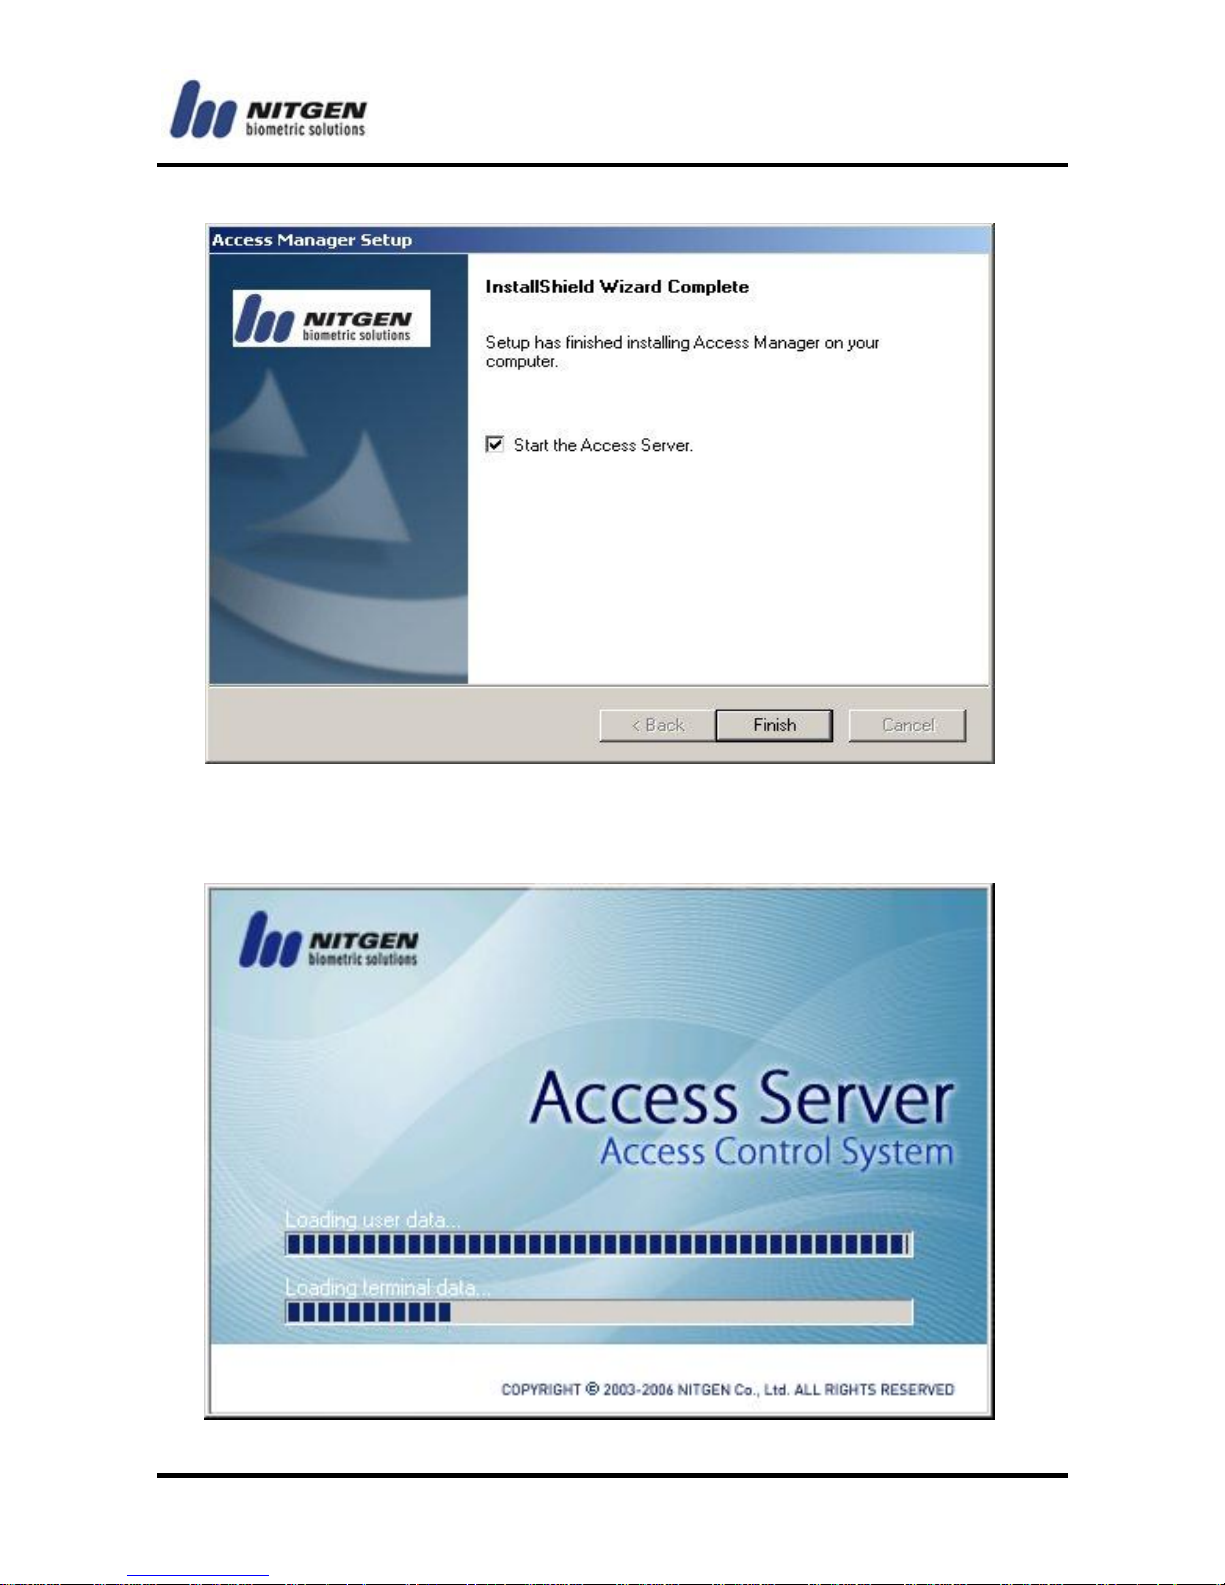
If you click <Finish>, the installation will be completed and Access
Server will be launched as below:
Page 20
- -
20
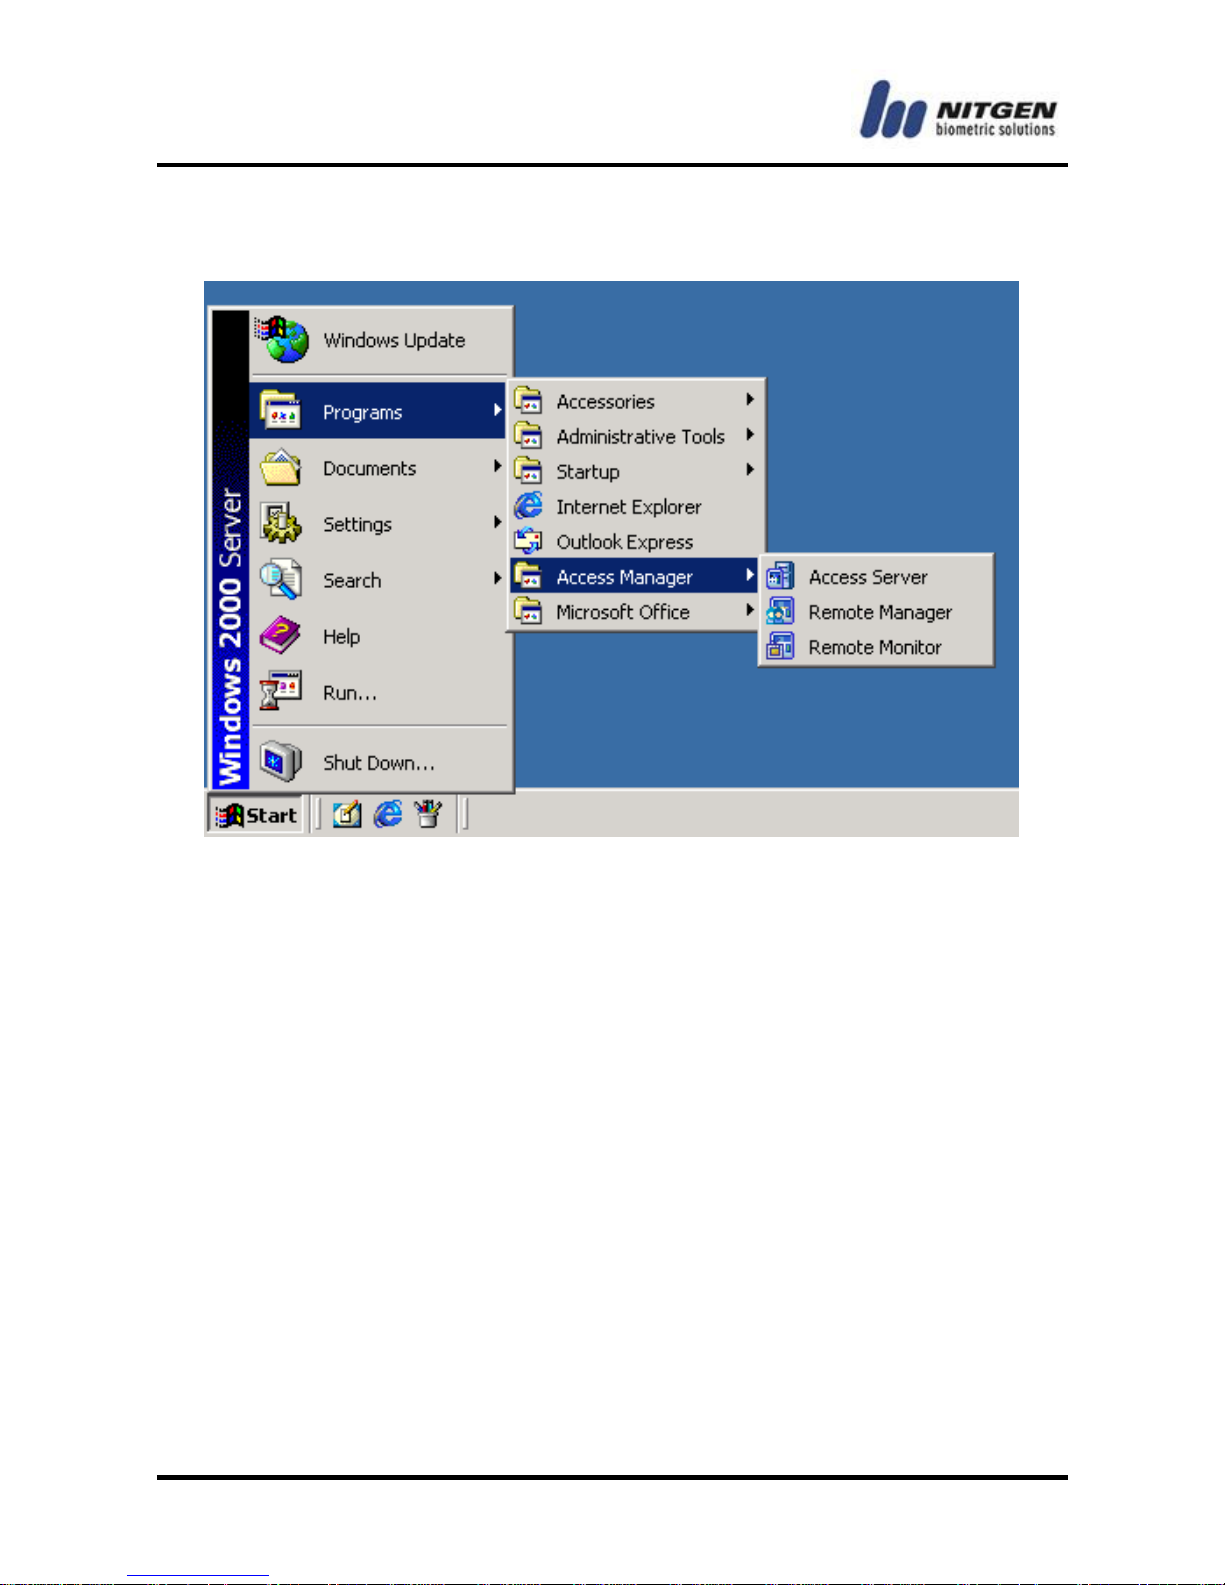
The Access Manager programs are added to the Windows Start
menu as below:
Page 21

-21-
Chapter 3
Program Introduction
3.1
Program overview
- 22
3.2
Basic setting and running
- 23
3.3
About menu
- 41
Page 22

- -
22
3.1 Program overview
Access Manager, the access control program, consists of Access
Server (server program), Remote Manager (client program), and
Remote Monitor (client program). Remote Manager and Remote
Monitor can be installed and used either on a same PC together
with Access Server, or on a remote PC on the network.
Access Server
Access Server communicates with the terminal and the remote
manager program. It has user database and event log database,
and performs fingerprint authentication in server authentication
mode. The manager cannot manage the server directly, but can
access and manage it only through Remote Manager and Remote
Monitor which are capable of simultaneous access of up to 8.
Remote Manager
It can be connected to the server to manage database. It can also
control and manage the access control terminal connected to the
server via the network.
Remote Monitor
It can be connected to the server to monitor terminal status and
event in real-time.
Page 23
-23-
3.2 Basic setting and running
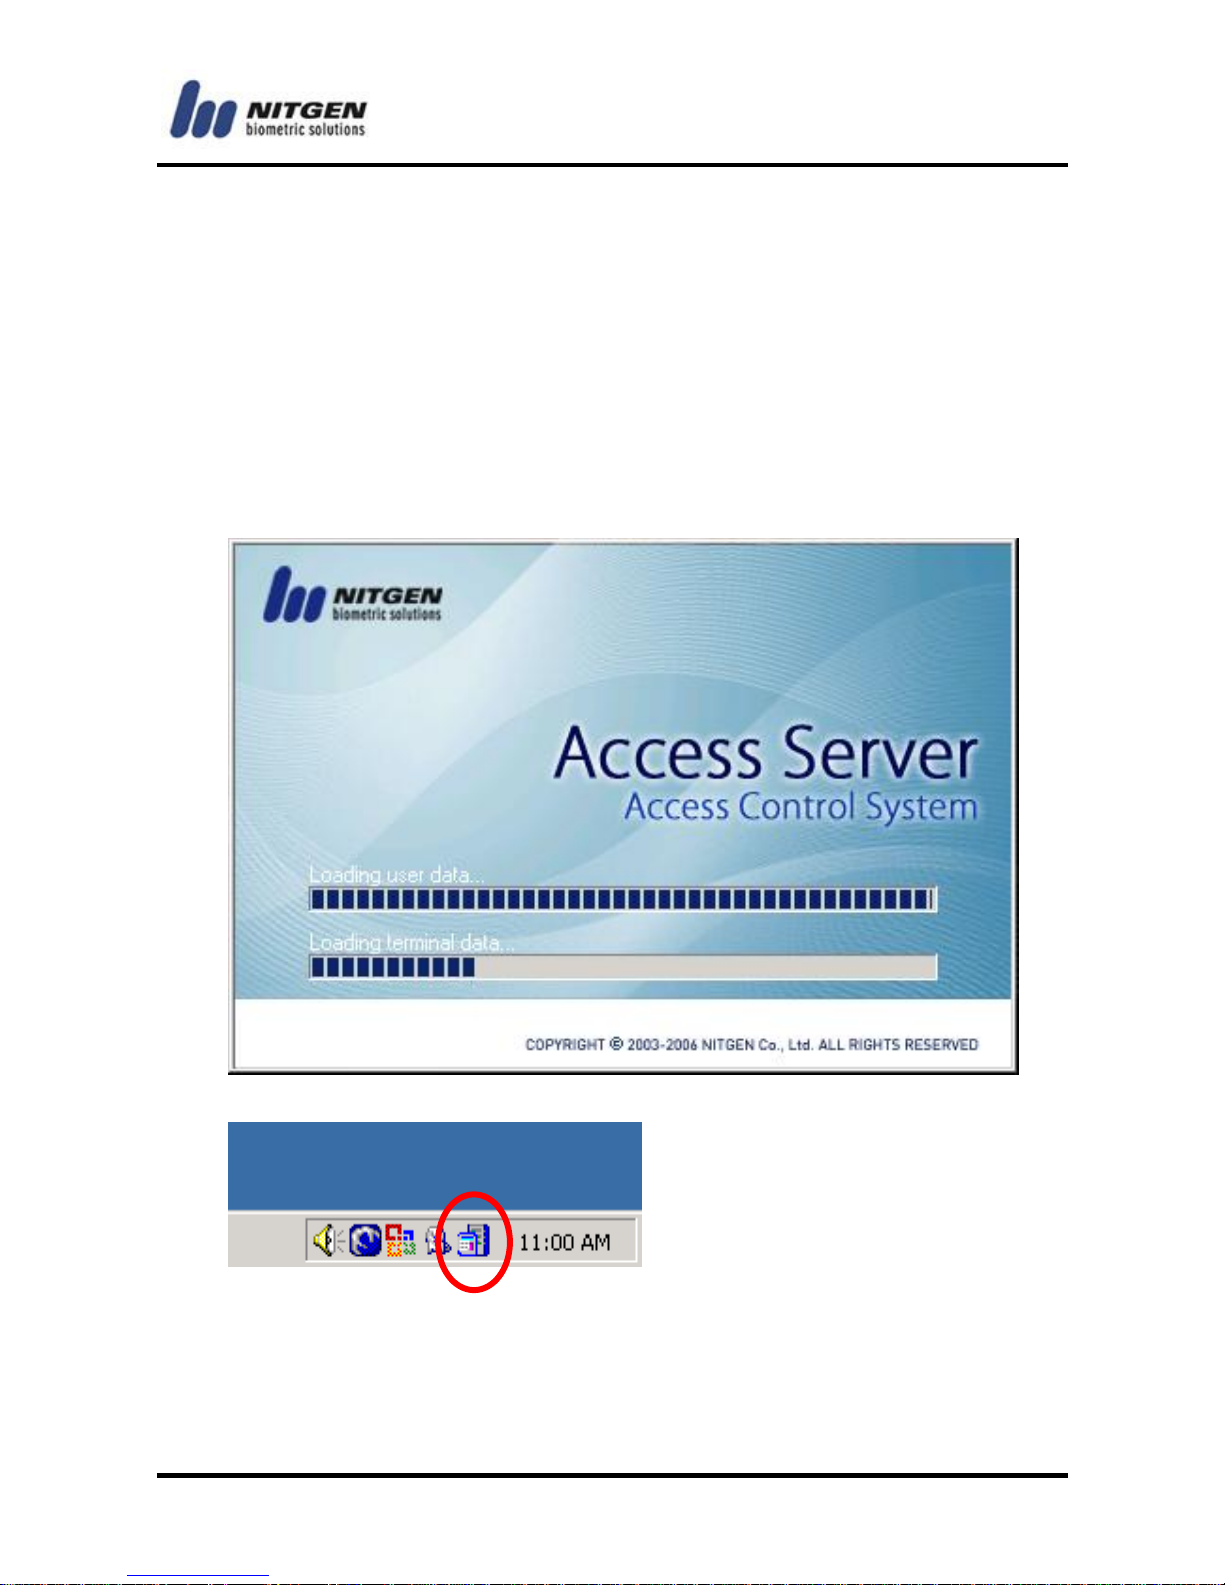
Running and setting of Access Server
When you launch the program, the below screen will appear with
the progress bar. After installation is completes, an icon will be
displayed in lower right corner of the screen to indicate the server
installation status.
Page 24
- -
24
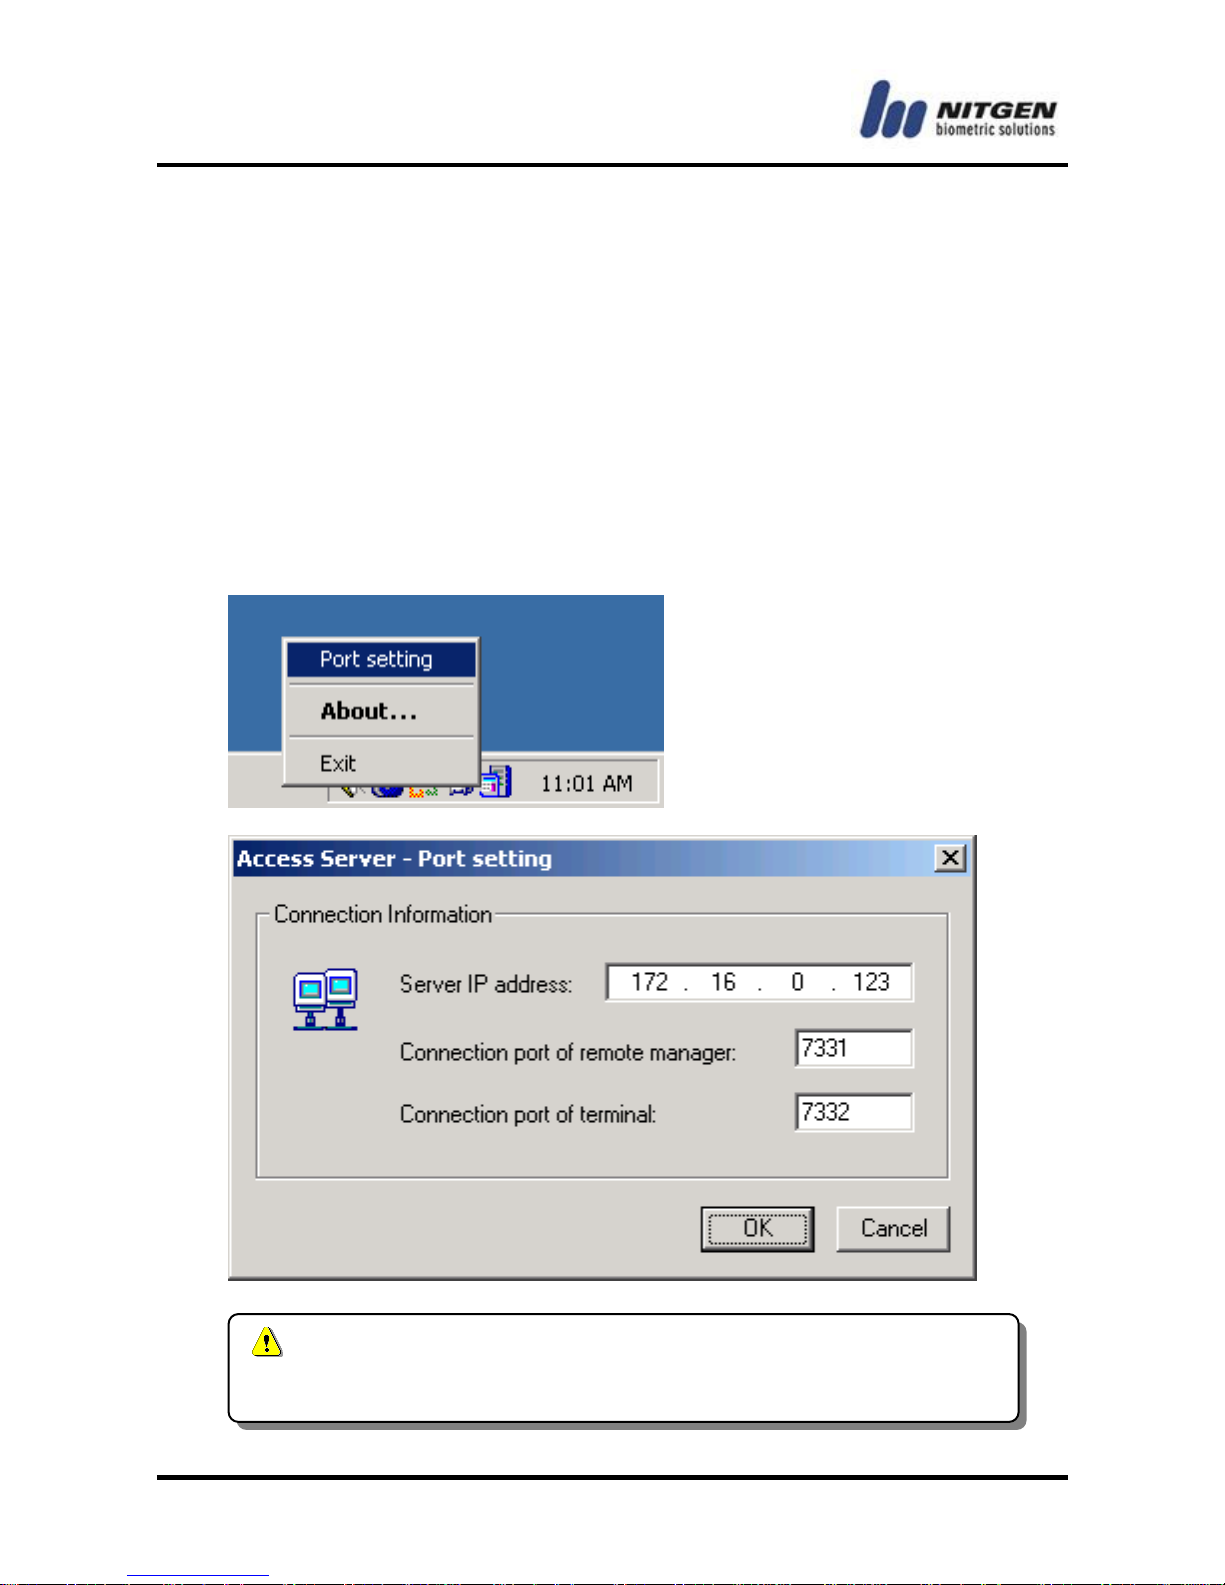
Port setting
Communication port match is required for the remote management
programs (Remote Manager and Remote Monitor) or the terminal
to communicate with the server (Access Server).
By default, all communication ports are matched. If there is any
conflict on server communication port, change it as well as the
access port of the remote management program or the terminal.
Right-click the server icon in the lower right corner of the screen
and choose Port setting to change port.
The port values displayed on the dialog above, might be
different from these of your site.
Page 25
-25-
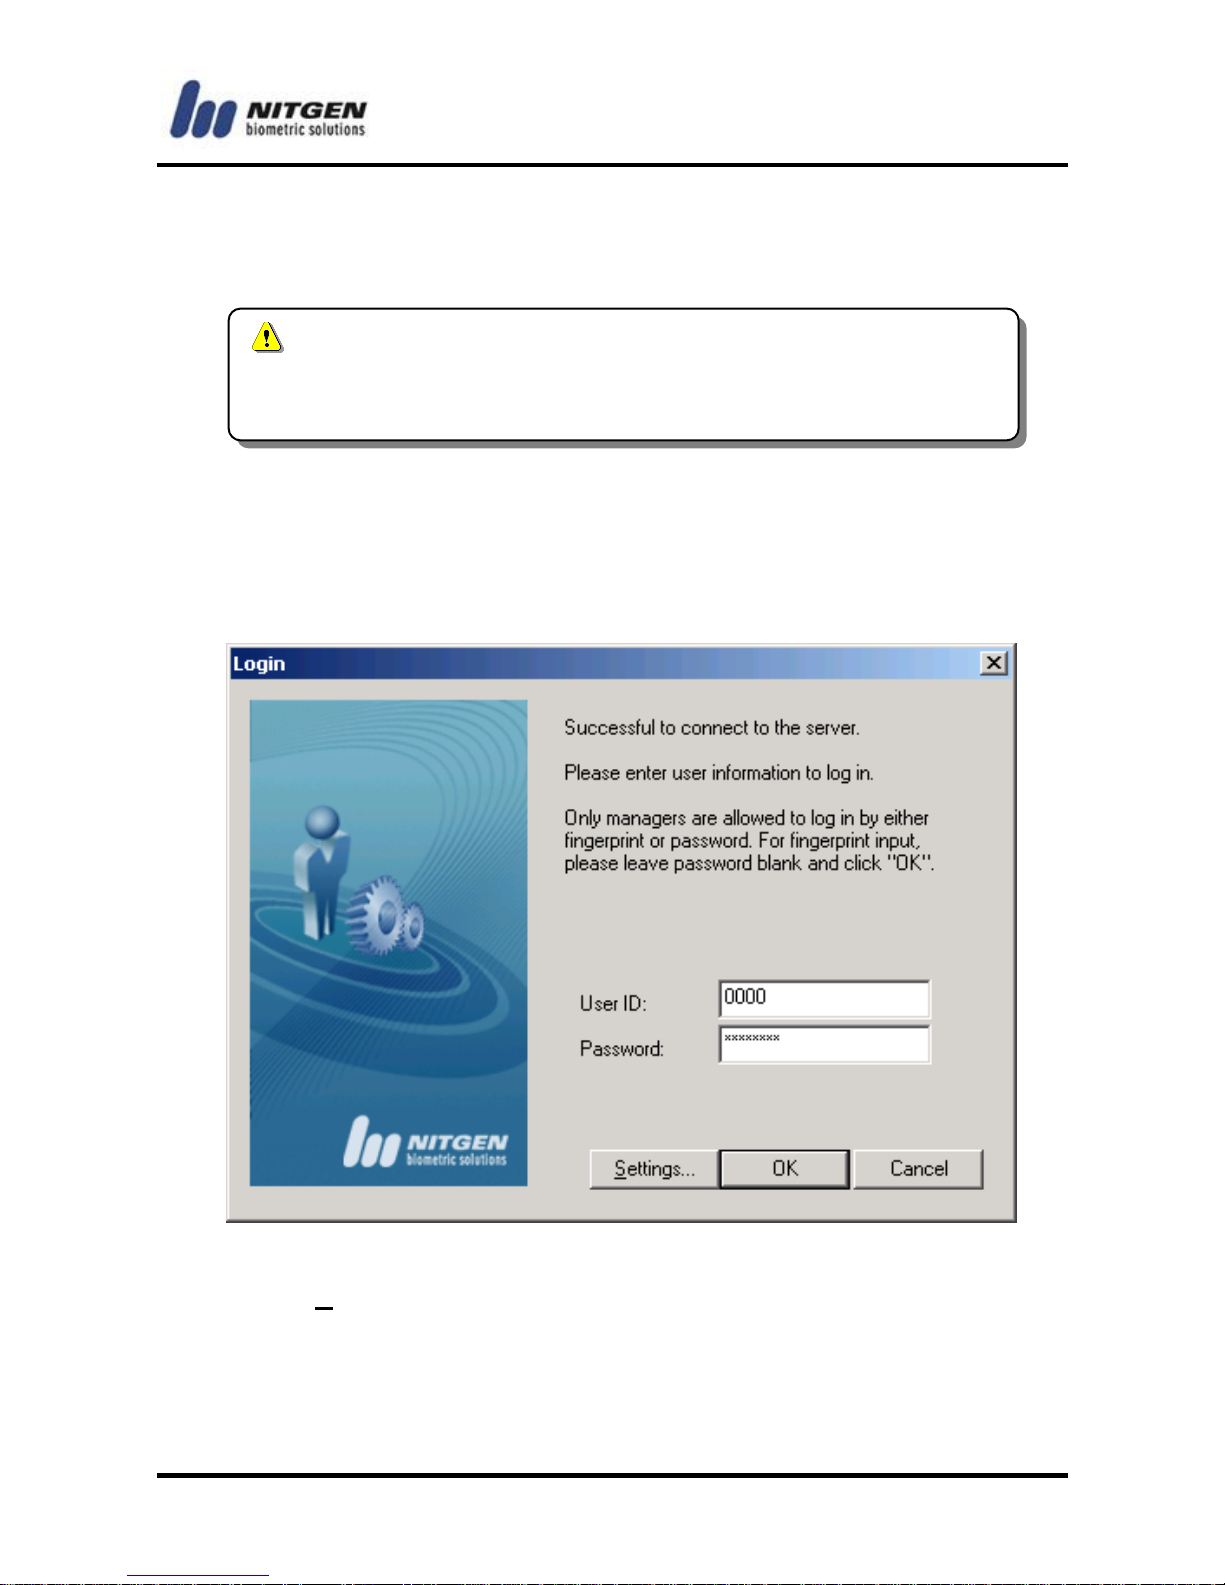
Running Remote Manager
If you install and run Remote Manager in the server PC, you do not
need to change network settings. When you run it from a remote
location for the first time, you will have to change network settings.
Click <Settings...> and set the network address of the server as
follows:
You can use Remote Manager and Remote Monitor only
when Access Server is active. Please run Access Server
first.
Page 26
- -
26
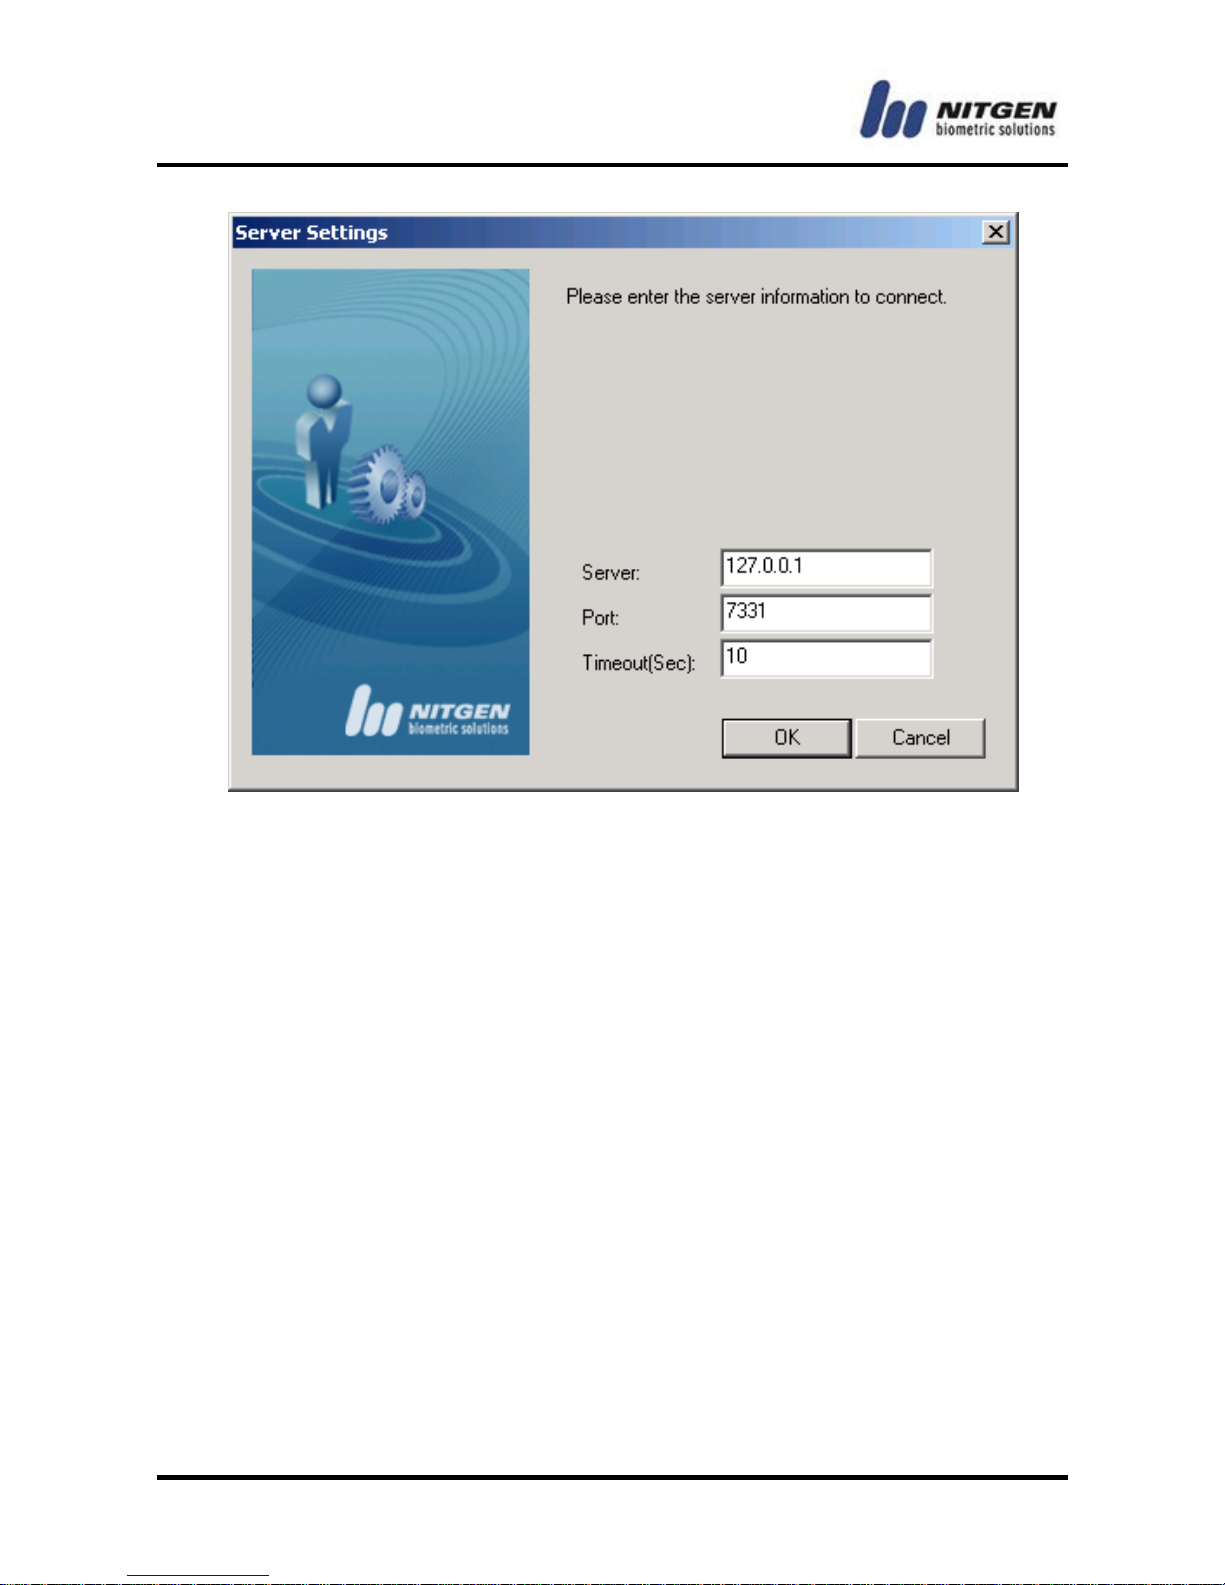
Server:
Enter the IP address of the server. The default is 127.0.0.1. If you
run Remote Manager in the server PC, use the value.
Port:
This is a port number for network communication with the server. If
there is a conflict, you must change it together with the port value
specified in Access Server.
Timeout (sec):
Enter a timeout value for network connection with the server. Any
connection attempt will stop after the specified time.
Click <OK> to complete the setting.
Page 27
-27-
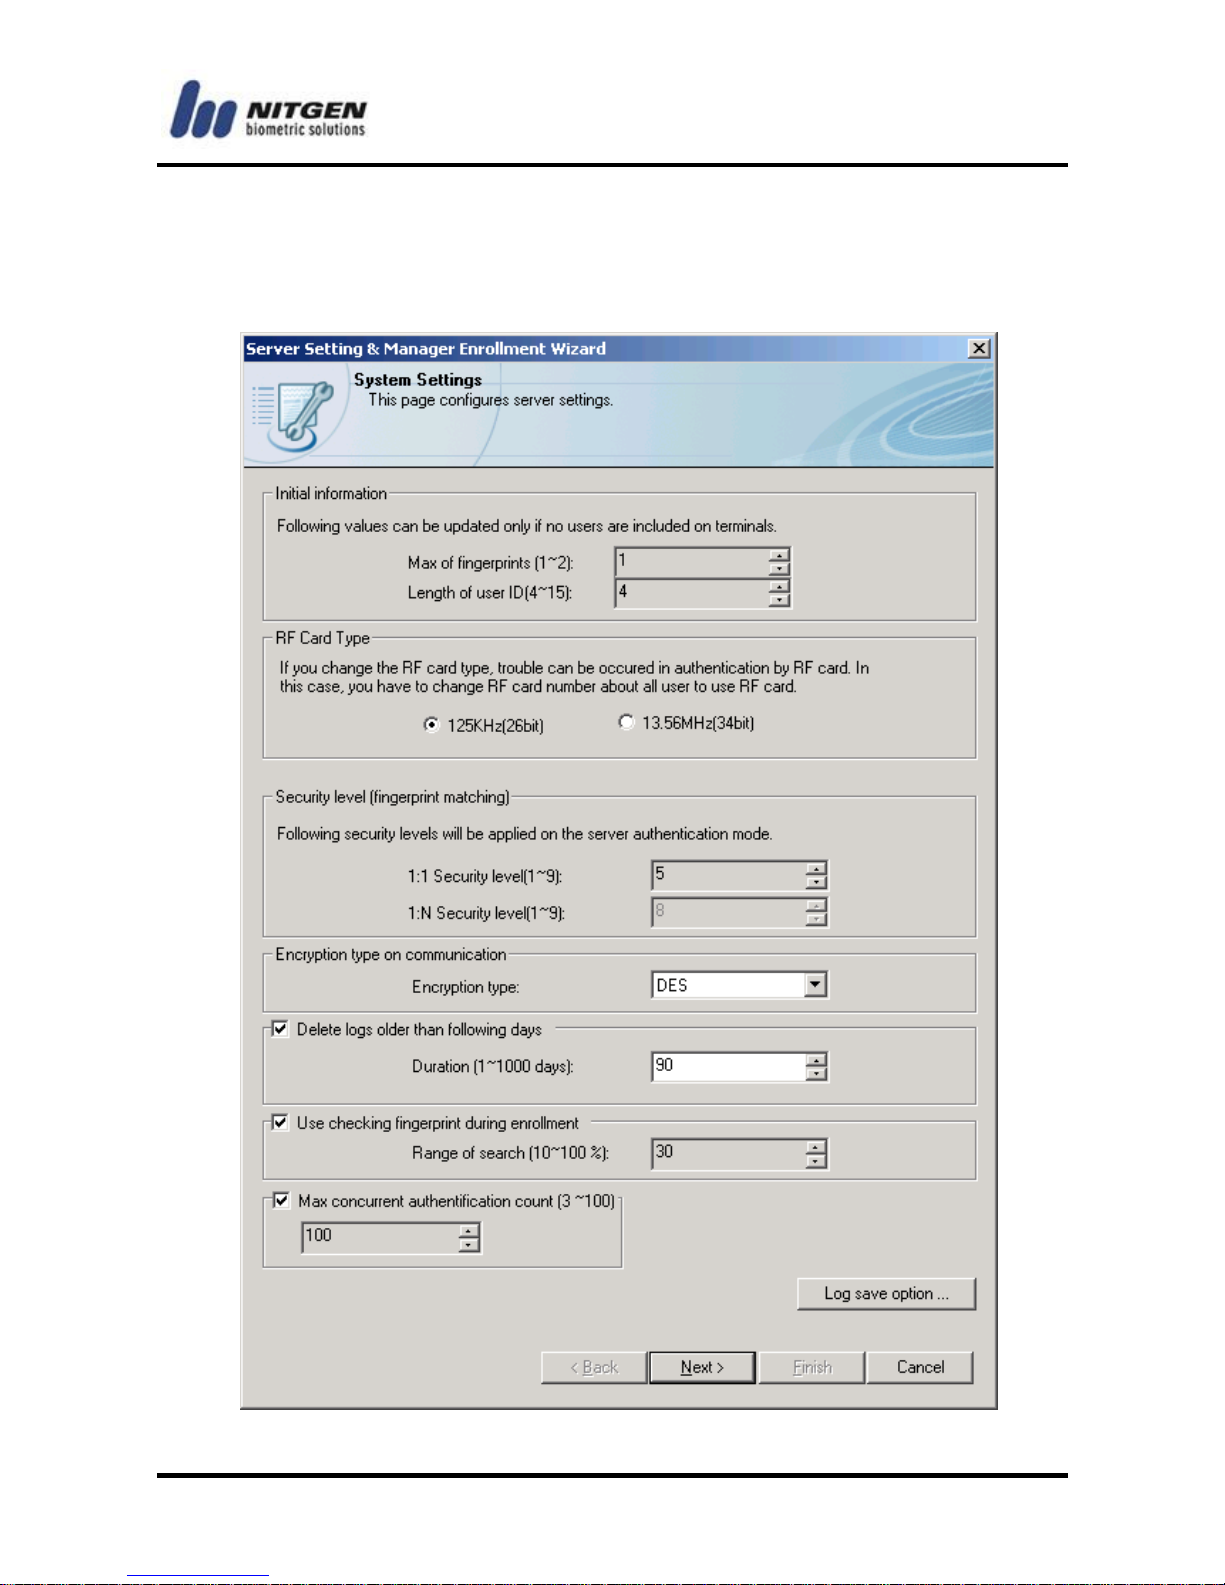
If you run Remote Manager for the first time either from the server
PC or from a remote PC on the network, the following Server
Setting & Manager Enrollment Wizard will appear immediately.
Page 28
- -
28
Initial information
Initial settings are hard to change because of the database
structure. So please set them up carefully. But you can increase
the value of Max of fingerprints or Length of user ID if you delete
all users registered in the terminal.
Max of fingerprints:
Specify the number of fingerprints that a user can enroll (1~2).
Length of user ID:
Specify ID length in 4~15 digits.
RF Card Type
When using RF card for user authentication, the RF card type must
be selected as the same with one in terminals. Please note that
change of this setting requires updating all users‟ RF input values
as well.
125 KHz (26bit) – low frequency
13.56 MHz (34bit) – high frequency
Security level (fingerprint matching)
To decrease the value of Max of fingerprints or Length of
user ID, you must delete all users registered in the server.
The card only terminal doesn't support some functions :
such as Max of fingerprints, Security level, Max
concurrent authenticatation count and Use checking
fingerprints during enrollment.
Page 29
-29-
Specify security level if you use fingerprint authentication. You can
choose a level between 1 and 9. The greater the number is, the
higher the security level is. You can specify security levels for 1:1
mode and 1:N mode separately to use the system more efficiently.
In general, set the 1:N mode security level higher than the 1:1
mode one.
1:1 Security level(1~9):
In this mode, ID should be entered first and then fingerprint needs
to be entered. The default is 5. The enrolled fingerprint
corresponding to the ID will be compared to the entered fingerprint
on a 1:1 basis, so you can set lower security level in this mode
than in 1:N mode without degrading security.
1:N Security level(1~9):
In this mode, you need to enter only fingerprint without ID
The default is 8. (This setting is not updatable.)
Encryption type on communication
Decide whether to encrypt incoming and outgoing content of
terminal in network communication.
Encryption type:
Choose whether to encrypt with DES.
A high security level may increase the false rejection rate
(fail to authenticate the right person) depending on the
quality of the fingerprint. In contrast, a low security level
may increase the false acceptance rate (allow
authentication for the wrong person).
Page 30
- -
30
Delete logs older than the following days
You can choose whether to save user access information with
period. If the terminal is connected to the network, access
information is transferred to the server in real-time, whereas if it is
in standalone mode without network connection, information is
saved within the terminal.
Use checking fingerprint during enrollment
When registering fingerprints for user registration, „Use checking
fingerprint during enrollment‟ prevents overlapping registration of
fingerprints if the same or similar fingerprints are registered in the
system. By setting a % value, similar fingerprints that may fall
within the % range are screened.
Max concurrent authentication count
The maximum value of concurrent authentication can be set at
between 3 to 100 depending on the capability of the system in
preparation for the situation in which a multiple number of terminals
send signals simultaneously.
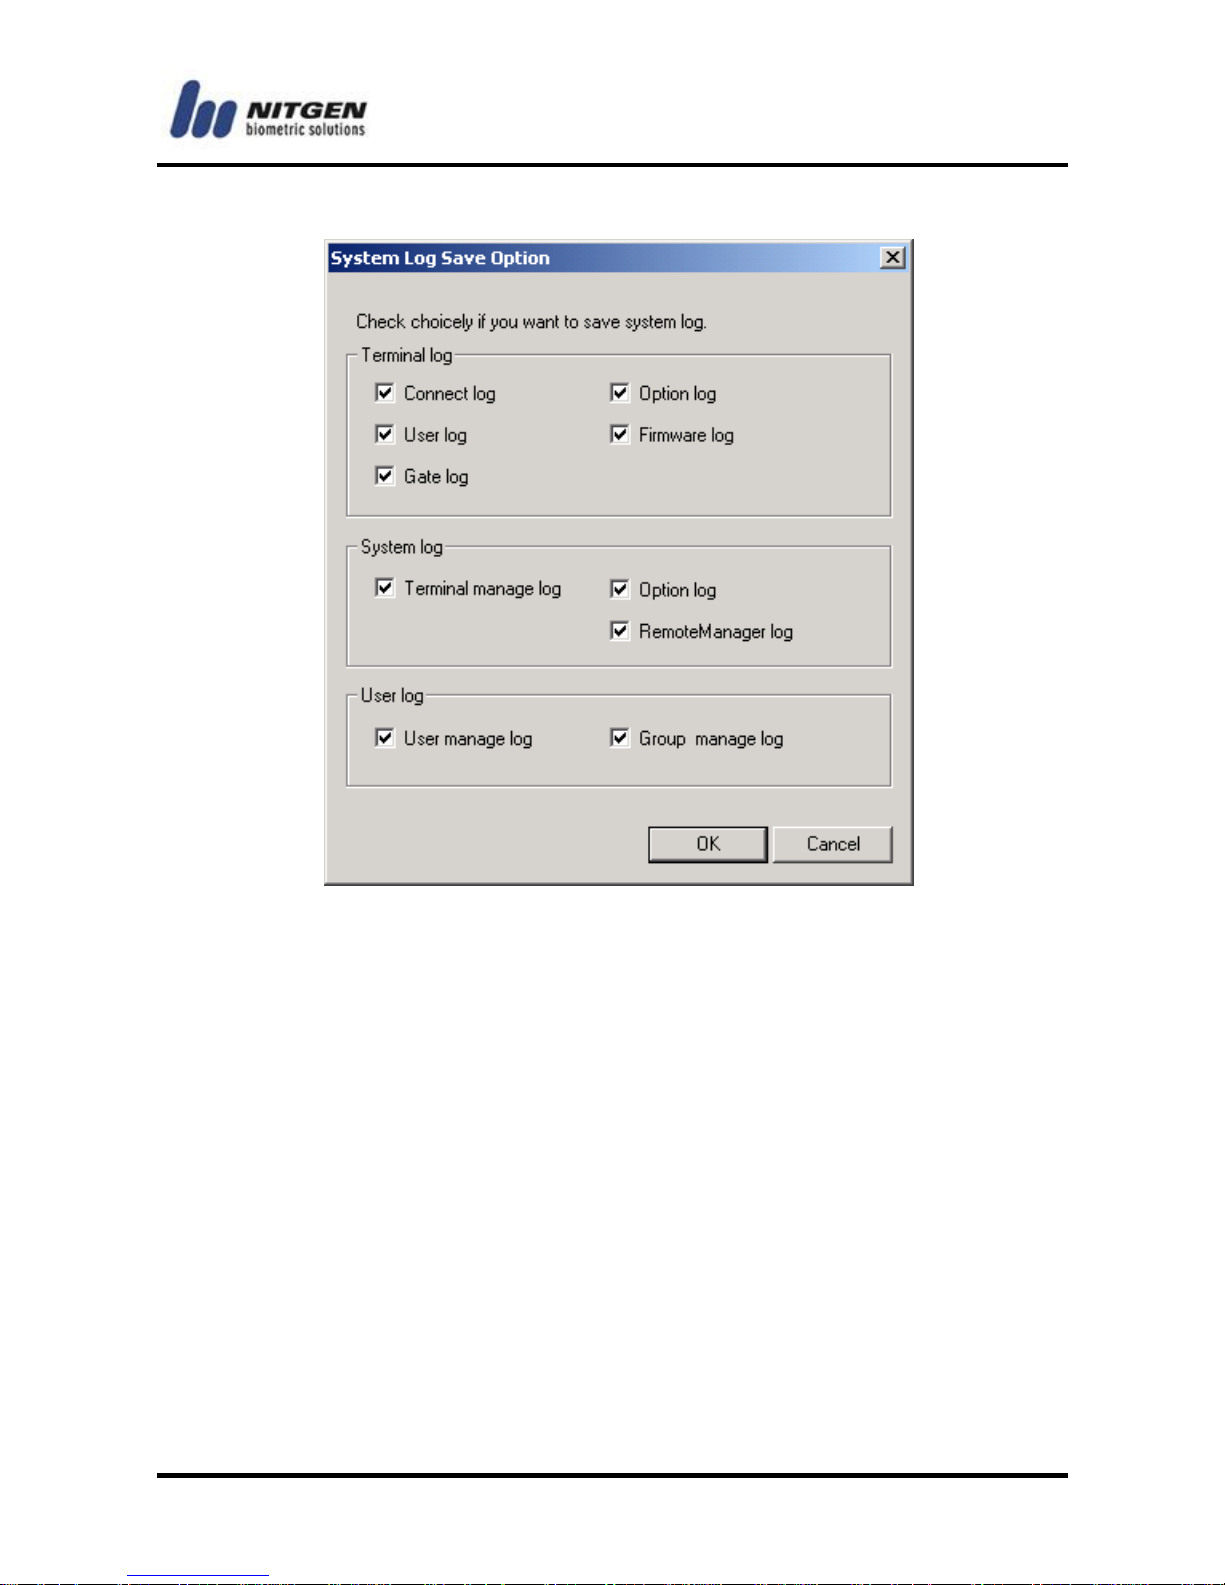
Log Save Option
For the system logs only, you can choose to save the logs you
want using System Log Save Option.
The system logs are diverse and occur frequently. So they need to
be saved in consideration of the system capacity. Choose only the
logs you need. By default, all are selected.
If you use encryption, security and system stability will be
enhanced. On the other hand, it will take longer to perform
encryption and decryption.
Page 31
-31-
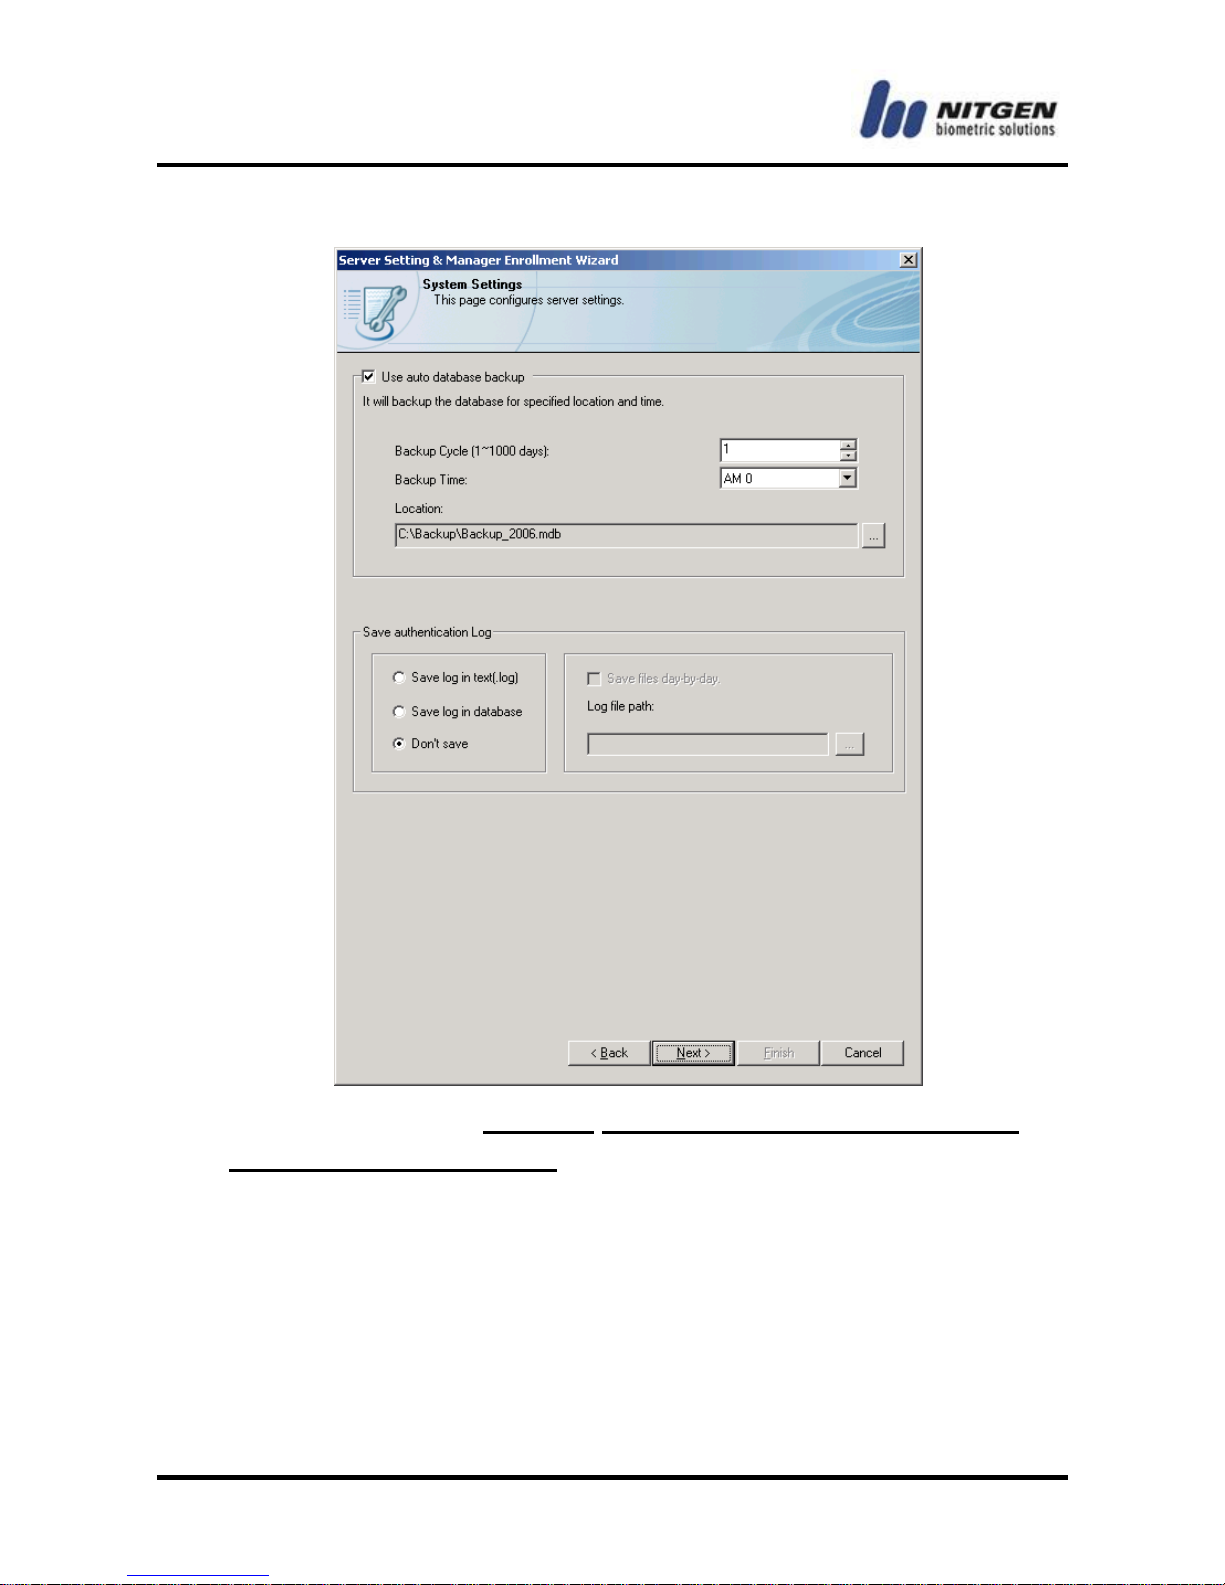
Click <OK> to continue the initial system setup, and the following
window will appear.
Page 32
- -
32
In the upper window, Location can be set only Remote Manager
program in the Server PC.
Use auto database backup
Choose this option to automatically back up the entire database
regularly. You can specify backup cycle (day), backup time, and
location.
Save authentication logs in text
Page 33

-33-
Use this option to save authentication log data as a text file so that
it can be used easily in such application as Time & Attendance.
The log file is saved separately from log data in the database.
● Save log in text(.log or .txt)
If you save the log file by date, the Log file classified by date. (The
date is the name of Log file)
● Save log in database
Lod data is saved at original DB in addition to a seperat database.
The name of the generated DB is „NITGENDBAC_EXT.mdb‟,
password is „123456‟.
There is only Log data in „NITGENDBAC_EXT.mdb‟, it can be used
for other external application programs.
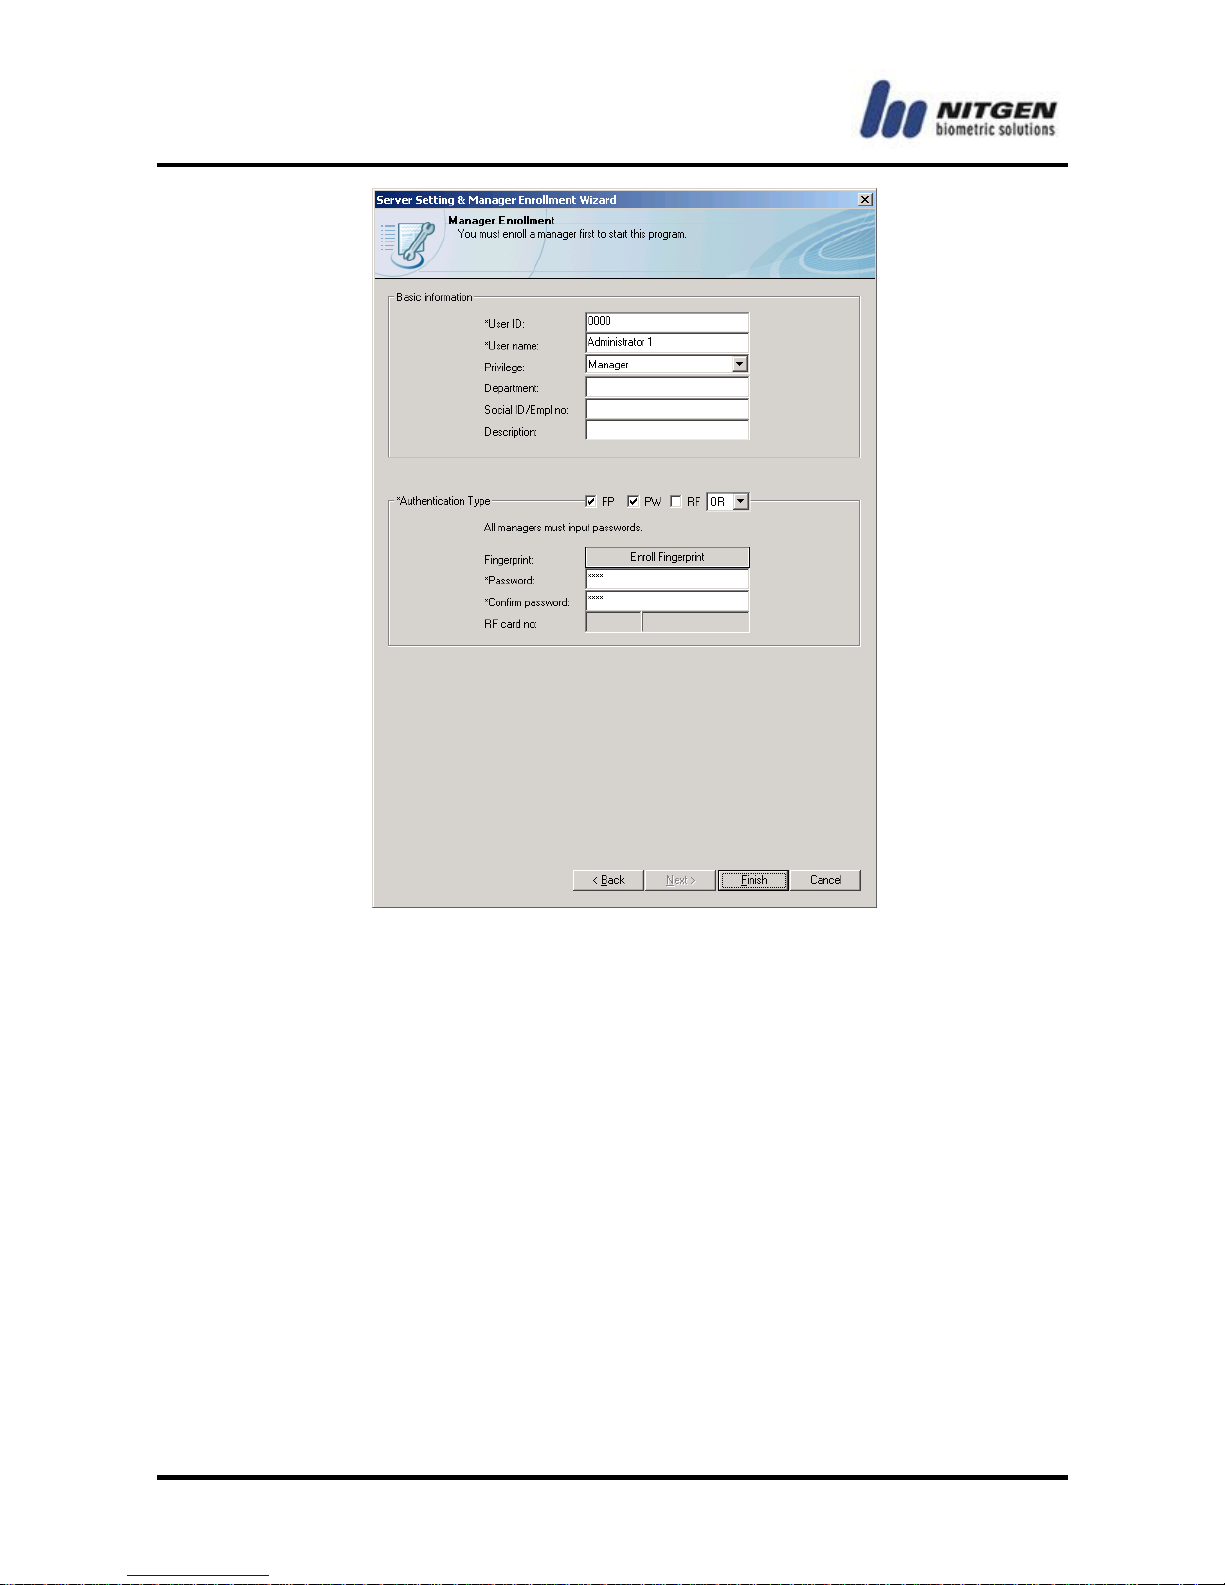
Click <Next> for manager registration, and the following window
will appear. You should register at least 1 manager to run the
program.
Page 34
- -
34
Basic information
Enter basic manager information. The user ID must be number
with the digit length of initial setting.
Authentication Type
You can use fingerprint, password, and RF with AND or OR
combination when running application or authenticating terminal
access. But RF can be used in terminal access authentication only.
For more information on how to use terminal with different
authentication types, refer to “NAC-3000 (or NAC-2500) Terminal
User Manual”.
Page 35
-35-
Check FP and click the <Enroll Fingerprint> button to display the
following window. If you do not use fingerprint authentication,
check PW and enter Password ignoring the following procedure.
The above window is the starting place of fingerprint enrollment.
Click <Next> to continue.
If you run the program for fingerprint authentication from a
server or a remote PC, you need the NITGEN fingerprint
recognition device.
Page 36
- -
36
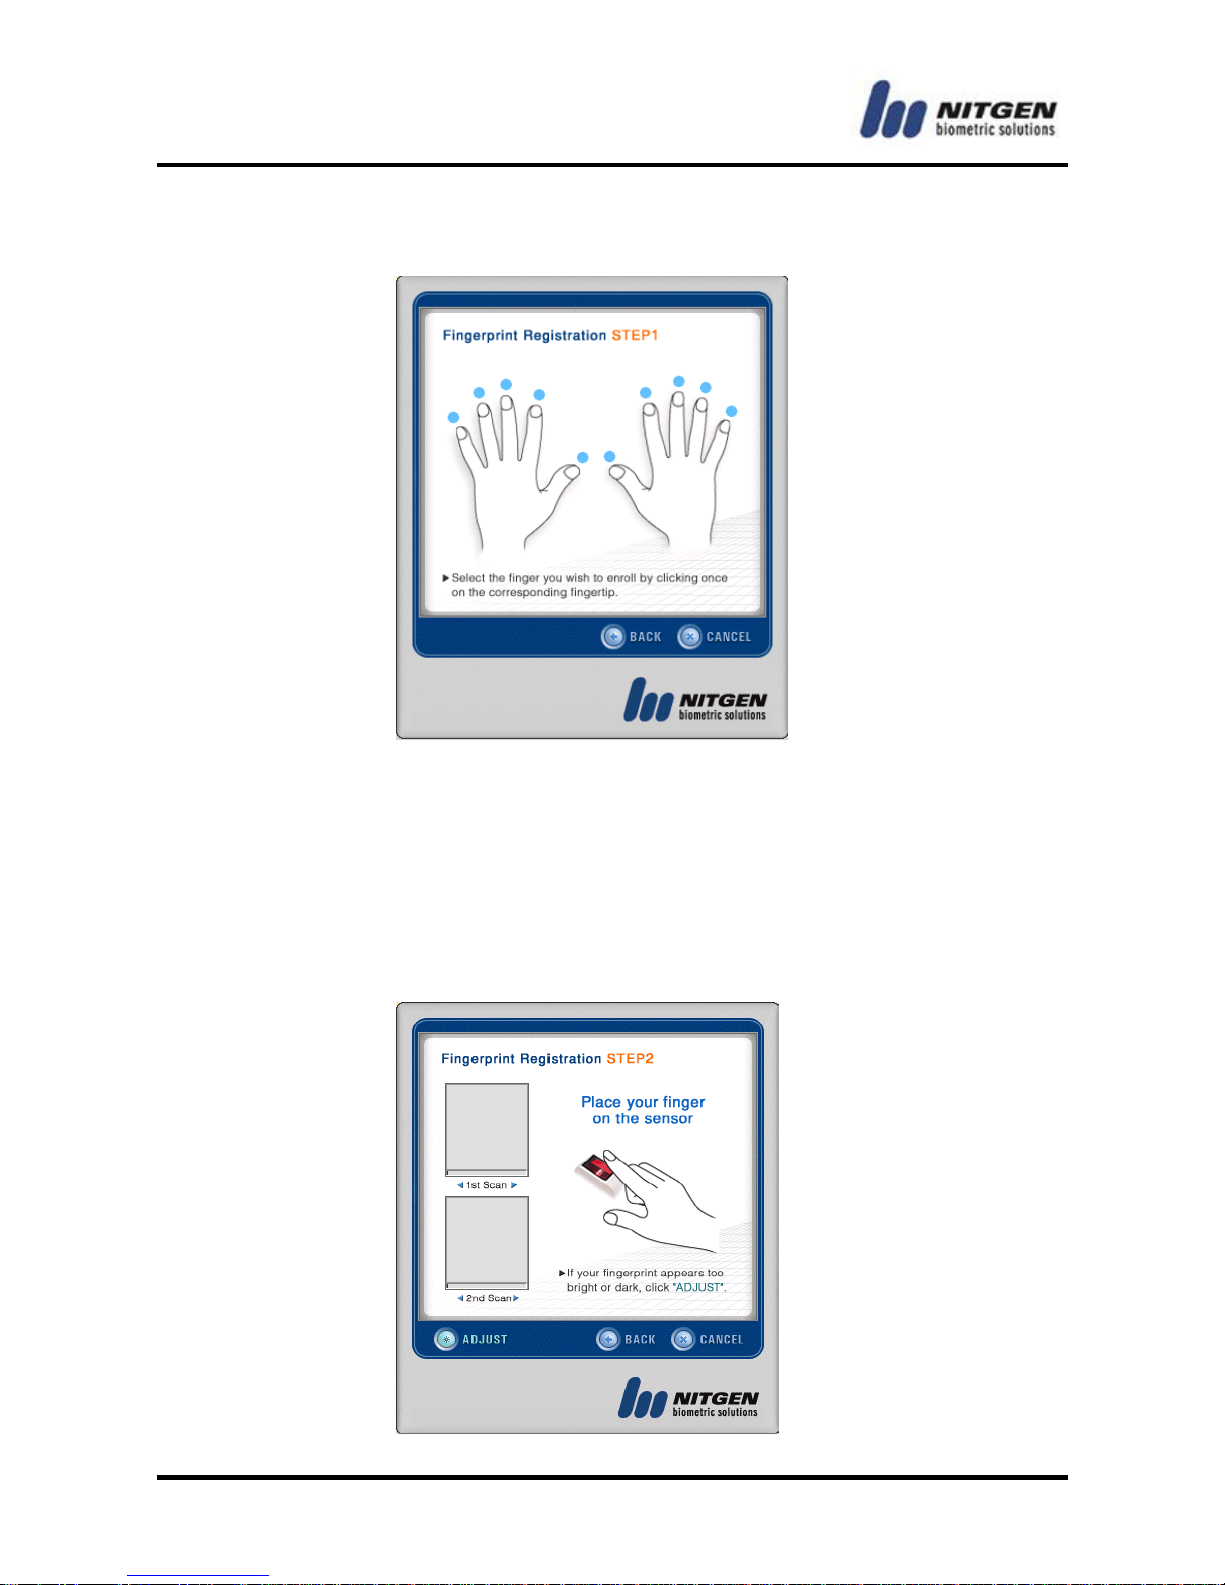
In the below window, check the finger of which fingerprint you want
to enroll.
When you choose a finger, the following window will appear. If you
choose two fingers, you should repeat the same registration
procedure for the second finger.
If you want to replace an enrolled finger with another, click it again
to remove and choose another one.
Page 37
-37-
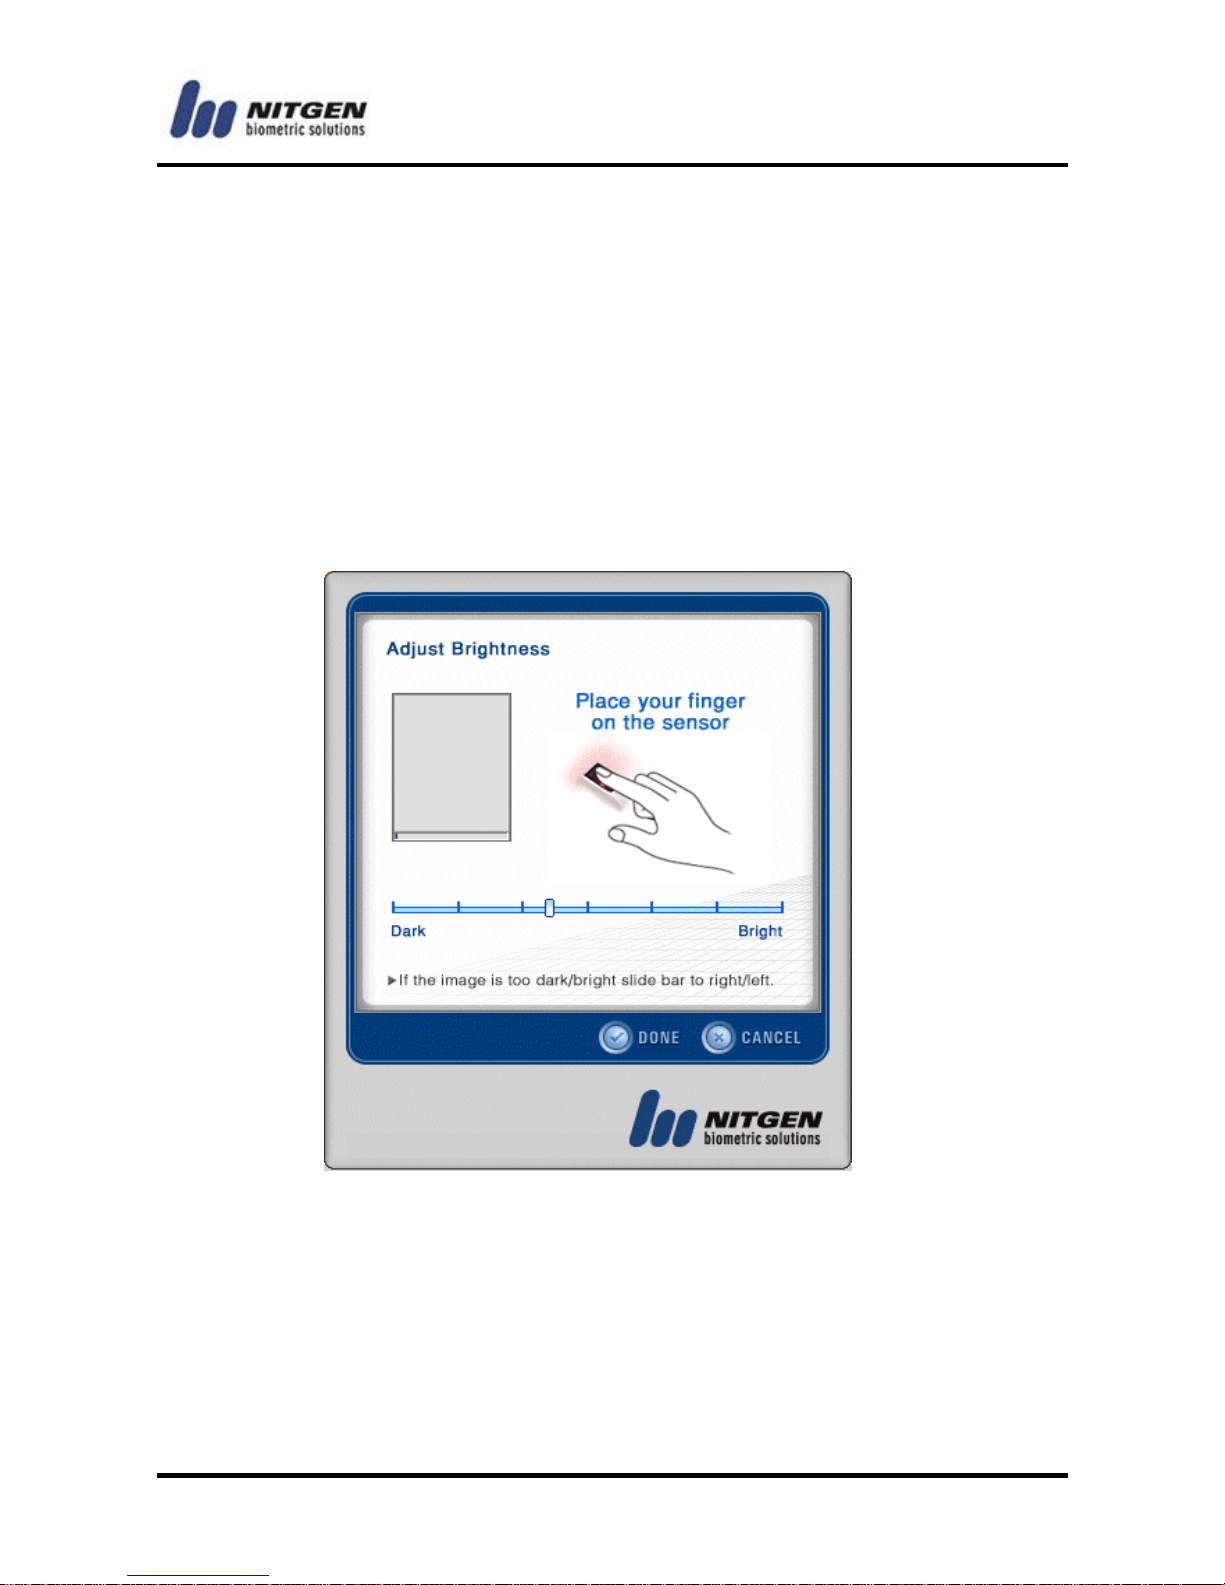
If you place the finger you chose in the previous step on the
fingerprint recognition sensor, its image will appear in the left
image box. Take off your finger and place it on the sensor once
again to complete the registration.
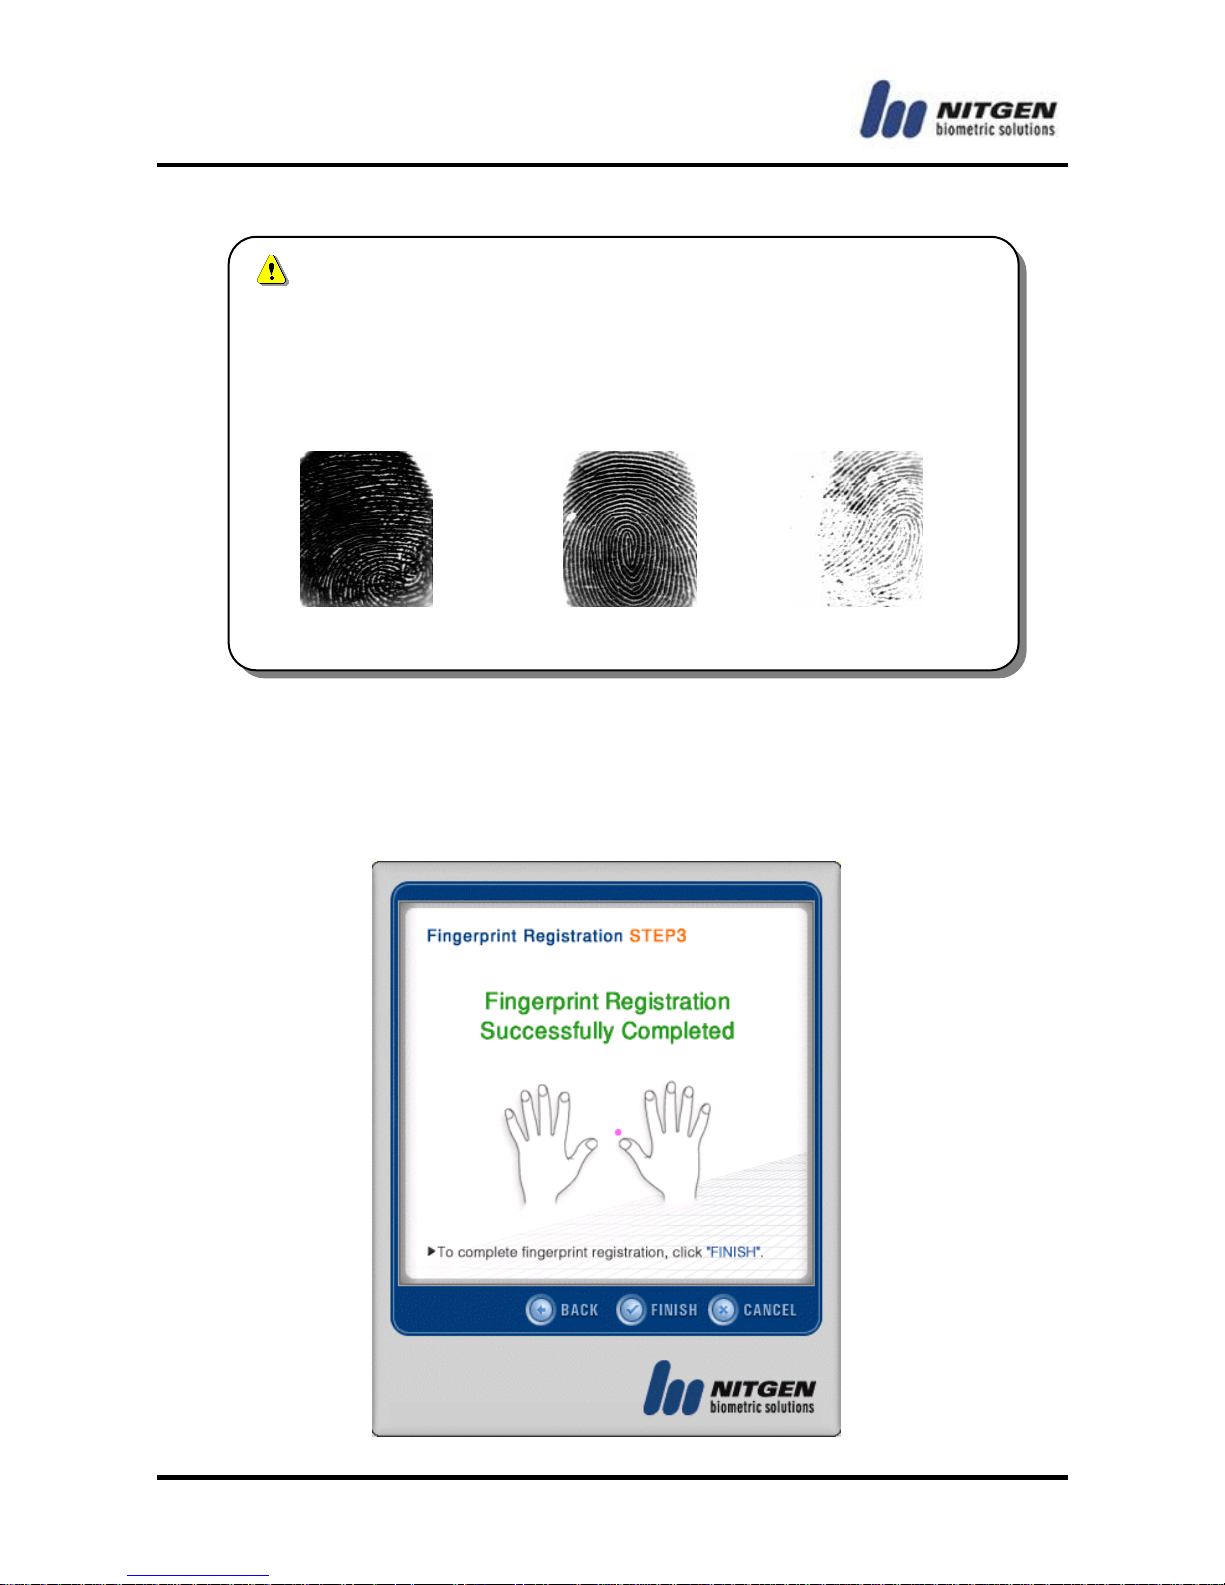
If you have problem with fingerprint registration, you can adjust the
brightness to optimize the condition. Click <ADJUST>, and the
following window will appear.
Place your finger on the fingerprint sensor, and use the slider to
adjust the brightness. Make adjustment so that fingerprint image
does not look too dark or too dim.
Page 38
- -
38
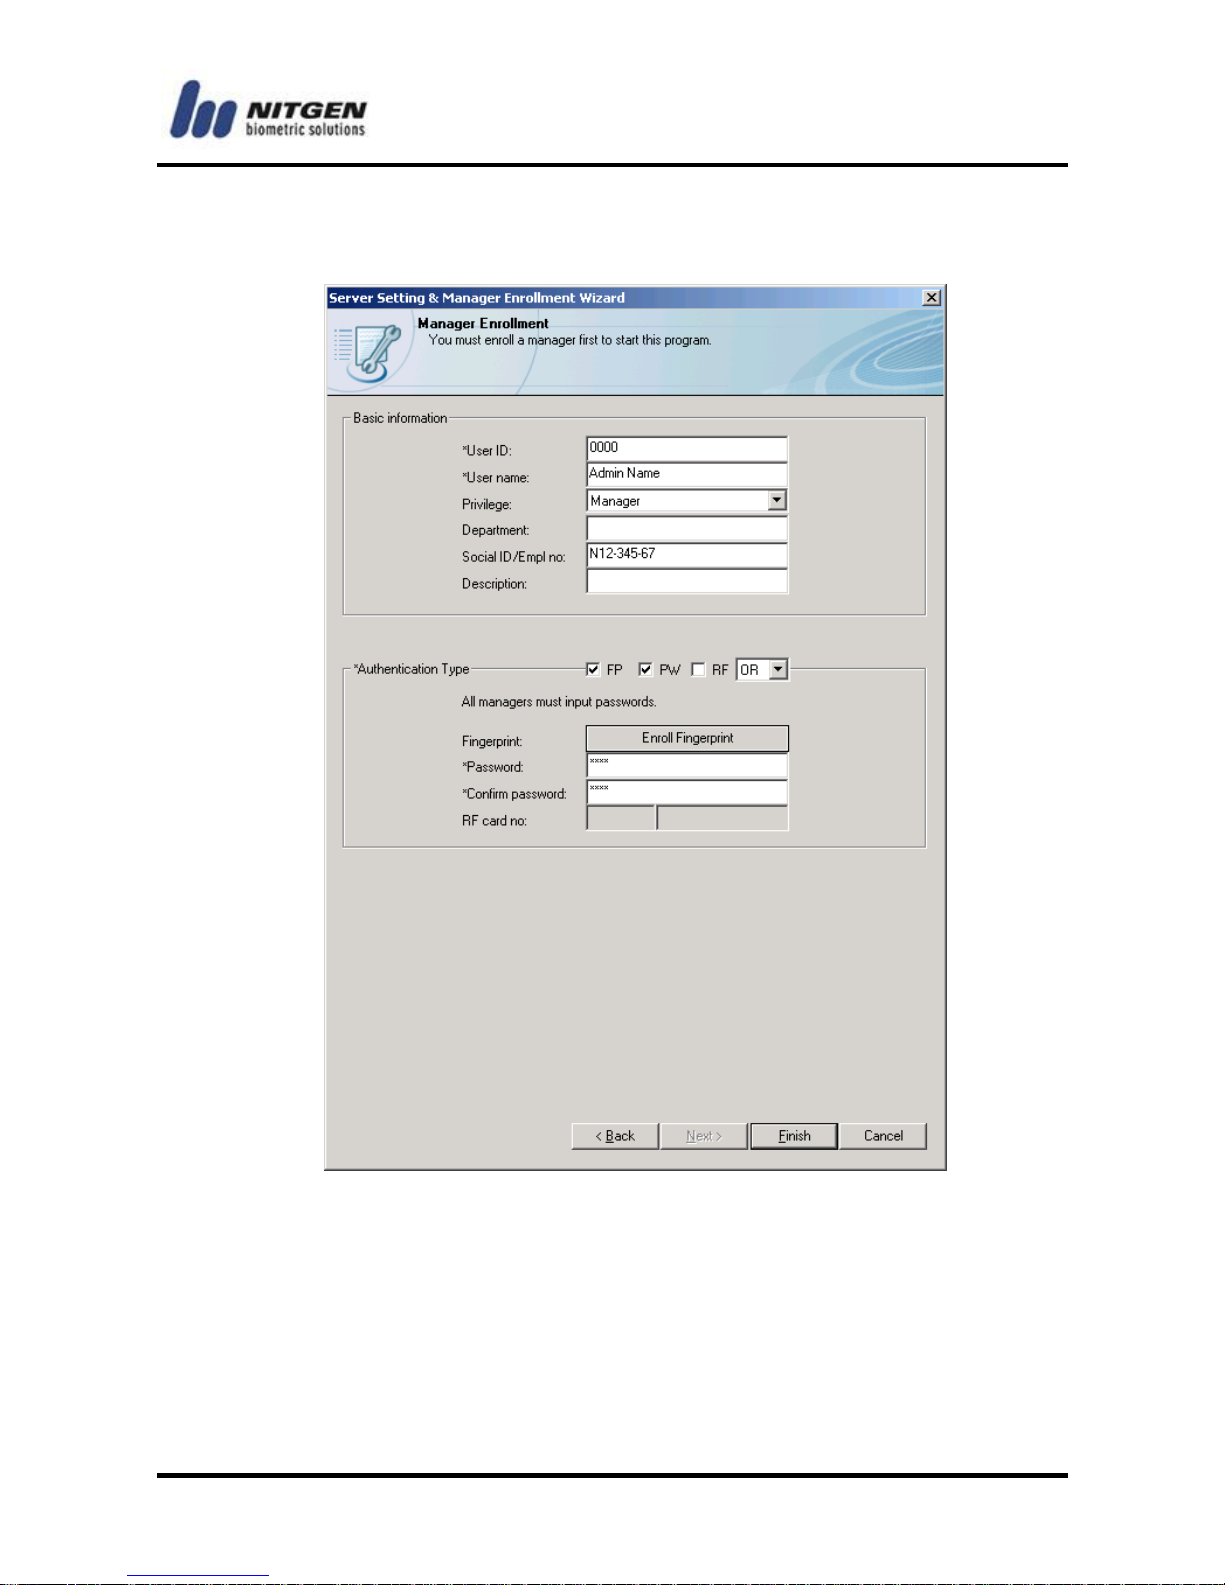
Click <Done> button to go back to the previous window. When you
complete the registration, the following success message will
appear.
If your finger is sweaty or wet, the image will look black
and dark. And if it is dry, the image will look dim. Make
adjustment until you get the normal image as shown
below.
Wet fingerprint (x)
Normal fingerprint (O)
Dry fingerprint (x)
Page 39
-39-
Click <Done> button to complete fingerprint registration procedure,
and you will go back to the following Manager Enrollment window.
Enter a password and press <Finish>, and the main window of
Remote Manager will appear.
Page 40
- -
40
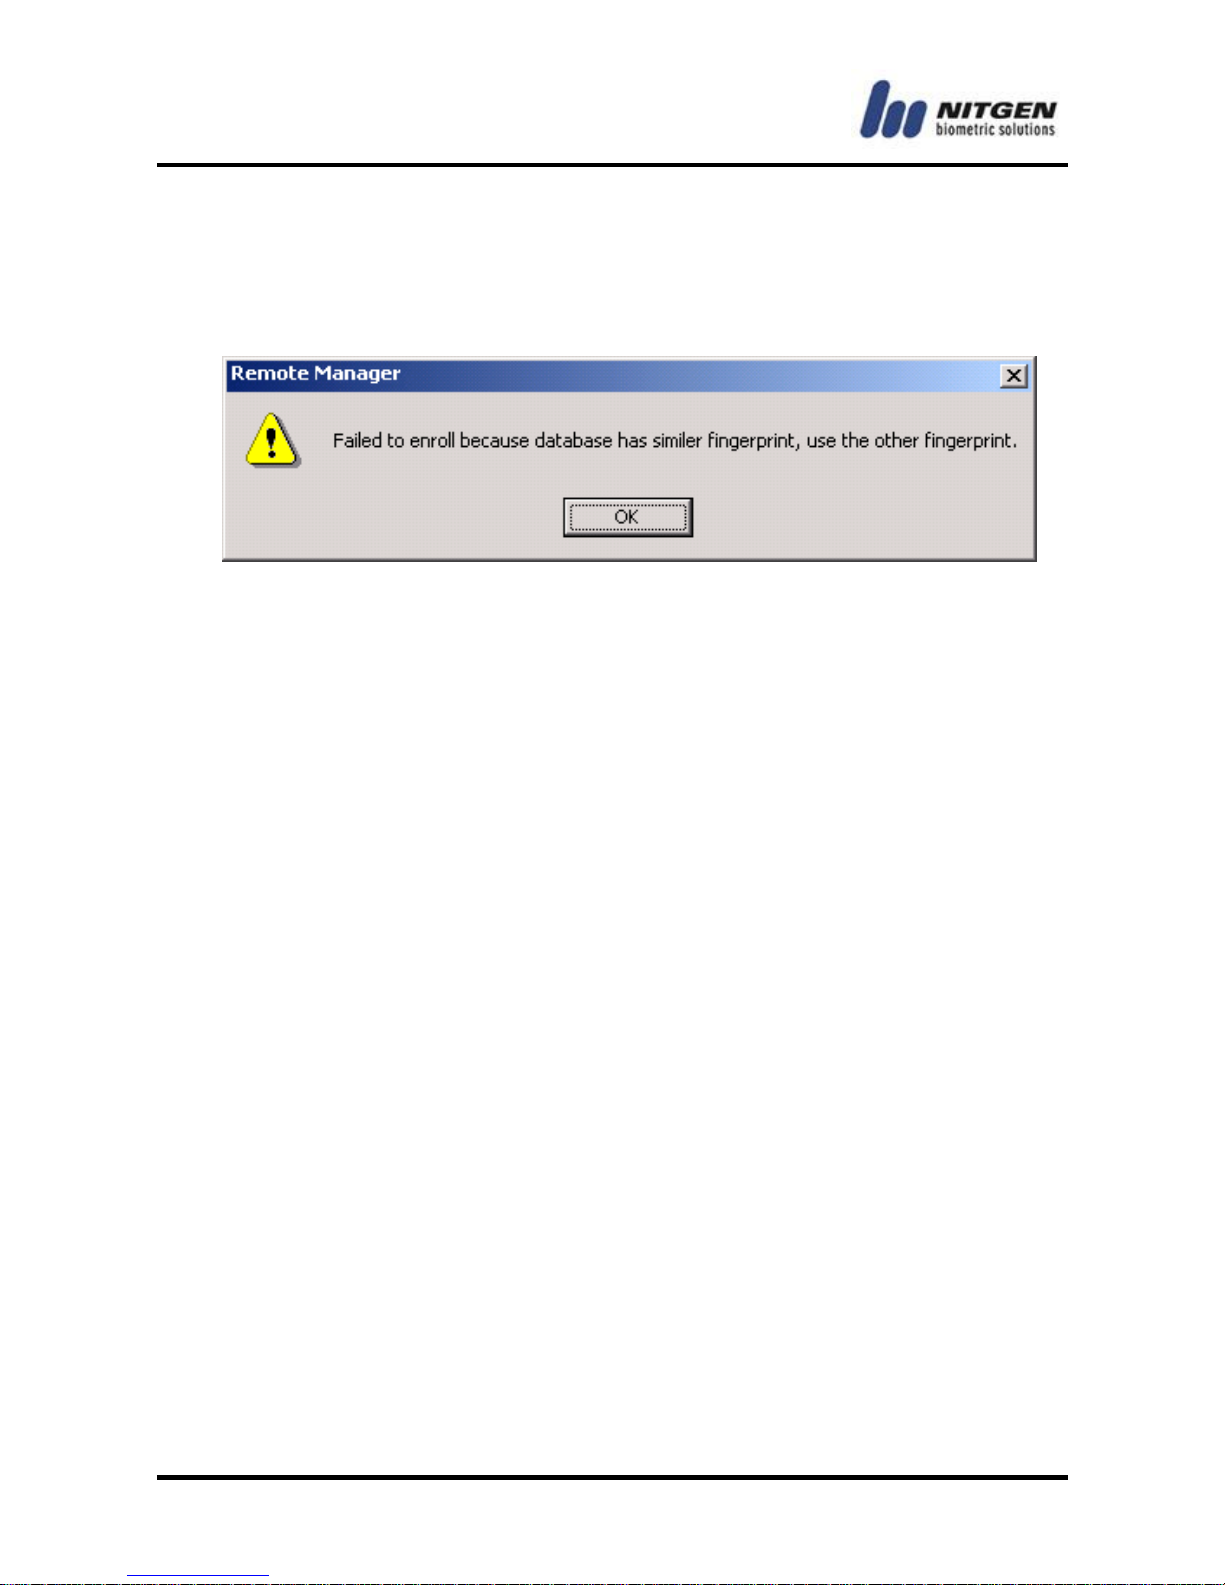
When you activated the similar fingerprint check function, it will
close down the fingerprint registration window if similar or the
same fingerprints are about to be registered with the following
error message.
In this case, you have to use a different fingerprint to continue the
registration process.
Page 41
-41-
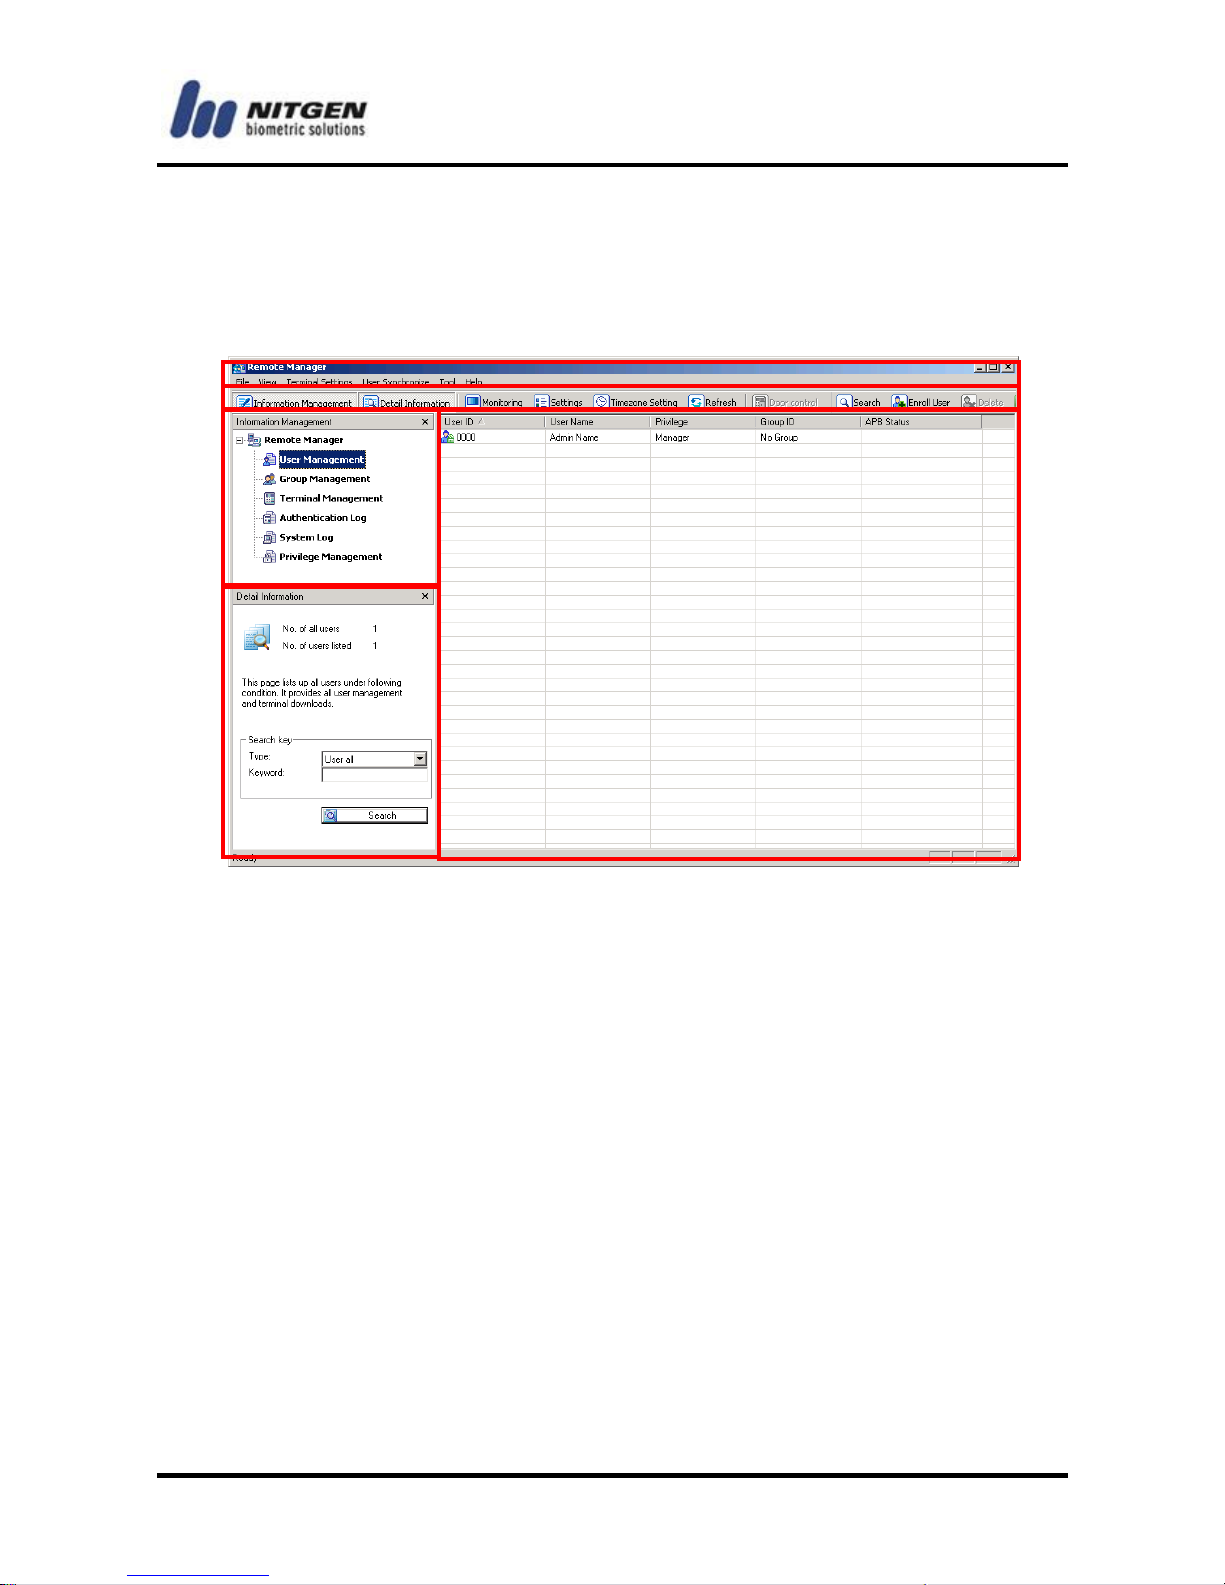
3.3 About menu
Screen configuration
(1) Menu bar
This is the main menu of Remote Manager.
File:
It provides such basic features as register, delete, search, view
properties, reconnect terminal, and close. Depending on the
submenu in the Information Management window or selected list,
you'll see different active/inactive commands.
View:
You can configure the screen as you need. You can show or hide
the Information Management and Detail Information windows.
Depending on the selected item in the Information Management
menu, the List window will be changed.
(5)
(1)
(2)
(4)
(3)
Page 42

- -
42
Terminal Settings:
You can change the settings for several terminals at once.
User Synchronize:
If the user information on the server is different from the one in the
terminal, you can synchronize them. If you select any terminal in
the List window, List up Users and Synchronize All Data will be
activated.
Tool:
You can do configurations for terminal monitoring, server options
and Anti Pass Back.
If you select Detail Information from Information Management
Window, excel printing settings will be activated.
Help:
You can get the software version.
(2) Toolbar
Frequently used features are gathered in one place so that you
can access them easily. Depending on the submenu you select in
the Information Management window, its configuration will be
changed.
Information Management:
Show or hide the Information Management window.
Detail Information:
Show or hide the Detail Information window.
Monitoring:
Start remote management monitoring.
Page 43
-43-
Settings:
Set the program options.
● Timezone Setting:
You can set up the timezone in many different ways: by hour, day
of the week, holiday, etc.
Also, You can keep the door opening always.
● Refresh:
Update the list if there's any change.
Gate Control:
Managers have the right to open gates.
This option is to activate or deactivate the gate control function.
After activating this option, gate controlling menus will be enabled,
<Gate Control> on the Remote Manager toolbar.
(3) Information Management window
You can select the management menu items. If you choose any
menu item, related data will appear in the List window on the right.
Right-click any menu item to show submenu.
(4) Detail Information window
When you select a menu item in the Information Management
window, statistical information on the corresponding data list will
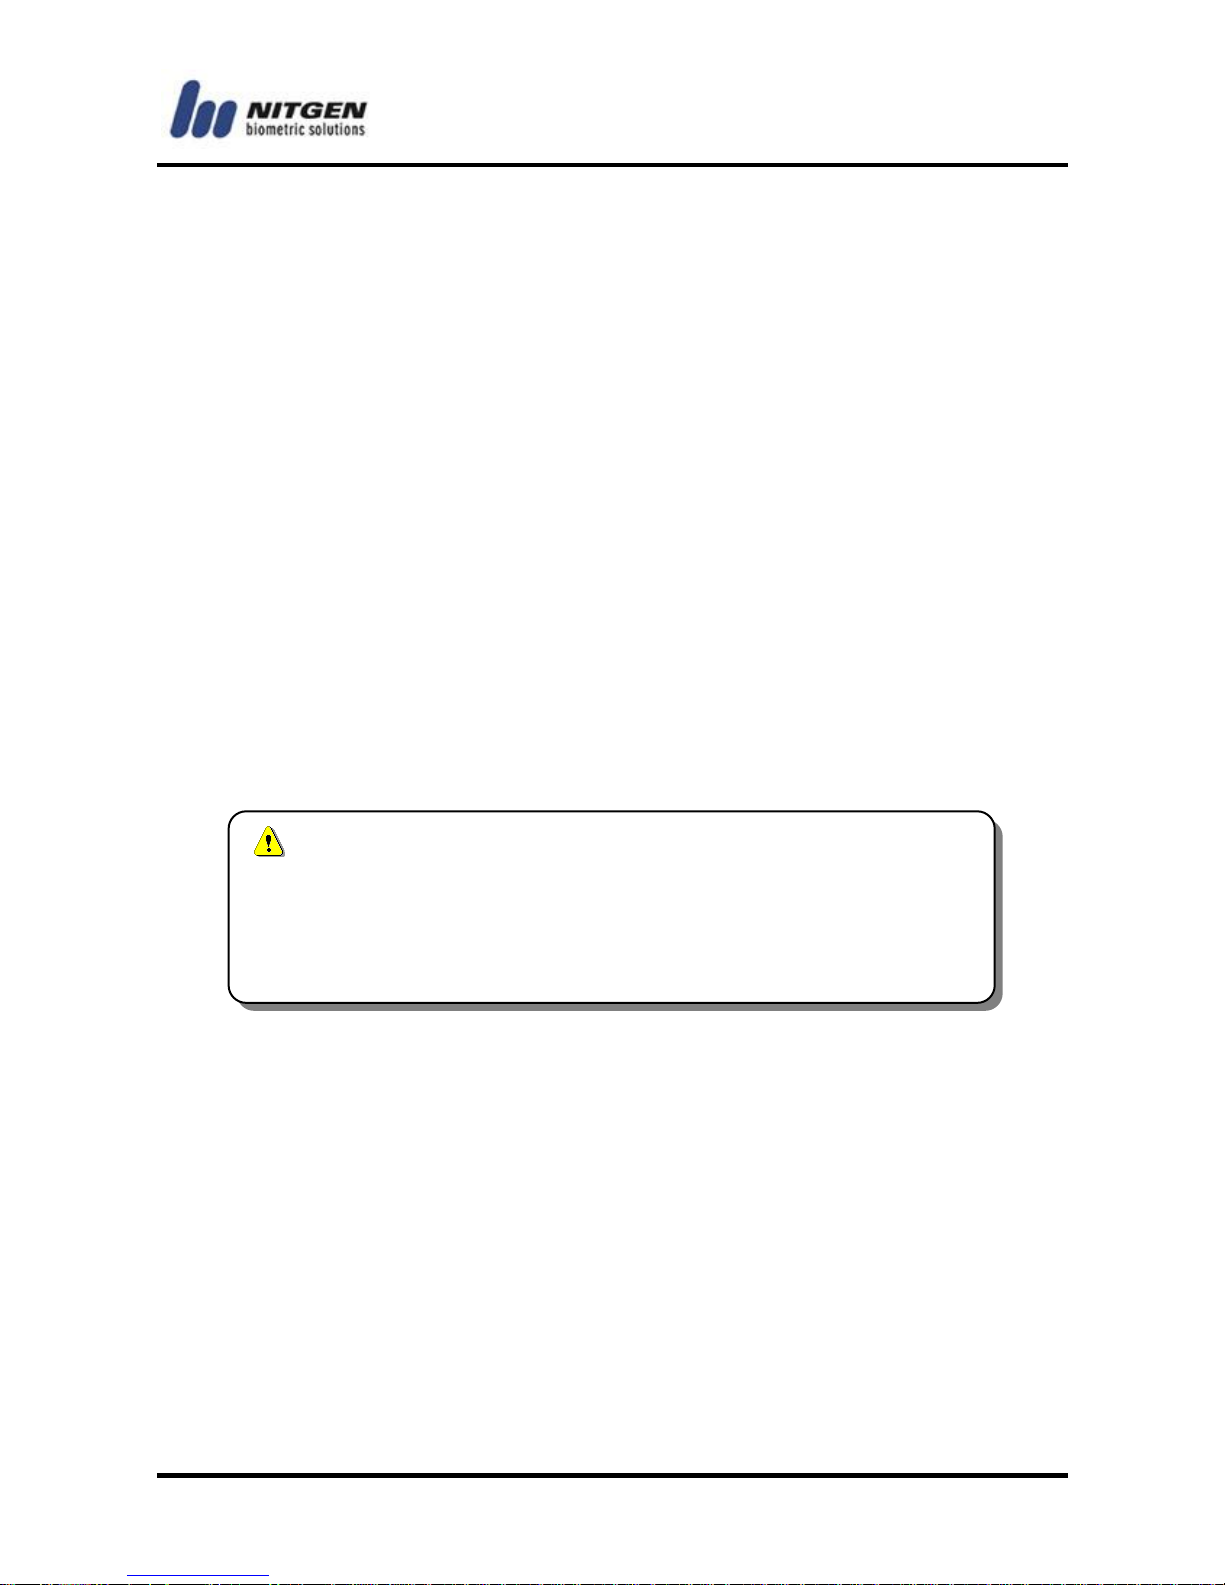
The 'Use timezone' of terminal is true, you can‟t use this
function.
If you are going to use this function, you should change
the 'Use timezone' setting with „false‟.
Page 44
- -
44
appear. In addition, you can use the Search window to find any
necessary information with search conditions.
(5) List window
This window shows data list and related information of the menu
item selected in the Information Management window. Double-click
any list item to see detailed information. You can use the <Shift> or
<Ctrl> key to select several items at once.
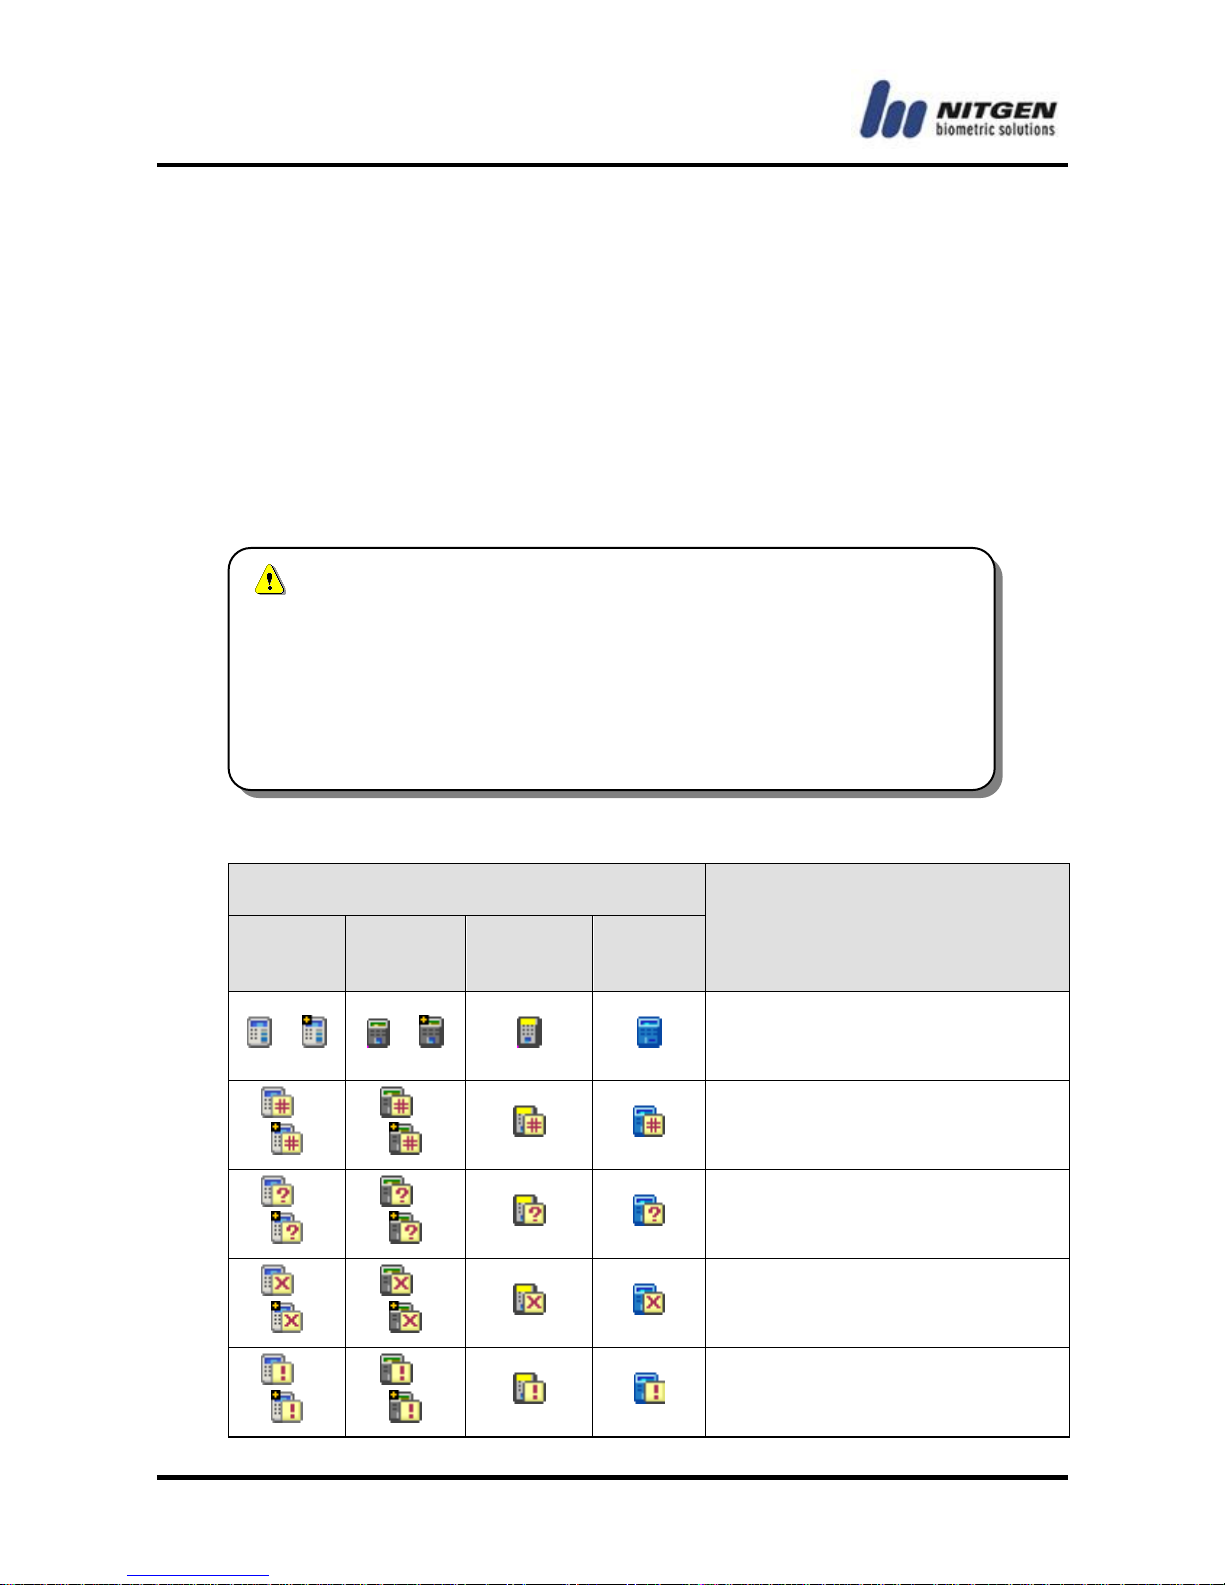
Description of icons
Terminal status
Description
3000 /
3000+
2500 /
2500+
FINGEKY-
ACCESS
Card
Only
/
/
The terminal is in normal
status.
/ /
The terminal has a
synchroniza-tion error.
/ /
The terminal is connected,
but not registered.
/ /
The terminal is not
connected.
/ /
The terminal has other
errors.
Keyboard shortcuts will help you to use the menu and
commands more easily. Press a shortcut key of a menu
while holding down the <Alt> key on the keyboard. If the
menu is open, you can simply press the corresponding
shortcut key of any submenu or command to select it.
Page 45
-45-
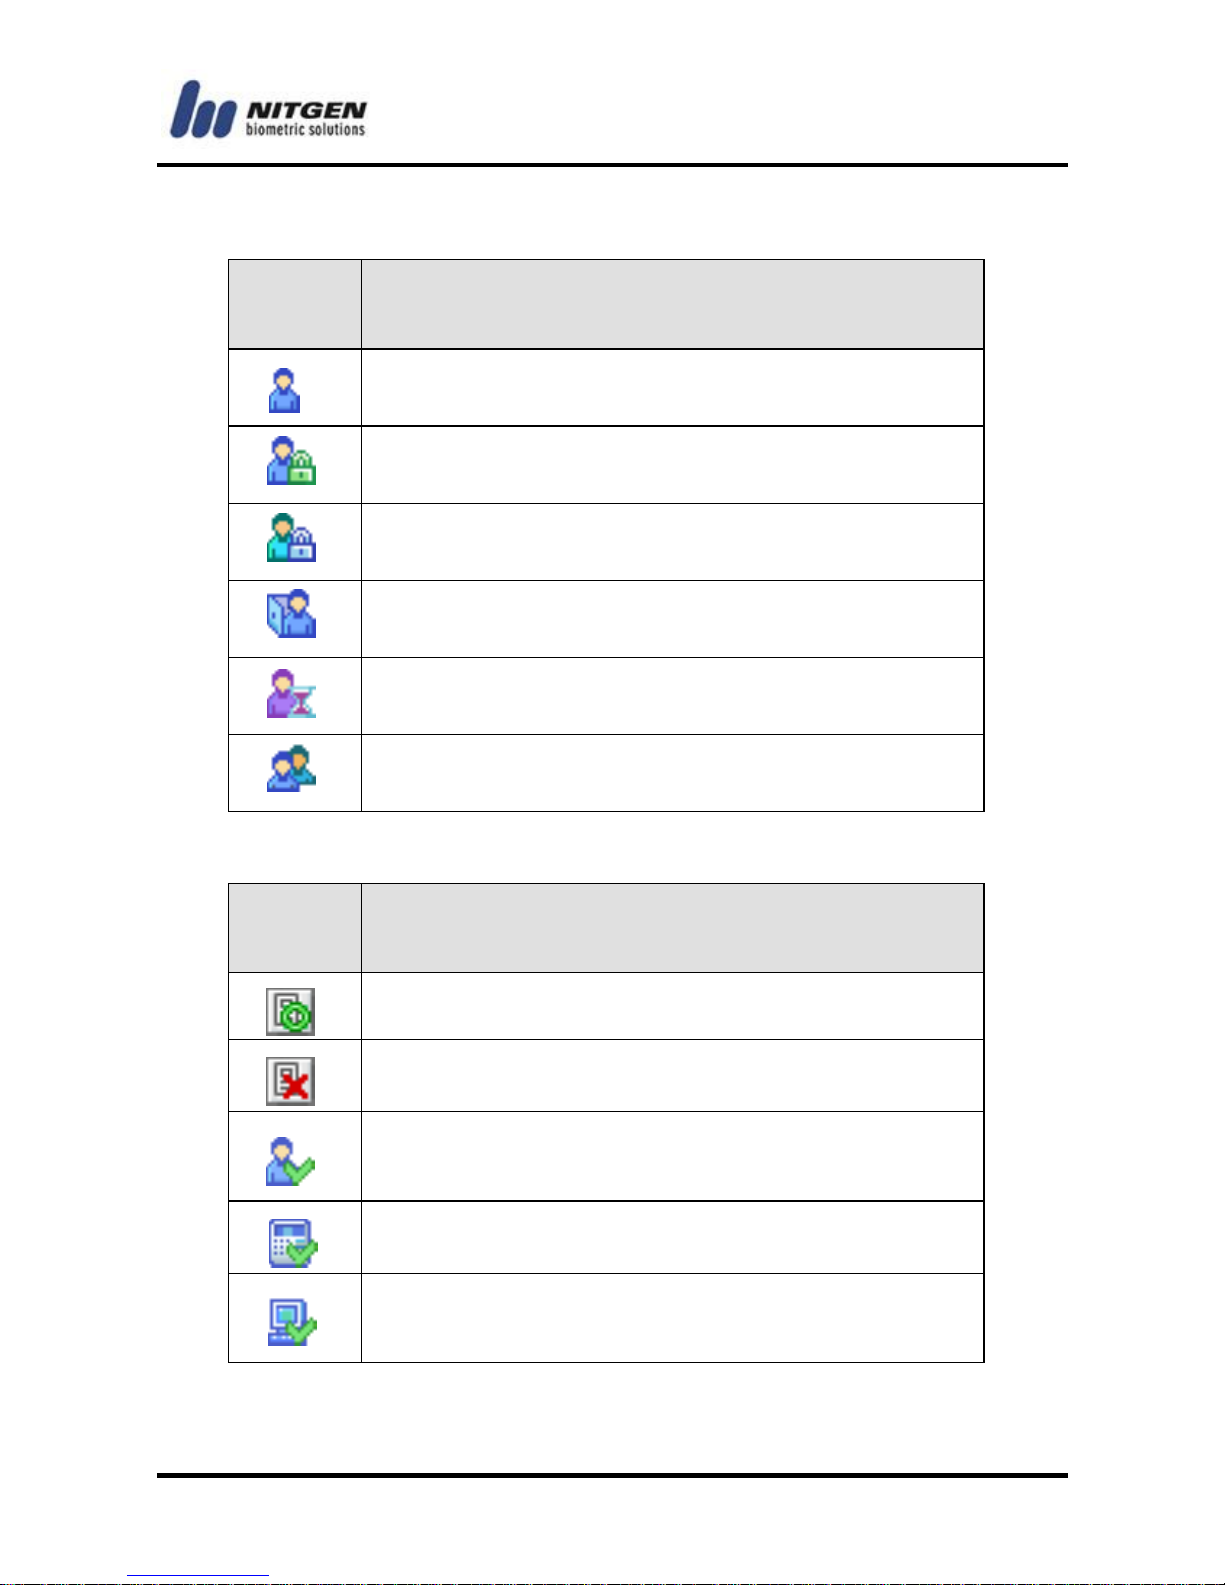
User
status
Description
Normal user
Program manager
Power User
Guest
Expired user
Group
Log
status
Description
Authentication succeeded
Authentication failed
System log of user information changes such as
registration and deletion
System log of terminal setting change
System log of program execution and setting
change
Page 46

- -
46
Chapter 4
How to Use the
Program
4.1
Terminal Management
- 47
4.2
User Management
- 74
4.3
Group Management
- 85
4.4
Log Management
- 90
4.5
Program Options
- 95
4.6
Timezone Setting
- 101
4.7
Privilege Management
- 110
4.8
Anti Pass Back
- 118
4.9
Terminal Monitoring
- 125
4.10
Watchdog
- 131
Page 47
-47-
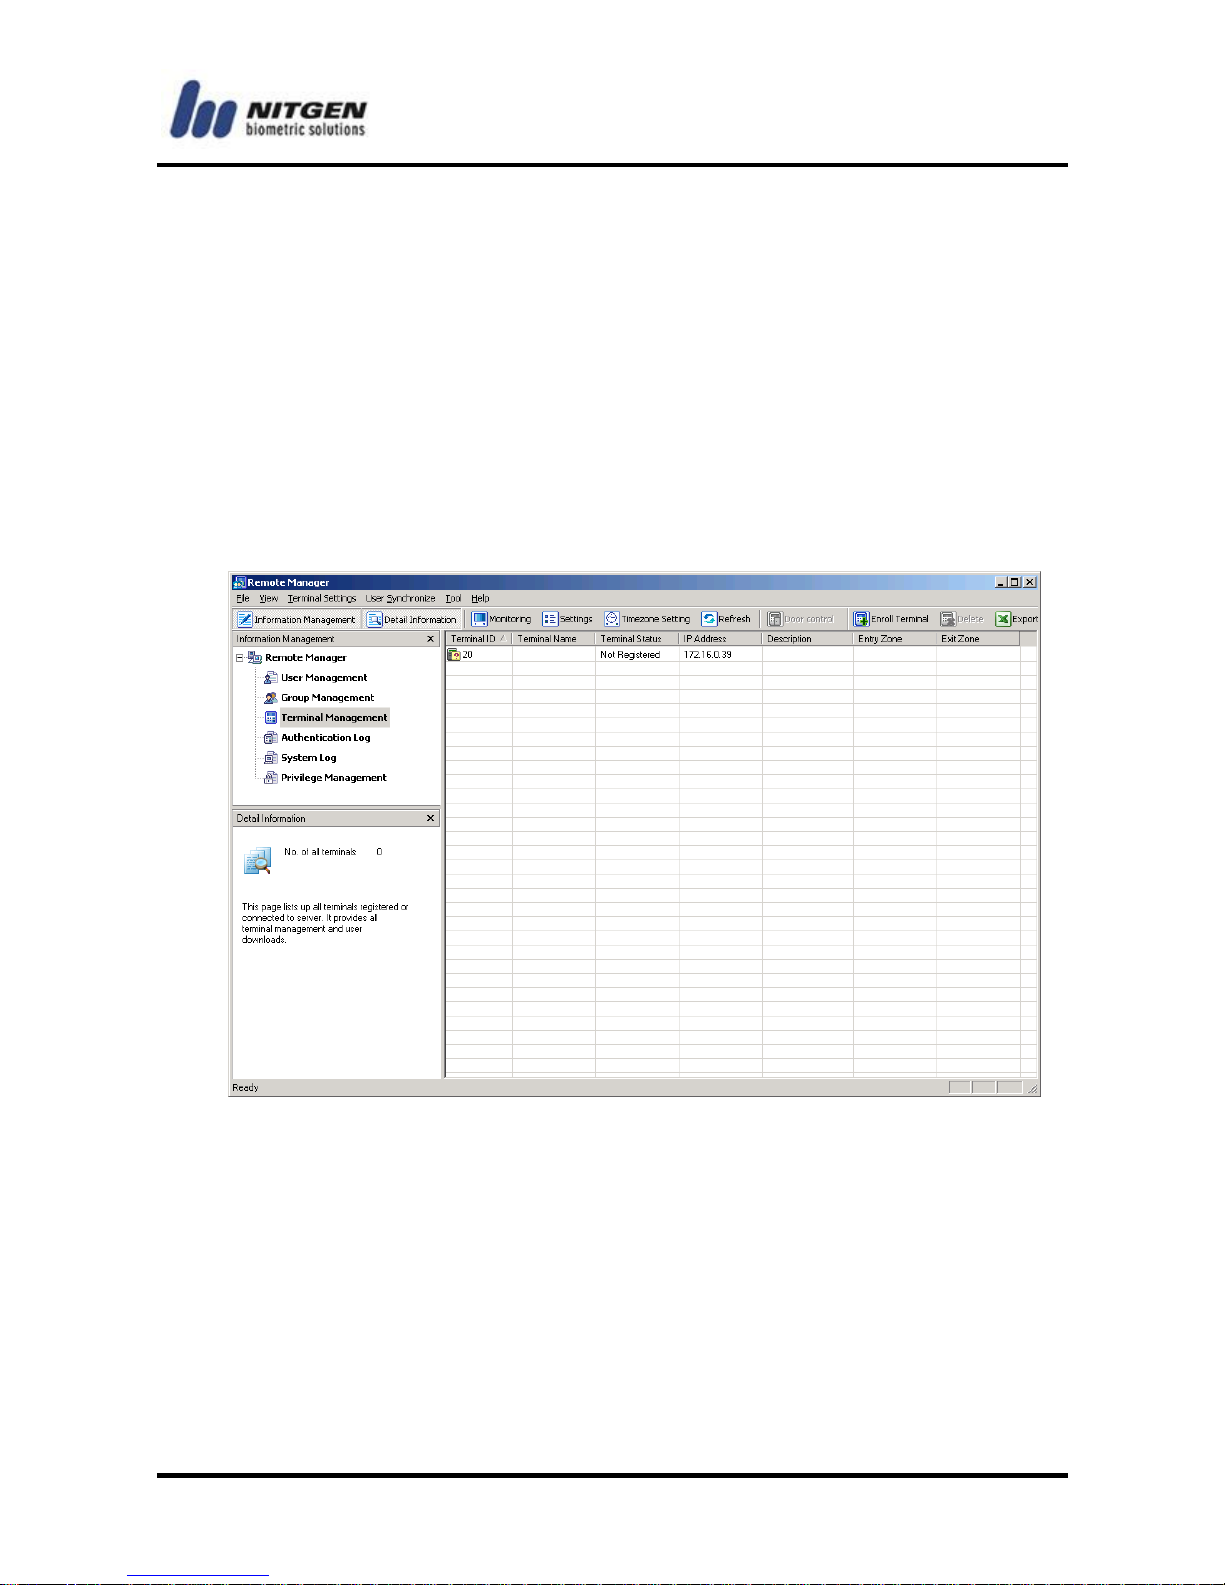
4.1 Terminal Management
You can select Terminal in the Information Management
window to do the necessary job on terminal.
Register a new terminal
If network setting is complete in a terminal with physical network
connection, you can see the terminal in the program. You can
register a new terminal as follows:
(1) Select Terminal Management in the Information Manag-
ement window.
(2) Double-click a terminal in the List window on the right, or right-
click a terminal to select Enroll Terminal from the submenu.
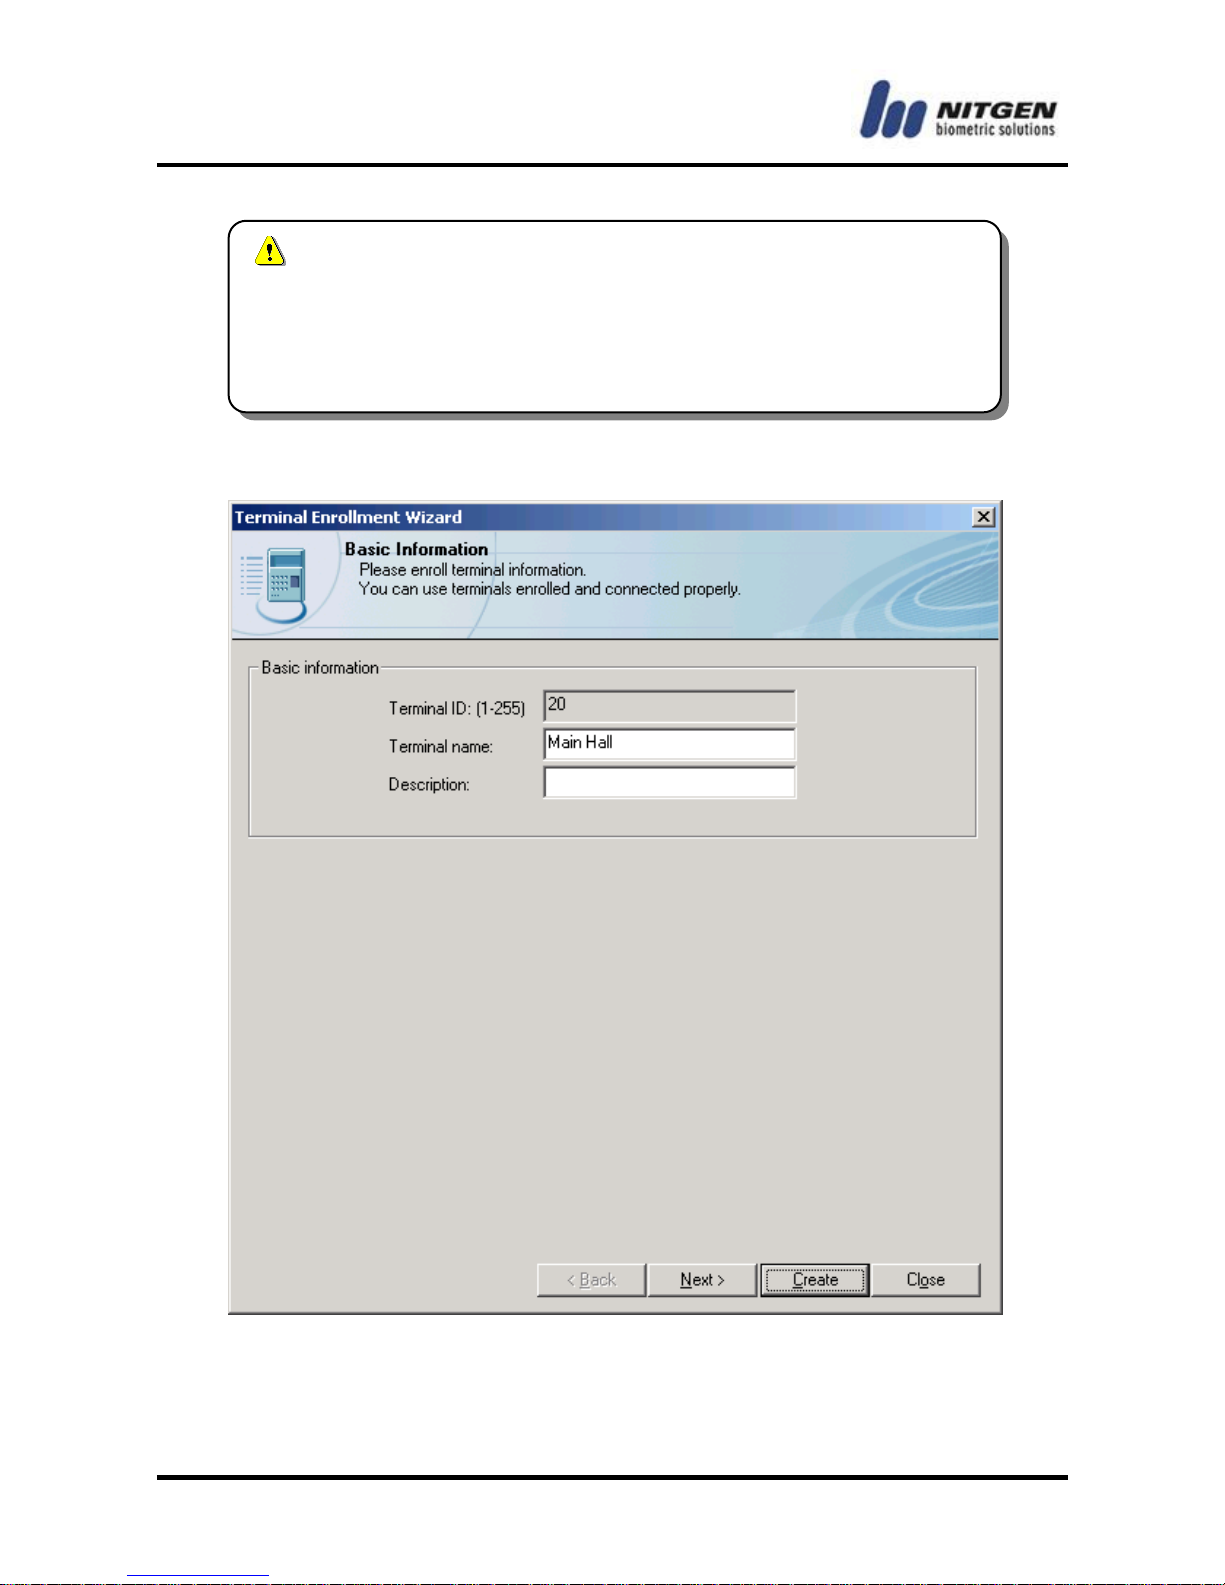
(3) The Terminal Enrollment Wizard window will appear as below.
The terminal ID is already entered.
Page 48
- -
48
Enter the terminal name and description, and proceed with the
buttons below.
Right-click Terminal Management or use the Enroll
Terminal button from the Toolbar to register a new
terminal. Unlike selecting a terminal in the List window,
however, the terminal ID is not entered in this case.
Page 49
-49-
<Next>: Proceed to the next step to add users to or delete users
from the terminal.
<Create>: Register another terminal.
<Close>: Cancel what you've done and exit the wizard window.
Delete Terminal
You can delete a terminal as follows:
(1) Select Terminal Management in the Information Manage-
ment window.
(2) Right-click a terminal in the List window and select Delete
from the submenu, or use the <Delete> key on the keyboard
to delete it. You can use the <Shift> or <Ctrl> key to delete
several terminals at once.
.
Terminal Properties
You can check and change the basic information of registered
terminals.
(1) Select Terminal Management in the Information Manage-
ment window.
(2) Right-click a terminal in the List window and choose
Properties from the submenu.
(3) When the Terminal Properties window is open, related
information will be displayed according to the submenu you
select on the left, and you can change this information.
After deleting a terminal, When you re-register it, you
should add users to the terminal again.
Page 50
- -
50
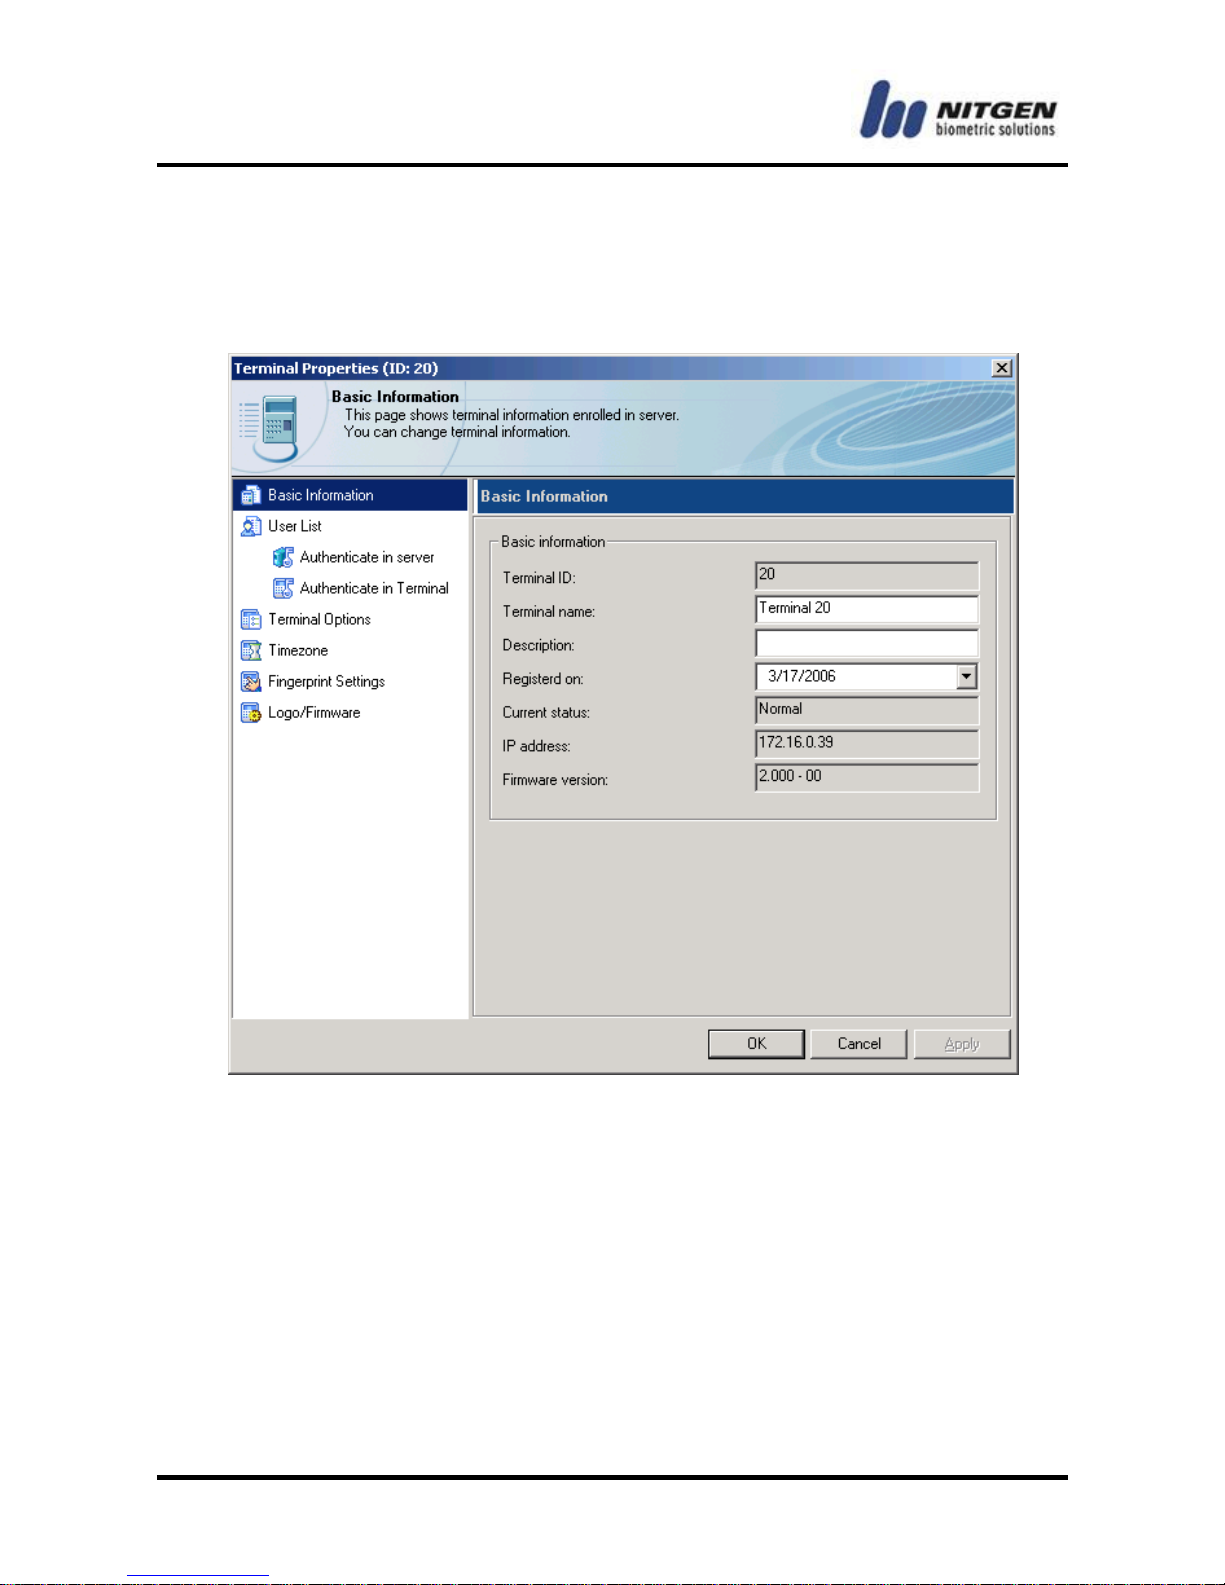
Basic Information.
You can check basic terminal information and modify name and
description in this window.
You can check basic terminal information and modify name and
description in this window.
Page 51
-51-
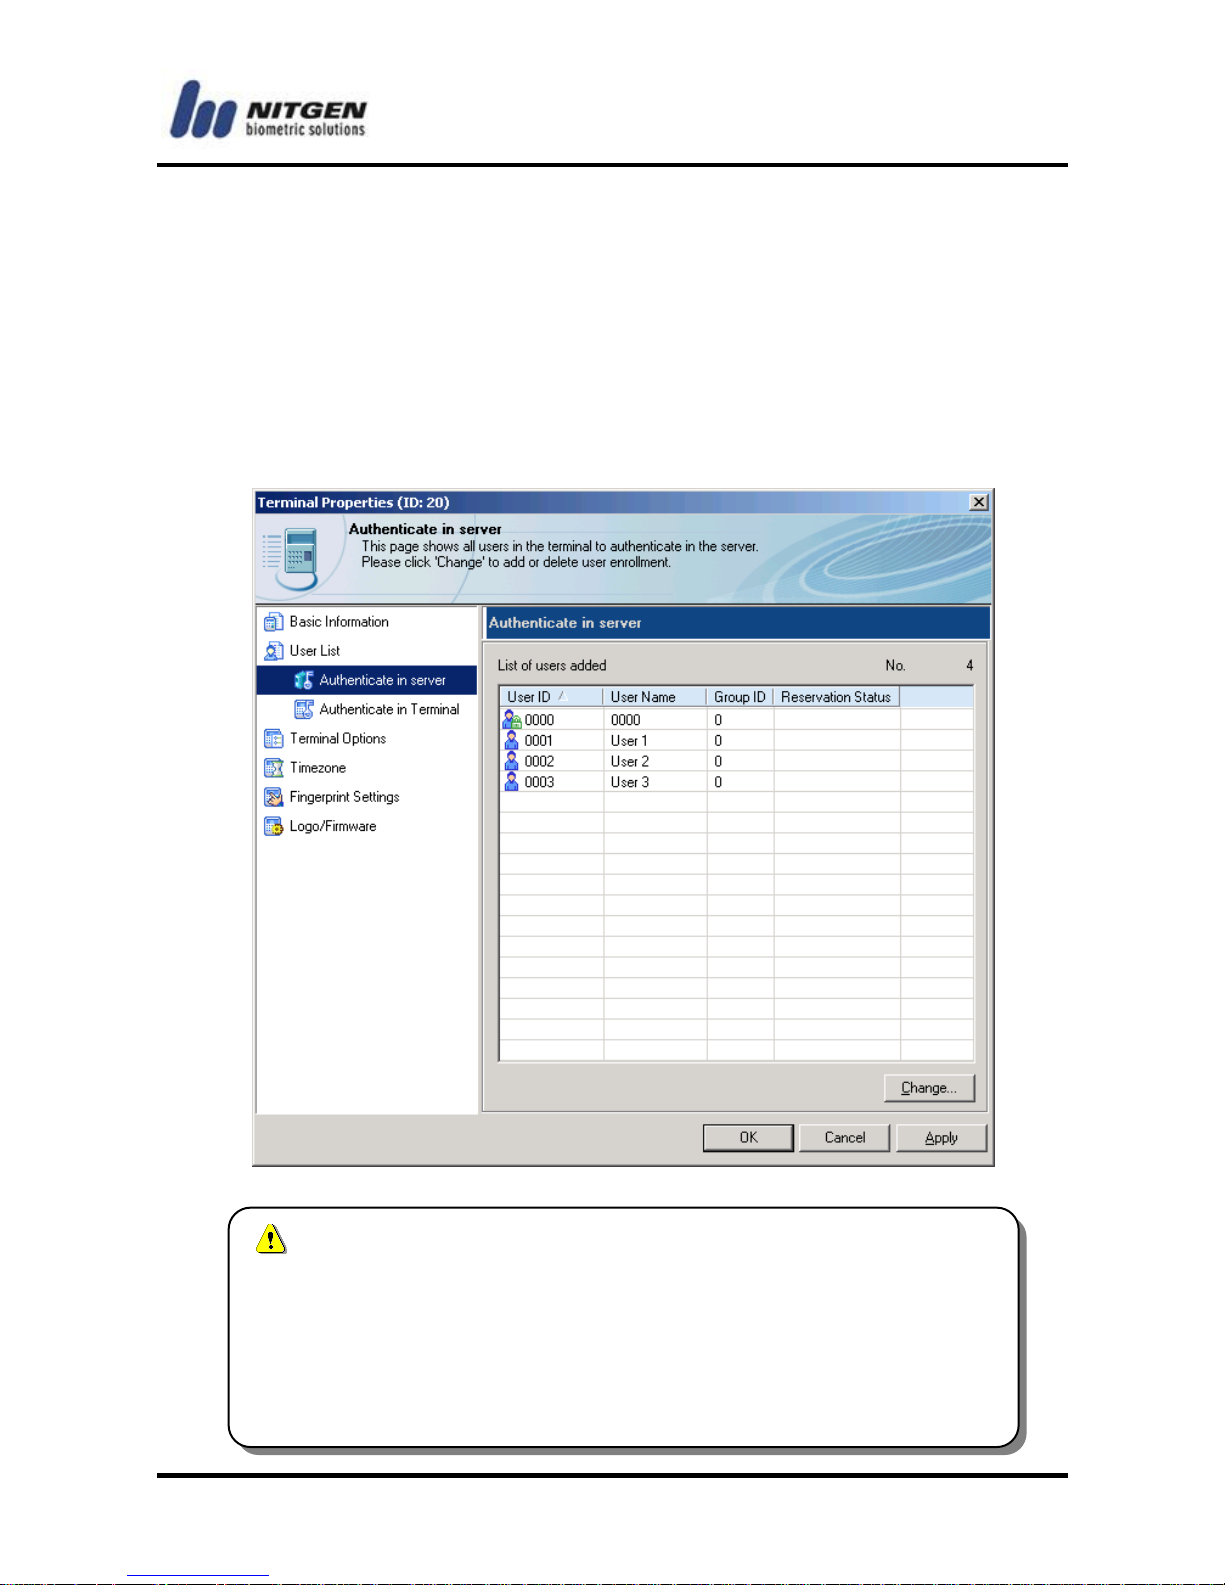
Authenticate in server
You can check the list of terminals authenticated by the server and
can add or delete users by clicking <Change>. User information
will not be stored in the terminal but the relevant user can still use
the system through authentication. 1:N authentication is not
possible and therefore you must type in user ID and use
fingerprint.
Adding or deleting users in a terminal may take from
several seconds to tens of minutes depending on the
number of users.
Server authenticated user should type in user ID and use
fingerprint when authenticated in the terminal.
Page 52
- -
52
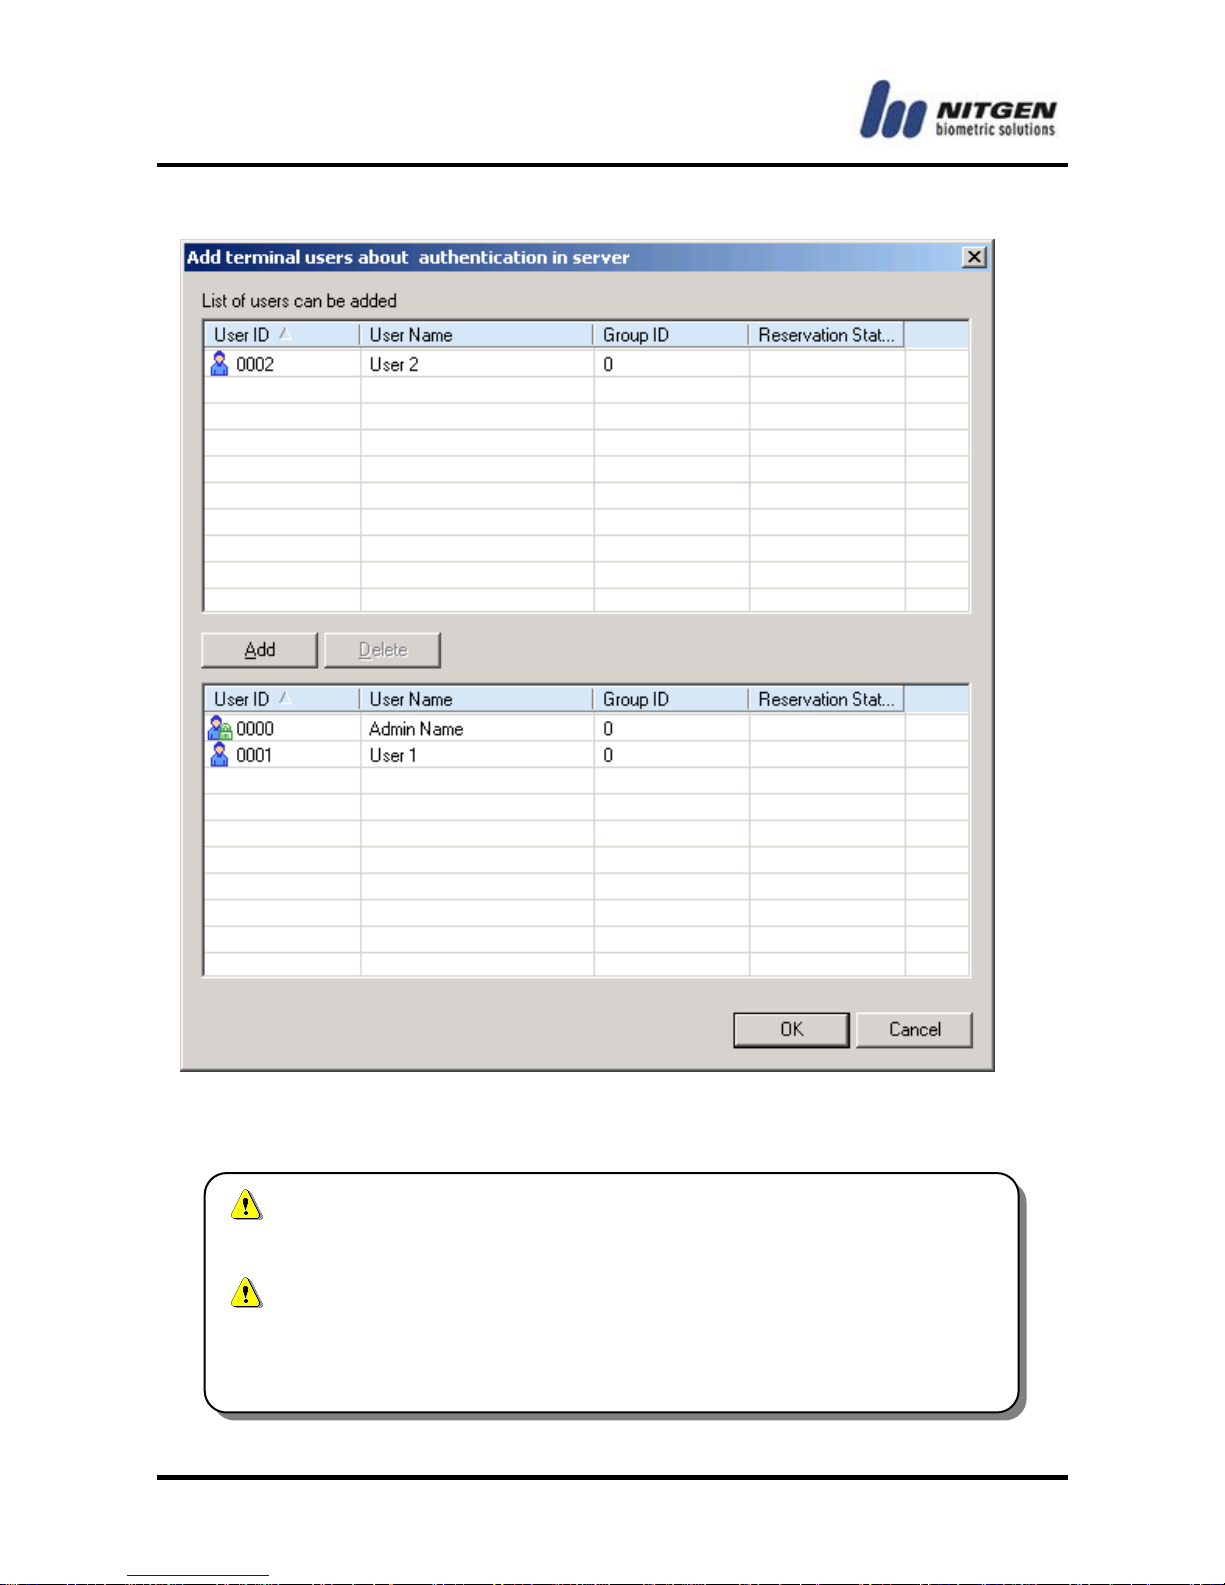
“Reservation” can be used to reserve user download
operations into terminals on specified date.
All reserved users are not available for authentication until
they are downloaded into terminals. The reservation date
must be later than the current date.
Page 53
-53-
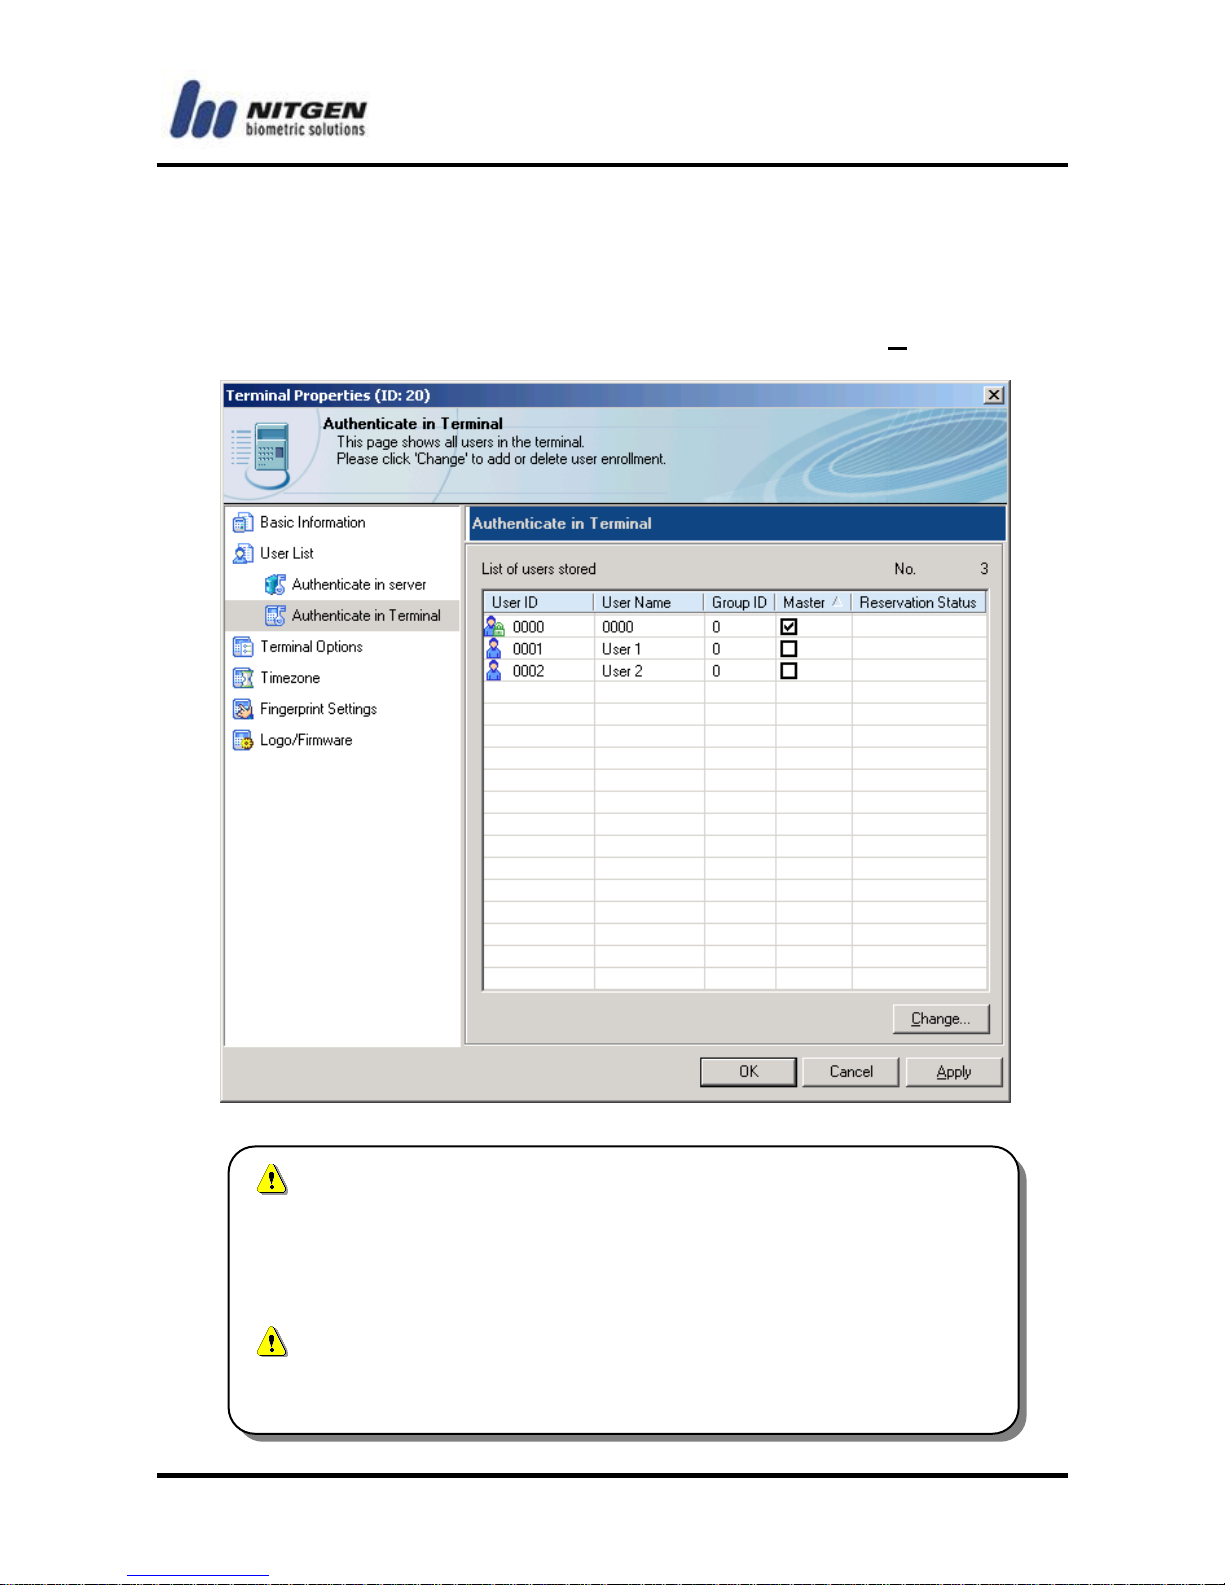
Authenticate in terminal
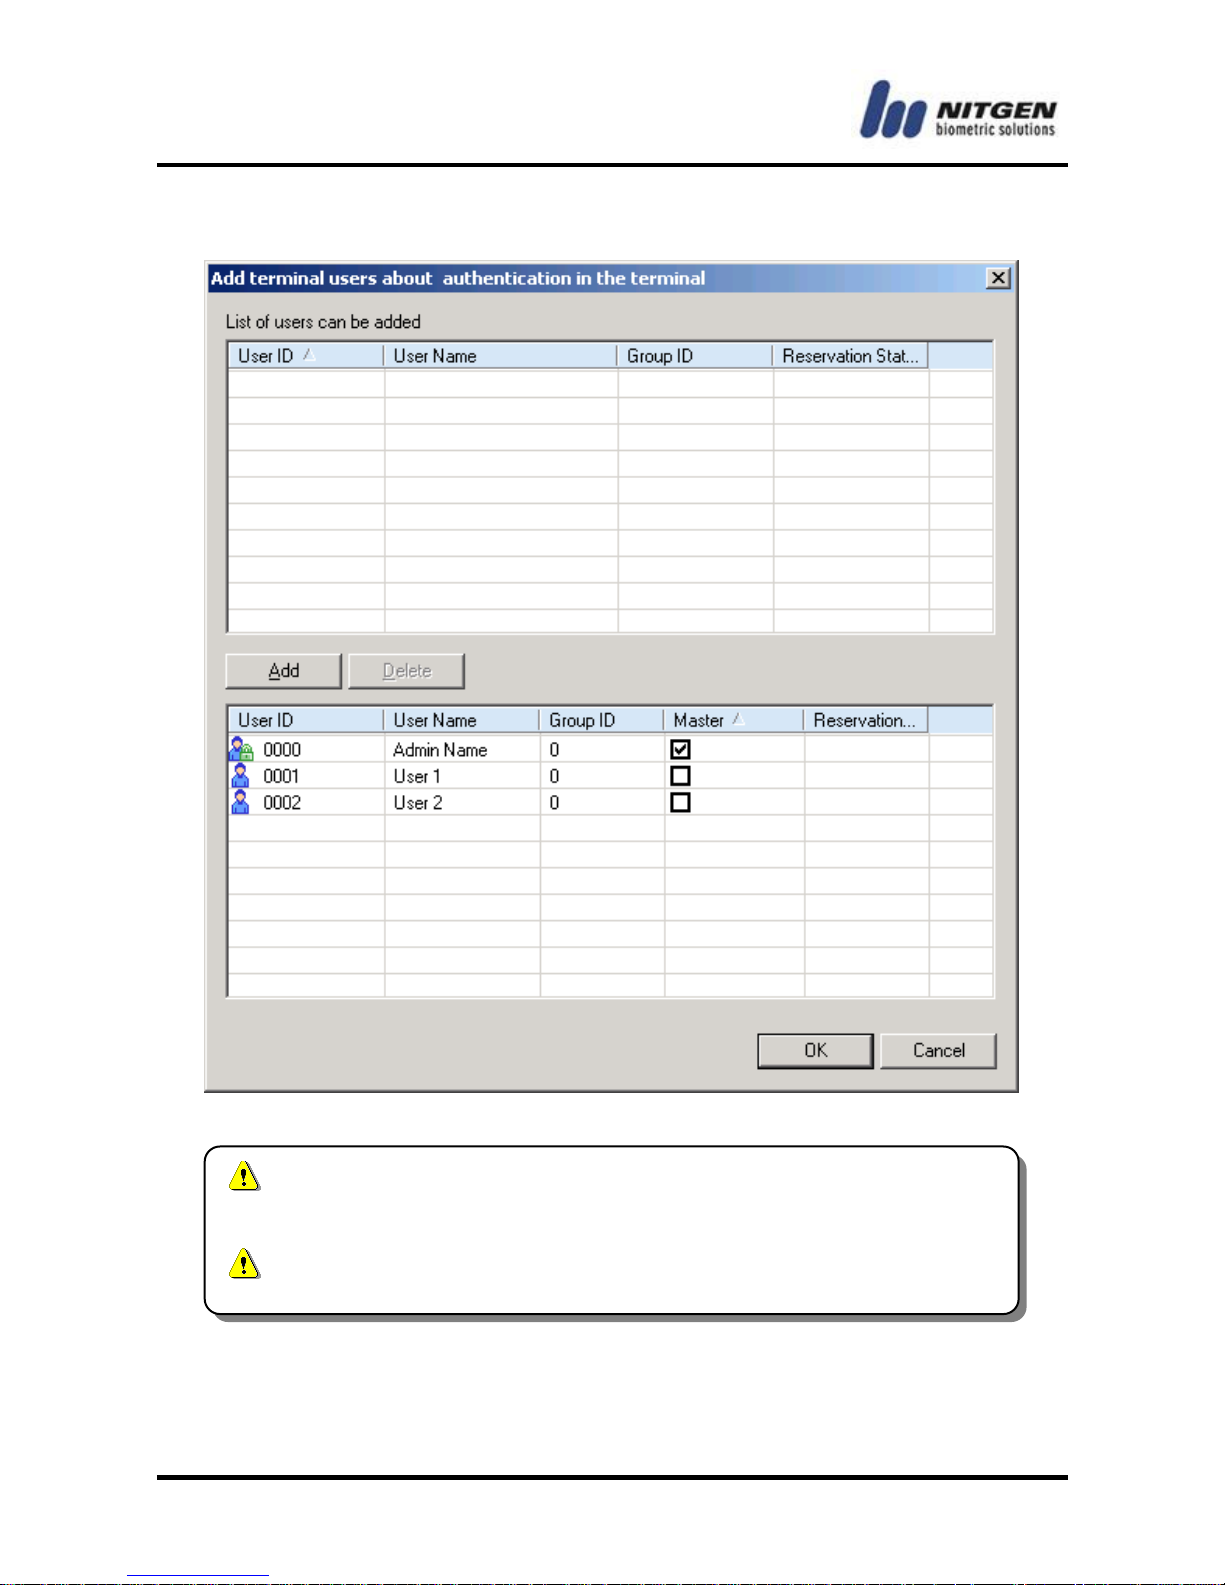
This is the list of users stored in the terminal and the relevant users
will be authorized in terminal. You can check the user list
registered in the terminal. To add or delete users, click <Change>.
Adding or deleting users in a terminal may take from
several seconds to tens of minutes depending on the
number of users. Please take note that the terminal
doesn't work while adding or deleting users.
Users authorized in terminal can be authorized only with
fingerprint. (1:N authenication possible)
Page 54
- -
54
One or more Master should be registered to the each
terminal, Master can change all terminal settings.
“Reservation” cannot be the master of a terminal.
Page 55
-55-
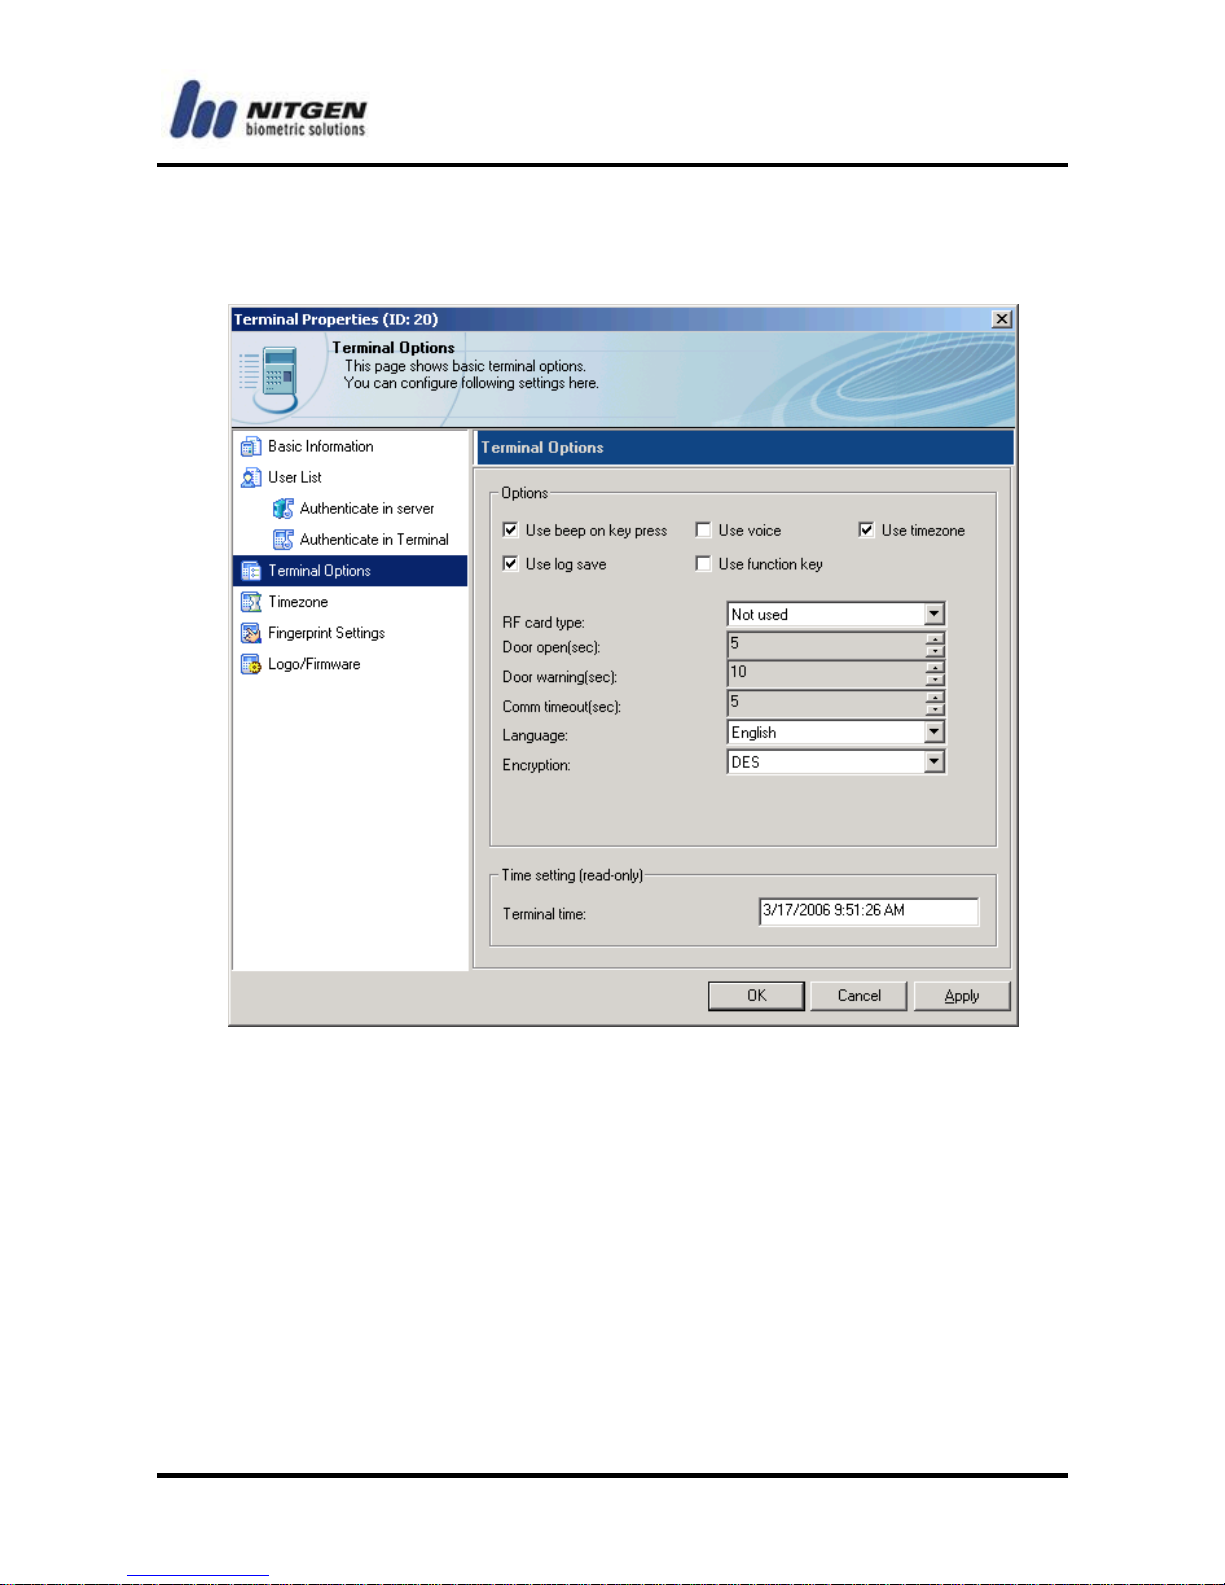
Terminal Options
You can set or modify terminal options and time as follows:
Use Beep on Key Press
Decide whether use Button Beep.
Use voice
Provide voice instruction on how to use the terminal for fingerprint
authentication.
Use timezone
Each terminal should determine whether to use a timezone
function or not. If this option is not selected, the terminal cannot
Page 56
- -
56
run timezone-related functions.
The logs are saved in a terminal
Use log save
Save user access information. If the terminal is connected to the
network, event information is sent to the server in real-time,
whereas in standalone mode without network connection,
information is saved within the terminal.
RF Card Type
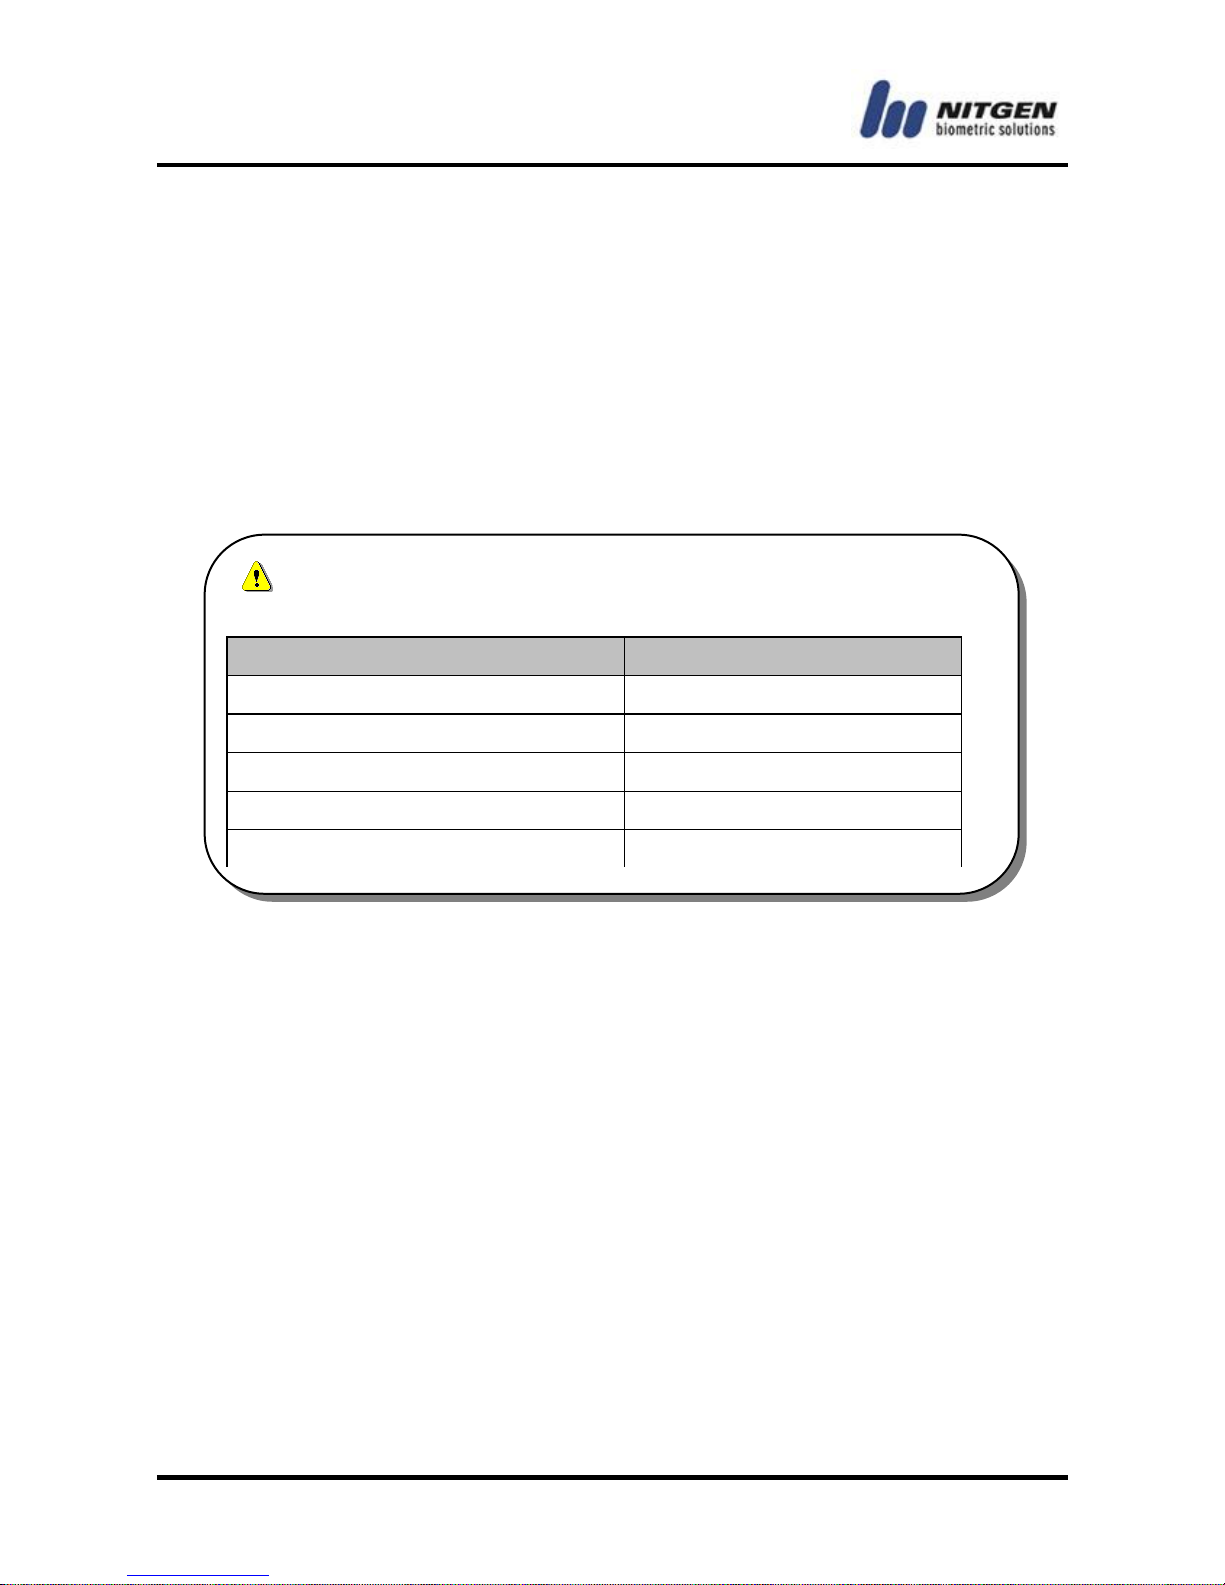
The maximum events which can be saved in a terminal are
as follows;
Terminal
count
NAC – 3000 (F/W V2.520 ↓)
6,000
NAC – 3000 (F/W V2.520 ↑)
15,000
NAC – 2500 (4M)
3,000
NAC – 2500 (8M)
90,000
NAC – 2500 (Card Only)
3,000
Page 57
-57-
When using RF card for user authentication, the RF card type
must be selected as the same with one in terminals.
Use function key
Choose this option to make the terminal's function keys (F1 ~ F4)
available in such application as Time & Attendance. But you
cannot use group authentication while it is active.
Door open (sec)
You can specify how long the door will be open after user
authentication is validated. You can specify between 1 and 20.
Door warning (sec)
It gives an alarm if the door is still open after the specified time
elapses. If the alarm sounds, check why the door is not closed and
take necessary steps to make sure that the door closes normally.
Specify a value between 1 and 20, but it should be greater than the
door open time.
Comm timeout (sec)
When the terminal communicates with the server via the network, it
will be assumed that the network connection is disabled if there is
no response within the specified time. You can specify a value
between 2 and 20. If the network environment is not stable, start
with 5 seconds and then increase the value gradually.
Door open and Door warning may not work in some
types of doors.
RF Card is an optional part of terminals. You cannot use
this option for any terminial with no RF module attached.
Page 58

- -
58
Language
Select the language of LCD display.
Encryption
Choose whether to use DES encryption type for the contents
transferred via the network.
Time setting (read-only)
It displays the current time of the terminal. You cannot change the
time in this window.
Timezone
Page 59
-59-
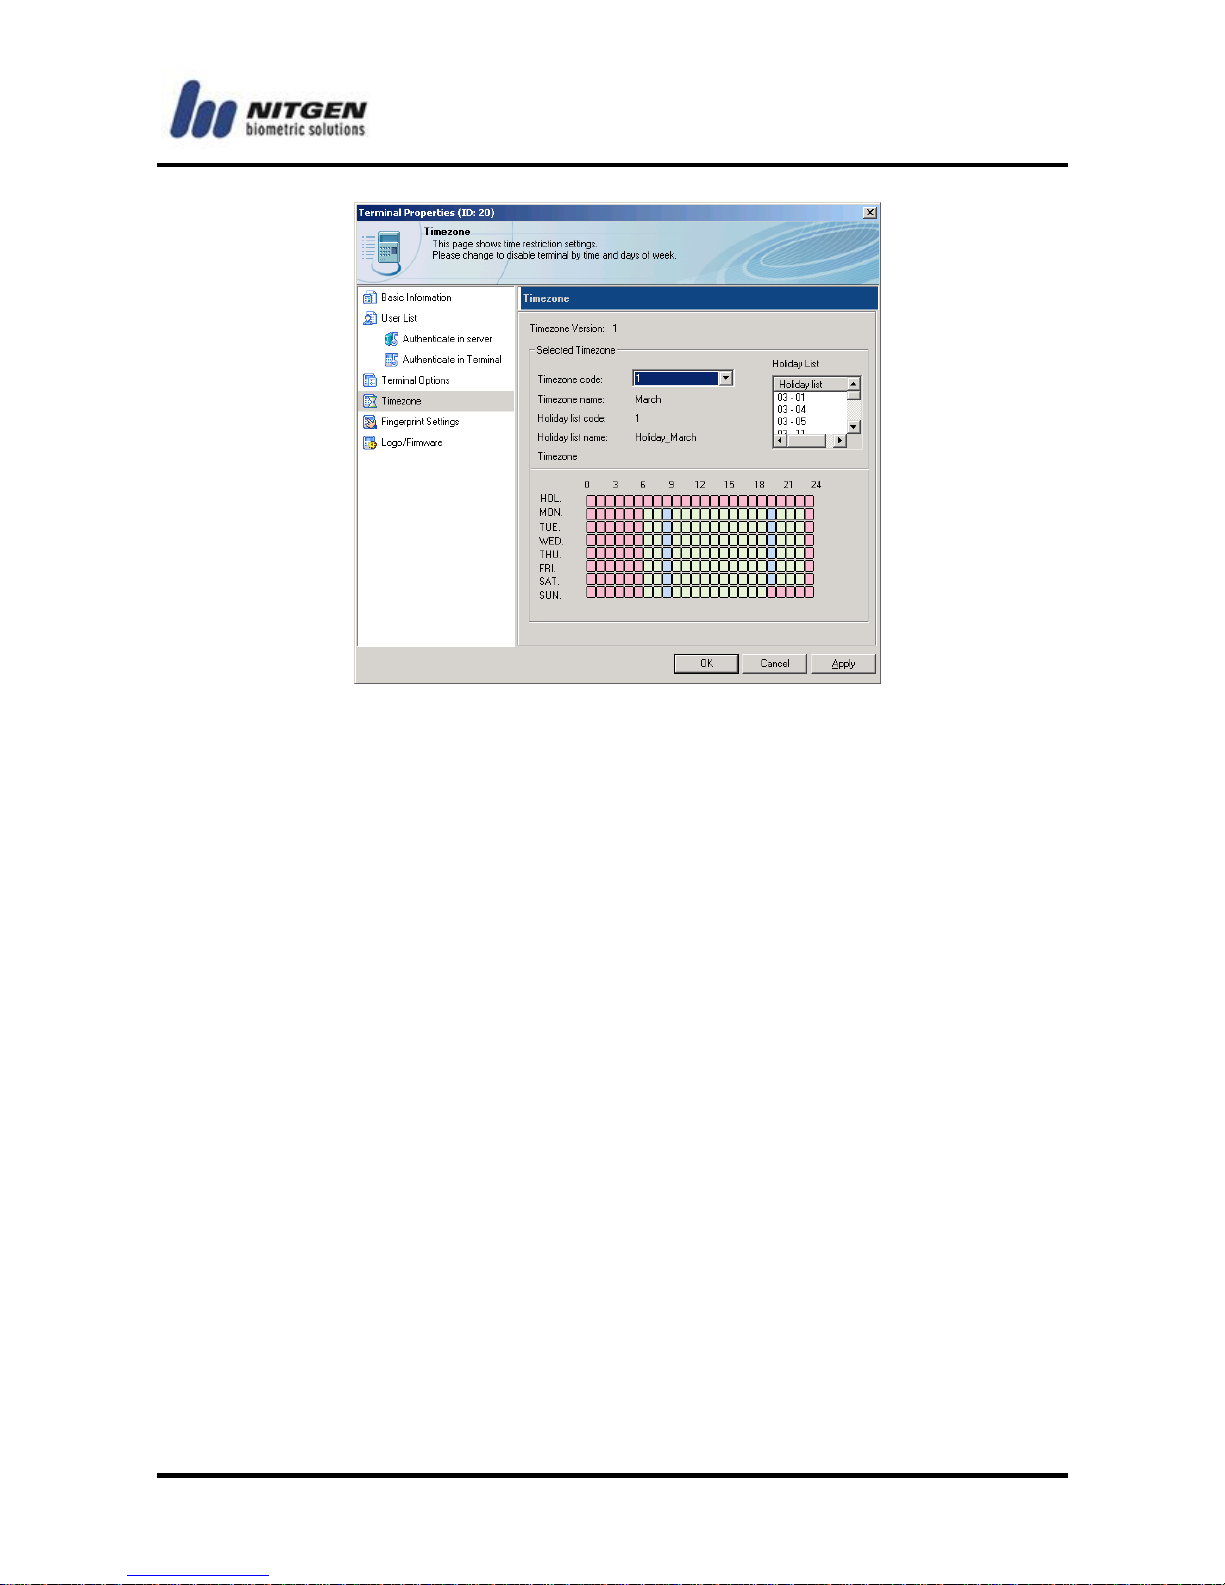
It shows the currently selected timezone.
To change the timezone, select Timezone Setting from the toolbar.
For more information, refer to 4.6 Timezone Setting later in this
manual.
● Timezone Version
If you change the timezone in the Timezone Setting window, the
version increases. This version is used to synchronize the
information saved in the terminal and the server.
● Selected Timezone
From the terminal, you must select at least one of the maximum 16
timezones set up in the Timezone Setting window. If you select a
timezone from the Timezone code combo box, the information on
the selected timezone will be displayed in a table form, and the
terminal operates with this timezone.
Page 60

- -
60
With regard to the holiday list, you can select one holiday code for
one timezone. You can also change it in the Timezone Setting
window.
How to read the timezone table
There are horizontal axis marked with 0, 3, 6, 9…, and
vertical axis marked with HOL, MON…in the timezone
table.
Green is the time for “permit the access”. Red is the time
for “deny the access”. Blue is the time for “always
opened the door”.
If a holiday is selected and the date of the holiday is
specified, it will work first regardless of the day of the
week.
EX1. As any access is denied for the entire 24 hours for
holiday list, terminals set for common users cannot have
an access on a specific date under holiday list.
EX2. For weekday, doors are set open from 8:00 AM to
9:00 AM, and users can have an access without
authentication.
Page 61
-61-
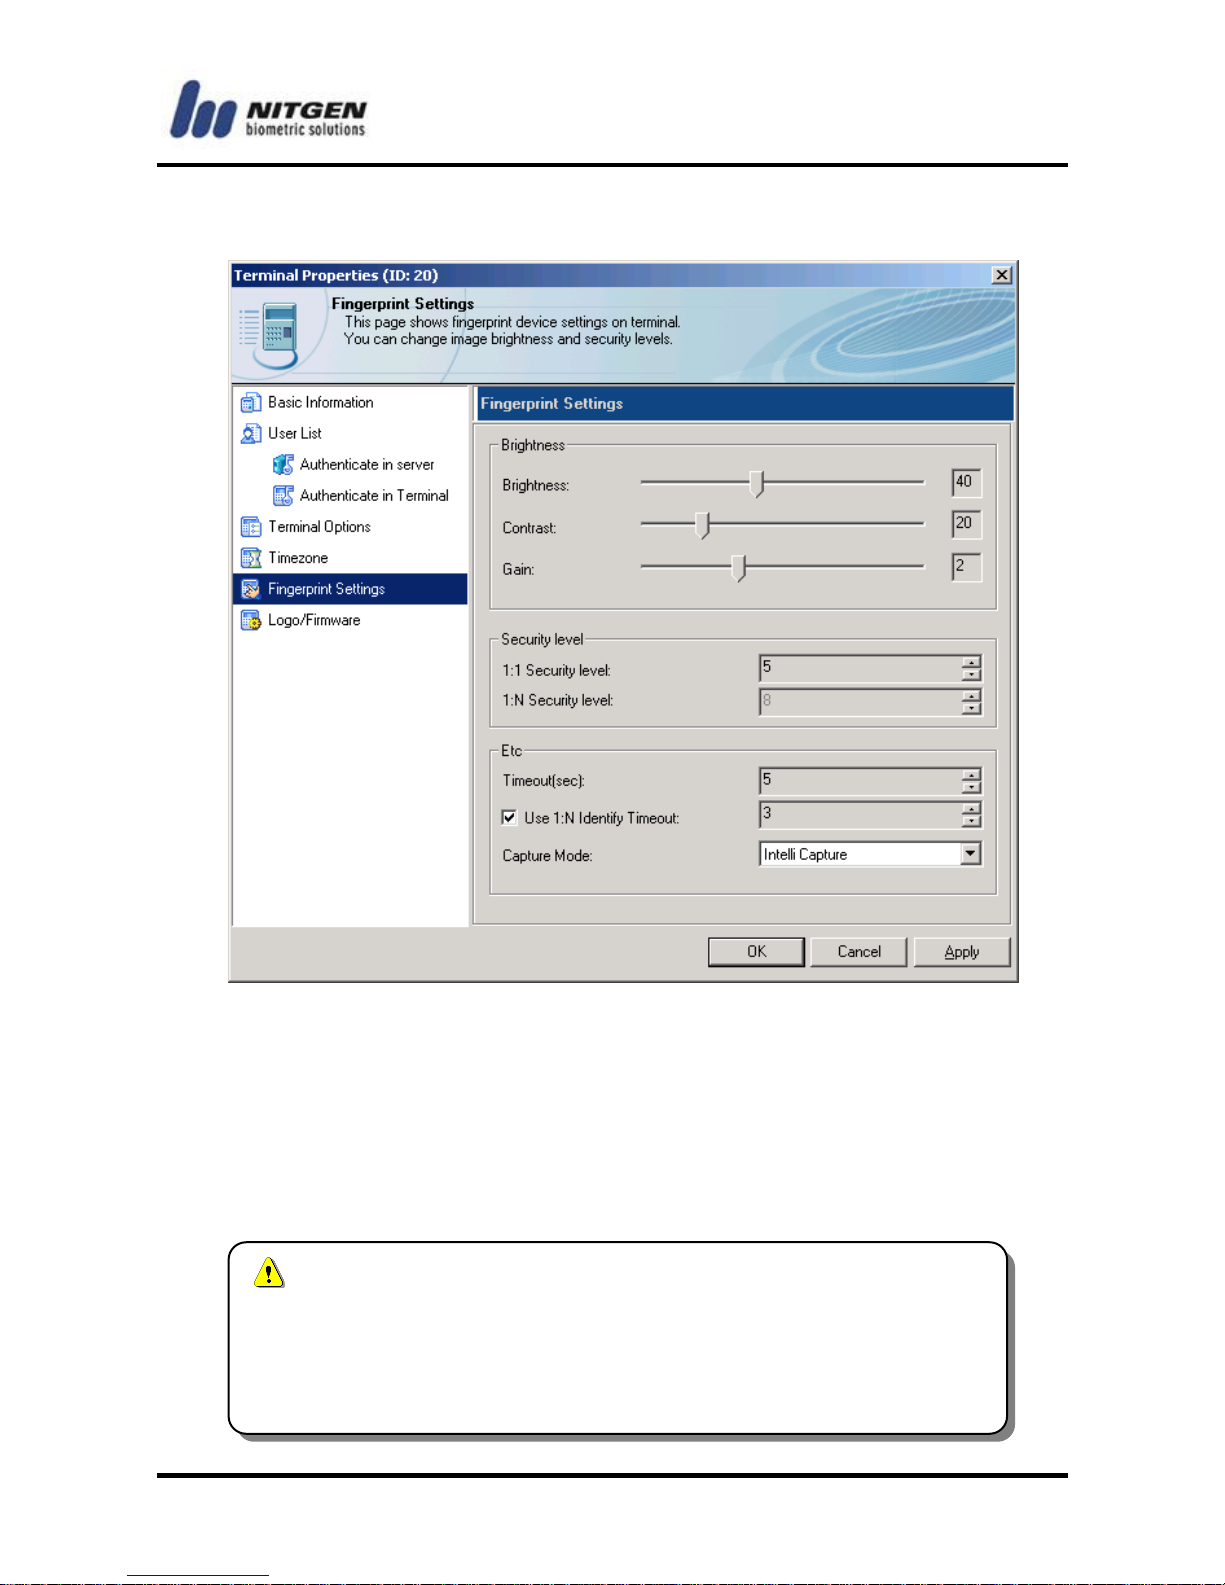
Fingerprint settings
Brightness
You can obtain a clear fingerprint image by adjusting the fingerprint
settings. The defaults of Brightness, Contrast and Gain are 40, 20
and 2 respectively.
These values can largely affect the fingerprint recognition
performance because they are very sensitive. So it is
highly recommended that default values be used without
any modification if possible.
Page 62
- -
62
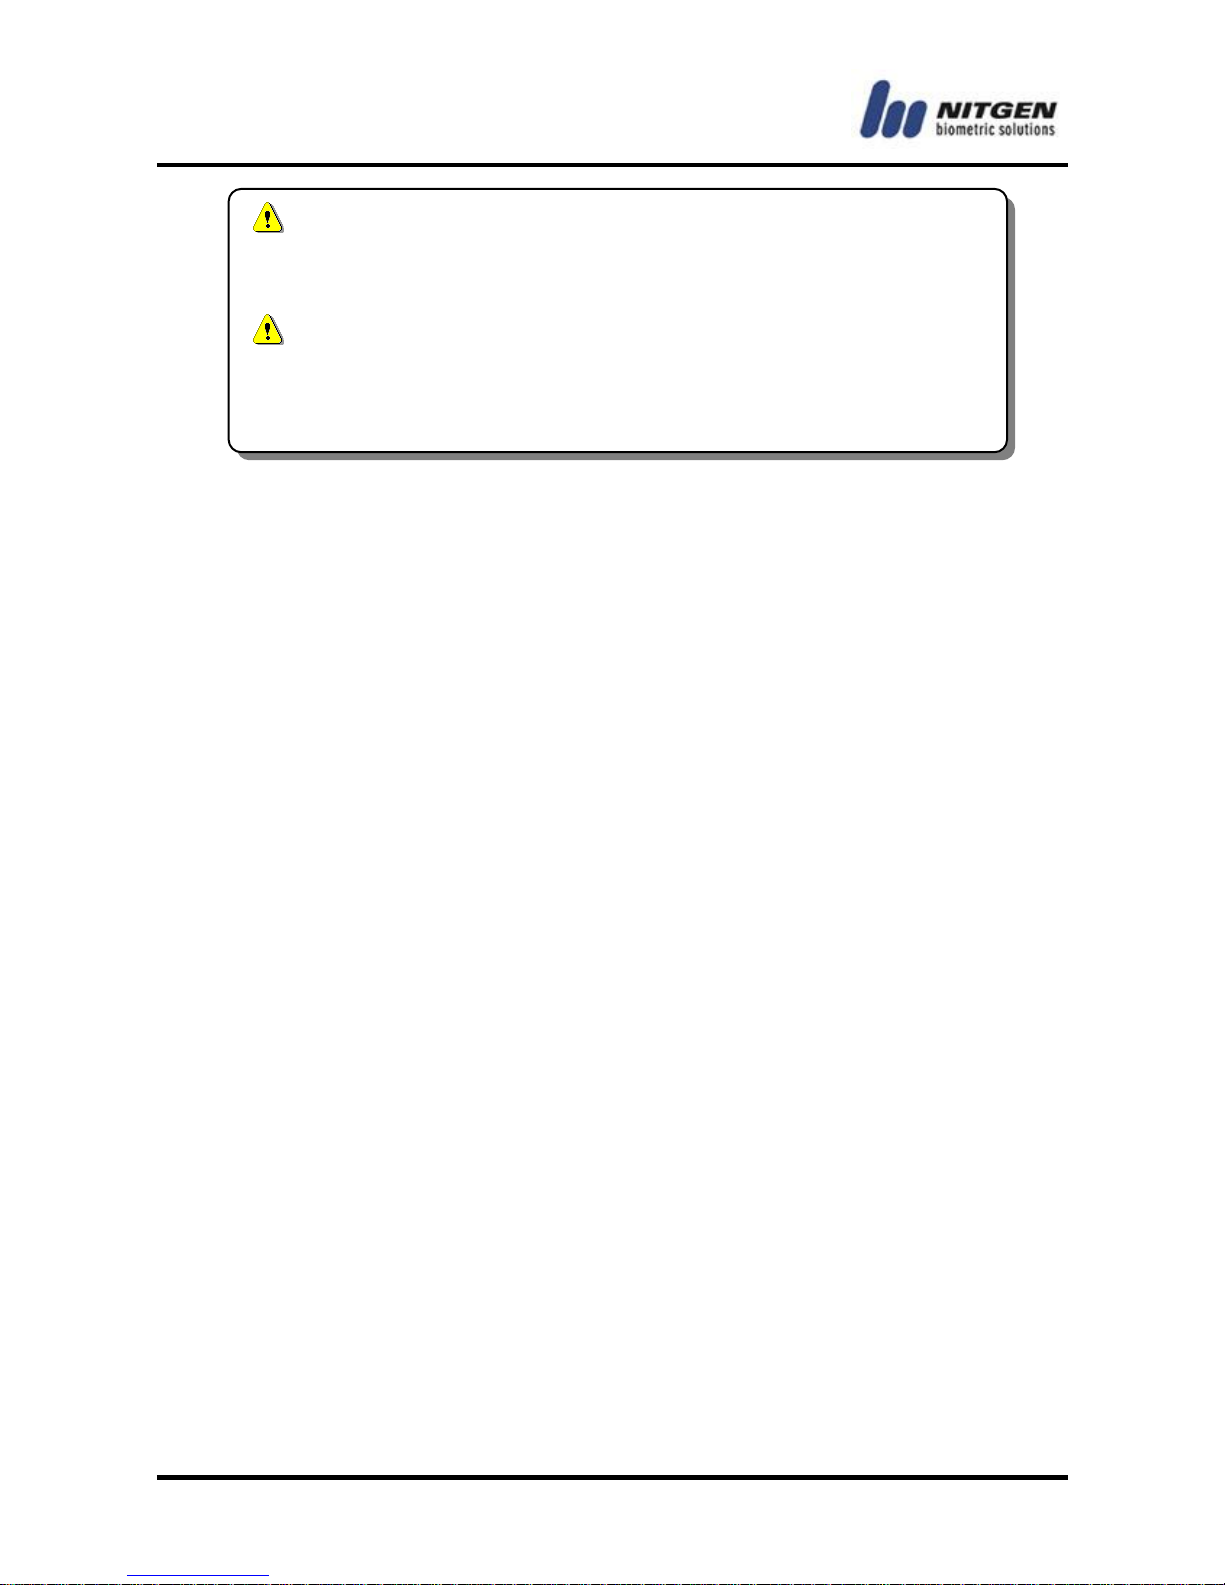
Security level
You can choose a level between 1 and 9. The greater the number
is, the higher the security level is. The default value of 1:1 Security
level is 5 and that of 1:N Security level is 8. The default is 8. (This
setting is not updatable.)
For more information, please refer to 3.2 Basic setting and
running.
Etc
(1) Timeout (sec)
You can set the timeout of fingerprint input within the range of 1
and 30 seconds. The terminal waits for fingerprint input during
the specified seconds. After that time, the LED will be turned off.
The default is 5 seconds.
(2) 1:N Authentication Time out
You can set the period of time out for 1:N authentication. The
system will search the fingerprint during the certain period of
time. The period range is from 2 seconds up to 9 seconds.
(Default time out value is 3 seconds)
(3) CAPTURE MODE
► Latent
To prevent any possible False Recognition by fingerprint latent
If the recognition performance is decreased because it is
very dry (i.e. in winter), adjust Brightness between 20 and
30 (recommendation: 20).
If the recognition performance is decreased because it is
very wet (i.e. in summer), adjust Brightness between 50
and 80 (recommendation: 60).
Page 63
-63-
which remain on the surface of sensor formed by dirt and sebum.
► Intelli Capture
To optimise the brightness of the fingerprint image captured from
extremely dry or wet finger.
Intelli Capture Mode contains Latent mode.
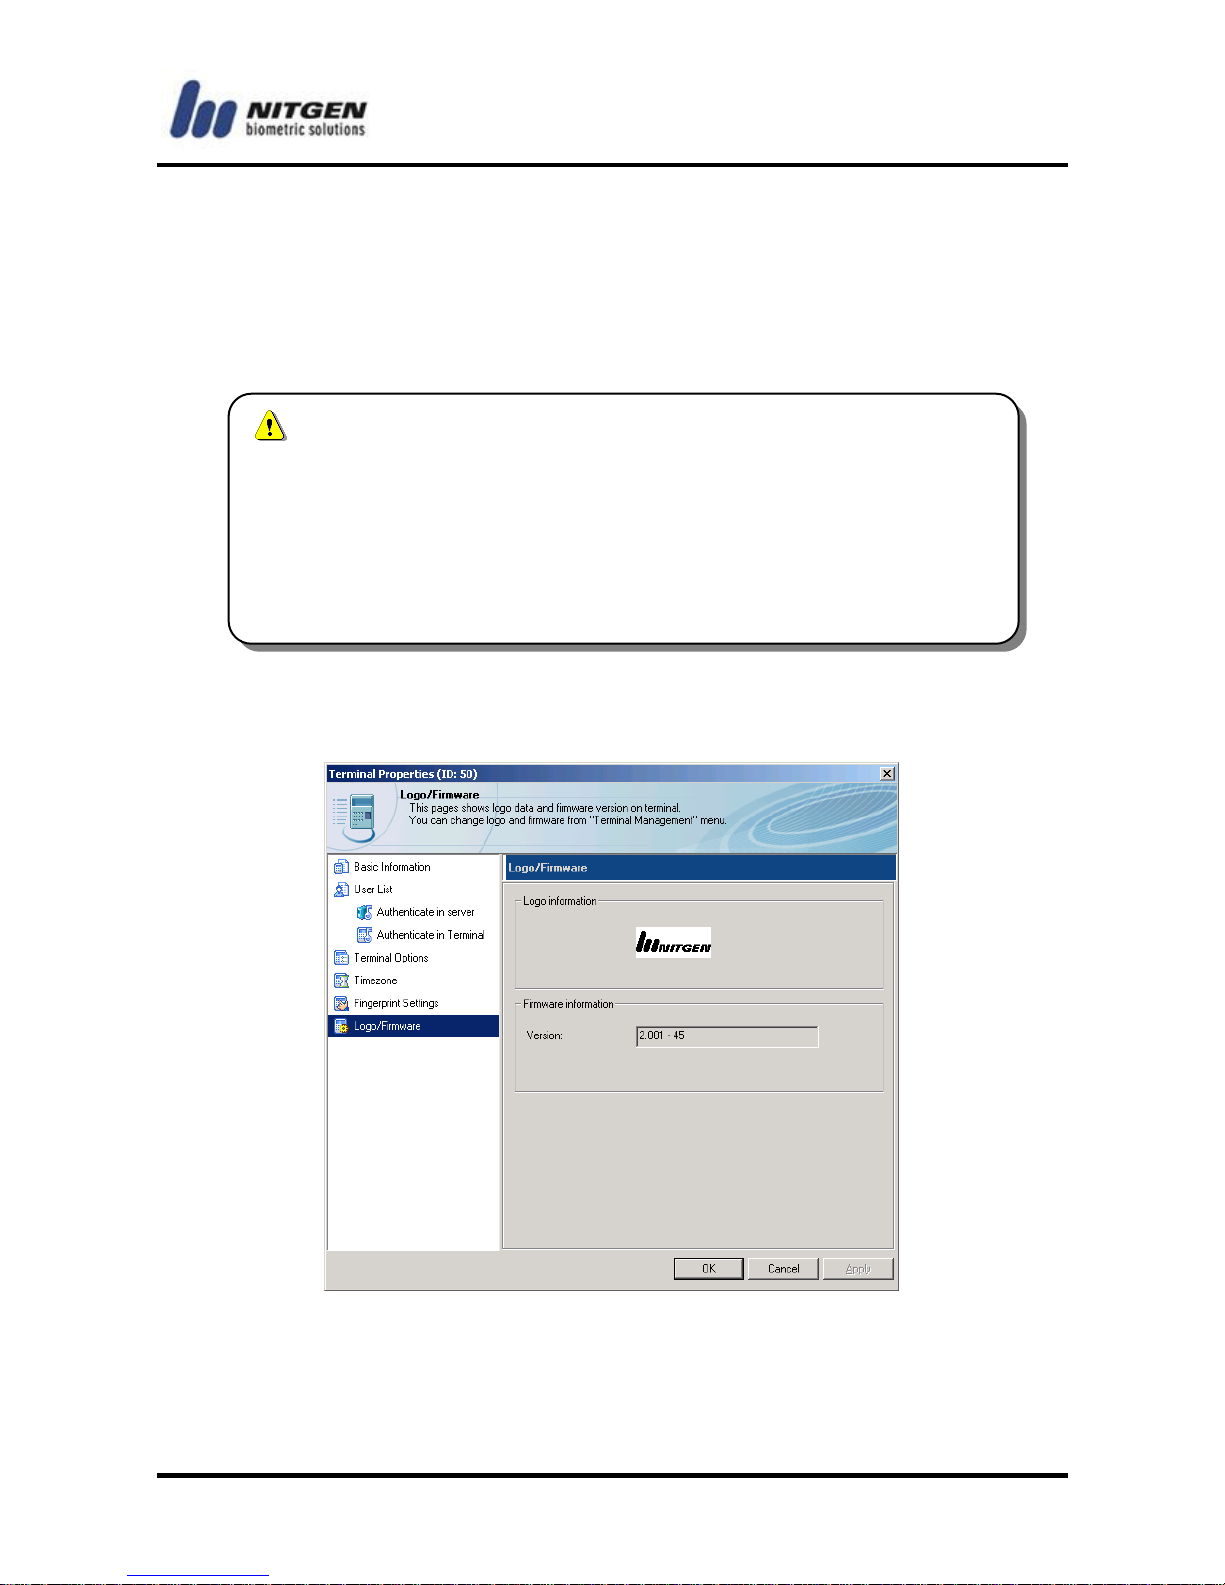
Logo/Firmware
You can check the logo and firmware version stored in the terminal
from the above window.
This feature can increase security but it may slow down
authentication time. So if high level of security is required,
you can use this feature. But you'd better not use this
feature in an environment where convenience and
quickness are more important (i.e. when used for Time &
Attendance).
Page 64
- -
64
Terminal Time Settings
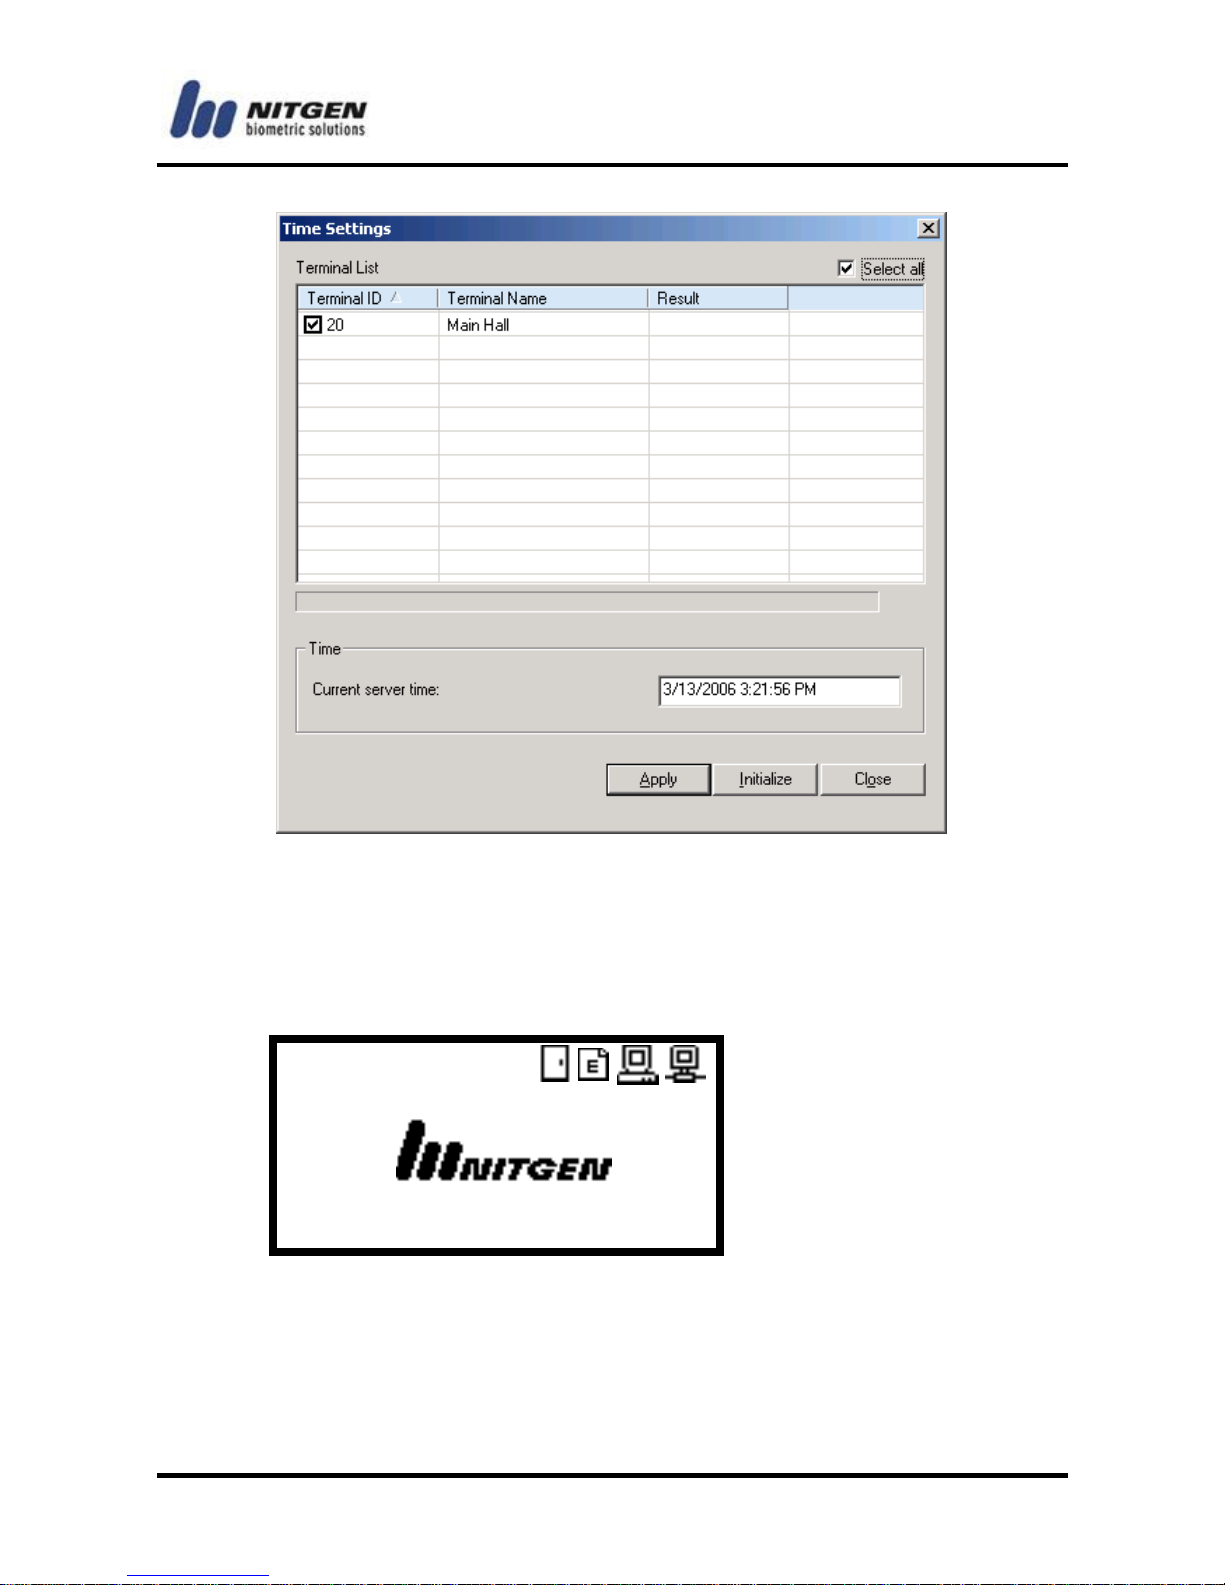
When the terminal is connected to the server, the terminal time is
automatically synchronized, but you can synchronize the time
manually.
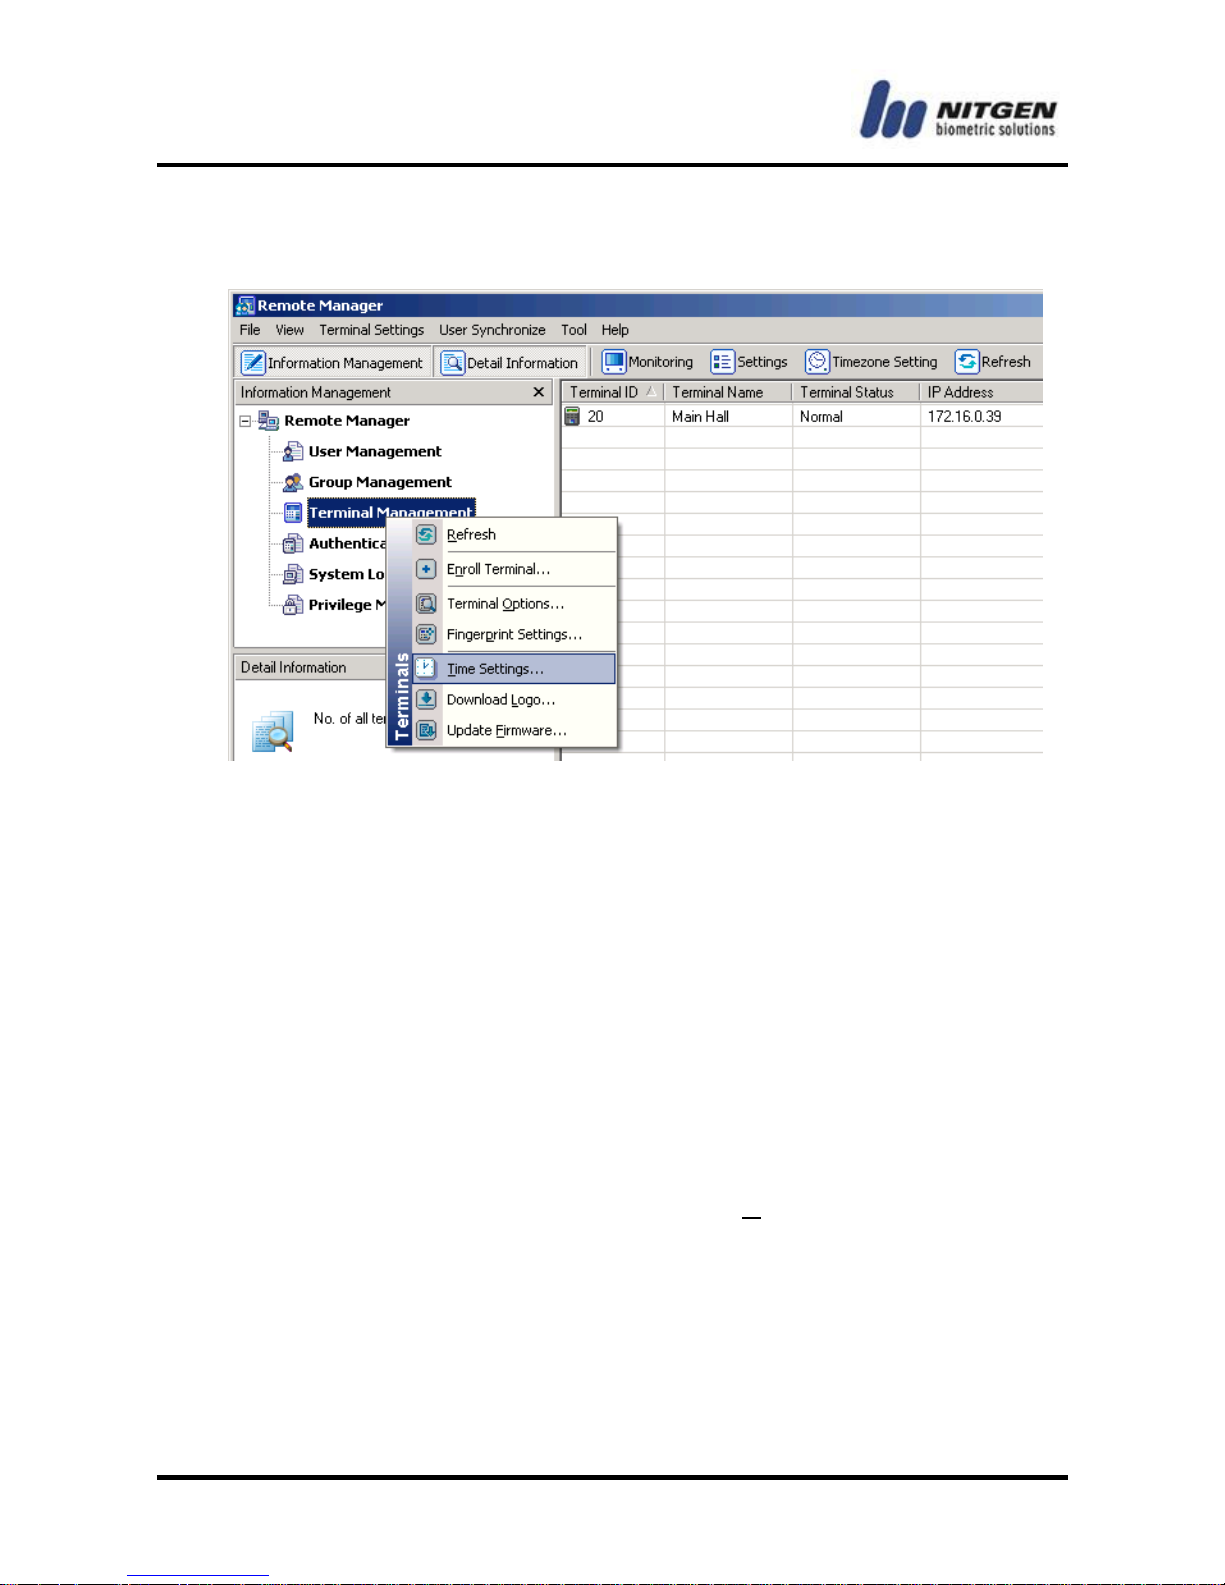
Right-click Terminal in the Information Management window
and choose Time Settings from the submenu, and the Time
Settings window will appear.
Alternatively, right-click a terminal in the List window and select
Time Settings from the submenu.
Select one or more terminals and click <Apply> to synchronize
with the server time.
Page 65
-65-
Download Logo
As shown in the below terminal LCD screen, you can register a
new logo or change the logo for a terminal.
NAC-3000 terminal only support this function.
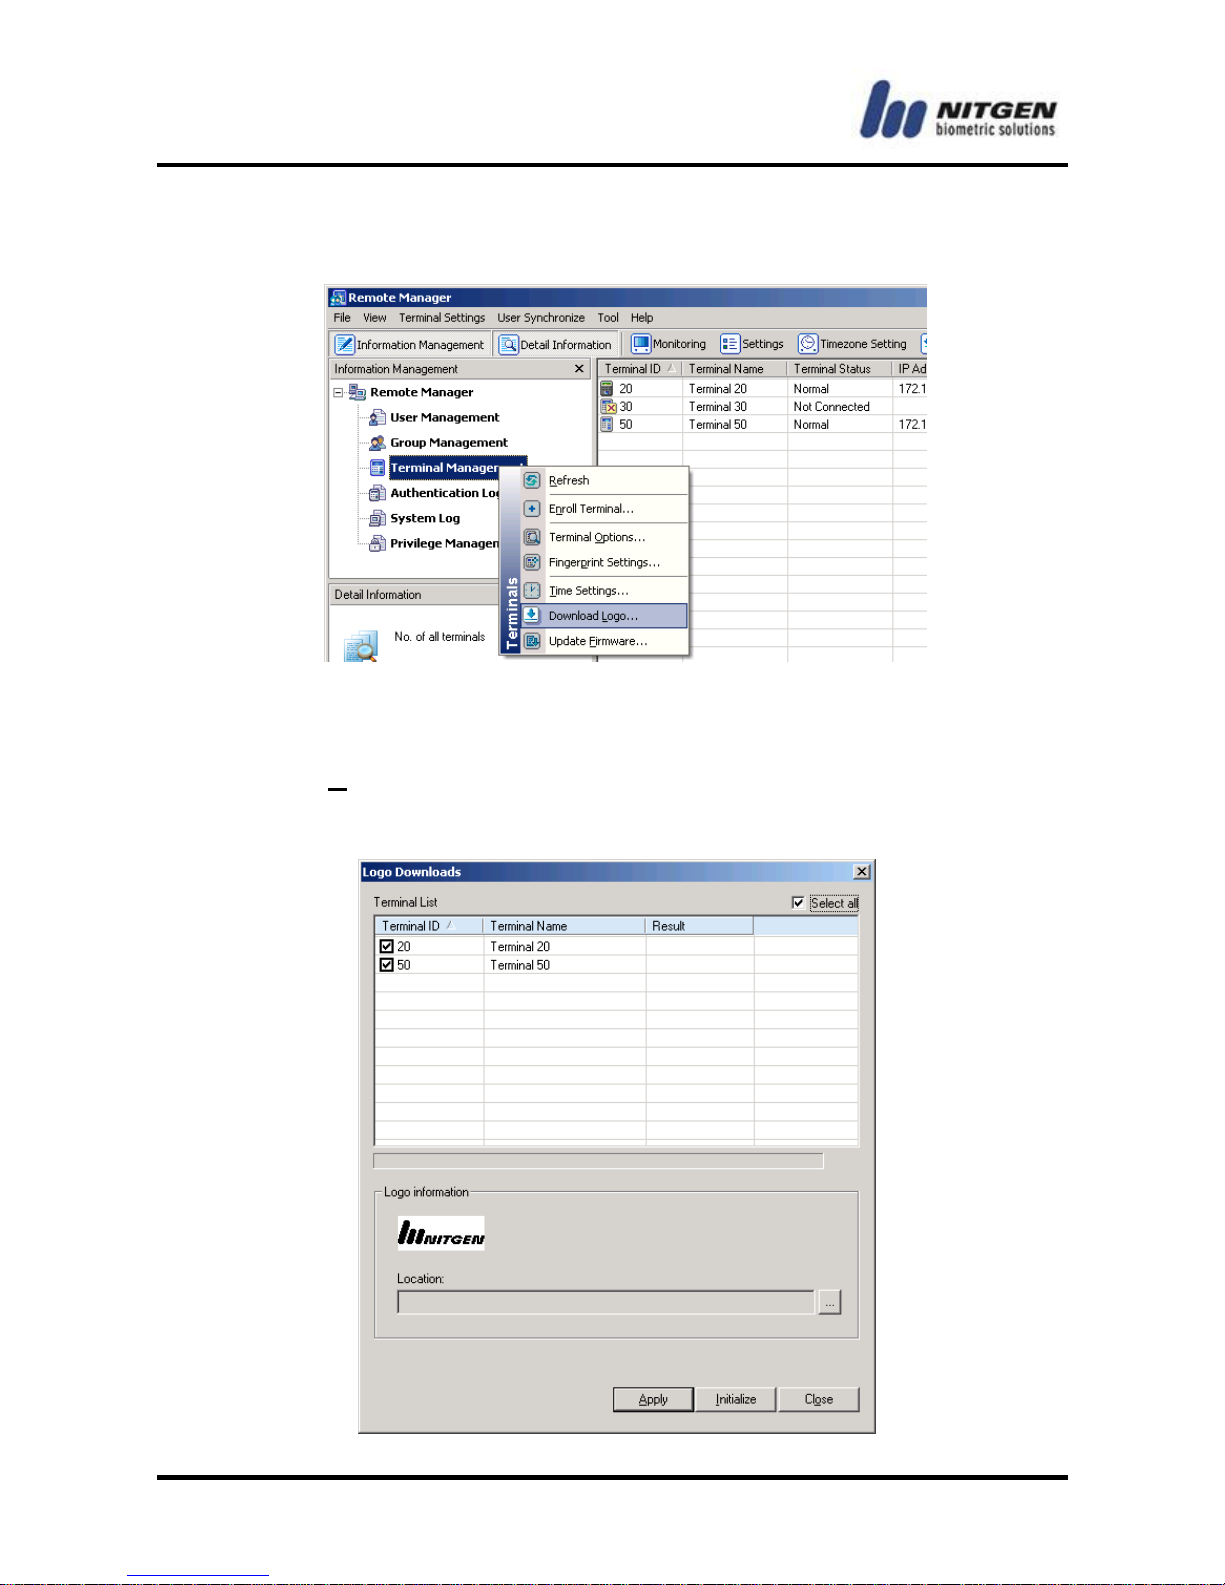
Right-click Terminal Management in the Information
Management window and choose Download Logo from the
submenu, and the Logo Downloads window will appear.
1 1 - J U L 0 9 : 2 5 : 0 3
Page 66
- -
66
Alternatively, right-click a terminal in the List window and select
Download Logo from the submenu.
In the following window, click <…> to locate the logo file you
want to download to a terminal. Then select the terminal and
click <Apply>. You can use only a black and white bitmap image
( 2color, *.bmp) with the size of 80 x 32 pixels as a log file.
Page 67
-67-
Update Firmware
You can use this feature to update firmware of terminal.
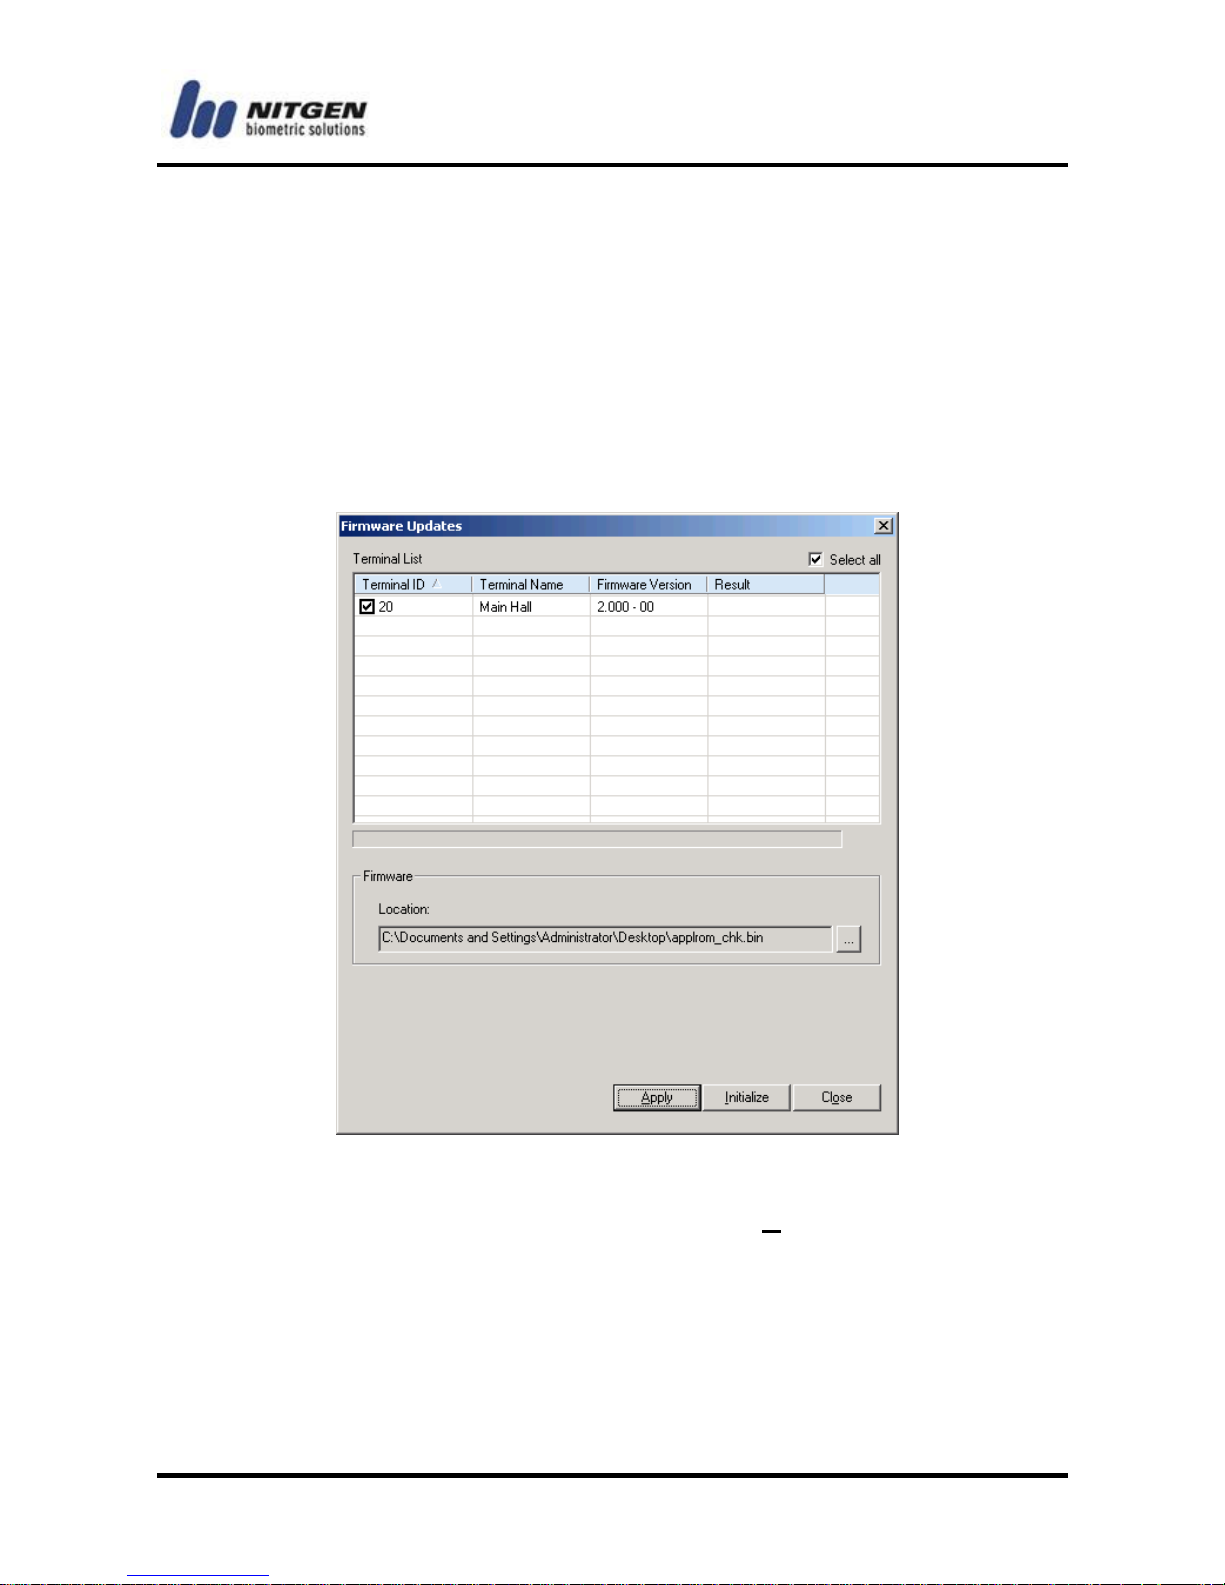
Right-click Terminal Management in the Information
Management window and choose Update Firmware from the
submenu, and the following Firmware Updates window will appear.
Alternatively, right-click a terminal in the List window and select
Update Firmware from the submenu.
Click <…> to locate the firmware file you want to download to a
terminal. Then select the terminal and click <Apply>.
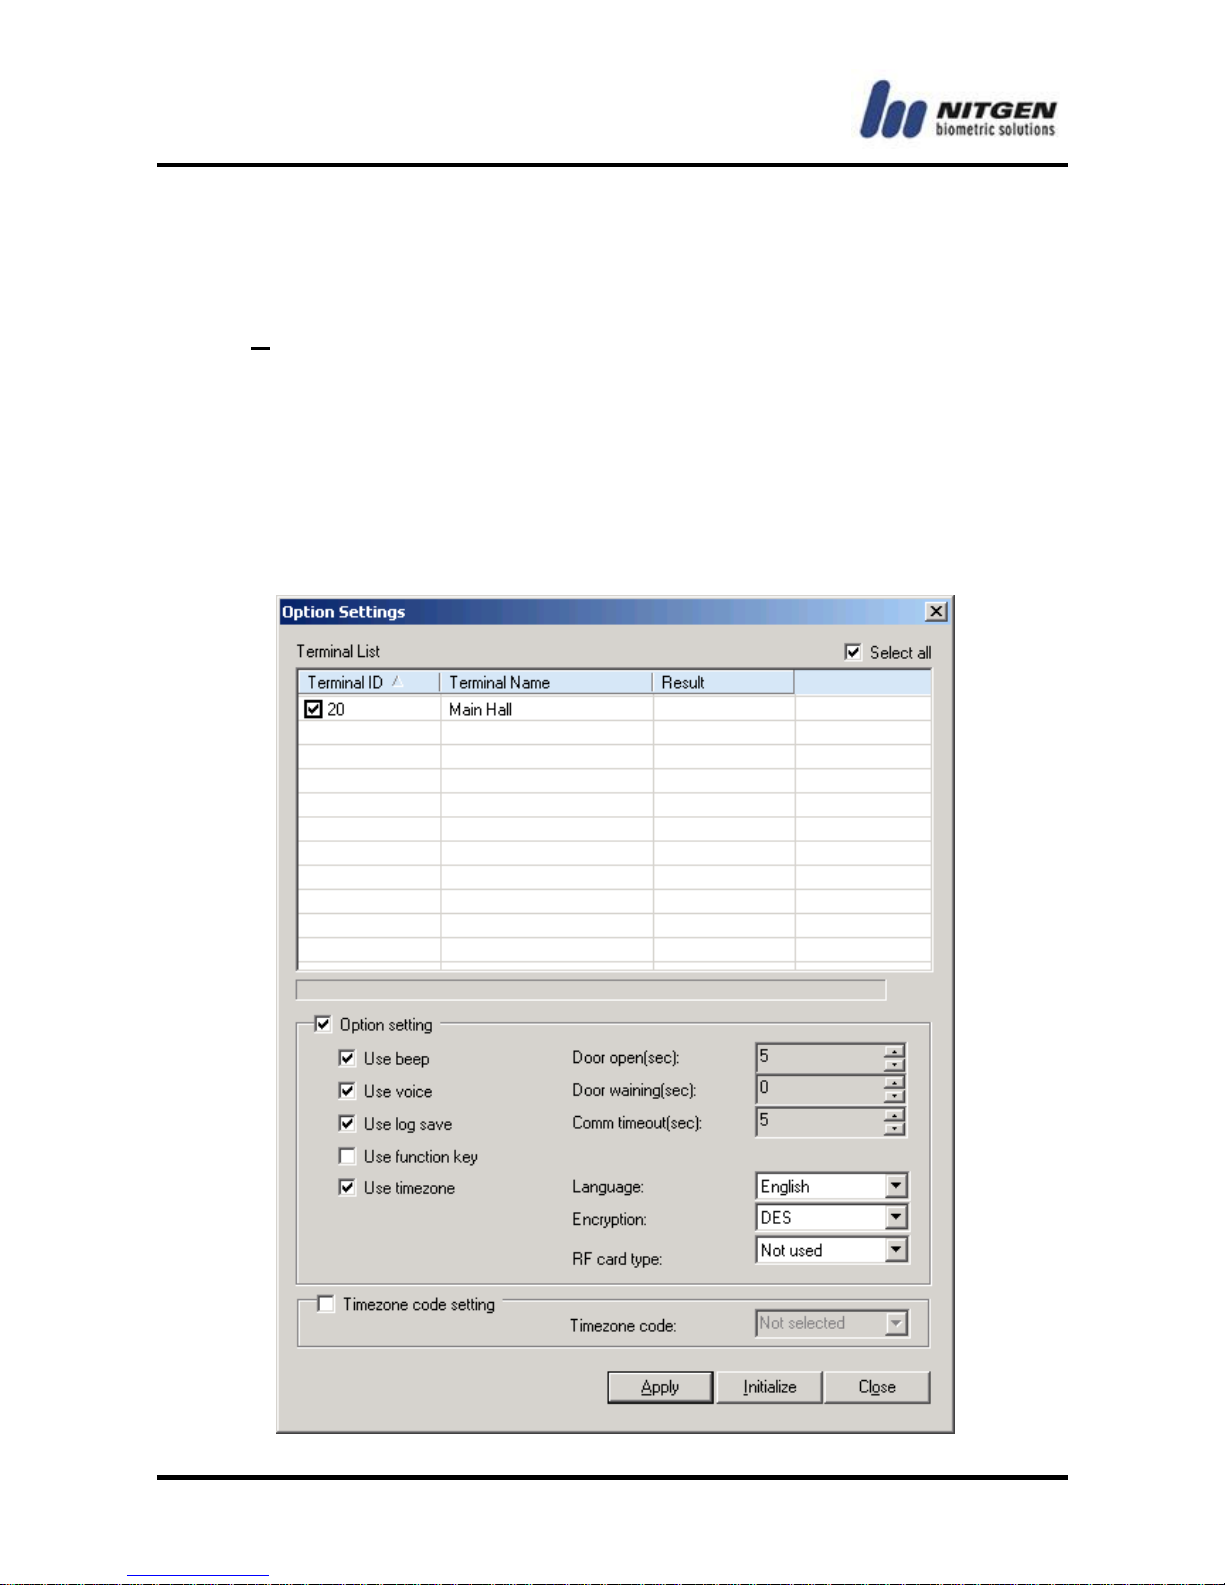
Terminal Options
Right-click Terminal Management in the Information
Management window and select Terminal Options from the
Page 68
- -
68
submenu, or select Terminal Settings > Terminal Options from
the Menu bar to change the settings of several terminals at once.
Select each terminal and make necessary changes, and then click
<Apply> to change the settings at once.
● Option setting check boxes
If you select an option setting, you can change its value.
● Timezone code check box
If you select Timezone code setting, you can change the
timezone code.
Page 69
-69-
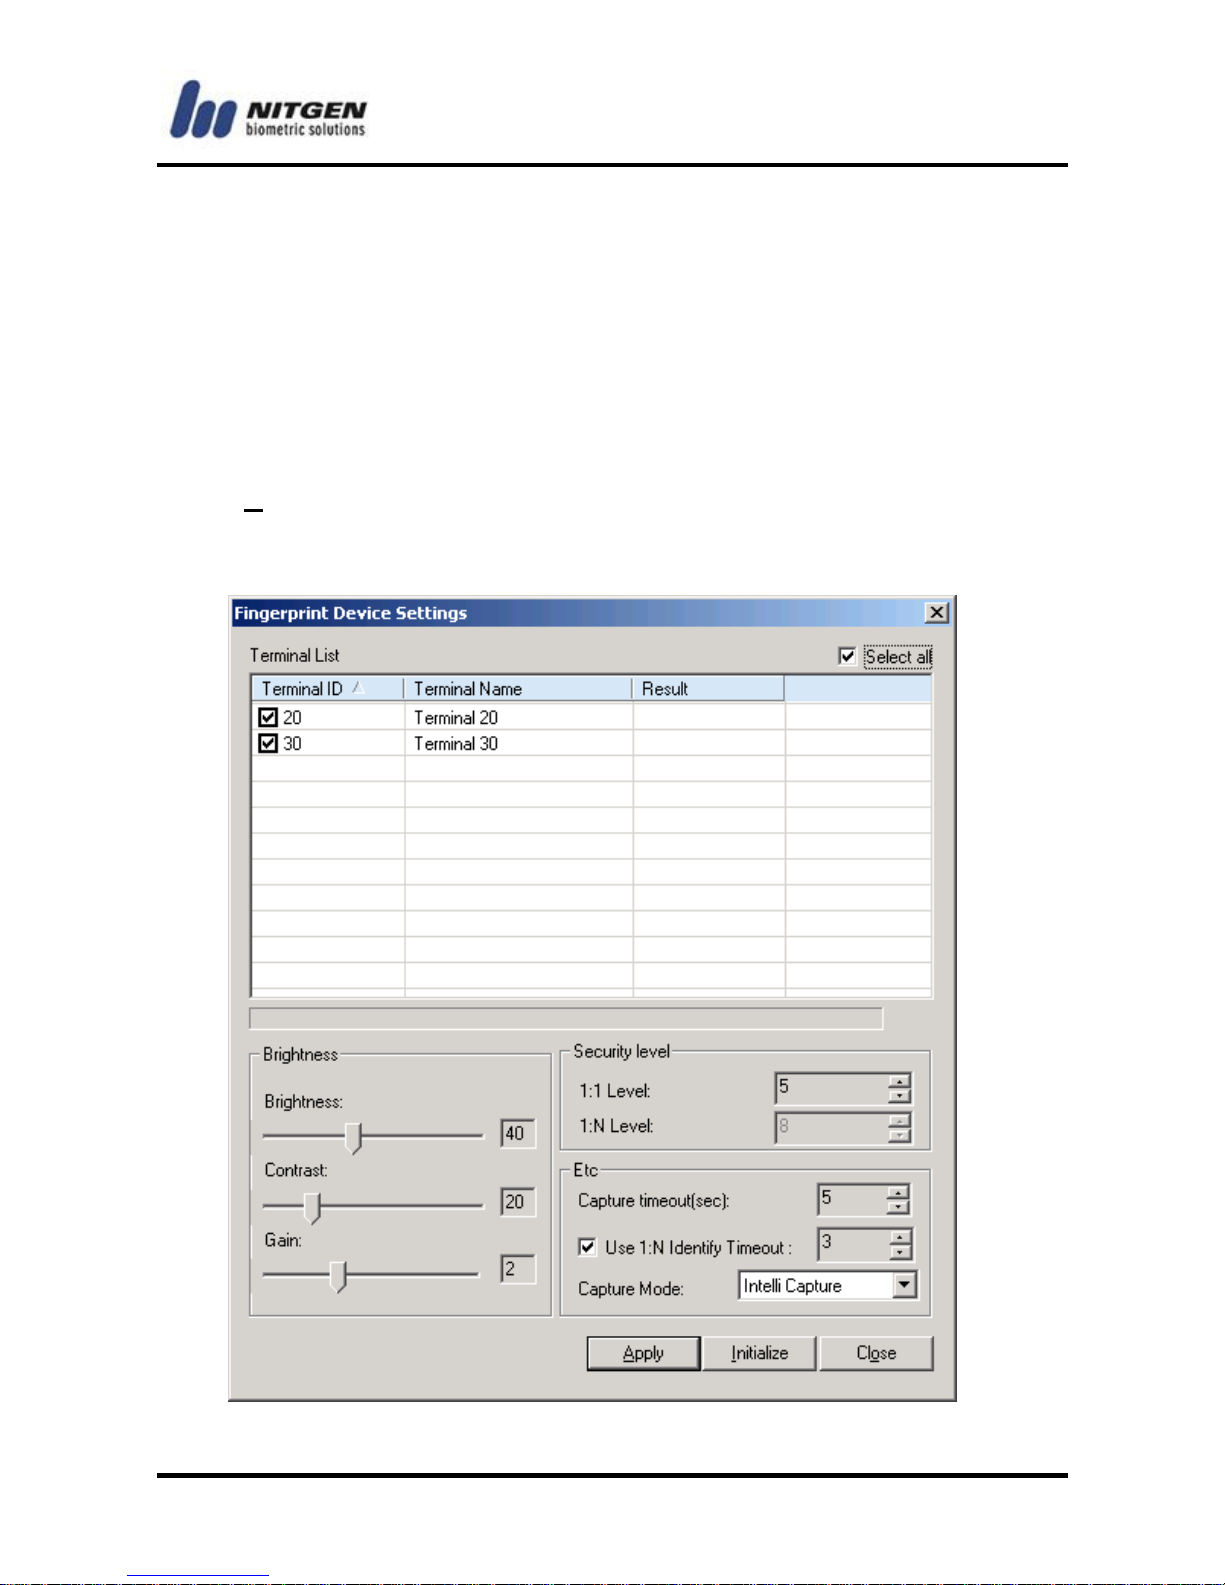
Fingerprint Device Settings
Right-click Terminal Management in the Information
Management window and choose Fingerprint Settings from the
submenu, or select Terminal Settings > Fingerprint Settings
from the menu bar to change the setting of several terminals at
once.
Select each terminal and make necessary changes, and then click
<Apply> to change the settings at once.
The terminal list don't include dedicated terminals to RF card.
Page 70
- -
70
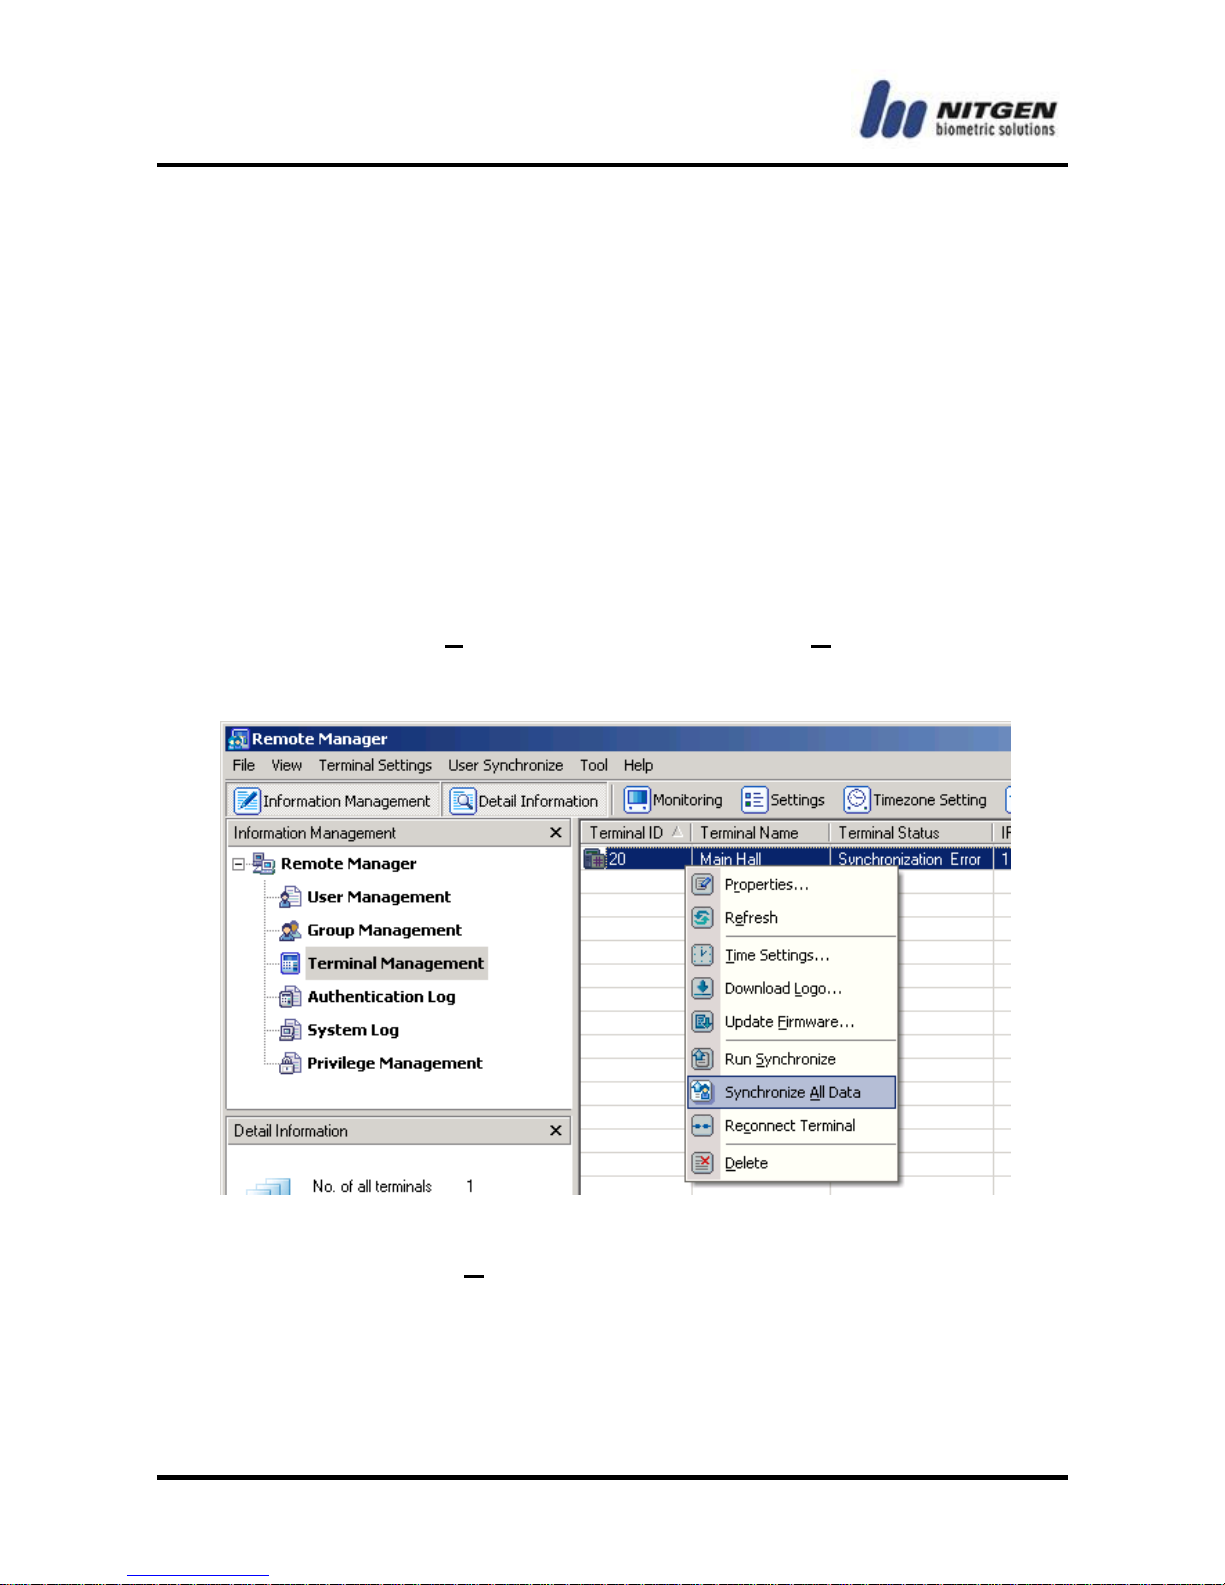
Synchronization
If user group and timezone information are changed in the server,
the corresponding information in the terminal will be changed as
well. If the information saved in the server and terminal doesn‟t
match each other because of network or other problems,
schronization errors may occur. The role of synchronization is to
correct those errors according to the information in the server. If a
synchronization error occurs, you can see such status as below on
the screen.
Right-click on the terminal that has a synchronization error, and
you can see Run Synchronize or Synchronize All Data from the
menu.
Click Synchronize All Data to synchronize all user data between
the server and the selected terminal. Doing this will solve all
synchronization errors including ID length mismatch or registered
fingerprint count mismatch.
Page 71
-71-
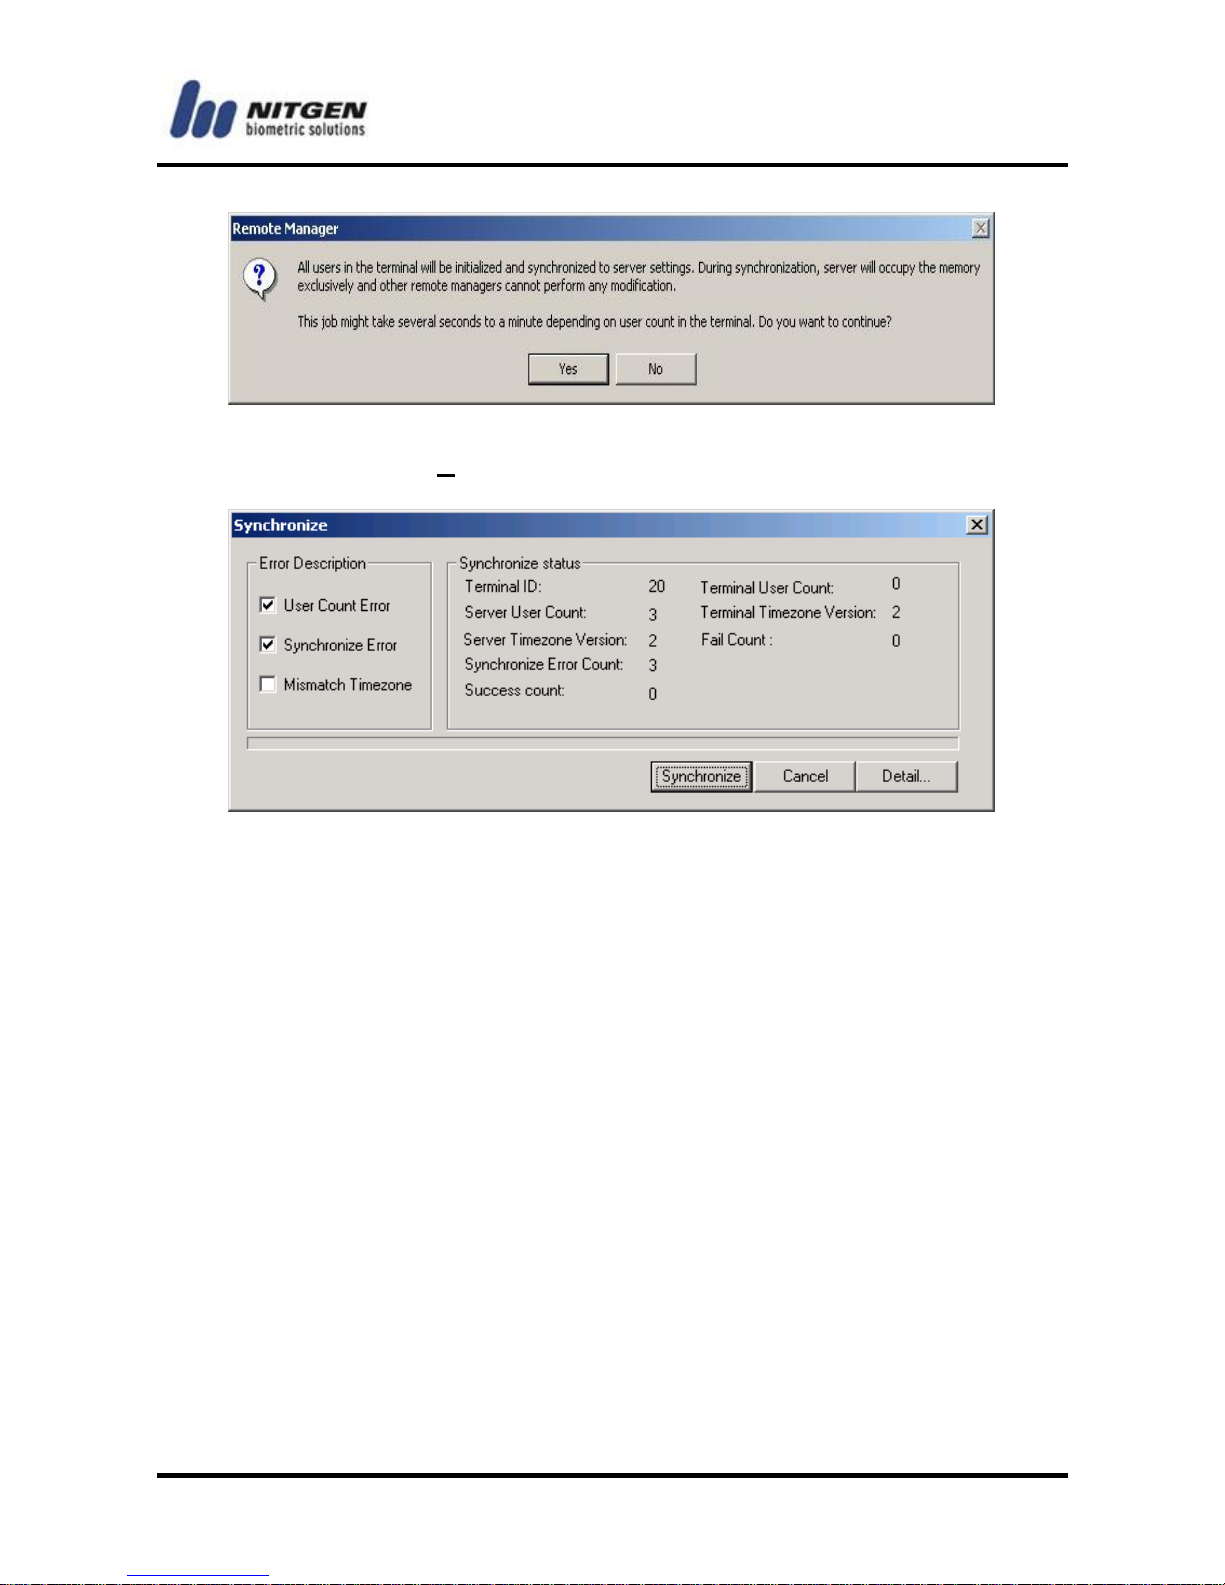
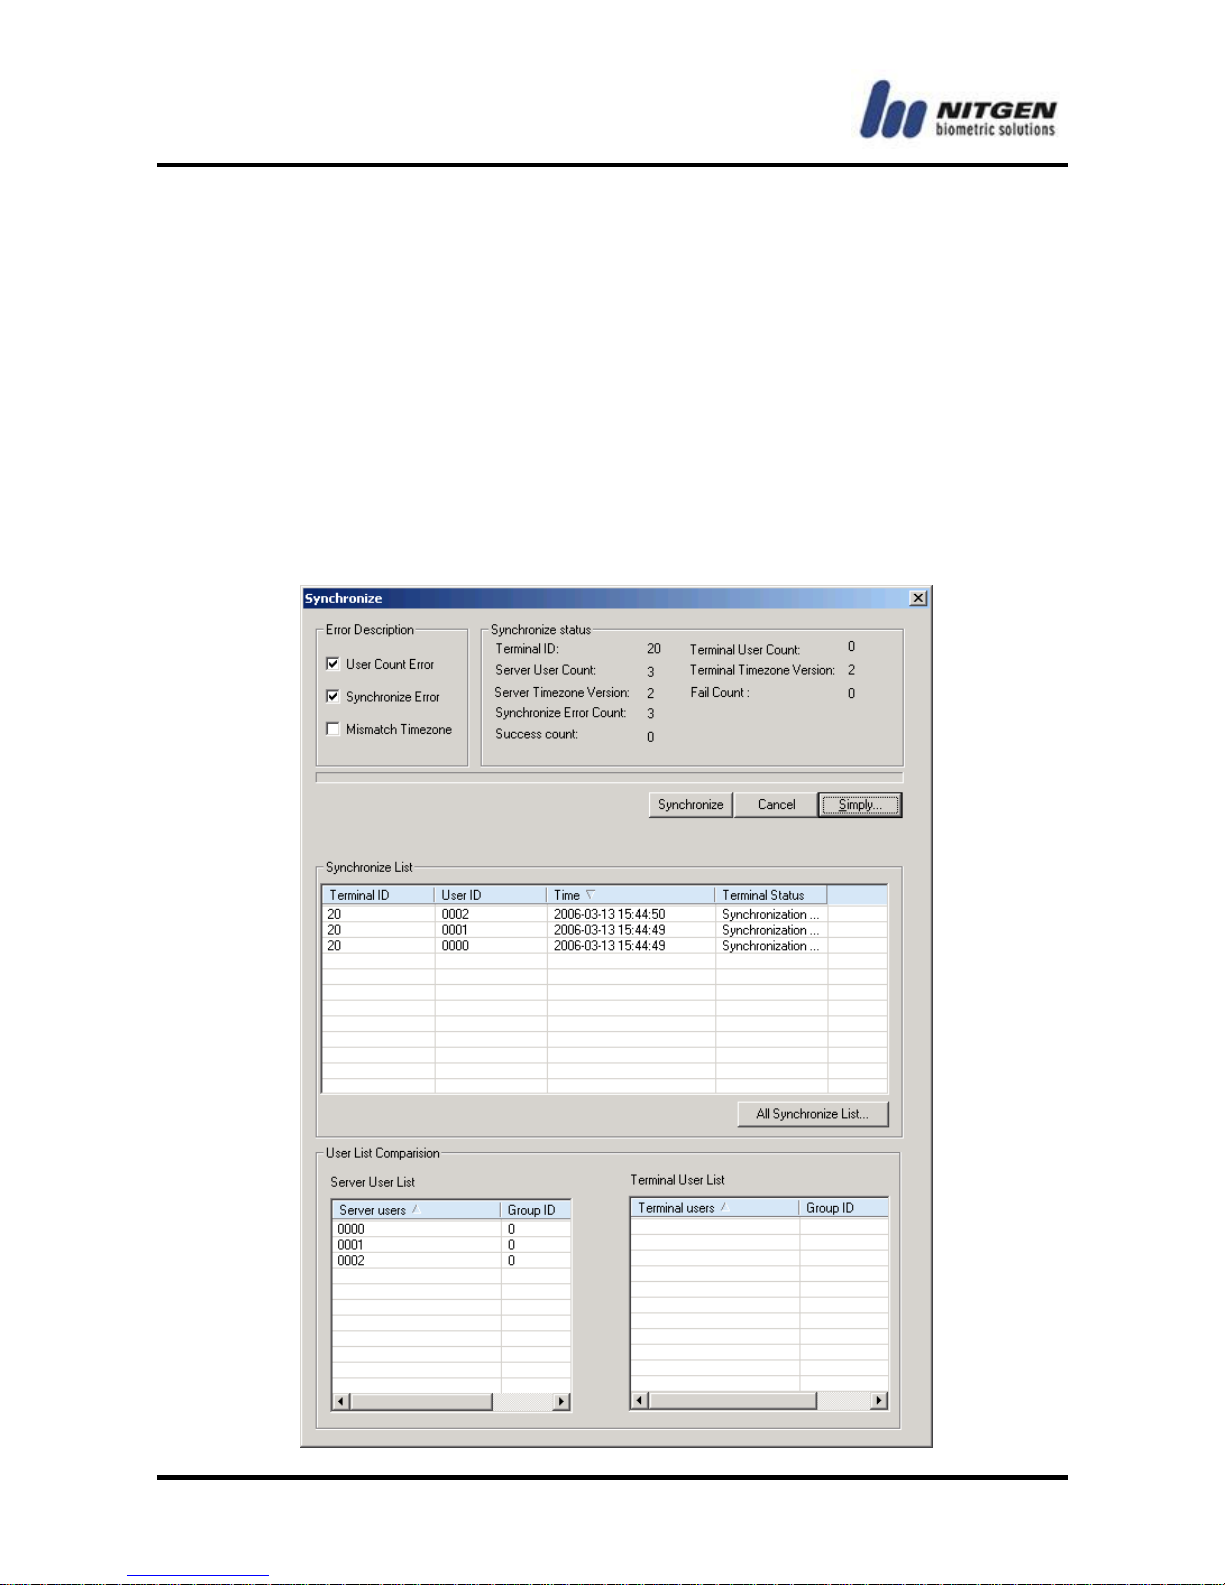
If you select Run Synchronize, the following screen will appear.
● Error Description
There are three types of synchronization errors.
User Count Error: It occurs when the user count in the terminal is
different from that in the server.
Synchronize Error: It occurs when the user information in the
terminal is different from that in the server.
Mismatch Timezone: It occurs when the timezone setting in the
terminal is different from that in the server.
Error Description shows which of these errors occur.
● Synchronize status
Brief information is provided so that you can identify the cause of
the error.
Page 72
- -
72
● Synchronization
If you click the <Synchronize> button, It corrects the
synchronization errors between the server and the terminal.
● Detail error information
If you click the <Detail…> button, you can see the list of
unsynchronized user information between the selected terminal
and the server.
You can also compare the users registered on the server with
those registered on the terminal.
Page 73
-73-
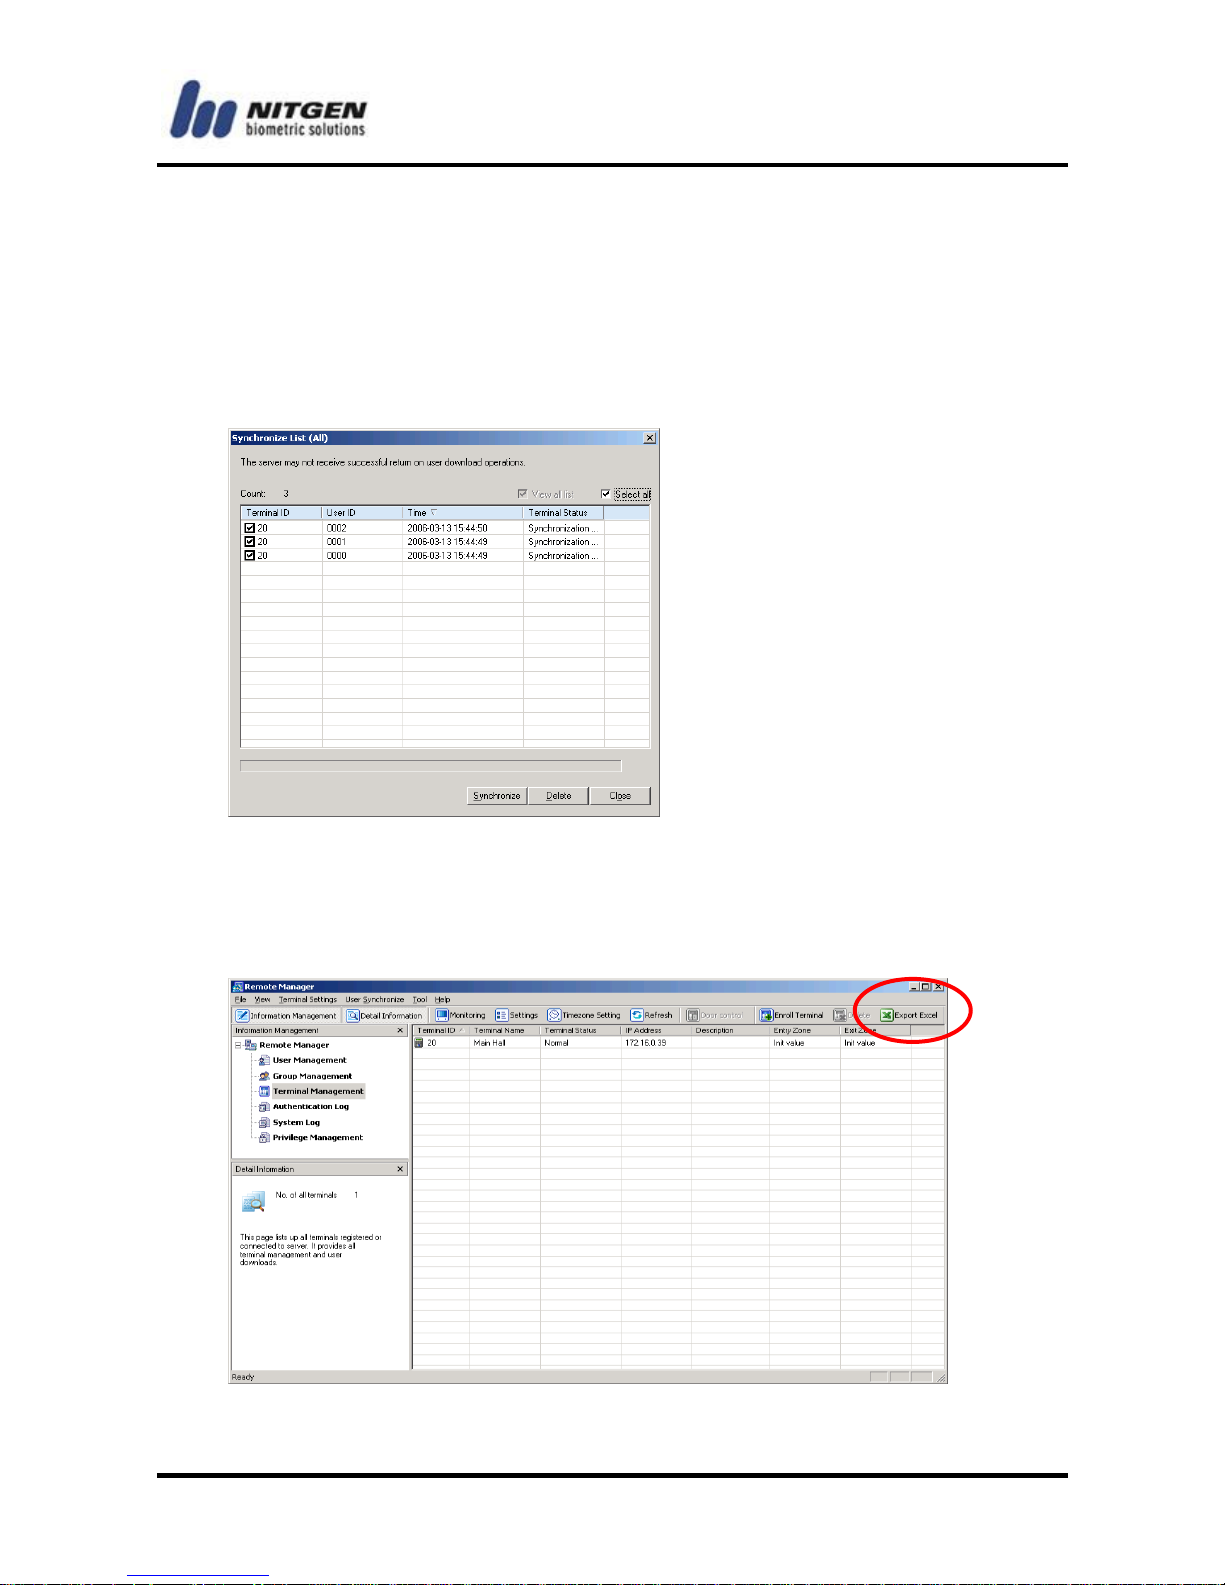
If you click the <All Synchronize List> button, the Synchronize
List (All) window will appear for all users and terminals.
If you click the <Synchronize> button in the following window, the
contents of the terminal will be modified in accordance with those
of the server for the errors in the Synchronize List.
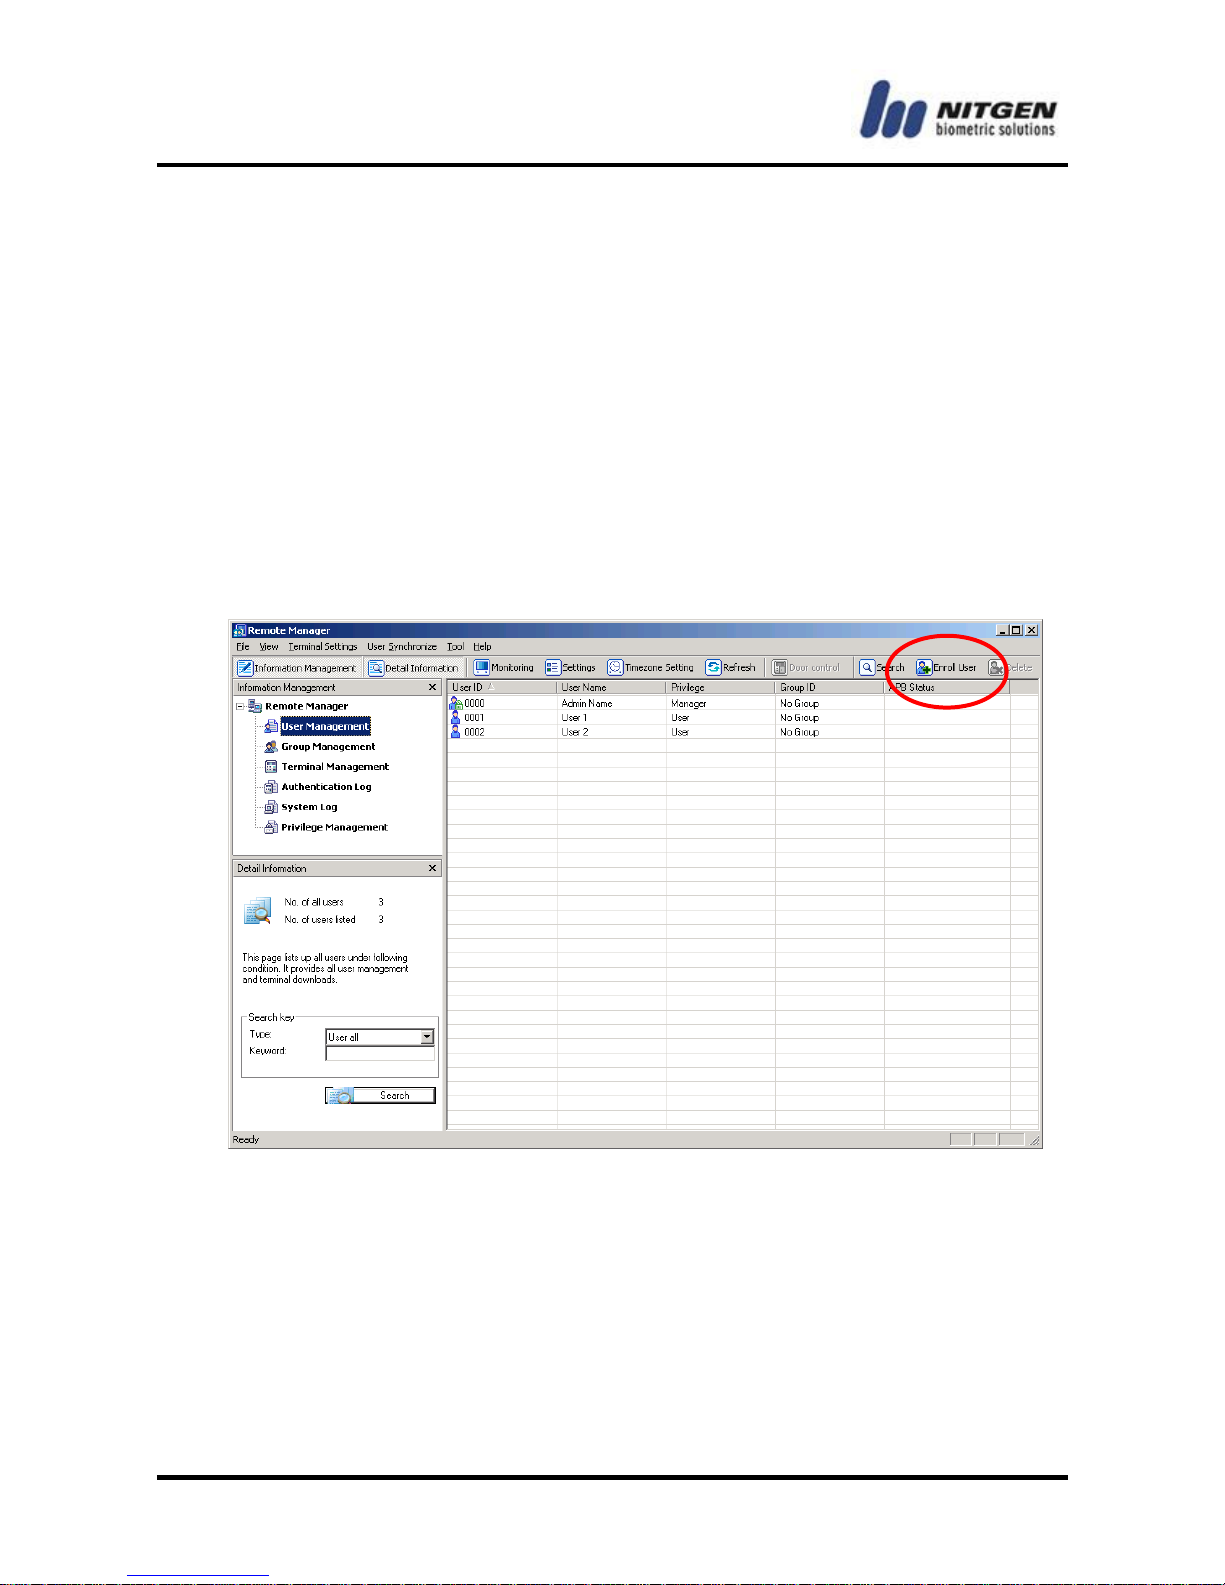
● EXPORT EXCEL
The Terminal list on the screen can be exported and saved as
Excel file by using “EXPORT EXCEL” Menu.
Page 74
- -
74
4.2 User Management
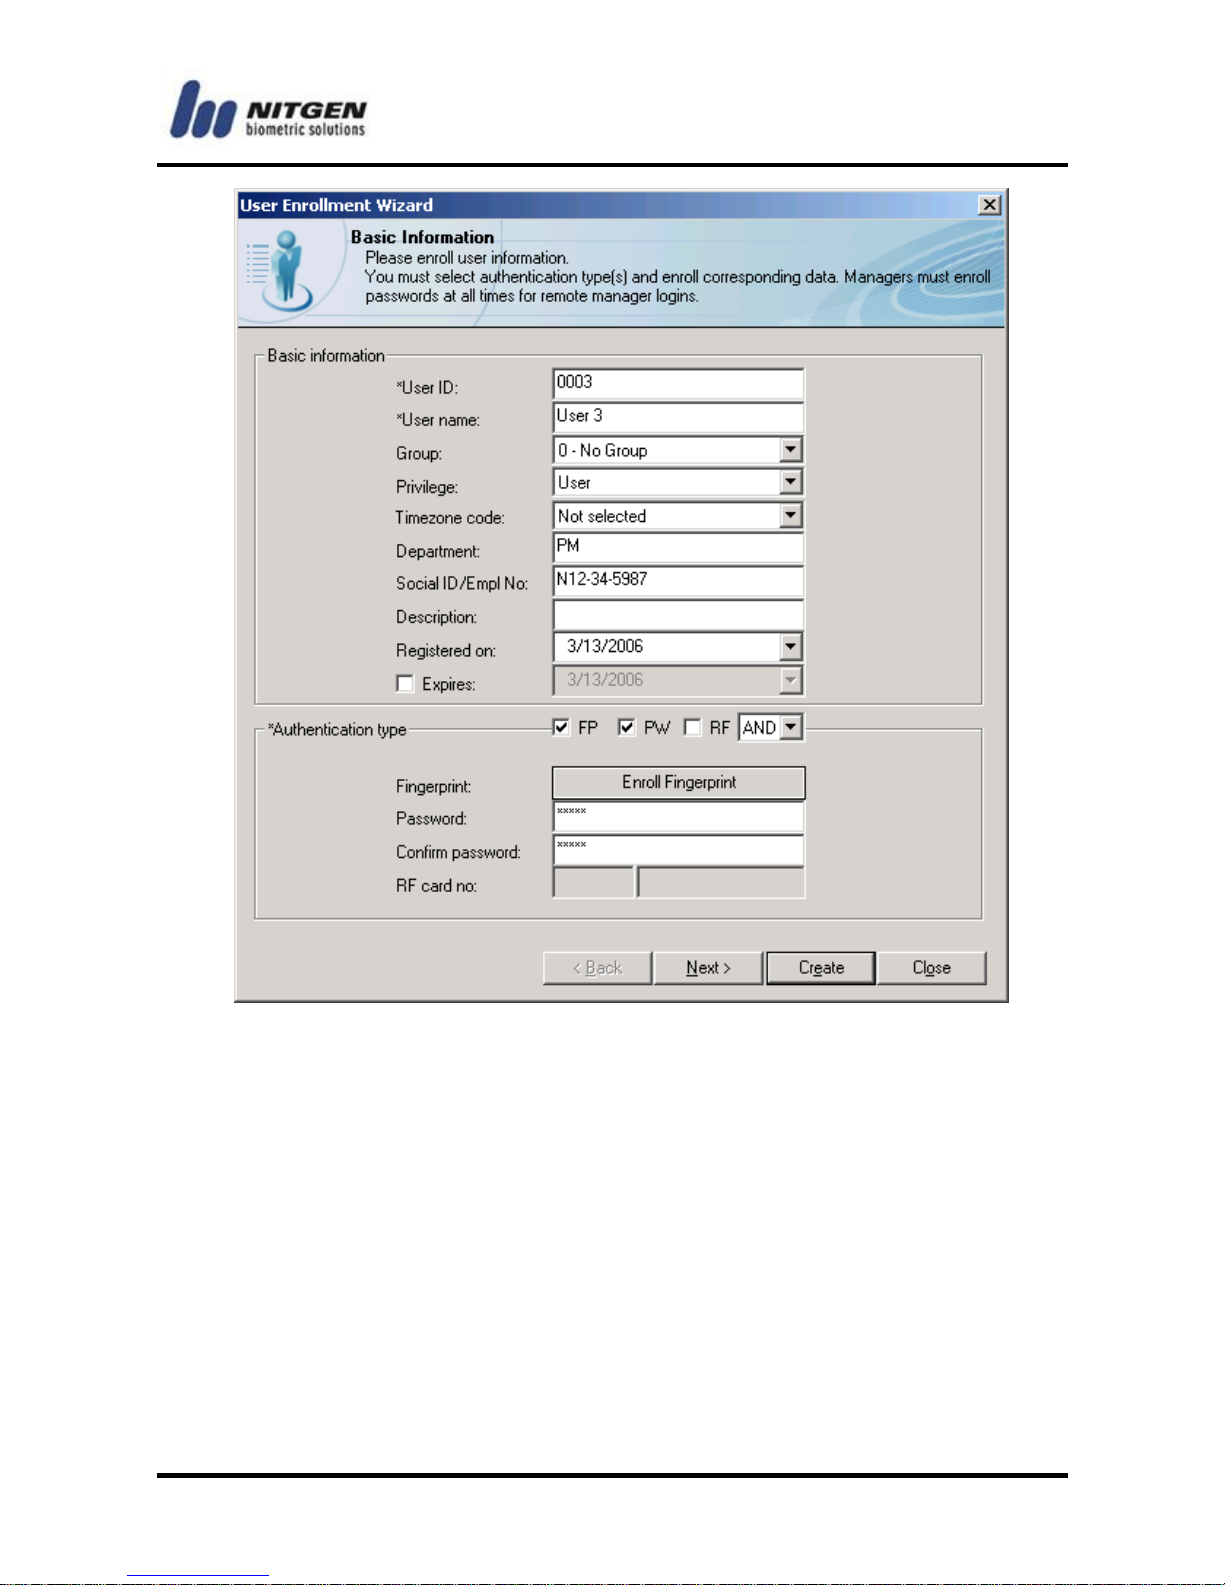
Enroll User
Enter and register basic information of a new user as follows:
(1) Select User Management in the Information Management
window.
(2) Right-click User Management and select Enroll User from the
submenu, or select Enroll User from the Toolbar.
Page 75
-75-
When you finish the setup of basic information and authentication
type, proceed with the buttons below.
<Next>: Proceed to the next step to add the user to or delete the
user from terminals.
<Create>: Register another user.
<Close>: Cancel what you've done and exit the wizard window.
Page 76

- -
76
Basic Information
User ID:
Enter a user ID with the specified digit length.
User name:
Enter a user name.
Privilege:
Choose one of the followings: Manager, User, Guest and Power
User. Manager can use the management programs, Remote
Manager and Remote Monitor. User and Guest have no
difference in privilege. But you can specify a temporary user as
Guest for more efficient management. Power user can only use
Power User Privilege functions.
(Please refer to 4.7 Privilege Management.)
Group:
Choose a group for a user.
● Timezone code:
Select the timezone code to determine the allowed time for the
user.
Social ID/Empl no:
Enter a Social ID or employee number of a user.
Description:
Enter a brief user description.
Registered on:
It indicates the date when a user has been registered. The date
can be updated if the user is registered with download
reservation.
Page 77

-77-
Expires:
You can specify an expire date. After the specified date, user
information is removed from the terminal and authentication for
the user is not available.
Authentication type
You can combine the following authentication types for your
convenience: Fingerprint, Password and RF. For more information
on how to use a terminal with different authentication types, refer
to NAC-3000 Terminal User Manual.
AND combination :
Access authentication will complete only after all combined
authentication types are validated.
OR combination :
Access authentication will complete after one of the
authentication types in the combination is validated.
(1) Fingerprint
Fingerprints are pre-enrolled, and a user's fingerprint is
compared to the pre-enrolled one when performing access
authentication. (Refer to 3.2 Basic settings and running on how
to enroll fingerprints.)
(2) Password
Authenticate with a pre-registered password (passwords can be
4~8 digits long.)
(3) RF card
Authenticate with an RF card. It is available only on terminals
equipped with RF card module.
Page 78
- -
78
The RF card number consists of a site code and an RF card
number. Therefore you must enter the site code and the RF card
number separately.
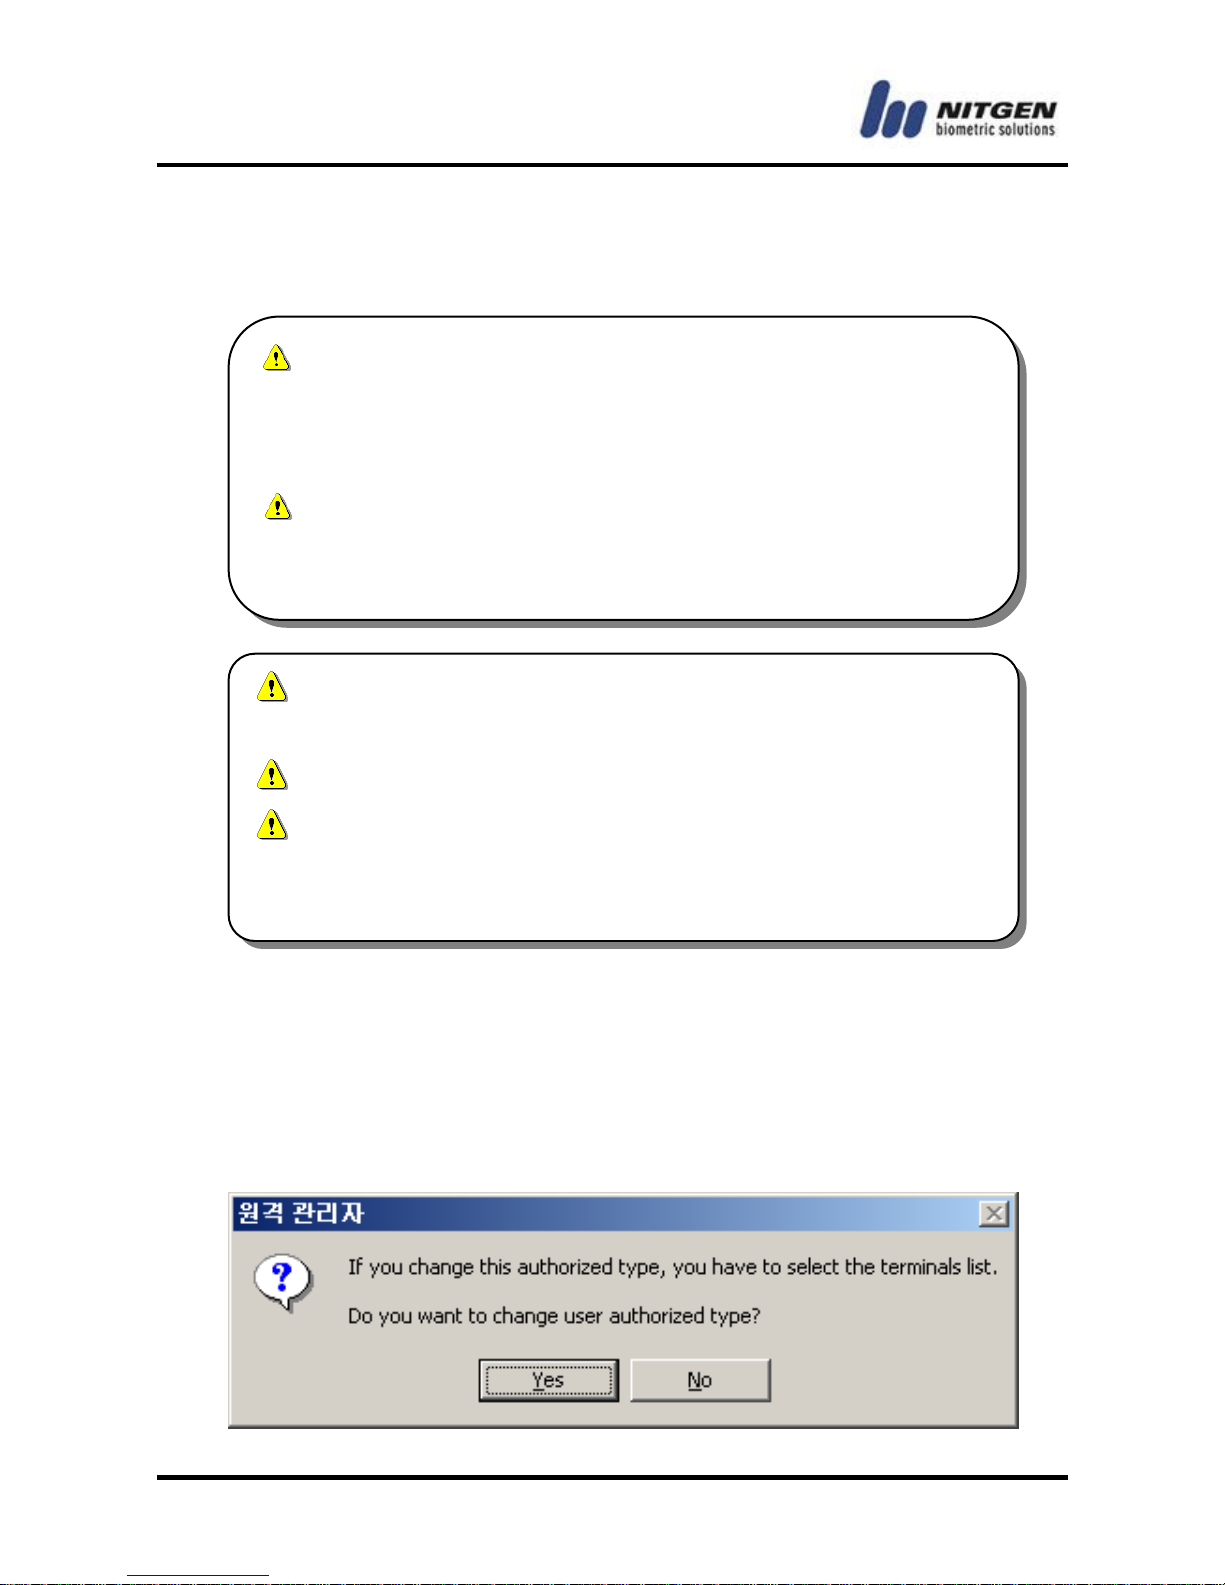
If a type of authentication is changed When the card only terminal
is registered in the Access Manager Server,
It may set a list of terminal again.
If you wanna change authentication type, push <Yes> button
and push <Next> button, after then, could you select a termin
al.
The users who required to authenticate at the Server side,
cannot use RF Card authentication without putting user ID first.
(However, the users who registered and authenticate at the Ter
minal side, RF Card authentication can be used.)
If you want RF Card authentication to be able to use
without user ID for Server authentication users, please ask to NI
TGEN Co., Ltd.
The dedicated terminal to RF card supports authenticatio
n using a password and RF ID.
You can not use enroll with only your fingerprint.
It operates without fingerprint authentication when you
enroll in the case of using authentication type of "fing
erprint and password" or "fingerprint and RF card".
Page 79
-79-
When basic information and authentication type are selected, please
refer to the following explanations on each button to proceed.
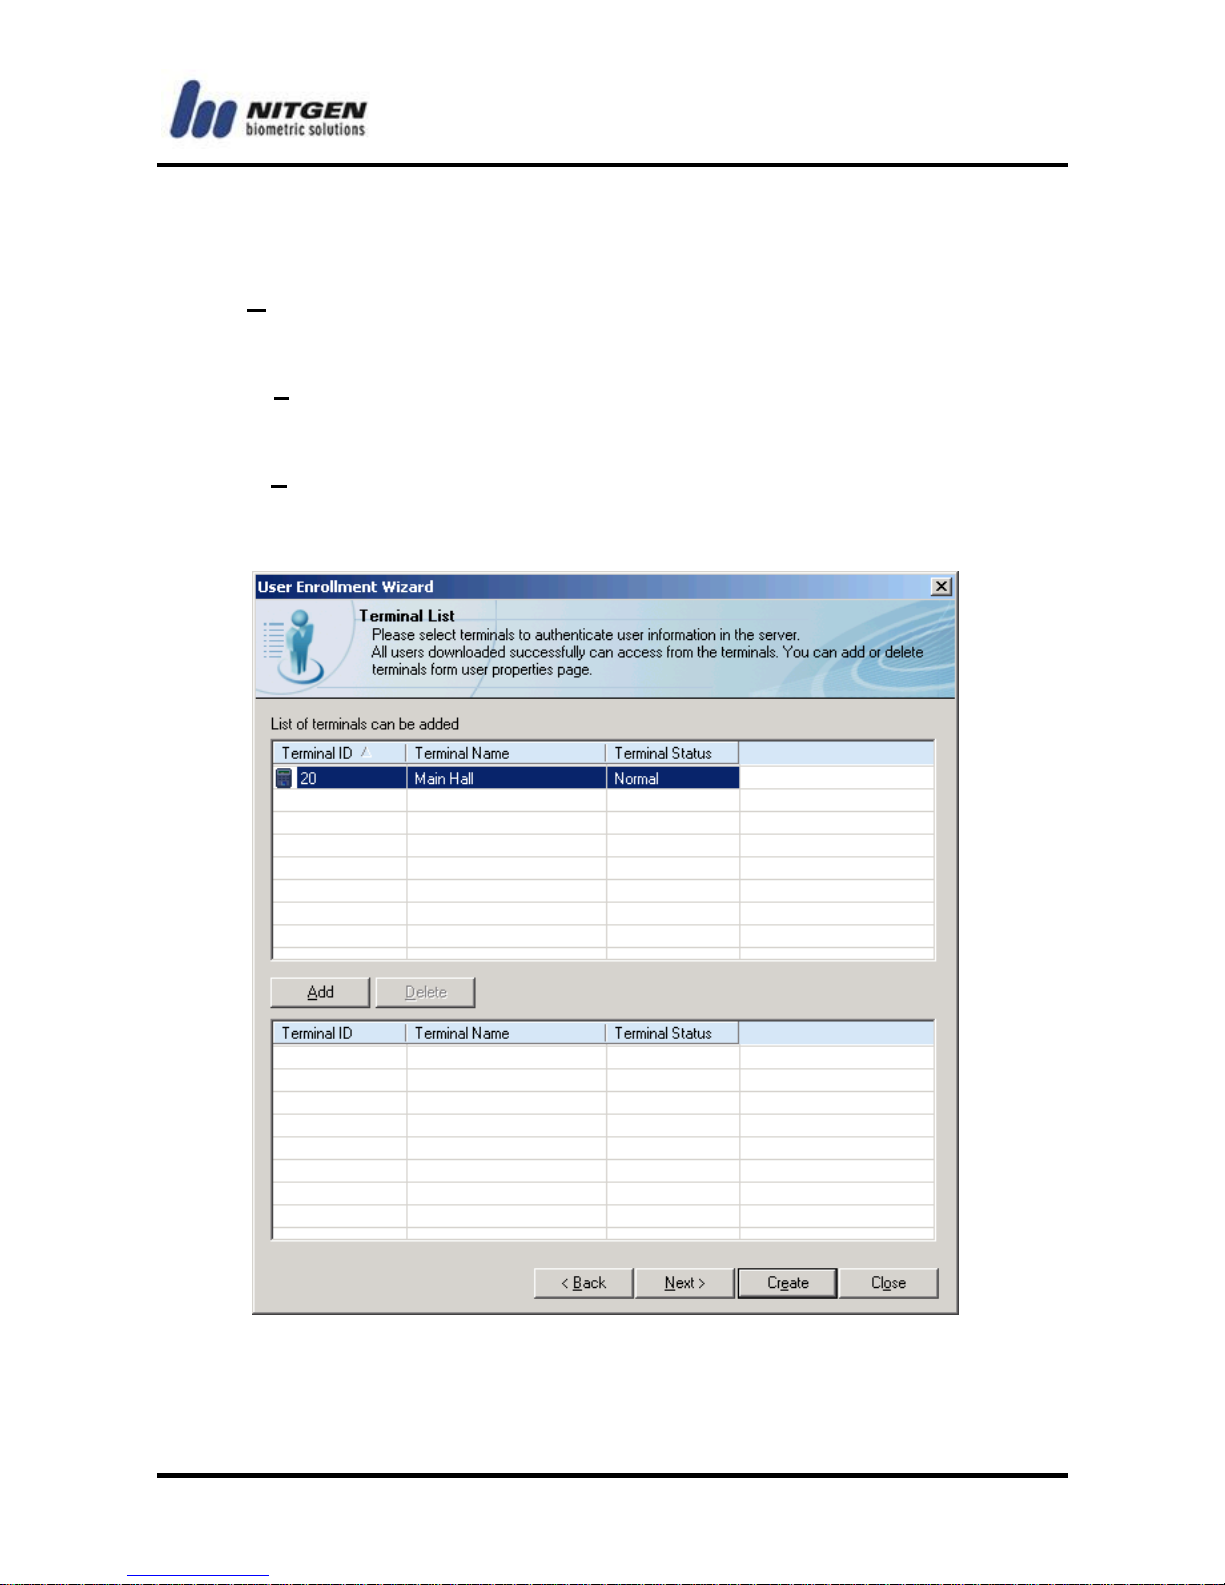
<Next>: to register users to a relevant terminal as server-
authenticated user or delete the user.
<Create>: to complete the registration and to start the registration
process for a new user.
<Close>: to cancel what have been typed in and to close the
wizard window.
Page 80
- -
80
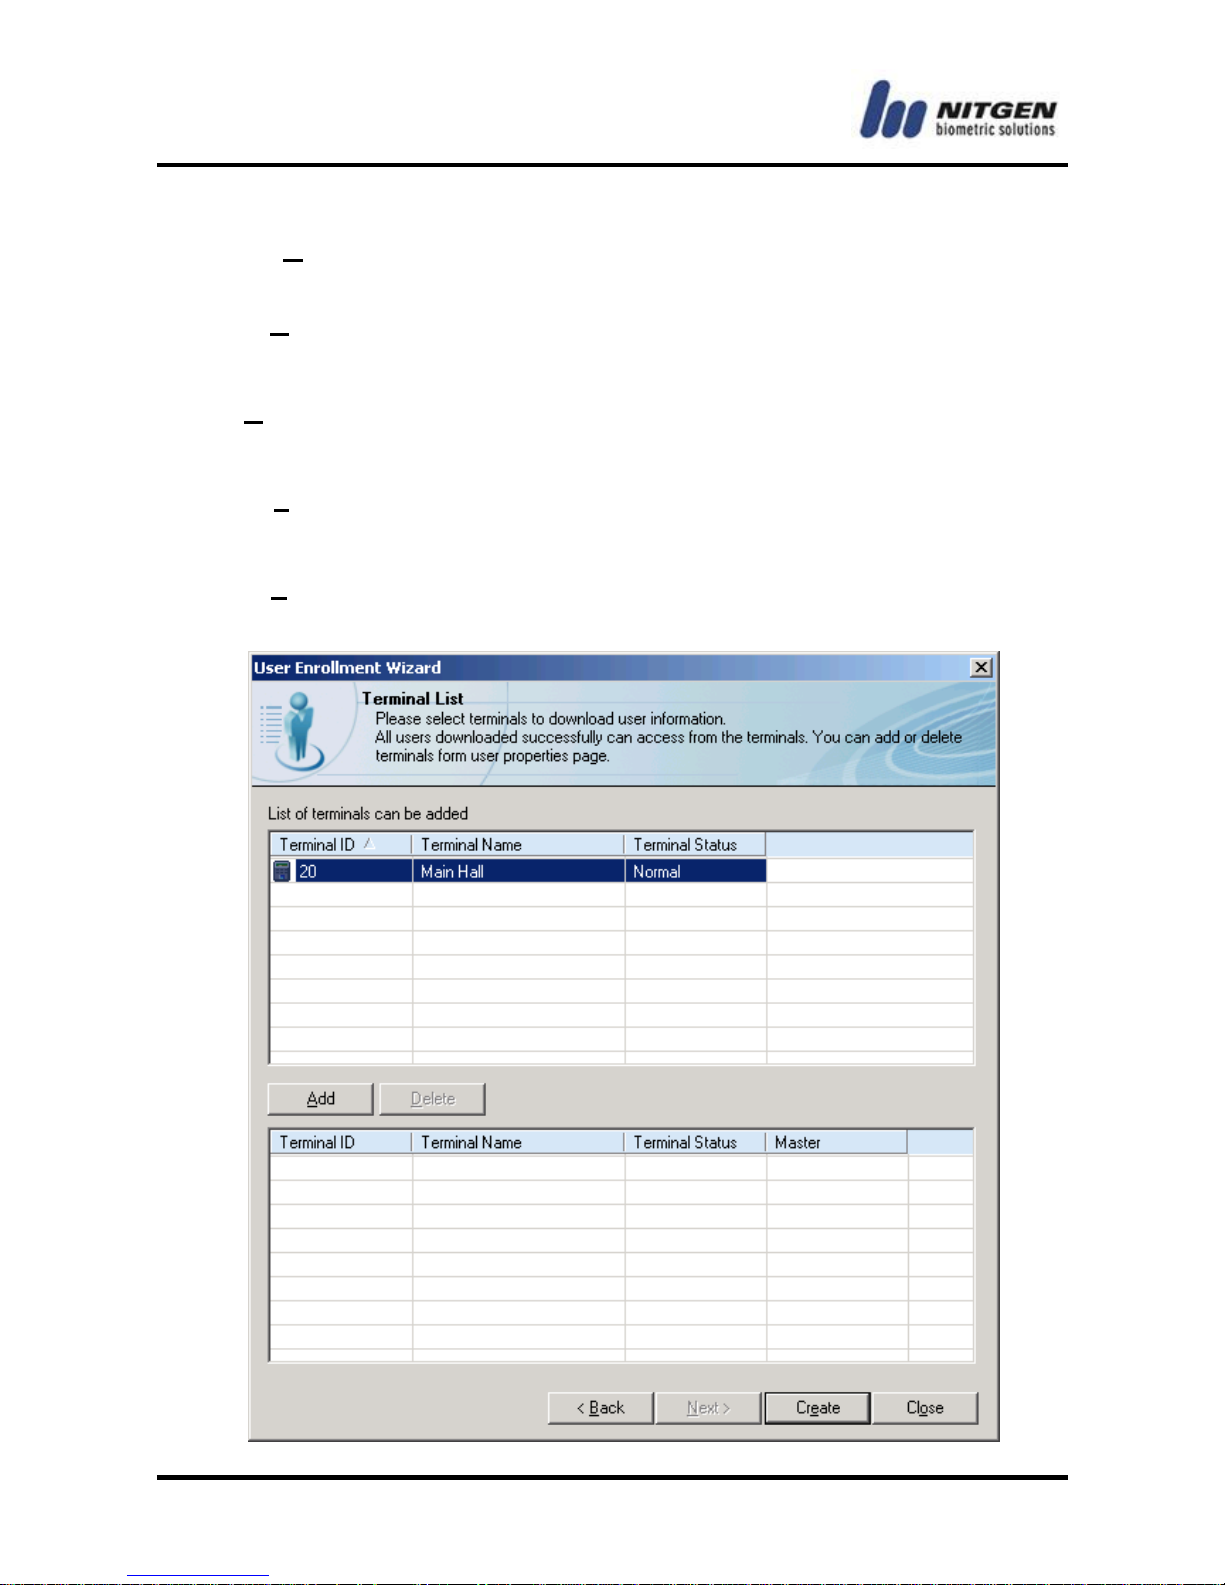
Select the desired terminal at the top of the screen and then click
on <Add> button to add a new terminal at the bottom part. When
selecting a terminal at the bottom part of the screen and clicking on
a <Delete> button, the relevant terminal will be deleted from the
list.
<Next>: to register users to a relevant terminal as terminal-
authenticated user or delete the user.
<Create>: to complete the registration and to start the registration
process for a new user.
<Close>: to cancel what have been typed in and to close the
wizard window.
Page 81

-81-
Select the desired terminal at the top of the screen and then click
on <Add> button to add a new terminal at the bottom part. When
selecting a terminal at the bottom part of the screen and clicking on
a <Delete> button, the relevant terminal will be deleted from the
list. A master can select the type of user right for terminals on the
list.
<Create>: to complete the registration and to start the registration
process for a new user.
<Close>: to cancel the procedures.
Delete User
You can delete users registered in the server. If the terminal is
connected to the network, user information in the terminal will also
be deleted. If you want to delete users from the terminal, not from
the server, use User List in the Terminal Properties window.
You can delete a user as follows:
(1) Select User Management in the Information Management
window.
(2) Select the user you want to delete in the List window, and
click the Delete button from the toolbar. Alternatively, you can
use the <Delete> key on the keyboard or click the right mouse
button to select Delete from the submenu.
You can choose multiple users in the List window using the
<Shift> or <Ctrl> key to delete them at once.
Page 82
- -
82
Check/Change User Properties
You can check or change basic information and available terminals
for a user.
(1) Select User Management in the Information Management
window.
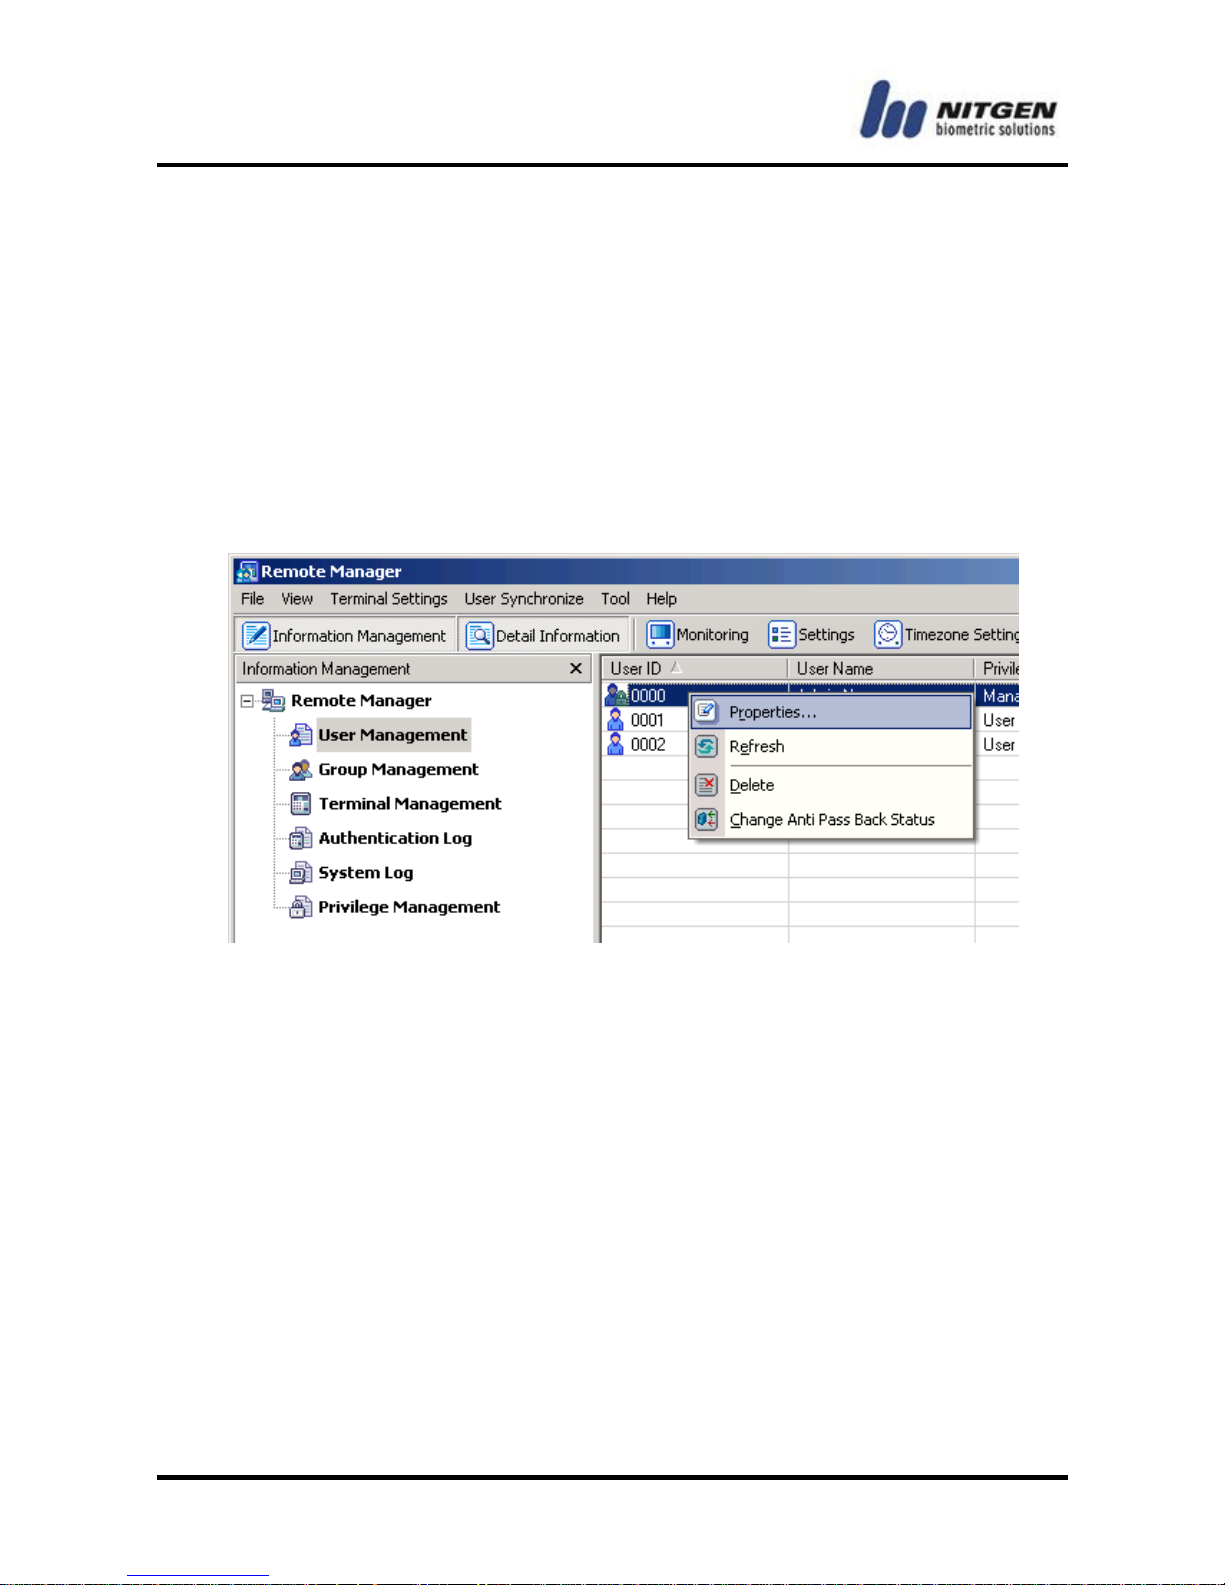
(2) Double-click a user in the List window, or right-click a user
and choose Properties from the submenu.
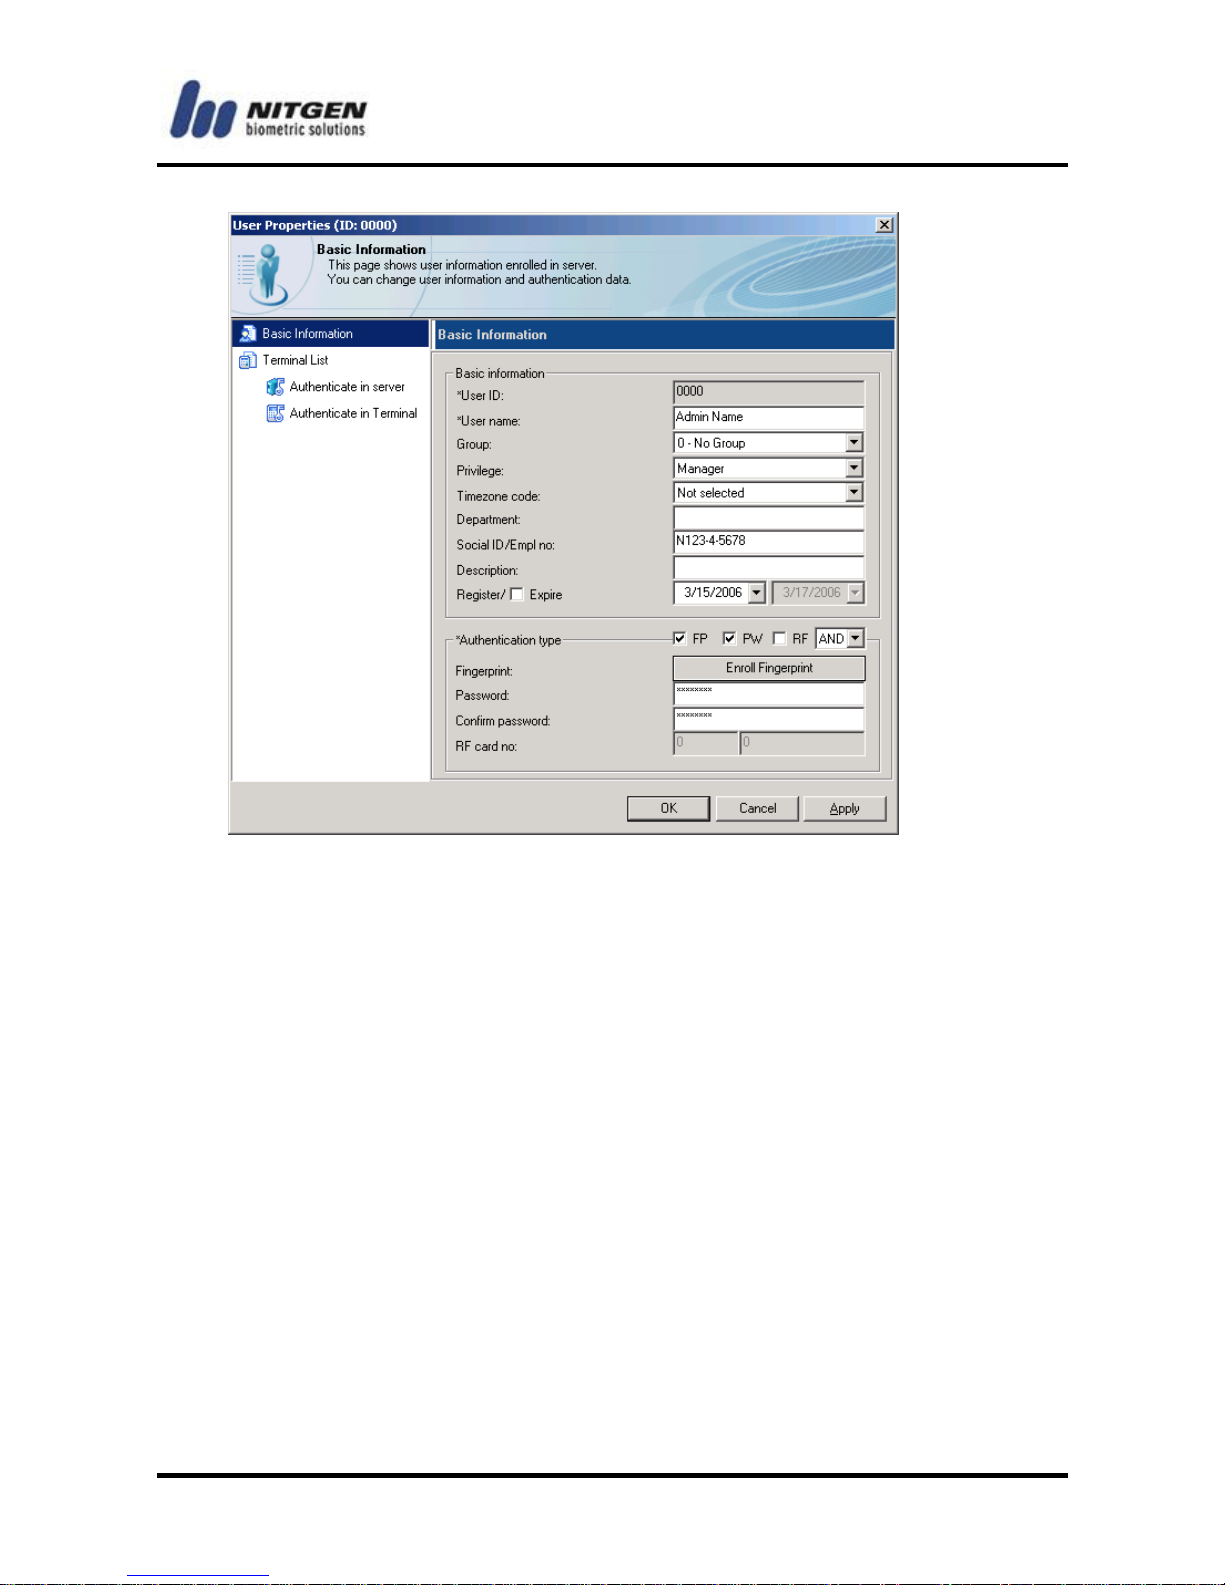
(3) In the below User Properties window, you can change basic
user information. To change available terminals for a user, select
Terminal List from the menu on the left.
Page 83
-83-
The rest of the procedure is the same as that of user registration.
User Search
If there are many users in the database, you can easily search
users with search conditions.
You can search users in the following way, and the search result
will be displayed in the List window.
(1) Select User Management in the Information Management
window.
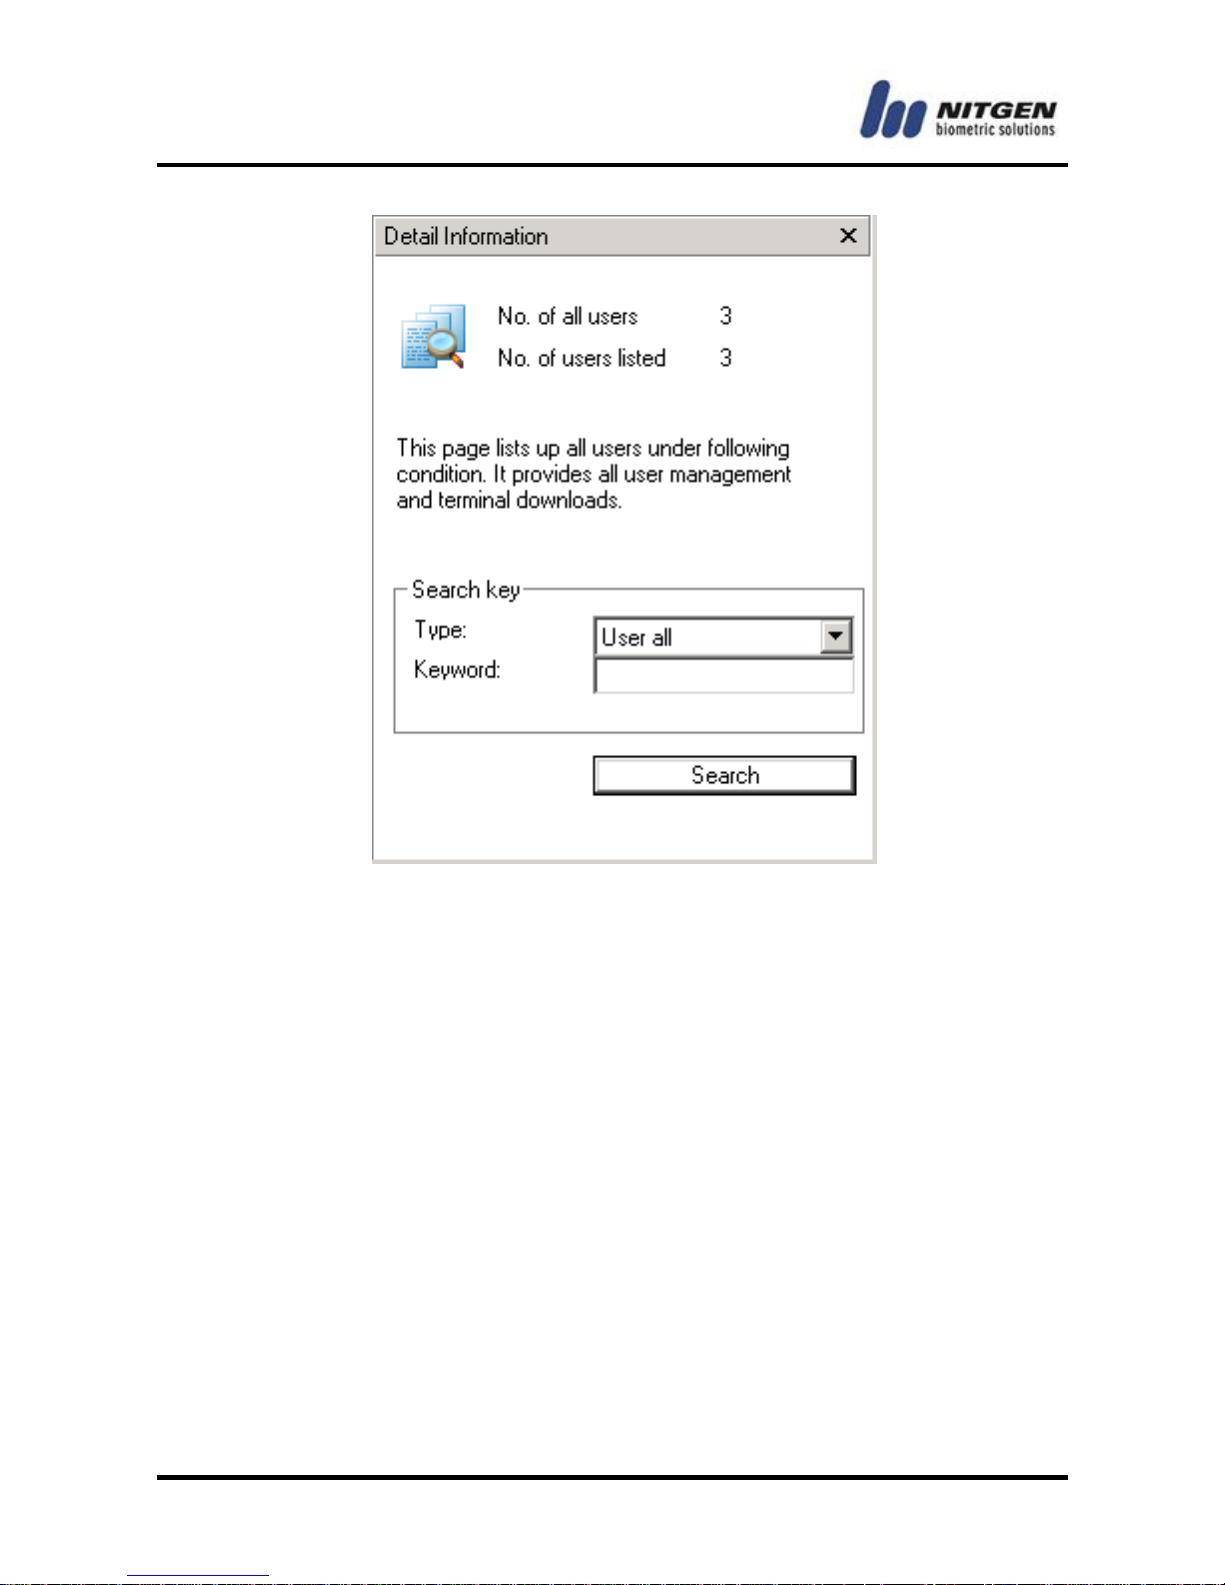
(2) If the Detail Information button is selected in the toolbar, you
can perform search in the Detail Information window as
below. Or, click the search button in the toolbar to open the
User Search window.
Page 84
- -
84
Search type
You can choose such condition as All users, user ID, user name,
group ID, terminal ID or Social ID/Empl no.
Keyword
Depending on the search condition you choose, you can enter an ID or
name.
Export Excel
The user information can be saved as Excel file.
To choose “Export Excel” on the Menu bar.
Page 85
-85-
4.3 Group Management
You can register or delete groups, and add or delete users in a
group.
Enroll Group
(1) Select Group Management in the Information Management
window.
(2) Click the right mouse button to select Enroll Group from the
submenu or click the Enroll Group button from the toolbar.
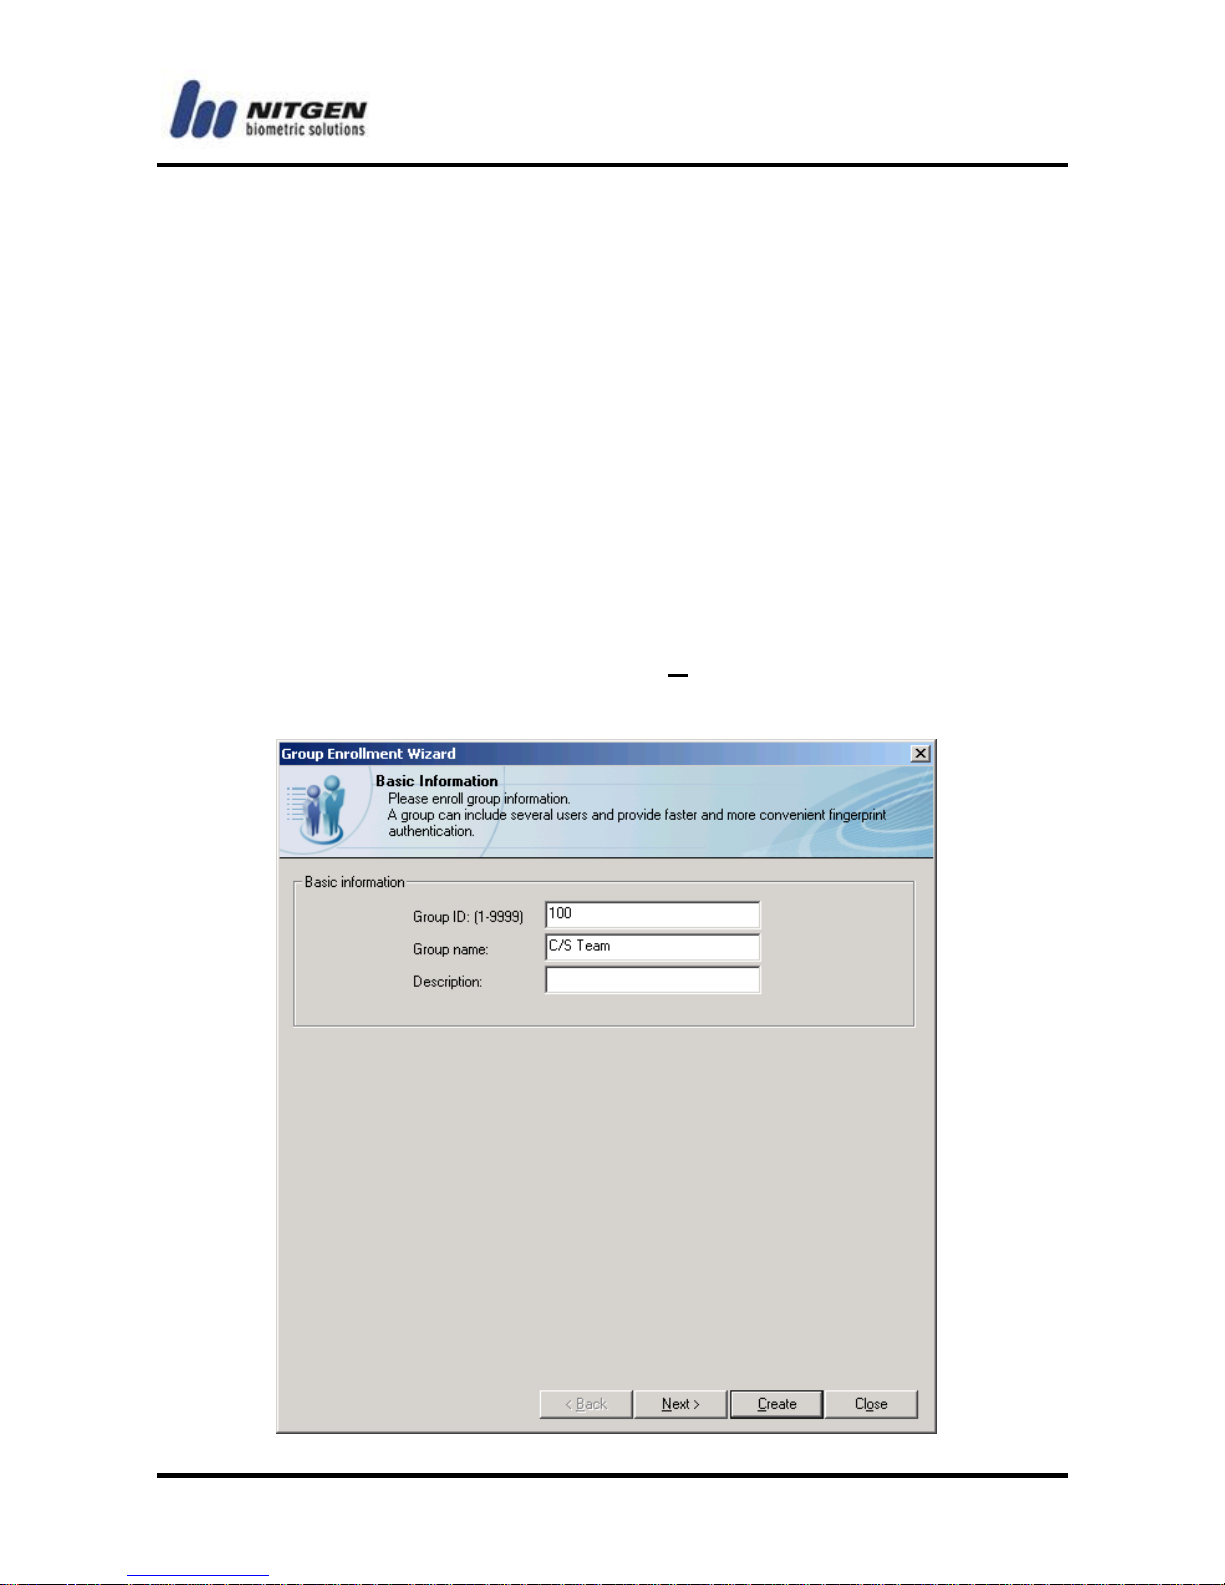
(3) When the following window appears, enter group ID, group
name, and description, and click <Next> to add or delete users
in the group.
Page 86
- -
86
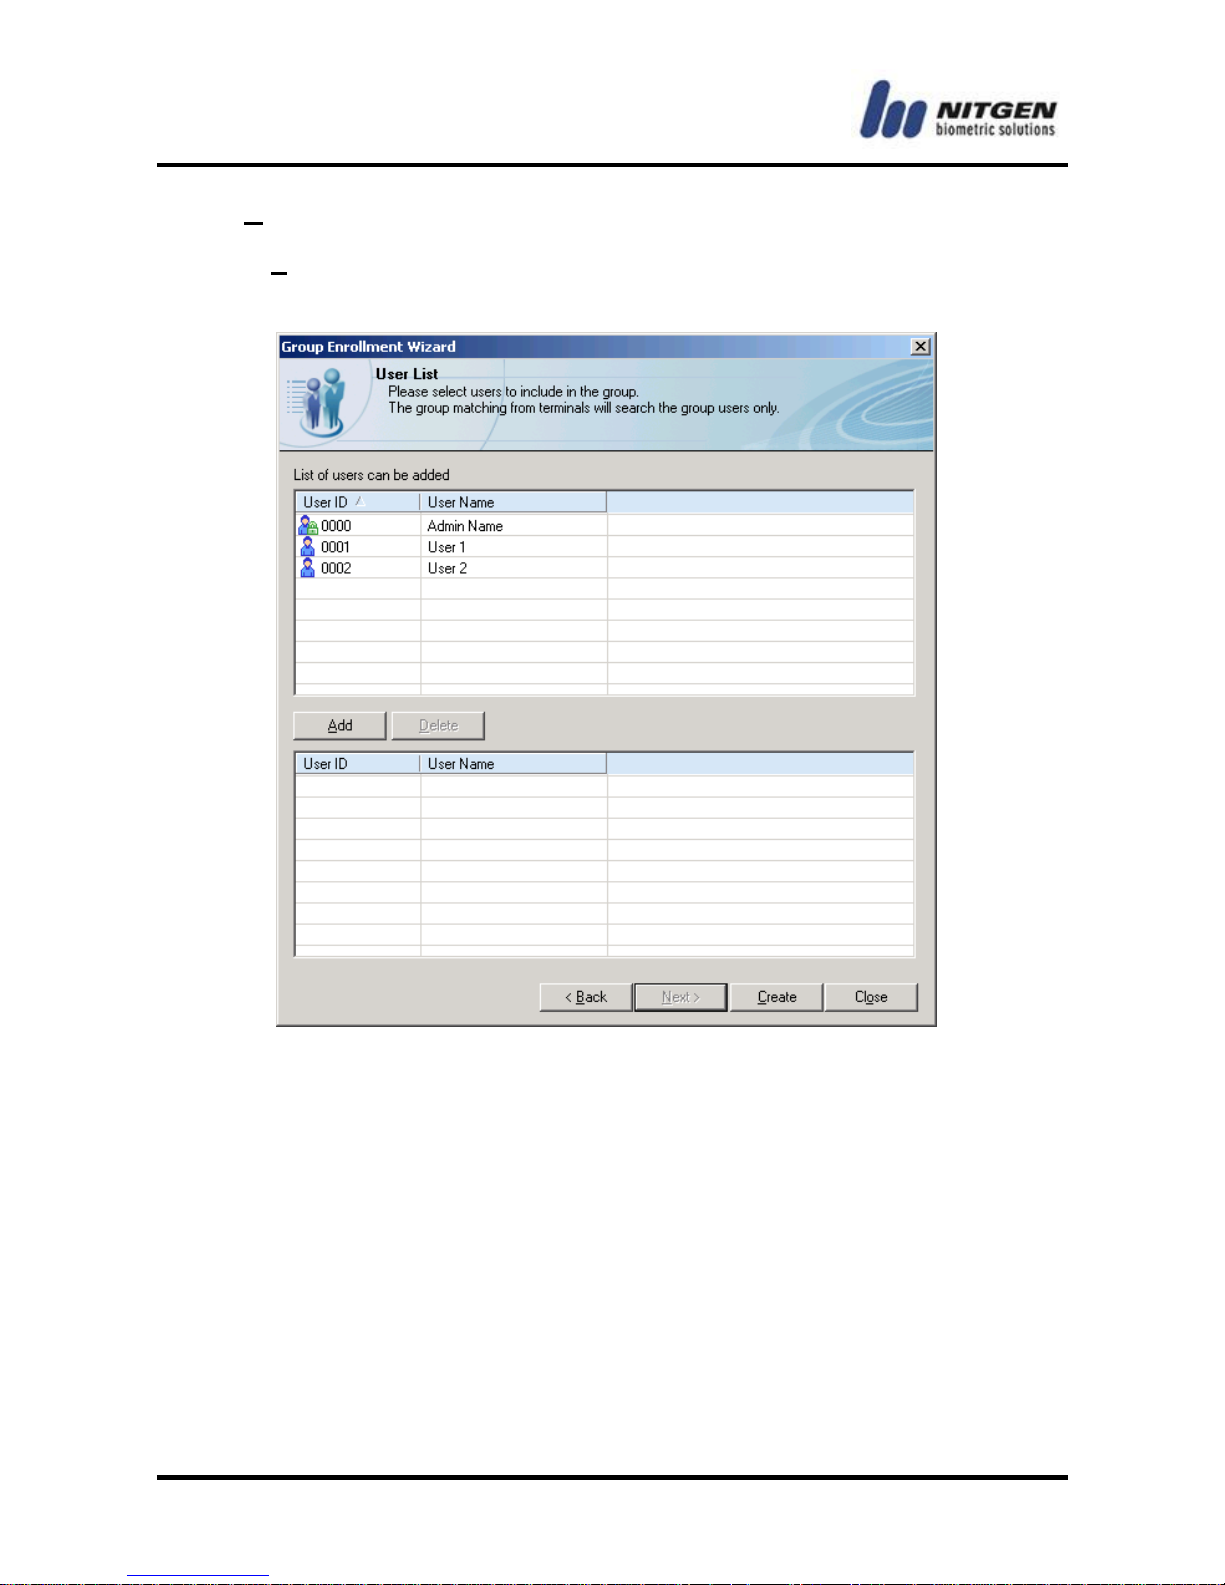
<Create>: Complete the registration and add another group.
<Close>: Cancel what you've done so far.
Page 87
-87-
Delete Group
You can delete a group as follows:
(1) Select Group Management in the Information Management
window.
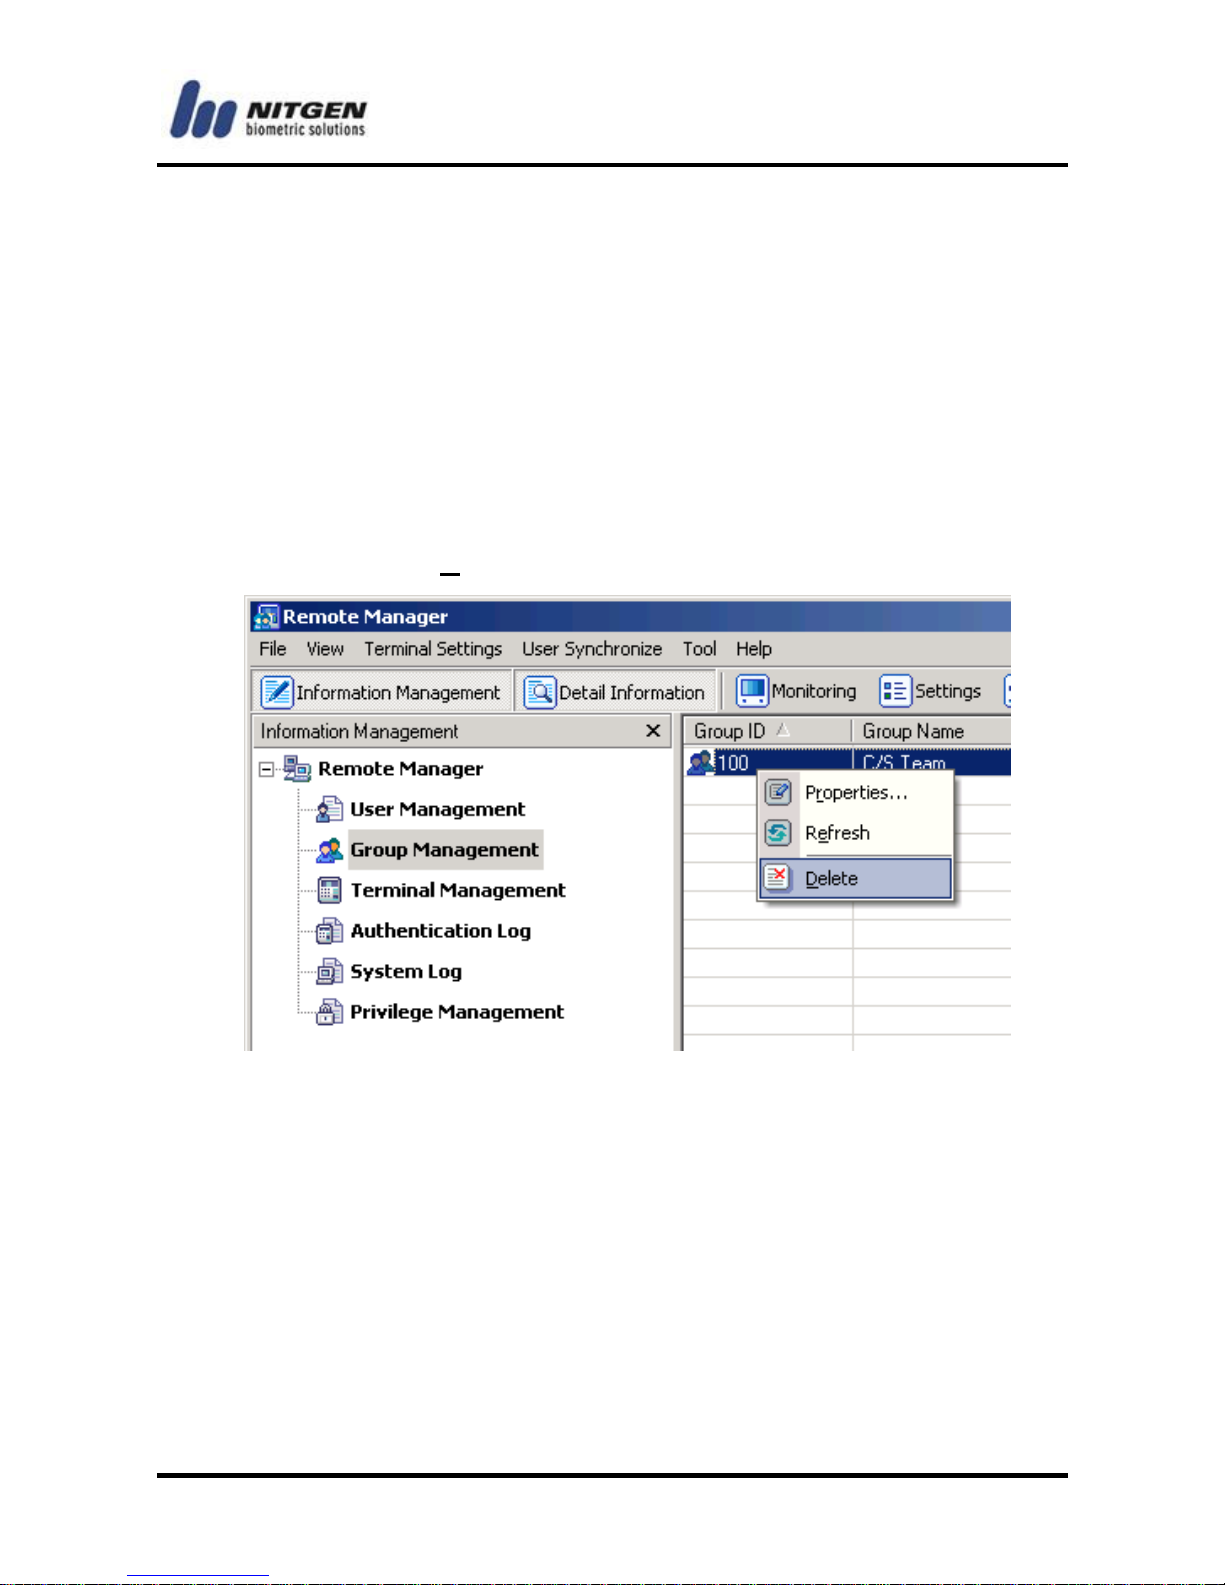
(2) Select the group you want to delete in the List window, and
click the Delete button from the toolbar. Alternatively, you can
use the <Delete> key on the keyboard or click the right mouse
button to select Delete from the submenu.
You can choose multiple groups in the List window using the
<Shift> or <Ctrl> key to delete them at once.
Page 88
- -
88
Check/Change Group Properties
You can check or change basic information and user list for a
group.
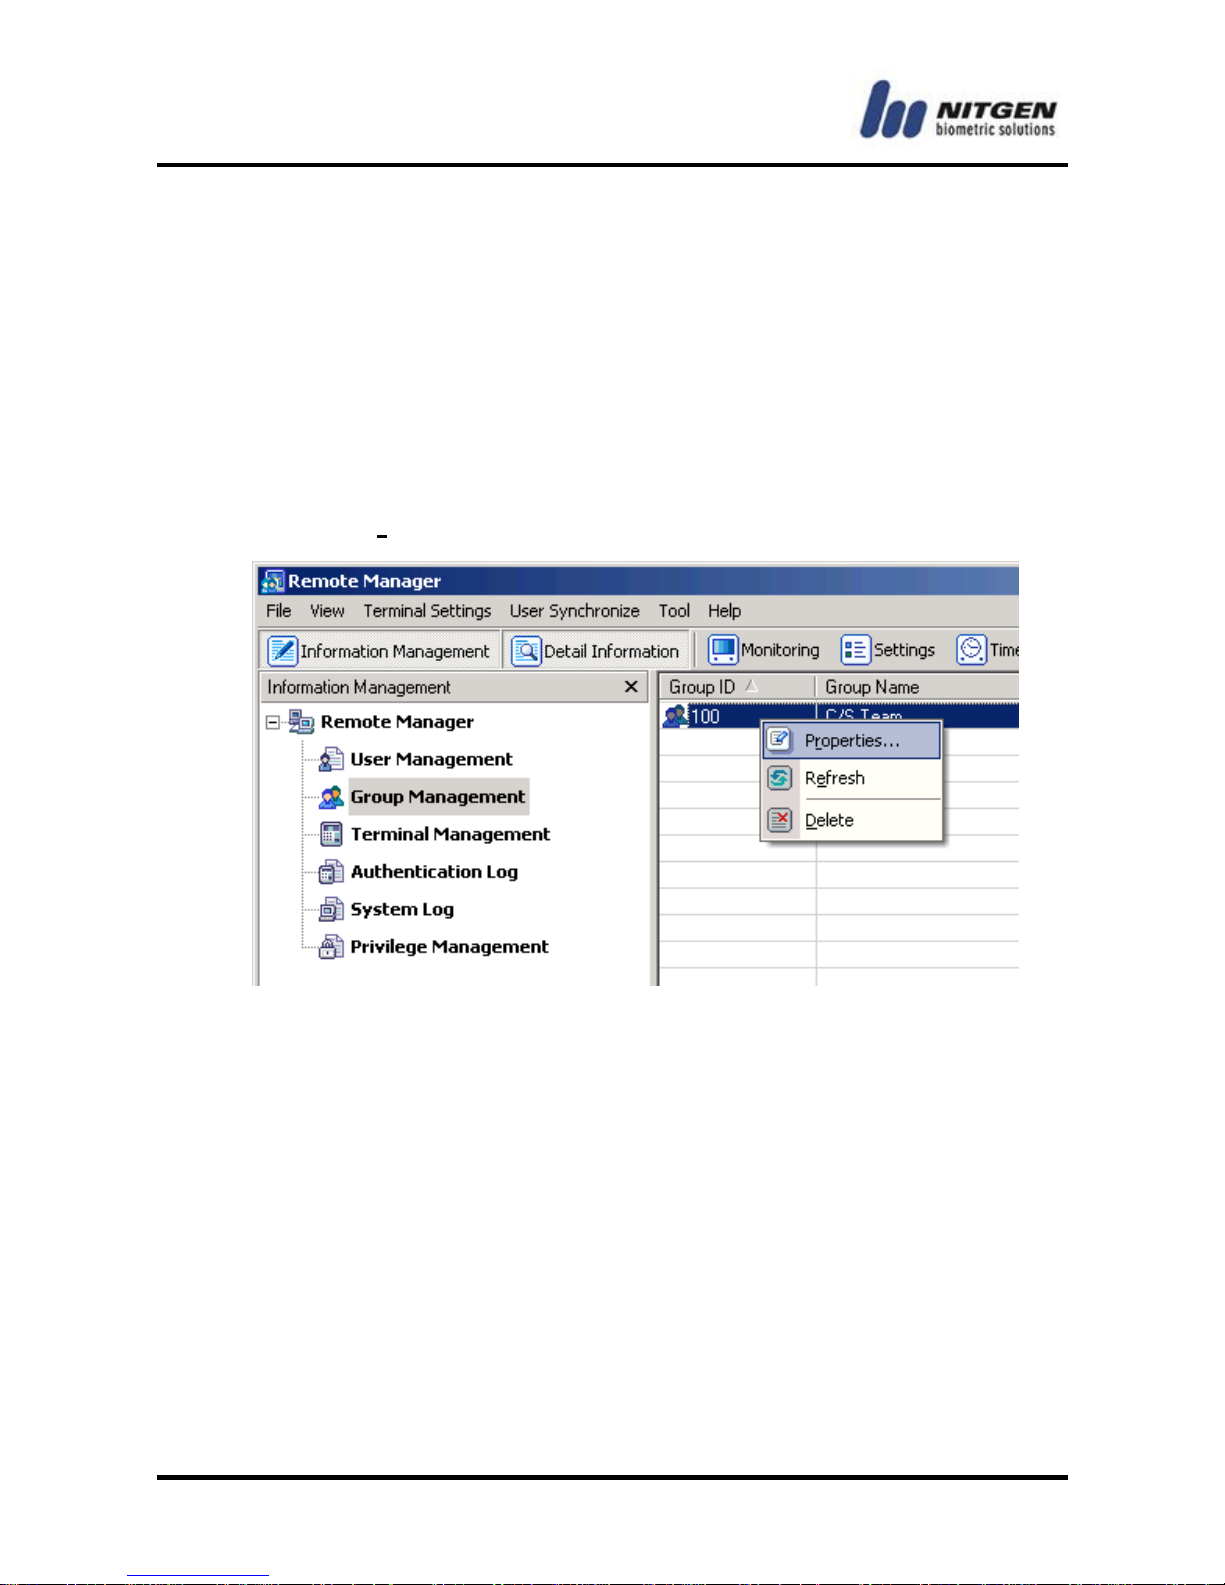
(1) Select Group Management in the Information Management
window.
(2) Double-click a group in the List window, or right-click a group
to select Properties from the submenu.
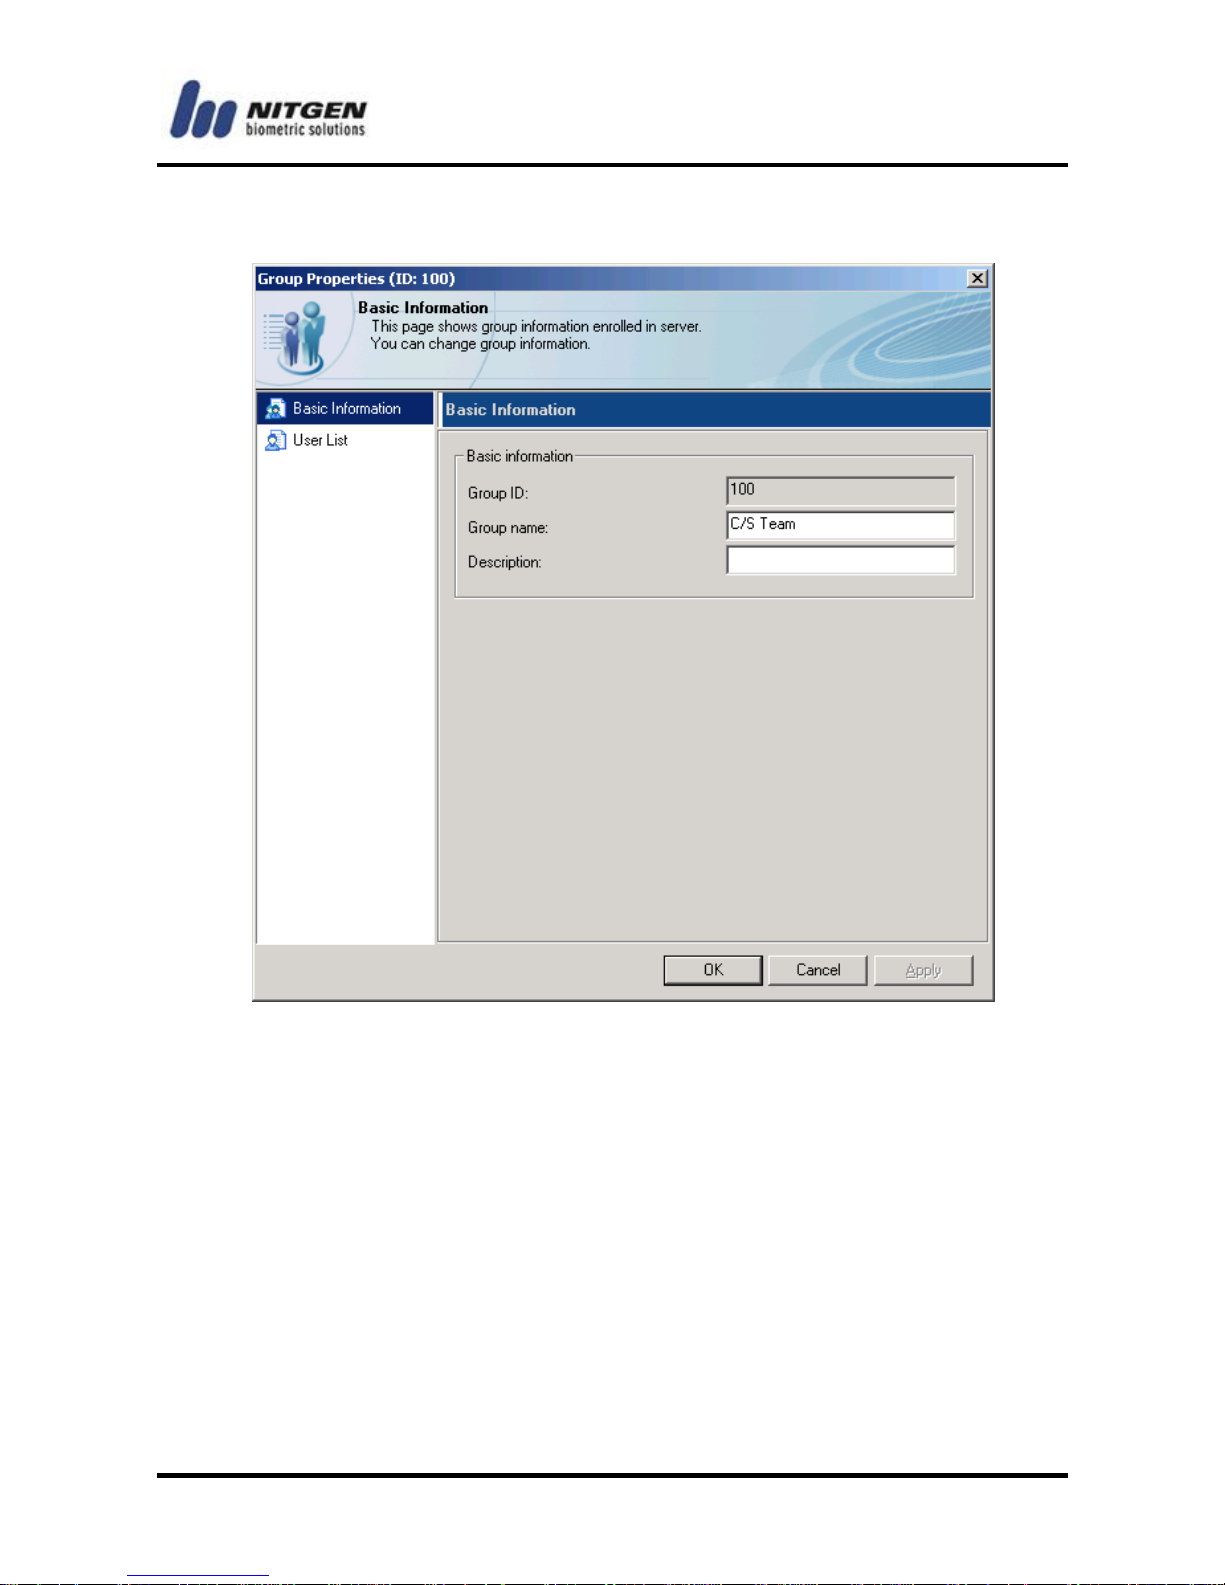
(3) In the following Group Properties window, you can change
basic information. To add or delete users in the group, select
User List from the menu on the left.
The rest of the procedure is the same as that of group
registration.
Page 89
-89-
Export Excel
The user information can be saved as Excel file.
To choose “Export Excel” on the Menu bar.
Page 90
- -
90
4.4 Log Management
Authentication log management
You can check and manage terminal access authentication log.
Log Properties
You can check authentication log in the following way, and the
search result will be displayed in the List window.
(1) Select Authentication Log in the Information Management
window.
(2) You can check authentication log information in the List
window.
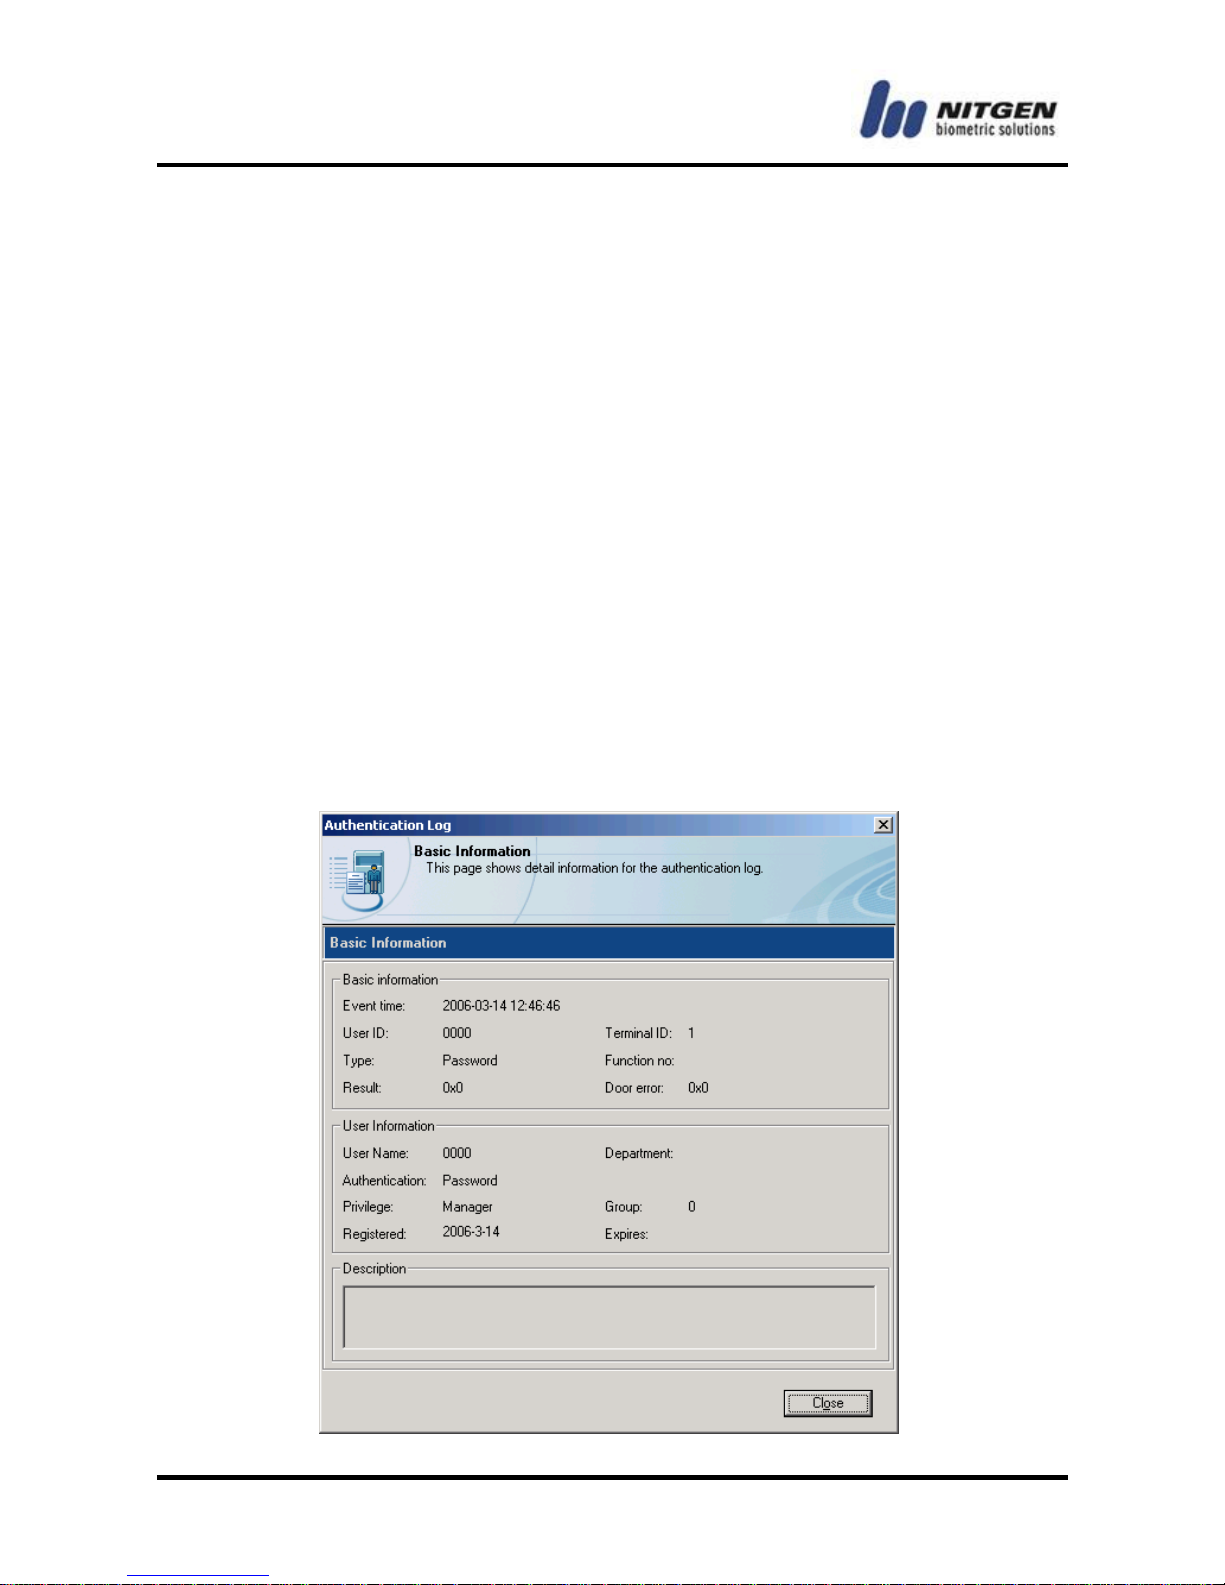
(3) To see detailed information, double-click a log or click the right
mouse button to select Properties from the submenu.
Page 91
-91-
Export Excel
You can save the log information as an Excel file.
(1) Select Authentication Log in the Information Management
window.
(2) Click the right mouse button to select Export Excel from the
submenu, or select Export Excel from the toolbar.
(3) Specify the location and file name, and click <Save>.
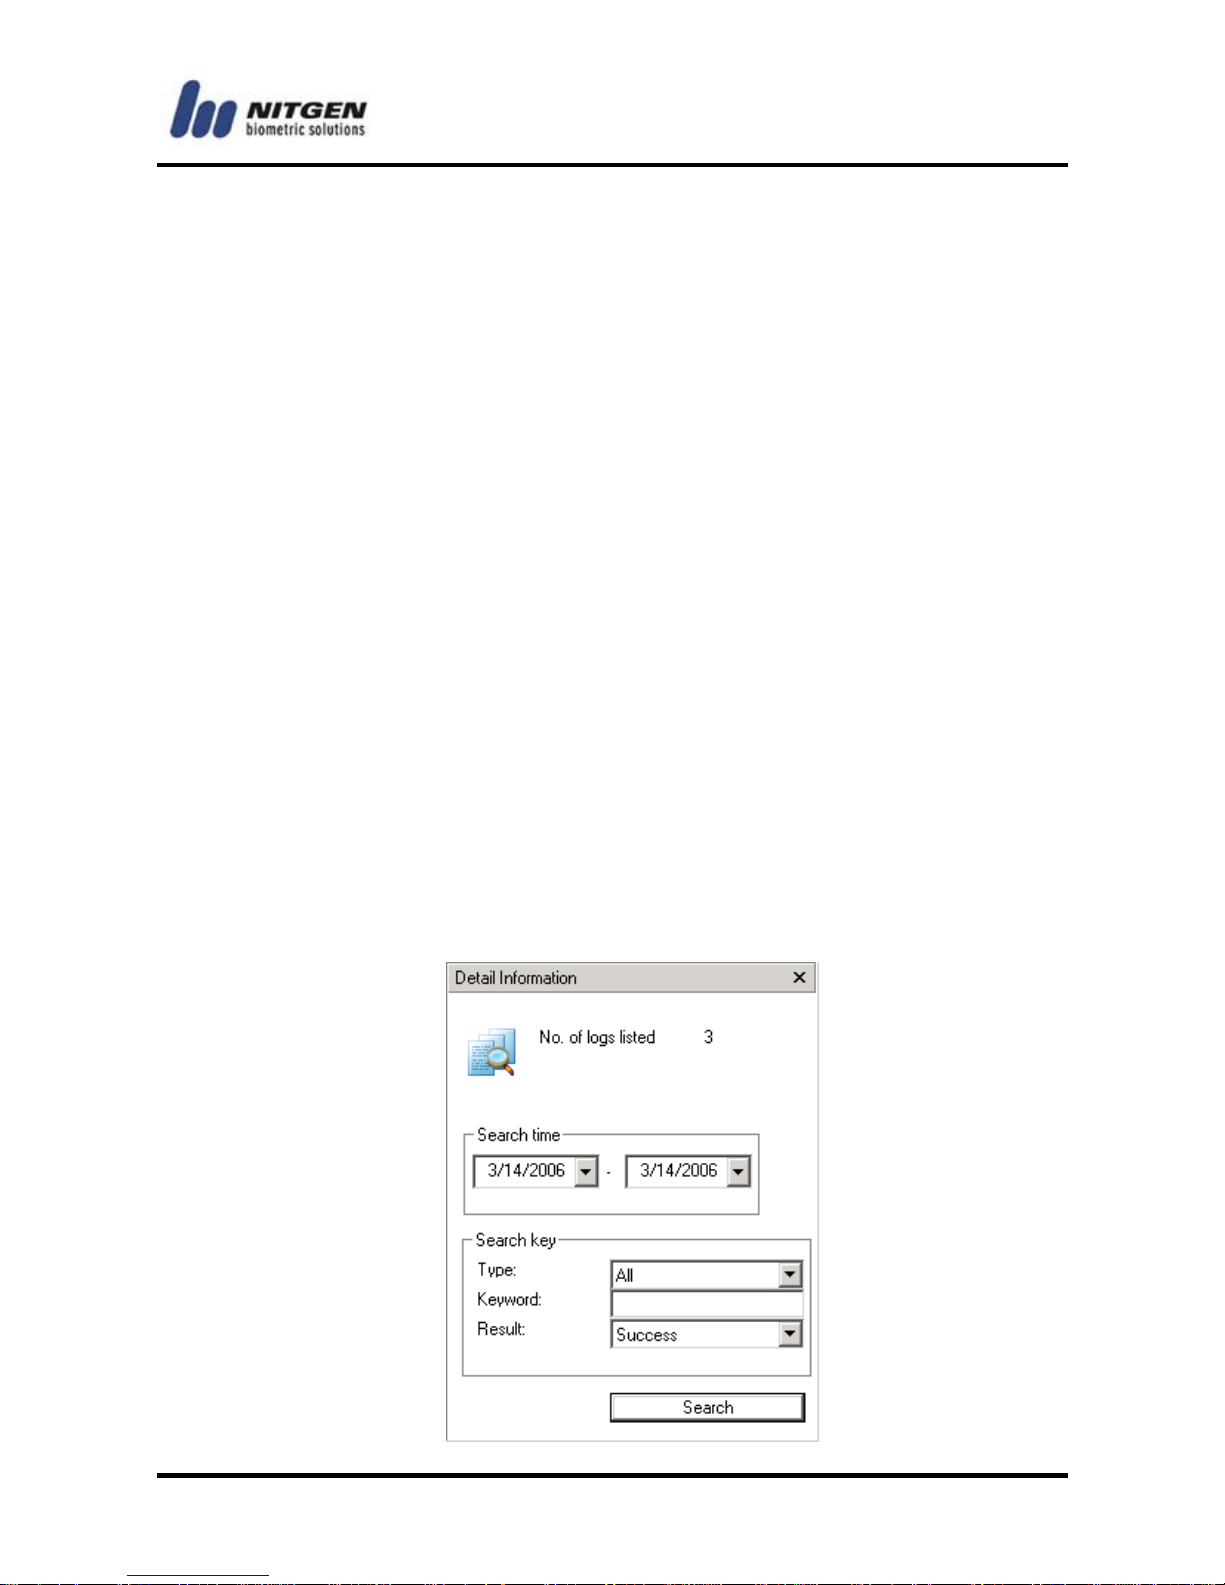
Authentication Log Search
If the log information is very large, you can search necessary
information as follows:
(1) Select Authentication Log in the Information Management
window.
(2) If the Detail Information button is selected in the toolbar, you
can perform search in the Detail Information window as below.
Or, click the search button in the toolbar to open the
Authentication Log Search window.
Page 92

- -
92
System Log Management
You can see system log information on program executions.
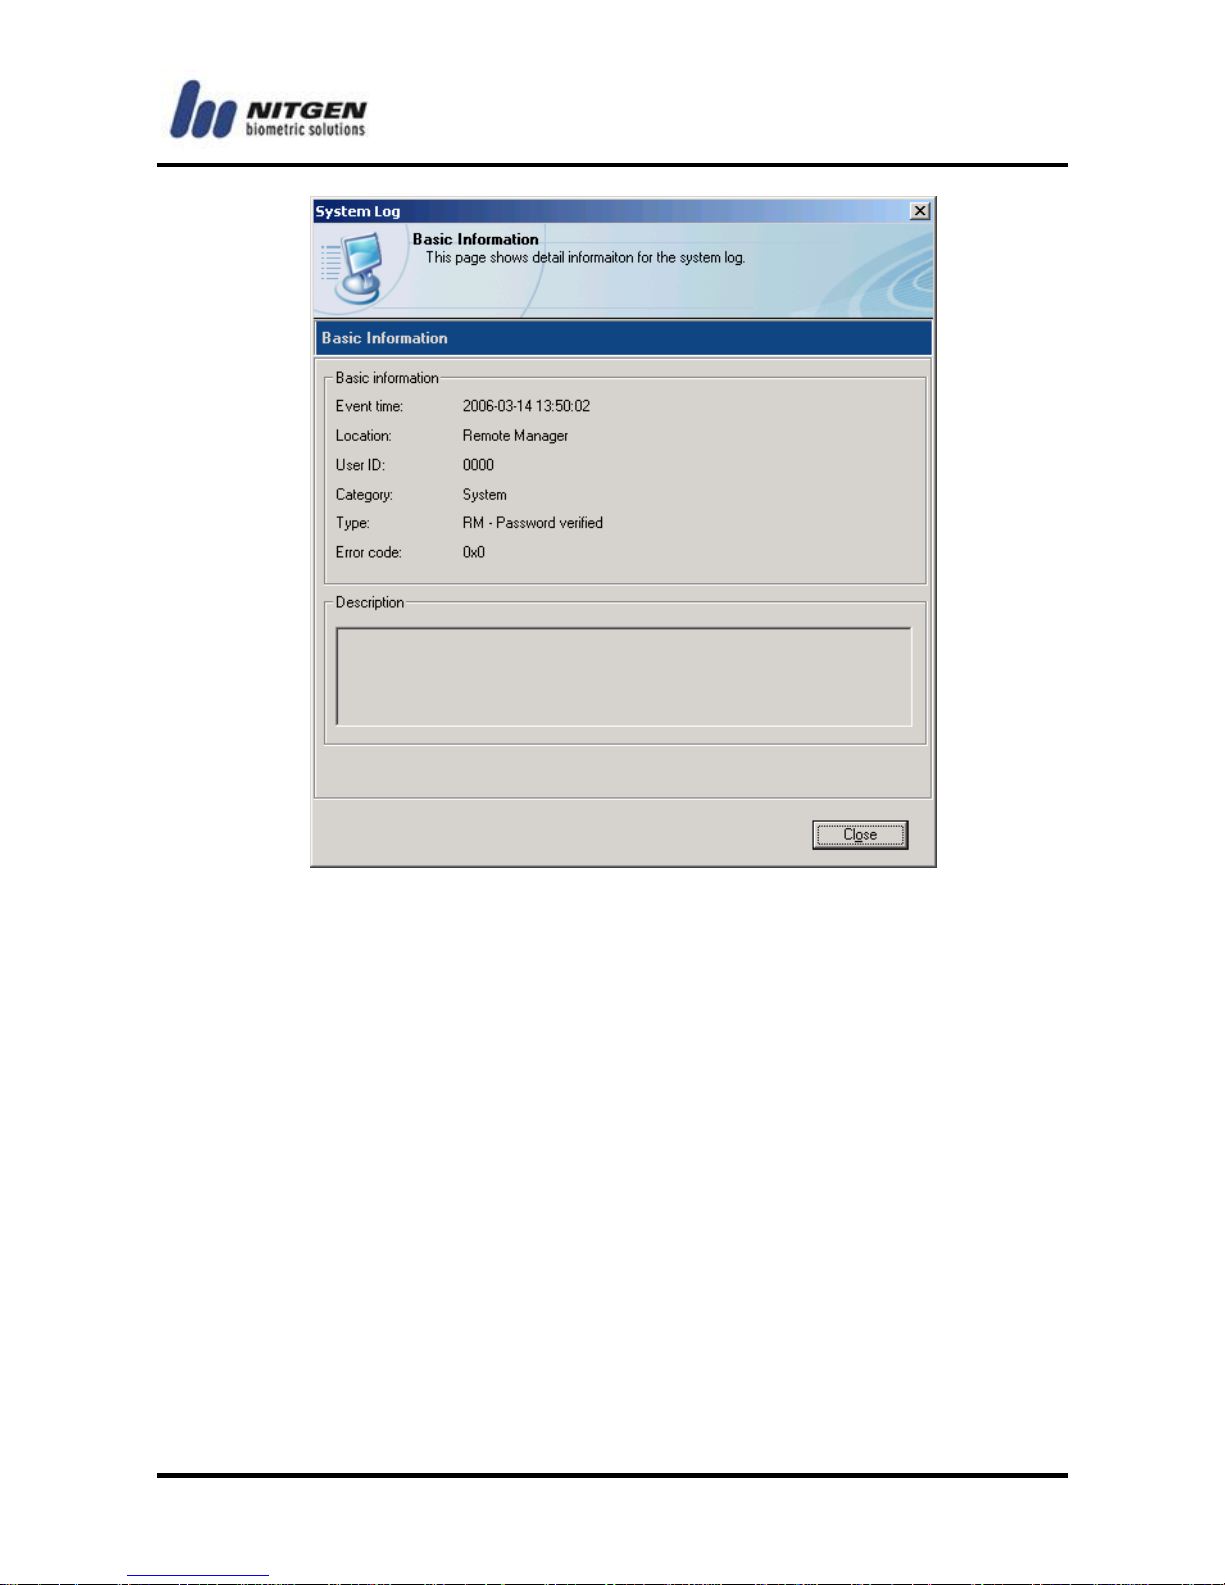
System Log Information
(1) Select System Log in the Information Management window.
(2) You can check system log information in the List window.
(3) To see detailed information, double-click a log or click the right
mouse button to select Properties from the submenu.
Page 93
-93-
Location is the terminal ID where the event took place. If this
value is Remote Manager, it means that the event is related with
Remote Manager.
Export Excel
You can save log information as an Excel file.
(1) Select System Log in the Information Management window.
(2) Click the right mouse button to select Export Excel from the
submenu, or select Export Excel from the toolbar.
(3) Specify the folder and name for the file, and click <Save>.
Page 94
- -
94
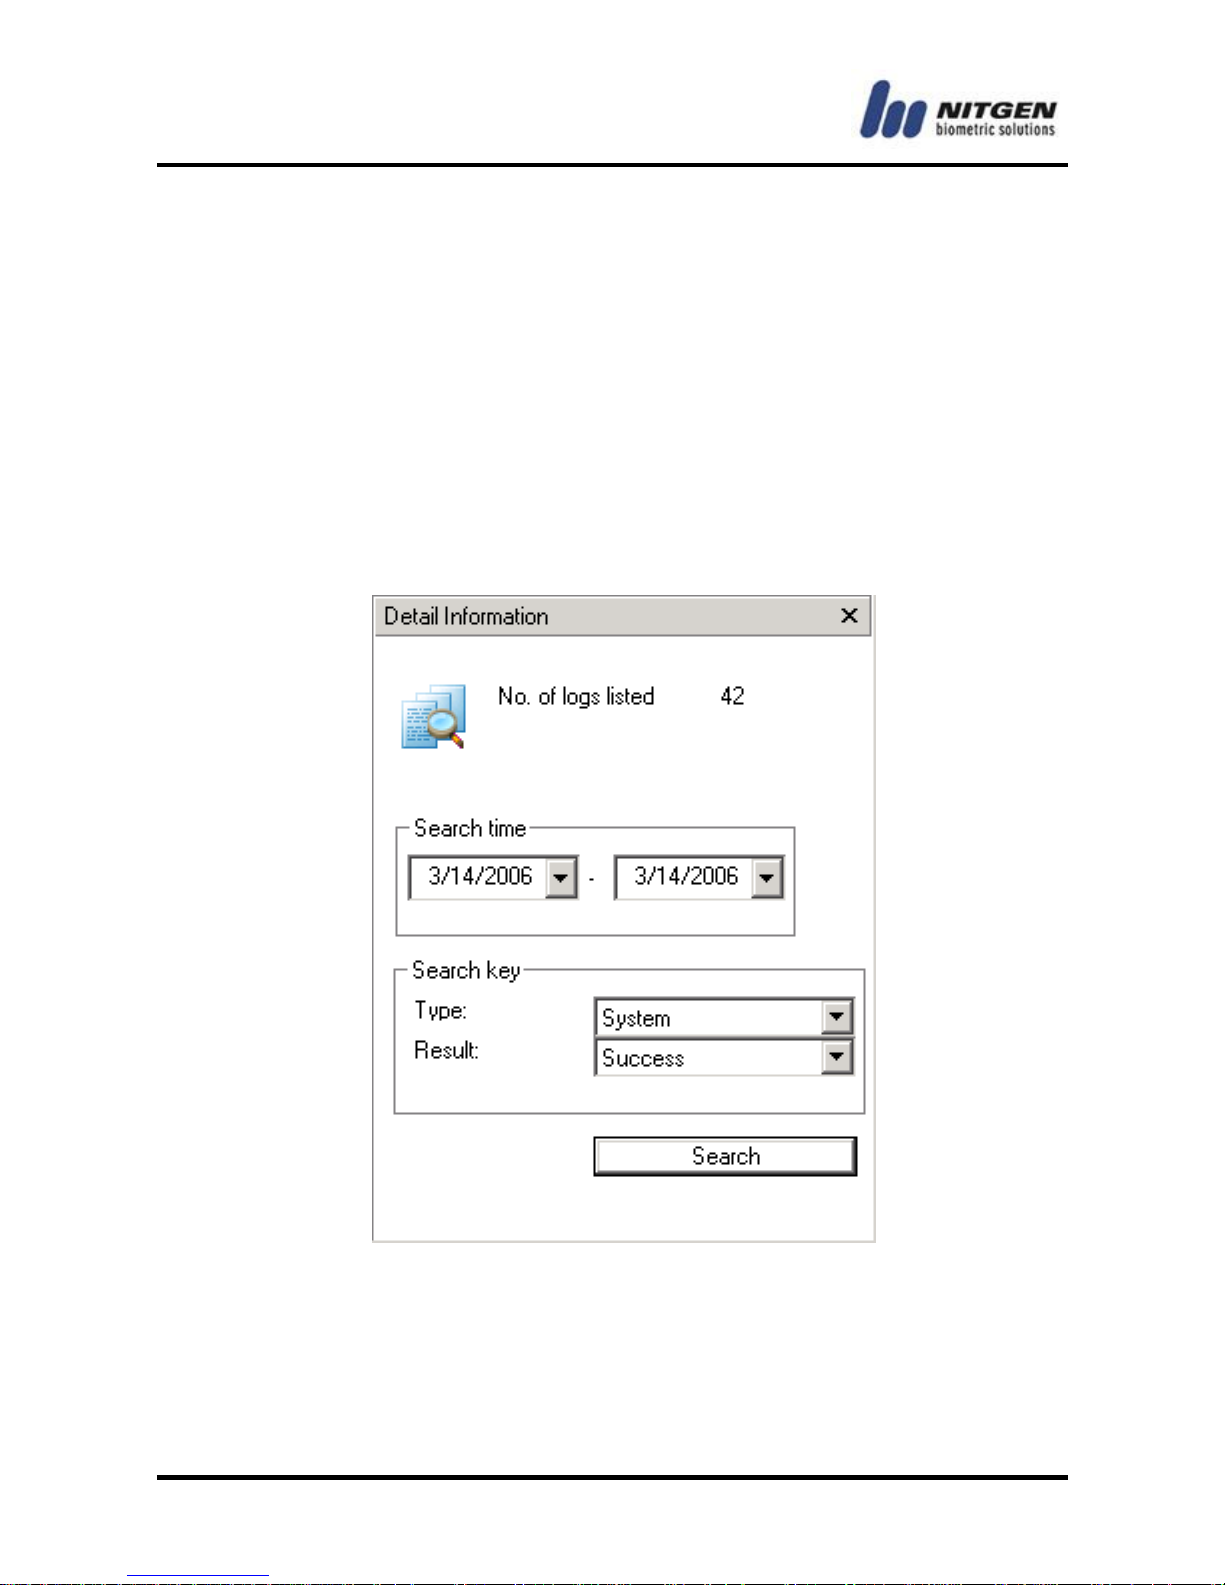
System Log Search
If the log information is very large, you can search necessary
information in the following way, and the search result will be
displayed in the List window.
(1) Select System Log in the Information Management window.
(2) If the Detail Information button is selected in the toolbar, you
can perform search in the Detail Information window as below.
Or, click the Search button in the toolbar to open the System
Log Search window.
Page 95
-95-
4.5 Program Options
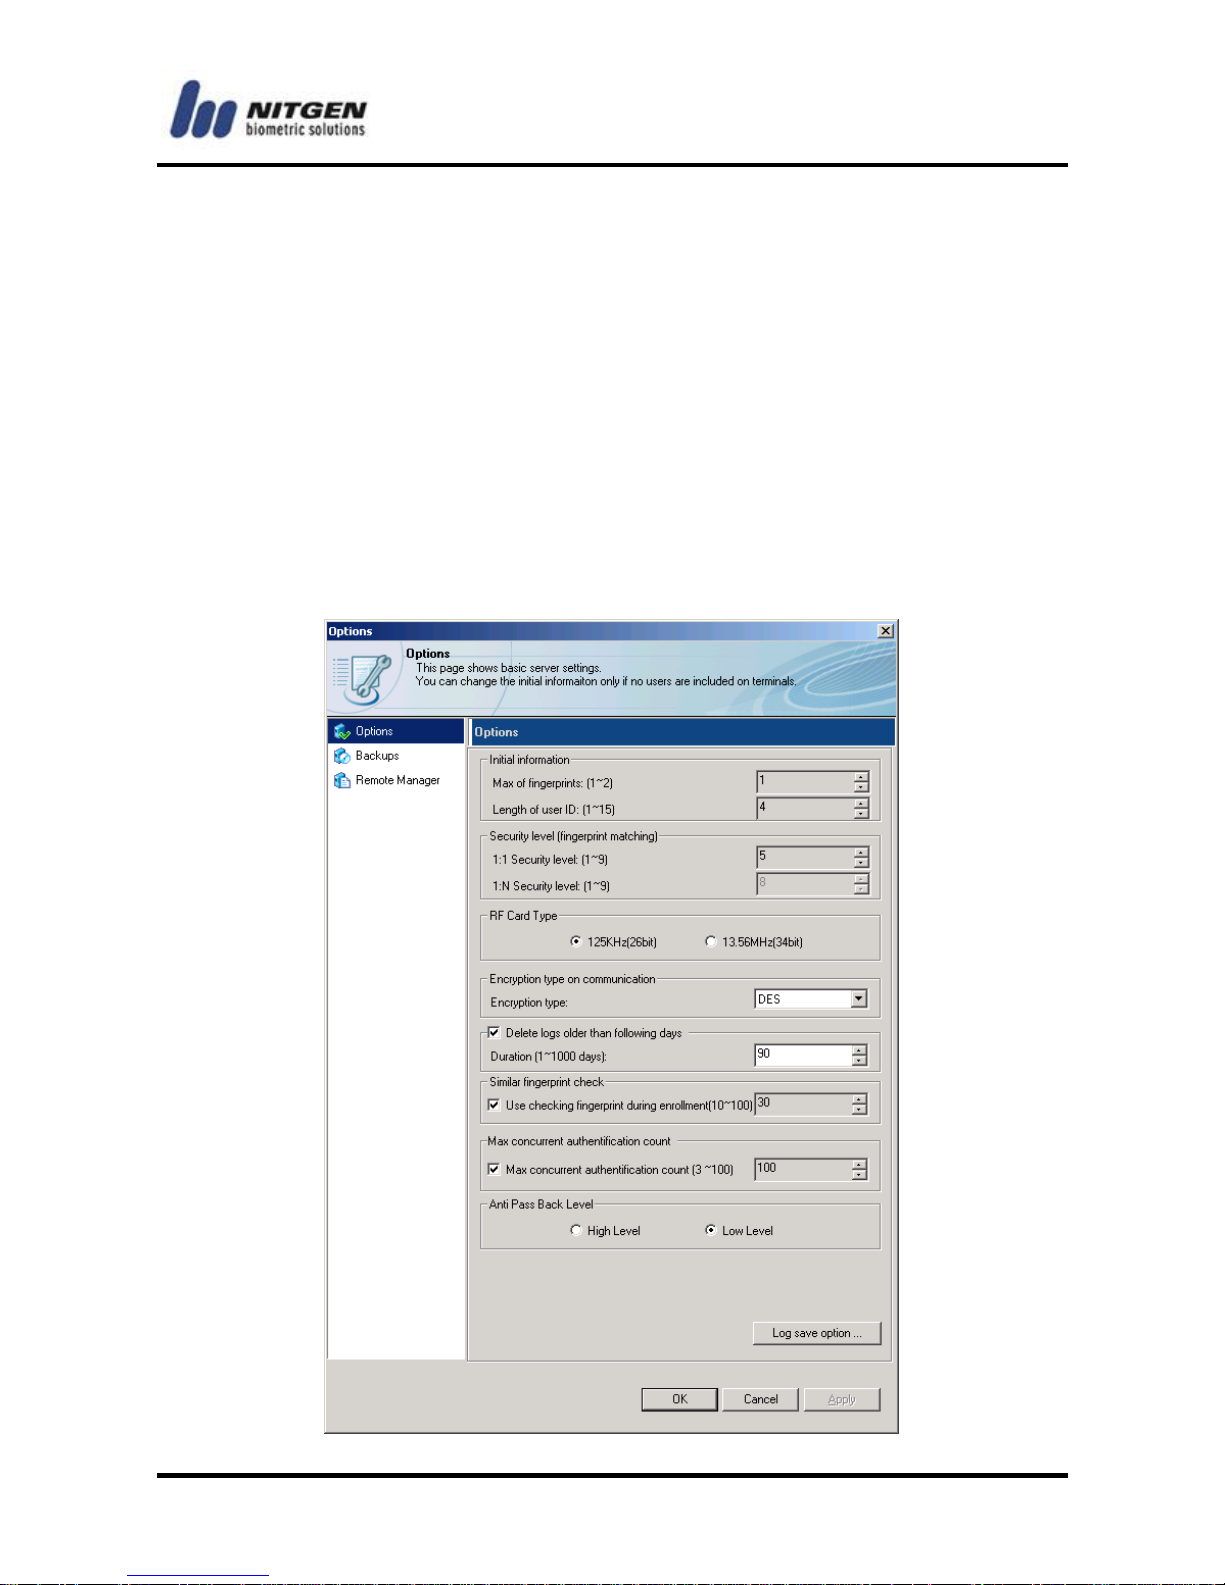
You can check or change the initial program settings.
Select Tool > Settings from the menu bar, or click the Settings
button from the toolbar to open the Options window.
Basic Server Settings
In the initial Options window, you can see the basic server settings.
For more information on the settings, refer to 3.2 Basic settings
and running.
Page 96
- -
96
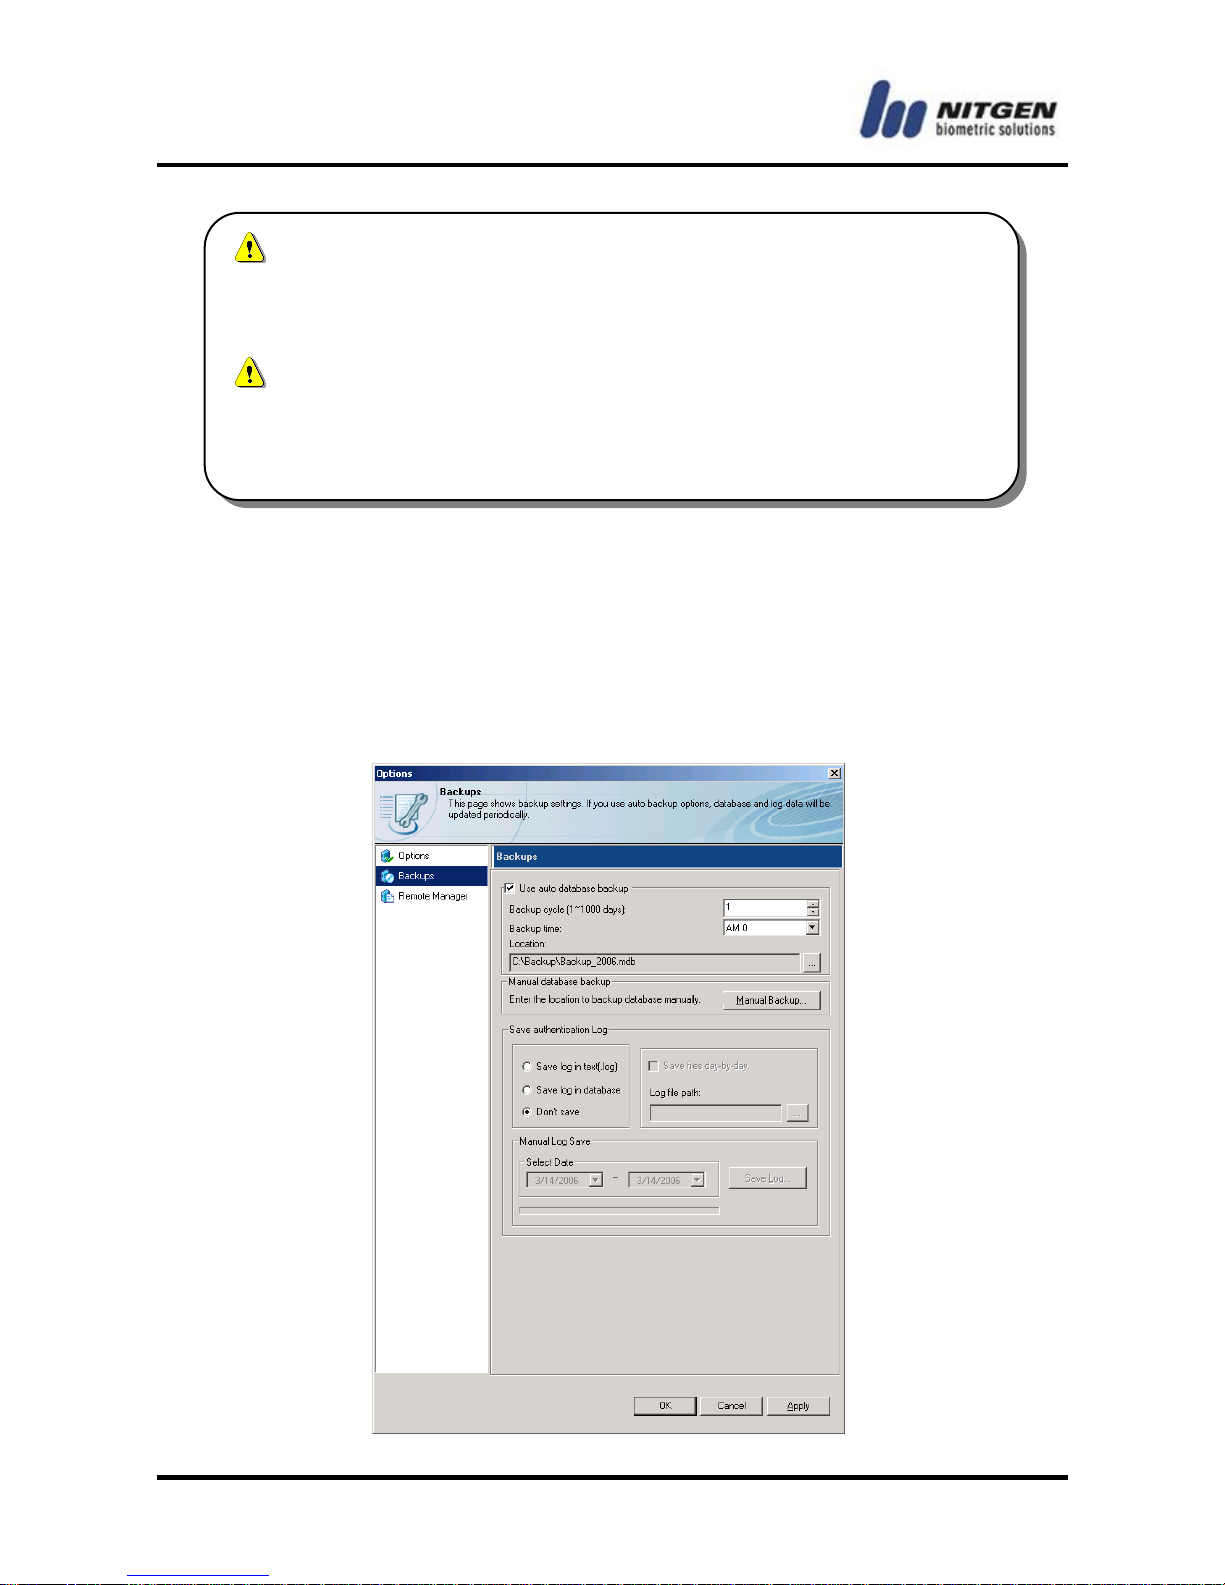
Server Backup Settings
Select Backups from the menu on the left of the Options window.
For more information on the settings, refer to 3.2 Basic settings
and running.
To increase the value of max of fingerprints or length of
user ID, delete all terminal users and set the value again.
And then re-register users by terminal.
To decrease the value of max of fingerprints or length of
user ID, you must delete all users registered in the server
as well as in the terminal.
Page 97

-97-
Manual Saving of Log Files
This will be activated when the above „log(.log) file save‟ is
selected.
To save text log, select the date and then click <Save Log..>
button to select the name of log that will be saved. Click OK when
done.
When „Save files day-by-day‟check box is selected, text log will be
saved on a day-by-day basis.
However, this function will be available only when the server and
remote admin program are located in the same position.
Ex) If the text log name is set as „textlog.log‟ and the log date
range is from 12/9/2005 to 13/9/2005.
1. When „Save files day-by-day‟is not selected, „textlog.log‟ will
save all the details of the log.
2. When „Save files day-by-day‟ is selected, „textlog_20050912.log‟,
„textlog_20050913.log‟and similar types will be used.
Page 98
- -
98
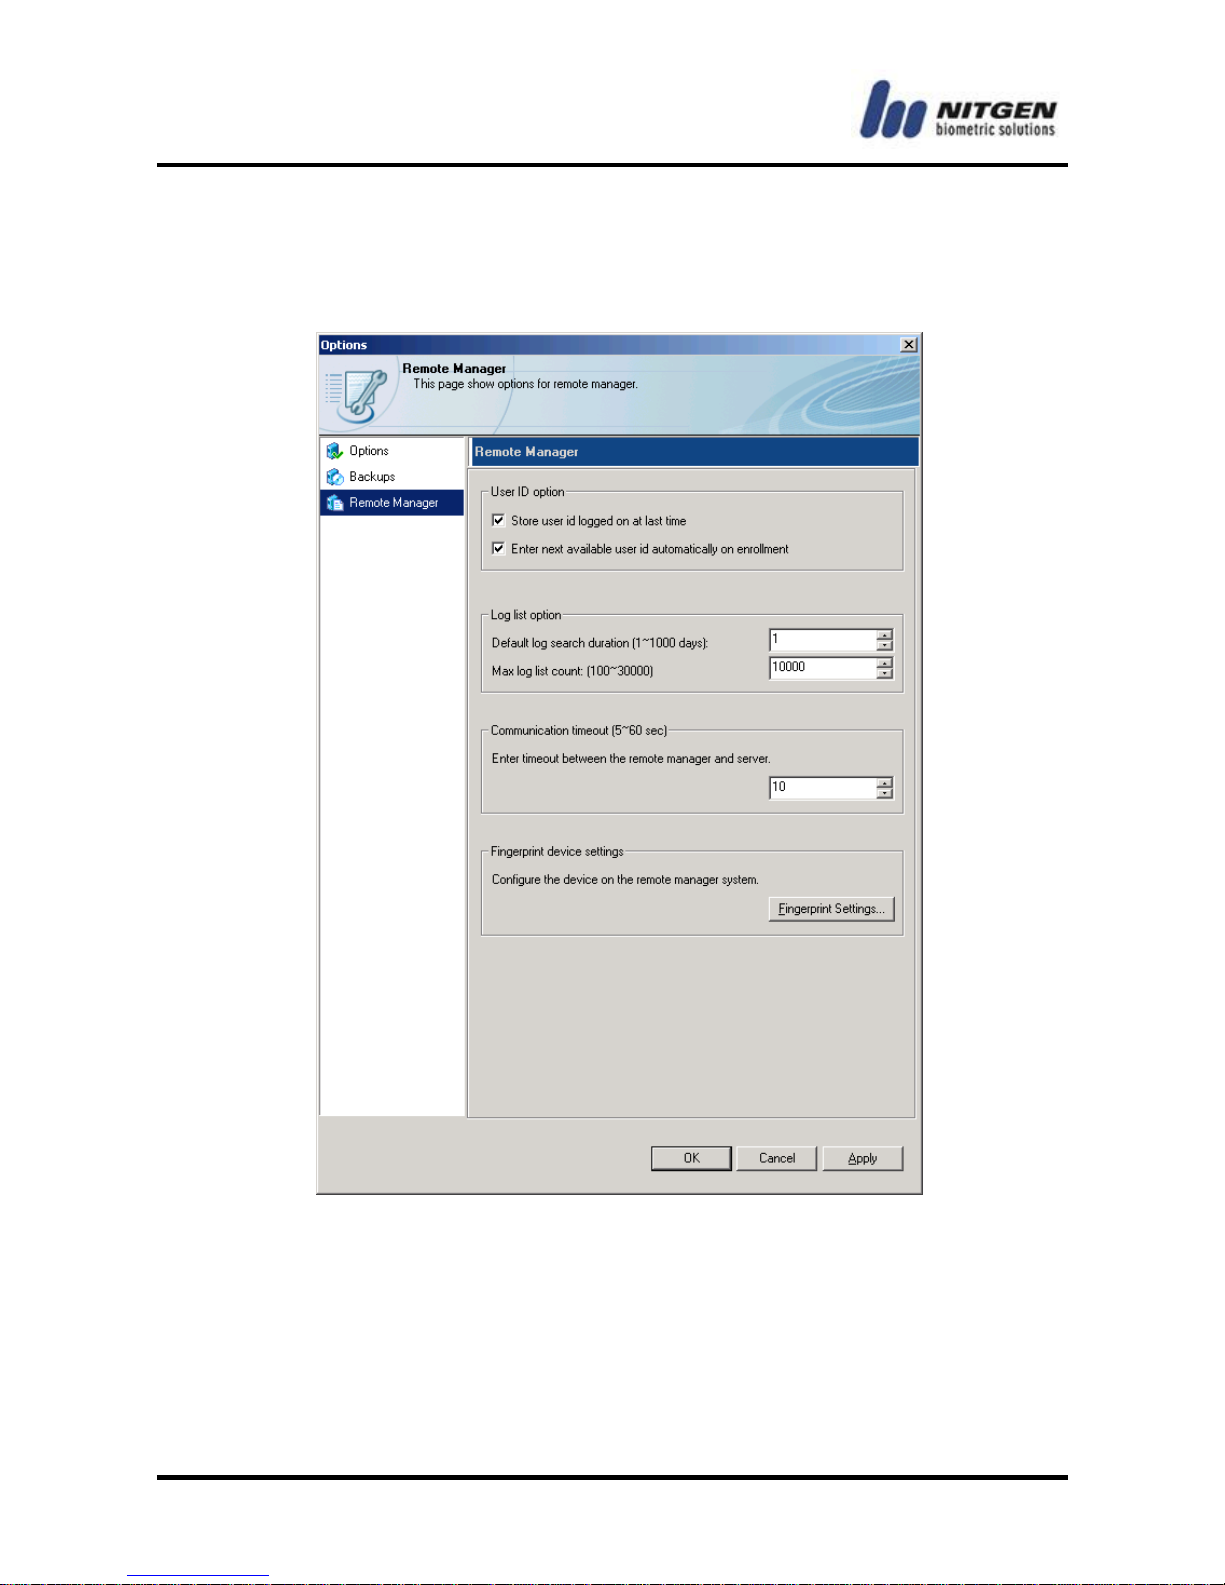
■ Remote Manager Settings
Select Remote Manager from the menu on the left of the Options
window.
User ID option
(1) Store user id logged on at last time
This feature automatically enters the manager's login ID at
program login.
Page 99
-99-
(2) Enter next available user id automatically on enrollment
When you register multiple users one by one, this feature
automatically generates the next ID incremented by 1.
Log list option
(1) Default log search duration (1~1000 day)
You can specify the basic search period. If you do not change
the value, the List window will show logs with the default.
(2) Max log list count (100 ~ 30000)
You can specify the number of logs to be displayed in the List
window between 100 and 30,000.
Communication timeout (5~60sec)
You can specify a value between 5 and 60. If there is no response
within the specified time limit, it will be assumed that there is no
network connection. If the network environment is not stable,
increase the value gradually.
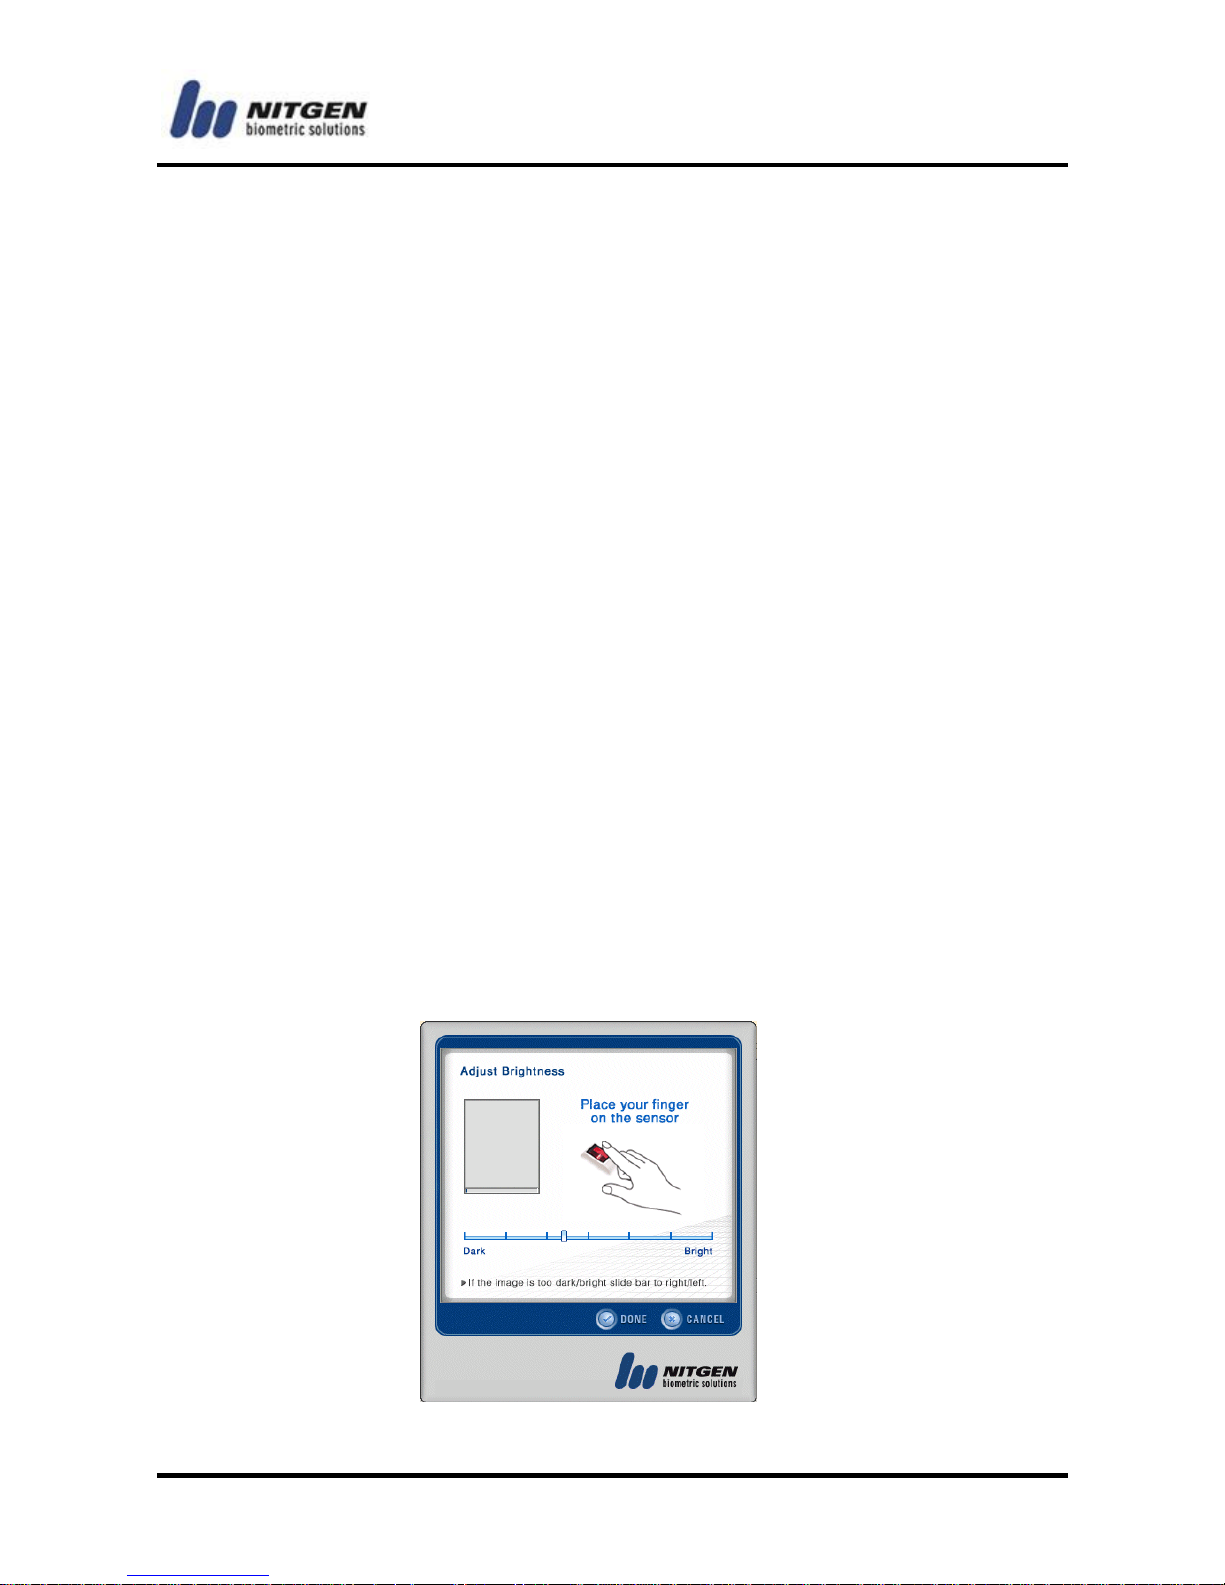
Fingerprint device settings
By properly adjusting the brightness of the fingerprint device used
by the remote management program, you can get clearer images.
Page 100
- -
100
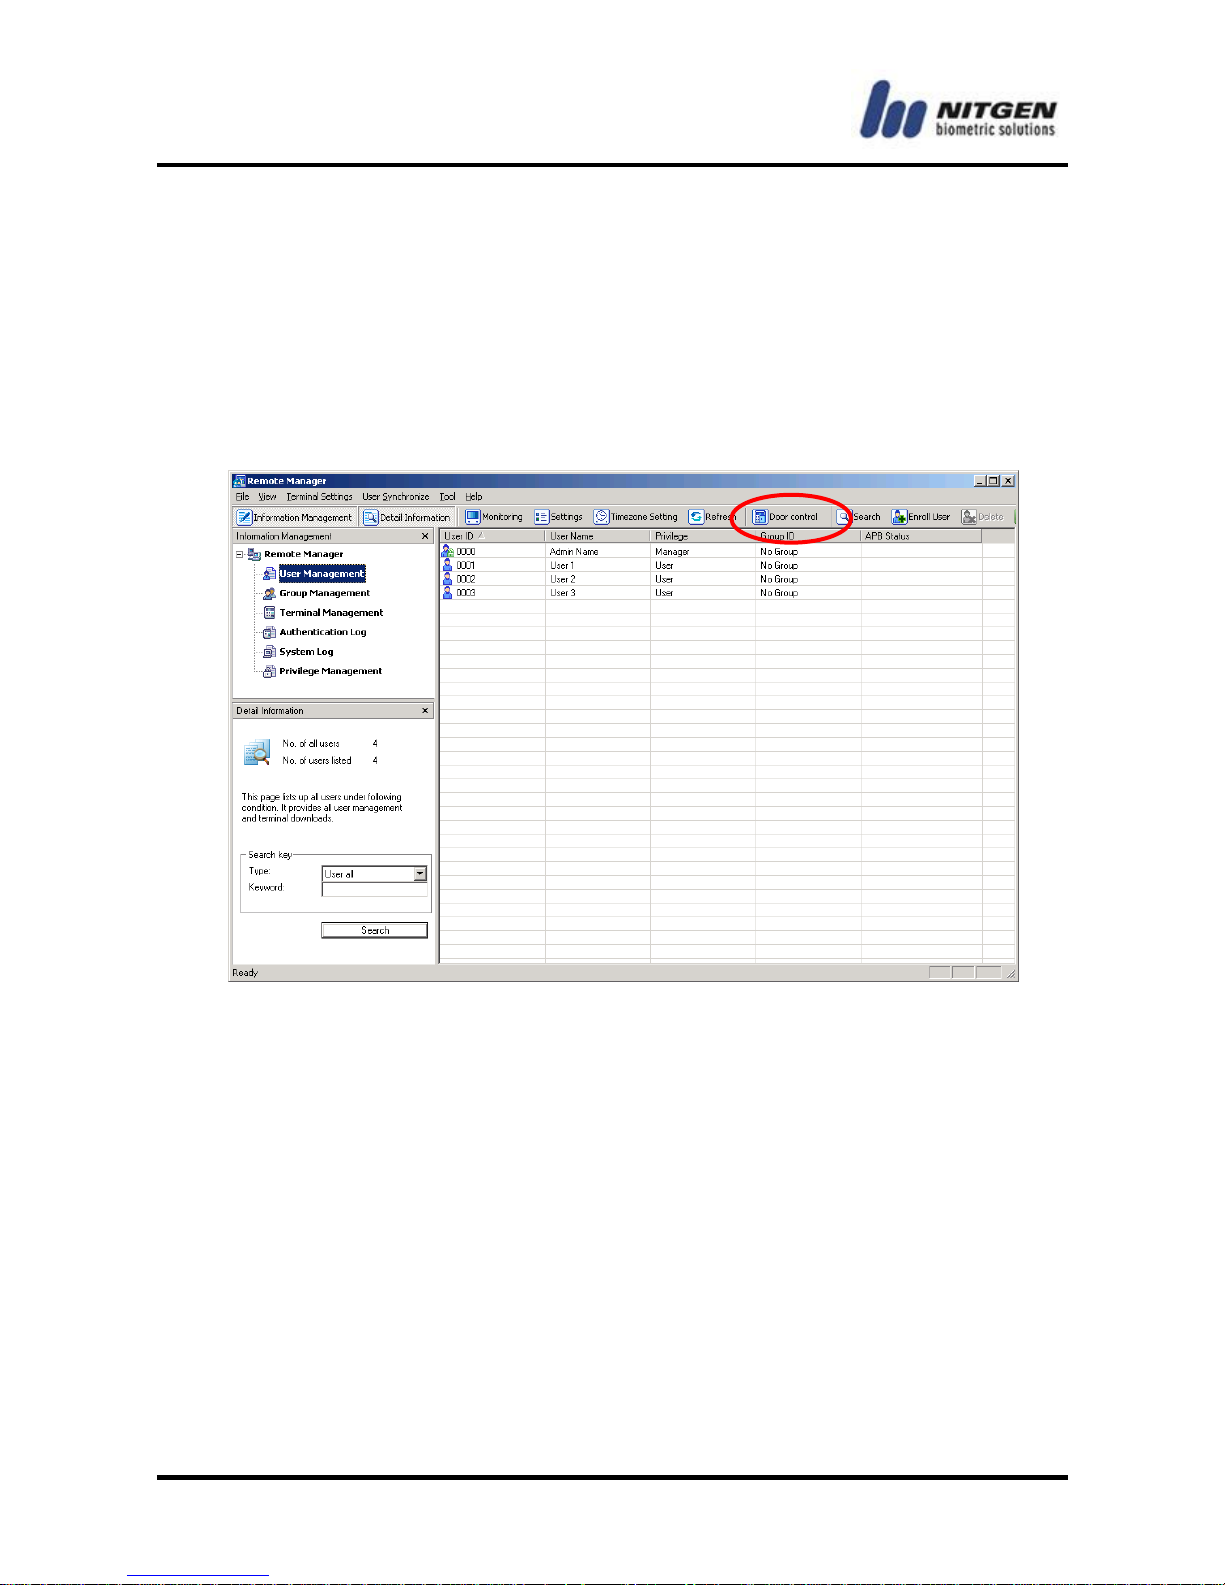
Enable Control Gate Function
An administrator can force open or close a door associated with a
specific terminal through remote controlling. If this option is
selected, <Door control> menu in a remote admin tool bar is
activated.
Please refer to toolbar in part 3.3 About Menu.
 Loading...