

Page 1
Flight
HID + LED
Lithium Ion
USER GUIDE
Page 2

NiteRider and Flight are trademarks of NiteRider, Inc.
All other trademarks are the property of their respective owners.
The information in this document is subject to change without notice.
© 2005 NiteRider, Inc. All rights reserved.
DISCOVER THE NIGHT!
Thank you for choosing the Flight™ from NiteRider, the
innovator in technical lighting systems. The Flight is the
industry’s premier action sports lighting system, incorporating
state-of-the-art lamp, battery, and digital technologies. The
Flight system includes:
• High-intensity discharge (HID) Solarc™ lamp for bright,
white light
• Auxiliary light-emitting diode (LED) lighting
• Compact, lightweight lithium-ion (Li-Ion) battery
• 1.5-hour Li-Ion charger
• Fuel (battery) gauge
• NiteRider’s patented “smart” technologies that protect the
battery and enhance safety
• Frame and helmet mounting
To get the most from your NiteRider light, we urge you to
familiarize yourself with the following safety and operation
instructions.
Page 3

1
PROTECTING
YOUR INVESTMENT
When not in use, always disconnect the headlamp from the
battery. To unplug, grasp the connector, not the cable.
Properly charge your battery to maximize its lifespan (see
“Battery Charging and Care” on page 11). To avoid damaging
your system, only charge your NiteRider battery with the
appropriate NiteRider charger.
The Flight will perform in wet weather conditions, but
submerging it in water will damage the system. If you need a
submersible light, NiteRider manufactures industrial-grade
dive light systems. For information, contact NiteRider Dive
Lights at 858.268.3850 or visit www.niteriderdive.com.
RIDING AT NIGHT
While the Flight will dramatically improve your view, control,
and enjoyment of night riding, please remember that cycling
at night is an inherently dangerous activity. In addition to
using your lighting system properly and riding with extreme
caution, NiteRider urges you to:
• never ride alone
• always let someone know where you are going
• wear a helmet and reflective clothing
• carry an auxiliary light and emergency supplies.
Page 4

NiteRider, Inc.
8205 Ronson Road, Suite E
San Diego, CA 92111 USA
800.466.8366
www.niterider.com
SUPPORT
If you experience difficulties during product installation or
operation, NiteRider provides free telephone support on
weekdays from 8:00 AM to 4:30 PM (Pacific Time) at
800.466.8366, ext. 4. You may also e-mail us at
WARRANTY
NiteRider stands behind its products with the following
warranties:
• Lifetime warranty on all mechanical components
• 1 year on cables and connectors, electronic components,
printed circuit boards, and HID bulbs and ballasts
• 180 days on rechargeable Li-Ion batteries and chargers
To repair or replace your product while under warranty, return
it (postage prepaid and insured with original sales receipt) to
the address below. Out-of-warranty repair service is also
available. For complete warranty information, please visit our
website.
2
Page 5

3
TABLE OF CONTENTS
Parts List and Identification
. . . . . . . . . . . . . . . . . . . 4
Quick Start
. . . . . . . . . . . . . . . . . . . . . . . . . . . . . . . . . . . 5
Mounting the Headlamp
. . . . . . . . . . . . . . . . . . . . . . 6
Universal Handlebar Mount . . . . . . . . . . . . . . . . . . . . . . 6
Helmet Mount . . . . . . . . . . . . . . . . . . . . . . . . . . . . . . . . . 7
Inserting the Headlamp . . . . . . . . . . . . . . . . . . . . . . . . . 7
Mounting the Battery
. . . . . . . . . . . . . . . . . . . . . . . . . 8
Frame Mount . . . . . . . . . . . . . . . . . . . . . . . . . . . . . . . . . 8
Pocket or Pack . . . . . . . . . . . . . . . . . . . . . . . . . . . . . . . . 8
Operation
. . . . . . . . . . . . . . . . . . . . . . . . . . . . . . . . . . . . 9
HID Lighting . . . . . . . . . . . . . . . . . . . . . . . . . . . . . . . . . . 9
LED Auxiliary Lighting . . . . . . . . . . . . . . . . . . . . . . . . . . 9
Fuel Gauge and Automatic Shut Off . . . . . . . . . . . . . . 10
Battery Charging and Care
. . . . . . . . . . . . . . . . . . 11
Using the 1.5-hour Li-Ion Charger . . . . . . . . . . . . . . . . 11
Smart Battery Protection . . . . . . . . . . . . . . . . . . . . . . . 12
Storage . . . . . . . . . . . . . . . . . . . . . . . . . . . . . . . . . . . . . 12
Run Times
. . . . . . . . . . . . . . . . . . . . . . . Inside Back Cover
Page 6
4
PARTS LIST
AND IDENTIFICATION
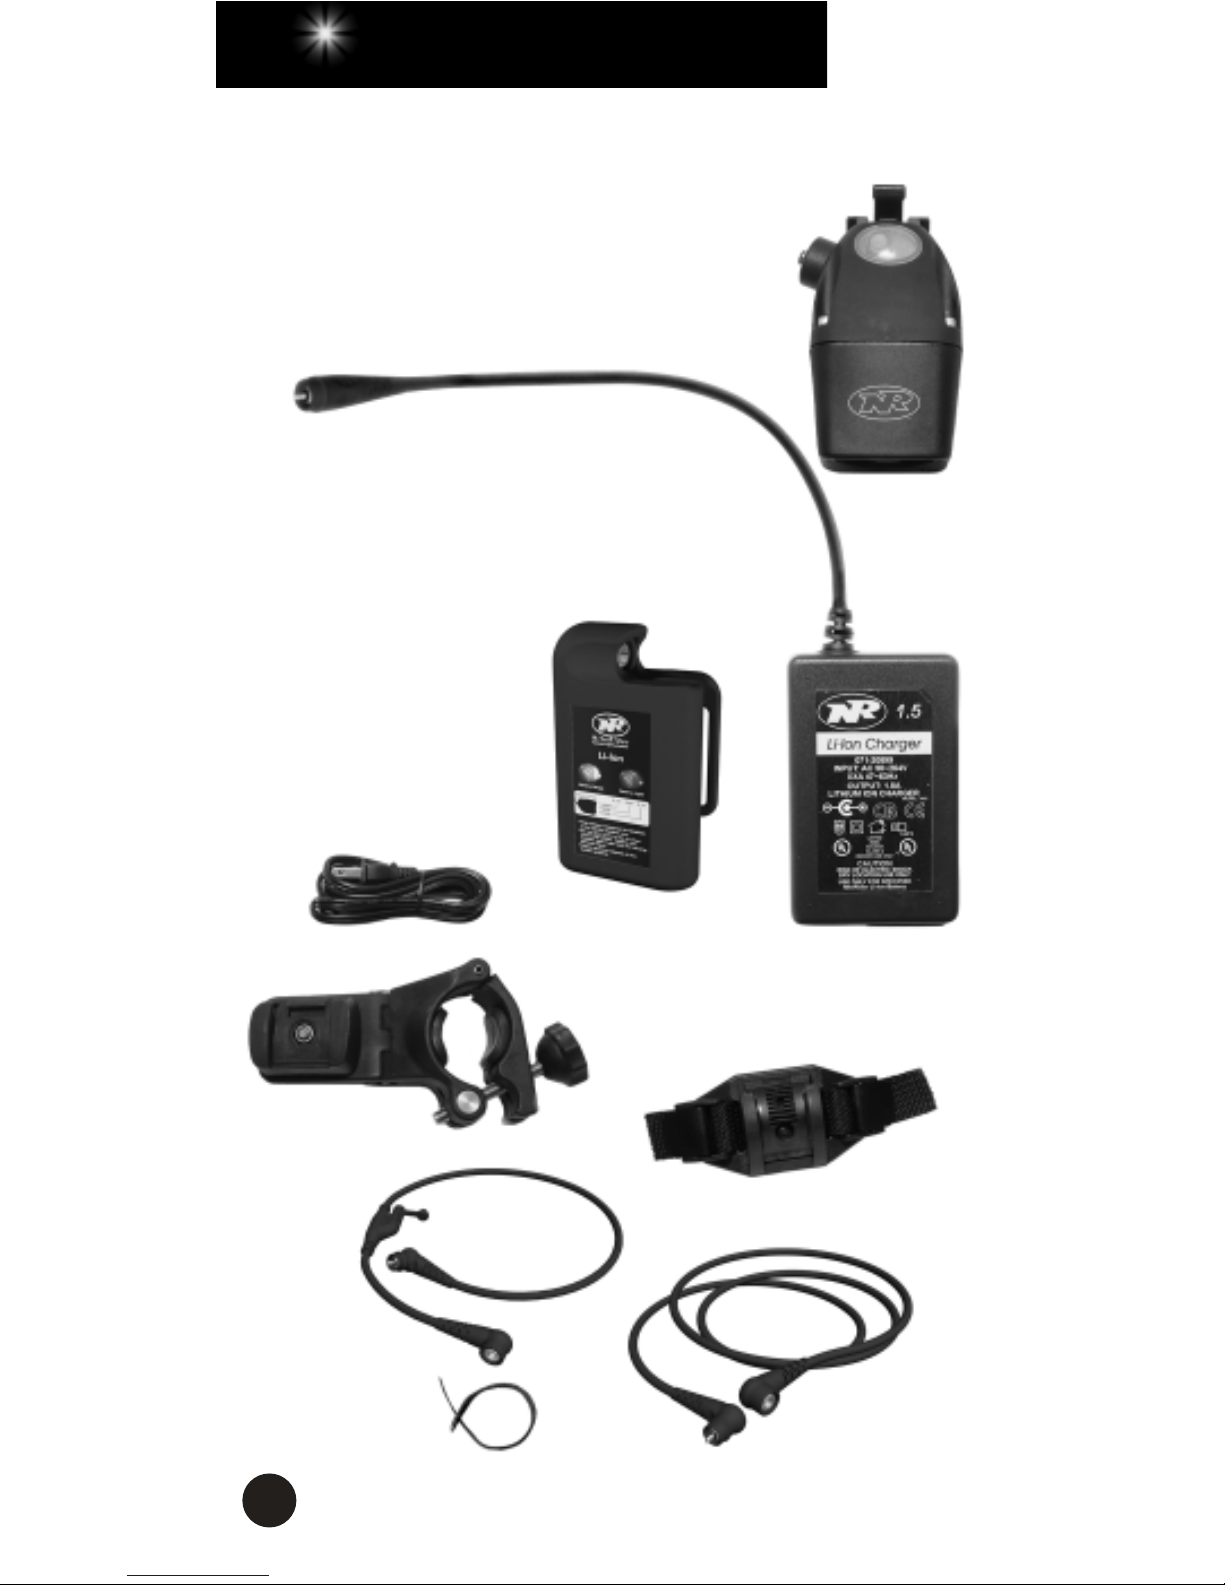
Please verify the contents of your Flight system:
A. High-output HID+LED headlamp
B. 1.5-hour Li-Ion charger
C. 4-hour Lithium-Ion battery
(pocket/frame-mount)
D. Charger power cord
E. Universal handlebar mount
F. Helmet mount
G. 20” handlebar cord
H. 52” helmet cord
J. Velcro cable tie
A
B
C
D
G
E
F
J
H
Page 7

5
QUICK START
1. Fully charge the battery before the first use. See “Using the
1.5-hour Li-Ion Charger” on page 11.
2. To mount the headlamp and battery, see “Mounting the
Headlamp” on page 6 and “Mounting the Battery” on
page 8.
3. Connect the battery to the headlamp with the helmet or
handlebar cord.
4. Press and release the headlamp power button. The LEDs
will come on in steady mode.
5. Press and release the power button again, and the HID
lamp will come on.
6. After approximately ten seconds, you may cycle through
the three HID brightness levels (high, medium, and low) by
consecutively pressing and releasing the power button.
7. To access the LED auxiliary light modes, see “Operation”
on page 9.
8. To turn the system off, press and hold the power button for
three seconds.
Page 8
6
MOUNTING THE HEADLAMP
The HID+LED headlamp can be mounted to the handlebar or
a helmet.
Universal Handlebar Mount
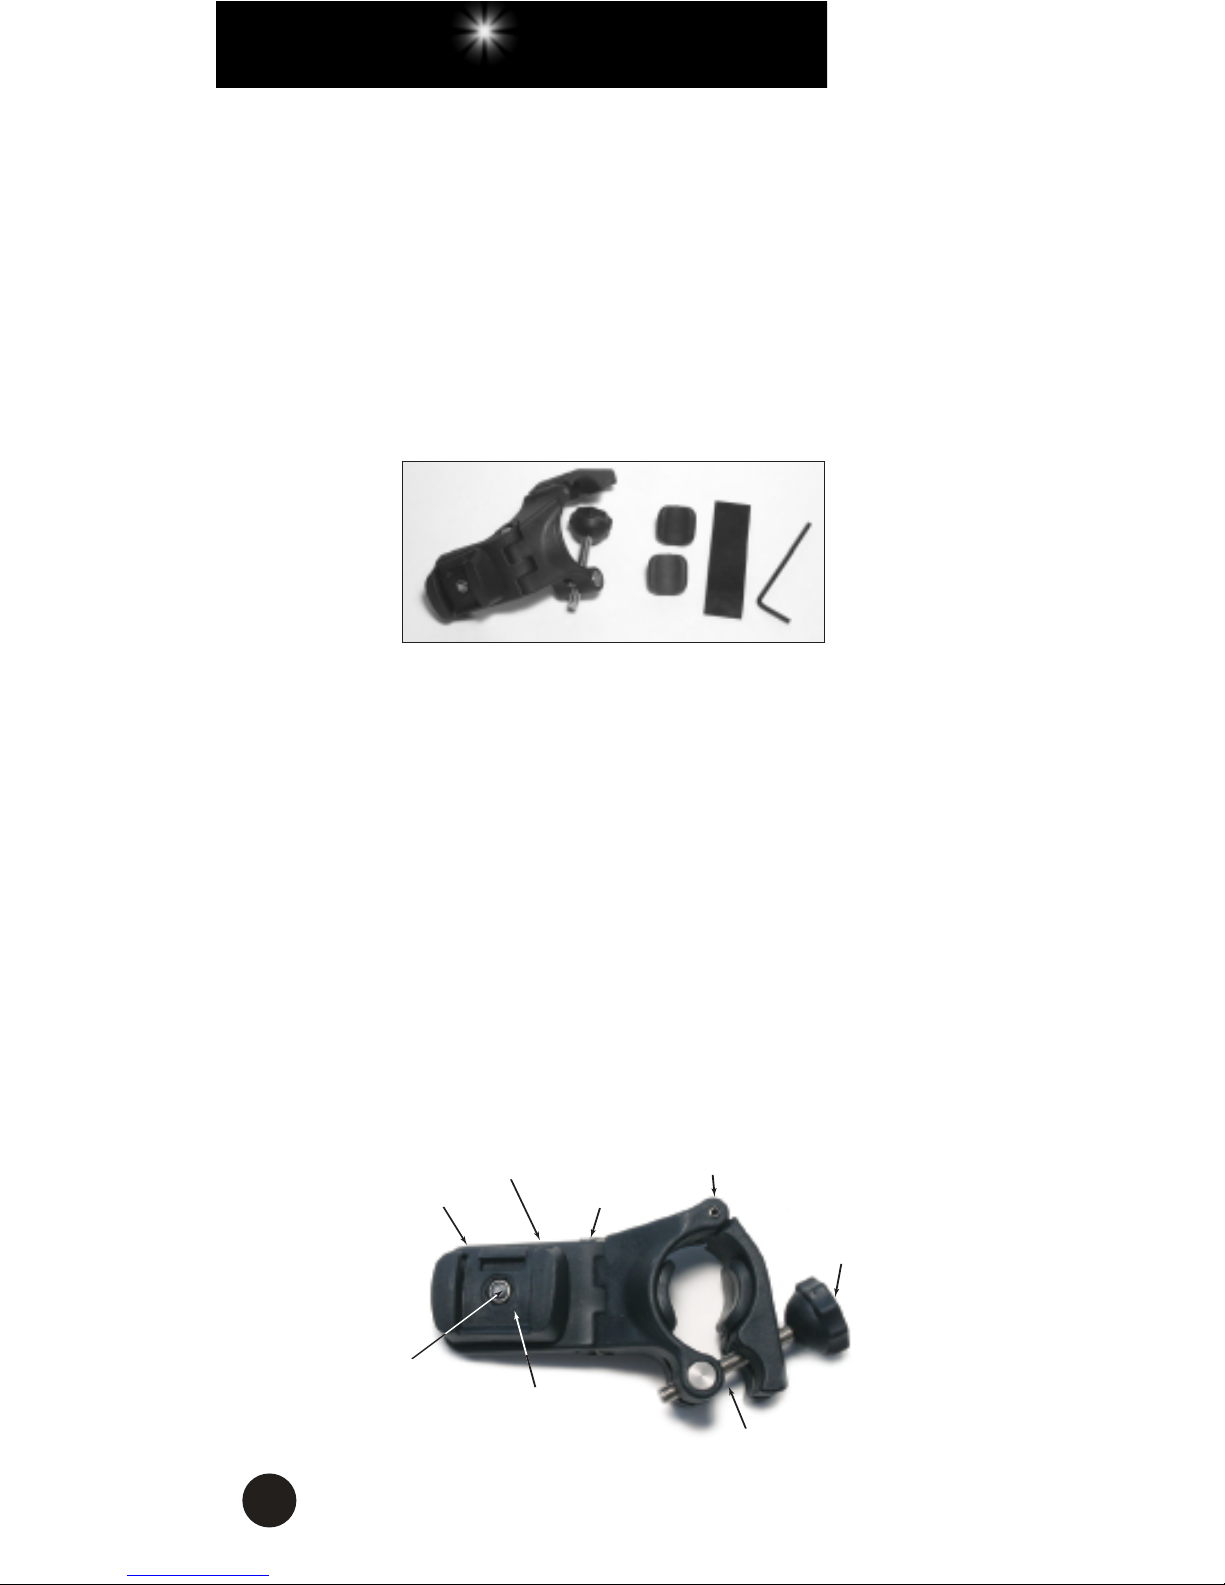
The Universal Handlebar Mount (UHM) is designed to fit on
virtually any handlebar. Included with the mount is a 2.5-mm
Allen wrench, a pair of black rubber bumpers already in
place, and a thin rubber shim to customize the fit on large
handlebars up to 32 mm in diameter.
Turn the knob counter-clockwise, allowing the hinge to swing
open. Place the mount on the handlebar on the left side the
stem, orienting the rectangular notch in the slider clip to the
rear. Swing the hinge down to make contact with the
handlebar. Swing the hex bolt up, seating the knob into its
recess. Turn the knob clockwise to tighten and secure the
mount to the handlebar.
The UHM can be adjusted to accommodate any handlebar
angle. By loosening the 2.5 x 30 mm Allen screw, you can
move the swing arm back and forth to straighten the
headlamp. Tighten the 2.5 x 30 mm screw after the
adjustment.
NOTCH
SWING ARM
2.5 x 30 MM
SCREW
HINGE
KNOB
HEX BOLT
SLIDER CLIP
2.5 x 12 MM
SCREW
Page 9
7
To pivot the headlamp, loosen the 2.5
x 12 mm screw located under the
slider clip and swing arm and rotate
the headlamp to the desired position.
Make this adjustment before
tightening the 2.5 x 30 mm screw.
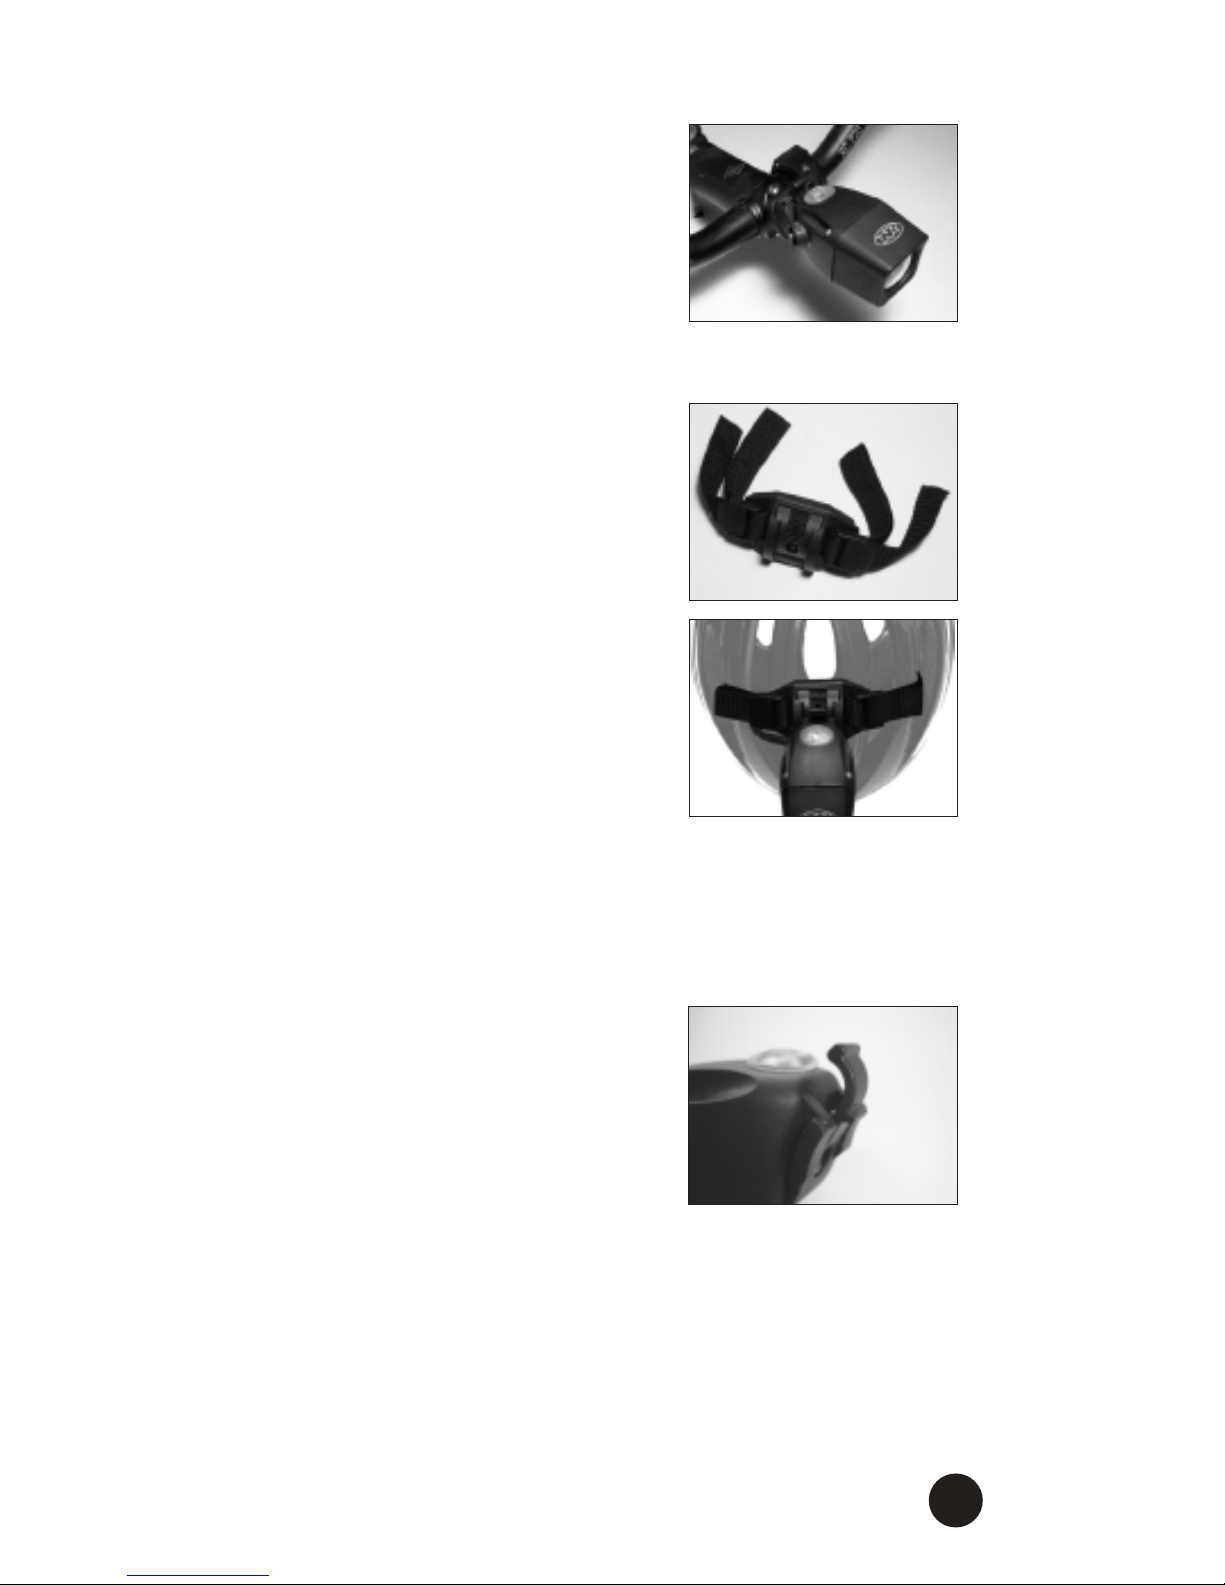
Helmet Mount
1. Unclamp the straps on each side
of the helmet mount and pull them
free.
2. Position the plastic mounting plate
as close to the centerline of the
helmet as possible, orienting the
parallel grooves on the slider clip
to the rear.
3. Feed each strap into and out of
two helmet vents, circling each
strap back to the upper edge of
the corresponding clamp.
4. Fasten the straps by inserting them into the clamps.
Inserting the Headlamp into
the Handlebar or Helmet Mount
Insert the headlamp mount into the
handlebar or helmet mount slider
clip from the rear of the slider
forward. Gently rocking the lamp as
you slide it may help. Do not push
the release lever when inserting the
headlamp into the slider clip; let the
lamp snap into place by itself.
To remove the headlamp, push the release lever and slide the
lamp backward.
Note
: After mounting the headlamp, adjust the headlamp so
it illuminates the road properly without distracting oncoming
riders.
Headlamp mount with
release lever
Page 10
8
MOUNTING THE BATTERY
The Li-Ion battery can be mounted to the bike frame or
placed in a jersey pocket, hydration pack, or fanny pack.
Warning
: For safety reasons, a cyclist should never be
tethered to the bike. If the headlamp is mounted to the
helmet, do not mount the battery to the frame. Conversely, if
the headlamp is mounted to the handlebar, do not place the
battery in a pocket or pack.
Frame Mount
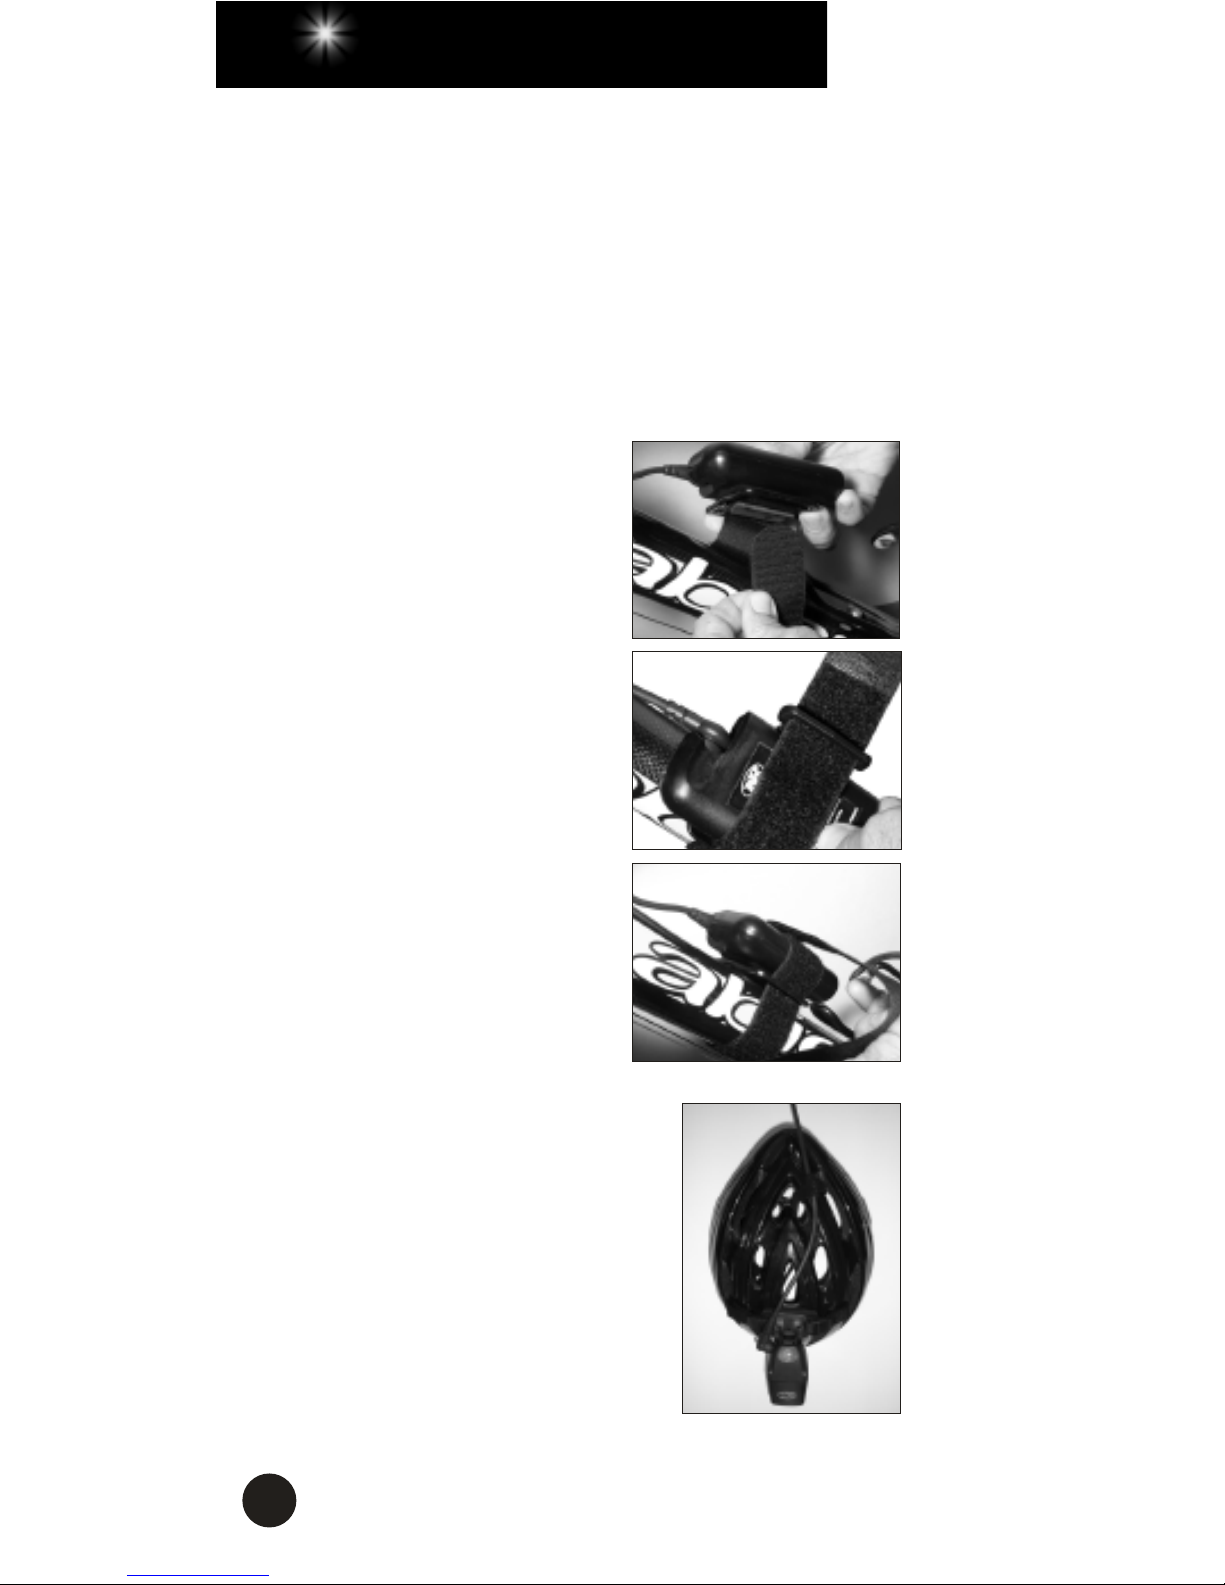
1. Thread the wide Velcro strap
through the slots on the top
of the battery clip.
2. Attach the concave surface
of the battery to a safe,
convenient location on the
frame (typically under the top
or down tube), placing the
Velcro strap over the tube but
under any shift or brake
cables.
3. Secure the handlebar cord to
the frame using the thin
Velcro tie. Make sure the
cord does not interfere with
any moving parts.
Pocket or Pack
1. Route the helmet cord through a
helmet vent or along the outside of
the helmet using the thin Velcro tie
to secure the cord.
2. Connect the helmet cord to the
battery, making sure the cord does
not interfere with any moving parts.
3. Simply place the battery in a
pocket or pack.
Page 11

9
OPERATION
HID Lighting
1. Connect the battery to the headlamp with the handlebar or
helmet cord. The auxiliary LED lights will briefly flash.
2. Press and release the headlamp power button located on
the top of the headlamp. The LED lights will come on in
steady mode.
3. Press and release the power button again and the HID
lamp will come on. The HID lamp may flicker and change
color as the bulb stabilizes. While the bulb is warming, the
red and green indicator LEDs within the power button will
flash. During this time no other light modes will be
accessible.
4. After approximately ten seconds, the HID lamp will reach
its full brightness and three HID brightness levels will be
available: high, medium, and low. To cycle through
brightness levels, consecutively press and release the
power button.
5. To turn the lamp off, press and hold the power button for
approximately three seconds.
Warning
: HID headlamps require adequate airflow during
operation (as in riding conditions). NiteRider discourages use
of the light in static conditions as excessive heat retention can
damage the lamp.
LED Auxiliary Lighting
The LED auxiliary lights increase your visibility in different
situations while conserving battery capacity. Three LED
modes are available:
•
Steady
mode is useful when facing a cyclist in close
proximity at night and is intended for non-riding situations.
•
Daylight
flash mode pulses the beam at a rate that is
highly visible to motorists during daylight hours. For
maximum visibility, aim the light at eye or rear-view mirror
level.
•
S.O.S.
, the universal distress signal in Morse code, can be
used during the day or night.
(continued)
Page 12

10
To access the LED lighting modes, first turn on the HID lamp
per the HID lighting instructions. Then press and hold the
power button for approximately six seconds until the HID bulb
goes out and the LEDs come on in steady mode.
To cycle the LEDs through daylight flash, SOS, and steady
modes, consecutively press and release the power button. To
turn the LEDs off and the HID bulb back on, press and hold
the power button for approximately six seconds. Or to turn the
lamp off, press and hold the power button for approximately
three seconds.
Note
: Should the HID lamp become damaged or fail while
riding, the LEDs will light automatically as a safety feature.
Fuel Gauge and Automatic Shut Off
The fuel (battery) gauge is a series of five indicator LEDs
within the headlamp power button, four of which are green
and one of which is red. When all green LEDs are brightly lit,
the battery is fully charged. As the battery discharges onefourth increments of its capacity, the green LEDs will go out
one by one. When the battery is near depletion, the red LED
will illuminate. At this time, the headlamp should be turned off
and the battery recharged.
If use continues, the HID headlamp will automatically shut off
to avoid overly discharging the battery. As a safety feature,
the LED auxiliary lights will automatically turn on when the
HID lamp shuts off. The LED lights consume minimal power
and will run for several hours.
OPERATION
CONTINUED
Page 13

11
BATTERY CHARGING
AND CARE
Rechargeable batteries can last years with proper care. Most
importantly, fully charge your battery:
• before the first use
• after each use
• before storing
• every 45 to 60 days when not in use.
Using the 1.5-hour Li-Ion Charger
Note
: The Li-Ion charger will charge a fully depleted battery
in approximately 1.5 hours.
Warning
: The Li-Ion charger is not compatible with NiMH
batteries.
1. Plug the power cord into the charger and then the wall
socket. The charger will conduct a self-diagnosis and the
charging indicator light (located on the back, upper-left
corner of the charger) will illuminate green, then amber,
and then back to green.
2. Connect the charger cable to the battery. If the battery is
not fully charged, the indicator light will turn amber,
signifying fast-charge mode. If the light flashes when you
first plug in the battery, the charger is preparing an overly
discharged battery for fast charging.
3. When the battery is fully charged, the indicator light will
turn green and charging will shut off automatically.
4. Unplug the charger from the battery and wall socket,
grasping the connectors rather than the cables. (Leaving
the battery and charger connected indefinitely will not harm
the cells.)
(continued)
Page 14

12
Smart Battery Protection
The Flight’s “smart” battery incorporates thermal protection
circuitry that turns the battery off when it overheats from
charging, external heat, or a short circuit. When the thermal
protection circuit is activated, the system will lock and the fuel
gauge will become dark. To clear the system and return it to
normal operation, unplug the light from the battery and allow
the battery to cool.
Similarly, intelligent lamp technology protects the battery from
overly discharging by turning the lamp off at the appropriate
time.
Storage
Rechargeable batteries perform better and last longer if they
are brought to a complete charge before storing and every
45 to 60 days when not in use.
Disconnect the battery from the headlamp, and store the
system in a cool dry place.
BATTERY CHARGING
AND CARE
CONTINUED
Page 15
RUN TIMES
Setting Run Time (hours)
HID
High 2:15
Medium 2:45
Low 3:30
LED
Steady 100:00
SOS or Flash 200:00
At the high setting, the HID bulb operates at full
power. The medium and low settings provide
slightly less light output but extend run times.
The above run times are based on a fully
charged battery.
Run times are approximations and will vary.
Page 16

NiteRider, Inc.
8205 Ronson Road, Suite E
San Diego, CA 92111 USA
800.466.8366
www.niterider.com
1
50-2
1
218
 Loading...