

Page 1
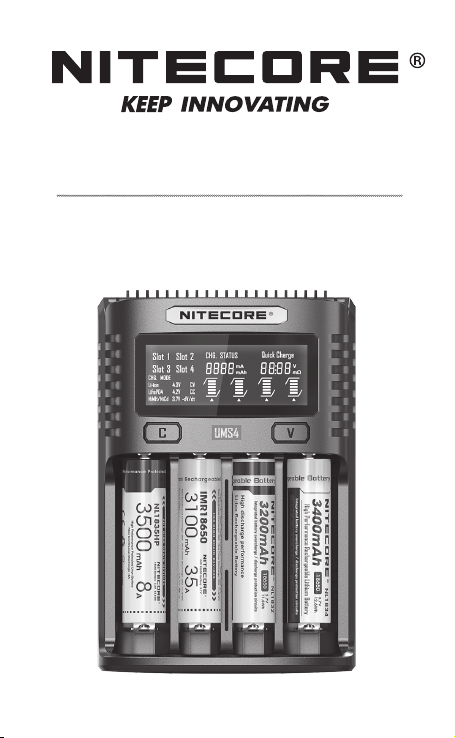
Intelligent USB
UMS4
• Automatic and High-Speed Charging
• Real-time Information Display
• Over-Discharged Li-ion Battery Activation
and IMR Battery Restoration
Four-Slot Superb Charger
Page 2

Features
• Intelligent USB Four-Slot Superb Charger
• QC 2.0 input available
• Capable of charging 4 batteries simultaneously and controlling each slot
independently
• Up to 3,000mA charging speed in a single slot
• Compatible with Li-ion and Ni-MH/Ni-Cd batteries with automatic detection
• Automatic detection of battery power level and automatic selection of the
appropriate voltage and charging mode (LiFePO4 and 3.8V Li-ion batteries
excluded)
• Automatic selection between 3 charging modes (CC, CV and dV/dt)
• Energy-ecient LCD display for real-time charging information
• Capable of manually selecting the charging cut-o voltage and the charging
current
• Automatic detection of large/small capacity batteries and automatic selection
of appropriate charging current
• Automatic termination upon charging completion
• Reverse polarity protection and short circuit protection
• Over-discharged battery activation
• Li-ion battery restoration
• Overtime charging protection
• Automatic detection of battery internal resistance and display of battery health
• Made from durable and re-retardant PC materials
• Optimal heat dissipation design
• Certied by RoHS, CE, FCC and CEC
• Insured worldwide by Ping An Insurance (Group) Company of China, Ltd.
Accessories
USB Charging Cable
Specications
Input: DC 5V/2A 12V/1.5A
18W (MAX)
Output: 4.35V±1% / 4.2V±1% / 3.7V±1% / 1.48V±1%
Standard Mode: 2,000mA*1 (MAX), 1,000mA*2 (MAX),
500mA*4 (MAX)
Compatible with:
IMR/Li-ion/LiFePO4: 10440, 14500, 14650, 16500, 16340(RCR123), 16650, 17350,
17500, 17650, 17670, 17700, 18350, 18490, 18500, 18650,
18700, 20700, 21700, 22500, 22650, 25500, 26500, 26650, 26700
Ni-MH (Ni-Cd): AA, AAA, AAAA, C, D
Dimensions: 159mm×107mm×41mm (6.26”×4.21”×1.61”)
Weight: 255.4g (9.01oz) (Charging cable not included)
QC Mode: 3,000mA*1 (MAX), 2,000mA*2 (MAX), 1,000mA*4 (MAX)
Page 3
(English) UMS4 User Manual
Operating Instructions
Connect to power source: connect the UMS4 to an external power source (a USB adapter, a computer or other
USB charging devices) via the USB charging cable.
Insert batteries: The UMS4 features 4 independently controlled charging slots. Insert batteries of supported types
into each slot according to the polarity marks on the slot. After battery installation, the UMS4 begins charging and
presents Battery Health by “Good” or “Poor”, Internal Resistance, Charging Current, Battery Voltage, Charged Volume
and Charging Time on the LCD screen.
Battery Inspection and Error Report: The UMS4 has reverse polarity protection and anti-short circuit function. If
there are batteries inserted with polar reversed or short-circuited, the LCD screen of relevant slot will indicate “EE EE”
and the power level display will ash to notify the user of an error.
Smart charging: The UMS4 can choose appropriate charging currents based on intelligent detection about battery
types and capacities. Manual charging current selection is also available. The UMS4 is compatible with:
1) 3.6V/3.7V Li-ion rechargeable batteries
2) 3.8V Li-ion rechargeable batteries (4.35V±1% when fully charged)
3) 1.2V Ni-MH/Ni-Cd rechargeable batteries
4) 3.2V LiFePO4 batteries
Default Settings
The default settings (not manually congured) for the UMS4 are:
Battery Type and Capacity
Li-ion batteries
(4.2V±1% when fully charged)
Ni-MH/Ni-Cd batteries
(1.48V±1% when fully charged)
* When charging 1 or 2 batteries, it is recommended to put them into Slot 1 and Slot 3, or into Slot 2 and Slot 4, to
achieve a higher default charging current of 2,000mA. Otherwise the default charging current is 1,000mA.
** When charging 1 or 2 batteries, it is recommended to put them into Slot 1 and Slot 3, or into Slot 2 and Slot 4,
to achieve a wider selectable range of charging current of 300mA-3,000mA. Otherwise the selectable range of
charging current is 300mA-2,000mA.
Note: The UMS4 can automatically select charging modes for Ni-MH/Ni-Cd batteries and 3.7V Li-ion batteries.
LiFePO4 batteries and 3.8V Li-ion batteries require manual settings on charging cut-o voltages. For the battery
whose length is >60mm (2.4”), the UMS4 automatically identies its capacity as >1,200mAh.
Button Operations
During the charging process:
Short press the C button to cycle through the charging status of the 4 slots.
Short press the V button to cycle through Battery Health, Internal Resistance, Charging Current, Battery Voltage,
Charged Volume and Charging time on the LCD screen.
Long press the C button to enter the Charging Setting Mode.
Long press the V button to enter Restoration Mode. (Only eective to over-discharged IMR batteries)
After entering the Charging Setting Mode:
Short press the C button to switch to dierent setting parameters (Charging Current and Cut-O Voltage).
Short press the V button to increase with a 100mA increment each time when setting the Charging Current; or to
switch to dierent battery types and voltage readings when setting the Cut-O Voltage.
Long press the V button to directly access the maximum setting when setting the Charging Current.
Long press the C button to save and exit the Charging Setting Mode.
Note: Perform no action in 10 seconds to exit the Charging Setting Mode without saving and return to the previous
settings.
Charging Voltage Settings
The UMS4 is compatible with 3.6V/3.7V Li-ion and Ni-MH/Ni-Cd batteries with automatic detection and adoption of the
suitable charging voltage. For LiFePO4 batteries and 3.8V Li-ion batteries, please follow the steps below for charging
voltage settings:
1. After the battery is inserted and the charging process begins, short press the C button to select the correct slot
and long press the C button to enter Charging Setting Mode.
>1,200 mAh 2,000mA* 300mA-2,000mA 2,000mA 300mA-3,000mA**
<1,200 mAh 1,000mA 300mA-2,000mA 1,000mA 300mA-2,000mA
AA/AAA 1,000mA 300mA-2,000mA 1,000mA 300mA-2,000mA
C/D 1,000mA 300mA-2,000mA 1,000mA 300mA-2,000mA
Standard Mode QC Mode
Default
Charging
Current
Selectable Range
of Charging
Current
Default
Charging
Current
Selectable Range of
Charging Current
Page 4

2. After entering Charging Setting Mode, short press the C button. When the screen shows the ashing text “CHG.
MODE”, short press the V button to select the correct charging voltage (3.7V/4.2V/4.3V).
3. For LiFePO4 batteries, the voltage needs to be set to 3.7V. For 3.8V Li-ion batteries, the voltage needs to be set to
4.3V.
4. When the setting is nalized, long press the C button to save and exit the Charging Setting Mode.
Charging Current Settings
Please follow the steps below for charging current settings:
1. After the battery is inserted and the charging process begins, short press the C button to select the correct slot
and long press the C button to enter Charging Setting Mode.
2. After entering Charging Setting Mode, the screen will show the ashing text “CHG. STATUS”. Short press the V
button to increase the charging current with a 100mA increment each time. Long press the V button to directly
access the maximum setting.
3. When the setting is nalized, long press the C button to save and exit the Charging Setting Mode.
Note: When the input power is insucient and a large charging current is set, the charger will automatically adopt
the intelligent current distribution according to the input power.
QC Charging Mode
The UMS4 is QC 2.0 input available. When the charger is powered by a QC supportive device or connected to a QC
adapter, the screen will show “Quick Charge” and the single slot max output will achieve 3,000mA.
Automatic Battery Internal Resistance Detection
When the UMS4 is on and the battery is installed, it will automatically detect and display the Internal Resistance
below the “CHG. STATUS”. When the Internal Resistance is below 250mΩ, it will show “Good” on the screen. When it
is above 250mΩ, it will show “Poor” on the screen to indicate that the battery should be replaced.
Charged Volume Calculation
During the charging process, the system will automatically calculate and display the Charged Volume below the “CHG.
STATUS”.
Anti-short Circuiting and Reverse Polarity Protection
If there are batteries inserted with polar reversed or short-circuited, the screen will ash to show “EE EE”.
Energy Saving Function
If there is no action to the buttons or batteries in 10 minutes, the screen will automatically go dim to save energy.
Perform any action to light up the screen.
Over-Discharged Li-ion Battery Activation
The UMS4 is capable of activating over-discharged Li-ion batteries with a protective circuit. After battery installation,
UMS4 will test and activate the battery before charging. When a battery is detected as damaged, the screen will show
“EE EE”.
Over-Discharged IMR Battery Restoration
When an over-discharged IMR battery is inserted, the screen will show “EE EE”. In this case, long press the V button
to enter Restoration Mode. After that, the charging process will continue. The battery should be replaced if it fails to
be restored after several attempts.
NOTE: When attempting to restore an IMR battery, reverse polarity protection is temporarily disabled. Please ensure
batteries are correctly inserted. Failing to do so may result in re or explosion.
Overtime Charging Protection
The UMS4 will separately calculate the charging time of each battery. When the charging time exceeds 20 hours in
one slot, it will automatically cease the charging process of this slot and display “END” below the “CHG. STATUS”. This
is to prevent possible overheat or even explosion due to battery quality issue.
Precautions
1. The charger is restricted to charging Li-ion, IMR, LiFePO4, Ni-MH/Ni-Cd rechargeable batteries only. DO NOT use
the charger with other types of batteries as this could result in battery explosion, cracking or leaking, causing
property damage and/or personal injury.
2. Moderate heat from this product is to be expected during the charging process, which is normal.
3. Ambient Temperature of Usage: -10~40℃ (14~104℉); Temperature of Storage: -20~60℃ (-4~140℉)
Page 5

(English) UMS4 User Manual
4. Carefully read all labels on the device to ensure batteries are installed correctly.
5. Please connect this charger to power supplies with the input voltage stated in the specications of the user
manual. If the input voltage is too low or too high, it may lead to malfunctions, or even a re.
6. DO NOT charge batteries if there is any sign of faulty or short circuit.
7. The charger is only to be used by adults above 18 years old. Children under this age must be supervised by an
adult when using the charger.
8. DO NOT leave the product unattended while it is connected to a power supply. Unplug the product at any sign of
malfunction.
9. Please make sure the correct program and settings are chosen and set. Incorrect program or setting may damage
the charger, or cause re and explosion.
10. DO NOT attempt to charge primary cells such as Zinc-Carbon, Lithium, CR123A, CR2, or any other unsupported
chemistry due to risk of explosion and re.
11. DO NOT charge a damaged IMR battery as doing so may lead to charger short-circuit or even explosion.
12. DO NOT charge or discharge any battery having evidence of leakage, expansion/swelling, damaged outer wrapper
or case, color-change or distortion.
13. Use the original adapter and cord for power supply. To reduce the risk of damage to the power cord, ALWAYS pull
by the connector rather than the cord. DO NOT operate the charger if it appears damaged in any way.
14. DO NOT expose the device to direct sunlight, heating devices, open ames, or rain and snow environment; avoid
extreme high or extreme low ambient temperatures and sudden temperature changes.
15. Store the device in ventilated areas. DO NOT use the device in moist environment and keep away from any
combustible materials.
16. Avoid any shock or impact to the device.
17. DO NOT place any conductive or metal object in the device to avoid short circuiting and explosions.
18. DO NOT overcharge or over-discharge the batteries. Please recharge the battery as soon as the power runs out.
19. Unplug the device and remove all batteries when it is not in use.
20. DO NOT disassemble or modify the device as doing so will render the product warranty invalid. Please refer to the
warranty section in the manual for complete warranty information.
21. DO NOT misuse in any way! Use for intended purpose and function only.
Disclaimer
This product is globally insured by Ping An Insurance (Group) Company of China, Ltd. NITECORE shall not be
held responsible or liable for any loss, damage or claim of any kind incurred as a result of the failure to obey the
instructions provided in this user manual.
Warranty Details
Our authorized dealers and distributors are responsible for warranty service. Should any problem covered under
warranty occurs, customers can contact their dealers or distributors in regards to their warranty claims, as long as the
product was purchased from an authorized dealer or distributor. NITECORE’s Warranty is provided only for products
purchased from an authorized source. This applies to all NITECORE products. To be qualied for warranty, please refer
to the “IMPORTANT WARRANTY NOTICE” section on top to validate your product.
Any DOA / defective product can be exchanged for a replacement through a local distributor/dealer within the 15
days of purchase. After 15 days, all defective / malfunctioning NITECORE® products can be repaired free of charge
for a period of 12 months (1 year) from the date of purchase. Beyond 12 months (1 year), a limited warranty applies,
covering the cost of labor and maintenance, but not the cost of accessories or replacement parts.
The warranty is nullied if the product(s) is/are:
1. broken down, reconstructed and/or modied by unauthorized parties
2. damaged from wrong operations (i.e. reverse polarity installation, installation of non-rechargeable batteries or
failure to obey the warnings)
3. damaged by batteries leakage.
For the latest information on NITECORE
an email to service@nitecore.com.
※ All images, text and statements specied herein this user manual are for reference purpose only. Should any
discrepancy occur between this manual and information specied on www.nitecore.com, information on our ocial
website shall prevail. SYSMAX Innovations Co., Ltd. reserves the rights to interpret and amend the content of this
document at any time without prior notice.
®
products and services, please contact a local NITECORE® distributor or send
Page 6

1. Charging Voltage
Lithium-ion (Li-ion) batteries have strict requirement on voltage control. Charging Li-ion batteries with electric voltage
beyond safety standard can lead to battery damage and explosion.
(1) 3.7V Li-ion Batteries / IMR Batteries
3.7V Li-ion batteries are the most common rechargeable Lithium batteries. The skins of these batteries are often
(2) 3.8V Li-ion Batteries
3.8V Li-ion batteries are comparatively rare. It usually has a 3.7V mark on its skin. Normally its seller will inform
(3) 3.2V LiFePO4 Batteries
3.2V LiFePO4 batteries have LiFePO4 and/or 3.2V marks on the skin. Be careful with this type of batteries. Without
2. Charging Current
For all rechargeable Lithium batteries (including Li-ion, IMR and LiFePO4 batteries), we suggest not using current
larger than 1C* for charging. For small capacity batteries, the charging current must be smaller than 1C.
* C=Capacity of a battery. For example, 1C in a 2600mAh rechargeable Lithium battery is 2.6A. 1C in a 3400mAh
rechargeable Lithium battery is 3.4A.
Excessively large charging current will lead to great amount of heat, and consequently battery damage and explosion.
Warning: Our chargers automatically judge and select charging current by the batteries’ length. For some
3. Precautions
(1) DO NOT short circuit the battery in any way.
(2) DO NOT use a 3.7V/3.8V Lithium battery when its voltage is lower than 2.8V, otherwise it can be over-discharged,
(3) We strongly recommend batteries with protective circuit. For batteries without protective circuit (such as IMR
(4) DO NOT discharge a battery with a discharging current larger than its maximum rated current.
4. Long-term Storage
The best storage voltage for 3.7V/3.8V rechargeable Lithium batteries is 3.7V. Voltage too low or too high can damage
your battery during storage. You can discharge a battery to 3.7V, or charge it to 3.7V in a charger before you keep it
in long-term storage.
Safety Instruction for Lithium-ion Batteries
marked with 3.6V/3.7V signs. If our chargers judge that an inserted battery is a Li-ion battery, the battery will be
automatically charged in 4.2V standard charging mode. You do not need extra voltage settings for these types of
batteries.
its buyer that it needs to be charged with 4.35V power. When charging this type of battery, please manually set
the charging voltage to 4.3V, otherwise the charger will charge at 4.2V by default, and cannot provide adequate
charging voltage.
manual setting, our chargers will charge this type of batteries with 4.2V, and will damage or even explode the
battery with excessive charging voltage. You need to manually set the charging voltage to 3.7V for safe charging.
long but small capacity batteries (i.e. 12650, 13650, 14650, 16650), please manually set appropriate
charging current (smaller than 1C).
and/or prone to explosion at next charging.
batteries), please stay alert for over-discharge and short circuit.
Validation code and QR code on package can be veried on NITECORE website.
The charger must be used with NITECORE’s ocial cords. Ocial cords are identied with clearly printed
NITECORE on the plug. During charging, third party cords can cause malfunction, overheat and even re
on the charger. Damages from using unocial cords cannot be covered by ocial warranty.
The charger is restricted to charging Li-ion, IMR, 3.2V LiFePO4, Ni-MH/Ni-Cd rechargeable batteries only.
DO NOT use the charger with other types of batteries as this could result in battery explosion, cracking or
leaking, causing property damage and/or personal injury.
Page 7

(简体中文)UMS4 使用说明书
使用说明
将 USB充电线一端连接 UMS4充电器,并把另一端接上 USB充电设备(USB 适配器、电脑或其他
接通电源:
USB 充电器设备)即可进行充电。
本充电器共有 4 个充电槽,每个充电槽均可独立控制,用户可在各个充电槽中按照充电器上所标识的
放入电池:
正负极方向正确放入不同种类的充电电池。
当电池放入 UMS4,并进入充电状态后,显示屏会显示电池健康状态(以Good,Poor 两个等级显示,Good 表
示电池状态健康,Poor 表示电池状态不健康)、电池内阻、充电电流、电池电压、已充电量及充电时间。
电池检测与报错:
量格整体闪烁提示。
智能充电:
兼容下面四大类型电池:
1) 3.6V/3.7V 锂离子充电电池
2) 3.8V 锂离子充电电池(充满为 4.35V±1%)
3) 1.2V 镍氢 /镍镉充电电池
4) 3.2V 磷酸铁锂电池。
默认充电参数
在不对充电器进行设置时,默认充电参数为:
(充满电为 4.2V±1%)
(充满电为1.48V±1%)
* 对单节电池充电,或对两节电池充电时(放入1 槽和 3 槽充电,或放入 2槽和 4 槽充电),默认充电电流为
** 对单节电池充电,或对两节电池充电时(放入 1 槽和 3 槽充电,或放入2 槽和 4 槽充电),可选电流范围为
注:
电池和 3.8V锂离子电池,需要用户手动设置截止充电电压。大于 60mm长的电池自动识别为大于 1200mAh电池。
功能键使用方法
当电池处于正常充电状态时:
短按“C”键: 可切换显示 4 个槽的充电状态;
短按“V”键: 可切换显示电池健康状态、电池内阻、充电电流、电池电压、已充电量、充电时间参数;
长按“C”键: 进入充电设置模式;
长按“V”键: 进入过放锂电池修复模式(本功能只对过放锂电池生效)。
当电池进入设置模式后:
短按“C”键: 可切换至当前电池所需设置的参数(充电电流和截止电压);
短按“V”键: 在设置电流时,每次短按“V”键,充电电流值递加 100mA;
在设置电压时,每次短按“V”键,可切换不同电池类型及截止电压;
长按“V”键: 在设置电流时,可快速设置充电电流至最大值;
长按“C”键: 保存设置并退出设置模式。
注:
前所使用的参数。
充电电压设置方法
本充电器可自动识别 3.6V/3.7V 锂离子充电电池和镍氢 /镍镉充电电池,当放入电池后,即可自动选择合适的充
电电压进行充电。如需对磷酸铁锂电池或 3.8V 锂离子充电电池充电时,请按以下步骤设置充电电压:
1. 放入电池并进入正常充电后,短按“C”键,选择相应的槽;再长按“C”键,进入充电设置模式;
2. 进入设置模式后,短按“C”键,当显示屏“CHG. MODE”字样下方信息闪烁显示时,可通过短按“V”键
3. 磷酸铁锂电池需手动设置电压为 3.7V,3.8V 锂离子充电电池需手动设置电压为4.3V;
4. 设置成功后长按“C”键,即可保存设置并退出设置模式。
UMS4 带防反接和短路保护功能。若电池故障或短路不可充时,屏幕显示“EE EE”,且该槽电
UMS4 可智能识别当前电池类型以及容量大小选择合适的充电电流,并提供手动选择充电电流功能。
电池类型与容量
>1200 mAh 2000mA* 300mA-2000mA 2000mA 300mA-3000mA**
锂电池
<1200 mAh 1000mA 300mA-2000mA 1000mA 300mA-2000mA
镍氢 / 镍镉电池
2000mA,其余情况默认充电电流为 1000mA。
300mA-3000mA,其余情况可选充电电流范围为:300mA-2000mA。
当装入镍氢 / 镍镉充电电池以及3.7V 锂离子电池时,充电器会自动选择合适的充电方式进行充电。磷酸铁锂
参数设置后,如没有长按“C”键保存。在无按键操作的 10秒后,充电器会自动退出设置模式,并恢复设置
选择充电电压模式(3.7V/4.2V/4.3V);
AA/AAA 1000mA 300mA-2000mA 1000mA 300mA-2000mA
C/D 1000mA 300mA-2000mA 1000mA 300mA-2000mA
标准充电模式 快充充电模式
默认充电电流 充电电流可选范围 默认充电电流 充电电流可选范围
Page 8

充电电流设置方法
请按以下步骤设置充电电流:
1. 放入电池并进入正常充电后,短按“C”键,选择相应的槽;再长按“C”键,进入充电设置模式;
2. 进入设置模式后,显示屏“CHG. STATUS”字样下方信息会闪烁显示,此时每次短按“V”键,充电电流值
以 100mA 递增,长按“V”键可快速增加至最大电流值;
3. 设置成功后长按“C”键,即可保存设置并退出设置模式。
当输入功率不足时,若设置了大电流充电,充电器会根据输入功率自动进行智能电流分配。
注:
快充充电功能
本充电器支持 QC 2.0 快充输入。当检测到所连接的供电设备(或适配器)支持 QC 快充时,显示屏右上方会显
示“Quick Charge”字样。此时单槽最大充电电流可达 3000mA。
自动检测电池内阻功能
充电器接通电源后放入电池,会自动检测电池的内阻值并在“CHG. STATUS”显示出来,当内阻小于 250mΩ,
显示“Good”;当内阻大于 250mΩ,则显示“Poor”,表明电池健康状态低下,建议用户更换电池
检测已充入电量功能
在充电过程中,UMS4 会自动计算已经充入电池的电量,并在“CHG. STATUS”实时显示出来。
电池防反接与防短路保护功能
当装入电池反接或短路时,显示屏会闪烁显示“EE EE”字样提示。
节能省电功能
若超出 3 分钟没有按键或电池操作,LCD 屏幕亮度会自动变暗以节能省电;当有按键或电池操作,显示屏会再次
亮起。
电池保护板激活功能
充电器对带电池保护电路的过放锂电池具有激活功能。当放入电池后,UMS4 将对电池进行检测和自动激活。充
电器无法激活的电池将会被认为是已损坏的电池,显示屏会显示“EE EE”字样提示用户。
锂电池修复功能
当放入过放的 IMR 锂电池时,显示屏会显示“EE EE”字样提示。此时长按“V”键,即可进入修复模式,修复完
成后会自动进入正常的充电模式。如经过多次修复都无法充电,建议更换有问题的电池。
当使用 IMR 电池修复功能时,防反接保护功能暂时失效。要注意保证电池安装正确,否则可能引起电池起火
注:
甚至爆炸。
充电超时保护功能
UMS4 将会对每一槽的电池充电时间进行独立计算,当充电时间超过20 小时,充电器会强行关断该槽充电功能,
“CHG. STATUS”下会显示“END”字样提示。有效防止由于电池质量问题引起的发热爆炸现象。
注意事项
1. 本充电器仅限于对锂电池、IMR、磷酸铁锂或镍氢 /镍镉充电电池进行充电,若对其他电池充电可能会导致
爆炸、电池破裂或漏液、人身伤害或财产损坏。
2. 充电器在电池充电过程中可能会发热,视为正常现象。
3. 使用环境:温度 -10-40℃(14~104 ℉),储藏温度:-20-60℃(-4~140 ℉)。
4. 请根据充电器上所标识的电极标志装入电池,充电时确保电池正确放置。
5. 请按照参数所述的输入电压连接使用本产品,输入电压过高或过低,会令充电器不能正常工作,甚至会引起
火灾。
6. 当电池出现故障或短路时,禁止充电。
7. 本充电器适用人群为 18 岁以上成年人,孩童必须在成人的监督下使用。
8. 当充电器开始工作时,不可无人看管。若发现有任何故障,请立即停止使用。
9. 必须选择正确的程序以及设定。不正确的充电程序或者设置可能会导致充电器损坏甚至爆炸。
10. 禁止使用本充电器对一次性电池充电,如 Zinc-Carbon(碳锌电池)、一次性锂金属电池、CR123A 电池、
CR2 电池,以及其它不支持充电材料的电池,否则可能引起火灾或爆炸风险。
11. 请勿对残缺的 IMR 电池充电,否则可能造成充电器短路而引起爆炸。
12. 若电池有漏液、膨胀、外皮破损、异色或变形等情况,禁止进行充放电。
13. 请连接原装充电线使用本产品。为降低损坏充电线的风险,拔出充电线时应捏住连接头拔出,不可捏住充电
线。若充电线有损坏的迹象,应停止使用。
Page 9

(简体中文)UMS4 使用说明书
14. 禁止将充电器暴露于明火或置于暴晒、雨雪环境中。避免在过高温、低温或温度骤变环境中使用。
15. 请置於通风处使用,切勿让充电器处在潮湿的环境中使用或置放。操作区域内不可放置易燃易爆物质。
16. 避免机械振动以及冲击,防止损坏充电器。
17. 请勿将导电材料或金属物体放入充电器内部,避免导致充电器发生短路爆炸的意外。
18. 请勿过充、过放电池,电池电量用光后请尽快充电。
19. 不使用充电器时,应将电池移除,并拔除充电线。
20. 切勿擅自拆卸、组装或改装充电器,可能会导致保修服务失效,详情请查看保固条款。
21. 不可将充电器作为他用!仅可将充电器用于指定用途。
免责声明
本产品由中国平安保险(集团)股份有限公司全球承保。对未按照本产品说明书正确指导操作发生任何事故或意外,
而导致第三方损失或索赔,本公司不承担任何责任。
保固服务
®
产品拥有售后保固服务。在购买本产品的15 天内,如果有任何质量问题均可向经销商要求免费更换。
NITECORE
在购买本产品的 12 个月内享受免费保固服务。在超过12 个月免费保固期后,本产品享有终身有限度保固服务,
如需要更换重要部件则需收取成本费用。
本保固规则不适用于以下情况:
1. 人为破坏,拆解,改装本产品。
2. 错误操作导致产品损坏(如装反电池、放入不可充电池或违反警示操作等)。
3. 电池漏液导致产品损坏。
如对奈特科尔产品有任何疑问,欢迎联系当地的代理商或发邮件到 4008869828@nitecore.cn
※ 本说明书的所有图片、陈述及文字信息仅供参考,请以官网 www.nitecore.cn 实际信息为准。广州希脉创新
科技有限公司拥有对说明书内容的最终解释权和修改权。
Page 10

附注:
一、充电电压:
锂充电电池对充电电压有严格的要求,充电电压超过标准范围将有可能导致电池损坏甚至发生爆炸的危险。
(1) 3.7V 锂离子 /IMR 电池
3.7V 锂离子充电电池是最常见的锂充电电池,通常会在电池外皮上会有 3.6V / 3.7V 的字样。我们的充电器
当检测到放入的电池是锂电池时会自动按照 4.2V 的标准充电模式进行充电,所以对于这种电池,您不需要
对充电电压进行任何设置。
(2) 3.8V 锂离子电池
3.8V 锂离子电池是比较少见的锂充电电池。跟 3.7V 电池一样,通常在电池外皮上也是标注着 3.7V的字样,
通常电池经销商会在销售时告知此款电池需要用 4.35V 充电。在对此种电池进行充电时,请手动设置充电电
压到 4.3V,否则充电器将自动按照 4.2V 标准程序进行充电,无法达到最大充电容量。
(3) 3.2V 磷酸铁锂电池
3.2V 磷酸铁锂电池的电池皮上会有 LiFePO4 字样或者标注的电压为3.2V。对这种电池充电必须格外小心,
因为在不作任何设置的情况下,我们的充电器会自动按照 4.2V 充电程序对这种电池进行充电,会导致过度
充电而损坏电池甚至引发爆炸危险。请手动设置充电器充电电压到 3.7V 为此种电池进行安全充电。
二、充电电流:
对于所有锂充电电池(Li-ion, IMR, LiFePO4), 我们不建议使用超过 1C * 电流进行充电。在对小容量电池
进行充电时请注意设置充电电流小于 1C。
*C =电 池表 示 的容 量数 值。例 如,2600mAh 的锂 充电 电池,1C=2.6A,3400mAh 的 锂充 电电 池
1C=3.4A。 过大的充电电流会引起电池在充电过程中严重发热,可能导致损坏电池甚至引发爆炸的风险。
特别注意:本充电器是根据电池长度进行充电电流自动选择的。对某些较长但容量比较低的电池进行充
电时(例如 12650, 13650, 14650, 16650 等),请手动设置合适的充电电流(小于 1C)。
三、使用锂电池注意事项
1. 请勿对锂电池进行短路。
2. 对于 3.7V / 3.8V 锂电池,请不要使用低于2.8V 电压充电,否则将会导致过度放电损坏锂电池或者引起再次
充电时爆炸的风险。
3. 我们强烈建议使用带有保护板的电池,对于部分不带保护板的电池,例如 IMR 电池,请格外注意不要短路
及过度放电。
4. 请勿使用超过电池额定最大放电电流进行放电。
四、长期储存
3.7V 及 3.8V 的锂充电电池最佳储存电压为3.7V,过高或者过低的电压将有可能在长期储存的过程中损坏锂电池。
您可以把电池放电至 3.7V 或使用充电器的 3.7V 充电程序把电池充电到3.7V 以便长期储存。
使用本充电器充电时必须使用标配的线材,在充电过程中使用非原装正版的线材可能会导致充电器不正
常工作,甚至会产生过热和烧毁等问题。由非原装正版线材所引致的问题将不能获得官方的保固服务。
本充电器仅限于对锂离子、IMR、3.2V 磷酸铁锂、镍氢 / 镍镉充电电池进行充电,若对其它类型的电池
进行充电可能会导致爆炸、电池破裂或漏液、造成人身伤害或财产损坏。
锂充电电池安全使用指南
包装附带防伪标签,支持网站验证或扫描二维码验明真伪。
Page 11

Thanks for purchasing NITECORE!
SYSMAX Innovations Co., Ltd.
TEL: +86-20-83862000 FAX: +86-20-83882723
E-mail: info@nitecore.com Web: www.nitecore.com
Address: Rm 2601-06, Central Tower, No.5 Xiancun Road,
Tianhe District, Guangzhou, 510623, Guangdong, China
Manufacturer: SYSMAX Power Technology, LLC
Pleasendusonfacebook:NITECOREvapeworldwide
Made in China
UMS2009418
 Loading...